Intermec Technologies 2126 PCMCIA Wireless Network Interface User Manual title
Intermec Technologies Corporation PCMCIA Wireless Network Interface title
Contents
- 1. APPENDIX M
- 2. APPENDIX N
APPENDIX N
578-100-008 Revision B Page 1 of 3
Compliance Statement Insert
Device Name: Hand-held Computer Model Number: 6400
The responsible party for the compliance of this device is: Intermec Technologies Corporation
Norand Mobile System Division
550 Second Street SE
Cedar Rapids, Iowa 52401 USA
(319) 369-3100
CAUTION: See users guide instructions for handling, charging, and replacing batteries. Failure to follow those instructions can result in
personal injury, fire, or battery explosion.
This product complies to the following approvals. The user(s) of this product are cautioned to use accessories and peripherals approved by
Norand Corporation. The use of accessories other than those recommended or changes to this product that are not approved by Norand
Corporation may void the compliance of this product and may result in the loss of the users authority to operate the equipment.
FCC Digital Emissions Compliance
This equipment has been tested and found to comply with the limits for a Class B digital device, pursuant to Part 15 of the FCC Rules. These limits are designed to
provide reasonable protection against harmful interference in a residential installation. This equipment generates, uses and can radiate radio frequency energy and, if not
installed and used in accordance with the instructions, may cause harmful interference to radio communications. However, there is no guarantee that interference will not
occur in a particular installation. If this equipment does cause harmful interference to radio or television reception, which can be determined by turning the equipment off
and on, the user is encouraged to try to correct the interference by one or more of the following measures:
• Reorient or relocate the radio of television receiving antenna.
• Increase the separation between the computer equipment and receiver.
• Connect the equipment into an outlet on a circuit different from that to which the radio or television receiver is connected.
• Consult the dealer or an experienced radio television technician for help.
Canadian Digital Apparatus Compliance
This Class B digital apparatus meets all requirements of the Canadian Interference-Causing Equipment Regulations.
Cet appareil numérique de la classe B respecte toutes les exigences du Règlement sur le matériel brouilleur du Canada.
FCC Spread Spectrum Transmitter Compliance
This device is also certified to operate under Part 15, Subpart C, Section 15.247 of the FCC rules for Intentional Radiation Products. This certification includes Docket
87-389 covering rules effective June 1994. It may not cause interference to authorized radio communication devices, and must accept any interference caused by those
devices.
Canadian RSS-210 Spread Spectrum Transmitter Compliance
Operation is subject to the following two conditions: (1) this device may not cause interference, and (2) this device must accept any interference, including interference
that may cause undesired operation of the device.
Canadian 2.4 GHz Spread Spectrum Radio Certification
This device requires a radio license, unless it is installed totally inside a building. (User’s must obtain this license.)
Une license radio est requise oour ces dispositifs, sauf ouor ceux installés tout á fait á l’intérieur d’un bâtiment. (Il faut que l’utilisateur obtienne cette license.)
Antenna Requirements
FCC rules section 15.203 and Canada RSS-210 require that this device be operated using an antenna furnished by Norand Corporation. The antenna coupling on this
product has been designed to accept only antennas manufactured Norand. Use of an antenna other than that furnished with the equipment is prohibited by FCC and
Industry Canada rules.
European Notice
The 902-928 MHz Spread Spectrum Transmission (SST) radio referred to within this manual is not available for sale in Europe (including, but not limited to, Great
Britain, Italy, Germany, France, Spain, Norway, Denmark, Sweden, Finland, Portugal, and the Benelux countries). Any references in this manual to 902-928 MHz SST, or
modules containing 902-928 MHz SST radios, should be disregarded by the users of this product in Europe.

578-100-008 Revision B Page 2 of 3
DECLARATION OF CONFORMITY
(According to ISO/IEC Guide 22 and EN 45014)
PAGE ONE OF TWO
THE PRODUCT HEREWITH COMPLIES WITH THE REQUIREMENTS OF :
THE LOW-VOLTAGE DIRECTIVE 72/32/EEC.
THE EMC DIRECTIVE 89/336/EEC.
Manufacturer’s Name: European Representative:
Intermec Technologies Corporation Intermec International Incorporated
550 2nd Street SE Sovereign House, Vastern Road
Cedar Rapids, Iowa 52401 Reading, Berkshire
RG1 8BT England
Declares that the product listed below:
Product Type: ITE/Residential, Commercial, and Light Industrial
Product Name: 6400 Hand-held Computer with all docking options
Model Number: 6400 Product Options: All
Beginning Serial Number: All Date Issued: April. 8, 1996
Conforms to the following product specifications:
Safety: IEC 950 / EN 60950
EMC: EN 55022 : 1995 / CISPR Publications 22 : 1993, Class B Limits and Methods
EN 50082-1 : 1992 Generic Immunity Standard
IEC 801-2 Tested per IEC 1000-4-2 : 1995-01
8 kV Air / 4 kV Direct, Criteria B
IEC 801-3 Tested per IEC 1000-4-3 : 1995-02
3 V/M, 27-1000 MHz, 80% @ 1kHz, Criteria A
IEC 801-4 Tested per IEC 1000-4-4 : 1995-01
Power leads 2 kV, Signal leads 1 kV, Criteria B
ETS 300 339 : Jun. 1993 Draft RES Generic EMC for radio equipments
IEC 801-2 per Draft prETS 300 339, Clause 9.2
+ 8 kV Air / + 4 kV Contact
IEC 801-3 per Draft prETS 300 339, Clause 9.1
3 V/M, 80-1000 MHz, 80% @ 400 Hz
Type Approval Certification(s): see second page of Declaration of Conformity
I, the undersigned, hereby declare that the equipment specified above conforms the above Directive(s) and
Standard(s).
Company Official: Arvin Danielson Position: Vice President
Signature: Signed Copy on File Date: August 4, 1998
European Contact: Scott Mercer, Intermec International Incorporated, Sovereign House, Vastern Road, Reading,
Berkshire, RG1 8BT England; Phone INT+44 118 987 9400; Fax INT+ 44 118 987 9401

578-100-008 Revision B Page 3 of 3
DECLARATION OF CONFORMITY
PAGE TWO OF TWO
Product Type: ITE/Residential, Commercial, and Light Industrial
Product Name: Hand-held Computer Model Number: 6400
Product Option: RM180
Type Approval Certifications:
ARGENTINA: FCC ID: EHARM24002PC AUSTRALIA: FCC ID: EHARM24002PC
AUSTRIA: CEPT-RLAN A BRAZIL: FCC ID: EHARM24002PC
CANADA: Canada 1008 101 760A CHILE: FCC ID: EHARM24002PC
COLOMBIA: FCC ID: EHARM24002PC COSTA RICA: FCC ID: EHARM24002PC
DENMARK: CEPT/RLAN/DK/9608 FINLAND: Label added in Finland
FRANCE: 960182PP0 GERMANY: G128682H
GREECE: ÁÑ×ÉÊÁ ÅËÅÃ×ÏÌÅÍÇ ÓÕÓÊÅÕÇ HONG KONG: FCC ID: EHARM24002PC
×ÑÇÓÇ:ÌÅÔÁÖÏÑÁÓ ÄÅÄÏÌÅÍÙÍ
'Åãêñéóç Êõêëïöñéáò ÕÐÌÅ/ÄÔÅÅ/ÅÊ537
ICELAND: CEPT-RLAN IS-2433-02 INDIA: FCC ID: EHARM24002PC
ITALY: (For 41-key terminal) (For 51-key terminal)
CEPT-RLAN I CEPT-RLAN I
DGPGF/SEGR/2/144-03/336997/AT/0001728 DGPGF/SEGR/2/144-03/336998/AT/0001725
del 09/09/1996 del 09/09/1996
KOREA: Radio Type Registration MEXICO: SCýT: RCPNORM97-308
NETHERLANDS: ministerie van verkeer waterstaat NORWAY: CEPT-RLAN N
NL9603057 CEPT R-LAN NL
PERU: FCC ID: EHARM24002PC POLAND: M£
Œ.H. Nr 043/98
SINGAPORE: TAC No. PMREQ-WLAN-B-0621-98 SPAIN: E D.G.Tel 06 97 0340
SWEDEN: Godkaend av Post- och Telestyrelsen TAIWAN: 85G0069
Ue 960059
CEPT-RLAN S Norand Corporation RM180
TURKEY: FCC ID: EHARM24002PC UNITED KINGDOM: CEPT-RLAN GB
UNITED STATES: FCC ID: EHARM24002PC VENEZUELA: FCC ID: EHARM24002PC
Product Option: RM188
Type Approval Certifications:
JAPAN: MKK Approved
Product Option: RM160
Type Approval Certifications:
ARGENTINA: FCC ID: EHARM915P AUSTRALIA: FCC ID: EHARM915P
BRAZIL: FCC ID: EHARM915P CANADA: Canada 1008 102 269
CHILE: FCC ID: EHARM915P COLOMBIA: FCC ID: EHARM915P
COSTA RICA: FCC ID: EHARM915P MEXICO: SCýT: RCPNORM97-319
PERU: FCC ID: EHARM915P UNITED STATES: FCC ID: EHARM915P
VENEZUELA: FCC ID: EHARM915P

6400 Hand-HeldComputer
USER’SGUIDE
""""""""""""""""""""""""""""
PN:961-047-093
RevisionA
September 1997

"NOTICEThispublicationcontainsinformationproprietarytoIntermecTechnologiesCorpo-
ration.Itisbeingsuppliedtoyouwiththe express understandingthat thein-
formationcontainedhereinisforthebenefitofthecontractingpartyonly,and
maynotbecopied,distributed,ordisplayedtothird partieswithout the express
writtenconsentofIntermecTechnologiesCorporation,andshall bereturnedto
IntermecTechnologiesCorporation uponwrittenrequest.Ifapurchase,license,or
nondisclosureagreementhasbeenexecuted,thetermsofthatagreementshall
governthisdocument.
Thispublicationisfurnishedforinformationonly,andtheinformationinitis
subject tochangewithoutnotice.Althougheveryefforthasbeenmadetoprovide
completeandaccurateinformation,IntermecTechnologiesCorporationassumes
noresponsibilityorliabilityforanyerrorsorinaccuraciesthatmayappearinthis
document.
DisclaimerofWarranties.Thesamplesourcecodeincludedinthisdocumentis
presentedfor reference only.Thecodedoesnotnecessarilyrepresentcomplete,
tested programs.Thecodeisprovided“ASISWITHALL FAULTS.”ALL
WARRANTIESARE EXPRESSLY DISCLAIMED,INCLUDING THE
IMPLIEDWARRANTIESOFMERCHANTABILITY AND FITNESS FORA
PARTICULARPURPOSE.
Wewelcomeyour commentsconcerningthispublication.Althougheveryefforthas
beenmadetokeepitfree oferrors,somemayoccur.Whenreportingaspecific
problem,pleasedescribeitbrieflyandincludethebooktitleand partnumber,as
well astheparagraphorfigurenumberandthepagenumber.
Sendyour commentsto:
IntermecTechnologiesCorporation
PublicationsDepartment
550 SecondStreetSE
CedarRapids,IA52401
INTERMEC,NORAND,NOR*WARE,PEN*KEY,PEN*VIEW,andTRAKKER are
registeredtrademarksandANTARES,JANUS,andRAPIDREParetrademarksof
IntermecTechnologiesCorporation.
Ó1996 IntermecTechnologiesCorporation.All rightsreserved.
Thispublicationprintedonrecycled paper.
Acknowledgments
AS/400,IBM,IBMPC,MicroChannel,PS/2,andOS/2areregistered
trademarksandAIXandPresentationManager aretrademarksofInternational
Business MachinesCorporation.
DEC,VAX,VMS,VT,andVT220 areregisteredtrademarksofDigitalEquipment
Corporation.
EthernetisatrademarkofXeroxCorporation.
MicrocleanII isaregisteredtrademarkofForesightInternational.
Microsoft,MS,andMS-DOS,andWindows,areregisteredtrademarksandVisual
BasicforWindows,andWindowsforPenaretrademarksofMicrosoftCorporation.
NortonDiskDoctorandNortonUtilities areregisteredtrademarksofPeter
NortonComputingInc.
Novell andUNIXareregisteredtrademarksofNovell Inc.
PenRight!andPenRight!ProaretrademarksofPenRightCorporation.
PKZIPandPKUNZIPareregisteredtrademarksofPKWARE,Inc.
PolyPM/2isaregisteredtrademarkofInternationalSoftwareSolutions.
SUN isatrademarkofSun Microsystems.
SanDiskisatrademarkofSanDiskCorporation.
TurboPascalisaregisteredtrademarkandBorland CandC++ forWindowsare
trademarksofBorlandInternational,Inc.
FCC ComputerCompliance
"NOTICEThisequipmentmeetsClass BdigitaldevicelimitsperPart15 ofFCC Rules.
Theselimitsprotectagainstinterferenceinaresidentialarea.Itemits,uses,and
canradiateradiofrequencyenergy.Ifyoudonotinstall andusethe equipment
accordingtoitsinstructions,itmayinterferewithradiosignals.However,thereis
noguarantee thatinterferencewill notoccurinaparticularinstallation.
Ifthisequipmentdoescauseharmful interferencetoradio ortelevisionreception,
whichcanbedeterminedbyturningourequipmentoff andon,theuserisencour-
agedtotrytocorrect theinterferencebyone ormore ofthefollowingmeasures:
"Reorientor relocatetheradio ortelevisionreceivingantenna.
"Increasetheseparationbetweenthecomputerequipmentandreceiver.
"Connect the equipmentintoanoutletonacircuitdifferentfromthat to
whichtheradio ortelevisionreceiverisconnected.
"Consult thedealeroranexperiencedradio ortelevisiontechnicianfor
help.
FCC SpreadSpectrumRadioCertification
"NOTICEThisdeviceiscertifiedto operateunderPart15,SubpartC,Section15.247 ofthe
FCC rulesforIntentionalRadiationProducts.ThiscertificationincludesDocket
87-389 coveringruleseffectiveJune1994.Itmaynotcauseinterferencetoautho-
rizedradiocommunicationdevices,andmustacceptanyinterferencecausedby
thosedevices.
AntennaRequirements
"NOTICEFCC rules section15.203 andCanada’sRSS-210 requirethat thisdevicebe oper-
atedusinganantennafurnishedbyIntermecTechnologiesCorporation.Thean-
tennacouplingonthisproducthasbeendesignedtoacceptonlyantennas
manufacturedbyus.Use ofanantennaotherthanthatfurnishedwiththe equip-
mentisprohibitedbyFCC andIndustryCanadarules.
CanadianComputerCompliance
ThisClass Bdigitalapparatusmeetsall requirementsoftheCanadianInterfer-
ence-CausingEquipmentRegulations.
Cetappareil numériquedelaclasseBrespectetouteslesexigencesduReglèment
surlematerialboilleurduCanada.
CanadianSpreadSpectrumRadioCertification
"NOTICEThisdevicecomplieswithRSS-210 ofIndustryCanada.Operationis subject tothe
followingtwoconditions:(1)thisdevicemaynotcauseinterference,and(2)this
devicemustacceptanyinterference,includinginterferencethatmaycauseunde-
siredoperationofthedevice.
Canadian2.4GHzRadio License
"NOTICEThisdevicerequiresaradiolicense,unless itisinstalledtotallyinsidea building.
(Usersmustobtainthislicense.)
Unelicenceradio estrequisepour cesdispositifs,saufpour ceuxinstalléstoutà
faitàl’intérieurd’un bâtiment.(Ilfautquel’utilisateurobtiennecettelicence.)
EuropeanNotice
The902--928 MHzSST(SpreadSpectrumTransmission)radioreferredtointhis
manual isnotavailableforsale oruseinEurope(including,butnotlimitedto,
GreatBritain,Italy,Germany,France,Spain,Norway,Denmark,Sweden,
Finland,Portugal,andtheBeneluxcountries).Anyreferencesinthismanualto
902--928 MHzSST,ormodulescontaining902--928 MHzSSTradios,shouldbe
disregardedbyusersofthisproductinEurope.
TelephoneInstallation Warning Notices
Thefollowingnoticesapplyto equipment thatmaybeconnectedtotelephonelines
orsystems.Foryourpersonalsafety,andtoprotect thisequipmentfrompotential
electricalorphysicaldamage,doNOTconnectequipment totelephonelinesor
datacommunicationequipmentunless thefollowingwarningshavebeenread,
understood,andcompliedwith.
"Neverinstall telephonewiringduringalightningstorm.
"Neverinstall telephonejacksinwetlocationsunless thejackis specifi-
callydesignedforwetlocations.
"Nevertouch uninsulatedtelephonewiresorterminalsunless thetele-
phonelinehasbeendisconnectedat thenetworkinterface.
"Usecautionwheninstallingormodifyingtelephonelines.
"Avoidusingatelephone(otherthancordless type)duringanelectrical
storm.Theremaybearemoteriskofelectricshockfromlightning.

"Donotusethetelephonetoreportagasleakinthevicinityoftheleak.
Installation du téléphone:avertissements
Lesavertissementsquisuivents’appliquentàtoutéquipementquipeutêtre
branchéauxlignesousystèmestéléphoniques.Pourvotresécuritépersonnelle et
pourprotégerl’équipementdetoutdommage électrique ouphysiquepotentiel,NE
PASbrancherun ordinateurtablette électronique ousespériphériquesauxlignes
téléphoniquesouéquipementsavantquelesavertissements suivantsaientétélus,
comprisetobservés:
"Nejamaisinstallerdecâblagetéléphoniquependantun orage électrique.
"Nejamaisinstallerdeprisetéléphoniquedansun endroithumideà
moinsquelapriseaitétéspécifiquementconçuepourêtreutilisée dans
lesendroitshumides.
"Nejamaistoucherlesfilsdetéléphone oudel’équipement terminalnon
isolésàmoinsquelalignetéléphoniquen’aitétédébranchée del’inter-
faceréseau.
"Userdeprudencelorsdel’installationoudelamodificationdelignes
téléphoniques.
"Éviterd’utiliserun téléphone(autrequ’un appareil téléphoniquesans
fil)pendantun orage électrique.Ilpourraityavoirun faiblerisqued’é-
lectrocutionparlafoudre.
"Nepasutiliserletéléphoneafindesignalerunefuitedegazàproximité
delafuite.
BCAUTION:Intermec Technologies Corporation suggests you buy cables fromus
toconnectwith otherdevices.Ourcables are safe,meetFCC rules,
and suitourproducts.Othercables may notbetested.They may
cause problemsfromelectrostaticdischargeorinducedenergy.Our
warranties do notcoverloss, injury,ordamagefromothercables.
BCAUTION:Intermec Technologies Corporation recommendsthatyou only
purchase Norand MobileSystemsDivision certifiedmodems.
Intermec does notcertify all modems availableinthemarketplace.
Intermec does notwarrantnoncertifiedmodems; furthermore,these
modemsmay cause problemsfromelectrostaticdischarge and may
notconformto FCC regulations.ForalistofNorand MobileSystems
Division certifiedmodems call CustomerSupportat1-800-221-9236 in
UnitedStates or(country code)800-633-6149 inCanada.
WARNING:Thelithiumion batterymay explodeifreplacedincorrectly.Replace
onlywiththe sameorequivalent type.
ADVERTISSEMENT:Labatterie aulithiumpeutexplosersielle estreplacée demanière
incorrecte.Ellenedoitêtreremplacée queparunebatterie
identiqueou similaire.

WARNING:Lithiumion batteries may explodeorcatchfireifovercharged dueto
improperdock installation.
ADVERTISSEMENT:Les batteries aulithiumpeuventexploserou prendrefeusielles
sont trop changées à cause d’unemauvaise installation dela
station d’accueil.
PEN*KEYRModel6400 Hand-HeldComputerUser’sGuide i
CONTENTS
""""""""""""""""""""""""""""
SECTION1
General Information
About thisUser’sGuide1-1..............................
SummaryofSections1-1.............................
UnpackingandInspecting1-2............................
Hand-HeldComputerMainComponents1-4...............
Hand-HeldComputerKeyboard1-7.......................
KeyDescriptions1-10.....................................
ENT(Enter)Key1-10.................................
SCANKey1-10.......................................
Period[.]Key1-10....................................
Minus[--] Key1-10....................................
NumericKeys1-11....................................
AlphabeticKeys1-11..................................
Backspace[] Key1-11.................................
ShiftKeys1-11.......................................
UsingShiftedFunctions1-13..........................
DisplayAnnunciatorLocationsonDisplayWindow1-15......
AnnunciatorDescriptions1-16.........................
DisplayAnnunciators(Messages)1-16..................
DisplayContrast1-19.................................
Backlight1-19........................................
WindowScrollingArrows1-19.........................
[l/O]SuspendorResume1-20..........................
Handstrap1-20..........................................
Buzzer1-23..............................................
Infrared(IrDA)Port1-23.................................
BatteryManagement1-23.................................
Battery1-24.............................................
MainBatteryPack1-24...............................
BackupBattery1-26..................................
Memory1-26.............................................

CONTENTS"
ii PEN*KEYRModel6400 Hand-HeldComputerUser’sGuide
MainMemory1-26....................................
Flash1-27...........................................
DiagnosticEEPROM1-27.................................
Resetting1-27...........................................
BatchTerminalOperation1-28............................
TerminalEmulation1-28..............................
AccessoriesandOptions1-28..............................
InternalScanner1-28.................................
InternalRadio1-28...................................
CommunicationAdapter1-29..........................
ScannerHandle1-31..................................
AdjustableWristStrapandAdjustableHandstrap1-33...
Hand-HeldComputerSpecifications1-35...................
900 MHzRadioOption1-37...............................
NICSpecifications1-37................................
2.4GHzRadioOption1-38................................
NICSpecifications1-39................................
RadioandScannerModules1-39.......................
SECTION2
Operation
Introduction2-1.........................................
BeforeUsingYourComputerfortheFirstTime2-1.........
RechargeableBatteryLabelling2-4.......................
InstallingtheMainBattery2-5...........................
RemovingtheMainBattery2-6...........................
MeasuringBatteryPackChargeLevel2-8.................
ChargingYourBatteryPack2-9..........................
InYourHand-HeldComputer2-9.....................
InAnExternalSource2-10............................
BatteryChargerLEDandErrorCodes2-12.................
ChargingIndicatorErrorCodes2-12.......................
BackupBattery2-13......................................
DownloadingProgramsToYourHand-HeldComputer2-14...
ProgrammingtheFlash2-14..............................
TurningYourHand-HeldComputerOnand
Off (Suspending)2-15.................................
TurningOnYourHand-HeldComputer2-15.............
SuspendingYourHand-HeldComputer2-15.............
UnderstandingtheKeyClicks2-16........................

CONTENTS"
PEN*KEYRModel6400 Hand-HeldComputerUser’sGuide iii
Scanning2-17............................................
UsinganIntegratedScanner2-17......................
InstallingtheOptionalScanningHandle2-19...........
InstallingtheOptionalScanningHandlewith
BatteryPack2-20................................
ChargingtheScannerHandleBatteries2-21............
UsingaTetheredBarCodeScanner2-22...................
TetheredScannerSupported2-22......................
Software2-24........................................
SettingTerminalEmulationtoAccept
TetheredLaserScanners2-24......................
SettingYourDOSApplicationtoAccept
TetheredLaserScanners2-25......................
SettingUpYourLS3203 orLS3603 RS-232
SerialScannerParameters2-25....................
SECTION3
TerminalEmulation Menu Screens
Introduction3-1.........................................
KeyboardFunctions3-1..................................
YellowandBlueShiftKeys3-1........................
Enter[ENT]Keys3-2................................
NumberKeys[0]Through[9]3-2......................
YUpandBDownArrows3-3........................
DisplayAnnunciators3-3................................
DisplayPosition0 3-3................................
DisplayPosition1 3-3................................
DisplayPosition2 3-4................................
DisplayPosition3 3-4................................
DisplayPosition4 3-4................................
DisplayPositions5--8 3-5.............................

CONTENTS"
ivPEN*KEYRModel6400 Hand-HeldComputerUser’sGuide
SettingtheOperatingParameters3-6.....................
OpeningtheMainMenu 3-6..........................
OpeningtheSet-UpParmsMenu 3-10..................
ProtocolOptions3-24.................................
DisplayOptions3-34..................................
RadioComm 3-35.....................................
ColdStart3-36.......................................
More3-36............................................
PrintDevice3-37.....................................
LCDParms3-37.........................................
ScreenSize3-38......................................
ScreenMode3-39.....................................
Annunciators3-41....................................
KeyUppercase3-41...................................
Scroll Window3-42...................................
BeeperSetup3-42........................................
KeyClick3-43........................................
ErrorTone3-44.......................................
BeeperSelect3-44....................................
Tests3-45...............................................
Peripherals3-45......................................
MemoryView3-49....................................
PacketDriverTest3-49...............................
HistogramOpts3-51..................................
Numbers3-52........................................
TimedNumbers3-52..................................
VersionInfo(Information)3-52............................
ExitMenus3-53..........................................
More3-53...............................................
KeyboardOpts3-53...................................
SaveParms3-54......................................
SessionMenu 3-54....................................
ToExitEmulationModeandReturntoDOS3-56............

CONTENTS"
PEN*KEYRModel6400 Hand-HeldComputerUser’sGuide v
SECTION4
Maintenance and Troubleshooting
Introduction4-1.........................................
LowBatteryIndication4-1...............................
CleaningYourHand-HeldComputer4-3...................
CaseandDisplay4-3.................................
DockingConnectors4-3..............................
Troubleshooting4-4.....................................
TroubleshootingTable4-4................................
DiagnosticInformation4-9...........................
RepairService4-10.......................................
APPENDIXA
ConnectorPin-Outs
8-PinDockingConnector(standard)A-1...................
OptionalCommunicationAdapter9-PinD-SubConnectorA-2
APPENDIXB
NORANDRUtilities Program
EntryPointB-1.........................................
Pop-UpMenusB-2.......................................
Drop-DownListsB-2.....................................
AlphanumericFieldsB-3.................................
TitleScreenB-4.........................................
LanguageSelectionB-5..................................

CONTENTS"
viPEN*KEYRModel6400 Hand-HeldComputerUser’sGuide
CommunicationsMenu B-6...............................
Option1BEGINCOMM SESSIONB-7................
Option2COMM SETTINGB-15........................
Option3UNITIDB-18................................
Option4NETWORKPARAMETERSB-18...............
Option4MODEMPARAMETERSB-20.................
Option5PHONENUMBER B-24.......................
Option9ADVANCEDUTILITIESB-25.................
APPENDIXC
KeyboardOverlays
41-KeyDOS/PC C-2......................................
51-KeyDOS/PC C-3......................................
41-Key5250 C-4.........................................
51-Key5250 C-5.........................................
41-Key3270 C-6.........................................
51-Key3270 C-7.........................................
41-KeyVT220 C-8.......................................
51-KeyVT220 C-9.......................................
41-KeyNATIVE C-10.....................................
51-KeyNATIVE C-11.....................................

CONTENTS"
PEN*KEYRModel6400 Hand-HeldComputerUser’sGuide vii
FIGURES
Figure1-1FrontView1-4................................
Figure1-2BackView1-5................................
Figure1-3TopView1-6..................................
Figure1-4BottomView1-6..............................
Figure1-5 41-KeyKeyboard1-8..........................
Figure1-6 51-KeyKeyboard1-9..........................
Figure1-7AnnunciatorLocationsOnDisplay1-15..........
Figure1-8BottomEndHandstrapAttachment1-21.........
Figure1-9TopEndHandstrapAttachment1-22.............
Figure1-10 CommunicationAdapterScannerConnector1-29
Figure1-11 CommunicationAdapterChargerConnector1-30.
Figure1-12 ScannerHandle1-31..........................
Figure1-13 ScannerHandlewithOptionalBatteryPack1-32
Figure1-14 AdjustableHandstrap1-33.....................
Figure1-15 AdjustableWristStrap1-34....................
Figure2-1ResettingYourComputer2-3...................
Figure2-2InstallingMainBatteryPack2-5...............
Figure2-3RemovingMainBatteryPack2-7...............
Figure2-4MainBatteryPackUndersideView
ShowingContacts2-8................................
Figure2-5MultipackCharger2-10.........................
Figure2-6SinglePackCharger2-11.......................
Figure2-7OptionalScannerHandle2-19...................
Figure2-8OptionalScannerHandlewithBatteryPack2-20. .
Figure2-9InsertingScannerHandleIntoCharger2-21......
Figure2-10 ConnectingaTetheredScanner2-23............
FigureA-1 8-PinDockingConnectorPinoutsA-1...........
FigureA-2 9-PinD-SubConnectorPinoutsA-2.............
TABLES
Table2-1ChargingIndicatorErrorCodes2-12..............
Table2-2SolutionNotes2-13..............................
Table4-1BasicTroubleshooting4-4.......................

CONTENTS"
viii PEN*KEYRModel6400 Hand-HeldComputerUser’sGuide

PEN*KEYRModel6400 Hand-HeldComputerUser’sGuide 1-1
Section 1
General Information
""""""""""""""""""""""""""""
About thisUser’sGuide
Thisuser’sguideisdividedintofoursectionsandthree ap-
pendixes.
SummaryofSections
Section 1
Containsgeneral informationabout thecomponentsofyour
computer.Thisincludeshowtheuser’sguideisorganized,
asummaryofthesections,andthespecificationsforyour
hand-heldcomputer.
Section 2
Describeshowtoprepareforusing yourhand-heldcomput-
er.
Section 3
Showstheterminalemulationmenu screensforsetting
parameters.This sectiononlyappliesifyouarerunning
NORANDRterminalemulationsoftware.

SECTION1"GeneralInformation
1-2PEN*KEYRModel6400 Hand-HeldComputerUser’sGuide
Section 4
Stepsyouthroughsomeprocedurestousewhentrouble-
shooting yourhand-heldcomputer.This sectionalsoin-
cludesinformationformaintaining your computer.Routine
maintenanceincludesrechargingthemainbatterypack;
replacingthehandstrap;andcleaningthekeyboard,con-
nectors,and display.
AppendixA
Pin-outsforthe externalconnectors.
AppendixB
NORANDROMUtilitiesProgramsareintendedforyour
systemadministratorforsettingparameterstosupport
yourapplication.
AppendixC
Containsterminalemulationoverlaysofferedforyour com-
puter.
Unpacking and Inspecting
Thefollowingproceduresexplainwhat todowhenyour
hand-heldcomputerarrives,andwhat todoifithasbeen
damagedinshipping:
1.Removethehand-heldcomputerfromits shippingcon-
tainerandinspectforany visibledamage.
2.Ifyourhand-heldcomputerwasdamagedinshipping,
recordthemodelnumber,partnumber,andserial
number.Thesenumberscanbefoundonthebackside
ofthehand-heldcomputer.
3.Saveall paperworkpertainingtoshipment,andim-
mediatelynotifythetransportcompanyofthedam-
ageditem(s).Followtheirinstructionsforfilinga
claimonthedamageditems.

SECTION1"GeneralInformation
PEN*KEYRModel6400 Hand-HeldComputerUser’sGuide 1-3
AuthorizedrepairofNORANDproductsisavailable onlyat
NORANDServiceCenters.Unauthorizedrepairvoidsany
andall warranties.ContactyourNORANDSalesRepre-
sentativeforadditional instructions.
SECTION1"GeneralInformation
1-4PEN*KEYRModel6400 Hand-HeldComputerUser’sGuide
Hand-HeldComputerMainComponents
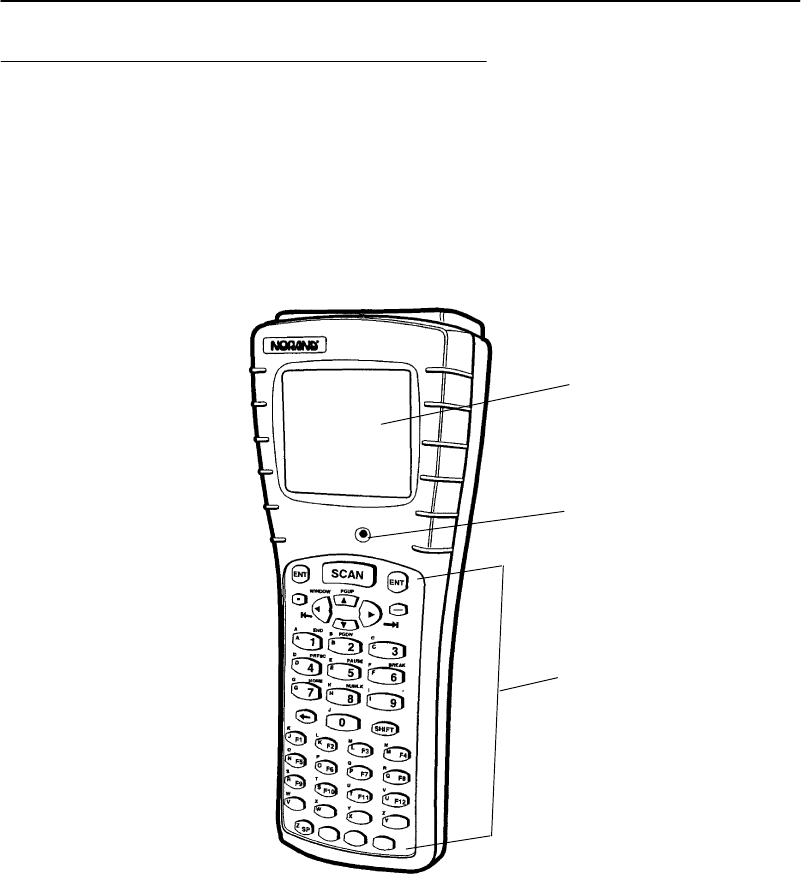
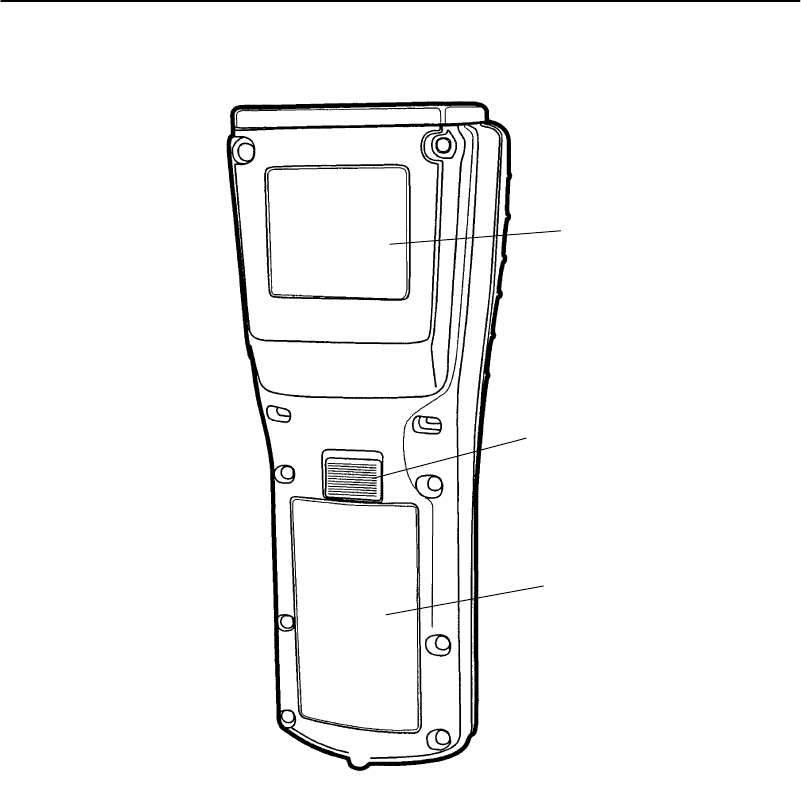
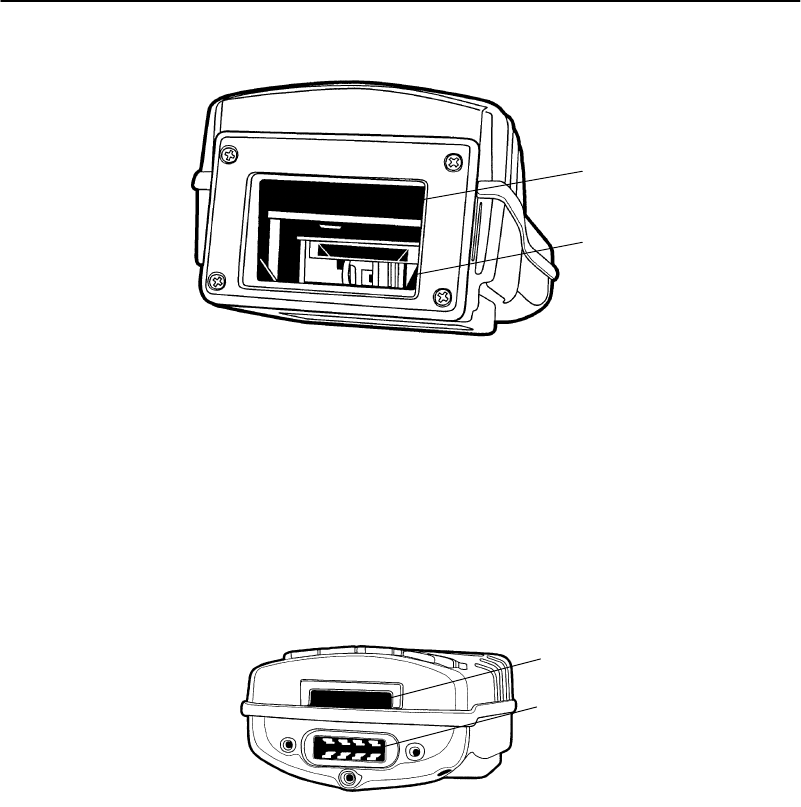
Figure1-1,Figure1-2,Figure1-3,andFigure1-4onpages
1-4,1-5,and1-6showyouthelocationofthemaincom-
ponentsforyourhand-heldcomputer.
1.Display
2.Buzzer
3.Keyboard
Figure 1-1
FrontView
1
2
3
SECTION1"GeneralInformation
PEN*KEYRModel6400 Hand-HeldComputerUser’sGuide 1-5
1.Label identifying model, serialnumberand class ofscanner(optional)
2.Batterypack latch
3.Batterypack
Figure 1-2
Back View
1
2
3
SECTION1"GeneralInformation
1-6PEN*KEYRModel6400 Hand-HeldComputerUser’sGuide
1.Radiocard(optional)
2.Scanner(optional)
Figure 1-3
Top View
Figure 1-4
BottomView
1. IrDA interface
2.Docking connectorand optionalcommunication adapterconnector
1
2
1
2

SECTION1"GeneralInformation
PEN*KEYRModel6400 Hand-HeldComputerUser’sGuide 1-7
Hand-HeldComputerKeyboard
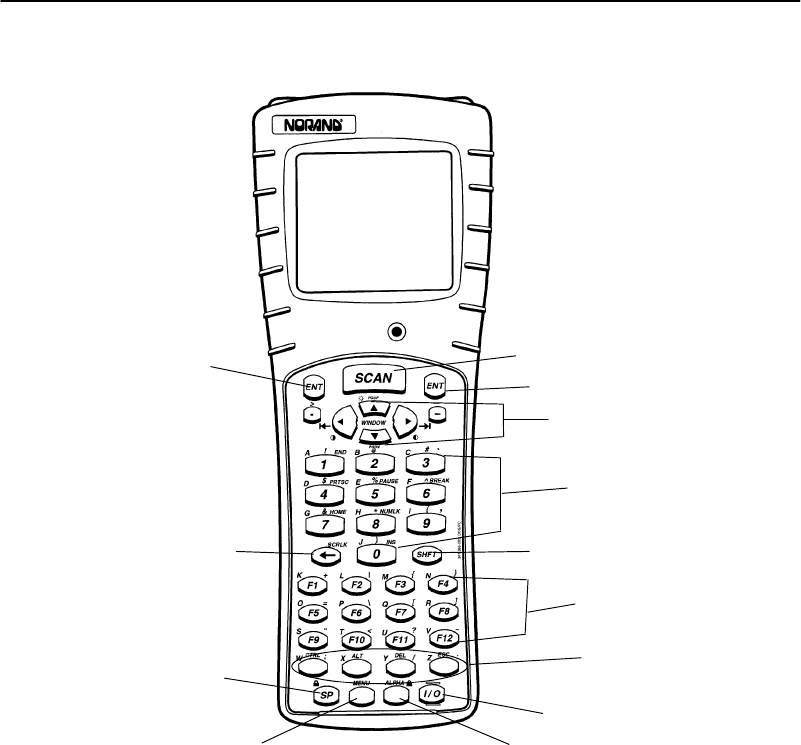
Thishand-heldcomputerprovidestwokeyboardoptions.
Figure1-5onpage1-8 andFigure1-6onpage1-9detail
the41-and51-keykeyboards.
"Forthe41-keykeyboard,functionandnumerickeys
aresinglekeystrokes.Alphabeticalcharacterscanbe
enteredbyusingthegreen,blue,oryellowshiftkeys.
"Forthe51-keykeyboard,alphabeticandnumerickeys
aresinglekeystrokes.Specialfunctionkeyscanbe
enteredbyusingthegreen,blue,oryellowshiftkeys.
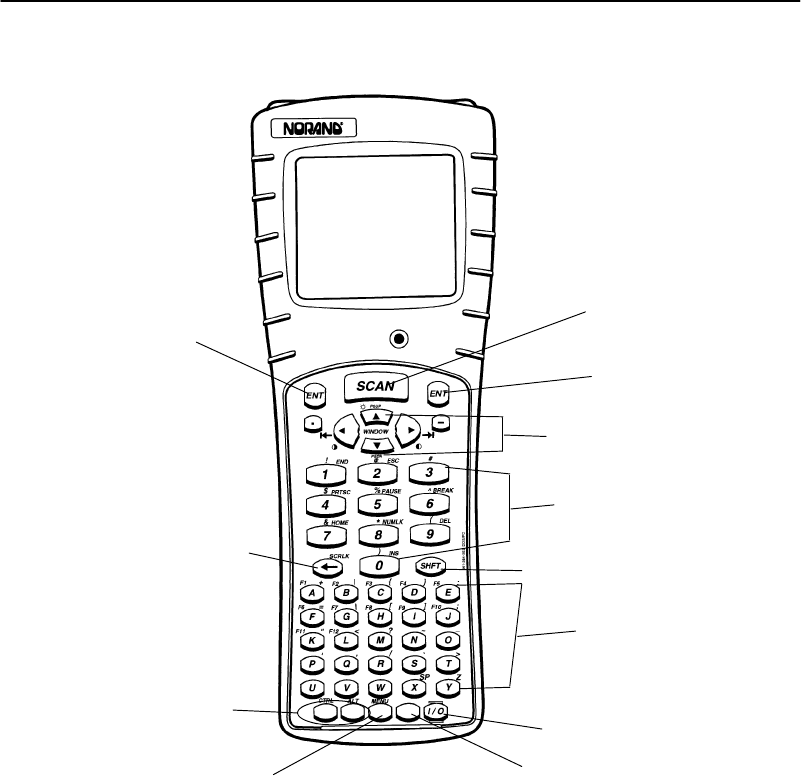
1.Scankey
2.ENTERkeys
3.Windowscrolling keys
4.Numeric keys (0--9)
5.Greenshift key
6.Function keys (F1--F12)
7.Specialfunction keys
(depending on keyboard
overlay used)
8. l/O(Suspend/Resume)key
9.Yellowshift key
10.Blue shift key
11.Space key
12.Backspace key
Key Descriptions(41-Key)1.Scankey
2.ENTERkeys
3.Windowscrolling keys
4.Numeric keys (0--9)
5.Greenshift key
6.Alphabetic keys
7. l/O(Suspend/Resume)key
8.Yellowshift key
9.Blue shift key
10.Specialfunction keys
(depending on keyboard
overlay used)
11.Backspace key
Key Descriptions(51-Key)
SECTION1"GeneralInformation
1-8PEN*KEYRModel6400 Hand-HeldComputerUser’sGuide
Figure 1-5
41-Key Keyboard
1
2
3
4
5
6
7
8
9
10
2
11
12
SECTION1"GeneralInformation
PEN*KEYRModel6400 Hand-HeldComputerUser’sGuide 1-9
Figure 1-6
51-Key Keyboard
1
2
3
4
5
6
7
2
11
98
10

SECTION1"GeneralInformation
1-10 PEN*KEYRModel6400 Hand-HeldComputerUser’sGuide
Key Descriptions
This sectionincludesadescriptionofhowtheshiftkeys
workandthedifferencesbetweena 41-keyand51-keykey-
board.Yourparticularkeyboardmayhaveanoverlaythat
hasadditionalkeysotherthanthosedescribedinthis sec-
tion.Refertoyourapplicationoperationmanualforde-
scriptionsofthosekeys.Thefollowingdescriptionscover
boththe41-keyand51-keycomputersusingaDOS/PC
overlay.
ENT(Enter)Key
TwoEnterkeysareprovidedfortheconvenience ofbothleft
andrighthandedusers.Thesekeysarethesameasan¿
(Enter)keyonaPC.You usethem to enterdata,orasa
“Yes”responsetodisplayprompts.
SCAN Key
Thiskeyisusedwithanintegratedscannertoreadbar
codelabels.Ifyourapplicationdoesnotuseascannerorif
youareusinganoptionaltetheredscanner,youprobably
will notusethiskey.Pressingthiskeyalsoresumesopera-
tion(awakenyourhand-heldcomputer)ifitisinthesus-
pendmode.
Period [.]Key
Usetheperiod[.]keyasaperiodoradecimalpoint.
Minus[-] Key
Usetheminus[--] keyto enternegativevaluesordashesin
characterfields.Theminuskeyisalsousedfor“No”re-
sponsestodisplayprompts.

SECTION1"GeneralInformation
PEN*KEYRModel6400 Hand-HeldComputerUser’sGuide 1-11
NumericKeys
Usethenumerickeysasyouwouldthose onacalculator.
Numericvaluesaresinglekeystroke operations.
AlphabeticKeys
Your computerprovidesthefull alphabetonboththe41-
and51-keykeyboards.Alphabetic charactersaresingle
keystroke operationswiththe51-keykeyboardbutaretwo
keystrokesona 41-keykeyboard.Alphabetic characters
canbe enteredonthe41-keykeyboardbyusingtheblue
shiftkey.
Backspace [ ] Key
Usethebackspacekeytobackthecursoruponecharacter
atatime.Holdingthiskeydowncausesthecursortocon-
tinuouslymovebackwardsuntil youstoporyourun outof
spacetomove.
Shift Keys
Yourhand-heldcomputerhasthree different “shift” func-
tionkeys.Thesekeystemporarilyshift thefunctionofthe
keyboard.Yourkeyboardhasagreen[SHFT]key,a blue
keyandayellowkey.Thegreenshiftkeyisastandard
shiftkey.Boththeblueandyellowkeysworkjustlikethe
shiftkey,andallowaccess todifferentalternatefunctions.
Yourkeyboardmayhaveuptothree color-codedlegends
(wordsor characters)abovesome ofthekeys.Thegreen,
blue,oryellow“shift” keyscorrespondtothose options.

SECTION1"GeneralInformation
1-12 PEN*KEYRModel6400 Hand-HeldComputerUser’sGuide
Green[SHFT]Key
Pressingthegreen[SHFT]keyshiftsthekeyboardbetween
uppercaseandlowercaseforasinglekeystroke entry.Ifthe
keyboardis setforuppercasecharacterentry,pressing
green[SHFT] followedbyacharacterkeyentersasingle
lowercasecharacter.
BlueKey
Usetheblueshiftkeyto entersinglekeystroke entriesof
thatshiftedoption.Theblueshiftedfunctionrelatestothe
bluelegendslocatedabovethekeys.
Using a 41-Key Keyboard
Onthe41-keykeyboard,abovetheyellowshiftkeyisAl-
phabeticLock,illustratedbythesymbolALPHA.This
locksthekeyboardso onlythealphabeticalcharactersare
entered.Press thebluekeyandthentheyellowkey.
ThebluepadlockisCAPSLOCK. Thiscausesalphabetic
characterstobecapitalized.Press thebluekeyandthen
thespacekey.
ALPHABETICorCAPSlockcontinuesuntil thebluethen
yellowshiftkeysarepressedagain.
Using a 51-Key Keyboard
Onthe51-keykeyboard,thereisnoALPHALock keybe-
causethealphabetical lettersarenotshiftedfunctions.
YellowKey
Usetheyellowshiftkeyto entersinglekeystroke entriesof
thatshiftedoption.Theyellowshiftfunctionsrelatestothe
yellowlegendsonyourkeyboard.

SECTION1"GeneralInformation
PEN*KEYRModel6400 Hand-HeldComputerUser’sGuide 1-13
Using Shifted Functions
This sectionexplainstheuse oftheshiftkeys.
TheRules
Thegreen[SHFT]keyisthesameastheSHIFT keyona
PCexceptthat thegreenshiftkeyalsorelatestothose
characterswheregreenlegendsappearabovethekeys.
EXAMPLE:OnaPC,SHIFT [3]producesthe#character,and thatisthe same
on the hand-heldcomputer.
Contrastandbacklightingare onthewindowscrollingar-
rowkeys.Thecontrastcontrolandbacklightcontrolare
not thesameasthePCshift.Thishand-heldcomputer
uses shiftleft,shiftrightandshiftupfor contrastandback-
lightcontrol. OnaPCthesekeystrokesproducea 4,6,and
8.Numericvalues0--9 areavailable onall the6400 Hand-
HeldComputerversions,thosekeysareusedforspecial
controlswithoutcausingcompatibilityissues.
Using theShifted Functions
Ifthefunctionyouwantisprintedonthekeyboardoverlay
(inblue,yellow, orgreen)thenyoumustfirstpress that
coloredshiftkeyimmediatelybeforethedesiredcolorfunc-
tion.That two-keycombinationalwaysdefinesthatkey.
EXAMPLE:A41-key DOS/PCkeyboardhasthe letterSin blue overthe [F9]
key.Therefore, to producealowercase’s’,press blue shift then the
[F9]key.
To produce an uppercaseS,press the green [SHFT]key, then blue
shift, then the [F9]key.
‘S’ isalways produced bypressing blue shift, then the [F9]key;ifyou
want tomodifythis,you press amodifierfirst.
EXAMPLE:To produceCTRL-S,press the [CTRL]key, then blue shift, then the
[F9]keyfor‘S’.
To produceALT-F9,press the [ALT]key, then the [F9]key.

SECTION1"GeneralInformation
1-14 PEN*KEYRModel6400 Hand-HeldComputerUser’sGuide
EXAMPLE:Pressing the green [SHFT]keyand then the [DEL]keyproducesa
dotinstead ofdeleting the characterat the cursor.The nearby keys
on thatrow[CTRL], [ALT], and [ESC]still behave normallywhen the
green [SHFT]ispressed first.
Thisiswhyannunciatorsareabsolutelycrucial,sinceyou
mustonlypress onekeyatatime.Theannunciatorstell
youwhichshiftkey youarepressingandholdingdown.Re-
fertopage1-16 forlocationsandmeaningsofdisplayan-
nunciators.
Pressingmorethanoneshiftkeyalongwithanotherkey
maynotalwaysproducetheresultyouexpected.Thishap-
pensasaresult:
"Ofthesequence ofkeyspressed,and
"Themodeyour computerisinat thetimethekeyis
pressed.
Thereisnoproblemwhenyoupress thegreen[SHFT]and
theyellowkey.Butifyoupress the[SHFT]andeitherthe
blue oryellowshiftkey,you usuallyexperiencedifferent
resultsthanyouexpect.
SummaryofShift Key Combinations
"Green[SHFT]andeitherblue oryellowshiftkeyand
anotherkeystroke,noconfusion
"Green[SHFT]andblueandyellowshiftkeyalong
withanotherkey,confusioncanoccur
Thisis similartoyourPC,iftheNUMLOCKorCAPS
LOCKisengagedthenpressingshiftandakeyusuallypro-
duces somethingotherthanwhatyouwant.Therefore,just
likewithaPC,toget theresultyouwantyou haveto
changeamode orthesequenceyoupress thekeys.
SECTION1"GeneralInformation
PEN*KEYRModel6400 Hand-HeldComputerUser’sGuide 1-15
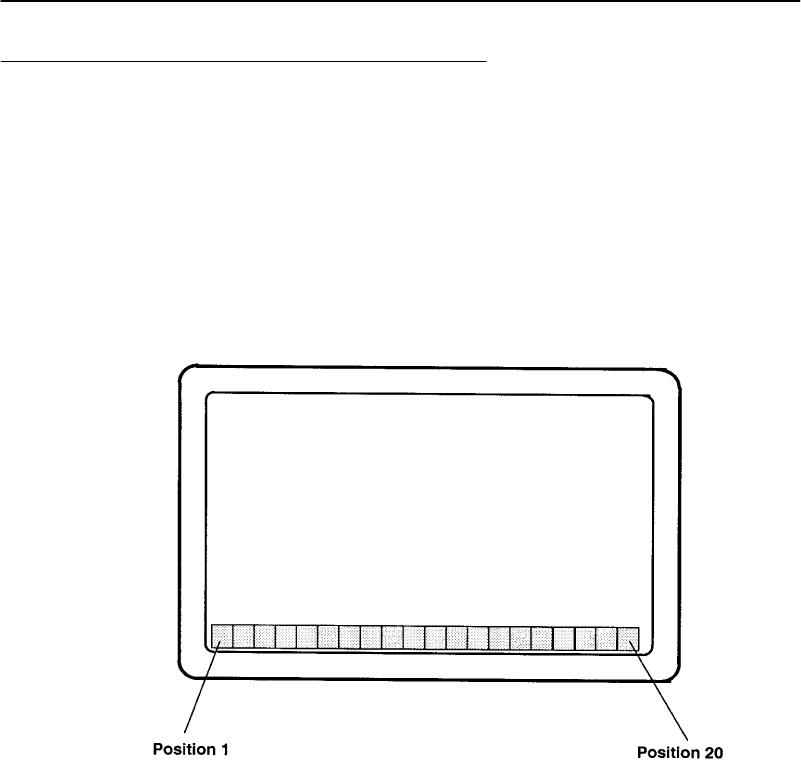
Display AnnunciatorLocationson
Display Window
Annunciatorsarelocatedat the extremebottomofthedis-
play,in20 separatepositions.Thefollowingfigureillus-
trateswhere eachannunciatorispositioned.Position1is
locatedinthelowerlefthandcornerand position20 com-
pletestherowinthelower righthandcorner.
Figure 1-7
AnnunciatorLocationsOnDisplay
S
C
SECTION1"GeneralInformation
1-16 PEN*KEYRModel6400 Hand-HeldComputerUser’sGuide
AnnunciatorDescriptions
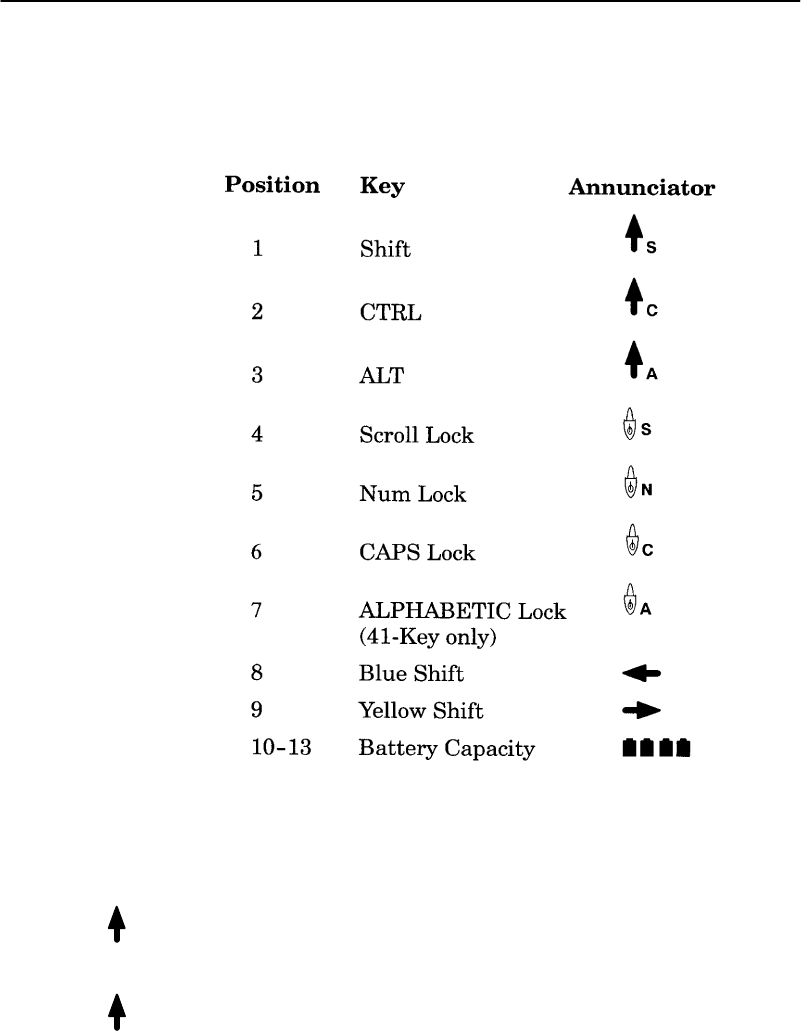
Annunciatorsappearonthebottomline ofthedisplay.
Display Annunciators(Messages)
Thesymbolscontainedinthis sectionarelargerthanactual
size.Themeaningoftheannunciatorsisdescribedbelow:
Shiftmode:AfterholdingdownthegreenShift[SHFT]
key,thenextcharacterwill beuppercase orthealternative
function.
Controlmode:Generally you usetheControlmodeasit
isdesignedinby yourparticularapplication.

A
S
N
C
A
SECTION1"GeneralInformation
PEN*KEYRModel6400 Hand-HeldComputerUser’sGuide 1-17
Altmode:Generally you usetheAlt modeasrequiredby
yourparticularapplication.
Scroll lockmode:Thismodelocksthekeyboardfor
scrollingonly.Byusingthescroll arrowsonthe
[WINDOW]keysyoucancontinuouslyscroll throughall
dataentered.Yourapplicationandkeyboard definition
showyouwhichkeyisdefinedforscrolling.Tounlock,
press thekeyagain.
NUMlockmode:Boththe41-keyand51-keyDOS/PC
keyboardshavethe optionforlockingthekeyboardin nu-
mericlockmode.Pressingtheyellowshift thenthenumber
8keysetsthisfunction.Tounlock,press theyellowshift
thenthenumber8keyagain.
CAPSlockmode:ThekeyboardisinCAPSlockmode
whenthisannunciatorisdisplayedonthebottomrowofthe
screen.All keystrokesare enteredasuppercasecharacters.
TounlockCAPSpress the[CAPS]key(51-keykeyboard)
againortheblueshiftandspacekeyusingthe41-keykey-
board.
Alphabeticlockmode:Onlythe41-keykeyboardshave
the optionforlockingthekeyboardinalphabeticmode.
Onlythosekeysthathavealphabetic charactersintheblue
shift modeareaffected.Theprimarykeyfunctionandthe
alphabeticareswappedinAlphabeticLock.Pressingthe
blueshiftandthentheyellowshift togglesAlphabeticLock
onandoff.Thefollowingexampleshowshowbyusingthe
number1key youcanproducecharacters1orA.
EXAMPLE:NormalOperation:Pressing the [1]keyproducesthe character‘1’;
pressing the blue shift keyand then the [1]keyproducesan ‘A’.
Using theAlphabeticLock:Pressing the [1]keyproducesan ‘A’;
pressing the blue shift keyand then the [1]keyproducesthe charac-
ter‘1’.

SECTION1"GeneralInformation
1-18 PEN*KEYRModel6400 Hand-HeldComputerUser’sGuide
BlueShiftMode:Thisannunciatorshowsyouthat the
keyboardisintheblueshift mode.Pressingakeyenters
thecharacterorperformsthefunctionshowninblue onthe
overlaytotheupperleftofthekey.
YellowShiftMode:Thisannunciatordisplayswhenthe
keyboardisintheyellowshift mode.Pressingakeyenters
thecharacterorperformsthefunctionshownonthe overlay
inyellowtotheupper rightofthekey.
BatteryPackGasGaugeIcons:
Thesebatteryiconsrepresent thechargelevel inyourmain
batterypack.
"Fouriconsindicatesmorethan76 %chargelevel
"Three iconsindicatesbetween51--75%
"Twoiconsindicatesbetween26--50%
"Oneiconindicatesbetween21--25%
Onceyour computergetsbelowthe20%range,theiconsare
replacedby“Ls”andafterthechargelevel isless than10%
your computeremitsaseriesofbeeps.
"FourLsindicatesbetween16--20%chargelevel
"Three Lsindicatesbetween11--15%.At the15%
chargelevel,your computerbeepsonce.Thesound
durationandfrequencyareatlevelsyou havesetfor
your computer.
"TwoLsindicatesbetween6--10%.At the10%and7%
chargelevels,your computerbeepsonce.Thesound
durationandfrequencyareatlevelsyou havesetfor
your computer.
"OneLindicatesbetween0--5%.At thischargelevel,
your computerbeepsthree timesatitscurrentsetting
levelforbothdurationandfrequency.
"NOTE:If you havethe beeperturned off,you will nothearanyof the low
batterybeep warnings.

SECTION1"GeneralInformation
PEN*KEYRModel6400 Hand-HeldComputerUser’sGuide 1-19
Thebatterypackiconsonyour computerdisplayreflect the
samestatusastheLEDsonthebatterypack.However,
theremaybeaoneminutedelayforupdatingtheiconson
thedisplaywhenthebatterypackisreplaced.
Display Contrast
Youcanadjust thecontrastofyourdisplay. Displaycon-
trastadjustmentisagreen[SHFT] function.Toincrease
thecontrast,press thegreen[SHFT]keyandthenthe[ ]
key(thewindowscroll-rightarrow).Todecreasethecon-
trast,press thegreen[SHFT]keyandthenthe[ ] key(the
leftwindowscroll arrow).
Backlight
Yourhand-heldcomputerdisplayhasa backlightfeature.
Backlightingthedisplayhelpswhen using yourhand-held
computerinpoorlylitworkingareas.Totoggletheback-
lightonandoff press andholdthegreen[SHFT]keythen
thebacklight[ ] key(thewindowscroll-uparrow).
WindowScrolling Arrows
Usethewindowscrollingarrowswhileintheblueshift
modetoadjust theareaofthescreenthatisvisible.Press-
ingtheblueshiftkeyandthenone ofthearrowkeysmoves
thedisplayonerowor columnatatimeuntil thearrowkey
isreleased.Thisallowsyoutopanacross the entirevirtual
CGAscreen.

SECTION1"GeneralInformation
1-20 PEN*KEYRModel6400 Hand-HeldComputerUser’sGuide
[l/O]Suspend orResume
Pressingthe[I/O]keydoesnot turnthehand-heldcomput-
eroff completely,butinstead putsitintoasuspendmode.
Suspendmode enablesthehand-heldcomputertoconserve
powerbutalso enablesit torespondquicklytodataentry.
Yourhand-heldcomputer respondstothescankey,thetrig-
geronthescannerhandle,orthe[I/O]key.Toforceyour
computerintosuspend,press the[I/O]key. Openingthe
batterypackdoorlatchalsoputsyour computerintosus-
pend.
Thehand-heldcomputerputsitselfintosuspendmodeifno
activityhasoccurredforasetperiodoftime.Thetimethat
elapsesbeforeitsuspendsisdeterminedbytheparameters
yousetusing yourapplicationsoftware,AUTOEXEC.BAT
orCONFIG.SYSfiles.
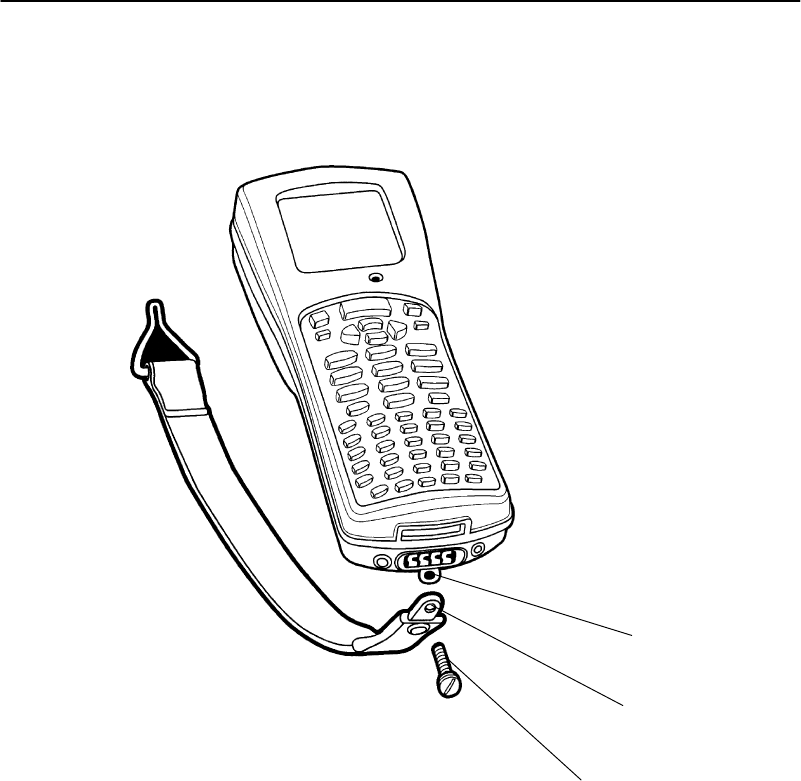
Handstrap
Anelastichandstrapisincludedforyourhand-heldcom-
puter.Usingthehandstrap providescomfort toyouand
alsohelpspreventyoufromaccidentallydropping your
hand-heldcomputer.
Whetheryouareleftor righthanded,thehandstrapcanbe
securedtothehand-heldcomputertoaccommodateyour
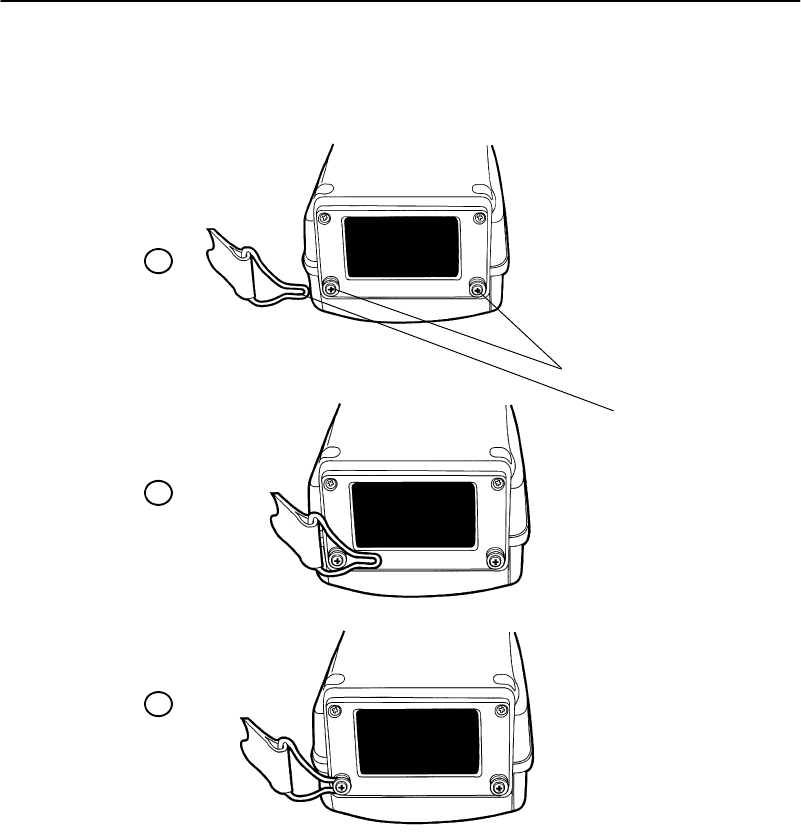
need.Figure1-8 andFigure1-9showhowtofastenthe
handstraptothetopandbottomofyourhand-heldcomput-
er.
Availableasoptionsandaccessoriesareanadjustable
handstrapandanadjustablewriststrap.Theseareshown
inFigure1-14 andFigure1-15 onpages1-33 and1-34 and
canbeattachedforeitherleftor righthandeduse.
SECTION1"GeneralInformation
PEN*KEYRModel6400 Hand-HeldComputerUser’sGuide 1-21
Figure 1-8
BottomEnd HandstrapAttachment
1
2
3
1.Handstrapattachmentscrewhole
2.Handstrapscrewattaching hole
3.Handstrapattaching screw
SECTION1"GeneralInformation
1-22 PEN*KEYRModel6400 Hand-HeldComputerUser’sGuide
Figure 1-9
Top End HandstrapAttachment
1
2
1.Handstrapattachmentbushings
2.Handstrapclipfastener
1
2
3

SECTION1"GeneralInformation
PEN*KEYRModel6400 Hand-HeldComputerUser’sGuide 1-23
Buzzer
Thebuzzersoundswhenyoupress akey(the“keyclick”)or
makeagoodscan,orwhencertainerror conditionsoccur.
RefertoFigure1-1onpage1-4forthelocationofthebuzz-
er.
BCAUTION:Keepall foreign materialoutof thebuzzeropening.Thebuzzer
opening isnotapencil orpen holder.Thebuzzeris sealed but
could bepunctured by sharp objectswhich harmthebuzzer
and allowrain,dirt,orothermaterialsto getinside your
hand-heldcomputer.
Youcanadjust thefrequencyandlengthoftime ofthebuzz-
ertonesthroughyourparametersettings.Theparameter
settingsaredetailedinSection3.
Infrared(IrDA)Port
TheIrDAportprovidesforthetransmittingofaninfrared
signalto:
"AprinterequippedwithanIrDAadapter
"ApersonalcomputerwithIrDAserialadapter
"AnyotherIrDAcompatibledevice
BatteryManagement
Thenormalchargetimeforthemainbatterypackis1.5
hoursfora2cell packand3hoursfora4cell pack.
Youshouldchargethebatterypackuntil thegreenLEDon
thecharger comeson,indicatingafullycharged pack.

SECTION1"GeneralInformation
1-24 PEN*KEYRModel6400 Hand-HeldComputerUser’sGuide
Afullychargedbatterypack,leftoutside ofachargeror
your computer,selfdischargesinabout20 days.Itisbest
totakebatteriesdirectlyfrom thechargingdeviceand
install themintoyour computer.
Yourbatterypacksareratedfor500 full charge/discharge
cyclesafterwhichtheyhave50%oftheiroriginalcapacity.
Themainandbackupbatterieswill notchargebelow32_F
(0_C)andabove104_F(40_C).Thebatterylife ofthecells
isreducedwhenrunningincoldtemperatures.
EXAMPLE:Yourcomputershould be used onlytwoshiftsa dayin a below0_C
environment to alloweighthoursforthe internalbackup batteryto
recharge inroomtemperature.
Itisalwaysagoodideatocheckthecapacityofyourbattery
packbeforeinsertingitintoyour computer,andchargeac-
cordingly.RefertoMeasuringBatteryPackCharge
Levelonpage2-8forinstructions.
Battery
MainBatteryPack
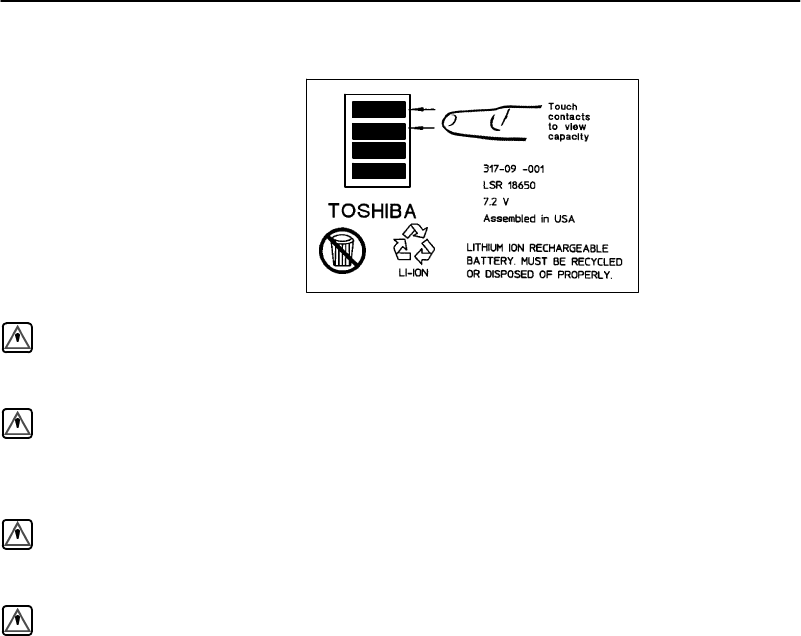
Thehand-heldcomputeroffersrechargeablelithiumion
mainbatterypacksin:
"Twocell
"Four cell
"Four cell inoptionalscannerhandle
SECTION1"GeneralInformation
PEN*KEYRModel6400 Hand-HeldComputerUser’sGuide 1-25
9
WARNING:Thebattery canexplodeifitisincorrectlyreplaced.Replace
onlywiththe sameorequivalentkind.
AVERTISSEMENT:Labatterie aulithiumpeutexplosersielle estreplacée de
manièreincorrecte.Ellenedoitêtreremplacée queparune
batterieidentiqueou similaire.
WARNING:Thelithiumbattery canexplodeifplacedincorrectlyinthe
charger.
AVERTISSEMENT:Les batteries aulithiumpeuventexploserou prendrefeusi
elles sont trop chargées à cause d’unemauvaise installation
dela station d’accueil.
Whenyourhand-heldcomputergoesintosuspendmodebe-
cause oflowmainbatterycondition,thedataisprotectedby
thebackupbattery.Yourhand-heldcomputerwill notac-
ceptdataorprocess transactionsuntil youdealwiththe
lowbatterycondition.Thebackupbatteryprotectsthedata
thatyou have enteredforatleast100 hours.

SECTION1"GeneralInformation
1-26 PEN*KEYRModel6400 Hand-HeldComputerUser’sGuide
Backup Battery
Yourhand-heldcomputer containsarechargeablenickel-
metalhydridebackupbattery.Thisbackupbatteryre-
chargeswhen neededfromeitheranexternalcharging
source(likeaprinterordock)orfrom themainbattery
pack.Ifthebackupbatteryiscompletelyrun downit takes
aminimumof8hourstocompletelyrechargebutitisbet-
tertorechargeitforafull 12 hours.
Thebackupbatteryremainsreadytoprotectyour
computersdatawheneverthemainbatterypackisremoved
orneedsrecharging.Thebackupbatteryshouldlastabout
500 cycles(dischargeandrecharge equalsacycle).This
batteryshouldlastforabout5yearsbeforeitneedstobe
replaced.Ifyourhand-heldcomputerfailstohold datafor
atleast100 hoursinthesuspendmode,sendyour
computerstotheNorandCustomerSupportCenterfor
replacement.
Memory
Thishand-heldcomputerdesign usesthesetypesof
memory:
"MainMemoryDRAM
"Flash
MainMemory
YourmainmemoryDRAMoptionsavailableare2,4or8
Megabytes.Thehand-heldcomputermainmemorywasor-
deredat thetimeyourunitwaspurchased.Toadd addi-
tionalmemory,sendyourhand-heldcomputerintoyourNo-
randCustomerSupportCenter.
Themainmemoryisprotectedbythebackupbatterydur-
inglowordeadmainbatteryconditionsorwhenthemain
batterypackisremoved.

SECTION1"GeneralInformation
PEN*KEYRModel6400 Hand-HeldComputerUser’sGuide 1-27
Flash
Flashmemoryisavailablein2or4Megabytes.Flash
storestheBIOSandDOS.Softwarestoredinflashisco-
piedintoDRAMforexecution.Yourapplicationmayalso
storeinformationinflashmemory.Flashmemoryretains
dataevenifall powersourcesaredepleted.
DiagnosticEEPROM
Thehand-heldcomputer collectsandstoresdiagnostics.
Theycanprovideuseful informationtoaNorandCustomer
SupportSpecialist,shouldyourhand-heldcomputerfail to
operate.Youwill beinstructedbytheNorand personnelto
completethenecessarystepswhiletheyaretroubleshooting
your computerwithyou.
Resetting
Intherare event thatyourhand-heldcomputerfailstore-
spondtoyourinput,it maybenecessaryto“reset.”A
“hard”resetofyourhand-heldcomputerisdonebyholding
downtheBlue,YellowandbothENT(Enter)keysall at the
sametime,until your computerstartsbeeping.Thisusual-
lytakesabout1--2seconds.Thismethodisequivalent to
poweringoff andonwithaPC.Resetting(alsocalledre-
booting)cantakeyourhand-heldcomputerupto45 se-
conds.
Dependingonthetype ofoverlay yourhand-heldcomputer
isprogrammedfor,usuallya“soft” resetisdonebypressing
Ctrl,Alt,andDelete.

SECTION1"GeneralInformation
1-28 PEN*KEYRModel6400 Hand-HeldComputerUser’sGuide
Batch TerminalOperation
Yourhand-heldcomputer containsinternalmemorysoit
cancollectandstoredata andthenat the endofadayor
shift,transmit(send)it toacentrallylocatedhostcomputer.
Manyapplicationsdothisuploadand downloadofinforma-
tiondaily,butsometimesthismayhappenseveraltimesa
day,oronlyoccurweekly.
TerminalEmulation
InTerminalEmulationyouareusing yourhand-held
computertoimitatetheappearanceandoperationof
anotherterminal(usuallyaparticularIBMorDEC display
monitor).Thekeyboardoverlaysforthe emulated
terminals supportedbythishand-heldcomputerare
containedinAppendixB.
Accessories and Options
InternalScanner
Yourhand-heldcomputer canbe orderedwithaninternal
integratedscanner.Anintegratedscannerprovidesthe
convenience ofhavingahand-heldcomputerandscannerin
one,forthefreedomofonehandedoperation.
InternalRadio
Yourhand-heldcomputer canbefactoryequippedwithei-
thera 902 MHzor2.4GHzspreadspectrumradio.This
hand-heldcomputerwitharadioprovidesforbothbatch
(storeandforward datatransferlater)andreal-time(right
now)interactionwithyourhostcomputerornetworkfor
flexibilityofoperation.
SECTION1"GeneralInformation
PEN*KEYRModel6400 Hand-HeldComputerUser’sGuide 1-29
Communication Adapter
BCAUTION:Thepinson the externalconnectorsof thehand-heldcomputer
arefragile.Attach ordisconnectcables withcareto prevent
damaging the connectors.
ExternalScannerConnector
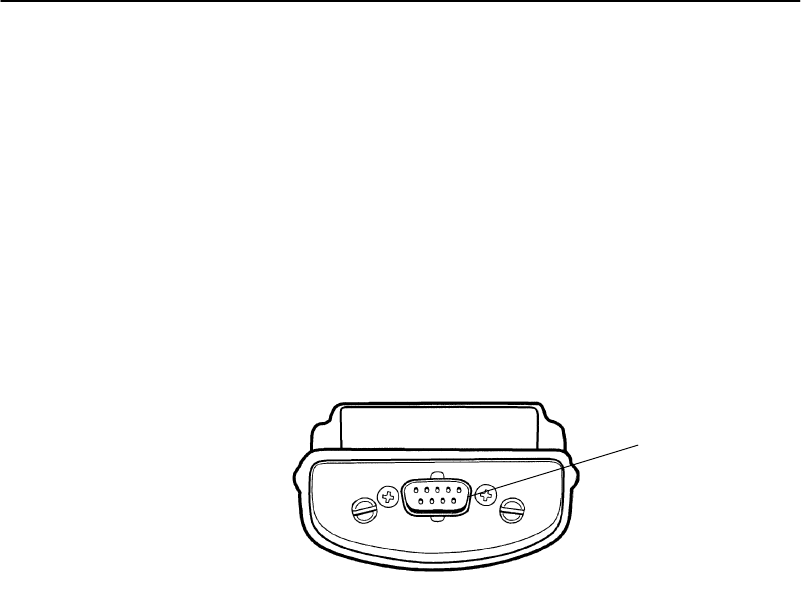
TheCommunicationAdapter containsa 9-pinconnectorfor
attachingatetheredscanner.AppendixAonpageA-2con-
tainsthepinoutsforthisconnector.
Figure 1-10
Communication AdapterScannerConnector
1.Scannerconnector
1
SECTION1"GeneralInformation
1-30 PEN*KEYRModel6400 Hand-HeldComputerUser’sGuide
Charge Jack
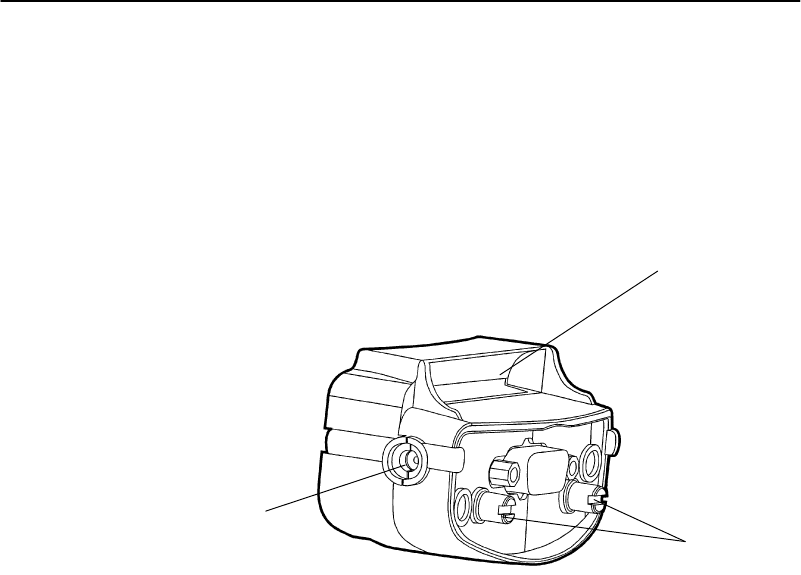
TheCommunicationAdapter containsachargejackonthe
sidefor connectingandcharging yourhand-heldcomputer
usinganoptionalAC wall chargerorDCcigarettecharger
accessory.
Figure 1-11
Communication AdapterChargerConnector
1
2
3
1. Infraredtransceiverlens
2.Communication adapterattachmentscrews
3.Externalchargejack
SECTION1"GeneralInformation
PEN*KEYRModel6400 Hand-HeldComputerUser’sGuide 1-31
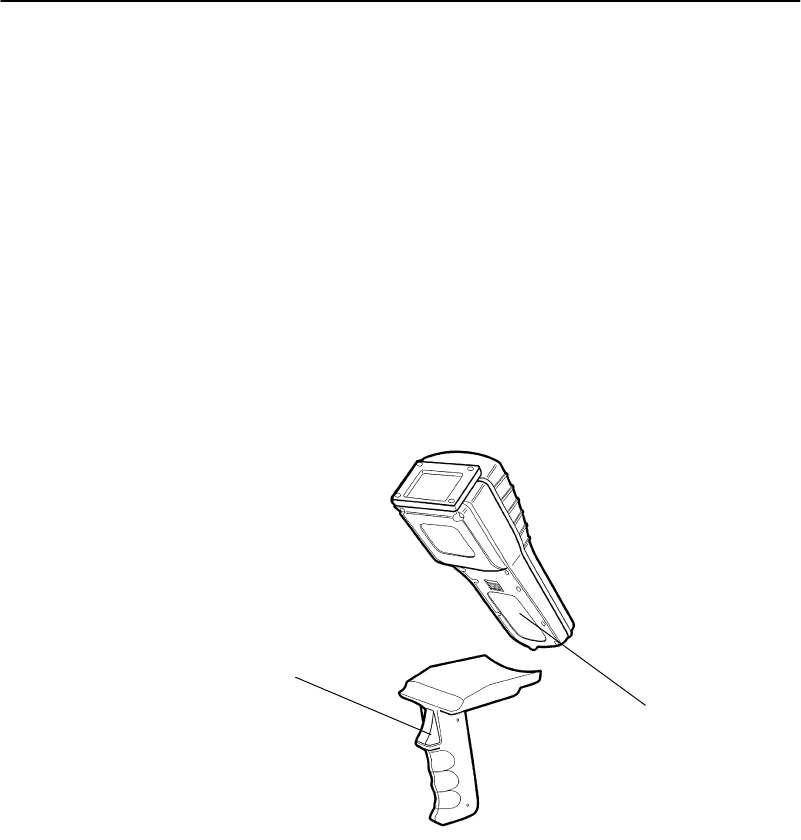
ScannerHandle
Ifyoudoalotofscanning,usingthe optionalscanninghan-
dlegivesyouameansforpointandshootscanning.The
scanninghandle offerstheseadvantages:
"Lightweight
"Easytoconnectanduse
"Optionalfour cell batterypack
"Caneasilydetachsothebatteriescanbechargedsep-
aratelyfrom thehand-heldcomputer
Figure 1-12
ScannerHandle
1.Twocell batterypack in hand-heldcomputer
2.Scanning trigger
2
1
SECTION1"GeneralInformation
1-32 PEN*KEYRModel6400 Hand-HeldComputerUser’sGuide
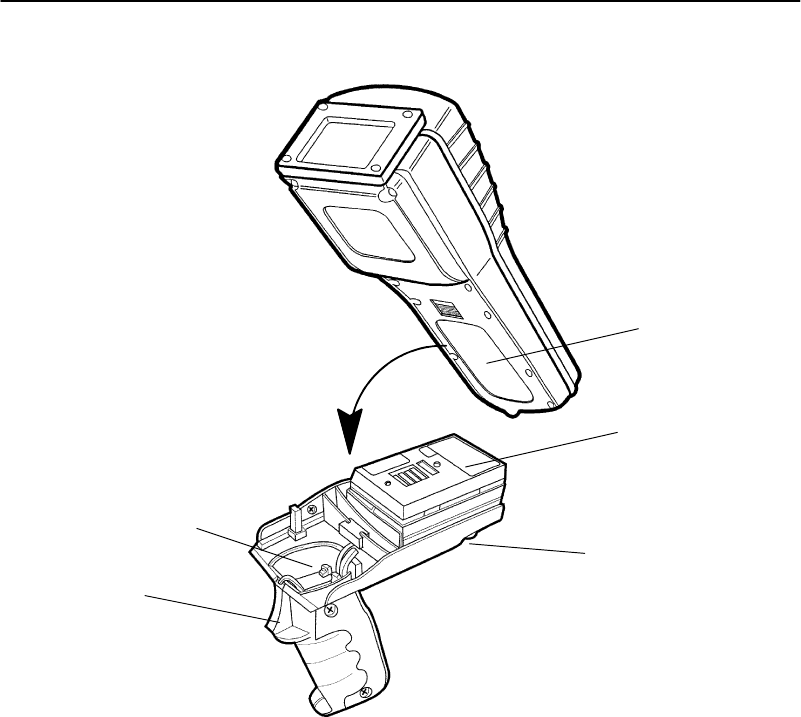
Figure 1-13
ScannerHandlewithOptionalBatteryPack
1.Battery compartment
2.Batterypack tofitincomputerbattery compartment
3.Button torelease handlefromcomputer
4.Scanning trigger
5.Batterypack in handle
3
2
4
5
1
SECTION1"GeneralInformation
PEN*KEYRModel6400 Hand-HeldComputerUser’sGuide 1-33
AdjustableWristStrapand
AdjustableHandstrap
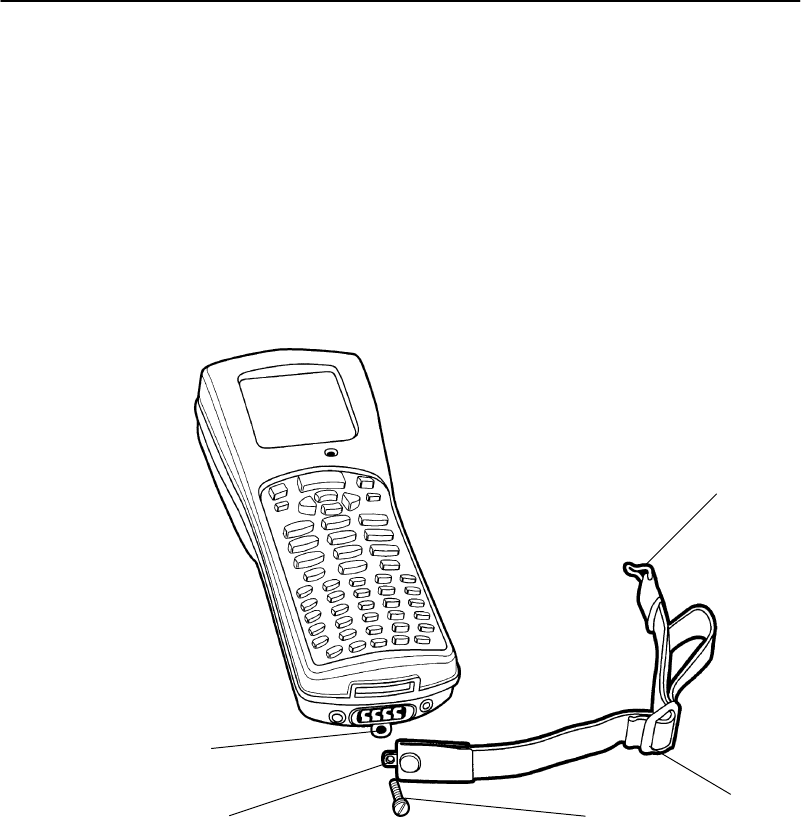
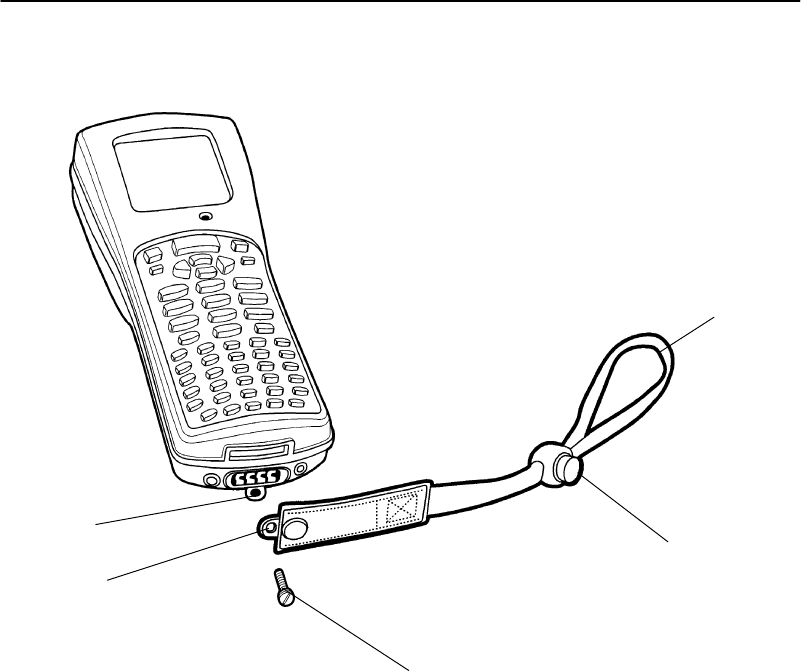
Youcanorderanoptionaladjustablewriststrapor
handstrap.Figure1-14 andFigure1-15 showhowtoattach
andadjust these optionalstraps.
Figure 1-14
AdjustableHandstrap
1
2
3
4
5
1.Top handstrapclipfastener
2.Handstrapadjustmentbuckle
3.Bottomhandstrapattachmentscrew
4.Handstrapattachmentscrewhole
5.Computerhandstrapattachmentscrewhole
SECTION1"GeneralInformation
1-34 PEN*KEYRModel6400 Hand-HeldComputerUser’sGuide
Figure 1-15
AdjustableWristStrap
2
1
3
4
5
1.Wristloop
2.Adjustmentknob (push button in,slide knob downstrap)
3.Wriststrapattachmentscrew
4.Wriststrapattachmentscrewhole
5.Computerwriststrapattachmentscrewhole

SECTION1"GeneralInformation
PEN*KEYRModel6400 Hand-HeldComputerUser’sGuide 1-35
Hand-HeldComputerSpecifications
Size:8.8inches(22.35 cm)long
3.3inches(8.4cm)wideatdisplay;2.9inches
(7.4cm)atkeyboard
2.2inches(5.6cm)tall
Temperature:
Recommended
Operating:--4to+122_F(--20 to+50_C)
Storage:--22 to+158_F(--30 to+70_C)
Weight:17--20 ounces(¶481--567 g)dependingonoptions
added
Humidity:0to100%noncondensing
Static
Protection:20 kV
Powersource:
Mainbattery:2cell LithiumIonbatterypack(standard)
4cell LithiumIonbatterypack(optional)
4
c
e
l
l
L
i
t
h
i
u
m
I
o
n
p
a
c
k
i
n
s
c
a
n
n
e
r
h
a
n
d
l
e
(
o
p
t
i
o
n
-
4
c
e
l
l
L
i
t
h
i
u
m
I
o
n
b
a
t
t
e
r
y
p
a
c
k
(
o
p
t
i
o
n
a
l
)
4cell LithiumIonpackinscanner handle(option-
al)
Backup
battery:150 mAnickel-metalhydride(NiMH)battery
(standard)
Chargingrate:
0to+40 _C:
(32 to104 °F)Fastcharge(fullycharge¶1.5hoursfora2cell
packand3hoursfora4cell pack)
Communication:
Physical
devices:AsynchronousRS-232 andRS-485,IrDA,Wireless
LocalAreaNetwork
Protocol:RS-232 protocolslikexmodem,ymodem,zmodem,
andKermit;NorandPrinterCommunications
Protocol(NPCP);IrDAthroughanIRadapter.
ForRFapplications:TCP/IP,Novell,anyEthernet
networkprotocolthatcanoperatewiththeODI
specification

SECTION1"GeneralInformation
1-36 PEN*KEYRModel6400 Hand-HeldComputerUser’sGuide
SystemComponents:
FLASH:1,2,or4megabytes(MB)
DRAM:2,4or8megabytes(MB)
Processor:AM386SC300,mixed3.3 and5volt,33 MHz.
Display:
Type:CGAcompatibleLCD
Size:160 (wide)by128 (long)pixels;
RadioModule:
2.4GHzSpread Spectrum
Interface:Internal
Range:Upto500 feet(152 meters)
DataRates
(throughput):800 kbpsor1.6Mbps,autoselecting
Modulation:FrequencyHoppingSpreadSpectrum(FHSS)
Frequency
Band:2400-2483 GHz
OutputPower100 mW
RadioModule:
902 mHzSpread Spectrum
Interface:Internal
Range:Upto1200 feet(366 meters)line ofsight
DataRates
(throughput):90,225,450 kbps,programmable
Modulation:DirectSequenceSpreadSpectrum(DSSS)
Frequency
Band:902--928 MHz
OutputPower250 mW

SECTION1"GeneralInformation
PEN*KEYRModel6400 Hand-HeldComputerUser’sGuide 1-37
900 MHzRadioOption
NIC*DeviceModelName
TypeIII 6710 Access Point.......
PEN*KEYR6400 .......
PEN*KEY6600 ........
PEN*KEY6100 ........
RM160
RM160
RM160
RM160
Radio
modulesRT1100 ................
RT1700 ................
RM60,RM70,RM70LR
(radiomodules)
RM60,RM70,RM70LR
(radiomodules)
*ConsultaNorand representativeforavailability.
NICSpecifications
Followingarenetworkingspecificationsforthe900 MHz
NIC.
Frequencyband:902--928 MHzspreadspectrumdirectsequence
Range:Upto1300 feetline ofsight
Coverage:100,000--350,000 squarefeetintypical indoor
installations
Datarate:90,225,or450 Kbps(dependsoninstallation)
Channelization:7@90 Kbps,1@225 or450 Kbps
Clientdriver:ODI
SoftwarecompatibilityRequiresNORANDcommunications softwareresidentin
theaccess point
Outputpower:250 mW
MAC protocol:NORANDopenwireless LANMAC radioprotocol
Regulatory
compliance:FCC 15.247;IndustryCanadaRSS 210 (Consulta
Norandrepresentativeforavailability.)

SECTION1"GeneralInformation
1-38 PEN*KEYRModel6400 Hand-HeldComputerUser’sGuide
2.4GHzRadioOption
Access PointNIC*DeviceModelName
TypeIII 6710 Access PointRM180
*RequiresNORAND communications softwareresidentinthe access
point.
Wireless
Station
NIC*DeviceModelName
TypeIII PEN*KEY6400 .......
PEN*KEY6600 ....... RM180
RM180
TypeII Laptopsandnotebooks.RM185
Mini-ISAPEN*KEY6100 .......
RT1100 ...............
RT1700 ...............
RM280
RM80,RM90,RM90LR
(radiomodules)
RM80,RM90,RM90LR
(radiomodules)
ISADesktops.............. RM380
*ConsultaNorand representativeforavailability.

SECTION1"GeneralInformation
PEN*KEYRModel6400 Hand-HeldComputerUser’sGuide 1-39
NICSpecifications
FollowingarenetworkingspecificationsfortheProxim2.4
GHzNIC.
Frequencyband:2.401--2.480 GHzSSTfrequencyhopping
Range:Upto500 feetline ofsight
Coverage:25,000 ft2(2,322 m2)typical indoors
Datarate:800 Kbpsor1.6Mbps,manualorautoselect
Clientdrivers:ODIandNDIS(v.2.0.1/DOSandWindows)
6710 &6910
(access point/gateway)RequiresNORANDcommunications softwareinthe
access pointoraccess point/gateway
Ethernetcompatibility:Ethernetpacket typesandaddressing
Outputpower:100 mW
MAC protocol:RangeLAN2
Regulatorycompliance:FCC 15.247;IndustryCanadaRSS 210;EuropeanUnion
ETS300-328 (ConsultaNorandrepresentativeforavail-
ability.)
Radioand ScannerModules
ModuleDescription
RM11 UHFradio
RM31 UHFradiowithintegrated,standard-rangescannerorlong-rangescan-
ner
RM60 900 MHzradio
RM70 900 MHzradiowithintegrated,standard-rangescanner
RM70LR900 MHzradiowithintegrated,long-rangescanner(suchasusedona
forklift)
RM80 2.4GHzradio
RM90 2.4GHzradiowithintegrated,standard-rangescanner
RM90LR2.4GHzradiowithintegrated,long-rangescanner(suchasusedona
forklift)

SECTION1"GeneralInformation
1-40 PEN*KEYRModel6400 Hand-HeldComputerUser’sGuide

PEN*KEYRModel6400 Hand-HeldComputerUser’sGuide 2-1
Section 2
Operation
""""""""""""""""""""""""""""
Introduction
This sectiontellsyou howto:
"Install andremovethemainbatterypack
"Chargethebatterypack
"Downloadapplicationsand parameters
"Program theFlashmemory
"“Power-up”yourhand-heldcomputer
"Understandthekeyclicks
"Scan usingintegrated(internal)ortethered(external)
scanners
BeforeUsing YourComputerfortheFirst
Time
Your computeris shippedwith unchargedbatteriesforsafe-
tyreasons.Chargeyour computerfor12 hoursbeforeusing
it thefirst time.Thisensuresthatboththemainandback-
upbatteriesarefullycharged.For completecharging
instructionsrefertoChargingYourBatteryPackbegin-
ningonpage2-9.
"NOTE:Afterthe initialcharging of12 hours, the normalcharge timeforthe
main batterypack is1.5 hoursfora2cell pack and 3 hoursfora op-
tionalscannerhandlewith4cell pack.

SECTION2"Operation
2-2PEN*KEYRModel6400 Hand-HeldComputerUser’sGuide
Ifyou usebatteriesandexternalbatterypackchargersbut
donotusedockstochargethebatteries,you needtofully
chargeyourbackupbattery.To ensurethebackupbattery
isfullycharged:
1.Insertafullychargedmainbatteryintoyour comput-
er.
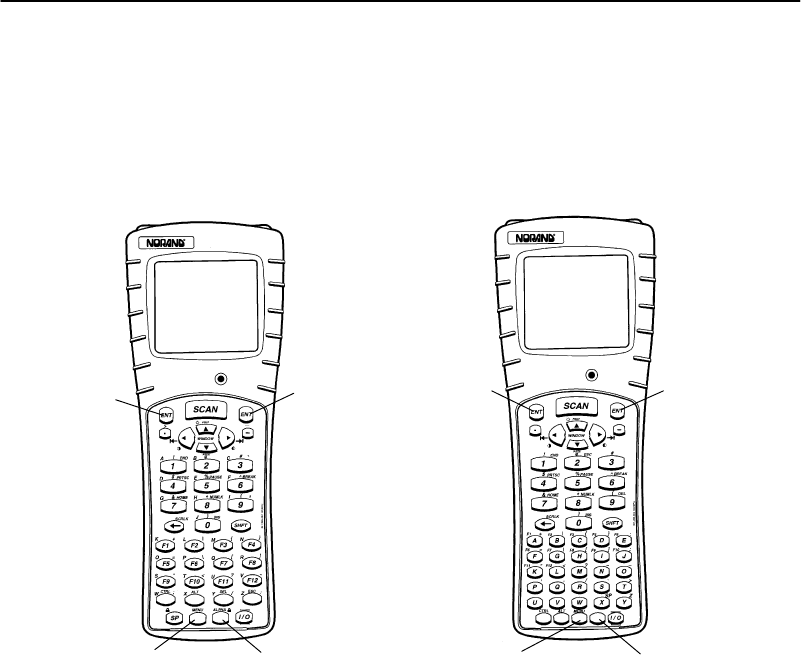
2.Perform thefourfinger reset(bothEnterkeys,blue
shift,andyellowshiftkeys)simultaneously.See
Figure2-1forlocationofkeys.
3.Allowyour computerto“boot” upandleaveitsus-
pendedfor10 hours.
"NOTE:Suspend meansto press and holdthe I/Okeyuntil the displaygoes
blank.
4.Insertanewandfullychargedbatterypacktobegin
operations.
SECTION2"Operation
PEN*KEYRModel6400 Hand-HeldComputerUser’sGuide 2-3
Figure 2-1
Resetting YourComputer
1
2
3
4
1
3
4
2
1.Enterkey
2.Yellowshift key
3.Blue shift key
4.Enterkey
41-Key Keyboard51-Key Keyboard
SECTION2"Operation
2-4PEN*KEYRModel6400 Hand-HeldComputerUser’sGuide
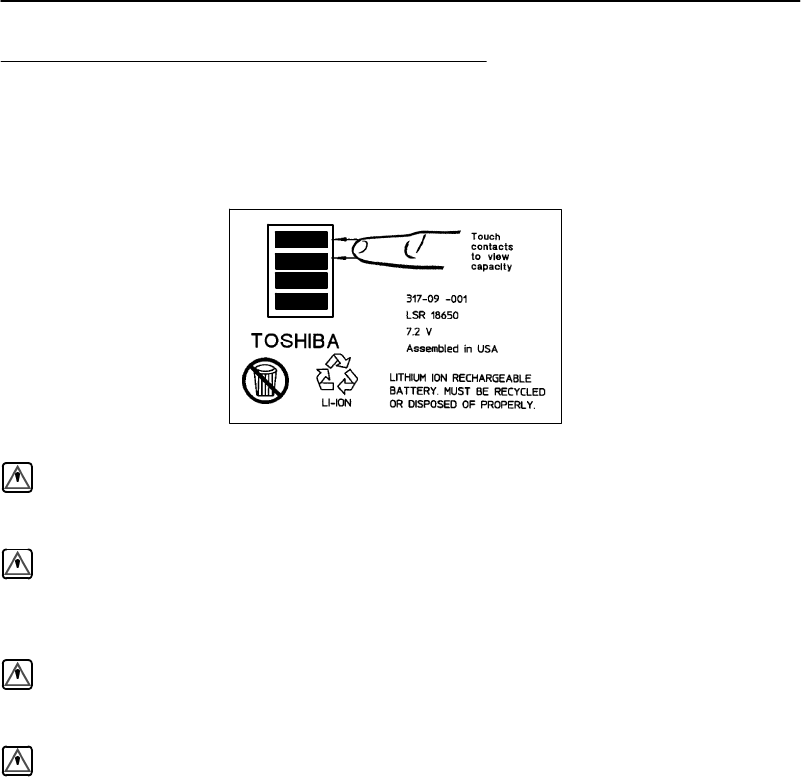
RechargeableBatteryLabelling
9
WARNING:Thebattery canexplodeifitisincorrectlyreplaced.Replace
onlywiththe sameorequivalentbatterytype.
AVERTISSEMENT:Labatterie aulithiumpeutexplosersielle estreplacée de
manièreincorrecte.Ellenedoitêtreremplacée queparune
batterieidentiqueou similaire.
WARNING:Thelithiumbattery canexplodeifplacedincorrectlyinthe
charger.
AVERTISSEMENT:Les batteries aulithiumpeuventexploserou prendrefeusi
elles sont trop chargées à cause d’unemauvaise installation
dela station d’accueil.
SECTION2"Operation
PEN*KEYRModel6400 Hand-HeldComputerUser’sGuide 2-5
Installing theMainBattery
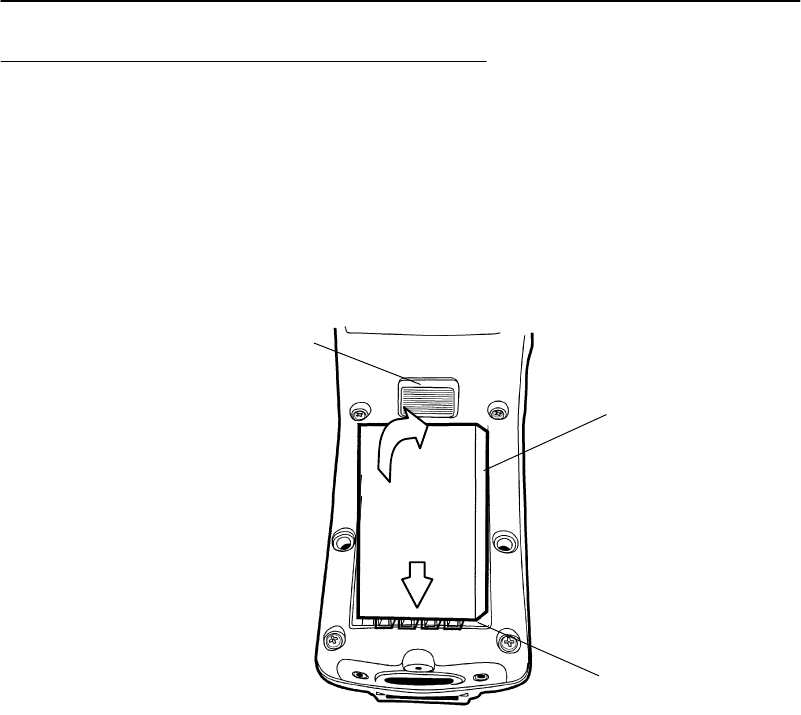
1.Positionthebatterypackwiththecontactsfacinginto
thebatterycompartmentandthefourprotrudingkeys
hookingunderthebottomendlipofthecompartment
(see Figure2-2).
2.Press inonthebatterypackuntil itsnapsintoplace.
1.Rechargeablebatterypack (contactson underside)
2.Battery compartment
3.Release latch
Figure 2-2
Installing MainBatteryPack
1
2
3
1
2

SECTION2"Operation
2-6PEN*KEYRModel6400 Hand-HeldComputerUser’sGuide
Removing theMainBattery
Beforeyouremovethemainbatterypack,ensurethatyour
computerisina“Suspend” mode,meaningthat thedisplay
isblank.Tosuspend press the[I/O]key.
Thestepsonthispageand2-8detail howtoremovethe
mainbatteryandcheckhowmuchpower remains.Referto
InstallingtheMainBatteryonpage2-5for replacing
thebattery.
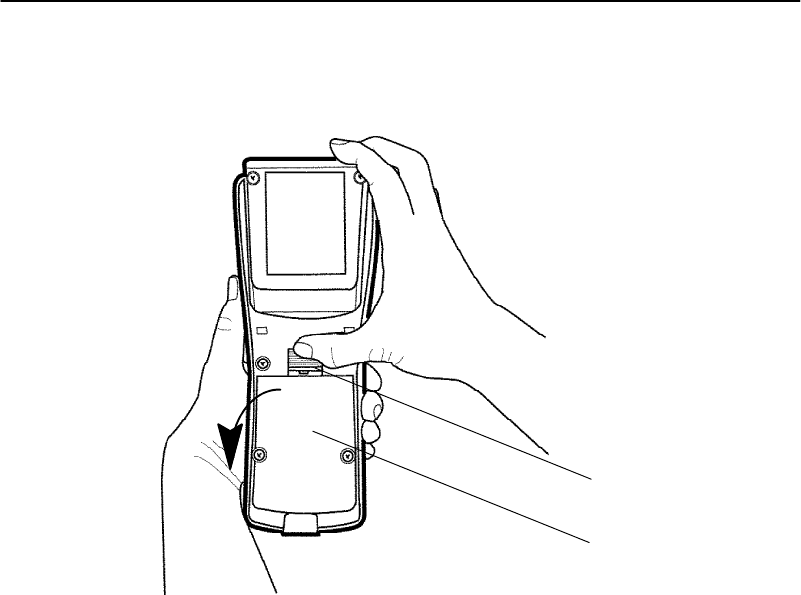
1.Withyourthumb,firmlypushthereleaselatchfor-
ward.Batterypopsupandoutofthecompartment.
2.Liftbatteryout.
SECTION2"Operation
PEN*KEYRModel6400 Hand-HeldComputerUser’sGuide 2-7
1.Release latch
2.Rechargeablebatterypack (contactson underside)
Figure 2-3
Removing MainBatteryPack
1
2
SECTION2"Operation
2-8PEN*KEYRModel6400 Hand-HeldComputerUser’sGuide
Measuring BatteryPack ChargeLevel
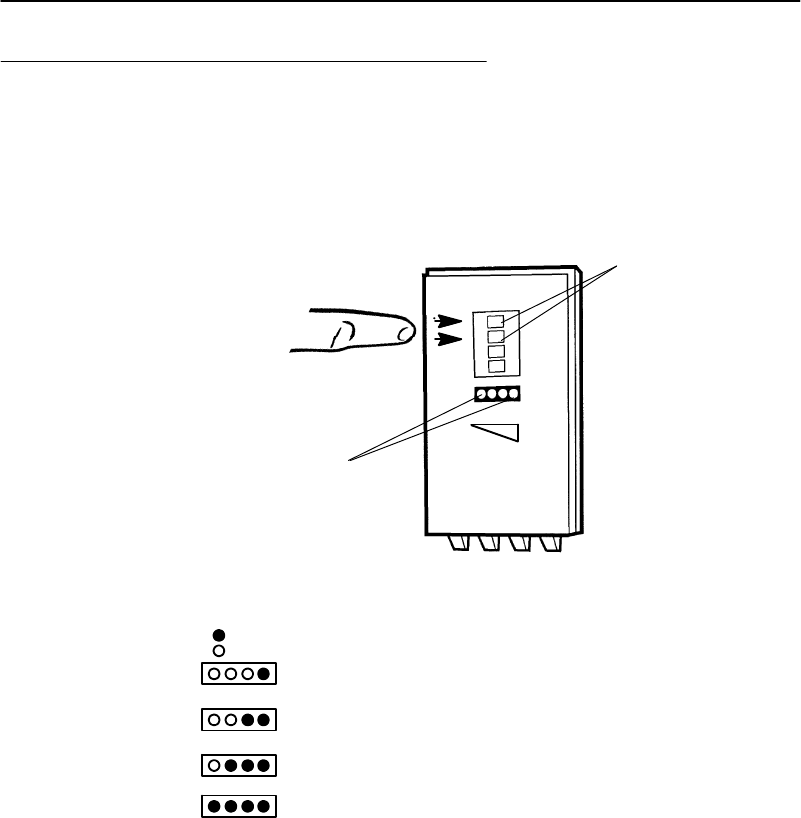
1.Touchyourfingeracross thefirst twocontacts.
2.Chargelevel isdisplayedfromright toleft.Thehigher
thebatterychargelevelthemoreLEDslight.
1
2
oneLED=21--25%chargelevel;
two LEDs=26--50%chargelevel;
three LEDs=51--75%chargelevel;
fourLEDs=76--100%chargelevel
Figure 2-4
MainBatteryPack UndersideViewShowing Contacts
=LEDon
=LEDoff
1.Contactsformeasuring chargelevel
2.LEDsthatshowchargelevel;see belowformeaning
3. Onceyour computergetbelowthe20%range,the
iconsarereplacedonthedisplaywithLsandafterthe
level isless than10%your computeremitsaseriesof
beeps.RefertoSection1page1-18 forthe explana-
tionoftheseLsandbeeps.

SECTION2"Operation
PEN*KEYRModel6400 Hand-HeldComputerUser’sGuide 2-9
Charging YourBatteryPack
Charging yourbatterypackcanbedone eitherinyour
hand-heldcomputerorinacharger.Thefollowingdevices
providechargingwhileyour computerisinsertedintothem:
InYourHand-HeldComputer
"6400 Seriesmultidock
"6400 Series singledock
"6400 Seriesvehicledock
Themultidock,singledock,andvehicledockinstallation
andinstructionsarecontainedinaseparateNORANDR
publication6400 Series DocksInstallationInstructions
NPN:962-020-004.
Usingthe optionalCommunicationAdapterallowsyouac-
cess tocharging yourhand-heldcomputerbyusing:
"Anacwall charger
"Acigarettelighteradapter
SECTION2"Operation
2-10 PEN*KEYRModel6400 Hand-HeldComputerUser’sGuide
InAnExternalSource
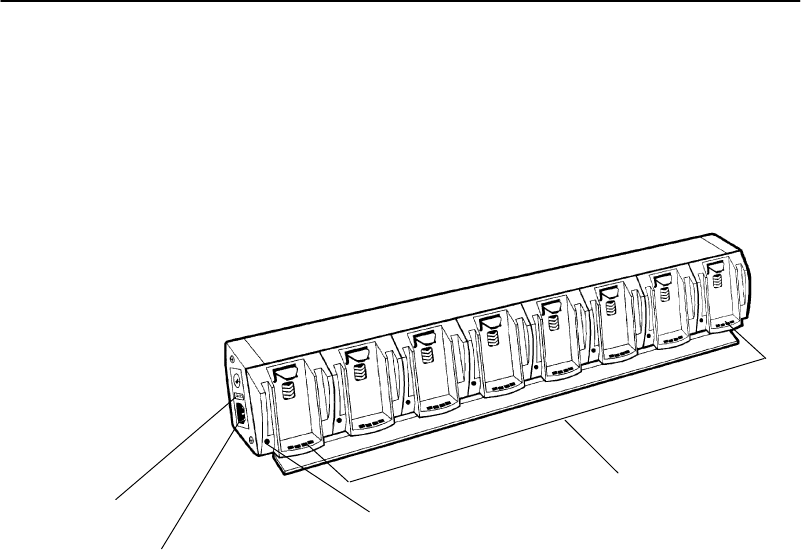
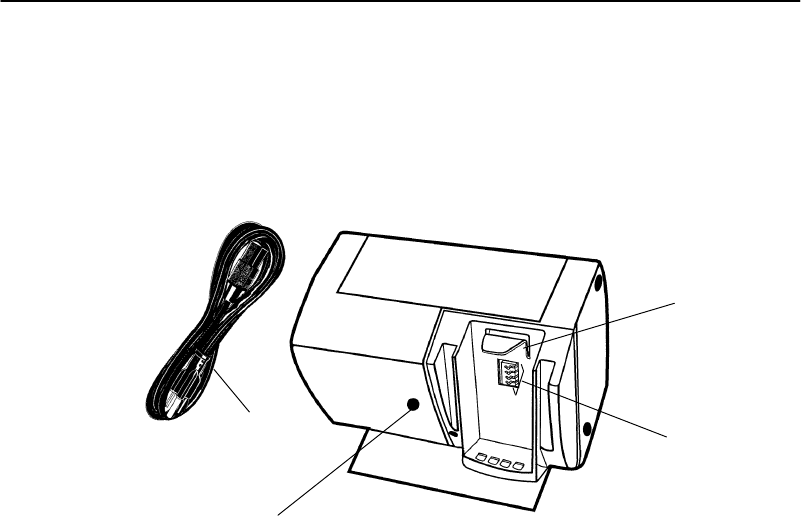
Figure2-5showsamultipackchargerandFigure2-6shows
asinglepackcharger.
Figure 2-5
Multipack Charger
1
2
3
1.Batterypack compartments(eight)
2.ChargeindicatorLED
3.Powercordconnector
4.Fuse holder
4
SECTION2"Operation
PEN*KEYRModel6400 Hand-HeldComputerUser’sGuide 2-11
Figure 2-6
SinglePack Charger
1
4
1.Batterypack compartment
2.Chargercontacts
3.Charging indicatorLED
4.Powercord
2
3

SECTION2"Operation
2-12 PEN*KEYRModel6400 Hand-HeldComputerUser’sGuide
BatteryChargerLEDand ErrorCodes
Whenyourbatterypackisplacedinamultipackorsingle
packcharger,thecharger’sLEDindicatesthebatterypack
chargingstatus:
"Redindicatesthat thebatteryischarging.
"Greenindicatesthebatterypackisfullycharged.
"Acombinationofa blinkingredandorangeLEDcan
indicate one oftwobasic conditions:Eithera badcon-
nection,inwhichcaseyou needtoremoveandreinsert
thebatterypackintothecharger,orthereisafaulty
batterythatneedstobereplaced.However,theindi-
cator canalsoalertyouofamoreseriouschargingor
producterror.Table2-1 andTable2-2onpage2-12
showyouthismore extensivelistoferror codesand
thesolution notes.
Charging IndicatorErrorCodes
Table2-1
Charging IndicatorErrorCodes
First
BlinkSecond
BlinkThird
BlinkPauseDescriptionSolutionNotes
OrangeOrangeOrangeOff HighVoltageFault1 and2
RedOrangeRedOff NoCommunication1
OrangeRedRedOff ChecksumError1
RedRedRedOff UpperCell Mismatch1 and3
RedRedOrangeOff LowerCell Mismatch1 and3
RedOrangeOrangeOff 5BadPacketsRe-
ceived1
OrangeRedOrangeOff WrongBatteryType1

SECTION2"Operation
PEN*KEYRModel6400 Hand-HeldComputerUser’sGuide 2-13
Table2-2
Solution Notes
NoteSolution
1Toisolatetheissuetothebatterypackitself,put the“suspected”battery
packintoacomputerandoperateforafewminutes.Then,trythe
batterypackindifferentcharger cupstosee ifthiserrorstill occurs.Ifit
doesoccur,sendthebatterypacktoyourservicecenterfor replacement.
2This situationcouldbecausedbya badcharger cuporacomputer.
Insertdifferentbatteriesintothis samecharger cup.Ifthecup produces
this same errorwiththe otherbatteries,thisindicatesthat thecupon
thechargerisbad.Toget thebatterybackintoagoodstate,put the
batterypackbackinthecomputerandoperateforafewminutes.Then
placethebatterypackintoadifferentcharger cupandrecharge.Send
thechargertoyourservicecenter.
3Leavethebatterypackinthechargerforaminimumof16 hours.Ifthe
error conditionstill exists,sendthebatterypacktoyourservicecenter.
Backup Battery
Afullychargedbackupbatteryprovidesprotectionfor
maintainingdata approximately100 hourswiththemain
batteryremovedor completelyrun down.Thebackup
batteryischargedfrom themainbatterypackandevery
timeyourhand-heldcomputerisplacedinadockor
chargingsource.
"NOTE:Yourcomputershould be placedonacharging sourcefor12 hours
before using the first timetofully charge the backup battery.
Thebackupbatteryisnotuser-replaceable.Tohaveyour
backupbatteryreplaced,senditintotheNorandCustomer
ServiceCenternearest toyou.Wheneveryousendinyour
hand-heldcomputerforservice,includeadescriptionof
whatyouwouldliketohavedonetoit.

SECTION2"Operation
2-14 PEN*KEYRModel6400 Hand-HeldComputerUser’sGuide
Downloading ProgramsTo Your
Hand-HeldComputer
Downloadingparameters,programdata,orinventoryis
donebyplacing yourhand-heldcomputerintoadock,
throughtheIrDAport,orthroughtheconnectoronthe op-
tionalCommunicationAdapterendcap.Thedockingde-
vicesnotonlytransmitdata betweenyourhand-heldcom-
puterandthehost,butalsoprovidechargingforyour
hand-heldcomputer.
Programming theFlash
Theflashdrive(c:\)isreadableandwriteable;therefore,
youcanmodify,createand deletefiles,etc.asyourneeds
demand.ThePEN*KEYRModel6400 Programmer’s
Reference GuideNPN:977-054-004 containsthecomplete
detailsforprogrammingflash.Theupper256 KBof flash
isreservedfortheBIOSandDOSfiles.Ifthisareaever
needsupdating youwill befurnishedwithcomplete
instructionsalongwiththeupdatedfiles.

SECTION2"Operation
PEN*KEYRModel6400 Hand-HeldComputerUser’sGuide 2-15
Turning YourHand-HeldComputerOn
and Off (Suspending)
Turning OnYourHand-Held
Computer
Turnyourhand-heldcomputeronbypressingandreleasing
the[I/O]key.Whenyourhand-heldcomputeriscoldbooted
(turningonthefirst time orafter resetting),itdisplays sev-
eralmessagesinrapidsuccession.Thefirst messageshows
thefirmwareversionanditsreleasedate(DD/MMM/YY).
Ifyouarejustresuming,thedisplayisrestoredtoitspre-
vious state.
Thescreensthatfollowdependonyourapplication.The
documentationthataddressesusingthishand-heldcomput-
erasa batch(storenowandsendlater)unitinstructyou
aboutall remainingoperations.
Suspending YourHand-Held
Computer
Tosuspendoperation,press andreleasethe[I/O]keyonce.
Suspendingoperationworksonlyifyour computerisnot
pluggedintoachargingsource.Thememorycontentsare
protectedwhenthepoweris suspended.
AutomaticSuspend
Yourhand-heldcomputerautomaticallyputsitselfintothe
suspendmodeafteraperiodofinactivity.However, waiting
tosuspendusesbatteryenergy.Thereforeitisbest to
manuallysuspendyourhand-heldcomputerbypressingthe
[I/O]keywhen notenteringdata.Thememorycontentsare
protectedwhenthepoweris suspended.

SECTION2"Operation
2-16 PEN*KEYRModel6400 Hand-HeldComputerUser’sGuide
TerminalEmulationprogramsdonotautomaticallysus-
pend.Whenlyingidlebutnot manuallysuspended,thein-
tegratedradiomoduleis still activeandwill drainbattery
muchasifitisactivelybeingused.Therefore,itisneces-
sarytomanuallysuspendyour computerbypressingthe
[I/O]key.
Understanding theKey Clicks
Youcommunicateyourintendedactiontoyourhand-held
computerthroughpressingakeyonthekeyboard.Your
hand-heldcomputer communicatesbacktoyouthroughan
audibleresponse,a“keyclick.”
Eachtimeyoupress akey,yourhand-heldcomputerlets
youknow withasingleaudiblekeyclick.Pressingcertain
keyscausestwoconsecutivekeyclicksthatoccuroneafter
anothersoquicklythat theyalmostsoundlikeasingle
beep.Thesetwoconsecutivekeyclicksoccurbecauseyour
hand-heldcomputerautomatically“presses” theshiftkey
foryouinthesecases.
EXAMPLE:An example ofconsecutivekey clicks isthe same aswhathappens
when you usethe “shift”keyonaPC.Thesekeys include a colon(:),
double quote(”),and percentsign(%).
Ifyouenteranincorrectactionorkeystroke,you heara
“beep.”Anerror“beep”islongerthanakeyclick.Anerror
“beep”isintendedtogetyourattentionandletyouknowan
erroroccurred.
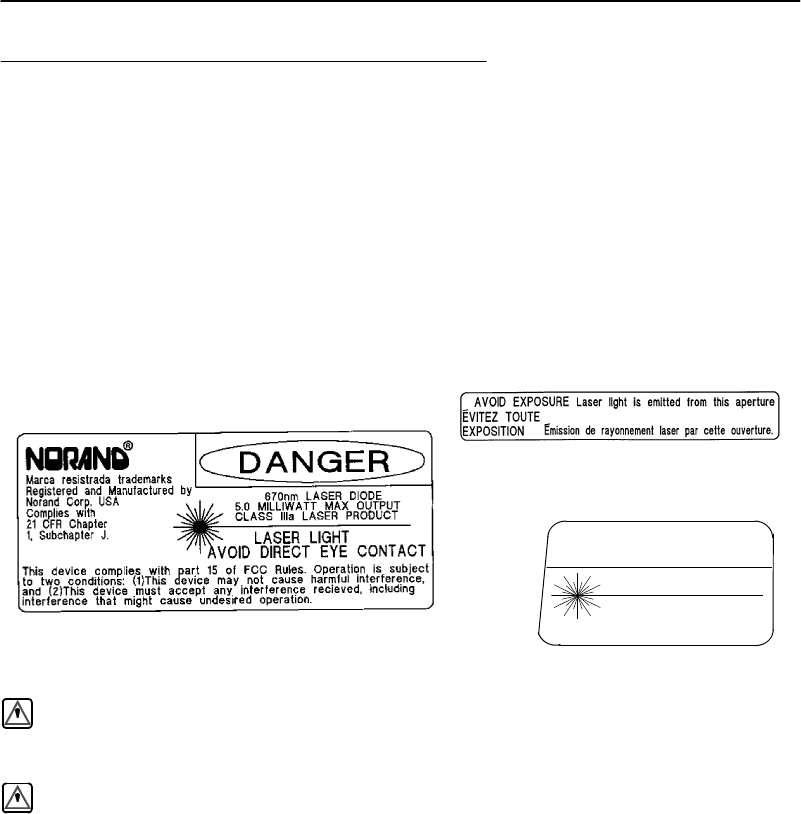
SECTION2"Operation
PEN*KEYRModel6400 Hand-HeldComputerUser’sGuide 2-17
Scanning
Youcanorderanintegratedscanneraspartofyourhand-
heldcomputer,oryoucanattachatethered5-voltserial,
decodedoutbar codescannertoyourhand-heldcomputer.
Scannersallowtheterminaltoreadandinterpretbar
codes.
Using anIntegratedScanner
Class IIIalaserlabel located on bottomsideofcomputer
Label locatedonlaserscannerlens
CAUTION
LASERLIGHT
DONOTSTAREINTOBEAM
670 nmLASER DIODE
1.0MILLIWATT MAXOUTPUT
CLASS II LASERPRODUCT
Class II Label
WARNING:Do notpoint the scanneratsomeone’s eyes orlookdirectlyinto
itwhenscanning.
AVERTISSEMENT:Neregardezpas lafenêtredu scannerlorsque vous
effectuezune scannérisation.Nepointezjamaislerayon
laserversles yeuxdequelqu’un.
Ifyourhand-heldcomputerhasbeenorderedwithaninter-
nal integratedscanner,youcanscanandkeydataonyour
hand-heldcomputer.Morecompletedetailsforsettingup
theparametersandoperatingtheintegratedscannerare
containedinthePEN*KEYRModel6400 Programmer’s
Reference GuideNPN:977-054-004.

SECTION2"Operation
2-18 PEN*KEYRModel6400 Hand-HeldComputerUser’sGuide
Tousetheintegratedscanner,simplypoint thetopofyour
unitat thebar code,press the[SCAN]keyandlistenfor
thebeepacknowledgingagoodscan.Ashorthigh-tone
beepindicatesagoodscan.Ifyou hearnobeep,scanthe
bar codeagain.Ifyouarestill notgettinga“goodscan”
beep,followtheseinstructions.
1.Ensureyouarepositioningthescanlensproperly
across thebar code.
2.Thescanbeam mustcross everybarandspace onthe
symbol.
3.Holdthescannerfartherawayforlargersymbols.
4.Holdthescanner closerforsymbolswithbarsthatare
closetogether.
"NOTE:Tip:After reading a barcode,aimthe lensawayfromthe barcodes
and press the SCANkeywithin 1/2second, to get the laserbeam
back on.Withthe laserbeamon,you havefivesecondstofind and
scan the nextbarcode.
RIGHTWRONG
012345 012345
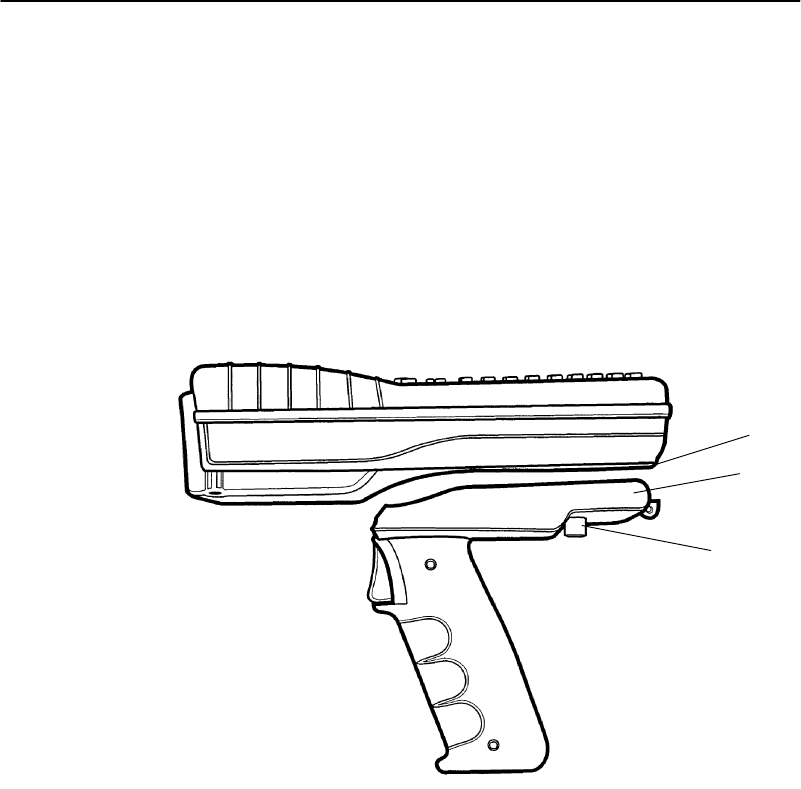
SECTION2"Operation
PEN*KEYRModel6400 Hand-HeldComputerUser’sGuide 2-19
Installing theOptionalScanning
Handle
Toattachthehandle:
1.Slipthehandle ontothebase ofyourhand-heldcom-
puter.
2.Securethetwoquarter-turnscrews.
Figure 2-7
OptionalScannerHandle
1.Bottomofhand-heldcomputer
2.Scannerhandle
3.Quarter-turnscrewfasteners
1
2
3
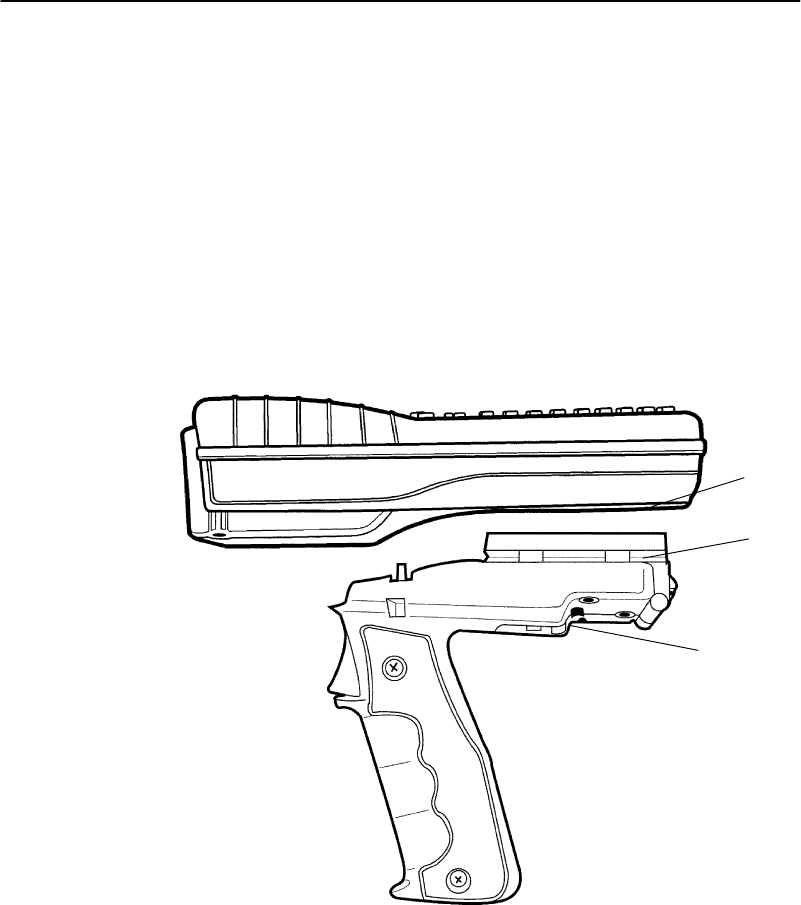
SECTION2"Operation
2-20 PEN*KEYRModel6400 Hand-HeldComputerUser’sGuide
Installing theOptionalScanning
HandlewithBatteryPack
Toattachthehandle:
1.Slipthehandle ontothebase ofyourhand-heldcom-
puter.
2.Snapintoplace.
3.Toremovethehandle,pushinonthereleasebutton
andliftoff.
Figure 2-8
OptionalScannerHandlewithBatteryPack
1.Bottomofhand-heldcomputer
2.Scannerhandlewith batterypack
3.Button torelease handlefromcomputer
1
2
3
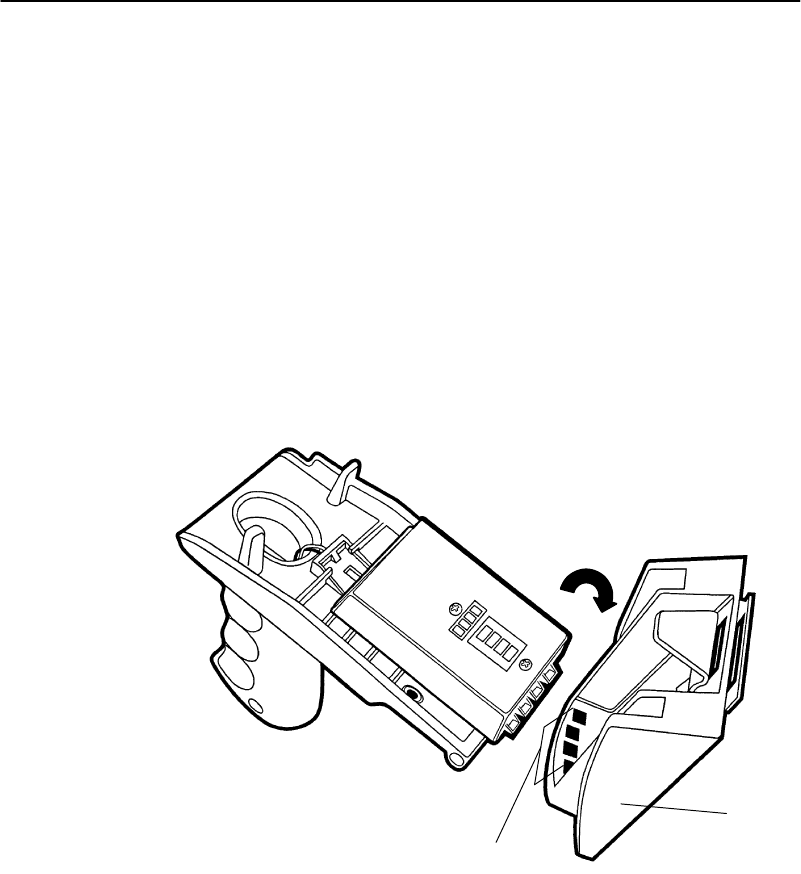
SECTION2"Operation
PEN*KEYRModel6400 Hand-HeldComputerUser’sGuide 2-21
Charging theScannerHandle
Batteries
Tochargethebatteriesinthescannerhandle:
1.Unscrewthetwoquarter-turnscrews securingthe
handletothehand-heldcomputer.Removethehand-
heldcomputer.
2.Slidethehandleintothechargerbyinsertingthekeys
ofthehandleintothenotchesinthecharger.The
singleunitcharger’sLEDilluminatesgreenwhenthe
batterypackisfullycharged.
Figure 2-9
Inserting ScannerHandleIntoCharger
2
1.Charger
2.Notch outsin batterypack chargercup
1

SECTION2"Operation
2-22 PEN*KEYRModel6400 Hand-HeldComputerUser’sGuide
Using aTetheredBarCodeScanner
Thetetheredbar codescannerattachestoyour computerat
the9-pinD-subconnectorlocatedonthebottomofthe op-
tionalCommunicationAdapter.Thecomputerprovidesthe
powertorun thescanner.
Yourhand-heldcomputersupportstheserial,decodedteth-
eredscannersintheNorand productline,theseinclude:
TetheredScannerSupported
SymbolScanners
"LS-3203ER-I200A,ExtendedRangepartnumber
858-042-800
"LS-3603-I200AFuzzyLogicpartnumber858-079-901
Cable:
"Straightscrewonconnectorserialcable321-518-001
PSCScanners
"PSC5300 IPSeriesStandardRangepartnumber
858-065-012
"PSC5300 IPSeriesVINpartnumber858-065-022
"PSC5300 IPSeriesLongRangepartnumber
858-065-052
"PSC5300 IPSeriesExtraLongRangepartnumber
858-065-072
"PSC5300 IPSeriesUltraLongRangepartnumber
858-065-092
"PSC5300 IPSeriesLongRangeHighPowerpartnum-
ber858-065-152
"PSC5300 IPSeriesExtraLongRangeHighPower
partnumber858-065-172
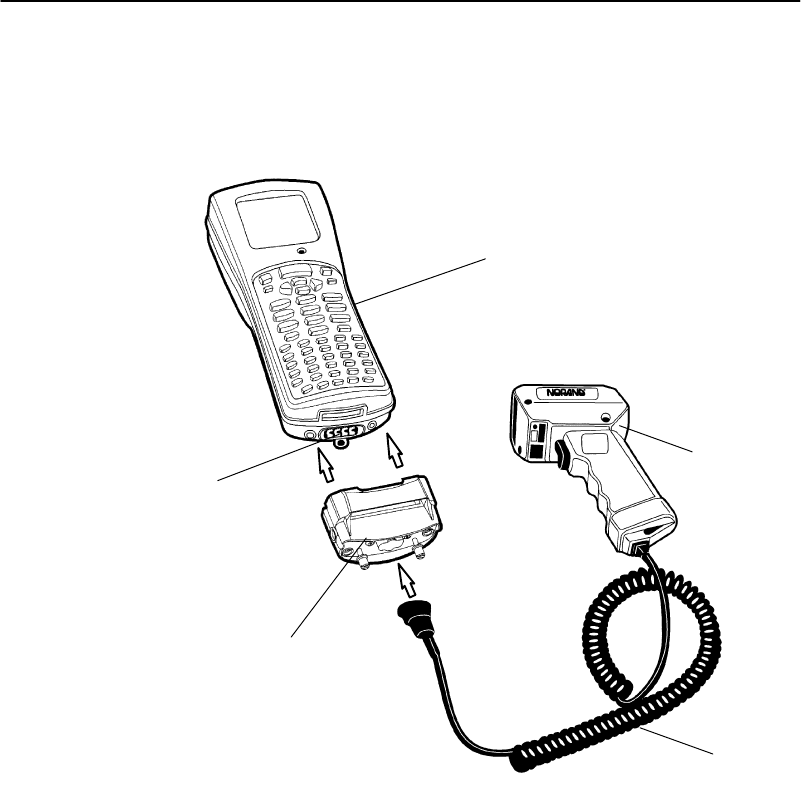
SECTION2"Operation
PEN*KEYRModel6400 Hand-HeldComputerUser’sGuide 2-23
Cable:
"Straightscrewonconnectorserialcable321-476-082
1.6400 Hand-heldcomputer
2.Scanner
3.RS-232 scannercable
4.Communication adapter
5.Communication adapterconnector
Figure 2-10
Connecting aTetheredScanner
2
1
3
4
5

SECTION2"Operation
2-24 PEN*KEYRModel6400 Hand-HeldComputerUser’sGuide
Software
ThesoftwarethatsupportstetheredscanningisV1.15+
BIOSandV5.10+terminalemulations.
Tetheredscanningis supportedforanyexternaldevicethat
sendsits serialdata at9600 baud,8data bits,noparity,1
stopbitwithanASCII STX(hex02)beforethedata andan
ASCII ETX(hex03)afterthedata.Noprotocols,suchas
ACK/NAK, RTS/CTS,orXON/XOFF,aresupported.All
8-bitcharactersbetweentheSTXandETXwill bestuffed
inthePC BIOSkeybuffer.
Setting TerminalEmulation to
AcceptTethered LaserScanners
1.InAUTOEXEC.BAT,ensurethescannerdriveris
loadedwith64SCN7B--T1--I0
2.From theTerminalEmulationmode,press theyellow
andthenthebluekeysto entertheTerminalEmula-
tionMainMenu.
3.Selectoption1)Set-upParms.
4.EnterpasswordCR52401.
5.Selectoption2)BarcodeParms.
6.AtScannerTypemenu select3)Laserand press ENT
fivetimes.
7.AtMainMenu select4)Tests
8.AtTestsmenu select1)Peripherals
9.AtPeripheralsmenu select5)ScannerTest
Ifyouexperienceproblemswith using yourlaserscanner
withterminalemulationtrythesesteps:
1.Reboot totheDOSprompt<YELLOW--BLUE--ENT--
ENT>press 0 atpause.
2.TypeDELCONFIG.DATpress ENT.

SECTION2"Operation
PEN*KEYRModel6400 Hand-HeldComputerUser’sGuide 2-25
3.Press CTRLALT DELtoreboot.
Setting YourDOSApplication to
AcceptTethered LaserScanners
InAUTOEXEC.BAT,ensurethescannerdriverisloadedin
thePS/DOSsectionwith64SCN7B--E--W--T1I0(thisis
forwedgescanning).
Setting UpYourLS3203 orLS3603
RS-232 SerialScannerParameters
Tetheredlaserpowerisalwayson,soatetheredlaser can
scan,decode,andsendthedata as soonasitisconnected,
evenwhenitisnotproperlyconfigured.Therefore,proper
operationofthetetheredlaserisnoindicationthat thela-
seriscorrectlyconfiguredforthescannerdriver64SCN7B.
Scanthefollowingbar codestosetupyourLS3203ER-
I200AorLS3603-I200Ascannersoitwill workwithyour
hand-heldcomputer.You needtoscanall thebar codes(ex-
ceptfortheHostTransmitCodeIDCharacterandHostDe-
codeOptions)to enableyourlaserscannertoworkwiththe
64SCN7Bscannerdriveronyourhand-heldcomputer.
SetAll Defaults
ScantheSetAll Defaultsbar codetosetupyourscanner
forRS-232 serialcommunication.

SECTION2"Operation
2-26 PEN*KEYRModel6400 Hand-HeldComputerUser’sGuide
DataTransmission Format
1.Scanthe<PREFIX><DATA><SUFFIX>bar code.
<PREFIX><DATA><SUFFIX>
2.ScanthePREFIXbar code.
3.ScanthePREFIXvalues1,0,0,2 bar codesfrompage
2-27.Ifyoumakeachange orwishtochangeyour
selection,scanCANCEL.
PREFIX
4.ScantheSUFFIXbar code.
5.ScantheSUFFIXvalues1,0,0,3 bar codesfrompage
2-27.Ifyoumakeachange orwishtochangeyour
selection,scanCANCEL.
SUFFIX

SECTION2"Operation
PEN*KEYRModel6400 Hand-HeldComputerUser’sGuide 2-27
RS-232 HostPrefix/SuffixValues
0
1
4
2
3
6
7
CANCEL
8
9
5

SECTION2"Operation
2-28 PEN*KEYRModel6400 Hand-HeldComputerUser’sGuide
RS-232 HostParity
NONE
RS-232 HostStop BitSelect
1STOPBIT
RS-232 HostASCII Format
8-BIT

SECTION2"Operation
PEN*KEYRModel6400 Hand-HeldComputerUser’sGuide 2-29
RS-232 HostTransmitCodeID Character
(Optional)
Select to enable ordisablethis setting.Thedefaultis
TransmitCodeIDCharacter.TheTransmitCodeIDChar-
actermustbe enabledifyouareusingFWP640H0or
FWP640H4terminalemulationsoftwareinyourhand-held
computer.
TRANSMITCODEID CHARACTER
DONOT TRANSMIT
CODEID CHARACTER
RS-232 HostDecodeOptions(Optional)
Scanone ofthesebar codesto enable ordisablethelaser
beepafteragoodscan.Ifyourhand-heldcomputerapplica-
tionbeepswhenitgets scannerdatathenyouwould prob-
ablywant todisablethelaserbeep.
DONOTBEEP AFTER
GOOD DECODE
BEEP AFTER
GOOD DECODE

SECTION2"Operation
2-30 PEN*KEYRModel6400 Hand-HeldComputerUser’sGuide
ProblemswithYourScanner
Ifyouarehavingproblemswithyourscanner:
1.Refertotheuserguideforyourscanner.
2.RefertothePEN*KEYRModel6400 Programmer’s
Reference GuideNPN:977-054-004
3.Call yourNorand24-hourCustomerResponseCenter
at1-800-221-9236.

PEN*KEYRModel6400 Hand-HeldComputerUser’sGuide 3-1
Section 3
TerminalEmulation Menu Screens
""""""""""""""""""""""""""""
Introduction
TheTerminalEmulationMenu Screensareprovidedtosup-
port terminalsrunningNORANDRTerminalEmulation
software.This sectiondescribesthemenususedtosetop-
eratingandscanningparametersforthehand-heldcomput-
er.Additional informationcanbefoundintheprogram-
mer’sguide ortechnicaloverviewforyourparticular
emulationprogram.
Keyboard Functions
Somekeysonthehand-heldcomputerhavespecialfunc-
tions, whichcanvarydependingupontheapplicationsoft-
ware. Generalfunctionkeys(keysthatperform thesame
task,regardless oftheapplication)aredescribedinthefol-
lowingparagraphs.
Yellowand BlueShift Keys
Usetheyellowandblueshiftkeystoput thekeyboardin
thedesired(yelloworblue)shift mode.Theseshiftedkey
functionsareshownonthekeyboardoverlaysinAppendix
C.

SECTION3"TerminalEmulation Menu Screens
3-2PEN*KEYRModel6400 Hand-HeldComputerUser’sGuide
ENTER[ENT]Keys
Press either[ENT]keytoselect the optionthatishigh-
lightedinthemenu shownonthedisplay.Afterselecting
anoption[ENT]either restoresthedisplaytotheprevious
menu oradvancestothenext menu.
NumberKeys [0]Through [9]
Manymenushavenumberedoptions.Tochooseaparticu-
laroption,press thenumerickeythatcorrespondstothat
option.
Onceyoumakeaselectionandyouremainat that menu
screen,the optionishighlighted,butyoucanselectaddi-
tionaloptions.Todeselectanenabledoption,press the
number correspondingtothatoption.
Insomecases,pressinganumberbringsupadifferent
menu (submenu).Thisallowsyoutofurthermodifythe
choicemadeintheparent menu.Press the[ENT]keyto
confirm thesettingsandexit thismenu.
Afterthemodification(s),youmay(dependingonthemenu
andfunction)bepermittedtoreturntotheparent menu to
makeadditionalselections.Therearealsosituationswhere
pressing[6]causesyourhand-heldcomputerto exitfroma
submenu or reboot.
Variousmenusrequire enteringanumber,butdonotneces-
sarilyhavesimplechoices suchas1,2,3,4,etc.Instead,
youmayhaveto enteranumberfromarange(example:
0--32).Youmayhavetopress [ENT]afterthese.
Theseinstancesaredetailedinthetext thatappliesto
thosemenus,orinthemenu displays.

SECTION3"TerminalEmulation Menu Screens
PEN*KEYRModel6400 Hand-HeldComputerUser’sGuide 3-3
YUpand BDownArrows
Thesekeysaredefinedbythehostcomputer.Usethese
keysto:
"Adjust thelengthandfrequencyofthekeyclickand
errorbuzzers.
"Set thedisplaysize(thenumberofrowsdisplayed
andcharactersper row)ofthedisplay.
Display Annunciators
Annunciators showthecurrentstatusoroperationinprog-
ress.Thefollowinglists some oftheannunciatorscommon
toall emulations.Theseannunciatorsoccupypositions0
through8ofthedisplay.Abibliographyfollowsthat tells
wheremoreinformationcanbefound.
Display Position 0
Radiocomputer.Theradioistransmittingdatatothe
basestation.
Display Position 1
Iftheradioiconisdisplayedinposition0thenposition1
showsthestatusoftheradiotransmission(either receiving,
sending,communicationloss,ormessagewaiting).Ifthere
isnoradioiconshowninposition0thenthispositionis
blankand position1showstheactivesession number1or
2.
Sending.Radiois sendingdatatothebasestation.
Receiving.Radioisreceivingdatafrom thebasestation.
Thisannunciatorappearsonlywhentheinformationisfor
thisparticular computer’saddress.

X
^
Y
A
"
A
SECTION3"TerminalEmulation Menu Screens
3-4PEN*KEYRModel6400 Hand-HeldComputerUser’sGuide
Communicationsloss.Nocommunicationwiththehost
computerhasoccurredforatleast60 seconds.Theradio
computermaybe outofradiorange,thebasestationmay
nothavepower,or communicationsfrom thehostcomputer
tothebasestationmaynotbeproperlysetup.
Message.You havereceivedamessageandithasnotbeen
read.
Display Position 2
InputInhibited.Thekeyboardhasacceptedenoughin-
formationforthecurrentinputfield.Ifthe“keyahead”fea-
tureison,theterminalstoresthekeystrokesmadeafter
“inputinhibited”appears.Thehost mayalsoinhibit(lock-
out)thekeyboarduponcertainerrorsorwhensending
additional informationtoyour computer.
InsertMode.Charactersareinserted,notoverwritten.
Display Position 3
AlphabetCharacter(green)ShiftMode.Thekeyboard
isinthealphabetcharactershift mode—anyalphabetchar-
acterkeystrokesare enteredasuppercasecharacters.
(blue)ShiftMode.Thekeyboardisinacoloredshift
mode—keystrokesenterthesymbolorperform thefunction
shownontheoverlay just totheupperleftofthekey.
(yellow)ShiftMode.Thekeyboardisinacoloredshift
mode—keystrokesenterthesymbolorperform thefunction
shownontheoverlay just totheupperrightofthekey.
Display Position 4
AlphaLock.ThisAlphaLocksymbol isusedonlyforthe
41-keykeyboardmodel.

SECTION3"TerminalEmulation Menu Screens
PEN*KEYRModel6400 Hand-HeldComputerUser’sGuide 3-5
Display Positions 5-8
BatteryPackGasGaugeIcons:
Thesebatteryiconsrepresent thechargelevel inyourmain
batterypack.
"Fouricons(positions5--8)indicatesmorethan76 %
chargelevel
"Three icons(positions5,6,, and7)indicatesbetween
51--75%
"Twoicons(positions5,and6)indicatesbetween
26--50%
"Oneicon(position5)indicatesbetween21--25%
Onceyour computergetsbelowthe20%range,theiconsare
replacedby“Ls”andafterthechargelevel isless than10%
your computeremitsaseriesofbeeps.
"FourLsindicatesbetween16--20%chargelevel
"Three Lsindicatesbetween11--15%.
"Three Lsindicatesbetween11--15%.At the15%
chargelevel,your computerbeepsonce.Thesound
durationandfrequencyareatlevelsyou havesetfor
your computer.
"TwoLsindicatesbetween6--10%.At the10%and7%
chargelevels,your computerbeepsonce.Thesound
durationandfrequencyareatlevelsyou havesetfor
your computer.
"OneLindicatesbetween0--5%.At thischargelevel,
your computerbeepsthree timesatitscurrentsetting
levelforbothdurationandfrequency.
"NOTE:If you havethe beeperturned off,you will nothearanyof the low
batterybeep warnings.
Thebatterypackiconsonyour computerdisplayreflect the
samestatusastheLEDsonthebatterypack.However,
theremaybeaoneminutedelayforupdatingtheiconson
thedisplaywhenthebatterypackisreplaced.

SECTION3"TerminalEmulation Menu Screens
3-6PEN*KEYRModel6400 Hand-HeldComputerUser’sGuide
Again,thesearejustafewofthedisplayannunciatorsthat
arecommontoall emulations.Thereare others,specificto
individualemulations,thatarenotshown here.
Annunciatorbibliography(emulation/referencesource/
NorandPartNumber):
"VT220/ANSITerminalEmulationProgrammer’sRef-
erence Guide.(NPN977-047-037)
"5250 SNAand AsynchronousTerminalEmulation
Programmer’sReference Guide.(NPN977-047-039)
"3270 TerminalEmulationProgrammer’sReference
Guide.(NPN977-047-040)
"NativeAsyncTerminalEmulationProgrammer’sRef-
erence Guide.(NPN977-047-038)
Setting theOperating Parameters
Makesurethereisafully-chargedbatterypackinthe
hand-heldcomputerbeforesettingtheparameters.
Opening theMainMenu
TheMainMenu isthefirstscreendisplayedwhenyouopen
thehand-heldcomputermenus.All othermenusare
accessedfrom theMainMenu.
To opentheMainMenu,press theyellowshift,thenthe
blueshift(MENU)key.Briefly,thesekeysgenerallyoper-
ateas:
"Blueshiftisforfunctionslabeledbybluelegends
abovethekeys.
"Greenshiftisforfunctionslabeledby greenlegends
abovethekeys.
"Yellowshiftisforfunctionslabeledby yellowlegends
abovethekeys.

SECTION3"TerminalEmulation Menu Screens
PEN*KEYRModel6400 Hand-HeldComputerUser’sGuide 3-7
"BluethenGreenshiftisCAPSLOCK.
"BluethenYellowshiftisAlphabeticLock(41-keyunits
only).
"YellowthenBlueshiftisTerminalEmulationmenus;
yourparticularemulationsoftwareprobablytreat the
keysfor contrastcontrol,backlightingandotherfunc-
tionsdifferently.
AftertheMainMenu appears,enteranumber(1through7)
tomakeaselection.TheMainMenu is shownbelow:
Main Menu
1) Set-up Parms
2) LCD Parms
3) Beeper Setup
4) Tests
5) Version Info
6) Exit Menus
7) More
SECTION3"TerminalEmulation Menu Screens
3-8PEN*KEYRModel6400 Hand-HeldComputerUser’sGuide
Main Menu
1) Set-up Parms
2) LCD Parms
3) Beeper Setup
4) Tests
5) Version Info
6) Exit Menus
7) More
Set Parameters
1) Radio #
2) Barcode Parms
3) Protocol Opts
4) Display Opts
5) Radio Comm
6) Cold Start
7) More
LCD Parms
1)
2) Screen Size
3) Screen Mode
4) Annunciators
5)
6) Key Uppercase
7) Scroll Window
Main Menu 2
1) Keyboard Opts
2) Save Parms
3)
4) Session Menu
Version Info
Firmware name
Version number
Date ddmmmyy
Beeper Setup
1) Key Click
2) Error Tone
3) Beeper Select
Tests
1) Peripherals
2)
3) Memory View
4) Packet Driver
5) Numbers
6) Timed Numbers
(1) (2)
(3) (4)
(5) (7)
ToreturntotheMainMenu from thehand-heldcomputer
menusprogram,simplypress the[ENT]keyseveraltimes.
Youcanthenselect6)ExitMenus,toreturntothe operat-
ingsystem.

SECTION3"TerminalEmulation Menu Screens
PEN*KEYRModel6400 Hand-HeldComputerUser’sGuide 3-9
Thefollowingparagraphsdescribe optionsavailablefrom
theMainMenu.
Set-UpParms
TheSet-upParms(parameters)menu ispassword protected
toguardagainstunwantedchangesorloss ofdata.
Inthismenu youcanchangethefollowing:
"Radioidentification number
"Bar codeparameters
"Hostandemulationmode options
"Displayoptions
"RadioComm (notuseraccessibleat thistime)
"Enablesystemsecuritywithaglobalpassword
Or,youcanrebootyourhand-heldcomputer.
LCD Parms
LCDParms(parameters)menu adjuststhefollowingdis-
play(LiquidCrystalDisplay)parameters:
"Screensize(numberoflinesdisplayedandcharacters
perline)
"Cursorposition(ScreenMode)
"Annunciators
"Uppercasedisplay
"Scrollingwindowparameters
BeeperSetup
BeeperSetupletsyouadjust thefrequencyandthelength
(duration)ofthebuzzer. Differentbuzzertonescanbepro-
grammed,andyoucanselect thebuzzeroutputforthe:
"Keyclick(indicatingthatavalidkeyhasbeenpressed
oragoodscanoccurred)
"Errortone(indicatingsome error conditionoccurred;
forexample,an unacceptablekeystroke.)

SECTION3"TerminalEmulation Menu Screens
3-10 PEN*KEYRModel6400 Hand-HeldComputerUser’sGuide
Tests
TheTestsmenu allowsyoutoperform thefollowingtests:
"Peripherals
"MemoryView
"PacketDriver
"Numbers
"TimedNumbers
Version Info
Youcan usetheUPandDOWNarrowkeysintheVersion
Infomenu todisplay:
"Thetype ofprograminFLASHROM
"Thereleasedate oftheprograminFLASHROM
ExitMenus
TheExitMenusoptionexitsfrom thehand-heldcomputer
menusandreturnstothe“initial”screen.
More
TheMore optionopensamenu calledMainMenu 2, which
letsyou(1)setakeyboard“type-ahead”option,(2)savepa-
rametersettingsasthenewhand-heldcomputerdefault
parameters,and(3)designatesessionswitchingparame-
ters.
Opening theSet-UpParmsMenu
TheSet-UpParms(parameters)menu ispassword pro-
tectedtopreventunauthorized personsfromchanging
hand-heldcomputerparameters.
Theparametersyousetonlyapplytothecurrentsession.
Ifmorethanonesessionisavailabletoyou,usetheSession
Menu (#4 inMainMenu 2)toverifyor changethecurrent
sessionbefore changingparametersettings.

SECTION3"TerminalEmulation Menu Screens
PEN*KEYRModel6400 Hand-HeldComputerUser’sGuide 3-11
To opentheSet-UpParmsmenu:
1.Press the[1]key.
2.Press the[ENT]key.
3.At theprompt,enterthepasswordCR52401.
TheSet-UpParmsmenu,andthemenusyoucanaccess
fromit,areshownonthefollowingpage.
SECTION3"TerminalEmulation Menu Screens
3-12 PEN*KEYRModel6400 Hand-HeldComputerUser’sGuide
Set-up Parms
1) Radio #
2) Barcode Parms
3) Protocol Opts
4) Display Opts
5) Radio Comm
6) Cold Start
7. More
Radio #
Enter Unit
Number:
xx
Press A for
Advanced Setup
Display Opts
1) Backlight
2) Cursor Mode
Scanner Type
1) No Scanner
2)
3) Laser
4)
5)
Protocol Opts
1) Host View Size
2) Data Stream
3) Extended Cmds
4) 5250
5) 3270
6) VT220
7) Native
(1) (2)
(3) (4)
(5) (6)
Protocol
1) SST
2) SST-Diag Mode
Cold Start
Enter “Y”
To Cold Start
terminal:
Set-up Parms
1) Menu Password
2) Print Device
(7)

SECTION3"TerminalEmulation Menu Screens
PEN*KEYRModel6400 Hand-HeldComputerUser’sGuide 3-13
Radio#
UsetheRadio#menu toset,view, or changethehand-held
computeridentification number.Thisnumberallowsthe
hostcomputertoidentifyindividualhand-heldcomputers
intheradiodatanetwork.Each hand-heldcomputermust
haveauniquenumberinthesamenetwork.
TheSetRadio# andtheAdvancedSetupmenus,areshown
onthefollowingpages.
Tosetor changethehand-heldcomputeridentification
number,usethenumerickeysonthehand-heldcomputer
keyboard.Afterenteringanumber(between0 and126),
press the[ENT]keytoreturntotheMainMenu,orthe[A]
keytogototheAdvancedSetupmenus.
TheLANIDnumber canbe0--255 dependingontheradio
youareusing.WiththeRM60/70 radiothenumber canbe
0--255 andwiththeRM80/90 radiotherangeis0--15.Your
computeronlycommunicateswithequipmentusingthe
sameIDnumberthatyouassignedtoyourLAN.
IfyouenteraLANIDnumberthatisdifferentfromwhatis
configuredinyourNET.CFGfileyouget thismessage.
LAN IDchanged
Needtoreboot
totake effect.
Ifthishappensthesystem modifiesyournet.cfgfilewhich
isusedbytheWTPPKT.EXEprogramoninitializationof
your computer.Therefore,thatiswhy you needtoreboot
your computer.

SECTION3"TerminalEmulation Menu Screens
3-14 PEN*KEYRModel6400 Hand-HeldComputerUser’sGuide
ThesecondoptionintheAdvancedSetupmenu allowsyou
tochangetheradioconfigurationsetting.At thepresent
timethisisnotusedandisleftavailablefor customset-
tingsnecessaryataparticular customersite.ANorand
SystemEngineerworkswithyoutomakethis setting.
Ifyour computerisusinganRM160/170 902 MHzor
RM180/190 2.4GHzradiomoduleusetheupand downar-
rowstopicktheDirectSequence(DS)andChannelconfigu-
ration.Ifyour computerisusinganRM111 Synthesized
UHFradioyouselectfrom thelist thepossiblefrequencies
foryour radiomodule.
UsethenextoptionintheAdvancedSetupmenu ifthereis
morethanonehostcomputeronyourSSTnetwork.This
allowsyoutodesignateuptothree hostcomputersforeach
hand-heldcomputer.Each hostisassignedaseparate
prioritylevel(1,2,or3).Whenpoweredon,thehand-held
computerseekshostA.IfhostAisnotavailable,thehand-
heldcomputerseekshostB;ifhostBisnotavailable,the
hand-heldcomputerattemptstologontohostC.
Whendesignatingadditionalhosts,youmust:
"Tell thehand-heldcomputerthehost type ofeach host
computer(Native,3270,5250,orVT220).
"Assignahand-heldcomputernumberforeach host.
"Tell thehand-heldcomputerthename ofeach host.
"NOTE:Selectionsinthesemenusapplyonlytothe currentsession.Usethe
Session Menu toverifyorchange the currentsession.
SECTION3"TerminalEmulation Menu Screens
PEN*KEYRModel6400 Hand-HeldComputerUser’sGuide 3-15
Advanced Setup
LAN
x
Radio #
Enter Unit
Number: xx
Press A for
Advanced Setup
(A)
ENTER
Advanced Setup
Radio Config#
Not currently used
ENTER
IFYOU HAVE
AN RM160/170 orRM180/190
RADIOMODULE
IFYOU HAVE
AN RM111 SYN UHF
RADIOMODULE
Set Frequency
Use Cursor Up
and Down Keys
To Adjust
xxxxxxxxx
ENTER(continueto nextpage)
Set Mode/Channel
Use Cursor Up
and Down Keys
To Adjust
DS xxxX
Channel xx
SECTION3"TerminalEmulation Menu Screens
3-16 PEN*KEYRModel6400 Hand-HeldComputerUser’sGuide
Advanced Setup
1) Host A
2) Host B
3) Host C
Host A
1) Native
2) 3270
3) 5250
4) VT220
Host A
(host emulation)
Unit# xxx
Enter Host Name:
xxxx
(1)ENTER
ENTER
ENTER
DONE
ENTER
ENTER
ENTER
Host A
Enter Unit
Number:
xxx

SECTION3"TerminalEmulation Menu Screens
PEN*KEYRModel6400 Hand-HeldComputerUser’sGuide 3-17
BarCodeParms
TheBarCodeParms(parameters)menusdesignate:
"Ifyouareusinga bar codescanner
"Scanoptions
"Thebar codesymbologiestouse(thecomputer can
onlydecodethebar codesymbologiesyouenable)
"Optionsforeachenabledbar codesymbology (e.g.,
minimumandmaximumbar codelengths)
TheScannerTypemenu isthefirstBarCodeParmsmenu.
Choosethedesiredoptionfrom thismenu and press the
[ENT]key.ThenextBarCodeParmsmenu appearsonthe
display.
ScannerType
UsetheScannerTypemenu todesignatethetype ofbar
codescanner.
Scanner Type
1) No Scanner
2)
3) Laser
4)
5)
Tomakeaselection,press thenumerickeycorrespondingto
thedesiredoption,thenpress the[ENT]key.Thistakes
youtotheScanOptionsmenu.
"NOTE:You can choose option 1,“NoScanner,”and still set the remaining
scannerand barcode options.Then,ifyou useascanneratalater
time,all parametersaresetand itisonlynecessaryto designatethe
scannertype.
"NOTE:Selected optionsare highlighted on the display.To deselectase-
lected option,press the keythatcorrespondstothatoption.

SECTION3"TerminalEmulation Menu Screens
3-18 PEN*KEYRModel6400 Hand-HeldComputerUser’sGuide
ScanOptions
UsetheScanOptionsmenu todesignatehowthehand-held
computerhandles scannedbar codes.TheScanOptions
menu is shownbelow. Descriptionsofthe optionsfollow.
Scan Options
1) Redundancy
2) MOD 10 Check
3) Concatenate
4) BC Type Char
5) Stream Scan
6) Scan All Flds
7) More
Redundancy:Thisoptionrequirestwoidenticalscansofa
bar code,onerightafteranother,beforethehand-heldcom-
puteracceptsthescanasvalid.
Mod10 Check:Whenyouselect thisoption,acheckdigit
isaddedat the endofthebar codeafteragoodread.This
isavariationofthemodulus10 formula andisusedinfre-
quently.
Foradditional informationonMod10,refertothebook
PEN*KEYR6400 Programmers Reference GuideNPN:
977-054-004.
Concatenate:Eachbar codereadisaddedtothe endof
thepreviousbar codereaduntil thecomputermeetsa
conditionthatforcestransmissiontothehost.
WhenthisoptionisOFF,eachbar codereadisplacedat the
beginningofthecurrentinputfield.Aftera bar codeis
placedinafield,anysubsequentreadreplacesthefirst
read.
BC TypeChar:Thisoptionaddsacharacterassociated
withthebar codetypeat thebeginningofthescannedbar
code.
StreamScan:Ifthescannedbar codeistoo bigforthe
inputfield,the overflowinformationappearsinthenext
field.Thiscontinuesuntil the entirebar codeisentered.

SECTION3"TerminalEmulation Menu Screens
PEN*KEYRModel6400 Hand-HeldComputerUser’sGuide 3-19
WhenthisoptionisOFF,andthescannedbar codeistoo
bigfortheinputfield,the overflowinformationisdropped.
ScanAll Fields:Whenyouselect thisoptionthescanner
isenabledwheneverthecursorisinaninputfield.When
thisoptionisOFF,thehostcomputermustenablethescan-
nerforeachinputfieldthatrequires scanned data.
Afteryoupress the[ENT]key,thedisplayadvancesto
additionalScanOptionsmenus.
To enablethescanoptions,press thenumerickey(s)corre-
spondingtothe optionsyouwant,thenpress [ENT].You
canenablemore thanoneScanOptionatatime.
ScanPreCharand ScanPostChar:Enterahexadeci-
malvaluefrom00--FF forthecharactertobesentpreceding
thescanned dataorafterthescanned data.Thevalue of
20hmeansthatpre orpostcharactersarenotsent.
Scan Options
1)
2) Scan PreChar
3) Scan PostChar
ScanOptionsTo EnableBarCodes
Therearemenusofoptionsto enable(ordisable)various
bar codesymbologies.To enablea bar code,press thenu-
merickeycorrespondingtothenumberofthebar code
symbology (as shownonthemenu),thenpress the[ENT]
key.
Afterenablingaparticularbar codeyoumayhavetoselect
variousoptionsforthebar code.Afterselectingthedesired
options,youarepromptedtosetlengthrequirements(such
asminimumandmaximumlength,fixedlengths,leading
andtrailingcharacteroptions,etc.).

SECTION3"TerminalEmulation Menu Screens
3-20 PEN*KEYRModel6400 Hand-HeldComputerUser’sGuide
Oncethelengthrequirementshavebeenset,thecomputer
returnstothesameScanOptionsmenu.Youmaythen
chooseto enableanotherbar codesymbology from that
menu,oryoucanadvancetothenextScanOptionsmenu
bypressingthe[ENT]key.
TheScanOptionsmenu,andthebar codesymbologiesyou
canenablefromit,areshown here.
UPC
1) Enabled
2) Add-On 2
3) Add-On 5
4)
5) Sys 0 UPCE
6) Expand E To A
Scan Options
1) UPC
2) EAN
3) Code 39
4) Code 128
5) Codabar
EAN
1) Enabled
2) Add-On 2
3) Add-On 5
4) Expand 8To13
Code 39
1) Enabled
2) Chk Digit
3) Extended
4) Encoded
5) Auto-Encoded
6)
7) Full ASCII
Code 128
1) Enabled
2) UCC/EAN
(1) (2)
(3) (4)
(5)
Codabar
1) Codabar

SECTION3"TerminalEmulation Menu Screens
PEN*KEYRModel6400 Hand-HeldComputerUser’sGuide 3-21
ScanOptionsofAdditionalBarCodes
Thismenu offersadditionalbar codeselections.Afterenab-
linga bar codesymbology,youcansetvariousoptionsfor
thebar code,thensetlengthoptionsforthebar code.
Whenall optionshavebeenset,thedisplayreturnstothe
ScanOptions(2)menu.TheScanOptions(2)menu andthe
bar codesymbologiesyoucanenablefromitareshownbe-
low.
Whenyou have enabledall neededbar codesymbologies,
press the[ENT]key.YoureturntothefirstScanOptions
menu.Press the[ENT]keyagaintobackoutandreturnto
theSet-UpParmsmenu.
Plessey
1) Enabled
2) MOD10 Chk
3) MOD11 Chk
Int 2of5
1) Enabled
2) Chk Digit
Scan Options (2)
1) Plessey
2)
3) Int 2of5
4)
5)
6)
(1)
(3)

SECTION3"TerminalEmulation Menu Screens
3-22 PEN*KEYRModel6400 Hand-HeldComputerUser’sGuide
LengthsOptions
TheLengthsOptionsmenusdeterminethemaximumand
minimumlengthforaspecificbar codesymbology.Setting
thelengthofenabledbar codeshelpsthehand-heldcom-
puterdetermineifascannedbar codeisvalidandimproves
hand-heldcomputer responsetime.
Thelengthoptionsmustbesetforeachenabledbar code.
Instructionsforsettingthelengthoptionsfollowonthe
nextpage.
SECTION3"TerminalEmulation Menu Screens
PEN*KEYRModel6400 Hand-HeldComputerUser’sGuide 3-23
(bar code type)
Max Length xx
(bar code type)
Max Length xx
Min Length xx
(bar code type)
Max Length xx
Min Length xx
Fix Length 1 xx
(bar code type)
Max Length xx
Min Length xx
Fix Length 1 xx
Fix Length 2 xx
(bar code type)
Max Length xx
Min Length xx
Fix Length 1 xx
Fix Length 2 xx
Fix Length 3 xx
Fix Length 4 xx
(bar code type)
Max Length xx
Min Length xx
Fix Length 1 xx
Fix Length 2 xx
Fix Length 3 xx
(bar code type)
Drop Leading xx
Drop Trailing xx
(bar code type)
Drop Leading xx
1. Keyinthemaximumlength(0--99) fortheselectedbar
code,thenpress [ENT].
2. Keyintheminimumlength(0--99) forthebar code,
thenpress [ENT].
"NOTE:I2 of5 only supportsfixed lengths1 and 2.Entriesinfixed lengths3
and 4 areignored aswell asminimumand maximumlengths.

SECTION3"TerminalEmulation Menu Screens
3-24 PEN*KEYRModel6400 Hand-HeldComputerUser’sGuide
"NOTE:The nextprompts set fixed barcode lengths(the enabled barcode
mustbe ofacertainlength—determined by yourentry).Fixed-length
entriesoverride the maximumand minimumlength entries(minimum
and maximumare used forchosen codes). If you do notwant fixed
lengthsforthe enabled barcode,enterzero(0).
3.Enterthefixedlength(0--99) forthedefinedbar code,
thenpress [ENT].Eachtimeyousetafixedlength,
(thenpress the[ENT]key)youarepromptedtoset
anotherfixedlength—uptofour.Tosetfewerthan
fourfixedlengths,enterzero(0) fortheunusedfixed
lengths.(Forexample,ifyouonlyrequire2fixed
lengths,enterzerowhentheFixedLength3 and4
promptsappearonthedisplay.)
"NOTE:Usethe next two promptsto drop a particularnumberofcharacters
fromthe front(leading)or rear (trailing)edge of the scanned bar
code.
4.Enterthenumberofcharacters(0--15)todropfrom
thebeginningofthescannedbar code,thenpress
[ENT].
5.Enterthenumberofcharacters(0--15)todropfrom
the endofthescannedbar code,thenpress [ENT].
Afteryou havesetall ofthelengthoptionsforthe enabled
bar codethedisplayreturnsto one oftheScanOptionsme-
nus(dependingonwhichmenu youenabledthebar code
from).
Protocol Options
Usethis selectiontodesignatethehand-heldcomputertype
ofthehostcomputer.Youcanalsodesignatewhichaddi-
tionalcommandsandcommandsetsareavailable.
TheProtocolOptsmenu has sevensubmenustocustomize
yourhand-heldcomputer.TheProtocolOptsmenu is
shownonthenextpage.

SECTION3"TerminalEmulation Menu Screens
PEN*KEYRModel6400 Hand-HeldComputerUser’sGuide 3-25
Protocol Opts
1) Host View Sze
2) Data Stream
3) Extended Cmds
4) 5250
5) 3270
6) VT220
7) Native
HostViewSize
TheHostViewSize optiontellsthehand-heldcomputerthe
formatofdisplayinformationsentfrom thehost.Thedis-
play viewingsize equals1920 (determinedbytakingthe
numberofrowstimesthenumberofcolumns).The excep-
tioniswith5250 TerminalEmulationwhichcan havean
additionalrowforerrormessagesandthereforecan have
2000 charactersinsteadof1920.
ThedefaultsettingforNativeTerminalEmulationis120
columnsby16 rows(equals1920).ThedefaultforVT220
TerminalEmulationis80 columnsby24 rows(equals
1920).Thedefaultfor5250 TerminalEmulationis80 col-
umnsby24 rows(25 witherrormessages).
Thedefaultfor3270 TerminalEmulationdependsonwhat
the originalsettingwasbeforeyouchangedto3270 Termi-
nalEmulation.Rememberthat thetotalcharactersmust
equal1920 (numberofrowsbythenumberofcolumns)un-
less using5250 TerminalEmulationwitherrormessages.
Host View Sze
Width
xx
Tochangethewidth,enteranumber(between1-- 80).
Press [ENT].andreturntotheProtocolOptsmenu.

SECTION3"TerminalEmulation Menu Screens
3-26 PEN*KEYRModel6400 Hand-HeldComputerUser’sGuide
DataStream
Usethismenu tospecifythedatastreamusedbythehost
computer.
Data Stream
1) Native
2) 3270
3) 5250
4) VT220
Enterthenumber correspondingtothetype ofthehost
computer.Press [ENT]andreturntotheProtocolOpts
menu.
ExtendedCMDS
WiththisoptionENABLED, thehostcomputer canchange
orusethefollowingfeaturesofthehand-heldcomputer:
"RS-232 communications(e.g., printer)
"Bar code options
"Displayscreenandfontsize
"Errortone
Extended Cmds
1) Enabled
2) Disabled
1.Press [1]to enablethe extendedcommandset,or
press [2]todisablethe extendedcommandset.
2.Press [ENT]toreturntotheProtocolOptsmenu.

SECTION3"TerminalEmulation Menu Screens
PEN*KEYRModel6400 Hand-HeldComputerUser’sGuide 3-27
5250 Options
The5250 Optionsmenu letsyouenablethefollowingfea-
turesif youare usingthe5250 communicationprotocol:
"BeepOnError
"AutoTab Scan
"Telnet
5250 Options
1) Beep On Error
2) Auto Tab Scan
3) Telnet
EnablingBeepOnError causesthebuzzertosoundwhen
anerror conditionoccurs,butallowsyoutocontinuework-
ing.Normally, whenanerroroccursthekeyboardlocks-up,
thehand-heldcomputermustbereseteitherfrom thehost
ortheRESETkeyonthehand-heldcomputeritself.
TheAutoTab Scanoptioncausesthecursortoautomatical-
lytab forwardtothenextinputfieldwhenagoodscanis
obtained.
Telnetallowsforthehandlingoftelnetoption negotiations
to establishasessionwithanappropriatetelnetserver.
To enablethese options:
1.Press [1]to enabletheBeepOnErroroption.
Press [2]to enabletheAutoTab Scanoption.
Press [3]to enabletheTelnetoption.
2.Press [ENT]toreturntotheProtocolOptionsmenu
screen.

SECTION3"TerminalEmulation Menu Screens
3-28 PEN*KEYRModel6400 Hand-HeldComputerUser’sGuide
3270 Options
The3270 Optionsmenu letsyouenablethefollowingfea-
turesif youare usingthe3270 communicationprotocol:
"KeyboardUnlock
"AutoTab Scn(scan)
"AutoEntr(enter)Scn
"Emulate3210
"Telnet
3270
1) Keybrd Unlock
2) Auto Tab Scan
3) Auto Entr Scn
4) Emulate 3210
5) Telnet
EnablingKeyboardUnlockunlocksthekeyboardafterthe
[PA1],[PA2],or[CLEAR]keysarepressed.(Normallythe
keyboardremainslocked—until unlockedorthehand-held
computerisresetbythehost—afteranyofthesekeysare
pressed.)When usingTokenRingonyourhost,thetab key
alsounlocksthekeyboard.
EnablingAutoTab Scancausesthecursortotab forwardto
thenextinputfieldwheneveragoodscanisobtained.
EnablingAutoEntrScanactuatesthe[ENTER]function
wheneveragoodscanisobtained.
EnablingEmulate3210 allowsyour3270 keyboardto emu-
latea 3210 terminal.
Telnetallowsforthehandlingoftelnetoption negotiations
to establishasessionwithanappropriatetelnetserver.

SECTION3"TerminalEmulation Menu Screens
PEN*KEYRModel6400 Hand-HeldComputerUser’sGuide 3-29
To enablethese options:
1.Press [1]to enabletheKeyboardUnlockoption.
Press [2]to enabletheAutoTab Scanoption.
Press [3]to enabletheAutoEntrScanoption.
Press [4]to enable3210 Emulationoption.
Press [5]to enabletheTelnetoption.
"NOTE:AutoTab Scan and AutoEntrScan cannotbe enabled at the same
time.
2.Press [ENT]toreturntotheProtocolOptionsmenu
screen.
3210 Emulation
TheNorand3210 emulationoptioncausesyour radiohand-
heldcomputertoperform thesamefunctionsastheRT3210
hand-heldcomputer.Forfull 3210 compatibility:youmust
disablebufferingthekeyboard,setcursortolazymode,and
set theLCDParmstoKeyUppercase.
Afterenablingthedesired3270 options,press the[ENT]
keytoreturntotheProtocolOptsmenu.

SECTION3"TerminalEmulation Menu Screens
3-30 PEN*KEYRModel6400 Hand-HeldComputerUser’sGuide
VT220
TheVT220 menu letsyouenablethefollowingfeaturesif
youare usingtheVT220 communicationprotocol:
"DELtoBS(deletetobackspace)
"CR toCRLF (carriagereturntocarriagereturnline
feed)
"AutoEntr(enter)Scn
"AutoTab Scan
"LocalEcho
"AnswerBack
"More
VT220
1) DEL to BS
2) CR to CRLF
3) Auto Entr Scn
4) Auto Tab Scan
5) Local Echo
6) AnswerBack
7) More
TheDELtoBSoption, whenenabled,causesthe[CLEAR]
keytodeletethecharactertotheleftofthecursorposition,
andmovesthecursorbackonespace.Whenthisoptionis
notenabled,the[CLEAR]keydeletesthecharacterat the
cursorsposition.
TheCR toCRLF option, whenenabled,causesthe[ENT]
keytoperformacarriagereturnandalinefeed.Whenthis
optionisnotenabled,the[ENT]keyperformsacarriage
returnonly.
EnablingAutoEntrScnactuatesthe[ENT]functionwhen-
everagoodscanisobtained.
TheAutoTab Scanoptioncausesthehand-heldcomputerto
automaticallytab tothenextinputfieldwhenagoodscan
isobtained.

SECTION3"TerminalEmulation Menu Screens
PEN*KEYRModel6400 Hand-HeldComputerUser’sGuide 3-31
"NOTE:The AutoEntrScan and AutoTab Scan options cannotbe enabled at
the sametime.
EnablingtheLocalEcho optionallowscharacterstobedis-
playedfromhand-heldcomputermemorybutnotfromhost
memory.
TheAnswerbackoptionallowsyoutoinputuptoa30char-
acterstring, whichisthensentbacktothehostinresponse
toaninquiry(hex05).
TheMore optioncallsupthefollowingscreen:
VT220
1) Screen Lock
2) DiscreteBells
3) UserKey Locked
4) RS232 Setup
5) VT220 Mode
6) Lock Mode
7) More
TheScreenLockoptionallowstheusertosetupandlock
thescreentoaspecifiedsize.Anycharactersfallingoutside
this screensizeareignoredbythehand-heldcomputer.
IftheDiscreteBellsoptionisenabled,thehand-heldcom-
puterbeepsforeachbell characterthehostsends.Ifthe
optionisdisabled,thehand-heldcomputerignoresbell
charactersifitisalreadybeeping.
Youcangetacommandfrom thehost thatdefinesthe
Functionkeys.IfUserKeyLockedis set thehostignores
thiscommandwhilethisoptionis set.

SECTION3"TerminalEmulation Menu Screens
3-32 PEN*KEYRModel6400 Hand-HeldComputerUser’sGuide
SelectingRS232 Setupallowsyoutoselectfromanother
menu ofchoices.Thesechoicesare:
RS232
1) RS232 Baud Rate
2) RS232 Parity
3) RS232 Stop Bits
4) RS232 Data Bits
5) RS232 Flow
Selectyour choice,thenpress the[ENT]keytoreturnto
theProtocolOptsmenu.
SelectingVT220 Modeallowsyoutoselectoperatingin
characterorblockmode.
Selectyour choice,thenpress the[ENT]keytoreturnto
theProtocolOptsmenu.
VT220 Mode
1) Char
2) Block
SelectingLockModedisablestheModekeyintheVT220
datastream.ThedefaultModekeytogglesbetweenblock
andcharactermodes.

SECTION3"TerminalEmulation Menu Screens
PEN*KEYRModel6400 Hand-HeldComputerUser’sGuide 3-33
SelectingMoremovesyoutoselect thetelnetoptionforthe
VT220 datastream.
VT220 Mode
1) Telnet
Telnetallowsforthehandlingoftelnetoption negotiations
to establishasessionwithanappropriatetelnetserver.
Makeyourselection,thenpress the[ENT]keytoreturnto
theProtocolOptsmenu.
Native
Thisoptionisenabledbydefault topreservebackwardcom-
patibility.Whenenabled,pressing<F1>isequivalent to
pressingBlue-0, whilepressing<F2>isequivalent topress-
ingBlue-1,etc.Whendisabled,<F1>isequivalent to
Blue-1,and<F2>isequivalent toBlue-2,etc.
Native
1) F1 is FUNC-0

SECTION3"TerminalEmulation Menu Screens
3-34 PEN*KEYRModel6400 Hand-HeldComputerUser’sGuide
Display Options
DisplayOptsallowsyoutochoosethebacklight timer
feature orhowthecursorappearsonthedisplay.
Display Opts
1) Backlight
2) Cursor Mode
3)
Backlight
SelectingBacklightdisplaysthis screen.
Backlight Timer
Use Cursor Up
And Down Keys
To Adjust
Usetheup[Y]and down[B]arrowstoselectanumber
fromOff to255.Thisisthenumberofsecondsthat the
backlightstaysonafterakeyispressed.

SECTION3"TerminalEmulation Menu Screens
PEN*KEYRModel6400 Hand-HeldComputerUser’sGuide 3-35
CursorMode
TheCursor Modemenu allowsyoutoselect thecursor
style.
Cursor Mode
1) Underline Blink
2) Block Blink
3) Underline
4) Block
> <
"CursorlocationintheBlockmodeisindicatedbyare-
versevideo (highlighted)block(J)character.
"Blinkmodescausesthecursortoappearand disap-
pearinitscurrentlocation.Blinkingcursoronly
worksusingthe16 lineby20 columnfontsettingor
18 x20 dependingonthesize ofdisplay you havese-
lectedonyour computer.
"Thecursorshapeisdisplayedbetween‘>’and‘<’.
Aftermaking yourselection,press the[ENT]key.Youthen
returntotheDisplayOptsmenu.
RadioComm
Thismenu allowsyouto enable ordisableSSTdiagnostic
mode.
"NOTE:Diagnosticmodesdisable datacompression and arereserved for
engineering tests.

SECTION3"TerminalEmulation Menu Screens
3-36 PEN*KEYRModel6400 Hand-HeldComputerUser’sGuide
ColdStart
TheColdStartoptionperformsahand-heldcomputer cold
start.Acoldstartresetsall hand-heldcomputerparame-
terstotheirdefaultvalues.
Cold Start
Enter “Y”
to Cold Start
terminal:
Press the[Y]keytocoldstart thehand-heldcomputer,or
press anyotherkeytoreturntotheSet-UpParmsmenu.
More
TheMore optionallowsyouto enableamenu password
protection.Thisoptionprovidesadded protectionbecause
onceitisenabled,thepasswordmustbe enteredbeforeany
furtheractivitycanoccurwithintheterminalemulation
menu screens.Thedefaultistohavethisoptiondisabled.
Set-up Parms
1) Menu Password
2) Print Device
EnablePassword
1.Press the[1]key.
2.At theprompt,enterthepassword3193693.Thisbe-
comesthepermanentpassword.Withthismenu pass-
word protectionenabled,enterthispasswordwhenev-
eryouaccess theterminalemulationmenu screens.

SECTION3"TerminalEmulation Menu Screens
PEN*KEYRModel6400 Hand-HeldComputerUser’sGuide 3-37
3.Press the[ENT]keyacouple oftimestoreturntothe
mainmenu.
4.Press [6]ExitMenu toreturntothemainterminal
screen.
DisablePassword
5.Todisablethispermanentpassword,press the[1]key.
The1)displaysin normalviewingtext.Youdonot
needto enterthepasswordtodisablethisfunction.
PrintDevice
PrintDevicemenu allowsestablishingextendedcommands
eitherfortheRS232 orIRDAprinterdrivers.
Print Device
1) RS232 Print
2) IRDA Print
1.Press [1]fortheRS232.
2.Press [2]fortheIRDA.
LCD Parms
TheLCDParms(parameters)menu allowsyoutoadjust
thefollowingfeaturesoftheliquidcrystaldisplay:
"Thescreensize(numberofrowsdisplayed,andthe
numberofcharactersdisplayedoneachrow).
"Thescreenmode(howthecursorpositionsitselfon
thedisplay).
"Makingall alphabetic characterkeystrokesuppercase
characters.

SECTION3"TerminalEmulation Menu Screens
3-38 PEN*KEYRModel6400 Hand-HeldComputerUser’sGuide
"Scrollingwindowparameters
LCD Parms
1)
2) Screen Size
3) Screen Mode
4) Annunciators
5)
6) Key Uppercase
7) Scroll Window
ScreenSize
ScreenSizeletsyouselect thenumberoflines,andcharac-
tersineachline,thatcanbeviewedonthedisplay.Choices
include:
"6rows, with10,13,16,20,26,or32 charactersper
row
"9rows, with10,13,16,20,26,or32 charactersper
row
"12 rows, with10,13,16,20,26,or32 charactersper
row
"18 rows, with10,13,16,20,26,or32 charactersper
row
Itisalsopossibletohaveselected5,8,10,and16 fornum-
berofrows.Thisdependsonwhatsize ofdisplay you have
selected. Onlyone optioncanbeselectedatatime.
Screen Size
10 13 16 20 26 32
6 Off Off Off off off off
9 Off Off Off off off off
12 Off Off Off off off off
18 Off Off Off ON off off

SECTION3"TerminalEmulation Menu Screens
PEN*KEYRModel6400 Hand-HeldComputerUser’sGuide 3-39
Tochangethescreensize:
1.Press thearrowkeys.Eachkeypress movestheword
Ononepositioninthedirectionofthearrowkey
pressed.ThewordOnindicatesthecurrentsetting
(thesettingaboveis18 rowswith20 charactersper
line—thewordOnisintherow18,column20).
2.WhenthewordONappearsinthepositioncorre-
spondingtothedesiredscreensize,press the[ENT]
key.
ScreenMode
UseScreenModetoselectcursorpositionandmovementas
youscroll throughdatainthedisplaybuffer.Thisbuffer
storesdatainastandardCRTformat(as sentfrom thehost
computer).Sinceyourhand-heldcomputerdisplayis small-
erthanaCRT,theseScreenMode optionsallowyouto opti-
mizeyourviewofinformation(data)onthehand-heldcom-
puterdisplay.
Inordertosee all ofthedataonthescreen,usethearrow
keystoscroll (or“move”)theviewportofthescreenonthe
display.
Screen Mode
1) Center Cursor
2) Corner Mode
3) Page Mode
4) Lazy Mode
5) Locked Mode
CenterCursoristhedefault mode.Inthismode,thecur-
sorbeginsnearthecenterofthedisplayandattemptsto
remainthereasyouscroll throughthedata.Uponreaching
anoutsideboundaryofthefull CRTscreen,thedisplay
stopsadvancingwhilethecursormovesbeyondthecenter

SECTION3"TerminalEmulation Menu Screens
3-40 PEN*KEYRModel6400 Hand-HeldComputerUser’sGuide
ofthescreen.Whenthecursor reachestheboundaryofthe
CRTscreen,anerrortonesounds(thehand-heldcomputer
“beeps”).Thecursordoesnotwraptothenextlineinthe
display.Thisoptionisrecommendedwhenyourapplication
programsendsthefull CRTdisplaytothehand-heldcom-
puter.
TheCornerModeoptionstartsthedisplayat theupper-
leftcornerofthefull CRTscreenandkeepsthecursorin
thelower-rightcornerofthedisplay.Asyouscroll,thecur-
sor remainsthereasdata advancesinthescrolled direction
(up,down,right,orleft)—until anoutsideboundaryofthe
full CRTscreenisreached.Thenthescreenstopsmoving
inrelationtothedisplayandthecursormovesinthe
scrolled direction(thecursornolonger remainsinthecor-
nerofthedisplay).Whenthecursor reachestheCRT
screenboundaryitstopsmoving.Thecursordoesnotwrap
tothenextlineinthedisplay.Anerrortonesoundsifyou
trytomovethecursorbeyondtheboundary.Thisoptionis
recommendedwhenyourapplication usesonlytheupper-
leftcornerofthefull CRTscreen.
ThePageModeoptiondividesthefull CRTscreeninto
predefined“pages,”andstartsthehand-heldcomputerdis-
playonpage1.Thecursorfirstappearsintheupper-right
cornerofthedisplay.Asyouscroll,onlythecursormoves
(thedataonthescreendoesnotappeartomove).When
youscroll off the edge ofthedisplayed page,thedisplay
snapstothenext(orprevious)page.Uponreachingthe
boundaryoftheCRTscreen,thecursorstopsmovingand
anerrortonesoundseachtimeyouattempt tomovebeyond
theboundary.
"NOTE:Some“pages”inPage Mode overlap each other (the sameinforma-
tion is shown on both pages).Thisoverlap occursbecausethe 24
rowby80 columnCRTscreen cannotbe divided equally.
LazyModestartsthecursorintheupperleftcornerofthe
hand-heldcomputerdisplay.Thecursormovesacross the

SECTION3"TerminalEmulation Menu Screens
PEN*KEYRModel6400 Hand-HeldComputerUser’sGuide 3-41
displayinthescrolled direction.Whenthecursorgoesbe-
yondthe edge ofthedisplay,thedata beginstomoveinthe
oppositedirectionthat thecursorismovinginandthecur-
sor remainsat the edge ofthedisplay.Whenyoureachan
outsideboundaryofthefull CRTdisplay,anerrortone
soundseachtimeyoutrytomovebeyondtheboundary.
WhenLockedModeis selectedthescreenviewislockedto
theupperlefthandcornerofthedisplay.Anycharacters
outside ofthedisplaywindowsizeyouselectarewrittento
thescreen,butyoucan notsee them.Thewindowingkeys
donot movethevisiblewindow.
"NOTE:In 5250 emulation the err_rowismapped tothe lastrowof the
screen sizeselected.
Annunciators
Youcanselectandchangethelocationoftheannunciators
onyourdisplayscreen.Thedefaultisthelower rightcor-
ner,the other choicesareanyofthe otherthree corners.
YoucanalsoselectStealthModewhichdisplaystheannun-
ciatorsonlywhenyoumakeachangeandthen hidesit
whenyoupress akey.
Key Uppercase
TheKeyUppercase option, whenenabled,causesthealpha-
betickeys(A--Z)todisplayasuppercasecharactersregard-
less oftheshiftor capslockmodesettings.

SECTION3"TerminalEmulation Menu Screens
3-42 PEN*KEYRModel6400 Hand-HeldComputerUser’sGuide
Scroll Window
Menu itemsare:(1)TabSize,(2)ScreenSize,(3)Define
Width,and(4)DefineHeight.Choices1 and2 allowyouto
definethesize(tab orscreensize)ofcursormovement:how
farit moveswitheachpress ofthearrowkey.Choices3
and4 allowyoutocustomizethescreensize.
Scroll Window
1) Tab Size
2) Screen Size
3) Define Width
4) Define Height
Option1causesthecursortomovebytheamountsetinop-
tions3 and4.
Option2causesthecursortomovebythevirtualscreen
sizeselectedinLCDParmsundertheMainMenu.
Options3 and4manuallydefinethex-axisandy-axis(up
and down)movementofthecursorwhenoption1(tab size)
is selected.
BeeperSetup
TheBeeperSetupmenusallowyoutoadjust thebeeper
tonesforkeyclicks(presses)anderror conditions.
Beeper Setup
1) Key Click
2) Error Tone
3) Beeper Select

SECTION3"TerminalEmulation Menu Screens
PEN*KEYRModel6400 Hand-HeldComputerUser’sGuide 3-43
Key Click
UsetheKeyClickoptiontoadjust thefrequencyandlength
(duration)ofthesoundmadewhenyoupress akey.
Thefrequencyofthetoneisadjustableinstepsfrom0to
32.Thelengthisadjustableinstepsfrom0to10.TheKey
Clickmenu screenandsubscreensareshownbelow.
Key Click
1)
2) Length
3) Frequency
Length
Use Cursor Up
and Down Keys
To Adjust
Key Click> xx
Frequency
Use Cursor Up
and Down Keys
To Adjust
Key Click> xx
(2) (3)
Toadjust thekeyclicktone:
1.Press key[2]orkey[3].
2.Press the[Y]or[B]keystomakethedesiredadjust-
ment.Eachkeypress isaccompaniedbyatoneat the
newfrequencyorlength.
3.Press [ENT]toconfirmyourselectionandreturnto
theprevious screen(KeyClickmenu).

SECTION3"TerminalEmulation Menu Screens
3-44 PEN*KEYRModel6400 Hand-HeldComputerUser’sGuide
ErrorTone
TheErrorTone optionletsyoutoadjust thelengthandfre-
quencyofthetonemadewhenanerroroccurs(forexample,
pressinganinvalidkey).TheErrorToneadjustments,and
theproceduresformakingthemareidenticaltotheKey
Clickadjustments.
BeeperSelect
TheBeeperSelectoptionletsyouturnoff theinternalbeep-
er.Thedefaultsettinghasthebeepersoundenabled.
Beeper Setup
1) Beep Internal
2)
ToturnthebeeperselectoptionOff:
1.Press [1]keytoturnoff theinternalbeeper.
2.Press [ENT]toconfirmyourselectionandreturnto
theprevious screen.

SECTION3"TerminalEmulation Menu Screens
PEN*KEYRModel6400 Hand-HeldComputerUser’sGuide 3-45
Tests
TheTestsmenusallowyoutotestperipherals,thedisplay,
RFcommunications,andmemory.
Tests
1) Peripherals
2)
3) Memory View
4) Packet Driver
5) Numbers
6) Timed Numbers
Peripherals
ThePeripheralsmenu allowsyoutotestvarioushand-held
computerperipheraldevices.Therearecurrentlyfourdif-
ferent tests:
"RS-232, whichteststhecommunicationportonthe
hand-heldcomputer.
"Display, whichteststhe operationofthehand-held
computerdisplay.
"Keyboard, whichteststhe operationofthehand-held
computerkeyboard.
"Scanner, whichteststhe operationofa bar codescan-
nerattachedtothehand-heldcomputer.
Theperipheralsmenu is shownbelow. Detailed descriptions
ofeachperipheraltestfollow.
Peripherals
1)
2) RS232 Test
3) Display Test
4) Keyboard Test
5) Scanner Test

SECTION3"TerminalEmulation Menu Screens
3-46 PEN*KEYRModel6400 Hand-HeldComputerUser’sGuide
RS232 Test
TheRS232 Testchecksthedatacommunicationportonthe
bottomofthehand-heldcomputer.
Thistestrequiresaspecial loop-backconnectorthatlinks
thefollowinginputandoutputpinsonthedataconnector:
"TheTXoutput totheRXinput
"TheDTRoutput totheDSRinput
"TheCTSoutput totheRTSinput
TheRS232 Testscreensareshownbelow.
RS232 Test
Attach RS232
Loopback
Connector
Press Enter
RS232 Test
Results:
RTS-CTS: xxxx
TX-RX: xxxx
Any Key To Stop
Torun thetest:
1.Select theRS232 Testfrom thePeripheralsmenu.
2.Attachtheloop-backconnectortotheroundconnector
onthebottomofthehand-heldcomputer,thenpress
[ENT].ThedisplaychangestothesecondRS232 Test
menu (shownabove).
Theconditionofeachline-pairdisplaysaspassingorfailing
thetest.Ifanytestfails,thehand-heldcomputershouldbe
returnedforservice.
SECTION3"TerminalEmulation Menu Screens
PEN*KEYRModel6400 Hand-HeldComputerUser’sGuide 3-47
Display Test
TheDisplayTestactivateseachelementintheLCDdisplay.
Ifalineappearsbroken,ortherearegapsinthedisplay,
theLCDpanelneedstobereplaced.
Toperform theDisplayTest:
1.From theDisplayTestMenu,press [ENT]tostart the
test.Thedisplayscreenispaintedwithaseriesof
vertical lines.
2.Visuallyinspect thelines.Forthetest topass,all
lines shouldappear clearandcomplete(nobrokenseg-
ments);press [ENT].Thedisplayscreenisthen
paintedwithaseriesofhorizontal lines.
3.Visuallyinspect thelinesusingthesamecriteria.The
displayscreenisthenpaintedblack.
4.Visuallyinspect thepaintedblacklines.Forthetest
topass,thescreenshouldbeuniformlyblack;press
[ENT].YoureturntothePeripheralsmenu.

SECTION3"TerminalEmulation Menu Screens
3-48 PEN*KEYRModel6400 Hand-HeldComputerUser’sGuide
Keyboard Test
TheKeyboardTestletsyoutesteachkeyonthehand-held
computerkeyboard.TheKeyboardTestscreenis shown
below:
Keyboard Test
Press a key
ENTER To Exit
Key =
’A’
Toperform thistest,press eachkeyonthekeyboard(except
the[ENT]key).Acharacter correspondingtothekey
pressedshouldappearonthedisplay.
ScannerTest
TheScannerTestallowsyoutotest the operationofan
attachedbar codescanner.From theScannerTest menu,
scananenabledbar code.Forthistest topass thebar code
andthebar codelengthshouldappearonthedisplay.Press
anykeyto exit.
TheScannerTestscreenis shownbelow.
Scanner Test
Scan Code>
Length>

SECTION3"TerminalEmulation Menu Screens
PEN*KEYRModel6400 Hand-HeldComputerUser’sGuide 3-49
MemoryView
Thismenu isreservedforengineeringtestandevaluation.
Memory View
F1 - Exit
F2 - Heap
F3 - Far Heap
F4 - Memory Dump
Address: XXXXXX
PacketDriverTest
ThePacketDrivertestsallowyoutotest theaccuracyof
datatransmissionstoandfrom thehand-heldcomputer.
Packet Driver
1)
2)
3) Packet Stats
4) Histogram
5)

SECTION3"TerminalEmulation Menu Screens
3-50 PEN*KEYRModel6400 Hand-HeldComputerUser’sGuide
PacketStats
ThePacketStats(statistics)testshowsthenumberofpack-
ets sentandreceived,numberoferrors,andnumberof
packetsdropped.
Receive
Statistics
Pkt xxx
Chr xxx
Err xxx
Lost xxx
Transmit
Statistics
Pkt xxx
Chr xxx
Err xxx
Transaction
Statistics
Qty xxx
Sec xxx
Qty/Min xxx
Ops xxx
RTC Statistics *See text
‘Histogram
Options’

SECTION3"TerminalEmulation Menu Screens
PEN*KEYRModel6400 Hand-HeldComputerUser’sGuide 3-51
HistogramOpts
ANorandengineermayaskyoutoaccess thismenu ifyour
hand-heldcomputerhasproblems.From thismenu you
canprovidetheNorandsystemengineerwithvital informa-
tionaboutyourhand-heldcomputer.
Theactualmenusarenotshowninthismanual,however
some ofthegeneralterminology is shownbelow. Severalof
themenu options,suchas“Clear...,”arepassword-pro-
tectedandare onlyaccessibleifthe engineerprovidesyou
withthecorrectpassword.
Terminology youmightsee:
"avg txtime
"avg transtime
"ptt (push-to-talk)count
"addrsonlist
"poll nodata
"sendretries
"rcvretries
"resetcount
"intervaltime
"timebucket#
ANorandengineerworkswithyouontheseselections.
Histogram Opts
1) Start
2) Stop
3) View

SECTION3"TerminalEmulation Menu Screens
3-52 PEN*KEYRModel6400 Hand-HeldComputerUser’sGuide
Numbers
TheNumberstestchecksthe operationofthehand-held
computermicroprocessor. Duringthetest,thehand-held
computerdisplayisfilledwith hexadecimalnumbersthat
moveacross thescreen horizontallyandscroll vertically.
Charactermovementindicatesthat theprocessoris still
running.
Thistestishelpful indetectinglockupsduringsevere oper-
atingconditions.
TimedNumbers
TheTimedNumberstestsdoesthesamethingastheNum-
berstestexcept thatitkeepstrackofthetimeinseconds
thatit tooktorun thetest.
Version Info(Information)
VersionInfo(Information)screenshows:
"Thename oftheprogramyouareusing
"Theversionoftheprogramyouareusing
"Thereleasedate oftheprogram
"Versionofradiodriver
"Macaddress ofcomputer
Version Info
Firmware name
Version x.x
Date ddmmmyy
MLID Ver xx.xx
xxxxxxxxxxxx

SECTION3"TerminalEmulation Menu Screens
PEN*KEYRModel6400 Hand-HeldComputerUser’sGuide 3-53
ExitMenus
TheExitMenusoption(#6)exitsyoufrom thisterminal
emulationsectionandreturnsyoutothescreenyouwereat
before enteringthis section.
More
TheMoreselectionopensMainMenu 2, whichis shownbe-
low.
Main Menu 2
1) Keyboard Opts
2) Save Parms
3)
4) Session Menu
KeyboardOpts
UsetheKeyboardOpts(options)menu tochoosetheType-
Aheadoption.Thisletsyoukeyininformationwhenthe
hand-heldcomputer cannotimmediatelysend datatothe
hostcomputer.
Keyboard Opts
1) Type-Ahead

SECTION3"TerminalEmulation Menu Screens
3-54 PEN*KEYRModel6400 Hand-HeldComputerUser’sGuide
Save Parms
SaveParms(parameters)retainstheparametersyoupro-
grammedintothehand-heldcomputer.Whenyousavepa-
rameters,theybecomethedefaultsettingsforthehand-
heldcomputer.WhenyouselectSaveParms,youare
promptedto enteraseven-characterpassword(CR52401),
as showninthefollowing. Oncethepasswordiscorrectly
entered,thehand-heldcomputerautomaticallysaves
(writestoEEPROM)theparameters.
Save Parms
Enter
Password
>.......
Save Parms
Working
Please Wait
........
Session Menu
TheSessionMenu allowsyoutodefinedifferenthostcom-
municationsessionsandtodesignatea“hotkey” thatal-
lows switchingquicklybetweenthedifferentsession.
UsetheSwitchoptiontochangethecurrentsession.The
current(orintended)sessionmustbeidentified(ordesig-
nated)beforesettingParameters.
WhenyouselectSetHotKey,thecurrenthotkeyisdis-
played.Usetheupand downkeystoviewtheavailable
SECTION3"TerminalEmulation Menu Screens
PEN*KEYRModel6400 Hand-HeldComputerUser’sGuide 3-55
choices.Whenthedesiredkeydisplays,press [ENT]toset
yourselection.TheSetHotKeyoptionisonlyavailable on
hand-heldcomputersthatsupportsessionswitching.
Use Cursor Up
and Down Keys
To Adjust
< xx >
Select Session Set Hot key
Session Menu
1) Switch
2) Set Hot Key
3) Copy Setup
(1)
(3)
Use Cursor Up
and Down Keys
To Adjust
“CopySetup”copies
parametersofbackground
session tothe current
session.
Session: x
Host: xxxx
<Datastream> xxx
“CopySetup”
ispassword
protected
(2)

SECTION3"TerminalEmulation Menu Screens
3-56 PEN*KEYRModel6400 Hand-HeldComputerUser’sGuide
To ExitEmulation Mode and Returnto
DOS
Ifyouwant to exit the emulationprogramyouareusing
andreturnbacktotheDOSkeyboardlayoutcompletethese
twosteps.
1. DoaColdRestart.
2.Press “Y”.
3.Press [ENT]severaltimes.Thisputsyouat theDOS
C:\prompt.
Ifyoudothehardresetofpressingandholdingtheblue
andyellowshiftkeys,andboth[ENT]keysthisexitsyouto
thebeginningofthecurrentemulationyouareusing.

PEN*KEYRModel6400 Hand-HeldComputerUser’sGuide 4-1
Section 4
Maintenance and Troubleshooting
""""""""""""""""""""""""""""
Introduction
Your computerisdesignedtowithstandnormalusein
harshenvironments. Occasionalmaintenanceisrequired
to ensuretrouble-free operation.Theproceduresinthis
sectionshouldhelpkeepyour computeringoodworking
condition.
Maintenanceproceduresincludedinthis sectionprovide
instructionsforidentifyingLowBatteryconditionsand
cleaning your computer.
LowBatteryIndication
BatteryPackGasGaugeIcons:
Thesebatteryiconsrepresent thechargelevel inyourmain
batterypack.
"Fouriconsindicatesmorethan76 %chargelevel
"Three iconsindicatesbetween51--75%
"Twoiconsindicatesbetween26--50%
"Oneiconindicatesbetween21--25%

SECTION4"Maintenance and Troubleshooting
4-2PEN*KEYRModel6400 Hand-HeldComputerUser’sGuide
Onceyour computergetsbelowthe20%range,theiconsare
replacedby“Ls”andafterthechargelevel isless than10%
your computeremitsaseriesofbeeps.
"FourLsindicatesbetween16--20%chargelevel
"Three Lsindicatesbetween11--15%.At the15%
chargelevel,your computerbeepsonce.Thesound
durationandfrequencyareatlevelsyou havesetfor
your computer.
"TwoLsindicatesbetween6--10%.At the10%and7%
chargelevels,your computerbeepsonce.Thesound
durationandfrequencyareatlevelsyou havesetfor
your computer.
"OneLindicatesbetween0--5%.At thischargelevel,
your computerbeepsthree timesatitscurrentsetting
levelforbothdurationandfrequency.
"NOTE:If you havethe beeperturned off,you will nothearanyof the low
batterybeep warnings.
Thebatterypackiconsonyour computerdisplayreflect the
samestatusastheLEDsonthebatterypack.However,
theremaybeaone-minutedelayforupdatingtheiconson
thedisplaywhenthebatterypackisreplaced.
Ifyouturnyour computeronanditdoesnotrespond,this
maymeanthatboththemainandbackupbatteryarerun
down.Just tobesure,insertyour computerinadockor
other chargingdevice,turniton,andsee ifthecomputer
responds.Ifitdoes,followthe“ChargingYourBattery
Pack”instructionsbeginningonpage2-9 andthe“Back-
upBattery”instructionsonpage2-13.Ifitdoesnotre-
spondwheninsertedintothe equipment thatprovides
charge,anotherproblemcouldexist.Ifthishappens,refer
totheTroubleshootingsectionforsolutions.

SECTION4"Maintenance and Troubleshooting
PEN*KEYRModel6400 Hand-HeldComputerUser’sGuide 4-3
Cleaning YourHand-HeldComputer
Periodic cleaninghelpsmaintaintheappearanceandreli-
abilityofyour computer.Whencleaning your computer,in-
spect thekeyboard,covers,display,connectors,and periph-
eralproductsforobvious signsofdamage orwear.
BCAUTION:Do notuse any abrasive cleaning compounds,ketonic solvents
(acetoneorketone)oraromatic solvents(tolueneorxylene) to
cleananypartofyourcomputer.These solutions cause
permanentdamagetoyourcomputer.
Neverpour cleanersdirectlyonthedisplaynorthecase.
Instead put thecleanseronasoftclothandgentlywipethe
case.
Case and Display
NorandCorporationrecommendscleaningthe exteriorof
your computerusingasoftclothdampenedwith:
"MICRO-CLEANII cleanser,madebyForesightIn-
ternational,Inc.4887 FStreet, Omaha,NE
68127-0205,telephone1-800-637-1344
"Glass cleanerorisopropylalcohol
Docking Connectors
Ifthedockingconnector contactsbecomedirtyortarnished,
cleanthemwithacottonswab dippedinisopropyl(andnot
ethyl)alcohol.It mayalsobenecessarytolightlyburnish
themwithapencil eraser.

SECTION4"Maintenance and Troubleshooting
4-4PEN*KEYRModel6400 Hand-HeldComputerUser’sGuide
Troubleshooting
Shouldyouencounterdifficultiesinroutine operation,
printing,or communications,thereareafewthingsyou
maydotocorrect theproblem:
"Refertoyourapplications(softwareuser)manualop-
eratingprocedures.
"Ensurethatelectricalandmechanicalconnectionsare
secureandundamaged.
"Checkbatterycondition.
Troubleshooting Table
ThisTroubleshootingtablelistsconditionsyoumightsee
andoffers somebasic remedies:
Table4-1
BasicTroubleshooting
ConditionSolution
ComputerDisplays
ShowsAnLAnd
EmitsAFive
SecondBeep
Thisisthelowestbatterychargelevelthatyour computer
will operatebeforeshuttingdown.Donotcontinueusing
until yourechargethemainbatterypack.
AsTheBattery
PackAges,ItIs
LosingCapacity
AndFewerLEDs
AreLighting
LithiumIonbatteriesloseabouthalfoftheiravailable
capacityafter500 cycles(useandrecharge=1cycle).
Therefore,afullychargedbatterypackafter500 cycles
showsless thanfourlitLEDs,thisisnormal.Planyour
chargingneedsaccordingly,andnotethat thecapacity
continuestodecreasewitheachcycle.
AFullyCharged
BatteryPackIn
TheComputerStill
DoesNotBringIt
ToLife.NoneOf
TheLEDsLight
OnTheBattery
Pack.
Leavethesamebatterypackinyour computerforatleast
30 minutes,toallowsometimetoputsomechargeintoyour
backupbattery.Thenreplacethebatterypackwithafully
charged pack.Put the originalbatterypackintoanexternal
batterycharger.

SECTION4"Maintenance and Troubleshooting
PEN*KEYRModel6400 Hand-HeldComputerUser’sGuide 4-5
Table4-1continued
BasicTroubleshooting
ConditionSolution
TheLEDsOnThe
BatteryPackDo
NotMatchthe
LEDsOnThe
Display
It takesaminuteafteryouputinthebatterypackforyour
computertocheckthestatusand displaytheupdated
batterychargelevel.
AfterAWeekendA
FullyCharged
BatteryPackDoes
NotLastThe
NormalLengthOf
Time
Thecomputerwasleftfortheweekendwithouta battery
packinit.Therefore,whenyoustartout theweekwiththe
freshchargedbatteryithastobuildupthechargelevel in
thebackupbatteryandthatleavesless powerforitsnormal
daysuse.
ComputerReboots
WhenABattery
PackIsInstalled
Thecomputerwasnotsuspended(pressingthe[I/O]keyto
blankthedisplay)beforethebatterywasreplaced.
Another reasoncanbethat thebackupbatterymaybe
drained.Rechargethecomputerforaminimumof12 hours.
Ifaproblemstill existsthensendyour computertothe
servicecenter.
PuttingThe
ComputerIntoA
ChargingDevice
TheChargeLED
BlinksDifferent
Colors
Thereisafaultstateconditionoccurringinthebatterypack
orthecharger.Forthecompletedetailsconcerningthe
sequence ofthecolorsoftheblinksrefertoSection2
BatteryChargerLEDandErrorCodesonpage2-12.
WhenPuttingThe
BatteryPackIn
TheChargerThe
LED NeverTurns
Green
Thereisafaultstateconditionoccurringinthebatterypack
orthecharger.Forthecompletedetailsconcerningthe
sequence ofthecolorsoftheblinksrefertoSection2
BatteryChargerLEDandErrorCodesonpage2-12.
ComputerDoes
NotTurnON When
The[I/O]KeyIs
Pressed
*Ensurethat thereisamainbatteryin.
*Ensurethat themainbatteryischarged.
*Ensurethat thebatterycompartmentdoorisclosed.

SECTION4"Maintenance and Troubleshooting
4-6PEN*KEYRModel6400 Hand-HeldComputerUser’sGuide
Table4-1continued
BasicTroubleshooting
ConditionSolution
ComputerDoes
NotTurnON When
PlacedInADock
*Ensurethedockispluggedin.
*Ensurethat thebatterycompartmentdoorisclosed.
*Reseatcomputerintodockto ensureproper connection.
ComputerShuts
DownDuringUse*Youmayhaveaverylowbattery.Tryrechargingthemain
battery.
*Youmayhavehit thebatterydoorlatch;thiscausesyour
computertosuspend.Checkthelatchthenpress the[I/O]
keytocontinue operation.
ComputerResets
WhenYouReplace
OrCheckThe
MainBattery
Thebackupbatterymaynotbefullycharged,allowatleast
8hourstocompletelyrechargethebackupbattery.
ComputerTurns
OFF WhenYou
OpenTheBattery
DoorLatch
Thisisthecorrectoperation,theunitshutsdownto
conserve energy andsavedata.
ComputerDoes
NotSuspend*Thecomputerstaysonwhenitisconnectedtoacharging
device.
*Thecomputerstaysonwhenitisprocessingdataorin
radiocommunications.
ThisisOK ifconnectedtoachargerorplacedinadock.If
thisisnot thecase,andeitheroftheseconditionscontinues
foralongperiodoftime,contactNorandsupportpersonnel,
asthisconditionrunsdownthebatteries.
ComputerDisplays
ABadTcom
Message
*Thecomputermaynotbemakingfull contactwiththe
dock.Tryreseatingtheunitinthedock.
*Thedockmaynotbeproperlyconnectedtothehost.Make
surethereisaconnection.TCOMerrorsmayhappenwhen
telephoneserviceislost,orfor reasonsnotrelatedtothe
physicalconnection.

SECTION4"Maintenance and Troubleshooting
PEN*KEYRModel6400 Hand-HeldComputerUser’sGuide 4-7
Table4-1continued
BasicTroubleshooting
ConditionSolution
ComputerTakesA
LongTimeToBoot
UpAfterAReset
Normaltimeisbetween30--45 seconds.Ifyoudonothave
your computer connectedtoachargingsourcethebooting
shouldbeless than30 seconds.Shortbeepsaboutone
secondapartoccurduringthebootingprocess toindicate
thatyourcomputerisworking.
Ifit takeslongerthanthat,contactNorandsupport
personnel.
TetheredLaser
DataAndInternal
LaserEngineData
DoesNotShowUp
InTheKeyBuffer
Load64SCN7Bwithboth“--e”and“--w”commandlines
switches.Bothareneededto enablepowertotheinternal
engineand direct thedatafrombothscannerstothe
keyboard.
WedgeMode
ApplicationDies
WhenScanning
DataUsingA
Tethered Scanner,
ButWorksFine
WithThe
Integrated
Scanner
Checkfornon-displayablepreamble,postamble,prefix,or
suffixcharactersbeingsentbythelaser.Theinternal laser
enginesendsapostamble of<cr-lf>bydefault.Either
disablethemor codetheapplicationtohandlethem.The
integratedscannerandtetheredlasersmaybeconfiguredby
scanningsetupbar codes.
Tethered Scan
DataDoesNot
ShowUpInThe
KeyBufferBut
TheIntegrated
LaserDataDoes
Ensurethat thetetheredlaserisconfiguredfor9600,n,8,1
andthebar codedataisprefixedwithanSTX(0x02)and
suffixedwithanETX(0x03).

SECTION4"Maintenance and Troubleshooting
4-8PEN*KEYRModel6400 Hand-HeldComputerUser’sGuide
Table4-1continued
BasicTroubleshooting
ConditionSolution
ComputerDoes
NotScanBarCodeWARNING:DoNotLookIntoScanner
*Ensurethat thereisamainbatteryin.
*Ensurethat themainbatteryischarged.
*Ensurethat thebatterycompartmentdoorisclosed.
*Ensurethebar codesymbology isturnedOn.Application
hastohavescannerturnedOn.
*Ensurethescannerlensisclean.
*Ensurethebar codeisfree ofsmearsordirt.
RefertoinstructionsforScanningbeginningonpage2-17.
PressingTheScan
KeyDoesNotTurn
ON Computer
*Normaloperationisthat thescankeyoncomputerwakes
itup,butifusingatetheredscanneritdoesnot.
*Ensurethat thereisamainbatteryinstalled.
*Ensurethat themainbatteryischarged.
*Ensurethat thebatterycompartmentdoorisclosed.
CanNotScan
Interleaved2Of5
BarCodes
Interleaved2of5onlydecodesbar codesthatare exactly
thesamenumberofcharactersasprogrammedintothe
integratedscannerlengths1 and2parameters.Bydefault,
thelengthsare14 and0.Alengthof0meansdisabled,so
only14 characterbar codeswill decode.Ensure one ofthe
lengthsis set tothelengthofyourbar codeandthe other
disabled.Donotleavebothlengths set,ifonlyoneis
needed,becauseInterleaved2of5caneasilymis-decode
intoanincorrectlength.
HearABeepWhen
Programming
ScannerToEnable
Interleaved2Of5,
ButNotWhen
TryingToSet
Length1
Beepsareheardat the endofaprogrammingsequence.
EnablingInterleaved2of5isaone-bar codesequence.
SettinganInterleaved2of5lengthisathree-bar code
sequence.Youwill nothearthebeepuntil thethird(last)
bar codeis scanned.Pleasenote,youmustscaneachbar
code ofamultiplesequencewithina 1/2secondofeach
other.Thisismosteasilyaccomplishedbymakingahigh
resolutioncopyoftheappropriatebar codesandarranging
themoneabovethe other.

SECTION4"Maintenance and Troubleshooting
PEN*KEYRModel6400 Hand-HeldComputerUser’sGuide 4-9
Table4-1continued
BasicTroubleshooting
ConditionSolution
PrintersFlow
ControlOnThe
SerialPortCauses
MissingData
Ensurewhenloading64SCN7Bthat the“--t0”switchisused
todisableitshandlingofserialportdata as scannerdata.
Otherwise,64SCN7BisreadinganyXON/XOFF messages
fromtheprinter.
“DASIScannerHW
Initialization
Failed.”
Press anykeytoproceed.Bydefault,64SCN7Bwill tryto
initializetheintegratedscanner.Ifyourcomputerdoesnot
haveanintegratedscanner,turnoff thehandlingofitwith
the64SCN7Bcommandlineswitch“--i0”.The error
messagewill notcauseanyproblems.Ifyoudohavean
integratedscanner,itisinoperativeandneedstobe
repaired.
RunningTN.EXE
DoesNotDisplay
Data
Add the“--p”commandlineswitchto64SCN7B--e--w.Also,
ensurethe[PCTCP TN]sectionofthePCTCP.INIfiles
contains“screen-saver=yes”.TN.EXEbypassestheBIOS
keybuffer,butTNisnotreadingthebuffer.The“--p”switch
causes64SCN7Btosendthekeystothehardwareinsteadof
theBIOS.The“--p”switchmaybetriedforanysoftware
thatreadskeysdirectlyfromthehardwareratherthanthe
BIOS.
Ifthesebasicsolutionsdonotsolveyourproblem,there
couldbeanumberofpossiblecauses.Additionalthingsto
try:
"Refertothesoftwaredocumentationwrittenforyour
application.Thisdocumentationmaycontaintrouble-
shootinginformation.
"Ifyoupurchasedyour computerfromaNorandVAR,
contact thembeforecontactingaNorandCustomer
ServiceCenter.

SECTION4"Maintenance and Troubleshooting
4-10 PEN*KEYRModel6400 Hand-HeldComputerUser’sGuide
"Contact theCustomerSupportSpecialistatyourNo-
randCustomerServiceCenter.Your regional Norand
CustomerServiceCenterisfullystaffedandequipped
torepairyour computer.CustomerSupportCenter
addressesandtelephonenumbersareprintedona
ProductServiceInformationcard.Thisdocumentis
packedwithall NORANDRproducts.
"Call theNorand24-hourCustomerResponseCenter
at1-800-221-9236.
DiagnosticInformation
Your computerisequippedwithdiagnostics.Youmightbe
askedtoperform taskstohelptheNorandCustomerSup-
portSpecialistortheCustomerResponseHotLineSpecial-
istdiagnosetheproblemsthatyouarehaving.

SECTION4"Maintenance and Troubleshooting
PEN*KEYRModel6400 Hand-HeldComputerUser’sGuide 4-11
RepairService
Ifyousendyour computerinforservice,besuretocarefully
packtheunitandincludeadescriptionoftheproblemand
themeasuresyoutriedtocorrectit.
Includeanyprintout(ifapplicable)and/orwritedowndis-
playederrormessagestoillustratetheproblem.Alsogive
completedetailsofeventsandcircumstancesleadingupto
thefailure.Includeyourname,address,and phonenum-
ber.
Ifpossiblepackall productsintheiroriginalboxes.Ifthe
originalcontainersarenotavailable,carefullypackeach
pieceand provideplentyofpackingmaterial.Thishelps
preventadditionaldamagetoyourproductwhileintransit.

SECTION4"Maintenance and Troubleshooting
4-12 PEN*KEYRModel6400 Hand-HeldComputerUser’sGuide
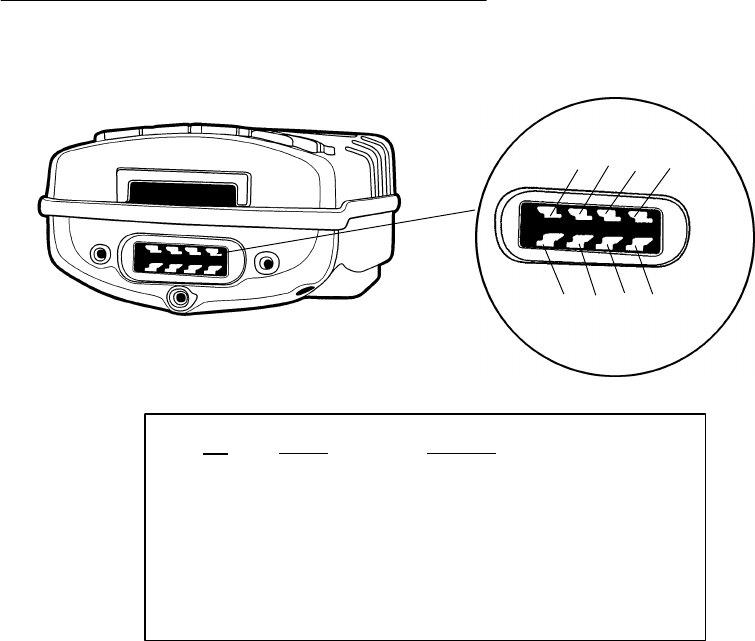
PEN*KEYRModel6400 Hand-HeldComputerUser’sGuide A-1
AppendixA
ConnectorPin-Outs
""""""""""""""""""""""""""""
8-PinDocking Connector(standard)
Figure A-1
8-PinDocking ConnectorPinouts
ComputerBottomEnd View
(WithoutOptionalCommunication Endcap)
1
2
3
4
5
6
7
8
PinSignalFunction
1BCLK BatteryClock
2 12.0VoltsChargePower
3GND Ground
4BDATBatteryData
5TXDTransmitData
6RXD Receive Data
7RTSRequestTo Send
8CTSClearTo Send
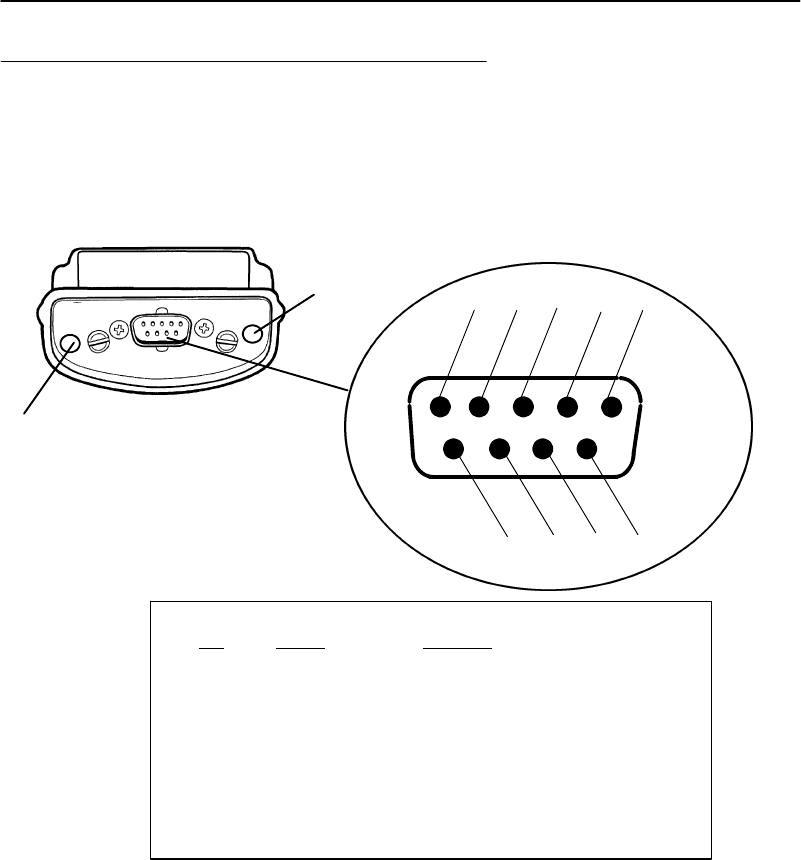
APPENDIXA"ConnectorPin-Outs
A-2PEN*KEYRModel6400 Hand-HeldComputerUser’sGuide
OptionalCommunication Adapter9-Pin
D-Sub Connector
Figure A-2
9-PinD-Sub ConnectorPinouts
1 2 3 4 5
6 7 8 9
Negative contact
Positive contact
PinSignalFunction
1NoConnectDataCarrierDetect
2RXD Receive Data
3TXDTransmitData
4loopedtoDSR DataTerminalReady
5GND Ground
6loopedtoDTR DataSend Ready
7RTSRequestTo Send
8CTSClearTo Send
9Vcc 5 volts*
BCAUTION:*5 voltson pin9isforuse withtetheredscanners and printers
only,thismay damagemodems.

PEN*KEYRModel6400 Hand-HeldComputerUser’sGuide B-1
AppendixB
NORANDRUtilities Program
""""""""""""""""""""""""""""
TheNORANDâUtilitiesProgramprovidesbasicfunctions
requiredtoprepareyourHand-HeldComputersforuse.
EntryPoint
NORAND UTILITIES
64 UTILS V01.05
COPYRIGHTNORAND
CORP.1994--1997
ALL RIGHTSRESERVED
[ENT]CONTINUE
Screen TitleDescription
This screenappearsafter cold-bootingthecomputer.
"ScreenTitle:(darkbarat thetop)containstheap-
plication name,suchas“NORANDUTILITIES”,and
thespecificscreen name,suchasMODEMPARAME-
TERS.
"KeyDescription:(darkbarat thebottom)contains
“action”keys.Movementkeys,suchasarrows,arenot
shown.
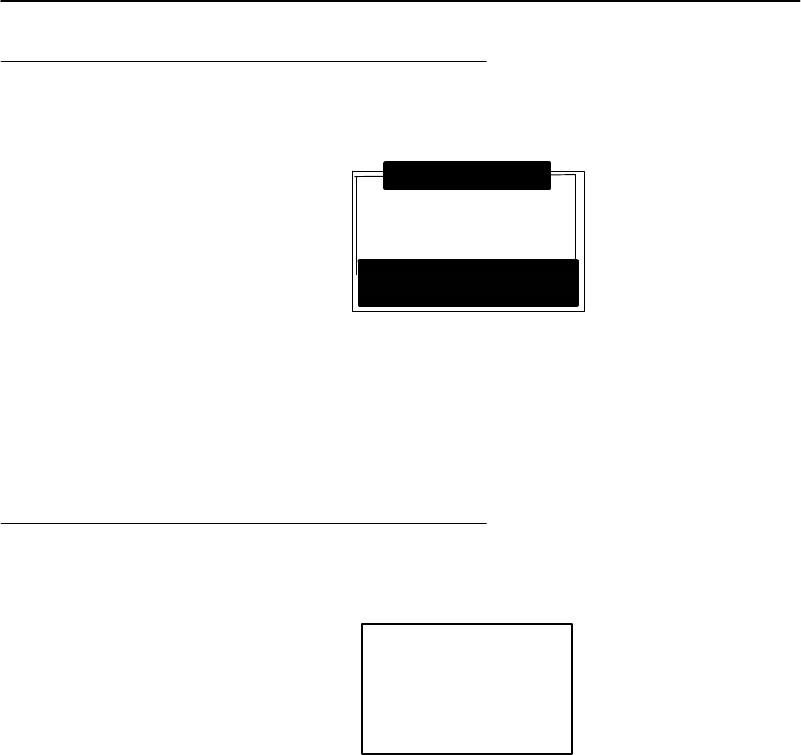
APPENDIXB"NORANDRUtilitiesProgram
B-2PEN*KEYRModel6400 Hand-HeldComputerUser’sGuide
Pop-UpMenus
UNITID2233233
WORKGROUP
6200IPL
[F4]RESET FACTORY
[--]QUIT
CHANGEUNITID
Pop-Upmenusappearafteramenu option.Press thenum-
berofanoptionyouwant toselect;orpress theYorB
keystoscroll throughthelistand press the[ENT]keyto
enter.Selectone optioneachtime.
Press the[--]keyto exitapop-upmenu.
Drop-Down Lists
1.NETWORK...
2.MODEM/DIRECT
3.ACCESSORYCARD
4.HANDHELD
5. INTERSERVER
Drop-downlistsprovidesuboptionsunderapop-upmenu.
Press thenumberofasuboption,orpress theYorBkeys
toscroll throughthelistand press the[ENT]keyto enter.
Selectonesuboptioneachtime.
Press the[--]keyto exitadrop-downlist.
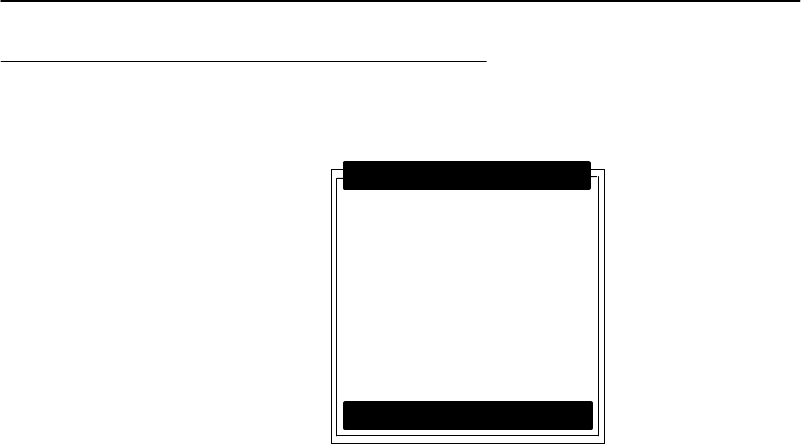
APPENDIXB"NORANDRUtilitiesProgram
PEN*KEYRModel6400 Hand-HeldComputerUser’sGuide B-3
AlphanumericFields
SERVER NAME
I.U.N. INCORPORATED
SERVERIP ADDRESS
123.123.123.123
CLIENTIP ADDRESS
123.123.123.123
RTR0.0.0.0
SUBNETMASK
0.0.0.0
NETWORK PARAMETERS
[--]QUIT
Ifyour computerhasanumerickeyboard,enteralphanu-
mericdata bypressingtheAand"keystoscroll backand
forththroughthesetofalphanumeric characters.Aftera
characteris selected,press the[ENT]keyto enterthat
character.Press [ENT]againtomovetothenextfield.
Ifyour computerhasanalphanumerickeyboard,press the
characters,thenpress the[ENT]keytomovetothenext
field.
Press [ENT]tosavethe entriesandexit themenu.Press
the[--]keyto exitwithoutsavingthe entries.

APPENDIXB"NORANDRUtilitiesProgram
B-4PEN*KEYRModel6400 Hand-HeldComputerUser’sGuide
TitleScreen
Whenyourebootor resetyour computer,theTitleScreen
appears:
NORAND UTILITIES
64 UTILS V01.05
COPYRIGHTNORAND
CORP.1994--1997
ALL RIGHTSRESERVED
[ENT]CONTINUE
Press the[ENT]keytocontinue.

APPENDIXB"NORANDRUtilitiesProgram
PEN*KEYRModel6400 Hand-HeldComputerUser’sGuide B-5
LanguageSelection
"NOTE:The NORAND UtilitiesProgramchecks filesforavailablelanguage
options.Ifno language resourcefilesexist, you do notsee this
menu.
Ifyourapplicationrequiresnon-Englishlanguages,the
LanguageSelectionmenu appears.Englishisthefirstop-
tion,followedbyuptonineadditionaloptions:
NORAND UTILITIES
LANGUAGE SELECTION
1.ENGLISH
2.
3.
4.
5.
6.
7.
8.
9.
0.
[--]QUIT
Press thenumberofalanguage,orpress theYorBkeys
toscroll throughthelist,thenpress the[ENT]keyto enter.
Press the[--]keyto exit thismenu.
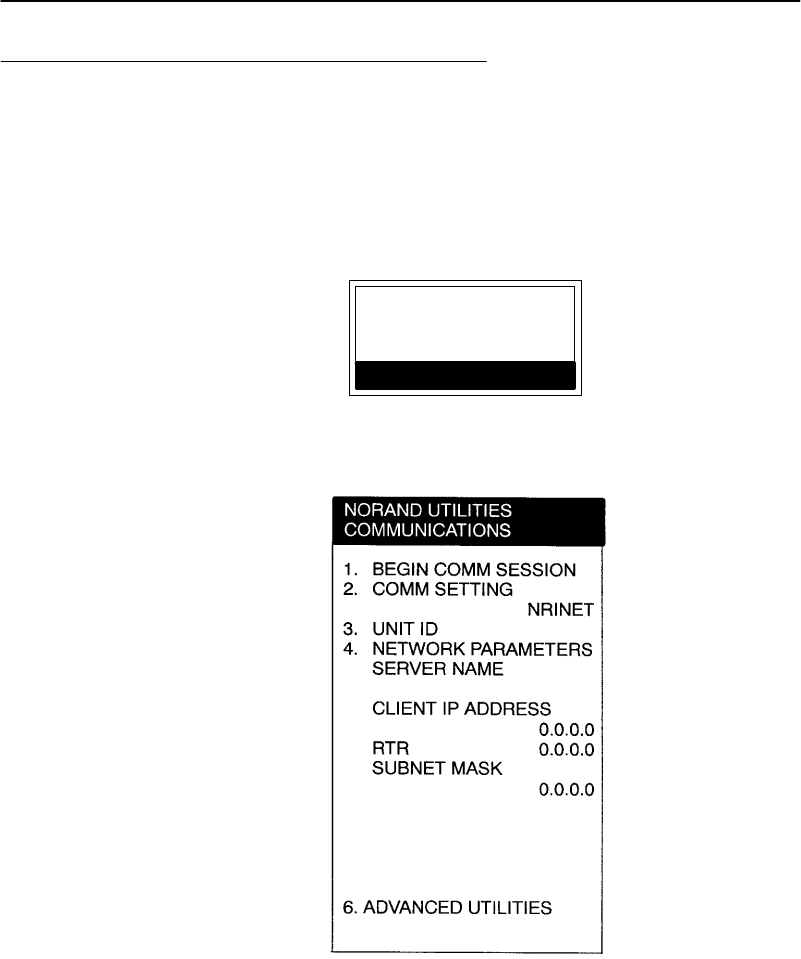
APPENDIXB"NORANDRUtilitiesProgram
B-6PEN*KEYRModel6400 Hand-HeldComputerUser’sGuide
CommunicationsMenu
"NOTE:The defaultisthe NPCPRS-485 communication.
"NOTE:If yourcomputerdoesnotsupportanyof the featureslisted, the
following pop-up menu appears.Press the [ENT]keytocontinue:
COMMUNICATIONS
FEATURE
NOTSUPPORTED
[ENT]CONTINUE
TheCommunicationsMenu appearsaftertheTitleScreen:
APPENDIXB"NORANDRUtilitiesProgram
PEN*KEYRModel6400 Hand-HeldComputerUser’sGuide B-7
Option 1BEGIN COMM SESSION
Ifyouselect thisoption,thecomputer repeatscommunica-
tionsuntil successfuloryoupress the[--]key.
"NOTE:If you press the [-] key, this verification windowappears:
ARE YOUSURE YOU
WANT TOSTOP
COMMUNICATIONS
NOW?
[ENT]STOP
[--]RESUME
BEGIN COMM SESSIONwithNETWORK
Ifyouselect thisoptionandOption2. COMM SETTINGS
is set toNETWORK, thisCommunicationStatusmenu ap-
pears:
NORAND UTILITIES
COMMUNICATIONS
COMM SETTINGS:
NRINET
SERVER NAME
CLIENTIP ADDRESS
0.0.0.0
RTR0.0.0.0
SIGNING ON
STATUS:20
[--]STOPCOMM

APPENDIXB"NORANDRUtilitiesProgram
B-8PEN*KEYRModel6400 Hand-HeldComputerUser’sGuide
WhileSIGNING ON isonscreen,STATUS:mayappear
withthestatusoftheattemptedconnection.RefertoSes-
sionStatusonpageB-10 formeaning.
Followingasuccessfulsession,NORANDUtilitiesexecutes
thedownloadedapplication.Ifthenecessaryprogramfiles
arenotfound,thismessagewindowappears:
MISSINGSYSTEM
FILES
[ENT]CONTINUE
Ifthesessionisunsuccessful,LASTSESSIONappearswith
thefailurestatus,suchas“T803.”
NORAND UTILITIES
COMMUNICATIONS
COMM SETTINGS:
NRINET
SERVER NAME
CLIENTIP ADDRESS
0.0.0.0
RTR0.0.0.0
SIGNING ON
STATUS:20
LASTSESSIONT803
INVALID HOSTNAME
ORIP ADDRESS
[--]STOPCOMM

APPENDIXB"NORANDRUtilitiesProgram
PEN*KEYRModel6400 Hand-HeldComputerUser’sGuide B-9
BEGIN COMM SESSIONwithMODEM/DIRECT
Ifyouselect thisoptionandOption2. COMM SETTINGS
is set toMODEM/DIRECT,thisCommunicationStatus
menu appears:
COMM SETTINGS:
MODEM/DIRECT
MODEMTYPE
NM2400/NM2400A
PROTOCOLBPS FMT
TTY2400 8N1
AUTOANSWERNO
CONFIGURING
LASTSESSION:T289
NORESPONSE FROM
MODEM
NORAND UTILITIES
COMMUNICATIONS
[--]STOPCOMM
"NOTE:The computermay stayat the “CONFIGURING”screen forabout20
secondsifamodemisnotdetected.
Ifthesessionisunsuccessful,LASTSESSIONappearswith
thefailurestatus,suchas“T289.”
BEGIN COMM SESSIONwithACCESSORYCARD
Ifyouselect thisoptionandOption2. COMM SETTINGS
is set toACCESSORYCARD, thesystemattemptsto exe-
cutetheapplicationfromaPCcard.Ifthe“MISSINGSYS-
TEMFILES” messageappears,press the[ENT]keytocon-
tinue.
APPENDIXB"NORANDRUtilitiesProgram
B-10 PEN*KEYRModel6400 Hand-HeldComputerUser’sGuide
BEGIN COMM SESSIONwithINTERSERVER
Ifyouselect thisoptionandOption2. COMM SETTINGS
is set toINTERSERVER,thisCommunicationStatusmenu
appears:
Press the[--]keyto exit this screen.
Session Status
Thefirstsinglecharacter code(“T”)isthesessionstatus,
whichappliestoall COMM SETTINGS.Therearefivesta-
tusespossible:
"“G”Goodsession
"“T”Unexpectedendoftransmission
"“H”Incorrectfileheaderencountered
"“F”File errorencountered
"“L”Telecommunicationsabortedbeforefirstfile
header received

APPENDIXB"NORANDRUtilitiesProgram
PEN*KEYRModel6400 Hand-HeldComputerUser’sGuide B-11
Thethree digitnumber(“289”)indicatesthespecificproto-
colerror.These error codesapplywhenCOMM SETTINGS
is set toNPCPRS-485 orNPCPRS-232:
"“0”No error
“1”MININET.EXEnotinstalled
“6”Userabortedcommunicationsbypressing
[--]
“11”Invalid parameterspecifiedincontrolfile
"NOTE:The following valuesindicate an error returned byMININET.EXE.
100 isadded tothe error returned byMININET.EXE to avoidconflict
with otherdefined errors.
“101”Illegalbufferlength
“103”Invalidcommand
“105”Commandtimedout
“106”Messageincomplete
“108”Illegal localsession number
“109”Noresourceavailable
“110”Sessionclosed
“111”Commandcanceled
“113”Duplicatenameinlocalnametable
“114”Nametableisfull
“115”Nameisderegistered,commandcomplete
“117”Localsessiontablefull
“118”Sessionopenrejected
“119”Invalidnamenumber
“120”Noanswer
“121”Namenotfound
“122”Namein use onremoteadapter
“123”Namedeleted
“124”Sessionendedabnormally
“125”Nameconflict
“126”Incompatibleremotedevice
“133”Networkinterfaceisbusy
“134”Too manycommandsoutstanding
“135”InvalidLANadapternumber
“136”Commandcompletedwhilecanceloccurring

APPENDIXB"NORANDRUtilitiesProgram
B-12 PEN*KEYRModel6400 Hand-HeldComputerUser’sGuide
“138”Commandnotvalidtocancel
“164”--“179”Unusualnetworkcondition
“180”--“354”Adaptermalfunction
These error codesapplywhenCOMM SETTINGSis set to
MODEM/DIRECTandPROTOCOLis set toTTY:
“0”No error
“6”[--]keypressed,abortingcommunications
“11”Invalid parameterspecifiedincontrolfile
“23”Endoftransmission
“101”Linelost
“102”Parityerror
“103”Charactergaptoo long
“104”Dataloss
“105”ExcessiveNAKs(noacknowledgements)
“106”Blockcounterror
“107”Blockcheckerror
“108”Blockframingerror
“109”Controlcharactererror
“2xx”Modemerror
“xx”Hayesresponsecode,or codedefinedby
program:
“86”Errorsendingcommandto
modem
“87”Expectednumeric responsenot
numeric
“88”Invalidresponseformat
“89”Nosignificantresponsefrom
modem
“97”COMportdisabledbysystem
duetolowbatteryor removalof
PCcardmodem.
“98”UnrecognizedEnglishresponse
“99”Memoryallocationerror

APPENDIXB"NORANDRUtilitiesProgram
PEN*KEYRModel6400 Hand-HeldComputerUser’sGuide B-13
These error codesapplywhenCOMM SETTINGSis set to
NOVELL NETWARE:
"“0”No error
“6”Userabortedcommunicationsbypressing
[--]key.
“100”Connectiontohostfailed.Verifynetwork
connection,verifythatPENKEYlogin name
existson host.
“101”Couldnotaccess includefile.Verifyexistence
ofincludefile on host.
“102”Couldnotallocateneededmemory.
These error codesapplywhenCOMM SETTINGSis set to
NRINET:
"“0”No error
“6”Userabortedcommunicationsbypressing
[--]key.
“800”PCTCP/IPkernel ismissing.
“801”InvalidclientIPaddress.Makesurethe entry
forCLIENTIPADDRESS iscorrect,ormake
suretheDHCPserverisrunning.
“802”InvalidService orServiceType,orinvalid port
number.
“803”Invalidhostname orIPAddress.Makesure
the entryforSERVER NAMEiscorrect,and
that theserverisrunning.
“804”Couldnotcreatesocket.Checkall cablesand
networkconnections.
“806”Blocksentwasincomplete orblockreceived
wasincomplete.
“807”Clientandservernegotiationfailed.
“808”Serverspecifiedan unsupportedblocksize.
“809”Invalidbufferpointer.
“810”All server connectionsarealreadyin use.Try
againlater.

APPENDIXB"NORANDRUtilitiesProgram
B-14 PEN*KEYRModel6400 Hand-HeldComputerUser’sGuide
“811”Timeoutwhilesendingdata.Connectionto
remotemachinedropped.Makesurethehost
is still running,andcheckall cablesand
networkconnections.
“812”Timeoutwhilereceivingdata.Connectionto
remotemachinedropped.Makesurethehost
is still running,andcheckall cablesand
networkconnections.
“935”Operationwouldblock.
“939”Destinationaddress required.
“940”Messagetoo long.
“948”Address alreadyin use.
“950”Networkisdown.
“951”Networkisunreachable.
“952”Networkdroppedconnectionor reset.
“954”Connectionresetbypeer.
“955”Nobufferspaceavailable.
“960”Connectiontimedout.
“961”Connectionrefused.
“962”Too manylevelsofsymboliclinks.
“963”Filenameistoo long.
“964”Hostisdown.
“965”Hostisunreachable.
“966”Directorynotempty.
These error codesapplywhenCOMM SETTINGSis set to
TFTP:
"“0”No error.
“1”TCP/IPkernel isnotloaded.
“6”Userabortedcommunicationsbypressing
[--]key.
“201”TFTP.EXEfailed.
“202”TFTP.EXEnotfound.
“203”Unknownserver.
“204”Remotefilenameisinvalid.
“205”Localfilenameisinvalid.
“206”Filenotfoundonserver.
“207”Timeout.

APPENDIXB"NORANDRUtilitiesProgram
PEN*KEYRModel6400 Hand-HeldComputerUser’sGuide B-15
Option 2COMM SETTING
Ifyouselect thisoption,theCommunicationsSettingsdrop-
downlistappears:
1.NETWORK...
2.MODEM/DIRECT
3.ACCESSORYCARD
4.HANDHELD
5. INTERSERVER
Press thenumberofacommunications settings,orpress
theYorBkeystoscroll throughthelist,thenpress the
[YES]keyto enter.
Suboption 1NETWORK
Ifyouselect this suboption,adrop-downlistappearswith
variousnetworks:
1.NPCPRS485
2.NPCPRS232
3.NRINET
4.TCP/IP BOOTP
5.NOVELL NETWARE
1.NETWORK...
Press thenumberofanetworkorpress theYorBkeysto
scroll throughthelist,thenpress the[ENT]keyto enter.
Thecomputer returnstotheCommunicationsMenu with
theselectednetworkassignedtoOption2. COMM SET-
TING.See asamplemenu onpageB-6.
Press the[--]keyto exit thisdrop-downlist.Thecomputer
takesyoutotheCommunicationsMenu.

APPENDIXB"NORANDRUtilitiesProgram
B-16 PEN*KEYRModel6400 Hand-HeldComputerUser’sGuide
Suboption 2MODEM/DIRECT
Ifyouselect this suboption,thecomputer returnstothe
CommunicationsMenu withtheMODEM/DIRECToption
assignedtoOption2. COMM SETTING:
NORAND UTILITIES
COMMUNICATIONS
1.BEGIN COMM SESSION
2.COMM SETTING
MODEM/DIRECT
3.UNITID
4.MODEMPARAMETERS
MODEMTYPE
NM2400/NM2400A
PROTOCOLBPS FMT
TTY2400 8N1
AUTOANSWERNO
5.PHONENUMBER
9...131369282
6.ADVANCED UTILITIES

APPENDIXB"NORANDRUtilitiesProgram
PEN*KEYRModel6400 Hand-HeldComputerUser’sGuide B-17
Suboption 3ACCESSORYCARD
Suboption 5INTERSERVER
Ifyouselecteitherofthesesuboptions,thecomputer re-
turnstotheCommunicationsMenu withACCESSORY
CARDorINTERSERVER assignedtoOption2. COMM
SETTING.
NORAND UTILITIES
COMMUNICATIONS
1.BEGIN COMM SESSION
2.COMM SETTING
ACCESSORYCARD
3.UNITID
6.ADVANCED UTILITIES
Suboption 4HANDHELD
APPENDIXB"NORANDRUtilitiesProgram
B-18 PEN*KEYRModel6400 Hand-HeldComputerUser’sGuide
Option 3UNITID
Ifyouselect thisoption,theChangeUnitIDpop-upmenu
appears:
UNITID2233233
WORKGROUP
6200IPL
[F4]RESET FACTORY
[--]QUIT
CHANGEUNITID
Enterupto eightcharacterstochangetheUnitID. Usethe
[¬SP]keytobackspaceandusethe[CLR]torestorethe
previousID. Press the[ENT]keytosavethenewIDand
returntotheCommunicationsSettingsmenu.Press the
[F4]keytoreset theIDtofactorydefault.Press [--]to exit
thispop-upmenu.
Option 4NETWORK PARAMETERS
NetworkParametersappearsasOption4whenOption2.
COMM SETTINGSis set to one ofthesethree NETWORK
options:NRINET,TFTP,orNOVELL NETWARE.

APPENDIXB"NORANDRUtilitiesProgram
PEN*KEYRModel6400 Hand-HeldComputerUser’sGuide B-19
NETWORK PARAMETERSwithNRINET
NETWORK PARAMETERSwith TFTP
Ifyouselect thisoptionandOption2. COMM SETTINGS
is set toNRINETorTFTP,thisNetworkParameterspop-up
menu appears:
SERVER NAME
SERVERIP ADDRESS
0.0.0.0
CLIENTIP ADDRESS
0.0.0.0
RTR0.0.0.0
SUBNETMASK
0.0.0.0
NETWORK PARAMETERS
[--]QUIT
Ifyou haveanalphanumerickeyboard,press thecharacters
tothehostname,thenpress the[ENT]keytosavethe
entryandmovetothenextfield.
Ifyou haveanumerickeyboard,usetheAand"keysto
scroll backandforththroughthegivensetofalphanumeric
characters.Afteracharacteris selected,press the[ENT]
keyto enterthatcharacter.Press [ENT]againtomoveto
thenextfield.Press theYorBkeystomovebetween
fields.
Press [ENT]tosavethe entriesandexit theNetworkPa-
rametersmenu.Press the[--]keyto exitwithoutsavingthe
entries.
APPENDIXB"NORANDRUtilitiesProgram
B-20 PEN*KEYRModel6400 Hand-HeldComputerUser’sGuide
NETWORK PARAMETERSwithNOVELL NETWARE
Ifyouselect thisoptionandOption2. COMM SETTINGS
is set toNOVELL NETWARE,thisframetypedrop-down
listappears:
1.802.2
2.ETHERNETII
3.802.3RAW
4.802.2W/SNAP
Press thenumberofaframetype,orpress theYorBkeys
toscroll throughthelistand press the[ENT]keyto enter.
Press the[--]keyto exit thisdrop-downlistwithoutchang-
ingtheframetype.
Option 4MODEMPARAMETERS
ModemParametersappearsasOption4whenOption2.
COMM SETTINGSis set toMODEM/DIRECT.
Ifyouselect thisoption,theModemParameterspop-up
menu appears.
1.MODEMTYPE
NM2400/NM2400A
2.PROTOCOLTTY
3.BPS RATE2400
4.DATAFORMAT8N1
5.AUTOANSWER--
MODEMPARAMETERS
[--]DONE
Press thenumberofamodemparametersoption,orpress
theYorBkeystoscroll throughthelist,thenpress the
[ENT]buttonto enter.
APPENDIXB"NORANDRUtilitiesProgram
PEN*KEYRModel6400 Hand-HeldComputerUser’sGuide B-21
Suboption 1MODEMTYPE
Ifyouselect this suboption,adrop-downlistappearswith
supportedmodem types.Press theYorBkeystoscroll
throughthelist,thenpress the[ENT]buttonto enter.
"Ifyouselectdrop-optionOTHEREXTERNALor
OTHERINTERNAL,theModemInitStringpop-up
menu appears:
ATE0V0Q0&M0&S1&C1&
D0&R/QX0L1
MODEMINITSTRING
[F2]TESTSTRING
[ENT]OK[--]QUIT
a.Entertheinitializationstringofthemodemyouare
using.Refertoyourmodem’sreferencemanualfor
information.
"NOTE:UseAand "keys on numeric keyboardstoscroll the alphanumeric
characterset.
"NOTE:If you leavethismenu blank,astring isnotsaved.
b.Press the[ENT]keyto enterthestringorpress the
[--]keyto exit thispop-upmenu.

APPENDIXB"NORANDRUtilitiesProgram
B-22 PEN*KEYRModel6400 Hand-HeldComputerUser’sGuide
"NOTE:Testing the modeminitialization string isoptional.
"Totest themodemstring,dothefollowing:
a.Press the[F2]key.Thecomputer replieswith
“PLEASEWAIT”andteststhestring:
PLEASE WAIT...
ATE0V0Q0&M0&S1&C1&
D0&R/QX0L1
MODEMINITSTRING
[F2]TESTSTRING
[ENT]OK[--]QUIT
Momentarily,thecomputerdisplaysthemodem’s
response:
RESULT:97
ATE0V0Q0&M0&S1&C1&
D0&R/QX0L1
MODEMINITSTRING
[F2]TESTSTRING
[ENT]OK[--]QUIT
"NOTE:Zeroindicatesthe modemwas successfully configured.Anyother
value indicatesan error.See page B-12 foralistofmodemerrors
defined bythisprogram. If thisisaNORAND modem,contact the
Norand CustomerResponseCenterat1-800-221-9236. If thisisnot
aNORAND modem,contactyourmodemsupplier.
b.Press the[ENT]keytoupdatethemodeminitial-
izationstring.Thecomputer returnstotheModem
Parameterspop-upmenu withOTHER EXTERNAL
orOTHER INTERNALassigned.

APPENDIXB"NORANDRUtilitiesProgram
PEN*KEYRModel6400 Hand-HeldComputerUser’sGuide B-23
Suboption 2PROTOCOL
Ifyouselect this suboption,adrop-downlistofvariouspro-
tocolsappears:
1.TTY
2.YMODEM
Press thenumberofaprotocol,orpress theYorBkeysto
scroll throughthelist,thenpress the[ENT]keyto enter.
Thecomputer returnstotheModemParameterspop-up
menu withtheselected protocolassigned.
Press the[--]keyto exit thisdrop-downlist.
Suboption 3BPS RATE
Ifyouselect this suboption,theBPSRatedrop-downlist
appearswithvariousbitspersecond(BPS)rates:
1.1200
2.2400
3.4800
4.9600
5.19200
6.38400
7.57600
8.115200
Press thenumberofaBPSrate,orpress theYorBkeys
toscroll throughthelist,thenpress the[ENT]keyto enter.
Thecomputer returnstotheModemParameterspop-up
menu withtheselectedBPSrateassigned.
Press the[--]keyto exit thisdrop-downlist.
APPENDIXB"NORANDRUtilitiesProgram
B-24 PEN*KEYRModel6400 Hand-HeldComputerUser’sGuide
Suboption 4DATAFORMAT
Ifyouselect this suboption,theDataFormatdrop-downlist
appears:
1.8N1
2.7E1
Press thenumberofadataformat,orpress theYorB
keystoscroll throughthelist,thenpress the[ENT]keyto
enter.Thecomputer returnstotheModemParameterspop-
upmenu withtheselected dataformatassigned.
Press the[--]keyto exit thisdrop-downlist.
Suboption 5AUTOANSWER
This suboptionisnotsupportedat thistime.
Option 5PHONENUMBER
Ifyouselect thisoption,thePhoneNumberpop-upmenu
appears:
9...13193693282
PHONENUMBER
[.]DIALINGPAUSE
[ENT]OK[--]QUIT
Enterupto16 characters.Usethe[¬SP]keytobackspace;
usethe[CLR]toreset tothepreviousphonenumber,and
press [.]toinsertadialingpausecommand(“,”).
Press the[ENT]keytosavethenewphonenumberand
returntotheCommunicationsSettingsmenu.
Press the[--]keyto exit thispop-upmenu.

APPENDIXB"NORANDRUtilitiesProgram
PEN*KEYRModel6400 Hand-HeldComputerUser’sGuide B-25
Option 6ADVANCED UTILITIES
Ifyouselect thisoption,theAdvancedUtilitiesmenu ap-
pears:
NORAND UTILITIES
ADVANCED UTILITIES
1.SETDATE/TIME
2.BATTERY STATUS
3.FORMATDRIVE D
4.FORMATRAMCARD
5.SETBOOTDRIVE
6.ABOUT
7.SETKEY CLICK
Press thenumberofanadvancedutilityoption,orpress the
YorBkeystoscroll throughthelist,thenpress the[ENT]
keyto enter.
APPENDIXB"NORANDRUtilitiesProgram
B-26 PEN*KEYRModel6400 Hand-HeldComputerUser’sGuide
Suboption 1SETDATE/TIME
Ifyouselect this suboption,theSetDate/Timepop-upmenu
appears:
DATE:01/20/80
TIME:23:12:04
SETDATE/TIME
[--]QUIT
Enternumbersforthemonth,day,year(1980--2079),hour,
minute,andsecond(upto23:59:59).Press the[ENT]key
aftereachentry.Anincorrectentrycausesthecomputerto
default totheinitialnumber.Press the[--]keyto exit this
pop-upmenu.
Suboption 2BATTERY STATUS
Usethis suboptiontocheckbatterystatus.TheBatterySta-
tus screenappearswhenyouselect this suboption:
MAINPACK
BATTERY STATUS
[--]QUIT
F
E
TYPE
CAPACITY
VOLTAGE
BACKUP
VOLTAGE
LCD
TEMP
CHARGEABLE
80%
7.8OK
7.2OK
23 C

APPENDIXB"NORANDRUtilitiesProgram
PEN*KEYRModel6400 Hand-HeldComputerUser’sGuide B-27
"Thebatteryfuelgaugedisplaysthebatterycapacity
level inblackfromleft toright.
"Thecapacityrangethatwill displayis5--100%.Ifthe
capacityisless than5%no operationofyour computer
will occuruntil you haverechargedthebatteryto ob-
tainatleast10%ofitscapacity.
"Batterytypeischargeablefor rechargeablebattery
pack.
"Thevoltagerangeis6--8.4volts.
"Thebackupbattery voltagewill rangefrom6--11 volts.
Below7voltsindicatesamostelydischargedbackup
battery.Between7--8voltsthebackupbatterycouldbe
inanychargedstate.Between8--11 voltsisamostly
chargedbackupbatteryandgoodforatleast100
hoursofbackupsupport.
"LCDtemperaturedisplaysincelciusandmeasures
the outsidetemperature ofthedisplay.Temperatures
less than-4_F(-20_C)orgreaterthan+122_F(+50_C)
cancausefaultydisplayoperation.

APPENDIXB"NORANDRUtilitiesProgram
B-28 PEN*KEYRModel6400 Hand-HeldComputerUser’sGuide
Suboption 3FORMATDRIVE D
Ifyouselect this suboption,theFormatRAMDrivepop-up
menu appears:
0MB0KB
FORMATDRIVE D
[ENT]OK[--]QUIT
EnterthetotalMBandKBfortheRAMdrive.
"NOTE:Azeroin bothfieldsdeletesthe RAMdrive.
Press the[ENT]keyaftereachentry.Apop-upverification
appears:
ALL DATAON
EXISTINGRAMDRIVE
WILL BE DESTROYED!
OKTOCONTINUE?
FORMATDRIVE D
[ENT]OK[--]QUIT
Press the[ENT]keytocontinue.Press the[--]keyto exit
themenu.
APPENDIXB"NORANDRUtilitiesProgram
PEN*KEYRModel6400 Hand-HeldComputerUser’sGuide B-29
Suboption 5SETBOOTDRIVE
Ifyouselect this suboption,theSetBootDrivepop-up
menu appears:
1.A:
2.B:
3.C:
SETBOOTDRIVE
[--]QUIT
5.E:
6.F:
4.D:
"NOTE:The currentdefaultdriveishighlighted inthismenu.
Press thenumberofa bootdrive,orpress theYorBkeys
toscroll throughthelist,thenpress the[ENT]keyto enter.
Thecomputer returnstotheAdvancedUtilitiesmenu.
Press the[--]keyto exit thispop-upmenu.
Suboption 6ABOUT
Ifyouselect this suboption,theversionofkeyboardcontrol-
lerandBIOSdisplays.
Press the[--]keyto exit thispop-upmenu.
APPENDIXB"NORANDRUtilitiesProgram
B-30 PEN*KEYRModel6400 Hand-HeldComputerUser’sGuide
Suboption 7SETKEY CLICK
Ifyouselect this suboption,theSetKeyClickpop-upmenu
appears:
SETKEY CLICK
[ENT]OK[--]QUIT
FREQUENCY2051 Hz
DURATION100 mS
Press thesortkeystoselect thefrequencyofthekey
clickorthelengthoftimetohearthekeyclick.Enterthe
newfrequencyandorthenewdurationsettings.
Press the[ENT]keyaftereachentry.Apop-upverification
appears.
Press the[ENT]keytocontinue.Press the[--]keyto exit
themenu.
PEN*KEYRModel6400 Hand-HeldComputerUser’sGuide C-1
AppendixC
KeyboardOverlays
""""""""""""""""""""""""""""
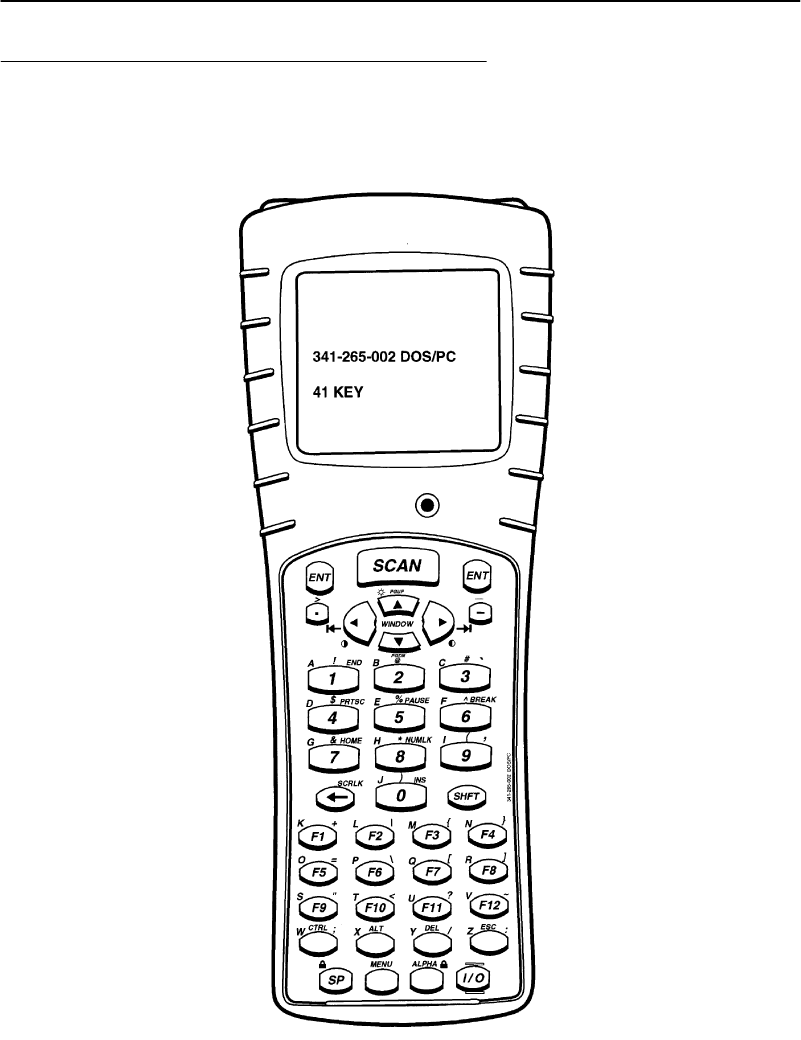
APPENDIXC"KeyboardOverlays
C-2PEN*KEYRModel6400 Hand-HeldComputerUser’sGuide
41-Key DOS/PC
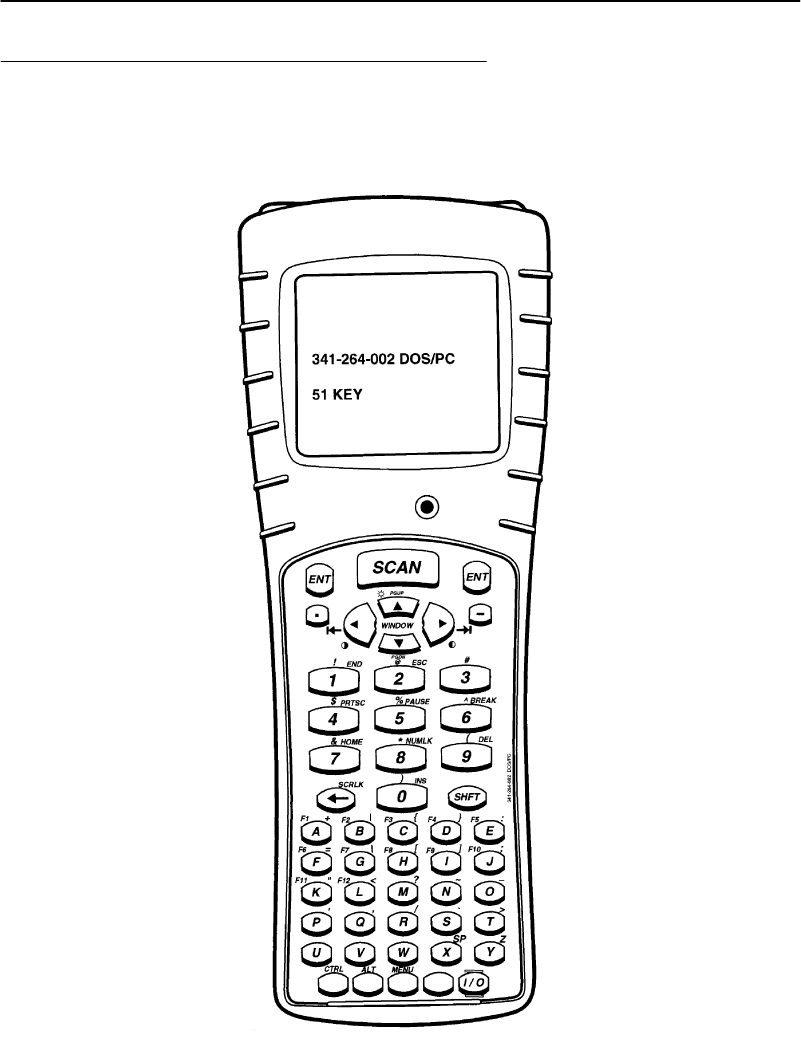
APPENDIXC"KeyboardOverlays
PEN*KEYRModel6400 Hand-HeldComputerUser’sGuide C-3
51-Key DOS/PC
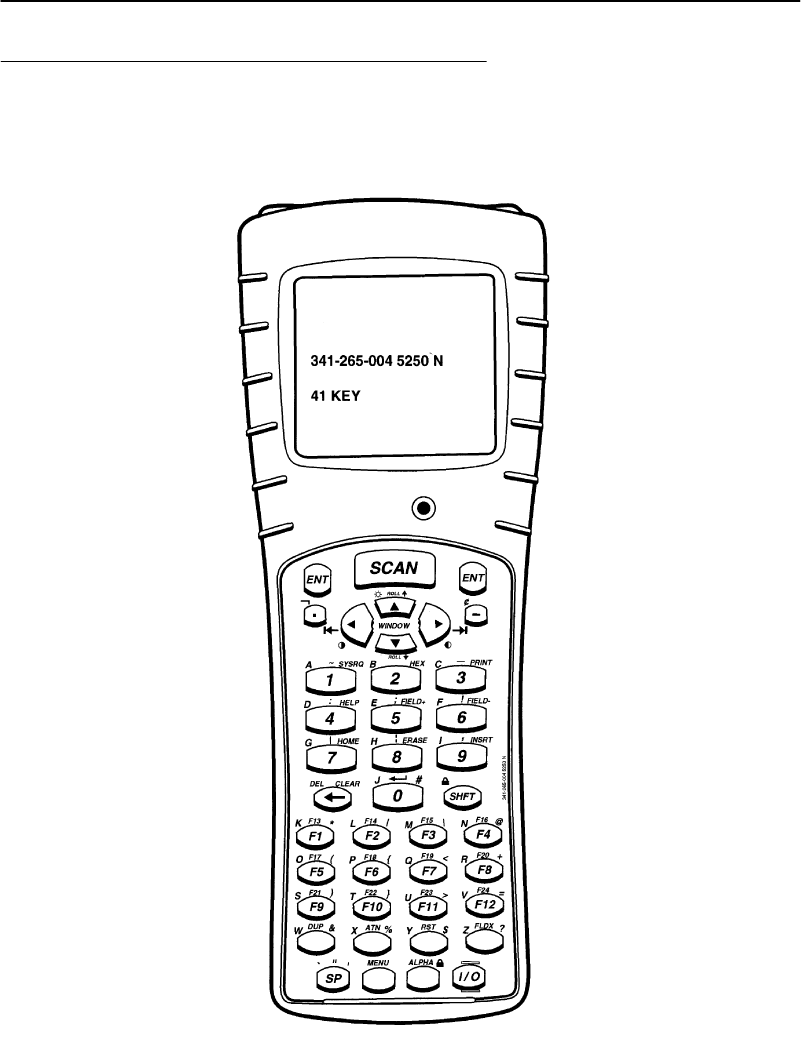
APPENDIXC"KeyboardOverlays
C-4PEN*KEYRModel6400 Hand-HeldComputerUser’sGuide
41-Key 5250
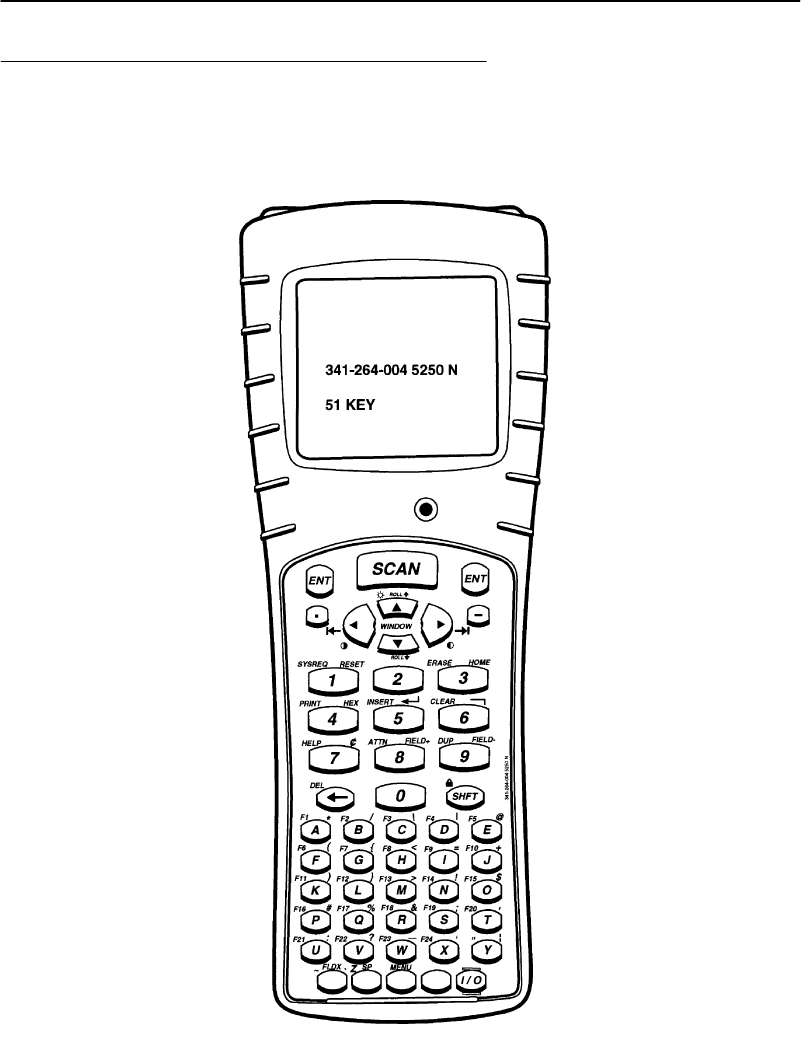
APPENDIXC"KeyboardOverlays
PEN*KEYRModel6400 Hand-HeldComputerUser’sGuide C-5
51-Key 5250
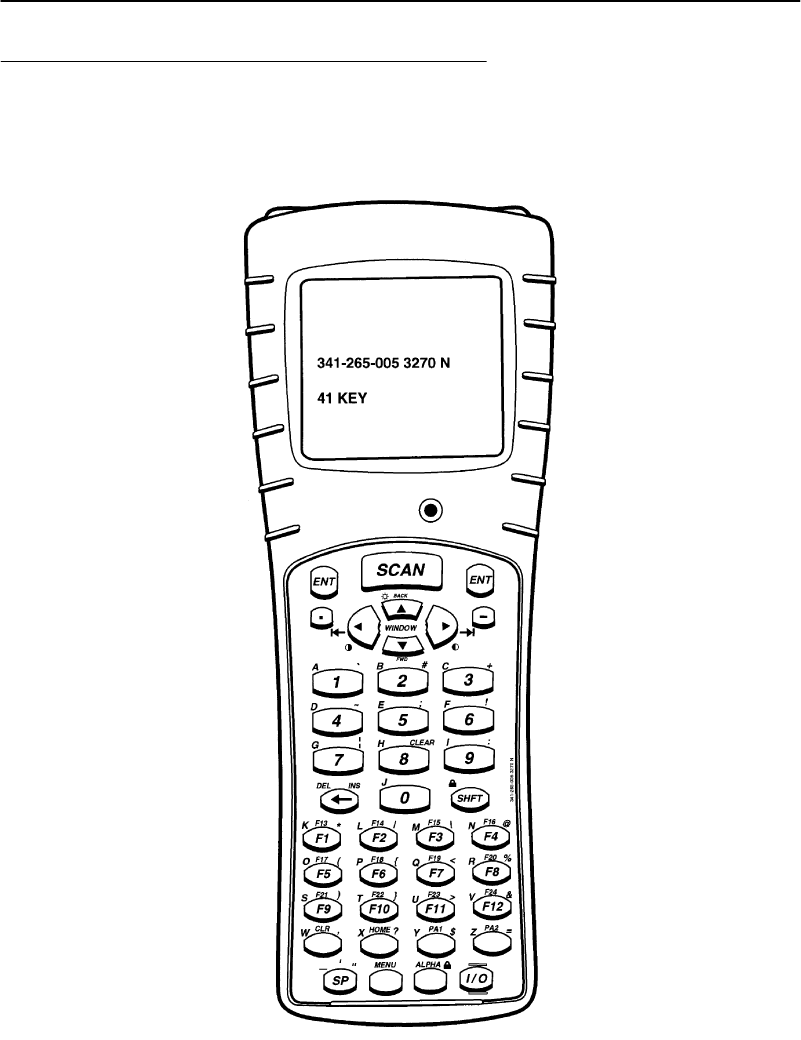
APPENDIXC"KeyboardOverlays
C-6PEN*KEYRModel6400 Hand-HeldComputerUser’sGuide
41-Key 3270
EOF
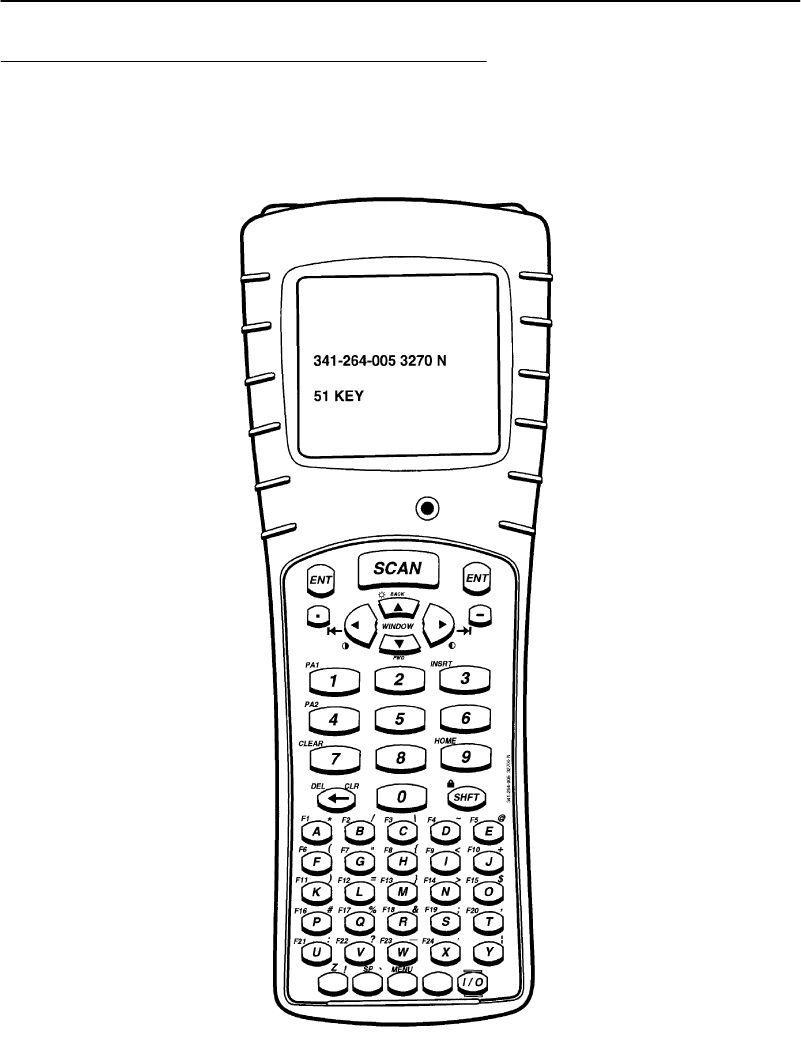
APPENDIXC"KeyboardOverlays
PEN*KEYRModel6400 Hand-HeldComputerUser’sGuide C-7
51-Key 3270
EOF
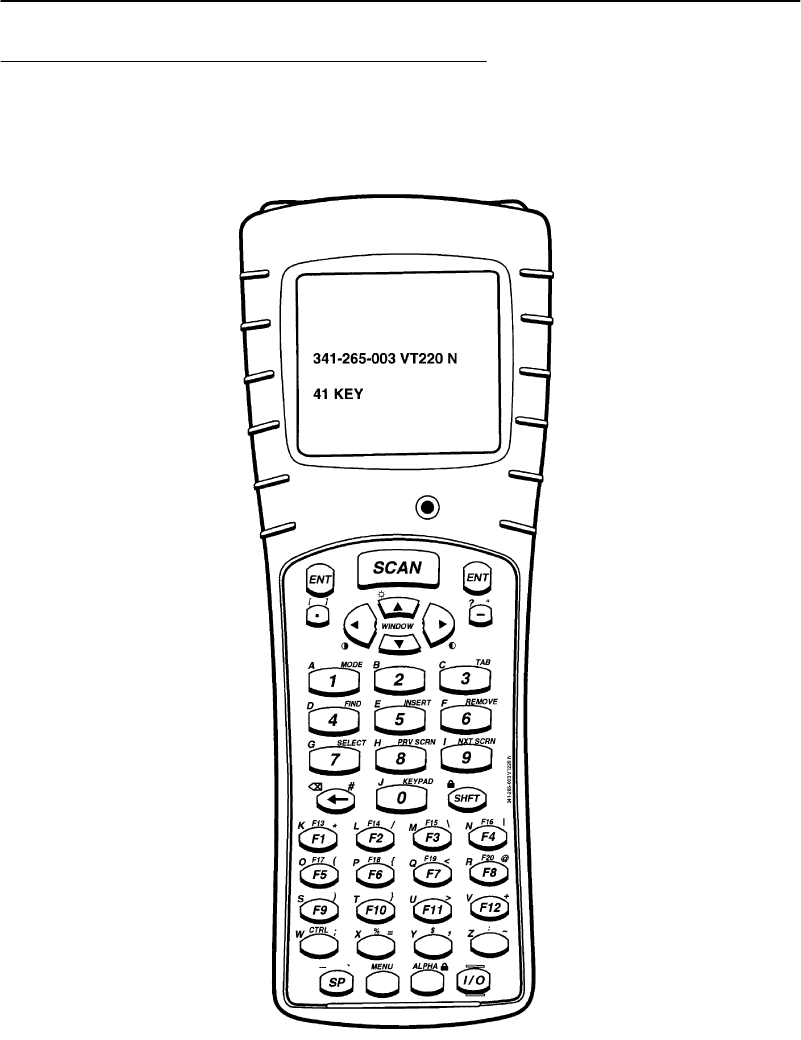
APPENDIXC"KeyboardOverlays
C-8PEN*KEYRModel6400 Hand-HeldComputerUser’sGuide
41-Key VT220
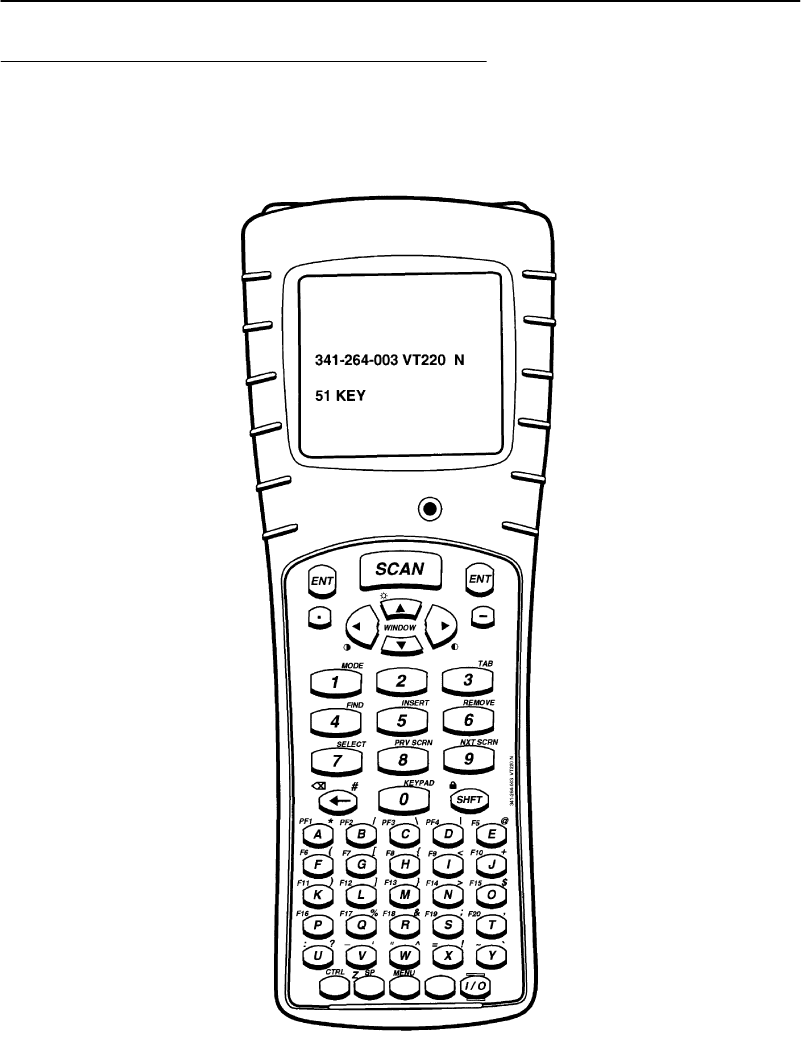
APPENDIXC"KeyboardOverlays
PEN*KEYRModel6400 Hand-HeldComputerUser’sGuide C-9
51-Key VT220
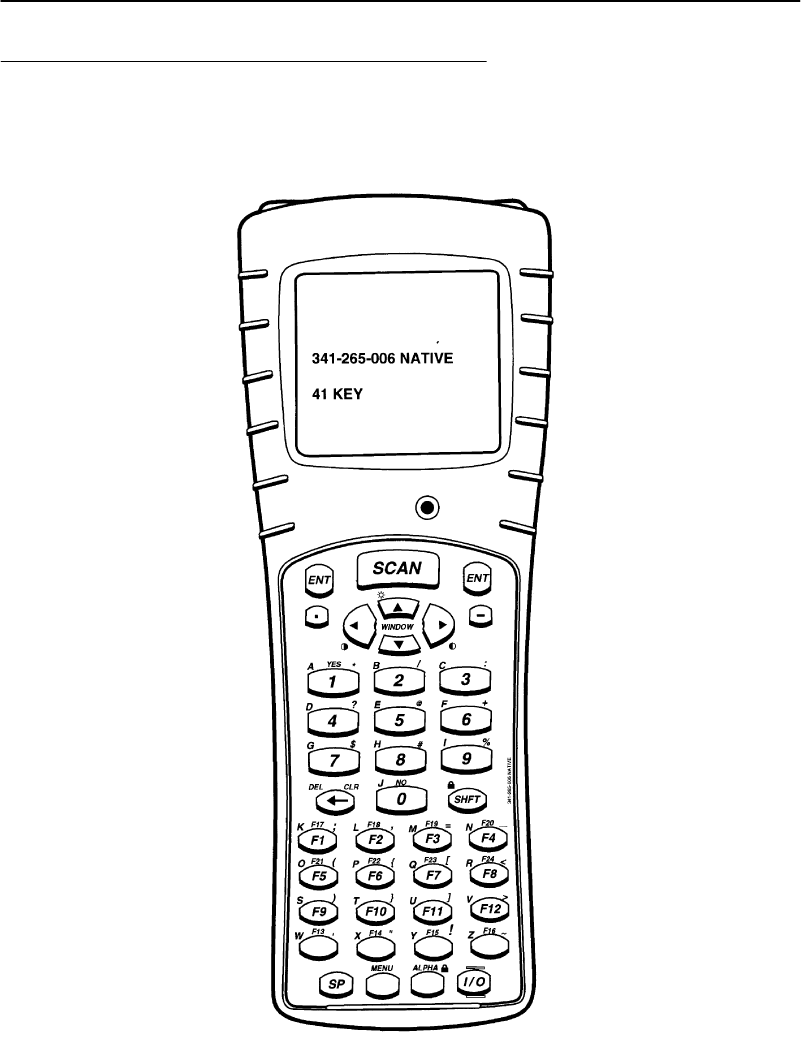
APPENDIXC"KeyboardOverlays
C-10 PEN*KEYRModel6400 Hand-HeldComputerUser’sGuide
41-Key NATIVE
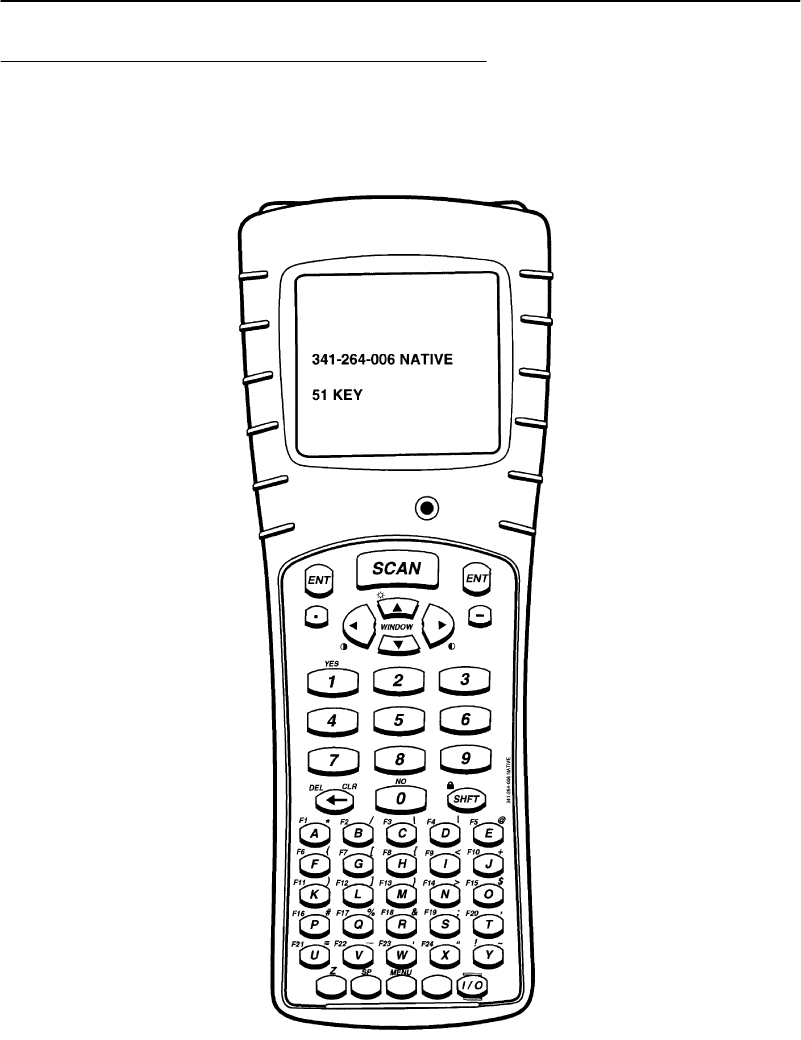
APPENDIXC"KeyboardOverlays
PEN*KEYRModel6400 Hand-HeldComputerUser’sGuide C-11
51-Key NATIVE

APPENDIXC"KeyboardOverlays
C-12 PEN*KEYRModel6400 Hand-HeldComputerUser’sGuide
PEN*KEYRModel6400 Hand-HeldComputerUser’sGuide Index-1
INDEX
""""""""""""""""""""""""""""
NUMBERS
3210 emulation,7-29
3270 options,7-28
41--Key3270 overlay,C-6
41--Key5250 overlay,C-4
41--KeyDOS/PCoverlay,C-2
41--KeyNATIVE overlay,C-10
41--KeyVT220 overlay,C-8
51--Key3270 overlay,C-7
51--Key5250 overlay,C-5
51--KeyDOS/PCoverlay,C-3
51--KeyNATIVE overlay,C-11
51--KeyVT220 overlay,C-9
5250 options,7-27
900 MHzradio option
NICmodelnames,5-37
specifications,5-37
A
Adjustablehandstrap,5-33
Adjustablewriststrap,5-33
Alphakeys,5-11
Alphabetickeys,5-11
Annunciatordescription,5-16
Annunciatormeaning,5-16
Annunciatorscreenposition,
5-15
Attachingascanner,6-22
Automaticsuspend,6-15
B
Backlight,5-19
setting,5-19
Backspacekey,5-11
Backupbattery,5-26,6-13
fullycharging,6-13
Bar codeparms,7-17
Batchterminaloperation,5-28
Batteries,5-24
backup,5-24,5-26
nickel-metalhydride,5-26
main,5-24
care,8-1
installing,6-5
lithiumion,5-24
lowbatteryindication,8-1
removing,6-6
replacing,6-6
Battery,status,utilitiesmenu,
B-26
Batterycapacity
icons,5-18,6-8,7-5,8-1
lowcapacitylevels,5-18,6-8,
7-5,8-1
lowlevelstatus,5-18,6-8,7-5,
8-1
Batterycapacityicons,5-18,6-8,
7-5,8-1
Batterychargingerrors,6-12
Batterydoesn’tbringcomputer
up,8-4
Battery gas
iconsforlevels,5-18,6-8,7-5,
8-1
lowcapacitylevels,5-18,6-8,
7-5,8-1
lowlevelreadings,5-18,6-8,
7-5,8-1
Batterymanagement,5-23
selfdischarge,5-23
Batterypack,chargelevel,5-18,
6-8,7-5,8-1
Batterypackloseschargelevel,
8-4
Beepersetup,7-9,7-42
errortone,7-44
keyclick,7-43
Blueshiftkey,5-12
Buzzer,5-23
C
Can notscanI2of5,8-8
Center cursor,7-39
Chargejack,5-30
Chargelevel icons,5-18,6-8,
7-5,8-1
Chargedbatterypackdoesn’t
last,8-5
Chargerindicators,6-10
combinationofblinkingred
andorange,6-10
Charging,first time,6-1
Chargingbackupbattery,6-13
Chargingmainbattery,6-9
usingamultipackcharger,
6-9
usingasinglepackcharger,
6-9
usingavehicledock,6-9
Chargingthescannerhandle
batteries,6-21
Cleaning,8-3
case,8-3
display,8-3
dockingconnector,8-3
keyboard,8-3
Coldstart,7-36
Communicationadapter,5-29
Compliances
900 MHzNIC,5-37
Proxim2.4GHzNIC,5-39
Computerdisplays,L,emitsfive
secondbeep,8-4
Computerdoesn’tsuspend,8-6

INDEX "
Index-2PEN*KEYRModel6400 Hand-HeldComputerUser’sGuide
Computerdoesn’t turnon
when[I/O]keyispressed,8-5
whenputindock,8-6
Computer reboots,whenbattery
packisinstalled,8-5
Computer resets,replacingor
checkingmainbattery,8-6
Computershutsdownduring
use,8-6
Computerturnsoff,opening
batterylatchdoor,8-6
Connectors,A-1,A-2
8-pindockingconnector,A-1
9-pincommunicationadapter,
A-2
Cornermode,7-40
Coveragearea
900 MHzNIC,5-37
Proxim2.4GHzNIC,5-39
Cursormode,7-35
D
DASIscannerHWinitialization
failed,8-9
Datarates
900 MHzNIC,5-37
Proxim2.4GHzNIC,5-39
Datastream,7-26
Desktops,5-38
DiagnosticEEPROM,5-27
Diagnosticinformation,8-10
Directsequence,5-37
Display,adjustingthecontrast,
5-19
Displayannunciators,5-16
terminalemulation,7-3
position0,7-3
position1,7-3
position2,7-4
position3,7-4
position4,7-4
position5--8,7-5
Displaymessagemeanings,5-16
Displaymessages,5-16
Displayoptions,7-34
cursormode,7-35
Displaytest,7-47
Displaysbadtcom message,8-6
Downloadingprograms,6-14
E
Endcap,5-29
ENTkey,5-10
Enterkey,5-10
Error codes,6-12
Errortone,7-44
Exitemuationandreturnto
DOS,7-56
Exitmenus,7-10,7-53
Extendedcommands(CMDS),
7-26
Externalscanner,6-22
Externalscanner connector,
5-29
F
First timeuse,6-1
FMradio,5-28
Fourfinger reset,6-2
Frequencybands
900 MHz,5-37
Proxim2.4GHz,5-39
Frequencyhopping,5-39
G
Greenshift[SHFT]key,5-12
H
Handstrap,5-20
Historgramoptstest,7-51
Hostviewsize,7-25
I
I/Okey,5-20
Infra-red port,5-23
Installingscannerhandle,6-19
Installingscannerhandlewith
batterypack,6-20
Integratedscanner,5-28,6-17
Interleaved2of5,troubleset-
tinglengths,8-8
Internalradio,5-28
Internalscanner,5-28
IrDAport,5-23
ISANIC,5-38
K
Keyclick,7-43
Keyuppercase,7-41
Keyboard descriptions,5-10
alpha,5-11
backspace,5-11
blueshift,5-12
enter,5-10
greenshift,5-12
I/Osuspendandor resume,
5-20
minus,5-10
number,5-11
period,5-10
scan,5-10
scrollingarrows,5-19
shift,5-11
yellowshift,5-12
Keyboardfeatures
41-keykeypad,5-7
51-keykeypad,5-7
Keyboardopts,7-53
Keyboardtest,7-48
Keypadoptions
41-keykeypad,5-7
51-keykeypad,5-7
L
Labelling,rechargeablebattery,
6-4
Laptops,5-38
Lazymode,7-40
LCDparms,7-9,7-37
keyuppercase,7-41
screenmode,7-39

"INDEX
PEN*KEYRModel6400 Hand-HeldComputerUser’sGuide Index-3
screensize,7-38
scroll window,7-42
settingannunciatorlocation,
7-41
LEDsonbatterydon’tmatch
display,8-5
Lengthoptions,7-22
Line ofsight
900 MHzNIC,5-37
Proxim2.4GHzNIC,5-39
Lockedmode,7-41
Longtimetoreboot,8-7
M
Mainbattery,6-5
care,8-1
installing,6-5
lowbatteryindication,8-1
Mainmenu,7-6
beepersetup,7-9
exitmenus,7-10
LCDparms,7-9
more,7-10
set-up parms,7-9
tests,7-10
versioninfo,7-10
Mainmenu 2
keyboardopts,7-53
more,7-53
Saveparms,7-54
sessionmenu,7-54
Mainproductcomponents,5-4
MemoryTypes,main,5-26
Memorytypes,flashROM,5-26
Memory viewtest,7-49
Mini-ISANIC
2.4GHz,5-38
900 MHz,5-37
Minuskey,5-10
More,7-10,7-36,7-53
keyboardopts,7-53
Saveparms,7-54
sessionmenu,7-54
N
Native,7-33
NDISdriver,Proxim2.4GHz
NIC,5-39
NetworkDeviceInterfaceSpeci-
ficationdriver.See NDIS
driver
Notebooks,5-38
Numberkeys,5-11
Numberstest,7-52
Numerickeys,5-11
O
ODIdriver
900 MHzNIC,5-37
Proxim2.4GHzNIC,5-39
OpenDataLinkInterfacedriv-
er.See ODIdriver
Openingmainmenu,7-6
Openingset-up parmsmenu,
7-10
Operatingparameters,7-6
Outputpower,5-37,5-39
P
Packetdrivertest,7-49
Packetstatstests,7-50
Pagemode,7-40
PEN*KEY6100 Computer
2.4GHzNIC,5-38
900 MHzNIC,5-37
PEN*KEY6400 Computer
900 MHzNIC,5-37
Proxim2.4GHzNIC,5-38
PEN*KEY6600 Computer
2.4GHzNIC,5-38
900 MHzNIC,5-37
Periodkey,5-10
Peripheralstest,7-45
Power,output,5-37,5-39
Poweroutput,5-37,5-39
Printermissesdata,8-9
Programmingflash,6-14
Protocoloptions,7-24
3210 emulation,7-29
3270 options,7-28
5250 options,7-27
datastream,7-26
extendedcommands(CMDS),
7-26
hostviewsize,7-25
native,7-33
VT220,7-30
Proxim2.4GHzradio option
NICmodelnames,5-38
specifications,5-39
Proxim,Inc., 2.4GHzNIC,5-38
R
Radio,5-28
Radio#,7-13
Radiocomm,7-35
Radiomodules,5-39
Range
900 MHzNIC,5-37
Proxim2.4GHzNIC,5-39
Rechargeablebatterylabelling,
6-4
Regulatorycompliance
900 MHzNIC,5-37
Proxim2.4GHzNIC,5-39
Removingscannerhandle,6-19
Removingscannerhandlewith
batterypack,6-20
Repairservice,8-11
Replaceablenickel-metalhy-
dridebackup,5-26
Replacingthemainbattery
pack,6-6
Resetting,5-27
RS232 test,7-46
RunningTN.EXEdoesnotdis-
playdata,8-9
S
Saveparms,7-54
Scankey,5-10
Scankeydoesnot turn uniton,
8-8
Scanoptions,7-18
lengthoptions,7-22

INDEX "
Index-4PEN*KEYRModel6400 Hand-HeldComputerUser’sGuide
Scanner
attachingatetheredscanner,
6-22
chargingbatteries,6-21
usinganintegratedscanner,
6-17
Scannerhandle,5-31
attaching,6-19,6-20
Scannermodules,5-39
Scannertest,7-48
Scannertype,7-17
Scanning,5-39,6-17
Screenannunciatorlocation,
7-41
Screenmode,7-39
center cursor,7-39
cornermode,7-40
lazymode,7-40
lockedmode,7-41
pagemode,7-40
Screensize,7-38
Scroll window,7-42
Scrollingarrows,5-19
Sessionmenu,7-54
Set-up parms,7-9
bar codeparms,7-17
coldstart,7-36
displayoptions,7-34
more,7-36
protocoloptions,7-24
radio#,7-13
radiocomm,7-35
scanoptions,7-18
scannertype,7-17
Settingup
DOSapplicationtohandle
tetheredlaserscanners,
6-25
LS3203 and3603 serialscan-
nerparameters,6-25
terminalemulationtohandle
tetheredscanners,6-24
Shiftfunctions,5-13
rulesforusing,5-13
using,5-13
Shiftkeys,5-11
blue,5-12
green,5-12
yellow,5-12
Specifications,5-35
900 MHzNIC,5-37
Proxim2.4GHzNIC,5-39
Storeandforward datatransfer,
5-28
SuspendandorResumekey,
5-20
T
Takingcare ofyourbatteries,
5-23
Terminalemulation,5-28
Terminalemulationstations,ra-
diomodules,5-39
Tests,7-10,7-45
display,7-47
historgramopts,7-51
keyboard,7-48
memory view,7-49
numbers,7-52
packetdriver,7-49
packetstats,7-50
peripherals,7-45
RS232,7-46
scanner,7-48
timednumbers,7-52
Tetheredscanner,6-22
datadoesn’tshowup,8-7
wedgemodeapplicationdies
scanningdata,8-7
Tetheredscanners supported,
6-22
hardwareconsiderations,6-22
softwareconsiderations,6-22
Throughput
900 MHzNIC,5-37
Proxim2.4GHzNIC,5-39
Timednumberstest,7-52
Troubleshooting,8-4
Troubleshootingtable,8-4
Turningoff,6-15
automaticsuspend,6-15
Turningon,6-15
TypeII NIC,5-38
TypeIII NIC
900 MHz,5-37
Proxim2.4GHz,5-38
U
Understandingthekeyclicks,
6-16
Unpackingandinspecting,5-2
Usingthefirst time,6-1
Usingthescannerhandle,6-19,
6-20
Utilitiesprogram,B-1
alphanumericfields,B-3
communicationsmenu,B-6
communicationsmenu op-
tions
option6ADVANCEDUTI-
LITIES,B-25
BEGINCOMM SESSION
withACCESSORY
CARD,B-9
BEGINCOMM SESSION
withINTERSERVER,
B-10
BEGINCOMM SESSION
withMODEM/DI-
RECT,B-9
BEGINCOMM SESSION
withNETWORK,B-7
option1BEGINCOMM
SESSION,B-7
option2COMM SETTING,
B-15
option4MODEMPA-
RAMETERS,B-20
option5PHONENUM-
BER,B-24
option3UNITID,B-18
communicationsmenu subop-
tions
about,B-29
ACCESSORYCARD,B-17
suboption5AUTOAN-
SWER,B-24
BATTERYSTATUS,B-26
suboption3BPSRATE,
B-23
suboption4DATAFOR-
MAT,B-24
FORMATDRIVE D,B-28
suboption4HANDHELD,
B-17
INTERSERVER,B-17
suboption1MODEM
TYPES,B-21

"INDEX
PEN*KEYRModel6400 Hand-HeldComputerUser’sGuide Index-5
option4NETWORKPA-
RAMTERS,B-18
suboption2MODEM/DI-
RECT,B-16
suboption3ACCESSORY
CARD,B-17
suboption5INTERSERV-
ER,B-17
suboption1NETWORK,
B-15
OTHER EXTERNAL,B-21
OTHER INTERNAL,B-21
suboption2PROTOCOL,
B-23
suboption5REMOTEOPS,
B-17
SETBOOTDRIVE,B-29
suboption1SETDATE/
TIME,B-26
setkeyclick,B-30
drop--downlists,B-2
languageselection,B-5
networkparameters
withNOVELL NETWARE,
B-20
withNRINETorTFTP,
B-19
pop--upmenus,B-2
titlescreen,B-4
Utilitiesprograms,B-1
V
Versioninfo,7-10,7-52
VT220,7-30
W
Will notscanbar code,8-8
Windowscrollingarrows,5-19
Wireless NICs
900 MHz
modelnames,5-37
specifications,5-37
ISA,5-38
mini-ISA
2.4GHz,5-38
900 MHz,5-37
Proxim2.4GHz
modelnames,5-38
specifications,5-39
TypeII,5-38
TypeIII
900 MHz,5-37
Proxim2.4GHz,5-38
Y
Yellowshiftkey,5-12

INDEX "
Index-6PEN*KEYRModel6400 Hand-HeldComputerUser’sGuide