Intermec Technologies 802UIAG 802UIAG User Manual CK60UserManual WinCE
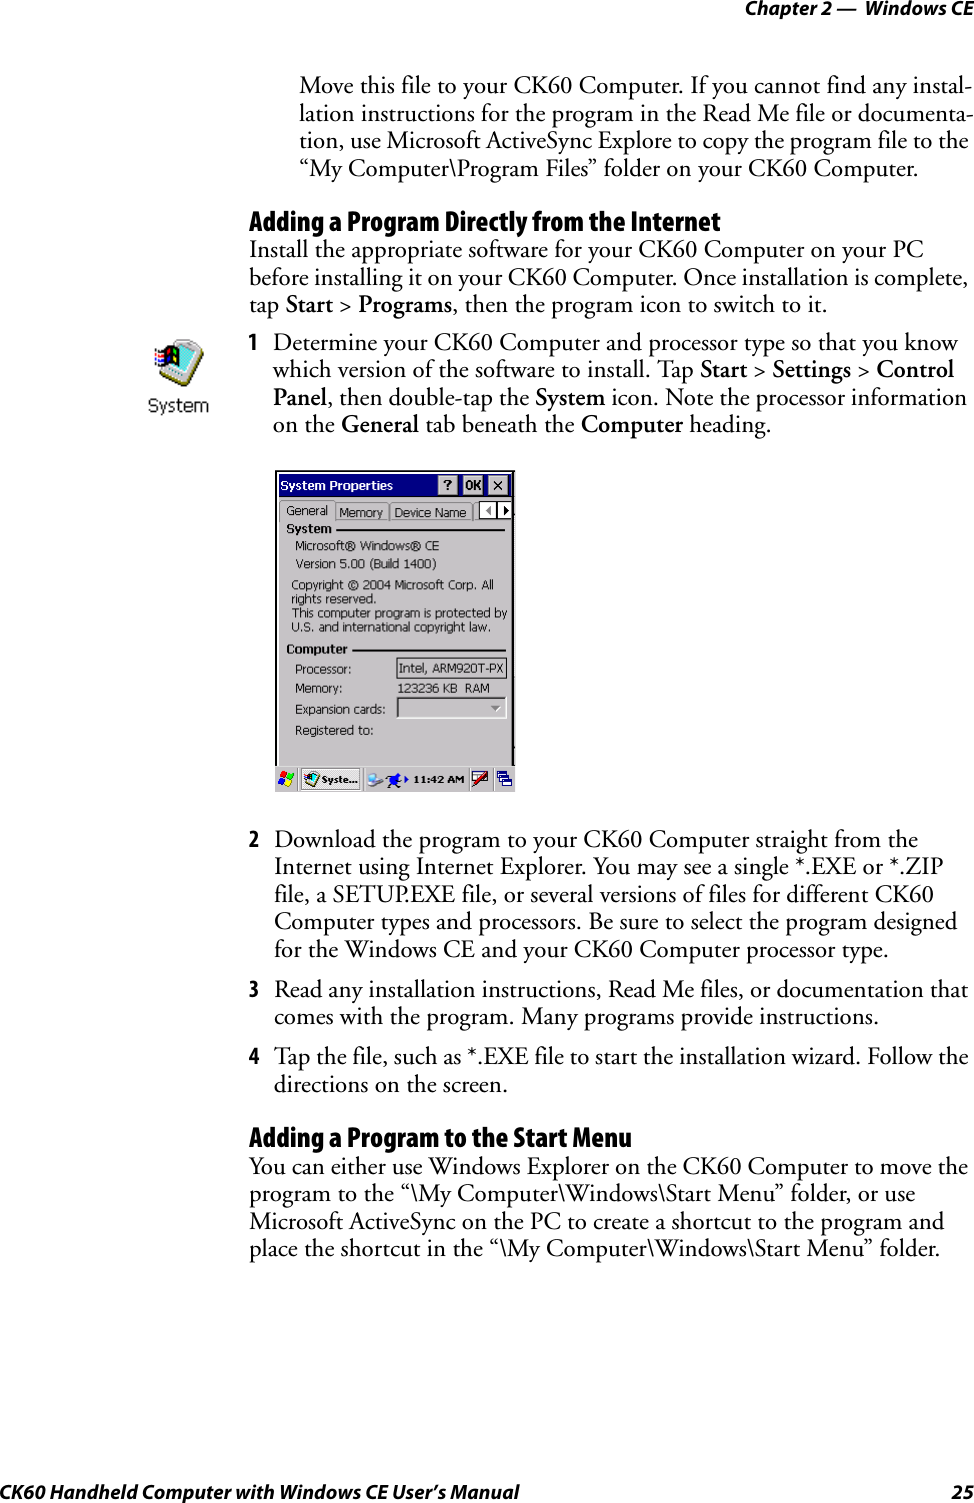
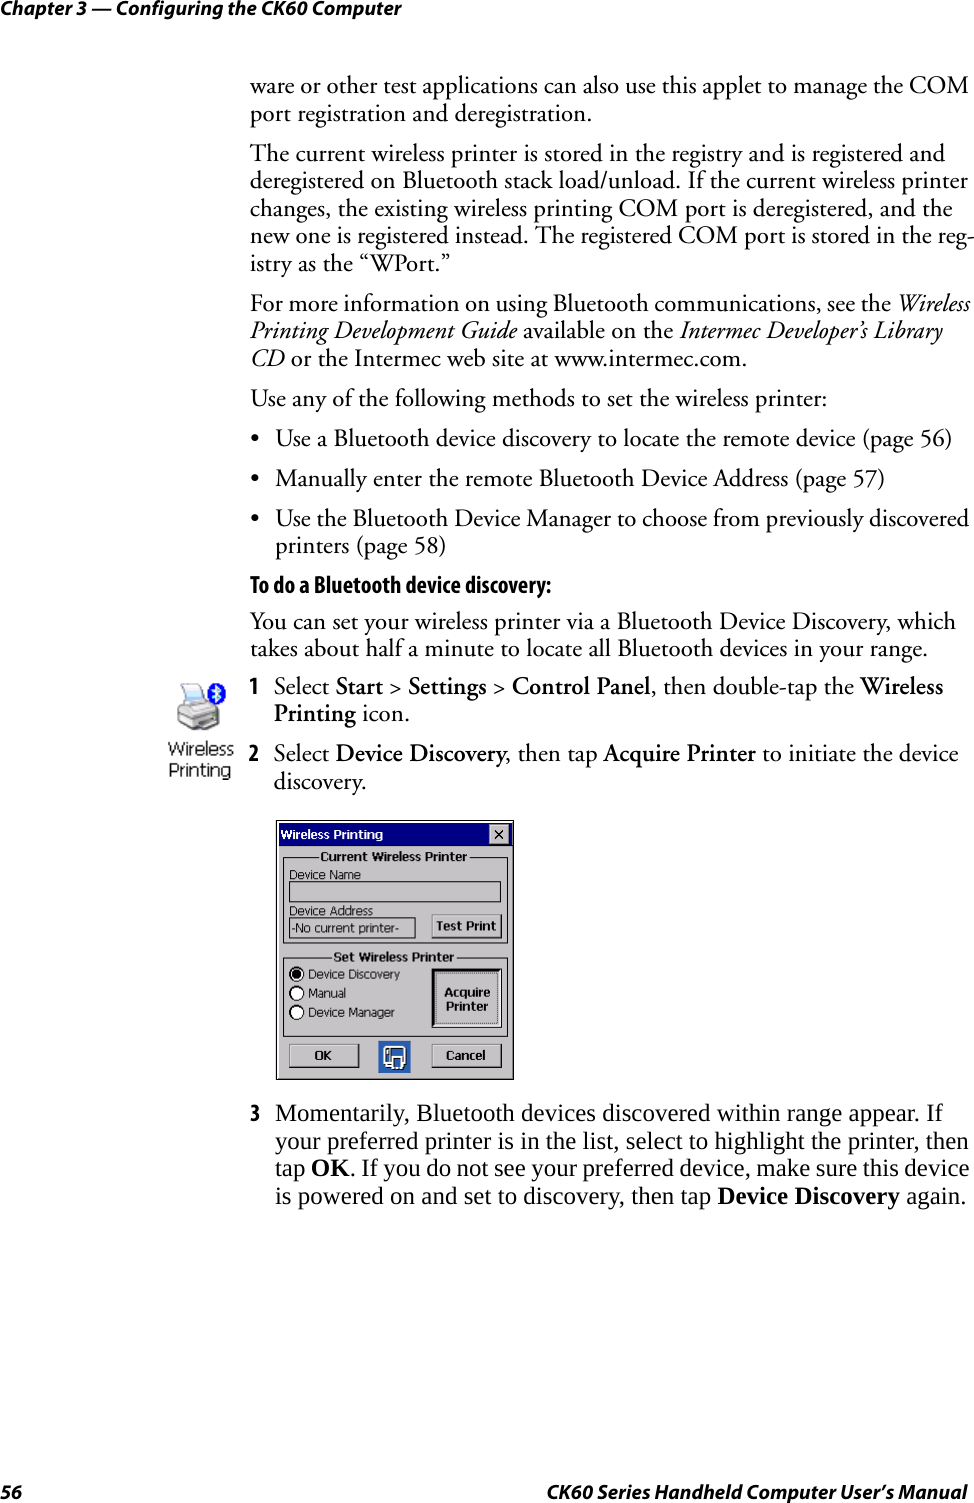
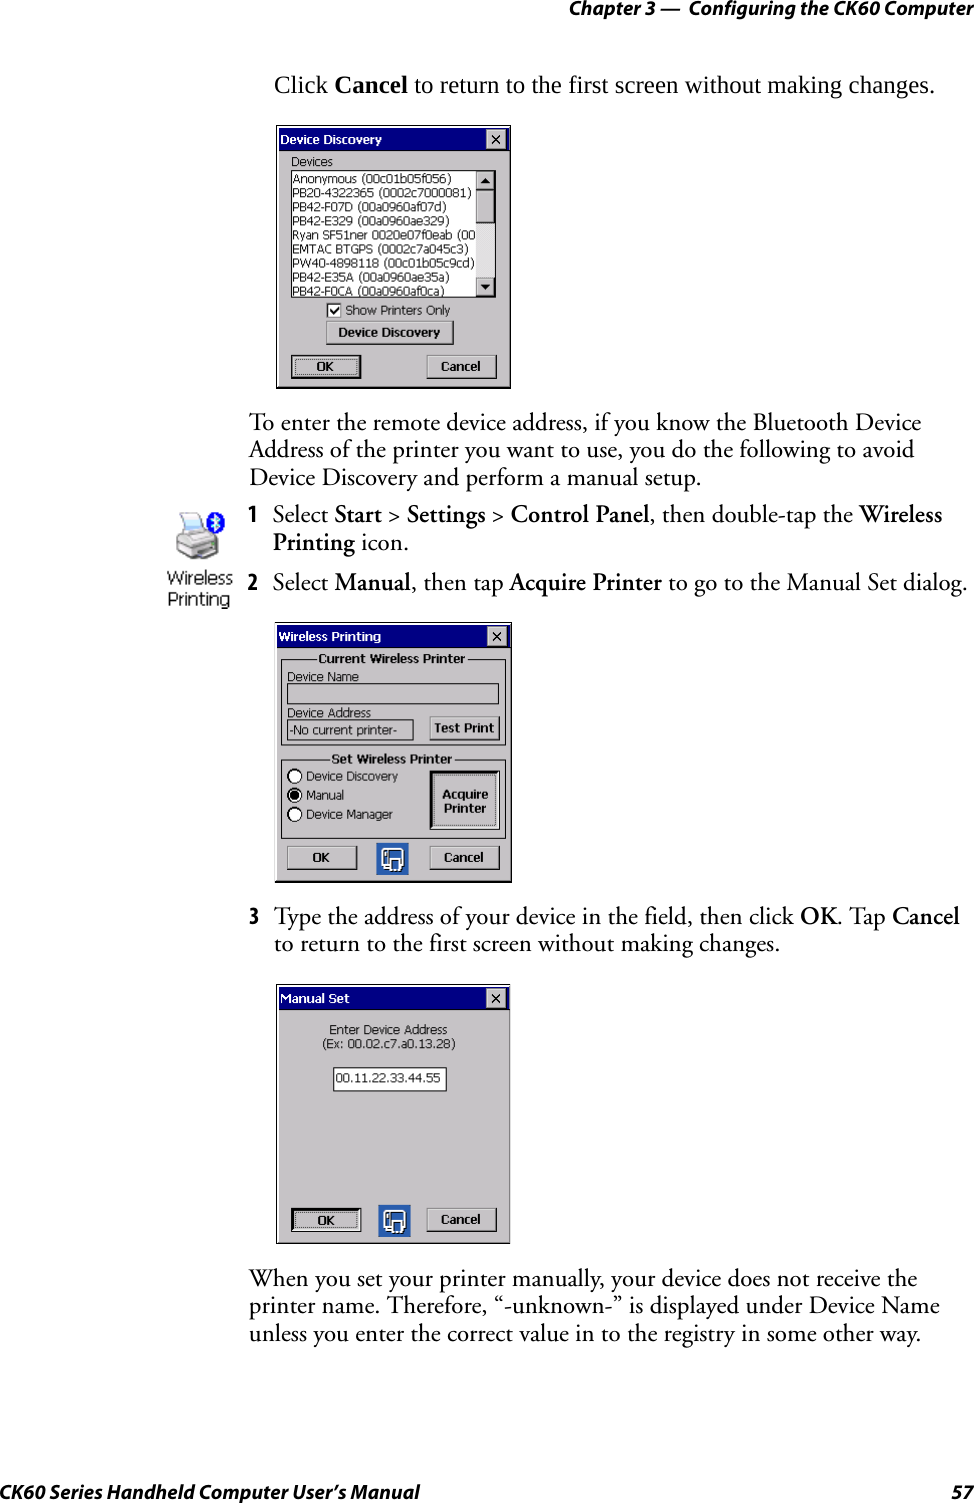
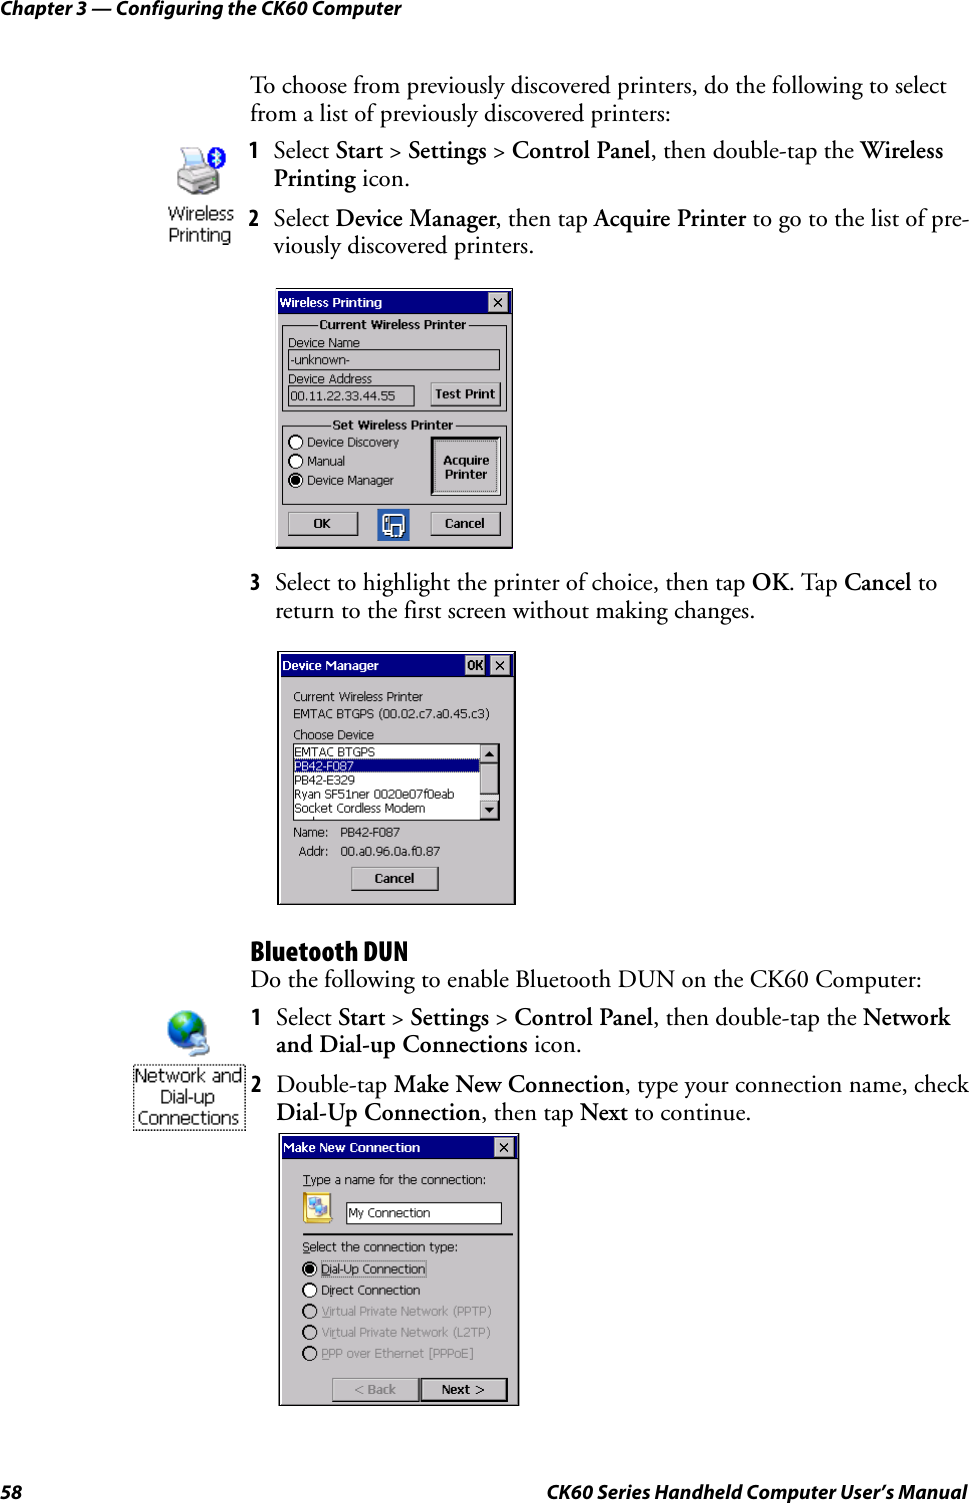
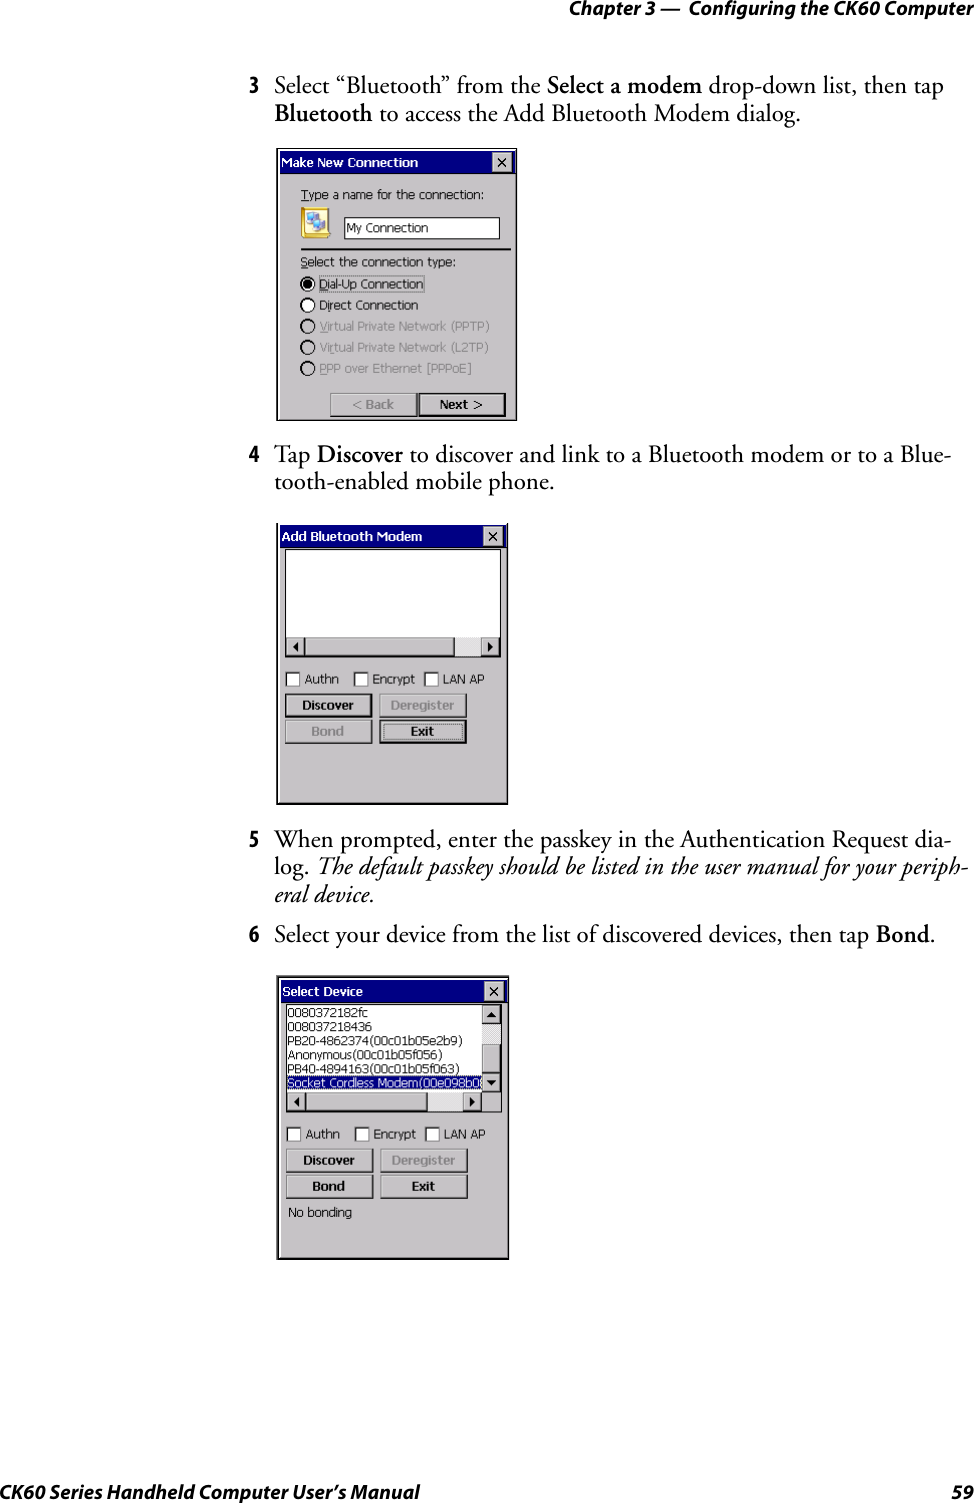
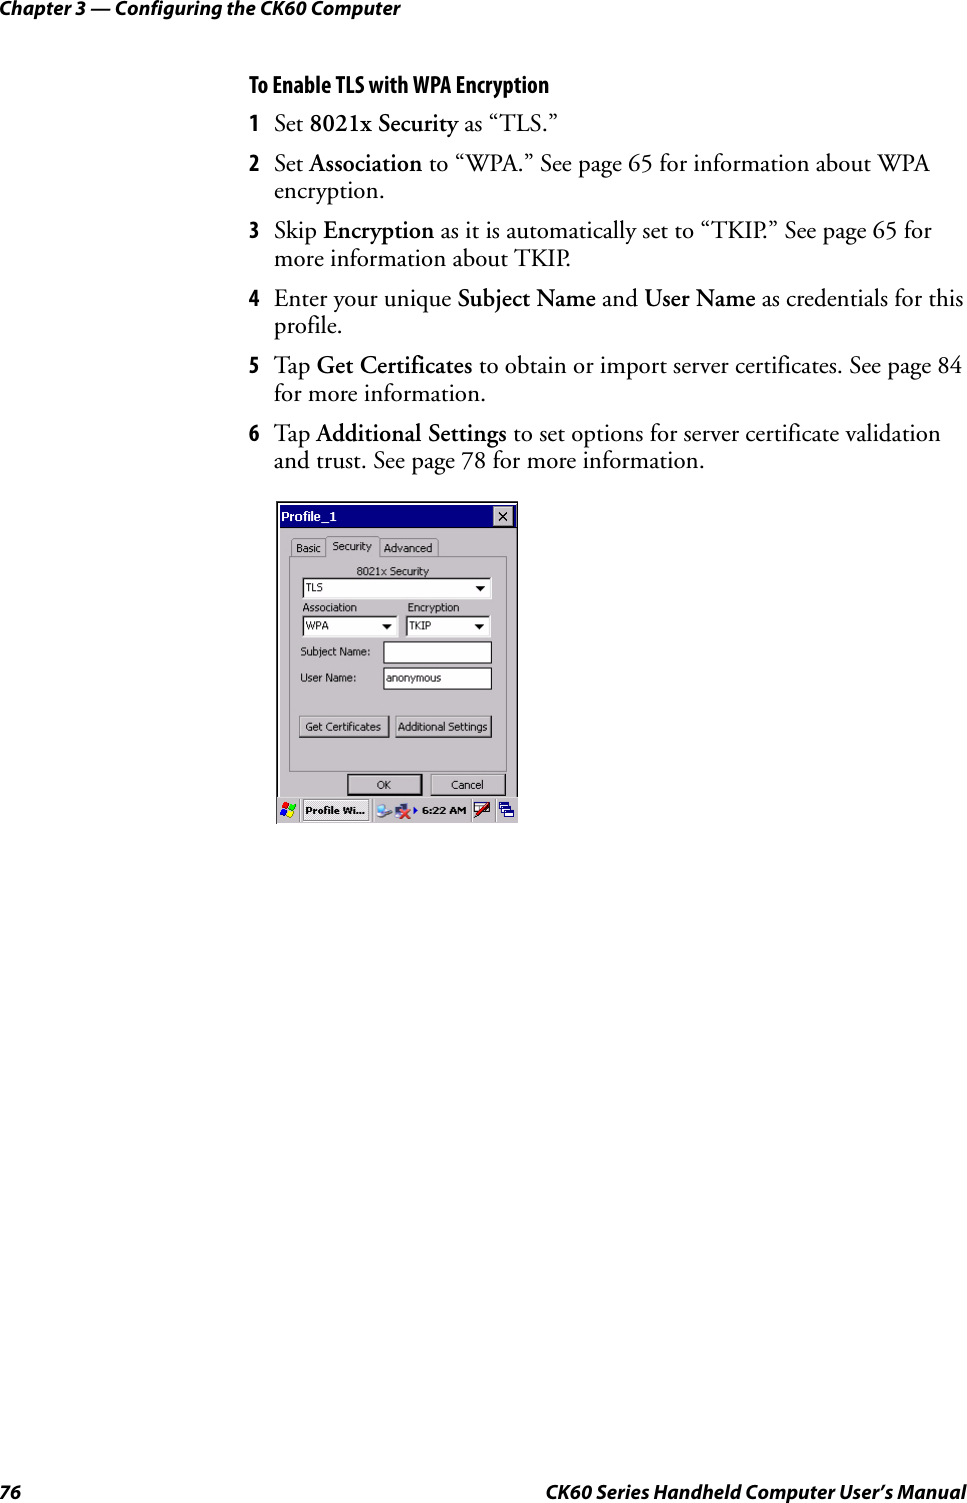
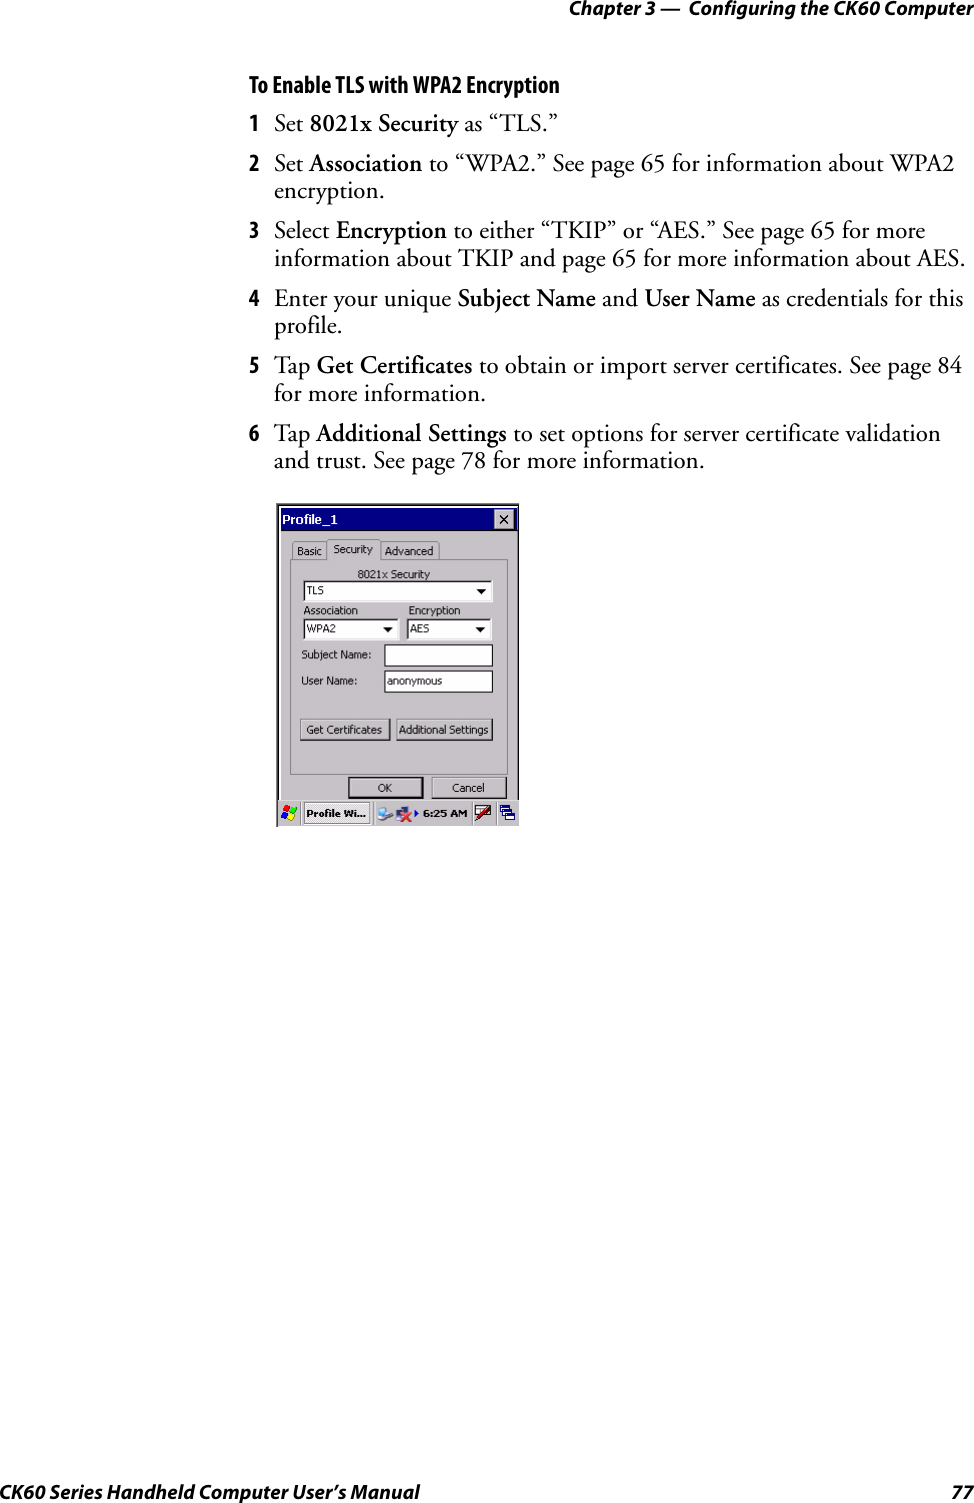
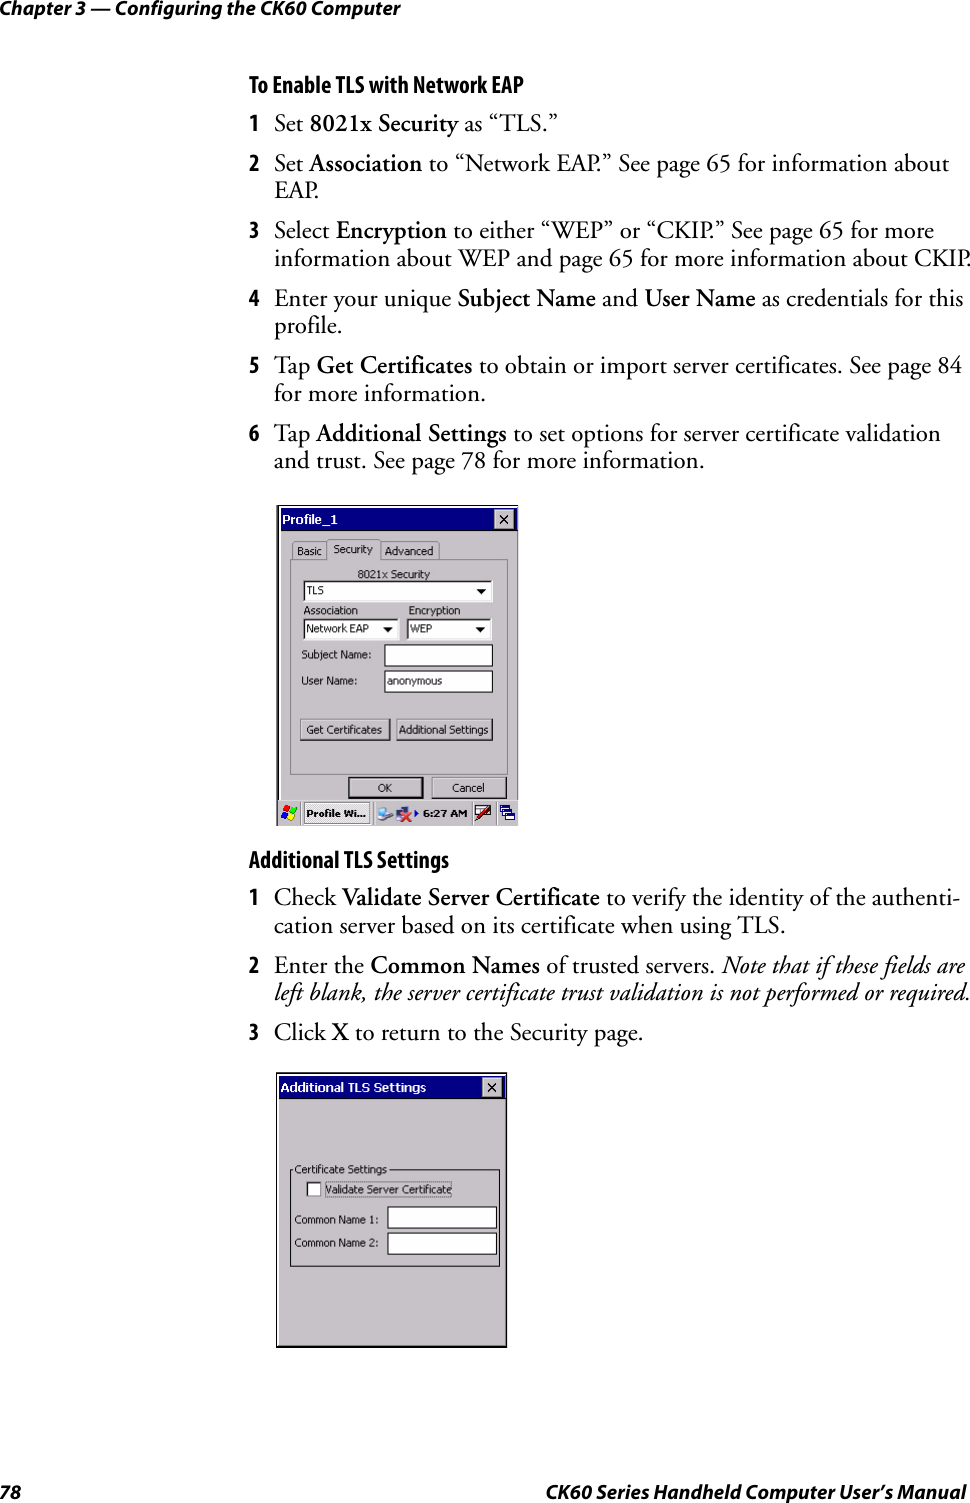
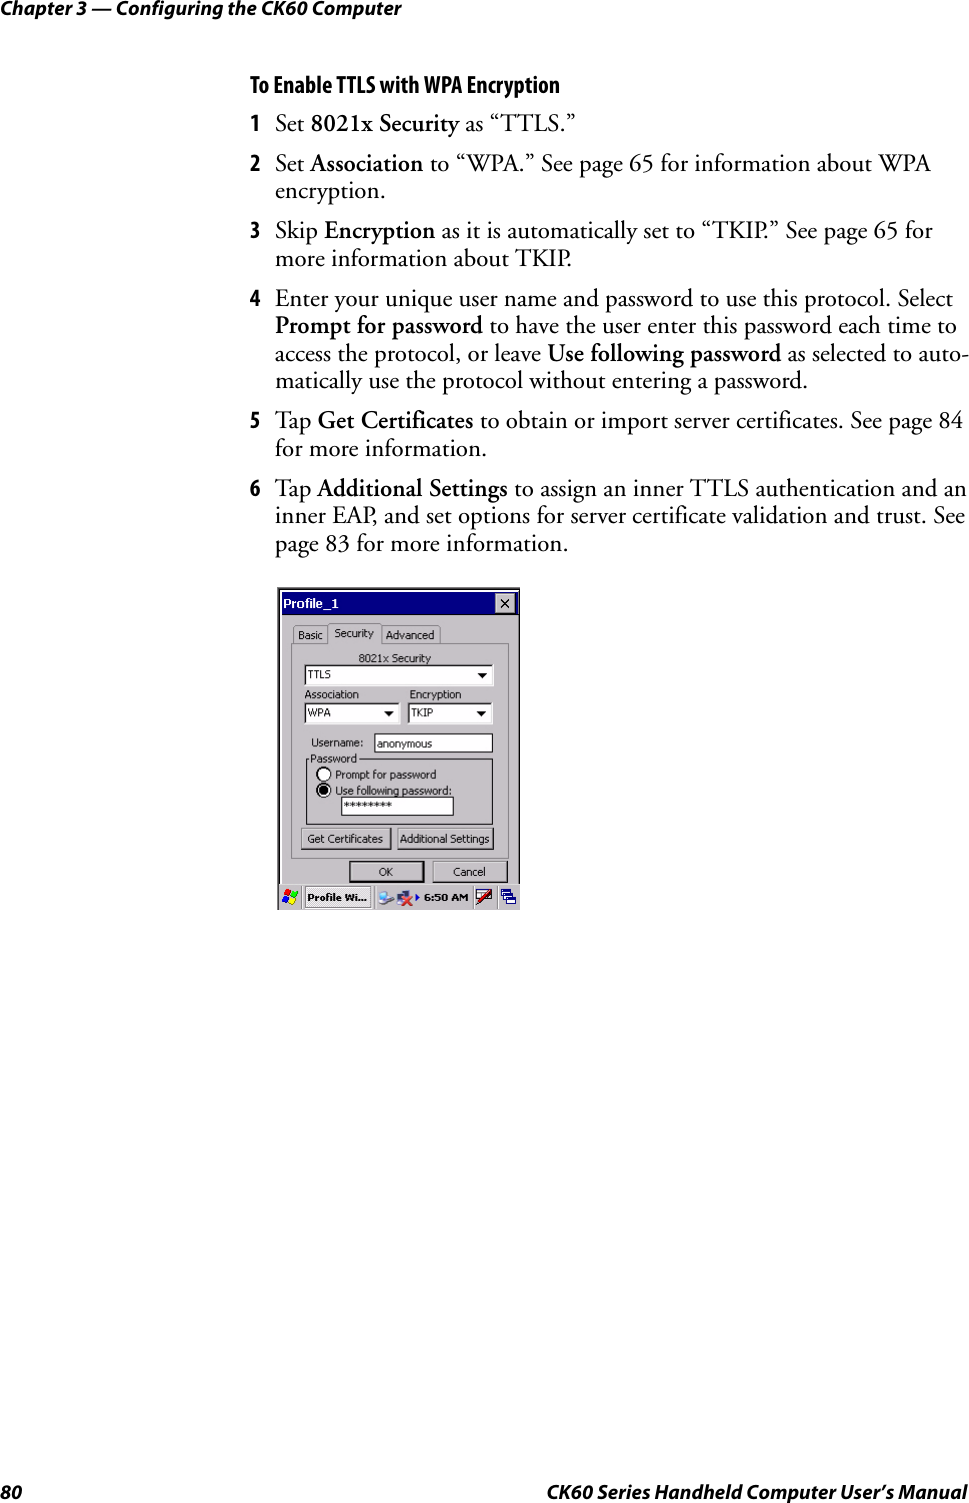
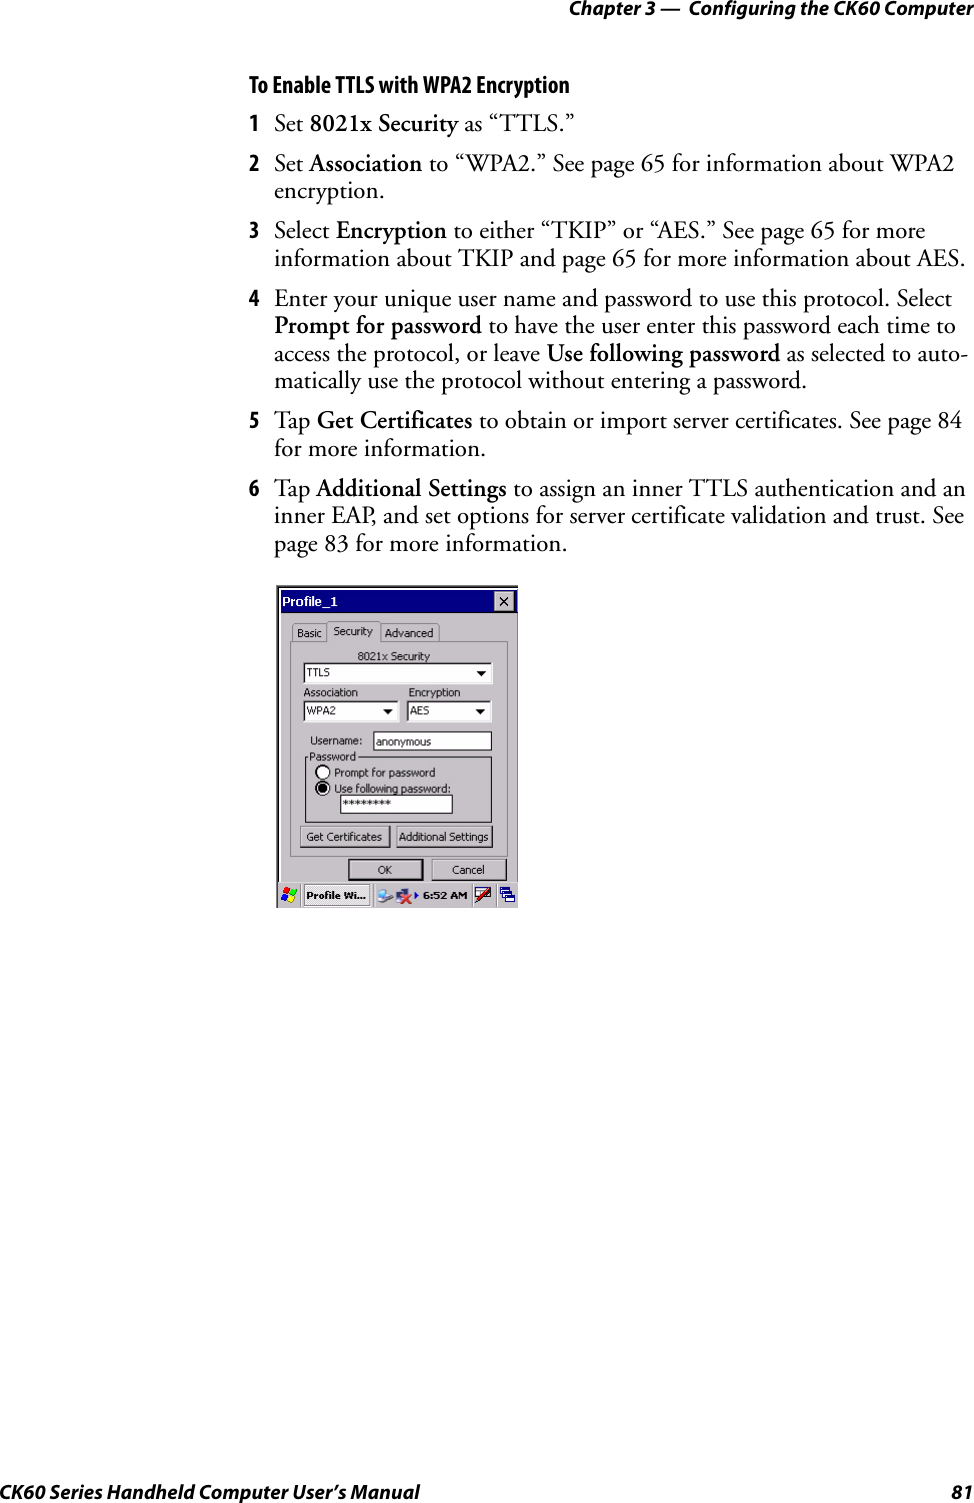
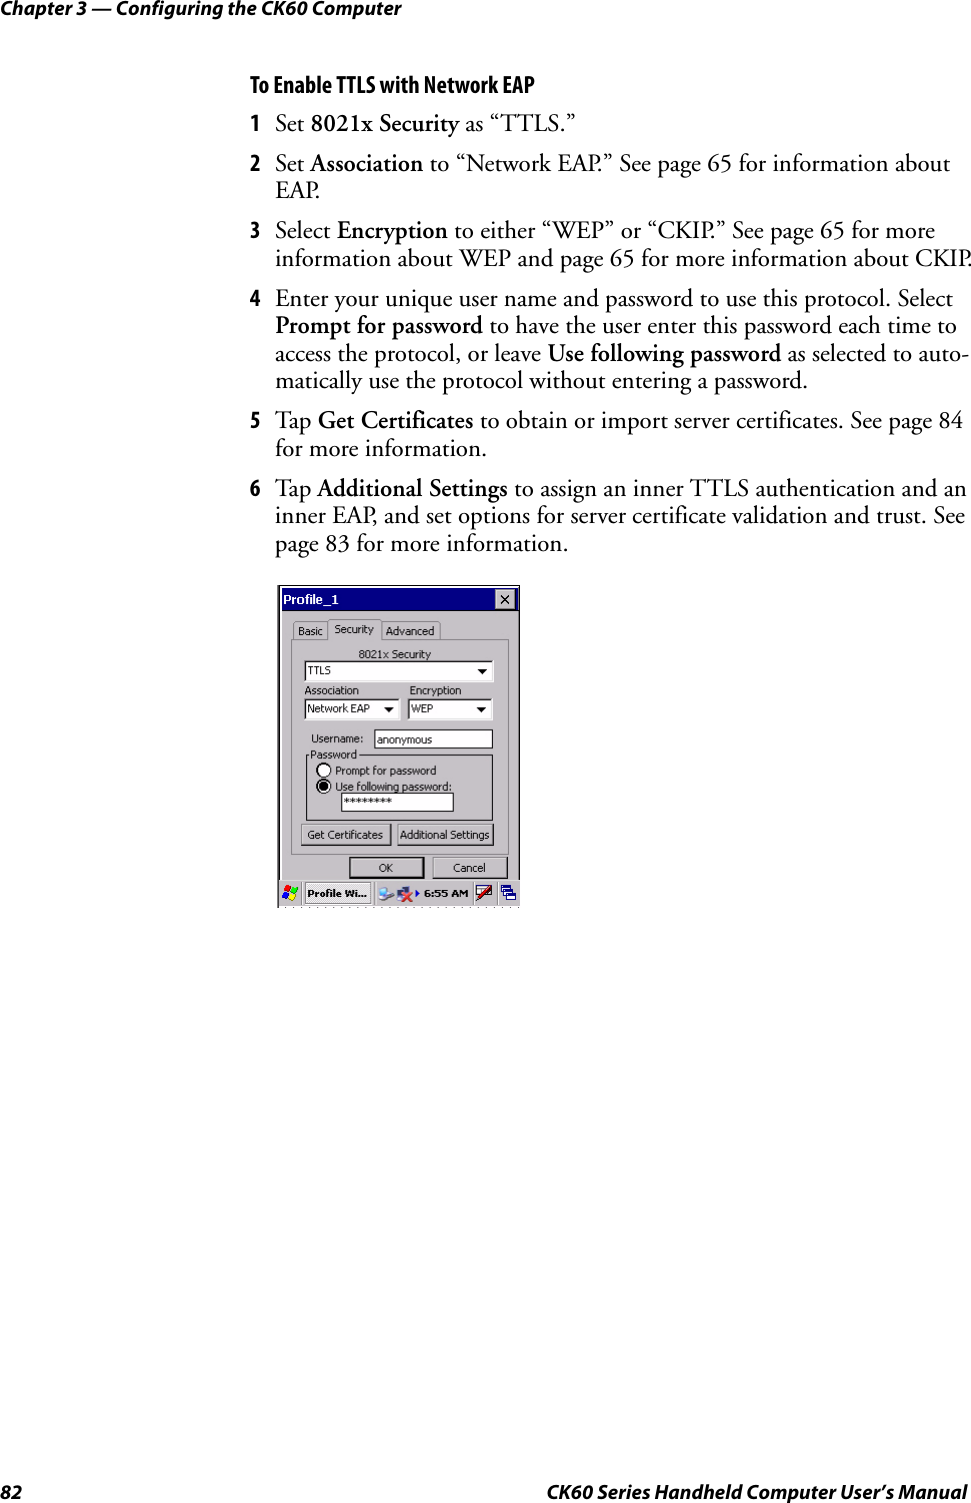
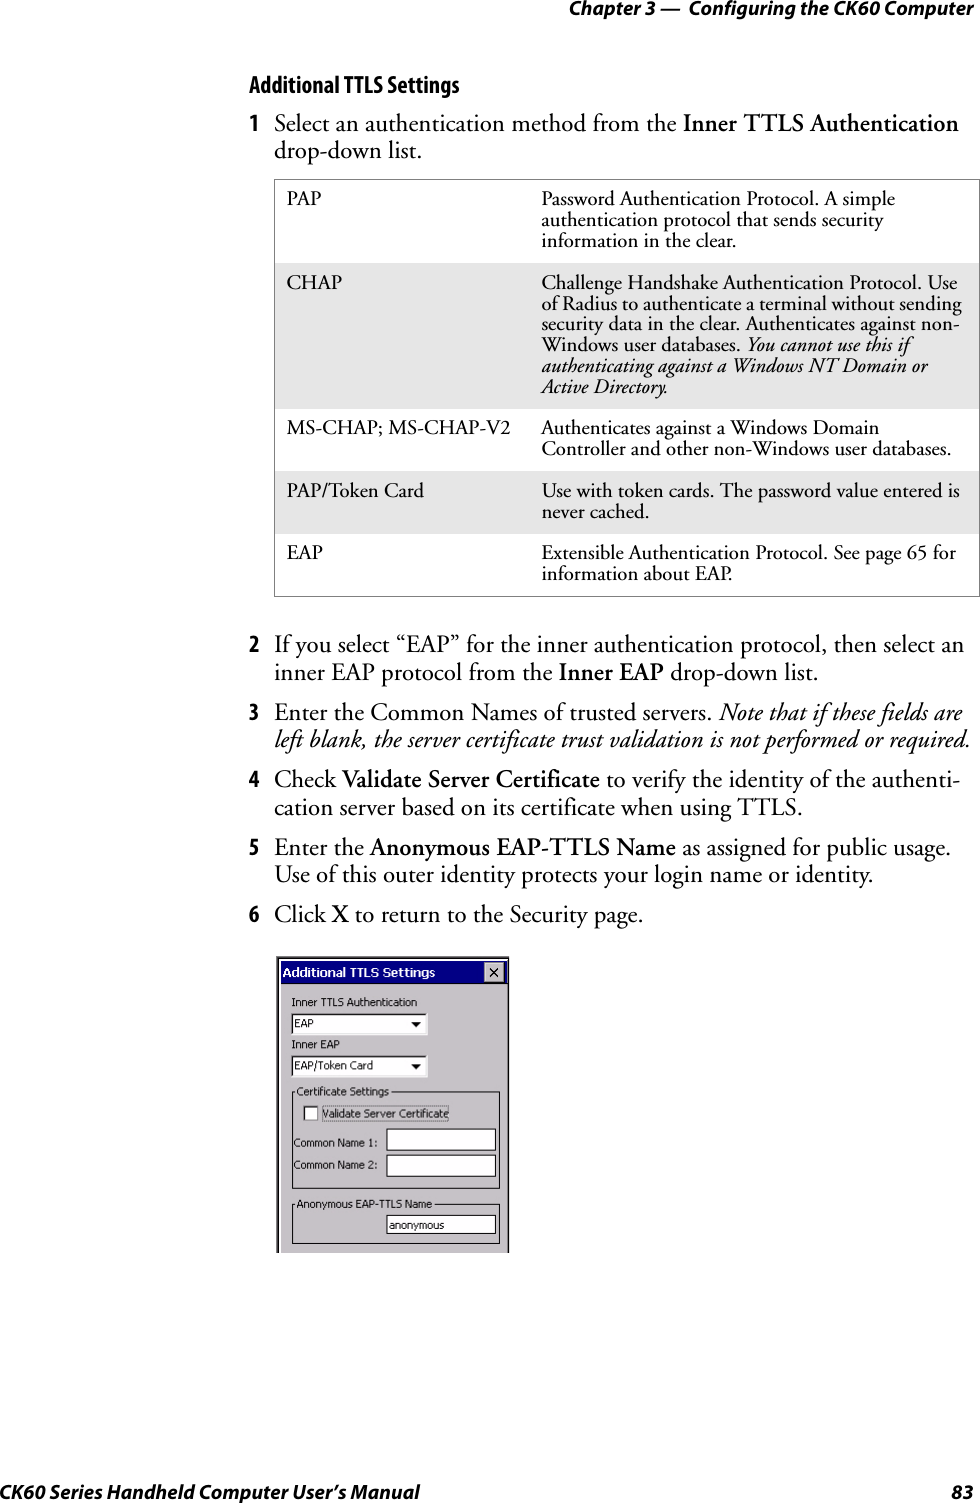
Intermec Technologies Corporation 802UIAG CK60UserManual WinCE
UserManual.wiki
>
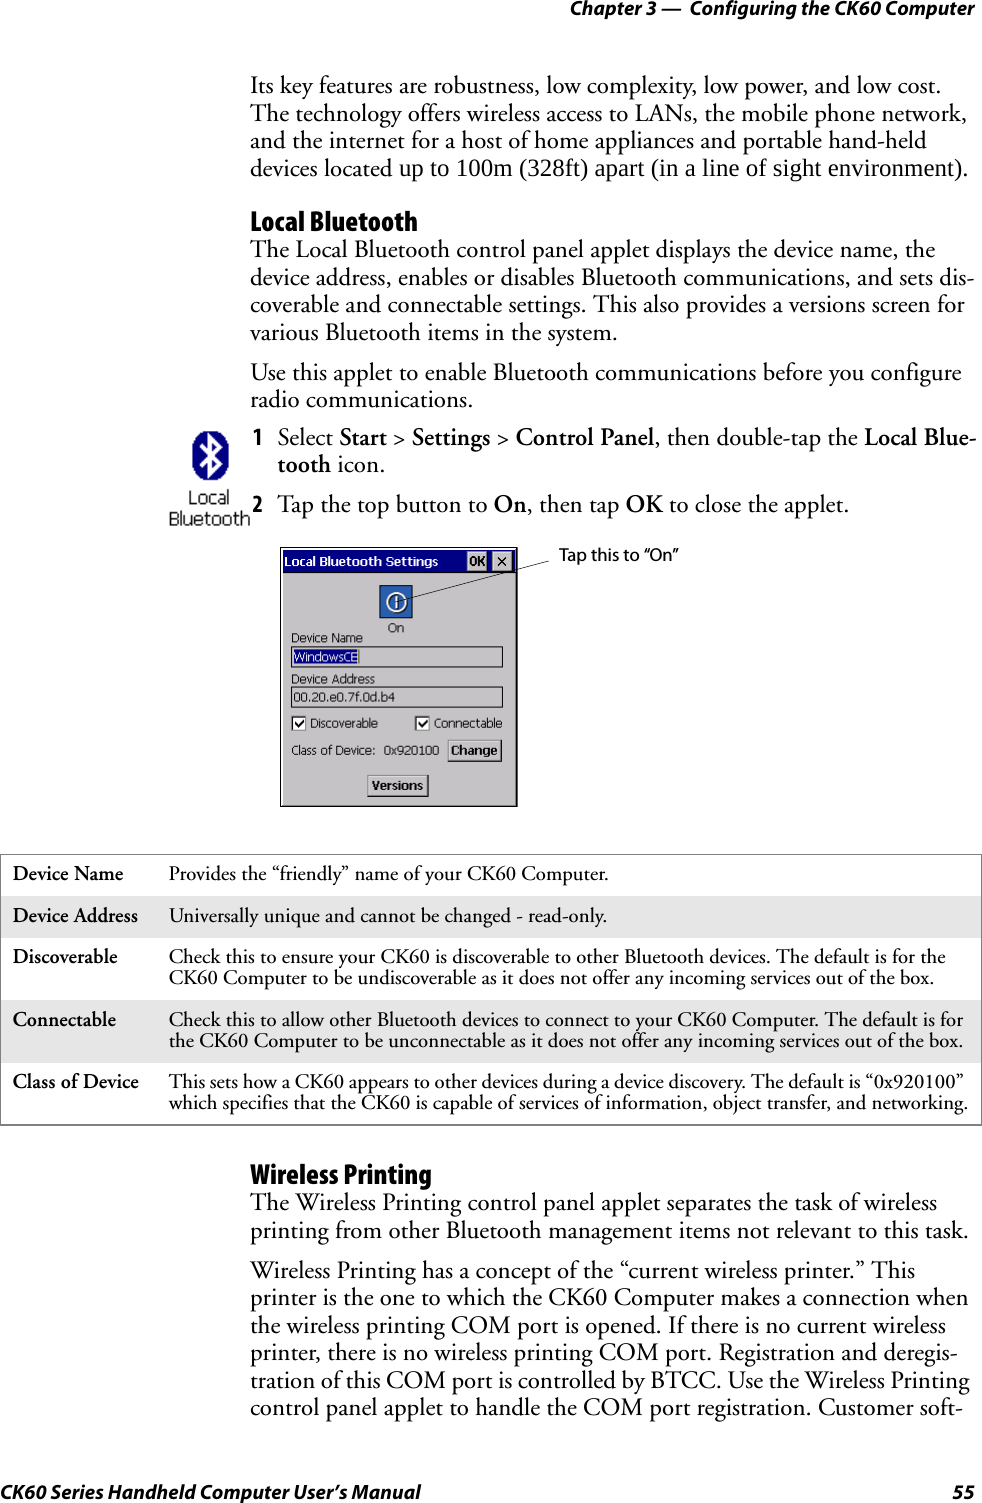
Intermec Technologies
>
802UIAG User Manual
>
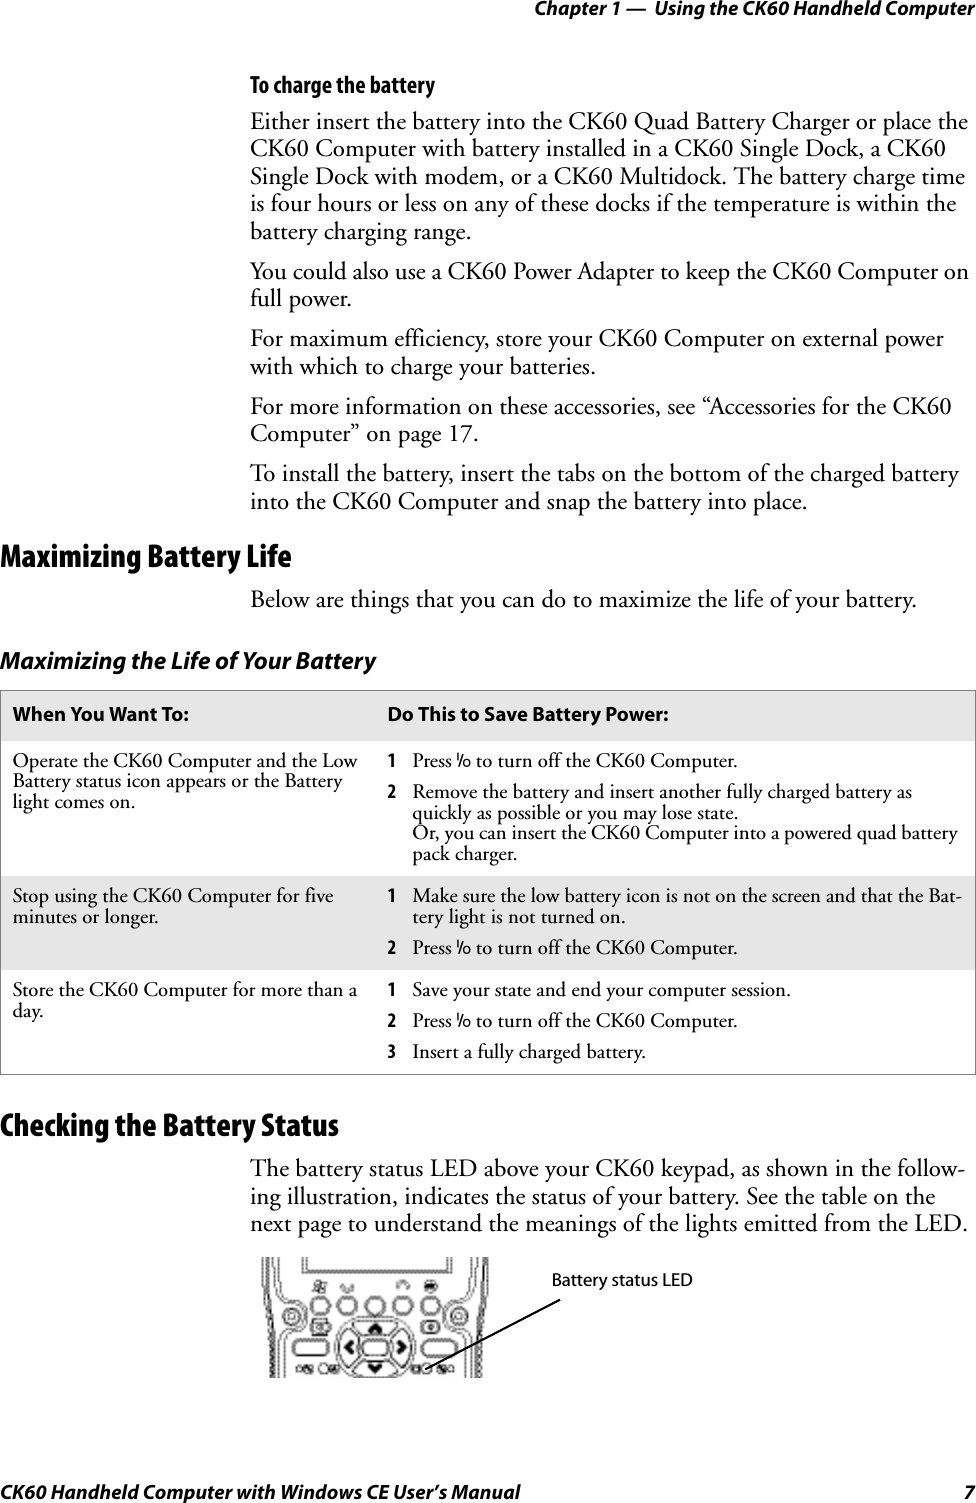
Users Manual
Contents
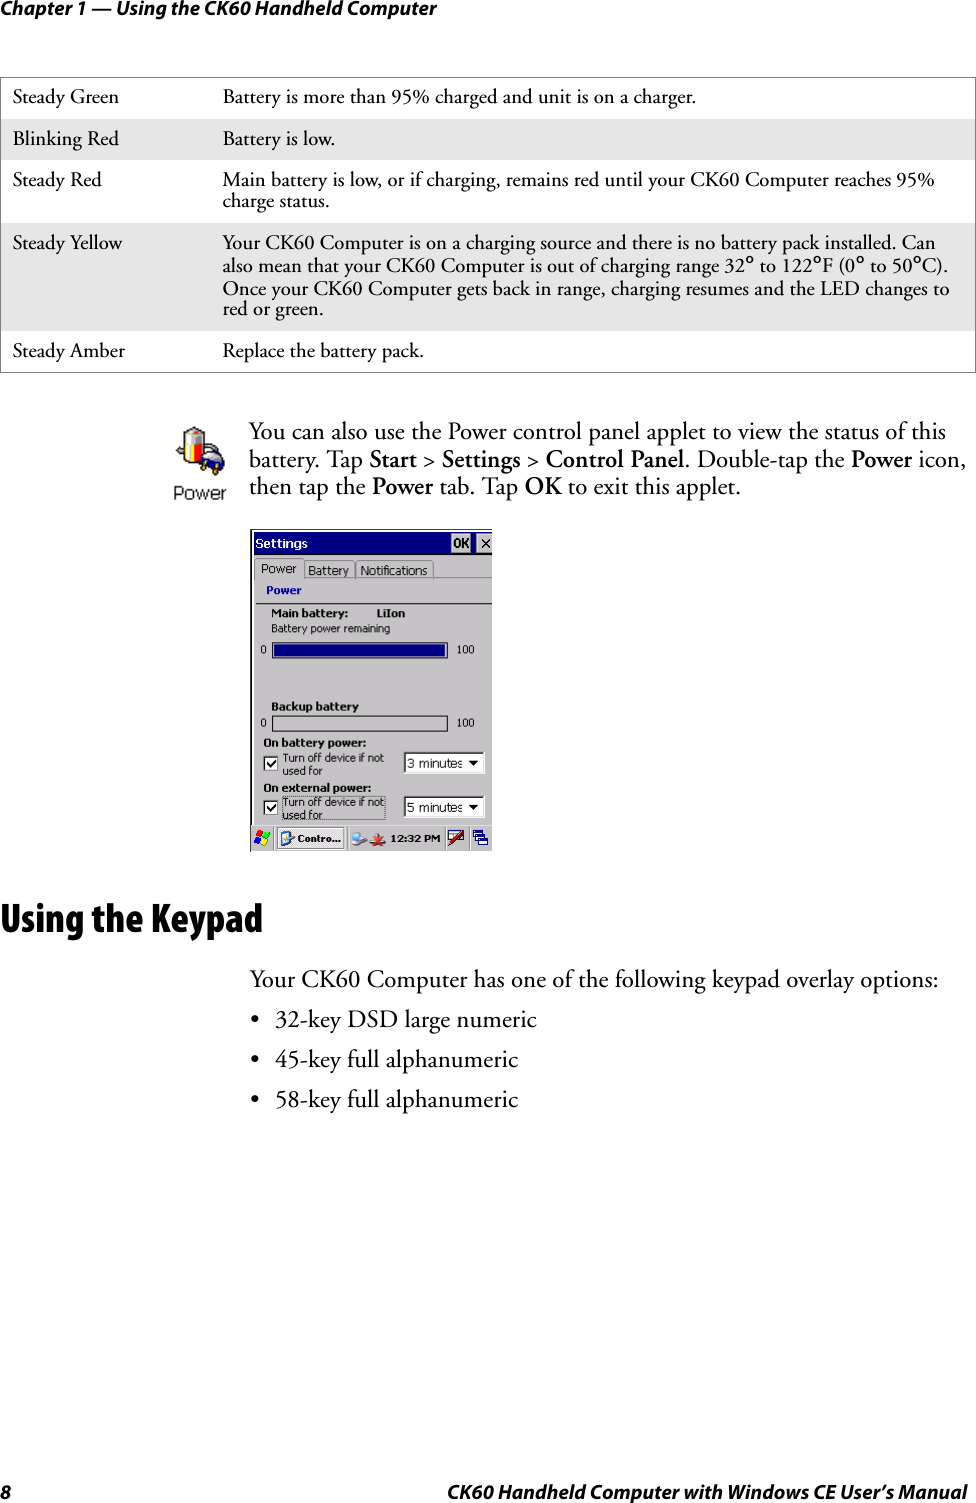
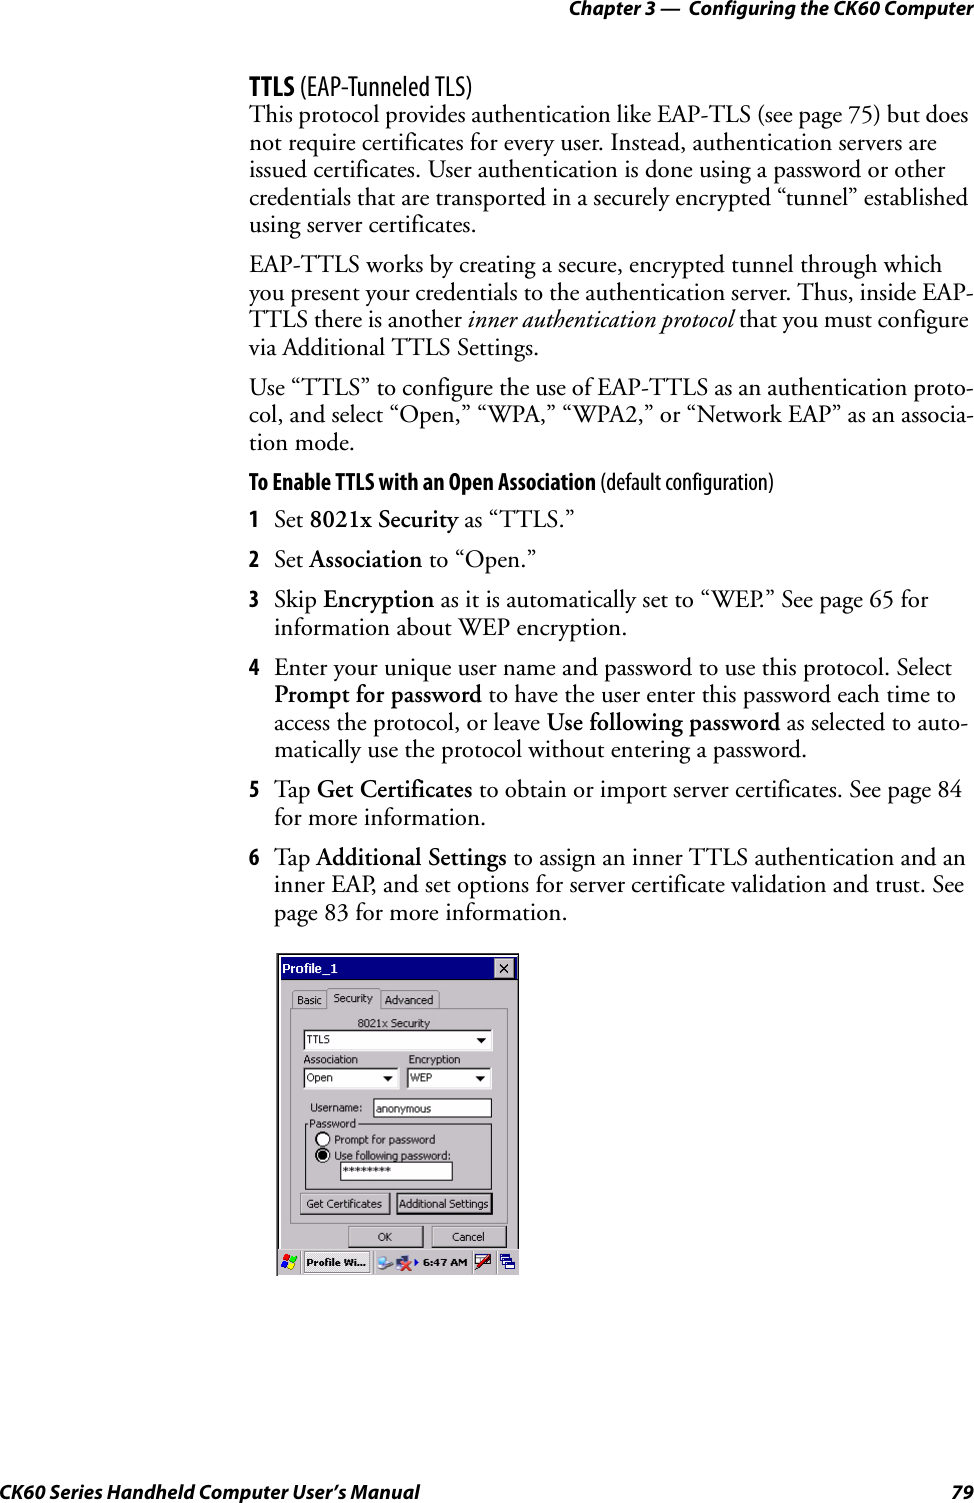
1.
Users Manual
2.
Compliance INsert
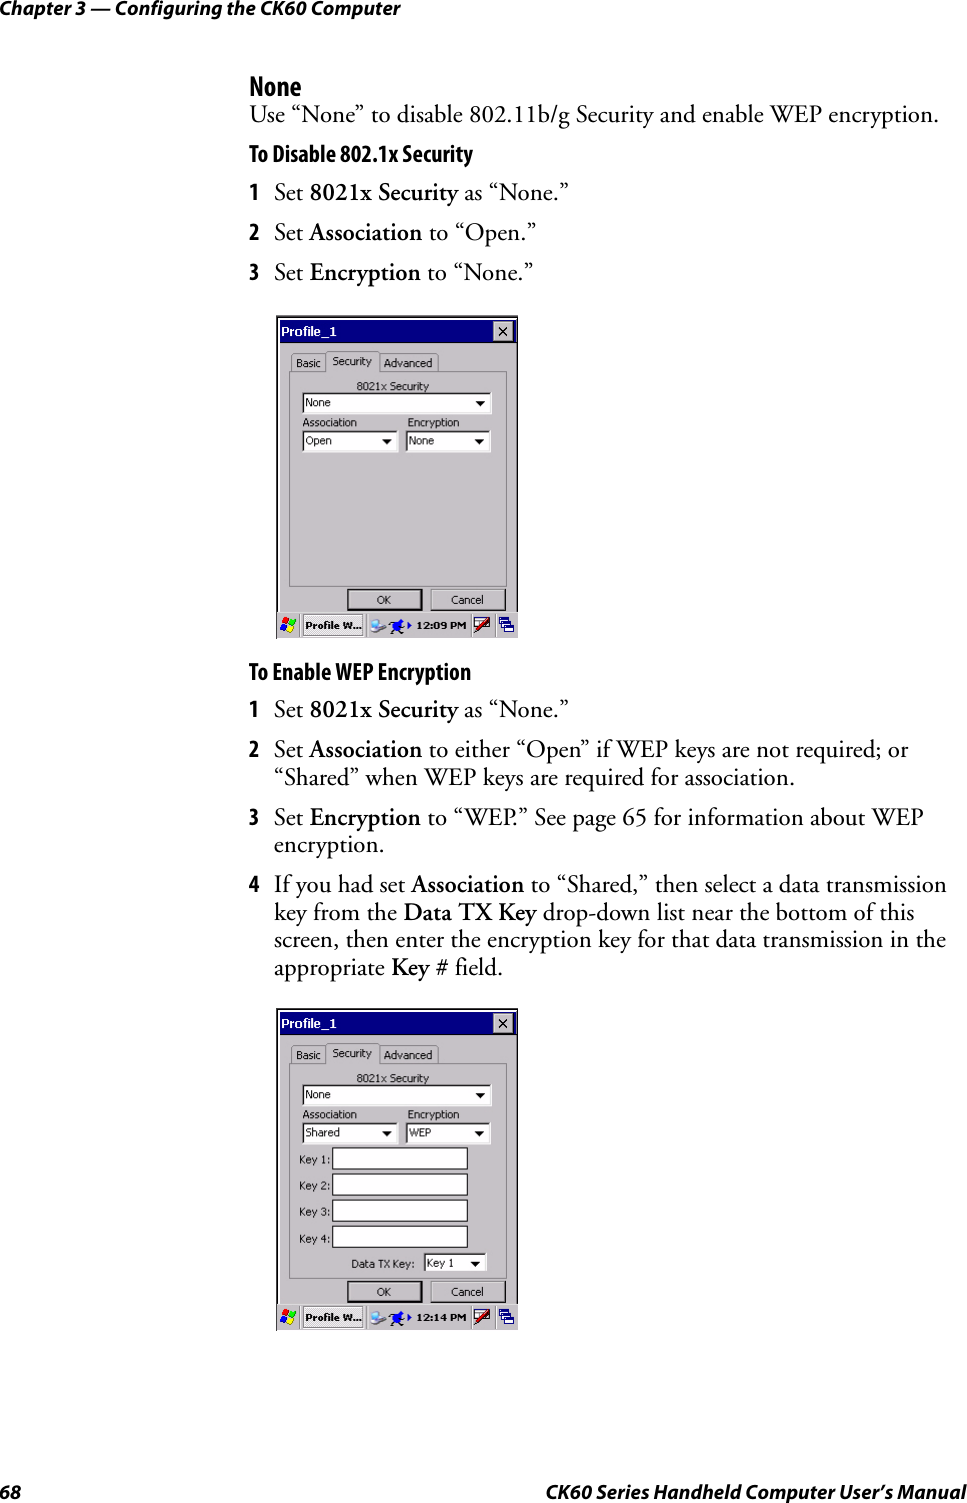
3.
User Manual
4.
Compliance Insert
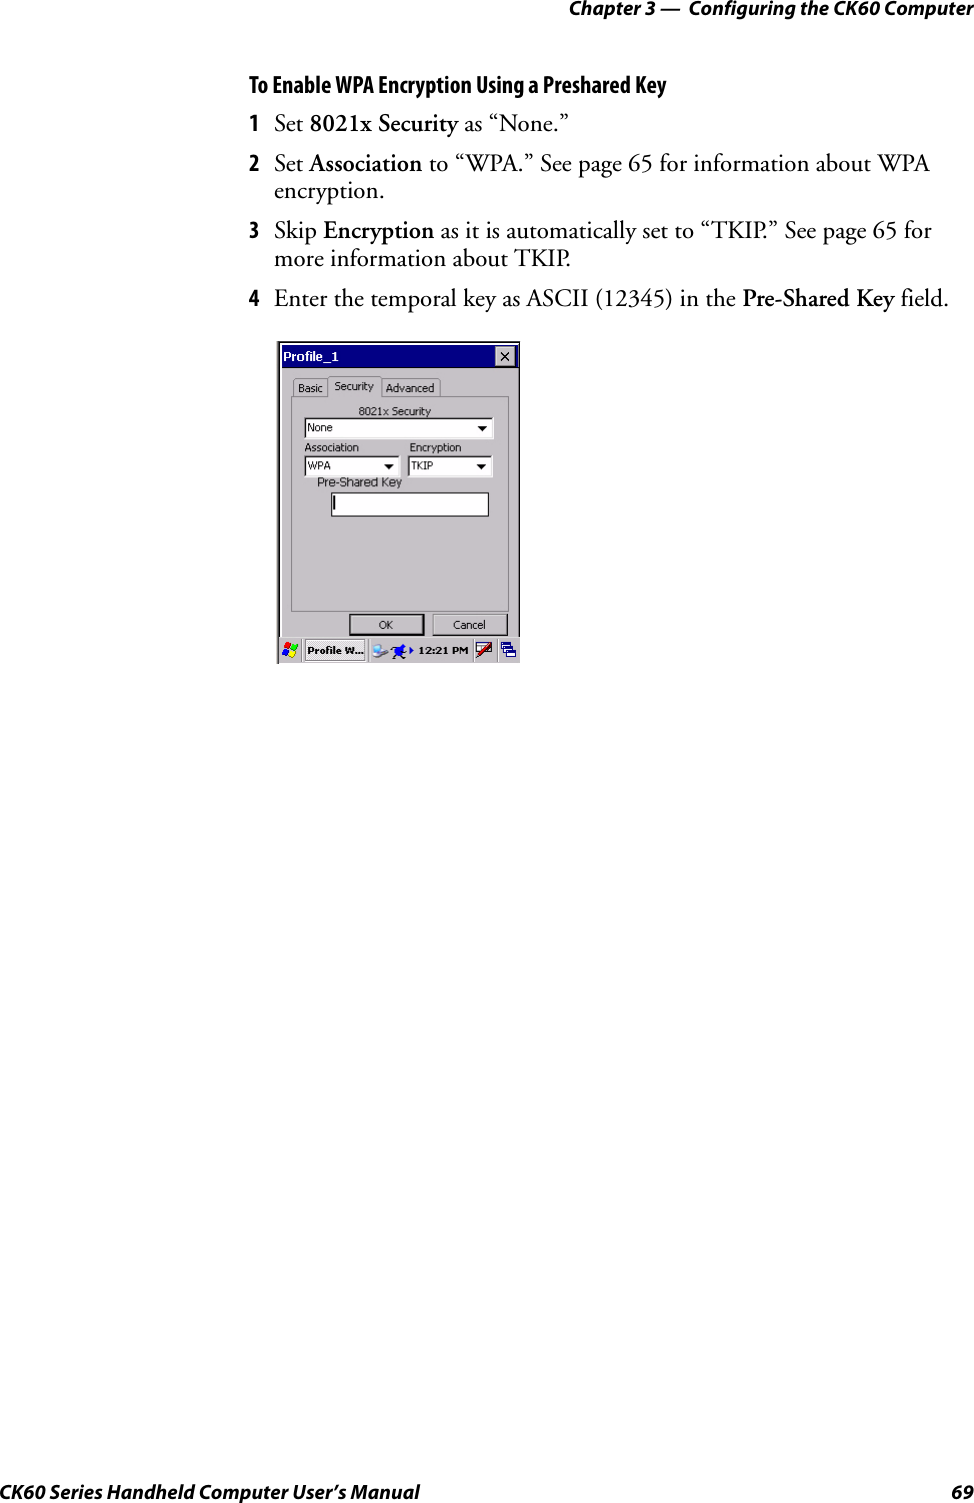
5.
User manual
6.
Radio Information
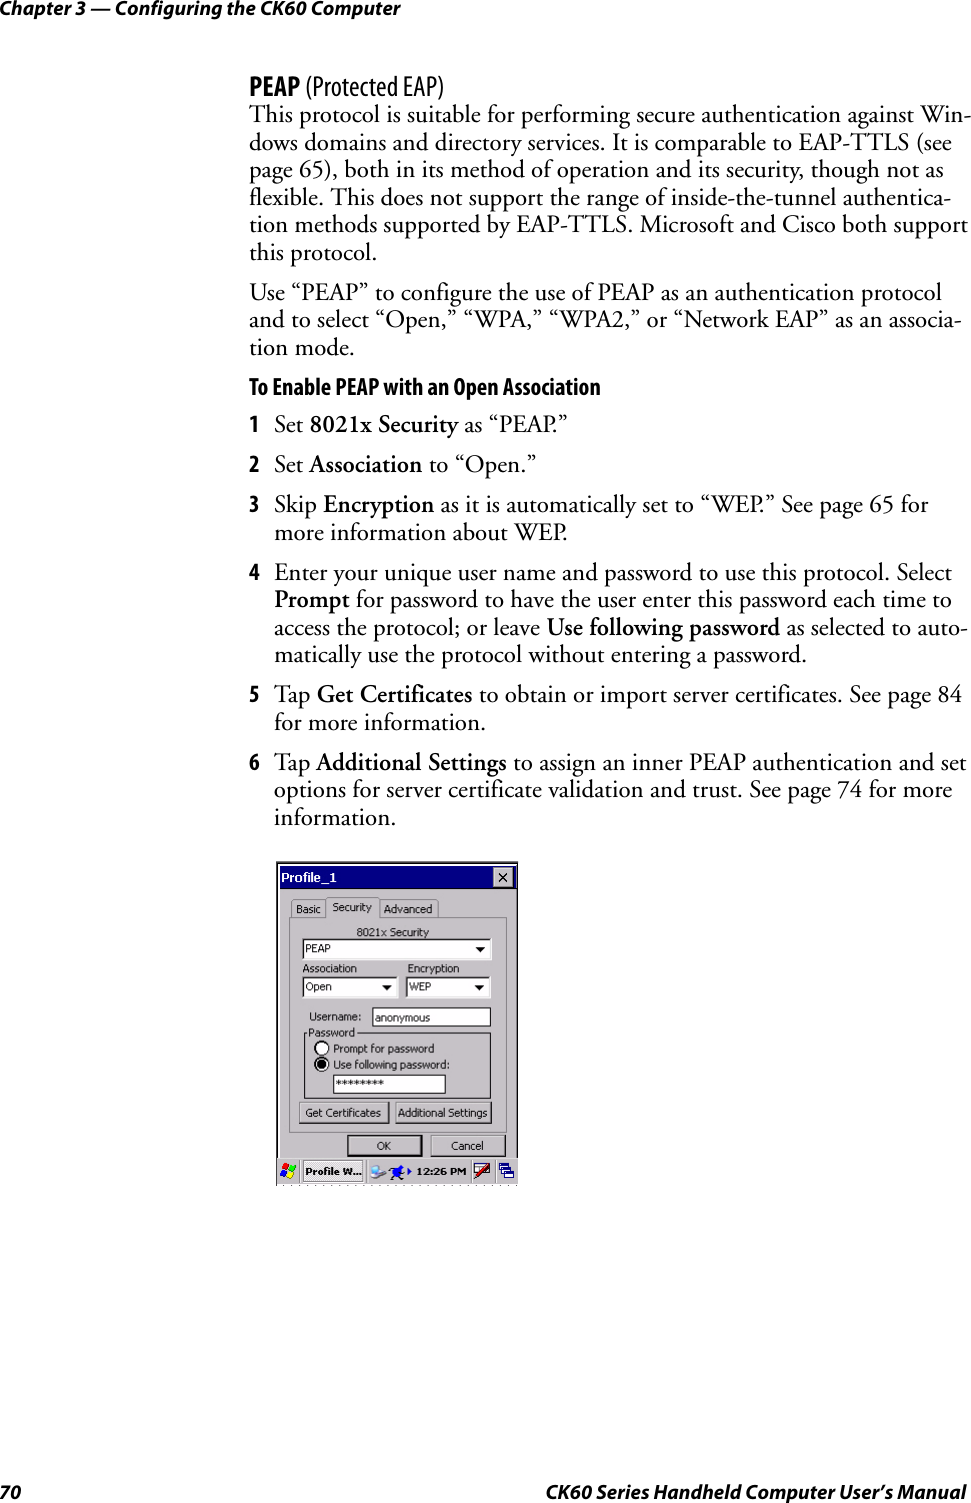
7.
User Manual part 1
8.
User Manual part 2
9.
User Manual part 3
10.
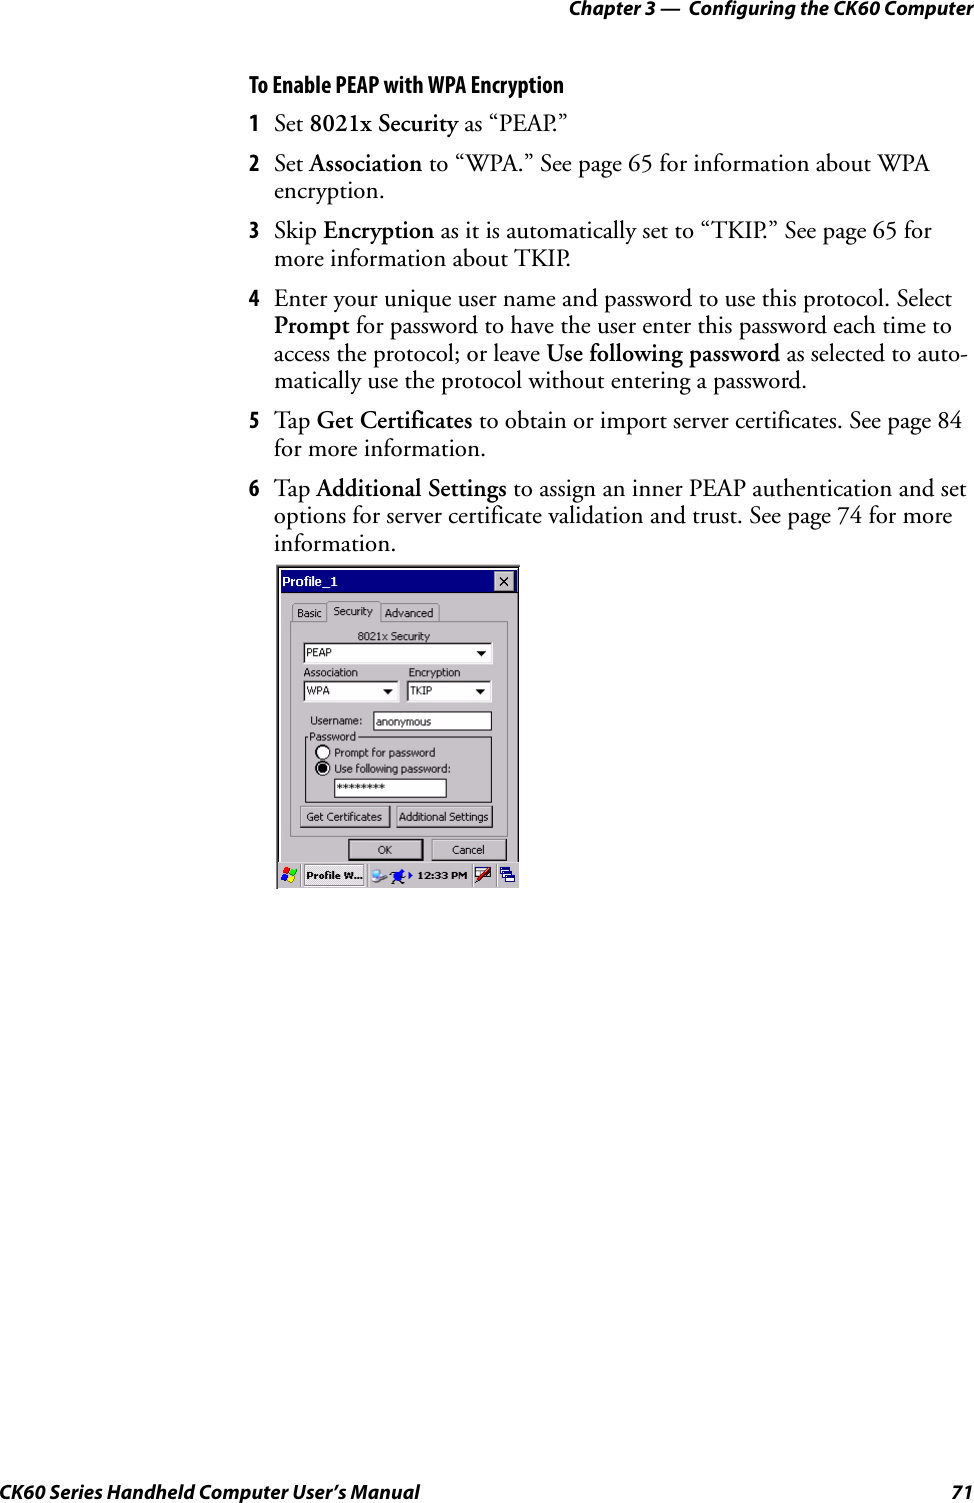
User Manual part 4
11.
User Manual part 4
Users Manual
Navigation menu
Upload a User Manual
Namespaces
Wiki Guide
HTML
PDF
Info
Views
User Manual
Discussion / Help
Navigation


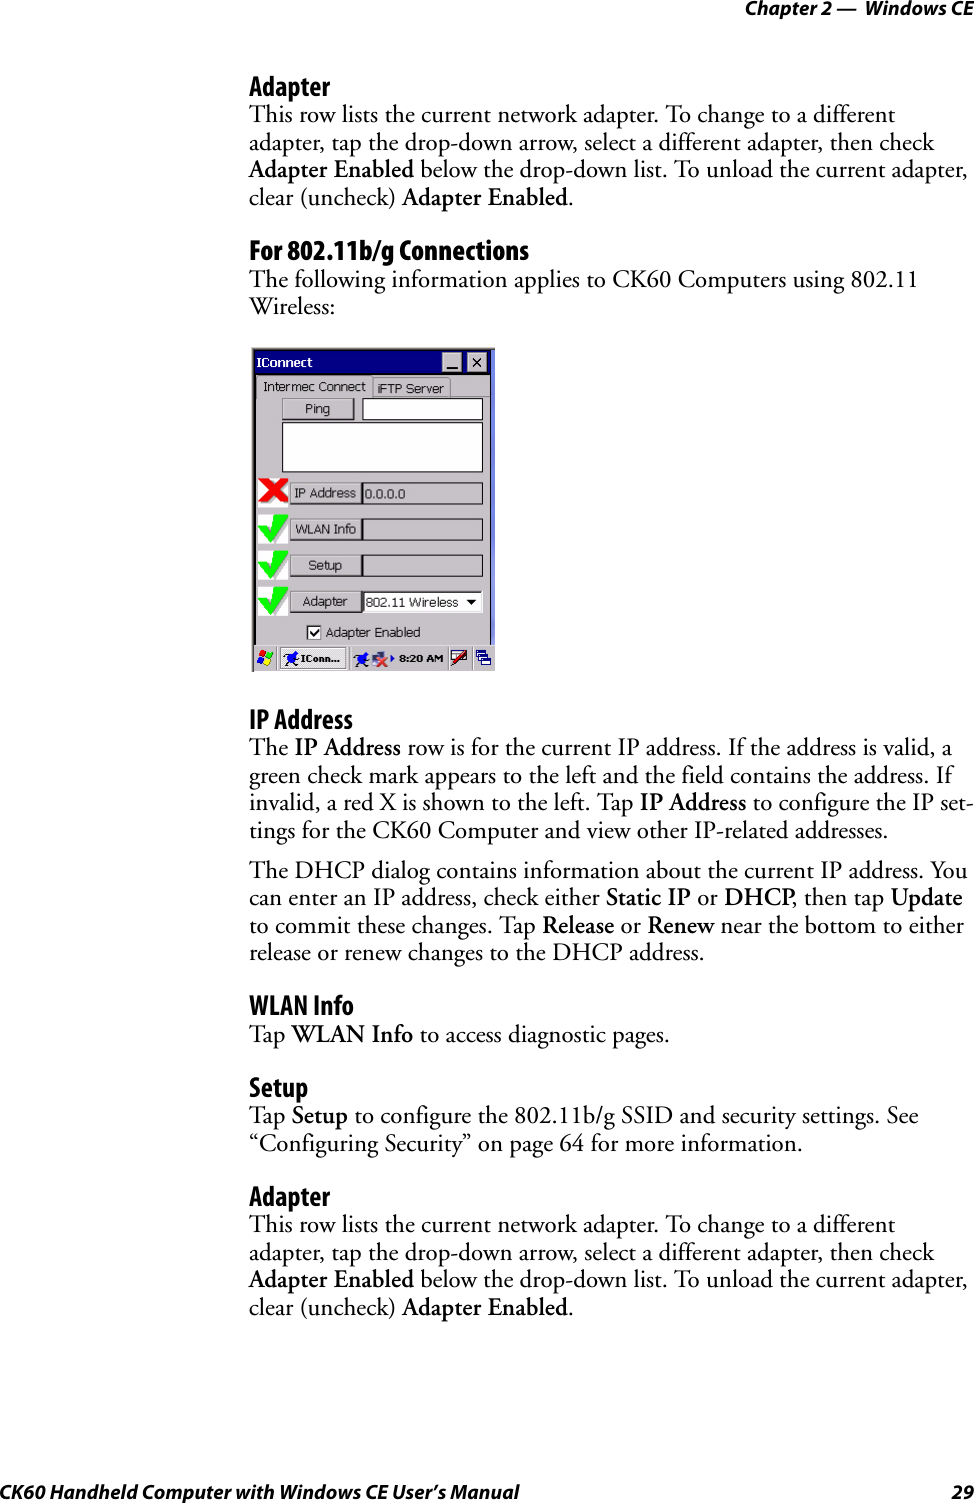
![Chapter 1 — Using the CK60 Handheld Computer10 CK60 Handheld Computer with Windows CE User’s Manual58-Key Full Alphanumeric KeypadThis keypad is for applications that enter mainly numeric data (0-9) and that may need to enter the entire alphabet. This keypad also provides shift function keys (F1-F24) and special characters, symbols, and functions by pressing color-coded key sequences.Using the Color-Coded KeysEach keypad available for the CK60 Computer provides color-coded keys to let you access additional characters, symbols, and functions printed on the keypad overlay. Once you understand how to use the color-coded keys and key sequences, you will know how to access all of the additional fea-tures printed on the keypad overlay. There are two color-coded modifier keys on the CK60 Computer: the orange B key and the green C key.You press and release the first key, then press and release the second key to access the color-coded character or function printed above a key. Note that there are several hidden characters (such as < or >) on each CK60 keypad that require using the color-coded keys to access them.Using the Color-Coded KeysYou Wan t To: Press: ExampleUse an orange character or func-tion printed above a key.B key, then the key with the charac-ter or function printed above it.Press B, then F7 to type the M char-acter on the 45-key keypad.Use a green character or function printed above a key.C key, then the key with the charac-ter or function printed above it.Press C, then Y to print the greater than symbol (>) on the 58-key key-pad..Lock the orange, green, Ctl, Alt, or Shift key to stay on.B, C, Ctl, A.t, or Shift key twice. Press C twice and the applicable icon appears in the status bar with a pad-lock.Unlock a green, orange, Ctl, Alt, or Shift key.B, C, Ctl, Alt, or Shift key once.Enter1203456789&*^CBADEFGJIHKLMNQPORXSTZUWVYEscSpaceShiftCTRLSymIns HomeHelpFld - EOFFld +AutoLgMenu+-=[]_'"~|.AttnHexPrint Reset SReqFMarkNewLnClr Clear Dup Erase Fld XCAPSPA1 PA2 PA3{`};:<>/\F9 F10 F11 F12 F13 F14F15 F16 F17 F18 F19 F20 F21F22 F23 F24DelRollPageF1 F2 F3 F4F5 F6 F7 F8Backlight keyGreen keyOrange keyScan keyPower key](https://usermanual.wiki/Intermec-Technologies/802UIAG.Users-Manual/User-Guide-548830-Page-22.png)

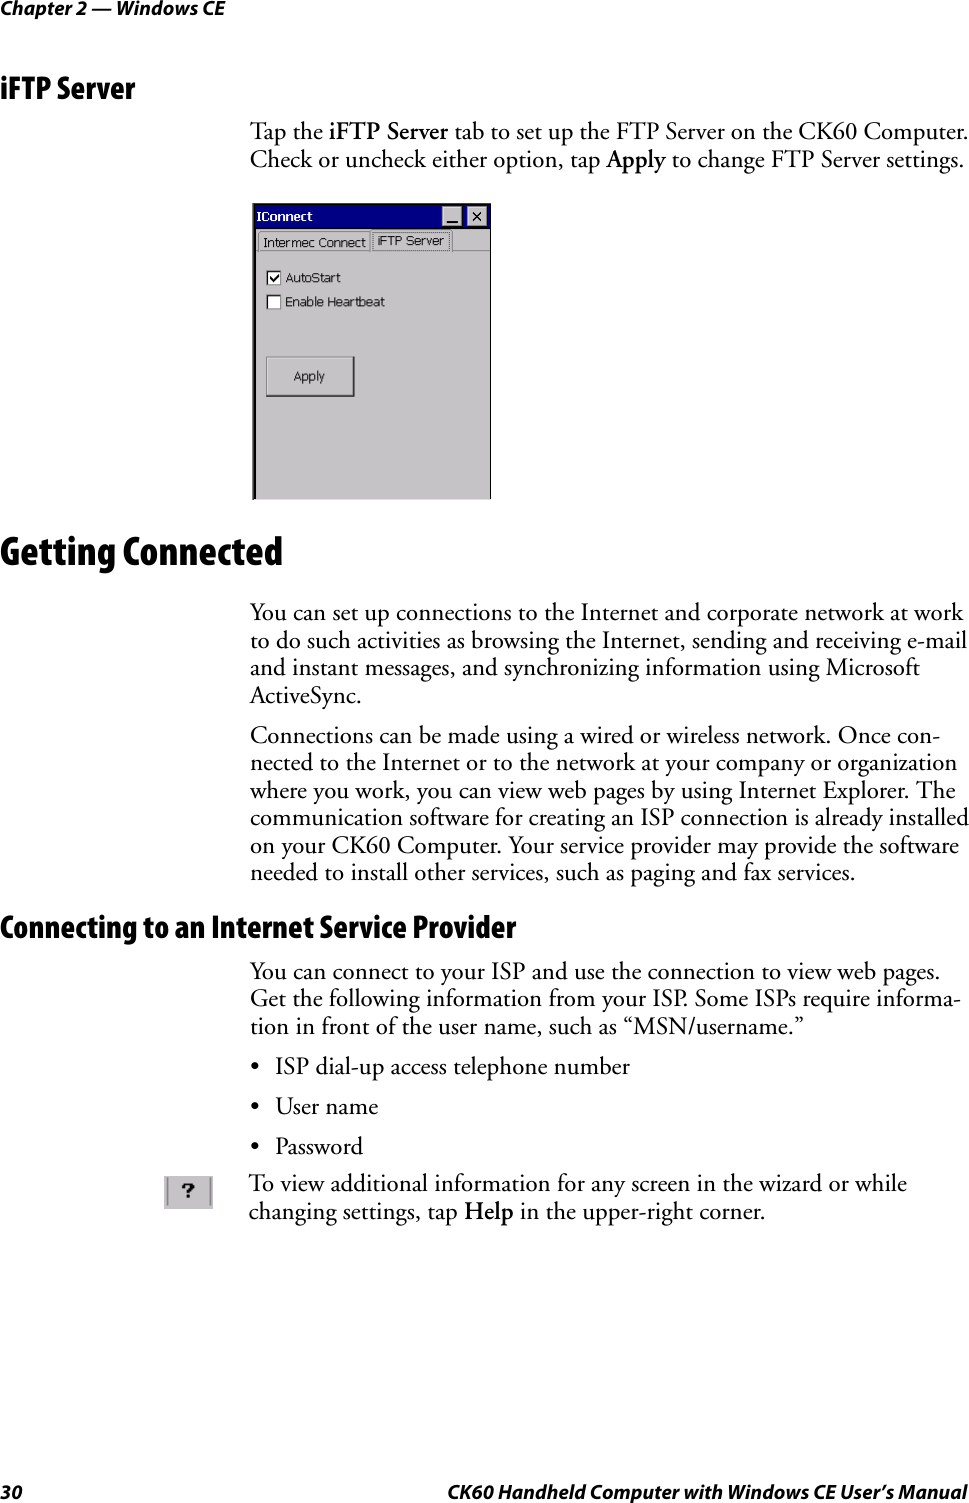

![Chapter 2 — Windows CECK60 Handheld Computer with Windows CE User’s Manual 35•In the Address bar that appears at the top of the screen, enter the web address you want to visit using the input panel, then tap the [Enter] key on the panel to go to that web site.• Tap the drop-down arrow to select from previously entered addresses.Note: To add a favorite link while using the CK60 Computer, go to the page you want to add, then select Favorites > Add to Favorites.Type the web address hereTap for a list of addresses](https://usermanual.wiki/Intermec-Technologies/802UIAG.Users-Manual/User-Guide-548830-Page-47.png)
![Chapter 3 — Configuring the CK60 Computer42 CK60 Series Handheld Computer User’s ManualLaunching Your Application AutomaticallyYou can configure the various media used in the Windows CE system with a folder name and can change the media in the registry of the system. Many of the startup components rely on folder names to locate information files, applications, or other related data.The registry keys used by FolderCopy and other startup components to retrieve the folder names are as follows:Flash File Store[HKLM\Drivers\BuiltIn\FlshDrv]"FolderName"="Flash File Store"SD Card (Storage Card)[HKLM\System\StorageManager\Profiles\SDMemory]"Folder"="Storage Card"Disk On Chip[HKLM\System\StorageManager\Profiles\TRUEFFS_DOC]"Folder"="DiskOnChip"During normal Windows CE system startup, there are Intermec-specific and non-Intermec components that require an orderly start to properly function. These non-Intermec components may also need to start them-selves so the Windows CE device can function properly. Since there are possible configurations that come from using one or more optional built-in peripheral devices, the platform components starting on the next page are required to manage startup.PreShellPreShell (PRESHELL.EXE) is launched prior to the Microsoft Shell and must execute a SignalStartup call before the Microsoft Shell launches.PreShell searches the “\Flash File Store\2577” directory for an executable of the same name. If one exists, that application is launched. This application can do what a customer desires prior to launching the Microsoft Shell. This feature allows end customers to make their own application the shell of the system. If desired, do not exit the custom shell nor call SignalStarted.PostShellPostShell (POSTSHELL.EXE) can launch an application after the Microsoft Shell has launched. There are utility applications that exist that can take advantage of “hooking” the startup for maintenance, for example.Note: This describes the system component startup for Intermec provided components only. It does not describe the bootstrap loader process. It only describes the component installation process provided by Windows CE. It is assumed that you understand the Microsoft CE startup procedures and are familiar with how Microsoft components start up.](https://usermanual.wiki/Intermec-Technologies/802UIAG.Users-Manual/User-Guide-548830-Page-54.png)
![Chapter 3 — Configuring the CK60 Computer44 CK60 Series Handheld Computer User’s ManualAutoRun is reserved for customer use to configure application launch sequences. It launches the CAB installer, AutoCab, as well as any customer programs that added to the AUTOUSER.DAT file and is described on the next page. The hierarchy of these files is shown below.AutoExecAutoExec (AUTOEXEC.EXE) automates operations such as pausing, launching processes, or signaling, and is configured through the AutoExec data file (AUTOEXEC.DAT). This script file must be in the same direc-tory as the program itself. Usage: AutoExec [-%[W]] [-E=["X"]] [-F=["Y"]] [-LOG=] [-W=[Z]]The return code from the process uses the standard error codes defined in WINERROR.H. Note: Intermec considers the usage of the AutoExec data file as “Intermec Private.” AutoExec installs Intermec applications such as Data Collection, Security Supplicants, Intermec Management, control panels, and shortcuts from components found in the Flash File System. Do not modify the AutoExec data file. Instead, use the AutoRun program to add software com-ponents.-% Passes an ID to use in a call to SignalStarted. This argument is useful only during system startup that relies on a SignalStarted to call. W is an integer value.-E Passes a signal event name to use when autoexec completes. X is a string value.-F Overrides the data file to use. This must be a fully qualified name. Default is “autoexec.dat” in the same loca-tion as the AUTOEXEC.EXE program. Y is a string value.-LOG Set to any value logs activity to AUTOEXEC.TXT (in the same location as the AUTOEXEC.EXE pro-gram). Default is disabled.-W Pauses the autoexec process by calling sleep for the number of seconds specified by Z. Z is an integer value.runautorun autoexec autorun autocopy autoreg foldercopy customer applications autocab autocab](https://usermanual.wiki/Intermec-Technologies/802UIAG.Users-Manual/User-Guide-548830-Page-56.png)
![Chapter 3 — Configuring the CK60 Computer46 CK60 Series Handheld Computer User’s ManualAutoRunAutoRun (AUTORUN.EXE) automates operations such as launching other processes and is configured through the AutoRun data file (AUTORUN.DAT). This script file must be in the same directory as the program itself.AutoRun supports the following script commands in AUTOUSER.DAT and AUTORUN.DAT.AutoRun handles quoted file names for the first parameter which allows you to specify path names or file names that contain white space. Note that only one set of quotes per command is supported.AUTORUN.DAT entry examples:AutoCopyAutoCopy (AUTOCOPY.EXE) copies or moves files from one location to another. It has no user interface and is configured through command line arguments. It has support for the following parameters, in no particular order:Usage: AutoCopy [-D["W"]] [-L["X"]] [-M[D]] [-Q[Y]] [-S["Z"]] Note: If you need to add steps at boot time, add them to AUTOUSER.DAT, not to AUTORUN.DAT. AUTORUN.DAT is pro-vided by Intermec and is subject to change. AUTOUSER.DAT is the desig-nated place for the end user to add steps to the boot time process.EXEC Launches a specified program, waits for it to complete (up to 10 minutes).CALL Processes a specified file of commands and returns.CHAIN Processes a specified file of commands and does not return.RUN Loads a specified program and executes it.LOAD Loads a specified program and executes it.RUN “Flash File Store\Apps\some.exe” arg1, arg2, arg3CALL “Flash File Store\2577\usercmds.dat”-D Indicates the destination file name and must be fully qualified. W is a string value.-L Indicates a fully qualified file name for logging to enable. Default is disabled. X is a string value.-M Moves file to a destination rather than copies the file. Default value is disabled. D is an integer value. D=1 indicates enabled, 0 is disabled.-Q Indicates if a message box should appear when an error occurs. Default is disabled. Y is an integer value.-S Indicates a source file name and must be fully qualified. Z is a string value.](https://usermanual.wiki/Intermec-Technologies/802UIAG.Users-Manual/User-Guide-548830-Page-58.png)
![Chapter 3 — Configuring the CK60 ComputerCK60 Series Handheld Computer User’s Manual 47The return code from the process uses the standard error codes defined in WINERROR.H.Example:; use AutoCopy to copy the control panel from flash file store to windows. autocopy.exe -S"\Flash File Store\System\Audio.cpl" -D"\Windows\Audio.cpl"; use AutoCopy to move the control panel from flash file store to windows. autocopy.exe -M1 -S"\Flash File Store\System\Audio.cpl" -D"\Windows\Audio.cpl"AutoRegThe AutoReg (AUTOREG.EXE) component adds registry information to the Windows CE registry. It has no user interface and is configured through command line arguments. Usage: AutoReg [-D] [-HKey] [-Q] “filename”The return code from the process uses the standard error codes defined in WINERROR.H.Example:; use AutoReg to install this registry information.autoreg.exe "\Flash File Store\install.reg"; use AutoReg to install this registry information. Delete the file afterwards.autoreg.exe -D "\Flash File Store\install.reg"; use AutoReg to extract registry information to a file. autoreg.exe -HHKEY_LOCAL_MACHINE\Software\Intermec\Version "\version.reg"The format of the input file, in this example, is the standard registry format which should ease the creation of the input file since there are many pub-licly available utilities to generate a registry file besides Notepad. One example of a tool is the Microsoft Remote Registry Editor.AutoCabAutoCab (AUTOCAB.EXE) extracts files, registry settings, and shortcuts from Windows CE cabinet (.CAB) files. The Windows CE startup sequence invokes AutoCab as a part of AutoExec and AutoRun. During the Windows CE startup sequence, AutoCab processes all CAB files in the “\CabFiles” directory relative to the current location of Autocab, unless the location is overridden by command line arguments. AutoCab can run as a stand-alone program to install a CAB file or a directory of CAB files.-D Deletes the registry file after successfully loading it. This allows for systems that have hives implemented.-H Saves the registry path, and all child entries, to the specific .REG registry file.-Q Indicates whether a message box should appear when a fatal error occurs.filename Fully qualified file name to read from or write to, encased in double quotes to support spaces in paths or file names. See examples below.](https://usermanual.wiki/Intermec-Technologies/802UIAG.Users-Manual/User-Guide-548830-Page-59.png)
![Chapter 3 — Configuring the CK60 Computer48 CK60 Series Handheld Computer User’s ManualAutoCab only installs the CAB file if it was not installed before by Auto-Cab. To track the installation of a CAB file, AutoCab marks the CAB file with the System attribute. This attribute is ignored if the device is perform-ing a cold-boot on a non-persistent file system.AutoCab preserves the CAB file after installation if the ReadOnly attribute is set. If not set, the CAB file is deleted automatically after installation.Usage:AutoCab [-ChkRst=][-File=][-Force][-Log=][-Move=][-Quiet=][-Show=][-Signal=]Command line switches are described below.If <PathName> references a single CAB file, that file is processed. If <Path-Name> references a directory, all the .CAB files in that directory is pro-cessed. If <PathName> is a wild card pattern, all files matching that pattern is processed, If <PathName> is omitted, InstallCab processes all the .CAB files in directory “\CabFiles.”Example:; Install all cab files in the \Flash File Store\XYZ directory, regardless.AutoCab -FILE="\Flash File Store\XYZ\*.cab" -FORCE; Install only one cab file, use Intermec cab installation displayAutoCab -FILE=”\myCab\app.cab” =show=2Customizing How Applications Load on the CK60 ComputerIf you have several processes that you need running in a specific order as the CK60 Computer turns on, you can use the AutoRun system to customize the way applications load. For compatibility with other Intermec comput-ers, you can place a copy of AUTORUN.EXE in the same folder as your AUTORUN.DAT file but it is not required.-ChkRst= Set to 1 to configure AutoCab to check for the Reset flag after all CAB files are installed. This file is cre-ated by CAB files that want a warm reset after installation. Default is 0 (do not check for flag).-File= Specifies the CAB files to extract. Note that the specified files need not end with the .CAB extension.-Force Forces the specified CAB files to extract regardless of whether it was previously extracted.-Log= Set to 1 to create a log file in the same folder that AutoCab is running. Useful for debugging CAB installation. Default is 0 (disabled).-Move= Set to 1 to force source CAB file deletion, even when read-only bit set on file. Default is 0 (disabled).-Quiet= Set to 0 to allow AutoCab to display user message box on errors. Useful for debugging CAB installation. Default is 1 (keep quiet).-Show= Set to 0 to prevent showing any installation progress interfaces. Also prevents user from canceling instal-lation. Set to 1 to show normal installation. Set to 2 to show Intermec installation progress interface (user can see what is installing but cannot cancel it). Default is 1 (show normal).-Signal= Set to string name of signal to use at the completion of CAB installation before a reboot occurs (if enabled). AutoCab uses WaitForSingleObject on this name. Default is disabled.](https://usermanual.wiki/Intermec-Technologies/802UIAG.Users-Manual/User-Guide-548830-Page-60.png)
![Chapter 3 — Configuring the CK60 ComputerCK60 Series Handheld Computer User’s Manual 91Using Reader CommandsAfter the CK60 Computer is connected to your network, you can send the CK60 Computer a reader command from an application to perform a task, such as changing the time and date. Some reader commands temporarily override the configuration settings and others change these settings.Change ConfigurationThe Change Configuration command must precede any configuration command. If you enter a valid string, the CK60 Computer configuration is modified and the computer emits a high beep. To send the Change Config-uration command through the network, use the $+ [command] syntax where command is the two-letter command syntax for the configuration command followed by the value to set for that command.You can also make changes to several different commands by using the $+ [command]...[command n] syntax. There are seven configuration com-mand settings that can be changed in this way. See each command for infor-mation on respective acceptable “data” values.Example 1To change the Beep Volume to Off, you can send this string to the CK60 Computer through the network:$+BV0where:$+Indicates Change Configuration.BVSpecifies the Audio Volume parameter.0Specifies a value of Off.Example 2To change the Beep Volume to Very Quiet and the Virtual Wedge Grid to 123:$+BV1AF123where:$+Indicates Change Configuration.BV1Specifies Audio Volume, set to Very Quiet (1)AF123Specifies Virtual Wedge Grid, set to a value of 123.Command SyntaxAudio Volume BVdataAutomatic Shutoff EZdataBacklight Timeout BFdataVirtual Wedge Grid AFdataPostamble AEdataPreamble ADdata](https://usermanual.wiki/Intermec-Technologies/802UIAG.Users-Manual/User-Guide-548830-Page-103.png)
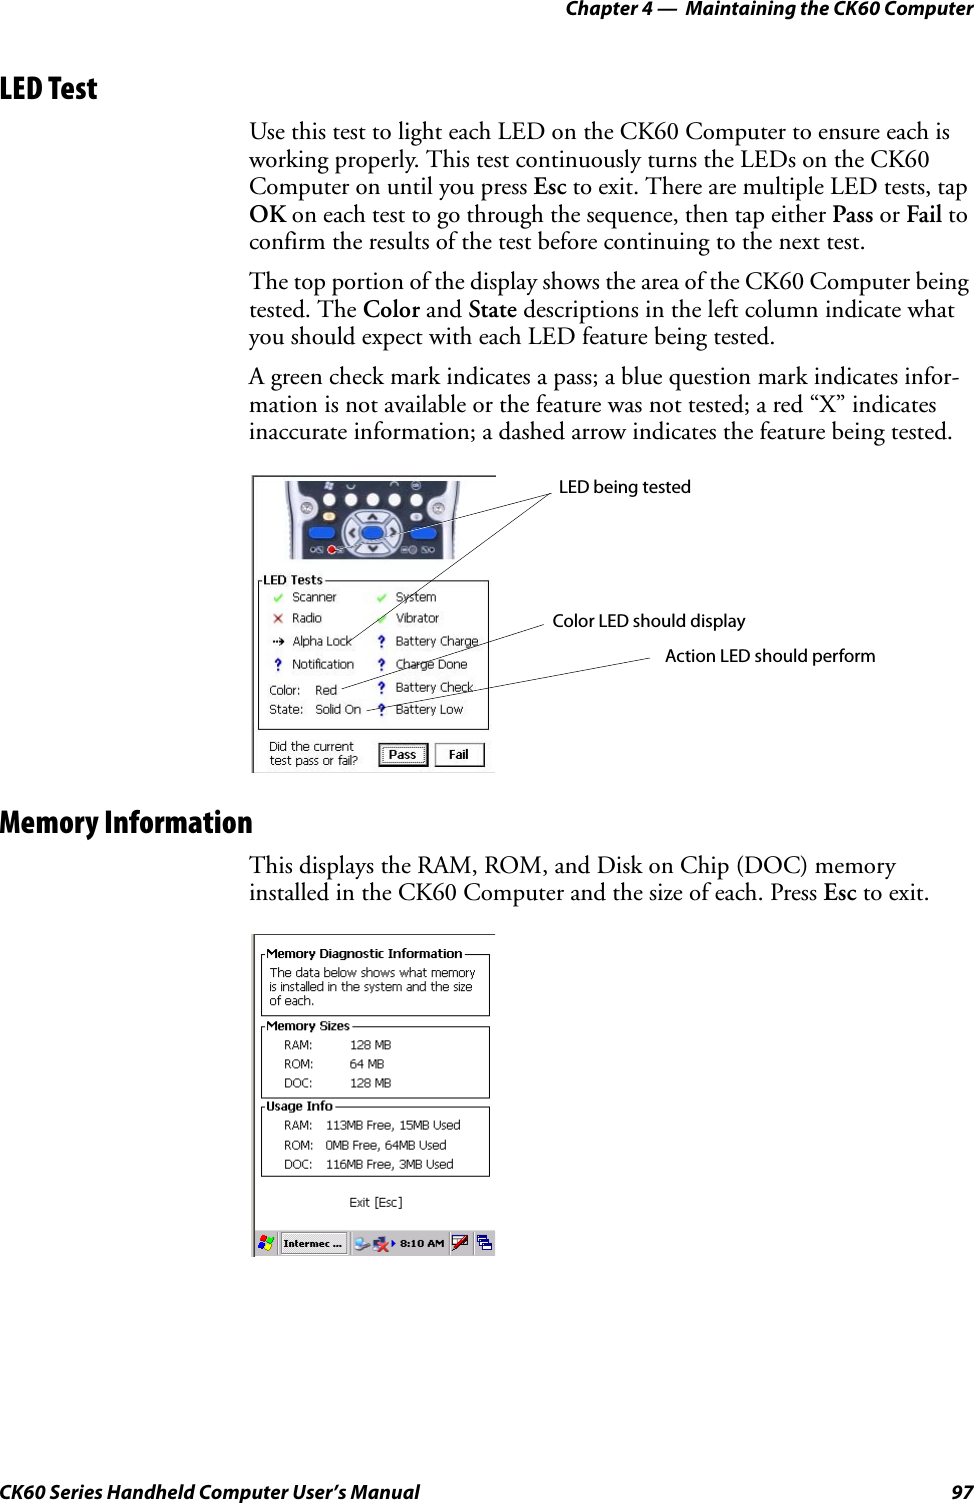
![Chapter 4 — Maintaining the CK60 Computer96 CK60 Series Handheld Computer User’s ManualHardware ConfigurationUse this test to read the hardware configuration and display it onscreen.The hardware configuration table shows important information about your CK60 Computer, such as the serial number, configuration number, model, software options, and scanner type. Share this information with your Inter-mec representative when consulting about hardware and software that may be installed at the factory.A green check mark indicates a pass; a blue question mark indicates infor-mation is not available; and a red “X” indicates inaccurate information.Keyboard (Keypad) TestUse this test to test the functionality of all the keys on your installed key-pad. This test runs continuously until you tap the screen to exit. Note that you do not test I key, or you will suspend the CK60 Computer. Press a key on the keypad for the screen to cover the same key with a block of color -- note the [8] key was pressed in the following illustration.Tap screen to exit the keypad testThe [8] key was pressed.](https://usermanual.wiki/Intermec-Technologies/802UIAG.Users-Manual/User-Guide-548830-Page-108.png)
![Chapter 6 — Bar Code SymbologiesCK60 Series Handheld Computer User’s Manual 117The fundamental requirement called for a symbology capable of being printed by existing data processing printers (primarily dot-matrix printers) that produce daily, work-in-progress, job, and product traceability docu-ments. The ability to print identification messages between 10 and 32 char-acters long, on existing forms and labels deemed an important requirement.Code 128 uniquely addresses this need as the most compact, complete, alphanumeric symbology available.Additionally, the Code 128 design with geometric features, improves scan-ner read performance, does self-checking, and provides data message man-agement function codes.Code 128 encodes the complete set of 128 ASCII characters without add-ing extra symbol elements. Code 128 contains a variable-length symbology and the ability to link one message to another for composite message trans-mission. Code 128, being a double-density field, provides two numeric val-ues in a single character.Code 128 follows the general bar code format of start code, data, check digit, stop code, and quiet code. An absolute minimum bar or space dimen-sion of nine mils (0.010 inch minimum nominal ± 0.001 inch tolerance) must be maintained.Characters in Code 128 consist of three bars and three spaces so that the total character set includes three start characters and a stop character.UCC/EAN-128 Shipping Container Labeling is a versatile tool that can ease movement of products and information. The Shipping Container Labeling bar code can take any form and usually has meaning only within the company or facility where applied.Because this random data can get mistaken later for an industry standard code format, the UCC and EAN chose a symbology uniquely identified from these other bar codes. This standard is for maximum flexibility, to handle the diversity of distribution in global markets by cost efficiency.The UCC/EAN-128 Container Labeling specification calls for a FUNC1 to immediately follow the bar code’s start character. FUNC1 also follows any variable-length application field. The specification also calls for the computer to send “]C1” for the first FUNC1. The specification requires that the computer send a “<GS>” (hex 1D) for subsequent FUNC1 codes in the bar code.Because “<GS>” is not compatible with computer emulation data streams, the Uniform Code Council has been asked to change the specification. This change is made to send the same three character sequence “]C1” to identify the embedded FUNC1 codes.This implementation should provide for clean application coding by identi-fying the same sequences for the same scanned codes. If the communication of bar code types is enabled, the Shipping Container Label codes precede with a “J”. These strings will appear on the computer display. The applica-tion may have to allow for strings longer than 48 characters (maximum](https://usermanual.wiki/Intermec-Technologies/802UIAG.Users-Manual/User-Guide-548830-Page-129.png)