Intermec Technologies CK31MIG2 802MIG2 User Manual 074023 front ai

Intermec Technologies Corporation 802MIG2 074023 front ai

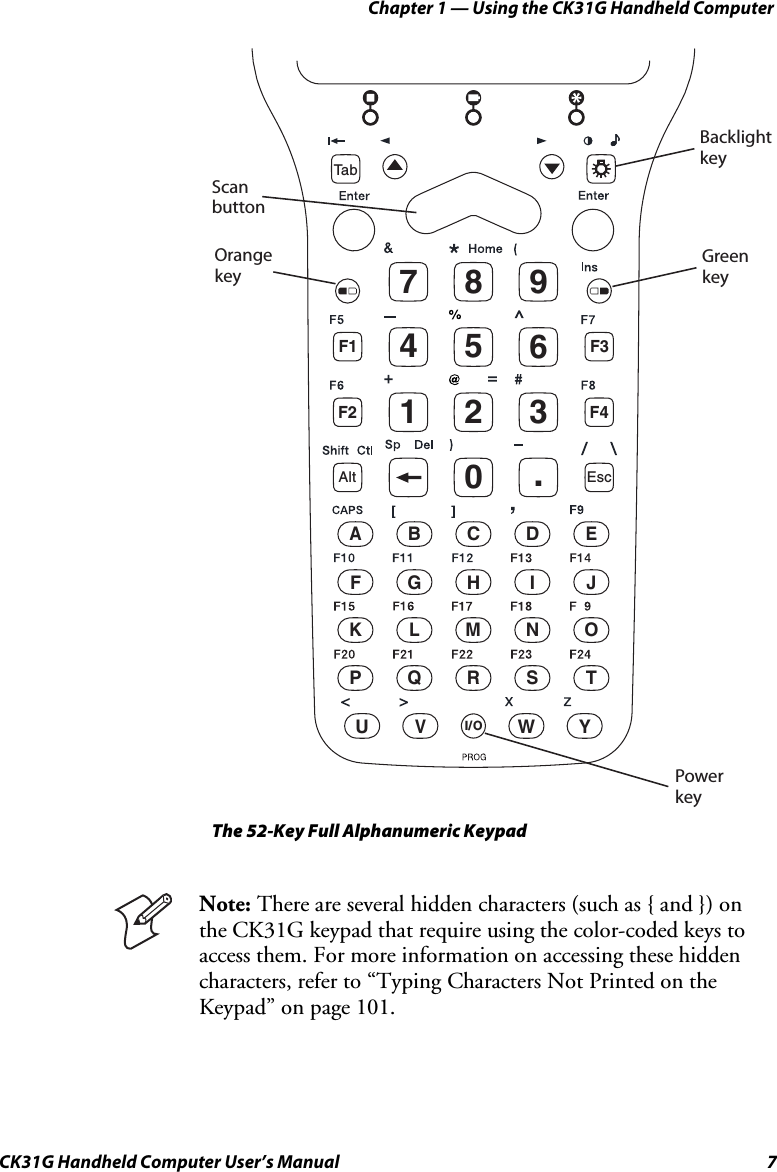
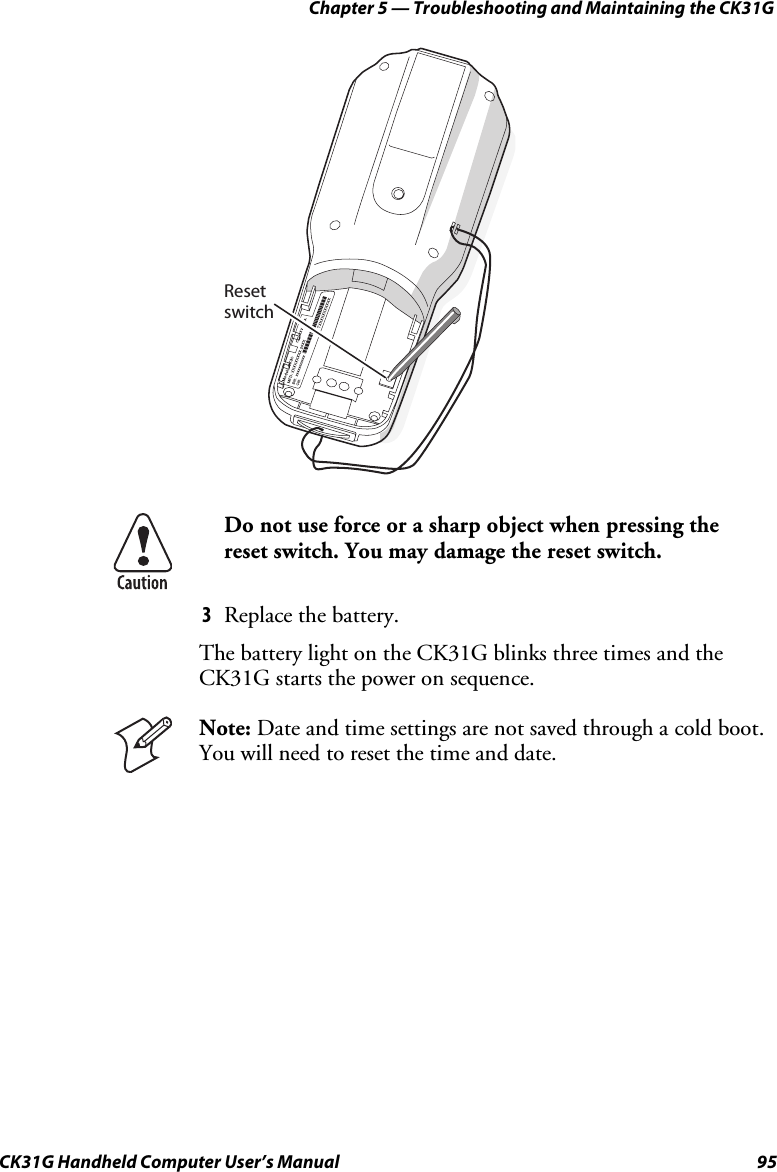
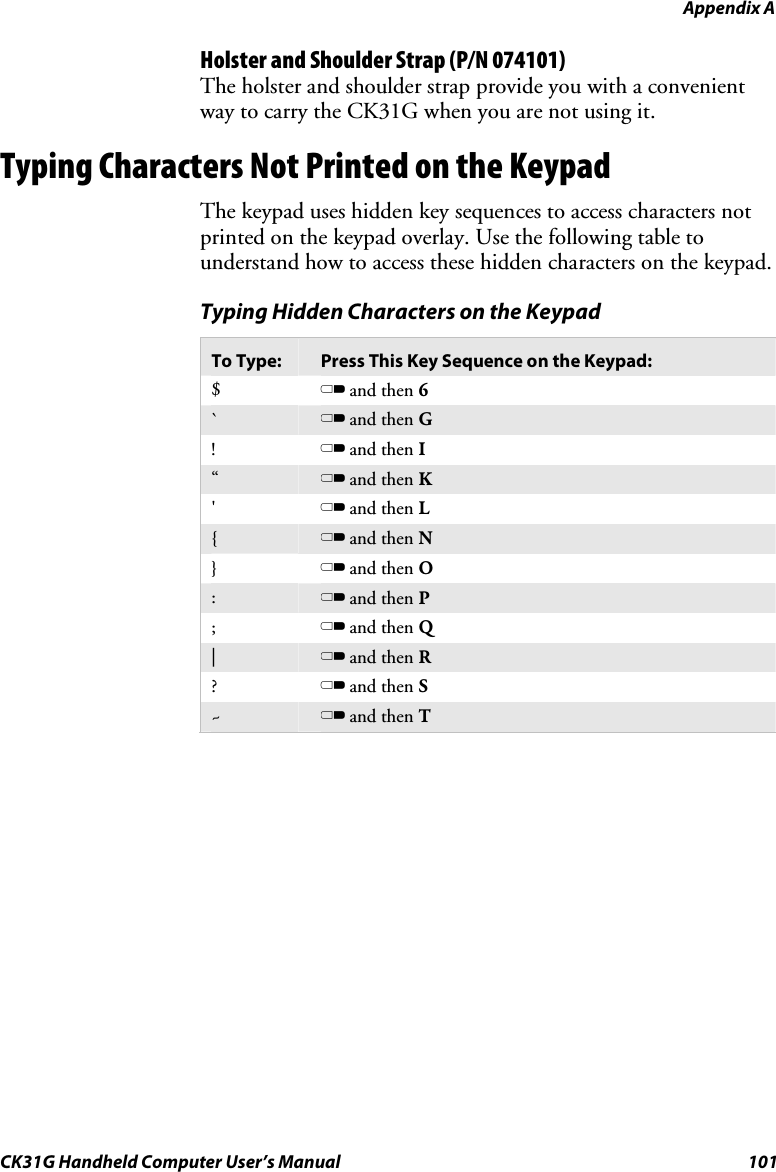
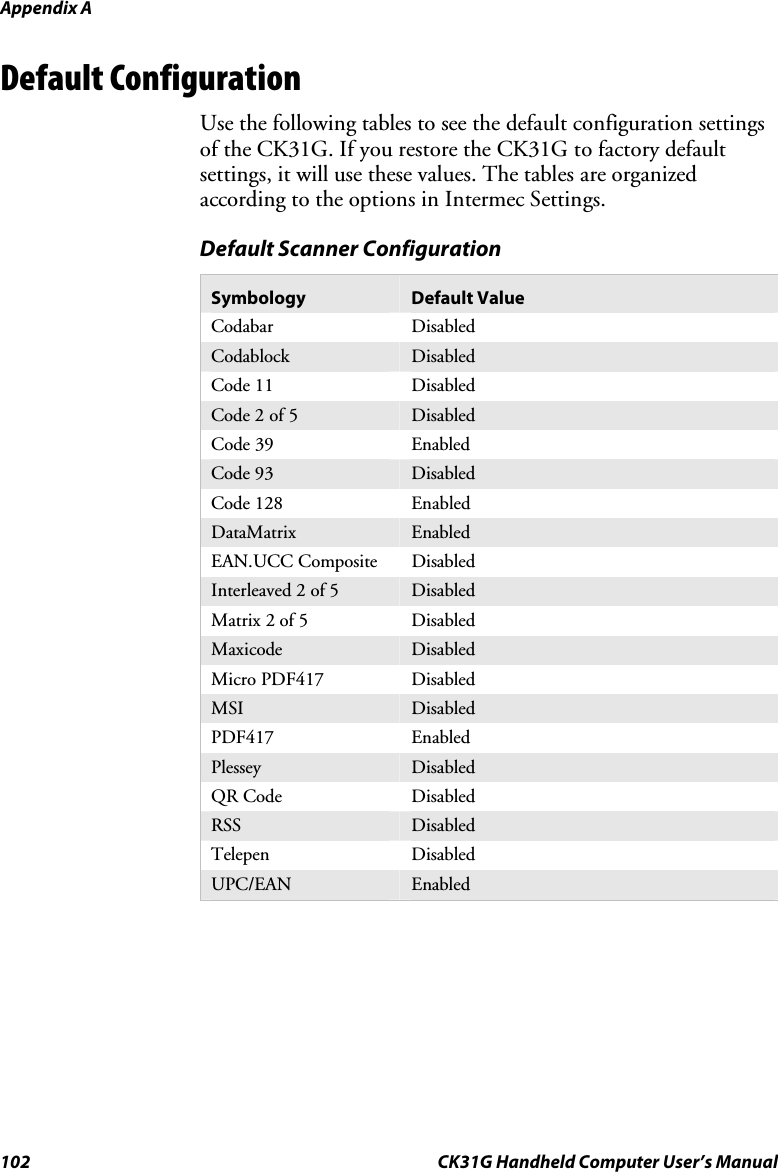
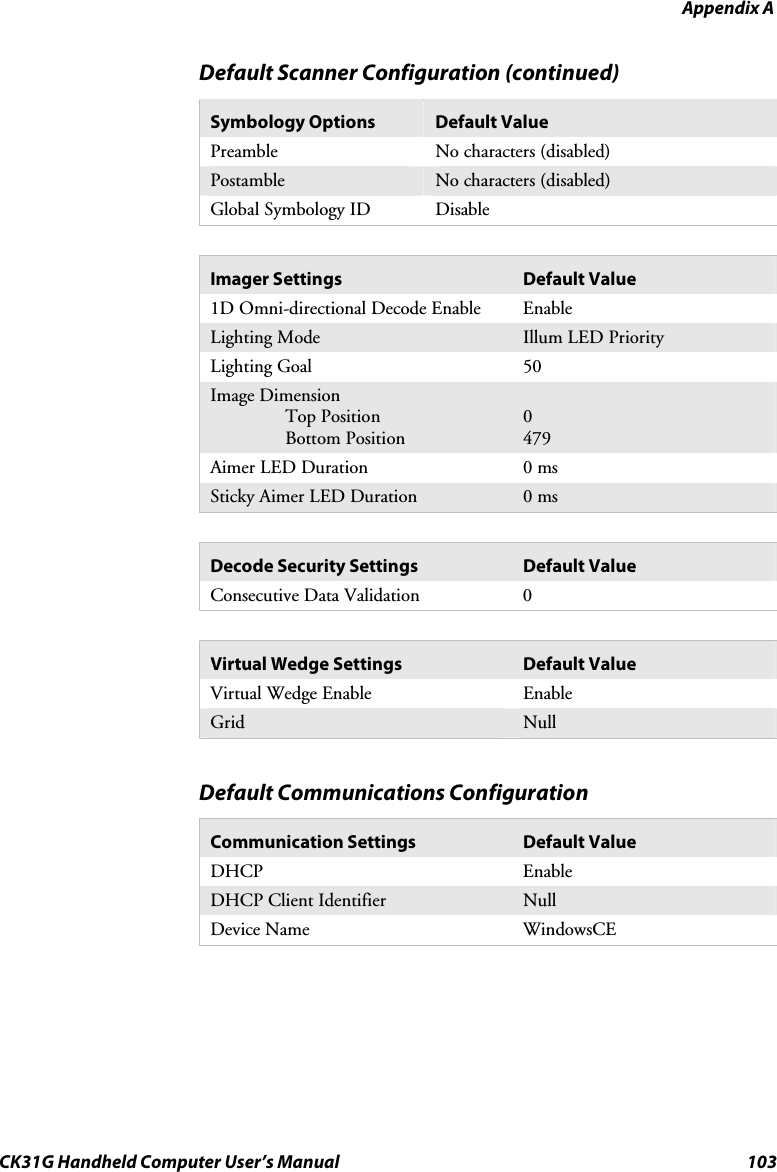
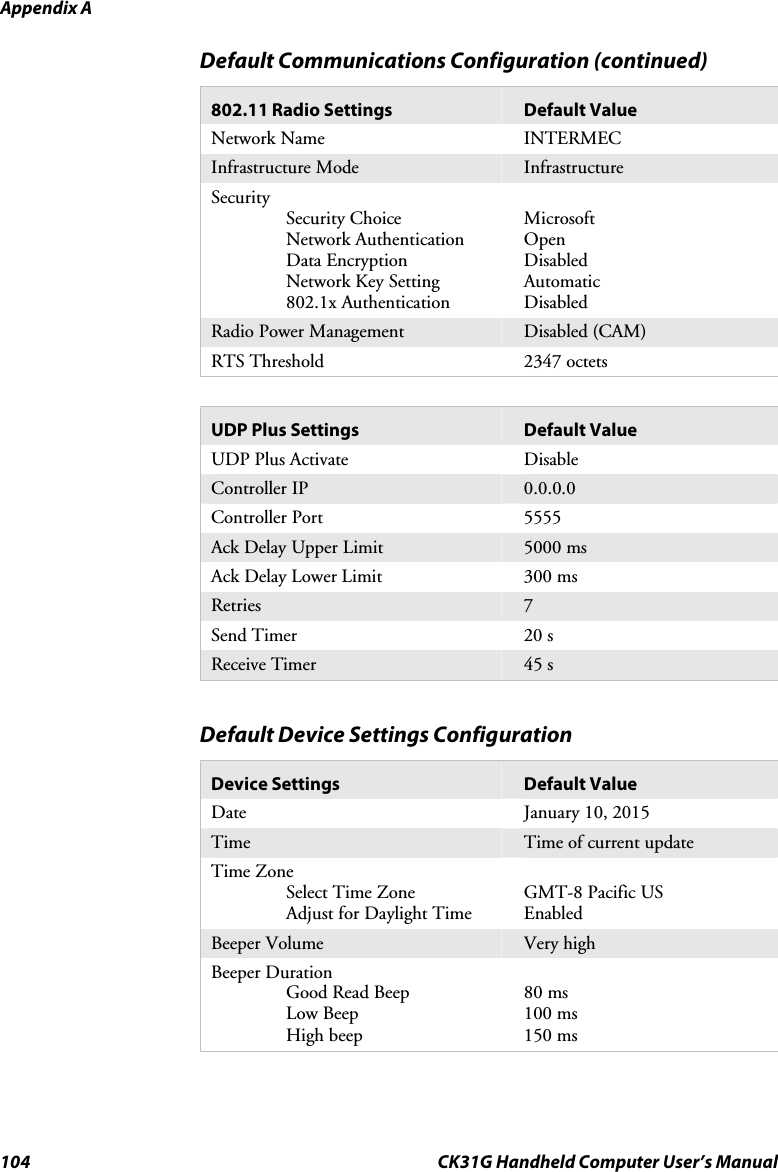
Intermec User Manual

CK31G Handheld ComputerUser's Manual
ii CK31G Handheld Computer User’s Manual Intermec Technologies Corporation Corporate Headquarters 6001 36th Ave. W. Everett, WA  98203 U.S.A. www.intermec.com  The information contained herein is proprietary and is provided solely for the purpose of allowing customers to operate and service Intermec-manufactured equipment and is not to be released, reproduced, or used for any other purpose without written permission of Intermec. Information and specifications contained in this document are subject to change without prior notice and do not represent a commitment on the part of Intermec Technologies Corporation. © 2004 by Intermec Technologies Corporation. All rights reserved. The word Intermec, the Intermec logo, Norand, ArciTech, CrossBar, Data Collection Browser, dcBrowser, Duratherm, EasyCoder, EasyLAN, Enterprise Wireless LAN, EZBuilder, Fingerprint, i-gistics, INCA (under license), InterDriver, Intermec Printer Network Manager, IRL, JANUS, LabelShop, Mobile Framework, MobileLAN, Nor*Ware, Pen*Key, Precision Print, PrintSet, RoutePower, TE 2000, Trakker Antares, UAP, Universal Access Point, and Virtual Wedge are either trademarks or registered trademarks of Intermec Technologies Corporation. Throughout this manual, trademarked names may be used. Rather than put a trademark (™ or ®) symbol in every occurrence of a trademarked name, we state that we are using the names only in an editorial fashion, and to the benefit of the trademark owner, with no intention of infringement.
Contents CK31G Handheld Computer User’s Manual iii Contents Before You Begin......................................................................................................vii Safety Summary .........................................................................................vii Safety Icons...............................................................................................viii Global Services and Support......................................................................viii Who Should Read This Document? ............................................................ix Related Documents .....................................................................................ix Patent Information.......................................................................................x Other Copyright Information.......................................................................x Using the CK31G Handheld Computer .............................................. 1 Introducing the CK31G Handheld Computer........................................................... 2 Using the Battery....................................................................................................... 3 Charging and Installing the Battery ............................................................. 4 Maximizing Battery Life .............................................................................. 5 Checking the Battery Status......................................................................... 6 Using the Keypad ...................................................................................................... 6 Using the Color-Coded Keys....................................................................... 8 Capitalizing All Characters .......................................................................... 9 Using the Power (I) Key............................................................................. 9 Disabling or Modifying Keypad Functions ................................................ 10 Using the Touch Screen........................................................................................... 12 Using the Touch Screen and Stylus ........................................................... 12 Understanding the Desktop....................................................................... 13 Understanding the Screen Icons ................................................................ 16 Repositioning a Window........................................................................... 17 Calibrating the Screen ............................................................................... 18 Understanding the Status Lights .............................................................................. 18 Understanding the Beeps......................................................................................... 19 Scanning Bar Codes................................................................................................. 20 Using the SD Card .................................................................................................. 22 1
Contents iv CK31G Handheld Computer User’s Manual Configuring the CK31G ................................................................................ 25 How to Configure the CK31G Parameters .............................................................. 26 Configuring the CK31G With the Setup Assistant .................................... 27 Configuring the CK31G Locally With Intermec Settings .......................... 28 Configuring the CK31G Remotely With Intermec Settings....................... 32 Configuring the CK31G for Your Network ............................................................. 32 Configuring Serial Communications ......................................................... 33 Configuring 802.11b/g Radio Communications........................................ 34 Configuring Security ............................................................................................... 37 Using Funk Security.................................................................................. 38 Using WPA Security.................................................................................. 39 Using 802.1x Security ............................................................................... 44 Using LEAP Security................................................................................. 47 Using Static WEP Security ........................................................................ 48 Loading a Certificate ................................................................................. 50 Disabling Security ..................................................................................... 53 Developing and Installing Applications......................................... 55 Developing Applications for the CK31G ................................................................. 56 Developing a New Application.................................................................. 56 Developing a Web-Based Application........................................................ 57 Installing Applications on the CK31G..................................................................... 57 Installing Applications Using ActiveSync................................................... 58 Installing Applications Using Your SD Card.............................................. 62 Installing Applications Using the FTP Server............................................. 62 Installing Applications Using Wavelink Avalanche..................................... 63 Launching Your Application Automatically ............................................................. 63 Setting or Changing the CK31G Password .............................................................. 64 Backing Up Your Files............................................................................................. 65 Upgrading Your CK31G ......................................................................................... 66 Upgrading the Operating System Using an SD Card................................. 66 Upgrading Your CK31G Remotely Using Intermec Settings ..................... 68 2 3
Contents CK31G Handheld Computer User’s Manual v Running Diagnostics...................................................................................... 71 Using Diagnostics on the CK31G............................................................................ 72 Understanding the Diagnostics Screens.................................................................... 72 802.11 Information................................................................................... 73 Authentication Information....................................................................... 73 Battery Information................................................................................... 74 Boot Code Version.................................................................................... 75 Button Link Reader Test........................................................................... 75 Configuration Table.................................................................................. 76 CPU Registers........................................................................................... 77 Display Test.............................................................................................. 78 Installed Fonts........................................................................................... 78 Intermec Value Version............................................................................. 79 Keypad Test .............................................................................................. 80 LED Test .................................................................................................. 80 Network Information................................................................................ 81 Network Test ............................................................................................ 81 Operating System Version ......................................................................... 82 Ping Utility ............................................................................................... 83 RAM Information..................................................................................... 83 SD Card Memory Test.............................................................................. 84 Sound Test................................................................................................ 85 Troubleshooting and Maintaining the CK31G........................... 87 Problems and Solutions ........................................................................................... 88 Problems While Operating the CK31G..................................................... 88 Problems While Configuring 802.1x Security............................................ 89 Problems With Wireless Connectivity ....................................................... 91 Problems Transmitting Data Through the Serial Port................................ 92 Problems While Scanning Bar Codes......................................................... 92 Booting the CK31G ................................................................................................ 94 Warm Booting the CK31G ....................................................................... 94 Cold Booting the CK31G ......................................................................... 94 Cleaning the Scanner Window and Screen............................................................... 96 45
Contents vi CK31G Handheld Computer User’s Manual Appendix................................................................................................................. 97 Physical and Environmental Specifications............................................................... 98 Accessories for the CK31G .................................................................................... 100 Typing Characters Not Printed on the Keypad ...................................................... 101 Default Configuration ........................................................................................... 102 Index ......................................................................................................................... 107  AI
Before You Begin CK31G Handheld Computer User’s Manual vii Before You Begin This section provides you with safety information, technical support information, and sources for additional product information. Safety Summary Your safety is extremely important. Read and follow all warnings and cautions in this document before handling and operating Intermec equipment. You can be seriously injured, and equipment and data can be damaged if you do not follow the safety warnings and cautions. Do Not Repair or Adjust Alone Do not repair or adjust energized equipment alone under any circumstances. Someone capable of providing first aid must always be present for your safety. First Aid Always obtain first aid or medical attention immediately after an injury. Never neglect an injury, no matter how slight it seems. Resuscitation Begin resuscitation immediately if someone is injured and stops breathing. Any delay could result in death. To work on or near high voltage, you should be familiar with approved industrial first aid methods. Energized Equipment Never work on energized equipment unless authorized by a responsible authority. Energized electrical equipment is dangerous. Electrical shock from energized equipment can cause death. If you must perform authorized emergency work on energized equipment, be sure that you comply strictly with approved safety regulations.
Before You Begin viii CK31G Handheld Computer User’s Manual Safety Icons  This section explains how to identify and understand warnings, cautions, and notes that are in this document.  A warning alerts you of an operating procedure, practice, condition, or statement that must be strictly observed to avoid death or serious injury to the persons working on the equipment.  A caution alerts you to an operating procedure, practice, condition, or statement that must be strictly observed to prevent equipment damage or destruction, or corruption or loss of data.  Note: Notes either provide extra information about a topic or contain special instructions for handling a particular condition or set of circumstances. Global Services and Support Warranty Information To understand the warranty for your Intermec product, visit the Intermec web site at http://www.intermec.com and click Service & Support > Service & Support. The Intermec Global Sales & Service page appears. From the Service & Support menu, move your pointer over Support, and then click Warranty. Disclaimer of warranties: The sample code included in this document is presented for reference only. The code does not necessarily represent complete, tested programs. The code is provided “as is with all faults.” All warranties are expressly disclaimed, including the implied warranties of merchantability and fitness for a particular purpose.
Before You Begin CK31G Handheld Computer User’s Manual ix Web Support Visit the Intermec web site at http://www.intermec.com to download our current manuals in PDF format. To order printed versions of the Intermec manuals, contact your local Intermec representative or distributor. Visit the Intermec technical knowledge base (Knowledge Central) at http://intermec.custhelp.com to review technical information or to request technical support for your Intermec product. Telephone Support You can find information on Intermec telephone support services at http://www.intermec.com/AIT. To find the correct telephone support number for your country, click Contact. Who Should Read This Document? The CK31G Handheld Computer User’s Manual provides you with information about the features of the CK31G and how to install, operate, maintain, and troubleshoot the CK31G. Before you install and configure the CK31G, you should be familiar with your network and general networking terms, such as IP address.  The Intermec Computer Command Reference Manual (P/N 073529) is available as a download from the Intermec web site. Please refer to this manual for help configuring your CK31G. The reference manual contains information about most of the CK31G commands. Related Documents The Intermec web site at http://www.intermec.com contains our documents that you can download in PDF format.  To order printed versions of the Intermec manuals, contact your local Intermec representative or distributor.
Before You Begin x CK31G Handheld Computer User’s Manual Patent Information Product is covered by one or more of the following patents: 4,455,523; 5,627,360; 4,553,081; 5,657,317; 4,709,202; 5,671,436; 4,845,419; 5,684,290; 4,961,043; 5,777,309; 5,195,183; 5,793,604; 5,216,233; 5,805,807; 5,218,187; 5,818,027; 5,218,188; 5,821,523; 5,227,614; 5,828,052; 5,241,488; 5,831,819; 5,278,487; 5,834,753; 5,322,991; 5,841,121; 5,331,136; 5,844,222; 5,331,580; 5,883,492; 5,349,678; 5,883,493; 5,397,885; 5,886,338; 5,371,858; 5,889,386; 5,373,478; 5,898,162; 5,410,141; 5,969,328; 5,488,575; 5,986,435; 5,500,516; 6,075,340; 5,504,367; 6,109,528; 5,508,599; 6,158,661; 5,530,619; 6,234,395; 5,567,925; 6,244,512; 5,568,645; 6,330,975; 5,592,512; 6,431,451; 5,598,007, 6,497,368; 5,617,343; 6,538,413.  There may be other U.S. and foreign patents pending. Other Copyright Information Microsoft, Windows, and the Windows logo are registered trademarks of Microsoft Corporation in the United States and/or other countries.  Wi-Fi is a registered certification mark of the Wi-Fi Alliance. This product includes software developed by the OpenSSL Project for use in the OpenSSL Toolkit. (http://www.openssl.org/) This product includes cryptographic software written by Eric Young. (eay@cryptsoft.com) This product uses Regex++, Index software during its operational phases. The owner of Regex++ has granted use of the software to anyone provided such use is accompanied by the following copyright and permission notice: Regex++, Index. (Version 3.31, 16th Dec 2001) Copyright © 1998-2001 Dr John Maddock
Before You Begin CK31G Handheld Computer User’s Manual xi Permission to use, copy, modify, distribute and sell this software and its documentation for any purpose is hereby granted without fee, provided that the above copyright notice appear in all copies and that both that copyright notice and this permission notice appear in supporting documentation. Dr John Maddock makes no representations about the suitability of this software for any purpose. It is provided “as is” without express or implied warranty.
Before You Begin xii CK31G Handheld Computer User’s Manual
 CK31G Handheld Computer User’s Manual  1  Using the CK31G Handheld Computer Use this chapter to familiarize yourself with the CK31G Handheld Computer. In this chapter you will find these sections: •  Introducing the CK31G Handheld Computer •  Using the Battery •  Using the Keypad •  Using the Touch Screen •  Understanding the Status Lights •  Understanding the Beeps •  Scanning Bar Codes •  Using the SD Card 1
Chapter 1 — Using the CK31G Handheld Computer 2  CK31G Handheld Computer User’s Manual Introducing the CK31G Handheld Computer The Intermec CK31G is an ergonomically designed handheld computer built on the Microsoft® Windows® CE .NET operating system. It is a lightweight, easy-to-use, reliable computer that runs client/server applications and browser-based applications.  13KCReady-to-WorkIndicator (blue)Good readlight (green)Touch screenUser-definedlightsScanbuttonSerialportSerialportcoverBatteryBatterylight CK31G Handheld Computer  CK31G Handheld Computers with an IEEE 802.11b/g radio installed are Wi-Fi® certified for interoperability with other 802.11b/g wireless LAN devices.
Chapter 1 — Using the CK31G Handheld Computer CK31G Handheld Computer User’s Manual  3 The CK31G includes these features: • 802.11b/g radio •  .NET Compact Framework •  Internet Explorer 6, SQL Server CE •  CCX v1.0 compliance •  Color display with touch screen •  2D area imager •  64MB RAM/64MB Flash Memory • 400 MHz Processor For a complete list of accessories, see “Accessories for the CK31G” on page 100. Using the Battery The CK31G uses an AB1G lithium-ion battery as its main power source. You must fully charge the main battery before you can use the CK31G. When you change the battery, a backup battery maintains your status, memory, and real-time clock for at least 10 minutes. If the battery light blinks or turns on solid, you cannot restore factory defaults or perform a warm or cold boot on your CK31G by using the I key. You must replace the battery with a fully charged battery before you can restore factory defaults or boot your CK31G.
Chapter 1 — Using the CK31G Handheld Computer 4  CK31G Handheld Computer User’s Manual   The lithium-ion battery pack that is used in this device may present a fire or chemical burn hazard if it is mistreated. Do not disassemble it, heat it above 100°C (212°F) or incinerate it.  Removing the main battery when the backup battery low or critically low icon displays in the status bar may cause your CK31G to cold boot and you may lose data.  If you fail to replace the battery immediately, you may lose important data or applications.    Dispose of used battery packs promptly. Keep away from children. Contact your local Intermec sales representative for replacement batteries. Several factors determine the life of your battery such as extreme temperatures, input devices, and your usage. For example, if you use a tethered scanner every day, you will need to replace your battery more often than someone who uses an internal scanner. Charging and Installing the Battery Make sure you fully charge the AB1G battery before you use your CK31G. You can charge the battery before or after you install it into the CK31G. To charge the battery •  Either insert the battery into the AC1 4-slot battery charger or place the CK31G with battery installed in the AD1 1-Bay Communications Dock. For more information on these accessories, see page 100. Use the next table to understand how long it will take to charge your batteries in each of the CK31G charging or communications dock accessories.
Chapter 1 — Using the CK31G Handheld Computer CK31G Handheld Computer User’s Manual  5 Charging Times for CK31G Batteries CK31G Accessory  Charging Time AC1 4-Slot Battery Charger  5 hours AD1 1-Bay Communications Dock  3 hours   To install the battery •  Insert the tabs on the bottom of the charged battery into the CK31G and snap the battery into place.   Battery latchAB1G battery Maximizing Battery Life There are several things that you can do to maximize the life of your fully charged battery. 1  Verify that Radio Power Management is enabled (Fast PSP). Enabling radio power management allows your radio to switch between awake and sleep modes based on network traffic. 2  Verify that the backlight timeout is set to 15 seconds. 3  Verify that each setting under Power Management has a value of 1 minute for a combined automatic shutoff time of 3 minutes.
Chapter 1 — Using the CK31G Handheld Computer 6  CK31G Handheld Computer User’s Manual You can use Intermec Settings to easily make all of these configuration changes. For help, see “Configuring the CK31G Locally With Intermec Settings” on page 28. Checking the Battery Status The easiest way to tell the status of your battery is to look at the battery icon in the status bar of your CK31G. Battery Icon Status Icon  Status  Battery has a medium charge. You should be able to work for several more hours before changing batteries.  Battery is low. You need to replace the battery soon.  Battery is critically low. You need to replace the battery now.   You can also check the battery status by looking at the Battery Status light on the front of the CK31G or by using the battery diagnostics screen. For help using the Battery Status light, see “Understanding the Status Lights” on page 18. For help using the Battery Information diagnostic screen, see “Battery Information” on page 74. Using the Keypad Your CK31G has a 52-key full alphanumeric keypad. The 52-key full alphanumeric keypad is designed for applications that enter mainly numeric data (0-9) and that may need to enter the entire alphabet. The keypad also provides function keys (F1-F24) and special characters, symbols, and functions by pressing color-coded key sequences.
Chapter 1 — Using the CK31G Handheld Computer CK31G Handheld Computer User’s Manual  7 789120.3456F1F2F3F4ABCDEFGHIJKLMNOPQRSTUVWYEscI/OAltTa bScanbuttonOrangekeyGreenkeyBacklightkeyPowerkey   The 52-Key Full Alphanumeric Keypad  Note: There are several hidden characters (such as { and }) on the CK31G keypad that require using the color-coded keys to access them. For more information on accessing these hidden characters, refer to “Typing Characters Not Printed on the Keypad” on page 101.
Chapter 1 — Using the CK31G Handheld Computer 8  CK31G Handheld Computer User’s Manual Using the Color-Coded Keys The keypad of the CK31G provides color-coded keys to let you access additional characters, symbols, and functions printed on the keypad overlay. Once you understand how to use the color-coded keys and key sequences, you will know how to access all of the additional features printed on the keypad overlay. There are two color-coded modifier keys on the CK31G: the orange B key and the green C key. You press and release the first key and then press and release the second key to access the color-coded character or function printed above a key. Using the Color-Coded Keys You Want To:  Press:  Example Use an orange character or function printed above a key. B key and then the key with character or function printed above it. Press B and then 2 to type the @ character. Use a green character or function printed above a key. C key and then the key with character or function printed above it. Press C and then 2 to type the = character. Lock the orange, green, Ctl, Alt, or Shift key to stay on. B , C, Ctl, Alt, or Shift key twice. Press C twice and the  appears in the status bar. Unlock a green, orange, Ctl, Alt, or Shift key. B , C, Ctl, Alt, or Shift key once. If   is in the status bar, press Alt and the locked icon disappears from the status bar.
Chapter 1 — Using the CK31G Handheld Computer CK31G Handheld Computer User’s Manual  9 Capitalizing All Characters To type all alphabetic characters as uppercase letters, you can enable the Caps Lock feature on the CK31G keypad. To enable Caps Lock 1  Press the orange  key. The   icon appears on the status bar. 2  Press A. The Caps Lock icon (   ) appears on the status bar. 3  Type an alphanumeric character. The letter appears as an uppercase character on the screen.  To disable Caps Lock •  Press the orange  key and then press A. The Caps Lock icon disappears from the status bar. Using the Power (I) Key When you press the I key to turn off the CK31G, you actually put the computer in Suspend mode. In Suspend mode, the CK31G continues to supply power to all memory, but turns off power to most hardware. This power-saving feature is designed to prolong battery life. When you press the I key to turn the CK31G back on, your computer resumes where it was when you turned it off. If you are using WPA or 802.1x security, the computer may need to reauthenticate before it starts your application.  If the Battery light flashes and your CK31G does not resume after pressing I, your battery may be too low to supply power. Replace the battery. If replacing the battery does not solve the problem, see “Booting the CK31G” on page 94.
Chapter 1 — Using the CK31G Handheld Computer 10  CK31G Handheld Computer User’s Manual Disabling or Modifying Keypad Functions You can disable the functionality of several keys on the keypad if you want to restrict the ability to perform adjustments made from the keypad, such as changing the display contrast. You can disable these keypad functions: • Beeper volume • Display contrast •  Backlight on and off •  Task Manager (opened by pressing Alt and then Tab)  You can modify this keypad function: •  The behavior of the I key. You can configure the boot functionality to either warm or cold boot when you press and hold the I key for five seconds. To disable keypad functions 1  From the Start menu, tap Intermec Settings. The Intermec Settings application appears. 2  Tap Device Settings > Keypad. The Keypad menu expands to show you the options.     3  Tap the function you want to disable from the Keypad menu to expand the branch.
Chapter 1 — Using the CK31G Handheld Computer CK31G Handheld Computer User’s Manual  11 4  Tap Disable to select it. 5  Save your changes and exit Intermec Settings. To change the I key behavior 1  From the Start menu, tap Intermec Settings. The Intermec Settings application appears. 2  Tap Device Settings > Keypad. The Keypad menu expands to show you the options. 3  Tap Configure Boot Functionality and select Warm boot or Cold boot.     4  Save your changes and exit Intermec Settings.
Chapter 1 — Using the CK31G Handheld Computer 12  CK31G Handheld Computer User’s Manual Using the Touch Screen The CK31G has a color touch screen display. The screen is 240 x 320 pixels. The desktop is 240 x 320 pixels and the taskbar is 240 x 20 pixels. In addition, the screen supports Unicode characters, user-programmable fonts, and bitmap graphics.    CK31G Start Screen Using the Touch Screen and Stylus Your CK31G has a stylus for selecting items and entering information. Use the stylus in place of a mouse.   Functions You Can Perform With the Stylus Action  Description Tap  Touch the screen once with the stylus to open items and select options. Drag  Hold the stylus on the screen and drag across the screen to select text and images.  Tap and hold  Tap and hold the stylus on an item to see a list of actions available for that item. On the pop-up menu that appears, tap the action you want to perform.   Desktop Taskbar
Chapter 1 — Using the CK31G Handheld Computer CK31G Handheld Computer User’s Manual  13 Understanding the Desktop The Start screen has two distinct areas: the desktop and the taskbar. The desktop displays shortcuts to some of the applications installed on the CK31G. The first time you turn on the CK31G, the taskbar displays the Start menu icon, the time, the keyboard icon, and the desktop icon. Most of the default shortcuts on the desktop are standard Windows CE applications. However, Intermec provides shortcuts to two additional applications: ScanDemo and Transcriber. ScanDemo is a simple application you can use to verify that your imager is working correctly. Transcriber enables you to write on the screen with your stylus and it converts your writing to text. Using ScanDemo ScanDemo is an application that enables the CK31G to read bar code labels and display the information encoded on the label along with the symbology used to encode it. To open ScanDemo 1  Double-tap the ScanDemo shortcut on the desktop. The ScanDemo application opens. 2  Scan a bar code label. For information on how to scan a bar code label, see “Scanning Bar Codes” on page 20. The information you scanned along with the symbology used to encode it appears on the screen:
Chapter 1 — Using the CK31G Handheld Computer 14  CK31G Handheld Computer User’s Manual To enable or disable symbologies 1  From the ScanDemo window, tap the Symbologies button to see the symbologies that are enabled.     2  Select or clear the symbologies you want to use and tap Back. 3  If you want to enable symbologies not shown on the Scanner Symbologies window, tap Intermec Settings. Intermec Settings appears on your screen. 4  From the Intermec Settings application, go to Scanners, Symbologies > Internal Scanner > Symbologies. 5  Enable or disable any of the symbologies you want to use. 6  Save your settings and close Intermec Settings. The Scanner Symbologies window reappears. 7  Tap Back. 8  Scan bar code labels. Using Transcriber In a program that accepts writing, such as Microsoft WordPad, you can use your stylus to write directly on the screen. Write the way you do on paper (print or cursive) and the Transcriber program will convert your writing to text.
Chapter 1 — Using the CK31G Handheld Computer CK31G Handheld Computer User’s Manual  15 To turn on Transcriber • Double-tap the Transcriber shortcut on the desktop or go to Start > Programs > Transcriber. The Transcriber Intro box appears and an icon ( ) appears in the taskbar with a dark gray background. To turn off Transcriber •  Tap the Transcriber icon in the taskbar. The background of the Transcriber icon turns light gray to match the taskbar and using the stylus does not produce a line on your desktop. To close Transcriber 1  Tap and hold the Transcriber icon in the taskbar until the menu appears. 2  Tap Close Transcriber. To select text 1  Tap and hold the stylus next to the text you want to select until the insertion point appears. 2  Without lifting, drag the stylus across the text you want to select. To get help for Transcriber 1  Tap and hold the Transcriber icon in the taskbar until the menu appears. 2  Tap Help. The help system for Transcriber appears on the screen.
Chapter 1 — Using the CK31G Handheld Computer 16  CK31G Handheld Computer User’s Manual Understanding the Screen Icons Use the screen icons on the status bar to see the battery status, network connections, and special keys or functions you may be using. Standard Microsoft icons are not included in this table. CK31G Screen Icons Icon  Description  Battery is low. You need to replace the battery soon.  Battery is critically low. You need to replace the battery now.   Backup battery is low. Charge or replace the AB1G battery now.  The CK31G is connected using ActiveSync.  CK31G is authenticated with strong connection to the access point.  CK31G is authenticated with good connection to the access point.  CK31G is authenticated with weak connection to the access point.  CK31G is associated with a strong connection to the access point.  CK31G is associated with a good connection to the access point.  CK31G is associated with a weak connection to the access point.  No connection to the access point. For help, see “Problems with Wireless Connectivity” on page 91.  Orange key is enabled.  Green key is enabled.  Orange key is locked.  Green key is locked.  Alt key is enabled.  Alt key is locked.    Ctl key is enabled.  Ctl key is locked.  Shift key is enabled.  Shift key is locked.  Caps Lock key is enabled.  No UDP Plus connection. For help, see “Configuring the Network Parameters for a UDP Plus Network” on page 36.  UDP Plus is transferring data.  UDP Plus is connected.  The window positioning feature is turned on.
Chapter 1 — Using the CK31G Handheld Computer CK31G Handheld Computer User’s Manual  17 Repositioning a Window If you need to move a window to see more of a screen, you can reposition the window without having to use the mouse pointer. When you turn on the positioning feature, the focus is on the top window. You can change the focus to another window by using Task Manager to select a different task. Simply press Alt and then Tab to bring up Task Manager to select a different task. To reposition a window 1  Press Alt and then E. An icon (   ) appears on the status bar. 2  Use the numeric keypad to move the window.      Repositioning a Window: Press the appropriate number key that shows the direction you want to move the window. To recenter the window in the CK31G screen • Press 5. To turn off the repositioning feature • Press Alt and then E.
Chapter 1 — Using the CK31G Handheld Computer 18  CK31G Handheld Computer User’s Manual Calibrating the Screen If the screen does not respond when you tap it with the stylus, you may need to calibrate the screen. To calibrate the screen 1  Press C and then B. The Start menu appears. 2  Press D to highlight Touch Calibrate and then press Enter. The calibration screen appears. 3  Follow the instructions to calibrate the screen. Understanding the Status Lights The status lights on the CK31G turn on to indicate the status of the battery, a successful decode of a bar code, or a user-defined function.  User-Defined lightsReady-to-WorkIndicator (blue)Battery lightGood read  light (green) CK31G Status Lights The battery light and the battery screen icons work with each other to alert you to the status of your battery. If the battery light comes on, check the status bar to see which battery icon appears on it. Use the CK31G Screen Icons table on page 16 to help determine when you need to replace your battery.
Chapter 1 — Using the CK31G Handheld Computer CK31G Handheld Computer User’s Manual  19 Understanding the CK31G Status Lights Light Name  Light  Description User-defined    Use the Developer’s Toolkit for AIT-III to program these lights to turn on and off for any task or error within your application.   Light Status  What It Means Battery  Off  The battery is charged.     On  Battery is critically low. You need to replace the battery now. Good Read     This light comes on when the CK31G successfully decodes a bar code. Ready-to-Work™ Indicator   Reserved for future use.  Understanding the Beeps The CK31G uses beeps to provide you with audio feedback when it performs some functions. For example, you hear a beep each time you scan a valid bar code. Understanding the CK31G Beeps Beep Sequence  What it Means High beep  You entered valid data or a valid command, the CK31G decoded a label, or the CK31G decoded the last row of a two-dimensional bar code. Three low beeps  You entered or scanned an invalid command. Click  You pressed a key.   You can change the beeper volume for your needs and environment. You can set the beeper volume to off, low (quiet), medium, high (loud), and very high (very loud - default). If necessary, you can also change the beep duration and beep frequency for good read, low, and high beeps.
Chapter 1 — Using the CK31G Handheld Computer 20  CK31G Handheld Computer User’s Manual Changing the Beeper Volume Method  Procedure Use the keypad.  Press C and then press E to increase the volume. There are five beep volumes on the CK31G including off. When you reach the loudest setting, the next setting is off. Use the Intermec Settings application. From the Start menu, choose Intermec Settings. Go to Device Settings > Beeper > Volume.   Scanning Bar Codes    Do not look directly into the window area or at a reflection of the laser beam while the laser is scanning. Long-term exposure to the laser beam can damage your vision. The 2D imager provides the ability to scan 2D bar code symbologies and supports omni-directional (360°) scanning. Omni-directional scanning means that you can position the CK31G in any orientation to scan a bar code label. Using the 2D area imager is very similar to taking a picture with a digital camera. When you unpack the CK31G, these bar code symbologies are enabled: • Code 39 • Code 128 • PDF417 • UPC/EAN • DataMatrix If you are using bar code labels that are encoded in a different symbology, you need to enable the symbology on the CK31G.  Use Intermec Settings to enable and disable symbologies for your scanner. For help understanding how to use Intermec Settings, see “Configuring the CK31G Locally With Intermec Settings” on page 28.
Chapter 1 — Using the CK31G Handheld Computer CK31G Handheld Computer User’s Manual  21 To scan a bar code label with the 2D area imager 1  Press I to turn on the CK31G. 2  Point the scanner window at the bar code label and hold the CK31G steady a few inches from the label. 3  Press the Scan button on the keypad or pull the trigger on a handle and center the red aiming beam over the bar code label.    CK31Scan buttonNTERMEC*INTERMEC*CGood Read light (green) Scanning: Using the 2D imager to scan a bar code label. The imager flashes repeatedly while it is trying to read a bar code. The aiming beam is smaller when the imager is closer to the bar code and larger when it is further away. When the CK31G successfully reads a bar code label, you hear a high beep and the green Good Read light turns on briefly. 4  Release the Scan button or the trigger.
Chapter 1 — Using the CK31G Handheld Computer 22  CK31G Handheld Computer User’s Manual Using the SD Card You can use a Secure Digital (SD) card to increase file storage and install software. The CK31G currently supports 256MB and 1GB SD cards. The SD card slot is located on the top of the CK31G just above the laser scanner window. To insert an SD card 1  Press I to turn off the CK31G. 2  Unscrew the two captive screws on the SD card door and remove the door. 3  Gently insert the SD card into the CK31G with the printed side facing the keypad and screen side of the CK31G.   CK31GSD card 4  Push the card into the slot until it latches in place. 5  Replace the door and attach it with the two captive screws.
Chapter 1 — Using the CK31G Handheld Computer CK31G Handheld Computer User’s Manual  23   Captivescrew(2 places)SD carddoor 6  Press I to turn on the CK31G. To remove the SD card 1  Press I to turn off the CK31G. 2  Remove the two screws on the SD card slot door and remove the door. 3  Push in on the SD card until you hear it unlatch. The card should eject far enough to easily remove it from the CK31G.  4  Remove the SD card from the CK31G. 5  Replace the door and attach it with the two captive screws.
Chapter 1 — Using the CK31G Handheld Computer 24  CK31G Handheld Computer User’s Manual
 CK31G Handheld Computer User’s Manual  25  Configuring the CK31G    Use this chapter to understand how to configure the CK31G to communicate in your network. In this chapter, you will find these sections: •  How to Configure the CK31G Parameters •  Configuring the CK31G for Your Network • Configuring Security 2
Chapter 2 — Configuring the CK31G 26  CK31G Handheld Computer User’s Manual How to Configure the CK31G Parameters You can configure many parameters on the CK31G, such as the bar code symbologies it decodes or the network settings. These characteristics are controlled by configuration parameters. The values you set for these configuration parameters determine how the computer operates. Use Setup Assistant  Use Intermec Settings Locally                    Use Intermec Settings on  the CK31G  to set most  parameters.Use Setup Assistant to quickly enternetworkparameters.Use Intermec Settings RemotelyUse Intermec Settingson your desktop PC to remotely configurenetwork parameters. Configuring the CK31G: The CK31G provides several ways for you to configure the communications, device, and imaging parameters.
Chapter 2 — Configuring the CK31G CK31G Handheld Computer User’s Manual  27 Configuring the CK31G With the Setup Assistant When first setting up the CK31G, use the Setup Assistant to set or enable basic network parameters and connect your CK31G to the network. The Setup Assistant guides you through setting the following basic network parameters: •  Date and time (including time zone) •  SSID (Network name) • 802.1x security •  DHCP server or IP address, subnet mask, and default router •  Primary and secondary DNS and WINS addresses • Device name •  Radio country code To set other parameters, use the Intermec Settings or another configuration method. The Setup Assistant runs on the CK31G the first time you turn on the computer.    The Setup Assistant Start Screen After you complete the Setup Assistant, the CK31G should be communicating with your network. A network connection icon appears in your taskbar. For more information on the network icons, see “Understanding the Screen Icons” on page 16.
Chapter 2 — Configuring the CK31G 28  CK31G Handheld Computer User’s Manual Configuring the CK31G Locally With Intermec Settings Use Intermec Settings to configure the CK31G and view system information. You can access Intermec Settings while running any application. To open Intermec Settings 1  Tap the Start icon or press C and then B. The Start menu appears.      2  Select Intermec Settings. The Intermec Settings application appears.
Chapter 2 — Configuring the CK31G CK31G Handheld Computer User’s Manual  29 Use the following diagram to help find the commands you need to use to configure your CK31Gs. These screens do not represent the exact information you will see on your CK31G. They have been modified to show you how the information is structured. For detailed information on most of the commands available in Intermec Settings, see the Intermec Computer Command Reference Manual (P/N 073529) available on the Intermec web site. Intermec Settings Menus: Use this diagram to help navigate through the Intermec Settings application. This diagram should only be used as a guide; it does not accurately represent all of the information you will see on your screen.
Chapter 2 — Configuring the CK31G 30  CK31G Handheld Computer User’s Manual Use this table to understand how to navigate and enter information in Intermec Settings. Navigating in Intermec Settings To Do This:  Press: Select or expand an option  •  Tap the option •  a or b to select an option Select text in a text box  •  From the highlighted option, press Tab •  Tap in the text box and drag the stylus over the text Expand an option  •  Tap the option • Press a or b to select an option and then press Alt-b Save settings  • Tap File > Save Settings • Press Alt-F and then press Enter  Restoring Default Settings You can restore the CK31G to factory default settings from Intermec Settings. For a complete list of the default settings, see “Default Configuration” on page 102.  Note: Using the Restore Defaults option resets all network parameters. As a result, you may lose network communications. This option should only be used by network administrators or by Intermec support personnel. To restore factory default settings 1  From Intermec Settings, select Device Settings > Restore Defaults.  2  Select Restore Defaults and choose the Run App button. A Run Application dialog box appears asking if you want to run the restore defaults program.
Chapter 2 — Configuring the CK31G CK31G Handheld Computer User’s Manual  31 3  Select Yes. The Restore Defaults dialog box appears.      4  Click OK. Your CK31G performs a cold boot and returns all of your settings to the factory default settings. When the CK31G is done booting, the Start Screen appears.  Note: You may need to reinstall some applications after restoring the default settings because any settings that were modified for your application will be reset. Exiting Intermec Settings When you are done modifying your device configuration and have saved your settings, you should exit Intermec Settings. To exit Intermec Settings •  From the Main Menu choose File > Exit. or • Tap the X in the upper right corner of the window. If you try to exit Intermec Settings without saving your changes, a message box appears asking if you want to save your configuration changes. Click Yes.
Chapter 2 — Configuring the CK31G 32  CK31G Handheld Computer User’s Manual Configuring the CK31G Remotely With Intermec Settings You can also use Intermec Settings remotely to configure your CK31G. The remote version of Intermec Settings provides these features: •  Intermec Settings can configure CK31Gs one-to-one through an ActiveSync connection. •  Intermec Settings can run as a plug-in to the Wavelink Avalanche device management system. Avalanche automates device management within a network and lets you install, update, and manage the software and configurations of wireless and other devices. The ActiveSync (one-to-one) version of Intermec Settings is available from the Intermec web site as part of the Intermec Developer’s Library (IDL) download or from the IDL CD. For information on installing ActiveSync and establishing a partnership, see “Installing Applications Using ActiveSync” on page 58. Intermec Settings is also available as part of a Wavelink Avalanche package for the CK31G. You can also download this package from the Intermec web site. For information on how to use the Intermec Settings application, see the online manual available from the Help menu in Intermec Settings. Configuring the CK31G for Your Network The CK31G is a versatile handheld computer that you can easily add to your wired or wireless data collection network. You can connect your CK31G to your network using: • Serial communications •  802.11b/g radio communications
Chapter 2 — Configuring the CK31G CK31G Handheld Computer User’s Manual  33 Configuring Serial Communications The CK31G has a serial port to transfer data to and receive data from another device via RS-232 communications. You can also insert the CK31G into a communications dock to transmit data to and receive data from a host computer or PC using RS-232 communications. The serial adapter and the communications dock are sold separately. For more information on accessories and how to order them, see page 100. PCEthernetSerial cableCK31GHost CK31G in a Serial Network. To use serial communications with your CK31G 1  Turn off the CK31G. 2  Connect the CK31G to the serial port of another device. You can do this in one of the following ways: •  Connect the CK31G serial port to a button link or serial printer using the 26-pin to DB9 (9-pin) serial adapter and a male-to-female null modem RS-232 cable.
Chapter 2 — Configuring the CK31G 34  CK31G Handheld Computer User’s Manual •  Connect the AD1 communications dock to the serial port of the other device using a DB9 to DB9 serial adapter cable. Insert the CK31G into the dock. 3  Turn on the CK31G. Configuring 802.11b/g Radio Communications  Make sure all components with antennas are at least 30 cm  (1 ft) apart when power is applied. Failure to comply could result in equipment damage. The wireless CK31G has an internal 802.11b/g radio to transfer data using wireless communications. This section of the manual assumes that you have already set up your wireless communications network including your access points. If you are using a UDP Plus network, you also need to have your Intermec Application Server communicating with a host computer. Your CK31G supports these network protocols: • TCP/IP • UDP Plus The next sections explain the parameters you need to configure for the CK31G to work in your wireless network. Configuring the Network Parameters for a TCP/IP Network In a TCP/IP network, the CK31G communicates with a host computer directly using TCP/IP. The access point acts as a bridge to allow communications between the wired network and the wireless network.
Chapter 2 — Configuring the CK31G CK31G Handheld Computer User’s Manual  35 EthernetTCP/IPDirect ConnectCK31Gs Access pointHost CK31G in a TCP/IP Direct Connect Network To use wireless communications in a TCP/IP network 1  Configure these network parameters on each CK31G in the network: •  Network name (SSID) •  Host IP address •  IP settings (if not using DHCP) • Network port
Chapter 2 — Configuring the CK31G 36  CK31G Handheld Computer User’s Manual 2  Configure security. For help, see “Configuring Security” on page 37. The easiest way to configure the network parameters on the CK31G is to use Intermec Settings. For help, see “Configuring the CK31G Locally With Intermec Settings” on page 28. Configuring the Network Parameters for a UDP Plus Network In a UDP Plus network, the CK31G communicates with a host computer through the Intermec Application Server. EthernetUDP PlusAccess pointHostIntermec Application ServerCK31Gs  CK31G in a UDP Plus Network
Chapter 2 — Configuring the CK31G CK31G Handheld Computer User’s Manual  37 The Intermec Application Server translate UDP Plus packets on the wireless network into TCP/IP packets on the wired network and vice versa. The access point acts as a bridge to allow communications between the wired network and the wireless network. To use wireless communications in a UDP Plus network 1  Configure these network parameters on each CK31G in the network: •  Network name (SSID) •  Controller IP address •  IP settings (if not using DHCP) • Network port 2  Configure the security. For help, see “Configuring Security” in the next section. The easiest way to configure the network parameters on the CK31G is to use Intermec Settings. For help, see “Configuring the CK31G Locally With Intermec Settings” on page 28. Configuring Security The CK31G provides three types of security for your wireless network: •  Wi-Fi Protected Access (WPA) • 802.1x • WEP Use the next sections to understand how to configure each type of security on your wireless CK31G. If you choose not to use security, see “Disabling Security” on page 53. For more information on the different types of security, see the MobileLAN™ secure 802.1x Security Solution Installation Guide (P/N 073134) available at www.intermec.com. The CK31G provides both Microsoft and Funk security. Microsoft security is the default setting. Use the following sections to set security using either Microsoft or Funk as your security choice.
Chapter 2 — Configuring the CK31G 38  CK31G Handheld Computer User’s Manual If you are using 802.1x security, this section also assumes that your authentication server and authenticators are properly configured. Using Funk Security Funk Odyssey security provides everything you get with Microsoft security with the addition of CCX v1.0 compliance. Funk security also enables you to use LEAP and TTLS authentication on your CK31G.  The type of security you choose is not dependent on your authentication server. To use Funk security, you need to: •  Select Funk security as your security choice •  Select a profile Selecting Funk as Your Security Choice The default security setting is Microsoft. If you want to use Funk security, you need to select it as your security choice. To select Funk security as your security choice 1  Tap the Start icon or press C and then B. The Start menu appears.  2  Select Intermec Settings. The Intermec Settings application appears. 3  Select Communications > 802.11 Radio > Security Choice. 4  From the Security Choice list, select Funk Security. 5  Press Enter. An alert box appears telling you that you must save your settings and warm boot the CK31G for your new security choice to take effect. 6  Tap OK or press Esc to clear the alert box. 7  Save your settings. 8  Warm boot your CK31G by pressing and holding the I key for five seconds.
Chapter 2 — Configuring the CK31G CK31G Handheld Computer User’s Manual  39 Selecting a Profile for Funk Security You can define up to four profiles for your Funk Odyssey security. Different profiles let your CK31G communicate in different networks without having to change all of your security settings. For example, you might want to set up one profile for the manufacturing floor and one for the warehouse. To select a profile for Funk security 1  Tap the Start icon or press C and then B. The Start menu appears.  2  Select Intermec Settings. The Intermec Settings application appears. 3  Select Communications > 802.11 Radio > Security Settings > Funk Security. 4  (Optional) Give your profiles meaningful names. a  Select a profile. The profile expands. b  Select Profile Label and a text box appears. c  Select the text in the box and type in your meaningful name. d  Press Enter. 5  Repeat Step 4 for as many profiles as you want to define. 6  Select the active profile you want to configure with security settings. 7  Configure your security settings. Using WPA Security Wi-Fi Protected Access (WPA) is a strongly enhanced, interoperable Wi-Fi security that addresses many of the vulnerabilities of Wired Equivalent Privacy (WEP). Instead of WEP, WPA uses Temporal Key Integrity Protocol (TKIP) for its data encryption method.  Currently, WPA satisfies some of the requirements in the IEEE 802.11i draft standard. When the standard is finalized, WPA will maintain forward compatibility.
Chapter 2 — Configuring the CK31G 40  CK31G Handheld Computer User’s Manual WPA runs in Enterprise (802.1x) mode or PSK (Pre-Shared Key) mode: •  In Enterprise mode, WPA provides user authentication using 802.1x and the Extensible Authentication Protocol (EAP). That is, an authentication server (such as a RADIUS server) must authenticate each device before the device can communicate with the wireless network. •  In PSK mode, WPA provides user authentication using a shared key between the authenticator and the CK31G. WPA-PSK is a good solution for small offices or home offices that do not want to use an authentication server. To use WPA security, you need: •  An authentication server (Enterprise mode only)  Note: You can also use a MobileLAN access point with software release 1.80 or later as an authentication server. For help, see the MobileLAN access WA2XG System Manual (P/N 074921). •  An access point with an 802.11b/g radio that supports WPA •  CK31G with the 802.11b/g radio and the 802.1x/WPA security option Configuring WPA Security With Funk Security Use these procedures to set WPA and WPA-PSK security on your CK31G with Funk security. To configure WPA security on your CK31G with Funk security 1  Make sure you have configured the communications and radio parameters on your CK31G. 2  Make sure you have selected Funk as your security choice. 3  Open Intermec Settings. 4  Choose Communications > 802.11 Radio > Security Settings > Funk Security > Profile. 5  For Association, choose WPA and press Enter. Encryption automatically defaults to TKIP.
Chapter 2 — Configuring the CK31G CK31G Handheld Computer User’s Manual  41 6  For Authentication, choose TTLS, PEAP, or TLS and press Enter. If you choose TTLS or PEAP: a  Select User name, type your user name, and then press Enter. b  Select Password prompt, choose Enter password now, and then press Enter.  Note: You can use Prompt for password to troubleshoot your connection to the network if you have problems. c  Select User Password, type a user password, and then press Enter. d  For Validate Server Certificate, choose Enabled and press Enter.  Note: You must have the date on the CK31G set correctly when you enable Validate Server Certificate. If you choose TLS: a  Load a user and root certificate on your CK31G. For help, see “Loading a Certificate” on page 50. b  For Validate Server Certificate, choose Enabled and press Enter. c  You must enter a User Name and Subject Name. You can also enter a Server Common Name if you want to increase your level of security. 7  Exit Intermec Settings. To enable WPA-PSK security on your CK31G with Funk security 1  Make sure you have configured the communications and radio parameters on your CK31G. 2  Make sure you have selected Funk as your security choice. 3  Open Intermec Settings. 4  Choose Communications > 802.11 Radio > Security Settings > Funk Security > Profile.
Chapter 2 — Configuring the CK31G 42  CK31G Handheld Computer User’s Manual 5  For Association, choose WPA and press Enter. 6  For Authentication, choose None and press Enter. 7  For Pre-Shared Key, enter the pre-shared key or the passphrase. The pre-shared key must be a value of 32 hex pairs preceded by 0x for a total of 66 characters. The value must match the key value on the access point. The passphrase must be from 8 to 63 characters. After you enter a passphrase, the CK31G internally converts it to a pre-shared key. This value must match the passphrase on the authenticator. 8  Exit Intermec Settings. Configuring WPA Security With Microsoft Security Use these procedures to set WPA and WPA-PSK security on your CK31G with Microsoft security. To enable WPA security on your CK31G with Microsoft security 1  Make sure you have configured the communications and radio parameters on your CK31G. 2  Open Intermec Settings. 3  Choose Communications > 802.11 Radio > Security Settings > Microsoft Security. 4  For Infrastructure Mode, choose Infrastructure. 5  For Network Authentication, choose WPA. 6  For Data Encryption, choose TKIP. 7  For 802.1x Authentication, choose either TLS or PEAP. If you choose TLS: a  Select Properties and tap the Run App button. The Auth. Settings box appears.
Chapter 2 — Configuring the CK31G CK31G Handheld Computer User’s Manual  43      b  From the Auth. Settings box, tap the Select button. c  Select your certificate from the list and press Enter. If you choose PEAP: a  Select Properties and tap the Run App button. The Auth. Settings box appears. b  Enable the Validate Server check box. c  Press Enter. Once the radio starts to authenticate, the Network Password dialog box appears:     d  Enter a User Name and Password and enable the Save Password check box. e  (Optional) In the Domain field, enter the Active Directory domain associated with the user account. f  Press Enter. 8  Exit Intermec Settings. To enable WPA-PSK security on your CK31G With Microsoft Security 1  Make sure you have configured the communications and radio parameters on your CK31G. 2  Open Intermec Settings.
Chapter 2 — Configuring the CK31G 44  CK31G Handheld Computer User’s Manual 3  Choose Communications > 802.11 Radio > Security Settings > Microsoft Security. 4  For Infrastructure Mode, choose Infrastructure. 5  For Network Authentication, choose WPA-PSK. 6  For Data Encryption, choose TKIP. 7  For Pre-Shared Key, enter the pre-shared key or the passphrase. The pre-shared key must be a value of 32 hex pairs preceded by 0x for a total of 66 characters. The value must match the key value on the authenticator. The passphrase must be from 8 to 63 characters. After you enter a passphrase, the CK31G internally converts it to a pre-shared key. This value must match the passphrase on the authenticator. 8  Exit Intermec Settings. Using 802.1x Security 802.1x security provides centralized user authentication using an authentication server, authenticators (access points), and supplicants. These components communicate using an EAP authentication type, such as TLS (Transport Layer Security) or PEAP (Protected Extensible Authentication Protocol). 802.1x security provides data encryption using dynamic WEP key management. To use 802.1x security, you need: •  An authentication server   Note: You can also use a MobileLAN access point with software release 1.80 or later as an authentication server. For help, see the MobileLAN access WA2XG System Manual (P/N 074921). •  An access point with an 802.11b/g radio •  A CK31G with an 802.11b/g radio and the 802.1x/WPA security option
Chapter 2 — Configuring the CK31G CK31G Handheld Computer User’s Manual  45 Configuring 802.1x Security With Funk Security 1  Make sure you have configured the communications and radio parameters on your CK31G. 2  Make sure you have selected Funk as your security choice. 3  Open Intermec Settings. 4  Choose Communications > 802.11 Radio > Security Settings > Funk Security > Profile. 5  For Association, choose Open and then press Enter. 6  For Encryption, choose WEP and then press Enter. 7  For Authentication, choose TTLS, PEAP, or TLS and then press Enter. If you choose TTLS or PEAP: a  Select User name, type your user name, and then press Enter. b  Select Password prompt, choose Enter password now, and then press Enter.  Note: You can use Prompt for password to troubleshoot your connection to the network if you have problems. c  Select User Password, type a user password, and then press Enter. d  For Validate Server Certificate, choose Enabled and press Enter. If you choose TLS: a  Load a user and root certificate on your CK31G. For help, see “Loading a Certificate” on page 50 for help. b  For Validate Server Certificate, choose Enabled and press Enter. c  You can also enter a User Name, Subject Name and Server Common Name if you want to increase your level of security. 8  Exit Intermec Settings.
Chapter 2 — Configuring the CK31G 46  CK31G Handheld Computer User’s Manual Configuring 802.1x Security With Microsoft Security 1  Make sure you have configured the communications and radio parameters on your CK31G. 2  Open Intermec Settings. 3  Choose Communications > 802.11 Radio > Security Settings > Microsoft Security. 4  For Infrastructure Mode, choose Infrastructure. 5  For Network Authentication, choose Open. 6  For Data Encryption, choose WEP. 7  For 802.1X Authentication, choose TLS or PEAP. If you choose TLS: a  Select Properties and tap the Run App button. The Auth. Settings box appears.      b  From the Auth. Settings box, choose the Select button. c  Select your certificate from the list and press Enter. If you choose PEAP: a  Select Properties and choose the Run App button. The Auth. Settings box appears. b  Select the Validate Server check box. c  Press Enter. Once the radio starts to authenticate, the Network Password dialog box appears:
Chapter 2 — Configuring the CK31G CK31G Handheld Computer User’s Manual  47     d  Enter a User Name and Password and enable the Save Password check box. e   (Optional) In the Domain field, enter the domain. f  Press Enter. 8  For Network Key Setting, choose Automatic. 9  Exit Intermec Settings. Using LEAP Security Lightweight Extensible Authentication Protocol (LEAP), also known as Cisco-Wireless EAP, provides username/password-based authentication between a wireless client and a RADIUS server. In the 802.1x framework, traffic cannot pass through an Ethernet hub or wireless network access point until it successfully authenticates itself.  The station must identify itself and prove that it is an authorized user before it is actually allowed to use the LAN. LEAP also delivers a session key to the authenticated station, so that future frames can be encrypted with a key that is different than keys used by others sessions To use LEAP security, you need: •  A RADIUS server •  Cisco access points  Note: LEAP security is not supported with Microsoft security.
Chapter 2 — Configuring the CK31G 48  CK31G Handheld Computer User’s Manual To enable LEAP security on your CK31G 1  Make sure you have selected Funk as your security choice. 2  Make sure you have configured the communications and radio parameters on your CK31G. 3  From Intermec Settings, choose Communications > 802.11 Radio > Security Settings > Funk Security > Profile. 4  For Authentication, choose LEAP and then press Enter. 5  For Association, choose Open or Network EAP and then press Enter. 6  For Encryption, choose WEP and then press Enter. 7  Select User name, type your user name, and then press Enter. 8  Select Password prompt, choose Enter password now, and then press Enter.  Note: You can use Prompt for password to troubleshoot your connection to the network if you have problems. 9  Select User Password, type a user password, and then press Enter. 10  Exit Intermec Settings. Using Static WEP Security The CK31G uses the Wired Equivalent Privacy (WEP) protocol to add security to your wireless network based on the 802.11b standard. To use WEP security, you need: •  A CK31G handheld computer with an 802.11b/g radio. •  An access point with an 802.11b/g radio. Configuring Static WEP Security With Funk Security 1  Make sure you have selected Funk as your security choice. 2  Make sure you have configured the communications and radio parameters on your CK31G.
Chapter 2 — Configuring the CK31G CK31G Handheld Computer User’s Manual  49 3  Open Intermec Settings. 4  Choose Communications > 802.11 Radio > Security Settings > Funk Security > Profile. 5  For Association, choose Open and then press Enter. 6  For Encryption, choose WEP and then press Enter. 7  For Authentication, choose None and then press Enter. 8  Select WEP Key and then define a value for each WEP key. You can define up to four WEP keys. Enter an ASCII key or a hex key that is either 5 bytes or 13 bytes long depending on the capability of the radio. Set a 5-byte value for 64-bit WEP or a 13-byte value for 128-bit WEP. Hex keys must be preceded by 0x and contain 5 or 13 hex pairs. 9  Select Network Key Index, choose the WEP key you want to use for transmitting data. 10  Exit Intermec Settings. Configuring Static WEP Security With Microsoft Security 1  Make sure you have configured the communications and radio parameters on your CK31G. 2  Open Intermec Settings. 3  Choose Communications > 802.11 Radio > Security Settings > Microsoft Security. 4  For Network Authentication, choose Open. 5  For Data Encryption, choose WEP. 6  For Network Key Setting, choose Enter Key and Index. 7  For Network Key Value, enter an ASCII key or a hex key that is either 5 bytes or 13 bytes long depending on the capability of the radio.  Set a 5-byte value for 64-bit WEP or a 13-byte value for 128-bit WEP. Hex keys must be preceded by 0x and contain 5 or 13 hex pairs. 8  For Network Key Index, select the key you want to use for data transmission.
Chapter 2 — Configuring the CK31G 50  CK31G Handheld Computer User’s Manual 9  Exit Intermec Settings. Loading a Certificate If you choose to use transport layer security (TLS) with WPA or 802.1x security, you need to have a unique client certificate on the CK31G and a trusted root certificate authority (CA) certificate. You can use a third-party CA to issue unique client certificates and a root certificate.  If you are using Active Directory® to issue certificates, you can use the Enroll Certificates application to load the certificates. If you are using a third-party CA, you can use the Import Root or User Certificates programs to load the certificates.  Note: Do not cold boot the CK31G. Cold booting the computer resets the time and date. To load certificates on the CK31G if you are using Active Directory 1  Configure the network and radio settings for the CK31G to communicate with your certificate authority or establish an ActiveSync connection with the CA. 2  From the Configuration Utility, Select Communications > 802.11 Radio > Security Settings > Certificates. 3  Select Enroll Certificates and tap the Run App button. 4  From the Run Application box, tap Yes. The Enroll Certificates dialog box appears.     5  In the Enroll Certificates dialog box, enter the User Name, Password, and Server (IP address) to log into the CA server.
Chapter 2 — Configuring the CK31G CK31G Handheld Computer User’s Manual  51 6  Tap OK or press Enter. A dialog box appears asking if you want to load the root certificate.     7  Press Enter for yes. The Enrollment Tool message box appears telling you that the user certificate has been added. 8  Press Enter to close the Enrollment Tool message box. 9  Configure your CK31G for WPA or 802.1x security. To load certificates on the CK31G if you are using a third-party CA  Note: You need to create the \temp\root and \temp\user folders on your CK31G before you can copy the certificate files to your handheld computer. 1  Copy your .cer file to the \temp\root folder on the CK31G. 2  Copy your .der and .pvk files to the \temp\user folder on the CK31G. 3  From the Configuration Utility, select Communications > 802.11 Radio > Security Settings > Certificates. 4  Select Import Root Certificates and tap the Run App button to load the .cer file. A dialog box appears asking if you want to add the certificate to the root store.
Chapter 2 — Configuring the CK31G 52  CK31G Handheld Computer User’s Manual 5  Press Enter to add the certificate. A message box appears telling you that the root certificate has been imported.     6  Tap OK or press Enter to close the Success message box. 7  Select Import User Certificate to load the .der and .pvk files. A message box appears telling you that the certificate has been imported.     8  Tap OK or press Enter to close the Success message box. 9  Configure your CK31G for WPA or 802.1x security.
Chapter 2 — Configuring the CK31G CK31G Handheld Computer User’s Manual  53 Disabling Security If you choose not to use security with your wireless network, you can disable it on the CK31G. Intermec recommends that you always set security in your network. To disable security  1  Open Intermec Settings. 2  Choose Communications > 802.11 Radio > Security Settings > Microsoft Security. 3  For Network Authentication, choose Open. 4  For Data Encryption, choose Disabled. 5  Close Intermec Settings.
Chapter 2 — Configuring the CK31G 54  CK31G Handheld Computer User’s Manual
 CK31G Handheld Computer User’s Manual  55  Developing and Installing Applications In this chapter you will find guidelines for developing applications using the Developer’s Toolkits for AIT-III. You will also find information on installing applications and automatically launching them. You will find these sections: •  Developing Applications for the CK31G •  Installing Applications on the CK31G •  Launching Your Application Automatically •  Setting or Changing the CK31G Password •  Backing Up Your Files •  Upgrading Your CK31G  3
Chapter 3 — Developing and Installing Applications 56  CK31G Handheld Computer User’s Manual Developing Applications for the CK31G The CK31G Handheld Computers run applications programmed in Microsoft Embedded Visual C++. The CK31G can also run applications developed for the .NET Compact framework using Microsoft C# and Visual Basic. Use this section to understand what you need to: •  Develop a new application for the CK31G. •  Develop a web-based application for the CK31G. Developing a New Application Use the Intermec Developer’s Toolkits for AIT-III CD to help develop your C++ and .NET applications. The CD contains two toolkits, the Intermec AIT-III Developer’s Toolkit and the Intermec AIT-III .NET Developer’s Toolkit. The toolkits contains hardware and software requirements, all of the functions that are supported by the CK31G, and how to use these functions. The Developer’s Toolkits for AIT-III is available on CD (P/N 074925) or as a download from the Intermec web site at www.intermec.com. You need these hardware and software components to use the Intermec toolkits: •  Pentium PC, 400 MHz or higher •  Windows 2000 (Service Pack 2 or later) or Windows XP (Home, Professional, or Server) •  For native C++ development, Microsoft eMbedded Visual C++ version 4.0 with eVC++ Service Pack 2 •  For .NET Development and Compact Framework (C# and VB.NET), Microsoft Visual Studio .NET 2003 •  128MB RAM (196MB recommended) •  360MB hard drive space for minimum installation (720MB for complete) •  CD-ROM drive compatible with multimedia PC specification
Chapter 3 — Developing and Installing Applications CK31G Handheld Computer User’s Manual  57 •  VGA or higher-resolution monitor (Super VGA recommended) •  Microsoft Mouse or compatible pointing device Developing a Web-Based Application You can develop web-based data collection applications for use on the CK31G. For help, see any HTML source book. The CK31G contains Internet Explorer (IE) 6.0 for Windows CE for you to use. The Microsoft standard IE 6.0 is available from the desktop and provides all of the common elements you expect to find.  To open Microsoft Internet Explorer • Double-tap Internet Explorer from the desktop. The Internet Explorer default window appears. Installing Applications on the CK31G There are several ways you can install applications on the CK31G: •  You can package your application as a cabinet (.cab) file. •  If you have a simple application, you may only need to deliver the .exe file. •  You can copy a directory structure that contains the application, supporting files, DLLs, images, and data files. Intermec recommends using CAB files to install your applications. The CK31G uses standard Windows CE CAB files and will install third-party CAB files. Before the CK31G executes a CAB file, it marks the file as read-only so that it will not be deleted after installation. After the CAB file is executed, the CK31G automatically saves any changes you have made to the registry or file system so that they will persist through a cold boot. This process means that you will not have to reinstall your applications when you perform a cold boot.
Chapter 3 — Developing and Installing Applications 58  CK31G Handheld Computer User’s Manual Intermec recommends that you store your applications in a folder specific to your application underneath the \PROGRAM FILES folder. Intermec recommends that you store your application data in one of these locations on the CK31G: •  The SDMMC Disk folder • The CK_FFS folder If you have an SD card inserted in your CK31G, it appears as the SDMMC Disk folder. This folder is the recommended location for placing your application install files.  The CK_FFS folder is an area of storage that is part of the CK31G flash memory. This storage area is not deleted during a cold boot. There are several ways you can install files and applications on the CK31G: • ActiveSync • SD Card • FTP Server • Wavelink Avalanche The following sections explain how to use each one of these processes to install your application on the CK31G. Installing Applications Using ActiveSync You can use ActiveSync to establish a connection between your PC and the CK31G. ActiveSync allows you to transfer files, synchronize files, perform remote debugging, and other device management activities. ActiveSync is a free application available from the Microsoft web site. To establish a partnership between your PC and the CK31G, you will need: •  A USB cable or a female-to-female null modem serial cable. •  An AD1 communications dock. •  ActiveSync version 3.7.1 or later.
Chapter 3 — Developing and Installing Applications CK31G Handheld Computer User’s Manual  59 Installing ActiveSync and Establishing a Partnership You can use either a USB cable or a serial cable to establish your initial partnership between the CK31G and your PC.  To install ActiveSync and establish a partnership 1  Download ActiveSync from the Microsoft web site and follow the onscreen instructions for installing it on your PC. When the installation process is complete, the Get Connected dialog box appears.     2  Connect the AD1 to your PC with the USB or serial cable. 3  If you are using a serial cable, from the CK31G Start Screen tap My Computer and then choose Program Files > ActiveSync Serial.  The default setting for ActiveSync on the CK31G is USB. 4  Click Next in the Get Connected dialog box. ActiveSync  detects a device on the USB or serial port and prompts you to set up a new partnership. 5  In the Set Up a Partnership dialog box, click Next. 6  In the Select Number of Partnerships dialog box, select Yes, I want to synchronize with only this computer and then click Next.
Chapter 3 — Developing and Installing Applications 60  CK31G Handheld Computer User’s Manual 7  In the Select Synchronization Settings dialog box, check the items you want to synchronize and click Next. 8  In the Setup Complete dialog box, click Finish.  When the partnership has been established, the following screen appears on your PC showing the device name of your CK31G and the Connected status.    The Microsoft ActiveSync Screen An ActiveSync icon ( ) also appears on the CK31G status bar indicating that it has established an ActiveSync partnership with your PC.  Note: If ActiveSync does not establish a partnership on the first try, the Get Connected dialog box appears on your PC with the message “Your device was not detected.” Make sure all of your cables are securely connected and click Next on the Get Connected dialog box until your device is detected. You may have to try removing the CK31G from the AD1 and then inserting it back into the communications dock to establish a partnership. Now that the partnership has been established, ActiveSync initiates all future connections. To connect to your PC using ActiveSync in the future, simply place a CK31G in the AD1 communications dock, connect the CK31G serially to your PC, or turn on the CK31G.
Chapter 3 — Developing and Installing Applications CK31G Handheld Computer User’s Manual  61 Using ActiveSync to Copy Files and Install Applications You can use ActiveSync to copy files to the CK31G and to install applications. Use the following procedures to learn how to copy files and install applications on the CK31G using ActiveSync. To install an application on the CK31G using ActiveSync 1  Connect the CK31G to your PC using ActiveSync. For help, see the previous section, “Installing ActiveSync and Establishing a Partnership.” 2  In the Microsoft ActiveSync screen, click Explore. Windows Explorer opens the Mobile Device window of your CK31G.     3  In Windows Explorer on your PC, browse to the file that you want to copy to your CK31G. 4  Right-click the file and click Copy.  5  Place the cursor in the SDMMC Disk or CK_FFS folder of your CK31G, right-click, and click Paste.
Chapter 3 — Developing and Installing Applications 62  CK31G Handheld Computer User’s Manual The file has now been copied to the CK31G and you can see it using My Computer on the CK31G. 6  Navigate to your application file and run it. After your application is installed, you can run it from the Program files folder from My Computer. Installing Applications Using Your SD Card If you have an SD card for your CK31G, this is the best place for you to install applications. To install applications using the SD card 1  If you are using an SD card reader, remove the SD card from the CK31G and place it in the reader. For help, see “Using the SD Card” on page 22. 2  Copy your application file to the SD card. If you are using ActiveSync, an FTP server, or Wavelink Avalanche to copy the files to the SD card, place the application in the SDMMC Disk folder located in My Computer. 3  If you are using an SD card reader, insert the SD card back into the CK31G. 4  Navigate to the SDMMC Disk folder and run your application. After your application is installed, you can run it from the Program files folder from My Computer. Installing Applications Using the FTP Server The CK31G has a built-in FTP server that connects to a network through the 802.11b/g radio or Ethernet. You can use the server to transfer your application file to the CK31G. Another benefit of using the FTP server is that you can create FTP scripts to automate the process of copying your files to the CK31G.  This option is useful when you need to send files to a large number of CK31Gs.
Chapter 3 — Developing and Installing Applications CK31G Handheld Computer User’s Manual  63 Installing Applications Using Wavelink Avalanche You can use the Wavelink Avalanche device management system to install applications on all of your wireless CK31Gs. The CK31G ships with the Avalanche Enabler already loaded on it.  Each time the Avalanche Enabler is activated (typically on a warm boot), the CK31G attempts to connect to the Avalanche Agent. When the CK31G connects to the agent, the Agent determines whether an update is available and immediately starts the software upgrade, file transfer, or configuration update.  To use Avalanche to remotely manage the CK31G 1  Install software packages and updates for the CK31G using the Avalanche Administrative Console. 2  Schedule the CK31G updates or manually initiate an update using the Avalanche Administrative Console. For more information on using Wavelink Avalanche, contact your local Intermec representative or visit the Wavelink web site at www.wavelink.com. Launching Your Application Automatically To launch your application automatically on the CK31G every time you perform a warm or cold boot, make sure your CAB file places a shortcut to your application in the \Windows\StartUp folder.
Chapter 3 — Developing and Installing Applications 64  CK31G Handheld Computer User’s Manual Setting or Changing the CK31G Password When you initially start the CK31G, there is no password to protect access to the CK31G. Anyone can turn on the CK31G and access all of the information and tools loaded on it. When you login to your CK31G with password protection enabled, the password icon (     ) appears in the taskbar.  To set a password 1  Tap the Start icon or press C and then B. The Start menu appears. 2  Select Settings > Control Panel > Password. The Password Properties dialog box appears.     3  Type your new password in the Password field, and then press Tab to move to the Confirm password field. 4  Type your new password in again. 5  Select the Enable password protection at power-on option. 6  Tap OK or press Enter. You are returned to the Control Panel. 7  Close the Control Panel.
Chapter 3 — Developing and Installing Applications CK31G Handheld Computer User’s Manual  65 To change your password 1  Tap the Start icon or press C and then B. The Start menu appears. 2  Select Settings > Control Panel > Password. The Enter Password dialog box appears.     3  In the Password field, type your password and tap OK or press Enter. 4  Type your new password in the Password field, and then press Tab to move to the Confirm password field. 5  Type your new password in again. 6  Select the Enable password protection at power-on option. 7  Tap OK or press Enter. You are returned to the Control Panel. 8  Close the Control Panel. Backing Up Your Files The CK31G makes it easy for you to make a backup copy of all files you have installed or modified on the computer that are not already located in the SDMMC Disk or CK_FFS folders. When you make a backup copy of the file system, the CK31G saves the file system to a folder called Persistent Copy. This folder and all of the files and subfolders it contains, are automatically restored when the CK31G cold boots. You should back up your files any time you want to make permanent changes to the files in the Persistent Copy folder. You also need to back up the files when you want to permanently delete a file. When you install a CAB file, the CK31G automatically performs this backup process.
Chapter 3 — Developing and Installing Applications 66  CK31G Handheld Computer User’s Manual To back up your files 1  Tap the Start icon or press C and then B. The Start menu appears. 2  Select Intermec Settings. 3  From Intermec Settings, select Device Settings > File Backup. 4  Select Backup Files Location and choose the location where you want your files to be backed up. 5  Select Backup the File System and choose the Run App button. A Run Application dialog box appears asking if you want to run the file backup program. 6  Select Yes. The Finalizing dialog box appears with a status bar showing you the progress of your file backup. A copy of all your files is saved to the Persistent Copy folder in your desired location. 7  Close Intermec Settings. Upgrading Your CK31G There are two ways to upgrade your CK31G: •  You can upgrade your computer using an SD card. •  You can remotely upgrade your computer using Intermec Settings. When you upgrade the operating system, you erase the current configuration and replace it with the new default configuration. You will need to set the network communications parameters on the CK31G to reestablish communications with the other devices in the wireless network.  Upgrading the Operating System Using an SD Card To upgrade the operating system, you need:  •  An SD card •  An SD card reader (optional)
Chapter 3 — Developing and Installing Applications CK31G Handheld Computer User’s Manual  67 •  The latest upgrade ZIP file. This file is available from the Intermec web site at www.intermec.com. Go to Service & Support > Downloads. Make sure the file you select is for your language and that it has an SD at the end of the file name. You can use any file transfer method (ActiveSync, FTP server, and so on) to copy the ZIP file to your SD card. Intermec recommends using an SD card reader.  Note: If you are using an SD card reader to copy files to your SD card, see “Using the SD Card” on page 22 for information on how to remove and insert the SD card. To upgrade the operating system 1  Download the latest upgrade ZIP file from the Intermec web site to your desktop PC. 2  Unzip the files on your desktop PC. 3  If you are using an SD card reader, remove the SD card from the CK31G and place it in the reader. 4  Copy all of the files to your SD card.  If you are using ActiveSync, an FTP server, or Wavelink Avalanche to copy the files to your CK31G, place the files in the SDMMC Disk folder. 5  If you are using an SD card reader, insert the SD card into the CK31G.  Note: Make sure the CK31G has completely loaded all of the upgrade files before you remove the SD card, warm boot, or cold boot the computer. 6  Perform a cold boot on the CK31G. For help, see “Cold Booting the CK31G” on page 94.
Chapter 3 — Developing and Installing Applications 68  CK31G Handheld Computer User’s Manual Upgrading Your CK31G Remotely Using Intermec Settings You can use Intermec Settings to upgrade the operating system on your Intermec CK31G through an ActiveSync connection. For information on installing ActiveSync and establishing a partnership, see “Installing Applications Using ActiveSync” on page 58. When you remotely upgrade your computer, you are updating the operating system and the Intermec Value Add (IVA) files. Before you can upgrade your computer, you need: •  The Intermec Settings application. This file is available from the Intermec web site as part of the Intermec Developer’s Library (IDL) download or from the IDL CD. •  The device upgrade ZIP file. This file is available from the Intermec web site at www.intermec.com. Go to Service & Support > Downloads. Make sure the file you select is for your language and that it has Intermec Settings at the end of the file name. To remotely upgrade a CK31G using Intermec Settings 1  Install the Intermec Settings application on your PC. 2  Create a device upgrade folder and unzip the device upgrade files to it. 3  On your PC, go to Start > Programs > Intermec > Intermec Settings > Upgrade Device. 4  In the Select upgrade folder dialog box, browse to the folder containing your upgrade files and click OK.  Intermec Settings begins the upgrade process. When the next message box appears on the PC display, you can remove the CK31G and place it in a powered dock.
Chapter 3 — Developing and Installing Applications CK31G Handheld Computer User’s Manual  69 The CK31G updates the system and then cold boots. 5  If you need to upgrade more CK31Gs, place another CK31G in the communications dock and the remote device upgrade starts automatically. 6  When you are done upgrading CK31Gs, choose File > Exit from the Main Menu.
Chapter 3 — Developing and Installing Applications 70  CK31G Handheld Computer User’s Manual
 CK31G Handheld Computer User’s Manual  71   Running Diagnostics Use diagnostics on the CK31G to analyze hardware problems, fix application problems, and view system information. Diagnostic Test  Page Number 802.11 Information  73 Authentication Information  73 Battery Information  74 Boot Code Version  75 Button Link Reader Test  75 Configuration Table  76 CPU Registers  77 Display Test  78 Installed Fonts  78 Intermec Value Version  79 Keypad Test  80 LED Test  80 Network Information  81 Network Test  81 Operating System Version  82 Ping Utility  83 RAM Information  83 SD Card Memory Test  84 Sound Test  85 4
Chapter 4 — Running Diagnostics 72  CK31G Handheld Computer User’s Manual Using Diagnostics on the CK31G You can access the Intermec Diagnostics at any time, even while running an application. The Intermec Diagnostics menu contains these options: • Hardware • Software • System Use the Hardware diagnostics menu to run tests on the CK31G or view system information. For example, you can run an LED test to determine if your CK31G lights are working correctly. Use the Software diagnostics menu to view the version of your operating system, the bootcode version, and Intermec Value Add (IVA) information. Use the System diagnostics menu to help analyze network, system, or applications problems on the CK31G. For example, you can run diagnostics to check the network communications. Understanding the Diagnostics Screens This section lists all of the diagnostics screens in alphabetical order. You will see the following information for each diagnostics screen: •  Description, purpose, and definition •  Location of diagnostic from the Start menu •  A sample diagnostics screen
Chapter 4 — Running Diagnostics CK31G Handheld Computer User’s Manual  73 802.11 Information The 802.11 Information diagnostic tool provides detailed information about your 802.11b/g radio. You can view information such as the SSID, the radio signal strength indicator (RSSI), the channel, and the MAC address of the connected access point. From the Start menu: • Go to Programs > Intermec Diagnostics > System > 802.11 Information Sample Screen  Authentication Information Use the Authentication Information diagnostic to see the state of your security authentication. You can use this information to troubleshoot why your device may not be authenticating. This diagnostic works with both Microsoft and Funk security choices.  From the Start menu: • Go to Programs > Intermec Diagnostics > System > Authentication Information
Chapter 4 — Running Diagnostics 74  CK31G Handheld Computer User’s Manual Sample Screen    Battery Information Use this diagnostic to view information on the CK31G main battery, backup battery, and AC power status. You can also use this screen to see the current volts and charging status. From the Start menu: • Go to Programs > Intermec Diagnostics > Hardware > Battery Information Sample Screen
Chapter 4 — Running Diagnostics CK31G Handheld Computer User’s Manual  75 Boot Code Version The Boot Code Version diagnostic displays the version of boot code loaded on your CK31G. From the Start menu: • Go to Programs > Intermec Diagnostics > Software > Boot Code Version Sample Screen    Button Link Reader Test Use the Button Link Reader Test to check the power to the button link, the COM port, and perform a loopback test with the button link reader and a loopback plug. From the Start menu: • Go to Programs > Intermec Diagnostics > Hardware > BtnLnk Reader Test
Chapter 4 — Running Diagnostics 76  CK31G Handheld Computer User’s Manual Sample Screen    Configuration Table Use the Configuration Table to view important information about your CK31G such as the serial number, configuration number, model, software options, and the scanner type.  You can use this information to tell the Intermec representative information on the hardware and software that were installed at the Intermec factory. From the Start menu: • Go to Programs > Intermec Diagnostics > Hardware > Configuration Table
Chapter 4 — Running Diagnostics CK31G Handheld Computer User’s Manual  77 Sample Screen  CPU Registers The CPU Registers diagnostic reads every register in the x-scale processor chip and displays the values. From the Start menu: • Go to Programs > Intermec Diagnostics >Hardware > CPU Registers Sample Screen
Chapter 4 — Running Diagnostics 78  CK31G Handheld Computer User’s Manual Display Test Use the Display Test to make sure that every pixel on the CK31G screen is working correctly. For example, you may want to test the screen if you do not see complete characters on the screen. The Display Test turns all pixels on, displays horizontal stripes, displays vertical stripes, and then turns all pixels off. From the Start menu: • Go to Programs > Intermec Diagnostics > Hardware > Display Test Sample Screen  Installed Fonts Use this screen to view all of the fonts installed on your CK31G. From the Start menu: • Go to Programs > Intermec Diagnostics > Software > Installed Fonts
Chapter 4 — Running Diagnostics CK31G Handheld Computer User’s Manual  79 Sample Screen  Intermec Value Version Use this screen to see the versions of Intermec Value Add (IVA) version of products on your CK31G. From the Start menu: • Go to Programs >Intermec Diagnostics > Software > Intermec Value Version Sample Screen
Chapter 4 — Running Diagnostics 80  CK31G Handheld Computer User’s Manual Keypad Test A developer can use the Keypad Test to quickly find the  hex value for any key on the keypad. You can also test to make sure the keypad is operating correctly. From the Start menu: • Go to Programs > Intermec Diagnostics > Hardware > Keypad Test Sample Screen  LED Test Use the LED Test to make sure that your LEDs (lights) are operating correctly. The LED Test turns the lights on the CK31G on in this sequence: Good Read light, the user-defined lights, Ready-to-Work Indicator, and then the System Status light. The lights blink one time each and then they blink five times each. From the Start menu: • Go to Programs > Intermec Diagnostics > Hardware > LED Test
Chapter 4 — Running Diagnostics CK31G Handheld Computer User’s Manual  81 Network Information Use the Network Information diagnostic screen to view the DHCP server IP address, the CK31G device address, and the MAC address. From the Start menu: • Go to Programs >Intermec Diagnostics > System > Network Information Sample Screen  Network Test Use the Network Test to test the network interface connection if you are using DHCP. The Network Test searches for a DHCP server first. When the test finds a server, press Enter to send the Ping command. If you do not have DHCP enabled, you need to enter the IP address of the host to ping and then press Enter. The test sends the ping command four times and displays the results. If you receive a result other than ping OK, the test failed. From the Start menu: • Go to Programs > Intermec Diagnostics > System > Network Test
Chapter 4 — Running Diagnostics 82  CK31G Handheld Computer User’s Manual Sample Screen  Operating System Version Use the OS Version diagnostic screen to view the operating system software version loaded on the CK31G. From the Start menu: • Go to Programs > Intermec Diagnostics > Software >  OS Version Sample Screen
Chapter 4 — Running Diagnostics CK31G Handheld Computer User’s Manual  83 Ping Utility Use the Ping Utility to test the network interface connection. Enter the IP address of the host to ping and then press Enter. The test sends the ping command four times and displays the results. If you receive a result other than ping OK, the test failed. From the Start menu: • Go to Programs > Intermec Diagnostics > System >  Ping Utility Sample Screen    RAM Information Use the RAM Information diagnostic to see how much RAM and flash memory is available on the CK31G. You can also see the Flash Part ID. From the Start menu: • Go to Programs > Intermec Diagnostics > Hardware > RAM Information
Chapter 4 — Running Diagnostics 84  CK31G Handheld Computer User’s Manual Sample Screen  SD Card Memory Test Use the SD Card Memory Test to view memory information on your SD card. Tap Start to initiate the memory test. From the Start menu: • Go to Programs > Intermec Diagnostics > Hardware >  SD Card Memory Test Sample Screen
Chapter 4 — Running Diagnostics CK31G Handheld Computer User’s Manual  85 Sound Test Use the Sound Test to make sure the entire beeper volume range and beep frequency range are available and working correctly. The Sound Test can also help you choose a beeper volume and frequency that you can hear in your working environment. When you select the test, the CK31G sounds a series of beeps from the default beep through the entire range of quiet to loud beeps. After it sounds the beeper volume, it cycles through the beeps starting with low frequency up through the highest frequency supported.  From the Start menu: • Go to Programs > Intermec Diagnostics > Hardware > Sound Test
Chapter 4 — Running Diagnostics 86  CK31G Handheld Computer User’s Manual
 CK31G Handheld Computer User’s Manual  87   Troubleshooting and Maintaining the CK31G Use this chapter to solve problems you may encounter while using the CK31G. You will also find information on booting the computer and routine maintenance.  If you have any problems using the CK31G, look in this chapter to find a possible solution. This chapter consists of the following sections: Sections  Page Problems While Operating the CK31G   88 Problems While Configuring 802.1x Security  89 Problems With Wireless Connectivity  91 Problems Transmitting Data Through the Serial Port  92 Problems While Scanning Bar Codes   92 Booting the CK31G   94 Cleaning the Scanner Window and CK31G Screen  96   5
Chapter 5 — Troubleshooting and Maintaining the CK31G 88  CK31G Handheld Computer User’s Manual Problems and Solutions You can also use the CK31G diagnostics to help analyze and solve problems. For help, see Chapter 4, “Running Diagnostics,” on page 71. If you send the CK31G in for service, it is your responsibility to save the computer data and configuration. Intermec is responsible only for ensuring that the keypad and other hardware features match the original configuration when repairing or replacing your computer. Problems While Operating the CK31G Problem  Solution You press I to turn on the CK31G and nothing happens. Make sure the contrast is not set all the way to the darkest or lightest setting. Press B and then E repeatedly until you reach the desired contrast level. Make sure the backlight is on by pressing E. Make sure you have a charged battery installed correctly. For help, see “Charging and Installing the Battery” on page 4. The battery may be discharged. Replace the battery with a spare charged battery, or charge the battery and try again. The Battery light is on.  The battery charge is low. You have a few minutes of power left. Immediately replace the battery with a spare charged battery, or charge the battery. The CK31G appears to be locked up and you cannot enter data. •  Wait at least 10 seconds and try again. If the CK31G is still connecting to the Intermec Application Server or the host, it ignores any input from the keypad or scanner. • Press I to turn off the CK31G and then press I again to turn on the CK31G. •  Press and hold the I button for five seconds to warm boot the CK31G. •  Perform a cold boot on the CK31G. For help, see “Cold Booting the CK31G” on page 94. •  Try reloading the firmware. For help, see “Upgrading Your CK31G” on page 66. •  If the CK31G will not boot or reset, contact your local Intermec service representative for help.
Chapter 5 — Troubleshooting and Maintaining the CK31G CK31G Handheld Computer User’s Manual  89 Problems While Operating the CK31G (continued) Problem  Solution You cannot type a character on the keypad or you can only type uppercase or lowercase letters. You may have accidentally locked a modifier key on the keypad. Check the CK31G taskbar to see if it contains an icon with a locked symbol. Press the necessary key sequence to unlock the key. For help, see “Using the Keypad” on page 6.   Problems While Configuring 802.1x Security If you have trouble configuring the computer for 802.1x security, check these problems and possible solutions.  Problems While Configuring 802.1x Security Problem   Solution The CK31G indicates that it is authenticated, but it does not communicate with the host.  Make sure that the CK31G IP address, host IP address, subnet mask, and default router are properly configured for your network.  Note: Do not cold boot the CK31G. Cold booting the computer resets the time and date. The CK31G does not appear to be authenticating and a network connection icon does not appear on the status bar. To see a list of network connections icons, see “Understanding the Screen Icons” on page 16. The CK31G may not be communicating with your access point. Make sure the network name on the CK31G is the same as the network name (SSID) of the access point that you are trying to communicate with. The default network name is “INTERMEC.”  The 802.1x security network may not be active. Make sure that the server software is properly loaded and configured on the server PC. For help, see the documentation that shipped with your server software.
Chapter 5 — Troubleshooting and Maintaining the CK31G 90  CK31G Handheld Computer User’s Manual Problems While Configuring 802.1x Security (continued) Problem   Solution A network connection icon appears in the status bar, but it disappears.  The CK31G may not be communicating with the access point that you want it to communicate with. Make sure that the network name on the CK31G is the same as the network name of the access point that you are trying to communicate with. The default network name is “INTERMEC.” The access point that you are trying to communicate with may not be communicating with the server. Make sure your access point is turned on, properly configured, and has 802.1x security enabled. The CK31G indicates that it is not authenticated.   Make sure that: •  The User Name and Password parameters on your CK31G match the user name and password on your authentication server. You may need to re-enter the password on both your CK31G and the authentication server.  •  On your authentication server, the user and group are allowed and the group policy is allowed to log in to the server. For help, see the documentation that shipped with your authentication server software.  •  The IP address and secret key for your access point must match the IP address and secret key on your authentication server. You may need to re-enter the IP address and secret key on both your access point and authentication server. •  Your authentication server is active and that it can communicate with your access point. You can use the PING utility to determine communications. Go to Start > Programs > Intermec Diagnostics > System >  Ping Utility. •  The authentication server software is running on the server PC. You are setting up multiple access points in a network, with different SSIDs, and the connection fails. The CK31G does not save WEP key values when you change the SSID. Re-enter the WEP key value after you change the SSID and save your changes. You should now be able to connect to the different access points. You receive a message saying “The server certificate has expired or your system date is incorrect” after you cold boot the CK31G. The date and time on the CK31G are not saved through a cold boot. You need to re-enter the date and time and then save your changes..
Chapter 5 — Troubleshooting and Maintaining the CK31G CK31G Handheld Computer User’s Manual  91 Problems With Wireless Connectivity Problem  Solution When you turn on the CK31G after it was suspended for a while (10-15 minutes or longer), it can no longer send or receive messages over the network. The host may have deactivated or lost your current terminal emulation session. In a TCP/IP direct connect network, you need to turn off the “Keep Alive” message (if possible) from the host so that the TCP session is maintained while a CK31G is suspended. The no network connection icon  (   )appears on the status bar.The CK31G is not communicating with the access point. The CK31G is not connected to the access point. Make sure the access point is turned on and operating. You may also be using the CK31G out of range of an access point. Try moving closer to an access point to re-establish communications.  Make sure the CK31G is configured correctly for your network. The radio parameters on the CK31G must match the values set for all access points the CK31G may communicate with. For help, see “Configuring 802.11b/g Radio Communications ” on page 34. If you have an 802.11b radio, the radio initialization process may have failed. Try resetting the CK31G. See “Booting the CK31G” on page 94. If you have tried these possible solutions and the no network connection icon still appears, you may have a defective radio card. For help, contact your local Intermec service representative. The CK31G is connected to the Intermec Application Server or host computer and you move to a new site to collect data. The network connection icon was visible but now the no network connection icon (   ) is visible. You may have gone out of range of an access point. Try moving closer to an access point or to a different location to re-establish communications. Once you are in range again, the network connection icon appears again. Any data you collected while out of range is transmitted over the network. The network connection icon is in the status bar, but the host computer is not receiving any data from the CK31G.  In a UDP Plus network, there may be a problem with the connection between the Intermec Application Server and the host computer. Check with your network administrator or see the user’s manual for the Intermec Application Server.  In a TCP/IP network, there may be a problem with the connection between the access point and the host computer. Check with your network administrator or use your access point user’s manual.
Chapter 5 — Troubleshooting and Maintaining the CK31G 92  CK31G Handheld Computer User’s Manual Problems Transmitting Data Through the Serial Port If you are having problems sending or receiving data through the integrated serial port on the CK31G, check these possible problems:  •  Make sure the CK31G is connected to the PC, host computer, or RS-232 serial device using the appropriate cable adapter and null modem cable.  •  If the CK31G is in a communications dock, make sure that the communications dock is connected to the serial device using the appropriate cable.  For more information on using the serial port, see “Configuring Serial Communications” on page 33. Problems While Scanning Bar Codes Problem  Solution You cannot see a red beam of light from the scanner when you press the Scan button and aim the scanner at a bar code label. There are two possible problems: •  You may be too far away from the bar code label. Try moving closer to the bar code label and scan it again. •  You may be scanning the bar code label “straight on.” Change the scanning angle and try again.  You can test the effective range of the scanner. Move within 61 cm (2 feet) of a wall and test the scanner. You need to be within the scanning range to scan bar code labels. For help scanning bar codes, see “Scanning Bar Codes” on page 20.
Chapter 5 — Troubleshooting and Maintaining the CK31G CK31G Handheld Computer User’s Manual  93 Problems While Scanning Bar Codes (continued) Problem  Solution When you release the Scan button or handle trigger, the Good Read light does not turn off. The Good Read light will remain on if you configure the CK31G to use continuous/edge triggering. If you configure the CK31G for level triggering and the Good Read light remains on, there may be a problem. Press the Scan button or pull the trigger again without scanning a bar code label. If the light is still on, contact your local Intermec service representative. The scanner will not read the bar code label.  Make sure you aim the scanner beam so it crosses the entire bar code label in one pass. The angle you are scanning the bar code label may not be working well, or you may be scanning the label “straight on.” Try scanning the bar code label again, but vary the scanning angle. The bar code label print quality may be poor or unreadable. To check the quality of the bar code label, try scanning a bar code label that you know will scan. Compare the two bar code labels to see if the bar code quality is too low. You may need to replace the label that you cannot scan. Make sure the bar code symbology you are scanning is enabled. Use Intermec Settings to check the symbologies. If your bar code symbology is disabled, enable it and then try scanning the bar code label again. Make sure that the application you are running on the computer is expecting input from a bar code. You may need to type this information instead of scanning it. The scanner does not read the bar code labels quickly, or the scanning beam seems to be faint or obscured. The scanner window may be dirty. Clean the window with a solution of ammonia and water. Wipe dry. Do not allow abrasive material to touch the window. You scan a valid bar code label to enter data for your application. The data decoded by the scan module does not match the data encoded in the bar code label.  The computer may have decoded the bar code label in a symbology other than the label’s actual symbology. Try scanning the bar code label again. Make sure you scan the entire label. To operate the computer quickly and efficiently, you should enable only the bar code symbologies that you are going to scan.
Chapter 5 — Troubleshooting and Maintaining the CK31G 94  CK31G Handheld Computer User’s Manual Booting the CK31G You seldom need to warm or cold boot the CK31G. The CK31G uses the configuration currently saved in flash memory during the boot process. You need to boot the CK31G when an application is locked up and will not respond, when you upgrade the firmware, or when you reflash the computer. The next instructions explain how you warm and cold boot the CK31G. Warm Booting the CK31G If your charged CK31G does not resume after pressing I, or if the computer or an application is locked up, you may need to warm boot it.  To warm boot the CK31G •  Press and hold I for 5 seconds. The CK31G tells you it is performing a warm boot and the screen comes back up to the start screen. Cold Booting the CK31G If the CK31G or application is locked up and does not respond to a warm boot, follow this procedure to perform a cold boot. When you perform a cold boot, all data in your RAM storage is deleted. To make a backup copy of everything in your RAM-based storage system, see “Backing Up Your Files” on page 65. To cold boot the CK31G 1  Remove the battery. 2  Using a small pointed device (such as the end of the stylus), press the reset switch on the backside of the CK31G.
Chapter 5 — Troubleshooting and Maintaining the CK31G CK31G Handheld Computer User’s Manual  95   Resetswitch  Do not use force or a sharp object when pressing the reset switch. You may damage the reset switch. 3  Replace the battery. The battery light on the CK31G blinks three times and the CK31G starts the power on sequence.  Note: Date and time settings are not saved through a cold boot. You will need to reset the time and date.
Chapter 5 — Troubleshooting and Maintaining the CK31G 96  CK31G Handheld Computer User’s Manual Cleaning the Scanner Window and Screen To keep the computer in good working order, you may need to perform these minor maintenance tasks: •  Clean the scanner window. •  Clean the CK31G screen. Clean the scanner window and CK31G screen as often as needed for the environment in which you are using the computer. To clean the CK31G, use a solution of ammonia and water.  There are no user-serviceable parts inside the CK31G. Opening the unit will void the warranty and may cause damage to the internal components. To clean the scanner window and computer screen 1  Press I to turn off the CK31G. 2  Dip a clean towel or rag in the ammonia solution and wring out the excess. Wipe off the scanner window and screen. Do not allow any abrasive material to touch these surfaces. 3  Wipe dry.
 CK31G Handheld Computer User’s Manual  97  Appendix  A
Appendix A 98  CK31G Handheld Computer User’s Manual Physical and Environmental Specifications Use this section to locate technical information about the CK31G and its available features and options. Physical Dimensions Length:  23.4 cm (9.22 in) Width:  9 cm (3.54 in) Thickness:  5.3 cm (2.07 in) Weight:  590 g (20.8 oz) Power Specifications Operating:  Rechargeable 2400 mAh lithium-ion battery Backup: Super Cap supplies 10 minutes bridge time while replacing the main battery Electrical Specifications Models: CK31G Electrical rating:  x 7,4 to 12 VDC; 500 mA peak Temperature and Humidity Specifications Operating temperature:  -20°C to 50°C (-4°F to 122°F) Operating humidity:  5 to 95% non-condensing  Storage temperature:  -20°C to 60°C (-4°F to 140°F) Storage humidity:  0 to 95% relative humidity, non-condensing Screen Specifications •  240 RGB x 320 pixels •  8.9 cm (3.52 in) diagonal square active area, ¼ VGA •  Contrast: eight settings •  LED backlight with high and low settings Keypad •  52-key full alphanumeric keypad
Appendix A CK31G Handheld Computer User’s Manual  99 Bar Code Symbologies • Codabar  • Maxicode •  Codablock  •  Matrix 2 of 5 • Code 11  • Micro PDF417 •  Code 2 of 5  •  MSI • Code 39  • PDF417 • Code 93  • Plessey • Code 128  • Telepen • DataMatrix  • RSS • EAN.UCC Composite  • UPC/EAN •  Interleaved 2 of 5    2D Area Imager Reading Distances Code  Size  Near Distance  Far Distance MaxiCode 35 mil  2.5 cm (1.0 inches)  30.5 cm (12 inches) DataMatrix 15 mil  6.9 cm (2.7 inches)  14 cm (5.5 inches) PDF417 10 mil  5.3 cm (2.1 inches)  20.3 cm (8 inches) PDF417 8 mil  5.8 cm (2.3 inches)  17.8 cm (7 inches) PDF417 6.6 mil  8.9 cm (3.5 inches)  13.3 cm (5.25 inches) Code 39 15 mil  2.8 cm (1.1 inches)  30 cm (11.8 inches) Code 39 8 mil  6.4 cm (2.5 inches)  16.8 cm (6.6 inches) UPC 13 mil  3.8 cm (1.5 inches)  29.2 cm (11.5 inches) *Code 39 retroreflective
Appendix A 100  CK31G Handheld Computer User’s Manual Accessories for the CK31G You can use these accessories (sold and ordered separately) with the CK31G. To order accessories, contact your local Intermec sales representative. 073573 Power Supply Use a 073573 power supply to provide power for the communications docks and chargers. AB1G Battery Use the lithium-ion battery to provide main power to the computer. AC1 4-Slot Battery Charger Use the AC1 to charge up to four AB1G batteries at a time. The battery charger is designed to sense when a battery is fully charged and not overcharge it, ensuring long and consistent battery life. AD1 Communications Dock Use the AD1 to charge your AB1G battery and provide power to your CK31G while still having the ability to communicate via a serial, Ethernet, or USB port. CK31G Dust Cover (P/N 074134) The dust cover protects the CK31G keypad in dusty environments. CK31G Handle (P/N 074141) The handle provides a convenient scanning trigger for the CK31G.  CK31G Serial Adapter (P/N 074144) The serial adapter is a 26-pin dual-row connector to DB-9 connector that connects directly to the bottom of the CK31G. CAC Adapter and Reader (P/N 074245 and 074102) Attach the CAC reader module to your CK31G to be able to read Common Access Cards (CACs).
Appendix A CK31G Handheld Computer User’s Manual  101 Holster and Shoulder Strap (P/N 074101) The holster and shoulder strap provide you with a convenient way to carry the CK31G when you are not using it. Typing Characters Not Printed on the Keypad The keypad uses hidden key sequences to access characters not printed on the keypad overlay. Use the following table to understand how to access these hidden characters on the keypad. Typing Hidden Characters on the Keypad To Type:  Press This Key Sequence on the Keypad: $  C and then 6 `  C and then G !  C and then I “  C and then K '  C and then L {  C and then N }  C and then O :  C and then P ;  C and then Q |  C and then R ?  C and then S ~  C and then T
Appendix A 102  CK31G Handheld Computer User’s Manual Default Configuration Use the following tables to see the default configuration settings of the CK31G. If you restore the CK31G to factory default settings, it will use these values. The tables are organized according to the options in Intermec Settings. Default Scanner Configuration Symbology  Default Value Codabar Disabled Codablock  Disabled Code 11  Disabled Code 2 of 5  Disabled Code 39  Enabled Code 93  Disabled Code 128  Enabled DataMatrix  Enabled EAN.UCC Composite  Disabled Interleaved 2 of 5  Disabled Matrix 2 of 5  Disabled Maxicode  Disabled Micro PDF417  Disabled MSI  Disabled PDF417 Enabled Plessey  Disabled QR Code  Disabled RSS  Disabled Telepen Disabled UPC/EAN  Enabled
Appendix A CK31G Handheld Computer User’s Manual  103 Default Scanner Configuration (continued) Symbology Options  Default Value Preamble  No characters (disabled) Postamble  No characters (disabled) Global Symbology ID  Disable  Imager Settings  Default Value 1D Omni-directional Decode Enable  Enable Lighting Mode  Illum LED Priority Lighting Goal  50 Image Dimension  Top Position  Bottom Position  0 479 Aimer LED Duration  0 ms Sticky Aimer LED Duration  0 ms  Decode Security Settings  Default Value Consecutive Data Validation  0  Virtual Wedge Settings  Default Value Virtual Wedge Enable  Enable Grid  Null  Default Communications Configuration Communication Settings  Default Value DHCP Enable DHCP Client Identifier  Null Device Name  WindowsCE
Appendix A 104  CK31G Handheld Computer User’s Manual Default Communications Configuration (continued) 802.11 Radio Settings  Default Value Network Name  INTERMEC Infrastructure Mode  Infrastructure Security  Security Choice  Network Authentication  Data Encryption   Network Key Setting  802.1x Authentication  Microsoft Open Disabled Automatic Disabled Radio Power Management  Disabled (CAM) RTS Threshold  2347 octets  UDP Plus Settings  Default Value UDP Plus Activate  Disable Controller IP  0.0.0.0 Controller Port  5555 Ack Delay Upper Limit  5000 ms Ack Delay Lower Limit  300 ms Retries  7 Send Timer  20 s Receive Timer  45 s  Default Device Settings Configuration Device Settings  Default Value Date  January 10, 2015 Time  Time of current update Time Zone   Select Time Zone   Adjust for Daylight Time  GMT-8 Pacific US Enabled Beeper Volume  Very high Beeper Duration   Good Read Beep  Low Beep  High beep  80 ms 100 ms 150 ms
Appendix A CK31G Handheld Computer User’s Manual  105 Default Device Settings Configuration (continued) Device Settings  Default Value Beeper Frequency   Good Read Beep  Low Beep  High beep  1950 Hz 512 Hz 1950 Hz Display  Backlight Timeout   Maximum Backlight Level  Screen Rotation  15 seconds Low Disable Keypad   Adjust Beeper Volume   Adjust Display Contrast   Adjust Backlight On and Off  Task Manager   Configure Boot Functionality  Enable Enable Enable Enable Warm boot Power Management  User Idle  System Idle  Suspend  1 minute 1 minute 1 minute Backup Files Location  Flash File System
Appendix A 106  CK31G Handheld Computer User’s Manual
 CK31G Handheld Computer User’s Manual  107  Index   I
Index 108  CK31G Handheld Computer User’s Manual Symbols and Numbers C key. See green key B key. See orange key I key illustration, 7 modify keypad function, 10 program to warm or cold boot, 11 using, 9 073573 power supply, described, 100 2D area imager reading distances, 99 4-slot battery charger , AC1 accessory, 100 802.11 Information diagnostic screen, 73 802.11b/g radio communications, configuring, 34 802.1x security configuring, 44 with Funk, 45 with Microsoft, 46 troubleshooting, 89–90 A AB1G battery described, 100 using, 3 AC1 4-slot battery charger accessory, described, 100 accessories, described, 100 ActiveSync installing and establishing a  partnership, 59 using to  copy and install files, 61 install applications, 58 upgrade operating system, 67 AD1 communications dock,  described, 100 AIT-III Developer’s toolkit, using to develop applications, 56 application developing web-based, 57 with toolkit, 56 installing with Avalanche, 63 ActiveSync, 58 FTP server, 62 SD card, 62 launching automatically, 63 storing on the CK31G, 58 applications developing new, 56 installing on the CK31G, 57 audio feedback. See beeps authenication Information diagnostic screen, 73 troubleshooting, 73 802.1x security, 89–90 automatically launching your  application, 63 Avalanche, using to remotely manage the CK31G, 63 B backing up files, to Persistent Copy  folder, 65 backlight key disable or modify keypad function, 10 illustration, 7 bar codes scanning, 20 scanning, troubleshooting, 92 supported symbologies, 99 symbologies, default, 20 battery AB1G accessory, 100 charger, AC1 accessory, 100 charging and installing, 4 charging times, 5 checking status, 6 Information, diagnostics screen, 74 installing, 5 maximizing life, 6 status icons, 6 using, 3 beeper volume disable or modify keypad function, 10 changing, 19 beeps testing, 85 understanding, 19 Boot Code Version, diagnostics screen, 75
Index CK31G Handheld Computer User’s Manual  109 booting CK31G, 94 cold, 94 warm, 94 Button Link Reader Test diagnostic, 75 C CAB file, using to install applications, 57 CAC adapter and reader, accessory described, 100 calibrating,touch screen, 18 capitalizing characters, 9 Caps Lock, using, 9 card, SD inserting or removing, 22 using to install applications, 62 using to store applications, 58 upgrade operating system, 66 CCX v1.0 compliance, 3, 38 certificates, loading for security, 50 changing a password, 64 characters not printed on keypad,  typing, 101 charging times, battery, 5 CK_FFS folder, using to store  applications, 58 CK31G default configuration settings, 102–105 description, 2 developing a new application, 56  troubleshooting, guide to, 87 cleaning scanner window, 96 screen, 96 cold boot,  performing, 94 preserving files through, 65 color-coded keys, using, 8 communications  default configuration settings, 104 dock, AD1 accessory, 100 configuration default settings, 102–105 number, finding with Configuration Table diagnostic, 76 Table, diagnostics screen, 76 configuring 802.11b/g radio communications, 34 802.1x security, 44 troubleshooting, 89–90 LEAP security, 47 parameters, 26 remotely with Intermec Settings, 32 security, 37 serial communications, 33 static WEP security, 48 TCP/IP network parameters, 34 UDP Plus network parameters, 36 using local Intermec Settings, 28 using Setup Assistant, 27 WPA security, 39 converting writing to text using Transcriber, 14 copy files to CK31G using ActiveSync, 61 copyright information, x cover, serial port, 2 CPU Register,  diagnostics screen, 77 reading, 77 D default configuration restoring, 30 settings, 102–105 desktop,  illustration, 12 understanding, 13 developing applications using the toolkit, 56 device IP address, viewing, 81 DHCP server IP address, viewing, 81 diagnostics 802.11 Information, 73 Authentication Information, 73 Battery Information, 74 Boot Code Version, 75 Button Link Reader Test, 75 CPU Registers, 77 Display Test, 78 Hardware Configuration Table, 76 Installed Fonts, 78 Intermec Value Version, 79 Keypad Test, 80
Index 110  CK31G Handheld Computer User’s Manual diagnostics (continued) LED Test, 80 Network Information, 81 Network Test, 81 Operating System Version, 82 Ping Utility, 83 RAM Information, 83 SD Card Memory Test, 84 Sound Test, 85 using, 72 diagram, Intermec Settings, 29 dimensions, physical, 98 disabling keypad functions, 10 security, 53 display  contrast, disable or modify keypad function, 10 Test, diagnostics screen, 78 dust cover, accessory described, 100 E, F electrical specifications, 98 Enroll Certificates, 50 environmental specifications, 98 exiting Intermec Settings, 31 Extensible Authentication Protocol  (EAP), 40 factory default settings, restoring, 30 files, backing up, 65 fonts, viewing installed, 78 FTP server using to install applications, 62 using to upgrade operating system, 67 function keys, using, 8 functions, keypad, modifying or  disabling, 10 Funk security configuring  802.1x security, 45 WEP, 48 WPA security, 40 WPA-PSK, 41 selecting a profile, 39 selecting as security choice, 38 using, 38 G,H Good Read light described, 19 troubleshooting, 93 green key illustration, 7 using, 8 gun. See CK31G handle, accessory described, 100 Hardware Diagnostics menu, 72 hidden characters, typing, 101 holster and shoulder strap, accessory described, 101 host computer not receiving data, troubleshooting, 91 humidity, specifications, 98 I ICCU. See Intermec Settings icons battery status, 6 understanding screen, 16 imager, 2D area reading distances, 99 Import Root utility, 50 inserting, SD card, 22 Installed Fonts, diagnostics screen, 78 installing ActiveSync, 59 applications with Avalanche, 63 FTP server, 62 SD card, 62 battery, 5 SD card, 22 Intermec Computer Command Reference Manual, 29 Intermec Developer’s Toolkits for AIT-III CD, 56 Intermec Settings exiting, 31 menu structure, illustrated, 29 navigating within, 30 opening on the CK31G, 28 package for Wavelink Avalanche, 32 using to configure the CK31G remotely, 32 using to remotely upgrade, 68
Index CK31G Handheld Computer User’s Manual  111 Intermec Value Version, diagnostics screen, 79 Internet Explorer, opening, 57 K, L keypad 52-key illustration, 7 functions, disabling, 10 option, 98 Test, diagnostic screen, 80 typing hidden characters, 101 using, 6–11 using color-coded keys, 8 launching applications automatically, 63 LEAP security, configuring, 47 LED Test, diagnostics screen, 80 lights status, 19 testing, 80 Lightweight Extensible Authentication Protocol (LEAP), described, 47 loading certificates for security, 50 locking a key, 8 M, N, O MAC address, viewing, 81 manuals, downloading from web, ix maximizing battery life, 6 memory, viewing available, 83, 84 menu structure, Intermec Settings, 29 Microsoft security configuring  802.1x security, 46 WEP, 49 WPA, 42 WPA-PSK, 43 modifying, keypad behavior, 10 moving a window, 17 navigating in Intermec Settings, 30 network  connection, testing, 81 Information, diagnostics screen, 81 protocols supported, 34 Test, diagnostics screen, 81 no network connection icon, troubleshooting, 91 Operating System Version, diagnostics screen, 82 operating system, upgrading, 66 operating the CK31G humidity range, 98 temperature range, 98 troubleshooting, 88 orange key illustration, 7 using, 8 P parameters, configuring CK31G, 26 passphrase setting for Funk WPA-PSK, 42 setting for Microsoft WPA-PSK, 44 password changing, 65 setting, 64 patent information, x Persistent Copy folder, backing up files, 65 physical dimensions, 98 specifications, 98 Ping command using to test network  communications, 83 using to test network connection, 81 Ping Utility, diagnostics screen, 83 plug, serial port. See serial port cover Power key. See I key power specifications, 98 power supply accessory, 100 Pre-Shared key Mode, WPA, 40 problems, finding and solving, 88 profile, selecting for Funk security, 39 Protected Extensible Authentication Protocol (PEAP), described, 44 R radio communications, configuring, 34 configuring 802.11b/g, 34 RAM Information, diagnostics screen, 83 reading distances, 2D area imager, 99 Ready-to-Work indicator described, 19 illustration, 2 register, displaying values, 77
Index 112  CK31G Handheld Computer User’s Manual remotely managing the CK31G, using Avalanche, 63 removing, SD card, 23 repositioning a window, 17 reset switch, 94 restoring default settings, 30 RS-232 communications, configuring, 33 S safety icons, viii summary, vii scan bar codes, using ScanDemo application, 13 scan button,  illustration, 7 troubleshooting, 92 ScanDemo, using, 13 scanner default configuration settings, 102–103 troubleshooting, 92 window, cleaning, 96 scanning bar codes, 20 screen cleaning, 96 specifications, 98 screen icons, understanding, 16 SD card inserting or removing, 22 Memory Test, diagnostics screen, 84 using to install applications, 62 store applications, 58 SDMMC disk, using to store  applications, 58 security choice, selecting Funk, 38 configuring, 37 802.1x, 44 LEAP, 47 WEP, 48 WPA, 40 disabling, 53 loading certificates, 50 using the Funk supplicant, 38 serial  adapter, accessory described, 100 communications configuring, 33 network diagram, 33 troubleshooting, 92 port cover, 2 setting a password, 64 settings, restoring default, 30 Setup Assistant, using to configure CK31G, 27 software  Diagnostics menu, 72 version, viewing, 82 sound test, 85 specifications electrical, 98 humidity, 98 power, 98 screen, 98 temperature, 98 start screen, understanding, 13 static WEP security, configuring, 48 status beeps, 19 checking battery, 6 lights, understanding, 18 storing your application on the  CK31G, 58 stylus, using with touch screen, 12 switch, reset, 94 symbologies, bar code default, 20 supported, 99 System Diagnostics menu, 72 T Task Manager, disable or modify keypad function, 10 taskbar described, 12 understanding, 13 TCP/IP network diagram, 35 network, configuring parameters, 34 technical support, accessing on web, ix temperature, specifications, 98
Index CK31G Handheld Computer User’s Manual  113 testing display, 78 keypad, 80 LEDs, 80 network connection, 81 sound, 85 TKIP, using with WPA, 39 touch screen calibrating, 18 understanding icons, 16 using, 12 using with stylus, 12 Transcriber, using, 14 Transport Layer Security (TLS),  described, 44 troubleshooting bar code symbologies, 93 configuring 802.1x security, 89–90 guide to finding solutions, 87 lost network connection after  suspend, 91 operating the CK31G, 88 preventive maintenance, 96 scanning bar codes, 92 serial communications, 92 wireless connectivity, 91 typing characters not printed on  keypad, 101 U UDP Plus network  configuring parameters, 36 diagram, 36 understanding screen icons, 16 status lights, 18 upgrading operating system with SD card, 66 Intermec Settings, 68 uppercase letters, typing, 9 User Certificates utility, 50 using battery, 3 Caps Lock, 9 diagnostics, 72 green key, 8 I key, 9 keypad, 6–11 orange key, 8 touch screen, 12 W warm booting, 94 warranty information, viii Wavelink Avalanche, package for  CK31G, 32 WEP security, configuring, 48 Wi-Fi Protected Access (WPA), 39 wireless communications configuring, 34 troubleshooting, 91 WPA security, 39 configuring with Funk, 40 Microsoft, 42 WPA-PSK security, 40 configuring with  Funk, 41 Microsoft, 43 writing on touch screen, converting with Transcriber, 14
Index 114  CK31G Handheld Computer User’s Manual
Corporate Headquarters6001 36th Avenue WestEverett, Washington 98203U.S.A.tel 425.348.2600fax 425.355.9551www.intermec.comCK31G Handheld Computer User's Manual*074023-001*P/N 074023-001

Navigation menu