Intermec Technologies CK31MIG2 802MIG2 User Manual CK31umfr
Intermec Technologies Corporation 802MIG2 CK31umfr
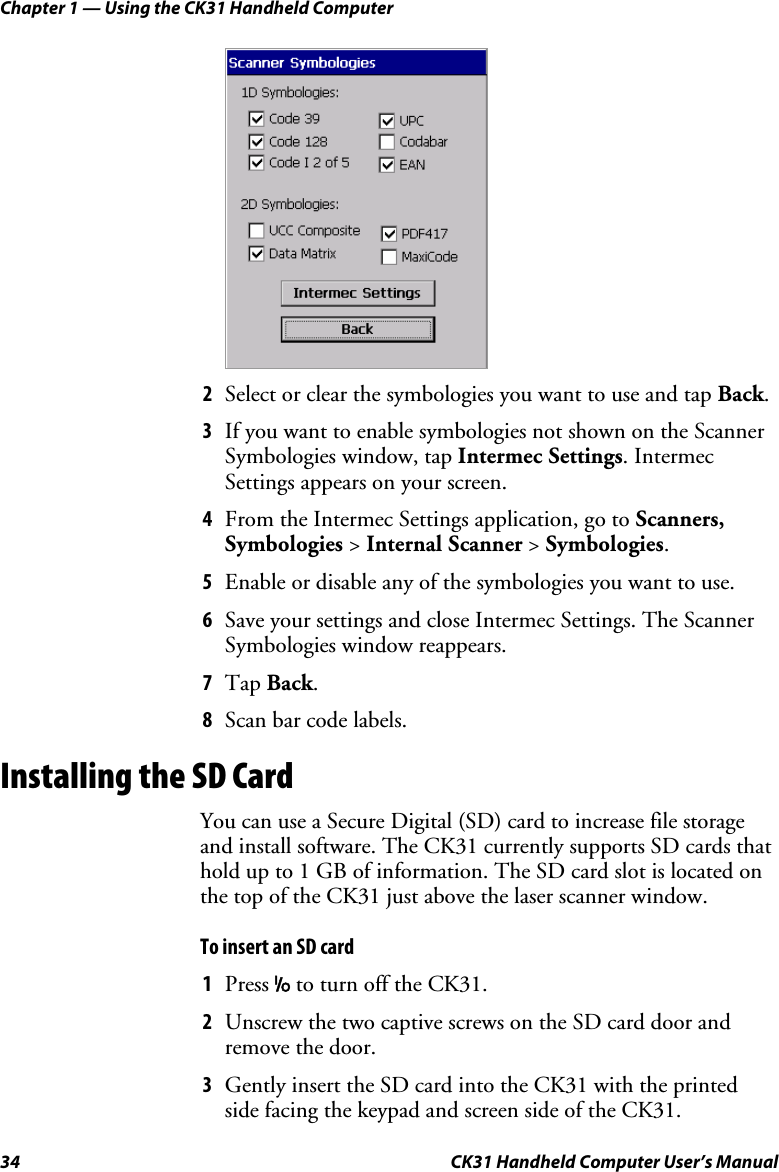
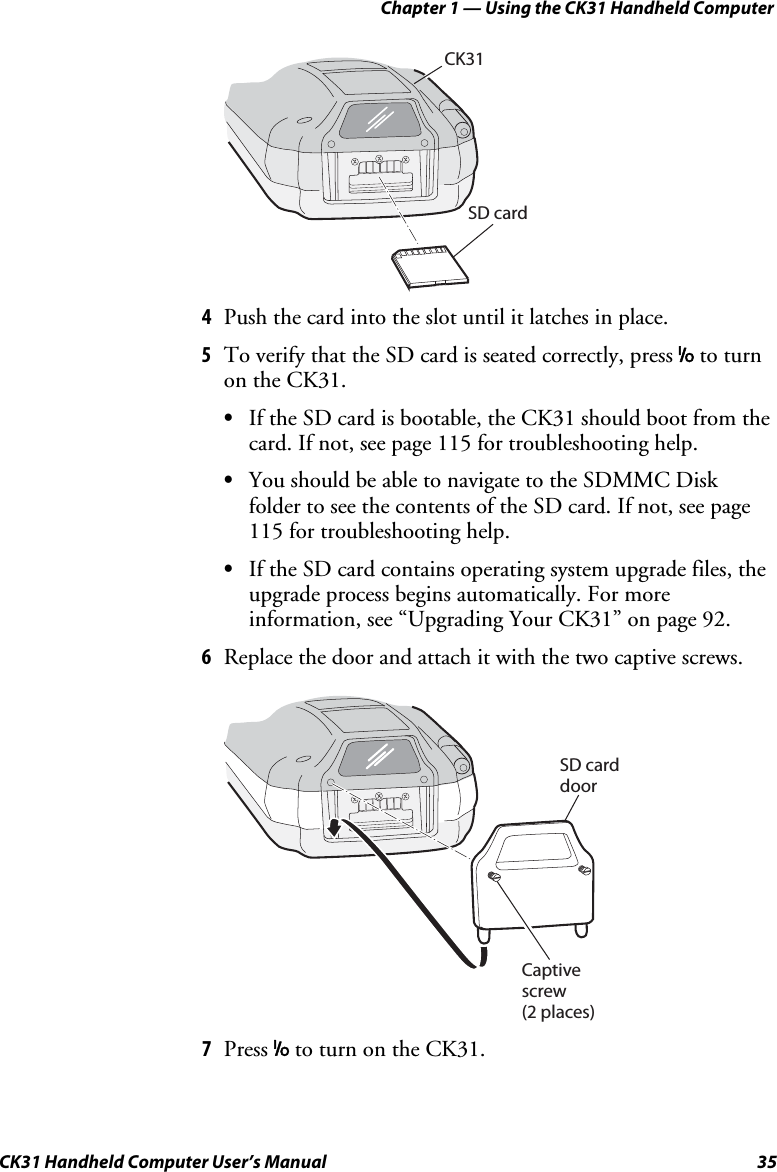
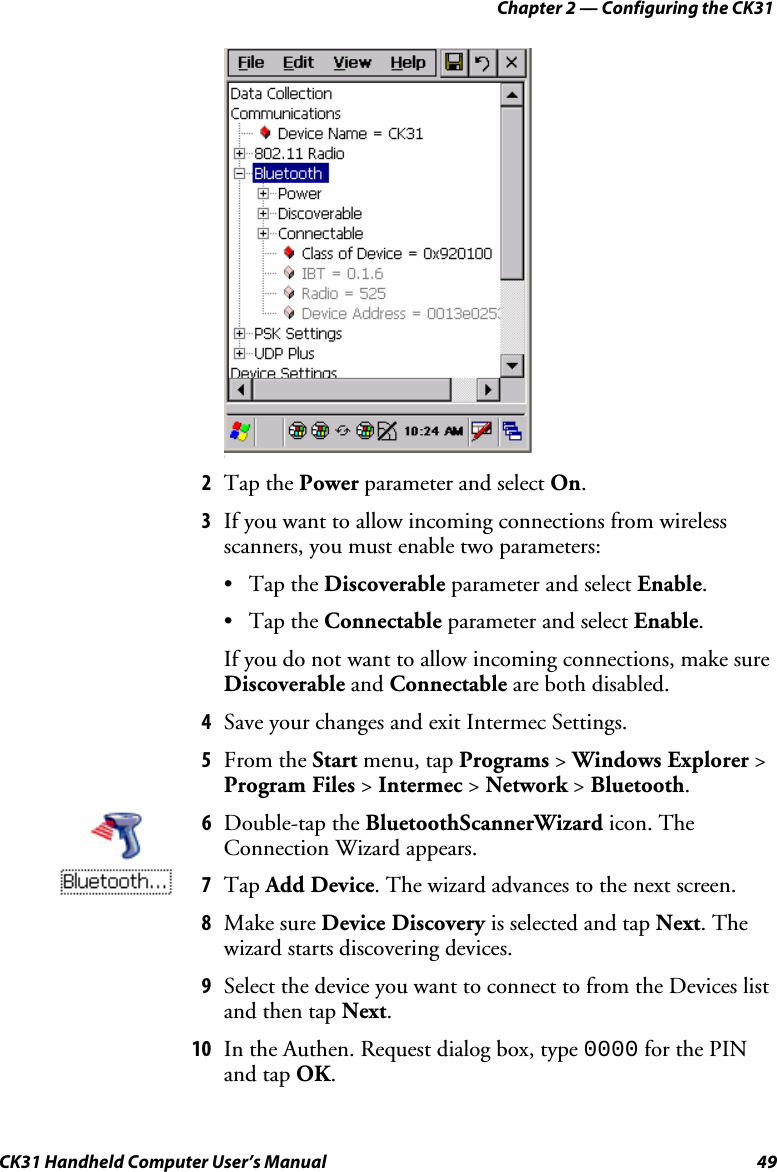
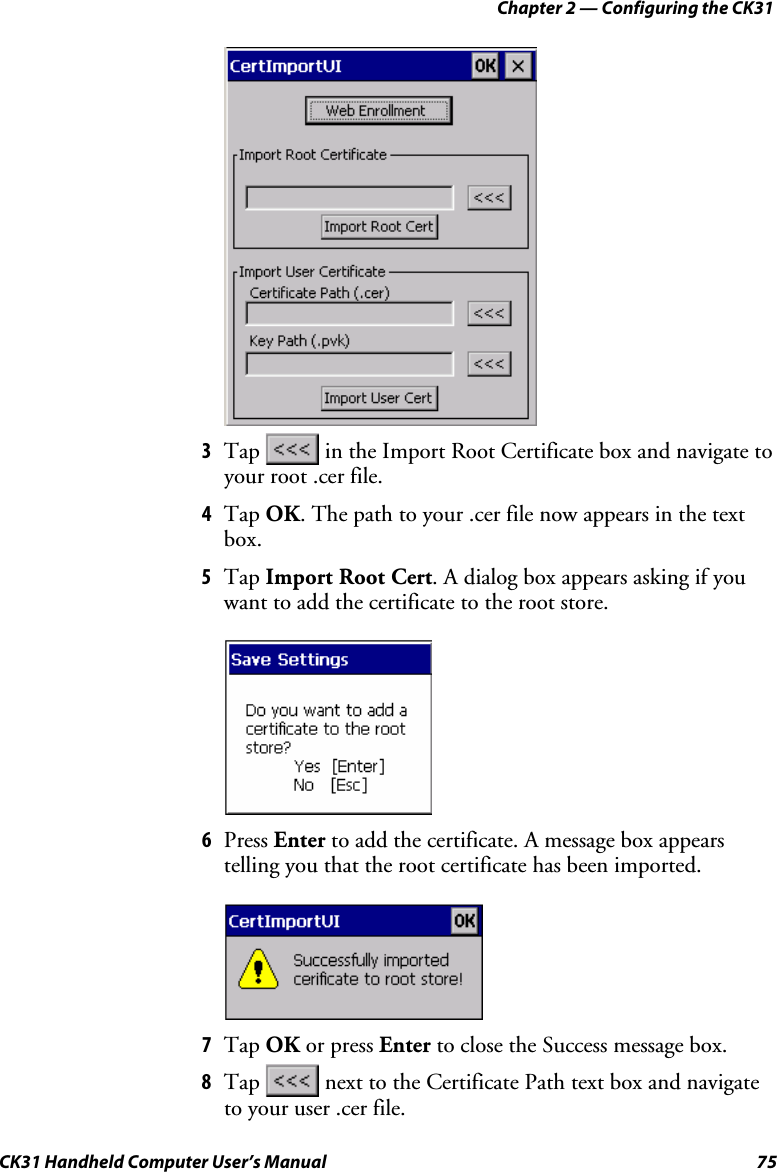
UserManual.wiki
>
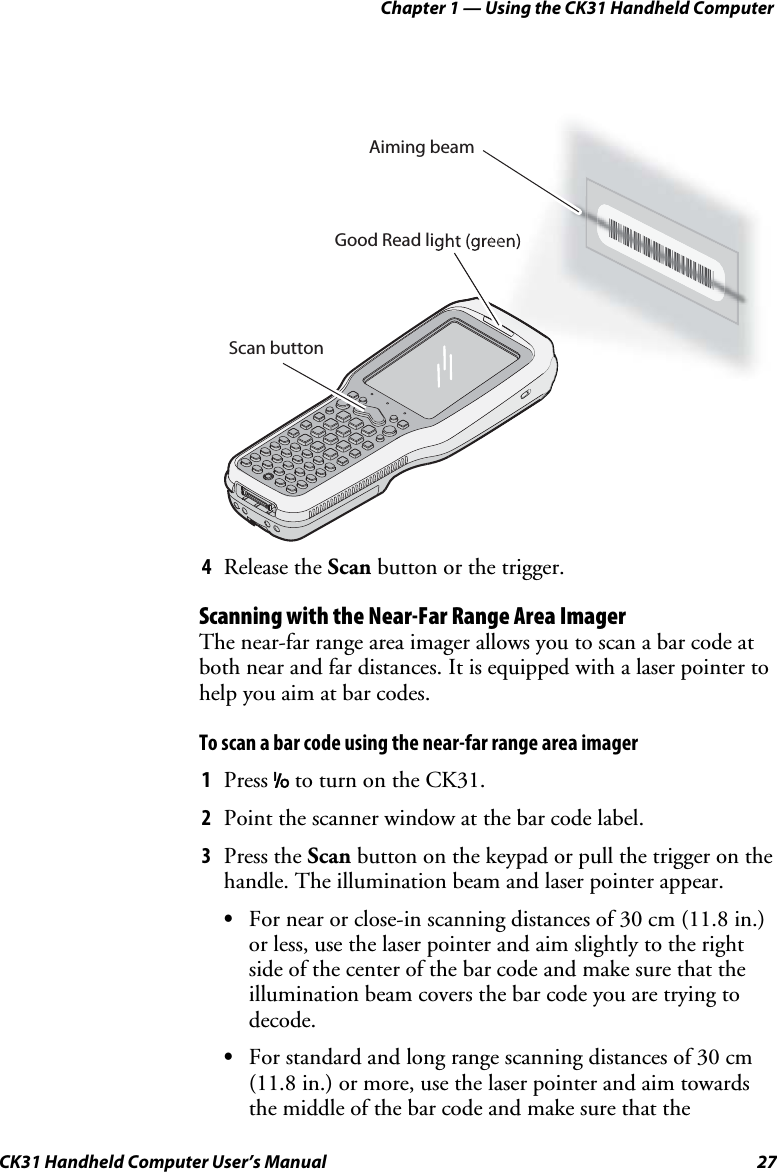
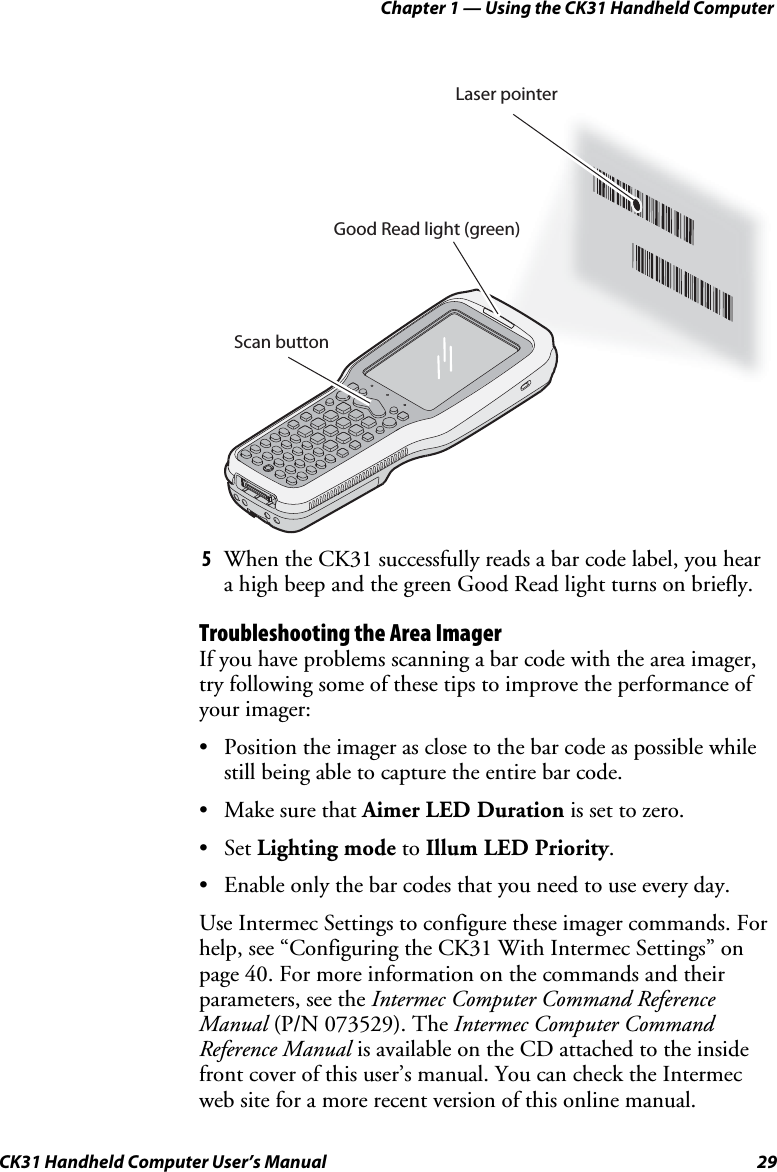
Intermec Technologies
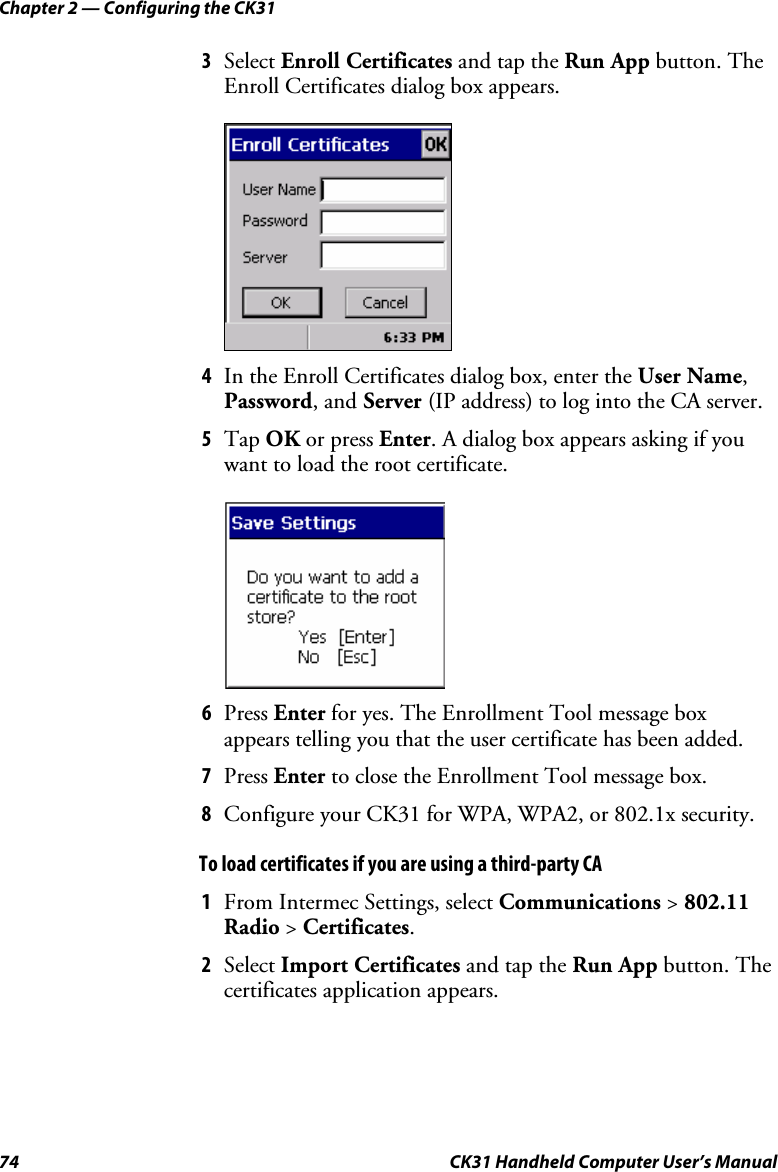
>
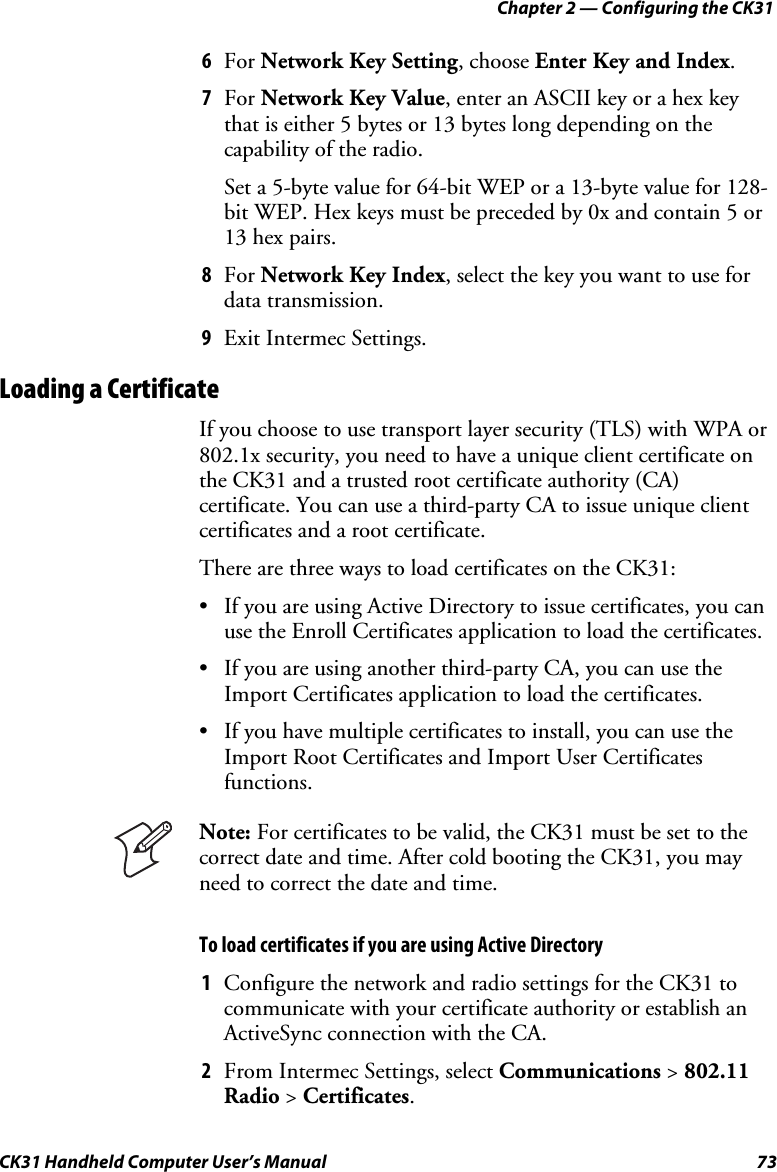
CK31MIG2 User Manual
>
User Manual 1
Contents
1.
Intermec User Manual
2.
Manual supplement
3.
User Manual 2
4.
User Manual 1
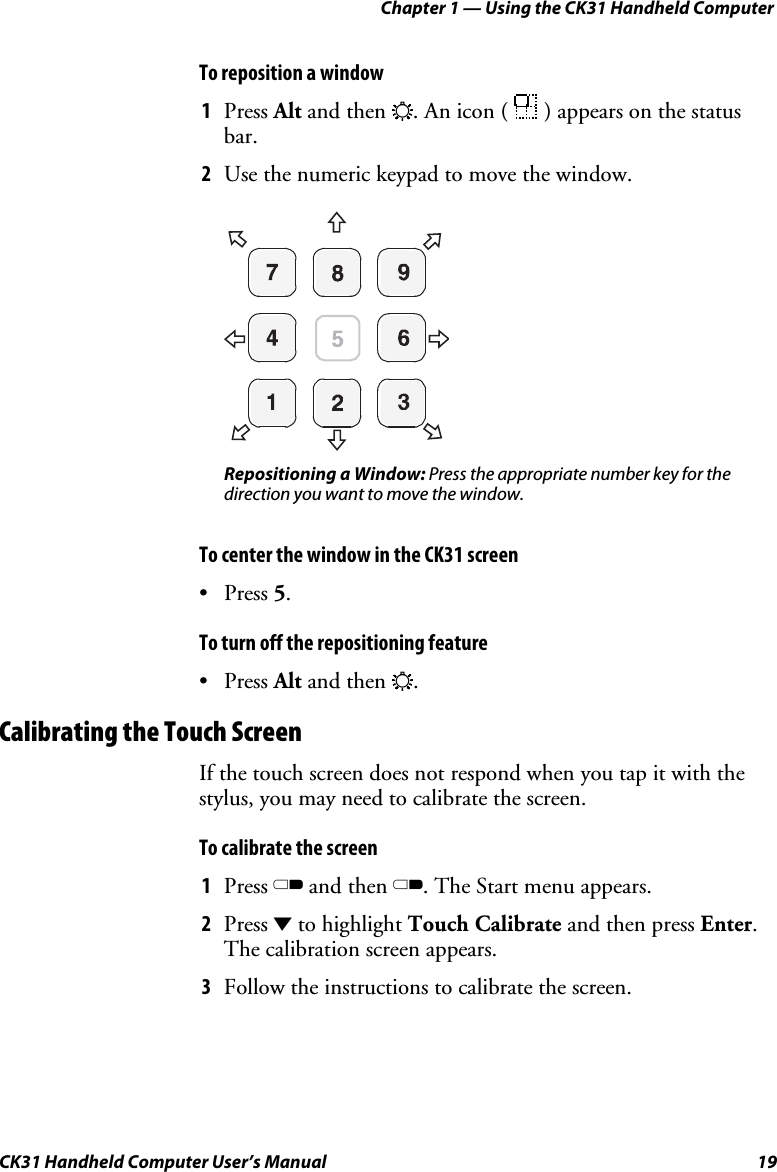
5.
User Manual 3
6.
Compliance Insert
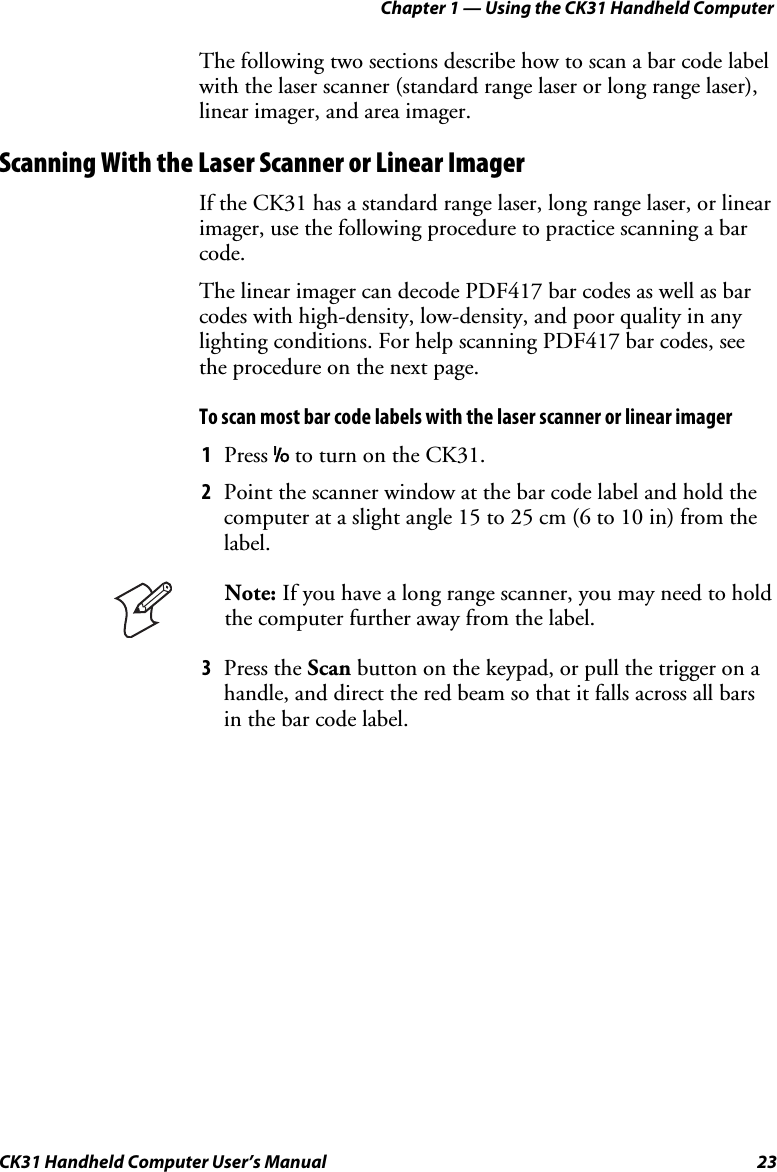
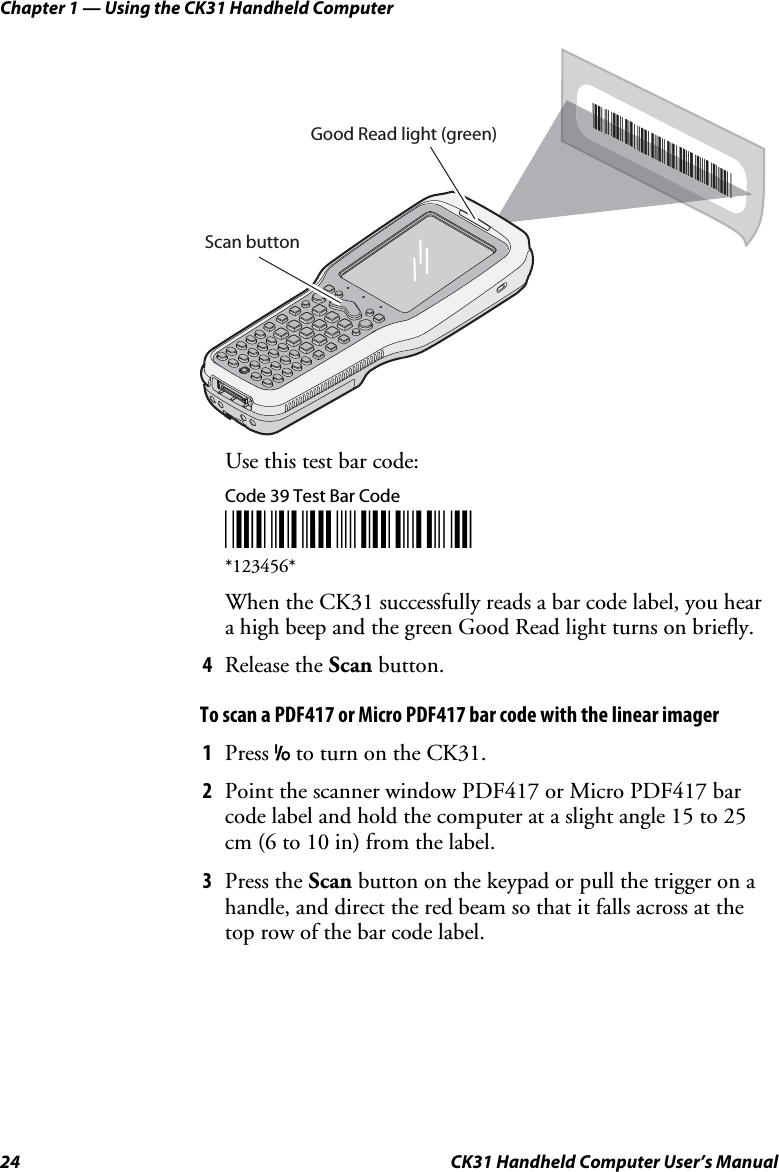
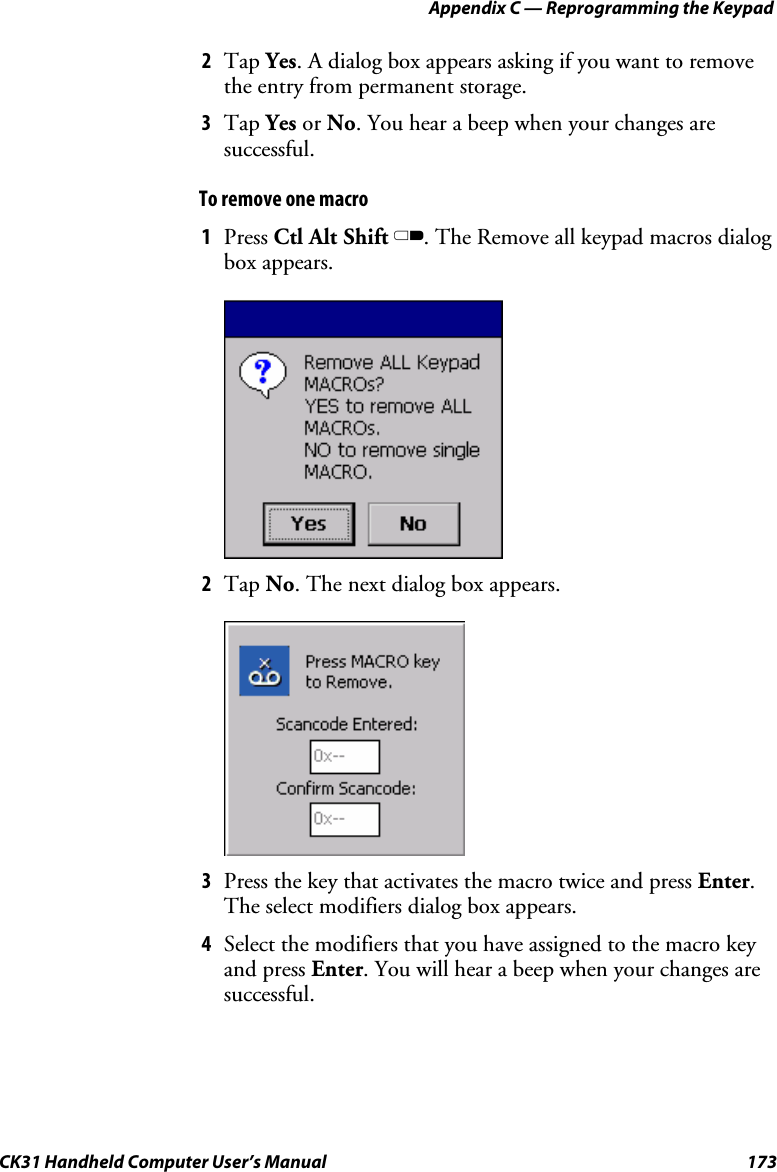
User Manual 1
Navigation menu
Upload a User Manual
Namespaces
Wiki Guide
HTML
PDF
Info
Views
User Manual
Discussion / Help
Navigation


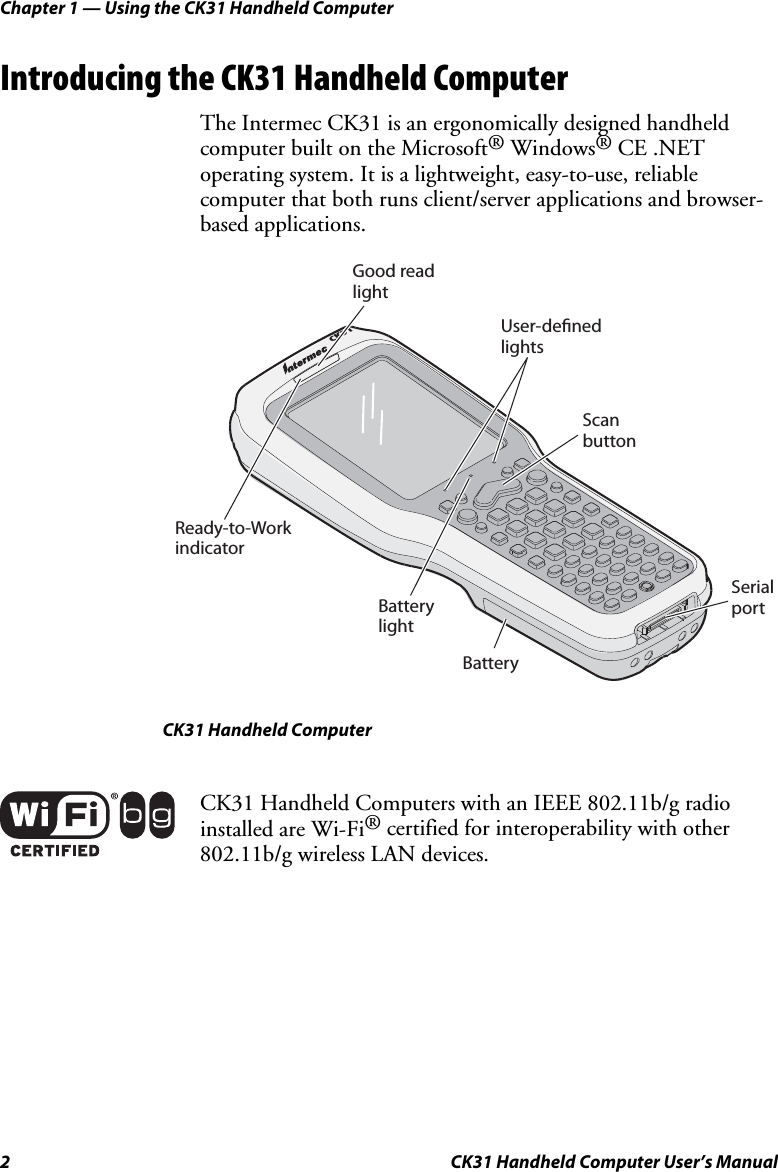


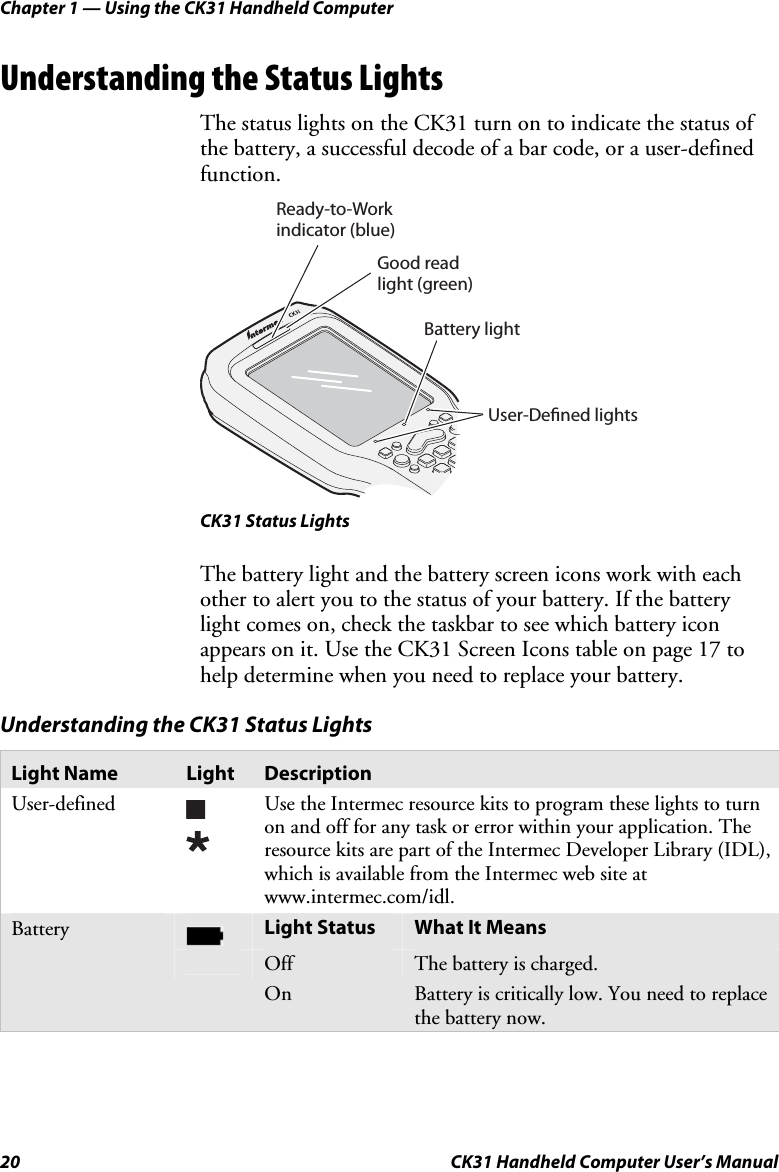
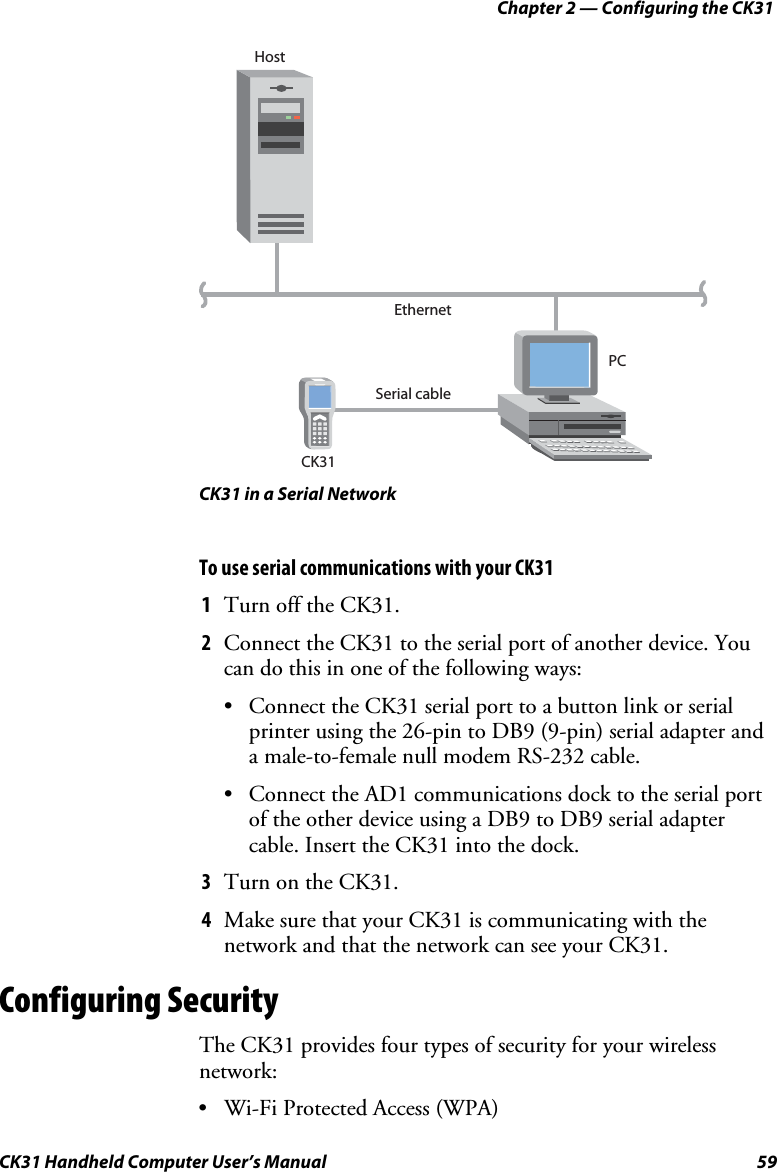
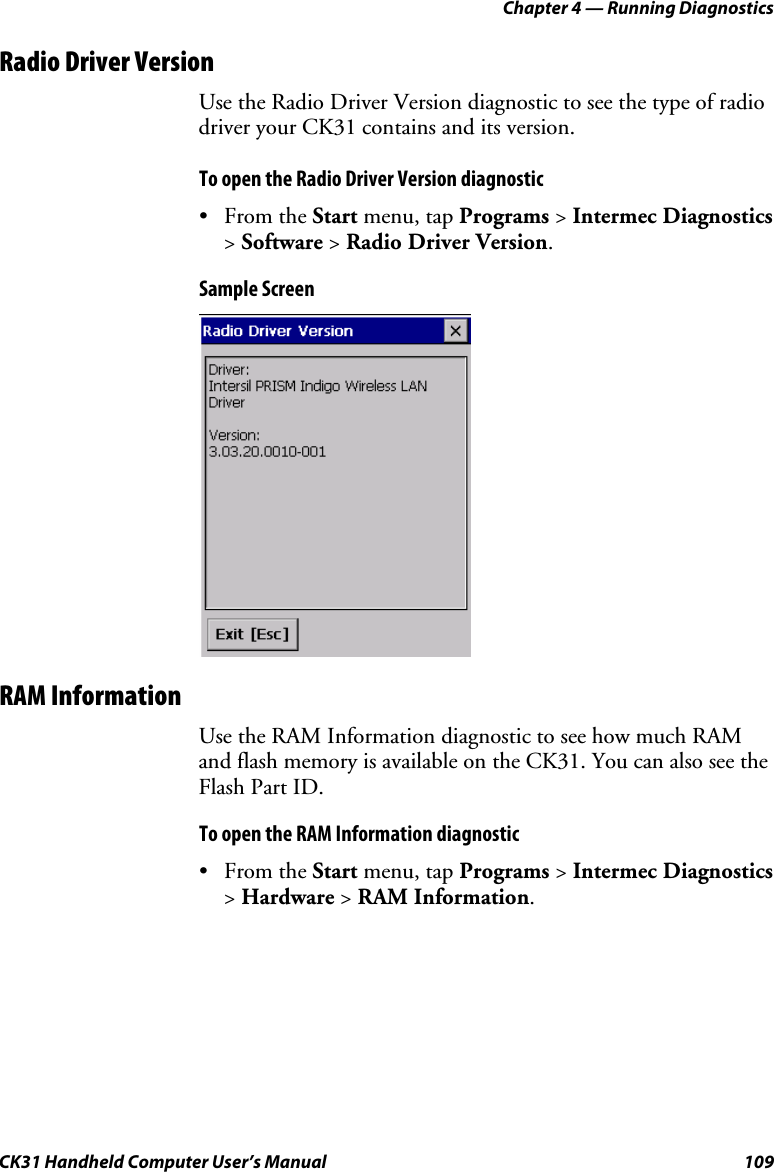
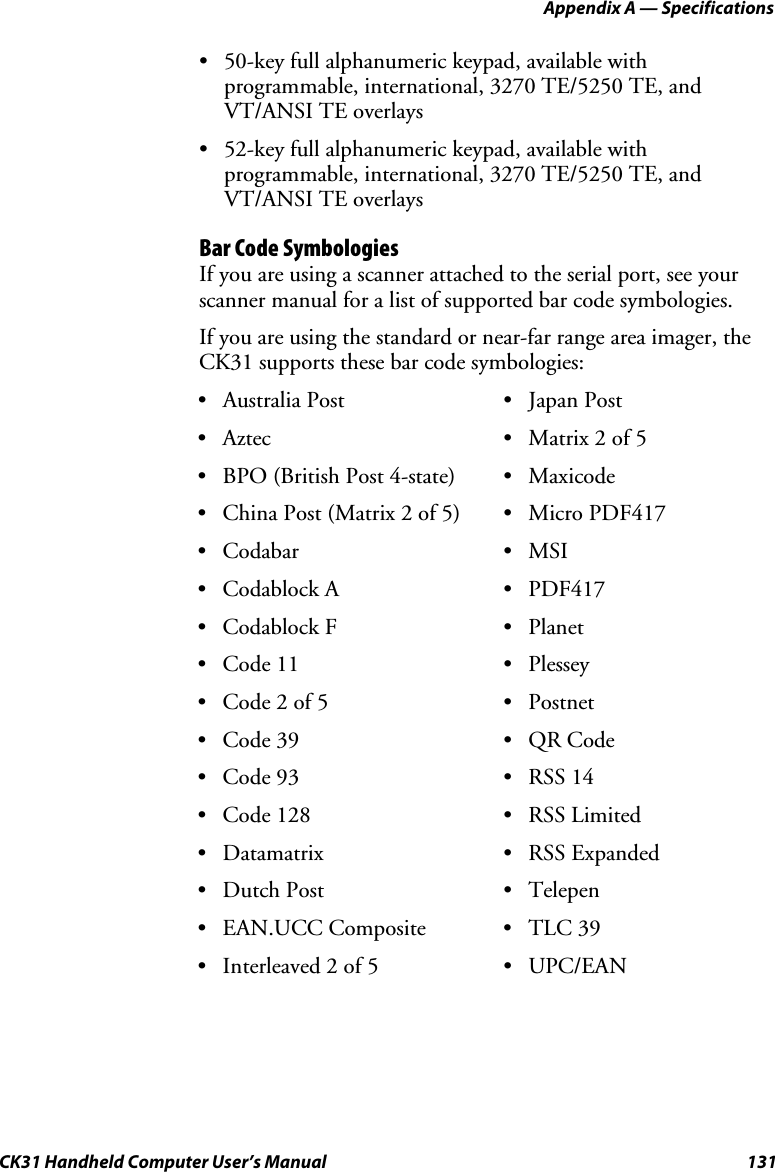
![Chapter 1 — Using the CK31 Handheld Computer 8 CK31 Handheld Computer User’s Manual The CK31 supports TE 2000 VT100/220/320/340 and ANSI, TE 2000 5250, and TE 2000 3270. When you order the CK31 with a TE 2000 application, you must order the corresponding keypad overlay. Use the TE 2000 keypad overlays to enter the same keys that you can enter on a VT/ANSI keyboard, and IBM 5250 keyboard, or an IBM 3270 keyboard. Like the standard CK31 overlay, the TE 2000 keypad overlays let you enter all the characters printed on or above the keys. The terminal emulation keypads also come with the same color-coded keys that are on the standard overlay. For help using TE 2000 terminal emulation, see the TE 2000 Terminal Emulation Programmer’s Guide (P/N 977-055-xxx). EnterEnterHomeCAPSSpDelInsADGBEHCFIJKLMNOPQRSTUVZXYW/\.PROG*?[]Shift&*(%$!^#)EscCtl AltAlphaSpTab1234567809F1 F2 F3 F4F5 F6 F7 F8F9 F10 F11 F12.,ScanbuttonOrangekeyGreenkeyBacklightkeyPowerkey 42-Key Large Numeric and Function Keypad: This keypad is designed for applications that accept mainly numeric data (0-9) and that need dedicated function keys (F1- F12). This keypad also lets you enter the entire alphabet and special characters by pressing color-coded key sequences.](https://usermanual.wiki/Intermec-Technologies/CK31MIG2.User-Manual-1/User-Guide-1305503-Page-25.png)
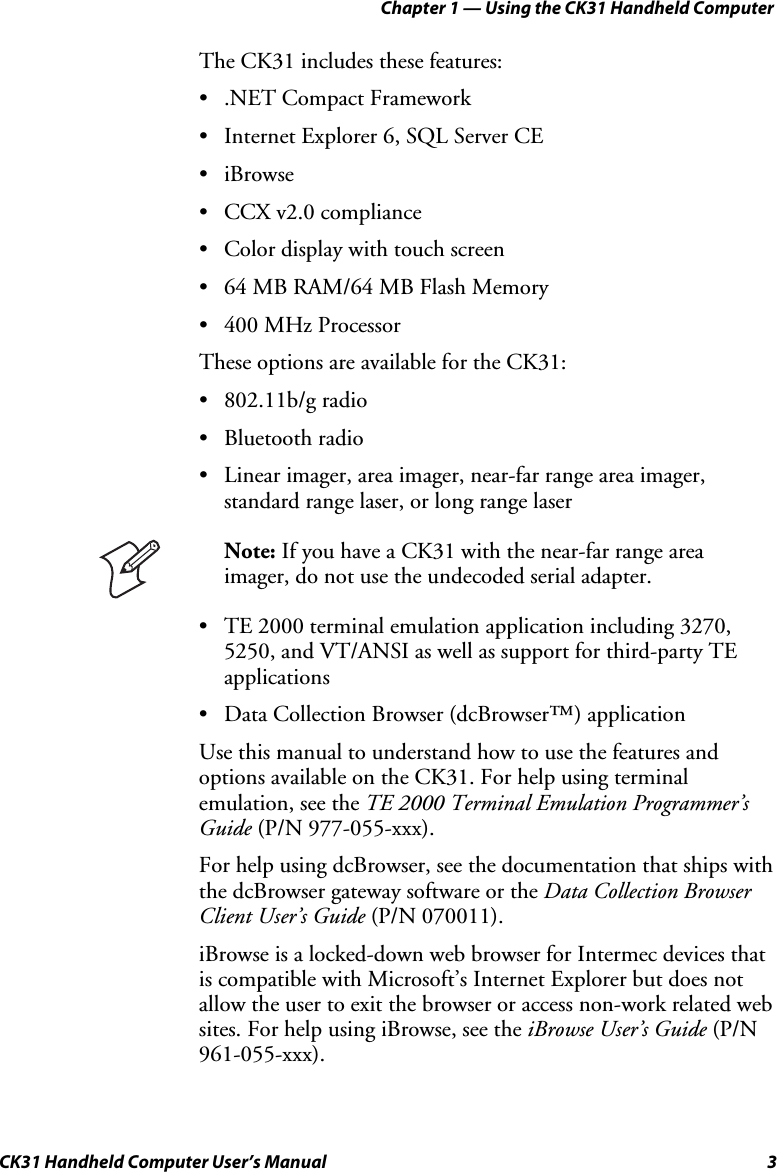
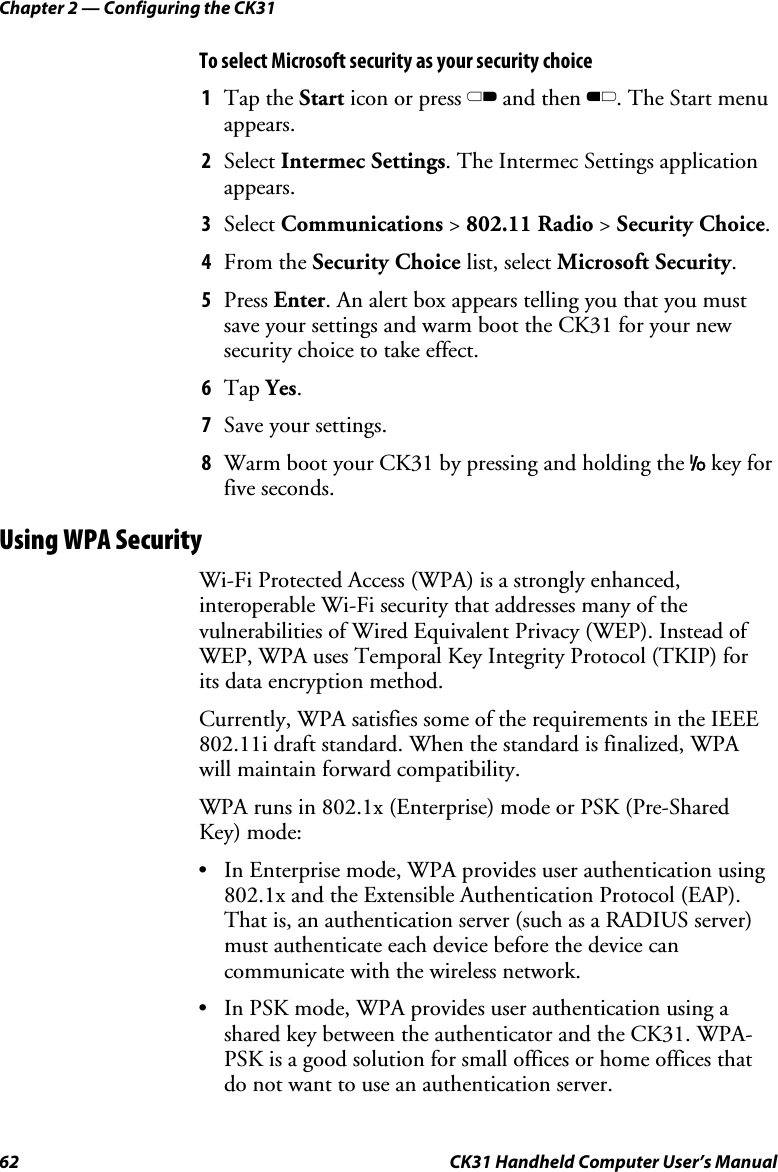
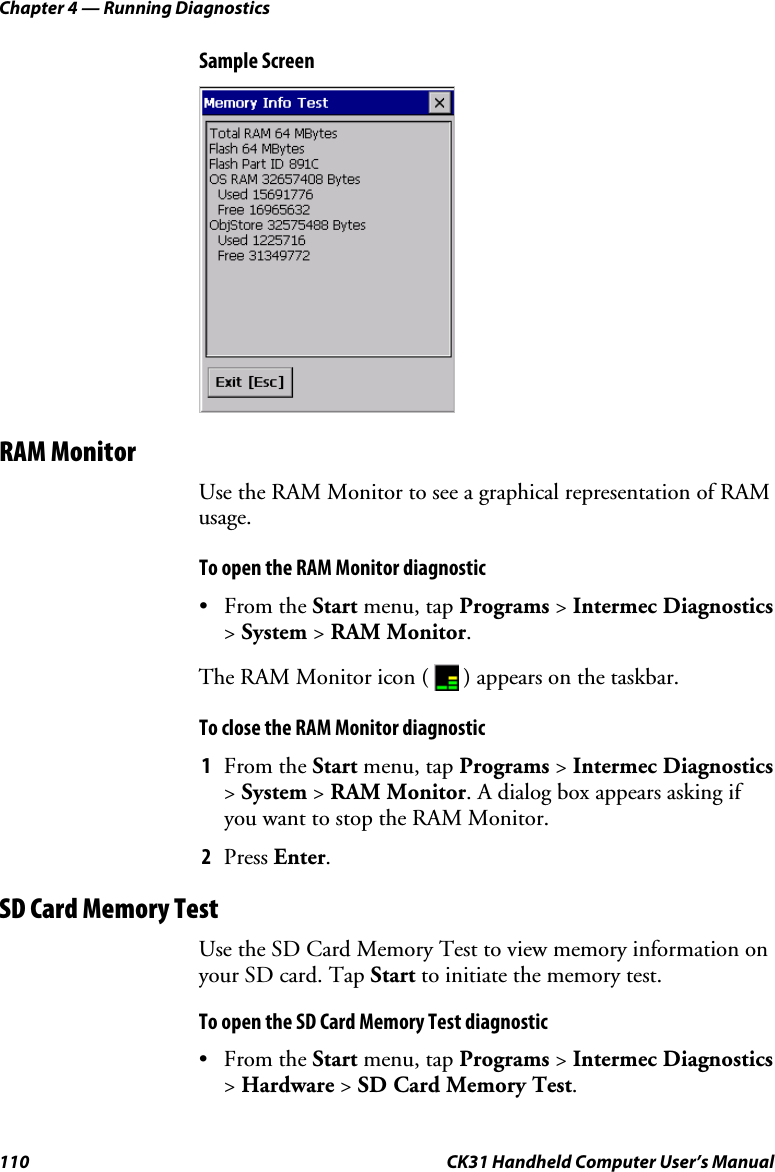
![Chapter 1 — Using the CK31 Handheld Computer CK31 Handheld Computer User’s Manual 9 HomeDelF7 F8 F9F6F5F4F1 F2 F3SpaceF10InsCAPSAlt?“‘+/\¦.PROG{}*[]PowerkeyEsc key GreenkeyBacklightkeyOrangekey 50-Key Full Alphanumeric Keypad: This keypad is designed for applications that accept mainly numeric data (0-9) and that may need to accept the entire alphabet. The keypad also provides shifted function keys (F1-F9) and special characters, symbols, and functions by pressing color-coded key sequences. Note: The 50-key keypad does not have a scan key, because it was designed to work with the required handle with the built-in scanner trigger.](https://usermanual.wiki/Intermec-Technologies/CK31MIG2.User-Manual-1/User-Guide-1305503-Page-26.png)


![Chapter 5 — Troubleshooting and Maintaining the CK31 120 CK31 Handheld Computer User’s Manual Problems With Wireless Connectivity (continued) Problem Solution While configuring or using wireless printing, you see the message, “The Bluetooth COM port does not exist [55]. This is probably because the computer was just resumed. Please wait a few seconds and try again.” If you recently resumed the CK31, wait a few seconds and try again. Otherwise, you need to make sure that the device you selected as the current wireless printer is a printer, is turned on, and is discoverable. To learn about the current wireless printer and the Bluetooth COM port, see “Creating an Application That Lets You Print Wirelessly” on page 51. While configuring or using wireless printing, you see the message, “Bluetooth is off. Would you like to turn it on and continue?” Tap Yes to dismiss the message. Follow the instructions in “Turning On Bluetooth Power” on page 51 to turn on the power to the Bluetooth radio. Problems Transmitting Data Through the Serial Port If you are having problems sending or receiving data through the integrated serial port on the CK31, check these possible problems: • Make sure the CK31 is connected to the PC, host computer, or RS-232 serial device using the appropriate cable adapter and null modem cable. • If the CK31 is in a communications dock, make sure that the communications dock is connected to the serial device using the appropriate cable. • Make sure that ActiveSync is not connecting to the CK31 through the serial port. • You cannot use the decoded serial adapter or AA2 to connect to any device other than a decoded scanner. The CK31 auto-detects the serial adapter or AA2, and the scanner software makes the COM port unavailable. Instead, use the AA3 to connect a device like a printer to the CK31. The AA3 requires an external power source. For more information on using the serial port, see “Configuring Serial Communications” on page 58.](https://usermanual.wiki/Intermec-Technologies/CK31MIG2.User-Manual-1/User-Guide-1305503-Page-137.png)


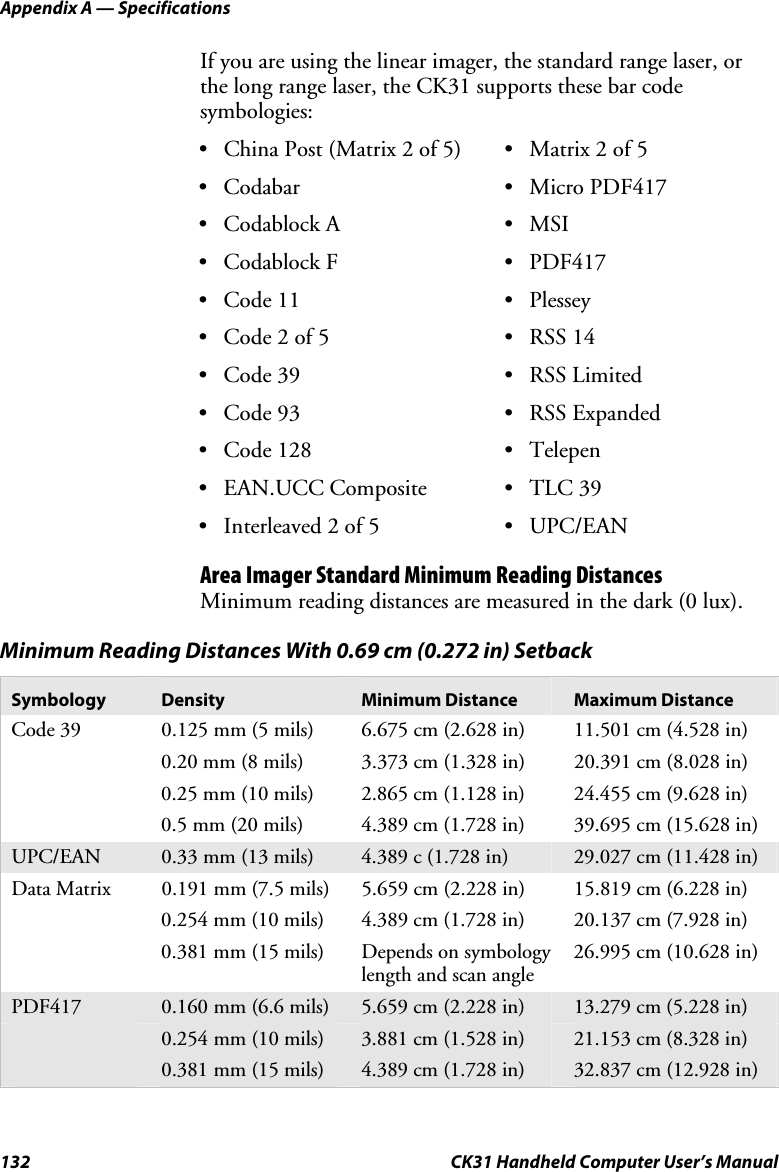


![Appendix A — Specifications CK31 Handheld Computer User’s Manual 143 Typing Hidden Characters on the International Keypads Press This Key Sequence on One of the Keypads: To Type: 42-Key 50-Key 52-Key $ Not hidden Not hidden C and then 6 { B and then a C and then S C and then 9 } B and then b C and then T C and then 0 < B and then _ Not hidden Not hidden > B and then ` Not hidden Not hidden ] C and then 9 Not hidden Not hidden [ C and then Tab Not hidden Not hidden , C and then Right Enter Not hidden Not hidden](https://usermanual.wiki/Intermec-Technologies/CK31MIG2.User-Manual-1/User-Guide-1305503-Page-160.png)
![Appendix A — Specifications 144 CK31 Handheld Computer User’s Manual Typing Hidden Characters on the 3270/5250 TE Keypads Press This Key Sequence on One of the Keypads: To Type: 42-Key 52-Key $ Not hidden C and then 6 < B and then _ Not hidden > B and then ` Not hidden ] C and then Alpha Not hidden [ C and then Tab Not hidden ` Not applicable C and then G ! Not hidden C and then I “ Not applicable C and then K ‘ Not applicable C and then L { B and then a C and then N } B and then b C key and then O : Not applicable C and then P ; Not applicable C and then Q ? Not hidden C and then R ~ Not applicable C and then T , C and then Right Enter Not hidden](https://usermanual.wiki/Intermec-Technologies/CK31MIG2.User-Manual-1/User-Guide-1305503-Page-161.png)
![Appendix A — Specifications CK31 Handheld Computer User’s Manual 145 Typing Hidden Characters on the VT/ANSI TE Keypads Press This Key Sequence on One of the Keypads: To Type: 42-Key 52-Key $ Not hidden C and then 6 ` Not applicable C and then G ! Not hidden C and then I « Not applicable C and then K ‘ Not applicable C and then L { B and then c C and then N } B and then d C key and then O : Not applicable C and then P ? C and then 5 C and then R ] C and then Alpha Not hidden [ C and then Tab Not hidden < B and then _ Not hidden > B and then ` Not hidden , C and then Right Enter Not hidden Pin Assignments for the Serial Port This section describes the 26-pin serial port of the CK31. Pin 13Pin 14Pin 1Pin 26 Identifying the Pins in the CK31 Serial Port](https://usermanual.wiki/Intermec-Technologies/CK31MIG2.User-Manual-1/User-Guide-1305503-Page-162.png)


![Appendix C — Reprogramming the Keypad 168 CK31 Handheld Computer User’s Manual 3 Press the key containing the modification you want to remove twice and press Enter. The select modifiers dialog box appears. 4 Select the modifiers that you have assigned to the key and press Enter. You will hear a beep when your changes are successful. Finding the Registry Entries for Keypad Changes The CK31 provides registry files for each keypad change you make. These files are located at: \CK_FFS\KeypadMods\KeypadModxxxx.reg Each modification has its own entry. To combine entries, copy all the keys into a single registry file and combine identical keys to contain the data from both files. For example if one .reg file contains: [HKEY_LOCAL_MACINE\HARDWARE\DEVICEMAP\KEYBD] "ScancodeFilterArray"=hex:\ 0a,00,00,00,04,00,00,00,00,00 And the other .reg contains: [HKEY_LOCAL_MACINE\HARDWARE\DEVICEMAP\KEYBD] "ScancodeFilterArray"=hex:\ 11,00,01,00,03,00,00,00,00,00 "KeyFilterProcess0x111"="\Windows\cmd.exe" "KeyFilterCmd0x111"="test" Your combined reg file should look like this: [HKEY_LOCAL_MACINE\HARDWARE\DEVICEMAP\KEYBD] "ScancodeFilterArray"=hex:\ 11,00,01,00,03,00,00,00,00,00, 0a,00,00,00,04,00,00,00,00,00 "KeyFilterProcess0x111"="\Windows\cmd.exe" "KeyFilterCmd0x111"="test"](https://usermanual.wiki/Intermec-Technologies/CK31MIG2.User-Manual-1/User-Guide-1305503-Page-185.png)


![Appendix C — Reprogramming the Keypad 174 CK31 Handheld Computer User’s Manual Finding the Registry Entries for Keypad Macros Registry files for each keypad macro are provided for you. These files are located at: \CK_FFS\KeypadMods\KeypadModxxxx.reg Each macro has its own entry. To combine entries, copy all the keys into a single registry file and combine identical keys to contain the data from both files. For example if one .reg file contains: [HKEY_LOCAL_MACINE\HARDWARE\DEVICEMAP\KEYBD] "ScancodeFilterArray"=hex:\ 08,00,0d,00,06,00,06,00,00,00 "KeyMacro0xd08"=hex:\ 08,00,00,00,00,00,00,00,\ 08,f0,00,00,7a,00,00,00,\ 10,00,00,00,19,00,00,00,\ 10,f0,00,00,01,00,00,00,\ 18,00,00,00,19,00,00,00,\ 18,f0,00,00,6e,00,00,00 And the other .reg contains: [HKEY_LOCAL_MACINE\HARDWARE\DEVICEMAP\KEYBD] "ScancodeFilterArray"=hex:\ 0d,00,05,00,06,00,06,00,00,00 "KeyMacro0x50d"=hex:\ 0a,00,00,00,00,00,00,00,\ 0a,f0,00,00,a0,00,00,00,\ 11,00,00,00,19,00,00,00,\ 11,f0,00,00,6c,00,00,00,\ 19,00,00,00,19,00,00,00,\ 19,f0,00,00,6b,00,00,00 Your combined reg file should look like this: "ScancodeFilterArray"=hex:\ 08,00,0d,00,06,00,06,00,00,00, 0d,00,05,00,06,00,06,00,00,00 "KeyMacro0xd08"=hex:\ 08,00,00,00,00,00,00,00,\ 08,f0,00,00,7a,00,00,00,\ 10,00,00,00,19,00,00,00,\ 10,f0,00,00,01,00,00,00,\ 18,00,00,00,19,00,00,00,\ 18,f0,00,00,6e,00,00,00 "KeyMacro0x50d"=hex:\](https://usermanual.wiki/Intermec-Technologies/CK31MIG2.User-Manual-1/User-Guide-1305503-Page-191.png)