Intermec Technologies CK31MIG2 802MIG2 User Manual CK31umfr
Intermec Technologies Corporation 802MIG2 CK31umfr
Contents
User Manual 1

CK31 Handheld
Computer
User’s Manual

CK31 Handheld
Computer
User’s Manual
ii CK31 Handheld Computer User’s Manual
Intermec Technologies Corporation
Worldwide Headquarters
6001 36th Ave. W.
Everett, WA 98203
U.S.A.
www.intermec.com
The information contained herein is provided solely for the purpose of allowing customers to
operate and service Intermec-manufactured equipment and is not to be released, reproduced, or
used for any other purpose without written permission of Intermec Technologies Corporation.
Information and specifications contained in this document are subject to change without prior
notice and do not represent a commitment on the part of Intermec Technologies Corporation.
© 2005-2007 by Intermec Technologies Corporation. All rights reserved.
The word Intermec, the Intermec logo, Norand, ArciTech, Beverage Routebook, CrossBar,
dcBrowser, Duratherm, EasyADC, EasyCoder, EasySet, Fingerprint, INCA (under license), i-
gistics, Intellitag, Intellitag Gen2, JANUS, LabelShop, MobileLAN, Picolink, Ready-to-Work,
RoutePower, Sabre, ScanPlus, ShopScan, Smart Mobile Computing, TE 2000, Trakker
Antares, and Vista Powered are either trademarks or registered trademarks of Intermec
Technologies Corporation.
There are U.S. and foreign patents as well as U.S. and foreign patent applications pending.

CK31 Handheld Computer User’s Manual iii
Document Change
This page records changes to this document. The document was
originally released as version 001.
Version Date Description of Change
002 10/2005 Added new scanner options, new keypad
options, updated information on Funk
security and configuration, added new
diagnostics, and added information on
SmartSystems.
003 06/2006 Revised to support RoHS compliance. Other
new information includes an updated list of
scanners and cables, instructions for scanning
PDF417 or Micro PDF417 bar codes,
instructions for loading multiple certificates,
expanded information about the backup
battery and the Backup Battery Very Low
dialog box, troubleshooting information for
the SD card, bar code symbologies listed by
scanner option, new information on scanner
reading distances, and an illustration that
identifies the pins in the serial adapter.
004 07/2006 Added the standard range laser and the long
range laser as scanning options. Added
instructions for configuring Bluetooth wireless
printing. Added two Bluetooth error messages
to the Troubleshooting chapter. Corrected the
minimum reading distances setbacks for the
area imager and linear imager.
005 06/2007 Added the near-far range area imager scanning
option. Added notes about not using the
undecoded serial adapter if you have a near-far
range area imager and about the impact of
radio use on battery life. Updated the path for
the warranty information.
006 11/2007 Added additional information about how you
scan bar code data using a near-far range area
imager.
iv CK31 Handheld Computer User’s Manual
Contents
CK31 Handheld Computer User’s Manual v
Contents
Before You Begin.......................................................................................................xi
Safety Icons.................................................................................................xi
Global Services and Support.......................................................................xii
Warranty Information..................................................................xii
Web Support ...............................................................................xii
Telephone Support .....................................................................xiii
Who Should Read This Document?.......................................................... xiv
Related Documents................................................................................... xiv
Patent Information.................................................................................... xiv
Other Copyright Information .................................................................... xv
Using the CK31 Handheld Computer.......................................................1
Introducing the CK31 Handheld Computer...............................................................2
What’s New? ..............................................................................................................4
Using the Battery........................................................................................................4
Charging and Installing the Battery ..............................................................5
Maximizing Battery Life...............................................................................6
Checking the Battery Status .........................................................................7
Using the Keypad .......................................................................................................7
Using the Color-Coded Keys......................................................................10
Capitalizing All Characters .........................................................................11
Using the Power (I) Key............................................................................12
Disabling or Modifying Keypad Functions.................................................12
Using the Touch Screen ...........................................................................................15
Using the Stylus .........................................................................................16
Understanding the Screen Icons .................................................................17
Repositioning a Window............................................................................18
Calibrating the Touch Screen.....................................................................19
Understanding the Status Lights...............................................................................20
Understanding the Beeps..........................................................................................21
Scanning Bar Codes..................................................................................................22
Scanning With the Laser Scanner or Linear Imager ....................................23
1
Contents
vi CK31 Handheld Computer User’s Manual
Scanning With the Standard or Near-Far Range Area Imager .....................26
Scanning with the Standard Area Imager......................................26
Scanning with the Near-Far Range Area Imager...........................27
Troubleshooting the Area Imager.................................................29
Attaching a Scanner to the Serial Port.........................................................30
Using Energy Saver Mode With Your 1551E or 1553 Scanner...................32
Verifying That Your Scanner Is Working..................................................................33
Installing the SD Card..............................................................................................34
Configuring the CK31.........................................................................................37
How to Configure the CK31 Parameters ..................................................................38
Configuring the CK31 With Setup Assistant..............................................39
Configuring the CK31 With Intermec Settings ..........................................40
Opening Intermec Settings ..........................................................40
Understanding the Commands in Intermec Settings ....................41
Navigating in Intermec Settings ...................................................42
Restoring Default Settings............................................................42
Exiting Intermec Settings.............................................................43
Configuring the CK31 With SmartSystems Console ..................................44
Synchronizing the CK31 System Time With a Time Server .......................44
Configuring the CK31 for Your Network.................................................................45
Configuring 802.11b/g Radio Communications.........................................45
Configuring the Network Parameters for a TCP/IP Network.......46
Configuring the Network Parameters for a UDP Plus Network....47
Configuring Bluetooth Communications for Wireless Scanners..................48
Configuring Bluetooth Communications for Wireless Printing ..................50
Turning On Bluetooth Power......................................................51
Creating an Application That Lets You Print Wirelessly...............51
Selecting the Current Wireless Printer on the CK31 ....................52
Configuring Ethernet Communications on Older CK31s...........................57
Configuring Serial Communications ..........................................................58
Configuring Security ................................................................................................59
Choosing Between Funk and Microsoft Security ........................................60
Selecting a Profile for Funk Security.............................................61
Selecting Microsoft as Your Security Choice.................................61
Using WPA Security ..................................................................................62
Configuring WPA Security With Funk Security...........................63
Configuring WPA Security With Microsoft Security....................65
Using 802.1x Security ................................................................................67
2
Contents
CK31 Handheld Computer User’s Manual vii
Configuring 802.1x Security With Funk Security ........................68
Configuring 802.1x Security With Microsoft Security..................69
Using LEAP Security..................................................................................70
Using Static WEP Security.........................................................................71
Configuring Static WEP Security With Funk Security .................72
Configuring Static WEP Security With Microsoft Security ..........72
Loading a Certificate ..................................................................................73
Disabling Security ......................................................................................77
Developing and Installing Applications..............................................79
Developing Applications for the CK31.....................................................................80
Developing a New Application...................................................................80
Developing a Web-Based Application.........................................................81
Converting a Trakker Antares Application to a CK31 Application..............81
Installing Applications on the CK31.........................................................................82
Installing Applications Using ActiveSync....................................................83
Installing ActiveSync and Establishing a Partnership ....................83
Using ActiveSync to Copy Files and Install Applications ..............85
Installing Applications Using Your SD Card ..............................................87
Installing Applications Using the FTP Server..............................................87
Installing Applications Using Wavelink Avalanche .....................................88
Installing Applications Using SmartSystems Console..................................88
Launching Your Application Automatically ..............................................................89
Setting or Changing the CK31 Password ..................................................................89
Backing Up Your Files..............................................................................................91
Upgrading Your CK31 .............................................................................................92
Upgrading the Operating System Using an SD Card..................................92
Upgrading Your CK31 Using SmartSystems Console.................................93
Running Diagnostics...........................................................................................95
Using Diagnostics on the CK31 ...............................................................................96
Understanding the Diagnostics Screens.....................................................................96
802.11 Information....................................................................................97
Authentication Information .......................................................................97
Battery Information....................................................................................98
3
4
Contents
viii CK31 Handheld Computer User’s Manual
Boot Code Version...................................................................................100
Configuration Table.................................................................................101
CPU Monitor ..........................................................................................102
CPU Registers..........................................................................................102
Display Test.............................................................................................103
Installed Fonts..........................................................................................104
Intermec Value Version............................................................................104
Keypad Test .............................................................................................105
LED Test .................................................................................................106
Network Information...............................................................................106
Network Test...........................................................................................107
Operating System Version........................................................................107
Ping Utility ..............................................................................................108
Radio Driver Version ...............................................................................109
RAM Information....................................................................................109
RAM Monitor..........................................................................................110
SD Card Memory Test.............................................................................110
Sound Test...............................................................................................111
Troubleshooting and Maintaining the CK31.................................113
Troubleshooting the CK31.....................................................................................114
Calling Product Support ..........................................................................114
Problems and Solutions............................................................................115
Problems While Operating the CK31.......................................................115
Problems While Configuring Security ......................................................117
Problems With Wireless Connectivity ......................................................119
Problems Transmitting Data Through the Serial Port...............................120
Problems While Scanning Bar Codes........................................................121
Booting the CK31 ..................................................................................................125
Warm Booting the CK31.........................................................................125
Cold Booting the CK31 ...........................................................................125
Cleaning the Scanner Window and Screen..............................................................126
Specifications .........................................................................................................129
Physical and Environmental Specifications .............................................................130
Physical Dimensions ..................................................................130
Power Specifications ..................................................................130
Electrical Specifications..............................................................130
Temperature and Humidity Specifications.................................130
5
A
Contents
CK31 Handheld Computer User’s Manual ix
Screen Specifications..................................................................130
Keypad Options.........................................................................130
Bar Code Symbologies ...............................................................131
Area Imager Standard Minimum Reading Distances ..................132
Linear Imager Reading Distances ...............................................134
Standard Range Laser Minimum Reading Distances ..................136
Near-Far Range Area Imager Reading Distances.........................138
Accessories for the CK31..........................................................................139
851-082-xxx Power Supply ........................................................139
AA2 Serial Cable Adapter (P/N 236-069-xxx)............................139
AA3 Serial Cable Adapter (P/N 236-070-xxx)............................139
AB1G Battery (P/N 318-020-xxx)..............................................139
AC1 4-Slot Battery Charger (P/N 852-904-xxx) ........................139
AC2 4-Bay Battery Charging Dock (P/N 852-905-xxx) .............139
AC3 8-Slot Battery Charging Dock (P/N 852-906-xxx).............139
AD1 Communications Dock (P/N 225-709-xxx).......................139
AD2 4-Bay Communications Dock (P/N 225-710-xxx).............140
CK30 and CK31 Handle (P/N 203-754-xxx) ............................140
CK31 Handstrap (P/N 075289) ................................................140
CK31 Holster and Belt ..............................................................140
CK31 Protective Boot................................................................140
CK31 Protective Case ................................................................140
CK31 Tethered Stylus (P/N 203-773-xxx).................................140
CK31 Vehicle Cradle (P/N 075436)..........................................140
Dust Cover ................................................................................140
Decoded Serial Adapter (P/N 225-715-001) ..............................141
Undecoded Serial Adapter (P/N 225-714-001) ..........................141
Typing Characters Not Printed on the Keypad .......................................................142
Pin Assignments for the Serial Port.........................................................................145
Default Settings....................................................................................................147
Default Configuration ............................................................................................148
Reprogramming the Keypad.......................................................................155
Reprogramming the Keypad...................................................................................156
Changing the Functionality of Keys or Key Combinations .....................................156
Starting the Reprogrammable Keypad Utility ...........................................157
Programming a Unicode Character ..........................................................158
B
C
Contents
x CK31 Handheld Computer User’s Manual
Programming a Virtual Key or Unicode Character ...................................159
Programming Any Key as a Function Key ................................................161
Launching an Application From a Key or Key Combination ....................163
Remapping a Hardware Scan Code ..........................................................165
Removing One or All Reprogramming Modifications ..............................166
Finding the Registry Entries for Keypad Changes .....................................168
Creating Keypad Macros ........................................................................................169
Starting the Keypad Macro Utility............................................................169
Recording a Keypad Macro ......................................................................170
Removing All or One Keypad Macro .......................................................172
Finding the Registry Entries for Keypad Macros.......................................174
Index..............................................................................................................................177
I

Before You Begin
CK31 Handheld Computer User’s Manual xi
Before You Begin
This section provides you with safety information, technical
support information, and sources for additional product
information.
Safety Icons
This section explains how to identify and understand warnings,
cautions, and notes that are in this document.
A warning alerts you of an operating procedure, practice,
condition, or statement that must be strictly observed to
avoid death or serious injury to the persons working on
the equipment.
A caution alerts you to an operating procedure, practice,
condition, or statement that must be strictly observed to
prevent equipment damage or destruction, or corruption
or loss of data.
Note: Notes either provide extra information about a topic or
contain special instructions for handling a particular condition
or set of circumstances.
Before You Begin
xii CK31 Handheld Computer User’s Manual
Global Services and Support
Warranty Information
To understand the warranty for your Intermec product, visit the
Intermec web site at www.intermec.com and click Support >
Returns and Repairs > Warranty.
Disclaimer of warranties: The sample code included in this
document is presented for reference only. The code does not
necessarily represent complete, tested programs. The code is
provided “as is with all faults.” All warranties are expressly
disclaimed, including the implied warranties of merchantability
and fitness for a particular purpose.
Web Support
Visit the Intermec web site at www.intermec.com to download
our current manuals (in PDF). To order printed versions of the
Intermec manuals, contact your local Intermec representative or
distributor.
Visit the Intermec technical knowledge base (Knowledge
Central) at intermec.custhelp.com to review technical
information or to request technical support for your Intermec
product.

Before You Begin
CK31 Handheld Computer User’s Manual xiii
Telephone Support
These services are available from Intermec.
Service
Description
In the U.S.A. and
Canada call 1-800-
755-5505 and
choose this option
Order
Intermec
products
• Place an order.
• Ask about an existing
order.
1 and then choose 2
Order
Intermec
media
Order printer labels and
ribbons.
1 and then choose 1
Order
spare parts
Order spare parts. 1 or 2 and then
choose 4
Technical
Support
Talk to technical support
about your Intermec
product.
2 and then choose 2
Service • Get a return authorization
number for authorized
service center repair.
• Request an on-site repair
technician.
2 and then choose 1
Service
contracts
• Ask about an existing
contract.
• Renew a contract.
• Inquire about repair
billing or other service
invoicing questions.
1 or 2 and then
choose 3
Outside the U.S.A. and Canada, contact your local Intermec
representative. To search for your local representative, from the
Intermec web site, click Contact.
Before You Begin
xiv CK31 Handheld Computer User’s Manual
Who Should Read This Document?
The CK31 Handheld Computer User’s Manual provides you with
information about the features of the CK31 and how to install,
operate, maintain, and troubleshoot the CK31. Before you
install and configure the CK31, you should be familiar with
your network and general networking terms, such as IP address.
The Intermec Computer Command Reference Manual (P/N
073529) is available on the CD attached to the inside front
cover of this user’s manual and as a download from the Intermec
web site. Please refer to this manual for help configuring your
CK31. The reference manual contains information about all of
the CK31 commands and provides bar codes that you can print
and scan when configuring supported commands.
Related Documents
The Intermec web site at www.intermec.com contains our
documents that you can download (in PDF).
To order printed versions of the Intermec manuals, contact your
local Intermec representative or distributor.
Patent Information
Product is covered by one or more of the following patents:
4882476, 4894523, 4953113, 4961043, 4970379, 4988852,
5019699, 5021642, 5038024, 5081343, 5095197, 5144119,
5144121, 5182441, 5187355, 5187356, 5195183, 5216233,
5216550, 5195183, 5195183, 5218191, 5227614, 5233172,
5241488, 5243602, 5258606, 5278487, 5288985, 5308966,
5322991, 5331136, 5331580, 5342210, 5349678, 5359185,
5371858, 5373478, 5389770, 5397885, 5410141, 5414251,
5416463, 5442167, 5464972, 5468947, 5468950, 5477044,
5486689, 5488575, 5500516, 5502297, 5504367, 5508599,
5514858, 5530619, 5534684, 5536924, 5539191, 5541419,
5548108, 5550362, 5550364, 5565669, 5567925, 5568645,
5572007, 5576529, 5592512, 5594230, 5598007, 5608578,
5616909, 5619027, 5627360, 5640001, 5657317, 5659431,
5671436, 5672860, 5684290, 5719678, 5729003, 5742041,
5761219, 5764798, 5777308, 5777309, 5777310, 5786583,
5793604, 5798509, 5798513, 5804805, 5805807, 5811776,
5811777, 5818027, 5821523, 5828052, 5831819, 5834753,
Before You Begin
CK31 Handheld Computer User’s Manual xv
5834749, 5837987, 5841121, 5842070, 5844222, 5854478,
5862267, 5869840, 5873070, 5877486, 5878395, 5883492,
5883493, 5886338, 5889386, 5895906, 5898162, 5902987,
5902988, 5912452, 5923022, 5936224, 5949056, 5969321,
5969326, 5969328, 5979768, 5986435, 5987192, 5992750,
6003775, 6012640, 6016960, 6018597, 6024289, 6034379,
6036093, 6039252, 6064763, 6075340, 6095422, 6097839,
6102289, 6102295, 6109528, 6119941, 6128414, 6138915,
6149061, 6149063, 6152370, 6155490, 6158661, 6164542,
6164545, 6173893, 6195053, 6234393, 6234395, 6244512,
6249008, 6328214, 6330975, 6345765, 6356949, 6367699,
6375075, 6375076, 6431451, 6435411, 6484944, 6488209,
6497368, 6532152, 6538413, 6539422, 6621942, 6641046,
6681994, 6687403, 6688523, 6732930
There may be other U.S. and foreign patents pending.
Other Copyright Information
Microsoft, Windows, and the Windows logo are registered
trademarks of Microsoft Corporation in the United States
and/or other countries.
Bluetooth is a trademark of Bluetooth SIG, Inc., U.S.A.
Wi-Fi is a registered certification mark of the Wi-Fi Alliance.
This product includes software developed by the OpenSSL
Project for use in the OpenSSL Toolkit.
(http://www.openssl.org/)
This product includes cryptographic software written by Eric
Young. (eay@cryptsoft.com)
This product uses Regex++, Index software during its
operational phases. The owner of Regex++ has granted use of the
software to anyone provided such use is accompanied by the
following copyright and permission notice:
Regex++, Index. (Version 3.31, 16th Dec 2001)
Copyright © 1998-2001 Dr. John Maddock
Before You Begin
xvi CK31 Handheld Computer User’s Manual
Permission to use, copy, modify, distribute and sell this software
and its documentation for any purpose is hereby granted
without fee, provided that the above copyright notice appear in
all copies and that both that copyright notice and this
permission notice appear in supporting documentation. Dr.
John Maddock makes no representations about the suitability of
this software for any purpose. It is provided “as is” without
express or implied warranty.

CK31 Handheld Computer User’s Manual 1
Using the CK31 Handheld
Computer
Use this chapter to familiarize yourself with the CK31 Handheld
Computer. In this chapter, you will find these sections:
• Introducing the CK31 Handheld Computer
• What’s New?
• Using the Battery
• Using the Keypad
• Using the Touch Screen
• Understanding the Status Lights
• Understanding the Beeps
• Scanning Bar Codes
• Verifying That Your Scanner Is Working
• Installing the SD Card
1
Chapter 1 — Using the CK31 Handheld Computer
2 CK31 Handheld Computer User’s Manual
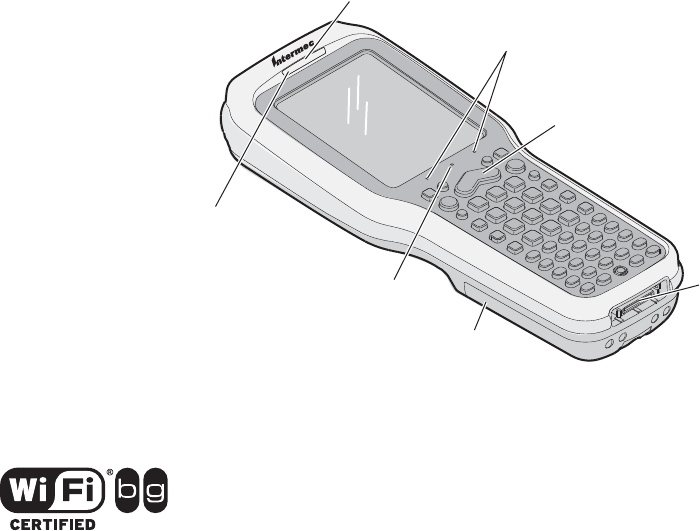
Introducing the CK31 Handheld Computer
The Intermec CK31 is an ergonomically designed handheld
computer built on the Microsoft® Windows® CE .NET
operating system. It is a lightweight, easy-to-use, reliable
computer that both runs client/server applications and browser-
based applications.
CK31
Ready-to-Work
indicator
Battery
light
Battery
Serial
port
Scan
button
User-defined
lights
Good read
light
CK31 Handheld Computer
CK31 Handheld Computers with an IEEE 802.11b/g radio
installed are Wi-Fi® certified for interoperability with other
802.11b/g wireless LAN devices.

Chapter 1 — Using the CK31 Handheld Computer
CK31 Handheld Computer User’s Manual 3
The CK31 includes these features:
• .NET Compact Framework
• Internet Explorer 6, SQL Server CE
• iBrowse
• CCX v2.0 compliance
• Color display with touch screen
• 64 MB RAM/64 MB Flash Memory
• 400 MHz Processor
These options are available for the CK31:
• 802.11b/g radio
• Bluetooth radio
• Linear imager, area imager, near-far range area imager,
standard range laser, or long range laser
Note: If you have a CK31 with the near-far range area
imager, do not use the undecoded serial adapter.
• TE 2000 terminal emulation application including 3270,
5250, and VT/ANSI as well as support for third-party TE
applications
• Data Collection Browser (dcBrowser™) application
Use this manual to understand how to use the features and
options available on the CK31. For help using terminal
emulation, see the TE 2000 Terminal Emulation Programmer’s
Guide (P/N 977-055-xxx).
For help using dcBrowser, see the documentation that ships with
the dcBrowser gateway software or the Data Collection Browser
Client User’s Guide (P/N 070011).
iBrowse is a locked-down web browser for Intermec devices that
is compatible with Microsoft’s Internet Explorer but does not
allow the user to exit the browser or access non-work related web
sites. For help using iBrowse, see the iBrowse User’s Guide (P/N
961-055-xxx).

Chapter 1 — Using the CK31 Handheld Computer
4 CK31 Handheld Computer User’s Manual
For a complete list of accessories, see “Accessories for the CK31”
on page 139.
What’s New?
The CK31 is now available with a near-far range area imager.
Using the Battery
The CK31 uses a model AB1G (P/N 318-020-xxx) lithium-ion
battery as its main power source. You must fully charge the main
battery before you can use the CK31. When you change the
battery, a backup battery maintains your status, memory, and
real-time clock for at least 10 minutes.
If the battery light blinks or turns on solid, you cannot restore
factory defaults or perform a warm or cold boot on your CK31
by using the I key. You must replace the battery with a fully
charged battery before you can restore factory defaults or boot
your CK31.
To ensure maximum battery life and product performance,
periodically replace the rechargeable lithium-ion battery.
Contact your local Intermec sales representative for replacement
batteries.
Note: The AB1G battery is designed to provide more than
a full shift of daily use. However, battery life depends on
individual usage patterns. Conditions such as wireless
coverage, power settings, roaming frequency, applications in
use, number of radios in use, ambient temperature, lithium-
ion battery maintenance, and individual use cases have an
effect on overall battery performance.
The lithium-ion battery pack that is used in this device may
present a fire or chemical burn hazard if it is mistreated. Do
not disassemble it, heat it above 100°C (212°F) or incinerate
it. Dispose of used battery packs promptly. Keep away from
children.
Removing the main battery when the backup battery low or
critically low icon appears on the taskbar may cause your
CK31 to cold boot and you may lose data.

Chapter 1 — Using the CK31 Handheld Computer
CK31 Handheld Computer User’s Manual 5
If you fail to replace the battery immediately, you may lose
important data or applications.
Charging and Installing the Battery
Make sure you fully charge the AB1G battery before you use
your CK31. You can charge the battery before or after you
install it into the CK31.
To charge the battery
• Either insert the battery into the AC1 4-slot battery charger
or place the CK31 with battery installed in the AC2 4-Bay
Charging Dock, AC3 8-Bay Charging Dock, AD1 1-Bay
Communications Dock, or AD2 4-Bay Communications
Dock. For more information on these accessories, see page
139.
Use the next table to understand how long it will take to charge
your batteries in each of the CK31 charging or communications
dock accessories.
Charging Times for CK31 Batteries
CK31 Accessory Battery Charging Time
AC1 4-Slot Battery Charger 5 hours
AC2 4-Bay Charging Dock 5 hours
AC3 8-Slot Charging Dock 5 hours
AD1 1-Bay Communications Dock 5 hours
AD2 4-Bay Communications Dock 5 hours
Chapter 1 — Using the CK31 Handheld Computer
6 CK31 Handheld Computer User’s Manual
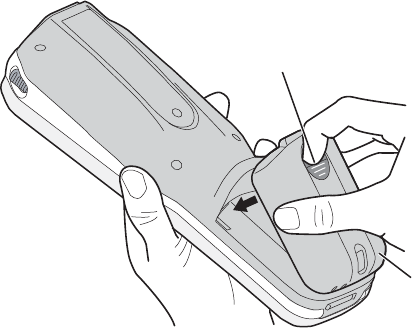
To install the battery
• Insert the tabs on the bottom of the charged battery into the
CK31 and snap the battery into place.
Battery
latch
AB1G
battery
Inserting the AB1G Battery
Maximizing Battery Life
There are several things that you can do to extend the life of
your fully charged battery.
• Verify that Radio Power Management is enabled (Fast PSP).
Enabling radio power management allows your radio to
switch between awake and sleep modes based on network
traffic. If you use the default setting of disabled (CAM), you
will have the best network performance (data throughput) but
it will draw the most power from your battery.
• Verify that the backlight timeout is set to 15 seconds.
• Verify that each setting under Power Management (User Idle,
System Idle, and Suspend) has a value of 1 minute for a
combined automatic shutoff time of 3 minutes.
You can use Intermec Settings to easily make all of these
configuration changes. For help, see “Configuring the CK31
With Intermec Settings” on page 40.

Chapter 1 — Using the CK31 Handheld Computer
CK31 Handheld Computer User’s Manual 7
Checking the Battery Status
The easiest way to tell the status of your battery is to look at the
battery icon in the status bar of your CK31. If you do not see a
battery icon, your battery has a good charge.
Battery Icon Status
Icon Status
Battery has a medium charge. You should be able to
work for several more hours before changing batteries.
Battery is low. You need to replace the battery soon.
Battery is critically low. You need to replace the battery
now.
You can also check the battery status by looking at the Battery
light on the front of the CK31 or by using the battery
diagnostics screen. For help using the Battery Information
diagnostic screen, see “Battery Information” on page 98.
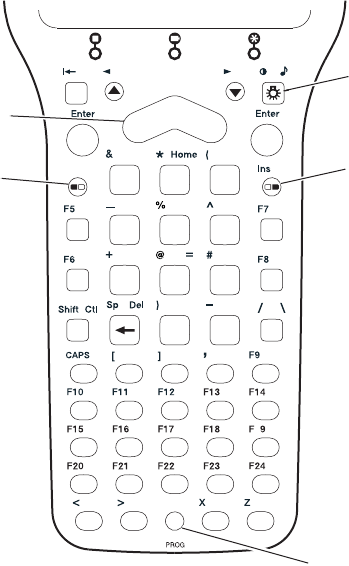
Using the Keypad
Your CK31 has one of the following keypad overlay options:
• 42-key large numeric and function
• 50-key full alphanumeric
• 52-key full alphanumeric
You can order all versions of the CK31 keypad with an
international overlay. The international overlay supports English
and many Western European languages, such as French,
German, Italian, Portuguese, and Spanish. You enter all of the
characters and functions printed above the keys just like you
would on a standard keypad.
Note: You must use the color-coded keys to access several
hidden characters (such as { and }) on the CK31 keypad. For
more information on the hidden characters, refer to “Typing
Characters Not Printed on the Keypad” on page 142.
Chapter 1 — Using the CK31 Handheld Computer
8 CK31 Handheld Computer User’s Manual
The CK31 supports TE 2000 VT100/220/320/340 and ANSI,
TE 2000 5250, and TE 2000 3270. When you order the CK31
with a TE 2000 application, you must order the corresponding
keypad overlay. Use the TE 2000 keypad overlays to enter the
same keys that you can enter on a VT/ANSI keyboard, and IBM
5250 keyboard, or an IBM 3270 keyboard. Like the standard
CK31 overlay, the TE 2000 keypad overlays let you enter all the
characters printed on or above the keys. The terminal emulation
keypads also come with the same color-coded keys that are on
the standard overlay.
For help using TE 2000 terminal emulation, see the TE 2000
Terminal Emulation Programmer’s Guide (P/N 977-055-xxx).
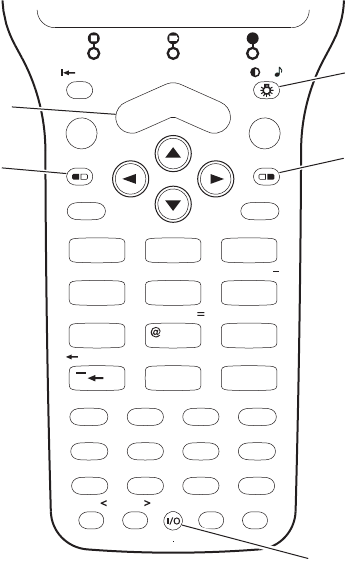
Enter
Enter
Home
CAPS
Sp
Del
Ins
A
D
G
B
E
H
C
F
I
J
KLMN
OPQR
STUV
Z
XY
W
/\
.
PROG
*
?
[]
Shift
&*(
%
$
!
^
#
)
Esc
Ctl Alt
Alpha
Sp
Tab
123
456
78
0
9
F1 F2 F3 F4
F5 F6 F7 F8
F9 F10 F11 F12
.
,
Scan
button
Orange
key
Green
key
Backlight
key
Power
key
42-Key Large Numeric and Function Keypad: This keypad is designed for
applications that accept mainly numeric data (0-9) and that need dedicated
function keys (F1- F12). This keypad also lets you enter the entire alphabet
and special characters by pressing color-coded key sequences.
Chapter 1 — Using the CK31 Handheld Computer
CK31 Handheld Computer User’s Manual 9
Home
Del
F7 F8 F9
F6F5
F4
F1 F2 F3
Space
F10
Ins
CAPS
Alt
?
“
‘
+
/
\
¦
.
PROG
{}
*
[]
Power
key
Esc key
Green
key
Backlight
key
Orange
key
50-Key Full Alphanumeric Keypad: This keypad is designed for
applications that accept mainly numeric data (0-9) and that may need to
accept the entire alphabet. The keypad also provides shifted function keys
(F1-F9) and special characters, symbols, and functions by pressing color-
coded key sequences.
Note: The 50-key keypad does not have a scan key, because it
was designed to work with the required handle with the built-in
scanner trigger.
Chapter 1 — Using the CK31 Handheld Computer
10 CK31 Handheld Computer User’s Manual
789
12
0.
3
456
F1
F2
F3
F4
ABCDE
FGH I J
KLMNO
PQRST
UV WY
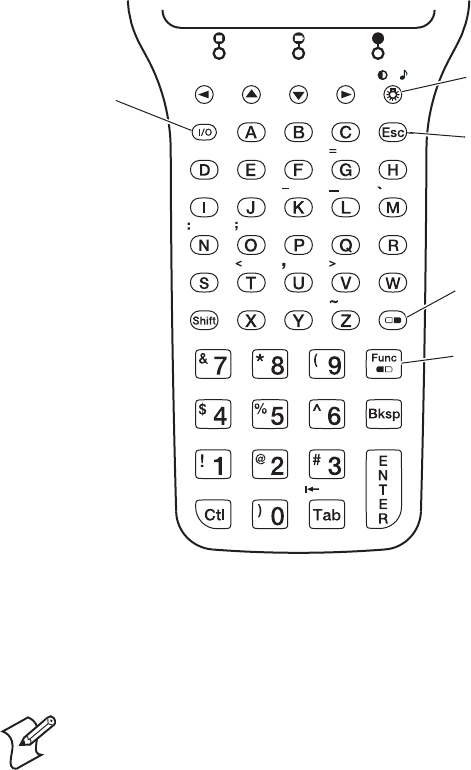
Esc
I/O
Alt
Ta b
Scan
button
Orange
key
Green
key
Backlight
key
Power
key
52-Key Full Alphanumeric Keypad: This keypad is designed for
applications that accept mainly numeric data (0-9) and that may need to
accept the entire alphabet. The keypad also provides function keys (F1-F24)
and special characters, symbols, and functions by pressing color-coded key
sequences.
Using the Color-Coded Keys
The keypad of the CK31 provides color-coded keys to let you
access additional characters, symbols, and functions printed
on the keypad overlay. Once you understand how to use the
color-coded keys and key sequences, you can access all of the
additional features printed on the keypad overlay. There are two
color-coded modifier keys on the CK31: the orange B key and
the green C key.

Chapter 1 — Using the CK31 Handheld Computer
CK31 Handheld Computer User’s Manual 11
You press and release the first key and then press and release the
second key to access the color-coded character or function
printed above a key.
Using the Color-Coded Keys
You Want To: Press: Example
Use an orange character or
function printed above a key.
B key and then the key
with character or function
printed above it.
Press B and then 2 to type
the @ character.
Use a green character or
function printed above a key.
C key and then the key
with character or function
printed above it.
Press C and then 2 to type
the = character.
Lock the orange, green, Ctl,
Alt, or Shift key to stay on.
B, C, Ctl, Alt, or Shift
key twice.
Press C twice and the
appears in the status bar.
Unlock a green, orange, Ctl,
Alt, or Shift key.
B, C, Ctl, Alt, or Shift
key once. If is in the status bar,
press Alt and the locked
icon disappears from the
status bar.
Note: The orange Contrast function (M or N) printed above the
Backlight E key does not perform any function on the CK31.
Capitalizing All Characters
To type all alphabetic characters as uppercase letters, you can
enable the Caps Lock feature on the CK31 keypad.
To enable Caps Lock
1 Press the orange B key. The B icon appears on the status
bar.
2 To enable Caps Lock and make the Caps Lock icon ( )
appear on the status bar, press a second key:
• On the 42-key keypad, press Shift.
• On the 50-key keypad, press Shift.
• On the 52-key keypad, press A.
3 Type an alphanumeric character. The letter appears as an
uppercase character on the screen.

Chapter 1 — Using the CK31 Handheld Computer
12 CK31 Handheld Computer User’s Manual
To disable Caps Lock
• Press the orange B key and then press either Shift or A
(depending on your keypad). The Caps Lock icon disappears
from the status bar.
Using the Power (I) Key
When you press the I key to turn off the CK31, you actually
put the computer in Suspend mode. In Suspend mode, the
CK31 continues to supply power to all memory, but turns off
power to most hardware. This power-saving feature is designed
to prolong battery life.
When you press the I key to turn the CK31 back on, your
computer resumes at the screen that was displayed when you
turned it off. If you are using WPA or 802.1x security, the
computer may need to reauthenticate before it resumes your
application.
If the Battery light flashes and your CK31 does not resume after
pressing I, your battery may be too low to supply power.
Replace the battery. If replacing the battery does not solve the
problem, see “Booting the CK31” on page 125.
Disabling or Modifying Keypad Functions
If you want to restrict the ability to perform adjustments made
from the keypad, such as changing the beeper volume, you can
disable the functionality of several keys on the keypad.
You can disable these keypad functions:
• Beeper volume
• Task Manager (opened by pressing Alt and then Tab)
Note: When you disable Alt Tab, you also disable Alt Esc.
You can modify this keypad function:
• The behavior of the I key. You can configure the boot
functionality to either warm or cold boot when you press and
hold the I key for five seconds.
Chapter 1 — Using the CK31 Handheld Computer
CK31 Handheld Computer User’s Manual 13
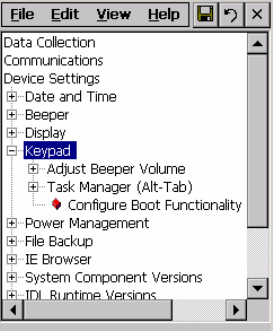
To disable specific keypad functions
1 From the Start menu, tap Intermec Settings. The Intermec
Settings application appears.
2 Tap Device Settings > Keypad. The Keypad menu expands
to show you the options.
3 Tap the function you want to disable from the Keypad menu
to expand the branch.
4 Tap Disable to select it.
5 Save your changes and tap File > Exit to exit Intermec
Settings.
Chapter 1 — Using the CK31 Handheld Computer
14 CK31 Handheld Computer User’s Manual
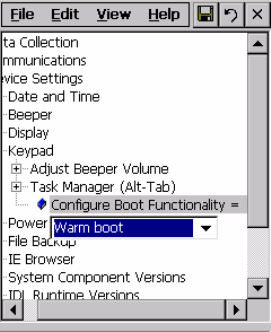
To change the I key behavior
1 From the Start menu, tap Intermec Settings. The Intermec
Settings application appears.
2 Tap Device Settings > Keypad. The Keypad menu expands
to show you the options.
3 Tap Configure Boot Functionality and select Warm boot
or Cold boot.
4 Save your changes and tap File > Exit to exit Intermec
Settings.
Chapter 1 — Using the CK31 Handheld Computer
CK31 Handheld Computer User’s Manual 15
Using the Touch Screen
The CK31 has a color touch screen display that features:
• a full screen size of 240 x 320 pixels.
• a desktop size of 240 x 300 pixels.
• a taskbar size of 240 x 20 pixels.
• support for Unicode characters, user-programmable fonts,
and bitmap graphics.
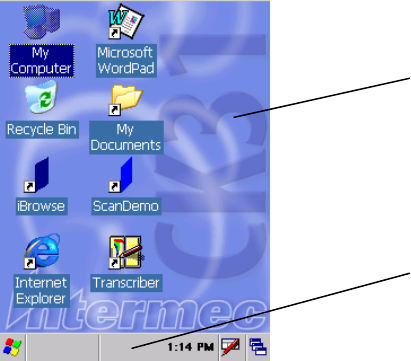
CK31 Start Screen
The Start screen has two distinct areas: the desktop and the
taskbar.
The desktop displays shortcuts to some of the applications
installed on the CK31. The first time you turn on the CK31, the
taskbar displays the Start menu icon, the time, the keyboard
icon, and the desktop icon.
Desktop
T
askbar

Chapter 1 — Using the CK31 Handheld Computer
16 CK31 Handheld Computer User’s Manual
Using the Stylus
Use the stylus, in place of a mouse, to select items and enter
information on the touch screen.
Functions You Can Perform With the Stylus
Action Description
Tap Touch the screen once with the stylus to select
options, close applications, or launch menus from
the taskbar.
Double-tap Double-tap the screen with the stylus to launch
applications.
Drag Hold the stylus on the screen and drag across the
screen to select text and images.
Tap and
hold
Tap and hold the stylus on an item to see a list of
actions available for that item. On the pop-up menu
that appears, tap the action you want to perform.
You can disable the touch screen if you want to prevent others
from performing functions using the stylus.
To disable the touch screen
1 From the Start menu, tap Settings > Control Panel.
2 Double-tap Stylus.
3 Select the Touch Panel Disable check box.
4 Exit the control panel.
To enable the touch screen capabilities again, you need to
navigate to the control panel using the keypad and use the Space
key to clear the Touch Panel Disable check box.
Chapter 1 — Using the CK31 Handheld Computer
CK31 Handheld Computer User’s Manual 17
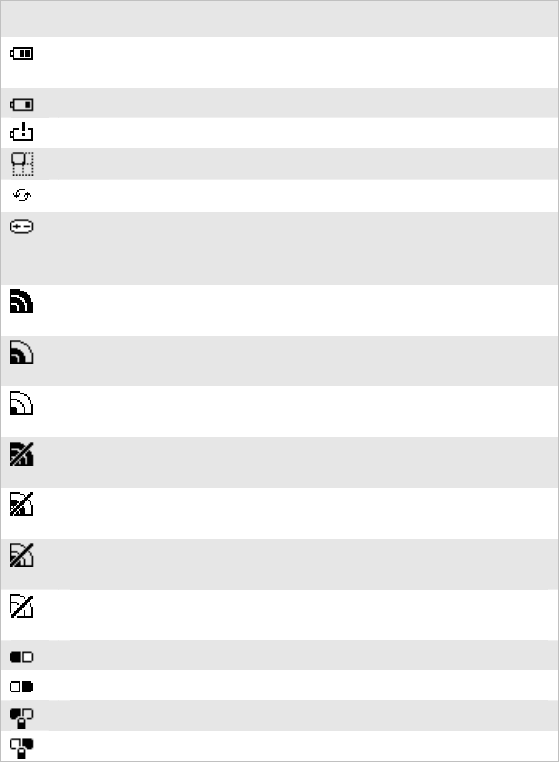
Understanding the Screen Icons
Use the screen icons on the status bar to see the battery status,
network connections, and special keys or functions you may be
using. Standard Microsoft icons are not included in this table.
CK31 Screen Icons
Icon Description
Battery is approximately half full. You should be able to work
for several more hours before changing batteries.
Battery is low. You need to replace the battery soon.
Battery is critically low. You need to replace the battery now.
The window positioning feature is turned on.
The CK31 is connected using ActiveSync.
Backup battery is low. Replace the battery or place the CK31
in a charger. Allow 15 minutes for the backup battery to
recharge.
Strong signal strength with the access point and security is
enabled.*
Medium signal strength with the access point and security is
enabled.*
Weak signal strength with the access point and security is
enabled.*
Strong signal strength with the access point, but security is
not configured correctly.
Medium signal strength with the access point, but security is
not configured correctly.
Weak signal strength with the access point and security is not
configured correctly.
No connection to the access point. For help, see “Problems
With Wireless Connectivity” on page 119.
Orange key is enabled.
Green key is enabled.
Orange key is locked.
Green key is locked.
* If you are using static WEP and you cannot send information
wirelessly, make sure your WEP key setting is correct.

Chapter 1 — Using the CK31 Handheld Computer
18 CK31 Handheld Computer User’s Manual
CK31 Screen Icons (continued)
Icon Description
Alt key is locked.
Alt key is enabled.
Ctl key is locked.
Ctl key is enabled.
Shift key is locked.
Shift key is enabled.
No UDP Plus connection. For help, see “Configuring the
Network Parameters for a UDP Plus Network” on page 47.
UDP Plus is transferring data.
UDP Plus is connected.
Caps Lock key is enabled.
The CPU monitor is enabled.
The RAM monitor is enabled.
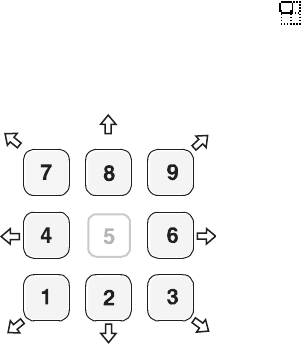
Repositioning a Window
If you need to move a window to see more of a screen, you can
reposition the window using the numeric keypad instead of the
mouse pointer. When you turn on the positioning feature, the
focus is on the top window. You can change the focus to another
window by using Task Manager to select a different task. Simply
press Alt and then Tab to bring up Task Manager to select a
different task.
Chapter 1 — Using the CK31 Handheld Computer
CK31 Handheld Computer User’s Manual 19
To reposition a window
1 Press Alt and then E. An icon ( ) appears on the status
bar.
2 Use the numeric keypad to move the window.
Repositioning a Window: Press the appropriate number key for the
direction you want to move the window.
To center the window in the CK31 screen
• Press 5.
To turn off the repositioning feature
• Press Alt and then E.
Calibrating the Touch Screen
If the touch screen does not respond when you tap it with the
stylus, you may need to calibrate the screen.
To calibrate the screen
1 Press C and then C. The Start menu appears.
2 Press D to highlight Touch Calibrate and then press Enter.
The calibration screen appears.
3 Follow the instructions to calibrate the screen.
Chapter 1 — Using the CK31 Handheld Computer
20 CK31 Handheld Computer User’s Manual
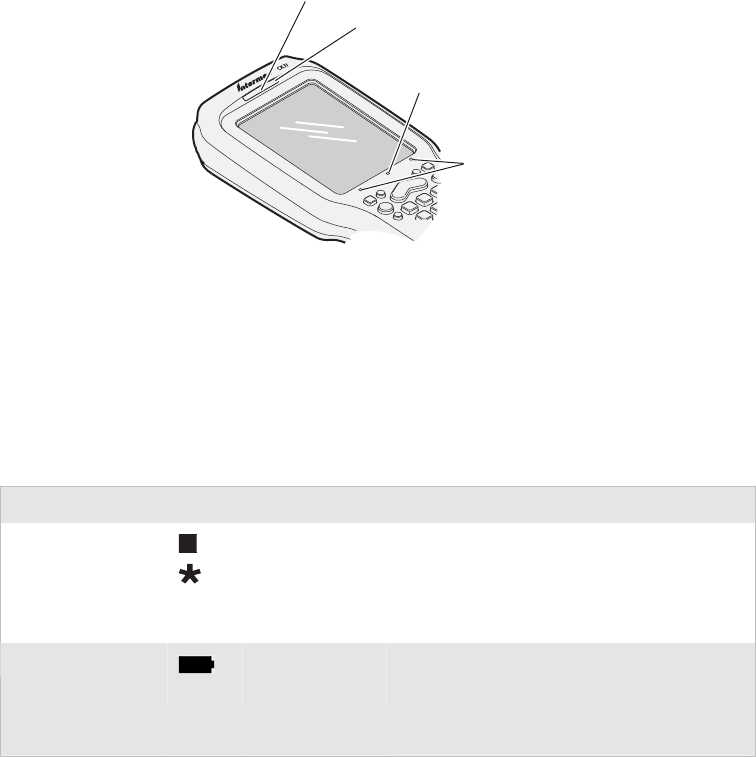
Understanding the Status Lights
The status lights on the CK31 turn on to indicate the status of
the battery, a successful decode of a bar code, or a user-defined
function.
User-Defined lights
Ready-to-Work
indicator (blue)
Battery light
Good read
light (green)
CK31 Status Lights
The battery light and the battery screen icons work with each
other to alert you to the status of your battery. If the battery
light comes on, check the taskbar to see which battery icon
appears on it. Use the CK31 Screen Icons table on page 17 to
help determine when you need to replace your battery.
Understanding the CK31 Status Lights
Light Name Light Description
User-defined
Use the Intermec resource kits to program these lights to turn
on and off for any task or error within your application. The
resource kits are part of the Intermec Developer Library (IDL),
which is available from the Intermec web site at
www.intermec.com/idl.
Light Status What It Means
Battery
Off The battery is charged.
On Battery is critically low. You need to replace
the battery now.

Chapter 1 — Using the CK31 Handheld Computer
CK31 Handheld Computer User’s Manual 21
Understanding the CK31 Status Lights (continued)
Light Name Light Description
Good Read This light comes on when the CK31 successfully decodes a bar
code.
This blue light indicates when the CK31 is ready to use in your
application, typically TE 2000. If you have problems using TE
2000, see the TE 2000 Terminal Emulation Programmer’s
Guide (P/N 977-055-xxx).
Light Status What It Means
Off The TE 2000 application has not loaded
successfully, or you are not running a Ready-
to-Work application.
Blinking The CK31 is not connected to the host.
Ready-to-Work™
indicator
On A connection to the server has been
established and all network connections are
active.
Understanding the Beeps
The CK31 uses beeps to provide you with audio feedback when
it performs some functions. For example, you hear a beep each
time you scan a valid bar code.
Understanding the CK31 Beeps
Beep Sequence What It Means
High beep You entered valid data or a valid command, the
CK31 decoded a label, or the CK31 decoded
the last row of a two-dimensional bar code.
Three low beeps You entered or scanned an invalid command.
Click You pressed a key.
You can change the beeper volume for your needs and
environment. You can set the beeper volume to off, low (quiet),
medium, high (loud), and very high (very loud - default).
If necessary, you can also change the beep duration and beep
frequency for good read, low, and high beeps. You cannot adjust
the keyclick volume or duration.

Chapter 1 — Using the CK31 Handheld Computer
22 CK31 Handheld Computer User’s Manual
Changing the Beeper Volume
Method Procedure
Use the keypad. Press C and then press E to increase the
volume. There are five beep volumes on the
CK31 including off. When you reach the
loudest setting, the next setting is off.
Use the Intermec
Settings application.
Go to Start > Intermec Settings > Device
Settings > Beeper > Volume.
Use the Beeper
Volume command.
For help, see “Beeper Volume” in the Intermec
Computer Command Reference Manual.
Scanning Bar Codes
Do not look directly into the window area or at a reflection
of the laser beam while the laser is scanning. Long-term
exposure to the laser beam can damage your vision.
Use the scanner to scan and enter bar code data. The type of
scanner you are using and the type of bar code you are decoding
determines the way you scan the bar code. The CK31 supports
the scanning of 1D linear bar codes and 2D images, depending
on the scanner model in your CK31. Plus, the way you scan bar
codes is different if you are using an integrated handle or a
scanner attached to the serial port.
When you unpack the CK31, these bar code symbologies are
enabled:
• Code 39
• Code 128
• PDF417 (if supported)
• UPC/EAN
• DataMatrix (area imagers only)
If you are using bar code labels that are encoded in a different
symbology, you need to enable the symbology on the CK31.
Use Intermec Settings to enable and disable symbologies for
your scanner. For help, see “Configuring the CK31 With
Intermec Settings” on page 40.

Chapter 1 — Using the CK31 Handheld Computer
CK31 Handheld Computer User’s Manual 23
The following two sections describe how to scan a bar code label
with the laser scanner (standard range laser or long range laser),
linear imager, and area imager.
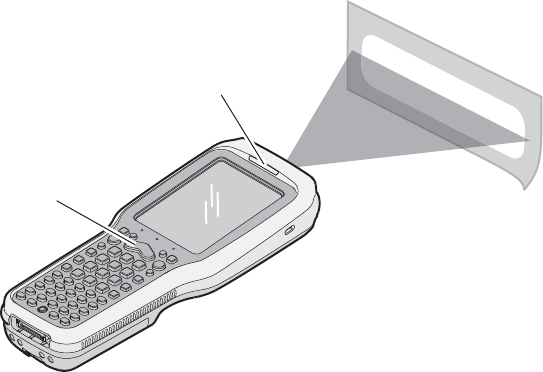
Scanning With the Laser Scanner or Linear Imager
If the CK31 has a standard range laser, long range laser, or linear
imager, use the following procedure to practice scanning a bar
code.
The linear imager can decode PDF417 bar codes as well as bar
codes with high-density, low-density, and poor quality in any
lighting conditions. For help scanning PDF417 bar codes, see
the procedure on the next page.
To scan most bar code labels with the laser scanner or linear imager
1 Press I to turn on the CK31.
2 Point the scanner window at the bar code label and hold the
computer at a slight angle 15 to 25 cm (6 to 10 in) from the
label.
Note: If you have a long range scanner, you may need to hold
the computer further away from the label.
3 Press the Scan button on the keypad, or pull the trigger on a
handle, and direct the red beam so that it falls across all bars
in the bar code label.
Chapter 1 — Using the CK31 Handheld Computer
24 CK31 Handheld Computer User’s Manual
*INTERMEC*
*INTERMEC*
Scan button
Good Read light (green)
Use this test bar code:
Code 39 Test Bar Code
*123456*
*123456*
When the CK31 successfully reads a bar code label, you hear
a high beep and the green Good Read light turns on briefly.
4 Release the Scan button.
To scan a PDF417 or Micro PDF417 bar code with the linear imager
1 Press I to turn on the CK31.
2 Point the scanner window PDF417 or Micro PDF417 bar
code label and hold the computer at a slight angle 15 to 25
cm (6 to 10 in) from the label.
3 Press the Scan button on the keypad or pull the trigger on a
handle, and direct the red beam so that it falls across at the
top row of the bar code label.
Chapter 1 — Using the CK31 Handheld Computer
CK31 Handheld Computer User’s Manual 25
Scan button
Good Read light (green)
Scanning a PDF417 or Micro PDF417 Bar Code Label
Use this test bar code:
PDF417 Test Bar Code
*123456789abcdefg*
4 Move the beam down all rows of the bar code label. The
CK31 clicks as it reads each row.
5 The CK31 emits a high beep and the green Good Read light
turns on briefly when the CK31 successfully reads the entire
bar code label.
You may need to continue moving the beam from the bottom
of the bar code label to the top, and back to the bottom, until
you hear the high beep.
6 Release the Scan button.
Chapter 1 — Using the CK31 Handheld Computer
26 CK31 Handheld Computer User’s Manual
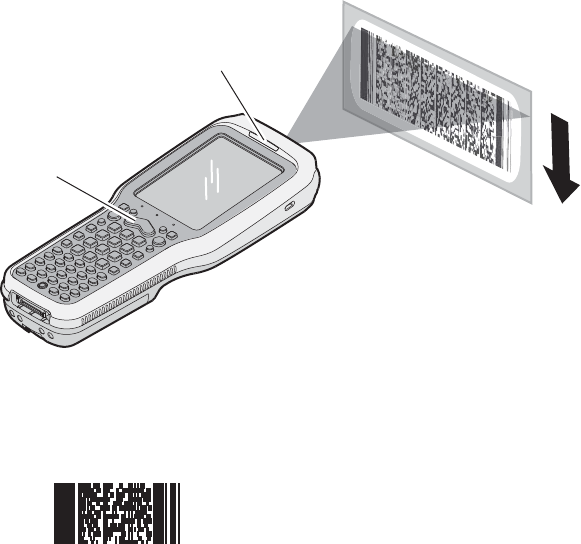
Scanning With the Standard or Near-Far Range Area Imager
Your CK31 may come with one of two types of area imagers:
• A standard area imager
• A near-far range area imager
Both area imagers allow you to scan 2D bar code symbologies
and supports omni-directional (360°) scanning. Omni-
directional scanning means that you can position the CK31 in
any orientation to scan a bar code label.
Scanning with the Standard Area Imager
The standard area imager comes equipped with an aiming beam
to help you scan bar codes. Use the following procedure to scan
a bar code label with the standard area imager.
To scan a bar code label with the area imager
1 Press I to turn on the CK31.
2 Point the scanner window at the bar code label and hold the
CK31 steady a few inches from the label.
3 Press the Scan button on the keypad or pull the trigger on a
handle and center the red aiming beam over the bar code
label, as shown in the illustration on the next page.
The aiming beam flashes repeatedly while the imager tries to
read a bar code. Also, the aiming beam is smaller when the
imager is closer to the bar code and larger when it is further
away.
When the CK31 successfully reads a bar code label, you hear
a high beep and the green Good Read light turns on briefly.
Chapter 1 — Using the CK31 Handheld Computer
CK31 Handheld Computer User’s Manual 27
Scan button
Good Read light (green)
Aiming beam
4 Release the Scan button or the trigger.
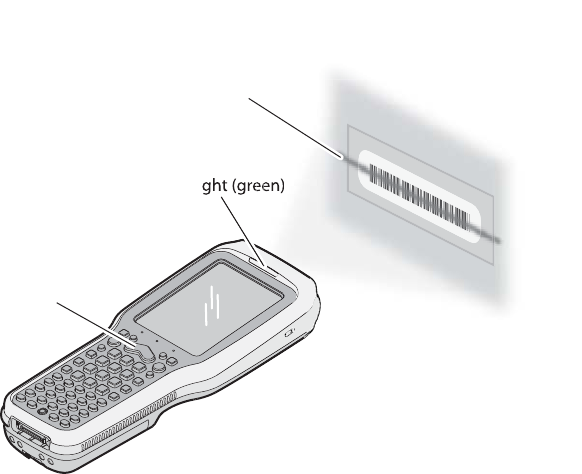
Scanning with the Near-Far Range Area Imager
The near-far range area imager allows you to scan a bar code at
both near and far distances. It is equipped with a laser pointer to
help you aim at bar codes.
To scan a bar code using the near-far range area imager
1 Press I to turn on the CK31.
2 Point the scanner window at the bar code label.
3 Press the Scan button on the keypad or pull the trigger on the
handle. The illumination beam and laser pointer appear.
• For near or close-in scanning distances of 30 cm (11.8 in.)
or less, use the laser pointer and aim slightly to the right
side of the center of the bar code and make sure that the
illumination beam covers the bar code you are trying to
decode.
• For standard and long range scanning distances of 30 cm
(11.8 in.) or more, use the laser pointer and aim towards
the middle of the bar code and make sure that the

Chapter 1 — Using the CK31 Handheld Computer
28 CK31 Handheld Computer User’s Manual
illumination beam covers the bar code you are trying to
decode.
Note: For near (close-in), standard, and long range
scanning, the illumination beam must be completely over
the bar code. The laser pointer acts as a guide and does not
need to be on the bar code.
4 When the CK31 successfully reads a bar code label, you hear
a high beep and the green Good Read light turns on briefly.
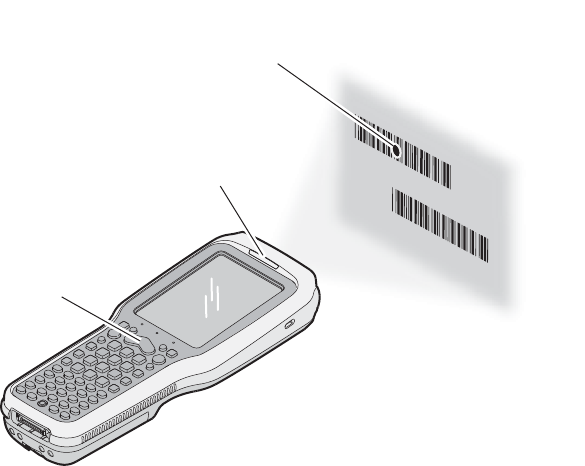
If there are multiple bar codes in one area, you should enable the
center-decoding parameter to read your bar codes. Use Intermec
Settings to enable and disable this parameter. For help, see
“Configuring the CK31 With Intermec Settings” on page 40.
The center-decoding parameter only decodes a bar code if:
• the laser pointer is on the bar code
• the illumination beam covers the bar code
To scan a bar code using center-decoding
1 Press I to turn on the CK31.
2 Point the scanner window at the bar code label.
3 Press the Scan button on the keypad or pull the trigger on the
handle. The illumination beam and the laser pointer appear.
4 Aim both the illumination beam and the laser pointer at the
bar code you want to scan.
Chapter 1 — Using the CK31 Handheld Computer
CK31 Handheld Computer User’s Manual 29
*JOHNB*
*JOHNB*
Good Read light (green)
Scan button
Laser pointer
5 When the CK31 successfully reads a bar code label, you hear
a high beep and the green Good Read light turns on briefly.
Troubleshooting the Area Imager
If you have problems scanning a bar code with the area imager,
try following some of these tips to improve the performance of
your imager:
• Position the imager as close to the bar code as possible while
still being able to capture the entire bar code.
• Make sure that Aimer LED Duration is set to zero.
• Set Lighting mode to Illum LED Priority.
• Enable only the bar codes that you need to use every day.
Use Intermec Settings to configure these imager commands. For
help, see “Configuring the CK31 With Intermec Settings” on
page 40. For more information on the commands and their
parameters, see the Intermec Computer Command Reference
Manual (P/N 073529). The Intermec Computer Command
Reference Manual is available on the CD attached to the inside
front cover of this user’s manual. You can check the Intermec
web site for a more recent version of this online manual.

Chapter 1 — Using the CK31 Handheld Computer
30 CK31 Handheld Computer User’s Manual
Attaching a Scanner to the Serial Port
You can attach a scanner to the serial port of the CK31 if you
order a serial adapter and a required cable. There are two serial
adapters available to support decoded and undecoded scanners.
Use the following two tables to locate the serial adapter and the
required cable you need for your scanner.
Undecoded Serial Adapter and Required Cables
Supported Scanner
Undecoded
Serial Adapter
Required Cable
128X wands* 225-714-001 069444-005*
1550C0500*, 1550C0502*,
1550C0504*
225-714-001 068424*
or 068425*
155XE 225-714-001 3-606030-10
1400 225-714-001 3-606030-10
* These products are not RoHS compliant and are discontinued. This
information is included here only for customers who have already
purchased these products.

Chapter 1 — Using the CK31 Handheld Computer
CK31 Handheld Computer User’s Manual 31
Decoded Serial Adapter or AA2 and Required Cables
Supported
Scanner
Decoded
Serial Adapter
Required Cable
1400 225-715-001
or AA2
3-604032-15,
3-604032-06*, or 3-606032-03*
1551E* 225-715-001
or AA2
3-604032-15,
3-604032-06*, or 3-606032-03*
1553E* 225-715-001
or AA2
3-604032-15,
3-604032-06*, or 3-606032-03*
1800 225-715-001
or AA2
3-366032-01*
SR60 225-715-001
or AA2
321-639-002
* These products are not RoHS compliant and are discontinued. This
information is included here only for customers who have already
purchased these products.
To attach a scanner to the serial port
1 Connect a scanner to the DB9 connector on the serial adapter
or cable.
2 Hook the serial adapter onto the battery on the CK31 and
then snap it into place, or connect the AA2 serial cable
adapter to the serial adapter.
Serial adapter
Battery
DB9 connector

Chapter 1 — Using the CK31 Handheld Computer
32 CK31 Handheld Computer User’s Manual
3 Refresh Intermec Settings. If you attach the undecoded serial
adapter, the default scanner is the 1550C05XX. If you attach
the decoded serial adapter, the default scanner is the 1551E.
4 Use Intermec Settings to select your scanner model and
configure the serial port. For help using Intermec Settings, see
“Configuring the CK31 With Intermec Settings” on page 40.
Note: When you attach an undecoded serial adapter to the
CK31, the internal scanner does not work.
Using Energy Saver Mode With Your 1551E or 1553 Scanner
Note: The 1551E, 1553, and the energy saver cable (P/N 3-
606032-03) are not RoHS compliant and are discontinued. This
information is included here only for customers who have
already purchased these products.
Use Energy Saver mode with your 1551E or 1553 scanner to
save battery power on your CK31. When you use Energy Saver
mode, the scanner is active while you are pressing the trigger and
goes into Standby mode after a good read. With Energy Saver
mode enabled, the current consumption drops to zero during
standby. Full energy is restored when you scan the next label.
To use Energy Saver mode, you need:
• an energy saver cable P/N 3-606032-03 for the serial port.
• firmware version 2.13 or later on the scanner.
For help using Intermec Settings, see “Configuring the CK31
With Intermec Settings” on page 40.
To enable Energy Saver mode
1 From Intermec Settings, choose Data Collection > Dock
Tethered Scanner > Scanner Settings > Energy saver mode.
2 Select Enable.
3 Exit Intermec Settings and save your changes.
Note: If the scanner stops working after you enable energy
saver mode, you may not be using an energy saver cable. For
Chapter 1 — Using the CK31 Handheld Computer
CK31 Handheld Computer User’s Manual 33
help, see “Problems While Scanning Bar Codes” on page 121.
Verifying That Your Scanner Is Working
Most of the default shortcuts on the desktop are standard
Windows CE applications. However, Intermec provides a
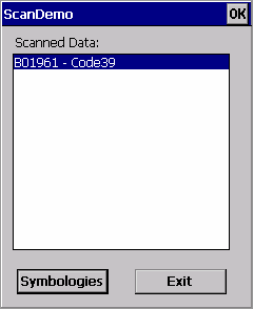
shortcut to an additional application called ScanDemo.
ScanDemo is a simple application you can use to verify that your
scanner is working correctly. ScanDemo enables the CK31 to
read bar code labels and display the information encoded on the
label along with the symbology used to encode it.
To open ScanDemo
1 Double-tap the ScanDemo shortcut on the desktop. The
ScanDemo application opens.
2 Scan a bar code label. For information on how to scan a bar
code label, see “Scanning Bar Codes” on page 22. The
information you scanned along with the symbology used to
encode it appears on the screen:
To enable or disable symbologies
1 From the ScanDemo window, tap the Symbologies button
to see the symbologies that are enabled.

Chapter 1 — Using the CK31 Handheld Computer
34 CK31 Handheld Computer User’s Manual
2 Select or clear the symbologies you want to use and tap Back.
3 If you want to enable symbologies not shown on the Scanner
Symbologies window, tap Intermec Settings. Intermec
Settings appears on your screen.
4 From the Intermec Settings application, go to Scanners,
Symbologies > Internal Scanner > Symbologies.
5 Enable or disable any of the symbologies you want to use.
6 Save your settings and close Intermec Settings. The Scanner
Symbologies window reappears.
7 Tap Back.
8 Scan bar code labels.
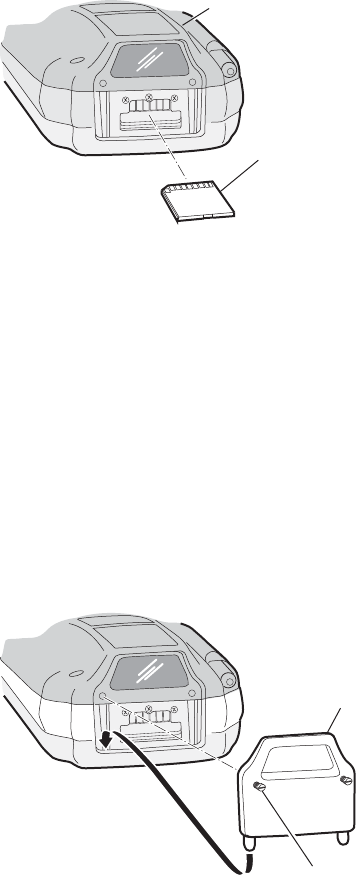
Installing the SD Card
You can use a Secure Digital (SD) card to increase file storage
and install software. The CK31 currently supports SD cards that
hold up to 1 GB of information. The SD card slot is located on
the top of the CK31 just above the laser scanner window.
To insert an SD card
1 Press I to turn off the CK31.
2 Unscrew the two captive screws on the SD card door and
remove the door.
3 Gently insert the SD card into the CK31 with the printed
side facing the keypad and screen side of the CK31.
Chapter 1 — Using the CK31 Handheld Computer
CK31 Handheld Computer User’s Manual 35
CK31
SD card
4 Push the card into the slot until it latches in place.
5 To verify that the SD card is seated correctly, press I to turn
on the CK31.
• If the SD card is bootable, the CK31 should boot from the
card. If not, see page 115 for troubleshooting help.
• You should be able to navigate to the SDMMC Disk
folder to see the contents of the SD card. If not, see page
115 for troubleshooting help.
• If the SD card contains operating system upgrade files, the
upgrade process begins automatically. For more
information, see “Upgrading Your CK31” on page 92.
6 Replace the door and attach it with the two captive screws.
Captive
screw
(2 places)
SD card
door
7 Press I to turn on the CK31.
Chapter 1 — Using the CK31 Handheld Computer
36 CK31 Handheld Computer User’s Manual
8 (Optional) Navigate to the SDMMC Disk folder to see the
contents of the SD card.
To remove the SD card
1 Press I to turn off the CK31.
2 Remove the two screws on the SD card slot door and remove
the door.
3 Push in on the SD card until you hear it unlatch. The card
should eject far enough to easily remove it from the CK31.
4 Remove the SD card from the CK31.
5 Replace the door and attach it with the two captive screws.

CK31 Handheld Computer User’s Manual 37
Configuring the CK31
Use this chapter to understand how to configure the CK31 to
communicate in your network. In this chapter, you will find
these sections:
• How to Configure the CK31 Parameters
• Configuring the CK31 for Your Network
• Configuring Security
2
Chapter 2 — Configuring the CK31
38 CK31 Handheld Computer User’s Manual
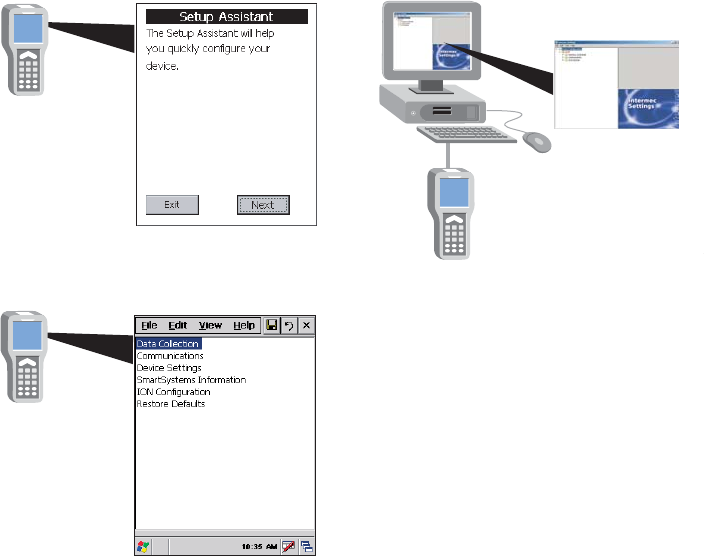
How to Configure the CK31 Parameters
You can configure many parameters on the CK31, such as the
bar code symbologies it decodes or the network settings. These
characteristics are controlled by configuration parameters. The
values you set for these configuration parameters determine how
the computer operates.
U se S etup Assista n t
Use Intermec Settings
Use Intermec
Settings on
the CK31
to set most
parameters.
Use Setup
Assistant to
quickly enter
network
parameters.
Use the SmartSystems Console
Use Intermec Settings
from within the
SmartSystems Console
to remotely congure
network parameters.
Configuring the CK31: The CK31 provides several ways for you to configure the communications,
device, and imaging parameters.

Chapter 2 — Configuring the CK31
CK31 Handheld Computer User’s Manual 39
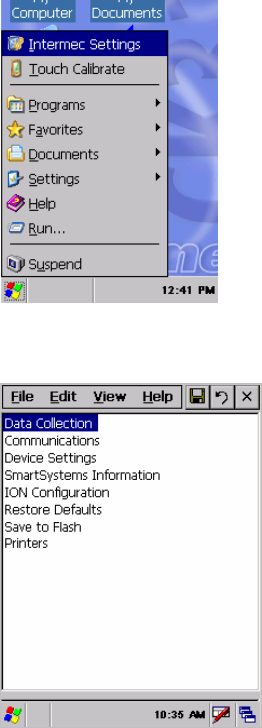
Configuring the CK31 With Setup Assistant
When first setting up the CK31, use Setup Assistant to set or
enable basic network parameters and connect your CK31 to the
network. Setup Assistant guides you through setting the
following basic network parameters:
• Date and time (including time zone)
• 802.11 radio
• WEP security
• DHCP server or IP address, subnet mask, and default router
• Device name
To set other parameters, use the Intermec Settings or another
configuration method. The Setup Assistant runs on the CK31
the first time you turn on the computer.
The Setup Assistant Start Screen
After you complete the Setup Assistant, the CK31 should be
communicating with your network. A network connection icon
appears in your taskbar. For more information on the network
icons, see “Understanding the Screen Icons” on page 17. For
detailed information on most of the commands available in
Intermec Settings, see the Intermec Computer Command
Reference Manual (P/N 073529).
Chapter 2 — Configuring the CK31
40 CK31 Handheld Computer User’s Manual
Configuring the CK31 With Intermec Settings
Use Intermec Settings to configure the CK31 and view system
information.
Opening Intermec Settings
You can open Intermec Settings while running any application.
To open Intermec Settings
1 Tap the Start icon or press C and then B. The Start menu
appears.
2 Select Intermec Settings. The Intermec Settings application
appears.
Chapter 2 — Configuring the CK31
CK31 Handheld Computer User’s Manual 41
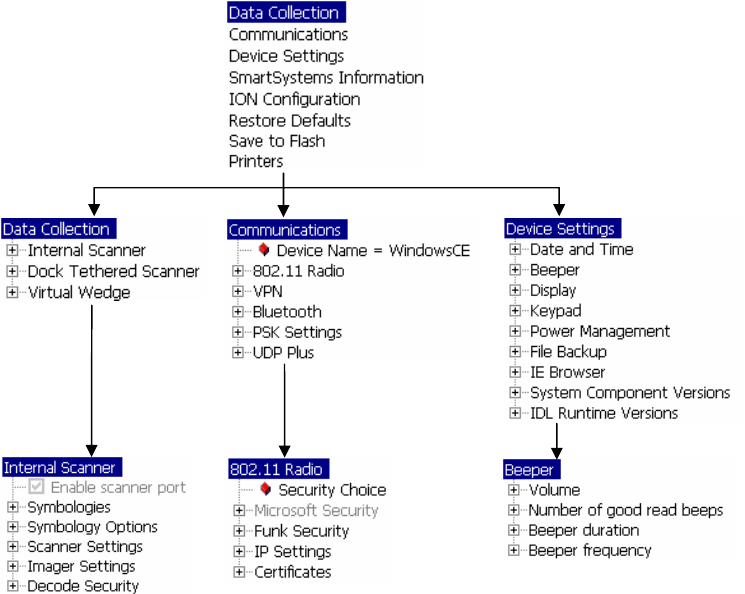
Understanding the Commands in Intermec Settings
Use the following diagram to help find the commands you need
to use to configure your CK31. These screens do not represent
the exact information you will see on your CK31. They have
been modified to show you how the information is structured.
For detailed information on most of the commands available in
Intermec Settings, see the Intermec Computer Command
Reference Manual (P/N 073529). The Intermec Computer
Command Reference Manual is available on the CD attached to
the inside front cover of this user’s manual. You can check the
Intermec web site for a more recent version of this online
manual.
Intermec Settings Menus: Use this diagram to help navigate through the Intermec Settings
application. This diagram should only be used as a guide; it does not accurately represent all of the
information you will see on your screen.

Chapter 2 — Configuring the CK31
42 CK31 Handheld Computer User’s Manual
Navigating in Intermec Settings
Use this table to understand how to navigate and enter
information in Intermec Settings.
Performing Tasks in Intermec Settings
To Perform
This Task
Do This
Select or expand an option • Tap the option
• a or b to select an option
Select text in a text box • From the highlighted option, press
Tab
• Tap in the text box and drag the
stylus over the text
Expand an option • Tap the option
• Press a or b to select an option
and then press B b
Save settings • Tap File > Save Settings
• Press Alt F and then press Enter
Restoring Default Settings
You can restore the CK31 to factory default settings from
Intermec Settings. For a complete list of the default settings, see
“Default Configuration” on page 148.
Note: The Restore Defaults command, restores all parameters,
including network settings, and erases the registry. As a result,
you may lose network communications. This option should only
be used by network administrators or by Intermec support
personnel.
To restore factory default settings
1 From Intermec Settings, select Restore Defaults.
2 Select Restore Defaults. The Run Apps button appears.
3 Tap the Run App button. The Restore Defaults dialog box
appears.

Chapter 2 — Configuring the CK31
CK31 Handheld Computer User’s Manual 43
4 Tap OK. The CK31 erases the registry and then performs a
cold boot. When the CK31 is done booting, the calibration
screen appears.
5 Follow the instructions on the screen to calibrate your stylus.
When you are done calibrating your stylus, the Setup
Assistant appears.
Note: You may need to reinstall some applications after
restoring the default settings because any settings that were
modified for your application will be reset.
Exiting Intermec Settings
When you are done modifying your device configuration and
saving your settings, exit Intermec Settings.
To exit Intermec Settings
• From the Main Menu choose File > Exit.
or
• Tap the X in the upper right corner of the window.
If you try to exit Intermec Settings without saving your changes,
a message box appears asking if you want to save your
configuration changes. Tap Yes.
Chapter 2 — Configuring the CK31
44 CK31 Handheld Computer User’s Manual
Configuring the CK31 With SmartSystems Console
The SmartSystems™ Console lets you manage all of your
SmartSystems-enabled devices at the same time from a
centralized host PC. The CK31 ships with a SmartSystems
client, which means it is SmartSystems-enabled. The console
displays all of the CK3 s in your network. In the console, you
can right-click a CK31 and a menu appears. To configure the
CK31, choose Intermec Settings from the menu.
The console is part of SmartSystems Foundation, which is
available for free from the Intermec web site. Go to
www.intermec.com/SmartSystems to download SmartSystems
Foundation. For help using the console, see the online manual
available from the Help menu in the console.
Synchronizing the CK31 System Time With a Time Server
To ensure real-time communications and updates, the time on
all of your CK31s needs to be synchronized with a network time
server. Network time servers acquire Coordinated Universal
Time (UTC) from an outside source such as the U.S. Naval
Observatory (USNO). The CK31 uses Simple Network Time
Protocol (SNTP) to synchronize with a network time server.
The default reference time server is the USNO
(tock.usno.navy.mil). To synchronize the time on your CK31
with this time server, you must have a valid connection to the
Internet.
You can also synchronize the CK31 system time with a
corporate network server within your firewall that is SNTP
capable. To use an internal corporate network server, you need
to set the domain name in the registry.

Chapter 2 — Configuring the CK31
CK31 Handheld Computer User’s Manual 45
Configuring the CK31 for Your Network
The CK31 is a versatile handheld computer that you can easily
add to your wired or wireless data collection network. You can
connect your CK31 to your network using:
• 802.11b/g radio communications.
• Bluetooth communications
• Serial communications.
Configuring 802.11b/g Radio Communications
Make sure all components with antennas are at least 30 cm
(1 ft) apart when power is applied. Failure to comply could
result in equipment damage.
The wireless CK31 has an internal 802.11b/g radio to transfer
data using wireless communications. This section of the manual
assumes that you have already set up your wireless
communications network including your access points. If you
are using a UDP Plus network, you also need to have your
Intermec Application Server communicating with a host
computer.
Your CK31 supports these network protocols:
• TCP/IP
• UDP Plus
The next sections explain the parameters you need to configure
for the CK31 to work in your wireless network.
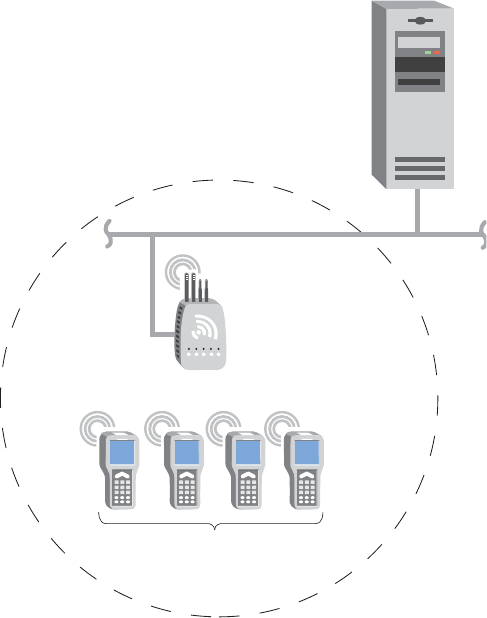
Chapter 2 — Configuring the CK31
46 CK31 Handheld Computer User’s Manual
Configuring the Network Parameters for a TCP/IP Network
In a TCP/IP network, the CK31 communicates directly with a
host computer using TCP/IP. The access point acts as a bridge
to allow communications between the wired network and the
wireless network.
Ethernet
TCP/IP
Direct Connect
CK31s
Access point
Host
CK31 in a TCP/IP Direct Connect Network
To use wireless communications in a TCP/IP network
1 Configure these network parameters on each CK31 in the
network:
• Network name (SSID)
• IP settings (if not using DHCP)
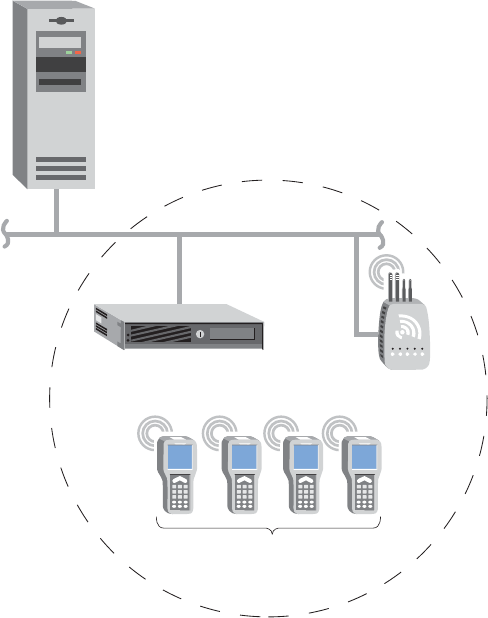
Chapter 2 — Configuring the CK31
CK31 Handheld Computer User’s Manual 47
2 Make sure that your CK31 is communicating with the
network and that the network can see your CK31.
3 Configure security. For help, see “Configuring Security” on
page 59.
The easiest way to configure the network parameters on the
CK31 is to use Intermec Settings. For help, see “Configuring the
CK31 With Intermec Settings” on page 40.
Configuring the Network Parameters for a UDP Plus Network
In a UDP Plus network, the CK31 communicates with a host
computer through the Intermec Application Server.
Ethernet
UDP Plus
Access point
Host
Intermec Application Server
CK31s
CK31 in a UDP Plus Network
Chapter 2 — Configuring the CK31
48 CK31 Handheld Computer User’s Manual
The Intermec Application Server translates UDP Plus packets on
the wireless network into TCP/IP packets on the wired network
and vice versa. The access point acts as a bridge to allow
communications between the wired network and the wireless
network.
To use wireless communications in a UDP Plus network
1 Configure these network parameters on each CK31 in the
network:
• Network name (SSID)
• Controller IP address
• IP settings (if not using DHCP)
• Network port
2 Make sure that your CK31 is communicating with the
network and that the network can see your CK31.
3 Configure the security. For help, see “Configuring Security”
on page 59.
The easiest way to configure the network parameters on the
CK31 is to use Intermec Settings. For help, see “Configuring the
CK31 With Intermec Settings” on page 40.
Configuring Bluetooth Communications for Wireless Scanners
You can send and receive information to devices wirelessly using
the Bluetooth radio. The Bluetooth technology uses short-range
radio links and allows for communications over a 10-meter
(32.8 foot) range. The nominal Bluetooth range for the CK31 is
typically less than 3 meters (9.8 feet).
This section explains how to configure the CK31 to
communicate with Bluetooth wireless scanners.
To configure Bluetooth communications for wireless scanners
1 From Intermec Settings, select Communications >
Bluetooth.
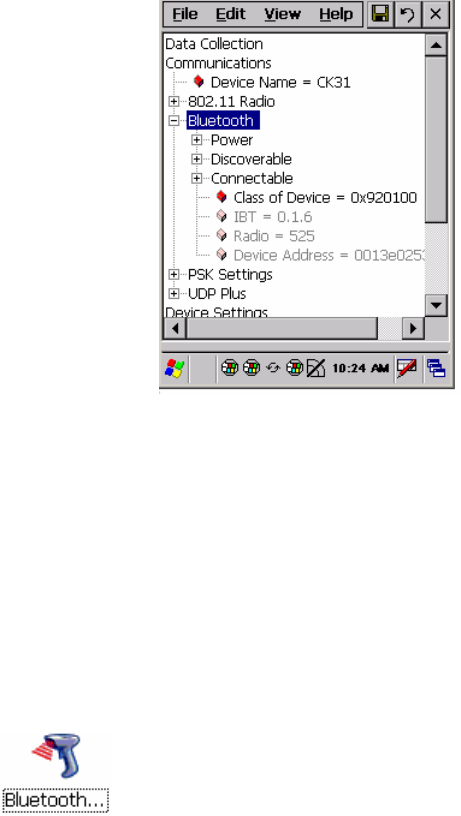
Chapter 2 — Configuring the CK31
CK31 Handheld Computer User’s Manual 49
2 Tap the Power parameter and select On.
3 If you want to allow incoming connections from wireless
scanners, you must enable two parameters:
• Tap the Discoverable parameter and select Enable.
• Tap the Connectable parameter and select Enable.
If you do not want to allow incoming connections, make sure
Discoverable and Connectable are both disabled.
4 Save your changes and exit Intermec Settings.
5 From the Start menu, tap Programs > Windows Explorer >
Program Files > Intermec > Network > Bluetooth.
6 Double-tap the BluetoothScannerWizard icon. The
Connection Wizard appears.
7 Tap Add Device. The wizard advances to the next screen.
8 Make sure Device Discovery is selected and tap Next. The
wizard starts discovering devices.
9 Select the device you want to connect to from the Devices list
and then tap Next.
10 In the Authen. Request dialog box, type 0000 for the PIN
and tap OK.

Chapter 2 — Configuring the CK31
50 CK31 Handheld Computer User’s Manual
11 Tap Finish.
Use this table to understand the settings you see in the
Bluetooth menu.
Bluetooth Settings
Setting Description
Power Set and view whether the Bluetooth radio is on or
off.
Discoverable Allows other Bluetooth devices to be able to
discover your CK31 during a device discovery.
Connectable Allows other Bluetooth devices to connect to your
CK31.
Class of Device Determines how the device appears to other
devices during discovery.
IBT Displays the version of the Intermec Bluetooth
Library.
Radio Displays the version of the Bluetooth Radio
Hardware.
Device Address Displays the Bluetooth address of your CK31.
Configuring Bluetooth Communications for Wireless Printing
You can send and receive information to Bluetooth printers
wirelessly using the Bluetooth radio. The Bluetooth technology
uses short-range radio links and allows for communications over
a 10-meter (32.8-foot) range.
This section explains how to configure the CK31 for Bluetooth
wireless printing. You need to:
• make sure that Bluetooth power is on. For help, see the next
section, “Turning on Bluetooth Power.”
• create an application that lets you print. For help, see
“Creating an Application That Lets You Print Wirelessly” on
page 51.
• select the current wireless printer on the CK31. For help, see
“Selecting the Current Wireless Printer on the CK31” on
page 52.
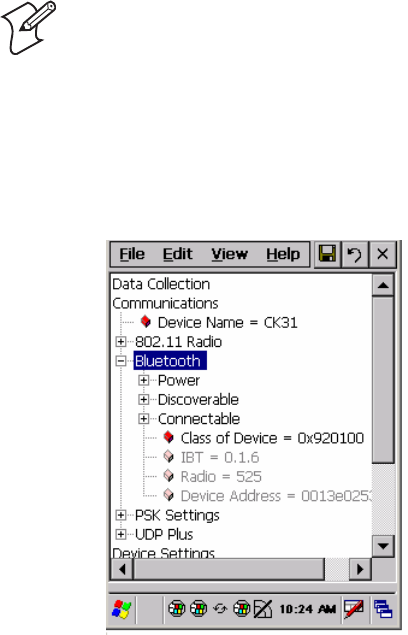
Chapter 2 — Configuring the CK31
CK31 Handheld Computer User’s Manual 51
Turning On Bluetooth Power
By default, Bluetooth power is off, so you need to make sure
that Bluetooth power is on.
Note: If you already configured the CK31 for Bluetooth wireless
scanners (as described in the previous section, “Configuring
Bluetooth Communications for Wireless Scanners”) this task is
already complete.
To turn on Bluetooth power
1 From Intermec Settings, select Communications >
Bluetooth.
2 Tap the Power parameter and select On.
3 Save your changes and exit Intermec Settings.
Creating an Application That Lets You Print Wirelessly
The CK31 does not ship with an application that lets you print
wirelessly. You must create an application that opens the wireless
printing COM port on the CK31. For help, see the Bluetooth
Resource Kit. The resource kit is part of the Intermec Developer
Library (IDL), which is available as a download from the
Intermec web site at www.intermec.com/idl.
Chapter 2 — Configuring the CK31
52 CK31 Handheld Computer User’s Manual
The Wireless Printing applet is available in the Control Panel
and separates the task of wireless printing setup from other
Bluetooth management tasks.
The Wireless Printing applet uses the concept of a “current
wireless printer.” The CK31 connects to the current wireless
printer when your application opens the wireless printing COM
port on the CK31. If there is no current wireless printer selected
on your CK31, there is no wireless printing COM port
registered on your CK31. You must select a current wireless
printer on your CK31, as described in the next section,
“Selecting the Current Wireless Printer on the CK31.”
The Wireless Printing applet performs these tasks on the CK31:
• Helping you select the current wireless printer
• Storing the current wireless printer in the registry
• Registering/deregistering the wireless printing COM port
• Storing the wireless printing COM port in the registry as the
WPort
Specifically, the current wireless printer is registered and
deregistered on Bluetooth stack load/unload. If you select a
different current wireless printer, the existing wireless printing
COM port is deregistered and the new one is registered instead.
The Wireless Printing applet uses the Bluetooth COM Port
Control to handle COM port registration/deregistration.
Selecting the Current Wireless Printer on the CK31
By default, there is no current wireless printer selected on the
CK31.
There are three ways to select the current wireless printer:
• Discovering the printer using Bluetooth device discovery
• Manually entering the printer’s Bluetooth device address
• Choosing the printer from a list of previously discovered
printers
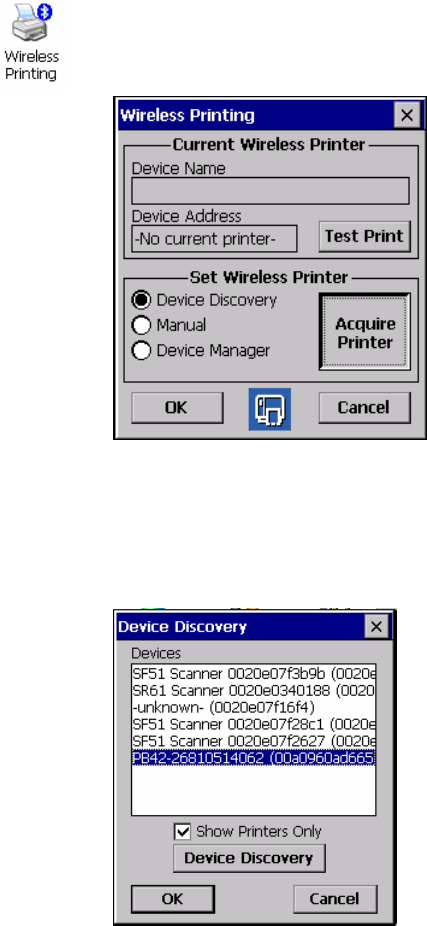
Chapter 2 — Configuring the CK31
CK31 Handheld Computer User’s Manual 53
To discover the printer with Bluetooth device discovery
1 Select Start > Settings > Control Panel and double-tap the
Wireless Printing icon. The Wireless Printing dialog box
appears.
2 Select Device Discovery and tap Acquire Printer to initiate
device discovery. All Bluetooth devices discovered within
range appear in the Devices box.
3 When your preferred printer appears in the Devices box,
select the printer name and tap OK.
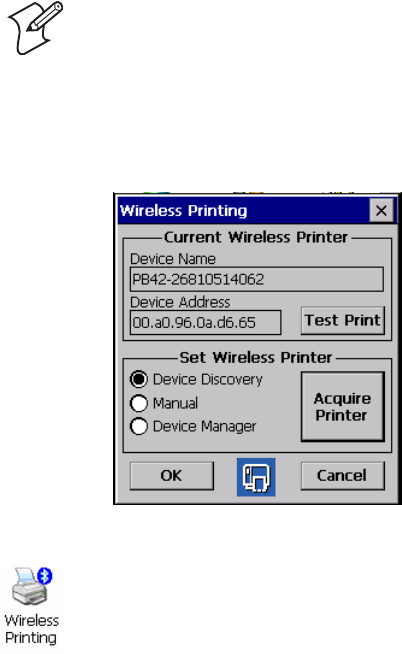
Chapter 2 — Configuring the CK31
54 CK31 Handheld Computer User’s Manual
If your preferred printer does not appear, make sure the
printer is powered on and discovery is enabled, and then
repeat Steps 1 through 3.
Note: Bluetooth devices that are not printers may be
displayed on this screen even though the Show Printers
Only check box is checked.
4 Tap Test Print. The printer prints a short message, verifying
that the printer has been selected as the current wireless
printer.
To manually enter the device address of the printer
1 Select Start > Settings > Control Panel and double-tap the
Wireless Printing icon. The Wireless Printing dialog box
appears.
2 Select Manual and tap Acquire Printer. The Manual Set
dialog box appears.
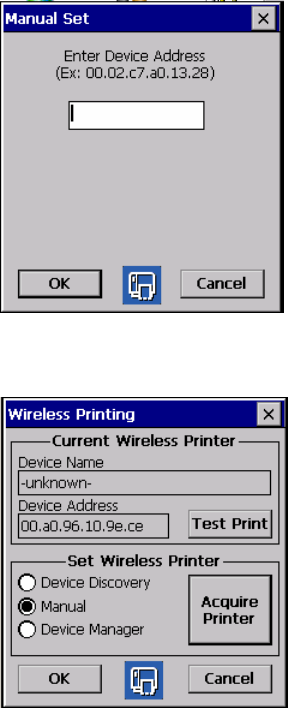
Chapter 2 — Configuring the CK31
CK31 Handheld Computer User’s Manual 55
3 Type the address of the printer in the field and tap OK. The
Wireless Printing dialog box appears.
The keyword -unknown- appears in the Device Name field,
because the printer’s name is not sent to the CK31 when you
manually enter the printer address.
4 Tap Test Print. The printer prints a short message, verifying
that the printer has been selected as the current wireless
printer.
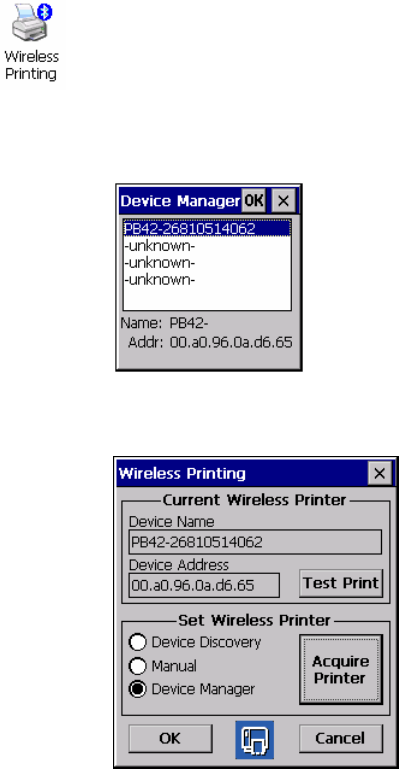
Chapter 2 — Configuring the CK31
56 CK31 Handheld Computer User’s Manual
To choose the printer from a list of previously discovered devices
1 Make sure you have already performed a Bluetooth device
discovery.
2 Select Start > Settings > Control Panel and double-tap the
Wireless Printing icon. The Wireless Printing dialog
appears.
3 Select Device Manager and tap Acquire Printer. The Device
Manager dialog appears with the list of previously discovered
devices.
4 Select the printer and tap OK. The Wireless Printing dialog
box appears.
5 Tap Test Print. The printer prints a short message, verifying
that the printer has been selected as the current wireless
printer.

Chapter 2 — Configuring the CK31
CK31 Handheld Computer User’s Manual 57
Configuring Ethernet Communications on Older CK31s
Note: The Ethernet option is no longer available on the CK31.
The information in this section is useful only if you already have
an installed base of older CK31s with the Ethernet option.
You can use an older CK31 directly in an Ethernet network if
you have ordered the Ethernet option on your CK31. Insert the
CK31 into an AD1 or AD2 Communications Dock. The
communications dock has an Ethernet connector that allows the
CK31 to communicate with your Ethernet network.
The CK31CN does not support Ethernet communications.
To use an older CK31 in an Ethernet network
1 Configure these network parameters on each CK31:
• If you have a DHCP server, enable DHCP.
• If you do not have a DHCP server, set these parameters:
a IP address
b Subnet mask
c Default router
2 If required for your network, you may also need to set these
parameters on each CK31:
• Primary and secondary DNS Servers
• Primary and secondary WINS Servers
3 Make sure that your CK31 is communicating with the
network and that the network can see your CK31.
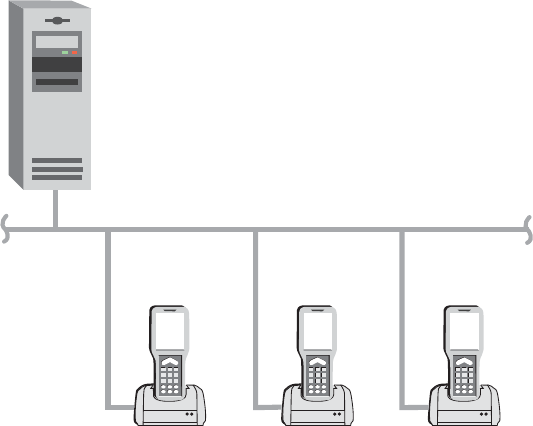
Chapter 2 — Configuring the CK31
58 CK31 Handheld Computer User’s Manual
Ethernet
CK31
Host
CK31 CK31
Older CK31s in an Ethernet Network
Configuring Serial Communications
The CK31 has a serial port to transfer data to and receive data
from another device via RS-232 communications. For a
technical description of the serial port, see “Pin Assignments for
the Serial Port” on page 145.
You can also insert the CK31 into a communications dock to
transmit data to and receive data from a host computer or PC
using RS-232 communications.
The serial adapter and the communications dock are sold
separately. For more information on accessories and how to
order them, see page 139.
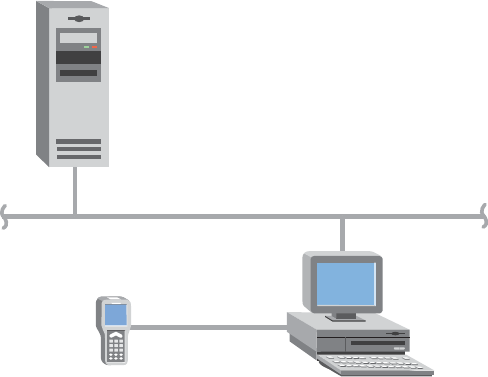
Chapter 2 — Configuring the CK31
CK31 Handheld Computer User’s Manual 59
PC
Ethernet
Serial cable
CK31
Host
CK31 in a Serial Network
To use serial communications with your CK31
1 Turn off the CK31.
2 Connect the CK31 to the serial port of another device. You
can do this in one of the following ways:
• Connect the CK31 serial port to a button link or serial
printer using the 26-pin to DB9 (9-pin) serial adapter and
a male-to-female null modem RS-232 cable.
• Connect the AD1 communications dock to the serial port
of the other device using a DB9 to DB9 serial adapter
cable. Insert the CK31 into the dock.
3 Turn on the CK31.
4 Make sure that your CK31 is communicating with the
network and that the network can see your CK31.
Configuring Security
The CK31 provides four types of security for your wireless
network:
• Wi-Fi Protected Access (WPA)

Chapter 2 — Configuring the CK31
60 CK31 Handheld Computer User’s Manual
• Wi-Fi Protected Access 2 (WPA2™)
• 802.1x
• WEP
This section explains how to configure security on your wireless
CK31. If you choose not to use security, see “Disabling
Security” on page 77. Intermec always recommends that you
implement security.
You must use either Funk or Microsoft security to implement
your security solution. For details, see the next section,
“Choosing Between Funk and Microsoft Security.”
If you are using WPA-802.1x, WPA2-802.1x, or 802.1x
security, this section also assumes that your authentication server
and authenticators are properly configured. For more
information on 802.1x security, see the MobileLAN™ secure
802.1x Security Solution Installation Guide (P/N 073134)
available at www.intermec.com.
Note: Your security choice does not depend on your
authentication server. For example, you can choose Funk security
if you use Microsoft Active Directory® to issue certificates.
Choosing Between Funk and Microsoft Security
The CK31 provides both Funk and Microsoft security choices.
Funk security is the default setting. Use the following sections to
set security using either Funk or Microsoft as your security
choice.
Both Funk and Microsoft offer similar features, but Funk
security also offers these features:
• CCX v2.0 compliance
• Support for LEAP and TTLS
• Configuration of up to four profiles
If you want to use the default Funk security, you need to select a
profile. For help, see the next section, “Selecting a Profile for
Funk Security.”
Chapter 2 — Configuring the CK31
CK31 Handheld Computer User’s Manual 61
If you want to use Microsoft security, you need to select it as
your security choice. For help, see “Selecting Microsoft as Your
Security Choice” on page 61.
Selecting a Profile for Funk Security
You can define up to four profiles for Funk security. Different
profiles let your CK31 communicate in different networks
without having to change all of your security settings. For
example, you may want to set up one profile for the
manufacturing floor and one for the warehouse.
By default, the active profile is Profile 1.
To select a profile for Funk security
1 Tap the Start icon or press C and then B. The Start menu
appears.
2 Select Intermec Settings. The Intermec Settings application
appears.
3 Select Communications > 802.11 Radio > Funk Security.
4 Select Active Profile, choose a profile from the list, and press
Enter.
5 Select the active profile to expand it.
6 (Optional) Give your profile a meaningful name:
a Select Profile Label and a text box appears.
b Select the text in the box, type a meaningful name, and
press Enter.
7 Configure your security settings.
8 (Optional) Repeat this process for each profile you want to
define.
9 Select one profile as the active profile by tapping Active
Profile and choosing a profile from the drop-down list.
10 Save your settings.
Selecting Microsoft as Your Security Choice
The default security setting is Funk. If you want to use
Microsoft security, you need to select it as your security choice.
Chapter 2 — Configuring the CK31
62 CK31 Handheld Computer User’s Manual
To select Microsoft security as your security choice
1 Tap the Start icon or press C and then B. The Start menu
appears.
2 Select Intermec Settings. The Intermec Settings application
appears.
3 Select Communications > 802.11 Radio > Security Choice.
4 From the Security Choice list, select Microsoft Security.
5 Press Enter. An alert box appears telling you that you must
save your settings and warm boot the CK31 for your new
security choice to take effect.
6 Tap Yes.
7 Save your settings.
8 Warm boot your CK31 by pressing and holding the I key for
five seconds.
Using WPA Security
Wi-Fi Protected Access (WPA) is a strongly enhanced,
interoperable Wi-Fi security that addresses many of the
vulnerabilities of Wired Equivalent Privacy (WEP). Instead of
WEP, WPA uses Temporal Key Integrity Protocol (TKIP) for
its data encryption method.
Currently, WPA satisfies some of the requirements in the IEEE
802.11i draft standard. When the standard is finalized, WPA
will maintain forward compatibility.
WPA runs in 802.1x (Enterprise) mode or PSK (Pre-Shared
Key) mode:
• In Enterprise mode, WPA provides user authentication using
802.1x and the Extensible Authentication Protocol (EAP).
That is, an authentication server (such as a RADIUS server)
must authenticate each device before the device can
communicate with the wireless network.
• In PSK mode, WPA provides user authentication using a
shared key between the authenticator and the CK31. WPA-
PSK is a good solution for small offices or home offices that
do not want to use an authentication server.

Chapter 2 — Configuring the CK31
CK31 Handheld Computer User’s Manual 63
To use WPA security, you need:
• an authentication server (Enterprise mode only).
Note: You can also use a MobileLAN access point with
software release 1.80 or later as an authentication server. For
help, see the system manual for your access point.
• an access point with an 802.11b/g radio that supports WPA.
• a CK31 with the 802.11b/g radio and the 802.1x/WPA
security option.
The CK31 also supports Wi-Fi Protected Access 2 (WPA2) if
you are using Funk security. WPA2 is a product certification
available through the Wi-Fi Alliance that certifies wireless
equipment is compatible with the 802.11i standard. WPA2 uses
the Advanced Encryption Standard (AES) for data encryption.
WPA2 runs in 802.1x (Enterprise) mode or PSK (Pre-Shared
Key) mode:
• For WPA2-802.1x mode, WPA2 requires authentication in
two phases; the first is an open system authentication and the
second uses 802.1x and an Extensible Authentication
Protocol (EAP) authentication method.
• In PSK mode, WPA2 provides user authentication using a
shared key between the authenticator and the CK31. WPA2-
PSK is a good solution for small offices or home offices that
do not want to use an authentication server.
Configuring WPA Security With Funk Security
Use these procedures to set WPA-802.1x, WPA2-802.1x, WPA-
PSK, or WPA2-PSK security on your CK31 with Funk security.
To configure WPA-802.1x or WPA2-802.1x with Funk security
1 Make sure you have configured the communications and
radio parameters on your CK31.
2 Make sure you have selected Funk as your security choice.
3 Open Intermec Settings.
4 Choose Communications > 802.11 Radio > Funk Security
> Profile.

Chapter 2 — Configuring the CK31
64 CK31 Handheld Computer User’s Manual
5 For Association, choose WPA or WPA2 and press Enter.
Encryption automatically defaults to TKIP if you are using
WPA. Encryption automatically defaults to AES if you are
using WPA2.
6 For 8021x, choose TTLS, PEAP, or TLS and press Enter.
If you choose TTLS or PEAP:
a For Prompt for Credentials, choose Enter credentials
now.
Note: You can use Prompt for credentials to troubleshoot
your connection to the network if you have problems.
b Select User name, type your user name, and then press
Enter.
c Select User Password, type a user password, and then
press Enter.
d For Validate Server Certificate, choose Yes and press
Enter.
Note: You must have the date on the CK31 set correctly
when you enable Validate Server Certificate.
If you choose TLS:
a Load a user and root certificate on your CK31. For help,
see “Loading a Certificate” on page 73.
b For Validate Server Certificate, choose Yes and press
Enter.
c You must enter a User Name and Subject Name. You can
also enter a Server Common Name if you want to increase
your level of security.
7 Exit Intermec Settings.
To enable WPA-PSK or WPA2-PSK with Funk security
1 Make sure you have configured the communications and
radio parameters on your CK31.
2 Make sure you have selected Funk as your security choice.
Chapter 2 — Configuring the CK31
CK31 Handheld Computer User’s Manual 65
3 Open Intermec Settings.
4 Choose Communications > 802.11 Radio > Funk Security
> Profile.
5 For Association, choose WPA or WPA2 and press Enter.
6 For 8021x, choose None and press Enter.
7 For Pre-Shared Key, enter the pre-shared key or the
passphrase.
The pre-shared key must be a value of 32 hex pairs preceded
by 0x for a total of 66 characters. The value must match the
key value on the access point. The passphrase must be from 8
to 63 characters. After you enter a passphrase, the CK31
internally converts it to a pre-shared key.
This value must match the passphrase on the authenticator.
8 Exit Intermec Settings.
Configuring WPA Security With Microsoft Security
Use these procedures to set WPA-802.1x and WPA-PSK
security on your CK31 with Microsoft security.
To enable WPA-802.1x with Microsoft security
1 Make sure you have configured the communications and
radio parameters on your CK31.
2 Open Intermec Settings.
3 Choose Communications > 802.11 Radio > Microsoft
Security.
4 For Infrastructure Mode, choose Infrastructure.
5 For Network Authentication, choose WPA. Data
Encryption automatically defaults to TKIP.
6 For 802.1x Authentication, choose either TLS or PEAP.
If you choose TLS:
a Select Properties and tap the Run App button. The Auth.
Settings dialog box appears.
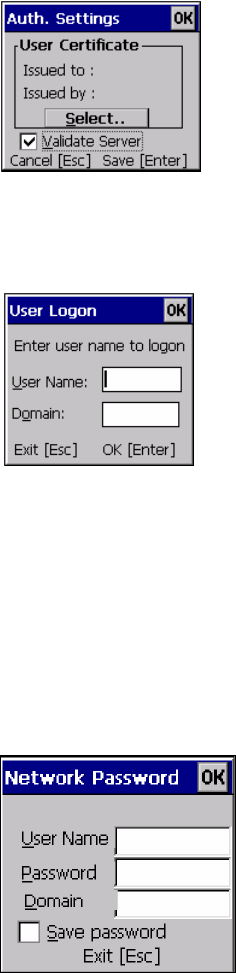
Chapter 2 — Configuring the CK31
66 CK31 Handheld Computer User’s Manual
b From the Auth. Settings box, tap the Select button.
c Select your certificate from the list and press Enter. The
User Logon dialog box appears.
d Enter a User Name and a Domain.
e Press Enter.
If you choose PEAP:
a Select Properties and tap the Run App button. The Auth.
Settings box appears.
b Enable the Validate Server check box.
c Press Enter. Once the radio starts to authenticate, the
Network Password dialog box appears.
Chapter 2 — Configuring the CK31
CK31 Handheld Computer User’s Manual 67
d Enter a User Name and Password and enable the Save
Password check box.
e (Optional) In the Domain field, enter the Active Directory
domain associated with the user account.
f Press Enter.
7 Exit Intermec Settings.
To enable WPA-PSK With Microsoft Security
1 Make sure you have configured the communications and
radio parameters on your CK31.
2 Open Intermec Settings.
3 Choose Communications > 802.11 Radio > Microsoft
Security.
4 For Infrastructure Mode, choose Infrastructure.
5 For Network Authentication, choose WPA-PSK. Data
Encryption automatically defaults to TKIP.
6 For Pre-Shared Key, enter the pre-shared key or the
passphrase.
The pre-shared key must be a value of 32 hex pairs preceded
by 0x for a total of 66 characters. The value must match the
key value on the authenticator. The passphrase must be from
8 to 63 characters. After you enter a passphrase, the CK31
internally converts it to a pre-shared key.
This value must match the passphrase on the authenticator.
7 Exit Intermec Settings.
Using 802.1x Security
802.1x security provides centralized user authentication using an
authentication server, authenticators (access points), and
supplicants. These components communicate using an EAP
authentication type, such as TLS (Transport Layer Security) or
PEAP (Protected Extensible Authentication Protocol). 802.1x
security provides data encryption using dynamic WEP key
management.
To use 802.1x security, you need:

Chapter 2 — Configuring the CK31
68 CK31 Handheld Computer User’s Manual
• an authentication server.
Note: You can also use a MobileLAN access point with
software release 1.80 or later as an authentication server. For
help, see the system manual for your access point.
• an access point with an 802.11b/g radio.
• a CK31 with an 802.11b/g radio and the 802.1x/WPA
security option.
Configuring 802.1x Security With Funk Security
1 Make sure you have configured the communications and
radio parameters on your CK31.
2 Make sure you have selected Funk as your security choice.
3 Open Intermec Settings.
4 Choose Communications > 802.11 Radio > Funk Security
> Profile.
5 For Association, choose Open and then press Enter.
6 For Encryption, choose WEP and then press Enter.
7 For Authentication, choose TTLS, PEAP, or TLS and then
press Enter.
If you choose TTLS or PEAP:
a Select User name, type your user name, and then press
Enter.
b Select Password prompt, choose Enter password now,
and then press Enter.
Note: You can use Prompt for password to troubleshoot
your connection to the network if you have problems.
c Select User Password, type a user password, and then
press Enter.
d For Validate Server Certificate, choose Enabled and press
Enter.
If you choose TLS:
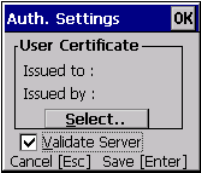
Chapter 2 — Configuring the CK31
CK31 Handheld Computer User’s Manual 69
a Load a user and root certificate on your CK31. For help,
see “Loading a Certificate” on page 73.
b For Validate Server Certificate, choose Yes and press
Enter.
c You must enter a User Name and Subject Name. You can
also enter a Server Common Name if you want to increase
your level of security.
8 Exit Intermec Settings.
Configuring 802.1x Security With Microsoft Security
1 Make sure you have configured the communications and
radio parameters on your CK31.
2 Open Intermec Settings.
3 Choose Communications > 802.11 Radio > Microsoft
Security.
4 For Infrastructure Mode, choose Infrastructure.
5 For Network Authentication, choose Open.
6 For Data Encryption, choose WEP.
7 For 802.1X Authentication, choose TLS or PEAP.
If you choose TLS:
a Select Properties and tap the Run App button. The Auth.
Settings box appears.
b From the Auth. Settings box, choose the Select button.
c Select your certificate from the list and press Enter. The
User Logon dialog box appears.
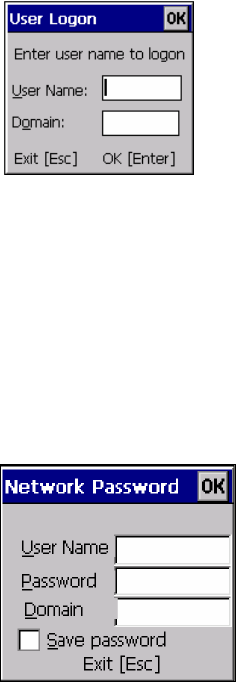
Chapter 2 — Configuring the CK31
70 CK31 Handheld Computer User’s Manual
d Enter a User Name and a Domain.
e Press Enter.
If you choose PEAP:
a Select Properties and choose the Run App button. The
Auth. Settings box appears.
b Select the Validate Server check box.
c Press Enter. Once the radio starts to authenticate, the
Network Password dialog box appears.
d Enter a User Name and Password and enable the Save
Password check box.
e (Optional) In the Domain field, enter the domain.
f Press Enter.
8 For Network Key Setting, choose Automatic.
9 Exit Intermec Settings.
Using LEAP Security
Lightweight Extensible Authentication Protocol (LEAP), also
known as Cisco-Wireless EAP, provides username/password-
based authentication between a wireless client and a RADIUS
Chapter 2 — Configuring the CK31
CK31 Handheld Computer User’s Manual 71
server. In the 802.1x framework, traffic cannot pass through an
Ethernet hub or wireless network access point until it
successfully authenticates itself.
The station must identify itself and prove that it is an authorized
user before it is actually allowed to use the LAN. LEAP also
delivers a session key to the authenticated station, so that future
frames can be encrypted with a key that is different than keys
used by other sessions.
To use LEAP security, you need:
• a RADIUS server.
• Cisco access points.
LEAP security is not supported with Microsoft security.
To enable LEAP security on your CK31
1 Make sure you have selected Funk as your security choice.
2 Make sure you have configured the communications and
radio parameters on your CK31.
3 From Intermec Settings, choose Communications > 802.11
Radio > Funk Security > Profile.
4 For 8021x, choose LEAP and then press Enter.
5 For Association, choose Open, WPA, WPA2, or Network
EAP and then press Enter. Encryption automatically defaults
to TKIP if you choose WPA, to AES if you choose WPA2,
and to WEP if you choose Open or Network EAP.
6 For Prompt for Credentials, choose Enter credentials now.
7 Select User name, type your user name, and then press
Enter.
8 Select User Password, type a user password, and then press
Enter.
9 Exit Intermec Settings.
Using Static WEP Security
The CK31 uses the Wired Equivalent Privacy (WEP) protocol
to add security to your wireless network based on the 802.11b
standard.
Chapter 2 — Configuring the CK31
72 CK31 Handheld Computer User’s Manual
To use WEP security, you need:
• a CK31 handheld computer with an 802.11b/g radio.
• an access point with an 802.11b/g radio.
Configuring Static WEP Security With Funk Security
1 Make sure you have selected Funk as your security choice.
2 Make sure you have configured the communications and
radio parameters on your CK31.
3 Open Intermec Settings.
4 Choose Communications > 802.11 Radio > Funk Security
> Profile.
5 For Association, choose Open and then press Enter.
6 For Encryption, choose WEP and then press Enter.
7 For 8021x, choose None and then press Enter.
8 Define a value for the keys you want to use. You can define
up to four keys (Key 1 through Key 4).
Enter an ASCII key or a hex key that is either 5 bytes or 13
bytes long depending on the capability of the radio. Set a 5-
byte value for 64-bit WEP or a 13-byte value for 128-bit
WEP. Hex keys must be preceded by 0x and contain 5 or 13
hex pairs.
9 For Transmit key, choose the key you want to use for
transmitting data.
10 Exit Intermec Settings.
Configuring Static WEP Security With Microsoft Security
1 Make sure you have configured the communications and
radio parameters on your CK31.
2 Open Intermec Settings.
3 Choose Communications > 802.11 Radio > Microsoft
Security.
4 For Network Authentication, choose Open.
5 For Data Encryption, choose WEP.

Chapter 2 — Configuring the CK31
CK31 Handheld Computer User’s Manual 73
6 For Network Key Setting, choose Enter Key and Index.
7 For Network Key Value, enter an ASCII key or a hex key
that is either 5 bytes or 13 bytes long depending on the
capability of the radio.
Set a 5-byte value for 64-bit WEP or a 13-byte value for 128-
bit WEP. Hex keys must be preceded by 0x and contain 5 or
13 hex pairs.
8 For Network Key Index, select the key you want to use for
data transmission.
9 Exit Intermec Settings.
Loading a Certificate
If you choose to use transport layer security (TLS) with WPA or
802.1x security, you need to have a unique client certificate on
the CK31 and a trusted root certificate authority (CA)
certificate. You can use a third-party CA to issue unique client
certificates and a root certificate.
There are three ways to load certificates on the CK31:
• If you are using Active Directory to issue certificates, you can
use the Enroll Certificates application to load the certificates.
• If you are using another third-party CA, you can use the
Import Certificates application to load the certificates.
• If you have multiple certificates to install, you can use the
Import Root Certificates and Import User Certificates
functions.
Note: For certificates to be valid, the CK31 must be set to the
correct date and time. After cold booting the CK31, you may
need to correct the date and time.
To load certificates if you are using Active Directory
1 Configure the network and radio settings for the CK31 to
communicate with your certificate authority or establish an
ActiveSync connection with the CA.
2 From Intermec Settings, select Communications > 802.11
Radio > Certificates.
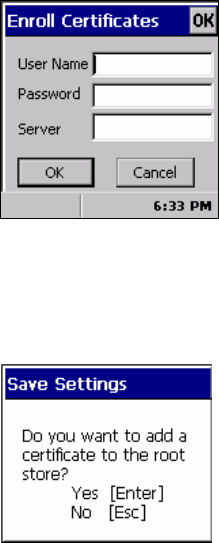
Chapter 2 — Configuring the CK31
74 CK31 Handheld Computer User’s Manual
3 Select Enroll Certificates and tap the Run App button. The
Enroll Certificates dialog box appears.
4 In the Enroll Certificates dialog box, enter the User Name,
Password, and Server (IP address) to log into the CA server.
5 Tap OK or press Enter. A dialog box appears asking if you
want to load the root certificate.
6 Press Enter for yes. The Enrollment Tool message box
appears telling you that the user certificate has been added.
7 Press Enter to close the Enrollment Tool message box.
8 Configure your CK31 for WPA, WPA2, or 802.1x security.
To load certificates if you are using a third-party CA
1 From Intermec Settings, select Communications > 802.11
Radio > Certificates.
2 Select Import Certificates and tap the Run App button. The
certificates application appears.
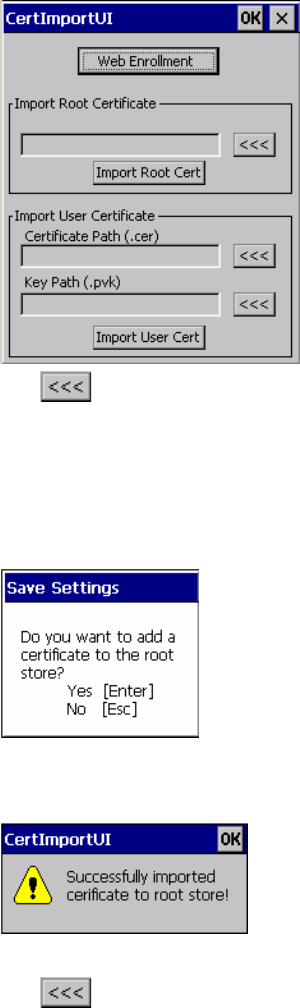
Chapter 2 — Configuring the CK31
CK31 Handheld Computer User’s Manual 75
3 Tap in the Import Root Certificate box and navigate to
your root .cer file.
4 Tap OK. The path to your .cer file now appears in the text
box.
5 Tap Import Root Cert. A dialog box appears asking if you
want to add the certificate to the root store.
6 Press Enter to add the certificate. A message box appears
telling you that the root certificate has been imported.
7 Tap OK or press Enter to close the Success message box.
8 Tap next to the Certificate Path text box and navigate
to your user .cer file.
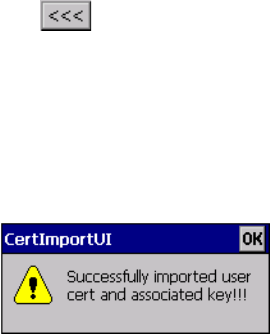
Chapter 2 — Configuring the CK31
76 CK31 Handheld Computer User’s Manual
9 Tap OK. The path to your .cer file now appears in the text
box.
10 Tap next to the Key Path text box and navigate to your
user .pvk file.
11 Tap OK. The path to your .pvk file now appears in the text
box.
12 Tap Import User Cert. A dialog box appears telling you that
the user certificate and the associated key were successfully
imported.
13 Tap OK or press Enter to close the Success message box.
14 Configure your CK31 for WPA, WPA2, or 802.1x security.
To load multiple certificates
1 Create the \Temp\Root and the \Temp\User folders on the
CK31.
2 Copy at least one root certificate .cer file into the
\Temp\Root folder.
3 Copy at least one user certificate .cer file and key .pvk file into
the \Temp\User folder. The filenames must match (for
example, cert1.cer and cert1.pvk).
4 From Intermec Settings, select Communications > 802.11
Radio > Certificates.
5 Select Import Root Certificates = False. Choose True from
the drop-down menu.
6 Select Import User Certificates = False. Choose True from
the drop-down menu.
7 Exit Intermec Settings and save your settings. The certificates
are immediately imported:
• All root certificates in \Temp\Root are imported into the
Trusted Authorities certificate store.

Chapter 2 — Configuring the CK31
CK31 Handheld Computer User’s Manual 77
Note: You are prompted when a root certificate is
imported, unless that certificate is already in the store.
• All certificate and key files in \Temp\User are imported
into the My Certificates certificate store.
• The Import Root Certificates and the Import User
Certificates settings are changed from True to False.
8 Configure your CK31 for WPA, WPA2, or 802.1x security.
Disabling Security
If you choose not to use security with your wireless network, you
can disable it on the CK31. Intermec recommends that you
always set security in your network.
To disable security
1 Open Intermec Settings.
2 Choose Communications > 802.11 Radio > Microsoft
Security.
3 For Network Authentication, choose Open.
4 For Data Encryption, choose Disabled.
5 Close Intermec Settings.
Chapter 2 — Configuring the CK31
78 CK31 Handheld Computer User’s Manual

CK31 Handheld Computer User’s Manual 79
Developing and Installing
Applications
In this chapter, you will find guidelines for developing
applications and converting existing Trakker Antares
applications. You will also find information on installing
applications and automatically launching them. In this chapter,
you will find these sections:
• Developing Applications for the CK31
• Installing Applications on the CK31
• Launching Your Application Automatically
• Setting or Changing the CK31 Password
• Backing Up Your Files
• Upgrading Your CK31
3
Chapter 3 — Developing and Installing Applications
80 CK31 Handheld Computer User’s Manual
Developing Applications for the CK31
The CK31 Handheld Computers run applications programmed
in Microsoft eMbedded Visual C++. The CK31 can also run
applications developed for the .NET Compact Framework using
Microsoft C# and Visual Basic.
Use this section to understand the hardware and software you
need to:
• develop a new application for the CK31.
• develop a web-based application for the CK31.
• convert a Trakker Antares application to a CK31 application.
Developing a New Application
Use the Intermec resource kits to develop new applications to
run on the CK31. The Intermec resource kits are a library of
C++ and .NET components grouped by functionality that you
can use to create applications for the CK31. The resource kits
are part of the Intermec Developer Library (IDL), which is
available as a download from the Intermec web site at
www.intermec.com/idl.
You need these hardware and software components to use the
Intermec resource kits:
• Pentium PC, 400 MHz or higher
• Windows 2000 (Service Pack 2 or later) or Windows XP
(Home, Professional, or Server)
• For native C++ development, Microsoft eMbedded Visual
C++ version 4.0 with eVC++ Service Pack 2
• For .NET Development and Compact Framework (C# and
VB.NET), Microsoft Visual Studio .NET 2003
• 128 MB RAM (196 MB recommended)
• 360 MB hard drive space for minimum installation (720 MB
for complete)
• CD-ROM drive compatible with multimedia PC
specification
Chapter 3 — Developing and Installing Applications
CK31 Handheld Computer User’s Manual 81
• VGA or higher-resolution monitor (Super VGA
recommended)
• Microsoft Mouse or compatible pointing device
Developing a Web-Based Application
You can develop web-based data collection applications for use
on the CK31. For help, see any HTML source book. The CK31
contains Internet Explorer (IE) 6.0 for Windows CE or iBrowse
for you to use. The Microsoft standard IE 6.0 is available from
the desktop and provides all of the common elements you expect
to find. iBrowse is also available from the desktop and provides a
locked-down browser with IE 6.0 compatibility.
To open Microsoft Internet Explorer or iBrowse
• Double-tap Internet Explorer or iBrowse from the desktop.
The Internet Explorer or iBrowse default window appears.
Converting a Trakker Antares Application to a CK31 Application
If you have an existing Trakker Antares application that you
would like to run on the CK31, you can use the Antares
Migration Resource Kit to convert it. The Antares Migration
Resource Kit is a set of libraries and tools that you use to convert
your existing Trakker Antares C applications into C++
applications for use on the CK31.
The CK31 does not support all Trakker Antares functions. You
may need to rewrite parts of your application when converting it
for use on the CK31. See the resource kit for a list of functions
that are not supported.
You need these hardware and software components to use the
resource kit:
• PC with at least 1 MB of free disk space running Microsoft
Windows 2000/XP
• Microsoft embedded Visual C++ version 4.0 with Service
Pack 2
• Antares Migration Resource Kit
Chapter 3 — Developing and Installing Applications
82 CK31 Handheld Computer User’s Manual
The resource kit is part of the Intermec Developer’s Library
(IDL), which is available from the Intermec web site at
www.intermec.com/idl.
Installing Applications on the CK31
There are several ways you can install applications on the CK31:
• You can package your application as a cabinet (.cab) file.
• If you have a simple application, you may only need to deliver
the .exe file.
• You can copy a directory structure that contains the
application, supporting files, DLLs, images, and data files.
Intermec recommends using CAB files to install your
applications. The CK31 uses standard Windows CE CAB files
and will install third-party CAB files. Before the CK31 executes
a CAB file, it marks the file as read-only so that it will not be
deleted after installation. After the CAB file is extracted, the
CK31 automatically saves any changes you have made to the
registry or file system so that they will persist through a cold
boot. This process means that you will not have to reinstall your
applications when your battery goes dead or you perform a cold
boot.
You can have your CAB files place your application in any of
these memory locations on the CK31:
• The RAM based file store (anywhere in the root \ directory)
• The Flash File System (the CK_FFS folder)
• On the SD card (SDMMC folder)
Intermec recommends that your CAB files place applications in
the Flash File System or on the SD card. Files in these non-
volatile storage locations are preserved through a cold boot.
You can also place applications in RAM, and they will
automatically be backed up to the Flash File System
(\CK_FFS\Persistent Copy folder). These files will be preserved
through a cold boot, or a complete battery drain and
accompanying cold boot.
Chapter 3 — Developing and Installing Applications
CK31 Handheld Computer User’s Manual 83
If you have an SD card inserted in your CK31, it appears as the
SDMMC Disk folder. This folder is the recommended location
for placing your application installation files.
There are several ways you can install files and applications on
the CK31:
• ActiveSync
• SD Card
• FTP Server
• Wavelink Avalanche
• SmartSystems Console
The following sections explain how to use each one of these
processes to install your application on the CK31.
Installing Applications Using ActiveSync
You can use ActiveSync to establish a connection between your
PC and the CK31. ActiveSync allows you to transfer files,
synchronize files, perform remote debugging, and other device
management activities. ActiveSync is a free application available
from the Microsoft web site.
To establish a partnership between your PC and the CK31, you
will need:
• a USB cable or a female-to-female null modem serial cable.
• an AD1 communications dock.
• ActiveSync version 3.7.1 or later.
Installing ActiveSync and Establishing a Partnership
You can use either a USB cable or a serial cable to establish your
initial partnership between the CK31 and your PC.
To install ActiveSync and establish a partnership
1 Download ActiveSync from the Microsoft web site and follow
the onscreen instructions for installing it on your PC. When
the installation process is complete, the Get Connected dialog
box appears.
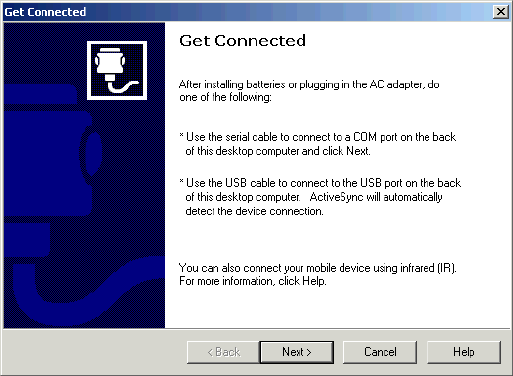
Chapter 3 — Developing and Installing Applications
84 CK31 Handheld Computer User’s Manual
2 Connect the AD1 to your PC with the USB or serial cable.
3 If you are using a serial cable, from the CK31 Start Screen tap
My Computer and then choose Program Files > ActiveSync
Serial.
The default setting for ActiveSync on the CK31 is USB.
4 Click Next in the Get Connected dialog box. ActiveSync
detects a device on the USB or serial port and prompts you to
set up a new partnership.
5 In the Set Up a Partnership dialog box, click Next.
6 In the Select Number of Partnerships dialog box, select Yes, I
want to synchronize with only this computer and then
click Next.
7 In the Select Synchronization Settings dialog box, check the
items you want to synchronize and click Next.
8 In the Setup Complete dialog box, click Finish.
When the partnership has been established, the following screen
appears on your PC showing the device name of your CK31 and
the Connected status.
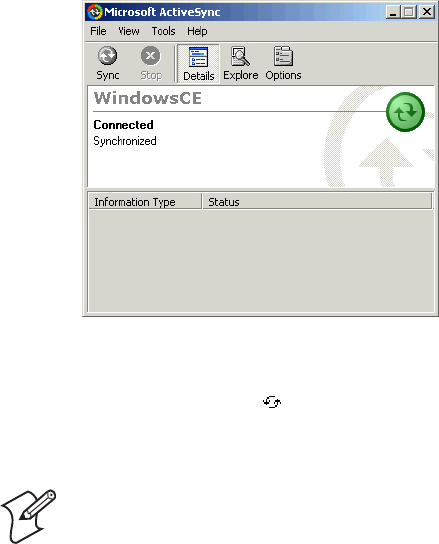
Chapter 3 — Developing and Installing Applications
CK31 Handheld Computer User’s Manual 85
The Microsoft ActiveSync Screen
An ActiveSync icon ( ) also appears on the CK31 status bar
indicating that it has established an ActiveSync partnership with
your PC.
Note: If ActiveSync does not establish a partnership on the first
try, the Get Connected dialog box appears on your PC with the
message “Your device was not detected.” Make sure all of your
cables are securely connected and click Next on the Get
Connected dialog box until your device is detected. You may
have to try removing the CK31 from the AD1 and then
inserting it back into the communications dock to establish a
partnership.
Now that the partnership has been established, ActiveSync
initiates all future connections. To connect to your PC using
ActiveSync in the future, simply place a CK31 in the AD1
communications dock, connect the CK31 serially to your PC, or
turn on the CK31.
Using ActiveSync to Copy Files and Install Applications
You can use ActiveSync to copy files to the CK31 and to install
applications. Use the following procedures to learn how to copy
files and install applications on the CK31 using ActiveSync.
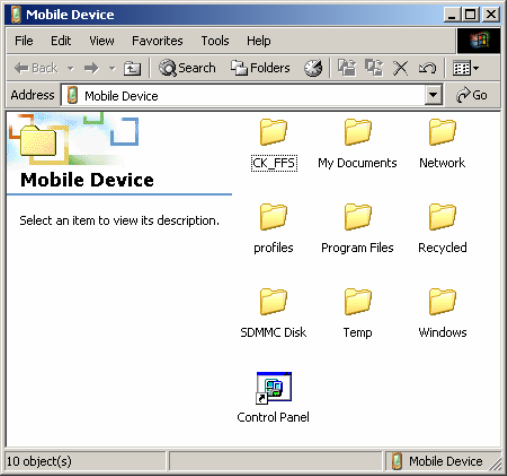
Chapter 3 — Developing and Installing Applications
86 CK31 Handheld Computer User’s Manual
To install an application on the CK31 using ActiveSync
1 Connect the CK31 to your PC using ActiveSync. For help,
see “Installing ActiveSync and Establishing a Partnership” on
page 83.
2 In the Microsoft ActiveSync screen, click Explore. Windows
Explorer opens the Mobile Device window of your CK31.
3 In Windows Explorer on your PC, browse to the file that you
want to copy to your CK31.
4 Right-click the file and click Copy.
5 Place the cursor in the SDMMC Disk or CK_FFS folder of
your CK31, right-click, and click Paste.
The file has now been copied to the CK31 and you can see it
using My Computer on the CK31.
6 Navigate to your application file and run it.
After your application is installed, you can run it from the
Program files folder from My Computer.
Chapter 3 — Developing and Installing Applications
CK31 Handheld Computer User’s Manual 87
Installing Applications Using Your SD Card
If you have an SD card for your CK31, this is the best place for
you to install applications.
To install applications using the SD card
1 If you are using an SD card reader, remove the SD card from
the CK31 and place it in the reader. For help, see “Installing
the SD Card” on page 34.
2 Copy your application file to the SD card.
If you are using ActiveSync, an FTP server, or Wavelink
Avalanche to copy the files to the SD card, place the
application in the SDMMC Disk folder located in My
Computer.
3 If you are using an SD card reader, insert the SD card back
into the CK31.
4 Navigate to the SDMMC Disk folder and run your
application.
Installing Applications Using the FTP Server
The CK31 has a built-in FTP server that connects to a network
through the 802.11b/g radio. You can use the server to transfer
your application file to the CK31. Another benefit of using the
FTP server is that you can create FTP scripts to automate the
process of copying your files to the CK31. This option is useful
when you need to send files to a large number of CK31s.
If you want to disable the FTP server, use a CAB file or another
method to modify the registry key
HKEY_LOCAL_MACHINE\COMM\FTPD. You need to set
the value IsEnabled (a REG_DWORD) to zero (0). If you set
the value to zero, the Web server will not accept connections
from the network, even from the local host.
Chapter 3 — Developing and Installing Applications
88 CK31 Handheld Computer User’s Manual
Installing Applications Using Wavelink Avalanche
You can use the Wavelink Avalanche device management system
to install applications on all of your wireless CK31s. The CK31
ships with the Avalanche Enabler already loaded.
Each time the Avalanche Enabler is activated (typically on a
warm boot), the CK31 attempts to connect to the Avalanche
Agent. When the CK31 connects to the agent, the Agent
determines whether an update is available and immediately starts
the software upgrade, file transfer, or configuration update.
To use Avalanche to remotely manage the CK31
1 Install software packages and updates for the CK31 using the
Avalanche Administrative Console.
2 Schedule the CK31 updates or manually initiate an update
using the Avalanche Administrative Console.
For more information on using Wavelink Avalanche, contact
your local Intermec representative or visit the Wavelink web site
at www.wavelink.com.
Installing Applications Using SmartSystems Console
You can use the SmartSystems Console to drag-and-drop
Intermec applications onto your CK31. The CK31 ships with
the SmartSystems client, which means it is SmartSystems-
enabled. The console is part of SmartSystems Foundation, which
you can download from www.intermec.com/SmartSystems.
For help using the console, see the online help.
To use SmartSystems Console to install an application
1 Download your application file from the Intermec web site
and unzip it on your desktop.
2 Double-click the application file to install it. The application
file should appear in the software vault.
3 From the SmartSystems Console in the software vault, drag-
and-drop the application onto each CK31 discovered in your
network.

Chapter 3 — Developing and Installing Applications
CK31 Handheld Computer User’s Manual 89
Launching Your Application Automatically
To automatically launch your application on the CK31 every
time you perform a warm or cold boot, make sure your CAB file
places a shortcut to your application in the \Windows\StartUp
folder.
Setting or Changing the CK31 Password
When you initially start the CK31, there is no password to
protect access to the CK31. Anyone can turn on the CK31 and
access all of the information and tools loaded on it. When you
login to your CK31 with password protection enabled, the
password icon ( ) appears in the taskbar.
Setting a password is sometimes called entering Admin mode or
Lockdown mode.
To set a password
1 Tap the Start icon or press C and then B. The Start menu
appears.
2 Select Settings > Control Panel > Password. The Password
Properties dialog box appears.
3 Type your new password in the Password field, and then
press Tab to move to the Confirm password field.
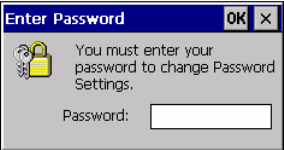
Chapter 3 — Developing and Installing Applications
90 CK31 Handheld Computer User’s Manual
4 Type in your new password again.
5 Select the Enable password protection at power-on option.
6 Tap OK or press Enter. You are returned to the Control
Panel.
7 Close the Control Panel.
To change your password
1 Tap the Start icon or press C and then B. The Start menu
appears.
2 Select Settings > Control Panel > Password. The Enter
Password dialog box appears.
3 In the Password field, type your password and tap OK or
press Enter.
4 Type your new password in the Password field, and then
press Tab to move to the Confirm password field.
5 Type in your new password again.
6 Select the Enable password protection at power-on option.
7 Tap OK or press Enter. You are returned to the Control
Panel.
8 Close the Control Panel.
Chapter 3 — Developing and Installing Applications
CK31 Handheld Computer User’s Manual 91
Backing Up Your Files
The CK31 makes it easy for you to make a backup copy of all
files you have installed or modified on the computer that are not
already located in the SDMMC Disk or CK_FFS folders. When
you make a backup copy of the file system, the CK31 saves the
file system to a folder called Persistent Copy. This folder and all
of the files and subfolders it contains are automatically restored
when the CK31 cold boots.
You should back up your files any time you want to make
permanent changes to the files in the Persistent Copy folder.
You also need to back up the files when you want to
permanently delete a file. When you install a CAB file, the
CK31 automatically performs this backup process.
To back up your files
1 Tap the Start icon or press C and then B. The Start menu
appears.
2 Select Intermec Settings.
3 From Intermec Settings, select Device Settings > File
Backup.
4 Select Backup Files Location and choose the location where
you want your files to be backed up.
5 Select Backup the File System and choose the Run App
button. A Run Application dialog box appears asking if you
want to run the file backup program.
6 Select Yes. The Finalizing dialog box appears with a status bar
showing you the progress of your file backup.
A copy of all your files is saved to the Persistent Copy folder
in your desired location.
7 Close Intermec Settings.

Chapter 3 — Developing and Installing Applications
92 CK31 Handheld Computer User’s Manual
Upgrading Your CK31
There are two ways to upgrade your CK31:
• You can upgrade your computer using an SD card.
• You can upgrade your computer using SmartSystems
Console.
When you remotely upgrade your computer, you are updating
the operating system and the embedded Intermec Value Add
(IVA) files.
Upgrading the Operating System Using an SD Card
To upgrade the operating system, you need:
• an SD card.
• an SD card reader (optional).
• the latest upgrade file. This file is available from the Intermec
web site at www.intermec.com. Go to Service & Support >
Downloads. Make sure the file you select is for your
language.
You can use any file transfer method (ActiveSync, FTP server,
and so on) to copy the upgrade files to your SD card. Intermec
recommends using an SD card reader.
Note: If you are using an SD card reader to copy files to your
SD card, see “Installing the SD Card” on page 34 for
information on how to remove and insert the SD card.
When you upgrade the operating system, you erase the current
configuration and replace it with the new default configuration.
You will need to set the network communications parameters on
the CK31 to reestablish communications with the other devices
in the wireless network.
To upgrade the operating system
1 Download the latest upgrade (.exe) file from the Intermec
web site to your desktop PC.

Chapter 3 — Developing and Installing Applications
CK31 Handheld Computer User’s Manual 93
2 Double-click the .exe file on your desktop PC. An
InstallShield application starts and walks you through the
process of extracting the upgrade files. You can designate the
folder where you want the files to unzip.
If you do not have SmartSystems Console installed, the
default location that the files are extracted to is:
Program Files\Intermec\CK3x OS vx.xx.xx.xxxx
where:
x.xx.xx.xxxx is the operating system upgrade version.
If you have SmartSystems Console installed, the default
location the files are extracted to is:
Program files\Intermec\SmartSystem\Ss_Lib\Software\ CK3x
OS vx.xx.xx.xxxx
where:
x.xx.xx.xxxx is the operating system upgrade version.
3 If you are using an SD card reader, remove the SD card from
the CK31 and place it in the reader.
4 Copy all of the files in Program Files\Intermec\CK3x OS
vx.xx.xx.xxxx to your SD card.
If you are using ActiveSync or an FTP server to copy the files
to your CK31, place the files in the SDMMC Disk folder.
5 If you are using an SD card reader, insert the SD card into
the CK31.
Note: Make sure the CK31 has completely loaded all of the
upgrade files before you remove the SD card, warm boot, or
cold boot the computer.
6 Perform a cold boot on the CK31. For help, see “Cold
Booting the CK31” on page 125.
Upgrading Your CK31 Using SmartSystems Console
You can use the SmartSystems Console to upgrade the operating
system on your CK31. The console is part of SmartSystems
Foundation, which is available from the Intermec web site.

Chapter 3 — Developing and Installing Applications
94 CK31 Handheld Computer User’s Manual
Before you can upgrade your computer, you need:
• SmartSystems Foundation. To download SmartSystems
Foundation, go to www.intermec.com/SmartSystems.
• the device upgrade .exe file. This file is available from the
Intermec web site at www.intermec.com. Go to Service &
Support > Downloads. Make sure the file you select is for
your language.
To upgrade a CK31 using SmartSystems Console
1 Install SmartSystems Foundation on your PC and open the
console.
2 Make sure the console and the CK31s are on the same
subnet.
3 Make sure your CK31s are either in a communications dock
or charging dock or that power management is disabled.
4 Download the device upgrade .exe file to your desktop PC.
5 Double-click the .exe file on your desktop PC. An
InstallShield application starts and walks you through the
process of extracting the upgrade files in the default location.
Note: Do not change the default location where InstallShield
extracts the files. SmartSystems Console requires that the files
be located in the default directory.
6 In the software vault, locate the device upgrade you want to
install.
7 Drag-and-drop the device upgrade onto each CK31 you want
to upgrade. SmartSystems Console will tell you that it is
installing the upgrade on your CK31.
Once the upgrade is done downloading to your CK31, your
CK31 replaces the operating system and then automatically cold
boots. Progress messages appear on the CK31 screen.
The SmartSystems Console will show your CK31 as being
offline until the CK31 reboots and reconnects to the system.

CK31 Handheld Computer User’s Manual 95
Running Diagnostics
The CK31 provides these diagnostic tests for troubleshooting.
Diagnostic Test Page Diagnostic Test Page
802.11 Information 97 LED Test 106
Authentication
Information
97 Network Information 106
Battery Information 98 Network Test 107
Boot Code Version 100 Operating System Version 107
Configuration Table 101 Ping Utility 108
CPU Monitor 102 Radio Driver Version 109
CPU Registers 102 RAM Information 109
Display Test 103 RAM Monitor 110
Installed Fonts 104 SD Card Memory Test 110
Intermec Value Version 104 Sound Test 111
Keypad Test 105
4
Chapter 4 — Running Diagnostics
96 CK31 Handheld Computer User’s Manual
Using Diagnostics on the CK31
You can access the Intermec Diagnostics at any time, even while
running an application. The Intermec Diagnostics menu
contains these options:
• Hardware
• Software
• System
Use the Hardware diagnostics menu to run tests on the CK31 or
view system information. For example, you can run an LED test
to determine if your CK31 lights are working correctly.
Use the Software diagnostics menu to view the version of your
operating system, the bootcode version, and Intermec Value Add
(IVA) information.
Use the System diagnostics menu to help analyze network,
system, or applications problems on the CK31. For example,
you can run diagnostics to check the network communications.
Understanding the Diagnostics Screens
This section lists all of the diagnostics screens in alphabetical
order. You will see the following information for each
diagnostics screen:
• Description, purpose, and definition
• Location of diagnostic from the Start menu
• A sample diagnostics screen
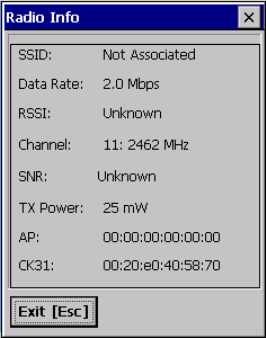
Chapter 4 — Running Diagnostics
CK31 Handheld Computer User’s Manual 97
802.11 Information
The 802.11 Information diagnostic provides detailed
information about your 802.11b/g radio. You can view
information such as the SSID, the radio signal strength indicator
(RSSI), the channel, and the MAC address of the connected
access point.
To open the 802.11 Information diagnostic
• From the Start menu, tap Programs > Intermec Diagnostics
> System > 802.11 Information.
Sample Screen
Authentication Information
Use the Authentication Information diagnostic to see the state of
your security authentication. You can use this information to
troubleshoot why your device may not be authenticating. This
diagnostic works with both Microsoft and Funk security choices.
To open the Authentication Information diagnostic
• From the Start menu, tap Programs > Intermec Diagnostics
> System > Authentication Information.
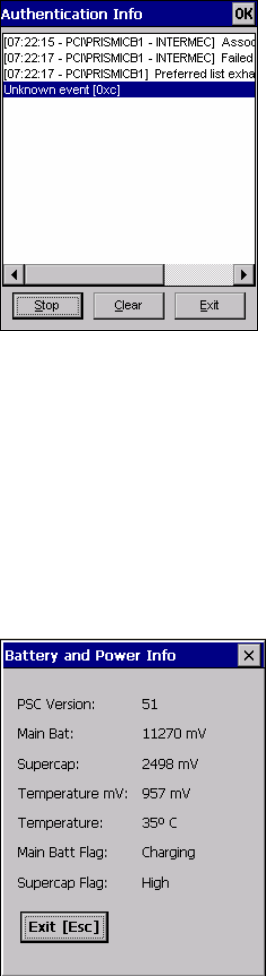
Chapter 4 — Running Diagnostics
98 CK31 Handheld Computer User’s Manual
Sample Screen
Battery Information
Use this diagnostic to view information on the CK31 main
battery, backup battery, and AC power status. You can also use
this screen to see the current volts and charging status.
To open the Battery Information diagnostic
• From the Start menu, tap Programs > Intermec Diagnostics
> Hardware > Battery Information.
Sample Screen

Chapter 4 — Running Diagnostics
CK31 Handheld Computer User’s Manual 99
The Main Bat field displays the voltage of the AB1G battery.
The following table shows how to interpret the voltage levels.
Main
Battery Status
Main Battery Voltage
Percentage
of Battery
High 8500 mV 100%
High > 8000 mV > 75%
Medium 7600 to 7999 mV 50% to 75%
Low 7200 to 7599 mV 25% to 50%
Critically low < 7199 mV < 25%
The Main Batt Flag field displays the battery status, which is
linked to the battery icon described on page 7. You can continue
using the battery until the CK31 indicates that the battery is
low: the battery light turns on and the low battery icon ( )
appears on the taskbar.
The Supercap field displays the voltage of the backup battery.
The main battery continually charges the backup battery unless
the main battery is critically low or removed.
Backup
Battery
Status
Backup Battery
Voltage
Condition
High > 2400 mV Fully charged
High > 2200 mV OK to swap the main battery
Low > 1750 mV OK to swap the main battery if
you first suspend the CK31
Low < 1750 mV Do not swap the main battery
because the CK31 might cold
boot
There are some usage patterns that can deplete the backup
battery. For example, if you remove the main battery every night
to charge it outside the CK31, the backup battery will be low in
the morning. This usage pattern does not harm the backup
battery.
When the backup battery is low, the Backup Battery Very Low
dialog box appears on your CK31 screen.

Chapter 4 — Running Diagnostics
100 CK31 Handheld Computer User’s Manual
Click the X to close the dialog box. The dialog box continues to
appear until the backup battery is fully charged. You must install
a fully charged main battery or place the CK31 in a charger. It
takes about 15 minutes for the backup battery to charge up to
2.4V.
If the Backup Battery Very Low dialog box continues to appear
for more than 15 minutes, view the Battery Information
diagnostic screen. If the Supercap Flag field is not Charging,
the backup battery may have failed. You may need to send the
CK31 to Intermec to have the backup battery replaced. For help,
see “Calling Product Support” on page 114.
Boot Code Version
The Boot Code Version diagnostic displays the version of boot
code loaded on your CK31.
To open the Boot Code Version diagnostic
• From the Start menu, tap Programs > Intermec Diagnostics
> Software > Boot Code Version.
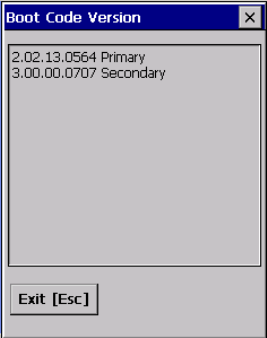
Chapter 4 — Running Diagnostics
CK31 Handheld Computer User’s Manual 101
Sample Screen
Configuration Table
Use the Configuration table to view important information
about your CK31 such as the serial number, configuration
number, model, software options, and the scanner type.
You can use this table to give the Intermec representative
information on the hardware and software that were installed at
the Intermec factory.
To open the Hardware Configuration diagnostic
• From the Start menu, tap Programs > Intermec Diagnostics
> Hardware > Configuration Table.
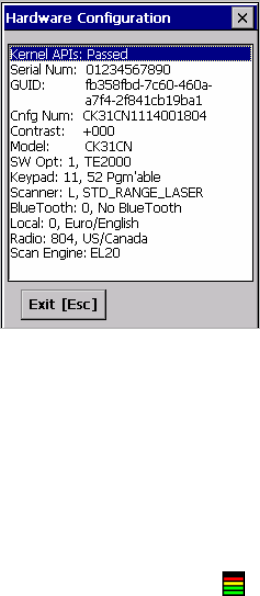
Chapter 4 — Running Diagnostics
102 CK31 Handheld Computer User’s Manual
Sample Screen
CPU Monitor
The CPU Monitor displays the activity of the CPU by using
bars in a graphical icon.
To open the CPU Monitor diagnostic
• From the Start menu, tap Programs > Intermec Diagnostics
> System > CPU Monitor.
The CPU Monitor icon ( ) appears on the taskbar.
To close the CPU Monitor diagnostic
1 From the Start menu, tap Programs > Intermec Diagnostics
> System > CPU Monitor. A dialog box appears asking if
you want to stop the CPU Monitor.
2 Press Enter.
CPU Registers
The CPU Registers diagnostic reads every register in the
PXA255 processor chip and displays the values.
To open the CPU Registers diagnostic
• From the Start menu, tap Programs > Intermec Diagnostics
> Hardware > CPU Registers.

Chapter 4 — Running Diagnostics
CK31 Handheld Computer User’s Manual 103
Sample Screen
Display Test
Use the Display Test to make sure that every pixel on the CK31
screen is working correctly. For example, you may want to test
the screen if you do not see complete characters on the screen.
The Display Test turns all pixels on, displays horizontal stripes,
displays vertical stripes, and then turns all pixels off.
To open the Display Test diagnostic
• From the Start menu, tap Programs > Intermec Diagnostics
> Hardware > Display Test.
Sample Screen
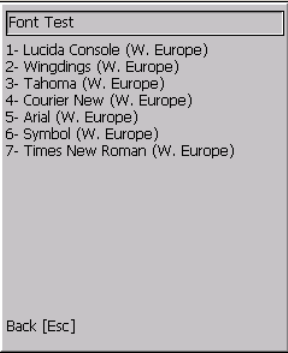
Chapter 4 — Running Diagnostics
104 CK31 Handheld Computer User’s Manual
Installed Fonts
Use this screen to view all of the fonts installed on your CK31.
You can press the number associated with a font to see an
example of how the font appears on the screen. For example,
press 1 to see how Lucida Console looks on the screen.
To open the Installed Fonts diagnostic
• From the Start menu, tap Programs > Intermec Diagnostics
> Software > Installed Fonts.
Sample Screen
Intermec Value Version
Use this screen to see the versions of Intermec Value Add (IVA)
products on your CK31.
To open the Intermec Value Version diagnostic
• From the Start menu, tap Programs >Intermec Diagnostics
> Software > Intermec Value Version.
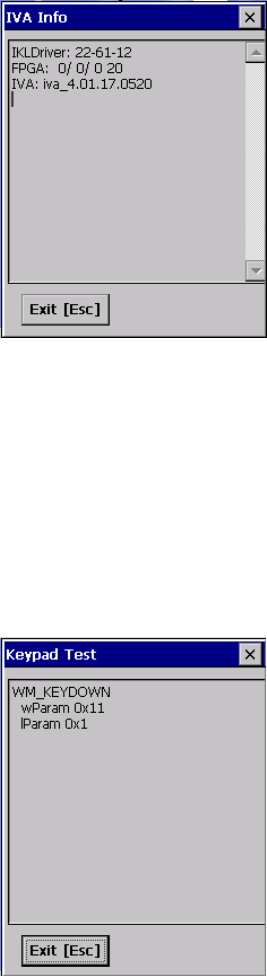
Chapter 4 — Running Diagnostics
CK31 Handheld Computer User’s Manual 105
Sample Screen
Keypad Test
A developer can use the Keypad Test to quickly find the hex
value for any key on the keypad. You can also test to make sure
the keypad is operating correctly.
To open the Keypad Test diagnostic
• From the Start menu, tap Programs > Intermec Diagnostics
> Hardware > Keypad Test.
Sample Screen
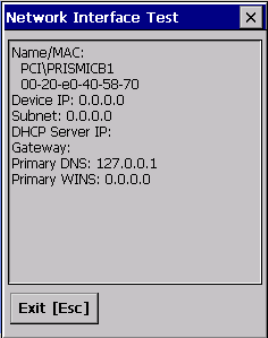
Chapter 4 — Running Diagnostics
106 CK31 Handheld Computer User’s Manual
LED Test
Use the LED Test to make sure that your LEDs (lights) are
operating correctly. The LED Test turns the lights on the CK31
on in this sequence: Good Read light, the user-defined lights,
Ready-to-Work indicator, and then the System Status light. The
lights blink one time each and then they blink five times each.
To open the LED Test diagnostic
• From the Start menu, tap Programs > Intermec Diagnostics
> Hardware > LED Test.
Network Information
Use the Network Information diagnostic screen to view the
DHCP server IP address, the CK31 device address, and the
MAC address.
To open the Network Information diagnostic
• From the Start menu, tap Programs > Intermec Diagnostics
> System > Network Information.
Sample Screen
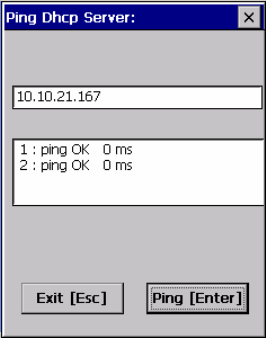
Chapter 4 — Running Diagnostics
CK31 Handheld Computer User’s Manual 107
Network Test
Use the Network Test to test the network interface connection if
you are using DHCP. The Network Test searches for a DHCP
server first. When the test finds a server, press Enter to send the
Ping command. If you do not have DHCP enabled, you need to
enter the IP address of the host to ping and then press Enter.
The test sends the ping command four times and displays the
results. If you receive a result other than ping OK, the test failed.
To open the Network Test diagnostic
• From the Start menu, tap Programs > Intermec Diagnostics
> System > Network Test.
Sample Screen
Operating System Version
Use the OS Version diagnostic screen to view the operating
system software version loaded on the CK31.
To open the OS Version diagnostic
• From the Start menu, tap Programs > Intermec Diagnostics
> Software > OS Version.
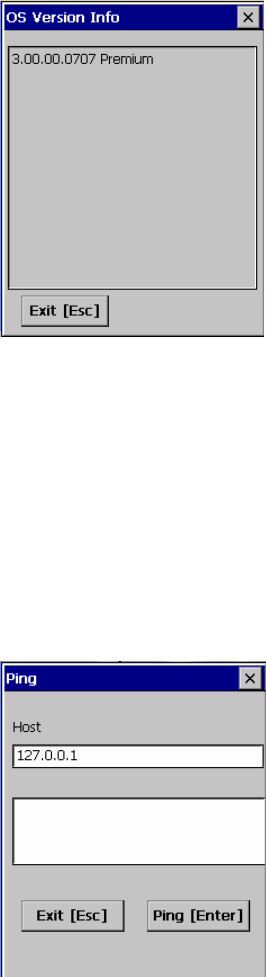
Chapter 4 — Running Diagnostics
108 CK31 Handheld Computer User’s Manual
Sample Screen
Ping Utility
Use the Ping Utility to test the network interface connection.
Enter the IP address of the host to ping and then press Enter.
The test sends the ping command four times and displays the
results. If you receive a result other than ping OK, the test failed.
To open the Ping Utility diagnostic
• From the Start menu, tap Programs > Intermec Diagnostics
> System > Ping Utility.
Sample Screen
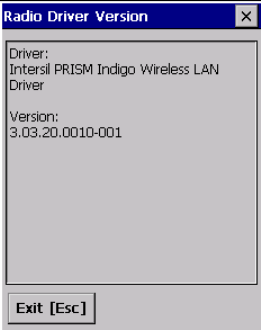
Chapter 4 — Running Diagnostics
CK31 Handheld Computer User’s Manual 109
Radio Driver Version
Use the Radio Driver Version diagnostic to see the type of radio
driver your CK31 contains and its version.
To open the Radio Driver Version diagnostic
• From the Start menu, tap Programs > Intermec Diagnostics
> Software > Radio Driver Version.
Sample Screen
RAM Information
Use the RAM Information diagnostic to see how much RAM
and flash memory is available on the CK31. You can also see the
Flash Part ID.
To open the RAM Information diagnostic
• From the Start menu, tap Programs > Intermec Diagnostics
> Hardware > RAM Information.

Chapter 4 — Running Diagnostics
110 CK31 Handheld Computer User’s Manual
Sample Screen
RAM Monitor
Use the RAM Monitor to see a graphical representation of RAM
usage.
To open the RAM Monitor diagnostic
• From the Start menu, tap Programs > Intermec Diagnostics
> System > RAM Monitor.
The RAM Monitor icon ( ) appears on the taskbar.
To close the RAM Monitor diagnostic
1 From the Start menu, tap Programs > Intermec Diagnostics
> System > RAM Monitor. A dialog box appears asking if
you want to stop the RAM Monitor.
2 Press Enter.
SD Card Memory Test
Use the SD Card Memory Test to view memory information on
your SD card. Tap Start to initiate the memory test.
To open the SD Card Memory Test diagnostic
• From the Start menu, tap Programs > Intermec Diagnostics
> Hardware > SD Card Memory Test.
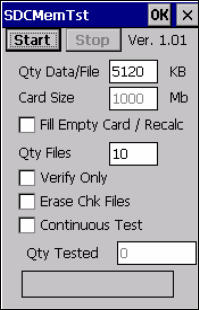
Chapter 4 — Running Diagnostics
CK31 Handheld Computer User’s Manual 111
Sample Screen
Sound Test
Use the Sound Test to make sure the entire beeper volume range
and beep frequency range are available and working correctly.
The Sound Test can also help you choose a beeper volume and
frequency that you can hear in your working environment.
When you select the test, the CK31 sounds a series of beeps
from the default beep through the entire range of quiet to loud
beeps. After it sounds the beeper volume, it cycles through the
beeps starting with low frequency up through the highest
frequency supported.
To start the Sound Test diagnostic
• From the Start menu, tap Programs > Intermec Diagnostics
> Hardware > Sound Test.
Chapter 4 — Running Diagnostics
112 CK31 Handheld Computer User’s Manual

CK31 Handheld Computer User’s Manual 113
Troubleshooting and
Maintaining the CK31
Use this chapter to solve problems you may encounter while
using the CK31. You will also find information on booting the
computer and routine maintenance.
If you have any problems using the CK31, look in this chapter
to find a possible solution. This chapter consists of the following
sections:
Sections Page
Calling Product Support 114
Problems While Operating the CK31 115
Problems While Configuring Security 117
Problems With Wireless Connectivity 119
Problems Transmitting Data Through the Serial Port 120
Problems While Scanning Bar Codes 121
Booting the CK31 125
Cleaning the Scanner Window and Screen 126
5
Chapter 5 — Troubleshooting and Maintaining the CK31
114 CK31 Handheld Computer User’s Manual
Troubleshooting the CK31
Use this chapter to troubleshoot some common problems you
may experience with your CK31. If you cannot find the answer
to your problem in the “Problems and Solutions” section, you
may need to call Product Support.
Calling Product Support
To talk to an Intermec Product Support representative, call
1-800-755-5505.
Before you call Intermec Product Support, make sure you have
the following information ready:
• Operating system version
• Configuration number
• Power management settings
• If you are using security, know the type (Funk or Microsoft)
and the full set of parameters
• If you are using terminal emulation (TE), know the version
and protocol
• If you are not using TE, know the language your custom
application was written in and the tools you used to create it
You can find most of the information listed above in Intermec
Diagnostics or Intermec Settings. Consult your application
developer for information on your custom application.
To find your operating system version
• Tap Start > Programs > Intermec Diagnostics > Software >
OS Version. Note the OS version and then press Esc to exit.
To find your configuration number
• Tap Start > Programs > Intermec Diagnostics > Hardware
> Configuration Table. Note the configuration number and
then press Esc to exit.
To open Intermec Settings
• Tap Start > Intermec Settings.

Chapter 5 — Troubleshooting and Maintaining the CK31
CK31 Handheld Computer User’s Manual 115
Problems and Solutions
You can also use the CK31 diagnostics to help analyze and solve
problems. For help, see Chapter 4, “Running Diagnostics,” on
page 95.
If you send the CK31 in for service, it is your responsibility to
save the computer data and configuration. Intermec is
responsible only for ensuring that the keypad and other
hardware features match the original configuration when
repairing or replacing your computer.
Problems While Operating the CK31
Problem Solution
You press I to turn on the CK31
and nothing happens.
• Make sure the contrast is not set all the way to the
darkest or lightest setting. Press B and then E
repeatedly until you reach the desired contrast level.
• Make sure the backlight is on by pressing E.
• Make sure you have a charged battery installed
correctly.
• The battery may be discharged. Replace the battery
with a spare charged battery, or charge the battery
and try again.
The Battery light is on. The battery charge is low. You have a few minutes of
power left. Immediately replace the battery with a spare
charged battery, or charge the battery.
You use your stylus to tap the
screen and nothing happens.
Recalibrate your touch screen. For help, see
“Calibrating the Touch Screen” on page 19.
You cannot type a character on
the keypad or you can only type
uppercase or lowercase letters.
You may have accidentally locked a modifier key on the
keypad. Check the CK31 taskbar to see if it contains an
icon with a locked symbol. Press the necessary key
sequence to unlock the key. For help, see “Using the
Keypad” on page 7.
You insert an SD card and cannot
find the SDMMC Disk folder on
the CK31. Or, you insert a
bootable SD card and the CK31
is not booting from the card.
The SD card may not be seated correctly. Push in on
the SD card until you hear it unlatch and the card is
ejected. Insert the SD card as described in Steps 3 and 4
of “Installing the SD Card” on page 34. If this does not
solve the problem, try another SD card.

Chapter 5 — Troubleshooting and Maintaining the CK31
116 CK31 Handheld Computer User’s Manual
Problems While Operating the CK31 (continued)
Problem Solution
The CK31 appears to be locked
up and you cannot enter data.
• Wait at least 10 seconds and try again. If the CK31
is still connecting to the Intermec Application Server
or the host, it ignores any input from the keypad or
scanner.
• Press I to turn off the CK31 and then press I again
to turn on the CK31.
• Press and hold I for five seconds to warm boot the
CK31.
• Perform a cold boot on the CK31. For help, see
“Cold Booting the CK31” on page 125.
• Try reloading the firmware. For help, see
“Upgrading Your CK31” on page 92.
• If the CK31 will not boot or reset, contact your local
Intermec service representative for help.
The Backup Battery Very Low
dialog box appears.
Click the X to close the dialog box. This dialog box
continues to appear until the backup battery is fully
charged. You must install a fully charged main battery
or place the CK31 into a charger. The backup battery
will fully charge in about 15 minutes.
Do not swap the main battery until this dialog box
stops appearing.
If the Backup Battery Very Low dialog box continues
to appear for more than 15 minutes, make sure that
the backup battery is charging. Follow the
instructions in “Battery Information” on page 98. If
the Supercap Flag field on the battery information
screen does not display Charging, you may need to
send the CK31 to Intermec to replace the backup
battery. For help, contact Product Support as
described on page 114.
You may also insert a fully charged main battery into
the CK31 and allow the backup battery to charge
overnight. In the morning, if the main battery is in
good condition and can run the CK31, cold boot the
CK31. The Backup Battery Very Low dialog box
should not appear. If it does, contact Product
Support.

Chapter 5 — Troubleshooting and Maintaining the CK31
CK31 Handheld Computer User’s Manual 117
Problems While Operating the CK31 (continued)
Problem Solution
The blue Ready-to-Work
indicator is off.
Try these possible solutions:
• The Ready-to-Work application (such as TE
2000) has not loaded successfully. For help, see the
documentation or online help for the application.
• The CK31 is not running a Ready-to-Work
application.
The blue Ready-to-Work
indicator is blinking.
Try these possible solutions:
• The Ready-to-Work application (such as TE
2000) may be running, but is not connected to a
host. Verify that the application is properly
configured to communicate with the host.
• The CK31 may be connected to the network
through an ActiveSync connection because it is not
SmartSystems-enabled. Upgrade the CK31 to
make it SmartSystems-enabled.
The blue Ready-to-Work
indicator is on.
A connection has been established, and all network
connections are active. There is nothing to
troubleshoot.
Problems While Configuring Security
If you have trouble configuring the computer for security, check
these problems and possible solutions.
Problems While Configuring Security
Problem Solution
You are using static WEP keys
and you have a strong connection
to the access point, but you
cannot communicate with it.
Make sure that you are using the correct static WEP key.
Sometimes you can see the strong signal strength and
security enabled icon ( ) even though you have the
WEP key set incorrectly.
You are setting up multiple access
points in a network, with different
SSIDs, and the connection fails.
The CK31 does not save WEP key values when you
change the SSID. Re-enter the WEP key value after you
change the SSID and save your changes. You should now
be able to connect to the different access points.

Chapter 5 — Troubleshooting and Maintaining the CK31
118 CK31 Handheld Computer User’s Manual
Problems While Configuring Security (continued)
Problem Solution
You receive a message saying “The
server certificate has expired or
your system date is incorrect”
after you cold boot the CK31.
The correct date and time on the CK31 are not always
saved through a cold boot. You need to re-enter the date
and time, and then save your changes.
The CK31 indicates that it is not
authenticated.
Make sure that:
• the User Name and Password on your CK31 match
the user name and password on your authentication
server. You may need to re-enter the password on both
your CK31 and authentication server.
• on your authentication server, the user and group are
allowed and the group policy is allowed to log in to
the server. For help, see the documentation that
shipped with your authentication server software.
• the IP address and secret key for your access point
must match the IP address and secret key on your
authentication server. You may need to re-enter the IP
address and secret key on both your access point and
authentication server.
• your authentication server is active and can
communicate with your access point. You can use the
PING utility to determine communications by
selecting Start > Programs > Intermec Diagnostics >
System > Ping Utility.
• the authentication server software is running on the
server PC.

Chapter 5 — Troubleshooting and Maintaining the CK31
CK31 Handheld Computer User’s Manual 119
Problems With Wireless Connectivity
Problem Solution
When you turn on the CK31
after it was suspended for 10-15
minutes or longer, it can no
longer send or receive messages
over the network.
The host may have deactivated or lost your current
terminal emulation session. In a TCP/IP direct connect
network, you need to turn off the “Keep Alive” message
(if possible) from the host so that the TCP session is
maintained while a CK31 is suspended.
The network connection icon is
in the status bar, but the host
computer is not receiving any
data from the CK31.
In a UDP Plus network, there may be a problem with
the connection between the Intermec Application
Server and the host computer. Check with your
network administrator or see the user’s manual for the
Intermec Application Server.
In a TCP/IP network, there may be a problem with the
connection between the access point and the host
computer. Check with your network administrator or
use your access point user’s manual.
The no network connection
icon ( ) appears on the status
bar. The CK31 is not
communicating with the access
point.
• The CK31 is not connected to the access point.
Make sure the access point is turned on and
operating. You may also be using the CK31 out of
range of an access point. Try moving closer to an
access point to re-establish communications.
• Make sure the CK31 is configured correctly for your
network. The radio parameters on the CK31 must
match the values set for all access points the CK31
may communicate with. For help, see “Configuring
802.11b/g Radio Communications” on page 45.
• If you have an 802.11b radio, the radio initialization
process may have failed. Try resetting the CK31. See
“Booting the CK31” on page 125.
• If you have tried these possible solutions and the no
network connection icon still appears, you may have
a defective radio card. For help, contact your local
Intermec service representative.
The CK31 is connected to the
Intermec Application Server or
host computer and you move to
a new site to collect data. The
network connection icon was
visible but now the no network
connection icon ( ) is visible.
You may have gone out of range of an access point. Try
moving closer to an access point or to a different
location to re-establish communications. Once you are
in range again, the network connection icon appears
again. Any data you collected while out of range is
transmitted over the network.

Chapter 5 — Troubleshooting and Maintaining the CK31
120 CK31 Handheld Computer User’s Manual
Problems With Wireless Connectivity (continued)
Problem Solution
While configuring or using
wireless printing, you see the
message, “The Bluetooth COM
port does not exist [55]. This is
probably because the computer
was just resumed. Please wait a
few seconds and try again.”
If you recently resumed the CK31, wait a few seconds
and try again.
Otherwise, you need to make sure that the device you
selected as the current wireless printer is a printer, is
turned on, and is discoverable.
To learn about the current wireless printer and the
Bluetooth COM port, see “Creating an Application
That Lets You Print Wirelessly” on page 51.
While configuring or using
wireless printing, you see the
message, “Bluetooth is off.
Would you like to turn it on
and continue?”
Tap Yes to dismiss the message. Follow the instructions
in “Turning On Bluetooth Power” on page 51 to turn
on the power to the Bluetooth radio.
Problems Transmitting Data Through the Serial Port
If you are having problems sending or receiving data through the
integrated serial port on the CK31, check these possible
problems:
• Make sure the CK31 is connected to the PC, host computer,
or RS-232 serial device using the appropriate cable adapter
and null modem cable.
• If the CK31 is in a communications dock, make sure that the
communications dock is connected to the serial device using
the appropriate cable.
• Make sure that ActiveSync is not connecting to the CK31
through the serial port.
• You cannot use the decoded serial adapter or AA2 to connect
to any device other than a decoded scanner. The CK31 auto-
detects the serial adapter or AA2, and the scanner software
makes the COM port unavailable. Instead, use the AA3 to
connect a device like a printer to the CK31. The AA3
requires an external power source.
For more information on using the serial port, see “Configuring
Serial Communications” on page 58.

Chapter 5 — Troubleshooting and Maintaining the CK31
CK31 Handheld Computer User’s Manual 121
Problems While Scanning Bar Codes
Problem Solution
You cannot see a red beam of light
from the scanner when you press the
Scan button and aim the scanner at
a bar code label.
Make sure you are using a supported scanner, as
listed in “Attaching a Scanner to the Serial Port”
on page 30. If you are using a supported scanner,
try these solutions in order:
• You may be too far from the bar code label.
Move closer to the bar code label and try again.
• You may be scanning the bar code label
“straight on.” Change the scanning angle and
try again.
• You can test the effective range of the scanner.
Move within 61 cm (2 feet) of a wall and try
again. You must be within the scanning range
to scan bar code labels. For help, see “Scanning
Bar Codes” on page 22.
When you release the Scan button
or handle trigger, the red beam of
light from the scanner does not turn
off.
If your CK31 contains an imager:
• If the CK31 is configured for continuous/edge
triggering, the red beam should remain on. This
is not a troubleshooting issue.
• If the CK31 is configured for level triggering
(default), the red beam should turn off. If the
red beam remains on, there may be a problem
with the scanner. Press the Scan button or pull
the trigger again without scanning a bar code
label. If the red beam is still on, contact your
local Intermec service representative.
If your CK31 contains a laser scanner:
• If you set the Aim then Scan parameter to
Enable and the Turn off after good read
parameter to Disable/Auto-Trigger, the red
beam should remain on. This is not a
troubleshooting issue.
• If those parameters are not configured, the red
beam should turn off. If the red beam remains
on, there may be a problem with the scanner.
Press the Scan button or pull the trigger again
without scanning a bar code label. If the red
beam is still on, contact your local Intermec
service representative.

Chapter 5 — Troubleshooting and Maintaining the CK31
122 CK31 Handheld Computer User’s Manual
Problems While Scanning Bar Codes (continued)
Problem Solution
The scanner does not read the bar
code labels quickly, or the scanning
beam seems to be faint or obscured.
The scanner window may be dirty. Clean the
window with a solution of ammonia and water.
Wipe dry. Do not allow abrasive material to touch
the window.
You scan a valid bar code label to
enter data for your application. The
data decoded by the scan module
does not match the data encoded in
the bar code label.
Try these possible solutions in order:
• The computer may have decoded the bar code
label in a symbology other than the label’s
actual symbology. Try scanning the bar code
label again. Make sure you scan the entire label.
• To operate the computer quickly and
efficiently, you should enable only the bar code
symbologies that you are going to scan.
You receive an error when changing
the scanner model with a serial
adapter attached.
Try these steps in order:
1 Check to make sure the serial adapter is
attached to the CK31.
2 Disconnect and then reconnect the serial
adapter to the CK31. The green Good Read
light flashes to indicate that the software is
auto-detecting the adapter and loading the
software.
3 Warm boot the CK31.
You receive a message reading
“Scanner Communication Failure”
when trying to connect a 1551E or
1553 decoded scanner.
Try these possible solutions in order:
• Make sure that you are using the correct cable
(P/N 3-606034-xx).
• Try enabling the scanner port. Go to Data
Collection > Dock Tethered Scanner >
Enable scanner port.
• Try upgrading the scanner firmware.
• Select ASCII as the scanner model.

Chapter 5 — Troubleshooting and Maintaining the CK31
CK31 Handheld Computer User’s Manual 123
Problems While Scanning Bar Codes (continued)
Problem Solution
Your 1551E or 1553 scanner
stopped working after you activated
energy saver mode or connected a
cable.
You can enable energy saver mode only if the
scanner is connected to the CK31 by the energy
saver cable P/N 3-606032-03. Follow these steps:
1 Disconnect the scanner from the CK31.
2 Find the Reset Factory Defaults bar code in the
scanner documentation.
3 While pulling the trigger, hold the scanner over
the Reset Factory Defaults bar code, and apply
external power to the scanner. The scanner is
reset to factory defaults.
4 Use Intermec Settings to disable energy saver
mode on the CK31.
5 Use Intermec Settings to disable the port.
6 Attach the scanner to the CK31.
7 Use Intermec Settings to enable the port.
8 Use the scanner to scan a bar code. The scanner
should work now, but energy saver mode is
disabled. Continue with Steps 9 through 11
only if you want to use energy saver mode.
9 Install the P/N 3-606032-03 energy saver cable.
10 Use Intermec Settings to enable energy saver
mode on the CK31.
11 Use the scanner to scan a bar code. Energy saver
mode is enabled.

Chapter 5 — Troubleshooting and Maintaining the CK31
124 CK31 Handheld Computer User’s Manual
Problems While Scanning Bar Codes (continued)
Problem Solution
The scanner will not read the bar
code label.
• Make sure you aim the scanner beam so it
crosses the entire bar code label in one pass.
• The angle you are scanning the bar code label
may not be working well, or you may be
scanning the label “straight on.” Try scanning
the bar code label again, but vary the scanning
angle.
• The bar code label print quality may be poor or
unreadable. To check the quality of the bar
code label, try scanning a bar code label that
you know will scan. Compare the two bar code
labels to see if the bar code quality is too low.
You may need to replace the label that you
cannot scan.
• Make sure the bar code symbology you are
scanning is enabled. Use Intermec Settings to
check the symbologies. If your bar code
symbology is disabled, enable it and then try
scanning the bar code label again.
• Make sure that the application you are running
on the computer is expecting input from a bar
code. You may need to type this information
instead of scanning it.
• If you are using the 2D imager, set Lighting
Mode to Illum LED priority and set Lighting
Goal to 100 (or greater). Use Intermec Settings
to change the Lighting Mode setting.
• If the bar code is rotated, make sure that you
have 1D Omni-directional scanning enabled.
Use Intermec Settings to enable 1D Omni-
directional scanning.
Chapter 5 — Troubleshooting and Maintaining the CK31
CK31 Handheld Computer User’s Manual 125
Booting the CK31
You seldom need to warm or cold boot the CK31. The CK31
uses the configuration currently saved in flash memory during
the boot process.
You need to boot the CK31 when an application is locked up
and will not respond, when you upgrade the firmware, or when
you reflash the computer. The next instructions explain how you
warm and cold boot the CK31.
Warm Booting the CK31
If your charged CK31 does not resume after pressing I, or if the
computer or an application is locked up, you may need to warm
boot it.
To warm boot the CK31
• Press and hold I for 5 seconds. The CK31 tells you it is
performing a warm boot and the screen comes back up to the
start screen.
Cold Booting the CK31
If the CK31 or application is locked up and does not respond to
a warm boot, follow this procedure to perform a cold boot.
When you perform a cold boot, all data in your RAM storage is
deleted. To make a backup copy of everything in your RAM-
based storage system, see “Backing Up Your Files” on page 91.
To cold boot the CK31
1 Remove the battery.
2 Using a small pointed device (such as the end of the stylus),
press the reset switch on the backside of the CK31.
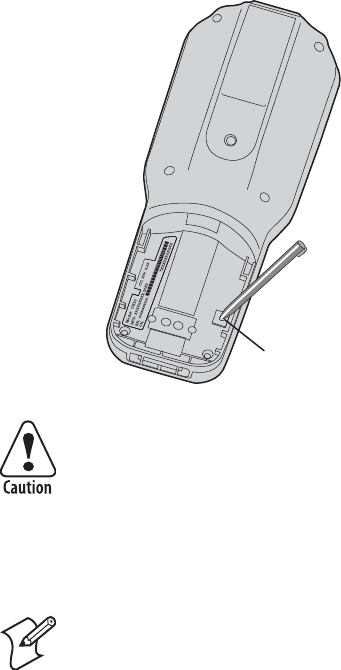
Chapter 5 — Troubleshooting and Maintaining the CK31
126 CK31 Handheld Computer User’s Manual
Reset
switch
Do not use force or a sharp object when pressing the
reset switch. You may damage the reset switch.
3 Replace the battery.
The battery light on the CK31 blinks three times and the CK31
starts the power on sequence.
Note: The correct date and time settings are not always saved
through a cold boot. You may need to need to reset the time and
date.
Cleaning the Scanner Window and Screen
To keep the computer in good working order, you may need to
perform these minor maintenance tasks:
• Clean the scanner window.
• Clean the CK31 screen.
Clean the scanner window and CK31 screen as often as needed
for the environment in which you are using the computer. To
clean the CK31, use a solution of ammonia and water.

Chapter 5 — Troubleshooting and Maintaining the CK31
CK31 Handheld Computer User’s Manual 127
There are no user-serviceable parts inside the CK31.
Opening the unit will void the warranty and may cause
damage to the internal components.
To clean the scanner window and computer screen
1 Press I to turn off the CK31.
2 Dip a clean towel or rag in the ammonia solution and wring
out the excess. Wipe off the scanner window and screen. Do
not allow any abrasive material to touch these surfaces.
3 Wipe dry.
Chapter 5 — Troubleshooting and Maintaining the CK31
128 CK31 Handheld Computer User’s Manual

CK31 Handheld Computer User’s Manual 129
Specifications
A
Appendix A — Specifications
130 CK31 Handheld Computer User’s Manual
Physical and Environmental Specifications
Use this section to locate technical information about the CK31
and its available features and options.
Physical Dimensions
Length: 23.4 cm (9.22 in)
Width: 9 cm (3.54 in)
Thickness: 5.3 cm (2.07 in)
Weight: 594 g (20.8 oz)
Power Specifications
Operating: Rechargeable 2400 mAh lithium-ion battery
Backup: Super Cap supplies 10 minutes bridge time
while replacing the main battery
Electrical Specifications
Models: CK31
Electrical rating: x 7,4 to 12; 500 mA peak
Temperature and Humidity Specifications
Operating temperature: -20°C to 50°C (-4°F to 122°F)
Operating humidity: 5 to 95% non-condensing
Storage temperature: -20°C to 60°C (-4°F to 140°F)
Storage humidity: 0 to 95% relative humidity, non-
condensing
Screen Specifications
• 240 RGB x 320 pixels
• 8.9 cm (3.52 in) diagonal square active area, ¼ VGA
• LED backlight with high and low settings
Keypad Options
• 42-key large numeric and function keypad, available with
programmable, international, 3270 TE/5250 TE, and
VT/ANSI TE overlays
Appendix A — Specifications
CK31 Handheld Computer User’s Manual 131
• 50-key full alphanumeric keypad, available with
programmable, international, 3270 TE/5250 TE, and
VT/ANSI TE overlays
• 52-key full alphanumeric keypad, available with
programmable, international, 3270 TE/5250 TE, and
VT/ANSI TE overlays
Bar Code Symbologies
If you are using a scanner attached to the serial port, see your
scanner manual for a list of supported bar code symbologies.
If you are using the standard or near-far range area imager, the
CK31 supports these bar code symbologies:
• Australia Post • Japan Post
• Aztec • Matrix 2 of 5
• BPO (British Post 4-state) • Maxicode
• China Post (Matrix 2 of 5) • Micro PDF417
• Codabar • MSI
• Codablock A • PDF417
• Codablock F • Planet
• Code 11 • Plessey
• Code 2 of 5 • Postnet
• Code 39 • QR Code
• Code 93 • RSS 14
• Code 128 • RSS Limited
• Datamatrix • RSS Expanded
• Dutch Post • Telepen
• EAN.UCC Composite • TLC 39
• Interleaved 2 of 5 • UPC/EAN

Appendix A — Specifications
132 CK31 Handheld Computer User’s Manual
If you are using the linear imager, the standard range laser, or
the long range laser, the CK31 supports these bar code
symbologies:
• China Post (Matrix 2 of 5) • Matrix 2 of 5
• Codabar • Micro PDF417
• Codablock A • MSI
• Codablock F • PDF417
• Code 11 • Plessey
• Code 2 of 5 • RSS 14
• Code 39 • RSS Limited
• Code 93 • RSS Expanded
• Code 128 • Telepen
• EAN.UCC Composite • TLC 39
• Interleaved 2 of 5 • UPC/EAN
Area Imager Standard Minimum Reading Distances
Minimum reading distances are measured in the dark (0 lux).
Minimum Reading Distances With 0.69 cm (0.272 in) Setback
Symbology Density Minimum Distance Maximum Distance
Code 39 0.125 mm (5 mils) 6.675 cm (2.628 in) 11.501 cm (4.528 in)
0.20 mm (8 mils) 3.373 cm (1.328 in) 20.391 cm (8.028 in)
0.25 mm (10 mils) 2.865 cm (1.128 in) 24.455 cm (9.628 in)
0.5 mm (20 mils) 4.389 cm (1.728 in) 39.695 cm (15.628 in)
UPC/EAN 0.33 mm (13 mils) 4.389 c (1.728 in) 29.027 cm (11.428 in)
Data Matrix 0.191 mm (7.5 mils) 5.659 cm (2.228 in) 15.819 cm (6.228 in)
0.254 mm (10 mils) 4.389 cm (1.728 in) 20.137 cm (7.928 in)
0.381 mm (15 mils) Depends on symbology
length and scan angle
26.995 cm (10.628 in)
PDF417 0.160 mm (6.6 mils) 5.659 cm (2.228 in) 13.279 cm (5.228 in)
0.254 mm (10 mils) 3.881 cm (1.528 in) 21.153 cm (8.328 in)
0.381 mm (15 mils) 4.389 cm (1.728 in) 32.837 cm (12.928 in)
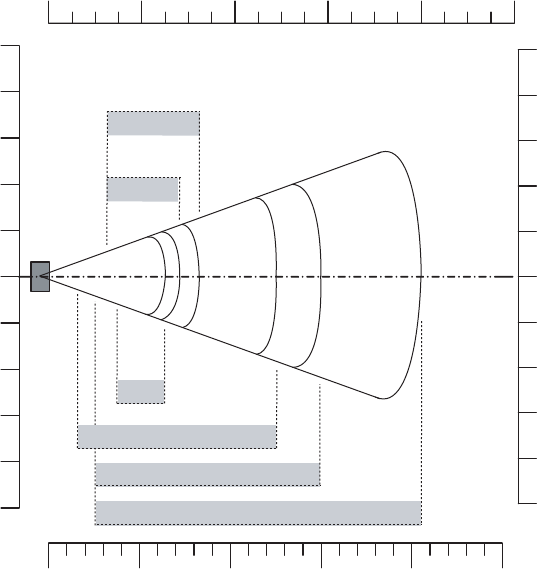
Appendix A — Specifications
CK31 Handheld Computer User’s Manual 133
8"
4"
6"
2"
0"
2"
4"
in
6"
8"
10"
10"
cm
10
5
0
5
10
15
20
20
15
25
25
05040302010
0" 16"12"8"4"
0.125mm / 5mils
0.25 mm / 10 mils
0.5 mm / 20 mils
Data Matrix 7.5 mils
100% contrast UPC EAN
PDF417 6.6 mils
Area Imager Minimum Reading Distances: This graphic does not include the 0.69
cm (0.272 in) setback for the CK31.

Appendix A — Specifications
134 CK31 Handheld Computer User’s Manual
Linear Imager Reading Distances
Minimum reading distances are measured in the dark (0 lux).
Minimum Reading Distances With 0.655 cm (0.258 in) Setback
Symbology
Bar Code
Contents
Density
Minimum
Distance
Maximum
Distance
Code 39 RESO 0.100 MM 0.1 mm
(4 mils)
10.27 cm
(4.04 in)
13.31 cm
(5.24 in)
R 0.125 MM
0.125 mm
(5 mils)
9.25 cm
(3.64 in)
16.36 cm
(6.44 in)
0.25 0.25 mm
(10 mils)
5.44 cm
(2.14 in)
23.22 cm
(9.14 in)
0.5 0.5 mm
(20 mils)
3.41 cm
(1.34 in)
30.33 cm
(11.94 in)
R1MM
1 mm
(40 mils)
6.96 cm
(2.74 in)
39.22 cm
(15.44 in)
UPC/EAN 120010010100 0.33 mm
(13 mils)
4.42 cm
(1.74 in)
25.25 cm
(9.94 in)
PDF417 10 mils 0.254 mm
(10 mils)
9.25 cm
(3.64 in)
16.10 cm
(6.34 in)
15 mils
0.381 mm
(15 mils)
7.22 cm
(2.84 in)
18.39 cm
(7.24 in)
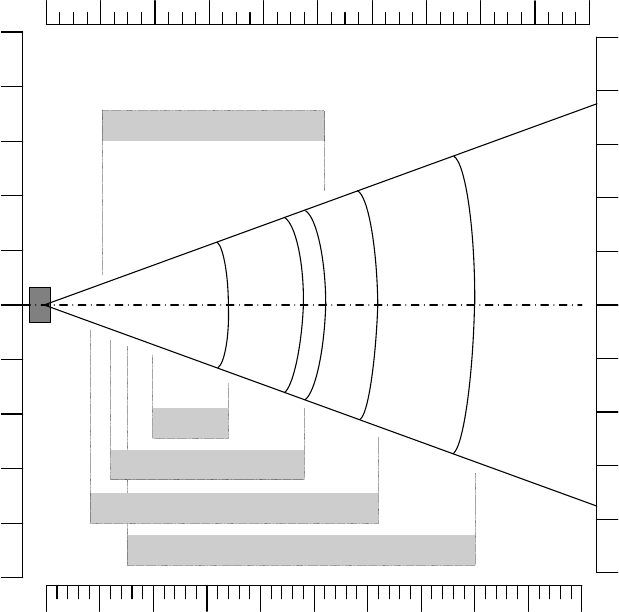
Appendix A — Specifications
CK31 Handheld Computer User’s Manual 135
8"
4"
6"
2"
0"
2"
4"
in
04540353025201510550
0" 18"16"14"12"10"8"6"4"2" 20"
100% contrast UPC/
EAN
0.5 mm/20 mil
1 mm/40 mil
6"
8"
10"
10"
0.25 mm/10 mil
0.125 mm/
5 mil
cm
10
5
0
5
10
15
20
20
15
25
25
Linear Imager Minimum Reading Distances: This graphic does not include the 0.665 cm (0.258 in)
setback for the CK31.

Appendix A — Specifications
136 CK31 Handheld Computer User’s Manual
Standard Range Laser Minimum Reading Distances
Minimum reading distances are measured in the dark (0 lux).
Minimum Reading Distances With 1.087 cm (0.428 in) Setback
Symbology Density Minimum Distance Maximum Distance
Code 39 0.125 mm (5 mils) 8.564 cm (3.272 in) 17.962 cm (7.072 in)
0.25 mm (10 mils) 5.770 cm (2.272 in) 37.774 cm (14.872 in)
0.5 mm (20 mils) 7.802 cm (3.072 in) 78.922 cm (31.072 in)
1 mm (40 mils) 8.818 cm (3.472 in) 130.992 cm (51.572 in)
1.3 mm (51 mils) Depends on the symbology
length and scan angle
148.772 cm (58.572 in)
UPC/EAN 0.33 mm (13 mils) 5.516 cm (2.172 in) 46.918 cm (18.472 in)
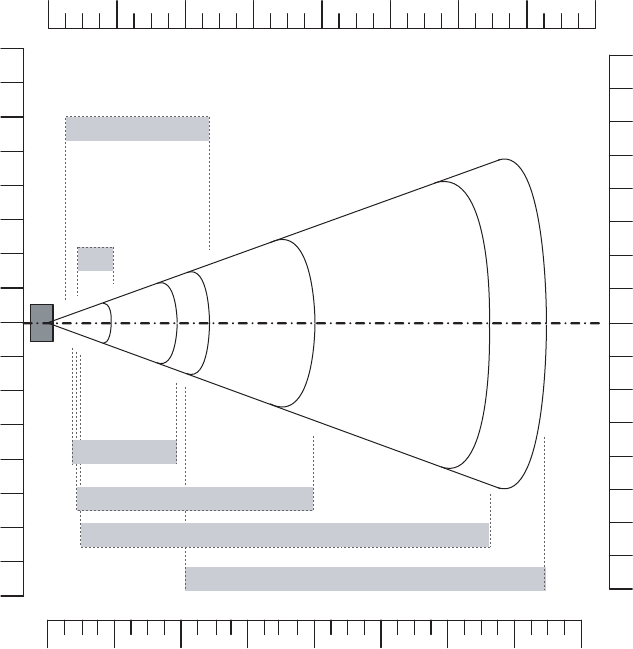
Appendix A — Specifications
CK31 Handheld Computer User’s Manual 137
in
080604020 100
cm
20
10
0
40
30
50
0" 32"24"16"8" 40"
0.125 mm
UPC / EAN
0.25 mm / 10 mils
0.5 mm / 20 mils
1 mm / 40 mils
64"48" 56"
120 140 160
60
70
80
20
10
40
30
50
60
70
80
0
32"
24"
16"
8"
40"
64"
48"
56"
32"
24"
16"
8"
40"
64"
48"
56"
1.3 mm / 51 mils
Standard Range Laser Minimum Reading Distances: This graphic does not include the 1.087
cm (0.428 in) setback for the CK31.

Appendix A — Specifications
138 CK31 Handheld Computer User’s Manual
Near-Far Range Area Imager Reading Distances
This section contains minimum and typical reading distances for
the near far range area imager.
Minimum Reading Distances
Minimum reading distances are measured in the dark (0 lux).
1D Symbologies Minimum Reading Distances With 0.889 cm (0.350 in) Setback
Symbology Density Minimum Distance Maximum Distance
Code 39 0.10 mm (3.8 mils) 18.889 cm (7.437 in) 31.111 cm (12.248 in)
0.25 mm (10 mils) 18.889 cm (7.437 in) 68.111 cm (26.815 in)
0.5 mm (20 mils) 19.889 cm (7.830 in) 109.111 cm (42.957 in)
1 mm (40 mils) 40.889 cm (16.098 in) 219.111 cm (86.264 in)
1.3 mm (51 mils) 100.889 cm (39.720 in) 309.111 cm (121.697 in)
2.54 mm (100 mils) 130.889 cm (51.531 in) 429.111 cm (168.941 in)
EAN 100% 0.33 mm 22.889 cm (9.011 in) 99.111 cm (39.020 in)
Appendix A — Specifications
CK31 Handheld Computer User’s Manual 139
Accessories for the CK31
You can use these accessories (sold and ordered separately) with
the CK31. To order accessories, contact your local Intermec
sales representative.
851-082-xxx Power Supply
Use the 851-082-xxx power supply to provide power for the
communications docks and chargers.
AA2 Serial Cable Adapter (P/N 236-069-xxx)
The AA2 serial cable adapter converts the CK31 serial connector
to a DB 9 serial connector. This adapter includes power on pin
9.
AA3 Serial Cable Adapter (P/N 236-070-xxx)
The AA3 serial cable adapter is a 26-pin dual-row connector to
DB-9 connector that connects directly to the bottom of the
CK31. This adapter does not include power on pin 9.
AB1G Battery (P/N 318-020-xxx)
Use the lithium-ion battery to provide main power to the
computer.
AC1 4-Slot Battery Charger (P/N 852-904-xxx)
Use the AC1 to charge up to four AB1G batteries at a time.
AC2 4-Bay Battery Charging Dock (P/N 852-905-xxx)
Use the AC2 to charge up to four AB1G batteries without
having to remove them from the CK31.
AC3 8-Slot Battery Charging Dock (P/N 852-906-xxx)
Use the AC3 to charge up to eight AB1G batteries without
having to remove them from the CK31. This charging dock
requires the 851-064-xxx power supply.
AD1 Communications Dock (P/N 225-709-xxx)
Use the AD1 to charge your AB1G battery and provide power to
your CK31 while still having the ability to communicate via a
serial, Ethernet, or USB port.
Appendix A — Specifications
140 CK31 Handheld Computer User’s Manual
AD2 4-Bay Communications Dock (P/N 225-710-xxx)
Use the AD2 to hold up to four CK31s with a battery installed.
The AD2 dock charges the batteries, provides power to the
computer, provides one Ethernet connector, and provides a
serial port for each inserted CK31.
CK30 and CK31 Handle (P/N 203-754-xxx)
The handle works with all models of the CK30 and CK31, and
provides a convenient scanning trigger.
CK31 Handstrap (P/N 075289)
The removable and adjustable handstrap makes it easy for you to
hold and use the CK31 without tiring your hand.
CK31 Holster and Belt
The holster and belt provide an easy way for you to carry the
CK31 while not using it. The holster and belt support either
right or left-handed use and you can use it to carry a CK31 with
or without a handle.
CK31 Protective Boot
The protective boot provides additional ruggedness for the
CK31.
CK31 Protective Case
The protective case provides a clear vinyl covering to protect the
screen and keypad area.
CK31 Tethered Stylus (P/N 203-773-xxx)
Use the tethered stylus to make sure that you never lose your
stylus.
CK31 Vehicle Cradle (P/N 075436)
Use the vehicle to attach your CK30 to a vehicle, such as a
forklift. The vehicle cradle provides protection from vibrations
that exceed the level the CK31 can withstand alone.
Dust Cover
The dust cover protects the CK31 keypad in dusty work areas.

Appendix A — Specifications
CK31 Handheld Computer User’s Manual 141
Decoded Serial Adapter (P/N 225-715-001)
The decoded serial adapter converts the 26-pin serial port on the
CK31 into a DB9 (9-pin) male serial connector that you can
connect to a decoded scanner.
Undecoded Serial Adapter (P/N 225-714-001)
The undecoded serial adapter converts the 26-pin serial port on
the CK31 into a DB9 (9-pin) male serial connector that you can
connect to an undecoded scanner.
Note: If you have a CK31 with the near-far range area
imager, do not use the undecoded serial adapter.

Appendix A — Specifications
142 CK31 Handheld Computer User’s Manual
Typing Characters Not Printed on the Keypad
The keypads use hidden key sequences to access characters not
printed on the keypad overlay. Use the following table to
understand how to access these hidden characters on the
keypads.
Typing Hidden Characters on the Keypad
Press This Key Sequence on One of the Keypads: To
Type: 42-Key 52-Key
$ Not hidden C and then 6
` C and then F9 C and then G
! Not hidden C and then I
“ C and then F6 C and then K
' C and then F7 C and then L
{ C and then F11 C and then N
} C and then F12 C and then O
: C and then F3 C and then P
; C and then F4 C and then Q
| C and then F8 C and then R
? Not hidden C and then S
~ C and then F10 C and then T
Y C and then Alpha Not hidden
, C and then Right Enter Not hidden

Appendix A — Specifications
CK31 Handheld Computer User’s Manual 143
Typing Hidden Characters on the International Keypads
Press This Key Sequence on One of the Keypads: To
Type: 42-Key 50-Key 52-Key
$ Not hidden Not hidden C and then
6
{ B and then a C and then S C and then
9
} B and then b C and then T C and then
0
< B and then _ Not hidden Not hidden
> B and then ` Not hidden Not hidden
] C and then 9 Not hidden Not hidden
[ C and then Tab Not hidden Not hidden
, C and then Right
Enter
Not hidden Not hidden

Appendix A — Specifications
144 CK31 Handheld Computer User’s Manual
Typing Hidden Characters on the 3270/5250 TE Keypads
Press This Key Sequence on One of the Keypads: To
Type: 42-Key 52-Key
$ Not hidden C and then 6
< B and then _ Not hidden
> B and then ` Not hidden
] C and then Alpha Not hidden
[ C and then Tab Not hidden
` Not applicable C and then G
! Not hidden C and then I
“ Not applicable C and then K
‘ Not applicable C and then L
{ B and then a C and then N
} B and then b C key and then O
: Not applicable C and then P
; Not applicable C and then Q
? Not hidden C and then R
~ Not applicable C and then T
, C and then Right Enter Not hidden

Appendix A — Specifications
CK31 Handheld Computer User’s Manual 145
Typing Hidden Characters on the VT/ANSI TE Keypads
Press This Key Sequence on One of the Keypads:
To Type: 42-Key 52-Key
$ Not hidden C and then 6
` Not applicable C and then G
! Not hidden C and then I
« Not applicable C and then K
‘ Not applicable C and then L
{ B and then c C and then N
} B and then d C key and then O
: Not applicable C and then P
? C and then 5 C and then R
] C and then Alpha Not hidden
[ C and then Tab Not hidden
< B and then _ Not hidden
> B and then ` Not hidden
, C and then Right Enter Not hidden
Pin Assignments for the Serial Port
This section describes the 26-pin serial port of the CK31.
Pin 13
Pin 14
Pin 1
Pin 26
Identifying the Pins in the CK31 Serial Port

Appendix A — Specifications
146 CK31 Handheld Computer User’s Manual
Pin Assignments for the Serial Port
Pin
Signal Name
I/O to
Terminal
Description
1 GND Ground
2 VCC_EXT (5V) O External 5V @ 500 mA maximum output
3 TXD O RS-232 TXD
4 RTS O RS-232 RTS
5 DTR O RS-232 DTR
6 RXD I RS-232 RXD
7 CD I RS-232 DCD (ActiveSync wakeup)
8 CTS I RS-232 CTS
9 DSR I RS-232 DSR
10 VIDEO I DBP from tethered undecoded scanner
11 SOS I Start of scan from tethered undecoded scanner
12 TETH_SCAN I Active low input used to indicate an external
scanner connection
13 GND Ground
14 GND Ground
15 TRIGGER I Trigger input from tethered undecoded scanner
16 LASEN O Laser enable output to tethered undecoded scanner
17 BEEP O Beep output to tethered undecoded scanner
18 GOODREAD O Good Read output to tethered undecoded scanner
19 VBUS I USB Wake-up (5V power from USB host)
20 UDC- I/O USB DATA – (Client)
21 UDC+ I/O USB DATA + (Client)
22 TX+ O Ethernet TPETXP
23 TX- O Ethernet TPETXN
24 RX+ I Ethernet TPERXP
25 RX- I Ethernet TPERXN
26 GND Ground

CK31 Handheld Computer User’s Manual 147
Default Settings
B

Appendix B — Default Settings
148 CK31 Handheld Computer User’s Manual
Default Configuration
Use the following tables to see the default configuration settings
of the CK31. If you restore the CK31 to factory default settings,
it will use these values.
The tables are organized according to the options in Intermec
Settings. For detailed information on most of the commands
available in Intermec Settings, see the Intermec Computer
Command Reference Manual (P/N 073529). The Intermec
Computer Command Reference Manual is available on the CD
attached to the inside front cover of this user’s manual. You can
check the Intermec web site for a more recent version of this
online manual.
Default Scanner Configuration
Symbology Default Value
AustraliaPost Disabled
Aztec Disabled
BPO Disabled
Codabar Disabled
Codablock A Disabled
Codablock F Disabled
Code 11 Disabled
Code 2 of 5 Disabled
Code 39 Enabled
Code 93 Disabled
Code 128 Enabled
DataMatrix Enabled
DutchPost Disabled
EAN.UCC Composite Disabled
Interleaved 2 of 5 Disabled
JapanPost Disabled
Matrix 2 of 5 Disabled
Maxicode Disabled
Micro PDF417 Disabled

Appendix B — Default Settings
CK31 Handheld Computer User’s Manual 149
Default Scanner Configuration (continued)
Symbology Default Value
MSI Disabled
PDF417 Enabled
Planet Disabled
Plessey Disabled
Postnet Disabled
QR Code Disabled
RSS 14 Disabled
RSS Limited Disabled
RSS Expanded Disabled
Telepen Disabled
TLC 39 Disabled
UPC/EAN Enabled
Symbology Options Default Value
Preamble No characters (disabled)
Postamble No characters (disabled)
Global Symbology ID Disabled
Scanner Settings Scanner Option Default Value
Triggering Mode Imager only Level
Aim then Scan Laser only Disable
Hardware Trigger Any scanner Enable
Turn Off After Good Read Any scanner Enable/One-shot
Imager Settings Default Value
Imager Decode Mode 2D imager
Lighting Mode Illum LED Priority

Appendix B — Default Settings
150 CK31 Handheld Computer User’s Manual
Default Scanner Configuration (continued)
Imager Settings Default Value
Lighting Goal 60
Image Dimension
Top Position
Bottom Position
0
479
Aimer LED Duration 0 ms
Sticky Aimer LED Duration 0 ms
Decode Security Settings Default Value
Consecutive Data Validation 0
Identical Consecutive Timeout 300 ms
Different Consecutive Timeout 0 ms
Virtual Wedge Settings Default Value
Virtual Wedge Enable Enable
Grid Null
Default Communications Configuration
Communication Settings Default Value
Device Name WindowsCE
802.11 Radio Settings Default Value
Security Choice Funk Security
Funk Security
Active Profile
Profile Label
Network Type
Channel
SSID
Power Mode
8021x
Association
Encryption
Pre-Shared Key
Profile 1
Profile_1
Infrastructure
3
INTERMEC
Disabled (CAM)
None
Open
None
Null

Appendix B — Default Settings
CK31 Handheld Computer User’s Manual 151
Default Communications Configuration (continued)
802.11 Radio Settings Default Value
IP Settings
DHCP
DHCP Client Identifier
Primary DNS
Secondary DNS
Primary WINS
Secondary WINS
Enabled
Null
0.0.0.0
0.0.0.0
0.0.0.0
0.0.0.0
Bluetooth Settings Default Value
Power Off
Discoverable Disable
Connectable Disable
Class of Device Null
IBT 0.16
Radio 525
Device Address Text string
PSK Settings Default Value
Protocol Selection TCP/IP
Remote Connection
Host IP
Host Port
Controller IP
Controller Port
0.0.0.0
5555
0.0.0.0
5555
Serial Port
Baud Rate
Parity
Data Bits
Stop Bits
Flow Control
Protocol
EOM1
EOM2
SOM
Reader Command
LRC
Handshake
115200 bps
Even
7 bits
1 stop bit
None
Configurable
0x03
No characters
0x02
Enabled without TMF
Disable
0x00 - Disable

Appendix B — Default Settings
152 CK31 Handheld Computer User’s Manual
Default Communications Configuration (continued)
UDP Plus Settings Default Value
UDP Plus Activate Disable
Controller IP 0.0.0.0
Controller Port 5555
Ack Delay Upper Limit 5000 ms
Ack Delay Lower Limit 300 ms
Retries 7
Send Timer 20 s
Receive Timer 45 s
Default Device Settings Configuration
Device Settings Default Value
Date and Time
Date
Time
Adjust for Daylight Time
Tuesday, January 06, 2015
Time of current update
Enabled
Beeper Volume Very high
Number of Good Read Beeps One
Beeper Duration
Good Read Beep
Low Beep
High beep
80 ms
100 ms
150 ms
Beeper Frequency
Good Read Beep
Low Beep
High beep
1950 Hz
512 Hz
1950 Hz
Display
Backlight Timeout
Maximum Backlight Level
Backlight On Good Read
Screen Rotation
15 seconds
Low
Off
Disable

Appendix B — Default Settings
CK31 Handheld Computer User’s Manual 153
Default Device Settings Configuration (continued)
Device Settings Default Value
Keypad
Adjust Beeper Volume
Task Manager
Configure Boot Functionality
Enable
Enable
Warm boot
Power Management
User Idle
System Idle
Suspend
1 minute
1 minute
1 minute
Backup Files Location Flash File System
Appendix B — Default Settings
154 CK31 Handheld Computer User’s Manual

CK31 Handheld Computer User’s Manual 155
Reprogramming the Keypad
C

Appendix C — Reprogramming the Keypad
156 CK31 Handheld Computer User’s Manual
Reprogramming the Keypad
You can use the reprogrammable keypad utility of the CK31 to:
• change the functionality of keypad keys or key combinations.
• create keypad macros.
Navigating Through the Reprogrammable Keypad Utility
To Do This Press This Key
Accept changes and advance to next dialog
box
Enter
Cancel a procedure Esc
Move between fields Tab
Move backward a field Shift Tab
Select or clear a radio button or check box Space
Move up or down selections within a box U or D
Changing the Functionality of Keys or Key Combinations
Use the reprogrammable keypad utility to change the
functionality of keypad keys or key combinations. The
reprogrammable keypad utility enables you to:
• program any Unicode character to any key or modified key
combination.
• program any Virtual Key/Unicode character to any key or
modified keystroke.
• use any key as a function key such as backlight and contrast.
• launch an application from a key or key combination.
• remap hardware scan codes.
Note: You cannot easily reprogram several keys on the CK31
keypad. If you have a special request, please contact your local
Intermec representative.
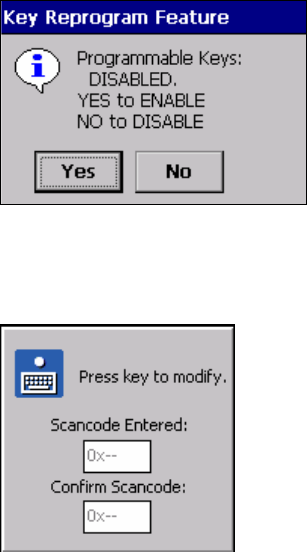
Appendix C — Reprogramming the Keypad
CK31 Handheld Computer User’s Manual 157
Starting the Reprogrammable Keypad Utility
Before you can reprogram any key, you need to enable the
reprogrammable keypad utility.
To enable the reprogrammable keypad utility
1 Double-tap My Computer on the desktop.
2 Double-tap the Windows folder.
3 From the Windows folder, double-tap FilterKeysToggle.exe.
The Key Reprogram Feature dialog box appears.
4 Tap Yes.
5 Press Ctl Alt Shift U. The reprogrammable keypad utility
appears.
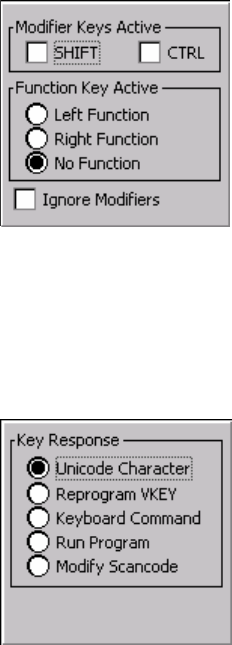
Appendix C — Reprogramming the Keypad
158 CK31 Handheld Computer User’s Manual
Programming a Unicode Character
You can program any Unicode character to any key or modified
key combination.
To program a Unicode character
1 Start the reprogrammable keypad utility.
2 Press the key you want to reprogram twice. The hexadecimal
scan code for the key appears in both fields.
3 Press Enter. The select modifiers dialog box appears.
4 Select the modifier or function keys that you want to press
before you access the key you are modifying. For example, if
you want to press Shift to access the reprogrammed key, you
select Shift. You do not need to select a modifier or function
key.
5 Press Enter. The Key Response dialog box appears.
6 Select Unicode Character and press Enter. The Unicode
dialog box appears.
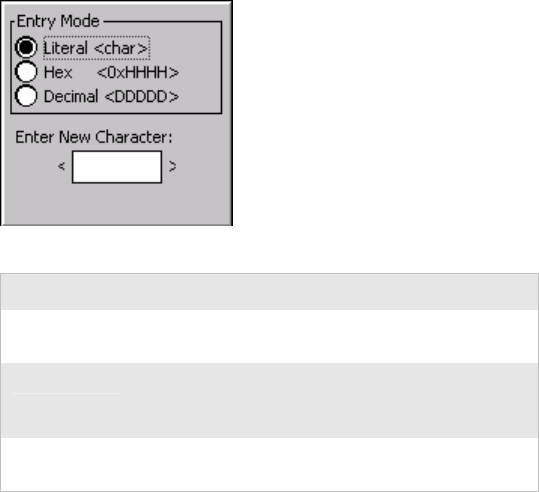
Appendix C — Reprogramming the Keypad
CK31 Handheld Computer User’s Manual 159
7 Select the Entry Mode for the Unicode character.
Entry Mode Description
Literal You enter the actual character that the key
combination produces.
Hex You enter a hex string. The hex string must be
preceded by 0x. The range is from 0x0 to
0xFFFF.
Decimal You enter a decimal string. The range is from 0
to 65535.
8 Press Tab or tap in the text box to select the Enter New
Character text box.
9 Type the new character or string and press Enter. A dialog
box appears asking if you want to commit your new entry to
permanent storage.
10 Tap Yes or No.
Programming a Virtual Key or Unicode Character
You can program any Virtual Key or Unicode character to any
key or modified key combination.
To program a Virtual Key or Unicode character
1 Start the reprogrammable keypad utility.
2 Press the key you want to reprogram twice. The hexadecimal
scan code for the key appears in both fields.
3 Press Enter. The select modifiers dialog box appears.
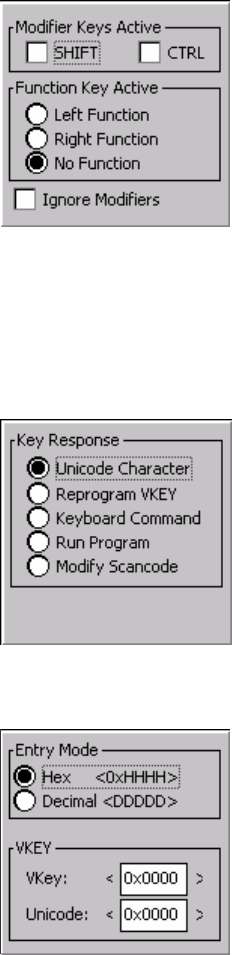
Appendix C — Reprogramming the Keypad
160 CK31 Handheld Computer User’s Manual
4 Select the modifier or function keys that you want to press
before you access the key you are modifying. For example, if
you want to press Shift to access the reprogrammed key, you
select Shift. You do not need to select a modifier or function
key.
5 Press Enter. The Key Response dialog box appears.
6 Select Reprogram VKEY and press Enter. The Virtual Key
(VKEY) dialog box appears.
7 Select the Entry Mode for the VKEY character.

Appendix C — Reprogramming the Keypad
CK31 Handheld Computer User’s Manual 161
Entry
Mode
Description
Hex You enter a hex string. The hex string must be
preceded by 0x. The range is from 0x0 to 0xFFFF.
Decimal You enter a decimal string. The range is from 0 to
65535.
8 Press Tab or tap in the text box to select the first VKEY text
box.
9 Type the Vkey string and press Tab or tap in the Unicode
text box.
10 Type the Unicode string and press Enter. A dialog box
appears asking if you want to commit your new entry to
permanent storage.
11 Tap Yes or No.
Programming Any Key as a Function Key
You can program any key to work as a function key. You can
choose for your function key to behave as:
• Scanner Trigger
• Backlight Key
• Contrast Key
• Volume Key
• Mouse Key Toggle
• Rotate Display
• Insert VKey
• LWIN VKey (Menu launch on CK31)
• Delete VKey
• Backtab VKey
• Pan Mode Toggle
• High Contrast Toggle (Accessibility changes to system colors)
• Contrast Lighter
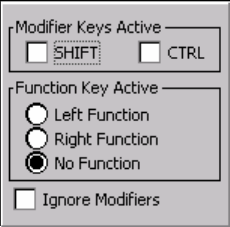
Appendix C — Reprogramming the Keypad
162 CK31 Handheld Computer User’s Manual
• Contrast Darker
• Reprogram Key (key sequence to launch the reprogrammable
keypad utility)
• Reprogram Key Delete (deletes the key sequence to launch
the reprogrammable keypad utility)
• Record MACRO (record a new key sequence to launch the
Macro Utility)
• Delete MACRO (deletes the key sequence to launch the
Macro Utility)
To program any key as a function key
1 Start the reprogrammable keypad utility.
2 Press the key you want to reprogram twice. The hexadecimal
scan code for the key appears in both fields.
3 Press Enter. The select modifiers dialog box appears.
4 Select the modifier or function keys that you want to press
before you access the key you are modifying. For example, if
you want to press Shift to access the reprogrammed key, you
select Shift. You do not need to select a modifier or function
key.
5 Press Enter. The Key Response dialog box appears.
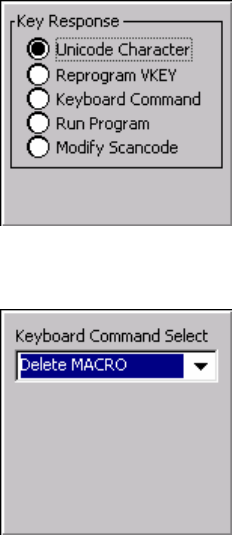
Appendix C — Reprogramming the Keypad
CK31 Handheld Computer User’s Manual 163
6 Select Keyboard Command and press Enter. The Keyboard
Command Select dialog box appears.
7 Select the desired function from the list and press Enter. A
dialog box appears asking if you want to commit your new
entry to permanent storage.
8 Tap Yes or No.
Launching an Application From a Key or Key Combination
You can program any key or key combination to launch an
application.
To program a key or key combination to launch an application
1 Start the reprogrammable keypad utility.
2 Press the key you want to reprogram twice. The hexadecimal
scan code for the key appears in both fields.
3 Press Enter. The select modifiers dialog box appears.

Appendix C — Reprogramming the Keypad
164 CK31 Handheld Computer User’s Manual
4 Select the modifier or function keys that you want to press
before you access the key you are modifying. For example, if
you want to press Shift to access the reprogrammed key, you
select Shift. You do not need to select a modifier or function
key.
5 Press Enter. The Key Response dialog box appears.
6 Select Run Program and press Enter. The application dialog
box appears.
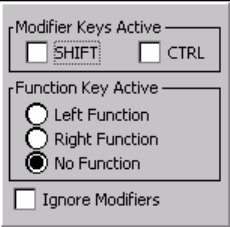
Appendix C — Reprogramming the Keypad
CK31 Handheld Computer User’s Manual 165
7 In the Application to run text box, type the location of the
application you want to launch or tap Browse to locate the
application.
8 (Optional) Enter any command line parameters you want to
use.
9 Press Enter. A dialog box appears asking if you want to
commit your new entry to permanent storage.
10 Tap Yes or No.
Remapping a Hardware Scan Code
You can remap the keys on the keypad to function the way you
want them to function for your work environment. For example,
you can remap the left Enter key to function as the right Enter
key on a 52-key keypad. This remapping is useful for a left-
handed person. When you remap a key, it ignores the select
modifiers dialog box.
To remap a key
1 Start the reprogrammable keypad utility.
2 Press the key you want to reprogram twice. The hexadecimal
scan code for the key appears in both fields.
3 Press Enter. The select modifiers dialog box appears.
4 Press Enter. The Key Response dialog box appears.
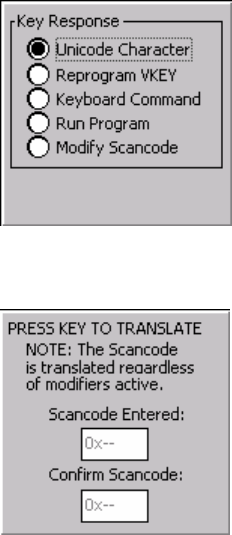
Appendix C — Reprogramming the Keypad
166 CK31 Handheld Computer User’s Manual
5 Select Modify Scancode and press Enter. The Press Key to
Translate dialog box appears.
6 Press the new key you want the scan code remapped to twice.
7 Press Enter. A dialog box appears asking if you want to
commit your new entry to permanent storage.
8 Tap Yes or No.
Removing One or All Reprogramming Modifications
You can remove all reprogramming modifications you made or
pick a specific modification to remove. Another way you can
remove all modifications is by choosing to restore defaults. For
help restoring defaults, see “Restoring Default Settings” on page
42.
To remove all reprogramming modifications
1 Press Ctl Alt Shift D. The Remove all keypad modifications
dialog box appears.
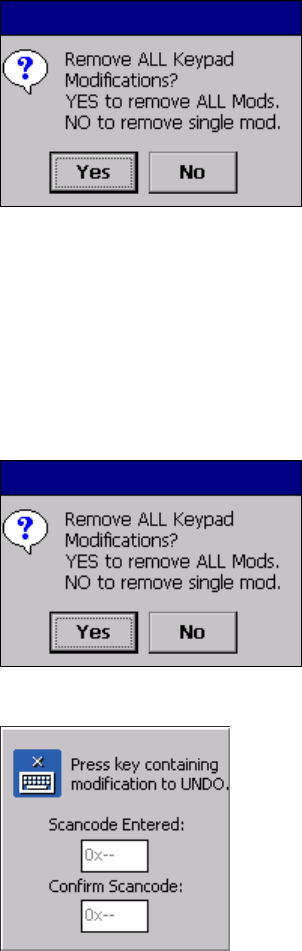
Appendix C — Reprogramming the Keypad
CK31 Handheld Computer User’s Manual 167
2 Tap Yes. A dialog box appears asking if you want to remove
the entry from permanent storage.
3 Tap Yes or No. You will hear a beep when your changes are
successful.
To remove one reprogramming modification
1 Press Ctl Alt Shift D. The Remove all keypad modifications
dialog box appears.
2 Tap No. The next dialog box appears.
Appendix C — Reprogramming the Keypad
168 CK31 Handheld Computer User’s Manual
3 Press the key containing the modification you want to remove
twice and press Enter. The select modifiers dialog box
appears.
4 Select the modifiers that you have assigned to the key and
press Enter. You will hear a beep when your changes are
successful.
Finding the Registry Entries for Keypad Changes
The CK31 provides registry files for each keypad change you
make. These files are located at:
\CK_FFS\KeypadMods\KeypadModxxxx.reg
Each modification has its own entry. To combine entries, copy
all the keys into a single registry file and combine identical keys
to contain the data from both files.
For example if one .reg file contains:
[HKEY_LOCAL_MACINE\HARDWARE\DEVICEMAP\KEYBD]
"ScancodeFilterArray"=hex:\
0a,00,00,00,04,00,00,00,00,00
And the other .reg contains:
[HKEY_LOCAL_MACINE\HARDWARE\DEVICEMAP\KEYBD]
"ScancodeFilterArray"=hex:\
11,00,01,00,03,00,00,00,00,00
"KeyFilterProcess0x111"="\Windows\cmd.exe"
"KeyFilterCmd0x111"="test"
Your combined reg file should look like this:
[HKEY_LOCAL_MACINE\HARDWARE\DEVICEMAP\KEYBD]
"ScancodeFilterArray"=hex:\
11,00,01,00,03,00,00,00,00,00,
0a,00,00,00,04,00,00,00,00,00
"KeyFilterProcess0x111"="\Windows\cmd.exe"
"KeyFilterCmd0x111"="test"

Appendix C — Reprogramming the Keypad
CK31 Handheld Computer User’s Manual 169
Creating Keypad Macros
A keypad macro is a sequence of keys mapped to a single key or
key combination. Keep the following considerations in mind
when programming with macros:
• You can only use one macro at a time.
• Do not use scan triggers in macros because they are timing
dependent.
• Avoid using key sequences that launch applications because of
timing issues.
• The best use of macros is as a tool for repetitive data entry.
Understanding the Macro Icons in the Status Bar
Icon Description
You are recording a macro.
You are deleting the macro.
You are playing the macro.
Starting the Keypad Macro Utility
Before you can record a macro, you need to enable the keypad
macro utility.
To enable the keypad macro utility
1 Double-tap My Computer.
2 Double-tap the Windows folder.
3 From the Windows folder, double-tap FilterKeysToggle.exe.
The Key Reprogram Feature dialog box appears.
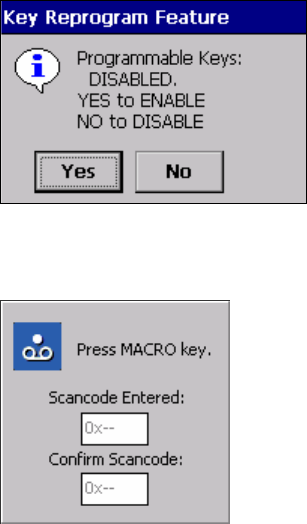
Appendix C — Reprogramming the Keypad
170 CK31 Handheld Computer User’s Manual
4 Tap Yes.
5 Press Ctl Alt Shift B. The keypad macro utility appears.
Recording a Keypad Macro
The best use of a macro is for entering repetitive data. However,
you can also record a series of steps in a procedure.
To record a keypad macro
1 Start the keypad macro utility.
2 Press the key you want to activate the macro twice. The
hexadecimal scan code for the key appears in both fields.
3 Press Enter. The select modifiers dialog box appears.
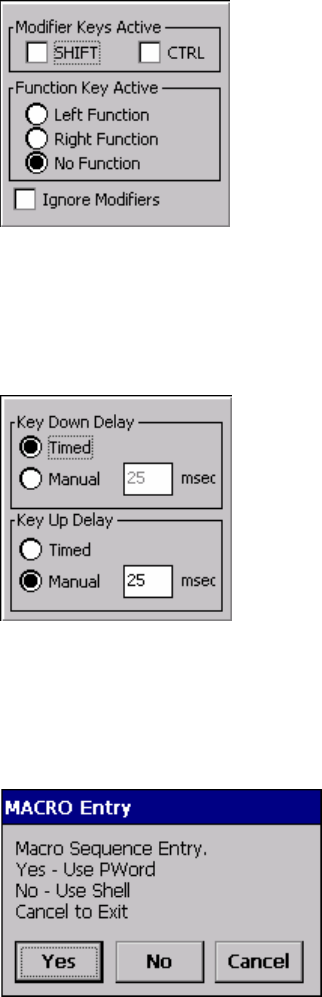
Appendix C — Reprogramming the Keypad
CK31 Handheld Computer User’s Manual 171
4 Select the modifier or function keys that you want to press
before you activate the macro. For example, if you want to
press Shift to activate the macro key, you select Shift. You do
not need to select a modifier or function key.
5 Press Enter. The select timing dialog box appears.
6 Select Timed or Manual for Key Down Delay and Key Up
Delay. If you select Timed, the key response delay matches
the timing of the key press. If you select Manual, you need to
enter the time for the delay.
7 Press Enter. The macro entry dialog box appears.
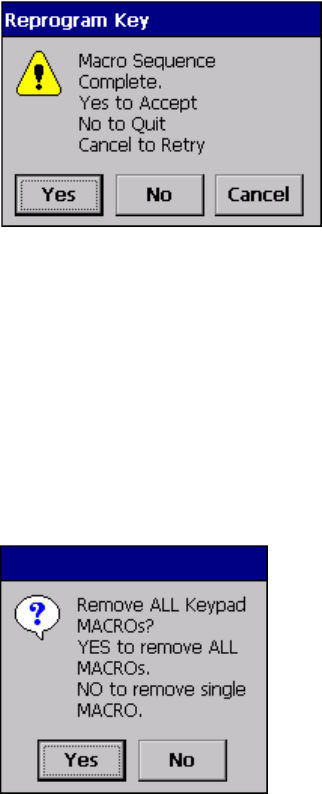
Appendix C — Reprogramming the Keypad
172 CK31 Handheld Computer User’s Manual
8 Tap Yes to launch Pocket Word if you want to enter data for
the macro. Tap No to use the Shell for recording your macro.
9 Either enter data in Pocket Word or perform a process in the
Shell.
10 Press Ctl Alt Shift B to stop recording the macro. The
reprogram key dialog box appears.
11 Tap Yes to accept your macro. A dialog box appears asking if
you want to commit your macro to permanent storage.
12 Tap Yes or No.
Removing All or One Keypad Macro
You can remove all macros or pick a specific macro to remove.
To remove all macros
1 Press Ctl Alt Shift C. The Remove all keypad macros dialog
box appears.
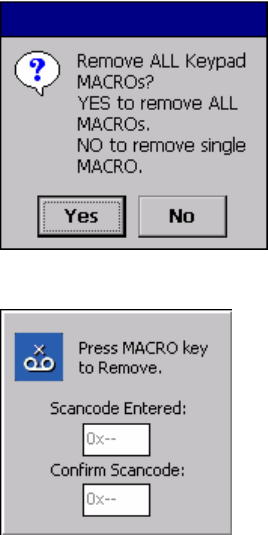
Appendix C — Reprogramming the Keypad
CK31 Handheld Computer User’s Manual 173
2 Tap Yes. A dialog box appears asking if you want to remove
the entry from permanent storage.
3 Tap Yes or No. You hear a beep when your changes are
successful.
To remove one macro
1 Press Ctl Alt Shift C. The Remove all keypad macros dialog
box appears.
2 Tap No. The next dialog box appears.
3 Press the key that activates the macro twice and press Enter.
The select modifiers dialog box appears.
4 Select the modifiers that you have assigned to the macro key
and press Enter. You will hear a beep when your changes are
successful.
Appendix C — Reprogramming the Keypad
174 CK31 Handheld Computer User’s Manual
Finding the Registry Entries for Keypad Macros
Registry files for each keypad macro are provided for you. These
files are located at:
\CK_FFS\KeypadMods\KeypadModxxxx.reg
Each macro has its own entry. To combine entries, copy all the
keys into a single registry file and combine identical keys to
contain the data from both files.
For example if one .reg file contains:
[HKEY_LOCAL_MACINE\HARDWARE\DEVICEMAP\KEYBD]
"ScancodeFilterArray"=hex:\
08,00,0d,00,06,00,06,00,00,00
"KeyMacro0xd08"=hex:\
08,00,00,00,00,00,00,00,\
08,f0,00,00,7a,00,00,00,\
10,00,00,00,19,00,00,00,\
10,f0,00,00,01,00,00,00,\
18,00,00,00,19,00,00,00,\
18,f0,00,00,6e,00,00,00
And the other .reg contains:
[HKEY_LOCAL_MACINE\HARDWARE\DEVICEMAP\KEYBD]
"ScancodeFilterArray"=hex:\
0d,00,05,00,06,00,06,00,00,00
"KeyMacro0x50d"=hex:\
0a,00,00,00,00,00,00,00,\
0a,f0,00,00,a0,00,00,00,\
11,00,00,00,19,00,00,00,\
11,f0,00,00,6c,00,00,00,\
19,00,00,00,19,00,00,00,\
19,f0,00,00,6b,00,00,00
Your combined reg file should look like this:
"ScancodeFilterArray"=hex:\
08,00,0d,00,06,00,06,00,00,00,
0d,00,05,00,06,00,06,00,00,00
"KeyMacro0xd08"=hex:\
08,00,00,00,00,00,00,00,\
08,f0,00,00,7a,00,00,00,\
10,00,00,00,19,00,00,00,\
10,f0,00,00,01,00,00,00,\
18,00,00,00,19,00,00,00,\
18,f0,00,00,6e,00,00,00
"KeyMacro0x50d"=hex:\
Appendix C — Reprogramming the Keypad
CK31 Handheld Computer User’s Manual 175
0a,00,00,00,00,00,00,00,\
0a,f0,00,00,a0,00,00,00,\
11,00,00,00,19,00,00,00,\
11,f0,00,00,6c,00,00,00,\
19,00,00,00,19,00,00,00,\
19,f0,00,00,6b,00,00,00
Appendix C — Reprogramming the Keypad
176 CK31 Handheld Computer User’s Manual

CK31 Handheld Computer User’s Manual 177
Index
I
Index
178 CK31 Handheld Computer User’s Manual
Numerics
1551 or 1553 scanner
attaching, 30
energy saver mode, 32
troubleshooting, 123
1D linear imager. See linear imager
26-pin serial port assignments, 145
2D area imager. See area imager
3
3270/5250 TE keypads, typing hidden
characters, 144
4-bay communications dock, described,
140
802.11 Information diagnostic screen, 97
802.11b/g radio
configuring, 45
displaying information, 97
802.1x security
configuring
with Funk security, 68
with Microsoft security, 69
overview, 67
troubleshooting, 117
what you need, 67
851-064-xxx power supply, 139
851-082-xxx power supply, 139
A
AA2 serial cable adapter accessory,
described, 139
AA3 serial cable adapter accessory,
described, 139
AB1G battery
described, 139
diagnostic information, 98
using, 4
AC1 4-slot battery charger, described, 139
AC2 4-bay battery charging dock
accessory, described, 139
AC3 8 slot battery charging dock
accessory, described, 139
accessories, described, 139
ActiveDirectory, using to issue certificates,
73
ActiveSync
icon, 17
installation requirements, 83
installing and establishing a partnership,
83
using to copy and install files, 85
using to install applications, 83
using to upgrade operating system, 92
AD1 communications dock, described,
139
AD2 4-bay communications dock,
described, 140
Admin mode, entering, 89
Advanced Encryption Standard (AES), 63
AES data encryption, 63
Antares Migration resource kit
hardware requirements, 81
using to convert Trakker Antares
applications, 81
application
converting from Trakker Antares, 81
developing
new, 80
web-based, 81
wireless printing, 51
with resource kits, 80
installing
overview, 82
using ActiveSync, 83
using Avalanche, 88
using FTP server, 87
using SmartSystems Console, 88
using the SD card, 87
launching
automatically, 89
from a key or key combination, 163
required for wireless printing, 51
storing in CK_FFS folder, 82
area imager
reading distances, 132
scanning with, 26
tips for improving performance, 29
audio feedback. See beeps
Index
CK31 Handheld Computer User’s Manual 179
authentication
diagnostics, 97
troubleshooting 802.1x security, 117
Authentication Information diagnostic
screen, 97
automatically launching your application,
89
Avalanche, using to remotely manage the
CK31, 88
B
B key. See orange key
backing up files, 91
backup battery
10 minutes to replace main battery, 4
described, 99
icon indicating low power, 17
specifications, 130
very low, 99, 116
Backup Battery Very Low dialog box
illustrated, 100
troubleshooting, 116
bar codes
scanning, 22
scanning, troubleshooting, 121
symbologies supported
by area imager, 131
by linear imager, 132
by long range laser, 132
by scanner, 131
by standard range laser, 132
symbologies, default, 22
battery
AB1G accessory, described, 139
Backup Battery Very Low dialog box,
100, 116
backup battery, icon, 17
charger
AC1 accessory, 139
AC2 accessory, 139
AC3 accessory, 139
charging and installing, 5
charging times, 5
checking status, 7
diagnostics, 98
disposal, 4
battery (continued)
icons, 17
installing, 6
low icon, understanding, 99
maximizing life, 6
specifications, 130
status icons, 7
understanding voltage, 99
using, 4
when to swap, 99
Battery Information, diagnostics screen, 98
beeper volume
changing, 21
disable or modify keypad function, 12
beeps
testing, 111
understanding, 21
blue light. See Ready-to-Work indicator
Bluetooth
choosing the printer from a list, 56
commands, described, 50
configuring
wireless printing, 50
wireless scanners, 48
current wireless printer
defined, 52
selecting, 52
default configuration, 151
discovering devices, 49, 53
incoming connections, allowing, 49
manually entering printer address, 54
power
troubleshooting, 120
turning on, 49, 51
range, defined, 48, 50
resource kit, 51
settings, described, 50
wireless printing
COM port, 52
troubleshooting, 120
Wireless Printing applet
defined, 52
icon illustrated, 53
Boot Code Version, diagnostics screen,
100
Index
180 CK31 Handheld Computer User’s Manual
booting
changing the I key functionality, 12
CK31, 125
cold, 125
warm, 125
C
C key. See green key
CAB file, using to install applications, 82
cables
for energy saver mode, 32
for serial adapters, 30
calibrating the touch screen, 19
calling Product Support, 114
capitalizing characters, 11
Caps Lock, using, 11
card, SD
cannot find SDMMC Disk folder, 115
diagnostics, 110
ejecting, 36
inserting, 34
removing, 36
troubleshooting, 115
using to install applications, 87
using to store applications, 83
using to upgrade the operating system,
92
verifying seated correctly, 35
will not boot from SD card, 115
CCX v2.0 compliance, 3
center decoding
using center decoding parameter, 28
certificates
for security, described, 73
issued by
ActiveDirectory, 73
third party certificate authority, 74
loading
methods, described, 73
multiple certificates, 76
with Enroll Certificates, 73
with Import Certificates, 74
with Import Root Certificate, 76
with Import User Certificate, 76
changing a password, 90
characters
capitalizing, 11
typing characters not printed on
keypad, 142
charging
4-bay battery dock, AC2, 139
4-slot battery charger, AC2, 139
8 slot battery dock, AC3, 139
overview, 5
time required for each accessory, 5
CK_FFS folder, application storage, 83
CK31
configuration methods, 38
default configuration settings, 148
described, 2
features, 3
illustrated, 2
specifications, 130
troubleshooting, guide to, 113
upgrading the operating system, 92
cleaning
scanner window, 126
touch screen, 126
cold boot
described, 125
preserving files through, 91
color-coded keys, using, 11
COM port
for Bluetooth wireless printing, 52
locked up, 120
troubleshooting, 120
communications dock
AD1 accessory, 139
AD2 accessory, 140
communications, default configuration
settings, 152
configuration number
finding, 101, 114
required by Product Support, 114
Configuration Table, diagnostics screen,
101
configuration, default settings, 148
configuring
802.11b/g radio communications, 45
802.1x security
troubleshooting, 117
Index
CK31 Handheld Computer User’s Manual 181
configuring (continued)
with Funk security, 68
with Microsoft security, 69
Bluetooth
wireless printing, 50
wireless scanners, 48
CK31 parameters, 38
Ethernet, for older CK31s, 57
LEAP security, 71
parameters, 38
security, 59
serial communications, 58
TCP/IP network parameters, 46
UDP Plus network parameters, 47
using local Intermec Settings, 40
using Setup Assistant, 39
using SmartSystems Console, 44
WEP security
with Funk security, 72
with Microsoft security, 72
wireless printing, 51, 52
WPA2-802.1x security, with Funk
security, 63
WPA2-PSK security, with Funk
security, 64
WPA-802.1x security
with Funk security, 63
with Microsoft security, 65
WPA-PSK security
with Funk security, 64
with Microsoft security, 67
contacting Intermec by phone, xiii
contrast, cannot adjust on CK31, 11
copying files to CK31 using ActiveSync,
85
copyright information, xv
CPU Monitor, diagnostics screen, 102
CPU Registers, diagnostics screen, 102
current wireless printer
defined, 52
selecting, 52
D
Data Collection Browser Client User’s
Guide, 3
data encryption, AES, 63
dcBrowser documentation, 3
decoded serial adapter
attaching, 30
cables, 31
described, 141
default configuration
communications settings, 150
device settings, 152
restoring, 42
scanner settings, 148
settings, 148
desktop
described, 15
illustrated, 15
developing applications
using the resource kits, 80
web-based, 81
device IP address, viewing, 106
DHCP server IP address, viewing, 106
diagnostics
802.11 Information, 97
Authentication Information, 97
Battery Information, 98
Boot Code Version, 100
CPU Monitor, 102
CPU Registers, 102
Display Test, 103
Hardware Configuration Table, 101
Installed Fonts, 104
Intermec Value Version, 104
Keypad Test, 105
LED Test, 106
Network Information, 106
Network Test, 107
Operating System Version, 107
Ping Utility, 108
Radio Driver Version, 109
RAM Information, 109
RAM Monitor, 110
SD Card Memory Test, 110
Sound Test, 111
using, 96
diagram, Intermec Settings, 41
dimensions, physical, 130
Index
182 CK31 Handheld Computer User’s Manual
disabling
FTP server, 87
keypad functions, 12
security, 77
symbologies, 33
touch screen, 16
Display Test, diagnostics screen, 103
displaying information
802.11b/g radio, 97
authentication, 97
battery, 98
boot code, 100
configuration number, 101
CPU registers, 102
device address, 106
DHCP server IP address, 106
flash memory available, 109
fonts installed, 104
IVA, 104
MAC address, 106
model, 101
operating system version, 107
radio driver, 109
RAM available, 109
RAM usage, 110
scanner type, 101
serial number, 101
software options, 101
drag-and-drop, using SmartSystems
Console, 88, 94
dust cover accessory, 140
E
E key, illustrated, 8, 9, 10
ejecting, SD card, 36
electrical specifications, 130
energy saver mode
troubleshooting, 123
using, 32
Enroll Certificates, 73
environmental specifications, 130
erasing the registry, 42
errors, finding and solving, 115
Ethernet
configuring older CK31s, 57
network diagram, 58
Ethernet (continued)
not available on new CK31s, 57
exiting Intermec Settings, 43
extending battery life, 6
Extensible Authentication Protocol (EAP),
62
F
factory default settings, restoring, 42
files
backing up, 91
copying with ActiveSync, 85
installing applications, 82
preserving through cold boot, 91
storing applications in the CK_FFS
folder, 83
flash file system, 82
flash part ID, 109
fonts, viewing installed, 104
FTP server
disabling, 87
using to install applications, 87
using to upgrade operating system, 92
function key
programming any key to be, 161
using, 11
functions, keypad, modifying or disabling,
12
Funk security
configuring
802.1x security, 68
LEAP security, 71
WEP, 72
WPA2-802.1x, 63
WPA2-PSK, 64
WPA-802.1x, 63
WPA-PSK, 64
overview, 60
selecting a profile, 61
selecting as security choice, 61
G
Good Read light
described, 21
troubleshooting, 121
green key, using, 11
Index
CK31 Handheld Computer User’s Manual 183
green light, 21
gun. See CK31
H
handle accessory, 140
handstrap accessory, 140
Hardware Diagnostics menu, 96
hardware scan code, remapping, 165
hidden characters, typing, 142
holster and belt accessory, 140
host computer not receiving data,
troubleshooting, 119
humidity, specifications, 130
I
I key
illustrated, 8, 9, 10
modify keypad function, 12
program to warm or cold boot, 12, 14
using, 12
iBrowse
described, 3
opening, 81
User’s Guide, 3
ICCU. See Intermec Settings
icons
battery status, 7
macros, 169
screen, 17
IDL
contains the resource kits, 80
described, 80
wireless printing, 51
imager
area
reading distances, 132
scanning, 26
linear
reading distances, 134
scanning, 23
near-far range area
reading distances, 138
scanning PDF417 or Micro PDF417,
24
Import Certificates, 74
Import Root Certificates, 76
Import User Certificates, 76
incoming Bluetooth connections, 49
inserting, SD card, 34
Installed Fonts, diagnostics screen, 104
installing
ActiveSync, 83
applications
overview, 82
using ActiveSync, 83
using Avalanche, 88
using SmartSystems Console, 88
using the FTP server, 87
using the SD card, 87
battery, 6
SD card, 34
Intermec Computer Command Reference
Manual, 41
Intermec Developer Library. See IDL
Intermec Readiness Indicator. See Ready-
to-Work indicator
Intermec resource kits
described, 80
requirements, 80
using to develop applications, 80
Intermec SDK. See IDL
Intermec Settings
Bluetooth settings, described, 50
commands, understanding, 41
exiting, 43
menu structure, illustrated, 41
navigating within, 42
opening, 40, 114
restoring default settings, 42
starting, 40, 114
Intermec Value Version, diagnostics
screen, 104
international keypads, using, 7
Internet Explorer, opening, 81
K
key
B, illustrated, 8, 9, 10
C, illustrated, 8, 9, 10
E, illustrated, 8, 9, 10
Esc, illustrated, 9
I, illustrated, 8, 9, 10
Index
184 CK31 Handheld Computer User’s Manual
key (continued)
icons, 17
locking or unlocking, 11
M or N performs no function, 11
Scan button, illustrated, 8, 9, 10
keypad
functions, disabling, 12
international, 7
keys, changing the functionality, 156
locating the changes registry files, 168
locating the keypad macro registry files,
174
macro utility, enabling, 169
macro, recording, 170
macros, creating, 156, 169
options, 130
programming any key to work as a
function key, 161
programming to launch an application,
163
remapping keys, 165
removing all reprogramming, 166
removing macros, 172
reprogramming, 156
reprogramming for Unicode characters,
158
reprogramming for Virtual Keys, 159
typing hidden characters, 142, 143
using, 8, 7–12
using color-coded keys, 11
Keypad Test, diagnostic screen, 105
L
laser scanner
how to scan, 23
options, 3
reading distances, 136
scanning with, 23
launching applications
automatically, 89
from a key or key combination, 163
LEAP security
configuring, 71
not available for Microsoft security, 71
overview, 71
what you need, 71
LED Test, diagnostics screen, 106
lights
status, 20, 21
testing, 106
understanding status, 20
Lightweight Extensible Authentication
Protocol. See LEAP security
linear imager
reading distances, 134
scanning with, 23
using, illustrated, 24, 25
loading certificates for security, 73
Lockdown mode, entering, 89
locking a key, 11
long range laser
available option, 3
scanning, 23
M
M or N key performs no function, 11
MAC address, viewing, 106
macros
creating keypad, 156, 169
enabling the keypad utility, 169
icons, illustrated, 169
recording, 170
removing, 172
stop recording, 172
manuals, downloading from web, xii
maximizing battery life, 6
memory
storage, 82
viewing available, 109, 110
viewing usage, 110
menu structure, Intermec Settings, 41
Micro PDF417 bar codes, how to scan, 24
Microsoft security
configuring 802.1x security, 69
configuring WEP, 72
configuring WPA-802.1x, 65
configuring WPA-PSK, 67
overview, 60
selecting as security choice, 61
modifying keypad functions, 12
Index
CK31 Handheld Computer User’s Manual 185
mouse
moving a window, 18
required for Intermec resource kits, 81
moving a window, 18
N
navigating in Intermec Settings, 42
near-far range area imager
available option, 3
reading distances, 138
scanning, 26
scanning using center-decoding, 28
tips for improving performance, 29
network connection, testing, 107
network icons, 17
Network Information, diagnostics screen,
106
network protocols supported, 45
Network Test, diagnostics screen, 107
new features, 4
no network connection icon
illustrated, 17
troubleshooting, 119
O
opening Intermec Settings, 40, 114
operating system
how to upgrade, 92
upgrading with SD card, 92
upgrading with SmartSystems Console,
93
Operating System Version, diagnostics
screen, 107
operating the CK31
humidity range, 130
temperature range, 130
troubleshooting, 115, 116, 117
options, keypad, 130
orange key, using, 11
P
parameters, configuring CK31, 38
passphrase
setting for Funk WPA-PSK, 65
setting for Microsoft WPA-PSK, 67
password
changing, 90
setting, 89
patents, list of, xiv
PDF417 bar codes, how to scan, 24
Persistent Copy folder, backing up files, 91
physical
dimensions, 130
specifications, 130
pin assignments, serial port, 145
Ping command
using to test network communications,
108
using to test network connection, 107
Ping Utility, diagnostics screen, 108
Power key. See I key
power specifications, 130
power supply accessory, 139
Pre-Shared Key (PSK), 62
printing. See wireless printing
problems, finding and solving, 115
Product Support, calling, 114
profile, selecting for Funk security, 61
programmer’s guide, TE 2000 Terminal
Emulation, 3
programming the CK31, 80
Protected Extensible Authentication
Protocol (PEAP), described, 67
protective
boot accessory, 140
case accessory, 140
PSK. See Antares Migration resource kit
R
radio
communications, configuring, 45
configuring 802.11b/g, 45
connection icons, 17
diagnostics, 109
Radio Driver Version, diagnostics screen,
109
RAM Information, diagnostics screen, 109
RAM Monitor, diagnostics screen, 110
reading CPU registers, 102
reading distances
area imager, 132
linear imager, 134
Index
186 CK31 Handheld Computer User’s Manual
reading distances (continued)
near-far range area imager, 138
standard range laser, 136
Ready-to-Work indicator
described, 21
illustrated, 2
troubleshooting, 117
recording macros
starting, 170
stopping, 172
red light, battery indicator, 20
register, displaying values, 102
registry
combining entries, 168, 174
erasing, 42
keypad changes, 168
keypad macros, 174
wireless printing, 52
remapping keys, 165
remotely managing the CK31, using
Avalanche, 88
removing
keypad macros, 172
programming modifications from keys,
166
SD card, 36
repositioning a window, 18
reprogrammable keypad utility
enabling, 157
navigating within, 156
reprogramming the keypad, 156
reset switch, 125
restoring default settings, 42
restricting access to menus, 89
RoHS compliance
not supported on discontinued cables
and scanners, 30, 32
supported
cables, 30
scanners, 30
serial adapters, 30
RS-232 communications, configuring, 58
S
safety icons, xi
Scan button
illustrated, 8, 9, 10
troubleshooting, 121
scan code, hardware, remapping, 165
ScanDemo
enabling or disabling symbologies, 33
using, 33
scanner
default configuration settings, 148–50
energy saver mode, 32
trigger, programming any key to be,
161
troubleshooting, 121
window, cleaning, 126
scanning
area imager, 26
bar codes, 22
laser scanner, 23
linear imager, 23
near-far range area imager, 26
PDF417 or Micro PDF417, 24
tips for improving area imager
performance, 29
using ScanDemo application, 33
screen. See touch screen
screen icons, understanding, 17
SD card
accessing files, 36, 83, 87
cannot find SDMMC Disk folder, 115
diagnostics, 110
ejecting, 36
inserting, 34
removing, 36
troubleshooting, 115
using to install applications, 87
using to store applications, 83
verifying seated correctly, 35
will not boot from SD card, 115
SD Card Memory Test, diagnostics screen,
110
SDMMC Disk folder
access to SD card contents, 36, 83, 87
cannot find after inserting SD card, 115
using to store applications, 83
Index
CK31 Handheld Computer User’s Manual 187
security
certificates, overview, 73
choice, Funk or Microsoft, defined, 60
configuring
802.1x
with Funk security, 68
with Microsoft security, 69
WEP
with Funk security, 72
with Microsoft security, 72
WPA2-802.1x security, with Funk
security, 63
WPA2-PSK security, with Funk
security, 64
WPA-802.1x security
with Funk security, 63
with Microsoft security, 65
WPA-PSK security
with Funk security, 64
with Microsoft security, 67
configuring LEAP, 71
disabling, 77
overview, 59
restricting access to menus, 89
selecting a Funk profile, 61
selecting Funk security, 61
selecting Microsoft security, 61
serial adapter
attaching, 30
decoded, 141
serial cable adapter
AA2 accessory, 139
AA3 accessory, 139
serial communications
configuring, 58
network diagram, 59
troubleshooting, 120
serial port pin assignments, 145
setting a password, 89
settings, restoring defaults, 42
Setup Assistant, using to configure CK31,
39
shortcuts on the desktop, 15
signal strength, icons, 17
SmartSystems Console
using to configure the CK31, 44
using to install applications, 88
using to upgrade the CK31, 93
SmartSystems Foundation
described, 44
downloading, 44, 94
SNTP, using to synchronize system time,
44
Software Diagnostics menu, 96
software version, viewing, 107, 114
sound test, 111
specifications
dimensions, 130
electrical, 130
humidity, 130
power, 130
temperature, 130
touch screen, 130
standard range imager
scanning, 26
standard range laser
available option, 3
reading distances, 136
scanning, 23
start screen, understanding, 15
starting Intermec Settings, 40, 114
Static WEP security. See WEP security
status
beeps, 21
checking battery, 7
icons, 17
lights, testing, 106
lights, understanding, 20
stylus, using with touch screen, 16
supercap. See backup battery
support, contacting Intermec, xiii
Suspend mode, defined, 12
switch, reset, 125, 126
symbologies
default, 22
supported
by area imager, 131
by linear imager, 132
by long range laser, 132
by scanner, 131
by standard range laser, 132
synchronizing time on CK31, 44
Index
188 CK31 Handheld Computer User’s Manual
System Diagnostics menu, 96
T
tapping screen, understanding, 16
Task Manager, opening, 18
taskbar
described, 15
illustrated, 15
TCP/IP
network diagram, 46
network, configuring parameters, 46
TE 2000 application
keypad, using, 8
Terminal Emulation Programmer’s
Guide, 3
technical support, accessing on web, xii
telephone support, xiii
temperature, specifications, 130
Temporal Key Integrity Protocol (TKIP),
62
terminal emulation, typing hidden
characters, 144
testing
display, 103
keypad, 105
lights, 106
network connection, 107
sound, 111
tethered stylus accessory, 140
third party certificate authority, using to
issue certificates, 74
time server
corporate network server, 44
default, 44
time, synchronizing with time server, 44
touch screen
calibrating, 19
cleaning, 126
disabling, 16
specifications, 130
understanding icons, 17
using, 15
using with stylus, 16
Trakker Antares application, converting to
CK31, 81
Transport Layer Security (TLS), described,
67
troubleshooting
1551 or 1553 scanner, 123
Backup Battery Very Low dialog box,
116
bar code symbologies, 122
COM port locked up, 120
configuring 802.1x security, 117
energy saver mode, 123
guide to finding solutions, 113
lost network connection after suspend,
119
operating the CK31, 115, 116, 117
preventive maintenance, 126
scanning bar codes, 121
serial communications, 120
wireless connectivity, 119
wireless printing, 120
typing characters not printed on keypad,
142
U
UDP Plus
icons, 18
network diagram, 47
network, configuring parameters, 47
undecoded serial adapter
attaching, 30
cables, 30
understanding
beeps, 21
commands in Intermec Settings, 41
screen icons, 17
start screen, 15
status lights, 20
tapping with stylus, 16
Unicode character
program to any key or key combination,
158
selecting an entry mode, 159
unlocking a key, 11
upgrading the operating system
overview, 92
using an SD card, 92
using SmartSystems Console, 93
Index
CK31 Handheld Computer User’s Manual 189
uppercase letters, typing, 11
using
battery, 4
Caps Lock, 11
diagnostics, 96
green key, 11
I key, 12
keypad, 7–12
orange key, 11
TE 2000 keypad, 8
touch screen, 15
V
vehicle cradle accessory, 140
Virtual Key (VKey)
program to any key or key combination,
159
selecting an entry mode, 160
voltages
backup battery, 99
main battery, 99
volume, changing beeper, 21
VT/ANSI keypad, typing hidden
characters, 145
W
warm booting, 125
warranty information, xii
Wavelink Avalanche, using to install
applications, 88
web-based application, developing, 81
WEP security
configuring
with Funk security, 72
with Microsoft security, 72
overview, 71
troubleshooting, 18
vulnerabilities, 62
what you need, 72
what’s new, 4
Wi-Fi certified logo, 2
window, repositioning, 18
wireless communications
configuring, 45
troubleshooting, 119
WEP troubleshooting tip, 18
wireless printing
applet
defined, 52
icon illustrated, 53
application, creating, 51
Bluetooth power, turning on, 51
choosing the printer from a list, 56
COM port, 52
configuring, 50
current wireless printer, selecting, 52
manually entering printer address, 54
troubleshooting, 120
two tasks, required, 50
Wireless Printing applet
defined, 52
icon illustrated, 53
wireless scanner
Bluetooth power, turning on, 49
configuring, 48
incoming connections, allowing, 49
WPA security
Enterprise mode, defined, 62
overview, 62
PSK mode, defined, 62
what you need, 63
WPA2 security
802.1x (Enterprise) mode, defined, 63
not available for Microsoft security, 63
overview, 63
PSK mode, defined, 63
WPA2-802.1x security, configuring with
Funk security, 63
WPA2-PSK security, configuring with
Funk security, 64
WPA-802.1x security
configuring
with Funk security, 63
with Microsoft security, 65
described, 62
WPA-PSK security
configuring
with Funk security, 64
with Microsoft security, 67
described, 62
passphrase, for Microsoft security, 67
Index
190 CK31 Handheld Computer User’s Manual

Worldwide Headquarters
6001 36th Avenue West
Everett, Washington 98203
U.S.A.
tel 425.348.2600
fax 425.355.9551
www.intermec.com
CK31 Handheld Computer User’s Manual
*075207-006*
P/N 075207-006