Intermec Technologies DRCB DRCB User Manual legal
Intermec Technologies Corporation DRCB legal
UserManual.wiki
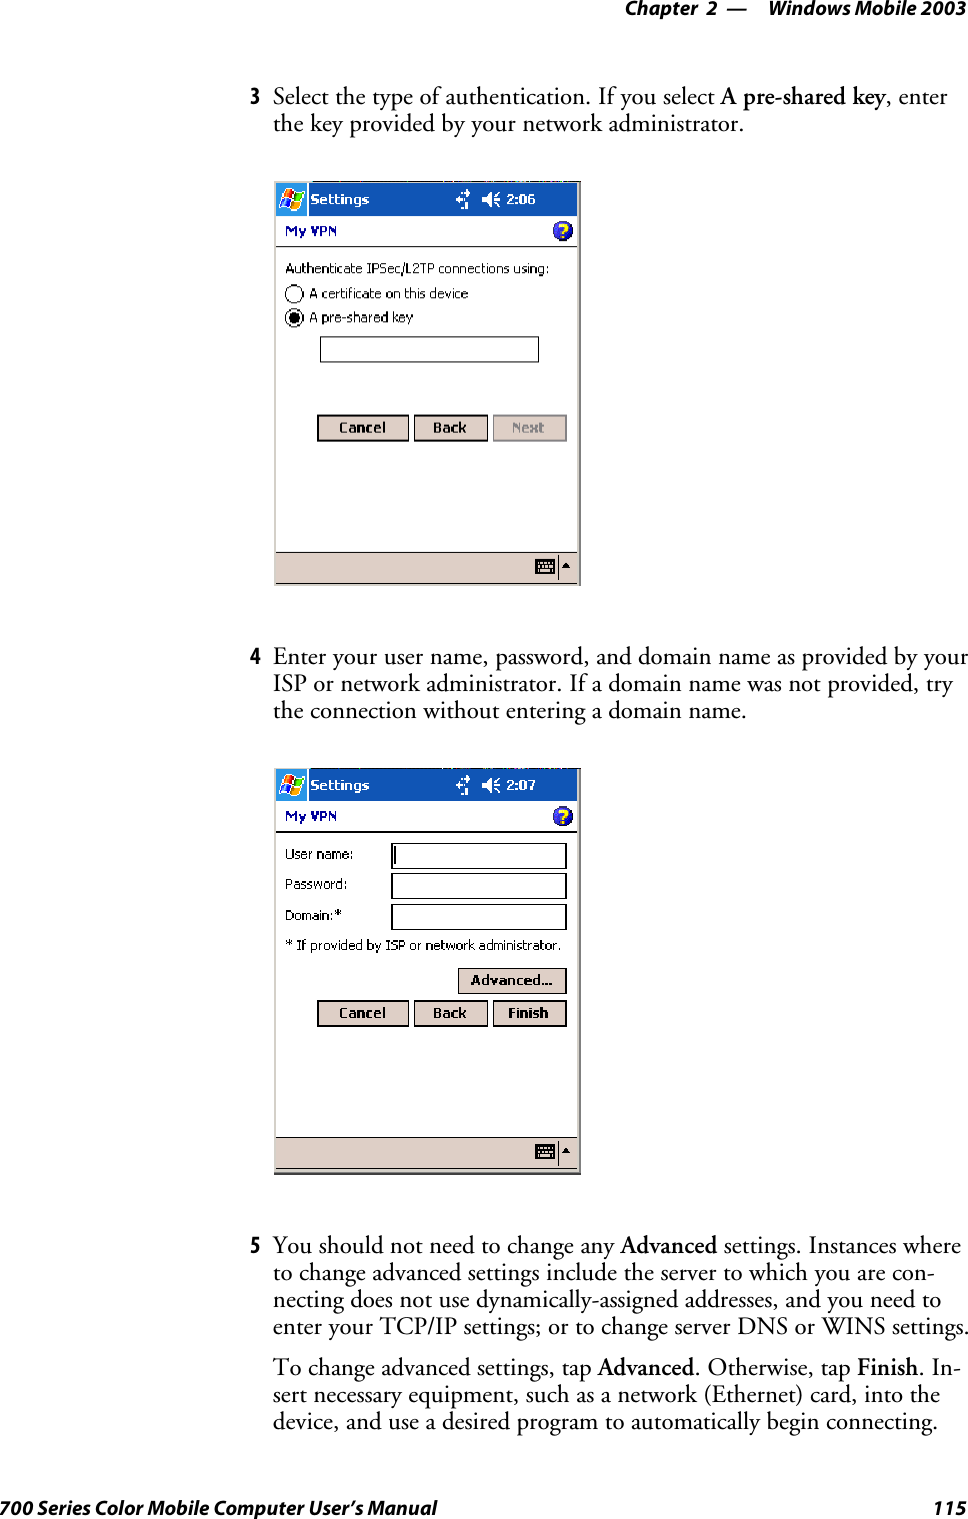
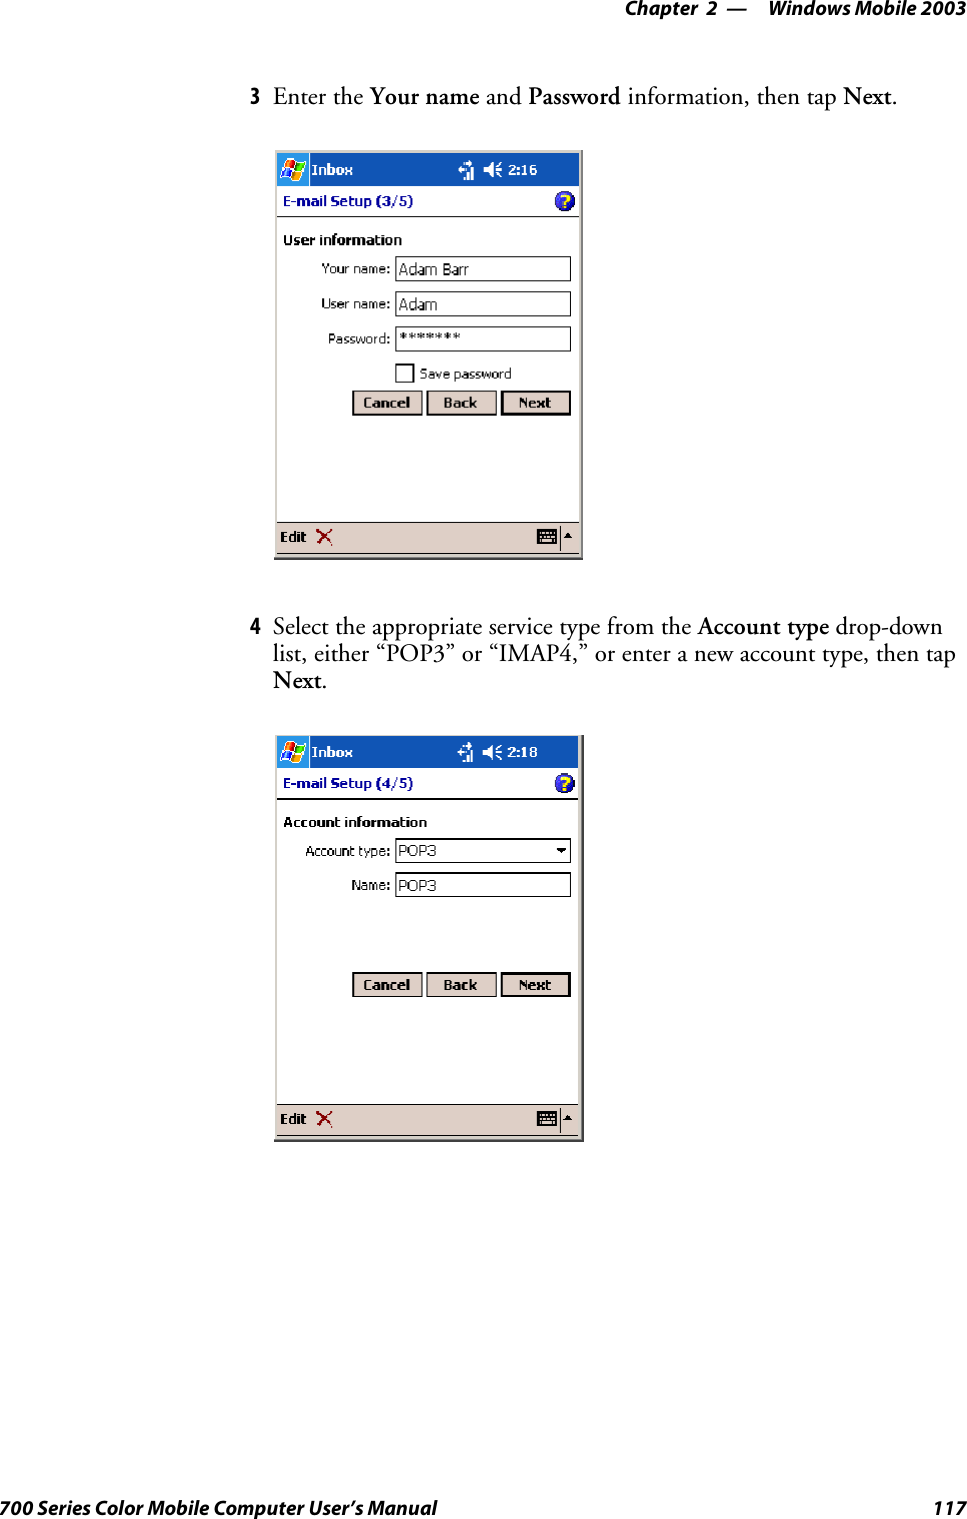
>
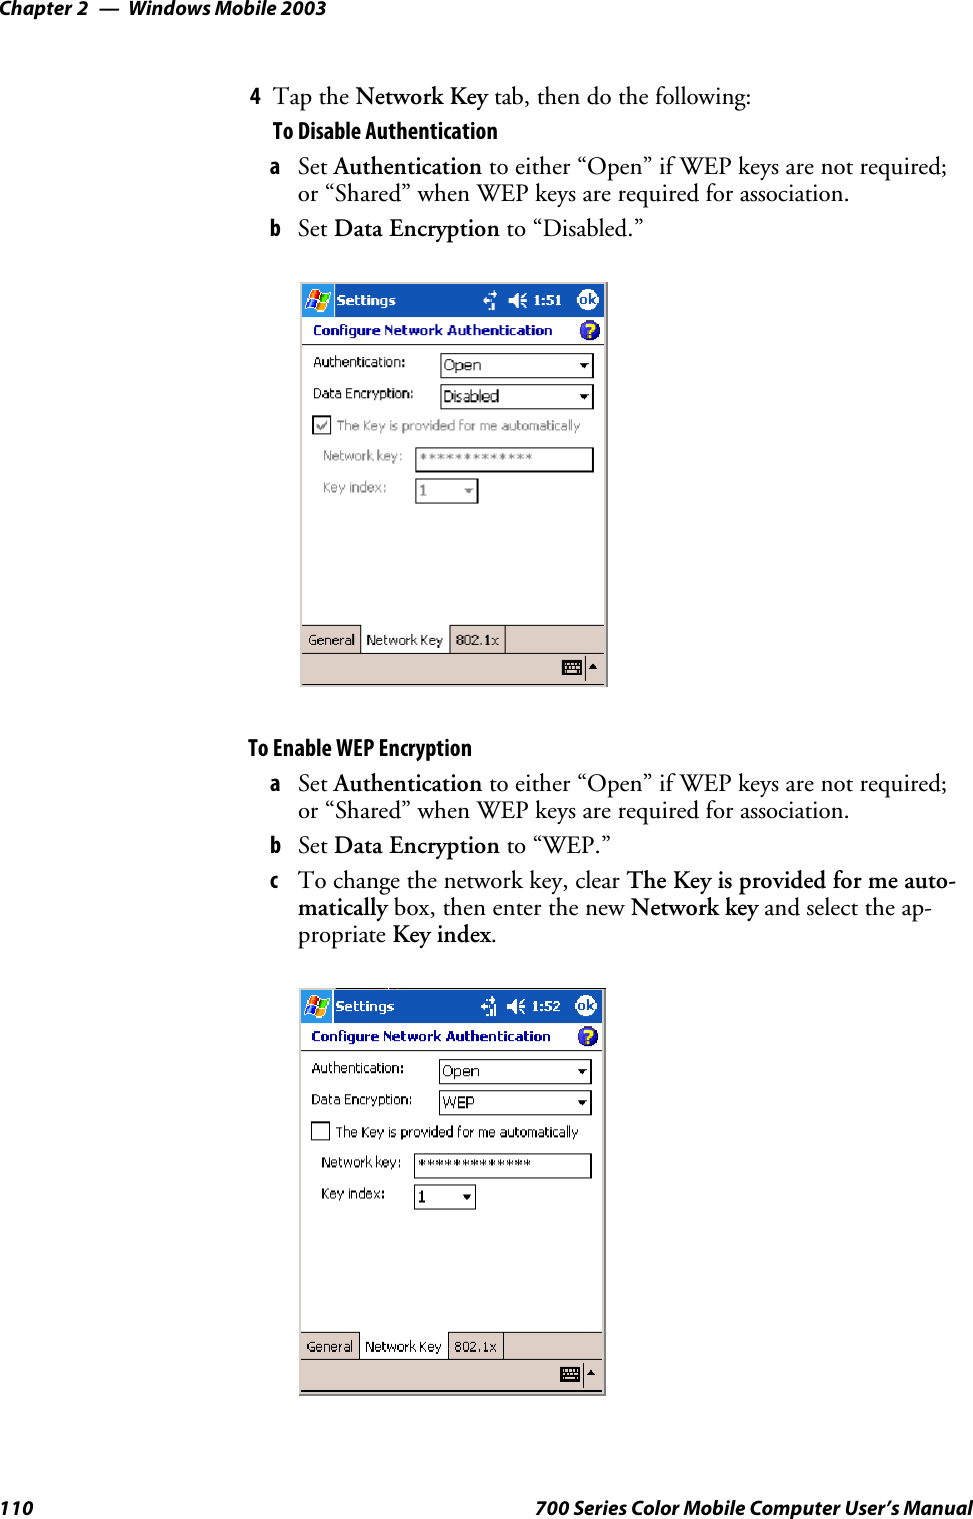
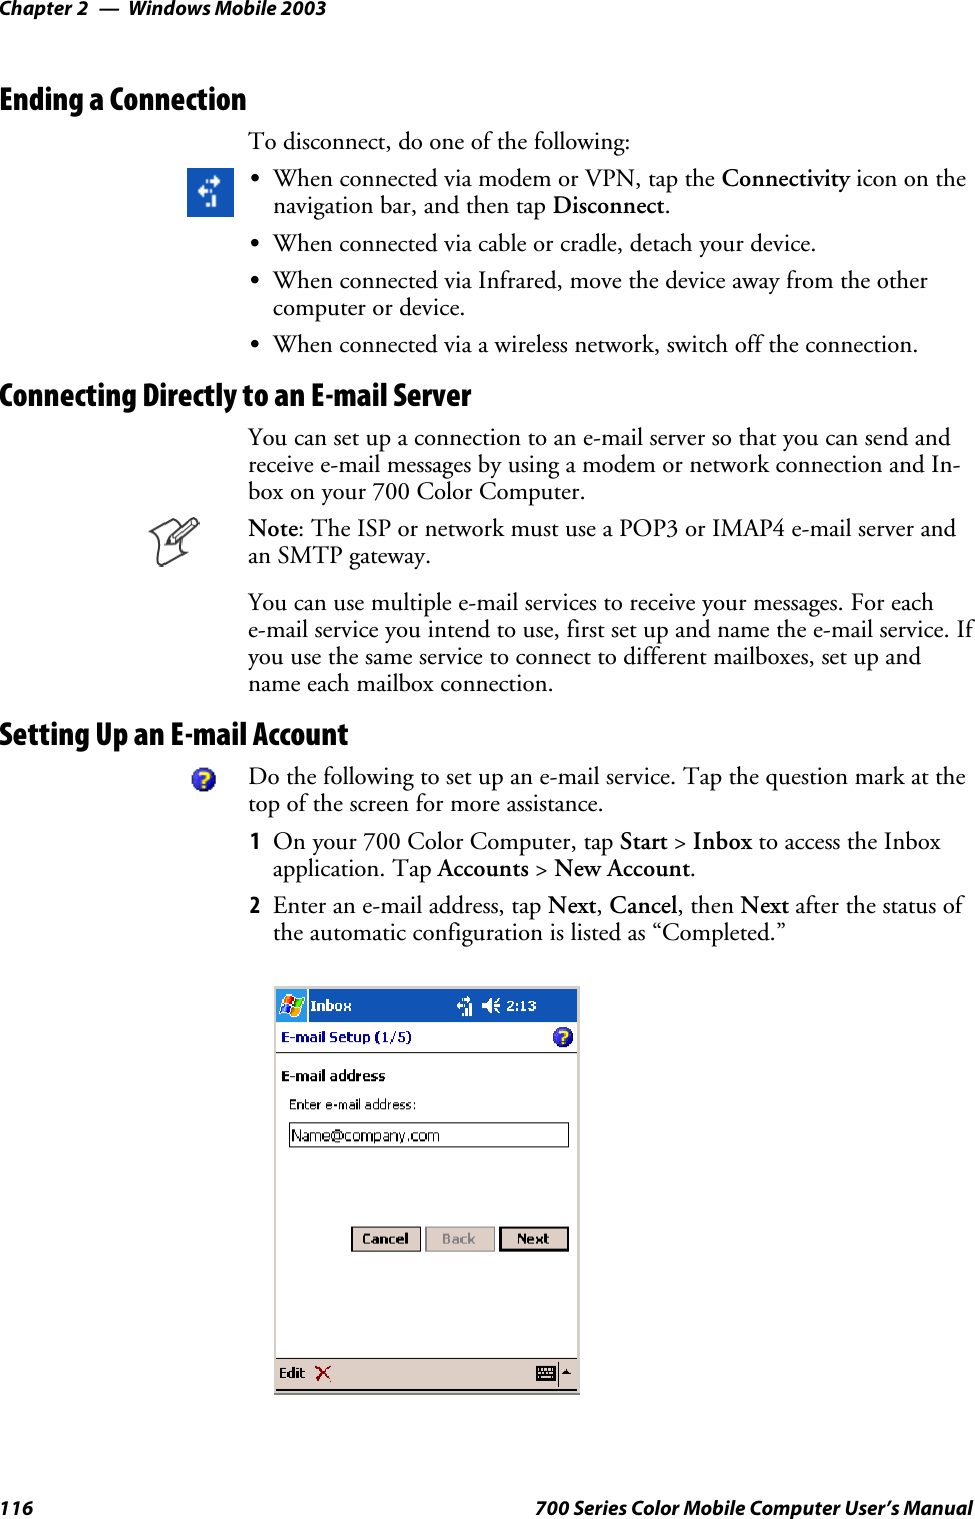
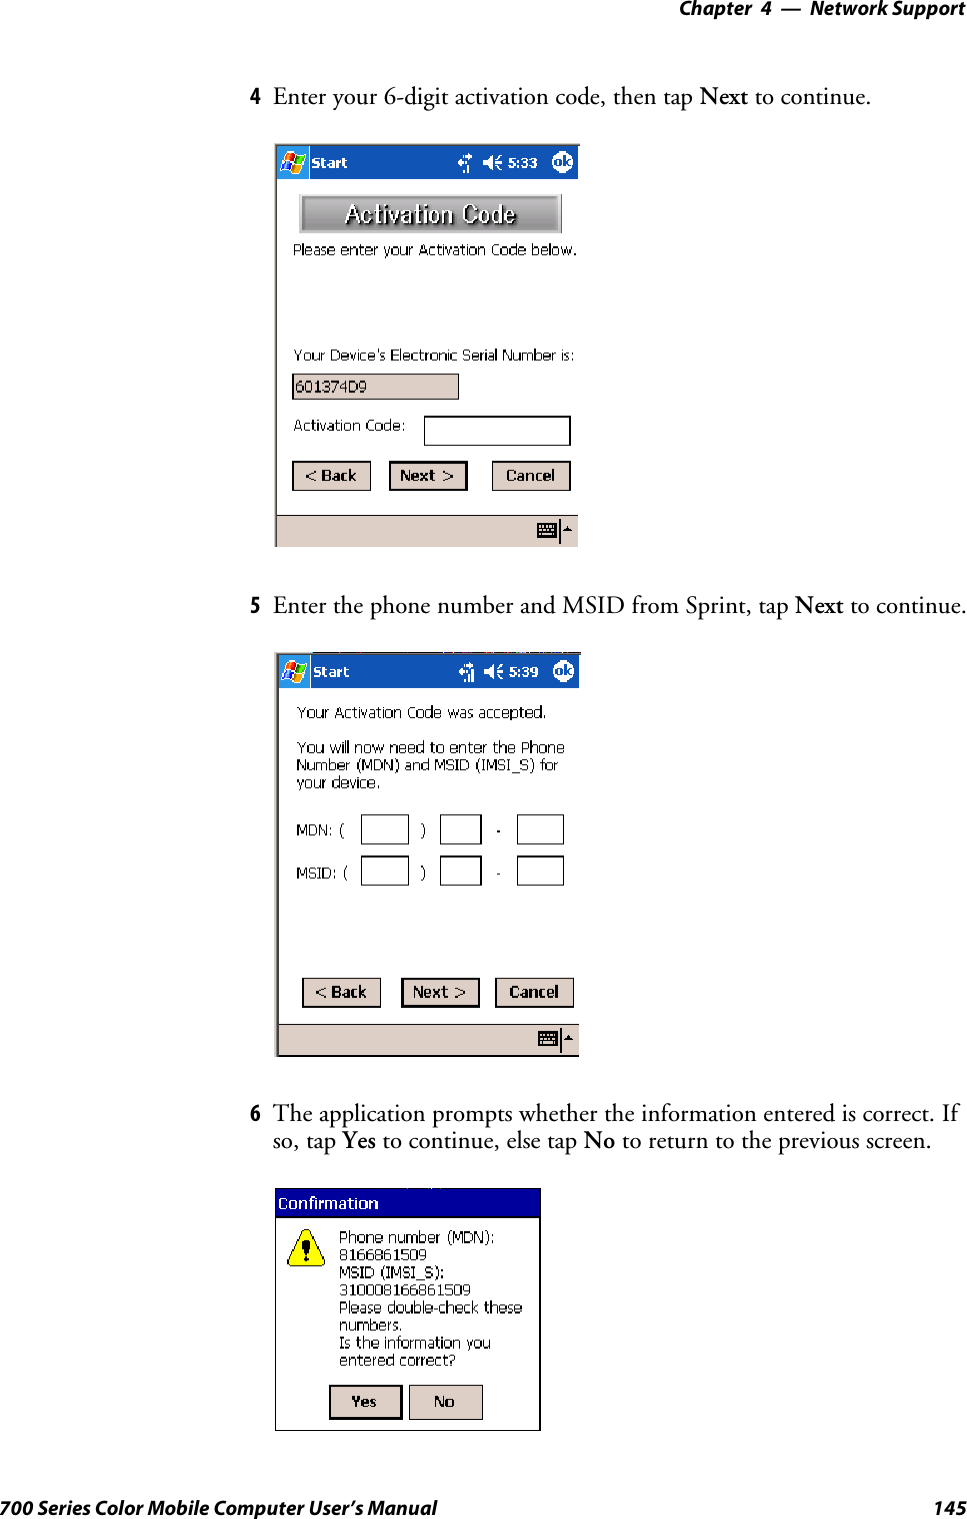
Intermec Technologies
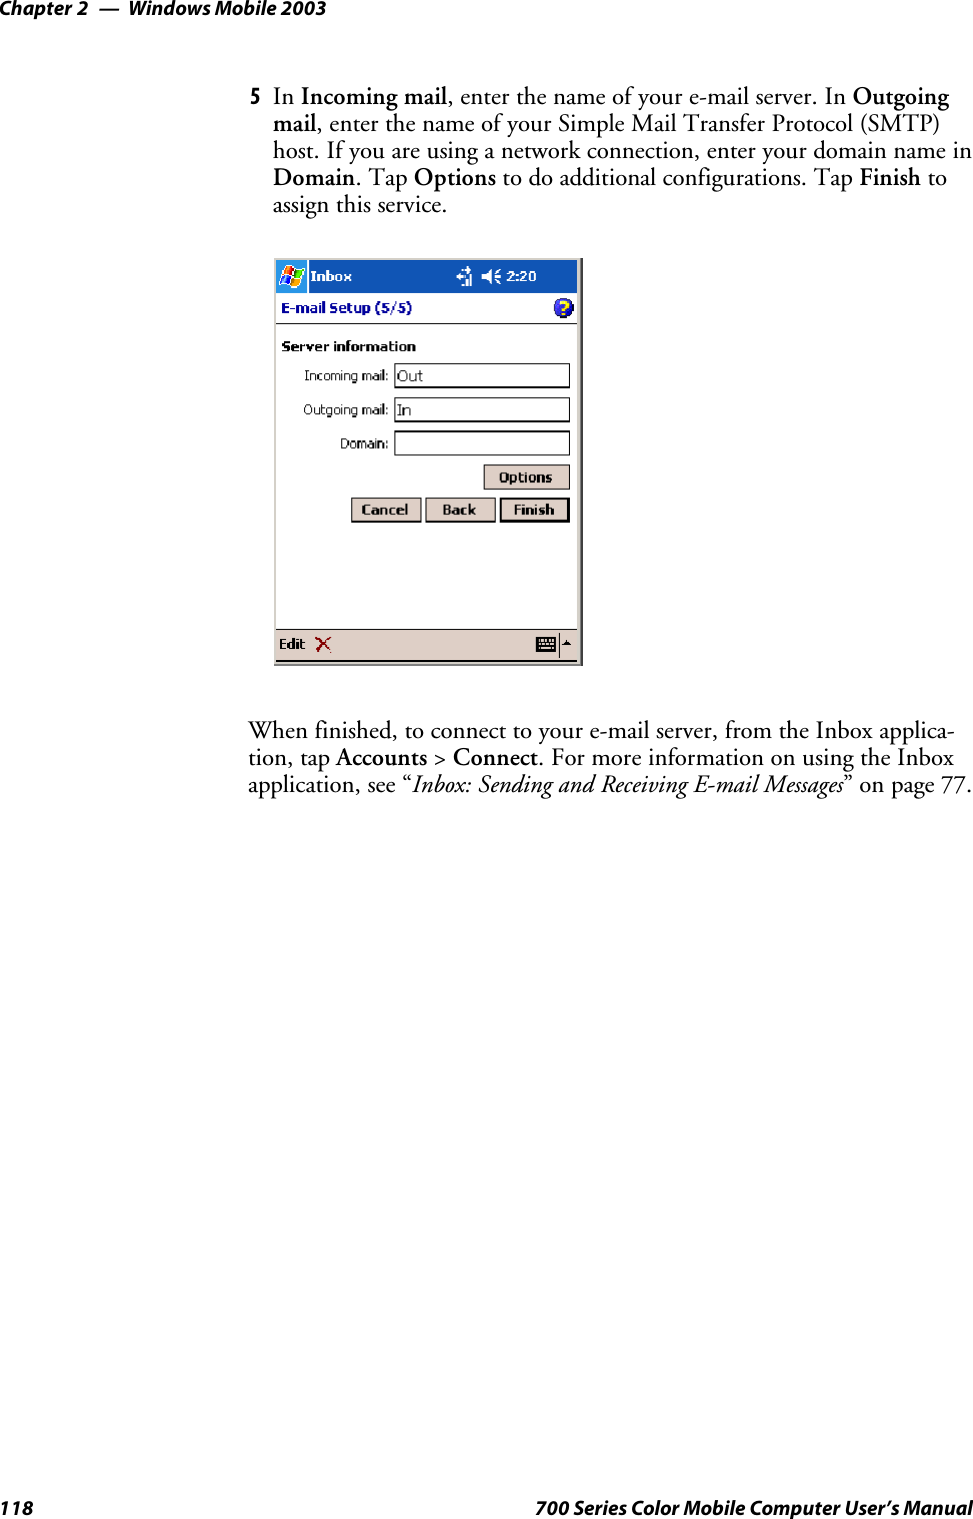
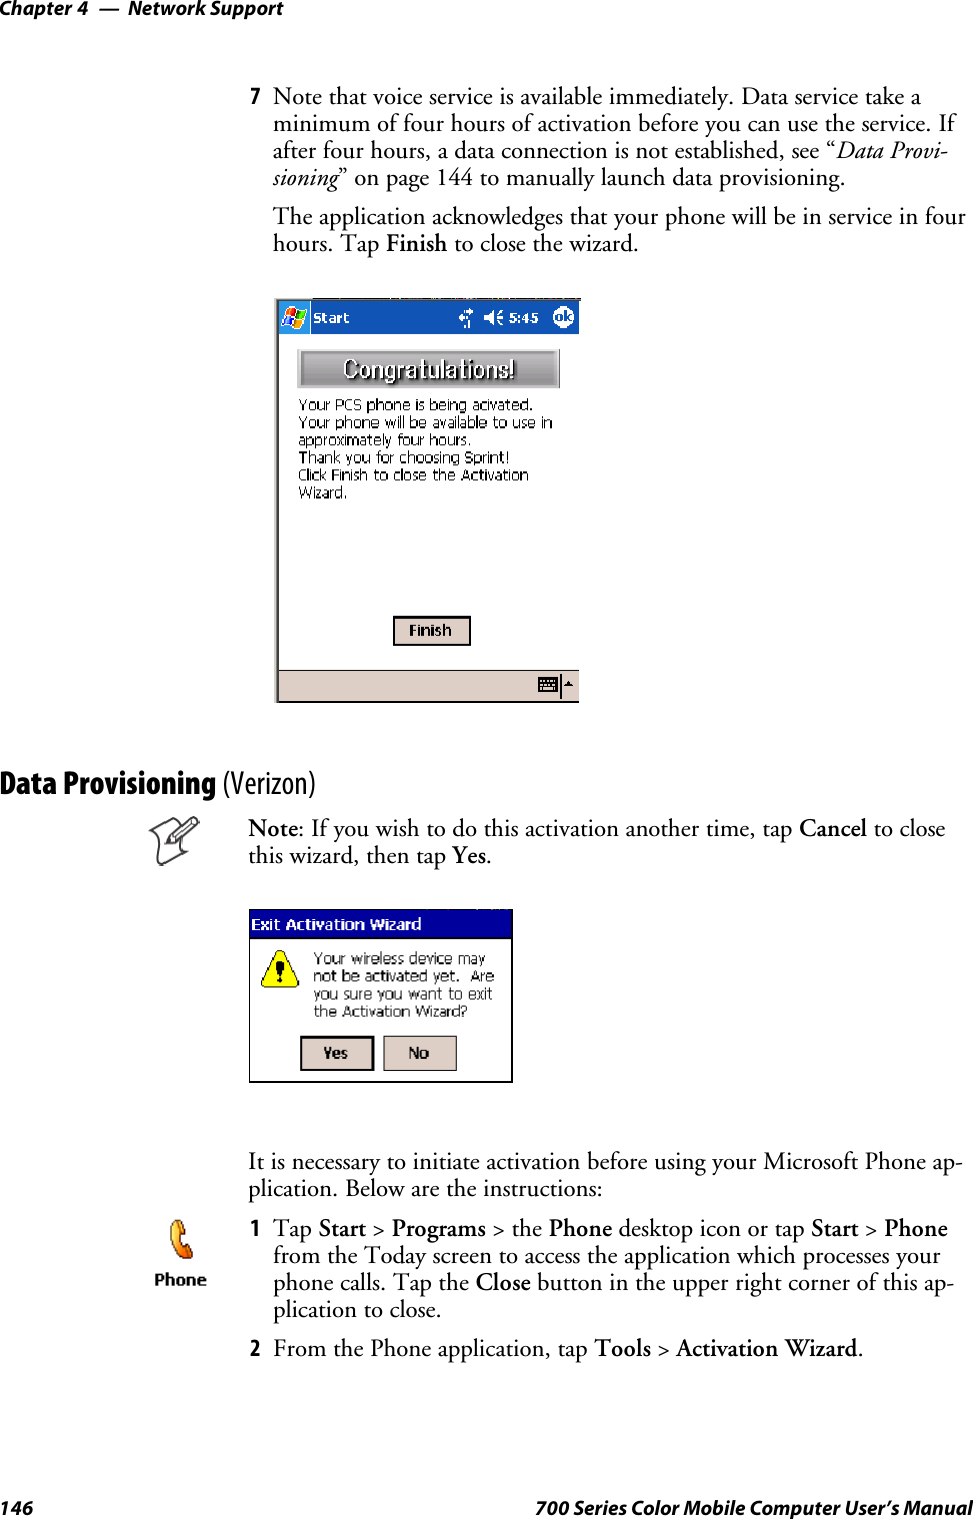
>
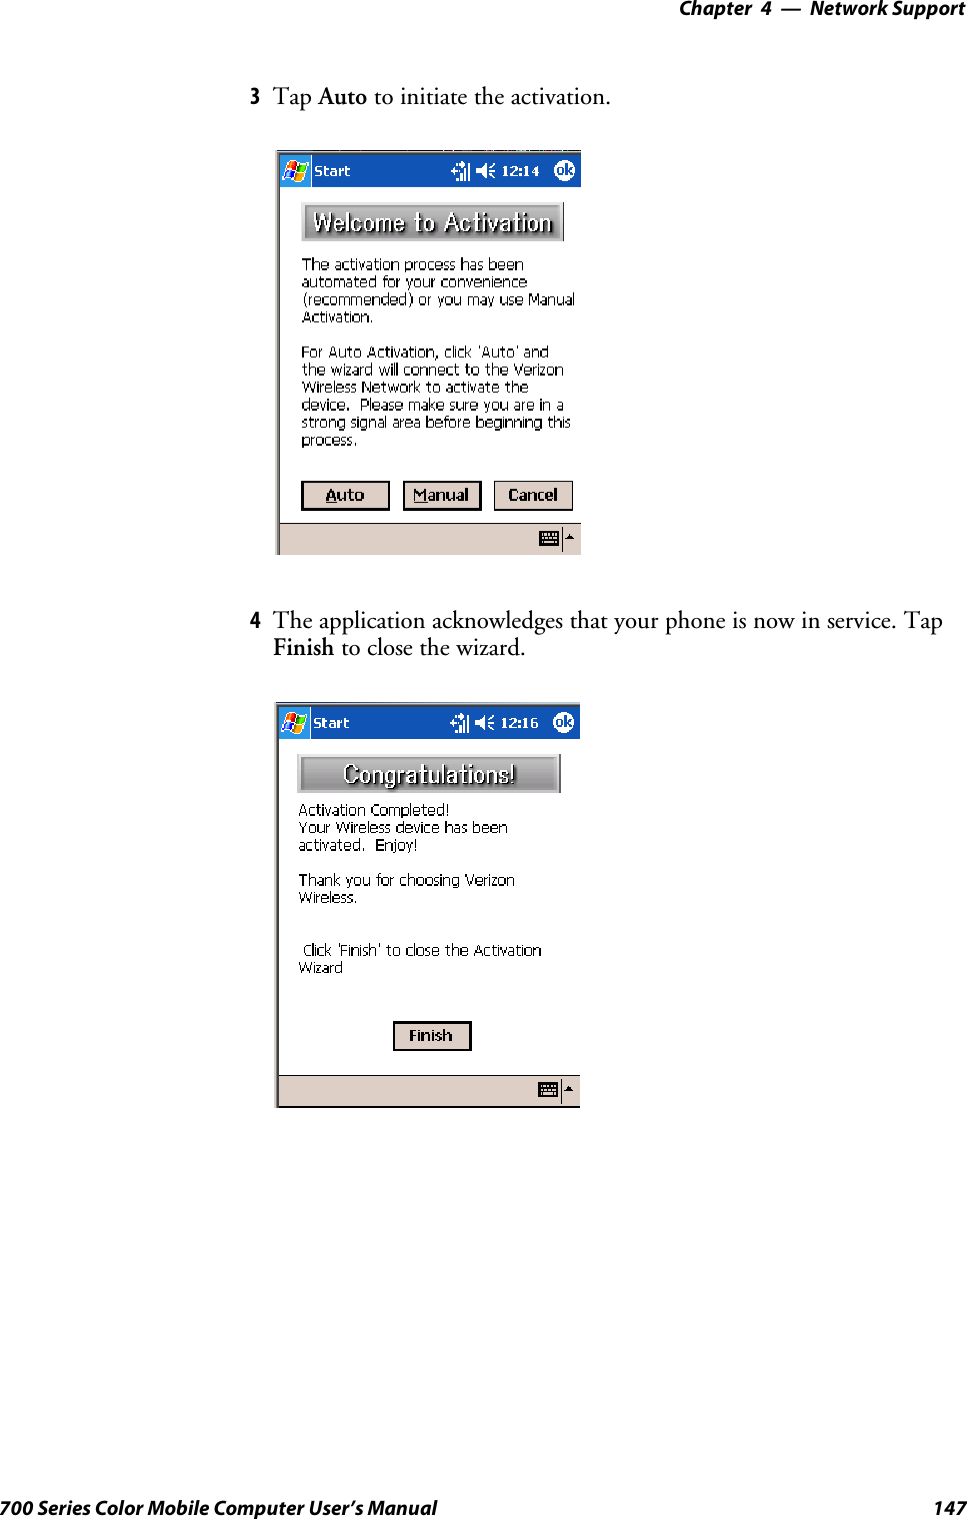
DRCB User Manual
>
User Manual 1 of 2
Contents
1.
Compliance Insert
2.
Users Manual 1 of 3
3.
Users Manual 2 of 3
4.
Users Manual 3 of 3
5.
User Manual 1 of 2
6.
User Manual 2 of 2
7.
User Manual
8.
Quick Start Guide
User Manual 1 of 2
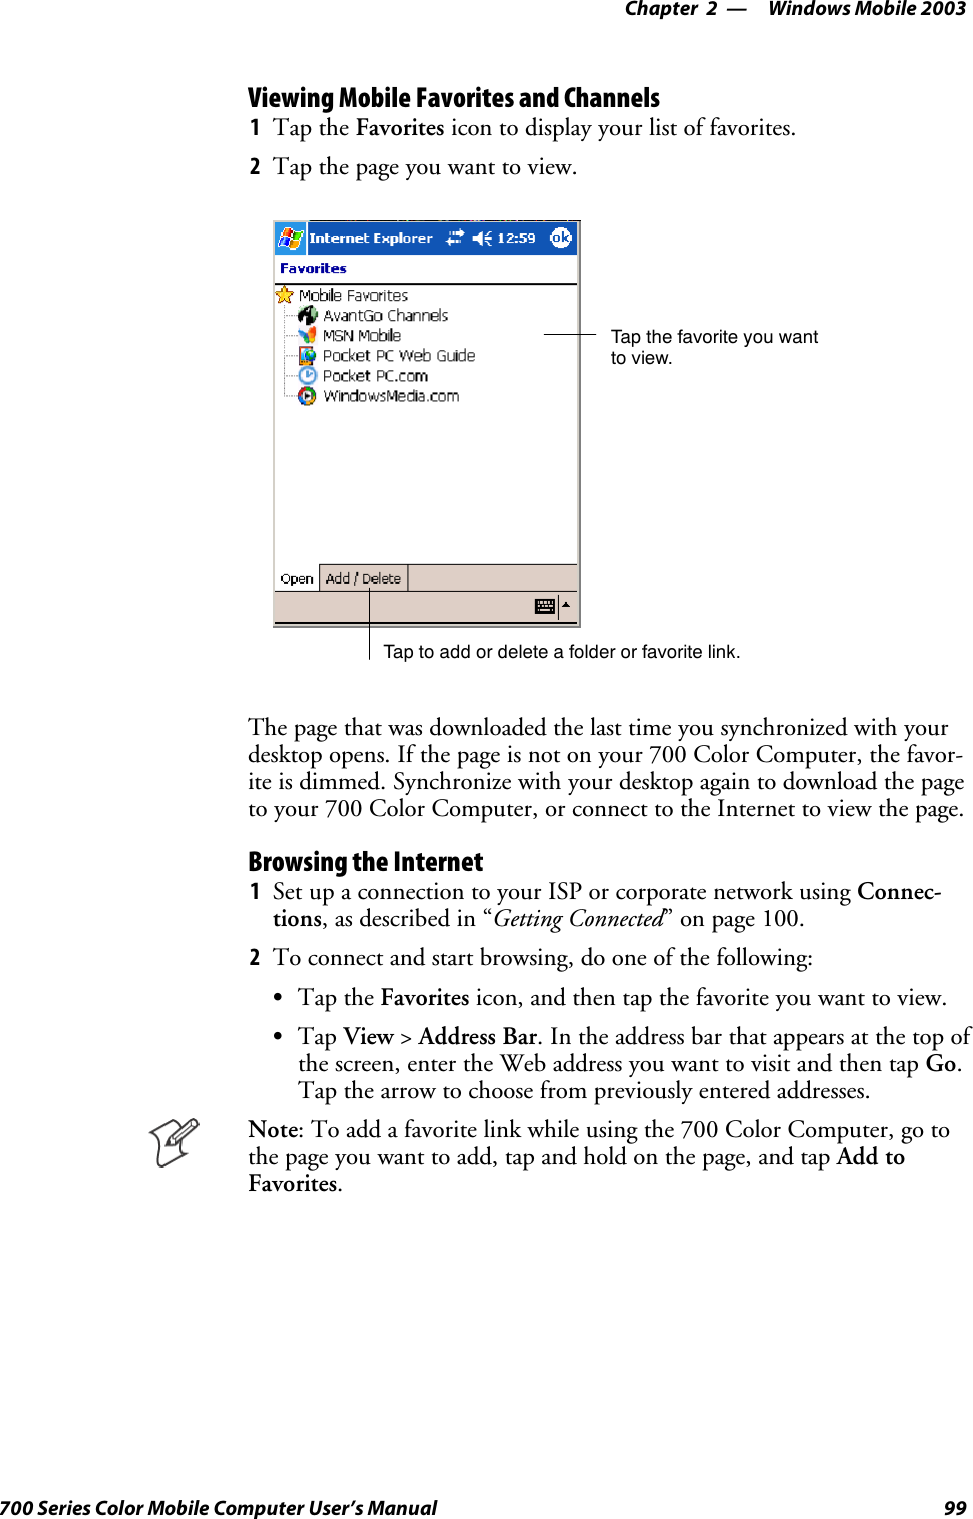
Navigation menu
Upload a User Manual
Namespaces
Wiki Guide
HTML
PDF
Info
Views
User Manual
Discussion / Help
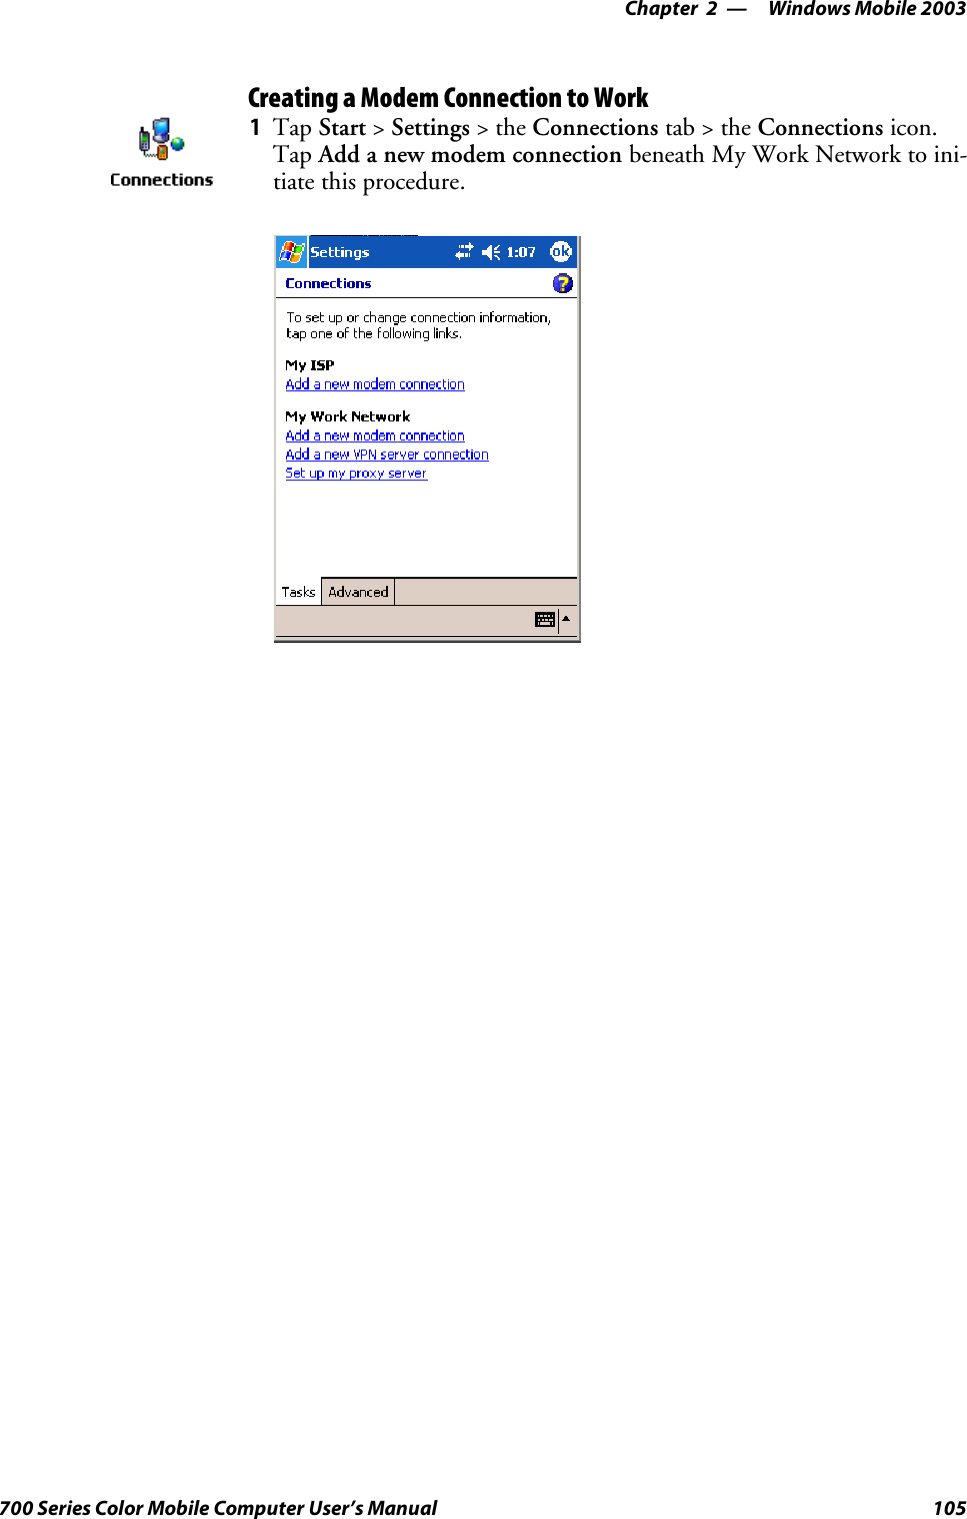
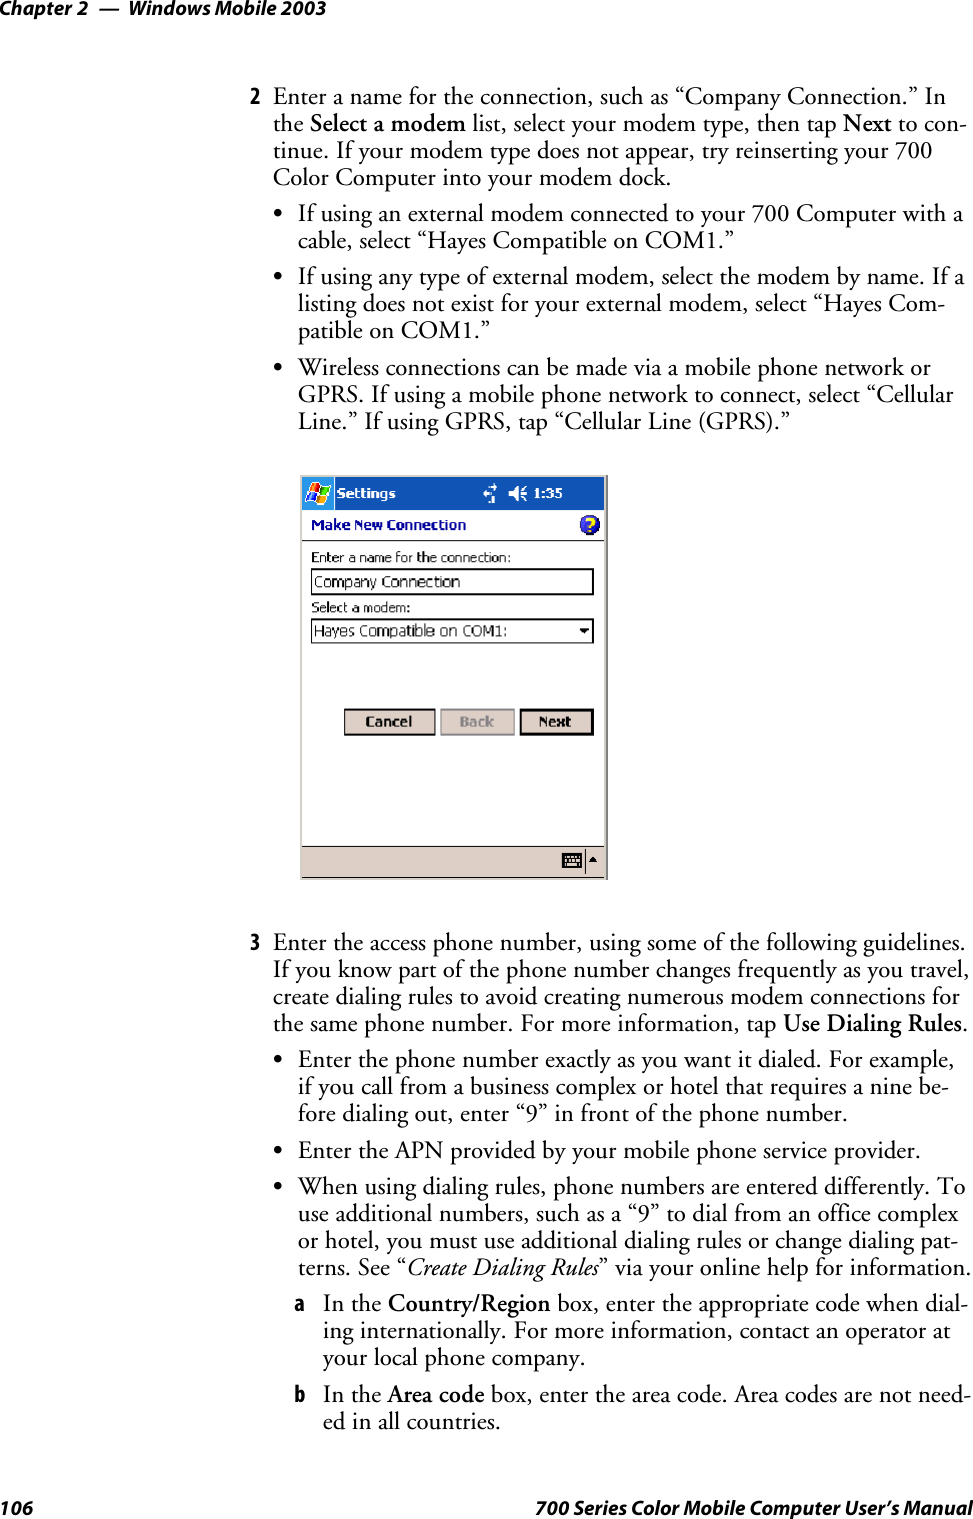
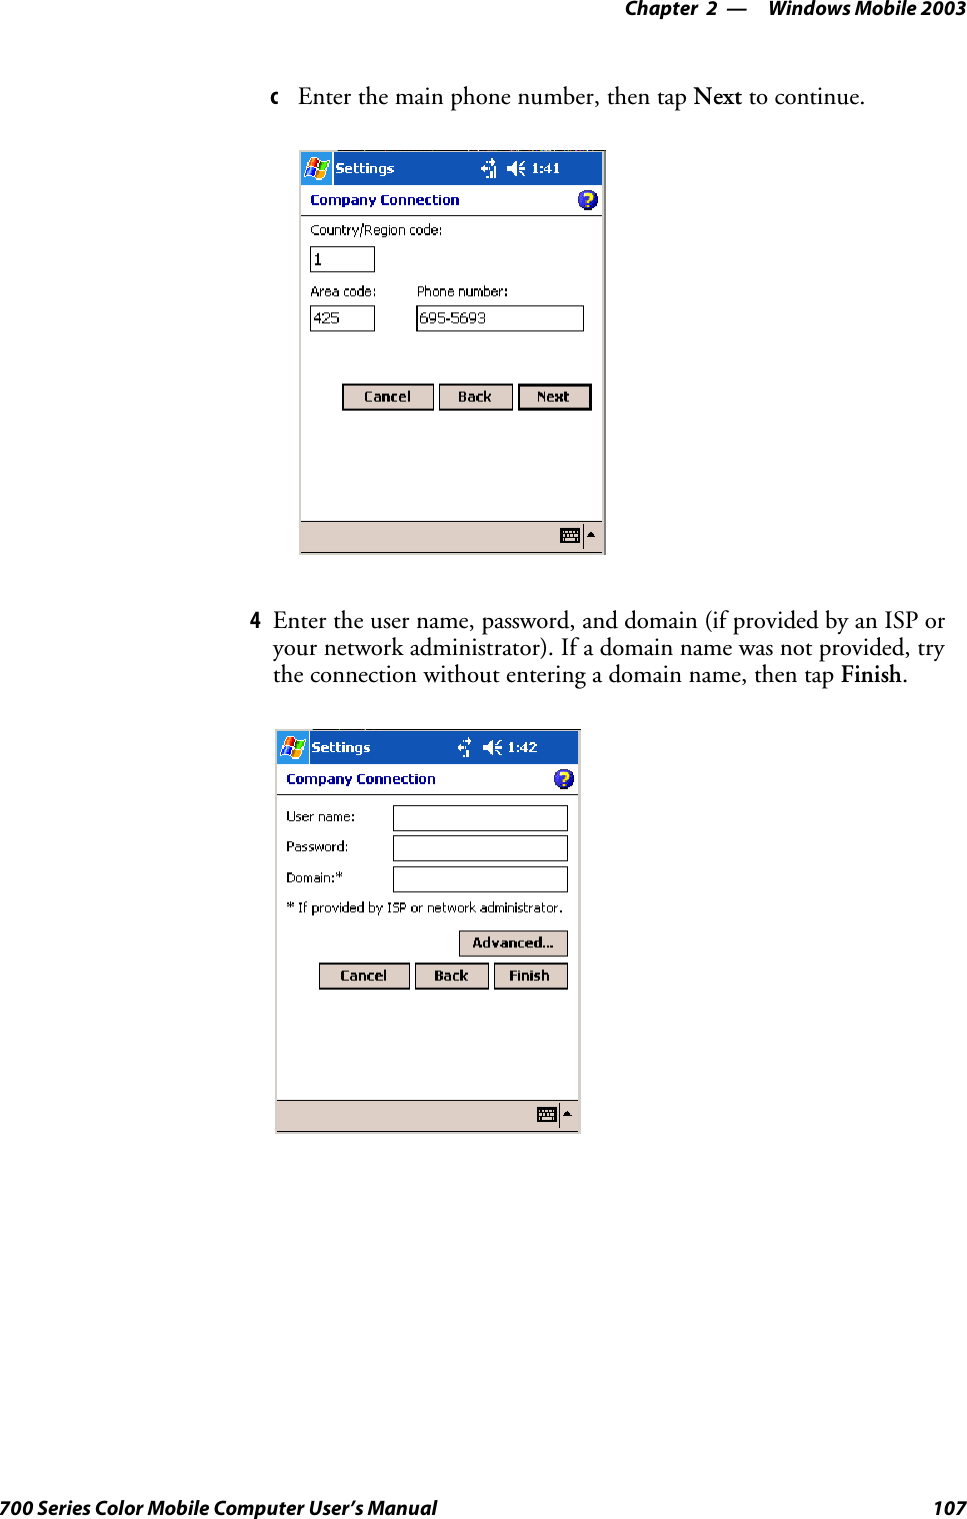
Navigation

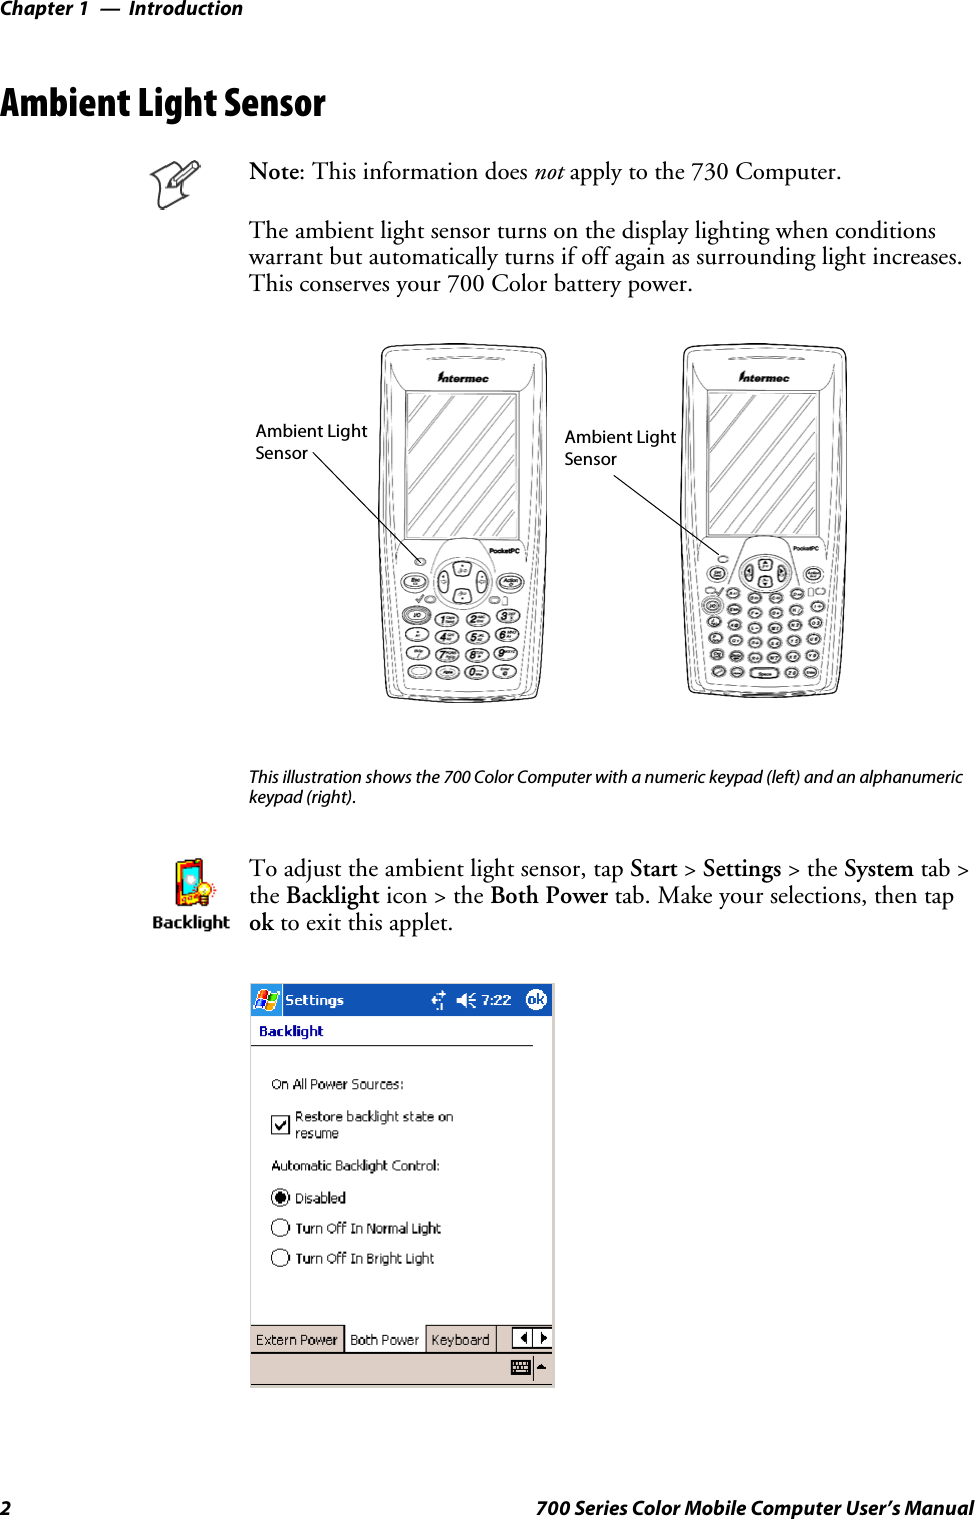
![Contentsv700 Series Color Mobile Computer User’s ManualContentsBefore You Begin xix.............................................................Safety Summary xix.......................................................Donotrepairoradjustalone xix.......................................First aid xix.......................................................Resuscitation xix...................................................Energized equipment xix.............................................Safety Icons xx...........................................................Global Services and Support xxi..............................................Warranty Information xxi............................................Web Support xxi...................................................Telephone Support xxi...............................................WhoShouldReadthisManual? xxii..........................................Related Documents xxii....................................................Patent Information xxiii....................................................Introduction1...............................................................Ambient Light Sensor 2..........................................................Audio System 3.................................................................Speaker 3...............................................................Microphone 4...........................................................External Headset Jack 4....................................................Battery 5......................................................................Beeper 7......................................................................Enable the Beeper 7.......................................................Disable the Scanner Mute 8.................................................Select a Beeper Volume 9...................................................Disable the Beeper 11.....................................................Keypad 12.....................................................................Backlight for Keypad 12....................................................Key Sequences 13.........................................................[Gold] or [Gold/White] Plane Keys 13..................................Alpha (Blue) Plane Keys 15...........................................LEDs 17......................................................................Modem Support 17..............................................................PSM Build Version 18...........................................................1](https://usermanual.wiki/Intermec-Technologies/DRCB.User-Manual-1-of-2/User-Guide-653440-Page-5.png)
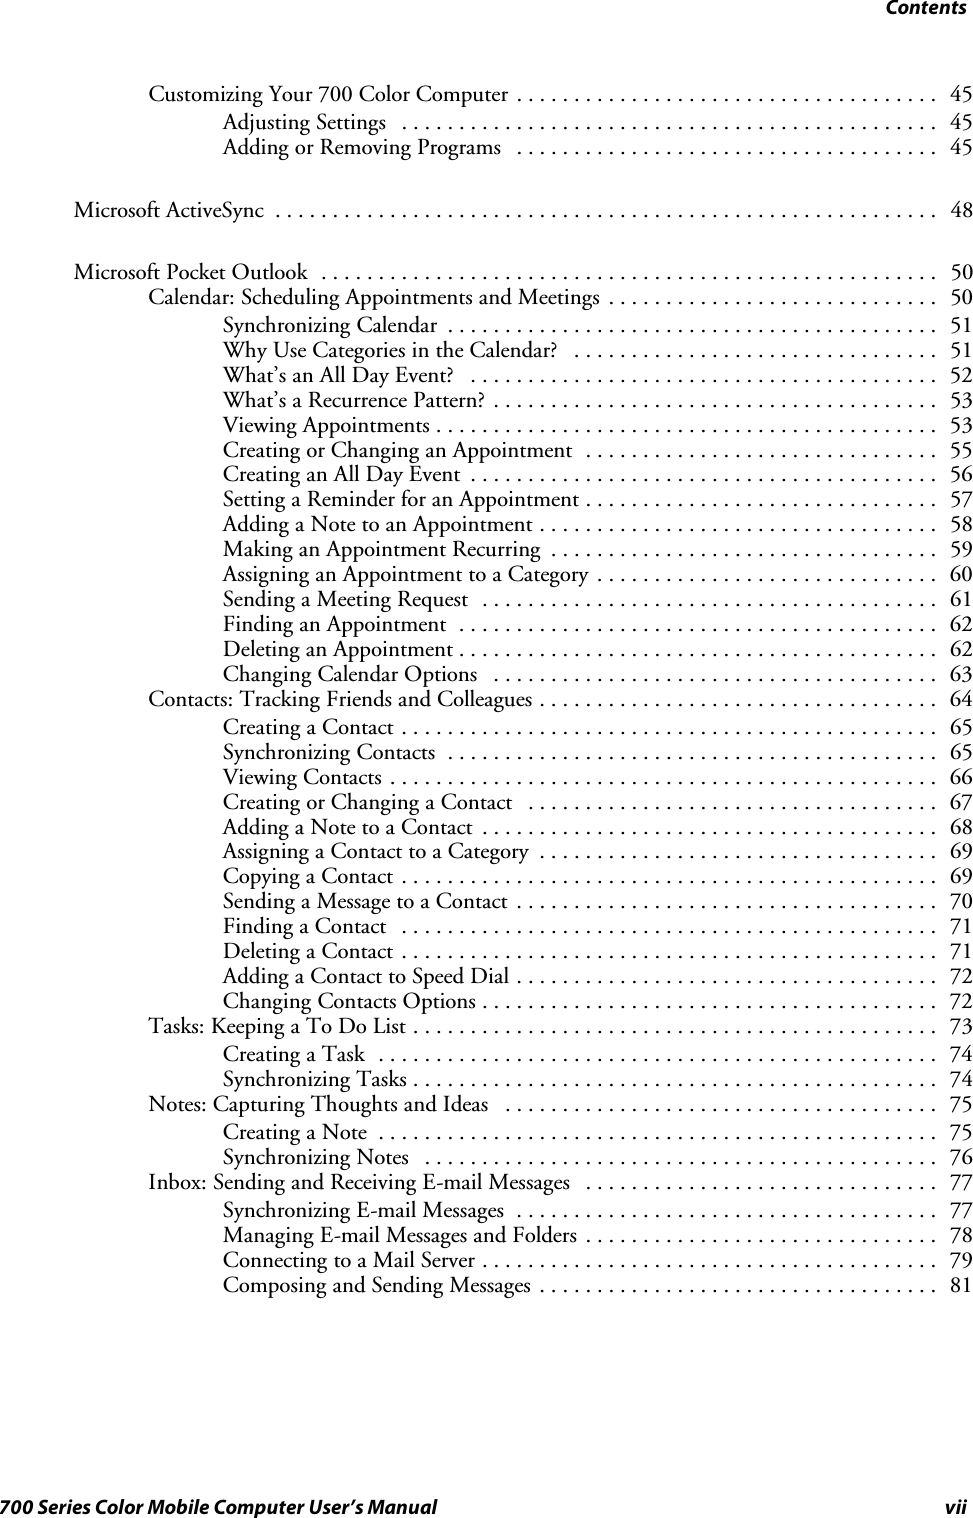

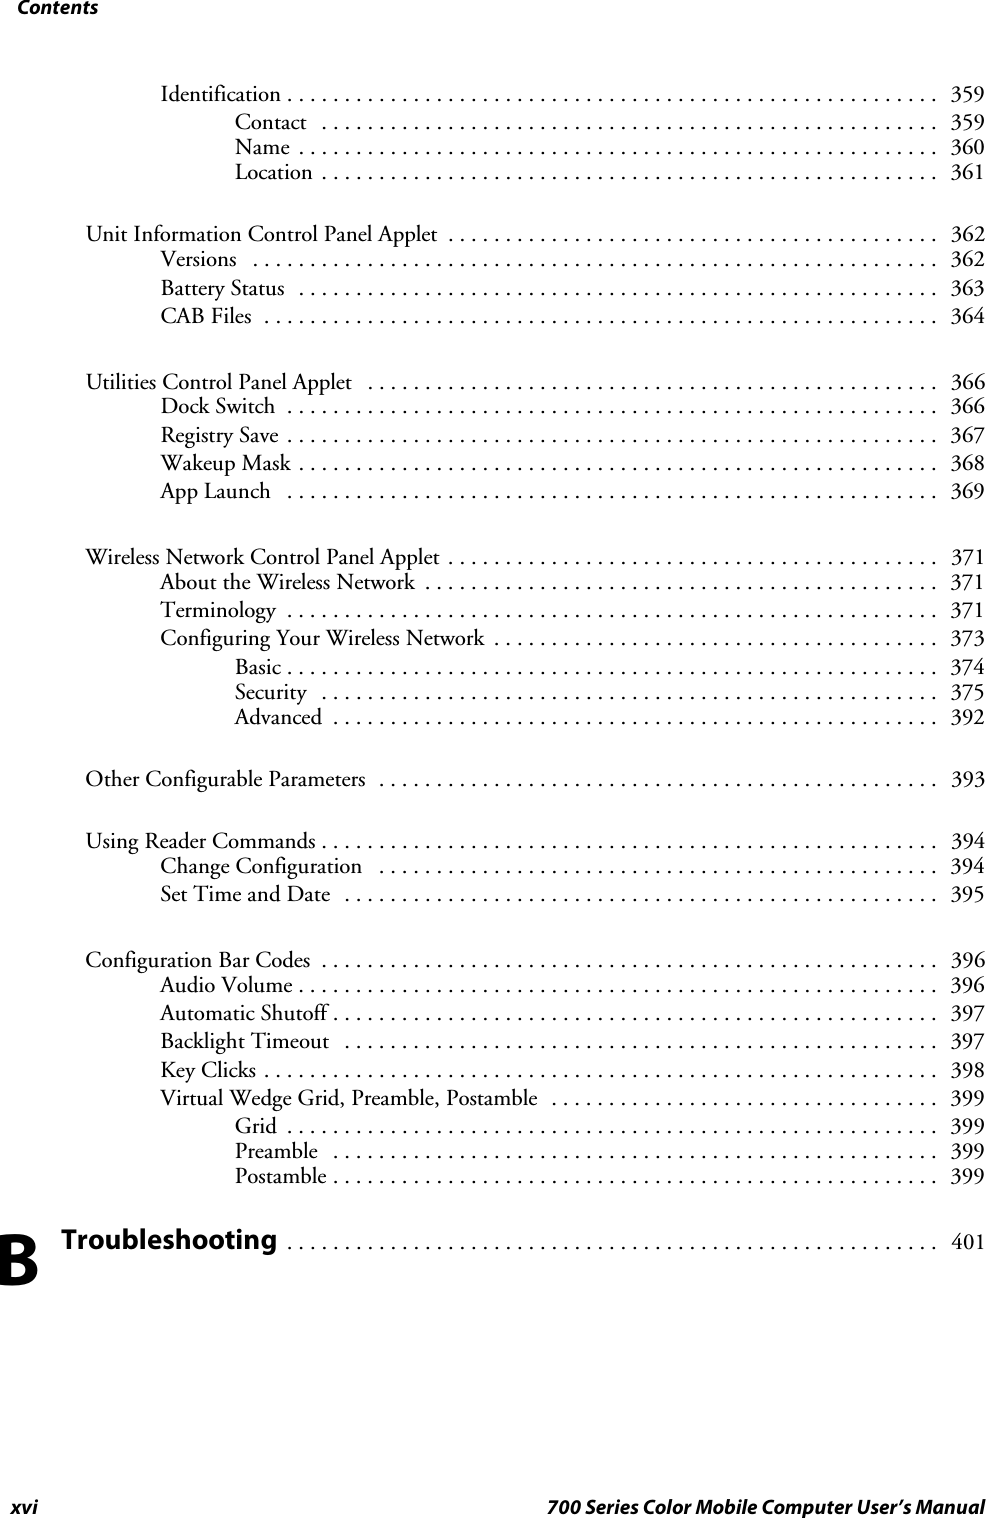


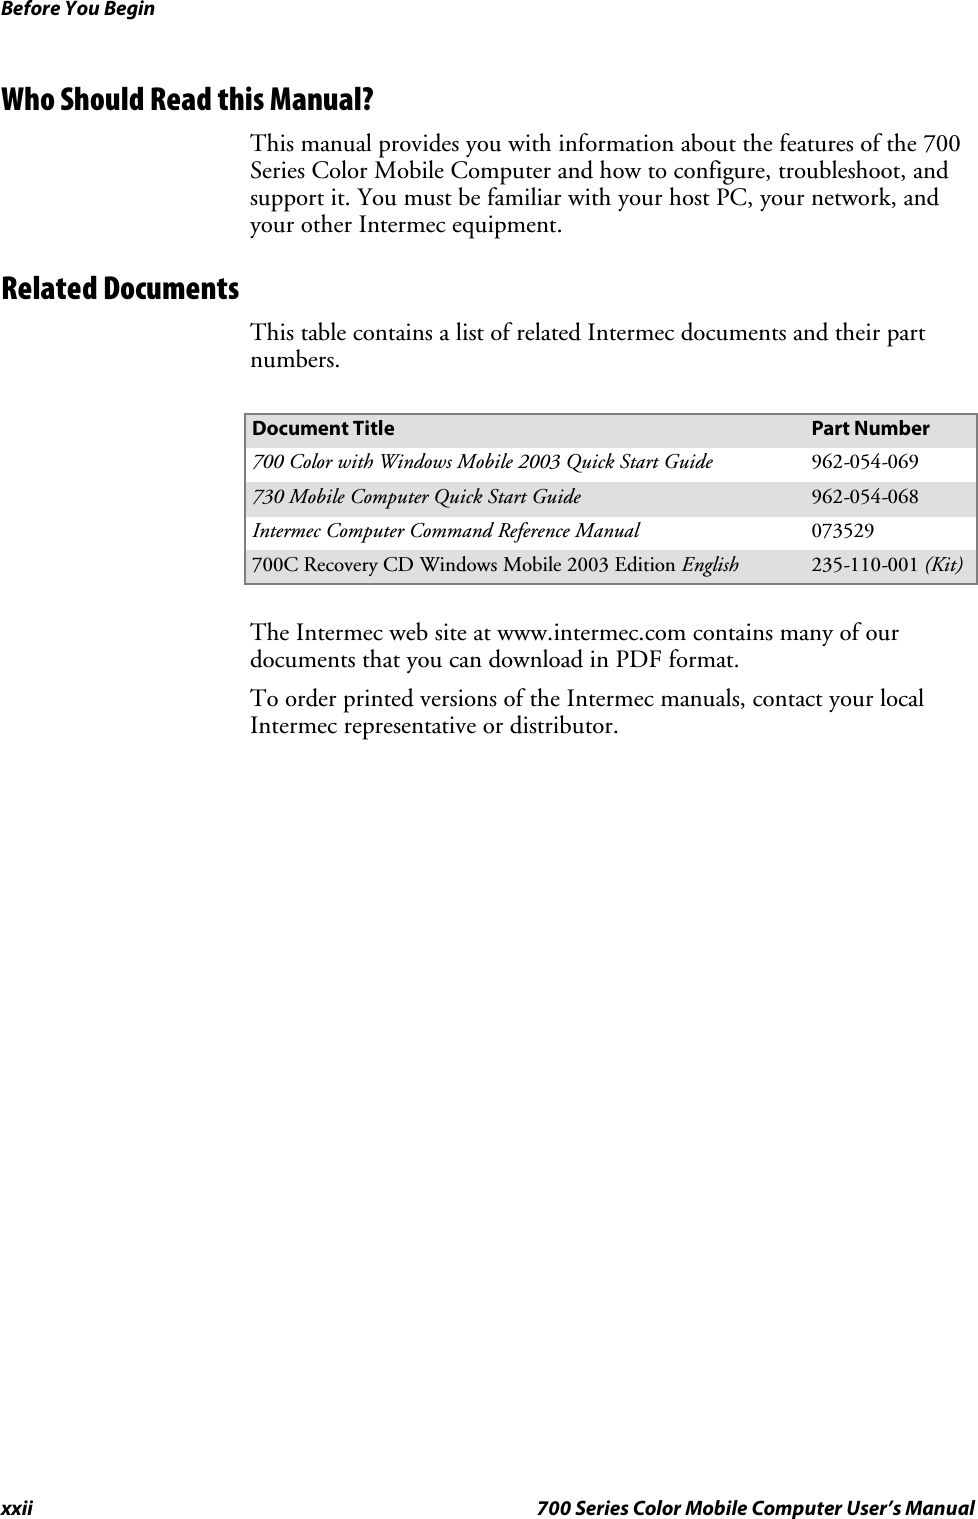

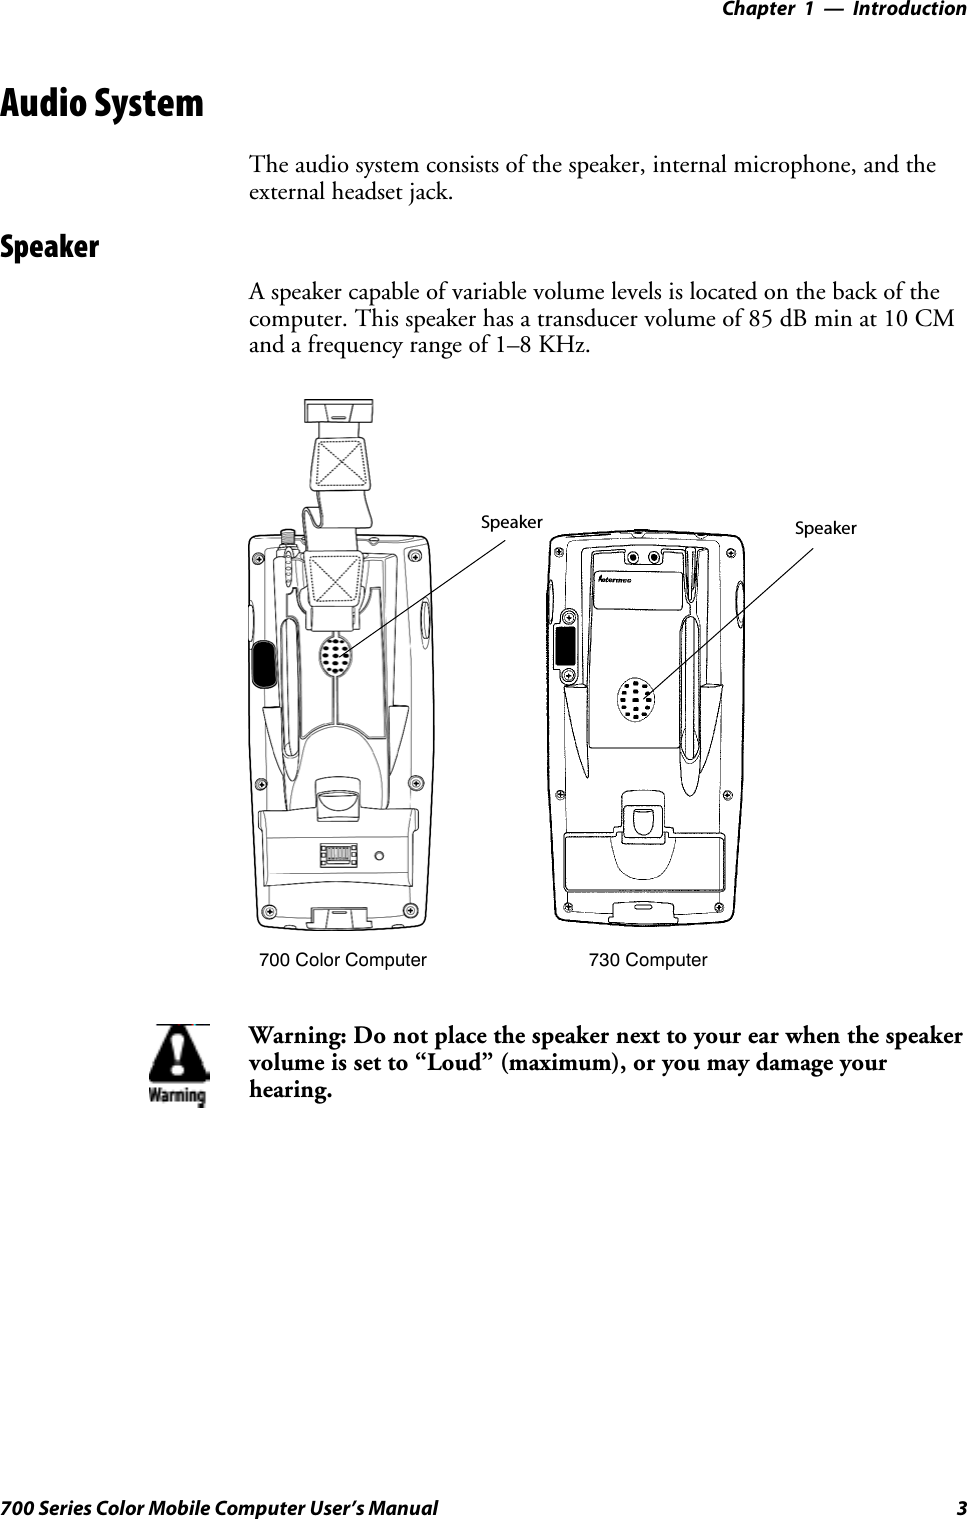
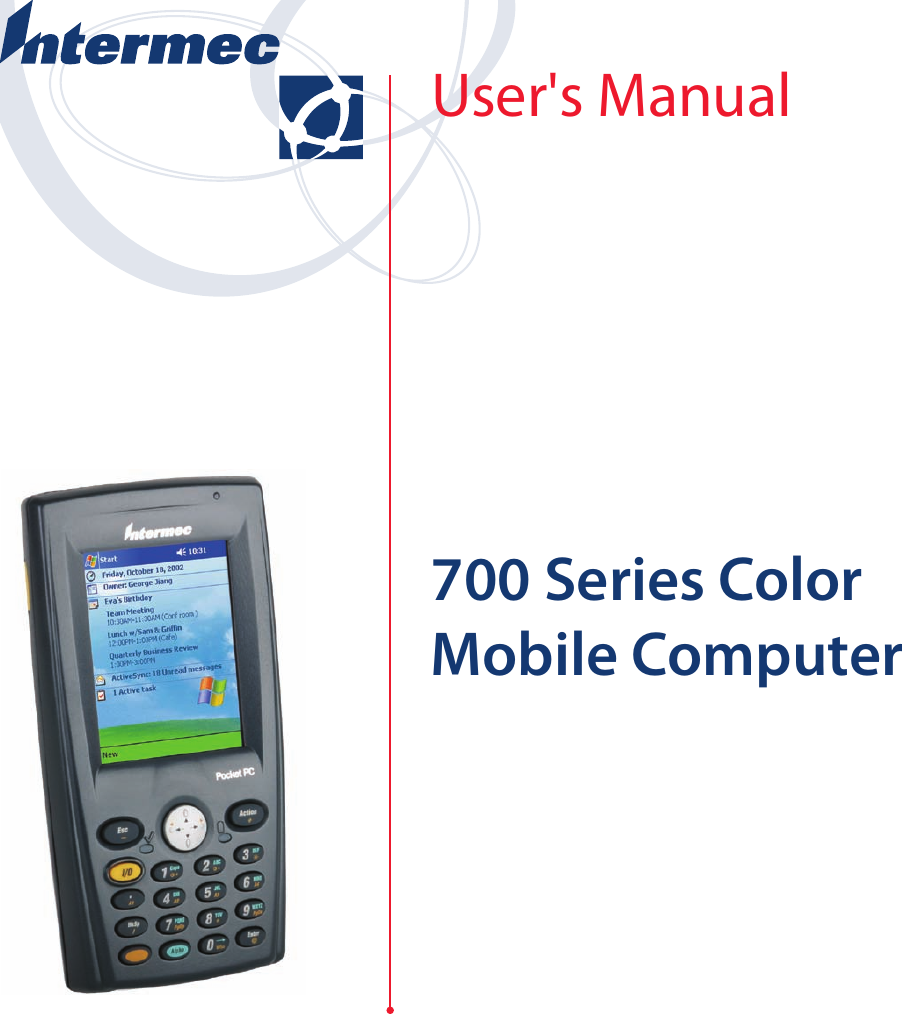
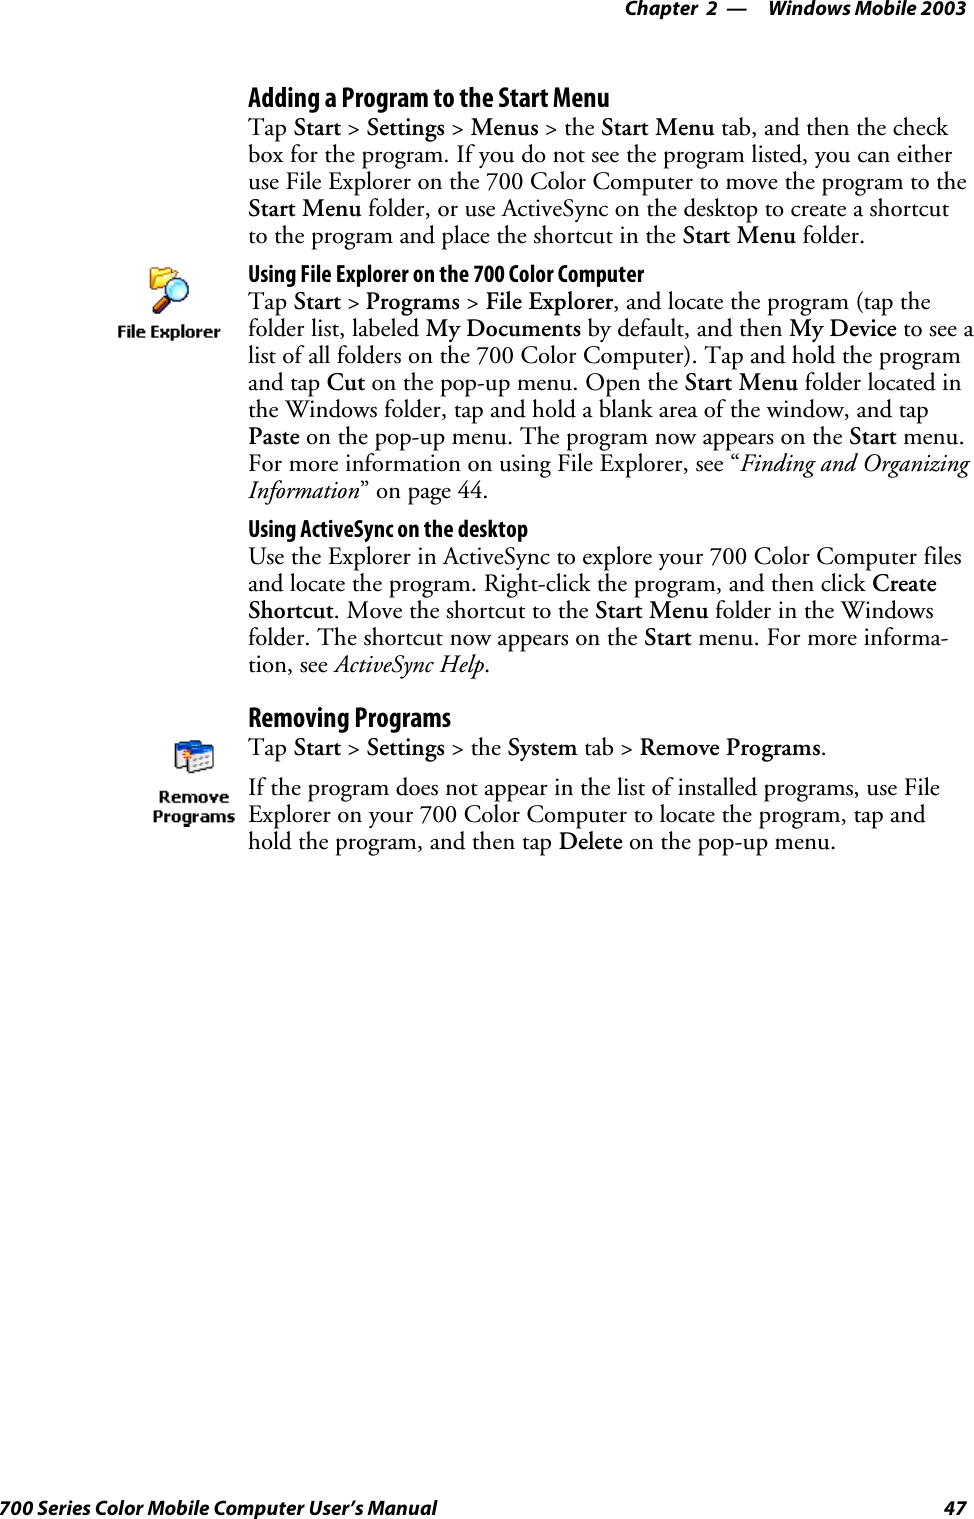
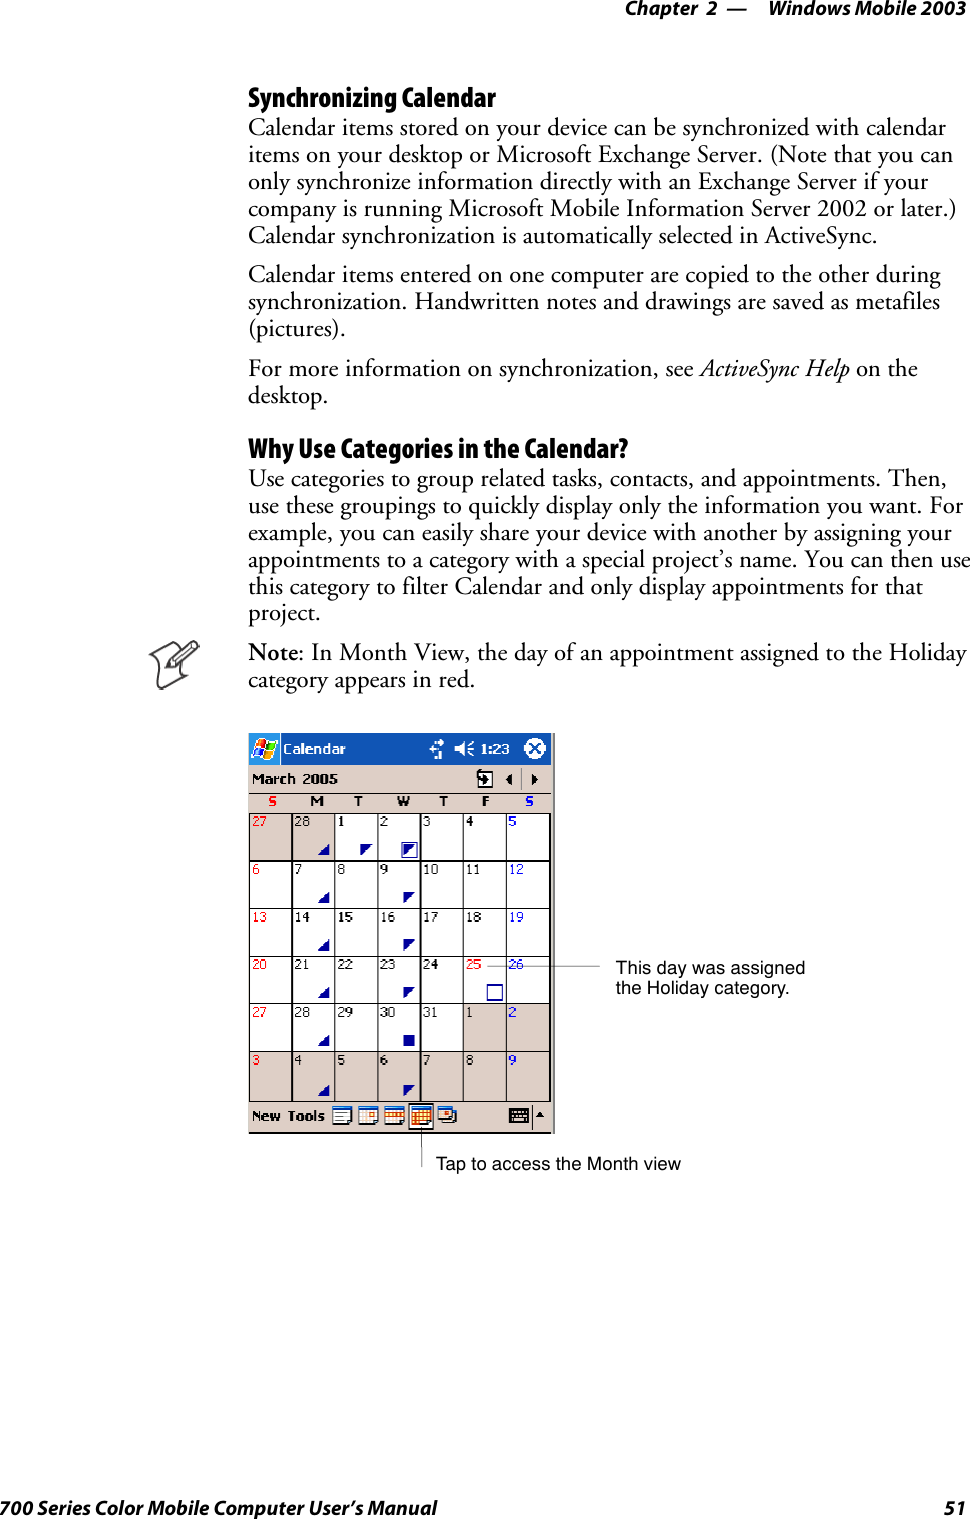
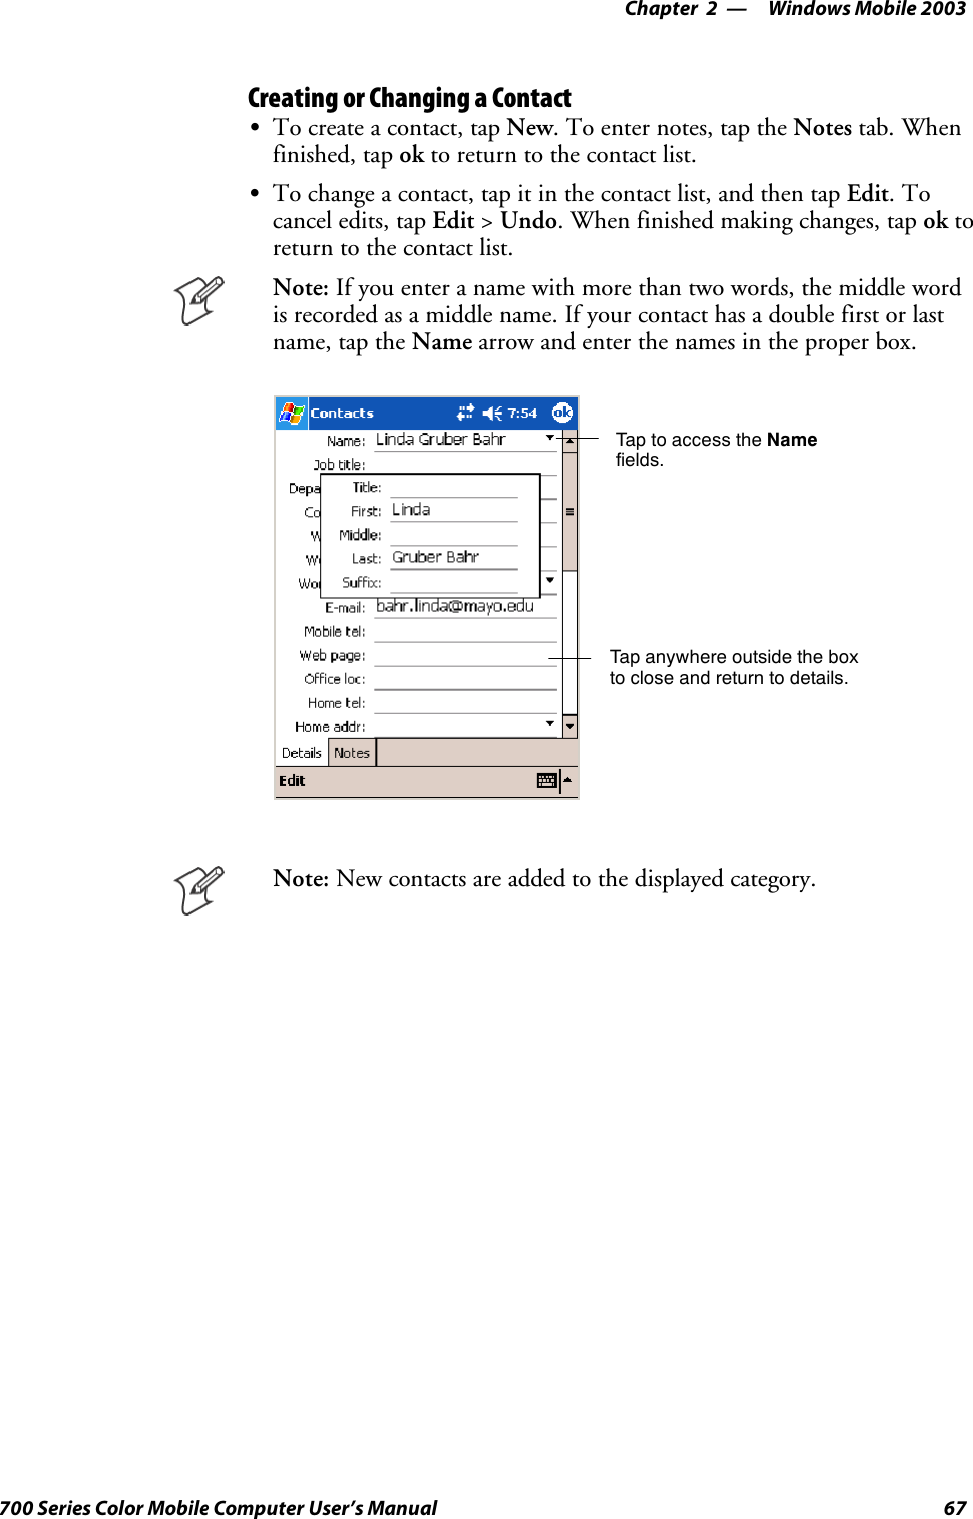
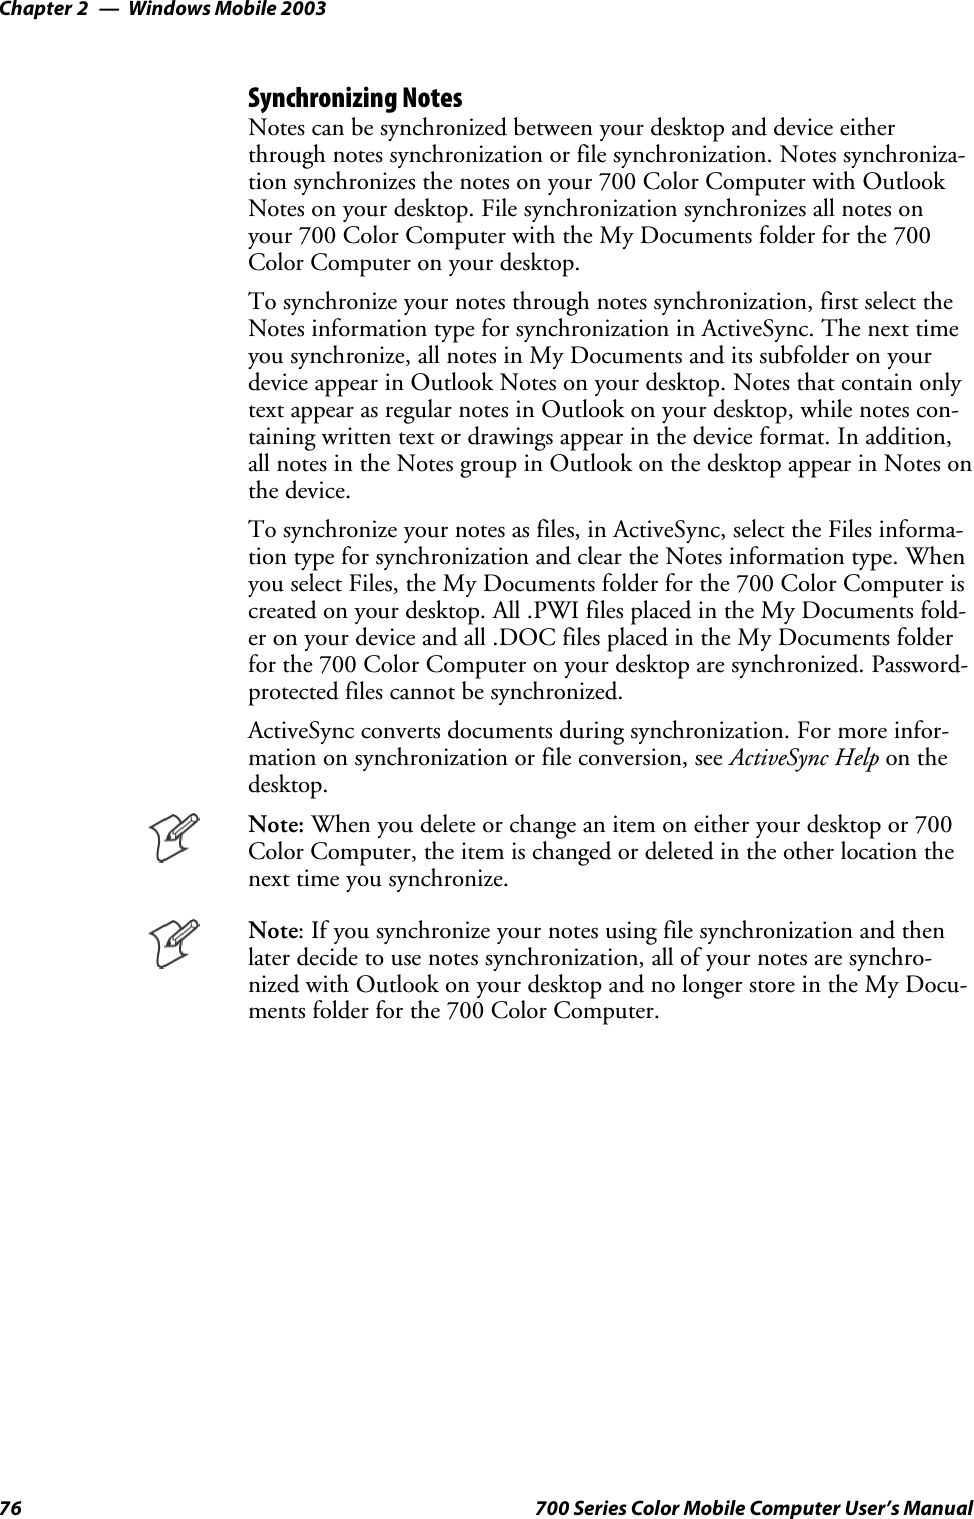
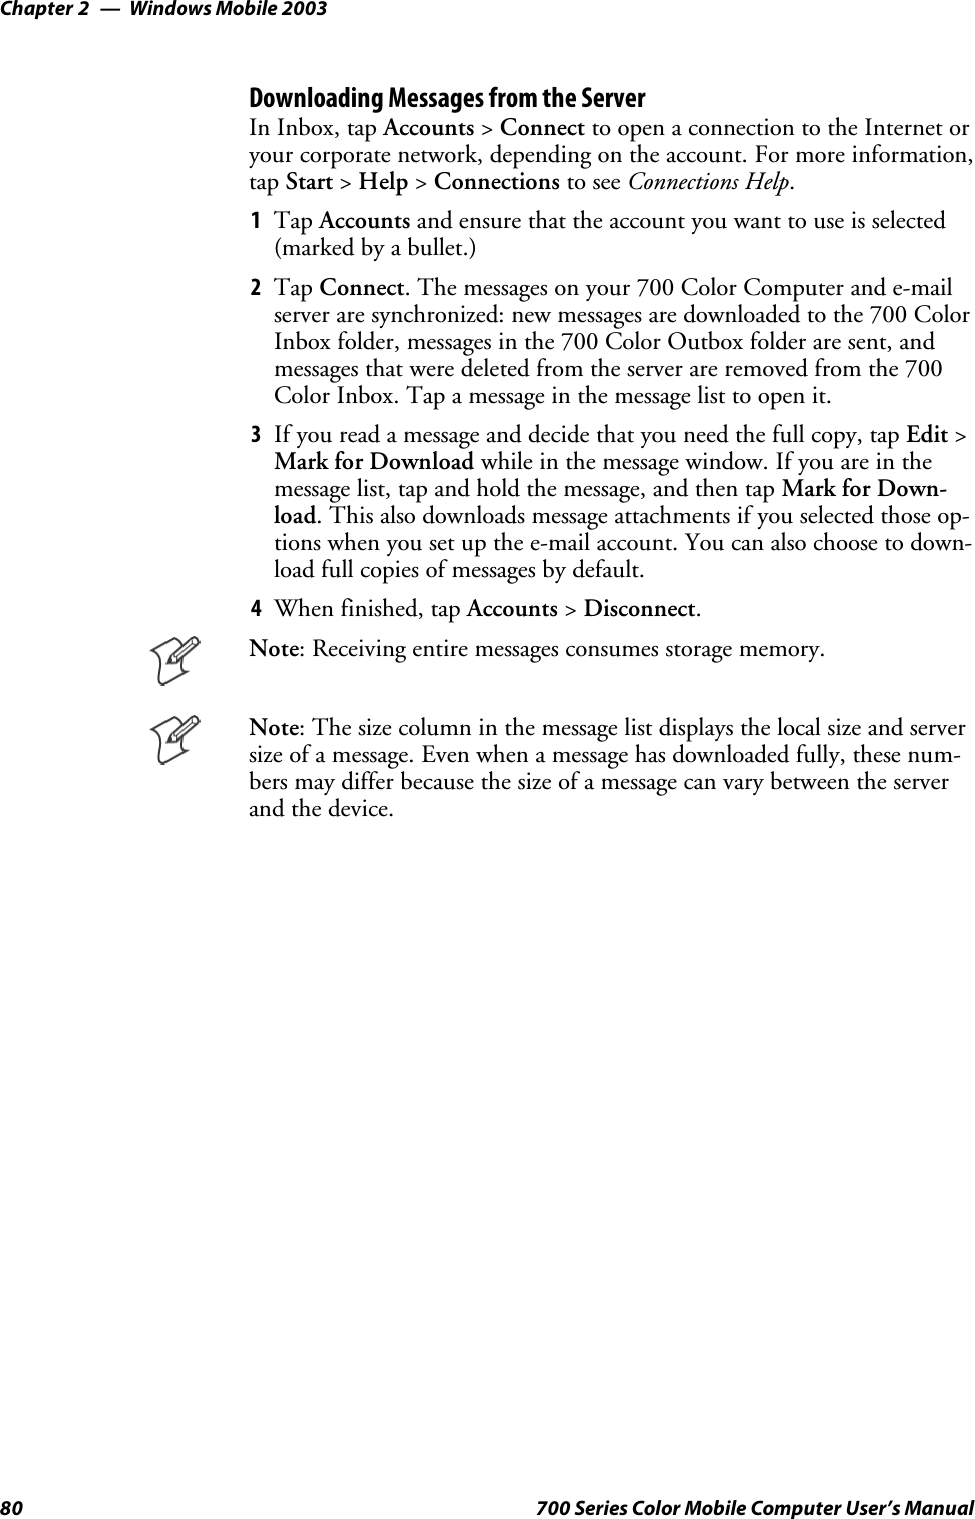
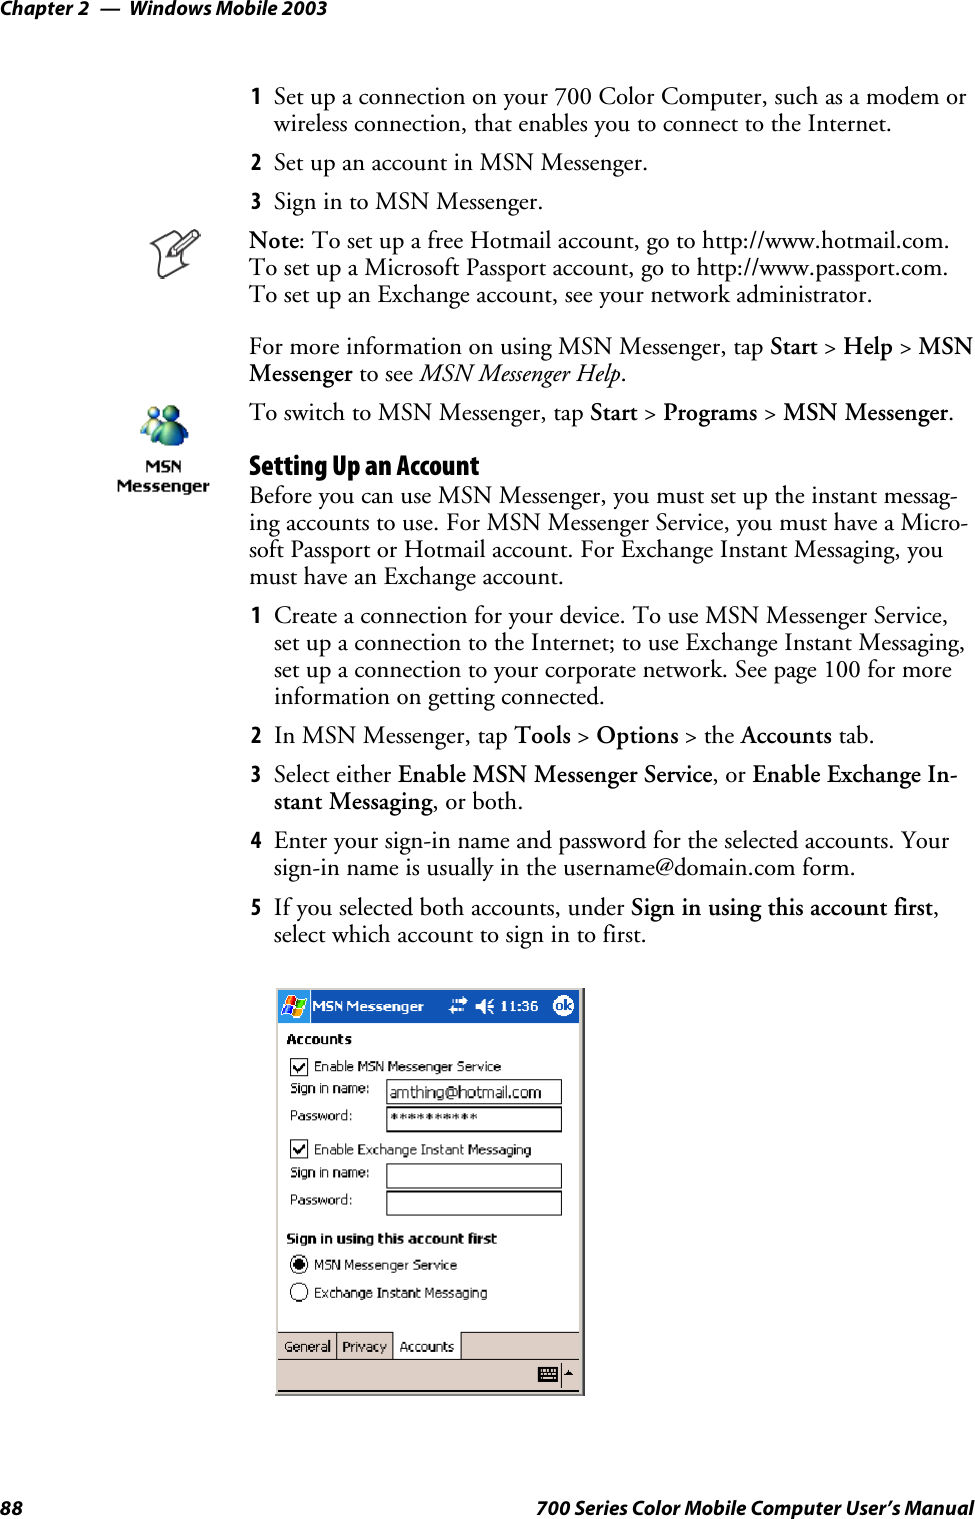
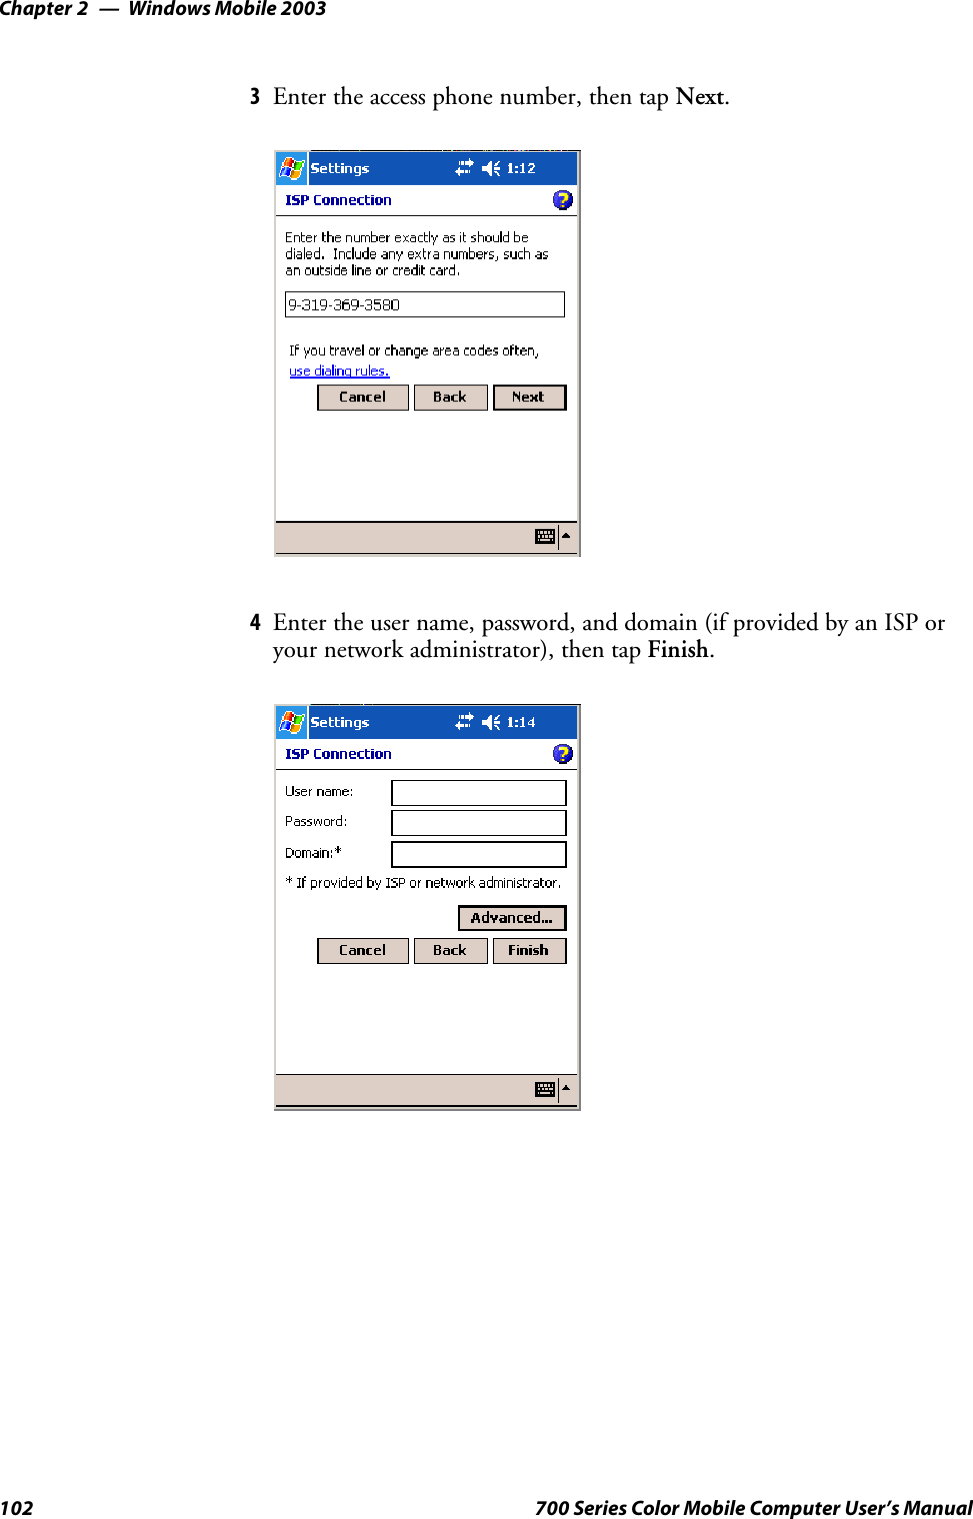
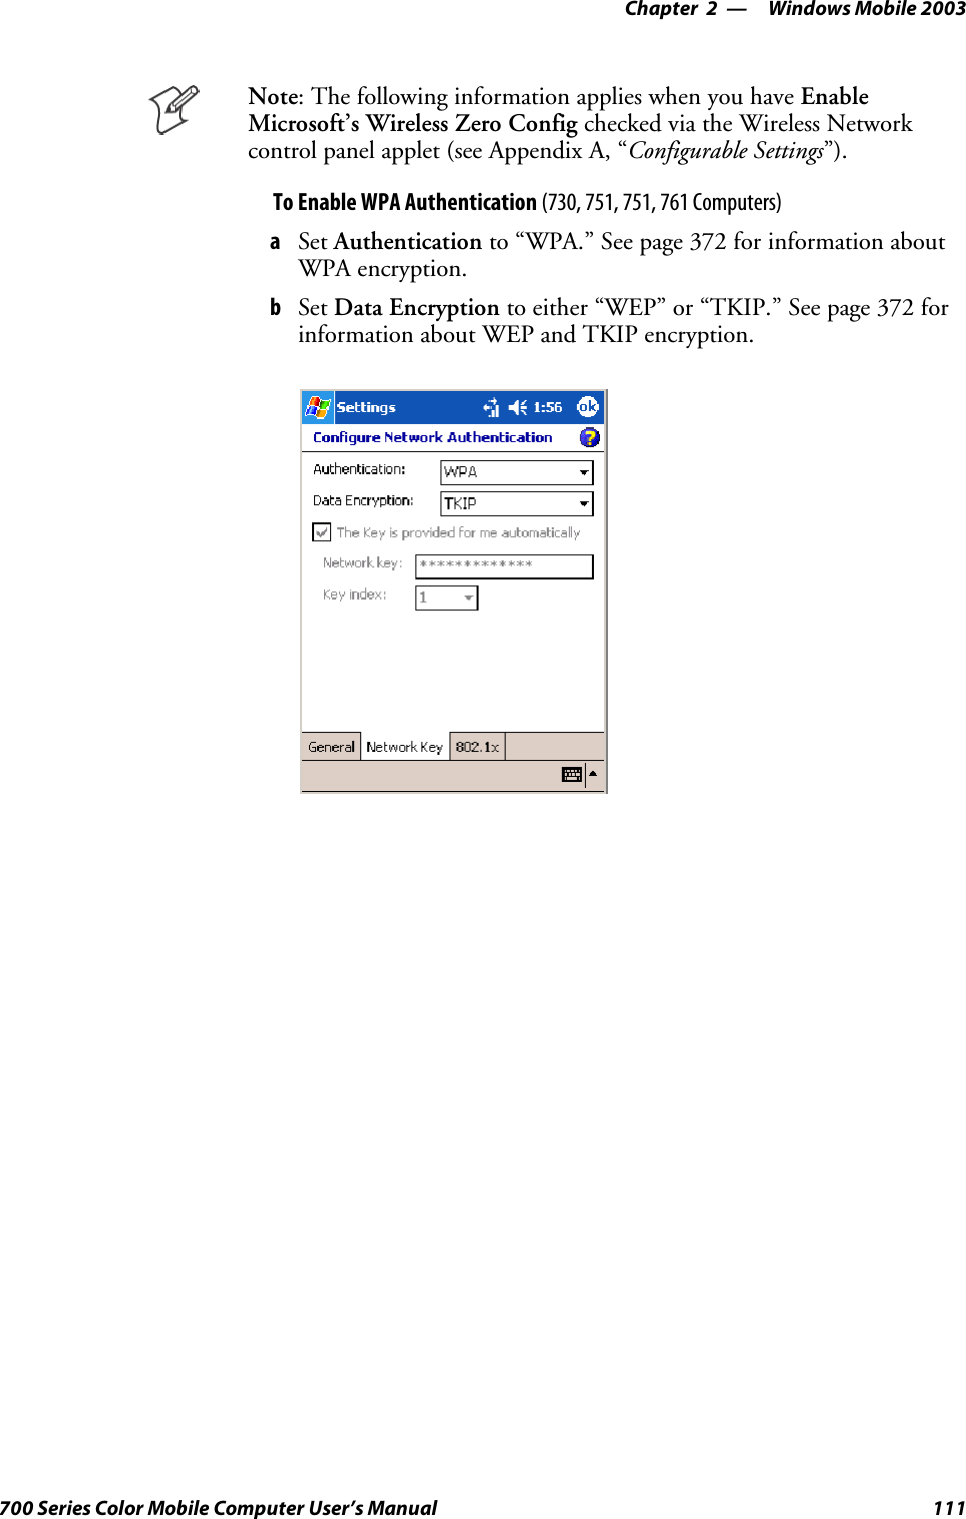
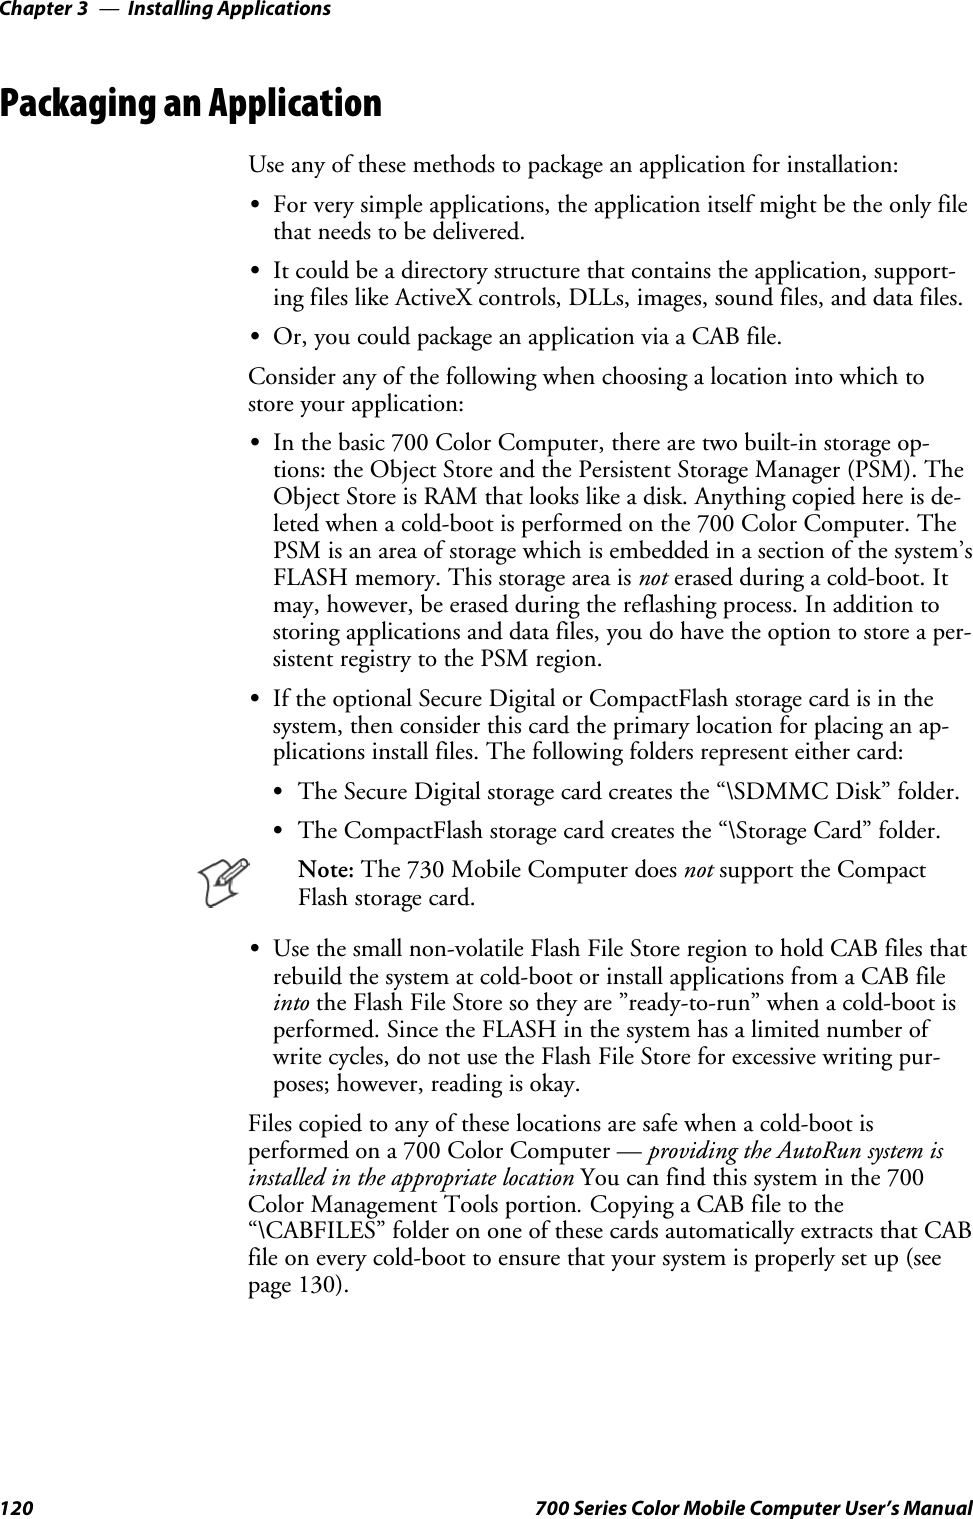
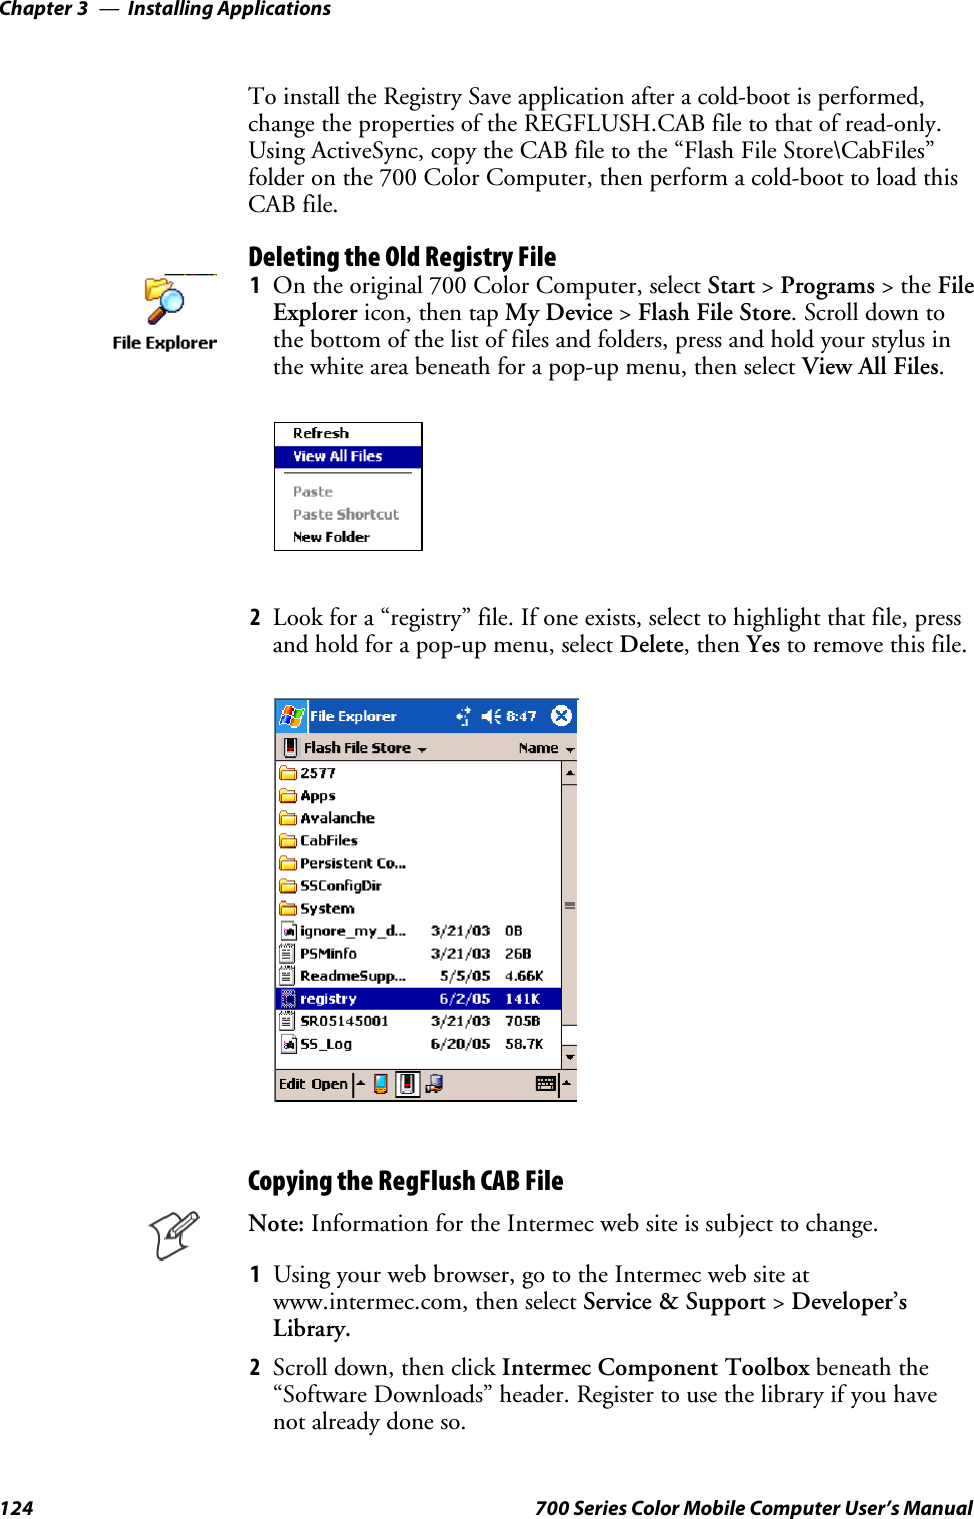
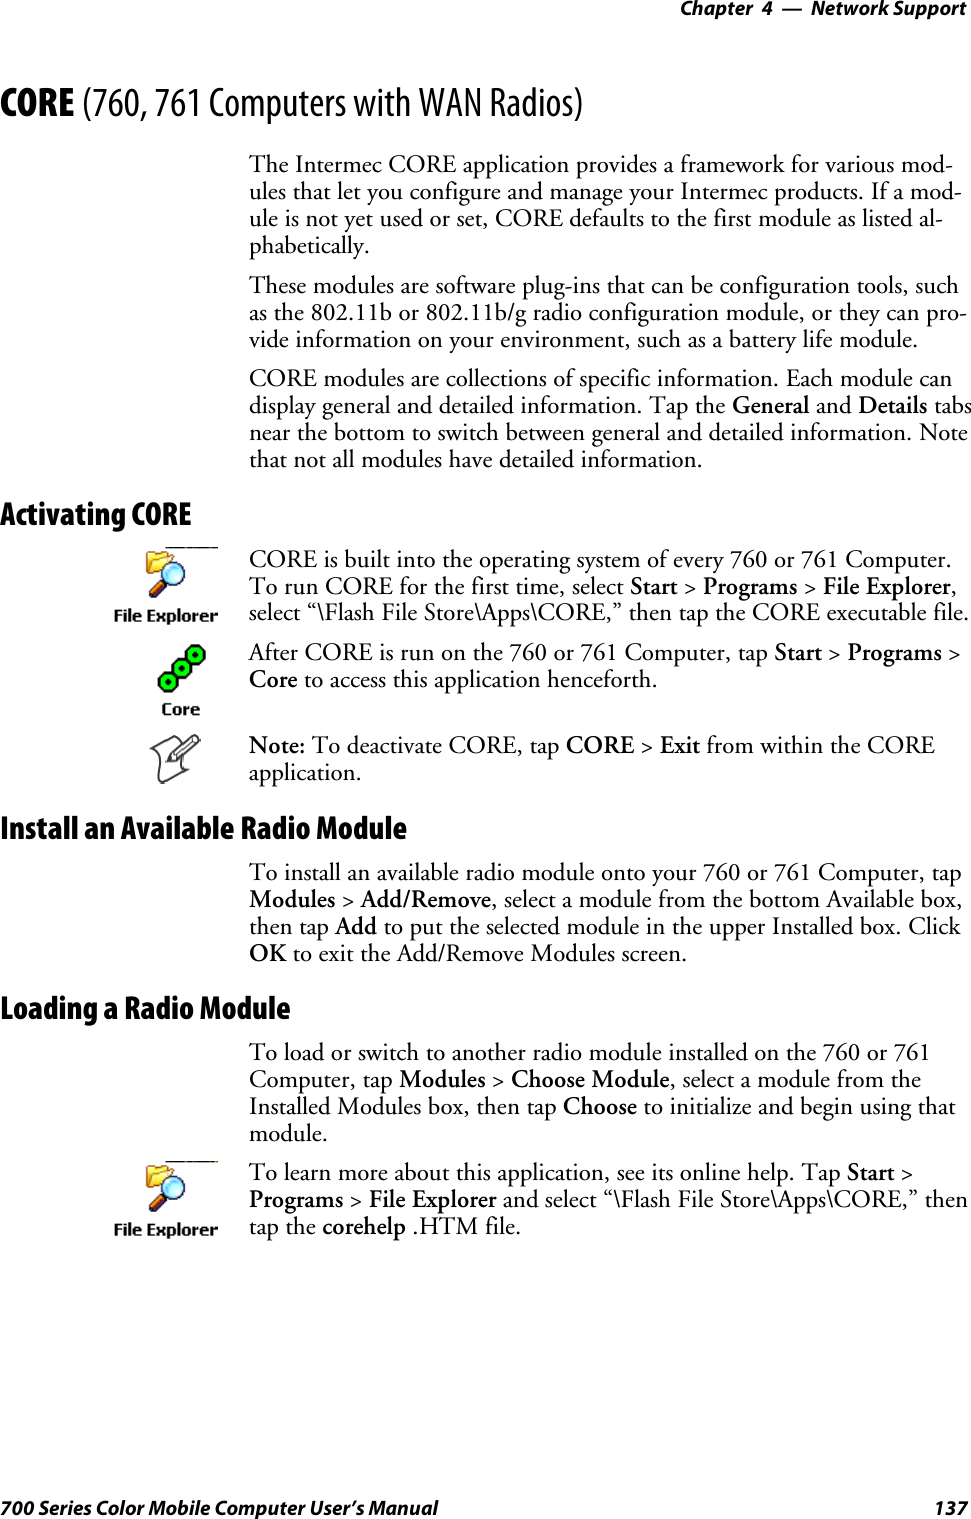
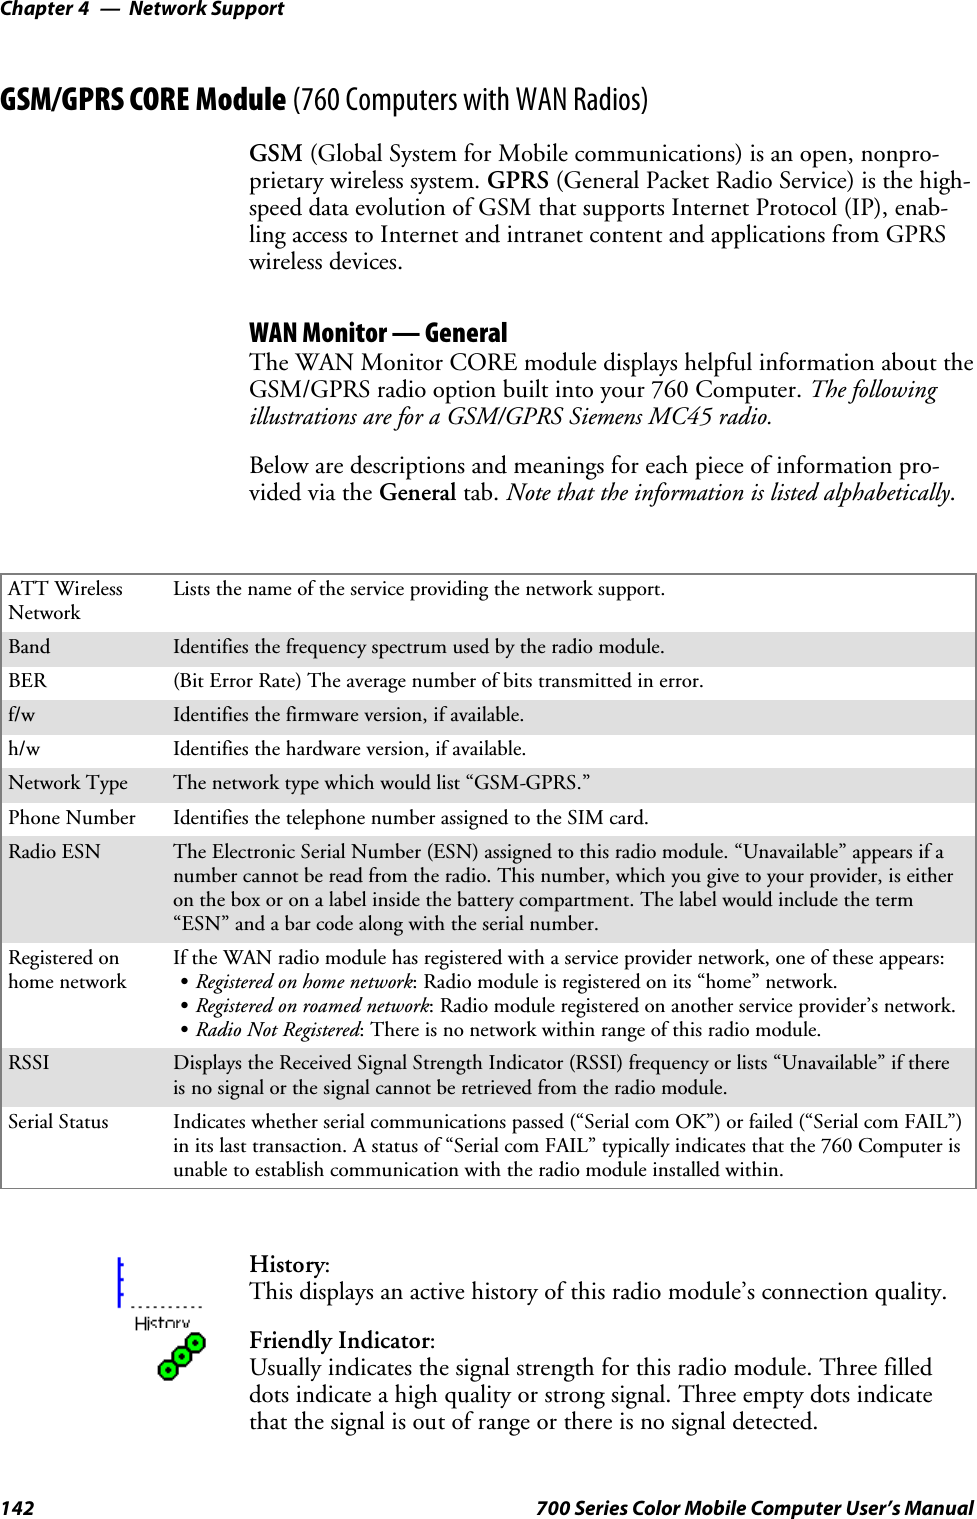
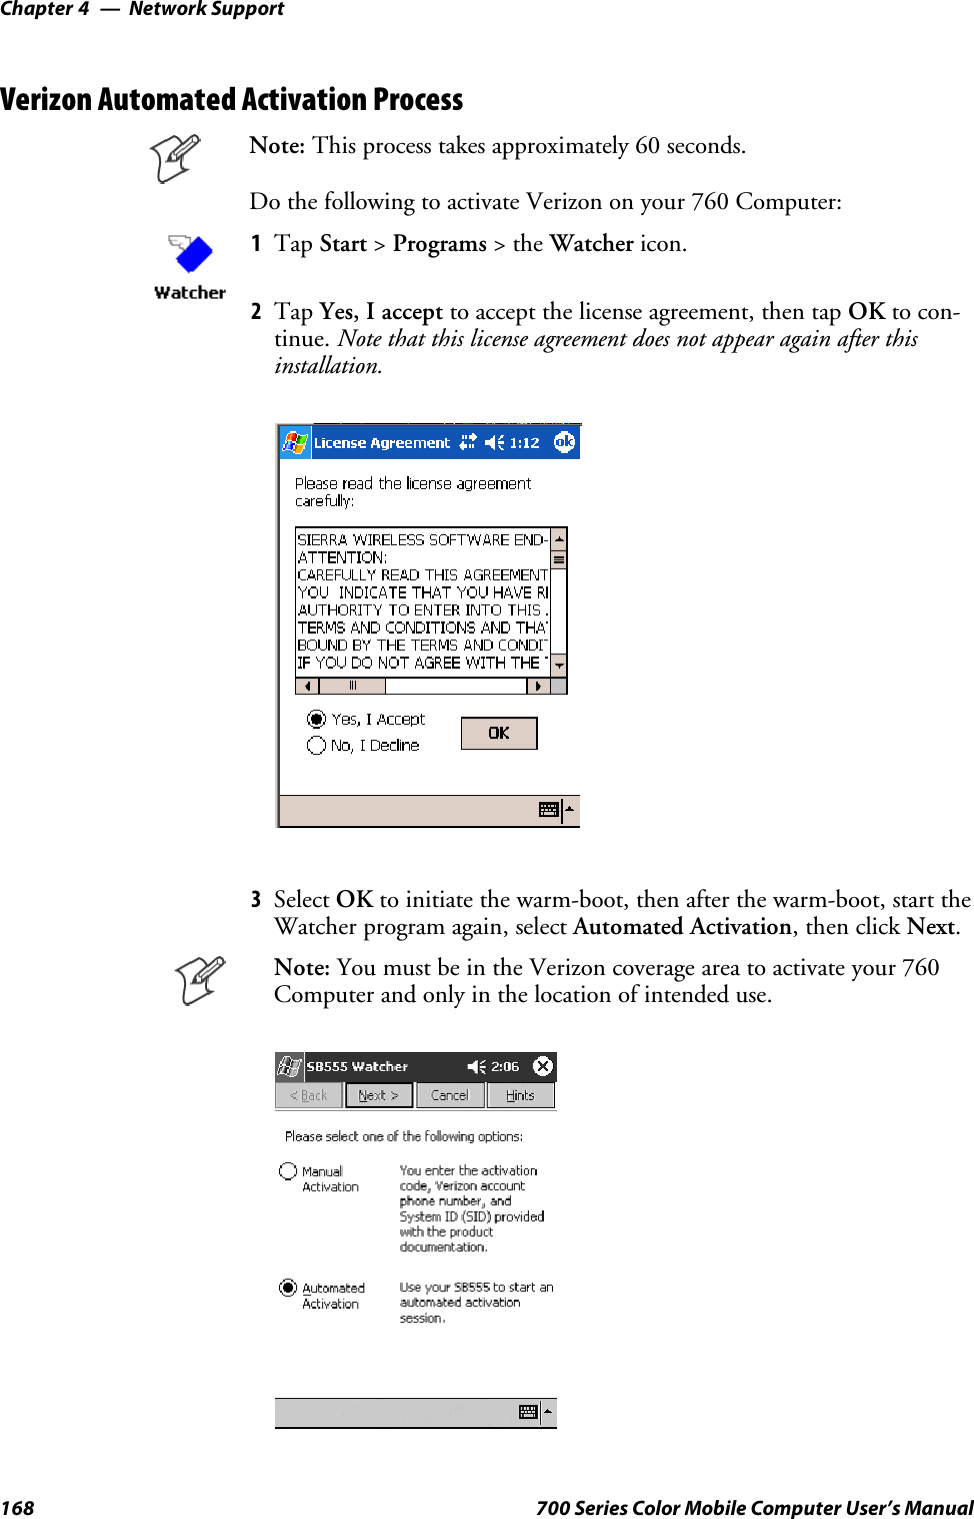
![Introduction—Chapter 113700 Series Color Mobile Computer User’s ManualKey SequencesUse the following key sequences to enter characters into your 700 ColorComputer using either a numeric keypad or an alphanumeric keypad.[Gold] or [Gold/White] Plane KeysThe [Gold] bplane key (numeric keypad) or the [Gold/White] cplanekey (alphanumeric keypad) provides you access to display controls, specialcharacters, and Pocket PC options.Press the [Gold] bkey or the [Gold/White] ckey for each gold planekey stroke you wish to make. For example to turn on the front light, pressandholdthe[Gold] bkey plus the 3key on the numeric keypad orpress and hold the [Gold/White] ckey plus the Ikey on the alphanu-meric keypad. To turn the front light off, press the appropriate keys again.Belowandonthenextpagearethekeysequences.Numeric KeypadThe following table lists sequences that use the [Gold] bplane key. SeeChapter 2, “Windows Mobile 2003,” for information about the Pocket PCapplications.Press the Keys To Do This[Gold]b3Toggle the backlight on or off (also goes through backlightpower levels if held down)[Gold]baAccess the Pocket PC Record application (see Note).[Gold]b4Access the Pocket PC Calendar application (see Note).[Gold]b5Access the Pocket PC Contacts application (see Note).[Gold]b6Access the Pocket PC Tasks application (see Note).[Gold]b7Move up one page.[Gold]b8Enter an asterisk (*).[Gold]b9Move down one page.[Gold]b0Access the Pocket PC Start menu.[Gold]beEnter an at symbol (@).[Gold]bKEnter a backslash (/).[Gold]bEEnter a minus sign (–).[Gold]bAEnter a plus sign (+).[Gold]b→Tab to the right.[Gold]b←Tab to the left.[Gold]bUIncrease volume[Gold]bDDecrease volumeNote: Pocket PC applications are accessible only if configured to do so in the App Launchportion of the Utilities control panel applet. See page 366 for more information.](https://usermanual.wiki/Intermec-Technologies/DRCB.User-Manual-1-of-2/User-Guide-653440-Page-37.png)
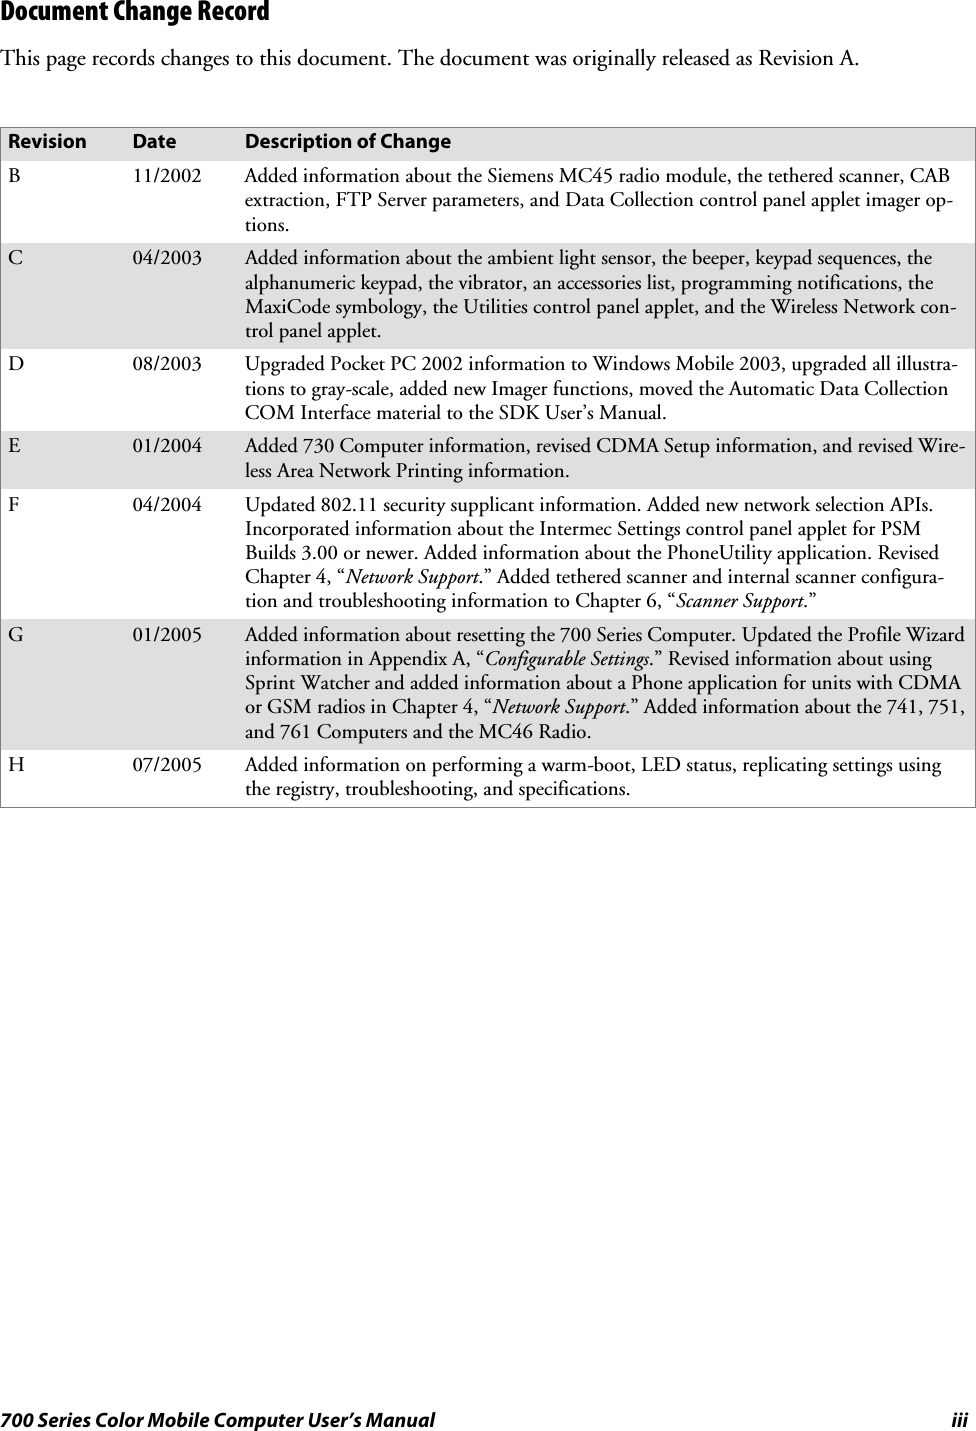
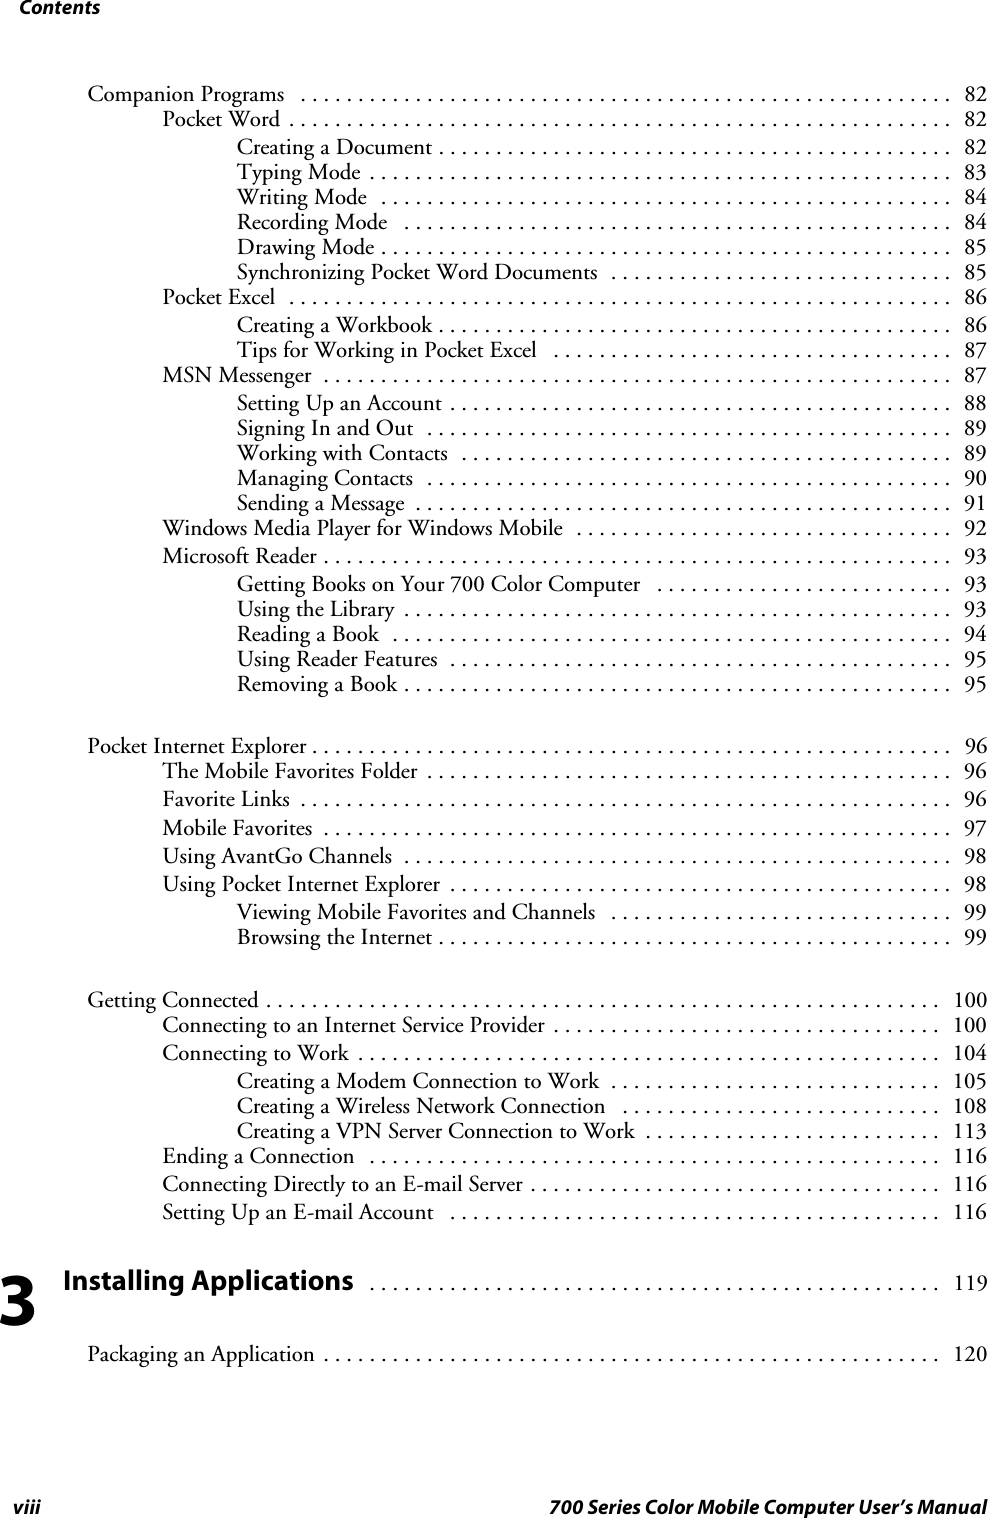
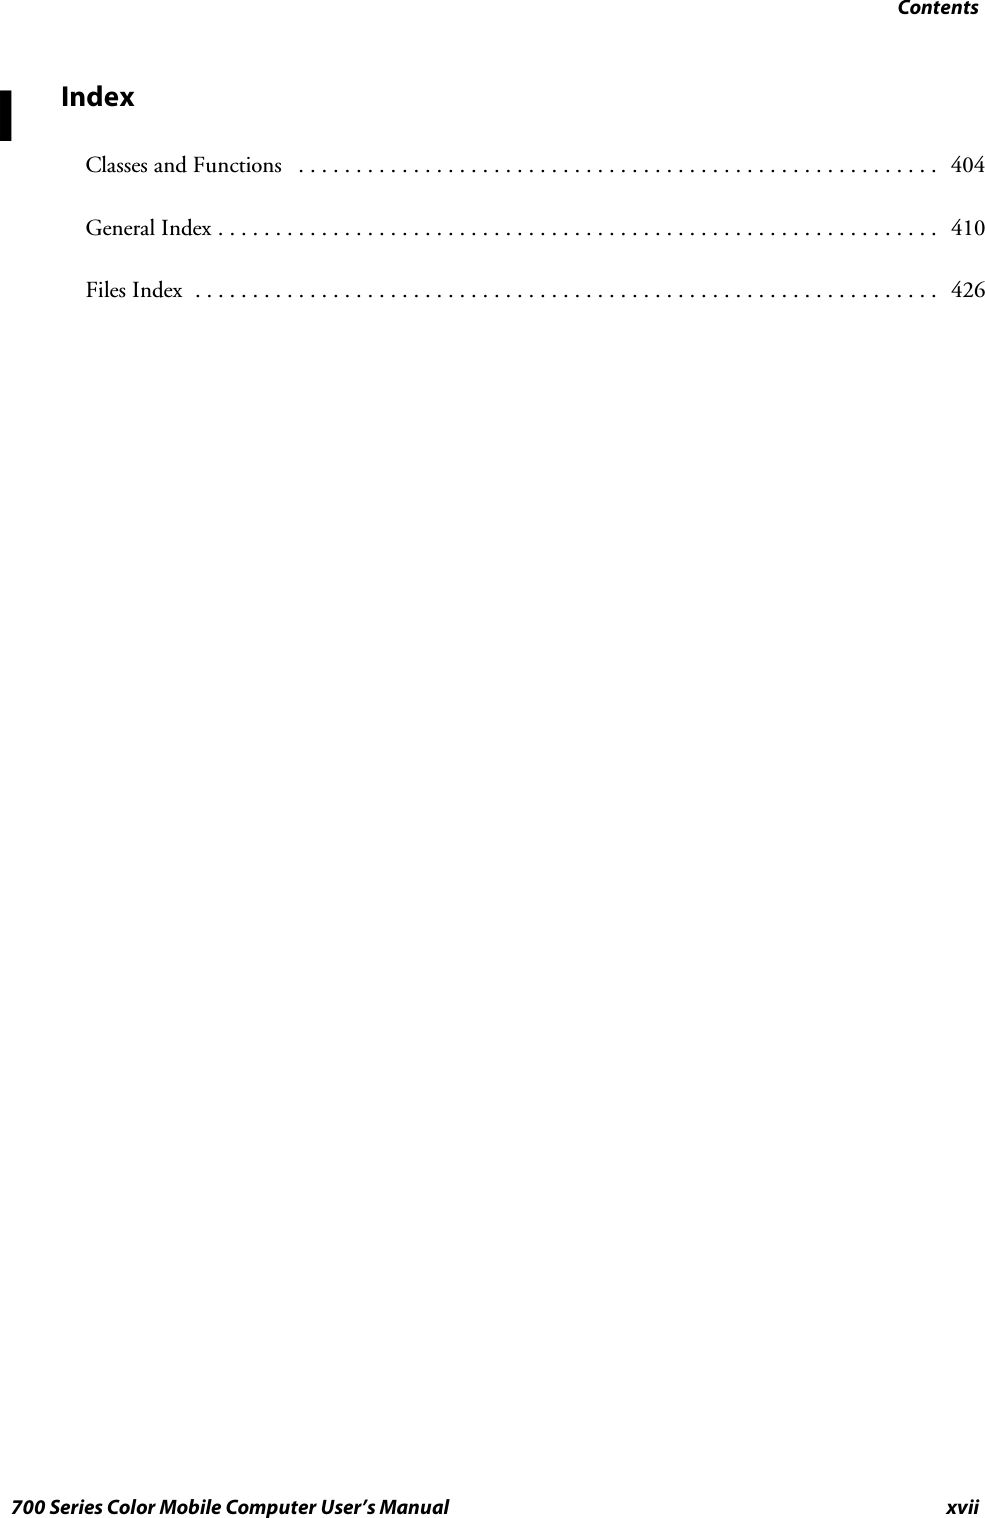
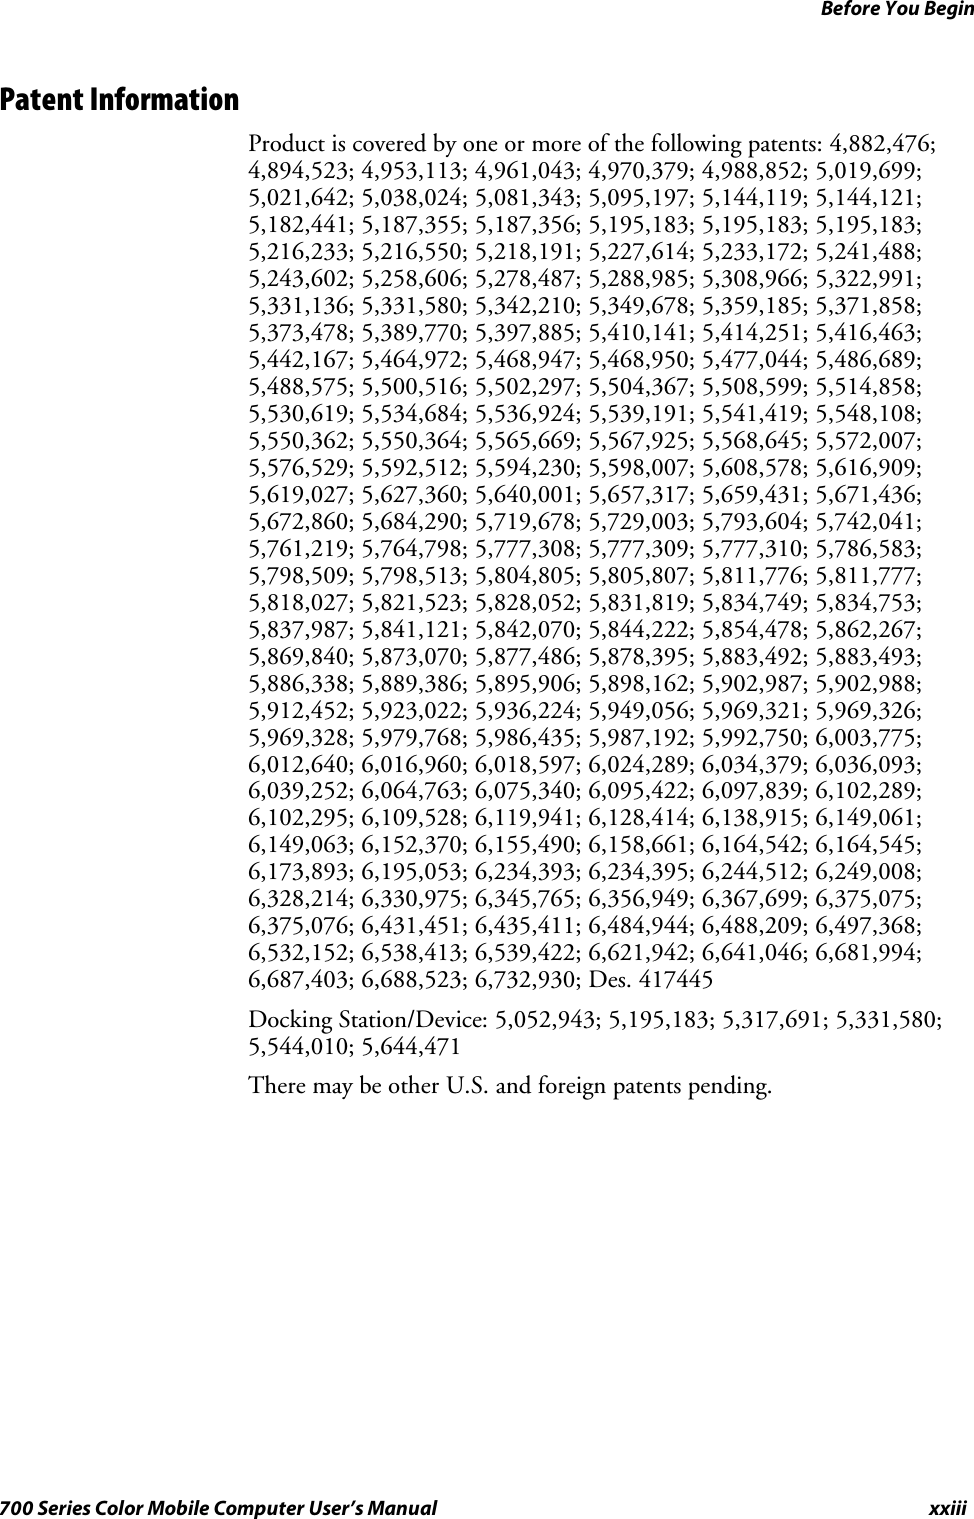
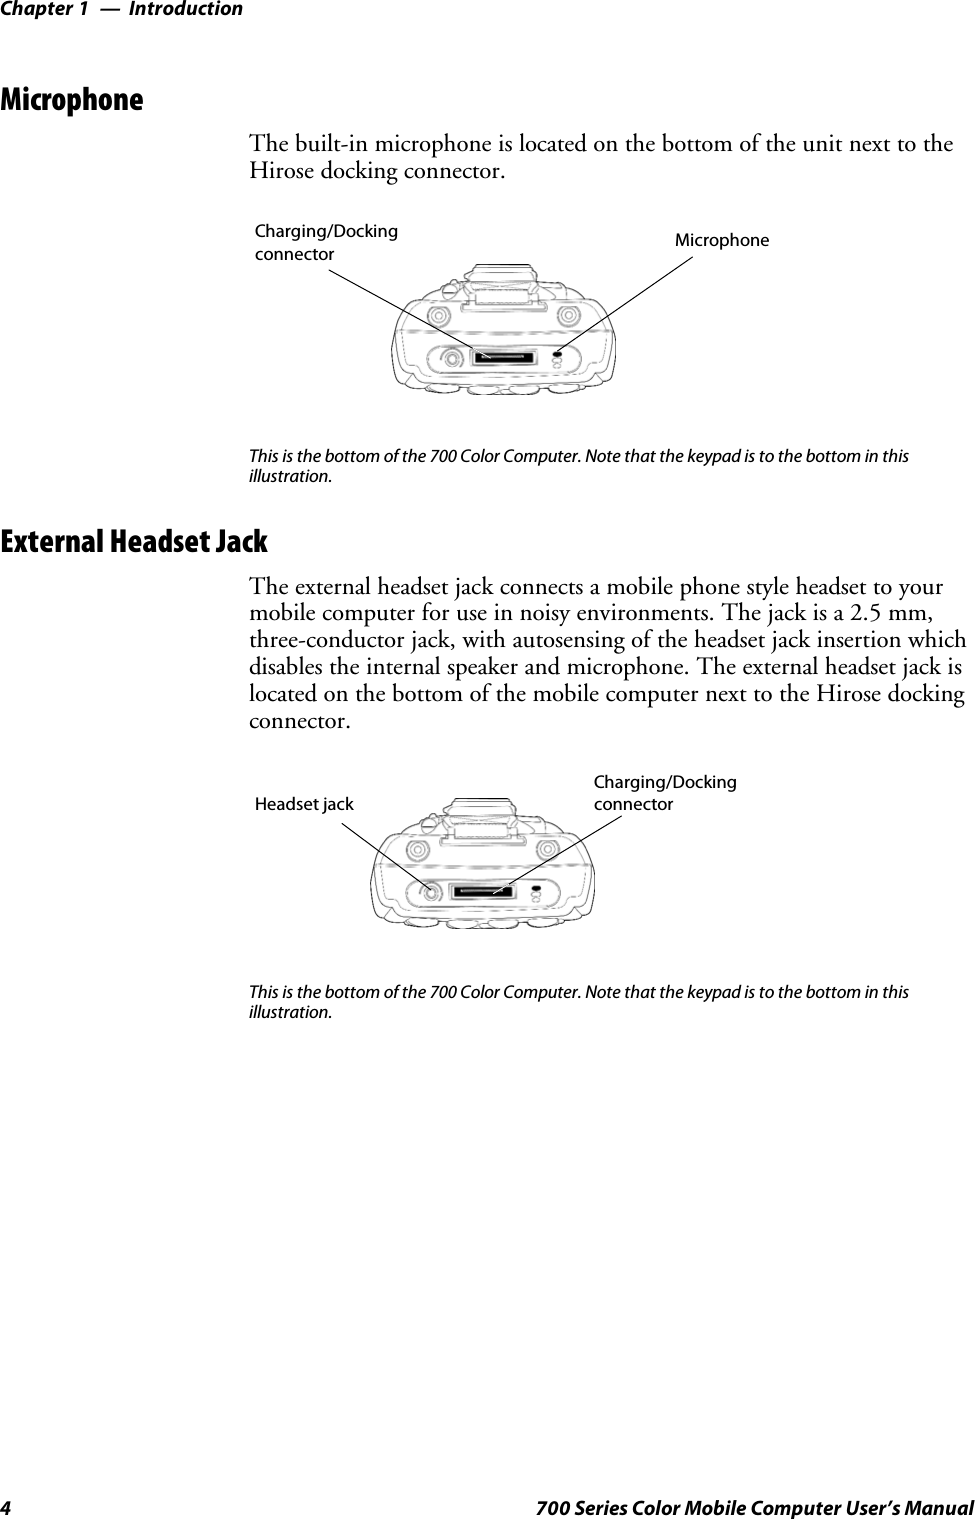
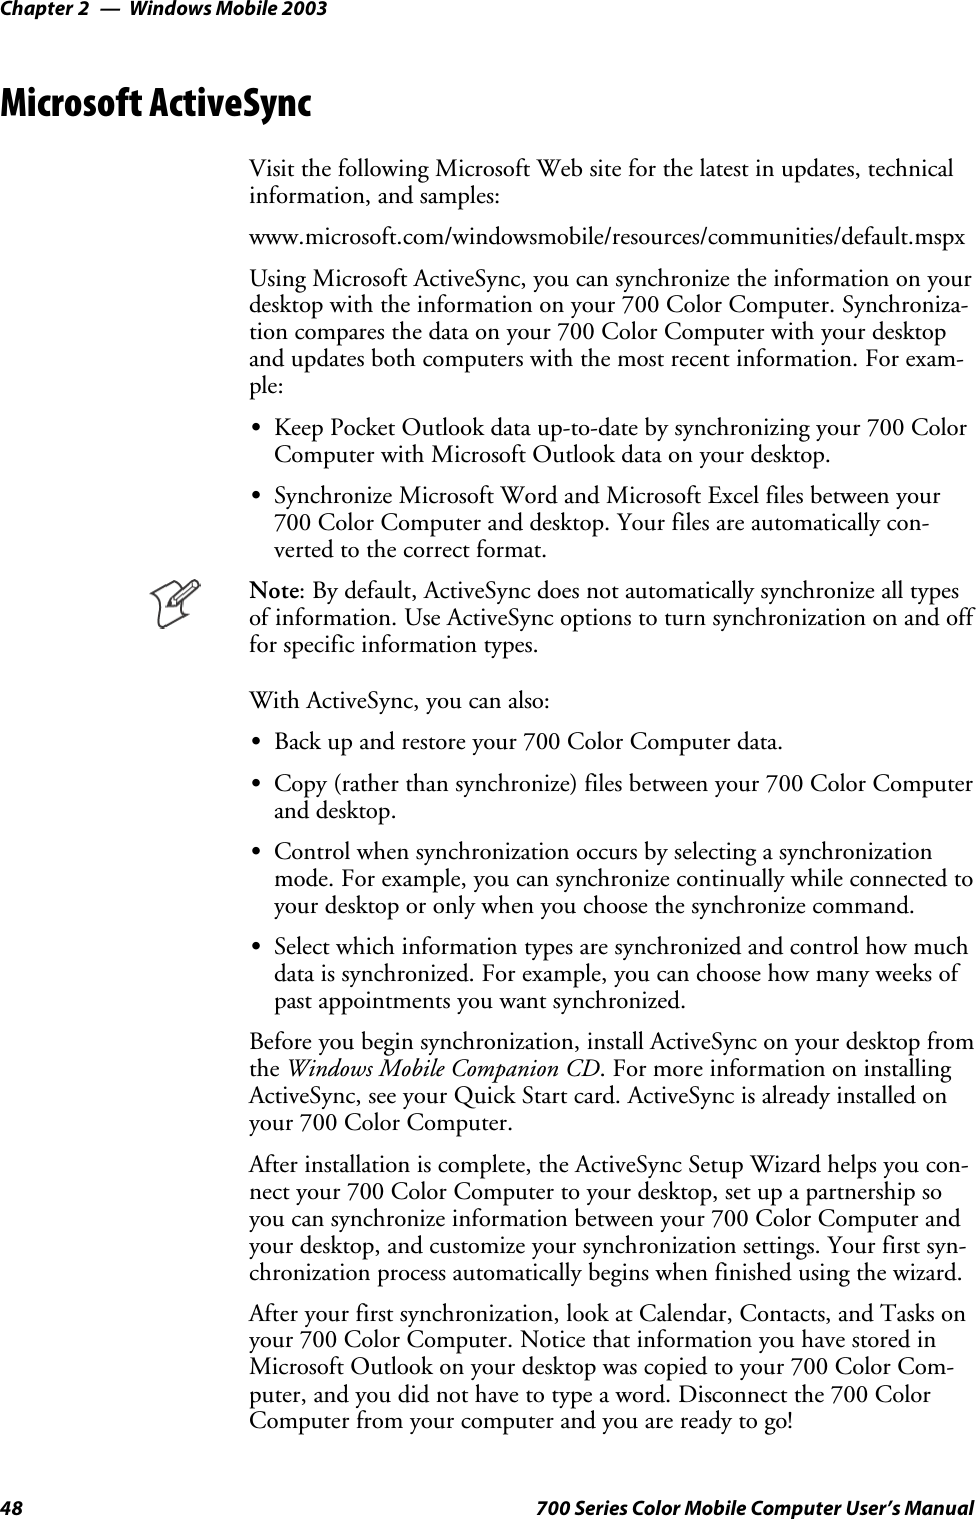
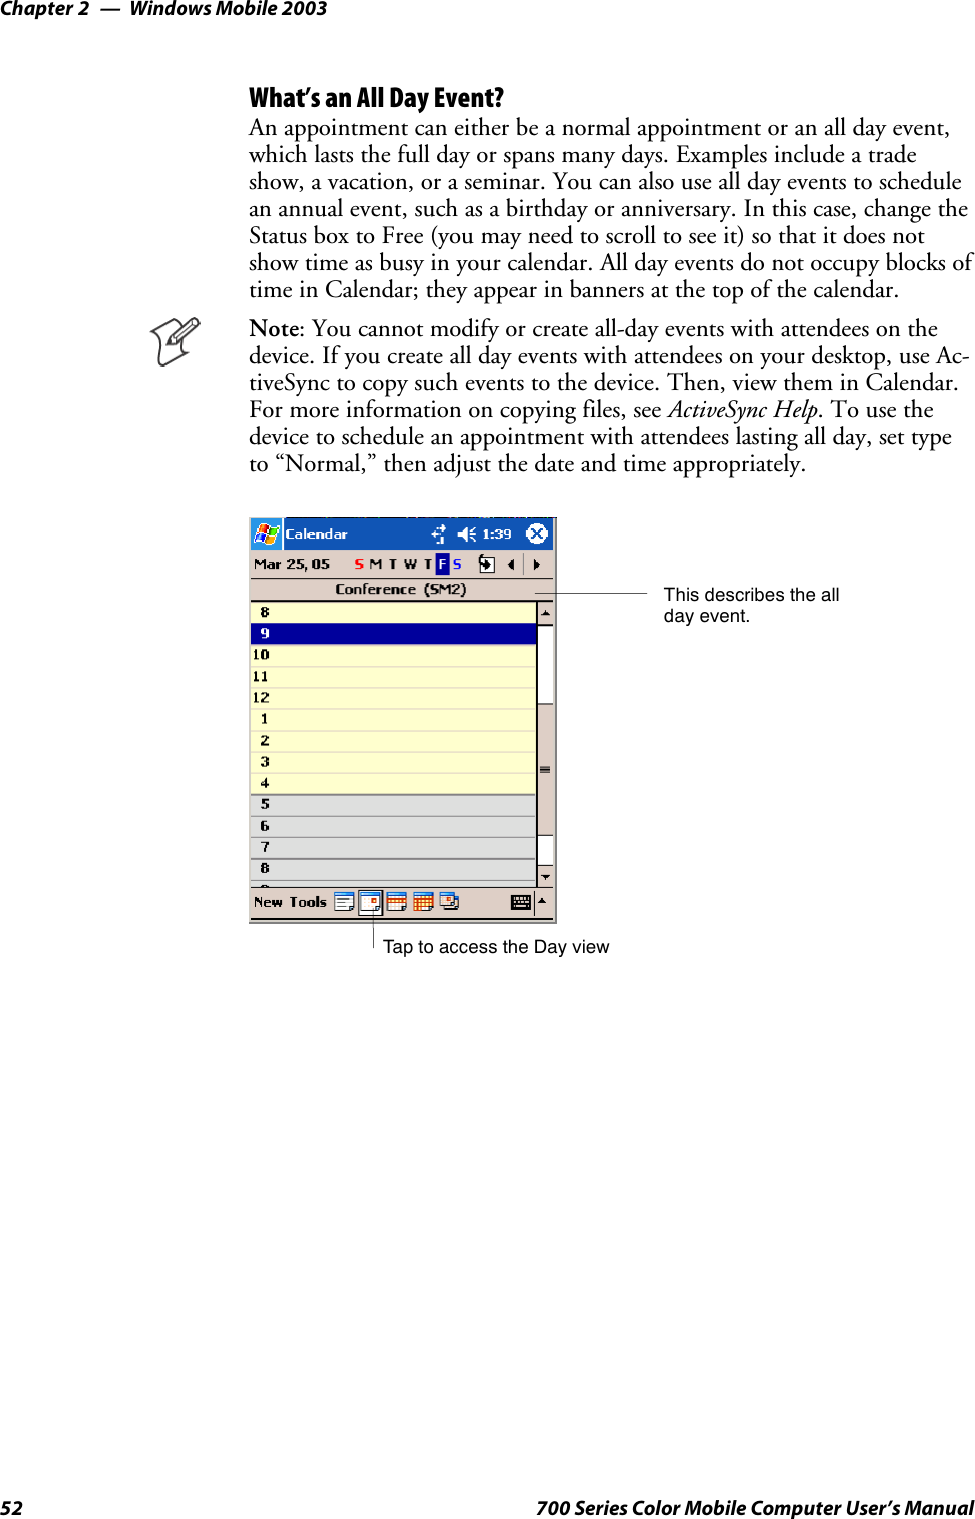
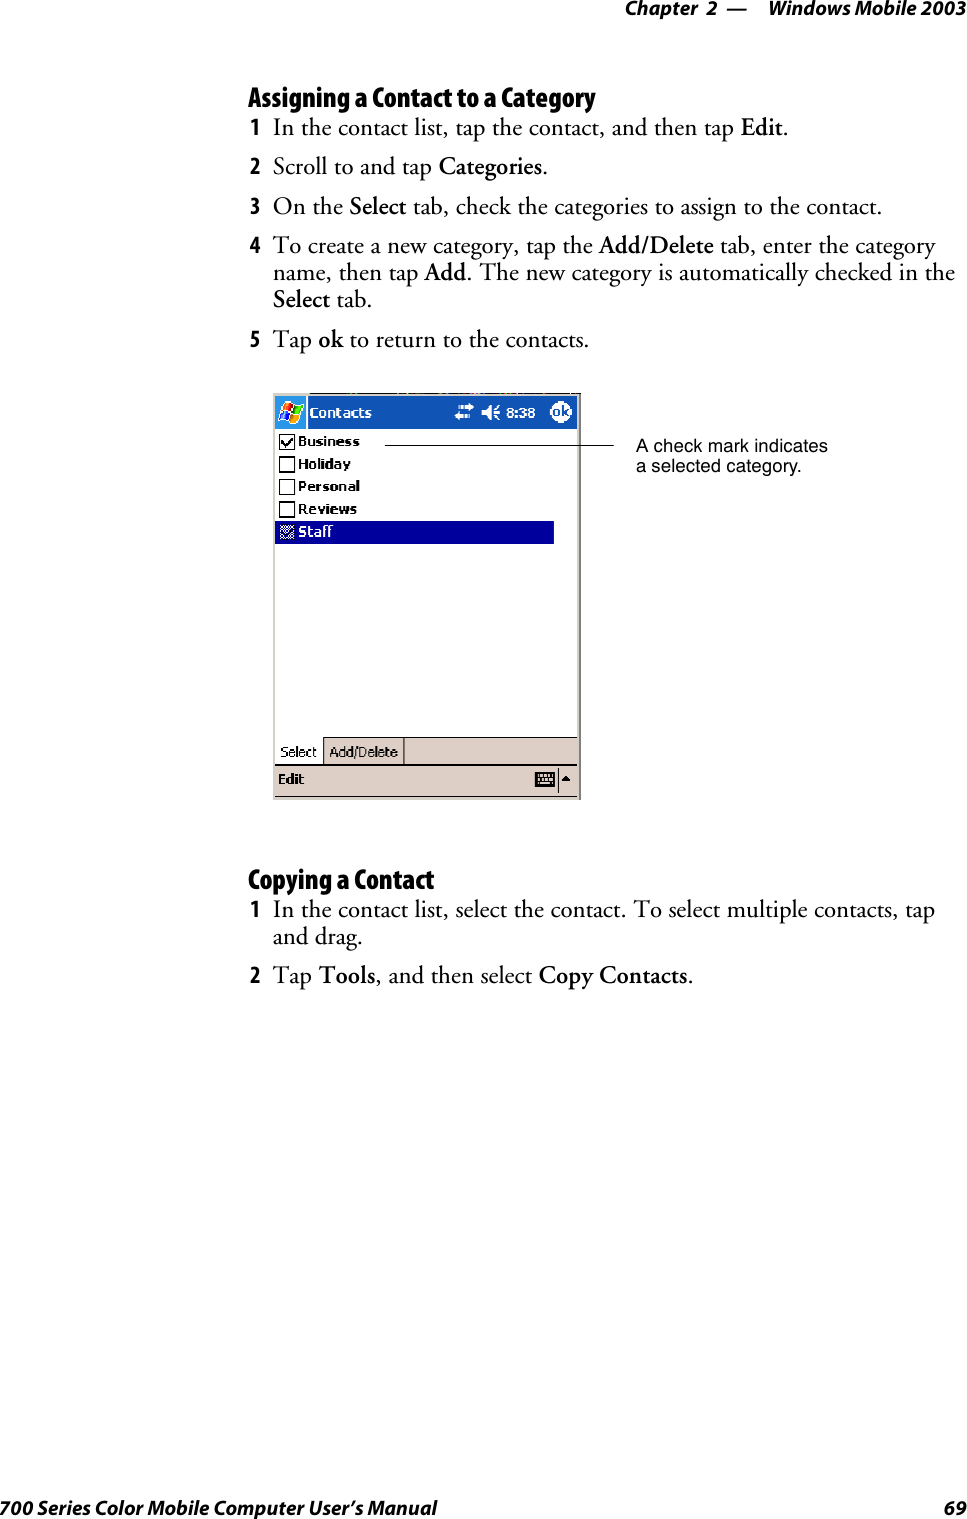
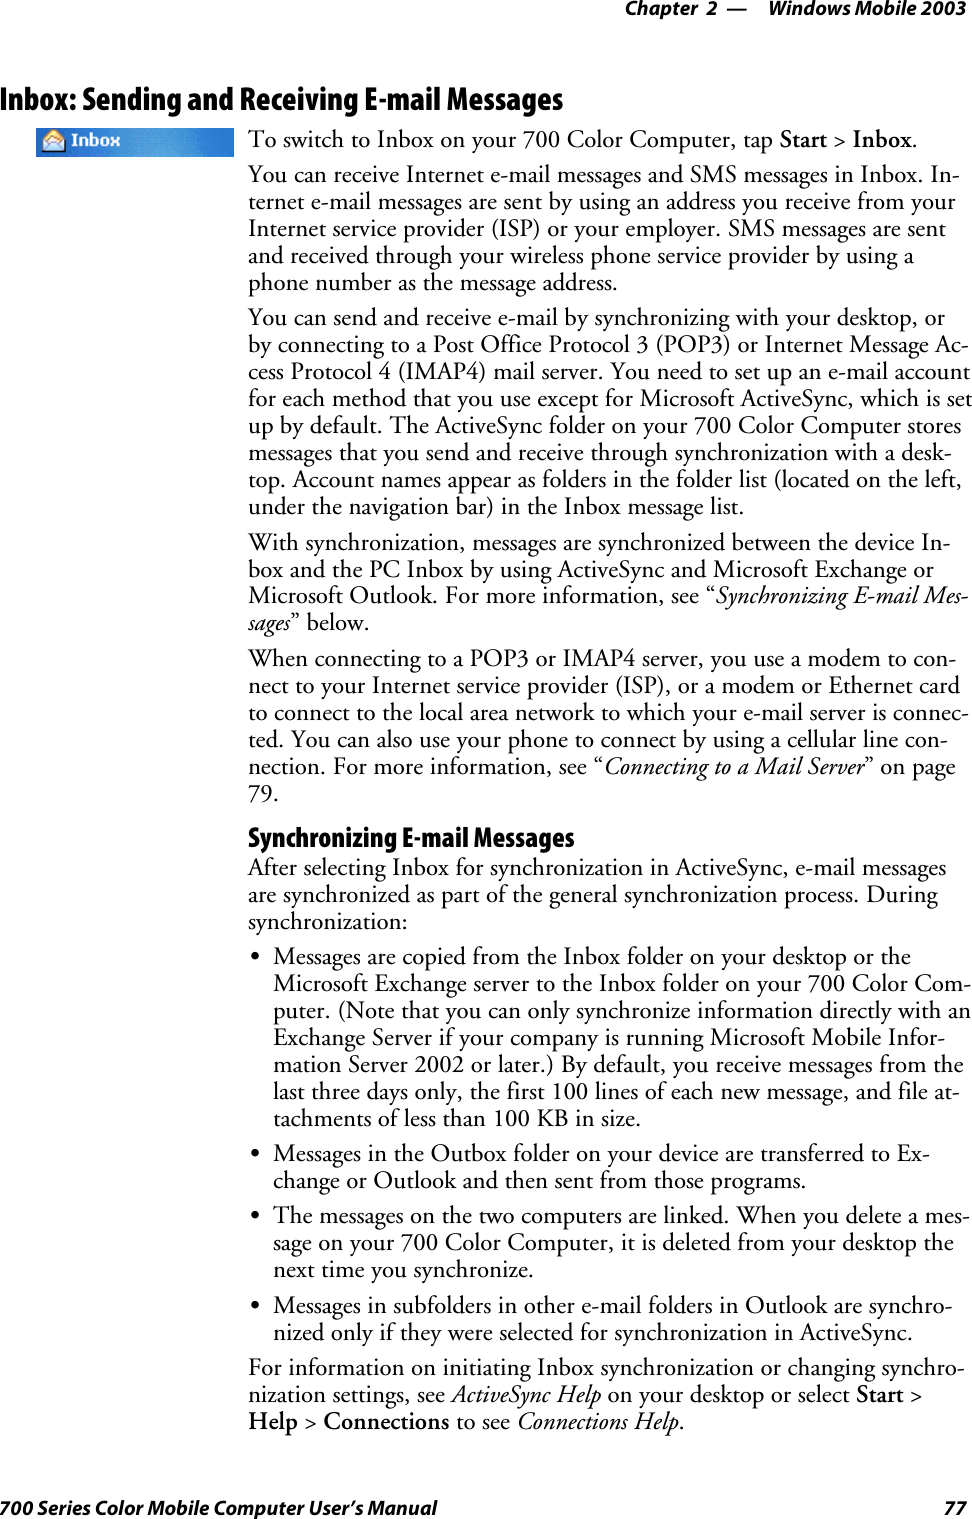
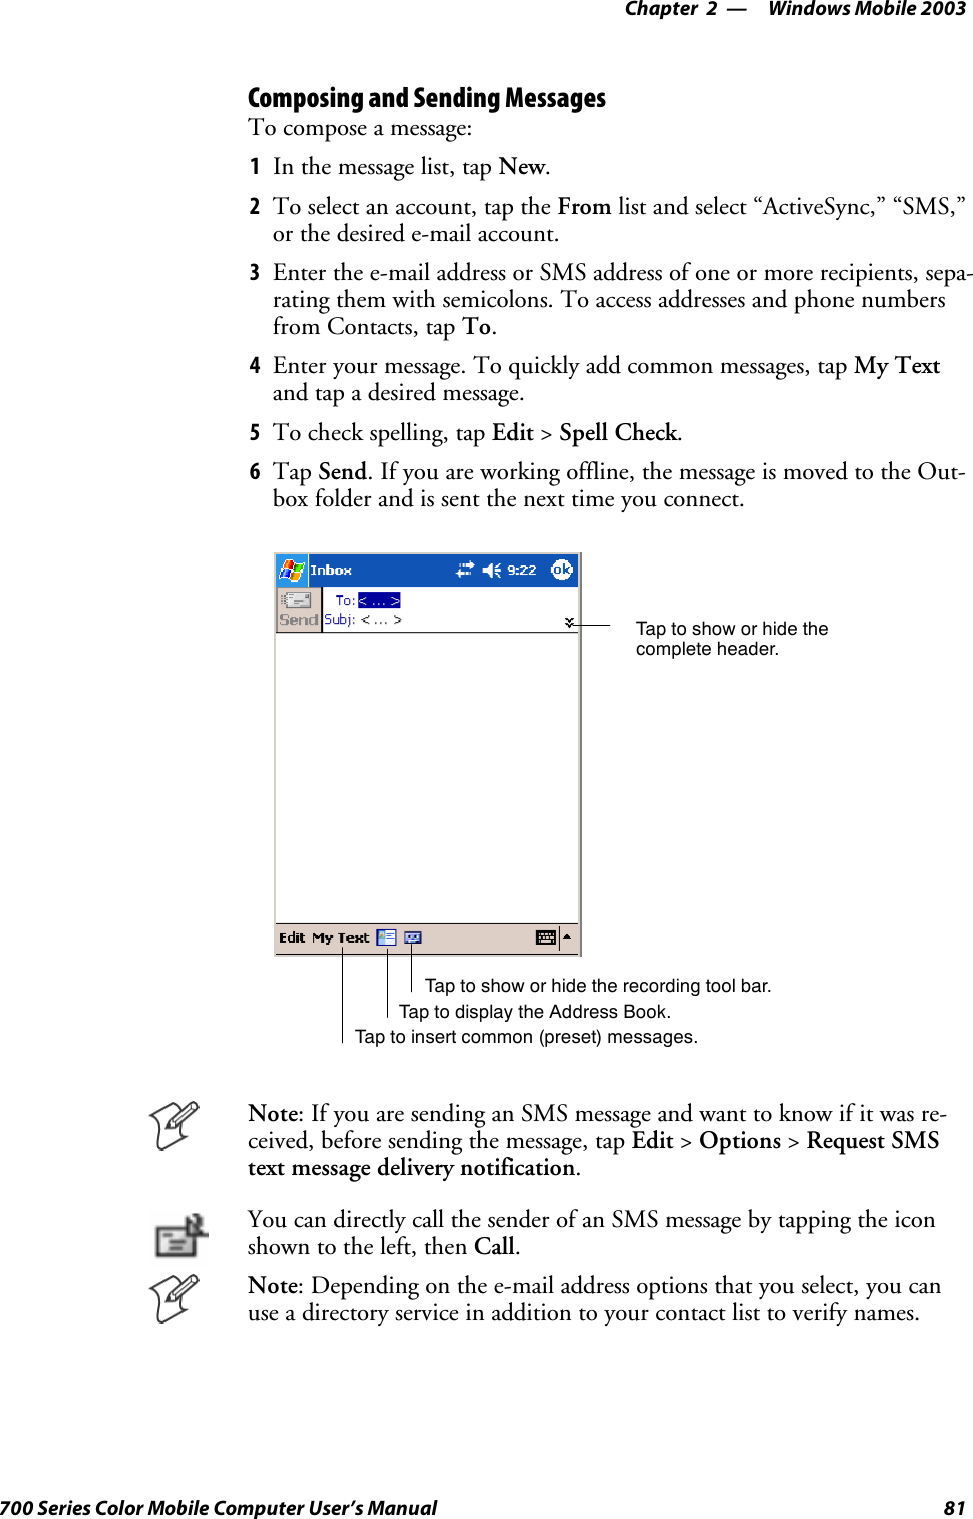
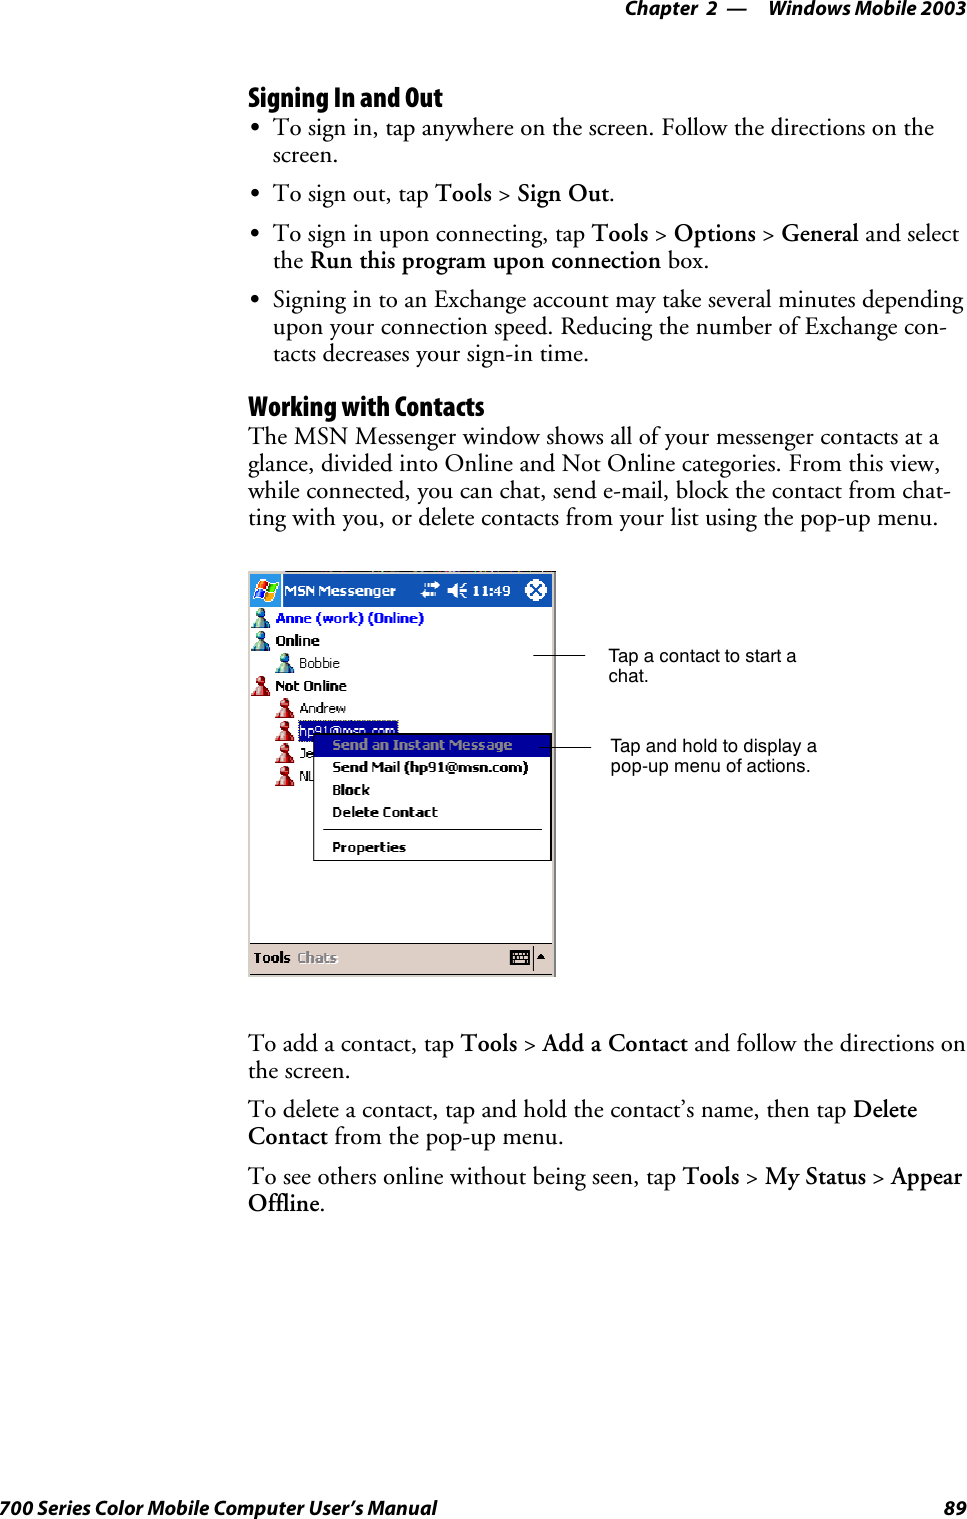
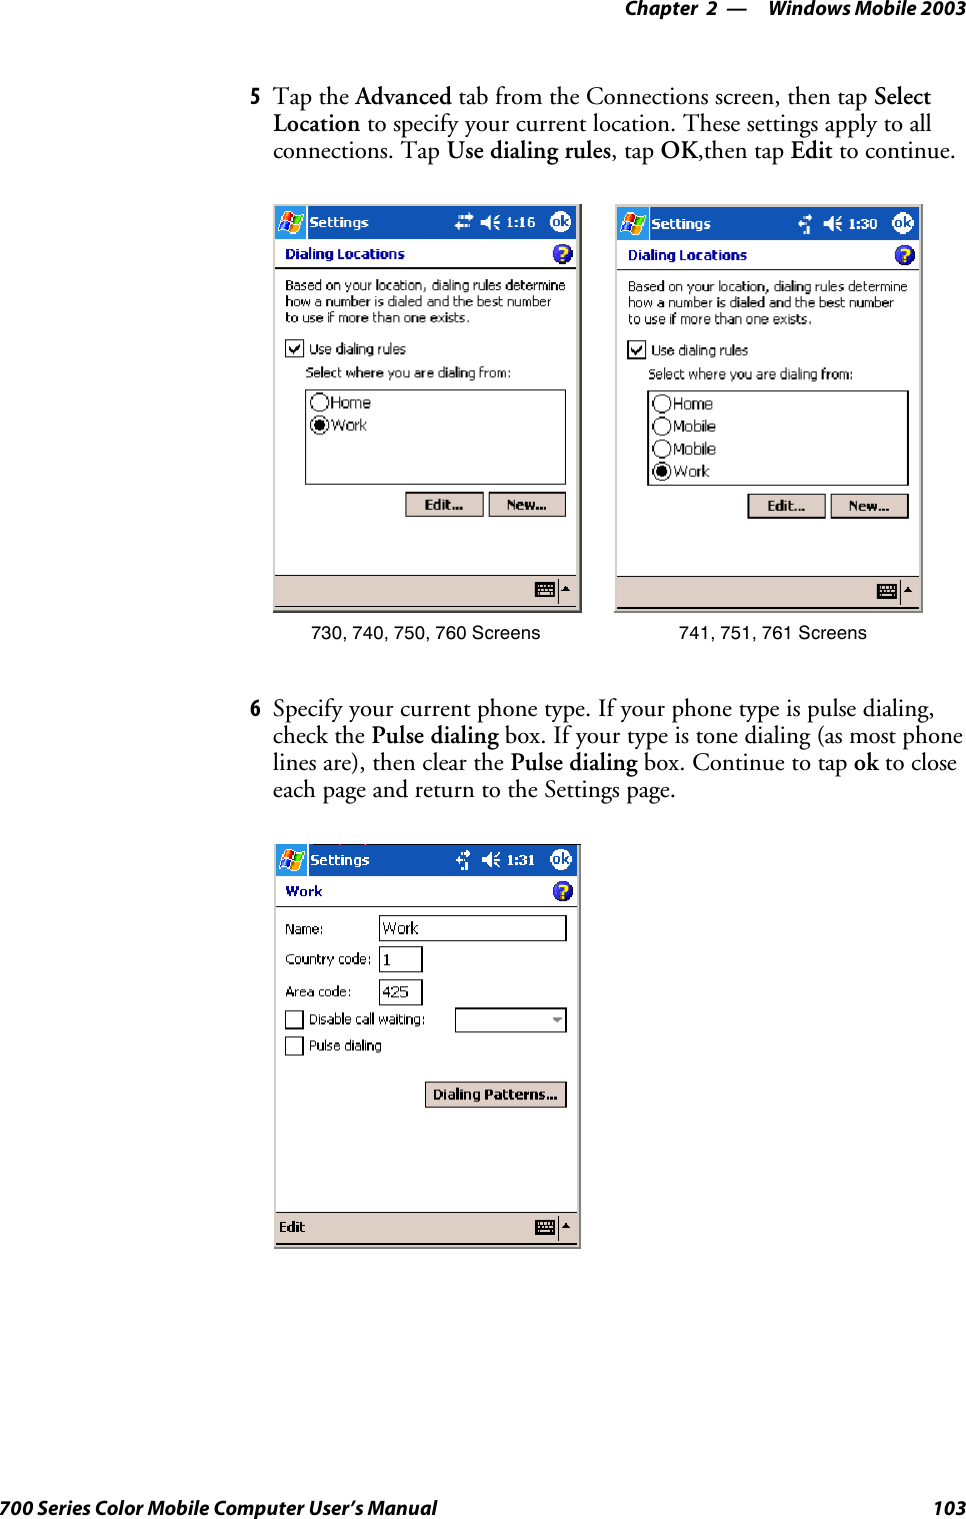
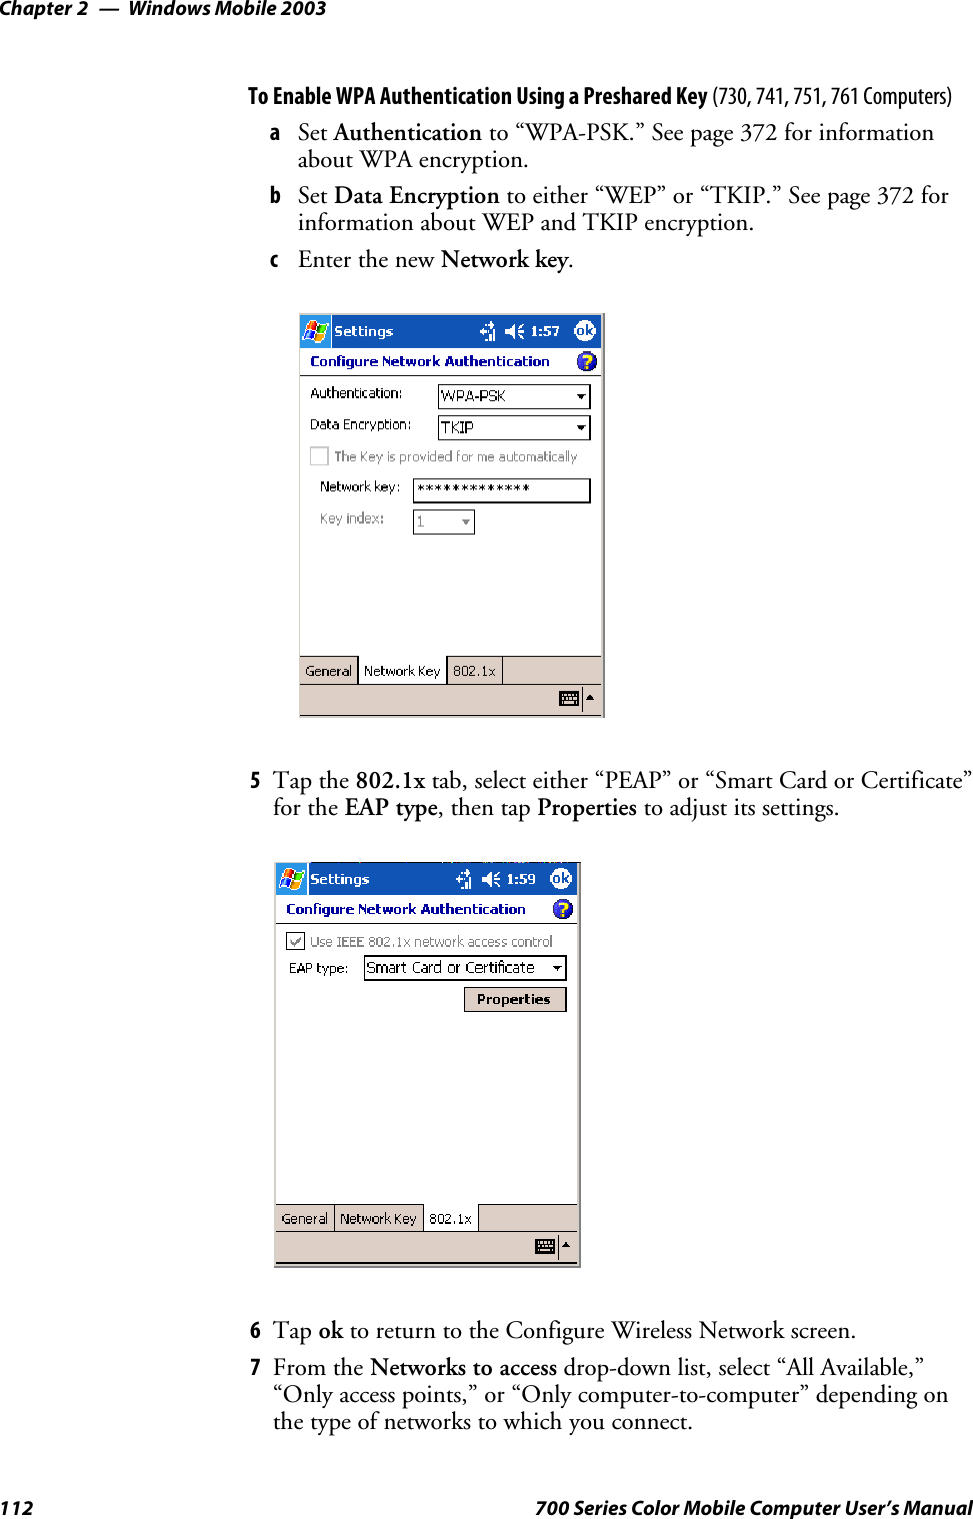
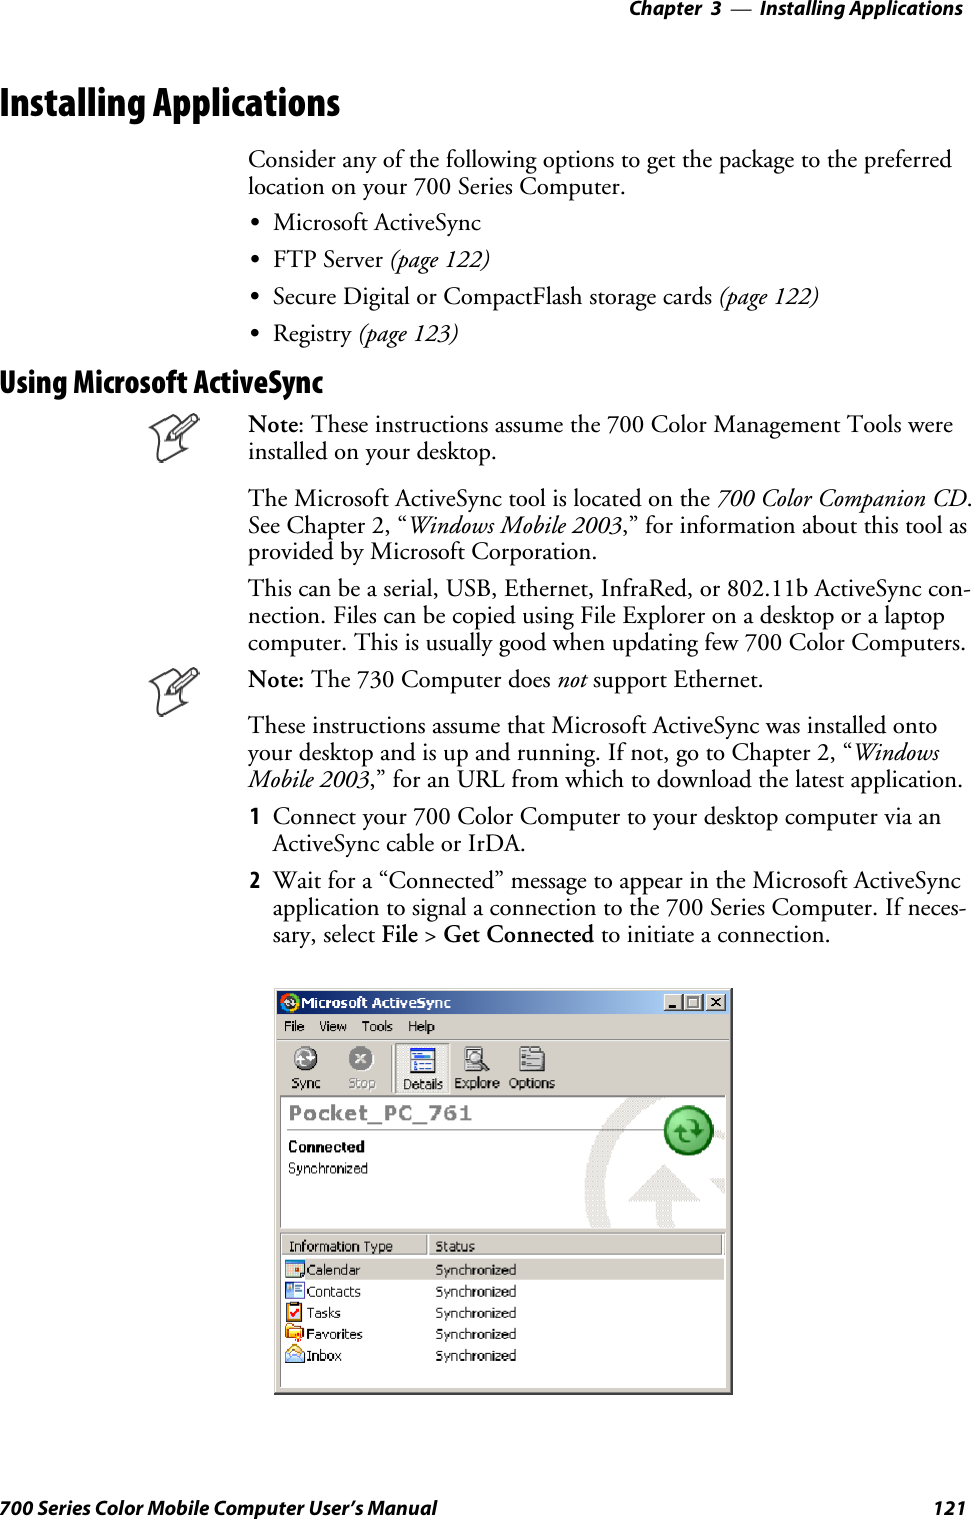
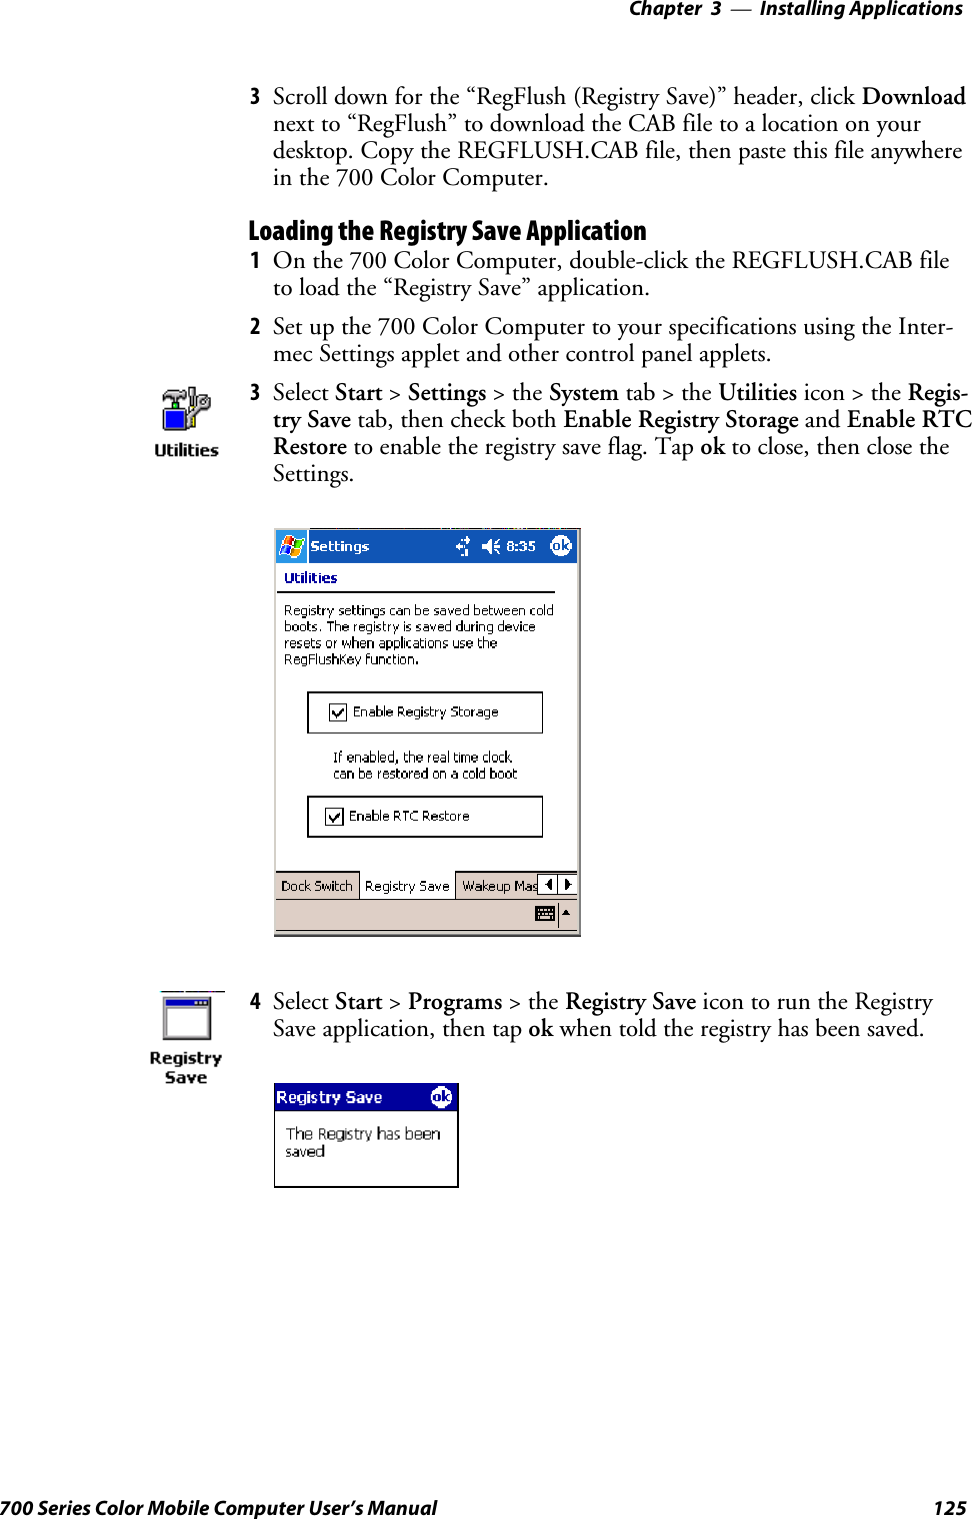
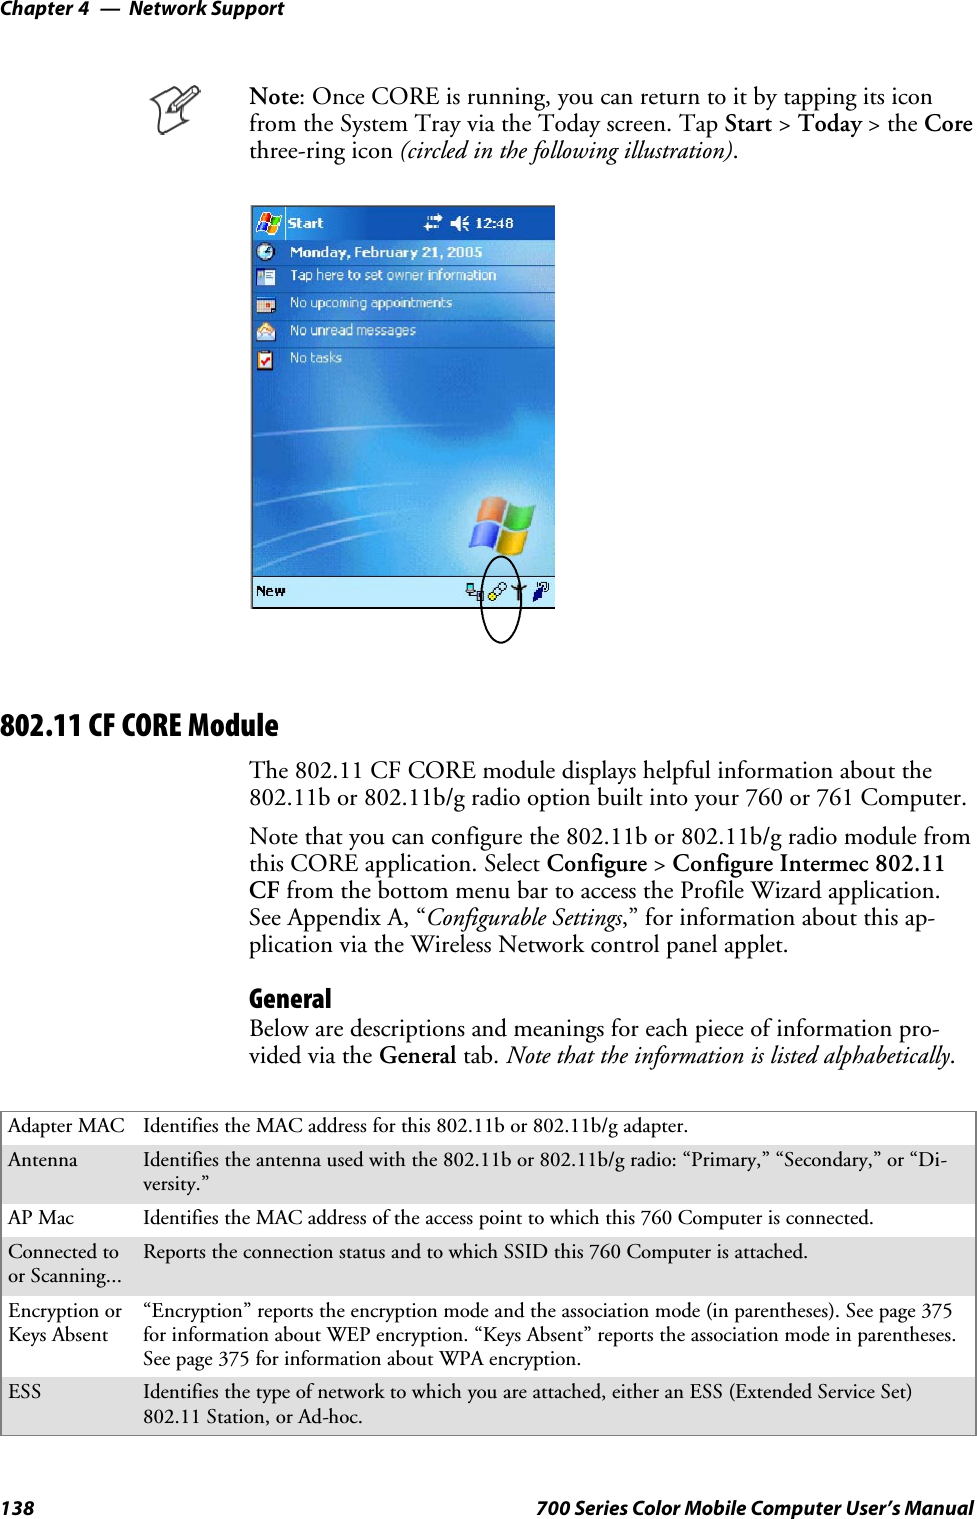
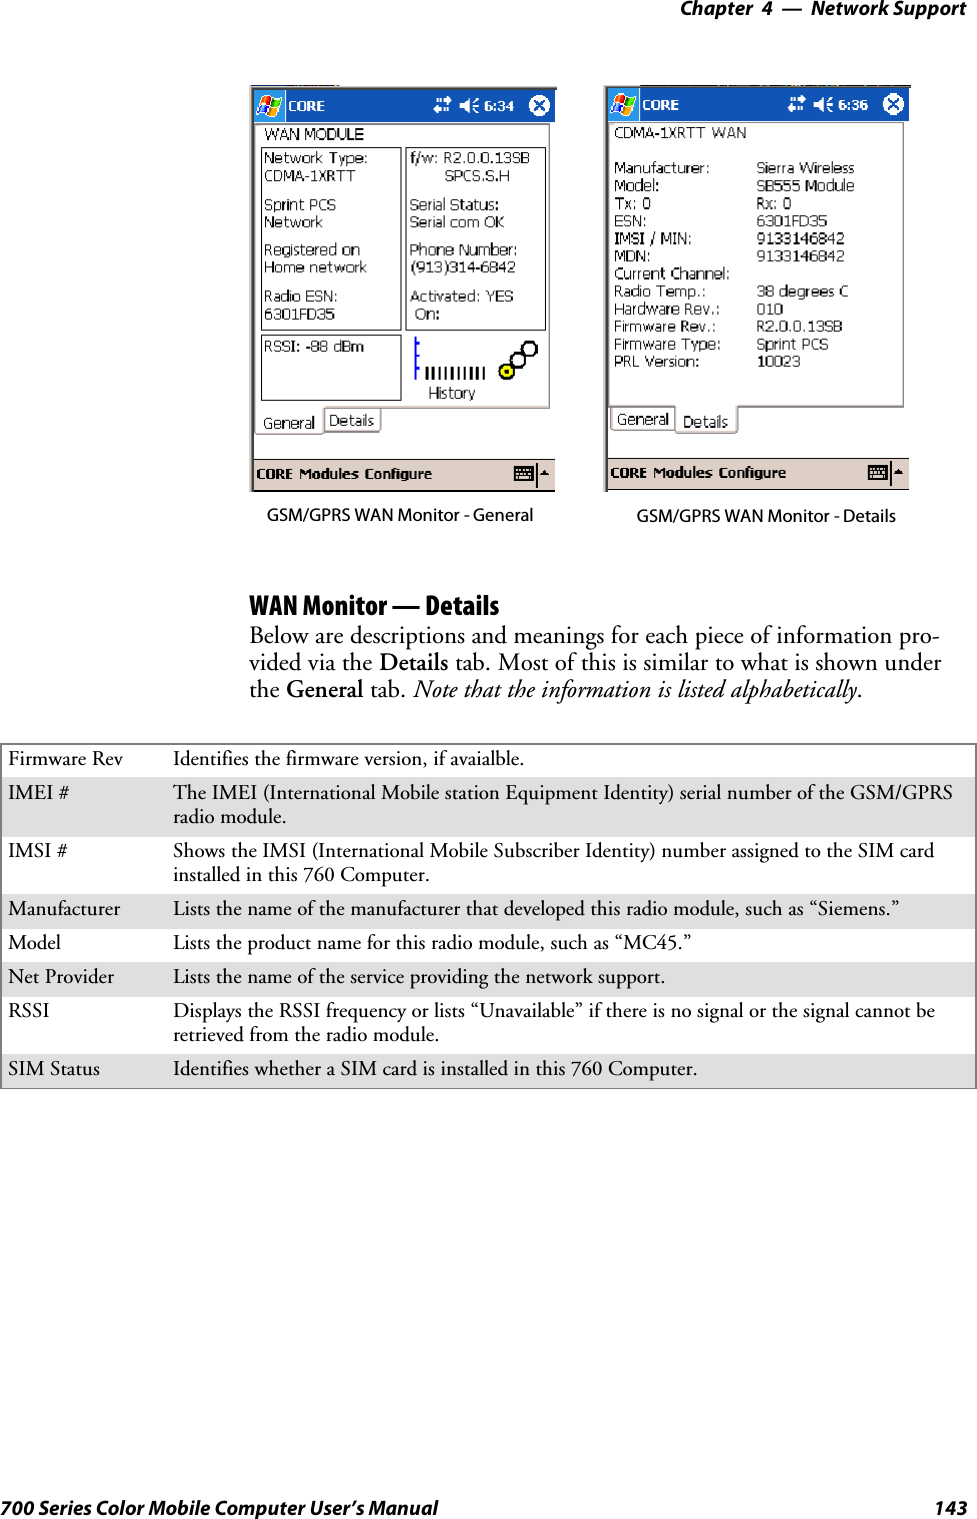
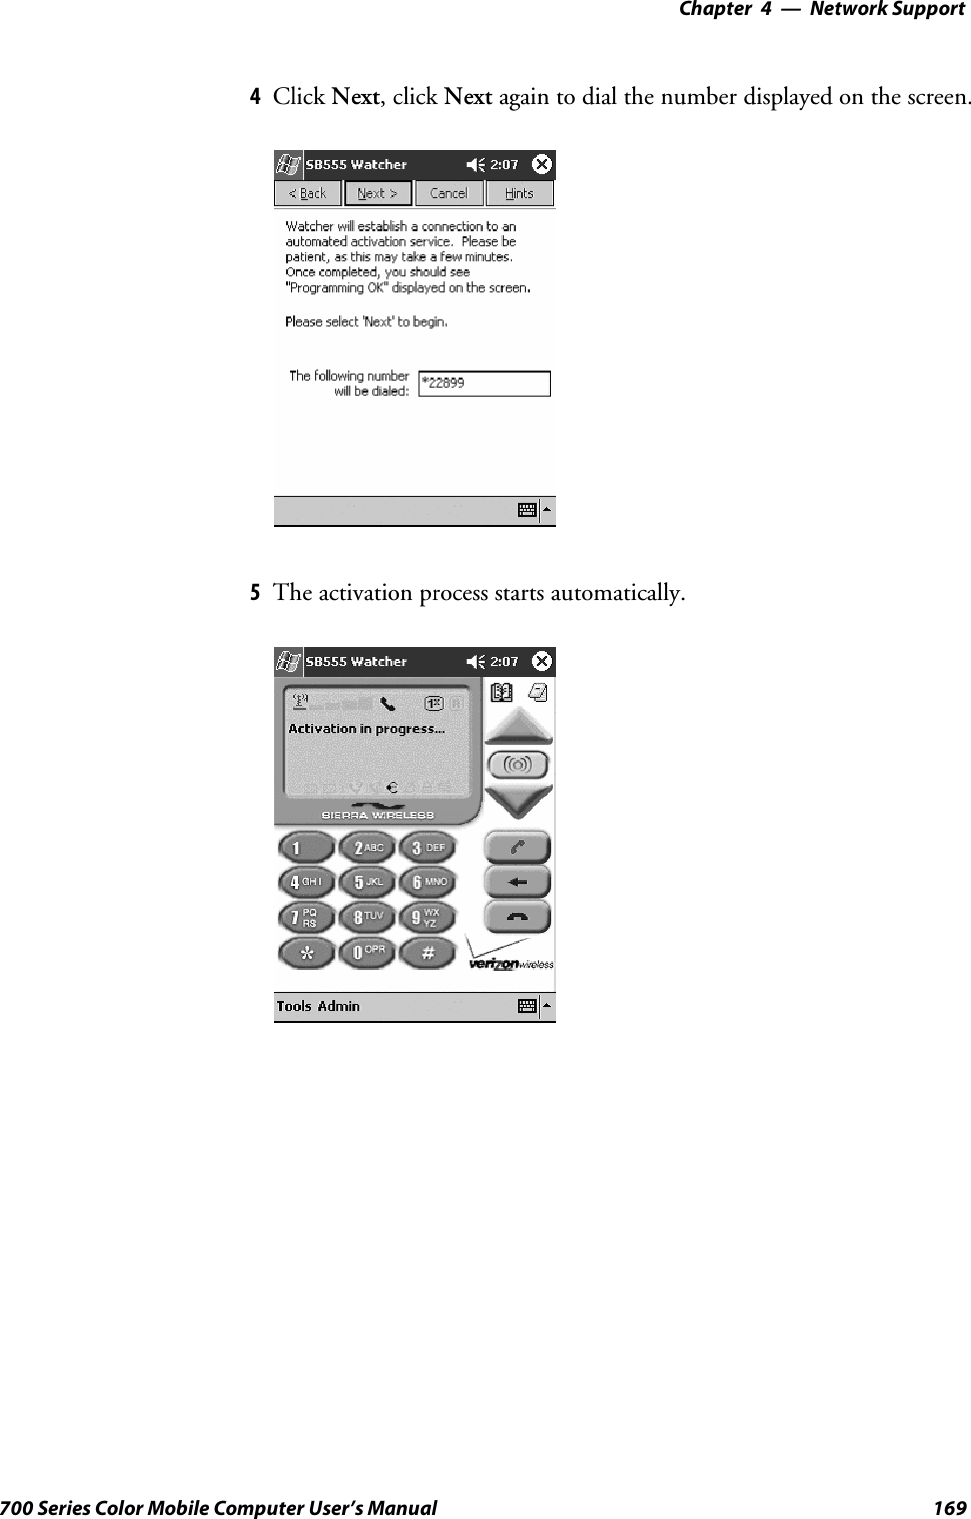
![IntroductionChapter —114 700 Series Color Mobile Computer User’s ManualAlphanumeric KeypadNote: This information does not apply to the 730 Computer.The following table lists sequences that use the [Gold/White] cplanekey. See Chapter 2, “Windows Mobile 2003,” for information about thePocket PC applications.Press the Keys To Do This[Gold/White]cIToggle the backlight on or off (also goes through backlightpower levels if held down)[Gold/White]cAAccess the Pocket PC Record application (see Note).[Gold/White]cBAccess the Pocket PC Calendar application (see Note).[Gold/White]cCAccess the Pocket PC Contacts application (see Note).[Gold/White]cDAccess the Pocket PC Tasks application (see Note).[Gold/White]cJMove up one page.[Gold/White]cGEnter an asterisk (*).[Gold/White]cPMove down one page.[Gold/White]cEAccess the Pocket PC Start menu.[Gold/White]cKEnter an at symbol (@).[Gold/White]cHEnter a backslash (/).[Gold/White]cLEnter a minus sign (–).[Gold/White]cREnter a plus sign (+).[Gold/White]clTab to the right.[Gold/White]cjTab to the left.[Gold/White]ckIncrease volume[Gold/White]cmDecrease volumeNote: Pocket PC applications are accessible only if configured to do so in the App Launchportion of the Utilities control panel applet. See page 366 for more information.](https://usermanual.wiki/Intermec-Technologies/DRCB.User-Manual-1-of-2/User-Guide-653440-Page-38.png)
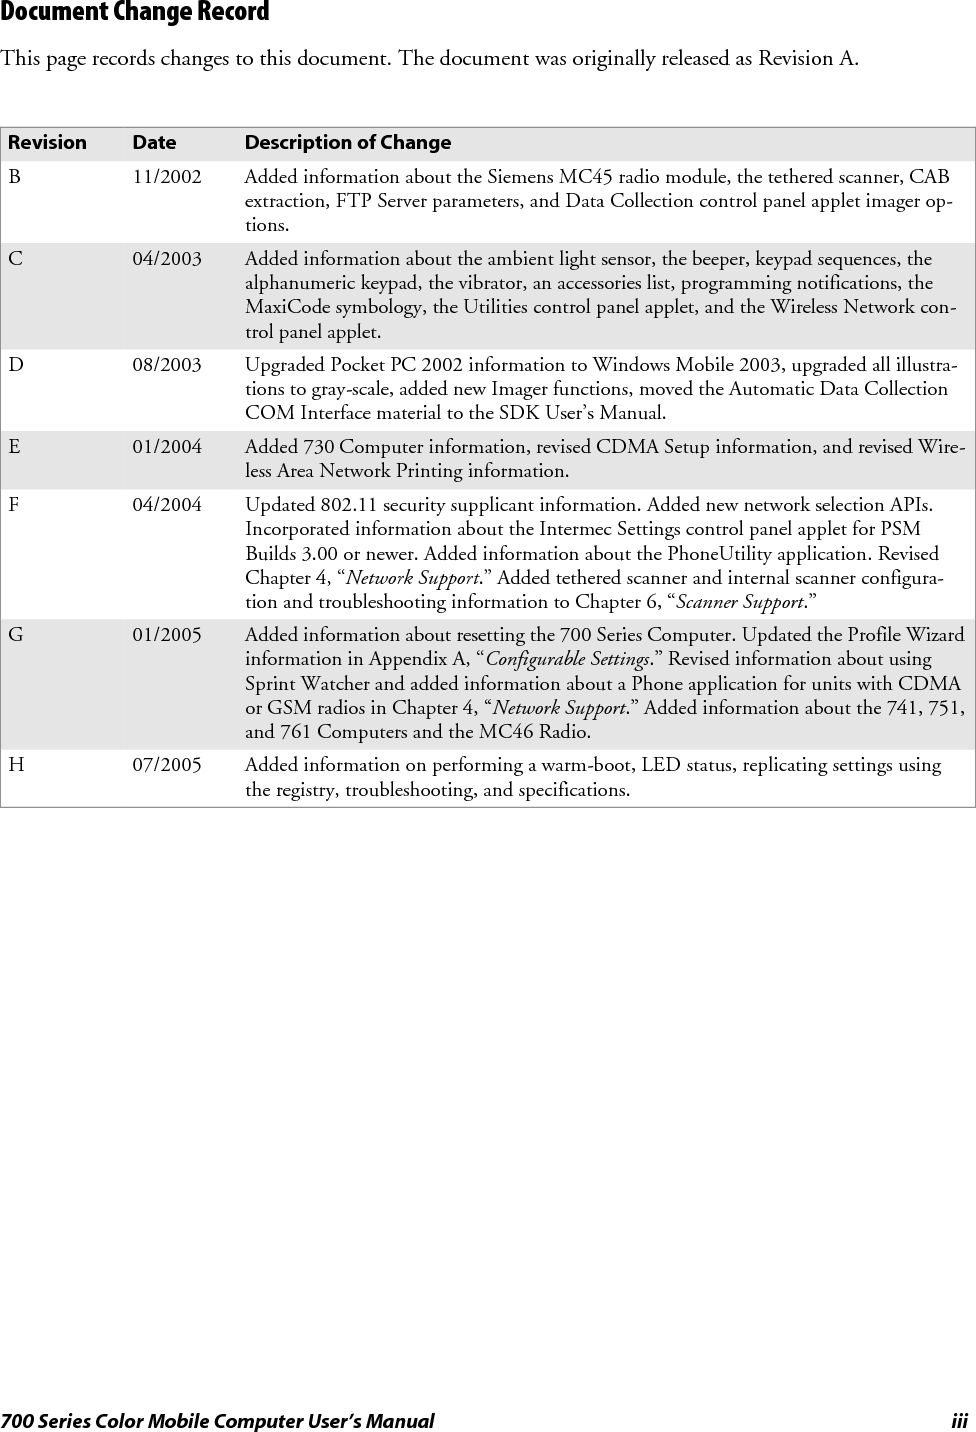
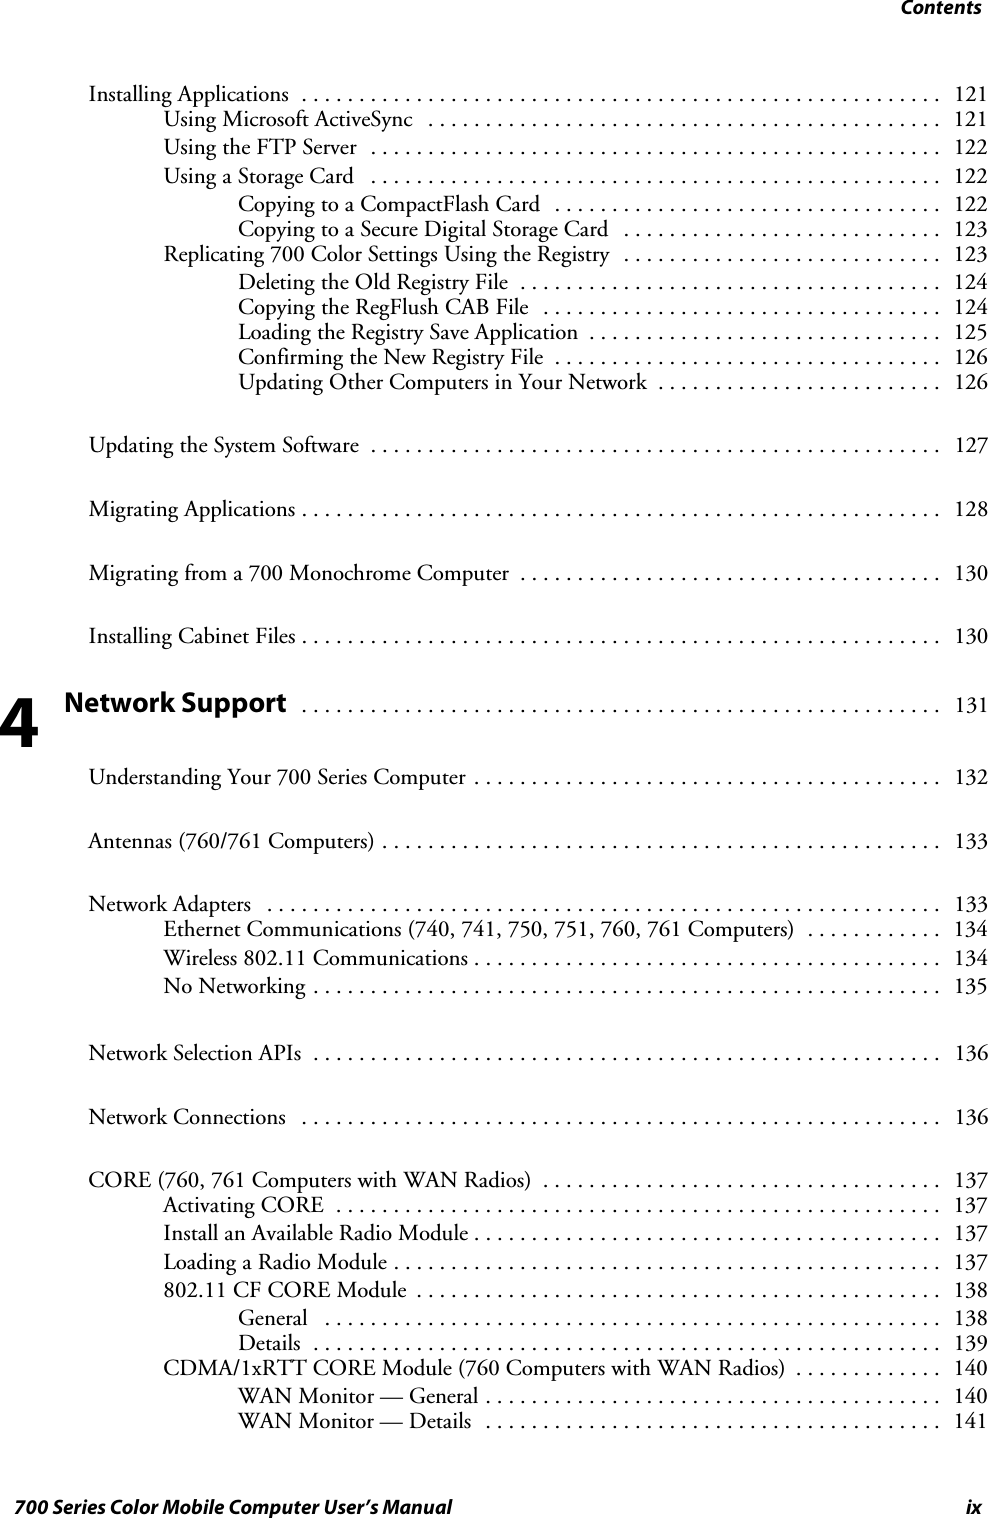
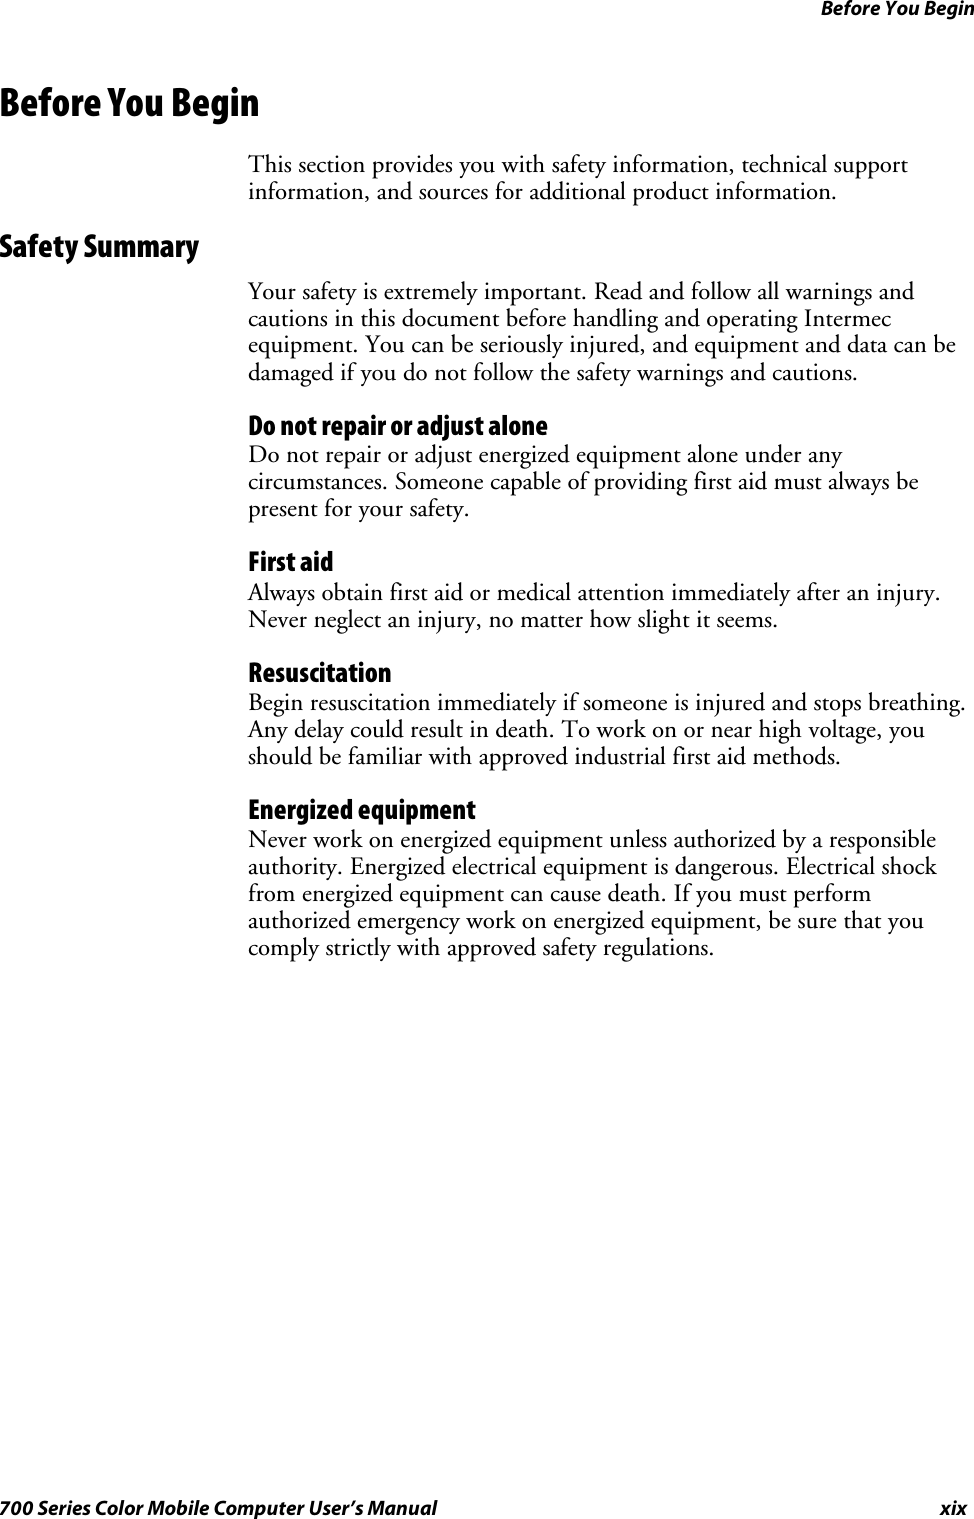
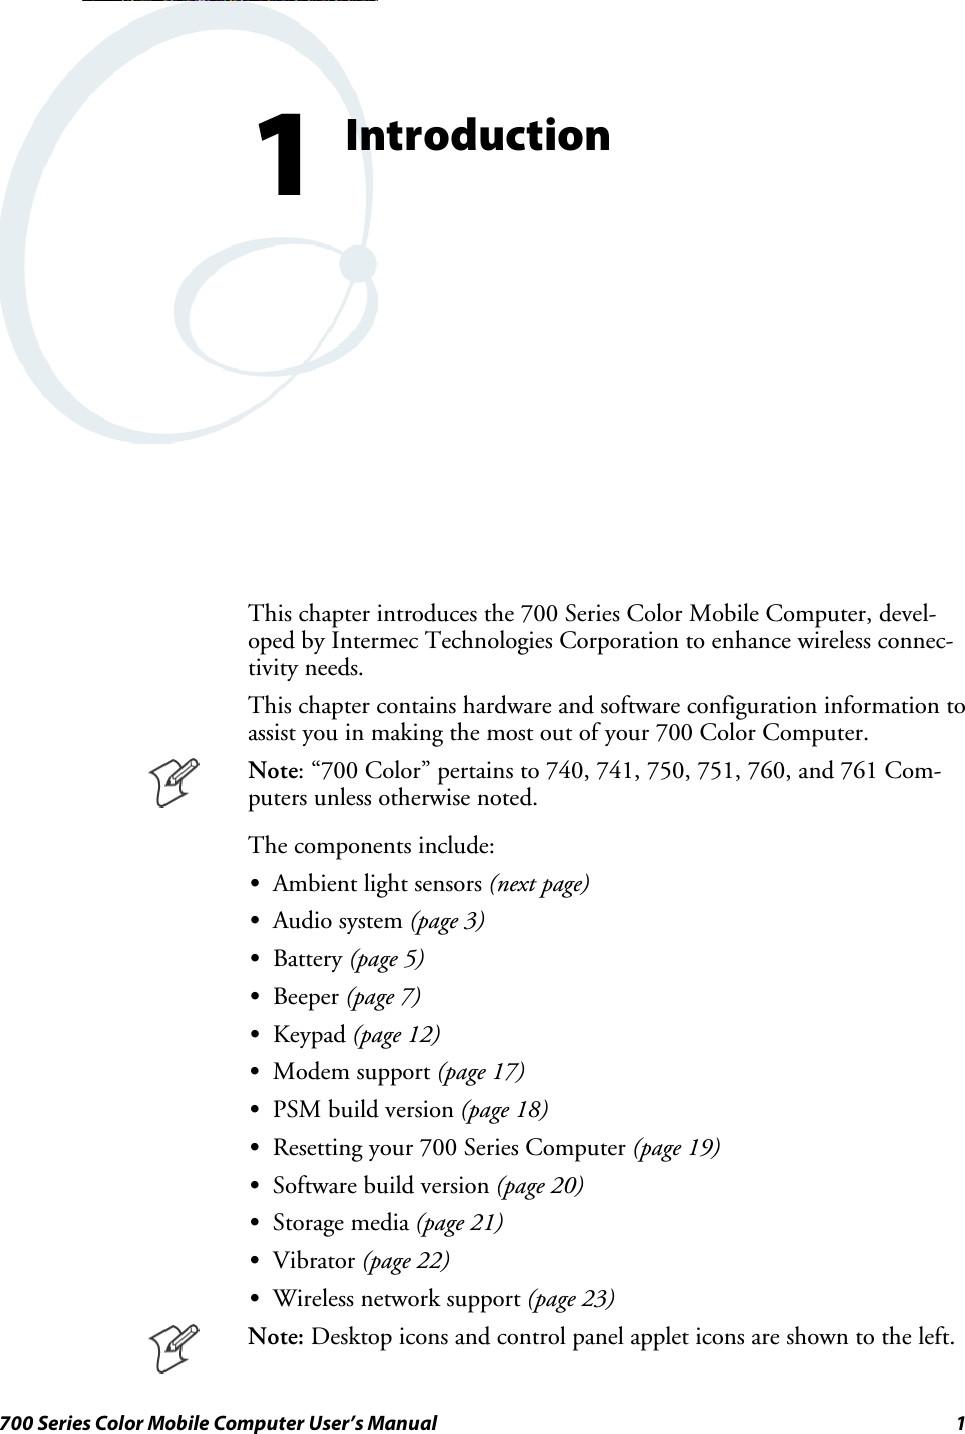
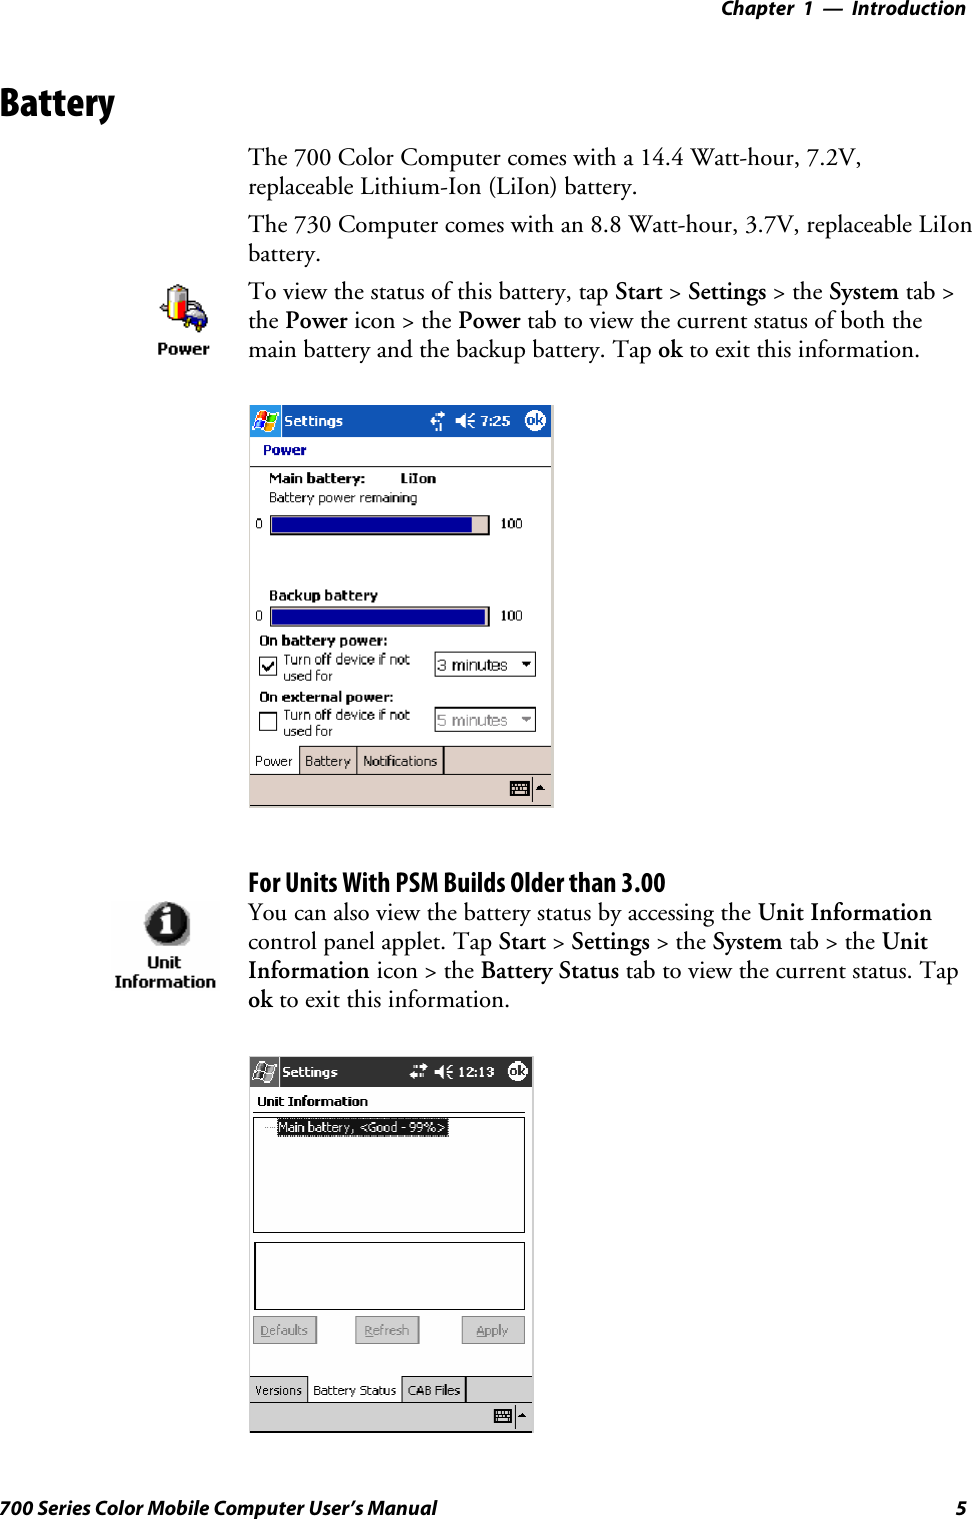
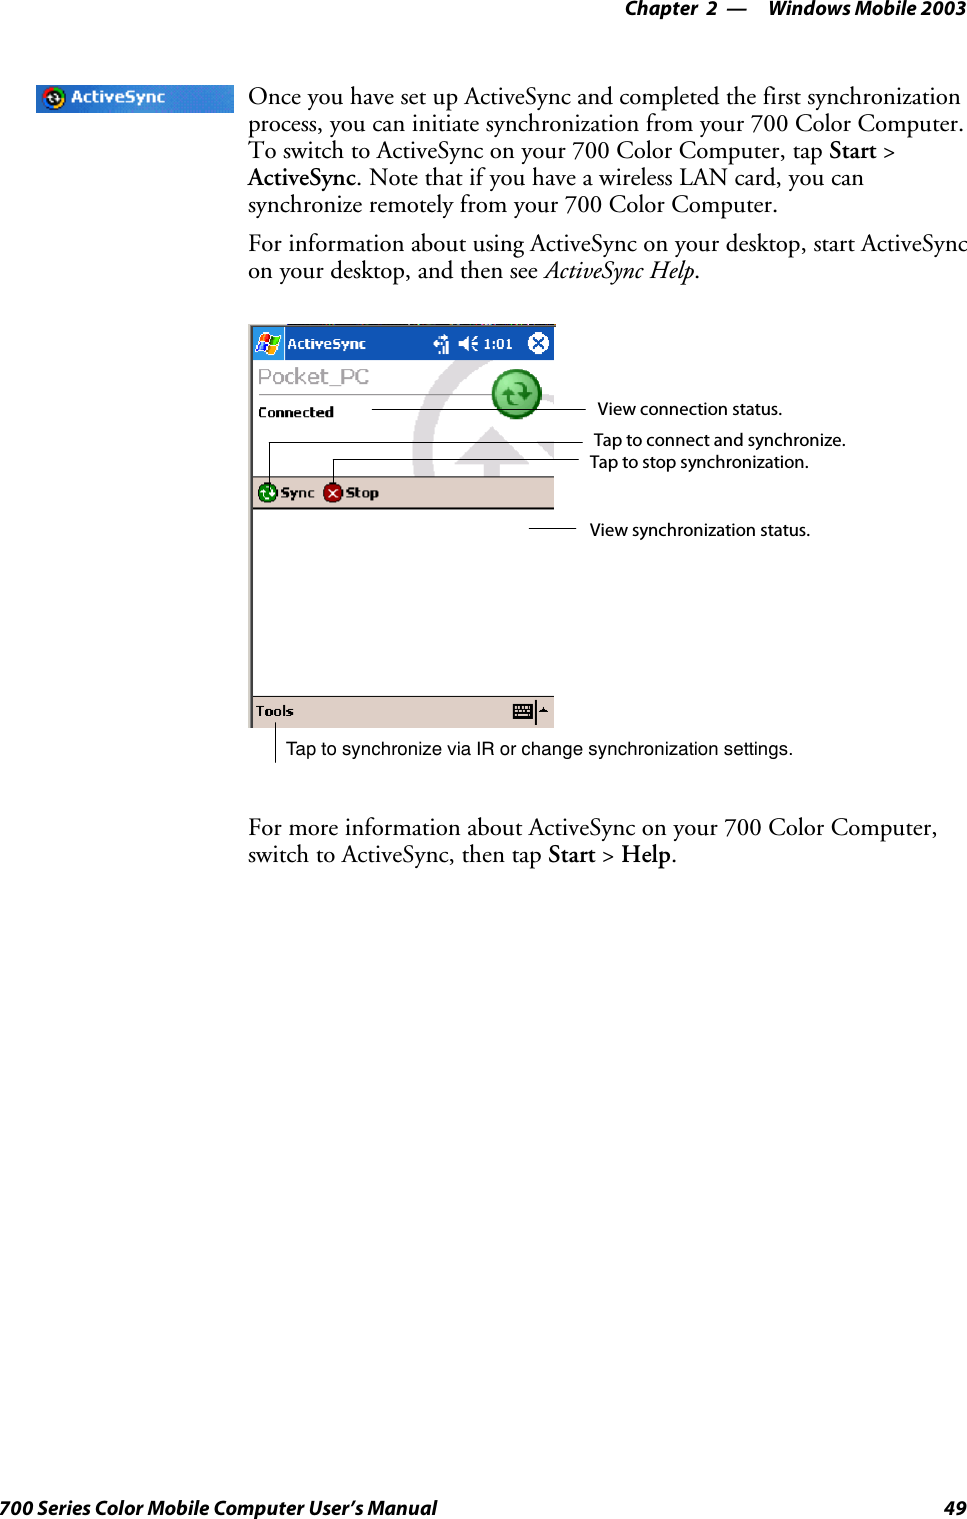
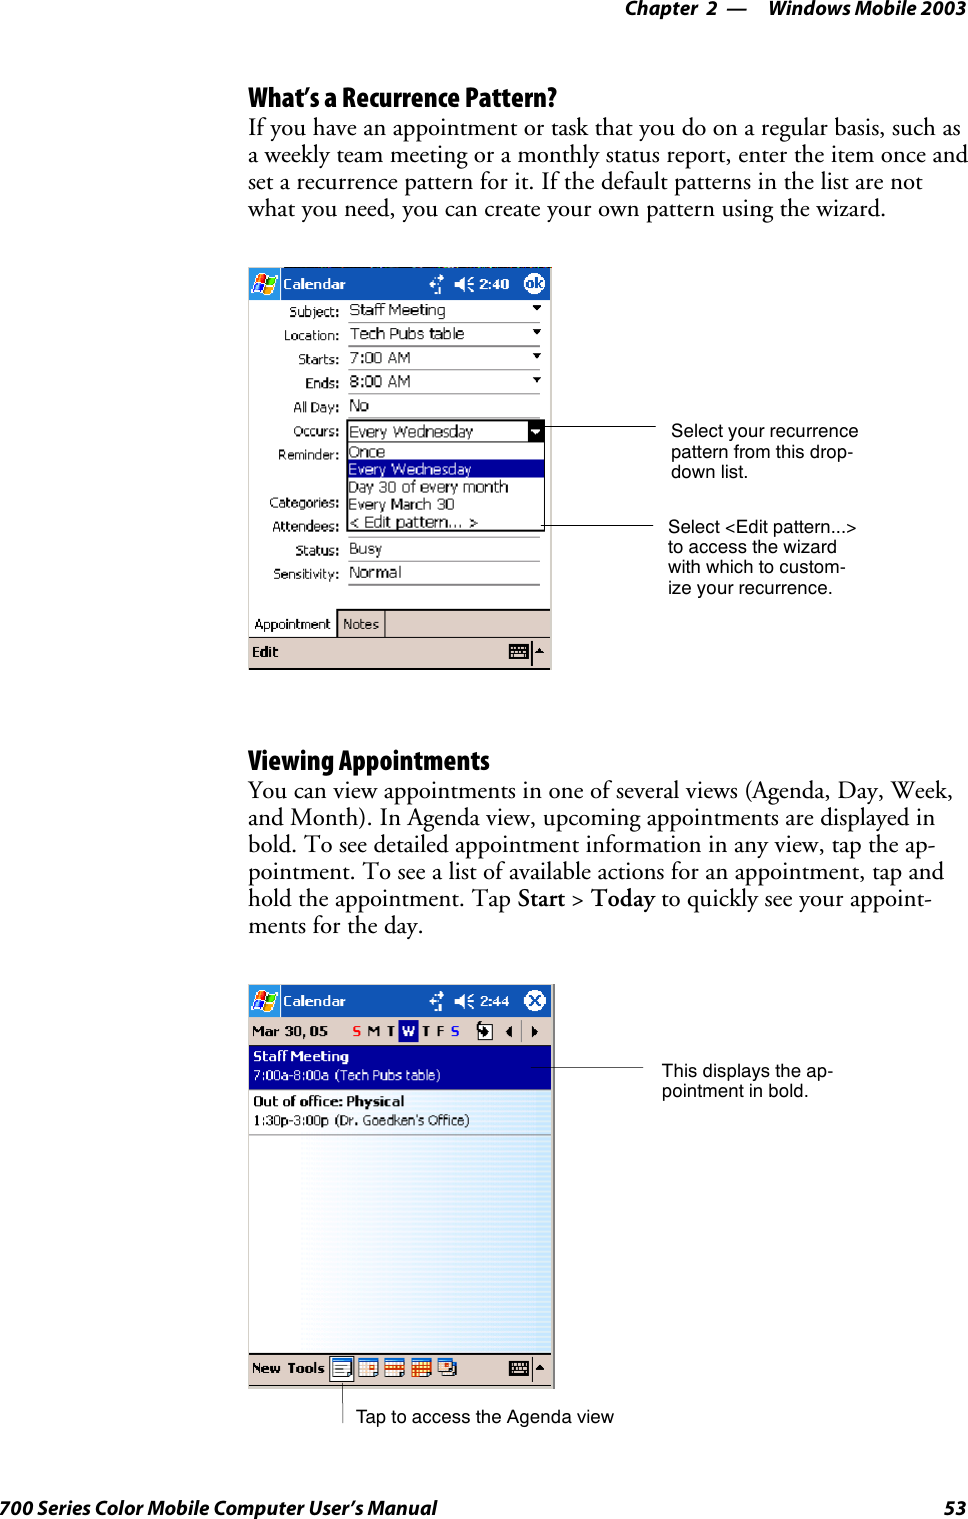
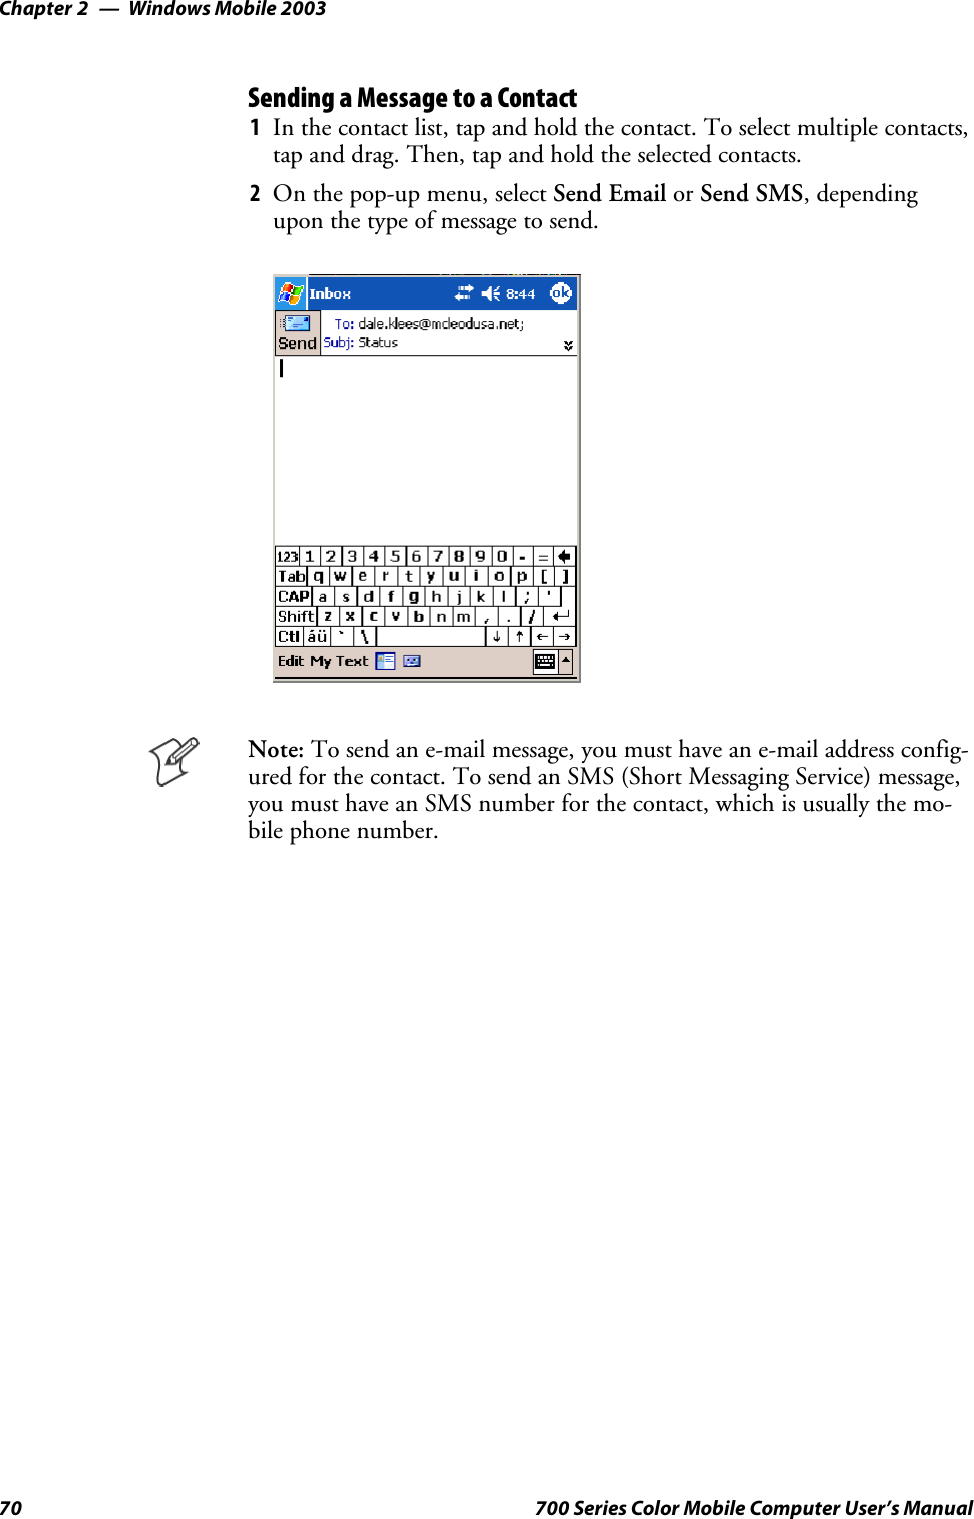
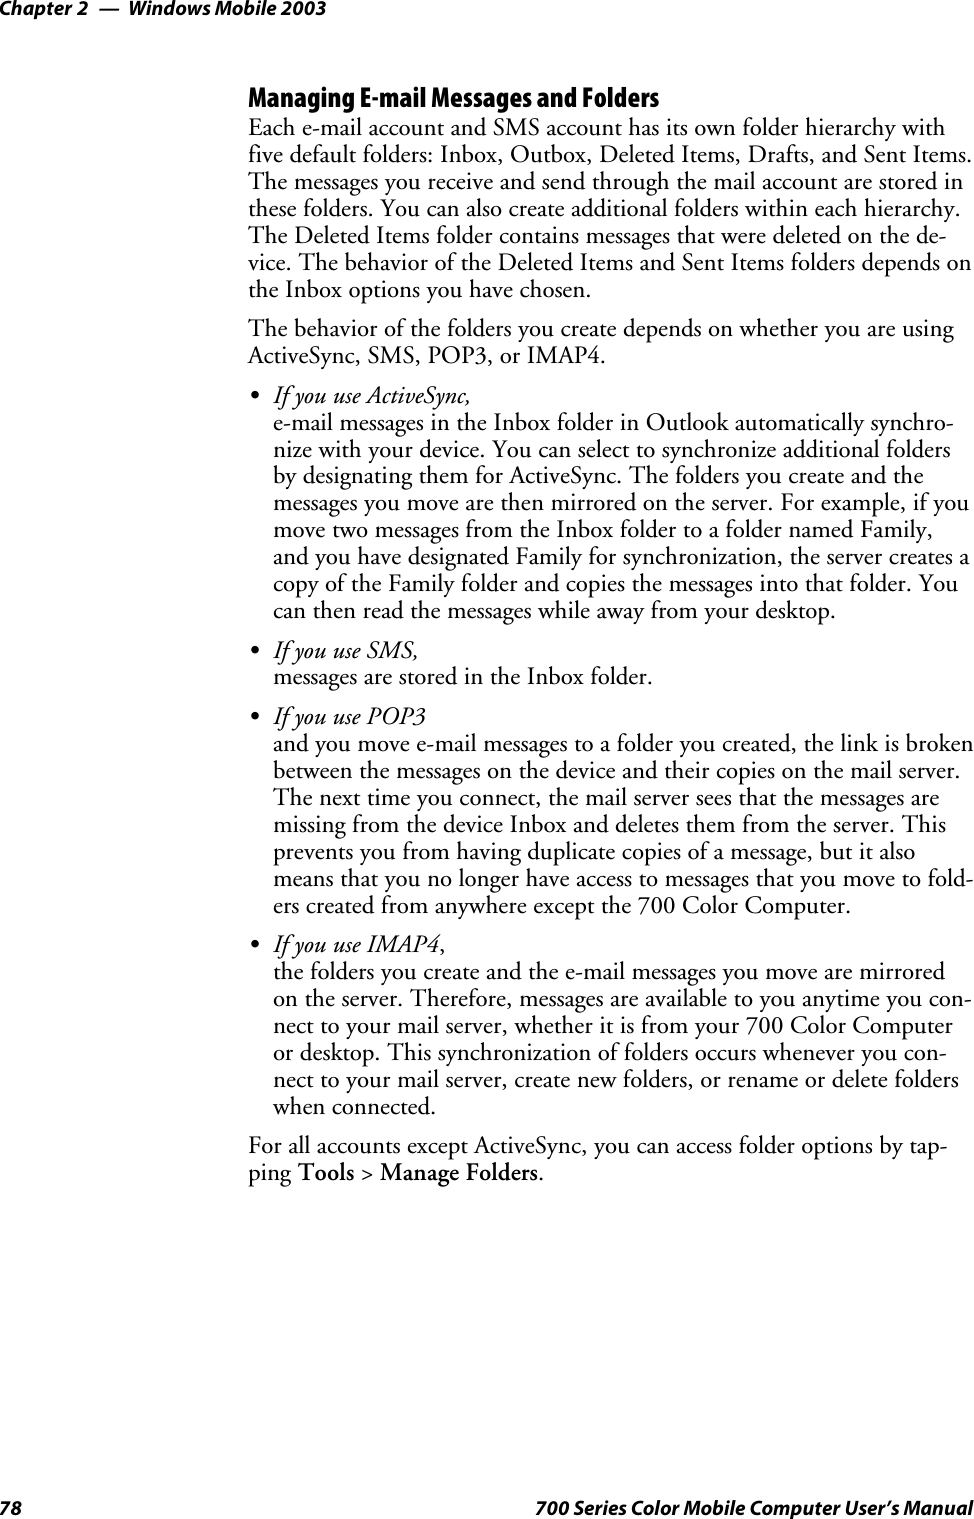
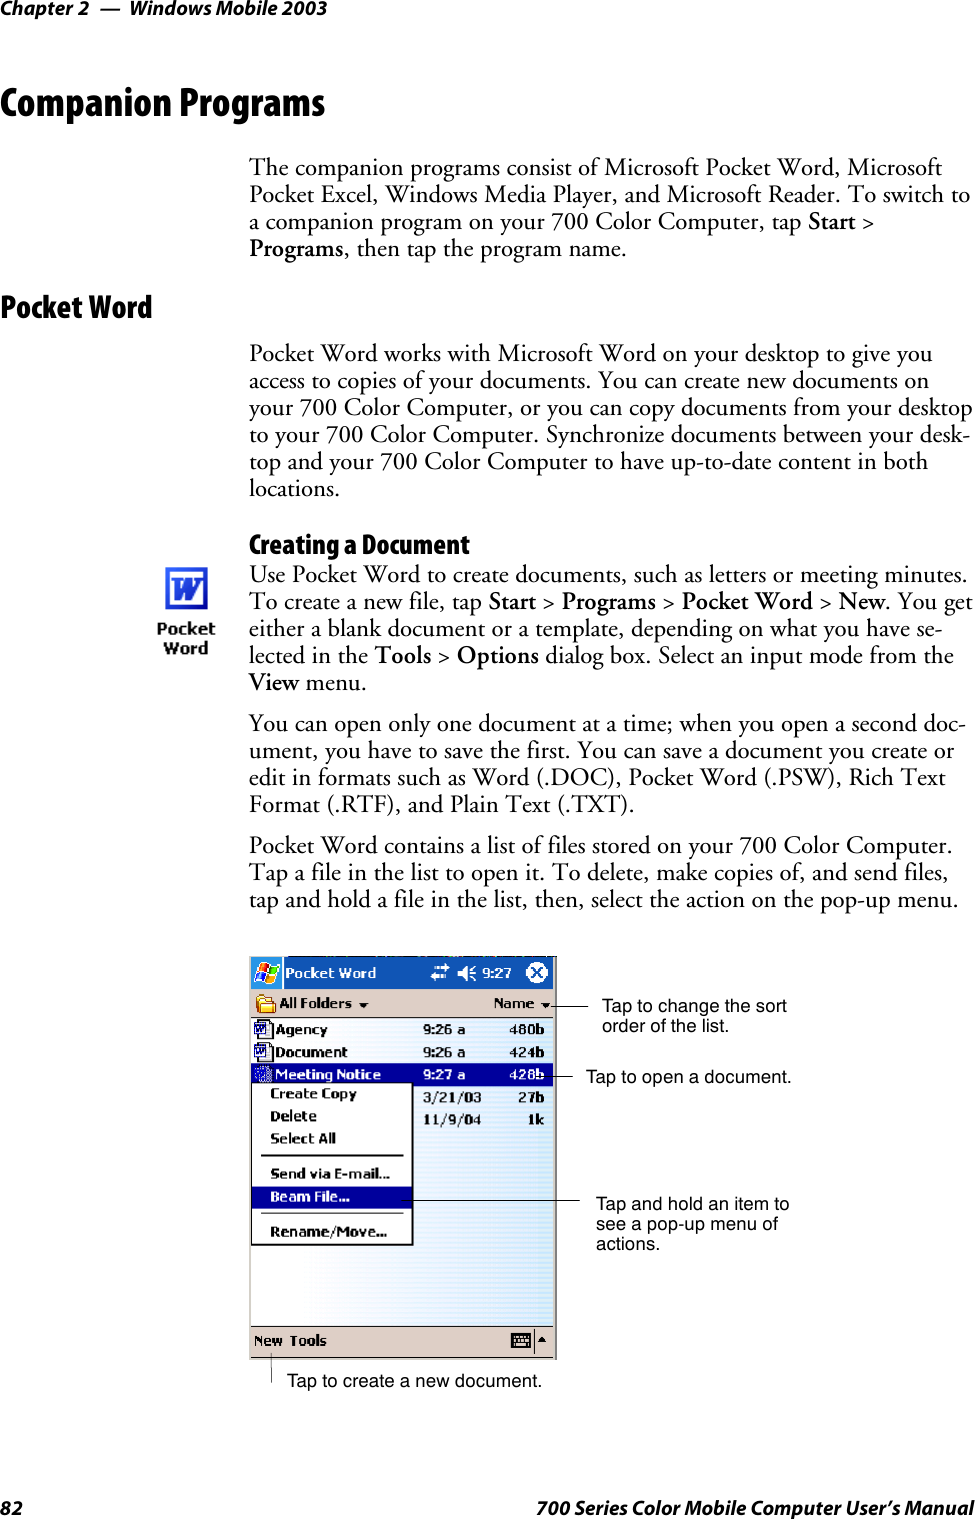
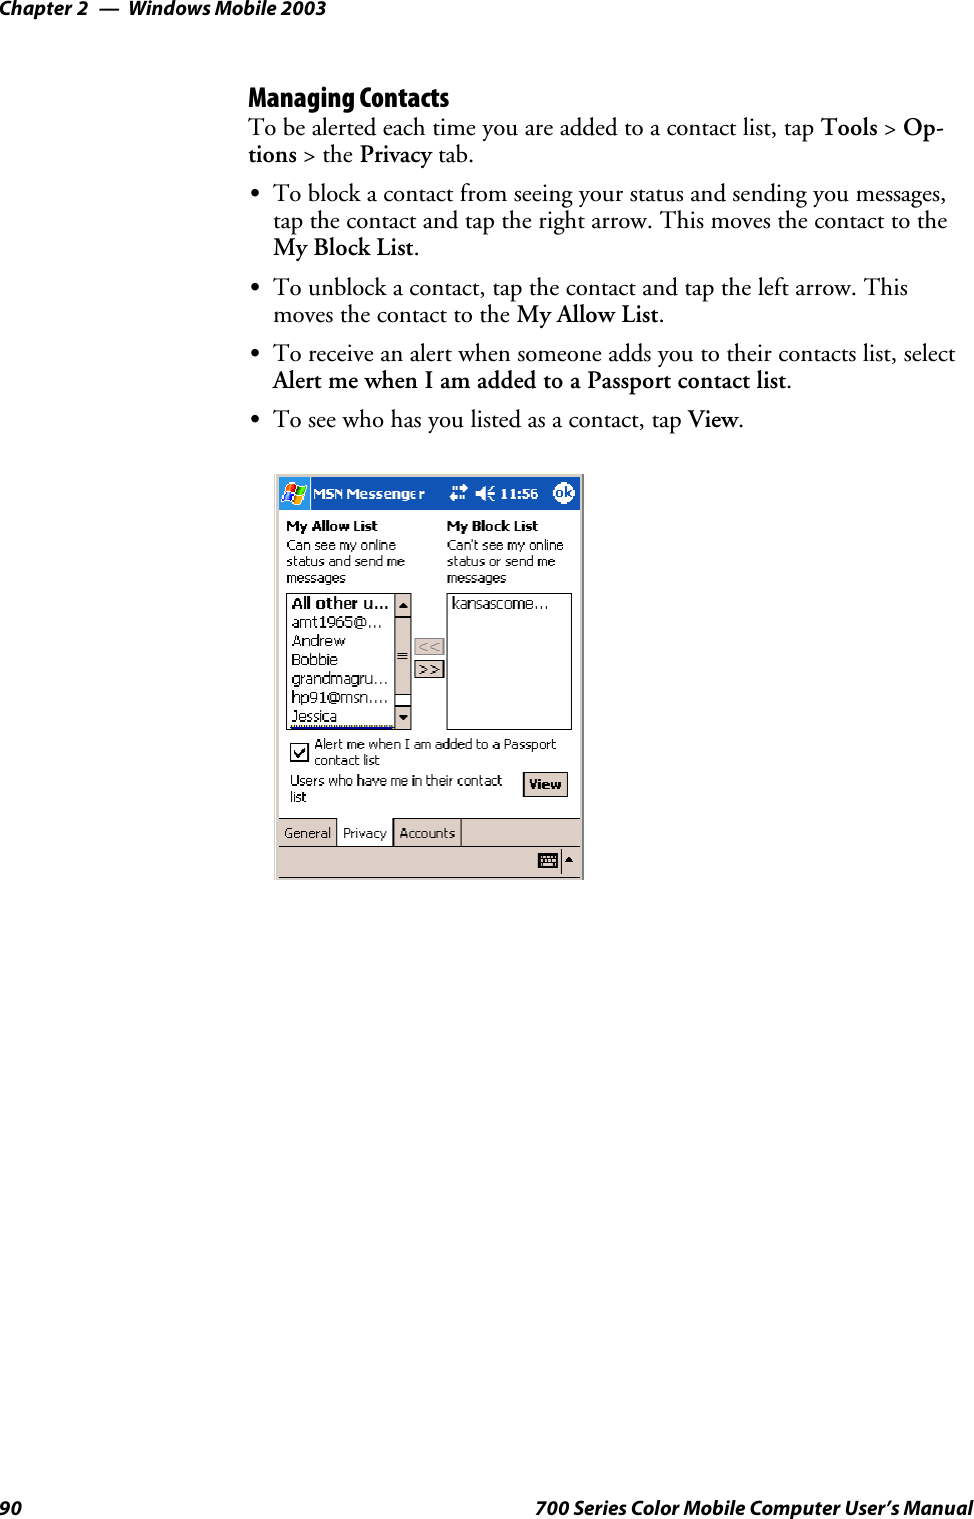
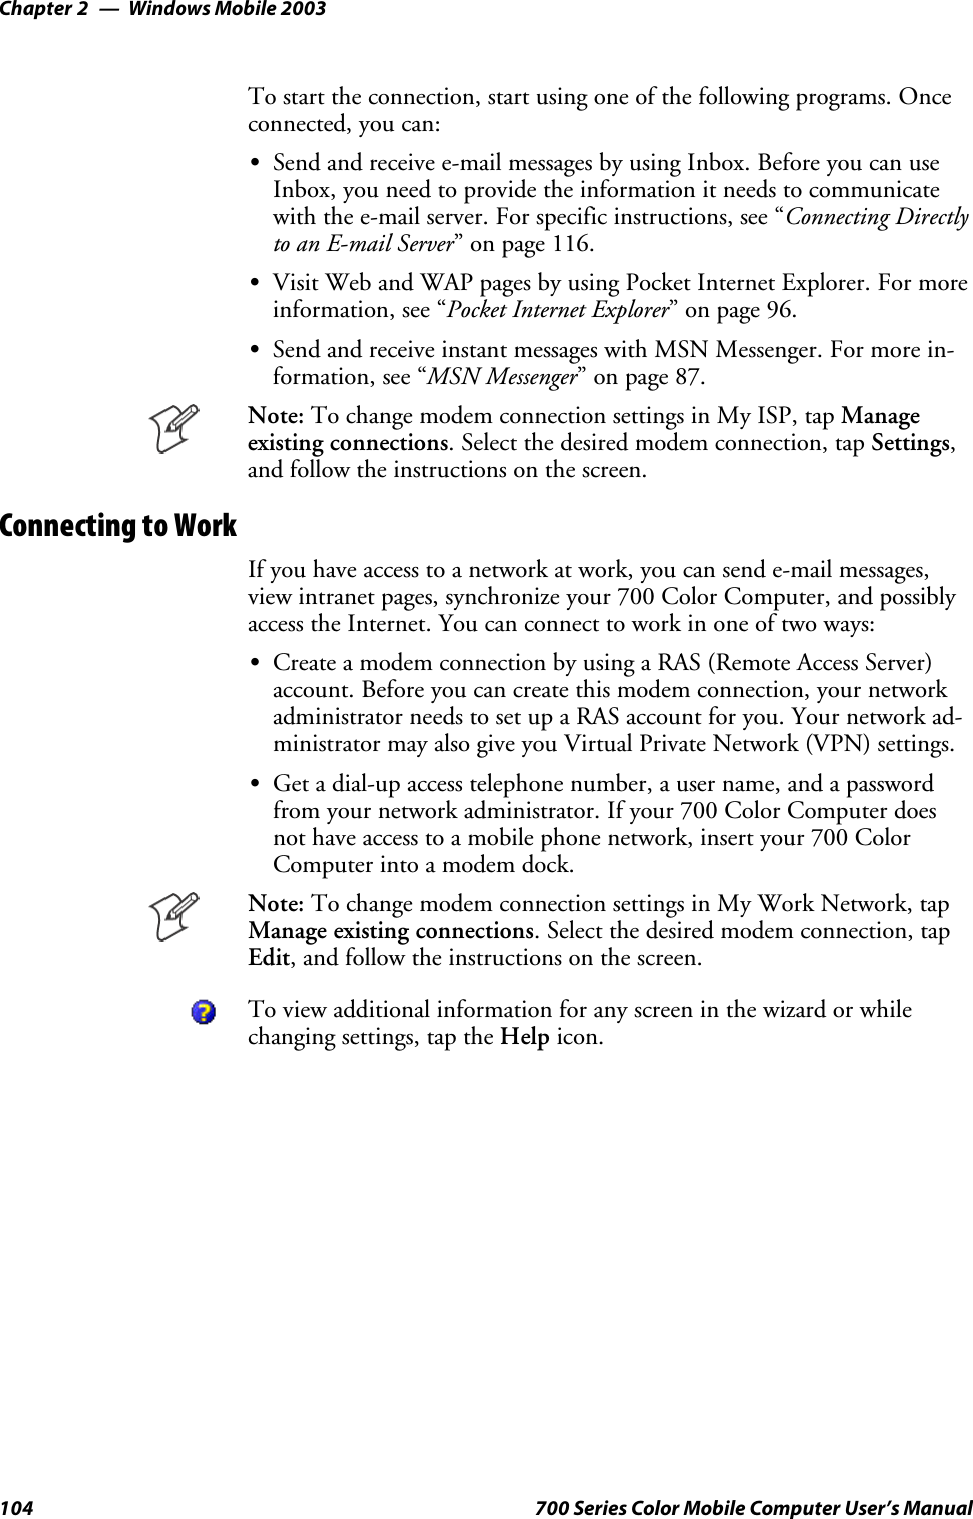
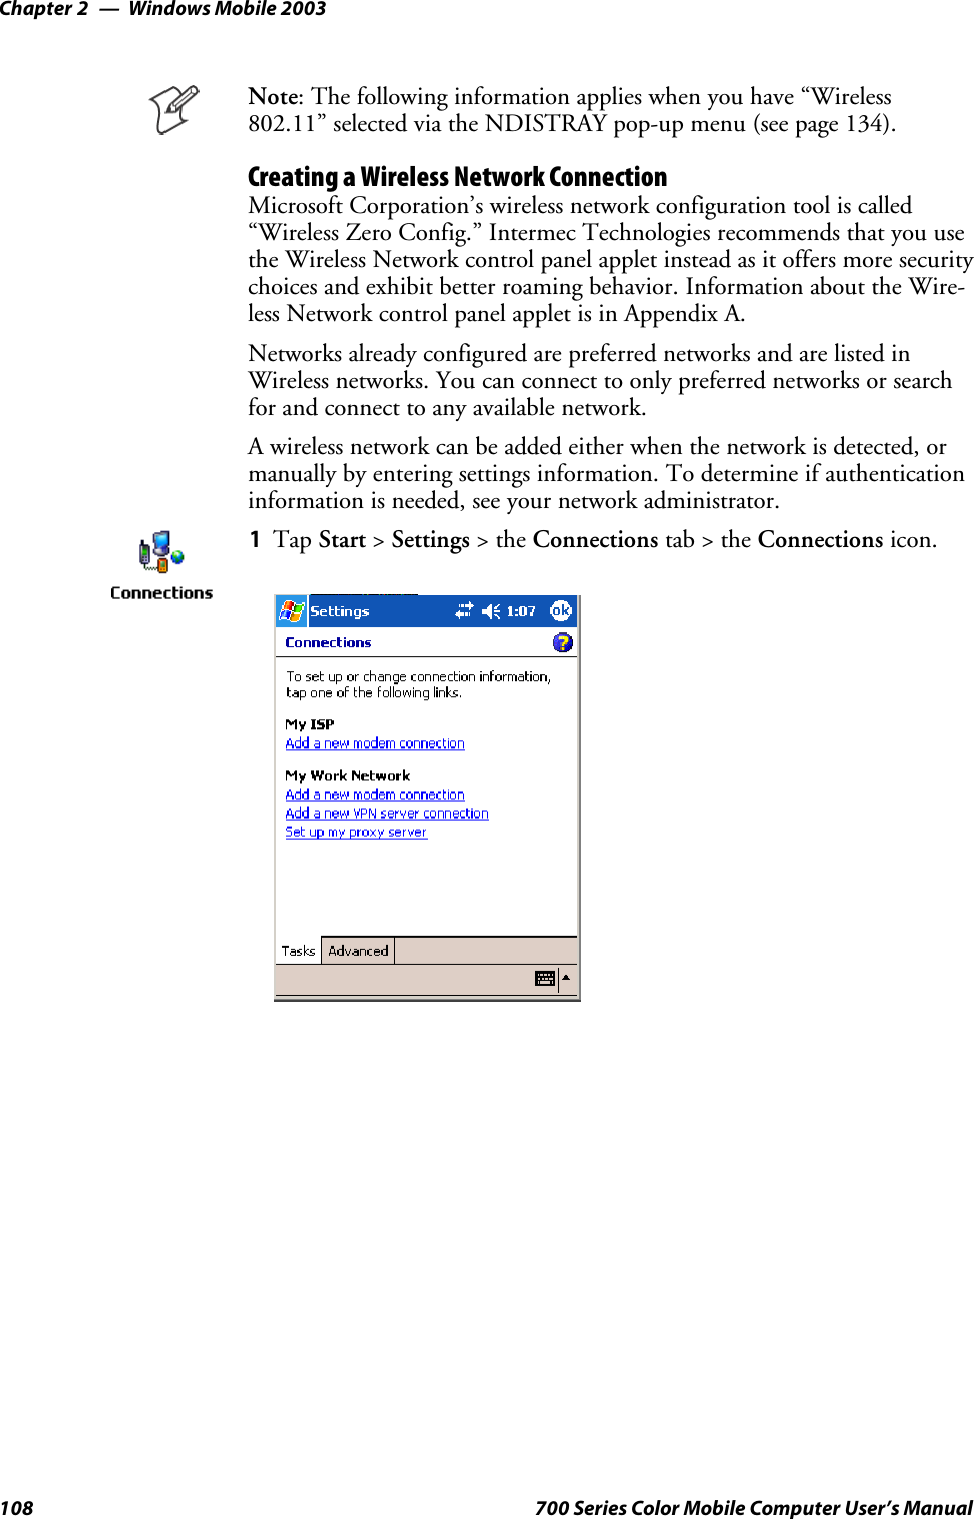
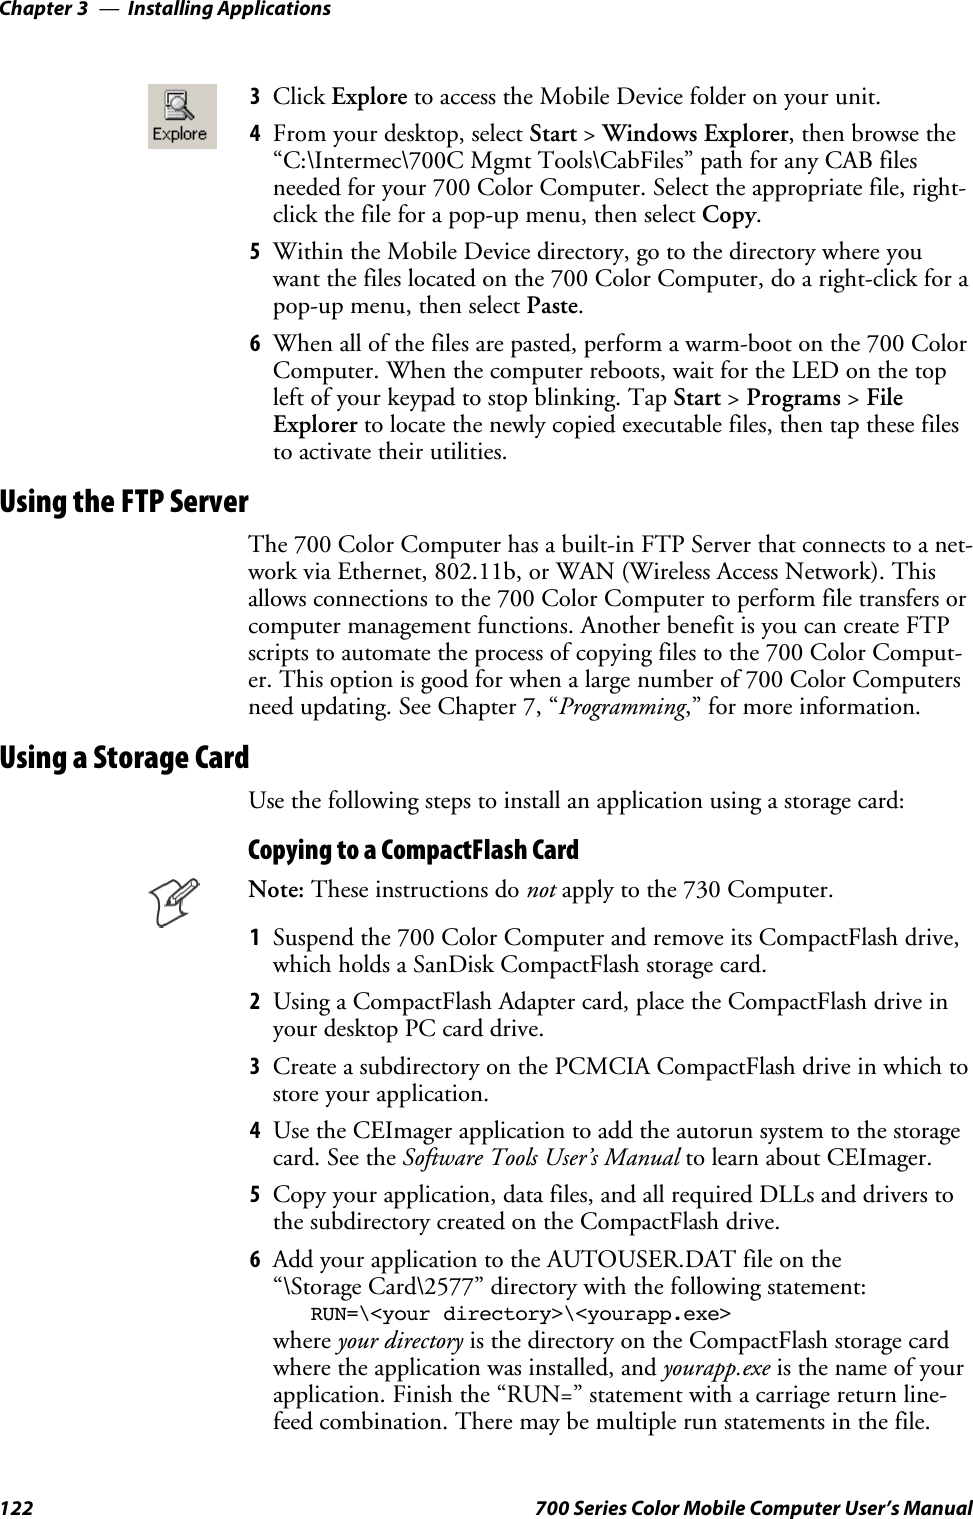
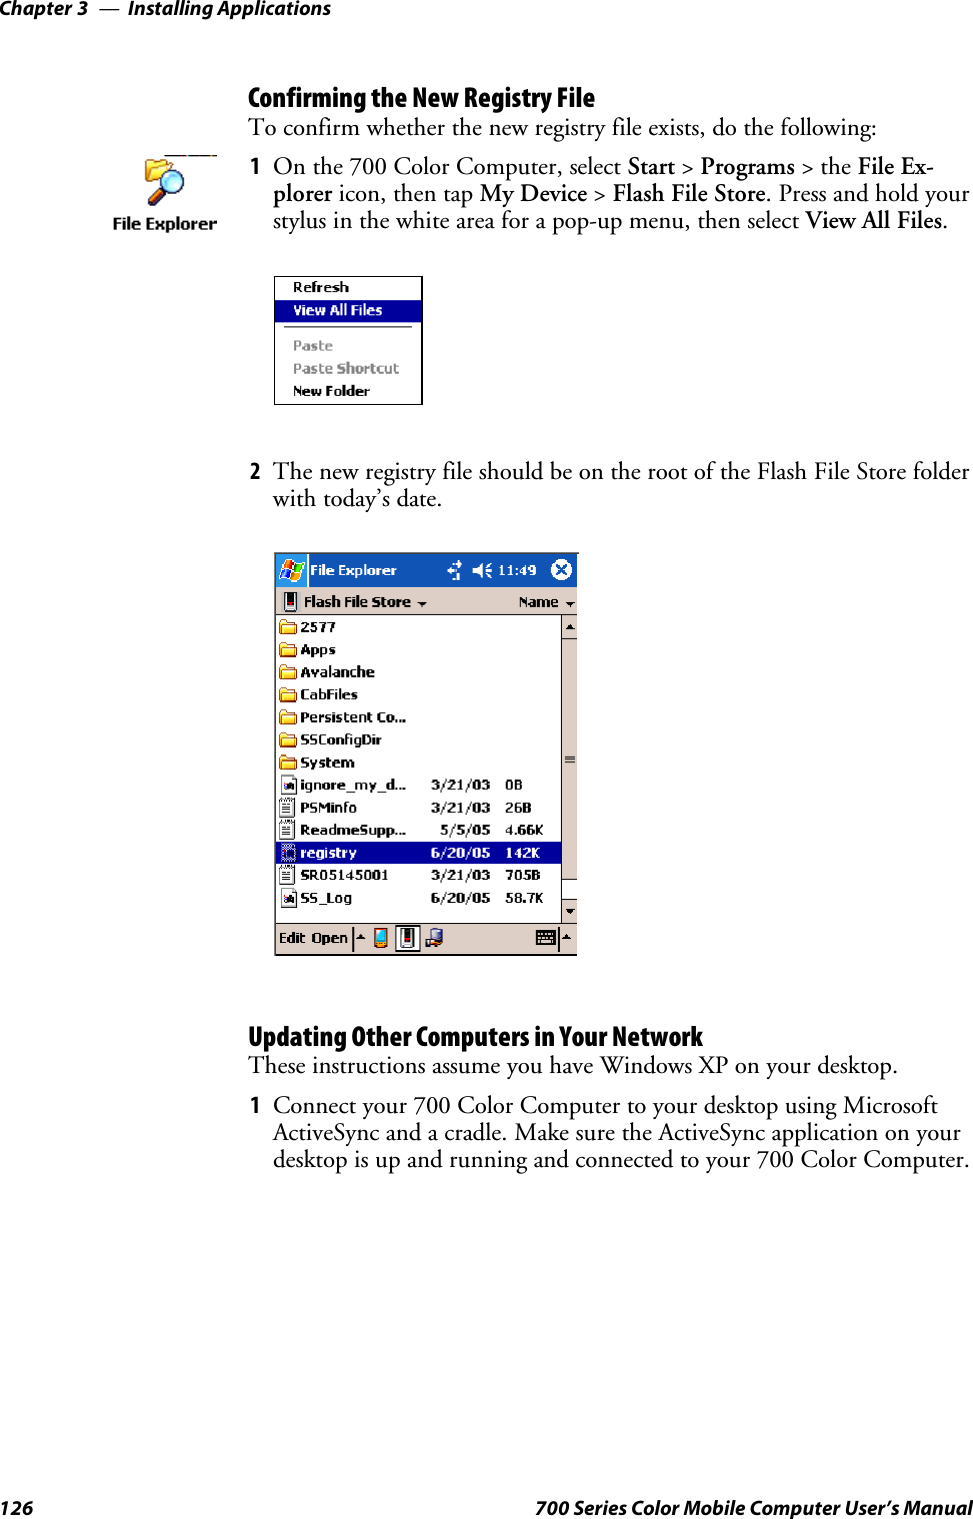
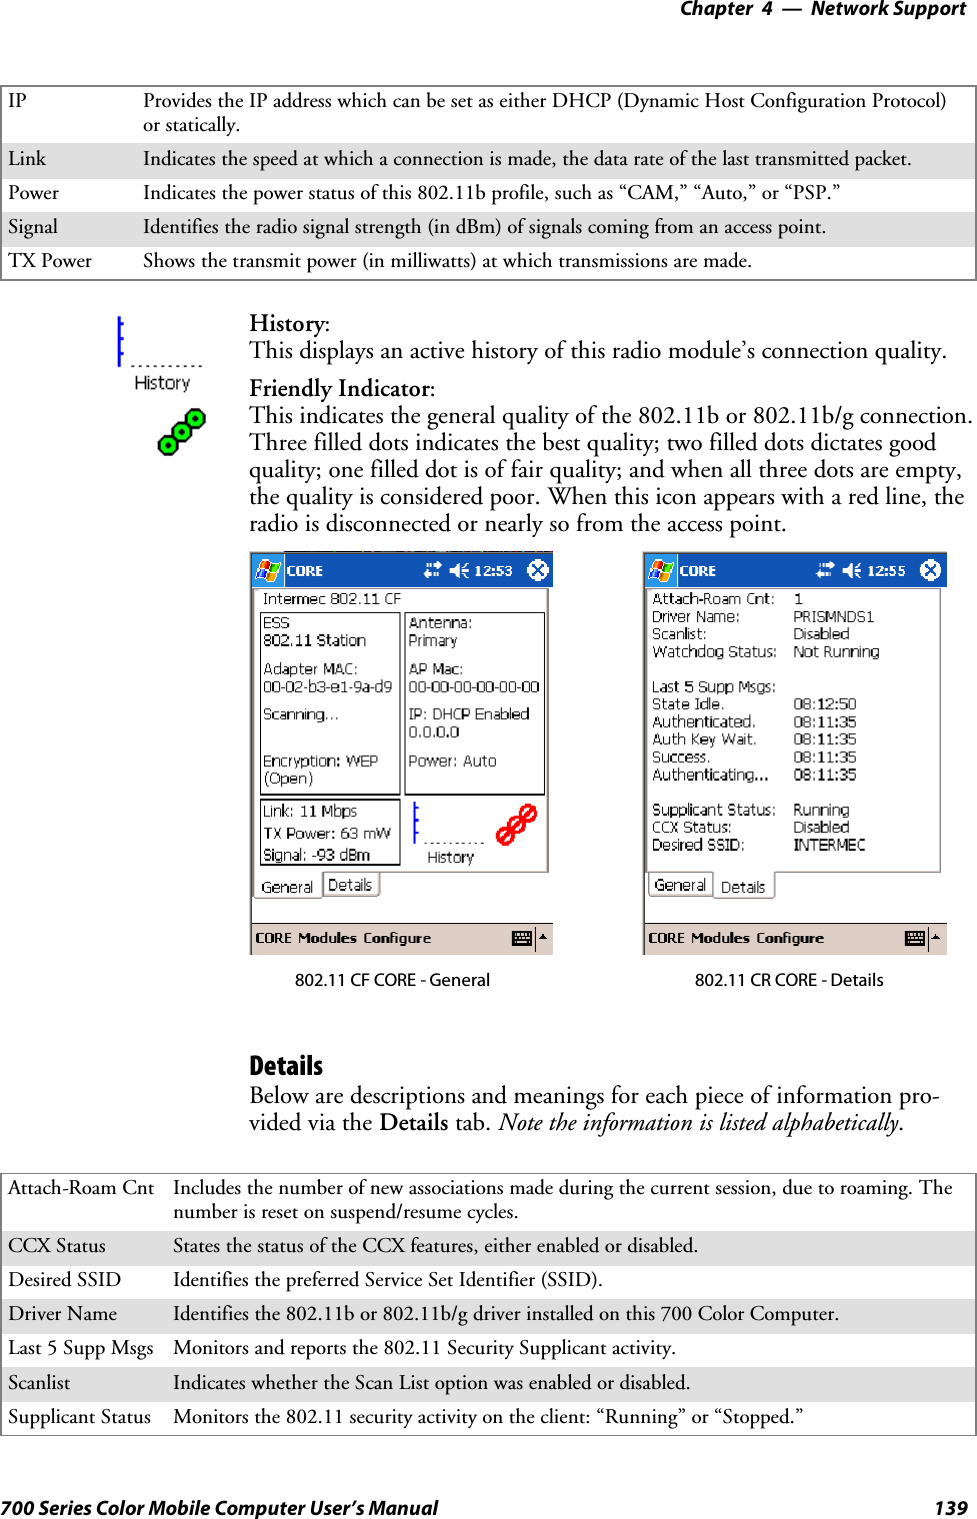
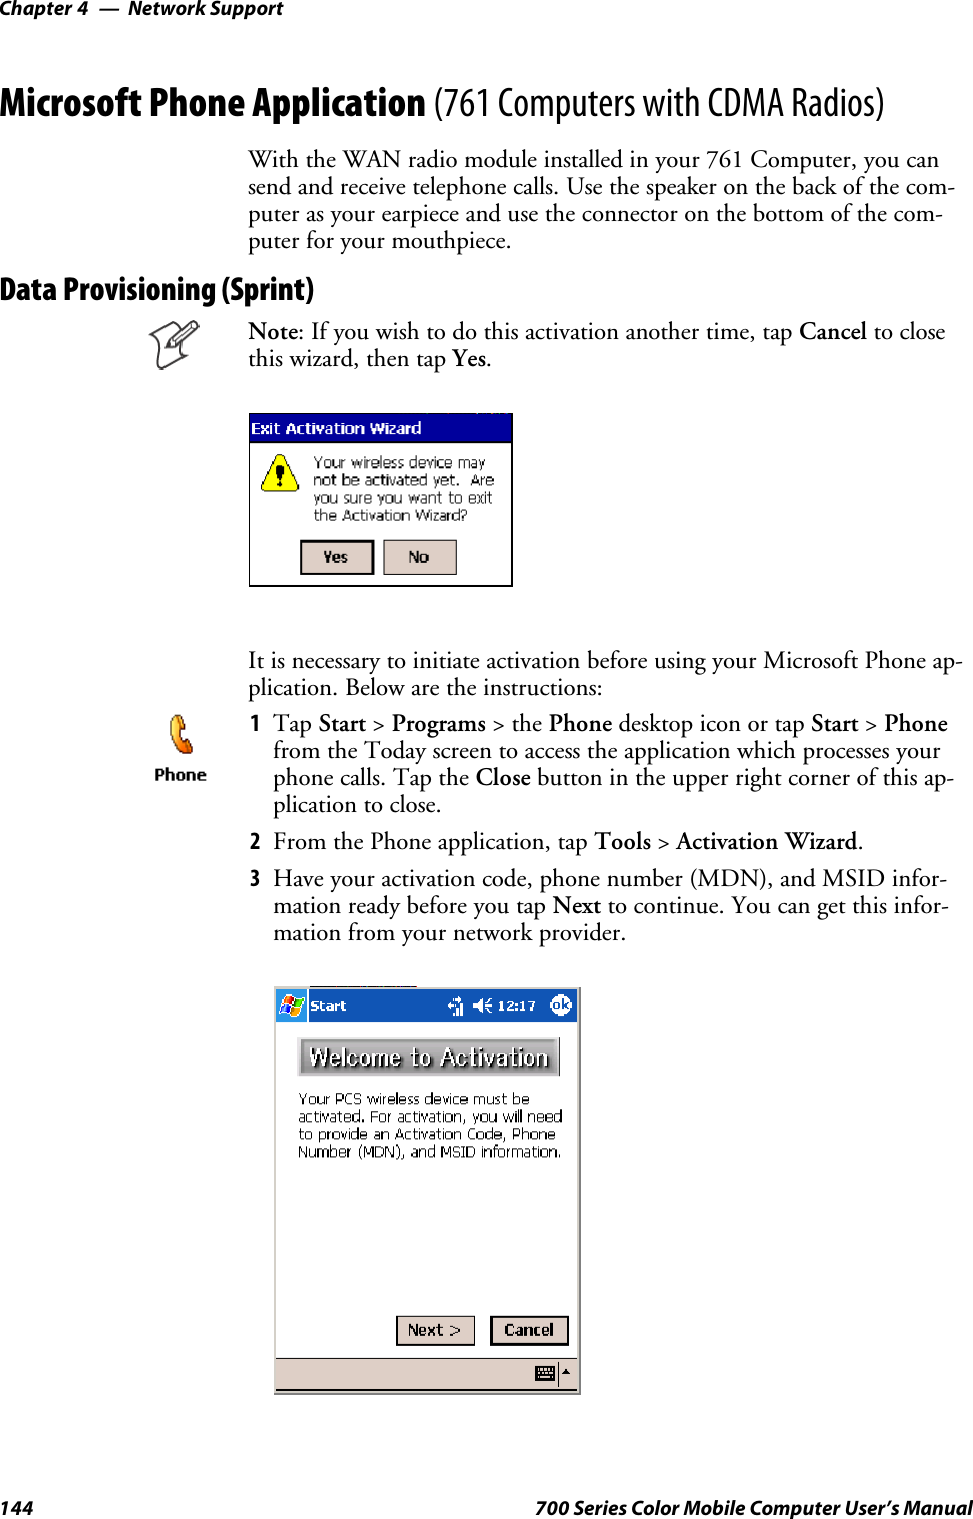
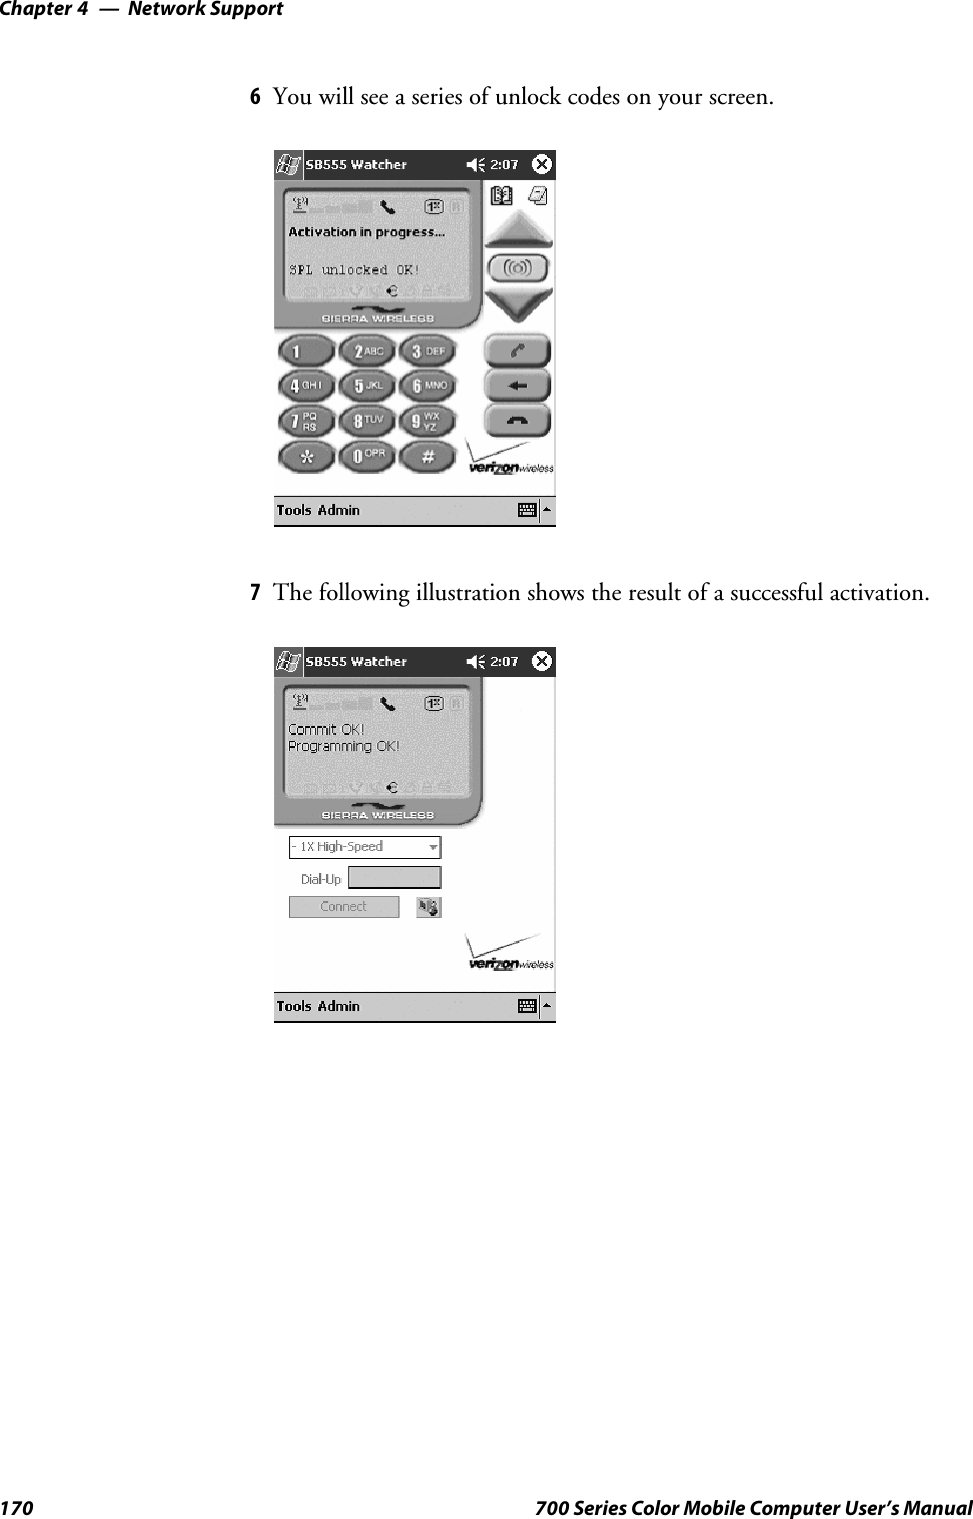
![Introduction—Chapter 115700 Series Color Mobile Computer User’s ManualAlpha (Blue) Plane KeysThe alphabet can be entered with either the numeric keypad or the alpha-numeric keypad. Below and on the next page are the key sequences.Numeric KeypadWhen you press F, the Scanning/Alpha LED (C)shows‘red’forthe Alpha mode. The keypad stays in Alpha mode until you press F.To type a lowercase ‘c,’ press F222(the [2] key threetimes). To type a letter on the same key as the last letter entered, wait twoseconds, then enter the correct series of keystrokes to create the next letter.WhileyouareintheAlphamodeandyoupress1to initiate the CAPSmode, you will render a CAPS LOCK until you press 1again. Onceyou are in CAPS mode, you stay in CAPS until it is pressed again.Press 0to enter a space.To Enter Press the Keys To Enter Press the KeysaF2 AF12bF22 BF122cF222 CF1222dF3 DF13eF33 EF133fF333 FF1333gF4 GF14hF44 HF144iF444 IF1444jF5 JF15kF55 KF155lF555 LF1555mF6 MF16nF66 NF166oF666 OF1666pF7 PF17qF77 QF177rF777 RF1777sF7777 SF17777tF8 TF18uF88 UF188vF888 VF1888wF9 WF19xF99 XF199yF999 YF1999zF9999 ZF19999](https://usermanual.wiki/Intermec-Technologies/DRCB.User-Manual-1-of-2/User-Guide-653440-Page-39.png)


![Printer Support—Chapter 5199700 Series Color Mobile Computer User’s ManualNPCP Printer DriverThe NPCP printer communications driver (NPCPPORT.DLL) is aStream Device Driver built into the operating system. The driver supportsonly NPCP communications to and from the 6820 and 4820 printers overa selected serial port.All applications use WIN32 API functions to access the drivers. Basic op-erations are easily implemented by applications through the CreateFile(),WriteFile(), ReadFile(), DeviceIOControl(), and CloseHandle() Win32APIs.Operations to upgrade printer modules, perform printer diagnostics, andget printer configuration are performed largely via DeviceIOControl()functions.About NPCPNPCP (Norand®Portable Communications Protocol) is a proprietaryprotocol that provides session, network, and datalink services for Intermecmobile computers in the Intermec LAN environment used with printersand data communications.NPCP Driver Installation and RemovalUseLPT9:fortheNPCPprinterdeviceandCOM1forthelastparame-ter. COM1 is the connection available via the 700 Color Computer.Applications use the RegisterDevice() function to install the driver.DeregisterDevice() uninstalls the device driver and frees memory spacewhen the driver is not required. Use the HANDLE returned byRegisterDevice() as the parameter to DeregisterDevice().Use the RegisterDevice() function call as demonstrated below. Specify thefull path name to the driver starting at the root for the RegisterDevice()function to work properly. The last parameter to RegisterDevice() is aDWORD that represents the name of the port for the NPCP streamdriver to use. Build this parameter on the stack if it is not to be paged outduringthecall.Thefirstparameter“LPT”(DeviceName)andthesecondparameter “9’ (index), indicate the name of the registered device, such asLPT9. This is used in the CreateFile() function call.Install(){HANDLE hDevice;TCHAR port[6];port[0] = TCHAR(‘C’);port[1] = TCHAR(‘O’);port[2] = TCHAR(‘M’);port[3] = TCHAR(‘1’);port[4] = TCHAR(‘:’);port[5] = TCHAR(0);hDevice = RegisterDevice ( (TEXT(”LPT”), 9,TEXT(“\\STORAGE CARD\\WINDOWS\\NPCPPORT.dll”), (DWORD)port);}](https://usermanual.wiki/Intermec-Technologies/DRCB.User-Manual-1-of-2/User-Guide-653440-Page-223.png)


![Printer SupportChapter —5204 700 Series Color Mobile Computer User’s ManualO’Neil Printer DriverThe DTR printer communications driver is a Stream Device Drivernamed ONEIL.DLL.All applications use WIN32 API functions to access drivers. Basicoperations are easily implemented by applications through theCreateFile(), WriteFile(), DeviceIOControl() and CloseHandle() Win32APIs.The driver supports communications to 6804DM, 6804T, 6805A, 6806,6808, 681T, and PB20 printers over a selected serial port.DTR Driver Installation and RemovalYour application must install the device driver by using the RegisterDe-vice() function. The driver name is ONEIL.DLL. We recommend thatyou use “DTR” for the Device Name parameter, “1” for the Device Driv-er index parameter, and use any of the following strings for the last param-eter:SNULL (==0) Defaults to COM1 @ 9600S“COM1” only COM port specified defaults to 9600S“COM1:9600” sets to COM port and specified bit rateS“COM1:19200” sets to COM port and specified bit rateUse the HANDLE returned by RegisterDevice() as the parameter toDeregisterDevice(). The correct usage of the RegisterDevice() function callis demonstrated below. You may use DeregisterDevice() to uninstall thedriver.Install(){HANDLE hDevice;TCHAR port[6];port[0] = TCHAR(‘C’);port[1] = TCHAR(‘O’);port[2] = TCHAR(‘M’);port[3] = TCHAR(‘1’);port[4] = TCHAR(‘:’);port[5] = TCHAR(0);hDevice = RegisterDevice ( (TEXT(”DTR”), 1, TEXT(”\\WINDOWS\\ONEIL.DLL”),(DWORD)port);}](https://usermanual.wiki/Intermec-Technologies/DRCB.User-Manual-1-of-2/User-Guide-653440-Page-228.png)