Invacare Wheelchair Atlas Users Manual 1130169B
Wheelchair Atlas 1130169
Atlas to the manual 301cf635-2b35-a644-d5da-b0008bc9b3c8
2015-02-02
: Invacare Invacare-Wheelchair-Atlas-Users-Manual-433494 invacare-wheelchair-atlas-users-manual-433494 invacare pdf
Open the PDF directly: View PDF ![]() .
.
Page Count: 32

Owner’s Operator and Maintenance Manual
DEALER: This manual MUST be given to
the user of the wheelchair.
USER: BEFORE using this wheelchair, read
this manual and save for future reference.
For more information regarding
Invacare products, parts, and services,
please visit www.invacare.com
Atlas™

Atlas™ 2Part No. 1130169
WARNING
A QUALIFIED TECHNICIAN MUST PERFORM THE INITIAL SET UP
OF THIS WHEELCHAIR. ALSO, A QUALIFIED TECHNICIAN MUST
PERFORM ALL PROCEDURES SPECIFICALLY INDICATED IN THE
MANUAL.
WHEELCHAIR USERS: DO NOT SERVICE OR OPERATE THIS
EQUIPMENT WITHOUT FIRST READING AND UNDERSTANDING
(1) THE OWNER’S OPERATOR AND MAINTENANCE MANUAL
AND (2) THE SEATING SYSTEM’S MANUAL (IF APPLICABLE). IF
YOU ARE UNABLE TO UNDERSTAND THE WARNINGS,
CAUTIONS, AND INSTRUCTIONS, CONTACT INVACARE
TECHNICAL SUPPORT BEFORE ATTEMPTING TO SERVICE OR
OPERATE THIS EQUIPMENT - OTHERWISE INJURY OR DAMAGE
MAY RESULT.
DEALERS AND QUALIFIED TECHNICIANS: DO NOT SERVICE OR
OPERATE THIS EQUIPMENT WITHOUT FIRST READING AND
UNDERSTANDING (1) THE OWNER’S OPERATOR AND
MAINTENANCE MANUAL, (2) THE SERVICE MANUAL (IF
APPLICABLE) AND (3) THE SEATING SYSTEM’S MANUAL (IF
APPLICABLE). IF YOU ARE UNABLE TO UNDERSTAND THE
WARNINGS, CAUTIONS AND INSTRUCTIONS, CONTACT
INVACARE TECHNICAL SUPPORT BEFORE ATTEMPTING TO
SERVICE OR OPERATE THIS EQUIPMENT - OTHERWISE, INJURY
OR DAMAGE MAY RESULT.
NOTE:Updatedversionsofthismanualareavailableonwww.invacare.com.

TABLE OF CONTENTS
Part No. 1130169 3Atlas™
TABLE OF CONTENTS
REGISTER YOUR PRODUCT ............................................................... 4
SPECIAL NOTES ................................................................................ 7
LABEL LOCATION ............................................................................ 8
TYPICAL PRODUCT PARAMETERS .................................................... 9
SECTION 1—GENERAL GUIDELINES ................................................. 10
Operating Information.............................................................................................................................10
Weight Training ........................................................................................................................................11
Weight Limitation.....................................................................................................................................11
SECTION 2—SAFETY/HANDLING OF WHEELCHAIRS ......................... 12
Safety/Handling of Wheelchairs.............................................................................................................12
Stability and Balance.................................................................................................................................12
Reaching, Leaning and Bending Forward ........................................................................................13
Reaching, Leaning Backwards............................................................................................................13
Coping With Everyday Obstacles.........................................................................................................14
A Note to Wheelchair Assistants ........................................................................................................14
Tipping.........................................................................................................................................................14
Tipping - Curbs.....................................................................................................................................14
Stairways.....................................................................................................................................................15
Escalators....................................................................................................................................................16
Transferring To and From Other Seats ..............................................................................................16
Unfolding and Folding Wheelchair .......................................................................................................17
Unfolding................................................................................................................................................17
Folding ....................................................................................................................................................17
SECTION 3—SAFETY INSPECTION/TROUBLESHOOTING .................... 18
Safety Inspection Checklist.....................................................................................................................18
Inspect/Adjust Initially ...................................................................................................................18
Inspect/Adjust Weekly ..................................................................................................................19
Inspect/Adjust Monthly .................................................................................................................19
Inspect/Adjust Periodically ...........................................................................................................19
Troubleshooting........................................................................................................................................20
Maintenance Safety Precautions............................................................................................................20
SECTION 4—FRONT RIGGINGS ........................................................ 22
Installing/Removing Front Riggings .......................................................................................................22
Installing..................................................................................................................................................22
Removing ...............................................................................................................................................22
Adjusting Footrest Height ......................................................................................................................23

TABLE OF CONTENTS
Atlas™ 4Part No. 1130169
TABLE OF CONTENTS
Raising/Lowering Elevating Legrest Assembly....................................................................................23
SECTION 5—ARMS ......................................................................... 24
Removing/Installing Armrests (Removable Armrests Only)...........................................................24
Removing ...............................................................................................................................................24
Installing..................................................................................................................................................24
SECTION 6—BACK ......................................................................... 25
Removing/Installing the Back (Removable Back Only).....................................................................25
SECTION 7—REAR WHEELS ............................................................. 26
Removing/Installing Rear Wheels .........................................................................................................26
SECTION 8—FRONT CASTERS ......................................................... 27
Adjusting Front Caster Height ..............................................................................................................27
SECTION 9—WHEEL LOCKS ............................................................. 28
Adjusting Wheel Locks ...........................................................................................................................28
SECTION 10—SEAT-TO-FLOOR HEIGHT ........................................... 30
Changing Seat-To-Floor Height.............................................................................................................30
SECTION 11—OPTIONS ................................................................... 31
Installing Anti-Tippers..............................................................................................................................31
LIMITED WARRANTY ..................................................................... 32
REGISTER YOUR PRODUCT
The benefits of registering:
1. Safeguard your investment.
2. Ensure long term maintenance and servicing of your purchase.
3. Receive updates with product information, maintenance tips, and industry news.
4. Invacare can contact you or your provider, if servicing is needed on your product.
5. It will enable Invacare to improve product designs based on your input and needs.
Register ONLINE at www.invacare.com
- or -
Complete and mail the form on the next page
Any registration information you submit will be used by Invacare Corporation only, and
protected as required by applicable laws and regulations.

Part No. 1130169 5Atlas™
Name _______________________________________________________________
Address _____________________________________________________________
City ___________________ State/Province __________
Zip/Postal Code ________
Email ___________________________________ Phone No. _________________
Invacare Model No. ______________________ Serial No. __________________
Purchased From _________________________Date of Purchase:___________
1. Method of purchase: (check all that apply)
❏ Medicare ❏ Insurance ❏ Medicaid ❏ Other __________________________
2. This product was purchased for use by: (check one)
❏ Self ❏ Parent ❏ Spouse ❏ Other
3. Product was purchased for use at:
❏ Home ❏ Facility ❏ Other
4. I purchased an Invacare product because:
❏ Price ❏ Features (list features) _________________________________________
5. Who referred you to Invacare products? (check all that apply)
❏ Doctor ❏ Therapist ❏ Friend ❏ Relative ❏ Dealer/Provider ❏ Other_________
❏ Advertisement (circle one): TV, Radio, Magazine, Newspaper ❏ No Referral_____
6. What additional features, if any, would you like to see on this product?
__________________________________________________________________________
7. Would you like information sent to you about Invacare products that may be available for a
particular medical condition? ❏ Yes ❏ No
If yes, please list any condition(s) here and we will send you information by email and/or mail about
any available Invacare products that may help treat, care for or manage such condition(s):
__________________________________________________________________________
8. Would you like to receive updated information via email or regular mail about the Invacare
home medical products sold by Invacare's dealers? ❏ Yes ❏ No
9. What would you like to see on the Invacare website?
__________________________________________________________________________
10. Would you like to be part of future online surveys for Invacare products? ❏ Yes ❏ No
11. User's Year of birth: ______________________________________________________
If at any time you wish not to receive future mailings from us, please contact us at Invacare Corporation,
CRM Department, 39400 Taylor Parkway, Elyria, OH 44035, or fax to 877-619-7996 and we will remove
you from our mailing list.
To find more information about our products, visit www.invacare.com.
PRODUCT REGISTRATION FORM
Register ONLINE at www.invacare.com - or -
Complete and mail this form
Cut Along Line
Fold
here
Fold
here

SPECIAL NOTES
Part No. 1130169 7Atlas™
SPECIAL NOTES
Signalwordsareusedinthismanualandapplytohazardsorunsafepracticeswhich
couldresultinpersonalinjuryorpropertydamage.Refertothefollowingtablefor
definitionsofthesignalwords.
NOTICE
THE INFORMATION CONTAINED IN THIS DOCUMENT IS SUBJECT TO
CHANGE WITHOUT NOTICE.
WHEELCHAIR USER
As a manufacturer of wheelchairs, Invacare endeavors to supply a wide variety of
wheelchairs to meet many needs of the end user. However, final selection of the
type of wheelchair to be used by an individual rests solely with the user and his/her
healthcare professional capable of making such a selection.
WHEELCHAIR TIE-DOWN RESTRAINTS
Wheelchair users should NOT be transported in vehicles of any kind while in
wheelchairs. As of this date, the Department of Transportation has not approved
any tie-down systems for transportation of a user while in a wheelchair, in a moving
vehicle of any type.
It is Invacare’s position that users of wheelchairs should be transferred into
appropriate seating in vehicles for transportation and use be made of the restraints
made available by the auto industry. Invacare cannot and does not recommend any
wheelchair transportation systems.
Invacare products are specifically designed and manufactured for use in conjunction
with Invacare accessories. Accessories designed by other manufacturers have not
been tested by Invacare and are not recommended for use with Invacare products.
SIGNAL WORD MEANING
DANGER Danger indicates an imminently hazardous situation which, if not avoided, will result in
death or serious injury.
WARNING Warning indicates a potentially hazardous situation which, if not avoided, could result in
death or serious injury.
CAUTION Caution indicates a potentially hazardous situation which, if not avoided, may result in
property damage.
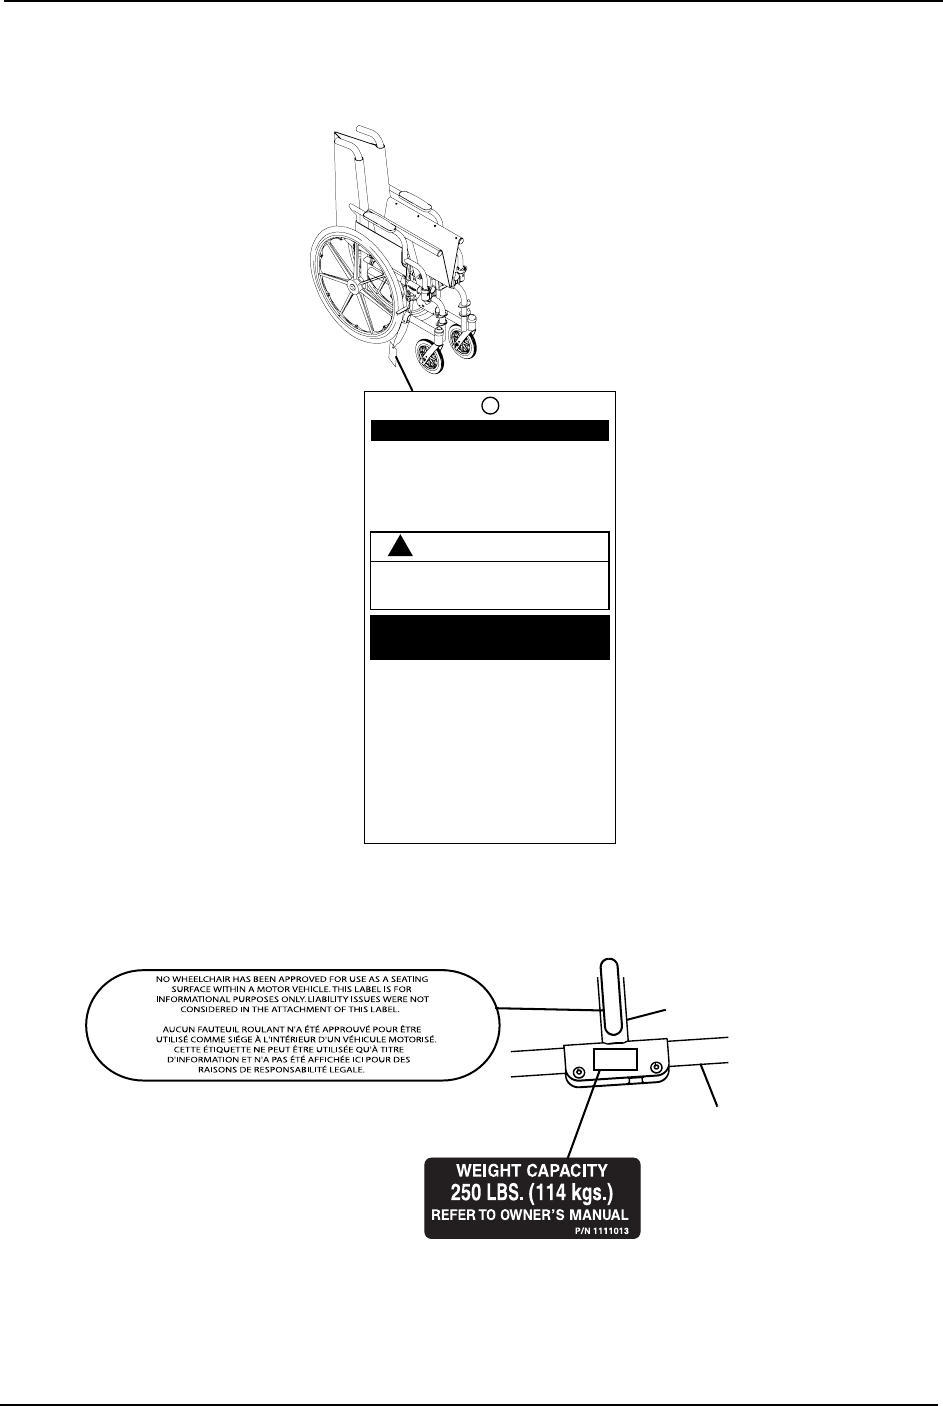
LABEL LOCATION
Atlas™ 8Part No. 1130169
IMPORTANT NOTICE
The wheel locks on this wheelchair have been
pre-set at the factory to comply with the
Veterans Administration functional Standard
8320.01 of the Federal Register, paragraph
3.2.4.5.3. If these wheel locks do not meet
your needs, follow instructions below.
!
CAUTION
Any wheel lock adjustments should embed
wheel lock shoe at least 1/8" into tire when
locked (3/16" on pneumatic tires).
INSTRUCTIONS FOR WHEEL
LOCK ADJUSTMENTS
1. Loosen wheel lock mounting fastener,
which runs through mounting bracket and
frame.
2. Slide clamp toward rear wheel until wheel
lock shoe is embedded into tire material at
least 1/8" when handle is engaged to the
lock position (3/16" for pneumatic tires).
3. Tighten mounting fastener to secure
mounting bracket in desired location and
recheck lock shoe embedding.
4. Inspect for correct locking action BEFORE
actual use.
00078X021-0394
LABEL LOCATION
Crossmember
Lower
Frame
Tube

TYPICAL PRODUCT PARAMETERS
Part No. 1130169 9Atlas™
TYPICAL PRODUCT PARAMETERS
*NOTE:Theseheightscanvary±¼inchduetotirewearandmanufacturingtolerances.
**NOTE:Weightsbasedon18x16inchwidewheelchairwithdesklengtharms.Weightswillvary
dependingonwheelchairoptions.
ATLAS A18PFR A18PLR A18RFR A18RLR
OVERALL WIDTH: 23 and 25 inches 24¼ and 26¼ inches
OVERALL DEPTH
(WITHOUT FRONT RIGGINGS): 31¼ inches
SEAT WIDTH: 18 inches
SEAT DEPTH: 16 inches
SEAT-TO-FLOOR*
(WITH 24 INCH WHEELS)
POSITION 1:
POSITION 2:
19 inches
20 inches
BACK STYLE: Fixed Removable
BACK HEIGHT: 16 inches
ARM STYLES: Permanent full length; urethane
armpad
Removable desk length; urethane
armpad
FRONT RIGGINGS: Hemi swingaway
footrest
Hemi swingaway
elevating legrests
Hemi swing-
away footrest
Hemi swingaway
elevating legrests
REAR AXLE: Single axle Dual axle
REAR WHEELS: 24-inch composite wheel/solid rubber tire
HANDRIMS: Composite
WHEEL LOCKS: Push to lock
CASTER SIZE: 8x1-inch solid rubber
UPHOLSTERY: Black nylon
FRAME FINISH Black
WEIGHT** (APPROX.): 38.63 pounds 42.48 pounds 40.23 pounds 36.38 pounds
SHIPPING WEIGHT**
(APPROX.):
43.48 pounds 47.33 pounds 45.08 pounds 41.23 pounds
WEIGHT LIMITATION: 250 lbs (114 kg)

SECTION 1—GENERAL GUIDELINES
Atlas™ 10 Part No. 1130169
SECTION 1—GENERAL GUIDELINES
WARNING
SECTION 1 - GENERAL GUIDELINES contains important information for the safe
operation and use of this product. DO NOT use this product or any available
optional equipment without first completely reading and understanding these
instructions and any additional instructional material such as owner’s manuals, ser-
vice manuals or instruction sheets supplied with this product or optional equip-
ment. If you are unable to understand the Warnings, Cautions or Instructions,
contact a healthcare professional, dealer or technical personnel before attempting
to use this equipment. Otherwise, injury or damage may occur.
Operating Information
Unlessotherwisenoted,allserviceandadjustmentshouldbeperformedwhilethe
wheelchairisunoccupied.
Todetermineandestablishyourparticularsafetylimits,practicebending,reachingand
transferringactivitiesinseveralcombinationsinthepresenceofaqualifiedhealthcare
professionalbeforeattemptingactiveuseofthewheelchair.
DONOTsitortransferintothewheelchairunlessitisfullyopenandtheseatframerails
arefullyseatedintothesideframeU‐blocks.
Avoidstoringorusingthewheelchairnearopenflameorcombustibleproducts.Serious
injuryordamagetopropertymayresult.
ALWAYSuseanti‐tippers.Whenoutdoorsonwet,softgroundorongravelsurfaces,
anti‐tippersmaynotprovidethesamelevelofprotectionagainsttipover.Extracaution
mustbeobservedwhentraversingsuchsurfaces.
DONOTtraverse,climborgodownrampsorslopesgreaterthan9°.
DONOTattempttomoveupordownaninclinewithawater,iceoroilfilm.
NEVERleaveanunoccupiedwheelchaironanincline.
DONOToperateonroads,streetsorhighways.
DONOTattempttorideovercurbsorobstacles.Doingsomaycauseyourwheelchairto
tipoverandcausebodilyharmtoyouordamagetothewheelchair.
DONOTattempttoreachobjectsifyouhavetomoveforwardintheseat.
DONOTattempttoreachobjectsifyouhavetopickthemupfromthefloorbyreaching
downbetweenyourknees.
DONOTleanoverthetopofthebackupholsterytoreachobjectsbehindyou,asthismay
causethewheelchairtotipover.
DONOTshiftyourweightorsittingpositiontowarddirectionyouarereachingasthe
wheelchairmaytipover.

SECTION 1—GENERAL GUIDELINES
Part No. 1130169 11 Atlas™
DONOTattempttostopamovingwheelchairwithwheellocks.Wheellocksarenot
brakes.
DONOTtipthewheelchairwithoutassistance.
DONOTuseanescalatortomoveawheelchairbetweenfloors.Seriousbodilyinjurymay
occur.
Beforeattemptingtotransferinoroutofthewheelchair,everyprecautionshouldbetaken
toreducethegapdistance.Turnbothcastersparalleltotheobjectyouaretransferring
onto.Whentransferringtoandfromthewheelchair,ALWAYSengagebothwheellocks.
DONOTattempttoliftthewheelchairbyanyremovable(detachable)parts.Liftingby
meansofanyremovable(detachable)partsofthewheelchairmayresultininjurytothe
userordamagetothewheelchair.
Ifthewheelchairisexposedtoextremetemperature(above100°Forbelow32°F),high
humidityand/orbecomeswet,priortouse,ensurethatthehandgripsdonottwistonthe
handle.Otherwise,damageorinjurymayoccur.
DONOTstandontheframeofthewheelchair.
DONOTstandonthefootplates.Whengettinginoroutofthewheelchair,makesurethat
thefootplatesareintheupwardpositionorswingfootreststowardstheoutsideofthe
wheelchair.
ALWAYSusethehandrimsforself‐propulsion.DONOTgriptherearwheelsthemselves.
ALWAYSkeephandsandfingersclearofmovingpartstoavoidinjury.
Weight Training
Invacaredoesnotrecommendtheuseofitswheelchairsasaweighttrainingapparatus.
Invacarewheelchairshavenotbeendesignedortestedasaseatforanykindofweight
training.Ifoccupantusessaidwheelchairasaweighttrainingapparatus,Invacareshall
notbeliableforbodilyinjuryordamagetothewheelchairandthewarrantyisvoid.
Weight Limitation
TheAtlaswheelchairhasaweightlimitationof250lbs(114kg).

SECTION 2—SAFETY/HANDLING OF WHEELCHAIRS
Atlas™ 12 Part No. 1130169
SECTION 2—SAFETY/HANDLING OF
WHEELCHAIRS
Safety/Handling of Wheelchairs
Safetyandhandlingofthewheelchairrequirethecloseattentionofthewheelchairuser
aswellastheassistant.Thismanualpointsoutthemostcommonproceduresand
techniquesinvolvedinthesafeoperationandmaintenanceofthewheelchair.Itis
importanttopracticeandmasterthesesafetechniquesuntilyouarecomfortablein
maneuveringaroundthefrequentlyencounteredarchitecturalbarriers.
Usethisinformationonlyasabasicguide.Thetechniquesthatarediscussedonthe
followingpageshavebeenusedsuccessfullybymany.
Individualwheelchairusersoftendevelopskillstodealwithdailylivingactivitiesthat
maydifferfromthosedescribedinthismanual.Invacarerecognizesandencourageseach
individualtotrywhatworksbestforhim/herinovercomingarchitecturalobstaclesthat
theymayencounter.However,allwarningsandcautionsgiveninthismanualMUSTbe
heeded.Techniquesinthismanualareastartingpointforthenewwheelchairuserand
assistantwithsafetyasthemostimportantconsiderationforall.
Stability and Balance
Toassurestabilityandproperoperationofyourwheelchair,youMUSTmaintainproper
balanceatalltimes.Yourwheelchairhasbeendesignedtoremainuprightandstable
duringnormaldailyactivitiesaslongasyoudonotmovebeyondthecenterofgravity.
Virtuallyallactivitieswhichinvolvemovementinthewheelchairhaveaneffectonthe
centerofgravity.Invacarerecommendsusingseat/chestpositioningstrapsforadditional
safetywhileinvolvedinactivitiesthatshiftyourweight.
DONOTleanforwardoutofthewheelchairanyfurtherthanthelengthofthearmrests.
Makesurethecastersarepointingintheforwardpositionwheneveryouleanforward.
Thiscanbeachievedbyadvancingthewheelchairandthenreversingitinastraightline.
WARNING
DO NOT attempt to reach objects if you have to move forward in the seat or pick
them up from the floor by reaching down between your knees.
Manyactivitiesrequirethewheelchairownertoreach,bendandtransferinandoutofthe
wheelchair.Thesemovementswillcauseachangetothenormalbalance,thecenterof
gravity,andtheweightdistributionofthewheelchair.Todetermineandestablishyour
particularsafetylimits,practicebending,reachingandtransferringactivitiesinseveral
combinationsinthepresenceofaqualifiedhealthcareprofessionalbeforeattempting
activeuseofthewheelchair.

SECTION 2—SAFETY/HANDLING OF WHEELCHAIRS
Part No. 1130169 13 Atlas™
Properpositioningisessentialforyoursafety.Whenreaching,leaning,orbending
forward,itisimportanttousethefrontcastersasatooltomaintainstabilityandbalance.
Reaching, Leaning and Bending Forward
WARNING
DO NOT attempt to reach objects if
you have to move forward in the seat or
pick them up from the floor by reaching
down between your knees.
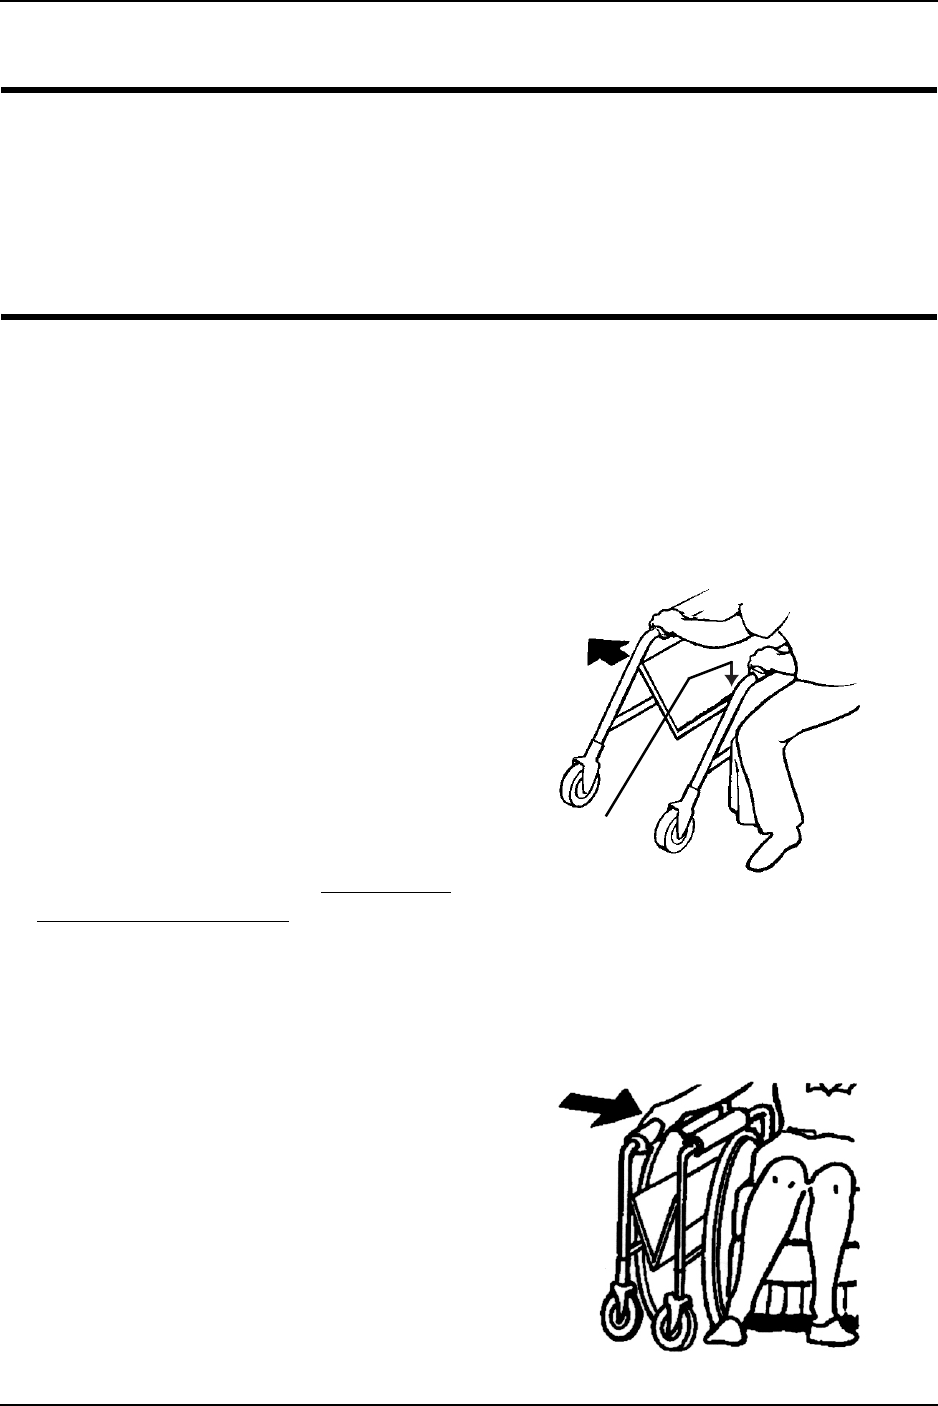
NOTE:Forthisprocedure,referto
FIGURE 2.1.
Positionthefrontcasterssothattheyare
extendedasfarforwardaspossibleand
engagewheellocks.
FIGURE 2.1 Reaching, Leaning and Bending
Forward
Reaching, Leaning Backwards
WARNING
DO NOT lean over the top of the back upholstery to reach objects behind you, as
this may cause the wheelchair to tip over.
NOTE:Forthisprocedure,refertoForthisprocedure,refertoFIGURE 2.2.
Positionwheelchairascloseaspossibletothedesiredobject.Pointfrontcastersforward
tocreatethelongestpossiblewheelbase.Reachbackonlyasfarasyourarmwillextend
withoutchangingyoursittingposition.
FIGURE 2.2 Reaching, Leaning Backwards

SECTION 2—SAFETY/HANDLING OF WHEELCHAIRS
Atlas™ 14 Part No. 1130169
Coping With Everyday Obstacles
Copingwiththeirritationofeverydayobstaclescanbealleviatedsomewhatbylearning
howtomanageyourwheelchair.Keepinmindyourcenterofgravitytomaintainstability
andbalance.
A Note to Wheelchair Assistants
Whenassistancetothewheelchairuserisrequired,remembertousegoodbody
mechanics.Keepyourbackstraightandbendyourkneeswhenevertippingthe
wheelchairortraversingcurbs,orotherimpediments.
DONOTattempttoliftthewheelchairbyanyremovable(detachable)parts.Liftingby
meansofanyremovable(detachable)partsofthewheelchairmayresultininjurytothe
userordamagetothewheelchair.
ALWAYScheckhandgripsforloosenessbeforeusingthewheelchair.Iflooseand/or
worn,replaceimmediately.
Whenlearninganewassistancetechnique,haveanexperiencedassistanthelpyoubefore
attemptingitalone.
Tipping
WARNING
DO NOT tip the wheelchair without assistance.
Whentippingthewheelchair,anassistantshouldgraspthebackofthewheelchairona
non‐removable(non‐detachable)part.Informthewheelchairoccupantbeforetippingthe
wheelchairandremindhim/hertoleanback.Besuretheoccupant’sfeetandhandsare
clearofallwheelsand/orpinchpoints.
Aftermasteringthetechniquesoftippingthewheelchair,usethefollowingmethodto
tacklecurbs,shortstairs,etc.
Tipping - Curbs
NOTE:Forthisprocedure,refertoFIGURE 2.3.
Placefootonthesteptubeandbegintotiltthewheelchairtowardyou.Applya
continuousdownwardmotionuntilthebalancepointisachievedandthefrontcasters
clearthecurb.Atthispoint,theassistantwillfeeladifferenceintheweightdistribution.
SECTION 2—SAFETY/HANDLING OF WHEELCHAIRS
Part No. 1130169 15 Atlas™
WARNING
When lowering the front casters of the
wheelchair, DO NOT let the wheelchair
drop the last few inches to the ground.
This could result in injury to the occu-
pant and/or damage to the wheelchair.
Rollthewheelchairforwardandslowly
lowerthefrontofthewheelchairinone
continuousmovementontothesidewalk.
Pushthewheelchairforwarduntiltherear
wheelsrollupandoverthecurb. FIGURE 2.3 Tipping - Curbs
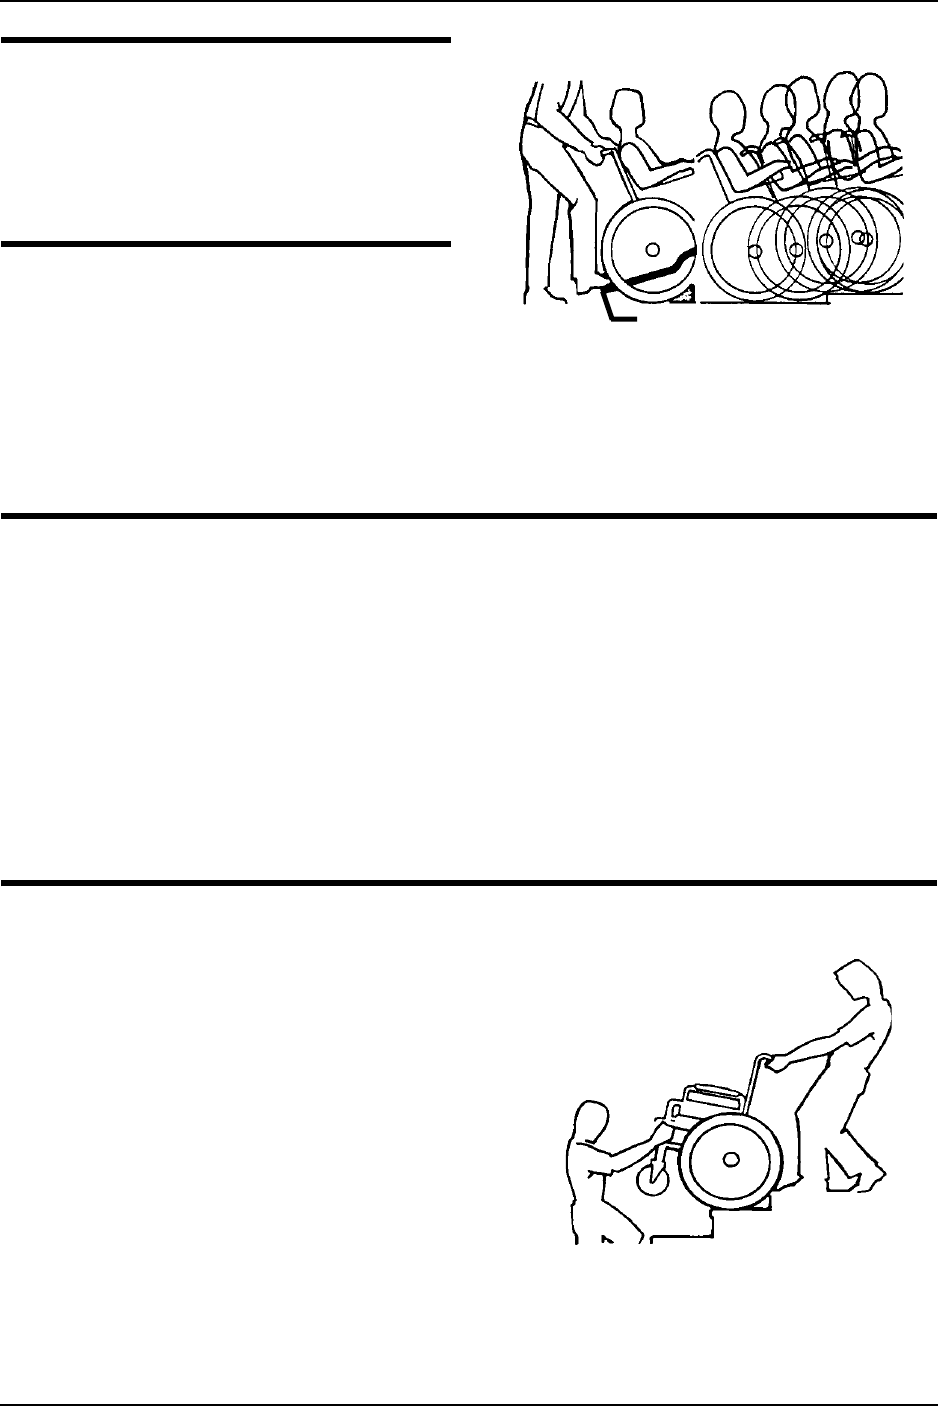
Stairways
WARNING
DO NOT attempt to lift a wheelchair by lifting on any removable (detachable)
parts. Lifting by means of any removable (detachable) parts of the wheelchair may
result in injury to the user or damage to the wheelchair.
ALWAYS check hand grips for looseness before using the wheelchair. If loose
and/or worn, replace immediately.
EXTREME caution is advised when it is necessary to move an occupied wheelchair
up or down the stairs. Invacare recommends that, if possible, the user be removed
from the wheelchair prior to moving. Invacare recommends using two assistants
and making thorough preparations. Make sure to use only secure, non-detachable
parts for hand-held supports.
NOTE:Forthisprocedure,refertoFIGURE 2.4.
Followthisprocedureformovingthe
wheelchairbetweenfloorswhenan
elevatorisnotavailable:
1. Ifnecessary,rotatetheanti‐tippersso
thewheelsarefacingup.
2. Afterthewheelchairhasbeentilted
backtothebalancepoint,oneassistant
(intherear)backsthewheelchairup
againstthefirststep,whilesecurely
graspinganon‐removable
(non‐detachable)partofthewheelchair
forleverage.
FIGURE 2.4 Stairways
3. Thesecondassistant,withafirmholdonanon‐detachablepartoftheframework,lifts
thewheelchairupandoverthestairandsteadiesthewheelchairasthefirstassistant
placesonefootonthenextstairandrepeatsSTEP1.
Step Tube
SECTION 2—SAFETY/HANDLING OF WHEELCHAIRS
Atlas™ 16 Part No. 1130169
4. Thewheelchairshouldnotbelowereduntilthelaststairhasbeennegotiatedandthe
wheelchairhasbeenrolledawayfromthestairway.
5. Ifnecessary,rotatetheanti‐tipperssothewheelsarefacingdown.
Escalators
WARNING
DO NOT use an escalator to move a wheelchair between floors. Serious bodily
injury may occur.
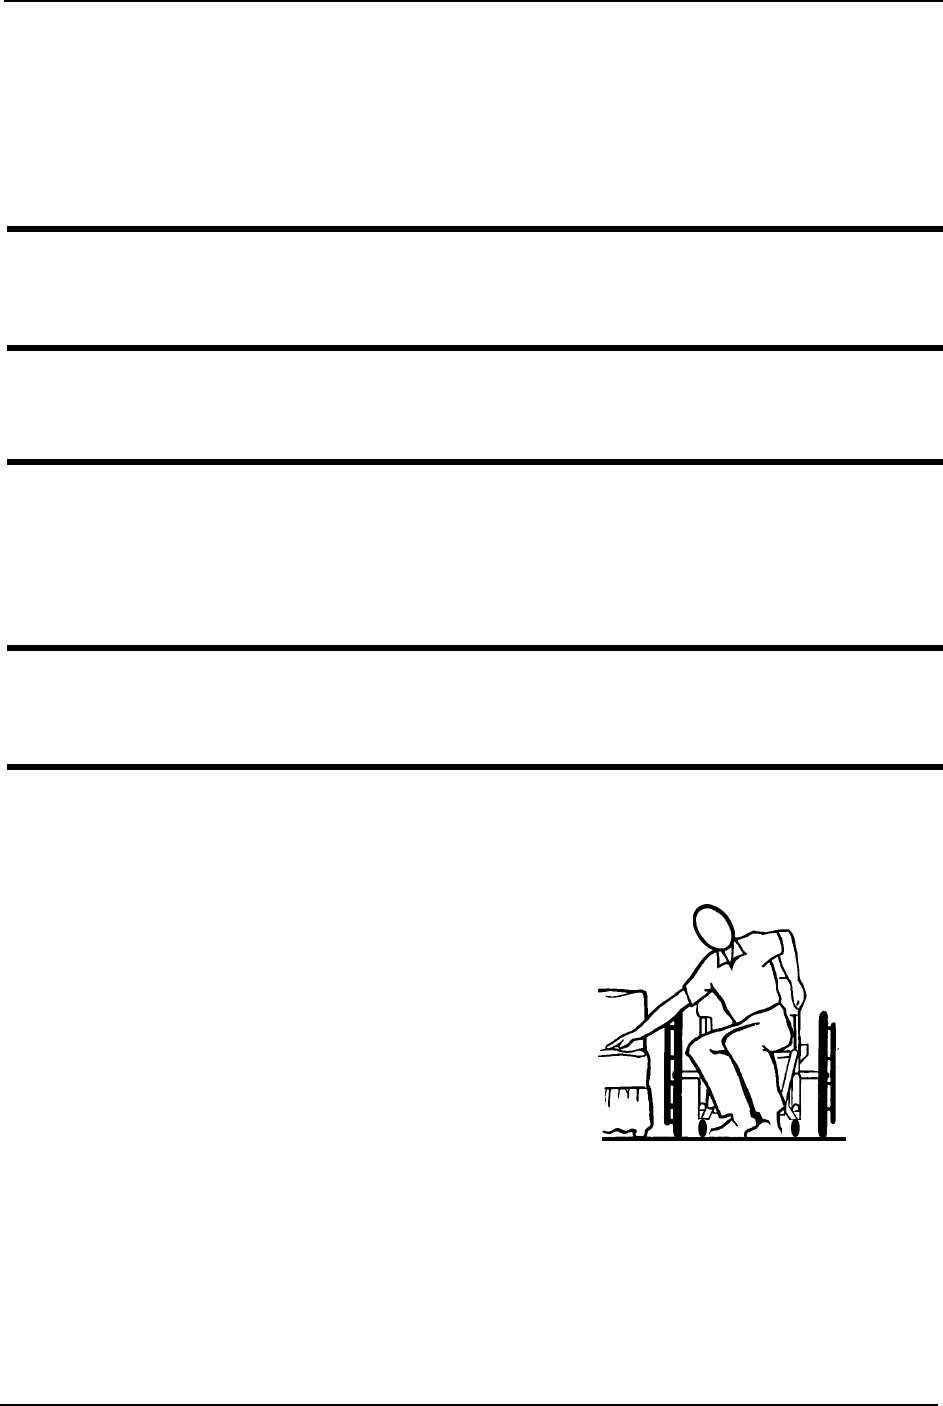
Transferring To and From Other Seats
WARNING
Before attempting to transfer in or out of the wheelchair, every precaution should
be taken to reduce the gap distance. Turn both casters parallel to the object you are
transferring onto. Also be certain the wheel locks are engaged to help prevent the
wheels from moving.
CAUTION
When transferring, position yourself as far back as possible in the seat. This will help
prevent damaged upholstery and the possibility of the wheelchair tipping forward.
NOTE:Forthisprocedure,refertoFIGURE 2.5.
NOTE:Thisactivitymaybeperformedindependentlyprovidedyouhaveadequatemobilityand
upperbodystrength.
Positionthewheelchairascloseaspossible
alongsidetheseattowhichyouare
transferring,withthefrontcasters
pointingparalleltoit.Removeorflipup
thearmrest.Engagewheellocks.Swing
awayorremovefrontrigging.Shiftbody
weightintoseatwithtransfer.
Duringindependenttransfer,littleorno
seatplatformwillbebeneathyou.Usea
transferboardifatallpossible. FIGURE 2.5 Transferring To and From
Other Seats
SECTION 2—SAFETY/HANDLING OF WHEELCHAIRS
Part No. 1130169 17 Atlas™
Unfolding and Folding Wheelchair
WARNING
ALWAYS keep hands and fingers clear of moving parts to avoid injury.
DO NOT place hand or fingers on the underside of the seat frame rail when opening
or closing the wheelchair.
DO NOT sit or transfer into the wheelchair unless it is fully open and the seat frame
rails are fully seated into the side frame U-blocks.
NOTE:Forthisprocedure,refertoFIGURE 2.6.
NOTE:Invacarerecommendsthatanon‐foldingdevicebeinstalledtokeepthewheelchairfrom
beingfoldedwhenleftunoccupiedinapublicplace.
Unfolding
1. Tiltthewheelchairtowardyou(raisingtheoppositewheelandcasteroffthe
ground/floor).
2. Placeyourhandonthetopoftheseat
railclosesttoyouwheretheseat
upholsteryisattached.
3. Pointyourfingersandthumbtothe
insideofthewheelchair.
4. Pressdownwardonthetopoftheseatrail
untilthewheelchairisfullyopenandthe
seatrailsarefullyseatedintheU‐blocks.
5. Engagebothwheellocks,openthe
footrest/legrestforclearanceandtransfer
intothewheelchair.RefertoTransferring
ToandFromOtherSeatsonpage 16. FIGURE 2.6 Unfolding and Folding
Wheelchair
Folding
NOTE:Forthisprocedure,refertoFIGURE 2.7.
1. Swingfootrest/legrestandcalfpads(if
equipped)inlockedpositiontothe
frontofthewheelchair.
2. Pivotfootplatesupwardtovertical
position.
3. Withbothhands,graspthemiddleof
theseatupholsteryatthefrontand
backedgeandliftup.
4. Continuetoclosethewheelchairby
graspingthearmrestfurthestfromyou
andpullingthearmresttowardyou. FIGURE 2.7 Folding
Press DOWN
on Seat Rail

SECTION 3—SAFETY INSPECTION/TROUBLESHOOTING
Atlas™ 18 Part No. 1130169
SECTION 3—SAFETY
INSPECTION/TROUBLESHOOTING
NOTE:Everysixmonthsorasnecessary,takeyourwheelchairtoaqualifiedtechnicianfora
thoroughinspectionandservicing.Regularcleaningwillreveallooseorwornpartsandenhance
thesmoothoperationofyourwheelchair.Tooperateproperlyandsafely,yourwheelchairmustbe
caredforjustlikeanyothervehicle.Routinemaintenancewillextendthelifeandefficiencyofyour
wheelchair.
Safety Inspection Checklist
Initialadjustmentsshouldbemadetosuityourpersonalbodystructureandpreference.
Thereafterfollowthesemaintenanceprocedures:
Inspect/Adjust Initially
❑Ensurethatthewheelchairrollsstraight(noexcessivedragorpulltooneside).
❑Inspectforlooseormissinghardwareonframeandcrossbraces.
❑Inspectforbentframeorcrossbraces.
❑Checkthatthewheellocksdonotinterferewithtireswhenrolling.
❑Checkthatthewheellockpivotpointsarefreeofwearandlooseness.
❑Checkthatthewheellocksareeasytoengage.
❑Ensurethatthewheellockspreventthewheelchairfrommovingwhenengaged.
❑Inspecttheseatandbackforripsandsagging.
❑Inspecttheseatandbackforlooseorbrokenhardware.
❑Inspectthebackcanehandgripsforwear/looseness/deterioration.
❑Inspecttiresforflatspotsandwear.
CAUTION
As with any vehicle, check the wheels and tires periodically for cracks and wear.
Replace if damaged.
❑Checkthatthereisnoexcessivesidemovementorbindingintherearwheelswhen
liftedandspun.
❑Inspectrearwheelsforcracksandwear(hubandrim).
❑Inspectrearwheelsforcracked,bentorbrokenspokes.
❑Ensureallspokesareuniformlytight.
❑Inspecthandrimsforsignsofroughedgesorpeeling.

SECTION 3—SAFETY INSPECTION/TROUBLESHOOTING
Part No. 1130169 19 Atlas™
❑Inspectaxleassemblyforpropertensionbyspinningcaster.Castershouldcometoa
gradualstop.
❑Adjustfrontcasters/forksbearingsystemifwheelwobblesnoticeablyorbindstoa
stop.
❑Ensurewheelbearingsarecleanandfreeofmoisture.
❑Checkheadtubelocknutsfortightness.
❑Inspectcastersforcracksandwear(hubandrim).
❑Inspectfrontcastersforcracked,bentorbrokenspokes.
❑Cleanupholsteryandarmrests.
❑Checkthatalllabelsarepresentandlegible.Replaceifnecessary.
❑Ensurethecastersarefreeofdebris.
Inspect/Adjust Weekly
❑Ensurethatthewheellockspreventthewheelchairfrommovingwhenengaged.
❑Inspecttiresforflatspotsandwear.
❑Inspectrearwheelsforcracked,bentorbrokenspokes.
❑Inspectaxleassemblyforpropertensionbyspinningcaster.Castershouldcometoa
gradualstop.
❑Inspectfrontcasterforcracked,bentorbrokenspokes.
❑Ensurethecastersarefreeofdebris.
Inspect/Adjust Monthly
❑Ensurethatthewheelchairrollsstraight(noexcessivedragorpulltooneside).
❑Checkthatthewheellocksdonotinterferewithtireswhenrolling.
❑Checkthatthewheellockpivotpointsarefreeofwearandlooseness.
❑Inspectseatandbackforlooseorbrokenhardware.
❑Inspectbackcanehandgripsforwear/looseness/deterioration.
❑Adjustfrontcasters/forksbearingsystemifwheelwobblesnoticeablyorbindstoa
stop.
❑Ensurewheelbearingsarecleanandfreeofmoisture.
❑Checkheadtubelocknutsfortightness.
❑Ensurethecastersarefreeofdebris.
Inspect/Adjust Periodically
❑Ensurethatthewheelchairrollsstraight(noexcessivedragorpulltooneside).
❑Inspectframeandcrossbracesforlooseormissinghardware.

SECTION 3—SAFETY INSPECTION/TROUBLESHOOTING
Atlas™ 20 Part No. 1130169
❑Inspectforbentframeorcrossbraces.
❑Checkthatwheellocksareeasytoengage.
❑Inspectseatandbacksforripsandsagging.
❑Checkthatthereisnoexcessivesidemovementorbindingintherearwheelswhen
liftedandspun.
❑Inspectrearwheelsforcracksandwear(hubandrim).
❑Inspecthandrimsforsignsofroughedgesorpeeling.
❑Adjustfrontcasters/forksbearingsystemifwheelwobblesnoticeablyorbindstoa
stop.
❑Ensurewheelbearingsarecleanandfreeofmoisture.
❑Inspectcastersforcracksandwear(hubandrim).
❑Cleanupholsteryandarmrests.
❑Checkthatalllabelsarepresentandlegible.Replaceifnecessary.
❑Ensurethecastersarefreeofdebris.
Troubleshooting
Maintenance Safety Precautions
WARNING
Unless otherwise noted, all service adjustments should be performed while the
wheelchair is unoccupied.
After any adjustments, repair or service and before use, make sure all attaching
hardware is tightened securely. Otherwise injury or damage may result.
Chair
Veers
Right/
Left
Chair 3
Wheels
Sluggish Turn or
Performance
Casters
Flutter
Squeaks
and
Rattles
Looseness
in
Chair
Solutions
XX X X
Check tires for
correct and equal
pressure.
XXXX
Check for loose nuts
and bolts.
XX
Check that rear
wheels are equally
spaced away from seat
frame.

SECTION 3—SAFETY INSPECTION/TROUBLESHOOTING
Part No. 1130169 21 Atlas™
WARNING
When cleaning rear cane or hand grip areas use only a clean towel lightly dampened
with cool water. Verify that grips are dry prior to use. Use of soap or ammonia
based cleaning solutions will result in the hand grips sliding off the cane assembly.
Failure to observe this warning may result in injury to the user or bystanders.
Replace any labels that are missing, worn, or torn. Refer to Label Location on
page 8 for a listing of the labels and their locations.
CAUTION
DO NOT overtighten hardware attaching to the frame. This could cause damage to
the frame tubing.
SECTION 4—FRONT RIGGINGS
Atlas™ 22 Part No. 1130169
SECTION 4—FRONT RIGGINGS
WARNING
After any adjustments, repair or service and before use, make sure all attaching
hardware is tightened securely. Otherwise injury or damage may occur.
Installing/Removing Front Riggings
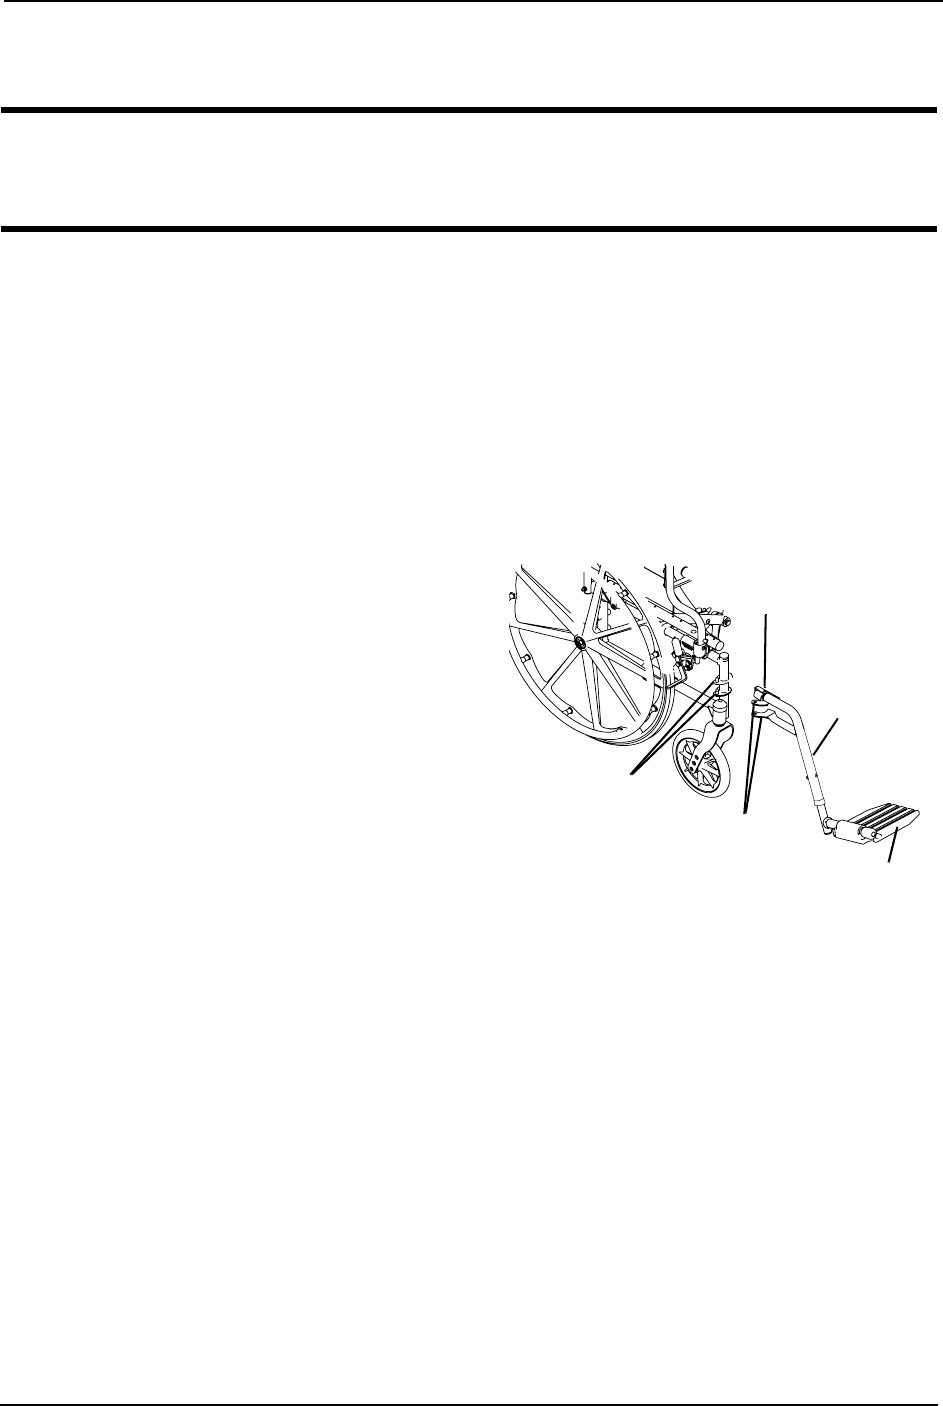
NOTE:Forthisprocedure,refertoFIGURE 4.1.
Installing
1. Turnthefrontriggingtotheside(openfootplateisperpendiculartowheelchair).
2. Installthefrontrigginghingeplatesontothehingepinsonthewheelchairframe.
3. Pushthefrontriggingtowardthe
insideofthewheelchairuntilitlocks
intoplace.
NOTE:Thefootplatewillbeontheinsideofthe
wheelchairwhenlockedinplace.
4. RepeatSTEPS1‐3fortheoppositeside
ofthewheelchair.
5. Toreleasethefrontrigging,pushthe
footrestreleaseleverinward,rotate
footrestoutward.
Removing
1. Pushthereleaseleverinwardand
rotatethefrontriggingoutward.
FIGURE 4.1 Installing/Removing Front
Riggings
2. Liftuponfrontriggingandremovefromthewheelchair.
3. RepeatSTEPS1‐2fortheoppositesideofthewheelchair.
Release Lever
Hinge Pins
Hinge Plates
Footplate
Swingaway
Footrest
SECTION 4—FRONT RIGGINGS
Part No. 1130169 23 Atlas™
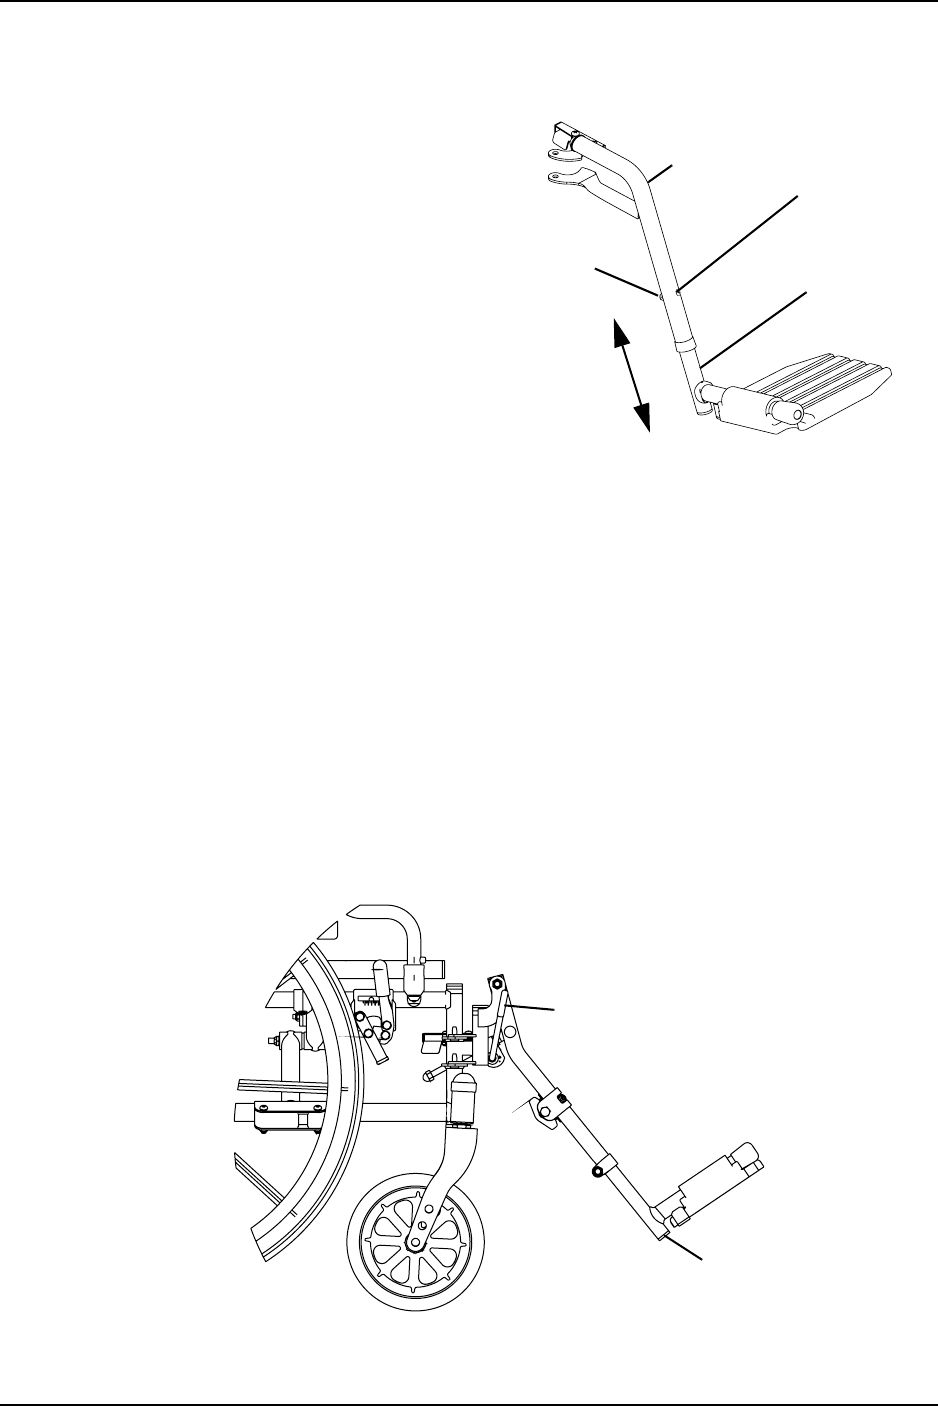
Adjusting Footrest Height
NOTE:Forthisprocedure,referto
FIGURE 4.2.
1. Loosen,butDONOTremove,thescrew
andlocknutthatsecuresthelower
footrestassemblytotheupperfootrest
support.
2. Repositionthelowerfootrestassembly
tothedesiredheight.
3. Securelytightenthescrewandlocknut
thatsecuresthelowerfootrest
assemblytotheupperfootrestsupport.
4. Ifnecessary,repeatSTEP1‐3forthe
oppositesideofthewheelchair. FIGURE 4.2 Adjusting Footrest Height
Raising/Lowering Elevating Legrest Assembly
NOTE:Forthisprocedure,refertoFIGURE 4.3.
1. Toraisetheelevatinglegrest,theassistantorusershouldholdthesupporttubeand
raisetheelevatinglegrestsuntilthedesiredheightisobtained.
2. Tolowertheelevatinglegrest,performthefollowing:
A. Supporttheuserlegwithonehand.
B. Pushlegrestreleaseleverdownwithotherhand.
C. Gentlyloweruserlegdownandrestitagainstthelegrest.
FIGURE 4.3 Raising/Lowering Elevating Legrest Assembly
Locknut Lower Footrest
Assembly
Upper
Footrest
Support Screw
Legrest Release Lever
Support Tube
SECTION 5—ARMS
Atlas™ 24 Part No. 1130169
SECTION 5—ARMS
WARNING
After any adjustments, repair or service and before use, make sure all attaching
hardware is tightened securely. Otherwise injury or damage may occur.
Removing/Installing Armrests (Removable Armrests
Only)
NOTE:Forthisprocedure,refertoFIGURE 5.1.
Removing
1. Pressandholdthearmrestreleasebuttonatthefrontofthearmrest.
2. Removearmrestfromarmrestsocketsbypullingstraightuponthearmrest.
3. RepeatSTEPS1and2fortheotherarmrest.
Installing
1. Positionarmrestoverfrontandreararmrestsockets.
2. Pushthearmrestdownandevenlyatbothendsuntilthefrontreleasebuttonsnaps
intoarmsockethole.
3. RepeatSTEPS1and2fortheotherarmrest.
FIGURE 5.1 Removing/Installing Armrests (Removable Armrests Only)
Armrest
Arm
Socket
Arm
Socket
Armrest
Release
Button
SECTION 6—BACK
Part No. 1130169 25 Atlas™
SECTION 6—BACK
WARNING
After any adjustments, repair or service and before use, make sure all attaching
hardware is tightened securely. Otherwise injury or damage may occur.
Remove the back for unoccupied transportation purposes only. Securely install the
back onto the wheelchair before use.
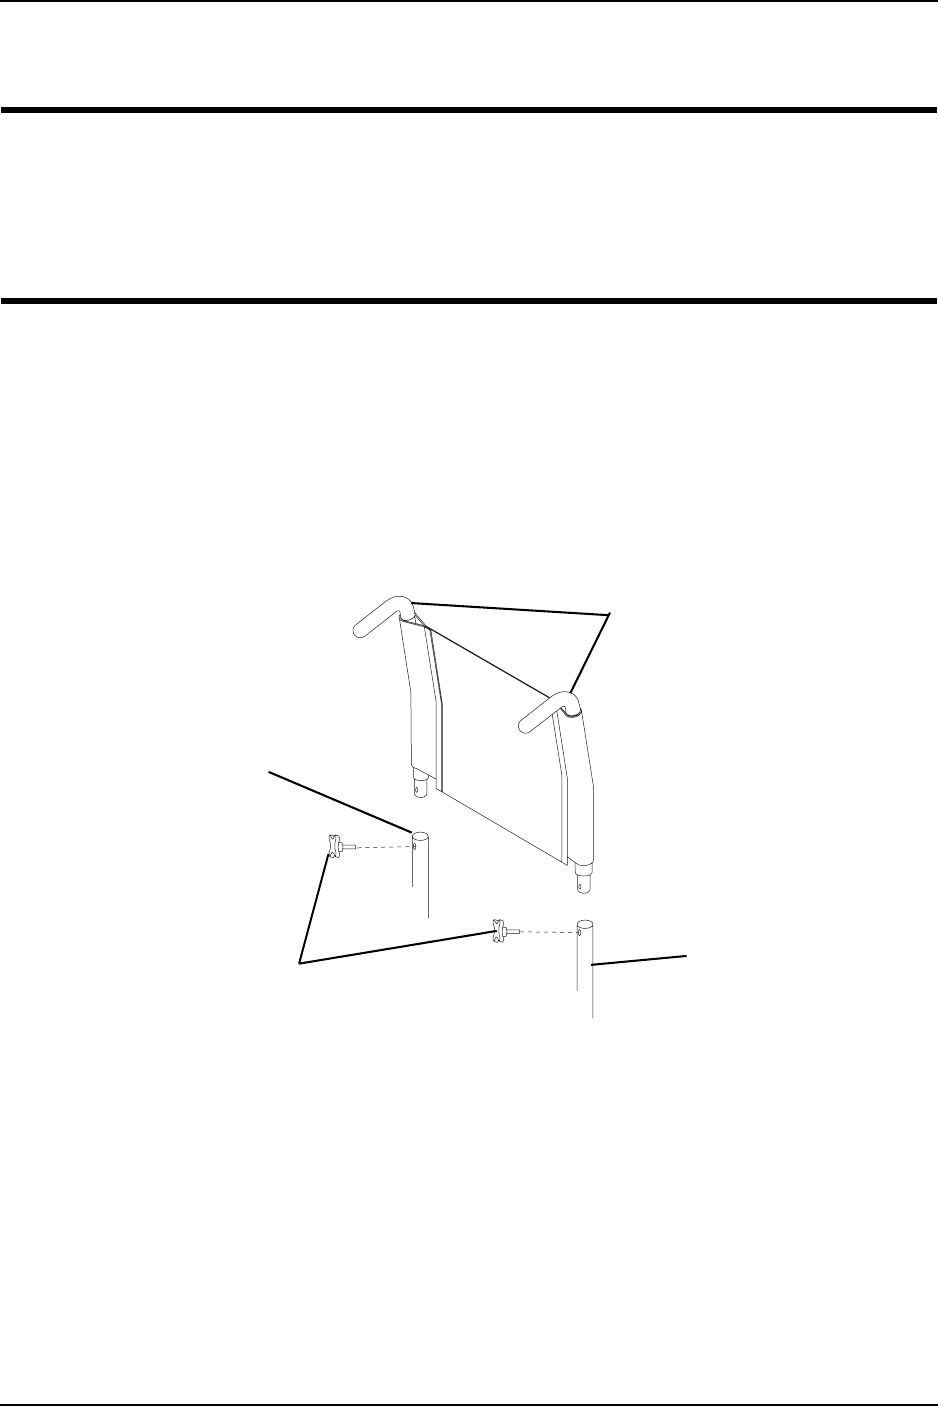
Removing/Installing the Back (Removable Back Only)
NOTE:Forthisprocedure,refertoFIGURE 6.1.
1. Removethetwoadjustmentknobsonthewheelchairframe.
2. Removethebackcanesfromthewheelchairframe.
NOTE:Toinstalltheback,reversethisprocedure.
FIGURE 6.1 Removing/Installing the Back (Removable Back Only)
Adjustment
Knobs
Back
Canes
Wheelchair
Frame
Wheelchair
Frame
SECTION 7—REAR WHEELS
Atlas™ 26 Part No. 1130169
SECTION 7—REAR WHEELS
WARNING
After any adjustments, repair or service and before use, make sure all attaching
hardware is tightened securely. Otherwise injury or damage may occur.
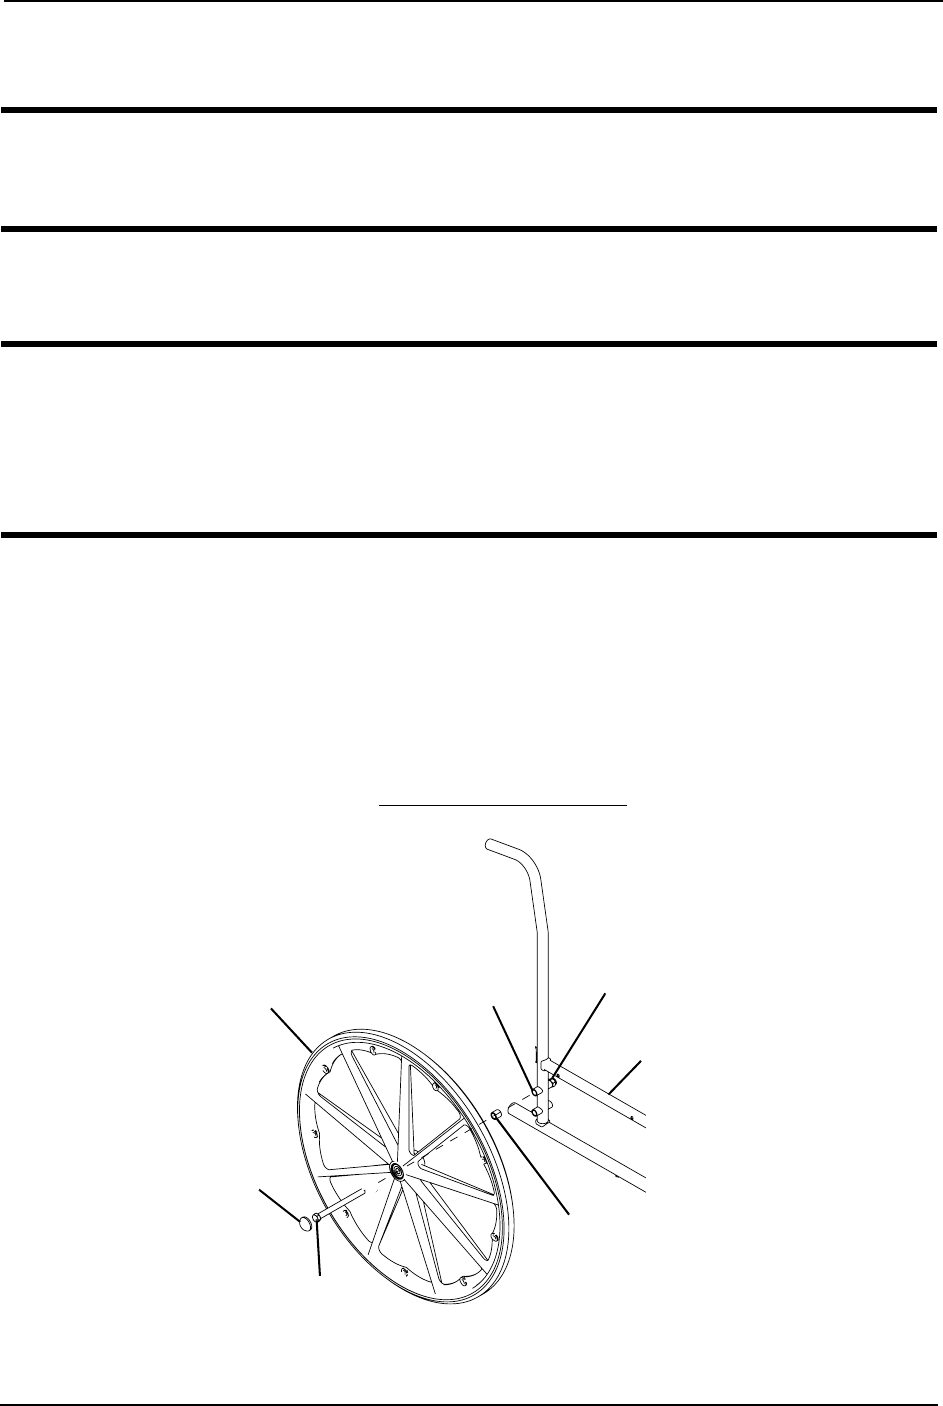
Removing/Installing Rear Wheels
WARNING
Only a qualified technician may change the size of the rear wheel or the
seat-to-floor height.
Make sure both rear wheels are the same size and are installed into the same
respective mounting hole before using the wheelchair. Otherwise, injury may occur.
NOTE:Forthisprocedure,refertoFIGURE 7.1.
1. Removethedustcap,hexscrew,spacerandlocknutthatsecuretherearwheeltothe
wheelchairframe.
2. RepeatSTEP1fortheoppositerearwheel.
3. Toreinstalltherearwheel(s)ontothewheelchair,reverseSTEPS1‐2.
4. Torquethelocknutto40ft‐lbs.
5. Adjustthewheellocks.RefertoAdjustingWheelLocksonpage 28.
FIGURE 7.1 Removing/Installing Rear Wheels
Dust Cap
Hex Screw
Spacer
Wheelchair Frame
Locknut
Axle Mounting Hole
Rear Wheel
SECTION 8—FRONT CASTERS
Part No. 1130169 27 Atlas™
SECTION 8—FRONT CASTERS
WARNING
After any adjustments, repair or service and before use, make sure all attaching
hardware is tightened securely. Otherwise injury or damage may occur.
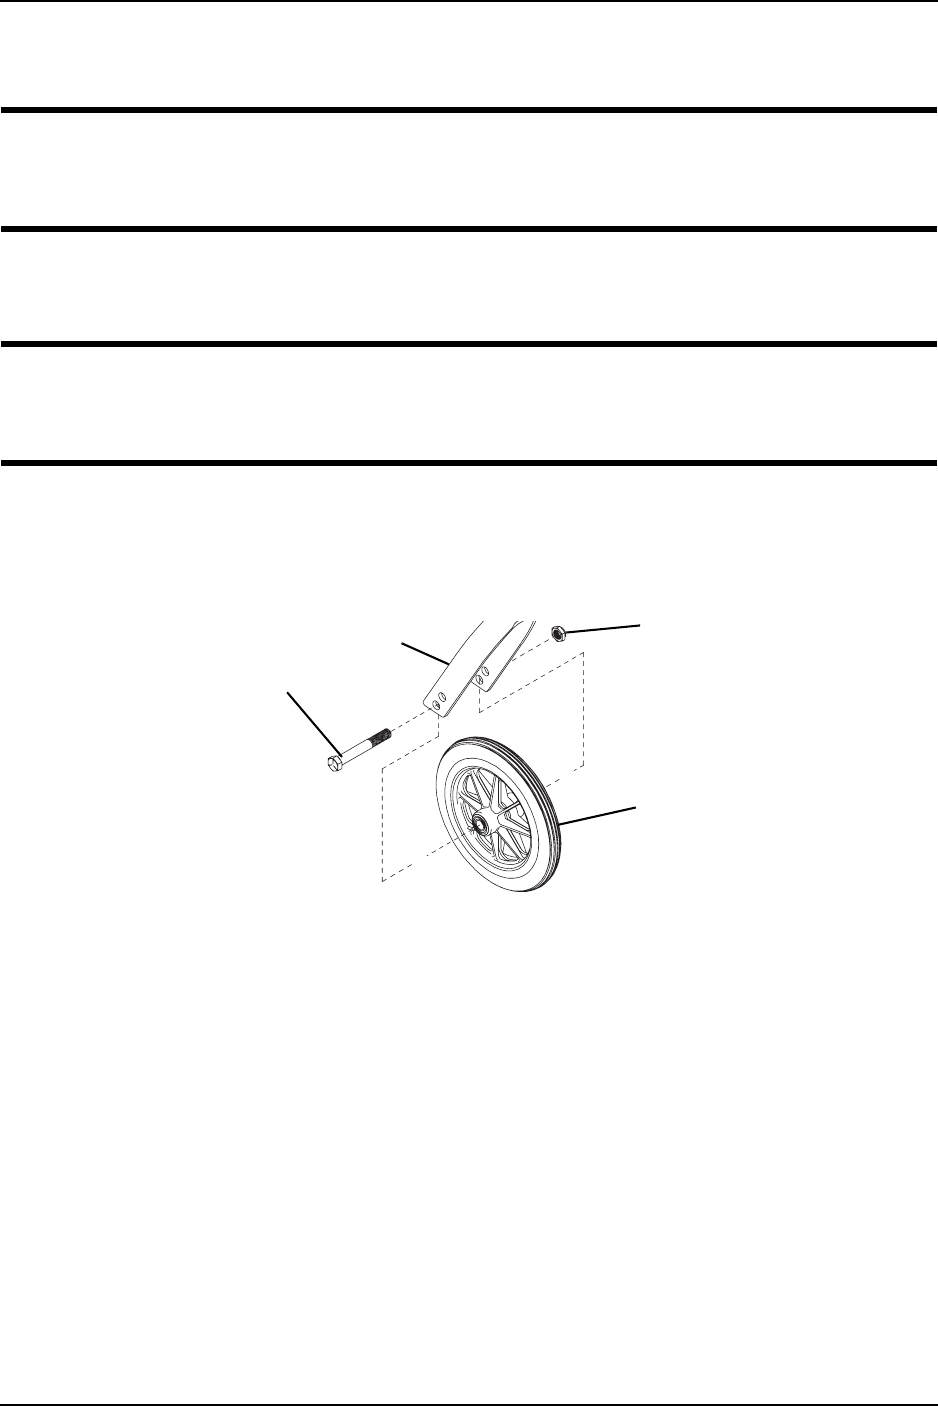
Adjusting Front Caster Height
WARNING
Make sure both front casters are the same size and are installed into the same
respective mounting hole before using the wheelchair. Otherwise, injury may occur.
NOTE:Forthisprocedure,refertoFIGURE 8.1.
1. Removethehexscrew,washersandlocknutthatsecurethefrontcastertothefork.
2. Toreinstallthenewfrontcasterontothefork,reverseSTEP1.
FIGURE 8.1 Adjusting Front Caster Height
Locknut
Fork
Front
Caster
Hex
Screw
NOTE:Adjustableheight
forkshown.

SECTION 9—WHEEL LOCKS
Atlas™ 28 Part No. 1130169
SECTION 9—WHEEL LOCKS
WARNING
After any adjustments, repair or service and before use, make sure all attaching
hardware is tightened securely. Otherwise injury or damage may occur.
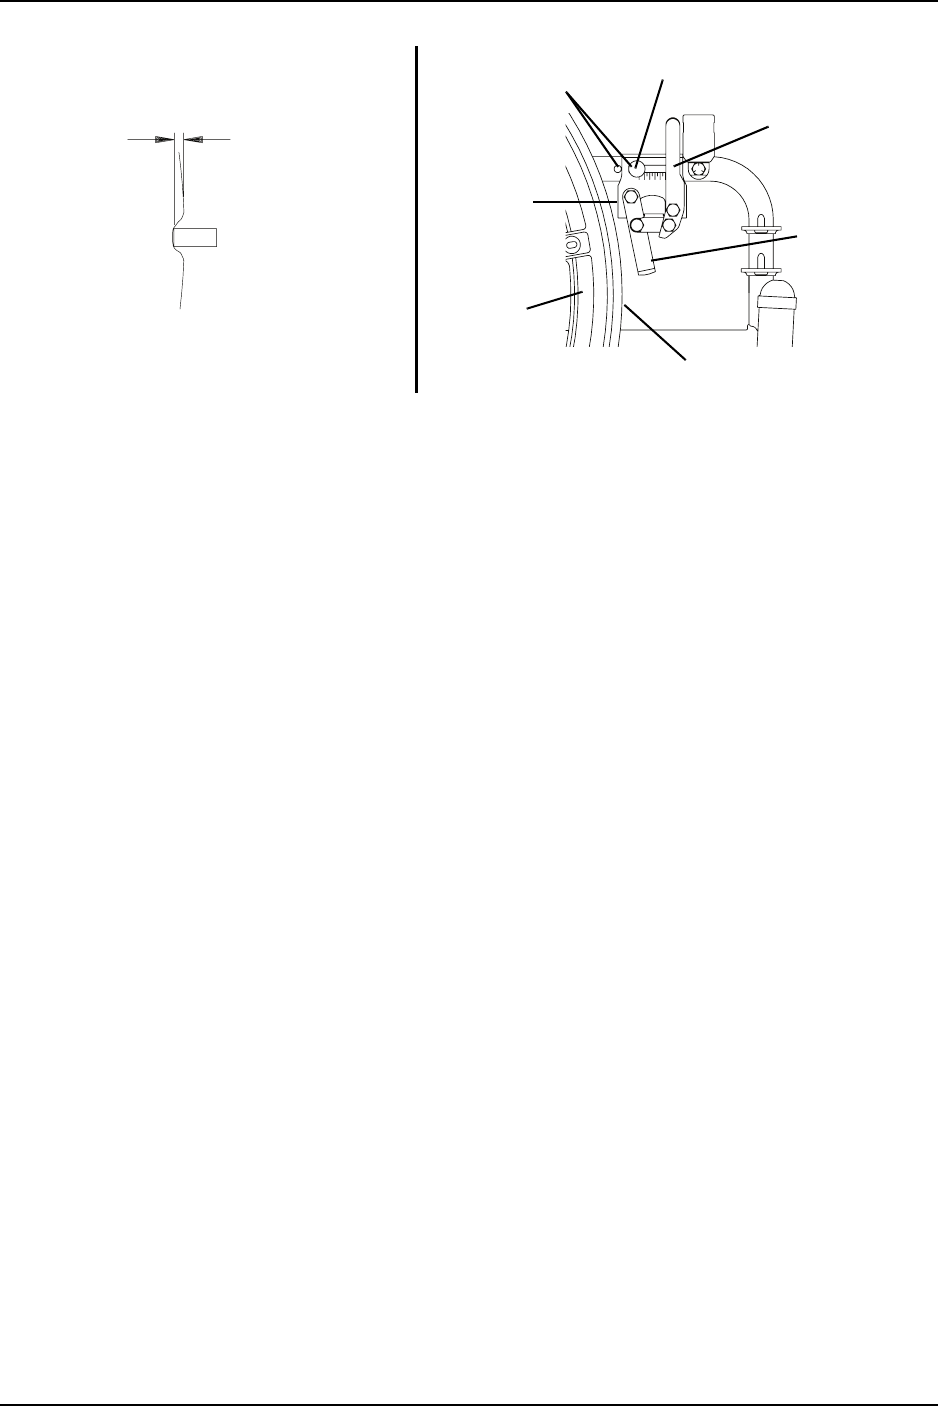
Adjusting Wheel Locks
WARNING
DO NOT attempt to stop a moving wheelchair with the wheel locks. WHEEL
LOCKS ARE NOT BRAKES.
NOTE:Forthisprocedure,refertoFIGURE 9.1.
1. Ensurethewheellockisintheopen(unlockedposition).
2. Loosentheboltandlocknutthatsecurethewheellockassemblytothewheelchair
frame.
3. Repositionthewheellocksothatwhenengaged,thewheellockshoeembedsthetire
1/8‐inchandholdsthewheelchair.
4. Securelytightentheboltandlocknutsecuringthewheellocktothewheelchairframe.
5. Engagethewheellock.
6. MeasurethedistancethewheellockisembeddedintothetireasshownindetailʺAʺ
ofFIGURE 9.1.
NOTE:Anywheellockadjustmentshouldembedthewheellockshoeatleast1/8‐inchintothetire
whenengaged.
7. RepeattheSTEPS1‐6untilthewheellockshoeembedsthetire1/8‐inchandholdsthe
wheelchair.
8. RepeatSTEPS1‐7fortheoppositewheellock.
9. Ifthemeasurementof1/8‐inchcannotbeachieved,removetheboltandlocknutthat
securethewheellocktothewheelchairframeandmountthewheellockinoneoftwo
mountingpositions.
10. RepeatSTEPS1‐9untilthewheellockholdsthewheelchair.Ifthecorrect
measurementstillcannotbeachieved,contactaqualifiedtechnician.
SECTION 10—SEAT-TO-FLOOR HEIGHT
Atlas™ 30 Part No. 1130169
SECTION 10—SEAT-TO-FLOOR
HEIGHT
WARNING
After any adjustments, repair or service and before use, make sure all attaching
hardware is tightened securely. Otherwise injury or damage may occur.
Changing Seat-To-Floor Height
WARNING
Seat-to-floor heights have specific positions depending on rear wheel size, rear
wheel position, and front caster position. These adjustments MUST be performed
by a qualified technician.
NOTE:Forthisprocedure,refertoFIGURE 10.1.
1. RefertothefollowingchartandtoFIGURE 10.1todeterminemountingpositionsfor
frontcasters/forksandrearwheelsforthedesiredseat‐to‐floorheight.
2. Removetherearwheelsfromthewheelchair.RefertoRemoving/InstallingRear
Wheelsonpage 26.
3. Removethefrontcastersfromthewheelchair.RefertoAdjustingFrontCasterHeight
onpage 27.
4. Reinstalltherearwheelsontothewheelchairinthemountingpositionindicatedinthe
chart.RefertoRemoving/InstallingRearWheelsonpage 26.
5. Re‐installthefrontcastersontothewheelchairinthemountingpositionindicatedin
thechart.RefertoAdjustingFrontCasterHeightonpage 27.
FIGURE 10.1 Changing Seat-To-Floor Height
SEAT-TO-FLOOR
HEIGHT
(IN INCHES)
8-INCH FRONT
CASTER MOUNTING
POSITION
REAR
WHEEL SIZE
REAR WHEEL
MOUNTING
POSITION
19 Top 24-inch Top
20 Bottom 24-inch Bottom
Rear Wheel Mounting
Positions
Fork Mounting Positions
Top
Top
Bottom
Bottom
SECTION 11—OPTIONS
Part No. 1130169 31 Atlas™
SECTION 11—OPTIONS
WARNING
After any adjustments, repair or service and before use, make sure all attaching
hardware is tightened securely. Otherwise injury or damage may occur.
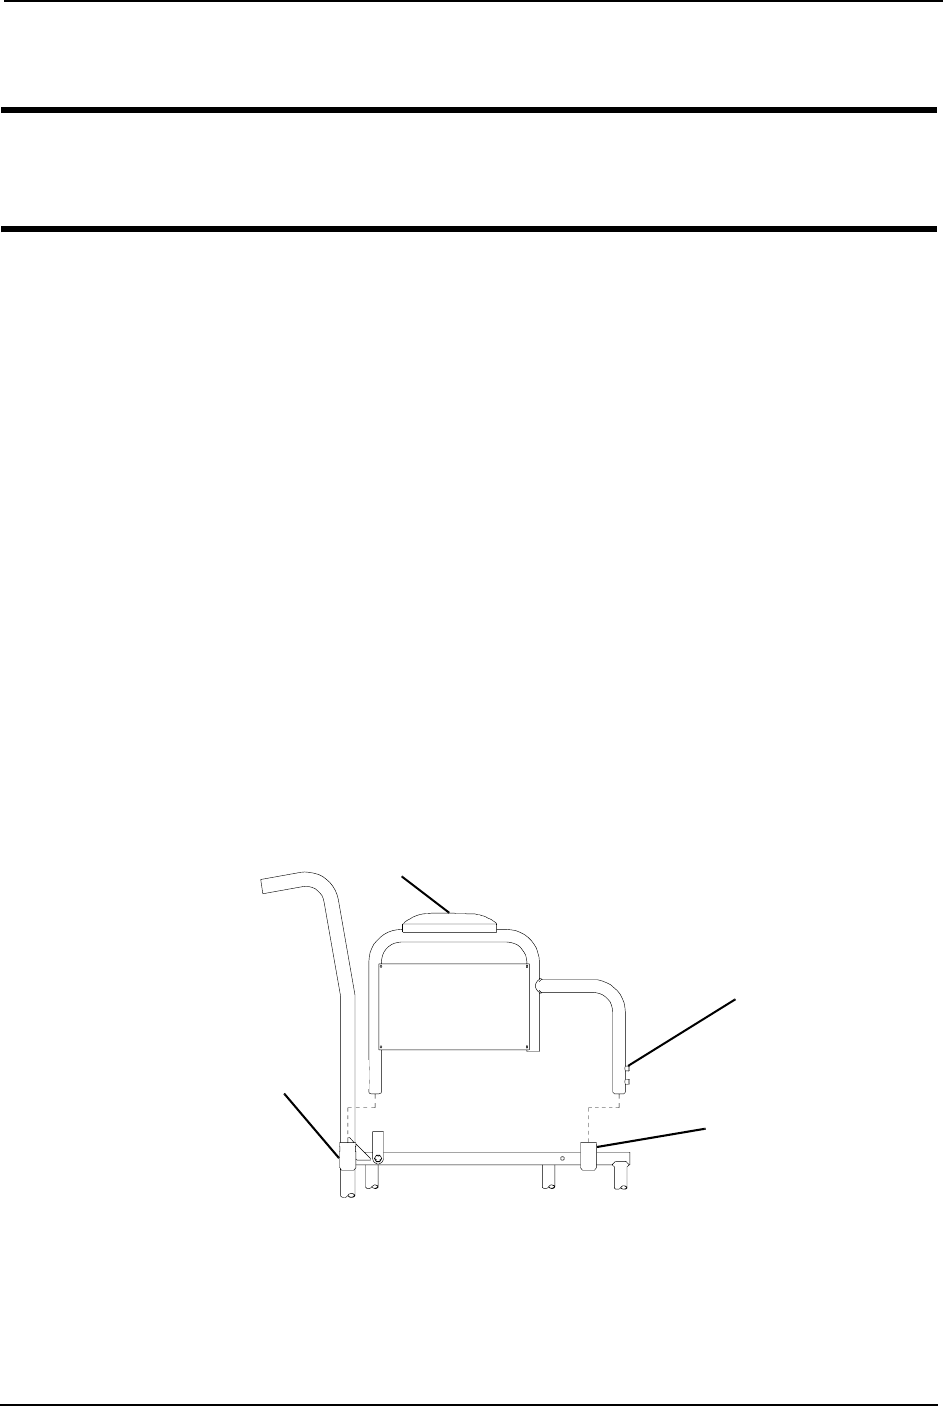
Installing Anti-Tippers
NOTE:Forthisprocedure,refertoFIGURE 11.1.
1. Removetherubbertipfromthelowerframetube.
2. Slidetheanti‐tipperontothelowerframetubeuntiltheanti‐clampwrapsaroundthe
lowerframetube.
3. Tightentheanti‐tipperclampbyturningthelocknutcounter‐clockwise.
4. RepeatSTEPS1to3fortheotheranti‐tipper.
FIGURE 11.1 Installing Anti-Tippers
Locknut
Anti-Tipper
Clamp
Lower
Frame
Tube

LIMITED WARRANTY
PLEASE NOTE: THE WARRANTY BELOW HAS BEEN DRAFTED TO COMPLY WITH
FEDERAL LAW APPLICABLE TO PRODUCTS MANUFACTURED AFTER JULY 4, 1975.
This warranty is extended only to the original purchaser/user of our products.
This warranty gives you specific legal rights and you may also have other legal rights which vary
from state to state.
Invacare warrants this product to be free from defects in materials and workmanship for a
period of one year from date of purchase. If within such warranty period any such product shall
be proven to be defective, such product shall be repaired or replaced, at Invacare’s option. This
warranty does not include any labor or shipping charges incurred in replacement part
installation or repair of any such product. Invacare’s sole obligation and your exclusive remedy
under this warranty shall be limited to such repair and/or replacement.
For warranty service, please contact the dealer from whom you purchased your Invacare
product. In the event you do not receive satisfactory warranty service, please write directly to
Invacare at the address at the bottom of this page. Provide dealer’s name, address, the product
model number, date of purchase, indicate nature of the defect and, if the product is serialized,
indicate the serial number. Do not return products to our factory without our prior consent.
LIMITATIONS AND EXCLUSIONS: THE FOREGOING WARRANTY SHALL NOT APPLY
TO SERIAL NUMBERED PRODUCTS IF THE SERIAL NUMBER HAS BEEN REMOVED OR
DEFACED, PRODUCTS SUBJECTED TO NEGLIGENCE, ACCIDENT, IMPROPER
OPERATION, MAINTENANCE OR STORAGE, PRODUCTS MODIFIED WITHOUT
INVACARE’S EXPRESS WRITTEN CONSENT INCLUDING, BUT NOT LIMITED TO,
MODIFICATION THROUGH THE USE OF UNAUTHORIZED PARTS OR ATTACHMENTS;
PRODUCTS DAMAGED BY REASON OF REPAIRS MADE TO ANY COMPONENT
WITHOUT THE SPECIFIC CONSENT OF INVACARE, OR TO A PRODUCT DAMAGED BY
CIRCUMSTANCES BEYOND INVACARE’S CONTROL, AND SUCH EVALUATION WILL
BE SOLELY DETERMINED BY INVACARE. THE WARRANTY SHALL NOT APPLY TO
PROBLEMS ARISING FROM NORMAL WEAR OR FAILURE TO ADHERE TO THESE
INSTRUCTIONS.
THE FOREGOING EXPRESS WARRANTY IS EXCLUSIVE AND IN LIEU OF ANY OTHER
WARRANTIES WHATSOEVER, WHETHER EXPRESS OR IMPLIED, INCLUDING THE
IMPLIED WARRANTIES OF MERCHANTABILITY AND FITNESS FOR A PARTICULAR
PURPOSE, AND THE SOLE REMEDY FOR VIOLATIONS OF ANY WARRANTY
WHATSOEVER, SHALL BE LIMITED TO REPAIR OR REPLACEMENT OF THE DEFECTIVE
PRODUCT PURSUANT TO THE TERMS CONTAINED HEREIN. THE APPLICATION OF
ANY IMPLIED WARRANTY WHATSOEVER SHALL NOT EXTEND BEYOND THE
DURATION OF THE EXPRESS WARRANTY PROVIDED HEREIN. INVACARE SHALL NOT
BE LIABLE FOR ANY CONSEQUENTIAL OR INCIDENTAL DAMAGES WHATSOEVER.
THIS WARRANTY SHALL BE EXTENDED TO COMPLY WITH STATE/PROVINCIAL
LAWS AND REQUIREMENTS.
Invacare Corporation www.invacare.com
USA
One Invacare Way
Elyria, Ohio USA
44036-2125
800-333-6900
Canada
570 Matheson Blvd E Unit 8
Mississauga Ontario
L4Z 4G4 Canada
800-668-5324
Invacare, the Medallion Design, and Yes,
you can. are registered trademarks of
Invacare Corporation.
Atlas is a trademark of Invacare
Corporation.
© 2006 Invacare Corporation
Part No. 1130169
Rev A - 6/23/06
PRODUCT MADE
IN CHINA
