Inventec Appliances R8 PANDIGITAL SUPERNOVA User Manual R80B400 SuperNova User Guide
Inventec Appliances Corp. PANDIGITAL SUPERNOVA R80B400 SuperNova User Guide
Contents
- 1. Users Manual 1
- 2. Users Manual 2
Users Manual 1

PANDIGITAL SUPERNOVA
8” Tablet eReader v1.9
Table of Contents
Pandigital SuperNova ....................................................... 5
Important Safety Precau ons ........................................... 6
Device Overview .............................................................. 7
Ge ng Started ............................................................... 11
HOME SCREEN ................................................................ 16
Applica ons Screen ........................................................ 19
Home Screen Func on Menu .......................................... 21
App Market (SlideME) ....................................................... 26
Barnes & Noble .............................................................. 30
Bluetooth Feature .......................................................... 54
Browser .......................................................................... 54
Calculator ....................................................................... 60
Calendar ......................................................................... 61
Camera ........................................................................... 64
Clock .............................................................................. 67
CONTACTS ...................................................................... 70
Dic onary ...................................................................... 73
Downloads ..................................................................... 73
Email .............................................................................. 74
ES File Explorer ............................................................... 78
Facebook ........................................................................ 85
FW Update ..................................................................... 85
Gallery ........................................................................... 88
HDMI Connec on ........................................................... 90
InTouch .......................................................................... 91
Music ............................................................................. 93
Notes ............................................................................. 97
Offi ceSuite Viewer .......................................................... 99
Search ...........................................................................106
Se ngs .........................................................................106
Speech Recorder ............................................................112
U Player .........................................................................113
Weather ........................................................................114
Wi-Fi Network Setup .....................................................117
Connect to Computer ....................................................119
Frequently Asked Ques ons ..........................................122
Ba ery Management .....................................................129
Technical Specifi ca ons .................................................130
Limited Warranty ..........................................................131
Note: The device style and features may differ from those documented in
this User Guide.
UG-E_R80B400_R80B452_v1.9_07-11
PANDIGITAL SUPERNOVA
8” Tablet eReader
A contemporary stylish electronic multimedia device designed for
straightforward functionality, featuring a full color TFT LCD display,
convenient touch-screen navigation, built-in cameras and microphone.
• Connect to a Wi-Fi network.
• Shop, purchase and download media from Barnes & Noble
Bookstore.
• Read digital eBooks anytime and anywhere.
• Connect accessories and peripherals (i.e. Keyboards, Mouse)
• Quickly and easily download AndroidTM applications.
• Take pictures and videos with front & back built-in cameras.
• View photo slideshows.
• Browse the web.

• Send/receive email.
• Play videos and audio fi les. Listen through the built-in speakers or
with headphones (not included).
• Play videos on your TV via HDMI connection.
• Play games.
• And much more!
FUN. EASY. EXPANDABLE.
Your Pandigital SuperNova Tablet eReader is a step up in multimedia
devices.
Congratula ons on your choice!
Package Contents
• 8” Pandigital SuperNova Tablet eReader
• AC Adapter
• USB Cable
• Quick Start Guide
• User Guide (preloaded in device)
Register your product
To register your product or view the product warranty, please visit us at
www.pandigital.net.
Important Safety Precautions
Always follow these basic safety precautions when using the device.
This reduces the risk of damage, fi re, electric shock, and injury.
• DO NOT expose this product to extreme heat or cold (i.e.,
leaving in auto). Extreme heat and cold can cause screen
damage and operational failure.
• Keep the device out of direct sunlight and heat sources.
• Do not expose this product to rain or moisture.
• Protect the power cord. Route power cords so that they are not
likely to be walked on or pinched by items placed on or against
them. Pay particular attention to the point where the cord attaches
to the device.
• Only use the AC adapter included with the device. Using any other
AC adapter voids your warranty.
• Do not remove the cover. There are no user-serviceable parts
inside.
Cleaning the Device
Treat the screen gently. To clean fi ngerprints or dust from the screen,
we recommend using a soft, non-abrasive cloth such as a camera lens
cloth.
Device Overview
HDMI “D” Mini DC
output port USB jack
Navigation buttons Microphone
Front LED indicator
camera Light Sensor
Earphone jack
Back
camera
Power
button
Volume
button
Power Button Usage
Turn On: Press & hold the power button 3 seconds.
Turn Off: Press & hold the power button for 3 seconds tap Power
off OK to confi rm the power off.
Sleep Mode On/Off (energy saver): To save battery energy, while the
unit is on you can turn sleep mode on/off by pressing & releasing the
power button quickly.
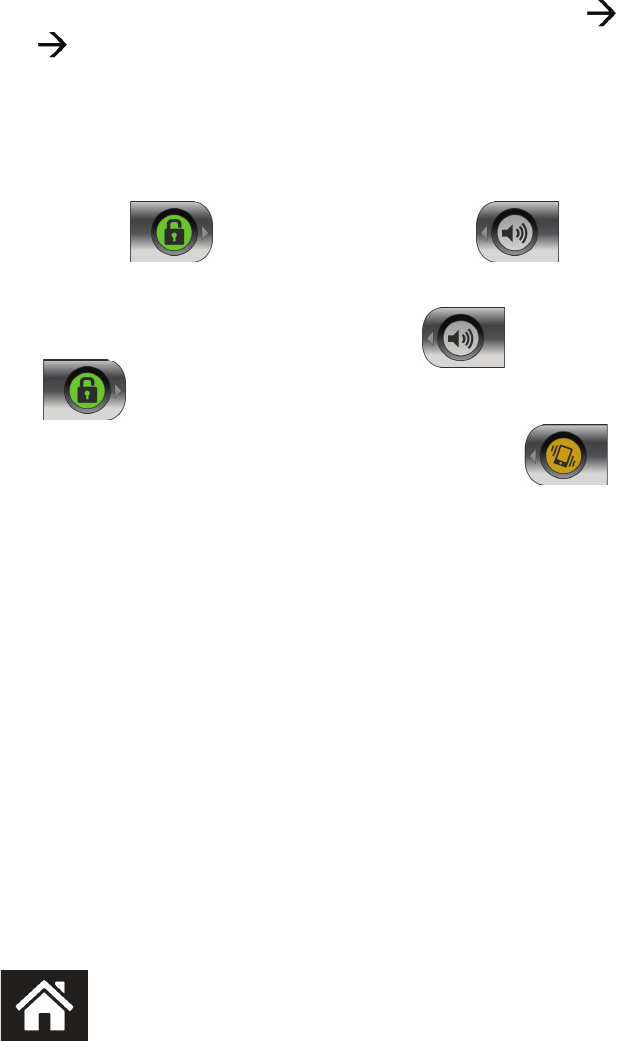
To unlock the screen after a power on or sleep mode, fi nger-slide the
Unlock bar towards the Sound bar .
Turn Sound Off/On: You can quickly and conveniently turn the device
sounds off/on by sliding the Sound bar towards the Unlock
bar .
When sounds are off, the Sound bar changes to . Slide again
to turn the sounds back on.
Reset device
In the event that the device does not respond to your touch, you can
force the device off by pressing & holding the power button for 6
seconds.
LED Indicator
LED off: Device on, in sleep mode, or off
LED Green: Charging device battery
Navigation Buttons
The navigation buttons at the bottom of the device can be used as
follows:
~ Stuck? Lost? Confused? Simply press the Home button to return
to the Home screen from any application.
~ Press and hold to display the most recent apps you launched,
then simply tap on an app icon to re-launch.

~ Display the Home screen Function Menu.
~ Display individual application Menu options.
~ Return to previous screens.
~ Clear pop-up menus.
~ In the Reader, turns pages back.
~ Perform quick web search.
~ In the Reader, turns pages forward.
Touch-Screen Navigation
The touch-screen allows for quick, easy and convenient navigation for
all applications.
Throughout the User Guide, you are instructed to use the following
touch navigation methods:
Tap = simple touch and release of your fi nger.
Touch & hold = touch your fi nger and hold in place until a response by
the application.
Touch & drag = touch & hold an item for a moment, and without lifting
your fi nger, move your fi nger on the screen until you reach the target
position.
Finger-slide = quick touch & slide your fi nger across the screen and
release.
Pinch-Screen Zoom
This device supports the “pinch-screen” zoom feature to zoom in and
out on application screens.
Zoom in: Spread fi nger and thumb, place on screen and “pinch”
together.
Zoom out: Place fi nger and thumb together on screen and slide apart.
Not all applications support the Pinch-Screen zoom feature.
microSDTM (SDHC) Card
The device supports up to 32GB microSDTM (SDHC) cards.
For simplicity purposes in this document, references to the “microSDTM
(SDHC) card” are listed as simply “SD card”.
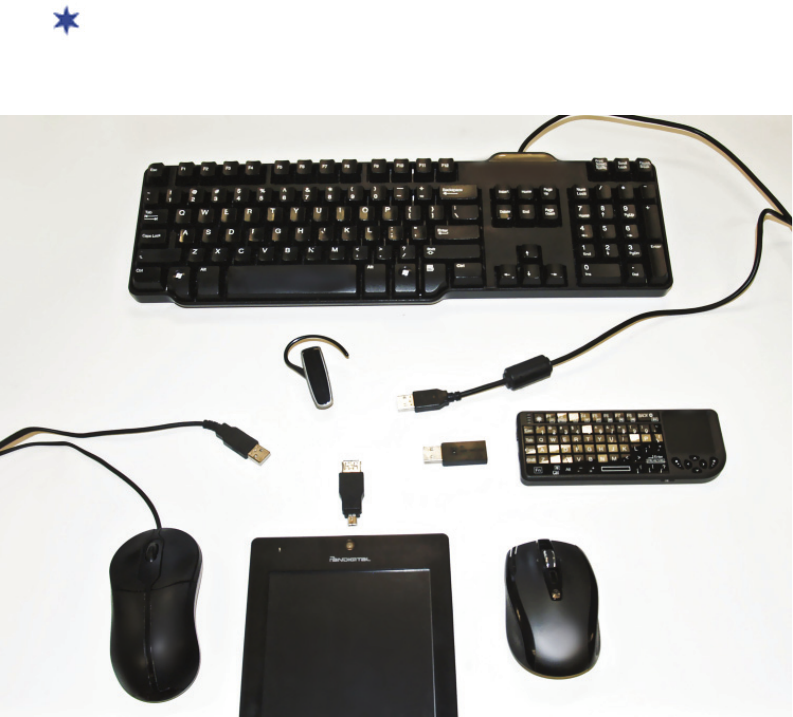
Accessories & Peripherals
The device’s miniUSB-OTG port supports many USB accessories and
peripherals (i.e., keyboards, mouse) that you can purchase locally
where electronics are sold.
Examples of supported items:
• Keyboards - wireless (with Wi-Fi dongle) or USB connected
• Mouse - wireless (with Wi-Fi dongle) or USB connected
• Bluetooth - device has built-in bluetooth capability
Your accessories or peripherals may require a miniUSB (Male) to
USB (female) adapter in order to connect to the device’s miniUSB
port.
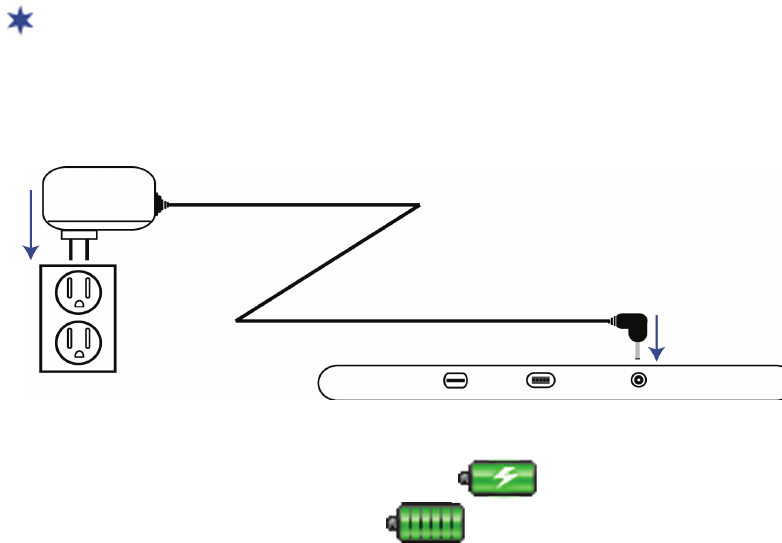
Getting Started
1. Charge the device
You can use the device while the battery is charging.
Plug the AC adapter into an electrical wall outlet, and then connect to
the device to fully charge the battery before use (approx. 5 hours).
Device top
Wall outlet
Power adapter
While charging, the battery icon displays as . When fully
charged, the battery icon displays as
y
y
y
y
y
y
.
2. Turn the device on
Press & hold the power button 3 seconds until
the Pandigital splash screen appears, and
then wait until the Welcome screen appears.
3. Initial Device Setup
The setup wizard prompts you through the initial steps for setting up
the device.
Select Language
1. Tap the currently displayed language to display all language
choices.
2. Tap on your desired language Next.
End User License Agreement
1. Read the End User License Agreement.
2. If in agreement, tap next to Accept Next.
You must accept the Agreement to proceed with the setup.
Wi-Fi Setup
Since many of your applications require an Internet connection, it is
recommended that you set up your Wi-Fi network now.
If you skip this section now, a warning message is displayed
and you will not be prompted to set up your Gmail or Barnes &
Noble accounts during the initial setup. You can set up your Wi-
Fi later through Se ngs or by tapping the My Wi-Fi widget on
the Home screen.
1. Tap Next to begin the Wi-Fi setup.
2. Tap
Wi-Fi to turn on. The device scans for local Wi-Fi networks
and lists all found.
3. Tap on the network to which you want to connect.
4. For secure networks, tap in the Password entry fi eld enter
the network password tap Connect.
5. Wait until a successful connection and “Connected” appears
under the network name. Tap Next.
The device checks the connection and either displays
a troubleshooting prompt or a message that your Wi-Fi
connection has been successfully established.
The Wi-Fi icon on the top of screens indicates the Wi-Fi
is connected, otherwise no icon is displayed.
If you are connecting via a public Wi-Fi hotspot, you may be
prompted to enter the hotspot login information prior to having
an active internet connection.
Select News Preference
This selection determines the default news feed that is displayed in
the InTouch application.
Tap on your primary news interest choice Next.
Set up Gmail Account
The InTouch application can access a Google Gmail account, so it
is recommended that you register your existing account or create a
new account now.
If you skipped the Wi-Fi setup section, you are not prompted
to set up your Gmail account now. You can set it up later via the
Google website.
If you enter an incorrect Gmail account or password, a
“Network Connection Timeout” error message is displayed.
You still need to set up an email account through the Email
application to check your email outside of InTouch and to use
the multiple features of the Email application.
1. Tap Login and enter your existing Gmail login information.
OR
tap Create and follow the prompts to create a new account
tap Exit to return to the Setup screen.
2. Tap
Next.
Set up Barnes & Noble Account
You need a Barnes & Noble account in order to download books,
newspapers and magazines. It is recommended that you register
your existing account or create a new account now.
If you skipped the Wi-Fi setup section, you are not prompted
to set up your Barnes & Noble account now. You can set it up
later using the Barnes & Noble application. The fi rst time you
attempt to log into the B&N Bookstore or B&N Library you will
be prompted for your account login information.
1. Tap Login and enter your existing Barnes & Noble account login
information.
OR
Tap Create and follow the prompts to create a new account
tap Exit to return to the Setup screen.
2. Tap
Next.
Set your Loca on
Your location is used by some applications that display information
based on a specifi c location.
1. Enter the city name of your location.
As you enter characters, matching locations are displayed so
you can simply tap the correct location when it appears. You
must select a location before you can proceed.
2. Tap
Next.
Ini al Setup Complete
Tap Start to begin using your device. The Home screen is
displayed.
4. Set Date & Time
The date & time should automatically be set using network-provided
values. If you notice the date and time are incorrect, set them correctly
according to your location.
IMPORTANT: In order to connect with your Barnes & Noble account
and your Facebook & Twitter accounts in InTouch, the date and time
must be set correctly according to your location.
1. On the Home screen, tap the Se ngs icon.
2. Tap
Date & me.
3. If it’s not already, select Automa c to have the date and time
automatically set according to your location. To manually set the
date and time, de-select Automa c.
4. Tap
Set date use the + or - to set the current date tap Set.
5. Tap
Select me zone select the correct time zone for your
location. (Finger-slide vertically to scroll the list.).
6. Tap
Set me use the + or – to set the correct time according to
your location tap Set.
7. Select your desired time format:
12 = 12:00am-12:00pm (default)
24 = 12:00-24:00
8. Select date format:
Normal (12/31/2011)
12/31/2011
31/12/2011
2011/12/31
9. Press to return to the Settings screen.

10. Press to return to the Home screen.
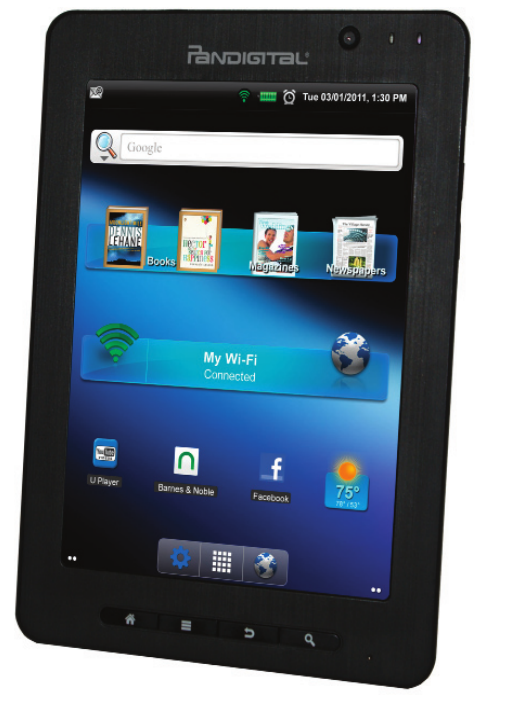
HOME SCREEN
Notifi cation icons (i.e., Email, SD card, downloads, etc.). Finger-
slide down on the notifi cation to view the details, then tap on a
detail listing to access corresponding application.
Wi-Fi connection status
Battery charge level status
Indicates Alarms are activated
Current Date and Time
Widgets (i.e., Web Search) and Shortcuts can be added to the
Home screen.
The My Books widget shows the most recently read books,
magazine and newspaper. Simply tap on a cover to open the
media fi le again.
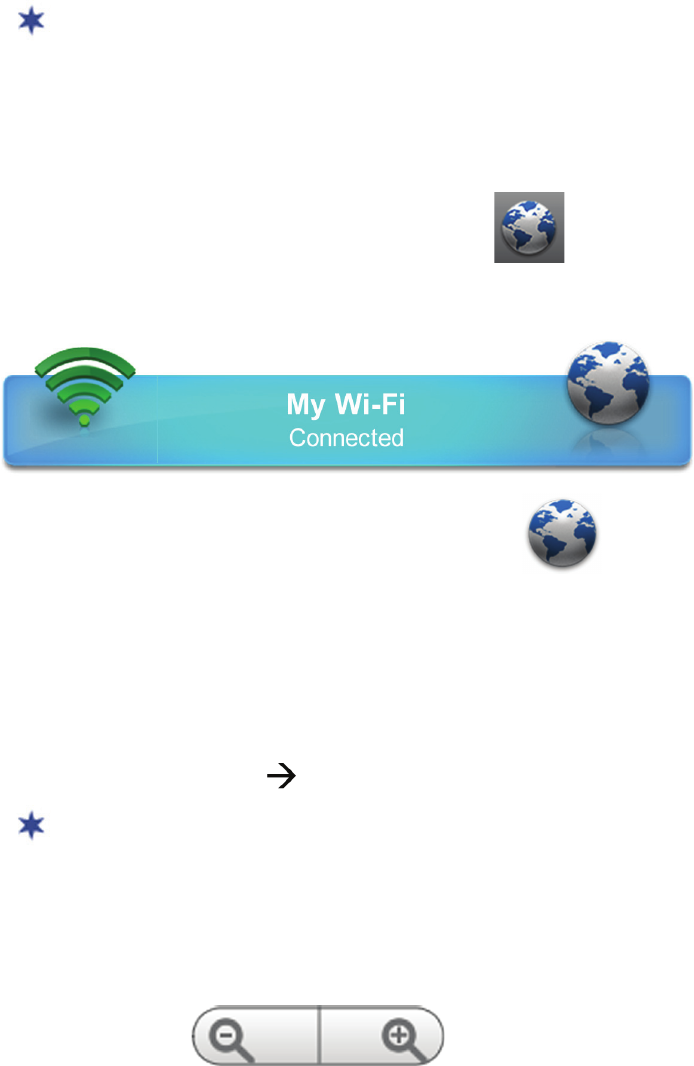
The My Wi-Fi widget allows quick access to set up and connect
to a local Wi-Fi network. After successful connection, simply tap
the globe icon to launch the browser.
Dots on left and right side of screen indicate the visible screen
of the 5 available screens. Tap the left or right dots (or fi nger-
slide the screen) to display extended screens.
Settings quick launch icon .
Applications screen quick launch icon .
Touch & hold on the icon to pop up thumbnails of all 5
screens. Tap on a screen to display it.
Browser quick launch icon .
Tap on any application icon or widget to launch it.
Touch, hold and slide icons or widgets to reposition them on the
screen.
Touch, hold and slide icons onto to remove them from
the Home screen. Removed application icons remain on the
Applications screen allowing you to copy them back onto the
Home screen later if desired.
Because you can move and remove applications and widgets
from the Home and Applications screens, the instructions
throughout this User Guide do not reference specifi c screens when
instructing you to tap on application icons and widgets.
Applications Screen
On the Home screen, tap to access the Applications screen.
As you add third party applications later, you may need to fi nger-
slide the screen vertically to see more application icons that are not
visible on the screen.
App Market (SlideME) ~ Market offering free and
purchasable third party AndroidTM applications.
Barnes & Noble ~ Shop on the Barnes & Noble
Bookstore, download purchased media, and access My Library.
Browser ~ Access the Internet and ‘surf the web’ whenever
desired.
Calculator ~ Calculator for basic math equations
(+ - x ÷).
Calendar ~ Display monthly calendar and schedule events.
Camera ~ Use front or back built-in camera to take pictures
or videos.

Clock ~ Digital clock screen with scheduled alarms
functionality.
Contacts ~ Create a list of personal contacts, which can be
linked to your email.
Dictionary ~ Quick access to the built-in dictionary.
Downloads ~ View history of items you’ve downloaded from
websites. You can also open and delete downloads.
Email ~ Send/Receive email using your existing email
addresses.
ES File Explorer ~ View and manage fi les and apps, and
backup fi les to your SD card. You can also use for installing third party
AndroidTM applications.
Facebook ~ Quick access to the Facebook website.
FW Update ~ Update the device fi rmware.
Gallery ~ View and manage photo fi les (JPG, JPEG, BMP,
PNG, non-animated GIF). Play and manage MPEG4 video fi les.
InTouch ~ Quick connect and view your Facebook, Twitter,
Gmail, and RSS news feed data all in one easy place.

Music ~ Play and manage audio fi les (MP3, WAV and AAC).
Notes ~ Convenient and quick way to write yourself notes
using the keypad or drawing with your fi nger.
Offi ceSuite Viewer ~ Open and view fi les of the following
formats: DOC, DOCX, TXT, XLS, XLSX, CSV, PPT, PPTX, PPS, PPSX
and PDF
Search ~ Quickly perform a web search.
Settings ~ Set many settings for personalizing and
enhancing the device as desired.
Speech Recorder ~ Create a WAV fi le by recording your
voice or other sounds using the built-in microphone.
U Player ~ View popular YouTube videos.
Weather ~ Check the weather forecasts for locations of your
choice. Set up multiple locations for quick viewing.
Home Screen Function Menu
On the Home screen, press to display the Home screen
Function Menu.
Add > Shortcuts
If the Add option is not available, the visible space is full so you
cannot add any shortcuts until you either delete items to free up
screen space or slide the screen left or right to display extended
screen space.
If you select items that are shortcuts already on the Home
screen, they will be duplicated, resulting in multiple icons for the
same item.
You can add quick access shortcuts on the Home screen for the
following items:
Applications Select desired application.
Bookmark Add a shortcut to a bookmarked web page.
Contact Add a shortcut to a contact from the Contacts application.
Music playlist Select desired playlist.
Settings Select desired settings function.
Add > Widgets
If the Add button is not available, the visible space is full so you
cannot add any widgets until you either delete items to free up
screen space or slide the screen left or right to display extended
screen space.
If you select a widget that is too large for the available empty
space, it won’t be added.
You can add widgets on the Home screen for the following items:
Analog clock A round analog clock.
Calendar Quickly show your scheduled events without launching
the calendar application.
Home screen tips Tips for navigating the Home and
Applications screens.
InTouch Convenient entry point to the InTouch RSS News Feeds.
Music Quickly begin playing music without launching the music
application.
My Books Convenient entry point into the eBook Reader and
eBook online services. Shows two most recently read books, and
the most recently read magazine and newspaper. Note: this is the
same as the factory preloaded widget on the Home screen.
My Wi-Fi Allows quick access to set up and connect to a local Wi-
Fi network. After successful connection, simply tap the globe icon to
launch the browser. This widget also shows the status of your Wi-Fi
connection. You may be connected to a Wi-Fi network but still need
login information for Internet access. Note: this is the same as the
factory preloaded widget on the Home screen.
Picture Frame Select a photo to appear on your Home screen
in a picture frame. Stretch the cropping frame to increase and
decrease the desired portion of the photo to be displayed.
Power Control Bar widget with popular Settings functions: Wi-Fi
on/off, Bluetooth on/off, Sync device and Screen Brightness.
Search Add a Web Search widget for performing quick Web and/
or Apps searches. Note: the “All” search is the same as the factory
preloaded widget on the Home screen.
SlideME Marketplace Bar widget with popular SlideME Marketplace
functions: Downloads, Purchases, Broadcasts, App Updates and
SAM updates.
Weather (1X1) Small widget showing the current temperature
of your selected City. Tap on the widget to launch the Today
application.
Weather (1X4) Larger widget shows date, time, and temperature
of the selected City. Tap on the widget to launch the Today
application.
Add > Folders
Creating folders on the Home screen allows you to organize your
applications and documents as desired.
If the Add button is not available, the visible space is full so you
cannot add any folders until you either delete items to free up
screen space or slide the screen left or right to display extended
screen space.
New folder Add a folder into which you can add applications as
desired (i.e., Games).
To rename the folder, tap on it to open it touch & hold on the
folder name at the top. Tap in the Folder name entry fi eld enter
the desired folder name tap OK.
To add applications from the Applications screen into the folder,
fi rst tap on the folder to open it open the Applications screen
touch & hold on an application icon. It is automatically copied
into the folder.
All contacts Add a folder containing the complete contact list from
the Contacts application.
Bluetooth received Add a folder containing a list fi les received
from other bluetooth users.
Starred contacts Add a folder containing the list of contacts
you’ve marked as favorites.
Add > Wallpapers
If the Add button is grayed out, the visible space is full. Slide
the screen to display an extended screen space to allow the Add
button to be available. Or, use the Wallpaper option instead of the
Add>Wallpaper option.
Usage is the same as the Wallpaper feature. See the “Wallpaper”
section below for instructions.
Manage apps
View all application properties and uninstall applications that you have
installed.
Tap on an application to view its properties and available action
options.
You cannot uninstall system and preloaded applications.
Wallpaper
Assign a different background image from a collection of preloaded
images or your from your personal photo collection.
Gallery
Assign a photo from your personal photo collection.
a) In the photo gallery, tap on the desired photo.
b) A cropping frame appears on the picture. Touch and drag the
edges of the frame to re-adjust the size. Touch and drag the entire
frame to reposition it.
c) Tap Save.
Live wallpapers
Select from a collection of preloaded animated wallpapers tap
Set wallpaper.
Live wallpapers use more battery energy than a static wallpaper.
Wallpapers
Finger-slide preloaded photos tap on desired photo Set
wallpaper.
Search
Perform a web search using the Web Search widget.
1. Enter the desired search text.
2. Matching and suggested text appears as you enter characters;
simply tap the desired match to launch the browser to your
selection.
3. Press to return to the Search screen.
Notifi cations
List of pending notifi cations (i.e., new email, calendar events,
completed downloads, etc.).
Finger-slide down on the notifi cation icons to view the details, then tap
on the details to access the corresponding application.
Settings
Refer to the “SETTINGS” application section for complete Settings
instructions.
App Market (SlideME)
Use the App Market application to access SlideME, a market offering
thousands of free and low cost third party AndroidTM applications.
In order to save memory space, application .apk fi les are
automatically deleted after installation has been completed. To
re-download purchased applications, use the Storage Locker
function.
Download FREE applications
1. Tap the App Market application icon.
2. The fi rst time, you are presented with the End User Agreement.
Read it and tap Agree to continue using SlideME.
3. The browser launches and displays the Marketplace. Tap on a
category to display the individual applications.
4. Tap on a desired application to view a description.
5. Tap
Compa bility to view the compatibility requirements.
6. To download to the device, tap Download Install.
7. You are prompted to accept the Permissions required for the
application or advised no permissions are required. Tap Ok to
continue.
8. Tap
Install.
9. Tap
Open to run the application now, or Done to return to the
application description press to return to the category
listing.
10. The application launch icon is added to the Applications
screen.
Purchase AndroidTM applications
You must have a SlideME account registered with your payment
methods in order to purchase applications. It is recommended that you
sign up/register through your computer by going to www.slideme.org/
user/register.
You can download FREE applications without a SlideME account.
1. Tap the App Market application icon. The browser launches
and displays the market web store.
2. Tap on a category to display the individual applications.
3. Tap on a desired application to view a description.
4. Tap
Compa bility to view the compatibility requirements.
5. To download to the device, tap Download Approve.
6. Enter your account login information select the remember me’
option if desired tap Login.
If the Terms & Conditions screen is displayed again, there was a
problem with your login information. Tap Approve and try again.
7. After successful login, tap Purchase.
8. You are prompted to accept the Permissions required for the
application or advised no permissions are required. Tap Ok to
continue.
9. Wait for the application to download tap Install.
10. Tap
Open to run the application now, or Done to return to the
application description press to return to the category
listing.
11. The application launch icon is added to the Applications
screen.
SlideME Category Menu Options
With the SlideME Home screen displayed, press to display the
Category menu options.
Top Apps
Display the most popular applications.
Latest
Display the applications most recently added to SlideME.
No fi ca ons
Display the following:
Your Downloads
Your Purchases
Broadcasts
App Updates
SAM updates
Search
Search for specifi c application name.
Refresh
Refresh the SlideME screen to ensure you are viewing the most
recent information.
More
Display the following options:

Storage Locker
When you purchase applications, they are automatically added
to your online Storage Locker. This allows you to re-download
them for free at any later time.
The device must be connected to a Wi-Fi network in order to
use this function.
Updates
Check for SlideME updates.
SD card
Select if you want to install applications that are stored on your
SD card.
a) Tap on an application.
b) Tap Install.
c) Tap Open to run the application now, or Done to return to the
application list.
Se ngs
General:
Free apps - when selected, free apps are included in app
listings.
Paid apps - when selected, paid apps are included in app
listings.
Show up to X screenshots - select the desired number of app
screenshots to be displayed with the app’s description.
Network:
Set the connection time-out duration (default = 50 seconds).
Debug
Enable bug reporting - when selected, if a problem is
encountered with an app, you are prompted to send a bug
report to SlideME.
Help
Display the SlideME account registration information and version
number.
Add-ons
Check for SlideME add-on apps.
The device must be connected to a Wi-Fi network in order to
use this function.
SlideME Application Menu Options
In the SlideME Home screen, tap on tap on a category to display the
list of applications press to display the application menu
options.
Sort
Select desired sort order to display the applications.
Search
Search for specifi c application name.
Categories
Return to the Category screen.
No fi ca ons
Display the following:
Your Downloads
Your Purchases
Broadcasts
App Updates
SAM updates
Help
Display the SlideME account registration information and version
number.
Add-ons
Check for SlideME add-on apps.
The device must be connected to a Wi-Fi network in order to
use this function.
Barnes & Noble
Use the Barnes & Noble application to:
• Shop on the Barnes & Noble online store
• Buy and download Books
• Buy single issues or subscriptions to Newspapers and Magazines
• Get free Books
• Get sample Books
• Support Books copied from SD cards and from your computer
• Support Adobe eBooks transferred from Adobe Digital Edition
(ADE)
• DRM-free Books downloaded from web browser
• Manage and read Books
Your Books, Newspapers and Magazines must be stored in the \
eBooks folder of the internal storage or in an \eBooks folder at the
root of a SD card.
Book, Newspaper and Magazine formats supported: EPUB and
PDF
Overview of Buying & Downloading Barnes & Noble Media
This is an overview only of the buying and downloading procedures.
Complete instructions for each step begin after the overview.
Tap the Barnes & Noble application icon.
Tap the B&N Bookstore tab.
The fi rst time, you are prompted for your Barnes & Noble login information
if you did not enter it during the initial device setup.
If you have an existing account, tap into the entry fi elds to enter your
Barnes & Noble account email address and password Sign In.
Or to register a new account, tap Create an Account, and then enter all
required user information.
Your login information is stored so you are not required to enter
the login information when selecting the B&N Bookstore or B&N
Library later.

After successful login, the Barnes & Noble Top 100 Books are displayed.
To view the Newspapers and Magazines, tap Favorites: Favorites
select your desired category.
Shop and purchase Books, Newspapers and Magazines, or get Free
Samples. Confi rm to download the media to the device.
After a successful sync with your account, your media is added to your
B&N Library. Tap a title’s Download button to download to My Library.

In My Library, tap on a title cover to open it.
Sign In and Out of your Barnes & Noble Account
IMPORTANT: In order to connect with your Barnes & Noble online
account, the date and time must be set correctly according to your
location.
Sign In
The fi rst time you tap on the B&N Bookstore or B&N Library tab,
you are prompted for your Barnes & Noble login information if you
did not enter it during the initial device setup.
If you have an existing account, tap into the entry fi elds to enter
your Barnes & Noble account email address and password Sign
In. Or to register a new account, tap Create an Account, and then
enter all required user information.
After a successful login, the B&N Bookstore displays the current
top selling Barnes & Noble Books, Magazines and Newspapers.
The B&N Library displays all the media in your Barnes & Noble
online account.
Your login information is stored so you are not required to enter
the login information when selecting the B&N Bookstore or B&N
Library later.
If you encounter network connection problems during the login
process, your wireless access point (WAP) may temporarily not
have Internet access even though the green Wi-Fi icon at the top of
the screen indicates the device is connected to a Wi-Fi network. To
verify the Internet access status, press and verify the status
on the My Wi-Fi widget bar is “No internet access”. Wait until the
status is “Connected” or try disconnecting/reconnecting the cable
to your WAP or reboot your WAP. You can also check the Internet
access status by launching the Browser to see if it can connect to
any website.
Sign Out
You can sign out of your Barnes & Noble account and sign in under
a different account if desired. However, it’s important to note that
when you sign out, the media associated with the current Barnes &
Noble account is removed from My Library. You can sign back into
the same account again later, and then you will have to redownload
the media that was removed during the sign out.
1. In the B&N Bookstore, B&N Library or My Library, tap
Sign Out.
2. Tap
Yes to sign out, or No to remain signed in.
B&N BOOKSTORE
You must have a registered Barnes & Noble account with a valid
credit card in order to purchase and download DRM-protected
Books or to download borrowed Books.
If the Wi-Fi signal is weak, the contents of the Bookstore may
not be able to load in the device. Try moving to a better Wi-Fi
signal area and the Bookstore will reconnect and retry to load the
Bookstore contents.
1. Tap the Barnes & Noble application icon B&N
Bookstore tab.
If you haven’t already logged into your Barnes & Noble account,
you are prompted for your login information.
2. After successful login, the B&N Bookstore displays the current top
100 Barnes & Noble Books, Magazines and Newspapers.
To display only Newspapers, Magazines, or other categories, tap
Favorites: Favorites select desired category.
3. You can sort the media by tapping the icon in the upper right corner
of the screen, and then select the desired sort option:
= Top Matches (default)
= Title (A-Z or Z-A)
= Publish Date (ASC-most recent fi rst, DSC=oldest fi rst)
= Price (Low-High or High-Low)
= Sale Rank (Low-High or High-Low)
= Author (last name, A-Z or Z-A).
Each time you tap Next 10 to display the next 10 media fi les, the
media fi les are sorted and appended at the bottom of the list. To
display all media fi les sorted together, tap the sort icon and reselect
your desired sort option.
4. Tap on
Buy Now, Get Sample, or Get Book for Free to add to your
Barnes & Noble online account.
Or
Tap on a media listing or select View Detail to view
a summary of the media, and then you can tap Buy Now, Get
Sample, or Get Book for Free.
5. If you select Buy Now, you are prompted to confi rm the purchase.
Tap Yes to confi rm Yes to download the title to the device.
6. If you select Get Sample or Get Book for Free, you are prompted to
add the title cover to My Library now allowing a faster download
later. If you don’t add now, you can download the book later from
the B&N Library tab.
7. Press to return to the B&N Bookstore screen from a Detail
screen.
Shop by Category
To make your shopping easier, you can display the media in the B&N
Bookstore by Favorites and Subjects categories.
Favorites Category
1. Tap the Barnes & Noble application icon B&N
Bookstore tab.
2. Tap Favorites: in upper left corner Favorites.
3. Tap on the desired category.
4. The media is displayed accordingly. To switch to a different
category, tap Favorites to display the category choices again.
Subjects Category
1. Tap the Barnes & Noble application icon B&N
Bookstore tab.
2. Tap Favorites: in upper left corner Subjects.
3. Tap on the desired subject. Here are just a few examples of the
many subjects you can choose:
Business & Personal Finances
Diet & Health
Fic on
Mystery & Crime
Non Fic on
Romance
Self Help
Sports & Adventure
4. The media is displayed accordingly. To switch to a different
category, tap Subjects: to display the category choices again.
Search for Specifi c Media
1. In the B&N Bookstore screen, tap to search for specifi c
media by title or author’s or publisher’s name.
2. Enter the string of text tap Go on keypad or at top of
screen.
3. Only the matching media fi les are displayed.
4. To exit the search mode, tap Category: Favorites select
desired category (default B&N Top 100).
Buy Periodicals
1. Tap the Barnes & Noble application icon B&N
Bookstore tab.
2. Tap Select category Favorites Newspapers or Magazines.
3. Tap
Subscribe Now or Buy Current Issue on the desired periodical
tap Yes to confi rm the purchase.
4. Single issues can be downloaded to the device immediately.
5. To download subscriptions, wait several minutes after your
purchase, and then tap the B&N Library tab to download.
If the recently purchased subscription periodical is not listed, tap
the re-sync icon.
Auto Download of Periodical Issues
If you have purchased subscriptions to periodicals, you can set up an
automatic daily check for new issues.
1. Tap the
Barnes & Noble application icon B&N
Bookstore or B&N Library tab.
2. Press Periodical.
3. Tap
Enable Periodical No fi ca on to turn on.
4. Tap the
+ – and AM/PM to set the desired time each day you want
the auto check to occur.
5. Tap
Save.
6. If new periodical issues are found when the auto check is activated,
you are prompted to download the issue(s).
If you are not connected to a Wi-Fi network when the auto check
is activated, you are advised that the periodical notifi cation failed
because no network is available.
If the Barnes & Noble application is not running at your
designated check time, the auto check is performed immediately
the next time you launch the application.
B&N LIBRARY
Use the B&N Library tab to sync with and display the media in your
online Barnes & Noble account so you can download it to the device.
1. Tap the
Barnes & Noble application icon B&N Library
tab.
2. If prompted, tap Yes to sync with your B&N Library.
3. You can sort the media by tapping the icon in the upper right corner
of the screen, and then select the desired sort option:
= Date Added (desc = most recent fi rst [default], asc=oldest
fi rst)
)
= Title (A-Z or Z-A)
= Author (last name, A-Z or Z-A).
4. Tap the applicable media button as desired. The media buttons on
each listing are based on the status of the media fi le:
Download = download purchased or free media to the device
Download Sample = download a sample book to the device
Downloading = a download is in progress
Read = open the media that has already been downloaded to the
device
Buy Now = purchase sample books and borrowed books that were
returned or the borrowed book offer has expired
View Subscrip on = view the periodical subscription which has
multiple issues available
Renew = renew a purchased periodical subscription
Lend to a friend = lend a book to another Barnes & Noble user
Return = return a borrowed book to the lender
Display Media by Category
You can display the media in the B&N Library by categories (i.e.,
Books, Sample Books, Magazines, Lendable Books, etc.):
1. Tap the
Barnes & Noble application icon B&N Library
tab.
2. Tap
Category.
3. Tap on the desired category from following options:
All = all media in your Barnes & Noble online account
Books = total books only
Sample Books = number of the total books that are samples
Magazines = total magazines only
Newspapers = total newspapers only
Archive = number of archived items
Book Off ers = number of pending offers to borrow books
Borrowed/Returned/Expired = number of borrowed books you still
have, have returned, or have expired
Lendable Books = books that are available to lend to other Barnes
& Noble users
Lent = books that you have lent to other Barnes & Noble users
4. The media is displayed accordingly. To switch to a different
category, tap Category: to display the category options again.
Sync with your Barnes & Noble Account
To be sure the media you are viewing is current, resync the B&N
Library with your online Barnes & Noble account by tapping .
Search for Specifi c Media
1. In the B&N Library screen, tap to search for specifi c media
by title, author’s or publisher’s name, or keyword in summary.
2. Enter the string of text tap Go on keypad or at top of
screen.

3. Only the matching media fi les are displayed.
4. To exit the search mode, tap Category: Favorites select
desired category (default All).
Delete or Archive Media in B&N Library
To help manage the media that’s displayed in the B&N Library, you
can delete or archive older media (i.e., old newspapers or magazines).
Touch & hold on a media listing tap Delete or Archive Yes to
confi rm.
Sample books cannot be archived.
Unarchive Media
To unarchive media fi les, tap Category Archive touch & hold on
a media listing Unarchive Yes. The media is added back into
your B&N Library.
Lend/Return Books
There are some books that Barnes & Noble classifi es as “lendable”,
which allows Barnes & Noble users to loan books to each other. This
means that you can loan books from your B&N Library to your friends,
and likewise, you can borrow books from your friends.
Please be aware of the following considerations before loaning or
borrowing any books:
• To loan a book, the recipient must have a Barnes & Noble account.
• To download a borrowed book, you must have a valid credit card
number assigned to your Barnes & Noble account.
• The book can only be loaned once. However, if the recipient rejects
your offer, you can lend it to someone else after it is returned to
you.
• The book can only be loaned for 14 days, at which time it is
automatically returned to the lender if it was not returned by then.
• Only one copy of a book can be read at a time. Therefore, the
lender does not have access to the book until after it has been
returned from the recipient.
• To unlock and open a borrowed book, the recipient may be
required to provide the default credit card name and number that is
registered with their Barnes & Noble account.
To quickly view your lendable books, already lent books, and
borrowed books, tap Category in the upper left of screen, and then
tap on the desired category.
Loan a Book
1. In the B&N Library screen, tap Lend to a Friend.
Only books that are lendable have a Lend to a Friend button.
2. In the Lend Book dialog box, tap in the To: entry fi eld enter the
recipient’s email address.
3. (optional) Tap in the Message entry fi eld enter a personal
message, which will be included in the notifi cation email that is
automatically sent to the recipient.
4. Tap
Lend.
After loaning the book, the status of the book is “Lent” and the book
is not available for you to read until the recipient returns the book or
rejects the offer.
Borrow a Book
If someone lends you a book, the book appears in the B&N Library so
you can accept or reject the offer.
Accept Offer
1. On the loaned book, tap Yes! Borrow this.
2. The loan complete message appears; tap OK. The book now has
Download and Return buttons.
3. Tap Download Yes.
4. The book is added to and displayed in My Library.
You can keep the book up to 14 days, at which time it will
automatically be returned if you have not returned it before then.
If you didn’t fi nish reading the book before it was returned, you
can easily purchase your own copy by tapping on the Buy Now
button that is added to the book after it’s returned.
Reject Offer
On the loaned book, tap No, Thanks to reject the offer. The book
is immediately removed from the B&N Library and returned to the
sender.
In order to download a borrowed book, you must have a valid
credit card registered in your Barnes & Noble account.
Return/Buy Borrowed Books
In the B&N Library screen, on the book listing, tap Return Yes.
After you return the book, a Buy Now button appears so you can
easily buy your own copy.
MY LIBRARY
The My Library displays all media that you have downloaded directly
from Barnes & Noble, transferred from Adobe Digital Editions,
downloaded from your web browser, saved email attachments, or
copied into the device from your computer.
If you have a SD card inserted with media fi les stored in a folder titled \
eBooks, those media fi les are also displayed in My Library.
1. Tap the
Barnes & Noble application icon My Library
tab.
2. The media you have downloaded or copied into the device from
your computer or SD card is displayed. Scroll the screen vertically
to access all media.
3. You can sort the media by tapping the icon in the upper right corner
of the screen, and then select the desired sort option:
= Date Added (desc-most recent fi rst [default], asc=oldest
fi rst)
)
= Title (A-Z or Z-A)
= Author (last name, A-Z or Z-A).
4. Tap on a media listing to open it.

The media labels signify the status of the media:
New = media has not yet been opened
Sample = free sample of book
Borrowed = borrowed book from another Barnes & Noble user
Lent = you loaned book to another Barnes & Noble user
Returned = you returned the borrowed book to lender
Expired = was borrowed more than 14 days ago
5. Newspapers and Magazines: Even if multiple issues are
available, only one cover is displayed.
Tap on a newspaper or magazine cover to access the available
issue list. Tap on an issue to open it.
Or
Touch & hold on a newspaper or magazine cover to display Go to
folder and Delete folder options.
Go to folder displays all available issues. You can single tap
to open an issue, or touch & hold on an issue to assign it to a
bookshelf or delete it.
Delete folder deletes all downloaded issues and folder.
Only one issue of Newspapers and Magazines is displayed.
When multiple issues are available, tap on the single issue shown
and all available issues are listed for you to choose the desired
issue to read.
Some sections of Magazines and Newspapers contain linked
topic headings; tap on a topic heading to jump to the associated
article.
If downloaded books have separate cover fi les, they are
downloaded along with the book. For books that don’t have
separate cover fi les, covers are extracted from the book fi le.
Bookshelves
You can create personal bookshelves into which you can save your
downloaded media (i.e., Short Stories, Drama, etc.).
The (#) following the bookshelf name indicates the number of
media fi les in the bookshelf.
Add New Bookshelf
1. In the My Library screen, tap .
2. Tap in the Title entry box enter the desired bookshelf name
(i.e., Short Stories, Drama, etc.) tap Save.
Add Media to Bookshelf
1. In the My Library screen, with “All” bookshelf displayed, touch
& hold on a media listing that you want to add to a different
bookshelf.
2. Tap Assign to other bookshelves tap on the desired bookshelf
OK.
Display Shelf
1. In the My Library screen, tap on Bookshelf at the left above the
top row of media.
2. Tap on the bookshelf you want to display.
3. Tap on
Bookshelf, All to display all media again.
The top row of every bookshelf displays your last read media.
Rename or Delete Bookshelf
1. In the My Library screen, press Se ngs
Bookshelf.
2. Tap the desired bookshelf.
3. If renaming, tap Rename Bookshelf tap in the name fi eld and
make desired change tap Save.
4. If deleting, tap Delete Bookshelf Yes.
Favorites Bookshelf
You can tag media fi les as Favorites so they are included in the
Favorites bookshelf.
1. In the My Library screen, touch & hold on a media listing tap
Set as Favorite.
2. Tap on Bookshelf at the left above the top row of media tap
Favorites.
3. Just the media fi les you’ve tagged as Favorites are displayed.
4. To untag, touch & hold on the media listing tap Remove from
favorite.
5. Tap on Bookshelf All to display all media again.
Search for Media
1. In the My Library screen, tap to search for a specifi c media
fi le by title or author’s name.
2. Enter the string of text tap Go on keypad or at top of
screen.
3. Only the matching titles are displayed.
4. Tap on
Bookshelf All to display all titles again.
Select Display Layout
Tap to display eBooks in List layout, which shows the title, author
and date added to the device.
Tap to display eBooks in Cover layout.
Delete Media from My Library
Touch & hold on a media listing tap Delete Book Yes to confi rm
deletion.
If you delete a Barnes & Noble media fi le, it is only deleted from
the device and can be re-downloaded from your Barnes & Noble
account at any later time.

READER
The Reader displays your eBooks (EPUB or PDF).
If the media fi le is an Adobe DRM-protected fi le that was copied
into the device by a method other than an Adobe Digital Editions
(ADE) transfer, you are prompted to load it into the device using
ADE.
If you attempt to open DRM-protected fi les copied into the device
that were purchased under a different Barnes & Noble account
than the one currently logged in, or you are not logged in, you are
prompted for the name and Credit Card number that was used to
purchase the media.
If downloaded books have separate cover fi les, they are
downloaded along with the book. For books that don’t have
separate cover fi les, covers are extracted from the book fi le.
Some sections of Magazines and Newspapers contain linked
topic headings; tap on a topic heading to jump to the associated
article.
When viewing the Pandigital SuperNova User Guide, depending
on the font size you are using, you may experience random
graphics that overlap text. Simply switch to a different font size to
eliminate the overlapping.
1. Tap the Barnes & Noble application icon.
2. In My Library, tap on a media listing to open it in the Reader.

Finger-slide or tap on either side of the screen within 200 pixels to
turn pages. You can also press or to turn pages.
You can touch & slide the dot on the progress bar at the bottom of
the screen to jump to other pages.
Reader Function Menu
With a book open in the Reader, the Reader Function Menu is
displayed at the top of the screen.
Return to My Library
Tap to return to the My Library screen while viewing any eBook
page.
Screen Brightness
Tap to display the brightness control. Tap anywhere on the bar
to change the setting, or tap & hold on the slide button and slide to
desired position.
Tap to close the brightness control.
Screen Orientation Lock
For optimal viewing while reading, the orientation of the screen
automatically rotates from vertical to horizontal depending on how you
hold the device.
When desired, you can lock the screen in the desired orientation to
prevent the auto-rotation while reading.
To lock, while viewing a page, tap .
To unlock, tap .
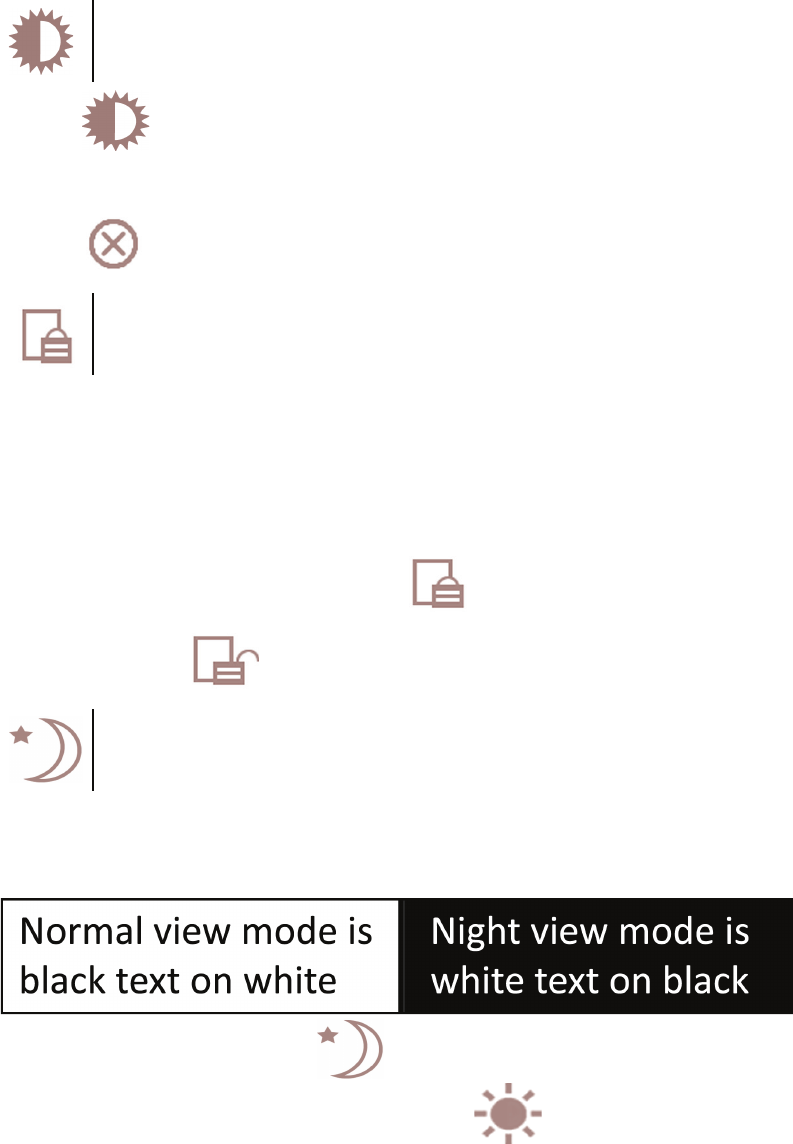
Night Mode
Night Mode switches the background to black with white text, allowing
you to view media without emitting as much light as the normal view
mode.
While viewing a page, tap .
To switch back to normal view mode, tap .
Table of Contents
Display the Table of Contents of the currently open eBook, allowing
you to quickly jump to a desired chapter.
1. While viewing a media page, tap .
2. The Table of Contents is displayed; tap on a chapter to jump to it.
Font Size
For optimal viewing, you can adjust the size of the onscreen text by
changing the Font Size.
1. While viewing a page, tap select desired font size.
2. Tap ‘X’ to close the options box.
Search
You can search the eBook fi le for a string of text.
1. While viewing a media page, tap .
2. Enter the string of text you want to fi nd tap .
3. The matching text is highlighted throughout the fi le. Use the arrows
to jump to next/previous match.
4. Tap to close the search mode.
Bookmark Page
You can bookmark pages so you can quickly return to those pages
later.
1. While viewing a media page, tap . A bookmark icon is
added on the page indicating the page has been bookmarked.
2. To display the list of all bookmarks in the eBook, tap
Bookmarks.
3. Tap on a bookmark to go to the page.
Delete Bookmarks
On the bookmarked page, simply tap
Or
Tap tap Bookmarks tap next to the bookmark(s)
you want to delete.
Highlight Text
As you read your media, you may want to highlight points of interest for
later reference.
1. Select single word: touch & hold on the desired word tap
Select multiple words: touch & hold on the beginning word. After
options appear, single tap briefl y on the last word tap .
2. Tap to close the options box without highlighting text.
3. To display the list of all highlights in the media fi le, tap
Highlights.
4. Tap on a highlight listing to jump to that page.
Delete Highlights
On the page containing highlighted text, touch & hold on the
highlighted text tap Edit Exis ng Highlight tap Delete.
Or
Tap tap Highlights tap next to the highlight(s) you
want to delete.
Add Note
As you read your media, you may want to add notes for later reference.
1. Select single word: touch & hold on the desired word tap
. Select multiple words: touch & hold on the beginning word. After
options appear, single tap briefl y on the last word tap .
2. Tap in the Add Note dialog box enter your note tap Save.
3. To display the list of all notes in the media fi le, tap
Notes.
4. Tap on a note listing to jump to that page.
Edit/Delete Notes
On the page containing a note, touch & hold on the highlighted word(s)
tap Edit Exis ng Note edit the note or tap Delete as desired.
If you want to perform a different operation within the highlighted
section of text, touch & hold on the desired word tap Start New
Selec on tap desired function icon (i.e., highlight text, add note,
etc.).
Dictionary
As you read your media, you can quickly look words up in the built-in
dictionary.
1. On a page, touch & hold on a word tap .
2. The dictionary launches with your selected word’s description listed
in the lower screen.
3. You can scroll the words listed above and below your selected
word, and simply tap to see the description.
4. Tap to close the dictionary and return to the Reader.
Web Search
As you read your media, you can quickly do a web search for a word or
string of text.
1. Select single word: touch & hold on the desired word tap
. Select multiple words: touch & hold on the beginning word. After
options appear, single tap briefl y on the last word tap .
2. The browser launches with the search results of your selected text.
Tap to close the options box without doing a web search.
Press to return to the Reader.
Adobe Digital Editions
eBooks and other digital content can be transferred to the device
through the Adobe Digital Editions (ADE) program. You can also use
ADE to transfer books that you have downloaded from public Libraries
using global distributors (such as Overdrive.com).
If an Adobe eBook has an expiration date, it will also expire on
the device. If an eBook is returned in ADE before it expires, the
next time you connect the device to your computer, ADE updates
the status of the returned eBook on the device, and you won’t be
able to read it.
Register and Download Software
1. Register a free Adobe account, from the Adobe website: www.
adobe.com/cfusion/membership.
2. Go to www.adobe.com/products/digitaleditions to download Adobe
Digital Editions (ADE) software to your computer.
3. Follow the prompts to install the software.

Authorize the device with ADE
1. After registering and installing the ADE software, enter your Adobe
account login information to activate your computer with the
software.
2. The ADE program opens.
3. Connect the device to your computer using the USB cable.
4. ADE detects the device and displays the Device Setup Assistant.
5. Click
Authorize Device click Finished.
After you authorize the device, it appears as a device in ADE titled
PD_Universe.
Download eBooks into ADE
There are many resources for downloading free and purchased
eBooks into ADE, including borrowed eBooks from public libraries.
Adobe has a Sample eBook Library which is a good place to start
downloading eBooks to see how ADE works: www.adobe.com/
products/digitaleditions/library.
Click on the Download button on an eBook listing, and when prompted
to Open or Save, click Open.
The eBook automatically downloads and opens in the ADE program.
Transfer eBooks from ADE into the device
1. Drag and drop the eBooks from the ADE collection into the device
(PD_Universe).
2. Disconnect the USB cable.
3. The My Library refreshes and the ADE transferred eBooks are
displayed.
4. Tap on the eBook to open it.
Delete Adobe eBooks from the device
1. Launch the Adobe Digital Editions program on your computer.
2. Connect the device to your computer via USB cable.
3. Click on
PD_Universe to display the eBooks in the Library window.
4. Cursor over the eBook you want to delete, click the upper left
corner arrow to display the Item Op ons.
5. Click
Delete Item from the drop down list.
Bluetooth Feature
The Pandigital SuperNova device has built-in Bluetooth capability,
allowing you to wirelessly connect multiple types of Bluetooth devices
(i.e., headset, headphones, keyboard, mouse) without an external
adapter.
1. Tap the
Se ngs icon Wireless & networks.
2. Tap
Bluetooth to enable the connection.
3. Tap
Bluetooth Se ngs.
(Optional) Tap Device name to enter a new Pandigital SuperNova
device name as desired.
Tap Discoverable to allow your bluetooth device to fi nd your
Pandigital SuperNova device (within 120 seconds).
4. Tap
Scan for devices. Bluetooth devices within range of the device
are listed.
5. Tap on your Bluetooth device to pair it with your Pandigital
SuperNova device.
6. After a successful connection, use your Bluetooth device for
hearing the audio output or navigating the Pandigital SuperNova
device.
Browser
Use the web browser to ‘surf the web’ and visit your favorite websites.
The Browser feature requires a connection to a Wi-Fi network.
If you have not set up your Wi-Fi network, do so now using the
instructions in the “Wi-Fi Network Setup” section.
Downloaded fi les are saved to a \download folder on your SD
card.
Launch the Browser
There are three methods you can use to launch the web Browser:
A. On the Home screen, tap the Browser icon at the bottom of
the screen.
B. On the Home screen, tap the My Wi-Fi widget
g
C. On the Applications screen, tap the Browser application
icon.
Go to a Different Website
When the web browser is launched, it opens to the default Home
website (which you can change if desired). To go to a different website,
tap in the URL address entry fi eld at the top of the screen and enter the
desired website address tap Go.
As you enter the website address, matching websites appear
allowing you to simply tap on the correct listing when it appears
without entering the complete address.
Zoom Web Pages
Use the “Pinch-Screen zoom” method, double tap the screen, or use
the zoom buttons that appear when you touch
& slightly slide on the screen.
Browser Function Menu
In an open browser window, press to display the Browser
Function Menu.
New Window
You can have up to 8 browser windows open at a time.
In an open browser window, press New Window.
A new browser window opens to the default Home page.
Bookmarks
You can bookmark the currently displayed web page, access the list of
all bookmarks, and manage bookmarks.
Bookmark a Web Page
1. In an open browser window, tap in upper right corner or press
tap Bookmarks.
2. Tap Add.
3. If you want to rename the bookmark, tap in the Name fi eld and
enter the desired name.
4. Tap
OK.
Go to Bookmarked Web Page
1. In an open browser window, tap in upper right corner or press
tap Bookmarks.
2. In the Bookmarks window, tap on the desired web page. The
browser displays the selected web page.
Manage Bookmarks
1. In an open browser window, tap in upper right corner or press
tap Bookmarks.
2. In the Bookmarks window, touch & hold on a bookmark to display
a Bookmark options menu.
Open Bookmarked page
1. To open web page in same browser window, tap Open.
2. To open web page in new browser window, tap Open in new
window.
Edit Bookmark
Tap Edit bookmark make desired edits to the Name and Location
address OK.
Add Shortcut to Home Screen
Tap Add shortcut to Home to quickly add a shortcut to the bookmarked
web page onto the Home screen.
Share Link
Tap Share link to email a bookmarked web page’s URL address to
someone. The email Compose window immediately opens with the
URL already listed in the body of the message.
Copy & Paste URL
Tap Copy link URL to copy the bookmarked web page’s URL so you
can paste it into a different application’s entry fi eld. To paste, touch &
hold in the entry fi eld to display a pop-up menu tap Paste.
Delete Bookmark
1. Tap Delete bookmark.
2. Tap
OK to confi rm deletion.
Set as homepage
Tap Set as homepage to set as the new default home page.
Windows
Up to the last 8 websites you have visited are cached and shown in the
Windows screen allowing you to quickly return to them.
New Window
1. In an open browser window, press tap Windows
New window.
2. A new browser window opens to the default home page.
Switch Windows
1. In an open browser window, press tap Windows.
2. Tap on the web site that you want to open.
Close Windows
1. In an open browser window, press tap Windows.
2. Tap on each window that you want to close.
When you’re in the Browser application, at least one window must
be open, so if you close all windows, a new window automatically
opens to your designated home web page.
Refresh
After a web page has completely loaded, you can reload it by pressing
tap
g
Refresh.
If you want to stop the reload, press tap Stop.
More
Tap More to access the following options.
Add Bookmark
1. In the More menu, tap Add bookmark.
2. If you want to rename the bookmark, tap in the Name fi eld and
enter the desired name.
3. Tap
OK.
Find on Page
You can search for a string of text within the currently displayed web
page.
1. In the More menu, tap Find on page.
2. Enter the desired string of text in the entry fi eld (word, phrase, etc.).
All matching text is highlighted as you enter the text.
3. If you want to scroll through the matches, tap .
4. Tap to close the entry box and resume normal viewing.
Select Text
You can select the text of a webpage address on the web page you’re
viewing, and then you can paste the text into web or other application
entry fi elds.
1. In the More menu, tap Select Text.
2. Touch, hold & slide your fi nger across the text you want to copy.
The text is copied to the clipboard.
3. Open an application with entry fi elds (i.e., email message), touch
& hold in the desired entry fi eld tap Paste from the pop-up Edit
text window.
Page Info
1. In the More menu, tap Page info.
2. The web page title and URL address is displayed.
3. Tap
OK to close.
Downloads
As you download fi les from websites, the download history is recorded
in the device. You can cancel downloads or clear the history through
this feature.
1. In the More menu, tap Downloads.
2. Press .
3. Tap
Cancel all downloads if you want to stop all pending downloads
from downloading
4. To remove a download, touch & hold on a download tap Delete
OK to confi rm deletion.
Settings
Finger-slide vertically to view all browser setting options.
You can set browser settings to enhance your Internet browsing.
In the More menu, tap Se ngs to display the following options:
Calculator