Inventec Appliances R8 PANDIGITAL SUPERNOVA User Manual R80B400 SuperNova User Guide
Inventec Appliances Corp. PANDIGITAL SUPERNOVA R80B400 SuperNova User Guide
Contents
- 1. Users Manual 1
- 2. Users Manual 2
Users Manual 2
Tap the Calculator application icon to use for basic math
equations (+ - x ÷).
To switch between the Advanced panel and Basic panel, press
Advanced panel or Basic panel.
Calendar
The Calendar application requires you to have an Exchange
email account set up in the device. Once set up, the device syncs
with your Exchange account and automatically populates the
calendar.
1. Tap the Calendar application icon.
2. If you have not yet set up an Exchange email account, you are
prompted to do so now.
3. After you set up the account, the calendar screen is displayed in
full month view.
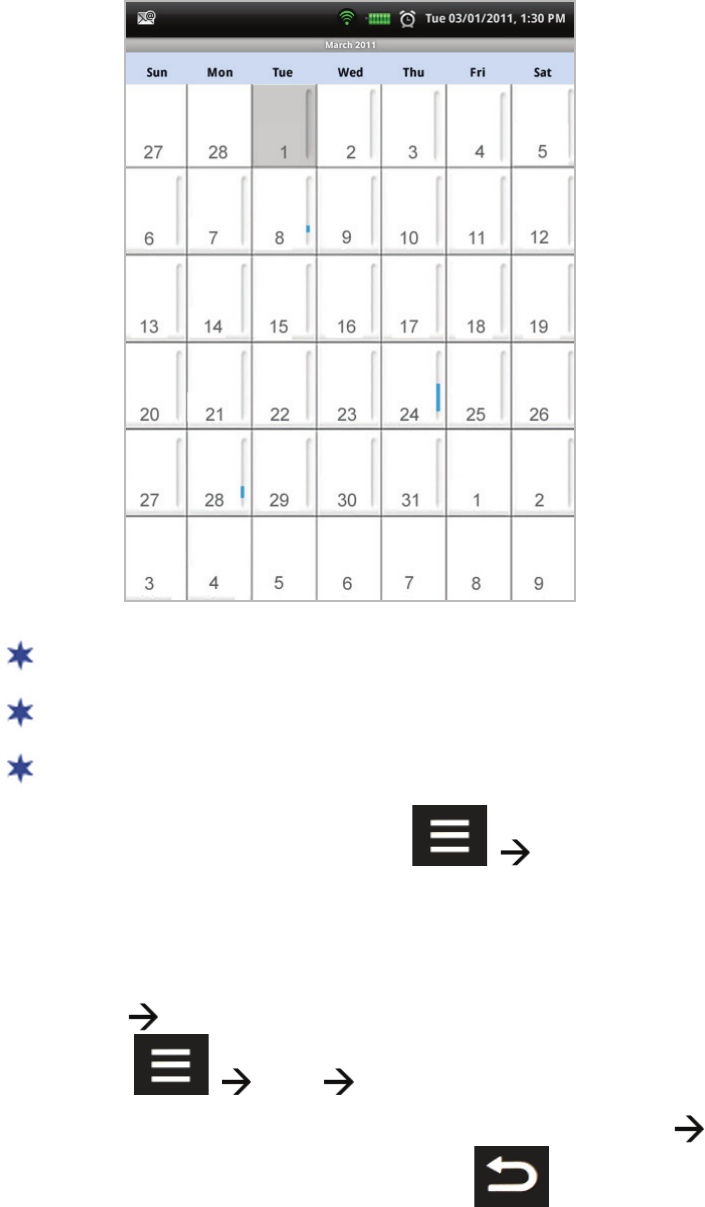
The shaded date is current date.
Finger-slide vertically from top or bottom to display other months.
Colored tabs indicate scheduled events.
To change to a different view, press the select desired view
(Day, Week, Today).
Add Event
1. On the Calendar screen, touch & hold on the date you want to add
an event tap New Event.
Or, press More New Event.
2. Tap in each entry fi eld to enter the desired event information tap
Done. (if Done button is not visible, press )
3. Press to return to the Home screen.
Edit Event
1. On the Calendar screen, touch & hold on the date an event tap
Show Agenda.
2. Tap on the event you want to change press Edit
event.
3. Make desired changes tap Done (if Done button is not visible,
press ).
4. Press Day, Week, Month or Today to display the desired
calendar screen.
5. Press to return to the Home screen.
Event Reminder Alerts
A pop-up alert appears before the event by the number of minutes you
selected.
Tap Snooze if you want to be reminded again in 5 minutes, or tap
Dismiss to cancel the alert.
Delete Events
1. On the Calendar screen, press Agenda.
2. Tap on the event you want to delete Delete event.
3. Tap
OK to confi rm delete.
4. Press Day, Week, Month or Today to display the desired
calendar screen.
5. Press to return to the Home screen.
Camera
The device includes two built-in cameras, one in front and one in back
of the device.
When you use the camera, the photos and videos are stored in folders
titled \Photos and \Video. The camera functions allow you to view the
camera taken photos/videos separate from other photos you’ve stored
on the device.
Tap the Camera application icon to turn the camera on.
Make sure the camera mode is selected.
Photo Function Settings
Settings
Select Camera
With the camera on, tap the icon select the front or
back camera (default = back).
White Balance Setting
With the camera on, tap the AW icon. Select the desired setting.
(default = Auto). The screen changes to show the results of your
choice.
Exposure, Picture size & Quality
With the camera on, tap the Se ngs icon.
Exposure Select the desired exposure setting (default = 0).
Picture size Select the desired number of pixels (default = 3M
Pixels).
Picture quality Select the desired picture quality (default =
Super fi ne).
Take Photos
1. With the camera on, set the camera settings as desired (see Photo
Function Settings).
2. Position the device to focus on your subject(s) as desired tap
to capture the image.
Preview New Photo
To preview the new photo you took with the device camera
immediately, tap on the thumbnail in the corner of the screen.
The photo opens full screen with zoom buttons at the bottom of the
screen. After the buttons fade away, tap the screen to redisplay them.
View all Photos
Photos taken with the device camera are stored in the internal storage
or your SD card in a \Photos folder.
1. Tap the
Gallery application icon.
2. Select the
Photos photo collection.
3. Tap on a photo to view it full screen.
4. Options at the bottom of the screen are displayed for 4 seconds.
Tap the screen to redisplay the options:
Slideshow Play a slideshow of all photos in the folder.
Menu>Share Allows you to send the photo via email.
Menu>Delete Delete the photo.
Menu>More
Details photo title, type, date/time taken, album (folder).
Set as wallpaper crop as desired and set photo as your
wallpaper.
Crop crop as desired and resave.
Rotate Left rotate the photo 90 degrees left.
Rotate Right rotate the photo 90 degrees right.
Video Function Settings
Settings
Select Camera
With the camera in video mode, tap the icon select the
front or back camera (default = back).
White Balance Setting
With the camera in Video mode, tap the AW icon.
Select the desired setting (default = Auto). The screen changes
to show the results of your choice.
Video Quality
With the camera in Video mode, tap the High icon.
Select the desired setting (default = High). The screen changes
to show the results of your choice.
Color Effect and Camera Settings
With the camera in Video mode, tap the Se ngs icon on
the side of the screen.
Color effect Select the desired color effect (default = None).
Camera settings Restore all settings to factory defaults.
Record Videos
1. Tap the Camera application icon.
2. Slide the button from camera to video .
3. Position the device to focus as desired tap to begin
recording your video.
4. To stop the video, tap . The video is stored in a \Video
folder.
5. To view your video immediately, tap on the thumbnail in the corner
of the screen.
6. To display the playing controls, while the video is playing, tap on
the screen.
View all Videos
Videos taken with the device camera are stored in a \Video folder.
1. Tap the
Gallery application icon.
2. Select the Videos collection.
3. Tap on a video to play it.
4. Select the desired video player, ES Video Player or Movies.
Clock
You can use the device as a desk clock and as an alarm clock with the
capability to set multiple alarms.
This clock icon displayed at the top of screens indicates
that one or more alarms have been set and are active.
It is recommended to connect the device to the AC adapter when
you intend to use the alarm feature.
1. Tap the Clock application icon.
2. To put the screen into a screen saver mode, tap the icon in
the upper right corner. The screen will dim and then fade in and
out to protect the screen from burn in. To take out of screen saver
mode, tap the icon again.
Alarm Settings
1. Tap the Clock application icon.
2. Tap
Alarms.
3. Press Se ngs to set the following options:
Alarm in silent mode When selected, the alarm alert plays even
if the device is in silent mode.
Alarm volume Set the volume for your alarm alert.
Snooze duration Set the number of minutes to wait after tapping
snooze before alert plays again.
Volume and Camera Set how the volume & camera buttons
respond when pressed during an alarm alert.
Add Alarm
1. Tap the Clock application icon.
2. If in Clock mode, tap Add Alarm.
Or
If already in Alarm mode, tap Add Alarm.
3. Tap the
+ - and AM/PM to set the desired time.
4. Tap
Set.
5. Tap Repeat if you want the alarm to repeat on specifi c days tap
on each desired day OK.
If you don’t select a repeat, the alarm is automatically deleted after
it is activated.
6. Tap
Ringtone to select the desired alarm alert sound tap OK.
7. Tap
Label to add a title for your alarm tap into the label entry
fi eld enter the desired title (i.e., lunch with friend, meeting, etc.)
tap OK.
8. Tap
Done.
9. Press to return to the Alarms screen, or to return to
the Home screen.
Shut Off Alarm Alert
When a scheduled alarm is activated, a pop-up window with the alarm
title appears.
Tap Dismiss to cancel the alert.
Tap Snooze if you want to be reminded again in the number of minutes
set for the Snooze duration (default = 10 minutes).
De-Activate Alarms
On alarms that you have set to repeat, you can temporarily de-activate
the alarms rather than delete them.
1. In the Alarms screen, tap .
2. Active alarms are indicated by the green bar under the clock icon.
Tap on an active alarm that you want to de-activate.
3. Tap on
Turn alarm on. When de-activated, the changes to
.
Edit Alarm
1. Tap the Clock application icon.
2. In the Alarms screen, tap .
3. Tap on the alarm you want to edit make desired edits.
4. Tap
Done.
Delete Alarm
1. Tap the Clock application icon.
2. In the Alarms screen, tap .
3. Touch & hold on the alarm you want to delete tap Delete Alarm.
4. Tap
OK to confi rm deletion.
View Photos or Play Music
You can view a photo slideshow or play music without exiting the
Clock app by simply tapping the photo or music icon at the bottom of
the screen.
To return to the Clock, press .
CONTACTS
You can create an address book of your personal contacts, including
personal notes as desired.
Add New Contacts
1. Tap the Contacts application icon.
2. Tap New Contact.
3. Tap in the entry fi elds to enter the contact’s information.
Finger-slide vertically to access all entry options.
4. If available, tap at the right of options to reveal additional
choices.
5. Tap on the option name to reveal choices.
6. Tap in the option entry fi elds to enter the contact’s information.
7. Tap
Done.
Import/Export Contacts
You can import contacts from or export to a SD card.
The fi le format must be vCard.
1. Tap the Contacts application icon.
2. Tap Import/Export.
3. Select
Import or Export as desired.
4. If importing, and multiple vCard fi les exist on the SD card, you’re
prompted to import all or select desired fi le.
Add Contact to Favorites
1. In the Contacts screen, tap on the desired contact name.
2. Tap in the upper right corner.
3. Tap to return to the Contacts screen.
4. Tap Favorites to view list of favorite contacts.
Edit Contacts
1. In the Contacts screen, tap on the desired contact name that you
want to edit.
2. Tap Edit contact.
3. Make desired changes tap Done.
Email Contacts
You must have a default email account set up before using this
feature. If you have not yet set up your account, do so now using
the “Add Email Accounts” section.
1. In the Contacts screen, tap on the contact that you want to email.
2. Touch & hold on the contact Send email.
3. Tap in the Subject and Compose Mail fi elds to enter your message.
4. (optional) If you want to add Cc or Bcc recipients, tap
Add Cc/Bcc enter the recipient’s email address.
5. Tap
Send.
Delete Contacts
1. In the Contacts screen, touch & hold on the contact tap Delete
contact.
Or
In the Contacts screen, tap on the contact you want to delete
tap tap Delete contact.
2. Tap
OK to confi rm the deletion.
Dictionary
The built-in dictionary allows you to quickly and conveniently look up
the defi nition of words, either within the media you are viewing or any
other words.
1. Tap the
Dic onary application icon.
2. Tap in the word entry fi eld. As you begin to enter text, matching
words appear.
3. Tap the desired word from the matching word list; the defi nition
appears and the keyboard disappears.
4. Tap
New Search to clear the entry fi eld and display the keyboard
again.
Downloads
As you download fi les from websites, the download history is recorded
in the device. You can cancel downloads or clear the history through
this feature.
1. Tap the
Downloads application icon.
1. The downloads are listed by most current at top. To resort by size,
press Sort by size.
2. Tap on a download to open it. You may need to select the desired
application to use for opening the fi le.
3. To delete downloads, tap next to the listing(s) to select
those you want to delete tap Delete.
Email
POP3, SMTP, IMAP and EXCHANGE accounts are supported.
While viewing your email, you can turn the device to rotate the
orientation of the screen.
Set up Email Account
You can enter one or more personal email addresses that you would
like to access through the device.
Set up First Account
1. Tap the Email application icon.
2. Tap in the Email address entry fi eld enter your email address.
3. Tap in the Password entry fi eld enter your email password.
4. (optional) Manual Setup: The server settings are automatically
populated based on your email account provider (i.e., gmail.
com, etc.). However, if you need to change the server settings tap
Manual Setup and make necessary changes.
5. Tap
Next. The device attempts to connect to the Email servers. If
unsuccessful, you are advised to check your entries and try again.
If successful, you are prompted to enter a name for the account
(optional).
6. Enter the
Name for outgoing messages tap Done.
Set up Additional Accounts
1. Tap the Email application icon.
2. With the Inbox screen displayed, press tap Accounts.

3. Press tap Add account.
4. Follow the steps 2-6 above.
During setup, if you are unable to connect to a free email
account, check with your email provider to make sure their servers
support free accounts on Post Offi ce Protocol (POP) or Simple Mail
Transfer Protocol (SMTP).
Set up Yahoo! Plus Account
The device does not support free Yahoo email accounts. Yahoo! Plus
accounts must use the following data when setting up your email
account.
• Incoming Mail Server Settings
• POP server: plus.pop.mail.yahoo.com
• Use SSL
• Port: 995
• Outgoing Mail Server Settings
• SMTP server: plus.smtp.mail.yahoo.com
• Use SSL
• Port: 465
• Use Authentication
• Account Name/Login Name: Your Yahoo! Mail ID (your email
address without the “@yahoo.com”, for example “testing80”)
• Email Address: Your Yahoo! Mail address (for example, testing80@
yahoo.com)
• Password: Your Yahoo! Mail password
Set up Juno Platinum or Turbo Account
The device does not support free Juno email accounts. Platinum or
Turbo Juno accounts must use the following data when setting up your
email account.
• Incoming Mail Server Settings
• POP server: pop.juno.comnovel
• Outgoing Mail Server Settings
• SMTP server: authsmtp.juno.com
Email Inbox
1. Tap the Email application icon.
2. If you set up only one email account, it opens immediately to the
account Inbox. If you set up multiple accounts, they are listed in the
Accounts screen.
3. Tap on the desired email account to open the Inbox.
4. To refresh the inbox, press tap Refresh.
Open Email Message
1. With the Inbox screen displayed, tap on an email message to open
it.
2. For attachments, tap Open to open the attachment, or tap Save to
save the attachment to the device.
3. To reply, tap Reply or Reply all.
a) Tap in the Compose Mail entry fi eld to enter your reply message.
b) Tap Send to send immediately, Save as dra to save without
sending, or Discard to discard without saving or sending.
4. To delete the email immediately, tap Delete.
Compose New Email Message
1. On the Inbox screen, press Compose.
2. Tap in the To entry fi eld and then enter the recipient’s email
address.
3. (optional) If you want to add Cc or Bcc recipients, press
Add Cc/Bcc enter the recipient’s email address.
4. Tap in the Subject entry fi eld to enter your desired subject title.
5. Tap in the Compose Mail area to enter your personal message.
6. If desired, attach a fi le by pressing Add A achment
select fi le type OK select desired fi le.
7. Tap
Send when ready to send your email.
8. You can save your message without sending it by tapping Save as
Dra .
9. If you do not want to send or save the message, tap Discard.
Edit Email Account
1. Tap the Email application icon.
2. With the Inbox screen displayed, press Accounts.
3. Touch & hold on the account you want to edit tap Account
se ngs.
4. Set your desired preferences to customize your email account (i.e.,
email check frequency, select ringtone for notifi cations, etc.).
5. Tap to return to previous screens.
Delete Email Accounts
If you have multiple accounts, and you delete the account
designated as the default account, the next email listed is
automatically set as the default.
1. Tap the Email application icon.
2. With the Inbox screen displayed, press Accounts.
3. Touch & hold on the account you want to delete tap Remove
account.
4. Tap
OK to confi rm the deletion.
Set Default Email Account
You must always have one account designated as the default account,
so if you have multiple email accounts, you can select any one as the
default.
1. Tap the Email application icon.
2. With the Inbox screen displayed, press Accounts.
3. Touch & hold on the account you want to edit tap Account
se ngs.
4. Tap
Default Account to select it.
ES File Explorer
Use the ES File Explorer to view the fi les in the internal storage or on
your SD card, and to quickly & easily install AndroidTM applications on
the device.
There are many interesting and free Android applications that
can be found on the web. Just launch your web browser and do a
search for “Android applications”.
ES File Explorer is a third party application designed for phones.
References to phones and various features may not be applicable
to this device.
View the ES File Explorer User Manual
1. Tap the ES File Explorer application icon.
2. Tap to display the User Manual.
3. Press twice to return to the File Explorer screen.
Manage Media fi les
You can manage media fi les (i.e., eBooks, photos, music or videos)
that are stored in the device’s internal storage or on a SD card.
1. Tap the
ES File Explorer application icon.
2. To view contents of the internal storage, make sure the is
displayed in upper left corner and tap PD_Universe folder.
To view contents of a SD card, tap on which changes to
.
3. Tap on a folder to view contents.
4. Tap on a fi le to launch the applicable application.
5. Touch & hold on a folder or fi le to launch option menus:
Paste
Paste copied folder/fi le (appears only after selecting “Copy”
function).
Open As
Open fi le as Text / Audio / Video / Image.
Cut
Cuts item and places on clipboard so you can paste it elsewhere.
Copy
Copy selected item so you can paste it elsewhere
Rename
Rename selected item.
Delete
Delete selected item.
Select All
Selects all listed items.

Shortcut
Add shortcut on Home screen to selected item.
Bookmark
Add shortcut or bookmark on Home screen to selected item
Compress
Create Zip fi le for the selected item.
Send
Email item to desired email address.
Set As Home
Sets selected folder as the default location when launching
application (appears only when a folder is selected).
Properties
Lists properties of items.
ES Function Menu
While in an ES File Explorer screen, press to display the
following functions:
Opera ons
Paste
Paste copied folder/fi le.
Open As
Open 1st listed fi le as Text / Audio / Video / Image
Cut
Cuts item and places on clipboard so you can paste elsewhere
Copy
Copy 1st listed item.
Rename
Rename 1st listed item.
Delete
Delete 1st listed item.
Select All
Selects all listed items.
Send

Email 1st listed item to desired email address
Proper es
Lists properties of items.
New
File
Add new text fi le in current folder.
a) Tap on fi le, open as Text.
b) Select ES Edit note.
c) Tap in fi le body to enter text.
d) Press .
e) Tap Save.
Folder
Add new empty folder into which you can copy or add fi les.
Search
Search all Video/Audio fi les, all Image fi les, runnable apps, and
.zip fi les. Tap Search any fi le by Name to specify a name and
search through all fi le types.
Manager
Task Manager
Use to manually stop (kill) applications.
App Manager
Lists applications on device.
Tap on an application to launch it.
Press for application function options.
Security Manager
Used to set application protection and a backup feature. (You
must install the Security Manager module.)
Bookmark Manager
Used to manage the bookmarks of fi les on the SD card, network
and Internet browser. (You must install the Bookmark Manager
module.)
SD Card Analyst
Analyzes storage usage on SD card.
Show/Hide Tabs
Shows Local/LAN/FTP tabs across top of screen (unless removed
in Settings>Layout Settings).
Se ngs
Theme Se ngs
Choose a theme or color for your UI & background.
Layout Se ngs
Hide/show some UI components (i.e.,non-applicable LAN, FTP).
File Se ngs
Hide fi les, Thumbview (use thumbnail as image icons), SD
capacity.
View
Choose desired view of items as Icons, List, or list with Details
(date & attributes)
Size
Select desired size of item icons.
Sort By
Name, Type, Size, Modifi ed, Random> Ascending/Descending.
Home Directory
Set desired default Home directory which displays when ES File
Explorer is launched.
App Backup Directory
Set desired default Backup directory for backed up apps.
Bluetooth op ons
N/A for this device.
Root op ons
N/A for this device.
More
Display the following options:
Refresh
Refreshes the screen.
Flip orienta on
Flips between Landscape/Portrait orientations.
Bookmark
N/A for this device.

Help Center
Tap Help to view the complete ES File Explorer User Manual.
About us
ES File Explorer version, EStrong’s website & Copyright notice.
Exit
Closes ES File Explorer application.
Install AndroidTM Applications using ES File Explorer
There are many interesting and free Android applications that
can be found on the web. Just launch your web browser and do a
search for “Android applications”.
Purchased or free AndroidTM applications that you have downloaded to
your computer can be installed quickly & easily on the device using the
ES File Explorer application.
1. Copy the .apk fi les that you want to install into the device (via USB
connection) or onto a SD card.
2. Tap the ES File Explorer application icon.
3. Locate the folder in the device or on your SD card in which the .apk
application fi les were saved.
4. Tap on the .apk fi le Install. The application is installed and the
application icon is added to the Applications screen.
5. Tap
Open to launch now, or Done to return to the previous screen.
Download AndroidTM Applications direct from a Website
There are many interesting and free Android applications that
can be found on the web. Just launch your web browser and do a
search for “Android applications”.
You can download AndroidTM applications directly from websites, and
then quickly and easily install them on the device.
1. Tap the
Browser application icon to launch the internet
browser.
2. Enter the desired website URL, and tap the download link for the
application you want to install on the device.
3. After the download is complete, touch & hold on the download fi le
(in the Download history screen) tap Open Install.
Uninstall AndroidTM Applications
You can also quickly and easily uninstall the AndroidTM applications that
you have installed.
1. Press Se ngs Applica ons Manage
applica ons.
2. Tap the application you want to uninstall Uninstall.
3. Tap
OK to confi rm the uninstall.
Import (copy) fi les from SD card into Internal Storage
1. Tap the ES File Explorer application icon.
2. To view contents of a SD card, tap .
3. Tap on a folder touch & hold on the fi le you want to import
tap Copy. The copied fi le is added to the “clipboard” signifi ed by the
at the bottom of the screen.
4. Tap to display internal storage tap PD_Universe.
If the root of the internal storage is not displayed, tap and
then again.
5. Tap on the folder into which you want to copy the fi le.
To create a new folder, press New Folder
enter the folder name tap OK.
6. Tap touch & hold on the fi le you want to import
tap Paste.
Facebook
The available features and functions are limited compared to
those available through the standard website accessed through
your computer browser.
1. Tap the Facebook application icon. The browser launches
and displays the Facebook login page.
2. The fi rst time, tap in the email address and password entry fi elds to
enter your login information tap Login.
3. Once logged in, posts on your wall are displayed. Finger-slide
vertically to view more posts.
4. Press to return to the Home screen.
FW Update
Use the FW Update application to easily check for fi rmware updates,
and update the fi rmware on the device if necessary.
Before you perform a fi rmware update, make sure the device is
fully charged or connected to the AC adaptor.
You can download the fi rmware update fi le to the internal storage
or to your SD card. The fi le is approximately 160MB, so be sure

you have enough space before beginning the download.
1. Tap the FW Update application icon.
2. Depending on the status of the device, one of the following
messages appears. Complete the applicable action:
Message: No Wi-Fi Connection. No Wi-Fi detected. Please
check connection.
Action: Tap Exit.
Tap the Se ngs application icon
Wireless & networks. Make sure Wi-Fi is on and
connect to a local Wi-Fi network.
Message: Serial number auto-detect failed. Please enter the
Serial Number of your device.
Action: Tap Cancel.
Tap the Se ngs application icon
About Device.
Locate and make a note of the Serial number .
Relaunch the FW Update application and enter the
number in the space provided tap Next.
Message: Your current fi rmware is the most updated version.
Action: No action is necessary. Tap Exit.
Message: A new Firmware is available for your device. Tap
Next button to download to your device.
Action: Tap Next to begin the download.
3. If you tapped Next to begin the download, the Download Update
window displays the device information and a download progress
bar as the fi rmware fi le is downloaded to the internal storage or
your SD card.
4. Wait while the fi le is downloaded; this may take up to 30 minutes
to fi nish.

IMPORTANT: If the download begins but doesn’t progress past 0%
in 5 minutes, there may be a problem with the Pandigital server.
Please contact customer support through the website: www.
pandigital.net/support.
5. If the download fails, tap Retry.
If the download was successful, tap Next to begin the update
process. The device automatically restarts, begins the fi rmware
update process, and when complete the device restarts again.
6. If you tapped Exit in step 4, follow these steps to manually start the
update process at any other time:
a) Turn the device off.
b) IF applicable, insert the SD card onto which you downloaded the
fi rmware.
c) Press the Volume + key and power bu on simultaneously for 3
seconds.
d) Release both buttons to start the fi rmware update process.
e) When complete the device automatically restarts.
Revert back to Previous Firmware Version
When you perform a fi rmware update, the update fi le is saved to the
internal storage or your SD card. If you perform another fi rmware
update, the existing update fi le will be moved into an \old fi rmware
folder before the new update fi le is downloaded.
After performing the new fi rmware update, if desired at a later time, you
can revert back to the previous version by following these steps:
1. Connect the device to your computer tap Turn on USB storage.
2. In a Windows Explorer or Mac Finders window, locate and delete
the fi rmware update fi le in the root of the internal storage or SD
card (i.e., IR80_[letters]_[most recent date].zip).
3. Move the previous fi rmware update fi le from the \old fi rmware
folder to the root of the internal storage or SD card (i.e., PR70_
[letters]_[older date].zip).
4. Turn the device off.
5. Press the
Volume + key and power bu on simultaneously for 3
seconds.
6. Release both buttons to start the fi rmware update process.
7. When complete the device automatically restarts.
Gallery
The Gallery is used for viewing both photos and videos.
To add photo and video fi les to the device, connect to your computer
(via USB connection) and copy the fi les into the device.
To Zoom in and out of a document, use the “Pinch-Screen zoom”
method or use the zoom buttons that
appear when you touch & slightly slide on the screen.
PHOTOS
Photo fi les can be displayed from the internal storage or from a SD
card.
Photo fi le formats supported: JPEG, BMP, PNG, and non-
animated GIF
Scroll through multiple pages of photos by fi nger sliding vertically
from top or bottom of screen.
1. Tap the Gallery application icon.
2. Tap on the Photo collection you want to open.
All collections are titled by the folder name containing the photo
fi les.
3. To view a single photo, tap on it.
4. To view a slideshow of all photos, tap on the screen tap
Slideshow.
To zoom the photo in/out, quickly tap twice on the photo. When
zoomed, fi nger-slide on the screen to view non-visible areas of the
photo.

Photo Function Menu
When a photo is displayed individually or during a slideshow, press
to display the Photo Function Menu.
Share
Email the displayed photo to someone.
Delete
Delete the displayed photo.
More
Display the following options:
Details
View photo fi le name, size, and resolution.
Set as
Set the displayed photo as a Contact icon or your Wallpaper.
Crop
Crop the photo as desired.
Rotate Le /Right
Rotate photo right or left; tap multiple times until desired
orientation is achieved. Rotated version is saved.
VIDEOS
Video fi les can be played from the internal storage or from a SD card.
Video fi le formats supported: MPEG4
Videos default to fi xed landscape (horizontal) viewing mode. The
orientation does not change if you turn the device.
Scroll through multiple pages of videos by fi nger sliding vertically
from top or bottom of screen.
1. Tap the Gallery icon.
2. Tap on the video collection you want to open.
The collections are titled by the folder name containing the video
fi les.
3. Tap on a video to play it.
4. Select the desired video player, ES Video Player or Movies.
5. While a video is playing, tap on the screen to display the video
control buttons:
Pause, Play, skip back or skip
forward in the video.
6. Tap to return to the Videos screen.
Delete Videos
1. Tap the Gallery icon.
2. Select desired video collection.
3. Touch & hold on the video you want to delete.
4. If desired, tap on additional videos.
5. Tap
Delete.
6. Tap
Confi rm Delete or Cancel.
HDMI Connection
You can connect the device to your TV via a “D” type microHDMI cable
(not included) allowing you to play videos on your device and watch
them on your TV screen.
The HDMI output is intended for displaying only videos.
Purchase a “D” type microHDMI to HDMI cable locally where
electronics are sold.
1. Tap the Se ngs icon Display.
2. Set
TV Mode and TV Resolu on based on your TV.
3. (Optional) If your TV supports the HDCP protocol, you can enable
this option to use the protocol.
4. Connect the “D” type microHDMI cable output port on the device
and to your TV’s HDMI port.
5. After a successful connection, the device screens are displayed on
your TV.
6. To navigate on the device screen:
a) Turn the device clockwise 90% (horizontal layout).
b) Finger-slide on the device screen to navigate to desired option
(may take more pressure than normally used).
c) To scroll the screen up or down, press and hold the Search
button as you fi nger-slide on the screen.
d) To select an option, single press the Search button
(similar to mouse click).
7. When fi nished, press and disconnect the cable.
InTouch
InTouch allows you to quickly and conveniently connect and view your
Facebook, Twitter, Gmail, and RSS news feed data all in one easy
place.
IMPORTANT: In order to successfully connect with your Facebook &
Twitter accounts, the date and time must be set correctly according to
your location. To set, refer to the Se ngs>Date & Time section.
1. Tap the
InTouch application icon.
2. A RSS news feed based on the News Preference you selected
during the initial device setup is displayed. If you want to change
your preference:
a) Press tap Accounts Select News.
b) Tap on the desired source for your news feed.
c) Tap Done.

3. To log into your Facebook, Twitter or Gmail account:
a) Press
y
tap Login for the desired account.
b) Tap in the entry fi elds and enter your login information.
c) Repeat for all desired accounts.
If you enter an incorrect Gmail account or password, a
“Network Connection Timeout” error message is displayed.
4. To post a message on your Facebook or Twitter account:
a) Tap the Whats New
y
y
y
y
y
y
y
y
y
y
icon.
b) Tap the drop down arrow next to the What’s on your mind
message fi eld.
c) Select from the following choices:
Facebook - With everyone OR Just friends
Twi er - Followers
All
The choice will be grayed out if you are not logged into your
account.
d) Tap in the message fi eld enter your message.
e) Tap Update.
5. To view your Email inbox and send an email:
a) Tap the Email icon. The Inbox is displayed.
b) Tap on a message to open it.
c) To reply, tap in the reply message area tap Send.
d) To send a message, tap the email Compose icon.
e) Tap in the entry fi elds to enter the recipient’s email address and
your message.
f) Tap Send.
6. To view your Updates Journal:
a) Tap the Journal icon.
b) Tap on a journal listing to see the details and add a comment if
desired.
c) To return to the Updates Journal screen, press .
Music
Music fi les can be played from the internal storage or from a SD
card. To save internal storage space for your reading media fi les,
you may want to keep your music fi les on a SD card.
Music fi le formats supported: MP3, WAV and AAC
Play Music
1. If applicable, insert your SD card containing your audio fi les.
2. Tap the Music application icon.
3. The Music screen displays all audio fi les found in available
storage.
4. Select the desired sort format by tapping the icons at the top of the
screen:
Artists Tap individual artist tap on an album to display album
songs tap on song to play it.
Albums Tap individual album to display songs on that album
tap on a song to play it.
Songs All audio fi les found in available storage. Tap on a song to
play it.
Playlists Lists all songs that you’ve added to a Playlist (see the
Playlist section).
5. To leave the music playing and return to previous screens, press
, or press to return to the Home screen.
6. To stop the music, tap the Pause icon.
Music Play Screen
When you select a song to play, the Music Play screen is displayed
with control buttons:
List view View currently selected song list. Tap on any song
to play it immediately.
Shuffl e Play songs in random order. When off, songs play in
the order listed in the Music Library.
Repeat Tap once to play all songs continuously until you
stop them, tap again to repeat a single song, and tap a third time to
turn the Repeat function off. When off, songs play through once and
then stop.
Previous Tap once to start current song over, tap twice to
play the previous song.
Pause/Stop Pause or stop song. Tap to play.
Next Play next song in song library.
Use the volume buttons on the side of the device to adjust the
volume.
Music Control Options
When the Music Play screen is displayed, press to display
music control options.
Library Return to the main Music screen.
Party Shuffl e Play songs in random order, until you turn Party
Shuffl e off.
Add to playlist Add the currently playing song to a playlist. Tap
Current playlist or New to add a new playlist.
Delete Permanently delete the currently playing song from the
storage source (internal or SD card).
Delete Music Files
You can delete music fi les using the following methods.
A. In the main Music Library screen, touch & hold on a listing tap
Delete. Depending on the sort option, you are prompted to confi rm
that you want to delete all songs by the selected artist, all songs on the
selected album, or just the selected song.
B. While playing an audio fi le, in the Music Play screen, press
to display music control options tap Delete. You are prompted
to confi rm the deletion.
Playlist s
You can create individual playlists of selected audio fi les from your
Music Library, allowing you to play a selected list at any time (i.e.,
your favorites, specifi c genre, specifi c artist, etc.).
Create New Playlist
1. In a Music Library screen, tap the desired sort option.
2. Touch & hold on the artist, album or song that you want to add to a
playlist.
3. Tap
Add to playlist New.
4. Tap in the Playlist name entry fi eld tap DEL on keypad to delete
the default “New playlist #” text enter the name you want (i.e.,
Love Songs, Instrumental, Easy Listening, etc.).
5. Tap Save.
The new playlist is added to the Playlist library.
Add Audio files to a Playlist
1. In a Music Library screen, tap the desired sort option.
2. Touch & hold on the artist, album or song that you want to add to
an existing playlist.
3. Tap
Add to Playlist.
4. Tap the name of an existing playlist.
You can also add the song that is playing in the Music Play screen by
pressing
g
Add to playlist.
Play songs in Playlist
1. In the Music Library screen, tap Playlists.
2. Tap on the desired playlist.
3. Tap on song title to play it.
Remove songs from Playlist
1. In a Playlist screen, touch & hold on a song you want to remove.
2. Tap
Remove from playlist.
Removing songs from a playlist does not delete them from the
main Music Library.
Rename or Delete a Playlist
1. Open the Playlists library.
2. Touch & hold on the playlist name tap Rename or Delete.
3. If renaming, tap in the Playlist name entry fi eld make desired
name change tap Save.
Deleting playlists does not delete songs from the main Music
Library.

Notes
The Notes application allows you to quickly and conveniently make
and keep short notes for yourself.
Two Operating Modes
You can use the keyboard for rich, editable text, or draw with your
fi nger to create pictures and sketches.
Each page allows both text and graphics to exist on each page.
But text and graphics remain independent so the text is always fully
editable and is layered below all of the graphics. The graphics are
layered above the text and its editing is independent of the text. For
example, you can draw and erase on top of text without affecting the
text.
Text Mode
In text mode, tap the screen to display the keyboard for entering the
text.
To change the inert point of your text, tap on the desired location.
When you are fi nished, tap Done to save and close the keyboard.
Edit Commands
Touch & hold on the screen to access a menu of text editing
commands and to access the clipboard for cutting and pasting.
Drawing Mode
In drawing mode, you have basic fi nger painting graphics, but useful to
jot down a quick phone number or address.
Tap the Brush icon at the bottom of the screen to select the
brush size and paint color.
Brush & Eraser
Use the Drawing mode to draw and the Eraser mode
to erase your graphics (does not erase text).
Undo & Redo
Graphics input is remembered as a series of strokes. Tap the Undo
to undo the most recent stroke(s) from the screen, and
press the Redo to redo the undos.
Pages
The Notes application is similar to a notepad or stack of pages. You
can add and delete pages as desired. The Add adds a new
page following the current and switches to that page.
In the bottom right corner of every page is a page index and counter
indicator. The fi rst number is the current page’s number, and the
second is the total number of pages.
Changing Pages
You can use the following methods for changing pages:
A. In Text mode, fi nger-slide the pages left or right to view pages one
at a time.
B. Press tap Page Select.
This displays a scrollable list of page titles from which you can select
the desired note to view.
Clear Note
Clears both text and graphics from the current page.
1. Press tap Clear.
2. Tap
OK to confi rm you want to clear the note.
Delete Note
1. Press tap Delete.
2. Tap
OK to confi rm you want to delete the note.
Share Note
You may share your note with others via email.
1. Press tap Share.
2. Tap in the entry fi elds to enter the email information.
3. Tap
Send.
Page Select
All notes are listed title. Simply tap on a title to jump to that note.
About
Displays the Notes copyright and version information.
Offi ceSuite Viewer
The Offi ceSuite viewer can be used to open and view fi les of the
following formats: DOC, DOCX, TXT, XLS, XLSX, CSV, PPT, PPTX,
PPS, PPSX and PDF
1. Tap the
Offi ceSuite application icon to open the File
Browser.
2. For fi les stored in the internal storage, tap Device PD_Universe.
For fi les stored on a SD card, tap Memory Card.
3. Tap on the folder containing the fi le(s) you want to open.
4. Tap on the data fi le you want to open. The appropriate viewer
launches and displays your data fi le.

File Browser Menu Options
On the Offi ceSuite Home screen, press to display menu
options.
Sort
Select the desired sort order
Name
Type
Size
Date modifi ed
Updates
Check for application updates.
The device must be connected to a Wi-Fi network in order to
use this function.
Help
Display the Offi ceSuite instructions.
The device must be connected to a Wi-Fi network in order to
use this function.
About
Display Offi ceSuite information, including version.
Rename Files
1. In the folder containing supported data fi les, touch & hold on a data
fi le.
2. Tap
Rename.
3. Tap in the fi le name entry fi eld enter the new name as desired.
4. Tap
OK.
Delete Files
1. In the folder containing supported data fi les, touch & hold on a data
fi le.
2. Tap
Delete OK to confi rm the deletion.
View File Properties
1. In the folder containing supported data fi les, touch & hold on a data
fi le.
2. Tap
Proper es.
3. The File properties window displays the fi le name, type, path, size
and date last modifi ed. Tap OK to close the window.
Word Document Viewer Menu Options
When you open a .doc, .docx or .txt data fi le, press to display
menu options and HELP fi le applicable to the Word Document
Viewer.
To Zoom in and out of a document, use the “Pinch-Screen zoom”
method or use the zoom buttons that
appear when you touch & slightly slide on the screen.
Find
Find string of text within the fi le.
Full screen
Hide top icons to display fi le in full screen.
To return to normal view, press tap Normal screen.
Word count
Display the word count in the open fi le.
Se ngs
Set text encoding.
Help
Display the Word Document Viewer instructions.
The device must be connected to a Wi-Fi network in order to
use this function.
About
Display Word Document Viewer information, including version.
Spreadsheet Viewer Menu Options

When you open a .xls, .xlsx or .csv data fi le, press to display
menu options and HELP fi le applicable to the Spreadsheet Viewer.
To Zoom in and out of a document, use the “Pinch-Screen zoom”
method or use the zoom buttons that
appear when you touch & slightly slide on the screen.
Sheets
When multiple sheets within a fi le, select sheet to view.
Charts
View charts when available in the fi le.
Go to...
Jump to specifi c cell.
Find
Find string of text within the fi le.
Full screen
Hide top icons to display fi le in full screen.
To return to normal view, press tap Normal screen.
More
View the following options:
Freeze
Freeze row, column or row & column.
Se ngs
Set CSV settings
Fit column
Fit text to column width
Help
Display the Spreadsheet Viewer instructions.
The device must be connected to a Wi-Fi network in order to
use this function.
About
Display Spreadsheet Viewer information, including version.
PowerPoint Presentations Viewer Menu Options
When you open a .ppt, .pps, .pptx, or .ppsx data fi le, press
to display menu options and HELP fi le applicable to the PowerPoint
Presentations Viewer.
To Zoom in and out of a document, use the “Pinch-Screen zoom”
method or use the zoom buttons that
appear when you touch & slightly slide on the screen.
Go to slide
Display thumbnails of slides to select desired slide.
Zoom
Select zoom percentage.
Full screen
Hide top icons to display fi le in full screen.
To return to normal view, press tap Normal screen.
Slide show
Play slideshow of fi le pages. To stop the slideshow, press
tap End slide show.
Outline view / Slide view
Select desired view layout, text or slide.
More
View the following options:
Find
Find string of text within the fi le.
Help
Display the PowerPoint Presentations Viewer instructions.
The device must be connected to a Wi-Fi network in order to
use this function.
About
Display PowerPoint Presentations Viewer information,
including version.
PDF Viewer Menu Options
When you open a .pdf data fi le, press to display menu options
and HELP fi le applicable to the PDF Viewer.
To Zoom in and out of a document, use the “Pinch-Screen zoom”
method or use the zoom buttons that
appear when you touch & slightly slide on the screen.
Go to page...
Jump to specifi c page number.
Zoom
Select zoom percentage.
Full screen
Hide top icons to display fi le in full screen.
To return to normal view, press tap Normal screen.
Help
Display the PDF Viewer instructions.
The device must be connected to a Wi-Fi network in order to
use this function.
About
Display PDF Viewer information, including version.
Upgrade to Offi ceSuite Pro Editor
The standard Offi ceSuite viewer application included with the device is
designed as a viewer only. The Offi ceSuite Pro version allows you to
create new documents and edit existing ones, as well as other features
the free viewer application does not offer.
Purchase Full Registered Version
1. Tap the Offi ceSuite application icon tap Offi ceSuite Pro
Upgrade.
2. The shopping cart is displayed with the upgrade purchase price

and an option to purchase the Download Protec on.
IMPORTANT: The Download Protection Service allows you
to have a secure copy of the application fi le of your purchased
software for 1 year. If you opt to not purchase the Download
Protection Service, be sure you backup the Offi ceSuite Pro
application .apk fi le to your computer or a SD card in case you ever
want to re-install it on the device.
3. When you’ve selected the desired options, tap Checkout.
4. The unique Device Identifi er number should automatically appear
in the Device Information screen; tap Next.
If the Device Identifi er is not fi lled in, get it from Se ngs About
Device Status Wi-Fi Mac address.
5. Enter your entire billing information tap Next Accept
Payment.
6. The order completed screen is displayed with the Activation Key
needed to unlock the software. (The activation key is also emailed
to you).
7. Tap on the Download link; the software .apk fi le is downloaded to
the device.
If you do not want to download now, you can download the apk
to your computer from the purchase confi rmation email which
contains the download link. Save the apk to a SD card or to the
root folder of the device and then install using the ES File Explorer
application.
8. In the download history screen, tap on the application Install.
9. Tap
Open Enter key enter the activation key number tap
OK.
10. The application is now a full-functioning registered version.
We recommend that you back up a copy of the Offi ceSuite Pro
application .apk fi le to your computer or on a SD card now.
Search
Tap the Search application icon to perform a web search.
1. Enter the desired search text.
2. Matching and suggested text appears as you enter characters;
simply tap the desired match to launch the browser to your
selection.
3. Press to return to the Search screen.
Settings
Set multiple functions that affect the normal usage of the device. You
can also set your personal preferences for some functions.
On the bottom of the Home screen, tap the icon.
Or
On the Applications screen, tap the Se ngs application icon.
Wireless & networks
See the “Wi-Fi Network Setup” section for instructions.
Sound
Silent mode
When selected, all sounds are silenced except media and
alarms (i.e., keyboard click, end of row ding, warning ding, etc.).
Volume
To adjust the Media, Alarm and Notifi cation volumes, tap &
slide the corresponding to desired volume
level tap OK.

No fi ca on ringtone
Select your desired notifi cation ringtone for event reminders,
email notifi cations, etc. from multiple choices. An example
sound clip plays after you select it.
Audible selec on
When selected, a sound is played when making screen
selections.
Screen lock sounds
When selected, a tone sounds when you lock and unlock the
screen.
Display
Brightness
Tap & slide to adjust the screen brightness as
desired tap OK.
Auto-rotate screen
When selected, the orientation of the screen automatically
switches between Portrait (vertical) and Landscape (horizontal)
when you rotate the device. When de-selected, the device stays
in the Portrait orientation.
Anima on
Select the desired window animations mode:
a) No animations
b) Some animations
c) All animations (default)
Screen meout
Adjust the delay before the screen automatically goes into sleep
mode (default = 10 minutes).
TV Mode
If connecting the device to your TV via HDMI cable (not
included), set the TV out mode:
HDMI (YCbCr) (default)
HDMI (RGB)
DVI
TV Resolu on
If connecting the device to your TV via HDMI cable (not
included), select the TV resolution based on your TV.
TV HDCP
If your TV supports the HDCP protocol, you can enable this

option and use the protocol.
Loca on and Security
Use wireless networks
When selected, your location will be visible to others in
applications (such as Maps).
Set up screen lock
You can set up a personal pattern, PIN or password which will
be required to unlock the device from sleep mode or power on.
Pa ern
a) Touch & slide your fi nger across at least 4 connecting dots to
set your desired pattern.
b) Repeat the pattern.
If you select the pattern lock, you can also set the Use visible
pa ern option. When selected, your swipe pattern shows from
dot to dot as you swipe.
PIN
a) Enter your desired PIN number tap Con nue.
b) Re-enter the PIN number tap OK.
If you select the PIN lock, you can also set the Visible
passwords option. When selected, your PIN numbers show as
you enter them.
Password
a) Enter your desired password tap Con nue.
b) Re-enter the password tap OK.
If you select the Password lock, you can also set the Visible
passwords option. When selected, your PIN numbers show as
you enter them.
Visible passwords
When selected, passwords show on screen as you enter them.
Applica ons
Unknown sources
When selected, you are permitted to install other AndroidTM
applications that you download from web sites, email
attachments, or other locations. Otherwise the Install blocked
message appears.
Manage applica ons

Manage and remove installed applications.
WARNING! Making changes to applications can result in errors
and failed launches. If you aren’t sure of what each setting is or
does, we recommend not making changes.
Downloaded
The applications you have copied or downloaded into the device
are listed. Tap on an application to install or uninstall it.
All
All applications and services are listed, whether currently
running or not. Tap on any listing for available functions, such as
Force stop, Uninstall, Clear data, Move to SD card, Move to MID
(device).
On SD card
All applications found on SD card are listed.
Running
The applications and services that are currently running are
listed. Tap on a listing to Force stop or Clear data.
Running services
View and control currently running services. When you close
an app, the service doesn’t automatically stop, so it’s still using
resources that you may want to free up. To stop a service, tap
on it tap Stop.
CAUTION: Before stopping a service, read the onscreen
information regarding the affects of stopping the service.
Storage use
View storage used by applications. Tap on an application to view
additional information and options.
Ba ery use
View what services are using the battery power.
Development
Set options for application development:
USB debugging When selected, the device will be in Debug
mode when you connect the device to your computer via USB.
Stay awake When selected, the screen does not go into sleep
mode while the battery is charging
Allow mock locations When selected, mock locations are
allowed.

Accounts & sync
Background data
When selected, applications are allowed to sync, send, and
receive data at any time.
Auto-sync
When selected, applications sync data automatically.
Privacy
Factory data reset
WARNING! When a Factory data reset is performed:
All Barnes & Noble account information is deleted.
All personalized data is deleted (email accounts, contacts, etc.).
All Books (except preloaded), Newspapers and Magazines are
removed.
We recommend that you back up all media to your computer
before resetting the defaults. If you don’t back up your Barnes &
Noble media, you can simply re-download the media after you
reset the device.
Tap Reset device Erase everything to proceed with reset.
Or
Press to cancel and return to previous screen.
When the factory reset is fi nished, the device automatically
restarts.
Wait for the Welcome screen to be displayed, and then follow
the setup wizard to complete the setup (refer to the Getting
Started>Initial Device Setup section for instructions).
SD card & device storage se ngs
View available internal and SD storage, format SD card, and
unmount SD card.
Total space and Available space
When a SD card is present, the total space and available space
is listed.
Mount / Unmount SD card
If no SD card is inserted, the option is Mount SD card.
If SD card is inserted, tap Unmount SD card to safely remove
the SD card. When safe to remove, the notifi cation message
appears at the top of the screen.

Format SD card
Tap to format and erase the contents of the SD card. Tap
Format SD card to proceed with the format, or press to
cancel and return to previous screen.
Internal device storage
Amount of internal storage available.
Internal memory
The total and available internal memory.
Language & keyboard
Select language
Select the desired language.
User dic onary
You can add words that may not be included in the default
dictionary to a personal dictionary.
Android keyboard
Set multiple settings to customize your keyboard behavior.
Voice input & output
Text-to-speech se ngs
This feature may be applicable to AndroidTM applications you
download. It is not applicable to the preloaded applications.
Accessibility
Not applicable to this device.
Date & me
Automa c
When selected, the date and time are automatically set
according to your location.
Set date
Available when Automatic is not selected.
Set the current date; use the + or – to set the current date and
then tap Set.
Select me zone
Select the correct time zone for your location. (Finger-slide
vertically to scroll the list.)
Set me
Available when Automatic is not selected.

Set the correct time for your location; use the + or – to set the
correct time according to your location and then tap Set.
Use 24-hour format
When selected, the time displays in 24-hour format instead of
12-hour.
12 = 12:00am-12:00pm (default)
24 = 12:00-24:00
Select date format
Tap to select the desired date format for displaying your date at
the top of the screen.
Normal (12/31/2011)
12/31/2011
31/12/2011
2011/12/31
About device
Status
Check the battery status & level, Wi-Fi MAC address, Bluetooth
address, and Up time (amount of time the device has been
powered on).
Ba ery Use
Display the services that are using the battery.
Legal Informa on
View the Open source licenses.
Technical Informa on
The Serial number, Android version, Kernel version and
Firmware version is information that you may be asked for if
you contact Customer Support.
Speech Recorder
By using the Speech Recorder application, you can record a WAV fi le
by speaking into the built-in microphone in the lower right corner of the
device.
1. Tap the Speech Recorder application icon.
2. Select the type of WAV fi le you want to create, 11KHz or 8KHz.
3. Select the type of “Utterances” you prefer.
4. Tap
Record and begin speaking into the microphone.
5. When you stop speaking, the sound clip is saved in the \
Recordings folder.
Playback your Recording
1. Press to exit the Speech Recorder application and return to
the Home screen.
2. Tap the Music application icon.
3. If you have a microSD card inserted, select Internal.
4. On the Artists list, tap Unknown ar st Records.
5. Your recording will be listed as “call_[name]_varro” or “dial_
[number]”. Tap on a listing to play the WAV clip.
If you want to rename your WAV clip, connect the device to your
computer and fi nd the WAV fi les in the PD_Universe\Recordings
folder.
U Player
Use the U Player application to view popular YouTube videos.
1. Tap the
U Player application icon. Popular YouTube videos
are listed by category.
2. Tap on a “View all...” category heading to display more videos in a
specifi c category.
3. Tap on a video to play it.
4. While the video is playing, tap on the screen to display the video
control panel buttons:
Pause / Play
Play previous video (left arrow)
Play next video (right arrow)
Stop
5. Press to return to the YouTube listing screen.
Search for Specific Video
1. Tap in the Search entry fi eld at the top of the screen.
2. Enter the desired text string tap .
3. Videos with matching text are listed. Finger-slide the screen
vertically to view all listings.
4. Press to return to the YouTube listing screen.
Resync YouTube Videos
Once you connect with YouTube, the video listing is cached in the
device and each time you close and reopen the YouTube application,
the same list is displayed until you resync the videos.
To resync the videos, while in the YouTube listing screen, press
Resync.
Weather
Use the Weather application to check the weather forecasts of desired
locations. The date and time are also displayed of the default location.
The Weather widget on the Home screen shows the forecast for
the default city that you chose during the initial device setup. You
can tap on the widget to access the complete Weather application.
1. On the Applications screen, tap the Weather application
icon.
2. Today’s weather forecast and time for the city that you chose
during the initial device setup are displayed.
Add Another Location
1. Tap the Add icon.
2. Tap in the city name entry fi eld enter the city name.
As you begin entering characters, matching cities appear allowing
you to simply tap on the desired city.
For each location you add, a dot is added at the bottom of the screen
so you can simply tap on a dot to switch locations.
To view all locations, tap . If all locations are not visible, fi nger-
slide the screen vertically.
To return to single location view, tap .
View 5-Day Forecast
To view the current 5-day’s weather forecast, display the desired
location tap anywhere within the square forecast window.
To return to the current forecast, tap .
Refresh the Forecast Screen
When viewing a single location forecast, tap the Refresh icon.
Weather App Settings
Delete Forecast Setup
1. With a forecast displayed, press Delete.
2. Select the location(s) you want to delete tap OK OK to
confi rm deletion.
Change Default Forecast Location
The initial default location is the one you entered during the initial
device setup. It is also the forecast that appears on the Weather
widget on the Home screen.
As you add locations, you can switch the default to a different
location if desired.
1. With a forecast displayed, press Change Default.
2. Select the desired location tap OK.
Set Unit of Measurement
1. With a forecast displayed, press Units.
2. Select the desired unit of measurement, Fahrenheit or Celsius
tap OK.
Set Clock Style
1. With a forecast displayed, press Clock Style.
2. Select between Digital and Round clock styles tap OK.
Set Alarm
1. With a forecast displayed, press Alarm Clock.
2. Tap Add Alarm.
3. Tap the
+ - and AM/PM to set the desired time.
4. Tap
Set.
5. Tap Repeat if you want the alarm to repeat on specifi c days
tap on each desired day OK.
If you don’t select a repeat, the alarm is automatically deleted
after it is activated.
6. Tap
Ringtone to select the desired alarm alert sound tap OK.
7. Tap
Label to add a title for your alarm tap into the label entry
fi eld enter the desired title (i.e., lunch with friend, meeting,
etc.) tap OK.
8. Tap
Done.
9. Press twice to return to the Weather screen.
About
View the Weather application information, such as version and
copyright.
Wi-Fi Network Setup
In order to connect to the Internet, you must have a Wi-Fi network set
up on the device.
For battery saving purposes, we recommend turning the Wi-Fi off
when you’re reading or performing functions that don’t require a
connection to the internet.
1. Tap the Se ngs icon Wireless & networks.
2. Make sure Wi-Fi is selected ( ).
3. Tap
Wi-Fi se ngs. The device scans for local Wi-Fi networks
and lists all found.
If your Wi-Fi broadcast is set as hidden, it won’t be found by the
auto scan. Tap Add Wi-Fi Network enter the network name
and password tap Save.
4. Tap on the network to which you want to connect.
5. For secure networks, tap in the Password entry fi eld to enter the
network password tap Connect.
6. After a successful connection, “Connected” appears under the
network name. Tap Next.
The Wi-Fi icon on the top of screens indicates the Wi-Fi is
connected, otherwise no icon is displayed.
If you are connecting via a public Wi-Fi hotspot, it may be
necessary to provide the hotspot login information prior to having
an active internet connection. Tap on the Browser icon and
enter the required hotspot login information when prompted.
‘Forget’ remembered Wi-Fi Network
When you connect to a Wi-Fi network, the device remembers the
settings for future connections. If you have connected to networks that
you no longer want “remembered”, tap on the network Forget.
If the network you “forget” is secure, future connections require
you to enter the network password again.
Bluetooth
Select to enable Bluetooth capability.
Bluetooth settings
Manage connections, set device name & discoverability.
Bluetooth select to enable Bluetooth capability
Device name
Discoverable when selected, your device can be found by other
Bluetooth users.
Scan for devices Tap to scan for local bluetooth devices; all devices
found are listed under Bluetooth devices. Tap on a device to pair it with
the device.
Advanced Wi-Fi Settings

After saving the Wi-Fi network setup, you can change your network
settings if desired by pressing Advanced.
Wi-Fi sleep policy:
You can specify whether you want the device to disconnect from the
Wi-Fi network:
A. When the device goes into sleep mode (default)*
B. Never when the device is plugged in, or
C. Never disconnect unless you turn the Wi-Fi off.
*Option A. is the recommended mode for saving the most battery
energy. The Wi-Fi automatically reconnects with the Wi-Fi network
after the device is out of sleep mode.
Use static IP:
When selected, follow the prompts to enter the desired IP address,
Gateway, Netmask, DNS1 and DNS2.
Connect to Computer
You can connect the device to a Windows or Macintosh computer via a
USB cable to copy fi les between the two devices.
Minimum system requirements
Required OS: (PC) Windows XP or higher
(MAC) OS X (10.5 or higher)
Required computer ports: USB*
* When the unit is connected to a PC or MAC, it is ONLY for fi le
transfer and the unit is recognized as an external storage drive.
Connect to Windows PC
1. Connect the small end of the USB cable to the device miniUSB
port, and the larger end to an available USB port on your computer.
2. On the device, tap Turn on USB storage OK.
3. You may be presented with a Windows AutoPlay dialog box; click
Open fi le to view fi les. Windows Explorer opens with the list of all
drives connected to your computer; the device drive is listed as

PD_Universe.
4. To copy fi les into the device, select and drag the desired fi les into
the appropriate pre-assigned folder based on fi le type:
\eBooks (EPUB, PDF)
\Photos (JPG, JPEG, BMP, PNG, non-animated GIF)
\Music (MP3, WAV, AAC)
\Videos (3GP, AVI, FLV, 3GPP, MOV, MP4, 3G2, MPEG4)
5. To copy fi les from the device into your computer, select and drag
the desired fi les to any desired location on your computer.
The device only recognizes fi les that are of a supported format.
File names may NOT include special characters; otherwise they
are not recognized by the device.
The Android partition where apps are installed is not visible in a
Windows Explorer window.
Disconnect from PC
It is important to always perform a safe PC ‘release’ before
disconnecting the USB cable from the device and computer.
Windows 7
1. On the Windows System Tray, click the hardware removal icon.
2. Click the
Eject Removable Disk message corresponding with the
device drive.
3. When the message “Safe to Remove Hardware” appears, you can
disconnect the USB cable from the device and computer.
Windows VISTA
1. On the Windows System Tray, click the hardware removal icon.
2. Click the
Safely remove USB mass Storage device message
corresponding with the device drive.
3. When the message “This device can now be safely removed from
the computer” appears, you can disconnect the USB cable from
the device and computer.
Windows XP

1. On the Windows System Tray, click the hardware removal icon.
2. Click
Remove Hardware Safely.
3. Select the storage device corresponding with the device, and then
click Stop to disconnect. A fi nal dialog box opens.
4. Click
Close.
5. When the message “It is now Safe to Disconnect Hardware”
appears, you can disconnect the USB cable from the device and
computer.
Connect to Macintosh Computer
Media fi les downloaded from Barnes & Noble to a Macintosh
computer are saved in an unsupported .pdb format. If you copy the
.pdb formatted books into the device, they will not be recognized.
You should always use the Purchase History feature to download
books directly from your Barnes & Noble account into the device.
Music, Video and Photo fi les can be copied from a Macintosh
computer into the device as long as they are in a supported fi le
format. Connect the small end of the USB cable to the device mini
USB port, and the larger end to an available USB port on your
computer.
1. Connect the small end of the USB cable to the device mini USB
port, and the larger end to an available USB port on your computer.
2. Macintosh recognizes the device drive as listed as PD_Universe.
3. To copy fi les into the device, select and drag the desired fi les into
the appropriate pre-assigned folder based on fi le type:
\eBooks (EPUB, PDF)
\Photos (JPG, JPEG, BMP, PNG, non-animated GIF)
\Music (MP3, WAV, AAC)
\Videos (MPEG4)
The device only recognizes fi les that are of a supported format.
File names may NOT include special characters; otherwise they
are not recognized by the device.
To copy fi les from the device into your computer, select and drag the
desired fi les to any desired location on your computer.
Disconnect from Macintosh
1. To safely disconnect from your Macintosh, select the PD_Universe
icon on your desktop and press Command-e to eject the disk.
2. When the icon is no longer on the desktop, it is safe to unplug the
USB cable.
Frequently Asked Questions
ADOBE BOOKS
Q: Does the device support Adobe books?
A: Yes. You can transfer Adobe and other media to the device using the
free Adobe Digital Editions (ADE) software to transfer them to the
device.
Q: Does the device support ADE eBooks which are DRM-protected?
A: Yes, as long as the eBook is in .epub or .pdf format.
Q: Does the device support eBooks borrowed from a public library
using a global distributor such as Overdrive.com?
A: Yes. Download the books to your computer and then use the free
Adobe Digital Editions (ADE) software to transfer them to the device.
ANDROIDTM
Q: What AndroidTM OS version is on the device?
A: 2.3
Q: What AndroidTM applications are compatible with the device?
A: Applications which are compatible with AndroidTM OS 2.3. However, as
of the writing of this document, many third party AndroidTM applications
have been designed for smart phones, so even though they are
compatible with OS 2.3, all functions may not be available on the
device.
Q: How do I install AndroidTM applications on the device?
A: Use the included ES File Explorer application. You can also download
& install applications directly from websites.
Q: When trying to install AndroidTM applications, why do I get “Install
blocked” message?
A: Be sure the “Unknown sources” option is turned on under Se ngs >

Applica ons > Unknown sources.
App Market - SAM (SlideME)
Q: Do I need a SlideME account to download applications?
A: You can download FREE applications without an account. However,
you must have an account to purchase applications.
Q: What kind of applications are available from the SlideME market?
A: There are thousands of applications categorized by type (i.e., Fun &
Games, Entertainment, Educational, etc.). And new applications are
added to the market daily.
Q: Does every application listed in the market work on my device?
A: All may not, even though the compatibility seems to match. Some
applications have been created for phones and require buttons that
your device does not have.
Q: How do I fi nd the instructions/rules for running an application I’ve
downloaded to my device?
A: Most applications have a built-in Help fi le to instruct and answer your
questions.
Barnes & Noble Application
Q: Do I need an account with Barnes & Noble to download from their
site?
A: You need an account and free or purchased media in your Barnes &
Noble online library before you can download to the device.
Q: How do I sign into my Barnes & Noble account on the device?
A: The fi rst time you tap the B&N Bookstore or B&N Library tabs, you are
prompted for your Barnes & Noble login information.
Q: Can I sign in with multiple Barnes & Noble accounts to download
to my device?
A: Yes, however you can only be signed into one account at a time and
only the media downloaded from the current account is displayed in
My Library. If you sign out of an account, the downloaded media is
removed from My Library.
Q: How do I purchase media from Barnes & Noble?
A: In the B&N Bookstore, scroll through the media listings and tap on the
Buy Now button on the desired media.

Q: How do I download media to the device after I purchase them
from Barnes & Noble?
A: After purchasing the media, you are prompted to download
immediately or later. If you don’t download immediately, at any
later time you can go into the B&N Library and tap on the media’s
Download button.
Q: How do I add media to My Library?
A: You can download media during the Barnes & Noble purchase
process, from the B&N Library, import media from your SD card, or
copy media fi les from your computer. All media fi les must reside in the \
ebooks folder in the device.
Q: Can I create personal bookshelves for organizing my media?
A: Yes. Refer to the “My Library>Bookshelves” section.
Q: How does the Lend/Return Books feature work?
A: You can lend or borrow Barnes & Noble “lendable” eBooks to/from
other Barnes & Noble users. Barnes & Noble determines which books
are “lendable”
Q: Can I loan or borrow books from other brands of eReaders, such
as a Nook?
A: Yes.
Q: How long can I lend or keep a borrowed book?
A: 14 days, at which time they are automatically returned to the lender if
they have not already been returned.
Q: Can I view media fi les in either vertical or horizontal orientation?
A: Yes, to automatically switch viewing orientation, simply turn the device
while viewing.
Q: Does the Reader have a built-in Dictionary?
A: Yes. On a page, touch & hold on the word you want to look up tap
.
Q: Can I read books stored on my SD card?
A: Yes. Be sure to save the book fi les in a \eBooks folder on your SD
card, otherwise they won’t be displayed in My Library.
BASIC FUNCTIONALITY
Q: Do I have to charge the battery before use?

A: You should charge the battery for at least 5 hours, but you can use the
device while it’s charging. Use the included AC adapter to charge; this
device does not charge via the USB cable.
Q: My unit seems to be frozen and is unresponsive. What do I do?
A: Reset the device by pressing & holding the power button for 6
seconds.
Q: I have attempted to perform a fi rmware update but it consistently
fails.
A: If the device has a low battery charge, you may not be able to perform
a successful update. Connect the device to the AC adapter and then
try again.
Q: Why doesn’t the device read my SD card?
A: If you format a SD card using a Macintosh computer, you must use the
FAT32 option when formatting the card, otherwise the device will not
read it.
Q: Why do I see references to “phone” in some of the setup screens
and various pop-up messages?
A: This is a result of the Android OS framework and should be ignored as
it does not affect the intended operation of the device.
Q: How do I contact Customer Support?
A: If this FAQ section doesn’t answer your questions, you can contact
Customer Support through our website www.pandigital.net/support.
BROWSER
Q: Do I need a separate Wi-Fi adapter to connect to the Internet?
A: No. The Wi-Fi adapter is built-in to the device.
Q: Can I have multiple browser windows open at the same time?
A: Yes, up to 8 windows. See the Browser section for instructions.
Q: Can I change browser settings?
A: Yes. There are multiple settings you can set as desired, including
privacy & security options. See the Browser section for instructions.
Q: Can I bookmark web pages?
A: Yes. Use the browser Bookmarks function.
CAMERA / VIDEO RECORDER
Q: How do I switch between camera and video player?

A: Slide the button from camera to video .
Q: How do I view photos and videos taken with the camera?
A: Use the Gallery application.
COMPUTER COMPATIBILITY
Q: Which media cards are compatible with my device?
A: Up to 32GB microSDTM (SDHC) card.
Q: Which Operating Systems are compatible with my device?
A: Microsoft Windows XP, WINDOWS VISTA, WINDOWS 7, MAC OS.
Q: How do I connect my device with my computer?
A: Use the USB cable included with the device, or any standard USB
cable. Refer to the “Connect to Computer” section.
EMAIL
Q: Can I use any of my personal email addresses to send/receive
email?
A: The device supports POP3, SMTP, IMAP and EXCHANGE accounts.
Some free email accounts are not supported on mobile devices. Check
with your email provider to see if your account is supported.
ES FILE EXPLORER
Q: Can I use the ES File Explorer application to install third party
AndroidTM applications that I’ve downloaded to my computer?
A: Yes, in fact it’s one of the easiest methods to use.
Q: Can I use ES File Explorer to import fi les from my SD card?
A: Yes. Refer to the Import section.
Q: Can I set application and function preferences?
A: Yes. While in an ES File Explorer screen, press to display the
function options.
FIRMWARE UPDATE
Q: How do I know if I need to update the device fi rmware?

A: To check for possible fi rmware updates, tap the FW Update
application icon. A message appears advising you whether or not there
is an update available for your device.
Q: What should I do if the fi rmware download begins but doesn’t
progress past 0% in 5 minutes?
A: There may be a problem with the Pandigital server. Please contact
customer support through the website: www.pandigital.net/support.
Q: If I update my device, what if I want to revert back to the previous
version?
A: You can revert back if you want. Follow the “Revert back to Previous
Firmware Version” instructions under the “Firmware Update” section.
GALLERY
Photos:
Q: What type of photo fi les can I view on my device?
A: JPG, JPEG, BMP, PNG, non-animated GIF
Q: How do I add photo fi les to my device?
A: You can copy photo fi les from your computer or from a SD card using
ES File Explorer.
Videos:
Q: What type of video fi les can I play on my device?
A: MPEG4 and YouTube videos.
Q: How do I add video fi les to my device?
A: You can copy video fi les from your computer or from a SD card using
ES File Explorer.
HDMI CONNECTION
Q: Can I display all applications on my TV when connected via a
HDMI cable?
A: Although you can display other applications, the HDMI output is only
intended for displaying videos.
Q: Where can I purchase a HDMI cable?
A: You can purchase a “D” type microHDMI cable locally where
electronics are sold.
INTOUCH
Q: How can I change the RSS News feed that is displayed?
A: a) On the InTouch screen, press tap Select News.
b) Tap on the desired source for your news feed.
c) Tap Done.
Q: How do I log into my Facebook, Twitter and Gmail accounts to
display in InTouch?
A: a) Press tap Login for the desired account.
b) Tap in the entry fi elds and enter your login information.
c) Repeat for all desired accounts.
Q: Why does “Network Connection Timeout” message appear when I
attempt to log into my Gmail account?
A: You have entered an incorrect Gmail account or password.
MUSIC
Q: What type of audio fi les can I play on my device?
A: MP3, WAV and AAC
Q: How do I add audio fi les to my device?
A: You can copy audio fi les from your computer or from a SD card using
the ES File Explorer application.
Q: Can I create a separate list of my favorite songs?
A: Yes. Use the Playlist feature.
NOTES
Q: Can I email notes to others?
A: Yes, following these steps:
a. With note displayed, press tap Share.
b. Tap in the entry fi elds to enter the email information.
c. Tap Send.
Offi ceSuite VIEWER
Q: What types of fi les are supported by Offi ceSuite?
A: DOC, DOCX, TXT, XLS, XLSX, CSV, PPT, PPTX, PPS, PPSX and

PDF
Q: Can I edit the supported fi le types?
A: The free application included with your device cannot. However, you
can quickly and easily upgrade to Offi ceSuite Pro which does allow you
to edit the supported fi le types.
Q: Can I view fi les stored in the device and on my SD card?
A: Yes. When you launch the application you are prompted for the desired
storage device.
Q: Can I set separate display preferences for the separate programs?
A: Yes. When you tap a fi le to open it, the applicable program launches;
press to display the options menu.
USB Connection
Q: Why doesn’t my computer recognize the device when I connect
via USB cable?
A: Be sure you tap the “Turn on USB storage” button on the device
screen after you connect the device to your computer.
Q: What should I do if the “Turn on USB Storage” button does not
appear on the screen when I connect?
A: Tap the white USB notifi cation icon in top left area of the screen.
U PLAYER
Q: Do I need to be connected to Wi-Fi to view the YouTube videos?
A: Yes, connect to Wi-Fi and then use the U Player application to view
YouTube videos.
WEATHER
Q: What locations can I view the weather forecast?
A: The initial city displayed is the one you assigned during the initial
device setup. You can set up any other city locations by pressing the
Add button.
Battery Management
The battery is not fully charged out of the box, so it is recommended

that you charge the battery for at least 5 hours before you start to use
the device.
The rechargeable battery is designed and manufactured to be used
and recharged frequently. As with all batteries, the capacity of the
battery reduces each time it is charged/depleted. However, you can still
try to prolong the battery’s lifetime by following the suggestions below:
• Use the device at least once a week.
• Charge the battery regularly and fully.
• Never leave the battery fully discharged for a long period of time.
• Always keep the device and the battery away from heat.
Charge Battery
Plug the AC adapter into an electrical wall outlet, and then connect to
the device to fully charge the battery before use (approx. 5 hours).
While charging, the battery icon displays as .
When fully charged, the battery icon displays as .
A fully discharged battery takes approximately 5 hours to fully charge,
but you can use the device while plugged in when desired.
When Wi-Fi is turned on and using the highest screen brightness
setting, the device consumes the battery power faster.
Technical Specifi cations
Product Specs
8” Capacitive Touch Digital TFT LCD
Resolution 600x800 pixels
Dimensions
Outer case: 6.25”w x 8.5”h
Screen: 8”
Android OS
Version 2.3
Compa ble Media Sources
Up to 32GB microSDTM (SDHC) card
Compa ble File Formats
eBooks = EPUB, PDF

Photos = JPG, JPEG, BMP, PNG, non-animated GIF
Audios = MP3, WAV, AAC
Videos = MPEG4
Offi ceSuite Compa ble File Formats
Word = DOC, DOCX
Excel = XLS, XLSX, CSV
Power Point = PPT, PPS, PPTX, PPSX
Text = TXT, PDF
Camera
2 cameras, front 0.3MP and back 3.0MP
USB Port
Mini USB 2.0 Host/OTG
Internal Storage
4GB
Wireless
Wi-Fi (802.11 B/G/N)
HDMI Output
HDMI output port - “D” type cable
Supports numerous TV resolutions
Audio input/output
Built-in microphone
Built-in stereo speakers
Stereo-mini earphone jack
Ba ery
Li-ion rechargeable 3400mAh, 3.7V
Limited Warranty
To register your product or view the product warranty, please visit us at www.pandigital.net.
FCC Notices
This device complies with Part 15 of the FCC Rules. Operation is subject to the following
two conditions: (1) this device may not cause harmful interference, and (2) this device must
accept any interference received, including interference that may cause undesired operation.
Federal Communications Commission (FCC) Statement Infor-
mation to the User
WARNING: Changes or modifications to this device not expressly approved by the party
responsible for compliance could void the user’s authority to operate the equipment.
This equipment has been tested and found to comply with the limits for a Class B digital device, pursuant
to Part 15 of the Federal Communication Commission (FCC) Rules. These limits are designed to
provide reasonable protection against harmful interference in a residential installation. This equipment
generates, uses, and can radiate radio frequency energy and if not installed and used in accordance
with the instructions, may cause harmful interference to radio communications. However, there is no
guarantee that interference will not occur in a particular installation. If this equipment does cause harmful
interference to radio or television reception, which can be determined by turning the equipment off and
on, the user is encouraged to try to correct the interference by one or more of the following measures:
• Reorient or relocate the receiving antenna.
• Increase the separation between the equipment and receiver.
• Connect the equipment to an outlet on a circuit different from that to which the receiver is
connected.
• Consult the dealer or an experienced radio/TV technician for help.
FCC Radiation Exposure Statement:
This equipment complies with FCC radiation exposure limits set forth for an uncontrolled
environment. This device is designed for hand-held operation only. The antenna(s) used for this
transmitter must not be collocated or operating in conjunction with any other antenna or transmitter
within a host device, except in accordance with FCC multi-transmitter product procedures.
Disclaimers
© 2011 Pandigital, Inc. or its affiliates. All rights reserved. Pandigital and the Pandigital logo are trademarks of
Pandigital Inc. Barnes & Noble and certain other logos used herein are trademarks of Barnes & Noble, Inc. All
rights reserved. Facebook and the “f” logo are registered trademarks of Facebook Inc. All rights reserved.
Pandigital device contains Adobe® Reader® Mobile software under license from Adobe
Systems Incorporated, Copyright© 1995-2009 Adobe Systems Incorporated. All rights
reserved. Adobe and Reader are trademarks of Adobe Systems Incorporated. All
rights reserved. microSDTM is a trademark of SD Card Association. All rights reserved.f
License Agreement and Terms of Use
By activating and using the 8” Pandigital SuperNova (the “Device”), you hereby consent and agree
to our License Agreement and Terms of Use.
The Device and Related Services
The Device is a portable electronic reading device that utilizes wireless connectivity to
enable users to shop for, download, browse, and read books, newspapers, magazines,
blogs, access websites, e-mail and other materials, all subject to the terms and conditions of
this Agreement. The “Service” means the wireless connectivity, provision of digital content,
software and support, and other services and support that Pandigital provides Device users.
Wireless Connectivity
Coverage and Service Interruptions: You acknowledge that if the device is located
in any area without applicable wireless connectivity, you may not be able to use
some or all elements of the wireless services. Pandigital is not responsible for
the unavailability of wireless service or any interruptions of wireless connectivity.
Digital Content
Unless specifically indicated otherwise, you may not sell, rent, lease, distribute, broadcast,
sublicense or otherwise assign any rights to the Digital Content or any portion of it to any third
party, and you may not remove any proprietary notices or labels on the Digital Content. In
addition, you may not, and you will not encourage, assist or authorize any other person
to, bypass, modify, defeat or circumvent security features that protect the Digital Content.
Software
Definitions: The following terms apply to the Device and to (a) all software (and the media on which
such software is distributed) of Pandigital or third parties that are pre-installed on the Device at time of
purchase or that Pandigital provides as updates/upgrades to the pre-installed software (collectively,
the “Device Software”), unless you agree to other terms as part of an update/upgrade process; and
(b) any printed, on-line or other electronic documentation for such software (the “Documentation”).
As used in this Agreement, “Software” means, collectively, the Device Software and Documentation.
Use of the Device Software: You may use the Device Software only on the Device. You may not separate
any individual component of the Device Software for use on another device or computer, may not
transfer it for use on another device or use it, or any portion of it, over a network and may not sell, rent,
lease, lend, distribute or sublicense or otherwise assign any rights to the Software in whole or in part.
No Reverse Engineering, Decompilation, Disassembly or Circumvention: You may not, and you will not
encourage, assist or authorize any other person to, modify, reverse engineer, decompile or disassemble
the Device or the Software, whether in whole or in part, create any derivative works from or of the
Software, or bypass, modify, defeat or tamper with or circumvent any of the functions or protections of
the Device or Software or any mechanisms operatively linked to the Software, including, but not limited
to, augmenting or substituting any digital rights management functionality of the Device or Software.
Automatic Updates: In order to keep your Software up-to-date, Pandigital
may automatically provide the device with updates/upgrades to the Software.
Export Regulations: You agree to comply with all export and re-export restrictions and
regulations of the Department of Commerce and other United States agencies and
authorities, and not to transfer, or encourage, assist or authorize the transfer of the Software
to a prohibited country or otherwise in violation of any such restrictions or regulations.
General
No Illegal Use and Reservation of Rights: You may not use the Device, the Service or the
Digital Content for any illegal purpose. You acknowledge that the sale of the Device to you
does not transfer to you title to or ownership of any intellectual property rights of Pandigital
or its suppliers. All of the Software is licensed, not sold, and such license is non-exclusive.
Information Received: The Device Software may provide Pandigital with data about
the device and its interaction with the Service (such as available memory, up-time,
log files and signal strength) and information related to the content on the device
and your use of it. Information we receive is subject to the Pandigital Privacy Notice.
Patents: The Device and/or methods used in association with the Device
may be covered by one or more patents or pending patent applications.
Termination: Your rights under this Agreement will automatically terminate without notice from
Pandigital if you fail to comply with any term of this Agreement. Pandigital’s failure to insist upon or
enforce your strict compliance with this Agreement will not constitute a waiver of any of its rights.
Disclaimer of Warranties: YOU EXPRESSLY ACKNOWLEDGE AND AGREE THAT USE OF
THE SERVICE, DEVICE, DIGITAL CONTENT AND SOFTWARE IS AT YOUR SOLE RISK.
EXCEPT FOR THE LIMITED WARRANTY, THE SERVICE, DEVICE, DIGITAL CONTENT
AND SOFTWARE ARE PROVIDED “AS IS” WITH ALL FAULTS AND WITHOUT WARRANTY
OF ANY KIND AND PANDIGITAL AND ITS SUPPLIERS AND LICENSORS DISCLAIM ALL
WARRANTIES, EXPRESS OR IMPLIED, INCLUDING, BUT NOT LIMITED TO, THE IMPLIED

WARRANTIES OF MERCHANTABILITY, FITNESS FOR A PARTICULAR PURPOSE, ACCURACY,
QUIET ENJOYMENT AND NON-INFRINGEMENT OF THIRD-PARTY RIGHTS. NO ORAL
OR WRITTEN INFORMATION OR ADVICE GIVEN BY PANDIGITAL OR AN AUTHORIZED
REPRESENTATIVE OF PANDIGITAL SHALL CREATE A WARRANTY. THE LAWS OF CERTAIN
JURISDICTIONS DO NOT ALLOW THE DISCLAIMER OF IMPLIED WARRANTIES. IF THESE
LAWS APPLY TO YOU, SOME OR ALL OF THE ABOVE DISCLAIMERS, EXCLUSIONS
OR LIMITATIONS MAY NOT APPLY TO YOU, AND YOU MAY HAVE ADDITIONAL RIGHTS.
Limitation of Liability: TO THE EXTENT NOT PROHIBITED BY LAW, NEITHER PANDIGITAL
NOR ITS SUPPLIERS OR LICENSORS SHALL BE LIABLE TO YOU FOR ANY INCIDENTAL OR
CONSEQUENTIAL DAMAGES FOR BREACH OF ANY EXPRESS OR IMPLIED WARRANTY,
BREACH OF CONTRACT, NEGLIGENCE, STRICT LIABILITY OR ANY OTHER LEGAL THEORY
RELATED TO THE SERVICE, DEVICE, DIGITAL CONTENT OR SOFTWARE, INCLUDING,
BUT NOT LIMITED TO, ANY DAMAGES ARISING OUT OF LOSS OF PROFITS, REVENUE,
DATA OR USE OF THE DEVICE OR SOFTWARE OR ANY ASSOCIATED PRODUCT, EVEN IF
PANDIGITAL HAS BEEN ADVISED OF THE POSSIBILITY OF SUCH DAMAGES. IN ANY CASE,
PANDIGITAL’S AGGREGATE LIABILITY UNDER THIS AGREEMENT SHALL BE LIMITED TO
THE AMOUNT ACTUALLY PAID FOR THE DEVICE. THE LAWS OF CERTAIN JURISDICTIONS
DO NOT ALLOW THE EXCLUSION OR LIMITATION OF INCIDENTAL OR CONSEQUENTIAL
DAMAGES. IF THESE LAWS APPLY TO YOU, SOME OR ALL OF THE ABOVE EXCLUSIONS
OR LIMITATIONS MAY NOT APPLY TO YOU, AND YOU MAY HAVE ADDITIONAL RIGHTS.
Disputes: ANY DISPUTE ARISING OUT OF OR RELATING IN ANYWAY TO THIS AGREEMENT
SHALL BE SUBMITTED TO CONFIDENTIAL ARBITRATION IN ALAMEDA COUNTY, EXCEPT
THAT, TO THE EXTENT YOU HAVE IN ANY MANNER VIOLATED OR THREATENED TO
VIOLATE PANDIGITAL’S INTELLECTUAL PROPERTY RIGHTS, PANDIGITAL MAY SEEK
INJUNCTIVE OR OTHER APPROPRIATE RELIEF IN ANY STATE OR FEDERAL COURT IN
THE COUNTY OF ALAMEDA, AND YOU CONSENT TO EXCLUSIVE JURISDICTION AND
VENUE IN SUCH COURTS. The arbitrator’s award shall be binding and may be entered as a
judgment in any court of competent jurisdiction. To the fullest extent permitted by applicable
law, no arbitration under this Agreement shall be joined to an arbitration involving any other
party subject to this Agreement, whether through class arbitration proceedings or otherwise.
Severability: If any term or condition of this Agreement shall be deemed invalid,
void, or for any reason unenforceable, that part shall be deemed severable and
shall not affect the validity and enforceability of any remaining term or condition.
Amendment: Pandigital reserves the right to amend any of the terms of this Agreement
at its sole discretion by posting the revised terms on the Pandigital.net website.
Your continued use of the Device and Software after the effective date of any such
amendment shall be deemed your agreement to be bound by such amendment.
Contact Information: For communications concerning this Agreement, you may
contact Pandigital by writing to Pandigital through our website: www.pandigital.net.
CE Notice
Pandigital hereby declares that the essential requirements set out in the R&TTE Directive 99/5/EC
have been fully fulfilled on our product with indication below:
Product Name: Pandigital SuperNova
Model Name: R80B400
Brand Name: Pandigital
Battery Statement
CAUTION: Risk of explosion if battery is replaced by an incorrect type. Dispose of used batteries
according to the instructions.
Radiation Exposure Statement
E=7.94851 V/m is the maximum E-Field strength when safety distance between the EUT and
human body is maintained at least 20cm, which is below 61V/m as required in Annex III table 2 of
EC Council Recommendation (1999/519/EC). This proves that the unit complies with the EN 62311
for RF exposure requirement.
European Community Compliance Statement
This indicates compliance with the R&TTE Directive 1999/5/EC and meets the relevant parts of
following technical specifications:
EN 300 328 – Electromagnetic compatibility and Radio spectrum Matters (ERM); Wideband
Transmission Systems; Data transmission equipment operating in the 2,4GHz ISM band and using
wide band modulation techniques; Harmonized EN covering essential requirements under article
3.2 of the R&TTE directive.
EN 301 489-1 - Electromagnetic compatibility and Radio spectrum Matters (ERM); ElectroMagnetic
Compatibility (EMC) standard for radio equipment and services; Part 1: Common technical
requirements.
EN 301 489-17 - Electromagnetic Compatibility and Radio Spectrum Matters (ERM);
Electromagnetic Compatibility (EMC) standard for radio equipment and services; Part 17 Specific
Conditions for Broadband Data Transmission Systems.
EN 60950 - Safety of Information Technology Equipment.
EN 62311: 2008– Assessment of electronic and electrical equipment related to human exposure
restrictions for electromagnetic fields (0 Hz - 300 GHz)
Marking by the symbol indicates that usage restrictions apply.
France - 2.4GHz for Metropolitan France :
In all Metropolitan departments, wireless LAN frequencies can be used under the following
conditions, either for public or private use:
• Indoor use: maximum power (EIRP*) of 100 mW for the entire 2400-2483.5 MHz
frequency band
• Outdoor use: maximum power (EIRP*) of 100 mW for the 2400-2454 MHz band and with
maximum power (EIRP*) of 10 mW for the 2454-2483 MHz band
Certification information (SAR) The device meets guidelines for exposure to radio waves.
The device is a radio transmitter and receiver. It is designed not to exceed the limits for exposure
to radio waves recommended by international guidelines. These guidelines were developed by
the independent scientific organization ICNIRP and include safety margins designed to assure the
protection of all persons, regardless of age and health.
The exposure guidelines for devices employ a unit of measurement known as the Specific
Absorption Rate or SAR. The SAR limit stated in the ICNIRP guidelines is 2.0 watts/kilogram (W/kg)
averaged over 10 grams of tissue. Tests for SAR are conducted using standard operating positions
with the device transmitting at its highest certified power level in all tested frequency bands.
This equipment complies with the European Council Recommendation of 12 July 1999 on the
Limitation of Exposure of the General Public to Electromagnetic Fields [1999/519/EC].