Contents
- 1. Users Manual
- 2. User Manual
- 3. USERS MANUAL
- 4. User manual
Users Manual

Velocity111UserManual
Thisisonlythebeginning.
Weareconstantlyenhancingandimprovingouruserexperience.Forthelatestinformationonwhat
we’veaddedandhowitworksvisitusonline.
www.velocitymobile.com
2
Copyright©2008VelocityMobileAllRightsReserved.
Nopartofthismanual,includingtheproductandsoftwaredescribedinit,maybereproduced,transmitted,transcribed,stored
inaretrievalsystem,ortranslatedintoanylanguageinanyform,byanymeans,withoutpriorwrittenpermissionfromVelocity
Mobile.
VelocityMobileprovidesthispublication“asis”withoutwarrantyofanykind.Thisinformationcouldincludetechnical
inaccuraciesortypographicalerrors.VelocityMobilemaymakeimprovementsand/orchangesintheproduct.Informationand
specificationscontainedinthisdocumentaresubjecttochangeatanytimewithoutnotice.
Theinformationcontainedinthisdocumentdoesnotaffectorchangetheproductspecificationsorwarranties.VelocityMobile
isnotliableforanydamagesresultingfromtheuseofthisproduct.
IMPORTANTPRECAUTIONS
PleasereadthefollowinginformationcarefullybeforeyoustartusingtheVelocity111toavoidanydamagecausedbyimproper
usage:
Thedeviceisnotchargedwhenyoutakeitoutofthebox.Thebatteryshouldbechargedforatleast8hoursbefore
firstuse.Donotremovethebatterywhilecharging.
Donotserviceanyproductyourself.Serviceneededoncomponentsinsidethesecompartmentsshouldbedonebyan
authorizedservicetechnicianorprovider.
Donotusebatterieswhichhavenotbeenspecifiedbythemanufacturer,asthismaycauseleakageorrupture.
Damagecausedbyusingbatteriesnotspecifiedbythemanufacturerisnotcoveredunderwarranty.
DonotchargethebatterywithanunspecifiedACAdapter,asthismaycausedamagetoboththedeviceandthe
battery.
DonotleavetheACadapterinplaceswherethetemperaturemaybelowerthan‐20℃(‐4℉)orhigherthan70℃(158
℉)asthismaydamagetheACadaptor.
Whendiscardingthebatteries,disposeoftheminapropermanner,accordingtothebatterymanufacturer’s
instructionsandyourlocallaws.
PoweroffthedeviceandremovethebatterybeforeinsertingSIMcard.MakesuretheSIMcardsnapscorrectlyinto
theSIMsocket.
Donotopenortamperwiththedevicecover,asthiswillvoidyourwarranty.
Donotpresshardonthisproduct,asitmaycausedamagetothescreenortheinternalcomponents.
Donotusethedeviceatgasorrefuelingstations,chemicalplants,andplacescontainingexplosivesorflammable
materials.Theproductshouldbeplacedawayfromheatsourcessuchasradiators,stoves,orotherproducts
(includingamplifiers)thatproduceheat.
Donotstrike,shake,orheatthedeviceinawaywhichmaycausebatteryleakageorruptureanddamagetothe
device.
Useonlyamanufacturer‐specifiedstylus.Donotscratchthescreenorotherwisebringitintocontactwithanyhard
objects(e.g.loosechangeinyourpocket).
Donotcleanthescreenwithchemicaldetergents.Onlyuseclothsspecificallydesignedforcleaningliquid‐crystal
displays.Unplugtheproductfromthewalloutletbeforecleaning.Donotuseliquidcleanersoraerosolcleaners.Use
adampclothforcleaning,butNEVERusewatertocleantheLCDscreen.
Donotexposethedevicetoprolongeddirectsunlight,orleavethedeviceinahumidenvironmentforextended
periodsoftime,asthismaycausedamagetothedeviceandbattery.
Donotimmersethedeviceinwater.Neverusetheproductinawetlocation.
Thedevicemayinterferewiththenavigationand/orcommunicationsystemsonaircraft.Theuseofthedeviceonan
aircraftisprohibitedbylawsinmostcountries.
Thisproductmaycausemedicalequipmenttomalfunction.Theuseofthisdeviceisforbiddeninmosthospitalsand
medicalclinics.
Alwaysusehands‐freedevices,ifyouneedtousethetelephonyservices,whiledrivingavehicle.
Pleaseturndownthevolumebeforeusingheadphonesorotheraudiodevices.
Donotplacetheproductonanunstablebase.
Donotpushobjectsofanykindintocabinetslotsorotheropeningsinthedevice.
Thedeviceshouldbeoperatedfromthetypeofpowerindicatedonthemarkinglabel.Iftherearenoticeablesignsof
overheating,unplugthedevicefromtheelectricaloutletimmediatelyandreferservicingtoanauthorizedservice
provider.
Warning:Donotremoveordamagethewarrantyvoidlabelonthedevice,asthiswillvoidyourwarranty.
3
Non‐ionizingRadiation
Thisproductshouldbeoperatedonlyinthesuggestedtypicalconditionstoensuregoodradiativeperformanceandsafetyfrom
interference.Forsafetyreasons,aswithallothermobileradio‐transmittingequipment,itisrecommendedthatnopartofthe
humanbodybeallowedtocometooclosetotheantennaduringoperationoftheequipment.
TrademarkInformation
Microsoft,MS‐DOS,Windows,WindowsNT,WindowsServer,WindowVista,WindowsMobile,ActiveSync,Excel,Internet
Explorer,WindowsLive,Outlook,PowerPoint,andWordareeitherregisteredtrademarksortrademarksofMicrosoft
CorporationintheUnitedStatesand/orothercountries.
Allothertrademarksarepropertyoftheirrespectiveowners.
4
TableofContents
VELOCITY111USERMANUAL ................................................................................................................................ 1
CHAPTER1:OVERVIEW.......................................................................................................................................... 6
1.1 INTRODUCTION .....................................................................................................................................................6
1.2 INTRODUCTION CONT............................................................................................................................................8
1.3 INSTALLING SIM CARD, BATTERY AND MICRO SD CARD.....................................................................................9
1.4 BATT ERY INFORMATION......................................................................................................................................11
CHAPTER2:BASICOPERATIONS........................................................................................................................... 13
2.1 GETTING STARTED ..............................................................................................................................................13
2.2 TODAY SCREEN...................................................................................................................................................14
2.3 VOTA (VELOCITY OVER THE AIR) .....................................................................................................................16
2.4 VELOCITY TOOLBAR...........................................................................................................................................17
2.5 START MENU ......................................................................................................................................................17
2.6 PROGRAMS, SETTINGS AND ICONS ......................................................................................................................18
2.7 INPUT METHODS.................................................................................................................................................20
CHAPTER3:SYNCHRONIZINGINFORMATION....................................................................................................... 23
3.1 INSTALLING AND SETTING UP ACTIVESYNC........................................................................................................23
3.2 INSTALLING AND SETTING UP WMDC................................................................................................................23
3.3 SYNCHRONIZING INFORMATION..........................................................................................................................24
3.4 CHANGING SETTINGS FOR AN INFORMATION TYPE .............................................................................................24
3.5 SYNCHRONIZING WITH EXCHANGE SERVER........................................................................................................25
3.6 SYNCHRONIZING VIA BLUETOOTH ......................................................................................................................25
CHAPTER4:PHONE.............................................................................................................................................. 26
4.1 MAKING A CALL .................................................................................................................................................26
4.2 CONFIGURING THE PHONE ..................................................................................................................................28
4.3 VOICE CALL IN-CALL OPTIONS ..........................................................................................................................30
4.4 VIDEO CALL IN-CALL OPTIONS ..........................................................................................................................31
CHAPTER5:CONTACTS&MESSAGING................................................................................................................. 33
5.1 USING CONTACTS ...............................................................................................................................................33
5.2 TEXT MESSAGING...............................................................................................................................................34
5.3 MULTIMEDIA MESSAGING SERVICE ....................................................................................................................35
5.4 E-MAIL ...............................................................................................................................................................36
5.5 USING SIM MANAGER........................................................................................................................................38
CHAPTER6:BASICAPPLICATIONS ........................................................................................................................ 40
6.1 USING CALENDAR ..............................................................................................................................................40
6.2 USING NOTES .....................................................................................................................................................41
6.3 USING TASKS ......................................................................................................................................................43
CHAPTER7:CONNECTINGTOTHEINTERNET ....................................................................................................... 45
7.1 SETTING UP INTERNET CONNECTIONS.................................................................................................................45
7.2 USING A WI-FI CONNECTION ..............................................................................................................................47
7.3 USING WIRELESS MANAGER ..............................................................................................................................49
7.4 USING INTERNET EXPLORER MOBILE .................................................................................................................50
CHAPTER8:TRANSFERRINGFILESTOANDFROMTHEDEVICE ............................................................................. 53
8.1 USING ACTIVESYNC ...........................................................................................................................................53
8.2 TRANSFERRING FROM MEMORY CARDS..............................................................................................................53
8.3 USING BLUETOOTH.............................................................................................................................................54
5
CHAPTER9:OTHERAPPLICATIONS....................................................................................................................... 56
9.1 WINDOWS LIVE MESSENGER..............................................................................................................................56
9.2 JETCET PDF5 ...................................................................................................................................................57
9.3 WINDOWS MEDIA...............................................................................................................................................58
9.4 MIDLET MANAGER ............................................................................................................................................59
9.5 PHONE PROFILE ..................................................................................................................................................59
9.6 GPS....................................................................................................................................................................60
9.7 INTERNET SHARING ............................................................................................................................................61
CHAPTER10:CAMERA ......................................................................................................................................... 63
10.1 OVERVIEW ........................................................................................................................................................63
10.2 TAKING A PICTURE ............................................................................................................................................64
10.3 TAKING A VIDEO................................................................................................................................................64
10.4 SETTINGS AND OPTIONS....................................................................................................................................64
10.5 PICTURES AND VIDEOS .....................................................................................................................................65
APPENDIX ............................................................................................................................................................ 66
A.1 SPECIFICATIONS .................................................................................................................................................66
A.2 REGULATORY NOTICES ......................................................................................................................................68

6
Chapter1:Overview
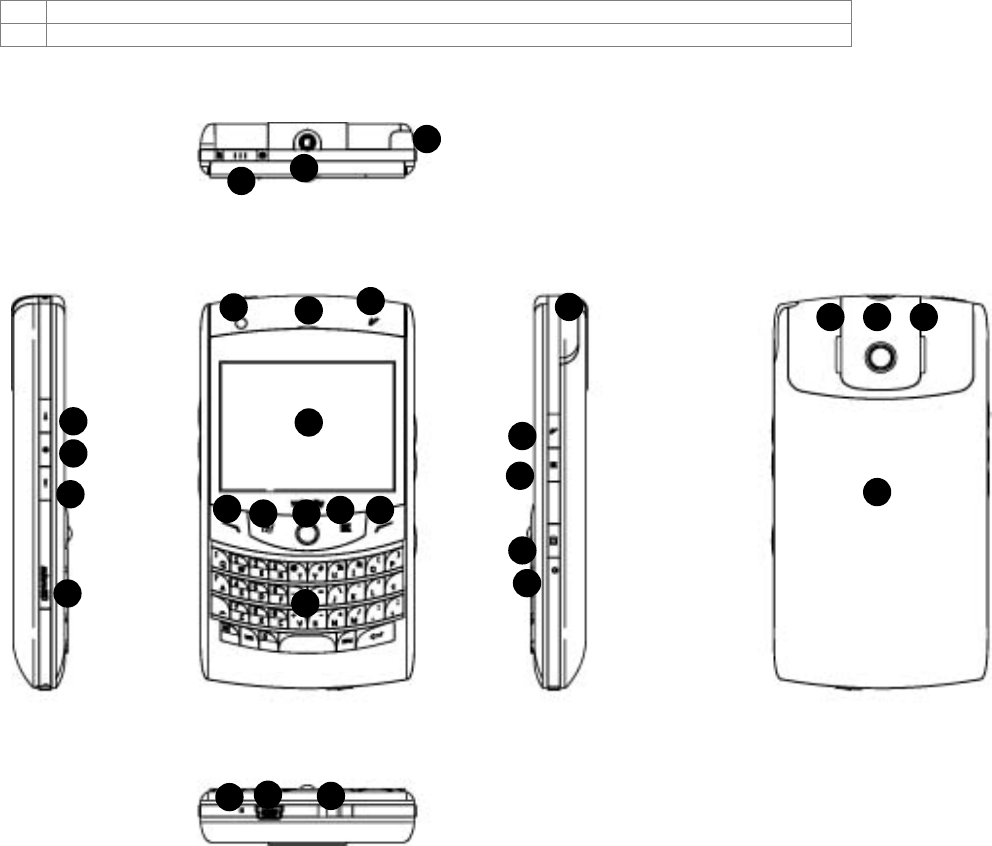
1.1 Introduction
HardwareOverview
1Volumeup
Presstoturnupthevolume;Pressandholdformaximumvolume.
2Record*
Presstorecordavoicenote.
3Volumedown
Presstoturndownthevolume;Pressandholdtoturntheringeroff.
4MicroSDCardSlot
5Powerslider
Slidethebuttontotherightandholdtoturnon;slidethebuttontothelefttolock,slidethebuttontothe
righttoturnoffthebacklight.
62.5mmHeadphoneTVout
7Stylus
8Forwardfacingcamera
Usethiscameraforvideocalling.
9Telephonereceiver
Speakerforlisteningtophonecalls.
10IndicationLED
Indicatesnotification/battery/GSMstatus.Thebluelightflasheswhennotificationsexistformessages,missed
callsorreminders.LEDdisplayssolidredorgreenlightwhenthebatteryisunderchargeorthebatteryisfully
charged.GreenlightflasheswhenGSM/UMTSison.
11Touchscreen
2.46‐inchTFTLCDtouchscreendisplay.
12SEND
Presstoactivatethedialerandtoinitiateacall.
13Start
Presstopulldownthestartmenu.
14Jogball
Scrollup,down,leftorrighttonavigate;presstoselect.
15OK
Presstomakeaselection.
16END
Presstoendacall;pressandholdtoreturntotheTodayscreen.
17QWERTYkeypad
18Microphone
19Mini‐USBCableConnector
20Backcoverlock
21VelocityButton
PresstolaunchVelocitytoolbar.Pressandholdtoactivatethelauncher.
22OK(sidekey)
Presstomakeaselection.
23CameraButton*
Pressandholdtolaunchthecamera.
24Reset
Usingthestylus,presstosoftresetthedevice.Besuretoswitchthedeviceintosleepmodebeforeresetting
thedevice,otherwiseunsaveddataorsettingsmaybelost.
25Speaker
7
26Maincamera
27Backcover
*Thesebuttonsareconfigurable.Toassignnewprograms/functions,selectStartSettingsButtons.
5
1
2
3
4
6
7
8910
11
12 13141516
17
18 1920
21
22
23
24
72526
27
25

8
1.2 Introductioncont.
What’sinthebox
ACAdapterStereoHeadsetUSBCable
VideoOutCableProtectivePouchBattery
UKPlugEUPlugExtraStylus
9
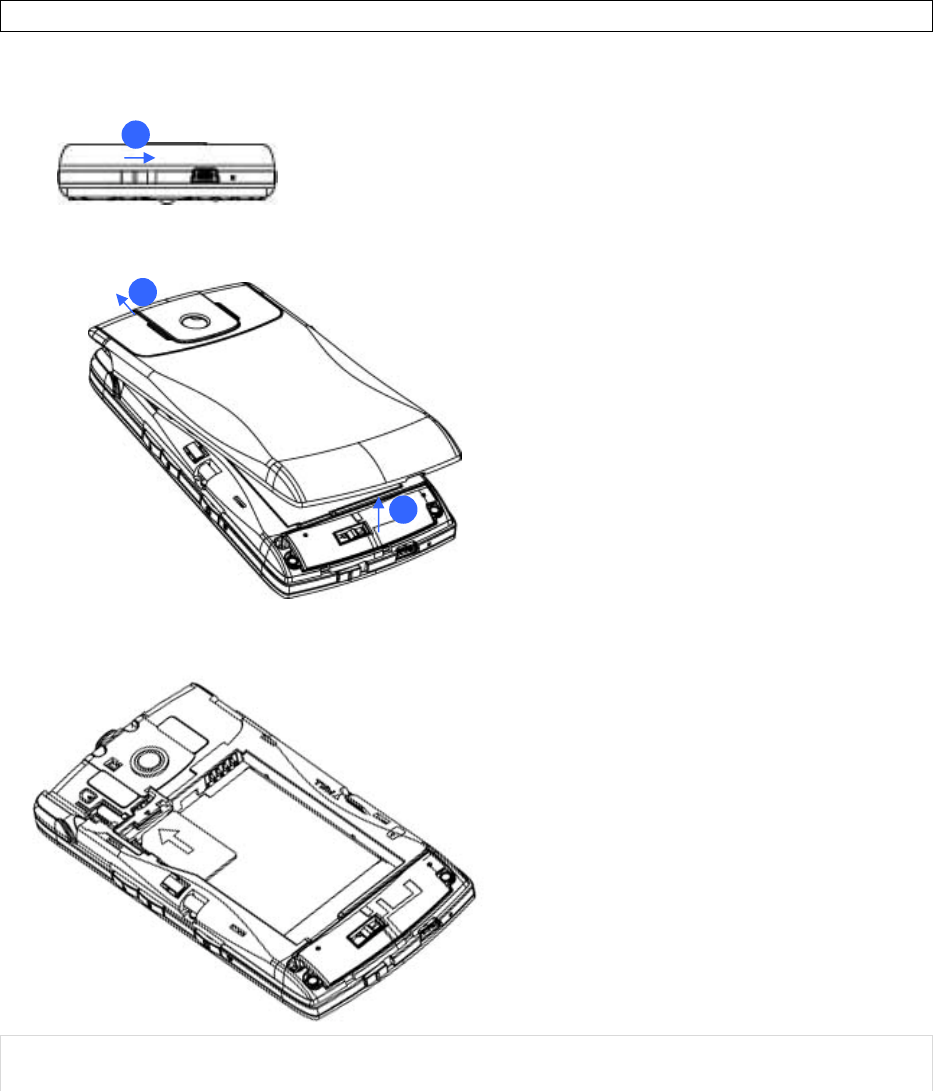
1.3InstallingSIMCard,BatteryandMicroSDCard
InstallingtheSIMCardandBattery
Ifyouwanttousethetelephonefeaturesofthedevice,youmustinstallavalidSIMcard.
Unlockandremovethebatterycover.
PlacetheSIMcardwiththegoldcontactfacingdown.
NOTE:WhenremovingtheSIMcard,pulloutthetraywhichfixestheSIMcard,andthenremovethe
SIMcardfromthetray.
11
1
2
3
10
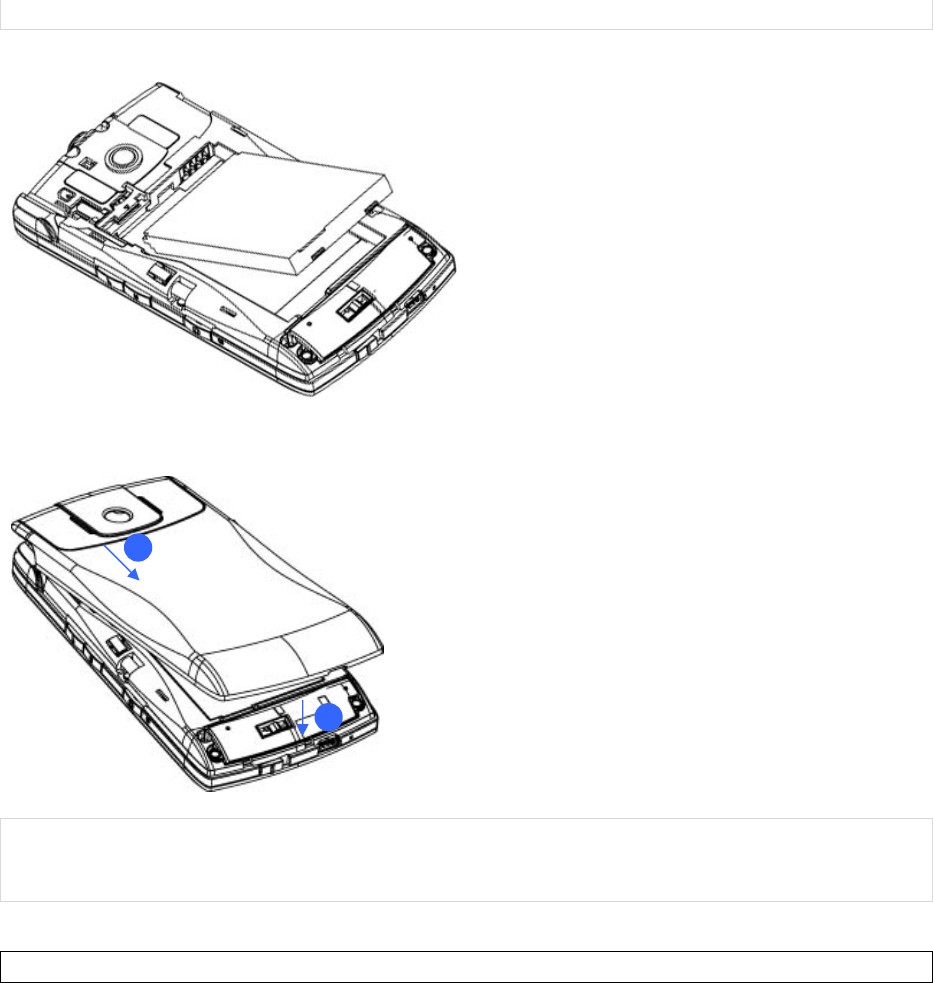
Reinsertthebattery.Pushtheoppositeendofthebatteryuntilitsnapsintoplace.
Replacethebackcover.Pressthebackcoveruntilitsnapsintoplace.
NOTE:ThedeviceissuppliedwitharechargeableLi‐ionpolymerbattery.Thisbatteryissupplied
completelydischargedandshouldbechargedforatleast8hoursbeforefirstuse.Pleasefollowthe
normalturn‐offproceduretoremovethebattery;otherwiseunsaveddatamaybelost.
InstallingaMicroSDCard
UseacertifiedMicroSDcardinthisslottoexpandthedevice’sstoragememory(SDHCsupported).To
installtheMicroSDcard,dothefollowing:
1. Unlockandremovethebackcover.
2. Removethemediacardslotcover.
2
1
11
3. Insertthemediacardintotheslotlogosideup.
ToremovetheMicroSDcard,gentlypressinonthecardtoeject.
NOTE:InsertingtheMicroSDcardinthewrongdirectionbyforcecancausedamagetothecardandthe
cardslot.
1.4BatteryInformation
Batteryperformancedependsonmanyfactors,includingyourwirelessserviceprovider’snetwork
configuration,signalstrength,thetemperatureoftheenvironmentinwhichyouoperateyourphone,
thefeaturesandsettingsyouselectanduse,itemsattachedtoyourphone’sconnectingports,andyour
voice,data,andotherprogramusagepatterns.
Batterylifeestimates(approximationssubjecttonetworkconditions):
Talktime(GSM):4hours
Standbytime(GSM):200hours
ChargeTime(average):
ChargebyACadaptor:3hours
ChargebyUSBbus:5hours
ReducingRiskofFireorBurns
Donotattempttoopen,disassembleorservicethebatterypack.
Donotcrushorpuncturethebattery,shorttheexternalcontactsordisposeofinfireor
water.
Donotexposetotemperaturesabove45˚C(113˚F)orbelow‐10˚C(14˚F).
Replaceonlywiththebatterypackdesignatedforthisproduct.
Recycleordisposeofusedbatteriesasstipulatedbylocalregulationandinamannerthat
respectstheenvironment.
CheckingtheBatteryPower
SelectStartSettingsSystemtabPower.

12
OptimizingPowerPerformance
SelectStartSettingsSystemtabPowerAdvancedandthenadjustsettings.
ManagingaLowBattery
Whenthelow‐batterywarningappears,dothefollowing:
1. TurnoffBluetoothand/orWiFiiftheyarecurrentlyenabled.
2. Immediatelysaveyourcurrentdata.
3. Pluginorturnoffthedevice.
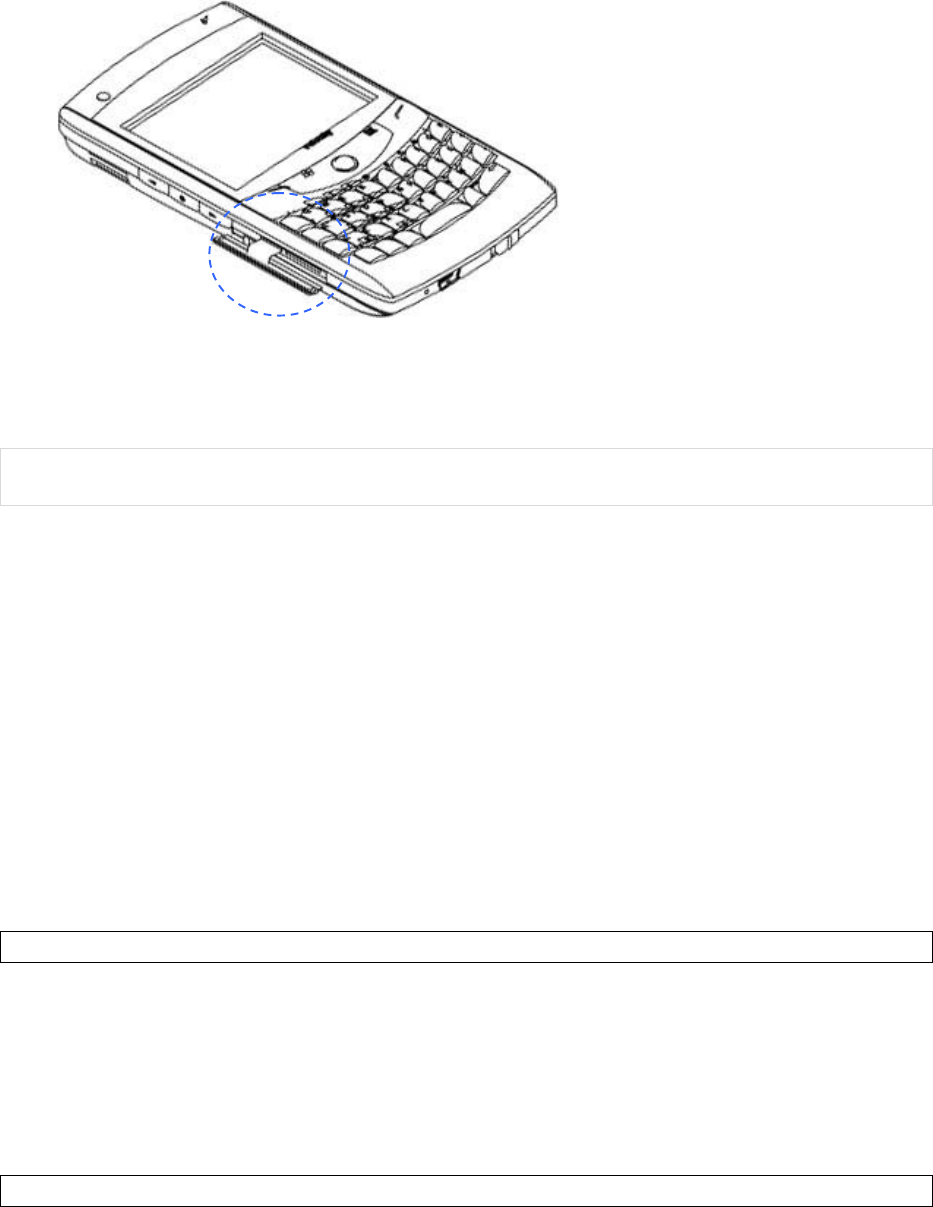
ChargingtheBattery
1. Tochargethebattery,makesurethebatteryissittinginthebatteryslotcorrectly.
2. Dooneofthefollowing:
ConnectthedevicetotheACadapterandplugtheACadapterintoapoweroutlet.
ConnectthedevicetoaPCwiththeUSBcable(suppliedwiththedevice).
NOTE:TochargethedevicewiththeUSBcable,youmustconnectthedevicetoafunctioningUSBport
onaPCthatispoweredon.
IMPORTANT:Forsafetyreasons,chargingwillnotoccurattemperaturesbelow0˚C/32˚Forabove
40˚C/104˚F.

13
Chapter2:BasicOperations
2.1GettingStarted
TurningOn/OfftheDevice
a) Whenthedeviceisoff:pushthepowerslideratthetopofthedevicetotherighttoturnonthe
device.
b) Whenthedeviceisturnedon:pushthepowerslidertotherighttoswitchthedeviceintosleep
mode.Youcanstillreceivephonecallsandmessageswhenthedeviceisinsleepmode.
c) Whenthedeviceisinsleepmode:pushthepowerslidertotheright.
d) Topoweroffthedevicecompletely,pushthepowerslidertotherightandholdfor3seconds
andthesystemwillaskyoutoconfirmbeforepoweringoffthedevice.
Calibratingthedevice
Calibratingthedeviceensuresthatthesystemwillrespondtoyouron‐screentouchinteractionsinthe
correctly.Whenyouturnonthedeviceforthefirstoftime,youwillbeaskedtocalibratethedevice.If
youwouldliketore‐calibratethedevice,followthestepsbelow:
1. SelectStartSettingsSystemtabScreen.
2. SelecttheAlignScreenbuttonandfollowtheon‐screeninstructions.
14
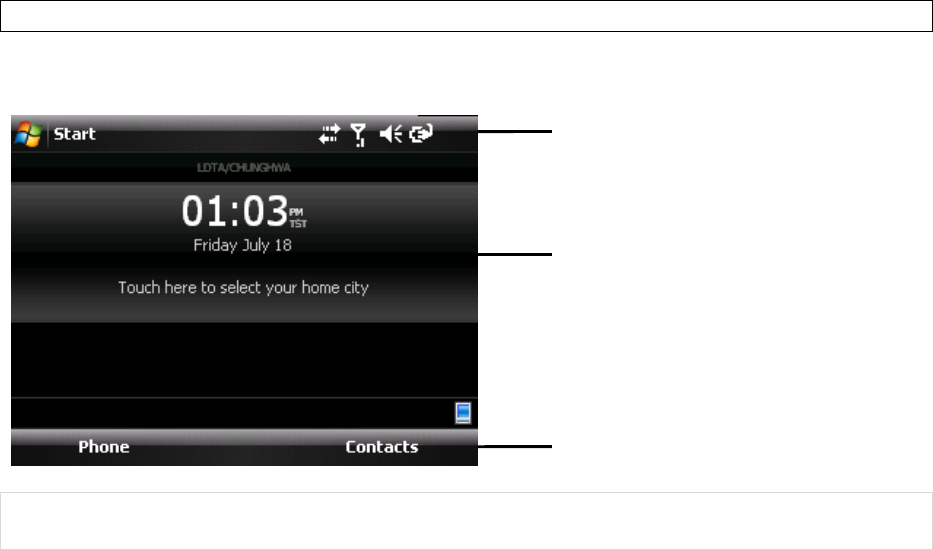
2.2TodayScreen
TodayScreen
TheTodayscreenisyourhomescreen.Itdisplayssystemstatusandshowsyouthetimeandweatherin
thecitythatyouselect.
NOTE:YoucanaccesstheTodayscreenbybringinguptheVelocitytoolbarandselectingtheTodayicon,
orbyselectingStartTodayorbypressingtheENDbutton.
StatusBar
Location
Softkeys
15
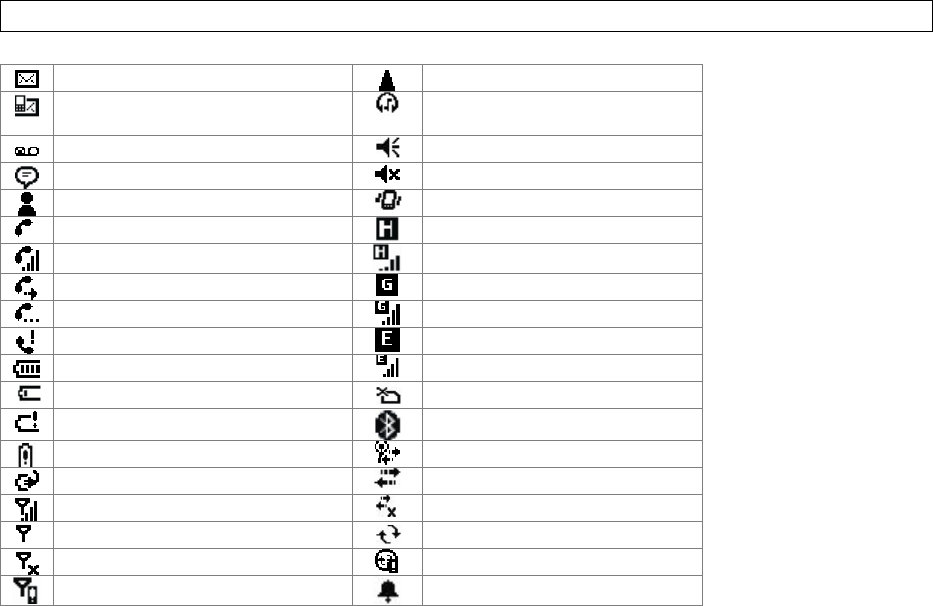
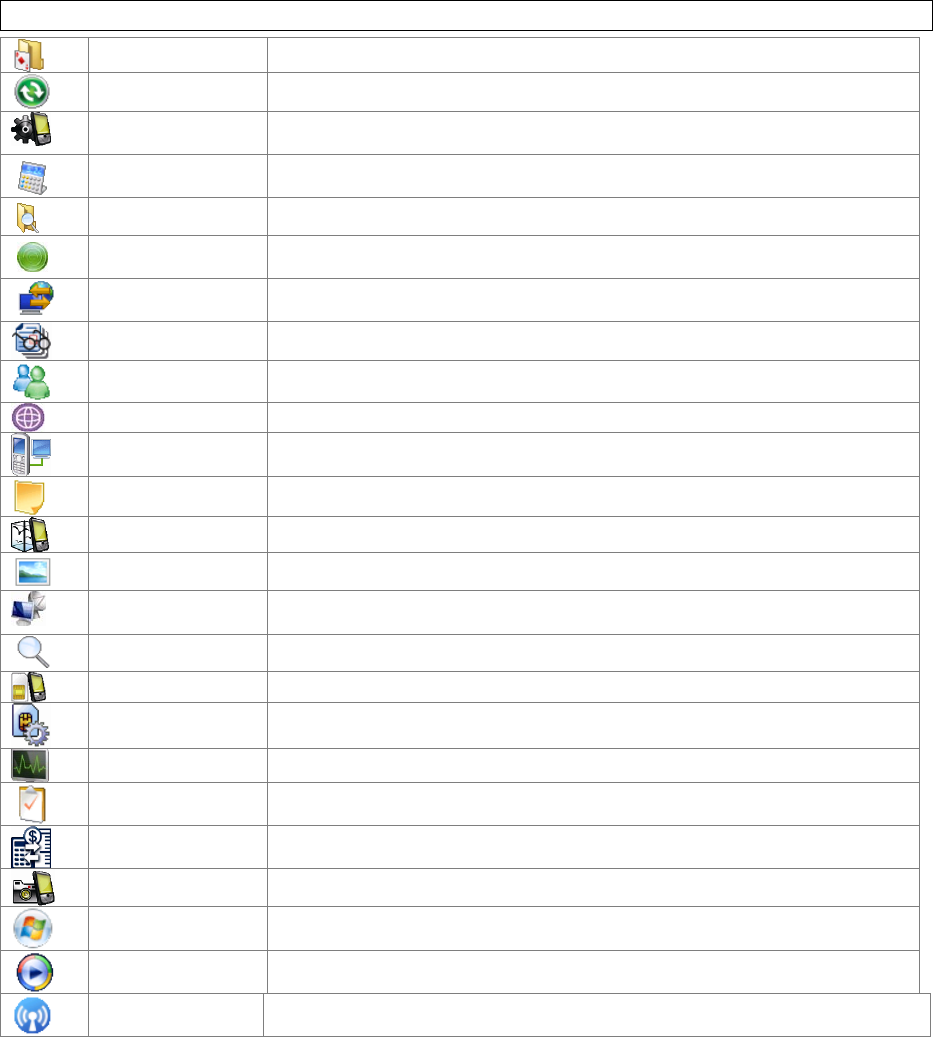
StatusBarNotificationIcons
Newe‐mailRoaming
NewText(SMS)orMultimedia(MMS)
messageBluetoothheadsetdetected
NewVoicemailmessageRingeron
NewnotificationsRingeroff
NewinstantmessageRingerinvibrationmode
VoicecallHSPAavailable
VoicecallinprogressHSPAinuse
CallsarebeingforwardedGPRSavailable
CallonholdGPRSinuse
MissedcallEDGEavailable
BatteryfullEDGEinuse
LowbatteryNoSIMcardinstalled
BatteryalertBluetoothconnectioninprogress
ExtremelylowbatteryWi‐Ficonnectioninprogress
BatterychargingDataConnectionisactive
SignalstrengthConnectionisnotactive
NosignalSynchronizationinprogress
FlightmodeSynchronizationerror
NoserviceAlarm
16
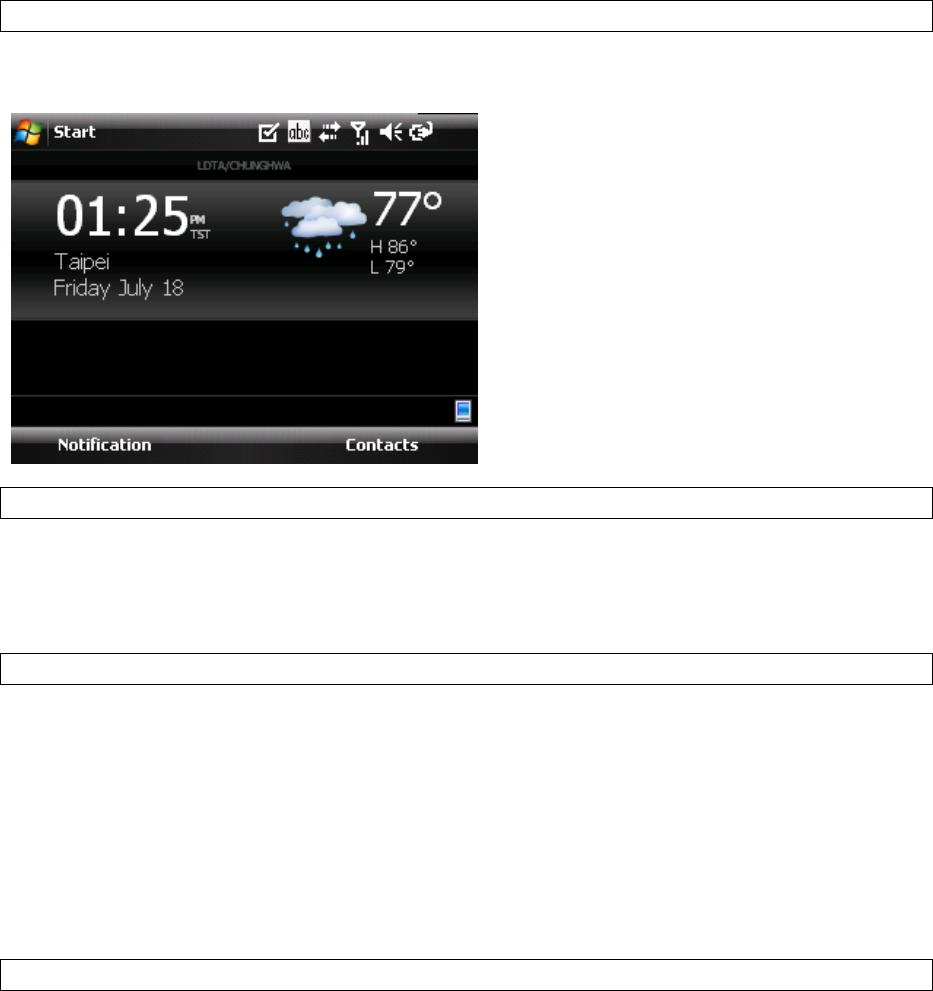
Location
Locationallowsyoutoseethetimeandweatherincitiesthatareimportanttoyourightfromyour
homescreen.
AddingLocations
Youcanaddlocationsthroughthelocationsettings.Toaccessthelocationsettings,pressandholdon
thelocationinformationpanelonyourhomescreen.SelectAddaCity,youcanthenenteracitydirectly
orlocatenearbycitiesviaGPS.
SwitchingLocations
Ifyouhavemorethanonelocation,youcanswitchthelocationbyslidingyourfingerleftorrightonthe
locationpanel.
2.3VOTA(VelocityOvertheAir)
VOTA(VelocityOvertheAir)isanover‐the‐airupdatessystemthatusesyourdevicesdataconnectionto
downloadandinstallsoftwareupgradesandnewfeatures.VOTAwillautomaticallyinstallthenecessary
filesandcleanuptheinstallationfilesattheendoftheupdateprocess.
InstallingaVOTA(VelocityOvertheAir)Update
1. AmessagewillappearinformingyouthataVOTAupdateisavailable.SelectInstall.
2. Forverification,selectInstalltocontinue.
3. VOTAwillbegindownloadingtheinstallationfiles.
4. VOTAwillbegintheinstallaftertheinstallationfileshavebeendownloaded.
5. VOTAwillcleanuptheinstallationfilesaftertheinstalliscomplete.
6. Theinstallationisnowcomplete.SelectClosetoexit.
17
2.4VelocityToolbar
TheVelocitytoolbarallowsyouto:
Createacustomized,quickaccesstooltoapplicationsyouprefer.
Closeopenapplications.
Tolaunchthetoolbar,presstheVelocitybuttononthesideofthedeviceorswipeyourfingertipfrom
theVelocitylogobelowthescreentowardthemiddleofthescreen.
Tocustomizethetoolbar,pressandholdtheVelocitybuttontoshowallapplicationsfirst.Pressand
holdaprogramiconandthendragitinordertoadd/removeitto/fromthetoolbar.
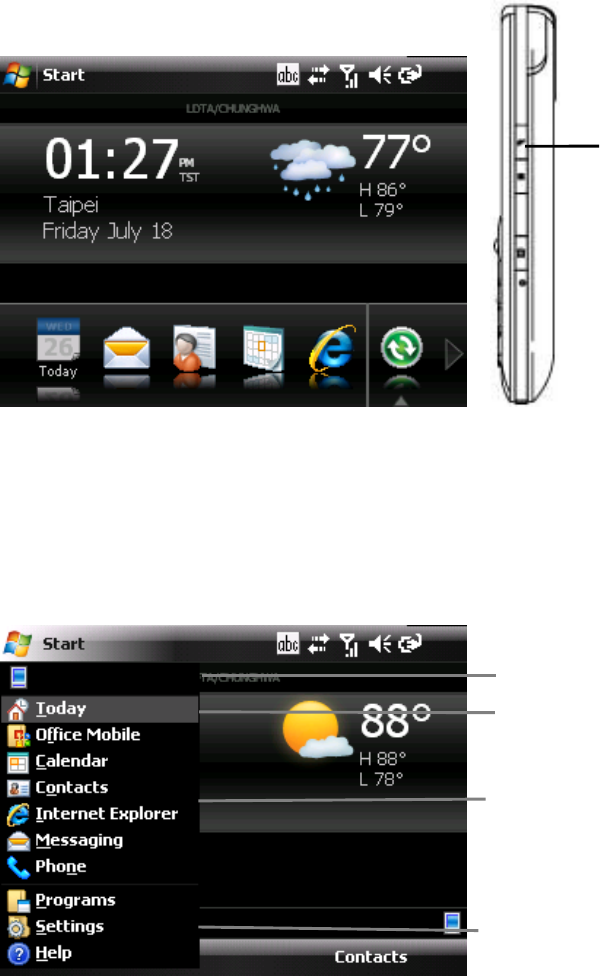
2.5StartMenu
TheStartmenuisaccessiblebyselectingtheStartbuttonatthetopleftofthescreenandisdividedinto
4mainfunctionsasfollow:
Recentlyusedapplications
Todayscreen
VelocityButton
Primaryapplications
MoreapplicationsandHelpinformation
18
2.6Programs,SettingsandIcons
Programs
GamesTwogamesareinstalledonthedevice:BubbleBreakerandSolitaire.
ActiveSyncSynchronizeinformationbetweenthedeviceandaPCorExchangeServer.
AutoConfigSelectyourmobileoperatormanuallyandautomaticallyapplythecorrectdatasettings
forthatoperator.
CalculatorPerformbasiccalculationssuchasaddition,subtraction,multiplicationanddivision.
FileExplorerOrganizeandmanagethefilesandfoldersonthedevice.
GettingStartedBriefintroductionsandshortcutsofcommonuseditems.
InternetSharingUsethedeviceasanexternalmodemforaPC,connectingthroughaUSBportor
Bluetooth.
JETCETPDF5ViewPDFsonthedevice.
MessengerSendandreceiveinstantmessageswithyourWindowsLiveMessengercontacts.
MIDletManagerInstallJavaapplicationsfromlocalfilesoranetwork.
ModemLinkSharethedeviceconnectionwithaPCorlaptop.
NotesTakenotesonthedevice.
PhoneProfileCreateandsetprofiles.
Pictures&VideosOrganizeandsharepicturesandvideos.
RemoteDesktop
MobileCreateaconnectionbetweenthedevicesandaWindowTerminalServer.
SearchSearchthedevice.
SIMManagerLetsyoumanageyourSIMcard.See“5.5UsingSIMManager”fordetails.
SimToolkitAsoftwaretoolkitthatcomeswiththeSIMcard.Thefunctionalityofthistoolkit
dependsonyourSIMcardprovider.
TaskManagerManagecurrentlyrunningprograms.
TasksCreate,editandsynchronizetasks.
UnitConverterConvertcommonlyusedmeasurements.
VCameraTakepicturesandvideos.
WindowsLiveAccessSpaces,InstantMessengerandWindowsLiveservices.
WindowsMediaPlaymusicandvideo.
WirelessManagerTurnon/offwireless,Bluetoothandphonefeatures.
19
Settings
Personal
ButtonsConfigurebuttonactions.
InputConfigureinputmethods.
LockSetapasswordtounlockthedevice.
MenusConfiguretheStartmenu.
OwnerInformationEnterandeditownerinformation.
PhoneConfigurethePhonefeatures.
Sounds&
NotificationsConfigureprogramandeventsounds.
TodayConfiguretheTodayscreenitemsandtheme,includingthebackgroundwall‐paperand
devicecolor‐scheme.
System
AboutWindowsMobileinformationanddevicename.
BacklightConfigurethedisplaybacklightandadjustthebrightnessofdisplayandkeypad.
CertificatesManagepersonalandrootcertificates.
Clock&AlarmsSettimeandalarms.
CustomerFeedbackSendvolunteered,non‐personalinformationabouthowyouuseWindowsMobile
softwaretoMicrosoft.
DeviceInformationDisplayinformationaboutdevicesystem,softwareandhardware.
EncryptionEncryptfilesastheyareplacedonastoragecard.
ErrorReportingEnableordisablesthein‐builterrorreportingsystem.
ExternalGPSLetyoudefinetheportsusedforGPSconfiguration.
FactoryResetResetallsettingstothemanufacturerdefaults.
ManagedProgramsListprogramsthathavebeeninstalledremotelybyyoursystemadministrator.
MemoryCheckavailabledevicememoryandmemorycardinformation.
PowerPowermanagementsettings.
RegionalSettingsConfigurethedevice’slocale.
RemoveProgramsAllowyoutoviewandremoveinstalledapplications.
ScreenLetyoualignthescreen.See“Calibratingthedevice”inChapter2fordetails.
TaskManagerHelpyoutomanagecurrentlyrunningprograms.
TV‐OUTConfigSelectyourTVoutputtypehere.
WindowsUpdateLetyoudownloadWindowsMobileupdatessuchascriticalsecurityfixes.
20
Connections
BeamTurnon/offthebeamfeature.
BluetoothConfigureBluetoothsettings.See“8.3UsingBluetooth”fordetails.
ConnectionsConfigurethedevice’sconnections.
DomainEnrollAllowyoutoconnectthedevicewithcompanyresources.
NetworkCardsConfigurethenetworkadapter.WhenconnectingtoWi‐Fi,youcanconfigurewireless
networkshereaswell.
USBConnectionYoucansetyourdevicetosynchronizewithaPCorfunctionasacardreaderwhenitis
connectedtoyourPCthroughtheUSBport.
Wi-FiNetworkDisplaydetailedinformationforaconnectedWi‐FiNetwork.YoucanchangeWi‐Fi
Networksettingshereaswell.
WirelessManagerTurnon/offwireless,Bluetoothandphonefeatures.
2.7InputMethods
Thedevicecontains4softwareinputmethods:keyboard,LetterRecognizer,BlockRecognizerand
Transcriber.
Keyboard
Letter/BlockRecognizer
Transcriber
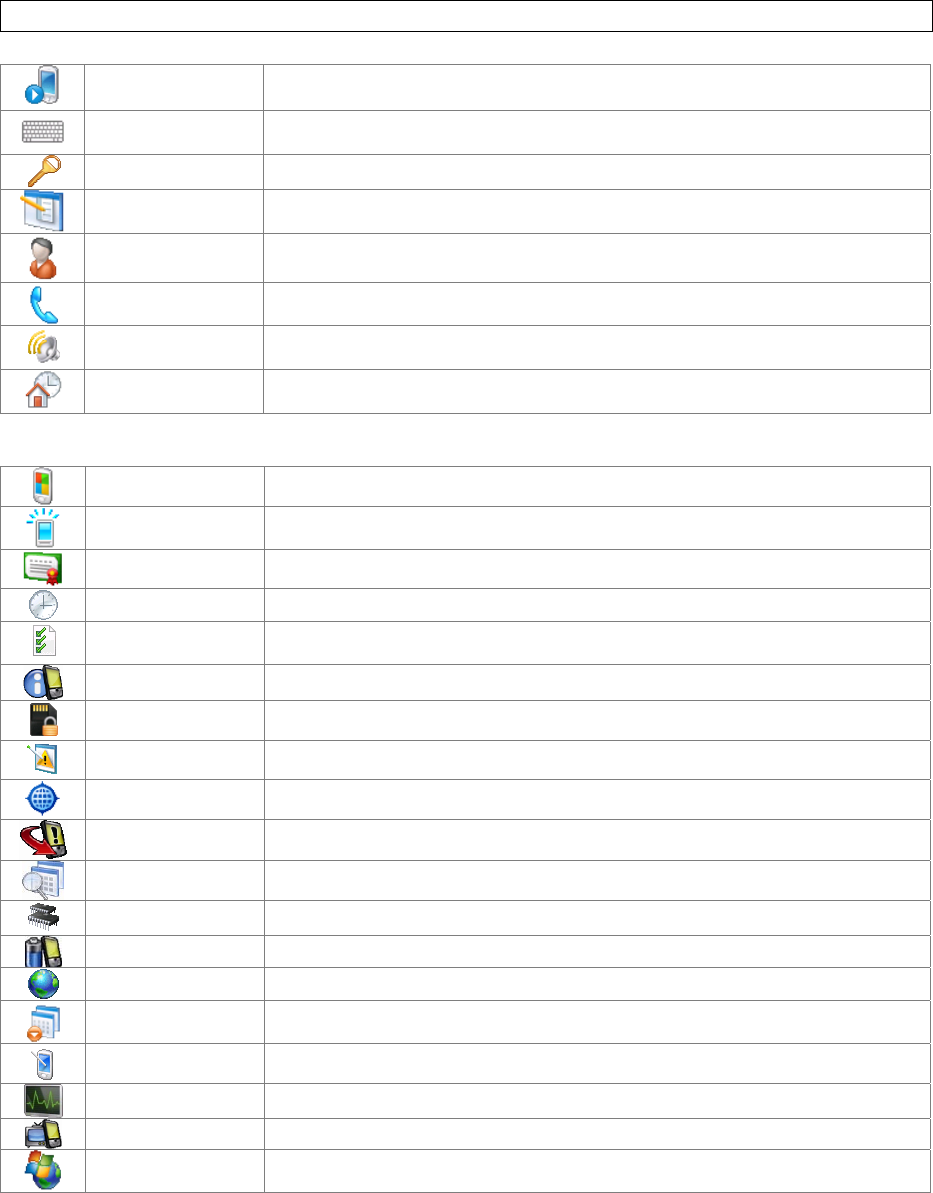
Keyboard
1. Selectthekeyboardicon inthecenterofthebottommenubartolaunchthekeyboard.If
thekeyboardisnottheselectedinputmethod,selectthearrownexttothekeyboardicon
andselectKeyboard.
2. Selectthekeysontheon‐screenkeyboardtoentertextordoanyofthefollowing:
Selectontheon‐screenkeyboardtoentercapitalletters.
Selectontheon‐screenkeyboardtoenteraccentedletters.
Selectontheon‐screenkeyboardtoentersymbolsandnumbers.
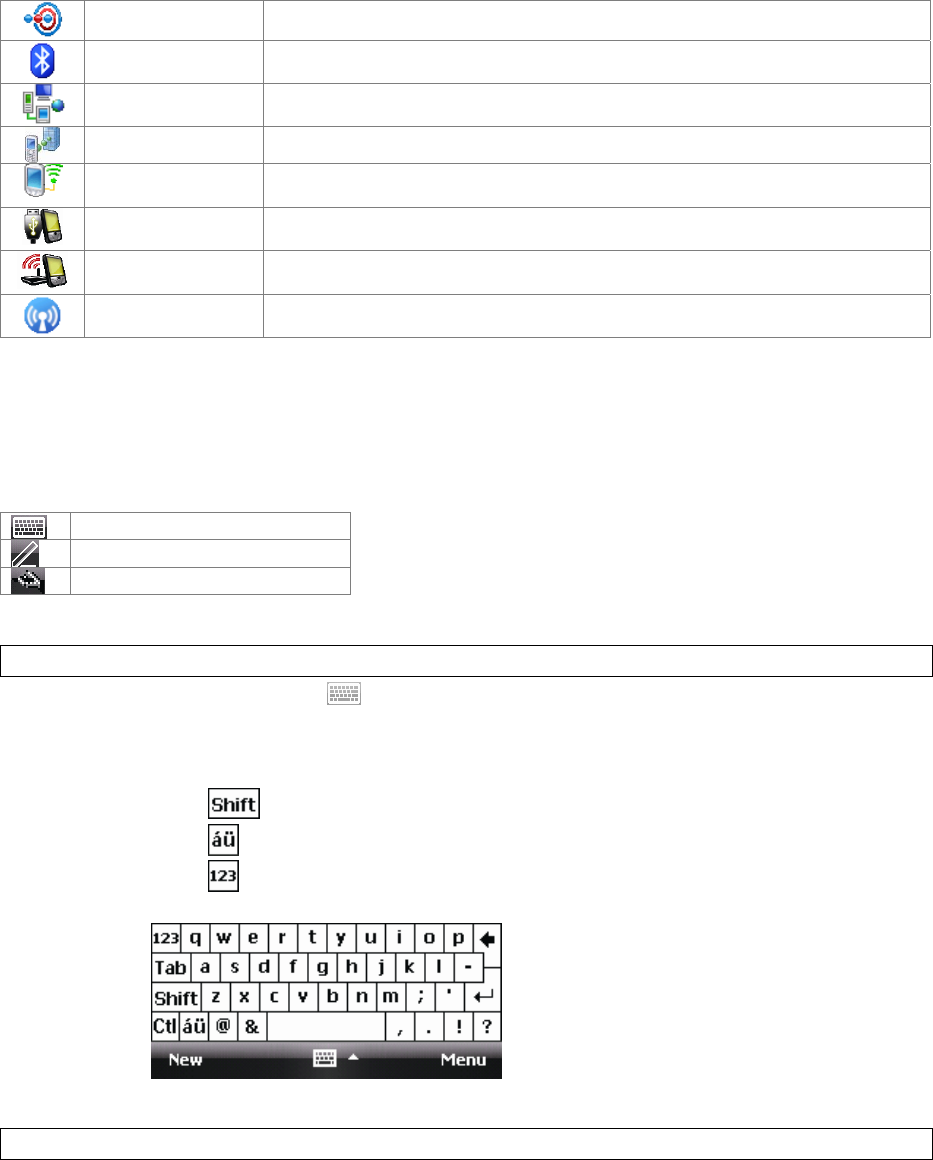
LetterRecognizer
LetterRecognizerrecognizesoneletter,numberorsymbolatatime.
21
TolaunchLetterRecognizer,selecttheinputmethodselectorarrow(theupwardarrow
nexttotheinputmethodicon)andselectLetterRecognizer.
Writeuppercaselettersintheleftrecognitionarea(theABCbox).
Writelowercaselettersinthemiddlerecognitionarea(theabcbox).
Writenumbersandsymbolsintherightrecognitionarea(the123box).
BlockRecognizer
BlockRecognizerrecognizesletterswritteninonestroke.
TolaunchBlockRecognizer,selecttheinputmethodselectorarrow(theupwardarrow
nexttotheinputmethodicon)andselectBlockRecognizer.
Writelowercaselettersinthetextrecognitionarea(theabcboxontheleft).
Writenumbersandsymbolsinthenumericrecognitionarea(the123boxontheright).
Toinputsymbols,selectanyrecognitionarea,textornumeric,onceandwritesymbols.
NOTE:Select?inLetterorBlockRecognizertoseeademoonhowtowriterecognizablecharacters.
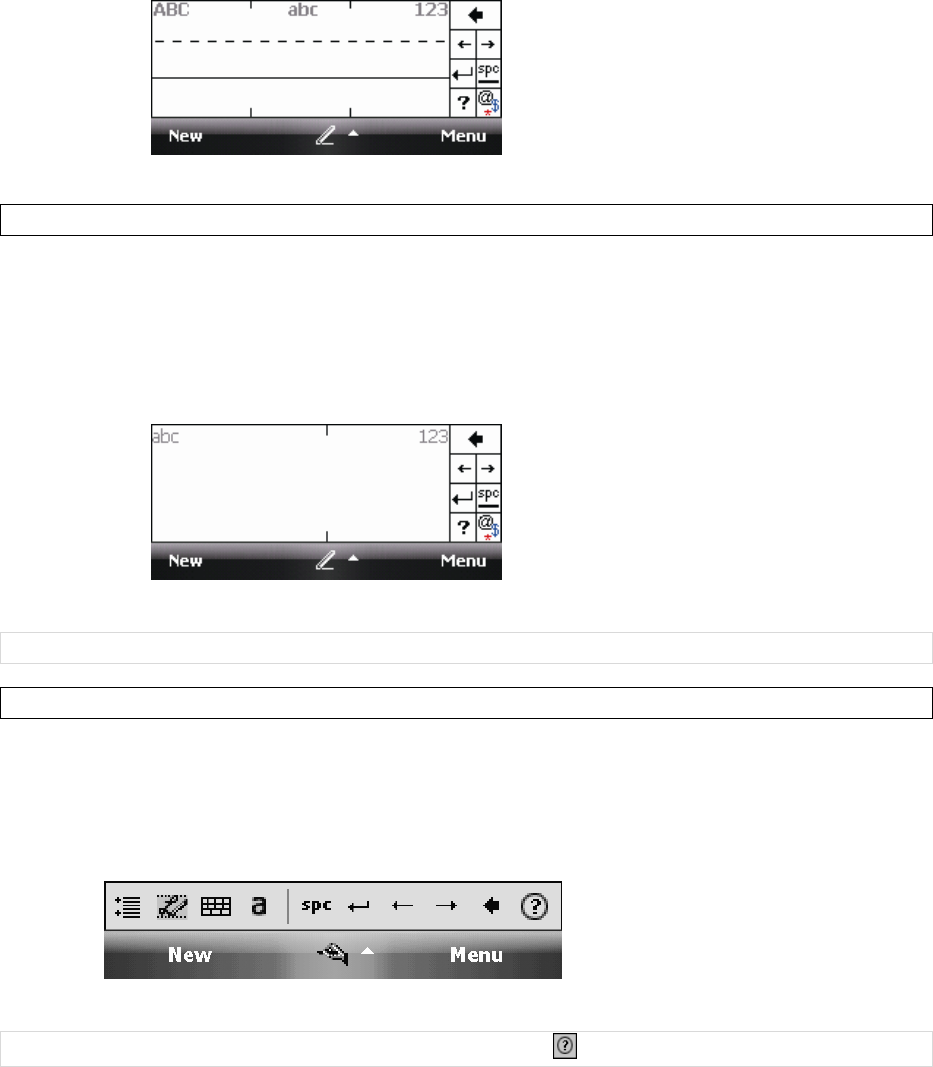
Transcriber
Transcriberrecognizeshandwritingincursiveand/orprint.Itusesthefullscreenasitsrecognitionarea.
Itinterpretsthemovementofthestylusonthescreenasyouwrite.
TolaunchTranscriber,selecttheinputmethodselectorarrow(theuparrownexttotheinput
methodicon)andselectTranscriber.
Writeanywhereonthescreen.
NOTE:TheTranscribercomeswithdetailedhelppages.Selectifyouneedfurtherassistance.
22
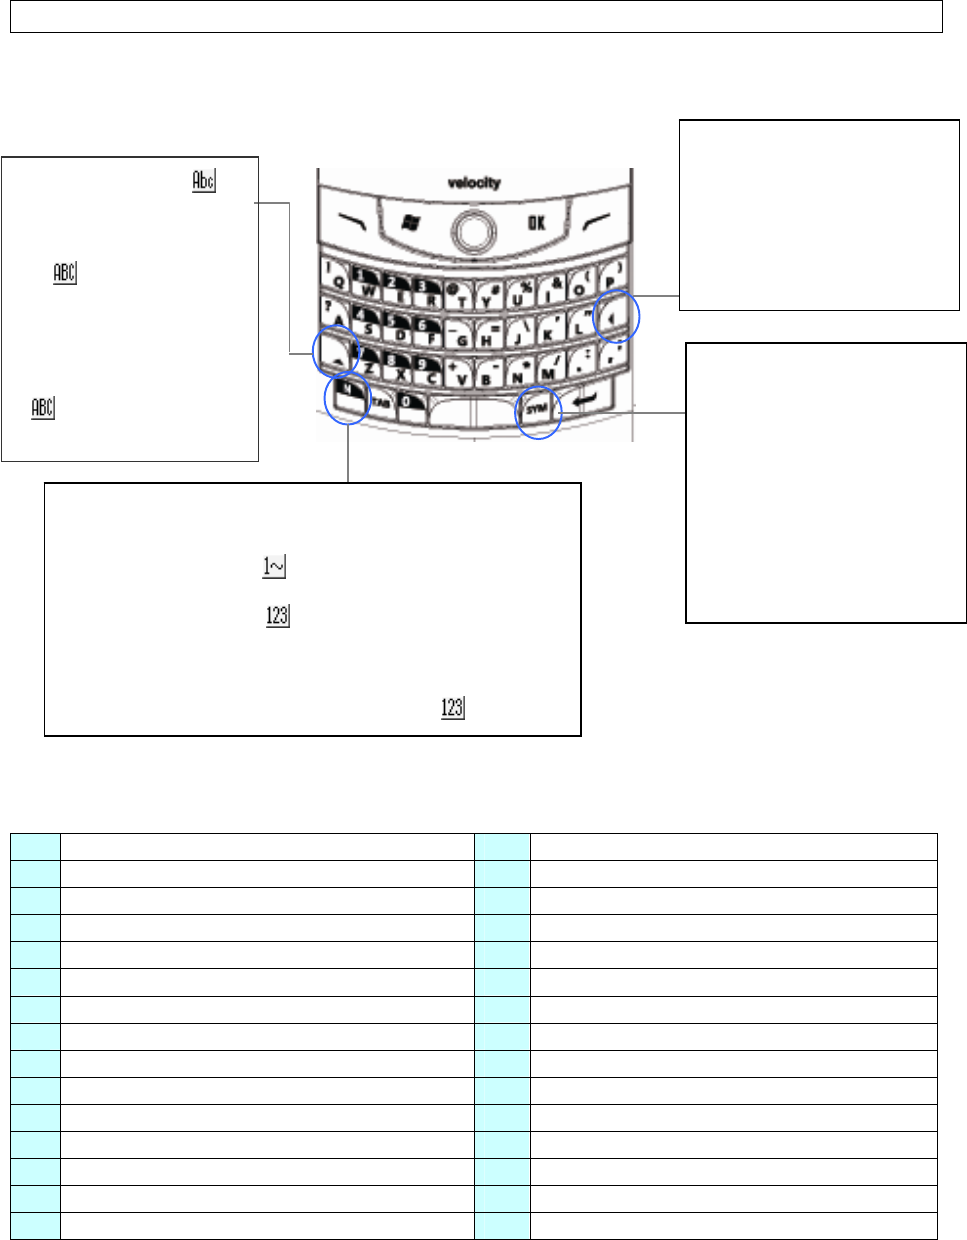
HardwareKeyboard
Otherthantheon‐screenkeyboard,thisdeviceisequippedwithaQWERTYkeyboard.Pleaseseebelow
fortipsofusingtheQWERTYkeypad.
Correspondingletters/symbolsforeachcharacter:
aàáâäåæãąă OÒÓÔÕÖŐØŒ
AÀÁÂÄÅÆÃĄĂ pþ
cçćĉ©PÞ
CÇĆĈ©r®
dðR®
DĐ sßşš
eèéêëę SߪŠ
EÈÉÊËĘ tț
iìíîïĩij TȚ
IÌÍÎÏĨIJ uùúûüűũµ
lł UÙÚÛÜŰŨµ
LŁ yý
nñYÝ
NÑzźż
oòóôõöőøœZŹŻ
(1) Pressthiskeyonce(),
thefirstletteryouenter
willbecapitalized.
(2) Pressingthiskeytwice
(),alllettersyouenter
willbecapitalized.
(3) Holddownthiskeyand
pressanotherkeyatthe
sametimetoentercapital
lettersconstantly.
Inmode,pressthiskeyagain
toenterlowercaseletters.
Pressthiskeytoerasetheletterto
theimmediateleftofthecursor.
Pressthe“FN”keyonceandthen
pressthiskeytodeletethefirst
letterontherightsideofthe
cursor.Todeletelettersconstantly,
holddownthe“FN”keyandpress
thiske
y
atthesametime.
Youcaninputsymbolsand
accentedlettersbyusingthiskey.
Afterpressingacharacter,press
the“SYM”keyrepeatedly,youcan
seeallaccenttypesofthis
characterbeingdisplayedin
sequencecyclically.Stoppressing
the“SYM”keywhilethedesired
charactershows.Pleaserefertothe
tablebelowforcorresponding
symbolsandaccentedlettersfor
eachcharacter.
The“FN”keyisusedtoaccessthesymbolsandnumbersonthe
keypad.Youcanchooseanyofthethreemethodstoinput
symbols/numbers:
(1)Pressthe“FN”keyonce(),thenextcharacteryouenterwillbea
symbolornumber.
(2)Pressthe“FN”keytwice(),youcanthenenternumbersand
symbolsconstantly.
(3)Holddownthe“FN”keyandpressanotherkeyatthesametimeto
enteritscorrespondingsymbol.
Toreturntoenterletters,pressthe“FN”keyagaininmode.

23
Chapter3:SynchronizingInformation
ActiveSyncandWindowsMobileDeviceCenter(WMDC)synchronizeinformationonthedevicewith
informationonyourPCorExchangeserver.ActiveSyncworksoncomputersthathavetheWindowsXP
OperatingsystemswhileWMCDworksoncomputersthathaveWindowsVista.
Specifically,youcanuseActiveSyncorWMCDto:
SynchronizeOutlooke‐mail,contacts,calendarortasksonyourphonewithyourPC.
Synchronizepictures,videoandmusicbetweenthedeviceandyourPC.
SynchronizeOutlooke‐mail,contacts,calendarappointmentsandtasksonyourphone
directlywithExchangeServer.
CopyfilesbetweenyourphoneandyourPCwithoutsynchronizing.
Selectwhichtypesofinformationaresynchronizedandspecifyhowmuchinformationis
synchronized.Forexample,youcanchoosehowmanyweeksofpastcalendarappointments
tosynchronize.
3.1InstallingandSettingupActiveSync
IMPORTANT:BesuretoinstallActiveSynconthePCbeforeconnectingthedevicetoit.
1. InstallActiveSynconyourPC,asdescribedontheWindowsMobile™GettingStartedDisc.
Aftersetupcompletes,theSynchronizationSetupWizardautomaticallystartswhenyou
connectthedevicetothePC(throughaUSBcableorBluetooth).
2. Followtheinstructionsonthescreentocompletethewizard.IntheSyncSetupWizard,you
can:
CreateasynchronizationrelationshipbetweenyourPCandthedevice.
ConfigureanExchangeServerconnectiontosynchronizedirectlywithExchangeServer.
TosynchronizethedevicewithExchangeServer,obtainthenameoftheExchangeServer,
yourusername,passwordanddomainnamefromyouradministratorbeforecompleting
thewizard.
Chooseinformationtypestosynchronize.
3. Oncesynchronizationcompletes,youcandisconnectyourphonefromyourPC.
3.2InstallingandSettingupWMDC
TheWindowsVistaoperatingsystemincludesthebasicWMDCapplicationpartiallyinstalled,youcan
fullyinstallWMDConyourcomputerfromtheGettingStartedDisc.
1. FollowtheinstructionontheWindowsMobile™GettingStartedDisctoinstallWMCDonyour
PC.
2. ConnectthedevicetoyourPC,WMDCwillstartautomatically.
3. DoeitherofthefollowingonthehomescreenofWMDC:
ClickSetupyourdevicetoselectitemsthatyourwanttosynchronize.WMDC
synchronizesthedeviceautomaticallywhenyoufinishthesetup.
ClickConnectwithoutsettingupyourdevicetotransferfiles,checkupdatesorexplore
thedevicewithoutsynchronizingOutlookinformation.
24
3.3SynchronizingInformation
StartingandStoppingSynchronizationManually
1. Onthedevice,selectStartProgramsActiveSync.
2. Tostartsynchronization,selectSync.
3. Tostopsynchronizing,selectStop.
IMPORTANT:Youcanstartandstopsynchronizationonlyifthedevicealreadyhasasyncrelationship
withaPCorExchangeServer.SomeAnti‐VirussoftwaremayconflictwithActiveSync.
ChangingInformationisSynchronized
ActiveSyncandWMDCsynchronizealimitedamountofinformationbydefaulttosavestoragespaceon
yourphone.Youcanchangetheamountofinformationthatissynchronizedbyperformingthefollowing
steps.
1. OntheTodayscreen,clickStartProgramsActiveSync.
2. SelectMenuOptions.
3. Dooneormoreofthefollowing:
Selectthecheckboxfortheitemsyouwanttosynchronize.Ifyoucannotselecta
checkbox,youmighthavetoclearthecheckboxforthesameinformationtypeelsewhere
inthelist.
Clearthecheckboxforanyitemsyouwanttoexclude.
Tocustomizesynchronizationofacomputer,selectthecomputernameandthenclick
Settings.
Tocustomizesynchronizationofparticularinformation,selecttheinformationtypeand
thenclickSettings.
Tostopsynchronizingwithonecomputercompletely,selectthecomputernameandclick
Delete.
IMPORTANT:Outlooke‐mailcanbesynchronizedwithonlyonecomputerandoneExchangeActiveSync
server.
3.4ChangingSettingsforanInformationType
IMPORTANT:Beforechangingsettingsforaninformationtypeonthedevice,disconnectthedevice
fromyourPC.
1. SelectStartProgramsActiveSyncMenuOptions.
2. Selectoneoftheinformationtypes(e.g.E‐mail,TasksorCalendaritems).
3. Dooneofthefollowing:
Tovieworchangesettingsforaninformationtype(whenavailable),selectSettings.
TovieworchangesettingsforacomputerorExchangeServer,selectSettings.
4. Changetheamountofinformationtobesynchronizedorothersettings.
5. SelectOK(orFinishintheExchangeServersettingswizard).

25
3.5SynchronizingwithExchangeServer
TosetupthedevicetosynchronizedirectlywithExchangeServer,youwillneedtogetthenameofthe
serverandtheserverdomainnamefromyourserviceproviderorsystemadministrator.Youmustalso
knowyourExchangeusernameandpassword.
1. Onthedevicescreen,selectStartProgramsActiveSyncMenuConfigureServer.Ifyou
havenotyetsetupsynchronizationwithExchangeServer,thismenuitemwillsayAddServer
Source.
2. EnteryourEmailaddressandthentapNext.
3. Enteryourusername,password,anddomainname,thenselectNext.Ifyouwantthedevice
tosaveyourpasswordsothatyouwillnotneedtoenteritoneachconnection,selecttheSave
passwordcheckbox.
4. InServeraddress,enterthenameoftheserverrunningExchangeServer,thenselectNext.
SelectThisserverrequiresanencrypted(SSL)connectionifyouwanttoreceivepersonal
informationmoresecurely.However,ifyouselectoptionthisandyourISPdoesnotsupportan
SSLconnection,youwillbeunabletoreceivee‐mail.
5. Selectthecheckboxesforthetypesofinformationitemsthatyouwanttosynchronizewith
ExchangeServer.
6. Tochangeavailablesynchronizationsettings,selectthetypeofinformationandselectSettings.
7. Tochangetherulesforresolvingsynchronizationconflicts,selectMenuAdvanced.
8. TapFinish.
NOTE:YoucanalsouseActiveSyncorWMDCtosetupthedevicetosynchronizeremotelywiththe
ExchangeServer.ThesetupwizardisstartedwhenyouconnectthedevicetoyourPCafterinstalling
ActiveSyncorWMCDonthePC.
3.6SynchronizingviaBluetooth
ConnectingtoaPCUsingBluetooth
1. YourPCmustbeequippedwithasuitableBluetoothradio.
2. FollowtheinstructionsinActiveSyncHelponthePCforconfiguringBluetoothonyourPCto
supportActiveSync.
3. Onthedevice,selectStartProgramsActiveSync.
4. SelectMenuConnectviaBluetooth.EnsurethatthedeviceandPCarewithincloserange.
5. IfthisisthefirsttimeyouhaveconnectedtothisPCviaBluetooth,youmustcompletethe
BluetoothwizardonthephoneandsetupaBluetoothpartnershipwiththePCbefore
synchronizing.Thisprocesswilltypicallyinvolveexchangingapass‐keybetweenthedeviceand
thePC.
6. SelectSync.
7. Whenfinished,selectMenuDisconnectBluetooth.
NOTE:Topreservebatterypower,turnoffBluetoothafterthesynchronizationiscompleted.
26
Chapter4:Phone
4.1MakingaCall
ThePhoneScreen
Fromthephonescreen,youcanseedialrecordsandContactsandchoosetomakeavideoorvoicecall.
ToaccessthePhoneScreen,doanyofthefollowing:
PresstheSENDhardwarebutton.
SelectPhoneontheTodayscreen.
SelectStartPhone.
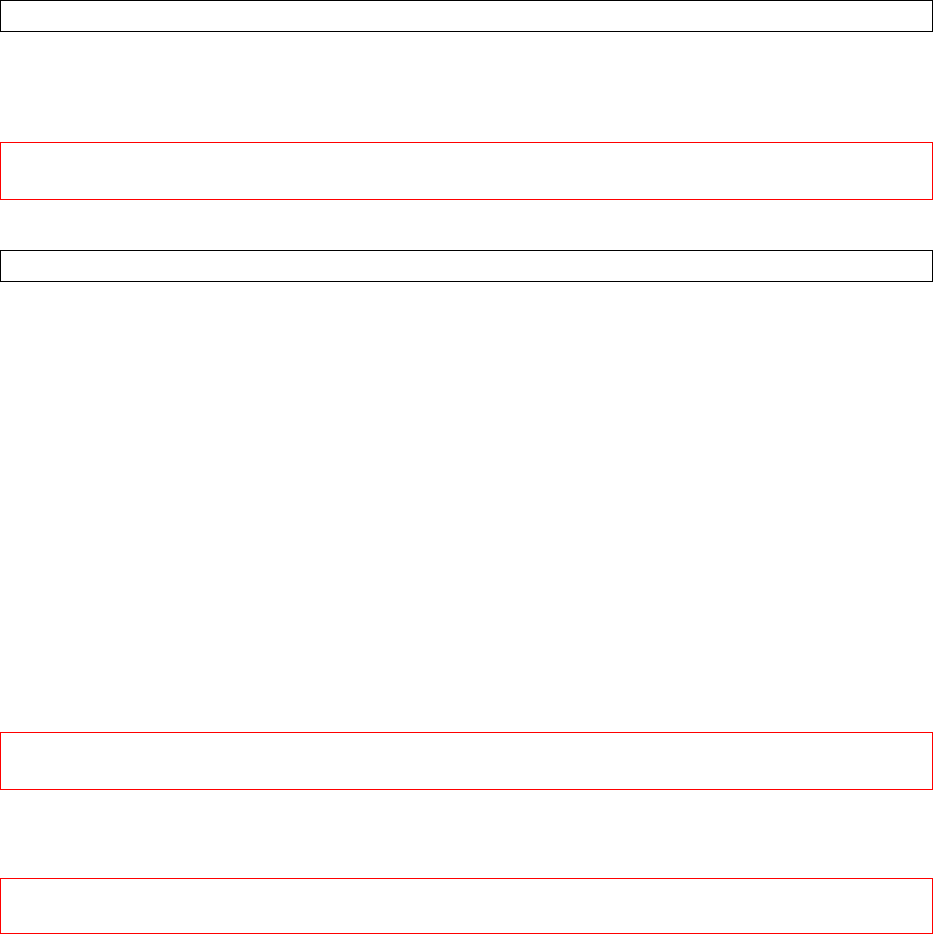
MakingaCallbyUsingthePhoneKeypad
1. OnthePhonescreen,selectKeypadifthekeypadisnotdisplayed.
2. Enterthenumbertodialusingthekeypad.
3. Selectmatchingcontactsthatcomeupinthesmartdialareatodialthatnumberand/or
contactorfinishenteringthenumberandpresstomakeavoicecallor tomakea
videocall.
Backspace
CallHistory
VideoCall
Voice Call
SmartDialArea

27
MakingaCallfromCallHistory
1. OnthePhonescreen,select todisplaycallhistoryfullscreen.
2. Scrolltothedesirednumberorcontact.PressTALKtomakeavoicecall;select
MenuVideocalltomakeavideocall.
MakingaCallfromContacts
DoeitherofthefollowingtomakeacallfromContacts:
VoiceCall.OnthePhoneScreen,selectHideKeypadtoshowallContactsonthesmartdial
area.Taponthedesiredcontactinthelistandthentaponthenumberyouwanttodial.
VideoCall.SelectContactsontheTodayscreen,scrolltothedesiredcontact,select
MenuVideocall.
MakingaCallfromSpeedDial
Youcancreatespeeddialentriesforfrequently callednumbersorfrequently accesseditems.SpeedDial
allowsyoutodialanumberbypressingasinglekey.Forexample,ifyouassignlocation2toacontactin
SpeedDial,youcansimplypressandhold2onthePhoneKeypadtodialthecontact’snumber.Speed
dialscanbecreatedonlyfornumbersthatarestoredinContacts.
OnthePhonescreen,doeitherofthefollowing:
SelectMenuSpeedDial.ScrolltothedesiredcontactandpressTALKtomakeavoicecall;
selectMenuVideocalltomakeavideocall.
SelectHideKeypadtoshowspeeddialentriesonthesmartdialarea.Scrolltothenumber
andthenpressTALK.
Tocreateaspeeddialentryforacontact
1. TapContactsontheTodayscreen.
2. Tapthecontactforwhomtocreateaspeeddial.
3. Scrolltothephonenumber(ifthereismorethanone)forwhichtocreateaspeeddial.
4. SelectMenuAddtoSpeedDial.
5. InLocation,selectthespeeddialnumbertouse.
6. SelectOKwhenfinished.
NOTE:Thefirstspeeddiallocationisgenerallyreservedforyourvoicemail.SpeedDialusesthenext
availablelocationbydefault.Ifyouwanttoplaceanumberinalocationthatisalreadyused,thenew
numberreplacestheexistingnumber.
Todeleteaspeeddialentry
1. OnthePhonescreen,selectHideKeypad.
2. Selecttheentrythatyouwanttodelete.
3. SelectDelete.

28
Receiving/RejectingaCall
Whenyoureceiveaphonecall,youhavetheoptiontoansweritorignoreit.
Toacceptanincomingcall,selectAnsweronthescreenorpressTALKtoacceptanincoming
call.
Tohangupacall,selectIgnoreonthescreenorpressEND.
NOTE:Toadjusttheearpiecevolumeduringacall,pressthevolumeup/downbuttononthephoneside
panel.Adjustingthevolumeatanyothertimetochangesoundlevelsforthephoneringer,system
notificationsandmusic.
Youcanmutethevolumeofincomingcallsbypressingandholdingthevolumedownbutton.
4.2ConfiguringthePhone
YourwirelessserviceprovidermayprovideusefulservicessuchasCallBarring,CallerID,CallForwarding,
CallWaiting,VoiceMailandTextMessagesandFixedDialing.Youcanviewandeditthesesettingsfrom
theNetwork.
ActivatingPINSecurity
MostSubscriberIdentityModule(SIM)cardsarepresetwithapersonalidentificationnumber(PIN)that
isprovidedbyyourwirelessserviceprovider.WhenPINSecurityisactivated,youneedtoenterthePIN
wheneveryouuseyourphone.
1. SelectStartSettingsPhoneRequirePINwhenphoneisused.
2. EnterthepresetPINprovidedbyyourwirelessserviceprovider.
3. SelectEnter.
NOTE:IfyourPINisenteredincorrectlythreetimes,theSIMcardwillbeblocked.Ifthishappens,you
canunblockitwiththePINUnblockingKey(PUK)obtainedfromyourwirelessserviceprovider.
ChangingtheRingTypeandRingTone
Youcanchoosehowtobenotifiedforincomingcalls.
1. SelectStartSettingsPhone.
2. IntheRingtypelist,selectthedesiredoption.
3. IntheRingtonelist,selectthesoundyouwanttouse.
4. SelectOK.
ChangingtheRingerVolume
Youcanpressvolumeupanddownontheleftsideofthedevicetochangetheringervolumeordothe
following:
1. Selectthevolumeiconinthestatusbaronthescreen.
2. Dooneofthefollowing:
Movetheslidertothedesiredvolumelevel.
SelectOn,VibrateorOfftoquicklychangeboththeringerandsystemandsettings.
29
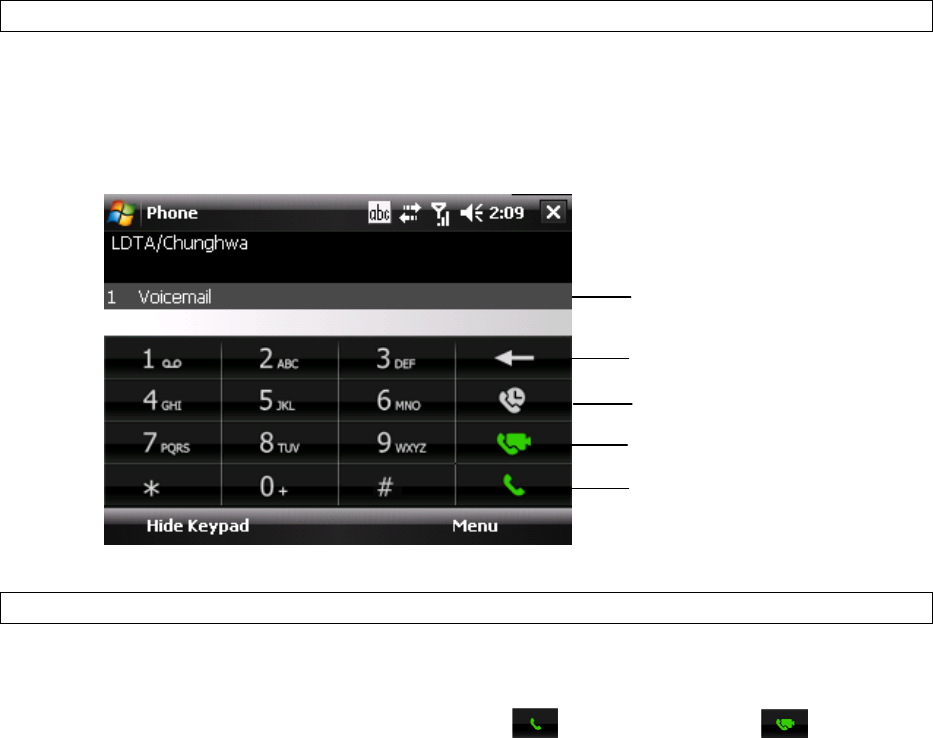
BlockingIncomingorOutgoingCalls
1. SelectStartSettingsPhoneServicestab.
2. SelectCallBarringGetSettings.
3. Choosethecallsyouwanttoblock,andselectOK.
Blockincomingcalls:Allcalls,Whenroaming,Off.
Blockoutgoingcalls:Allcalls,International,Internationalexcepttohomecountry,Off.
DisplayingCallerID
Youcanprovideawayforpeopletoseeyournumberwhenyouarecallingthem.
1. SelectStartSettingsPhoneServicestab.
2. SelectCallerIDGetSettings.
3. SelectEveryone,NooneorOnlytocontact.
CallWaiting
Whenyouareinanothercall,youwillbenotifiedofanincomingcallifthisoptionisselected.
1. SelectStartSettingsPhoneServicestabCallWaitingGetSettings.
2. SelectNotifymeorDonotnotifyme,thenselectOK.
NOTE:AnotherwayofchangingphonesettingsistoselectMenuOptionsServicesfromthePhone
keypad.
TimeUpdate
Youcanhavethedeviceupdatethetimezoneandclockautomaticallywhenitconnectstoawireless
serviceprovider’snetwork.(Notallserviceproviderssupportthisfunction,pleasecontactyourservice
providerfordetails.)
SelectStartSettingsPhoneTimeUpdatetab,thenselectUpdatetimezoneandclock
automatically(NITZ).
30
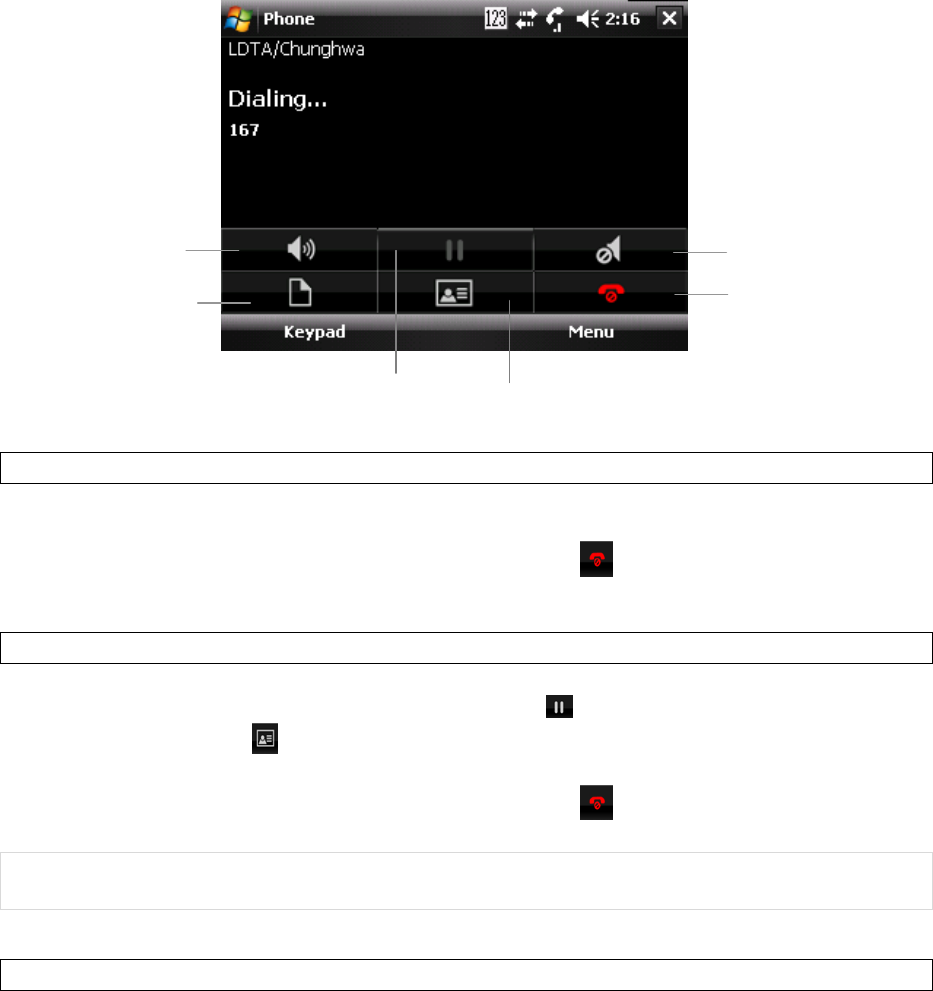
4.3VoiceCallIn‐CallOptions
Thedeviceprovidesvariousoptionsformanagingmultiplecallsatthesametime.Youarenotifiedwhen
youhaveanotherincomingcall,andyouhavethechoiceofignoringoracceptingthecall.Ifyouare
alreadyonacallandacceptthenewcall,youcanchoosetoswitchbetweenthetwocallersorsetupa
conferencecallbetweenallthreeparties.
AnsweringaSecondCall
1. SelectAnswertotakethesecondcallandputthefirstcallonhold.
2. Toswitchbetweentwocalls,tapMenuSwap.
3. Toendthesecondcallandreturntothefirstcall,selectonthescreenorpresstheEND
hardwarebutton.
ConferenceCall
1. Eitherputacallonholdanddialasecondnumberoracceptasecondincomingcallwhenyou
haveoneinprogress.(Todialasecondnumber,taponthescreentoputthefirstphoneon
holdandthentaporKeypadtodialasecondnumber.)
2. TapMenuConference.
3. Toendthesecondcallandreturntothefirstcall,selectonthescreenorpressEND.
NOTE:Iftheconferenceconnecitonissuccessful,theword“conference”willappearatthetopofthe
screen.Notallserviceproviderssupportconferneccalling.Contactyourserviceproviderfordetails.
MutingtheMicrophone
Thedevice’smicrophonecanbeturnedoffduringacall.Ifyouturnoffthemicrophone,thecaller
cannothearyou.However,youcanstillhearthecaller.
SelectMuteduringacalltoturnthemicrophoneoff.
SpeakerOn/Off
Note
Mute
/
Unmute
EndCall
Contact
Hold
31
SelectUnmutetoturnthemicrophoneon.
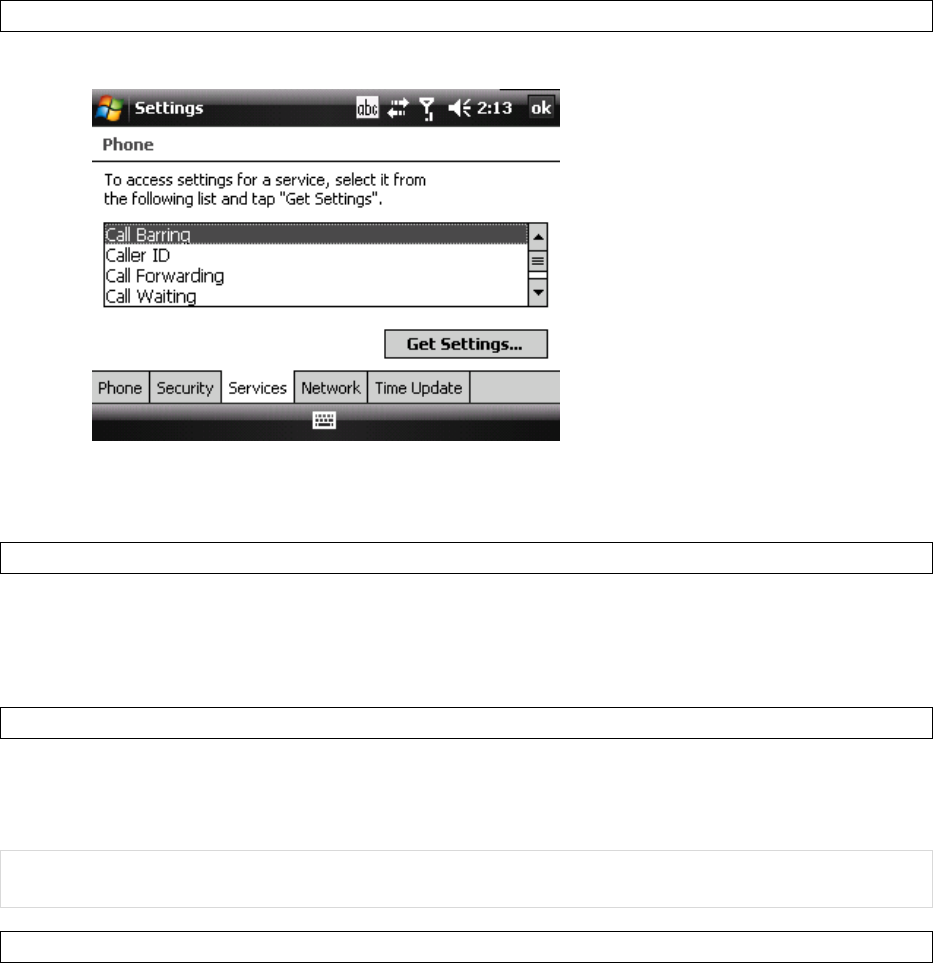
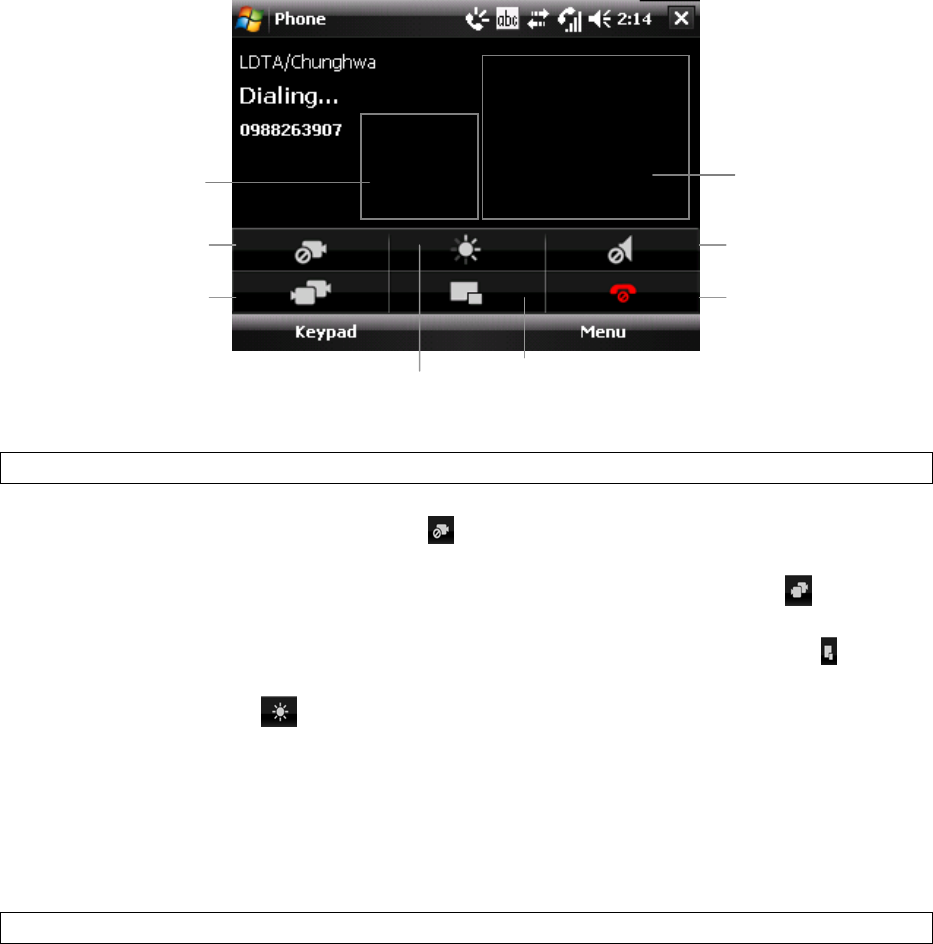
4.4VideoCallIn‐CallOptions
Wheninavideocall,youcanseeyourselfandthepersonyouaretalkingtoshowingonthescreenat
thesametime.Duringthecall,youcanchoosetoturnoffthecameraorswitchbetweentheforward
facingcameraandthemaincamera.
ChangingSettings
Turnoffcamera.Theleftwindowplaysthelocalcapturedvideofromthecameraonthe
device,toturnoffthiscamera,selectonthescreen.Youcanstillseethecapturedvideo
fromtheotherside.
Switchcamera.Toswitchbetweentheforwardfacingormaincameras,selectonthe
screen.
SwitchWindow.Toswitchthesizeofpreviewwindowandremotewindow,selectonthe
screen.
Brightness.Selectonthescreentoadjustthebrightness;therearefourlevelsfor
brightness.
NightMode.Duringacall,selectMenuNightModeOn/Offtoswitchbetweennightmode
andnormalmode.
Hands‐free.IfyouuseBluetoothheadset,selectMenuTurnHands‐freeOn/Offtoswitch
betweenspeakerandheadset.
VideoCallOptions
Youcanshowastillimagewhileturningoffthecameraandassignaringtoneforvideocall.
1. SelectMenuVideoCallOptionsonthePhonescreen.
2. InDefaultvideosetting,selecttheimagethatyouwanttodisplaywhenyou
turnoffthecamera.
CameraOn
/
Of
f
Otherperson
You
SwitchCameraEndCall
SwitchWindow
Mute/Unmute
Brightness
32
3. IfyouselectUserdefine,tapthetextboxunderFiletoviewavailablepictures
andthenselectone.
4. InVideocallringtone,assignaringtoneinthedrop‐downlist.

33
Chapter5:Contacts&Messaging
5.1UsingContacts
InContactsyoucanstorephonenumbers,e‐mailaddresses,homeaddressesandanyotherinformation
thatrelatestoacontact(suchasabirthdayorananniversarydate).Youcanalsoaddapictureorassign
aspecificringtonetoacontact.
Youcanquicklycommunicatewithpeopleusingthecontactlist.Clickacontactinthelistforasummary
ofcontactinformationandavailablecommunicationmethods.Thissummarypagewillallowyoutocall
orsendamessage,dependingontheinformationavailableforthatcontact.
IfyouuseOutlookonyourPC,youcansynchronizecontactsbetweenyourphoneandPC.
CreatingaNewContact
1. Doanyofthefollowing:
SelectStartContactsNew.
SelectContactsontheTodayscreen New.
2. SelectOutlookContact.
3. Enterinformationforthenewcontact.
4. SelectOK.
NOTE:Ifsomeonewhoisn'tinyourlistofcontactscallsyouorsendsyouamessage,youcancreatea
contactfromCallHistoryorfromthemessagebyselectingMenuSavetoContacts.
TosaveanexistingcontacttoyourSIMcard,openthecontact,selectMenuSavetoSIM.
ViewingandEditingContactInformation
1. SelectStartContactsorselectContactsontheTodayscreen.
2. Selectthecontactwhoseinformationyouwanttoview.
3. Toedittheinformation,selectMenuEdit.
4. Doanyofthefollowing:
SelectPictureandselectapictureyouwanttoadd.Thiscanbeanexistingpicture,oryou
cantakeanewpictureusingthecameraprogram.
SelectRingToneandselecttheringtoneyouwanttouseforthiscontact.Thiswillallow
youtoknowwhoiscallingwithouthavingtolookatthescreen.
SelectCategoriesandselectoneoftheoptionsorcreateanewcategory.
5. Whenfinishedmakingchanges,selectOK.
SendinganE‐mailtoaContact
1. SelectStartContactsontheTodayscreen.
2. Selectthecontactfromthelist.
3. Selectthee‐mailaccounttouse.
4. Enterasubject,composeyourmessage,thenselectSend.

34
SendingaTextMessagetoaContact
1. SelectStartContactsorselectContactsontheTodayscreen.
2. Selectthecontactyouwanttosendatextmessageto,thenselectSendtextmessage.
3. ComposeyourmessagethenpressSend.
CreatingaSIMContact
Contactscanbecreatedandstoredonasubscriberidentitymodule(SIM).IfyoumovetheSIMto
anotherphone,yourSIMcontactsaremovedaswell.
1. SelectStartContactsNew.Alternatively,selectContactsontheTodayscreenandthen
selectNew.
2. SelectSIMContact.
3. EnterthenameandphonenumberofthecontactthenselectOK.
5.2TextMessaging
CreatingaTextMessage
1. SelectStartMessagingTextMessages.
2. SelectMenuNew.
3. Entertherecipient’stextmessagenumberintheTofield.Insertasemicolon(;)between
multipletextmessagenumbers.
4. EnteryourmessageandselectSend.Dependingonphonesignal,textmessageswillbesent
immediately.
NOTE:Youcanquicklyentertextmessagenumbersfromyourcontactcards.IntheTofield,pressENTER
andselectarecipientfromthelist.Thenselecttherecipient’sphonenumber.
Youcanrequestadeliverynotificationforthetextmessage.SelectMenuMessageOptionsRequest
messagedeliverynotification.
UsingPresetTextMessages
Youcanquicklyinsertpresetorfrequentlyusedmessagesintoyourtextmessage.Whilecomposinga
message,selectMenuMyTextandthenaddapresetmessagetoinsert.
ReadingaTextMessage
1. SelectStartMessagingTextMessages.
2. SelectInbox▼, thenselectInboxunderTextMessages.
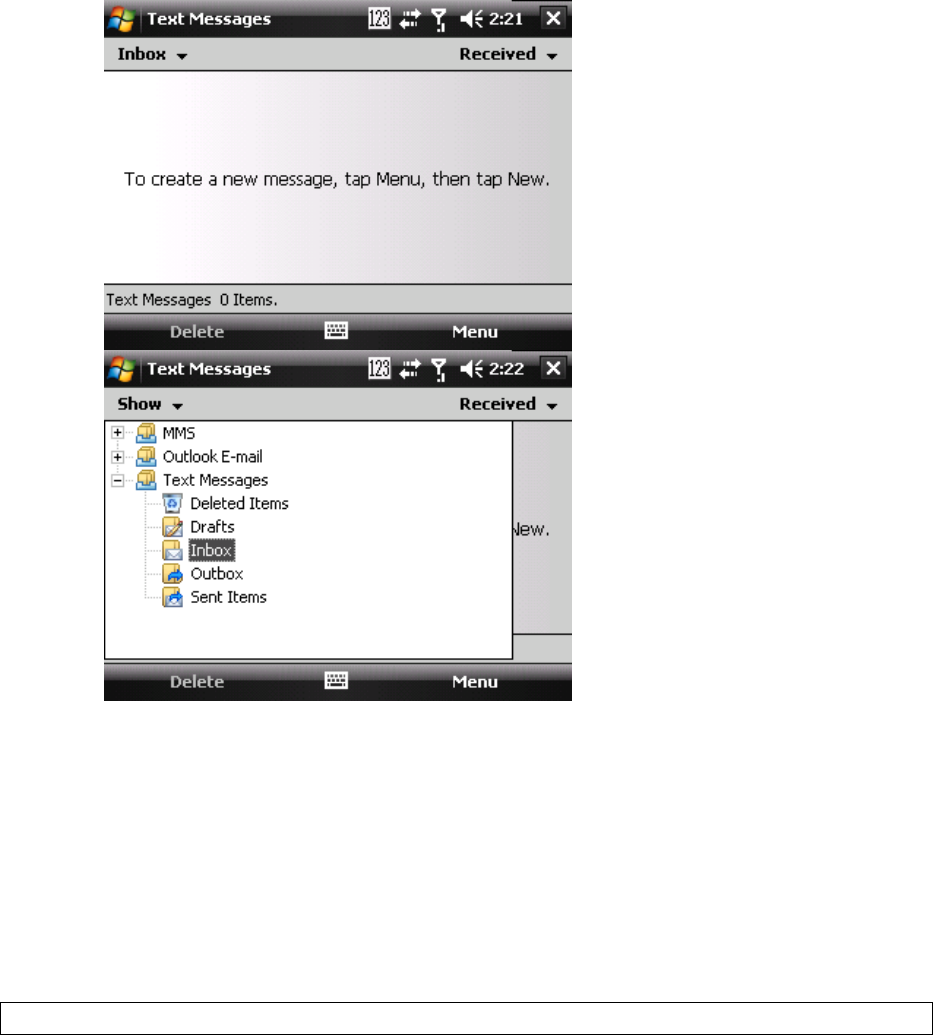
35
3. Inthemessagelist,selectthetextmessageyouwanttoread.
5.3MultimediaMessagingService
CreatingandsendingMultimediaMessageService(MMS)messagestoyourfriendsandfamilyisfunand
easy.Youcanincludetextaswellasexistingornewlycapturedphotos,videoclipsoraudiobefore
sendingyourMMS.
MMSmessagescanbebrokenupintovariousslides,whereeachoftheslidescanbeanycombinationof
audioorvideoclip,animageand/ortext.
ComposingaMMSMessage
1. SelectStartMessagingMMS.
2. SelectMenuNew.
3. EntertherecipientaddressesintheTo,Cc,and/orBccfields.Insertasemicolonbetween
multipleaddresses.
4. InSubject,enterasubject.
5. Tocreateaslide,doanycombinationofthefollowing:
SelectInsertPicture/Videoandselectapictureorvideoclip(orsnaporrecordanew
one).

36
SelectInsertAudioandselectanaudioclip.
SelectInsertTextandenteramessage.
SelectMenuInsertSoundRecorder,thenselecttheRECORDbutton()torecorda
newaudioclip.SelectSTOP()buttontostoprecording.
SelectMenuOptionsBackgroundColor, selectabackgroundcolorfortheslide.
6. SelectSend.
NOTE:Afterthefirstslideisfilledwithcontent,youcanselectMenuSlidesInserttoaddanother
slidetoyourMMSmessage.
PreviewingaMMSMessage
YoucanpreviewanMMSmessagebeforesendingit.
1. TopreviewyourMMSmessageaftercomposingitbutbeforesendingit,select
MenuPreview.
2. SelectDoneorReplaytodismissorrepeatthepreview.
ReadingaMMSMessage
1. SelectStartMessaging.
2. Makesurethefolderdrop‐downlistsaysInbox▼.Ifitdoesn’t,selectthefolderdrop‐downlist
andselectInboxunderMMS.
3. Inthemessagelist,selecttheMMSmessageyouwanttoread.
ConfiguringMMSSettings
MMSsettingsaretypicallyacombinationofuserpreferencesandnetworkoperatorsettings.Youwill
needtoconsultyournetworkoperatorfordetailsontheMMSsettingsspecifictothenetwork.
1. SelectStartMessagingMMS.
2. SelectMenuMMSSettings.
3. Selectthetypeofoptionstochange.
4. SelectOK.
5.4E‐mail
SettingupanE‐mailAccount
BeforeyousetupyourInternete‐mailaccount,pleaseensurethatyouhavethenecessaryinformation
fromyoure‐mailserviceprovider.Thekindofinformationyou’llneedtohavereadyistabulatedbelow.
Usethisasacheck‐listbeforeproceedingwiththeaccountset‐up.
SettingDescription
UsernameUsuallythefirstpartofyoure‐mailaddress,whichappearsbeforethe“at”sign(@).Forsomee‐
mailserviceproviders,thefulle‐mailaddressisusedastheusername.
PasswordChooseastrongpassword.Youwillhavetheoptiontosaveyourpassword,sothatyoudonot
needtoenteriteachtimeyouconnecttoyoure‐mailserver.
DomainThedomainname.Thismaynotalwaysberequired.
ServertypeThetypeofe‐mailserverthathostsyourmailbox(POP3orIMAP4).
AccountnameAfriendlynameforthisaccount(e.g.“MyWebmail”).Youmustuseadifferentnameforeach

37
accountthatyousetup.
NetworkThetypeofnetworkyoure‐mailserverconnectsto(e.g.WorkorTheInternet).
IncomingmailserverThenameofyoure‐mailserver(POP3orIMAP4).
RequireSSLconnectionSelectthistoensureyoualwaysreceivee‐mailforthisaccountusinganSSLconnection.This
enablesyoutoreceivepersonalinformationmoresecurely.Pleasenotethatifyouselectthisand
yourISPdoesnotsupportanSSLconnection,youwillnotbeabletoconnecttoreceivee‐mail.
OutgoingmailserverThenameofyouroutgoinge‐mailserver(SMTP).
Outgoingserverrequires
authentication
Youroutgoinge‐mailserver(SMTP)mayrequireauthentication.Note:unlessotherwisespecified
inthenextsection,yourpreviouslygivenusernameandpasswordwillbeusedforauthenticating
againsttheoutgoinge‐mailserver.
OutgoingserversettingsYouroutgoinge‐mailservermayrequiredifferentauthenticationsettingsthanyourincominge‐
mailserver.
Usedifferentusername
foroutgoingserver
Acheckboxthatletsyouenterseparatesettingsforyouroutgoinge‐mailserver.
UsernameYourusernamefortheoutgoinge‐mailserver.
PasswordYourpasswordfortheoutgoinge‐mailserver.
DomainThedomainnameoftheoutgoinge‐mailserver.
RequireSSLconnection
(Outgoingmailserver
only)
Aconnectionthatenablesyoutosendpersonalinformationmoresecurely.Notethatifyouselect
thisandyourISPdoesnotsupportanSSLconnection,youwillnotbeabletosende‐mail.
Nowyouarereadytosetupyouraccount:
1. SelectStartMessagingSetupE‐mail.
2. Enteryoure‐mailaddressandpassword.SelectSavepasswordifyouwant,oryoucanenter
thepasswordeachtimeyousendandreceivee‐mail.ThenselectNext.
3. SelectNext.Ifthedeviceisconnectedtotheinternet,theAutoSetupfeaturewillattemptto
retrievesettingsforthise‐mailaccount,savingyoutheeffortoftypinginalltherequired
settings.Ifnomatchingsettingsarefound(orifnointernetconnectionexists),thenyouwill
needtoentereachsettingmanually.
4. Enterthenameyouwanttoappearwhenyousendmessages, thenselect Next.
5. InAutomaticSend/Receive,selectafrequencyforsending/receivinge‐mail.Pleasenotethat
datachargeswillprobablybeincurredifyousendandreceivee‐mailoutsideofWi‐Fior
Bluetoothrange.SelectReviewalldownloadsettingstochangeyoure‐mailsettings;
otherwise,selectFinishtostartdownloadingmessages.
NOTE:Tochangeoptionsforane‐mailaccount,selectStartMessagingMenuOptionsandthen
selectthetypeofoptionstochange.
IMPORTANT:Ifyousaveyourpasswordandthenloseyourphone,someonefindingyourphonemight
beabletogainaccesstoyoure‐mail.
ComposinganE‐mailMessage
1. SelectStartMessaging.
2. Selectane‐mailaccounttouse.
3. SelectMenuNew.Thiswillbringupanewe‐mailform.
4. Enterrecipiente‐mailaddressesintheTo,Ccand/orBccfieldsasnecessary.Insertasemicolon
(;)betweenmultipleaddresses.
5. IntheSubjectfield,typeinasubject.
6. Enteramessage.

38
7. SelectSend.E‐mailmessagesarestoredinOutboxandaresenttorecipientsthenexttimeyou
synchronizeorconnecttoyoure‐mailserverandsendandreceivemail.
NOTE:Youcanquicklyentere‐mailaddressesfromyourcontactcards.IntheTofield,pressENTERand
selectarecipientfromthelist.Then,selecttherecipient’se‐mailaddress.
Tochangemessagesettingssuchasitspriority,selectMenuMessageOptioninthemessageyouare
editing.SelectthetypeofoptionstochangeandthenSelectOK.
ReadinganE‐mailMessage
1. SelectStartMessaging, selectane‐mailaccount.
2. Makesurethefolderdrop‐downmenusaysInbox▼.Ifitdoesn’t,selectthedrop‐downmenu
andselectInboxunderthise‐mailaccount.
3. Inthee‐maillist,selectthee‐mailmessageyouwanttoread.
NOTE:Unreade‐mailsarenormallylistedintheMessagingitemontheTodayscreen.Youcanaccess
unreade‐mailsdirectlybyselectingtheMessagingitemontheTodayscreen.
5.5UsingSIMManager
TheSIMManagerallowsyoutomanagethephonebookinyourSIMcard.UsingtheSIMManager,you
caneasilytransferphonebookentriesfromyourSIMcardtoContacts.
AddingaPhonebookEntrytotheSIMCard
PleasenotethatSIMcardcontactscanstorefarlessinformationthanOutlookcontacts.Thereisa
restrictiononthelengthofthecontactname,youcanonlyhaveonenumberpercontact.
1. SelectStartProgramsSIMManager.
2. SelectNewandenterthenameandphonenumberyouwanttoadd.
3. SelecttheAddbutton.
DeletingaPhonebookEntryfromtheSIMCard
1. SelectStartProgramsSIMManager.
2. SelectanentryyouwanttodeleteandtapMenuDelete.
3. SelectYestoconfirmthatyouwanttodeletethecontact.
SavingPhonebookEntriestoContacts
1. SelectStartProgramsSIMManager.
2. SelecttheentriesthatyouwanttosavetoContactsbycheckingthecheckboxesinfront.Select
MenuCheckAllifyouwanttoselectallentries.
3. SelectMenuSavetoContacts.
4. SelectOKtoclosethenotificationdialogbox.

39
SavingContactstoSIMCard
1. SelectStartProgramsSIMManager.
2. SelectMenuContactstoSIM.
3. Selectthephonetype(s)fromtheOutlookContactsandthenselectOK.
4. SelectthecontactsyouwanttosavetoSIMcardbycheckingthecheckboxesinfront.Select
MenuCheckAllifyouwanttoselectallcontacts.
5. SelectSave.
NOTE:OneSIMcardentrycanonlystoreonephonenubmer,ifyouselectmorethanonephonetype
fromtheOutlookContacts(e.g.WorktelandMobiletel),SIMManagerwillcreatdifferententries
seperatelyforthesamecontactandmarktheentrieswithaphonetypeabbreviation(e.g.Chris/WTand
Chirs/MT).

40
Chapter6:BasicApplications
6.1UsingCalendar
UsetheCalendarapplicationtoscheduleappointments,includingmeetingsandotherevents.Your
appointmentsforthedaycanbedisplayedontheTodayscreen.IfyouuseOutlookonyourPC,youcan
synchronizeappointmentsbetweenthedeviceandPC.YoucanalsosetCalendartoremindyouof
appointmentswithanaudiblealarmorflashinglight.
Youcanlookatyourappointmentsinseveraldifferentviews(Day,Week,Month,YearandAgenda).To
seedetailedappointmentinformationinanyview,selecttheappointment.
MakinganAppointment
1. SelectStartCalendar.Alternatively,youcanselecttheappointmentitemontheToday
Screen.
2. SelectMenuNewAppointment.
3. Enterinformationabouttheappointment.
4. SelectOK tosavetheappointment.
NOTE:Ifyoumakethisappointmentasanall‐dayevent,itwillnotoccupyblocksoftimeinCalendar;
instead,itwillappearinbannersatthetopoftheCalendarview.
Youcanassignacategorytoanappointmentorcreateanewcategoryforit.
DeletinganAppointment
1. SelectStartCalendar.
2. InAgenda/Day/Weekview,selecttheappointmenttodelete.
3. SelectMenuDeleteAppointment.
4. Iftheappointmentisrecurring,selectAlltodeletetheseriesorselectOnetodeleteonlythe
currentoccurrence.
NOTE:WhenyoudeleteanappointmentinCalendaronyourphone,itisalsodeletedonyourPCthe
nexttimeyousynchronize.IftheappointmenthasnotbeensynchronizedwithaPC,itwillbedeleted
onlyfromthephone.
ChangingCalendarViews
YoucanlookatyourappointmentsinAgenda,Day,Week,MonthorYearview.Toseedetailed
appointmentinformationinanyview,selecttheappointment.Toseealistofavailableactionsforan
appointment,selectandholdtheappointment.
1. SelectStartCalendar.
2. SelectMenuView, thenselect theviewyouwant.Youcanviewyourcalendarinthe
followinglayouts:
Today’sagenda:yourcurrentday’sactivitiesataglance.Upcomingappointsappearin
boldtext;pastappointmentsaredimmed.

41
Appointmentfortheweek:yourscheduleforthewholeweek.
Agendaforaspecificdate:yourscheduleforasingledayinaday‐plannerlayout.Free
andbusyperiodareshownintimeslotsof1/2houror1hour.
Appointmentforthemonth:yourfreeandbookeddaysforamonth.indicatesthere
isamorningappointment;indicatesthereisaafternoonappointment; indicates
therearebothmorningandafternoonappointments;indicatesthereisaall‐day
event.
NOTE:InMonthview,adatewillappearinredwhentheHolidaycategoryisassignedtoany
appointmentforthatday.
YoucanalsocyclethroughtheviewsbyselectingAgenda,Day,Week,MonthorYearonthemenubar.
YoucanquicklyseeyourappointmentsforthecurrentdayinAgendaview,selectMenuGotoToday.
ChangingtheDefaultCalendarSettings
1. SelectStartCalendar.
2. SelectMenuToolsOptionsandthendooneoftheflowing:
InStartin,selectthecalendarviewyouprefer.
Tospecifythefirstdayoftheweek,in1stdayofweek,selectSundayorMonday.
Tospecifythenumberofdaysyouwanttoappearinaweek,inWeekview,select5‐day
week,6‐dayweek,or7‐dayweek.
3. SelectOKtosavesettings.
6.2UsingNotes
TheNotesprogramhelpsyoutoquicklycapturethoughts,questions,reminders,to‐dolistsandmeeting
notes.Youcancreatehandwrittenandtypednotes,recordvoicenotes,converthandwrittennotesto
textforeasyreadabilityandsendnotestoothers.
Yournotesandrecordingsaredisplayedinthenotelist.Ifyouhavealonglist,selectthesortlist
(labeledNamebydefault),andselecttheoptionyouwant.Toopenanoteorplayarecording,selectit.
Toseealistofavailableactionsforanoteorrecording,selectandholdthenoteorrecording.
CreatingaNote
1. SelectStartProgramsNotes.
2. SelectNewandentertext.
3. SelectOKtosaveyournote.
SettingtheDefaultInputModeandTemplateforNotes
1. SelectStartProgramsNotes.
2. SelectMenuOptions.
3. SelectoneofthefollowingmodesinDefaultmode:
SelectWritingifyoupreferyournotestobehandwritten.
SelectTypingifyouwouldlikeyournotestobetyped.
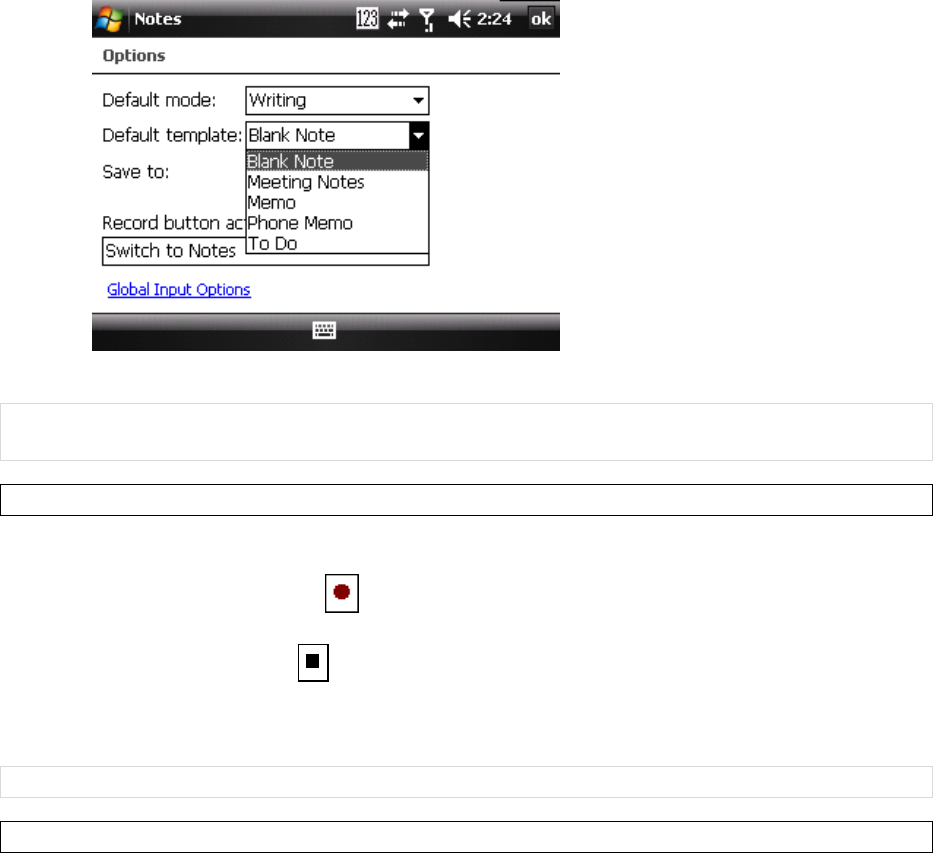
42
4. SelectatemplatefromDefaulttemplate.
5. SelectOKtosaveyoursettings.
NOTE:Youcanchangetheinputmodewheneditinganote.SelectMenuDrawtoswitchtoadifferent
mode.AcheckmarknexttoDrawindicatesthatitisinwritingmode.
CreatingaStand‐aloneVoiceRecording
1. SelectStartProgramsNotes.
2. Iftherecordingtoolbarisnotshown,selectMenuViewRecordingToolbar.
3. SelecttheRECORDbuttonontherecordingtoolbarandspeakintothemicrophoneto
startavoicerecording.
4. SelecttheSTOPbuttonontherecordingtoolbarwhenfinished.Therecordingwillappear
inthenoteslist,andyoucanreviewitbyselectingit.
5. SelectOKtoreturntothenoteslist.
NOTE:Exceptcreatingastand‐alonevoicerecording,youcanalsoaddavoicerecordingtoanote.
EditingaHandwrittenNote
TwoimportantoptionsforeditingahandwrittennotearetheUndo/RedoInkitemsandtheselectAll
andClearitems:
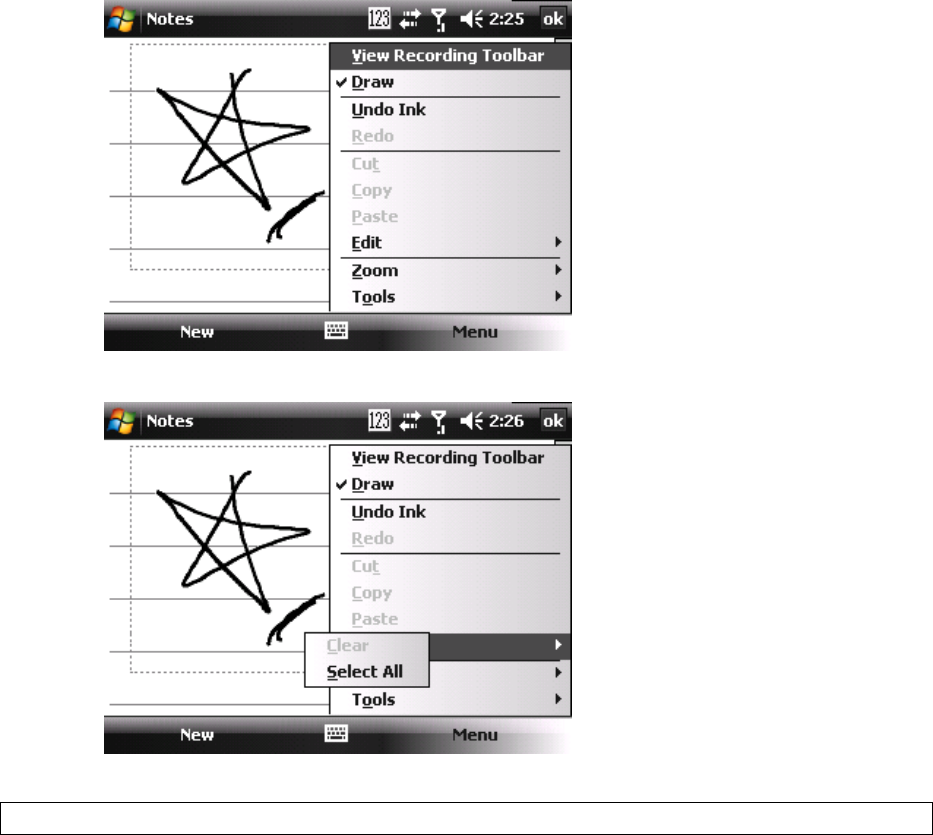
43
Undo/RedoInk
SelectAll/Clear
DeletingaNote
1. SelectStartProgramsNotes.
2. SelectandholdthenotethenselecttheDeletecommand.
3. SelectYestoconfirmdeletingtheselectednote.
6.3UsingTasks
UseTaskstokeeptrackofthingsyouneedtodo.Ataskcanoccuronceorrepeatedly(recurring).You
cansetremindersforyourtasksandyoucanorganizethembyusingcategories.
Yourtasksaredisplayedinatasklist.Overduetasksaredisplayedinred.
IfyouuseOutlookonyourPC,youcansynchronizetasksbetweenthedeviceandPCsothattasksyou
createorupdateonyourPCwillalsobeupdatedonthedeviceandviceversa.

44
NOTE:Toquicklyseethenumberofactivetasksyouhave,selectStartToday.IftheTasksitemis
enabled,youwillseethenumberofactivetaskslistedontheTodayscreen.
CreatingaTask
1. SelectStartProgramsTasks.
2. Dooneofthefollowing:
Selecttheboxlabeledselectheretoaddanewtask,enterthetasknameandpressthe
jogball.
SelectMenuNewTask,andthenenterdetailsaboutthenewtask.
NOTE:YoucansynchronizeinformationonyourphonewithyourPCtokeepyourtasklistuptodatein
bothlocations.
IfyoucreateanewtaskwithareminderonyourPCandthensynchronizetaskswithyourphone,the
reminderwillplayatthetimeitwassetonyourPC.
Youcanassignacategorytoataskorcreateanewcategoryforit.Wheneditingatask,select
CategoriesNewandthengivethenewcategoryaname.SelectDoneandthenewcategorywill
appearinthelist.
DeletingaTask
1. SelectStartProgramsTasks.
2. Selectthetask,selectMenuDeleteTask.
ChangingaTask
1. SelectStartProgramsTasks.
2. SelectanexistingtaskandselectEdit.
3. Whenfinishedmakingchanges,selectOK.
Sorting/FilteringYourTasks
1. SelectStartProgramsTasks.
2. Dooneofthefollowing:
Tosortthetasks,selectMenuSortby,thenselectasortingoption(e.g.StatusorDue
Date).
Tofilterthetasksbycategory,selectMenuFilter,thenselectacategorytodisplay.
SettingTasksOptions
1. SelectStartProgramsTasks.
2. SelectMenuOptions,thereare3optionsyoucanset:
Setremindersfornewitems
Showstartandduedates
ShowTasksentrybar
45
Chapter7:ConnectingtotheInternet
7.1SettingupInternetconnections
Thedevice’spowerfulnetworkingcapabilitiesallowyoutoaccesstheInternetoryourcorporate
networkatworkthroughtelephonyorwirelessconnections.Specifically,youcanconfigurethedeviceto
establishaconnectionviaGPRS/EDGE/HSPA,Dial‐upandWi‐Fi,orsetupaVPNornetworkProxy.
Withanactiveconnectiononthedevice,youcanbrowsetheWeb,downloade‐mailsoruseWindow
LiveMessenger.Checkwithyourserviceprovidertoseeifaconnectionhasalreadybeensetupforyou
andifover‐the‐airconfigurationissupported.
Ifyouneedtomanuallysetupaconnection,itisimportantthatyouobtainthefollowinginformation
fromyourInternetServiceProvider(ISP)orthecompanywhoseintranetyouaretryingtoaccess:
Username
Password
Accesspointname(requiredforGPRSconnection)
Domainname(requiredforaccessingacorporatenetworkoranintranet)
CreatingaGPRS/EDGE/HSPAConnection
Everynetworkconnectionisdifferent.Youshouldgatheralloftherelevantinformationornetwork
settingsyouneedbeforestartingthisprocess.
1. SelectStartSettingsConnectionstabConnections.
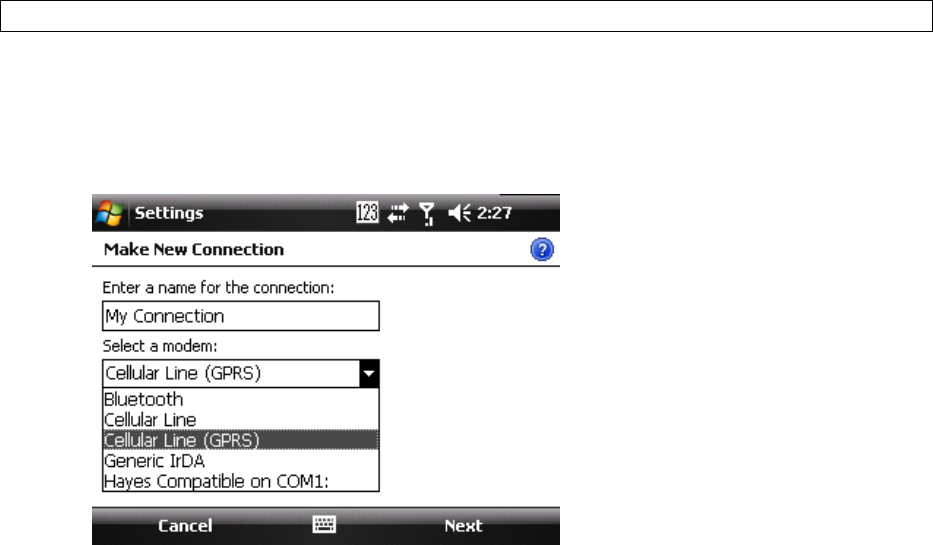
2. SelectAddanewmodemconnection.
3. Enteranamefortheconnection.
4. Inselectamodem,selectCellularLine(GPRS)Nexttocontinue.
5. InAccesspointname,entertheaccesspointname thenselect Next.Accesspointnamewillbe
providedbyyourcarrier.
6. InUsername,enteryourusernamefortheGPRSnetwork,ifrequired.
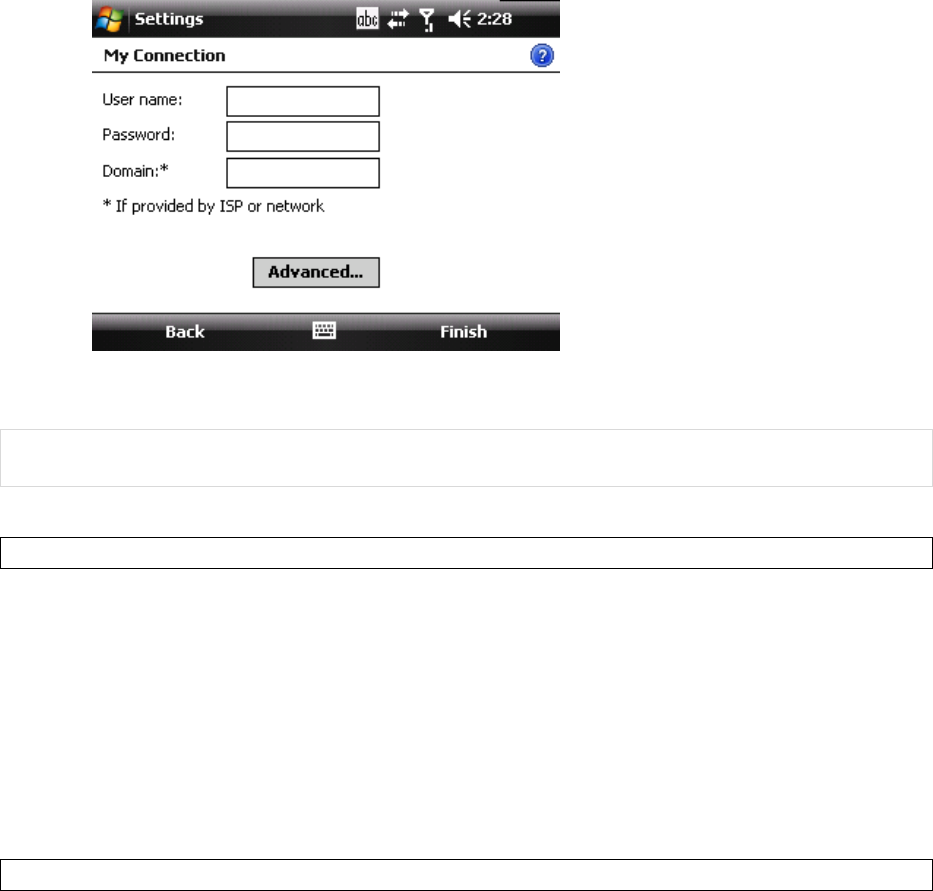
46
7. InPassword,enterapassword,ifrequired.Thisinformationisalsoprovidedbyyournetwork
operator.
8. Ifrequired,selectAdvancedandenterinformationrelatedtoServersandTCP/IP.
9. SelectFinish.
NOTE:ThedevicecannotconnecttoaPCthroughActiveSyncwhileconnectingtotheInternetusing
GPRS/EDGE/HSPA.
CreatingaDial‐upConnection
Noallserviceprovidersupportdial‐upconnection,pleaseconsultwithyourserviceprovider.Youwill
needaphonenumbertoconnecttotheInternet,ausernameandapasswordinordertocontinuethe
followingsteps.
1. SelectStartSettingsConnectiontabConnections.
2. UnderMyISP,selectAddanewmodemconnection.
3. InEnteranamefortheconnection,enteranamefortheconnection.
4. InSelectamodem,selectCellularLineNext.
5. Enterthephonenumberprovidedbyyourserviceprovider,selectNext.
6. Entertheusernameandpassword,selectFinish.
CreatingaProxyConnection
ProxyconnectionletsyouaccesstheInternetthroughanintermediaryIPaddress.Youshouldgatherall
oftherelevantinformationornetworksettingsyouneedbeforestartingthisprocess.
1. SelectStartSettingsConnectionstabConnections.
2. SelectSetupmyproxyserver.
3. CheckthecheckboxinfrontofThisnetworkconnectstotheInternet.
4. CheckthecheckboxinfrontofThisnetworkusesaproxyservertoconnecttotheInternet.
5. UnderProxyserver,entertheproxyservername.
6. Iftheproxyserverusesadifferentportorrequiresausernameandpassword,selectAdvanced,
selecttheproxytypetochangeitssettings,thenenterusername,passwordand/orport
numberintheproperfields.
7. SelectOK.
47
StartingaConnectionManually
Youcanstartaconnectionmanuallyifthereismorethanoneconnectiontypesetonthedevice.
1. SelectStartSettingsConnectionstabConnections.
2. SelectManageexistingconnections.
3. Selectandholdthedesiredconnectiontype,thentapConnect.
DeletingaConnection
1. SelectStartSettingsConnectionstabConnections.
2. SelectManageexistingconnectionsintheMyISPsection.
3. Selectandholdontheconnectionyouwanttodelete,thenselecttheDeletecommand.
7.2UsingaWi‐FiConnection
Wi‐Fiiswirelessradiotechnologythatallowsyoutoaccesse‐mail,theinternetandbroadband
multimediacontent.Whenthedeviceencountersahot‐spot(aplacewhereyoucanaccessWi‐Fi
networks)itcanthenconnecttothatnetworkwirelessly.Whilesomehotspotsarefree,themostrobust
publicWi‐Finetworksareprovidedbyprivateinternetserviceproviders(ISPs)orwirelesscarriers,and
usingthesenetworkswilltypicallyrequirepaymentofaconnectionfee.
NOTE:YoumayneedtoconsultyourISPbeforerunningthisutility.
IMPORTANT:TheWi‐FiconnectionisdisabledwhenthedeviceissynchronizingwithaPC.
TheWi‐FiconnectionandtheGSMconnectioncannotexistatthesametime.TheGSMconnectionwill
bedisabledautomaticallywhilehavingaWi‐Ficonnection,andviceversa.
ConnectingtoaWi‐FiNetwork
1. SelectStartSettingsConnectionstabWirelessManager.
2. SelectthethirdbuttontoturnonWi‐Ficonnection(unlessitalreadysays“On”).
3. Followthepromptstofinishrelatedsettings.WhenaWi‐Ficonnectionisactivated,theicon
showsatthetopofthescreen.
4. IfyouwanttoswitchtoanotherWi‐Finetwork,selectStartSettingsConnectionstabWi‐Fi.
(Theprogram“NetworkCards”willchangeitsnameinto“Wi‐Fi”iftheWi‐Finetworkisconnected
successfully.)
5. OntheWirelesstab,youcanseetheconnectednetworkandotheravailablewirelessnetworks.
48
6. SelectawirelessnetworkthenselectConnect.
7. Followthepromptstofinishrelatedsettings.
8. SelectOKtoclosethewindow.
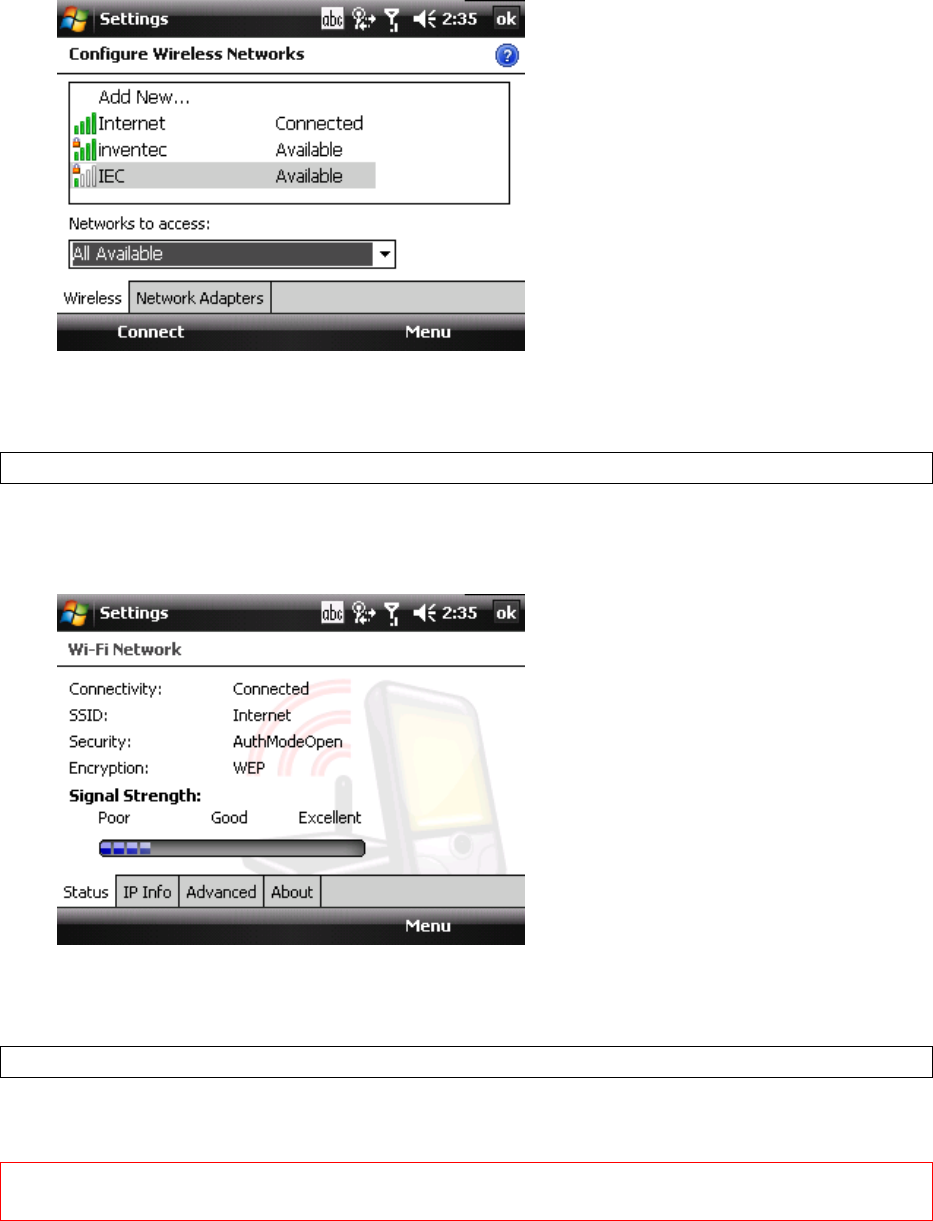
CheckingtheWi‐FiConnection
YoucancheckthecurrentwirelessconnectionstatusafterconnectingtoaWi‐FiNetwork.
1. SelectStartSettingsConnectionstabWiFiNetwork.
2. InformationsuchastheSSID(theWi‐Finetworkname)andthewirelessnetworksignalstrength
willbeshowninasummaryscreen.
3. SelectothertabstocheckIPinformation,changepowersavingsettingsorreviewotheradvanced
settings.
4. SelectOK.
ConfiguringWi‐FiSettings
YoucanconfigurewirelessnetworksonthedevicebyaddingnewWi‐Ficonnectionsandediting
currentlyavailablenetworks.
IMPORTANT:ThescreenforwirelessnetworksconfigurationcanonlybeaccessedafterWi‐Fiisturned
on.
49
CreatingaWirelessConnection
SomeWi‐Finetworksarehidden.Youmightsometimesneedtoenterthenetworksettingsmanually.To
setupanewWi‐Finetworkconnection,youwillfirstneedtohaveyourhomeroutersettingsor
informationfromyouradministratoraboutjoiningthecorporateWi‐Finetwork.
1. AfterturningonWi‐Fionthedevice,doeitherofthefollowing:
OpenWirelessManager,selectMenuWi‐FiSettings.
SelectStartSettingsConnectionstabNetworkCards.
2. OntheWirelesstabAddNew.
3. EntertheNetworkname,selectaNetworktype,thenselectNext.Ifyouwanttoconnectto
anotherdeviceinsteadofanetworkthroughanaccesspoint,selectThisisadevice‐to‐device(ad‐
hoc)connection.
4. Enterrequiredinformation,thenselectNext.
5. SelectUseIEEE802.1xnetworkaccesscontroltouseEAP(ExtensibleAuthenticationProtocol).
SelectEAPtype:PEAPorSmartCardorCertificate.
6. SelectFinish.
EditingaWirelessNetwork
1. OpenWirelessManagerandthenselectMenuWi‐FiSettings.
2. OntheWirelesstab,youcanseecurrentlyavailablewirelessnetworks.Selectandholdthe
networkyouwanttoedit,thenselectEditonthepop‐upmenu.
3. Changethesettingsofthiswirelessnetworkasrequired.
4. SelectFinishtosaveyoursettings.
7.3UsingWirelessManager
YoucanuseWirelessManagertoactivateandde‐activatethevariouswirelessfeaturesonthedevice,
includingcellularphone,BluetoothandWi‐Fi.WirelessManagerisusefulwhenyouneedtoreduce
batteryconsumptionorifyouusethedeviceonanaircraft.
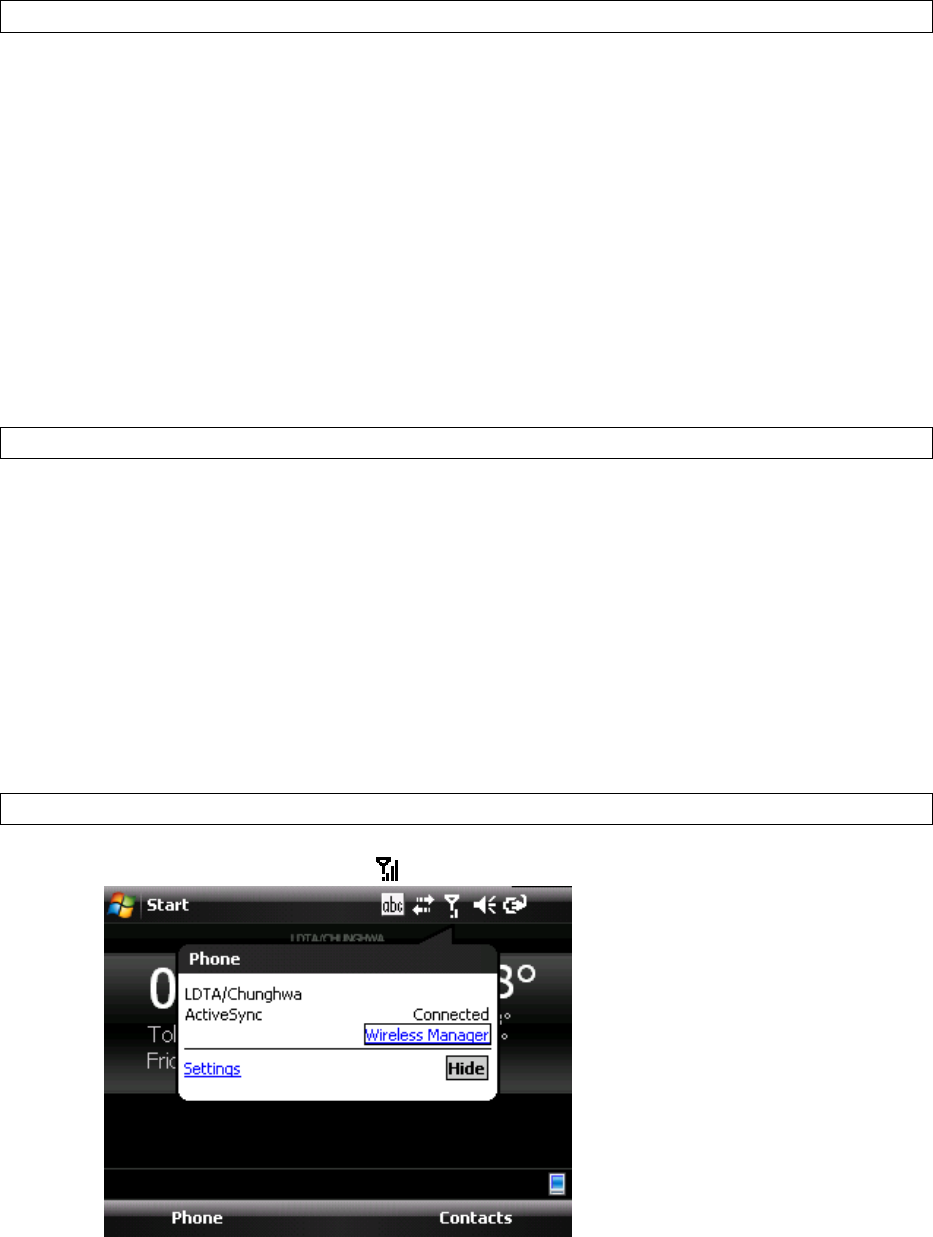
OpeningWirelessManager
ToopentheWirelessManager,dooneofthefollowing:
Selectthesignalstrengthicon()atthetopofthescreenthenselectWirelessManager.
50
SelectStartSettingsConnectionstabWirelessManager.
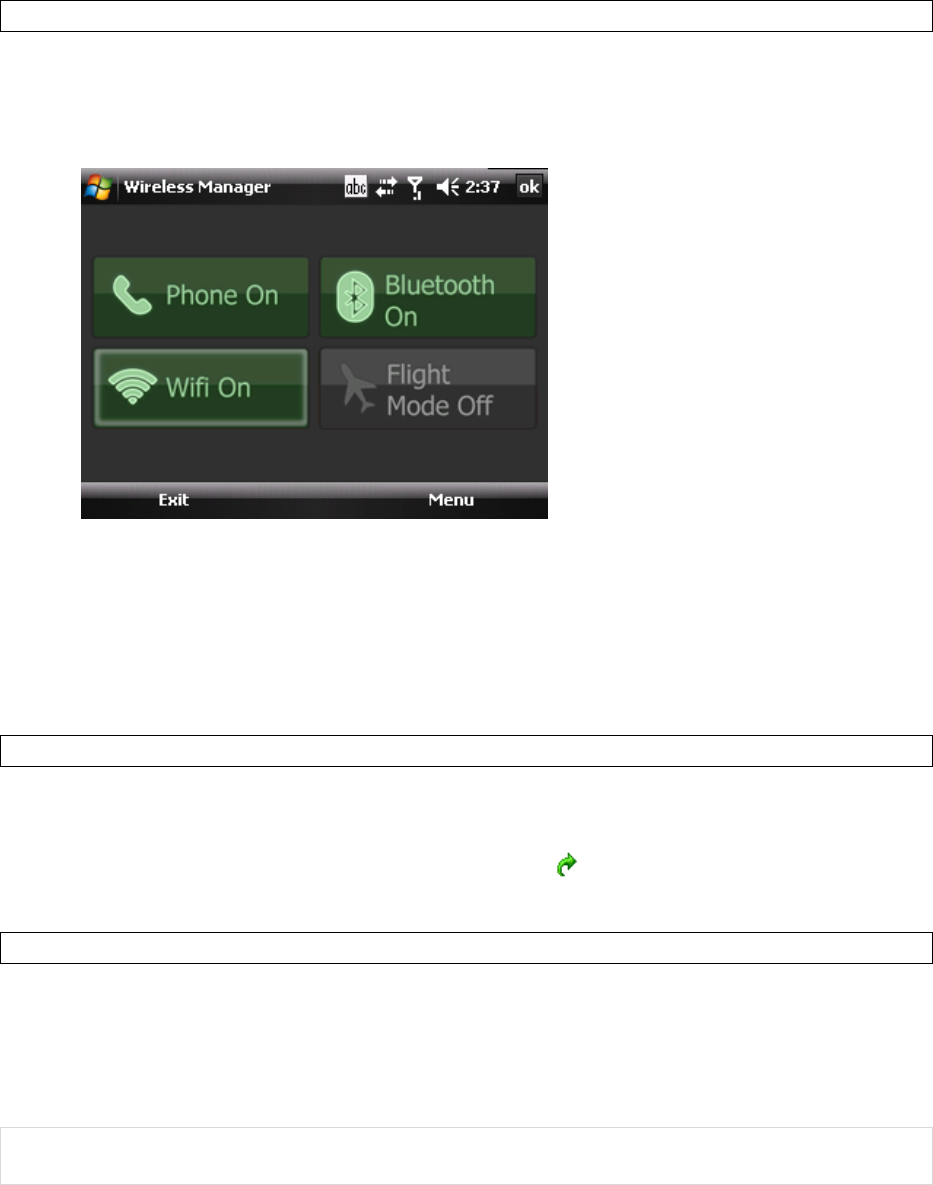
EnablingandDisablingaWirelessFeature
TheWirelessManagerallowsyoutoturnconnectionsonandoffquicklyandeasily.
1. Phone:turnthephoneonandoff.
2. Bluetooth:turnBluetoothonandoff.
3. Wifi:turnwifionandoff.
4. Flightmode:turnalloff.
7.4UsingInternetExplorerMobile
InternetExplorerMobileisafull‐featuredWebbrowser,optimizedforuseonyourphone.Youcanuse
InternetExplorerMobiletobrowsetheInternetonceyouhavesetupyourInternetconnection(ifyou
haven’tdoneso,pleasereadtheprevioussectionsbeforecontinuing).
BrowsingtheInternet
1. TobrowsetheInternetyoumusthaveavalidconnectionestablished.
2. SelectStartInternetExplorer.
3. Doeitherofthefollowing:
Entertheaddressintheaddressbar,andSelect .
SelectFavorites thenselect aWebPagefromthelist.
AddingaWebPagetotheFavoriteList
1. SelectStartInternetExplorer.
2. Togotothepageyouwanttoadd,selectMenuAddtoFavorites.
3. ConfirmorchangethenameandWebpageaddress.
4. InCreatein,selectafolderforthisfavorite.
5. SelectAdd.
NOTE:AquickwaytoaddfavoritestoyourphoneistosynchronizewithyourPCusingActiveSync.For
moreinformation,seeActiveSyncHelponyourPC.

51
DeletingaFavorite
1. SelectStartInternetExplorer.
2. SelectFavorites.
3. OntheAdd/Deletetab,selectthefavoritetodelete.
4. SelecttheDeletebutton.
5. SelectYestoconfirmthedeletion.
ChangingtheSizeofTextonWebPages
1. SelectStartInternetExplorer.
2. SelectMenuViewZoomLevel,thenselectthesizeyouwant.
ShowingorHidingPicturesonWebPages
1. SelectStartInternetExplorer.
2. SelectMenuViewShowPictures.ImagesontheWebpagesthatyouvisitwillbedownload.
Un‐checkthisitemifyoudonotwantInternetExplorertoshowpictures.
ChangingWebPageDisplayOptions
1. SelectStartInternetExplorer.
2. SelectMenuView,thenselectoneofthefollowing:
1. OneColumn.Arrangesthecontentintoonecolumnthatisaswideasthescreen.This
meansthatyouwillrarelyhavetoscrollhorizontally.
2. FitToScreen.Maintainsalayoutsimilartowhatyouseeonadesktopcomputer,but
makesitemssmallerandarrangesthecontentsothatyoucanseemostofitwithout
havingtoscrollhorizontally.
3. Desktop.Keepsthesamelayoutandsizeasonadesktopcomputer,whichwillrequire
bothhorizontalandverticalscrolling.
SendaLinkbyE‐mail
1. SelectStartInternetExplorer.
2. Gotothepageyouwanttosend.
3. SelectMenuToolsSendLink.
4. TheMessagingaccountslistwillappear.Selectanaccount.
5. Anewmessagewillbecreatedwiththepageaddressinsertedinthemessagebody.Choosea
recipient,enteranyaccompanyingmessagethenselectSend.
ClearingHistory,Cookies,orTemporaryFiles
FromtimetotimeyoumightwanttoclearupspaceonthedeviceandwipeInternetExplorer’sbrowser
history.
1. SelectStartInternetExplorer.
2. SelectMenuToolsOptions.
3. SelecttheMemorytab.
4. Changethenumberintheday(s)boxifneeded.
5. SelectClearHistoryorDeleteFiles thenselectOK.

52
ViewingaPageinFullScreenMode
1. SelectStartInternetExplorer.
2. SelectMenuViewFullScreen.
NOTE:Toexitfullscreenmode,selectandholdonthescreenandthenun‐checktheFullScreenitemin
thepop‐upmenutocanceltheselection.

53
Chapter8:TransferringFilesToandFromthedevice
YoumightneedtotransferapplicationdatasuchasWorddocuments,Excelspreadsheets,PowerPoint
slidesand/ormediafilesfromyourPCtothedevice,andviceversa.Thissectiondescribesdifferent
methodsfortransferringfilestoandfromthedevice.
8.1UsingActiveSync
NOTE:TotransferfilesfromPCtothedevicewithActiveSync,WindowsXPusersmustfirstinstall
MicrosoftActiveSynconthePCfirst.WindowsVistausersdonotneedtoinstallActiveSync,butshould
useWindowsMobileDeviceCenter,whichcomespre‐installedwithVista.Pleasereferto“Chapter3.
SynchronizingInformation”fordetailsonhowtoinstallandsetupActiveSync.
1. ConnectthedevicetothePCwiththeUSBcable.MicrosoftActiveSynconthePCshouldstart
uptheSynchronizationSetupWizardautomatically.
2. SelectaninformationtypeunderSynchronizationOptionsintheSynchronizationSetup
Wizardbycheckingtheappropriatecheckbox.
3. SelecttheSettingsbuttonandaddthefilesyouwanttotransfertothedevice.SelecttheOK
buttonwhenyoufinish.
4. SelectNext,thenselectFinishtostartthesynchronizationprocess.
5. Onthedevice,selectStartProgramsFileExplorer.Thenewlytransferredfilesshould
appearunderMyDocuments.Checktoseeifthefileshavebeentransferredtothedevice
successfully.
8.2TransferringfromMemoryCards
1. Insertyourmemorycardintothedevice’sMicroSDcardslot.(See“1.3InstallingSIMcard,
BatteryandMicroSDcard”fordetails.)
2. SelectStartProgramsFileExplorer.
3. IntheShowlist,selectStorageCard.
4. FileExplorershoulddisplayallthefilesstoredinyourmemorycard.Selectandholdthefileor
folderyouwanttotransferthenselectCopyfromthepop‐upmenu.
5. FromtheShowlistinFileExplorer,choosethedestinationfolderforthecopiedfiles.(For
example,selectMyDeviceMyDocuments.)
6. Inthedestinationfolder,selectMenuEditPaste.
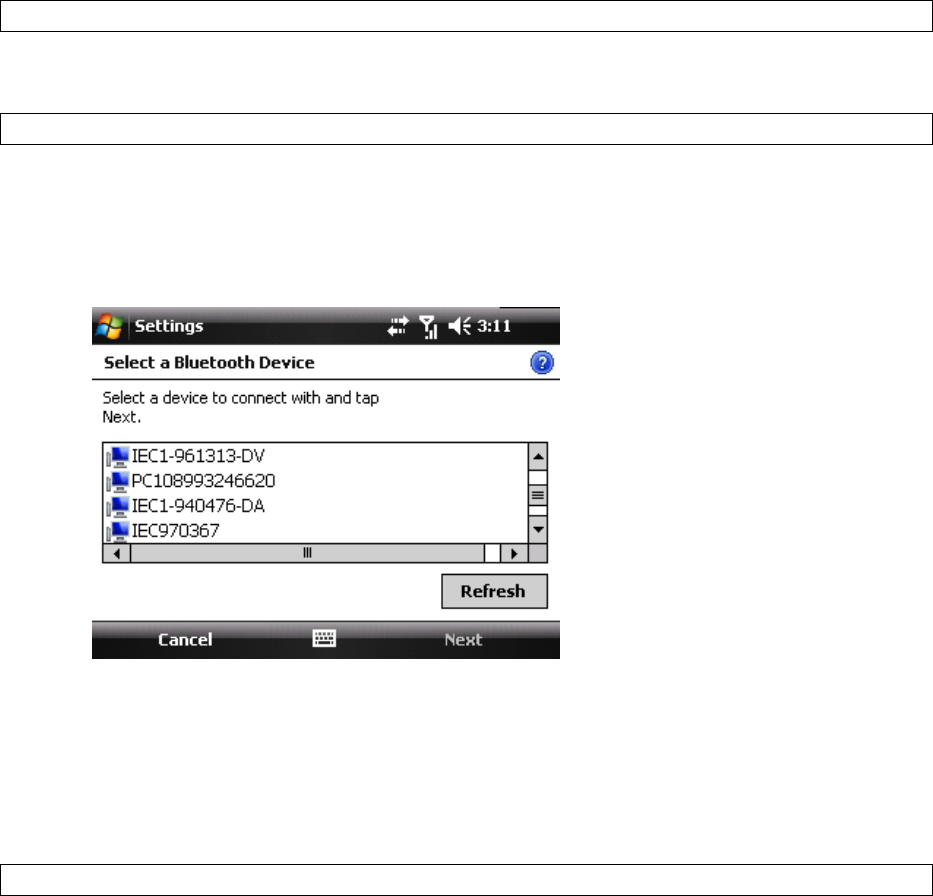
54
8.3UsingBluetooth
Bluetoothisashort‐rangewirelesscommunicationtechnology.DeviceswithBluetoothcapabilitiescan
exchangeinformationoveradistanceofabout10meterswithoutrequiringaphysicalconnection.
Beforetransferringfiles,youmustturnonBluetoothandestablishaBluetoothpartnershipbetweenthe
deviceandtheotherdevice.
TurningonBluetooth
1. SelectStartSettingsConnectionstabBluetoothModetab.
2. SelecttheTurnonBluetoothoption.
CreatingaBluetoothPartnership
1. SelectStartSettingsConnectionstabBluetooth,thenselecttheDevicetab.
2. SelectAddnewdevice.ThedevicesearchesforotherBluetooth‐enableddevicesanddisplays
theminthelist.
3. SelectthedevicewithwhichyouwanttocreateaBluetoothpartnership,thenselectNext.If
thedeviceyouarelookingfordoesnotappearinthelist,ensurethatitisinrangeandthatit
hasbeenmadediscoverable,thenselectRefresh.
4. InPasscode,enteranalphanumericpasscodebetween1and16characters,thenselectNext.
Otherwise,leavethepasscodeblank.Forsecurityreasons,itisstronglyrecommendedthatyou
useapasscode.
5. Enterthesamepasscodeontheotherdevice(therewillbeaprompttodoso).
6. Selecttheservicetousefromthepartnerdevice,andselectFinish.Oneofthemostcommon
examplesofthisistochoosetheMicrosoftActiveSyncservicefromthelistofyourPC’s
availableBluetoothservices.
ReceivingaFile
Beforereceivingfiles,youmustallowincomingbeams.SelectStartSettingsConnectionstabBeam,
thenenabletheReceiveallincomingbeamsoption.
Toreceivebeamedinformation,thedevicemustfirstbemadediscoverable.

55
1. SelectStartSettingsConnectionstabBluetooth,thenselecttheModetab.
2. SelectMakethisdevicevisibletootherdevices.
3. OnyourPC(orotherBluetooth‐enableddevice),locatethefileoritemyouwanttosend.For
example,onyourPCyouwoulduseWindowsExplorertolocatethefile.
4. Intheexampleabove,right‐clickthefileandselectthedestinationdeviceunder“to
Bluetooth.”
5. SelectYeswhenthedevicepromptsaboutreceivingafile.
6. Afterthetransmissionprocessisfinished,thefileshouldbesavedinMyDocumentsonthe
device.
BeaminganItem
Onceyoucreateapartnership,thetwopartneredBluetooth‐enableddevicesdon'tneedtobe
discoverabletocommunicate.InCalendar,Contacts,Notes,TasksandPictures,youcanbeamfilesand
informationtootherdevicesusingBluetooth.
1. TurnonBluetooth.SelectStartSettingsConnectionstabBluetoothModetab.
SelecttheTurnonBluetoothcheckbox.
2. Selectanitemyouwanttobeam.Forexample,openataskinTasks.
3. SelectMenuBeam.
4. Selectthedestinationdevice.
5. SelectOKafterthetransferisdone.
NOTE:Ifthetargetdevicedoesnotappearinthelist,ensurethatthedeviceispoweredon,discoverable
andwithincloserangeofthedevice.Also,ensurethatBluetoothhasbeenenabledonthedevice.
Bluetoothisturnedoffbydefault.However,ifyouturnBluetoothonthedevicewillrememberthis
settingandturnitbackonautomaticallywheneverthedevicepowersup.Tosavebatterypower,please
remembertoturnBluetoothoffafterbeaminginformation.
56
Chapter9:OtherApplications
9.1WindowsLiveMessenger
YoucansendinstantmessagesovertheInternetwithWindowsLiveMessenger.
NOTE:ThedevicemustbeconnectedtotheInternetbeforeyoucanstartusingWindowsLive
Messenger.ToconnecttotheInternet,referto“Chapter7.ConnectingtotheInternet”fordetails.
YoumusthaveavalidMicrosoft.NETPassportorHotmailaccountbeforeyoucansignintoWindows
LiveMessenger.
SigningInToWindowsLiveMessenger
1. SelectStartProgramsMessenger.
2. InSigninas,chooseadisplaystatus(e.g.OnlineorBusy),thenselectSignin.
3. BeforeusingWindowsLivemessengerforthefirsttime,youhavetoaccepttheWindowsLive
TermsofUseandPrivacyStatement.SelectAccepttocontinue.
4. EnteryourWindowsLiveIDandpasswordandselectNext.
5. SelectwhethertoshowWindowsLiveontheTodayscreenornot.ThenselectNext.
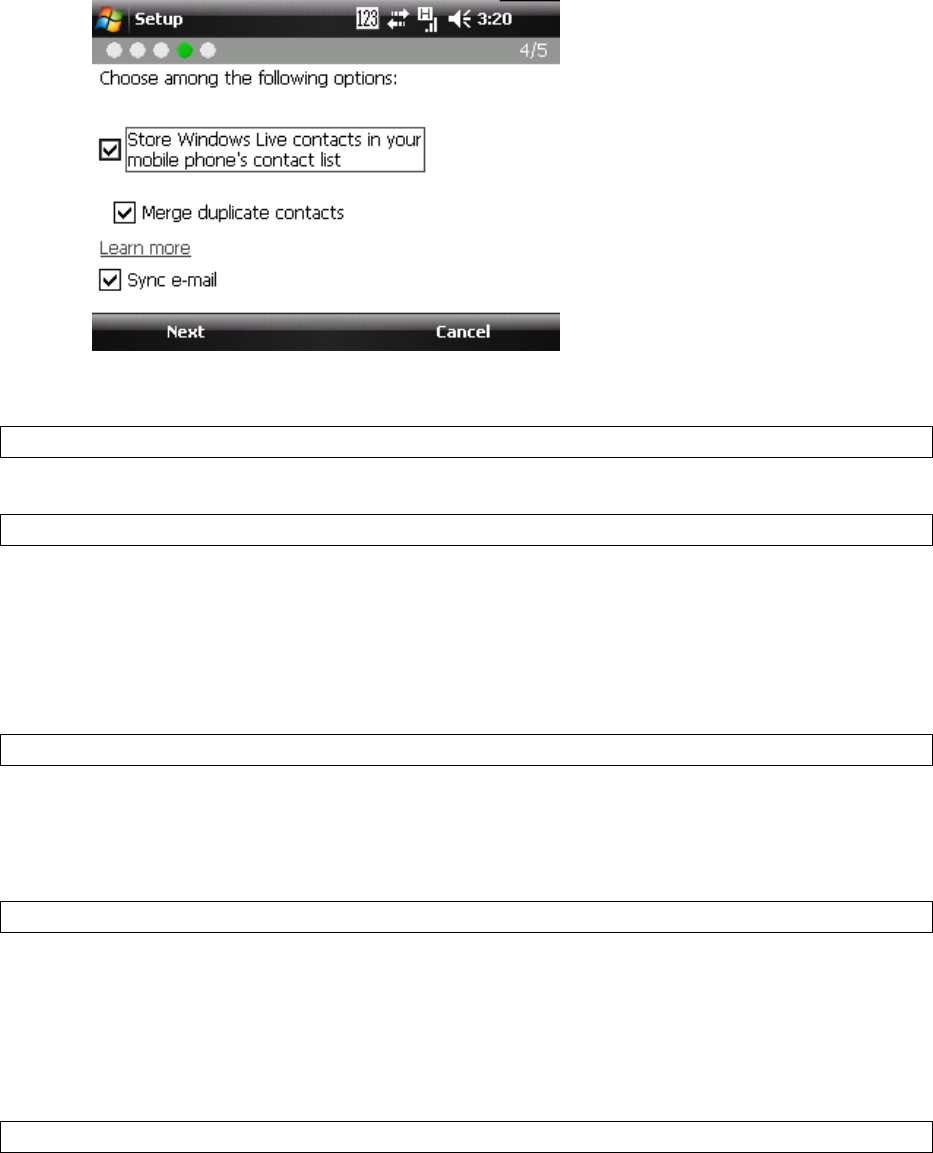
57
6. ChoosefromtheSyncoptionsandselectNext.
7. WindowsLivewillthensignyouinonline.
TosignoutofWindowsLiveMessenger
SelectMenuSignout.
Adding/DeletingaWindowsLiveMessengerContact
1. SignintoWindowsLiveMessenger.
2. Doanyofthefollowing:
Toaddacontact,selectMenuAddNewContact, thenfollowtheon‐screen
instructions.
Todeleteacontact,selectandholdthecontactnameintheWindowsLivecontactlist,
selectViewcontact’sinfoMenuDeleteContact.
SendinganInstantMessage
1. SignintoWindowsLiveMessenger.
2. Selectthecontact’sname,thenselectSendIM.
3. Enteramessage,selectMenuSend.
4. Toclosethechatwindow,selectMenuEndconversation.
ChangingWindowsLiveMessengerSettings
1. SignintoWindowsLiveMessenger.
2. SelectMenuOptions.
3. SelectfromtheavailableoptionsDone.
9.2JETCETPDF5
OpeningaPDFFile
ToopenafileinJETCETPDF5,selectthePDFfileinFileExplorerordothefollowing:
58
1. SelectStartProgramsJETCETPDF5.
2. Selectthefilethatyouwanttoview.
3. Ifyouwanttoopenafileonthenetwork,taptoselectthelocationandentertheserver
address.
ViewingtheDocument
AfteropeningafilewithJETCETPDF5,youcanchoosetoviewthefileinfullscreenorzoomin/outthe
file.
TapMenuViewFullscreen.Usethefour‐waynavigationpadonthescreentonavigate
throughthedocument.
TapMenuViewTools.Selecttofitthewidthofthepageontothescreen.Select to
displaytheentirepageon‐screen.Select/tozoomin/outthefileintherangefrom
25%to200%.
9.3WindowsMedia
ThedevicecomeswithWindowsMediaPlayerpre‐loaded,whichallowsyoutoplaydigitalaudioand
videofilesstoredlocallyoronanetwork.
TransferringMusicandVideostothedevice
Ifyouwanttostorethemediafilestoastoragecard,insertaMicroSDcardonthedevicebefore
connectingthedevicetoaPC.
1. Onyourcomputer,openWindowsMediaPlayer.
2. ConnectthedevicetoyourcomputerusingaUSBcable.
3. InWindowsMediaPlayeronyourcomputer,clickSync.
4. DrageachitemyouwanttosynchronizetothedevicepaneontherightsideoftheWindows
MediaPlayerwindow.
5. Atthebottomofthedevicepane,clickStartSync.Thiswillstartthesynchronizationprocess.
6. Aftertransferringyourmediafiles,updateyourmobiledeviceMediaLibrary:
a. SelectStartProgramsWindowsMedia.
b. SelectMenuLibraryMyDevice.
c. SelecttheLibraryStorageCardifthefilesarestoredintheMicroSDcard.Otherwise,
skipthisstep.
d. SelectMenuUpdateLibrary.
e. SelectDonewhenupdateiscompleted.
PlayingMediaFilesonthedevice
1. SelectMenuLibrarytoopentheLibraryscreen.
2. Selectacategory(e.g.MyMusic>AllMusic).
3. SelectanitemthenselectPlay.
4. Youcanthenusethefollowingfunctionswhenplayingaudioorvideofiles:

59
SavingaNewPlaylist
1. SelectStartProgramsWindowsMedia.
2. SelectMenuLibrary.
3. Selectacategory(e.g.MyMusic>AllMusic).
4. Selectanitem,selectMenuQueueUp.SelecteditemwillbeaddedtotheNow
Playinglistimmediately.
5. SelectMenuNowPlaying.
6. SelectMenuSavePlaylist.
7. Enteranamefortheplaylist,thenselectDone.
OntheWindowsMediaplaybackscreenyoucanSelectMenuOptionstochangeplaybacksettings.
9.4MIDletManager
AMIDletisaJavaprogramwhichcanbedownloadedfromtheInternetExplorerMobileandworkon
thedevice.YoucanuseMIDletManagertohandleallJavafilesonthedevice,includingdownload,
installation,upgradeanddeletionofMIDlets.
InstallingaMIDlet
1. SelectStartProgramMIDletManager.
2. SelectActionsInstall,selectwhethertoinstalltheMIDletfromlocalstorageorawebsite.
TodownloadandinstalltheMIDletfromawebsite,launchtheMIDlethyperlinkonthe
websiteandthenfollowpromptsonthescreentocompletetheinstallation.
ToinstalltheMIDletfromlocalstorage,doubleclickonthefileandthenfollowon‐
screenpromptstocompletetheinstallation.
3. SelectOKonthescreen.
9.5PhoneProfile
Profilesdefinehowthedevicereactswhenyoureceiveacalloramessage,howyourkeypadsounds
whenyoupressakeyandmore.Selectorcustomizethemostsuitableprofileforyourenvironment,
suchaswhenyouareinameetingoroutdoors.Theprofilesavailableare:Normal,Silent,Vibrate,
OutdoorandHeadset.Eachofthemcanberenamedorcustomizedtofityourownneeds.
:Displaythevideoinfullscreen.
:LaunchesaWebsitewhereyoucanfindmusicandvideostoplay.
:Skiptothebeginningofthecurrentfileortothepreviousfile.
:Pause/Play.
:Skiptothenextfile.
:Decreasethevolumelevel.
:Increasethevolumelevel.
:Movetoadifferentpositioninthecurrentlyplayingtrack.

60
ViewingProfileDetails
Youcanviewthedefaultofeachprofilebydoingthefollowing:
1. SelectStartProgramsPhoneProfile.
2. Selectaprofile,selectMenuSystemProfile.
EditingaProfile
1. SelectStartProgramsPhoneProfile.
2. SelectaprofilethenselectEdit.
3. Selectyourpreferredsoundoptionsforcallsandmessaging.
4. SelecttheAdvancetabtosetdialpadsoundorauto‐answeringfunction.
5. SelectOKtoapplythechanges.
RestoringaProfile
1. SelectStartProgramsPhoneProfile.
2. Doeitherofthefollowing:
Selecttheprofilethatyouwanttorestoretodefault,selectMenuRestoreSelected.
SelectMenuRestoreAlltorestoreallprofilestodefault.
3. SelectOK.
UsingAudioFilesasRingTones
Youcanuseyourownaudiofileasaringtone.Thedevicesupports.wav,.wma,.mid(type0),.mp3
audioformatfilesasringtones.Fortheaudiofilestoberecognizedbytheprofilesasringtones,you
mustplaceyouraudiofilesinoneofthefollowingfolders:
MyDevice\Windows
MyDevice\Windows\Rings
StorageCard\Rings
OpenFileExplorer,Selectandholdthefile,andthenselecttheSetAsRingtonecommand.
9.6GPS
AGPS(GlobalPositioningSystem)signalreceiverisbuiltinthedevice.Youhavetoinstallamapping
softwareonthedevicetostartnavigating.Pleasefollowtheinstructionofyourmappingsoftwareto
installitandusethenavigationfunctions.YoumayneedtospecifytheGPShardwareportwhen
installingthemappingsoftware.Selectthefollowingvalueifrequested.
GPShardwareport:COM9.
Baudrate:9600.
IMPORTANT:SomemappingsoftwareorGPSnavigationsoftwaremaynotbecompatiblewiththe
device,pleaseconsultwiththesoftwareprovider/retailerbeforeinstallingthesoftware.
ReceivingBetterSatelliteSignals
GPSpositioningislimitedbybadweather(e.g.rainyorcloudydays)andusagelocation(e.g.tall
buildings,tunnels,underpasses,trees,bridges…etc).MostGPSdonotworkindoors,norcanGPSsignals
penetratebuildings,carsunshadesandheatreflectivefilmwithmetalliccontent.

61
ItcantakeseveralminutesthefirsttimeyouestablishaGPSconnection.Ifyoufindthedevicecannot
detectthesatellitesignal,trythefollowing:
Movethedevicetoanopenspacewithouttallbuildingsortreesaroundit.
Makesuretherearenowirelesscommunicationproducts(e.g.radar‐detectingdevicesand
mobilephones)nearbysincetheseproductsmaycauseunstablesignalreception.
ConnectanexternalBluetoothGPSreceiver(notincludedinthepackage)tothedevicein
ordertoenhancethereception.
ImportantNoticeaboutUsingGPS
Pleasesetnavigationdestinationsbeforedriving.Itisforbiddeninmostcountiestooperate
theGPSsystemwhendriving.
TheGPSisbuiltandoperatedbytheUSDefenseDepartment.Theaccuracyoflocationdata
maybeaffectedbychangesmadebytheDepartment.
GPSshouldnotbeusedforpreciselocationmeasurement.Itcanonlybeusedasanavigation
aid.
Donotturnonthecarenginewhenthedeviceisconnectedtothecarcharger(notincluded
inthepackage)asthismaydamagethedevice.
MakesuretheDCvoltageprovidedbyyourcarandtheelectriccurrentsuppliedfromyour
carchargerarecompatiblewiththedevicebeforeusingthem.
UsingtheGPSmaydrainthebatteryfasterthanusual.
9.7InternetSharing
WithInternetSharing,youcanconnectyourPCornotebooktotheInternetbyusingthedevice’s
networkingcapability.
NOTE:PleaseremembertoinstallavalidSIMcardandestablishaGPRSordial‐upconnectionbefore
usingInternetSharing.
InordertouseaUSBcableconnection,youhavetoinstallActiveSyncorWMDConyourPC(referto
chapterthree).
PleasedisableActiveSyncorWMDCbeforelaunchingInternetSharing.
SettinguptheDeviceasaUSBModem
1. SelectStartProgramsInternetSharing.
2. InPCConnection,selectUSB.
3. InNetworkConnection,selecttheconnectionthatyouwanttouse.
4. ConnectthedevicetoyourPCwiththeUSBcable.
5. TapConnectonthedevice.
SettinguptheDeviceasaBluetoothModem
1. EstablishaBluetoothpartnershipbetweenthedeviceandyourPC(refertochapter8.3)and
makesureBluetoothonthedeviceandyourPCareturnedon.
2. SelectStartProgramsInternetSharing.
3. InPCConnection,selectBluetoothPAN.
62
4. InNetworkConnection,selecttheconnectionthatyouwanttouse.
5. TapConnectonthedevice.
6. SetupaBluetoothPAN(PersonalAreaNetwork)onyourPC.
7. TapConnectonthedevice.
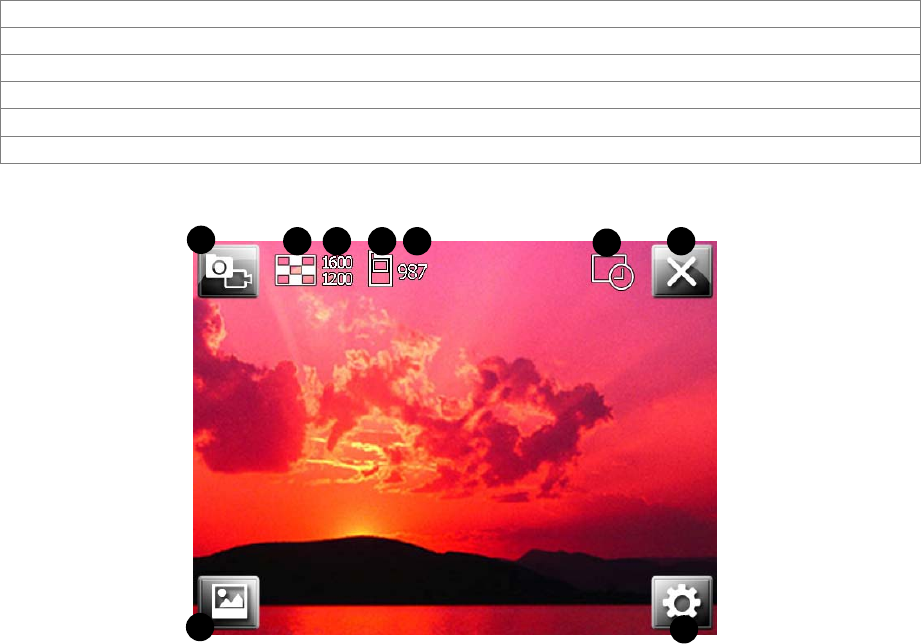
63
Chapter10:Camera
10.1Overview
Thebuilt‐inCameraapplicationallowsyoutousethecamera/microphonetocapturevideosandimages.
Yourcamerahasthefollowingfeatures:
Singleimagecapture
Timecontrolledcapture
Videocapture
Quality,sizeandfileformatoptions
Specialeffects
Advancedoptionsincludinganti‐flicker,storagelocation,resetcounter
Toopenthecamera,pressandholdthecamerabuttononthesideofthedevice.
1. Capturemode
2. Resolution
3. Quality
4. Storagelocation
5. Shotsremaining
6. Singleshot/Timer
7. Close
8. Settings
9. Viewallpictures
1234 5 67
8
9
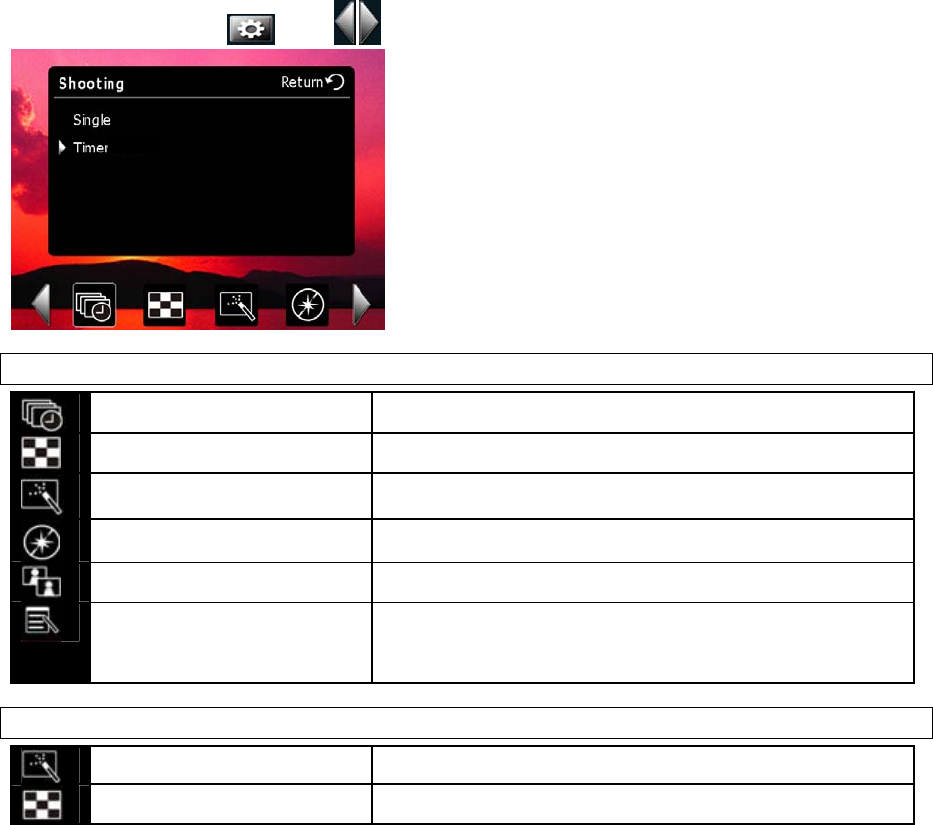
64
10.2Takingapicture
1. Pressandholdthecamerabuttontolaunchthecameraapplication.
2. Positionthedevicesothattheimageyouwanttocaptureofisdisplayedonthescreen.
3. Pressthecamerabuttontotakethepicture.
10.3Takingavideo
1. Pressandholdthecamerabuttontolaunchthecameraapplication.
2. Ifthecameraisinstillcapturemode,pressthecapturemodeicononthetopleft.
3. Positionthedevicesothatimageyouwanttocaptureisdisplayedonthescreen.
4. Pressthecamerabuttontostartrecording.
5. Pressthecamerabuttontostoprecording.
10.4SettingsandOptions
Toaccesssettings,press.Press toswitchbetweenmenupages.
StillCamera
ShootingmodeSingle‐shot,Timer‐shot
ResolutionUGA(16000*1200),VGA(640*480),QVGA(320*240)
EffectOff,Negative,Monochrome,Sepia
AntiflickerOff,50Hz,60Hz
QualityHigh,Low,Normal
OtherMyDocuments/StorageCard:selectwhereyouwantto
saveyourfiles.
ResetCounter:resetthefilenamingcounterbackto1.
VideoCameraSettings
EffectOff,Negative,Monochrome,Sepia
ResolutionQCIF(176*144),QVGA(320*240)

65
Videoformat3GP,MP4
OtherMyDocuments/StorageCard:selectwhereyouwantto
saveyourfiles.
ResetCounter:resetthefilenamingcounterbackto1.
10.5PicturesandVideos
ViewingandEditingPictures
Toviewcapturedpictures,tap.Scrolltoapictureanddoanyofthefollowing:
SelectMenu.Youcanseealistofoptionsformanagingthepicture(e.g.Delete).
SelectView.Youcanviewtheselectedpicture.
SelectViewandthenselectMenu.Fromthemenulist,youcanZoomin/out,editand
renamethepicture.
ViewingandManagingVideos
1. SelectStartProgramsPictures&Videos.
2. SelectMyPictures▼, thenselectMyVideosunderMyDocuments.
3. TapavideocliptoplayitorselectMenutoshowalistofavailableoptions.

66
Appendix
A.1Specifications
SystemInformation
ProcessorQualcommMSM7201,400MHz
OperatingSystemWindowsMobile6.1Professional
Memory128MBDDRSDRAM
256MBFlashROM
DimensionsandWeight
Dimensions116x62x15mm
Weight145gwithbattery
KeysandNotifications
KeysJogball
VelocityButton
Volumeupanddown
Start
OK
OK(side)
Record(configurable)
CameraButton(configurable)
PowerButton
SENDandEND
QWERTYKeypad
ResetButton
NotificationsVibrate
Audible
Visualmessage
LED:GSM/UMTS(GreenBlink)
Missedcall/MessageNotification(BlueBlink)
Charging(Red)
FullCharged(Green)
Display
TypeTFTLCDwithtouchpanelandbacklight
Size/Resolution2.46’’QVGA320x24065Kcolors
Cellularconnectivity
BandGSM/GPRS/EDGE:850, 900, 1800, 1900MHz
UMTS/HSDPA/HSUPA:850,1900, 2100MHz
UMTSupto384kdownloadandupload
HSDPA/HSUPAupto7.2Mbpsdownloadand2Mbpsupload

67
SystemGSM/GPRS/EDGEclass10supported
AntennaEmbedded(2G/3Gallband,Wi‐Fi,GPS,Bluetooth)
ConnectivityandInterface
Bluetooth2.0compliant+EDR
SDIOSupported,MicroSDformfactor
USBUSB2.0FullSpeed,miniUSB(Activesyncandcharging)
Wi‐Fi802.11b/gcompliant
ExternalMemoryCard
CardSlotMicroSDwithSDIO
BatteryandPower
Battery/CapacityLithium‐IonPolymerCell,1410mAh
Talk/StandbyTime4hours/200hours(average)
CameraModule
TypeMaincamera:2.0MPCMOSsensorcamerawithFixFocus
Secondcamera:0.3MPCMOS
MaxResolution16000x1200
GPS
ChipsetQualcommgpsOne(MSM7201integrated)
GPSReceiver8channels
AGPScompatibleYes
Others
HeadsetConnector2.5mmstereoconnector
TV‐outThrough2.5mmaudiojackwithAVcable

68
A.2RegulatoryNotices
RegulatoryAgencyIDs
Forregulatoryidentificationpurposes,yourproductisassignedamodelnumberofVelocity111.
Toensurecontinuedreliableandsafeoperationofthedevice,useonlytheaccessorieslistedbelowwith
yourVelocity111.
TheBatteryPackhasbeenassignedamodelnumberofVelocity111.
ThisproductisintendedforusewithacertifiedClass2LimitedPowerSource,rated5VoltsDC,
maximum1Amppowersupplyunit.
EuropeanUnionNotice
ProductswithCEmarkingcomplywiththeR&TTEDirective(99/5/EC),theEMCDirective(89/336/EEC),
andtheLowVoltageDirective(73/23/EEC)issuedbytheCommissionoftheEuropeanCommunity.
CompliancewiththesedirectivesimpliesconformitytothefollowingEuropeanNorms(inparentheses
aretheequivalentinternationalstandards).
ETSIEN301489‐1
ElectromagneticcompatibilityandRadiospectrumMatters(ERM);ElectroMagnetic
Compatibility(EMC)standardforradioequipmentandservices;Part1:Commontechnical
requirements.
ETSIEN300328
ElectromagneticcompatibilityandRadiospectrumMatters(ERM);WidebandTransmission
systems;datatransmissionequipmentoperatinginthe2.4GHzISMbandandusingspread
spectrummodulationtechniques.
EN50360/EN50361
Productstandardtodemonstratethecomplianceofmobilephoneswiththebasicrestrictions
relatedtohumanexposuretoelectromagneticfields(300MHz–3GHz)
ETSIEN301489‐7
ElectromagneticcompatibilityandRadiospectrummatters(ERM);ElectroMagnetic
Compatibility(EMC)standardforradioequipmentandservices;Part7:Specificconditionsfor
mobileandportableradioandancillaryequipmentofdigitalcellularradio
telecommunicationssystems(GSMandDCS).
ETSIEN301489‐17
ElectromagneticcompatibilityandRadiospectrumMatters(ERM);ElectroMagnetic
Compatibility(EMC)standardforradioequipmentandservices;Part17:Specificconditions
for2.4GHzwidebandtransmissionsystemsand5GHzhighperformanceRLANequipment.
EN60950‐1(IEC60950‐1)
SafetyofinformationTechnologyEquipment.
ETSIEN301511
Globalsystemformobilecommunications(GSM);HarmonizedENformobilestationsinthe
GSM900andGSM1800bands,coveringessentialrequirementsofarticle3.2oftheR&TT
directive(1995/5/EC).

69
FederalCommunicationsCommissionNotice
Thisdevicecomplieswithpart15oftheFCCRules.Operationissubjecttothefollowingtwoconditions:
(1)Thisdevicemaynotcauseharmfulinterference,and(2)thisdevicemustacceptanyinterference
received,includinginterferencethatmaycauseundesiredoperation.Thisequipmenthasbeentested
andfoundtocomplywiththelimitsforaClassBdigitaldevice,pursuanttoPart15oftheFCCRules.
Theselimitsaredesignedtoprovidereasonableprotectionagainstharmfulinterferenceinaresidential
installation.Thisequipmentgenerates,uses,andcanradiateradiofrequencyenergyand,ifnotinstalled
andusedinaccordancewiththeinstructions,maycauseharmfulinterferencetoradiocommunications.
However,thereisnoguaranteethisequipmentdoesnotcauseharmfulinterferencetoradioorTV
reception.Thiscanbedeterminedbyturningtheequipmentonandoff.Theuserisencouragedtotryto
correcttheinterferencebyoneormoreofthefollowingmeasures:
Reorientorrelocatethereceivingantenna.
Increasetheseparationbetweentheequipmentandreceiver.
Connecttheequipmentintoanoutletonacircuitdifferentfromthattowhichthereceiveris
connected.
Consultthedealeroranexperiencedradioortelevisiontechnicianforhelp.
SARInformation
0.633W/Kg@1g(FCC)head
1.050W/Kg@1g(FCC)body
NOTE: THE MANUFACTURER IS NOT RESPONSIBLE FOR ANY RADIO OR TV INTERFERENCE
CAUSED BY UNAUTHORIZED MODIFICATIONS TO THIS EQUIPMENT. SUCH MODIFICATIONS
COULD VOID THE USER'S AUTHORITY TO OPERATE THE EQUIPMENT.

70
ExposuretoRadioFrequency(RF)Signals
Yourwirelessphoneisaradiotransmitterandreceiver.Itisdesignedandmanufacturednottoexceed
theemissionlimitsforexposuretoradiofrequency(RF)energysetbytheFederalCommunications
CommissionoftheU.S.Government.Theselimitsarepartofcomprehensiveguidelinesandestablish
permittedlevelsofRFenergyforthegeneralpopulation.Theguidelinesarebasedonthesafety
standardspreviouslysetbybothU.S.andinternationalstandardsbodies:
AmericanNationalStandardsInstitute(ANSI)IEEE.C95.1‐1992
NationalCouncilonRadiationProtectionandMeasurement(NCRP).Report86.1986
InternationalCommissiononNon‐IonizingRadiationProtection(ICNIRP)1996
MinistryofHealth(Canada),SafetyCode6.Thestandardsincludeasubstantialsafetymargin
designedtoassurethesafetyofallpersons,regardlessofageandhealth.
IntheU.S.andCanada,theSARlimitformobilephonesusedbythepublicis1.6Watts/kg(W/kg)
averagedoveronegramoftissue.Thestandardincorporatesasubstantialmarginofsafetytogive
additionalprotectionforthepublicandtoaccountforanyvariationsinusage.Normalconditionsonly
ensuretheradiativeperformanceandsafetyoftheinterference.Aswithothermobileradio
transmittingequipment,usersareadvisedthatforsatisfactoryoperationoftheequipmentandfor
personalsafetyreasons,itisrecommendedthatnopartofthehumanbodybeallowedtocometoo
closetotheantennaduringoperationoftheequipment.
WEEENotice
TheWasteElectricalandElectronicEquipment(WEEE)Directiveisdesignedtoencourageandregulate
thecollection,re‐use,recyclingandrecoveryofwasteelectricalandelectronicequipment,which
enteredintoforceasEuropeanlawon13thFebruary2003.TheDirectiveaimstoimprovethelevelof
recyclingofelectricalandelectronicequipment(EEE)andencouragesdesignerstodevelopproducts
withrecyclingefficiencyinmind;italsoaimstoimproveourenvironmentandreduceriskstohuman
healththroughthepropertreatmentofdiscardedgoods.
TheWEEElogo()ontheproductanditsaccessoriesoronitsboxindicatesthatthisproductmust
notbedisposedofordumpedwithyourotherhouseholdwaste.Youareliabletodisposeofallyour
electronicorelectricalwasteequipmentbyrelocatingovertothespecifiedcollectionpointforrecycling
ofsuchhazardouswaste.Isolatedcollectionandproperrecoveryofyourelectronicandelectricalwaste
equipmentatthetimeofdisposalwillallowustohelpconservenaturalresourcesandreduceharmto
theenvironmentandhumanhealth.
Formoreinformationaboutelectronicandelectricalwasteequipmentdisposal,recoveryandcollection
points,pleasecontactyourlocalgovernmentoffice,householdwastedisposalservice,theretailerfrom
whereyoupurchasedtheequipment,orthemanufactureroftheequipment.
RoHSCompliance
ThisproductisincompliancewithDirective2002/95/ECoftheEuropeanParliamentandoftheCouncil
of27January2003,ontherestrictionoftheuseofcertainhazardoussubstancesinelectricaland
electronicequipment(RoHS)anditsamendment.
SAR compliance for body-worn operations is restricted to belt-clips, holsters, or similar accessories
that have no metallic component in the assembly and which provide at least 1.5 cm separation
between the device and the users body

71
Warning!
DANGEROFEXPLOSIONIFBATTERYISINCORRECTLYREPLACED.TOREDUCERISKOFFIREORBURNS,DO
NOTDISASSEMBLE,CRUSH,PUNCTURE,SHORTEXTERNALCONTACTS,EXPOSETOTEMPERATUREABOVE
60.C(140.F),ORDISPOSEOFINFIREORWATER.REPLACEONLYWITHSPECIFIEDBATTERIES.RECYCLEOR
DISPOSEOFUSEDBATTERIESACCORDINGTOTHELOCALREGULATIONSORREFERENCEGUIDESUPPLIED
WITHYOURPRODUCT.
A.3PCRequirementtoRunActiveSync4.5
ToconnectthedevicetoaWindowsPCrunninganyWindowsoperatingsystempriortoWindowsVista*,
youmusthaveMicrosoft®ActiveSync®programinstalledonyourPC.ActiveSync4.5isincludedinthe
InstallationCD,whichiscompatiblewiththefollowingoperatingsystemsandapplications:
Microsoft®Windows®2000ServicePack4
Microsoft®Windows®Server2003ServicePack1
Microsoft®Windows®Server2003IA64EditionServicePack1
Microsoft®Windows®Server2003x64EditionServicePack1
Microsoft®Windows®XPProfessionalServicePacks1and2
Microsoft®Windows®XPHomeServicePacks1and2
Microsoft®Windows®XPTabletPCEdition2005
Microsoft®Windows®XPMediaCenterEdition2005
Microsoft®Windows®XPProfessionalx64Edition
Microsoft®Outlook®98,Microsoft®Outlook®2000andMicrosoft®Outlook®XP,and
Microsoft®Outlook®2003messagingandcollaborationclients
Microsoft®Office97,excludingOutlook
Microsoft®Office2000
Microsoft®OfficeXP
Microsoft®Office2003
Microsoft®InternetExplorer4.01orlater(required)
Microsoft®SystemsManagementServer2.0
*IfyouareaWindowsVistauserpleaseuseWindowsMobileDeviceCenter,notMicrosoftActiveSync,
fordeviceconnectivitybetweenyourWindowsMobiledeviceandWindowsVista.