Inventec WS9603 WIRELESS POINT OF SALE PDA User Manual MRT320 new use
Inventec (Shanghai) Corporation WIRELESS POINT OF SALE PDA MRT320 new use
Inventec >
users manual

Wireless POS (Point Of Sale) MRT320 User manual Version 1.1
Confidential Date: 2006-09-12
MRT320 Wireless Hand-Held Retail Unit
User Manual

Wireless POS (Point Of Sale) MRT320 User manual Version 1.1
Confidential Date: 2006-09-12
Copyright
© 2006 MP2 Solutions Inc.
Please read this User Manual carefully before using the device. MP2 Solutions shall not be liable for
technical, editorial errors, or omissions contained herein; Nor for incidental or consequential damages
resulting from the furnishing, performance, or use of this material.
This document contains information protected by copyright. The information in this document is subject
to change without notice. No part of this document may be photocopied or reproduced in any form
without prior written consent from MP2 Solutions.
MRT320, MP2, and the MP2 logo are trademarks of MP2 Solutions. Microsoft, Win CE 5.0 are
trademarks of Microsoft Corporation. All other product names mentioned herein may be
trademarks of their respective companies.

Wireless POS (Point Of Sale) MRT320 User manual Version 1.1
Confidential Date: 2006-09-12
Preface
Welcome
Congratulations on your purchase of the MRT320 Wireless Hand-Held Retail Unit. This powerful,
portable, and flexible device will change the way your enterprise accepts wireless payment transactions
in the field, manages inventory, and incorporates mobility into retail operations.
Manual contents
This manual provides details and instructions on operating your device including how to connect your
device to other machines, using optional devices, and troubleshooting.
Messages
Messages are used in this manual to bring important information to your attention. Each type of
message is identified and shown below.
CAUTION: A caution informs you that improper use of the device or failure to follow instructions may
cause data loss or damage to your device.
NOTE: Please read. A note is a hint or advice that helps you to make best use of your equipment.
Contact us
Please contact MP2 Solutions, Inc. for the latest and best in wireless technology and solutions.
MP2 Solutions Inc.
866 MPTWO22 (866-678-9622)
2811 Internet Blvd, Frisco TX, 75034
Email: support@mptwo.com

Wireless POS (Point Of Sale) MRT320 User manual Version 1.1
Confidential Date: 2006-09-12
Federal Communication Commission(FCC)
Product Name: Wireless Hand-Held Retail Unit
Module Number: MRT320
This device complies with Part 15 of the FCC Rules. Operation is subject to the following two conditions:
This device may not cause harmful interference.
This device must accept any interference received, including interference that may cause
undesired operation.
This equipment has been tested and found to comply with the limits for a class B digital device, pursuant
to part 15 of the FCC Rules. These limits are designed to provide reasonable protection against harmful
interference in a residential installation.
This equipment generates, uses and can radiate radio frequency energy and, if not installed and used in
accordance with the instructions, may cause harmful interference to radio communications. However,
there is no guarantee that interference will not occur in a particular installation. If this equipment does
cause harmful interference to radio or television reception, which can be determined by turning the
equipment off and on, the user is encouraged to try to correct the interference by one or more of the
following measures:
Reorient or relocate the receiving antenna.
Increase the separation between the equipment and receiver.
Connect the equipment into an outlet on a circuit different from that to which the receiver is
connected.
Consult the dealer or an experienced radio/TV technician for help.
CAUTION
The manufacturer is not responsible for any radio or TV interference caused by unauthorized
modifications to this equipment. Such modifications could void the user’s authority to operate the
equipment.
The antenna(s) used for this transmitter must not be co-located or operating in conjunction with
any other antenna or transmitter.

Wireless POS (Point Of Sale) MRT320 User manual Version 1.1
Confidential Date: 2006-09-12
Table of Contents
CHAPTER 1 THE GRAND TOUR…………………………………….…………………..…. 1
WHAT IS IN THE BOX………………………………………………………………………1
FRONT SIDE………………………………………………………………………………..2
TOP SIDE………………………………………………………………………………… .3
BOTTOM SIDE……………………………………………………………………………...3
LEFT SIDE………………………………………………………………………………… 3
RIGHT SIDE………………………………………………………………………….….....4
BACK SIDE……………………………………………………………………………...…5
USB CRADLE……………………………………………………………………………...6
INDICATORS…………………………………………………………………………….....7
CHAPTER 2 OPERATING BASICS…………………………………………………………..… .8
TURNING ON/OFF AND STANDBY…………………………………………………….…...8
USING THE STYLUS………………………………………………………………….…….9
USING THE KEYPAD…………………………………………………………….…….….10
CHARGING YOUR DEVICE……………………………………………………………….11
REPLACING THE BAT T E RY PACK…………………………………………………………12
ALIGNING THE SCREEN………………………………………………………………….14
RESETTING YOUR DEVICE………………………………………………………………15
CHAPTER 3 PERIPHERALS & EXPANSIONS……………………………………………….16
USING THE BAR CODE SCANNER…………………………………………………….. ...16
USING THE MSR MODULE………………………………………………………………17
USING THE THERMAL PRINTER………………………………………………………….17
USING THE MEMORY CARD ………………………………………………..……………19

Wireless POS (Point Of Sale) MRT320 User manual Version 1.1
Confidential Date: 2006-09-12
Surfing the internet…………………………………………………………………….20
CONNECT MRT320 TO PCVIA ACTIVESYNC………………………………………………20
CHAPTER 4 COMPANION PROGRAMS………………………………………………………23
OPERATING SYSTEM………………………………………….........………...23
APPENDIX SPECIFICATIONS…………………………………………………………………..25

Wireless POS (Point Of Sale) MRT320 User manual Version 1.1
Confidential Date: 2006-09-12
1
Chapter 1 The Grand Tour
This chapter will identify the components of the device and briefly explain how they function.
What is in the Box
Check to make sure you have all the following items:
MRT320 Wireless Hand-Held Retail Unit (including stylus and hand strap)
Charging Cradle
AC Adaptor
Power Cord
USB Synch Cable
Lithium-ion Battery Pack (with screw cover)
Roll Paper
Companion CD
Wireless POS (Point Of Sale) MRT320 User manual Version 1.1
Confidential Date: 2006-09-12
2
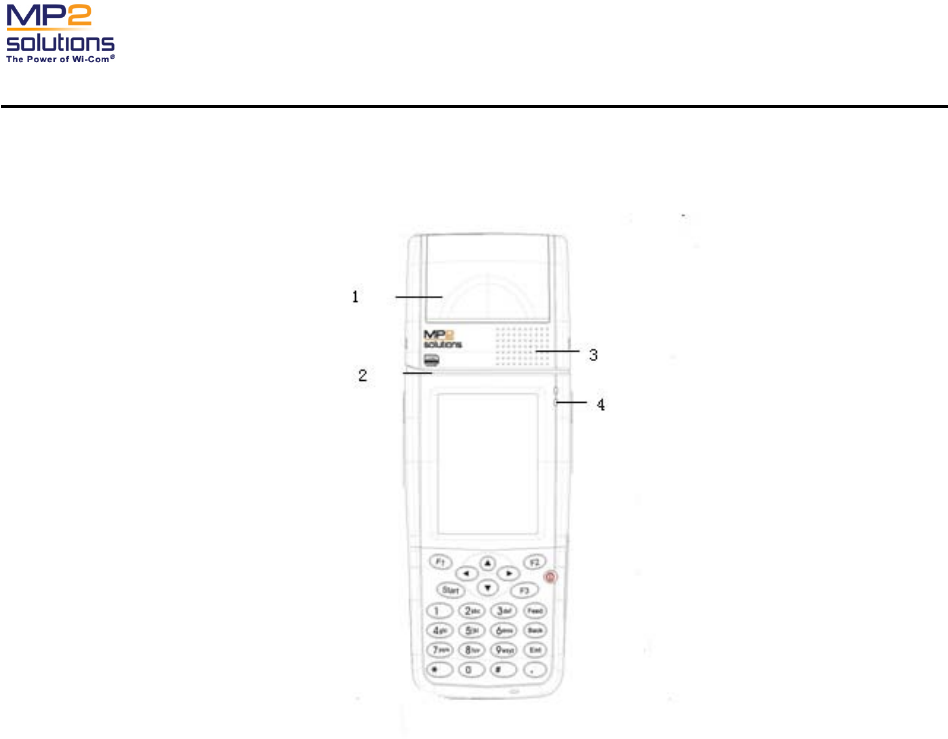
Front Side
1 Thermal Printer
Refer to the “Using the Thermal Printer” section in Chapter 3.
2 Magnetic Stripe Reader (MSR)
Refer to the “Using the MSR Module” section in Chapter 3.
3 Speaker
Produces sound generated by software as well as audio alarms and notification generated by the
system.
4 Power Indicator
(green/amber) Refer to the “Indicators” section below in this chapter.
Wireless POS (Point Of Sale) MRT320 User manual Version 1.1
Confidential Date: 2006-09-12
3
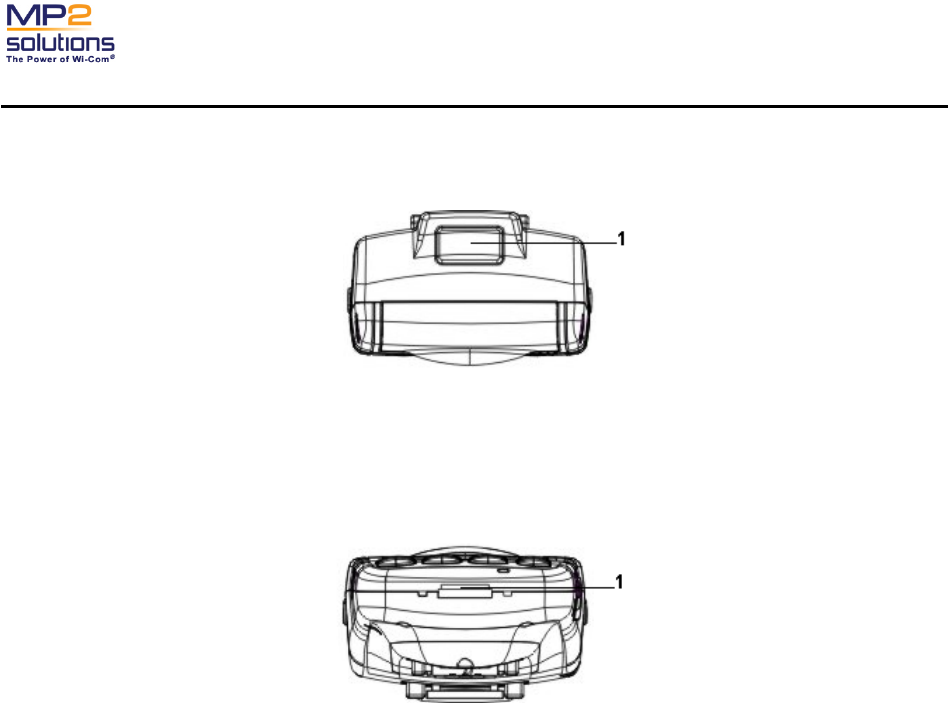
Top Side
1 Bar Code Scanner
Refer to the “Using the Bar Code Scanner” section in Chapter 3.
Bottom Side
1 Docking Connector
Use it to connect with the USB cradle.
Left Side
1 Scan Button
Refer to the “Using the Bar Code Scanner” section in Chapter 3.

Wireless POS (Point Of Sale) MRT320 User manual Version 1.1
Confidential Date: 2006-09-12
4
Right Side
1 Stylus
Refer to the “Using the Stylus” section in Chapter 2.
2 Scan Button
Refer to the “Using the Bar Code Scanner” section in Chapter 3.
3 SD/MMC Slot
It can accommodate one memory card (SD/MMC).
4 Headphone Jack
Wireless POS (Point Of Sale) MRT320 User manual Version 1.1
Confidential Date: 2006-09-12
5
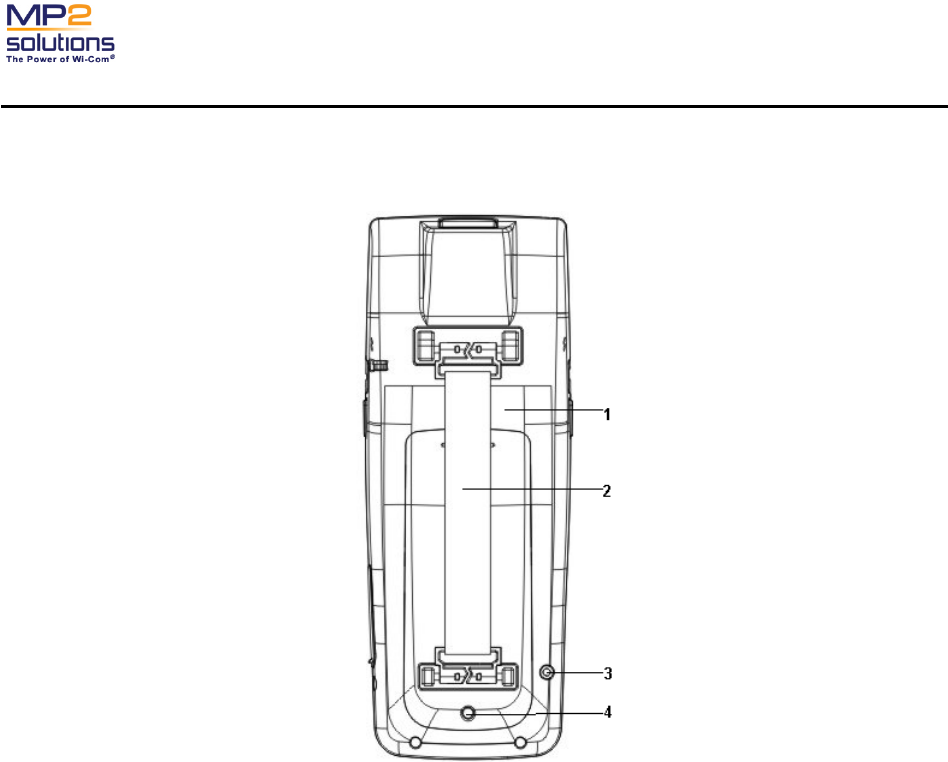
Back Side
1 Battery Pack
Powers the device when the AC adaptor is not connected
2 Hand Strap
Supports hand for steady use.
3 Reset Button
Perform warm boot
4 Battery cover screw
Secures the battery pack cover
Wireless POS (Point Of Sale) MRT320 User manual Version 1.1
Confidential Date: 2006-09-12
6
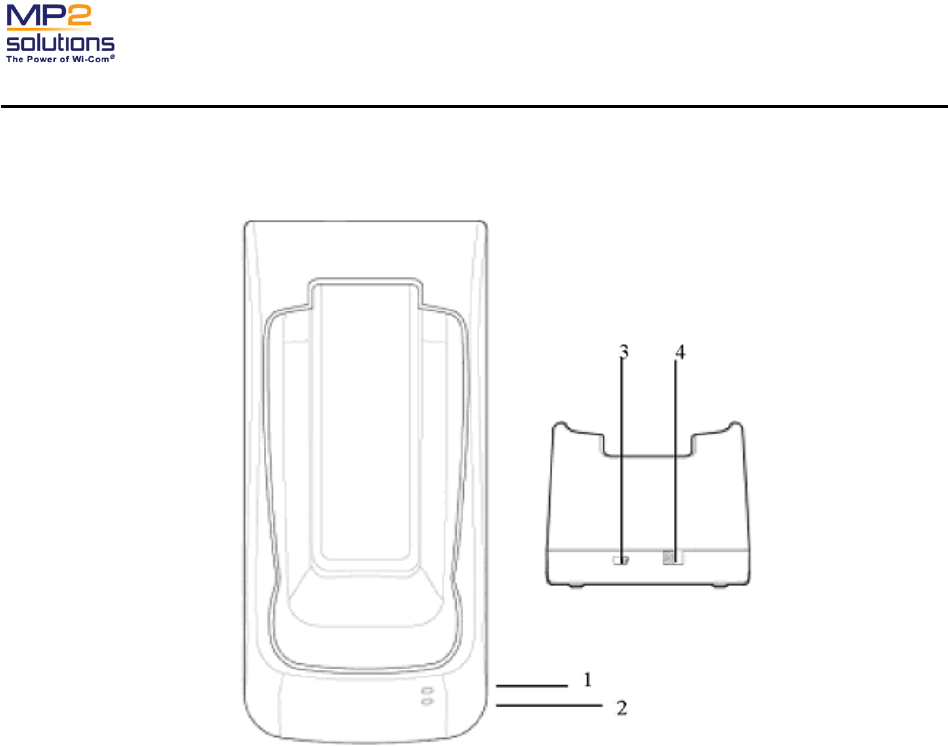
USB Cradle
1 Charging Indicator
(amber) Refer to the “Indicators” section below in this chapter.
2 DC-IN Indicator
(green) Refer to the “Indicators” section below in this chapter.
3 USB Port
Connects to PC via the USB cable
4 DC-IN Jack
Connects to external power via the AC adaptor

Wireless POS (Point Of Sale) MRT320 User manual Version 1.1
Confidential Date: 2006-09-12
7
Indicators
Refer to the “Front Side” and “USB Cradle” section above in this Chapter to locate the indicators.
Indicators on the Front Side
Power Indicator: Indicates the power status.
Amber: Indicates the AC adaptor is connected and charging the battery.
Green: Indicates the AC adaptor is connected and the battery is fully charged.
No light: During normal device use, the indicator light is not active .
Indicators on the USB Cradle
Charging Indicator: Indicates the battery status.
Amber: Indicates the AC adaptor is connected and charging the battery.
Green: Indicates the AC adaptor is connected and supplying proper power to the device.
No light: During normal device use, the indicator light is not active.
Power Indicator: Indicates the AC adaptor connection status
Green: Indicates the AC adaptor is connected
No light: Indicates the AC adaptor is not connected.

Wireless POS (Point Of Sale) MRT320 User manual Version 1.1
Confidential Date: 2006-09-12
8
Chapter 2 Operating Basics
This chapter gives useful information on basic operations including turning the device on/off, using the
stylus, and keypad.
Turning On/Off and Sleep mode
NOTE: The battery pack and the cover screw are removed from the device when shipped from the
factory. When using the MRT320 for the first time, please install the battery pack. Refer to “Replacing the
Battery Pack” section below.
Turning on the MRT320
To turn on your device, do one of the following:
Place the device into the cradle with power adaptor, which will turn on the device
automatically.
Press the Power key with power supplied from battery pack only, the power key is located at
the upper-right corner of the keypad.
Sleep Mode (Temporary off state)
The MRT320 supports sleep mode. In sleep mode the device is on a low power consumption status. The
display turns off, and all applications hibernate.
There are two ways for the MRT320 to enter sleep mode:
Manually: When the device is turned on, press the power key, at least two seconds,to enter
sleep mode. Press the power key once to switch back on mode when MRT320 is in sleep
mode.
Automatically: The device provides a battery save mode to conserve battery power. You may
select a short delay for entering sleep mode when the device is not in use. Refer to the
“Managing the Power” section in Chapter 4.
Cold boot and System Reset of the MRT320
In general, the device is either in run mode or in sleep mode. In order to prevent data loss, it is not
recommended to turn on the MRT320 with a “cold boot”.
CAUTION: All data and applications installed on the memory will be lost if the cold boot is conducted. It
is highly recommended to install your program in flash named Disk A or Disk B and place your data to

Wireless POS (Point Of Sale) MRT320 User manual Version 1.1
Confidential Date: 2006-09-12
9
the flash memory or memory card.
Using the Stylus
The stylus for the MRT320 serves as a mouse or navigation tool. You can use it to select an item, open a
program, and to input information.
Tap: Touch the screen with the stylus to open items and select options.
Drag: Hold the stylus on the screen and drag across the screen to select text and images.
Drag in a list to select multiple items.
Tap and hold: Tap and hold the stylus on an item to see a list of actions available for that item.
On the pop-up menu that appears, tap the action you want to perform.
NOTE: The stylus is designed to attach to the device. Return the stylus to its proper position on the
device when it is not in use. Refer to the “Right Side” section in Chapter 1.
Wireless POS (Point Of Sale) MRT320 User manual Version 1.1
Confidential Date: 2006-09-12
10
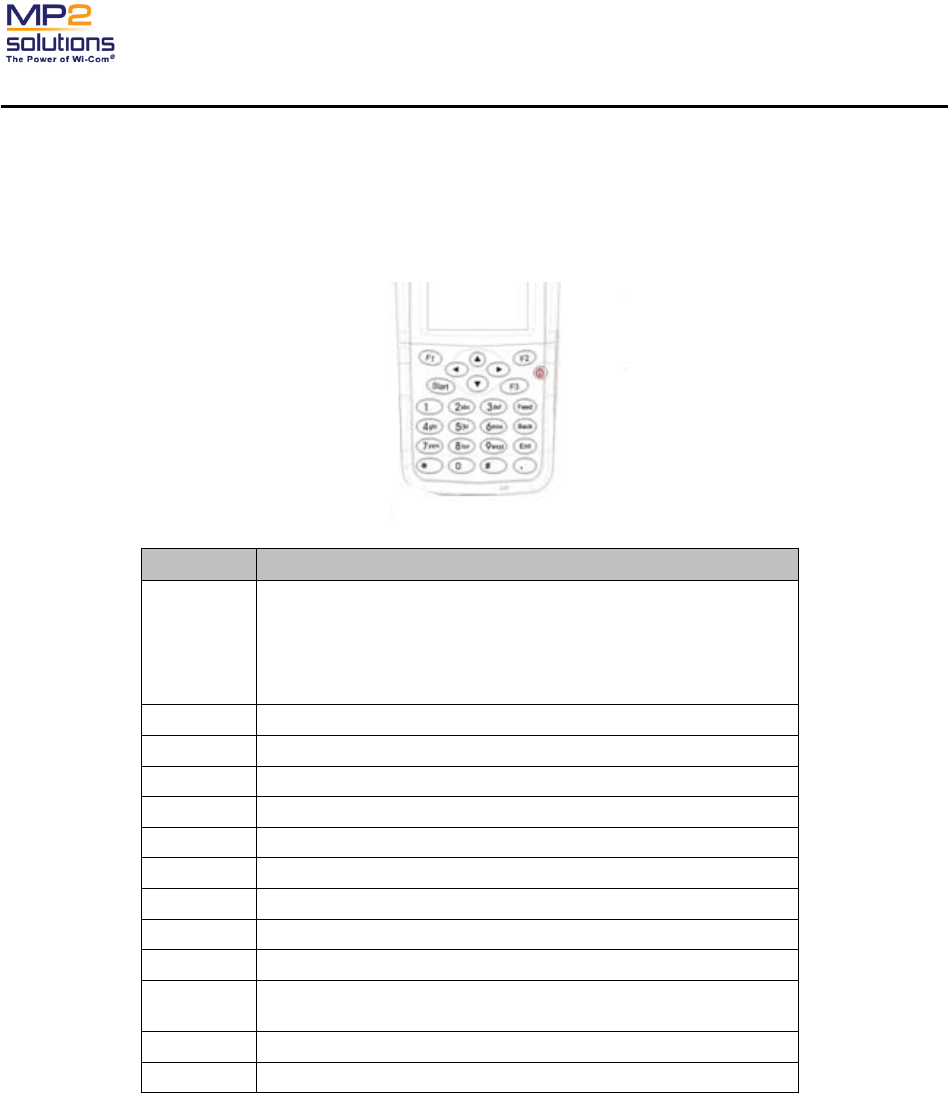
Using the Keypad
This keypad can produce letters, numbers, special symbols, and perform some functions, such as
turning on and off the device and launching applications.
KEY FUNCTION
Power
Press it for 1-2 seconds to start the device.
Press it for 3-4 seconds to enter or exit sleep mode.
Press it for seconds to turn on/off the backlight.
Press it and reset button simultaneously to enter cold
boot
F1 Press it to run AP
F2 Press it to run AP
F3 Press it to run AP
Feed Press it to advance the paper.
Back Press it to backspace
Ent Press it to enter
• Press it to input the symbol “.”
* Press it to input the symbol “*”
# Press it to input the symbol “#”
arrow keys Press them to move up/down/right/left.
0-9 Press them to input 0~9 or A~Z.
Start Press it to display the start menu
Wireless POS (Point Of Sale) MRT320 User manual Version 1.1
Confidential Date: 2006-09-12
11
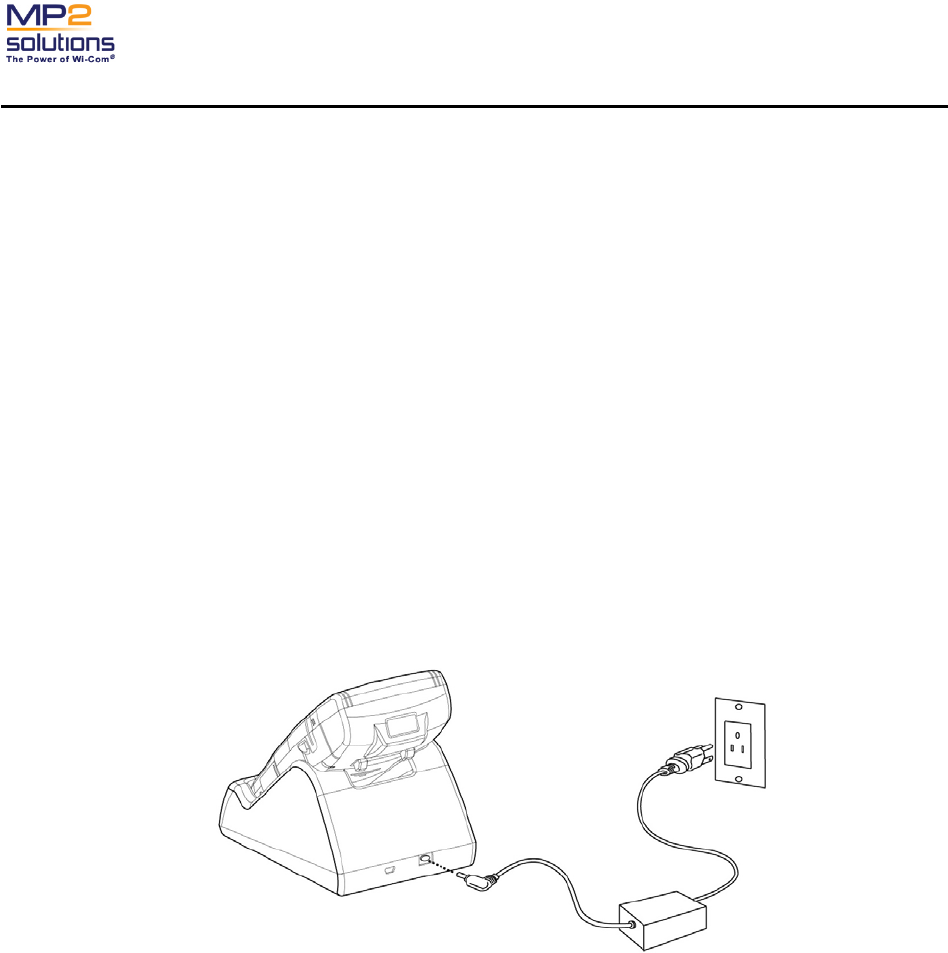
Charging Your Device
Connect the AC adaptor via the USB cradle to charge the battery pack or to operate the device with
external power. It is also the fastest way to get started. The battery pack will need to be charged before
you can operate from battery power.
To connect the AC adapter properly, follow the steps below:
1. Put the device into the cradle.
NOTE: To reduce damage to the connector, grasp the cradle with one hand while placing the
device into the cradle or while removing.
2. Insert the AC adaptor plug into the DC-IN jack at the back of the cradle.
3. Connect the AC adaptor to an electrical outlet with the power cord. Please note that the AC power
voltage should be within the range of 100~240V.
4. Notice the Charging indicator on the cradle and the Power indicator on the MRT320 for the status
of charging. Refer to “Indicators” section in Chapter 1.
In general, it takes about 4~5 hours to charge the device fully. It is strongly recommended that this
device be charged for 12 hours continuously when you use the device the first three times in order to
extend the battery’s life.
CAUTION:
1. Use only AC adaptors recommended by us. Other AC adaptors may cause damage to the device.
2. The devices can work about half an hour with the support of Backup battery on the condition that
battery pack is out of power.

Wireless POS (Point Of Sale) MRT320 User manual Version 1.1
Confidential Date: 2006-09-12
12
Replacing the Battery Pack
Once the battery pack reaches the end of its operating life, you will need to install a new one.
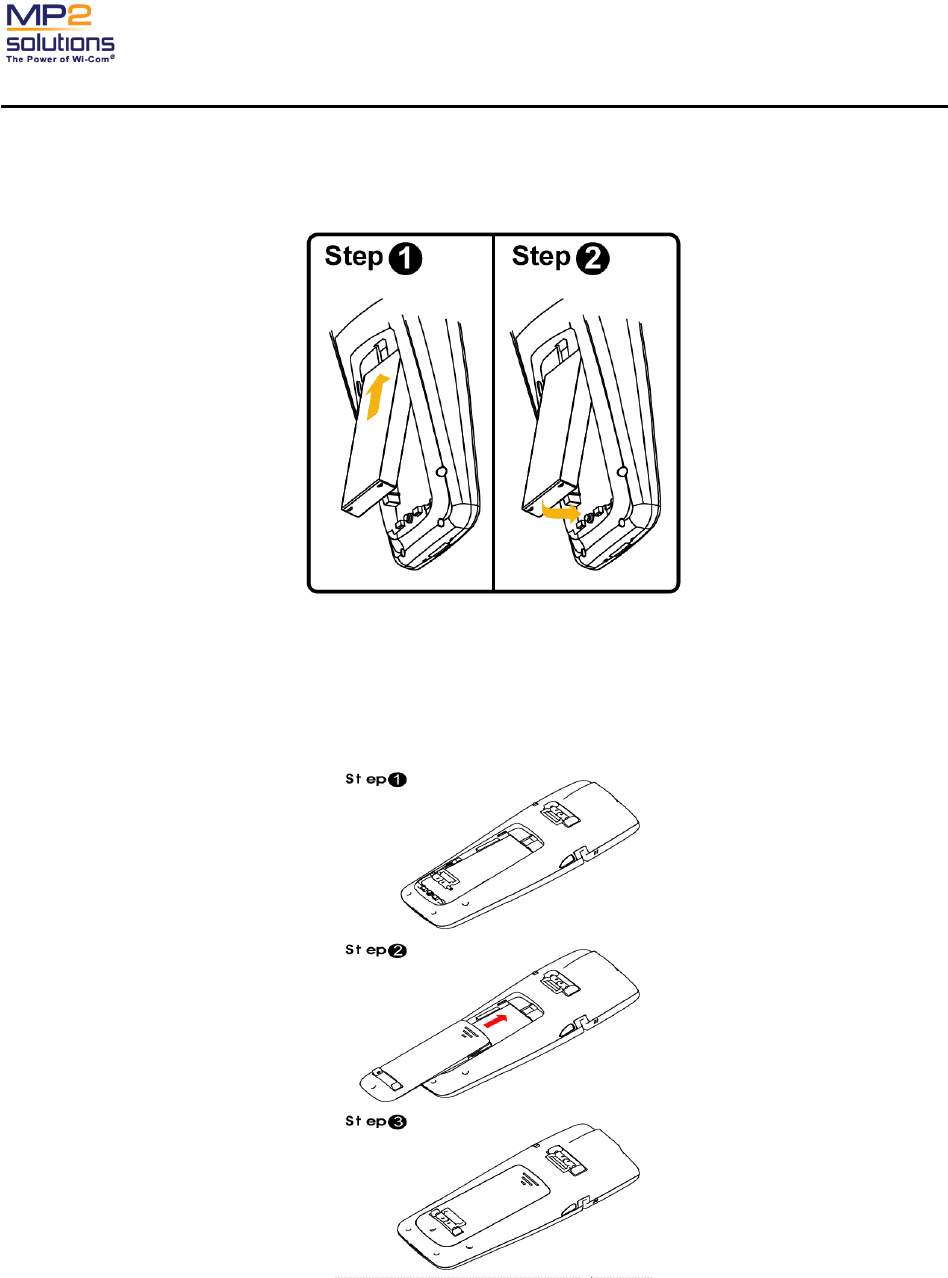
Removing the Battery Pack
To remove a battery pack properly, follow the steps below:
1. The device should be in sleep mode before taking off the battery cover.
2. Turn the device upside down with the back of the device facing you.
3. Remove the screw on the battery cover with a screwdriver. Refer to the “Back Side” section in
Chapter 1 to locate the screw.
4. Pull the hand strap away from the device to lift off the cover of the battery pack easily.
5. Take the battery pack out.
CAUTION: data in memory can be reserved only half an hour without battery pack.
Installing the Battery Pack
NOTE: The battery pack and the cover screw are removed from the device when shipped out of the
factory. When using the MRT320 for the first time, please install the battery pack.
To install the battery pack properly, follow the steps below:
1. Turn the device upside down with the back of the device facing you.
Wireless POS (Point Of Sale) MRT320 User manual Version 1.1
Confidential Date: 2006-09-12
13
2. Pull the hand strap away from the device to remove the cover of the battery pack easily.
3. Insert the battery pack until it is firmly seated.
CAUTION: Insert the battery as the label shows to avoid damaging the connector. Use only the
recommended battery packs as replacements.
4. Seat the battery cover and secure it with the screw. Refer to the “Back Side” section in Chapter 1 to
locate the screw.

Wireless POS (Point Of Sale) MRT320 User manual Version 1.1
Confidential Date: 2006-09-12
14
NOTE: Make sure the screw is tightened. This secures the battery pack in the case. Removal of
the battery pack will cause data loss.
Aligning the Screen
When you turn on the screen of your device for the first time, you will be guided through the alignment
process. Screen alignments are required if your device is not responding properly, or following a hard
reset.
To align your screen, follow the steps below:
1. From the [Start] menu, tap the [Settings] > [Control panel] > [Stylus] icon > tab [Calibration]
> [Recalibrate] button to begin the realignment process.
2. Follow up the instructions from the application.
3. Tap [OK].

Wireless POS (Point Of Sale) MRT320 User manual Version 1.1
Confidential Date: 2006-09-12
15
Resetting Your Device
If your device responds slowly, stops responding as unexpected, or “freezes”, try resetting it.
Warm boot: Use the stylus to press the Reset button on the back panel of the device. Refer to
the “Back Side” section in Chapter 1 to locate the button.
Cold boot: If the device cannot be reset with the operation above, you may press and hold the
Power key using the stylus to press the Reset button on the back panel of the device.
CAUTION: Unsaved data in running programs may be lost after a soft reset. And all the data and
applications you installed in the memory of the device will be lost.
Wireless POS (Point Of Sale) MRT320 User manual Version 1.1
Confidential Date: 2006-09-12
16
Chapter 3 Peripherals & Expansions
This chapter tells you how to use peripherals to expand the device’s capabilities and its versatility. It
includes using the thermal printer, MSR, bar code scanner, memory cards as well as connecting to your
PC.
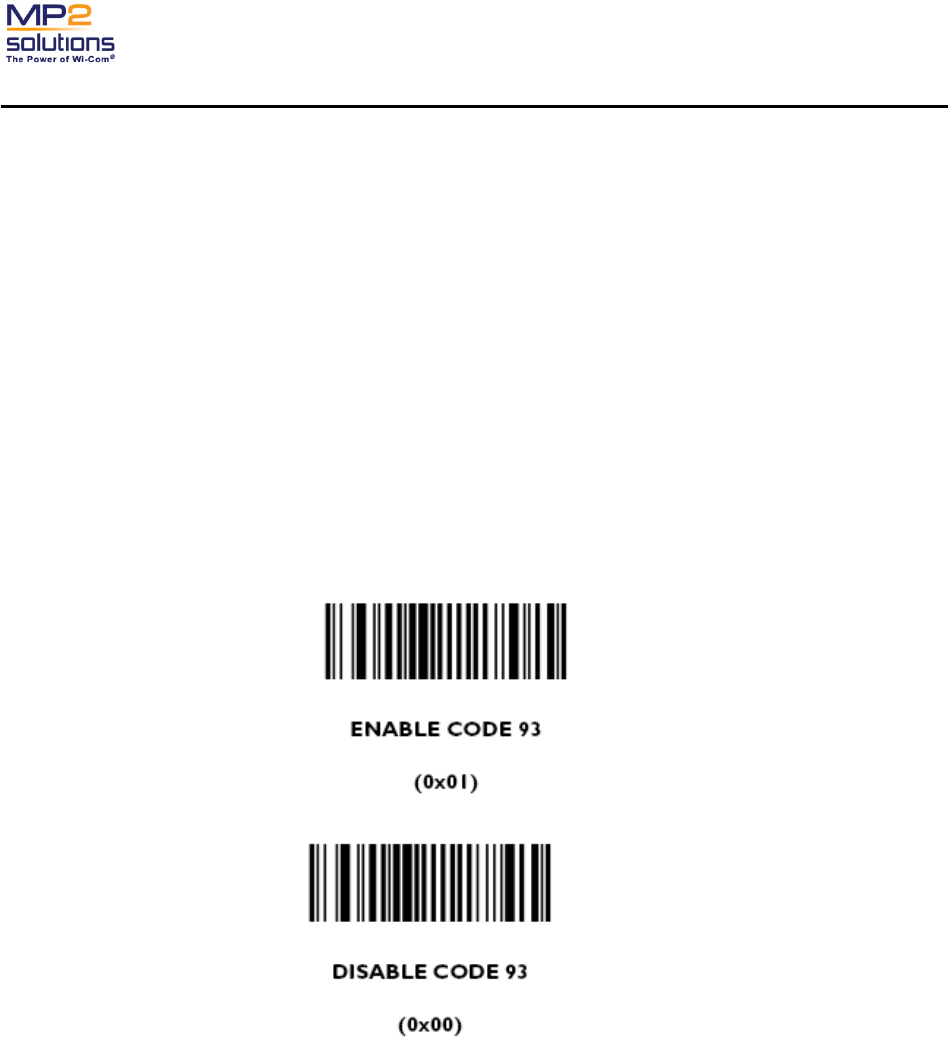
Using the Bar Code Scanner
There is an integrated bar code scanner on the top of the MRT320. Refer to “Top Side” section in
Chapter 1.
To scan a bar code, Please refer to application user manual from MP2.
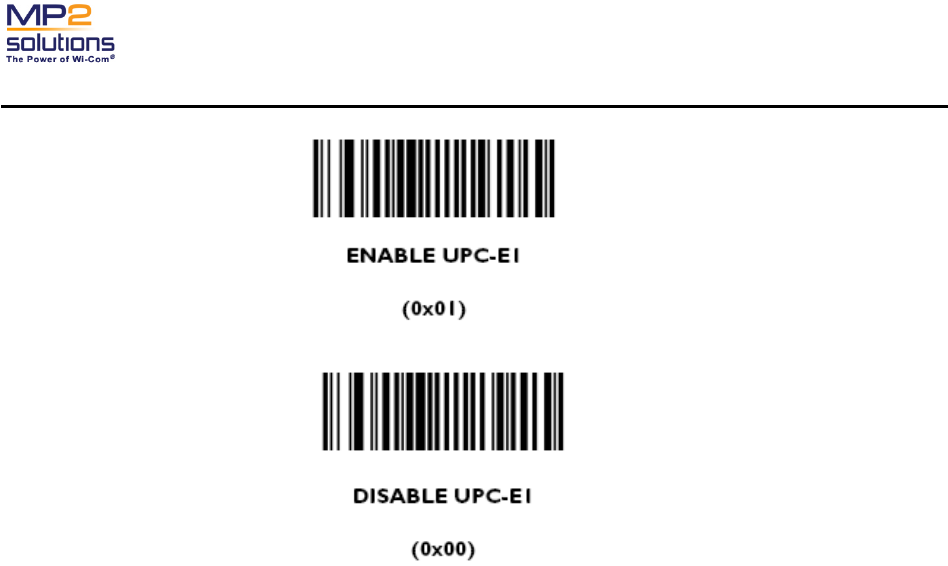
NOTE: 1.Start scanning on one side of the bar code. Make sure that you scan the complete bar code.
2. To enable or disable Code 93, scan the appropriate bar code below;
3. To enable or disable Code UPC-E1, scan the appropriate bar code below;
Wireless POS (Point Of Sale) MRT320 User manual Version 1.1
Confidential Date: 2006-09-12
17
CAUTION: The bar code scanner uses a laser to read bar codes. Although it uses a safety laser, avoid
looking directly into the beam.
Using the MSR Module
There is a magnetic stripe reader (MSR) on the front of the MRT320. Refer to “Front Side” section in
Chapter 1.
To read a magnetic card correctly, Please refer to application user manual from MP2:
NOTE: The side with the magnetic stripe should face the reader.
Using the Thermal Printer
There is an integrated thermal printer on the front of the MRT320. Refer to “Front Side” section in
Chapter 1.
Inserting a Paper Roll
NOTE: Use the paper roll included in the packing box. The paper width is 58 mm.
To insert a paper roll properly, following the steps below:
1. Pull the printer cover to open.
2. Insert a paper roll into the paper compartment.

Wireless POS (Point Of Sale) MRT320 User manual Version 1.1
Confidential Date: 2006-09-12
18
3. Push the printer cover to close.
NOTE: Insert the paper roll carefully to make sure the paper is parallel to the printer.
CAUTION: When inserting a paper roll, be careful to avoid touching the sharp blade.
Printing Receipts
NOTE: the maximum period for the ON time is 30 seconds. After typing 0.9 meters, the printer should be
stopped printing for 10 seconds.
You may use the thermal printer to print bar codes, labels, and receipts following the steps below:
1. Check to make sure the paper is installed correctly in the paper compartment.
2. Use the stylus to activate the corresponding command on the screen.
NOTE: You may directly perform the Print command after scanning the bar code or reading
magnetic stripes.
3. The paper will advance while printing. After the printing has been completed, tear off the paper
along the blade.
4. Check the printed result.
CAUTION:
1. Once there are no paper roll in the device, there are a warning message while printing.
2. As long as you receive the message of overheat, just stop printing till the temperature of printer
backs normal.

Wireless POS (Point Of Sale) MRT320 User manual Version 1.1
Confidential Date: 2006-09-12
19
Using the Memory Card
The device is equipped with a memory card slot. It can accommodate one memory card (SD/MMC).
Refer to the “Right Side” section in Chapter 1.
NOTE: You may use the memory card to back up the data before a hard reset of your device.
Installing the Memory Card
To install a Memory card properly, follow the steps below:
1. Remove the card cover in the SD/MMC slot.
NOTE: The cover is attached to the device with a hook.
2. Insert the memory card, with the golden finger facing down.
NOTE: Refer to the icon at the right of the card slot for the proper direction.
3. Push the connection edge of the card firmly into the slot.
4. Replace the cover on the card.
Removing the Memory Card
1. Close all applications using this card.
2. Remove the card cover on the card.
3. Push down on the card to eject it out of the slot.
4. Grasp the card and gently pull it out.
5. Replace the card cover in the SD/MMC slot.
Wireless POS (Point Of Sale) MRT320 User manual Version 1.1
Confidential Date: 2006-09-12
20
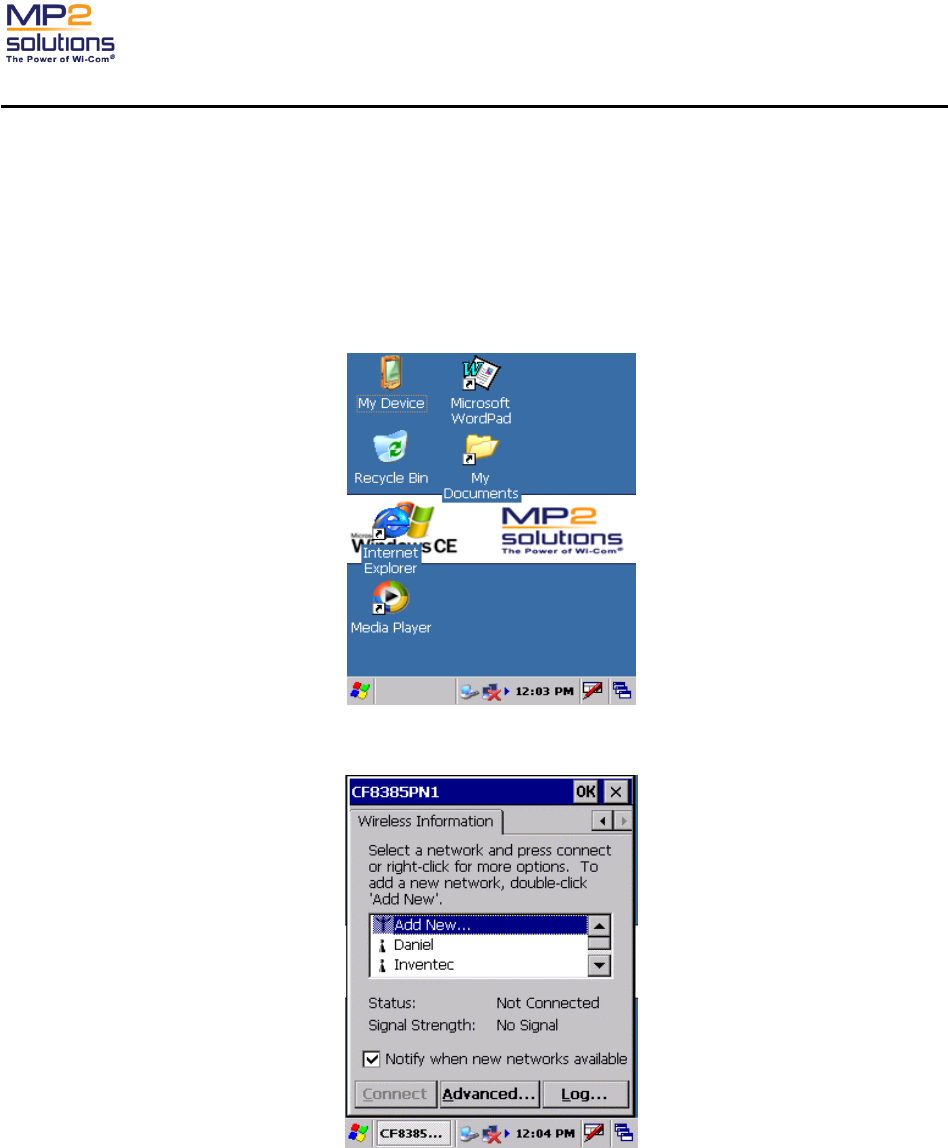
Surfing the internet
The MRT320 has embedded Wireless Lan, you can have an internet connection via WLAN.
To connect the internet, follow the steps below:
1. Double click wireless ICON at the device working, which ICON is located on the bottom of desktop.
2. Press right arrow on the TAB-BAR until you see the interface of “Wireless Information”.
Wireless POS (Point Of Sale) MRT320 User manual Version 1.1
Confidential Date: 2006-09-12
21
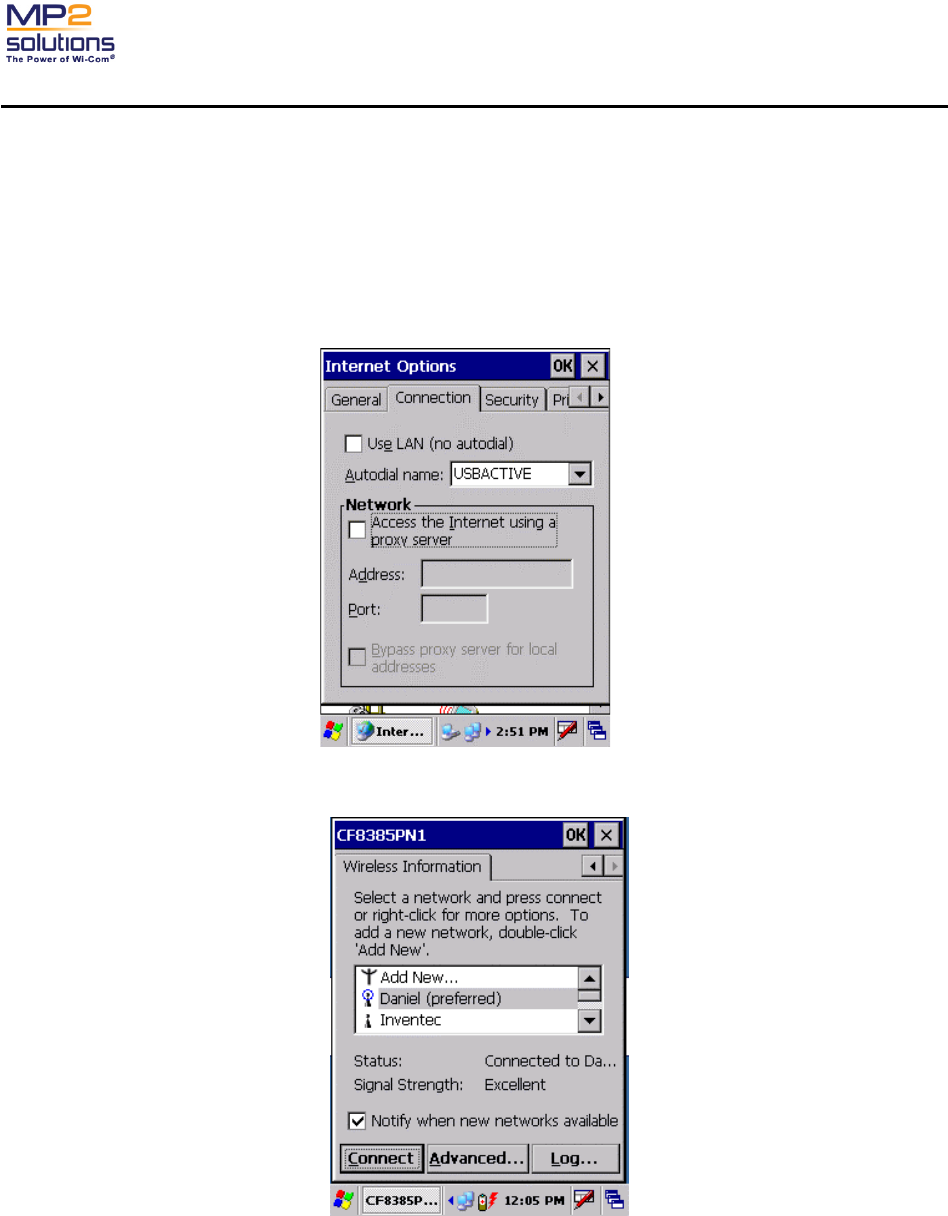
Note: Once you connect AP through proxy sever, please follow the steps to set proxy sever,
To open, tap [Start] - [Settings] - [Control Panel] - [Internet Options] -
[Connection]
Choose “Access the internet using a proxy sever”
Input proxy sever [Address] and [Port], then, Press “OK”.
3. Choose the AP you want to connect, then press “Connect” button to connect the AP.
Wireless POS (Point Of Sale) MRT320 User manual Version 1.1
Confidential Date: 2006-09-12
22
Connecting MRT320 to PC via ActiveSync
The MRT320 has internal platform of Win CE 5.0, which introduced the ability for you to transfer the
Internet connection to the device via “ActiveSync Pass Through” if you have an Internet connection on
your desktop PC.
To connect your device to the Internet via ActiveSync, follow the steps below:
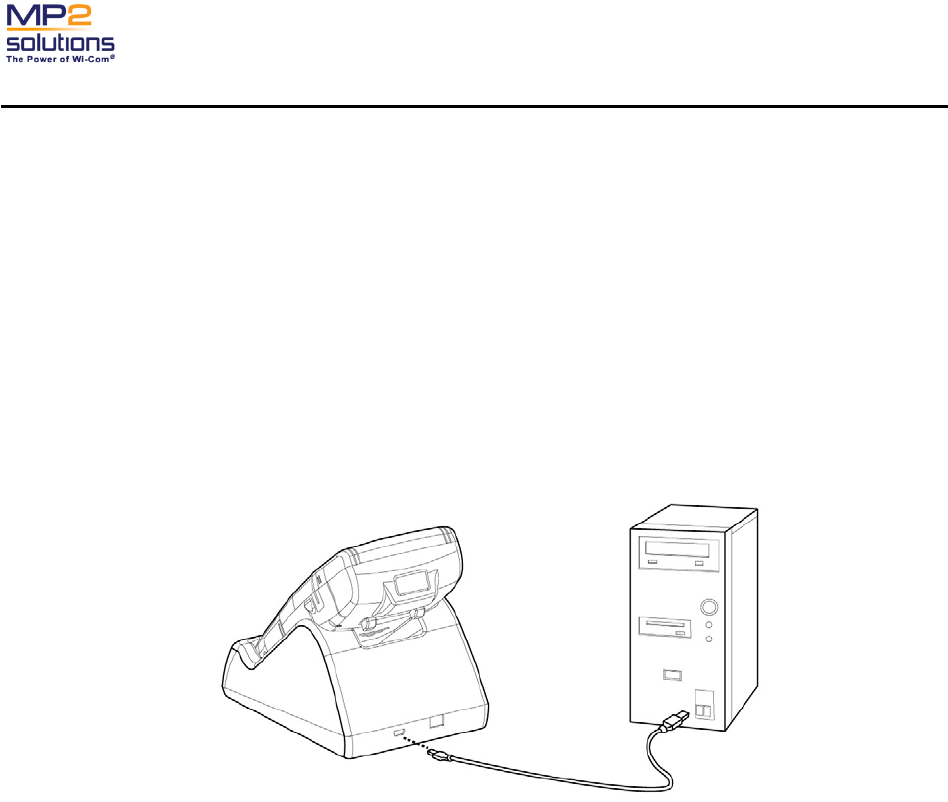
1. Place the device into the cradle.
NOTE: To reduce damage to the connector, grasp the cradle with one hand while placing the
device into the cradle or while removing.
2. Connect the USB port on the cradle and PC with the USB cable.
3. The “New Partnership” window appears on your desktop. You may select either [Standard
partnership] or [Guest partnership] at your own choice.
NOTE: Microsoft ActiveSync program must be installed on the PC before the connection.
4. The “Microsoft ActiveSync” window appears with the message “Connected”.
NOTE: Version of Microsoft ActiveSync program 4.1.0 or later is recommended.

Wireless POS (Point Of Sale) MRT320 User manual Version 1.1
Confidential Date: 2006-09-12
23
Chapter 4 Companion Programs
This chapter briefly introduces the operating system and applications built-into the MRT320.
Operating System
The device has internal operation system of Windows CE 5.0. Refer to online help on the device for
details.

Wireless POS (Point Of Sale) MRT320 User manual Version 1.1
Confidential Date: 2006-09-12
24
Appendix Specifications
CPU Intel Xscale PXA270, 520MHz
Memory 128MB SDRAM; 128MB Flash
Audio AC97 CODEC
speakers x 1; stereo headphone jack x1
Display 3.5” QVGA TFT LCD, 64K color
Peripheral
Thermal Printer with paper width 58mm, 12 lines/s (UART)
Barcode Scanner (UART)
MSR (magnetic stripe reader)
MMC/SD/SDIO Slot
USB1.1 Cradle
Power AC/DC Adaptor:
Battery: lithium-ion,
Buttons Button : Reset button x 1; Scan button x 2
Key: F1, F2, F3, Start, 4-way direction, 0-9 numbers, Feed, Back, Ent, *, #, Decimal
Indicators
On panel: Power indicator (amber/green); Incoming Call indicator (unavailable
in this model)
On cradle: Charging indicator (amber); DC-IN indicator (green)
Dimension about 239.32 (L) x 91.37 (W) x 57.51 (H) (mm)
Certification UL, FCC , FDA