Iradio Electronics DM-568 Digital Two-way Radio User Manual
Iradio Electronics Co., Ltd. Digital Two-way Radio
User Manual

DM
R
Digital Two-Way Radio
DM-580

Thanks for your favor in product.This manual
provides guidance for you to quickly know how to use
this product.
To avoid bodily injury or property loss caused by
misoperations. please carefully read this manual before
using our product.
Preface
This manual is applicable to the following product: DM-580.
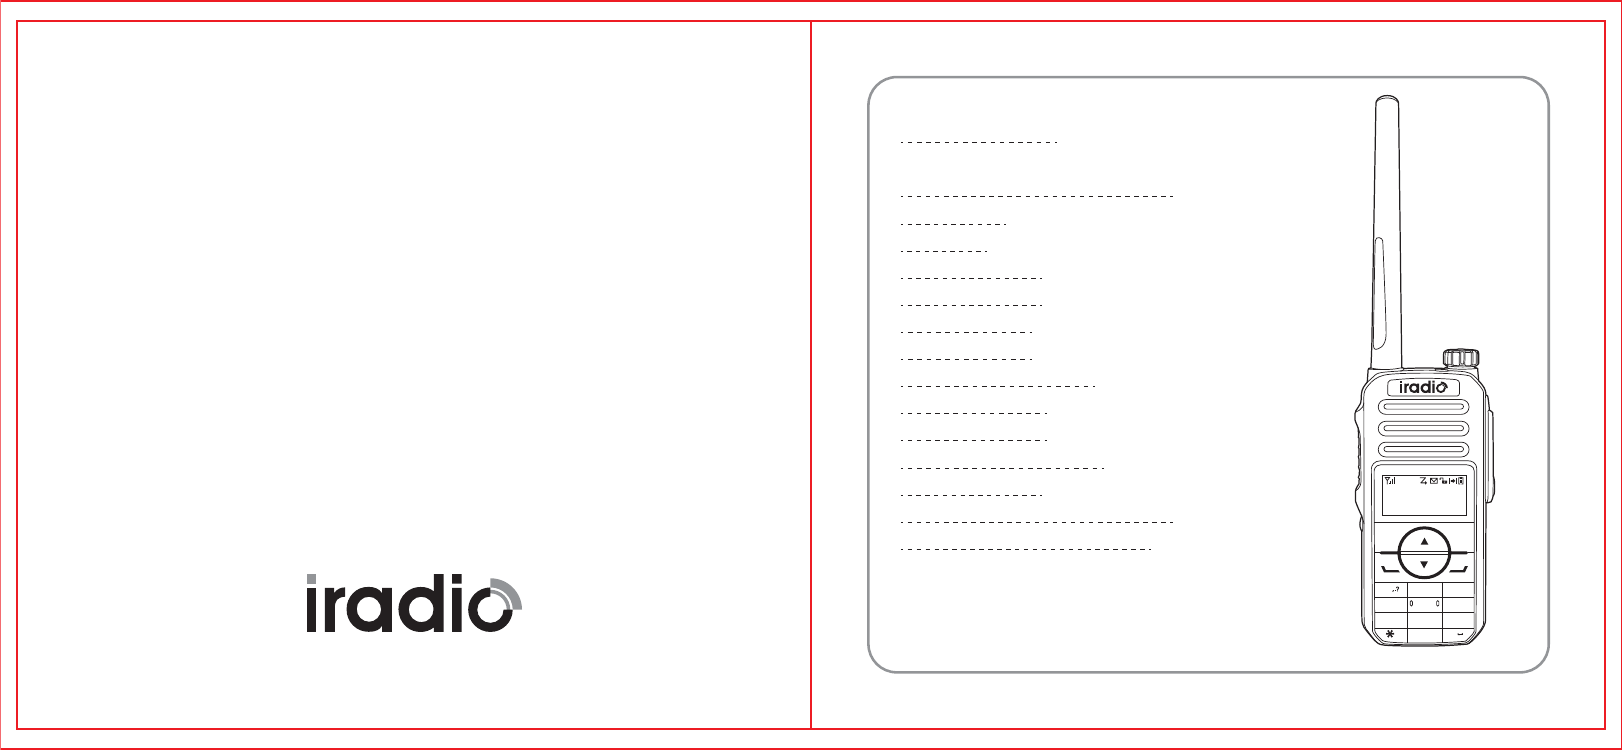
Welcome to use iradio digital two-way radio.
H
Zonel CH 1
VOX
4A403.325
MENU BACK
1ABC DEF
GHI
PQRS
DEL CAPS
TUV WXYZ
JKL MNO
23
4
56
7
8
0
#
9
Main Function
UHF:400-470MHz
1000 Channels
250 Zones
Message Function
CTCSS/DCS
VOX Function
DTMF Function
High/Low power Selection
Scan Function
Low Power Alert
Emergency Alarm Function
Digital Encryption
Side Key P1/P2 Can be Customized
Single Call、Group Call、All Call

CONTENTS
Section 1..............................................................................................................01-02
Attention....................................................................................................................01
Unpacking and device checking.................................................................................02
Section 2..............................................................................................................03-10
Familiar with the radio...........................................................................................04-05
Preparation before using.......................................................................................06-10
Charging the battery.......................................................................................... 06
Attaching the battery..........................................................................................07
Attaching the antenna........................................................................................08
Attaching the belt clip........................................................................................09
Attaching the audio accessory/programming cable..........................................10
Section 3..............................................................................................................11-15
Basic operations........................................................................................................12
Turning the radio on/off.....................................................................................12
Adjusting the volume........................................................................................12
Selecting a zone................................................................................................12
Channels、users ID、talk group ID selection...................................................12
Call......................................................................................................................12-15
Private Call.........................................................................................................13
Group Call..........................................................................................................14
All Call................................................................................................................15
Section 4..............................................................................................................16-48
Emergency Alarm Function and operations............................................................17-20
Emergency type.................................................................................................17
Emergency Mode...............................................................................................18
Operation of sending emergency alarm............................................................19
Operation of receiving emergency alarm..........................................................19
Operation of replying emergency alarm............................................................20
Menu Functions and Operations............................................................................21-30
Character input..................................................................................................21
English character mode.....................................................................................21
Radio Detection.................................................................................................22
Send a Radio Detection.....................................................................................22
Setting contacts person....................................................................................23
Call recording function......................................................................................23
Missed call screen.............................................................................................23
Store/Delete Missed,Answered,Outgoing list name/ID.....................................23
Call prompt operation.......................................................................................24
Receiving & Confirm call prompt......................................................................24
Message function..............................................................................................24
Encryption.................................................................................................................25
Basci encryption................................................................................................25
DTMF..................................................................................................................26
Make a DTMF call......................................................................................................26
Anti-Theft..................................................................................................................26

Time..........................................................................................................................41
Date...........................................................................................................................41
Radio Info.............................................................................................................42-43
My number................................................................................................................42
Versions....................................................................................................................43
Program Radio.....................................................................................................43-48
RX Frequency............................................................................................................44
TX Frequency ......................................................................................................44-45
Channel Name...........................................................................................................45
TOT...........................................................................................................................46
CTC/DCS..................................................................................................................46
Encode.................................................................................................................46-47
Decode......................................................................................................................47
Color code............................................................................................................47-48
Repeater Slot............................................................................................................48
Technical Parameter...........................................................................................49-51
General...............................................................................................................49
Receiving............................................................................................................50
Transmitting........................................................................................................51
Guarantee.................................................................................................................52
Kill Function...............................................................................................................26
Revival Function........................................................................................................27
Scanning list ........................................................................................................27-30
Check the Members of Scanning List..........................................................................28
Scanning indicator and method..................................................................................28
There are two scaning methods..................................................................................29
Start/stop Scanning....................................................................................................29
Reply ........................................................................................................................30
Utilities.................................................................................................................31-41
Radio Settings...........................................................................................................31
Talk around...............................................................................................................32
Tones/Alerts..............................................................................................................33
All Tones...................................................................................................................33
Keypad Tones............................................................................................................34
Power Level Setting..............................................................................................34-35
Back light...................................................................................................................35
Squelch.....................................................................................................................36
Intro Screen...............................................................................................................37
Keypad Lock..............................................................................................................37
Language..................................................................................................................38
LED indicator light.....................................................................................................38
VOX..........................................................................................................................39
Password Lock..........................................................................................................40
Clock....................................................................................................................41-42

User's Manual
Attention
Unpacking and device checking
Preparation before using
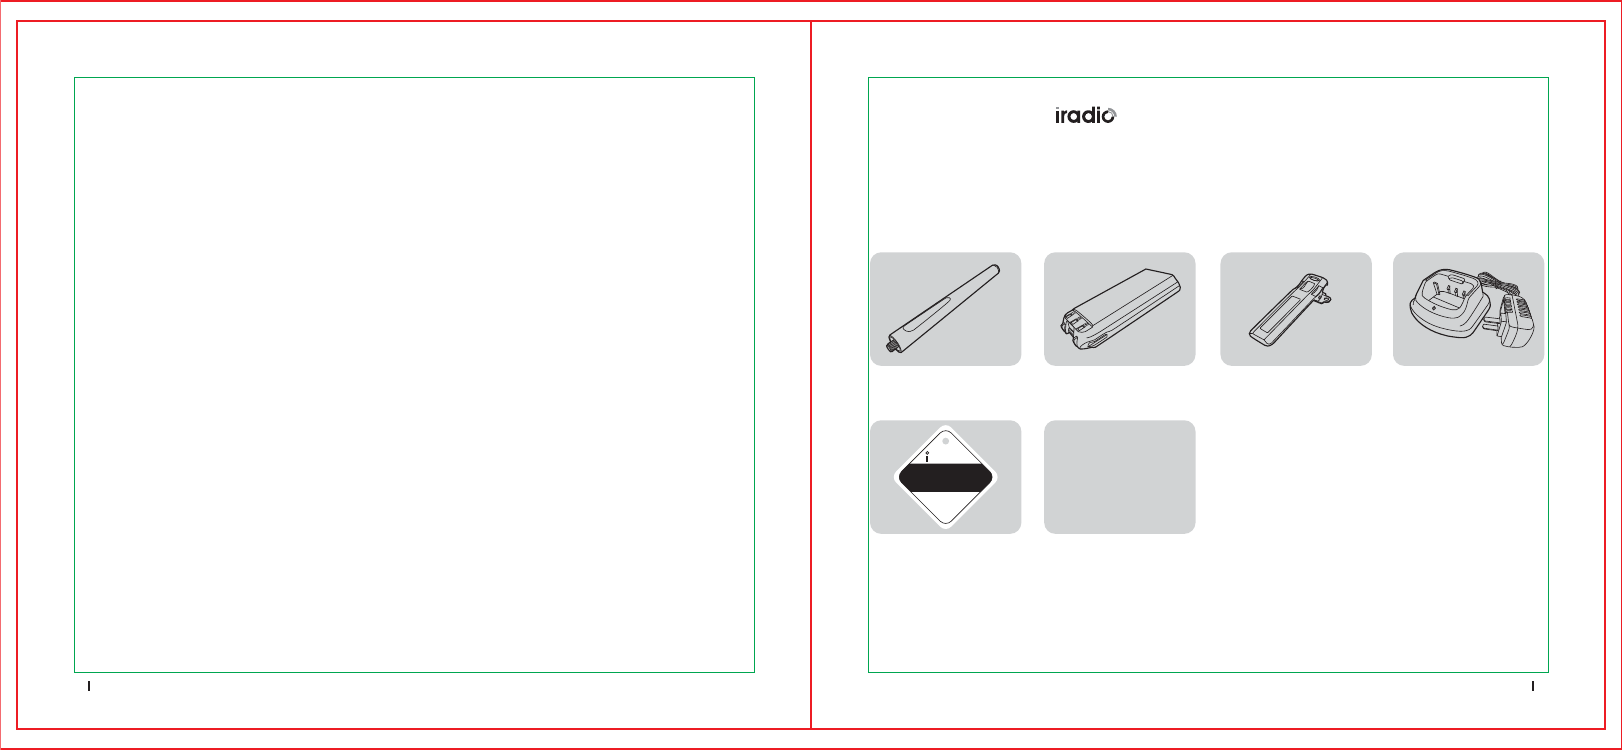
Charger (1)Belt Clip (1)Li-ion battery (1)Antenna (1)
Verification (1) User's Manual (1)
ATTENTION
Please read the following brief instructions, if you non-compliance with these rules may
cause danger or violate the law.
1.Obey the government regulation before using this radio, improper operation may violate the
law and will be punished.
2.Turn off the radio before entering flammable or explosive areas.
3.Do not charge or change the battery in flammable or explosive areas.
4.Do not use radio which antenna is damaged, touching of the damaged antenna will cause heat injury.
5.Do not attempt to open the radio: the maintenance work must be done by technical expert only.
6.To avoid troubles caused by electromagnetic interference or electromagnetic compatibility,
please turn off the radio in places where have the banner“ Do not use wireless equipment,”
Such as hospital and other health-care areas.
7.In a car with a safety airbag, do not put the radio within the scope of the airbag deployed.
8.Do not put the radio under the direct sunshine or hot areas.
10. If you smell radio appears fumes or burning, please shut off it’s power immediately and
contact with your local dealer.
Before using:
1.Please check whether the packing box is damaged or not.
2.Please unpack packing box carefully,and confirm the following list of items are in the box.If any
items are missing or have been damaged during shipment,please contact dealers immediately.
Unpacking and device checking
01 02
radio
艾迪欧
CERTIFICATION
Supplied accessories
Note:
The antenna may vary with different frequency bands.And the frequency band is marked on the
label of antenna.If no,please refer to the label on the radio unit for frequency band information.
9.When you transmit the signaling, please keep away from radio's antenna for 3.1CM
at least.
User's Manual
MENU BACK
1ABC DEF
GHI
PQRS
DEL CAPS
TUV WXYZ
JKL MNO
23
4
56
7
8
0#
9
P1 P2
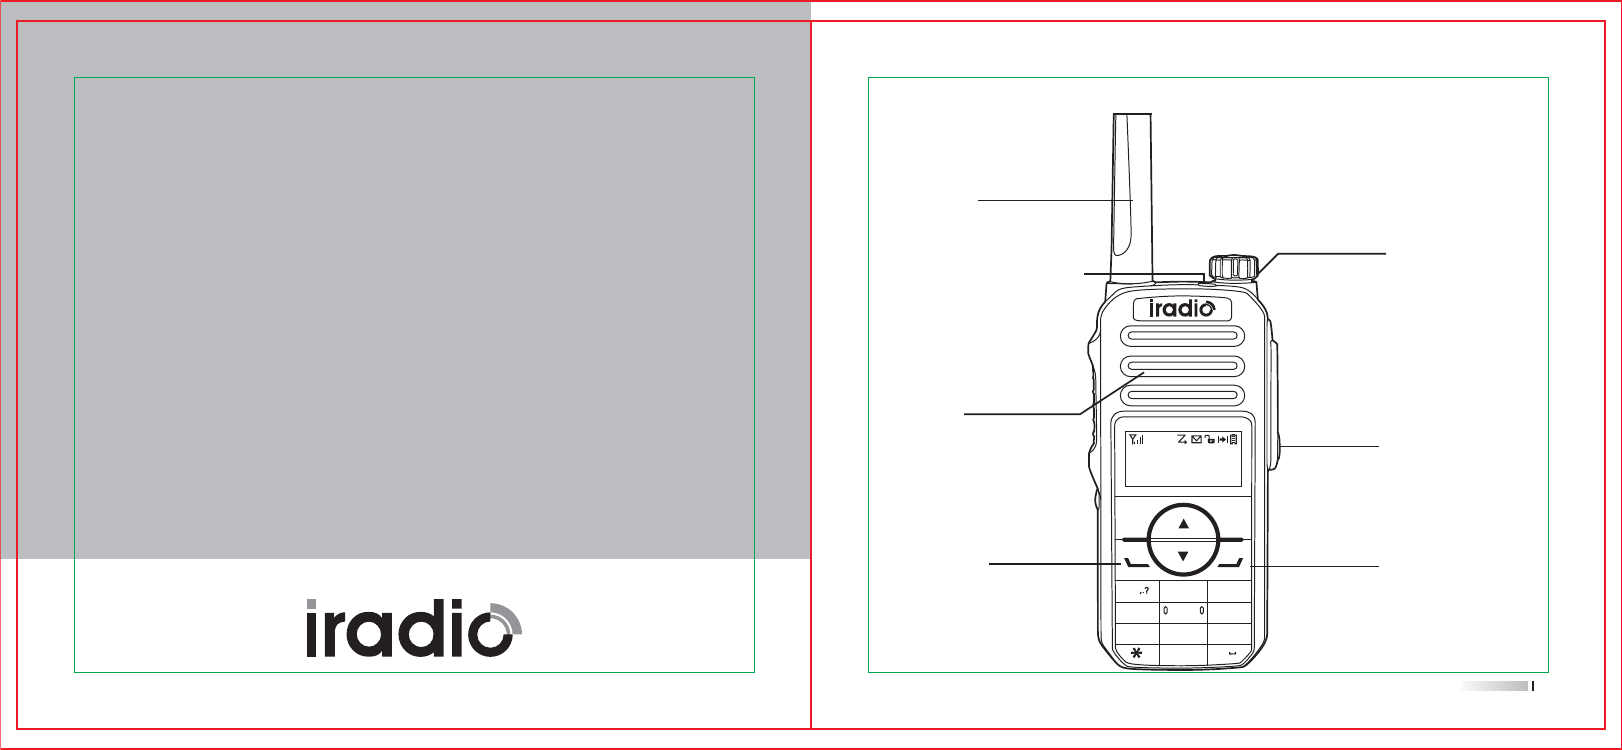
Microphone
sound input
Antenna
with threaded head. for
transmitting and receiving
LED indicator light
The indicator light turns red when
transmit, turns green when receive.
It blinks red when the battery
capacity is low, and blinks green
when scanning.
sound output
Speaker
Power/volume knob
To power on/off and adjust the volume.
Rotate it clockwise, a "click" sound is
heard and a "Du" tone prompts the
radio power on, continue to rotate it to
adjust the volume. Rotate it counter-
clockwise until a "click" sound is heard,
it powers off.
Familiar with the radio
Preparation before using
Basic operations
04
Familiar with the radio
H
Zonel CH 1
VOX
4A403.325

Li ion battery
For charging the radio
PTT switch
Side key
The battery release button
Notice: Either Long-press or Short-press of Side-key /P1-key /P2-key can be set by program
software.
Mic/speaker jack/
programming port
Used to connect headset or
external programming cable.
Programmable via PC
programming software.
05 06
Use only the charger and battery specified by charger, LED can indicate the charging
process. Charge diagram
Preparation before using
Charging the battery
Procedures
1.Connect the power adapter to AC socket.See arrow 1.
2.Plug the power adapter into the rear jack of the charger.See arrow 2.
3.Place the radio with the battery attached,into the charger.See arrow 3.
LED Indicator Status
Red Charging
Green Fully charged
1
2
3
H
Zonel CH 1
VOX
4A403.325
MENU BACK
1ABC DEF
GHI
PQRS
DEL CAPS
TUV WXYZ
JKL MNO
23
4
56
7
8
0#
9
H
Zonel CH 1
VOX
4A403.325
MENU BACK
1ABC DEF
GHI
PQRS
DEL CAPS
TUV WXYZ
JKL MNO
23
4
56
7
8
0#
9
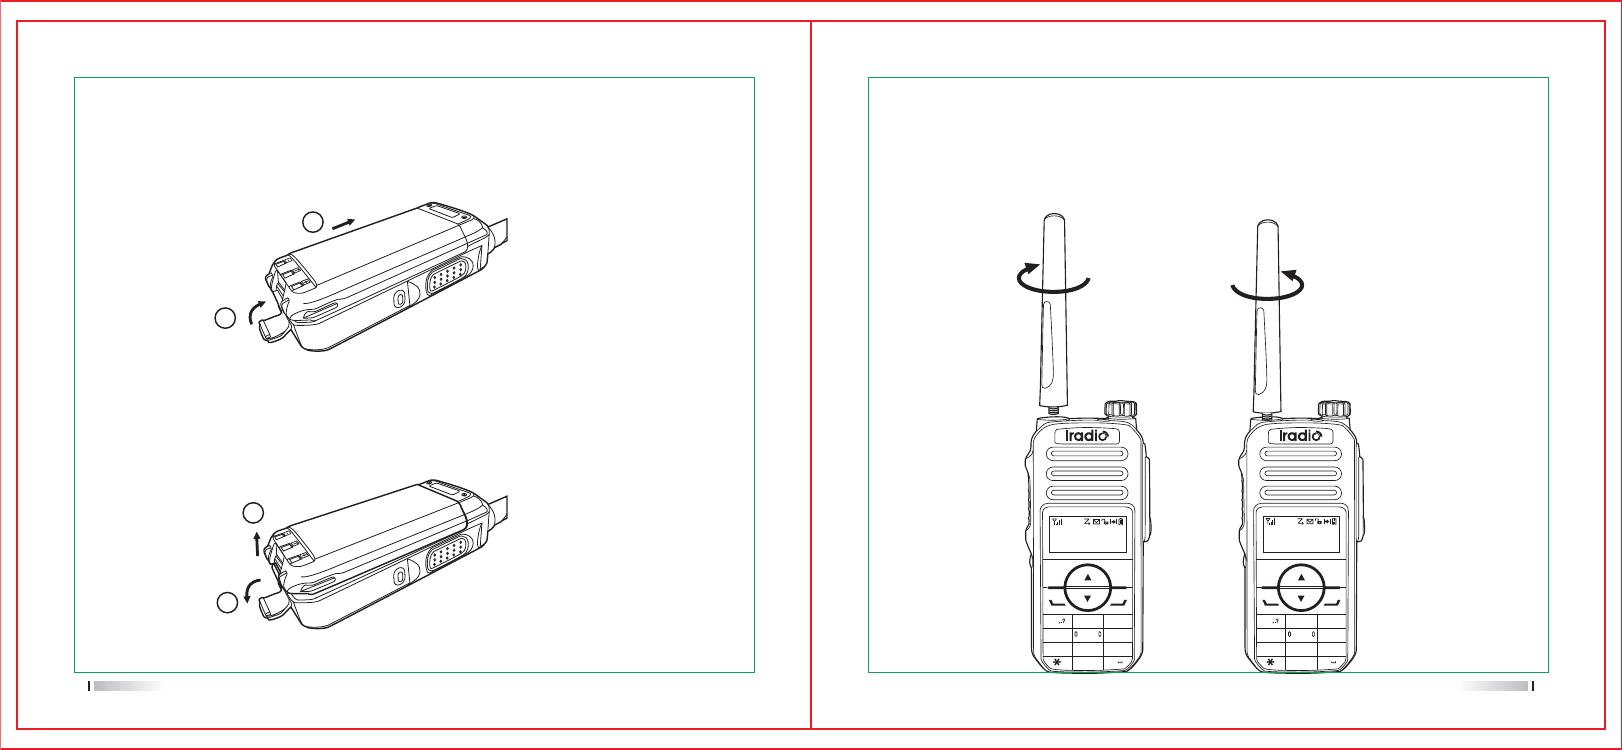
Attaching the battery
1)Slide the battery into the radio`s slot.(Arrow 1)
2)Buckle the battery until the battery and radio were tightly fixed. (Arrow2)
Attaching the antenna
1)Turn the antenna clockwise to fasten it.
2)To remove the antenna,rotate it counter-clockwise.
1
1
2
2
3)To remove the battery,turn off the radio first.Then release the lock catch
to unlock the battery. (Arrow2)
07 08
1
ABC
2
DEF
3
GHI
4
JKL
5
MNO
6
PQRS
7
TUV
8
CAPS
0
WXYZ
9
#
DEL
MENU BACK
1
ABC
2
DEF
3
GHI
4
JKL
5
MNO
6
PQRS
7
TUV
8
CAPS
0
WXYZ
9
#
DEL
MENU BACK
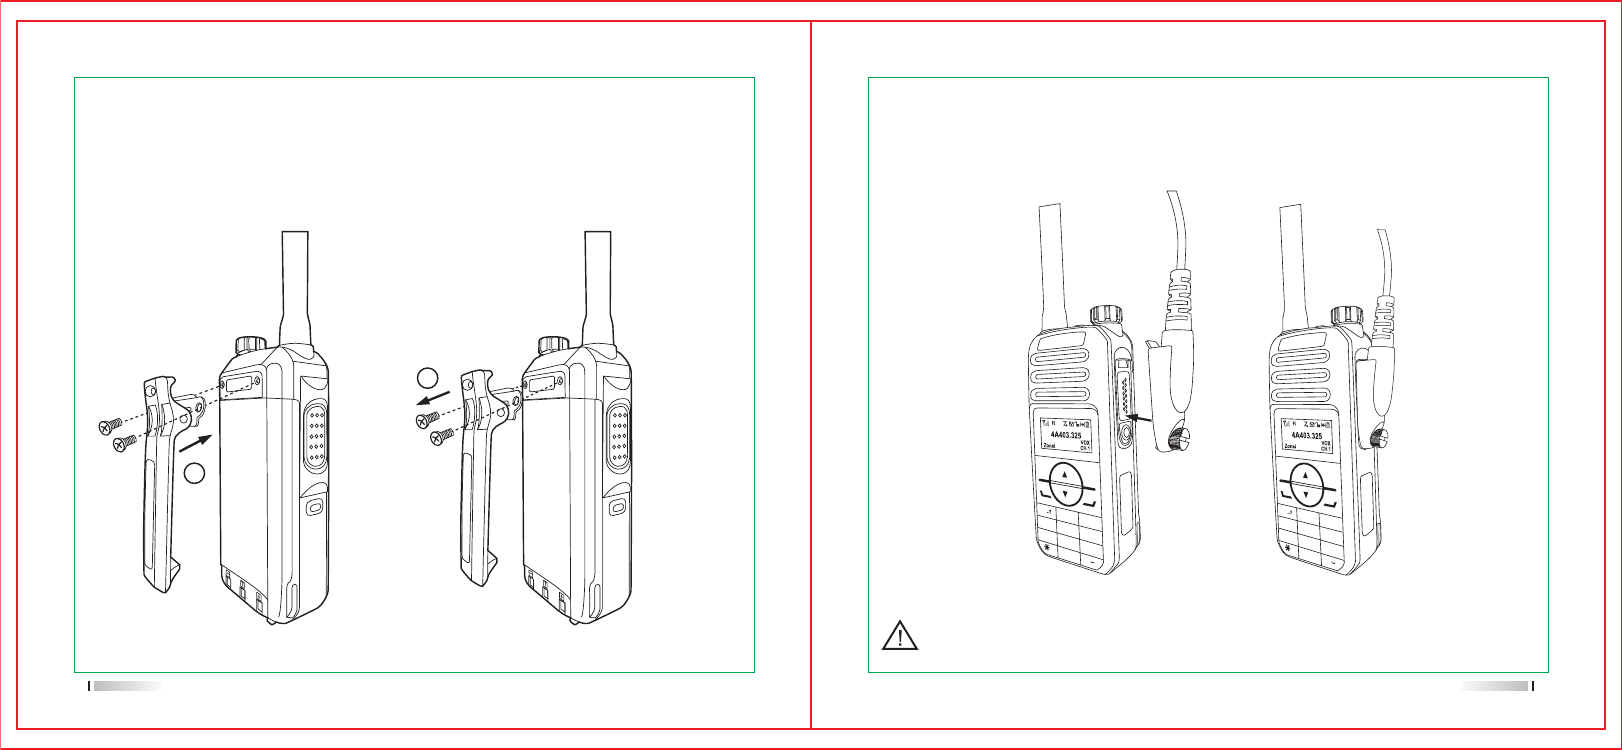
Attaching the audio accessory/programming cable
1)Using screw-driver to release the screw.
2)Align the plug with the accessory jack.
3)Tighten the screw on the plug.
To remove accessories,loosen the screw.
Caution:When you are using as external accessory,waterproof performance of the
radio may get affected.
1
2
09 10
Attaching the belt clip
1)Using two screws align the screw holes on the belt clip with those on the radio`s body,and
then tighten this two screws.(Arrow 1)
2)Loosen the screw set to remove the belt clip.(Arrow 2)

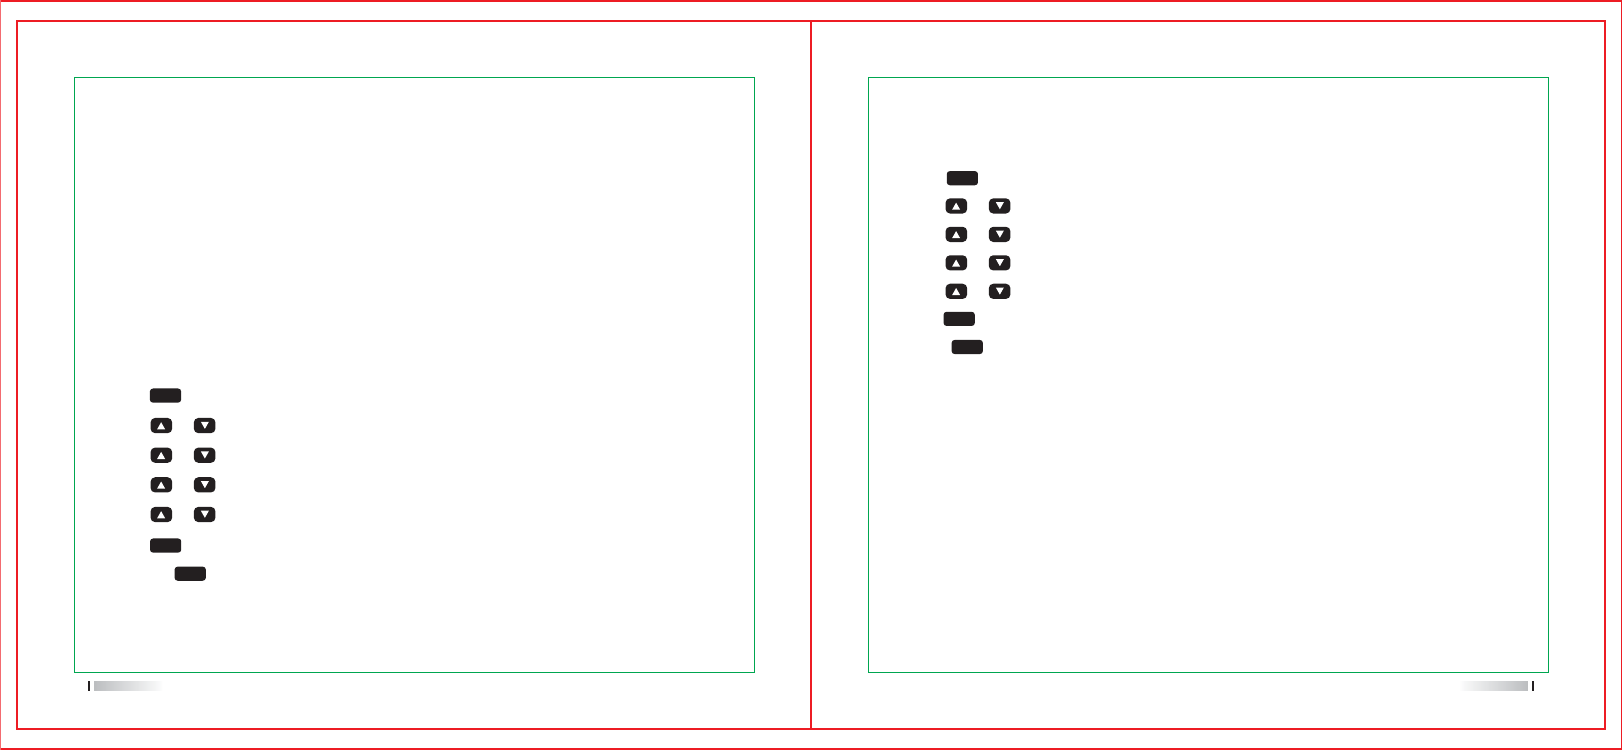
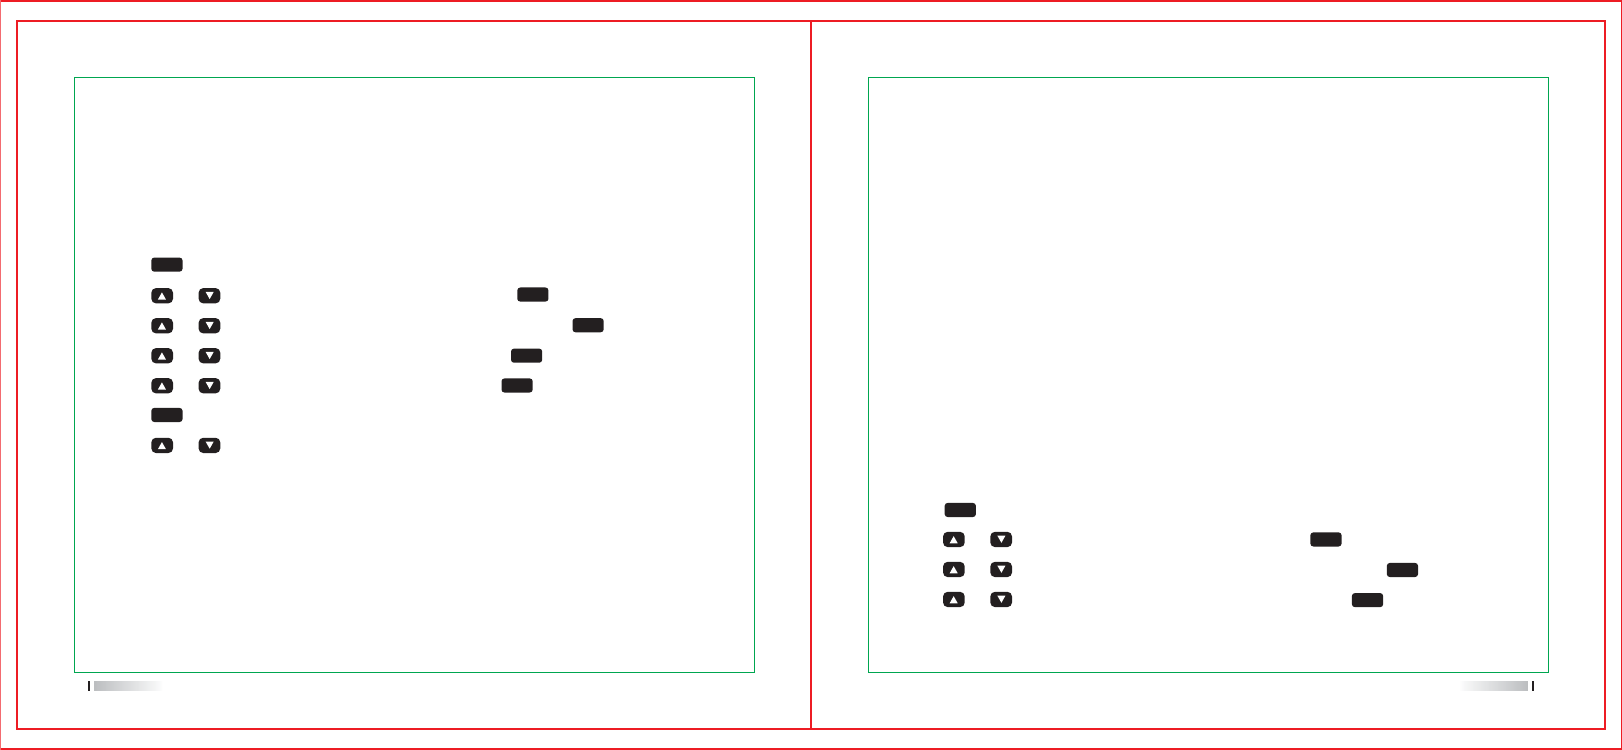
Selecting a zone
A zone is a group of channels exhibiting the same property,and is programmed by your dealer.
The radio supports up to 64 zones.each with a maximum of 16 channels.You may select a zone
through any of the following methods:
1.Press key to enter menu,go to the menu”Zone”, and use the [ or ] key to select your
desired zone.
2.You may quickly toggle to your desired zone by pressing the key to confirm.
Channels、users ID、talk group ID selection
Select Channels、users ID、talk group ID by pressing [ or ] key.
MENU
MENU
User's Manual
Basic operations
Private Call、Group Call、All Call
Basic operations
Turning the radio on/off
Rotate the radio on-off/volume control knob,clockwise/counter-clockwise until a click is heard to
turn the radio on/off.
Adjusting the volume
After turning the radio on,rotate the radio on-off/volume control knob clockwise to increase the
call volume,or counter-clockwise to decrease it.
Call
To ensure an optimal volume of the receiving radio,hold the radio approximately 2.5 to 5
centimeters away from your mouth.
12
Group Call
Transmitting a group call
You may transmit a group call through any of the following methods.
1.Transmitting a call to the preset contact
In the home screen,hold down the [ PTT ] key to transmit a group call to the group call contact
preset for the current channel.
2.Transmitting a call through contact list or call logs
Answered/Outgoing list.
2)Use the [ or ] key to select the group call contact you want to call.
3)Hold down the [ PTT ]key to transmit the group call.
1)Transmitting a call through contact list or call logs
Answered/Outgoing list.
3)Use the [ or ] key to select the private call contact you want to call.
MENU
MENU
Private call
Transmitting a private call
Transmitting a private call through any of the following methods:
In the home screen,hold down the [PTT] key to transmit a private call to the private call contact
preset for the current channel.
Note: Your dealer may preset a contact for each digital channel. The preset contact could
be a private call contact,a group call contact or an all call contact.
Receiving and responding to a group call
1)When a group call is received,the LED indicator light for green light.
2)In the home screen,top line will display RSSI etc status icon,In the display area below, the first
line shows group call + User`s name/ID,next line shows a group call icon.
4)You may hold down the [ PTT ] key within the preset time period to call back. If you do not
respond to a received group call,your radio`s Missed Call Log will display the missed calling
number.
13 14
Receiving and responding to a private call
1)When a private call is received,the LED indicator light for green light.
2)In the home screen,top line will display RSSI etc status icon,In the display area below, the
first line shows private call + User`s name/ID,next line shows a private call icon.
3)You may hold down the [ PTT ] key within the preset time period to call back.If you do not
respond to a received private call, your radio`s Missed Call Log will display the missed
calling number.

User's Manual
All Call
Transmitting an all call
Method are the same as those in transmitting a group call.
Note: You can transmit an all call only when it is enabled by your dealer. And you cannot
respond to an all call.
Calls on analog channels
To transmit on an analog channel, hold down the [ PTT ] key and speak into the microphone.
To receive, release the [ PTT ] key.
15
Emergency Alarm Function and Operations
Menu Functions and Operations

Emergency Alarm Function
In case of an emergency, you can use the feature to ask for help from your companion or control
center.The emergency process has the highest priority.You can make emergency operation even
when your radio is transmitting or receiving.
To enable the feature on a channel.an emergency system must be assigned to the channel via the
programming software.In addition,the system name,emergency type and emergency mode are
settable via the programming software.
Emergency type
For each emergency mode,there are four emergency types available.You can select one of them
via the programming software.
Emergency Type Description
Disabled
Regular
Silent
Silent with Voice
Turn off the function of emergency alarm
In emergency mode,the radio will give
audible and visible indication.
In emergency mode,the radio won`t give any
audible or visible indication.
In emergency mode,the radio won`t give any
audible or visible indication,but will receive
voice from the companion or control center
automatically.
Emergency Mode
Emergency Mode Description
Emergency Alarm
Emergency Alarm with Call
In this mode,you can send alarm information
to your companion or control center by pressing
the programmed emergency key, but you cannot
talk with them.
In this mode,you can send alarm information
by pressing the programmed emergency key,
then press [PTT ] and speak into the microphone,
allowing your voice and background noise to
be transmitted,release the [ PTT ] key to
receiving.
In this mode,press the programmed emergency
key to go to the revert channel, then you can
speak into the microphone, allowing your voice
and background noise to be transmitted
automatically(You do not need to hold down
the [PTT] key).
Emergency Alarm with Voice to Follow
17 18

1.Press any key to stop all sounds of receiving an emergency alarm.
2.Hold the radio approximately 2.5 to 5 centimeters away from your mouth. If you turn on the
function of Channel free indication tone, when you release [ PTT ] key, you will heard a short
prompt tone,indicates that this channel can use now.
3.Press [PTT] to start a call,LED indicator light flashing red color.The radio are on the emergency
alarm mode.
4.Release the [PTT] to receiving the call,when the sender part reply,LED indicator light flashing
green color. You will see the group call icon、Talk Group ID and sender part ID.
5.After finish the call, short press[ ]key, then press preset key to turn off the alarm.
6.Radio back to home screen.
Operation of sending emergency alarm
1.Press preset key to turn on the emergency alarm function.
2.Home screen will display
3.While receiving confirmation of emergency alarm, it will prompt Emergency call tone and the
LED indicator light will flashing green color.
Emergency Alarm
1)The screen display emergency alarm success. or if the radio didn`t received any confirmation
of emergency alarm and used all the number of replication,will send a prompt tone, then display
emergency alarm failure on screen.
2)The radio exit emergency alarm mode,and back to the home screen.
Emergency Alarm with Call
Refer to the description of Emergency Alarm with Call.
Emergency Alarm with Voice to Follow
Refer to the description of Emergency Alarm with Voice to Follow.
Operation of receiving emergency alarm
1.While you receiving emergency alarm,the alarm and number of receiving will interchanging
display with sender`s name and ID.
2.Sending one prompt tone and LED indicator light flashing red color.
3.If activated,radio will confirm the emergency alarm automatically. While you receiving the
emergency alarm,the screen will display the prompt of emergency alarm,meanwhile you can
not receive other prompt or other calling,until you exit the emergency alarm mode.
Caution: Short press[ ]key, then press preset key to turn off the alarm.
MENU
MENU
19 20
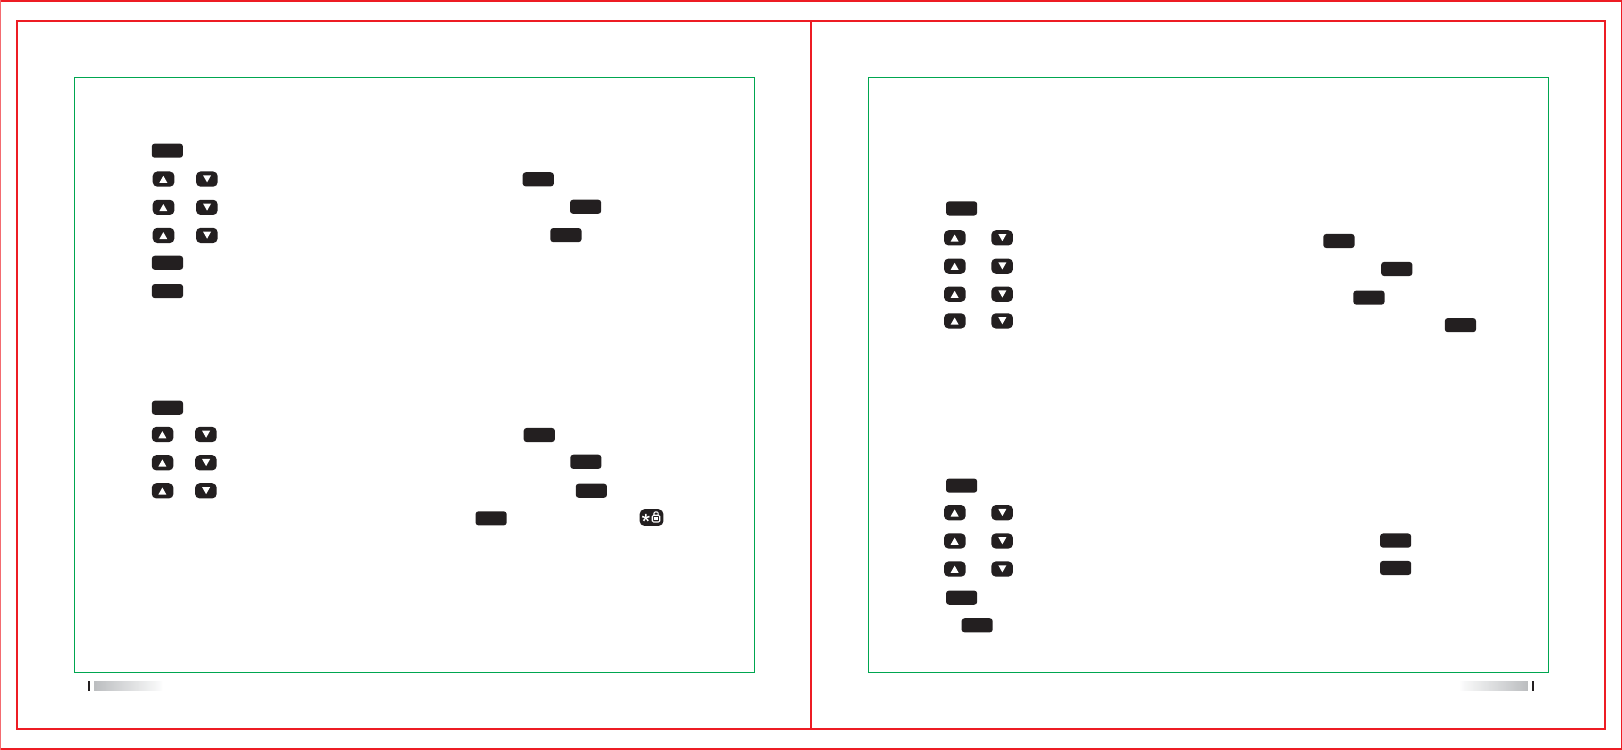
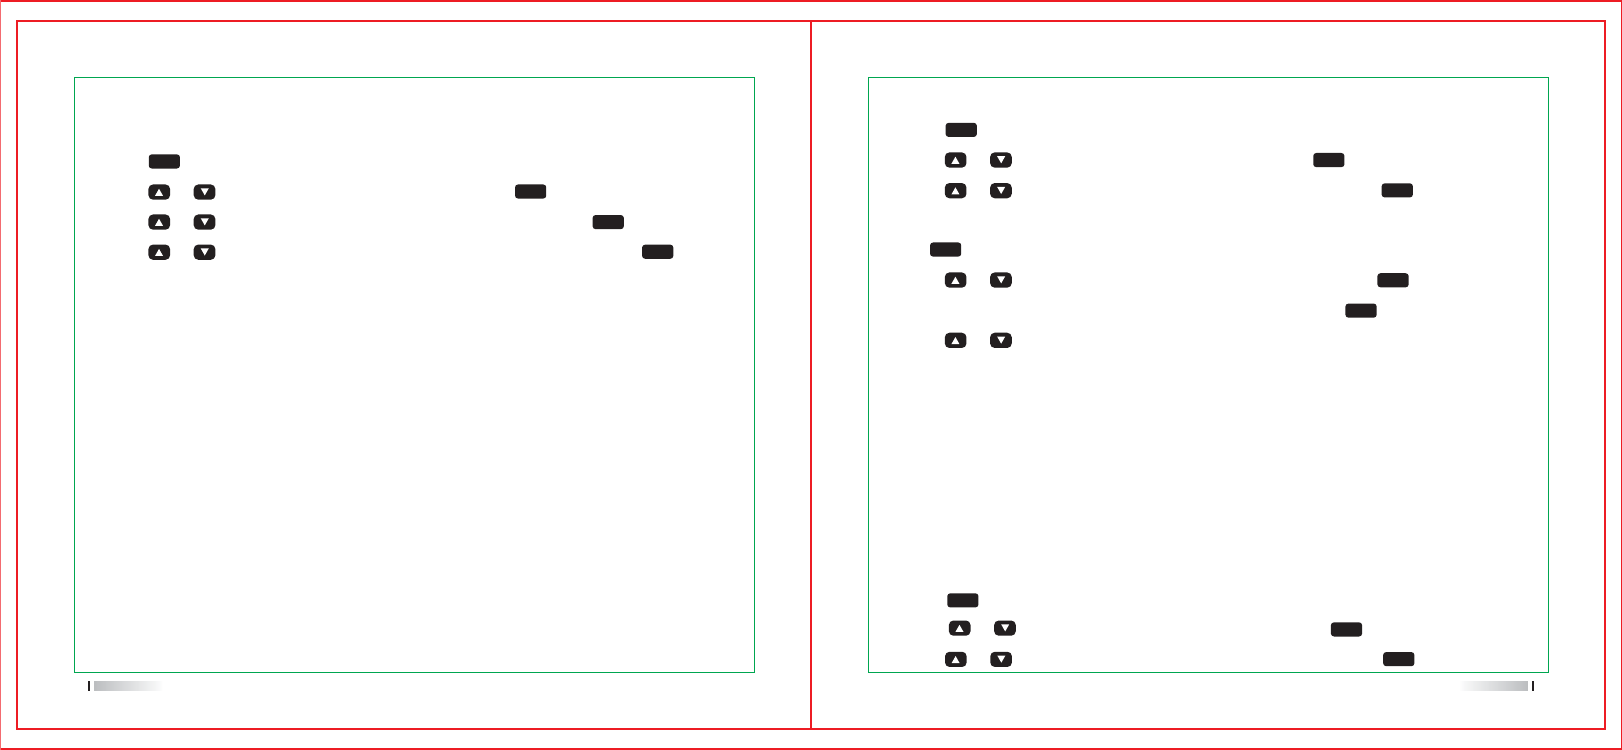
Operation of replying emergency alarm

1.Press [ ] to enter menu mode.
2.Go to Call Log, press [ ] to confirm.
3.Go to the user`s name or ID that you required.,then press[ ]to confirm.Or go to Manual dial,
press [ ] to confirm,edit ID number then press [ ] key.
4.Go to radio detection,,then press [ ] to confirm.
5.The screen display radio detection: <user`s name or ID>, Indicates that the intercom is being
detected.LED indicator light flashing red color.
6.Waiting confirmation.
7.If the target radio is active in the system, you will hear a prompt voice, the screen display target
radio have responded.
Or if the target radio is not active in the system, you will hear a prompt voice, the screen display
target radio didn`t responded.
8.Radio will back to user`s name or ID screen. If you press [ ] while waiting confirmation, you
will hear a prompt voice and the radio will terminate all retry and exit the walkie talkie
detection mode.
Send a Radio Detection
Button
1
1 2 345678
abc2 A B C
def 3 D E F
ghi 4 GHI
jkl5JKL
mn o 6 M N O
pqrs 7 P Q RS
YZ
tuv8TUV
wx
Long press “0” to switch the case of character.
Backspace,can delete one character or one number.
Space key,long press”#”can switch input method.
yz 9 WX
910111213
1.,
?!@&
'%- : * #
2
3
4
5
6
7
8
9
0
*
#
MENU
MENU
MENU
MENU
MENU
MENU
MENU
Menu Functions and Operations
Character input
You can use 3×4 alphanumeric keyboard to To access the radio`s function. While using
keyboard to input user`s name or message,have three mode to select:
1.English character mode.
2.Chinese input method mode.
3.Digital input mode
While input ID by keyboard,only can using digital input mode.
English character mode
Some characters need to press a key several times,The following table shows the number
of times you need to press a key to get the desired character.
Radio Detection
Activation function allows you to determine whether there are other walkie talkies in the system
is active,and won`t disturb the walkie talkie users.This feature only suitable for user`s name or ID.
21 22
Receiving & Confirm call prompt
The screen will display calling party`s alias/ID when you received a call prompt.
1.You will heard a reduplicated sound,LED indicator light flashing red color.
2.Press and release [PTT] key to confirm call prompt,or press [ ] key then select “Ignore”
to exit call prompt mode.
1.Press [ ] to enter menu mode.
2.Press [ or ] key to Call Log, press [ ] to confirm.
3.Go to the list that you want, press [ ] to choose current name/ID
4.You can select store or delete.
5.If you store the ID, press[ ] ,input it`s name that you want,then press [ ] to confirm.
MENU
MENU
MENU
MENU MENU
MENU
MENU
Call prompt operation
This function allow you to send a prompt in order to remind receiver call back while free.
Note:This function only suitable for user alias/ID,it can sending by Call Log or manual dialing.
Message function
23 24
Setting contacts person
Call log provides “Address Book” for radio.Each entry corresponds to an user`s name or ID for
initiating the call. In addition,Each entry is different according to the settings,consist of group
call、private call and all call.This radio support digital call log.
Entries in the “Contacts” show the following information:
Contacts List
New Contact
Manual Dial
Call recording function
This radio can record recent Missed, Answered, Outgoing information.You can press [Call Log]
to check and manage the recent call. While check the list, press [PTT] to initiate a call.
Missed call screen
Whenever you missed the call,it will display a missed calling message in home screen, you can
check or check later.
Note:If press [PTT] key while check missed call,it will initiate a call with current number.
Store/Delete Missed,Answered,Outgoing list name/ID
To access this item,press the [ ] key and then select [Message].
New message
You can create new text message(144 characters at most)and send it to an individual user
or to a talk group.
Quick text
Under this option there are some text message(50 entries at most).You can choose to edit
and send any entry.
InBox
The InBox can save up to 50 received messages.When the InBox is full,the earliest message
will be overwritten by the latest one automatically.
For each message,you can choose to perform any of these operations:Reply,Forward,View

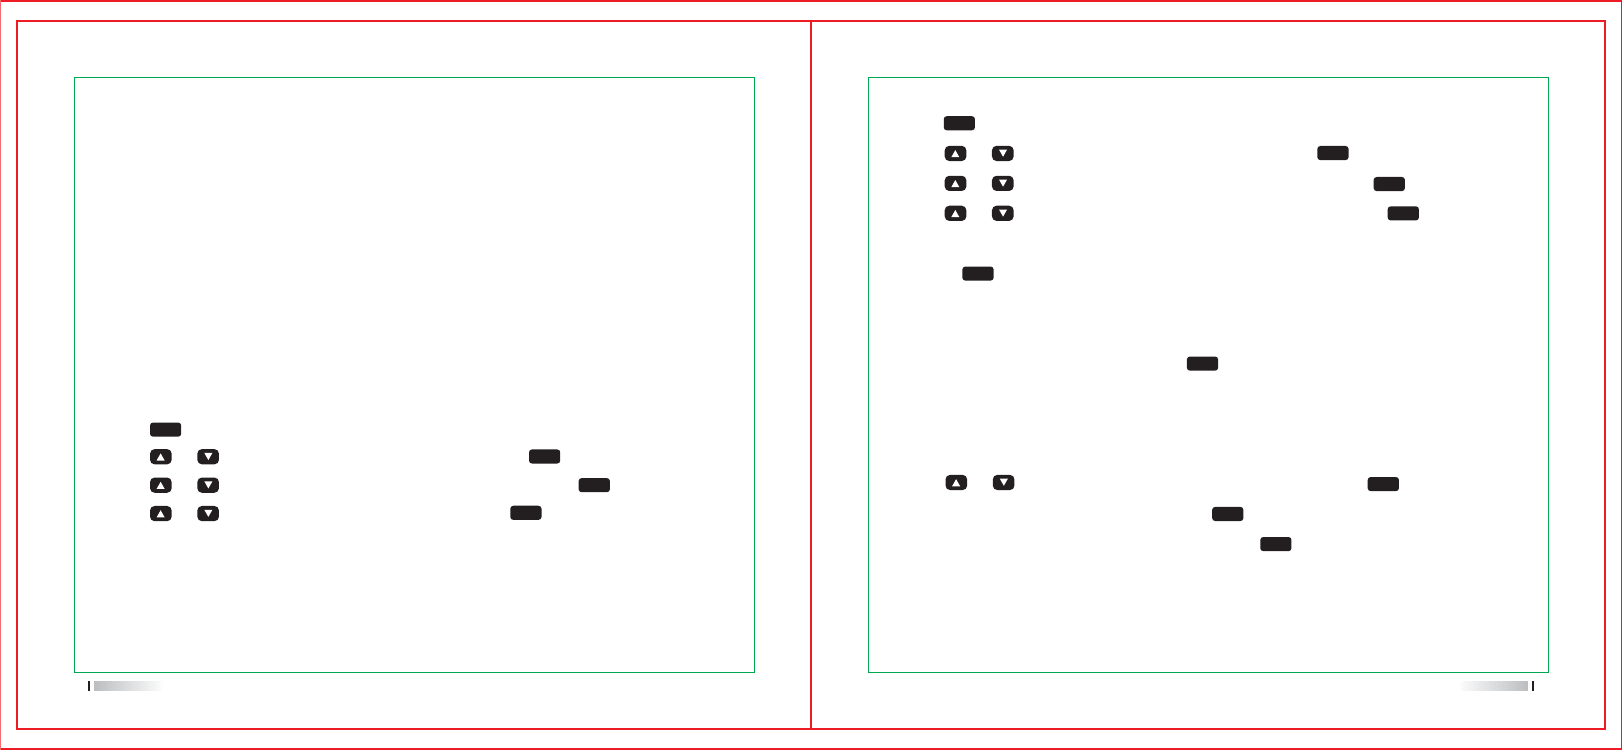
1. Press [ ] key to enter the menu
2. Press [ or ] key and choose Contact list, then press [ ] key to confirm, the
contacts are grouped by letter.
3. Press [ or ] key to choose the name or ID, and press [ ] key to confirm.
Or press [ or ] key to choose Manual Dial, press [ ] twice and input the user’s name
and ID, then press [ ] to confirm.
4. Press [ or ] key to choose Radio disable, and press [ ] key to confirm.
5.The screen displays: radio disable:<user’s name or ID>, Indicator light turns red.
MENU
MENU
MENU
MENU
MENU
MENU
Encryption
If this function is enabled,which is beneficial to preventing other users on the channel by using
a number of encryption and decryption technologies for unauthorized eavesdropping.The launch
of signaling and user identification is unencrypted. The encryption must be enabled so that the
radio can transmit the signal encrypted, even if you don’t have to encrypt it when receive it.
DTMF
Make a DTMF call
Anti-Theft
Two way radio can only be assigned to one of the above encryption types. In order to decrypt
the encrypted call or data transmission, the receiver must have the same encryption key with
the transmitter.(Apply to Basic encryption)
if your radio received the call of different encryption keys or key values and keyID, then you
will receive some confused noisy.(Basic encryption)
Press the pre-programmed encryption key to turn on or turn off this function.
Dual Tone Multi-Frequency (DTMF) function allows you to operate the radio when there is interference
in the radio system
1. Press and hold [ PTT ] key.
2. Input the number you need.
You can disable DTMF tone by turning off all radio prompt sound.
You can revival or kill any radio in the system. For example, you might want to disable a stolen
radio, to prevent thief using it, and enable it when you get it back.
Note: Only the radio with kill or revival function can be enable and disable.
Basic encryption
Kill Function
Choose Menu,
25 26
OutBox
The OutBox can save up to 50 sent messages.When the OutBox is full,the earliest message
will be overwritten by the latest one automatically.
For each of message, you can choose to perform any of these operations: Resend,Forward,
Delete All”.
Drafts
The Drafts can save up to 50 sent messages.When the Drafts is full, the earliest message
will be overwritten by the latest one automatically.
For each of message, you can choose to perform any of these operations:Send, Save and
When scanning, The radio will scan the current channels in a circular manner throughout the pre-
programmed scanning list to find out which channel has received the signal. LED turns red and
flashes, the scanning icon will appear on the screen.
When scanning in dual modes,If the radio is in a digital channel while lock in an analogue channel,
will switch from digital mode to analogue mode automatically during the call duration.Vice versa.
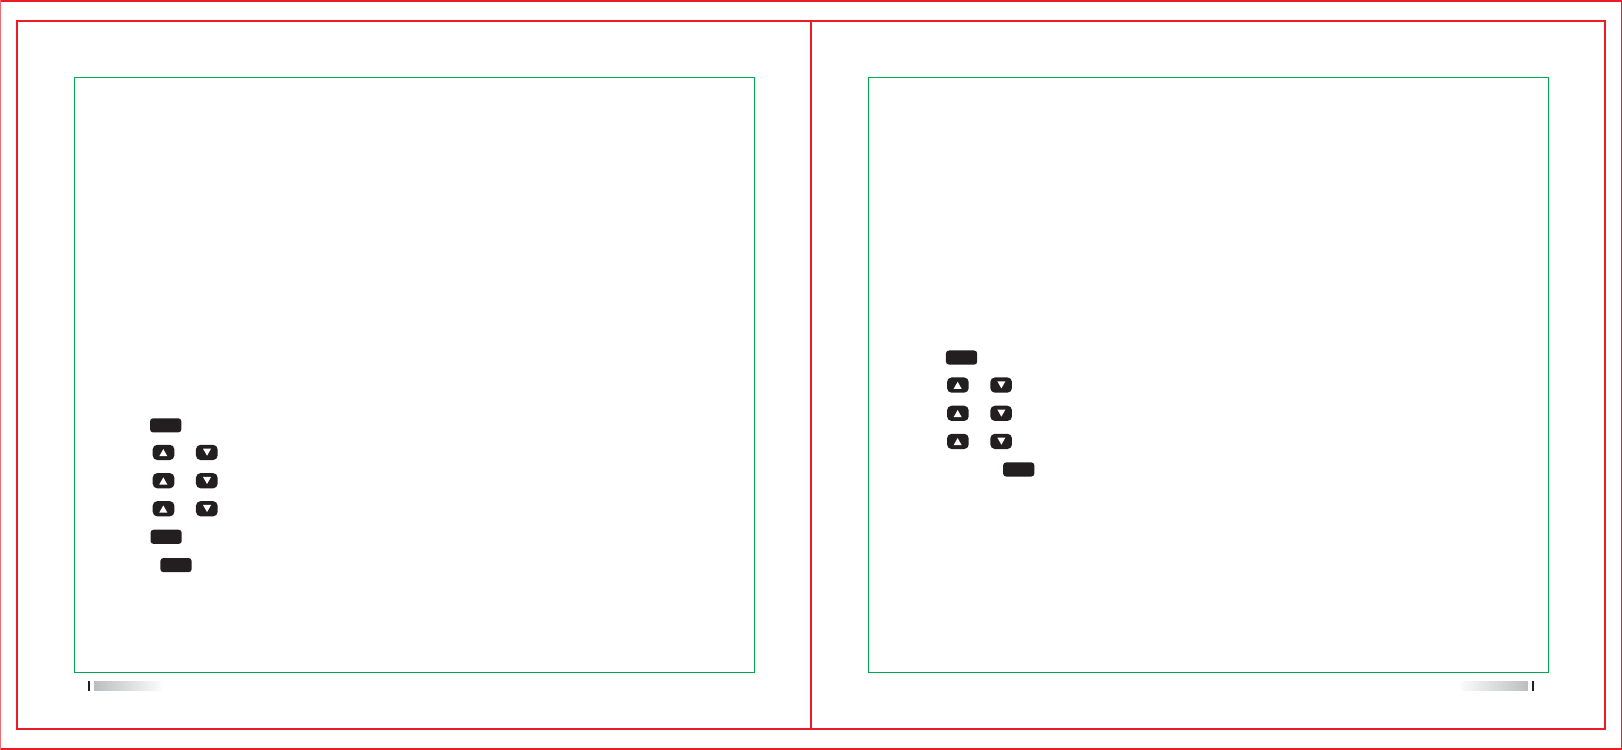
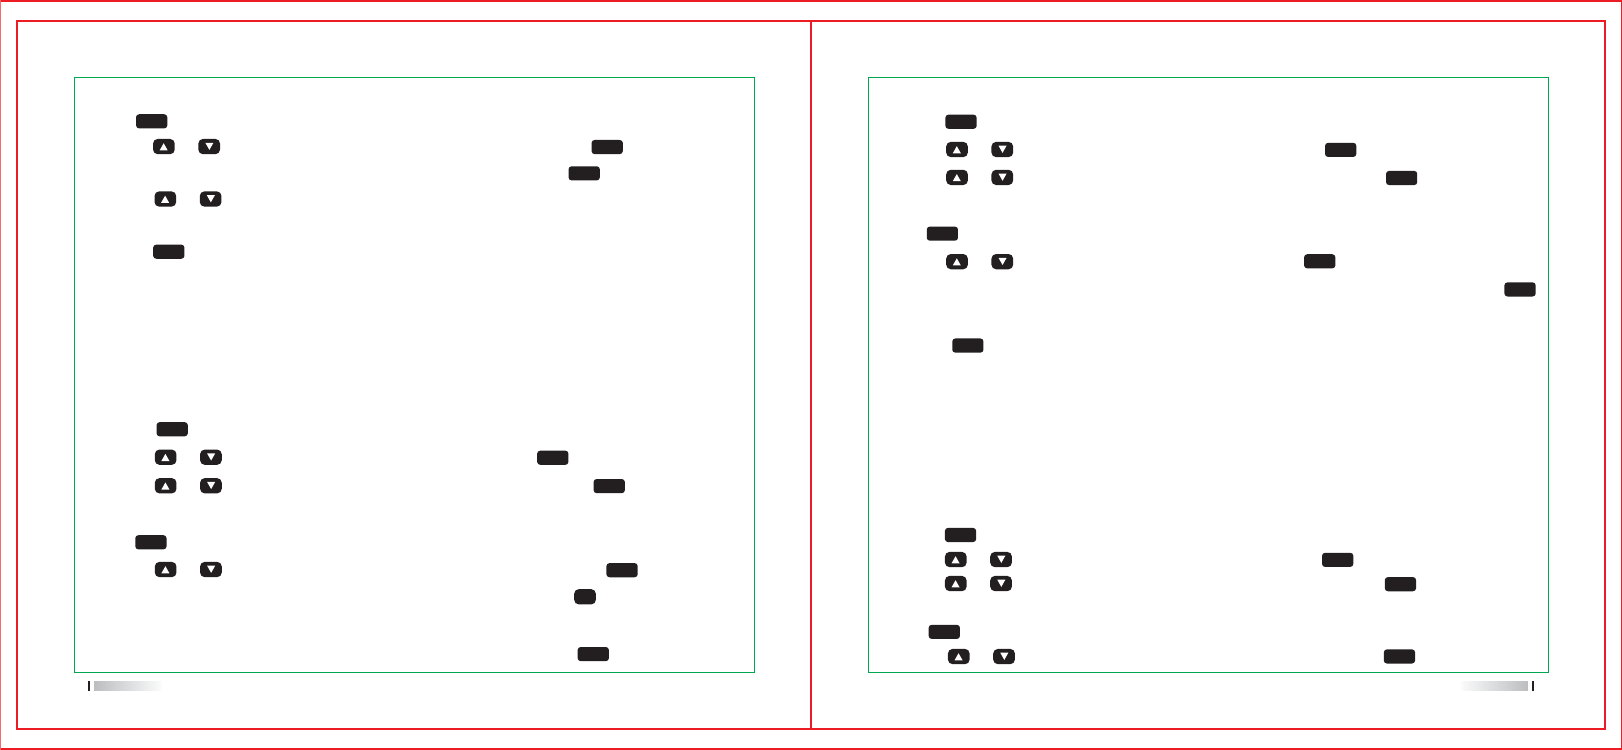
1.Press the [ ] key to enter the menu.
2.Press [ or ] key and choose Scan, then press the [ ] key to confirm.
3.Press [ or ] key to view/edit the scanning list. then press the [ ] key to confirm.
4.Use [ or ] key to check members in scanning list.
5.If the priority channel has been set,the priority icon will appear in the left of user name,
it means the user is priority channel or priority channel . If the priority channel is
none , then the radio won’t display the special icon. In a scanning list, the radio can’t
have more than one priority channel 1 or priority channel 2.
6. Wait for confirmation.
7. The radio will issue a prompt sound when disable the radio successfully, and the screen
displays:radio disable successfully.
The radio will issue a prompt sound as well when it fail to disable the radio. And the screen
displays: Radio disable failed.
During the process of disabling the radio, please do not press the [ ] key, otherwise,
you won’t get the confirmation.
Use menu function:
1.Press [ ] key to enter the menu.
2.Press [ or ] key and choose Contact list, then press [ ] key to confirm, the
contacts are grouped by letter.
3. Press [ or ] key to choose the name or ID, and press [ ] key to confirm.
Or Press [ or ] key to choose Manual Dial, press[ ] twice and input the user’s
name and ID, then press [ ] key to confirm.
4. Press [ or ] key to choose Radio enable, and press [ ] key to confirm.
5.The screen displays: radio enable:<user’s name or ID>, Indicator light turns red.
6. Wait for confirmation.
7.The radio will issue a prompt sound when enable the radio successfully, and the screen
displays:radio enable successfully.
The radio will issue a prompt sound as well when it fail to enable the radio. And the screen
displays: Radio enable failed.
During the process of disabling the radio, please do not press the [ ] key,otherwise,
you won’t get the confirmation.
MENU
MENU
MENU
MENU
MENU
MENU
MENU
MENU
MENU
MENU
MENU
Revival Function
Scanning list
Create the scan list and assign them to each channel or each group. There are up to 250
scanning lists available, each list is up to 16 members.
Each scanning list supports mixed analogue and digital channels. You can edit the scanning
list to add/delete the channel or set up a priority channel.
Check the Members of Scanning List
1 2
N
Scanning indicator and method:
27 28

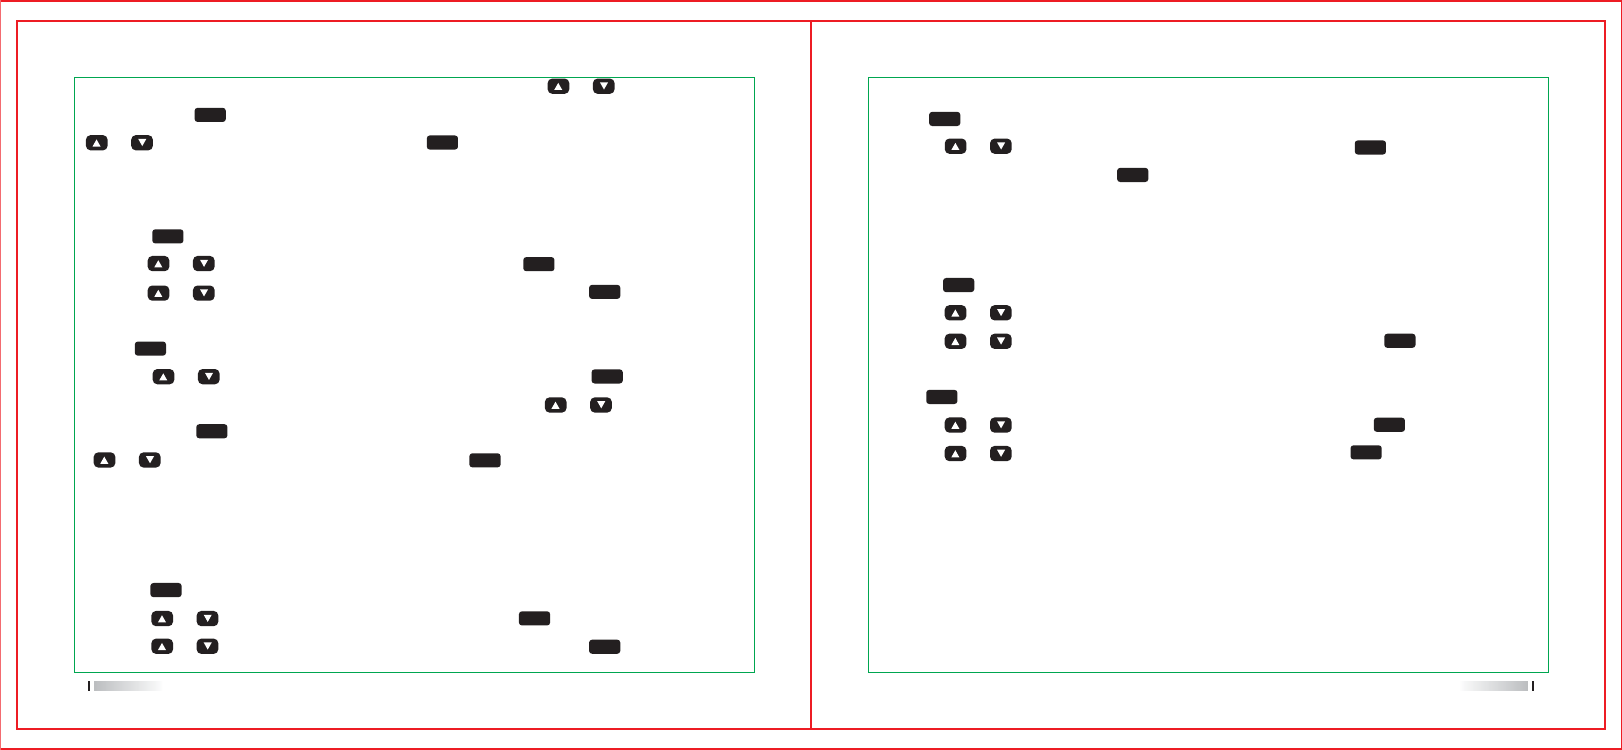
Press the scanning key which has been programmed by software or enter the menu list.
1.Press the [ ] key to enter the menu
2.Press [ or ] key and choose Scan, then press the [ ] key to confirm.
3.If the scanning function is disable, the scanning interface displays TURN ON, or if this
function is enable, the scanning interface displays TRUN OFF.
4.Press the [ ] key to confirm.
5. When this function is enable, indicator light turns red and flashes, the scanning icon
appears on the screen; when this function is disable, LED indicator light and scanning
icon disappear.
MENU
MENU
MENU
There are two scanning methods
According to pre-programmed the scanning key to turn on/off scanning or enter
the Menu and choose Scan. When you start to scan, radio will detect all channels/contact groups
in the pre-programmed scan list.
When you select an already activated auto scan channels/contact groups,radio
will start to scan from the activated auto scan channel.
Start/stop Scanning:
Radio detect active channel/contact group when scanning, at this time radio will stay in this
channel/contact group, which called “scanning hold time”.
Procedure:
1. Hold the radio in a vertical position and keep one to two inches (2.5 to 5.0 cm) distance
from the mouth. If the “channel idle tone” is enable, then you will hear a short prompt sound
when release the PTT button after transmitting the signal, which indicates that the channel
is idle, and waiting for your response.
2.Press PTT button during the hold time, the LED indicator light turns red.
3.Release PTT button to receive the signal.
4.If you didn’t respond the signal during the hold time, the radio will carry on scanning.
3029
Reply

Utilities
The utilities shall consist of the following options:
Radio Settings
Talk around
This function allows the radio that continues to communicate where the repeater does
not work, or the radio is out of the range of repeater while is within the call range of other
radios. That called “talk around”.
Press the 1750hz replay echo/talk around key which has been programmed via software,
then you can switch these two kinds of modes.
Use the menu function
1. Press Key to enter the menu
2.Press [or ] key and choose Utilities, then press key to confirm.
3.Press [or ] key and choose Radio Setting, then press key toconfirm.
4.then press key to confirm. and choose Talk around, then press key to to confirm.
5.If radio is in 1750hz reply mode, you will see selected Turn off, when the radio is in talk
around mode, you will see selected Turn on.
6.press key to confirm.
7.The screen displays talk around icon( ), or it will disappear when this function has shut
down.
8.The interface will return to the previous options list.
Even after shutdown,talk around will be remained.
31 32
All Tones
If needed, all tones could be enable or disable.(Except emergency alerts tone).
Press All tones key which pre-programmed by software to turn on/off this function.
Keypad Tones
If needed, Keypad tones could be enable or disable.
Use the menu function:
1.Press [ ] key to enter the menu
2.Press [ or ] key and choose utilities,then press key to confirm.
3.Press [ or ] key and choose radio settings, then press key to confirm.
4.Press [ or ] key and choose tones/alerts,then press key to confirm.
5.Press [ or ] key and choose keypad tones,then press key to confirm.
6.Press [ ] key to turn on, the screen displays”keypad tones on”
Or press [ ] key to turn off all tones, the screen displays “keypad tones off”.
MENU
MENU
MENU
Power Level Setting
There is High/Low power available for each channel.
Setting:High power allow you to communicate with other radio with long distance. Low
power allows you to communicate with other radio with short distance. Press High/Low
power key which has been programmed by software, you can switch high/low power.
Use the menu function:
1.Press key to enter the menu
2.Press [or ] key and choose utilities,then press key to confirm.
3.Press [or ] key and choose radio settings, then press key to confirm.
4.Press [or ] key and choose Power,then press key to confirm.
Tones/Alerts
Including the following options:
1.Press [ ] key to enter the menu
2.Press [ or ] key and choose utilities,then press key to confirm.
3.Press [ or ] key and choose radio settings, then press key to confirm.
4.Press [ or ] key and choose tones/alerts,then press key to confirm.
5.Press [ or ] key and choose all tone,then press key to confirm.
6.Press [ ] key to turn on all tones,the screen displays”all tones on”
Or 6.Press [ ] key to turn off all tones, the screen displays “all tones off”.
MENU
MENU
MENU
Use the menu function:
33 34
1.Press [ ] key to enter the menu
2.Press [ or ] key and choose utilities,then press key to confirm.
3.Press [ or ] key and choose radio settings, then press key to confirm.
4.Press [ or ] key and choose Back light, then press key to confirm.
5.Select Press [ ] Normal or Tight, then press key to Confirm.
6.The interface will return to the option list of radio settings option list.
Use the menu function:
1.Press [ ] key to enter the menu
2.Press [ or ] key and choose utilities,then press key to confirm.
3.Press [ or ] key and choose radio settings, then press key to confirm.
4.Press [ or ] key and choose Back light, then press key to confirm.
5.Press [ ] key to turn on this function when the interface displays Auto On.
Or Press [ ] key to turn off this function when the interface displays Turn off.
Once you turn off this function, the back light of keypad and screen will be shut down.
5.Under the instruction to switch the power.
6.Press key to confirm high/low power
7.The interface will return to the radio setting options.
Press <back> to return the main interface. The power level icon will be displayed on
the screen.
MENU
MENU
MENU
MENU
MENU
Back light
You can turn on or off the screen back light according to your requirement.
Press the Back light key which has been programmed by software, to turn on/off
this function.
Squelch
Adjust the squelch level to filter useless call with low signal or when there’s too much
background noise.
Setting:The normal value is default value, to filter (useless) call or background strictly.
However, a call from a remote location may also be filtered out.
Press the squelch level key which has been pre-programmed by software, to switch
between Normal and Tight.
Use the menu function:
35 36
1.Press [ ] key to enter the menu
2.Press [ or ] key and choose utilities,then press key to confirm.
3.Press [ or ] key and choose radio settings, then press [ ] key to confirm.
4.Press [ or ] key and choose LED indicator, then press [ ] key to confirm.
5.Press [ ] key to turn on,the screen displays”All LED’s on”
Or Press [ ] key to turn off, the screen displays “All LED’s off”.
1.Press [ ] key to enter the menu
2.Press [ or ] key and choose utilities,then press [ ] key to confirm.
3.Press [ or ] key and choose radio settings, then press [ ] key to confirm.
4.Press [ or ] key and choose Language, then press [ ] key to confirm.
5.Press [ or ] key and choose the language option, then press [ ] key to
confirm.
6.The interface displays the selected language and return to the main interface.
1.Press [ ] key to enter the menu
2.Press [ or ] key and choose utilities,then press [ ] key to confirm.
3.Press [ or ] key and choose Intro Screen, then press [ ] key to confirm.
4.Press [ or ] key and choose Keypad Lock, then press [ ] key to confirm.
5.The interface displays “keypad locked”. Press [ ] , then press [ ] Key to
unlock the keypad.
6.The screen displays Keypad unlock and return the main interface.
If needed, Intro Screen could be enable or disable.
1.Press [ ] key to enter the menu
2.Press [ or ] key and choose utilities,then press [ ] key to confirm.
3.Press [ or ] key and choose Intro Screen, then press [ ] key to confirm.
4.Press [ or ] key and choose Back light, then press [ ] key to confirm.
5.Press [ ] key to turn on,the screen displays”Intro screen on”
6.Press [ ] key to turn off, the screen displays “Intro screen off”.
MENU
MENU
MENU
MENU
MENU
MENU
MENU
MENU
MENU
MENU
MENU
MENU
MENU
MENU
MENU
MENU
MENU
MENU
MENU
MENU
MENU
Intro Screen
Keypad Lock
You can lock the keypad to prevent the unexpected input.
Radio supports the following languages:
English
Chinese
Language
LED indicator light
If needed, LED Indicator could be enable or disable.
37 38
1.Press [ ] key to enter the menu
2.Press [ or ] key and choose utilities,then press [ ] key to confirm.
3.Press [ or ] key and choose radio settings, then press [ ] key to confirm.
4.Press [ or ] key and choose Password Lock, then press [ ] key to confirm.
5.Input the correct eight-digit number password which has been programmed by software,
then press [ ] key to confirm.
6.If the password is incorrect, the interface displays “wrong password”, if the pass word
is correct, the interface will change to the Password lock options list.
7.If the first line displays “turn on”,press [ ] key to confirm, then you should input the
correct password to turn on the radio.If the first line displays “turn off”, press If the first
line displays to confirm, then you can turn on the radio directly while don’t have to input
the password.
8.Press [ or ] key and choose Change Pwd, then press [ ] key to confirm.
9.Enter 8 digits new password. then press [ ] key to confirm.
10.Confirm the new 8 digits password,hen press [ ] key to confirm.
11.Screen displays that Password changed.
Note:The password should be 8 digits number.
VOX
This function allows you to initiate voice-activated hands-free calls on pre-programmed
channels. Whenever a microphone with VOX function detect voice, radio will transmit
signals automatically with the pre-programmed period of time.
Press [PTT] button during the operation will disable VOX function, to re-enale the VOX
function, You must do one of the following options:
Note:Only the radio with these functions can be enable or disable VOX.
Press VOX key which has been pre-programmed by software to turn on/off this function.
Use the menu function:
1.Press [ ] key to enter the menu
2.Press [ or ] key and choose utilities, then press [ ] key to confirm.
3.Press [ or ] key and choose radio settings, then press [ ] key to confirm.
4.Press [ or ] key and choose VOX, then press [ ] key to confirm.
MENU
MENU
MENU
MENU
MENU
MENU
MENU
MENU
MENU
MENU
MENU
MENU
MENU
Password Lock
39 40
My Number
1.Press [ ] key to enter the menu
2.Press [ or ] key and choose utilities,then press [ ] key to confirm.
3.Press [ or ] key and choose radio information, then press [ ] key to confirm.
4.Press [ or ] key and choose My Number, then press [ ] key to confirm.
5.The radio’s ID and name will be displayed on the interface.
1.Press [ ] key to enter the menu
2.Press [ or ] key and choose utilities,then press [ ] key to confirm.
3.Press [ or ] key and choose radio settings, then press [ ] key to confirm.
4.Press [ or ] key and choose Clock, then press [ ] key to confirm.
5.Press [ or ] key and choose time, then press [ ] key to confirm.
6.Press [ ] key to enter time setting interface
7.Press [ or ] key to move right and left and choose the number you want to change,
the number turns to reverse video text, input the right number via keypad.
8.The screen display “time saved” after pressing key to confirm.
MENU
MENU
MENU
MENU
MENU
MENU
MENU
MENU
MENU
MENU
Clock
Clock settings are divided into:
Time
4.Press [or ] key and choose Clock, then press key to confirm.
5.Press [or ] key and choose date, then press key to confirm.
6.Press key to enter date setting interface
7.Press [or ] key to move right and left and choose the number you want to change,
the number turns to reverse video text, input the right number via keypad.
8.The screen display “date saved” after pressing key to confirm.i
Radio Info
The Radio Info contains the following parts:
Note: Press Back key to return the previous interface.
Date
1.Press key to enter the menu
2.Press [or ] key and choose utilities,then press key to confirm.
3.Press [or ] key and choose radio settings, then press key to confirm.
41 42
TX Frequency
1.Press [ ] key to enter the menu
2.Press [ or ] key and choose utilities,then press [ ] key to confirm.
3.Press [ or ]key and choose Program Radio,then press [ ]key to confirm.
1.Press [ ] key to enter the menu
2.Press [ or ] key and choose utilities,then press [ ] key to confirm.
3.Press [ or ] key and choose Program Radio, then press [ ] key to confirm.
4.Input the correct password which has been programmed already by software.then
press [ ] key to confirm.
5.Press [ or ] key and choose RX Frequency, then press [ ] key to confirm.
6.The screen displays the current RX frequency,then press [ ] key to confirm.
7.Press [ or ] key to move right and left and choose the number you want to change,
the number turns to reverse video text, input the right number via keypad.
8.Press key to save the new frequency, the screen display “RX frequency saved”.
Note: Editing frequency will be limited within the frequency range setted by programming
software, If the frequency is less than the minimum of the frequency range, the radio
will take the minimal value, conversely, when it greater than the maximum, take the
maximal value of the frequency range.
Versions
Display radio firmware version.
1.Press [ ] key to enter the menu
2.Press [ or ] key and choose utilities,then press [ ] key to confirm.
3.Press [ or ] key and choose radio information, then press [ ] key to confirm.
4.Press [ or ] key and choose Firmware Ver./CP Ver., then press [ ] key to
confirm.
5.The radio’s version will be displayed on the interface.
MENU
MENU
MENU
MENU
MENU
MENU
MENU
MENU
MENU
MENU
MENU
MENU
MENU
Program Radio
This Option allows you to edit the channel content.
The editable channel content contains the following options:
43 44
RX Frequency
Encode
1.Press [ ] key to enter the menu
2.Press [ or ] key and choose utilities,then press [ ] key to confirm.
3.Press [ or ] key and choose Program Radio, then press[ ]key to confirm.
4.Input the correct password which has been programmed already by software.then
press [ ] key to confirm.
5.Press [ or ] key and choose QT/DQT Code, then press [ ] key to confirm.
TOT
1.Press [ ] key to enter the menu
2.Press [ or ] key and choose utilities,then press [ ] key to confirm.
3.Press [ or ] key and choose Program Radio, then press [ ] key to confirm.
4.Input the correct password which has been programmed already by software.then
press [ ] key to confirm.
5.Press [ or ] key and choose TOT, then press [ ] key to confirm.
6.The screen displays infinite, 15S,30S.....555S(Increasing 15S each time),Press [ ]
key to choose the option you want.then The interface displays “TOT saved” after
pressing [ ] key.
Channel Name
1.Press [ ] key to enter the menu
2.Press [ or ] key and choose utilities,then press [ ] key to confirm.
3.Press [ or ] key and choose Program Radio, then press [ ] key to confirm.
4.Input the correct password which has been programmed already by software.then
press [ ] key to confirm.
5.Press [ or ] key and choose Channel Name, then press [ ] key to confirm.
6.The screen displays the current channel name, then press [ ] key to change the
letter, number, Chinese input method, the same as text editing.
7.The screen displays “Channel name saved” after pressing [ ] key.
4.Input the correct password which has been programmed already by software.then
press [ ] key to confirm.
5.Press [ or ] key and choose TX Frequency, then press [ ] key to confirm.
6.The screen displays the current TX frequency,then press [ ] key to confirm.
7.Press [ or ] key to move right and left and choose the number you want to
change, the number turns to reverse video text, input the right number via keypad.
8.Press [ ] key to save the new frequency, the screen display “TX frequency saved”.
Note:Editing frequency will be limited within the frequency range setted by programming
software, If the frequency is less than the minimum of the frequency range, the radio
will take the minimal value, conversely, when it greater than the maximum, take the
maximal value of the frequency range.
MENU MENU
MENU
MENU
MENU
MENU
MENU
MENU
MENU
MENU
MENU
MENU
MENU
MENU
MENU
MENU
MENU
MENU
MENU
MENU
MENU
MENU
CTC/DCS
CTCSS/DCS is available only in analogue channel, it contains:
CTCSS/DCS encoding
CTCSS/DCS decoding
#1
45 46
4.Input the correct password which has been programmed already by software.then
press [ ] key to confirm.
5.Press [ or ] key and choose Color Code, then press [ ] key to confirm.
6.Input the number and press [ ] key to confirm.
Repeater Slot
Repeater Slot is available only in digital channels.
1.Press [ ] key to enter the menu
2.Press [ or ] key and choose utilities,then press key to confirm.
3.Press [ or ] key and choose Program Radio, then press [ ] key to confirm.
4.Input the correct password which has been programmed already by software. then
press [ ] key to confirm.
5.Press [ or ] key and choose Repeater Slot, then press [ ] key to confirm.
6.Press [ or ] key and choose repeater slot, then press [ ] key to confirm.The
interface displays “Repeater slot saved”.
MENU
MENU
MENU
MENU
MENU
MENU
MENU
MENU
Color Code
Color Code is available only in digital mode.
1.Press [ ] key to enter the menu
2.Press [ or ] key and choose utilities,then press [ ] key to confirm.
3.Press [ or ] key and choose Program Radio, then press [ ] key to confirm.
6.There’s empty option and all kinds encoding value,press [ or ] key and choose
Empty, press [ ] key confirm. Then the CTCSS/DCS has been shut down. press
[ or ] key and choose the codes, press [ ] key to confirm. The interface displays
“QT/DQT encode saved”.
MENU
MENU
MENU
MENU
Decode
1.Press [ ] key to enter the menu
2.Press[ or ] key and choose utilities,then press [ ] key to confirm.
3.Press[ or ] key and choose Program Radio, then press [ ] key to confirm.
4.Input the correct password which has been programmed already by software.then
press [ ] key to confirm.
5.Press [ or ] key and choose QT/DQT Code, then press [ ] key to confirm.
6.There’s empty option and all kinds decoding value,press[ or ] key and choose
Empty, press [ ] key confirm. Then the CTCSS/DCS has been shut down. press
[ or ] key and choose the codes, press [ ] key to confirm. The interface
displays “QT/DQT decode saved”.
MENU
MENU
MENU
MENU
MENU
MENU
MENU
MENU
47 48

General Receiving
Frequency Range
Channel Storage
Channel Spacing
Working Voltage
Battery Type
Working Temperature
Store Temperature
Antenna Impedance
Dimension
UHF:400-470MHz
1000 channels
7.4V DC
Polymer lithium battery
-30℃~+60℃
-40℃~+85℃
130*58*35mm
Analogue Sensibility
Digital Sensibility
Co-channel Rejection
Adjacent Channel Selectivity
Spurious Response
Audio Power
Audio Distortion
Audio Response
Weight
0.22uV/-120dBm(20dB SINDA)
0.282uV/-118dBm(BER 5%)
TIA603C:65Db ETSI:60dB
TIA603C:75Db ETSI:70dB
1W
(Type)
1dB~-3dB
300g
49 50
Technical Parameter
12.5KHz

Model Number:
Serial Number:
Purchase Date:
Dealer: Telephone:
User`s Name: Telephone:
Address: Post Code:
Remarks:
1.This guarantee card to be kept by user,we will not re offer if lost.
2.This guarantee card should be filled by dealer,otherwise it`s invalid.
3.Do not alter the guarantee card,please confirm that the serial number on the
guarantee card is the same with radio.
4.One-year guarantee for radio,half a year guarantee for accessory.
5.Users can get maintenance service from following ways:
Transmitting
Output power
Frequency Stability
Adjacent channel power
Idle Time Slot Power
FM Modulation Mode
Modulation maximum deviation
Nonactive slot power
Digital protocol
Vocoder type
Modulation BER(Bit Error Rate)
4FSK digital mode
±1ppm
12.5KHz@11K0F3E
2.5KHz@12.5KHz
-57dBm
ETSI TS 102 361-1-2-3
AMBE+2TM
Guarantee
Please cut along with this line
51 52
High:5W Low:1W
7K60F1D, 7K60F1E
FCC Statement
INFORMATION TO THE DIGITAL DEVICE USER REQUIRED BY THE FCC
This equipment has been tested and found to comply with the limits for a Class B digital device,
pursuant to Part 15 of the FCC Rules. These limits are designed to provide reasonable protection
against harmful interference in a residential installation. This equipment generates, uses and can
generate radio frequency energy and, if not installed and used in accordance with the instructions,
may cause harmful interference to radio communications. However, there is no guarantee that the
interference will not occur in a particular installation. If this equipment does cause harmful
interference to radio or television reception, which can be determined by turning the equipment
off and on, the user is encouraged to try to correct the interference by one or more of the following
measures:
• Reorient or relocate the receiving antenna.
• Increase the separation between the equipment and receiver.
• Connect the equipment to an outlet on a circuit different from that to which the receiver is connected.
• Consult the dealer for technic
FCC WARNING
This equipment generates or uses radio frequency energy. Changes or modifications to this
equipment may cause harmful interference unless the modifications are expressly approved
by the party responsible/Iradio Electronics Co., Ltd. The user could lose the authority to operate
this equipment if an unauthorizedchange or modification is made.
This Iradio transceiver has been tested and complies with the standards listed below, in regards
to Radio Frequency (RF) energy and electromagnetic energy (EME) generated by the transceiver.
• FCC 47 CFR 1.1307, 1.1310 & 1.1093 RF exposure limits for Occupational Use Only. RF
Exposure limits adopted by the FCC are generally based on recommendations from the National
Council on Radiation Protection and Measurements & the American National Standards Institute.
• American National Standards Institute (ANSI)/Institute of Electrical and Electronic Engineers
(IEEE) C95.1: 2005
The following list provides you with the information required to ensure that you are aware of RF
exposure and of how to operate this transceiver so that the FCC RF exposure limitations are not
exceeded.
• While transmitting (holding the PTT switch or speaking with VOX enabled), always keep the
antenna and the radio at least 2.5cm (1 inch) from your body or face, as well as from any bystanders.
• Do not transmit for more than 50% of the total transceiver use time; transmitting over 50% of
the total use time may exceed the limits in accordance to the FCC RF exposure requirements.
Nominal transceiver operation is 5% transmission time, 5% reception time, and 90% stand-by time.
• Use only the specified antenna for this transceiver; this may be either the antenna provided with
the transceiver or another antenna authorized by Iradio. Use only Iradio authorized accessories
(antennas, battery packs, belt clips, Speaker/Mics or headsets etc.): When worn on the body,
always place the radio in a Iradio recommended clip or carrying case meant for this product.
The use of other than recommended or approved body-worn accessories may result in RF exposure
levels which exceed the FCC’s occupational/controlled environment RF exposure limits.