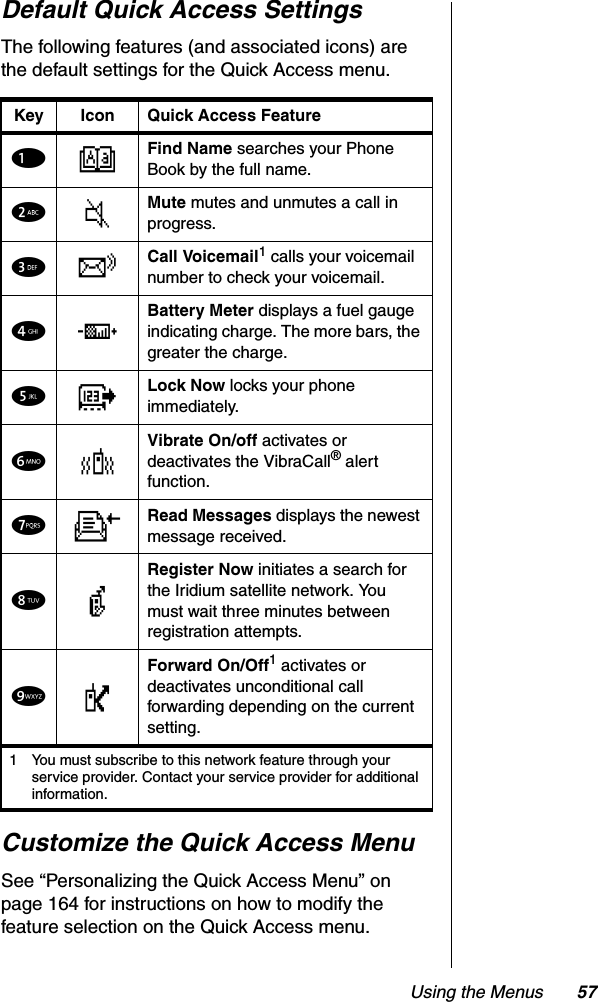
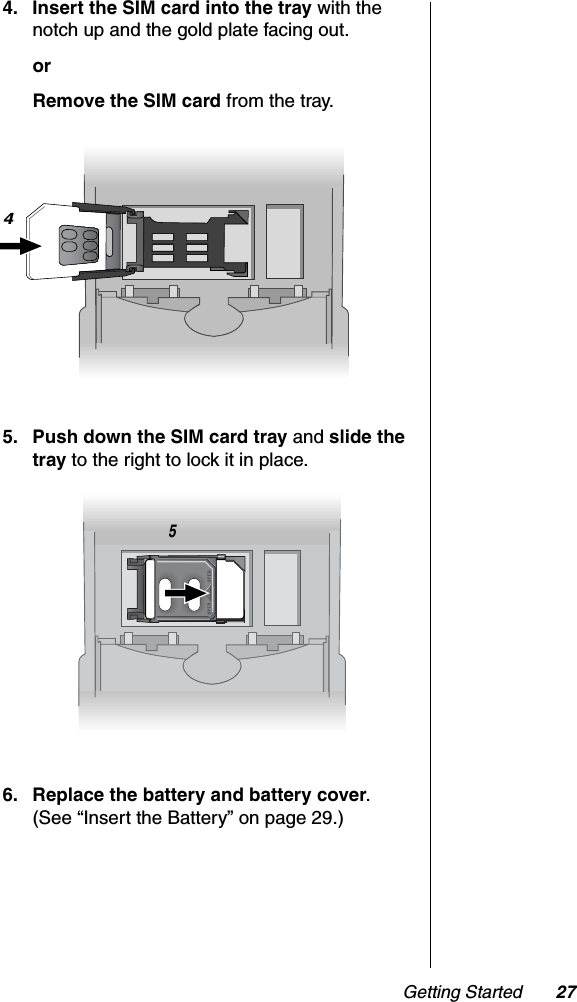
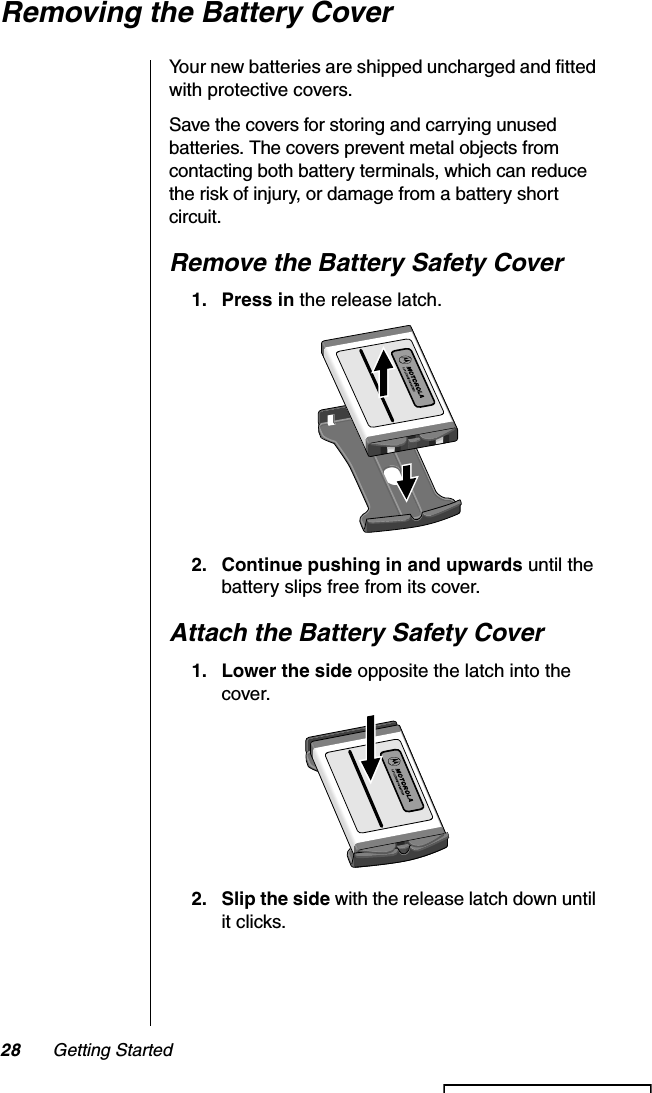
Iridium Satellite 9505A Satellite Telephone User Manual old User Guide
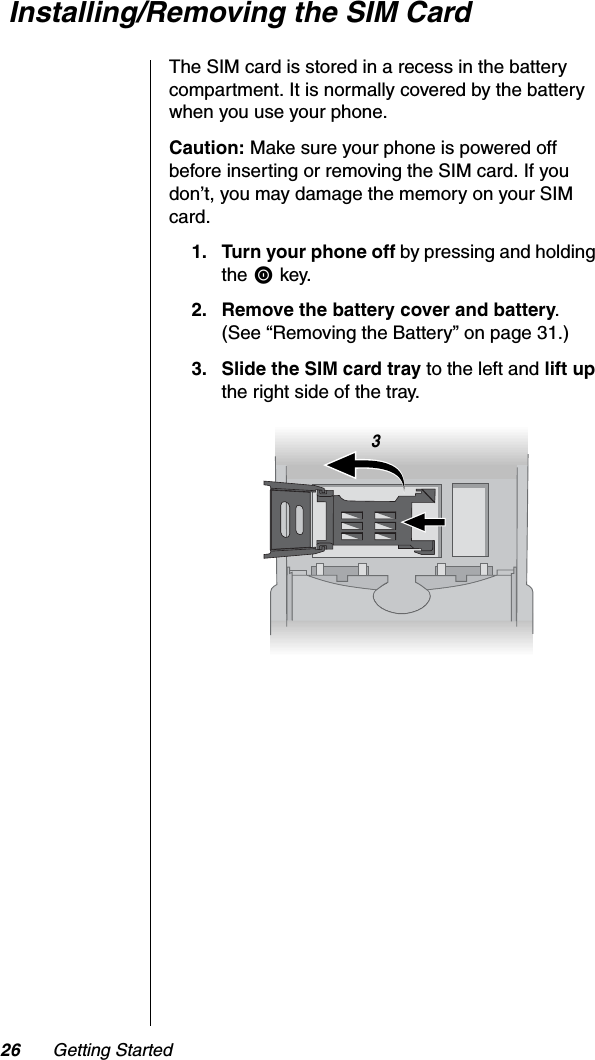
Iridium Satellite LLC Satellite Telephone old User Guide
UserManual.wiki
>
Iridium Satellite
>
9505A User Manual
User guide
Navigation menu
Upload a User Manual
Namespaces
Wiki Guide
HTML
PDF
Info
Views
User Manual
Discussion / Help
Navigation

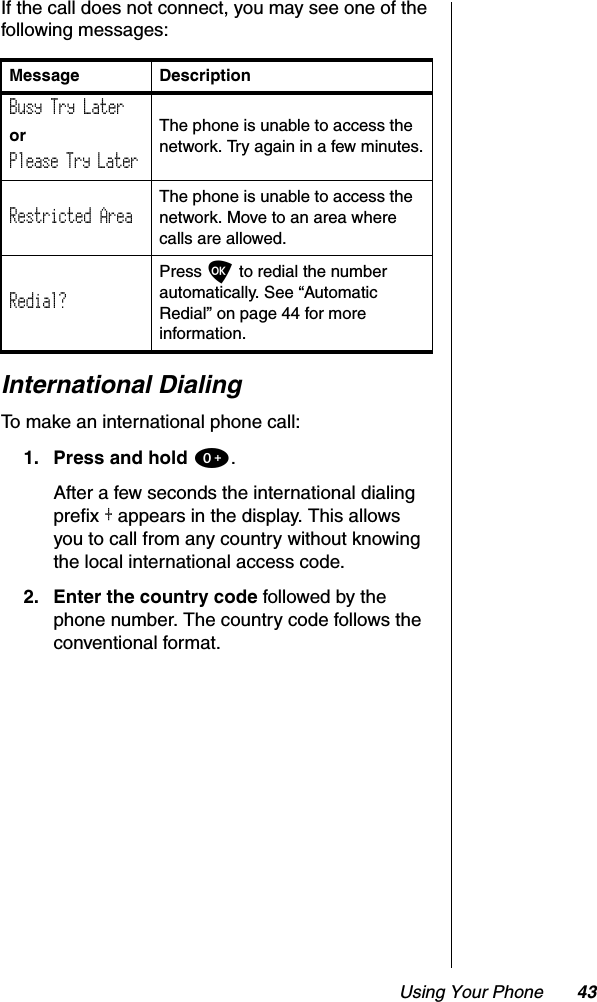
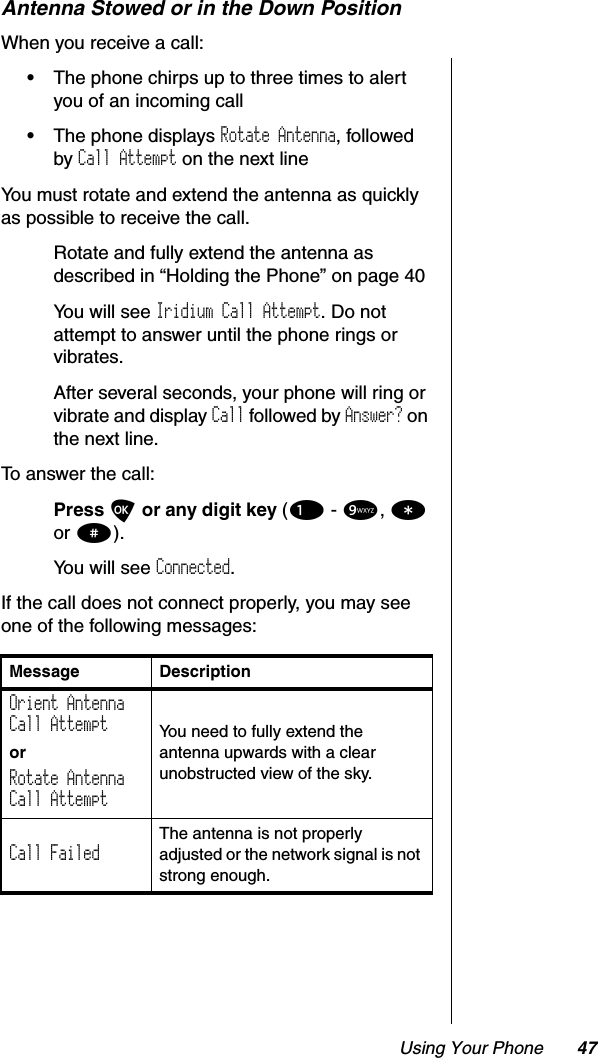
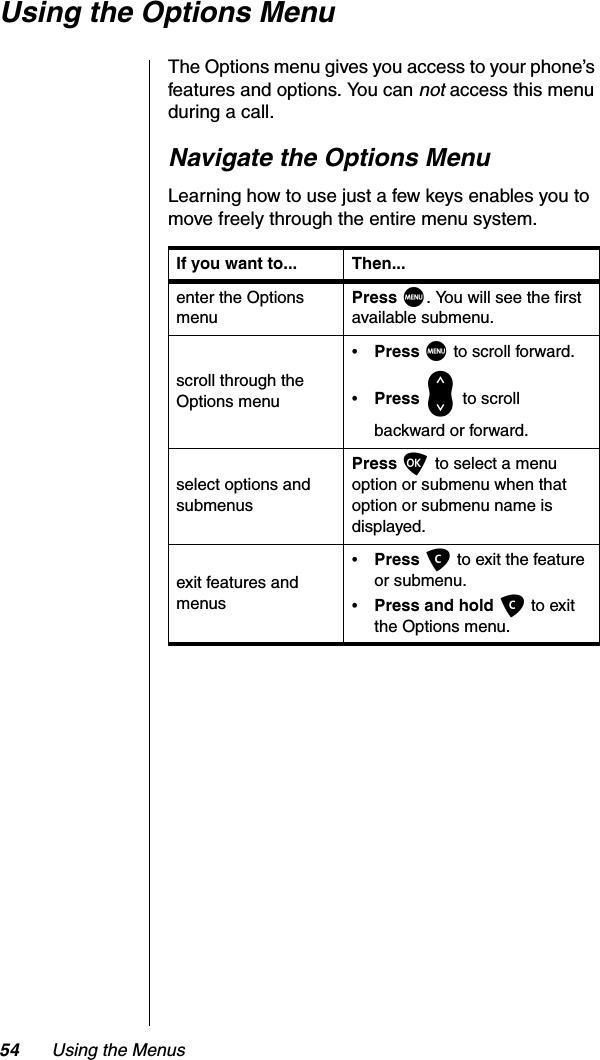
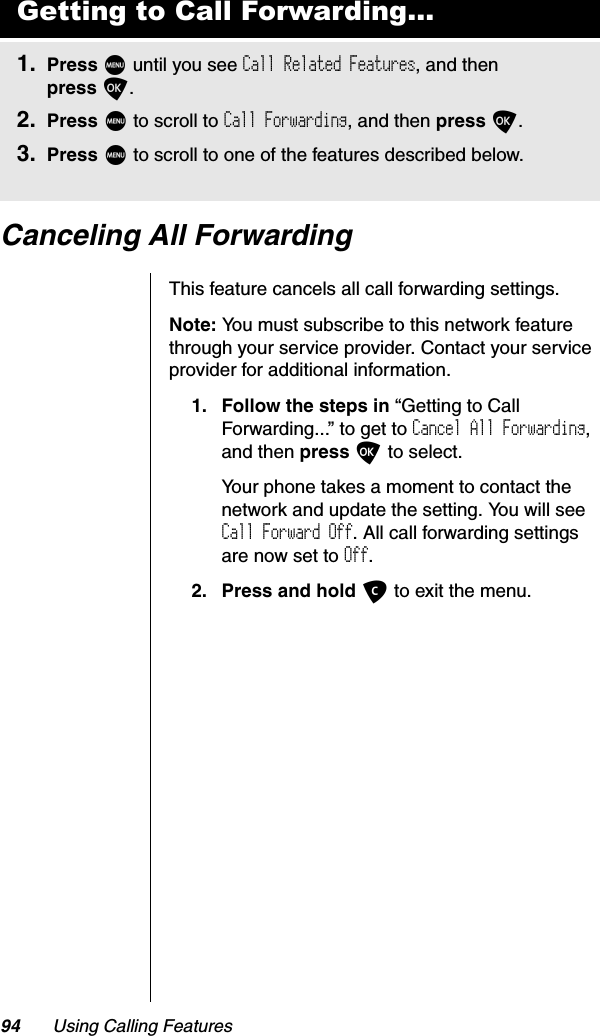
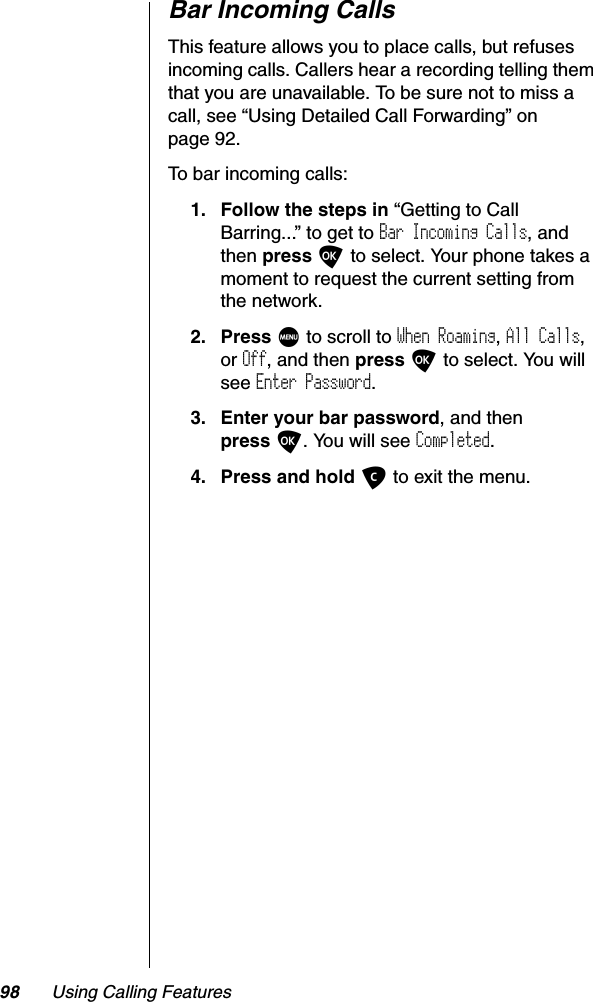
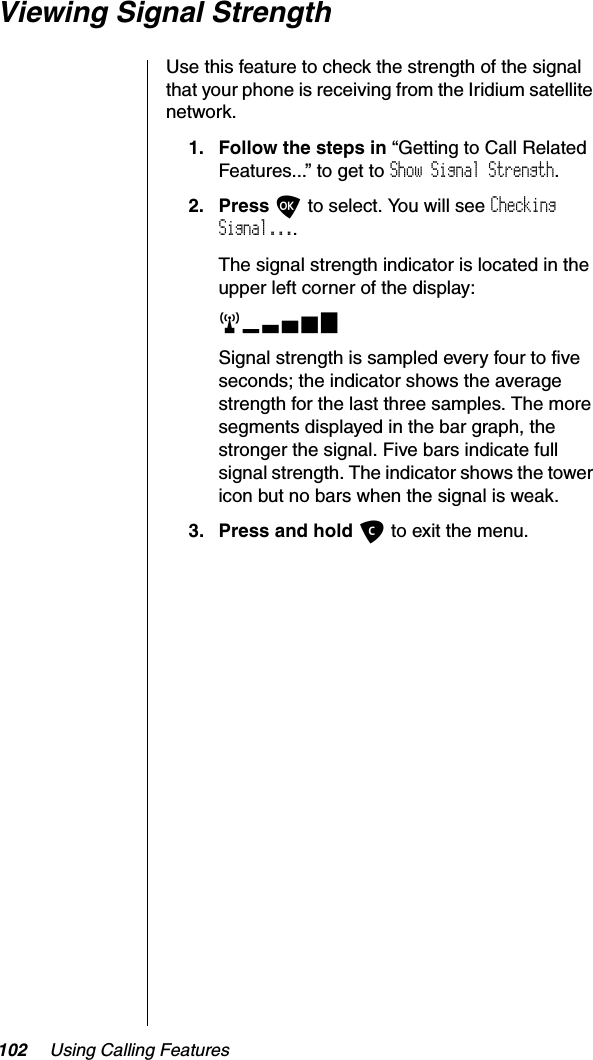
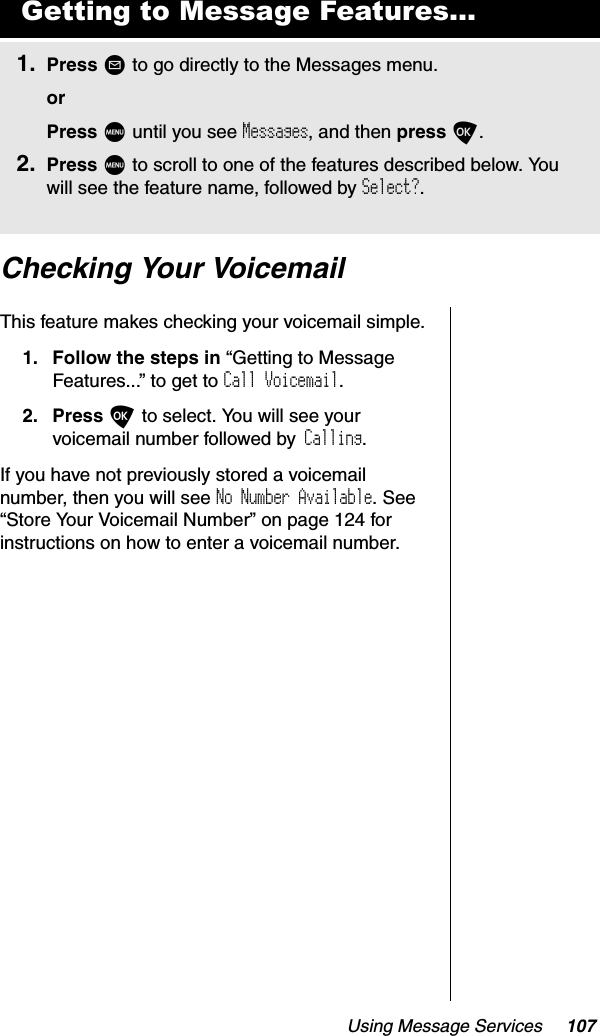
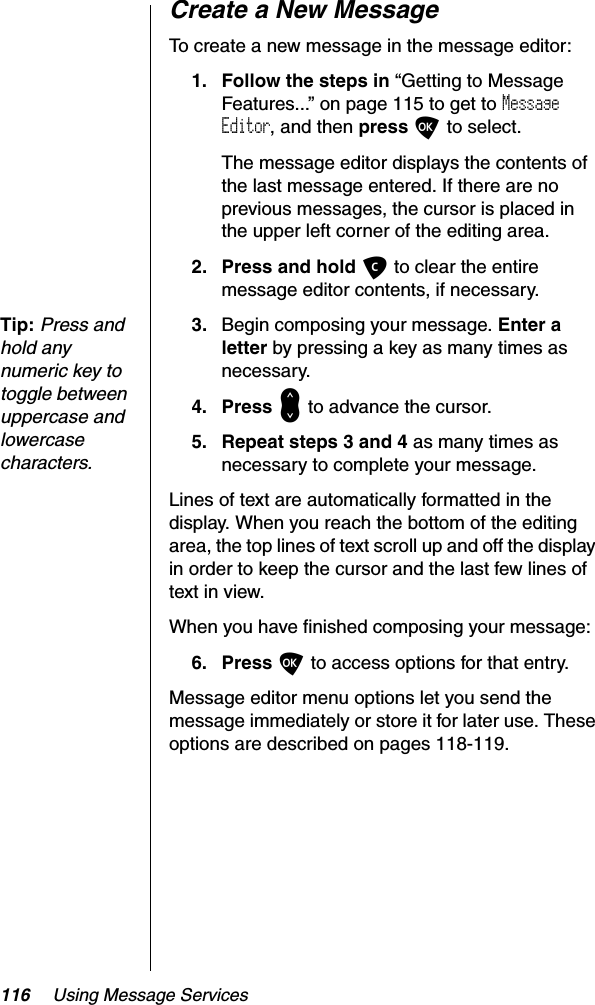
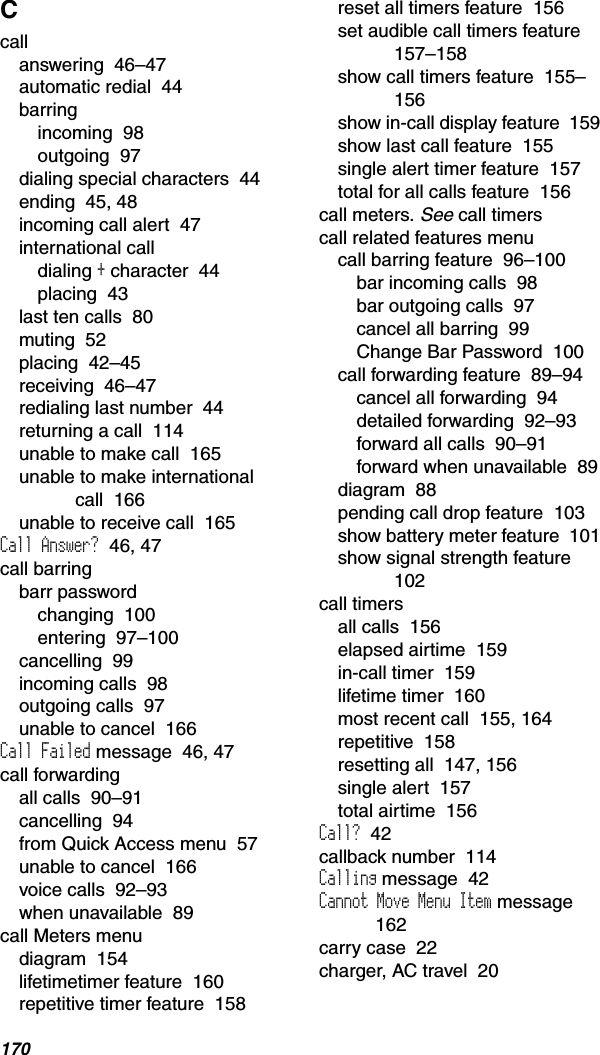
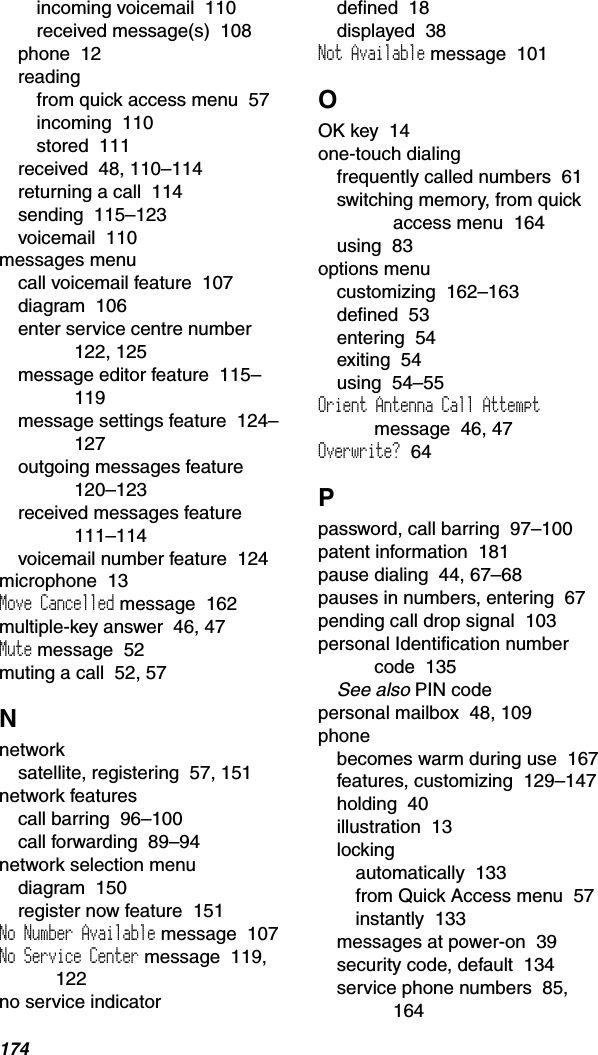
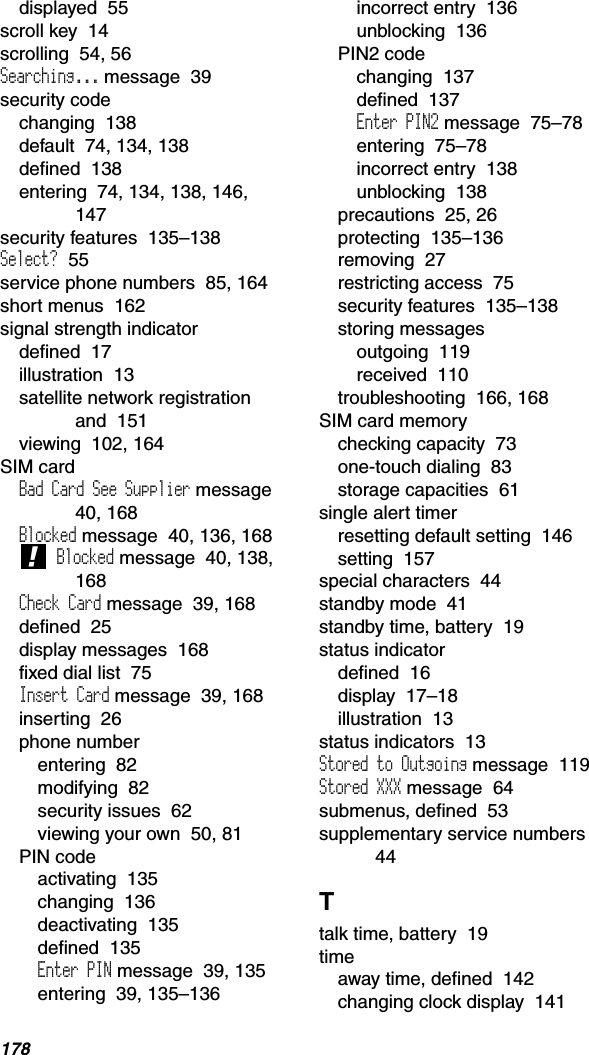
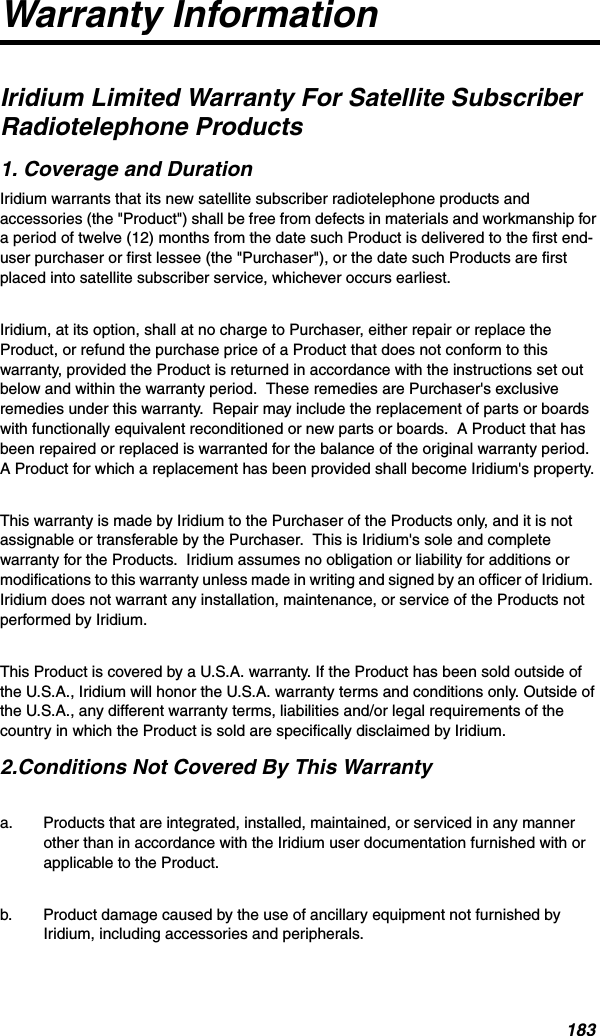
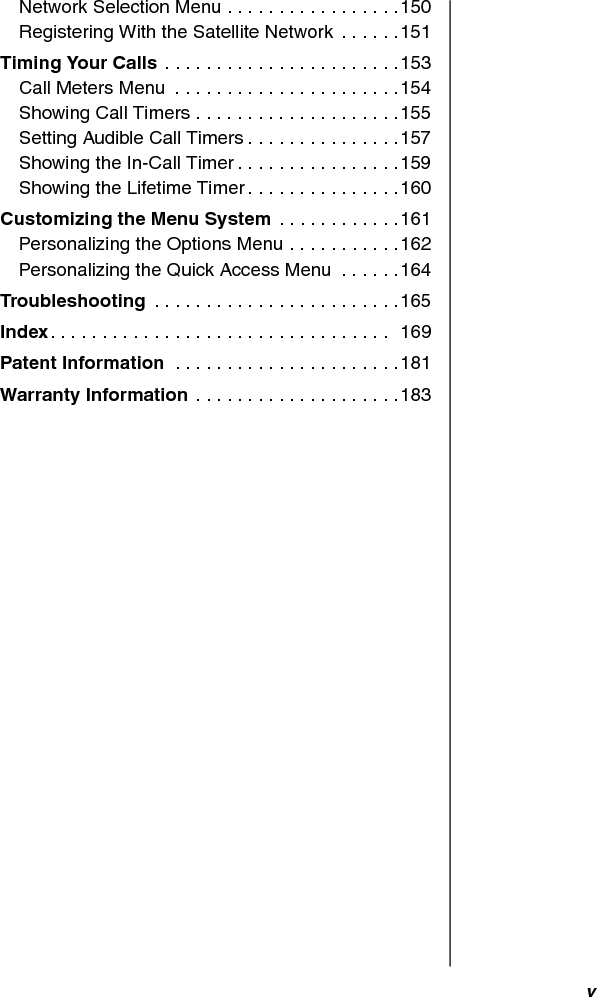
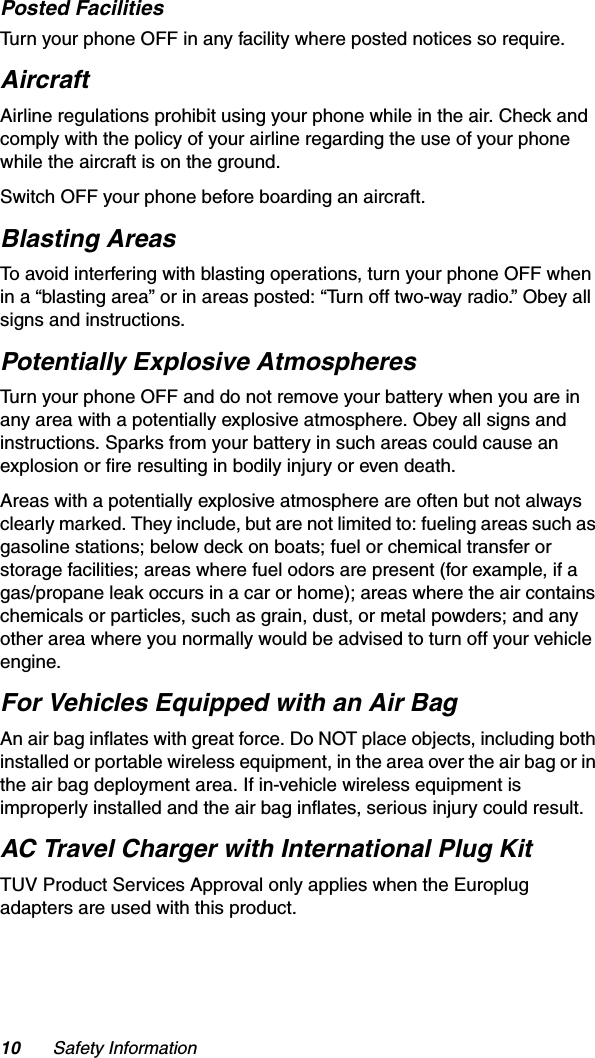
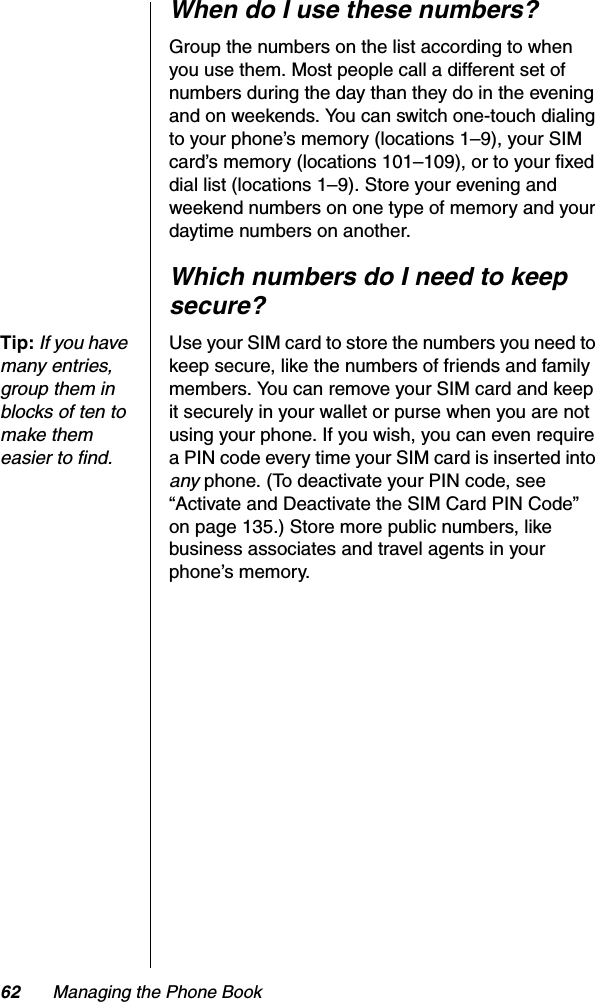
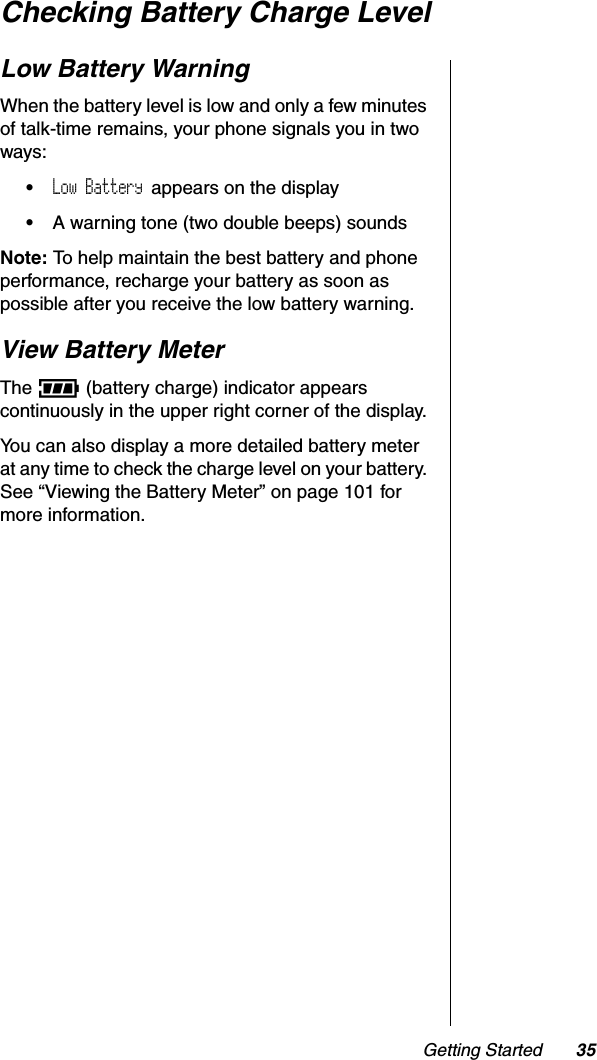
![SatelliteAntenna LockRelease ButtonDisplayMicrophoneHeadset JackReal-TimeClockBattery ChargeIndicatorEarpieceSignal StrengthIndicatorStatusIndicatorSatelliteAntennaVolumeControlKeysDisplay and Status IndicatorsAlphanumericKeypadAccessory andPower ConnectorBattery CompartmentConnectorMessage KeyQuick AccessKeyRepresents functions not on front of phone.HELPFUL HINTS• Need clear view of sky, outdoors, away from buildings and tall structures.Rotate and fully extend antenna into a vertical position.• Wait until registration is complete (you will see A Registered and the +and n indicators). If no registration (n missing), press E 8.• To dial, press: [0 0]or [0 and hold for two seconds], [country code],[phone number], O.• Talk with antenna above your head and vertical to the ground.](https://usermanual.wiki/Iridium-Satellite/9505A/User-Guide-487528-Page-3.png)
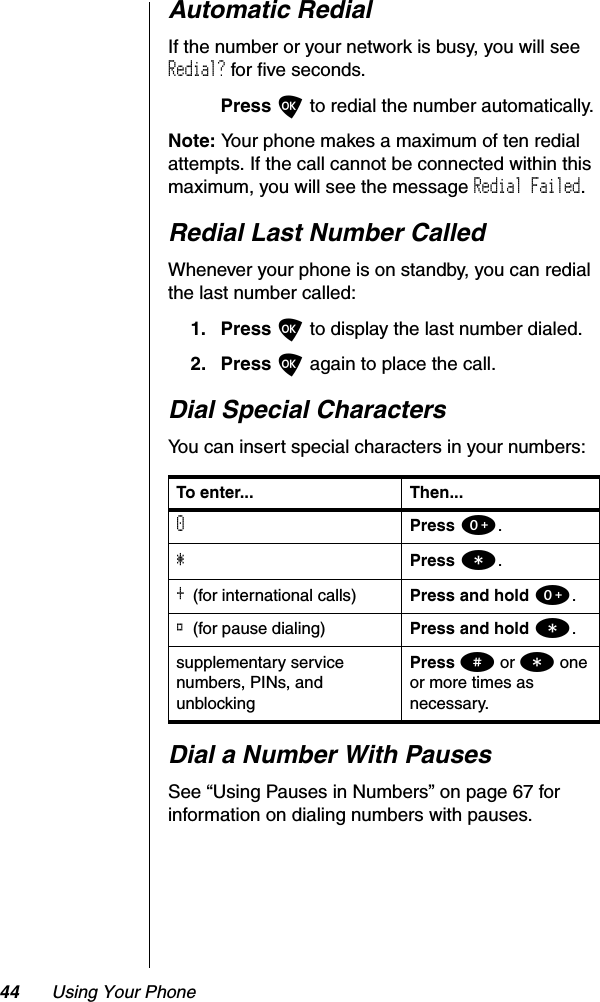
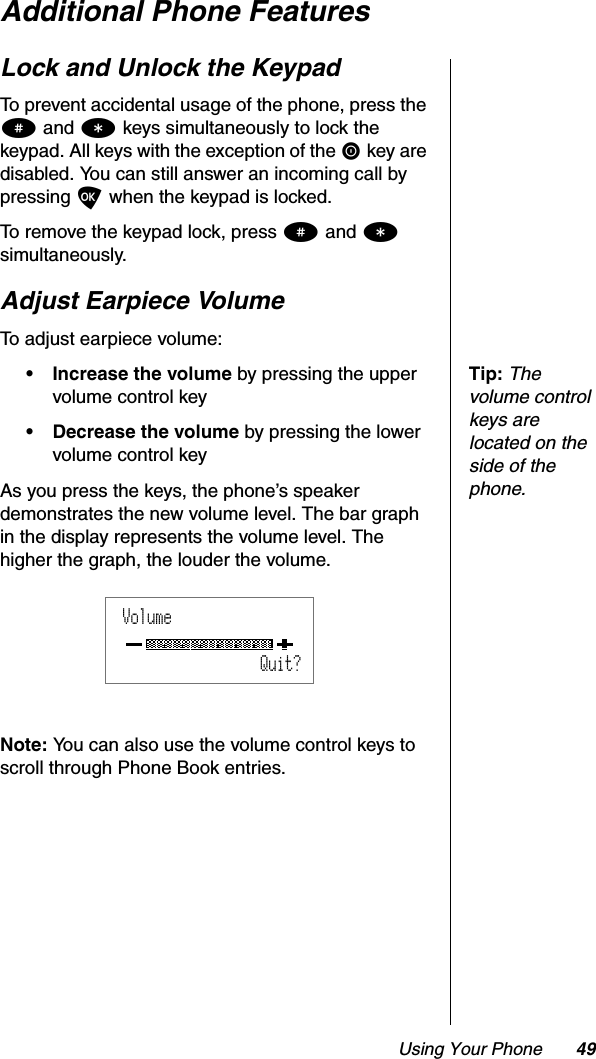
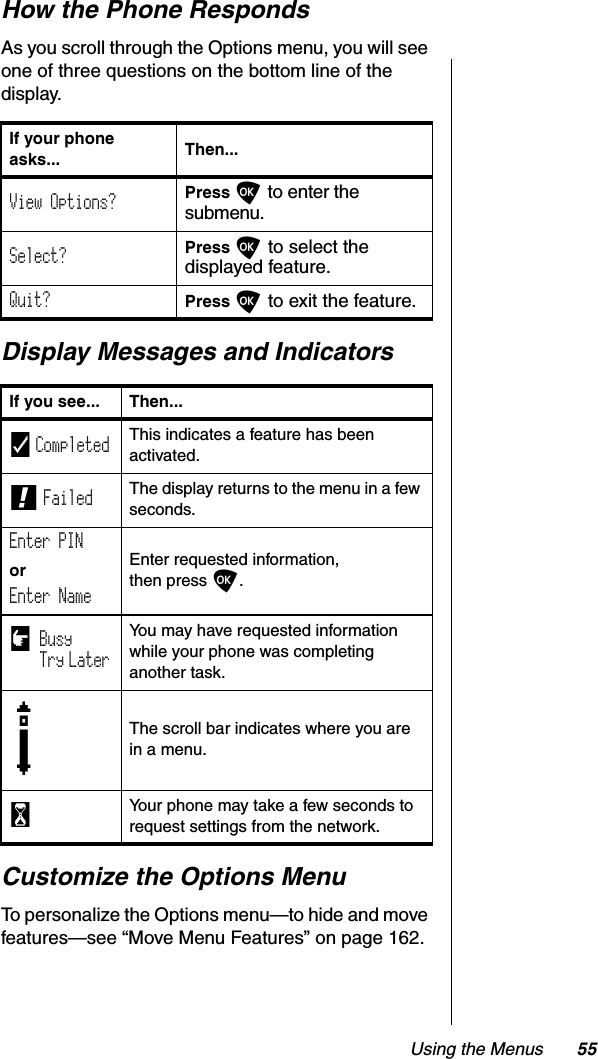
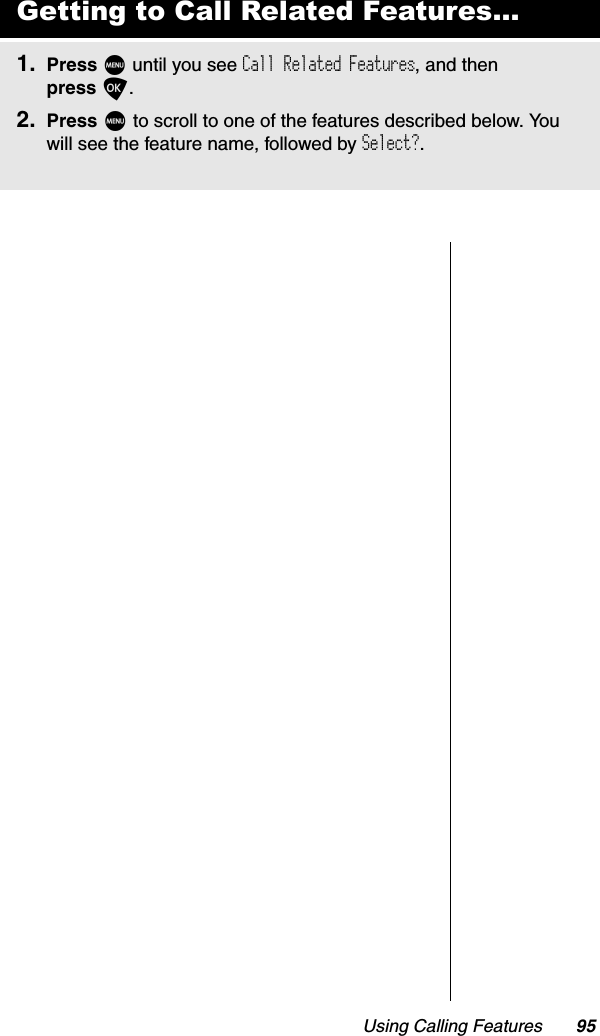
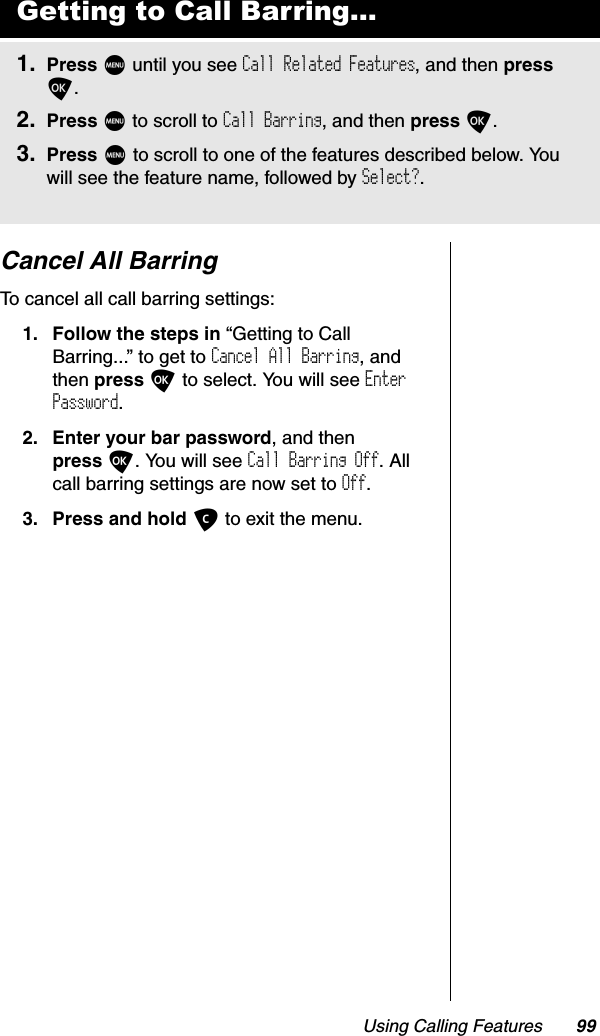
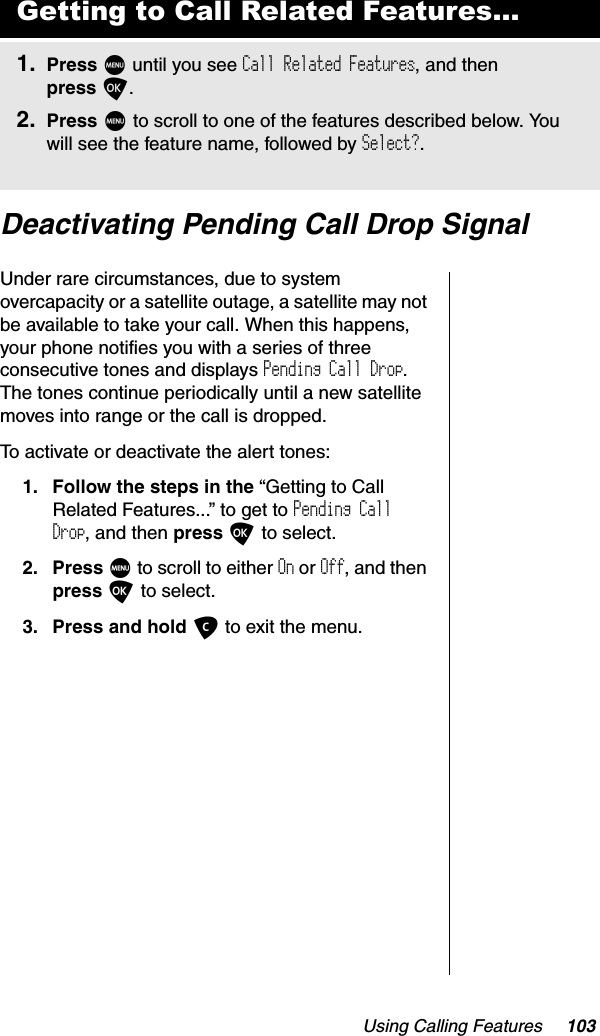
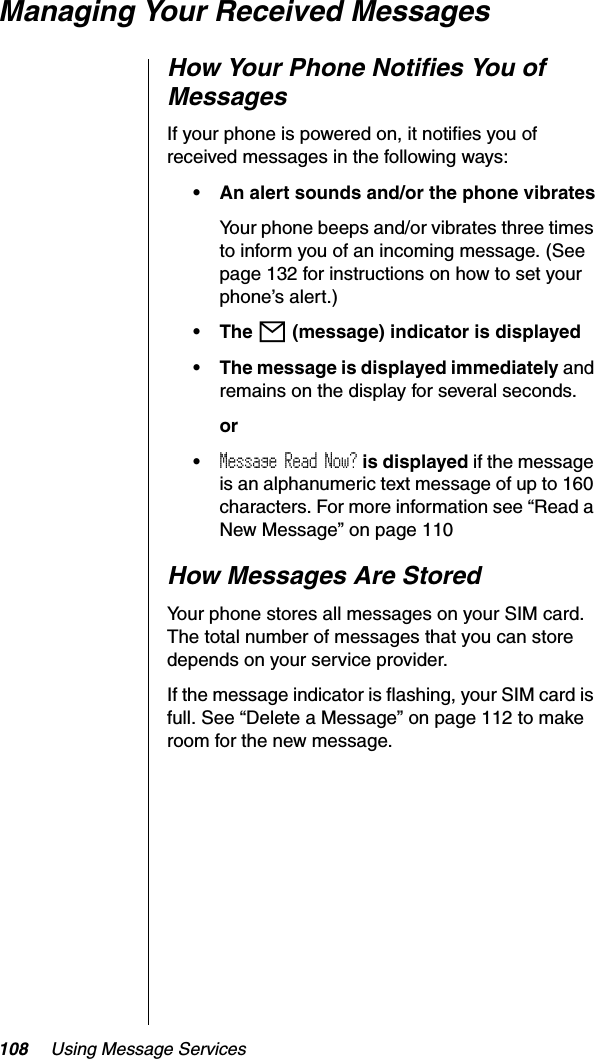
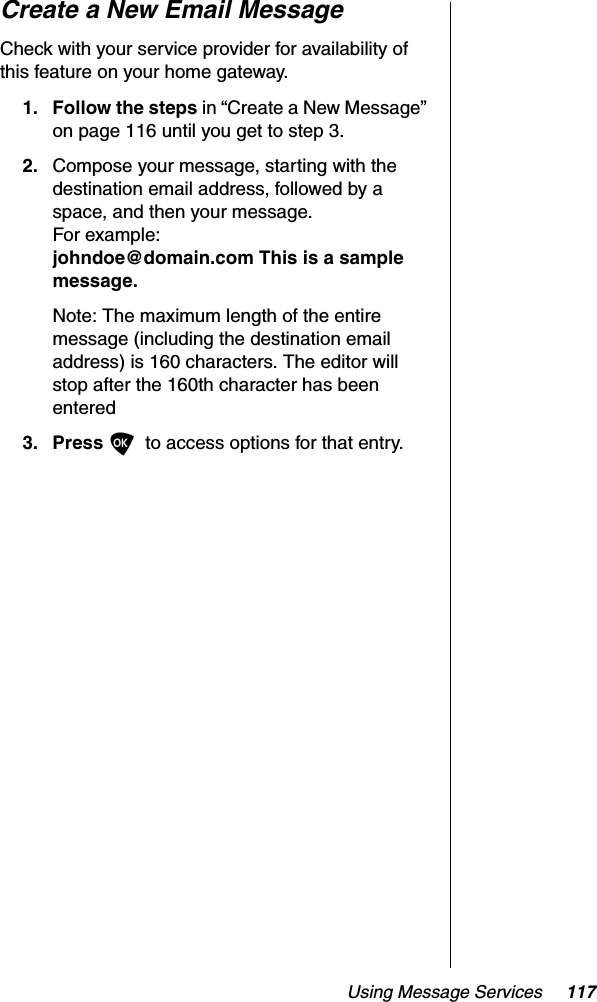
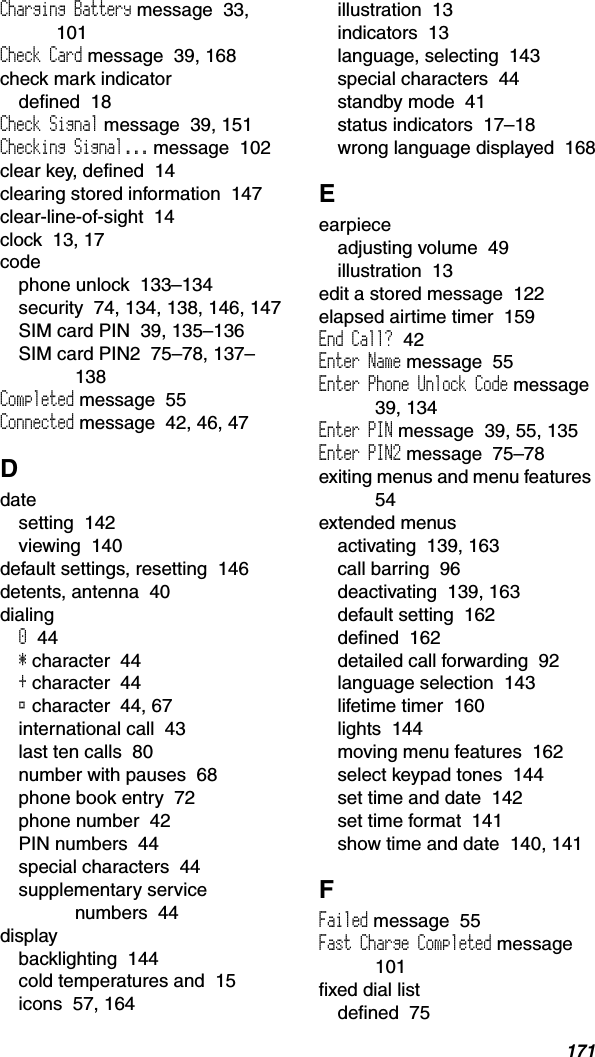
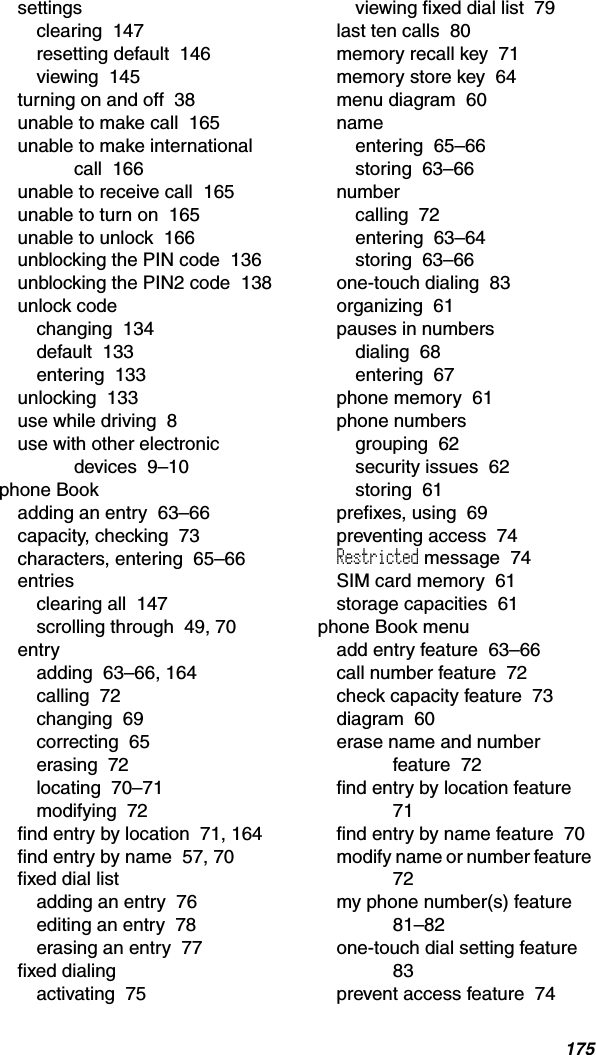
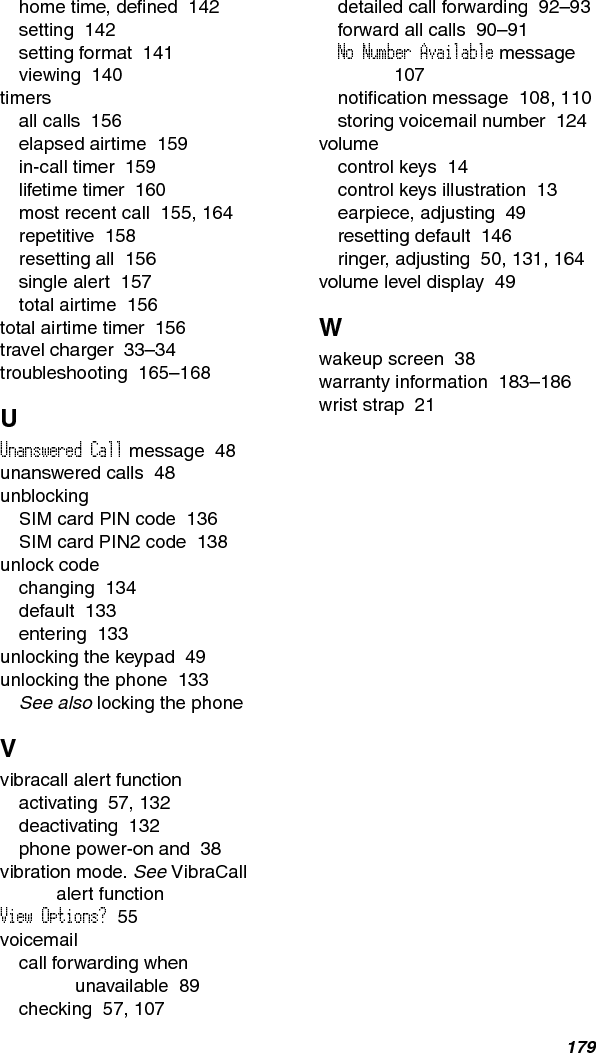
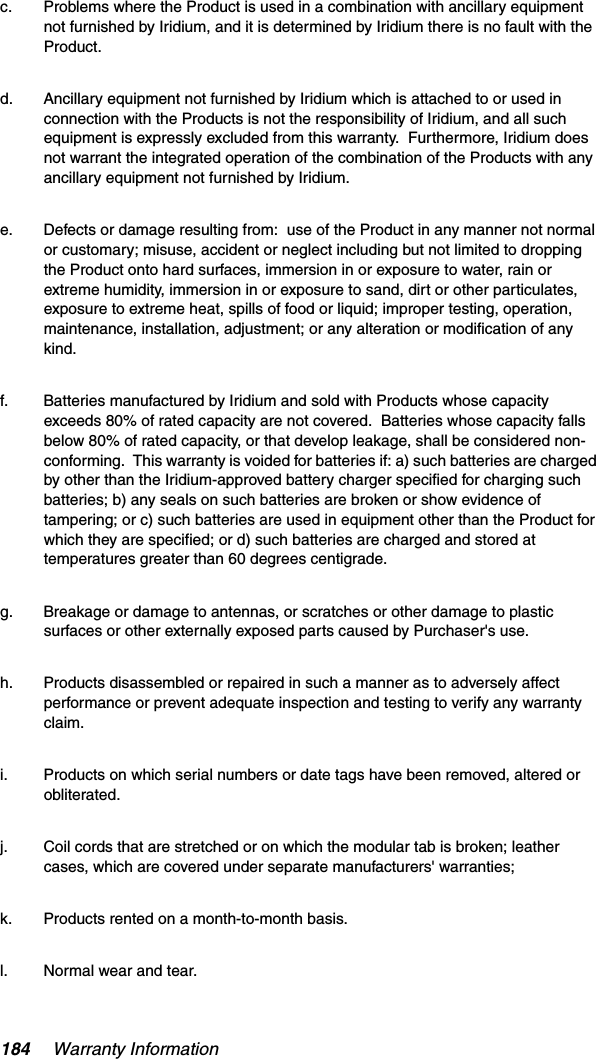
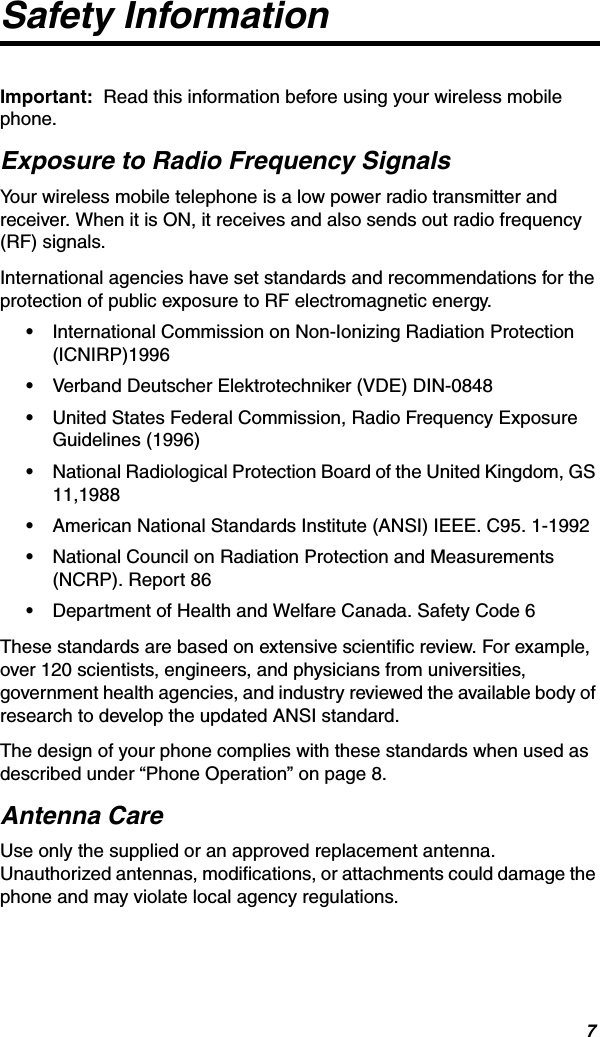
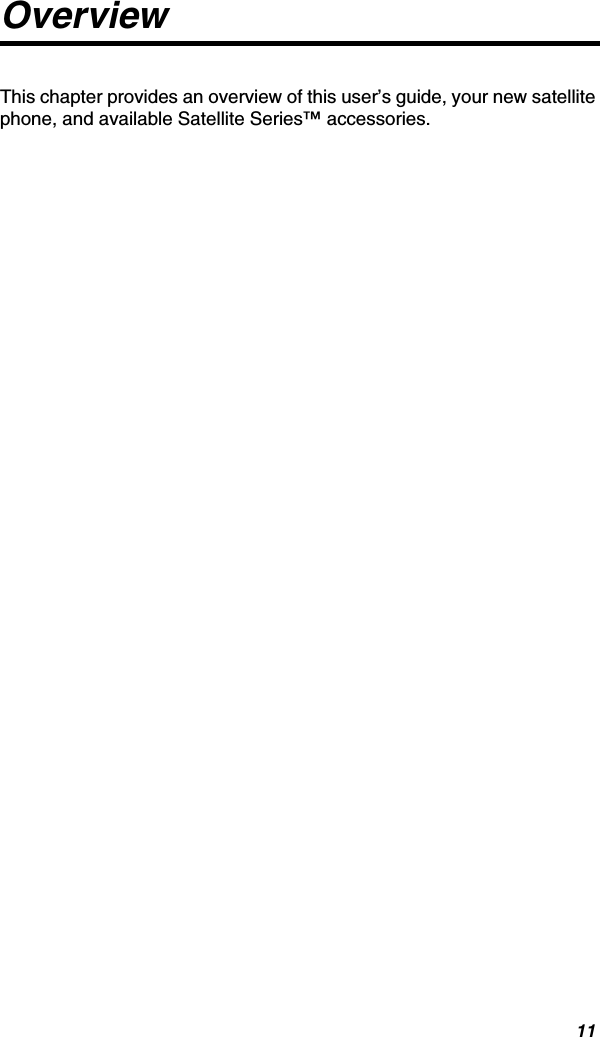
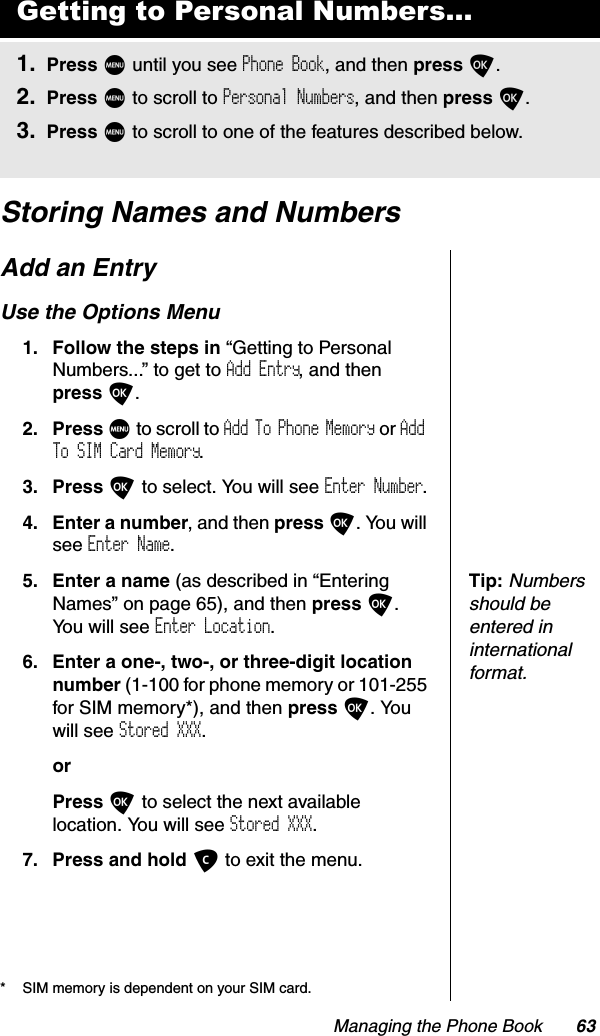
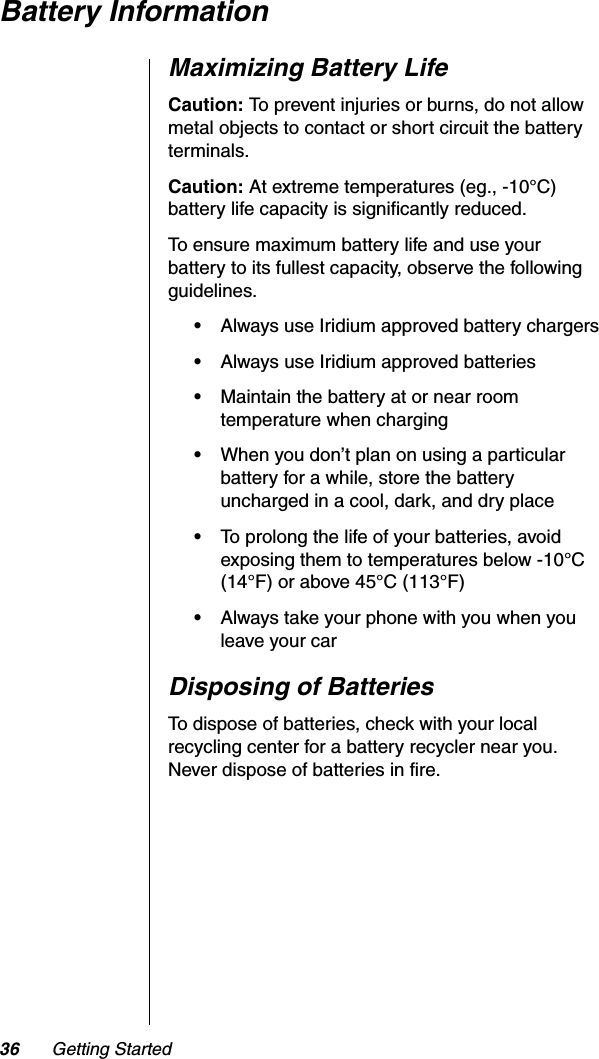
![3. Insert the SIM card.1. Rotate and extend the antenna.2. Remove battery door.4. Push down and slide the SIM card tray to the right.6. Install the battery by matching arrows on phone and battery.5. Remove battery’s protective cover.7. Attach battery door cover.8. Attach charging device.Getting StartedDisplay your phone number:Press Q#.Also refer to the “View Your SIM Card Phone Number(s)” section of theUser’s Guide.Special Features Continued9505 PORTABLE QUICK REFERENCEFind Name1EMuteCall VoicemailLock NowBattery MeterRecall a number from the phone book:1. Press Q.2. Enter the one-, two-, or three-digit location number of the entry,and then press O.3. Press O to call the displayed entry. Recall last ten numbers dialed:1. Press Muntil you see Phone Book, and then press O.2. Press Mto scroll to Last Ten Calls,and then press O to select. 3. Press M to scroll to Last Calls Made and then press O to select.4. Press M to scroll to the number you are looking for.5. Press O to place a call to that number.Quick Access MenuPhone Book2345Vibrate On/OffRead MessagesRegister NowForward On/Off6789Keypad disable:Press *and # keys simultaneously to prevent accidental usageof the phone. All keys with the exception of the S key will be disabled. Youcan still answer an incoming call by pressing Owhen the keypad is locked.To remove the keypad disable, press * and # simultaneously.Factory default for satellite mode.Turn the phone's power on/off: Press and hold S.Place a call: You need a clear view of the sky, away from tall structuresRotate and extend the antenna in a vertical position. To dial,press: [0 0]or [0 and hold for two seconds], [country code],[phone number], O.End a call: Press C.Adjust earpiece volume:Press upper and lower volume keys on the side of the phone.Adjust ringer volume:Press Eand then the upper and lower volume keys on the side ofthe phone.Answer a call (with antenna rotated and extended):Phone rings and/or vibratesAfter Call followed by Answer? is in display, press O.Answer a call (with antenna stowed):Phone chirpsRotate and extend antennaPhone will ring and/or vibrateAfter Call followed by Answer? is in display, press O.Clear the last digit in the display or exit a submenu:Press C.Clear the entire display or exit the menu system:Press and hold C.Select prompt language:Press and hold C to return to idle display.Press M 2 6 O to go to the language selection submenu.Press M until you see the preferred language.Press O to select.Basic OperationSpecial Features(Top)(Top)(Top)✁](https://usermanual.wiki/Iridium-Satellite/9505A/User-Guide-487528-Page-4.png)


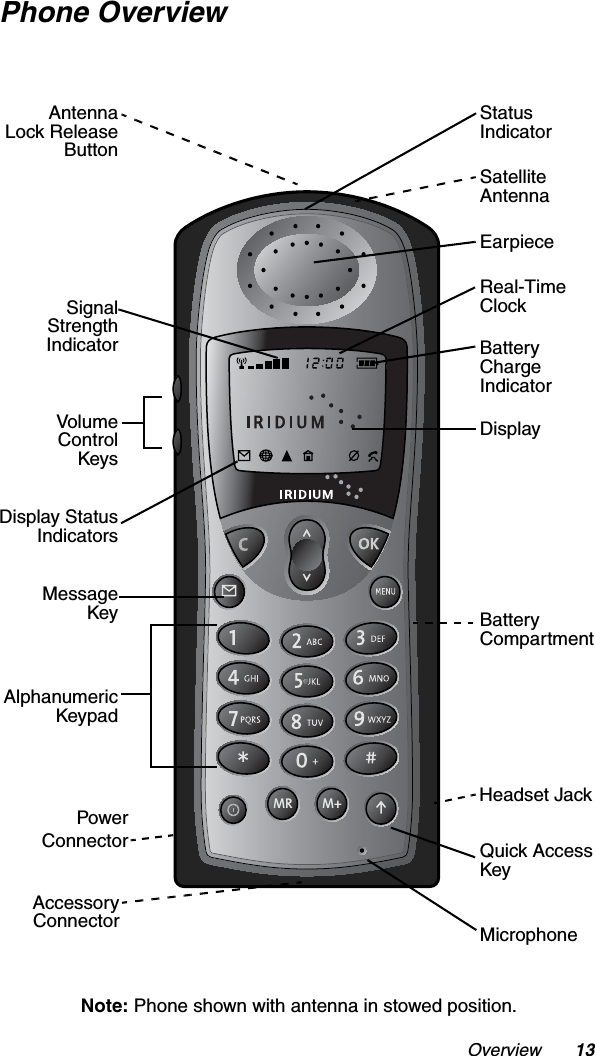


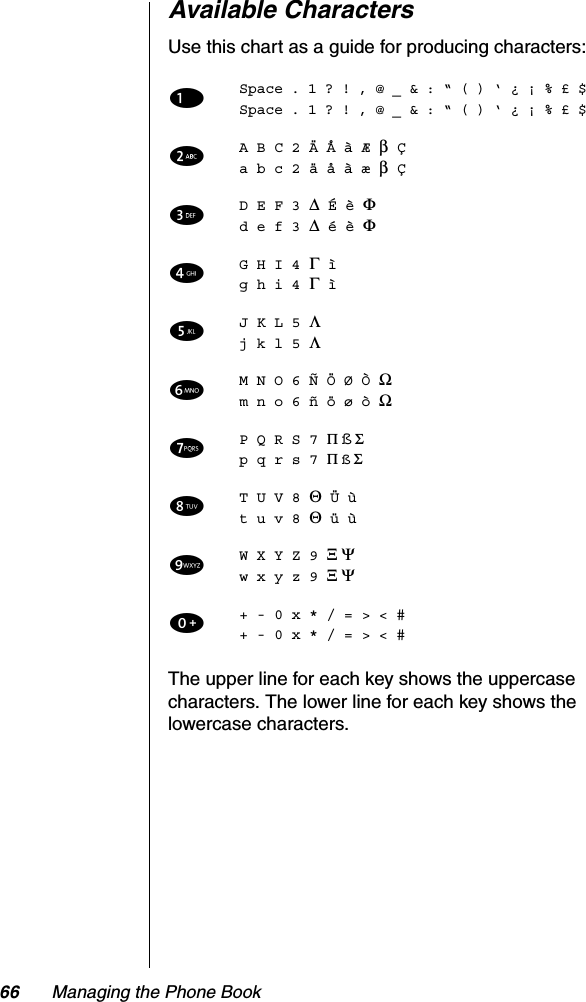


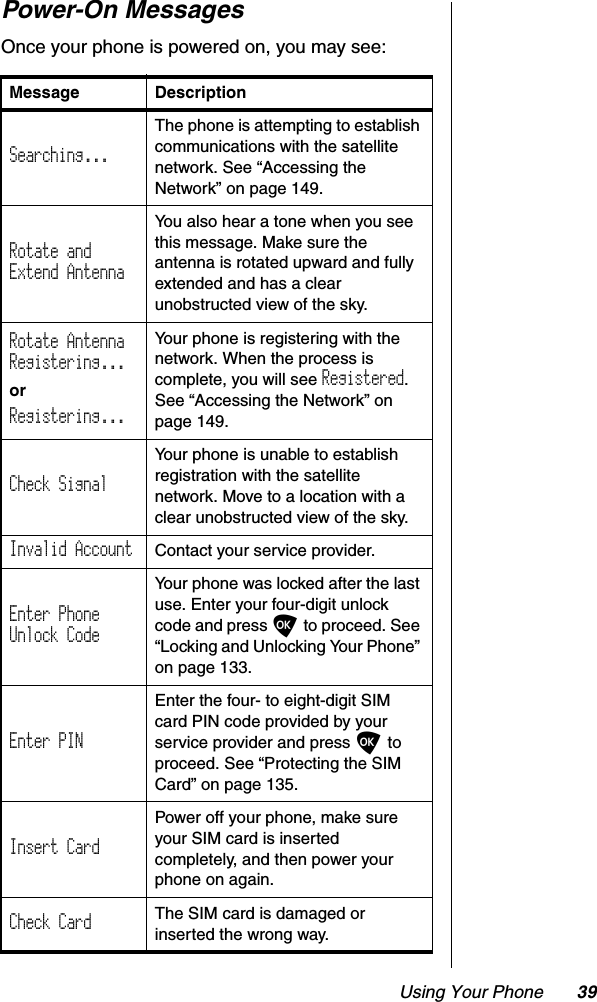
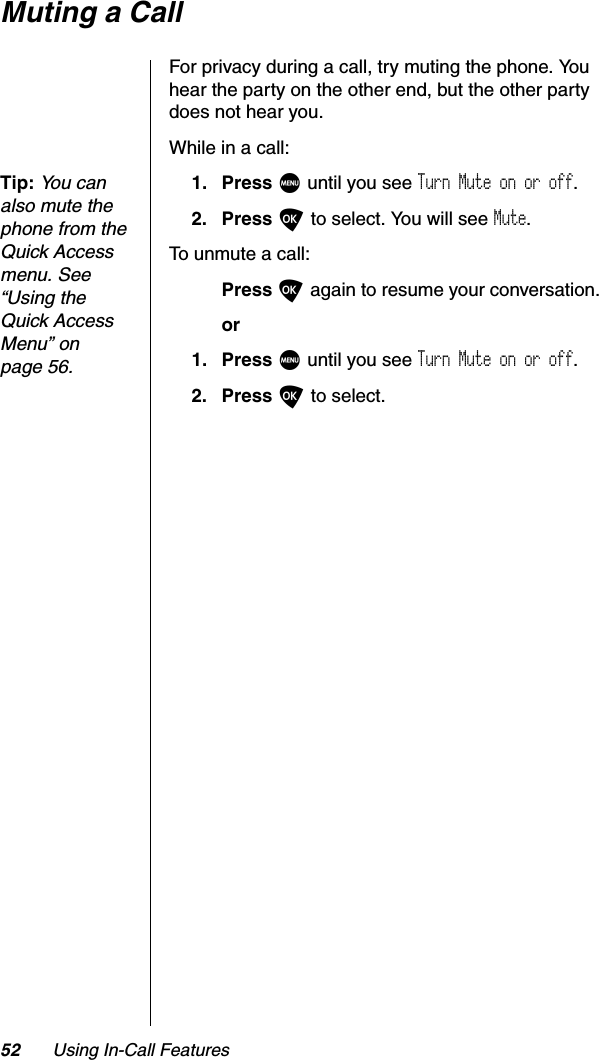
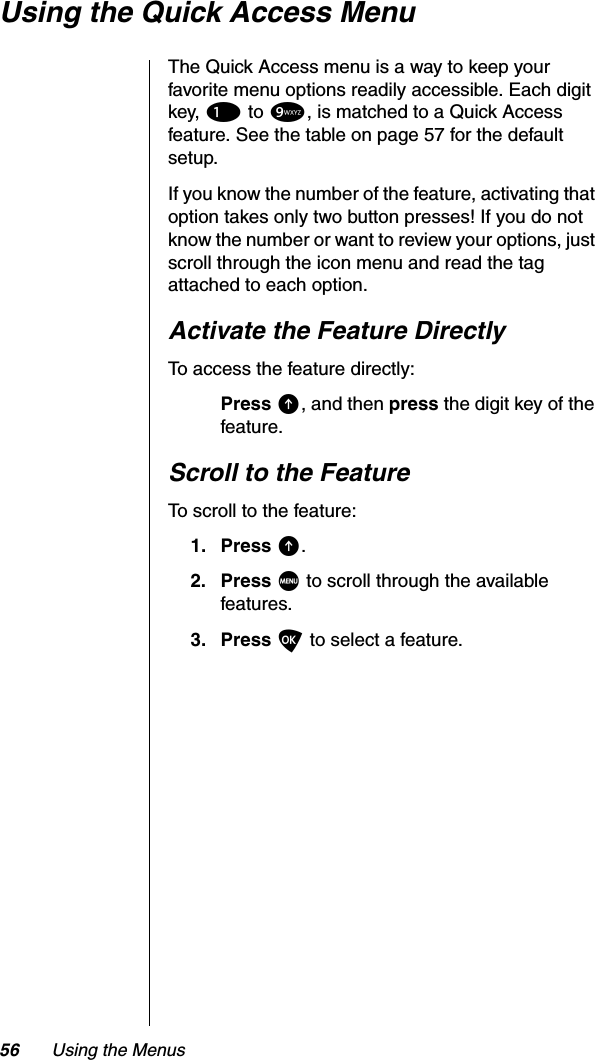
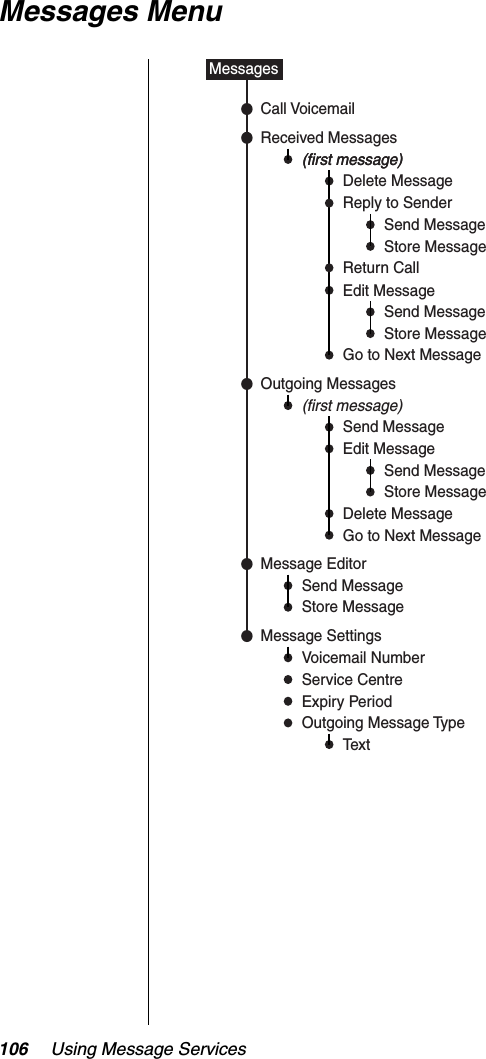
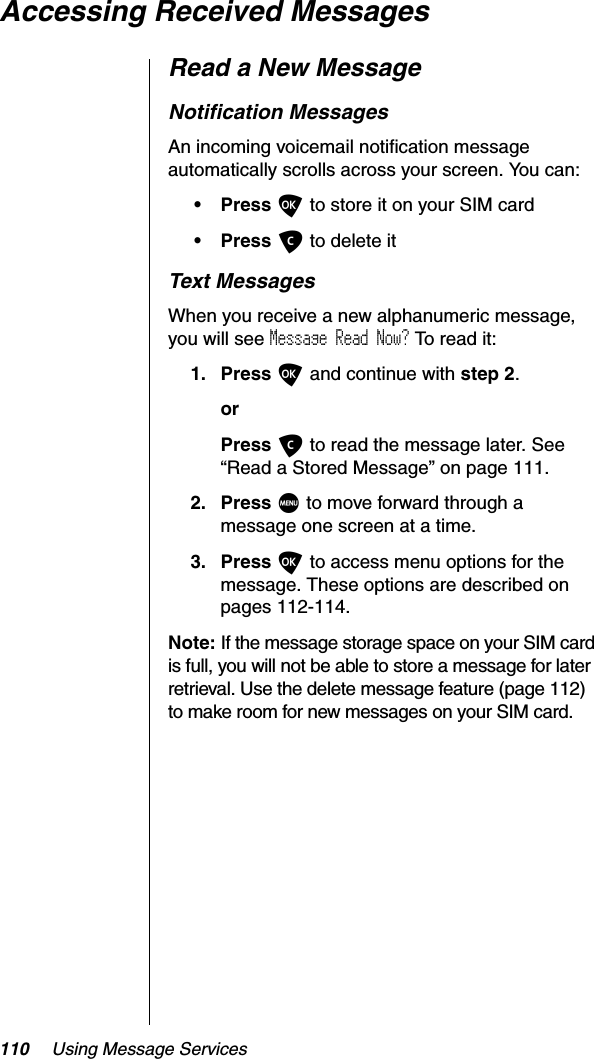
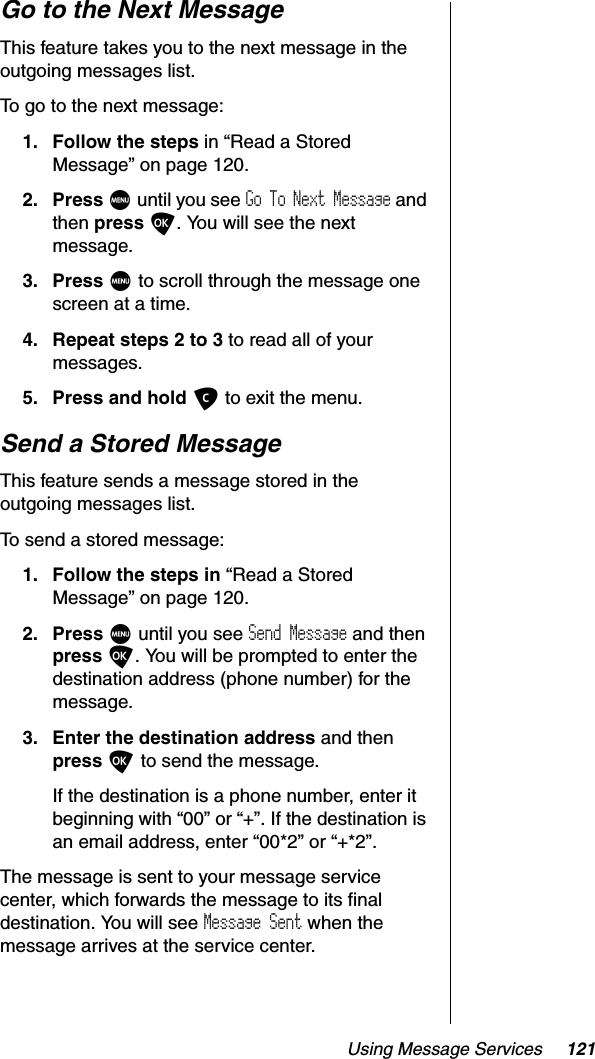
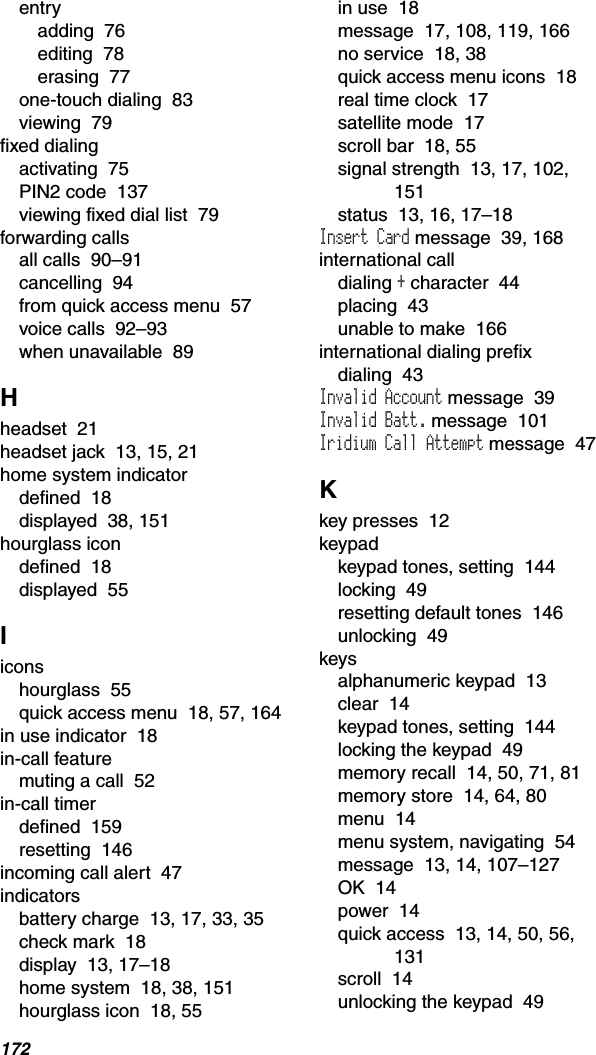
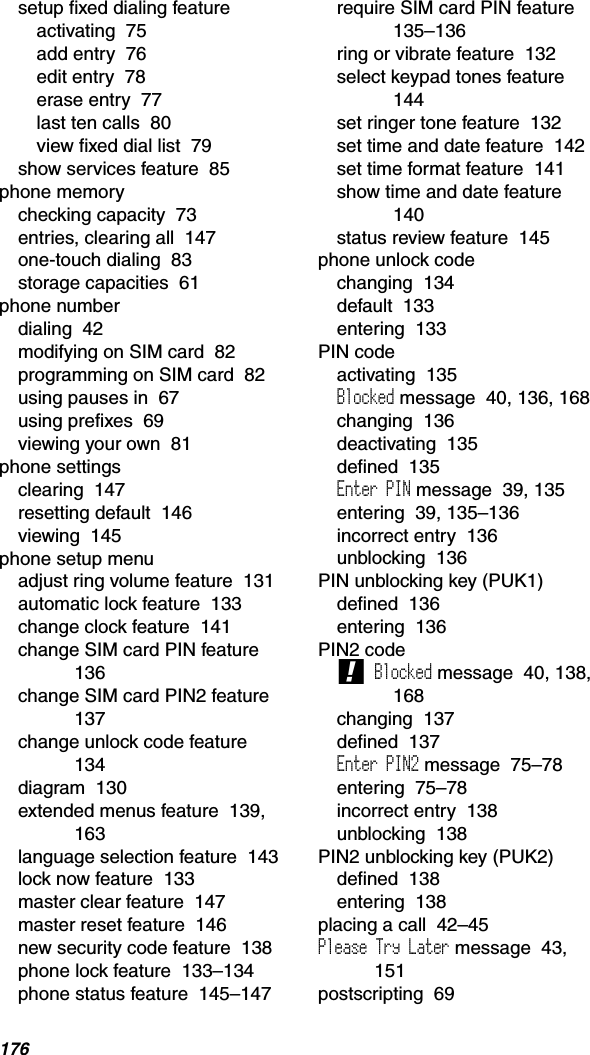
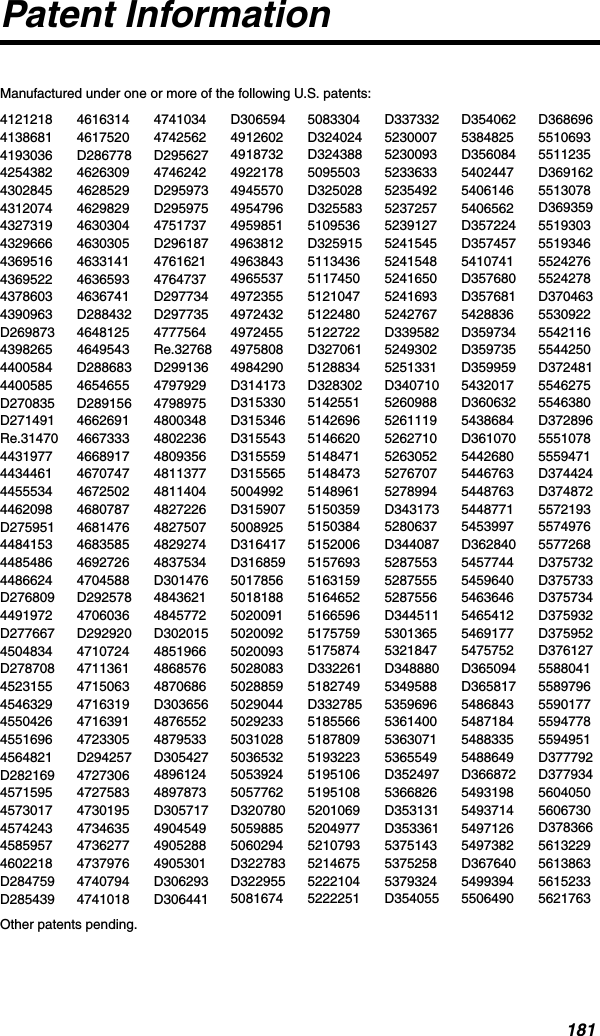
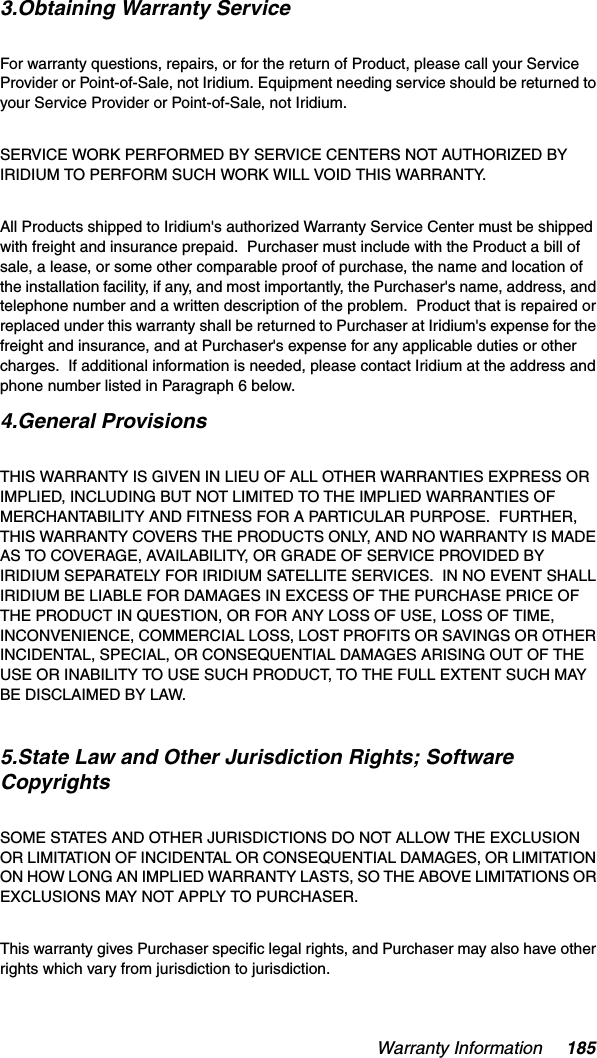
![42 Using Your PhonePlacing a CallTo place a call, your phone must be powered on, have a SIM card inserted, be unlocked, and be in contact with the satellite network. See “Accessing the Network” on page 149 for network information.You can enter a phone number up to a maximum of 20 digits. The digits are displayed in two rows, 16 digits in the top line and four digits in the next line.Dial a Number1. Rotate and fully extend the satellite antenna. “See Holding the Phone” on page 40.Tip:If you make a mistake, press C once to delete the last digit, or press and hold C to clear all digits.2. Enter the number using the digit keys. As you begin entering digits, you will see Call?.You must enter the phone number in international format:[international access code,00, or +][country code or Iridium country code][phone number]Note: If you are calling another Iridium satellite subscriber, use the Iridium country code, then phone number.3. Press O. You will see Calling followed by the number you dialed.You will see either the flashing message Calling or the flashing messages Calling,Registering..., and the phone will play a series of setup tones.If the call connects and is answered, Connectedappears on the display for a few seconds, followed by End Call?.](https://usermanual.wiki/Iridium-Satellite/9505A/User-Guide-487528-Page-78.png)