Itron 100G Utility Meter Transceiver User Manual 100G Installation Guide
Itron, Inc. Utility Meter Transceiver 100G Installation Guide
Itron >
Contents
Users Manual 3

Chapter 5 American/Actaris Commercial Meter Installation
• New tamper seals
• Four screws for securing the 100G ERT Module assembly to the meter. These screws
have holes drilled into the heads to accept wire tamper seals.
• Four internal tooth star washers used to attach the meter to the index mounting plate.
Materials Supplied By You
You must supply the following items to install, initialize, and check the 100G ERT Module
on the meter.
• Small and medium flat-blade or Phillips screwdrivers Used to remove and tighten
index and index-cover screws.
• Side-cutting plier/wire snips Used for cutting wire seals, if necessary.
• Small putty knife Used to remove all traces of old gaskets from the meter.
• Meter seals, wire seals, and seal press Used to secure the meter from tampering, if
necessary.
• 11/32-inch nut driver or other blunt tool Used to securely seat new tamper plugs
over screw holes.
• FC200SR with EndPoint-Link or EndPoint-Link Pro software Used to program
and check ERT assembly.
Replacement Screws
Replacement screws for mounting the index cover must be slotted, zinc-plated, steel
machine screws. Sizing options are shown below.
For mounting 100G ERT Module assemblies on meters:
• Use 12 - 24 x 1/2-inch slotted, Fillister head machine screws, drilled to accept wire
seals.
Preinstallation Preparations
Before installing the 100G ERT Module on a meter, verify that:
• All Itron gas modules are 100G ERT Modules for your brand of gas meters.
• The model numbers of all meters on which the 100G ERT Modules will be installed
are included in the Meter Compatibility List.
56 Natural Gas Solutions 100G Installation Guide
Installing the 100G ERT Module
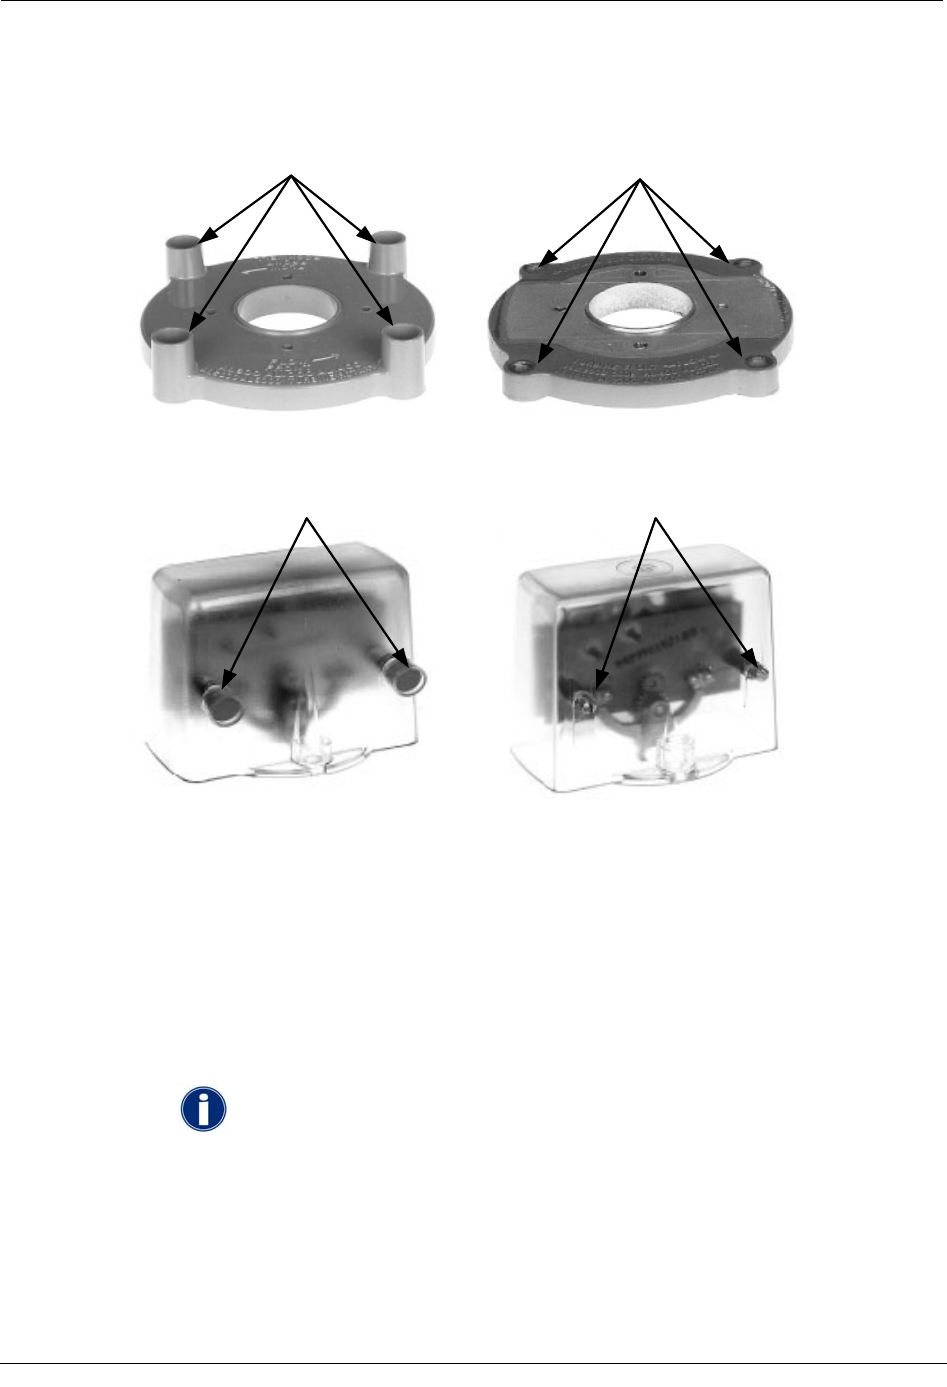
There are two types of index mounting plates for American Commercial meters. One type is
made of plastic and has tamper seal cups. The other type is made of metal and has no
tamper seal cups.
Tamper seal cups No tamper seal cups
Similarly, there are index covers with tamper seal cups and ones with out tamper seal cups.
Tamper seal cups No tamper seal cups
Installing the 100G ERT Module
There are four major steps to installing the 100G ERT Module on a meter:
• Remove the index
• Assemble the 100G ERT Module
• Program the 100G ERT Module
• Attach the 100G ERT Module to the meter.
NOTE Properly dispose of all unused screws, old index covers, gaskets, tamper
seals, and other left-over materials. Do not leave any materials on customer
premises.
Natural Gas Solutions 100G Installation Guide 57
Chapter 5 American/Actaris Commercial Meter Installation
To remove the index
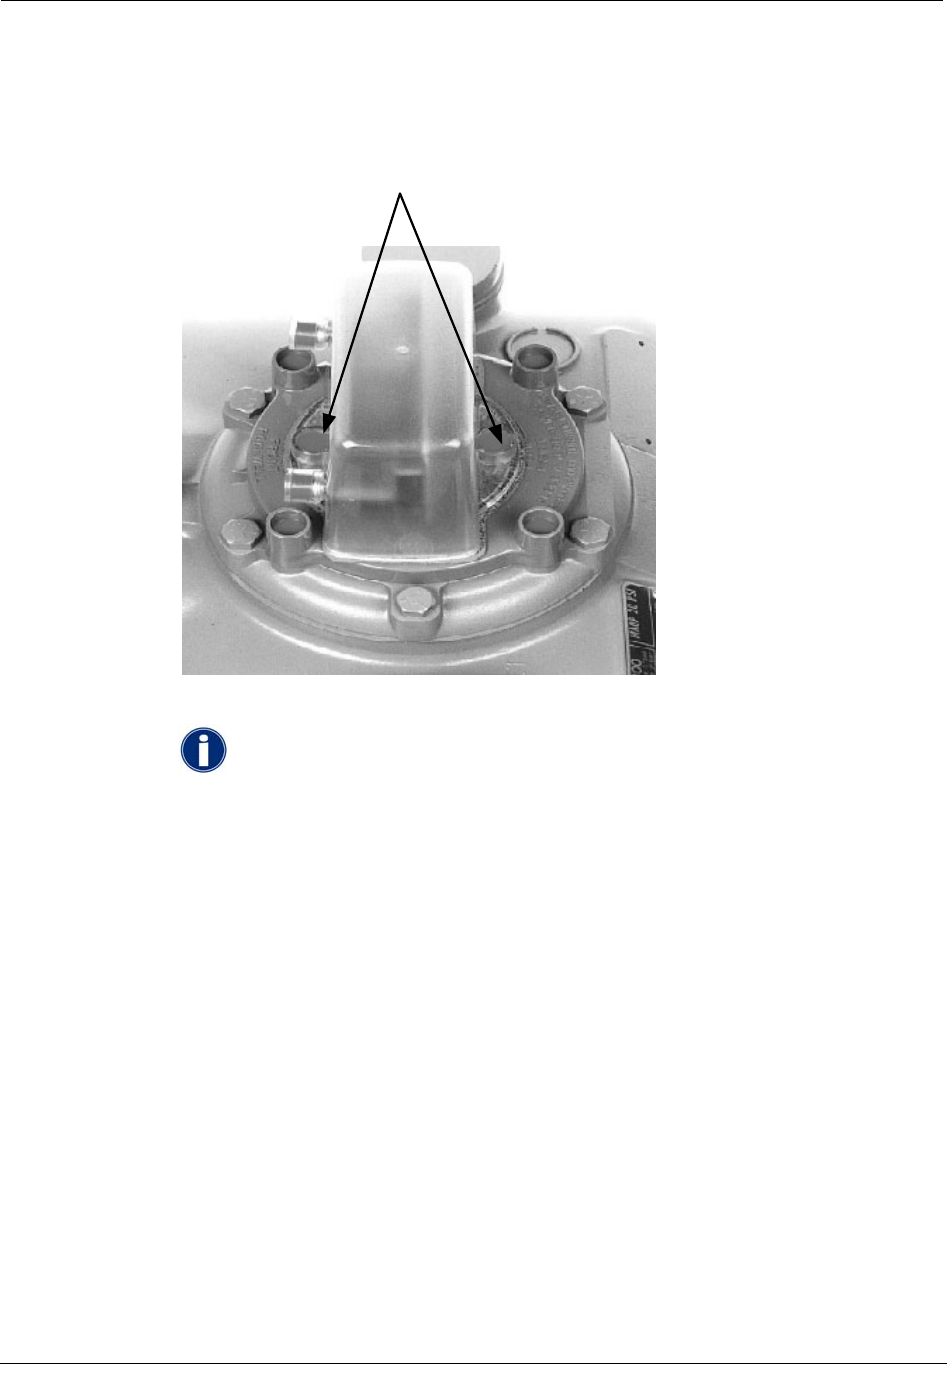
1. Remove the tamper seals or wire seals from the index cover and the mounting plate
screws.
Tamper seals
For illustrative purposes in the procedure a plastic index mounting plate with
tamper seal cups was used.
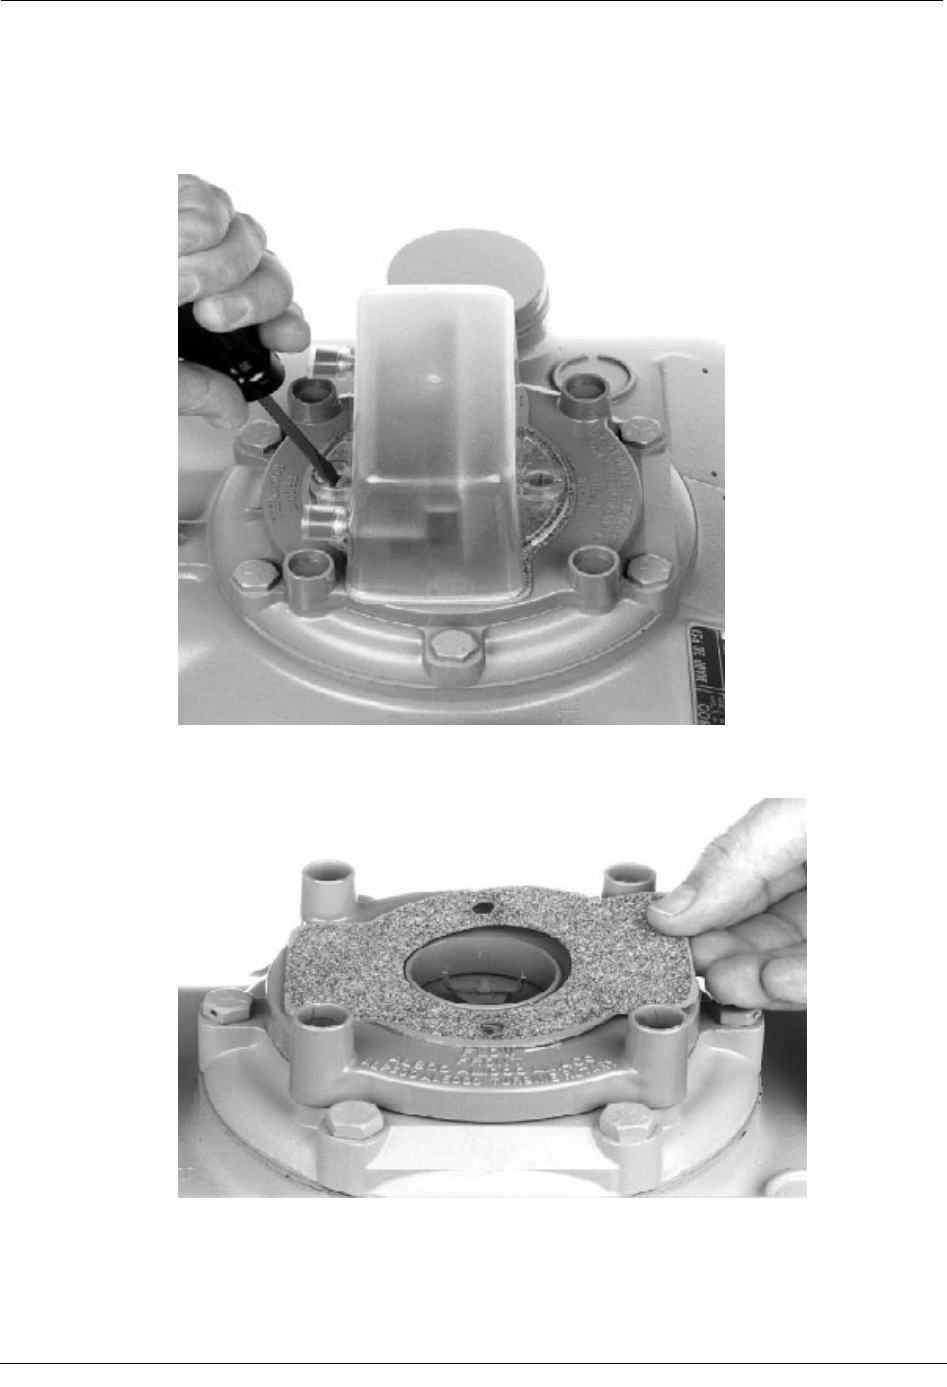
2. Remove the index cover screws from the meter. Verify that they are 1/2-inch long and
are not corroded.
58 Natural Gas Solutions 100G Installation Guide
Installing the 100G ERT Module
• If the screws are the correct length, and are not corroded, keep them for later
use.
• If the screws are an incorrect length or are corroded, dispose of them properly.
Use the screws listed in Replacement Screws on page 56.
3. Remove the gasket from the index cover mounting plate and set it aside where it will
not get damaged. You will use the gasket later in the installation.
Natural Gas Solutions 100G Installation Guide 59
Chapter 5 American/Actaris Commercial Meter Installation
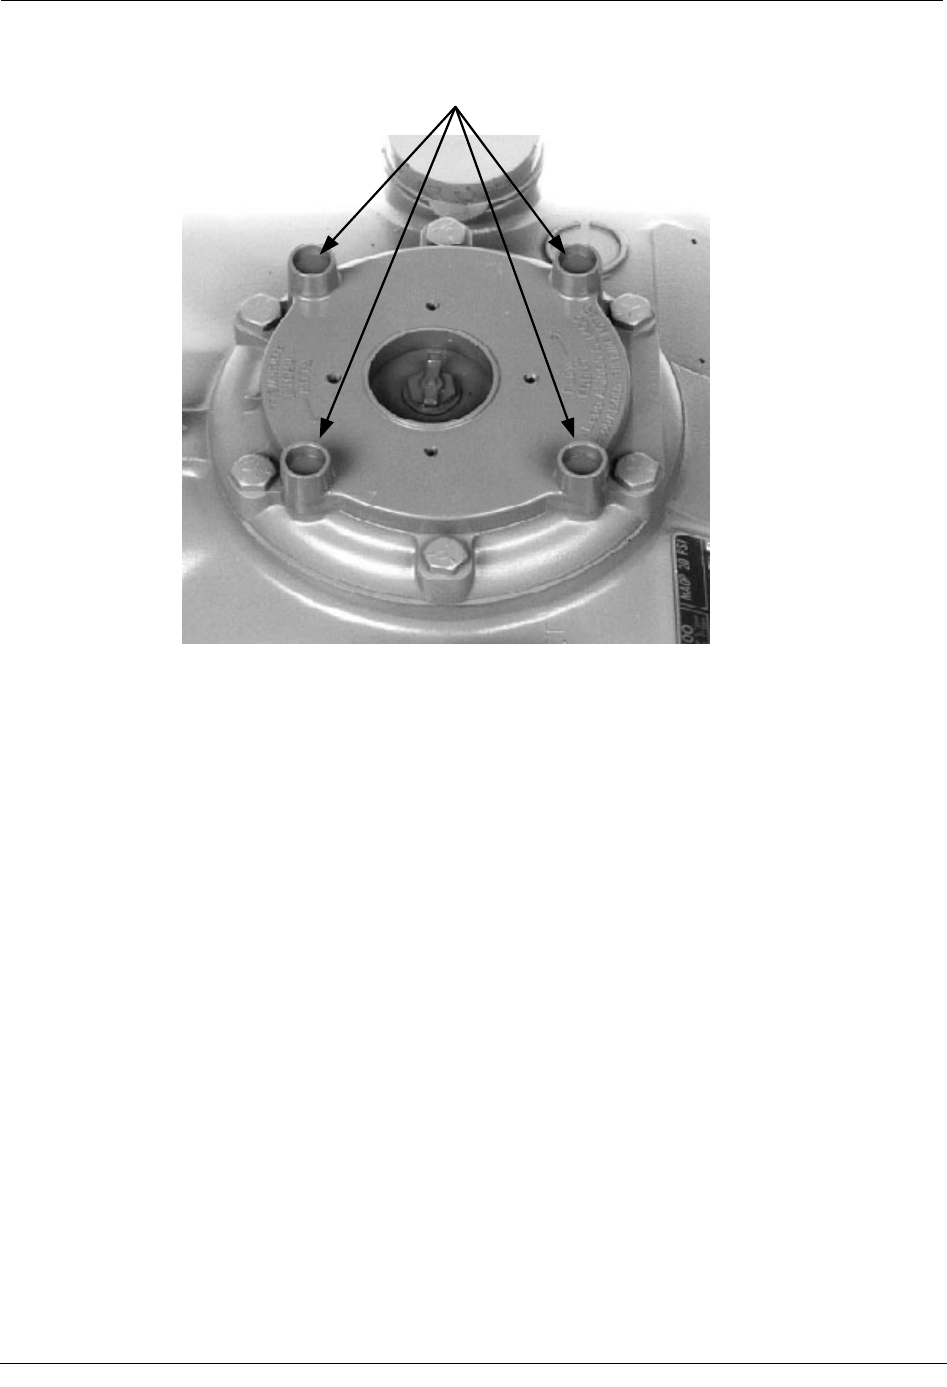
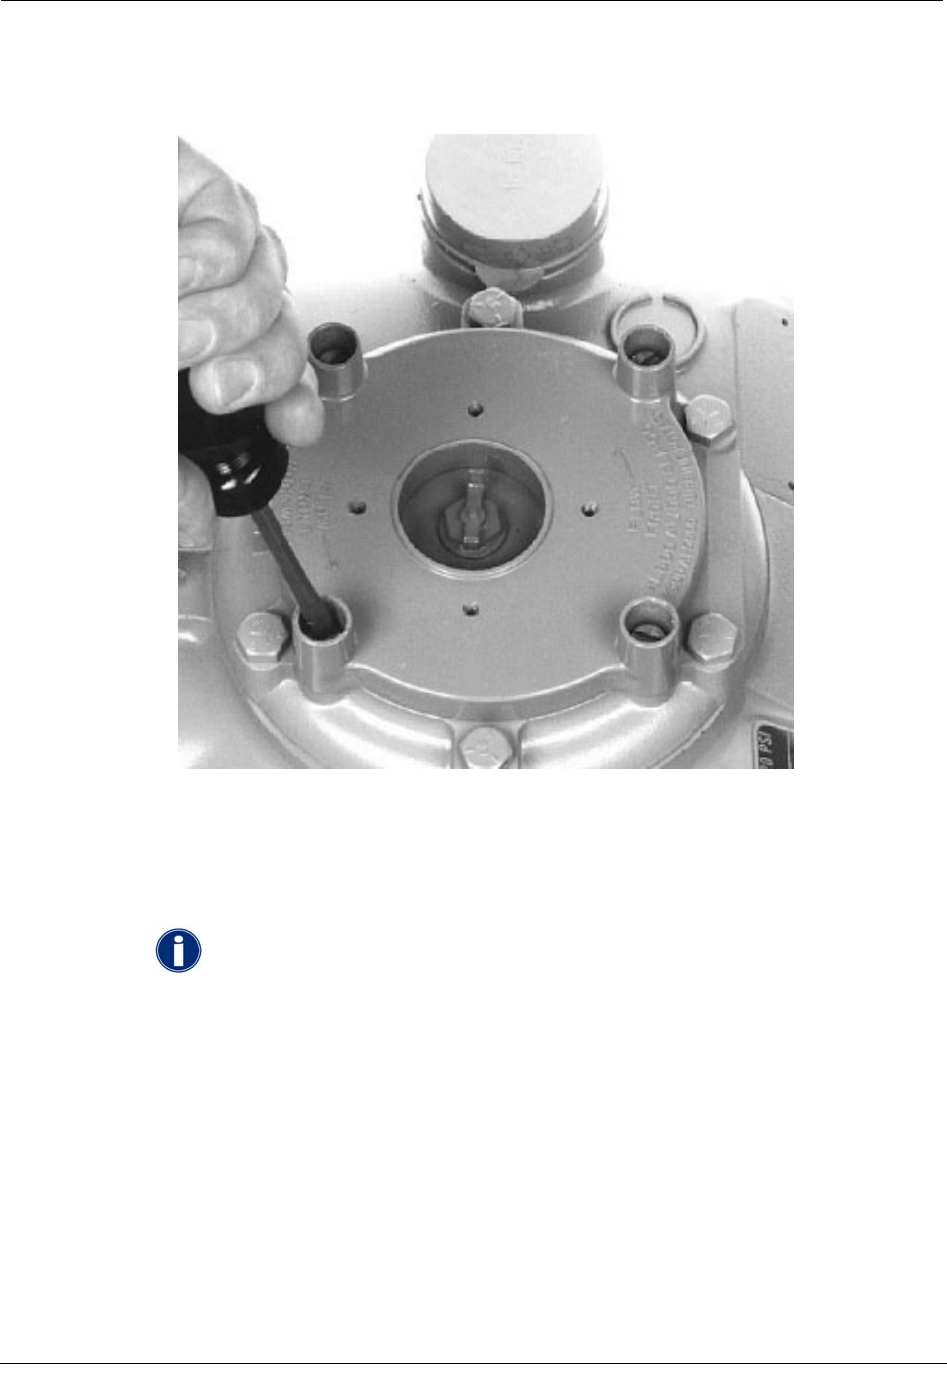
4. Remove the four tamper seals from the mounting plate.
Remove tamper seals
60 Natural Gas Solutions 100G Installation Guide
Installing the 100G ERT Module
5. Remove the mounting plate screws and separate the mounting plate from the meter.
Set the mounting plate aside where it will not get damaged. You will use it later in the
installation.
Program the ERT
The ERT must be programmed using the FC200SR with EndPoint-Link software. See the
Endpoint-Link ERT Programming Guide (TDC-0411) for more information.
IMPORTANT You must perform the following programming procedure for
the ERT module to function properly.
When programming the ERT module, you must take note of the drive rate shown on the
index of the meter. Program the meter based on the drive rate shown on the index.
To program the ERT module
1. Using the FC200SR, program the reading of the index that was on the meter into the
ERT module assembly.
Natural Gas Solutions 100G Installation Guide 61

Chapter 5 American/Actaris Commercial Meter Installation
• For initial programming, hold the FC200SR approximately 1 foot away from
the 100G.
• For reprogramming (30 days or more past initial programming), hold the
FC200SR approximately 4 to 5 feet away from the 100G.
Be sure to program the 100G to the correct mode for the reading technology what will
be used (for example, Fixed Network Mode, Mobile/Handheld Mode, or Hard to Read
Mobile/Handheld Mode). In Endpoint-Link Pro v5.0, you will have access to the one
mode that was defined by your system administrator.
During programming, the 100G ERT module is programmed to the nearest 100 cubic
feet; the last two digits (the tens and units) are programmed as zeros (0). Once
programming is complete, however, the ERT module assembly can be read to the
nearest cubic foot.
2. Slowly turn the ERT module drive wriggler two turns in the direction indicated on the
index drive rate. This lets you verify the ERT module is counting properly after
assembly.
IMPORTANT Do not turn the drive wriggler faster than one turn per second.
3. Read the ERT module assembly using the FC200SR. Consult the EndPoint-Link ERT
Programming Guide (TDC-0411) or other applicable instructions for details on how to
read an ERT.
• If this reading is higher than the one you programmed in step 1 above, the ERT
module assembly is counting correctly.
• If the ERT module assembly reading is not higher than what was programmed
in step 1, replace the ERT module with a new one.
To attach the 100G ERT Module to the meter
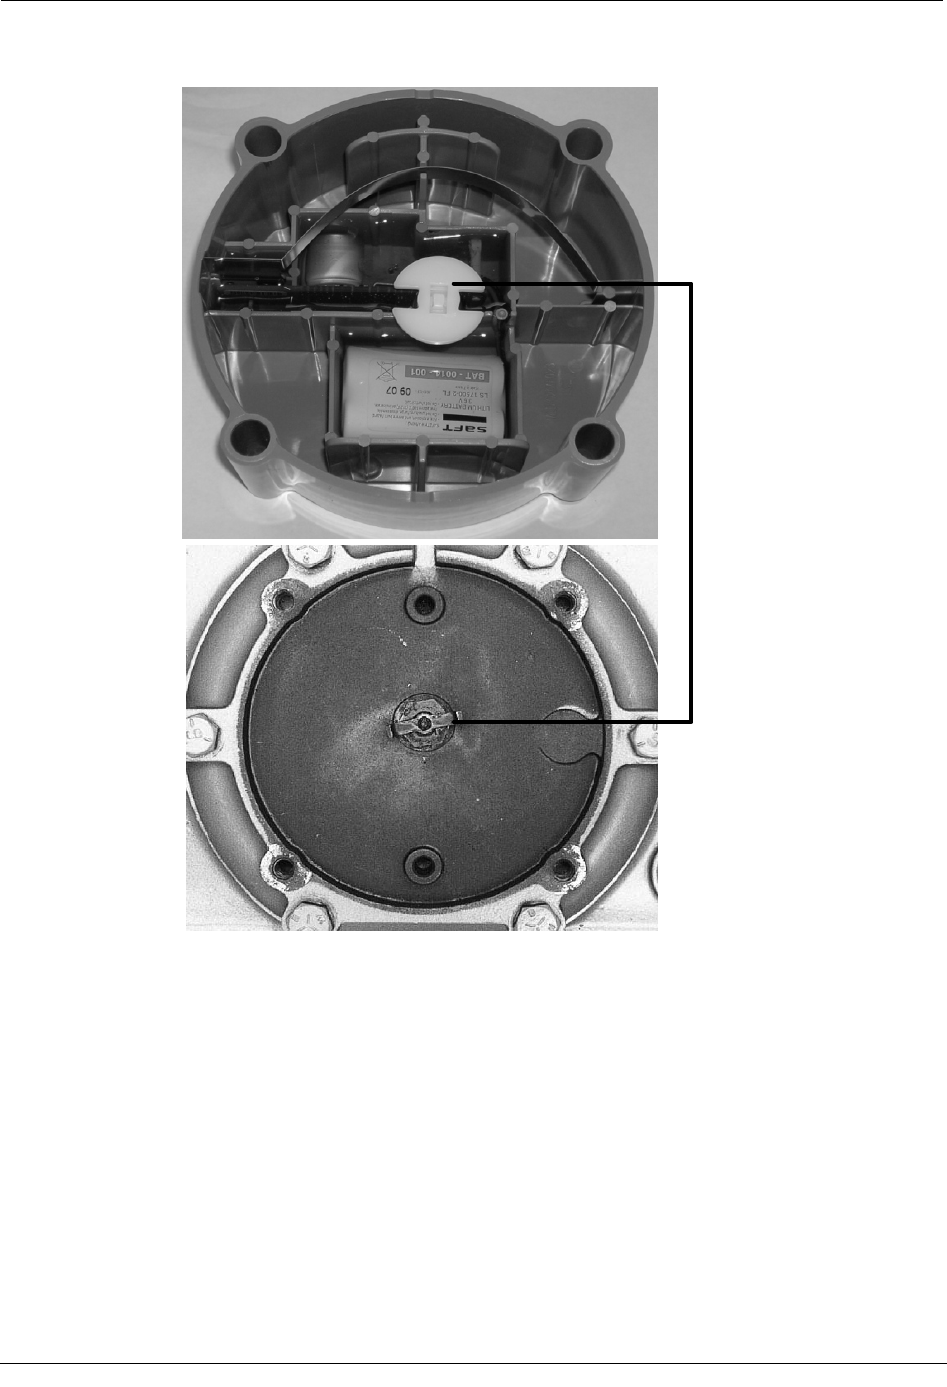
1. Turn the ERT module upside down and turn the wriggler until its drive notches line up
with drive teeth of the meter wriggler.
IMPORTANT The 100G ERT Module must be handled carefully so that the
metal passive radiator antenna does not get damaged.
62 Natural Gas Solutions 100G Installation Guide
Installing the 100G ERT Module
Line up notches
with teeth
Natural Gas Solutions 100G Installation Guide 63
Chapter 5 American/Actaris Commercial Meter Installation
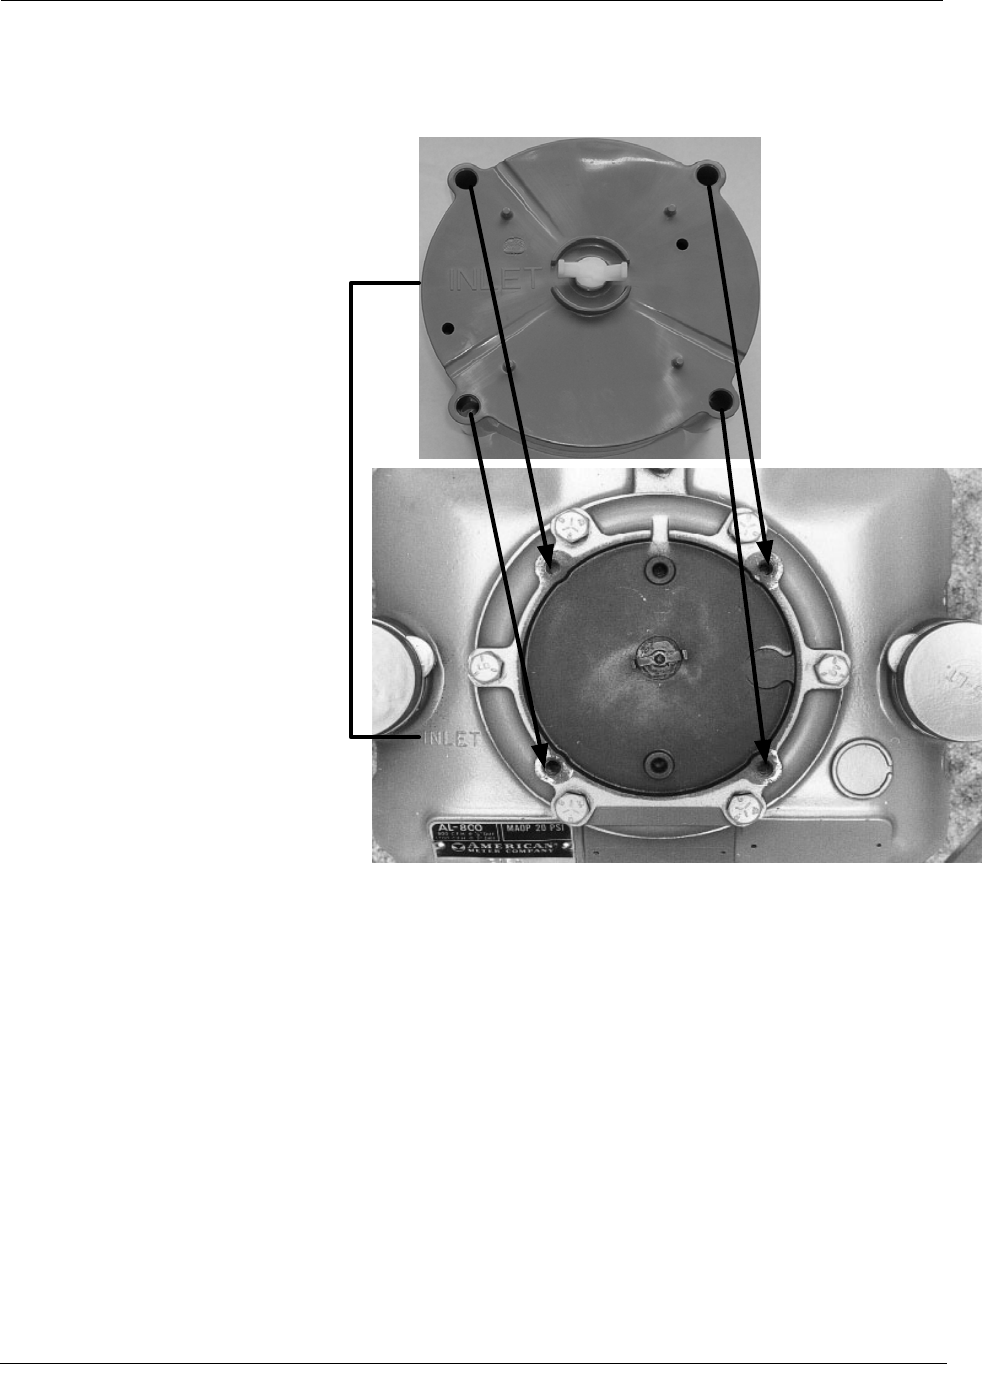
2. Position the ERT module so its screw holes line up with the screw holes in the meter
top then place the ERT module on the meter top. Make sure the INLET label on the
ERT module is next to the INLET label on the meter case.
INLET label on
same side
64 Natural Gas Solutions 100G Installation Guide
Installing the 100G ERT Module
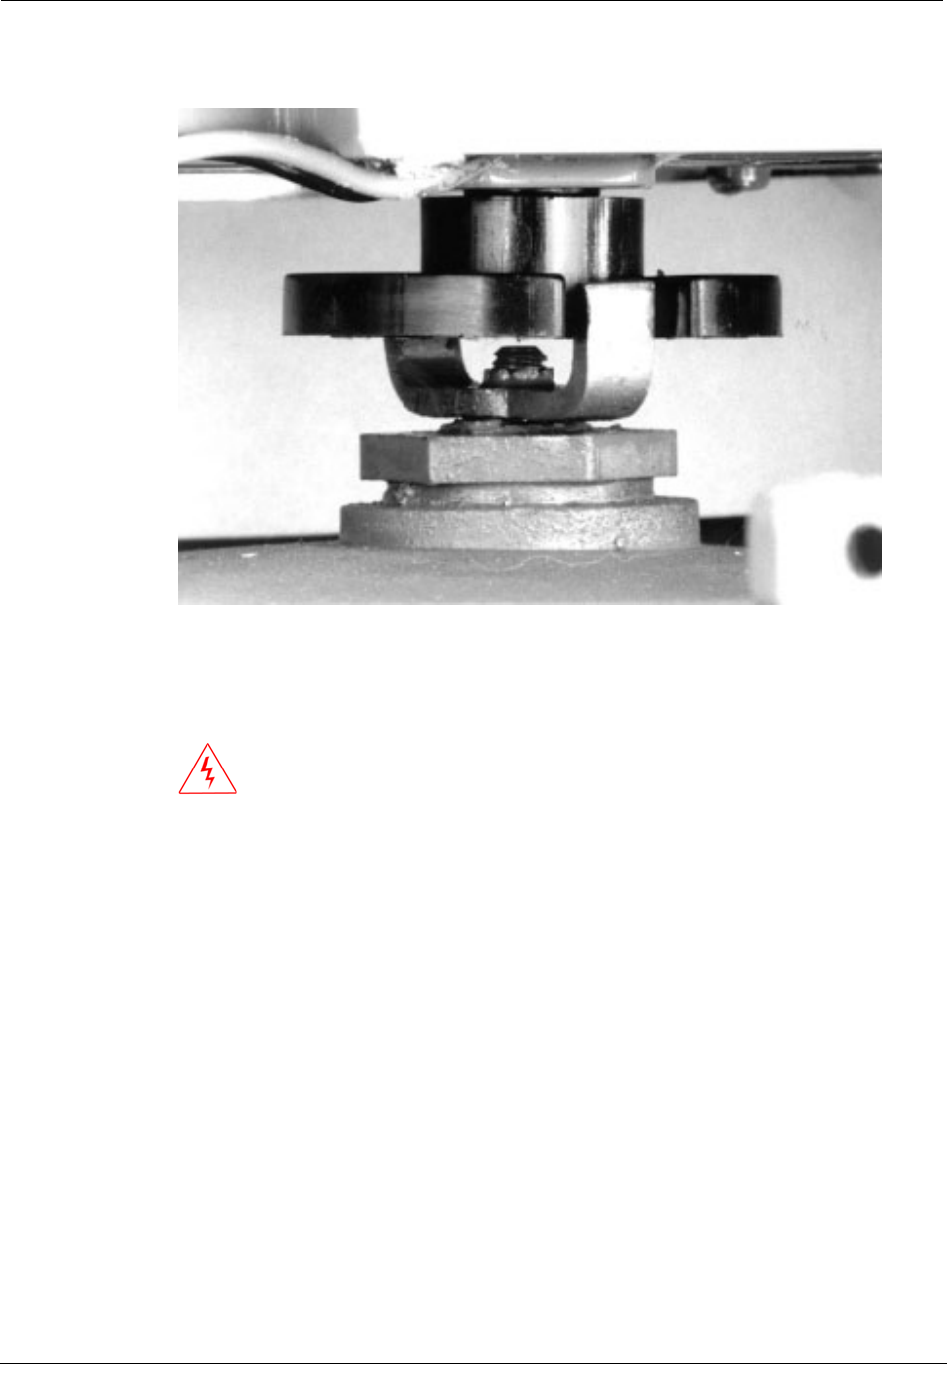
3. Carefully lower the 100G ERT Module onto the meter top so that its notches align
with the teeth on the meter wriggler.
4. Make sure there is no gap between the bottom of the ERT module and the top of the
meter. If there is a gap, it is because the drive notches of the ERT module's lower
wriggler are not properly aligned with the meter wriggler's drive teeth.
WARNING! Do not press down on the ERT module if there is a gap.
If you do, you may damage the ERT module or the meter wriggler.
5. To eliminate a gap, slowly turn the ERT module upper wriggler back and forth with
your fingers until the ERT module drops down onto the top of the meter.
Natural Gas Solutions 100G Installation Guide 65
Chapter 5 American/Actaris Commercial Meter Installation
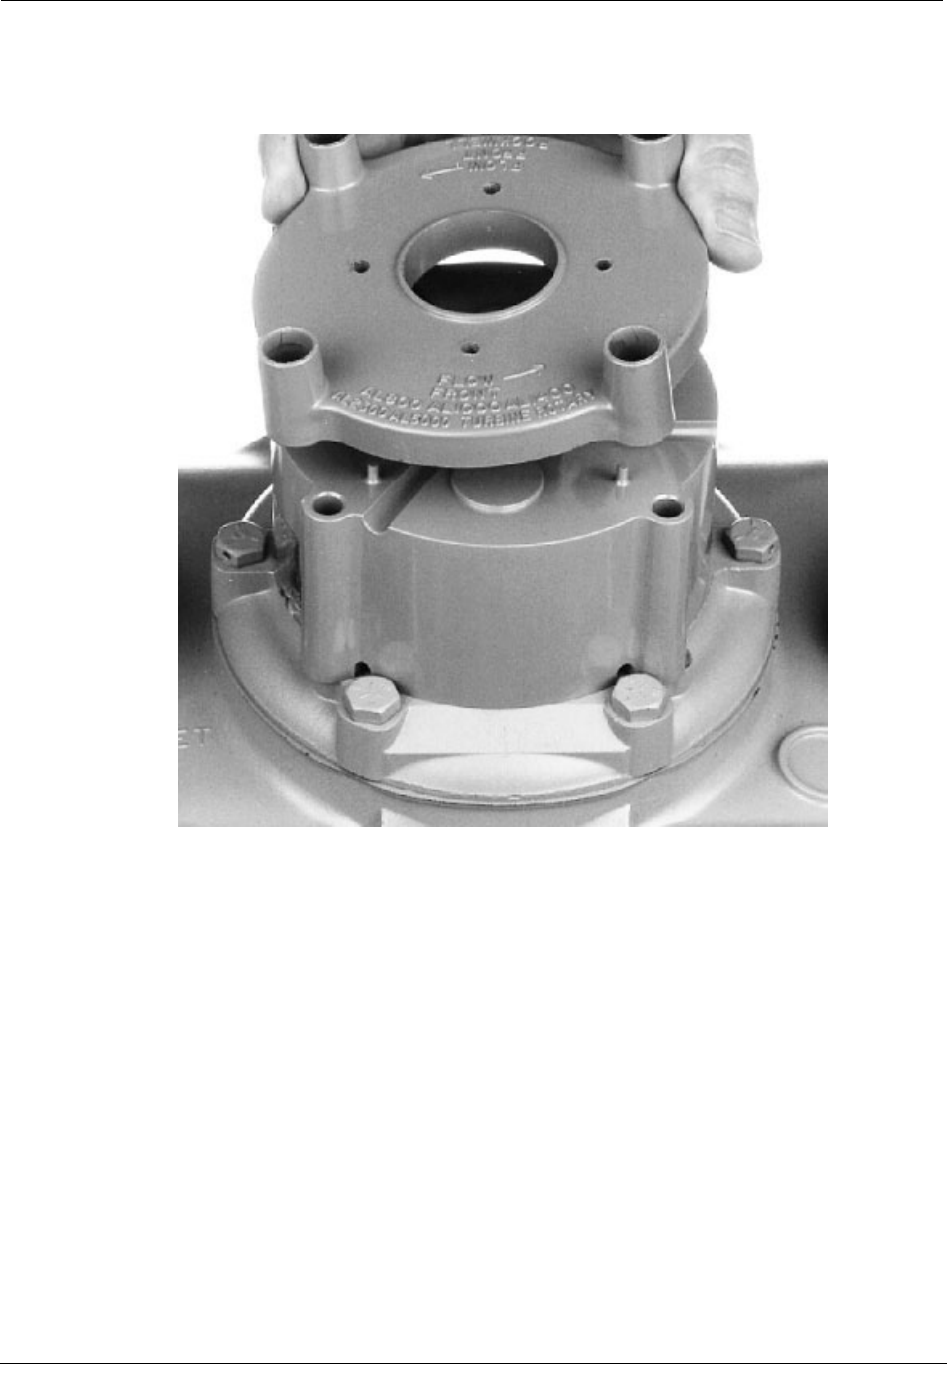
6. Place the index cover mounting plate on the ERT module so the words "FLOW
FRONT AL800 AL1000 AL1400 AL2300 AL5000 TURBINE ROTARY" are toward
the front of the meter.
66 Natural Gas Solutions 100G Installation Guide
Installing the 100G ERT Module
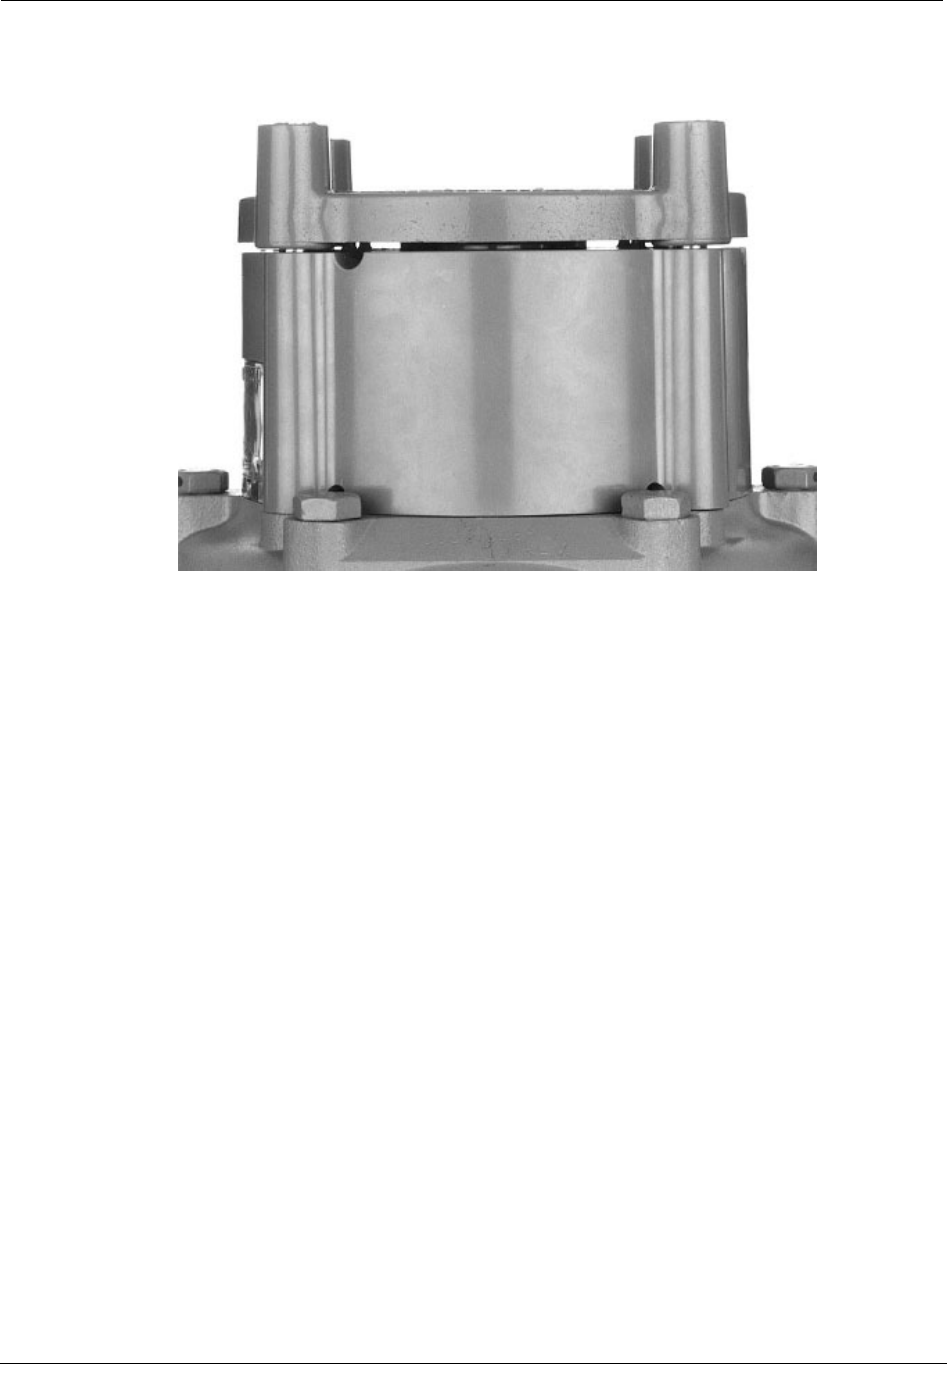
A gap at the screw locations is normal both before and after the index cover
mounting-plate screws are tightened.
7. Install the four ERT module mounting screws and tighten them, in a diagonal
sequence. Turn each screw 1/4 to 1/2 turn after it contacts the mounting plate. If you
are using a torque wrench, tighten to 72 inch-pounds.
8. Place new tamper seals over screws and press the seals into place with an 11/32 inch
nut driver, or other blunt tool.
To attach the index and cover
1. Get the gasket you removed and place it on the index cover mounting plate.
Natural Gas Solutions 100G Installation Guide 67
Chapter 5 American/Actaris Commercial Meter Installation
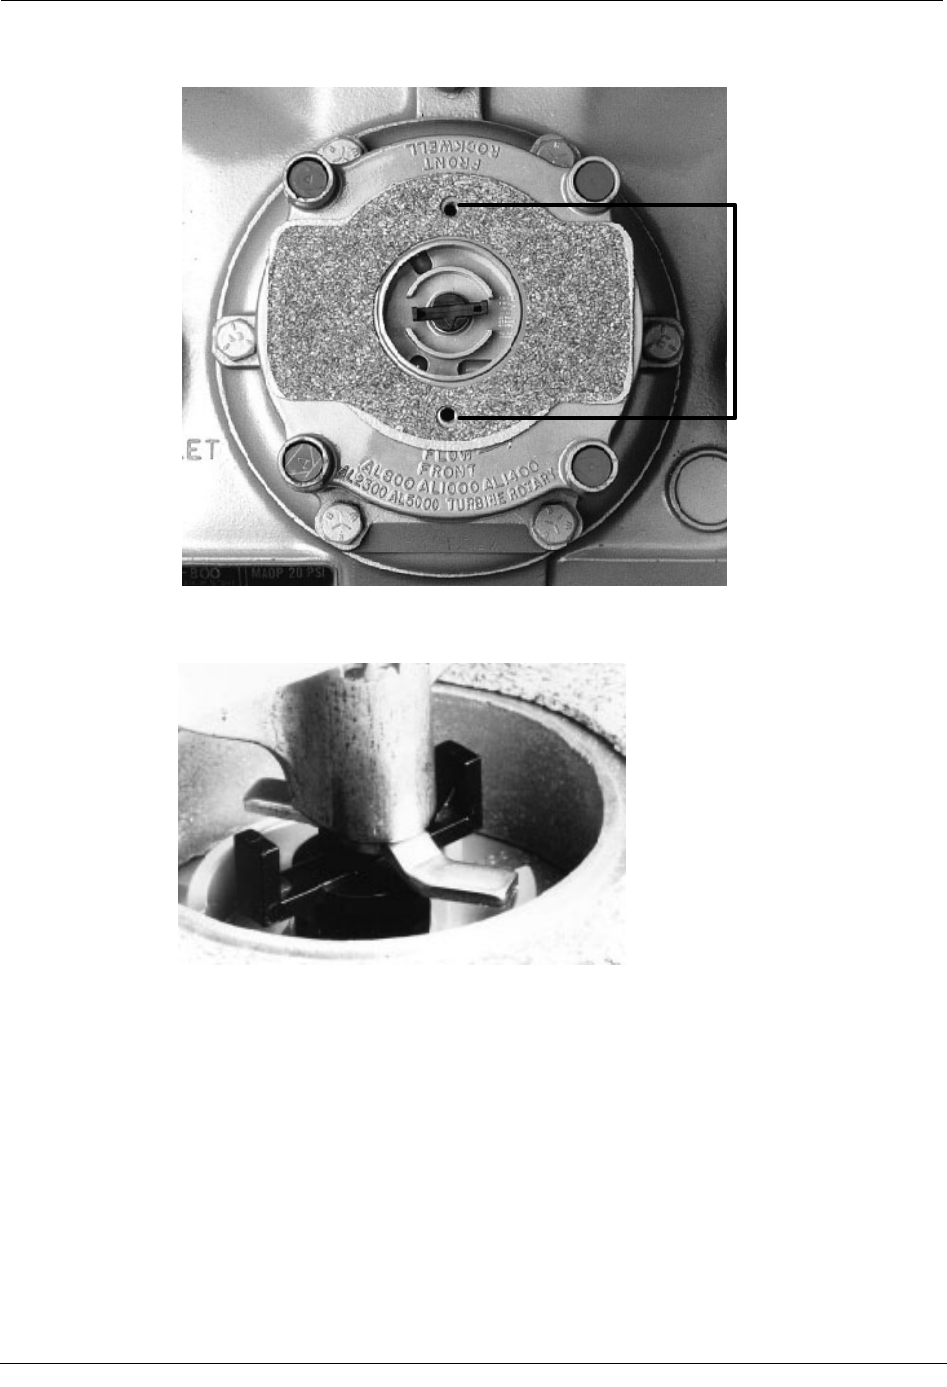
2. Align the gasket screw holes with the mounting plate's screw holes.
Align with screw
holes
3. Turn the index wriggler so it will go across the ERT module wriggler when you put
the index onto the mounting plate.
4. Carefully lower the index and cover onto the mounting plate, facing the same way it
was before you removed it.
5. Align the index cover screw holes with the screw holes in the gasket and index cover
mounting plate.
6. Make sure there is no gap between the bottom of the index cover and the top of the
gasket. If there is a gap, it is probably because the index wriggler is riding on top of
the ERT module's upper wriggler. To eliminate a gap, repeat steps 2, 3, and 4 until the
cover fits properly.
68 Natural Gas Solutions 100G Installation Guide
Installing 100G ERT Module on Actaris
WARNING! Do not press down on the index cover if there is a gap. If
you do, you can damage the index wriggler or ERT module wriggler.
7. Turn each screw 1/4 to 1/2 turn after it contacts the cover.
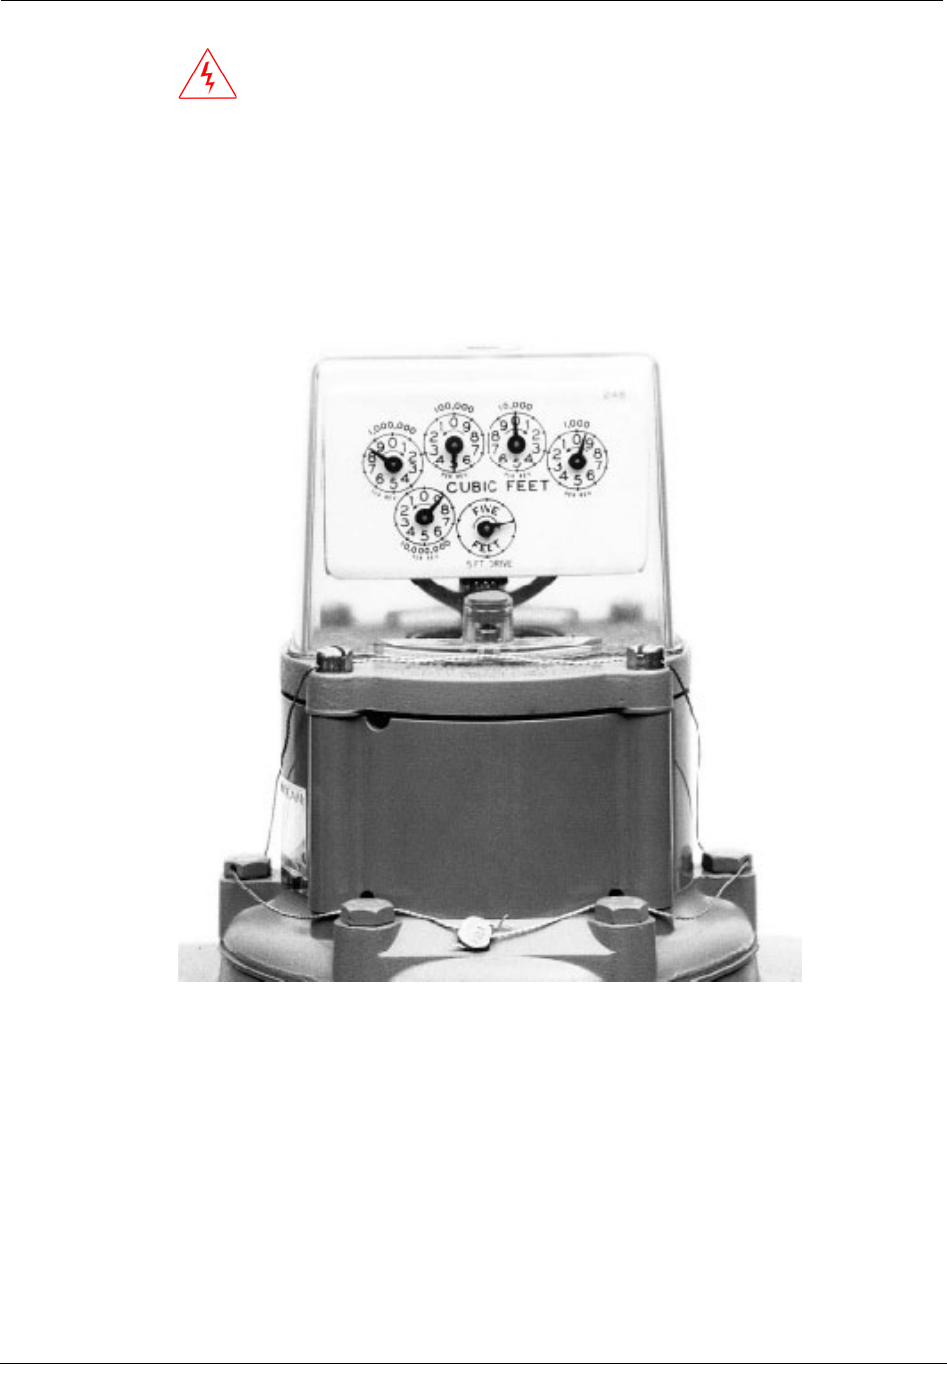
8. Place new tamper or wire seals over or through the screw heads.
9. Press tamper seals into place with an 11/32 nut driver, or other blunt tool, or crimp the
seal if you are using wire seals.
Installing 100G ERT Module on Actaris
The information in this section guides you through the installation of the 100G ERT Module
on Actaris 675A, 800A and 1000A meters. The installation requires an adapter kit (Actaris
part number 80005901) which must be ordered from Actaris. The kit contains:
• One adapter plate
• Four ERT mounting screws
• Four screw bushings
Natural Gas Solutions 100G Installation Guide 69
Chapter 5 American/Actaris Commercial Meter Installation
• One extension driver
The old adapter plate will not work with the 100G ERT Module. However, the new adapter
plate will work with the old and new Itron ERTs.
To mount the index assembly to the adapter plate
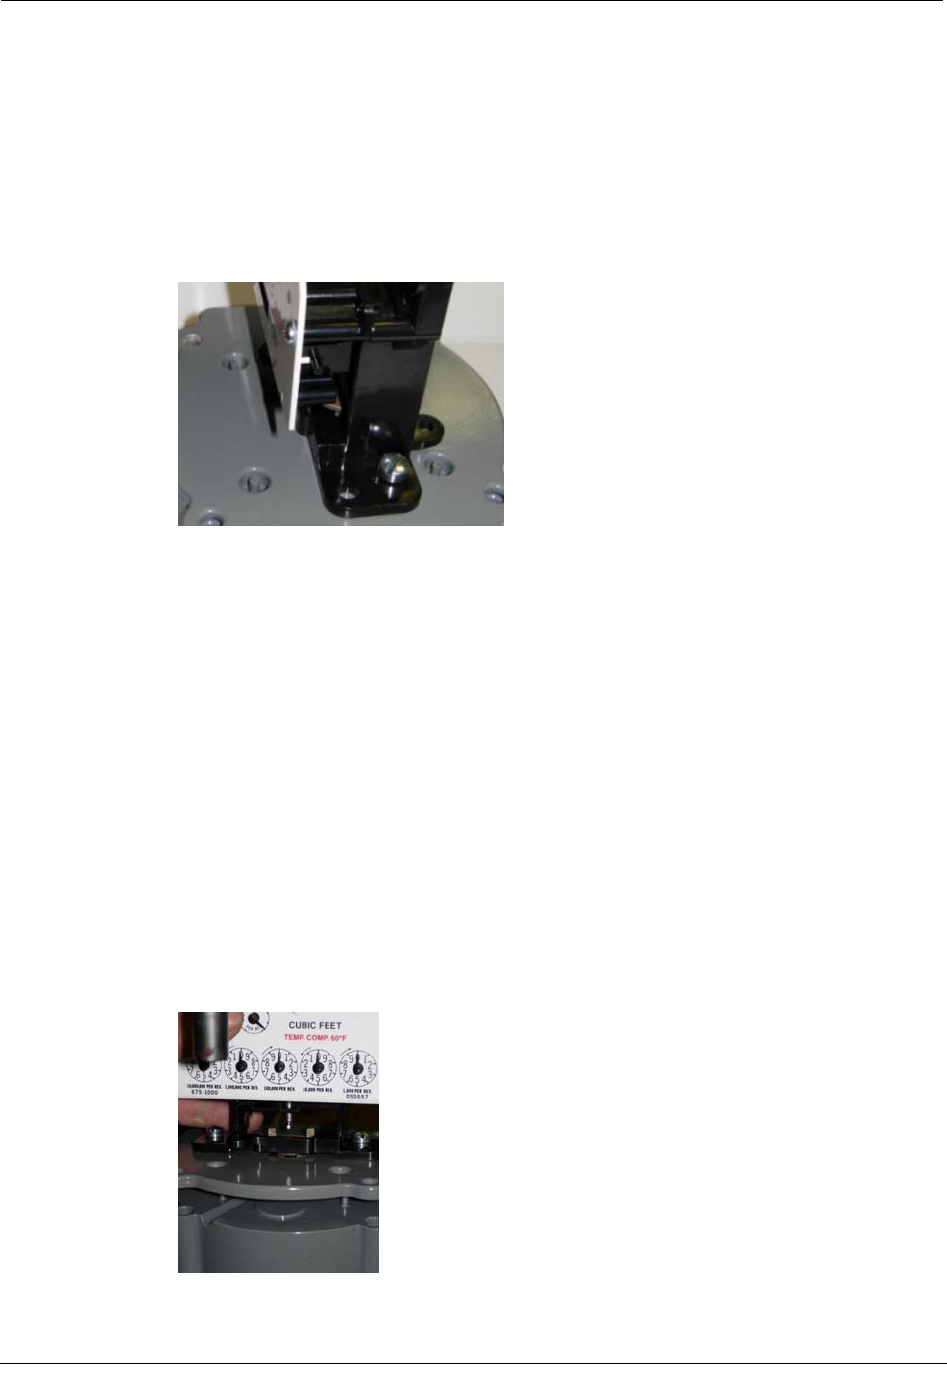
1. Align the index assembly so that the back outside holes on the index mounting bracket
line up with the two smaller holes towards the center of the adapter plate.
2. Place and tighten the two bracket screws. When assembled, the index assembly should
look centered on the adapter plate.
3. Turn the 100G ERT Module upside down in your hand.
4. Use the other hand to place the four screw bushings into the 100G ERT Module's
screw holes. If the screw bushings become dislodged before final assembly, replace
them and repeat process.
5. Turn the 100G ERT Module right side up.
6. Place the extension driver onto the 100G ERT Module wriggler.
7. Turn the meter’s IDM outer drive dog so it is facing the same direction as the 100G
ERT Module wriggler.
8. Carefully place the 100G ERT Module onto the meter. Make sure the meter’s IDM
outer drive dog is still lined up with the 100G ERT Module wriggler. The INLET
label on the meter top must be beside the INLET label on the 100G ERT Module.
9. Gently place the adapter plate and index assembly onto the 100G ERT Module
attached to the meter.
70 Natural Gas Solutions 100G Installation Guide
Installing 100G ERT Module on Actaris
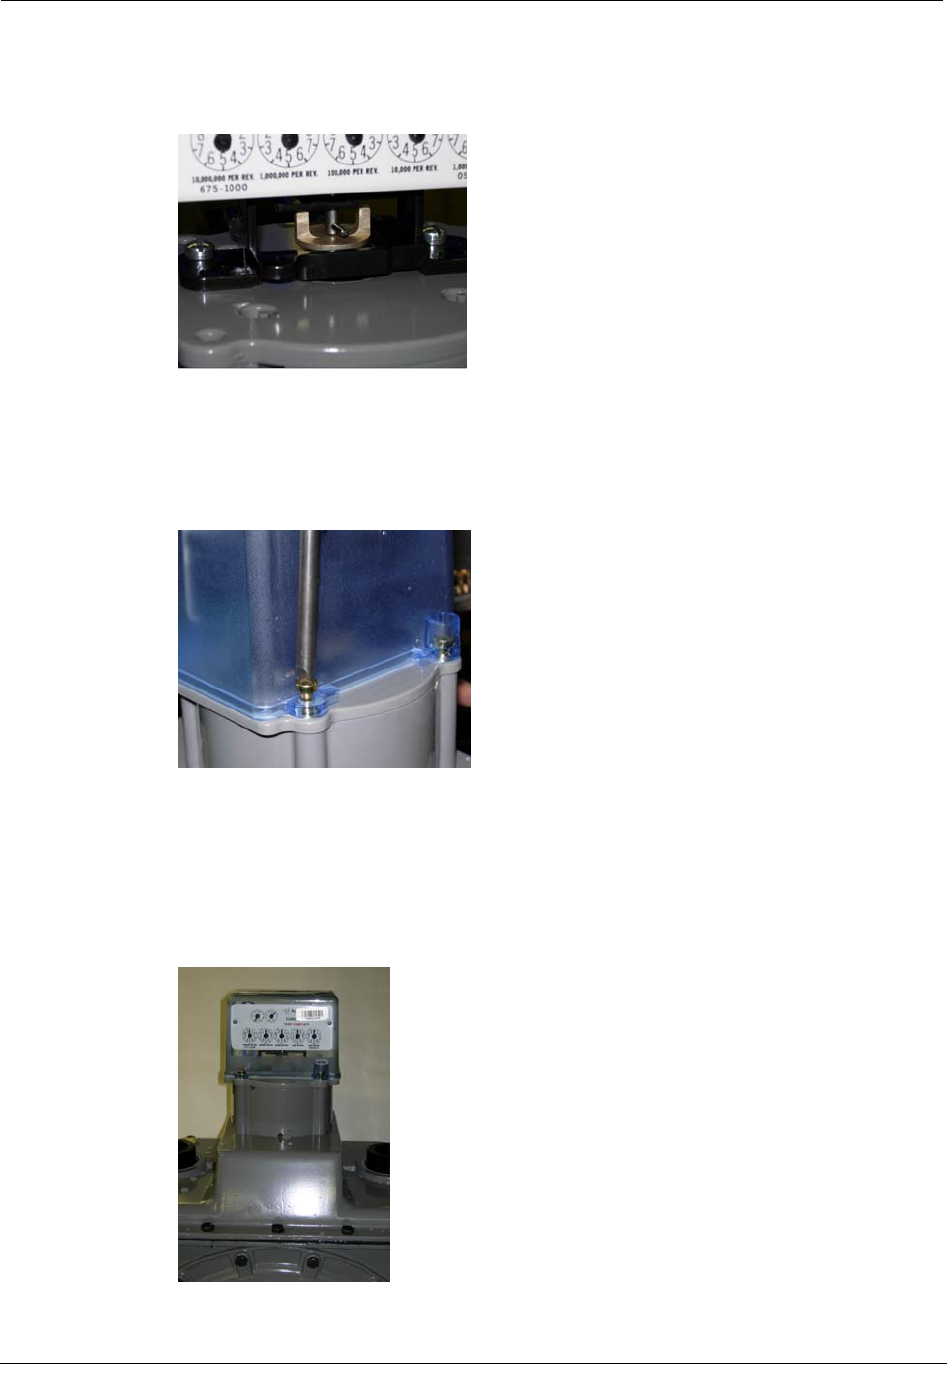
10. Turn the index drive dog so it fits into the extension driver. The hole in the center of
the adapter plate should fit comfortably around the extension driver and the rivets in
the 100G ERT Module should fit into the holes in the adapter plate.
11. Place the index cover over the index assembly. The transparent section of the cover
needs to be on the same side as the index dials so the meter readers can read the dials
clearly.
12. Align the four holes in the index cover with the holes located in each corner of the
adapter plate and install the cover screws.
13. Turn each screw 1/4 to 1/2 turn after it contacts the cover.
14. Place the tamper seals into the front right and back left of the screw holes of the index
cover.
15. Install tamper seals over the screws and press them into place with an 11/32 nut
driver, or some other blunt tool. The tamper seals should not protrude above the index
cover screw holes.
Natural Gas Solutions 100G Installation Guide 71

Chapter 5 American/Actaris Commercial Meter Installation
72 Natural Gas Solutions 100G Installation Guide

CHAPTER 6
National/Lancaster Meter Installation
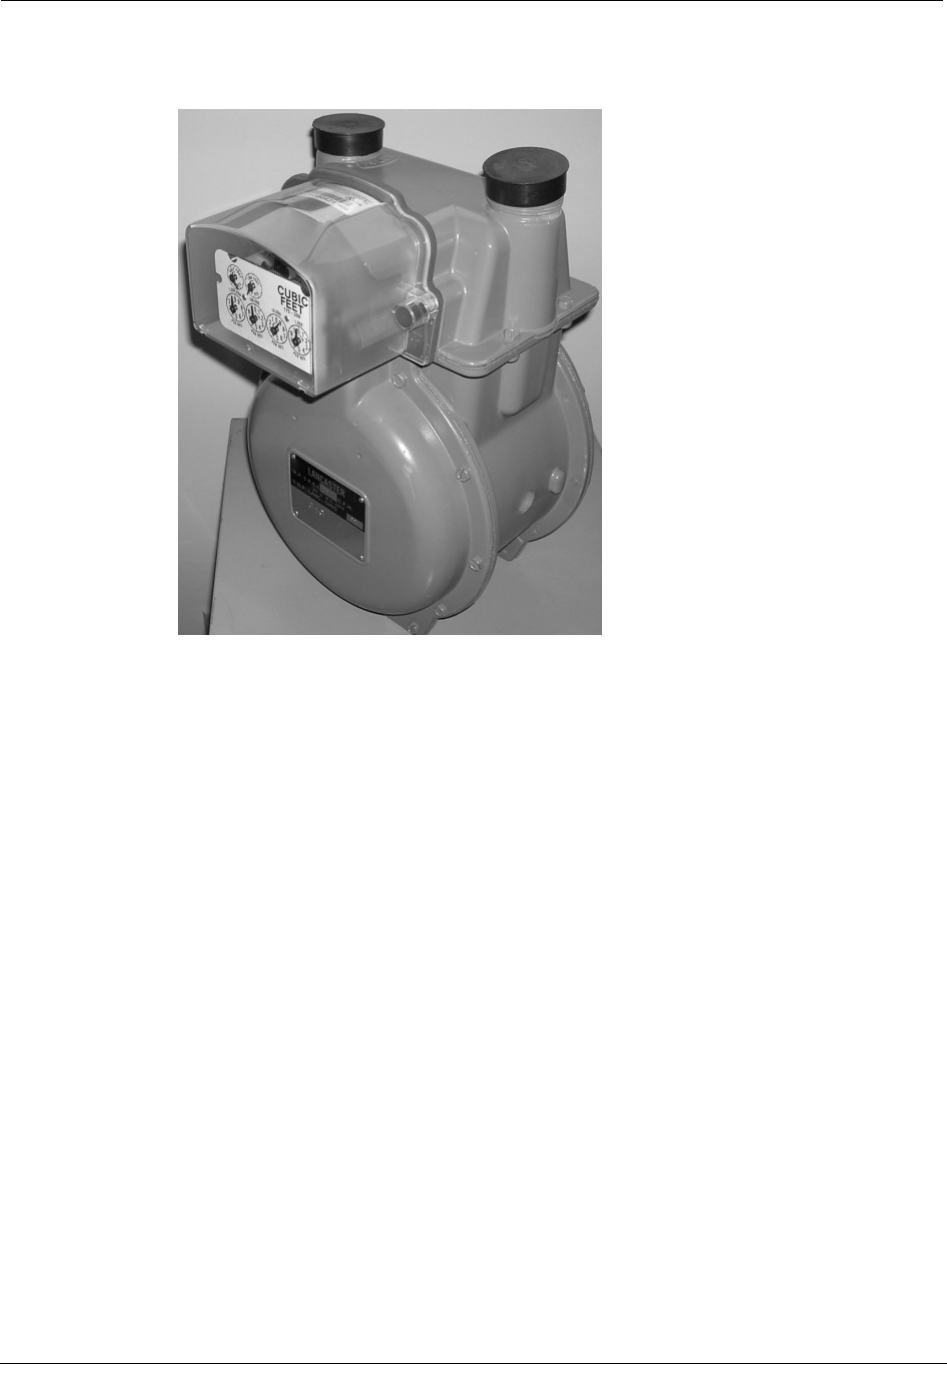
The 100G ERT Module can be installed on 175-250 CFH National/Lancaster gas meters.
Index Compatibility
100G ERT Modules for National/Lancaster meters can only be used with dial type indexes
from National or Actaris/Schlumberger.
Installation Prerequisites
The following items are required to install the Itron 100G ERT Module.
Materials Supplied By Itron
The following items are supplied by Itron:
• 100G ERT Modules
• New tamper seals
• Two screws for attaching the 100G ERT Module to the meter.
Materials Supplied By You
You must supply the following items to install, initialize, and check the 100G ERT Module
on the meter.
• Small and medium flat-blade or Phillips screwdrivers Used to remove and tighten
index and index-cover screws.
• Side-cutting plier/wire snips Used for cutting wire seals, if necessary.
• Small putty knife Used to remove all traces of old gaskets from the meter.
• Meter seals, wire seals, and seal press Used to secure the meter from tampering, if
necessary.
• 11/32-inch nut driver or other blunt tool Used to securely seat new tamper plugs
over screw holes.
• FC200SR with EndPoint-Link or EndPoint-Link Pro software Used to program
and check ERT assembly.
Replacement Screws
Replacement screws used in this procedure are shown below.
Natural Gas Solutions 100G Installation Guide 73

Chapter 6 National/Lancaster Meter Installation
For mounting 100G ERT Module assemblies on meters:
• Use 10-24 x 3/4-inch flat head, stainless steel, Phillips head screws (Itron part number
SCR-0014-004).
For mounting indexes on 100G ERT Module backplates by their legs:
• Use 6-19 x 3/8-inch thread forming, zinc-plated, Phillips head screws (Itron part
number SCR-0015-001).
For mounting indexes through 100G ERT Module backplate mounting holes:
• Use 6-19 x 3/8-inch thread forming, zinc-plated, Phillips filister head screws (Itron
part number SCR-0037-001).
Preinstallation Preparations
Before installing the 100G ERT Module on a meter, verify that:
• All Itron gas modules are 100G ERT Modules for your brand of gas meters.
• The model numbers of all meters on which the 100G ERT Modules will be installed
are included in the Meter Compatibility List.
Installing the 100G ERT Module
There are four major steps to installing the 100G ERT Module on a meter:
• Remove the index
• Assemble the 100G ERT Module
• Program the 100G ERT Module
• Attach the 100G ERT Module to the meter.
NOTE Properly dispose of all unused screws, old index covers, gaskets, tamper
seals, and other left-over materials. Do not leave any materials on customer
premises.
To remove the index
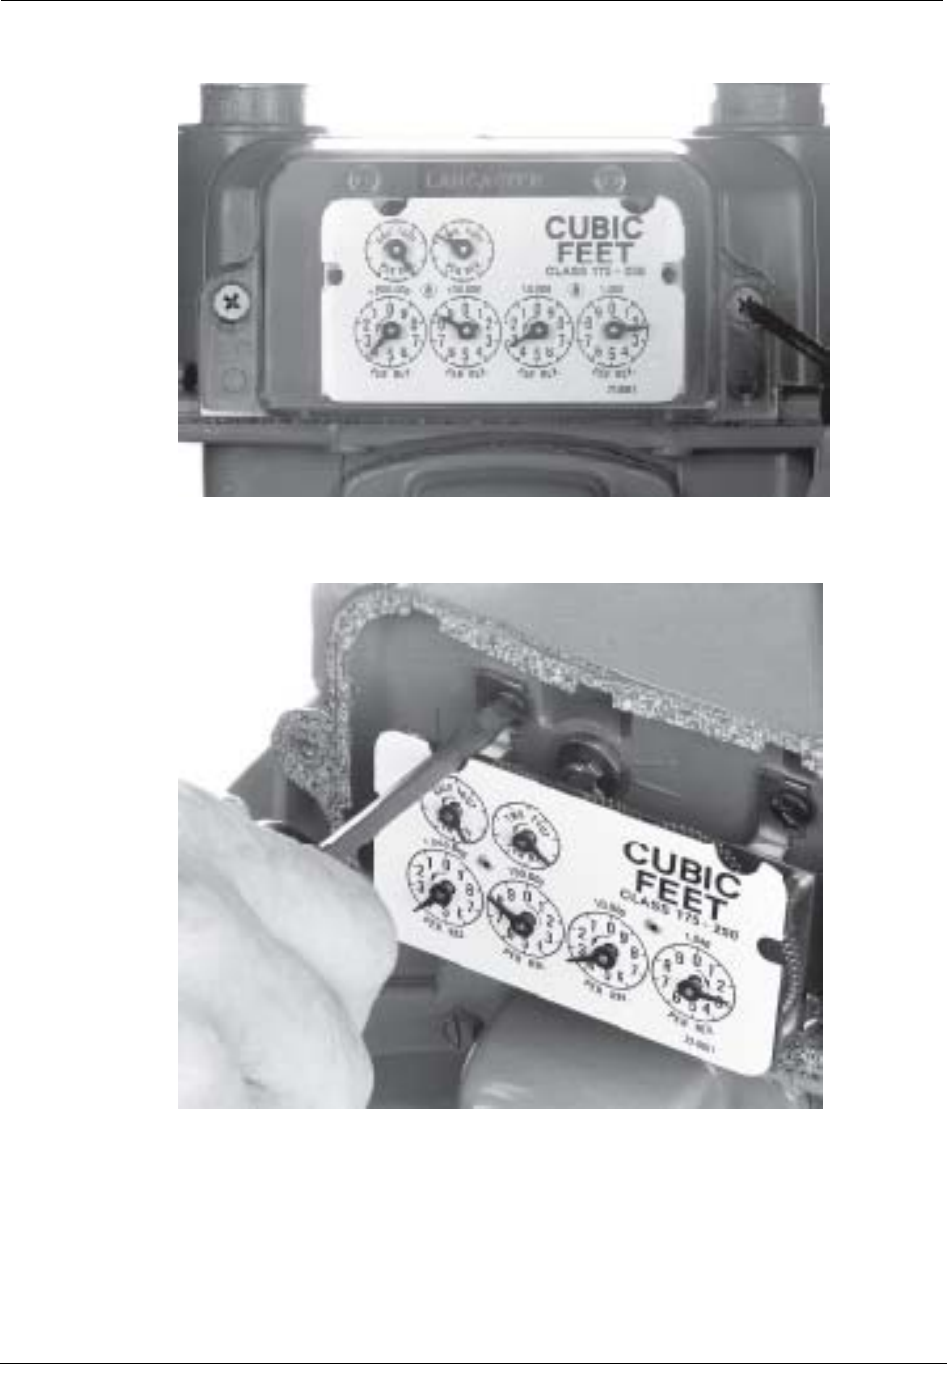
1. Remove any tamper seals from the meter.
74 Natural Gas Solutions 100G Installation Guide
Installing the 100G ERT Module
2. Remove the two screws and dispose of them properly.
3. Remove the index cover from the meter.
4. Remove the index mounting screws and the index from the meter.
Natural Gas Solutions 100G Installation Guide 75
Chapter 6 National/Lancaster Meter Installation
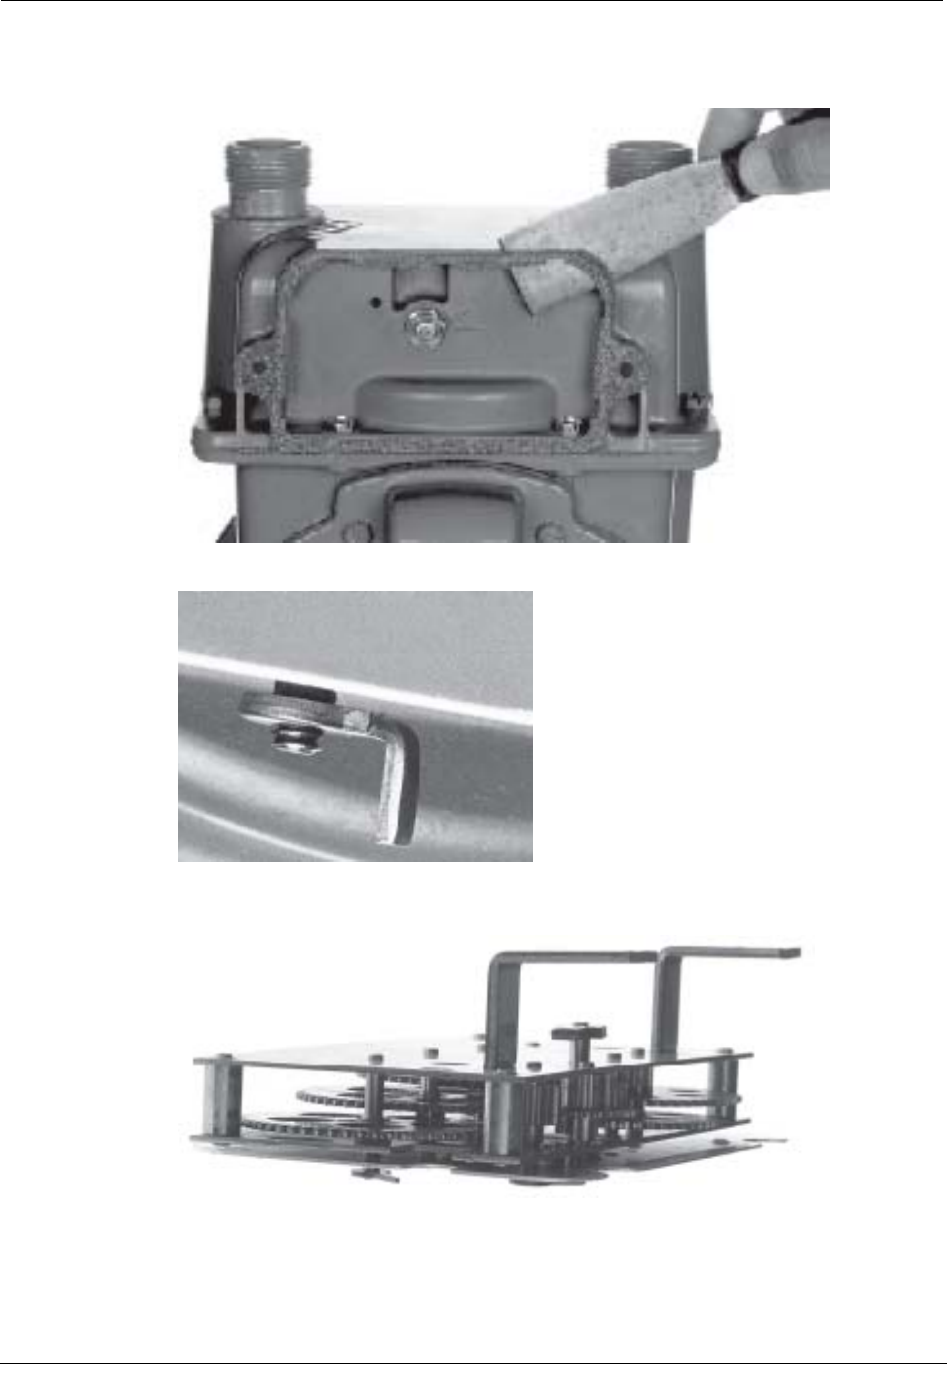
5. Remove all traces of the old index cover gasket from the meter. The new ERT module
has its own gasket.
6. Make sure the meter drive dog sticks straight out from the meter.
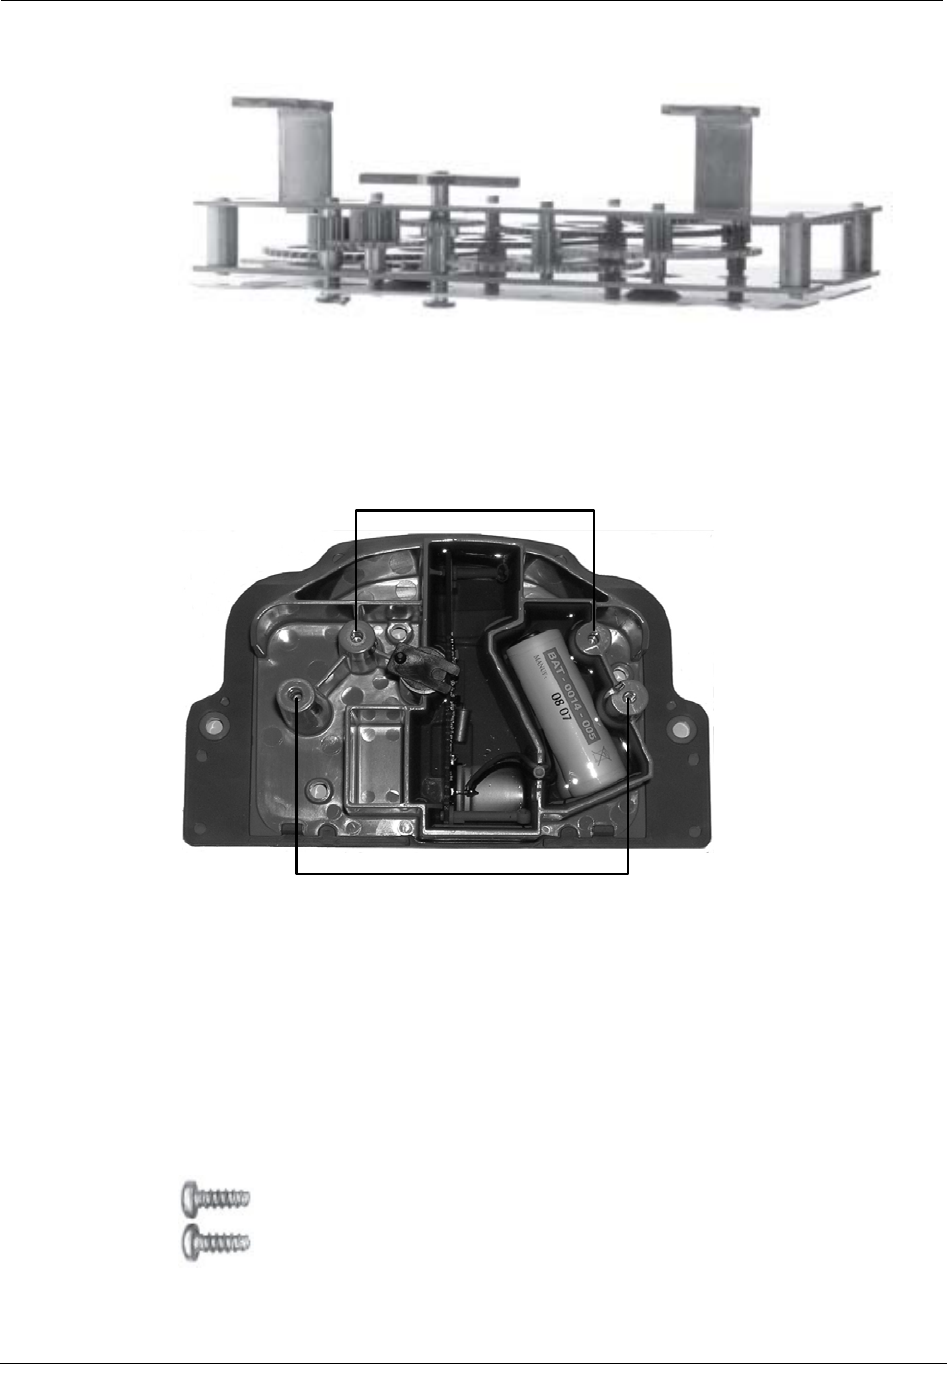
7. If the index has mounting legs, make sure each leg is parallel to the back of the index,
as shown, to provide for proper alignment between ERT and meter.
76 Natural Gas Solutions 100G Installation Guide
Installing the 100G ERT Module
8. Make sure the index wriggler is parallel to the surface of the index.
Indexes that do not have mounting legs must be attached to the ERT module’s index
backplate mounting posts.
Indexes that have mounting legs only, must be attached to the ERT modules’ index
bracket mounting posts.
Leg bracket
mounting posts
Backplate
mounting posts
Indexes that have mounting legs as well as holes for mounting without legs can be
mounted by using SCR-0015-001 to attach the mounting legs or by removing the two
mounting legs and using SCR-0037-001 to attach the index to the ERT modules’
index backplate mounting posts.
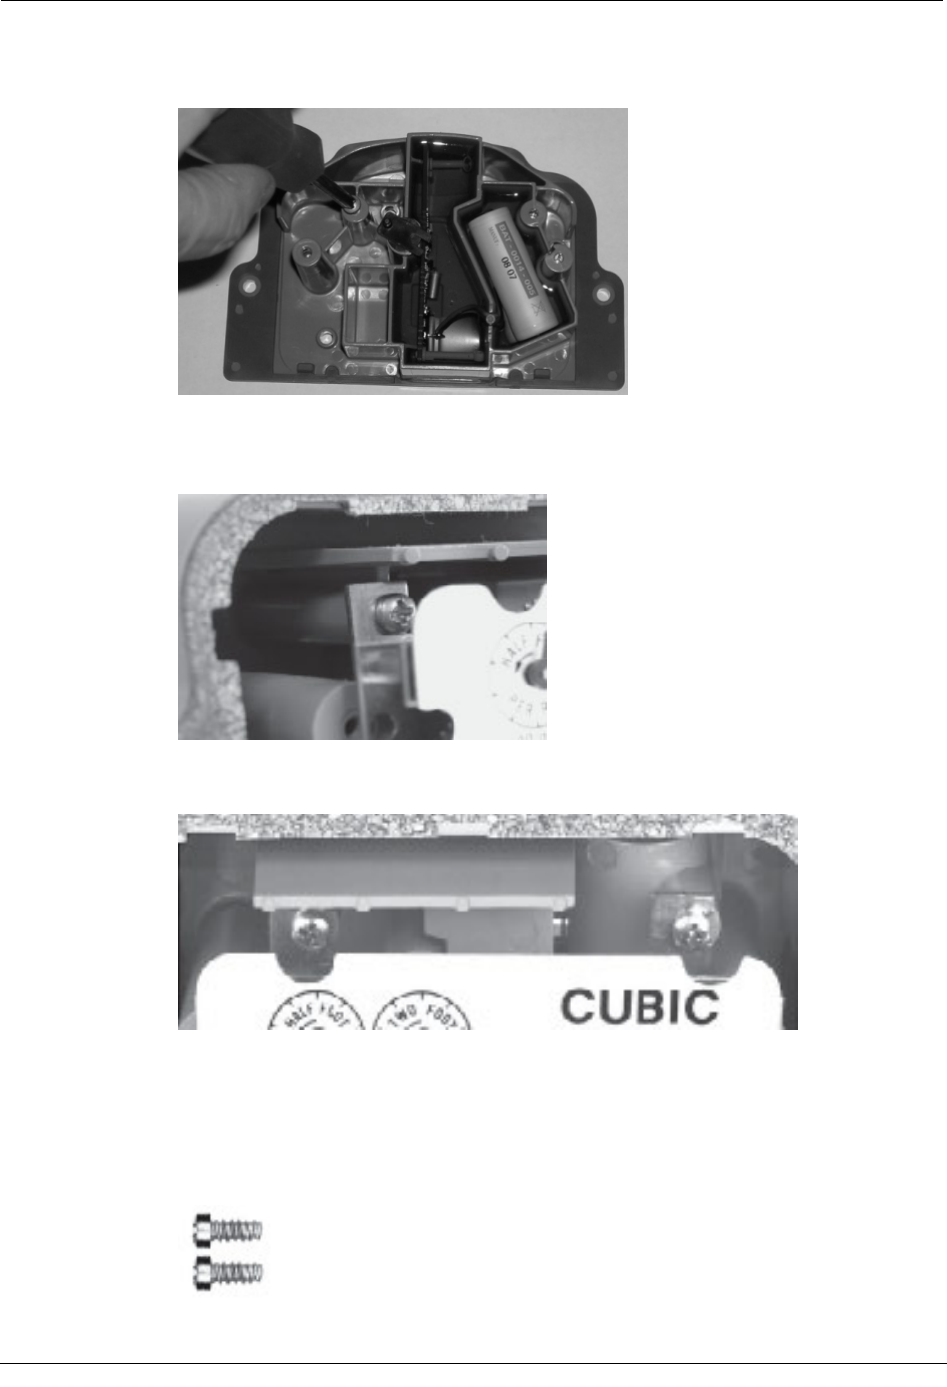
To attach the index to the 100G ERT Module using the mounting legs
1. Get two new screws (part number SCR-0015-001) for attaching indexes to ERT
modules by their legs.
Natural Gas Solutions 100G Installation Guide 77
Chapter 6 National/Lancaster Meter Installation
2. Install an index mounting screw in the left mounting hole and tighten the screw just
enough to hold it in place.
3. Place the index’s mounting leg screw slot under the screw head and tighten the screw
enough to hold the index leg in place, but loose enough so you can pivot the index
around the screws.
4. Make sure the index’s right mounting leg screw slot is positioned over the ERT
module’s right index mounting leg screw hole.
5. Turn each screw 1/4 to 1/2 turn after it contacts the mounting leg.
To attach the index to 100G ERT Module without mounting legs
1. Get two screws (part number SCR-0037-001) for attaching indexes to ERT modules
by their backplate mounting screw holes.
78 Natural Gas Solutions 100G Installation Guide

Installing the 100G ERT Module
2. Put the index mounting screws through the mounting screw hole in the ERT index
backplate mounting post.
3. Turn each screw 1/4 to 1/2 turn after it contacts the index backplate.
Program the ERT
The ERT must be programmed using the FC200SR with EndPoint-Link software. See the
Endpoint-Link ERT Programming Guide (TDC-0411) for more information.
IMPORTANT You must perform the following programming procedure for
the ERT module to function properly.
When programming the ERT module, you must take note of the drive rate shown on the
index of the meter. Program the meter based on the drive rate shown on the index.
To program the ERT module
1. Using the FC200SR, program the reading of the index that was on the meter into the
ERT module assembly.
• For initial programming, hold the FC200SR approximately 1 foot away from
the 100G.
• For reprogramming (30 days or more past initial programming), hold the
FC200SR approximately 4 to 5 feet away from the 100G.
Be sure to program the 100G to the correct mode for the reading technology what will
be used (for example, Fixed Network Mode, Mobile/Handheld Mode, or Hard to Read
Mobile/Handheld Mode). In Endpoint-Link Pro v5.0, you will have access to the one
mode that was defined by your system administrator.
During programming, the 100G ERT module is programmed to the nearest 100 cubic
feet; the last two digits (the tens and units) are programmed as zeros (0). Once
programming is complete, however, the ERT module assembly can be read to the
nearest cubic foot.
2. Slowly turn the ERT module drive wriggler two turns in the direction indicated on the
index drive rate. This lets you verify the ERT module is counting properly after
assembly.
Natural Gas Solutions 100G Installation Guide 79
Chapter 6 National/Lancaster Meter Installation
IMPORTANT Do not turn the drive wriggler faster than one turn per second.
3. Read the ERT module assembly using the FC200SR. Consult the EndPoint-Link ERT
Programming Guide (TDC-0411) or other applicable instructions for details on how to
read an ERT.
• If this reading is higher than the one you programmed in step 1 above, the ERT
module assembly is counting correctly.
• If the ERT module assembly reading is not higher than what was programmed
in step 1, replace the ERT module with a new one.
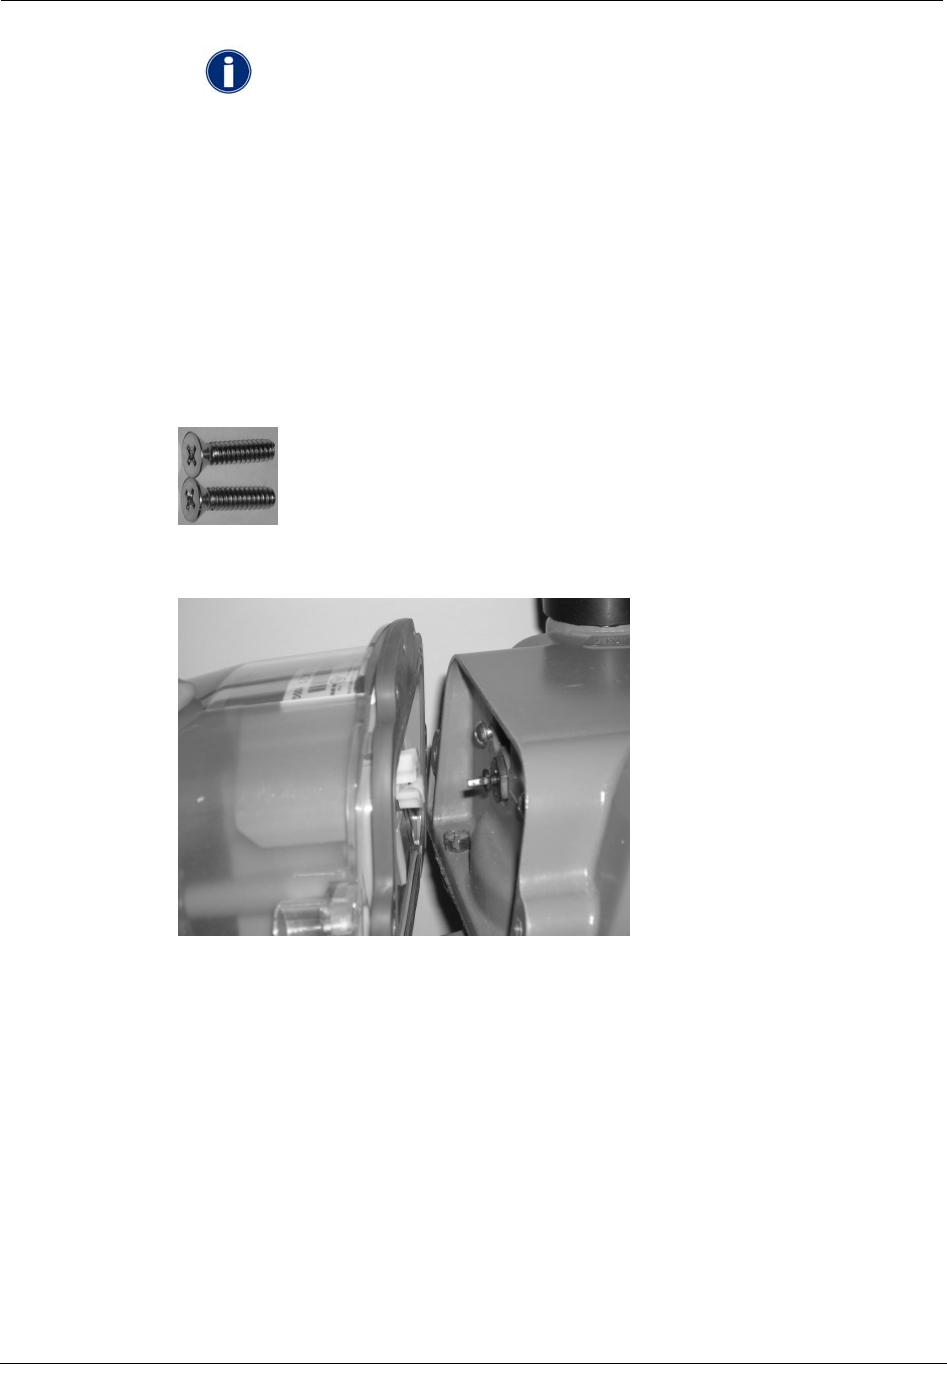
To attach the 100G ERT Module to the meter
1. Get two new ERT module mounting screws (part number SCR-0014-004).
2. Carefully place the ERT module assembly on the meter. Make sure the meter drive
dog aligns with the white wriggler drive slot.
3. Make sure there is no gap between the 100G ERT Module and the meter.
If there is a gap, the end of the meter drive dog is probably riding on the face of the
ERT module wriggler drive post instead of in its drive slot. To eliminate the gap:
Remove the ERT module. Repeat step 2 to align the ERT module drive dog.
4. Turn each screw 1/4 to 1/2 turn after it contacts the cover.
80 Natural Gas Solutions 100G Installation Guide
Installing the 100G ERT Module
5. Install tamper seals over the screws and press them into place with an 11/32 nut
driver, or some other blunt tool.
Natural Gas Solutions 100G Installation Guide 81

Chapter 6 National/Lancaster Meter Installation
82 Natural Gas Solutions 100G Installation Guide