JBL CBT_70J And 70JE New Installation Guide Swivel CBT 70J Install
JBL_CBT_70J_70JE_Install_Guide_swivel JBL CBT 70JE-1 | Extension for CBT 70J-1 Line Array Column Speaker
User Manual: JBL JBL CBT 70J-1 | Constant Beamwidth Technology™ Two-Way Line Array Column with Asymmetrical Vertical Cove
Open the PDF directly: View PDF ![]() .
.
Page Count: 8
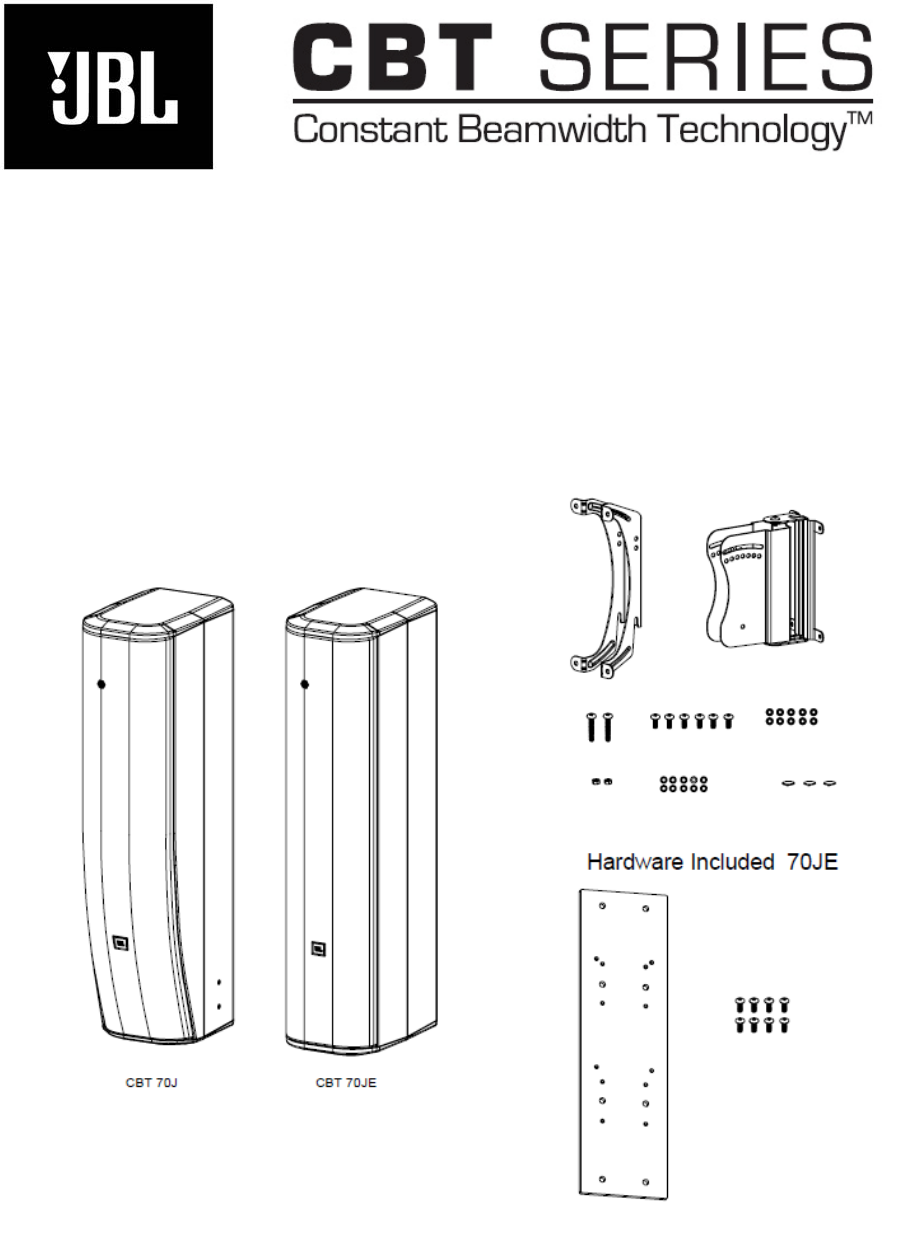
CBT 70J-1 and CBT 70JE-1
Bracket Installation Guide
Rev B – For Swivel/Tilt Wall Bracket
Included:
SWIVEL-TILT
SPEAKER BRACKET WALL BRACKET
COUPLER PLATE
M6-60L M6-15L Pan head SS Flat washers
M6-nuts SS Lock washers switch covers
M6-20L
Flat head
SS Lock washers
SS Flat washers
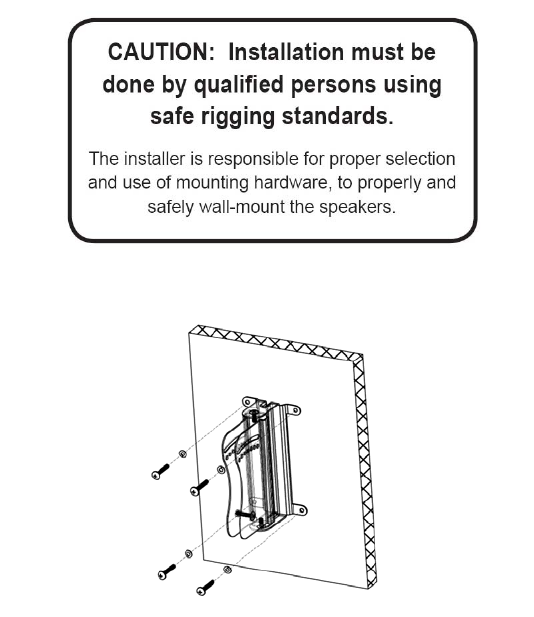
WALL MOUNTING
Note that the BRACKET ASSEMBLY consists of a SPEAKER BRACKET and a WALL BRACKET.
1) RUN WIRING -- Run the wiring from the power amplifier to the location desired for mounting the
JBL CBT Loudspeakers.
2) ATTACHING WALL BRACKET TO WALL -- Using a level to ensure that the WALL BRACKET is
straight, secure the WALL BRACKET to the wall. Be sure to use the appropriate wall anchors for
attaching the bracket. Use all four screw holes for maximum integrity and safety. Be sure that the
slot feature is at the top.
Hardware for attaching WALL BRACKET to wall is not included.
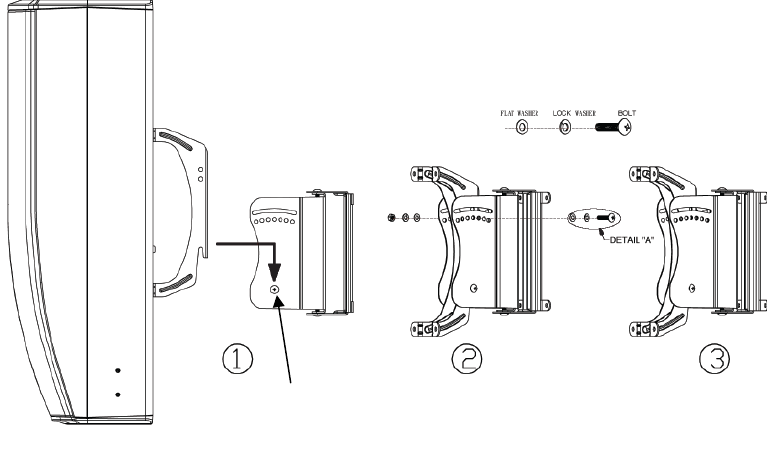
3) ATTACH SPEAKER BRACKET TO SPEAKER
3a) CBT 70J-1 -- Mount the SPEAKER BRACKET to the speaker with the provided M6-15L
hardware. For the CBT 70J-1 there are three (3) possible mounting positions. Choose the one
that best suits the application. Be sure the hook feature is downward.

3b) CBT 70J-1 + 70JE-1 Vertical Array -- Mount the COUPLER PLATE (included with the CBT 70JE-1)
to the CBT 70J-1 and CBT 70JE-1 speakers with the provided eight (8) pieces of M6-20L flat-head bolts.
(See “CBT 70J-1 and CBT 70JE1 Coupler Plate Dimensions & Connection Point Locations” drawing,
below, for exact locations).
Then attach the SPEAKER BRACKET to the COUPLER PLATE with the provided M6-15L pan-head
bolts, lock washers and flat washers. Be sure the hook feature is downward.
8 pieces of
the provided
M6-20L flat-
head bolts
4 pieces of
the provided
M6-15L pan-
head bolts
with lock
washers &
flat washers
Tilt angles ±15° OK
4) SLIDE SPEAKER WITH SPEAKER BRACKET ONTO WALL BRACKET
Make sure the PIVOT BOLT is installed in-place in the WALL BRACKET. It consists of the M6-60L
bolt with lock washer and flat washer on the head (as shown in DETAIL “A”, below) and secured in
place with flat washer, lock washer and M6 nut. Leave the nut loose (do not tighten).
Once the wall mount has been attached to the wall and speaker mount has been attached to the
speaker, slide the speaker forward so that the SPEAKER BRACKET engages into the WALL
BRACKET, dropping the hook slot of the SPEAKER BRACKET onto the pivot bolt (which will already
be installed loosely in the WALL BRACKET).
DETAIL “A”
PIVOT BOLT Location
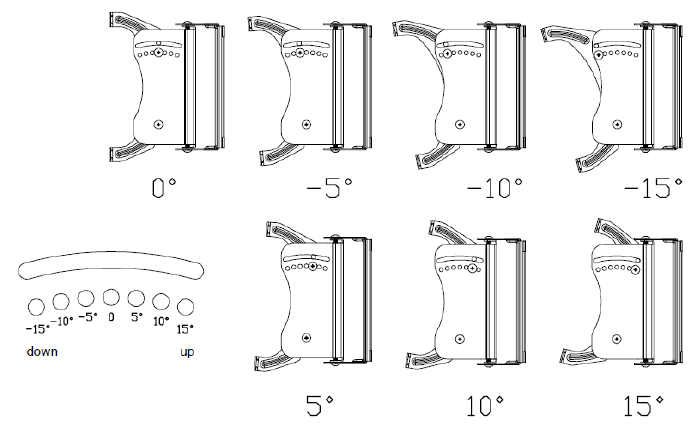
5) SET THE TILT ANGLE – Once the speaker has nested securely on the pivot bolt, slide the second
M6-60L bolt into one of the holes in top of the wall bracket to set the angle.
5a) TILT ANGLES -- The bracket allows for +/-15 degrees of tilt.
5b) PRE- SET ANGLES and CONTINUOUSLY VARIABLE ANGLE -- The bracket has through
holes for mounting angles of +/- 15 degrees in 5 degree increments. There is also a slot above the
holes for continuously variable adjustment. The pre-set angles are recommended for accurate
aiming.
5C) SECURE THE ANGLE SETTING -- Once the angle has been chosen re- tighten both bolts
with hardware provided.

6) SET THE SWIVEL (PAN) ANGLE – Loosen the top and bottom bolts on the pivot. Adjust the
side-to-side swivel (ie, pan) aiming angle of the speaker. Re-tighten the bolts securely at desired
swivel (pan) angle.
Maximum Swivel Angles before Wall Interference – The bracket swivels a full 90 degrees from
side-to-side, however when mounting the CBT speaker onto a wall, the side-to-side swivel may be
limited by the end of the speaker encountering the wall. The maximum swivel angle depends on:
a) which of the rear-panel insert points on the speaker the SPEAKER BRACKET is mounted onto,
and b) the down-tilt angle setting.
The following charts lists the typical maximum side-to-side swivel angles for some of the possible
Speaker Bracket mounting point locations, and for 0°, 5°, 10°, and 15° down-tilt angle settings.
(For the combination CBT 70J-1+70JE-1 array, the only recommended mounting point for the
SPEAKER BRACKET is on the Coupler Plate, so that is the only mounting point shown in the
chart for the array.)
Model
SPEAKER
BRACKET
Mounting
Position on
Speaker
Maximum Swivel (Pan) Angle at Down-Tilt of:
0º
Down-Tilt 5°
Down-Tilt 10º
Down-Tilt 15º
Down-Tilt
CBT 70J-1
Top Position 80° Swivel 77° Swivel 74° Swivel 66° Swivel
Middle Position 80° Swivel 77° Swivel 76° Swivel 73° Swivel
Bottom Position 80° Swivel 78° Swivel 77° Swivel 77° Swivel
CBT 70J-1 +
70JE-1 Array
On Coupler Plate
(This is the only
allowable bracket
position for the array.)
80° Swivel 76° Swivel 69° Swivel 48° Swivel
Maximum Swivel Angles in Other Mounting Situations – The bracket itself can swivel up to 90
degrees (side-to-side), so if the speaker is being mounted onto a pole or an outside corner, for
example, where interference with a wall may not be a factor, then greater swivel angles than those
stated in the above chart may be achieved.
7) SAFETY CABLE -- Attach a safety cable (not included) to any of the 6 mm inserts on the back of
the CBT 70J and/or 70JE cabinet using the included M6-15L mm bolt. Prepare to attach the other
end of the cable to a secondary attachment point on the wall.
8) SWITCH COVERS – To discourage tampering with the switch settings, adhesive switch covers are
provided. Peel off the backing from the switch cover and stick the cover over the switch shaft,
lining up the ridge with the recess in the switch shaft.

CBT 70J-1 Bracket Dimensions
CBT 70J-1 and CBT 70JE-1 Coupler Plate Dimensions & Connection Point Locations
JBL Professional
8500 Balboa Blvd.
Northridge, CA 91355
USA
CBT70-1 Install Rev-B
04
/
11
Countersunk thru holes (8 places) for
flat-head screws into back cabinet
inserts of CBT 70J-1 and CBT 70JE-1
4
–
M6 x 8 mm
threaded holes
for included
CBT 70J-1
wall bracket
