JBL T 65 X Wing T65
User Manual: JBL T-65 X-Wing Product Support – Propel RC USA - World class remote control drones
Open the PDF directly: View PDF ![]() .
.
Page Count: 38
HIGH PERFORMANCE BATTLE DRONES
PILOT’S HANDBOOK
T65 XWING
WARNING: Never leave Li-poly batteries charging unattended
for extended periods of time. Please refer to enclosed safety
instructions.
TABLE OF CONTENTS
TABLE OF CONTENTS
PAGE
01. Features
02. Pilot’s gear
03. Vehicle stats
04. Package contents
05. Controller battery installation
06. Ship battery installation
08. Charging your ship’s battery
08. Replacing the propeller blades
09. Turning your controller on
10. Syncing your ship
11. Controller functions
12. Learning how to y (T-mode)
13. Protective cage
14. Preparing for ight
15. Flight Controls
16. Flying tips
17. Recognizing the front and back of your ship
18. Speed select
19. Turn On/O LEDs & auxiliary weapons
20. Auto-start and auto-land
21. Combat
22. Warnings
23. FCC Notice
24. Warranty and legal information
25. Pilot’s Log
04
Fold-out page (After Pg. 4)
05
06
07
08
09
10
10
11
14
15
16
17
18
18
18
19
20
21
22
31
33
34
39

4
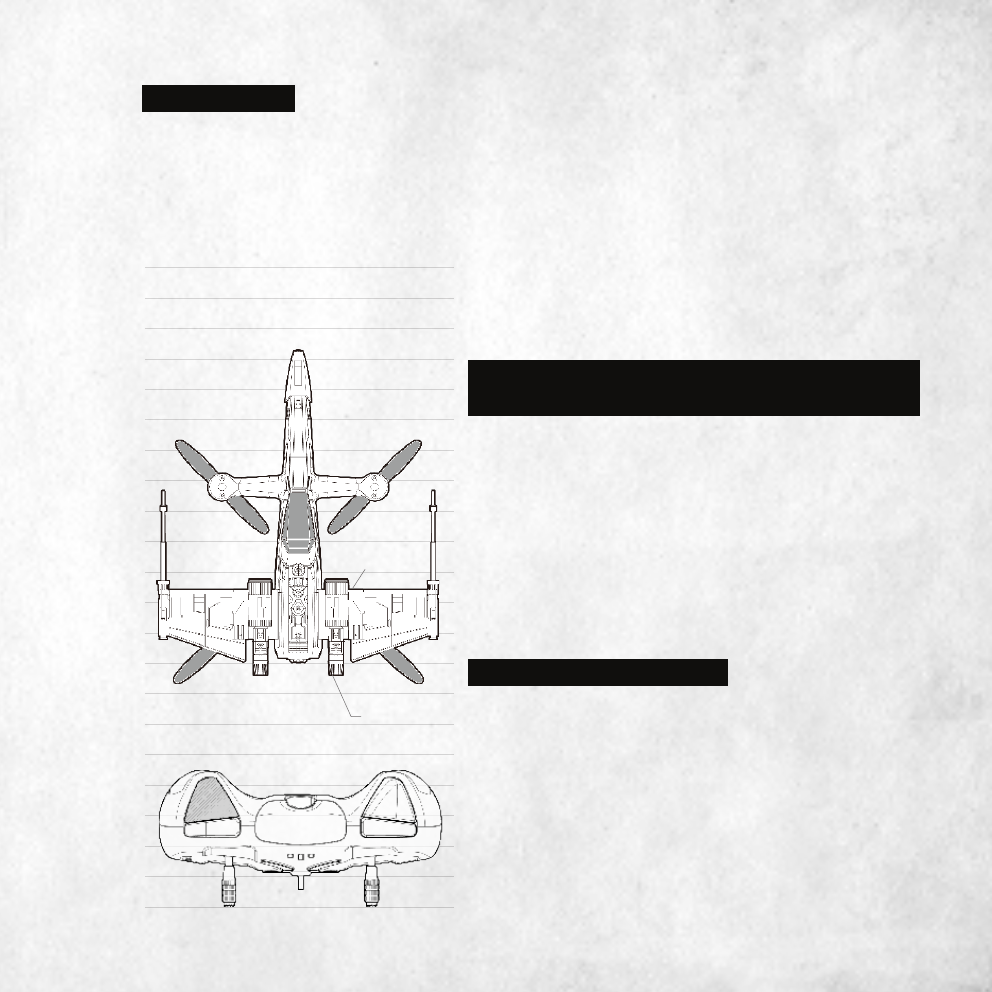
FEATURES:
• Built-in 6-axis gyroscope keeps the X-wing extremely stable in all conditions
• 4-channel ight controls allow for incredible maneuvering including 360˚ rolls
• LED directional lights make your ship easy to follow
• Hand-painted collectible ship
• Running lights illuminate your ship during low-light ying
• Barometric pressure sensor (repulsorlift) for xed altitude hovering
• Auto-start and auto-land functions
• Gyroscope calibration
• Crash protection with Auto-Land
• T-mode training for beginner pilots
• Dynamically integrated sound tracks and battle sounds create an immersive experience
• Controller tactile feedback during battling sequences
• Replaceable batteries for extended play
• Swappable Li-poly batteries for continuous play
• Infrared battling technology
• Built-in
Star Wars
soundtracks for complete sonic immersion
• Controller speaker and headphone jack
• Easy-to-replace parts and transparent blades
• Protective cage
• Screwdriver for replacing controller batteries and ship repair
• …and a few fun surprises
• Companion smartphone app coming soon. Stay posted at
www.propelsw.com
COMING SOON:
Speed change
Auto-start / Auto-land
IR Receiver
IR Transmitter
Propeller
Battery Lock
Back Lights
Battery
Barometric pressure
sensor On/O
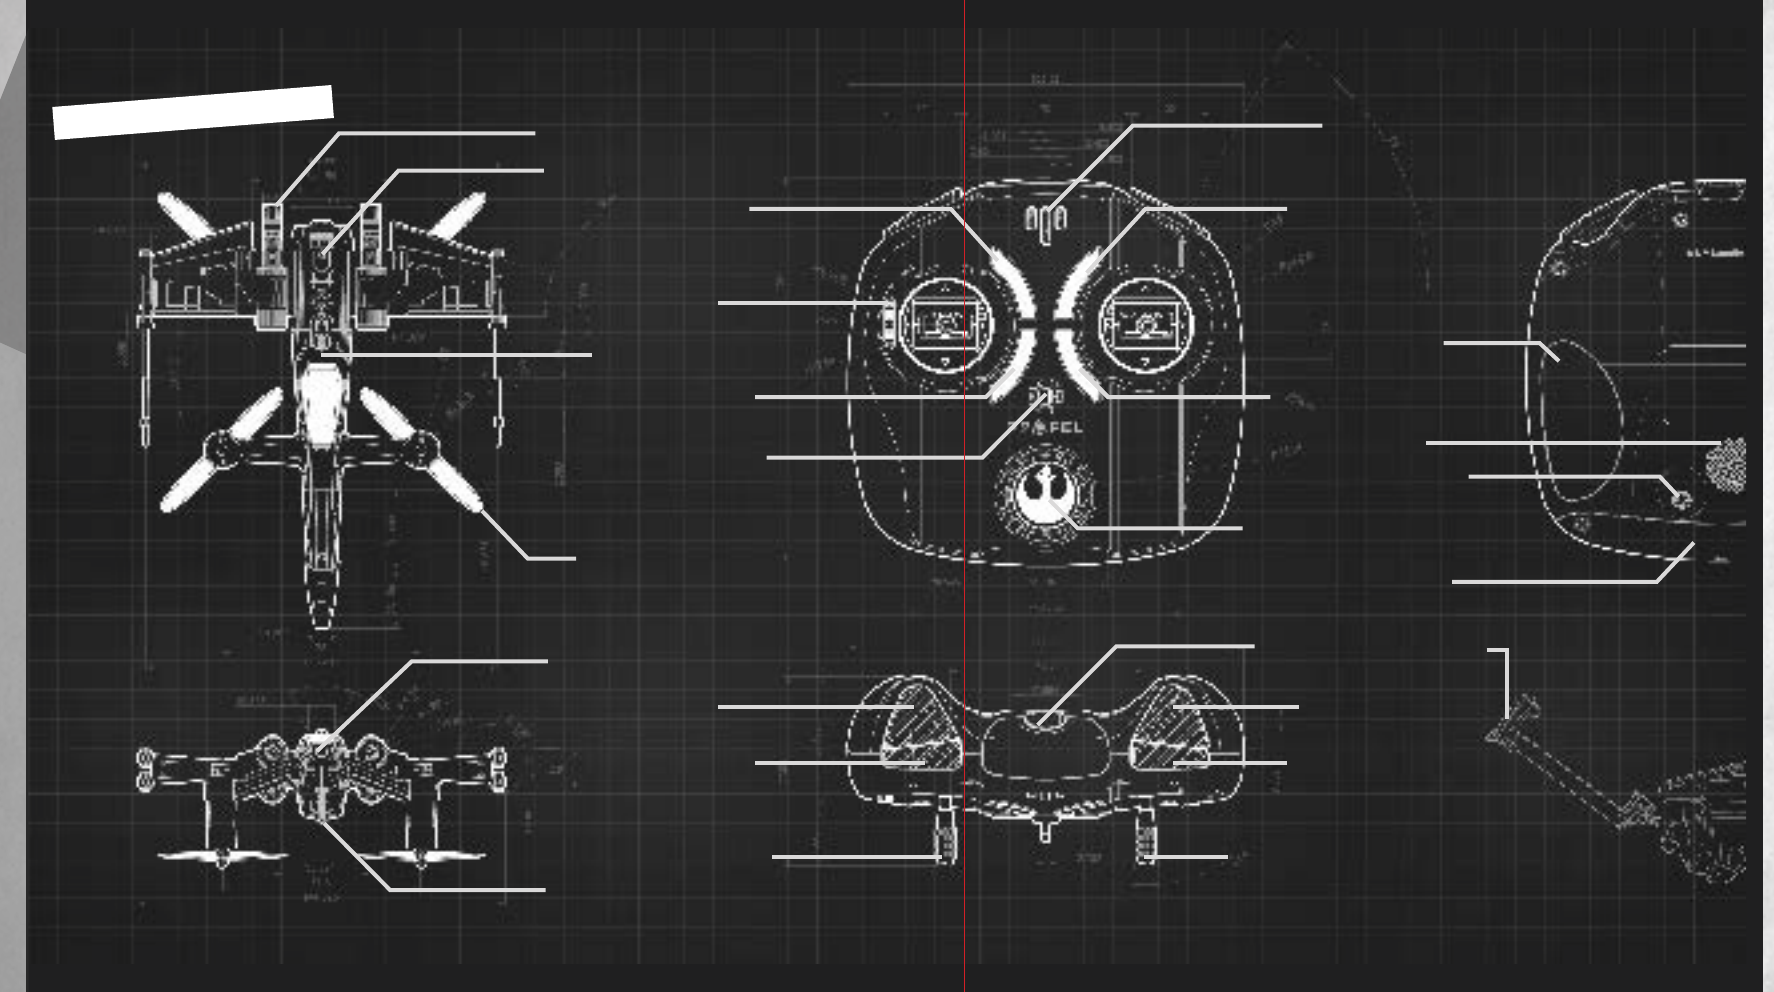
PILOT’S GEAR
Controller Power on/o
Extended
Phone Holder
Detail
Weapons Fire
Phone holder Pull tab
Turn On/O LED’s
Handle grip
Speaker
Headphone Jack
Battery Cover
Life LED’s
Clockwise Roll
Right Gimbal (Control stick)
Calibrate Gyro
Counterclockwise Roll
Bluetooth Sync for
future app integration
Neck Strap Attachment
(Lanyard not included)
Left Gimbal (Control stick)
65
OPEN PAGE
-
TOP SECRET
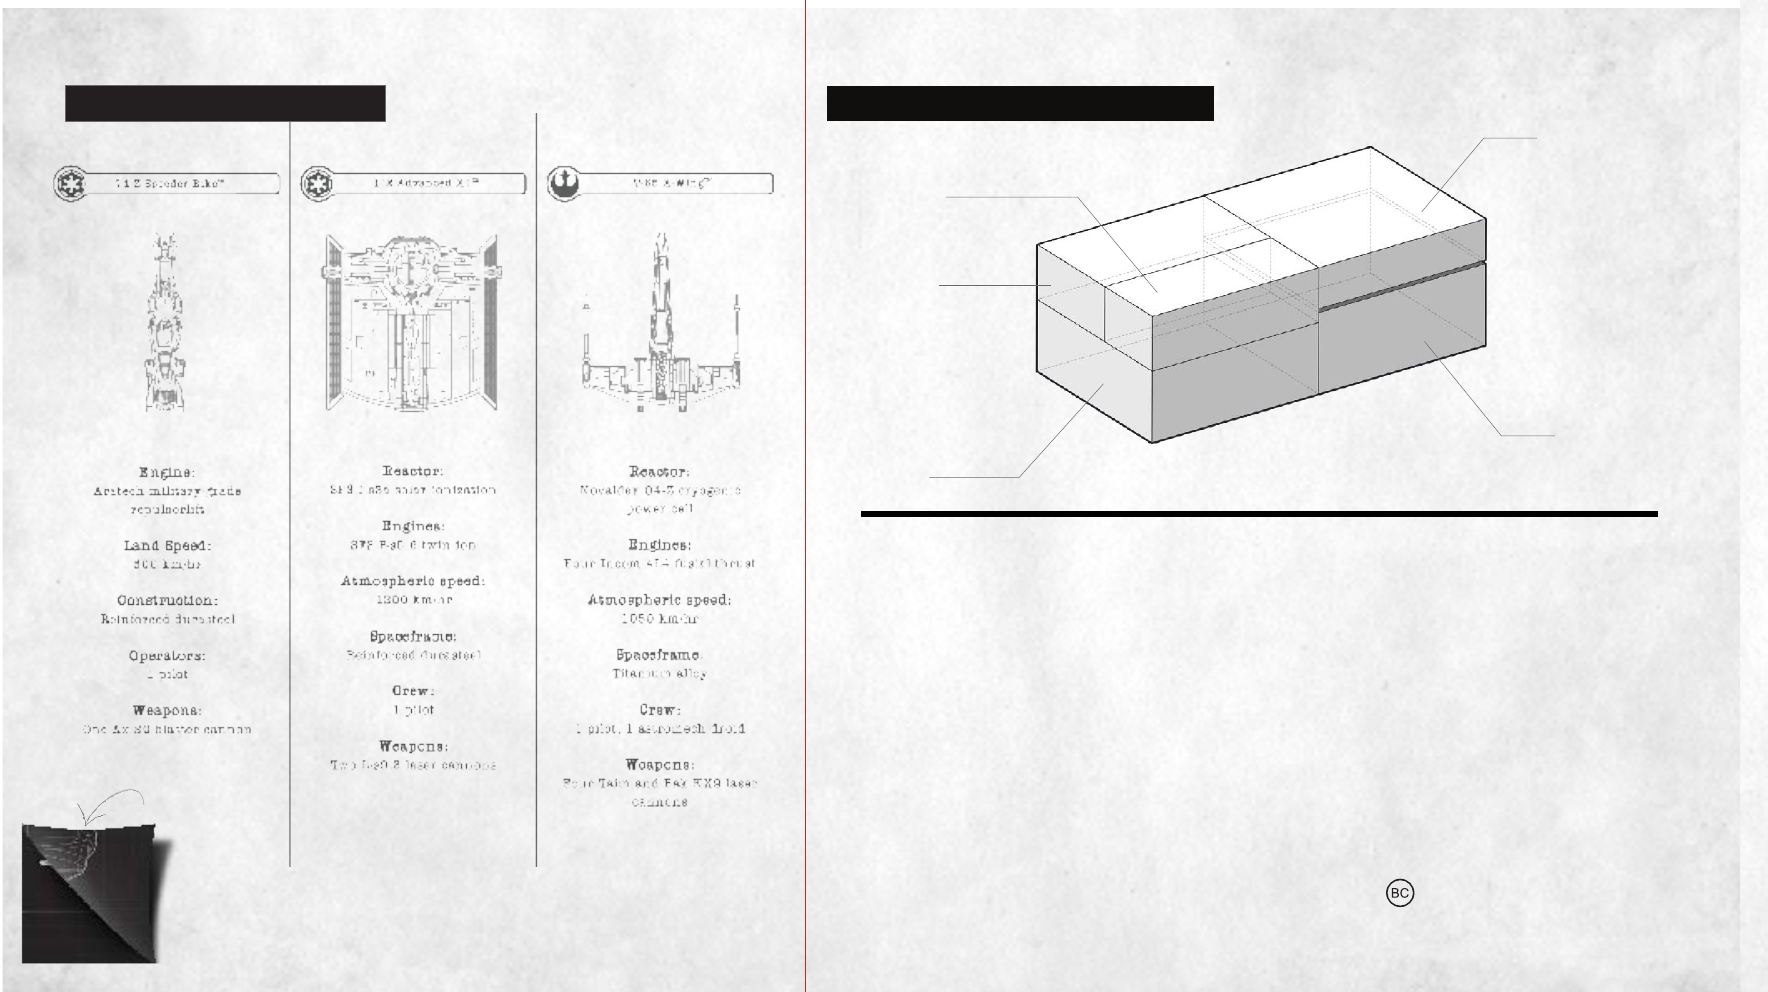
VEHICLE STATS
T65 XWING
- 2.4 GHz WIRELESS CONTROLLER
1 XWING BATTERY
- INSTRUCTION BOOKLET
CHARGER + USB CABLE + WALL ADAPTER
(wall adapter + USB is for both packaging and battery charger)
PROTECTIVE TRAINING CAGE
SCREWDRIVER in side of controller
PROPELLER MULTITOOL
FAUX BATTERY COVER (Used for display purposes)
SPARE PARTS
Colors and styles may vary
PACKAGE CONTAINS:
CONTROLLER
TRAINING
CAGE
EXTRA ACCESSORIES
WALL CHARGER
& BATTERIES
HIGH
PERFORMANCE
BATTLE DRONE
7
1 -UNSCREw ANd SlidE
2 -4 AA bATTERiES
3 -PUT bACk COvER
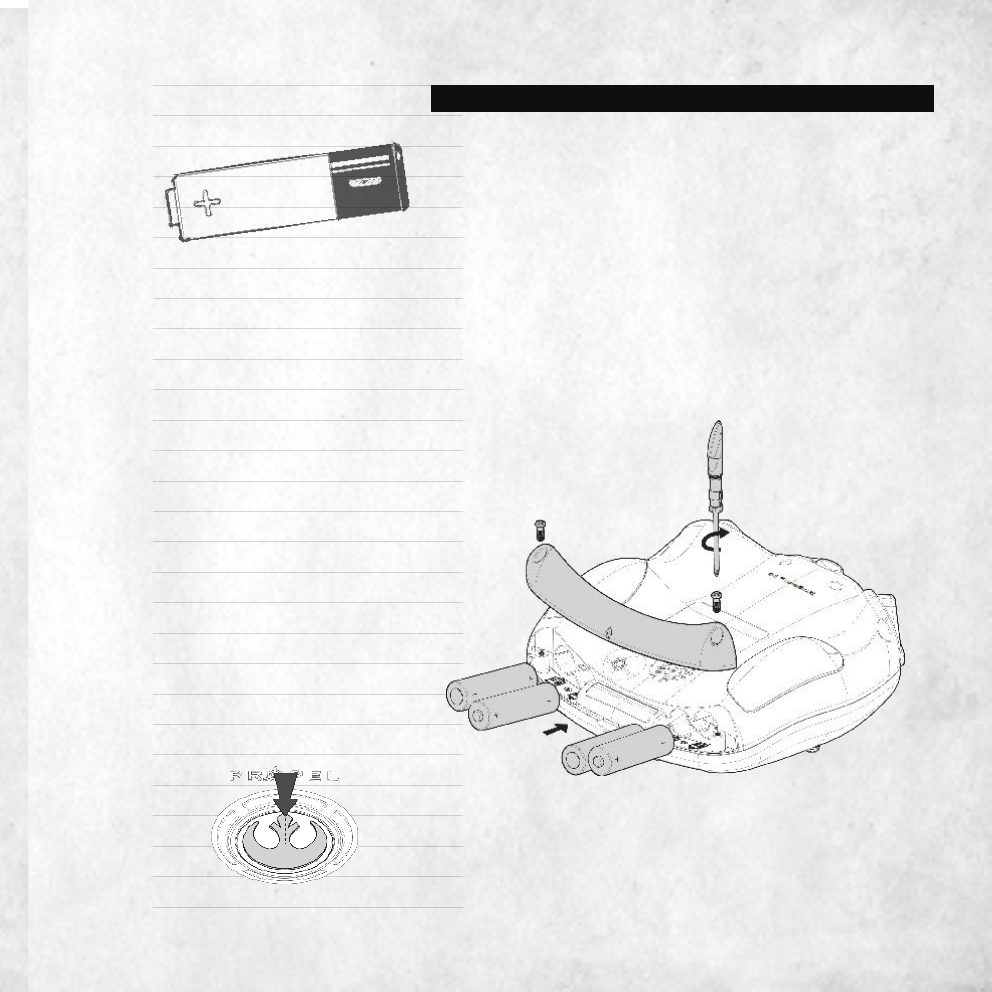
REMOTE CONTROL BATTERY INSTALLATION
(
All
ThE
lEdS
ON
ThE
CONTROllER
ShOUld
bE
flAShiNG
)
1. On the back of the controller, unscrew and
slide o the battery cover.
2. Install 4 “AA” alkaline batteries (1.5V
rechargeable batteries are preferred) into the
controller.
3. Replace the battery cover and secure it with
screws.
4. Replace the screwdriver into the side of the
controller
5. Turn over the controller and push the power
button for 2 seconds, and verify that the LEDs
are on.
ChECk PROPER ORiENTATiON!
- ThERE iS A SCREwdRivER
hiddEN iN ThE RiGhT SidE ARm Of ThE
CONTROllER.
USE AlkAliNE OR 1.5v
REChARGAblE bATTERiES
8
SLIDE TO LOCK /
UNLOCK BATTERY
SHIP BATTERY INSTALLATION
NOTE: The ship has no on/o switch , and
automatically turns on when the Li-poly battery is
connected. To switch o simply unlock, and remove
the battery.
1. During your rst installation, slide the clasp to the unlocked position (as shown
in illustration) to unlock the battery. Next, remove the battery cover that comes in
the package, as this cover is cosmetic and used for display purposes only.
2. Slide the fully-charged battery into the ship’s battery compartment (see diagram).
3. Push down and make sure the battery is fully seated as shown below. The ship’s
LED lights will illuminate and start ashing when the battery is properly connected.
4. Close the clasp to lock the battery securely in place.
FIRST INSERT THE NOSE
OF THE BATTERY AT A
FORWARD ANGLE, NEXT
PUSH THE BACK OF THE
BATTERY DOWN
9
STEAdy REd ->PlUGGEd iN
bliNkiNG REd ->ChARGiNG
iN PROGRESS
BLUE
90% charged
GREEN
Fully charged
Illustration A
CHARGING YOUR SHIPS LIPOLY BATTERY
1. Insert the correct wall socket
extension into the wall adapter
depending on the country you are
in (see illustration A).
2. Next, connect the USB charging
cord to the wall adapter and the
charger.
5. Average charging time is approximately
30 minutes to reach 90% charge and an
additional 10 minutes to charge completely. We
suggest ying at a 90% charged battery. A 90%
charged battery can power your ship for 6-8
minutes depending on environment and ight
aggressiveness. Never leave Li-poly batteries
sitting in charger for extended periods of time.
3. When the ship’s battery is charged to 90%, the
charging indicator light will turn blue.
4. When the ship’s battery is fully charged, the
charging indicator light will turn green.
N
OTE
: T
hE
C
hARGiNG
AdAPTER
will
ShOw
A
REd
iNdiCATOR
liGhT
whEN
PlUGGEd
iN
,
ANd
A
bliNkiNG
REd
iNdiCATOR
liGhT
whEN
ChARGiNG
ThE
bATTERy
.
bATTERy
10
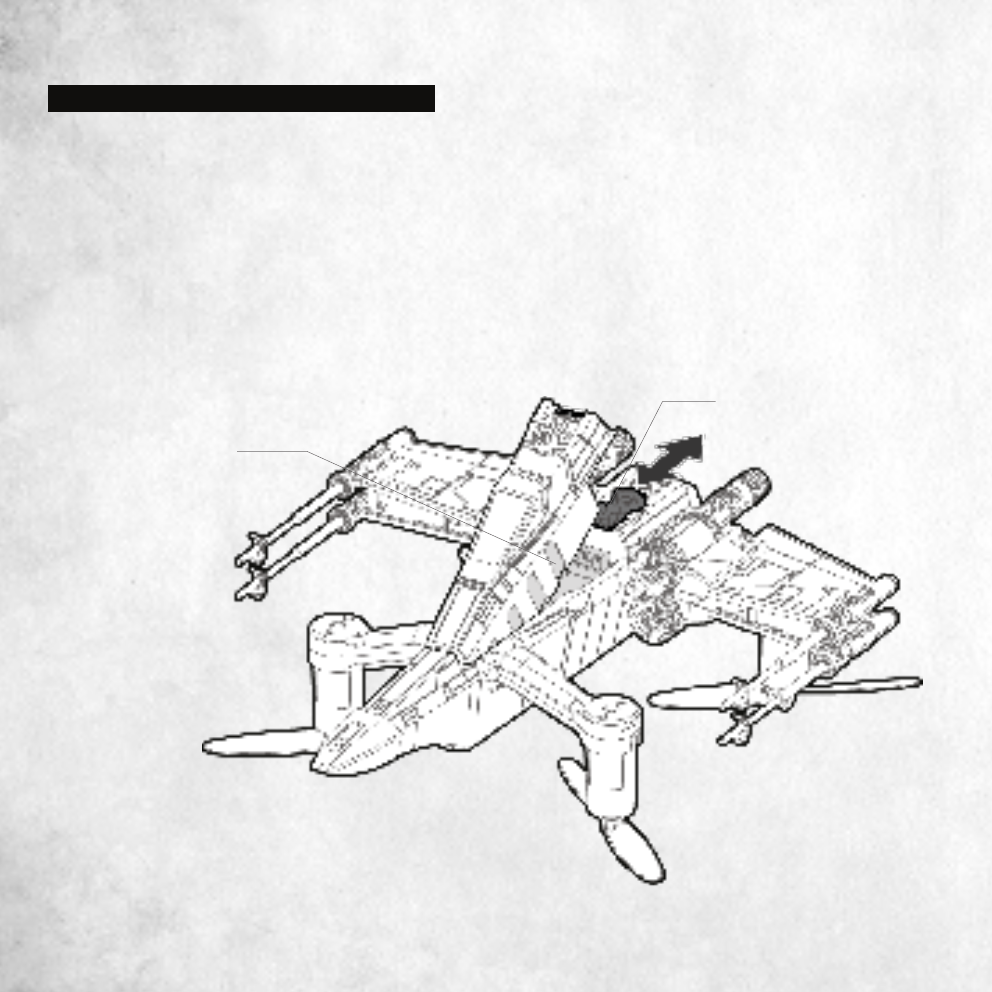
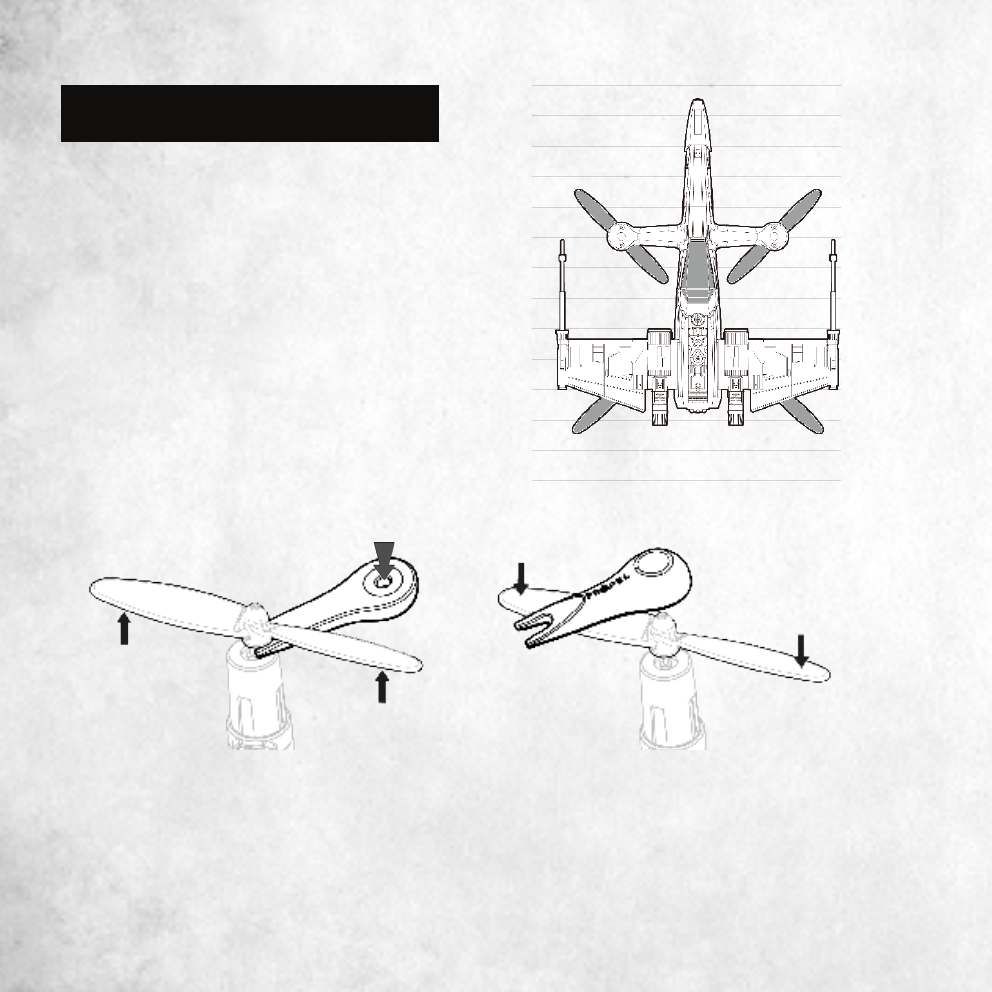
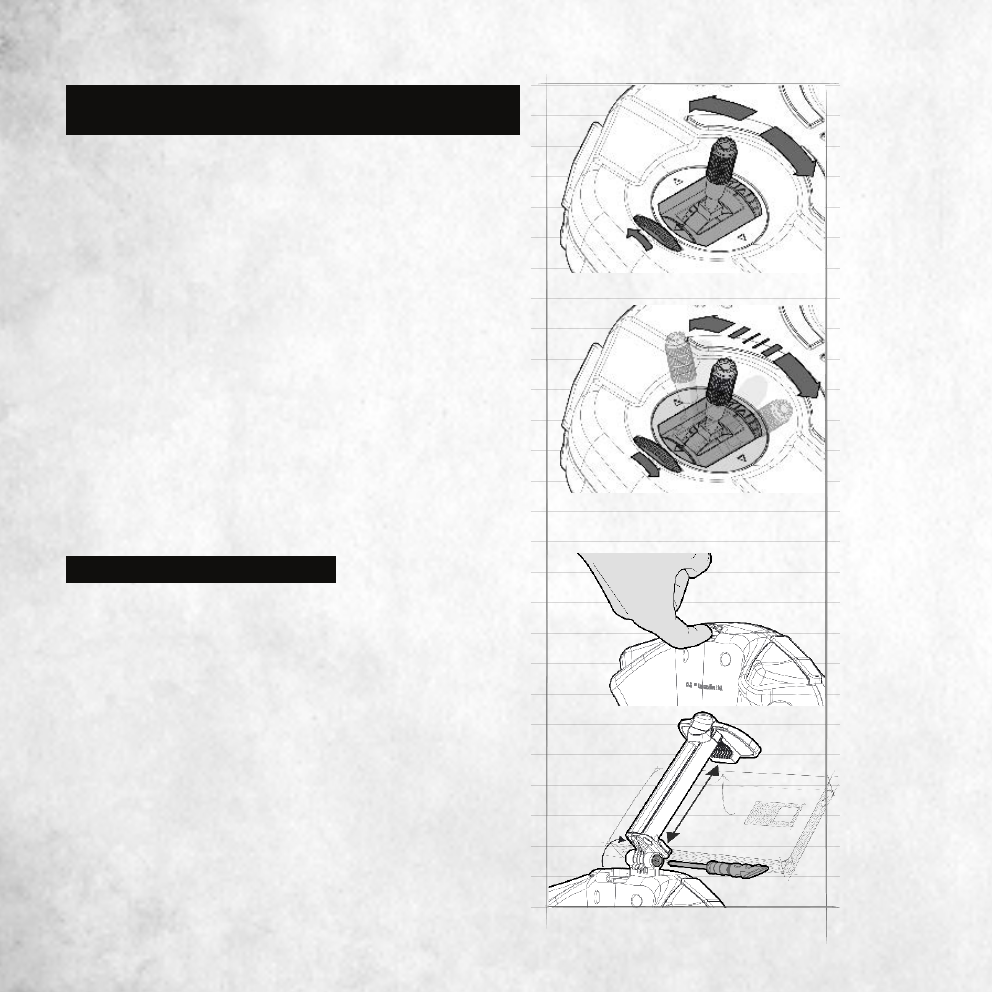
Your X-wing’s propeller system is a precision
instrument that may need repair or replacement
from time to time for optimal ight function.
Crash landing from high-speed aerial ights may
cause damage to your propellers.
1. The ship has four propellers, two “A”
Propellers, and two “B” Propellers.
2. When replacing the propeller blades, make sure
to put A propellers on A Motors, and B Propellers
on B motors, as per the diagram at the right.
3. To replace the blade, gently pull o the broken
blade and snap the new correct blade in place by
pushing down rmly.
PROPELLER INSTALLATION AND
REPLACEMENT
A
B
B
A
Multi-Tool:
The multi-tool is used to help install and remove the propellers from the ship.
1. To remove the propeller, wedge the thin side of the multi-tool between the motor
mount and the propeller and push the propeller upwards.
2. To install the propeller use the opposite side of the multi-tool to push down on
the propeller blade. You will notice some pressure and then the blade will move
into place. The proper position of the propeller is when the base of the blade shaft is
seated slightly below the motor hole. Always check to make sure that the blade spins
freely.
11
2 SECOND PUSH
ON/OFF
All liGhTS
flAShiNG
REd
CONTROLLER POWER ON/OFF
SYNC TO SHIP: FOR SINGLEPERSON PLAY
Important! When syncing your ship with the con-
troller, always check that the ship is on a at level
surface. This ensures that the 6-axis gyro is prop-
erly calibrated. Your ship utilizes an automatic 2.4
GHz channel selection system that allows up to
12 people to y side-by-side in the same wireless
range with no interference.
Hold button for 2 seconds and the power will turn
on, followed by a slight vibration. All LEDs (life
LEDs and speed LEDs) will ash red until the con-
troller is synced to the ship.
Hold button for 2 seconds and the power will turn
o. The vibration motor will spin and all LEDs will
ash red for 3 seconds.
Push the left control stick all the way up until you
hear 1 beep, then push the stick all the way down.
You will hear 2 beeps to indicate the controller is
synced. Once synced, the LEDs surrounding the
power button will illuminate to indicate the select-
ed speed.
At this point you may want to listen to the open-
ing soundtrack that plays after your controller
powers on, while you continue reading.
AT
ThiS
POiNT
yOU
mAy
ChOOSE
TO
liSTEN
TO
ThE
OPENiNG
SOUNdTRACk
ThAT
PlAyS
whEN
yOU
POwER
ON
yOUR
CONTROllER
,
whilST
yOU
CONTiNUE
REAdiNG
ThiS
hANdbOOk
.
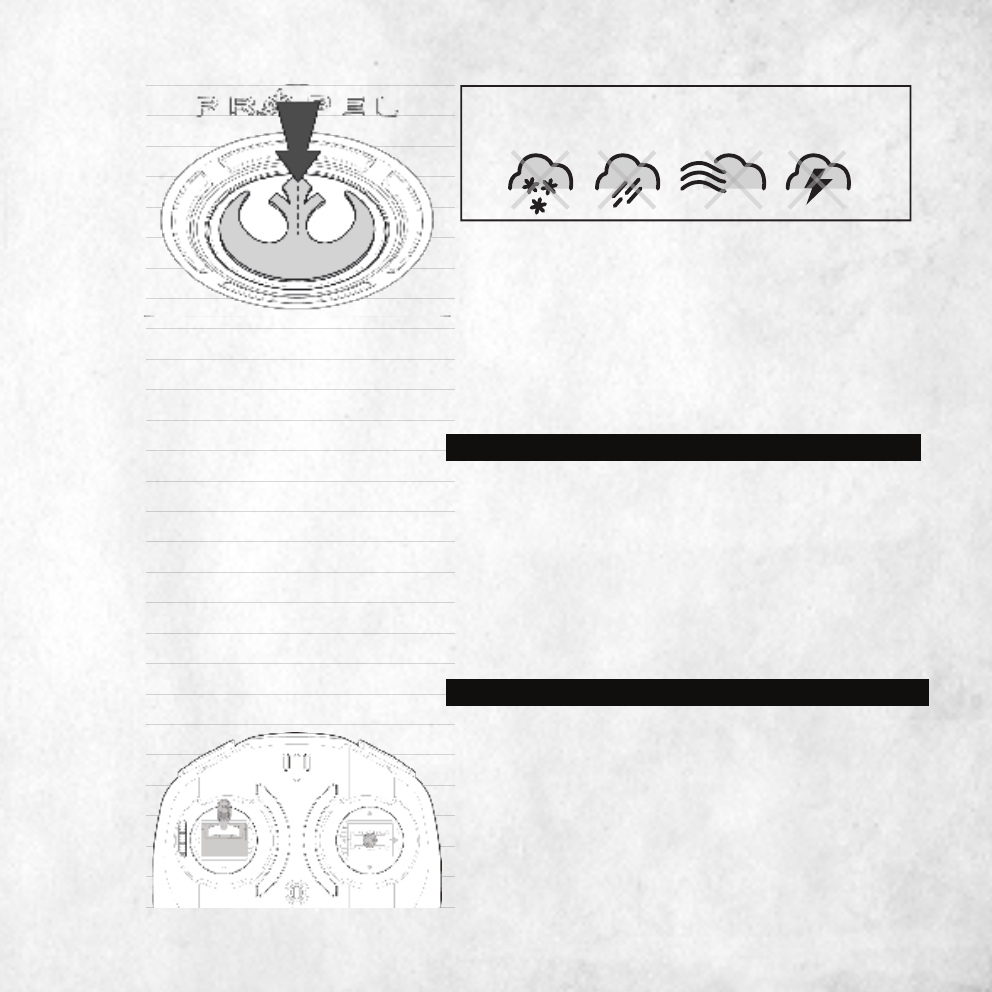
WARNING!
Do not fly your ship in foul weather!
12
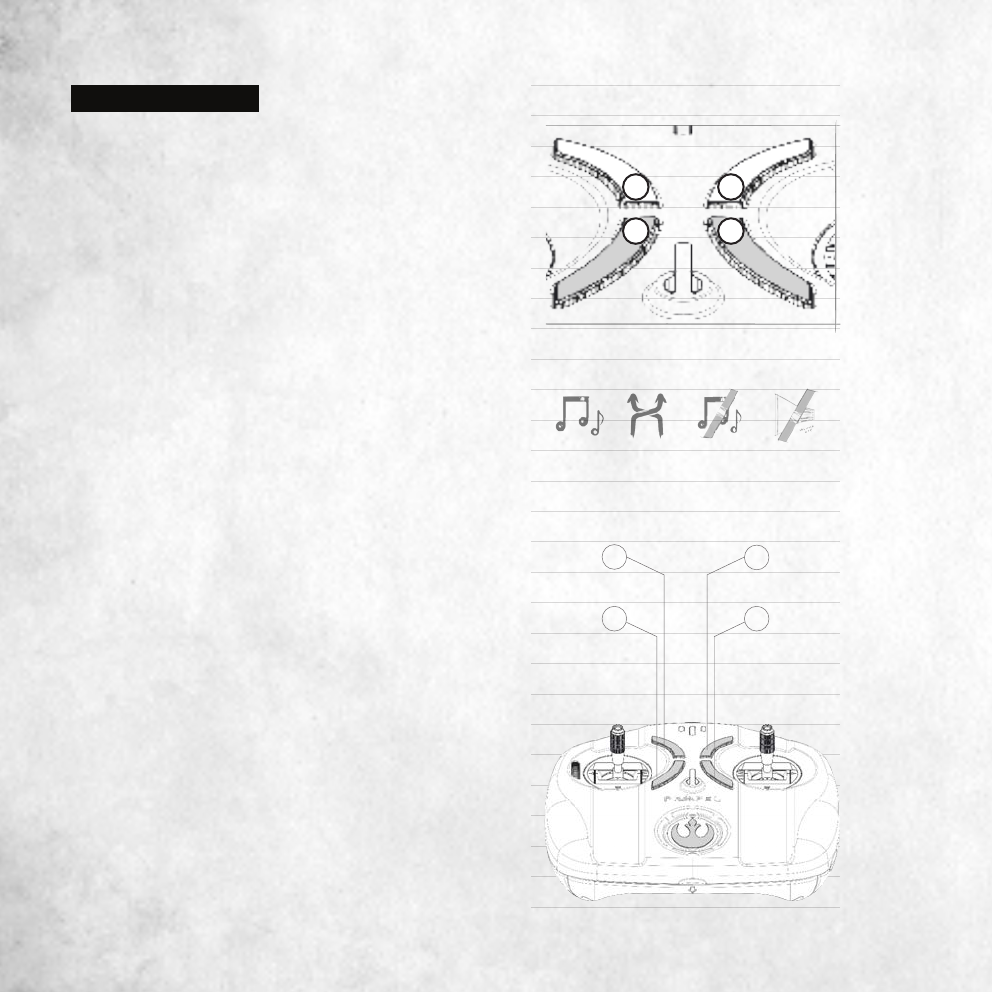
MUSIC MODE
Music mode lets you adjust the volume on your
speaker or headphones or choose a background
track. To enter music mode, hold down button 2
and button 4 for two seconds. The Life LEDs will
glow blue (or red in simulation mode). Push both
buttons again for two seconds to exit music mode.
If no buttons are pushed for ve seconds while in
music mode, the controller will automatically exit
the mode.
No other buttons will function while in music
mode except for the 4 buttons on the face of the
controller (buttons 1, 2, 3, and 4).
1. Change track: Push once to change the track
(up to six times). Push again to shue all tracks
(conrmed by the “shue all” sound). Push
again to turn o the music but keep the sound
eects (conrmed by the “music o” sound).
Push again to turn all sounds o (conrmed by
the “all sound o” sound). Push again to start
over again from the beginning.
TITLE: “MAIN TITLE”
MOVIE:
STAR WARS:
A NEW HOPE
TITLE: “THE BATTLE OF ENDOR 1”
MOVIE:
STAR WARS:
RETURN OF
THE JEDI
TITLE: “THE THRONE ROOM”
MOVIE:
STAR WARS:
A NEW HOPE
TITLE: “THE ASTEROID FIELD”
MOVIE:
STAR WARS:
THE EMPIRE
STRIKES BACK
2. Change Volume: To change volume rst enter
music mode, then push button (3) to increase
volume or push button (4) to decrease volume.
(See diagram)
X-wing soundtracks
TRACk
1-7
mUSiC
Off
SOUNdS
Off
ShUfflE
CHANGE
TRACK
ENTER MUSIC MODE
VOLUME
UP
VOLUME
DOWN
1
2 4
3
1 2
3 4
TITLE: “ALLIANCE ASSEMBLY”
MOVIE:
STAR WARS:
RETURN OF
THE JEDI
TITLE: “LANDOS PALACE”
MOVIE:
STAR WARS:
THE EMPIRE
STRIKES BACK
TITLE: “THE STARS AWAIT”
COMPOSER: DAVID PELLICCIARO
13
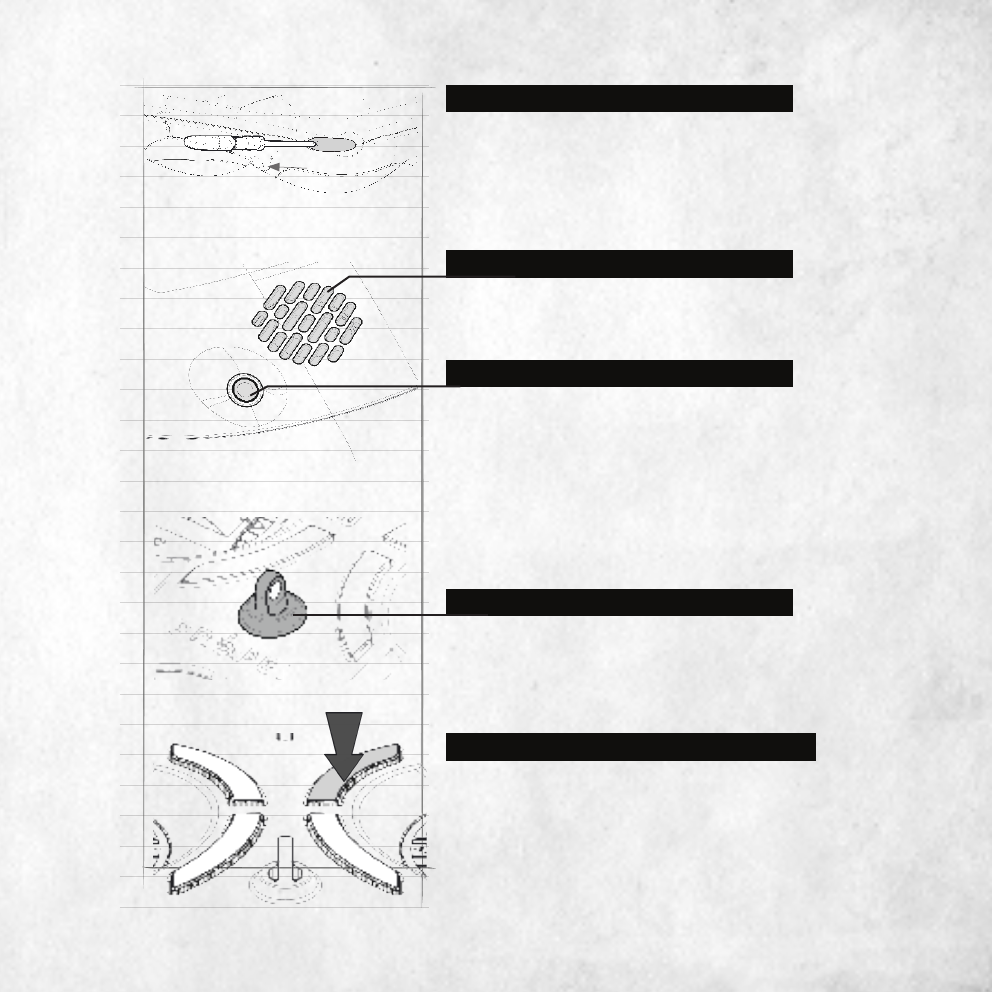
SCREWDRIVER
SPEAKER
NECK STRAP ATTACHMENT
HEADPHONE JACK
This handy screwrdiver attaches to your
controller and can be used to remove screws from
the battery cover or to tighten the screw on the
phone holder. It can also be used to remove parts
on your ship if repairs are needed.
The controller’s speaker will play every sound,
including music, explosions, and more.
For use with a lanyard, to help support the
controller around your neck.
(Lanyard not included)
The controller’s headphone jack functions in the
same way as the speaker, but will only work when
the headphones are plugged in. When headphones
are connected, the controller’s speaker will
switch o and all sound will be routed through
the headphones. When the headphones are
unplugged, sound will resume through the
speaker.
CALIBRATE
If you experience a hard landing or crash, and
your ship begins to drift in a particular direction,
you will need to land and recalibrate the gyro. On
a at level surface with the ship’s motors stopped,
hold down the button for 2 seconds to calibrate
the gyro.
14
Barometric Pressure OFF
Barometric Pressure ON
BAROMETRIC PRESSURE SENSOR ON/OFF
REPULSORLIFT ON/OFF
SMARTPHONE HOLDER
To use the smartphone holder, extend the pull tab
on the top back side of the controller and pull it
out until you hear a click.
Pull the end out and place your smartphone
inside. It will close around your smartphone
using spring pressure.
You can adjust the angle of your phone and lock
it into place by tightening the screw at the base
of the phone holder using the screwdriver in the
side of the controller.
The barometric pressure sensor maintains the
altitude of your ship above the ground, simulating
the anti-gravity eect of a repulsorlift engine. This
also lets you adjust your altitude incrementally
during ight. Push the gimbal up or down and
then release it, and your ship will hover at the
new altitude.
Having the barometric pressure sensor activated
enables your ship to perform an auto-start, but it
also limits your angle of inclination and makes it
less agile at performing stunts.
15
LEARNING HOW TO FLY TMODE
If this is your rst time ying please read the
following instructions. If you are an experienced
pilot feel free to skip ahead to the next section.
T-mode is a special ying mode intended to help
ease new pilots into learning basic ight controls
in a safe environment.To operate in T-mode
you must rst activate the repulsorlifts on the
controller (see repulsorlifts on page 14). When
in T-mode, your ship will help you to learn how to
y by moving in a controlled slow rate with added
stability. T-mode allows you to familiarize yourself
with the various functions of the control sticks
before moving on to normal speed ratings.
INVISIBLE CEILING AND FLOOR:
When ying upwards in T-mode, your altitude
is automatically governed by an invisible ceiling
at approximately 6 feet (2 meters). In addition
to the ceiling there is also an invisible oor that
prevents your ship from touching the ground
creating a safe area to y. In order to land your
ship in T-mode you will need to activate the auto-
landing sequence (See auto-landing on page 21).
To enter T-mode, hold down the speed change
button for 3 seconds. You will know you have
entered T-mode when all the lights around the
power button turn blue. To exit T-mode simply
press the speed control button once again and
you will hear a beep and the LED speed indicator
lights around the power button will return to red. TMODE
100-foot radius
16
PROTECTIVE CAGE
For beginner pilots we strongly suggest using
the protective cage. Make sure you install your
protective cage before ight. This cage protects
the propeller blades and the outside of the ship
from taking damage when crashing into walls and
other objects.
INSTALLING THE CAGE:
To install the cage place the ship in the cage with
the central bar running from front to the back
(not side to side) and with the 4 C-shaped plastic
connectors slide over each of the motor arms (see
diagram a). Proceed to securely fasten the cage
by pinching the 4 C-shaped connectors with your
thumb and forenger until you feel a small snap
indicating that the connector is locked into the
motor arm (see diagram b).
Note: Make sure the cage C-shaped connectors
are seated all the way in the highest position (see
diagram c)
diagram c
diagram b
diagram a
17
4 “AA”bATTERiES
POwER ON
100 fOOT RAdiUS
NO RivERS
GOOd wEAThER
100 fEET
SPEED 1
SPEED 3
SPEED 2
TMODE
REd lEd’S -STOP
flAShiNG whEN SyNCEd
TO ShiP
PREPARING FOR FLIGHT
FOR MULTIPERSON PLAY
Before beginning, ensure that all ships and
controllers are powered o. Make sure that no
other 2.4 GHz devices are in the area.
Each person must sync their ship individually,
one at a time, in order to avoid interference.
Follow steps on page 11 (“SYNC TO SHIP: FOR
SINGLE-PERSON PLAY”), making sure to keep
away from others while ensuring that no one else
is syncing at the same time.
After one player syncs their ship, it should be left
on until all players have nished syncing their
own ships.
Should a mistake or interference occur, all players
should turn o their controllers and ships for 60
seconds and begin the process again.
• Verify that the controller has 4“AA” batteries
and the ship’s battery is fully charged.
• Make sure your ship and controller are both
powered on.
• Operate in a large space, with an open radius of
at least 100 feet.
• Check the environment to ensure it has no
obstacles or a river. Set your ship on a clean at
surface before takeo.
DO NOT FLY YOUR Ship DURING RAIN, SNOW,
OR HEAVY WINDS.
18
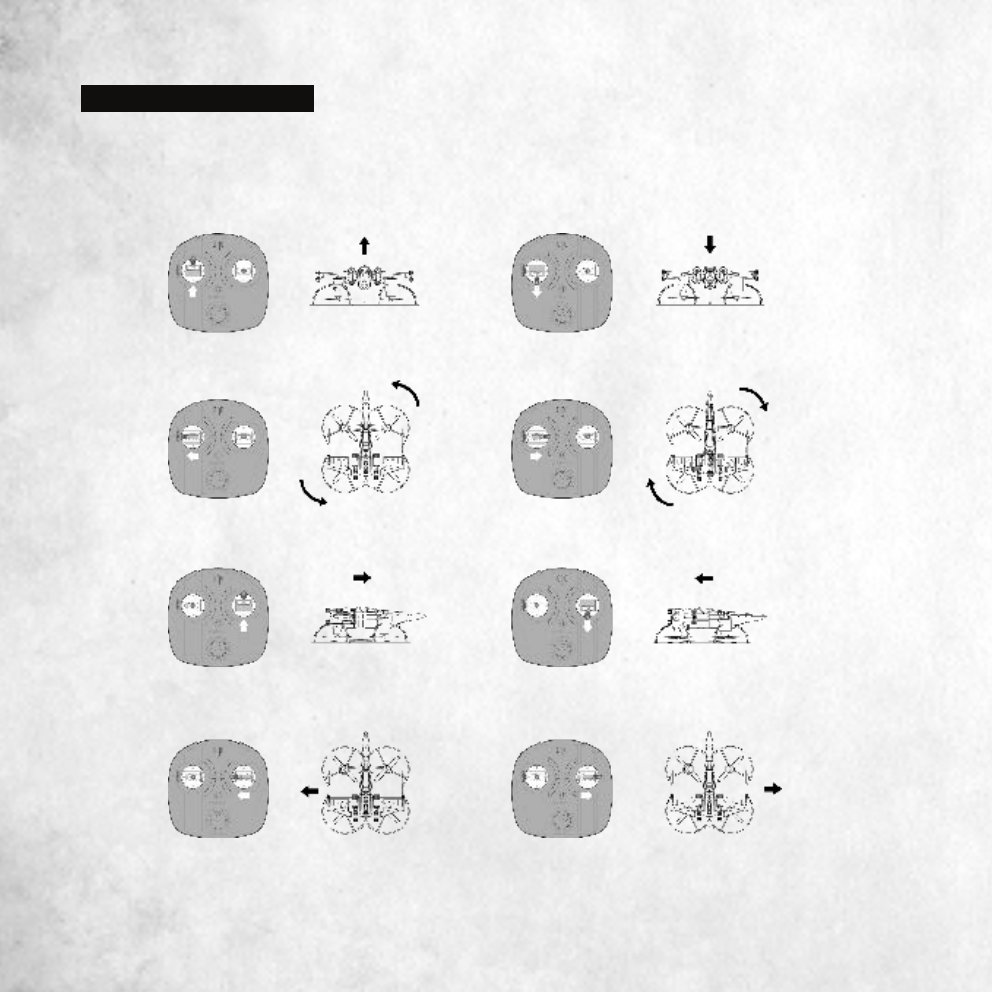
FLIGHT CONTROL
These are the basic ight functions for your ship. While learning to y it is best to
begin with a large space, at least until you get used to the basics. Once you master
your ship you can tackle more advanced maneuvers.
Practice makes perfect! Once you have these steps mastered, move to the next level.
Move the Throttle up to increase the speed of
the motors and the X-wing will rise up.
Move the Throttle stick left and the
X-wing will rotate left.
Move the Direction Control up and the
X-wing will move forward.
Move the Direction Control left and
the X-wing will bank to the left.
Move the Throttle down to decrease the
speed of the motors and the X-wing will
descend.
Move the Throttle stick right and the
X-wing will rotate right.
Move the Direction Control down
and the X-wing will move backward.
Move the Direction Control right and the
X-wing will bank to the right.
19
RUNNiNG
liGhTS
REAR liGhTS
White LEDS
Red LEDS
FLYING TIPS
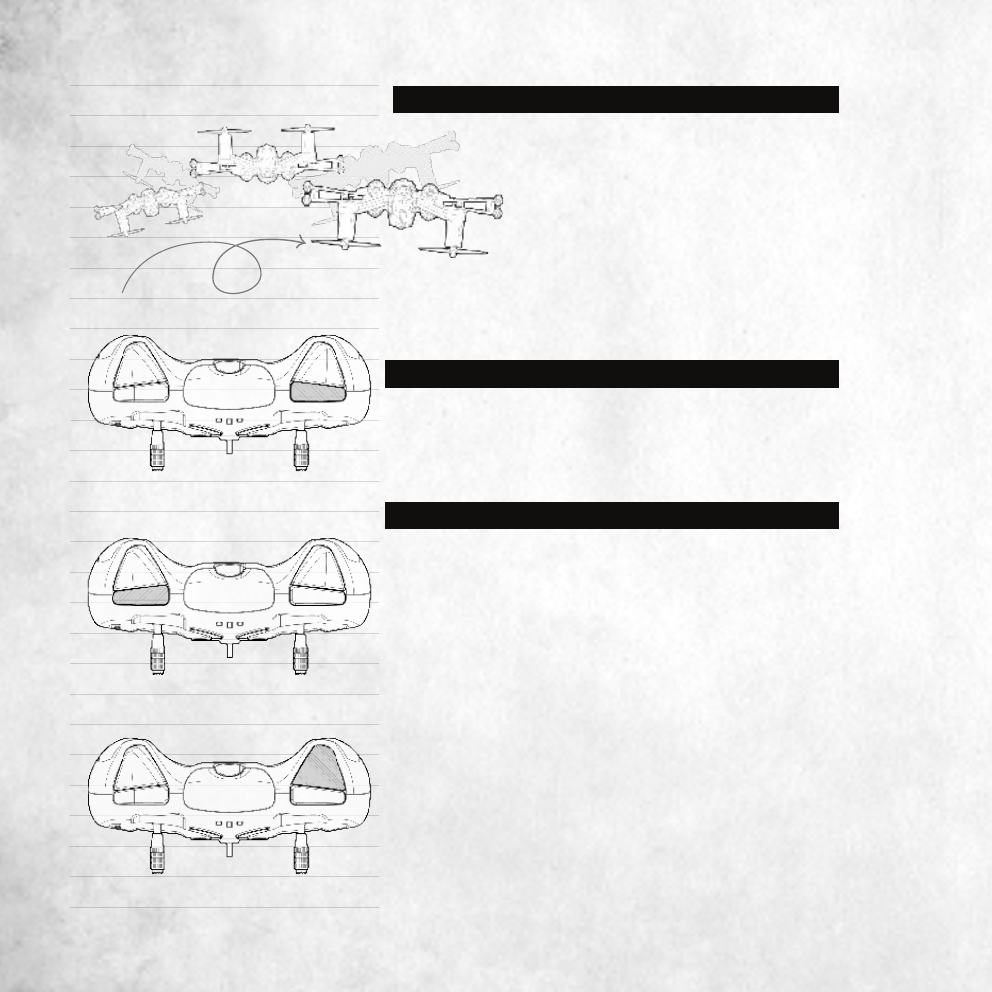
RECOGNIZING THE FRONT AND BACK OF
THE SHIP
SPEED SELECT BUTTON
• Operate your ship in a wide space. Ideally, the space will have at least a 100-foot
radius.
• If you are ying your ship with others, make sure spectators are located behind
you.
• For best performance, it is recommended that you operate the ship during zero
wind conditions, as wind can greatly aect ight performance.
Even though your ship has four rotors, it still
has a “front” or forward-facing direction, and a
back”or backwards-facing direction.
NOTE: The front of the ship displays white
LEDs. The back displays red LEDs.
Your ship has 3 speed settings: SLOW, MEDIUM
and HIGH. The default setting is SLOW.
Change the speeds using the speed select
button.
Select your speed according to your ying skill.
The speed select button is located on the top left
side of the controller.
fRONT
bACk
SPEEd SElECT
20
on/o
aux weapons
2 bEEP
1 seconds 4 seconds
on/o
white LEDS
1
bEEP
_____________ _____________
REd -SyNCEd TO ShiP
SPEED CHANGE
SPEED 1
SPEED 3
SPEED 2
TMODE
TURN ON/OFF LED’S AND AUX WEAPONS
When the controller is powered on, it will always
start on Speed Mode 1. If the controller was in
Speed Mode 3 before turning it o, it will return to
Speed Mode 1 when it is turned back on.
Push the button to change speeds between Modes
1-3. If you are in Speed Mode 3 and press the
button, you will cycle over to Speed Mode 1.
Flying speed is indicated by the LEDs surrounding
the controller’s power button.
Push the button for 1 second (you will hear
1 beep) to turn on/o the white LEDs that
illuminate your ship. (The red LEDs in the rear of
your ship will remain on.)
Hold down the button for 4 seconds (you will hear
2beeps) to turn on/o your ship’s aux weapons.
Note thatwhen the set of aux weapons are
activated, the IR transceiver will be deactivated,
and vice versa.
Simultaneously push the left and right gimbals
(control sticks) down and in to activate the
emergency stop. This will cut all power to the
motors and the ship will fall to the ground. This is
only to be used in case of emergency, as the ship
may get damaged when it hits the ground.
EMERGENCY STOP
21
AUTOSTART/AUTOLAND
AUTOSTART
AUTOLAND
When repulsorlifts are activated, push
button once when on the ground to auto-
start.
Push button for 2 seconds when in the
air to auto-land.
Push button for 2 seconds while in the air to auto-land.
When auto-land is pushed it will override the left sticks (gimbals) control, unless the
left stick (gimbal) is moved up or down during the auto-land operation.
The right control stick will function normally during the auto-land sequence,
allowing you to control the direction of your descent.
If the barometric pressure sensor is o (for a manual take-o ), then the left stick
must be moved all the way down before the blades will unlock and allow you to
control the throttle manually.
Auto-start only works when the barometric pressure sensor is activated.
If barometric pressure sensor is activated, auto-start will work only if the left stick
(gimbal) is in the center position.
The right control stick will function normally during the auto-start sequence,
allowing you to control the direction of your take-o.
After auto-start button is pressed, motors will activate and the ship will take o and
hover at a height of approximately 6 feet.
If the left stick (gimbal) is pushed up or down, the auto-start will be canceled and
normal controls will resume.
22
Push the right trigger button
while ying and your ship will
perform a 360-degree roll in a
clockwise motion while con-
tinuing its current movement.
If the ship is ying forward it
will continue to move forward as
it performs the roll, and will per-
form similarly with any direc-
tional movement.
CLOCKWISE ROLL A
Clockwise Roll (A)
COUNTERCLOCKWISE ROLL B
Counterclockwise Roll (B)
WEAPONS FIRE C
Weapons Fire (C)
Push the left trigger button while ying and your
ship will perform a 360-degree roll in a counter-
clockwise motion while continuing its current
trajectory.
Your ship comes pre-installed with infrared
battling transmitters and receivers as well as
laser receivers. Only one type of weapon can be
used at a time, meaning you can either ght with
infrared weapons or with aux weapons.
Push the button to re the weapon. Let go and
push again to re a second time.
The weapons button activates either the infrared
LED or the aux weapons, depending on which
weapons system is equipped. If aux weapons
are activated, the infrared LED transmitter and
receiver will be deactivated. If the infrared LED
transmitter is activated, the laser receivers will be
deactivated.
When weapons are red, you will hear a sound
from the controller’s speaker (or headphones if
plugged in).

23
COUNTERCLOCKWISE ROLL B
IR BATTLING
BATTLING
With IR battling, the infrared transmitters in the front of the ship will send a signal
and the infrared receiver beneath the ship will register a hit.
IR battling is relatively easy because it sends a wide signal and the receiver points
down underneath the ship. If you aim anywhere beneath your target ship from a
range of less than 2-3 meters, you will most likely score a hit.
A few things to note about IR
battling:
Sunlight greatly reduces the
distance that an IR signal
can travel. Battling outside in
daytime means that you will
need to be especially close to
your opponent to score a hit.
When battling indoors, IR
signals can bounce o of walls
(especially white walls). You can
sometimes achieve a hit even if
you weren’t directly aiming at
your opponent, if you re using
the right angle.
When IR battling, you will
not be able to battle with any
Star Wars
ships that are set to
use aux weapons.
TRANSMITTERS
RECEIVER
When battling with your vehicle it is best toy outside in a wide open space of
about 200-300 feet, in an open eld with no obstruction such as trees, houses, open
water, or power lines. When battling indoors it is recommended to do so in a very
large open area such as a gymnasium or sports center with high ceilings and no
obstructions.
24
2nd HIT 3rd HIT
FULL LIFE 1st HIT
LIFE LED’S
When the controller’s power is turned on, all 3
life LEDs will ash.
Once synced, all 3 life LEDs will glow red.
Reactions to being hit:
When the ship is hit by an opponent, it will react
and alter its ight.
No additional hits can be inicted on the ship
during this time.
FIRST HIT:
The ship will continue on its current trajectory,
but will rock back and forth two times left to
right in a uid motion. The controller will vibrate
for 3 seconds and play a unique sound eect
through the speaker. During this time, the 3 life
LEDs will ash and the ship will not react to any
other weapons. At the end of the maneuvers, only
2 life LEDs will remain lit, and the player who
has struck your ship will receive a notication
through their controller of a successful hit.
SECOND HIT:
Similar to rst hit, but the movement will be
more aggressive. The 3 life LEDs will ash and
the ship will not react to any other weapons. At
the end of the rocking, only 1 life LED will remain
lit, and the player who has struck your ship will
receive a notication through their controller of a
successful hit.

25
GAME RESET
During a 3rd hit auto-landing you will have no access to throttle as your ship
descends and stops. During this time, the 3 life LEDs will ash and the ship will not
react to any other weapons re.
All ight controls will return to normal after the 10 seconds are up. Three new life
LEDs will light up on your controller, signifying that you may re-enter the battle.
THIRD HIT AUTO-LANDING
This is the nal hit in battle.
When you have been hit a 3rd time your ship
will enter into auto-land mode and descend in
a downward spiral.
TAKING OVER LANDING SEQUENCE
Pulling your left throttle stick all the way
down during auto-landing sequence will
activate user-controlled landing mode.
This feature allows you to take control of your
direction while you fall.
This may be used to avoid hitting an obstacle.
IN ADVANCED MODE REUPULSORLIFT
DEACTIVATED
When descending, all the controls will remain
active except the throttle, allowing you to
move freely and create your own crash-landing
pattern.
26
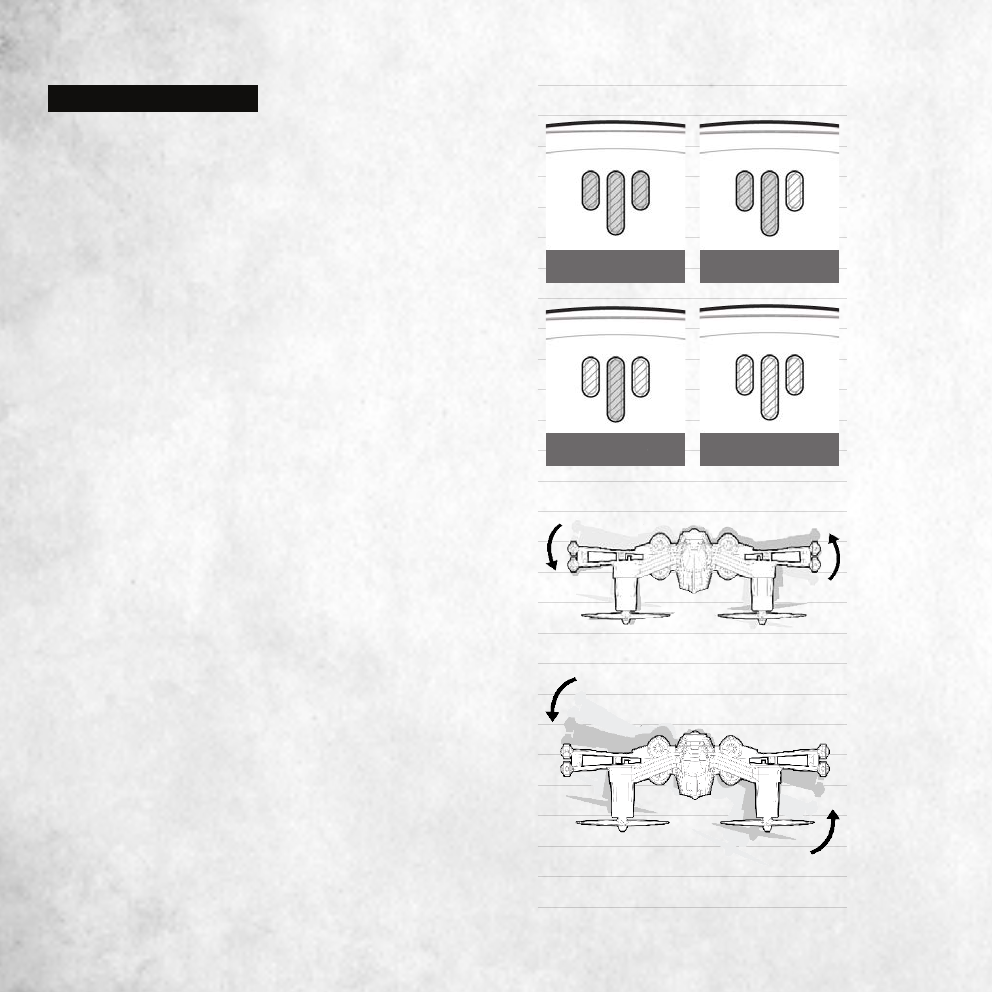
whEN yOU’RE iN ThE RiGhT SPOT, USE A
COmbiNATiON Of yOUR yAw ANd AilERON
(SidEwAyS STRAfE) CONTROlS TO STRAfE iN A
fUll CiRClE AROUNd yOUR OPPONENT . if yOU
TimE iT RiGhT, yOU CAN dEvASTATE imPERiAl
ATTACkERS.
STAy iN fRONT
Of yOUR ENEmy’S
TURN
wATCh
fOR
ThE
COUNTER
TURN
!
EASE iNTO SidE
SliP-GET ON
TARGET
27
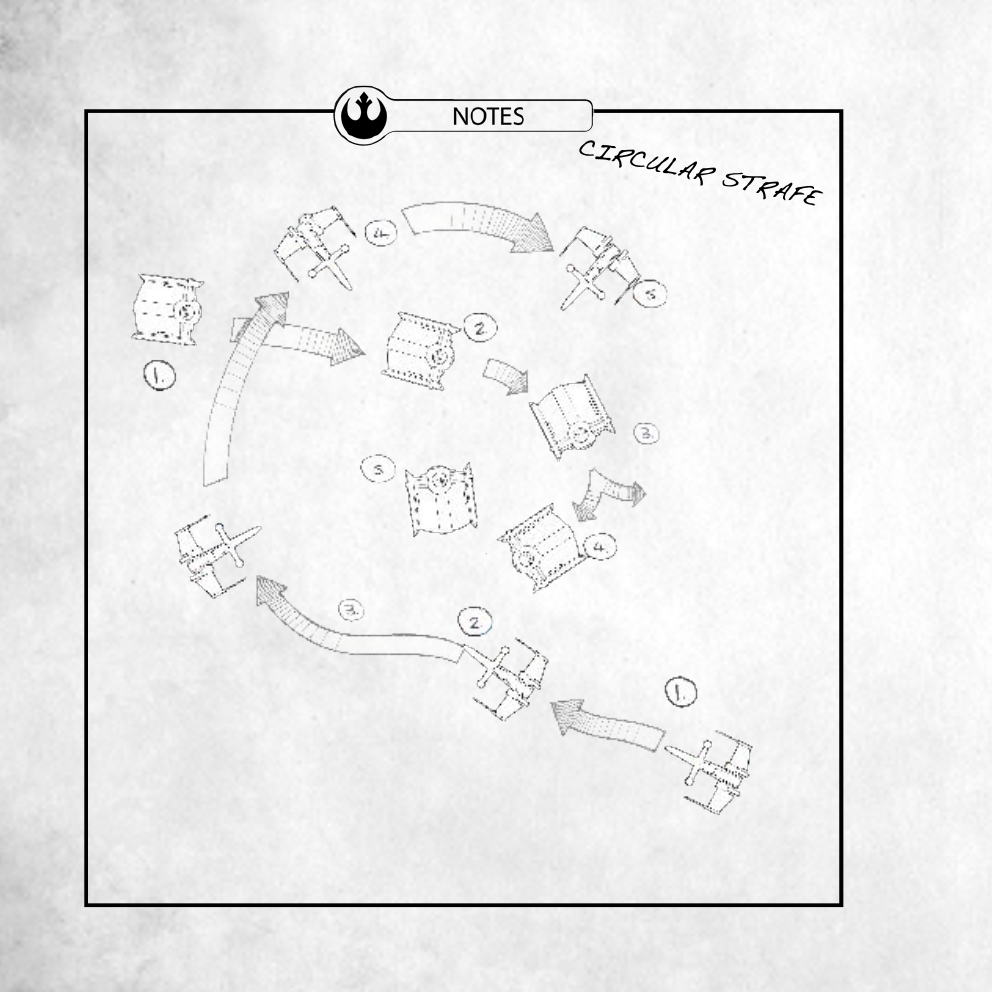
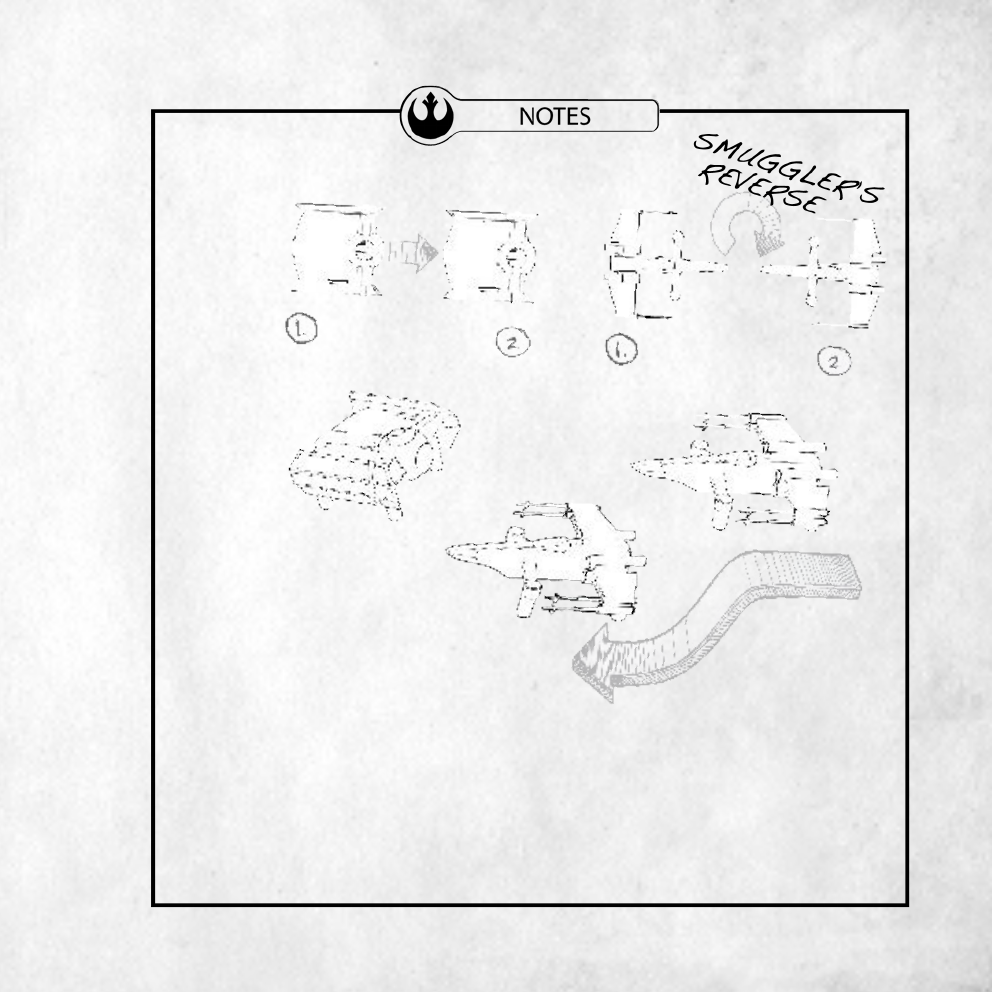
CUT yOUR ThROTTlE ANd dROP bENEATh ThE ElEvATiON Of A ChASiNG ENEmy. PROTECT
yOUR X-wiNG’S vUlNERAblE UNdERbElly whilE mANEUvERiNG iNTO ATTACk POSiTiON!
kRiff
ThE
EmPEROR
!
wATCh
him
SAil
by
!
ClEAR
SkiES
28
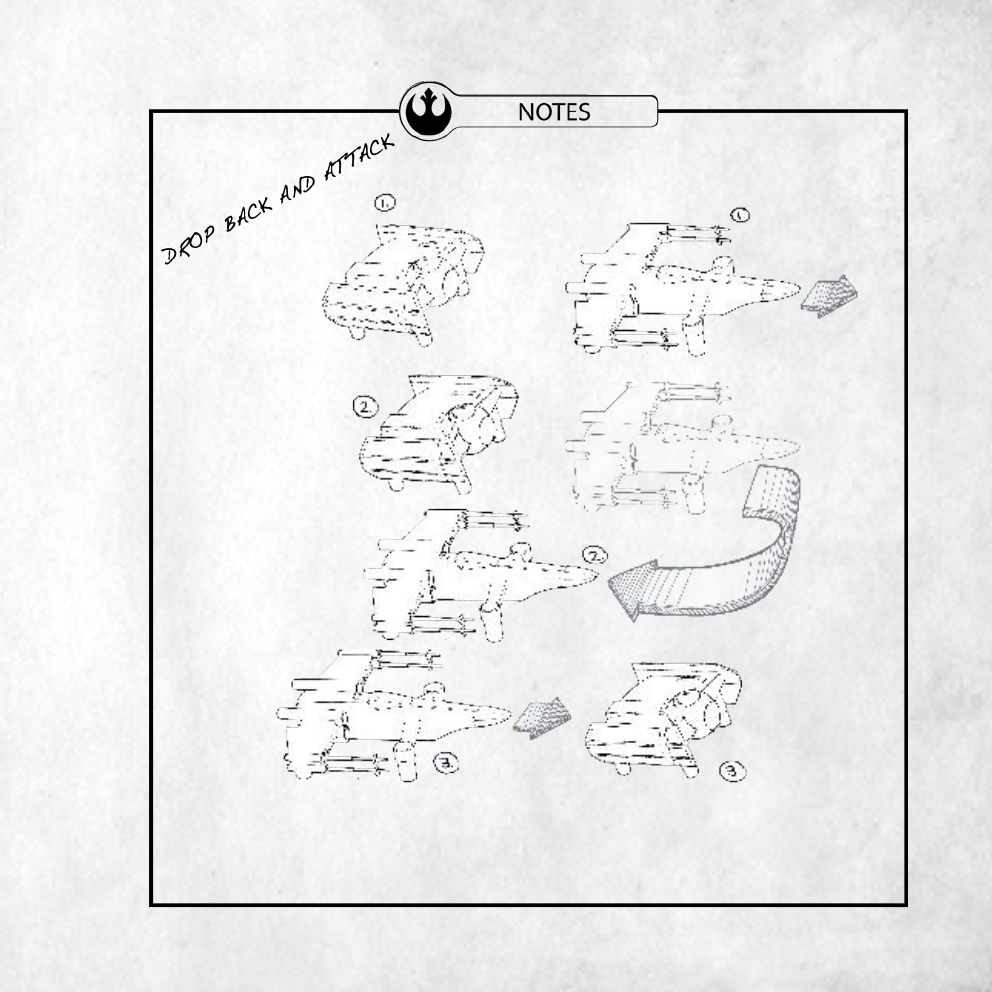
whEN yOUR ENEmy iS ClOSiNG iN fROm yOUR REAR, EXECUTE A jUmPiNG hOP, by
PUlliNG UP ANd EASiNG Off ON yOUR ThROTTlE, lOSiNG yOUR fORwARd SPEEd ANd
dROPPiNG bACk bEhiNd ThEm. if yOU dO iT RiGhT, yOU’ll fiNd yOURSElf iN A
POSiTiON fOR A kill ShOT.
SAy NO TO mEmORy-wiPEd
ASTROmEChS
GET ON hiS TAil qUiCk!
NOSE UP! PROTECT yOUR
bElly
29
m
OST
R
EbEl
PilOTS
kNOw
ThiS
ONE
. m
AkE
A
180
dEGREE
TURN
AT
fUll
ThROTTlE
,
RESUlTiNG
iN
A
RAPid
diRECTiONAl
ChANGE
wiTh
AlmOST
NO
TURNiNG
ARC
. y
OU
CAN
ThEN
SURPRiSE
yOUR
ENEmy
wiTh
A
fOUR
-
CANNON
lASER
blAST
.
T
hiS
bOld
mANEUvER
CAN
SURPRiSE
AN
ENEmy
wiTh
iTS
bRAzEN
,
STARiNG
-
dEfEAT
-
iN
-
ThE
-
fACE
APPROACh
!
PREy TURNS PREdATOR
180 dEGREE
yAw TURN
dROP bElOw TO ATTACk
yOUR ENEmy’S bElly
30
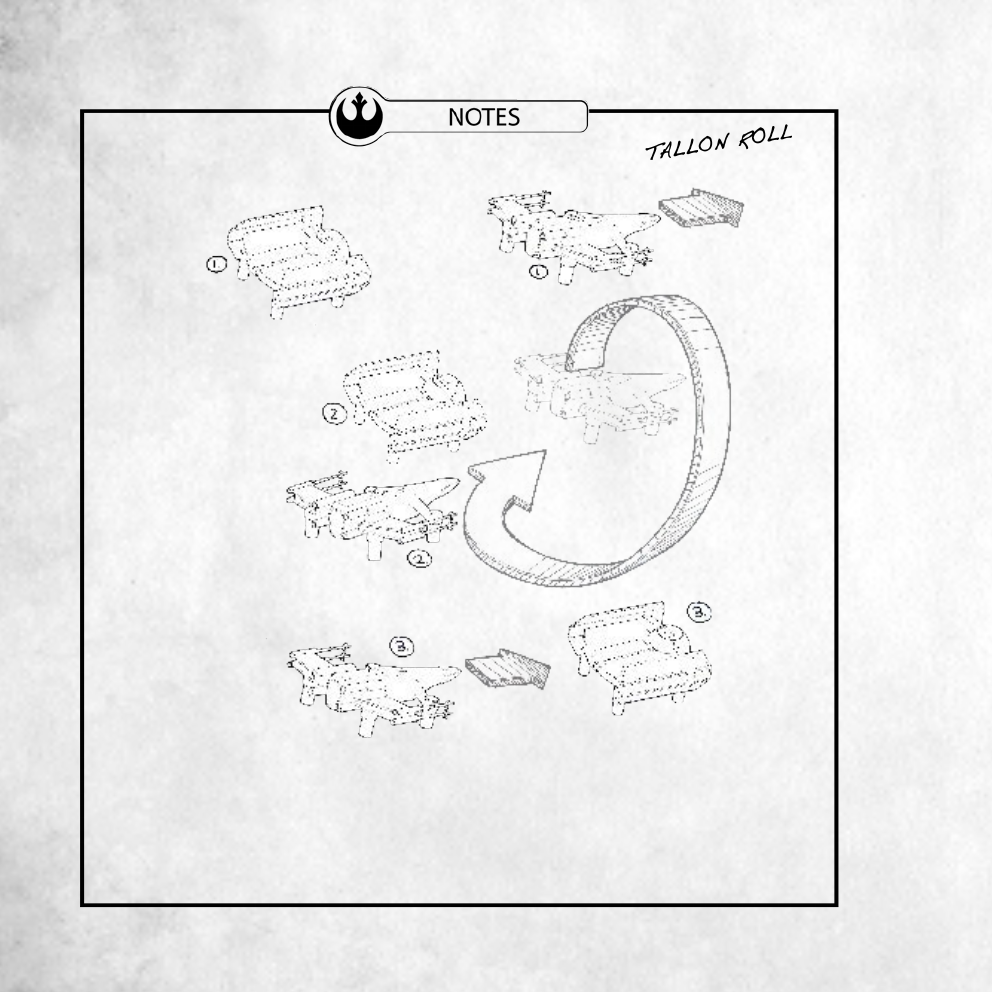
NAmEd AfTER AdAR TAllON, imPERiAl dEfECTOR whO bRAvEly AidEd ThE AlliANCE,
ThE TAllON ROll iS A TRiCky TEChNiqUE ThAT’S EXECUTEd whEN AN ENEmy PilOT iS
APPROAChiNG fAST fROm ThE REAR.
if ThE PilOT lEvElS OUT ANd PUllS UP whilE ROlliNG AwAy fROm ThE diRECTiON
Of ThE TURN, ThEy CAN SliP bACk iN bEhiNd ThE ENEmy wiTh NO lOSS Of diSTANCE
OR SPEEd.
h
E
wONT
bE
AblE
TO
fOllOw
!
h
Ey
v
AdER
EAT
vACUUm

31
XWING WARNING
Your X-wing is designed for INDOOR or OUTDOOR use. The X-wing blades revolve at
high speeds and can cause harm to the user, spectators, and animals.
Stand clear of the ship to reduce the risk of getting into its ight path. Warn
spectators that you will be ying your ship so that they can remain aware of its
position. Before ying, inspect the ship’s rotor blades to ensure they are securely
fastened.
WARNING!
Choking/Cutting Hazard: Small parts/sharp rotor blades.
Keep hands, hair and loose clothing away from the propeller when the power switch
is in the ON position.
Turn o the controller and ship’s power switches when not in use.
The included charger is built specically for the X-wing’s Li-poly battery.
Do not use it to charge any other battery.
New alkaline or rechargable 1.5v batteries are recommended for maximum
performance.

32
Always remove the batteries from the controller when it is not being used for an
extended period of time.
To clean, gently wipe the controller and ship with a clean damp cloth.
Keep your equipment away from direct heat or sunlight.
Do not submerge the controller or ship in water. This can damage the unit beyond
repair.
Parental guidance recommended when installing or replacing batteries.
This ship uses a Li-poly rechargeable battery. If the battery no longer stays charged,
dispose of it properly according to local disposal requirements.
CONTROLLER BATTERIES:
Controller requires 4 “AA” batteries (not included). Please read the important
battery safety warning below.
Do not mix alkaline, standard (carbon-zinc) and rechargeable batteries (Nickel
Metal Hydride).
Do not mix old and new batteries.
Non-rechargeable batteries are not to be recharged.
Rechargeable batteries are to be removed from the item before being charged (if
removable).
Rechargeable batteries are only to be charged under adult supervision.
Exhausted batteries should be removed immediately and must be recycled or
disposed of properly according to state or local government ordinances and
regulations.
The supply terminals are not to be short-circuited.
Only batteries of the same or equivalent type as recommended are to be used.
Batteries are to be inserted with the correct polarity (see inside booklet for diagram).
Do not dispose of batteries in a re as batteries may leak or explode.
BATTERY WARNINGS
CARE AND MAINTENANCE

33
CAUTION: Changes or modications not expressly approved by the party responsible
for compliance could void the user’s authority to operate the equipment.
NOTE: This equipment has been tested and found to comply with the limits for
a Class B digital device, pursuant to Part 15 of the FCC Rules. These limits are
designed to provide reasonable protection against harmful interference in a
residential installation. This equipment generates, uses and can radiate radio
frequency energy and, if not installed and used in accordance with the instructions,
may cause harmful interference to radio communications. However, there is no
guarantee that interference will not occur in a particular installation. If this
equipment does cause harmful interference to radio or television reception, which
can be determined by turning the equipment o and on, the user is encouraged to
try to correct the interference by one or more of the following measures:
• Re-orient or relocate the receiving antenna.
• Increase the separation between the equipment and receiver.
• Connect the equipment into an outlet on a circuit dierent from that to which the
receiver is connected.
• Consult the dealer or experienced radio/TV technician for help.
This device complies with Part 15 of the FCC Rules. Operation is subject to the
following two conditions :
(1) This device may not cause harmful interference, and
(2) this device must accept any interference received, including interference that
may cause undesired operation.
FCC PART 15 C NOTICE

34
At Propel, we make premium products using the very best components.
There are, on occasions, reasons for customers to return products to us. Propel UK
oers a 90-day warranty to cover these eventualities, the details of which can be
found on the Propel UK website at propelrc.co.uk.
In the event of this being necessary you are required to choose the correct reason
for the return. The details as to what is required are below. For our full terms and
conditions please visit our website and select “customer care,” where you will nd
our Returns Policy and Procedures.
If you have simply changed your mind:
If you have received an item which you have decided you do not wish to keep for
whatever reason, then you must inform us within 7 working days of the proof of
purchase, in writing to the following address:
Propel UK C/O 9, Sterling Centre Eastern Road Bracknell Berkshire United Kingdom
RG12 2PW
Alternatively, you may send an email to customercare@propel.co.uk.
PROPEL UK RETURNS POLICY
If you receive your item and nd it to be faulty, you have 7 working days from the
proof-of-purchase date to inform us, either in writing by mail to the address above or
by e-mail to customercare@propel.co.uk.
A Propel Customer Care Representative will contact you and provide you with an
RMA form containing all the necessary information for us to proceed with your
request. We will then arrange to collect the item from you, and once the fault has
been veried, we will either replace or fully refund the item. If however, the item is
found not to be faulty, you will be charged for all return carriage costs incurred by
us. Again, all items should be returned in their original packaging complete with any
accessories, power cords and/or documentation, including manuals.
ITEMS FAULTY ON ARRIVAL

35
RETURNED ITEMS FAILING
WITHIN THE WARRANTY PERIOD
If a fault occurs within the rst 90 days from the date of purchase (and the fault is
covered under the manufacturer’s guarantee) then you will need to go to propelrc.
co.uk and select the “customer care” link and request a Return Merchandise
Authorization Form or “RMA”. You will need to ship the product to our address
(see above) with a copy of the completed RMA form inside the box. Once the item
is received, our technicians will inspect the product and if found faulty, repair or
replace the product and ship it back to you at no extra cost.
All returned goods must be returned in adequate packaging. Propel will not be
responsible for any damage that is incurred to goods that are not packaged in the
original packaging that the goods were shipped in. If you do not have the original
packaging, you will need to obtain appropriate packaging and ensure that the
returning goods are protected against the rigors of courier transit. Please also send
the package in a manner that requires a signature upon delivery. Propel UK will not
be responsible for any packages mislaid or stolen in transit.
If the returned item is found not to be faulty and the problem is one of incorrect
usage, operator error and/or operator damage, the customer will be liable for the
carriage costs of the goods back to us and also for returning the product back to the
customer. Once product is received, our warranty repair technicians will review the
product to determine if it was actually faulty or not. If the product is deemed not
faulty according to Propel’s warranty guidelines, a customer care representative
will contact you with a quote to repair and replace the product. Please note that
all carrier charges and repair charges must be collected before we can return the
product.
Please ensure that all goods returned have a copy of the original proof of purchase
and a completed RMA form stating the full reasons for return. Failure to do this may
slow down any repair or refund.
PROPEL UK RETURNS POLICY

36
ITEMS DAMAGED DURING TRANSIT
In the event that you purchased online, and later signed for, an item that has
clearly been damaged in transport, you should add a comment to your signature
for the items with the courier. You must also still inform us within the 7-working-
day period if you have accepted goods which were clearly damaged when you
received them by completing the Returns Authorisation Form with all the required
information. Items must then be boxed in all original packaging, whether that
packaging is damaged or not and again complete with any and all accessories,
including paperwork and manuals. We will then arrange collection of the item. Once
we receive the item back into our shop we will send a replacement item out to you or
if requested, we will issue a full refund to the credit card used to pay for the item.
In all cases, any goods being returned must be adequately packaged and protected.
Propel UK will not be responsible for any damage or loss of goods that occurs in
transit back to us.
If you need to reach us, please email us at customerservice@propelrc.co.uk.
Alternatively, you can go to www.propelrc.co.uk and click on the "customer care" tab
to schedule an appointment to speak with a propel customer care associate.
Refunds
Qualifying refunds shall be made within 30 days from receipt of returned goods, and
shall be for the full original purchase price you paid for said goods, provided that the
goods are returned by you at your own cost and received by us in a new and unused
condition. Qualifying goods returned otherwise shall be refunded the full original
purchase price less any costs incurred in shipping or re-packaging.
Please ensure that all goods returned have a copy of the original proof of purchase
and a completed RMA form stating the full reasons for return. Failure to do this may
slow down any repair or refund.
Schipholweg 321, Badhoevedorp 1171 PL, The Netherlands
+44(0)330 123 3457
© 2017 Rooftop Group Europe, BV. All Rights Reserved.
www.propelsw.com
PROPEL UK RETURNS POLICY

37
ROOFTOP BRANDSTM warrants to the original consumer that this product is free from any
electrical or mechanical defects for a period of 90 DAYS from the date of purchase. If any such
defect is discovered within the warranty period, ROOFTOP BRANDSTM will repair or replace
the unit free of charge upon receipt of the unit, shipped postage prepaid and insured to our
warranty center. The warranty covers normal consumer use and does not cover damage that
occurs in shipment or failure that results from alterations, accident, misuse, abuse, neglect,
wear and tear, inadequate maintenance, commercial use or unreasonable use of the unit.
Removal of any parts/components voids all warranties. This warranty does not cover cost of
repairs made or attempted outside by third-party individuals or companies. Any applicable
implied warranties, including warranties of merchantability and tness, are hereby limited
to 90 DAYS from the date of purchase. Consequential or incidental damages resulting from
a breach of any applicable express or implied warranties are hereby excluded. Some states
do not allow limitations on the duration of implied warranties and do not allow exclusion of
incidental or consequential damages, so the above limitations and exclusions in these instances
may not apply.
If your product begins to malfunction or stop working, immediately call or email our warranty
center at the phone/email listed below. If it is determined that a return is necessary, our
warranty department will issue you an RMA number/form and an address to the nearest return
center for shipping the product to. IMPORTANT NOTICE: We will reject all returns that are not
accompanied by an issued RMA form and number so make sure to contact our warranty center
before attempting to return your product!
Please repack your product in a durable box,
preferably in the original carton, and send it
prepaid, and adequately insured.
Include the RMA form that was issued by our
warranty department along with your daytime
telephone number and email address (if
available) inside the shipping carton. If your
warranty has expired, contact our warranty
center for charged service.
For further information please send all inquiries
to customerservice@rooftopbrands.com
REPAIR/REPLACE PRODUCT
LIMITED 90DAY WARRANTY NORTH AMERICA
PREPARATION FOR SHIPPING
YOUR PRODUCT
IMPORTANT NOTICE!
DO NOT ATTEMPT TO SHIP YOUR
PRODUCT BACK WITHOUT FIRST
CONTACTING OUR WARRANTY
DEPARTMENT AT:
ROOFTOP BRANDSTM
WARRANTY REPLACEMENT
DEPARTMENT
TEL: + 1(877) 353 5334
customerservice@rooftopbrands.com

38
WEEE Directive & Product Disposal
At the end of its serviceable life, this product should
not be treated as household or general waste. It
should be handed over to the applicable collection
point for the recycling of electrical and electronics
equipment, or returned to the supplier for disposal.
Internal/Supplied Batteries
This symbol on the battery indicates that the battery is
to be collected separately. This battery is designed for
separate collection at an appropriate collection point.
©2017 Rooftop Brands™ All rights reserved
Tel: + 1(877) 353 5334 www.propelsw.com
Made in China
Conforms to safety requirements of RED 2014/53/EU, FCC,RSS210.
This device complies with Industry Canada licence-exempt RSS standard(s).
Operation is subject to the following two conditions: (1) this device may not
cause interference, and (2) this device must accept any interference, including
interference that may cause undesired operation of the device.
Le présent appareil est conforme aux CNR d’Industrie Canada applicables aux
appareils radio exempts de licence. L’exploitation est autorisée aux deux conditions
suivantes : (1) l’appareil ne doit pas produire de brouillage, et (2) l’utilisateur de
l’appareil doit accepter dout brouillage radioélectrique subi, même si le brouillage est
susceptible d’en compromettre le fonctionnement.
INDUSTRY CANADA NOTICE CANADA ONLY
V4.2

39
PILOT’S LOG
