JRI 10620-03 SIRIUS BOX User Manual Notice SiriusWeb 012014 EN Mise en page 1
JRI MAXANT SIRIUS BOX Notice SiriusWeb 012014 EN Mise en page 1
JRI >
User Manual

réf : 08869 G
®
Installation guide
Congratulations - you have just
purchased a SiriusWeb solution. Once
installed, SiriusWeb will allow you to
monitor your storage or living areas and
consult the measurements from any PC
connected to the Internet.
© JRI 1
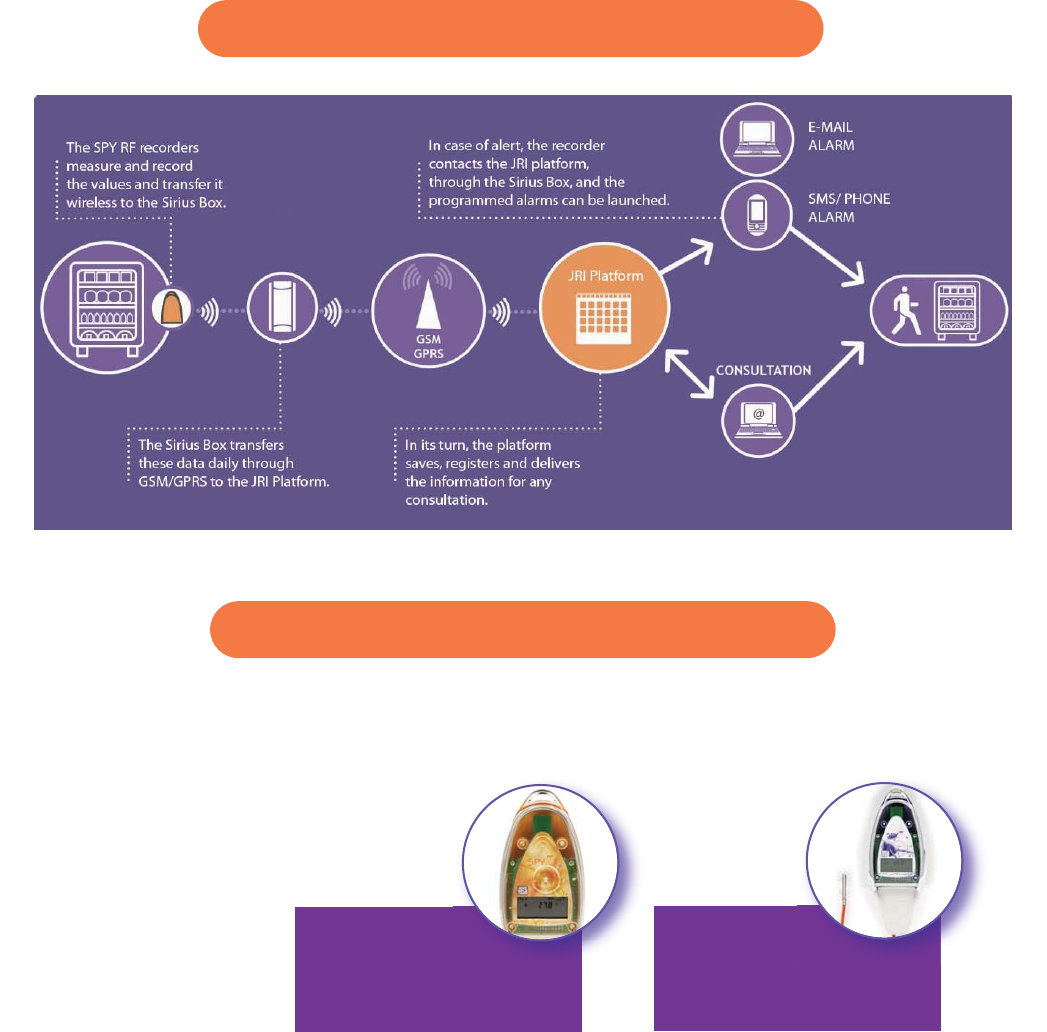
Function diagram
Unpack carefully your parcel and check that you have all the below mentioned items. Then proceed
with the installation of the SPY RF and your SiriusBox as described below.
1- The SPY RF recorders
3- One wall mounting bracket for each SPY RF recorder
(only supplied with remote probe SPY RF recorders).
2- The SiriusBox includes a wall mounting bracket and a
power supply cord.
4- Double-sided adhesive tape for each SPY RF recorder
(only supplied with remote probe SPY RF recorders).
Provided material
Ambient probe model SPY RF
T+, Green, Air and TH
Remote probe model SPY RF
U, N and C
Your step installation guide
© JRI 2
Note: Go straight to Step 2 if you have an orange SPY RF T+, Mini SPY Green or SPY RF TH -type
recorder.
Connect the probes to the SPY RF only if you have a model with a remote probe (refer to the user
manual of the SPY RF recorders).
Note: JRI advises you to consult your certified SPY RF installer in order to carry out the installation
of the recorders properly.
> Ambient recorders (SPY RF T+, TH, Green, Air)
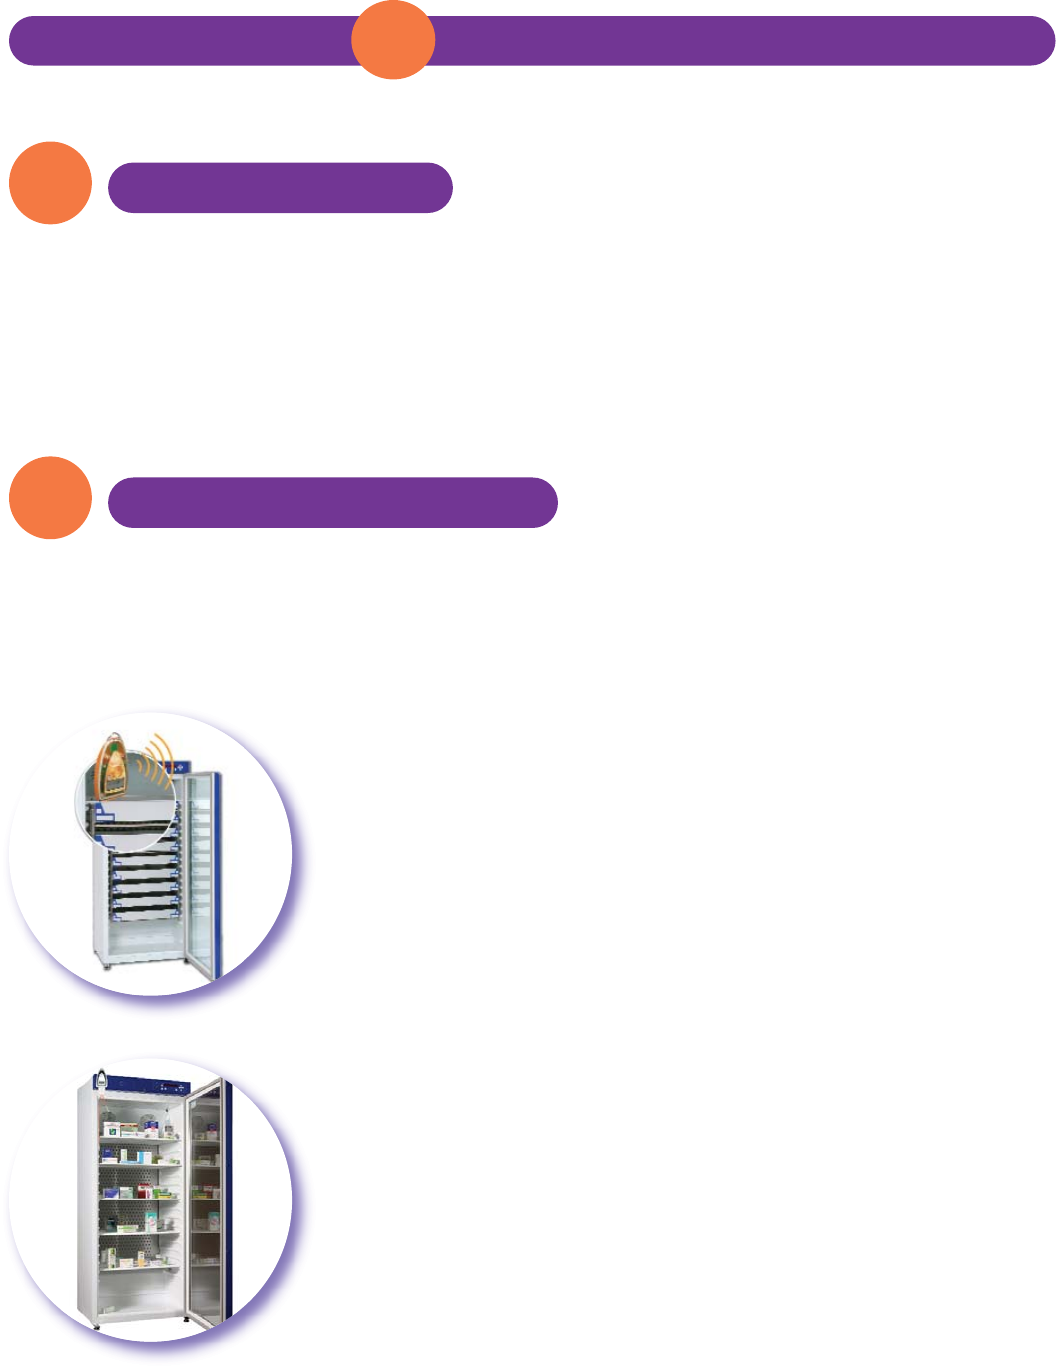
Place the recorder(s) in an upright position inside the
compartment/chamber/area you want to monitor, about two thirds
up.
or
> Remote recorders (SPY RF U, N or C)
Place the recorder(s) outside the compartment/chamber/area in an
upright position as high up as possible on the exterior partition (of
the compartment/chamber). A wall mounting bracket and double-
sided adhesive tape are provided for this purpose.
The probe connected to the recorder must be placed in the centre
inside the compartment/chamber/area in order to register a tempe-
rature as uniform as possible.
Put the flat cable of the probe through the door seal at the level of
the hinges of your compartment/chamber.
1Connect your probes
2Install your SPY RF recorders
12
3Install your SiriusBox
4Connect your SiriusBox
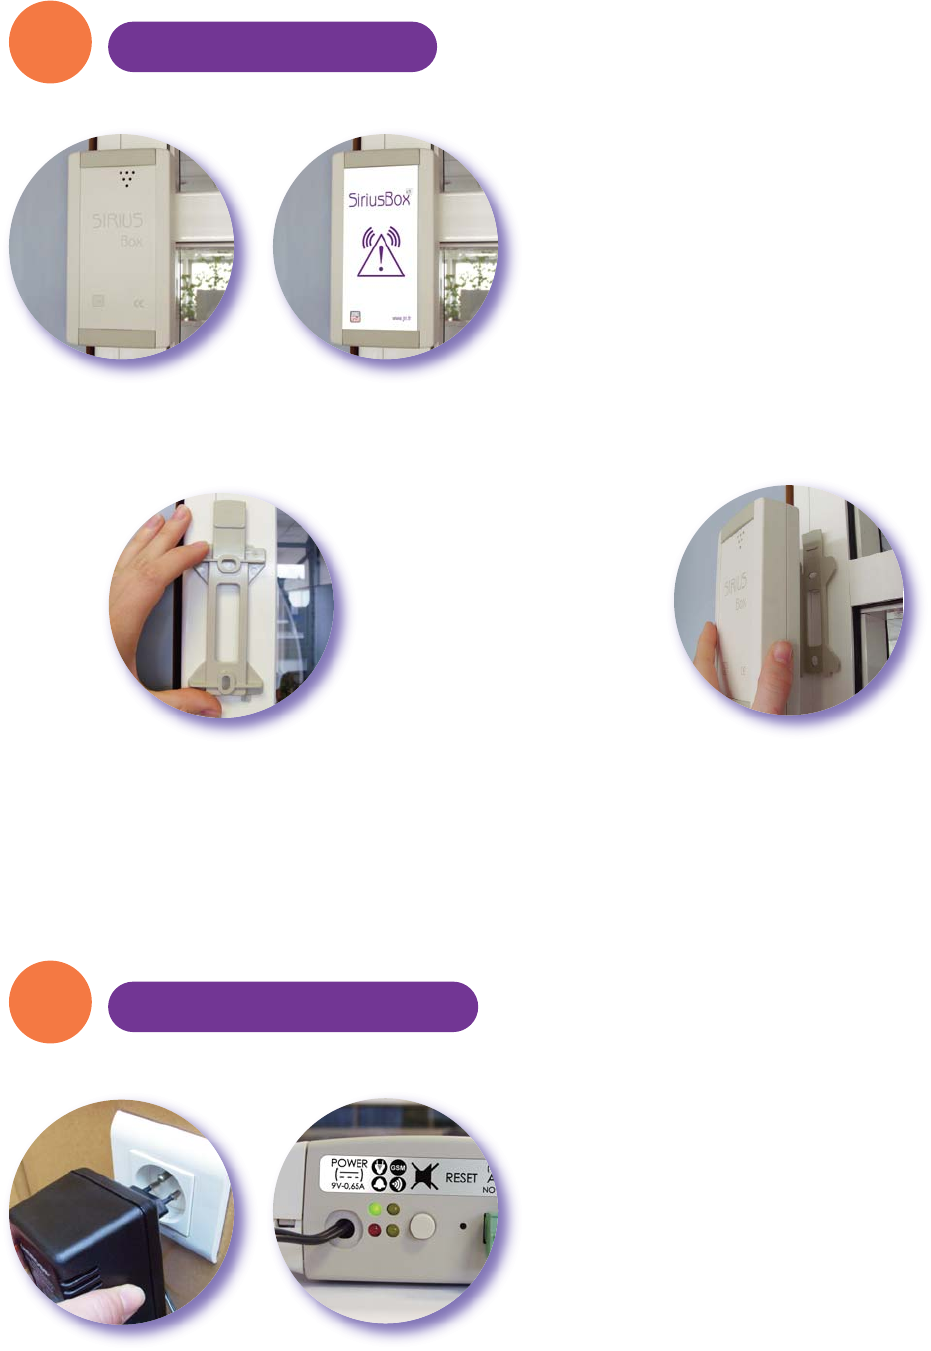
Fasten the SiriusBox on the wall mounting
bracket by sliding it upwards, then downwards
until you hear a click.
(note: to unfasten the SiriusBox, push gently
on the release lever, push the box upwards and
then downwards).
© JRI 3
Fix the wall mounting bracket to the wall in an
upright position (at a height of 2 m minimum and
50 cm from the ceiling).The release lever should
turn upwards. Depending on the surface of the
wall, use two screws or double-sided adhesive
tape or Velcro.
Choose an appropriate place on the wall close to a socket. It is important that you are in a GSM
coverage area. The SiriusBox must be placed at a reasonable distance from the SPY RF recorders
(max. 50 m).
Plug the adapter into the socket.
At the bottom of the box, the first green LED lights up indicating that the SiriusBox is powered.
© JRI 4
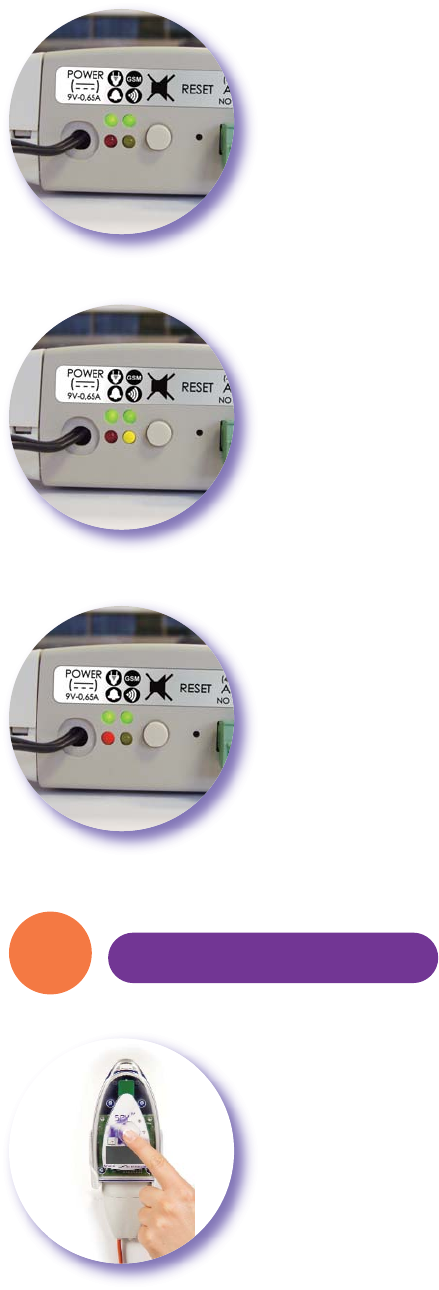
If the temperature is not displayed on the SPY RF recorder(s), press the push-button for at least 5
seconds to set it going (refer to the user manual of the recorders...). Your system is now working.
The yellow LED indicates that data exchanges between the SiriusBox and
the SPY RF recorders are taking place.
The second green LED lights up when the connection to the GSM network
is established. It turns on 10-30 seconds after being connected. If it does
not, this means that there is an insufficient GSM coverage. In this case,
move the device and try again.
The red LED indicates that an alert is on.
5Start your recorders
7Display
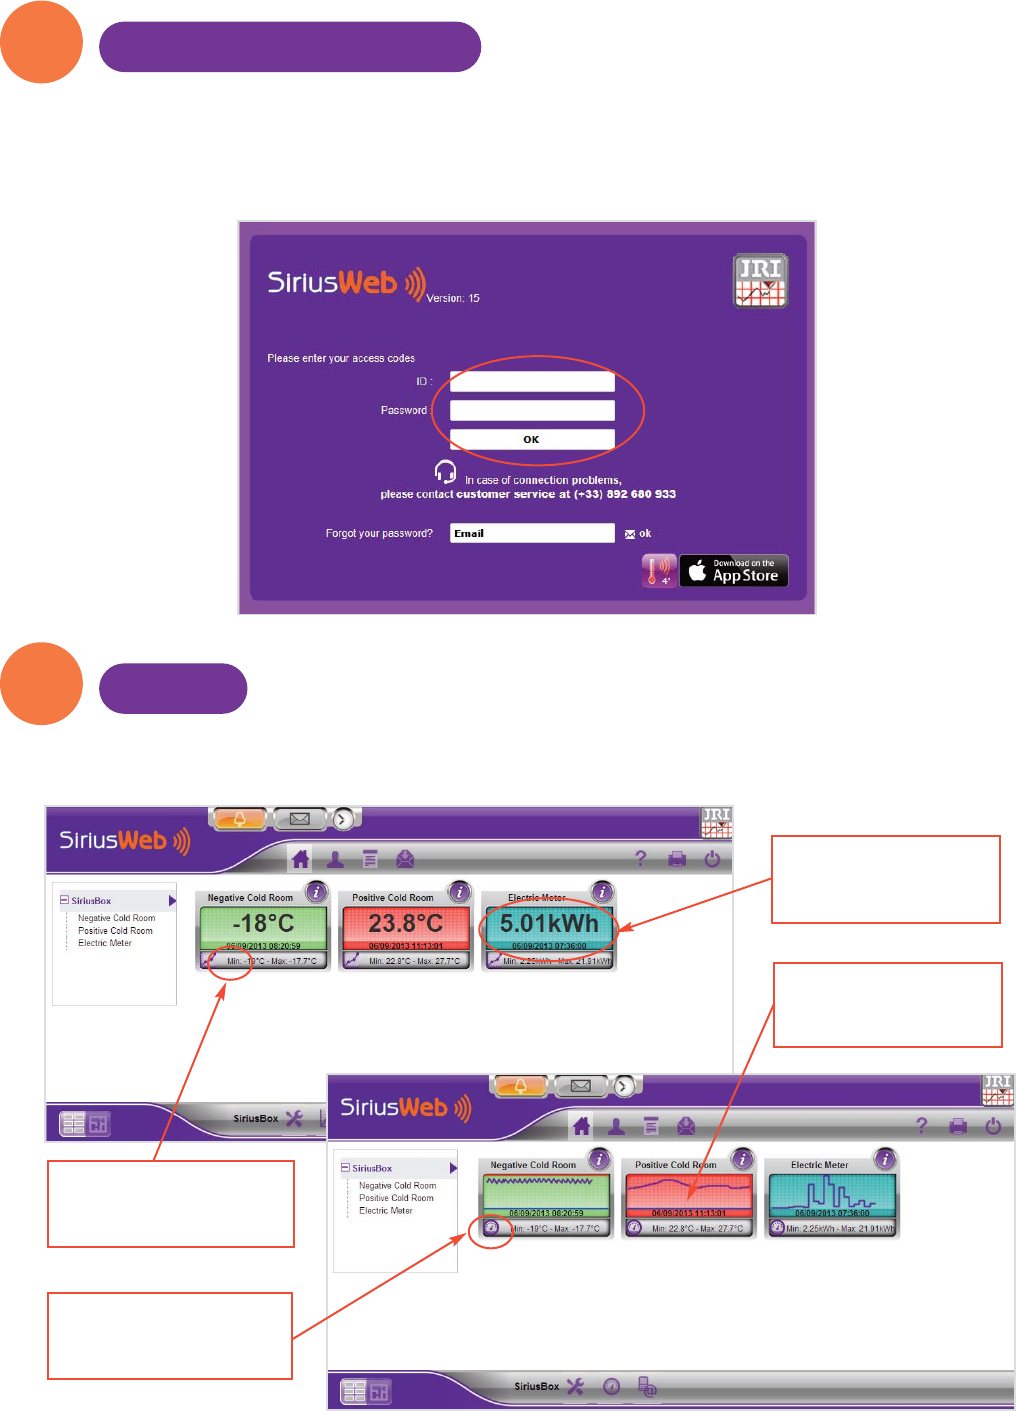
6Log on to the SiriusWeb
Log on to the www.jri-maxant.com website using your login and password.
Click "CUSTOMER ACCESS" in the upper right corner. A window appears. Enter your login and
password, then click "OK” .
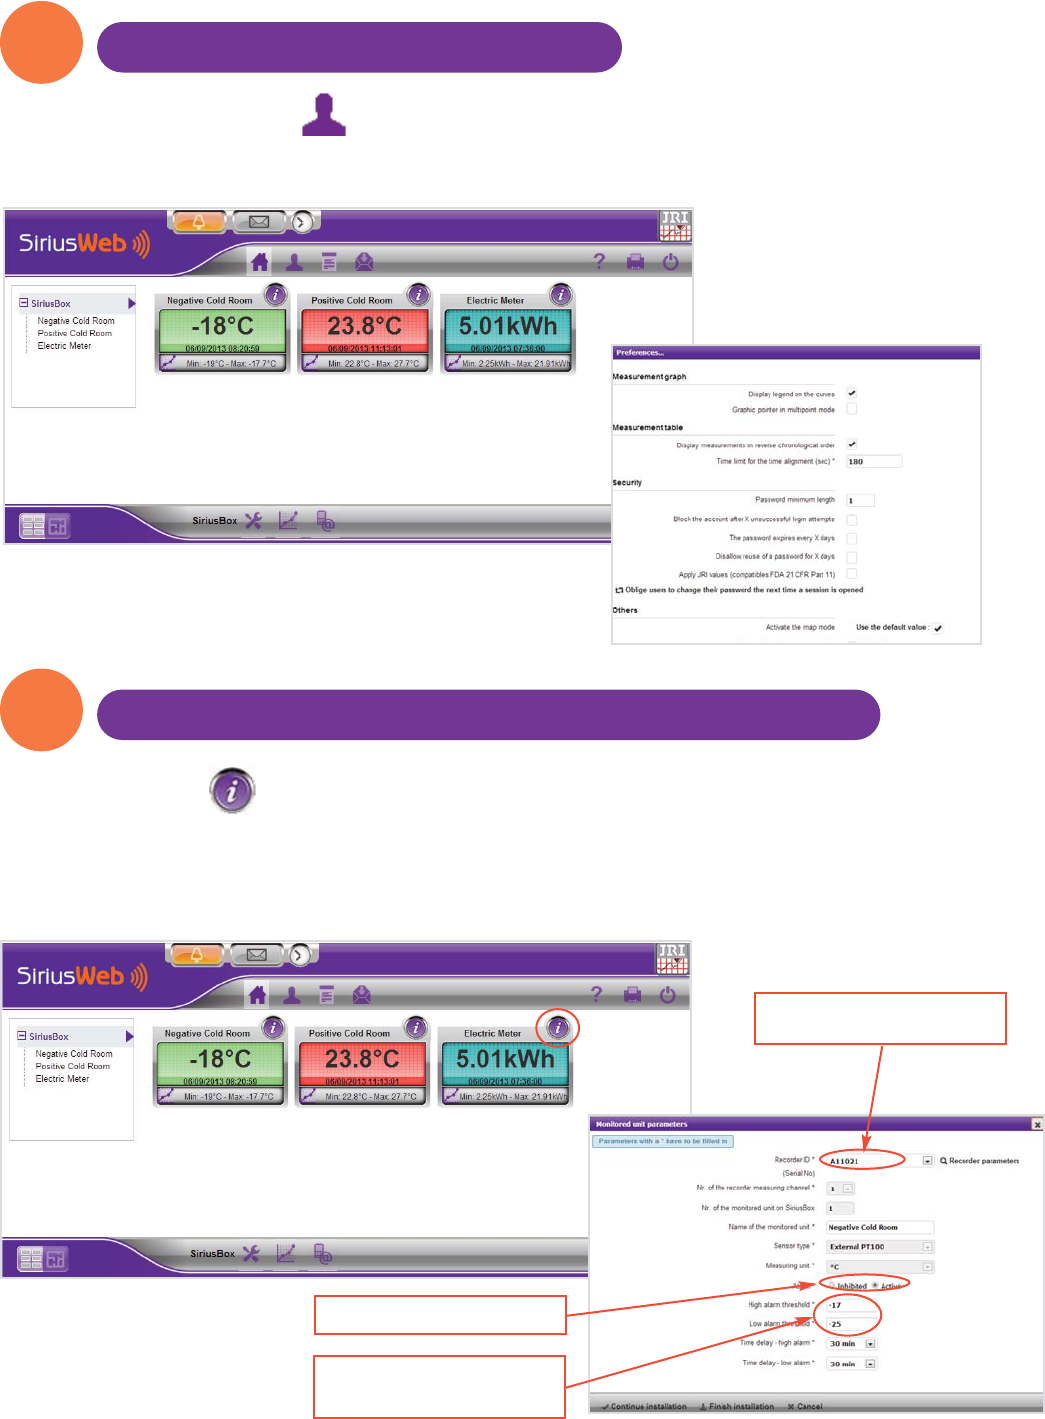
General consultation of all your monitored units (M.U.) straight from the home page.
Note : Generally, the locally recorded data is transferred to the SiriusWeb platform every 3 hours to be
displayed.
© JRI 5
Last measurement
transferred to SiriusWeb
platform
State of alarm colour
Graph display of the last
24 hours
Digital display of the last
24 hours
9
8
Activate your threshold alarms and your time delays
Manage your profiles (Site manager only)
© JRI 6
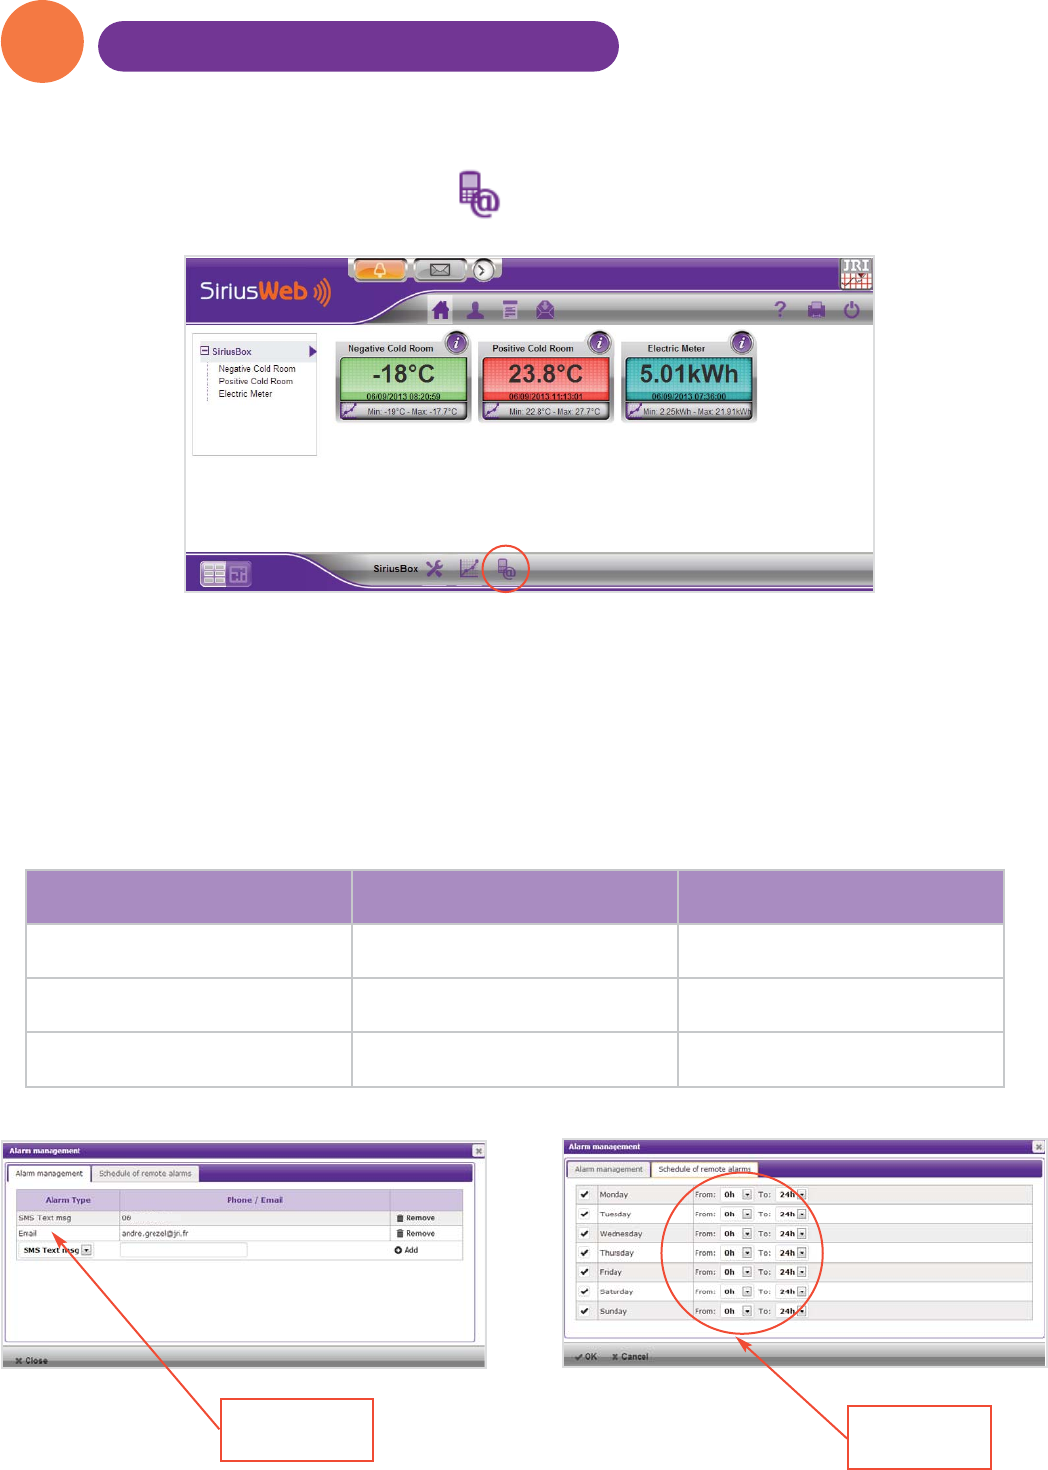
Click on the button to open the monitored unit parameters.
Enter the name of your monitored unit and activate the alarm of your recorder. Set also your alarm
thresholds and time delays. Once these fields are filled in, click on "FINISH INSTALLATION".
If you have more than one monitored unit to configure, click on “CONTINUE
INSTALLATION”. After having registered/entered all your devices, click on “FINISH INSTALLATION”.
When you click “PROFILE” , you can set different logins and passwords to access the
SiriusWeb website and then manage multiple profiles: user, administrator...
Note : JRI advises to have data for each monitored unit for at least a couple of days in order to
determine the threshold values and the time delays.
(Site manager only)
Enter the name of your
monitored unit
Activate the alarm
Set your alarm thresolds
and time delays
10 Activate your alarms (Site manager only)
© JRI 7
JRI advises to set several different types of alarms.
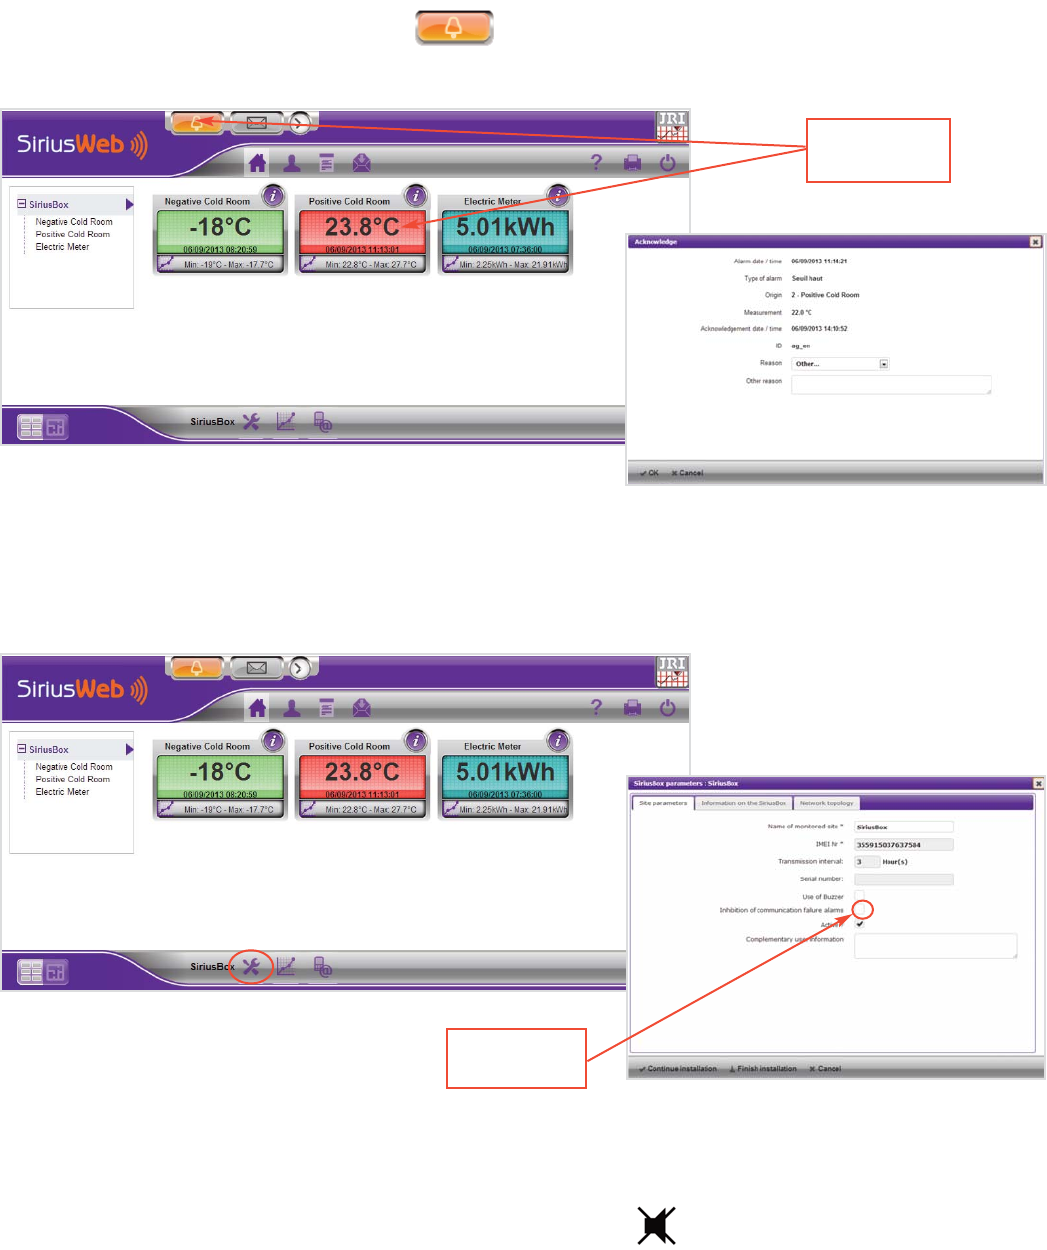
Click on the “ALARM MANAGENENT” icon
A- Remote alerts
Configure your alert types (SMS text message, email, phone call) and your remote alarms.
The remote alarms planning is used to activate the monitored units’ alerts during a specific period
of time. Once the type of alerts is selected, click on “ADD”.
Alarm types Remote alarms
schedule
SMS / Text message Phone call Email
2 phone numbers
can be configured
2 phone numbers
can be configured Unlimited email addresses
One single SMS text message is
sent 3 attempts every 15 minutes Every email is sent once
Acknowledgment is possible Acknowledgment is possible No acknowledgment
© JRI 8
You can shut down the buzzer by pressing on push button
However, it is necessary to give the reason of the alarm on the SiriusWeb interface.
If necessary (persistent default or problem to connect to SiriusWeb), it is possible to reset the
SiriusBox by inserting a metal rod (paperclip) into the hole provided for this purpose (RESET).
B- Local alerts
If you want to be locally alerted, click on “SiriusBox parameters” and activate the buzzer of your
SiriusBox which beeps in case of alarm.
In case of alert, click on “ALARM LIST” and indicate the reason of the alarm.
In case of alarm, acknowledgment of the buzzer is achieved in the same way as for remote alarms.
Current alarm
Buzzer
activation
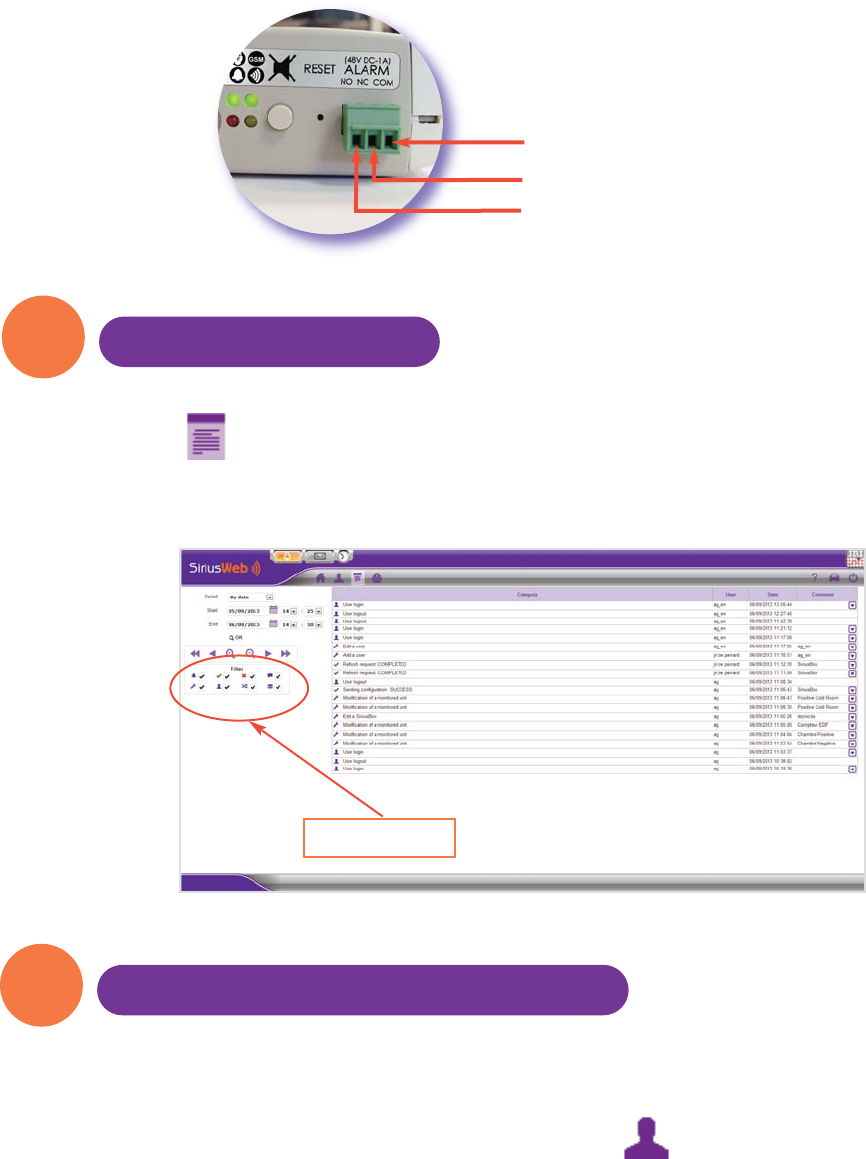
Common
Relay output :
Connection with an additional alarm system
NC (normally closed)
No (normally opened)
Note : It is possible to install an additional alarm system allowing to send alarms even if the GPRS
signal is down (voice dialer, sound and visual alarm device, transmission to a telemonitoring com-
pany ...).
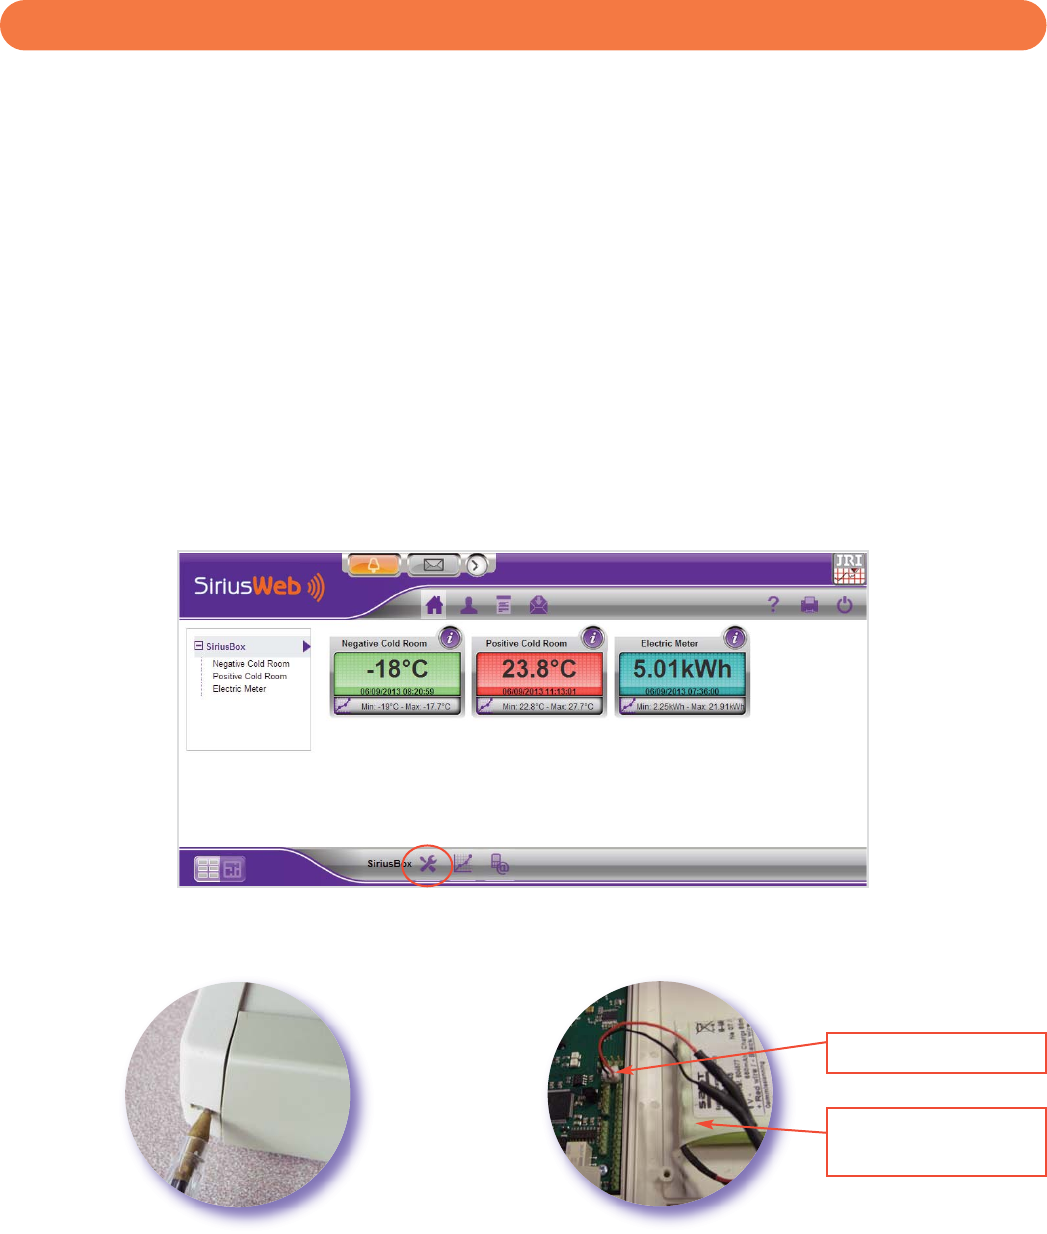
While clicking on , you can review the complete list of operated actions on your installation.
You can sort the information per type of events.
© JRI 9
11 Review the Audit trail
12 Configure a weekly report by email
Filters
You can receive a weekly report (every Tuesday) presenting a sum up of your data.
In “Preferences” select the case “Activate the remote reading” and type the email address of the
addresse(s) of the report.
To configure it, access your profile by clicking on the icon
© JRI 10
Unplug the Sirius Box. You should receive an alert depending on the pre-programmed alerts.
If you don’t receive any alert, follow the steps:
1/ Check your alerts programming (Buzzer and/or text message, email, voice message) on Sirius-
Web.
2/ Check the connection of the power supply of the SiriusBox.
3/ Check the GPRS communication level.
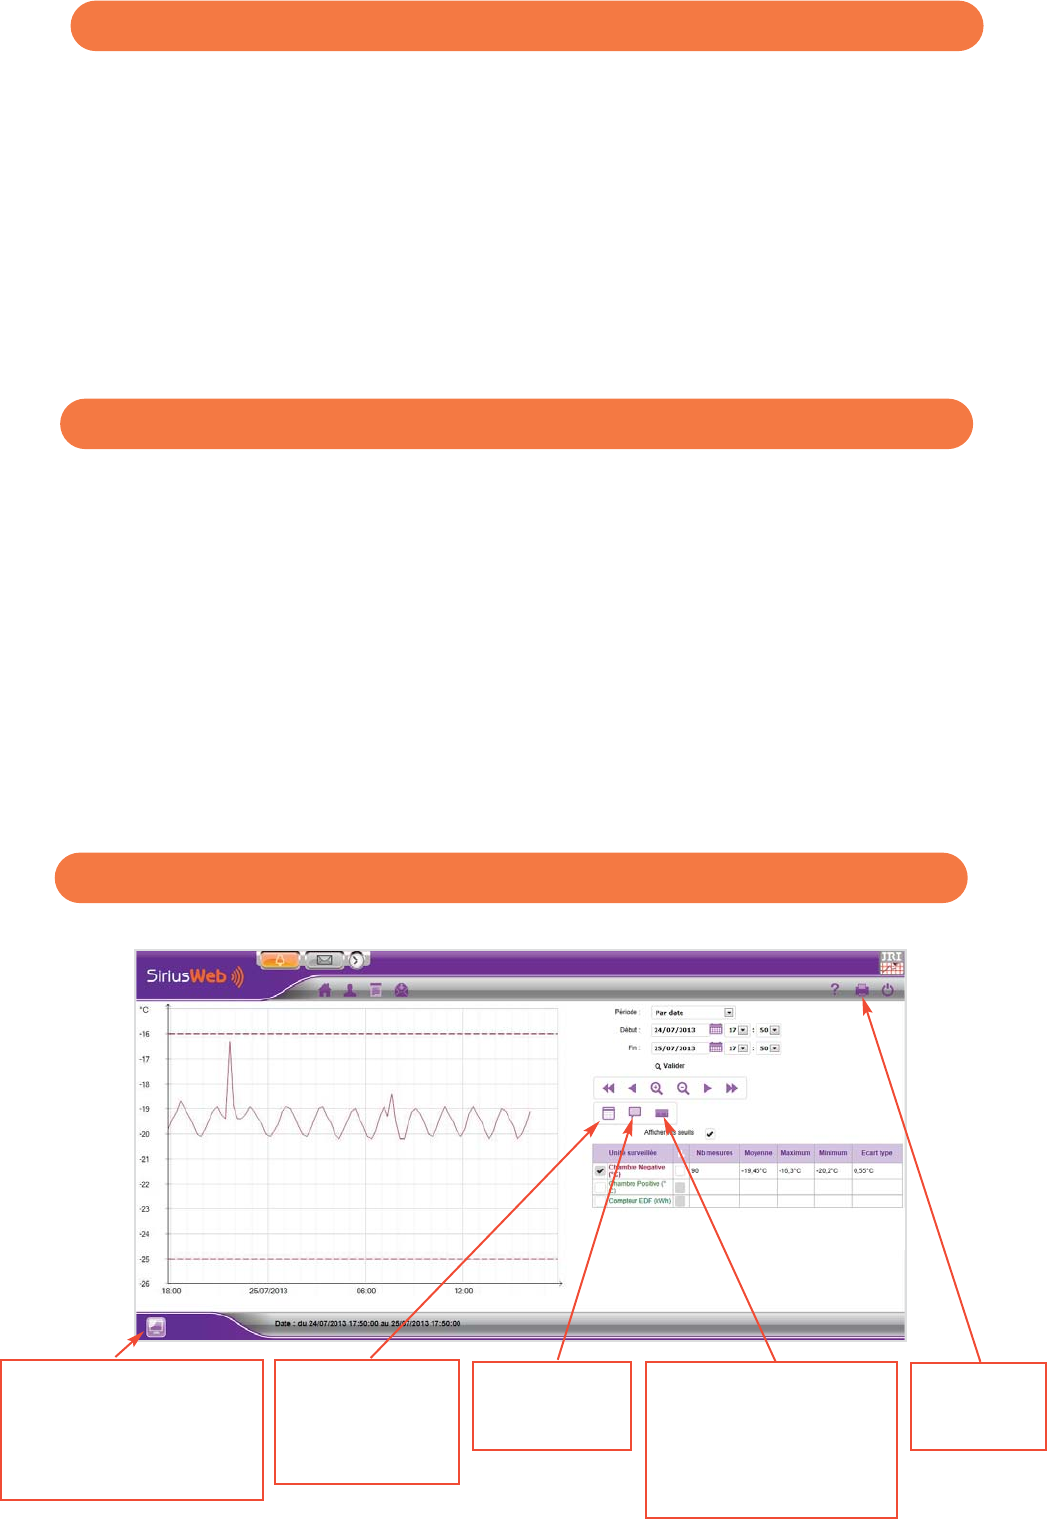
Click on “SIRIUSBOX PARAMETERS” to access the information on the SiriusBox. The minimum level
of communication is 2 grades.
4/ Check the connection of the backup battery.
Backup battery
Connector
Your installation should now be working. However if you still don’t have any communication, please
contact our technical support.
Before going through the checking steps, please wait for 8 hours while the system is turned on.
Open the Sirius Box with the help of a pen
placing it inside both holes on the upper and
down sides of the SiriusBox.
Check that the connector of the backup
battery is connected to the electronic board.
Advice to check that your installation is working
Advice to check measurement upload
In case of failure
Icons glossary
© JRI 11
1/ Check that temperature is displayed on the LCD screen or that the leds are blinking.
2/ Check that the measurements of your monitored units displayed on SiriusWeb are less than
8 hours.
If the lights are off, check the power of the SiriusBox by checking the plug.
If the SiriusBox does not work, perform a soft reset by inserting a metal rod (such as a paper clip)
into the hole provided for this purpose (RESET).
If there are no longer measurements on SiriusWeb, check that the recorders are on. If they are off,
press at least 5 sec their push button to turn them on. If they still do not start, replace the battery
and turn on the recorders.
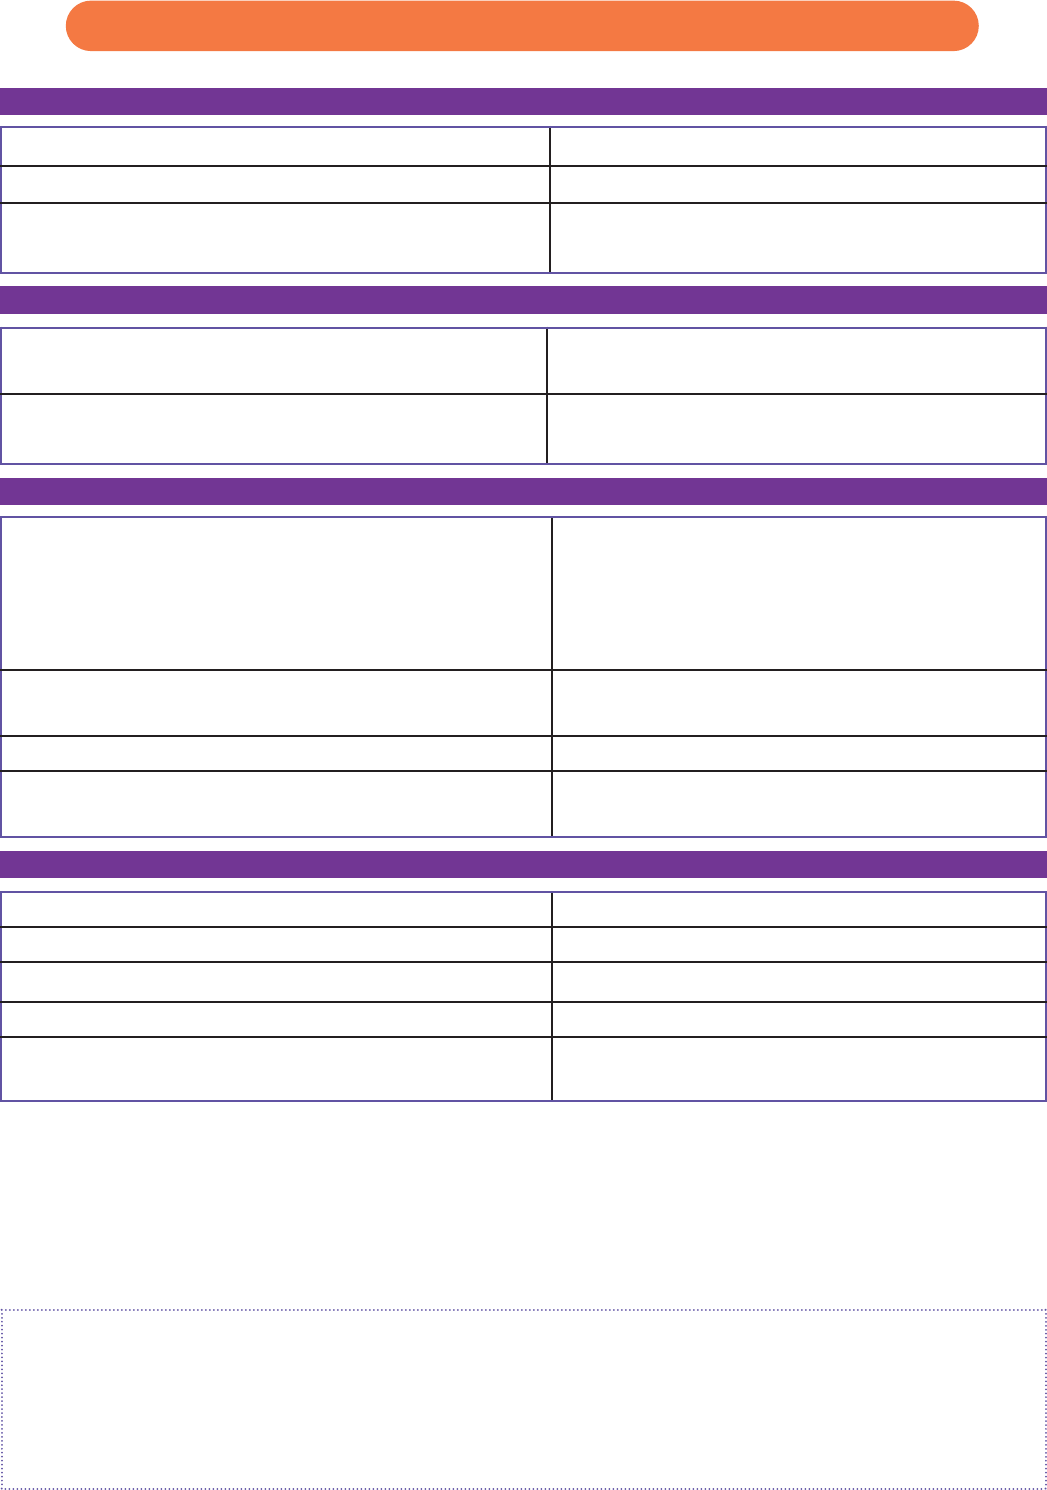
Refresh
measurements of
all monitored units
linked to the SiriusBox
Print the
page
Display
measurements
list
Add a
comment Adapt the display of
the curve according to
the selected interval
© JRI 12
Emission band ISM 868 MHz
Maximum radiated power 10 dBm (10 mW)
Range with SpyRF satellites in buildings Up to 50 meters depending on the
environment
Radio features
Emission band GSM 900 MHz or DCS 1800 MHz
(depending on the operator of the mobile subscription)
Maximum radiated power 2W in GSM mode
1W in DCS mode
GPRS features
Power supply Adapter plug (European model) with
regulated output voltage :
input: 230 V CA
output: 9 V CC - 650 mA
cord fixed: 1,80 m
Power consumption Average consumption : 0,5 W
Peak consumption : 5 W
Backup battery NiMH capacity 650mAh
Backup battery lifetime Fully operational autonomy : 12h rs
Loading time : 100hrs
Electrical features
Dimensions 154x84x37 mm
Weight 270g (without adapter)
Protection index IP20 - to be used indoors only
Conditions of use 0°C to 50°C - 0 to 90% RH
Pollution / altitude (IEC 61010-1) Degree of pollution : 2
Operating altitude: 0 to 2000m
Mechanical and environmental features
Installation Precautions
SiriusBox hub must be fixed in a vertical position (such as that SpyRF satellites). A wall mounting bracket is provided.
This support can be fixed to the wall with two screws, or with a double-sided adhesive (also provided).
The SiriusBox should not be fixed on a metal surface and in a place with insufficient GSM network coverage.
A socket should be available nearby (within a maximum of 3m) to allow plugging in the AC adapter. It serves as the
disconnecting device.
Key features
WARNING
This unit contains a rechargeable NiMH battery. Never attempt to disassemble, to charge and to short circuit. Always
use the battery correctly, do not expose to temperatures above 100 ° C, do not wet and respect the polarities. Keep
the battery out of the reach of children. Always replace the battery with the templates
provided by JRI. They have a undeceived connector to prevent polarity reversal.
JRI disclaims all liability for use of a different battery. In case of non-compliance with these instructions,
alcalins hydroxides may leak from the valve safety.

© JRI 13
Symbols
Maintenance
RECYCLING: Do not dispose in a landfill or in a container collection waste. Comply with the legislation for the
disposal.
ELECTRICAL POWER: This unit is DC powered from a 230 V AC adapter. Comply with the safety rules in the
use of electric power. Use an electrical installation complies with the legislation.
CE MARKING: This device is certified to the European regulations for electrical safety,
flamability, radiation emission disturbing and immunity to electrical interference nearby.
ELECTRICAL INSULATION: This device is protected by a double electrical insulation or electrical insulation rein-
forced.
No maintenance is necessary. For cleaning, do not use water but a dry cloth.
Safety / Certifications
CE radio compliant : EN 301 489 / EN 300 220 / EN 61010 / EN 301 511
Warranty
JRI products carry a one year warranty and guarantee against defects in their components or workmanship.
During this period if any product supplied by the Company proves on inspection to be defective, the Company will at
its own option replace the same or refund to the Buyer the price of the product.
In no circumstances will JRI' liability exceed the price of the product paid by the buyer or the cost of replacement.
JRI shall not in any event be liable to the Buyer for any indirect or consequential loss or damage costs or expenses what-
soever which might arise out of or in connection with the supply of the product or its consequent use.
Consequently, the products warrantee and guarantee specified above, does not cover damage caused by fair wear and
tear, abnormal storage conditions, incorrect use, accidental misuse, abuse, neglect, misapplication or modification, or
use with non-JRI' hardware/software. No warranty of fitness for a particular purpose is offered and the user assumes the
entire risk of using the product.
In line with our policy of continuous development, we reserve the right to amend our product specification without prior
notice.
FCC ID Box=W4510620-03
FCC ID GPRS=N7NWISMO228
FREQUENCY
This device is designed to operate in the band [902.22 – 904.149] MHz.
FCC COMPLIANCE STATEMENT
This device complies with part 15 of the FCC Rules. Operation is subject to the following two conditions: This device
may not cause harmful interference, and must accept any interference received, including interference that may cause
undesired operation.
INFORMATION TO THE USER
The user’s manual or instruction manual for an intentional or unintentional radiator shall caution the user that changes
or modifications not expressly approved by the party responsible for compliance could void the user's authority to ope-
rate the equipment.
FCC RADIATION EXPOSURE STATEMENT
The antenna(s) used for this transmitter must be installed to provide a separation distance of at least 20 cm from all
persons.
Recycling
Important note
If it must be discarded, this equipment must be in compliance with the legislation on electronic equipment. It should
never be disposed in the landfill or never be treated by the services of the road. For more information, call the JRI cus-
tomer service.
© JRI 14
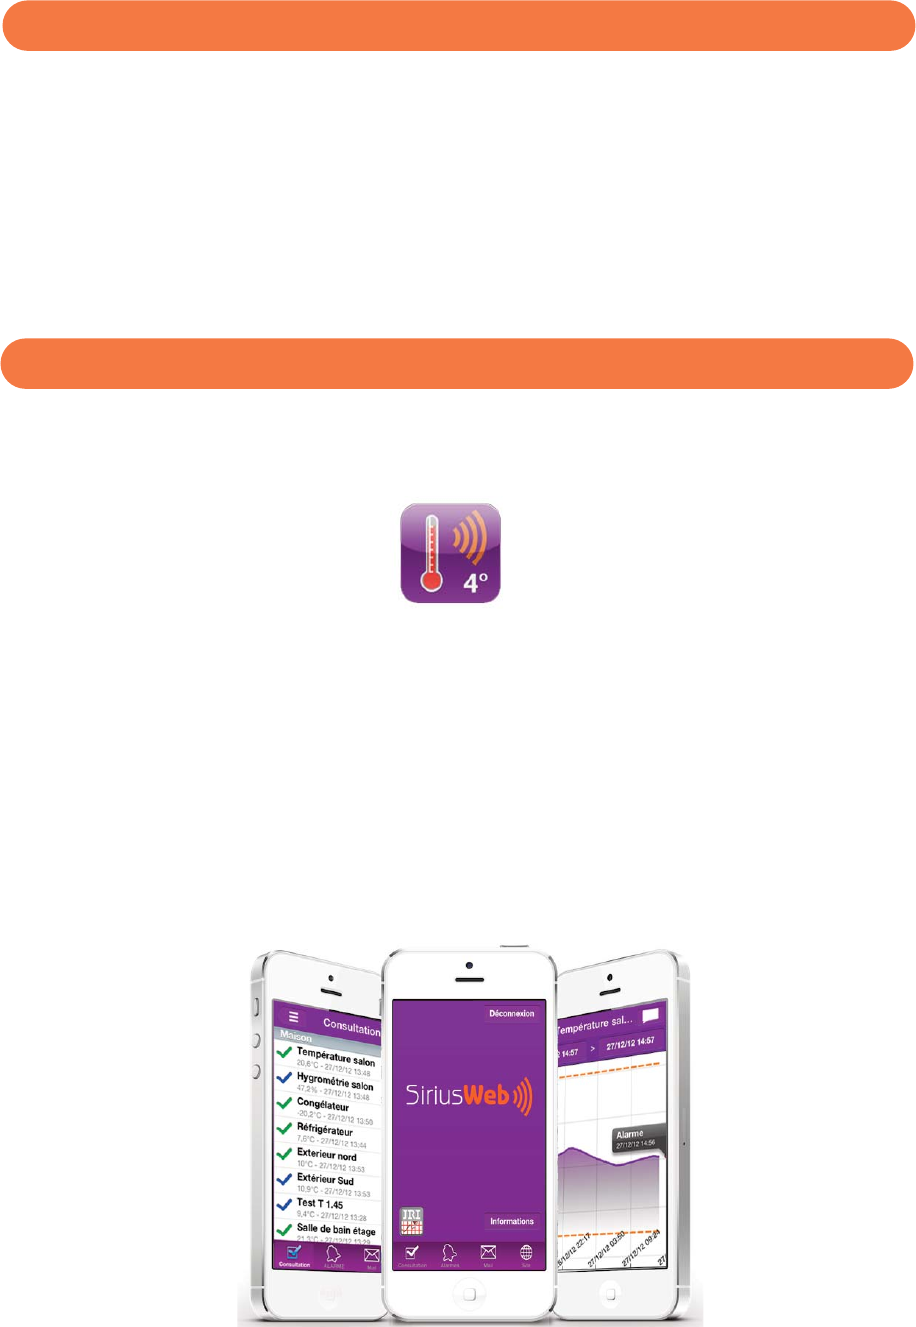
SiriusWeb iPhone App
Minimal configuration
You can now have SiriusWeb on your iPhone. Go on AppStore, download
the App and enter your login and password.
- Display all your monitored units : temperature values, thresholds, measurement graph
- Management of alarms and history
- Send email to our technical support
It is also available in German, Spanish, Italian, Portuguese and Dutch.
The iPhone SiriusWeb App offers the following functions:
Internet Browser :
Internet Explorer 7 +, FireFox 1.0 + and Chrome 1.0 + and Safari 2.0 +.
Screen resolution: 1280px * 680px at least
Javascript must be enabled.

Our technical support is at your disposal on
+33 3 63 15 80 07
Indicate your SiriusWeb login
click
in the upper right corner of the siriusweb.fr site in order to
forward us your question.
or
click
In the upper right corner of the SiriusWeb.fr
website to access the FAQ
Technical assistance