JVC KENWOOD 39553 Vehicle Console with Bluetooth Transmitter User Manual Impreza Navi
JVC KENWOOD Corporation Vehicle Console with Bluetooth Transmitter Impreza Navi
Contents
- 1. User Manual 1 of 2
- 2. User Manual 2 of 2
User Manual 2 of 2
42
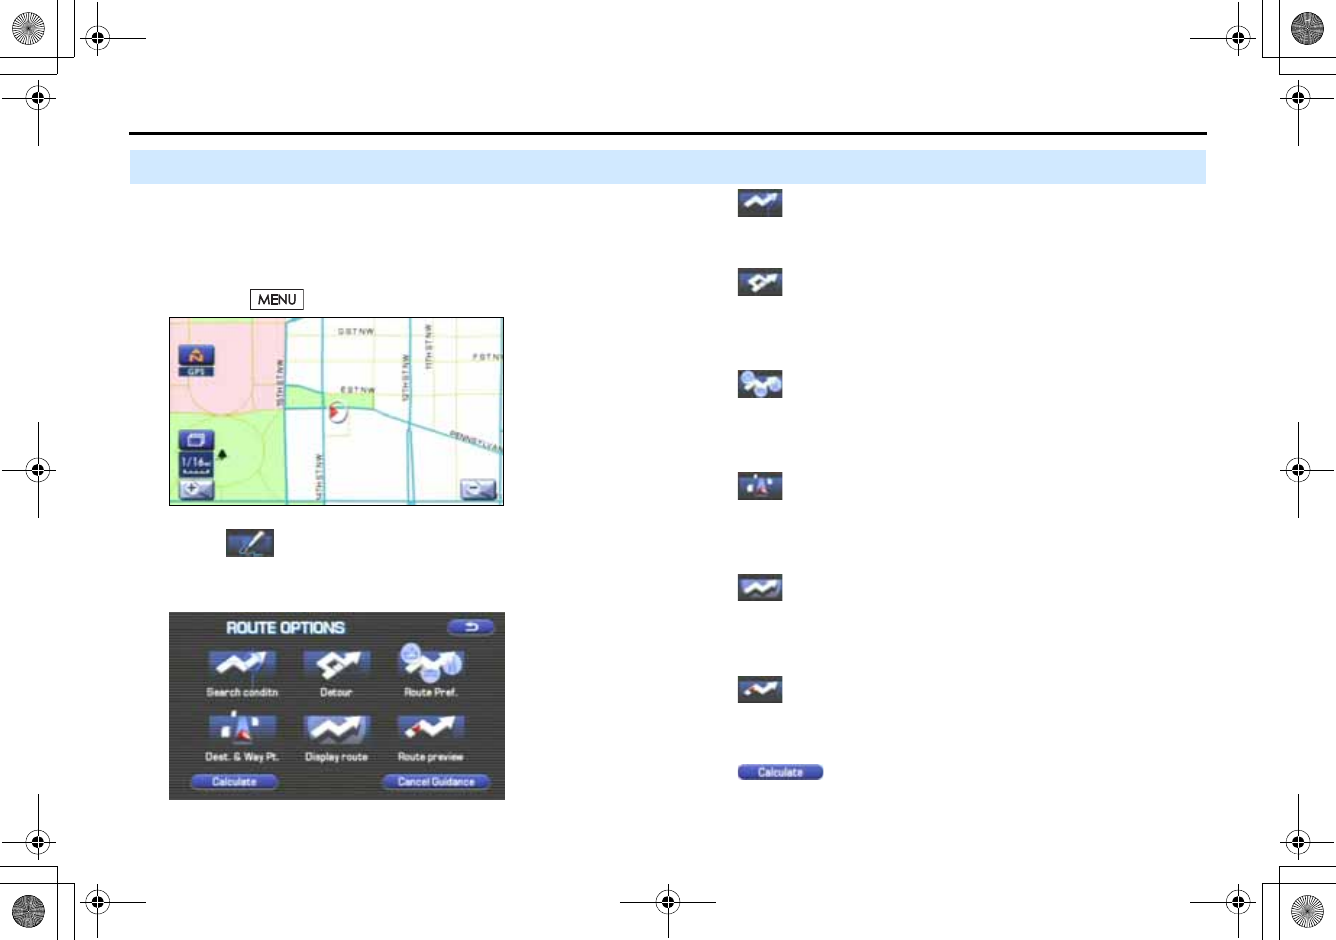
Route Options
Setting Route Options
Using the functions available from the Route Options screen,
you can change the route options, stop the route guidance or
check the route. Use the following procedures:
1Press the button.
2Select (route options).
The Route Options screen will appear. Select any of the following
displayed functions as necessary:
(search condition):
This function allows you to specify the way in which the system
calculates the route to the destination. (See Page 43.)
(detour):
This function allows you to prompt the system to calculates an
alternative route from your current position within a specified dis-
tance. (See Page 44.)
(route preferences):
This function allows you to prompt the system to alter the route
search conditions and recalculate the route accordingly. (See Page
45.)
(destination and waypoint):
This function allows you to modify the destination and waypoints,
and prompt the system to recalculate the route accordingly. (See
Page 45.)
(display route):
This function allows you to confirm the entire route and, if neces-
sary, prompt the system to recalculate the route according to your
specification. (See Page 49.)
(route preview):
This function allows you to simulate a drive along the system-cal-
culated route before departure. (See Page 50.)
(calculate):
Selecting this key prompts the system to recalculate the route.
+ORTG\CA0CXKDQQMࡍࠫ㧞㧜㧜㧣ᐕ㧡㧞㧢ᣣޓᦐᣣޓඦᓟ㧢ᤨ㧠ಽ
43
Route Options
(cancel guidance):
Selecting this key prompts the system to stop route guidance.
Note that this erases the destination and waypoints. To prompt
the system to start guidance again, select (calculate).
NOTE
A recalculated route will sometimes be the same route as the one displayed
before recalculation.
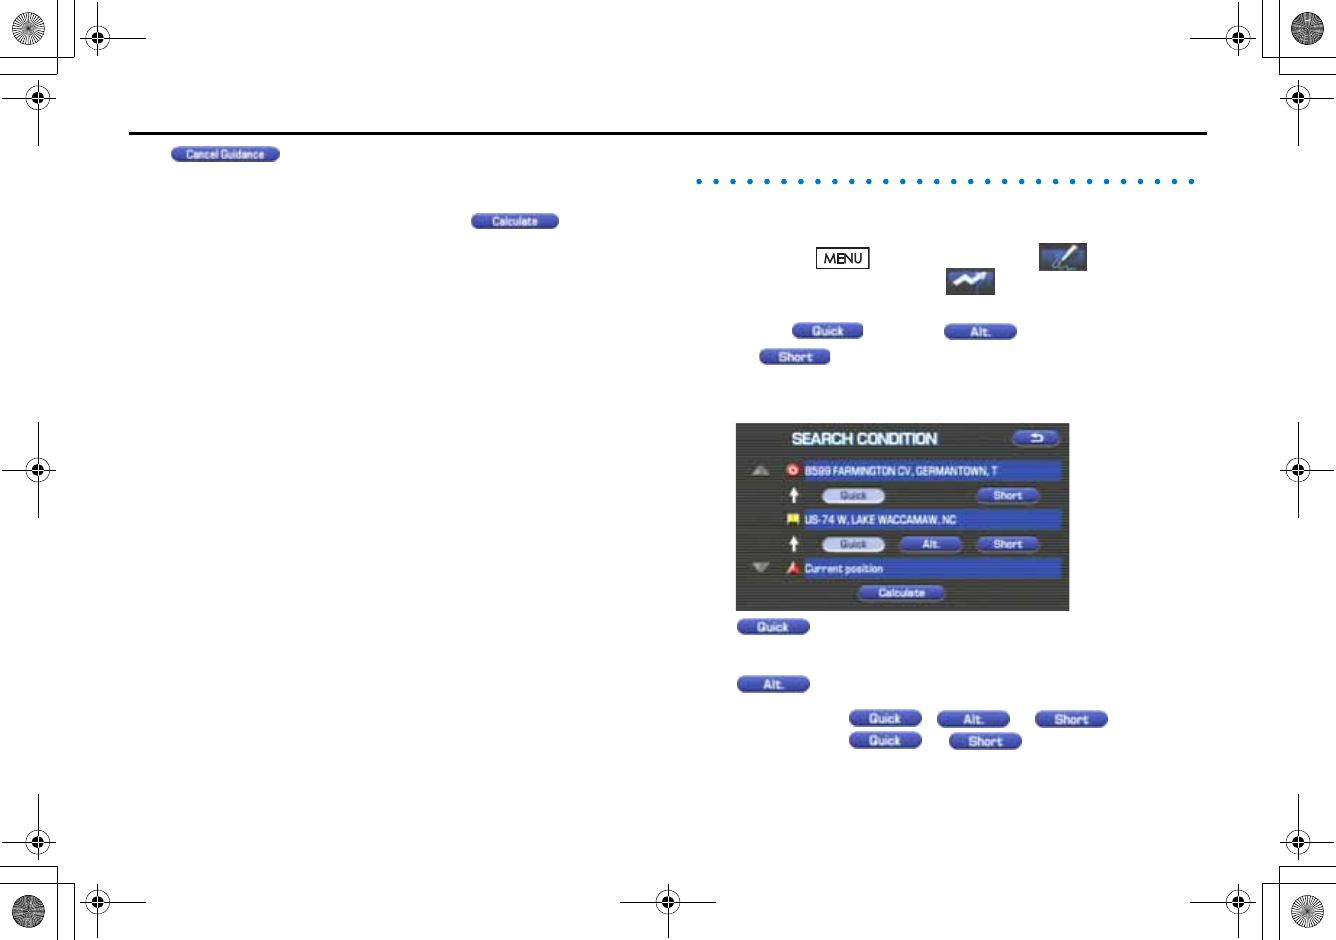
Search condition
You can specify the way in which the system calculates your route.
1Press the button, then select (route
options), and then select (search condition).
2Select (Quick), (Alt.),
or (Short) to specify the way of calculating the
route to reach the next waypoint or the destination from
the current point.
: The system will calculate a route with the shortest
driving time required.
: The system will calculate an alternative route.
(You can select , or for the first
waypoint. Only or can be specified for the
second and subsequent waypoints.)
+ORTG\CA0CXKDQQMࡍࠫ㧞㧜㧜㧣ᐕ㧡㧞㧢ᣣޓᦐᣣޓඦᓟ㧢ᤨ㧠ಽ
44
Route Options
: The system will calculate a route with the shortest
driving distance.
3Select (calculate)
4Select (start).
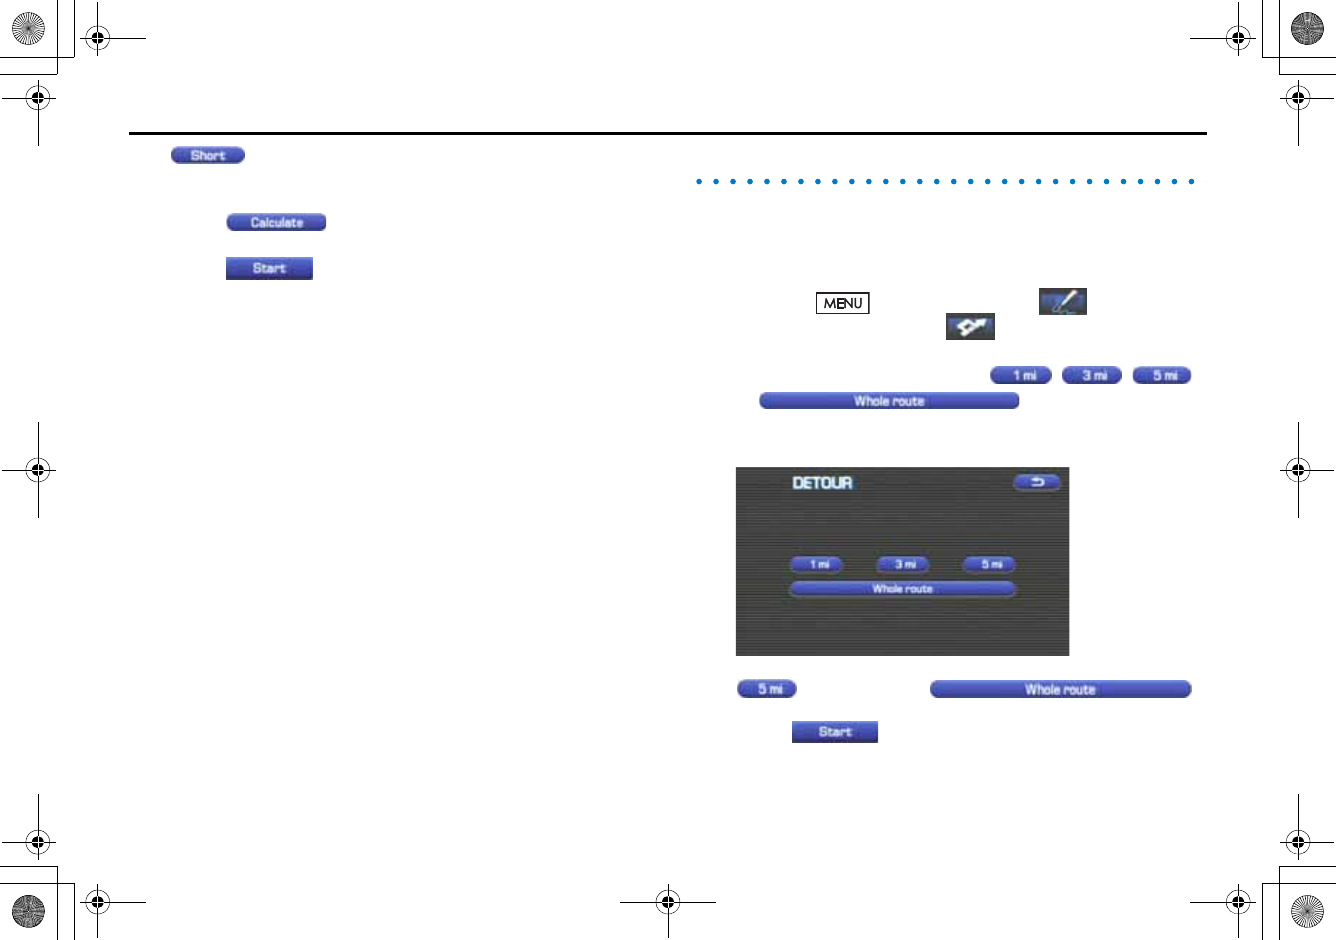
Detour
You can specify a detour distance from your current position. The sys-
tem will calculate an alternative route according to the distance specifi-
cation, enabling you to take a detour.
1Press the button, then select (route
options), and then select (detour).
2Select a detour distance using , , ,
or (whole route).
The system will then calculate an alternative route that detours
from the current location within the specified distance.
When driving on the freeway, make a selection from among
, 15 mi, 25 mi and .
3Select (start).
NOTE
If you are driving off the route, it is not possible to calculate a detour route.
+ORTG\CA0CXKDQQMࡍࠫ㧞㧜㧜㧣ᐕ㧡㧞㧢ᣣޓᦐᣣޓඦᓟ㧢ᤨ㧠ಽ
45
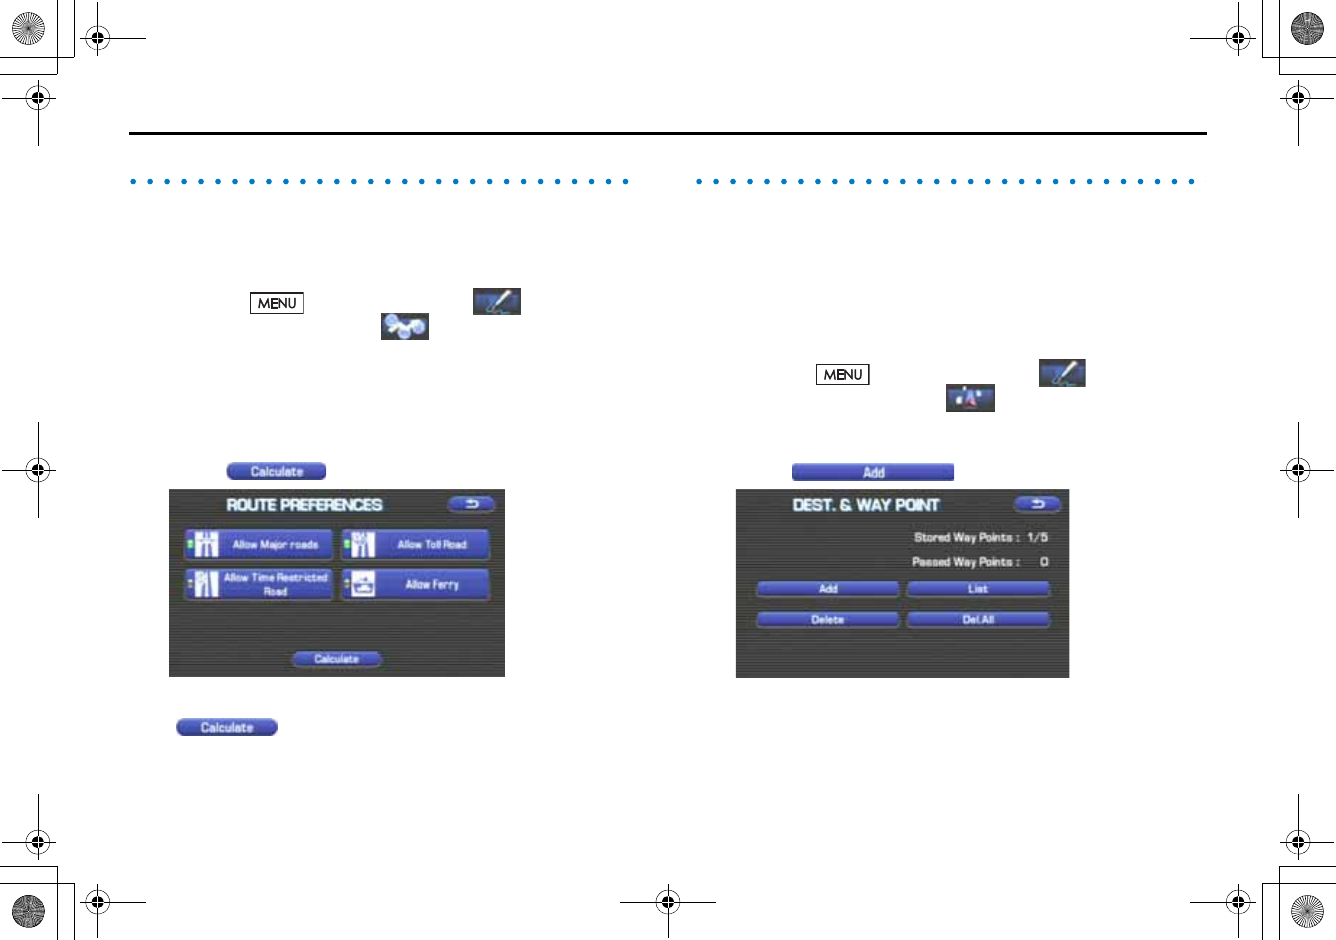
Route Options
Route preferences
Use this function to specify preferred route search conditions. The sys-
tem will start recalculating the route according to your specified condi-
tions.
1Press the button, then select (route
options), and then select (route preferences).
2Specify conditions by selecting keys.
Each time you select a key, it will toggle between "usage" and
"non-usage" of the corresponding roads or ferries.
3Select (calculate).
NOTE
•The (calculate) key can be selected during route guidance.
•The route calculation will not always be able to follow the specified condi-
tions.
Destination and waypoints
You can change the destination or waypoints for the route calculation
by using this function.
■Addition of waypoints
Use the following procedure to add new waypoints to the current route
for recalculation.
1Press the button, then select (route
options), and then select (destination and way-
points).
2Select (add).
+ORTG\CA0CXKDQQMࡍࠫ㧞㧜㧜㧣ᐕ㧡㧞㧢ᣣޓᦐᣣޓඦᓟ㧢ᤨ㧠ಽ
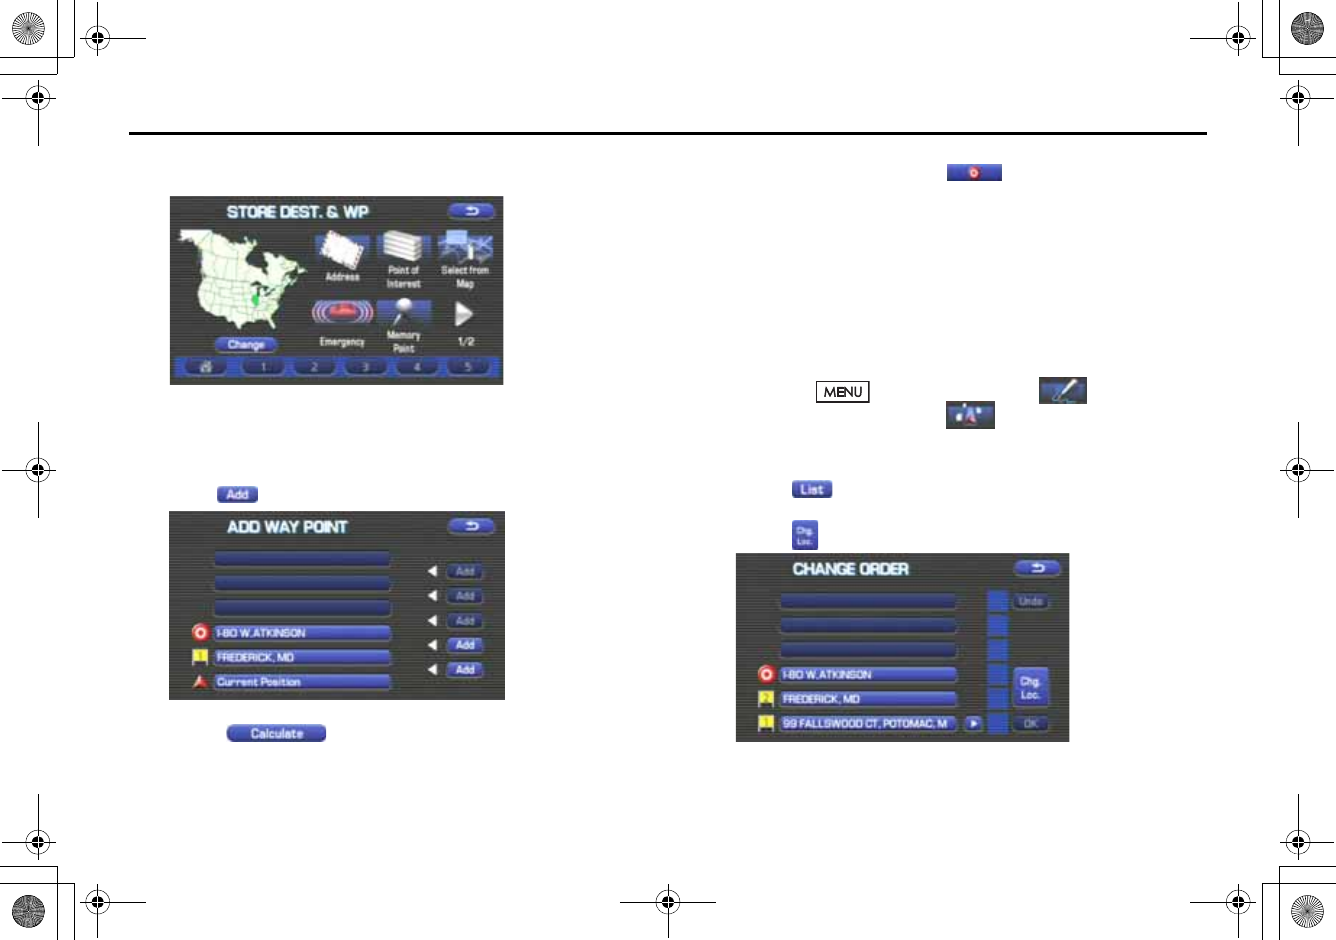
46
Route Options
3Set a waypoint using any method available from the
screen.
4Specify the order in which all the set waypoints are to be
visited.
Choose the location of the waypoint to be added, and then
select (add).
5Select (calculate).
NOTE
•When a new destination is set using (destination), it will replace the
current destination and the route calculation will be carried out again.
•Step 4 must be performed for the second and any subsequent waypoints.
•Repeat Steps 1 to 4 for each waypoint to be set.
■Modifying destination or waypoint positions
Use this procedure to modify the destination or waypoint positions. The
screen will display the calculated route and the positions of the destina-
tion or waypoints that you will be able to modify.
1Press the button, then select (route
options), and then select (destination and way-
points).
2Select (list).
3Select (change location).
+ORTG\CA0CXKDQQMࡍࠫ㧞㧜㧜㧣ᐕ㧡㧞㧢ᣣޓᦐᣣޓඦᓟ㧢ᤨ㧠ಽ
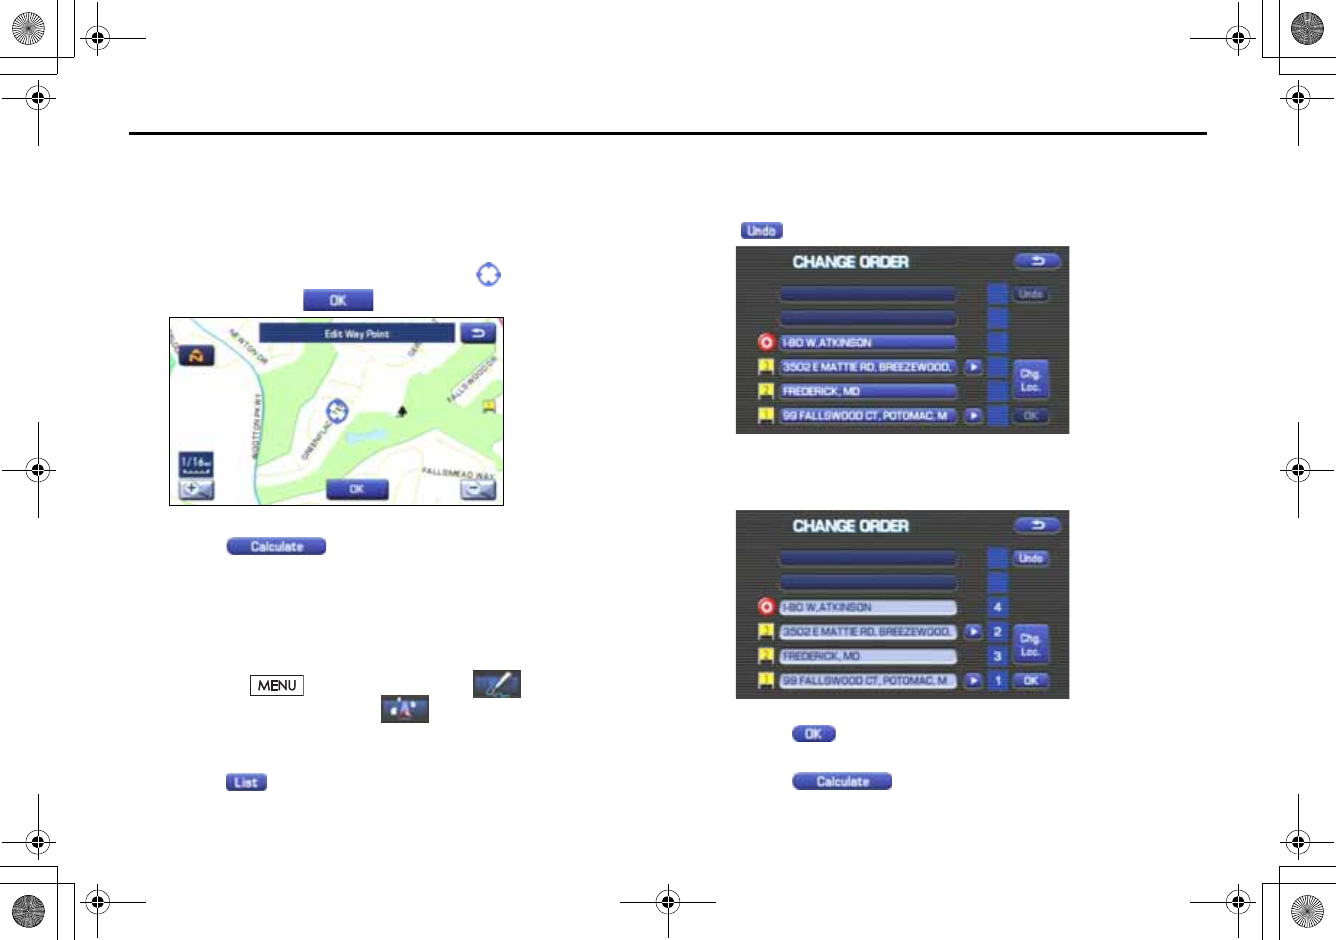
47
Route Options
4Select the key corresponding to the location that is to be
modified.
The map for the area around your current location will be dis-
played.
5Scroll the map to bring the crosshair to the location
and then select .
6Select (calculate).
■Modifying visiting order
You can change the order for visiting your waypoints by using this pro-
cedure.
1Press the button, then select (route
options), and then select (destination and way-
points)
2Select (list).
3Select the waypoint keys according to the order of your
visit.
If you wish to cancel the visiting order number indication, select
(undo).
4When you complete the sequencing, the visiting order
will be updated automatically.
5Select .
6Select (calculate).
+ORTG\CA0CXKDQQMࡍࠫ㧞㧜㧜㧣ᐕ㧡㧞㧢ᣣޓᦐᣣޓඦᓟ㧢ᤨ㧠ಽ
48
Route Options
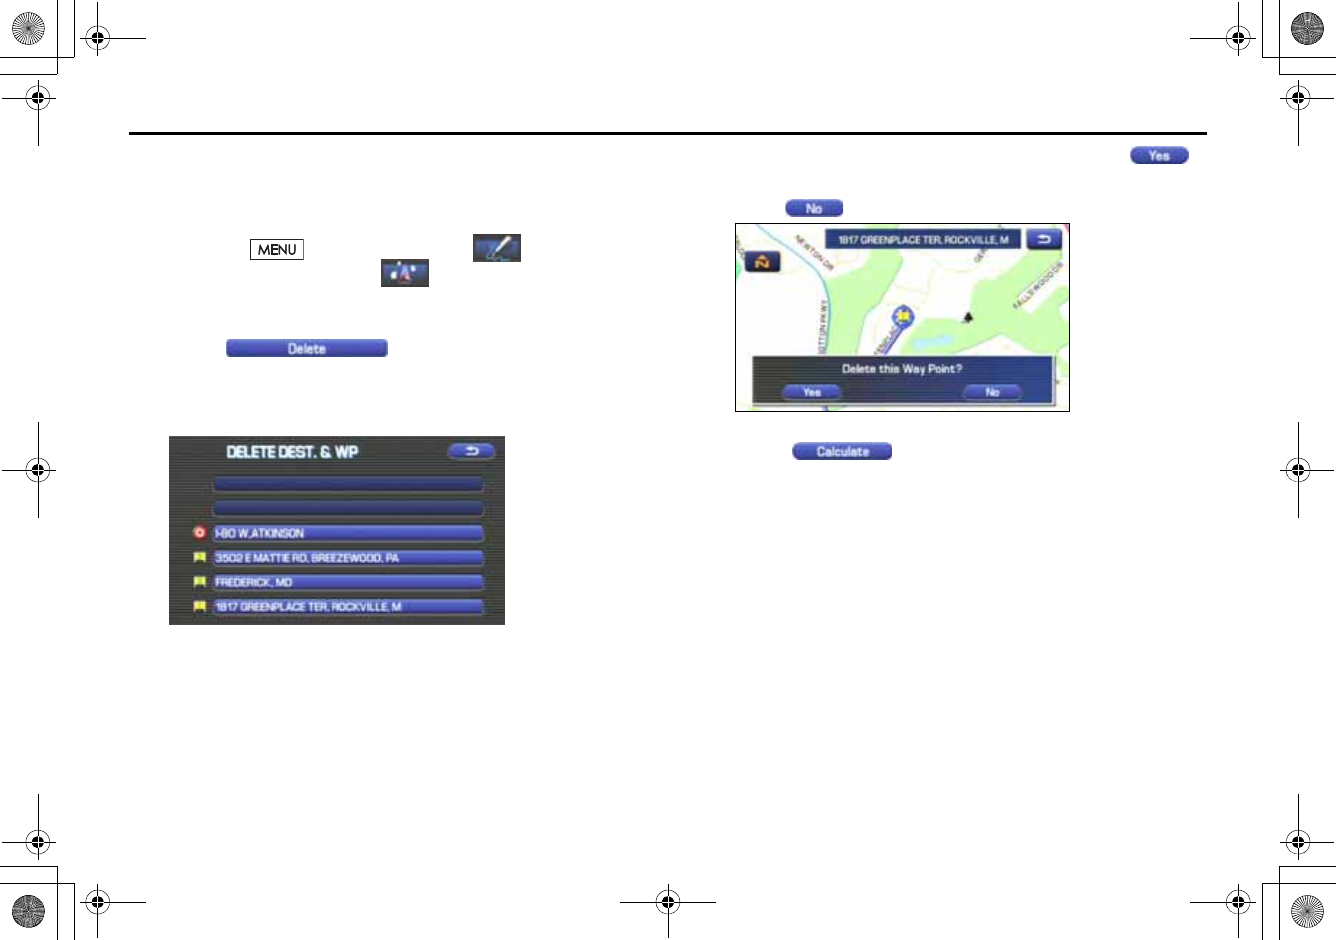
■Deleting destination or waypoints
Use this procedure when you wish to delete the previously set destina-
tion or waypoint.
1Press the button, then select (route
options), and then select (destination and way-
points).
2Select (delete).
3Select the key corresponding to the destination or way-
point you wish to delete.
4Confirmation message will be displayed. Select
(yes).
Select (no) to cancel the deletion.
5Select (calculate).
+ORTG\CA0CXKDQQMࡍࠫ㧞㧜㧜㧣ᐕ㧡㧞㧢ᣣޓᦐᣣޓඦᓟ㧢ᤨ㧠ಽ
49
Route Options
■Deleting destination and all waypoints
You can delete the destination and all previously set waypoints in a sin-
gle process.
1Press the button, then select (route
options), and then select (destination and way-
points).
2Select (delete all).
3Confirmation message will be displayed. Select
(yes).
Select (no) to cancel the deletion.
Display route
Use this function to display the entire route. You can also specify an area
you wish to avoid and prompt the system to recalculate the route
accordingly.
1Press the button, then select (route
options), and then select (display route).
2Select (turn list).
The entire route screen will appear and then it will change to the
Turn List screen.
+ORTG\CA0CXKDQQMࡍࠫ㧞㧜㧜㧣ᐕ㧡㧞㧢ᣣޓᦐᣣޓඦᓟ㧢ᤨ㧠ಽ
50
Route Options
(avoid):
Select this key if you wish to specify any areas to avoid from the
list of street names.
(Reroute):
The system will recalculate the route.
If the data for the route cannot be shown on one screen, scroll the
screen using the and keys.
3When the Reroute is selected: Select (start).
Route preview
The system can show you an automated simulation of the calculated
route.
1Press the button, then select (route
options), and then select (route preview).
2Start the simulation drive according to the calculated
route using the keys on the screen as follows:
: Move to the start point.
: The simulation drive will start toward the start point. After
the start, this key will be displayed as ,and when it is
selected, the simulation drive will switch to high-speed
driving.
: The simulation drive will stop.
: The simulation drive will start toward the destination.
After the start, this key will be displayed as , and
+ORTG\CA0CXKDQQMࡍࠫ㧞㧜㧜㧣ᐕ㧡㧞㧢ᣣޓᦐᣣޓඦᓟ㧢ᤨ㧠ಽ
51
Route Options
when it is selected, the simulation drive will switch to
high-speed driving.
: Move to the destination.
: The EDIT ROUTE PREVIEW screen will be displayed. (See
Page 51.)
NOTE
The visual speed of the simulation vehicle varies with the map scale selected.
The speed appears to be faster with a wide-area map than with a zoom-in map.
■Setting conditions for simulation drive
You can change the simulation drive conditions using this procedure.
1Press the button, then select (route
options), and then select (route preview).
2Select (edit).
The EDIT ROUTE PREVIEW screen will appear.
(to destination or next waypoint):
The simulation drive will stop at the destination or the next way-
point.
(to next POI):
The simulation drive will stop at a point of interest that has been
set up on the route.
(delete):
A selected POI will be deleted.
+ORTG\CA0CXKDQQMࡍࠫ㧞㧜㧜㧣ᐕ㧡㧞㧢ᣣޓᦐᣣޓඦᓟ㧢ᤨ㧠ಽ
52
Route Options
POI keys:
When you select one of the six POI category keys, the system will
retrieve the selected POI from the Quick POI storage and display it on
the map. When you select the (others)
key, you can find POIs of other categories. For more details, See Page
56.
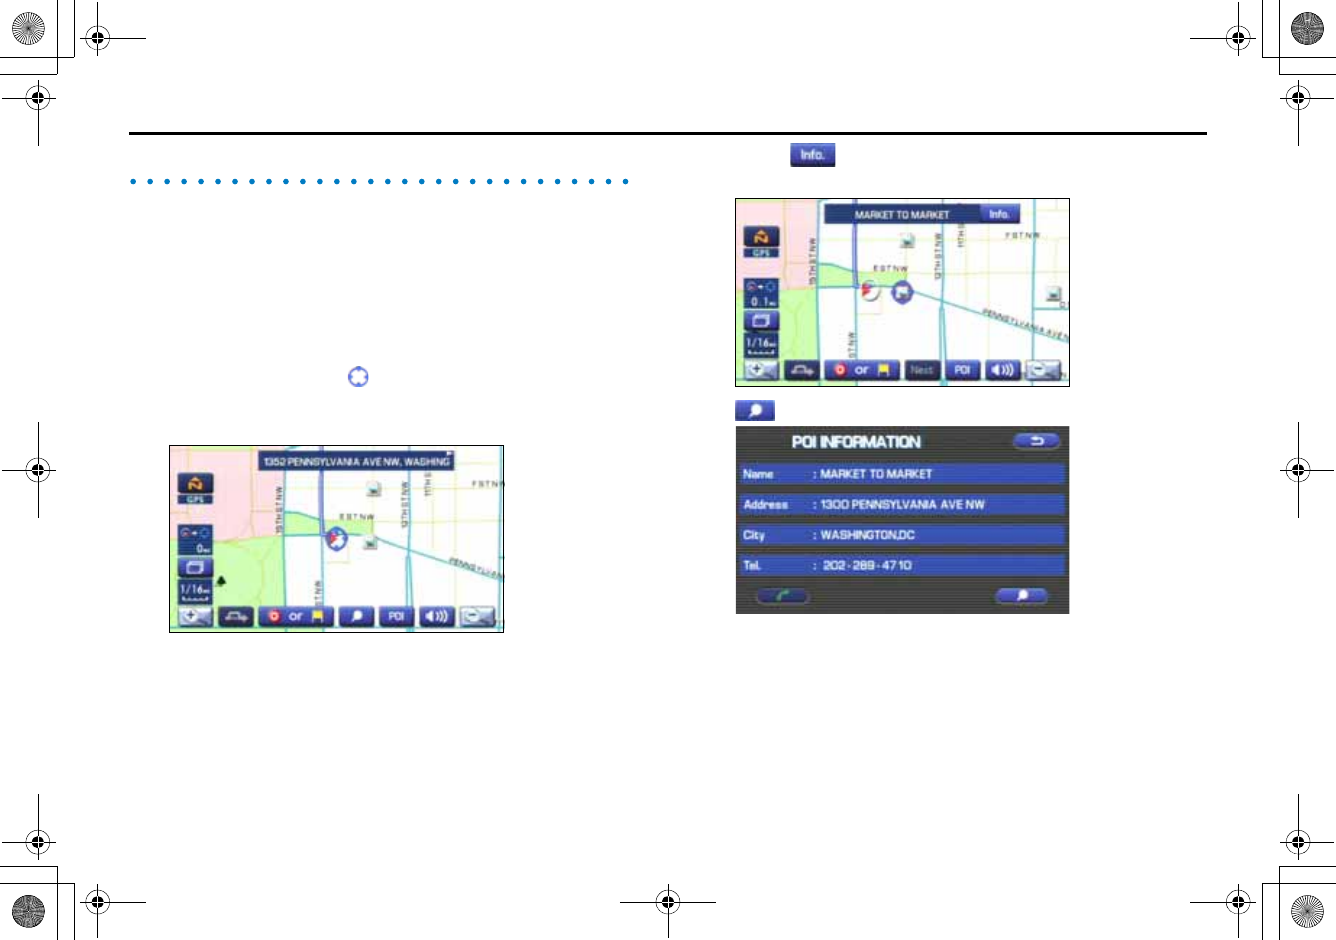
If, for example, the (to next POI) category
key is selected and a simulation drive is started, your simulation
vehicle will then stop at a restaurant on the route.
If you then select (information), the system will display
information on the restaurant.
.
Selecting allows you to make a phone call to the phone
number displayed.
* The Bluetooth Phone is required to be set in advance
NOTE
You must finish the simulation drive before you actually start to drive. Although
the simulation drive will automatically stop when you actually start to drive, not
finishing it properly can lead to an error in the display of your vehicle's current
position.
+ORTG\CA0CXKDQQMࡍࠫ㧞㧜㧜㧣ᐕ㧡㧞㧢ᣣޓᦐᣣޓඦᓟ㧢ᤨ㧠ಽ
53
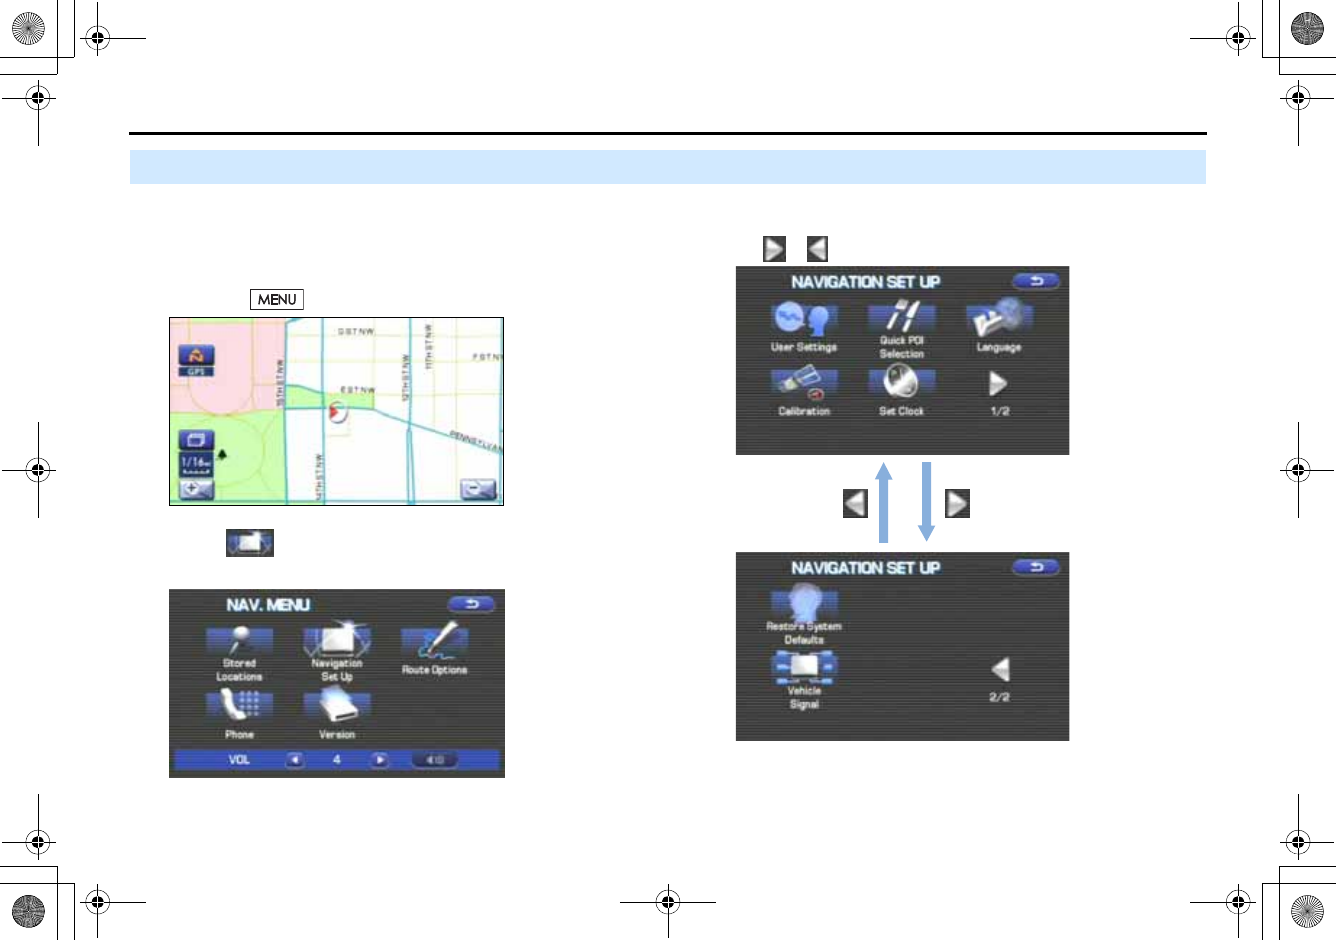
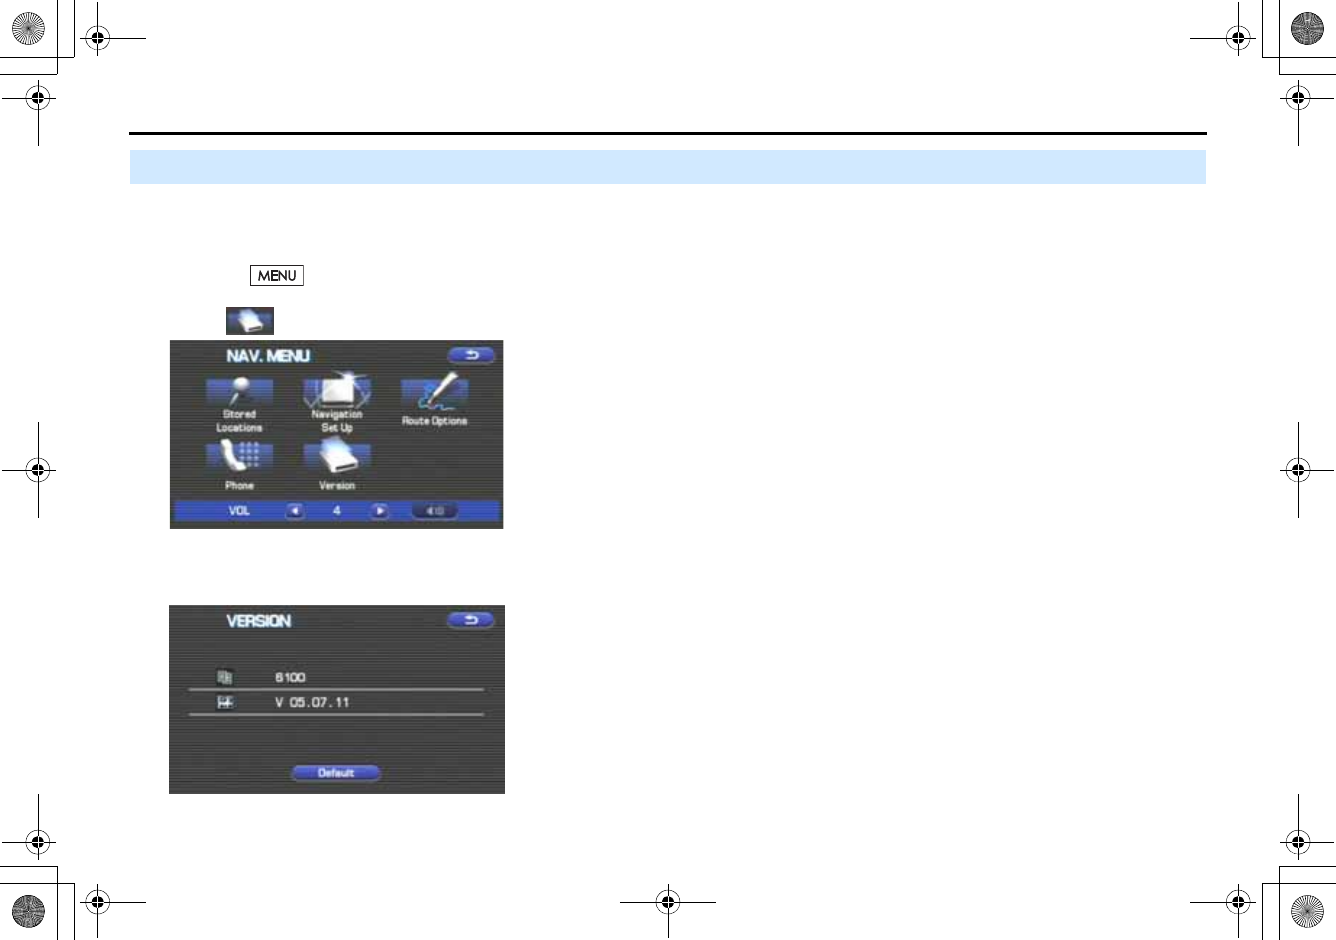
Navigation Setup
Setting Your Navigation System
Using the functions available from the Navigation Setup
screen, you can change the map display conditions and alter
the route guidance conditions.
1Press the button.
2Select (navigation setup).
The NAVIGATION SET UP screen will appear.
Select any of the displayed functions as necessary. This screen
consists of two pages. Change the page by using
the or keys.
+ORTG\CA0CXKDQQMࡍࠫ㧞㧜㧜㧣ᐕ㧡㧞㧢ᣣޓᦐᣣޓඦᓟ㧢ᤨ㧠ಽ
54
Navigation Setup
(user settings):
This function allows you to change the screen display and sound
settings. (See Page 54.)
(quick POI selection):
This function allows you to set the point of interest categories that
are displayed when you select the menu from the current position
screen. (See Page 56.)
(language):
This function allows you to change the language for the menu
screens and the voice guidance. (See Page 57.)
(calibration):
You can use this function to correct display errors in the vehicle's
position and direction. (See Page 57.)
(set clock):
This function allows you to set the time. (See Page 59.)
(restore system defaults):
This function allows you to change the system's current settings
back to the default settings (factory settings). (See Page 60.)
(Vehicle Signal):
This function allows you to confirm the vehicle signal, the version
of the DVD-ROM disc. (See Page 60.)
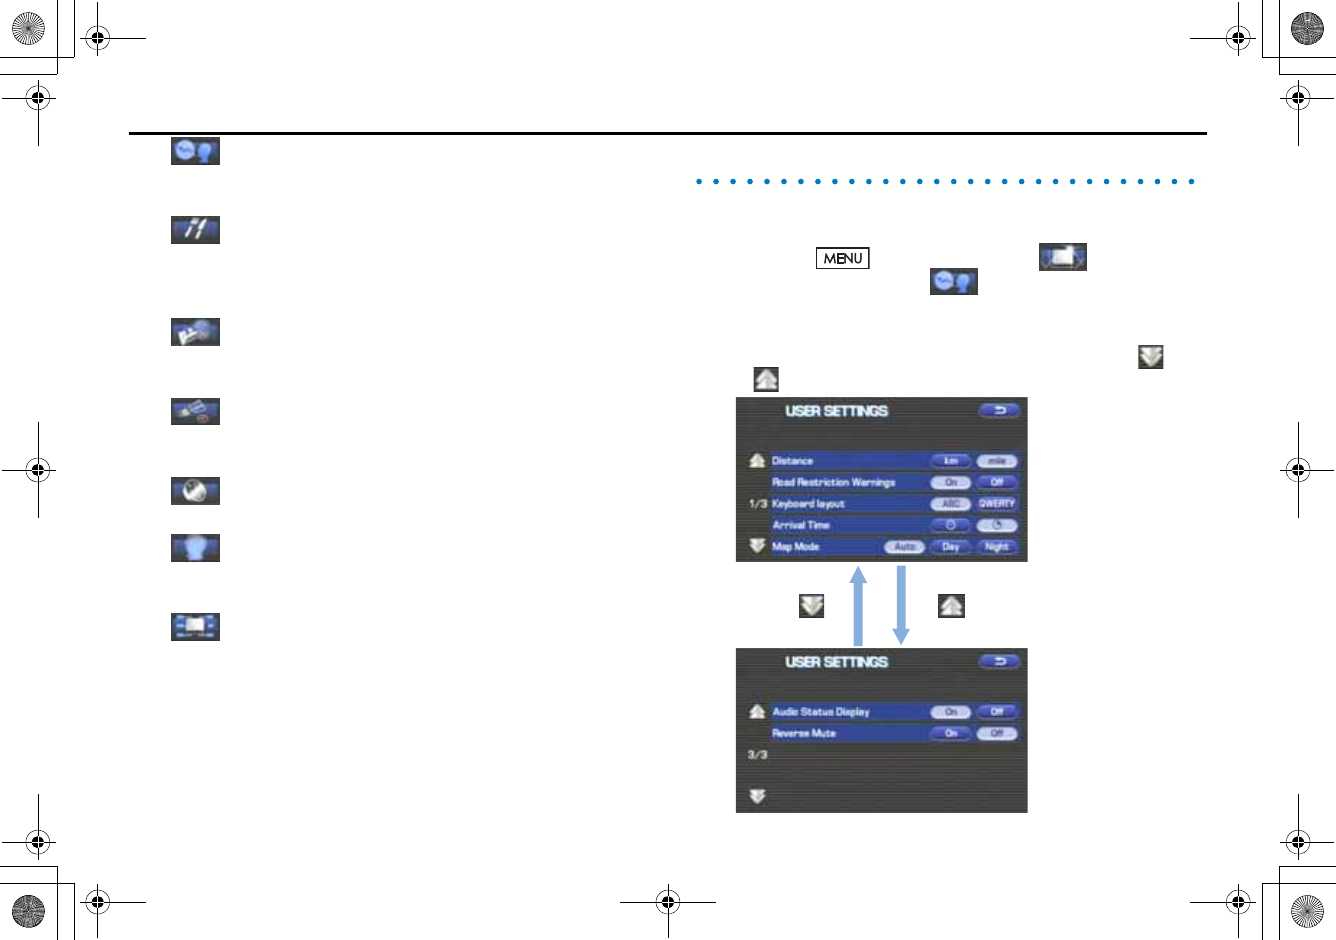
User settings
You can change the screen display and sound settings using this procedure.
1Press the button, then select (navigation
setup), and then select (user settings).
2Select the setting item you wish to change.
The USER SETTINGS screen consists of three pages. Use the
or keys to change the screen page when selecting a setting item.
+ORTG\CA0CXKDQQMࡍࠫ㧞㧜㧜㧣ᐕ㧡㧞㧢ᣣޓᦐᣣޓඦᓟ㧢ᤨ㧠ಽ
55
Navigation Setup
Distance:
Units of distance can be selected from (km)
and (mile).
Road Restriction Warnings:
You can select or deselect display of traffic restriction warnings
during route guidance.
Keyboard layout:
The layout of input keys can be selected from ("ABC" lay-
out) or ("QWERTY" layout).
Arrival Time:
Time of arrival at the destination or a waypoint can be displayed in
two different ways: estimated arrival time or remaining driving
time. Select for the estimated arrival time display
or for the remaining time display.
Map Mode:
The map display mode can be set to any of the automatic, day-
time, and nighttime modes.
(automatic):
The brightness of the display will automatically change to day-
time brightness and nighttime brightness when the headlights
are turned off and on, respectively.
(daytime):
The brightness of the display is fixed at the daytime setting
regardless of whether the headlights are on or off.
(nighttime):
The brightness of the display is fixed at the nighttime setting
regardless of whether the headlights are on or off.
Guidance Screen:
This function allows you to select or deselect display of guidance
messages on the screen.
Freeway Information:
This function allows you to select or deselect display of guidance
messages when driving on freeway.
Auto Volume:
A setting can be made so that the sound volume of the naviga-
tion system automatically increases as the speed of the vehicle
increases.
Beep:
A setting can be made so that a beep sounds.
Clock Display:
A setting can be made so that the clock is displayed.
Audio Status Display:
A setting can be made so that the status of the audio system is
displayed.
Reverse Mute:
A setting can be made so that the sound volume of the audio sys-
tem is reduced while reversing the vehicle.
<Estimated arrival time> <Required remaining time>
+ORTG\CA0CXKDQQMࡍࠫ㧞㧜㧜㧣ᐕ㧡㧞㧢ᣣޓᦐᣣޓඦᓟ㧢ᤨ㧠ಽ
56
Navigation Setup
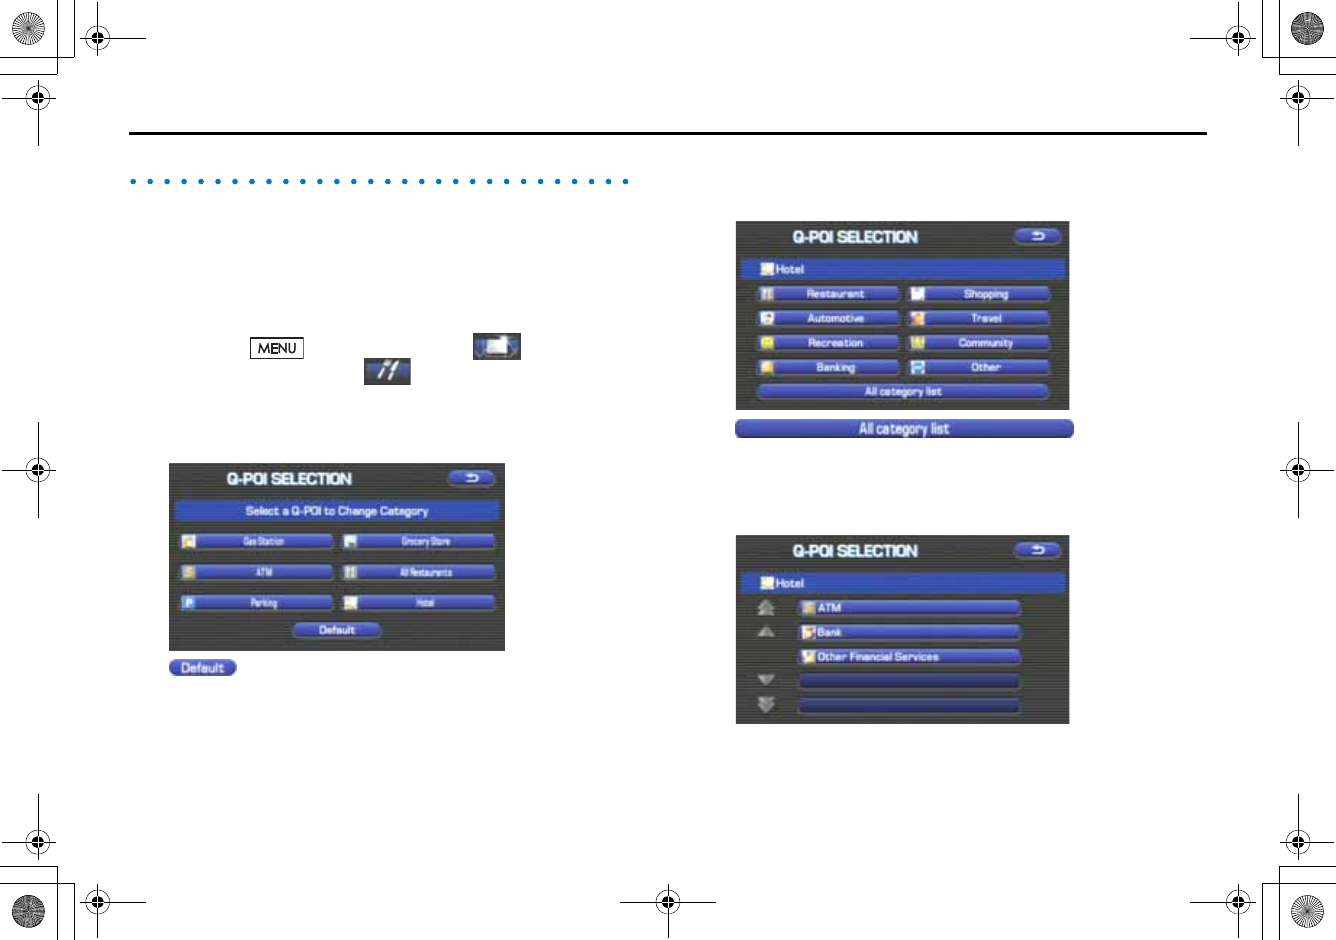
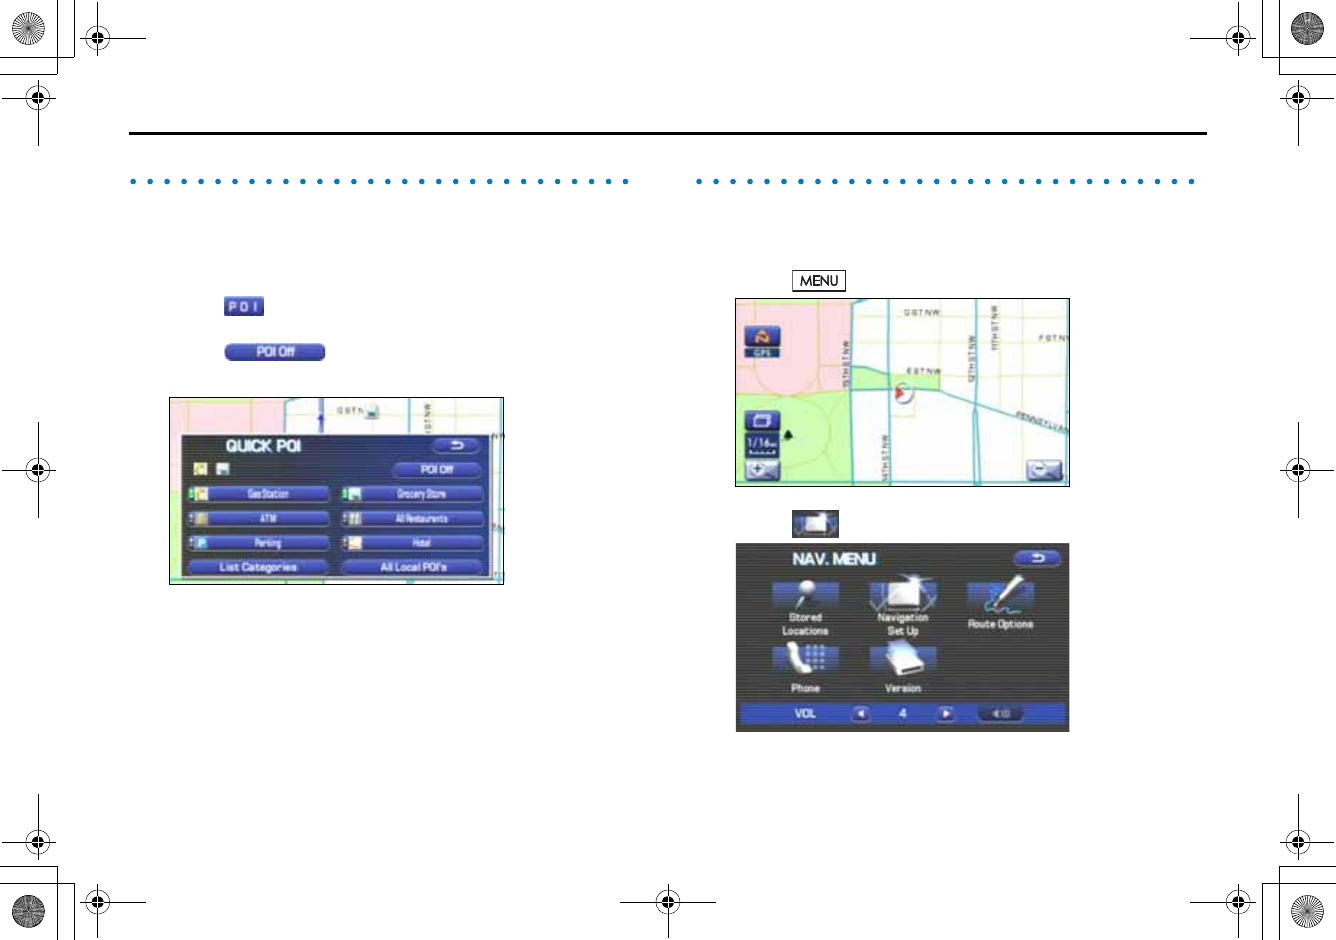
Quick POI selection
Using this function, you can set the point of interest categories that are
displayed when you select the Point of Interest menu key on the cur-
rent map screen. Set up to six different categories that you use most fre-
quently. (See Page 72 for the method of displaying POI categories on
the map and searching for the nearest points of interest.)
1Press the button, then select (navigation
setup), and then select (quick POI selection).
2Select one of the six category keys you wish to program
into the Quick POI storage.
(default):
Use this key to restore the factory settings.
3Select a category.
Once you have selected a category key, subcategories will be dis-
played.
(all category list):
Subcategories from all individual categories will be displayed
together.
4Select the subcategories to be displayed on the map.
NOTE
Repeat Steps 1 to 4 to add more POI categories for display on the menu screen.
+ORTG\CA0CXKDQQMࡍࠫ㧞㧜㧜㧣ᐕ㧡㧞㧢ᣣޓᦐᣣޓඦᓟ㧢ᤨ㧠ಽ
57
Navigation Setup
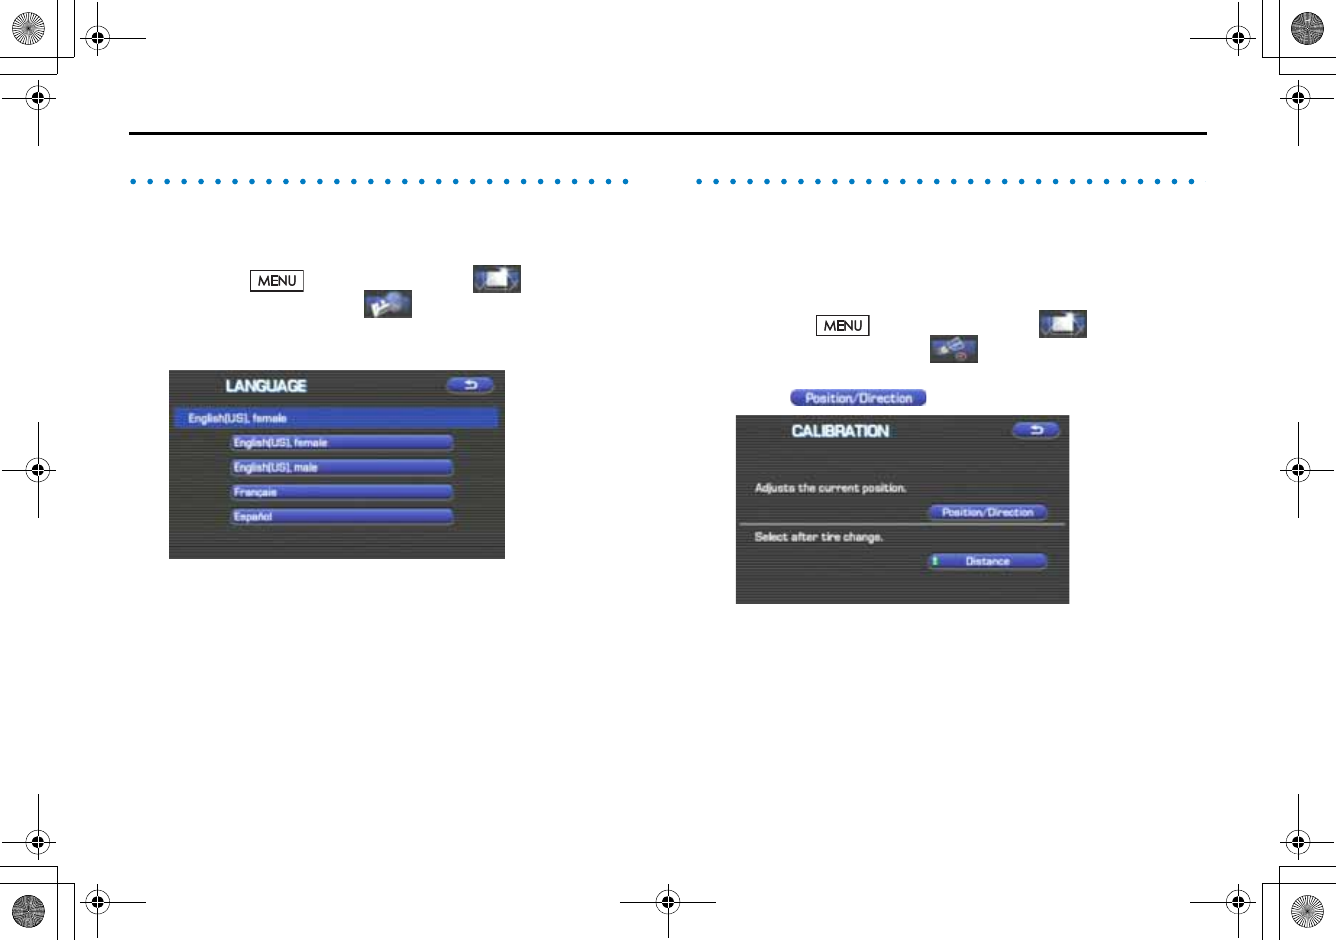
Language Selection
Use the following procedure to select your preferred language for the
menu screens and the voice guidance.
1Press the button, then select (navigation
setup), and then select (language)
2Select your preferred language from the list.
Calibration
This function allows you to correct any display errors in the position and
direction of your vehicle on the map display.
■Adjusting current position and direction
1Press the button, then select (navigation
setup), and then select (calibration).
2Select (position/direction).
+ORTG\CA0CXKDQQMࡍࠫ㧞㧜㧜㧣ᐕ㧡㧞㧢ᣣޓᦐᣣޓඦᓟ㧢ᤨ㧠ಽ
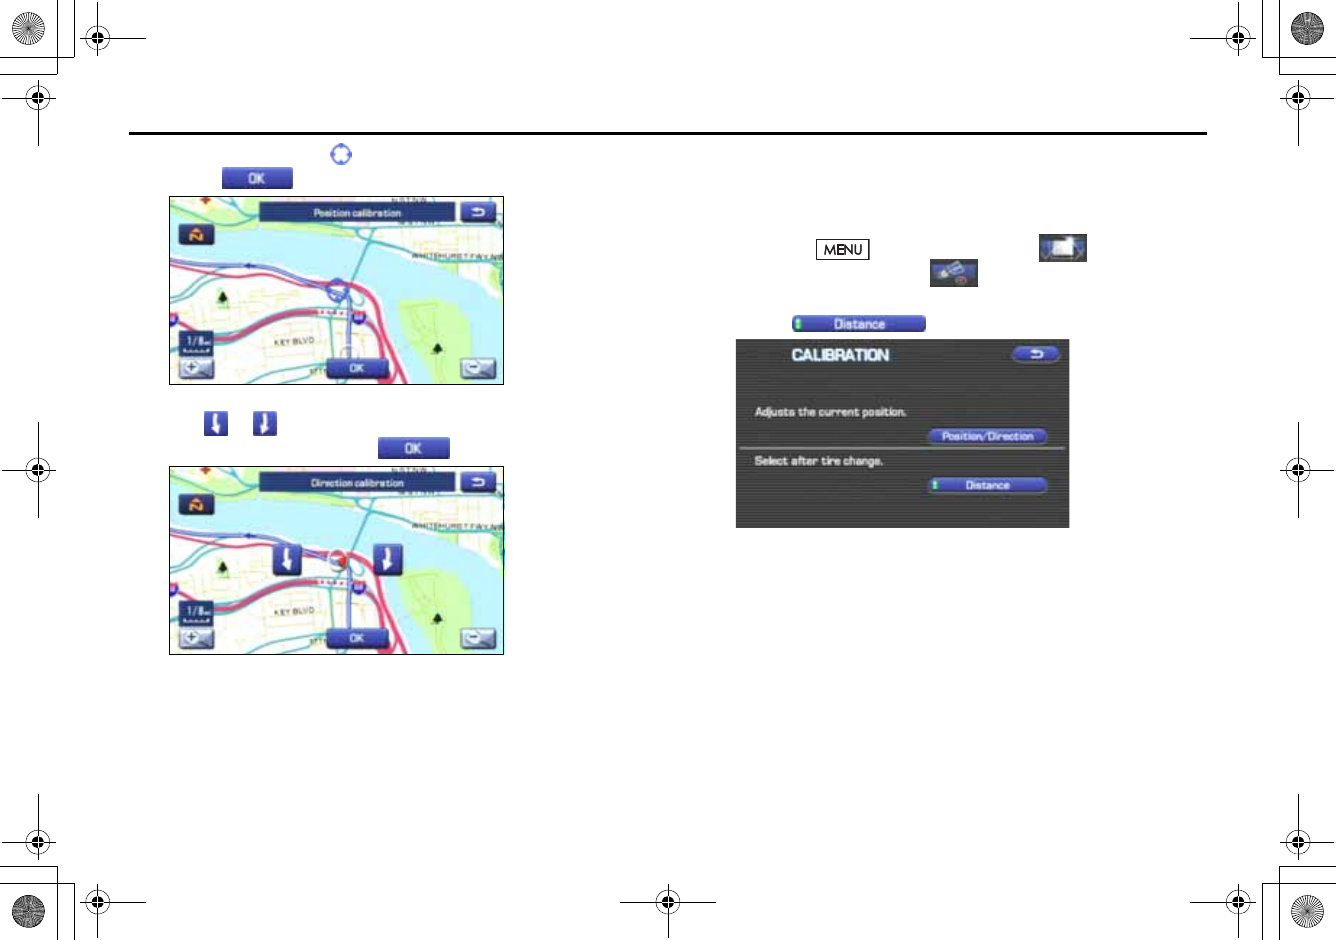
58
Navigation Setup
3Move the crosshair to the correct position, and then
select .
4Use or to adjust the direction in which you are
heading, and then select .
■Distance
When selected, this function automatically corrects an error in the cur-
rent position display that might occur after tire replacement.
1Press the button, then select (navigation
setup), and then select (calibration).
2Select .
NOTE
You will have to drive about 6 miles (10 km) before the distance correction is
complete.
+ORTG\CA0CXKDQQMࡍࠫ㧞㧜㧜㧣ᐕ㧡㧞㧢ᣣޓᦐᣣޓඦᓟ㧢ᤨ㧠ಽ
59
Navigation Setup
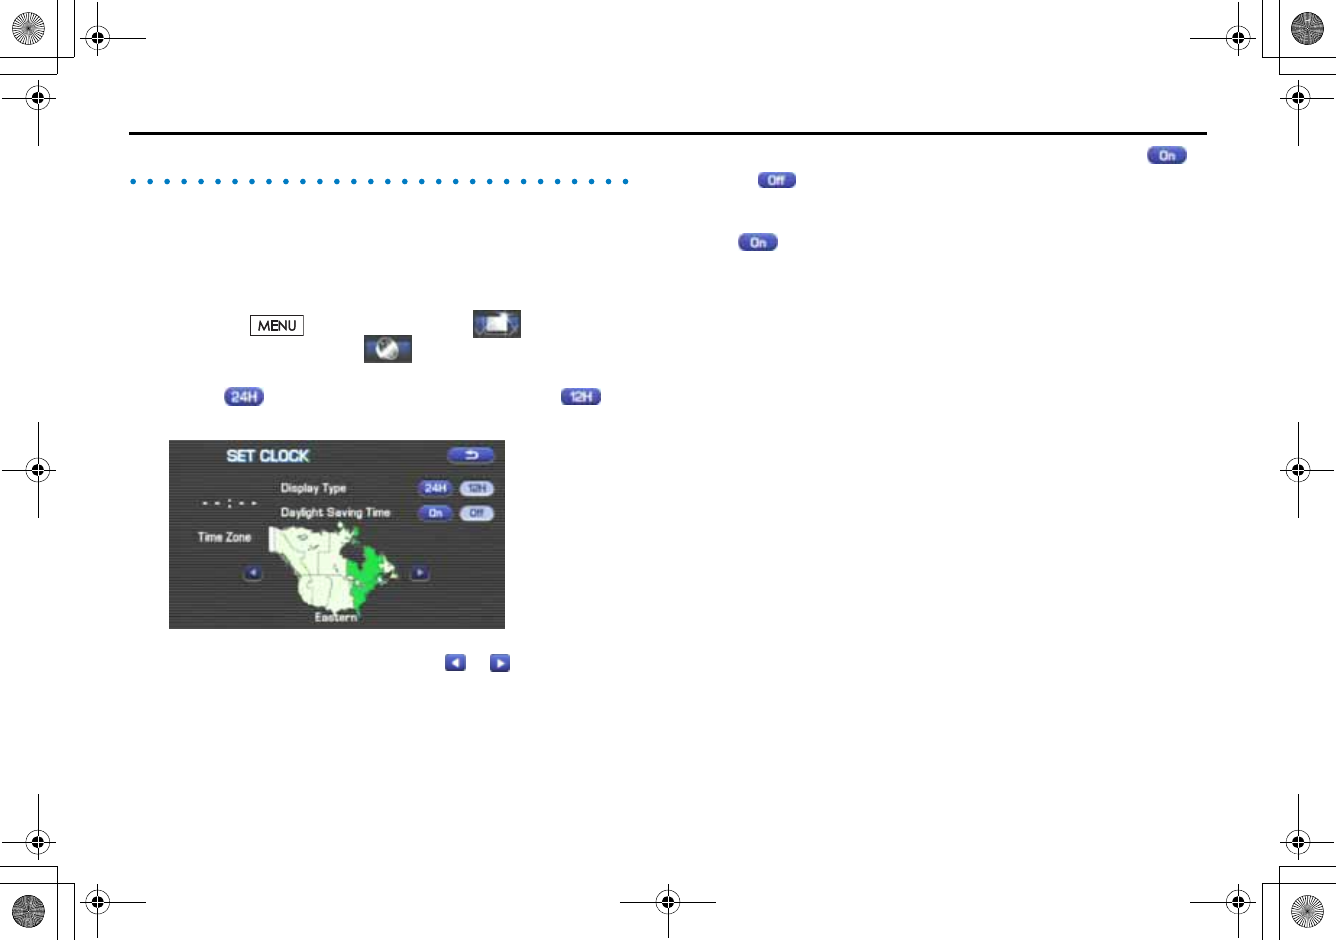
Set clock
Since the adjustments for minutes and seconds are made automatically
using the time data provided by GPS satellites, you can set your clock by
simply performing a time-zone and daylight saving time adjustment
using this function.
1Press the button, then select (navigation
setup), and then select (set clock).
2Select if you prefer 24-hour display; select for
12-hour display.
3Select the time-zone by pressing or .
NOTE
Initial time-zone setting of this navigation unit is Eastern (Disc A)/Mid (Disc B)/
Pacific (Disc C).
4Select the daylight saving time mode by pressing
or .
NOTE
Select to advance the time by one hour.
+ORTG\CA0CXKDQQMࡍࠫ㧞㧜㧜㧣ᐕ㧡㧞㧢ᣣޓᦐᣣޓඦᓟ㧢ᤨ㧠ಽ
60
Navigation Setup
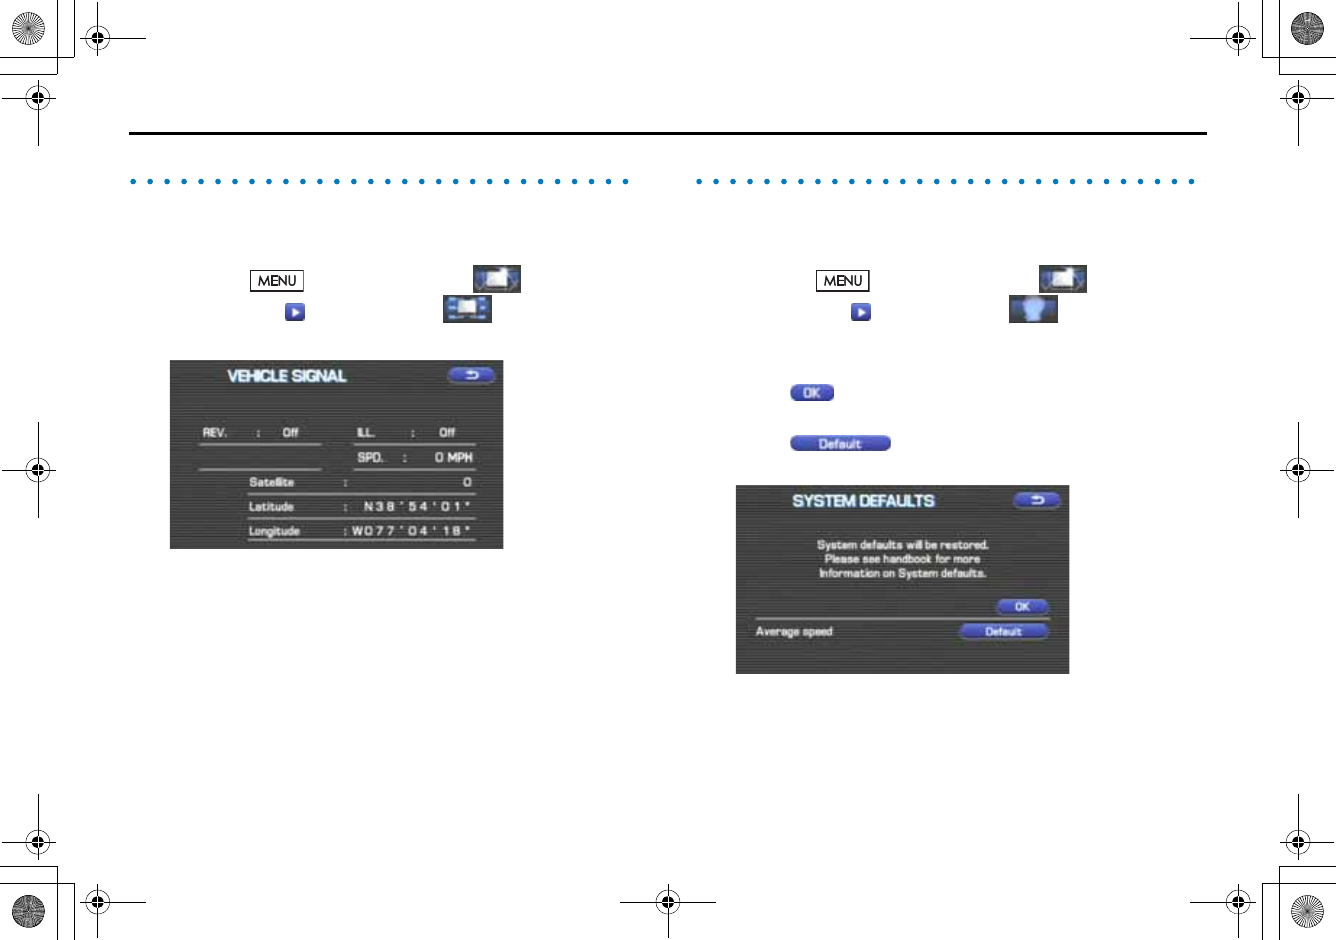
Vehicle signal
This function allows certain vehicle data and GPS satellite data to be dis-
played.
1Press the button, then select (navigation
setup), select and then select (vehicle signal).
The VEHICLE SIGNAL screen will appear.
Restore system defaults
Use this function if you want to change all of the system's current set-
tings back to the default settings.
1Press the button, then select (navigation
setup), select and then select (restore system
defaults).
2Select to return all current systems settings to
default.
Select (default) to return average speed set-
ting to default.
NOTE
If you select this function, all your settings will be deleted.
+ORTG\CA0CXKDQQMࡍࠫ㧞㧜㧜㧣ᐕ㧡㧞㧢ᣣޓᦐᣣޓඦᓟ㧢ᤨ㧠ಽ
61
Navigation Setup
[Default List]
Item Initial condition
Map display
Search Area
Display Guidance Language
Map Orientation (1 and 2 screen)
Map Display Mode
Map Display Scale
Map Configuration
Q-POI Map Display
Show POI Icon Display
Right Screen Setting, POI
Passage Point Display/
Current Location, Map Screen (Time
Requirement, Time, Direction / Distance)
Passage Point Display/
Full Route, Map Screen (Time Require-
ment, Time, Direction / Distance)
Restricted Road
Freeway Information
Disc A (WEST): CA
Disc B (MID): IL
Disc C (EAST): DC
US English, female
North up
Single-screen display
Single-screen:
10,000 map (1/16 mi) (100 m)
Dual-screen:
40,000 map (1/4 mi) (500 m)
Arrow Mode
Off
Off
On
Next passage point
Destination
On
Off
Volume Control
Volume Preset
4
Navigation Setup Menu
Distance
Road Restriction Warnings
Reverse Mute
Keyboard Layout
Arrival Time
mile
On
Off
ABC
Required remaining time
Item Initial condition
Map Mode
Guidance Screen
Q-POI Selection
Language Selection
Auto
On
A: Gas station
B: ATM
C: Parking
D: Grocery store
E: All Restaurants
F: Hotel
US English, female, male,
French, Espanõl
Route Options
Search Condition
Route Preferences
Quick
Allow Toll Road: Off
Allow Ferry: Off
Allow Major Roads: On
Allow Time Restricted Road:
Off
Item Initial condition
+ORTG\CA0CXKDQQMࡍࠫ㧞㧜㧜㧣ᐕ㧡㧞㧢ᣣޓᦐᣣޓඦᓟ㧢ᤨ㧠ಽ
62
Stored Locations
You can store, edit, or delete any destinations, waypoints, and
other marked points using the procedures described in this
section.
1Press the button.
2Select (stored locations).
3Select the desired item.
(Memory Points):
Use this function to place markers on the map. (See Page 63.)
(Avoid Area):
Use this function to store into the system's memory any areas you
want to avoid. (See Page 68.)
(Previous Destination):
Use this function to delete previously stored destinations and
waypoints. (See Page 70.)
(Display memory point icons):
Selecting this key allows you to display icons for memory points.
Each of the above six functions has some or all of the following
four standard editing functions (see the table below):
(add):
You can store a new location into memory.
(list):
You can see a list of the stored locations.
(delete):
You can delete stored locations.
(delete all):
You can delete all stored locations.
+ORTG\CA0CXKDQQMࡍࠫ㧞㧜㧜㧣ᐕ㧡㧞㧢ᣣޓᦐᣣޓඦᓟ㧢ᤨ㧠ಽ
63
Stored Locations
Editing keys displayed for each function are as follows:
The numbers in parentheses following the function names indicate the
maximum locations you can store in the memory.
Memory points
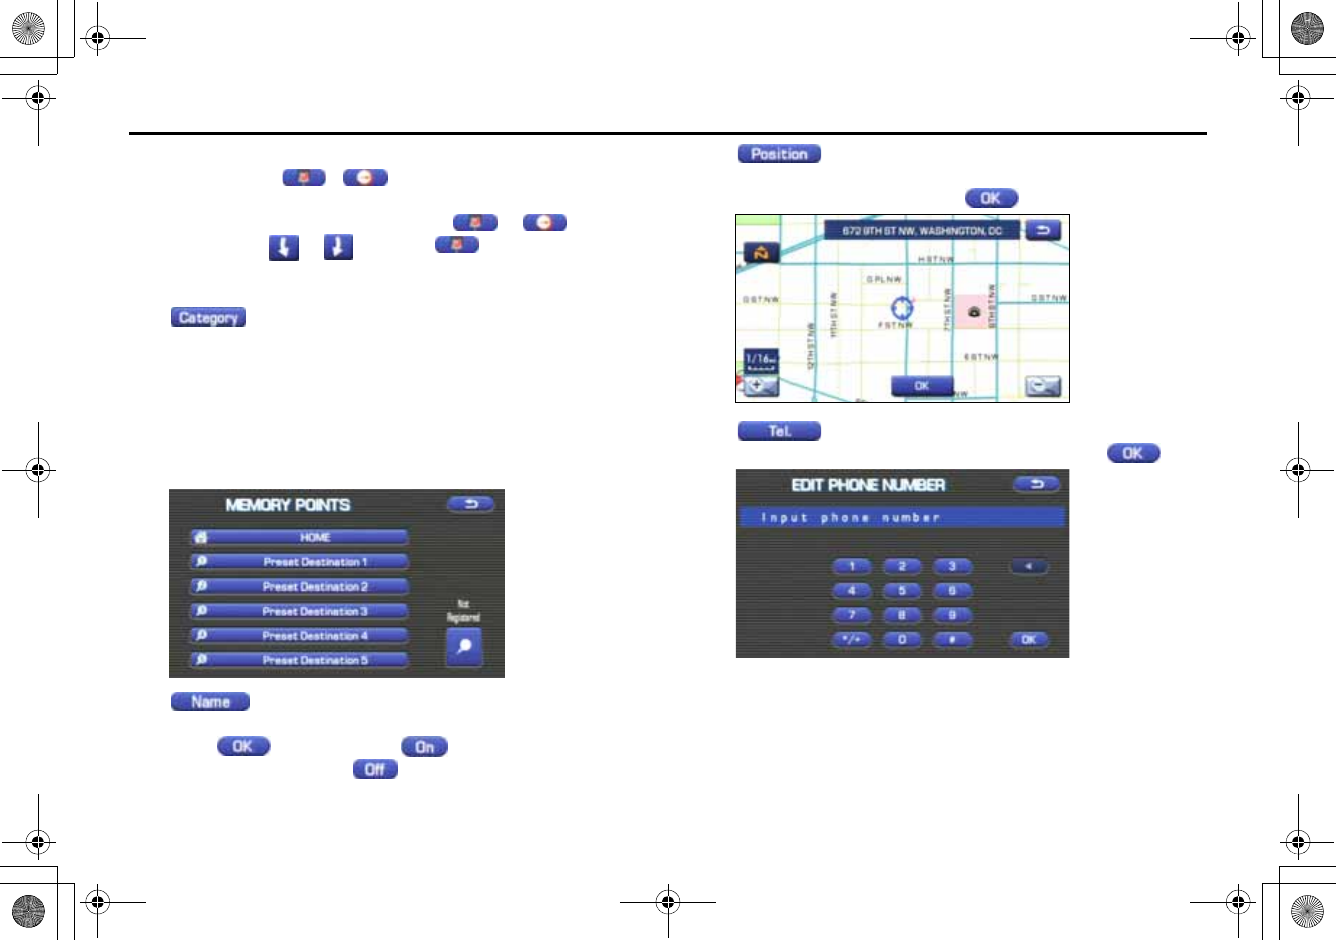
■Storing new memory points
Memory points can be stored into any of the four categories of storage
locations.
1Press the button, then select (stored loca-
tions), and then select (memory points).
2Select (add).
Memory Points (100)
Avoid Area (10)
Previous Deset. (5)
+ORTG\CA0CXKDQQMࡍࠫ㧞㧜㧜㧣ᐕ㧡㧞㧢ᣣޓᦐᣣޓඦᓟ㧢ᤨ㧠ಽ
64
Stored Locations
3Set the memory point using the preferred method avail-
able on the displayed screen.
NOTE
Up to 100 memory points can be stored. Once that number has been reached,
you must delete memory points that you no longer require (See Page 67) before
you can store new memory points. The number of memory points you can store
is indicated on the screen.
■Reviewing and modifying memory points
Using this function, you can review the stored memory points in the
form of a list on the screen and modify names, icons, telephone num-
bers, and other memory point data.
1Press the button, then select (stored loca-
tions), and then select (memory points).
2Select (list).
+ORTG\CA0CXKDQQMࡍࠫ㧞㧜㧜㧣ᐕ㧡㧞㧢ᣣޓᦐᣣޓඦᓟ㧢ᤨ㧠ಽ
65
Stored Locations
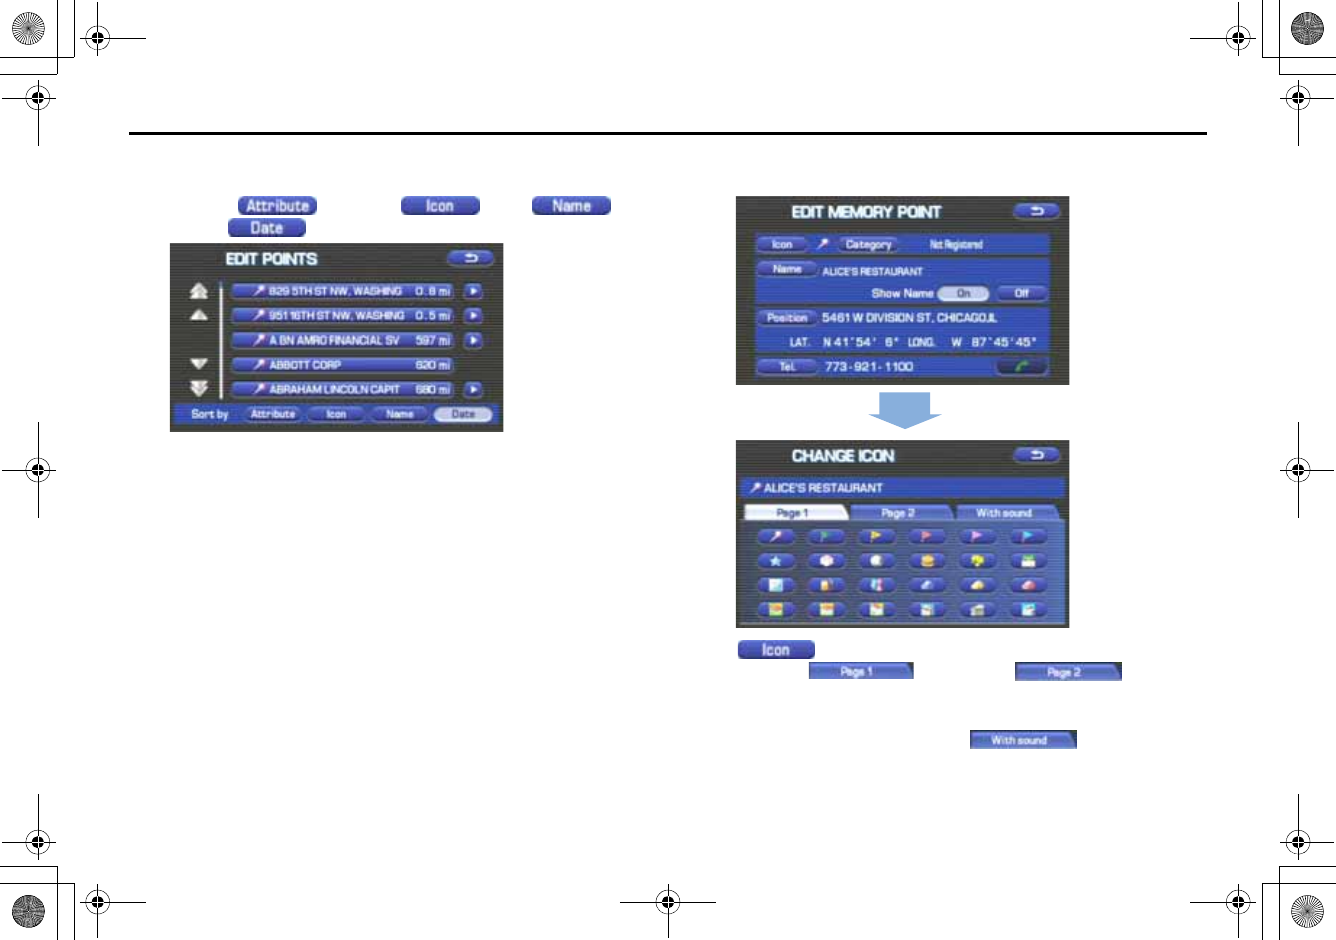
3Select the memory point to be modified.
You can change the sequence in which memory points are listed by
selecting (Attribute), (icon), (na
me), or (date)
.
4Select the category key corresponding to the memory
point to be modified.
(icon): Selecting this key allows you to choose a dis-
play icon. (Page 1) and (Page 2) of
the CHANGE ICON screen contain standard icons, whereas the
"With Sound" (with sound) page contains icons that are accompa-
nied by response sounds. Select (with sound) to
listen to these sounds.
+ORTG\CA0CXKDQQMࡍࠫ㧞㧜㧜㧣ᐕ㧡㧞㧢ᣣޓᦐᣣޓඦᓟ㧢ᤨ㧠ಽ
66
Stored Locations
NOTE
The "With direction" ( / ) keys in the "With Sound" page are
used to activate response sounds only when you come near the mem-
ory point from the specified direction. Select or and set
the direction using or . Selecting allows you to listen to
respective sounds.
(category): Use this key to change the storage cate-
gory. After selecting this key, select either key of HOME or Preset
Destinations 1 to 5.
For memory points to which the category has been set, it is possi-
ble to set them quickly as a destination. It is convenient to set in
advance the category to your home or a spot to which you go fre-
quently. When setting it as a destination, select the relevant key
on the DESTINATION ENTRY screen. See Page 22.
(name): Select this key to change the name of a mem-
ory point. When the change has been completed,
select (OK). Then select (on) if the name is to be
displayed on the map, or (off ) if it is not to be displayed.
(position): Select this key to review the memory
points and modify a memory point on the map screen. After
checking or modifying it, select (OK).
(Tel): Select this key to modify a telephone number.
When the modification has been completed, select (OK).
+ORTG\CA0CXKDQQMࡍࠫ㧞㧜㧜㧣ᐕ㧡㧞㧢ᣣޓᦐᣣޓඦᓟ㧢ᤨ㧠ಽ
67
Stored Locations
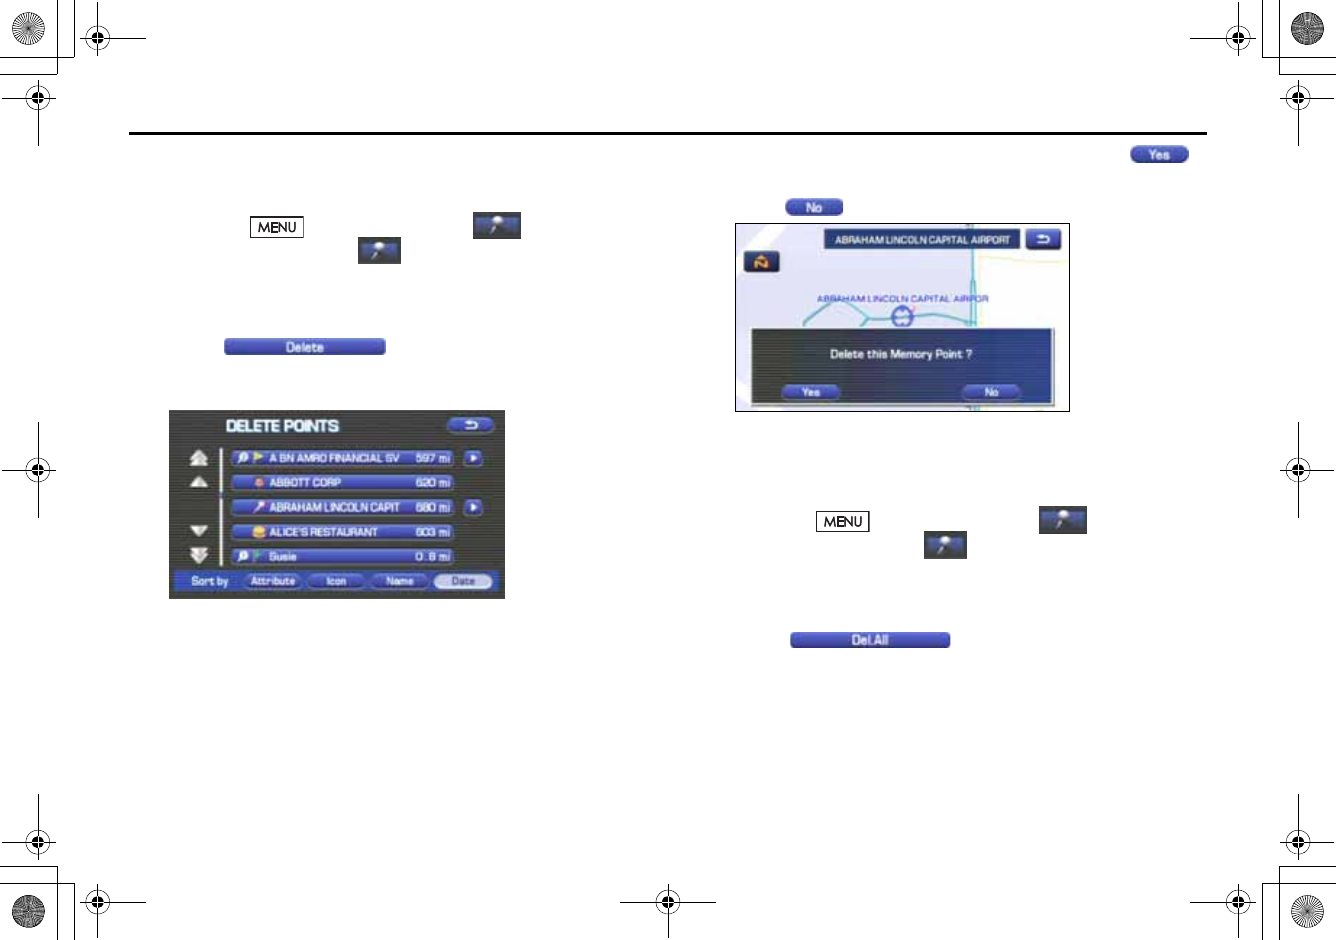
■Deleting memory points
You can delete stored memory points by using this function.
1Press the button, then select (stored loca-
tions), and then select (memory points).
2Select the category of the memory point to be deleted.
3Select (delete).
4Select the memory point to be deleted.
5Confirmation message will be displayed. Select
(yes).
Select (no) to cancel the deletion.
■Deleting all memory points
Using this function, you can delete all memory points.
1Press the button, then select (stored loca-
tions), and then select (memory points).
2Select the category of the memory points to be deleted.
3Select (delete all).
+ORTG\CA0CXKDQQMࡍࠫ㧞㧜㧜㧣ᐕ㧡㧞㧢ᣣޓᦐᣣޓඦᓟ㧢ᤨ㧠ಽ
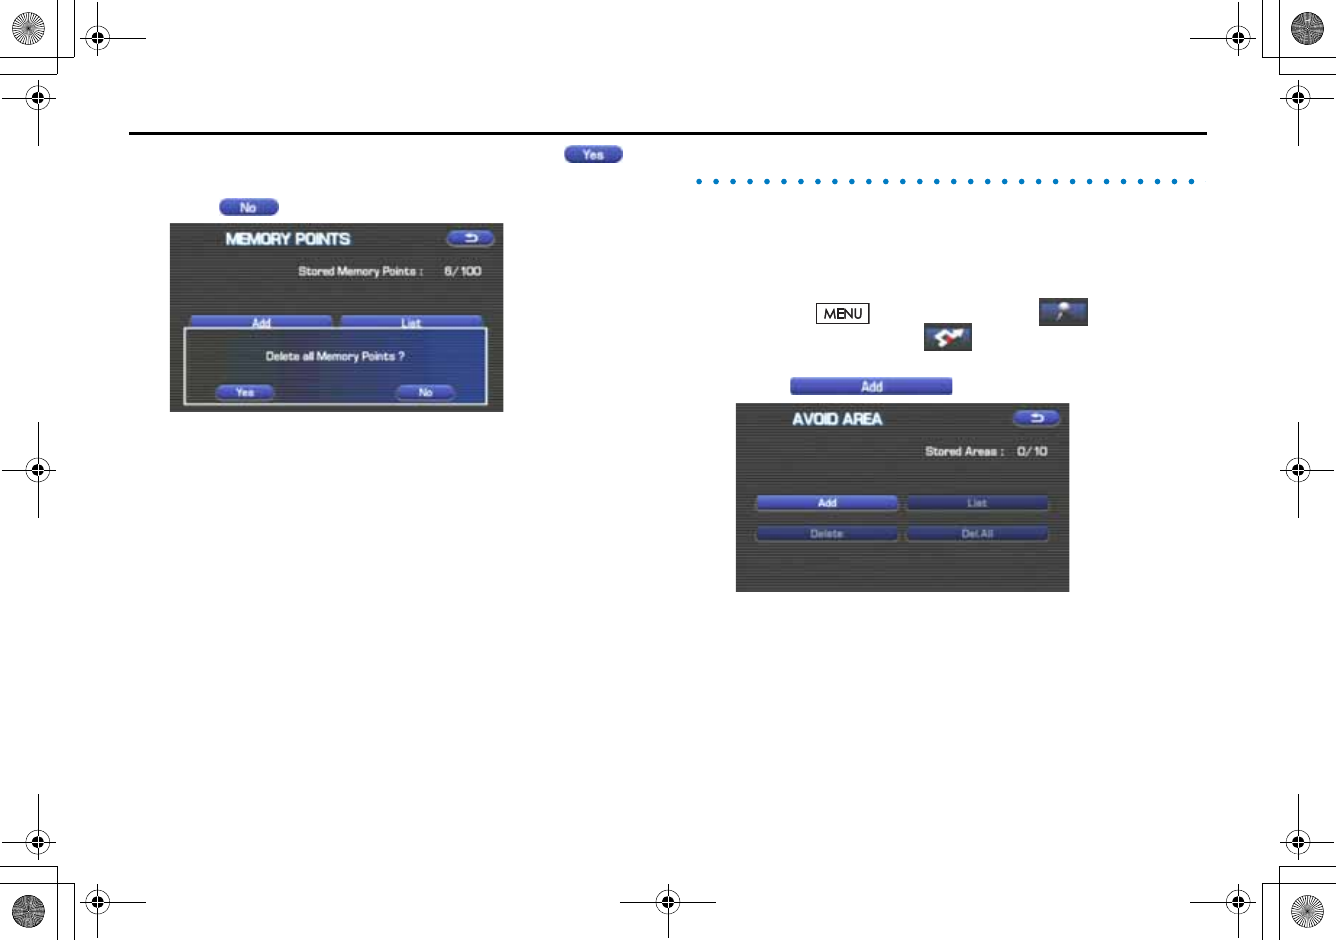
68
Stored Locations
4Confirmation message will be displayed. Select
(yes).
Select (no) to cancel the deletion.
Avoid area
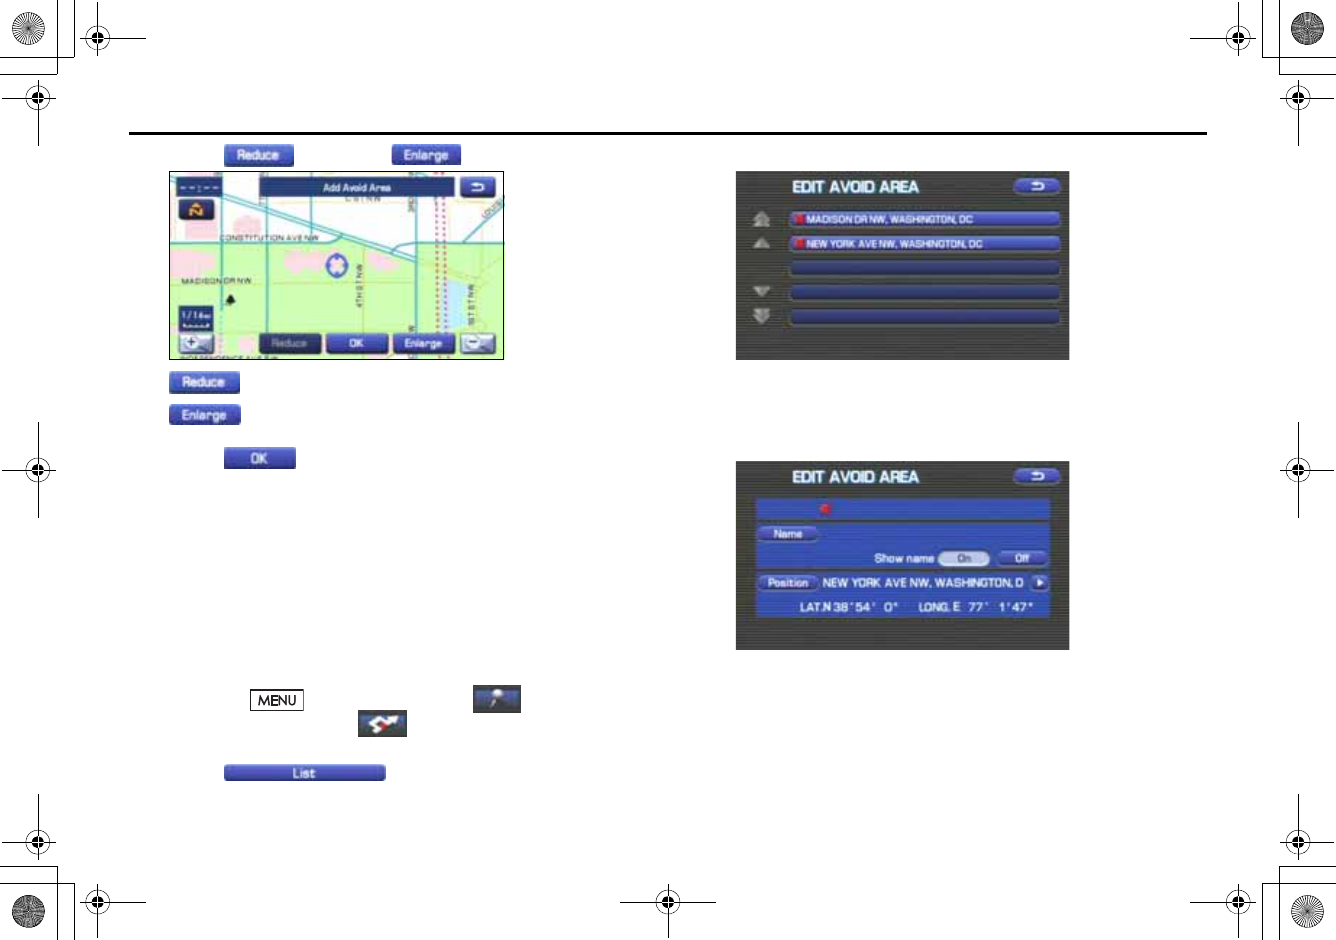
■Storing avoid areas
If you use this function to store into the system's memory the areas you
want to avoid, the system will avoid the areas when calculating routes.
1Press the button, then select (stored loca-
tions), and then select (avoid area).
2Select (add).
3Set an avoid area using your preferred method.
A map including the specified avoid area will appear.
The method of setting avoid areas is identical to that of setting
destinations.
+ORTG\CA0CXKDQQMࡍࠫ㧞㧜㧜㧣ᐕ㧡㧞㧢ᣣޓᦐᣣޓඦᓟ㧢ᤨ㧠ಽ
69
Stored Locations
4Select (reduce) or (enlarge).
(reduce): Reduces the size of the avoid area.
(enlarge): Increases the size of the avoid area.
5Select (OK).
NOTE
•Reduce the scale of the map to specify a larger area.
•Avoid areas can be set only when the scale of the map is 0.6 mile (1 km) or
less.
■Reviewing and modifying avoid areas
Using this function, you can review the stored avoid areas in the form of
a list and modify them if necessary.
1Press the button, then select (stored loca-
tions), and then select (avoid area).
2Select (list).
3Select the avoid area to be modified.
4Select the key corresponding to the item to be modified.
For details regarding the function of each key, refer to "Reviewing
and modifying memory points" on Page 64.
NOTE
The methods for deleting individual and all avoid areas are the same as those
described on Page 67 and 67 for memory points.
+ORTG\CA0CXKDQQMࡍࠫ㧞㧜㧜㧣ᐕ㧡㧞㧢ᣣޓᦐᣣޓඦᓟ㧢ᤨ㧠ಽ

70
Stored Locations
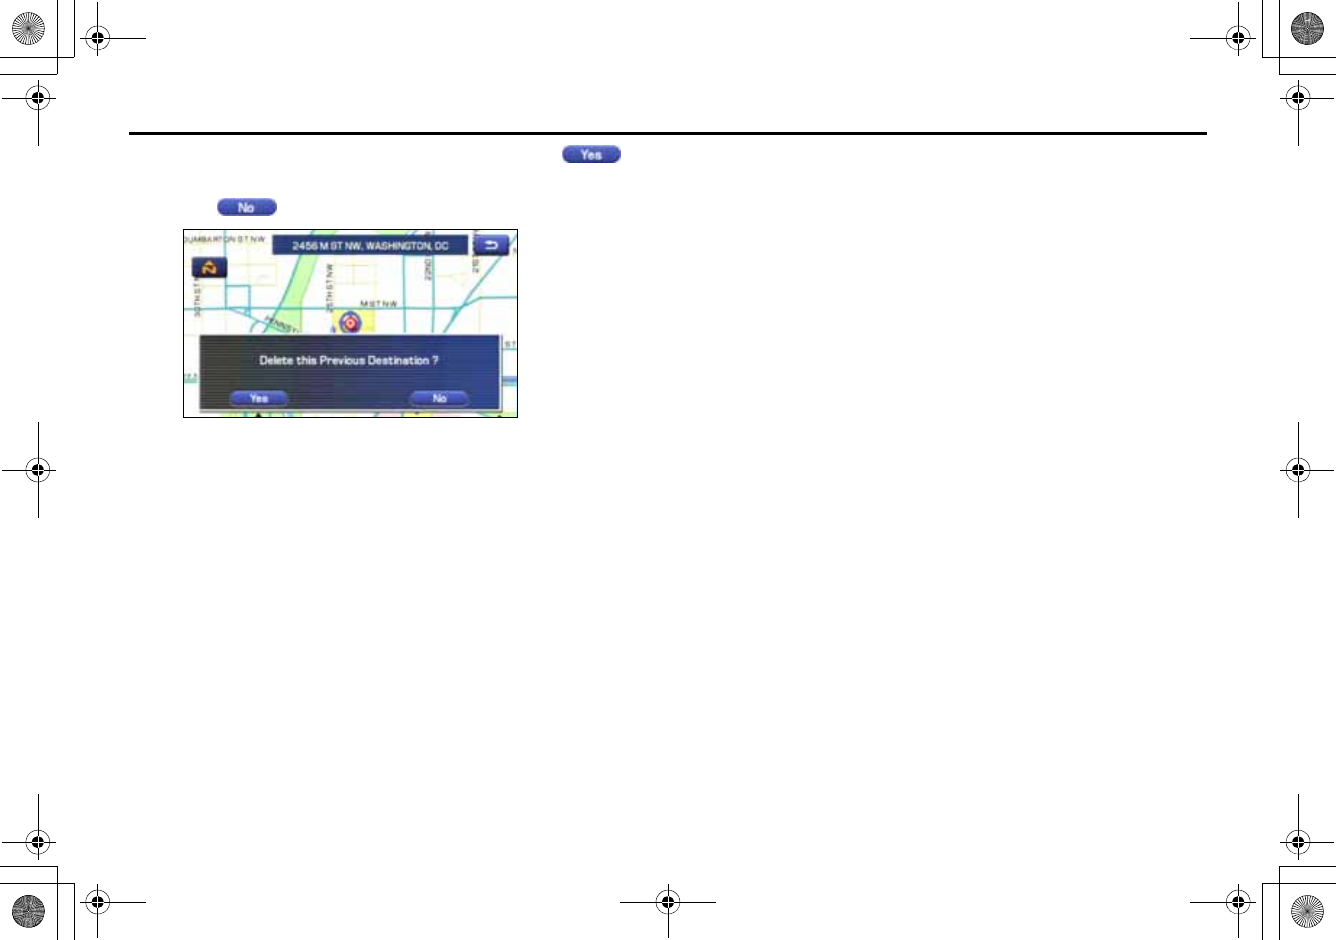
Previous destination (deleting stored locations)
Use this function to delete previously set destinations.
1Press the button, then select (stored loca-
tions), and then select (previous destinations).
2Select (delete).
If (all delete) is selected, all previously set
destinations will be deleted.
3Select the destination to be deleted.
: Use this key to display up to five previous destinations.
: Use this key to display the previous destination.
: Use this key to display the next destination.
: Use this key to display up to five of the next destinations.
(name): Use this key to search through the list by name
(alphabetical search).
(date): Use this key to search through the list by date.
+ORTG\CA0CXKDQQMࡍࠫ㧞㧜㧜㧣ᐕ㧡㧞㧢ᣣޓᦐᣣޓඦᓟ㧢ᤨ㧠ಽ
71
Stored Locations
4Confirmation message will be displayed. Select
(yes).
Select (no) to cancel the deletion.
+ORTG\CA0CXKDQQMࡍࠫ㧞㧜㧜㧣ᐕ㧡㧞㧢ᣣޓᦐᣣޓඦᓟ㧢ᤨ㧠ಽ
72
Other Functions
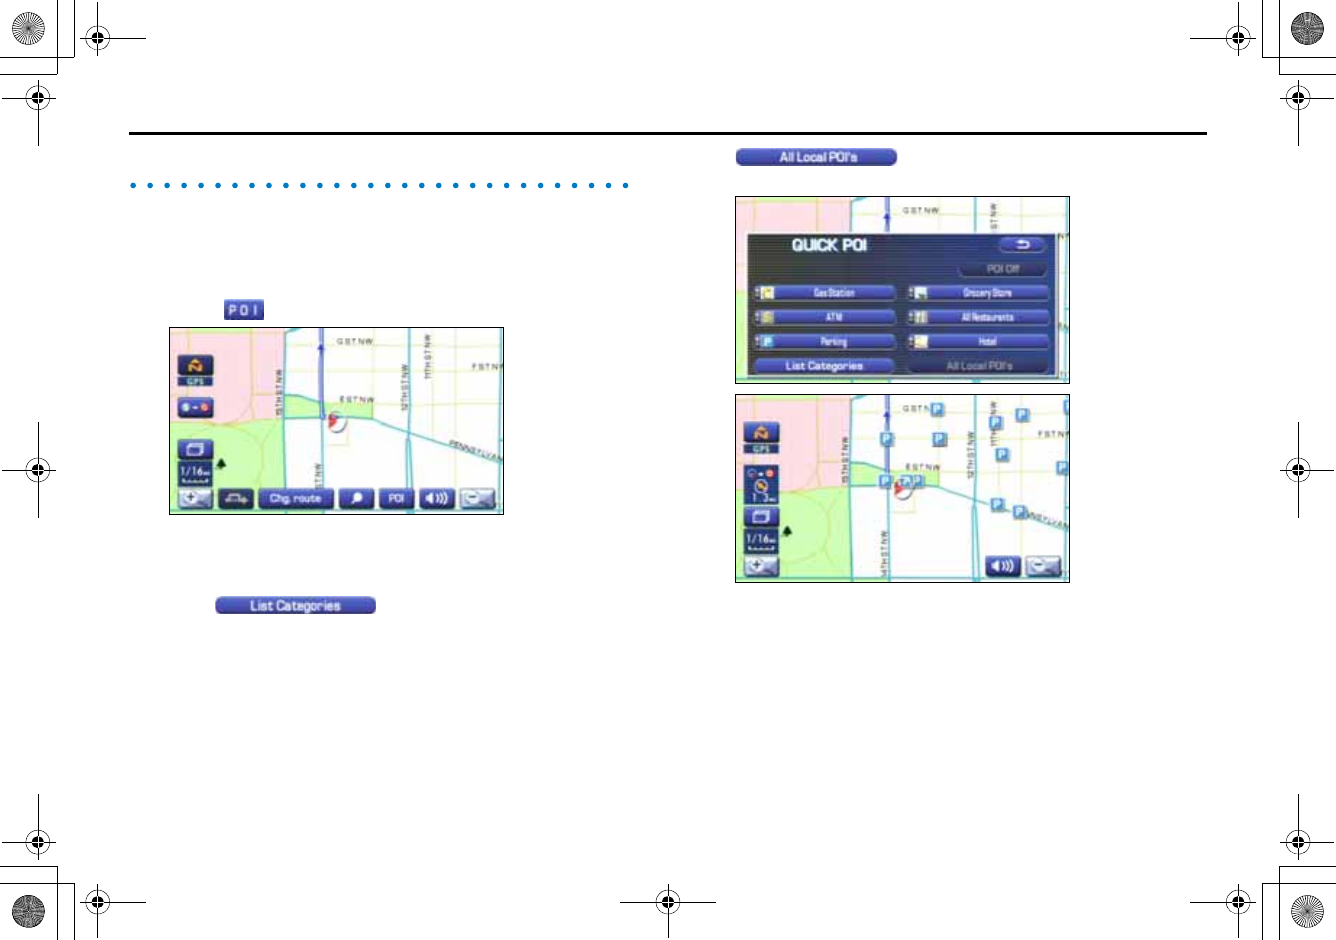
Displaying POIs on a map
Using this function, you can display POIs on the current map screen.
1Touch the current map screen.
2Select (points of interest).
3Select desired POIs using the displayed category keys.
When selecting two or more categories,
select to make a selection of them. The
selection of up to five categories is available.
(all local POIs): Use this key to search for all
local points of interest (see below).
Once you have made your selection of POIs, corresponding mark-
ers will appear on the current map screen.
To delete the markers for these POIs, See Page 75.
NOTE
Displayed information about each POI facility might not include recent changes.
It is recommended that you check the location or business days/hours before
departure.
+ORTG\CA0CXKDQQMࡍࠫ㧞㧜㧜㧣ᐕ㧡㧞㧢ᣣޓᦐᣣޓඦᓟ㧢ᤨ㧠ಽ
73
Other Functions
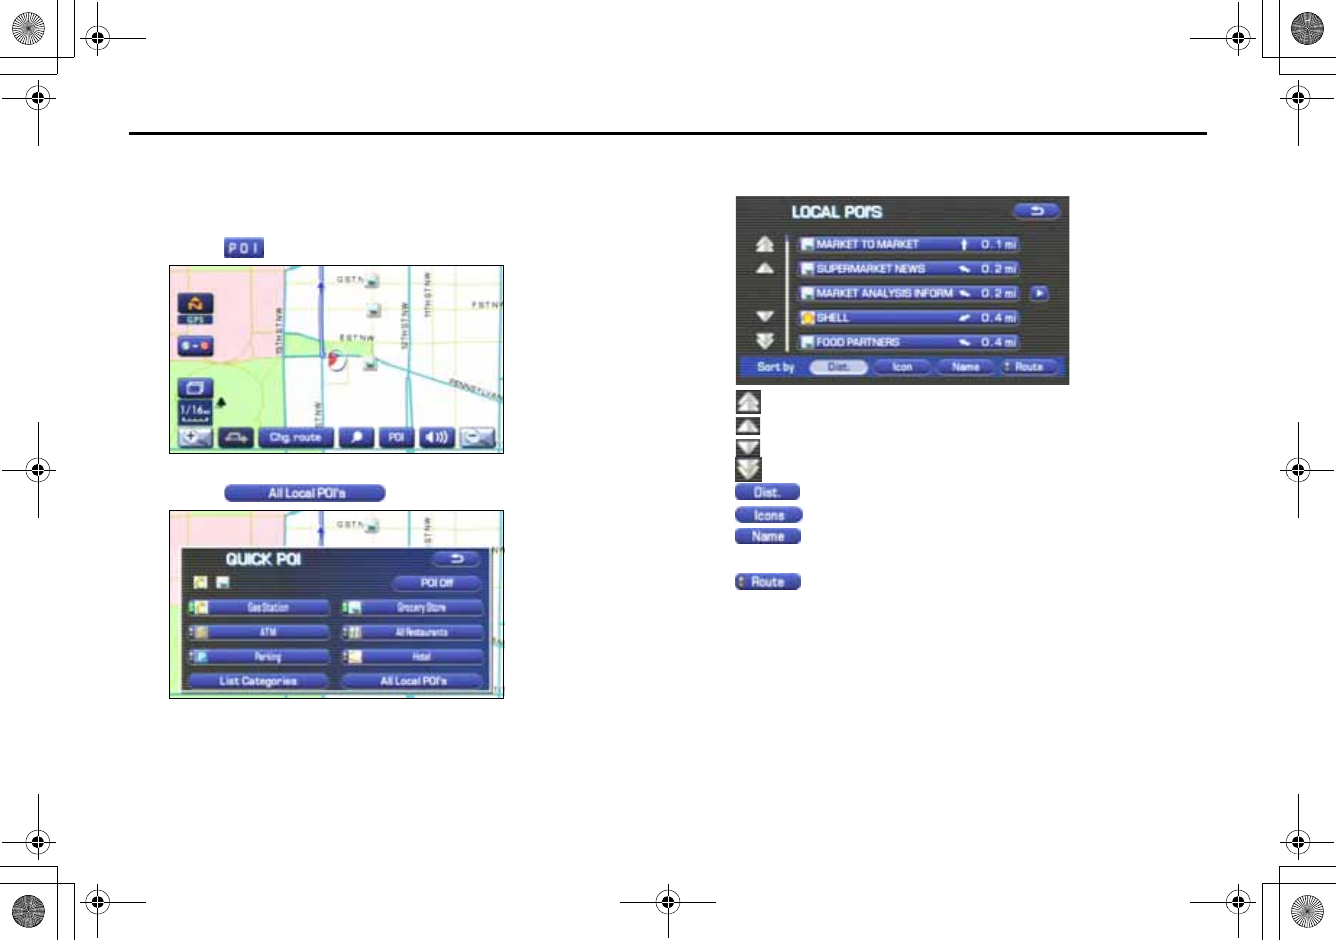
■Local search
1Touch the current map screen.
2Select (points of interest).
3Select (all local points of interest).
When searching local points of interest, it is necessary to set in
advance the category you want to make a search to the Quick POI.
(See Page 74.)
4Select the POI you want to find from the list of catego-
ries.
: Use this key to display up to five previous POIs.
: Use this key to display the previous POI.
: Use this key to display the next POI.
: Use this key to display up to five of the next POIs.
: Use this key to search through the list by distance.
: Use this key to search through the list by icon type.
: Use this key to search through the list by name (alpha-
betical search).
: Use this key to display a list of POIs only along the
route up to the destination.
Once you have made your selection of POIs, corresponding mark-
ers will appear on the map.
+ORTG\CA0CXKDQQMࡍࠫ㧞㧜㧜㧣ᐕ㧡㧞㧢ᣣޓᦐᣣޓඦᓟ㧢ᤨ㧠ಽ
74
Other Functions
Displaying POI data
You can display the information on a POI, such as the name, address
and telephone number.
1Display the desired POI markers on the current map
screen. (See Page 56 and 72 for the procedure.)
2Select the POI marker for which you want information by
moving the crosshair over it.
The name of the POI will appear.
If no data is stored for the selected POI, no name is displayed.
3Select (information).
The information on the POI will be displayed.
: Use this key to store the POI location as a memory point.
+ORTG\CA0CXKDQQMࡍࠫ㧞㧜㧜㧣ᐕ㧡㧞㧢ᣣޓᦐᣣޓඦᓟ㧢ᤨ㧠ಽ
75
Other Functions
Deleting POI markers
Use this function when you want to delete any POI markers on the map.
1Touch the current map screen.
2Select (point of interest).
3Select (point of interest off).
The marker for the POI will disappear from the map.
Editing Quick POI categories
Use this function when you want to edit the Quick POI categories on
this unit.
1Select (menu).
2Select (navigation set up).
+ORTG\CA0CXKDQQMࡍࠫ㧞㧜㧜㧣ᐕ㧡㧞㧢ᣣޓᦐᣣޓඦᓟ㧢ᤨ㧠ಽ

76
Other Functions
3Select (quick POI selection).
4Select the item that you want to edit.
(Following procedure show how to change the category from
ATM to SUBARU dealership on Quick POI for example.)
5Select (ATM)
6Select (automotive).
7Select (SUBARU dealership).
+ORTG\CA0CXKDQQMࡍࠫ㧞㧜㧜㧣ᐕ㧡㧞㧢ᣣޓᦐᣣޓඦᓟ㧢ᤨ㧠ಽ
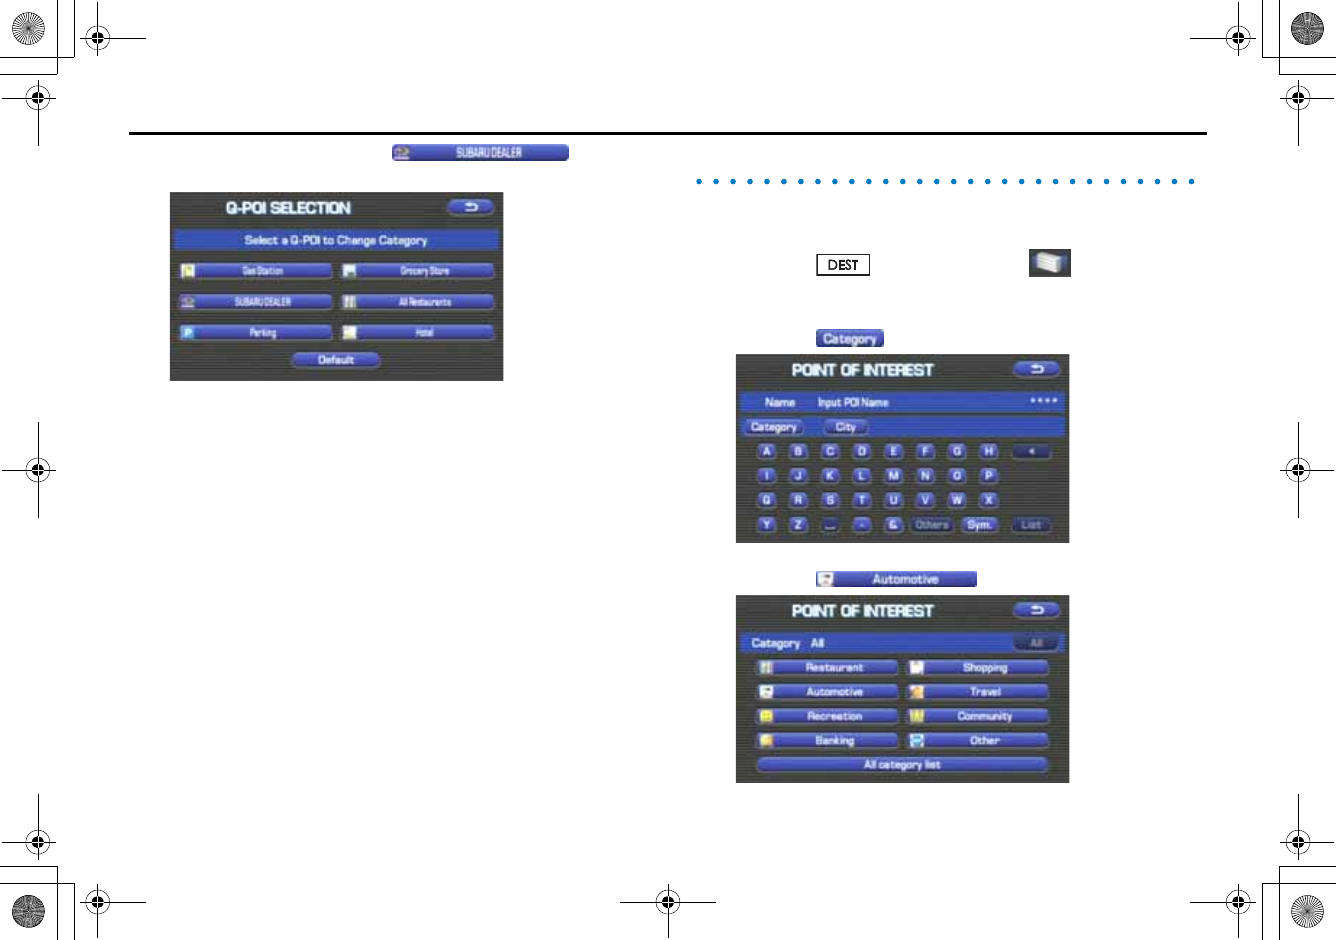
77
Other Functions
Shopping Mall bookmarked as to Quick
POI.
Selecting [Default] returns the Q-POI SELECTION items to their
default settings.
SUBARU dealership search
■SUBARU dealership search from POI
1Press the button and select (point of inter-
est).
2Press the (category).
3Press the (automotive).
+ORTG\CA0CXKDQQMࡍࠫ㧞㧜㧜㧣ᐕ㧡㧞㧢ᣣޓᦐᣣޓඦᓟ㧢ᤨ㧠ಽ
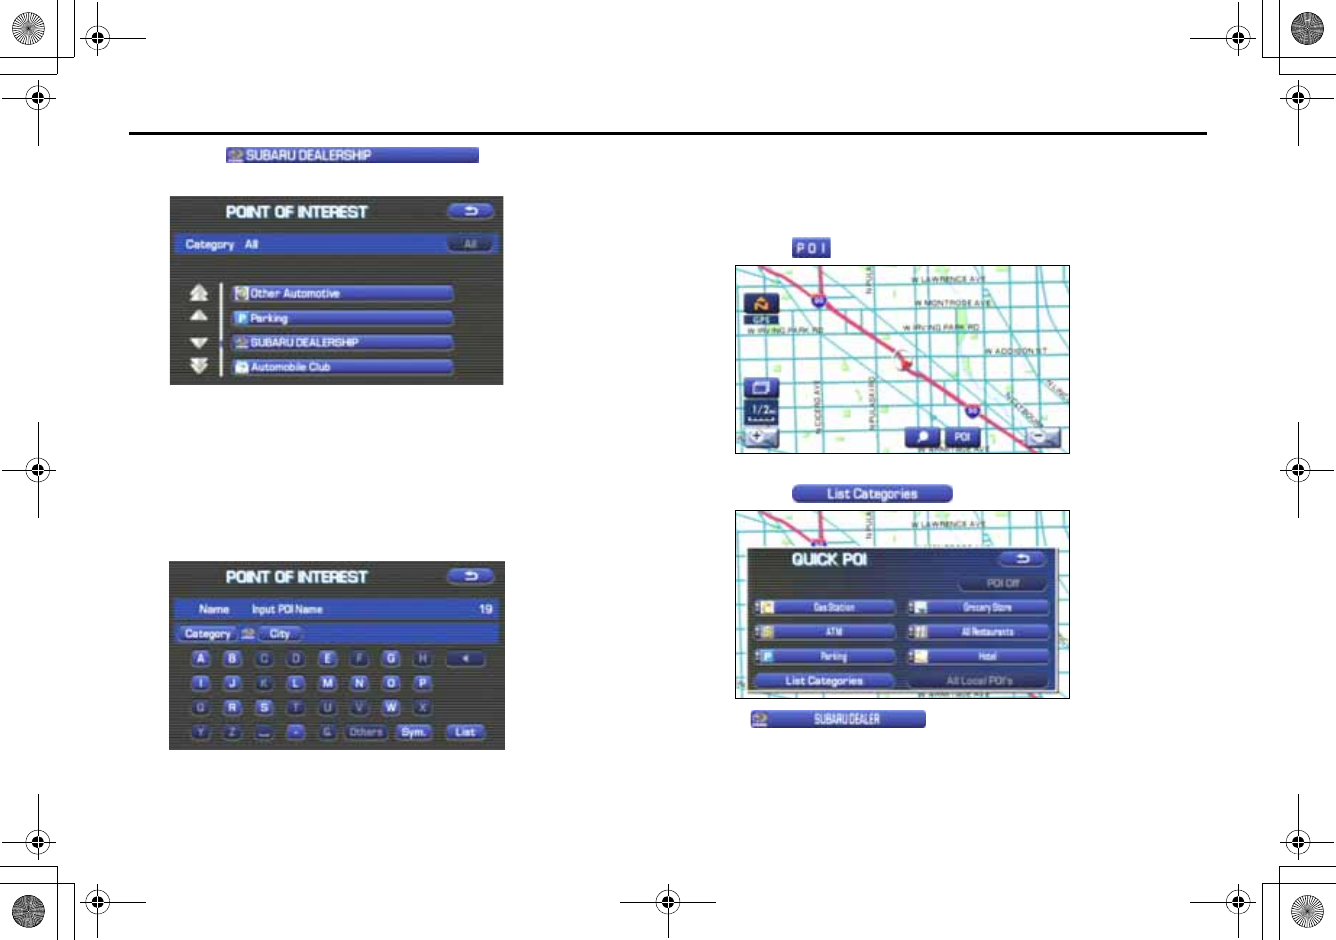
78
Other Functions
4Select (SUBARU dealer-
ship) from the list.
NOTE
•Displayed information about a specific facility might not include recent
changes. It is recommended that you check the location or business days/
hours of a desired point of interest before departure.
5The system refine the destination search only for SUB-
ARU dealership.
■Displaying SUBARU dealership on map
1Touch the current map screen.
2Select (points of interest).
3Select (list categories).
If (SUBARU DEALER) has been registered
as a quick POI on the screen shown above, turn it on and then
proceed to step 6.
+ORTG\CA0CXKDQQMࡍࠫ㧞㧜㧜㧣ᐕ㧡㧞㧢ᣣޓᦐᣣޓඦᓟ㧢ᤨ㧠ಽ
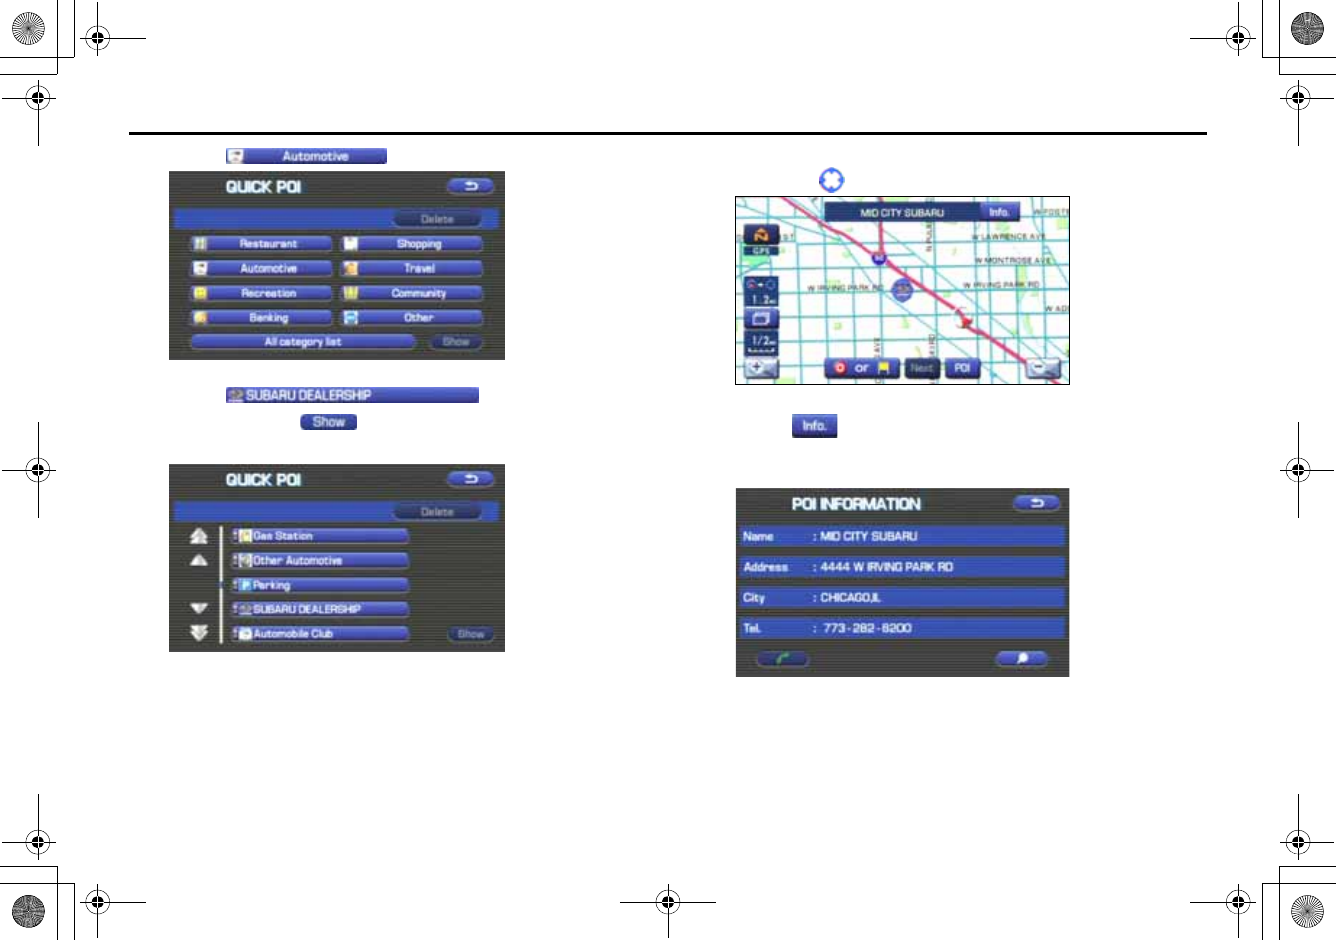
79
Other Functions
4Select (automotive).
5Select (SUBARU dealer-
ship) and press (show).
The POI marker of SUBARU dealership will appear.
6Select the SUBARU dealership marker by moving the
cross hair over it.
7Select (info).
8The information of SUBARU dealership will be displayed.
+ORTG\CA0CXKDQQMࡍࠫ㧞㧜㧜㧣ᐕ㧡㧞㧢ᣣޓᦐᣣޓඦᓟ㧢ᤨ㧠ಽ
80
Version and Initialization
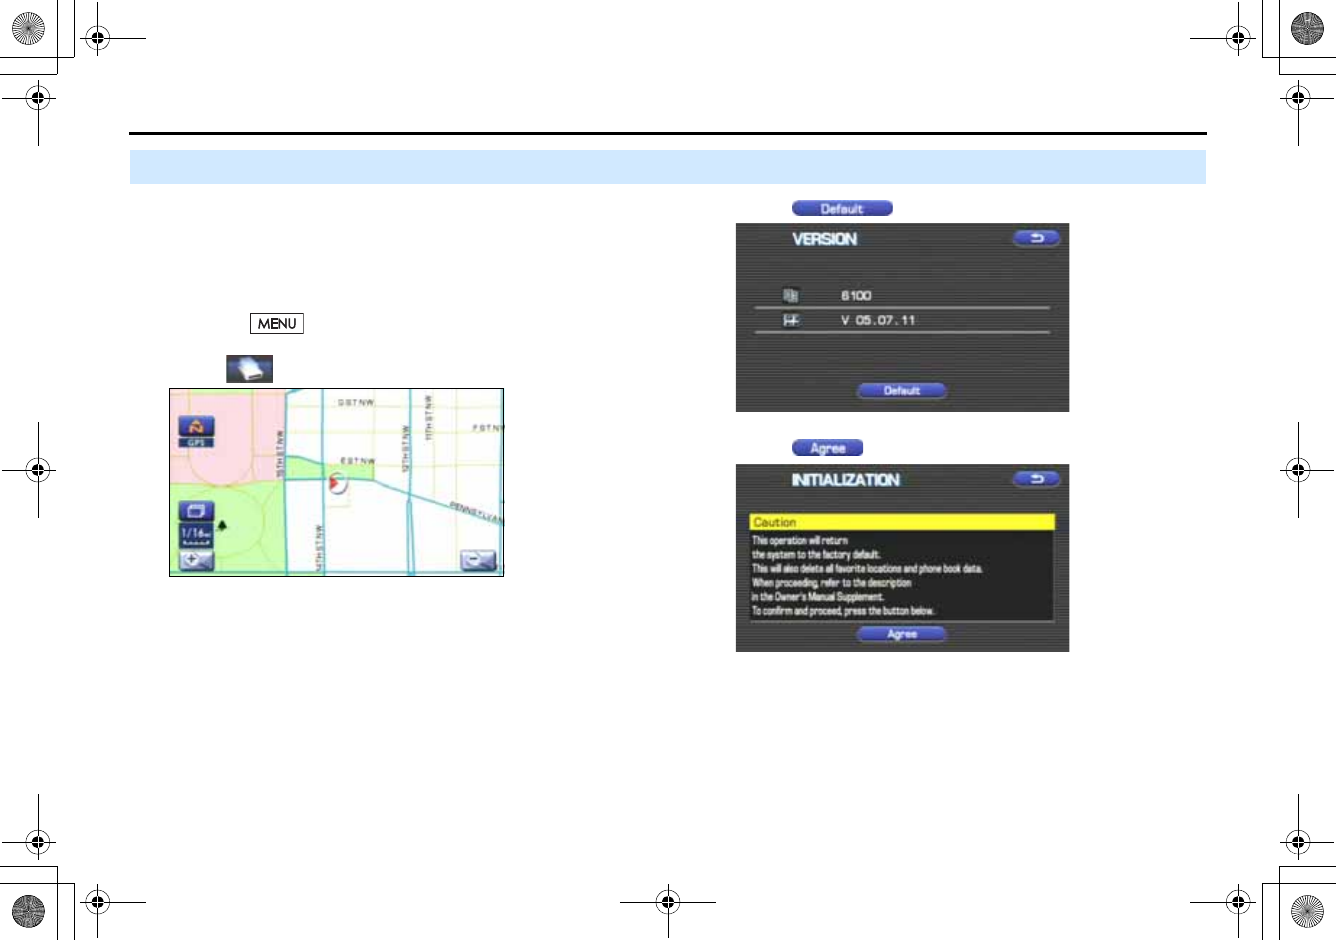
Version
Use this function to check the version of the DVD-ROM disc
you are presently using.
1Press the button.
2Select (version).
3The version of the DVD-ROM disc will be displayed on
the screen.
+ORTG\CA0CXKDQQMࡍࠫ㧞㧜㧜㧣ᐕ㧡㧞㧢ᣣޓᦐᣣޓඦᓟ㧢ᤨ㧠ಽ
81
Version and Initialization
Initialization of the navigation settings
The settings of the navigation system can be initialized. When
initialized, data such as memory points, travel history and
telephone numbers are all deleted. Data once deleted cannot
be restored.
1Press the button.
2Select (version).
3Select .
4Select .
+ORTG\CA0CXKDQQMࡍࠫ㧞㧜㧜㧣ᐕ㧡㧞㧢ᣣޓᦐᣣޓඦᓟ㧢ᤨ㧠ಽ
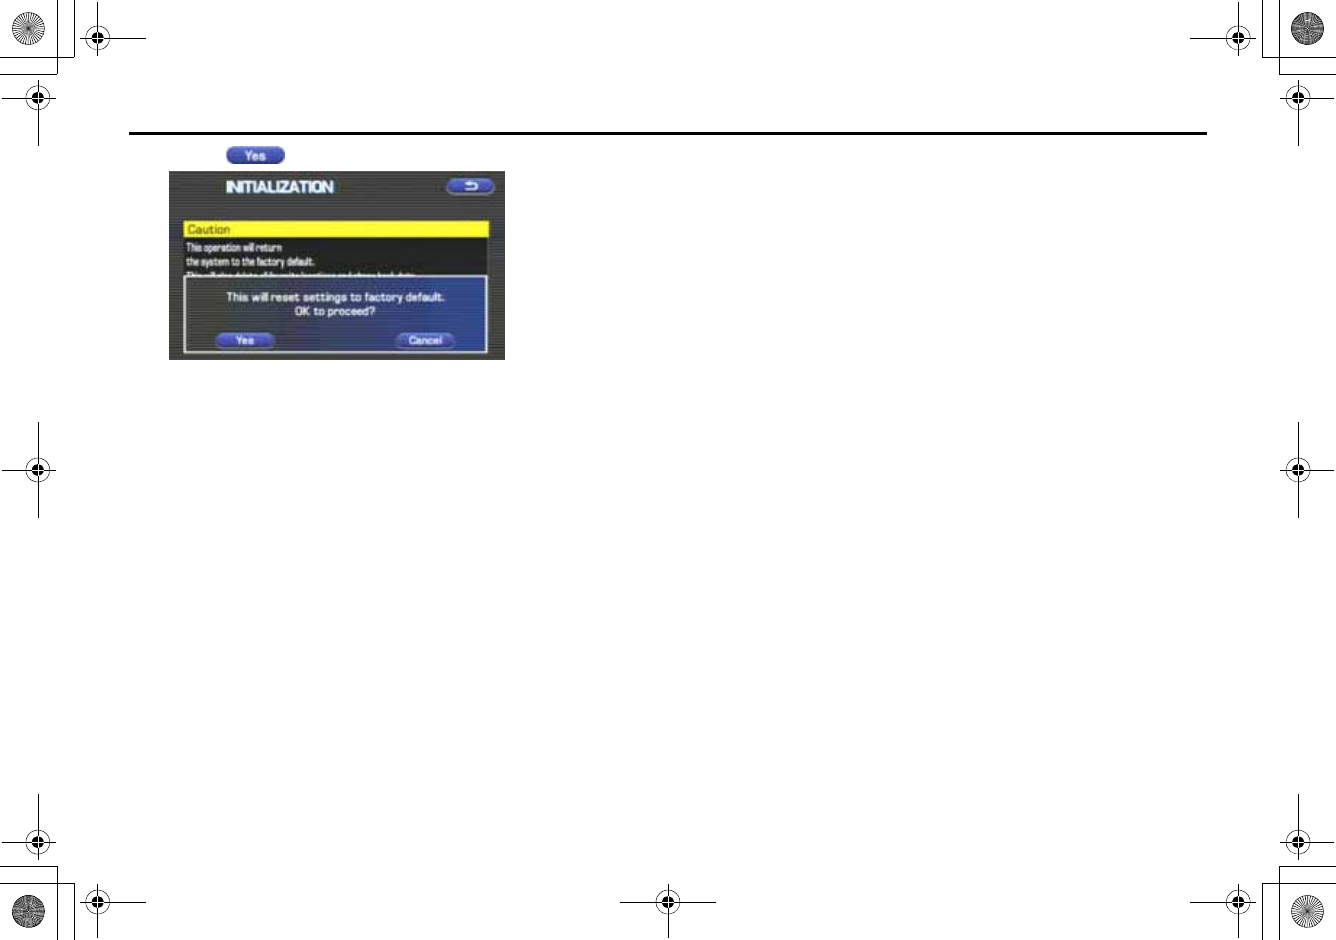
82
Version and Initialization
5Select .
6The navigation system is restarted automatically.
All of the settings are initialized.
+ORTG\CA0CXKDQQMࡍࠫ㧞㧜㧜㧣ᐕ㧡㧞㧢ᣣޓᦐᣣޓඦᓟ㧢ᤨ㧠ಽ

83
General Information
■Accuracy of vehicle position
Area in which GPS signals cannot be received
Because the radiowave signals from the GPS satellites travel primarily
by line of sight, the navigation system might not be able to receive
the signals in the areas described below.(If the GPS mark does not
appear on the map screen, it means that the GPS radiowave signals
are not being properly received.)
(1) Inside a tunnel
(2) Inside a building
(3) Under a three-dimensional road system such as for high speed
roads
(4) On boulevards lined with trees
(5) Between buildings
(6) Under a cliff or in a cave
•If the GPS antenna or its surroundings are blocked by an obstacle
(including cargo), it might not be possible for the system to
receive the GPS radiowave signals.
•If multiple paths are created due to the reflection from buildings,
a large measurement error could occur, causing the vehicle's
mark to deviate from its actual position.
Deviation of the vehicle's position mark
The vehicle's position mark could deviate from its actual position
when the vehicle is being driven under the conditions listed below or
due to conditions of the GPS satellites.
If the vehicle travels on a road whose actual shape differs from that in
the map data, the vehicle's mark could deviate from the actual posi-
tion. The correct position will eventually appear on the screen
through the correction function. If the screen does not show the cor-
rect position for an excessively long time, correct the current position
or make an automatic correction.
(1) The vehicle's mark could appear on a parallel road.
(2) When the road splits into a narrow Y, the vehicle's mark could
appear on the other fork of the Y.
(3) When the vehicle makes a right or left turn, the vehicle's mark
could appear on one street ahead or behind.
(4) If the vehicle is transported by means other than the vehicle's
own power, such as on a ferryboat, the vehicle's mark will
remain in the position it was before the transport until the sys-
tem can calculate the position through the GPS.
(5) When the vehicle is driven on a steep incline, the vehicle's mark
could deviate from its actual position.
(6) If there are continuous gradual curves in the same direction, the
vehicle's mark could deviate from its actual position.
(7) If the vehicle is driven in a zigzag pattern, such as through fre-
quent lane changes, the vehicle's mark could deviate from its
actual position.
(8) If the vehicle is placed on a turntable, such as in a parking area,
and turned with the ignition OFF, the vehicle's mark could devi-
ate from its actual orientation. The vehicle's mark could also
deviate even after the vehicle has exited the parking area.
(9) The vehicle's mark could deviate from its actual position if the
vehicle is driven using tire chains or snow tires on a snow-cov-
ered road or on a mountainous road.
+ORTG\CA0CXKDQQMࡍࠫ㧞㧜㧜㧣ᐕ㧡㧞㧢ᣣޓᦐᣣޓඦᓟ㧢ᤨ㧠ಽ
84
General Information
(10) The vehicle's mark could deviate from its actual position after
the tires have been replaced.
■How the vehicle position is detected
Detecting the vehicle's position through the GPS
GPS stands for "Global Positioning System", which is a system used for
detecting an object's position through the use of satellites of the U.S.
Department of Defense.
Radiowave signals from three or more satellites are received by the
navigation system, which utilizes the principle of triangulation to
detect the position at which the radiowave signals are received.
When the navigation unit is receiving the GPS radiowave signals, a
"GPS" mark will appear on the map screen.
Detecting the vehicle's position through self-contained naviga-
tion
Self-contained navigation is a system that detects the vehicle's posi-
tion by calculating the vehicle's driven distance and turning angle
though the use of various types of sensors that are mounted on the
vehicle.
Through the use of self-contained navigation, the vehicle's position
can be detected even in an area where the GPS radiowave signals
cannot be received.
Making corrections to the detection of the vehicle's position
through map matching
•In map matching, the position information resulting from the
detection of the vehicle's position and the locus of the travel of
the vehicle up to the present are constantly compared to the
shape of the roads on the map in order to correct the vehicle's
position mark to the most appropriate road.
•If the vehicle is driven on a road whose actual shape differs from
its map data, the vehicle's position mark on the map could devi-
ate from its actual position.
Occasionally, the correction of the vehicle's position mark to the
actual road on the map can be observed, particularly after the
vehicle has turned at an intersection or has exited from a parking
area.
■Accuracy of the route guidance
The conditions listed below do not indicate a malfunction.
(1) The guidance might prompt the driver to drive straight even
though the vehicle is being driven on a straight road.
(2) The directional guidance could display multiple place names.
(3) If the vehicle makes a turn at an intersection before the guided
route, the wrong type of voice guidance could be outputted.
(4) The guidance might not be outputted while the vehicle is mak-
ing a turn at an intersection.
(5) The system might not be able to search for the proper route.
(6) If there is no road to the destination or if there is only a narrow
road, the route might be indicated up to an area that is short of
the destination.
(7) The repeat search could take a long time while the vehicle is
being driven at high speeds.
(8) While the system is searching again for the route, the route indi-
cation might not appear in time for the next right or left turn.
(9) The route might not change even if a search is made again.
+ORTG\CA0CXKDQQMࡍࠫ㧞㧜㧜㧣ᐕ㧡㧞㧢ᣣޓᦐᣣޓඦᓟ㧢ᤨ㧠ಽ
85
General Information
(10) The system might guide the driver to make a U-turn.
(11) The system might guide the driver to a road that cannot actu-
ally be travelled (such as a road to which entry is prohibited).
(12) The system might not output guidance even if the vehicle is
driven in reverse on the guided route.
(13) The system might not use a local ferryboat even if the ferry pri-
ority is selected.
(14) If the intersection that you're being guided to is near the end of
the route search, the system might not be able to provide guid-
ance.
(15) The route might not go on a toll road even if the toll-road prior-
ity is selected.
Similarly, a route that uses a toll road could appear on the
screen even if the toll-road priority is not selected. (The driver
may or may not be able to select "toll-road priority" if both toll
and free roads are available.)
+ORTG\CA0CXKDQQMࡍࠫ㧞㧜㧜㧣ᐕ㧡㧞㧢ᣣޓᦐᣣޓඦᓟ㧢ᤨ㧠ಽ
86
General Information
When a Problem Occurs
Confirm whether the problem is due to a minor operational error or a malfunction in the system by referring to the table below
before you contact your SUBARU dealer for any repair service.
The map does not scroll even when the vehicle is moving.
The screen shown might not be the current map screen. See Page 12 of this manual for instructions on displaying the current map
screen.
The vehicle marker does not appear.
The screen shown might not be the current map screen. See Page 12 of this manual for instructions on displaying the current map
screen.
The GPS marker is not displayed.
The GPS antenna or your vehicle might be in a position where GPS signals
cannot be received.
Try moving the GPS antenna or your vehicle to a position where there are no
obstacles around.
There is no voice guidance.
•Route guidance might be suspended.
•The guidance volume might be too low.
•See "Volume" on Page 11.
Small spots or bright flashes appear on the screen display.
This is probably due to the natural characteristics of the liquid crystal
display (LCD). There is nothing wrong with the display and no need for concern.
The DVD-ROM disc cannot be ejected.
The disc might be incompatible or might have been inserted incorrectly.
+ORTG\CA0CXKDQQMࡍࠫ㧞㧜㧜㧣ᐕ㧡㧞㧢ᣣޓᦐᣣޓඦᓟ㧢ᤨ㧠ಽ