JVC KD R80BTUN R80BT User Manual GET0800 004A
KD-R80BTUN KD-R80BTUN (Asia) GET0800-004A
User Manual: JVC KD-R80BTUN KD-R80BTUN English, Indonesian,
Open the PDF directly: View PDF ![]() .
.
Page Count: 58
[TIPE]
[TAPE MOBIL]
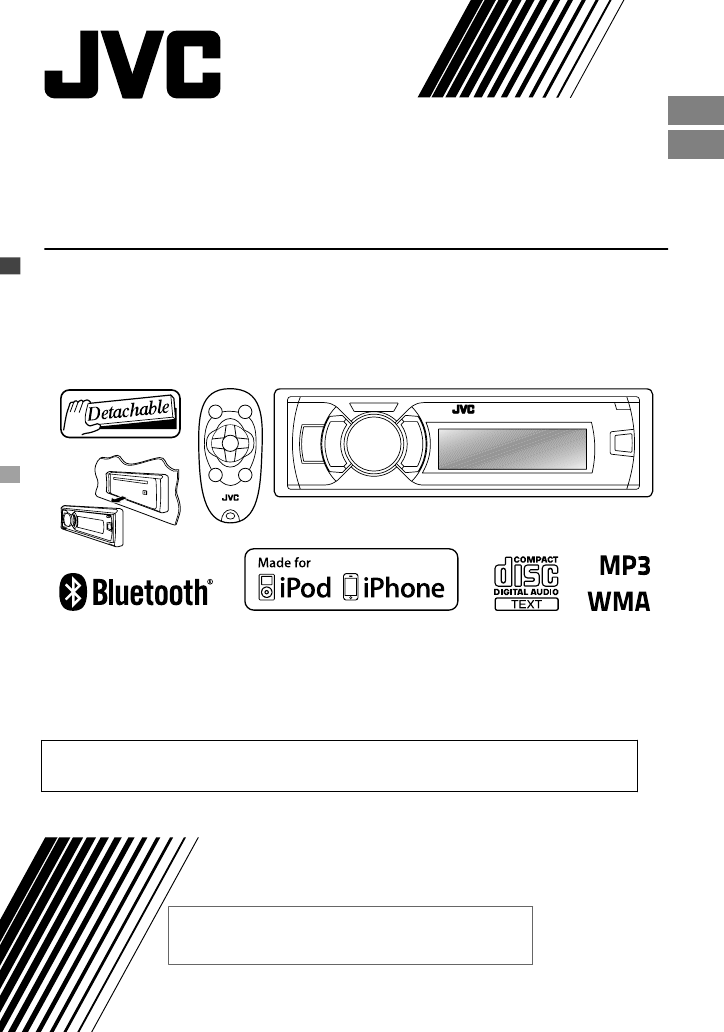
CD RECEIVER / ALAT PENERIMA CD
For canceling the display demonstration, see page 4. /
Untuk membatalkan tampilan demonstrasi, lihat halaman 4.
ENGLISH
INDONESIA
INSTRUCTIONS
BUKU PETUNJUK
ʷʿʷʷƖʷʷʻ
ƾƿ
KD-R80BT
For installation and connections, refer to the separate manual.
Untuk instalasi dan penyambungan, lihat buku pedoman terpisah.

Thank you for purchasing a JVC product.
Please read all instructions carefully before operation, to ensure your complete understanding and to
obtain the best possible performance from the unit.
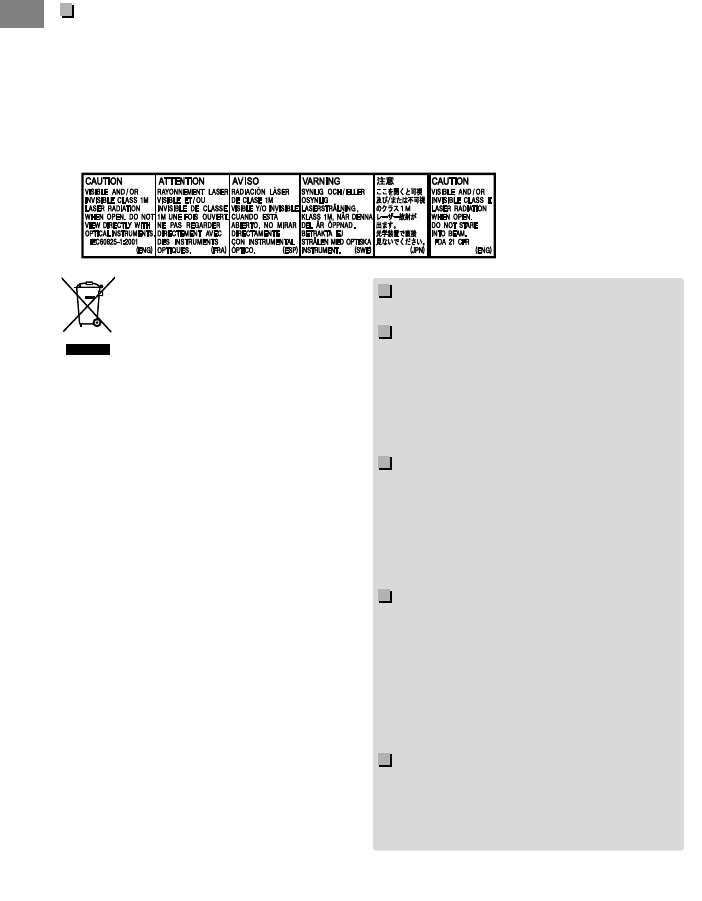
IMPORTANT FOR LASER PRODUCTS
1. CLASS 1 LASER PRODUCT
2. CAUTION: Do not open the top cover. There are no user serviceable parts inside the unit;
leave all servicing to qualified service personnel.
3. CAUTION: Visible and/or invisible class 1M laser radiation when open. Do not view
directly with optical instruments.
4. REPRODUCTION OF LABEL: CAUTION LABEL, PLACED OUTSIDE THE UNIT.
[European Union only]
Warning:
Stop the car before operating the unit.
Caution:
Adjust the volume so that you can hear sounds
outside the car. Driving with the volume too high
may cause an accident.
Avoid using the USB device or iPod/iPhone if it
might hinder driving safety.
Caution on volume setting:
Digital devices (CD/USB) produce very little noise
compared with other sources. Lower the volume
before playing these digital sources to avoid
damaging the speakers by the sudden increase of
the output level.
Temperature inside the car:
If you have parked the car for a long time in hot
or cold weather, wait until the temperature in the
car becomes normal before operating the unit.
appears on the display and animation/text
scroll will be stopped to prevent the display from
being blurred when the temperature falls below
0°C. Once operating temperature is normalised,
these functions will start working again.
Condensation:
When the car is air-conditioned, moisture may
collect on the laser lens. This may cause disc read
errors. In this case, remove the disc and wait for
the moisture to evaporate.
2|ޓENGLISH
2012/2/6ޓ16:12:22KD-R80BT_UN_EN

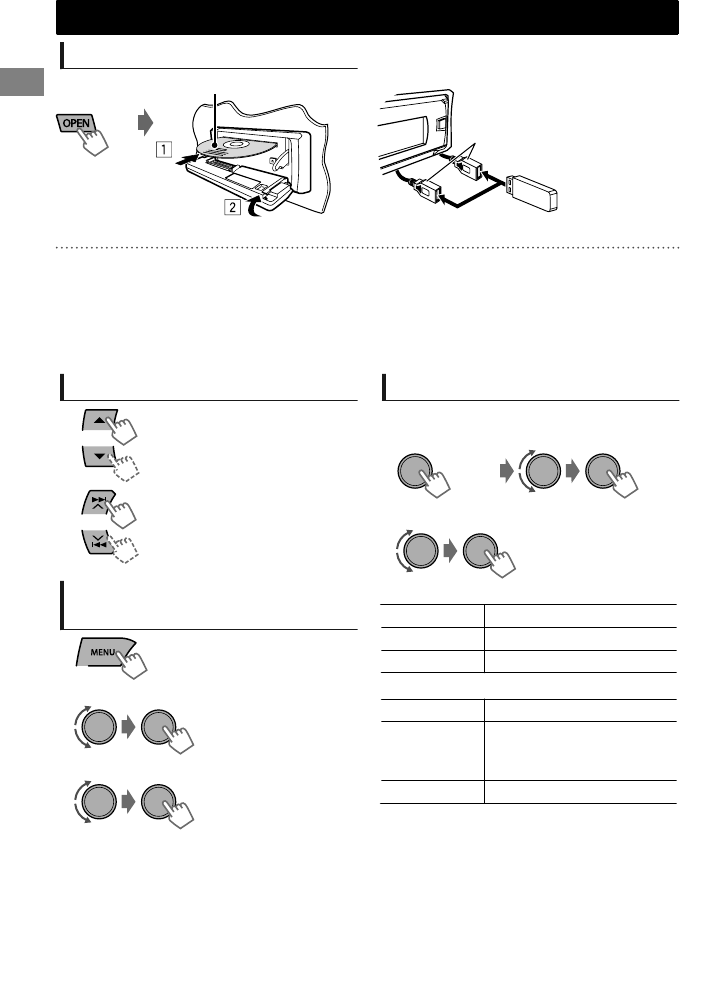
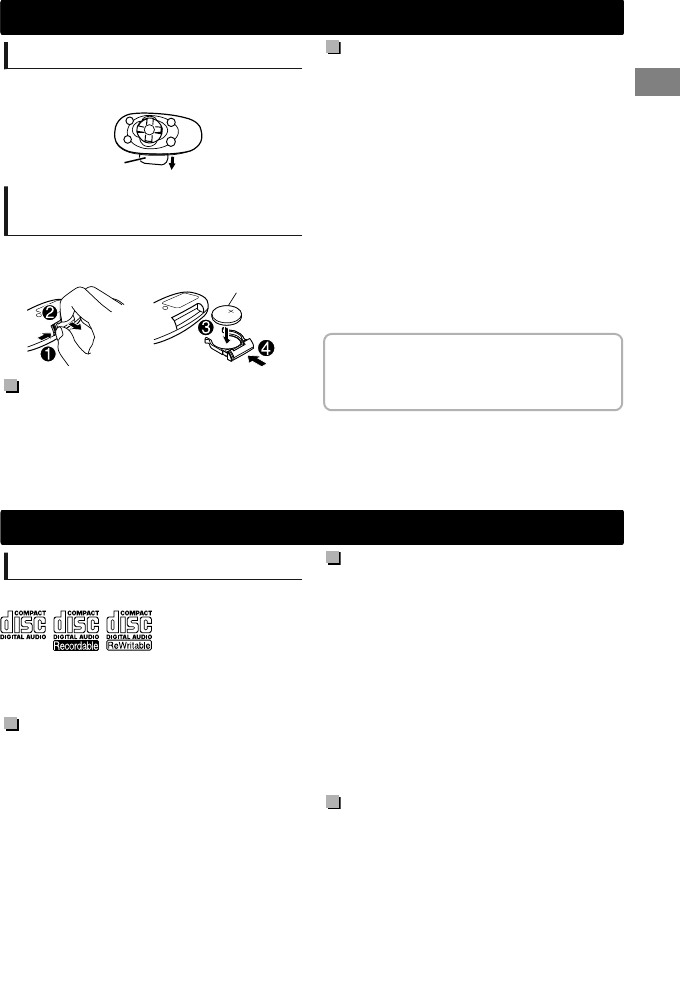
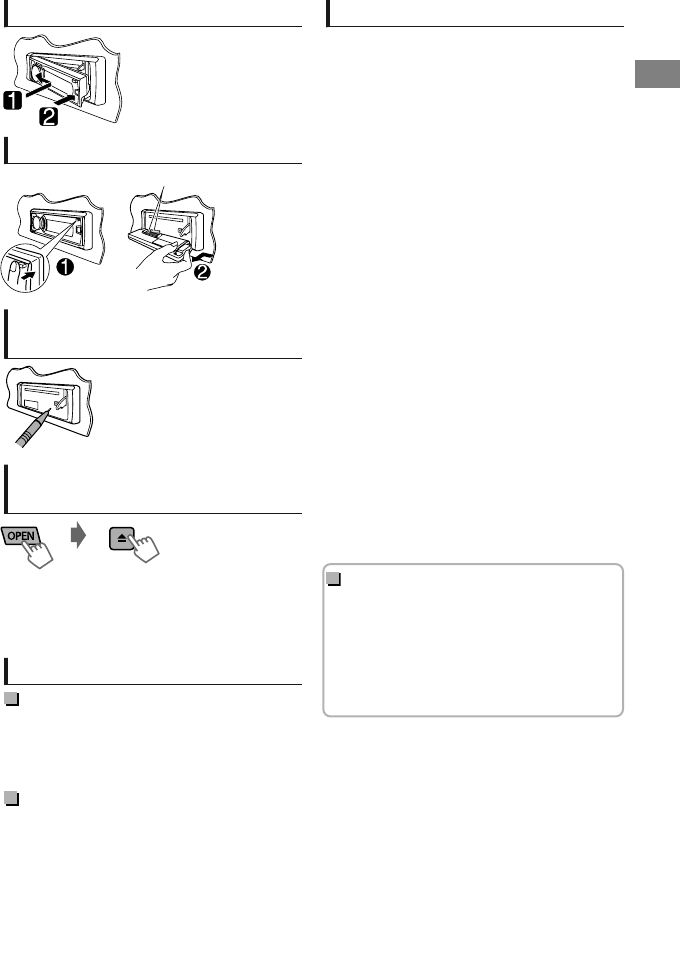
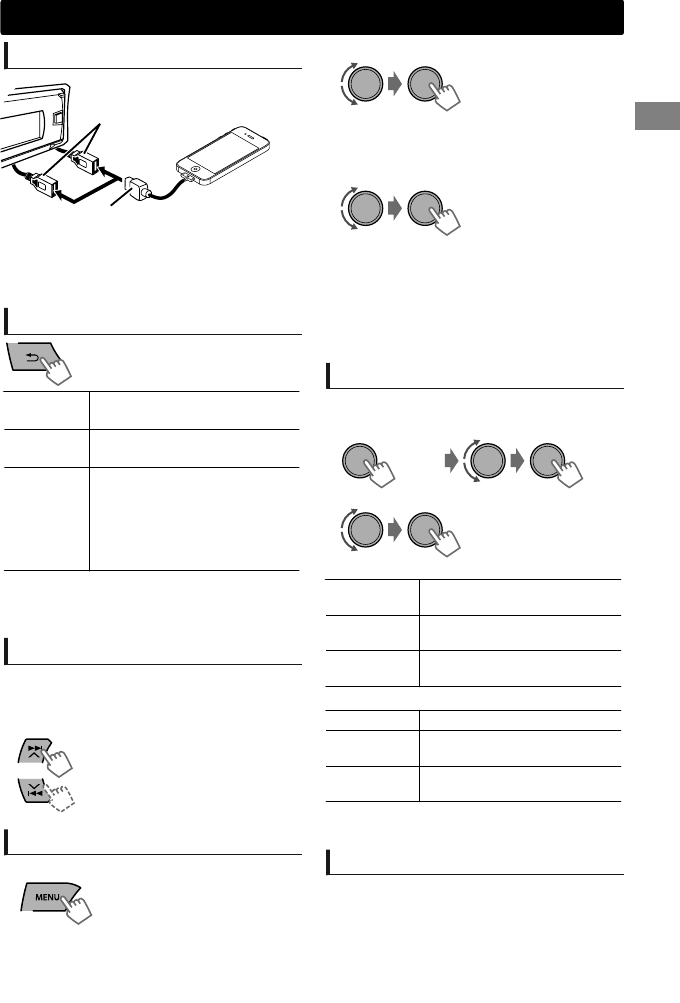
How to attach the control panel
How to detach the control panel
Avoid touching the connectors.
How to reset your unit
Your preset adjustments will also
be erased.
How to forcibly eject a disc
(Hold)
Be careful not to drop the disc when it ejects.
If this does not work, reset your unit.
Maintenance
Cleaning the unit
Wipe off the dirt on the panel with a dry silicon or
soft cloth. Failure to observe this precaution may
result in damage to the unit.
Cleaning the connector
Wipe off dirt on the connector of the unit and
panel. Use a cotton swab or cloth.
Contents
Preparation ............................................................ 4
Canceling the display demonstration
Setting the clock
Basic operations ................................................... 4
Radio ........................................................................ 6
CD/USB .................................................................... 8
iPod/iPhone
............................................................. 9
Quick Search ....................................................... 10
External components ...................................... 10
Bluetooth姞 connection
..................................... 11
Bluetooth mobile phone ................................ 13
Bluetooth audio player ................................... 17
Illumination color adjustments .................... 18
Brightness adjustments .................................. 19
Sound adjustments .......................................... 19
Menu operations ............................................... 20
Remote controller
............................................... 23
Additional information ................................... 23
Troubleshooting ................................................ 26
Specifications ..................................................... 28
How to read this manual:
This manual mainly explains operations using
the buttons on the control panel.
< > indicates the displays on the control
panel.
[XX] indicates the initial setting of a menu
item.
ENGLISHޓ|3
2012/2/6ޓ16:12:22KD-R80BT_UN_EN
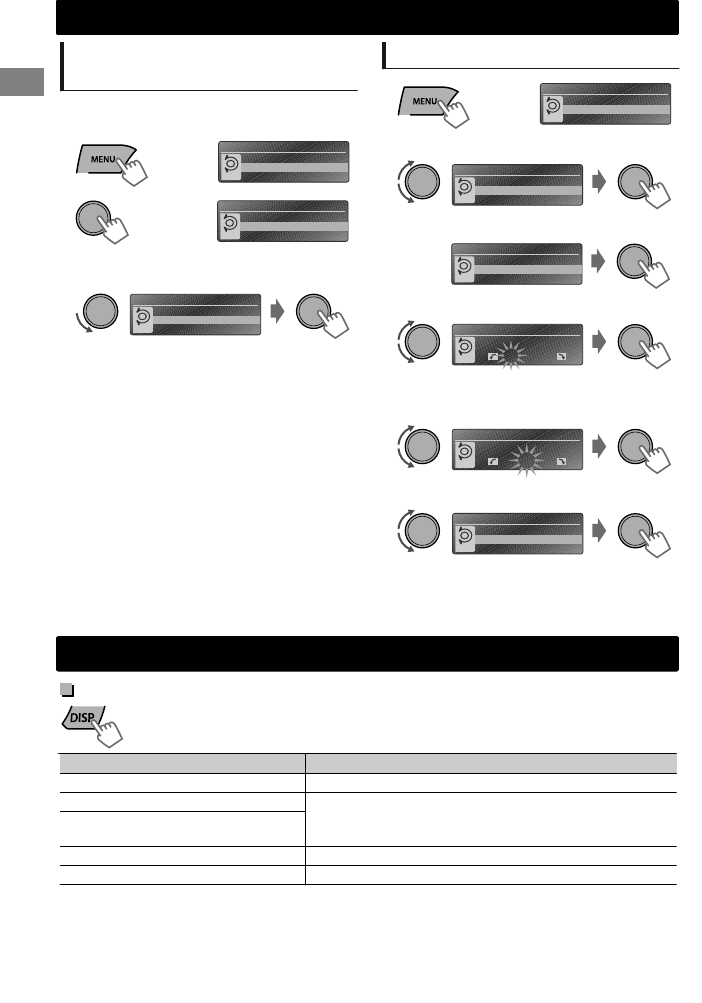
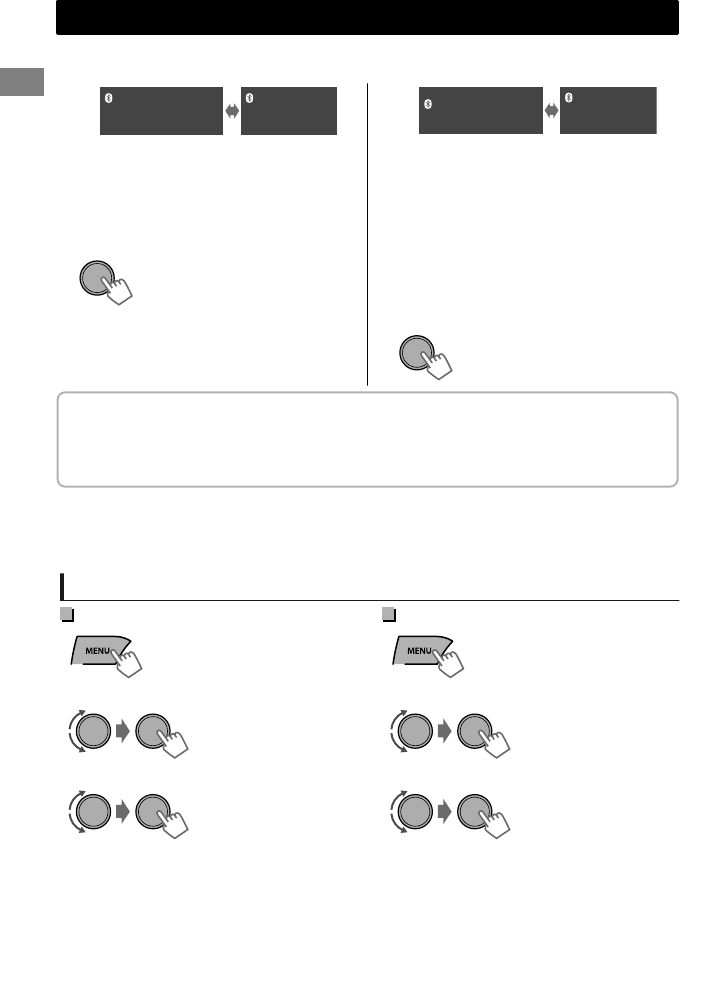
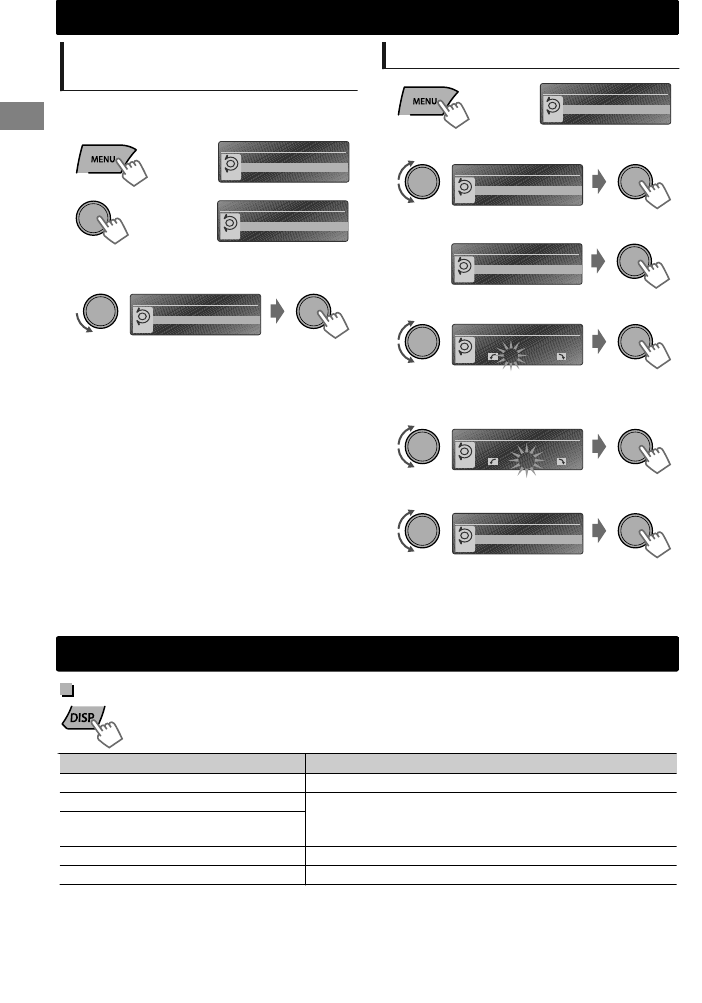
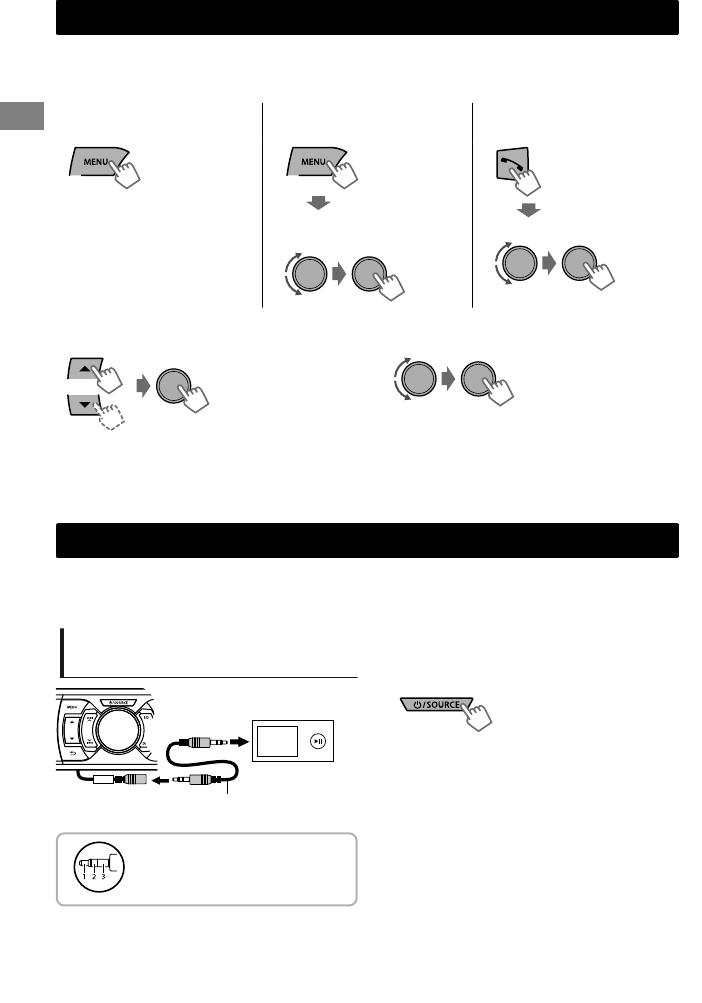
Canceling the display
demonstration
The display demonstration is always turned on
unless you cancel it.
SET UP
DEMO
Clock
PUSH
(Hold)
1
(Initial setting)
DEMO
Off
On
PUSH
2
DEMO
Off
On
PUSH
3Select <Off>.
4Press MENU to exit.
Setting the clock
SET UP
DEMO
Clock
PUSH
(Hold)
1
Clock
DEMO
Clock
Color
PUSH
2Select <Clock>.
Clock
Clock Display
Set Clock
24/12H
PUSH
3Select <Set Clock>.
1 : 00AM
Set Clock
PUSH
(Initial setting)
4Adjust the hour.
1 : 00AM
Set Clock
PUSH
5Adjust the minute.
Clock
Set Clock
Clock Adjust
24/12H
PUSH
6Select <24H/12H>.
7Select <24Hours> or <12Hours>.
8Press MENU to exit.
Basic operations
Display information
Changes the display information. (Press)
Scrolls the current display information. (Hold)
Source Display (Normal display pattern)*1
Radio Station name/Frequency
CD/USB/Bluetooth Audio Track title/Album title/Artist*
*“No Name” appears for conventional CDs or if not
recorded.
iPod/iPhone (Headunit Mode/iPod
Mode)
iPod/iPhone (Application Mode) Application Mode
External Components (AUX) Aux In
*1 Display information varies for large font and large clock display patterns.
Preparation
Preparation
4|ޓENGLISH
2012/2/6ޓ16:12:22KD-R80BT_UN_EN
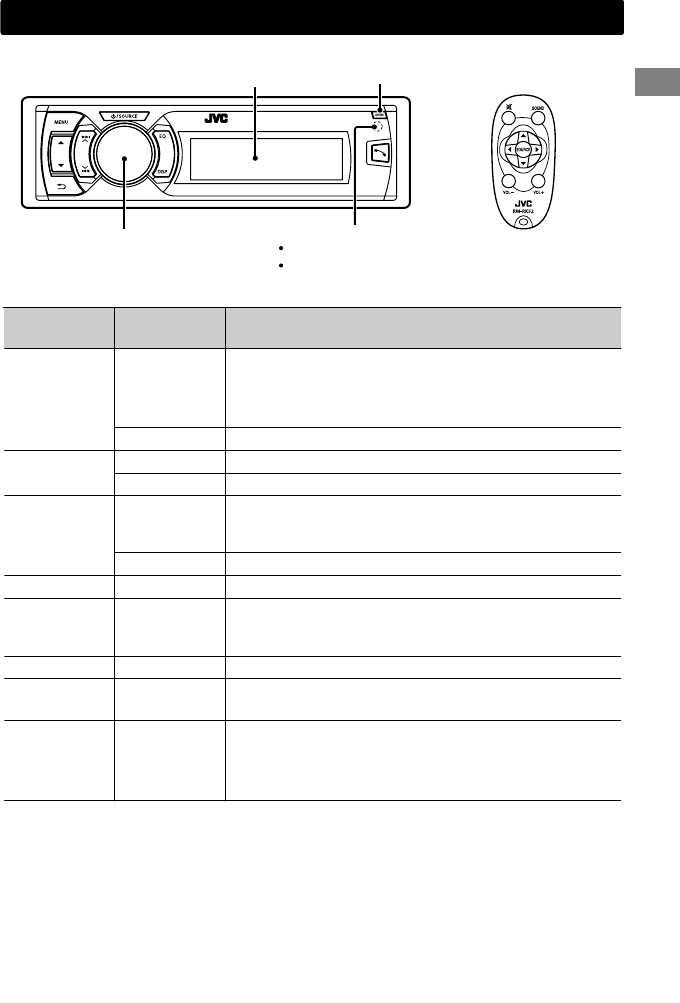
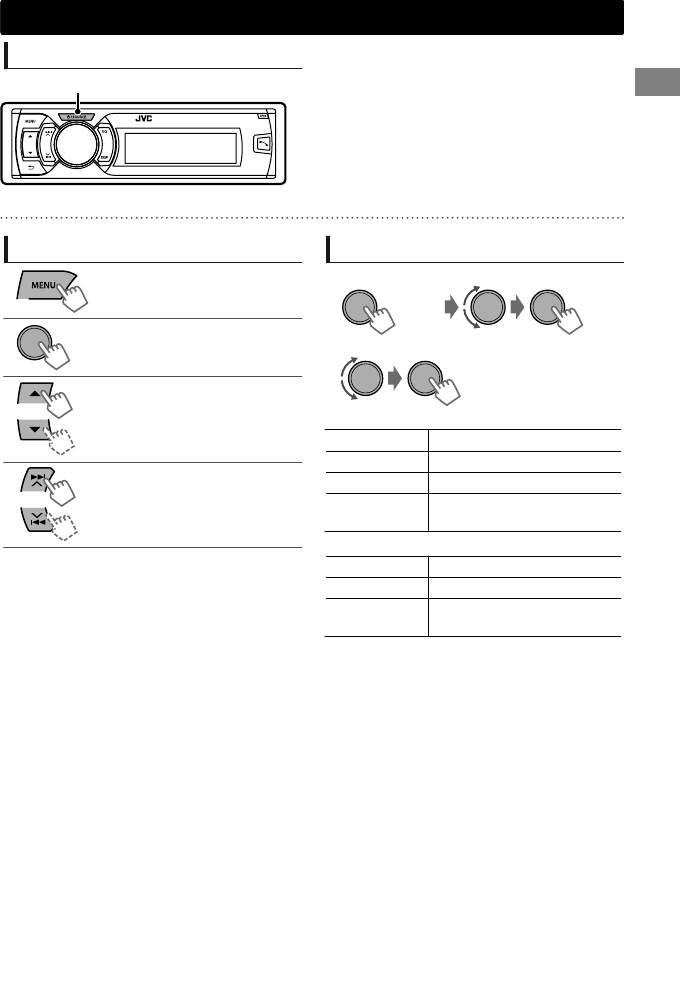
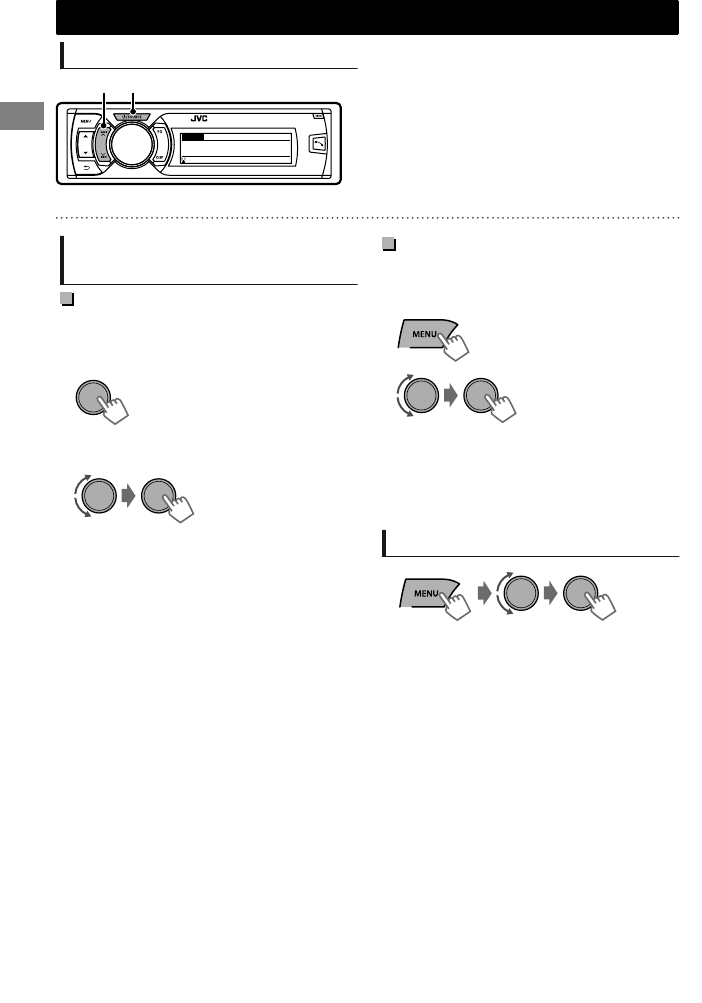
Remote controller
Display window
Control panel
DO NOT expose to bright sunlight.
Remote sensor
Control dial Aim the remote controller directly at the sensor.
Flips down the panel
When you press or hold the following button(s)...
Control panel Remote
controller General function
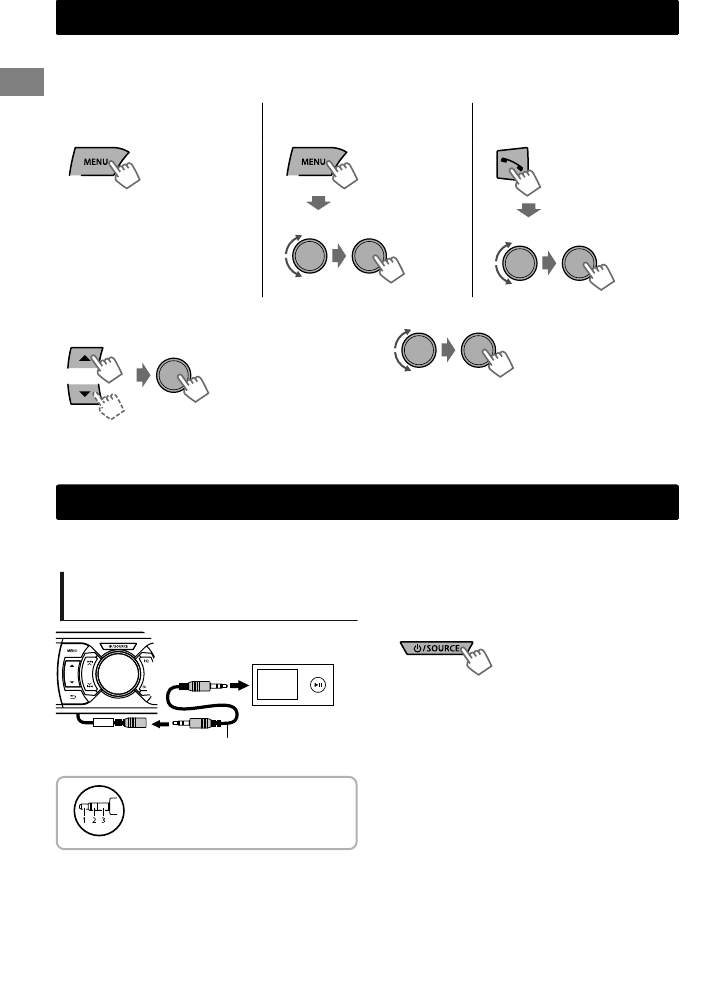
/SOURCE —
Turns on.
Turns off. (Hold)
Press the /SOURCE button on the control panel and turn
the control dial within 2 seconds to select the source.
SOURCE Press repeatedly to select the source.
Control dial
(turn)
VOL - / + Adjusts the volume level.
— Selects items.
Control dial
(press)
)
Mutes the sound or pauses playback.
Press the button again to cancel muting or resume
playback.
— Confirms selection.
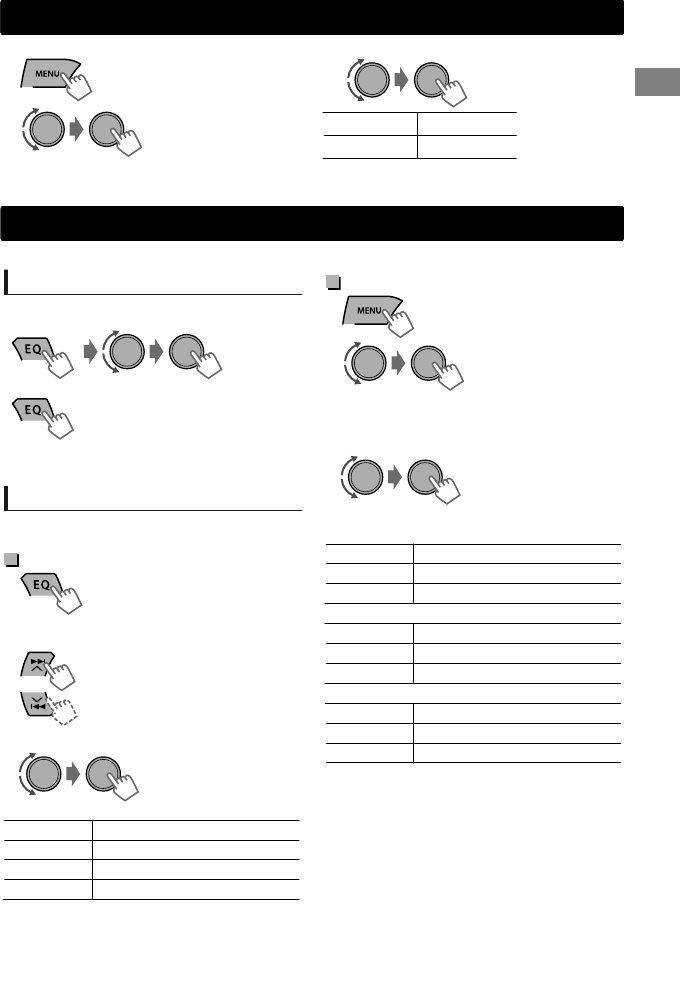
EQ SOUND Selects the preset sound mode. (' page 19)
—
Enters “Hands-Free” menu (' page 14), or answers
incoming call when the unit rings.
Ends a call. (Hold)
— Returns to the previous menu.
/ / Selects a preset station. (' page 6)
Selects MP3/WMA/WAV folder. (' page 8)
/ /
Searches for a station automatically. (' page 6)
Searches for a station manually. (Hold)
Selects track. (' page 8, 9, 17)
Fast-forwards or reverses track. (Hold)
Basic operations
ENGLISHޓ|5
2012/2/6ޓ16:12:22KD-R80BT_UN_EN
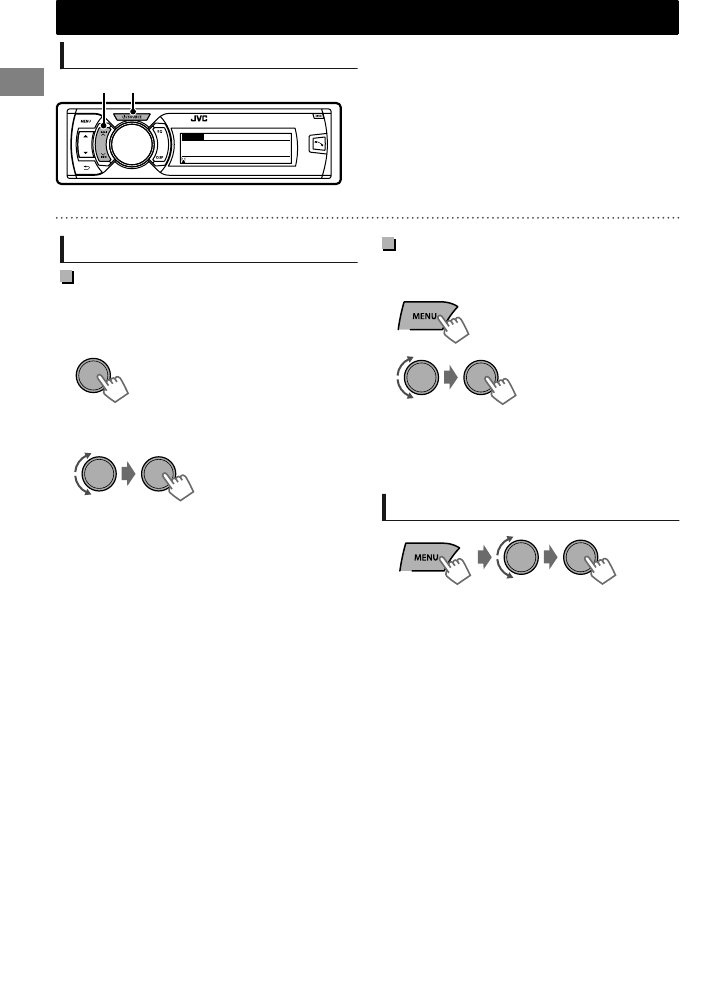
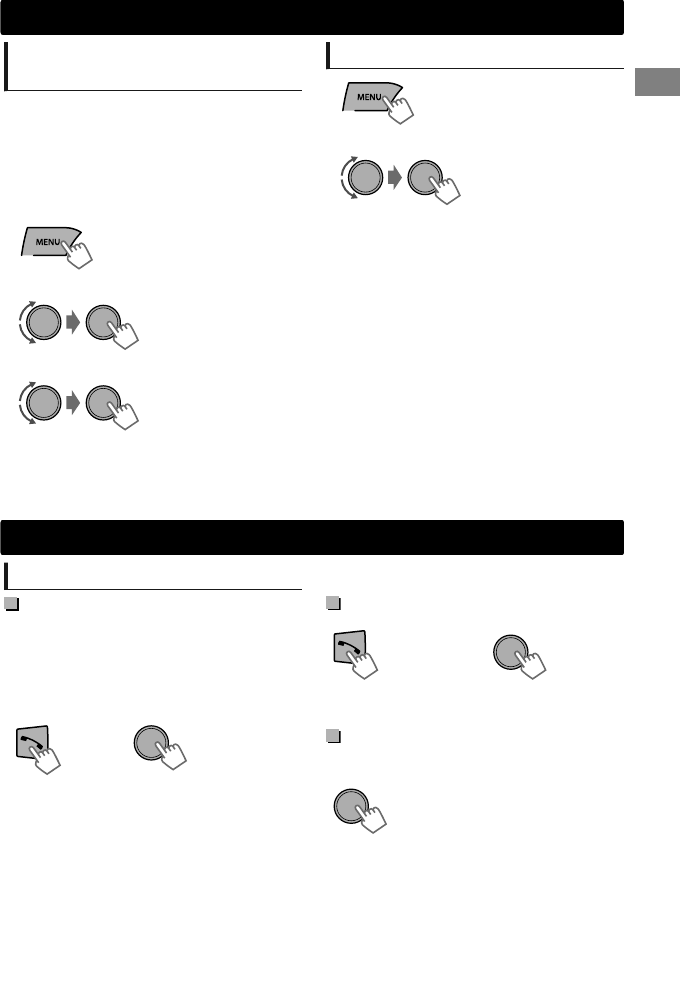
Searching for a station
88.3 MHz
ST DYNAMIC 1:00AM
FM
A
BSelect <FM> or <AM>.
Auto search. (Press)
Manual search. (Hold)
“M” appears, then press the button repeatedly.
“ST” lights up when receiving an FM stereo broadcast with sufficient signal strength.
Storing stations in memory
Manual presetting
You can preset up to 18 stations for FM and 6
stations for AM.
While listening to a station...
(Hold)
“Preset Mode” screen appears.
1
The preset number flashes.
2Select preset number.
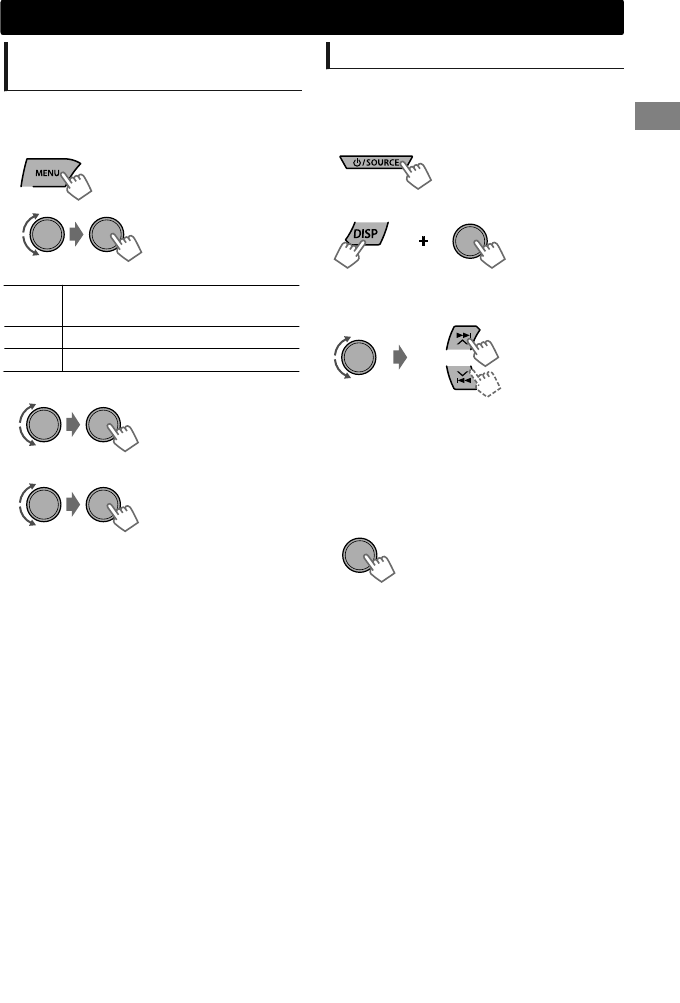
Auto presetting (FM only)
SSM (Strong-station Sequential Memory)
You can preset up to 18 stations for FM.
(Hold)
1
-<Tuner>
-<SSM>
-<SSM 01 – 06>
“SSM” appears. When all the stations are stored,
“SSM” disappears.
2
To preset <SSM 07 – 12>/<SSM 13 – 18>,
repeat steps 1 and 2.
Selecting a preset station
You can also select a preset station using / .
Radio
Radio
6|ޓENGLISH
2012/2/6ޓ16:12:22KD-R80BT_UN_EN

Setting the Radio Timer
You can tune in to a preset station at a specific
time regardless of the current source.
(Hold)
1
-<Tuner>
-<Radio Timer>
-<Off>/<Once>/
<Daily>
[Off] Cancels Radio Timer.
Once Activates once.
Daily Activates daily.
2
-<FM>/<AM>
-<1> ... <18> for FM/
<1> ... <6> for AM
3Select the preset station.
4Set the activation time.
5Press MENU to exit.
lights up after the Radio Timer has been set.
Only one timer can be set. Setting a new timer
will override the previous setting.
The Radio Timer will not activate if the unit is
turned off or if <AM> is set to <Hide> after
selecting an AM station for the timer.
(' page 22)
Naming the stations
You can assign names for up to 30 station
frequencies (FM and AM) using a maximum of 8
characters for each name.
1Select <FM> or <AM>.
(Hold)
(Hold)
2Enter “Name Entry” menu.
Move
Select
Select the desired character (A to Z, 0 to 9, —, /, <,
>) or a space, then move to the next (or previous)
character position.
Repeat step 3 until you have finished entering the
name.
3Enter the desired name.
4Press the control dial to confirm.
If you try to assign names to more than 30
station frequencies, “Name Full” appears.
Delete unwanted names before assignment.
To erase the entire name, press and hold DISP
after step 2, then press the control dial.
Radio
ENGLISHޓ|7
2012/2/6ޓ16:12:22KD-R80BT_UN_EN
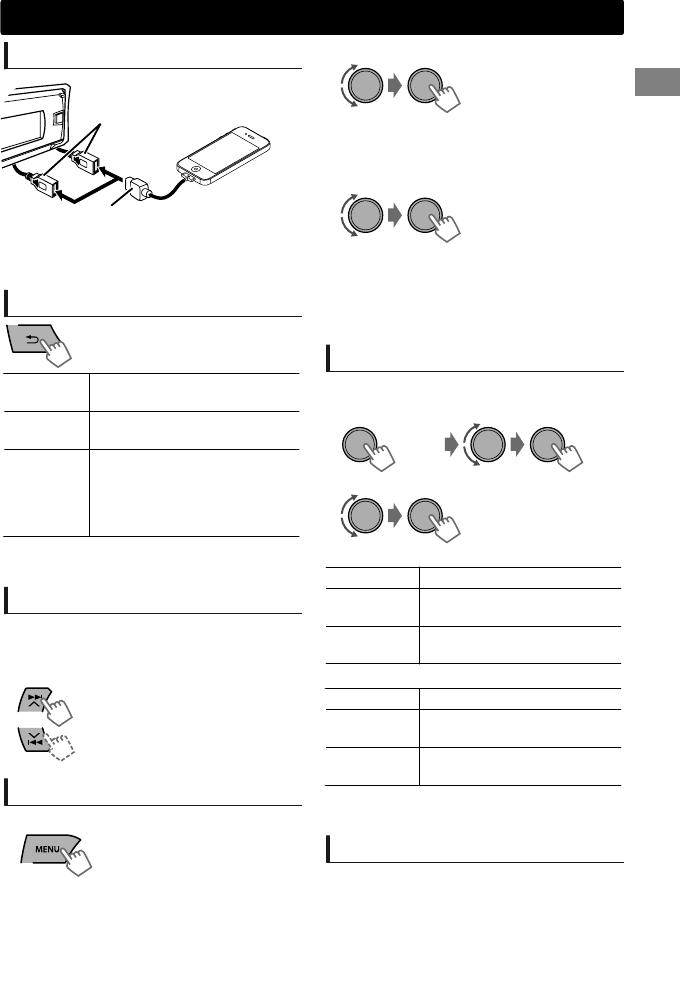
Playing a CD/USB device
Label side
The source changes to “CD” and playback starts.
or
USB cable from the rear
of the unit
The source changes to “USB” and playback starts.
This unit can play MP3/WMA files stored in CD-R, CD-RW, and MP3/WMA/WAV files in USB mass
storage device (such as a USB memory and Digital Audio Player).
Make sure all important data has been backed up. We shall bear no responsibility for any loss of data
in USB mass storage class device while using this system.
Ejected disc not removed within 15 seconds will reload automatically.
If the disc cannot be ejected, ' page 3.
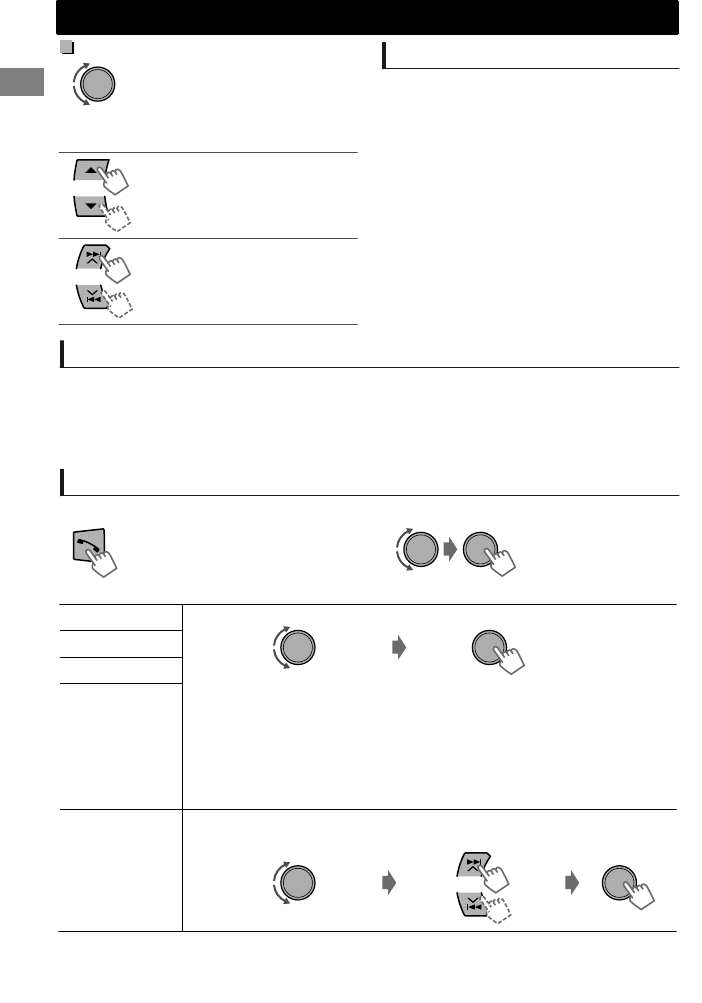
Selecting a folder/track
Selects folder.
(For MP3/WMA/WAV)
Selects track. (Press)
Fast-forwards or reverses the
track. (Hold)
Selecting a track/folder from
the list
1
2Select a folder. (For MP3/WMA/WAV)
For MP3/WMA/WAV
If there are many folders or tracks, you can fast
search for the desired folder or track by turning
the control dial quickly, or use Quick Search
(' page 10).
3Select a track.
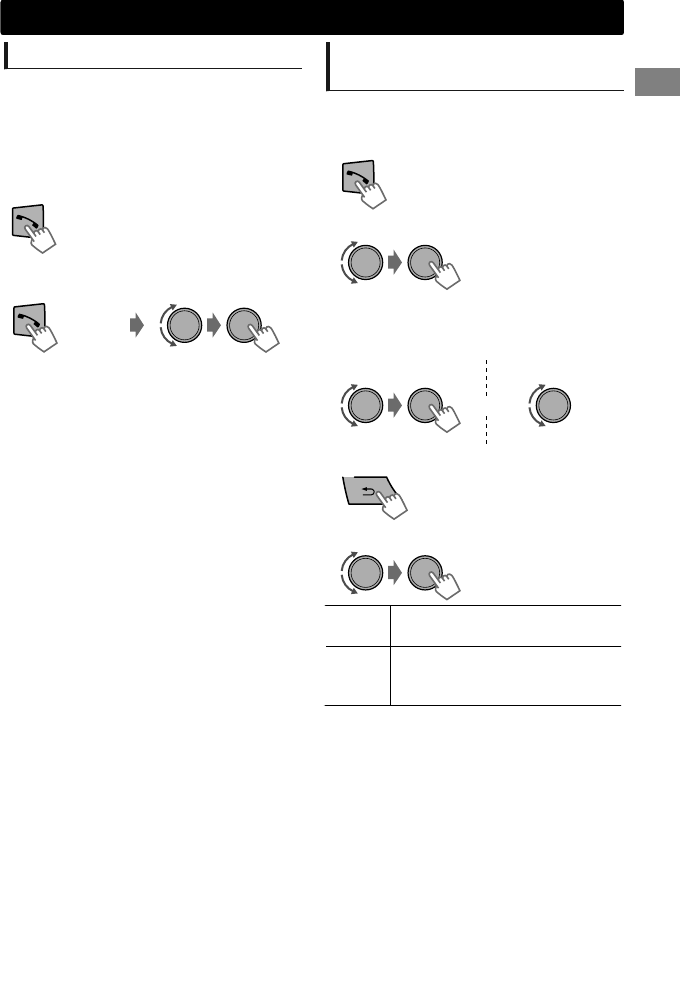
Selecting the playback modes
You can select one of the following playback
modes at a time.
(Hold)
<Repeat>)<Random>
1
2
Repeat
Off Cancels repeat playback.
Track Repeats current track.
Folder * Repeats current folder.
Random
Off Cancels random playback.
Folder *
Randomly plays all tracks of
current folder, then tracks of
next folders.
All Randomly plays all tracks.
* For MP3/WMA/WAV
CD/USB
CD/USB
8|ޓENGLISH
2012/2/6ޓ16:12:22KD-R80BT_UN_EN
iPod/iPhone
Playing an iPod/iPhone
or
USB cable from the rear
of the unit
USB 2.0 cable (not supplied)*
The source changes to “iPod-1/iPod-2” and
playback starts.
* Recommend to use a cable suitable for car use.
Selecting the control mode
-<Headunit Mode>/
<iPod Mode>/
<Application Mode>
Headunit
Mode
Controls iPod playback through
this unit.
iPod Mode Controls iPod playback from the
iPod/iPhone.
Application
Mode
The sound of any functions
(music, games, applications, etc.)
running on the connected iPod/
iPhone is emitted through the
speakers connected to this unit.
You can also change the setting using <iPod
Switch> in the menu. (' page 22)
Selecting a track
Applicable under <Headunit Mode>/<iPod
Mode> only.
For <Application Mode>, applicable only for
some audio applications.
Selects track/chapter. (Press)
Fast-forwards or reverses the
track. (Hold)
Selecting a track from the list
Applicable under <Headunit Mode> only.
1
(Hold)
Playlists)Artists)Albums)Songs)
Podcasts)Genres)Composers)
Audiobooks) (back to the beginning)
2Select the desired list.
Repeat this step until the desired track is selected.
If the selected menu contains many tracks, you
can fast search for the desired track by turning
the control dial quickly, or use Quick Search
(' page 10).
3Select the desired track.
Selecting the playback modes
Applicable under <Headunit Mode> only.
You can select one of the following playback
modes at a time.
(Hold)
<Repeat>)<Random>
1
2
Repeat
Off Cancels repeat playback.
One Functions the same as “Repeat
One” of the iPod.
All Functions the same as “Repeat
All” of the iPod.
Random
Off Cancels random playback.
Song Functions the same as “Shuffle
Songs” of the iPod.
Album Functions the same as “Shuffle
Albums” of the iPod.
“Album” is not applicable for some iPod/
iPhone.
iPod/iPhone application
You can operate JVC original application with this
unit in <Application Mode>. For more details, visit
JVC website: <http://www3.jvckenwood.com/
english/car/index.html> (English website only).
ENGLISHޓ|9
2012/2/6ޓ16:12:22KD-R80BT_UN_EN
If you have many folders/tracks/contacts, you can search through them quickly according to the first
character (A to Z, 0 to 9 and OTHERS).
1Enter list menu or “Hands-Free” menu.
CD (MP3/WMA)/
USB (MP3/WMA/WAV)
iPod/iPhone Bluetooth phonebook
Select the desired list. Select <Phonebook>.
“OTHERS” appears if the first character is not A to
Z or 0 to 9, such as #, -, !, etc.
2Select the desired character (A to Z, 0 to 9
and OTHERS).
For CD/USB and iPod/iPhone, repeat step 3 until
the desired track is selected.
Searching may not work on some of the layers
of the selected menu (for iPod/iPhone).
3Select your desired folder/track/contact.
External components
You can connect an external component to the AUX (auxiliary) cable from the rear of the unit.
For details, refer also to the instructions supplied with the external components.
Playing an external component
from AUX
AUX
Portable audio
player, etc.
3.5 mm stereo mini plug
(not supplied)
Use a 3-terminal plug head
stereo mini plug for optimum
audio output.
.
1Connect to AUX cable from the rear of the
unit.
2Select <AUX IN>.
3Turn on the connected component and
start playing the source.
Quick Search
Quick Search
10 |ޓENGLISH
2012/2/6ޓ16:12:22KD-R80BT_UN_EN
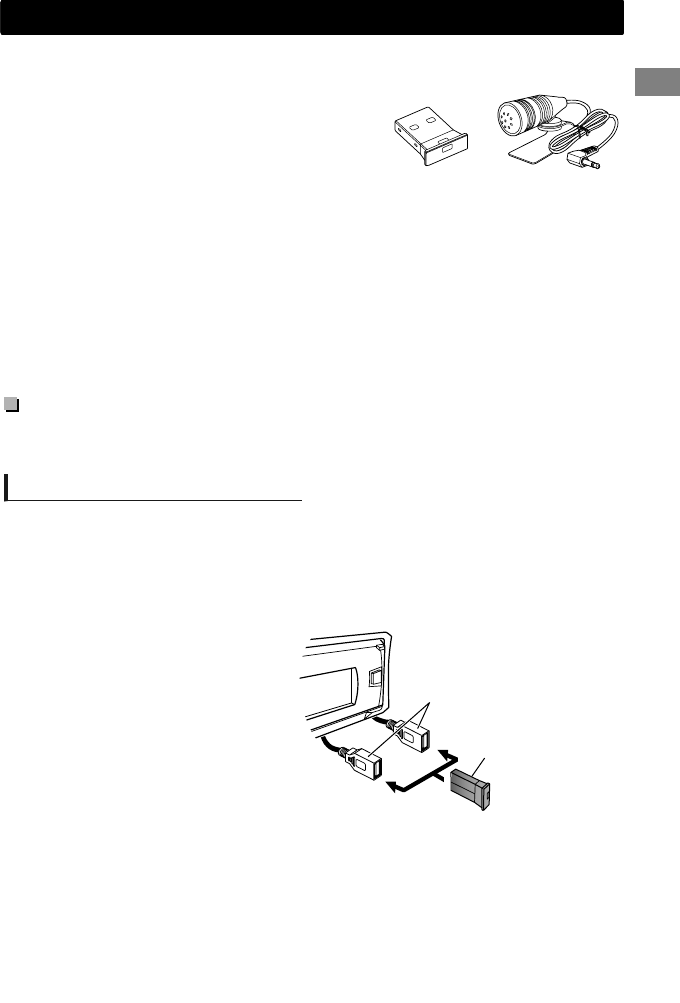
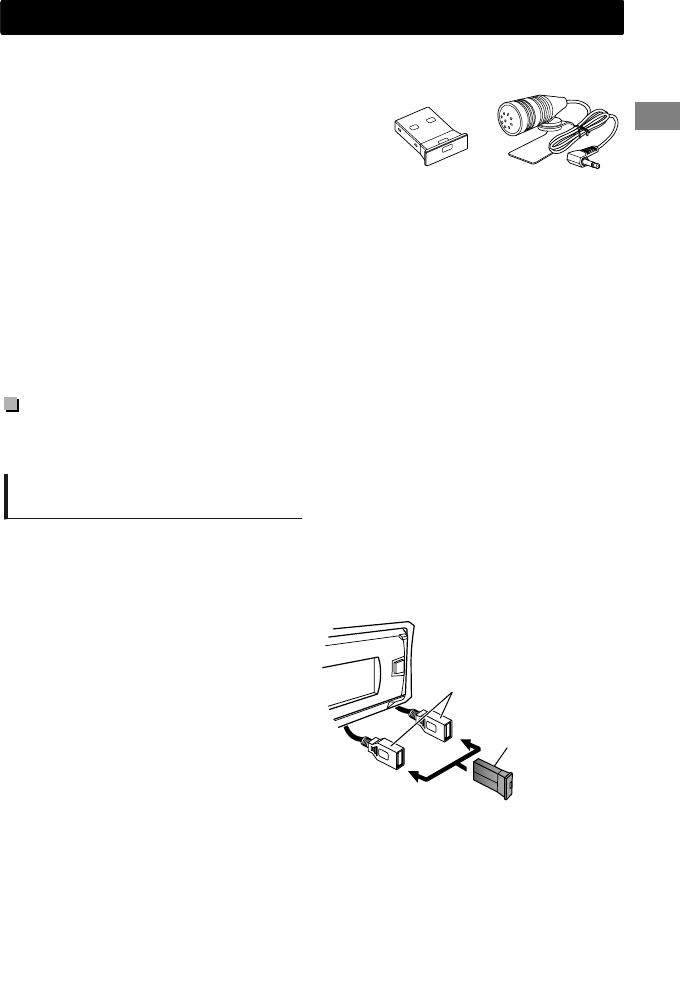
By connecting the supplied KS-UBT1 USB Bluetooth Adapter and microphone to this unit, you can
operate a Bluetooth device using this unit. Refer to the “Installation/Connection Manual” for details on
connecting the microphone.
Once the USB Bluetooth Adapter is attached, this unit is always
available for pairing.
Refer also to the instructions supplied with the Bluetooth
device.
Refer to the separate appendix to check the countries where
you may use the Bluetooth function.
If you turn off the unit, detach the control panel, or unplug the USB Bluetooth Adapter during a
phone call conversation, the Bluetooth connection is disconnected. Continue the conversation using
your mobile phone.
This unit supports the following Bluetooth profiles
Hands-Free Profile (HFP 1.5)
Object Push Profile (OPP 1.1)
Phonebook Access Profile (PBAP 1.0)
Advanced Audio Distribution Profile (A2DP 1.2)
Audio/Video Remote Control Profile (AVRCP 1.3)
Warning:
Stop the car in a safe place before operating complicated steps such as dialing numbers, using
phonebook, etc.
KS-UBT1 Microphone
Pairing a Bluetooth device
When connecting a Bluetooth device to the unit for the first time, perform pairing between the unit and
the device.
Up to five Bluetooth devices can be registered in this unit.
A maximum of two Bluetooth phones and one Bluetooth audio device can be connected at any
time.
This unit supports Secure Simple Pairing (SSP).
1Connect the USB Bluetooth adapter
(KS-UBT1) to one of the USB input
terminals.
KS-UBT1
or
USB cable from the
rear of the unit
2Search and select “JVC Unit” on the Bluetooth device.
For some Bluetooth devices, you may need to enter the Personal Identification Number (PIN) code
immediately after searching.
Bluetooth
姞
connection
Bluetooth
姞
connection
ENGLISHޓ|11
2012/2/6ޓ16:12:22KD-R80BT_UN_EN
3Perform (A) or (B) depending on what appears on the display.
For some Bluetooth devices, pairing sequence may vary from the steps described below
Pairing?
Yes: Press VOL
No: Press BACK
Pairing?
Device:
Passkey: XXXXXX
(A)
[Device name]
“XXXXXX” is a 6-digit passkey randomly
generated during each pairing.
Operate the Bluetooth device to confirm
the passkey.
Ensure that the passkey which appears
on the unit and Bluetooth device is the
same.
Select “Yes” to confirm the passkey.
Pairing?
Yes: Press VOL
No: Press BACK
Pairing?
Device: [Device name]
(B)
You can change to a desired PIN code before
pairing. (' page 22)
(2) If only “Pairing” appears, operate the
Bluetooth device to confirm pairing.
(1) When the Bluetooth device prompts
you to key in a PIN or passcode, enter the
PIN code “0000” into the Bluetooth
device. The above should then appear on
the display.
Select “Yes” to confirm the pairing.
After pairing is successful, “Pairing COMPLETED” appears on the display.
The unit will establish a connection with the newly paired Bluetooth device and you can then control
the Bluetooth device through the unit.
“” will light up when a phone is connected.
“” will light up when an audio device is connected.
Once the connection is established, the device is registered to the unit and there is no need to
perform the pairing again unless you delete the registered device.
Some Bluetooth devices may not be able to connect to the unit after pairing. Connect the device to
the unit manually. Refer to the instruction manual of the Bluetooth device for more information.
Connecting/Disconnecting a registered device manually
To connect
1
(Hold)
-<Bluetooth>
-<Phone>/<Audio>
-<Connect>
2Select <Connect>.
“Connecting...” appears on the display when the
unit is connecting to the device.
“Connected”#“[Device Name]” appears on the
display when the device is connected.
3Select the desired device.
4Press MENU to exit.
To disconnect
1
(Hold)
-<Bluetooth>
-<Phone>/<Audio>
-<Disconnect>
2Select <Disconnect>.
“Disconnected”#“[Device Name]” appears on the
display when the device is disconnected.
3Select the desired device.
4Press MENU to exit.
Bluetooth
姞
connection
12 |ޓENGLISH
2012/2/6ޓ16:12:22KD-R80BT_UN_EN
Connecting to JVC original
application
JVC original application is designed to view JVC
car receiver status and perform simple control
operations on Android smart phones.
For JVC original application operations, visit JVC
website:
<http://www3.jvckenwood.com/english/car/
index.html> (English website only).
1
(Hold)
-<Bluetooth>
-<Application>
-<Connect>
2Select <Connect>.
“Connected”#“[Device Name]” appears on the
display when the device is connected.
3Select the desired smart phone.
4Press MENU to exit.
Deleting a registered device
(Hold)
1
-<Bluetooth>
-<Delete Pairing>
- [Device Name]
-<Delete OK?>
“OK” appears when the device is deleted.
2Select <Delete OK>.
3Press MENU to exit.
Bluetooth mobile phone
Receiving a call
To receive a call
When there is an incoming call, the source
automatically changes to “BT-1”/“BT-2”.
“Receiving...” appears on the display, followed
by the phone number or name.
The display flashes in blue. (' page 16)
or
You can also press ////SOURCE on the
remote control to answer a call.
When <Auto Answer> is set to <On>, the unit
answers incoming calls automatically.
(' page 16)
To end a call
(Hold) or (Hold)
You can also press and hold ////SOURCE
on the remote control to end a call.
To deactivate/activate hands-free
mode
During a phone conversation...
Operations may vary according to the
connected Bluetooth device.
Bluetooth
姞
connection
ENGLISHޓ|13
2012/2/6ޓ16:12:22KD-R80BT_UN_EN
Adjustments during a call
Phone volume(00 — 50)
[Volume 15]: Volume
adjustments made during a call
will not affect the other
sources.
Microphone level
(01— 03)[02]: As the number
increases, the microphone
becomes more sensitive.
Noise Reduction and Echo
Cancellation mode:
Turns on/off.
Text message notification
When a text message is received, the unit rings
and “[Device Name]”#“Received Message”
appears.
<Message Notice> must be set to <On>.
(' page 16)
You cannot read, edit, or send a message
through the unit.
This feature is only available on certain phones.
Switching between two connected mobile phones
When two mobile phones are connected to the unit, you can access to both “Hands-Free” menus.
Press to enter 1st phone’s “Hands-Free” menu.
Press twice to enter 2nd phone’s “Hands-Free” menu.
Press to return to 1st phone’s “Hands-Free” menu.
Making a call from the hands-free menu
1Enter the “Hands-Free” menu.
Refer to the table below
for options.
2Select a calling method.
3Select and call the contact (name/phone number).
Dialed Calls
Call
Select the name/phone number
If the phonebook contains many numbers, you can fast search for the desired
number by turning the control dial quickly, or use Quick Search (' page 10).
“No History Found” appears if there is no recorded call history.
“No Data” appears if no entries are found in the Bluetooth device’s
phonebook.
“Send Phonebook Manually” appears if <Phonebook Select> is set to
<In Unit> or the phone does not support PBAP. (' page 16)
Received Calls
Missed Calls
Phonebook
Dial Number Enter the phone number to dial.
Call
Move the entry position
Select number/character
Bluetooth mobile phone
14 |ޓENGLISH
2012/2/6ޓ16:12:22KD-R80BT_UN_EN
Using voice recognition
You can use the voice recognition features of the
connected phone through this unit.
“Not Support” appears if the connected phone
does not support this feature.
If only one phone is connected,
(Hold)
If two phones are connected,
1Enter voice recognition mode.
(Hold)
Select the desired phone
Enter “phone list”
2When “Waiting Voice”#“[Device Name]”
appears on the display, speak the name of
the contact you want to call or the voice
command to control the phone functions.
Supported voice recognition features vary for
each phone. Please refer to the instruction
manual of the connected phone for details.
Deleting a contact (name/
phone number)
Only when <Phonebook Select> is set to <In
Unit>. (' page 16)
1Enter the “Hands-Free” menu.
-<Dialed Calls>/
<Received Calls>/
<Missed Calls>/
<Phonebook>
2Select a call method.
3Select the contact (name/phone number)
to be deleted.
Phone Number
or
Name
(Hold)
4Enter “Delete Entries” menu.
Delete Selected name/phone number
from step 3 is deleted.
Delete
All
All name/phone numbers from
selected menu in step 2 are
deleted.
5Select <Delete> or <Delete All>.
Bluetooth mobile phone
ENGLISHޓ|15
2012/2/6ޓ16:12:22KD-R80BT_UN_EN

Using the Settings menu
1Enter the “Hands-Free” menu.
2Select <Settings>. To return to the previous menu, press .
To exit from the menu, press MENU.
3Repeat this step to perform the necessary
settings.
The following settings are applicable to the paired device. If another device is paired, perform the
settings again.
Menu item Selectable setting (Initial: [XX])
Phonebook
Select *
[In Phone]: The unit browses the phonebook of the connected phone.
In Unit: The unit browses the phonebook registered in the unit. (You can copy
the phonebook memory using <Phonebook Trans> (' page 22).)
Auto Answer On: The unit answers incoming calls automatically.
[Off]: The unit does not answer incoming calls automatically.
Ringing Tone [In Unit]: The unit rings to alert you when a call/text message comes in.
–Call Tone: Select your preferred ring tone (Tone 1 — 5) for incoming calls.
–Message Tone: Select your preferred ring tone (Tone 1 — 5) for incoming
text messages.
Default ring tone is different according to the paired device.
In Phone: The unit uses the connected phones’ ring tone to alert you when a
call/text message comes in. (The connected phone will ring if it does not
support this feature.)
Ringing Color Color 01 — 29[06]: Select your preferred color for incoming call/text message
alerts.
Off: Cancels.
NR/EC Mode [On]: Turns on the Noise Reduction and Echo Cancellation of the connected
microphone for clearer sound.
Off: Cancels.
MIC Setting Level (01— 03)[02]: The sensitivity of the microphone increases as the MIC
level is increased.
Message Notice [On]: The unit rings and “[Device Name]”#“Received Message” appears to alert
you of an incoming text message.
Off: The unit does not alert you of an incoming text message.
* Selectable only when the connected phone supports PBAP.
Bluetooth mobile phone
16 |ޓENGLISH
2012/2/6ޓ16:12:22KD-R80BT_UN_EN
Playing a Bluetooth audio player
ASelect <BT-1> or <BT-2> depending on
the location of the USB Bluetooth adapter
KS-UBT1.
Operate the Bluetooth audio player to start
playback.
Operations and display indications may differ according to their availability on the connected device.
Basic operations
Starts or resumes playback.
Mutes the sound.
Selects group/folder.
Reverse skips or forward skips.
(Press)
Fast-forwards or reverses the
track. (Hold)
Selecting the playback modes
For Bluetooth devices that support AVRCP 1.3.
(Hold)
<Repeat>)<Random>
1
2
Repeat
Off Cancels repeat playback.
Track Repeats current track.
All Repeats all tracks.
Group Repeats all tracks of the
current group.
Random
Off Cancels random playback.
All
Randomly plays all tracks.
Group Randomly plays all tracks of
the current group.
Bluetooth audio player
Bluetooth audio player
ENGLISHޓ|17
2012/2/6ޓ16:12:22KD-R80BT_UN_EN

Illumination color adjustments
All zone
Display zone
Button zone
All zone: Includes both Button zone and
Display zone.
Selecting the preset color
You can select a preset color for <Button Zone>,
<Display Zone>, and <All Zone> separately.
(Hold)
1
2Select <Color>.
Button Zone Color 01-29/User/
COLORFLOW 1-3*
* Color changes in
different speeds.
Display Zone
All Zone
Initial color: Button Zone [Color 06], Display
Zone [Color 01], All Zone [Color 06].
If <All Zone> is selected, the button and
display illumination will change to the current/
selected <Button Zone> color.
3
4Press MENU to exit.
Storing your own adjustments
You can store your own day and night colors for
<Button Zone> and <Display Zone> separately.
(Hold)
1
2Select <Color Setup>.
Day
Color
Button
Zone
Press / to select a
primary color <Red/
Green/Blue>, then
turn the control dial
to adjust the level
<00-31>. Repeat this
procedure until you
have adjusted all the
three primary colors.
Your adjustment is
automatically stored
to “User”.
If “00” is selected for
all the primary colors
for <Display Zone>,
nothing appears on
the display.
Display
Zone
Night
Color
Button
Zone
Display
Zone
Menu
Color
On Changes the display and
buttons illumination
during menu, list search,
and playback mode
operations.
Off
Night Color/Day Color is changed by turning
on/off your car’s headlight.
3
4Press MENU to exit.
18 |ޓENGLISH
2012/2/6ޓ16:12:22KD-R80BT_UN_EN
You can select your preferred brightness for <Button Zone>,<Display Zone> separately.
(Hold)
1
-<Dimmer>
-<Brightness>
-<Day Brightness>/
<Night Brightness>
2Button Zone Level 00 to 31
Display Zone Level 00 to 31
3
4Press MENU to exit.
Sound adjustments
This unit memorizes sound settings adjusted for each individual source.
Selecting the preset sound
You can select a preset sound mode, for each
individual source, suitable for the music genre.
- - - - - - - - or - - - - - - - -
Press repeatedly.
DYNAMIC-VOCAL-BASS-USER-FLAT-
NATURAL-(back to the beginning)
Storing your own adjustments
While listening, you can adjust and store the tone
level for each individual source.
Easy Equalizer
(Hold)
1
2Select a setting item (Sub. W/Bass/Middle/
Treble).
(Initial: [XX])
Sub.W* 00 to 08 [08]
Bass -6 to +6 [+5]
Middle -6 to +6 [0]
Treble -6 to +6 [+5]
The adjustments are stored and <USER> is
activated.
3Adjust the level.
Pro Equalizer
(Hold)
1
-<PRO EQ>
-<Bass>/<Middle>/
<Treble>
2
3Press / to adjust the frequency.
4Press / to adjust the Q-slope.
Adjust the sound elements of the selected tone.
Bass (Initial: [XX])
Frequency 60/80/[100]/200 Hz
Level Lvl -6 to +6 [+5]
Q[Q1.0]/Q1.25/Q1.5/Q2.0
Middle
Frequency 0.5/[1]/1.5/2.5 kHz
Level Lvl -6 to +6 [0]
Q Q0.75/Q1.0/[Q1.25]
Treble
Frequency 10/[12.5]/15/17.5 kHz
Level Lvl -6 to +6 [+5]
Q[FIX]
5Adjust the level.
6Repeat steps 2 to 5 to adjust other tones.
The adjustments are stored and <USER> is
activated.
7Press MENU to exit.
* Adjustable only when <Subwoofer On/Off>
is set to <On>. (' page 21)
Brightness adjustments
Brightness adjustments
ENGLISHޓ|19
2012/2/6ޓ16:12:22KD-R80BT_UN_EN
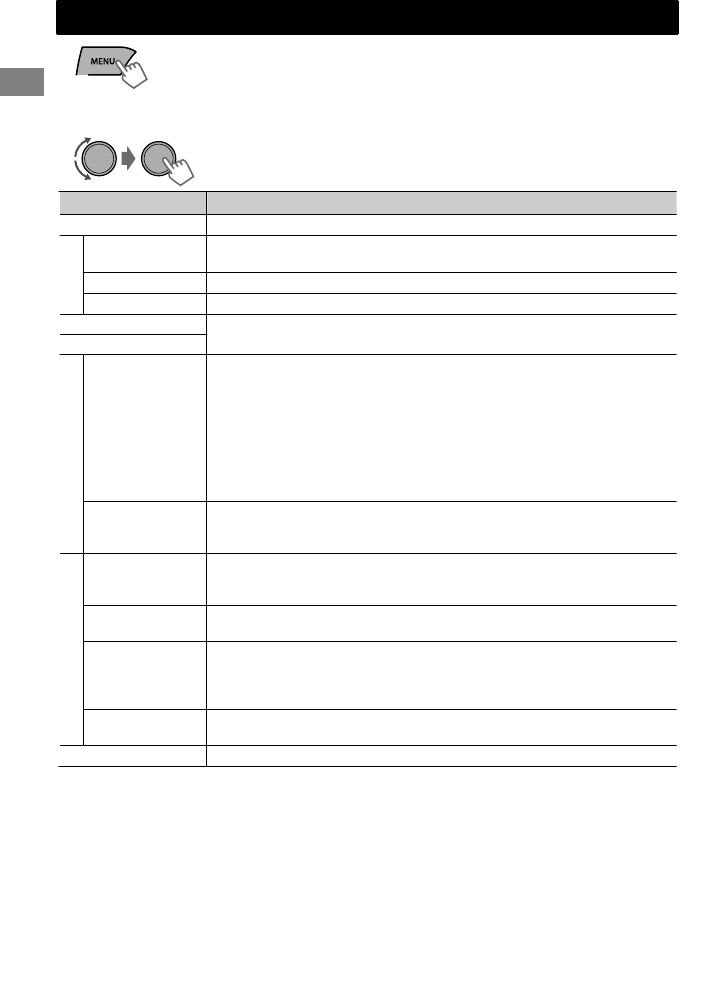
(Hold)
If no operation is done for about 60 seconds, the
operation will be canceled.
1
2
3Repeat step 2 if necessary.
To return to the previous menu, press .
To exit from the menu, press DISP or MENU.
Menu item Selectable setting (Initial: [XX])
DEMO For settings, ' page 4.
Clock
Clock Display On: Shows the clock display when the power is off.
[Off]: Cancels.
Set Clock For settings, ' page 4.
24H/12H For settings, ' page 4.
Color For settings, ' page 18.
Color Setup
Dimmer
Dimmer Set Selects the display and button illumination adjusted in the <Brightness>/
<Color Setup> setting.
Off: Selects the Day adjustments.
On: Selects the Night adjustments.
[Auto]: Changes between the Day and Night adjustments when you turn
off/on the car headlights. *1
Time Set: Sets the start/end timer for dimmer. Turn the control dial to
adjust the start time, then press the control dial to confirm. Repeat this step
to enter the end time.
Brightness Day Brightness[31]/Night Brightness[15]: Brightness settings for the
display and button illumination for day and night.
Button Zone/Display Zone: Sets the brightness levels 00 — 31.
Display
Scroll *2 Off: Cancels.
[Once]: Scrolls the display information once.
Auto: Repeats scrolling (at 5-second intervals).
Tag Display [On]: Shows the TAG information while playing MP3/WMA/WAV tracks.
Off: Cancels.
LCD Type [Negative]: Negative pattern of the display.
Positive: Positive pattern of the display.
Auto: Positive pattern will be selected during the day*3, while negative will
be selected during the night*3.
Contrast Level 01 — Level 15 [Level 09]: Adjusts the contrast of the display to
make indications clear and legible.
PRO EQ For settings, ' page 19.
*1 The illumination control lead connection is required. (See “Installation/Connection Manual”.)
This setting may not work correctly on some vehicles (particularly on those having a control
dial for dimming). In this case, change the setting to other than <Dimmer Auto>.
*2 Some characters or symbols will not be shown correctly (or will be blanked) on the display.
*3 Depends on the <Dimmer Set> setting.
Menu operations
Menu operations
20 |ޓENGLISH
2012/2/6ޓ16:12:22KD-R80BT_UN_EN

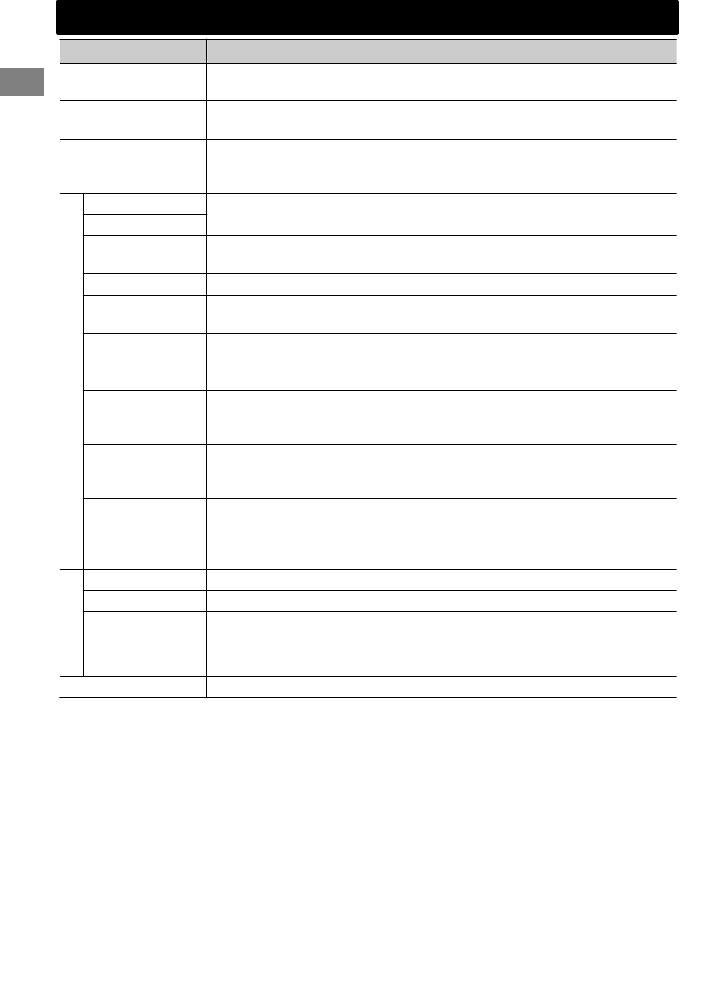
Menu item Selectable setting (Initial: [XX])
Audio
Fad/Bal *4*5
R6 — F6[0]: Press / to adjust the front and rear speaker output balance.
L6 — R6[0]: Press / to adjust the left and right speaker output balance.
Loud
(Loudness)
On: Boosts low and high frequencies to produce a well-balanced sound at a
low volume level.
[Off]: Cancels.
Volume Adjust Level -5 — Level +5[Level 0]: Presets the volume adjustment level of
each source, compared to the FM volume level. Before adjustment, select
the source you want to adjust. (“FIX” appears if “FM” is selected.)
Subwoofer On/
Off
[On]: Turns on the subwoofer output.
Off: Cancels.
Subwoofer LPF *6
LOW 55Hz/MID 85Hz/[HIGH 120Hz]: Audio signals with frequencies
lower than 55 Hz/85 Hz/120 Hz are sent to the subwoofer.
Subwoofer
Level *6
00 — 08[08]: Adjusts the subwoofer output level.
Subwoofer
Phase *6
[0 Deg] (normal)/180 Deg (reverse): Selects the subwoofer phase.
HPF
(High-pass filter)
Low 100Hz/Mid 120Hz/High 150Hz: Activates the High Pass Filter. Audio
signal with frequencies lower than 100 Hz/120 Hz/150 Hz are cut off from
the front/rear speakers.
[Off]: Deactivates. (All signals are sent to the front/rear speakers.)
Beep
(Keytouch tone)
[On]/Off: Activates or deactivates the keypress tone.
Amplifier Gain
Off: Deactivates the built-in amplifier.
Low Power: Limits the maximum volume level to 30. (Select if the
maximum input power of each speaker is less than 50 W to prevent
damaging the speakers.)
[High Power]: The maximum volume level is 50.
Tuner
SSM For settings, ' page 6. (Displayed only when the source is “FM”.)
IF Band
(Intermediate
frequency band)
[Auto]: Increases the tuner selectivity to reduce interference noises
between adjacent stations. (Stereo effect may be lost.)
Wide: Subject to interference noises from adjacent stations, but sound
quality will not be degraded and the stereo effect will remain.
Stereo/Mono Displayed only when the source is “FM”.
[Stereo]: Enables stereo FM reception.
Mono: Improves the FM reception but stereo effect will be lost.
Radio Timer For settings, ' page 7.
*4 If you are using a two-speaker system, set the fader level to “0”.
*5 This adjustment will not affect the subwoofer output.
*6 Displayed only when <Subwoofer On/Off> is set to <On>.
Menu operations
ENGLISHޓ|21
2012/2/6ޓ16:12:22KD-R80BT_UN_EN
Menu item Selectable setting (Initial: [XX])
USB *7 Drive Change: Selects to change the drive when a device with multiple
drives is connected to the USB input terminal.
iPod Switch *8
(iPod/iPhone control)
[Headunit Mode]/iPod Mode/Application Mode:
For settings, ' page 9.
Audiobooks *8 Normal/Faster/Slower: Selects the playback speed of the Audiobooks
sound file in your iPod/iPhone.
Initial selection depends on your iPod/iPhone setting.
Bluetooth *9
Phone *10 Connect/Disconnect: Connects or disconnects the Bluetooth phone/
audio device. (' page 12)
Audio
Application Connect/Disconnect: Connects or disconnects the application in the
smart phone. (' page 13)
Delete Pairing For settings, ' page 13.
Phonebook
Trans
Copies up to 400 numbers from the phonebook memory of a connected
phone to the unit via OPP.
Set PIN Code Changes the PIN code (1 to 6-digits). (Default PIN code: 0000)
Turn the control dial to select a number, press / to move to the entry
position. After entering the PIN code, press the control dial to confirm.
Auto Connect [On]: Establishes connection automatically with the Bluetooth device when
the unit is turned on.
Off: Cancels.
Initialize [No]: Cancels.
Yes: Initializes all the Bluetooth settings (including stored pairing,
phonebook, and etc.).
Information Connected Phone/Connected Audio/Connected Application *11:
Displays connected phone/audio/application device name.
My BT Name: Displays the unit name (JVC Unit).
My Address: Shows address of USB Bluetooth Adapter.
Source Select
AM Source *12 [Show]/Hide: Enables or disables “AM” in source selection.
AUX Source *12 [Show]/Hide: Enables or disables “AUX In” in source selection.
Bluetooth
Audio *13
[Show]/Hide: Enables or disables “BT Audio” in source selection.
Software Version Displays the firmware version of the unit.
*7 Displayed only when the source is “USB-1/USB-2”.
*8 Displayed only when the source is “iPod-1/iPod-2”.
*9 If the USB Bluetooth Adapter is not connected to the unit, “Please Connect BT Adapter”
appears on the display.
*10 <Connect> will not be displayed if two Bluetooth phones are connected at the same time.
*11 Displayed only when a Bluetooth phone/audio player/application is connected.
*12 Displayed only when the unit is in any source other than the corresponding source “AM
Source/AUX Source”.
*13 Displayed only when the USB Bluetooth Adapter (KS-UBT1) is attached and current source is
not “BT-1/BT-2”.
Menu operations
22 |ޓENGLISH
2012/2/6ޓ16:12:22KD-R80BT_UN_EN
Preparing
When you use the remote controller for the first
time, pull out the insulation sheet.
Insulation sheet
Replacing the lithium coin
battery
If the effectiveness of the remote controller
decreases, replace the battery.
CR2025
Caution:
Danger of explosion if battery is incorrectly
replaced. Replace only with the same or
equivalent type.
Battery shall not be exposed to excessive heat
such as sunshine, fire, or the like.
Warning:
Do not install any battery other than CR2025 or
its equivalent.
Do not leave the remote controller in places
(such as dashboards) exposed to direct
sunlight for a long time.
Store the battery in places out of reach of
children.
Do not recharge, short, disassemble, heat the
battery, or dispose of it in a fire.
Do not place the battery with other metallic
materials.
Do not poke the battery with tweezers or
similar tools.
Insulate the battery by wrapping it with tape
when disposing or storing it.
This unit is equipped with the steering wheel
remote control function. For details, refer also to
the instructions supplied with the remote
adapter.
Additional information
About discs
This unit can only play the following CDs:
This unit can play back multi-session discs;
however, unclosed sessions will be skipped
during playback.
Unplayable discs
Discs that are not round.
Discs with coloring on the recording surface or
discs that are dirty.
Recordable/ReWritable disc that has not been
finalized. (For details on disc finalization, refer
to your disc writing software and your disc
recorder instruction manual.)
8 cm CD. Attempting to insert using an adapter
can cause malfunction. There may also be
problems ejecting the disc if inserted.
Handling discs
Do not touch the recording surface of the disc.
Do not stick tape etc. on the disc, or use a disc
with tape stuck on it.
Do not use any accessories for the disc.
Clean from the center of the disc and move
outwards.
Clean the disc with a dry silicon or soft cloth.
Do not use any solvents.
When removing discs from this unit, pull them
out horizontally.
Remove any burrs from the center hole and
disc edge before inserting a disc.
DualDisc playback
The Non-DVD side of a “DualDisc” does not
comply with the “Compact Disc Digital Audio”
standard. Therefore, the use of Non-DVD side of a
DualDisc on this product may not be
recommended.
Remote controller
Remote controller
ENGLISHޓ|23
2012/2/6ޓ16:12:22KD-R80BT_UN_EN

About audio files
Playable files
File extensions: MP3(.mp3), WMA(.wma),
WAV(.wav)
For MP3/WMA discs:
Bit rate:
MP3/WMA: 5 kbps - 320 kbps
Sampling frequency:
MP3 (MPEG-1): 32 kHz, 44.1 kHz, 48 kHz
MP3 (MPEG-2): 16 kHz, 22.05 kHz, 24 kHz
WMA: 8 kHz - 48 kHz
For USB devices:
Bit rate:
MP3 (MPEG-1): 32 kbps - 320 kbps
MP3 (MPEG-2): 8 kbps - 160 kbps
WMA: 5 kbps - 320 kbps
WAV: Linear PCM at 705 kbps and 1 411 kbps
Sampling frequency:
MP3 (MPEG-1): 32 kHz, 44.1 kHz, 48 kHz
MP3 (MPEG-2): 16 kHz, 22.05 kHz, 24 kHz
WMA: 8 kHz - 48 kHz
WAV: 44.1 kHz
Channel:
WMA/WAV: 1 ch/2 ch
Variable bit rate (VBR) files. (The elapsed time
for VBR files will not be displayed correctly.)
Unplayable files
MP3 files:
- encoded in MP3i and MP3 PRO format
- encoded in an inappropriate format
- encoded with Layer 1/2
WMA files:
- encoded in lossless, professional, and voice
format
- not based upon Windows Media® Audio
- copy-protected with DRM
Files which include data such as AIFF, ATRAC3,
etc.
File/folder names
This unit supports files/folder names recorded in a
format compliant with ISO 9660 Level 1, Level 2,
Romeo, or Joliet, and the proper extension code
<.mp3>, <.wma> or <.wav>.
Others
This unit can show WMA Tag and ID3 Tag
Version 1.0/1.1/2.2/2.3/2.4 (for MP3).
The search function works but search speed is
not constant.
About USB device
When connecting a USB cable, use the USB 2.0
cable.
You cannot connect a computer or portable
HDD to the USB input terminal of the unit.
Connect only one USB device to the unit at a
time. Do not use a USB hub.
USB devices equipped with special functions
such as data security functions cannot be used
with the unit.
Do not use a USB device with 2 or more
partitions.
This unit cannot recognize a USB device whose
rating is other than 5 V and exceeds 1 A.
This unit may not recognize a memory card
inserted into the USB card reader.
This unit may not play back files in a USB
device properly when using a USB extension
cord.
Depending on the shape of the USB devices
and connection ports, some USB devices may
not be attached properly or the connection
might be loose.
Operation and power supply may not work as
intended for some USB devices.
The maximum number of characters for:
– Folder names: 25 characters
– File names: 25 characters
– MP3 Tag: 128 characters
– WMA Tag: 128 characters
– WAV Tag: 128 characters
This unit can recognize a total of 20000 files,
2000 folders (999 files per folder including
folder without unsupported files), and of 8
hierarchies. However, the display can only
show until 999 folders/files.
Cautions
Do not pull out and attach the USB device
repeatedly while “READING” is shown on the
display.
Electrostatic shock at connecting a USB device
may cause abnormal playback of the device. In
this case, disconnect the USB device then reset
this unit and the USB device.
Do not leave a USB device in the car, expose to
direct sunlight, or high temperature. Failure to
do so may result in deformation or cause
damages to the device.
Additional information
24 |ޓENGLISH
2012/2/6ޓ16:12:22KD-R80BT_UN_EN

About iPod/iPhone
iPod/iPhone that can be connected to this unit:
- iPod touch (4th generation)
- iPod touch (3rd generation)
- iPod touch (2nd generation)
- iPod touch (1st generation)
- iPod classic
- iPod with video (5th generation)*
- iPod nano (6th generation)
- iPod nano (5th generation)
- iPod nano (4th generation)
- iPod nano (3rd generation)
- iPod nano (2nd generation)
- iPod nano (1st generation)*
- iPhone 4S
- iPhone 4
- iPhone 3GS
- iPhone 3G
- iPhone
*<iPod Mode>/<Application Mode> are not
applicable.
It is not possible to browse video files on the
“Videos” menu in <Headunit Mode>.
The song order displayed on the selection
menu of this unit may differ from that of the
iPod.
When operating an iPod/iPhone, some
operations may not be performed correctly or
as intended. In this case, visit the following JVC
website:
<http://www3.jvckenwood.com/english/car/
index.html> (English website only).
About Bluetooth
Depending on the Bluetooth version of the
device, some Bluetooth devices may not be
able to connect to this unit.
This unit may not work with some Bluetooth
devices.
Signal conditions vary, depending on the
surroundings.
When the unit is turned off, the device is
disconnected.
For more information about Bluetooth, visit the
following JVC website:
<http://www3.jvckenwood.com/english/car/
index.html> (English website only)
Trademark and license notice
Microsoft and Windows Media are either
registered trademarks or trademarks of
Microsoft Corporation in the United States
and/or other countries.
The Bluetooth word mark and logos are owned
by the Bluetooth SIG, Inc. and any use of such
marks by JVC KENWOOD Corporation is under
license. Other trademarks and trade names are
those of their respective owners.
“Made for iPod” and “Made for iPhone” mean
that an electronic accessory has been designed
to connect specifically to iPod, or iPhone,
respectively, and has been certified by the
developer to meet Apple performance
standards. Apple is not responsible for the
operation of this device or its compliance with
safety and regulatory standards. Please note
that the use of this accessory with iPod, or
iPhone may affect wireless performance.
iPhone, iPod, iPod classic, iPod nano, and iPod
touch are trademarks of Apple Inc., registered
in the U.S. and other countries.
Additional information
ENGLISHޓ|25
2012/2/6ޓ16:12:22KD-R80BT_UN_EN
Symptom Remedy/Cause
4General
No sound, sound interrupted or
static noise.
Check the cords, antenna and cable connections.
Check the condition of the disc, connected device and
recorded tracks.
Ensure to use the recommended stereo mini plug when
connecting to an external component. (' page 10)
“Miswiring Check Wiring Reset
The Unit”/“Warning Check
Wiring Reset The Unit” appears
on the display and no operations
can be done.
Ensure the terminals of the speaker leads are properly insulated
with tape before resetting the unit. (' page 3)
If the message does not disappear, consult your JVC car audio
dealer or kits supplying company.
The unit does not work at all. Reset the unit. (' page 3)
Source cannot be selected. Check the <Source Select> setting. (' page 22)
The correct characters are not
displayed (e.g. album name).
This unit can only display letters (upper case), numbers, and a
limited number of symbols.
4FM/AM
SSM automatic presetting does
not work.
Store stations manually.
4CD/USB/iPod/iPhone
“Please Eject” appears on the
display. Press [], then insert the disc correctly.
“In Disc” appears on the display. The disc cannot be ejected properly. Make sure nothing is
blocking the loading slot.
“Reading” keeps flashing on the
display.
A longer readout time is required. Do not use too many
hierarchical levels and folders.
Reload the disc or reattach the USB device.
Tracks/folders are not played
back in the order you have
intended.
The playback order is determined by the file name (USB) or the
order in which files were recorded (disc).
The elapsed playing time is not
correct.
This sometimes occurs during playback. This is caused by how
the tracks are recorded on the disc.
“No File” appears on the display. Check whether the selected folder, the connected USB device,
or the iPod/iPhone contains a playable file.
“Not Support” appears on the
display and track skips.
Check whether the track is a playable file format.
“Cannot Play” flashes on the
display.
The unit cannot detect the
connected device.
Check whether the connected device is compatible with this
unit. (USB: ' page 28) (iPod/iPhone: ' page 25)
Ensure that the device contains files in the supported
formats. (' page 24)
Reattach the device.
The iPod/iPhone does not turn
on or does not work.
Check the connection between this unit and iPod/iPhone.
Detach and reset the iPod/iPhone using hard reset. For
details on resetting the iPod/iPhone, refer to the instruction
manual supplied with the iPod/iPhone.
Check whether <iPod Switch> setting is appropriate.
(' page 9)
Troubleshooting
Troubleshooting
26 |ޓENGLISH
2012/2/6ޓ16:12:22KD-R80BT_UN_EN

Symptom Remedy/Cause
4Bluetooth
“BT-1”/“BT-2” cannot be
selected.
Check <Bluetooth Audio> in the <Source Select> setting.
(' page 22)
No Bluetooth device is detected. Search from the Bluetooth device again.
Reset the unit. (' page 3)
Pairing cannot be made. Make sure you have entered the same PIN code to both the
unit and Bluetooth device.
Delete pairing information from both the unit and the
Bluetooth device, then perform pairing again.
“Pairing Full” appears on the
display when trying to perform
pairing.
You have already registered the maximum of five Bluetooth
devices in the unit. To pair another device, delete an existing
paired device from the unit first. (' page 13)
Echo or noise occurs. Adjust the microphone unit’s position.
Adjust <NR/EC Mode> and <Mic Level> to a better
combination. (' page 16)
Phone sound quality is poor. Reduce the distance between the unit and the Bluetooth
device.
Move the car to a place where you can get a better signal
reception.
The unit does not respond when
you try to copy the phonebook
to the unit.
You may have tried to copy the same entries (as stored) to the
unit. Press DISP or to exit.
Sound is being interrupted or
skipped during playback of a
Bluetooth audio player.
Reduce the distance between the unit and the Bluetooth
audio player.
Turn off, then turn on the unit and try to connect again.
Other Bluetooth devices might be trying to connect to the
unit.
The connected Bluetooth audio
player cannot be controlled.
Check whether the connected Bluetooth audio player
supports Audio/Video Remote Control Profile (AVRCP). (Refer
to the instructions of your audio player.)
Disconnect and connect the Bluetooth player again.
“Voice” calling method is not
successful.
Use “Voice” calling method in a more quiet environment.
Reduce the distance from the microphone when you speak
the name.
Change “NR/EC Mode” to “Off” (' page 16), then try again.
“Not Support” appears when
trying to perform voice dial.
The connected phone does not support this feature.
“Connection Error” appears on
the display.
The device is registered but the connection has failed. Connect
the device manually. (' page 12)
“Error” appears on the display. Try the operation again. If “Error” appears again, check if the
device supports the function you have tried.
“Please Wait” appears on the
display.
The unit is preparing to use the Bluetooth function. If the
message does not disappear, turn off and turn on the unit, then
connect the device again (or reset the unit). (' page 3)
“HW Error” appears on the
display.
Reset the unit and try the operation again. If “HW Error” appears
again, consult your nearest JVC car audio dealer.
“BT Device Not Found” appears
on the display.
The unit failed to search for the registered Bluetooth devices
during Auto Connect. Turn on Bluetooth from your device
and connect manually.
Troubleshooting
ENGLISHޓ|27
2012/2/6ޓ16:12:22KD-R80BT_UN_EN
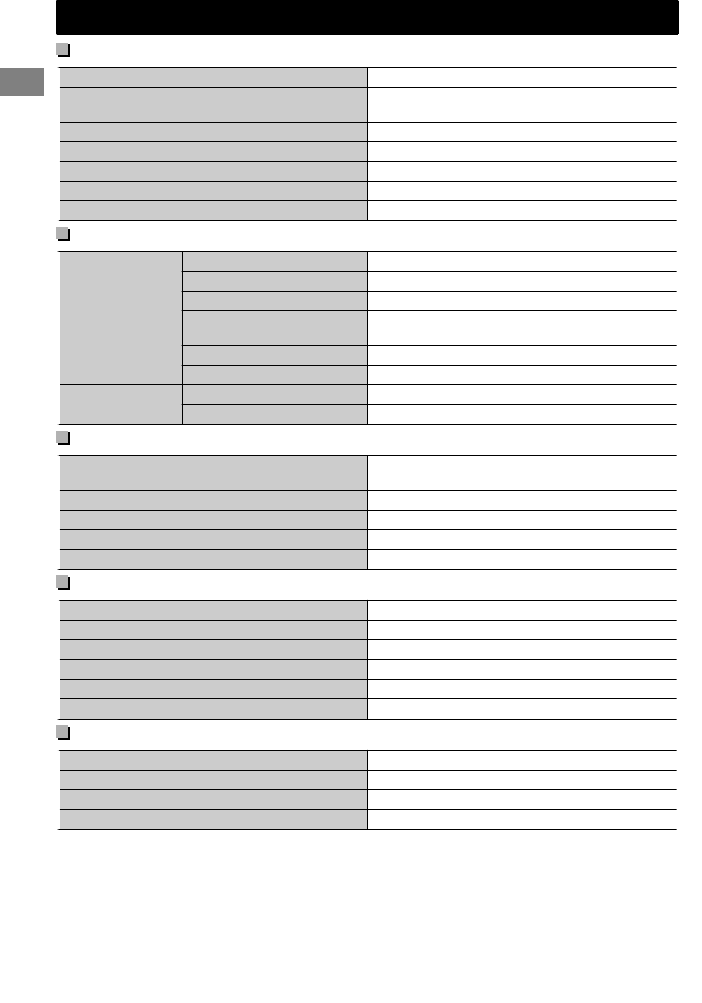
AUDIO AMPLIFIER SECTION
Maximum Power Output 50 W per channel
Continuous Power Output (RMS) 20 W per channel into 4Ω, 40 Hz to 20 000 Hz at
less than 1% total harmonic distortion.
Load Impedance 4Ω (4Ω to 8Ω allowance)
Frequency Response 40 Hz to 20 000 Hz
Signal-to-Noise Ratio 80 dB
Line-Out, Subwoofer-Out Level/Impedance 4.8 V/20 kΩ load (full scale)
Output Impedance ≤ 600Ω
TUNER SECTION
FM Frequency Range 87.5 MHz to 108.0 MHz
Usable Sensitivity 9.3 dBf (0.8 μV/75Ω)
50 dB Quieting Sensitivity 16.3 dBf (1.8 μV/75Ω)
Alternate Channel
Selectivity (400 kHz) 65 dB
Frequency Response 40 Hz to 15 000 Hz
Stereo Separation 40 dB
AM Frequency Range 531 kHz to 1 611 kHz
Sensitivity/Selectivity 20 μV/40 dB
CD PLAYER SECTION
Signal Detection System Non-contact optical pickup (semiconductor
laser)
Number of Channels 2 channels (stereo)
Frequency Response 5 Hz to 20 000 Hz
Signal-to-Noise Ratio 98 dB
Wow and Flutter Less than measurable limit
USB SECTION
USB Standard USB 1.1, USB 2.0
Data Transfer Rate (Full Speed) Max. 12 Mbps
Compatible Device Mass storage class
Compatible File System FAT 32/16/12
Playable Audio Format MP3/WMA/WAV
Maximum Supply Current DC 5 V " 1 A
BLUETOOTH SECTION
Version Bluetooth 2.1 certified (+EDR)
Power Class Class 2 Radio
Service Area 10 m
Profile HFP 1.5, OPP 1.1, A2DP 1.2, AVRCP 1.3, PBAP 1.0
Specifications
Specifications
28 |ޓENGLISH
2012/2/6ޓ16:12:22KD-R80BT_UN_EN

GENERAL
Power Requirement (Operating Voltage) DC 14.4 V (11 V to 16 V allowance)
Grounding System Negative ground
Allowable Operating Temperature 0°C to +40°C
Dimensions
(W × H × D)
Installation Size approx. 182 mm × 52 mm × 159 mm
Panel Size approx. 188 mm × 59 mm × 13 mm
Mass 1.4 kJ (excluding accessories)
Subject to changes without notice.
Specifications
ENGLISHޓ|29
2012/2/6ޓ16:12:22KD-R80BT_UN_EN
Terima kasih telah membeli produk JVC.
Harap membaca seluruh petunjuk dengan teliti sebelum mengoperasikan, untuk memastikan anda
memahami secara keseluruhan dan mendapatkan performansi terbaik dari unit ini.
PENTING UNTUK PRODUK-PRODUK LASER
1. PRODUK LASER KELAS 1
2. PERHATIAN: Jangan membuka penutup atas. Tidak ada bagian yang dapat diperbaiki
oleh pengguna di dalam unit tersebut; biarkanlah semua bagian yang
diperbaiki untuk memenuhi syarat perbaikan teknis.
3. PERHATIAN: Apabila terbuka, radiasi laser kelas 1M dapat terlihat dan/atau tidak terlihat.
Jangan langsung melihatnya dengan alat optik.
4. REPRODUKSI DARI LABEL: LABEL PERHATIAN, TEMPATKAN DI LUAR UNIT TERSEBUT.
[Hanya Uni Eropa]
Peringatan:
Hentikan mobil sebelum mengoperasikan unit.
Perhatian:
Sesuaikan volume agar Anda masih dapat
mendengar suara di luar mobil. Mengemudi
sembari mendengar volume unit yang terlalu
tinggi dapat menyebabkan kecelakaan.
Hindari penggunaan perangkat USB atau iPod/
iPhone jika hal ini dapat mengganggu keamanan
pengemudian Anda.
Perhatian pada pengaturan
volume:
Perangkat digital (CD/USB) tidak terlalu berisik jika
dibandingkan dengan sumber lainnya. Turunkan
volume sebelum memutar sumber-sumber
digital ini untuk menghindari kerusakan pada
pengeras suara akibat peningkatan level output
[keluaran] yang tiba-tiba.
Suhu dalam mobil:
Jika anda telah memarkir mobil terlalu lama
dalam cuaca yang panas atau dingin, tunggu
hingga suhu dalam mobil menjadi normal
kembali sebelum mengoperasikan unit ini.
tampak pada tampilan dan guliran animasi/
teks akan dihentikan untuk mencegah agar
tampilan tidak kabur saat suhu turun di bawah
0°C. Begitu suhu operasi normal kembali, fungsi-
fungsi ini akan mulai bekerja lagi.
Kondensasi:
Jika mobil dilengkapi AC, uap air bisa bertumpuk
pada lensa laser. Kondisi bisa menyebabkan
kesalahan baca pada disk. Untuk mengatasi hal
ini, keluarkan disk dan tunggu sampai uap air
menguap.
2|ޓINDONESIA
2012/2/6ޓ16:10:10KD-R80BT_UN_IN
Cara memasang panel kontrol
Cara melepas panel kontrol
Jangan menyentuh konektor.
Bagaimana cara mereset unit
anda
Penyetelan-penyetelan
pengaturan awal anda akan
terhapus juga.
Bagaimana secara paksa
mengeluarkan sebuah disk
(Tahan)
Hati-hati untuk tidak menjatuhkan disk
tersebut ketika dikeluarkan.
Jika ini tidak bekerja, coba mengeset kembali
(reset) unit anda.
Perawatan
Membersihkan unit
Seka kotoran pada panel dengan silikon kering
atau kain halus. Jika tindakan pencegahan ini
tidak dilakukan, unit ini bisa mengalami
kerusakan.
Membersihkan konektor
Seka kotoran pada konektor unit dan panel.
Gunakan kapas bertangkai (cutton bud) atau kain.
Daftar isi
Persiapan ................................................................ 4
Membatalkan display demonstrasi
Pengaturan jam
Pengoperasian dasar .......................................... 4
Radio ........................................................................ 6
CD/USB .................................................................... 8
iPod/iPhone ........................................................... 9
Pencarian Cepat ................................................ 10
Komponen eksternal ....................................... 10
Koneksi Bluetooth姞.......................................... 11
Ponsel Bluetooth ............................................... 13
Audio player Bluetooth ................................... 17
Penyesuaian warna sinar ................................ 18
Penyesuaian kecerahan .................................. 19
Penyesuaian suara ............................................ 19
Pengoperasian menu ...................................... 20
Remote kontrol .................................................. 23
Informasi tambahan ......................................... 23
Pemecahan Masalah ........................................ 26
Spesifikasi ............................................................ 28
Cara membaca manual ini:
Manual ini terutama menjelaskan
pengoperasian menggunakan tombol-
tombol pada panel kontrol.
< > menunjukkan tampilan-tampilan pada
panel kontrol.
[XX] menunjukkan pengaturan awal suatu
item menu.
INDONESIAޓ|3
2012/2/6ޓ16:10:10KD-R80BT_UN_IN
Membatalkan display
demonstrasi
Peragaan tampilan selalu dalam kondisi
dihidupkan kecuali Anda membatalkannya.
SET UP
DEMO
Clock
PUSH
(Tahan)
1
(Pengaturan awal)
DEMO
Off
On
PUSH
2
DEMO
Off
On
PUSH
3Pilih <Off>.
4Tekan MENU untuk keluar.
Pengaturan jam
SET UP
DEMO
Clock
PUSH
(Tahan)
1
Clock
DEMO
Clock
Color
PUSH
2Pilih <Clock>.
Clock
Clock Display
Set Clock
24/12H
PUSH
3Pilih <Set Clock>.
1 : 00AM
Set Clock
PUSH
(Pengaturan awal)
4Setel jam.
1 : 00AM
Set Clock
PUSH
5Setel menit.
Clock
Set Clock
Clock Adjust
24/12H
PUSH
6Pilih <24H/12H>.
7Pilih <24Hours> atau <12Hours>.
8Tekan MENU untuk keluar.
Pengoperasian dasar
Informasi tampilan
Mengubah informasi tampilan. (Tekan)
Menggulir informasi tampilan saat ini. (Tahan)
Sumber Tampilan (Pola tampilan normal)*1
Radio Nama stasiun/Frekuensi
CD/USB/Audio Bluetooth Judul trek/Judul album/Artis*
*“No Name” muncul untuk CD konvensional atau jika tidak
direkam.
iPod/iPhone (Headunit Mode/iPod
Mode)
iPod/iPhone (Application Mode) Application Mode
Komponen eksternal (AUX) Aux In
*1 Informasi tampilan bervariasi untuk pola tampilan huruf besar dan jam besar.
Persiapan
Persiapan
4|ޓINDONESIA
2012/2/6ޓ16:10:10KD-R80BT_UN_IN

Remote kontrol
Jendela tampilan
Panel kontrol
JANGAN SAMPAI terkena sinar matahari.
Sensor remote kontrol
Tombol kontrol Arahkan remote kontrol langsung pada sensor.
Balik panel ke bawah
Jika Anda menekan atau menahan tombol berikut...
Panel kontrol Remote
kontrol Fungsi umum
/SOURCE —
Menghidupkan.
Mematikan. (Tahan)
Tekan /SOURCE tombol pada panel kontrol dan putar
tombol kontrol dalam 2 detik untuk memilih sumber.
SOURCE Tekan berulang-ulang untuk memilih sumber.
Tombol kontrol
(putar)
VOL - / + Menyetel level volume.
— Memilih item.
Tombol kontrol
(tekan)
)
Membungkam suara atau menghentikan pemutaran untuk
sementara.
Tekan tombol lagi untuk membatalkan pembungkaman
suara atau melanjutkan pemutaran.
— Mengkonfirmasi pemilihan.
EQ SOUND Memilih mode suara prasetel. (' halaman 19)
—
Masuk menu “Bebas-Tangan” (' halaman 14), atau
menjawab panggilan masuk saat unit berdering.
Mengakhiri panggilan. (Tahan)
— Kembali ke menu sebelumnya.
/ / Memilih stasiun prasetel. (' halaman 6)
Memilih folder MP3/WMA/WAV. (' halaman 8)
/ /
Mencari stasiun secara otomatis. (' halaman 6)
Mencari stasiun secara manual. (Tahan)
Memilih trek. (' halaman 8, 9, 17)
Maju cepat atau memundurkan trek. (Tahan)
Pengoperasian dasar
INDONESIAޓ|5
2012/2/6ޓ16:10:10KD-R80BT_UN_IN
Mencari stasiun
88.3 MHz
ST DYNAMIC 1:00AM
FM
A
BPilih <FM> atau <AM>.
Pencarian otomatis. (Tekan)
Pencarian manual. (Tahan)
“M” muncul, kemudian tekan tombol berulang-
ulang.
“ST” menyala saat menerima siaran FM stereo dengan kekuatan sinyal cukup.
Menyimpan stasiun dalam
memori
Prasetel manual
Anda dapat menyetel sampai 18 stasiun FM dan 6
stasiun AM.
Sewaktu mendengarkan stasiun...
(Tahan)
Layar “Preset Mode” muncul.
1
Nomor preset berkedip-kedip.
2Memilih stasiun preset.
Prasetel otomatis (FM saja)
SSM (Memori Urutan Stasiun-Kuat)
Anda dapat memprasetel sampai 18 stasiun radio
untuk FM.
(Tahan)
1
-<Tuner>
-<SSM>
-<SSM 01 – 06>
“SSM” muncul. Setelah semua stasiun tersimpan,
“SSM” hilang.
2
Untuk melakukan penyetelan awal
<SSM 07 – 12>/<SSM 13 – 18>, ulangi langkah
1 dan 2.
Memilih stasiun prasetel
Anda juga bisa memilih stasiun prasetel
menggunakan / .
Radio
Radio
6|ޓINDONESIA
2012/2/6ޓ16:10:10KD-R80BT_UN_IN
Menyetel Pengatur Waktu
Radio
Anda bisa mendengarkan stasiun prasetel pada
saat tertentu tanpa memperhatikan sumber saat
ini.
(Tahan)
1
-<Tuner>
-<Radio Timer>
-<Off>/<Once>/
<Daily>
[Off] Membatalkan Pengatur Waktu
Radio.
Once Mengaktifkan satu kali.
Daily Mengaktifkan setiap hari.
2
-<FM>/<AM>
-<1> ... <18> untuk FM/
<1> ... <6> untuk AM
3Memilih stasiun prasetel.
4Menyetel waktu pengaktifan.
5Tekan MENU untuk keluar.
menyala setelah Pengatur Waktu Radio
selesai disetel.
Hanya satu pengatur waktu yang bisa disetel.
Menyetel satu pengatur waktu baru akan
membatalkan setelan sebelumnya.
Pengatur Waktu Radio tidak akan diaktifkan jika
unit mati atau jika <AM> disetel menjadi
<Hide> setelah memilih stasiun AM untuk
pengatur waktu. (' halaman 22)
Memberi nama stasiun
Anda bisa memberi nama paling banyak 30
frekuensi stasiun (FM dan AM) menggunakan
maksimum 8 karakter untuk setiap nama.
1Pilih <FM> atau <AM>.
(Tahan)
(Tahan)
2Masukkan menu “Nama Entri”.
Pindah
Pilih
Pilih karakter yang dikehendaki (A sampai Z,
0 sampai 9, —, /, <, >) atau spasi, lalu pindah ke
posisi karakter berikutnya (atau sebelumnya).
Ulangi langkah 3 hingga Anda selesai
memasukkan nama.
3Masukkan nama yang dikehendaki.
4Tekan tombol kontrol untuk
mengkonfirmasi.
Jika Anda mencoba memberi nama lebih dari
30 frekuensi stasiun, muncul “Name Full”.
Hapus nama yang tidak diinginkan sebelum
memberi nama.
Untuk menghapus seluruh nama, tekan dan
tahan DISP setelah langkah 2, lalu tekan tombol
kontrol.
Radio
INDONESIAޓ|7
2012/2/6ޓ16:10:10KD-R80BT_UN_IN

Memainkan perangkat CD/USB
Sisi label
Sumber berubah menjadi “CD” dan pemutaran
dimulai.
atau
Kabel USB dari bagian
belakang unit
Sumber berubah menjadi “USB” dan pemutaran
dimulai.
Unit ini dapat memutar file MP3/WMA yang disimpan dalam CD-R, CD-RW, dan file MP3/WMA/WAV
dalam alat penyimpanan massal USB (seperti memori USB dan Digital Audio Player).
Pastikan semua data penting sudah di-back up. Kami tidak bertanggung jawab untuk segala
kehilangan data dalam perangkat kelas penyimpanan massal USB sewaktu menggunakan sistem ini.
Disk yang keluar yang tidak diambil dalam 15 detik akan masuk kembali secara otomatis.
Jika disk tidak dapat dikeluarkan, ' halaman 3.
Memilih folder/trek
Memilih folder.
(Untuk MP3/WMA/WAV)
Memilih trek. (Tekan)
Maju cepat atau
memundurkan trek. (Tahan)
Memilih trek/folder dari daftar
1
2Memilih folder. (Untuk MP3/WMA/WAV)
Untuk MP3/WMA/WAV
Jika terdapat banyak folder atau trek, Anda
dapat mencari folder atau trek yang diinginkan
secara cepat dengan cara memutar tombol
kontrol secara cepat, atau gunakan Pencarian
Cepat (' halaman 10).
3Memilih trek.
Memilih mode-mode putar ulang
Anda hanya bisa memilih mode putar ulang
berikut satu-satu.
(Tahan)
<Repeat>)<Random>
1
2
Repeat
Off Membatalkan pemutaran
berulang.
Track Mengulangi trek yang
sekarang diputar.
Folder * Mengulangi folder yang
sekarang diputar.
Random
Off Membatalkan pemutaran
acak.
Folder *
Memutar secara acak semua
trek dari folder yang sekarang
diputar, kemudian trek dari
folder berikutnya.
All Memutar secara acak semua
trek.
* Untuk MP3/WMA/WAV
CD/USB
CD/USB
8|ޓINDONESIA
2012/2/6ޓ16:10:10KD-R80BT_UN_IN
iPod/iPhone
Memainkan iPod/iPhone
atau
Kabel USB dari bagian
belakang unit
Kabel USB 2.0 (tidak disediakan)*
Sumber berubah menjadi “iPod-1/iPod-2” dan
pemutaran dimulai.
* Dianjurkan untuk menggunakan kabel yang
sesuai untuk di mobil.
Memilih mode kontrol
-<Headunit Mode>/
<iPod Mode>/
<Application Mode>
Headunit
Mode
Mengendalikan pemutaran iPod
melalui unit ini.
iPod Mode Mengendalikan pemutaran iPod
melalui iPod/iPhone.
Application
Mode
Suara dari setiap fungsi (musik,
game, aplikasi, dsb.) yang
berjalan di iPod/iPhone yang
terhubung dipancarkan melalui
speaker yang terhubung ke unit
ini.
Anda juga bisa mengubah setelan
menggunakan <iPod Switch> dalam menu.
(' halaman 22)
Memilih trek
Berlaku dalam <Headunit Mode>/<iPod Mode>
saja.
Untuk <Application Mode>, berlaku hanya
untuk sebagian aplikasi audio.
Memilih trek/chapter. (Tekan)
Maju cepat atau memundurkan
trek. (Tahan)
Memilih trek dari daftar
Berlaku dalam <Headunit Mode> saja.
1
(Tahan)
Playlists)Artists)Albums)Songs)
Podcasts)Genres)Composers)
Audiobooks) (kembali ke permulaan)
2Memilih daftar yang dikehendaki.
Ulangi langkah ini sampai trek yang dikehendaki
dipilih.
Jika menu terpilih berisi banyak trek, Anda
dapat mencari trek yang diinginkan secara
cepat dengan cara memutar tombol kontrol
secara cepat, atau gunakan Pencarian Cepat
(' halaman 10).
3Memilih trek yang dikehendaki.
Memilih mode-mode putar ulang
Berlaku dalam <Headunit Mode> saja.
Anda hanya bisa memilih mode putar ulang
berikut satu-satu.
(Tahan)
<Repeat>)<Random>
1
2
Repeat
Off Membatalkan pemutaran
berulang.
One Fungsinya sama seperti
“Repeat One” dari iPod.
All Fungsinya sama seperti
“Repeat All” dari iPod.
Random
Off Membatalkan pemutaran acak.
Song Fungsinya sama seperti
“Shuffle Songs” dari iPod.
Album Fungsinya sama seperti
“Shuffle Albums” dari iPod.
“Album” tidak berlaku untuk sebagian iPod/
iPhone.
Aplikasi iPod/iPhone
Anda bisa menjalankan aplikasi asli JVC dengan
unit ini dalam <Application Mode>. Untuk
perincian lebih lanjut, kunjungi situs web JVC:
<http://www3.jvckenwood.com/english/car/
index.html> (Khusus situs web berbahasa Inggris).
INDONESIAޓ|9
2012/2/6ޓ16:10:10KD-R80BT_UN_IN
Jika Anda memiliki banyak folder/trek/kontak, Anda bisa mencari melalui semuanya secara cepat
berdasarkan karakter pertama (A sampai Z, 0 sampai 9 dan OTHERS).
1Masukkan menu daftar atau menu “Bebas-Tangan”.
CD (MP3/WMA)/
USB (MP3/WMA/WAV)
iPod/iPhone Buku telepon Bluetooth
Memilih daftar yang
dikehendaki. Pilih <Phonebook>.
“OTHERS” muncul jika karakter pertama bukan A
sampai Z atau 0 sampai 9, seperti #, -, !, dll.
2Pilih karakter yang dikehendaki (A sampai
Z, 0 sampai 9 dan OTHERS).
Untuk CD/USB dan iPod/iPhone, ulangi langkah 3
sampai trek yang dikehendaki terpilih.
Pencarian mungkin tidak bekerja pada
sebagian lapisan menu terpilih (untuk iPod/
iPhone).
3Pilih folder/trek/kontak yang Anda
kehendaki.
Komponen eksternal
Anda bisa menghubungkan komponen eksternal ke kabel AUX (auxiliary) dari bagian belakang unit.
Untuk rincian selengkapnya, lihat juga buku petunjuk yang disediakan bersama komponen eksternal
tersebut.
Memutar komponen eksternal
dari AUX
AUX
Audio player
portabel, dsb.
Steker mini stereo 3.5 mm
(tidak disediakan)
Gunakan steker mini stereo
dengan kepala steker 3-terminal
agar hasil suara audio optimal.
.
1Hubungkan ke kabel AUX dari bagian
belakang unit.
2Pilih <AUX IN>.
3Hidupkan komponen yang telah
tersambung dan mulai memutar sumber
tersebut.
Pencarian Cepat
Pencarian Cepat
10 |ޓINDONESIA
2012/2/6ޓ16:10:10KD-R80BT_UN_IN
Dengan menghubungkan Adaptor Bluetooth USB KS-UBT1 dan mikrofon yang disediakan ke unit ini,
Anda bisa mengoperasikan perangkat Bluetooth menggunakan unit ini. Lihat “Manual Pemasangan/
Penyambungan” untuk perincian lebih lanjut mengenai cara menghubungkan mikrofon.
Begitu Adaptor Bluetooth USB terpasang, unit ini akan selalu
tersedia untuk dipasangkan.
Lihat juga petunjuk yang disediakan bersama perangkat
Bluetooth.
Lihat lampiran terpisah untuk memeriksa negara tempat
Anda bisa menggunakan fungsi Bluetooth.
Jika Anda mematikan unit, melepaskan panel kontrol, atau mencabut Adaptor Bluetooth USB saat
sedang bicara di telepon, hubungan Bluetooth akan terputus. Lanjutkan pembicaraan menggunakan
ponsel Anda.
Unit ini mendukung profil-profil Bluetooth berikut
Profil Bebas-Tangan (HFP 1.5)
Profil Object Push (OPP 1.1)
Profil Akses Buku Telepon (OPP 1.0)
Profil Distribusi Audio Lanjut (A2DP 1.2)
Profil Remote Kontrol Audio/Video (AVRCP 1.3)
Peringatan:
Hentikan mobil di tempat aman sebelum melakukan langkah-langkah rumit seperti menekan nomor,
menggunakan buku telepon dll.
KS-UBT1 Mikrofon
Memasangkan perangkat
Bluetooth
Saat menghubungkan perangkat Bluetooth ke unit untuk pertama kalinya, pasangkan unit dengan
perangkat.
Paling banyak lima perangkat Bluetooth bisa didaftarkan dalam unit ini.
Maksimum dua telepon Bluetooth dan satu perangkat audio Bluetooth bisa dihubungkan setiap saat.
Unit ini mendukung Perpasangan Mudah dan Aman (Secure Simple Pairing / SSP).
1Hubungkan adaptor Bluetooth USB
(KS-UBT1) ke salah satu terminal masukan
USB.
KS-UBT1
atau
Kabel USB dari bagian
belakang unit
2Cari dan pilih “JVC Unit” pada perangkat Bluetooth.
Untuk sebagian perangkat Bluetooth, Anda mungkin perlu memasukkan kode Nomor Identifikasi
Pribadi (PIN) segera setelah melakukan pencarian.
Koneksi Bluetooth姞
Koneksi Bluetooth姞
INDONESIAޓ|11
2012/2/6ޓ16:10:10KD-R80BT_UN_IN
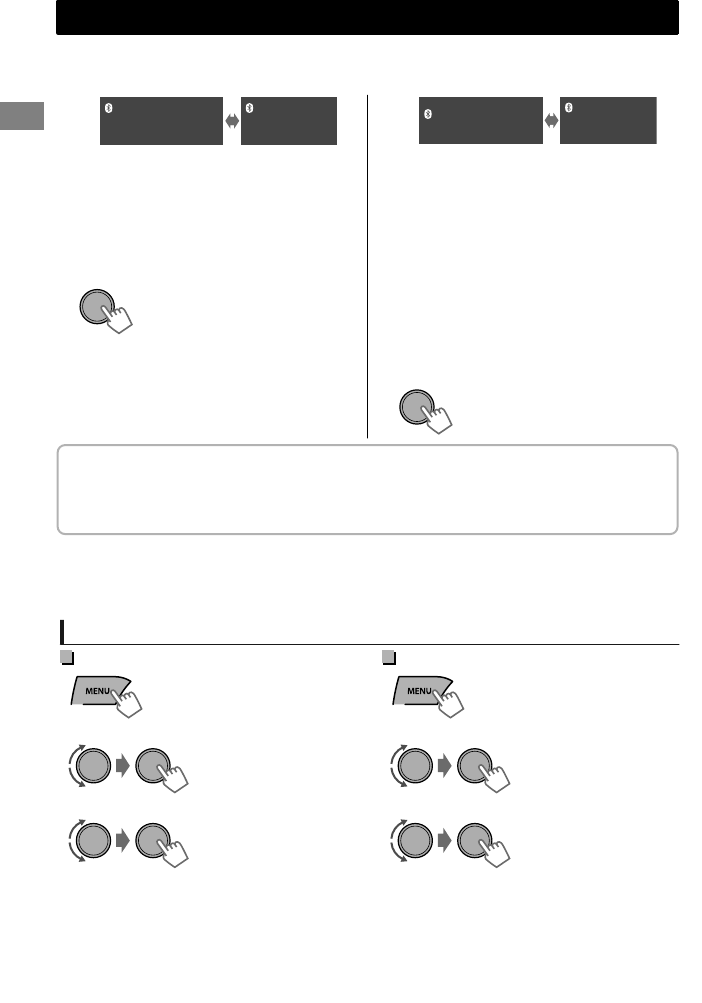
3Lakukan (A) atau (B) tergantung apa yang tampak pada tampilan.
Untuk sebagian perangkat Bluetooth, urutan perpasangan mungkin berbeda dari langkah-langkah
yang dijelaskan di bawah
Pairing?
Yes: Press VOL
No: Press BACK
Pairing?
Device:
Passkey: XXXXXX
(A)
[Nama perangkat]
“XXXXXX” adalah kode kunci masuk 6 digit
yang dihasilkan secara acak selama masing-
masing perpasangan.
Operasikan perangkat Bluetooth untuk
mengonfirmasi kode kunci masuk.
Pastikan bahwa kode kunci masuk yang
tampak pada unit dan perangkat
Bluetooth sama.
Pilih “Yes” untuk mengonfirmasi kode
kunci masuk.
Pairing?
Yes: Press VOL
No: Press BACK
Pairing?
Device:
[Nama perangkat]
(B)
Anda bisa mengubah kode PIN seperti yang
Anda inginkan sebelum memasangkan.
(' halaman 22)
(2) Hanya jika “Pairing” muncul,
operasikan perangkat Bluetooth untuk
mengonfirmasi perpasangan.
(1) Saat perangkat bluetooth meminta
Anda untuk memasukkan PIN atau kode
masuk (passcode), masukkan kode PIN
“0000” ke dalam perangkat bluetooth. Hal
di atas selanjutnya harus muncul pada
tampilan.
Pilih “Yes” untuk mengonfirmasi
perpasangan.
Setelah perpasangan berhasil, “Pairing COMPLETED” muncul pada tampilan.
Unit akan mengadakan koneksi dengan perangkat Bluetooth yang baru dipasangkan dan Anda lalu
bisa mengendalikan perangkat Bluetooth lewat unit.
“” akan menyala saat telepon terhubung.
“” akan menyala saat perangkat audio terhubung.
Begitu ada koneksi, perangkat didaftarkan ke unit dan tidak perlu melakukan perpasangan lagi kecuali
Anda menghapus perangkat terdaftar.
Sebagian perangkat Bluetooth mungkin tidak bisa terhubung ke unit setelah perpasangan.
Hubungkan unit ke perangkat secara manual. Lihat manual instruksi dari perangkat Bluetooth untuk
informasi lebih lanjut.
Menghubungkan/Memutuskan hubungan perangkat terdaftar secara manual
Untuk menghubungkan
1
(Tahan)
-<Bluetooth>
-<Phone>/<Audio>
-<Connect>
2Pilih <Connect>.
“Connecting...” muncul pada tampilan saat unit
dihubungkan ke perangkat.
“Connected”#“[Nama Perangkat]” muncul pada
tampilan saat perangkat terhubung.
3Pilih perangkat yang dikehendaki.
4Tekan MENU untuk keluar.
Untuk memutuskan hubungan
1
(Tahan)
-<Bluetooth>
-<Phone>/<Audio>
-<Disconnect>
2Pilih <Disconnect>.
“Disconnected”#“[Nama Perangkat]” muncul
pada tampilan saat perangkat dilepas.
3Pilih perangkat yang dikehendaki.
4Tekan MENU untuk keluar.
Koneksi Bluetooth姞
12 |ޓINDONESIA
2012/2/6ޓ16:10:10KD-R80BT_UN_IN
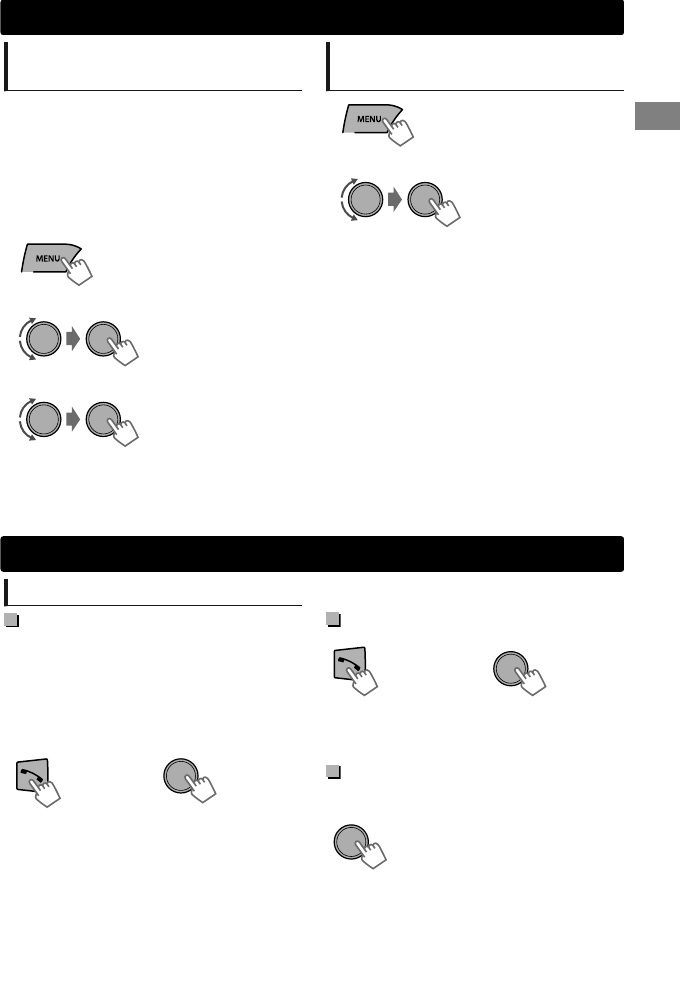
Menghubungkan ke aplikasi
asli JVC
Aplikasi asli JVC dirancang untuk melihat status
penerima mobil JVC dan melakukan operasi
kontrol sederhana pada smart phone Android.
Untuk pengoperasian aplikasi asli JVC, kunjungi
situs web JVC:
<http://www3.jvckenwood.com/english/car/
index.html> (Khusus situs web berbahasa
Inggris).
1
(Tahan)
-<Bluetooth>
-<Application>
-<Connect>
2Pilih <Connect>.
“Connected”#“[Nama Perangkat]” muncul
pada tampilan saat perangkat terhubung.
3Pilih smart phone yang dikehendaki.
4Tekan MENU untuk keluar.
Menghapus perangkat
terdaftar
(Tahan)
1
-<Bluetooth>
-<Delete Pairing>
- [Nama Perangkat]
-<Delete OK?>
“OK” muncul saat perangkat dihapus.
2Pilih <Delete OK>.
3Tekan MENU untuk keluar.
Ponsel Bluetooth
Menerima panggilan
Untuk menerima panggilan
Saat ada panggilan masuk, sumber secara
otomatis berubah menjadi “BT-1”/“BT-2”.
“Receiving...” muncul pada tampilan, diikuti
dengan nomor telepon atau nama.
Tampilan berkedip berwarna biru.
(' halaman 16)
atau
Anda juga bisa menekan ////SOURCE
pada remote kontrol untuk menjawab panggilan.
Saat <Auto Answer> disetel ke <On>, unit
menjawab panggilan masuk secara otomatis.
(' halaman 16)
Untuk mengakhiri panggilan
(Tahan) atau (Tahan)
Anda juga bisa menekan dan menahan ///
/SOURCE pada remote kontrol untuk
mengakhiri panggilan.
Untuk menonaktifkan/
mengaktifkan mode bebas-tangan
Selama pembicaraan telepon...
Pengoperasian mungkin berbeda sesuai
dengan perangkat Bluetooth yang terhubung.
Koneksi Bluetooth姞
INDONESIAޓ|13
2012/2/6ޓ16:10:10KD-R80BT_UN_IN
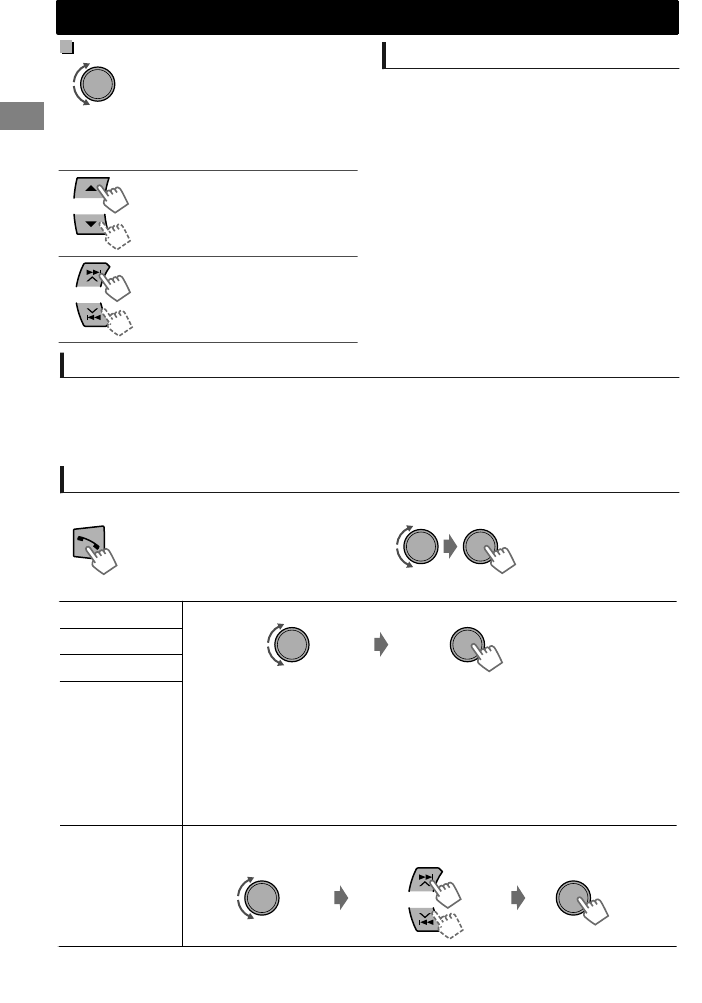
Penyesuaian selama panggilan
Volume telepon(00 — 50)
[Volume 15]: Penyesuaian
volume yang dibuat selama
panggilan tidak akan
memengaruhi sumber-sumber
lainnya.
Level mikrofon
(01— 03)[02]: Semakin tinggi
angka, semakin sensitif
mikrofon.
Mode Pengurangan Derau
dan Pembatalan Gema:
Mengaktifkan/menonaktifkan.
Pemberitahuan pesan teks
Saat menerima pesan teks, unit berdering dan
“[Nama Perangkat]”#“Received Message”
muncul.
<Message Notice> harus disetel ke <On>.
(' halaman 16)
Anda tidak bisa membaca, mengubah, atau
mengirim pesan melalui unit.
Fitur ini hanya tersedia pada telepon-telepon
tertentu.
Beralih antara dua ponsel yang terhubung
Saat dua ponsel terhubung ke unit, Anda bisa mengakses kedua menu “Bebas-Tangan”.
Tekan untuk memasuki menu “Bebas-Tangan” telepon pertama.
Tekan dua kali untuk memasuki menu “Bebas-Tangan” telepon kedua.
Tekan untuk kembali ke menu “Bebas-Tangan” telepon pertama.
Membuat panggilan dari menu bebas-tangan
1Masukkan menu “Bebas-Tangan”.
Lihat pilihan-pilihannya di
tabel di bawah ini.
2Pilih metode panggilan.
3Pilih dan panggil kontak (nama/nomor telepon).
Dialed Calls
Panggil
Pilih nama/nomor telepon
Jika buku telepon berisi banyak nomor, Anda dapat mencari nomor yang
diinginkan secara cepat dengan cara memutar tombol kontrol secara cepat,
atau gunakan Pencarian Cepat (' halaman 10).
“No History Found” muncul jika tidak ada riwayat panggilan yang terekam.
“No Data” muncul jika tidak ada entri yang ditemukan dalam buku telepon
perangkat Bluetooth.
“Send Phonebook Manually” muncul jika <Phonebook Select> disetel ke
<In Unit> atau telepon tidak mendukung PBAP. (' halaman 16)
Received Calls
Missed Calls
Phonebook
Dial Number Masukkan nomor telepon yang akan dihubungi.
Panggil
Pindahkan posisi entri
Pilih nomor/karakter
Ponsel Bluetooth
14 |ޓINDONESIA
2012/2/6ޓ16:10:10KD-R80BT_UN_IN
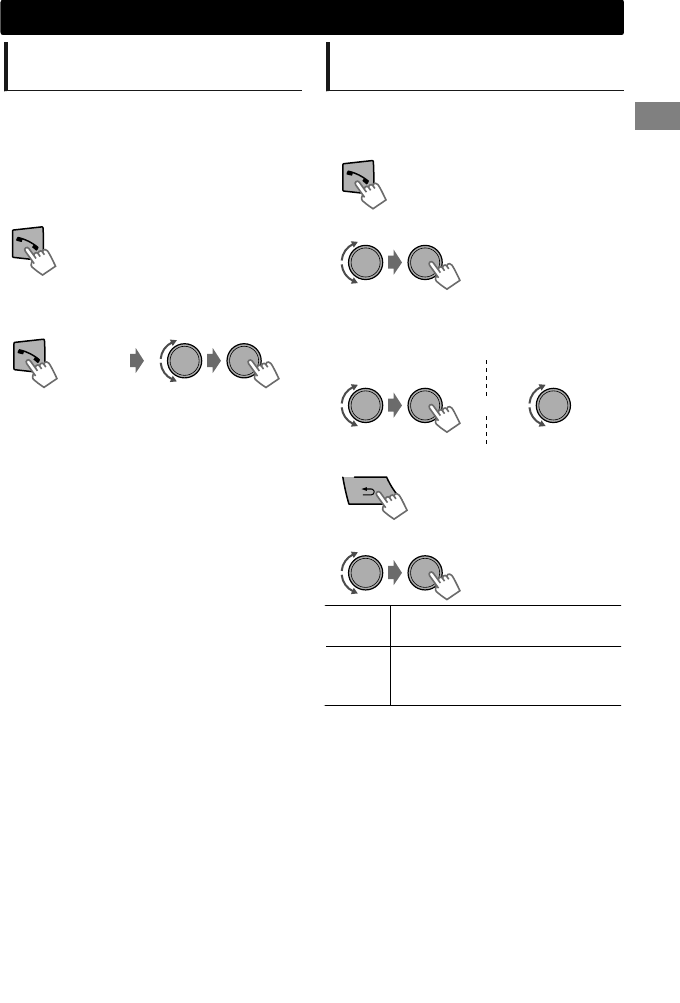
Menggunakan pengenalan
suara
Anda bisa menggunakan fitur pengenalan suara
pada telepon yang terhubung lewat unit ini.
“Not Support” jika telepon yang terhubung
tidak mendukung fitur ini.
Jika hanya satu telepon yang terhubung,
(Tahan)
Jika dua telepon terhubung,
1Masuk mode pengenalan suara.
(Tahan)
Pilih telepon yang
dikehendaki.
Masukkan “daftar
telepon”
2Saat “Waiting Voice”#“[Nama Perangkat]”
muncul pada tampilan, sebutkan nama
kontak yang ingin Anda panggil atau
perintah suara untuk mengontrol fungsi
telepon.
Fitur pengenalan suara yang didukung bervariasi
untuk setiap telepon. Lihat manual instruksi
telepon yang terhubung untuk perinciannya.
Menghapus kontak (nama/
nomor telepon)
Hanya bila <Phonebook Select> disetel ke
<In Unit>. (' halaman 16)
1Masukkan menu “Bebas-Tangan”.
-<Dialed Calls>/
<Received Calls>/
<Missed Calls>/
<Phonebook>
2Pilih metode panggilan.
3Pilih kontak (nama/nomor telepon) yang
akan dihapus.
Nomor Telepon
atau
Nama
(Tahan)
4Masuk menu “Hapus Entri”.
Delete Nama/nomor telepon terpilih dari
langkah 3 dihapus.
Delete
All
Semua nama/nomor telepon dari
menu terpilih dalam langkah 2
dihapus.
5Pilih <Delete> atau <Delete All>.
Ponsel Bluetooth
INDONESIAޓ|15
2012/2/6ޓ16:10:10KD-R80BT_UN_IN
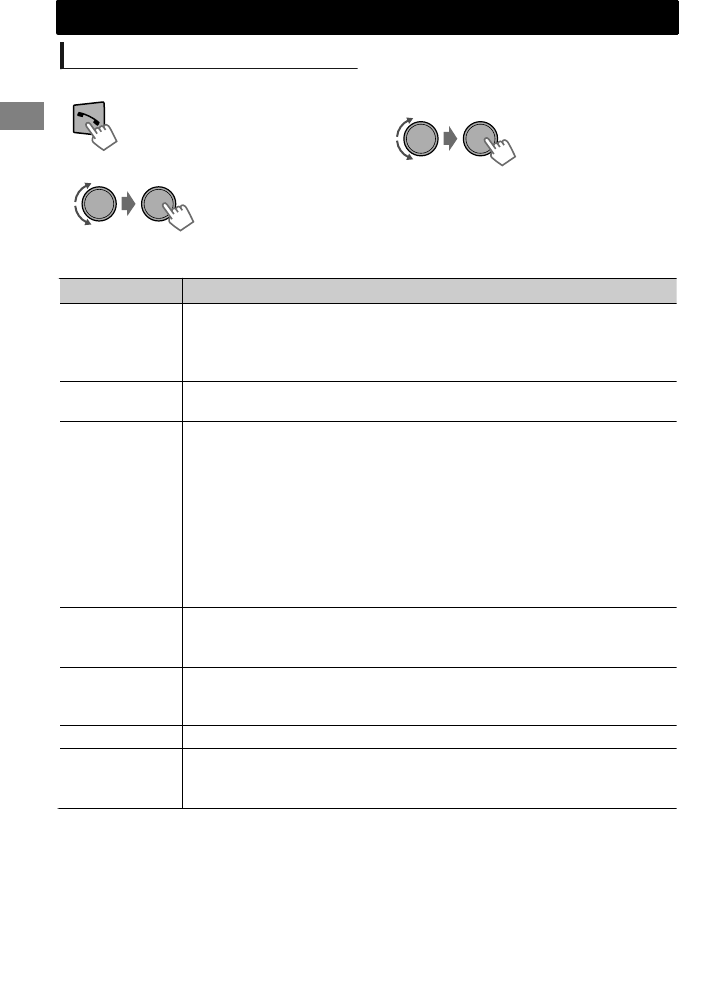
Menggunakan menu Settings
1Masukkan menu “Bebas-Tangan”.
2Pilih <Settings>. Untuk kembali ke menu sebelumnya, tekan .
Untuk keluar dari menu, tekan MENU.
3Ulangi langkah ini untuk melakukan
setelan yang diperlukan.
Setelan berikut berlaku untuk perangkat pasangan. Jika ada perangkat lain yang dipasangkan, lakukan
setelan lagi.
Item menu Pengaturan yang dapat dipilih (Permulaan: [XX])
Phonebook
Select *
[In Phone]: Unit meramban buku telepon dalam telepon yang terhubung.
In Unit: Unit meramban buku telepon yang terdaftar dalam unit. (Anda bisa
menyalin memori buku telepon menggunakan <Phonebook Trans>
(' halaman 22).)
Auto Answer On: Unit menjawab panggilan masuk secara otomatis.
[Off]: Unit tidak menjawab panggilan masuk secara otomatis.
Ringing Tone [In Unit]: Unit berdering untuk memberi tahu Anda saat ada panggilan/pesan
teks yang masuk.
–Call Tone: Pilih nada dering pilihan Anda (Tone 1 — 5) untuk panggilan
masuk.
–Message Tone: Pilih nada dering pilihan Anda (Tone 1 — 5) untuk pesan
teks masuk.
Nada dering standar berbeda sesuai dengan perangkat pasangan.
In Phone: Unit menggunakan nada dering telepon yang terhubung untuk
memberi tahu Anda saat ada panggilan/pesan teks yang masuk. (Telepon yang
terhubung tidak akan berdering jika mendukung fitur ini.)
Ringing Color Color 01 — 29[06]: Pilih warna pilihan Anda untuk pemberitahuan panggilan/
pesan teks masuk.
Off: Dibatalkan.
NR/EC Mode [On]: Mengaktifkan Pengurangan Derau dan Pembatalan Gema pada mikrofon
terhubung agar suara lebih jernih.
Off: Dibatalkan.
MIC Setting Level (01— 03)[02]: Kepekaan mikrofon naik bila level MIC naik.
Message Notice [On]: Unit berdering dan “[Nama Perangkat]”#“Received Message” muncul
untuk memberi tahu Anda bahwa ada pesan teks masuk.
Off: Unit tidak memberi tahu Anda bahwa ada pesan teks masuk.
* Hanya bisa dipilih bila telepon yang terhubung mendukung PBAP.
Ponsel Bluetooth
16 |ޓINDONESIA
2012/2/6ޓ16:10:10KD-R80BT_UN_IN
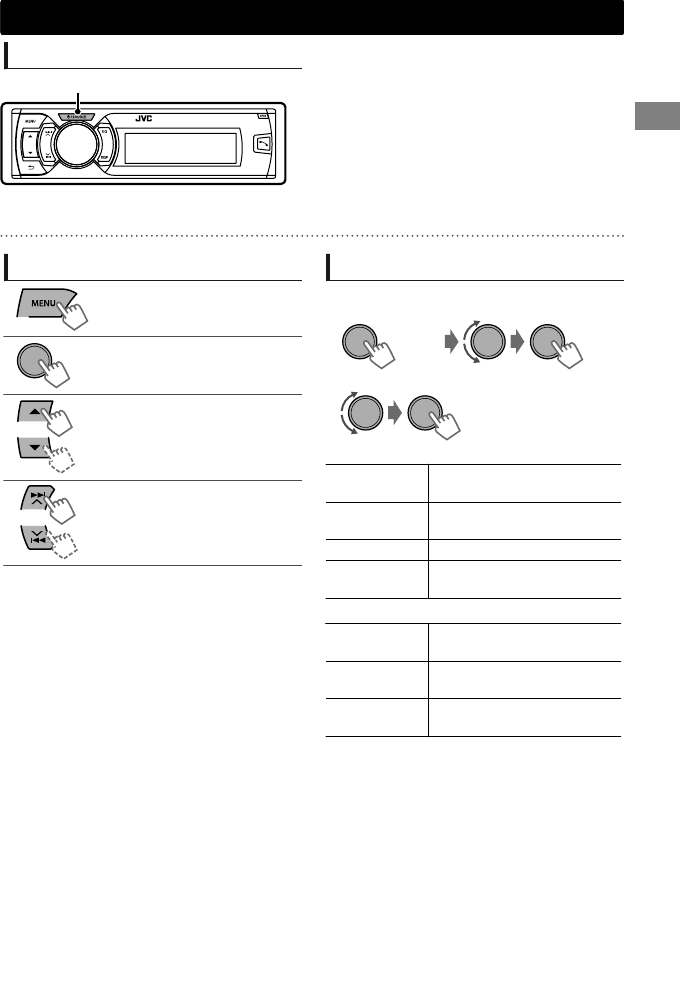
Memutar audio player Bluetooth
APilih <BT-1> atau <BT-2> tergantung
lokasi adaptor Bluetooth USB KS-UBT1.
Operasikan pemutar audio Bluetooth untuk
memulai pemutaran.
Pengoperasian dan indikasi tampilan mungkin berbeda tergantung ada tidaknya pada perangkat
terhubung.
Pengoperasian dasar
Memulai atau meneruskan
pemutaran.
Membungkam suara.
Memilih grup/folder.
Melompat balik atau melompat
maju. (Tekan)
Maju cepat atau memundurkan
trek. (Tahan)
Memilih mode pemutaran
Untuk perangkat Bluetooth yang mendukung
AVRCP 1.3.
(Tahan)
<Repeat>)<Random>
1
2
Repeat
Off Membatalkan pemutaran
berulang.
Track Mengulangi trek yang
sekarang diputar.
All Mengulangi semua trek.
Group Mengulangi semua trek grup
saat ini.
Random
Off Membatalkan pemutaran
acak.
All
Memutar secara acak semua
trek.
Group Memutar secara acak semua
trek dari grup saat ini.
Audio player Bluetooth
Audio player Bluetooth
INDONESIAޓ|17
2012/2/6ޓ16:10:10KD-R80BT_UN_IN
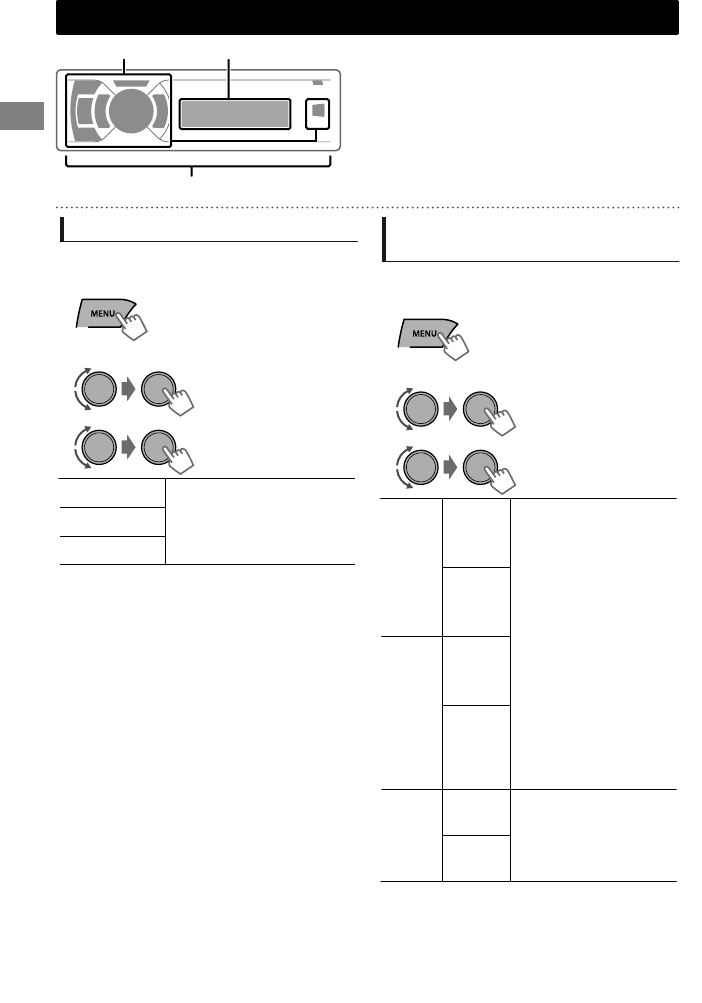
Penyesuaian warna sinar
Semua zona
Zona tampilan
Zona tombol
Semua zona: Termasuk zona Tombol dan
zona Tampilan.
Memilih warna prasetel
Anda juga bisa memilih warna prasetel untuk
<Button Zone>,<Display Zone>, dan <All Zone>
secara terpisah.
(Tahan)
1
2Pilih <Color>.
Button Zone Color 01-29/User/
COLORFLOW 1-3*
* Warna berubah dalam
kecepatan berbeda.
Display Zone
All Zone
Warna awal: Button Zone [Color 06], Display
Zone [Color 01], All Zone [Color 06].
Jika <All Zone> dipilih, sinar tombol dan
tampilan akan berubah menjadi warna
<Button Zone> saat ini/yang dipilih.
3
4Tekan MENU untuk keluar.
Menyimpan pengaturan Anda
sendiri
Anda dapat menyimpan warna siang dan malam
Anda sendiri untuk <Button Zone> dan
<Display Zone> secara terpisah.
(Tahan)
1
2Pilih <Color Setup>.
Day
Color
Button
Zone
Tekan / untuk
memilih satu warna
utama <Red/Green/
Blue>, lalu putar
tombol kontrol untuk
mengatur level
<00-31>. Ulangi
prosedur ini sampai
Anda sudah menyetel
semua tiga warna
primer.
Pengaturan Anda
secara otomatis
disimpan ke “User”.
Jika “00” dipilih untuk
semua warna utama
untuk <Display Zone>,
tidak akan ada yang
muncul di layar.
Display
Zone
Night
Color
Button
Zone
Display
Zone
Menu
Color
On Mengubah cahaya layar
dan tombol sewaktu
menjalankan pencarian
daftar menu dan mode
pemutaran.
Off
Night Color/Day Color diubah dengan
menghidupkan/mematikan lampu depan
mobil Anda.
3
4Tekan MENU untuk keluar.
18 |ޓINDONESIA
2012/2/6ޓ16:10:10KD-R80BT_UN_IN

Anda bisa memilih kecerahan yang Anda sukai untuk <Button Zone> dan <Display Zone> secara terpisah.
(Tahan)
1
-<Dimmer>
-<Brightness>
-<Day Brightness>/
<Night Brightness>
2Button Zone Level 00 ke 31
Display Zone Level 00 ke 31
3
4Tekan MENU untuk keluar.
Penyesuaian suara
Unit ini mengingat setelan suara yang disesuaikan untuk masing-masing sumber.
Memilih suara prasetel
Anda bisa memilih mode suara prasetel yang
sesuai untuk genre musik bagi masing-masing
sumber.
- - - - - - - - atau - - - - - - - -
Tekan berulang-ulang.
DYNAMIC-VOCAL-BASS-USER-FLAT-
NATURAL-(kembali ke permulaan)
Menyimpan pengaturan Anda
sendiri
Saat mendengarkan, Anda dapat menyesuaikan
dan menyimpan tingkat nada untuk masing-
masing sumber.
Penyama Mudah
(Tahan)
1
2Pilih satu item pengaturan (Sub. W/Bass/
Middle/Treble).
(Permulaan: [XX])
Sub.W* 00 ke 08 [08]
Bass -6 ke +6 [+5]
Middle -6 ke +6 [0]
Treble -6 ke +6 [+5]
Pengaturan disimpan dan <USER> diaktifkan.
3Menyetel level.
Penyama Pro
(Tahan)
1
-<PRO EQ>
-<Bass>/<Middle>/
<Treble>
2
3Tekan / untuk mengatur frekuensi.
4Tekan / untuk mengatur kemiringan-
Q.
Menyesuaikan elemen suara nada yang dipilih.
Bass (Permulaan: [XX])
Frekuensi 60/80/[100]/200 Hz
Tingkat Lvl -6 ke +6 [+5]
Q[Q1.0]/Q1.25/Q1.5/Q2.0
Middle
Frekuensi 0.5/[1]/1.5/2.5 kHz
Tingkat Lvl -6 ke +6 [0]
Q Q0.75/Q1.0/[Q1.25]
Treble
Frekuensi 10/[12.5]/15/17.5 kHz
Tingkat Lvl -6 ke +6 [+5]
Q[FIX]
5Atur level.
6Ulangi langkah 2 hingga 5 untuk
mengatur nada lainnya.
Pengaturan disimpan dan <USER> diaktifkan.
7Tekan MENU untuk keluar.
* Hanya bisa diatur apabila <Subwoofer On/
Off> disetel ke <On>. (' halaman 21)
Penyesuaian kecerahan
Penyesuaian kecerahan
INDONESIAޓ|19
2012/2/6ޓ16:10:10KD-R80BT_UN_IN

(Tahan)
Jika tidak dilakukan operasi selama kurang lebih
60 detik, operasi tersebut akan dibatalkan.
1
2
3Ulangi langkah 2 jika perlu.
Untuk kembali ke menu sebelumnya, tekan .
Untuk keluar dari menu, tekan DISP atau
MENU.
Item menu Pengaturan yang dapat dipilih (Permulaan: [XX])
DEMO Untuk pengaturannya, ' halaman 4.
Clock
Clock Display On: Menunjukkan tampilan jam saat daya mati.
[Off]: Dibatalkan.
Set Clock Untuk pengaturannya, ' halaman 4.
24H/12H Untuk pengaturannya, ' halaman 4.
Color Untuk pengaturannya, ' halaman 18.
Color Setup
Dimmer
Dimmer Set Memilih tampilan dan pencahayaan tombol yang diatur dalam setelan
<Brightness>/<Color Setup>.
Off: Memilih pengaturan Siang.
On: Memilih pengaturan Malam.
[Auto]: Mengubah pengaturan antara Siang dan Malam saat Anda
mematikan/menghidupkan lampu depan mobil. *1
Time Set: Menyetel pencatat waktu mulai/selesai untuk peredup cahaya.
Putar tombol kontrol untuk mengatur waktu mulai, lalu tekan tombol
kontrol untuk mengkonfirmasi. Ulangi langkah ini untuk memasukkan
waktu selesai.
Brightness Day Brightness[31]/Night Brightness[15]: Setelan Kecerahan untuk
tampilan dan pencahayaan tombol untuk siang dan malam.
Button Zone/Display Zone: Menyetel level kecerahan 00 — 31.
Display
Scroll *2 Off: Dibatalkan.
[Once]: Menggulir informasi tampilan satu kali.
Auto: Mengulangi penggulungan (selang waktu 5-detik).
Tag Display [On]: Menunjukkan informasi TAG sementara memutar trek-trek MP3/
WMA/WAV.
Off: Dibatalkan.
LCD Type [Negative]: Pola tampilan negatif.
Positive: Pola tampilan positif.
Auto: Pola positif akan dipilih selama hari*3, sementara pola negatif akan
dipilih selama malam*3.
Contrast Level 01 — Level 15 [Level 09]: Mengatur kontras tampilan agar
tulisannya jelas dan bisa dibaca.
PRO EQ Untuk pengaturannya, ' halaman 19.
*1 Diperlukan koneksi control lead yang bersinar. (Lihat “Manual Pemasangan/Penyambungan”.)
Pengaturan ini mungkin tidak berfungsi dengan benar pada beberapa kendaraan, (khususnya
pada kendaraan yang memiliki tombol kontrol untuk meredupkan cahaya). Dalam hal ini,
ubahlah pengaturan ke pengaturan lain, selain <Dimmer Auto>.
*2 Beberapa karakter atau simbol tidak akan diperlihatkan dengan tepat (atau akan
dikosongkan) pada tampilan.
*3 Tergantung pada setelan <Dimmer Set>.
Pengoperasian menu
Pengoperasian menu
20 |ޓINDONESIA
2012/2/6ޓ16:10:10KD-R80BT_UN_IN
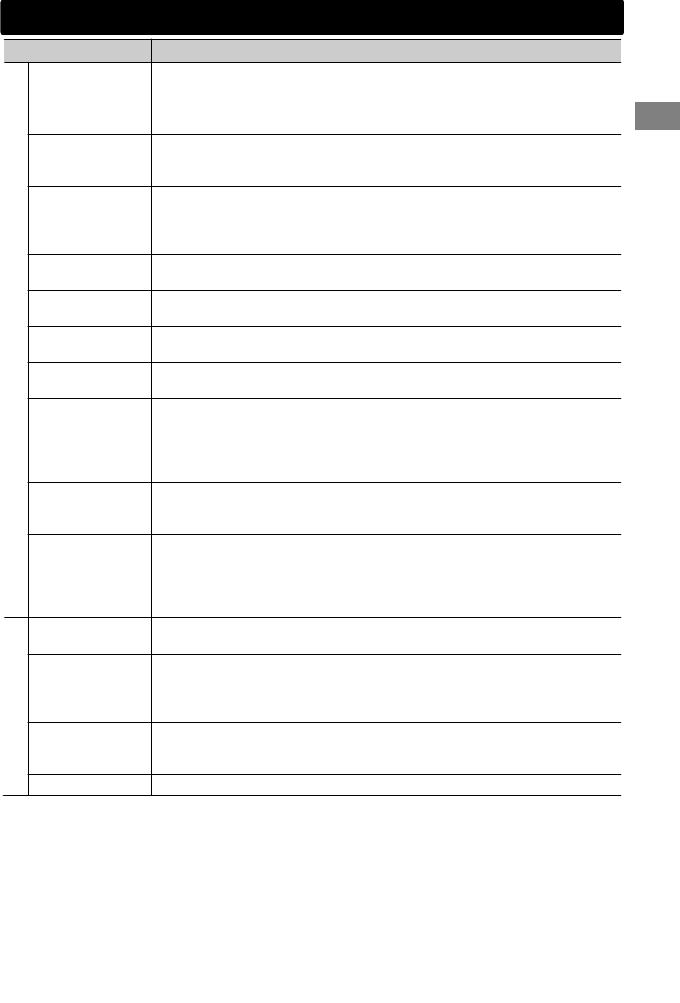
Item menu Pengaturan yang dapat dipilih (Permulaan: [XX])
Audio
Fad/Bal *4*5 R6 — F6[0]: Tekan / untuk menyesuaikan keseimbangan output
speaker depan dan belakang.
L6 — R6[0]: Tekan / untuk menyesuaikan keseimbangan output
speaker kiri dan kanan.
Loud
(Kekerasan suara)
On: Menguatkan frekuensi-frekuensi rendah dan tinggi untuk menghasilkan
keseimbangan suara yang baik pada level volume rendah.
[Off]: Dibatalkan.
Volume Adjust Level -5 — Level +5[Level 0]: Prasetel tingkat penyesuaian volume setiap
sumber, bandingkan dengan tingkat volume FM. Sebelum melakukan
penyesuaian, pilih sumber yang ingin Anda sesuaikan. (“FIX” muncul jika
“FM” dipilih.)
Subwoofer On/
Off
[On]: Menghidupkan keluaran subwoofer.
Off: Dibatalkan.
Subwoofer LPF *6
LOW 55Hz/MID 85Hz/[HIGH 120Hz]: Sinyal audio dengan frekuensi lebih
rendah daripada 55 Hz/85 Hz/120 Hz dikirim ke subwoofer.
Subwoofer
Level *6
00 — 08[08]: Setel level keluaran subwoofer.
Subwoofer
Phase *6
[0 Deg] (normal)/180 Deg (terbalik): Memilih fase subwoofer.
HPF
(High-pass filter)
Low 100Hz/Mid 120Hz/High 150Hz: Mengaktifkan High Pass Filter. Sinyal
audia dengan frekuensi lebih rendah daripada 100 Hz/120 Hz/150 Hz
diputuskan dari pengeras suara depan/belakang.
[Off]: Menonaktifkan. (Semua sinyal dikirim ke pengeras suara depan/
belakang.)
Beep
(Nada sentuh
kunci)
[On]/Off: Mengaktifkan atau menonaktifkan suara sentuh-kunci.
Amplifier Gain
Off: Menonaktifkan amplifier yang terpasang.
Low Power: Membatasi level volume maksimal hingga 30. (Pilih jika daya
input maksimal masing-masing speaker kurang dari 50 W, agar tidak
merusak pengeras suara.)
[High Power]: Level volume maksimal adalah 50.
Tuner
SSM Untuk pengaturannya, ' halaman 6. (Hanya ditampilkan bila sumbernya
adalah “FM”.)
IF Band
(Pita frekuensi
antara)
[Auto]: Penambahan selektivitas radio untuk menekan gangguan noise di
antara stasiun-stasiun dekat. (Efek stereo mungkin hilang).
Wide: Dapat terkena desis interferensi dari stasiun radio yang berdekatan,
tapi kualitas suara tidak akan menurun dan efek stereo tidak akan hilang.
Stereo/Mono Hanya ditampilkan bila sumbernya adalah “FM”.
[Stereo]: Memungkinkan penerimaan FM stereo.
Mono: Meningkatkan penerimaan FM, efek stereo akan hilang.
Radio Timer Untuk pengaturannya, ' halaman 7.
*4 Jika anda menggunakan sistem dua-speaker, atur level pemudar pada “0”.
*5 Penyesuaian ini tidak mempengaruhi keluaran subwoofer.
*6 Hanya ditampilkan apabila <Subwoofer On/Off> disetel ke <On>.
Pengoperasian menu
INDONESIAޓ|21
2012/2/6ޓ16:10:10KD-R80BT_UN_IN
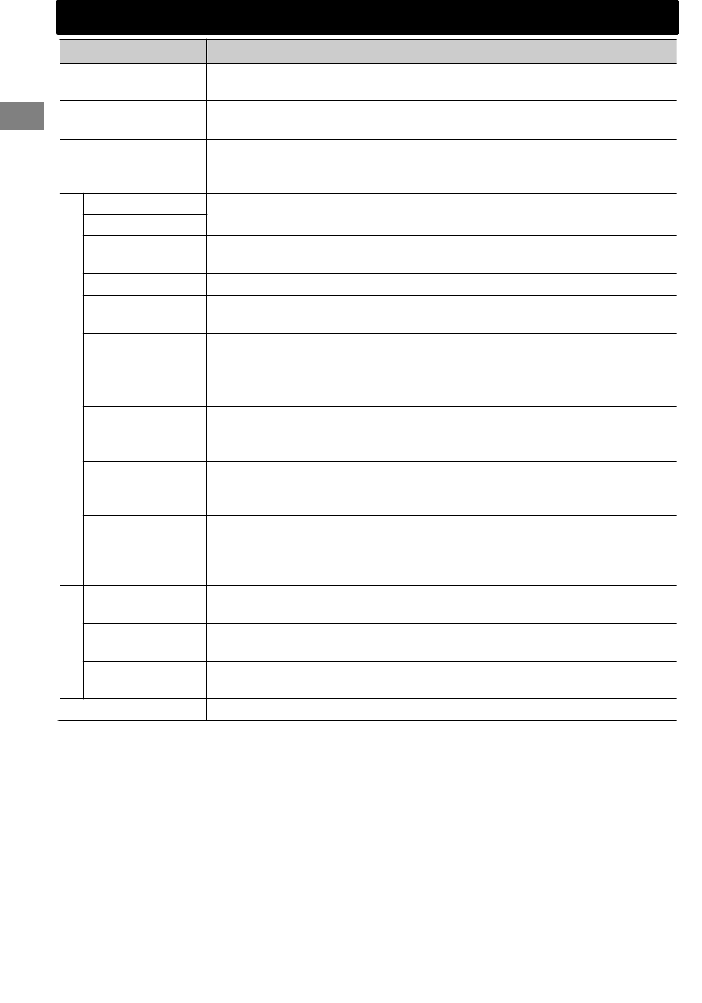
Item menu Pengaturan yang dapat dipilih (Permulaan: [XX])
USB *7 Drive Change: Memilih untuk mengubah drive saat perangkat yang
memiliki beberapa drive dihubungkan ke terminal masukan USB.
iPod Switch *8
(kontrol iPod/iPhone)
[Headunit Mode]/iPod Mode/Application Mode:
Untuk pengaturannya, ' halaman 9.
Audiobooks *8 Normal/Faster/Slower: Memilih kecepatan pemutaran file suara
Audiobook dalam iPod/iPhone Anda.
Pemilihan awal tergantung pada setelan iPod/iPhone Anda.
Bluetooth *9
Phone *10 Connect/Disconnect: Menghubungkan atau memutuskan hubungan
perangkat telepon/audio Bluetooth. (' halaman 12)
Audio
Application Connect/Disconnect: Menghubungkan atau memutuskan hubungan
aplikasi dalam smart phone. (' halaman 13)
Delete Pairing Untuk pengaturannya, ' halaman 13.
Phonebook
Trans
Menyalin hingga 400 nomor dari memori buku telepon pada telepon yang
terhubung ke unit lewat OPP.
Set PIN Code Mengubah kode PIN (1 hingga 6 digit). (Kode PIN standar: 0000)
Putar tombol kontrol untuk memilih nomor, tekan / untuk berpindah
ke posisi entri. Setelah memasukkan kode PIN, tekan tombol kontrol untuk
mengonfirmasi.
Auto Connect [On]: Membuat hubungan secara otomatis dengan perangkat Bluetooth
saat unit dihidupkan.
Off: Dibatalkan.
Initialize [No]: Dibatalkan.
Yes: Menginisialisasi semua setelan Bluetooth (termasuk perpasangan yang
tersimpan, buku telepon dll.).
Information Connected Phone/Connected Audio/Connected Application *11:
Menampilkan nama perangkat telepon/audio/aplikasi yang terhubung.
My BT Name: Menampilkan nama unit (JVC Unit).
My Address: Menunjukkan alamat Adaptor Bluetooth USB.
Source Select
AM Source *12 [Show]/Hide: Mengaktifkan atau menonaktifkan “AM” pada pemilihan
sumber.
AUX Source *12 [Show]/Hide: Mengaktifkan atau menonaktifkan “AUX In” pada pemilihan
sumber.
Bluetooth
Audio *13
[Show]/Hide: Mengaktifkan atau menonaktifkan “BT Audio” pada
pemilihan sumber.
Software Version Menampilkan versi firmware unit.
*7 Hanya ditampilkan bila sumbernya adalah “USB-1/USB-2”.
*8 Hanya ditampilkan bila sumbernya adalah “iPod-1/iPod-2”.
*9 Jika Adaptor Bluetooth USB tidak terhubung ke unit, “Please Connect BT Adapter” tampak
pada tampilan.
*10 <Connect> tidak akan ditampilkan jika dua telepon Bluetooth terhubung pada saat yang
sama.
*11 Ditampilkan hanya saat telepon/audio player/aplikasi Bluetooth terhubung.
*12 Ditampilkan hanya jika unit berada dalam sumber selain sumber yang bersangkutan
“AM Source/AUX Source”.
*13 Ditampilkan hanya jika Adaptor Bluetooth USB (KS-UBT1) terpasang dan sumber saat ini
bukan “BT-1/BT-2”.
Pengoperasian menu
22 |ޓINDONESIA
2012/2/6ޓ16:10:10KD-R80BT_UN_IN
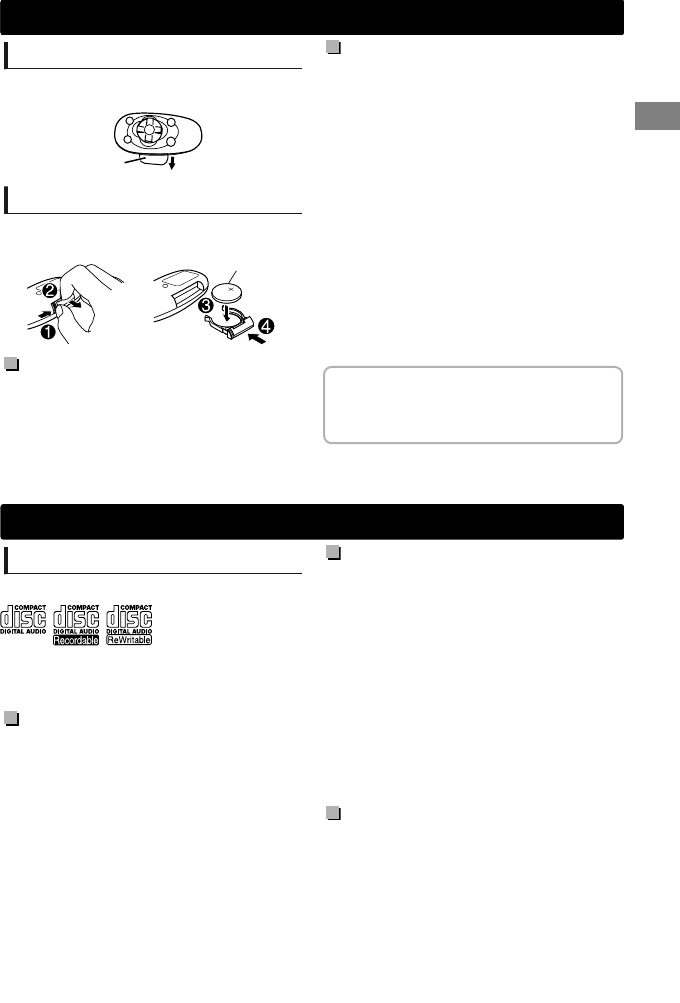
Mempersiapkan
Jika Anda menggunakan remote kontrol untuk
pertama kali, lepaskan lembar perekat.
Lembar perekat
Mengganti baterai koin litium
Jika efektivitas remote kontrol menurun,
gantilah baterainya.
CR2025
Perhatian:
Bahaya ledakan, jika salah mengganti baterai.
Hanya mengganti dengan jenis yang sama
atau setara.
Baterai tidak boleh terpaparkan ke udara panas
yang berlebihan seperti sinar matahari, api atau
semacamnya.
Peringatan:
Jangan memasang baterai selain CR2025 atau
yang setara.
Jangan meninggalkan remote kontrol dalam
tempat (seperti dasbor) yang terkena sinar
matahari langsung untuk waktu yang lama.
Simpan baterai di tempat yang tidak dapat
dijangkau anak-anak.
Jangan mengisi ulang, hubung pendek, ambil
bagian, memanaskan baterai atau
menempatkannya dalam api.
Jangan meletakkan baterai bersama bahan-
bahan dari logam lainnya.
Jangan mendorong baterai dengan penjepit
atau alat yang sejenis.
Sekat baterai dengan membungkusnya
menggunakan selotip saat membuang atau
menyimpannya.
Unit ini dilengkapi dengan fungsi kontrol jarak
jauh roda kemudi. Untuk rincian selengkapnya,
lihat juga buku petunjuk yang disediakan
bersama remote adapter.
Informasi tambahan
Mengenai disk
Unit ini hanya dapat memutar CD berikut:
Unit ini dapat memutar ulang disk-disk multisesi;
namun, sesi-sesi yang belum ditutup akan
dilewati selama pemutaran.
Disk yang tidak bisa diputar
Disk yang tidak bundar.
Disk yang permukaan perekamannya belang-
belang atau disk yang kotor.
Disk yang bisa direkam/ditulis ulang yang
belum dituntaskan. (Untuk perincian mengenai
penuntasan disk, lihat perangkat lunak
penulisan disk dan manual instruksi perekam
disk Anda.)
CD 8 cm. Berupaya memasukan dengan
adaptor bisa mengakibatkan kerusakan.
Mungkin juga sulit mengeluarkan disk jika
dimasukkan.
Menangani disk
Jangan sentuh permukaan perekaman disk.
Jangan rekatkan selotip dll., pada disk, atau
menggunakan disk yang masih ditempeli
selotip.
Jangan gunakan aksesoris apa pun untuk disk.
Bersihkan dari bagian tengah disk dengan
gerakan ke arah luar.
Bersihkan disk dengan silikon kering atau kain
halus. Jangan gunakan pelarut apa pun.
Saat mengeluarkan disk dari unit ini, tarik disk
secara horizontal.
Hilangkan gerigis dari lubang tengah dan tepi
disk sebelum memasukkan disk.
Pemutaran disk ganda
Sisi yang non-DVD dari sebuah “DualDisc”, tidak
tunduk pada standar “Compact Disc Digital
Audio”. Oleh karena itu, penggunaan sisi Non-
DVD dari sebuah DualDisc pada produk ini tidak
disarankan.
Remote kontrol
Remote kontrol
INDONESIAޓ|23
2012/2/6ޓ16:10:10KD-R80BT_UN_IN
Tentang file audio
File yang bisa diputar
Ekstensi file: MP3(.mp3), WMA(.wma),
WAV(.wav)
Untuk disk MP3/WMA:
Kecepatan bit:
MP3/WMA: 5 kbps - 320 kbps
Frekuensi sampling:
MP3 (MPEG-1): 32 kHz, 44.1 kHz, 48 kHz
MP3 (MPEG-2): 16 kHz, 22.05 kHz, 24 kHz
WMA: 8 kHz - 48 kHz
Untuk perangkat USB:
Kecepatan bit:
MP3 (MPEG-1): 32 kbps - 320 kbps
MP3 (MPEG-2): 8 kbps - 160 kbps
WMA: 5 kbps - 320 kbps
WAV: Linear PCM pada 705 kbps dan
1 411 kbps
Frekuensi sampling:
MP3 (MPEG-1): 32 kHz, 44.1 kHz, 48 kHz
MP3 (MPEG-2): 16 kHz, 22.05 kHz, 24 kHz
WMA: 8 kHz - 48 kHz
WAV: 44.1 kHz
Saluran:
WMA/WAV: 1 sal/2 sal
File berkecepatan bit variabel (VBR). (Waktu
berlalu untuk file VBR tidak akan ditampilkan
secara benar.)
File yang tidak bisa diputar
File MP3:
- terkode dalam format MP3i dan MP3 PRO
- terkode dalam format yang tidak semestinya
- terkode dengan Lapisan 1/2
File WMA:
- terkode dalam format lossless, professional
dan voice
- tidak berbasis pada Windows Media® Audio
- proses penyalinan dilindungi (copy-
protected) dengan DRM
File yang berisi data seperti AIFF, ATRAC3, dsb.
Nama file/folder
Unit ini mendukung nama file/folder yang
direkam dalam format yang sesuai dengan ISO
9660 Level 1, Level 2, Romeo, atau Joliet, dan
kode ekstensi <.mp3>, <.wma> atau <.wav>
yang benar.
Lainnya
Unit ini dapat memperlihatkan WMA Tag dan
ID3 Tag Versi 1.0/1.1/2.2/2.3/2.4 (untuk MP3).
Fungsi pencarian bekerja tetapi kecepatan
pencarian tidak konstan.
Tentang perangkat USB
Saat menghubungkan kabel USB, gunakan
kabel USB 2.0.
Anda tidak dapat menghubungkan komputer
atau HDD portabel ke terminal input USB unit.
Setiap kali hanya dapat menghubungkan satu
perangkat USB ke unit. Jangan menggunakan
hub USB.
Perangkat USB yang dilengkapi dengan fungsi-
fungsi khusus seperti fungsi keamanan data
tidak dapat digunakan dengan unit ini.
Jangan menggunakan perangkat USB dengan
2 atau lebih partisi.
Unit ini tidak dapat mengenali perangkat USB
yang pentarafannya di luar 5 V dan melampaui
1 A.
Unit ini mungkin tidak mengenali kartu
memori yang dimasukkan ke dalam pembaca
kartu USB.
Unit ini mungkin tidak bisa memutar file yang
ada dalam USB dengan benar jika kabel
sambungan USB digunakan.
Bergantung pada bentuk perangkat USB dan
port sambungan, beberapa perangkat USB
mungkin tidak dapat dipasang dengan baik
atau mungkin sambungannya longgar.
Pengoperasian dan catu daya mungkin tidak
berfungsi sebagaimana mestinya untuk
beberapa perangkat.
Jumlah karakter maksimum untuk:
– Nama folder: 25 karakter
– Nama file: 25 karakter
– MP3 Tag: 128 karakter
– WMA Tag: 128 karakter
– WAV Tag: 128 karacter
Unit ini dapat mengenali total 20000 file, 2000
folder (999 file per folder termasuk folder tanpa
file yang tidak didukung), dan 8 hierarki.
Namun, tampilan hanya bisa menampilkan 999
folder/file.
Perhatian-perhatian
Jangan menarik atau melepaskan perangkat
USB berulang-ulang sewaktu “READING”
[Membaca] diperlihatkan di layar tampilan.
Sengatan listrik saat menghubungkan
perangkat USB dapat menyebabkan
pemutaran yang tidak normal pada perangkat.
Jika demikian halnya, putuskan hubungan
perangkat USB, kemudian reset unit ini dan
perangkat USB.
Jangan meninggalkan perangkat USB di dalam
mobil, terpapar ke sinar matahari langsung
atau suhu tinggi. Karena bisa mengubah
bentuk perangkat atau menyebabkan
kerusakan.
Informasi tambahan
24 |ޓINDONESIA
2012/2/6ޓ16:10:10KD-R80BT_UN_IN

Tentang iPod/iPhone
iPod/iPhone yang bisa dihubungkan ke unit ini:
- iPod touch (generasi 4)
- iPod touch (generasi 3)
- iPod touch (generasi 2)
- iPod touch (generasi 1)
- iPod classic
- iPod dengan Video (generasi 5)*
- iPod nano (generasi 6)
- iPod nano (generasi 5)
- iPod nano (generasi 4)
- iPod nano (generasi 3)
- iPod nano (generasi 2)
- iPod nano (generasi 1)*
- iPhone 4S
- iPhone 4
- iPhone 3GS
- iPhone 3G
- iPhone
*<iPod Mode>/<Application Mode> tidak
termasuk.
Anda tidak dapat menelusuri file video pada
menu “Videos” dalam <Headunit Mode>.
Urutan lagu yang ditampilkan pada menu
pemilihan unit ini mungkin berbeda dari iPod
itu.
Bila mengoperasikan iPod/iPhone, beberapa
pengoperasian mungkin tidak dapat dilakukan
dengan benar atau sebagaimana mestinya. Jika
ini terjadi, kunjunglah situs web JVC berikut:
<http://www3.jvckenwood.com/english/car/
index.html> (Khusus situs web berbahasa
Inggris).
Tentang Bluetooth
Tergantung pada versi Bluetooth pada
perangkat, sebagian perangkat Bluetooth
mungkin tidak bisa terhubung ke unit ini.
Unit ini mungkin tidak bekerja dengan
sebagian perangkat Bluetooth.
Kondisi sinyal bervariasi, tergantung pada
keadaan sekitarnya.
Bila unit dimatikan, perangkat terputus
hubungan.
Untuk informasi lebih lanjut tentang Bluetooth,
kunjungilah situs web JVC berikut:
<http://www3.jvckenwood.com/english/car/
index.html> (situ web hanya dalam bahasa
Inggris)
Merek dagang dan
pemberitahuan lisensi
Microsoft dan Windows Media adalah baik
merek dagang yang terdaftar maupun merek
dagang dari Badan Hukum Microsoft di
Amerika Serikat dan/atau negara-negara lain.
Logo dan merek kata Bluetooth adalah milik
the Bluetooth SIG, Inc. dan semua penggunaan
merek tersebut oleh JVC KENWOOD
Corporation dilakukan di bawah lisensi. Merek
dagang dan nama dagang lainnya adalah milik
pemiliknya masing-masing.
“Made for iPod” and “Made for iPhone” mean
that an electronic accessory has been designed
to connect specifically to iPod, or iPhone,
respectively, and has been certified by the
developer to meet Apple performance
standards. Apple is not responsible for the
operation of this device or its compliance with
safety and regulatory standards. Please note
that the use of this accessory with iPod, or
iPhone may affect wireless performance.
iPhone, iPod, iPod classic, iPod nano, and iPod
touch are trademarks of Apple Inc., registered
in the U.S. and other countries.
Informasi tambahan
INDONESIAޓ|25
2012/2/6ޓ16:10:10KD-R80BT_UN_IN
Gejala Perbaikan/Sebab
4Umum
Tidak ada suara, suara terputus
atau bunyi statis.
Periksa kabel, antena dan sambungan kabel.
Periksa kondisi disk, perangkat yang terhubung dan rekaman
trek.
Pastikan untuk menggunakan colokan mini stereo yang
disarankan saat menghubungkan ke komponen eksternal.
(' halaman 10)
“Miswiring Check Wiring Reset
The Unit”/“Warning Check
Wiring Reset The Unit” muncul di
layar dan pengoperasian tidak
dapat dilakukan.
Pastikan bahwa terminal kabel pengeras suara teredam baik
dengan selotip sebelum menyetel ulang unit tersebut.
(' halaman 3)
Jika pesan itu tidak lenyap, hubungi dealer audio mobil JVC
Anda atau perusahaan yang memasok perlengkapan audio
Anda.
Unit tidak berfungsi sama sekali. Setel ulang unit. (' halaman 3)
Sumber tidak dapat dipilih. Periksa <Source Select> setelan. (' halaman 22)
Karakter-karakter yang benar
tidak ditampilkan (misalnya
nama album).
Unit ini hanya dapat menampilkan huruf (huruf besar), nomor
dan simbol dalam jumlah yang terbatas.
4FM/AM
Preset (pengaturan awal) SSM
otomatis tidak berfungsi.
Simpan stasiun-stasiun secara manual.
4CD/USB/iPod/iPhone
“Please Eject” muncul pada
tampilan. Tekan [], kemudian masukkan disk dengan benar.
“In Disc” muncul pada tampilan. Disk tidak dapat dikeluarkan dengan benar. Pastikan tidak ada
yang memblokir slot pemuatan.
“Reading” tetap berkedip pada
tampilan.
Waktu yang lama diperlukan. Jangan menggunakan terlalu
banyak tingkat hierarki dan folder.
Masukkan lagi disk atau sambungkan lagi perangkat USB.
Trek/folder lagu tidak diputar
kembali dalam urutan yang Anda
maksudkan.
Urutan pemutaran ditentukan oleh nama file (USB) atau urutan
perekaman file (disk).
Waktu putar yang sudah lewat
tidak benar.
Kadang-kadang ini terjadi sewaktu pemutaran. Hal ini
disebabkan dengan bagaimana trek-trek tersebut direkam pada
disk.
“No File” muncul pada tampilan. Periksa apakah folder terpilih, perangkat USB yang terhubung,
atau iPod/iPhone berisi file yang bisa diputar.
“Not Support” muncul pada
tampilan dan trek melompat.
Periksa apakah trek merupakan format file yang dapat diputar.
“Cannot Play” berkedip pada
display.
Unit tidak dapat mendeteksi
perangkat yang terhubung.
Periksa apakah perangkat yang terhubung kompatibel
dengan unit ini. (USB: ' halaman 28)
(iPod/iPhone: ' halaman 25)
Pastikan bahwa perangkat berisi file yang formatnya
didukung. (' halaman 24)
Hubungkan lagi perangkat.
iPod/iPhone tidak menyala atau
tidak berfungsi.
Periksa sambungan antara unit ini dan iPod/iPhone.
Lepaskan dan setel ulang iPod/iPhone menggunakan reset
keras. Untuk perincian mengenai cara menyetel ulang iPod/
iPhone, lihat manual petunjuk yang disediakan bersama
iPod/iPhone.
Periksa apakah pengaturan <iPod Switch> sudah benar.
(' halaman 9)
Pemecahan Masalah
Pemecahan Masalah
26 |ޓINDONESIA
2012/2/6ޓ16:10:10KD-R80BT_UN_IN

Gejala Perbaikan/Sebab
4Bluetooth
“BT-1”/“BT-2” tidak dapat dipilih. Periksa <Bluetooth Audio> dalam <Source Select> setelan.
(' halaman 22)
Tidak ada perangkat Bluetooth
yang terdeteksi.
Mencari dari perangkat Bluetooth lagi.
Setel ulang unit. (' halaman 3)
Perpasangan tidak bisa
dilakukan.
Pastikan Anda memasukkan kode PIN yang sama ke kedua
unit dan perangkat Bluetooth.
Hapus informasi perpasangan dari kedua unit dan perangkat
Bluetooth, lalu lakukan perpasangan lagi.
“Pairing Full” muncul pada
tampilan saat mencoba
melakukan perpasangan.
Anda telah mendaftarkan maksimum lima perangkat
Bluetooth dalam unit. Untuk memasangkan perangkat lain,
pertama-tama hapus perangkat pasangan yang sudah ada
dari unit. (' halaman 13)
Gema atau derau terjadi. Sesuaikan posisi unit mikrofon.
Sesuaikan <NR/EC Mode> dan <Mic Level> agar menjadi
kombinasi yang lebih baik. (' halaman 16)
Kualitas suara telepon buruk. Kurangi jarak antara unit ini dan iPod/iPhone.
Pindahkan mobil ke tempat yang penerimaan sinyalnya
lebih baik.
Unit ini tidak menanggapi saat
Anda mencoba menyalin buku
telepon ke unit.
Anda mungkin mencoba menyalin entri yang sama (seperti
tersimpan) ke unit. Tekan DISP atau untuk keluar.
Suara terputus atau terlompati
selama pemutaran audio player
Bluetooth.
Kurangi jarak antara unit ini dan audio player Bluetooth.
Matikan, lalu hidupkan unit dan coba menghubungkan lagi.
Sebagian perangkat Bluetooth mungkin sedang mencoba
menghubungkan ke unit.
Audio player Bluetooth yang
terhubung tidak bisa dikontrol.
Periksa apakah audio player Bluetooth yang terhubung
mendukung Profil Remote Kontrol Audio/Video (AVRCP).
(Lihat petunjuk audio player Anda.)
Putuskan dan hubungkan player Bluetooth lagi.
Cara panggil “Voice” tidak
berhasil.
Gunakan cara panggil “Voice” di lingkungan yang lebih
tenang.
Kurangi jarak dari mikrofon saat Anda menyebut nama.
Ubah “NR/EC Mode” menjadi “Off” (' halaman 16), lalu
coba lagi.
“Not Support” muncul saat
mencoba melakukan
penyambungan dengan suara.
Telepon yang terhubung tidak mendukung fitur ini.
“Connection Error” muncul pada
tampilan.
Perangkat tidak terdaftar namun koneksi gagal. Hubungkan
perangkat secara manual. (' halaman 12)
“Error” muncul pada tampilan. Coba mengoperasikan lagi. Jika “Error” muncul lagi, periksa
apakah perangkat mendukung fungsi yang Anda coba.
“Please Wait” muncul pada
tampilan.
Unit sedang bersiap untuk menggunakan fungsi Bluetooth. Jika
pesan tidak menghilang, matikan dan hidupkan unit, lalu
hubungkan perangkat lagi (atau reset unit). (' halaman 3)
“HW Error” muncul pada
tampilan.
Reset unit dan coba mengoperasikan lagi. Jika “HW Error”
muncul lagi, hubungi agen penjual audio mobil JVC Anda yang
terdekat.
“BT Device Not Found” muncul
pada tampilan.
Unit gagal mencari perangkat Bluetooth yang terdaftar
selama Auto Connect. Hidupkan Bluetooth dari perangkat
Anda dan hubungkan secara manual.
Pemecahan Masalah
INDONESIAޓ|27
2012/2/6ޓ16:10:10KD-R80BT_UN_IN
BAGIAN PENGUAT AUDIO
Maksimum keluaran power 50 W per saluran
Output Power Kontinu (RMS) 20 W per saluran ke dalam 4Ω, 40 Hz hingga
20 000 Hz pada distorsi harmoni total yang
kurang dari 1%.
Impedansi Beban 4Ω (kelonggaran 4Ω sampai 8Ω)
Respon Frekuensi 40 Hz sampai 20 000 Hz
Perbandingan Sinyal ke desis 80 dB
Tingkat/Impendansi Line-Out, Subwoofer-Out 4.8 V/20 kΩ beban (skala penuh)
Impedansi Output ≤ 600Ω
BAGIAN TUNER
FM Cakupan Frekuensi 87.5 MHz sampai 108.0 MHz
Sensitivitas yang dapat
digunakan
9.3 dBf (0.8 μV/75Ω)
50 dB Sensitivitas Peredaan 16.3 dBf (1.8 μV/75Ω)
Selektifitas Saluran Alternatif
(400 kHz) 65 dB
Respon Frekuensi 40 Hz sampai 15 000 Hz
Pemisahan Stereo 40 dB
AM Cakupan Frekuensi 531 kHz sampai 1 611 kHz
Sensitifitas/Selektifitas 20 μV/40 dB
BAGIAN ALAT PEMUTAR CD
Sistem Pendeteksi Sinyal Optik non kontak terbuka (laser semikonduktor)
Jumlah Saluran 2 saluran (stereo)
Respon Frekuensi 5 Hz sampai 20 000 Hz
Perbandingan Sinyal ke desis 98 dB
Wow dan Flutter Kurang dari batas ukuran
BAGIAN USB
USB Standard USB 1.1, USB 2.0
Laju Transfer Data (Kecepatan Penuh) Maks. 12 Mbps
Perangkat Kompatibel Kelas penyimpanan massal
Sistem File Kompatibel FAT 32/16/12
Format Audio yang Dapat Diputar MP3/WMA/WAV
Arus Pasokan Maksimum DC 5 V " 1 A
BAGIAN BLUETOOTH
Versi Bluetooth 2.1 disertifikasi (+EDR)
Power Class Radio Kelas 2
Area Servis 10 m
Profil HFP 1.5, OPP 1.1, A2DP 1.2, AVRCP 1.3, PBAP 1.0
Spesifikasi
Spesifikasi
28 |ޓINDONESIA
2012/2/6ޓ16:10:10KD-R80BT_UN_IN

UMUM
Power yang Diperlukan (Voltase Pengoperasian) DC 14.4 V (kelonggaran 11 V sampai 16 V)
Sistem Pertanahan Tanah negatif
Temperatur pengoperasian yang diizinkan 0°C sampai +40°C
Dimensi
(L × T × P)
Ukuran instalasi kira-kira 182 mm × 52 mm × 159 mm
Ukuran panel kira-kira 188 mm × 59 mm × 13 mm
Massa 1.4 kJ (tidak termasuk aksesoris)
Dapat berubah sewaktu-waktu tanpa pemberitahuan.
Spesifikasi
INDONESIAޓ|29
2012/2/6ޓ16:10:10KD-R80BT_UN_IN
Having TROUBLE with operation?
Please reset your unit
Refer to page of How to reset your unit
Ada MASALAH dengan unit anda?
Silakan setel (reset) terlebih dahulu unit anda
Lihat pada halaman bagaimana cara mereset unit anda.
Ƒ
ʛʹʷʸʹÅÈÆÅÈ·Ê¿ÅÄ ʷʹʸʹ
