JVC KW V30BTEU User Manual V30BTEU, V50BTEU LVT2526 001A
KW-V30BTEU KW-V30BTEU Instruction manual (Europe) LVT2526-001A
User Manual: JVC KW-V30BTEU KW-V30BTEU, KW-V50BTEU Английский, Французский, Русский, Инструкция пo эkcплуataции
Open the PDF directly: View PDF ![]() .
.
Page Count: 181 [warning: Documents this large are best viewed by clicking the View PDF Link!]

LVT2526-001A (EU)© 2014 JVC KENWOOD Corporation
Please read all instructions carefully before operation to obtain the
best possible performance from the unit.
Veuillez lire attentivement toutes les instructions avant d’utiliser
l’appareil afin de bien comprendre son fonctionnement et d’obtenir
les meilleures performances possibles.
Перед тем, как приступать к эксплуатации, пожалуйста,
внимательно прочитайте все инструкции с тем, чтобы полностью
изучить и обеспечить оптимальную работу этого устройства.
MONITOR WITH DVD RECEIVER
INSTRUCTION MANUAL
MONITEUR AVEC RÉCEPTEUR DVD
MODE D’EMPLOI
МОНИТОР С DVD-РЕСИВЕРОМ
ИHCTPУKЦИЯ ПO ЭKCПЛУATAЦИИ
KW-V50BT/KW-V30BT
ENGLISH
FRANÇAIS
РУCCKИЙ
KW-V_Mid_EU.indb 1 2014/01/28 16:26
2
CONTENTS
BEFORE USE...................................................2
How to reset your unit.................................................... 3
How to forcibly eject a disc........................................... 3
INITIAL SETTINGS .........................................4
BASICS ...........................................................5
Component names and functions ............................. 5
Common operations ....................................................... 6
Common screen operations ......................................... 7
Selecting the playback/video source ........................ 8
DISCS .............................................................9
USB...............................................................14
iPod/iPhone ................................................16
Apps ............................................................. 19
TUNER .......................................................... 20
OTHER EXTERNAL COMPONENTS .............24
Using external audio/video players—AV-IN ........24
Using external audio players—Front AUX
(only for KW-V30BT) ......................................................24
Using a rear view camera ............................................25
Using a smartphone—HDMI/MHL ...........................26
Using an external monitor— Rear Source ............26
BLUETOOTH ................................................27
SETTINGS ..................................................... 35
Settings for using applications of the iPod/
iPhone/Android ..............................................................35
Sound adjustment .........................................................36
Adjustment for video playback .................................37
Changing display design .............................................39
Customizing the Home screen ..................................40
Customizing the system settings .............................40
Setting menu items .......................................................41
REMOTE CONTROLLER ...............................43
CONNECTION/INSTALLATION ...................45
REFERENCES ................................................ 50
Maintenance ....................................................................50
More information ........................................................... 50
Error message list ...........................................................54
Troubleshooting ............................................................. 55
Specifications ...................................................................57
How to read this manual:
• Illustrations of KW-V50BT are mainly used for explanation. The displays and panels shown in this manual
are examples used to provide clear explanations of the operations. For this reason, they may be different
from the actual displays or panels.
• This manual mainly explains operations using the buttons on the monitor panel and touch panel. For
operations using the remote controller (RM-RK256 ), see page 43.
• < > indicates the various screens/menus/operations/settings that appear on the touch panel.
• [ ] indicates the buttons on the touch panel.
• Indication language: English indications are used for the purpose of explanation. You can select the
indication language from the <Settings> menu. (Page42)
BEFORE USE
V WARNINGS: (To prevent accidents and
damage)
• DO NOT install any unit or wire any cable in a
location where;
– it may obstruct the steering wheel and gearshift
lever operations.
– it may obstruct the operation of safety devices
such as air bags.
– it may obstruct visibility.
• DO NOT operate the unit while driving.
If you need to operate the unit while driving, be
sure to look around carefully.
• The driver must not watch the monitor while
driving.
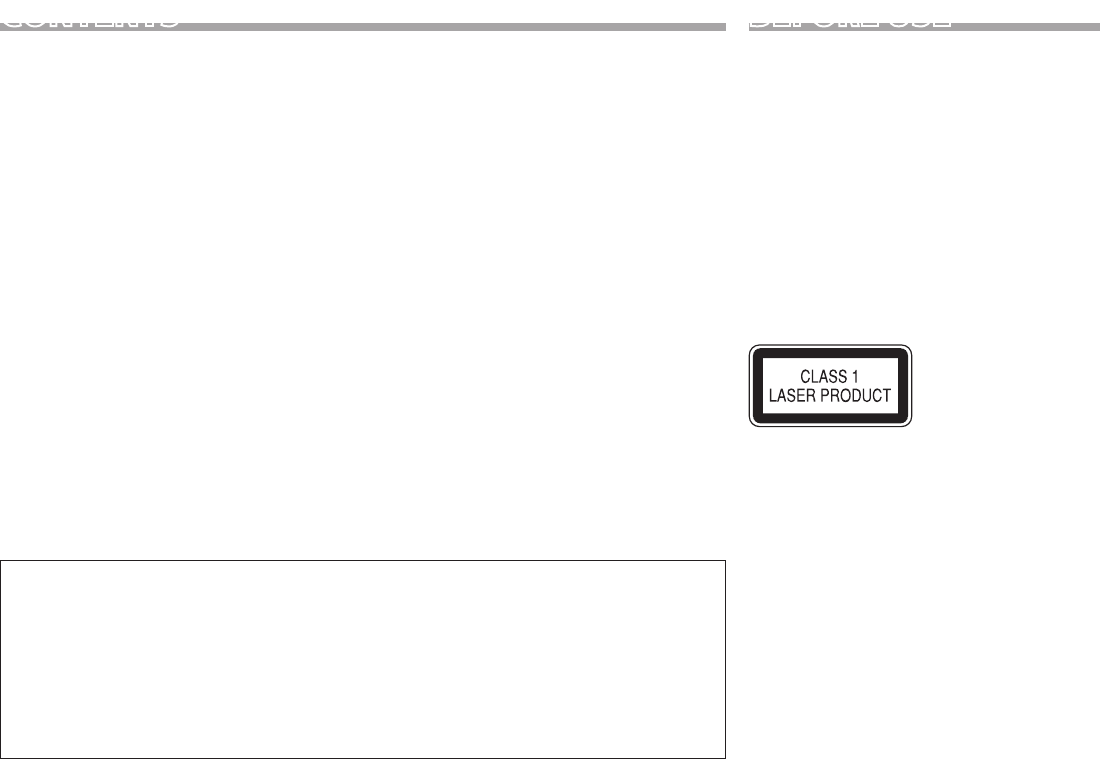
The marking of products using lasers
The label is attached to the chassis/case and says
that the component uses laser beams that have
been classified as Class 1. It means that the unit is
utilizing laser beams that are of a weaker class. There
is no danger of hazardous radiation outside the unit.
KW-V_Mid_EU.indb 2 2014/01/28 16:26
ENGLISH 3
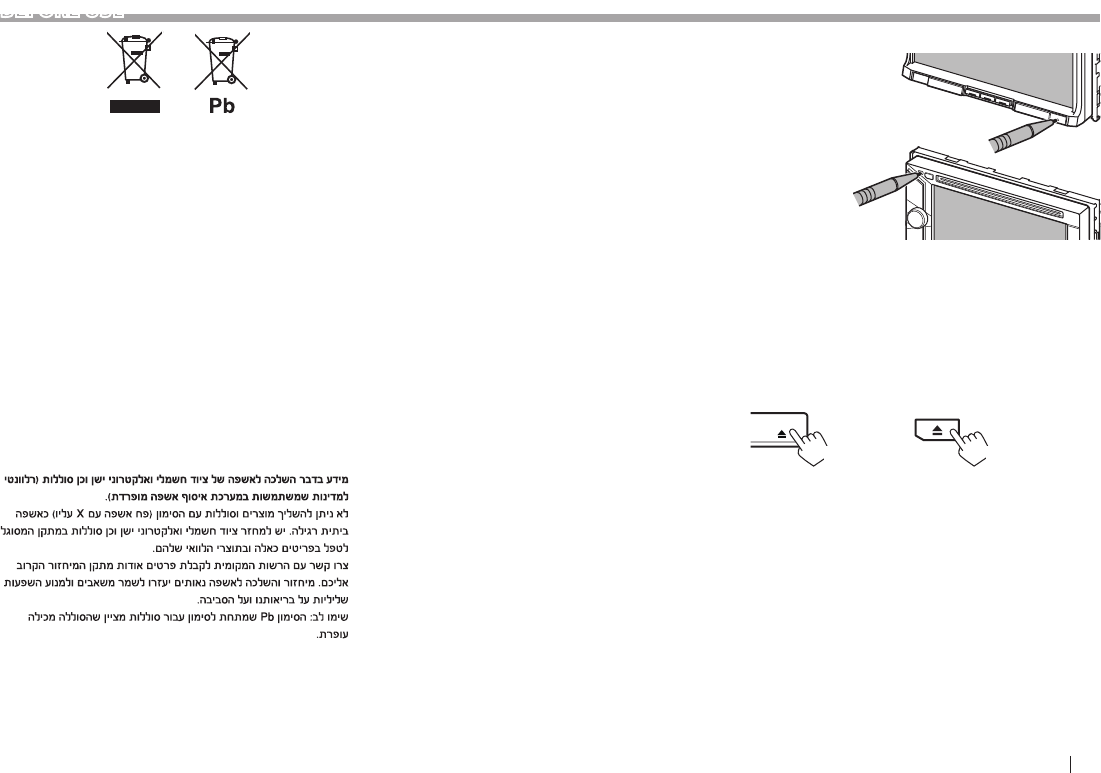
Information on Disposal of Old Electrical and
Electronic Equipment and Batteries (applicable
for EU countries that have adopted separate
waste collection systems)
Products and batteries with the symbol (crossed-
out wheeled bin) cannot be disposed as household
waste.
Old electrical and electronic equipment and
batteries should be recycled at a facility capable of
handling these items and their waste byproducts.
Contact your local authority for details in locating a
recycle facility nearest to you.
Proper recycling and waste disposal will help
conserve resources whilst preventing detrimental
effects on our health and the environment.
Notice: The sign “Pb” below the symbol for batteries
indicates that this battery contains lead.
For Israel
V Cautions on the monitor:
• The monitor built into this unit has been
produced with high precision, but it may have
some ineffective dots. This is inevitable and is not
considered defective.
• Do not expose the monitor to direct sunlight.
• Do not operate the touch panel using a ball-point
pen or similar tool with a sharp tip.
Touch the buttons on the touch panel with your
finger directly (if you are wearing a glove, take it
off).
• When the temperature is very cold or very hot...
– Chemical changes occur inside, causing
malfunction.
– Pictures may not appear clearly or may move
slowly. Pictures may not be synchronized with
the sound or picture quality may decline in such
environments.
For s afety...
• Do not raise the volume level too much, as this
will make driving dangerous by blocking outside
sounds, and may cause hearing loss.
• Stop the car before performing any complicated
operations.
Temperature inside the car...
If you have parked the car for a long time in hot or
cold weather, wait until the temperature in the car
becomes normal before operating the unit.
❏ How to reset your unit
KW-V30BT
KW-V50BT
• Your preset adjustments will also be erased
(except the registered Bluetooth devices).
❏ How to forcibly eject a disc
Press and hold M on the monitor panel for 10
seconds.
KW-V50BT KW-V30BT
(Hold)(Hold)
• Be careful not to drop the disc when it ejects.
• If this does not work, reset your unit. (See above.)
BEFORE USE
KW-V_Mid_EU.indb 3 2014/01/28 16:26
4
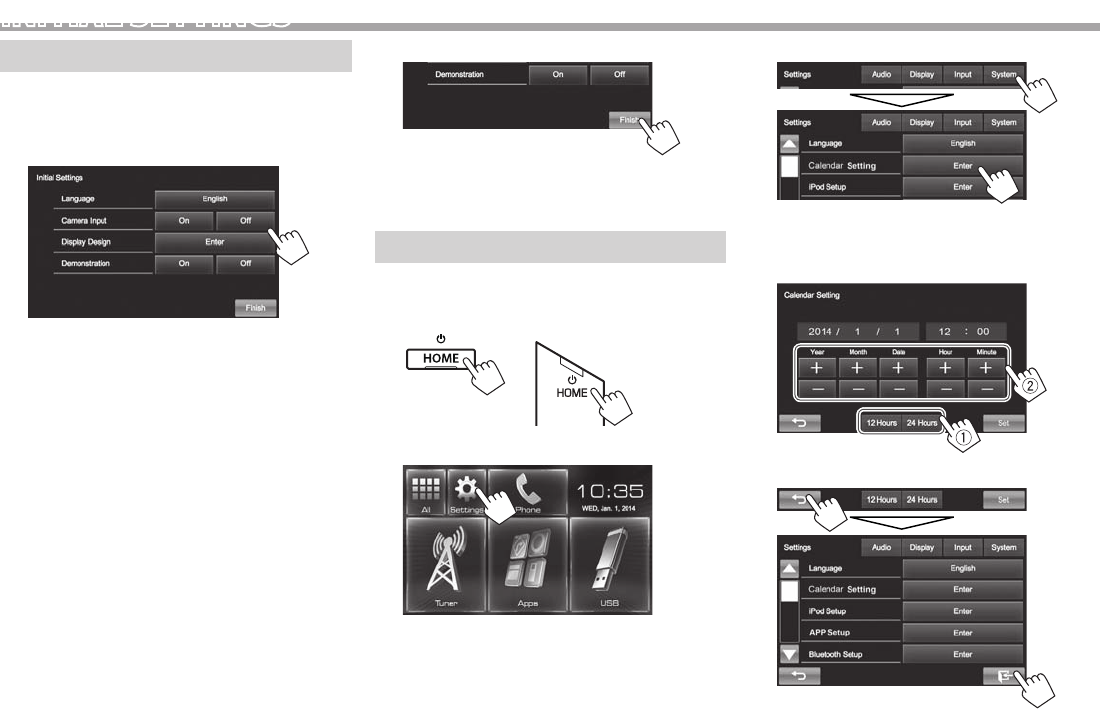
INITIAL S ETTINGS
Initial s etup
When you power on the unit for the first time or
reset the unit, the initial setting screen appears.
• You can also change the settings on the
<Settings> screen. (Page41)
1
<Language>
(Page42)
Select the text language
used for on-screen
information.
• Set <GUI Language>
to display the operation
buttons and menu items
in the selected language
([Local]: initially
selected) or English
([English]).
<Camera Input>
(Page42)
Select [On] when
connecting the rear view
camera.
<Display Design>
(Page42)
Select the background and
the panel color.
<Demonstration>
(Page42)
Activate or deactivate the
display demonstration.
2 Finish the procedure.
The Home screen is displayed.
• [AV Off] is selected initially. Select the
playback source. (Page8)
Calendar/Clock settings
1 Display the Home screen.
KW-V50BT KW-V30BT
2 Display the <Settings> screen.
3 Display the <Calendar Setting> screen.
4 Select the time display format (1), then set
the calendar and the clock time (2).
• Press [Set] to set the second to “00”.
5 Finish the procedure.
KW-V_Mid_EU.indb 4 2014/01/28 16:26
ENGLISH 5
BASICS
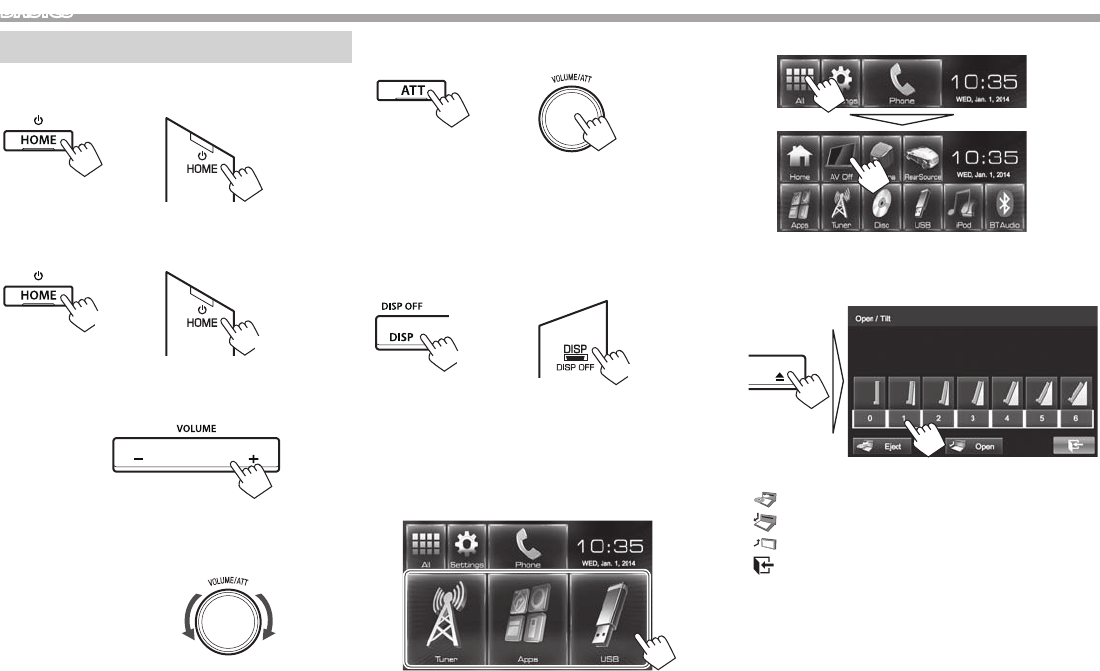
Component names and functions
KW-V50BT
1 Screen (touch panel)
2 Monitor panel*
3 Remote sensor
4 VOLUME –/+ button
Adjusts the audio volume. (Page 6)
5 ATT button
Attenuates the sound. (Page 6)
6 HOME/ button
• Displays the Home screen. (Press) (Page 7)
• Turns off the power. (Hold) (Page 6)
• Turns on the power. (Press) (Page 6)
7 FNC/ button
• Pops up the <Function Menu>/<Video
Menu> screen on the source control screen.
(Press) (Page 7)
• Activates the voice dialing. (Hold) (Page 32)
8 DISP/DISP OFF button
• Switches the screen between the current
source and the App screen from the connected
iPod touch/iPhone/Android. (Press)
• Turns off the screen. (Hold) (Page 6)
• Turns on the screen. (Hold) (Page 6)
9 M (Eject) button
• Displays the <Open/Tilt> screen. (Press)
(Page 6)
• Ejects the disc forcibly. (Hold) (Page 3)
p Reset button
Resets the unit. (Page 3)
KW-V30BT
1 Reset button
Resets the unit. (Page 3)
2 M (Eject) button
• Ejects the disc. (Press) (Page 9)
• Ejects the disc forcibly. (Hold) (Page 3)
3 Loading slot
4 HOME/ button
• Displays the Home screen. (Press) (Page 7)
• Turns off the power. (Hold) (Page 6)
• Turns on the power. (Press) (Page 6)
5 FNC/ button
• Pops up the <Function Menu>/<Video
Menu> screen on the source control screen.
(Press) (Page 7)
• Activates the voice dialing. (Hold) (Page 32)
6 VOLUME/ATT knob
• Attenuates the sound. (Press) (Page 6)
• Adjusts the audio volume. (Turn) (Page 6)
7 DISP/DISP OFF button
• Switches the screen between the current
source and the App screen from the connected
iPod touch/iPhone/Android. (Press)
• Turns off the screen. (Hold) (Page 6)
• Turns on the screen. (Hold) (Page 6)
8 AUX input jack
9 Monitor panel*
p Screen (touch panel)
* You can change the color of the buttons on the monitor panel.
(Page 39)
V Caution on the volume setting:
Digital devices produce very little noise
compared with other sources. Lower the
volume before playing these digital sources
to avoid damaging the speakers by sudden
increase of the output level.
KW-V_Mid_EU.indb 5 2014/01/28 16:26
6
BASICS
Common operations
❏ Turning on the power
KW-V50BT KW-V30BT
❏ Turning off the power
KW-V50BT KW-V30BT
(Hold)
(Hold)
❏ Adjusting the volume
To adjust the volume (00 to 35)
KW-V50BT
Press + to increase, and press – to decrease.
• Holding the button increases/decreases the
volume continuously.
KW-V30BT
Turn to the right to increase, and turn to the left to
decrease.
To attenuate the sound
KW-V50BT KW-V30BT
The ATT indicator lights up.
To cancel the attenuation: Press the same button
again.
❏ Turning off the screen
KW-V50BT KW-V30BT
(Hold) (Hold)
To turn on the screen: Press and hold DISP on the
monitor panel.
❏ Turning on/off the AV source
You can activate the AV function by selecting a
source on the Home screen.
To select a source not displayed on the Home
screen: Press [All]. (Page 8)
To turn off the AV source:
❏ Monitor panel operations — <Open/
Tilt> (only for KW-V50BT)
[0] – [6] Selects an angle.
[ Eject] Ejects the disc.
[ Open] Opens the monitor panel.
[ Close] Closes the monitor panel.
[ ]Exits from the <Open/Tilt> screen.
KW-V_Mid_EU.indb 6 2014/01/28 16:26

ENGLISH 7
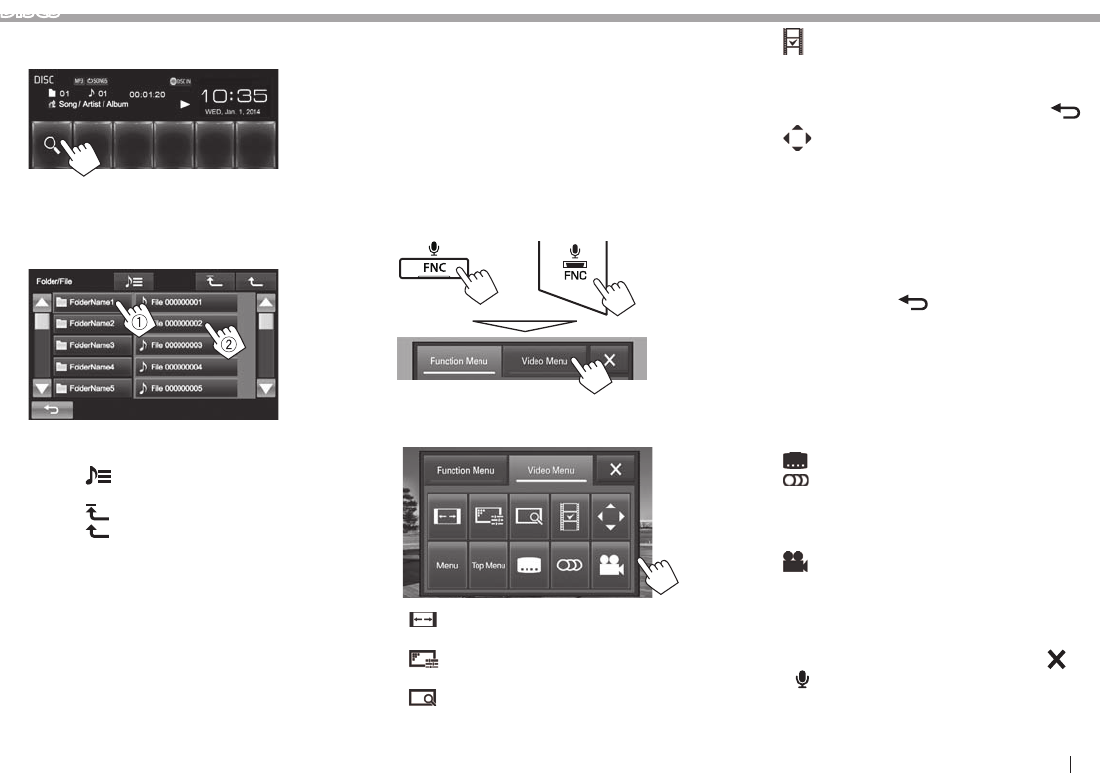
BASICS
Common screen operations
❏Common screen descriptions
You can display other screens any time to change
the source, show the information, or change the
settings, etc.
Source control screen
Performs source playback operations.
• The operation buttons vary depending on the
selected source.
• Touching the text information changes the
information type.
<Function Menu>/<Video Menu> screen
While displaying to the source control screen,
you can display/hide other operation buttons by
pressing FNC/ on the monitor panel.
<Function Menu> screen
1 2
3
4
<Video Menu> screen
5
6
Common operating buttons:
1 Switches to the <Video Menu> screen.
2 Closes the <Function Menu>/<Video Menu>
screen and returns to the source control screen.
3 Displays sub-function buttons for source
playback.
• The buttons vary depending on the selected
source.
4 Short-cut buttons
[ ] Displays the phone control screen.
(Page 31)
[]Activates the voice dialing.
(Page 32)
[]Displays the sound adjustment
screen. (Page36)
[]Displays the <Display> menu
screen. (Page42)
[TP] Activates/deactivates TA standby
reception mode. (Page 22)
5 Switches to the <Function Menu> screen.
6 Operation buttons for video playback.
(Page37)
• The buttons vary depending on the selected
source.
Home s creen
Displays the source control screen/settings screen
and changes the picture source.
• To display the Home screen, press HOME on the
monitor panel.
4
12 3
Common operating buttons:
1 Displays all the sources. (Page8)
2 Displays the <Settings> screen. (See below.)
3 Displays the phone control screen. (Page 31)
4 Changes the playback source. (Page 8)
<Settings> screen
Changes the detailed settings. (Page 41)
34
2
1
Common operating buttons:
1 Selects the menu category.
2 Changes the page.
3 Returns to the previous screen.
4 Displays the current source control screen.
KW-V_Mid_EU.indb 7 2014/01/28 16:26
8
BASICS
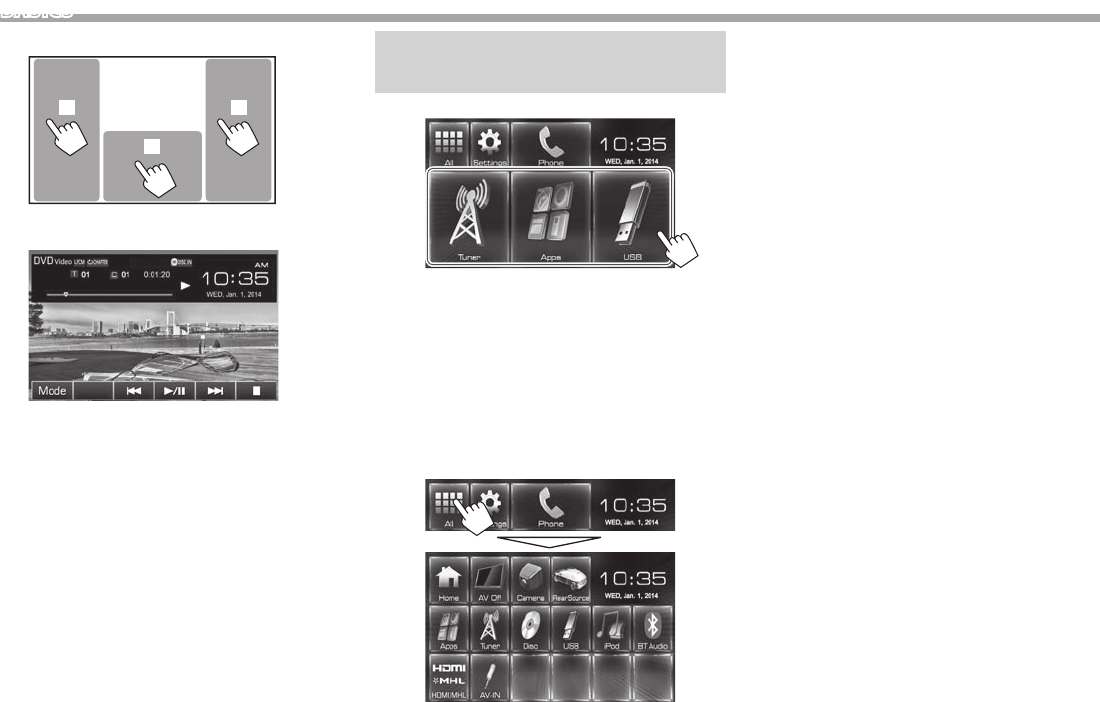
❏Touch screen operations
1
32
1 Displays the source control screen while playing
a video.
• The operation buttons disappear when the
screen is touched or when no operation is
done for about 10 seconds.
2 Goes to the previous chapter/track.*
3 Goes to the next chapter/track.*
* Not available for video from an external component. Dragging your
finger to the left or right functions in the same way as touching.
Selecting the playback/video
source
On the Home screen:
• For [USB]/[iPod] : When playing a source with the
jacket picture/Artwork/picture data shown, the
jacket picture/Artwork/picture data is displayed
on the button instead of the source icon on the
Home screen.
• You can change the items to display on the Home
screen. (Page40)
❏ To display all sources and items on the
screen
To restore the screen: Press [Home].
[AV Off] Turns off the AV source.
(Page 6)
[Camera] Switches to a camera connected
to the rear view camera input.
(Page 25)
[RearSource] Selects the rear source to display on
the external monitor. (Page 26)
[Apps] Switches to the App screen from
the connected iPod touch/iPhone.
(Page 19)
[Tuner] Switches to the radio broadcast.
(Page 20 )
[Disc] Plays a disc. (Page 9)
[USB] Plays files on a USB device.
(Page 14)
[iPod] Plays an iPod/iPhone. (Page 16)
[BT Audio] Plays a Bluetooth audio player.
(Page 33)
[HDMI/MHL] Plays a device connected to
the HDMI/MHL input terminal.
(Page 26)
[AV-IN] Switches to an external component
connected to the AV-IN1 terminal
on the rear panel. (Page 24)
[Front AUX]*
Switches to an external component
connected to AUX input terminal
on the monitor panel. (Page 24)
*
Only for KW-V30BT.
KW-V_Mid_EU.indb 8 2014/01/28 16:26
ENGLISH 9
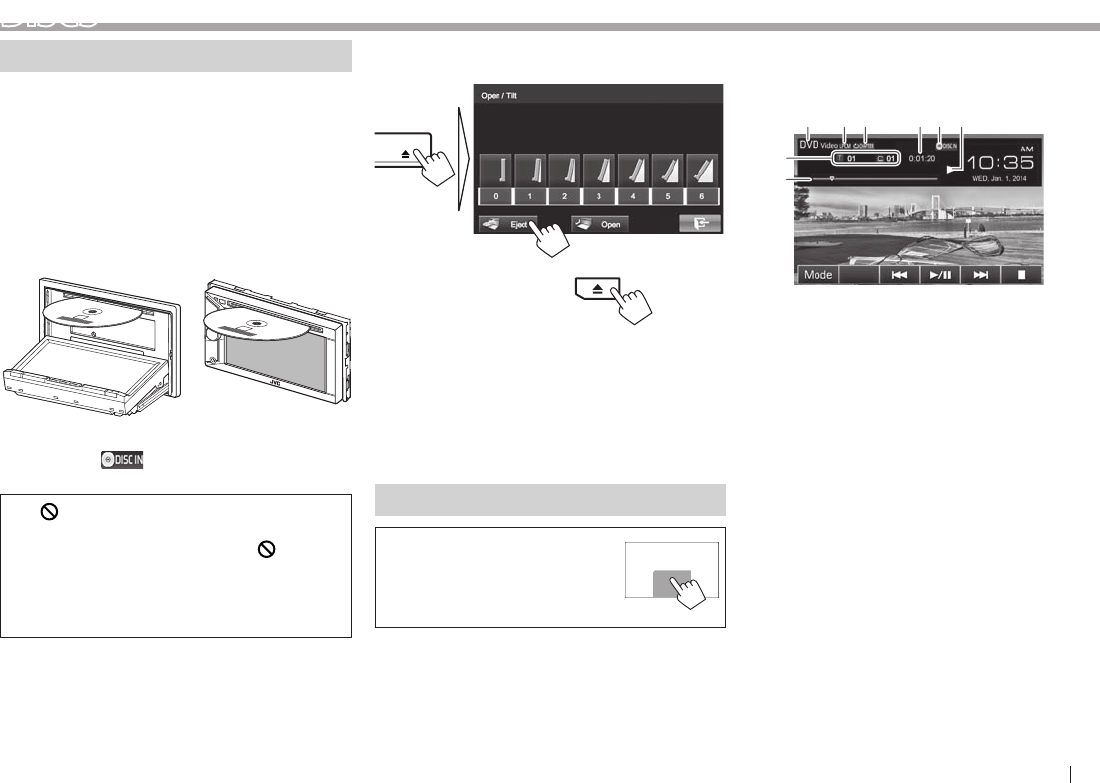
DISCS
Playing a disc
• If a disc does not have a disc menu, all tracks on
it will be played repeatedly until you change the
source or eject the disc.
• For playable disc types/file types, see page 51.
❏Inserting a disc
Insert a disc with the label side facing up.
• For KW-V50BT: To open the monitor panel, see
page 6.
KW-V50BT KW-V30BT
The source changes to “DISC” and playback starts.
• The DISC IN ( ) indicator lights up while a
disc is inserted.
• If “ ” appears on the screen, the unit cannot
accept the operation you have tried to do.
– In some cases, without showing “ ,”
operations will not be accepted.
• When playing back a multi-channel encoded
disc, the multi-channel signals are downmixed
to stereo.
❏ Ejecting a disc
KW-V50BT
KW-V30BT
• When removing a disc, pull it horizontally.
• You can eject a disc when playing another AV
source.
• If the ejected disc is not removed within
60 seconds, the disc is automatically inserted
again into the loading slot to protect it from dust.
• If the disc cannot be ejected, see page 3.
Playback operations
When the operation buttons are
not displayed on the screen, touch
the area shown on the illustration.
• To change settings for video
playback, see page 37.
❏Indications and buttons on the source
control screen
For DVD/DVD-VR/VCD/DivX/MPEG1/MPEG2
1 23 54
8
6
7
Playback information
1 Media type
2 Audio format
3 Playback mode (Page12)
4 Playing time
5 DISC IN indicator
6 Playback status
7 Current playback item information
• DVD Video: Title no./Chapter no.
• DVD-VR: Program no. (or Playlist no.)/Chapter
no.
• DivX/MPEG1/MPEG2: Folder no./Track no.
• VCD: Scene no. (with PBC) or Track no. (without
PBC)
8 Progress bar*
* Appears only for DVD Video.
KW-V_Mid_EU.indb 9 2014/01/28 16:26
10
DISCS
Operation buttons
[Mode] Changes the settings for disc
playback on the <Mode> screen.
(Page13)
[]*1Displays the folder/track list.
(Page11)
[S] [T]• Selects a chapter/track. (Press)
• Reverse/forward search.*2 (Hold)
[I/W]Starts/pauses playback.
[o]Stops playback.
[]*3Selects repeat playback mode.
(Page12)
[]*1 *3Selects random playback mode.
(Page12)
[]*3 *4Displays an Original Program/
Playlist screen.
[ ] [ ]*3 *5Plays in frame-by-frame.
[ ] [ ]*1 *3Selects a folder.
[PBC]*3 *6Activates or deactivates the VCD
PBC (Playback Control) function.
*1 Does not appear for DVD/DVD-VR/VCD.
*2 Search speed varies depending on the type of disc or file.
*3 Press FNC/ on the monitor panel to display the <Function
Menu> screen to select the item. (Page7)
*4 Appears only for DVD-VR.
*5 Appears only for DVD/DVD-VR.
*6 Appears only for VCD.
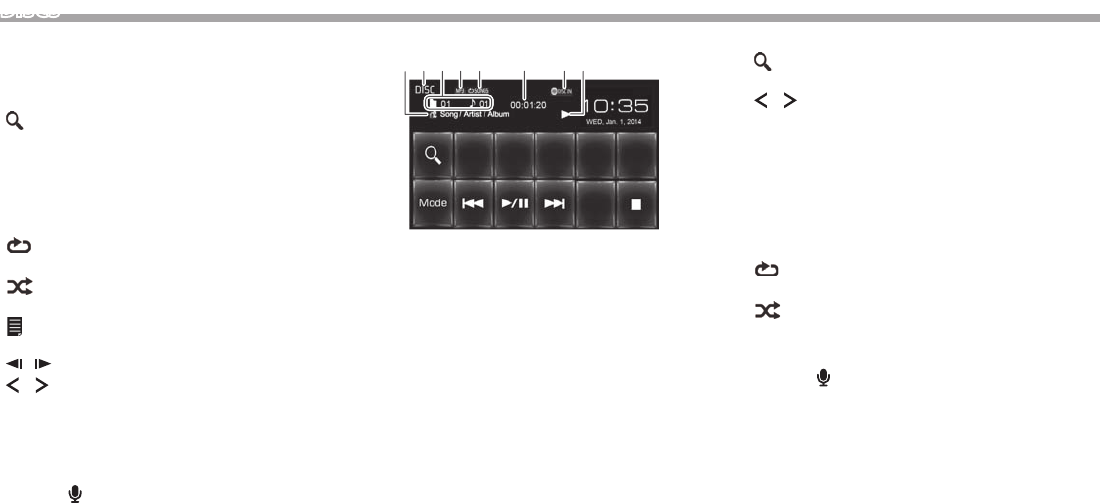
For C D/MP3/WMA/AAC
4256731 8
Playback information
1 Track/file information
• Touching the text information changes the
information type.
2 Media type
3 Current playback item information
• MP3/WMA/AAC: Folder no./Track no.
• CD: Track no.
4 Audio format
5 Playback mode (Page12)
6 Playing time
7 DISC IN indicator
8 Playback status
Operation buttons
[ ]*1Displays the folder/track list.
(Page11)
[ ] [ ]*1 *2Selects a folder.
[Mode] Changes the settings for disc
playback on the <Mode> screen.
(Page13)
[S] [T]• Selects a track. (Press)
• Reverse/forward search.*3 (Hold)
[I/W]Starts/pauses playback.
[o]Stops playback.
[]*2Selects repeat playback mode.
(Page12)
[]*2Selects random playback mode.
(Page12)
*1 Does not appear for CD.
*2 Press FNC/ on the monitor panel to display the <Function
Menu> screen to select the item. (Page7)
*3 Search speed varies depending on the type of disc or file.
KW-V_Mid_EU.indb 10 2014/01/28 16:26
ENGLISH 11
DISCS
❏ Selecting a folder/track on the list
1
2 Select the folder (1), then the item in the
selected folder (2).
• Repeat the procedure until you select the
desired track.
• You can change the page to display more
items by pressing [J]/[K].
• Press [ ] to open the folder containing the
current track.
• Press [] to return to the root folder.
• Press [] to return to the upper layer.
❏ Video menu operations
You can display the video menu screen during video
playback.
• Available items on the screen differ depending on
the types of the loaded disc and playback files.
• The operation buttons disappear when the screen
is touched or when no operation is done for about
10 seconds.
1 Display the <Video Menu> screen.
KW-V50BT KW-V30BT
2
For DVD/DVD-VR/DivX/MPEG1/MPEG2
[ ] Selects the aspect ratio.
(Page38)
[]Displays the picture adjustment
screen. (Page37)
[]* Displays the picture size
selecting screen. (Page38)
[ ]* Switches to the direct disc menu
mode. Touch the target item to
select.
• To exit from the menu
selecting screen, press [ ].
[]* Displays the menu/playlist/
original program/scene selecting
screen.
• [J] [K] [H] [I]: Selects an
item.
• [Enter]: Confirms the
selection.
• [Return]: Returns to the
previous screen.
• [ ]: Displays the menu
screen of the top layer when
several menu screens exist on
the disc.
– For DivX: Exits from the
scene selecting screen.
[Menu]* Displays the disc menu.
[Top Menu]* Displays the disc menu (DVD).
[]* Selects the subtitle type.
[]Selects the audio type.
• For DVD-VR: Selects the audio
channel (ST: stereo, L: left, R:
right).
[]* Selects the view angle.
* May not appear depending on the media/file etc.
• Touching any position other than operation
buttons displays the source control screen.
• To close the <Video Menu> screen, press [ ] or
FNC/ on the monitor panel.
KW-V_Mid_EU.indb 11 2014/01/28 16:26

12
DISCS
For VCD
[ ] Selects the aspect ratio.
(Page38)
[]Displays the picture adjustment
screen. (Page37)
[]Displays the picture size selecting
screen. (Page38)
[]Displays/hides the direct selecting
buttons.
[]Selects the audio channel (ST:
stereo, LL: left, RR: right).
• To select a track directly, press [ ] to
display the direct selecting buttons, then...
– When you enter a wrong number, press
[CLR] to delete the last entry.
• Touching any position other than operation
buttons displays the source control screen.
• To close the <Video Menu> screen, press [ ] or
FNC/ on the monitor panel.
❏Selecting playback mode
1 Display the <Function Menu> screen.
KW-V50BT KW-V30BT
2
[ ] Selects Repeat playback mode.
[]Selects Random playback mode.
• To close the <Function Menu> screen, press
[ ] or FNC/ on the monitor panel.
• For DVD/DVD-VR/VCD (without PBC): Repeat play
is available.
For CD/DivX/MPEG1/MPEG2/MP3/WMA/AAC:
Repeat and Random play are available.
– You cannot activate the repeat mode and the
random mode at the same time.
• Each time you press the button, the playback
mode changes. (The corresponding indicator
lights up.)
– Available items differ depending on the types of
loaded disc and playback file.
CHAPTER Repeats current chapter.
TITLE Repeats current title.
SONGS Repeats current track.
FOLDER Repeats all tracks of the
current folder.
FOLDER Randomly plays all tracks of
the current folder, then tracks
of the next folders.
ALL Randomly plays all tracks.
To cancel Repeat/Random playback: Press the
button repeatedly until the indicator disappears.
KW-V_Mid_EU.indb 12 2014/01/28 16:26
ENGLISH 13
DISCS
Settings for disc playback
• The items available on the <Mode> screen are
different depending on the discs/files played back.
❏Setting items
<Menu
Language>*
Select the initial disc menu language.
(Initial: English ) (Page53)
<Subtitle>* Select the initial subtitle language
or turn subtitles off (Off). (Initial:
English ) (Page53)
<Audio
Language>*
Select the initial audio language.
(Initial: Original) (Page53)
<D.Range
Compres.>*
You can change the dynamic range
while playing Dolby Digital software.
• Off: Select this to enjoy a powerful
sound at a low volume level with
its full dynamic range.
• On (initial): Select this to reduce
the dynamic range a little.
• Dialog: Select this to reproduce
movie dialog more clearly.
<Angle
Mark>
Select whether to display the angle
mark.
• On (initial): Select this to display
the angle mark.
• Off: Select this to hide the angle
mark.
<Monitor
Type>*
Select the monitor type to watch a
wide screen picture on the external
monitor.
16:9
(Initial) 4:3 LB 4:3 PS
<Parental
Level>*
Set the parental level.
(See the right column.)
<CD Read> Select the files to play back a disc
containing music files. You cannot
change the setting when a disc is
inserted.
• 1 (initial): Automatically
distinguishes between audio file
discs and music CDs.
• 2: Forces to play as a music CD. No
sound can be heard if an audio file
disc is played.
* You can change these settings only while playback is stopped.
Setting the parental lock
The parental lock cannot be set during DVD
playback.
1 Display the <Parental Level> screen.
On the <Mode> screen:
2 Enter the 4-digit parental pass code (1),
and press [Enter] (2).
• To clear the entry, press [Clear].
3 Adjust the parental level (Off, Level 1 to
Level 8).
KW-V_Mid_EU.indb 13 2014/01/28 16:26
14
USB
Connecting a USB device
You can connect a USB mass storage class device
such as a USB memory, Digital Audio Player etc. to
the unit.
• For details about connecting USB devices, see
page 48 .
• You cannot connect a computer or portable HDD
to the USB input terminal.
• For playable file types and notes on using USB
devices, see page 52.
When a USB device is connected...
The source changes to “USB” and playback starts.
• All tracks in the USB device will be played
repeatedly until you change the source.
Playback operations
When the operation buttons are
not displayed on the screen, touch
the area shown on the illustration.
• To change settings for video
playback, see page 37.
❏Indications and buttons on the source
control screen
For audio files (MP3/WMA/WAV/AAC/FLAC)
34 756 821
For video/picture files (MPEG1/MPEG2/H.264/
WMV/JPEG/BMP/PNG)
4 7562
Playback information
1 Track/file information
• Touching the text information changes the
information type.
2 Current playback item information
3 Audio format
4 Playback mode (See the right column.)
5 Playing time
6 Progress bar
7 Playback status
8 Jacket picture (Shown while playing if the file has
tag data that includes the jacket picture)
Operation buttons
[Mode] Changes the picture display time
setting on the <Mode> screen.
(Page15)
[]Displays the list selection screen.
(Page15)
[S] [T]• Selects a track. (Press)
• Reverse/forward search.*1 (Hold)
[I/W]Starts/pauses playback.
[ ] [ ]*2Selects a folder.
[ ]*2 *3 *4Selects repeat playback mode.
• SONGS: Repeats current track/
file.
• FOLDER: Repeats all tracks/
files in the current folder or
specified category.
[]*2 *3 *4• ALL:
– When selecting the track/file
from the folder, randomly plays
all tracks/files of the current
folder, then the tracks/files of
the next folder.
– When selecting the track/file
from the category, randomly
plays all tracks/files of the
specified category.
*1 Search speed varies depending on the file type.
*2 Press FNC/ on the monitor panel to display the <Function
Menu> screen to select the item. (Page7)
*3 To cancel random or repeat mode, press the button repeatedly until
the indicator disappears.
*4 You cannot activate the repeat mode and the random mode at the
same time.
KW-V_Mid_EU.indb 14 2014/01/28 16:26
ENGLISH 15
USB
❏ Setting <Picture Display Time>
Set the interval between slides during slide-shows of
the picture files.
❏ Selecting a track in a list
1
2 Select the list.
• To cancel the procedure, press [ ].
3 Select the track.
• You can change the page to display more
items by pressing [J]/[K].
• To list the items in alphabetical order, press
[ABC ], then select the first character.
• Press [ ] to open the folder containing the
current track.
• Press [] to return to the root folder.
• Press [] to return to the upper layer.
• If you want to play all tracks in the folder,
press [I] on the right of the desired folder.
• On the <Category List>/<Folder List>
screen: You can switch the file type to list:
Press [ ] to list audio files, [ ] to list video
files, or [ ] to list still picture files.
From the <Category List> screen:
Select the category (1), then the item in the
selected category (2).
From the <Link Search> screen:
Select the tag type to display the list of contents
containing the same tag as the track/file
currently played back (1), then the item (2).
From the <Folder List> screen:
Select the folder (1), then the item in the
selected folder (2).
KW-V_Mid_EU.indb 15 2014/01/28 16:26
16
iPod/iPhone
• To use iPod touch/iPhone Apps, see page 19.
Preparation
❏ Connecting i Pod/iPhone
• For details about connecting iPod/iPhone, see
page 48 .
• For playable iPod/iPhone types, see page 53.
Connect your iPod/iPhone according to your
purpose or the type of the iPod/iPhone.
Wired connection
• To listen to music:
Use USB 2.0 cable (accessory of the iPod/iPhone)
or KS-U62 (optional accessory).
• To watch video and listen to music:
– For iPod/iPhone except for iPhone 5/iPod touch
(5th Generation)/iPod nano (7th Generation),
use USB Audio and Video cable for iPod/
iPhone—KS-U59 (optional accessory).
– For iPhone 5/iPod touch (5th Generation)/iPod
nano (7th Generation), use the HDMI cable
KS-U60 (optional accessory) and USB 2.0 cable
(accessory of the iPod/iPhone)/KS-U62 (optional
accessory) through Lightning-Digital AV adapter
(accessory of the iPod/iPhone).
Bluetooth connection
Pair the iPod/iPhone through Bluetooth. (Page27)
• For iPhone 5/iPod touch (5th Generation)/iPod
nano (7th Generation): To watch the video,
connect your iPod/iPhone to HDMI/MHL input
terminal using KS-U60 (optional accessory).
(Page 48 )
• For iPod/iPhone except for iPhone 5/iPod touch
(5th Generation)/iPod nano (7th Generation):
You cannot watch the video with Bluetooth
connection.
❏ Selecting the iPod/iPhone device to
play and connection method
When connecting the iPod/iPhone device for
first time, the setup screen (for connection, etc.)
appears. Follow the procedure on the setup screen
to configure the settings.
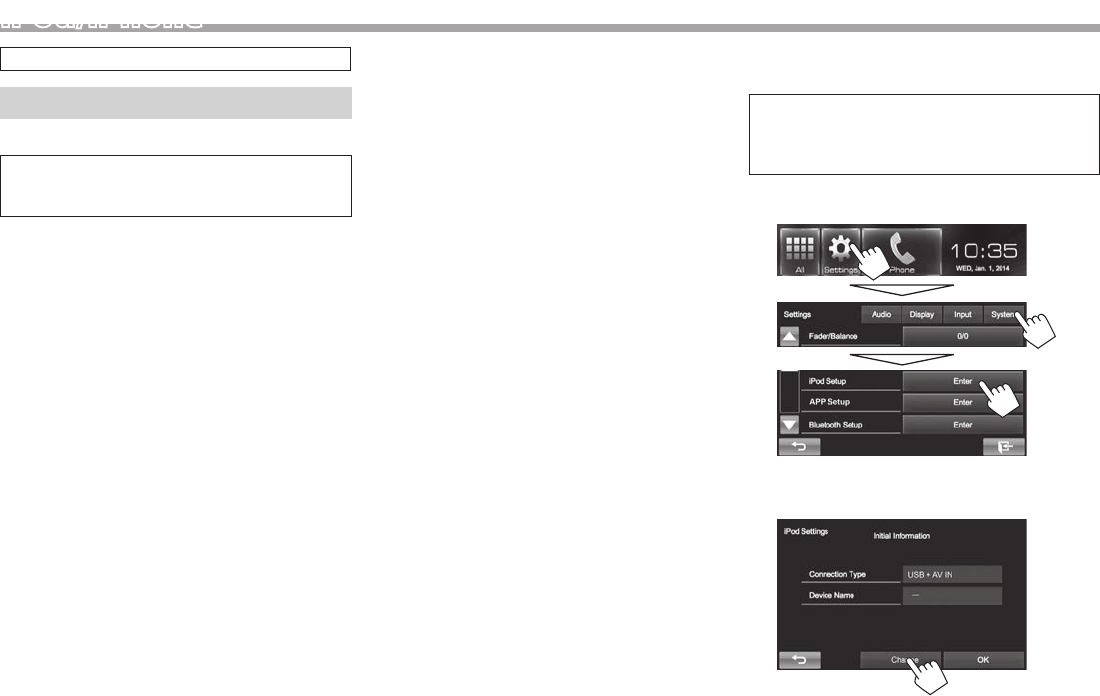
1 Display the <iPod Settings> screen.
On the Home screen:
• If [Enter] for <iPod Setup> cannot be
selected, turn off the AV source. (Page6)
2
• If you do not need to change the setting,
press [OK] to exit from the setup screen.
KW-V_Mid_EU.indb 16 2014/01/28 16:26
ENGLISH 17
iPod/iPhone
3 Select the connection method (1), then
press [Next] (2).
<USB +
AV-IN>
Select this when the iPod/
iPhone is connected using KS-
U59 (optional accessory).
<USB 1 wire> Select this when the iPod/
iPhone is connected using USB
2.0 cable (accessory of the iPod/
iPhone) or KS-U62 (optional
accessory).
<HDMI +
Bluetooth>
Select this when the iPod/
iPhone is connected using
HDMI cable KS-U60 (optional
accessory) and USB 2.0 cable
(accessory of the iPod/iPhone)/
KS-U62 (optional accessory)
through Lightning-Digital AV
adapter (accessory of the iPod/
iPhone).
<Bluetooth> Select this when the iPod/
iPhone is connected via
Bluetooth.
• When selecting <USB + AV-IN> or <USB 1
wire>, go to step 5.
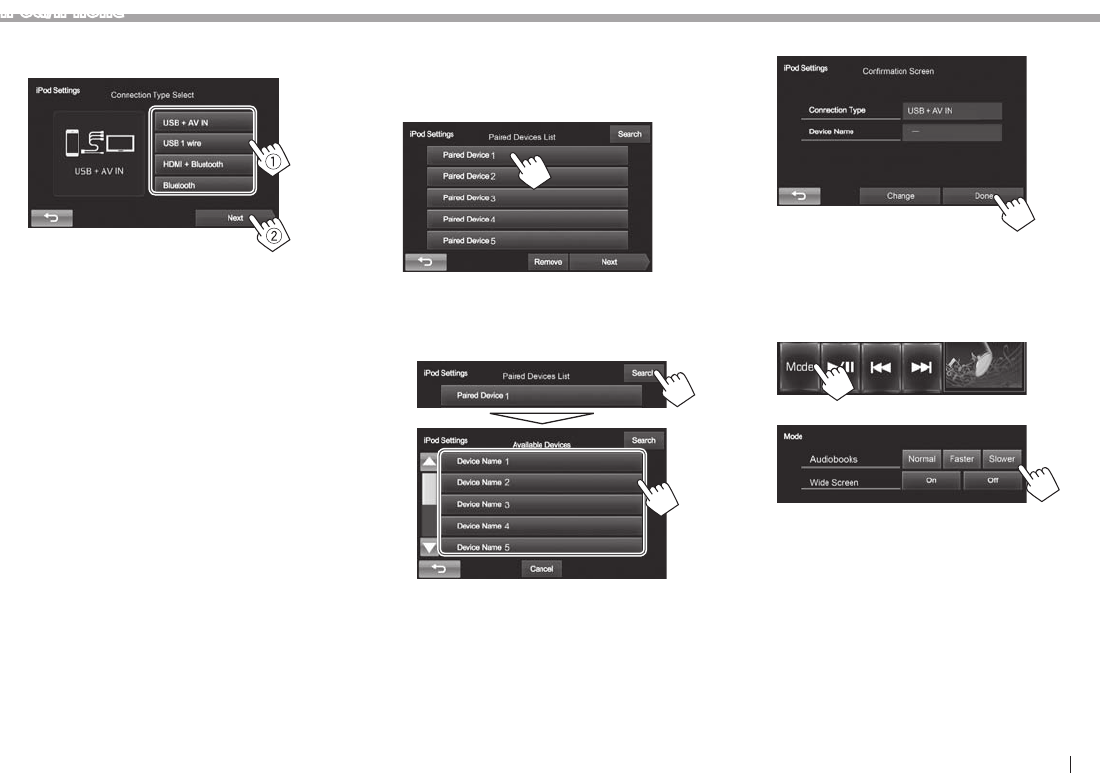
4 When selecting <HDMI + Bluetooth> or
<Bluetooth> as the connection method,
paired device list appears. Select the target
device.
• If desired device is not listed, press [Search]
for searching the available iPod/iPhone
devices, then select the target device from the
<Available Devices> screen.
– You can change the page to display more
items by pressing [J]/[K].
– To stop searching, press [Cancel].
5 Confirm the settings.
❏ Selecting preference settings for iPod/
iPhone playback
When the source is “iPod”...
1
2
<Audiobooks> Select the speed of audio
books.
<Wide
Screen>*
• [On]: Select this to display
the video compatible with
wide-screen display in wide-
screen.
• [Off]: Select this to
deactivate.
* You cannot change the setting when iPod/iPhone is connected.
KW-V_Mid_EU.indb 17 2014/01/28 16:26
18
iPod/iPhone
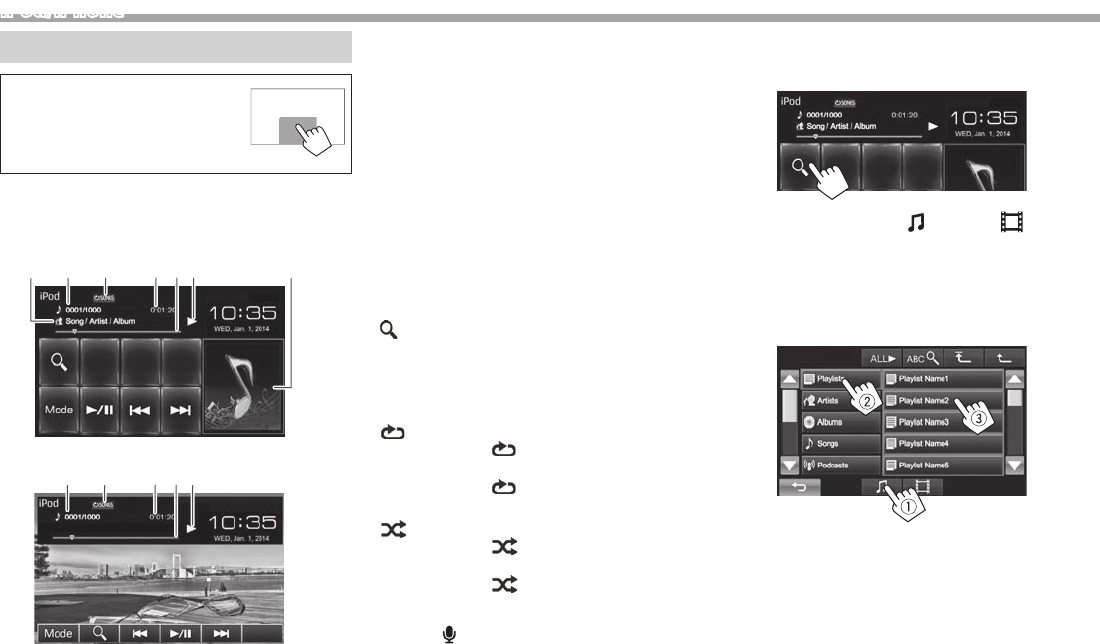
Playback op erations
When the operation buttons are
not displayed on the screen, touch
the area shown on the illustration.
• To change settings for video
playback, see page 37.
❏Indications and buttons on the source
control screen
For audio playback
3 645 721
For video playback
3 6452
Playback information
1 Song/video information
• Touching the text information changes the
information type.
2 Track no./Total track number
3 Playback mode (See below.)
4 Playing time
5 Progress bar
6 Playback status
7 Artwork (Shown if the song contains Artwork)
Operation buttons
[Mode] Changes the settings for iPod/iPhone
playback on the <Mode> screen.
(Page17)
[]Displays the audio/video file list. (See
the right column.)
[S] [T]• Selects an audio/video file. (Press)
• Reverse/forward search. (Hold)
[I/W]Starts/pauses playback.
[]*1 Selects repeat playback mode.
• SONGS: Functions the same as
“Repeat One.”
• ALL: Functions the same as
“Repeat All.”
[]*1 *2Selects random playback mode.
• SONGS: Functions the same
as “Shuffle Songs.”
• ALBUMS: Functions the same
as “Shuffle Albums.”
*1 Press FNC/ on the monitor panel to display the <Function
Menu> screen to select the item. (Page7)
*2 To cancel random mode, press the button repeatedly until the
indicator disappears.
❏ Selecting an audio/video file from the
list
1
2 Select the menu ( : audio or : video)
(1), a category (2), then a desired item
(3).
• Select the item in the selected layer until a
desired file starts playing.
Audio menu:
KW-V_Mid_EU.indb 18 2014/01/28 16:26

ENGLISH 19
Apps
You can use an App of the connected iPod touch/
iPhone/Android on this unit.
• When you use an iPod touch or iPhone App, see
also page 54 for safety instructions.
• For Apps you can use on this unit, visit
<http://www.jvc.net/cs/car/>.
Preparation
1 Connect the iPod touch/iPhone/Android.
• For wired connection, see page 48 for iPod
touch/iPhone or page 49 for Android.
– To view the video, connect the device
by using KS-U59 or KS-U60 (optional
accessory).
• For Bluetooth connection, see page 27.
2 Select the iPod touch/iPhone/Android
device to use and connection method on
the <App Settings> screen. (Page 35)
When connecting the device for first time, the
setup screen (for connection, etc.) appears. Follow
the procedure on the setup screen to configure
the settings.
Using an App
❏ Playback operations
1 Start App on your iPod touch/iPhone/
Android.
2 Select “Apps” as the source. (Page8)
❏Operation buttons on the source
control screen
[S] [T]Selects an audio/video file.
[I/W]Starts/pauses playback.
• You can operate some functions of the App on the
touch panel.
• For some applications such as navigation
applications, the operating buttons and
information are not shown. You can perform the
operations on the touch panel, such as scrolling
the map.
You can also play back the audio/video using
iPod/iPhone itself instead of the unit.
❏Switching to the App screen while
listening to another source
KW-V50BT KW-V30BT
iPod/iPhone
Video menu:
• You can change the page to display more
items by pressing [J]/[K].
• To list the items in alphabetical order, press
[ABC ], then select the first character.
• Press [ALL I] to play all songs/videos.
• Press [] to return to the top layer.
• Press [] to return to the upper layer.
• Available categories differ depending on the type
of your iPod/iPhone.
KW-V_Mid_EU.indb 19 2014/01/28 16:26
20
TUNER
Listening to the radio
❏Indications and buttons on the source
control screen
9
8
123 4 6
p
75
Tuner reception information
1 Preset no.
2 The station frequency currently tuned in/PS
(station name) for FM Radio Data System when
PS signal is coming in
3 ST/MO indicator
• The ST indicator lights up when receiving an
FM stereo broadcast with sufficient signal
strength.
4 DX/LO indicator
5 Standby reception indicators (TP/NEWS)
6 AF indicator
7 PTY code for FM Radio Data System
8 Band
9 Text information
• Touching the text information changes the
information type.
p Preset list
Operation b uttons
[P1] – [P6] • Selects a stored station. (Press)
• Stores the current station. (Hold)
[Mode] Changes the settings for tuner
reception on the <Mode> screen.
(Pages21–23)
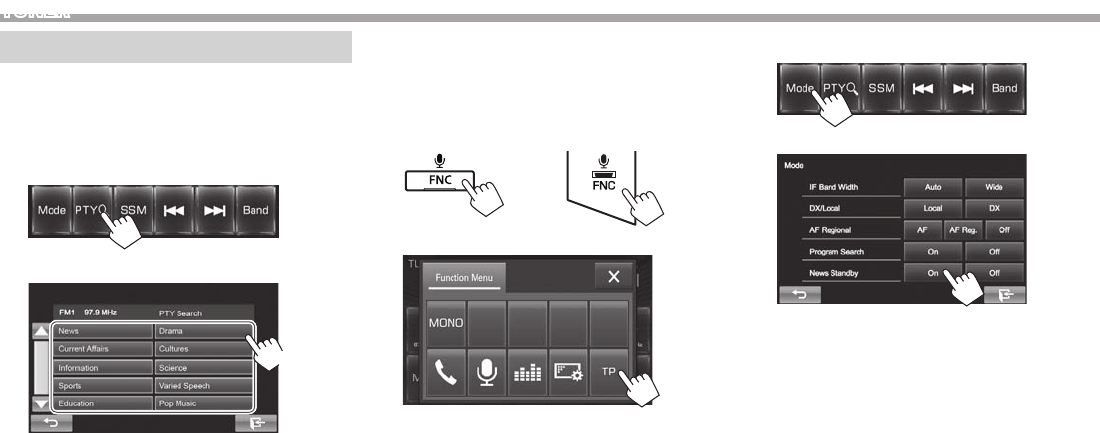
[PTY ]*1Enters PTY search mode. (Page22)
[SSM] Presets the stations with the
strongest signals automatically.
(Page21)
[S] [T]Searches for a station.
• Auto search (Press)
• Manual search (Hold)
[Band] Selects the band.
[MONO]*1*2Activates/deactivates monaural
mode. (See the right column.)
[TP]*2Activates/deactivates TA standby
reception mode. (Page22)
*1 Appears only when FM is selected as the source.
*2 Press FNC/ on the monitor panel to display the <Function
Menu> screen to select the item. (Page7)
❏ Improving the FM reception
Activate monaural mode for better reception.
1 Display the <Function Menu> screen.
KW-V50BT KW-V30BT
2
Monaural mode is activated. The MO indicator
lights up.
• FM reception is improved, but the stereo
effect will be lost.
• To close the <Function Menu> screen, press
[] or FNC/ on the monitor panel.
To restore the stereo effect: Press [MONO] on the
<Function Menu> screen.
KW-V_Mid_EU.indb 20 2014/01/28 16:26

ENGLISH 21
TUNER
❏ Tuning in FM stations only with strong
signals—LO/DX (Local/Distance-
extreme)
1
2
[Local] Select this to tune in only to stations
with sufficient signal strength. The
LO indicator lights up.
[DX] Deactivate the function. The DX
indicator lights up.
❏Reducing interference during FM
reception
1
2
[Auto] Increases the tuner selectivity
to reduce interference between
adjacent stations. (Stereo effect may
be lost.)
[Wide] Subject to the interference from
adjacent stations, but sound quality
will not be degraded and the stereo
effect will remain.
Presetting stations
❏ Storing stations in the memory
You can preset 6 stations for each band.
Automatic p resetting — SSM (St rong-station
Sequential Memory)
(Hold)
Local stations with the strongest signals are found
and stored automatically.
Manual p resetting
1 Tune in to a station you want to preset.
(Page 20)
2 Select a preset number.
(Hold)
The station selected in step 1 is stored.
❏Selecting a preset station
KW-V_Mid_EU.indb 21 2014/01/28 16:26
22
TUNER
FM Radio Data System features
❏ Searching for FM Radio Data System
programs—PTY Search
You can search for your favorite programs being
broadcast by selecting the PTY code for your favorite
programs.
1
2 Select a PTY code.
(Hold)
• You can change the page to display more
items by pressing [J]/[K].
PTY Search starts.
If there is a station broadcasting a program of
the same PTY code as you have selected, that
station is tuned in.
❏ Activating/deactivating TA/News
Standby Reception
TA Standby Reception
1 Display the <Function Menu> screen.
KW-V50BT KW-V30BT
2
The unit is in standby to switch to Traffic
Announcement (TA) if available. (The TP
indicator lights up in white.)
If the TP indicator is lit in gray, tune into another
station providing Radio Data System signals.
To deactivate TA Standby Reception: Press [TP].
(The TP indicator goes off.)
• The volume adjustment for Traffic Announcement
is automatically memorized. The next time the
unit switches to Traffic Announcement, the
volume is set to the previous level.
News Standby Reception
1
2
The unit is in standby to switch to News Program if
available. (The NEWS indicator lights up in white.)
• If the NEWS indicator is lit in gray, tune into
another station providing Radio Data System
signals.
To deactivate News Standby Reception:
Select [Off] for <News Standby>. (The NEWS
indicator goes off.)
• The volume adjustment while receiving News
is automatically memorized. The next time the
unit switches to News, the volume is set to the
previous level.
KW-V_Mid_EU.indb 22 2014/01/28 16:26
ENGLISH 23
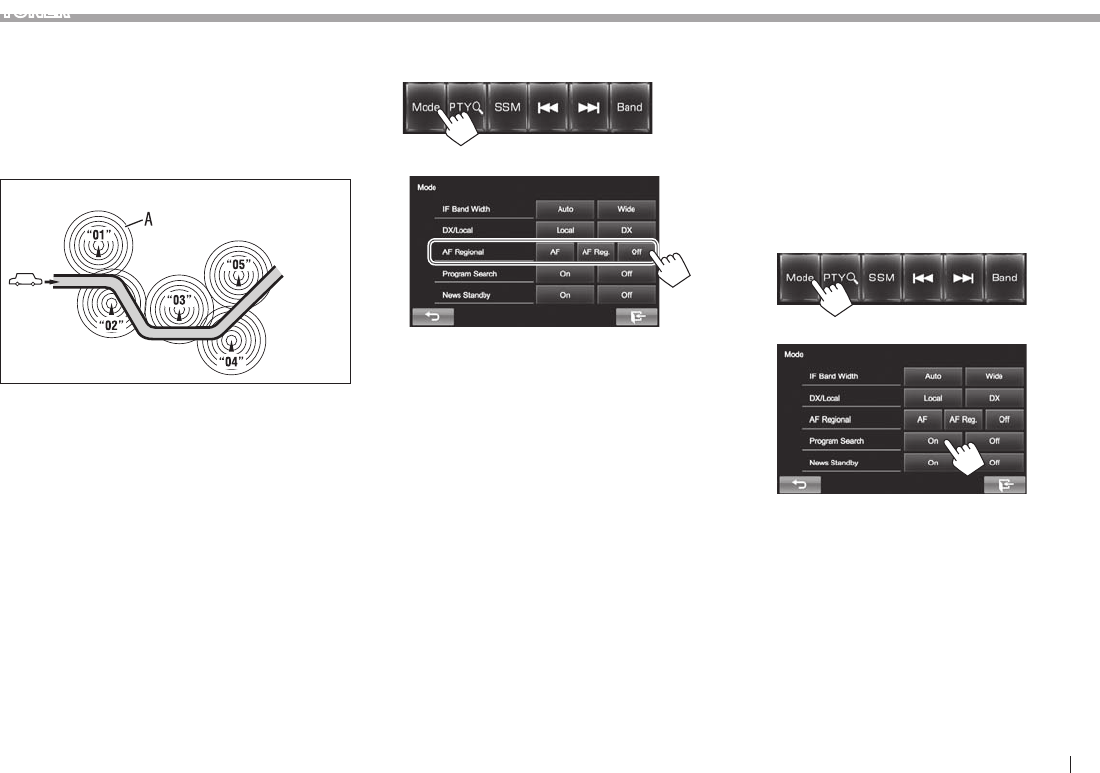
TUNER
❏Tracing the same program
—Network-Tracking Reception
When driving in an area where FM reception is not
sufficient enough, this unit automatically tunes in to
another FM Radio Data System station of the same
network, possibly broadcasting the same program
with stronger signals.
Program A broadcasting on different frequency areas (01 – 05)
• When shipped from the factory, Network-Tracking
Reception is activated.
To change the Network-Tracking Reception
setting
1
2
[AF] Switches to another station. The
program may differ from the one
currently received (the AF indicator
lights up).
[AF Reg.] Switches to another station
broadcasting the same program
(the AF indicator lights up).
[Off] Cancels.
❏ Automatic station selection—Program
Search
Usually when you select preset stations, the preset
station is tuned in.
If the signals from the preset FM Radio Data System
station are not sufficient for good reception, this
unit, using the AF data, tunes in to another station
broadcasting the same program that the original
preset station is broadcasting.
To activate Program Search
1
2
• The unit takes some time to tune in to another
station using program search.
To deactivate Program Search: Select [Off] for
<Program Search>.
KW-V_Mid_EU.indb 23 2014/01/28 16:26
24
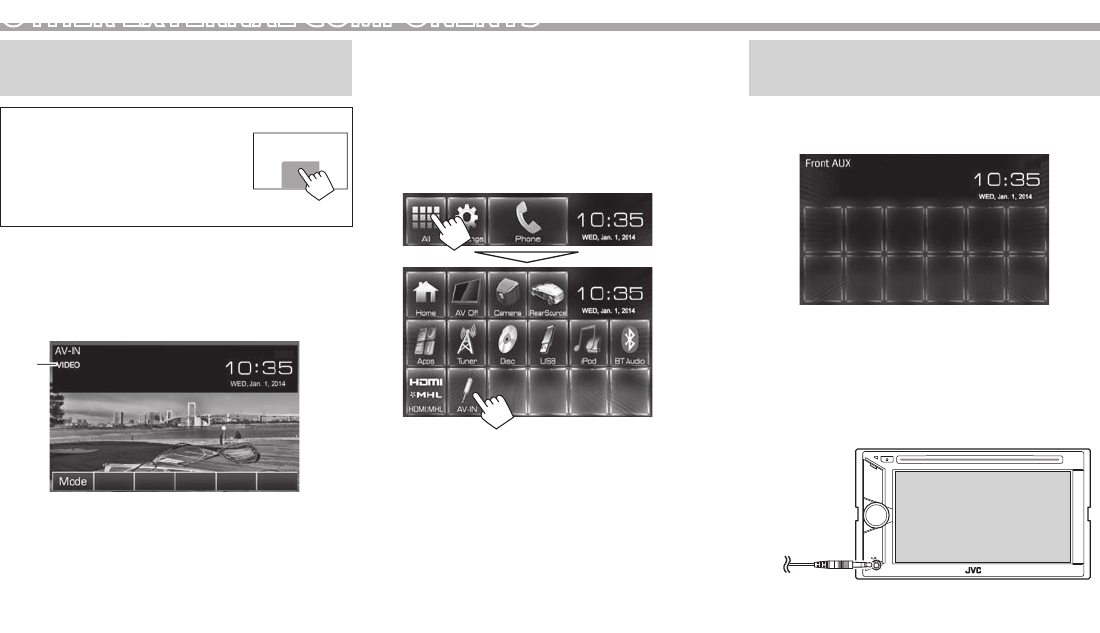
OTHER EXTERNAL COMPONENTS
Using external audio/video
players—AV-IN
• When the operation buttons
are not displayed on the screen,
touch the area shown on the
illustration.
– To change settings for video
playback, see page 37.
You can connect an external component to the
AV-IN1 terminal. (Page 49 )
❏Indications and buttons on the source
control screen
1
Playback information
1 AV-IN name
Operation buttons
[Mode] Changes the AV-IN name.
• Press [H] or [I] to select an AV-IN
name.
❏Starting playback
1 Connect an external component to the
AV-IN1 terminal.
• To connect an external component, see
page 49 .
2 Select “AV-IN” as the source.
On the Home screen:
3 Turn on the connected component and
start playing the source.
Using external audio players—
Front AUX (only for KW-V30BT)
❏Indications and buttons on the source
control screen
❏Starting playback
1 Connect an external component to the
AUX jack on the monitor panel.
• Use a 3.5 mm stereo mini plug (commercially
available).
2 Select “FrontAUX” as the source.
(Page8)
3 Turn on the connected component and
start playing the source.
KW-V_Mid_EU.indb 24 2014/01/28 16:26
ENGLISH 25
OTHER EXTERNAL COMPONENTS
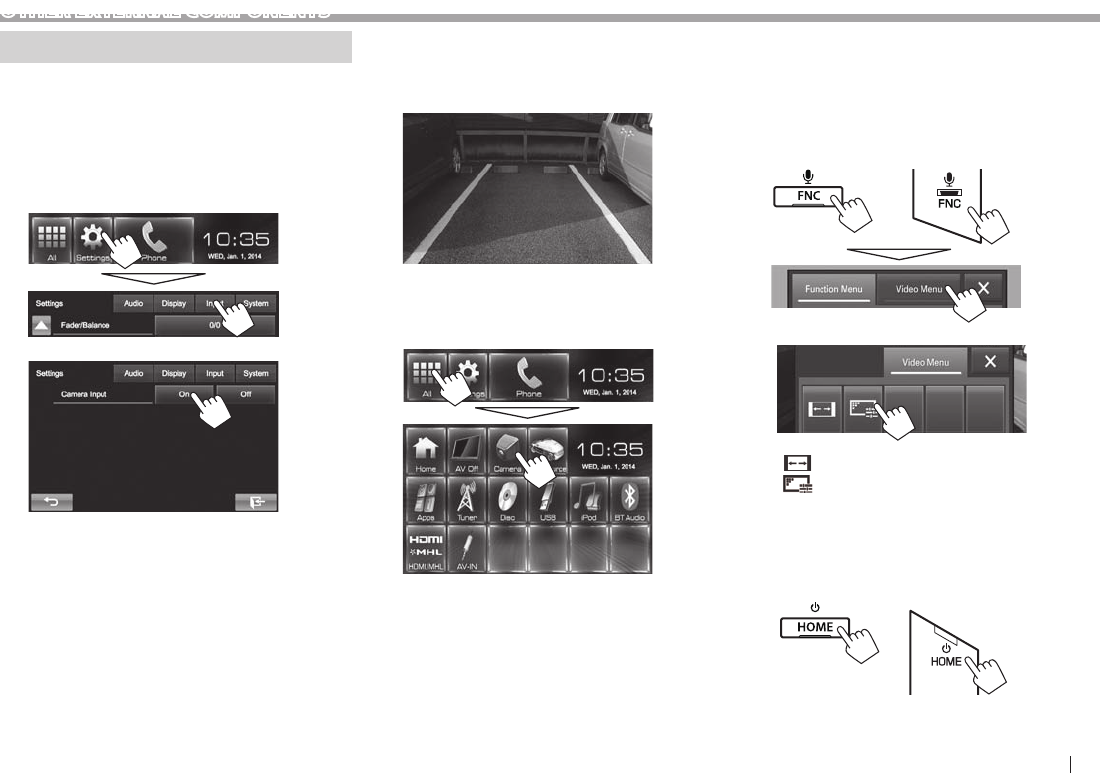
Using a rear view camera
• To connect a rear view camera, see page 49 .
• To use a rear view camera, a REVERSE GEAR
SIGNAL lead connection is required. (Page 47 )
❏Activating the rear view camera
1 Display the <Input> setting screen.
On the Home screen:
2
To deactivate: Select [Off] for <Camera Input>.
❏ Displaying the picture from the rear
view camera
The rear view screen is displayed when you shift the
gear to the reverse (R) position.
To display the picture from the rear view camera
manually
On the Home screen:
Adjusting the picture from the rear view camera
When displaying the picture from the rear view
camera manually, you can change the setting of the
picture.
1 Display the <Video Menu> screen.
KW-V50BT KW-V30BT
2
[ ] Selects the aspect ratio. (Page38)
[]Displays the picture adjustment
screen. (Page37)
To exit the rear view screen
KW-V50BT KW-V30BT
KW-V_Mid_EU.indb 25 2014/01/28 16:26
26
OTHER EXTERNAL COMPONENTS
Using a smartphone—HDMI/MHL
❏What is HDMI/MHL?
HDMI stands for High Definition Multi-media
Interface. An HDMI connection can transfer a digital
video source signal (such as from a DVD player)
without conversion to analog.
A new feature that has been added to HDMI that
extends its capabilities further is MHL, or Mobile
High-definition Link.
Both interfaces allow your smartphone to connect to
the device. When it is connected, you can see your
smartphone’s screen on the monitor.
❏Displaying the screen of the
smartphone
You can display the screen of your smartphone
connected via HDMI/MHL input terminal.
1 Connect your smartphone to the HDMI/
MHL input terminal. (Page 49 )
• Use HDMI cable KS-U60 (optional accessory)
or MHL cable KS-U61 (optional accessory).
2 Select “HDMI/MHL” as the source.
On the Home screen:
3 Start an application or playback on your
smartphone.
Using an external monitor— Rear
Source
You can enjoy the rear source playback on an
external monitor connected to the AV-OUT VIDEO
and AV-OUT AUDIO terminals, while listening to any
source.
• You can control the rear source playback on the
remote controller . (Page43)
❏Displaying rear source images on the
external monitor
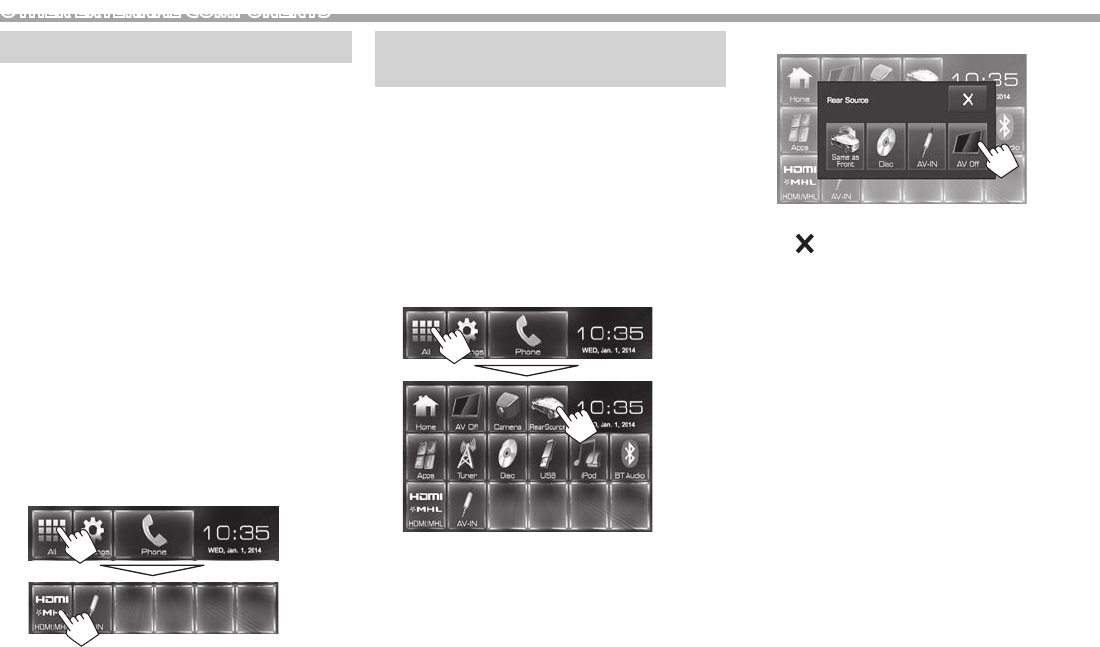
1 Display the <Rear Source> screen.
On the Home screen:
2 Select the rear source.
• To close the <Rear Source> screen, press
[].
While activating rear source...
• To view a front source image on the rear monitor,
press [Same as Front] on the <Rear Source>
screen.
• If the selected source is not “DISC” or “AV-IN”,
nothing appears on the rear monitor.
KW-V_Mid_EU.indb 26 2014/01/28 16:26
ENGLISH 27
BLUETOOTH
Information for using Bluetooth®
devices
Bluetooth is a short-range wireless radio
communication technology for mobile devices such
as mobile phones, portable PCs, and other devices.
Bluetooth devices can be connected without cables
and communicate with each other.
Notes
• While driving, do not perform complicated
operations such as dialing numbers, using the
phone book, etc. When you perform these
operations, stop your car in a safe place.
• Some Bluetooth devices may not connect to this
unit depending on the Bluetooth version of the
device.
• This unit may not work for some Bluetooth
devices.
• Connecting conditions may vary depending on
your environment.
• For some Bluetooth devices, the device is
disconnected when the unit is turned off.
Bluetooth Information: If you wish to receive
more information about Bluetooth, visit the
following JVC web site:
<http://www.jvc.net/cs/car/>
Bluetooth profile
This unit supports the following Bluetooth profiles:
• HFP (Hands-Free Profile) 1.6
• A2DP (Advanced Audio Distribution Profile) 1.2
• AVRCP (Audio/Video Remote Control Profile) 1.4
• GAP (Generic Access Profile)
• PBAP (Phone Book Access Profile) 1.0
• SDP (Service Discovery Profile)
• SPP (Serial Port Profile) 1.1
About mobile phones compatible with Phone
book Access Profile (PBAP)
If your mobile phone supports PBAP, you can
display the phone book and call lists on the touch
panel screen when the mobile phone is connected.
• Phone book: up to 600 entries
• Dialed calls, received calls, and missed calls: up
to 10 entries each
Connecting Bluetooth devices
❏ Registering a new Bluetooth device
When you connect a Bluetooth device to the unit for
the first time, pair the unit and the device. Pairing
allows Bluetooth devices to communicate with each
other.
• The pairing method differs depending on the
Bluetooth version of the device.
– For devices with Bluetooth 2.1: You can pair the
device and the unit using SSP (Secure Simple
Pairing) which only requires confirmation.
– For devices with Bluetooth 2.0: You need to
enter a PIN code both on the device and unit for
pairing.
• Once the connection is established, it is registered
in the unit even if you reset the unit. Up to 5
devices can be registered in total.
• Two devices for Bluetooth phone and one for
Bluetooth audio can be connected at a time.
• To use the Bluetooth function, you need to turn on
the Bluetooth function of the device.
• To use the registered device, you need to connect
the device to the unit. (Page29)
Auto p airing
When <Auto Pairing> is set to [ON], iPhone is
automatically paired when connected via USB.
(Page34)
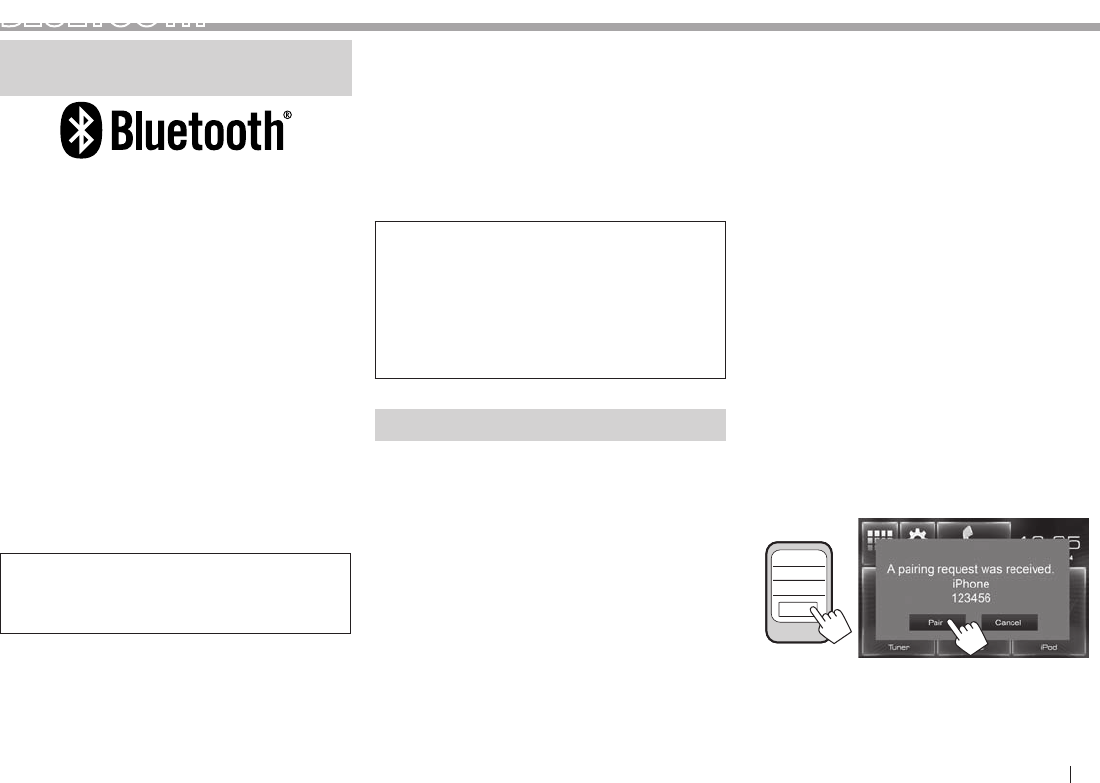
Pairing a Bluetooth device using SSP (for
Bluetooth 2.1)
When the Bluetooth device is compatible with
Bluetooth 2.1, a pairing request is sent from an
available device.
1 Search the unit (“KW-V****”) from your
Bluetooth device.
2 Confirm the request both on the device
and the unit.
123456
OK
• Press [Cancel] to reject the request.
KW-V_Mid_EU.indb 27 2014/01/28 16:26
28
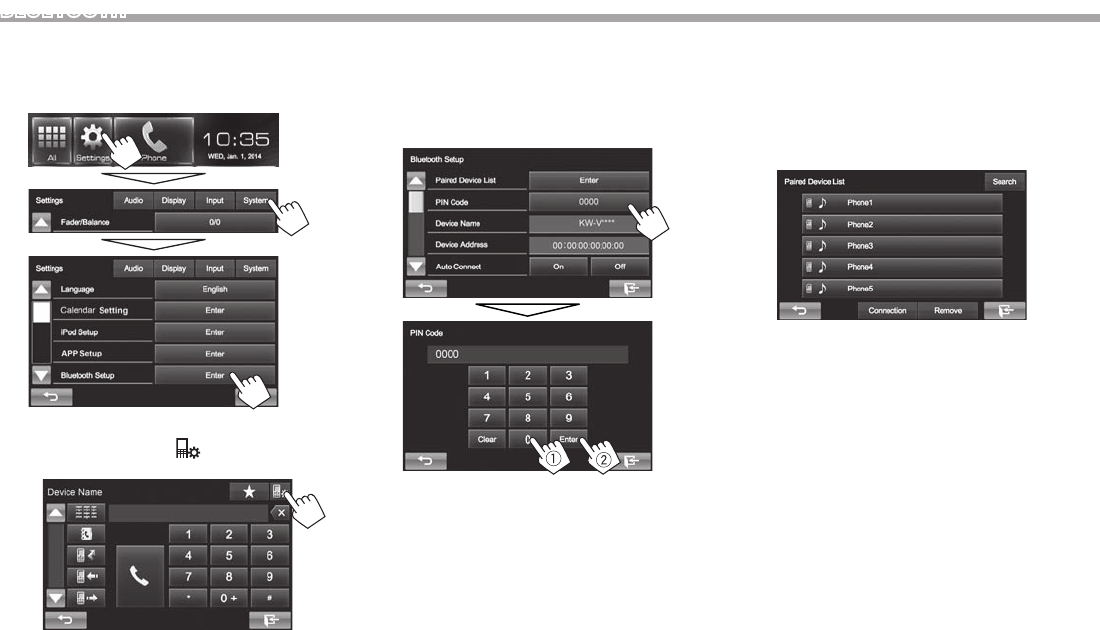
BLUETOOTH
Pairing a Bluetooth device from the target device
using a PIN code (for Bluetooth 2.0)
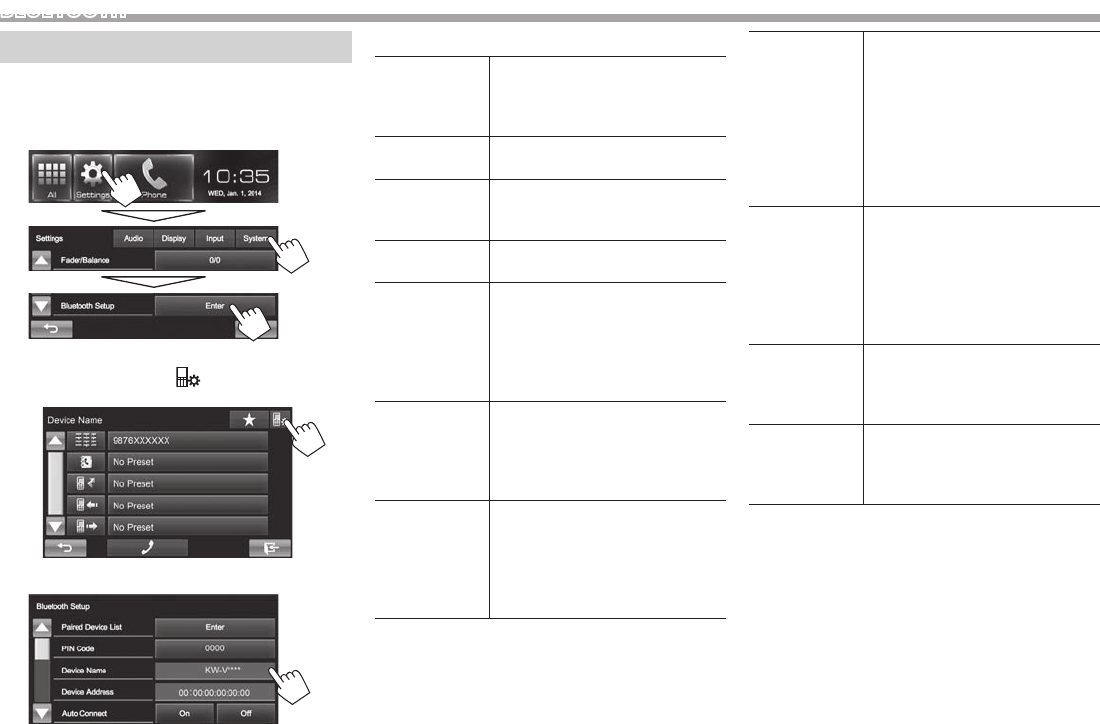
1 Display the <Bluetooth Setup> screen.
On the Home screen:
• You can also display the <Bluetooth Setup>
screen by pressing [ ] on the phone control
screen. (Page31)
2 Change the PIN code.
• If you skip changing the PIN code, go to step
3.
• The PIN code is initially set to “0000”.
• The maximum number of digits in the PIN
code is 15.
• Press [Clear] to delete the last entry.
3 Search the unit (“KW-V****”) from your
Bluetooth device.
4 Select the unit (“KW-V****”) for your
Bluetooth device.
• If the PIN code is required, enter “0000”
(initial).
When pairing is complete, the device is listed on
<Paired Device List>.
• To use the paired device, connect the device
on <Paired Device List>. (Page29)
KW-V_Mid_EU.indb 28 2014/01/28 16:26
ENGLISH 29
BLUETOOTH
Pairing a Bluetooth device from this unit using a
PIN code (for Bluetooth 2.0)
1 Display the <Bluetooth Setup> screen.
(Page28)
2
3 Search for the available devices.
• To cancel searching devices, press [Cancel].
4 Select the device you want to pair.
A confirmation message appears. Press [Pair].
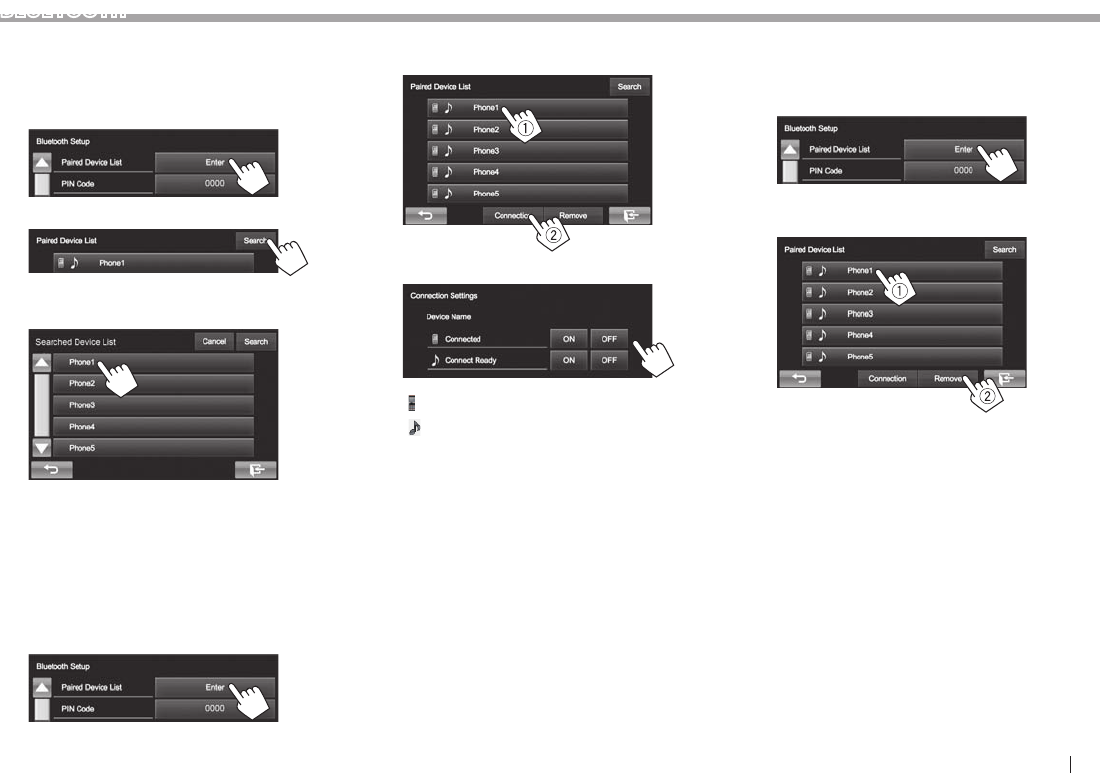
❏ Connecting/disconnecting a registered
Bluetooth device
Two devices can be connected simultaneously.
1 Display the <Bluetooth Setup> screen.
(Page28)
2
3 Select the device you want to connect (1),
then press [Connection] (2).
4 Select [On] or [Off] for the target.
: Mobile phone
: Audio device
• The status is shown as follows:
– “Connected”: A connection has been
established.
– “Connect Ready”: A connection can be
established.
– “Disconnected”: No connection is
established.
❏Deleting a registered Bluetooth device
1 Display the <Bluetooth Setup> screen.
(Page28)
2
3 Select a device to delete (1), then press
[Remove] (2).
A confirmation message appears. Press [Yes].
KW-V_Mid_EU.indb 29 2014/01/28 16:26

30
BLUETOOTH
Using the Bluetooth mobile phone
❏Receiving a call
When a call comes in...
• Call information is displayed if acquired.
• Phone operation is not available while the
picture from the rear view camera is displayed.
(Page25)
To reject a call
When <Auto Answer> is set to [On] (Page34)
The unit answers the incoming call automatically.
❏Ending a call
While talking...
❏Adjusting the volume of calls/earpiece/
microphone
While talking...
• You can adjust the volume level between 0 to 15
(initial: 3).
• This adjustment does not affect the volume level
of the other sources.
• Use the monitor panel to adjust the call/earpiece
volume. (Page6)
❏Switching between handsfree mode
and phone mode
While talking...
Each time you press the button, the talking method
is switched ( : handsfree mode / :
phone mode).
❏ Reducing noise/adjusting the echo
cancel level
While talking...
• To adjust the echo volume (between −1 to +1,
initial: 0): Adjust <EC LEVEL>.
• To adjust the noise reduction volume (between
0 to −20, initial: −10) : Adjust <NR LEVEL>.
KW-V_Mid_EU.indb 30 2014/01/28 16:26
ENGLISH 31
BLUETOOTH
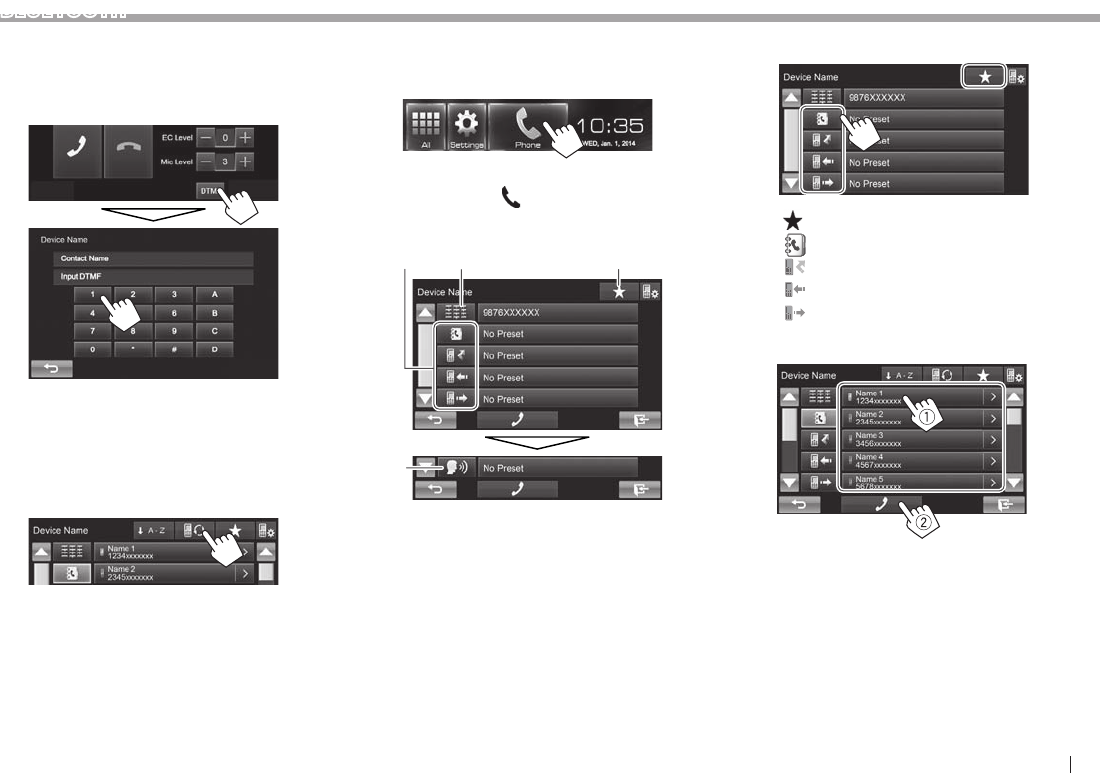
❏ Sending text during a call
You can send text during a call using the DTMF (Dual
Tone Multi Frequency) function.
While talking...
❏ Switching between the two devices
connected
When two devices are connected, you can change
the device to use.
On the phone control screen (see the right column):
• The name of the active device appears. The
devices are switched each time the button is
pressed.
❏ Making a call
1 Display the phone control screen.
On the Home screen:
• You can also display the phone control screen
by pressing [] on the <Function Menu>
screen. (Page 7)
2 Select a method to make a call.
231
4
1From the phone book*/call lists
2Direct number entry
3From the preset list
• To preset, see page33.
4Voice dialing
* When the mobile phone is not compatible with Phone Book Access
Profile (PBAP), the phone book is not displayed.
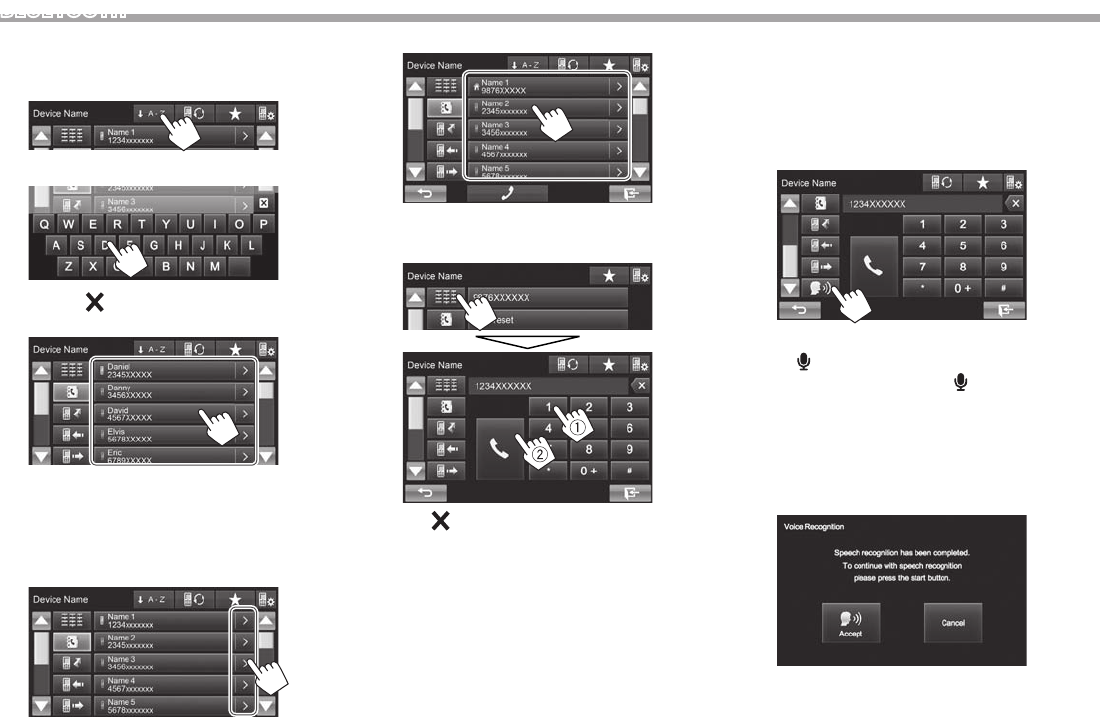
From the preset list/phone book/call lists
1
[ ] From the preset list
[ ] From the phone book
[ ] From the missed call list
[ ] From the received call list
[ ] From the dialed call list
2 Select the target (1), then make a call (2).
• You can change the page to display more
items by pressing [J]/[K].
KW-V_Mid_EU.indb 31 2014/01/28 16:26
32
BLUETOOTH
• To use the A to Z search on phone book:
When the phone book list is displayed, you can
search by initial.
1
2 Select the initial.
• Press [ ] to cancel the A to Z search.
3 Select a phone number from the list.
• To display the details of an entry:
When the phone book list is displayed, you can
display the details of an entry and select a phone
number if several phone numbers are registered.
1 Display the details of the desired entry.
2 Select a phone number to call.
Direct number entry
You can enter up to 32 numbers.
• Press [ ] to delete the last entry.
• Press and hold [0+] to add “+” to the phone
number.
Voice di aling
• Available only when the connected mobile phone
has a voice recognition system.
1 Activate voice dialing.
On the phone control screen:
• Press [K] repeatedly to change the page on
the phone control screen.
• You can also activate voice dialing by pressing
[] on the <Function Menu> screen
(Page7) or holding FNC/ on the monitor
panel.
2 Say the name of the person you want to
call.
• If the unit cannot find the target, the following
screen appears. Press [Accept], then say the
name again.
To cancel voice dialing: Press [Cancel].
KW-V_Mid_EU.indb 32 2014/01/28 16:26
ENGLISH 33
BLUETOOTH
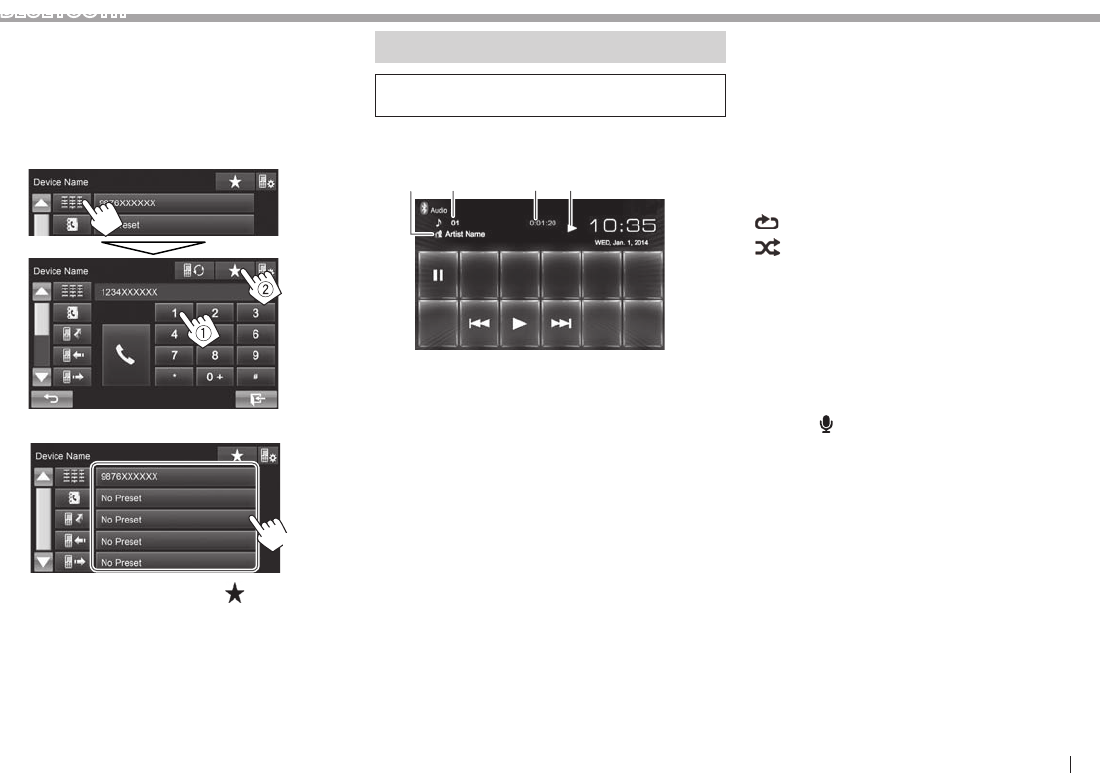
❏ Presetting p hone nu mbers
You can preset up to 5 phone numbers.
1 Display the phone control screen.
(Page31)
2 Enter the numbers on the direct number
entry screen, then display the preset list.
3 Select a preset number to store into.
(Hold)
• To display the preset list, press [ ] on the phone
control screen.
Using the Bluetooth audio player
• To register a new device, see page27.
• To connect/disconnect a device, see page29.
❏Indications and buttons on the source
control screen
3 421
• The operation buttons, indications and
information displayed on the screen differ
depending on the connected device.
Playback information
1 Tag data (current track title/artist name/album
title)*1
• Touching the text information changes the
information type.
2 Track no.*1
3 Playing time*1
4 Playback status*1
Operation buttons
[ ]*1 *2 *3Selects repeat playback mode.
[]*1 *2 *3Selects random playback mode.
[W]Pauses playback.
[I]Starts playback.
[S] [T]• Selects a track. (Press)
• Reverse/forward search. (Hold)
*1 Available only for devices compatible with AVRCP 1.3.
*2 To cancel random and repeat mode, press the button repeatedly
until the indicator disappears.
*3 Press FNC/ on the monitor panel to display the <Function
Menu> screen to select the item. (Page7)
KW-V_Mid_EU.indb 33 2014/01/28 16:26
34
BLUETOOTH
Settings for Bluetooth devices
You can change various settings for using Bluetooth
devices on the <Bluetooth Setup> screen.
1 Display the <Bluetooth Setup> screen.
On the Home screen:
• You can also display the <Bluetooth Setup>
screen by pressing [ ] on the phone control
screen. (Page31)
2 Configure the Bluetooth settings.
❏Setting items
<Paired Device
List>
Press [Enter] to show the list
of registered devices. You can
connect a device or delete
registered devices. (Page29)
<PIN Code> Changes the PIN code of the unit.
(Page28)
<Device
Name>
Shows the device name to be
shown on the Bluetooth device—
KW-V****.
<Device
Address>
Shows the MAC address of the
unit.
<Auto
Connect>
• On (Initial): The connection is
automatically established with
the last connected Bluetooth
device when the unit is turned
on.
• Off: Cancels.
<HF/Audio
Output>
Select the speakers used for
Bluetooth (both phone and audio
player).
• Front: Front speakers only.
• All (Initial): All speakers.
<Auto
Answer>
• On: The unit answers the
incoming calls automatically in
5 seconds.
• Off (Initial): The unit does not
answer the calls automatically.
Answer the calls manually.
< Auto Pai ring> • On (initial): Establishes
pairing automatically with the
connected iOS device (such as
iPhone) even if the Bluetooth
function is deactivated on
the device. (Auto pairing may
not work for some devices
depending on the iOS version.)
• Off: Cancels.
<Ring Mode> • System (Initial): The ring tone
set on the unit is used.
• Phone: The ring tone set on
the mobile phone is used.
(This function may not work
depending on the mobile
phone.)
<Ring Tone
Change>
When <Ring Mode> is set to
<System>, select the ring tone
for received calls from [Tone1]
(Initial), [Tone2], [Tone3].
<Initialize> Hold [Enter] to reset all settings
you have made for using
Bluetooth mobile phone and
Bluetooth audio player.
KW-V_Mid_EU.indb 34 2014/01/28 16:26
ENGLISH 35
SETTINGS
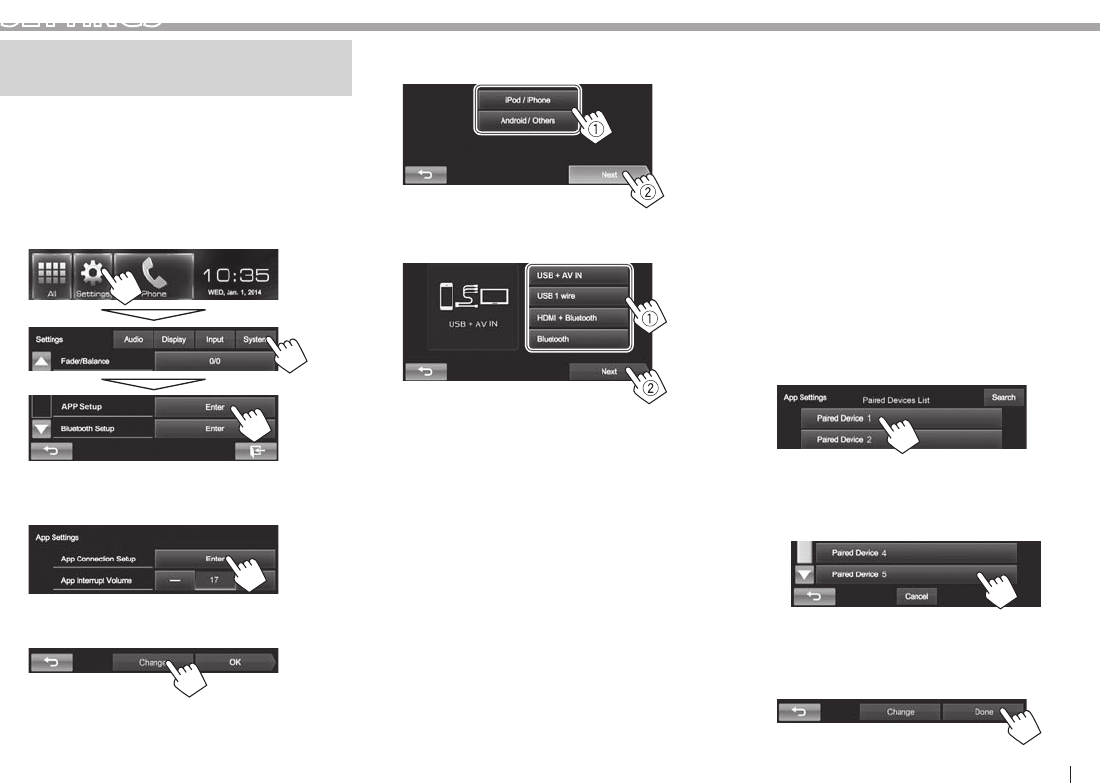
Settings for using applications of
the iPod/iPhone/Android
Before using applications of the iPod/iPhone/
Android , select the device to use and connection
method.
1 Pair the iPod/iPhone/Android device
through Bluetooth. (Page27)
2 Display the <App Settings> screen.
On the Home screen:
• If [Enter] for <App Setup> cannot be
selected, turn off the AV source. (Page6)
3
4 Check the current device status, then press
[Change].
• If you do not need to change the setting,
press [OK] to exit from the setup screen.
5 Select the device type (1), then press
[Next] (2).
6 Select the connection method (1), then
press [Next] (2).
For Android:
<HDMI/MHL
+ Bluetooth>
Select this when the Android
is connected both by cable to
HDMI/MHL input terminal and
via Bluetooth.
<Bluetooth> Select this when the device is
connected via Bluetooth.
For iPod/iPhone:
<USB +
AV-IN>
Select this when the iPod/
iPhone is connected using KS-
U59 (optional accessory).
<USB 1 Wire> Select this when the iPod/
iPhone is connected using USB
2.0 cable (accessory of the iPod/
iPhone).
<HDMI +
Bluetooth>
Select this when the iPod/
iPhone is connected using
HDMI cable KS-U60 (optional
accessory) and USB 2.0 cable
(accessory of the iPod/iPhone)
through Lightning-Digital AV
adapter (accessory of the iPod/
iPhone).
<Bluetooth> Select this when the iPod/
iPhone is connected via
Bluetooth.
• When selecting <USB + AV-IN> or <USB 1
wire>, go to step 8.
7 When selecting <HDMI + Bluetooth> or
<Bluetooth> as the connection method,
paired device list appears. Select the target
device.
• If desired device is not listed, press [Search]
for searching the available iPod/iPhone
devices, then select the target device from the
<Available Devices> screen.
– You can change the page to display more
items by pressing [J]/[K].
– To stop searching, press [Cancel].
8 Confirm the settings.
KW-V_Mid_EU.indb 35 2014/01/28 16:26
36
SETTINGS
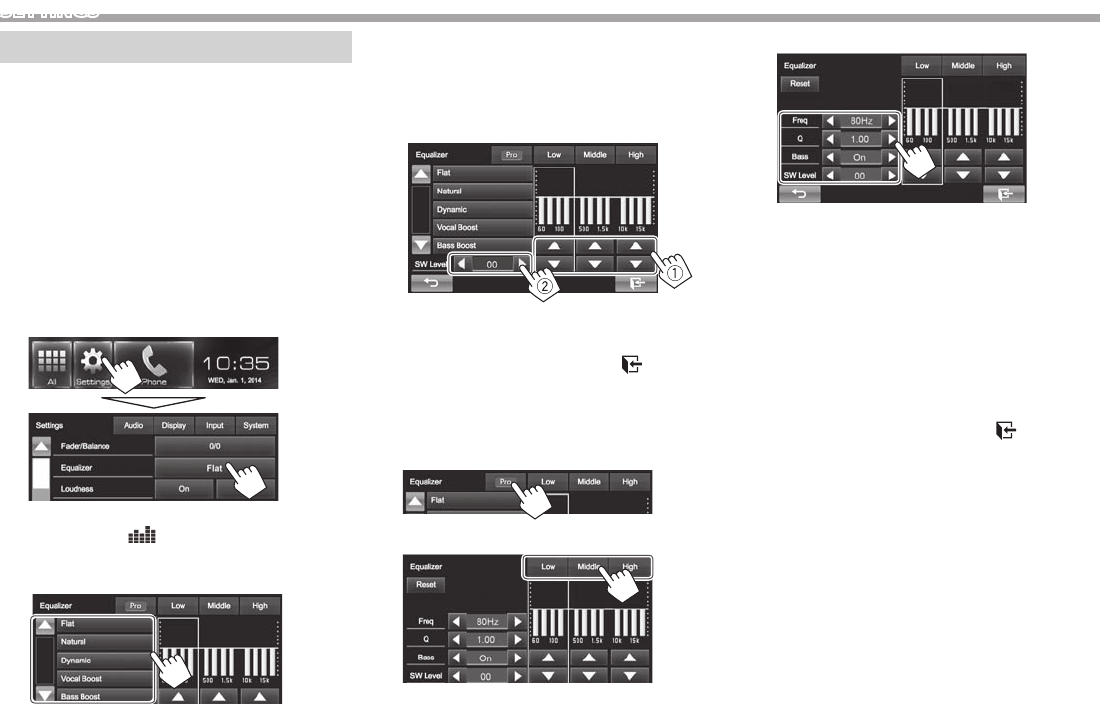
Sound ad justment
❏ Using the sound equalization
• The adjustment is memorized for each source until
you adjust the sound again. If the source is a disc,
the adjustment is stored for each of the following
categories.
– DVD/DVD-VR/VCD
– CD
– DivX/MPEG1/MPEG2/MP3/WMA/WAV
• You cannot adjust the sound when the AV source
is turned off.
Selecting a preset sound mode
1 Display the <Equalizer> screen.
On the Home screen:
• You can also display the <Equalizer> screen
by pressing [] on the <Function Menu>
screen. (Page 7)
2 Select a sound mode.
• You can change the page to display more
items by pressing [J]/[K].
Storing your own adjustment—Customizing
preset sound mode
1 Select a sound mode. (See the left column.)
2 Adjust the level of each band (1), then
select the subwoofer level (2).
The adjustments are stored and <User> is
activated.
• To finish the procedure, press [ ].
Storing your own adjustment—Adjusting the
sound precisely
1 Select a sound mode (see the left column),
then...
2 Select a band.
3 Adjust the sound.
<Reset> Changes the level of each band
(Low/Middle/High) to “0”.
<Freq> Selects frequency.
<Q> Adjusts the width of the
frequency.*1
<Bass> Activates/deactivates bass.*2
<SW Level> Adjusts subwoofer level.
The adjustments are overwritten if the <User>
setting has been created (see the left column),
and <User> is activated.
• To finish the procedure, press [ ].
• The adjustments are memorized until you adjust
sound again.
• To make adjustment for other bands, repeat steps
2 and 3.
*1 Fixed for “High” band.
*2 Only for “Low” band.
KW-V_Mid_EU.indb 36 2014/01/28 16:26
ENGLISH 37
SETTINGS
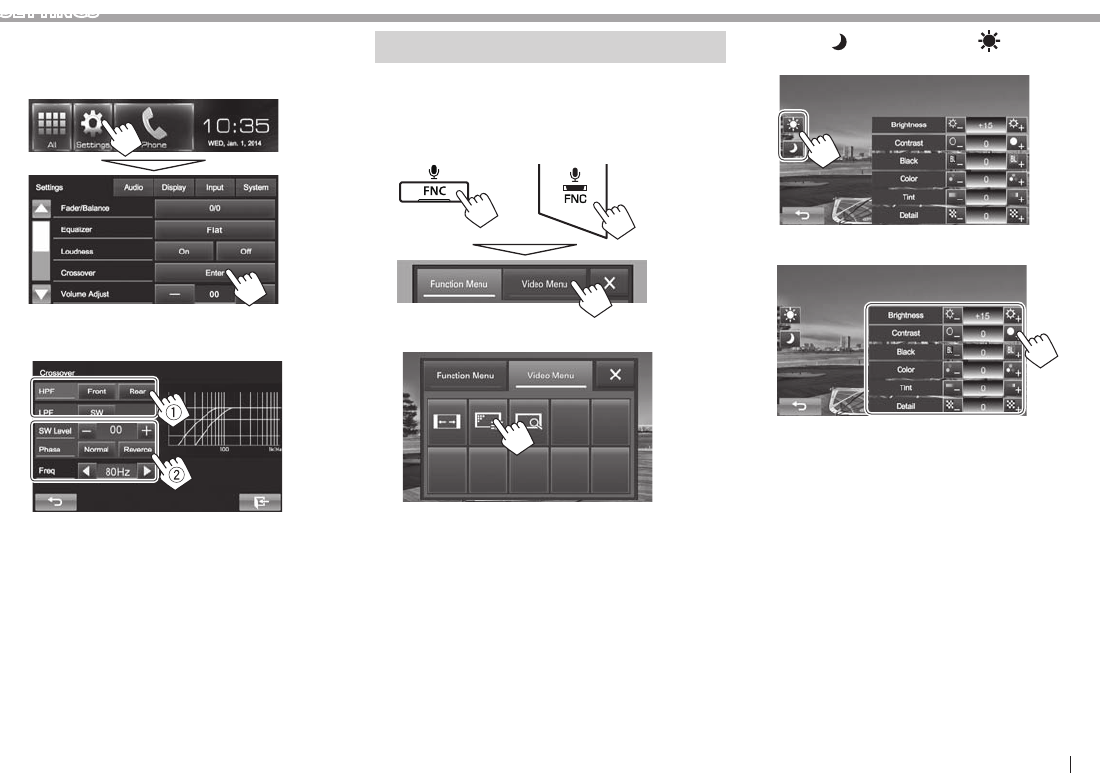
❏ Adjusting the crossover frequency
1 Display the <Crossover> screen.
On the Home screen:
2 Select the item to adjust (1), then make
adjustments (2).
<HPF> Adjusts the crossover for the
front ([Front]) or rear ([Rear])
speakers (high pass filter).
<LPF> Adjusts the crossover for the
subwoofer (low pass filter).
<SW Level> Adjusts the subwoofer level.
<Phase> Selects the phase for the
subwoofer.*
<Freq> Adjusts the crossover frequency.
* Not selectable when <Freq> is set to <Through>.
Adjustment for video playback
❏ Adjusting the picture
You can adjust the picture quality.
1 Display the <Video Menu> screen.
KW-V50BT KW-V30BT
2 Display the adjustment menu.
3 Select [ ] (dimmer on) or [ ] (dimmer
off).
4 Adjust the picture.
<Brightness> Adjusts the brightness. (−15
to +15)
<Contrast> Adjusts the contrast. (−10 to
+10)
<Black> Adjusts the blackness. (−10 to
+10)
<Color> Adjusts the color. (−10 to +10)
<Tint> Adjusts the tint. (−10 to +10)
<Detail> Adjusts the detail. (−2 to +2)
KW-V_Mid_EU.indb 37 2014/01/28 16:26

38
SETTINGS
❏ Changing the aspect ratio
You can change the aspect ratio for video playback.
• You cannot change the aspect ratio while playing
USB device.
1 Display the <Video Menu> screen.
KW-V50BT KW-V30BT
2 Display the adjustment menu.
3 Select the aspect ratio.
<Full>* For 16:9 original pictures
4:3 signal 16:9 signal
<Regular>* For 4:3 original pictures
4:3 signal 16:9 signal
<Panorama> For viewing 4:3 pictures
naturally on the wide screen
4:3 signal 16:9 signal
<Zoom1> −
<Zoom3>
Changes the magnification.
• The aspect ratio is
automatically selected to
match the video source.
* While DivX is played back with <Monitor Type> set to
[16:9] (Page 13), the aspect ratio is not set correctly.
❏ Zooming the picture
You can zoom the picture (<Full>, <Zoom1> to
<Zoom3>). Zooming is available only when disc is
played back.
• When <Aspect> is set to <Panorama> (see the
left column), the picture is zoomed with the aspect
ratio of the <Full> setting.
1 Display the <Video Menu> screen.
KW-V50BT KW-V30BT
2 Display the adjustment menu.
3 Change the magnification (1), then move
the zooming frame (2).
• [J][K][H][I] are not displayed when <Full> is
selected.
• The zoom function cannot be used for some video
sources.
KW-V_Mid_EU.indb 38 2014/01/28 16:26
ENGLISH 39
SETTINGS
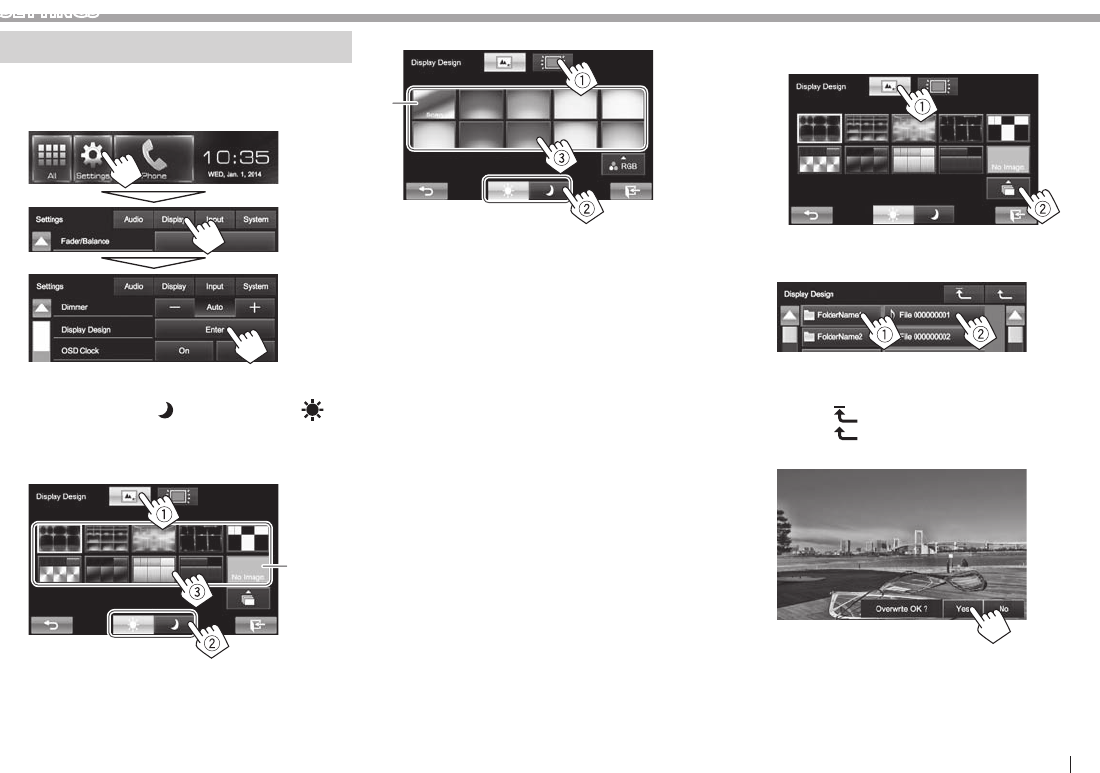
Changing display design
You can change the background and panel color.
1 Display the <Display Design> screen.
On the Home screen:
2 Select an item to change (1), select the
dimmer setting ([ ]: Dimmer On or [ ]:
Dimmer Off) (2), then select the design or
color (3).
To change the background design:
*1
To change the panel color:
*2
• You can also adjust the color by yourself. Press
[RGB] to display the color adjuster screen,
then adjust the color.
*1 Store your own scene beforehand. (See below.)
*2 Selecting this changes the illumination color gradually.
❏Storing your favorite image for the
background
You can set your favorite image (JPEG/PNG/BMP file)
stored on the connected USB device.
• Use the JPEG/PNG/BMP file that the resolution is
800 x 480 pixels.
• The color of the captured image may look
different from that of the actual scene.
1 Connect the USB device with the image
stored. (Page 48 )
2 Display the <Display Design> screen. (See
the left column.)
3 Display the <User Background File
Select> screen.
4 Select the file for the background image
(1), then confirm the selection (2).
• You can change the page to display more
items by pressing [J]/[K].
• Press [] to return to the root folder.
• Press [] to return to the upper layer.
5 Confirm the selection.
The existing image is replaced with the new
one.
• Press [No] to return to the previous screen.
KW-V_Mid_EU.indb 39 2014/01/28 16:26
40
SETTINGS
neercs emoH eht gnizimotsuC
You can arrange the items to display on the Home
screen.
1 Display the <Menu Customize> screen.
On the Home screen:
Press and hold the icon you want to replace.
(Hold)
2 Select the item you want to display on the
position selected in step 1 (1), then press
[HOME].
• Repeat the procedure to place icons for other
items.
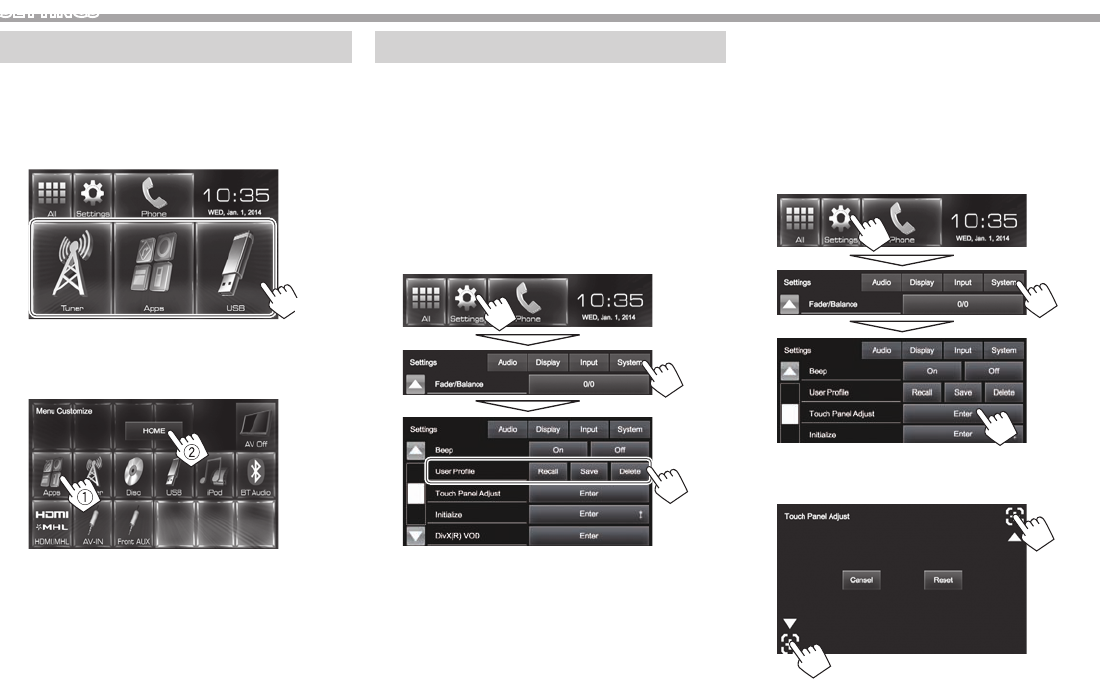
Customizing the system settings
❏sgnittes eht gnillacer/gniziromeM
You can memorize the following settings:
• Settings on the <Settings> screen: Fader/
Balance, Equalizer, Loudness, Crossover
(<HPF>/<LPF>/<SW Level> settings), Volume
Adjust, Speaker Select, Display Design
• Settings for “AV-IN”: AV-IN Name
On the Home screen:
• Press [K] repeatedly to change the page on the
<System> menu screen.
[Recall] Recalls the memorized settings.
[Save] Memorizes current settings.
[Delete] Deletes the memorized settings.
A conrmation message appears. Press [Yes].
❏ noitisop hcuot eht gnitsujdA
You can adjust the touch position on the touch
panel if the position touched and the operation
performed do not match.
1 Display the <Touch Panel Adjust> screen.
On the Home screen:
• Press [K] repeatedly to change the page on
the <System> menu screen.
2 Touch the center of the marks at the lower
left and at the upper right as instructed.
• To reset the touch position, press [Reset].
• To cancel the current operation, press
[Cancel].
KW-V_Mid_EU.indb 40 2014/01/28 16:26
ENGLISH 41
SETTINGS
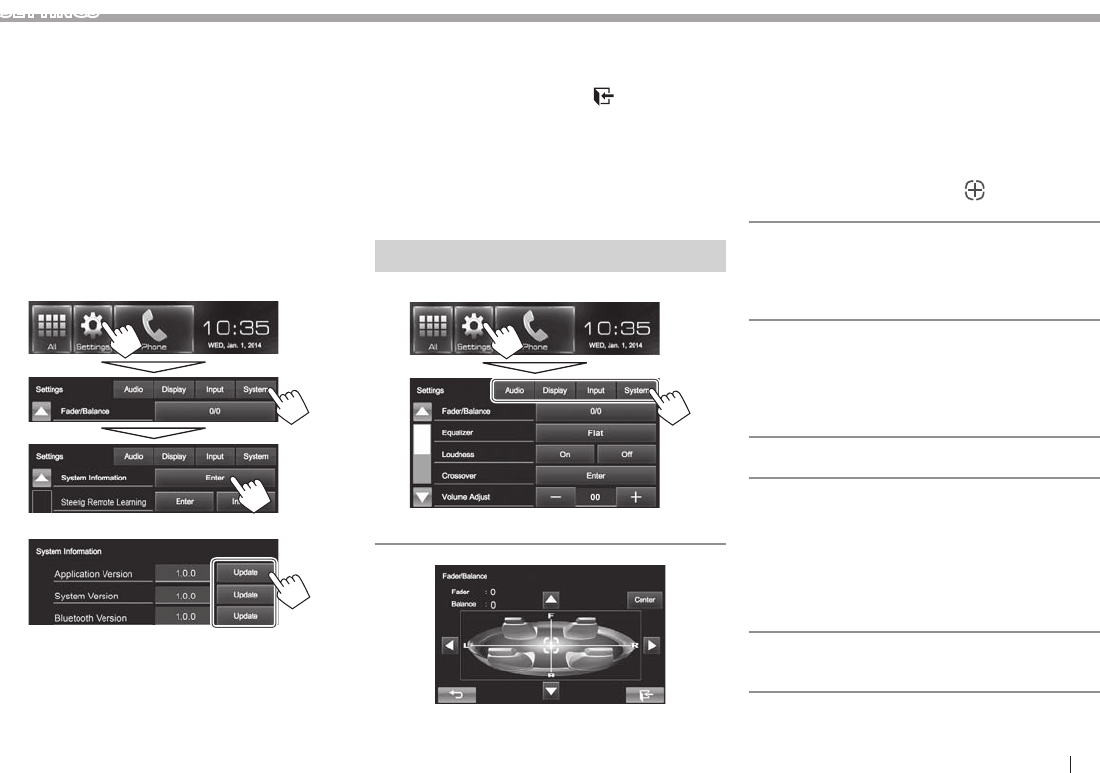
❏ Updating the system
You can update the system by connecting a USB
device containing an update file.
• To update the system, visit <http://www.jvc.net/
cs/car/>.
1 Create an update file, copy it to a USB
device, and connect it to the unit.
• To connect a USB device, see page 48 .
2 Display the <System Information>
screen.
On the Home screen:
• Press [K] repeatedly to change the page on
the <System> menu screen.
3
<Application
Version>
Updates the system
application.
<System Version> Updates the system.
<Bluetooth
Version>
Updates the Bluetooth
application.
It may take a while.
If the update has been completed successfully,
“Update Completed” appears. Reset the unit.
• To finish the procedure, press [ ].
• If the update has failed, turn the power off and
then on, and retry the update.
• Even if you have turned off the power during the
update, you can restart the update after the power
is turned on. The update will be performed from
the beginning.
Setting menu items
❏Displaying the <Setup> menu screen
❏<Audio> setting screen
<Fader/Balance>
Fader: Adjust the front and rear speaker output
balance.
• F6 to R6 (Initial: 0)
– When using a two-speaker system, set the fader
to the center (0).
Balance: Adjust the left and right speaker output
balance.
• L6 to R6 (Initial: 0)
Press [J]/[K]/[H]/[I] or drag [ ] to adjust.
– To clear the adjustment, press [Center].
<Equalizer>
Change the sound mode or adjust and store the
equalization for each source. (Page36)
• Flat (Initial)/Natural/Dynamic/Vocal Boost/Bass
Boost/Vibrant/User
<Loudness>
You can activate/deactivate loudness.
• On (Initial): Boost low and high frequencies to
produce a well-balanced sound at a low volume
level.
• Off: Cancels.
<Crossover>
Adjust the crossover frequency. (Page37)
<Volume Adjust>
Adjust and store the auto-adjustment volume level
for each source. (For discs, the adjustment is stored
for each of the following categories: DVD/DVD-VR/
VCD, CD, and DivX/MPEG1/MPEG2/MP3/WMA/WAV.)
The volume level will automatically increase or
decrease when you change the source.
• –15 to +6 (Initial: 00)
<Speaker Selec t>
Select the size of the connected speaker.
• Standard (Initial)/Narrow/Middle/Wide
KW-V_Mid_EU.indb 41 2014/01/28 16:26
42
SETTINGS
❏<Display> setting screen
• You can also display <Display> setting screen by
pressing [ ] on the <Function Menu> screen.
<Dimmer>
• Auto (Initial): Dims the screen and button
illumination when you turn on the headlights.
• nO : Activates dimmer.
• O: Cancels.
>ngiseD yalpsiD<
Change the display design (background and panel
<OSD Clock>
• On: Displays the clock while a video source is
played back.
• O (Initial): Cancels.
>noitartsnomeD<
• On (Initial): Activates the demonstration on the
screen.
• O: Cancels.
<Scroll>
• Auto: Repeats scrolling.
• Once (Initial): Scrolls the displayed information
once.
• O: Cancels.
Touching the information bar scrolls the text
regardless of this setting.
>tsujdA IUG<
Adjust the brightness and blackness of the screen.
Press [Enter] to display the setting screen, select
[] (Dimmer On)/[ ] (Dimmer O), then change
the following settings:
• Brightness: Adjusts brightness.
– –15 to +15 (Initial: 00 for Dimmer On/+15 for
Dimmer O)
• Black: Adjusts blackness.
– –10 to +10 (Initial: 00)
❏<Input> setting screen
>tupnI aremaC<
• On (Initial): Displays the picture from the rear view
camera when you shift the gear to the reverse (R)
position.
• O: Select this when no camera is connected.
❏<System> setting screen
>egaugnaL<
Select the text language used for on-screen
information.
• English (Initial)/Español/Français/Deutsch/
Italiano/Nederlands/Руccĸий /Português/
/ / /Türkçe/ / /
• GUI Language: Select a language used for
displaying operation buttons and menu items.
– English (Initial)/Local (the language selected
above)
<Calendar Setting>
>puteS doPi<
<APP Setup>
• APP Connection Setup: Congure the Apps
• APP Interrupt Volume: Adjust the volume of App.
– 00 to 35 (Initial: 17)
>puteS htooteulB<
Congure settings for using a Bluetooth device,
such as connection and other general operations.
<Beep>
• On (Initial): Activates the key-touch tone.
• O: Cancels.
<User Prole>
You can memorize, recall, or clear the settings you
>tsujdA lenaP hcuoT<
Adjust the touch position of the buttons on the
<Initialize>
Initialize all settings you have made. Hold [Enter] to
initialize the settings.
• After initializing the settings, adjust the settings
on the <Initial Settings> screen.
<DivX® VOD>
This unit has its own Registration Code. Once you
have played back a le with the Registration Code
recorded, this unit’s Registration Code is overwritten
for copyright protection.
• Press [Enter] to display the information.
• To return to the previous screen, press [OK].
<System Information>
Displays the version information of the software.
<Steering Remote Learning>
This setting is not used.
KW-V_Mid_EU.indb 42 2014/01/28 16:26
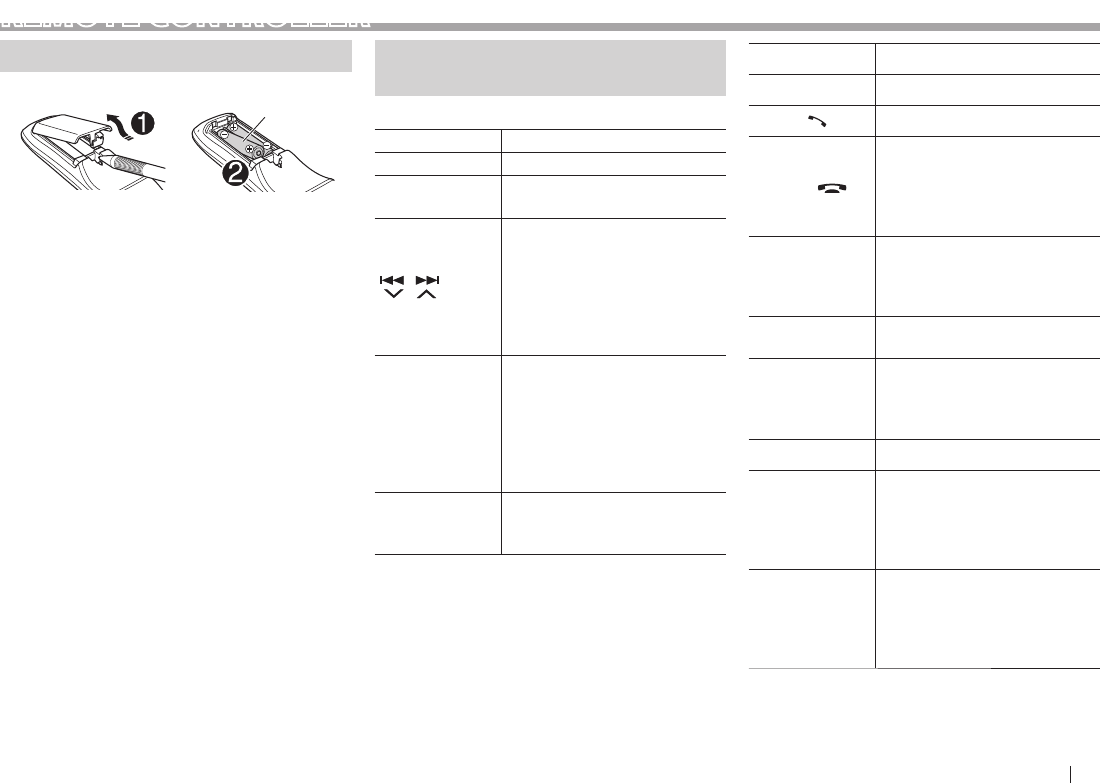
ENGLISH 43
REMOTE C ONTROLLER
Installing the batteries
❏Installing the batteries
R03/LR03/AAA
Insert the batteries into the remote controller by
matching the polarity (+ and –) correctly.
• If the effectiveness of the remote controller
decreases, replace the batteries.
V Caution:
• Danger of explosion if battery is incorrectly
replaced. Replace only with the same or
equivalent type.
• Batteries shall not be exposed to excessive heat
such as sunshine, fire, or the like.
Before using the remote controller:
• Aim the remote controller directly at the remote
sensor on the unit.
• DO NOT expose the remote sensor to bright light
(direct sunlight or artificial lighting).
Operations using the remote
controller (RM-RK256 )
❏Basic button functions
ATT Attenuates/restores the sound.
DISP Does not function for this unit.
J/K• Selects the preset stations.
• Selects a title/item/folder.
/
• Searches for stations
automatically.
• Searches for stations
manually. (Hold)
• Selects a track.
• Reverse search/forward
search. (Hold)
O/N
• Reverse search/forward
search.
• DVD-Video/DVD-VR/VCD:
Slow motion playback
(during pause).
• DVD-VR/VCD: Reverse slow
motion does not work.
VOL +/VOL –
• Adjusts the volume level.
• The “2nd VOL” function does
not work for this unit.
SOURCE Selects the source.
I/WStarts/pauses*
playback.
PHONE/ Answers incoming calls.
BAND/o/
Selects the bands.
Stops playback.
Ends the call.
Pauses playback of Bluetooth
audio.
0 – 9
(Page44)
• Enters a number while
holding SHIFT.
• The “SETUP” function does
not work for this unit.
1 – 6 Enters preset station number
while holding SHIFT.
ASPECT
Changes the aspect ratio.
To check the current aspect
ratio setting, operate on the
touch panel. (Page38)
RETURN Returns to the previous screen.
TOP M
(Page44)
• DVD-Video: Shows the disc
menu.
• DVD-VR: Shows the Original
Program screen.
• VCD: Resumes PBC playback.
MENU
(Page44)
• DVD-Video: Shows the disc
menu.
• DVD-VR: Shows the Playlist
screen.
• VCD: Resumes PBC playback.
KW-V_Mid_EU.indb 43 2014/01/28 16:26

44
REMOTE CONTROLLER
F/G/D/E
• DVD-Video: Makes selection/
settings.
• DivX: Skips back or forward by
about 5 minutes.
ENT Confirms selection.
OSD/ Does not function for this unit.
DUAL/ Does not function for this unit.
SHIFT Functions with other buttons.
DIRECT/CLR
• Enters direct search mode when
pressed with the SHIFT button.
(See the right column.)
• Erases a misentry when pressed
with the SHIFT button.
• “SURROUND” function does not
work for this unit.
*
Does not work while listening to Bluetooth audio.
❏ Searching for an item directly
Tuner f requency
1 Press DIRECT while holding SHIFT to enter the
search mode.
2 Press number buttons while holding SHIFT to
enter a frequency.
• To erase a misentry, press CLR (clear) while
holding SHIFT.
3 Press ENT to confirm the entry.
DVD-Video/DVD-VR/DivX/MPEG1/MPEG2/MP3/
WMA/VCD/CD
1 Press DIRECT while holding SHIFT to enter the
search mode.
• Each time you press DIRECT, the item to search
for changes.
2 Press a number button while holding SHIFT to
select a desired item.
• To erase a misentry, press CLR (clear) while
holding SHIFT.
3 Press ENT to confirm the selection.
❏ Various disc operations
Using the disc menu
• DVD-Video/DVD-VR
1 For DVD Video, press TOP M or MENU.
For DVD-VR, press...
• TOP M: To display Original Program
• MENU: To display Playlist
2 Press F/G/D/E to select an item you want to
play.
3 Press ENT to confirm the selection.
• VCD
During PBC playback...
1 Press DIRECT while holding SHIFT to enter the
search mode.
2 Press a number button while holding SHIFT to
select the item you want to play.
3 Press ENT to confirm the selection.
• To return to the previous screen, press RETURN.
To cancel PBC playback
1 Press o to stop PBC playback.
2 Press DIRECT while holding SHIFT.
3 Press a number button while holding SHIFT to
select a desired track.
4 Press ENT to confirm the selection.
• To resume PBC, press TOP M or MENU.
KW-V_Mid_EU.indb 44 2014/01/28 16:26
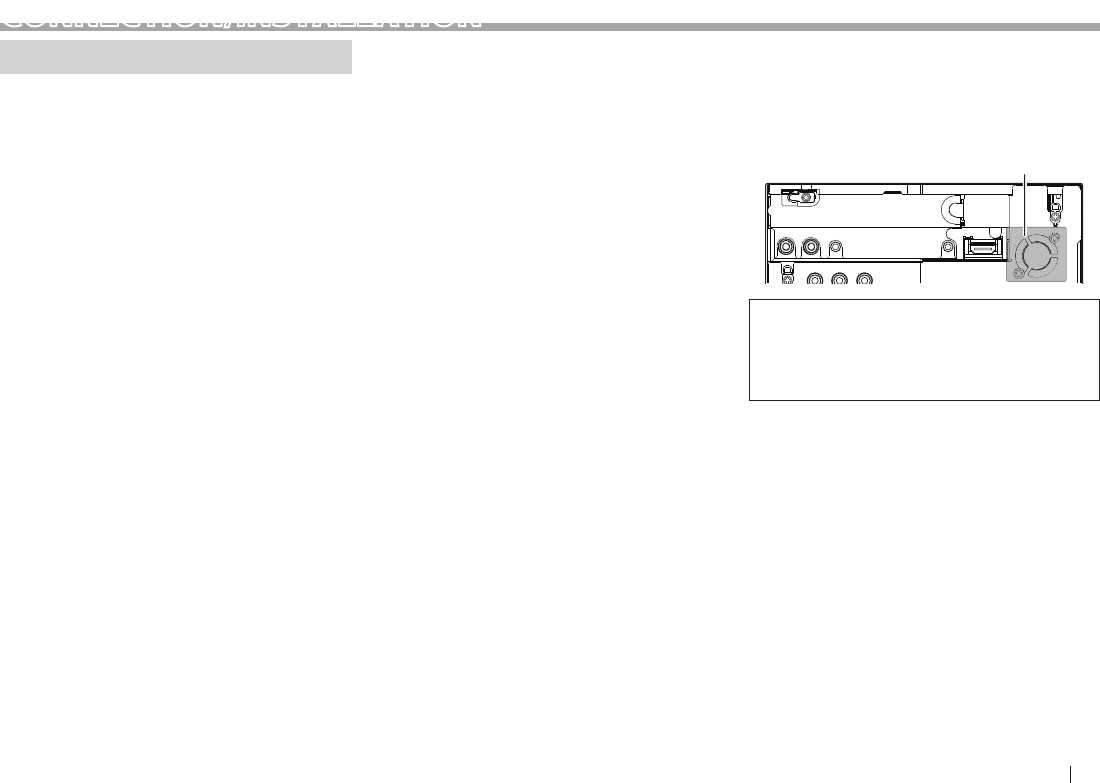
ENGLISH 45
CONNECTION/INSTALLATION
Before installing the unit
V WARNING
• If you connect the ignition wire (red) and the
battery wire (yellow) to the car chassis (ground),
you may cause a short circuit, that in turn may
start a fire. Always connect those wires to the
power source running through the fuse box.
• Do not cut out the fuse from the ignition wire (red)
and the battery wire (yellow). The power supply
must be connected to the wires via the fuse.
V Precautions on installation and connection
• Mounting and wiring this product requires
skills and experience. For best safety, leave the
mounting and wiring work to professionals.
• Make sure to ground the unit to a negative 12V
DC power supply.
• Do not install the unit in a spot exposed to direct
sunlight or excessive heat or humidity. Also avoid
places with too much dust or the possibility of
water splashing.
• Do not use your own screws. Use only the screws
provided. If you use the wrong screws, you could
damage the unit.
• If the power is not turned on (“MISWIRING Check
wiring connection then reset unit”, “WARNING
Check wiring connection then reset unit” is
displayed), the speaker wire may have a short
circuit or have touched the chassis of the vehicle
and the protection function may have been
activated. Therefore, the speaker wire should be
checked.
• If your car’s ignition does not have an ACC
position, connect the ignition wires to a power
source that can be turned on and off with the
ignition key. If you connect the ignition wire to a
power source with a constant voltage supply, such
as with battery wires, the battery may be drained.
• Only for KW-V50BT:
If the console has a lid, make sure to install the
unit so that the monitor panel will not hit the lid
when closing and opening.
• If the fuse blows, first make sure the wires are not
touching to cause a short circuit, then replace the
old fuse with one with the same rating.
• Insulate unconnected wires with vinyl tape or
other similar material. To prevent a short circuit,
do not remove the caps on the ends of the
unconnected wires or the terminals.
• Connect the speaker wires correctly to the
terminals to which they correspond. The unit may
be damaged or fail to work if you share the ·
wires or ground them to any metal part in the car.
• When only two speakers are being connected to
the system, connect both connectors either to
the front output terminals or to the rear output
terminals (do not mix front and rear). For example,
if you connect the ª connector of the left speaker
to a front output terminal, do not connect the ·
connector to a rear output terminal.
• After the unit is installed, check whether the brake
lamps, blinkers, wipers, etc. on the car are working
properly.
• Mount the unit so that the mounting angle is 30°
or less.
• Do not press hard on the panel surface when
installing the unit to the vehicle. Otherwise scars,
damage, or failure may result.
• This unit has a cooling fan to decrease the
internal temperature. Do not mount the unit
in a place where the cooling fan of the unit is
blocked. Blocking these openings will prevent the
cooling of the internal temperature and result in
malfunction.
Cooling fan
V CAUTION
Install this unit in the console of your vehicle.
Do not touch the metal part of this unit during and
shortly after the use of the unit. Metal parts such as
the heat sink and enclosure become hot.
❏Supplied accessories for installation
1 Wiring harness x 1
2 Trim plate x 1
3 Extension wire x 1
4 Extraction keys x 2
5 Microphone x 1
6 Fixture for HDMI/MHL connector x 1
7 Screws for fixture (M2.6 x 6 mm) x 1
KW-V_Mid_EU.indb 45 2014/01/28 16:26

46
CONNECTION/INSTALLATION
❏Installation procedure
1 To prevent a short circuit, remove the key
from the ignition and disconnect the ·
battery.
2 Make the proper input and output wire
connections for each unit.
3 Connect the speaker wires of the wiring
harness.
4 Take Connector B on the wiring harness
and connect it to the speaker connector in
your vehicle.
5 Take Connector A on the wiring harness
and connect it to the external power
connector in your vehicle.
6 Connect the wiring harness connector to
the unit.
7 Install the unit in your car.
8 Reconnect the · battery.
9 Press the reset button.
10 Configure <Initial Setup>. (page4)
Installing/removing the unit
❏Installing the unit
• Bend the tabs of the mounting sleeve with a
screwdriver or similar utensil and attach it in place.
❏Installing the trim plate
Attach the trim plate (2).
2
❏Removing the trim plate
1 Engage the catch pins on the extraction
key (4) and remove the two locks on the
lower part. Lower the frame and pull it
forward.
4
2 Remove the upper two locations.
• The frame can be removed from the top side in
the same manner.
❏Removing the unit
1 Remove the trim plate. (See the left
column.)
2 Insert the two extraction keys (4), then
pull them as illustrated so tat the unit can
be removed.
4
• Be careful to avoid injury from the catch pins on
the extraction key.
KW-V_Mid_EU.indb 46 2014/01/28 16:26
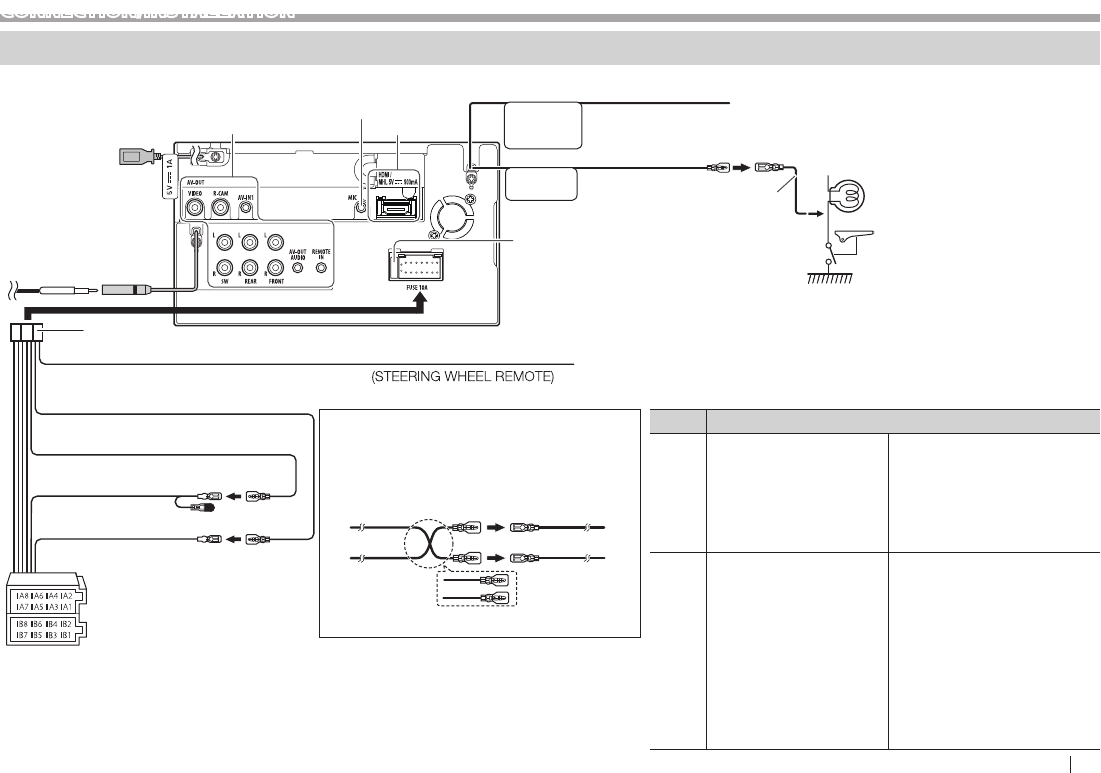
ENGLISH 47
CONNECTION/INSTALLATION
Connection
❏ Connecting wires to terminals
PARKING
BRAKE
REVERSE
GEAR
SIGNAL
Pin Color and functions of Connector A and B
A4 Yellow Battery
A5 Blue with white stripe Power control
A6 Orange with white stripe Dimmer
A7 Red Ignition (ACC)
A8 Black Ground connection
B1 Purple Right speaker ª (rear)
B2 Purple with black stripe Right speaker · (rear)
B3 Gray Right speaker ª (front)
B4 Gray with black stripe Right speaker · (front)
B5 White Left speaker ª (front)
B6 White with black stripe Left speaker · (front)
B7 Green Left speaker ª (rear)
B8 Green with black stripe Left speaker · (rear)
Red
(Ignition wire)
Unit
Yellow
(Battery wire)
Vehicle
Red (A7)
Yellow (A4)
Default wiring
Connecting the ISO connectors
You may need to modify the wiring of the
supplied wiring harness as illustrated below.
Page 49 Page49
USB terminal:
Pages48 – 49
Connect the aerial cord
to the aerial terminal.
10 A fuse
Connect to the vehicle’s reverse lamp harness when
using the optional rear view camera.
Connect to the vehicle’s parking
brake detection switch harness.
• For best safety, be sure to
connect the parking sensor.
To the OE remote adapter matching your car
• If no connections are made, do not let the cable come out from the tab.
Purple with white stripe
(Reverse sensor wire)
Light green
(Parking sensor wire) 3
1
Light blue with yellow stripe (Steering remote control wire)
Yellow (Battery wire)
Red (Ignition wire)
Red (A7)
Yellow (A4)
Connector A
Connector B
Pages48 – 49
KW-V_Mid_EU.indb 47 2014/01/28 16:26
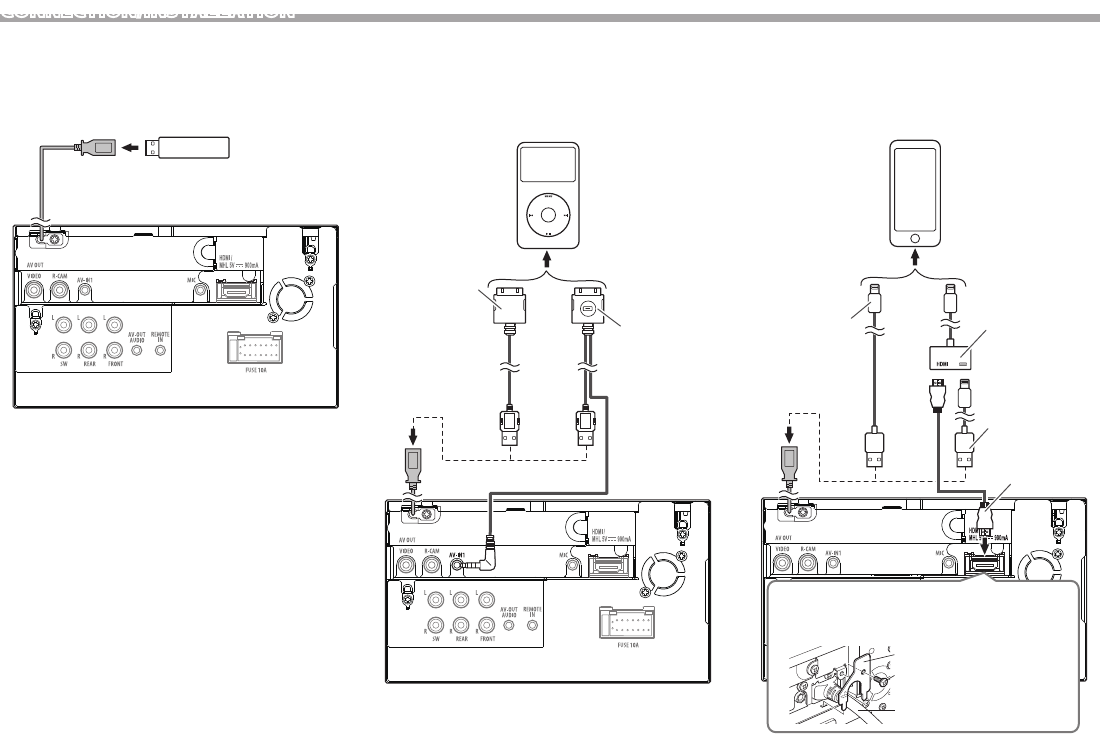
48
CONNECTION/INSTALLATION
❏ Connecting a USB device
USB device
(commercially available)
❏ Connecting an iPod/iPhone
iPod/iPhone except for iPhone 5/iPod touch
(5th Generation)/iPod nano (7th Generation)
(commercially available)
KS-U59
(optional accessory)
USB 2.0 cable
(accessory of the
iPod/iPhone)
iPhone 5/iPod touch (5th Generation)/iPod
nano (7th Generation) (commercially available)
Lightning-Digital
AV adapter
(accessory of the
iPod/iPhone)
USB 2.0 cable (accessory
of the iPod/iPhone)
or KS-U62 (optional
accessory)
USB 2.0 cable
(accessory of the
iPod/iPhone) or
KS-U62 (optional
accessory)
KS-U60
(optional accessory)
HDMI/MHL cable
6
7
If you connect the HDMI/MHL connector, fix the HDMI/MHL
cable using the fixture (6) and screw (7).
KW-V_Mid_EU.indb 48 2014/01/28 16:26
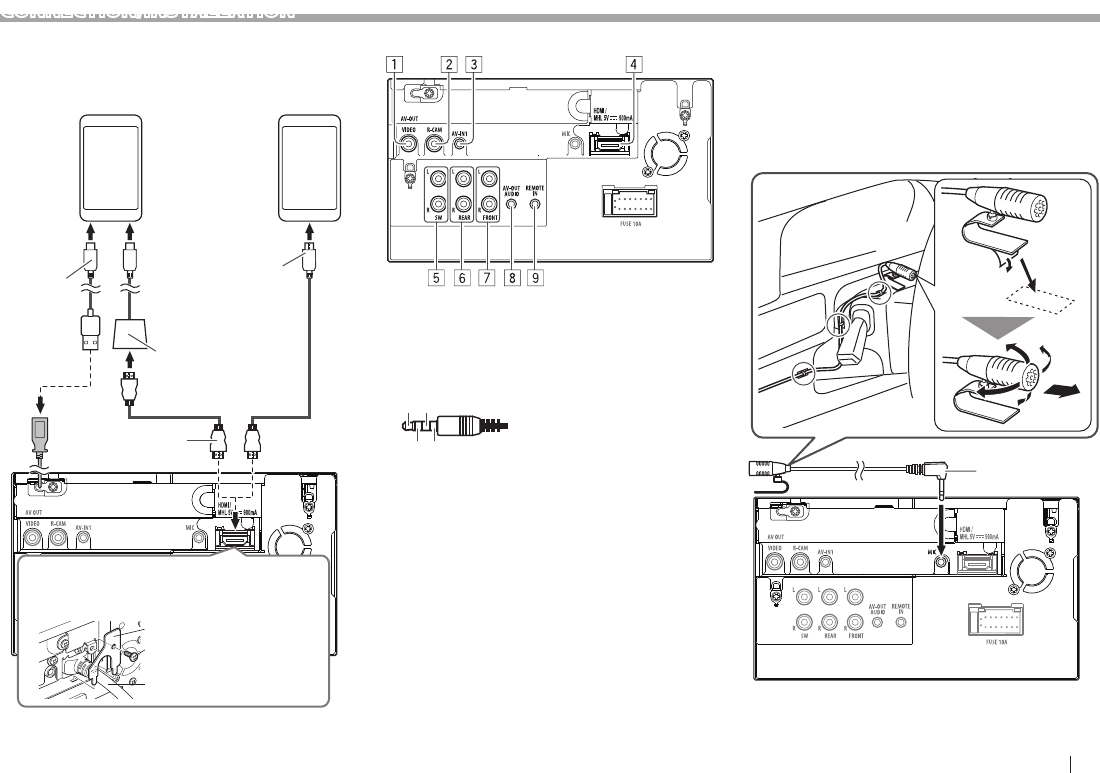
ENGLISH 49
CONNECTION/INSTALLATION
❏ Connecting a Smartphone
Android, etc.
(with HDMI)
(commercially available)
Android, etc.
(with MHL)
(commercially available)
Micro USB Micro HDMI (Type D)
Micro HDMI to HDMI adapter
(commercially available)
KS-U60
(optional accessory)
Micro USB to
USB cable
(commercially
available)
KS-U61
(optional accessory)
HDMI/MHL cable
6
7
If you connect the HDMI/MHL connector, fix the HDMI/MHL
cable using the fixture (6) and screw (7).
❏ Connecting external components
1 AV-OUT/Video output (Yellow)
2 Rear view camera input (Yellow)
3 Audio Video input (AV-IN1)
• Connect the following type of 4-pole mini
plug:
1
24
31 Left audio
2 Right audio
3 Ground
4 Composite video
4 HDMI/MHL input
5 Subwoofer preout (monaural output)
• Subwoofer left output (White)
• Subwoofer right output (Red)
6 Rear preout
• Audio left output (White)
• Audio right output (Red)
7 Front preout
• Audio left output (White)
• Audio right output (Red)
8 AV-OUT/ Audio output (ø3.5 mini jack)
Resistance-free stereo type mini plug
9 Steering wheel remote controller input
❏ Connecting microphone for Bluetooth
Connect the microphone (5) to the MIC terminal.
• To install the microphone, peel off the adhesive
tape, fix on the installation position, then adjust
the direction of the microphone to face the driver.
After installing, fix the microphone cable to the car
with clamps (commercially available).
5
KW-V_Mid_EU.indb 49 2014/01/28 16:26

50
REFERENCES
Maintenance
❏Caution on cleaning the unit
Do not use any solvent (for example, thinner,
benzine, etc.), detergent, or insecticide. This may
damage the monitor or the unit.
Recommended cleaning method:
Gently wipe the panel with a soft, dry cloth.
❏Moisture condensation
Moisture may condense on the lens inside the unit in
the following cases:
• After starting the heater in the car.
• If it becomes very humid inside the car.
Should this occur, the unit may malfunction. In this
case, eject the disc and leave the unit turned on for a
few hours until the moisture evaporates.
❏How to handle discs
• When removing a disc from its case, press down
the center holder of the case and lift the disc out,
holding it by the edges.
– Always hold the disc by the edges. Do not touch
its recording surface.
• When storing a disc in its case, gently insert the
disc around the center holder (with the printed
surface facing up).
– Make sure to store discs in their cases after use.
❏To keep discs clean
A dirty disc may not play correctly.
If a disc does become dirty, wipe it with a soft cloth
in a straight line from center to edge.
• Do not use any solvents (for example,
conventional record cleaner, spray, thinner,
benzine, etc.) to clean discs.
❏To play new discs
New discs may have some rough spots around the
inner and outer edges. If such a disc is used, this unit
may reject the disc.
• To remove these rough spots, rub the edges with
a pencil or ball-point pen, etc.
More information
❏File playback
Playing DivX files (for discs only)
• This unit can play back DivX files with the
extension code <.divx>, <.div>, or <.avi>
(regardless of the letter case—upper/lower).
• Audio stream should conform to MP3 or Dolby
Digital.
• The file encoded in the interlaced scanning mode
may not be played back correctly.
• The maximum bit rate for video signals (average)
is 4 Mbps.
Playing MPEG1/MPEG2 files
• This unit can play back MPEG1/MPEG2 files with
the extension code <.mpg> or <.mpeg>.
• The stream format should conform to MPEG
system/program stream.
The file format should be MP@ML (Main Profile at
Main Level)/SP@ML (Simple Profile at Main Level)/
MP@LL (Main Profile at Low Level).
• Audio streams should conform to MPEG1 Audio
Layer-2 or Dolby Digital.
• The maximum bit rate for video signals (average)
is 4 Mbps.
KW-V_Mid_EU.indb 50 2014/01/28 16:26

ENGLISH 51
REFERENCES
Playing JPEG/BMP/PNG files (for USB only)
• This unit can play back picture files with the
extension code <.jpg>, <.jpeg>, <.bmp> or
<.png>.
• This unit can play back files that are at 32 x 32 to
8192 x 7 680 (PNG: 800 x 480) resolution.
It may take time to display the file depending on
its resolution.
• This unit can play back baseline JPEG files.
Progressive JPEG files or lossless JPEG files cannot
be played.
Playing audio files (for discs: MP3/WMA/AAC, for
USB: MP3/WMA/WAV/AAC/FLAC)
• This unit can play back files with the extension
code <.mp3>, <.wma>, <.wav>, <.m4a> or <.flac>
(regardless of the letter case—upper/lower).
• This unit can play back files that meet the
conditions below:
– Bit rate:
MP3: 8 kbps – 320 kbps
WMA: 48 kbps – 192 kbps
AAC: For discs: 16 kbps – 320 kbps
For USB: 32 kbps – 320 kbps
– Sampling frequency:
MP3: 8 kHz – 48 kHz
WMA: For discs: 32 kHz – 48 kHz
For USB: 8 kHz – 48 kHz
WAV: 44.1 kHz
AAC: 16 kHz – 48 kHz
FLAC : 8 kHz – 48 kHz
• This unit can show ID3 Tag Version
1.0/1.1/2.2/2.3/2.4 (for MP3).
• This unit can also show WMA/AAC/FLAC Tag.
• This unit can play back files recorded in VBR
(variable bit rate).
• Files recorded in VBR have a discrepancy in
elapsed time indication.
• This unit cannot play back the following files:
– MP3 files encoded with MP3i and MP3 PRO
format.
– MP3 files encoded with Layer 1/2.
– WMA files encoded with lossless, professional,
and voice format.
– WMA files which are not based upon Windows
Media® Audio.
– WMA/AAC files copy-protected with DRM.
– AAC files encoded using any other application
than iTunes.
– AAC files copy-protected with FairPlay (except
those stored on an iPod).
– Files which have data such as AIFF, ATRAC3, etc.
• This unit can display jacket pictures that meet the
conditions below:
– Picture size: 32 x 32 to 1 232 x 672 resolution
– Data size: less than 650 KB
– File type: JPEG/PNG/BMP
Playing H.264/WMV files (for USB only)
• This unit can play back files with the extension
code <.mp4>, <.wmv>, <.avi> or <.mkv>.
• The stream format should conform to MPEG
system/program stream.
❏Disc playback
Playable disc types
Disc type Recording format,
file type, etc.
DVD
• DTS sound cannot be
reproduced or emitted
from this unit.
DVD Video*1
DVD Recordable/Rewritable
(DVD-R/-RW*2, +R/+RW*3)
• DVD Video: UDF bridge
• DVD-VR
• DivX/MPEG1/MPEG2/MP3/
WMA/AAC: ISO 9660 level1,
level2, Romeo, Joliet
• DVD Video
• DVD-VR*4
• DivX/MPEG1/
MPEG2
• MP3/WMA/AAC
Dual Disc DVD side
CD/VCD • VCD (Video CD)
• Audio CD/
CDText (CD-DA)
CD Recordable/Rewritable
(CD-R/-RW)
• ISO 9660 level1, level2,
Romeo, Joliet
• VCD (Video CD)
• CD-DA
• DivX/MPEG1/
MPEG2
• MP3/WMA/AAC
*1 DVD Region code: 2
If you insert a DVD Video disc of an incorrect Region Code, “Region
Code Error” appears on the screen.
*2 DVD-R recorded in multi-border format is also playable (except for
dual layer discs). DVD-RW dual layer discs are not playable.
*3 It is possible to play back finalized +R/+RW (Video format only)
discs. “DVD” is selected as the disc type when a +R/+RW disc is
loaded. +RW double layer discs are not playable.
*4 This unit cannot play back contents protected with CPRM (Content
Protection for Recordable Media).
KW-V_Mid_EU.indb 51 2014/01/28 16:26

52
REFERENCES
Unplayable discs
• Unplayable disc types and formats are as follows:
– DVD-Audio/DVD-ROM discs
– MPEG4/WAV/JPEG/FLAC/MKV/DVD+VR/DVD-
RAM recorded on DVD-R/RW or +R/+RW
– SVCD (Super Video CD), CD-ROM, CD-I (CD-I
Ready), DTS-CD
– MPEG4/WAV/JPEG/FLAC/MKV recorded on
CD-R/RW
• Discs that are not round.
• Discs with coloring on the recording surface or
discs that are dirty.
• Recordable/Rewritable discs that have not been
finalized.
• 8 cm disc. Attempting to insert using an adapter
may cause malfunction.
DualDisc playback
The Non-DVD side of a “DualDisc” does not comply
with the “Compact Disc Digital Audio” standard.
Therefore, the use of Non-DVD side of a DualDisc on
this product cannot be recommended.
Playing Recordable/Rewritable discs
• This unit can recognize a total of 64 770 files and
254 folders (a maximum of 255 files per folder).
• Use only “finalized” discs.
• This unit can play back multi-session discs;
however, unclosed sessions will be skipped while
playing.
• Some discs or files may not be played back due to
their characteristics or recording conditions.
• Up to 64 characters of disc information can be
displayed.
❏About data stored in the connected
USB device/iPod/iPhone
• We bear no responsibility for any loss of data in an
iPod/iPhone and USB mass storage class device
while using this unit.
❏ USB playback
Playable files on a USB device
• This unit can play the following types of files
stored in a USB mass storage class device.
– JPEG/BMP/PNG/MPEG1/MPEG2/MP3/WMA/
WAV/AAC/FLAC/MPEG4/ H.264/MPEG4 AVC /
WMV (VC-1)
• This unit can recognize a total of 5 000 files and
250 folders (a maximum of 999 files per folder).
• Make sure all important data has been backed up
to avoid losing the data.
Notes on using a USB device
• This unit may not play back files in a USB device
properly when using a USB extension cable.
• USB devices equipped with special functions such
as data security functions cannot be used with the
unit.
• Do not use a USB device with 2 or more partitions.
• Depending on the shape of the USB devices and
connection ports, some USB devices may not be
attached properly or the connection might be
loose.
• This unit cannot recognize a USB device whose
rating is other than 5 V and exceeds 1 A.
• This unit may not recognize a memory card
inserted into the USB card reader.
• Connect only one USB device to the unit at a time.
Do not use a USB hub.
• When connecting with a USB cable, use the USB
2.0 cable.
• The maximum number of characters (when the
characters are 1 byte):
– Folder names: 128 characters
– File names: 128 characters
• Avoid using the USB device if it might affect
driving safety.
• Do not pull out and connect the USB device
repeatedly while “Now Reading...” is shown on the
screen.
• Electrostatic shock at connecting a USB device
may cause abnormal playback of the device. In this
case, disconnect the USB device then reset this
unit and the USB device.
• Operation and power supply may not work as
intended for some USB devices.
• Do not leave a USB device in the car, or expose
to direct sunlight or high temperature to avoid
deformation or damage to the device.
KW-V_Mid_EU.indb 52 2014/01/28 16:26

ENGLISH 53
REFERENCES
❏Notes on playing iPod/iPhone
• iPod/iPhone that can be connected to this unit:
Made for
– iPod with video
– iPod classic
– iPod nano (7th Generation)
– iPod nano (6th Generation)
– iPod nano (5th Generation)
– iPod nano (4th Generation)
– iPod nano (3rd Generation)
– iPod touch (5th Generation)
– iPod touch (4th Generation)
– iPod touch (3rd Generation)
– iPod touch (2nd Generation)
– iPod touch (1st Generation)
– iPhone 5
– iPhone 4S
– iPhone 4
– iPhone 3GS
– iPhone 3G
– iPhone
• When operating an iPod/iPhone, some operations
may not be performed correctly or as intended. In
this case, visit the following JVC web site: <http://
www.jvc.net/cs/car/>
• For some iPod/iPhone models, the performance
may be abnormal or unstable during operation. In
this case, disconnect the iPod/iPhone device, then
check its condition.
If the performance is not improved or slow, reset
your iPod/iPhone.
• When you turn on this unit, the iPod/iPhone is
charged through the unit.
• The text information may not be displayed
correctly.
❏ Language codes (for DVD/DVD-VR language selection)
AA Afar GL Galician MI Maori SO Somali
AB Abkhazian GN Guarani MK Macedonian SQ Albanian
AF Afrikaans GU Gujarati ML Malayalam SR Serbian
AM Ameharic HA Hausa MN Mongolian SS Siswati
AR Arabic HI Hindi MO Moldavian ST Sesotho
AS Assamese HR Croatian MR Marathi SU Sundanese
AY Aymara HU Hungarian MS Malay (MAY) SW Swahili
AZ Azerbaijani HY Armenian MT Maltese TA Tamil
BA Bashkir IA Interlingua MY Burmese TE Telugu
BE Byelorussian IE Interlingue NA Nauru TG Tajik
BG Bulgarian IK Inupiak NE Nepali TH Thai
BH Bihari IN Indonesian NO Norwegian TI Tigrinya
BI Bislama IS Icelandic OC Occitan TK Turkmen
BN Bengali, Bangla IW Hebrew OM (Afan) Oromo TL Tagalog
BO Tibetan JA Japanese OR Oriya TN Setswana
BR Breton JI Yiddish PA Panjabi TO Tonga
CA Catalan JW Javanese PL Polish TR Turkish
CO Corsican KA Georgian PS Pashto, Pushto TS Tsonga
CS Czech KK Kazakh QU Quechua TT Tatar
CY Welsh KL Greenlandic RM Rhaeto-Romance TW Twi
DZ Bhutani KM Cambodian RN Kirundi UK Ukrainian
EL Greek KN Kannada RO Rumanian UR Urdu
EO Esperanto KO Korean (KOR) RW Kinyarwanda UZ Uzbek
ET Estonian KS Kashmiri SA Sanskrit VI Vietnamese
EU Basque KU Kurdish SD Sindhi VO Volapuk
FA Persian KY Kirghiz SG Sangho WO Wolof
FI Finnish LA Latin SH Serbo-Croatian XH Xhosa
FJ Fiji LN Lingala SI Singhalese YO Yoruba
FO Faroese LO Laothian SK Slovak ZU Zulu
FY Frisian LT Lithuanian SL Slovenian
GA Irish LV Latvian, Lettish SM Samoan
GD Scots Gaelic MG Malagasy SN Shona
KW-V_Mid_EU.indb 53 2014/01/28 16:26

54
❏ Using Apps of iPod touch/iPhone
SAFETY I NSTRUCTIONS
Use of the iPhone Navigation App is only permitted
if the traffic conditions are suitable and you are
absolutely sure that no risk, obstruction or injury
will be incurred to you, your passengers or other
road users. The requirements of the Road Traffic
Regulations must always be followed and may vary
by state. The destination must not be entered while
the vehicle is in motion.
iPhone Navigation guidance may not be applicable
to the current situation because of changes in traffic
conditions (e.g. changes in tollroads, principal roads,
one-way traffic, or other traffic regulations). In this
case, observe the current traffic signs or regulations.
• Traffic signs should be observed carefully while
driving using the iPhone Navigation App. iPhone
Navigation App is only an aid. The driver must
always decide whether or not to heed the
information provided. We do not accept liability
for erroneous data provided by the iPhone
Navigation App.
• Do not operate the unit while driving.
❏Sound signals emitted through the rear
terminals
Through the analog terminals (Speaker out/REAR
OUT/FRONT OUT/AV-OUT Audio)
2-channel signal is emitted. When playing multi-
channel encoded disc, multi-channel signals are
downmixed.
Error message list
If an error occurs while using the unit, a message
appears. Take appropriate action according to the
following message/remedy/cause list.
“No Signal”:
• Start the playback on the external component
connected to the AV-IN1 input terminal.
• Start playback on the smartphone connected to
HDMI/MHL input terminal.
• Check the cords and connections.
• Signal input is too weak.
“MISWIRING Check wiring connection then reset
unit”/“WARNING Check wiring connection then
reset unit”:
• A speaker cord has shorted or it has come in to
contact with the car chassis. Wire or insulate the
speaker cord as appropriate, then reset the unit.
(Pages3 and 53 )
“Parking Brake”:
• No playback picture is shown when the parking
brake is not engaged.
“Eject Error”/“Loading Error”:
• Eject the disc forcibly. (Page3)
“Restricted Device”:
• Check whether the connected iPod/iPhone is
compatible with this unit. (Page53)
“USB Device Error”:
• The USB power voltage is abnormal.
• Turn off and turn on the unit.
• Connect another USB device.
“Connection Error”:
• The device is registered but the connection has
failed. Connect the registered device. (Page29)
“Please Wait...”:
• The unit is preparing to use the Bluetooth
function. If the message does not disappear, turn
off and turn on the unit, then connect the device
again (or reset the unit).
“No Voice Device”:
• The connected mobile phone does not have a
voice recognition system.
“No Data”:
• No phone book data is contained in the connected
Bluetooth phone.
“Initialize Error”:
• The unit has failed to initialize the Bluetooth
module. Try the operation again.
“Dial Error”:
• Dialing has failed. Try the operation again.
“Hung Up Error”:
• The call has not ended yet. Park your car, and use
the connected mobile phone to end the call.
“Pick Up Error”:
• The unit has failed to receive a call.
REFERENCES
KW-V_Mid_EU.indb 54 2014/01/28 16:26

ENGLISH 55
Troubleshooting
What appears to be trouble is not always serious.
Check the following points before calling a service
center.
• For operations with the external components,
refer also to the instructions supplied with the
adapters used for the connections (as well as
the instructions supplied with the external
components).
❏General
No sound comes out of the speakers.
• Adjust the volume to the optimum level.
• Check the cords and connections.
No picture is displayed on the screen.
• Turn on the screen. (Page6)
The unit does not work at all.
• Reset the unit. (Page3)
The remote controller does not work.
• Replace the battery.
❏Discs
Disc can be neither recognized nor played back.
• Eject the disc forcibly. (Page3)
Recordable/Rewritable discs cannot be played
back.
• Insert a finalized disc.
• Finalize the discs with the component which you
used for recording.
Tracks on the Recordable/Rewritable discs
cannot be skipped.
• Insert a finalized disc.
• Finalize the discs with the component which you
used for recording.
Playback does not start.
• The format of files is not supported by the unit.
No picture appears on the external monitor.
• Connect the video cord correctly.
• Select the correct input on the external monitor.
DivX/MPEG1/MPEG2/MP3/WMA/AAC disc cannot
be played back.
• Record the tracks using a compliant application on
the appropriate discs. (Page51)
• Add appropriate extension codes to the file
names.
Tracks on the Recordable/Rewritable discs are
not played back as you have intended them to
play.
• Playback order may differ from the one played
back using other players.
❏USB
“Now Reading...” does not disappear from the
screen.
• Turn the power off and on again.
While playing a track, sound is sometimes
interrupted.
• The tracks are not properly copied into the USB
device. Copy tracks again, and try again.
Tracks are not played back as you have intended
them to play.
• Playback order may differ from the one played
back using other players.
REFERENCES
KW-V_Mid_EU.indb 55 2014/01/28 16:26

56
❏iPod/iPhone
No sound comes out of the speakers.
• Disconnect the iPod/iPhone, then connect it again.
• Select another source, then reselect “iPod”.
The iPod/iPhone does not turn on or does not
work.
• Check the connecting cable and its connection.
• Update the firmware version.
• Charge the battery.
• Reset the iPod/iPhone.
Sound is distorted.
• Deactivate the equalizer either on this unit or the
iPod/iPhone.
A lot of noise is generated.
• Turn off (uncheck) “VoiceOver” of the iPod/iPhone.
For details, visit <http://www.apple.com>.
No operations are available when playing back a
track containing Artwork.
• Operate the unit after the Artwork is loaded.
Videos cannot be played.
• Connect with USB Audio and Video cable JVC
KS-U59 for iPod/iPhone except for iPhone 5/
iPod touch (5th Generation)/iPod nano (7th
Generation) or JVC KS-U60 and USB2.0 cable
through Lightning-Digital AV adapter for iPhone
5/iPod touch (5th Generation)/iPod nano (7th
Generation) . Other cables cannot be used.
No sound of videos comes out.
• Connect with USB Audio and Video cable JVC
KS-U59 for iPod/iPhone except for iPhone 5/
iPod touch (5th Generation)/iPod nano (7th
Generation) or JVC KS-U60 and USB2.0 cable
through Lightning-Digital AV adapter for iPhone
5/iPod touch (5th Generation)/iPod nano (7th
Generation). Other cables cannot be used.
❏Tuner
SSM automatic presetting does not work.
• Store stations manually. (Page21 )
Static noise while listening to the radio.
• Connect the aerial firmly.
❏AV-IN
No picture appears on the screen.
• Turn on the video component if it is not on.
• Connect the video component correctly.
❏ Bluetooth
Phone sound quality is poor.
• Reduce the distance between the unit and the
Bluetooth mobile phone.
• Move the car to a place where you can get a better
signal reception.
The sound is interrupted or skipped while using a
Bluetooth audio player.
• Reduce the distance between the unit and the
Bluetooth audio player.
• Disconnect the device connected for Bluetooth
phone.
• Turn off, then turn on the unit.
• (When the sound is not yet restored) connect the
player again.
The connected audio player cannot be
controlled.
• Check whether the connected audio player
supports AVRCP (Audio Video Remote Control
Profile).
Bluetooth device does not detect the unit.
• Search from the Bluetooth device again.
The unit does not make pairing with the
Bluetooth device.
• For devices compatible with Bluetooth 2.1:
Register the device using a PIN code. (Page28)
• For devices compatible with Bluetooth 2.0:
Enter the same PIN code for both the unit and
target device. If the PIN code of the device is not
indicated on its instructions, try “0000” or “1234.”
Echo or noise occurs.
• Adjust the microphone unit position.
• Adjust the echo volume or noise reduction
volume. (Page30)
The unit does not respond when you try to copy
the phone book to the unit.
• You may have tried to copy the same entries (as
stored) to the unit.
REFERENCES
KW-V_Mid_EU.indb 56 2014/01/28 16:26

ENGLISH 57
Specifications
❏Monitor section
Picture Size (W x H)
KW-V50BT: 6.95 inches (diagonal) wide
156.6 mm x 81.6 mm
KW-V30BT: 6.1 inches (diagonal) wide
136.2 mm x 72 mm
Display System Transparent TN LCD panel
Drive System TFT active matrix system
Number of Pixels 1 152 000 (800H × 480V × RGB)
Effective Pixels 99.99%
Pixel Arrangement
RGB striped arrangement
Back Lighting LED
❏DVD player section
D/A Converter 24 bit
Audio Decoder Linear PCM/Dolby Digital/MP3/
WMA/AAC
Video Decoder MPEG1/MPEG2/DivX
Wow & Flutter Below Measurable Limit
Frequency Response
96 kHz Sampling: 20 Hz to 22 000 Hz
48 kHz Sampling: 20 Hz to 22 000 Hz
44.1 kHz Sampling: 20 Hz to 20 000 Hz
Total Harmonic Distortion
0.010% (1 kHz)
Signal to Noise Ratio
94 dB (DVD-Video 96 kHz)
Dynamic Range 91 dB (DVD-Video 96 kHz)
Disc Format DVD-Video/DVD-VR/VIDEO-CD/
CD-DA
Sampling Frequency
44.1 kHz/48 kHz/96 kHz
Quantifying Bit Number
16/20/24 bit
❏USB interface section
USB Standard USB 2.0 High Speed
Compatible Devices
Mass storage class
File System FAT 16/32
Maximum Power Supply Current
DC 5 V 1 A
D/A Converter 24 bit
Video Decoder MPEG1/MPEG2/MPEG4/H.264/
MPEG4 AVC/WMV/JPEG/BMP/
PNG
Audio Decoder MP3/WMA/AAC/WAV/FLAC
REFERENCES
KW-V_Mid_EU.indb 57 2014/01/28 16:26

58
❏HDMI interface section
Connector Type TYPE-A
Input Resolution VGA (640 x 480p@59.94 Hz/
60 Hz), 480p (720 x 480p@
59.94 Hz/60 Hz)
Input Audio Type 32 kHz, 44.1 kHz, 48 kHz, 16-bit
Linear PCM
❏MHL interface section
Supported Version
MHL2
Input Resolution VGA (640 x 480p@59.94 Hz/
60 Hz), 480p (720 x 480p@
59.94 Hz/60 Hz)
Input Audio Type 32 kHz, 44.1 kHz, 48 kHz, 16-bit
Linear PCM
Maximum Power Supply Current
DC 5 V 900 mA
❏Bluetooth section
Technology Bluetooth 3.0 + EDR
Frequency 2.4 GHz to 2.4835 GHz
Output Power +4 dBm (MAX), 0 dBm (AVE),
Power Class 2
Maximum Communication Range
Line of sight approx. 10 m
(32.8ft)
Audio Codec SBC/AAC/MP3
Profile HFP (Hands Free Profile)
PBAP (Phonebook Access Profile)
A2DP (Advanced Audio
Distribution Profile)
AVRCP (Audio/Video Remote
Control Profile)
GAP (Generic Access Profile)
SDP (Service Discovery Profile)
SPP (Serial Port Profile)
❏FM tuner section
Frequency Range (50 kHz)
87.5 MHz to 108.0MHz
Usable Sensitivity (S/N: 30 dB Dev 22.5 kHz)
9.3 dBf (0.8 μV/75 Ω)
Quieting Sensitivity (S/N: 46 dB Dev 22.5 kHz)
15.2 dBf (1.6 μV/75 Ω)
Frequency Response (± 3.0 dB)
30 Hz to 15 kHz
Signal to Noise Ratio
75 dB (MONO)
Selectivity (± 400 kHz)
≥ 80 dB
Stereo Separation 45 dB (1 kHz)
❏ LW tuner section
Frequency Range (9 kHz)
153 kHz – 279 kHz
Signal to Noise Ratio
65 dB
Usable Sensitivity 45 μV
❏MW tuner section
Frequency Range (9 kHz)
531 kHz – 1 611 kHz
Signal to Noise Ratio
65 dB
Usable Sensitivity 25 μV
REFERENCES
KW-V_Mid_EU.indb 58 2014/01/28 16:26

ENGLISH 59
❏Video section
Color System of External Video Input
NTSC/PAL
External Video Input Level (RCA/mini jack)
1 Vp-p/75 Ω
External Audio Max Input Level (mini jack)
2 V/25 kΩ
Video Output Level (RCA jack)
1 Vp-p/75 Ω
Audio Output Level (mini jack)
1.2 V/10 kΩ
❏Audio section
Maximum Power (Front & Rear)
50 W × 4
Full Bandwidth Power (Front & Rear)
( at less than 1% THD)
22 W × 4
Preout Level 4 V/10 kΩ
Preout Impedance ≤ 600 Ω
Speaker Impedance
4 Ω to 8 Ω
Equalizer Control Range
Low: 60 Hz, 80 Hz, 100 Hz, 150 Hz, ±10dB
Mid: 500 Hz, 1 kHz, 1.5 kHz, 2 kHz, ±10dB
High: 10 kHz, 12.5 kHz, 15 kHz, 17.5kHz, ±10dB
❏General
Operating Voltage 14.4 V (10.5 V to 16 V allowable)
Maximum Current Consumption
10 A
Installation Dimensions (W × H × D)
182 mm × 111 mm × 162 mm
Operational Temperature Range
–10°C to +60°C
Weight
KW-V50BT : 2.8 kg
KW-V30BT : 2.2 kg
Design and specifications are subject to change
without notice.
❏Trademarks and licenses
• Manufactured under license from Dolby
Laboratories. Dolby and the double-D symbol are
trademarks of Dolby Laboratories.
• “DVD Logo” is a trademark of DVD Format/Logo
Licensing Corporation registered in the US, Japan
and other countries.
• The “AAC” logo is a trademark of Dolby
Laboratories.
• Microsoft and Windows Media are either
registered trademarks or trademarks of Microsoft
Corporation in the United States and/or other
countries.
• “Made for iPod,” and “Made for iPhone” mean
that an electronic accessory has been designed
to connect specifically to iPod, or iPhone,
respectively, and has been certified by the
developer to meet Apple performance standards.
Apple is not responsible for the operation of
this device or its compliance with safety and
regulatory standards. Please note that the use
of this accessory with iPod, or iPhone may affect
wireless performance. iPhone, iPod, iPod classic,
iPod nano, and iPod touch are trademarks of
Apple Inc., registered in the U.S. and other
countries.
• Lightning is a trademark of Apple Inc.
• This item incorporates copy protection technology
that is protected by U.S. patents and other
intellectual property rights of Rovi Corporation.
Reverse engineering and disassembly are
prohibited.
• Font for this product is designed by Ricoh.
REFERENCES
KW-V_Mid_EU.indb 59 2014/01/28 16:26

60
REFERENCES
• DivX®, DivX Certified® and associated logos are
trademarks of Rovi Corporation or its subsidiaries
and are used under license.
• ABOUT DIVX VIDEO: DivX® is a digital video
format created by DivX, LLC, a subsidiary of Rovi
Corporation. This is an official DivX Certified®
device that plays DivX video. Visit divx.com for
more information and software tools to convert
your files into DivX videos.
• ABOUT DIVX VIDEO-ON-DEMAND: This DivX
Certified® device must be registered in order to
play purchased DivX Video-on-Demand (VOD)
movies. To obtain your registration code, locate
the DivX VOD section in your device setup menu.
Go to vod.divx.com for more information on how
to complete your registration.
• THIS PRODUCT IS LICENSED UNDER THE MPEG-
4 VISUAL PATENT PORTFOLIO LICENSE FOR
THE PERSONAL AND NON-COMMERCIAL USE
OF A CONSUMER FOR (i) ENCODING VIDEO
IN COMPLIANCE WITH THE MPEG-4 VISUAL
STANDARD (“MPEG-4 VIDEO”) AND/OR (ii)
DECODING MPEG-4 VIDEO THAT WAS ENCODED
BY A CONSUMER ENGAGED IN A PERSONAL
AND NON-COMMERCIAL ACTIVITY AND/OR WAS
OBTAINED FROM A VIDEO PROVIDER LICENSED
BY MPEG LA TO PROVIDE MPEG-4 VIDEO. NO
LICENSE IS GRANTED OR SHALL BE IMPLIED FOR
ANY OTHER USE. ADDITIONAL INFORMATION
INCLUDING THAT RELATING TO PROMOTIONAL,
INTERNAL AND COMMERCIAL USES AND
LICENSING MAY BE OBTAINED FROM MPEG LA,
LLC. SEE HTTP://WWW.MPEGLA.COM.
• THIS PRODUCT IS LICENSED UNDER THE AVC
PATENT PORTFOLIO LICENSE FOR THE PERSONAL
USE OF A CONSUMER OR OTHER USES IN WHICH
IT DOES NOT RECEIVE REMUNERATION TO
(i)ENCODE VIDEO IN COMPLIANCE WITH THE AVC
STANDARD ("AVC VIDEO") AND/OR (ii)DECODE
AVC VIDEO THAT WAS ENCODED BY A CONSUMER
ENGAGED IN A PERSONAL ACTIVITY AND/OR WAS
OBTAINED FROM A VIDEO PROVIDER LICENSED
TO PROVIDE AVC VIDEO. NO LICENSE IS GRANTED
OR SHALL BE IMPLIED FOR ANY OTHER USE.
ADDITIONAL INFORMATION MAY BE OBTAINED
FROM MPEG LA, L.L.C. SEE HTTP://WWW.MPEGLA.
COM
• Android is a trademark of Google Inc.
• The Bluetooth® word mark and logos are
registered trademarks owned by Bluetooth SIG,
Inc. and any use of such marks by JVC KENWOOD
Corporation is under license. Other trademarks
and trade names are those of their respective
owners.
• The terms HDMI and HDMI High-Definition
Multimedia Interface, and the HDMI logo are
trademarks or registered trademarks of HDMI
Licensing LLC in the United States and other
countries.
• MHL and the MHL logo are a trademark or
registered trademark of MHL, LLC.
- Incorporates MHL 2
• libFLAC
Copyright (C) 2000,2001,2002,2003,2004,2005,
2006,2007,2008,2009 Josh Coalson
Redistribution and use in source and binary forms,
with or without modification, are permitted
provided that the following conditions are met:
– Redistributions of source code must retain the
above copyright notice, this list of conditions
and the following disclaimer.
– Redistributions in binary form must reproduce
the above copyright notice, this list of
conditions and the following disclaimer in the
documentation and/or other materials provided
with the distribution.
– Neither the name of the Xiph.org Foundation
nor the names of its contributors may be used
to endorse or promote products derived from
this software without specific prior written
permission.
THIS SOFTWARE IS PROVIDED BY THE COPYRIGHT
HOLDERS AND ONTRIBUTORS “AS IS” AND ANY
EXPRESS OR IMPLIED WARRANTIES, INCLUDING,
BUT NOT LIMITED TO, THE IMPLIED WARRANTIES
OF MERCHANTABILITY AND FITNESS FOR
A PARTICULAR PURPOSE ARE DISCLAIMED.
IN NO EVENT SHALL THE FOUNDATION OR
CONTRIBUTORS BE LIABLE FOR ANY DIRECT,
INDIRECT, INCIDENTAL, SPECIAL, EXEMPLARY, OR
CONSEQUENTIAL DAMAGES (INCLUDING, BUT
NOT LIMITED TO, PROCUREMENT OF SUBSTITUTE
GOODS OR SERVICES; LOSS OF USE, DATA, OR
PROFITS; OR BUSINESS INTERRUPTION) HOWEVER
CAUSED AND ON ANY THEORY OF LIABILITY,
WHETHER IN CONTRACT, STRICT LIABILITY, OR
TORT (INCLUDING NEGLIGENCE OR OTHERWISE)
ARISING IN ANY WAY OUT OF THE USE OF THIS
SOFTWARE, EVEN IF ADVISED OF THE POSSIBILITY
OF SUCH DAMAGE.
KW-V_Mid_EU.indb 60 2014/01/28 16:26

ENGLISH 61
Declaration of Conformity with regard to the EMC Directive 2004/108/EC
Declaration of Conformity with regard to the R&TTE Directive 1999/5/EC
Declaration of Conformity with regard to the RoHS Directive 2011/65/EU
Manufacturer:
JVC KENWOOD Corporation
3-12 Moriya-cho, Kanagawa-ku, Yokohama-shi, Kanagawa, 221-0022, Japan
EU Representative:
JVC Technical Services Europe GmbH
Konrad-Adenauer-Allee 1-11, D-61118 Bad Vilbel, Germany
English
Hereby, JVC KENWOOD declares that this unit
“KW-V50BT/KW-V30BT” is in compliance with the
essential requirements and other relevant provisions
of Directive 1999/5/EC.
Français
Par la présente JVC KENWOOD déclare que l’appareil
“KW-V50BT/KW-V30BT” est conforme aux exigences
essentielles et aux autres dispositions pertinentes de
la directive 1999/5/EC.
Par la présente, JVC KENWOOD déclare que ce
“KW-V50BT/KW-V30BT” est conforme aux exigences
essentielles et aux autres dispositions de la directive
1999/5/EC qui lui sont applicables.
Deutsch
Hiermit erklärt JVC KENWOOD, dass sich dieser
“KW-V50BT/KW-V30BT” in Übereinstimmung mit
den grundlegenden Anforderungen und den anderen
relevanten Vorschriften der Richtlinie 1999/5/EC
befindet. (BMWi)
Hiermit erklärt JVC KENWOOD die Übereinstimmung
des Gerätes “KW-V50BT/KW-V30BT” mit den
grundlegenden Anforderungen und den anderen
relevanten Festlegungen der Richitlinie 1999/5/
EC. (Wien)
Nederlands
Hierbij verklaart JVC KENWOOD dat het toestel
“KW-V50BT/KW-V30BT” in overeenstemming is met
de essentiële eisen en de andere relevante bepalingen
van richtlijn 1999/5/EC.
Bij deze verklaat JVC KENWOOD dat deze “KW-V50BT/
KW-V30BT” voldoet aan de essentiële eisen en aan de
overige relevante bepalingen van Richtlijn 1999/5/EC.
Italiano
Con la presente JVC KENWOOD dichiara che questo
“KW-V50BT/KW-V30BT” è conforme ai requisiti
essenziali ed alle altre disposizioni pertinenti stabilite
dalla direttiva 1999/5/EC.
Español
Por medio de la presente JVC KENWOOD declara que
el “KW-V50BT/KW-V30BT” cumple con los requisitos
esenciales y cualesquiera otras disposiciones
aplicables o exigibles de la Directiva 1999/5/EC.
Português
JVC KENWOOD declara que este “KW-V50BT/
KW-V30BT” está conforme com os requisitos
essenciais e outras disposições da Directiva 1999/5/
EC.
Polska
JVC KENWOOD niniejszym oświadcza, że “KW-V50BT/
KW-V30BT” spełnia zasadnicze wymogi oraz inne
istotne postanowienia dyrektywy 1999/5/EC.
Český
JVC KENWOOD tímto prohlašuje, že tento
“KW-V50BT/KW-V30BT” je ve shode se základními
požadavky a dalšími príslušnými ustanoveními
smernice 1999/5/EC.
Magyar
Alulírott, JVC KENWOOD, kijelenti, hogy a jelen
“KW-V50BT/KW-V30BT” megfelel az 1999/5/
EC irányelvben meghatározott alapvető
követelményeknek és egyéb vonatkozó előírásoknak.
Svenska
Härmed intygar JVC KENWOOD att denna
“KW-V50BT/KW-V30BT” stär l överensstämelse med
de väsentliga egenskapskrav och övriga relevanta
bestämmelser som framgår av direktiv 1999/5/EC.
Suomi
JVC KENWOOD vakuuttaa täten että “KW-V50BT/
KW-V30BT” tyyppinen laite on direktiivin 1999/5/EC
oleellisten vaatimusten ja sitä koskevien direktiivin
muiden ehtojen mukainen.
Slovensko
S tem JVC KENWOOD izjavlja, da je ta “KW-V50BT/
KW-V30BT” v skladu z osnovnimi zahtevami in
ostalimi ustreznimi predpisi Direktive 1999/5/EC.
Slovensky
Spoločnosť JVC KENWOOD týmto vyhlasuje, že
“KW-V50BT/KW-V30BT” spĺňa zákldné požiadavky a
ďalšie prislušné ustanovenia Direktĺvy 1999/5/EC.
Dansk
Undertegnede JVC KENWOOD erklærer harved, at
følgende udstyr “KW-V50BT/KW-V30BT” overholder
de væsentlige krav og øvrige relevante krav i direktiv
1999/5/EC.
Ελληνικά
ΜΕ ΤΗΝ ΠΑΡΟΥΣΑ JVC KENWOOD ΔΗΛΩΝΕΙ ΟΤΙ
“KW-V50BT/KW-V30BT” ΣΥΜΜΟΡΦΩΝΕΤΑΙ ΠΡΟΣ
ΤΙΣ ΟΥΣΙΩΔΕΙΣ ΑΠΑΙΤΗΣΕΙΣ ΚΑΙ ΤΙΣ ΛΟΙΠΕΣ ΣΧΕΤΙΚΕΣ
ΔΙΑΤΑΞΕΙΣ ΤΗΣ ΟΔΗΓΙΑΣ 1999/5/EC.
Eesti
Sellega kinnitab JVC KENWOOD, et see “KW-V50BT/
KW-V30BT” vastab direktiivi 1999/5/EC põhilistele
nõudmistele ja muudele asjakohastele määrustele.
Latviešu
Ar šo, JVC KENWOOD, apstiprina, ka “KW-V50BT/
KW-V30BT” atbilst Direktīvas 1999/5/EC galvenajām
prasībām un citiem tās nosacījumiem.
Lietuviškai
Šiuo, JVC KENWOOD, pareiškia, kad šis “KW-V50BT/
KW-V30BT” atitinka pagrindinius Direktyvos 1999/5/
EC reikalavimus ir kitas svarbias nuostatas.
Malti
Hawnhekk, JVC KENWOOD, jiddikjara li dan
“KW-V50BT/KW-V30BT” jikkonforma mal-ħtiġijiet
essenzjali u ma provvedimenti oħrajn relevanti li
hemm fid-Dirrettiva 1999/5/EC.
Українська
Компанія JVC KENWOOD заявляє, що цей виріб
“KW-V50BT/KW-V30BT” відповідає ключовим
вимогам та іншим пов’язаним положенням
Директиви 1999/5/EC.
Türkçe
Bu vesileyle JVC KENWOOD, “KW-V50BT/KW-V30BT”
ünitesinin, 1999/5/EC Direktifinin başlıca
gereksinimleri ve diğer ilgili hükümleri ile uyumlu
olduğunu beyan eder.
Hrvatski
Ovime JVC KENWOOD izjavljuje da je ova jedinica
“KW-V50BT/KW-V30BT” je u skladu s osnovnim
zahtjevima i drugim relevantnim odredbama
Direktive 1999/5/EC.
KW-V_Mid_EU.indb 61 2014/01/28 16:26
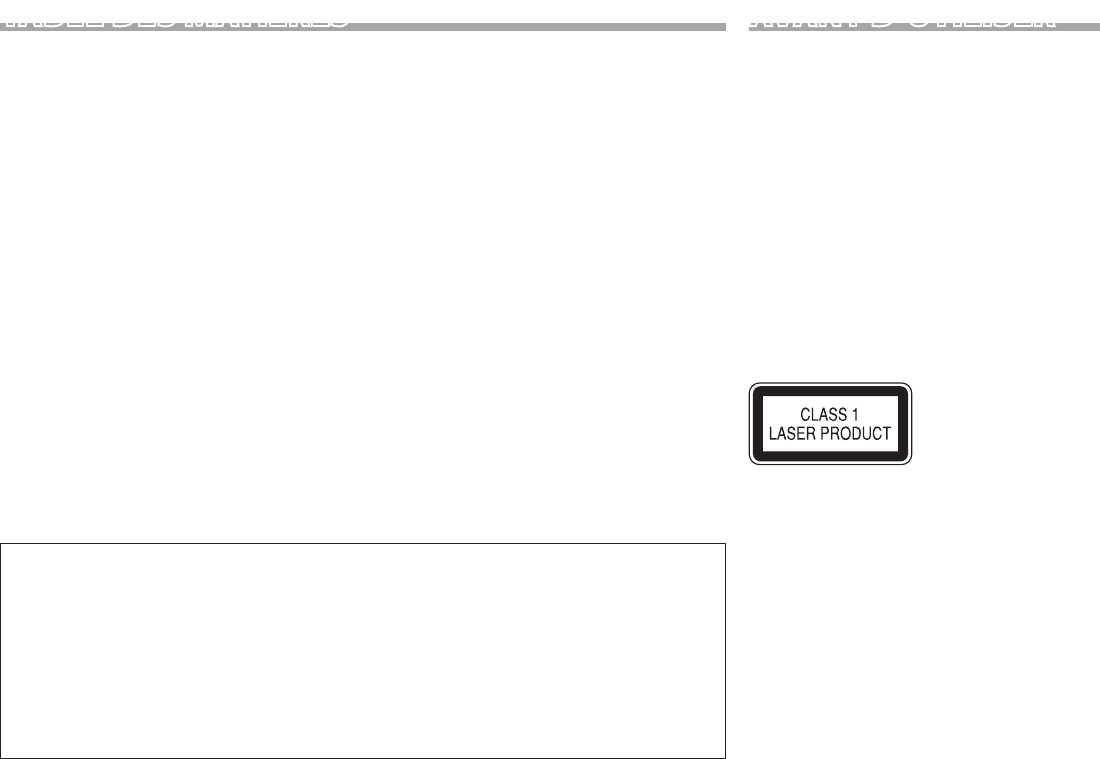
2
TABLE DES MATIERES
AVANT D ’UTILISER ........................................ 2
Comment réinitialiser votre appareil ........................ 3
Comment forcer l’éjection d’un disque .................... 3
RÉGLAGES INITIAUX .....................................4
RÉGLAGES DE BASE ......................................5
Noms des composants et fonctions .......................... 5
Opérations communes................................................... 6
Opérations communes sur l’écran ............................. 7
Sélection de la lecture/source vidéo ......................... 8
DISQUES ........................................................9
USB...............................................................14
iPod/iPhone.................................................16
Apps ............................................................. 19
TUNER .......................................................... 20
AUTRE APPAREIL EXTÉRIEUR .....................24
Utilisation d’un lecteur audio/vidéo extérieur—
AV-IN ...................................................................................24
Utilisation d’un lecteur audio extérieur—
Front AUX (uniquement pour le KW-V30BT) ........24
Utilisation d’une caméra de recul ............................25
Utilisation d’un smartphone—HDMI/MHL ...........26
Utilisation d’un moniteur extérieur— Source
arrière .................................................................................26
BLUETOOTH.................................................27
RÉGLAGES ...................................................35
Réglages pour utiliser les applications de l’iPod/
iPhone/Android ..............................................................35
Ajustements sonores ....................................................36
Ajustement pour la lecture vidéo .............................37
Changement de la disposition de l’affichage ......39
Personnalisation de l’écran d’accueil ......................40
Modification des réglages système .........................40
Éléments du menu de réglage ..................................41
TÉLÉCOMMANDE ........................................43
CONNEXION/INSTALLATION ......................45
RÉFÉRENCES ................................................ 50
Entretien ............................................................................50
Plus d’informations ........................................................ 50
Liste des messages d’erreur ........................................54
Dépannage ....................................................................... 55
Spécifications ...................................................................57
Comment lire ce manuel:
• Les illustrations du KW-V50BT sont utilisées principalement pour les explications. Les affichages et
les panneaux montrés dans ce manuel sont des exemples utilisés pour aider à mieux comprendre les
explications et les opérations. Pour cette raison, les affichages et les panneaux représentés peuvent être
différents de leur apparence réelle.
• Ce mode d’emploi explique les opérations en utilisant les touches du panneau du moniteur et du
panneau tactile. Pour les opérations en utilisant de la télécommande (RM-RK256), voir page 43.
• < > indique les divers écrans/menus/opérations/réglages qui apparaissent sur le panneau tactile.
• [ ] indique les touches sur le panneau tactile.
• Langue des indications: Les indications en anglais sont utilisées dans un but explicatif. Vous pouvez
choisir la langue des indications à partir du menu <Settings>. (Page42)
AVANT D’UTILISER
V AVERTISSEMENTS: (Pour éviter tout accident
et tout dommage)
• N’INSTALLEZ aucun appareil ni aucun câble dans
un endroit où:
– il peut gêner l’utilisation du volant ou du levier
de vitesse.
– il peut gêner le fonctionnement de dispositifs de
sécurité tels que les coussins de sécurité.
– il peut gêner la visibilité.
• NE manipulez pas l’appareil quand vous
conduisez.
Si vous devez commander l’appareil pendant que
vous conduisez, assurez-vous de bien regarder
autour de vous.
• Le conducteur ne doit pas regarder le moniteur
lorsqu’il conduit.
Marquage des produits utilisant un laser
L’étiquette est fixée au châssis/boîtier et informe que
l’appareil utilise des rayons laser qui ont été classifiés
comme Classe 1. Cela signifie que l’appareil utilise
des rayons laser qui sont d’une classe plus faible. Il
n’y a pas de danger de radiation accidentelle hors de
l’appareil.
KW-V_Mid_EU_FR.indb 2 1/29/2014 12:32:33 PM
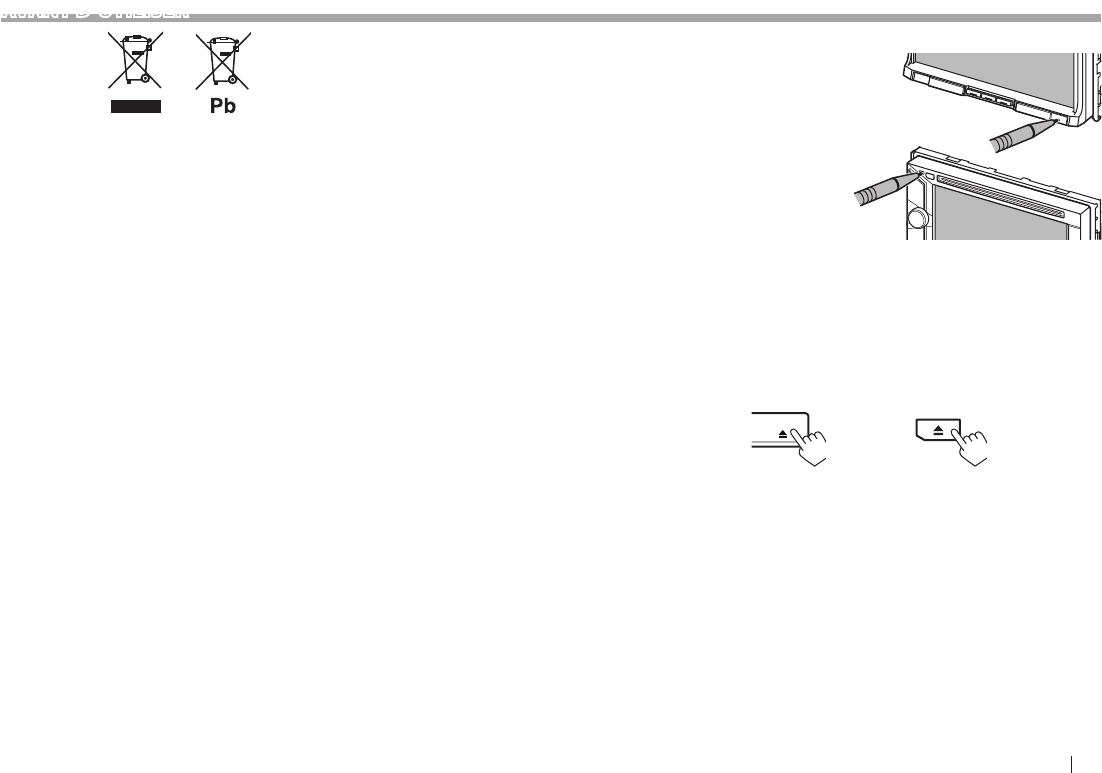
FRANÇAIS 3
Information sur l’élimination des anciens
équipements électriques et électroniques et piles
électriques (applicable dans les pays de l’Union
Européenne qui ont adopté des systèmes de
collecte sélective)
Les produits et piles électriques sur lesquels
le pictogramme (poubelle barrée) est apposé
ne peuvent pas être éliminés comme ordures
ménagères.
Les anciens équipements électriques et
électroniques et piles électriques doivent être
recyclés sur des sites capables de traiter ces produits
et leurs déchets.
Contactez vos autorités locales pour connaître le site
de recyclage le plus proche.
Un recyclage adapté et l’élimination des déchets
aideront à conserver les ressources et à nous
préserver des leurs effets nocifs sur notre santé et sur
l’environnement.
Avis: La marque “Pb” en dessous du symbole des
piles indique que cette pile contient du plomb.
V Précautions concernant le moniteur:
• Le moniteur intégré à l’appareil est un produit
de grande précision, mais qui peut posséder des
pixels déficients. C’est inévitable et ce n’est pas
considéré comme un mauvais fonctionnement.
• N’exposez pas le moniteur à la lumière directe du
soleil.
• N’utilisez pas le panneau tactile avec un stylo bille
ou un objet similaire pointu similaire.
Touchez les touches sur le panneau tactile
directement avec un doigt (si vous portez des
gants, retirez-les).
• Quand la température est très basse ou très
élevée...
– Un changement chimique se produit à l’intérieur,
causant un mauvais fonctionnement.
– Les images peuvent ne pas apparaître
clairement ou se déplacer doucement. Les
images peuvent ne pas être synchronisées avec
le son ou la qualité de l’image peut être réduite
dans de tels environnements.
Pour sécurité...
• N’augmentez pas le volume trop haut, car cela
rendrait la conduite dangereuse en bloquant les
sons de l’extérieur et pourrait créer une perte
d’audition.
• Arrêtez la voiture avant de réaliser toute opération
compliquée.
Température à l’intérieur de la voiture...
Si votre voiture est restée garée pendant longtemps
dans un climat chaud ou froid, attendez que la
température à l’intérieur de la voiture redevienne
normale avant d’utiliser l’appareil.
❏ Comment réinitialiser votre appareil
KW-V30BT
KW-V50BT
• Vos ajustements préréglés sont aussi effacés (sauf
le périphérique Bluetooth enregistré).
❏ Comment forcer l’éjection d’un disque
Maintenez pressée M sur le panneau du moniteur
pendant 10 secondes.
KW-V50BT KW-V30BT
(Maintenir
pressée)
(Maintenir
pressée)
• Faites attention de ne pas faire tomber le disque
quand il est éjecté.
• Si cela ne fonctionne pas, essayez de réinitialiser
l’appareil. (Voir ci-dessus.)
AVANT D’UTILISER
KW-V_Mid_EU_FR.indb 3 1/29/2014 12:32:34 PM
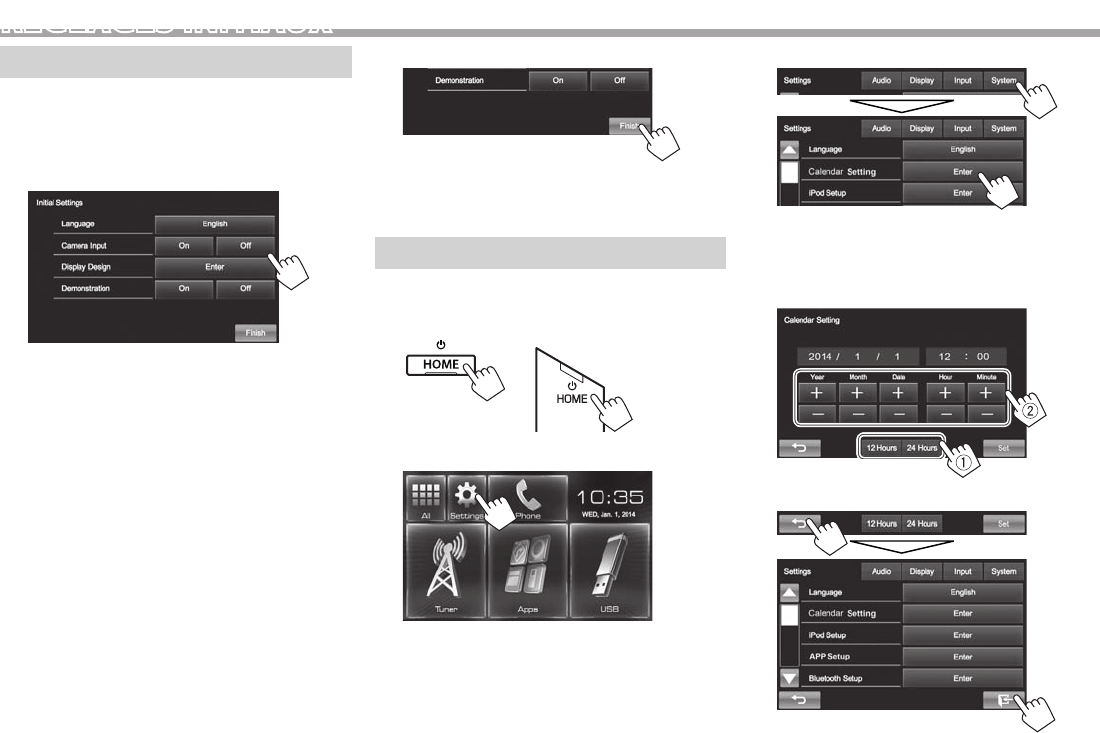
4
RÉGLAGES IN ITIAUX
Réglages initiaux
Quand vous mettez l’appareil sous tension pour la
première fois ou réinitialisez-le, l’écran des réglages
initiaux apparaît.
• Vous pouvez aussi changer les réglages sur l’écran
<Settings>. (Page41)
1
<Language>
(Page42)
Choisissez la langue des
textes utilisés pour les
informations sur l’écran.
• Réglez <GUI Language>
pour afficher les touches
de commande et les
éléments de menu
dans la langue choisie
([Local]: sélectionné
initialement) ou Anglais
([English]).
<Camera Input>
(Page42)
Choisissez [On] quand
une caméra de recul est
connectée.
<Display Design>
(Page42)
Choisissez la couleur du
fond et du panneau.
<Demonstration>
(Page42)
Mettez en ou hors service
la démonstration des
affichages.
2 Terminez la procédure.
L’écran d’accueil est affiché.
• [AV Off] est choisi initialement. Choisissez la
source de lecture. (Page8)
Réglages du calendrier/horloge
1 Affichez l’écran d’accueil.
KW-V50BT KW-V30BT
2 Affichez l’écran <Settings>.
3 Affichez l’écran <Calendar Setting>.
4 Sélectionnez le format d’affichage (1),
puis réglez le calendrier et l’heure (2).
• Appuyez sur [Set] pour régler les secondes
sur “00”.
5 Terminez la procédure.
KW-V_Mid_EU_FR.indb 4 1/29/2014 12:32:35 PM
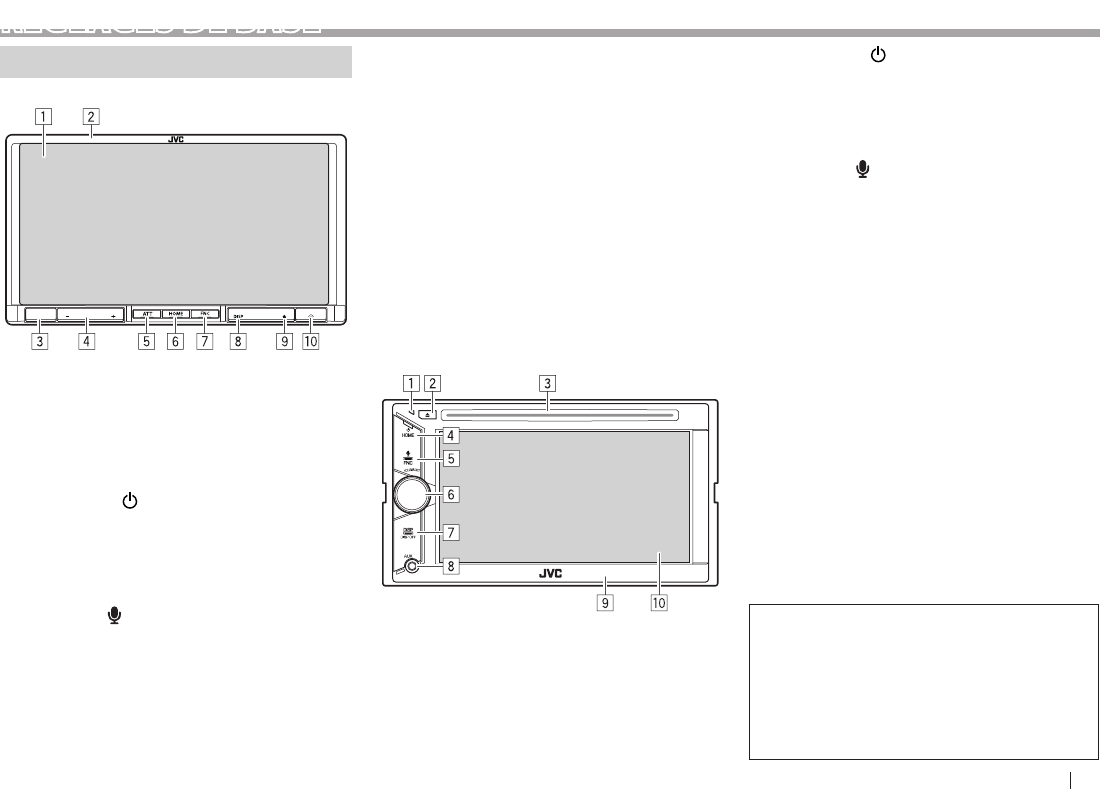
FRANÇAIS 5
RÉGLAGES DE BASE
Noms des composants et fonctions
KW-V50BT
1 Écran (panneau tactile)
2 Panneau du moniteur*
3 Capteur de télécommande
4 Touche VOLUME –/+
Ajuste le volume audio. (Page 6)
5 Touche ATT
Atténue le son. (Page 6)
6 Touche HOME/
• Affiche l’écran d’accueil. (Appuyer) (Page 7)
• Met l’appareil hors tension. (Maintenir pressée)
(Page 6)
• Met sous tension de l’appareil. (Appuyer)
(Page 6)
7 Touche FNC/
• Fait apparaître la fenêtre de l’écran <Function
Menu>/<Video Menu> sur l’écran de
commande de la source. (Appuyer) (Page 7)
• Mets en service la composition vocale.
(Maintenir pressée) (Page 32)
8 Touche DISP/DISP OFF
• Commute l’écran entre la source actuelle et
l’écran de l’application à partir de l’iPod touch/
iPhone/Android connecté. (Appuyer)
• Met l’écran hors service. (Maintenir pressée)
(Page 6)
• Met l’écran en service. (Maintenir pressée)
(Page 6)
9 Touche M (éjection)
• Affiche l’écran <Open/Tilt>. (Appuyer)
(Page 6)
• Éjecte le disque de force. (Maintenir pressée)
(Page 3)
p Touche de réinitialisation
Réinitialise l’appareil. (Page 3)
KW-V30BT
1 Touche de réinitialisation
Réinitialise l’appareil. (Page 3)
2 Touche M (éjection)
• Éjecte le disque. (Appuyer) (Page 9)
• Éjecte le disque de force. (Maintenir pressée)
(Page 3)
3 Fente d’insertion
4 Touche HOME/
• Affiche l’écran d’accueil. (Appuyer) (Page 7)
• Met l’appareil hors tension. (Maintenir pressée)
(Page 6)
• Met sous tension de l’appareil. (Appuyer)
(Page 6)
5 Touche FNC/
• Fait apparaître la fenêtre de l’écran <Function
Menu>/<Video Menu> sur l’écran de
commande de la source. (Appuyer) (Page 7)
• Mets en service la composition vocale.
(Maintenir pressée) (Page 32)
6 Bouton VOLUME/ATT
• Atténue le son. (Appuyer) (Page 6)
• Ajuste le volume audio. (Tourner) (Page 6)
7 Touche DISP/DISP OFF
• Commute l’écran entre la source actuelle et
l’écran de l’application à partir de l’iPod touch/
iPhone/Android connecté. (Appuyer)
• Met l’écran hors service. (Maintenir pressée)
(Page 6)
• Met l’écran en service. (Maintenir pressée)
(Page 6)
8 Prise d’entrée AUX
9 Panneau du moniteur*
p Écran (panneau tactile)
* Vous pouvez changer la couleur des touches du panneau du
moniteur. (Page 39)
V Précautions sur le réglage du volume:
Les appareils numériques produisent très
peut de bruit par rapport aux autres sources.
Réduisez le volume avant de reproduire
ces sources numériques afin d’éviter
d’endommager les enceintes par la soudaine
augmentation du niveau de sortie.
KW-V_Mid_EU_FR.indb 5 1/29/2014 12:32:35 PM
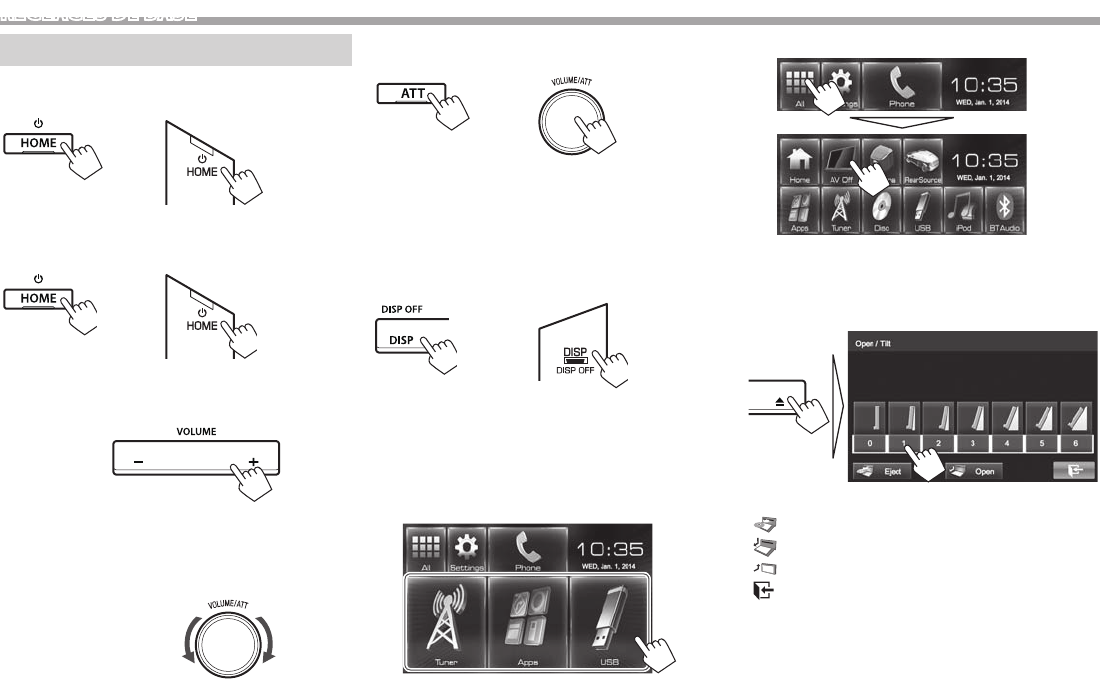
6
RÉGLAGES DE BASE
Opérations communes
❏ Mise sous tension de l’appareil
KW-V50BT KW-V30BT
❏ Mise hors tension de l’appareil
KW-V50BT KW-V30BT
(Maintenir
pressée) (Maintenir
pressée)
❏ Réglage du volume
Pour ajuster le volume (00 à 35)
KW-V50BT
Appuyez sur + pour augmenter, appuyez sur – pour
diminuer.
• Maintenir la touche pressée augmente/diminue le
volume de façon continue.
KW-V30BT
Tournez vers la droite pour augmenter, et tournez
vers la gauche pour diminuer.
Pour atténuer le son
KW-V50BT KW-V30BT
L’indicateur ATT s’allume.
Pour annuler l’atténuation: Appuyez de nouveau
sur la même touche.
❏ Mise hors service de l’écran
KW-V50BT KW-V30BT
(Maintenir
pressée) (Maintenir
pressée)
Pour mettre en service l’écran: Maintenez enfoncé
DISP sur le panneau du moniteur.
❏ Mise en/hors service la source AV
Vous pouvez mettre en service la fonction AV en
choisissant la source sur l’écran d’accueil.
Pour sélectionner une source non affichée sur
l’écran d’accueil: Appuyez sur [All]. (Page 8)
Pour mettre la source AV hors service:
❏ Opérations du panneau du moniteur —
<Open/Tilt> (uniquement pour
KW-V50BT)
[0] – [6] Choisit un angle.
[ Eject] Éjecte le disque.
[ Open] Ouvre le panneau du moniteur.
[ Close] Ferme le panneau du moniteur.
[ ]Quitte l’écran <Open/Tilt>.
KW-V_Mid_EU_FR.indb 6 1/29/2014 12:32:36 PM
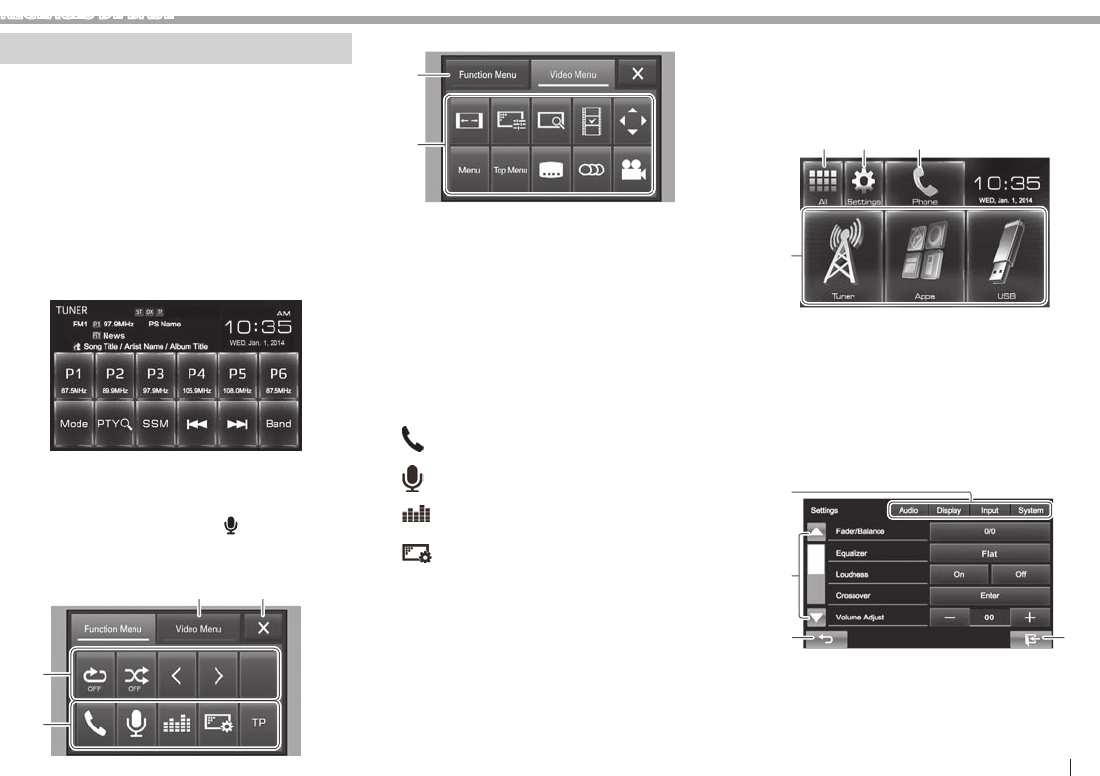
FRANÇAIS 7
RÉGLAGES DE BASE
Opérations communes sur l’écran
❏Descriptions communes de l’écran
Vous pouvez afficher d’autres écrans n’importe
quand pour changer la source, afficher les
informations, ou changer les réglages, etc.
Écran de commande de la source
Permet de réaliser des opérations de lecture de la
source.
• Les touches de commande varient en fonction de
la source sélectionnée.
• Toucher le texte d’information change le type
d’information.
Écran <Function Menu>/<Video Menu>
Lors de l’affichage de l’écran de commande de la
source, vous pouvez afficher/cacher les touches de
commande en appuyant sur FNC/ sur le panneau
du moniteur.
Écran <Function Menu>
1 2
3
4
Écran <Video Menu>
5
6
Touches de commande communes:
1 Commute sur l’écran <Video Menu>.
2 Ferme l’écran <Function Menu>/<Video Menu>
et retourne sur l’écran de commande de la
source.
3 Affiche les touches de sous-fonction pour la
lecture de la source.
• Les touches varient en fonction de la source
sélectionnée.
4 Touches de raccourci
[ ] Affiche l’écran de commande du
téléphone. (Page31)
[]Mets en service la composition
vocale. (Page 32)
[]Affiche l’écran d’ajustement du
son. (Page36)
[]Affiche l’écran de menu
<Display>. (Page 42)
[TP] Met en/hors service le mode
d’attente de réception TA.
(Page22)
5 Commute sur l’écran <Function Menu>.
6 Touches de fonctionnement pour la lecture
vidéo. (Page37)
• Les touches varient en fonction de la source
sélectionnée.
Écran d ’accueil
Affiche l’écran de commande/réglages de la source
et change la source d’image.
• Pour afficher l’écran d’accueil, appuyez sur HOME
sur le panneau du moniteur.
4
12 3
Touches de commande communes:
1 Affiche toutes les sources. (Page8)
2 Affiche l’écran <Settings>. (Voir ci-dessous.)
3 Affiche l’écran de commande du téléphone.
(Page 31)
4 Change la source de lecture. (Page 8)
Écran <Settings>
Change les réglages détaillés. (Page 41)
34
2
1
Touches de commande communes:
1 Choisissez la catégorie du menu.
2 Change la page.
3 Retourne à l’écran précédent.
4 Affiche l’écran actuel de commande de la source.
KW-V_Mid_EU_FR.indb 7 1/29/2014 12:32:38 PM
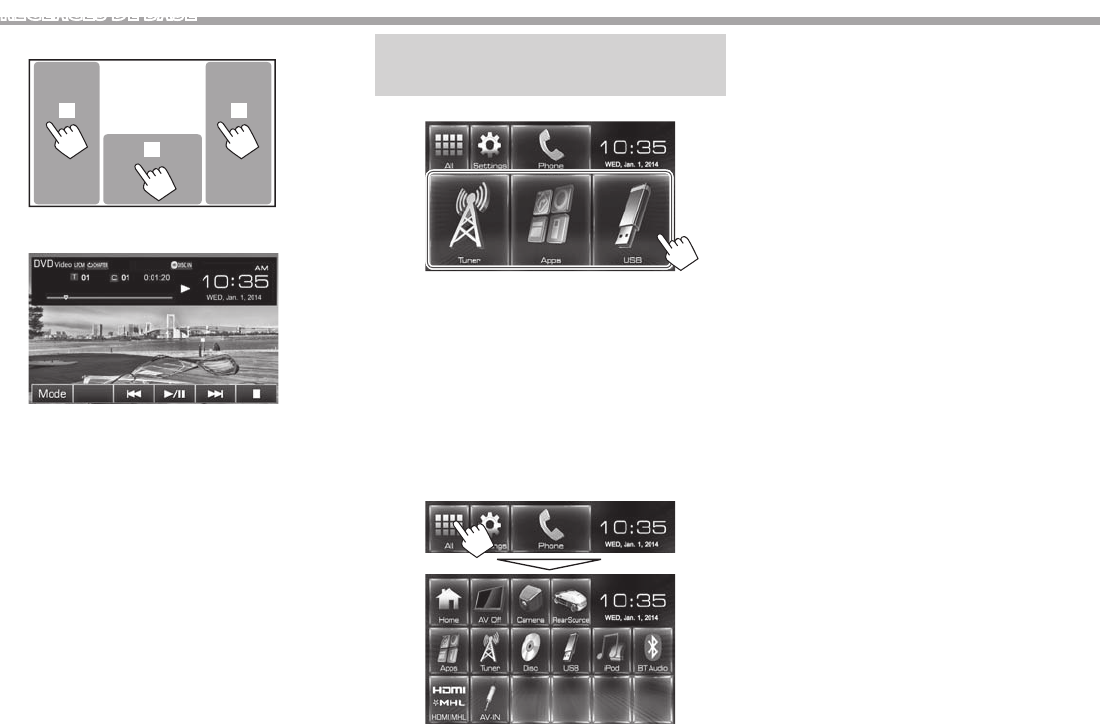
8
RÉGLAGES DE BASE
❏Fonctionnement tactile
1
32
1 Affiche l’écran de commande de la source
pendant la lecture d’une séquence vidéo.
• Les touches de commande disparaissent
si vous touchez l’écran ou quand aucune
opération n’est réalisée pendant environ
10 secondes.
2 Retourne au chapitre/plage précédente.*
3 Retourne au chapitre/plage suivante.*
* Non disponible pour le signal vidéo venant de l’appareil extérieur.
Faire glisser votre doigt vers la gauche ou vers la droite fonctionne
de la même façon que toucher.
Sélection de la lecture/source
vidéo
Sur l’écran d’accueil:
• Pour [USB]/[iPod] : Lors de la lecture d’une
source avec des données d’image de pochette/
illustration/image affichées, les données d’image
de pochette/illustration/image sont affichées sur
la touche au lieu de l’icône de la source sur l’écran
d’accueil.
• Vous pouvez changer les éléments à afficher sur
l’écran d’accueil. (Page40)
❏ Pour afficher toutes les sources et tous
les éléments de l’écran
Pour rétablir l’écran: Appuyez sur [Home].
[AV Off] Met hors service la source AV.
(Page 6)
[Camera] Commute sur une caméra connecté
à l’entrée de la caméra de recul.
(Page 25)
[RearSource] Sélectionne la source arrière à
afficher sur le moniteur extérieur.
(Page 26)
[Apps] Commute sur l’écran de l’App
à partir de l’iPod touch/iPhone
connecté. (Page 19)
[Tuner] Commute sur la réception radio.
(Page 20)
[Disc] Reproduit un disque. (Page 9)
[USB] Reproduit les fichiers sur un
périphérique USB. (Page 14)
[iPod] Reproduit les fichiers sur un iPod/
iPhone. (Page 16)
[BT Audio] Reproduit les fichiers sur un lecteur
audio Bluetooth. (Page 33)
[HDMI/MHL] Lit l’appareil connecté à la prise
d’entrée HDMI/MHL. (Page 26)
[AV-IN] Commute sur un appareil extérieur
connecté à la prise d’entrée AV-IN1
sur le panneau arrière. (Page 24)
[Front AUX]* Commute sur un appareil extérieur
connecté à la prise d’entrée AUX sur
le panneau du moniteur. (Page 24)
* Uniquement pour le KW-V30BT.
KW-V_Mid_EU_FR.indb 8 1/29/2014 12:32:39 PM
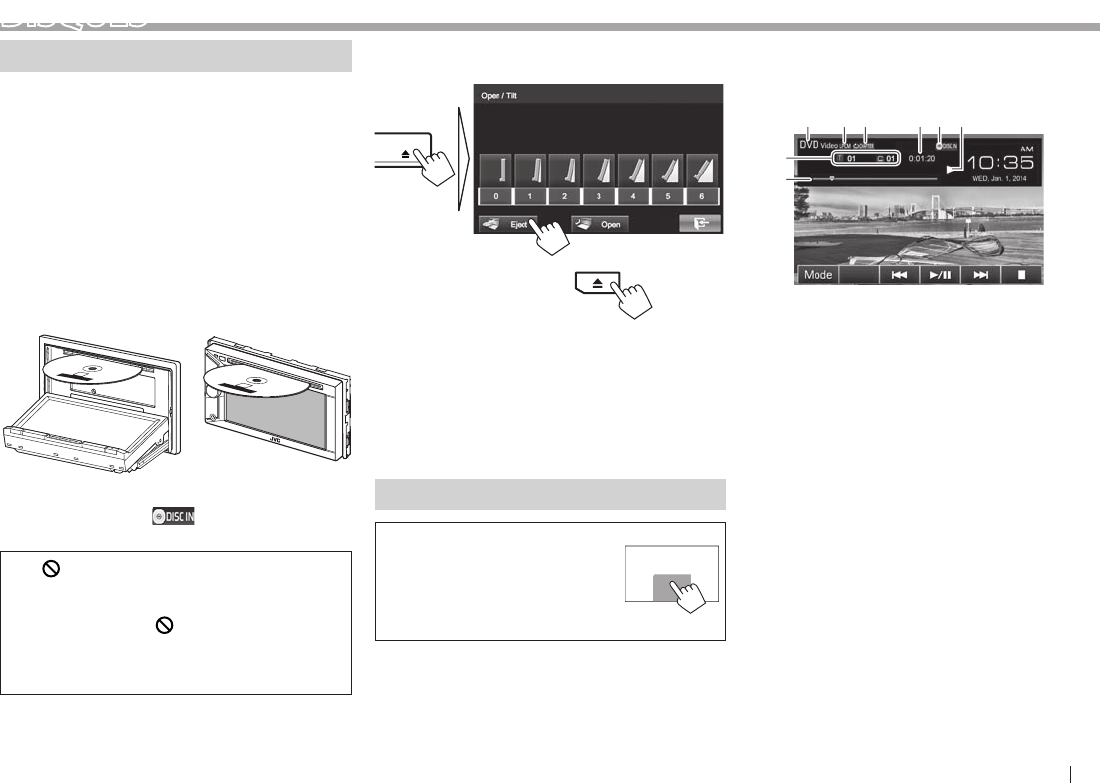
FRANÇAIS 9
DISQUES
Lecture d’un disque
• Si le disque ne possède pas de menu de disque,
toutes ses plages sont reproduites répétitivement
jusqu’à ce que vous changiez la source ou éjectiez
le disque.
• Pour les types de disque/types de fichier
reproductibles, voir page 51.
❏Insertion d’un disque
Insérez un disque avec la partie imprimée dirigée
vers le haut.
• Pour le KW-V50BT: Pour ouvrir le panneau du
moniteur, voir page 6.
KW-V50BT KW-V30BT
La source change sur “DISC” et la lecture démarre.
• L’indicateur DISC IN ( ) s’allume quand un
disque est inséré.
• Si “ ” apparaît sur l’écran, c’est que l’appareil ne
peut pas accepter la commande effectuée.
– Dans certains cas, la commande peut être
refusée sans que “ ” apparaisse.
• Lors de la lecture d’un disque codé multicanaux,
les signaux multicanaux sont sous mixés en
stéréo.
❏ Éjection d’un disque
KW-V50BT
KW-V30BT
• Pour retirer un disque, tirez-le horizontalement.
• Vous pouvez éjecter un disque lors de la lecture
d’une autre source AV.
• Si le disque éjecté n’est pas retiré avant 60
secondes, il est réinséré automatiquement dans la
fente d’insertion pour le protéger de la poussière.
• Si le disque ne peut pas être éjecté, voir page 3.
Opérations de lecture
Quand les touches de commande
ne sont pas affichées sur l’écran,
touchez la zone montrée sur
l’illustration.
• Pour changer les réglages pour
la lecture vidéo, voir page 37.
❏Indications et touches sur l’écran de
commande de la source
Pour le DVD/DVD-VR/VCD/DivX/MPEG1/MPEG2
1 23 54
8
6
7
Informations sur la lecture
1 Type de support
2 Format audio
3 Mode de lecture (Page12)
4 Durée de lecture
5 Indicateur DISC IN
6 État de lecture
7 Informations sur l’élément en cours de lecture
• DVD Vidéo: No. de titre/No. de chapitre
• DVD-VR: No. de programme (ou No. de liste de
lecture)/No. de chapitre
• DivX/MPEG1/MPEG2: No. de dossier/No. de
plage
• VCD: No de scène (avec PBC) ou No de plage
(sans PBC)
8 Barre de progression*
* Apparaît uniquement pour les DVD Vidéo.
KW-V_Mid_EU_FR.indb 9 1/29/2014 12:32:39 PM
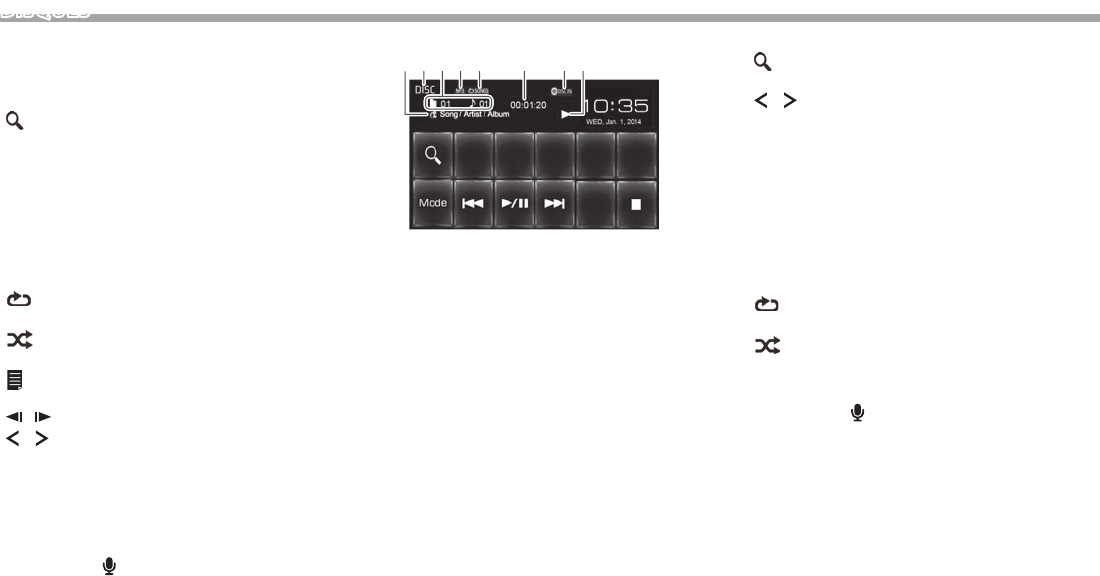
10
DISQUES
Touches de commande
[Mode] Change les réglages de lecture
de disque sur l’écran <Mode>.
(Page13)
[]*1Affiche la liste des dossiers/plages.
(Page11)
[S] [T]• Choisit un chapitre/plage.
(Appuyer)
• Recherche vers l’arrière/vers
l’avant.*2 (Maintenez pressée)
[I/W]Démarre/arrête momentanément
(pause) la lecture.
[o]Arrête la lecture.
[]*3Choisit le mode de lecture répétée.
(Page12)
[]*1 *3Choisit le mode de lecture aléatoire.
(Page12)
[]*3 *4Affiche l’écran de programme
original/liste de lecture.
[ ] [ ]*3 *5Lecture image par image.
[ ] [ ]*1 *3Choisit un dossier.
[PBC]*3 *6Active ou désactive la fonction VCD
PBC (commande de lecture).
*1 N’apparaît pour les DVD/DVD-VR/VCD.
*2 La vitesse de recherche varie en fonction du type de disque ou de
fichier.
*3 Appuyez sur FNC/ sur le panneau du moniteur pour afficher
l’écran <Function Menu> et sélectionner un élément.
(Page7)
*4 Apparaît uniquement pour les DVD-VR.
*5 Apparaît uniquement pour les DVD/DVD-VR.
*6 Apparaît uniquement pour les VCD.
Pour C D/MP3/WMA/AAC
4256731 8
Informations sur la lecture
1 Informations sur la plage/fichier
• Toucher le texte d’information change le type
d’information.
2 Type de support
3 Informations sur l’élément en cours de lecture
• MP3/WMA/AAC: No. de dossier/No. de plage
• CD: No. de plage
4 Format audio
5 Mode de lecture (Page12)
6 Durée de lecture
7 Indicateur DISC IN
8 État de lecture
Touches de commande
[ ]*1Affiche la liste des dossiers/plages.
(Page11)
[ ] [ ]*1 *2Choisit un dossier.
[Mode] Change les réglages de lecture
de disque sur l’écran <Mode>.
(Page13)
[S] [T]• Choisit une plage. (Appuyer)
• Recherche vers l’arrière/vers
l’avant.*3 (Maintenez pressée)
[I/W]Démarre/arrête momentanément
(pause) la lecture.
[o]Arrête la lecture.
[]*2Choisit le mode de lecture répétée.
(Page12)
[]*2Choisit le mode de lecture aléatoire.
(Page12)
*1 N’apparaît pas pour les CD.
*2 Appuyez sur FNC/ sur le panneau du moniteur pour afficher
l’écran <Function Menu> et sélectionner un élément.
(Page7)
*3 La vitesse de recherche varie en fonction du type de disque ou de
fichier.
KW-V_Mid_EU_FR.indb 10 1/29/2014 12:32:40 PM
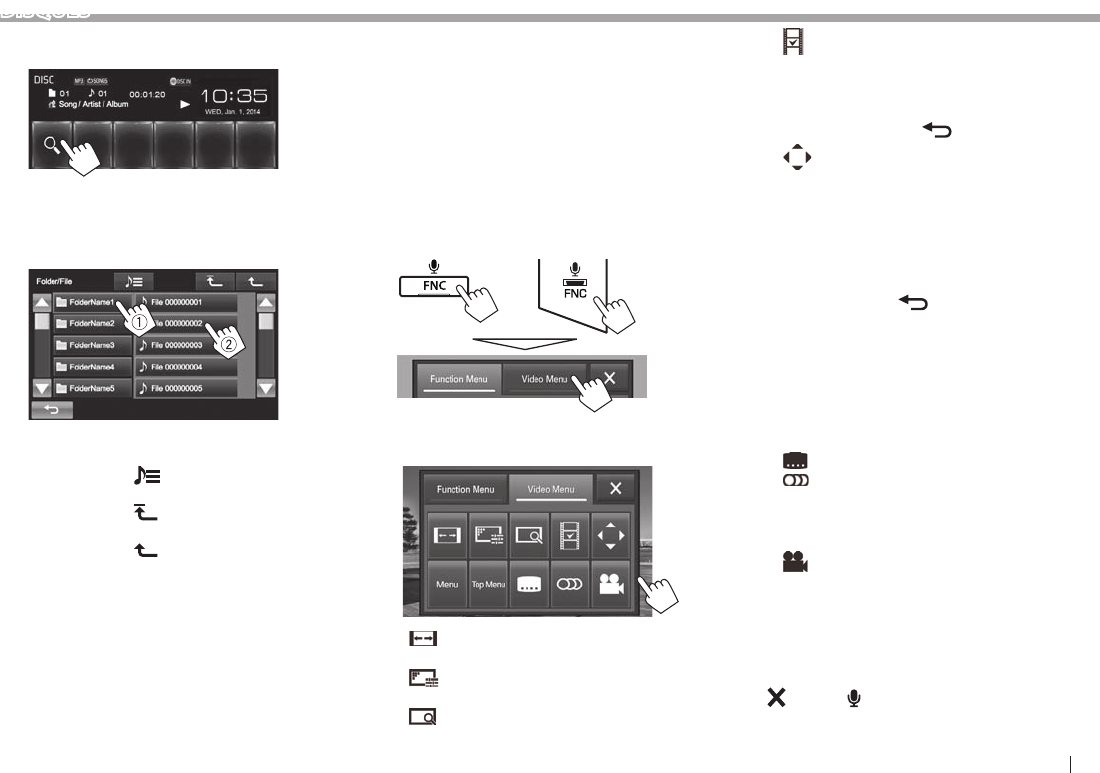
FRANÇAIS 11
DISQUES
❏ Sélection d’un dossier/plage sur la liste
1
2 Sélectionnez le dossier (1), puis l’élément
dans le dossier sélectionné (2).
• Répétez la procédure jusqu’à ce que vous
choisissiez la plage souhaitée.
• Vous pouvez changer la page pour afficher
plus d’éléments en appuyant sur [J]/[K].
• Appuyez sur [ ] pour ouvrir le dossier
contenant la plage actuelle.
• Appuyez sur [] pour retourner au dossier
racine.
• Appuyez sur [] pour retourner au niveau
précédent.
❏ Utilisation du menu vidéo
Vous pouvez afficher l’écran du menu vidéo pendant
une lecture vidéo.
• Les éléments disponibles sur l’écran diffèrent
en fonction des types de disque en place et des
fichiers compatibles.
• Les touches de commande disparaissent si vous
touchez l’écran ou quand aucune opération n’est
réalisée pendant environ 10 secondes.
1 Affichez l’écran <Video Menu>.
KW-V50BT KW-V30BT
2
Pour le DVD/DVD-VR/DivX/MPEG1/MPEG2
[ ] Permet de choisir le format de
l’image. (Page38)
[]Affiche l’écran d’ajustement de
l’image. (Page37)
[]* Affiche l’écran de sélection de la
taille de l’image. (Page38)
[ ]* Commute sur le mode de menu
directe de disque. Touchez
l’élément cible pour le choisir.
• Pour quitter l’écran de
sélection de menu, appuyez
sur [ ].
[]* Affiche l’écran de sélection
du menu/liste de lecture/
programme original/scène.
• [J] [K] [H] [I]: Choisit un
élément.
• [Enter]: Valide la sélection.
• [Return]: Retourne à l’écran
précédent.
• [ ]: Affiche l’écran de menu
du niveau supérieur quand
plusieurs écrans de menu
existent sur le disque.
– Pour les DivX: Quitte l’écran
de sélection de scène.
[Menu]* Affiche le menu de disque.
[Top Menu]* Affiche le menu de disque (DVD).
[]* Choisit le type de sous-titre.
[]Choisit le type audio.
• Pour les DVD-VR: Choisit le
canal audio (ST: stéréo,
L: gauche, R:droit).
[]* Choisit l’angle de vue.
* Il peut ne pas apparaître en fonction du support/fichier, etc.
• Toucher n’importe quelle autre position que les
touches de fonctionnement permet d’afficher
l’écran de commande de la source.
• Pour fermer l’écran <Video Menu>, appuyez sur
[] ou FNC/ sur le panneau du moniteur.
KW-V_Mid_EU_FR.indb 11 1/29/2014 12:32:41 PM
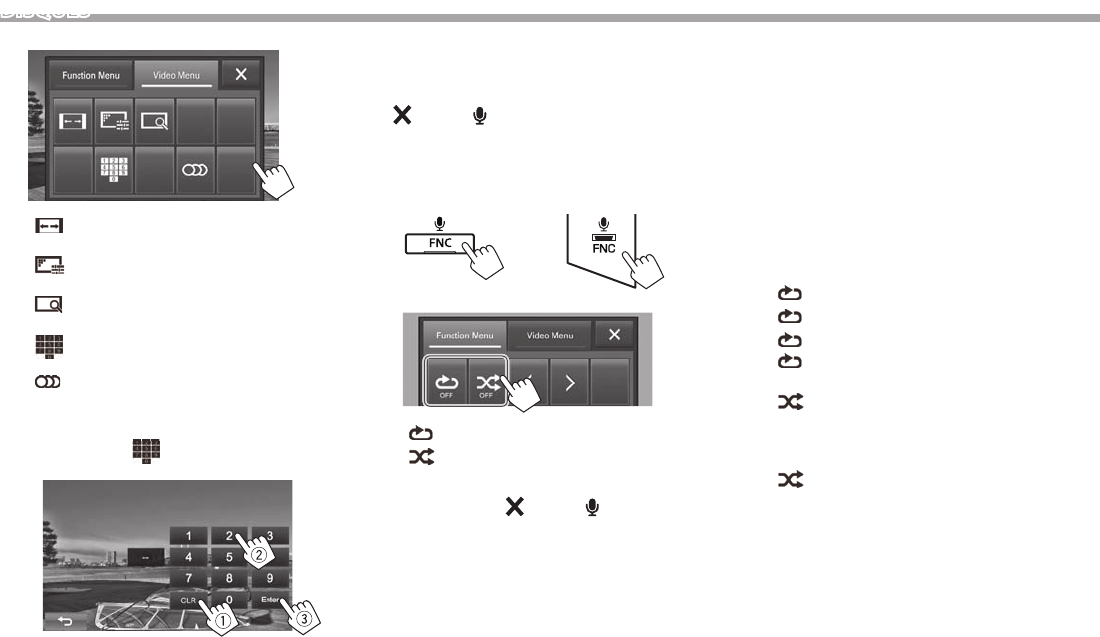
12
DISQUES
Pour les VCD
[ ] Permet de choisir le format de
l’image. (Page38)
[]Affiche l’écran d’ajustement de
l’image. (Page37)
[]Affiche l’écran de sélection de la
taille de l’image. (Page38)
[]Affiche/cache les touches de
sélection directe.
[ ] Choisit le canal audio (ST: stéréo,
LL: gauche, RR:droit).
• Pour sélectionner un plage directement,
appuyez sur [ ] pour afficher les touches de
sélection directe, puis...
– Quand vous entrez un mauvais numéro,
appuyez sur [CLR] pour supprimer le
dernier chiffre entré.
• Toucher n’importe quelle autre position que les
touches de fonctionnement permet d’afficher
l’écran de commande de la source.
• Pour fermer l’écran <Video Menu>, appuyez sur
[] ou FNC/ sur le panneau du moniteur.
❏Sélection du mode de lecture
1 Affichez l’écran <Function Menu>.
KW-V50BT KW-V30BT
2
[ ] Choisit le mode de lecture répétée.
[]Choisit le mode de lecture aléatoire.
• Pour fermer l’écran <Function Menu>,
appuyez sur [ ] ou FNC/ sur le panneau du
moniteur.
• Pour les DVD/DVD-VR/VCD (sans PBC) : La lecture
répétée est disponible.
Pour CD/DivX/MPEG1/MPEG2/MP3/WMA/AAC : La
lecture répétée et aléatoire est disponible.
– Vous ne pouvez pas mettre en service le mode
de répétition et le mode de lecture aléatoire en
même temps.
• Chaque fois que vous appuyez sur la touche,
le mode de lecture change. (L’indicateur
correspondant s’allume.)
– Les éléments disponibles diffèrent en fonction
des types de disque en place et des fichiers
compatibles.
CHAPTER Répète le chapitre actuel.
TITLE Répète le titre actuel.
SONGS Répète la plage actuelle.
FOLDER Répète toutes les plages du
dossier actuel.
FOLDER Reproduit aléatoirement de
toutes les plages du dossier
actuel, puis de toutes les
plages des dossiers suivants.
ALL Reproduit aléatoirement
toutes les plages.
Pour annuler la lecture répétée/aléatoire:
Appuyez répétitivement la touche jusqu’à ce que
l’indicateur disparaisse.
KW-V_Mid_EU_FR.indb 12 1/29/2014 12:32:43 PM
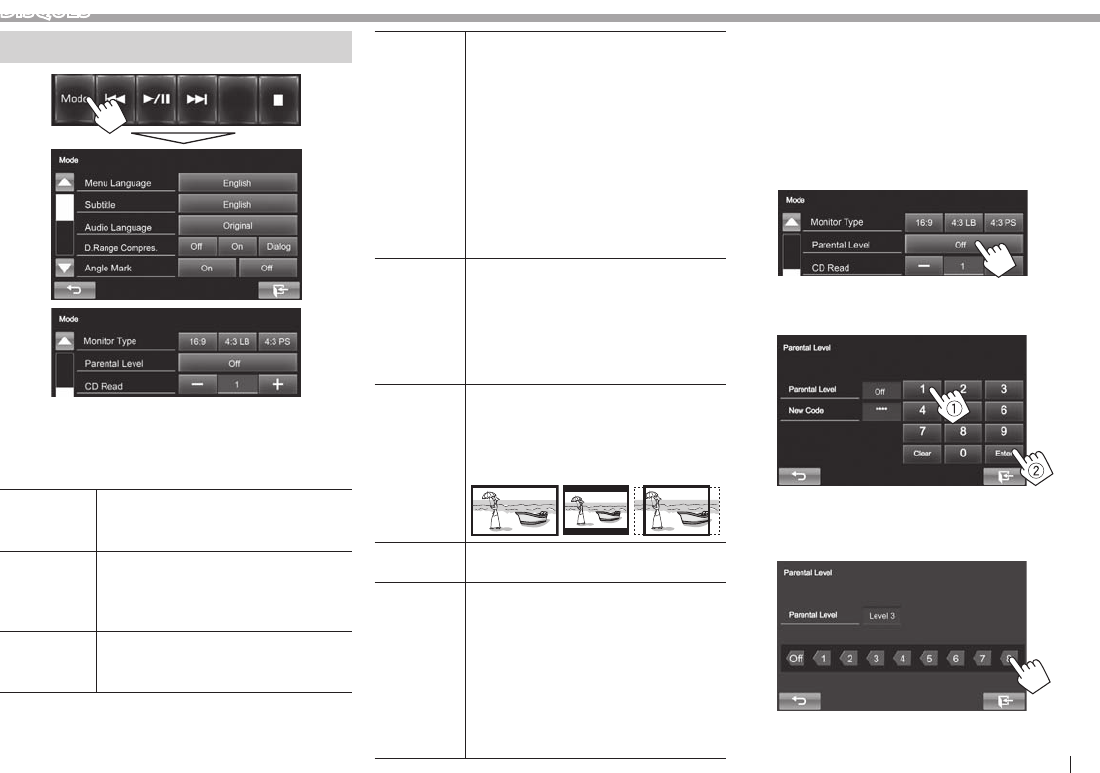
FRANÇAIS 13
DISQUES
Réglages pour la lecture de disque
• Les éléments disponibles sur l’écran <Mode> sont
différents en fonction des disques/fichiers lus.
❏Réglages possibles
<Menu
Language>*
Choisissez la langue initiale du menu
de disque. (Réglage initial: English)
(Page53)
<Subtitle>* Choisissez la langue initiale des
sous-titres ou supprimes les sous-
titres (Off). (Réglage initial: English)
(Page53)
<Audio
Language>*
Choisissez la langue initiale des
dialogues. (Réglage initial: Original)
(Page53)
<D.Range
Compres.>*
Vous pouvez changer la plage
dynamique pendant la lecture d’un
support Dolby Digital.
• Off
: Choisissez ce réglage pour
profiter d’un son puissant à un faible
niveau de volume avec toute la
plage dynamique.
• On (Réglage initial): Choisissez ce
réglage pour réduire légèrement la
plage dynamique.
• Dialog: Choisissez ce réglage pour
reproduire les dialogues des films
plus clairement.
<Angle
Mark>
Sélectionnez d’afficher ou non la
marque d’angle.
• On (Réglage initial): Sélectionnez
ce réglage pour afficher la marque
d’angle.
• Off: Sélectionnez ce réglage pour
cacher la marque d’angle.
<Monitor
Type>*
Choisissez le type de moniteur de façon à
ce qu’il corresponde à une image d’écran
large sur votre moniteur extérieur.
16:9
(Réglage initial)
4:3 LB 4:3 PS
<Parental
Level>*
Réglez le niveau de censure parental.
(Référez-vous à la colonne de droite.)
<CD Read> Sélectionnez les fichiers pour lire
un disque contenant des fichiers
musicaux. Vous ne pouvez pas changer
le réglage quand un disque est inséré.
• 1 (Réglage initial): Distingue
automatiquement les disques de
fichiers audio et les CD de musique.
• 2: Reproduit de force le disque comme
CD musical. Aucun son ne peut être
entendu si un fichier audio est lu.
* Vous pouvez changer ces réglages uniquement pendant que la
lecture est arrêtée.
Réglage du verrou parental
Le verrouillage parental peut être réglé pendant la
lecture de DVD.
1 Affichez l’écran <Parental Level>.
Sur l’écran <Mode>:
2 Entrez les 4 chiffres du code parental (1),
et appuyez sur [Enter] (2).
• Pour annuler l’entrée, appuyez sur [Clear].
3 Ajustez le niveau parental (Off, Level 1 à
Level 8).
KW-V_Mid_EU_FR.indb 13 1/29/2014 12:32:44 PM
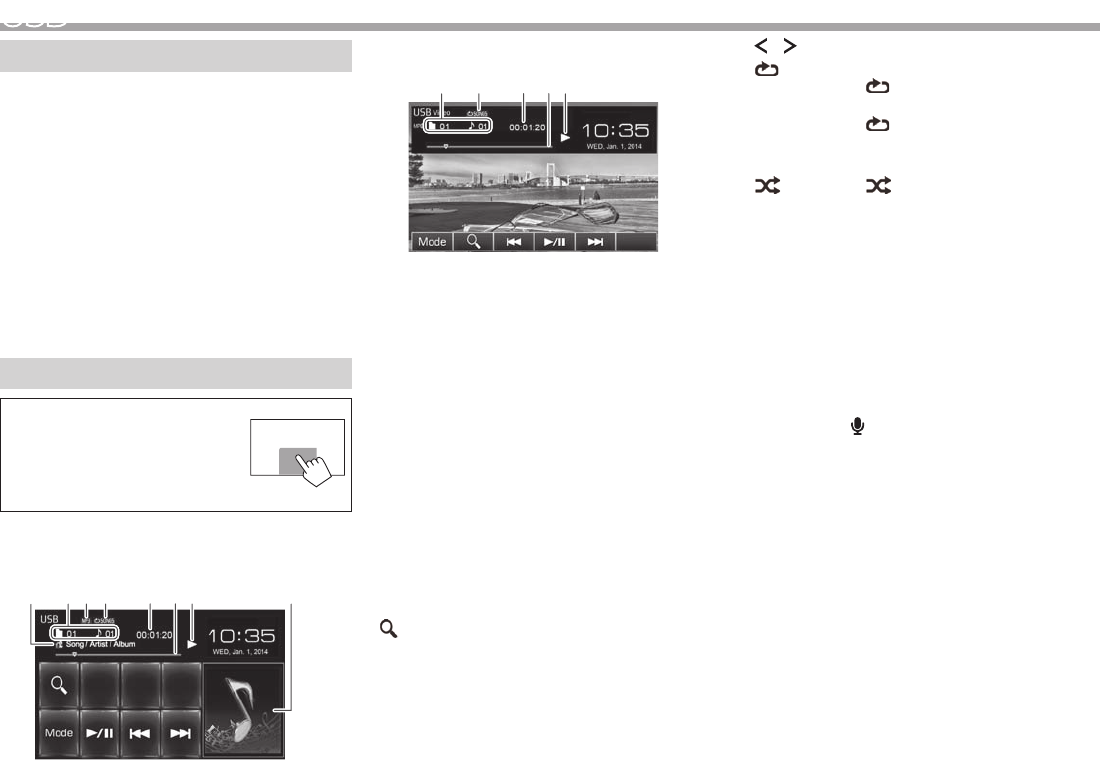
14
USB
Connexion d’un périphérique USB
Vous pouvez connecter un périphérique USB à
mémoire de grande capacité tel qu’une mémoire
USB, un lecteur audio numérique, etc. à cet appareil.
• Pour les détails sur les périphériques USB,
reportez-vous à la page 48.
• Vous ne pouvez pas connecter un ordinateur ou
un disque dur portable à la prise d’entrée USB.
• Pour les types de fichier reproductibles et les
remarques sur les périphériques USB, reportez-
vous à la page 52.
Quand un périphérique USB est connecté...
La source change sur “USB” et la lecture démarre.
• Toutes les plages du périphérique USB sont
reproduites répétitivement jusqu’à ce que vous
changiez la source.
Opérations de lecture
Quand les touches de commande
ne sont pas affichées sur l’écran,
touchez la zone montrée sur
l’illustration.
• Pour changer les réglages pour
la lecture vidéo, voir page 37.
❏Indications et touches sur l’écran de
commande de la source
Pour les fichiers audio (MP3/WMA/WAV/AAC/FLAC)
34 756 821
Pour les fichiers vidéo/images (MPEG1/
MPEG2/H.264/WMV/JPEG/BMP/PNG)
4 7562
Informations sur la lecture
1 Informations sur la plage/fichier
• Toucher le texte d’information change le type
d’information.
2 Informations sur l’élément en cours de lecture
3 Format audio
4 Mode de lecture (Référez-vous à la colonne de
droite.)
5 Durée de lecture
6 Barre de progression
7 État de lecture
8 Image de la pochette (Affichée si le fichier
possède de données de balise qui comprennent
l’image de la pochette)
Touches de commande
[Mode] Change les réglages d’affichage
de l’heure sur l’image sur l’écran
<Mode>. (Page15)
[]Affiche l’écran de sélection de liste.
(Page15)
[S] [T]• Choisit une plage. (Appuyer)
• Recherche vers l’arrière/vers
l’avant.*1 (Maintenez pressée)
[I/W]Démarre/arrête momentanément
(pause) la lecture.
[ ] [ ]*2Choisit un dossier.
[]*2 *3 *4Choisit le mode de lecture répétée.
• SONGS: Répète la plage/
fichier actuel.
• FOLDER: Répète toutes les
plages/fichiers dans le dossier
actuel ou la catégorie spécifiée.
[]*2 *3 *4• ALL:
– Quand une plage/fichier est
sélectionnée dans le dossier, lit
aléatoirement toutes les plages/
fichiers du dossier actuel, puis
les plages/fichiers du dossiers
suivant.
– Lors de la sélection d’une plage/
fichier à partir d’une catégorie, lit
aléatoirement toutes les plages/
fichier de la catégorie spécifiée.
*1 La vitesse de recherche varie en fonction du type de fichier.
*2 Appuyez sur FNC/ sur le panneau du moniteur pour afficher
l’écran <Function Menu> et sélectionner un élément.
(Page7)
*3 Pour annuler le mode de lecture aléatoire ou répétée, appuyez
répétitivement sur la touche jusqu’à ce que l’indication disparaisse.
*4 Vous ne pouvez pas mettre en service le mode de répétition et le
mode de lecture aléatoire en même temps.
KW-V_Mid_EU_FR.indb 14 1/29/2014 12:32:44 PM
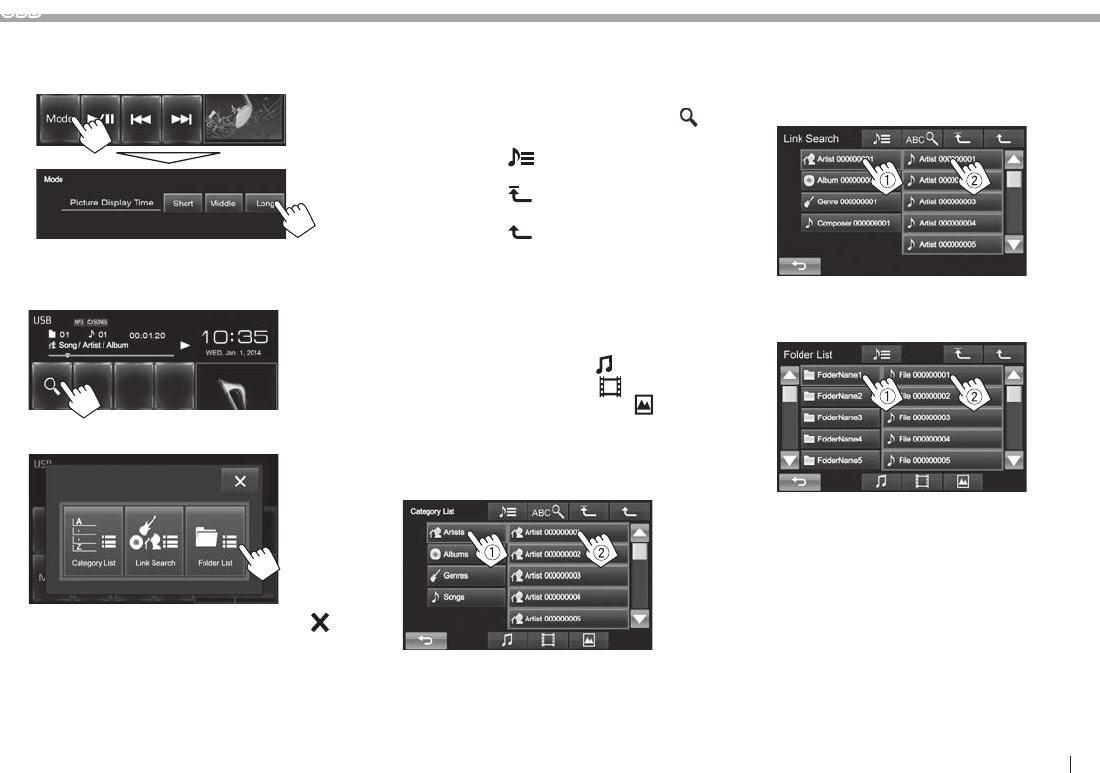
FRANÇAIS 15
USB
❏ Réglage <Picture Display Time>
Sélectionnez l’intervalle entre l’affichage des images
pendant un diaporama de fichiers d’image.
❏ Sélection d’une plage dans la liste
1
2 Sélectionnez la liste.
• Pour annuler la procédure, appuyez sur [ ].
3 Sélectionnez la plage.
• Vous pouvez changer la page pour afficher
plus d’éléments en appuyant sur [J]/[K].
• Pour afficher les éléments de la liste dans
l’ordre alphabétique, appuyez sur [ABC ],
puis sélectionnez le premier caractère.
• Appuyez sur [ ] pour ouvrir le dossier
contenant la plage actuelle.
• Appuyez sur [] pour retourner au dossier
racine.
• Appuyez sur [] pour retourner au niveau
précédent.
• Si vous souhaitez lire toutes les pages du
dossier, appuyez sur [I] sur la droite du
dossier souhaité.
• Sur l’écran <Category List>/<Folder List>:
Vous pouvez commuter le type de fichier
dans la liste: Appuyez sur [ ] pour afficher la
liste des fichiers audio, sur [ ] pour afficher
la liste des fichiers vidéo, ou sur [ ] pour
afficher la liste des images fixes.
À partir de l’écran <Category List>:
Sélectionnez la catégorie (1), puis un élément
dans la catégorie sélectionnée (2).
À partir de l’écran <Link Search>:
Sélectionnez le type de balise pour afficher la
liste des contenus contenant la même balise
que la plage/fichier actuellement lue (1), puis
l’élément (2).
À partir de l’écran <Folder List>:
Sélectionnez le dossier (1), puis l’élément dans
le dossier sélectionné (2).
KW-V_Mid_EU_FR.indb 15 1/29/2014 12:32:45 PM

16
iPod/iPhone
• Pour utiliser l’App d’un iPod touch/iPhone, voir
page 19.
Préparation
❏ Connexion d’un iPod/iPhone
• Pour les détails sur l’iPod/iPhone, reportez-vous
à la page 48.
• Pour les types d’iPod/iPhone, voir page 53.
Connectez votre iPod/iPhone en fonction de votre
but ou du type d’iPod/iPhone.
Connexion par fil
• Pour écouter la musique:
Utilisez le câble USB 2.0 (accessoire du iPod/
iPhone) ou KS-U62 (en option).
• Pour regarder une séquence vidéo et écouter la
musique:
– Pour l’iPod/iPhone sauf l’iPhone 5/iPod touch
(5e génération)/iPod nano (7e génération),
utilisez un câble audio USB et un câble vidéo
pour iPod/iPhone—KS-U59 (accessoire en
option).
– Pour l’iPhone 5/iPod touch (5e génération)/iPod
nano (7e génération), utilisez le câble HDMI
KS-U60 (accessoire en option) et un câble
USB 2.0 (accessoire de l’iPod/iPhone)/KS-U62
(en option) via l’adaptateur Lightning-Digital AV
(accessoire de l’iPod/iPhone).
Connexion Bluetooth
Appariez le périphérique iPod/iPhone par Bluetooth.
(Page27)
• Pour l’iPhone 5/iPod touch (5e génération)/
iPod nano (7e génération): Pour regarder une
vidéo, connectez votre iPod/iPhone à la prise
d’entrée HDMI/MHL en utilisant le KS-U60
(accessoire en option). (Page48)
• Pour l’iPod/iPhone sauf pour l’iPhone 5/iPod touch
(5e génération)/iPod nano (7e génération): Vous
ne pouvez pas regarder le vidéo avec la connexion
Bluetooth.
❏ Sélection du périphérique iPod/iPhone
à lire et de la méthode de connexion
Lors de la connexion d’un iPod/iPhone pour
la première fois, l’écran de réglage (pour la
connexion, etc.) apparaît. Suivez la procédure sur
l’écran de réglage pour configurer les réglages.
1 Affichez l’écran <iPod Settings>.
Sur l’écran d’accueil:
• Si [Enter] pour <iPod Setup> ne peut pas
être sélectionné, mettez la source AV hors
tension. (Page 6)
2
• Si vous n’avez pas besoin de changer le
réglage, appuyez sur [OK] pour quitter l’écran
de réglage.
KW-V_Mid_EU_FR.indb 16 1/29/2014 12:32:46 PM
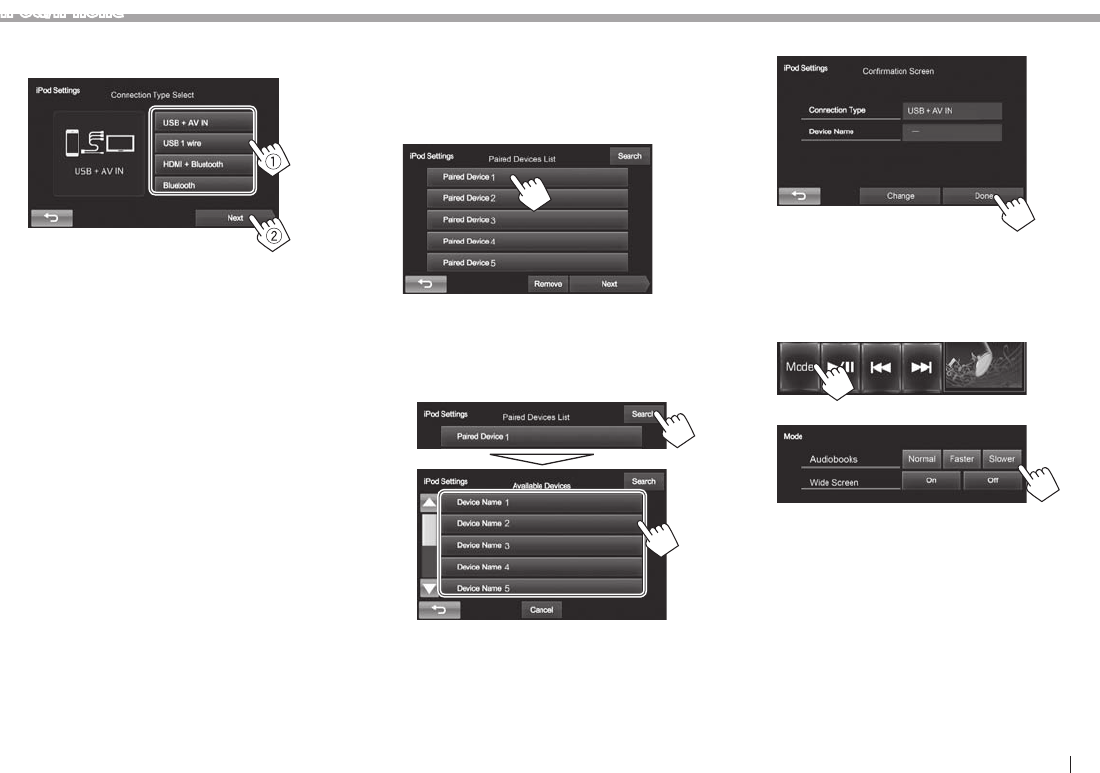
FRANÇAIS 17
iPod/iPhone
3 Sélectionnez la méthode de connexion
(1), puis appuyez sur [Next] (2).
<USB +
AV-IN>
Sélectionnez ce réglage quand
l’iPod/iPhone est connecté en
utilisant le KS-U59 (en option).
<USB 1 wire> Sélectionnez ce réglage quand
l’iPod/iPhone est connecté
en utilisant le câble USB 2.0
(accessoire du iPod/iPhone) ou
KS-U62 (en option).
<HDMI +
Bluetooth>
Sélectionnez ce réglage quand
l’iPod/iPhone est connecté
avec le câble HDMI KS-U60
(accessoire en option) et un
câble USB 2.0 (accessoire
de l’iPod/iPhone)/KS-U62
(en option) via l’adaptateur
Lightning-Digital AV (accessoire
de l’iPod/iPhone).
<Bluetooth> Sélectionnez ce réglage quand
l’iPod/iPhone est connecté via
Bluetooth.
• Si vous avez sélectionné <USB + AV-IN> ou
<USB 1 wire>, allez à l’étape 5.
4 Si vous avez sélectionné <HDMI +
Bluetooth> ou <Bluetooth> comme
méthode de connexion, la liste des
périphériques appariés apparaît. Choisissez
l’appareil cible.
• Si l’appareil souhaité n’est pas dans la liste,
appuyez sur [Search] pour rechercher les
iPod/iPhone disponibles, puis sélectionnez
l’appareil cible sur l’écran <Available
Devices>.
– Vous pouvez changer la page pour afficher
plus d’éléments en appuyant sur [J]/[K].
– Pour arrêter la recherche, appuyez sur
[Cancel].
5 Validez les réglages.
❏ Sélection des réglages des préférences
pour la lecture iPod/iPhone
Quand la source est “iPod”...
1
2
<Audiobooks> Choisissez la vitesse des
livres audio.
<Wide Screen>* • [On]: Sélectionnez ce
réglage pour afficher une
vidéo compatible avec
l’affichage sur écran large
en format d’écran large.
• [Off]: Sélectionnez ce
réglage pour désactiver la
fonction.
* Vous ne pouvez pas changer le réglage quand un iPod/iPhone est
connecté.
KW-V_Mid_EU_FR.indb 17 1/29/2014 12:32:46 PM
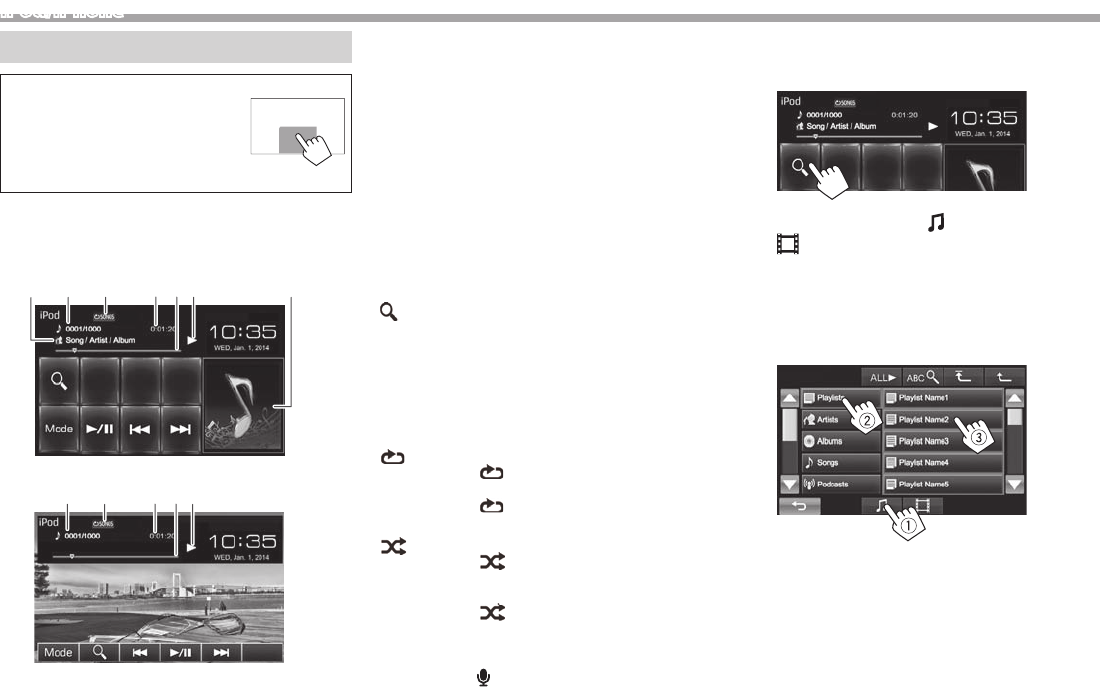
18
iPod/iPhone
Opérations de lecture
Quand les touches de commande
ne sont pas affichées sur l’écran,
touchez la zone montrée sur
l’illustration.
• Pour changer les réglages pour
la lecture vidéo, voir page 37.
❏Indications et touches sur l’écran de
commande de la source
Pour la lecture audio
3 645 721
Pour la lecture vidéo
3 6452
Informations sur la lecture
1 Informations sur le morceau/séquence vidéo
• Toucher le texte d’information change le type
d’information.
2 No. de plage/nombre total de plages
3 Mode de lecture (Voir ci-dessous.)
4 Durée de lecture
5 Barre de progression
6 État de lecture
7 Illustration (Affichée si le morceau contient une
illustration)
Touches de commande
[Mode] Change les réglages pour la lecture
d’iPod/iPhone sur l’écran <Mode>.
(Page17)
[]Affiche la liste des fichiers audio/vidéo.
(Référez-vous à la colonne de droite.)
[S] [T]• Choisit un fichier audio/vidéo.
(Appuyer)
• Recherche vers l’arrière/vers l’avant.
(Maintenir pressée)
[I/W]Démarre/arrête momentanément
(pause) la lecture.
[]*1 Choisit le mode de lecture répétée.
• SONGS: Fonctionne de la même
façon que “Repeat One”.
•
ç
ALL: Fonctionne de la même
façon que “Repeat All”.
[]*1 *2Choisit le mode de lecture aléatoire.
• SONGS: Fonctionne de la
même façon que la fonction “Shuffle
Songs”.
• ALBUMS: Fonctionne de la
même façon que la fonction “Shuffle
Albums”.
*1 Appuyez sur FNC/ sur le panneau du moniteur pour afficher
l’écran <Function Menu> et sélectionner un élément.
(Page7)
*2 Pour annuler le mode de lecture aléatoire, appuyez répétitivement
sur la touche jusqu’à ce que l’indication disparaisse.
❏ Sélection d’un fichier audio/vidéo à
partir de la liste
1
2 Choisissez le menu ( : audio ou
: vidéo) (1), une catégorie (2), puis
l’élément souhaité (3).
• Choisissez l’élément dans le niveau choisi
jusqu’à ce que la lecture du fichier souhaité
démarre.
Menu Audio:
KW-V_Mid_EU_FR.indb 18 1/29/2014 12:32:47 PM
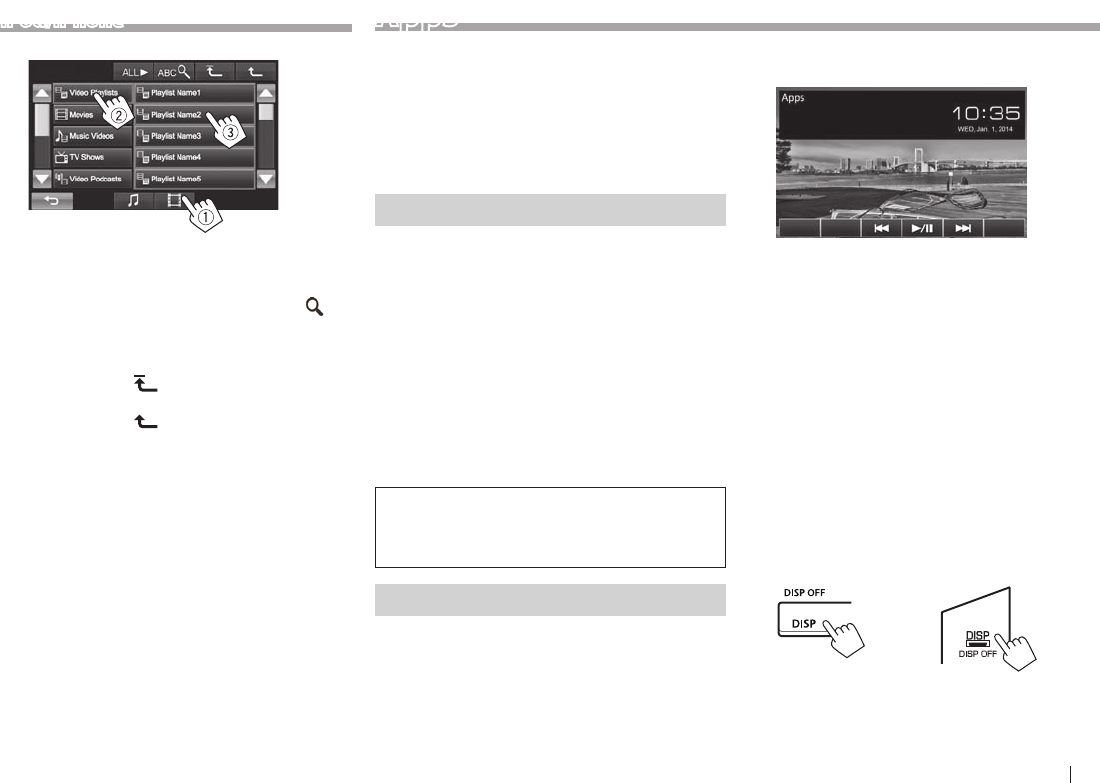
FRANÇAIS 19
Apps
Vous pouvez utiliser une App de l’iPod touch/
iPhone/Android connecté, sur cet appareil.
• Quand vous utilisez une application (App) d’un
iPod touch ou iPhone, référez-vous à la page 54
pour les instructions de sécurité.
• Pour les App que vous pouvez utiliser sur cet
appareil, consultez le site
<http://www.jvc.net/cs/car/>.
Préparation
1 Connectez le iPod touch/iPhone/Android.
• Pour la connexion par fil, reportez-vous à
la page48 pour l’iPod touch/iPhone ou à la
page49 pour Android.
– Pour voir la vidéo, connectez le
périphérique en utilisant KS-U59 ou KS-U60
(accessoire en option).
• Pour la connexion Bluetooth, reportez-vous à
la page 27.
2 Sélectionnez le périphérique iPod touch/
iPhone/Android à utiliser et la méthode
de connexion sur l’ecran <App Settings>.
(Page35)
Lors de la connexion d’un périphérique pour
la première fois, l’écran de réglage (pour la
connexion, etc.) apparaît. Suivez la procédure sur
l’écran de réglage pour configurer les réglages.
Utilisation d’une application
❏ Opérations de lecture
1 Démarrez l’App sur votre iPod touch/
iPhone/Android.
2 Choisissez “Apps” comme source. (Page8)
❏Touches de fonctionnement sur l’écran
de commande de la source
[S] [T]Choisit un fichier audio/vidéo.
[I/W]Démarre/arrête momentanément
(pause) la lecture.
• Vous pouvez commander certaines fonction d’une
App sur le panneau tactile.
• Pour certaines application telles que les
applications de navigation, les touches de
commande et les informations n’apparaissent pas.
Vous pouvez réaliser les opérations sur le panneau
tactile, telles que faire défiler la carte.
Vous pouvez aussi lire le signal audio/vidéo en
utilisant un iPod/iPhone à la place de l’appareil.
❏Commutation de l’écran de l’App
pendant l’écoute d’une autre source
KW-V50BT KW-V30BT
iPod/iPhone
Menu vidéo:
• Vous pouvez changer la page pour afficher
plus d’éléments en appuyant sur [J]/[K].
• Pour afficher les éléments de la liste dans
l’ordre alphabétique, appuyez sur [ABC ],
puis sélectionnez le premier caractère.
• Appuyez sur [ALL I] pour lire tous les
morceaux/vidéos.
• Appuyez sur [] pour retourner au niveau
supérieur.
• Appuyez sur [] pour retourner au niveau
précédent.
• Les catégories disponibles diffèrent en fonction du
type de votre iPod/iPhone.
KW-V_Mid_EU_FR.indb 19 1/29/2014 12:32:48 PM
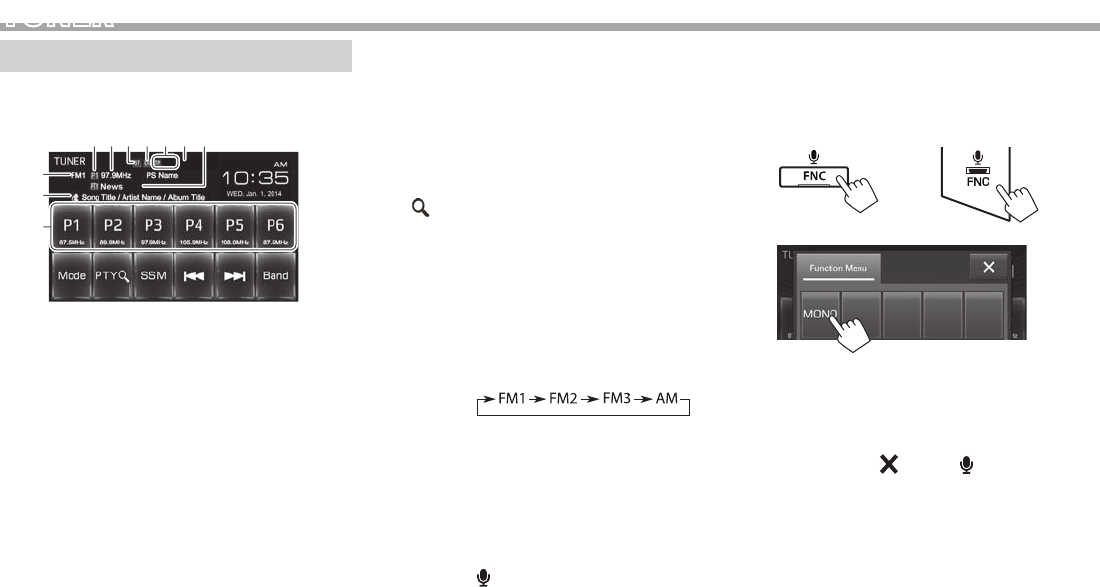
20
TUNER
Écoute de la radio
❏Indications et touches sur l’écran de
commande de la source
9
8
123 4 6
p
75
Informations sur la réception du tuner
1 No. de préréglage
2 La fréquence de la station actuellement
accordée/PS (nom de la station) pour le système
Radio Data System FM quand le signal PS est
reçu.
3 Indicateur ST/MO
• L’indicateur ST s’allume lors de la réception
d’une émission FM stéréo avec un signal
suffisamment fort.
4 Indicateur DX/LO
5 Indicateurs d’attente de réception (TP/NEWS)
6 Indicateur AF
7 Code PTY pour FM Radio Data System
8 Bande
9 Texte d’information
• Toucher le texte d’information change le type
d’information.
p Liste des préréglages
Touches de commande
[P1] – [P6] • Choisit une station mémorisée.
(Appuyer)
• Mémorise la station actuelle.
(Maintenir pressée)
[Mode] Change les réglages pour la
réception du tuner sur l’écran
<Mode>. (Pages21–23)
[PTY ]*1Entrez en mode de recherche de PTY.
(Page22)
[SSM] Prérègle automatiquement les
stations possédant les signaux les
plus forts. (Page21)
[S] [T]Recherche une station.
• Recherche automatique (Appuyez)
• Recherche manuelle (Maintenez
pressée)
[Band] Choisit la bande.
[MONO]*1*2Met en/hors service le mode
monophonique. (Référez-vous à la
colonne de droite.)
[TP]*2Met en/hors service le mode
d’attente de réception TA.
(Page22)
*1 Apparaît uniquement quand FM est choisi comme source.
*2 Appuyez sur FNC/ sur le panneau du moniteur pour afficher
l’écran <Function Menu> et sélectionner un élément.
(Page7)
❏ Amélioration de la réception FM
Mettez en service le mode monaural pour obtenir
une meilleure réception.
1 Affichez l’écran <Function Menu>.
KW-V50BT KW-V30BT
2
Le mode monophonique est activé. L’indicateur
MO s’allume.
• La réception FM est améliorée, mais l’effet
stéréo est perdu.
• Pour fermer l’écran <Function Menu>,
appuyez sur [ ] ou FNC/ sur le panneau du
moniteur.
Pour rétablir l’effet stéréo : Appuyez sur [MONO]
sur l’écran <Function Menu>.
KW-V_Mid_EU_FR.indb 20 1/29/2014 12:32:49 PM
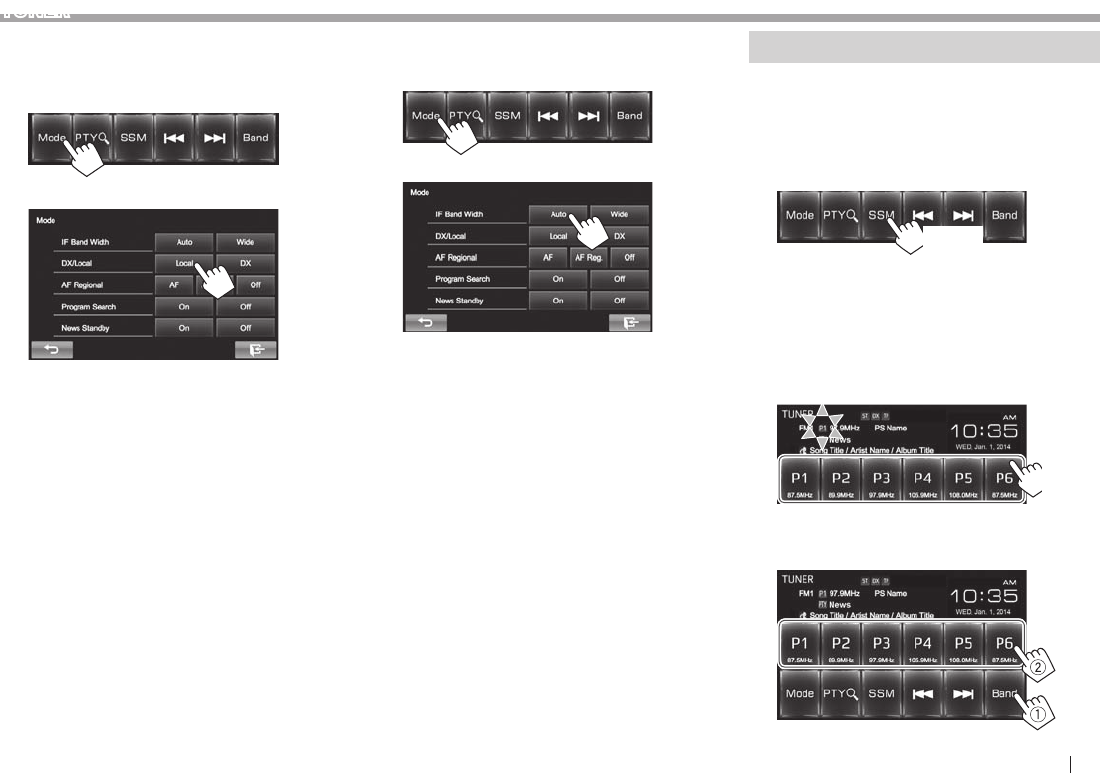
FRANÇAIS 21
TUNER
❏ Pour accorder uniquement les stations
FM avec un signal fort—LO/DX (Local/
grande distance)
1
2
[Local] Choisissez ce réglage pour accorder
uniquement les stations dont
le signal est suffisamment fort.
L’indicateur LO s’allume.
[DX] Mettez la fonction hors service.
L’indicateur DX s’allume.
❏Réduction des interférences pendant la
réception FM
1
2
[Auto] Augmente la sélectivité du tuner
pour réduire les interférences entre
les stations adjacentes. (L’effet stéréo
peut être perdu.)
[Wide] Il y a des interférences des stations
adjacentes, mais la qualité du son
n’est pas dégradée et l’effet stéréo
est conservé.
Préréglage des stations
❏ Mémorisation des stations
Vous pouvez prérégler 6 stations pour chaque
bande.
Préréglage a utomatique—SSM(Mémorisation
automatique séquentielle des stations
puissantes)
(Maintenir
pressée)
Les stations locales avec les signaux les plus forts
sont recherchées et mémorisées automatiquement.
Préréglage m anuel
1 Accordez la station que vous souhaitez
prérégler. (Page 20)
2 Choisissez un numéro de préréglage.
(Maintenir
pressée)
La station choisie à l’étape 1 est mémorisée.
❏Sélection d’une station préréglée
KW-V_Mid_EU_FR.indb 21 1/29/2014 12:32:50 PM

22
TUNER
Fonctions de FM Radio Data System
❏ Recherche d’un programme FM Radio
Data System—Recherche PTY
Vous pouvez rechercher vos programmes préférés
en choisissant le code PTY correspondant à vos
programmes préférés.
1
2 Choisissez un code PTY.
(Maintenir
pressée)
• Vous pouvez changer la page pour afficher
plus d’éléments en appuyant sur [J]/[K].
La recherche PTY démarre.
S’il y a une station diffusant un programme du
code PTY que vous avez choisi, la station est
accordée.
❏ Mise en/hors service l’attente de
réception TA/News
Attente de réception TA
1 Affichez l’écran <Function Menu>.
KW-V50BT KW-V30BT
2
L’appareil est en attente pour commuter sur
l’annonce d’informations routières (TA), si elle
est disponible. (L’indicateur TP s’allume en
blanc.)
Si l’indicateur TP s’allume en gris, accordez une
autres station diffusant des signaux Radio Data
System.
Pour mettre hors service l’attente de réception
TA: Appuyez sur [TP]. (L’indicateur TP s’éteint.)
• L’ajustement du volume pour les annonces
d’informations routières est mémorisé
automatiquement. La prochaine fois que l’appareil
commute sur des annonces d’informations
routières, le volume est réglé sur le niveau
précédent.
Attente de réception d’informations
1
2
L’appareil est en attente pour commuter sur
un programme d’informations si disponible.
(L’indicateur NEWS s’allume en blanc.)
• Si l’indicateur NEWS s’allume en gris, accordez une
autres station diffusant des signaux Radio Data
System.
Pour mettre hors service l’attente de réception
d’informations: Choisissez [Off] pour <News
Standby>. (L’indicateur NEWS s’éteint.)
• L’ajustement du volume pendant la réception
d’informations est mémorisé automatiquement.
La prochaine fois que l’appareil commute sur des
informations, le volume est réglé sur le niveau
précédent.
KW-V_Mid_EU_FR.indb 22 1/29/2014 12:32:50 PM
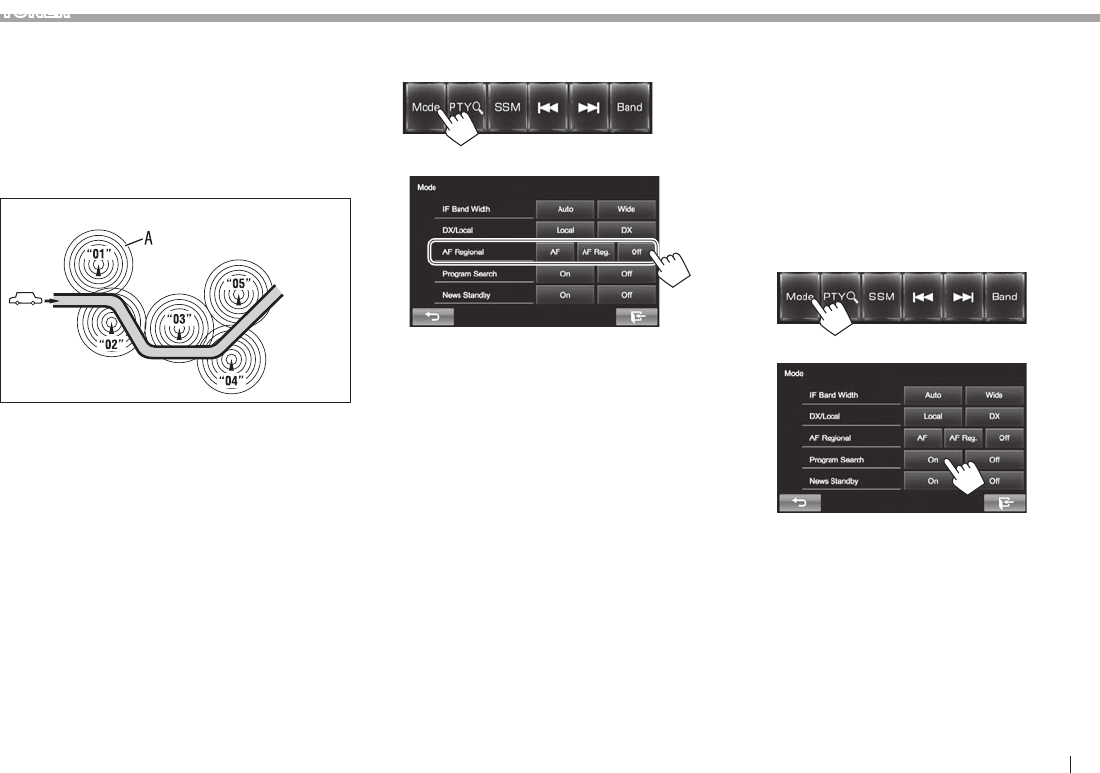
FRANÇAIS 23
TUNER
❏Poursuite du même programme
—Poursuite de réception en réseau
Lorsque vous conduisez dans une région où la
réception FM n’est pas suffisamment forte, cet
appareil accorde automatiquement une autre
station FM Radio Data System du même réseau,
susceptible de diffuser le même programme avec un
signal plus fort.
Programme A diffusé sur une zone de fréquence différente (01 à 05)
• À l’expédition de l’usine, la poursuite de réception
en réseau est en service.
Pour changer le réglage de la poursuite de
réception en réseau
1
2
[AF] Commute sur une autre station.
Le programme peut différer du
programme actuellement reçu
(l’indicateur AF s’allume).
[AF Reg.] Commute sur une autre station
diffusant le même programme
(l’indicateur AF s’allume).
[Off] Annulation.
❏ Sélection automatique des stations—
Recherche de programme
Normalement quand vous choisissez une station
préréglé, la station préréglée est accordée.
Si les signaux des stations préréglés FM Radio Data
System ne permettent pas une bonne réception, cet
appareil utilise les données AF et accorde une autre
station diffusant le même programme que la station
préréglée originale.
Pour mettre en service la recherche de
programme
1
2
• Il faut un certain temps à cet appareil pour
accorder une autre station en utilisant la recherche
de programme.
Pour mettre hors service la recherche de
programme : Choisissez [Off] pour <Program
Search>.
KW-V_Mid_EU_FR.indb 23 1/29/2014 12:32:51 PM
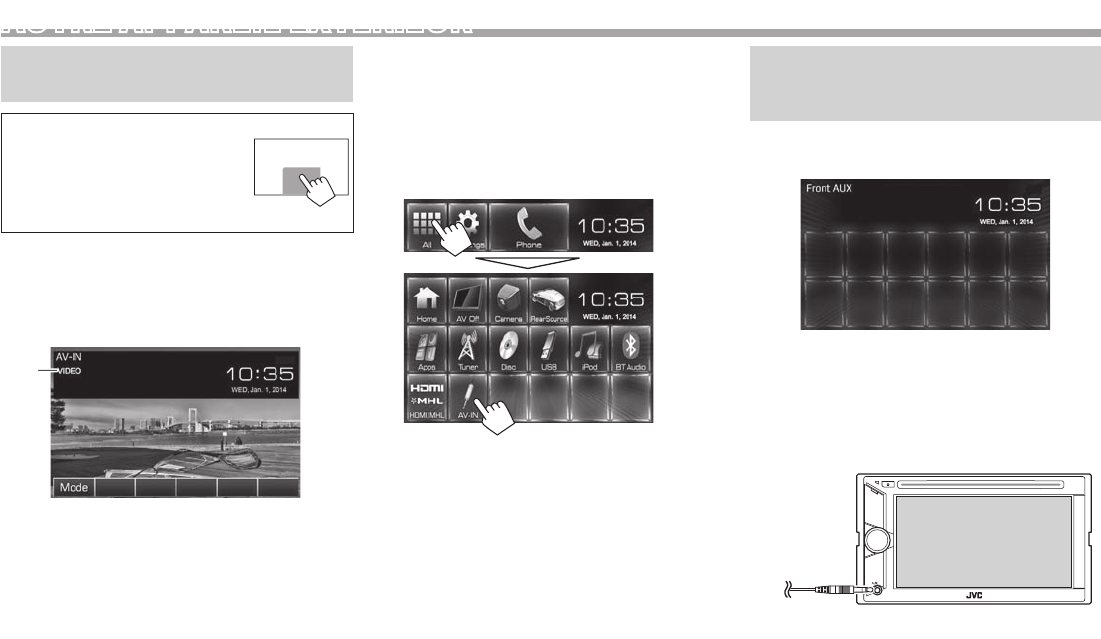
24
AUTRE APPAREIL EXTÉRIEUR
Utilisation d’un lecteur audio/vidéo
extérieur—AV-IN
• Quand les touches de commande
ne sont pas affichées sur l’écran,
touchez la zone montrée sur
l’illustration.
– Pour changer les réglages pour
la lecture vidéo, voir page 37.
Vous pouvez connecter un appareil extérieur à la
prise AV-IN1. (Page49)
❏Indications et touches sur l’écran de
commande de la source
1
Informations sur la lecture
1 Nom de l’entrée AV-IN
Touches de commande
[Mode] Change le nom de l’entrée AV-IN.
• Appuyez sur [H] ou [I] pour choisir le
nom de l’entrée AV-IN.
❏Démarrage de la lecture
1 Connectez un appareil extérieur à la prise
AV-IN1.
• Pour connecter un appareil extérieur, voir la
page49.
2 Choisissez “AV-IN” comme source.
Sur l’écran d’accueil:
3 Mettez l’appareil connecté sous tension et
démarrez la lecture de la source.
Utilisation d’un lecteur audio
extérieur—Front AUX (uniquement
pour le KW-V30BT)
❏Indications et touches sur l’écran de
commande de la source
❏Démarrage de la lecture
1 Connectez un appareil extérieur à la prise
AUX sur le panneau du moniteur.
• Utilisez un mini fiche stéréo 3,5 mm
(disponible dans le commerce).
2 Choisissez “FrontAUX” comme source.
(Page8)
3 Mettez l’appareil connecté sous tension et
démarrez la lecture de la source.
KW-V_Mid_EU_FR.indb 24 1/29/2014 12:32:51 PM
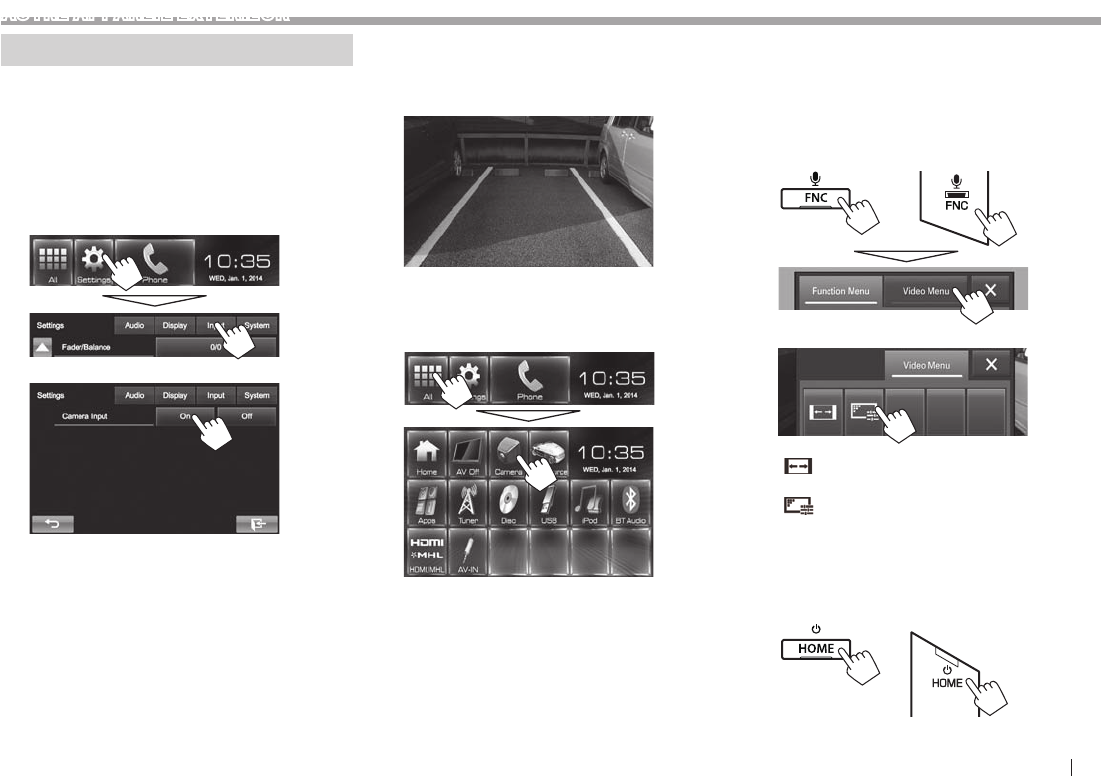
FRANÇAIS 25
AUTRE APPAREIL EXTÉRIEUR
Utilisation d’une caméra de recul
• Pour la connexion d’une caméra de recul, voir
page49.
• Pour utiliser la caméra de recul, la connexion du fil
REVERSE GEAR SIGNAL est requise. (Page47)
❏Mise en service de la caméra de recul
1 Affichez l’écran de réglage <Input>.
Sur l’écran d’accueil:
2
Pour désactiver: Choisissez [Off] pour <Camera
Input>.
❏ Affichage de l’image de la caméra de
recul
L’écran de vue arrière apparaît quand vous déplacez
le levier de vitesse en position de marche arrière (R).
Pour afficher l’image de la caméra de recul
manuellement
Sur l’écran d’accueil:
Ajustement de l’image de la caméra de recul
Lors de l’affichage de l’image à partir de la caméra
de recule manuellement, vous pouvez changer le
réglage de l’image.
1 Affichez l’écran <Video Menu>.
KW-V50BT KW-V30BT
2
[ ] Permet de choisir le format de l’image.
(Page38)
[ ] Affiche l’écran d’ajustement de
l’image. (Page37)
Pour quitter l’écran de vue arrière
KW-V50BT KW-V30BT
KW-V_Mid_EU_FR.indb 25 1/29/2014 12:32:52 PM
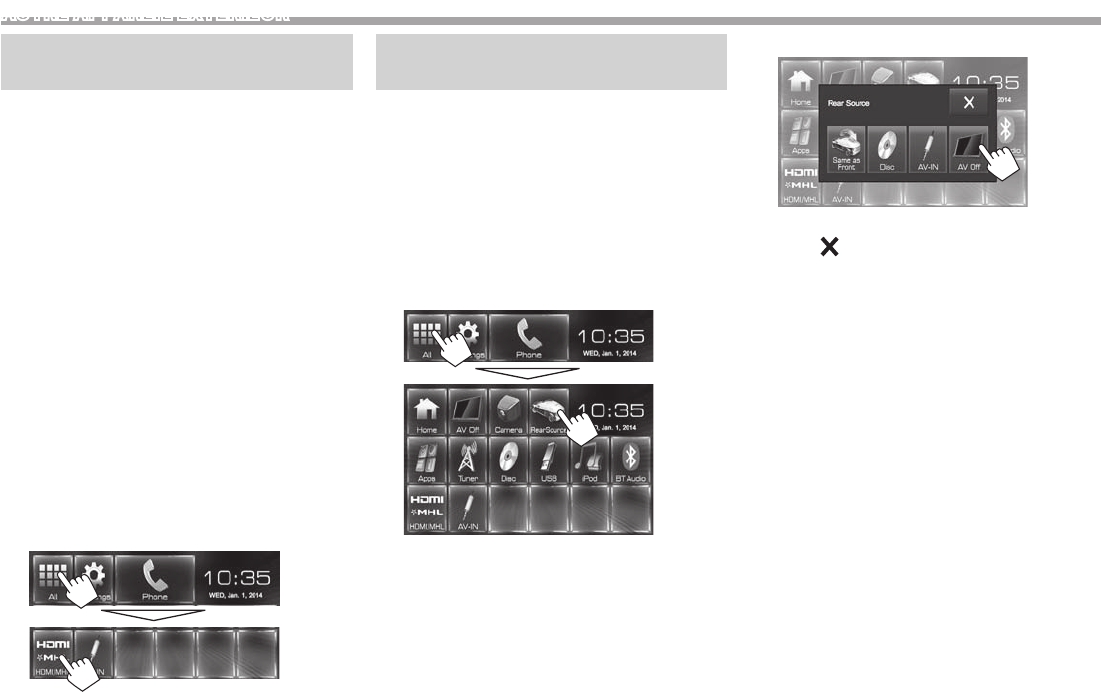
26
AUTRE APPAREIL EXTÉRIEUR
Utilisation d’un smartphone—
HDMI/MHL
❏Qu’est-ce que le HDMI/MHL?
HDMI signifie High Definition Multi-media Interface
(Interface multimédia haute définition). Une
connexion HDMI peut transférer un signal de la
source vidéo numérique (comme celle d’un lecteur
DVD) sans conversion en analogique.
MHL (Mobile High-definition Link) est une nouvelle
caractéristique qui a été ajouté à l’interface HDMI et
qui étend ses capacités.
Les deux interfaces permettent à votre smartphone
de se connecter à l’appareil. Quand il est connecté,
vous pouvez voir l’écran de votre smartphone sur le
moniteur.
❏Affichage de l’écran du smartphone
Vous pouvez afficher l’écran de du smartphone
connecté via la prise d’entrée HDMI/MHL.
1 Connectez votre smartphone à la prise
d’entrée HDMI/MHL. (Page49)
• Utilisez le câble HDMI KS-U60 (accessoire en
option) ou le câble MHL KS-U61 (accessoire
en option).
2 Choisissez “HDMI/MHL” comme source.
Sur l’écran d’accueil:
3 Démarrez une application ou la lecture sur
votre smartphone.
Utilisation d’un moniteur
extérieur— Source arrière
Vous pouvez profiter de la lecture de la source
arrière sur le moniteur extérieur connecté aux prises
AV-OUT VIDEO et AV-OUT AUDIO, tout en écoutant
une autre source.
• Vous pouvez commander la lecture de la source
arrière sur la télécommande. (Page 43)
❏Affichage des images de la source
arrière sur le moniteur extérieur
1 Affichez l’écran <Rear Source>.
Sur l’écran d’accueil:
2 Choisissez la source arrière.
• Pour fermer l’écran <Rear Source>, appuyez
sur [ ].
Lors de la mise en service de la source arrière...
• Pour voir une source avant sur le moniteur arrière,
appuyez sur [Same as Front] sur l’écran <Rear
Source>.
• Si la source choisie est autre que “DISC” ou “AV-IN”,
rien n’apparaît sur le moniteur arrière.
KW-V_Mid_EU_FR.indb 26 1/29/2014 12:32:53 PM
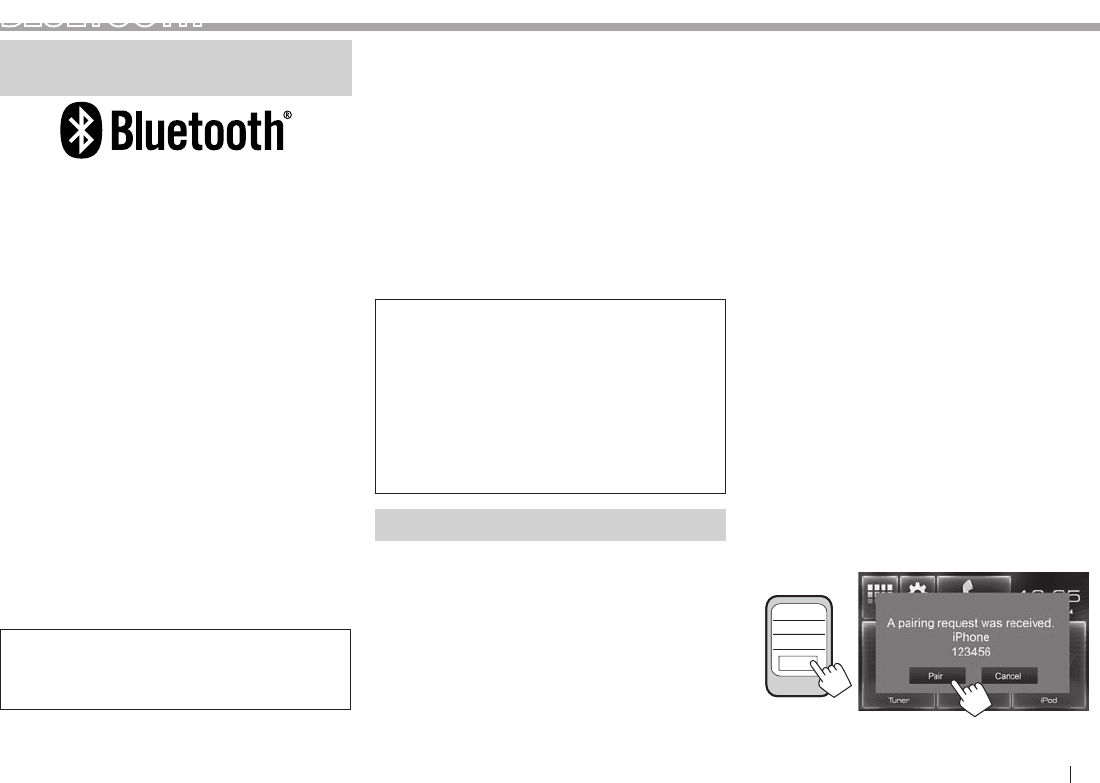
FRANÇAIS 27
BLUETOOTH
Informations pour l’utilisation de
périphériques Bluetooth®
Bluetooth est une technologie de communication
radio à courte distance pour les appareils portables
tels que les téléphones portables, les ordinateurs
portables, etc. Les appareils Bluetooth peuvent être
connectés sans câble et communiquer les uns avec
les autres.
Remarques
• Pendant que vous conduisez, ne réalisez
pas d’opérations compliquées telles que la
composition d’un numéro, l’utilisation du
répertoire téléphonique, etc. Pour réaliser ces
opérations, arrêtez votre voiture dans un endroit
sûr.
• Il se peut que certains périphériques Bluetooth
ne puissent pas être connectés à cet appareil en
fonction de la version Bluetooth du périphérique.
• Cet appareil peut ne pas fonctionner avec certains
périphériques Bluetooth.
• Les conditions de connexion peuvent varier en
fonction des circonstances autour de vous.
• Pour certains périphériques Bluetooth, le
périphérique est déconnecté quand l’appareil est
mis hors tension.
Informations sur le système Bluetooth: Si
vous souhaitez recevoir plus d’informations sur le
système Bluetooth, consultez le site web de JVC
suivant: <http://www.jvc.net/cs/car/>
Profile Bluetooth
Cet appareil prend en charge les profiles Bluetooth
suivants:
• HFP (Hands-Free Profile—Profile mains libres) 1.6
• A2DP (Advanced Audio Distribution Profile—Profile
de distribution audio avancé) 1.2
• AVRCP (Audio/Video Remote Control Profile—
Profile de télécommande audio/vidéo) 1.4
• GAP (Generic Access Profile—Profile d’accès
générique)
• PBAP (Phonebook Access Profile—
Profile d’accès au répertoire téléphonique) 1.0
• SDP (Service Discovery Profile—Profile de
découverte de service)
• SPP (Serial Port Profile—Profile de port série) 1.1
À propos des téléphones portables compatibles
avec le profile PBAP (Phone book Access
Profile—Profile d’accès au répertoire
téléphonique)
Si votre téléphone portable prend en charge le
profile PBAP, vous pouvez afficher le répertoire
téléphonique et les listes d’appels sur l’écran tactile
quand le téléphone portable est connecté.
• Répertoire téléphonique: 600 entrées maximum
• Appels passées, appels reçus et appels manqués:
10 entrées maximum pour chaque
Connexion de périphériques Bluetooth
❏ Enregistrement d’un nouveau
périphérique Bluetooth
Quand vous connecter un périphérique Bluetooth à
l’appareil pour la première fois, faites les pairage entre
l’appareil et le périphérique. Le pairage permet aux
périphériques Bluetooth de communiquer entre eux.
• La méthode de pairage diffère en fonction de la
version Bluetooth du périphérique.
– Pour les périphériques avec Bluetooth 2.1: Vous
pouvez faire le pairage du périphérique et de
l’appareil en utilisant SSP (Secure Simple Pairing)
qui nécessite uniquement une confirmation.
– Pour les périphériques avec Bluetooth 2.0:
Vous avez besoin d’entrer un code PIN sur le
périphérique et l’appareil pour le pairage.
• Une fois que la connexion est établie, le
périphérique reste enregistré dans cet appareil
même si vous réinitialisez l’appareil. Un maximum
de 5 appareils peuvent être enregistrés en tout.
• Deux périphériques pour la téléphonie Bluetooth et
un pour l’audio Bluetooth peuvent être connectés
en même temps.
• Pour utiliser la fonction Bluetooth, vous devez
mettre en service la fonction Bluetooth du
périphérique.
• Pour utiliser le périphérique enregistré, vous devez
connecter le périphérique à l’appareil. (Page29)
Pairage a utomatique
Quand <Auto Pairing> est réglé sur [ON], l’iPhone
est apparié automatiquement quand il est connecté
via USB. (Page34)
Pairage d’un périphérique Bluetooth en utilisant
SSP (pour Bluetooth 2.1)
Quand le périphérique Bluetooth est compatible
avec Bluetooth 2.1, la demande de pairage est
envoyée à partir du périphérique compatible.
1 Recherchez l’appareil (“KW-V****”) à partir
de votre périphérique Bluetooth.
2 Validez la demande sur le périphérique est
l’appareil.
123456
OK
• Appuyez sur [Cancel] pour refuser les demande.
KW-V_Mid_EU_FR.indb 27 1/29/2014 12:32:54 PM
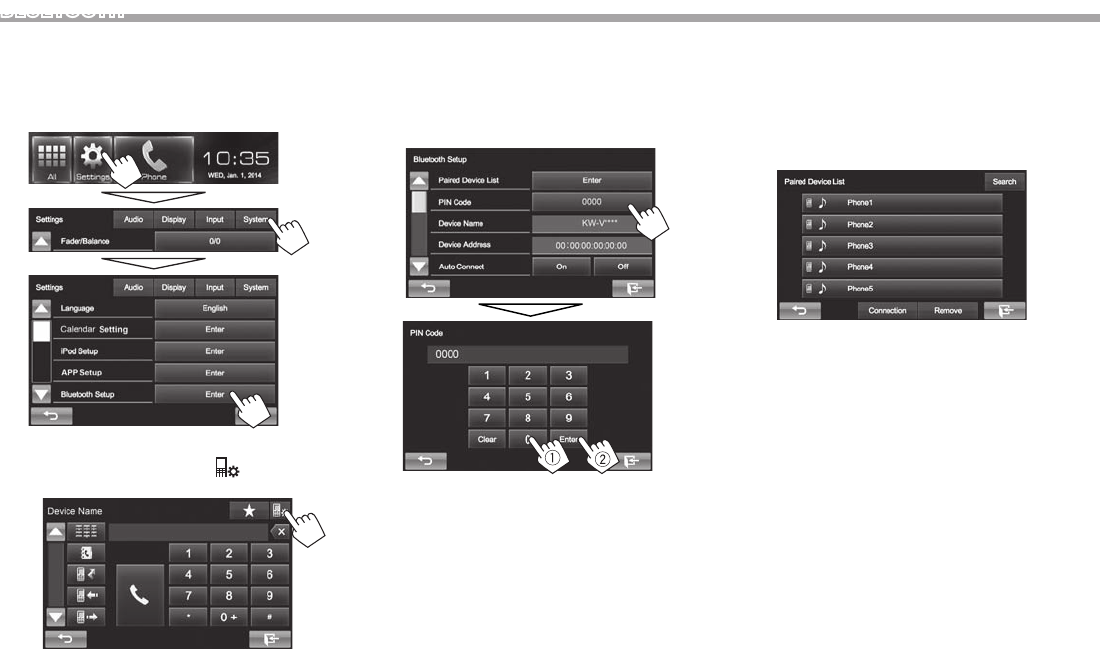
28
BLUETOOTH
Pairage d’un périphérique Bluetooth à partir du
périphérique cible en utilisant un code PIN (pour
Bluetooth 2.0)
1 Affichez l’écran <Bluetooth Setup>.
Sur l’écran d’accueil:
• Vous pouvez aussi afficher l’écran <Bluetooth
Setup> en appuyant sur [ ] sur l’écran de
commande du téléphone. (Page31)
2 Changez le code PIN.
• Si vous ne souhaitez pas changer le code PIN,
allez à l’étape 3.
• Le code PIN est réglé initialement sur “0000”.
• Le nombre maximum de chiffres pour le code
PIN est de 15.
• Appuyez sur [Clear] pour supprimer la
dernière entrée.
3 Recherchez l’appareil (“KW-V****”) à partir
de votre périphérique Bluetooth.
4 Recherchez l’appareil (“KW-V****”) pour
votre périphérique Bluetooth.
• Si le code PIN est requis, entrez “0000” (réglage
initial).
Quand le pairage est terminé, le périphérique
apparaît dans la liste <Paired Device List>.
• Pour utiliser le périphérique apparié,
connectez-le dans <Paired Device List>.
(Page29)
KW-V_Mid_EU_FR.indb 28 1/29/2014 12:32:54 PM
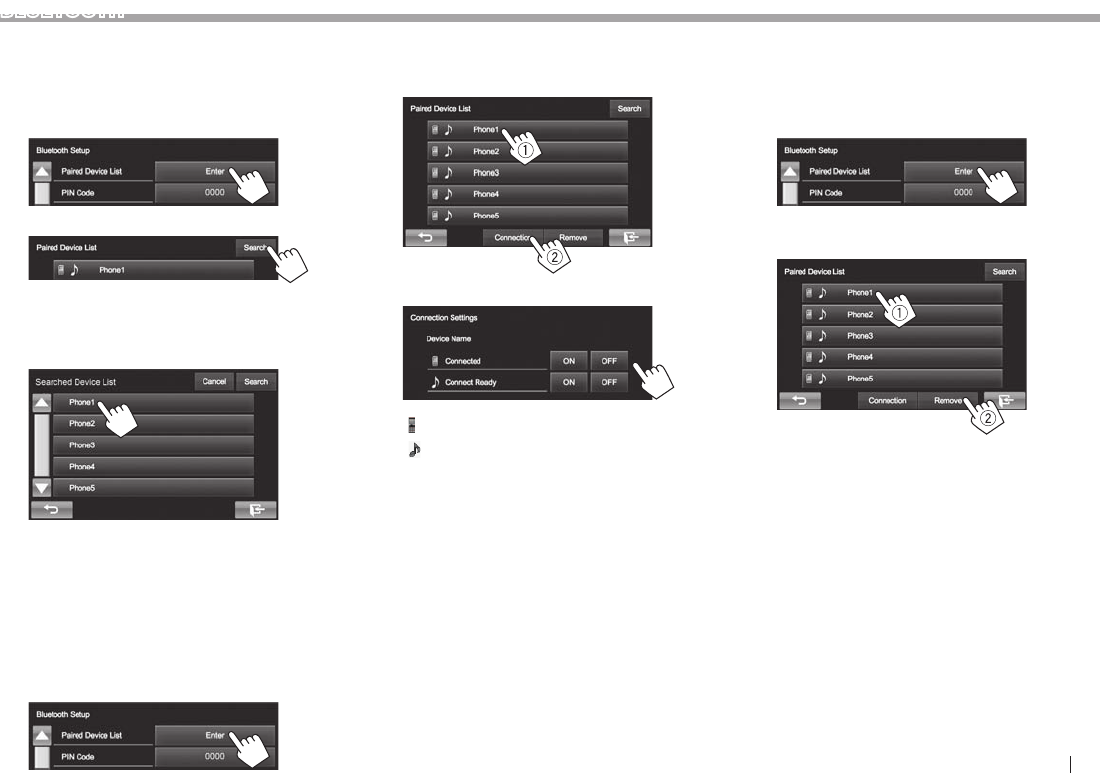
FRANÇAIS 29
BLUETOOTH
Pairage d’un périphérique Bluetooth à partir
de cet appareil en utilisant un code PIN (pour
Bluetooth 2.0)
1 Affichez l’écran <Bluetooth Setup>.
(Page28)
2
3 Recherchez les périphériques disponibles.
• Pour annuler la recherche des périphériques,
appuyez sur [Cancel].
4 Choisissez le périphérique que vous
souhaitez apparier.
Un message de confirmation apparaît. Appuyez sur
[Pair].
❏ Connexion/déconnexion d ’un
périphérique Bluetooth enregistré
Deux périphériques peuvent être connectés
simultanément.
1 Affichez l’écran <Bluetooth Setup>.
(Page28)
2
3 Sélectionnez le périphérique que vous
souhaitez connecter (1), puis appuyez sur
[Connection] (2).
4 Sélectionnez [On] ou [Off] pour la cible.
: Téléphone portable
: Audio Device
• L’état est affiché de la façon suivante:
– “Connected”: Une connexion a été établie.
– “Connect Ready”: Une connexion peut être
établie.
– “Disconnected”: Aucune connexion n’est
établie.
❏Suppression d’un périphérique
Bluetooth enregistré
1 Affichez l’écran <Bluetooth Setup>.
(Page28)
2
3 Choisissez un périphérique à supprimer
(1), puis appuyez sur [Remove] (2).
Un message de confirmation apparaît. Appuyez
sur [Yes].
KW-V_Mid_EU_FR.indb 29 1/29/2014 12:32:55 PM
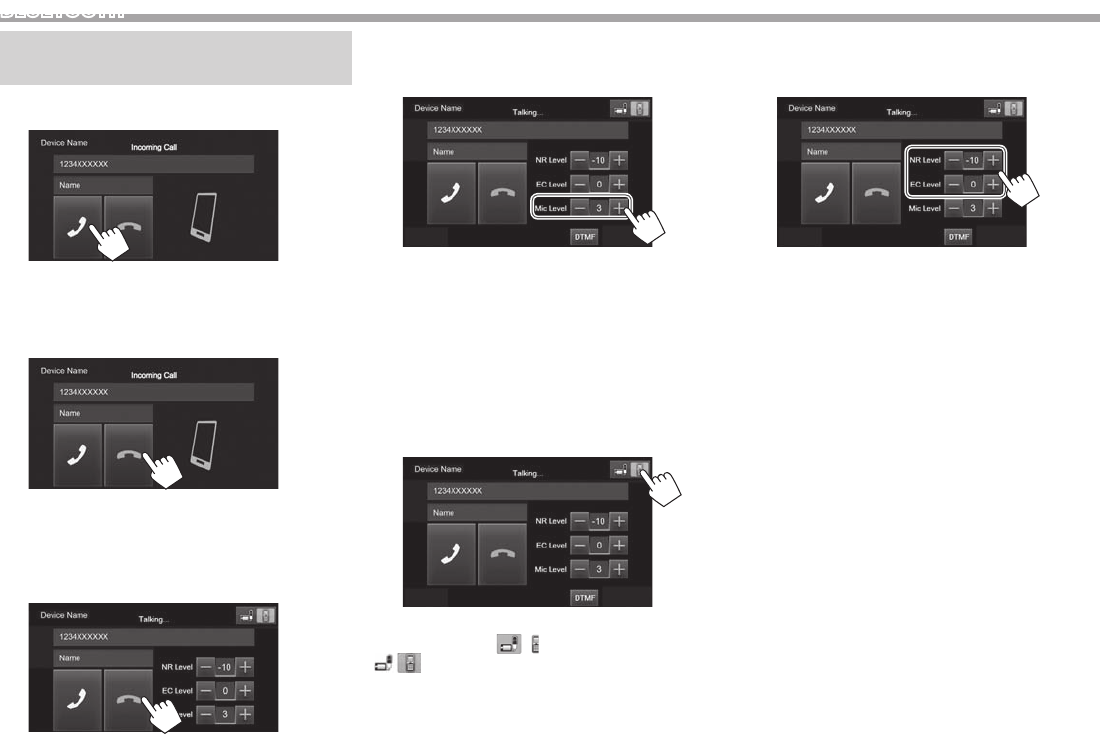
30
BLUETOOTH
Utilisation d’un téléphone portable
Bluetooth
❏Réception d’un appel
Quand un appel arrive...
• Les informations sur l’appel sont affichées si elles
peuvent être obtenues.
• Le téléphone ne peut pas être utilisé lorsque
l’image de la caméra de recul est affichée. (Page25)
Pour refuser un appel
Quand <Auto Answer> est réglé sur [On]
(Page34)
L’appareil répond automatiquement à l’appel entrant.
❏Terminer un appel
Pendant une conversation...
❏Ajustement du volume des appels/
oreillettes/microphone
Pendant une conversation...
• Vous pouvez ajuster le niveau de volume entre 0
et 15 (réglage initial: 3).
• Cet ajustement n’affecte pas le niveau de volume
des autres sources.
• Utilisez le panneau du moniteur pour ajuster le
volume d’appel/écouteurs. (Page6)
❏Commutation entre le mode mains
libres et le mode téléphone
Pendant une conversation...
Chaque fois que vous appuyez sur la touche, la
méthode change ( : mode mains libres /
: mode téléphone).
❏ Réduction du bruit/ajustement du
niveau d’annulation d’écho
Pendant une conversation...
• Pour ajuster le volume de l’écho (entre –1 et +1,
réglage initial: 0): Ajustez <EC LEVEL>.
• Pour ajuster le volume de réduction de bruit
(entre 0 et –20, réglage initial: –10): Ajustez
<NR LEVEL>.
KW-V_Mid_EU_FR.indb 30 1/29/2014 12:32:55 PM
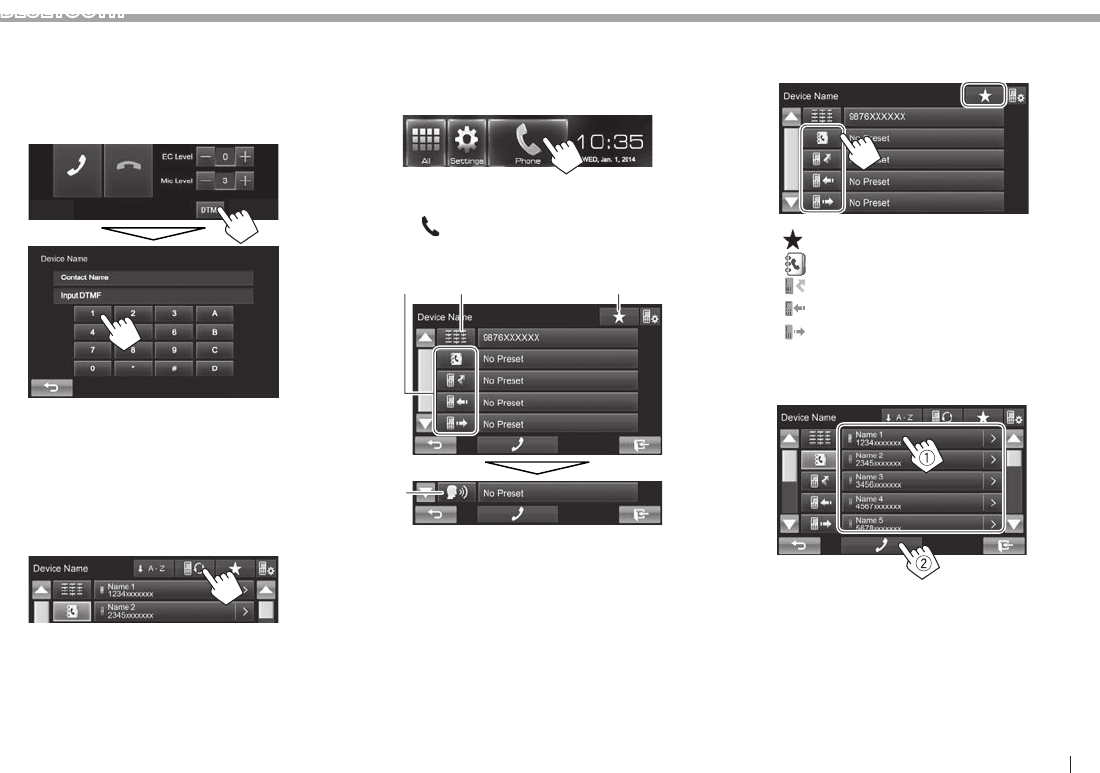
FRANÇAIS 31
BLUETOOTH
❏ Envoi d’un texte pendant un appel
Vous pouvez envoyer un texte pendant un appel
en utilisant la fonction DTMF (Dual Tone Multi
Frequency).
Pendant une conversation...
❏ Commutation entre les deux
périphériques connectés
Quand 2 périphériques sont connectés, vous pouvez
changer le périphérique à utiliser.
Sur l’écran de commande du téléphone (voir la
colonne de droite):
• Le nom du périphérique actif apparaît. Le
périphérique commute chaque fois que vous
appuyez sur la touche.
❏ Pour faire un appel
1 Affichez l’écran de commande du
téléphone.
Sur l’écran d’accueil:
• Vous pouvez aussi afficher l’écran de
commande du téléphone en appuyant sur
[] sur l’écran <Function Menu>. (Page7)
2 Choisissez une méthode pour faire un
appel.
231
4
1À partir du répertoire téléphonique*/des
listes d’appels
2Entrée directe de numéro
3À partir de la liste des préréglages
• Pour le préréglage, reportez-vous à la
page33.
4Composition vocale
* Quand le téléphone portable n’est pas compatible avec Phone Book
Access Profile (PBAP), le répertoire téléphonique n’est pas affiché.
À partir de la liste des préréglages/du répertoire
téléphonique/des listes d’appels
1
[ ] À partir de la liste des préréglages
[ ] À partir du répertoire téléphonique
[ ] À partir de la liste des appels manqués
[ ] À partir de la liste des appels reçus
[ ] À partir de la liste des appels réalisés
2 Sélectionnez la cible (1), puis faites un
appel (2).
• Vous pouvez changer la page pour afficher
plus d’éléments en appuyant sur [J]/[K].
KW-V_Mid_EU_FR.indb 31 1/29/2014 12:32:56 PM
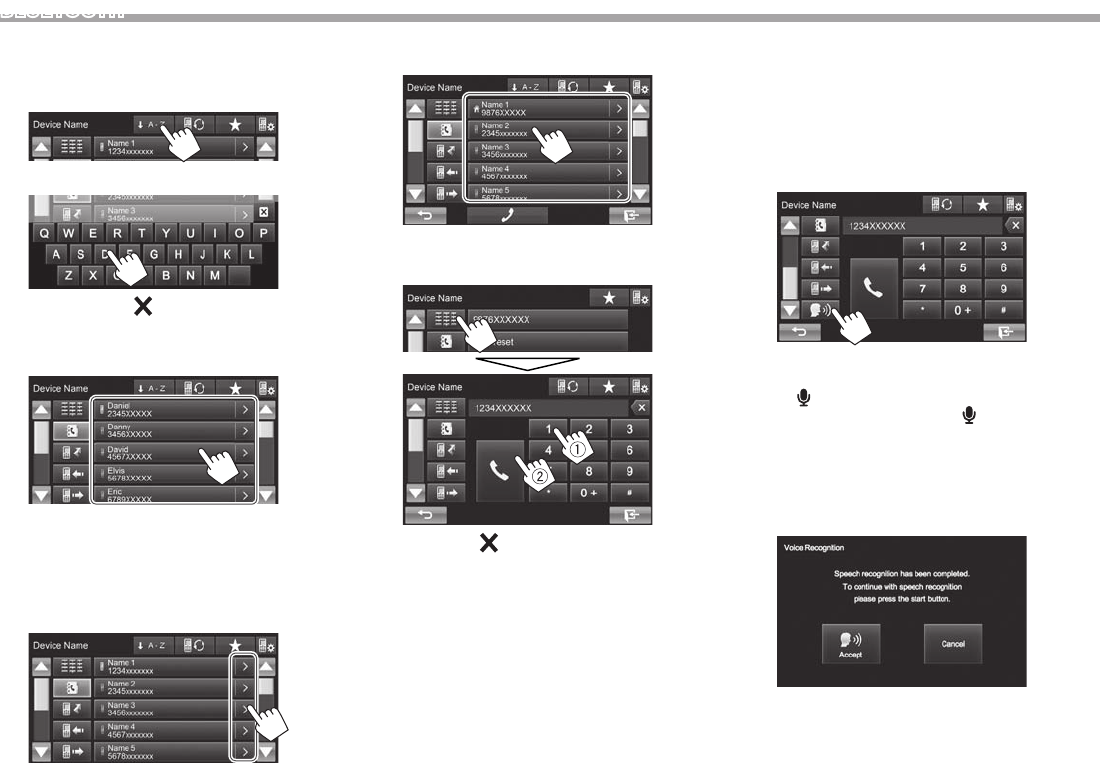
32
BLUETOOTH
• Pour utiliser les recherche A-Z sur le répertoire
téléphonique:
Quand le répertoire téléphonique est affiché, vous
pouvez faire une recherche à partir de l’initial.
1
2 Choisissez le réglage initial.
• Appuyez sur [ ] pour annuler la recherche
A à Z.
3 Choisissez un numéro de téléphone dans
la liste.
• Pour afficher les détails d’une entrée:
Quand le répertoire téléphonique est affiché, vous
pouvez afficher les détails d’une entrée et choisir
un numéro de téléphone si plusieurs numéros
sont enregistrés.
1 Affichez les détails de l’entrée souhaitée.
2 Choisissez un numéro de téléphone à
appeler.
Entrée directe de numéro
Vous pouvez entrer un maximum de 32 nombres.
• Appuyez sur [ ] pour supprimer la dernière
entrée.
• Maintenez pressé [0+] pour ajouter “+” au numéro
de téléphone.
Composition v ocale
• Disponible uniquement quand le téléphone
portable connecté possède un système de
reconnaissance vocale.
1 Mettez en service voice dialing.
Sur l’écran de commande du téléphone:
• Appuyez répétitivement sur [K] pour
changer de page sur l’écran de commande du
téléphone.
• Vous pouvez aussi activer la composition
vocale (voice dialing) en appuyant sur
[] sur l’écran <Function Menu> (Page 7) en
maintenant enfoncé FNC/ sur le panneau du
moniteur.
2 Dites le nom de la personne que vous
souhaitez appeler.
• Si l’appareil ne peut pas trouver la cible, l’écran
suivant apparaît. Appuyez sur [Accept], puis
dites de nouveau le nom.
Pour annuler la composition vocale: Appuyez sur
[Cancel].
KW-V_Mid_EU_FR.indb 32 1/29/2014 12:32:56 PM
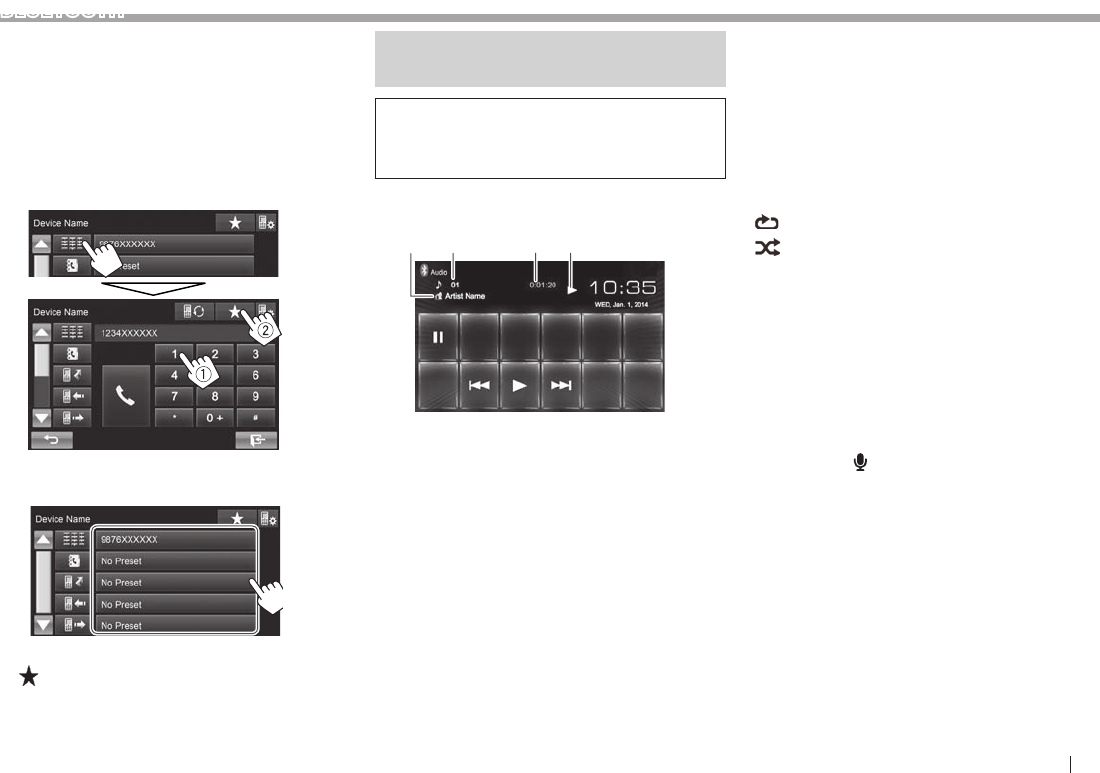
FRANÇAIS 33
BLUETOOTH
❏ Préréglage de numéros de téléphone
Vous pouvez prérégler un maximum de 5 numéros
de téléphone.
1 Affichez l’écran de commande du
téléphone. (Page31)
2 Entrez les numéros sur l’écran d’entrée
directe de numéro, puis affichez la liste des
préréglages.
3 Choisissez un numéro de préréglage à
mémoriser.
(Maintenir
pressée)
• Pour afficher la liste des préréglages, appuyez sur
[] sur l’écran de commande du téléphone.
Utilisation d’un lecteur audio
Bluetooth
• Pour enregistrer un nouveau périphérique, voir
page27.
• Pour connecter/déconnecter un périphérique,
voir page29.
❏Indications et touches sur l’écran de
commande de la source
3 421
• Les touches de commande, les indicateurs et les
informations affichées sur l’écran diffèrent en
fonction du périphérique connecté.
Informations sur la lecture
1 Données de balise (titre de la plage actuelle/nom
de l’artiste/titre de l’album)*1
• Toucher le texte d’information change le type
d’information.
2 No. de plage*1
3 Durée de lecture*1
4 État de lecture*1
Touches de commande
[ ]*1 *2 *3Choisit le mode de lecture répétée.
[]*1 *2 *3Choisit le mode de lecture aléatoire.
[W]Met la lecture en pause.
[I]Démarre la lecture.
[S] [T]• Choisit une plage. (Appuyer)
• Recherche vers l’arrière/vers
l’avant. (Maintenir pressée)
*1 Disponible uniquement pour les périphériques compatibles avec
AVRCP 1.3.
*2 Pour annuler le mode de lecture aléatoire et répétée, appuyez
répétitivement sur la touche jusqu’à ce que l’indication disparaisse.
*3 Appuyez sur FNC/ sur le panneau du moniteur pour afficher
l’écran <Function Menu> et sélectionner un élément.
(Page7)
KW-V_Mid_EU_FR.indb 33 1/29/2014 12:32:58 PM
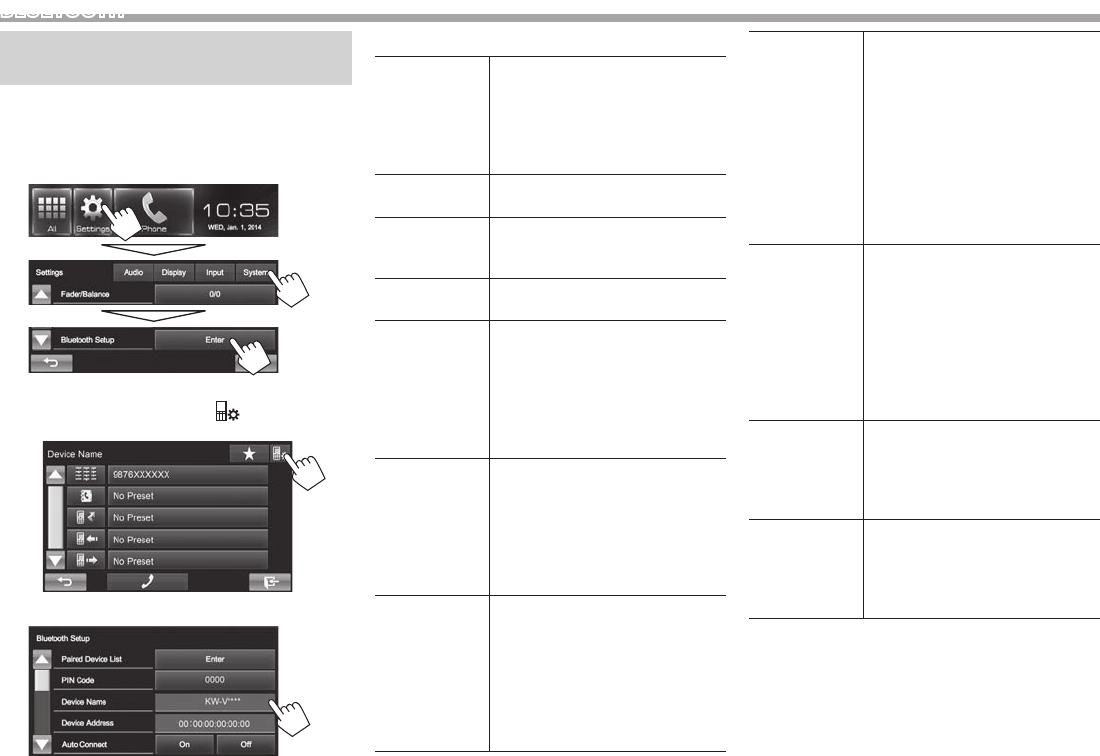
34
BLUETOOTH
Réglages des périphériques
Bluetooth
Vous pouvez changer divers réglages d’utilisation
des périphériques Bluetooth sur l’écran <Bluetooth
Setup>.
1 Affichez l’écran <Bluetooth Setup>.
Sur l’écran d’accueil:
• Vous pouvez aussi afficher l’écran <Bluetooth
Setup> en appuyant sur [ ] sur l’écran de
commande du téléphone. (Page31)
2 Configurez les réglages Bluetooth.
❏Réglages possibles
<Paired Device
List>
Appuyez sur [Enter] pour
afficher la liste des périphériques
enregistrés. Vous pouvez
connecter un périphérique ou
supprimer des périphériques
enregistrés. (Page29)
<PIN Code> Change le code PIN de l’appareil.
(Page28)
<Device
Name>
Affiche le nom du périphérique
qui apparaîtra sur le périphérique
Bluetooth — KW-V****.
<Device
Address>
Affiche l’adresse MAC de l’appareil.
<Auto
Connect>
• On (Réglage initial): La
connexion est établie
automatiquement avec le
dernier périphérique Bluetooth
connecté quand l’appareil est
mis sous tension.
• Off: Annulation.
<HF/Audio
Output>
Choisissez les enceintes utilisés
pour Bluetooth (pour le téléphone
et le lecture audio).
• Front: Enceintes avant
uniquement.
• All(Réglage initial): Toutes les
enceintes.
<Auto
Answer>
• On: L’appareil répond
automatiquement aux appels
entrant en 5 secondes.
• Off (Réglage initial):
L’appareil ne répond pas
automatiquement aux appels
entrant. Répondez aux appels
manuellement.
<Auto P airing> • On (Réglage initial): Établit le
pairage automatiquement avec
le périphérique iOS connecté
(tel qu’un iPhone) même
si la fonction Bluetooth est
désactivée sur le périphérique.
(Le pairage automatique peut
ne pas fonctionner pour certains
périphériques en fonction de la
version de l’iOS.)
• Off: Annulation.
<Ring Mode> • System (Réglage initial): La
tonalité de la sonnerie réglée sur
l’appareil est utilisée.
• Phone: La tonalité de
la sonnerie réglée sur le
téléphone portable est utilisée.
(Cette fonction peut ne pas
fonctionner en fonction du
téléphone portable.)
<Ring Tone
Change>
Quand <Ring Mode> est réglé sur
<System>, sélectionnez la tonalité
de la sonnerie de réception
d’appel parmi [Tone1] (Réglage
initial), [Tone2], [Tone3].
<Initialize> Maintenez pressé [Enter] pour
réinitialiser tous les réglages que
vous avez réalisés pour utiliser un
téléphone portable Bluetooth et
un lecture audio Bluetooth.
KW-V_Mid_EU_FR.indb 34 1/29/2014 12:32:58 PM

FRANÇAIS 35
RÉGLAGES
Réglages pour utiliser les
applications de l’iPod/iPhone/
Android
Avant d’utiliser des applications de l’iPod/iPhone/
Android, sélectionnez le périphérique à utiliser et la
méthode de connexion.
1 Appariez le périphérique iPod/iPhone/
Android par Bluetooth. (Page27)
2 Affichez l’écran <App Settings>.
Sur l’écran d’accueil:
• Si [Enter] pour <APP Setup> ne peut pas être
sélectionné, mettez la source AV hors tension.
(Page 6)
3
4 Vérifiez l’état actuel du périphérique,
appuyez sur [Change].
• Si vous n’avez pas besoin de changer le
réglage, appuyez sur [OK] pour quitter l’écran
de réglage.
5 Sélectionnez le type de périphérique (1),
puis appuyez sur [Next] (2).
6 Sélectionnez la méthode de connexion
(1), puis appuyez sur [Next] (2).
Pour Android:
<HDMI/MHL
+ Bluetooth>
Sélectionnez ce réglage quand
le périphérique Android est
connecté à la fois par câble à la
prise d’entrée HDMI/MHL et par
Bluetooth.
<Bluetooth> Sélectionnez ce réglage quand
le périphérique est connecté
via Bluetooth.
Pour iPod/iPhone:
<USB +
AV-IN>
Sélectionnez ce réglage quand
l’iPod/iPhone est connecté en
utilisant le KS-U59 (en option).
<USB 1 Wire> Sélectionnez ce réglage quand
l’iPod/iPhone est connecté
en utilisant le câble USB 2.0
(accessoire du iPod/iPhone).
<HDMI +
Bluetooth>
Sélectionnez ce réglage quand
l’iPod/iPhone est connecté
avec le câble HDMI KS-U60
(accessoire en option) et un
câble USB 2.0 (accessoire de
l’iPod/iPhone) via l’adaptateur
Lightning-Digital AV (accessoire
de l’iPod/iPhone).
<Bluetooth> Sélectionnez ce réglage quand
l’iPod/iPhone est connecté via
Bluetooth.
• Si vous avez sélectionné <USB + AV-IN> ou
<USB 1 wire>, allez à l’étape 8.
7 Si vous avez sélectionné <HDMI +
Bluetooth> ou <Bluetooth> comme
méthode de connexion, la liste des
périphériques appariés apparaît. Choisissez
l’appareil cible.
• Si l’appareil souhaité n’est pas dans la liste,
appuyez sur [Search] pour rechercher les
iPod/iPhone disponibles, puis sélectionnez
l’appareil cible sur l’écran <Available
Devices>.
– Vous pouvez changer la page pour afficher
plus d’éléments en appuyant sur [J]/[K].
– Pour arrêter la recherche, appuyez sur
[Cancel].
8 Validez les réglages.
KW-V_Mid_EU_FR.indb 35 1/29/2014 12:32:59 PM
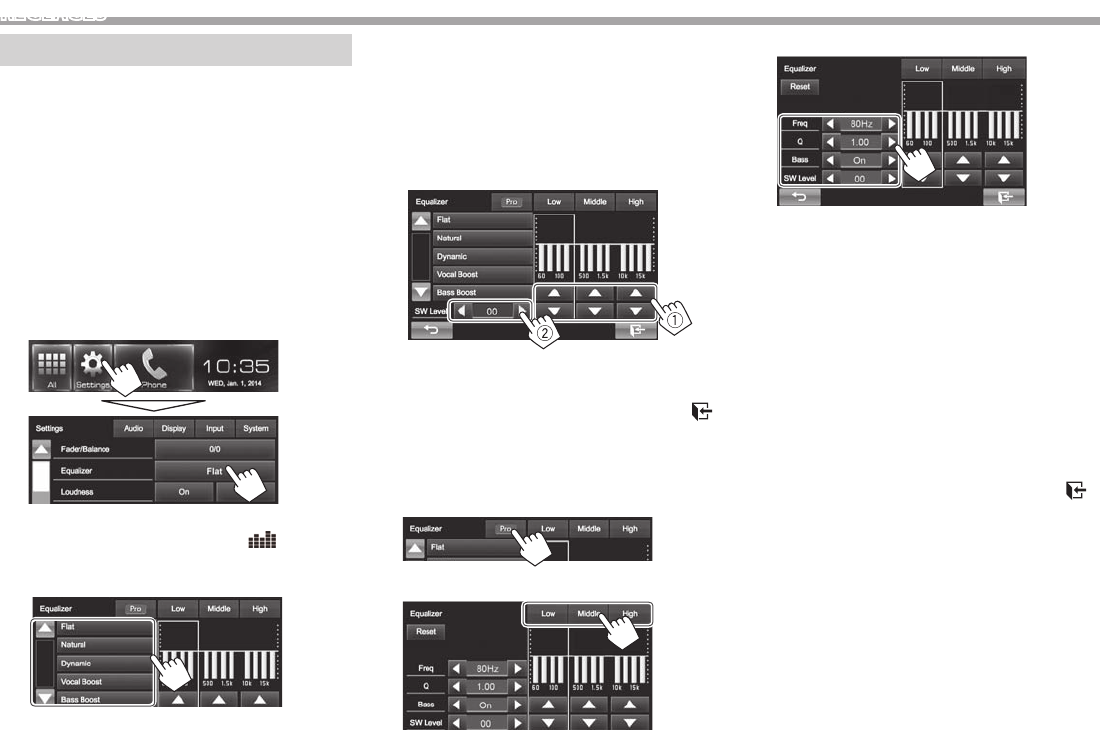
36
RÉGLAGES
Ajustements sonores
❏ Utilisation de l’égalisation du son
• L’ajustement est mémorisé pour chaque source
jusqu’à ce que vous ajustiez de nouveau le son. Si
la source est un disque, l’ajustement est mémorisé
pour chacune de catégories suivantes.
– DVD/DVD-VR/VCD
– CD
– DivX/MPEG1/MPEG2/MP3/WMA/WAV
• Vous ne pouvez pas ajuster le son quand la source
AV est hors tension.
Sélection d’un mode sonore préréglé
1 Affichez l’écran <Equalizer>.
Sur l’écran d’accueil:
• Vous pouvez aussi afficher l’écran
<Equalizer> en appuyant sur [] sur l’écran
<Function Menu>. (Page7)
2 Choisissez un mode sonore.
• Vous pouvez changer la page pour afficher
plus d’éléments en appuyant sur [J]/[K].
Mémorisation de votre propre ajustement—
Personnalisation d’un mode sonore préréglé
1 Choisissez un mode sonore. (Voir la
colonne de gauche.)
2 Ajustez le niveau de chaque bande (1),
puis choisissez le niveau du caisson de
grave (2).
Les réglages sont mémorisés et <User> est
activé.
• Pour terminer la procédure, appuyez sur [ ].
Mémorisation de votre propre ajustement—
Ajustement précis du son
1 Sélectionnez un mode sonore (voir la
colonne de gauche), puis...
2 Choisissez une bande.
3 Ajustez le son.
<Reset> Change le niveau de chaque
bande (Low/Middle/High) sur
“0”.
<Freq> Choisit la fréquence.
<Q> Ajuste la largeur de la bande
de fréquence.*1
<Bass> Met en/hors service les
graves.*2
<SW Level> Ajuste le niveau du caisson de
grave.
Ces réglages sont remplacés si le réglage
<User> a été fait (voir la colonne de gauche), et
que <User> est activé.
• Pour terminer la procédure, appuyez sur [ ].
• Les réglages sont mémorisés jusqu’à ce que vous
ajustiez de nouveau le son.
• Pour ajuster les autres bandes, répétez les étapes
2 et 3.
*1 Fixé pour la bande “High” (aigus).
*2 Uniquement pour la bande “Low” (graves).
KW-V_Mid_EU_FR.indb 36 1/29/2014 12:33:00 PM
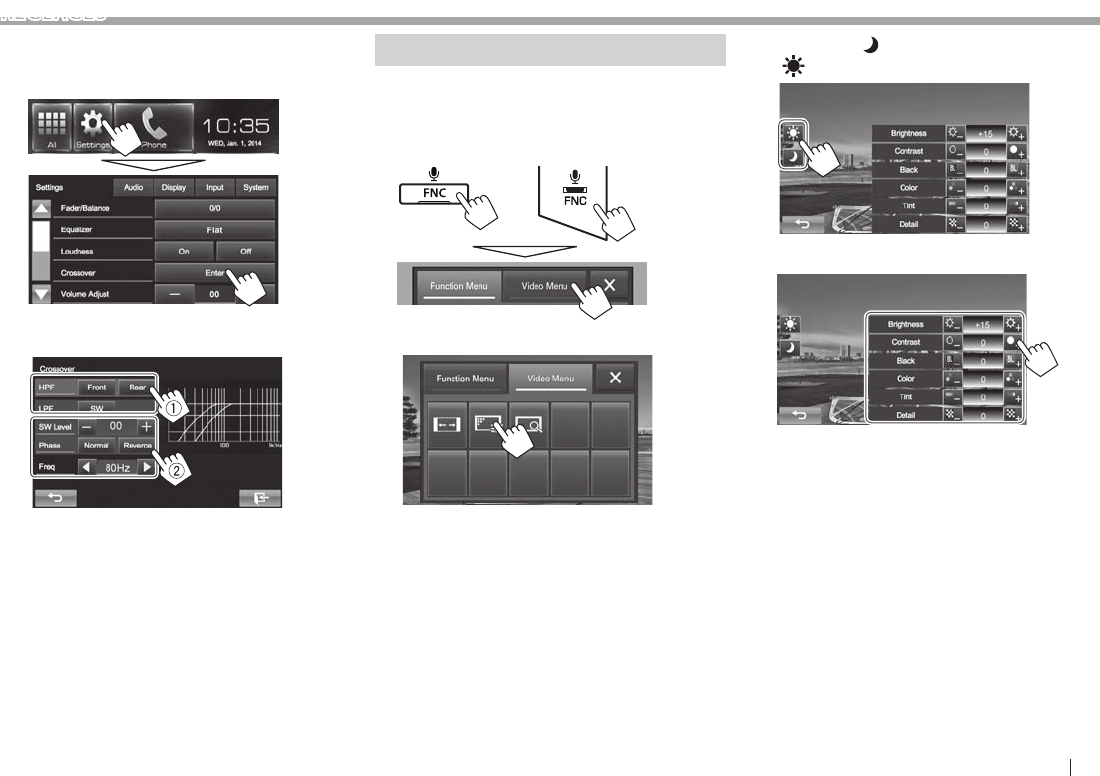
FRANÇAIS 37
RÉGLAGES
❏ Ajustement de la fréquence de transition
1 Affichez l’écran <Crossover>.
Sur l’écran d’accueil:
2 Choisissez l’élément à ajuster (1), puis
faites l’ajustement (2).
<HPF> Ajuste la transition entre les
enceintes avant ([Front]) et
arrière ([Rear]) (filtre passe haut).
<LPF> Ajuste la transition pour le
caisson de grave (filtre passe bas).
<SW Level> Ajuste le niveau du caisson de
grave.
<Phase> Choisit la phase pour le caisson
de grave.*
<Freq> Ajuste la fréquence de transition.
* Ne peut pas être choisi quand <Freq> est réglé sur
<Through>.
Ajustement pour la lecture vidéo
❏ Ajustement de l’image
Vous pouvez ajuster la qualité de l’image.
1 Affichez l’écran <Video Menu>.
KW-V50BT KW-V30BT
2 Affichez le menu de réglage.
3 Choisissez [ ] (gradateur en service) ou
[] (gradateur hors servie).
4 Ajustez l’image.
<Brightness> Ajuste la luminosité. (–15 à
+15)
<Contrast> Ajuste le contraste. (–10 à +10)
<Black> Ajuste la noirceur. (–10 à +10)
<Color> Ajuste la couleur. (–10 à +10)
<Tint> Ajuste la teinte. (–10 à +10)
<Detail> Ajuste les détails. (–2 à +2)
KW-V_Mid_EU_FR.indb 37 1/29/2014 12:33:00 PM
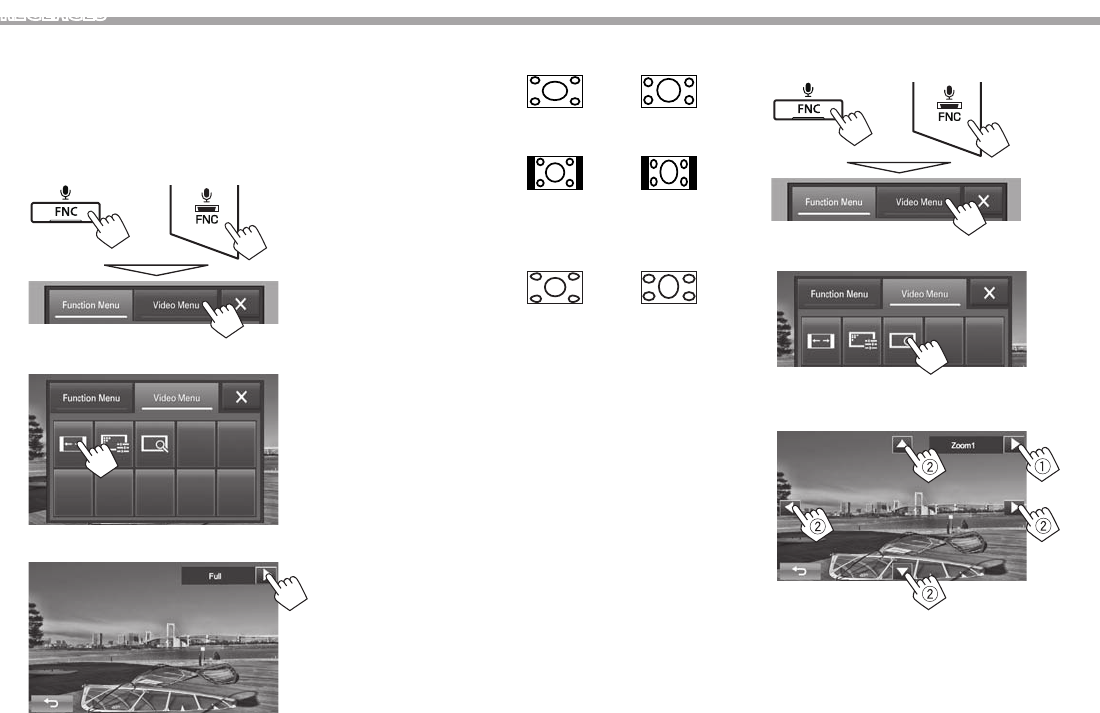
38
RÉGLAGES
❏ Sélection du format de l’image
Il est possible de changer le format pour la lecture
vidéo.
• Vous ne pouvez pas changer le format d’écran
pendant la lecture du périphérique USB.
1 Affichez l’écran <Video Menu>.
KW-V50BT KW-V30BT
2 Affichez le menu de réglage.
3 Choisissez le format de l’image.
<Full>* Pour les images originales 16:9
Signal 4:3 Signal 16:9
<Regular>* Pour les images originales 4:3
Signal 4:3 Signal 16:9
<Panorama> Pour voir les images 4:3
naturellement sur un écran
large
Signal 4:3 Signal 16:9
<Zoom1> −
<Zoom3>
Change le grossissement.
• Le format d’image est
choisi automatiquement en
fonction de la source vidéo.
* Pendant une lecture DivX avec <Monitor Type> réglé
sur [16:9] (Page 13), le format de l’image n’est pas réglé
correctement.
❏ Agrandissement de l’image
Vous pouvez agrandir l’image (<Full>, <Zoom1>
à <Zoom3>). La fonction de zoom est disponible
uniquement quand un disque est lu.
• Quand <Aspect> est réglé sur <Panorama> (voir
la colonne de gauche), l’image est agrandie avec le
format d’image du réglage <Full>.
1 Affichez l’écran <Video Menu>.
KW-V50BT KW-V30BT
2 Affichez le menu de réglage.
3 Changez l’agrandissement (1), puis
déplacez le cadre du zoom (2).
• [J][K][H][I] ne sont pas affichés quand <Full>
est sélectionné.
• La fonction de zoom ne peut pas être utilisée pour
certaines sources vidéo.
KW-V_Mid_EU_FR.indb 38 1/29/2014 12:33:01 PM
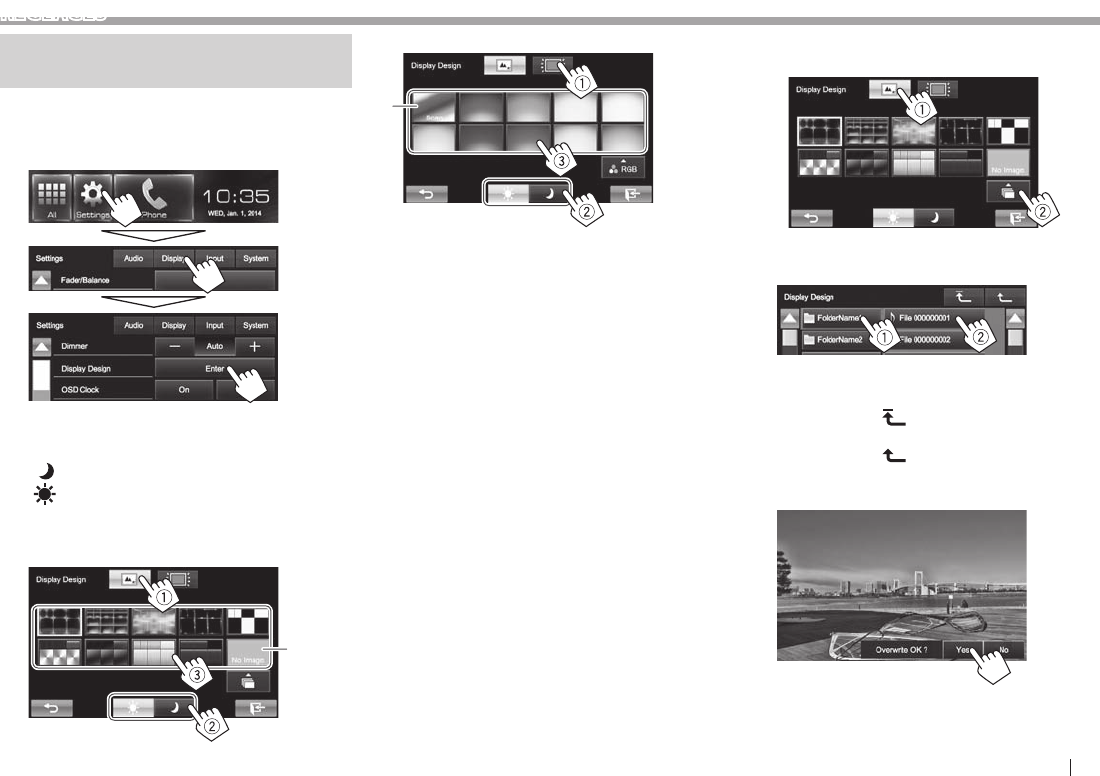
FRANÇAIS 39
RÉGLAGES
Changement de la disposition de
l’affichage
Vous pouvez changer la couleur du fond et du
panneau.
1 Affichez l’écran <Display Design>.
Sur l’écran d’accueil:
2 Sélectionnez un élément à changer (1),
sélectionnez le réglage du gradateur
([ ]: Gradateur en service ou
[]: Gradateur hors service) (2), puis
sélectionnez la disposition ou la couleur
(3).
Pour changer la disposition du fond:
*1
Pour changer la couleur du panneau:
*2
• Vous pouvez ajuster la couleur par vous
même. Appuyez sur [RGB] pour afficher
l’écran d’ajustement de la couleur, puis ajustez
la couleur.
*1 Mémorisez votre propre scène en avance. (Voir ci-dessous.)
*2 Choisir ce réglage change la couleur d’éclairage graduellement.
❏Mémorisation de votre image favorite
pour le fond
Vous pouvez régler votre image favorite (fichier
JPEG/PNG/BMP) mémorisée sur le périphérique USB
connecté.
• Utilisez le fichier JPEG/PNG/BMP d’une résolution
de 800 x 480 pixels.
• La couleur de l’image capturée peut paraître
différente de celle de la scène réelle.
1 Connectez le périphérique USB qui
contient l’image mémorisée. (Page48)
2 Affichez l’écran <Display Design>. (Voir la
colonne de gauche.)
3 Affichez l’écran <User Background File
Select>.
4 Sélectionnez le fichier pour l’image de
fond (1), puis validez la sélection (2).
• Vous pouvez changer la page pour afficher
plus d’éléments en appuyant sur [J]/[K].
• Appuyez sur [] pour retourner au dossier
racine.
• Appuyez sur [] pour retourner au niveau
précédent.
5 Validez le choix.
L’image existante est remplacée par la nouvelle.
• Appuyez sur [No] pour retourner à l’écran
précédent.
KW-V_Mid_EU_FR.indb 39 1/29/2014 12:33:03 PM
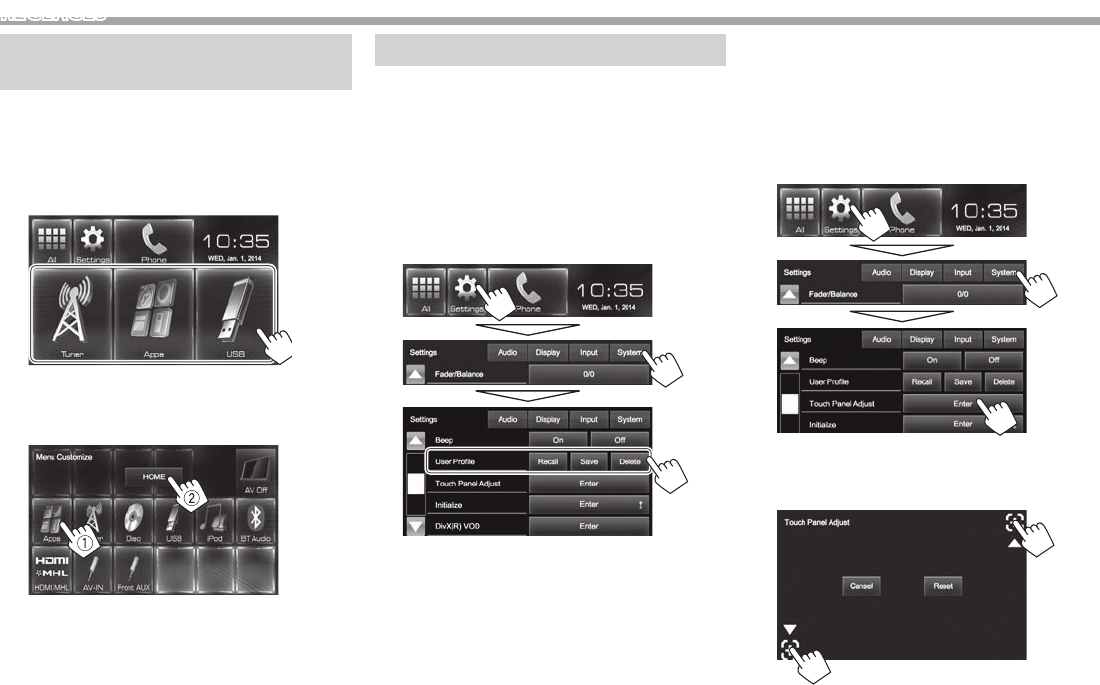
40
RÉGLAGES
Personnalisation de l’écran
d’accueil
Vous pouvez arranger les éléments à afficher sur
l’écran d’accueil.
1 Affichez l’écran <Menu Customize>.
Sur l’écran d’accueil:
Maintenez enfoncé l’icône que vous souhaitez
remplacer.
(Maintenir
pressée)
2 Sélectionnez l’élément que vous souhaitez
afficher sur la position sélectionnée à
l’étape 1 (1), puis appuyez sur [HOME].
• Répétez la procédure pour placer les icônes des
autres éléments.
Modification des réglages système
❏ Mémorisation/rappel des réglages
Vous pouvez mémoriser les réglages suivants:
• Réglages sur l’écran <Settings>: Fader/Balance,
Equalizer, Loudness, Crossover (Réglages
<HPF>/<LPF>/<SW Level>), Volume Adjust,
Speaker Select, Display Design
• Réglages pour “AV-IN”: AV-IN Name
Sur l’écran d’accueil:
• Appuyez répétitivement sur [K] pour changer de
page sur l’écran de menu <System>.
[Recall] Rappelle les réglages sauvegardés.
[Save] Mémorise les réglages actuels.
[Delete] Supprime les réglages mémorisés.
Un message de confirmation apparaît. Appuyez
sur [Yes].
❏ Réglage de la position tactile
Vous pouvez ajuster la position tactile sur le
panneau tactile si la position touchée et l’opération
réalisée ne correspondent pas.
1 Affichez l’écran <Touch Panel Adjust>.
Sur l’écran d’accueil:
• Appuyez répétitivement sur [K] pour changer
de page sur l’écran de menu <System>.
2 Touchez le centre des marques en bas à
gauche et en haut à droite comme on vous
le demande.
• Pour réinitialiser la position de toucher,
appuyez sur [Reset].
• Pour annuler l’opération actuelle, appuyez sur
[Cancel].
KW-V_Mid_EU_FR.indb 40 1/29/2014 12:33:04 PM
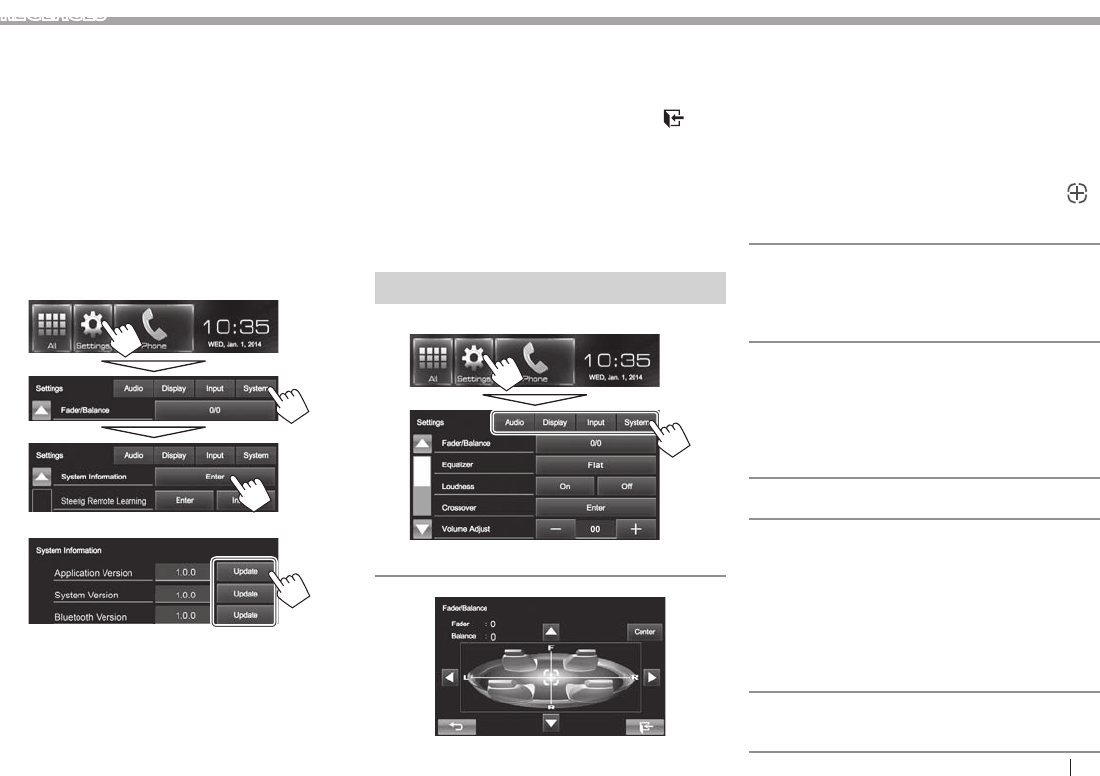
FRANÇAIS 41
RÉGLAGES
❏ Mise à jour du système
Vous pouvez mettre à jour le système en connectant
un dispositif USB contenant un fichier de mise à jour.
• Pour la mise à jour du système, consultez
<http://www.jvc.net/cs/car/>.
1 Créez un fichier de mise à jour, copiez-
le sur un dispositif USB et connectez ce
dernier sur l’appareil.
• Pour connecter un périphérique USB, voir
page 48.
2 Affichez l’écran <System Information>.
Sur l’écran d’accueil:
• Appuyez répétitivement sur [K] pour changer
de page sur l’écran de menu <System>.
3
<Application
Version>
Met à nouveau l’application
système.
<System
Version> Met à jour le système.
<Bluetooth
Version>
Met à jour l’application
Bluetooth.
Cela peut prendre un certain temps.
Si la mise à jour est effectuée avec succès,
“Update Completed” apparaît. Réinitialisez
l’appareil.
• Pour terminer la procédure, appuyez sur [ ].
• Si la mise à jour a échouée, mettez l’appareil hors
tension puis de nouveau sous tension, et essayez
de nouveau la mise à jour.
• Même si vous avez mis l’appareil hors tension
pendant la mise à jour, vous pouvez reprendre la
mise à jour après remettre l’appareil sous tension.
La mise à jour est effectuée à partir du début.
Éléments du menu de réglage
❏Affichage de l’écran de menu <Setup>
❏Écran de réglage <Audio>
<Fader/Balance>
Fader: Ajustez la balance de sortie avant-arrière des
enceintes.
• F6 à R6 (Réglage initial: 0)
– Lors de l’utilisation d’un système à deux
enceintes, réglez le fader au centre (0).
Balance: Ajustez la balance de sortie gauche-droite
des enceintes.
• L6 à R6 (Réglage initial: 0)
Appuyez sur [J]/[K]/[H]/[I] ou faites glisser [ ]
pour ajuster.
– Pour annuler l’ajustement, appuyez sur [Center].
<Equalizer>
Changez le mode sonore ou ajustez et mémorisez
l’égalisation pour chaque source. (Page36)
• Flat (Réglage initial)/Natural/Dynamic/Vocal
Boost/Bass Boost/Vibrant/User
<Loudness>
Vous pouvez mettre en/hors service la fonction de
loudness.
• On (Réglage initial): Accentue les basses et hautes
fréquences pour produire un son plus équilibré
aux faibles niveaux de volume.
• Off: Annulation.
<Crossover>
Ajustez la fréquence de croisement. (Page37)
<Volume Adjust>
Ajustez et mémorisez automatiquement le niveau
de volume pour chaque source. (Pour les disques,
l’ajustement est mémorisé pour chacune des
catégories suivantes: DVD/DVD-VR/VCD, CD et
DivX/MPEG1/MPEG2/MP3/WMA/WAV.) Le niveau de
volume augmente ou diminue automatiquement
quand vous changez la source.
• –15 à +6 (Réglage initial: 00)
<Speaker S elect>
Choisissez la taille des enceintes connectées.
• Standard (Réglage initial)/Narrow/Middle/Wide
KW-V_Mid_EU_FR.indb 41 1/29/2014 12:33:05 PM
42
RÉGLAGES
❏Écran de réglage <Display>
• Vous pouvez aussi acher l’écran <Display> en
appuyant sur [ ] sur l’écran <Function Menu>.
(Page 7)
<Dimmer>
• Auto
l’éclairage des touches quand vous allumez les
feux de la voiture.
• : Met en service le gradateur.
• : Annulation.
>ngiseD yalpsiD<
Changez la disposition de l’achage (couleur du
<OSD Clock>
• : Ache l’horloge pendant qu’une source
vidéo est reproduite.
• O
>noitartsnomeD<
• On
démonstration sur l’écran.
• : Annulation.
<Scroll>
• : Répète le délement.
• Once
informations achées.
• : Annulation.
Toucher une barre d’information permet de faire
déler le texte quel que soit le réglage.
<GUI Adjust>
Ajustez la luminosité et la noirceur de l’écran.
Appuyez sur [Enter] pour acher l’écran de réglage,
choisissez [ ] (gradateur en service)/[ ] (gradateur
• : Ajuste la luminosité.
– –15 à +15 00 quand le
gradateur est en service/+15 quand le gradateur
est hors service)
• : Ajuste la noirceur.
– –10 à +10 00)
❏Écran de réglage <Input>
>tupnI aremaC<
• On
de recul quand vous placez le levier de vitesse en
position marche arrière (R).
• : Choisissez ce réglage quand aucune caméra
n’est connectée.
❏Écran de réglage <System>
>egaugnaL<
Choisissez la langue des textes utilisés pour les
informations sur l’écran.
• English (Réglage initial)/Español/Français/
Deutsch/Italiano/Nederlands/Руccĸий/
Português/ / / /Türkçe/
/ /
• : Sélectionnez une langue pour
acher les touches de fonctionnement et les
options de menu.
– English (Réglage initial)/Local (la langue choisie
ci-dessus)
<Calendar Setting>
<iPod Setup>
<APP Setup>
• : Congurez les réglages
• : Ajustez le volume de
l’application.
– 00 à 35 17)
>puteS htooteulB<
Congurez les réglages d’utilisation du périphérique
Bluetooth, tels que la connexion est les autres
<Beep>
• On
sonore des touches.
• : Annulation.
<User Prole>
Vous pouvez mémoriser, rappeler ou annule les
>tsujdA lenaP hcuoT<
Ajustez la position tactile des touches sur l’écran.
<Initialize>
Initialise tous les réglages que vous avez réalisé.
Maintenez pressée [Enter] pour initialiser les
réglages.
• Après l’initialisation des réglages, ajustez les
réglages sur l’écran <Initial Settings>.
<DivX® VOD>
Cet appareil possède son propre code
d’enregistrement. Une fois que vous avez
reproduit un chier sur lequel se trouve un code
d’enregistrement, le code d’enregistrement
de l’appareil est remplacé pour des raisons de
protection des droits d’auteur.
• Appuyez sur [Enter] pour acher l’information.
• Pour retourner à l’écran précédent, appuyez sur
[OK].
<System Information>
Ache les informations sur la version du logiciel.
<Steering Remote Learning>
Ce réglage n’est pas utilisé.
KW-V_Mid_EU_FR.indb 42 1/29/2014 12:33:05 PM
FRANÇAIS 43
TÉLÉCOMMANDE
Mise en place des piles
❏Mise en place des piles
R03/LR03/AAA
Insérez les piles dans la télécommande en
respectant les polarités (+ et –).
• Si la télécommande perd de son efficacité,
remplacez les piles.
V Attention:
• Danger d’explosion si la pile est remplacée de
façon incorrecte. Remplacez-la uniquement avec
le même type de pile ou un type équivalent.
• La pile ne doit pas être exposée à une chaleur
excessive telle que la lumière du soleil, un feu ou
quelque chose de similaire.
Avant d’utiliser la télécommande:
• Dirigez la télécommande directement sur le
capteur de télécommande de autoradio.
• N’EXPOSEZ PAS le capteur de télécommande à
une forte lumière (lumière directe du soleil ou
éclairage artificiel).
Opérations en utilisant de la
télécommande (RM-RK256)
❏Fonctions de base des touches
ATT Atténue/rétablit le son.
DISP Ne fonctionne pas pour cet
appareil.
J/K
• Choisit des stations
préréglées.
• Choisit un titre/élément/
dossier.
/
• Recherche des stations
automatiquement.
• Recherche des stations
manuellement. (Maintenir
pressée)
• Choisit une plage.
• Recherche vers l’arrière/
recherche vers l’avant.
(Maintenir pressée)
O/N
• Recherche vers l’arrière/
recherche vers l’avant.
• DVD-Vidéo/DVD-VR/VCD:
Lecture au ralenti (pendant
une pause).
• DVD-VR/VCD: La lecture
au ralenti vers l’arrière ne
fonctionne pas.
VOL +/VOL –
• Ajuste le niveau de volume.
• La fonction “2nd VOL” ne
fonctionne pas avec cet
appareil.
SOURCE Choisit la source.
I/W
Démarre/arrête
momentanément (pause)* la
lecture.
PHONE/ Permet de répondre aux appels
entrants.
BAND/o/
Choisit les bandes.
Arrête la lecture.
Termine l’appel.
Met la lecture audio Bluetooth
en pause.
0 – 9
(Page44)
• Permet d’entrer un chiffre
tout en maintenant pressée
SHIFT.
• La fonction “SETUP” ne
fonctionne pas avec cet
appareil.
1 – 6
Permet d’entrer un numéro
de station préréglée tout en
maintenant pressée SHIFT.
ASPECT
Change le format d’écran.
Pour vérifier le réglage du
format d’image, utilisez le
panneau tactile. (Page38)
RETURN Retourne à l’écran précédent.
TOP M
(Page44)
• DVD Vidéo: Affiche le menu
de disque.
• DVD-VR: Affiche l’écran du
programme original.
• VCD: Reprend la lecture PBC.
MENU
(Page44)
• DVD Vidéo: Affiche le menu
de disque.
• DVD-VR: Affiche l’écran de
liste de lecture.
• VCD: Reprend la lecture PBC.
KW-V_Mid_EU_FR.indb 43 1/29/2014 12:33:06 PM

44
TÉLÉCOMMANDE
F/G/D/E
• DVD Vidéo: Permet de réaliser la
sélection/les réglages.
• DivX: Fait un saut d’environ 5
minutes vers l’arrière ou l’avant.
ENT Valide la sélection.
OSD/ Ne fonctionne pas pour cet
appareil.
DUAL/ Ne fonctionne pas pour cet
appareil.
SHIFT Fonctionne avec les autres touches.
DIRECT/CLR
• Appuyez sur cette touche tout
en maintenant pressée la touche
SHIFT pour accéder au mode de
recherche directe. (Référez-vous à
la colonne de droite.)
• Appuyez sur cette touche tout en
maintenant pressée SHIFT pour
annuler une mauvaise entrée.
• La fonction “SURROUND” ne
fonctionne pas avec cet appareil.
* Ne fonctionne pas lors de l’écran d’une source audio Bluetooth.
❏ Recherche d’un élément directement
Fréquence du tuner
1 Appuyez sur DIRECT tout en maintenant SHIFT
pressée pour entrer en mode de recherche.
2 Appuyez sur les touches numériques tout en
maintenant SHIFT pressée pour entrer une
fréquence.
• Pour annuler une mauvaise entrée, appuyez
sur CLR (annuler) tout en maintenant SHIFT
pressée.
3 Appuyez sur ENT pour valider l’entrée.
DVD Vidéo/DVD-VR/DivX/MPEG1/MPEG2/MP3/
WMA/VCD/CD
1 Appuyez sur DIRECT tout en maintenant SHIFT
pressée pour entrer en mode de recherche.
• Chaque fois que vous appuyez sur DIRECT,
l’élément à rechercher change.
2 Appuyez sur une touche numérique tout en
maintenant SHIFT pressée pour choisir un
élément souhaité.
• Pour annuler une mauvaise entrée, appuyez
sur CLR (annuler) tout en maintenant SHIFT
pressée.
3 Appuyez sur ENT pour valider le choix.
❏ Diverses opérations relatives aux
disques
Utilisation du menu de disque
• DVD-Vidéo/DVD-VR
1 Pour DVD Vidéo, appuyez sur TOP M ou MENU.
Pour DVD-VR, appuyez sur...
• TOP M: Pour afficher le programme orignal
• MENU: Pour afficher la liste de lecture
2 Appuyez sur F/G/D/E pour choisir un élément
que vous souhaitez reproduire.
3 Appuyez sur ENT pour valider le choix.
• VCD
Pendant la lecture PBC...
1 Appuyez sur DIRECT tout en maintenant SHIFT
pressée pour entrer en mode de recherche.
2 Appuyez sur une touche numérique tout en
maintenant SHIFT pressée pour choisir l’élément
que vous souhaitez reproduire.
3 Appuyez sur ENT pour valider le choix.
• Pour retourner à l’écran précédent, appuyez sur
RETURN.
Pour annuler la lecture PBC
1 Appuyez sur o pour arrêter la lecture PBC.
2 Appuyez sur DIRECT tout en maintenant SHIFT
pressée.
3 Appuyez sur une touche numérique tout en
maintenant SHIFT pressée pour choisir une plage
souhaitée.
4 Appuyez sur ENT pour valider le choix.
• Pour reprendre la lecture PBC, appuyez sur TOPM
ou MENU.
KW-V_Mid_EU_FR.indb 44 1/29/2014 12:33:06 PM
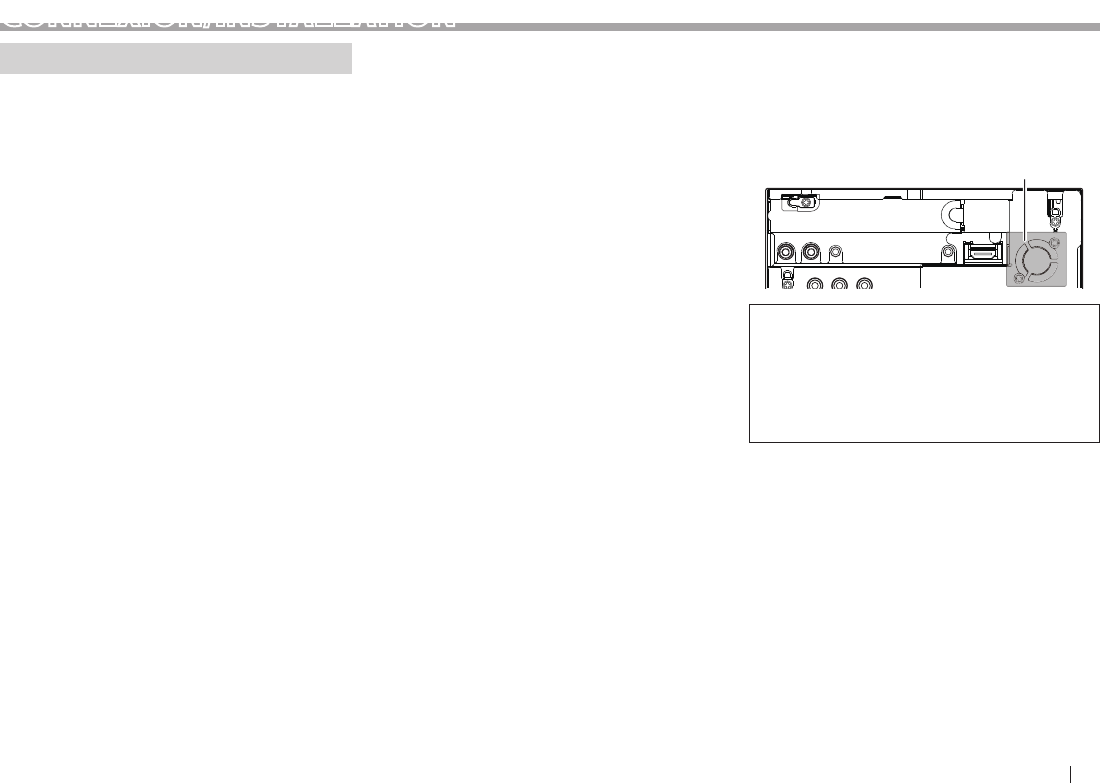
FRANÇAIS 45
CONNEXION/INSTALLATION
Avant d’installer l’appareil
V AVERTISSEMENT
• Si vous connectez le câble d’allumage (rouge) et
le câble de batterie (jaune) au châssis de la voiture
(masse), vous risquez de causer un court-circuit
qui peut provoquer un incendie. Connectez
toujours ces câbles à la source d’alimentation
passant par le boîtier de fusibles.
• Ne coupez pas le fusible du câble d’allumage
(rouge) et du câble de batterie (jaune).
L’alimentation doit être connectée aux câbles via
le fusible.
V Précautions sur l’installation et les connexions
• Le montage et le câblage de ce produit nécessite
des compétences et de l’expérience. Pour une
meilleure sécurité, laissez un professionnel
effectuer le travail de montage et de câblage.
• Assurez-vous de mettre l’appareil à la masse sur
une alimentation négative de 12V CC.
• N’installez pas l’appareil dans un endroit exposé
directement à la lumière du soleil, à une chaleur
excessive ou à l’humidité. Évitez également
les endroits trop poussiéreux ou exposés aux
éclaboussures.
• N’utilisez pas vos propres vis. N’utilisez que les vis
fournies. L’utilisation de vis incorrectes pourrait
endommager l’appareil.
• Si l’appareil n’est pas sous tension (“MISWIRING
Check wiring connection then reset unit”,
“WARNING Check wiring connection then reset
unit” est affiché), ile se peut que le câble d’enceinte
soit court-circuité ou touche le châssis du véhicule
et que la fonction de protection a été activée. Le
câble des enceintes doit donc être vérifié.
• Si l’allumage de votre voiture n’a pas de position
ACC, connectez le câble d’allumage à une source
d’alimentation qui peut être mise sous et hors
tension avec la clef de contact. Si vous connectez
le câble d’allumage à une source d’alimentation
constante, comme un câble de batterie, la batterie
risque de se décharger.
• Uniquement pour le KW-V50BT:
Si la console est équipée d’un couvercle, assurez-
vous d’installer l’appareil de façon à ce que le
panneau du moniteur ne touche pas le couvercle
lors de la fermeture ou de l’ouverture.
• Si un fusible saute, assurez-vous d’abord que
les câbles n’ont pas causé de court-circuit puis
remplacez le vieux fusible par un nouveau de
même valeur.
• Isolez les câbles non-connectés avec un ruban
de vinyle ou d’un autre matériel similaire. Pour
éviter les courts-circuits, ne retirez pas non plus les
capuchons à l’extrémité des câbles non-connectés
ou des prises.
• Connectez séparément chaque câble d’enceinte
à la borne correspondante. L’appareil peut être
endommagé si le câble négatif · pour une des
enceintes ou le câble de masse entre en contact
avec une partie métallique du véhicule.
• Quand deux haut-parleurs seulement sont
connectés au système, connectez les câbles soit
aux prises de sortie avant, soit aux prises de sortie
arrière (c.a.d. ne mélangez pas l’avant et l’arrière).
Par exemple, si vous connectez le câble ª du haut
parleur de gauche à une prise de sortie avant, ne
connectez pas le câble · du haut-parleur droit à
la prise de sortie arrière.
• Après avoir installé l’appareil, vérifiez si les lampes
de frein, les indicateurs, les clignotants, etc. de la
voiture fonctionnent correctement.
• Monter l’unité de façon à ce que l’angle de
montage soit de 30° ou moins.
• N’appuyez pas trop fort sur la surface du panneau
lors de l’installation de l’appareil dans le véhicule.
Sinon, des fissures, des dommages ou d’autres
défaillances peuvent se produire.
• Cet appareil possède un ventilateur de
refroidissement pour diminuer la température
interne. Ne montez pas l’appareil dans un endroit
où le ventilateur de refroidissement de l’appareil
est bloqué. Bloquer ces ouvertures empêche le
refroidissement de la température interne et peut
entraîner un mauvais fonctionnement.
Ventilateur de refroidissement
V ATTENTION
Installez cet appareil dans la console de votre
véhicule.
Ne touchez pas la partie métallique de cet appareil
pendant ou juste après son utilisation. Les parties
métalliques, comme le dissipateur de chaleur et le
boîtier, deviennent chaudes.
❏Accessoires fournis pour l’installation
1 Câblage électrique x 1
2 Plaque de garniture x 1
3 Câble d’extension x 1
4 Clés d’extraction x 2
5 Microphone x 1
6 Fixation pour le connecteur HDMI/MHL x 1
7 Vis pour la fixation (M2,6 x 6 mm) x 1
KW-V_Mid_EU_FR.indb 45 1/29/2014 12:33:06 PM
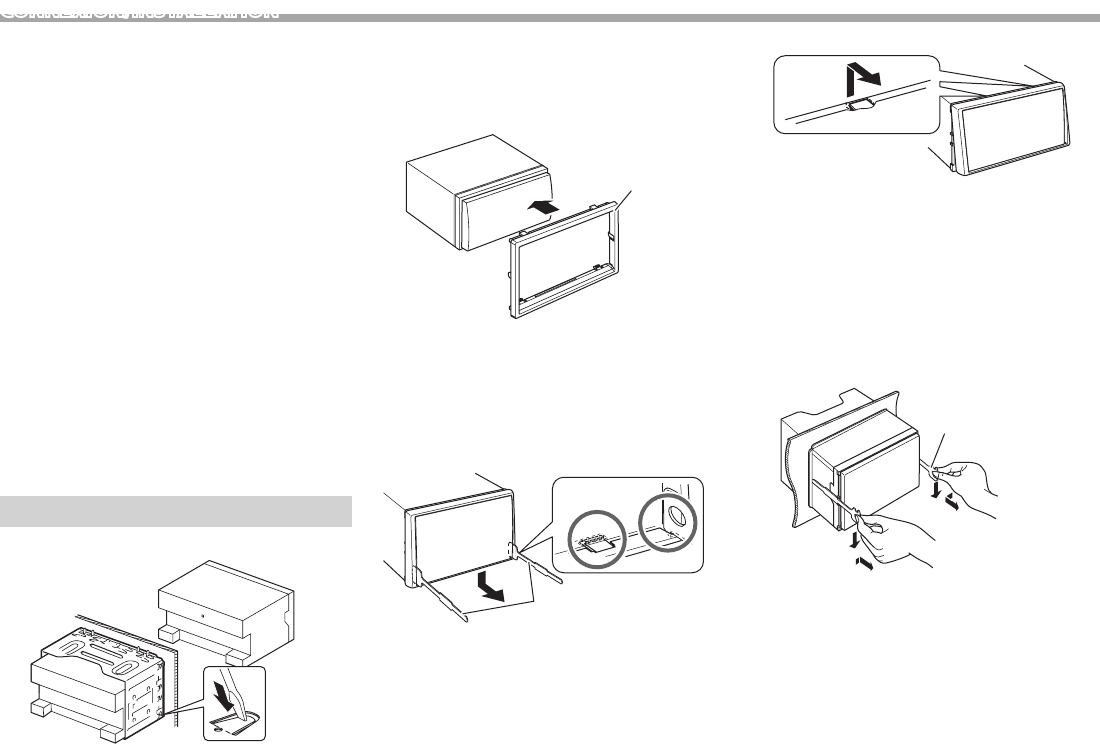
46
CONNEXION/INSTALLATION
❏Procédure d’installation
1 Pour éviter les courts-circuits, retirez la clef
de contact et déconnectez la borne · de
la batterie.
2 Effectuez correctement la connexion des
câbles de sortie et d’entrée de chaque
appareil.
3 Connectez les câbles de haut-parleur du
faisceau de câbles.
4 Prenez le connecteur B sur le câblage
électrique et connectez-le au connecteur
haut-parleur de votre véhicule.
5 Prenez le connecteur A sur le câblage
électrique et connectez-le au connecteur
d’alimentation externe de votre véhicule.
6 Connectez le connecteur du câblage
électrique à l’appareil.
7 Installez l’appareil dans votre voiture.
8 Reconnectez la · batterie.
9 Appuyez sur la touche de réinitialisation.
10 Configurez <Initial Setup>. (Page4)
Installation/retrait de l’appareil
❏Installation de l’appareil
• Tordre les pattes du manchon de montage avec un
tournevis ou un outil similaire et fixer.
❏Installation de la plaque de garniture
Fixez la plaque de garniture (2).
2
❏Retrait de la plaque de garniture
1 Engagez les broches de saisie sur la clé
d’extraction (4) et retirez les deux verrous
de la partie inférieure. Abaissez le cadre et
tirez vers l’avant.
4
2 Retirez les deux emplacements supérieurs.
• Le châssis peut être également retiré à partir du
côté supérieur de la même façon.
❏Retrait de l’appareil
1 Retirez la plaque de garniture. (Voir la
colonne de gauche.)
2 Insérez les deux clés d’extraction (4), puis
tirez de la façon illustrée de façon à retirer
l’appareil.
4
• Faites attention de ne pas vous blesser avec les
loquets de la clé d’extraction.
KW-V_Mid_EU_FR.indb 46 1/29/2014 12:33:07 PM

FRANÇAIS 47
CONNEXION/INSTALLATION
Connexion
❏ Connexion des câbles aux bornes
PARKING
BRAKE
REVERSE
GEAR
SIGNAL
Connexion des connecteurs ISO
Vous aurez peut-être besoin de modifier le
câblage du faisceau de fils fourni comme
montré sur l’illustration ci-dessous.
Broche Couleurs et fonctions des connecteurs A et B
A4 Jaune Batterie
A5 Bleu avec bande blanche Commande d’alimentation
A6 Orange avec bande
blanche Gradateur
A7 Rouge Allumage (ACC)
A8 Noir Connexion de la masse
B1 Violet Enceinte droit ª (arrière)
B2 Violet avec bande noire Enceinte droit · (arrière)
B3 Gris Enceinte droit ª (avant)
B4 Gris avec bande noire Enceinte droit · (avant)
B5 Blanc Enceinte gauche ª (avant)
B6 Blanc avec bande noire Enceinte gauche · (avant)
B7 Vert Enceinte gauche ª (arrière)
B8 Vert avec bande noire Enceinte gauche · (arrière)
Rouge
(Câble d’allumage)
Appareil
Jaune
(Câble de
batterie)
Véhicule
Rouge (A7)
Jaune (A4)
Câblage par défaut
Page49 Page49
Prise USB:
Pages48 – 49
Connectez le câble
d’antenne à la prise
d’antenne.
Fusible 10 A
Connectez le faisceau de câbles des feux de recule lors
de l’utilisation de la caméra de recule optionnelle.
Connectez-le faisceau de câble
du commutateur de détection
du frein de stationnement.
• Pour une meilleure sécurité,
assurez-vous de connecter
le capteur de frein de
stationnement.
À l’adaptateur de télécommande OE correspondant à votre voiture
• Si aucune connexion n’est faite, ne laissez pas le câble sortir de la languette.
Violet avec bande blanche
(Câble de capteur de
marche arrière)
Vert clair
(Câble de capteur de
frein de stationnement)
3
1
Bleu clair avec bande jaune (Fil de télécommande de volant)
Jaune (Câble de batterie)
Rouge (Câble d’allumage)
Rouge (A7)
Jaune (A4)
Connecteur A
Connecteur B
Pages48 – 49
KW-V_Mid_EU_FR.indb 47 1/29/2014 12:33:08 PM

48
CONNEXION/INSTALLATION
❏ Connexion d’un périphérique USB
Périphérique USB
(en vente dans le commerce)
❏ Connexion d’un iPod/iPhone
iPod/iPhone sauf pour l’iPhone 5/iPod touch
(5e génération)/iPod nano (7e génération)
(en vente dans le commerce)
KS-U59
(en option)
Câble USB 2.0
(accessoire du iPod/
iPhone)
iPhone 5/iPod touch (5e génération)/iPod nano
(7e génération) (en vente dans le commerce)
Adaptateur
Lightning-Digital
AV
(accessoire de
l'iPod/iPhone)
Câble USB 2.0
(accessoire du iPod/
iPhone) ou KS-U62
(en option)
Câble USB 2.0
(accessoire du
iPod/iPhone) ou
KS-U62 (en option)
KS-U60
(en option)
Câble HDMI/MHL
6
7
Si vous connectez le connecteur HDMI/MHL, fixez le câble
en utilisant la fixation de câble (6) et les vis (7).
KW-V_Mid_EU_FR.indb 48 1/29/2014 12:33:08 PM

FRANÇAIS 49
CONNEXION/INSTALLATION
❏ Connexion d’un smartphone
Android, etc.
(avec HDMI)
(en vente dans le commerce)
Android, etc.
(avec MHL)
(en vente dans le commerce)
Micro USB Micro HDMI (Type D)
Adaptateur Micro HDMI à HDMI
(en vente dans le commerce)
KS-U60
(en option)
Câble Micro
USB à USB
(en vente dans
le commerce)
KS-U61
(en option)
Câble HDMI/MHL
6
7
Si vous connectez le connecteur HDMI/MHL, fixez le câble
en utilisant la fixation de câble (6) et les vis (7).
❏ Connexion d’appareils extérieurs
1 AV-OUT/Sortie vidéo (Jaune)
2 Entrée de la caméra de recul (Jaune)
3 Entrée audio/vidéo (AV-IN1)
• Connectez le type suivant de fiches mini 4
broches:
1
24
31 Audio gauche
2 Audio droit
3 Masse
4 Vidéo composite
4 Entrée HDMI/MHL
5 Sortie de préamplification de caisson de grave
(sortie monophonique)
• Sortie gauche du caisson de graves (Blanc)
• Sortie droite du caisson de grave (Rouge)
6 Préamplification arrière
• Sortie audio gauche (Blanc)
• Sortie audio droite (Rouge)
7 Préamplification avant
• Sortie audio gauche (Blanc)
• Sortie audio droite (Rouge)
8 AV-OUT/Sortie audio (mini fiche ø3,5)
Mini fiche de type stéréo sans résistance
9 Entrée pour la télécommande de volant
❏ Connexion d’un microphone pour
Bluetooth
Connectez le microphone (5) à la prise MIC.
• Pour installer le microphone, décollez le ruban
adhésif, fixez le microphone sur la position
d’installation, puis ajustez la direction du
microphone pour qu’il soit dirigé vers le
conducteur. Après l’installation, fixez le câble du
microphone à la voiture avec des serre-câble
(en vente dans le commerce).
5
KW-V_Mid_EU_FR.indb 49 1/29/2014 12:33:09 PM

50
RÉFÉRENCES
Entretien
❏Précaution sur le nettoyage de
l’appareil
N’utilisez aucun solvant (par exemple, un diluant, de
la benzine, etc.), aucun détergent ou insecticide. Cela
pourrait endommager le moniteur ou l’appareil.
Méthode de nettoyage recommandée:
Essuyez doucement le panneau avec un chiffon
doux et sec.
❏Condensation
De la condensation peut se produire sur la lentille à
l’intérieur de l’appareil dans les cas suivants:
• Après le démarrage du chauffage dans la voiture.
• Si l’intérieur de la voiture devient très humide.
Si cela se produit, l’appareil risque de ne pas
fonctionner correctement. Dans ce cas, éjectez le
disque et laissez l’autoradio sous tension pendant
quelques heures jusqu’à ce que l’humidité s’évapore.
❏Comment manipuler les disques
• Pour retirer un disque de sa boîte, faites pression
vers le centre du boîtier et soulevez légèrement le
disque en el tenant par ses bords.
– Tenez toujours le disque par ses bords. Ne
touchez pas la surface enregistrée.
• Pour remettre un disque dans sa boîte, insérez-le
délicatement sur le support central (avec la surface
imprimée dirigée vers le haut).
– Conservez les disques dans leur boîte quand
vous ne les utilisez pas.
❏Pour garder les disques propres
Si le disque est sale, sa lecture risque d’être
déformée.
Si un disque est sale, essuyez-le avec un chiffon
doux, en ligne droite du centre vers les bords.
• N’utilisez pas de solvant (par exemple, un
nettoyant conventionnel pour disque vinyle, un
vaporisateur, un diluant, du benzène, etc.) pour
nettoyer les disques.
❏Pour reproduire un disque neuf
Les disques neufs ont parfois des ebarbures sur le
bord intérieur et extérieur. Si un tel disque est utilisé,
cet autoradio risque de le rejeter.
• Pour retirer ces ebarbures, frotter les bords avec un
crayon, un stylo, etc.
Plus d’informations
❏Lecture de fichier
Lecture de fichiers DivX (pour les disques
uniquement)
• Cet appareil peut reproduire les fichiers DivX
portant le code d’extension <.divx>, <.div> ou
<.avi> (quel que soit la casse des lettres).
• Le flux audio doit être conforme au format MP3 ou
Dolby Digital.
• Les fichiers codés en mode à balayage entrelacé
ne peuvent pas être reproduits correctement.
• Le débit binaire maximum (moyen) pour les
signaux vidéo est de 4Mbps.
Lecture de fichiers MPEG1/MPEG2
• Cet appareil peut reproduire les fichier MPEG1/
MPEG2 portant l’extension <.mpg> ou <.mpeg>.
• Le format de transmission en continu doit être
conforme au système/programme MPEG.
Le format de fichier doit être MP@ML (profil
principal au niveau principal)/SP@ML (profil
simple au niveau principal)/MP@LL (profil principal
au niveau inférieur).
• Les flux audio doivent être conforme au format
MPEG1 Audio Layer-2 ou Dolby Digital.
• Le débit binaire maximum (moyen) pour les
signaux vidéo est de 4Mbps.
KW-V_Mid_EU_FR.indb 50 1/29/2014 12:33:10 PM

FRANÇAIS 51
RÉFÉRENCES
Lecture de fichiers JPEG/BMP/PNG (pour USB
uniquement)
• Cet appareil peut reproduire les fichier d’image
portant l’extension <.jpg>, <.jpeg>, <.bmp> ou
<.png>.
• Cet appareil peut reproduire des fichiers qui sont à
la résolution de 32 x 32 à 8 192 x 7 680
(PNG: 800 x 480).
Il peut prendre un certain temps pour afficher un
fichier en fonction de sa résolution.
• Cet appareil peut reproduire les fichiers JPEG
au format de base (baseline). Les fichiers JPEG
progressifs ou sans perte (lossless) ne peuvent pas
être reproduits.
Lecture de fichiers audio (pour les disques: MP3/
WMA/AAC, pour USB: MP3/WMA/WAV/AAC/
FLAC)
• Cet appareil peut reproduire les fichiers portant
le code d’extension <.mp3>, <.wma>, <.wav>,
<.m4a> ou <.flac> (quel que soit la casse des
lettres).
• Cet autoradio peut reproduire les fichiers
respectant les conditions suivantes:
– Débit binaire:
MP3: 8 kbps à 320 kbps
WMA: 48 kbps à 192 kbps
AAC: Pour les disques: 16 kbps à 320 kbps
Pour USB: 32 kbps à 320 kbps
– Fréquence d’échantillonnage:
MP3: 8 kHz à 48 kHz
WMA: Pour les disques: 32 kHz à 48 kHz
Pour USB: 8 kHz à 48 kHz
WAV: 44,1 kHz
AAC: 16 kHz à 48 kHz
FLAC: 8 kHz à 48 kHz
• Cet appareil peut affiché les balises ID3, version
1.0/1.1/2.2/2.3/2.4 (pour MP3).
• Cet appareil peut aussi afficher les balises WMA/
AAC/FLAC.
• Cet auroradio peut reproduire les fichiers
enregistrés au mode VBR (débit binaire variable).
• Les fichiers enregistrés en VBR affichent une durée
écoulée différente.
• Cet autoradio ne peut pas reproduire les fichiers
suivants:
– Fichiers MP3 codés au format MP3i et MP3 PRO.
– Fichiers MP3 codés avec Layer 1/2.
– Fichiers WMA codés sans perte, professionnels
et formats vocaux.
– Fichiers WMA qui ne sont pas basés sur Windows
Media® Audio.
– Fichiers au format WMA/AAC protégés contre la
copie avec DRM.
– Les fichiers AAC codées en utilisant un autre
logiciel que iTunes.
– Fichiers AAC protégés contre la copie avec
FairPlay (sauf ceux qui se trouvent sur un iPod).
– Fichiers qui contiennent des données telles que
AIFF, ATRAC3, etc.
• Cet appareil peut afficher les images de pochette
qui respectent les conditions suivantes:
– Taille de l’image: Résolution de 32 x 32 à
1 232 x 672
– Taille des données: moins de 650 KB
– Type de fichier: JPEG/PNG/BMP
Lecture de fichiers H.264/WMV (pour USB
uniquement)
• Cet appareil peut lire les fichier portant l’extension
<.mp4>, <.wmv>, <.avi> ou <.mkv>.
• Le format de transmission en continu doit être
conforme au système/programme MPEG.
❏Lecture de disque
Types de disques reproductibles
Type de disque Format
d’enregistrement,
type de fichier, etc.
DVD
• Le son DTS ne peut pas être
reproduit ni sorti par cet
appareil.
DVD Vidéo*1
DVD enregistrable/
réinscriptible (DVD-R/-RW *
2
,
+R/+RW *
3
)
• DVD Vidéo: UDF bridge
• DVD-VR
• DivX/MPEG1/MPEG2/
MP3/WMA/AAC: ISO 9660
Niveau1, Niveau2, Romeo
et Joliet
• DVD Vidéo
• DVD-VR*4
• DivX/MPEG1/
MPEG2
• MP3/WMA/AAC
Dual Disc Côté DVD
CD/VCD • VCD (CD Vidéo)
• CD Audio/CD
Text (CD-DA)
CD enregistrables/
réinscriptibles (CD-R/-RW)
• ISO 9660 Niveau1,
Niveau2, Romeo et Joliet
• VCD (CD Vidéo)
• CD-DA
• DivX/MPEG1/
MPEG2
• MP3/WMA/AAC
*1 Code de région DVD: 2
Si vous insérez un disque DVD Vidéo d’un code de région incorrect
“Region Code Error” apparaît sur le moniteur.
*2 Les DVD-R enregistrés au format multi-bords peuvent aussi être
reproduits (sauf les disques à double couche). Les disques DVD-RW à
double couche ne peuvent pas être reproduits.
*3 Il est possible de reproduire des disques +R/+RW (format vidéo
uniquement) finalisés. “DVD” est choisi pour le type du disque quand
un disque +R/+RW est mis en place. Les disques +RW à double
couche ne peuvent pas être reproduits.
*4 Cet appareil ne peut pas reproduire les contenus protégés par CPRM
(Content Protection for Recordable Media).
KW-V_Mid_EU_FR.indb 51 1/29/2014 12:33:10 PM

52
RÉFÉRENCES
Disques non reproductibles
• Les types et les formats des disques non
reproductibles sont les suivants:
– Disques DVD-Audio/DVD-ROM
– MPEG4/WAV/JPEG/FLAC/MKV/DVD+VR/DVD-
RAM enregistrés sur DVD-R/RW ou +R/+RW
– SVCD (Super Video CD)/CD-ROM/CD-I (CD-I
Ready), DTS-CD
– MPEG4/WAV/JPEG/FLAC/MKV enregistrés sur
CD-R/RW
• Disques qui ne sont pas ronds.
• Disques avec des colorations sur la surface
d’enregistrement ou disques sales.
• Disques enregistrables/réinscriptibles qui n’ont
pas été finalisés.
• Disque de 8 cm. Essayer d’insérer un disque
à l’aide d’un adaptateur peut entraîner un
dysfonctionnement de l’appareil.
Lecture de disque double face
La face non DVD d’un disque à “DualDisc” n’est pas
compatible avec le standard “Compact Disc Digital
Audio”. Par conséquent, l’utilisation de la face non
DVD d’un disque à double face sur cet appareil n’est
pas recommandée.
Lecture de disques enregistrables/réinscriptibles
• Cet appareil peut reconnaître un maximum de
64770 fichiers, 254 dossiers (un maximum de 255
fichiers par dossier).
• Utilisez uniquement des disques “finalized”.
• Cet autoradio peut reproduire les disques multi-
session; mais les sessions non fermée sont sautées
lors de la lecture.
• Certains disques ou fichiers ne peuvent pas être
reproduits à cause de leurs caractéristiques ou des
conditions d’enregistrement.
• Un maximum de 64 caractères des informations
du disque peuvent être affichés.
❏À propos des données stockées sur le
périphérique USB/iPod/iPhone
• Nous ne pouvons être tenus responsable pour
toute perte de données dans un iPod/iPhone et un
périphérique USB à mémoire de grande capacité
lors de l’utilisation de cet appareil.
❏ Lecture USB
Fichiers reproductibles sur un périphérique USB
• Cet appareil peut les types de fichier suivants
mémorisés sur un périphérique USB de mémoire
de grande capacité.
– JPEG/BMP/PNG/MPEG1/MPEG2/MP3/WMA/
WAV/AAC/FLAC/MPEG4/ H.264/MPEG4 AVC /
WMV (VC-1)
• Cet appareil peut reconnaître un maximum de
5000 fichiers, 250 dossiers (un maximum de 999
fichiers par dossier).
• Assurez-vous que toutes les données importantes
ont été sauvegardées pour éviter toute perte de
données.
Remarques sur l’utilisation d’un périphérique
USB
• Il se peut que cet appareil ne puisse pas reproduire
correctement des fichiers d’un périphérique USB
quand celui-ci est connecté à l’aide d’un cordon
prolongateur.
• Les périphériques USB munis de fonctions
spéciales telles que des fonctions de protection
des données ne peuvent pas être utilisés avec cet
appareil.
• N’utilisez pas un périphérique USB avec 2
partitions ou plus.
• En fonction de la forme du périphérique USB
et du port de connexion, il se peut que certains
périphériques USB ne puissent pas être connectés
correctement ou que la connexion soit lâche.
• Cet appareil ne peut pas reconnaître les
périphériques USB dont l’alimentation n’est pas de
5 V et dépasse 1 A.
• Il se peut que cet appareil ne reconnaisse pas la
carte mémoire insérée dans le lecteur de carte
USB.
• Connectez uniquement un périphérique USB à
la fois à cet appareil. N’utilisez pas de nœud de
raccordement USB.
• Lors de la connexion avec un câble USB, utilisez un
câble USB 2.0.
• Nombre maximum de caractère (pour les
caractères d’un octet):
– Noms de dossier: 128 caractères
– Noms de fichier: 128 caractères
• Éviter d’utiliser le périphérique USB s’il peut gêner
la conduite en toute sécurité.
• Ne déconnectez puis reconnectez pas le
périphérique USB répétitivement pendant que
“Now Reading...” apparaît sur l’écran.
• Un choc électrostatique à la connexion d’un
périphérique USB peut causer une lecture
anormale du périphérique. Dans ce cas,
déconnectez le périphérique USB puis réinitialiser
cet appareil et le périphérique USB.
• Le fonctionnement et l’alimentation peuvent
ne pas fonctionner comme prévu pour certains
périphériques USB.
• Ne laissez pas un périphérique USB dans la
voiture, ou exposé aux rayons directs du soleil
ou aux hautes températures pour éviter toute
déformation ou dommage du périphérique.
KW-V_Mid_EU_FR.indb 52 1/29/2014 12:33:10 PM

FRANÇAIS 53
RÉFÉRENCES
❏Remarques sur la lecture d’un iPod/
iPhone
• iPod/iPhone pouvant être connectés à cet
appareil:
Made for
– iPod with video
– iPod classic
– iPod nano (7th Generation)
– iPod nano (6th Generation)
– iPod nano (5th Generation)
– iPod nano (4th Generation)
– iPod nano (3rd Generation)
– iPod touch (5th Generation)
– iPod touch (4th Generation)
– iPod touch (3rd Generation)
– iPod touch (2nd Generation)
– iPod touch (1st Generation)
– iPhone 5
– iPhone 4S
– iPhone 4
– iPhone 3GS
– iPhone 3G
– iPhone
• Lors de l’utilisation de iPod/iPhone, certaines
opérations peuvent ne pas être réalisées
correctement ou comme prévues. Dans ce cas,
consultez le site Web JVC suivant:
<http://www.jvc.net/cs/car/>
• Pour certains modèles d’ iPod/iPhone, les
performances peuvent paraitre anormales ou
instables pendant le fonctionnement. Dans ce
cas, déconnectez le périphérique iPod/iPhone et
vérifiez son état.
Si les performances ne sont pas améliorées ou
deviennent plus lentes, réinitialisez votre iPod/
iPhone.
• Quand vous mettez cet appareil sous tension,
iPod/iPhone est chargé à travers l’appareil.
• Le texte d’information peut ne pas être affiché
correctement.
❏ Codes de langue (pour la sélection de la langue des DVD/DVD-VR)
AA Afar GL Galicien MI Maori SO Somalien
AB Abkhazien GN Guarani MK Macédonien SQ Albanais
AF Afrikaans GU Gujarati ML Malayalam SR Serbe
AM Amharique HA Hausa MN Mongol SS Siswati
AR Arabe HI Hindi MO Moldavien ST Sesotho
AS Assamais HR Croate MR Marathi SU Soudanais
AY Aymara HU Hongrois MS Malais (MAY) SW Swahili
AZ Azerbaïdjanais HY Arménien MT Maltais TA Tamil
BA Bashkir IA Interlingua MY Birman TE Télougou
BE Biélorusse IE Interlangue NA Nauruan TG Tadjik
BG Bulgare IK Inupiak NE Népalais TH Thaï
BH Bihari IN Indonésien NO Norvégien TI Tigrinya
BI Bislama IS Islandais OC Langue d’oc TK Turkmène
BN Bengali, Bangladais IW Hébreu OM (Afan) Oromo TL Tagalog
BO Tibétain JA Japonais OR Oriya TN Setswana
BR Breton JI Yiddish PA Panjabi TO Tongan
CA Catalan JW Javanais PL Polonais TR Turc
CO Corse KA Géorgien PS Pashto, Pushto TS Tsonga
CS Tchèque KK Kazakh QU Quechua TT Tatar
CY Gallois KL Groenlandais RM Rhaeto-Romance TW Twi
DZ Bhutani KM Cambodgien RN Kirundi UK Ukrainien
EL Grec KN Kannara RO Roumain UR Ourdou
EO Espéranto KO Coréen (KOR) RW Kinyarwanda UZ Ouzbek
ET Estonien KS Kashmiri SA Sanskrit VI Vietnamien
EU Basque KU Kurde SD Sindhi VO Volapük
FA Persan KY Kirghiz SG Sango WO Ouolof
FI Finnois LA Latin SH Serbo-Croate XH Xhosa
FJ Fidji LN Lingala SI Cingalais YO Yoruba
FO Faroese LO Laotien SK Slovaque ZU Zoulou
FY Frison LT Lithuanien SL Slovène
GA Irlandais LV Latvian, Letton SM Samoan
GD Gaélique écossais MG Malagasy SN Shona
KW-V_Mid_EU_FR.indb 53 1/29/2014 12:33:10 PM

54
❏ Utilisation d’une App d’un iPod touch/
iPhone
INSTRUCTIONS DE SÉCURITÉ
L’utilisation d’une application (App) de navigation
iPhone est permise uniquement si les conditions
de circulation le permettent et que vous êtes
absolument sûr que vous, vos passagers et les
autres usagers de la route ne courent aucun risque
d’obstruction ou de blessures. Les règles du code de
la route doivent être respectées et peuvent varier
selon l’état. La destination ne doit pas être entrée
pendant que le véhicule est en mouvement.
Le guidage de navigation iPhone peut ne pas être
disponible dans une situation donnée à cause
de changements dans les conditions de la route
(par exemple, changement de péages, de routes
principales, de routes à sens unique ou d’autres
régulations routières). Dans ce cas, respectez les
panneaux et les règlements routiers en cours.
• Respectez scrupuleusement les panneaux de la
circulation lorsque vous conduisez en utilisant
le système de navigation. L’application (App)
de navigation iPhone est seulement une aide.
Le conducteur doit jours décider s’il doit tenir
compte ou non des informations fournies. Nous
ne pouvons être tenus responsable pour toute
donnée erronée fournie par l’application (App)
de navigation iPhone.
• Ne manipulez pas l’appareil quand vous
conduisez.
❏Signaux sonores émis par les prises
arrière
Par les prises analogiques (Sortie des enceintes/
REAR OUT/FRONT OUT/AV-OUT Audio)
Un signal à 2 canaux est sorti. Lors de la lecture d’un
disque codé multicanaux, les signaux multicanaux
sont sous mixés.
Liste des messages d’erreur
Si une erreur se produit pendant l’utilisation de
l’appareil, un message apparaît. Prenez l’action
appropriée en fonction de la liste des messages/
remèdes/causes suivante.
“No Signal”:
• Démarrez la lecture sur l’appareil extérieure
connecté à la prise d’entrée AV-IN1.
• Démarrez la lecture sur le smartphone connecté à
la prise d’entrée HDMI/MHL.
• Vérifiez les cordons et les connexions.
• Les signaux d’entrée sont trop faibles.
“MISWIRING Check wiring connection then reset
unit”/“WARNING Check wiring connection then
reset unit”:
• Un cordon d’enceinte a été court-circuité ou est
entré en contact avec le châssis de la voiture.
Connectez ou isolez le cordon d’enceinte comme
il se doit, puis réinitialisez l’appareil. (Pages3
et53)
“Parking Brake”:
• Aucune image de lecture n’apparaît si le frein à
main n’est pas engagé.
“Eject Error”/“Loading Error”:
• Éjecter le disque de force. (Page3)
“Restricted Device”:
• Vérifiez si le iPod/iPhone connecté est compatible
avec cet appareil. (Page53)
“USB Device Error”:
• L’alimentation USB est anormale.
• Mettez l’appareil hors puis sous tension.
• Connectez un autre périphérique USB.
“Connection Error”:
• Le périphérique est enregistré mais la connexion
a échouée. Connectez le périphérique enregistré.
(Page29)
“Please Wait...”:
• L’appareil se prépare pour utiliser la fonction
Bluetooth. Si le message ne disparaît pas, mettez
l’appareil hors tension puis sous tension, puis
connecter de nouveau le périphérique (ou
réinitialisez l’appareil).
“No Voice Device”:
• Le téléphone portable connecté ne possède pas
de système de reconnaissance vocale.
“No Data”:
• Aucune donnée de répertoire téléphonique ne se
trouve dans la mémoire du téléphone Bluetooth
connecté.
“Initialize Error”:
• L’appareil n’a pas pu initialiser le module
Bluetooth. Essayez de nouveau l’opération.
“Dial Error”:
• La numérotation a échouée. Essayez de nouveau
l’opération.
“Hung Up Error”:
• L’appareil n’est pas encore terminé. Garez votre
voiture et utilisez le téléphone portable connecté
pour terminer l’appel.
“Pick Up Error”:
• L’appareil n’a pas pu recevoir un appel.
RÉFÉRENCES
KW-V_Mid_EU_FR.indb 54 1/29/2014 12:33:11 PM

FRANÇAIS 55
Dépannage
Ce qui apparaît être un problème n’est pas toujours
sérieux. Vérifiez les points suivants avant d’appeler
un centre de service.
• Pour les opérations des appareils extérieurs,
référez-vous aussi aux modes d’emploi fournis
avec les adaptateurs utilisés pour les connexion
(de même qu’aux instructions fournies avec les
composants extérieurs).
❏Généralités
Dans ce cas, aucun son ne sort par les haut-
parleurs.
• Ajustez le volume sur le niveau optimum.
• Vérifiez les cordons et les connexions.
Aucune image n’apparaît sur l’écran.
• Mettez l’écran en service (Page6)
Cet autoradio ne fonctionne pas du tout.
• Réinitialisez l’appareil. (Page3)
La télécommande ne fonctionne pas.
• Changez la pile.
❏Disques
Le disque ne peut pas être reconnu ni reproduit.
• Éjecter le disque de force. (Page3)
Les disques enregistrables/réinscriptibles ne
peuvent pas être reproduits.
• Insérez un disque finalisé.
• Finalisez les disques avec l’appareil qui a été utilisé
pour l’enregistrement.
Les plages sur les disques enregistrables/
réinscriptibles ne peuvent pas être sautées.
• Insérez un disque finalisé.
• Finalisez les disques avec l’appareil qui a été utilisé
pour l’enregistrement.
La lecture ne démarre pas.
• Le format des fichiers n’est pas pris en charge par
l’appareil.
Aucune image n’apparaît sur le moniteur
extérieur.
• Connectez le cordon vidéo correctement.
• Choisissez l’entrée correcte sur le moniteur
extérieur.
Les disques DivX/MPEG1/MPEG2/MP3/WMA/AAC
ne peuvent pas être lus.
• Enregistrez les plages en utilisant une application
compatible sur les disques appropriés. (Page51)
• Ajoutez le code d’extension approprié pour les
noms des fichiers.
Les plages sur les disques enregistrables/
réenregistrables ne sont pas reproduites comme
vous le souhaitiez.
• L’ordre de lecture peut différer de celui utilisé par
d’autres lecteurs.
❏USB
“Now Reading...” ne disparait pas de l’écran.
• Mettez l’appareil hors tension et de nouveau sous
tension.
Lors de la lecture d’une plage, le son tes parfois
interrompu.
• Les plages ne sont pas copiées correctement sur le
périphérique USB. Copiez de nouveau les plages et
essayez encore.
Les plages ne sont pas reproduites comme vous
le souhaitiez.
• L’ordre de lecture peut différer de celui utilisé par
d’autres lecteurs.
RÉFÉRENCES
KW-V_Mid_EU_FR.indb 55 1/29/2014 12:33:11 PM

56
❏iPod/iPhone
Dans ce cas, aucun son ne sort par les haut-
parleurs.
• Déconnectez iPod/iPhone, puis connectez-le à
nouveau.
• Choisissez une autre source puis choisissez de
nouveau “iPod”.
iPod/iPhone ne peut pas être mis sous tension ou
ne fonctionne pas.
• Vérifiez le câble de connexion et le raccordement.
• Mettez à jour la version du micrologiciel.
• Chargez de la batterie.
• Réinitialisez iPod/iPhone.
Le son est déformé.
• Mettez hors service l’égaliseur sur cet appareil ou
sur iPod/iPhone.
Beaucoup de bruit est généré.
• Mettez hors service (décochez) la fonction
“VoiceOver” de l’iPod/iPhone. Consultez le site
<http://www.apple.com> pour en savoir plus.
Aucune opération n’est disponible pendant la
lecture d’une plage contenant une illustration.
• Faites l’opération une fois que l’illustration est
chargée.
Les séquences vidéo ne peuvent pas être lues.
• Faites une connexion avec le câble USB audio et
vidéo JVC KS-U59 pour iPod/iPhone sauf pour
l’iPhone 5/iPod touch (5e génération)/iPod nano
(7e génération) ou un câble JVC KS-U60 et USB2.0
via l’adaptateur Lightning-Digital AV pour
iPhone 5/iPod touch (5e génération)/iPod nano
(7e génération). Les autres câbles ne peuvent pas
être utilisées.
Le son de la source vidéo ne sort pas.
• Faites une connexion avec le câble USB audio et
vidéo JVC KS-U59 pour iPod/iPhone sauf pour
l’iPhone 5/iPod touch (5e génération)/iPod nano
(7e génération) ou un câble JVC KS-U60 et USB2.0
via l’adaptateur Lightning-Digital AV pour
iPhone 5/iPod touch (5e génération)/iPod nano
(7e génération). Les autres câbles ne peuvent pas
être utilisées.
❏Tuner
Le préréglage automatique SSM ne fonctionne
pas.
• Mémorises les stations manuellement. (Page21)
Bruit statique pendant l’écoute de la radio.
• Connectez l’antenne solidement.
❏AV-IN
Aucune image n’apparaît sur l’écran.
• Mettez l’appareil vidéo sous tension s’il ne l’est pas
déjà.
• Connectez le périphérique vidéo correctement.
❏Bluetooth
Le son du téléphone est de mauvaise qualité.
• Réduisez la distance entre cet appareil et le
téléphone portable Bluetooth.
• Déplacez la voiture dans un endroit où vous
pouvez obtenir un meilleur signal de réception.
Le son est interrompu ou saute lors de
l’utilisation d’un lecteur audio Bluetooth.
• Réduisez la distance entre cet appareil et le lecteur
audio Bluetooth.
• Déconnectez le périphérique connecté pour le
téléphone Bluetooth.
• Mettez l’appareil hors tension, puis de nouveau
sous tension.
• (Si le son n’est toujours pas rétabli) connectez de
nouveau le lecteur.
Le lecteur audio connecté ne peut pas être
commandé.
• Vérifiez si le lecteur audio connecté prend en
charge AVRCP (Audio/Video Remote Control
Profile—Profile de télécommande audio/vidéo).
Le périphérique Bluetooth ne détecte pas
l’appareil.
• Faites de nouveau une recherche à partir du
périphérique Bluetooth.
L’appareil ne réalise pas le pairage avec le
périphérique Bluetooth.
• Pour les périphériques compatibles avec
Bluetooth 2.1: Enregistrez le périphérique en
utilisant le code PIN. (Page28)
• Pour les périphériques compatibles avec
Bluetooth 2.0: Entrez le même code PIN pour
cet appareil et l’appareil cible. Si le code PIN du
périphérique n’est pas indiqué sur ses instructions,
essayez “0000” ou “1234”.
Il y a un écho ou du bruit.
• Ajustez la position du microphone.
• Ajustez le volume d’écho ou le volume de
réduction de bruit. (Page30)
L’appareil ne répond pas quand vous essayez de
copier le répertoire d’adresse.
• Vous avez peut-être essayé de copier les mêmes
entrées (déjà mémorisées) sur l’appareil.
RÉFÉRENCES
KW-V_Mid_EU_FR.indb 56 1/29/2014 12:33:11 PM
FRANÇAIS 57
Spécifications
❏Section du moniteur
Taille de l’image (L × H)
KW-V50BT: Écran large de 6,95 pouces
(diagonal)
156,6 mm x 81,6 mm
KW-V30BT: Écran large de 6,1 pouces
(diagonal)
136,2 mm x 72 mm
Système d’affichage
Panneau LCD TN transparent
Système d’entraînement
Système à matrice active TFT
Nombre de pixels 1 152 000 (800H × 480V × RVB)
Pixels effectifs 99,99%
Disposition des pixels
Disposition rayée RVB
Rétroéclairage Diode DEL
❏Section du lecteur de DVD
Convertisseur D/A 24 bit
Décodeur audio Linear PCM/Dolby Digital/MP3/
WMA/AAC
Décodeur vidéo MPEG1/MPEG2/DivX
Pleurage et scintillement
Non mesurables
Réponse en fréquence
Échantillonnage 96 kHz: 20 Hz à 22000 Hz
Échantillonnage 48 kHz: 20 Hz à 22000 Hz
Échantillonnage 44,1 kHz: 20 Hz à 20000 Hz
Distorsion harmonique totale
0,010% (1 kHz)
Rapport signal sur bruit
94 dB (DVD-Vidéo 96 kHz)
Plage dynamique 91 dB (DVD-Vidéo 96 kHz)
Format du disque DVD-Vidéo/DVD-VR/VIDEO-CD/
CD-DA
Fréquence d’échantillonnage
44,1 kHz/48 kHz/96 kHz
Nombre de bits quantificateur
16/20/24 bit
❏Section de l’interface USB
Standard USB USB 2.0 High Speed
Périphériques compatibles
À mémoire de grande capacité
Système de fichier
FAT 16/32
Courrant d’alimentation maximum
CC 5 V 1 A
Convertisseur D/A
24 bit
Décodeur vidéo MPEG1/MPEG2/MPEG4/H.264/
MPEG4 AVC/WMV/JPEG/BMP/
PNG
Décodeur audio MP3/WMA/AAC/WAV/FLAC
RÉFÉRENCES
KW-V_Mid_EU_FR.indb 57 1/29/2014 12:33:11 PM

58
❏Section de l’interface HDMI
Type de connecteur
TYPE-A
Résolution d’entrée
VGA (640 x 480p@59,94 Hz/
60 Hz), 480p (720 x 480p@
59,94 Hz/60 Hz)
Type de signal audi d’entrée
32 kHz, 44,1 kHz, 48 kHz, 16 bits
Linear PCM
❏Section de l’interface MHL
Version prise en charge
MHL2
Résolution d’entrée
VGA (640 x 480p@59,94 Hz/
60 Hz), 480p (720 x 480p@
59,94 Hz/60 Hz)
Type de signal audi d’entrée
32 kHz, 44,1 kHz, 48 kHz, 16 bits
Linear PCM
Courrant d’alimentation maximum
CC 5 V 900 mA
❏Section Bluetooth
Technologie Bluetooth 3.0 + EDR
Fréquence 2,4 GHz à 2,4835 GHz
Puissance de sortie
+4 dBm (MAX), 0 dBm (AVE),
Classe d’alimentation 2
Plage de communication maximum
Ligne de vue approximative 10 m
(32,8 pieds)
Codec audio SBC/AAC/MP3
Profile HFP (Hands-Free Profile—Profile
mains libres)
PBAP (Phonebook Access
Profile—Profile d’accès au
répertoire téléphonique)
A2DP (Advanced Audio
Distribution Profile—Profile de
distribution audio avancé)
AVRCP (Audio/Video Remote
Control Profile—Profile de
télécommande audio/vidéo)
GAP (Generic Access Profile—
Profile d’accès générique)
SDP (Service Discovery Profile—
Profile de découverte de service)
SPP (Serial Port Profile—Profile
de port série)
❏Section du tuner FM
Plage de fréquences (50 kHz)
87,5 MHz à 108,0MHz
Sensibilité utile (S/N: 30 dB Dev 22,5 kHz)
9,3 dBf (0,8 µV/75 )
Seuil de sensibilité (S/N: 46 dB Dev 22,5 kHz)
15,2 dBf (1,6 µV/75 )
Réponse en fréquence (± 3,0 dB)
30 Hz à 15 kHz
Rapport signal sur bruit
75 dB (MONO)
Sélectivité (± 400 kHz)
≥ 80 dB
Séparation stéréo 45 dB (1 kHz)
❏Section tuner GO
Plage de fréquences (9 kHz)
153 kHz à 279 kHz
Rapport signal sur bruit
65 dB
Sensibilité utile 45 V
❏Section tuner PO
Plage de fréquences (9 kHz)
531 kHz à 1 611 kHz
Rapport signal sur bruit
65 dB
Sensibilité utile 25 V
RÉFÉRENCES
KW-V_Mid_EU_FR.indb 58 1/29/2014 12:33:11 PM

FRANÇAIS 59
❏Section vidéo
Standard couleur de l’entrée vidéo extérieure
NTSC/PAL
Niveau d’entrée vidéo extérieure (prise cinch/mini)
1 Vp-p/75
Niveau d’entrée audio maximum extérieure
(prise mini)
2 V/25 k
Niveau de sortie vidéo (prise cinch)
1 Vp-p/75
Niveau de sortie audio (prise mini)
1,2 V/10 k
❏Section audio
Puissance maximum (avant et arrière)
50 W × 4
Pleine Puissance de Largeur de Bande (avant et
arrière)
(avec moins de 1% DHT)
22 W × 4
Niveau de préamplification
4 V/10 k
Impédance du préamplificateur
≤ 600
Impédance d’enceinte
4 à 8
Plage de commande de l’égaliseur
Bas: 60 Hz, 80 Hz, 100 Hz, 150 Hz, ±10dB
Moyen: 500 Hz, 1 kHz, 1,5 kHz, 2 kHz, ±10dB
Haut: 10 kHz, 12,5 kHz, 15 kHz, 17,5kHz, ±10dB
❏Généralités
Tension de fonctionnement
14,4 V (10,5 V à 16 V admissibles)
Consommation de courant maximale
10 A
Dimensions d’installation (L × H × P)
182 mm × 111 mm × 162 mm
Plage de températures de fonctionnement
–10°C à +60°C
Poids
KW-V50BT: 2,8 kg
KW-V30BT: 2,2 kg
Le modèle et les caractéristiques peuvent être sujets
à modifications sans avis préalable.
❏Marques de commerce et licences
• Fabriqué sous licence de Dolby Laboratories. Le
terme Dolby et le sigle double D sont des marques
commerciales de Dolby Laboratories.
• Le “DVD Logo” est une marque de commerce
de DVD Format/Logo Licensing Corporation,
enregistrée aux États-Unis, au Japon et dans
d’autres pays.
• Le logo “AAC” est une marque de commerce de
Dolby Laboratories.
• Microsoft et Windows Media est une marque
déposée ou une marque de commerce de
Microsoft Corporation aux États-Unis et/ou dans
les autres pays.
• “Made for iPod,” and “Made for iPhone” mean
that an electronic accessory has been designed
to connect specifically to iPod, or iPhone,
respectively, and has been certified by the
developer to meet Apple performance standards.
Apple is not responsible for the operation of
this device or its compliance with safety and
regulatory standards. Please note that the use
of this accessory with iPod, or iPhone may affect
wireless performance. iPhone, iPod, iPod classic,
iPod nano, and iPod touch are trademarks of Apple
Inc., registered in the U.S. and other countries.
• Lightning is a trademark of Apple Inc.
• Cet appareil intègre une technologie de protection
contre la copie protégée par des brevets
américains et d’autres droits sur la propriété
intellectuelle de Rovi Corporation. L’ingénierie
inverse et le désassemblage sont interdits.
• Les polices de caractères utilisées pour cet appareil
sont conçues par Ricoh.
RÉFÉRENCES
KW-V_Mid_EU_FR.indb 59 1/29/2014 12:33:11 PM

60
RÉFÉRENCES
• DivX®, DivX Certified® and associated logos are
trademarks of Rovi Corporation or its subsidiaries
and are used under license.
• ABOUT DIVX VIDEO: DivX® is a digital video
format created by DivX, LLC, a subsidiary of Rovi
Corporation. This is an official DivX Certified®
device that plays DivX video. Visit divx.com for
more information and software tools to convert
your files into DivX videos.
• ABOUT DIVX VIDEO-ON-DEMAND: This DivX
Certified® device must be registered in order to
play purchased DivX Video-on-Demand (VOD)
movies. To obtain your registration code, locate
the DivX VOD section in your device setup menu.
Go to vod.divx.com for more information on how
to complete your registration.
• THIS PRODUCT IS LICENSED UNDER THE MPEG-
4 VISUAL PATENT PORTFOLIO LICENSE FOR
THE PERSONAL AND NON-COMMERCIAL USE
OF A CONSUMER FOR (i) ENCODING VIDEO
IN COMPLIANCE WITH THE MPEG-4 VISUAL
STANDARD (“MPEG-4 VIDEO”) AND/OR (ii)
DECODING MPEG-4 VIDEO THAT WAS ENCODED
BY A CONSUMER ENGAGED IN A PERSONAL
AND NON-COMMERCIAL ACTIVITY AND/OR WAS
OBTAINED FROM A VIDEO PROVIDER LICENSED
BY MPEG LA TO PROVIDE MPEG-4 VIDEO. NO
LICENSE IS GRANTED OR SHALL BE IMPLIED FOR
ANY OTHER USE. ADDITIONAL INFORMATION
INCLUDING THAT RELATING TO PROMOTIONAL,
INTERNAL AND COMMERCIAL USES AND
LICENSING MAY BE OBTAINED FROM MPEG LA,
LLC. SEE HTTP://WWW.MPEGLA.COM.
• THIS PRODUCT IS LICENSED UNDER THE AVC
PATENT PORTFOLIO LICENSE FOR THE PERSONAL
USE OF A CONSUMER OR OTHER USES IN WHICH IT
DOES NOT RECEIVE REMUNERATION TO (i)ENCODE
VIDEO IN COMPLIANCE WITH THE AVC STANDARD
("AVC VIDEO") AND/OR (ii)DECODE AVC VIDEO
THAT WAS ENCODED BY A CONSUMER ENGAGED
IN A PERSONAL ACTIVITY AND/OR WAS OBTAINED
FROM A VIDEO PROVIDER LICENSED TO PROVIDE
AVC VIDEO. NO LICENSE IS GRANTED OR SHALL
BE IMPLIED FOR ANY OTHER USE. ADDITIONAL
INFORMATION MAY BE OBTAINED FROM MPEG LA,
L.L.C. SEE HTTP://WWW.MPEGLA.COM
• Android est une marque de commerce de Google
Inc.
• La marque du mot et les logos Bluetooth® sont des
marques déposées de Bluetooth SIG, Inc. et toute
utilisation de ces marques par JVC KENWOOD est
faite sous licence. Les autres marques et noms de
commerce sont la propriété de leur propriétaire
respectif.
• The terms HDMI and HDMI High-Definition
Multimedia Interface, and the HDMI logo are
trademarks or registered trademarks of HDMI
Licensing LLC in the United States and other
countries.
• MHL and the MHL logo are a trademark or
registered trademark of MHL, LLC.
- Incorporates MHL 2
• libFLAC
Copyright (C) 2000,2001,2002,2003,2004,2005,
2006,2007,2008,2009 Josh Coalson
Redistribution and use in source and binary forms,
with or without modification, are permitted
provided that the following conditions are met:
– Redistributions of source code must retain the
above copyright notice, this list of conditions
and the following disclaimer.
– Redistributions in binary form must reproduce
the above copyright notice, this list of
conditions and the following disclaimer in the
documentation and/or other materials provided
with the distribution.
– Neither the name of the Xiph.org Foundation
nor the names of its contributors may be used
to endorse or promote products derived from
this software without specific prior written
permission.
THIS SOFTWARE IS PROVIDED BY THE COPYRIGHT
HOLDERS AND ONTRIBUTORS “AS IS” AND ANY
EXPRESS OR IMPLIED WARRANTIES, INCLUDING,
BUT NOT LIMITED TO, THE IMPLIED WARRANTIES
OF MERCHANTABILITY AND FITNESS FOR
A PARTICULAR PURPOSE ARE DISCLAIMED.
IN NO EVENT SHALL THE FOUNDATION OR
CONTRIBUTORS BE LIABLE FOR ANY DIRECT,
INDIRECT, INCIDENTAL, SPECIAL, EXEMPLARY, OR
CONSEQUENTIAL DAMAGES (INCLUDING, BUT
NOT LIMITED TO, PROCUREMENT OF SUBSTITUTE
GOODS OR SERVICES; LOSS OF USE, DATA, OR
PROFITS; OR BUSINESS INTERRUPTION) HOWEVER
CAUSED AND ON ANY THEORY OF LIABILITY,
WHETHER IN CONTRACT, STRICT LIABILITY, OR
TORT (INCLUDING NEGLIGENCE OR OTHERWISE)
ARISING IN ANY WAY OUT OF THE USE OF THIS
SOFTWARE, EVEN IF ADVISED OF THE POSSIBILITY
OF SUCH DAMAGE.
KW-V_Mid_EU_FR.indb 60 1/29/2014 12:33:11 PM

FRANÇAIS 61
Déclaration de conformité se rapportant à la directive EMC 2004/108/EC
Déclaration de conformité vis à vis de la Directive 1999/5/CE de R&TTE
Déclaration de conformité se rapportant à la directive RoHS 2011/65/EU
Fabricant:
JVC KENWOOD Corporation
3-12 Moriya-cho, Kanagawa-ku, Yokohama-shi, Kanagawa, 221-0022, Japan
Représentants EU:
JVC Technical Services Europe GmbH
Konrad-Adenauer-Allee 1-11, D-61118 Bad Vilbel, Germany
English
Hereby, JVC KENWOOD declares that this unit
“KW-V50BT/KW-V30BT” is in compliance with the
essential requirements and other relevant provisions
of Directive 1999/5/EC.
Français
Par la présente JVC KENWOOD déclare que l’appareil
“KW-V50BT/KW-V30BT” est conforme aux exigences
essentielles et aux autres dispositions pertinentes de
la directive 1999/5/EC.
Par la présente, JVC KENWOOD déclare que ce
“KW-V50BT/KW-V30BT” est conforme aux exigences
essentielles et aux autres dispositions de la directive
1999/5/EC qui lui sont applicables.
Deutsch
Hiermit erklärt JVC KENWOOD, dass sich dieser
“KW-V50BT/KW-V30BT” in Übereinstimmung mit
den grundlegenden Anforderungen und den anderen
relevanten Vorschriften der Richtlinie 1999/5/EC
befindet. (BMWi)
Hiermit erklärt JVC KENWOOD die Übereinstimmung
des Gerätes “KW-V50BT/KW-V30BT” mit den
grundlegenden Anforderungen und den anderen
relevanten Festlegungen der Richitlinie 1999/5/
EC. (Wien)
Nederlands
Hierbij verklaart JVC KENWOOD dat het toestel
“KW-V50BT/KW-V30BT” in overeenstemming is met
de essentiële eisen en de andere relevante bepalingen
van richtlijn 1999/5/EC.
Bij deze verklaat JVC KENWOOD dat deze “KW-V50BT/
KW-V30BT” voldoet aan de essentiële eisen en aan de
overige relevante bepalingen van Richtlijn 1999/5/EC.
Italiano
Con la presente JVC KENWOOD dichiara che questo
“KW-V50BT/KW-V30BT” è conforme ai requisiti
essenziali ed alle altre disposizioni pertinenti stabilite
dalla direttiva 1999/5/EC.
Español
Por medio de la presente JVC KENWOOD declara que
el “KW-V50BT/KW-V30BT” cumple con los requisitos
esenciales y cualesquiera otras disposiciones
aplicables o exigibles de la Directiva 1999/5/EC.
Português
JVC KENWOOD declara que este “KW-V50BT/
KW-V30BT” está conforme com os requisitos
essenciais e outras disposições da Directiva 1999/5/
EC.
Polska
JVC KENWOOD niniejszym oświadcza, że “KW-V50BT/
KW-V30BT” spełnia zasadnicze wymogi oraz inne
istotne postanowienia dyrektywy 1999/5/EC.
Český
JVC KENWOOD tímto prohlašuje, že tento “KW-V50BT/
KW-V30BT” je ve shode se základními požadavky a
dalšími príslušnými ustanoveními smernice 1999/5/
EC.
Magyar
Alulírott, JVC KENWOOD, kijelenti, hogy a jelen
“KW-V50BT/KW-V30BT” megfelel az 1999/5/
EC irányelvben meghatározott alapvető
követelményeknek és egyéb vonatkozó előírásoknak.
Svenska
Härmed intygar JVC KENWOOD att denna
“KW-V50BT/KW-V30BT” stär l överensstämelse med
de väsentliga egenskapskrav och övriga relevanta
bestämmelser som framgår av direktiv 1999/5/EC.
Suomi
JVC KENWOOD vakuuttaa täten että “KW-V50BT/
KW-V30BT” tyyppinen laite on direktiivin 1999/5/EC
oleellisten vaatimusten ja sitä koskevien direktiivin
muiden ehtojen mukainen.
Slovensko
S tem JVC KENWOOD izjavlja, da je ta “KW-V50BT/
KW-V30BT” v skladu z osnovnimi zahtevami in
ostalimi ustreznimi predpisi Direktive 1999/5/EC.
Slovensky
Spoločnosť JVC KENWOOD týmto vyhlasuje, že
“KW-V50BT/KW-V30BT” spĺňa zákldné požiadavky a
ďalšie prislušné ustanovenia Direktĺvy 1999/5/EC.
Dansk
Undertegnede JVC KENWOOD erklærer harved, at
følgende udstyr “KW-V50BT/KW-V30BT” overholder
de væsentlige krav og øvrige relevante krav i direktiv
1999/5/EC.
Ελληνικά
ΜΕ ΤΗΝ ΠΑΡΟΥΣΑ JVC KENWOOD ΔΗΛΩΝΕΙ ΟΤΙ
“KW-V50BT/KW-V30BT” ΣΥΜΜΟΡΦΩΝΕΤΑΙ ΠΡΟΣ
ΤΙΣ ΟΥΣΙΩΔΕΙΣ ΑΠΑΙΤΗΣΕΙΣ ΚΑΙ ΤΙΣ ΛΟΙΠΕΣ ΣΧΕΤΙΚΕΣ
ΔΙΑΤΑΞΕΙΣ ΤΗΣ ΟΔΗΓΙΑΣ 1999/5/EC.
Eesti
Sellega kinnitab JVC KENWOOD, et see “KW-V50BT/
KW-V30BT” vastab direktiivi 1999/5/EC põhilistele
nõudmistele ja muudele asjakohastele määrustele.
Latviešu
Ar šo, JVC KENWOOD, apstiprina, ka “KW-V50BT/
KW-V30BT” atbilst Direktīvas 1999/5/EC galvenajām
prasībām un citiem tās nosacījumiem.
Lietuviškai
Šiuo, JVC KENWOOD, pareiškia, kad šis “KW-V50BT/
KW-V30BT” atitinka pagrindinius Direktyvos 1999/5/
EC reikalavimus ir kitas svarbias nuostatas.
Malti
Hawnhekk, JVC KENWOOD, jiddikjara li dan
“KW-V50BT/KW-V30BT” jikkonforma mal-ħtiġijiet
essenzjali u ma provvedimenti oħrajn relevanti li
hemm fid-Dirrettiva 1999/5/EC.
Українська
Компанія JVC KENWOOD заявляє, що цей виріб
“KW-V50BT/KW-V30BT” відповідає ключовим
вимогам та іншим пов’язаним положенням
Директиви 1999/5/EC.
Türkçe
Bu vesileyle JVC KENWOOD, “KW-V50BT/KW-V30BT”
ünitesinin, 1999/5/EC Direktifinin başlıca
gereksinimleri ve diğer ilgili hükümleri ile uyumlu
olduğunu beyan eder.
Hrvatski
Ovime JVC KENWOOD izjavljuje da je ova jedinica
“KW-V50BT/KW-V30BT” je u skladu s osnovnim
zahtjevima i drugim relevantnim odredbama
Direktive 1999/5/EC.
KW-V_Mid_EU_FR.indb 61 1/29/2014 12:33:11 PM

2
СОДЕРЖАНИЕ
ПЕРЕД И СПОЛЬЗОВАНИЕМ ........................2
Как перенастроить Ваше устройство.................... 3
Принудительное извлечение диска ...................... 3
НАЧАЛЬНЫЕ Н АСТРОЙКИ ..........................4
ОСНОВНАЯ ИНФОРМАЦИЯ ........................ 5
Названия и функции компонентов ........................ 5
Стандартные операции ............................................... 6
Стандартные операции на экране .......................... 7
Выбор источника воспроизведения/видео ....... 8
ДИСКИ ........................................................... 9
USB...............................................................14
iPod/iPhone.................................................16
Приложения ...............................................19
ТЮНЕР .........................................................20
ДРУГОЕ ВНЕШНЕЕ УСТРОЙСТВО .............24
Использование внешних аудио-/
видеопроигрывателей — AV-IN .............................24
Использование внешних аудиопроигрывателей
— Front AUX (только для KW-V30BT) ...................24
Использование камеры заднего вида ................25
Использование смартфона — HDMI/MHL.........26
Использование внешнего монитора —
Rear S ource .......................................................................26
BLUETOOTH.................................................27
НАСТРОЙКИ ...............................................35
Настройки для использования приложений на
iPod/iPhone/Android ....................................................35
Настройки звучания ...................................................36
Регулировка для воспроизведения видео .......37
Изменение дизайна индикации ............................39
Пользовательская настройка экрана Home ....40
Пользовательская настройка системных
параметров .....................................................................40
Элементы меню настройки ......................................41
ПУЛЬТ ДИСТАНЦИОННОГО
УПРАВЛЕНИЯ .............................................. 43
ПОДСОЕДИНЕНИЕ/УСТАНОВКА ..............45
СПРАВОЧНАЯ И НФОРМАЦИЯ .................. 50
Обслуживание ............................................................... 50
Дополнительная информация ...............................50
Список сообщений об ошибках .............................54
Устранение проблем...................................................55
Технические характеристики .................................57
Как пользоваться данным руководством:
• Для объяснения используются главным образом иллюстрации KW-V50BT. Иллюстрации индикации
и панелей, приведенные в настоящем руководстве, представляют собой примеры, используемые
для понятного объяснения операций. По этой причине они могут отличаться от реального вида
индикации или панелей.
• В данном руководстве главным образом объясняются операции, выполняемые с помощью
кнопок на панели монитора и сенсорной панели. Операции с помощью пульта дистанционного
управления (RM-RK256), см. на стр. 43.
• < > обозначает изменяемые экраны/меню/операции/настройки, которые появляются на сенсорной
панели.
• [ ] обозначает кнопки на сенсорной панели.
• Язык отображения: Элементы индикации на английском языке используются в качестве примера
с целью объяснения. Язык отображаемой индикации можно выбрать из меню <Settings>. (стр.42)
ПЕРЕД
ИСПОЛЬЗОВАНИЕМ
V ПРЕДУПРЕЖДЕНИЯ: (Предотвращение
несчастных случаев и повреждений)
• НЕ устанавливайте устройства и не
прокладывайте провода в местах, где:
– оно может помешать рулевому управлению и
переключению передач;
– оно может помешать функционированию
средств безопасности, например,
пневмоподушкам;
– может ухудшиться обзор.
• НЕ управляйте устройством во время вождения
автомобиля.
При необходимости управления устройством
во время вождения автомобиля внимательно
следите за дорогой.
• Водителю не следует смотреть на монитор во
время вождения.
KW-V_Mid_EU_RU_03.indb 2 1/29/2014 12:54:31 PM
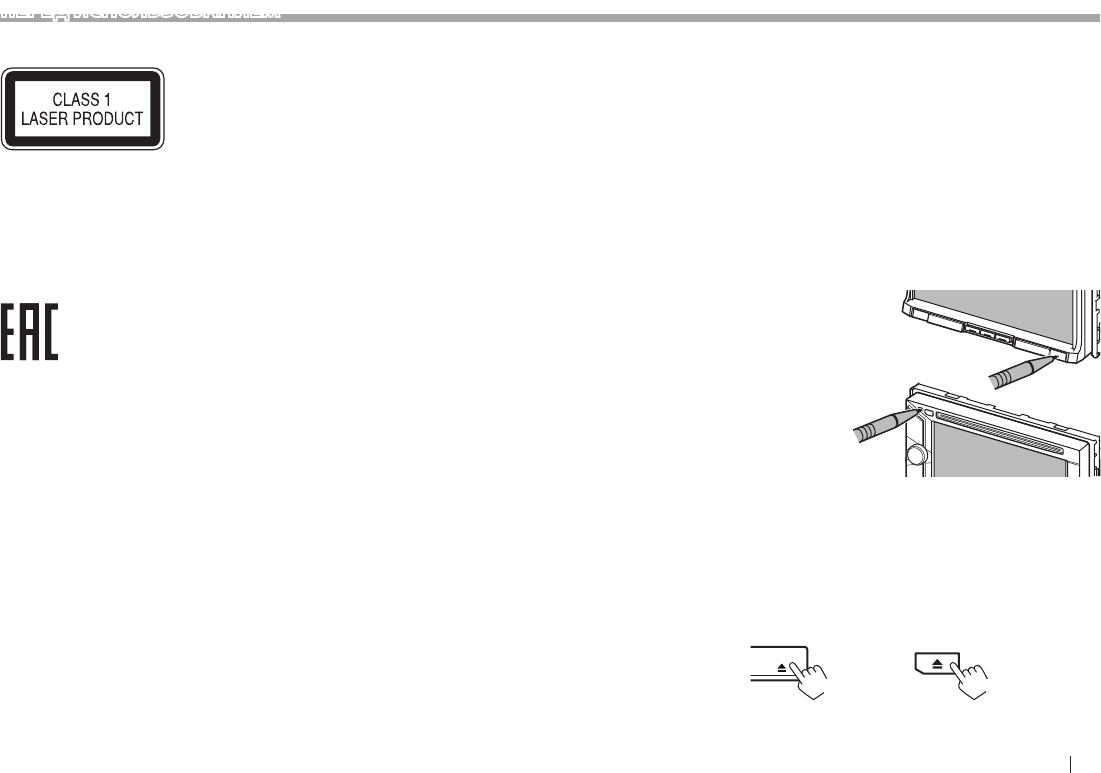
РУCCKИЙ 3
Маркировка изделий, в которых используется
лазер
К корпусу/оболочке прикреплена наклейка,
указывающая на то, что компонент использует
лазерные лучи, классифицируемые как Класс 1.
Это значит, что устройство использует лазерные
лучи, относящиеся к классу слабых лучей.
Снаружи устройства риск опасного излучения
отсутствует.
Дата изготовления (месяц/год) находится на
этикетке устройства.
V Предостережения (монитор):
• Встроенный в устройство монитор изготовлен
с высокой точностью, однако он может иметь
нерабочие точки. Это неизбежно и не считается
дефектом.
• Не подвергайте монитор воздействию прямых
солнечных лучей.
• Не используйте шариковую ручку и подобные
предметы с острым наконечником для работы с
сенсорной панелью.
Касайтесь кнопок сенсорной панели
непосредственно пальцами (если на Вас
перчатки, необходимо их снять).
• При слишком низкой или слишком высокой
температуре может произойти следующее:
– Внутри происходит химическая реакция,
приводящая к неисправности устройства.
– Изображения могут отображаться нечетко
или воспроизводиться замедленно. Может
нарушаться синхронность изображения и
звука или ухудшаться качество изображения.
Для Вашей безопасности...
• Не повышайте слишком сильно уровень
громкости, поскольку это заглушает внешние
звуки, делая опасным управление автомобилем,
а также может привести к потере слуха.
• Остановите автомобиль перед тем, как
выполнять любые сложные операции.
Температура внутри автомобиля...
Если Вы припарковали Ваш автомобиль на
длительное время в жаркую или холодную
погоду, перед тем, как включать это устройство,
подождите до тех пор, пока температура в
автомобиле не придет в норму.
❏ Как перенастроить Ваше устройство
KW-V30BT
KW-V50BT
• Запрограммированные настройки будут также
удалены (за исключением зарегистрированных
устройств Bluetooth).
❏ Принудительное извлечение диска
Нажмите и удерживайте M на панели монитора в
течение 10 секунд.
KW-V50BT KW-V30BT
(Удерживать)(Удерживать)
• Будьте осторожны, не уроните диск при извлечении.
• Если это не поможет, попробуйте перенастроить
приемник. (См. выше.)
ПЕРЕД ИСПОЛЬЗОВАНИЕМ
KW-V_Mid_EU_RU_03.indb 3 1/29/2014 12:54:32 PM
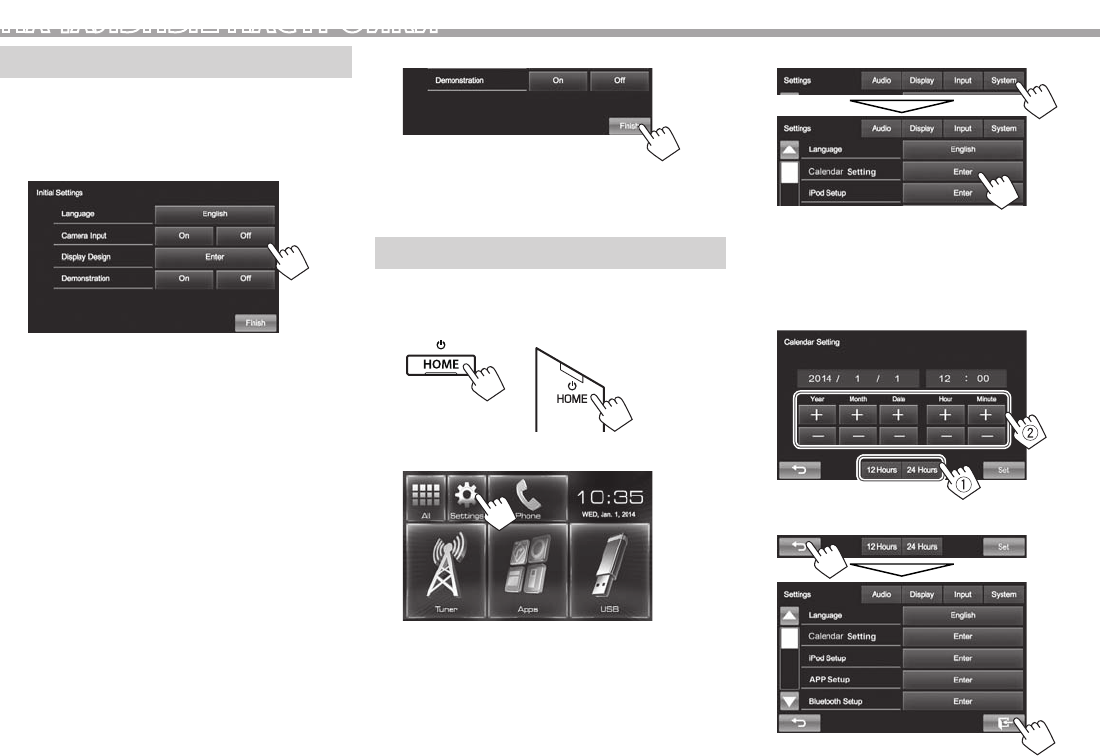
4
НАЧАЛЬНЫЕ Н АСТРОЙКИ
Начальная н астройка
При первом включении питания устройства или
после сброса настроек устройства отображается
экран начальной настройки.
• Вы также можете изменить настройки на экране
<Settings>. (стр.41)
1
<Language>
(стр.42)
Выбор языка текста,
используемого
для отображения
информации на экране.
• Установите <GUI
Language>, чтобы
отображать кнопки
управления и элементы
меню на выбранном
языке ([Local]: выбрано
по умолчанию) или
на английском языке
([English]).
<Camera Input>
(стр.42)
Выберите [On] при
подключении камеры
заднего вида.
<Display Design>
(стр.42)
Выбор фона и цвета
панели.
<Demonstration>
(стр.42)
Включение или
отключение
демонстрации функций
дисплея.
2 Завершите процедуру.
Отображается экран Home.
• Изначально выбрано [AV Off]. Выберите
источник воспроизведения. (стр.8)
Настройки календаря/часов
1 Откройте экран Home.
KW-V50BT KW-V30BT
2 Откройте экран <Settings>.
3 Откройте экран <Calendar Setting>.
4 Выберите формат индикации времени
(1), затем установите календарь и время
на часах (2).
• Нажмите [Set], чтобы установить секунды
на “00”.
5 Завершите процедуру.
KW-V_Mid_EU_RU_03.indb 4 1/29/2014 12:54:33 PM
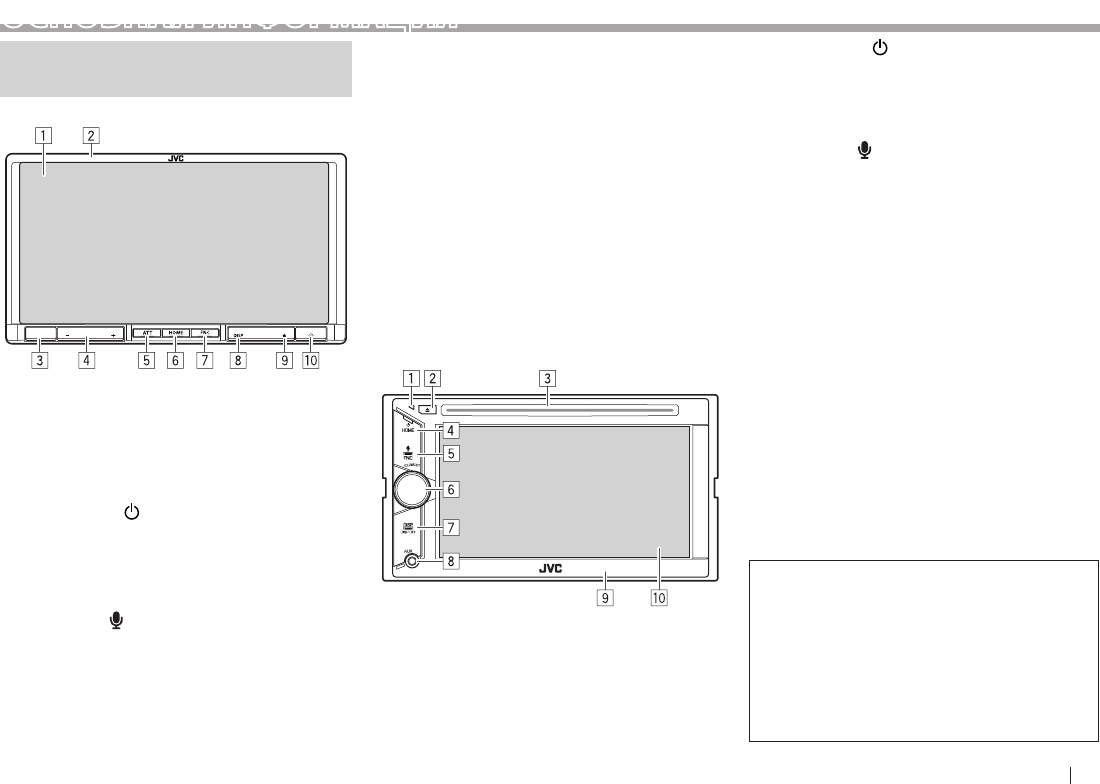
РУCCKИЙ 5
ОСНОВНАЯ ИНФОРМАЦИЯ
Названия и функции
компонентов
KW-V50BT
1 Экран (сенсорная панель)
2 Панель монитора*
3 Телеметрический датчик
4 Кнопка VOLUME –/+
Настройка уровня громкости звука. (стр.6)
5 Кнопка ATT
Ослабление звука. (стр.6)
6 Кнопка HOME/
• Отображение экрана Home. (Нажмите)
(стр.7)
• Выключение питания. (Удерживание)
(стр.6)
• Включение питания. (Нажмите) (стр.6)
7 Кнопка FNC/
• Отображение экрана <Function
Menu>/<Video Menu> на экране
управления источником. (Нажмите)
(стр.7)
• Включение голосового набора номера.
(Удерживание) (стр.32)
8 Кнопка DISP/DISP OFF
• Переключение экрана между текущим
источником и экраном приложения с
подключенного iPod touch/iPhone/Android.
(Нажмите)
• Выключение экрана. (Удерживание)
(стр.6)
• Включение экрана. (Удерживание) (стр.6)
9 Кнопка M (извлечение)
• Отображение экрана <Open/Tilt>. (Нажмите)
(стр.6)
• Принудительное извлечение диска.
(Удерживание) (стр.3)
p Кнопка сброса
Выполните сброс устройства. (стр.3)
KW-V30BT
1 Кнопка сброса
Выполните сброс устройства. (стр.3)
2 Кнопка M (извлечение)
• Извлечение диска. (Нажмите) (стр.9)
• Принудительное извлечение диска.
(Удерживание) (стр.3)
3 Загрузочный отсек
4 Кнопка HOME/
• Отображение экрана Home. (Нажмите)
(стр.7)
• Выключение питания. (Удерживание)
(стр.6)
• Включение питания. (Нажмите) (стр.6)
5 Кнопка FNC/
• Отображение экрана <Function
Menu>/<Video Menu> на экране
управления источником. (Нажмите)
(стр.7)
• Включение голосового набора номера.
(Удерживание) (стр.32)
6 Ручка VOLUME/ATT
• Ослабление звука. (Нажмите) (стр.6)
• Настройка уровня громкости звука.
(Поворачивайте) (стр.6)
7 Кнопка DISP/DISP OFF
• Переключение экрана между текущим
источником и экраном приложения с
подключенного iPod touch/iPhone/Android.
(Нажмите)
• Выключение экрана. (Удерживание)
(стр.6)
• Включение экрана. (Удерживание) (стр.6)
8 Дополнительный входной разъем AUX
9 Панель монитора*
p Экран (сенсорная панель)
* Можно изменить цвет кнопок на панели монитора. (стр.39)
V Предостережение, касающееся
настройки громкости:
По сравнению с другими источниками
воспроизведения цифровые устройства
создают незначительный шум. Уменьшите
громкость перед воспроизведением, чтобы
предотвратить повреждение динамиков из-
за внезапного повышения уровня громкости
на выходе.
KW-V_Mid_EU_RU_03.indb 5 1/29/2014 12:54:34 PM
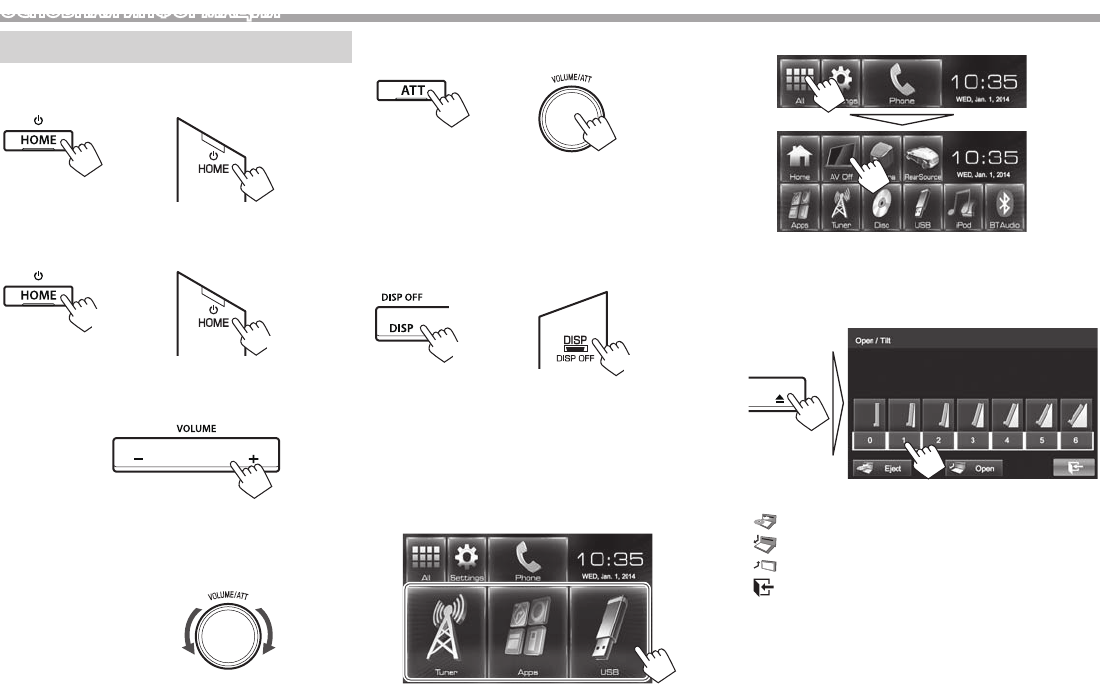
6
ОСНОВНАЯ ИНФОРМАЦИЯ
Стандартные операции
❏ Включение п итания
KW-V50BT KW-V30BT
❏ Выключение п итания
KW-V50BT KW-V30BT
(Удерживать)
(Удерживать)
❏ Настройка громкости
Настройка уровня громкости (от 00 до 35)
KW-V50BT
Нажмите +, чтобы повысить; нажмите –, чтобы
понизить.
• Удержание кнопки непрерывно повышает/
понижает уровень громкости.
KW-V30BT
Поворачивайте вправо, чтобы повысить, и
поворачивайте влево, чтобы понизить.
Ослабление звука
KW-V50BT KW-V30BT
Загорается индикатор ATT.
Чтобы отменить приглушение звука: Нажмите
ту же кнопку еще раз.
❏ Выключение экрана
KW-V50BT KW-V30BT
(Удерживать) (Удерживать)
Включение э крана: Нажмите и удерживайте DISP
на панели монитора.
❏ Выключение/выключение источника
аудио/видео
Вы можете включить функцию аудио/видео,
выбрав источник на экране Home.
Чтобы выбрать источник, который не
отображается на экране Home: Нажмите [All].
(стр.8)
Выключение источника аудио/видео:
❏ Операции на панели монитора —
<Open/Tilt> (только для
KW-V50BT)
[0] – [6] Выбор угла.
[ Eject] Извлечение диска.
[ Open] Открытие панели монитора.
[ Close] Закрытие панели монитора.
[ ]Выход из экрана <Open/Tilt>.
KW-V_Mid_EU_RU_03.indb 6 1/29/2014 12:54:34 PM
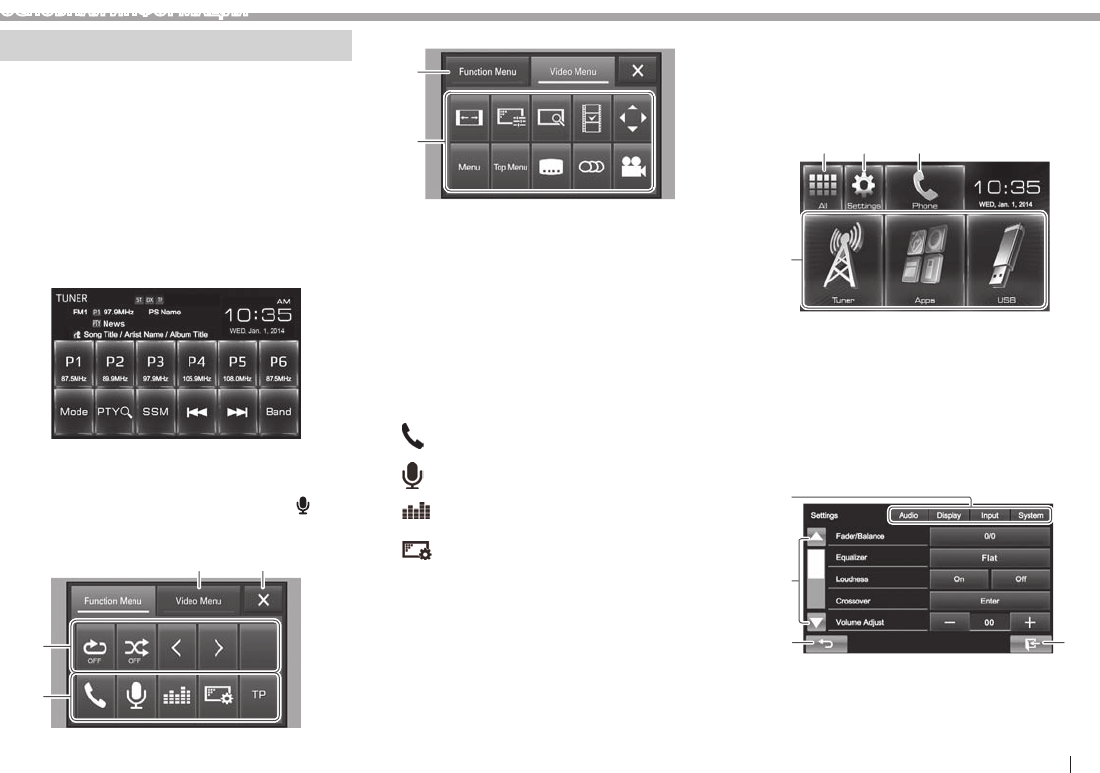
РУCCKИЙ 7
ОСНОВНАЯ ИНФОРМАЦИЯ
Стандартные операции на экране
❏Стандартные описания экрана
Вы можете переключать на дисплей на
отображение других экранов в любое время
для переключения источника, просмотра
информации или изменения настроек и т.д.
Экран управления источником
Выполнение операций воспроизведения
источника.
• Кнопки управления отличаются в зависимости
от выбранного источника.
• Прикосновение к текстовой информации
переключает тип информации.
Экран <Function Menu>/<Video Menu>
Во время отображения экрана управления
источником вы можете отображать/скрывать
другие кнопки управления нажатием FNC/ на
панели монитора.
Экран <Function Menu>
1 2
3
4
Экран <Video Menu>
5
6
Общие кнопки управления:
1 Переключение на экран <Video Menu>.
2 Закрытие экрана <Function Menu>/<Video
Menu> и возврат к экрану управления
источником.
3 Отображение кнопок подфункций для
воспроизведения источника.
• Кнопки отличаются в зависимости от
выбранного источника.
4 Кнопки быстрого доступа
[ ] Отображение экрана управления
мобильного телефона. (стр.31)
[]Включение голосового набора
номера. (стр.32)
[]Отображение экрана настройки
звучания. (стр.36)
[]Отображение экрана меню
<Display>. (стр. 42)
[TP] Включение/отключение режима
резервного приема TA. (стр.22)
5 Переключение на экран <Function Menu>.
6 Кнопки управления для воспроизведения
видео. (стр.37)
• Кнопки отличаются в зависимости от
выбранного источника.
Экран Hom e
Отображение экрана управления источником/
экрана настроек и переключение источника
изображения.
• Чтобы отобразить экран Home, нажмите HOME
на панели монитора.
4
12 3
Общие кнопки управления:
1 Отображение всех источников. (стр.8)
2 Отображение экрана <Settings>. (См. ниже.)
3 Отображение экрана управления мобильного
телефона. (стр.31)
4 Переключение источника воспроизведения.
(стр.8)
Экран <Settings>
Изменение подробных настроек. (стр.41)
34
2
1
Общие кнопки управления:
1 Выбор элементов меню.
2 Переключение страницы.
3 Возврат к предыдущему экрану.
4 Отображение экрана управления источником.
KW-V_Mid_EU_RU_03.indb 7 1/29/2014 12:54:36 PM
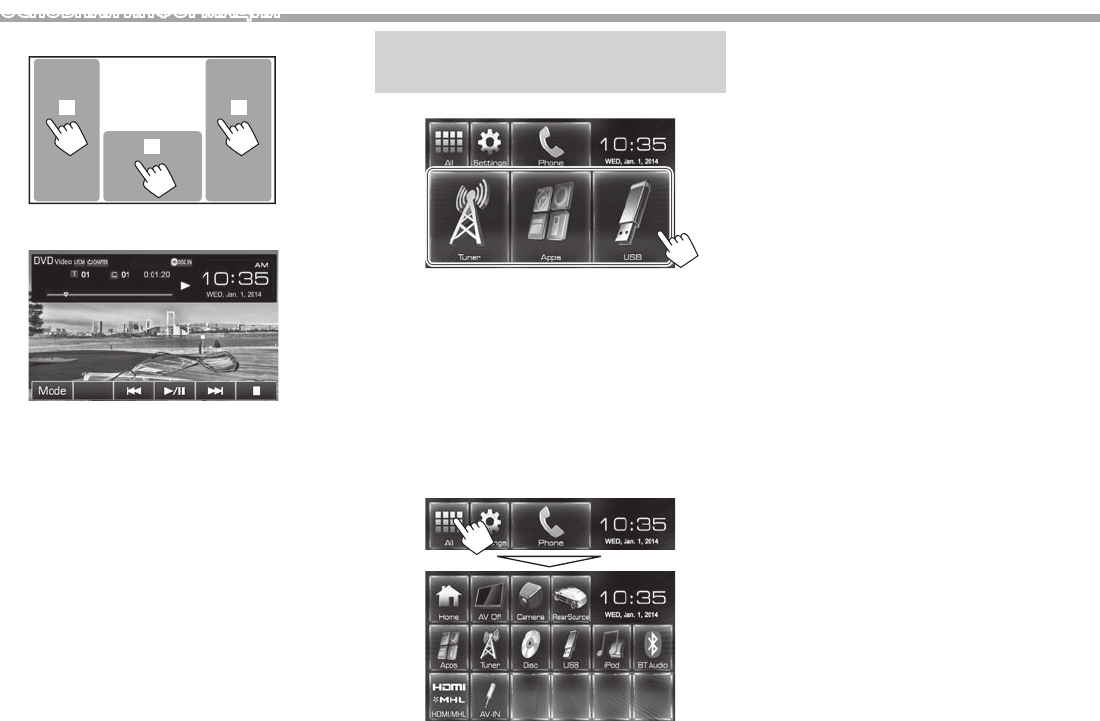
8
ОСНОВНАЯ ИНФОРМАЦИЯ
❏Управление на сенсорном экране
1
32
1 Отображение экрана управления источником
во время воспроизведения видео.
• Кнопки управления исчезают при
прикосновении к экрану, или если в
течение 10 секунд не выполняется никаких
операций.
2 Переход к предыдущему разделу/дорожке.*
3 Переход к следующему разделу/дорожке.*
* Недоступно для видео с внешнего компонента. Перетаскивание
пальца влево или вправо работает так же, как касание.
Выбор источника
воспроизведения/видео
На экране Home:
• Для [USB]/[iPod]: При воспроизведении
источника с отображением картинки обложки/
Artwork/данных изображения, на экране
Home картинка обложки/Artwork/данные
изображения отображаются на кнопке вместо
значка источника.
• Вы можете изменить элементы для
отображения на экране Home. (стр.40)
❏ Отображение всех источников и
элементов на экране
Восстановление экрана: Нажмите [Home].
[AV Off] Выключение источника аудио/
видеою. (стр.6)
[Camera] Переключение на камеру,
подключенную к входу камеры
заднего вида. (стр.25)
[RearSource] Выбор заднего источника для
отображения на внешнем
мониторе. (стр.26)
[Apps] Переключение на экран
приложения с подключенного
iPod touch/iPhone. (стр.19)
[Tuner] Переключение на прием передач
радиовещания. (стр.20)
[Disc] Воспроизведение диска. (стр.9)
[USB] Воспроизведение файлов на
устройстве USB. (стр.14)
[iPod] Воспроизведение iPod/iPhone.
(стр.16)
[BT Audio] Воспроизведение
аудиопроигрывателя Bluetooth.
(стр.33)
[HDMI/MHL] Воспроизведение устройства,
подключенного к входному
разъему HDMI/MHL. (стр.26)
[AV-IN] Переключение на внешнее
устройство, подключенное к
входному разъему AV-IN1 на
задней панели. (стр.24)
[Front AUX]* Переключение на внешнее
устройство, подключенное к
входному разъему AUX на панели
монитора. (стр.24)
* Только для KW-V30BT.
KW-V_Mid_EU_RU_03.indb 8 1/29/2014 12:54:37 PM
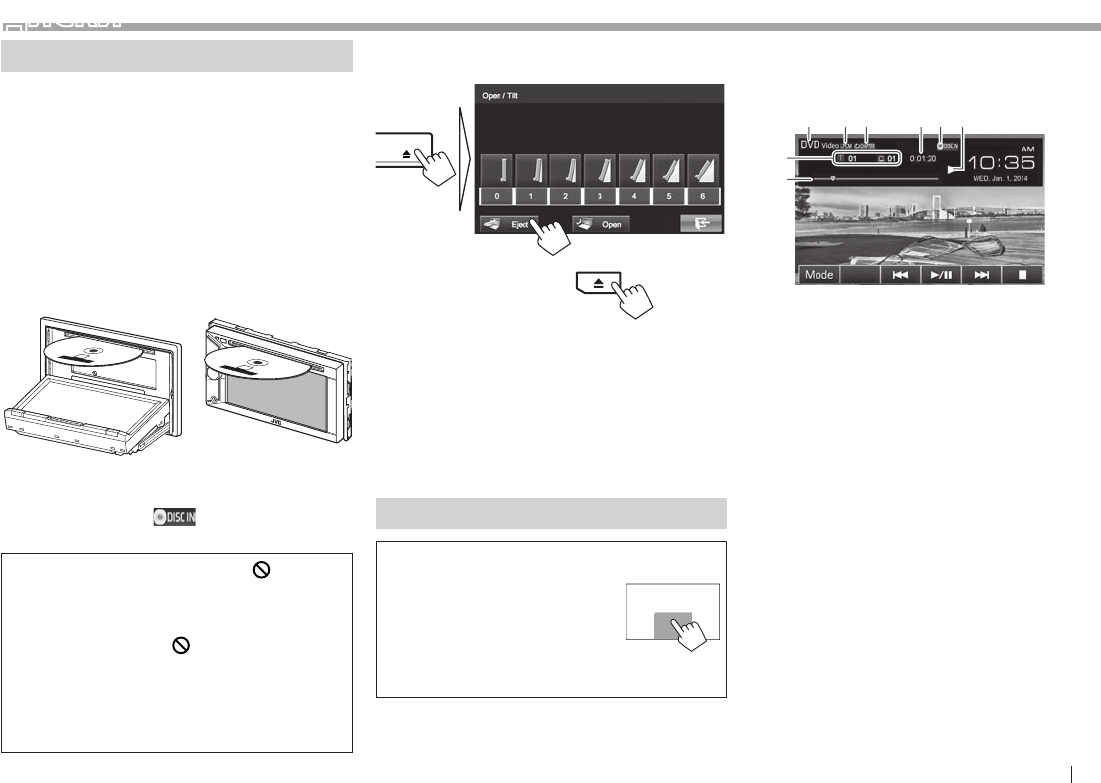
РУCCKИЙ 9
ДИСКИ
Воспроизведение диска
• Если на диске нет дискового меню, все дорожки
будут воспроизводиться последовательно до
тех пор, пока не вы не переключите источник
или не извлечете диск.
• За информацией о воспроизводимых типах
дисков/типах файлов обращайтесь на стр. 51.
❏Установка диска
Вставляйте диск стороной этикетки вверх.
• Для KW-V50BT: Чтобы открыть панель монитора,
см. стр. 6.
KW-V50BT KW-V30BT
В качестве источника звука указывается “DISC”, и
начинается воспроизведение.
• Индикатор DISC IN ( ) загорается, когда
вставляется диск.
• Если на экране появляется знак “ ”,
устройство не поддерживает операцию,
которую Вы пытаетесь выполнить.
– Иногда операция не выполняется и при
отсутствии значка “ ”.
• При воспроизведении диска с
многоканальным кодированием
выполняется понижающее преобразование
многоканальных сигналов до
стереофонических.
❏ Извлечение диска
KW-V50BT
KW-V30BT
• Вынимая риск, тяните его горизонтально.
• Диск можно извлечь во время воспроизведения
другого источника аудио/видео.
• Если в течение 60 секунд извлеченный диск
не будет вынут, он автоматически помещается
обратно в загрузочный отсек в целях защиты от
загрязнения.
• Если не удается выгрузить диск, см. на стр. 3.
Воспроизведение
Когда кнопки управления
не отображаются на экране,
прикоснитесь к зоне,
показанной на рисунке.
• Изменение настроек
для воспроизведения
видеоматериалов, см. на
стр. 37.
❏Элементы индикации и кнопки на
экране управления источником
Для DVD/DVD-VR/VCD/DivX/MPEG1/MPEG2
1 23 54
8
6
7
Информация о воспроизведении
1 Тип носителя
2 Аудиоформат
3 Режим воспроизведения (стр.12)
4 Время воспроизведения
5 Индикатор DISC IN
6 Состояние воспроизведения
7 Информация о текущем воспроизводимом
элементе
• Видео DVD-диск: № названия/№ раздела
• DVD-VR: № программы (или № списка
воспроизведения)/№ раздела
• DivX/MPEG1/MPEG2: № папки/№ дорожки
• VCD: № сцены (с PBC) или № дорожки (без
PBC)
8 Индикатор выполнения*
* Отображается только для Видео DVD-дисков.
KW-V_Mid_EU_RU_03.indb 9 1/29/2014 12:54:37 PM
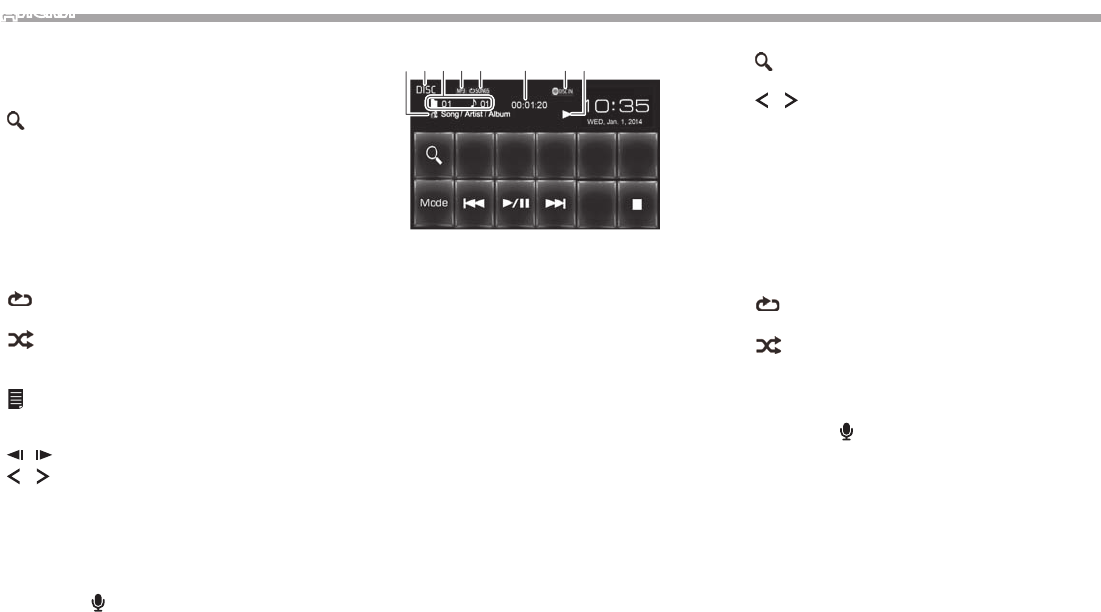
10
ДИСКИ
Кнопки операций
[Mode] Переключение настроек для
воспроизведения диска на экране
<Mode>. (стр.13)
[]*1Отображение списка папок или
дорожек. (стр.11)
[S] [T]• Выбор раздела или дорожки.
(Нажмите)
• Поиск назад или вперед.*2
(Удерживать)
[I/W]Начало воспроизведения или
пауза.
[o]Останов воспроизведения.
[]*3Выбор режима повторного
воспроизведения. (стр.12)
[]*1 *3Выбор режима воспроизведения
в произвольном порядке.
(стр.12)
[]*3 *4Отображение экрана
Оригинальная программа/Список
воспроизведения.
[] [ ]*3 *5Покадровое воспроизведение.
[ ] [ ]*1 *3Выбор папки.
[PBC]*3 *6Включение или выключение
функции VCD PBC (Управление
воспроизведением).
*1 Не отображается для DVD/DVD-VR/VCD.
*2 Скорость поиска зависит от типа диска или файла.
*3 Нажмите FNC/ на панели монитора, чтобы отобразить экран
<Function Menu> для выбора элементов. (стр.7)
*4 Отображается только для DVD-VR.
*5 Отображается только для DVD/DVD-VR.
*6 Отображается только для VCD.
Для C D/MP3/WMA/AAC
4256731 8
Информация о воспроизведении
1 Информация о дорожке/файле
• Прикосновение к текстовой информации
переключает тип информации.
2 Тип носителя
3 Информация о текущем воспроизводимом
элементе
• MP3/WMA/AAC: № папки/№ дорожки
• CD: № дорожки
4 Аудиоформат
5 Режим воспроизведения (стр.12)
6 Время воспроизведения
7 Индикатор DISC IN
8 Состояние воспроизведения
Кнопки операций
[ ]*1Отображение списка папок или
дорожек. (стр.11)
[ ] [ ]*1 *2Выбор папки.
[Mode] Переключение настроек для
воспроизведения диска на экране
<Mode>. (стр.13)
[S] [T]• Выбор дорожки. (Нажмите)
• Поиск назад или вперед.*3
(Удерживать)
[I/W]Начало воспроизведения или
пауза.
[o]Останов воспроизведения.
[]*2Выбор режима повторного
воспроизведения. (стр.12)
[]*2Выбор режима воспроизведения
в произвольном порядке.
(стр.12)
*1 Не отображается для CD.
*2 Нажмите FNC/ на панели монитора, чтобы отобразить экран
<Function Menu> для выбора элементов. (стр.7)
*3 Скорость поиска зависит от типа диска или файла.
KW-V_Mid_EU_RU_03.indb 10 1/29/2014 12:54:38 PM
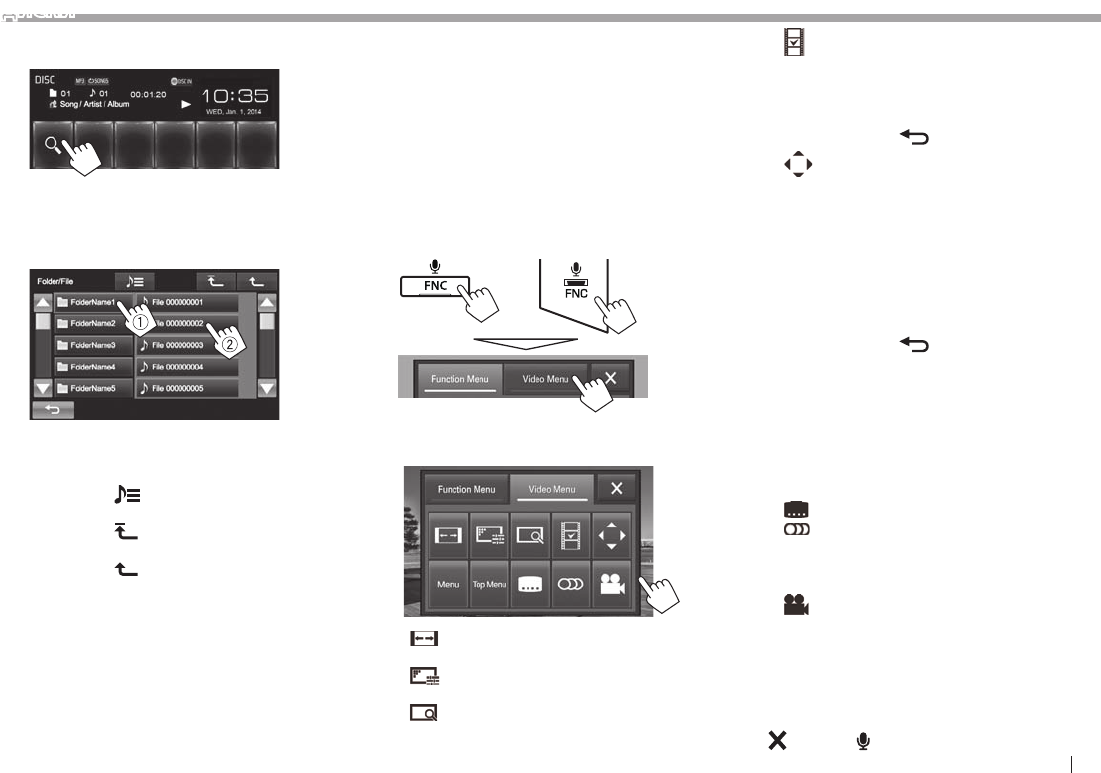
РУCCKИЙ 11
ДИСКИ
❏ Выбор папки/дорожки из списка
1
2 Выберите папку (1), затем элемент в
выбранной папке (2).
• Повторяйте процедуру, пока не выберите
требуемую дорожку.
• Вы можете переходить на другие страницы
для отображения других элементов, нажав
[J]/[K].
• Нажмите [ ], чтобы открыть папку, в
которой содержится текущая дорожка.
• Нажмите [], чтобы вернуться в корневую
папку.
• Нажмите [], чтобы вернуться на более
высокий уровень.
❏ Операции в меню видео
Вы можете отобразить экран меню видео во
время воспроизведения видео.
• Доступные элементы на экране отличаются в
зависимости от типов загруженного диска и
воспроизводимых файлов.
• Кнопки управления исчезают при
прикосновении к экрану, или если в течение 10
секунд не выполняется никаких операций.
1 Откройте экран <Video Menu>.
KW-V50BT KW-V30BT
2
Для DVD/DVD-VR/DivX/MPEG1/MPEG2
[ ] Выбор форматного
соотношения. (стр.38)
[]Отображение экрана
настройки картинки. (стр.37)
[]* Отображение экрана выбора
размера картинки. (стр.38)
[ ]* Переключение в режим
прямого меню диска.
Коснитесь желаемого
элемента, чтобы выбрать его.
• Чтобы выйти из экрана
выбора меню, нажмите
[].
[]* Отображение экрана
выбора меню/списка
воспроизведения/
оригинальной программы/
сцены.
• [J] [K] [H] [I]: Выбор
элемента.
• [Enter]: Подтверждение
выбора.
• [Return]: Возврат к
предыдущему экрану.
• [ ]: Отображение экрана
меню высшего уровня, когда
на диске имеется несколько
экранов меню.
– Для DivX: Выход из экрана
выбора сцены.
[Menu]* Отображение меню диска.
[Top Menu]* Отображение меню диска
(DVD).
[]* Выбор типа субтитров.
[]Выбор типа аудио.
• Для DVD-VR: Выбор
аудиоканала (ST:стерео,
L:левый, R:правый)
[]* Смена угла обзора.
* Может не отображаться в зависимости от носителя/файла и т.д.
• Прикосновение к любой позиции, кроме
кнопок управления, отображает экран
управления источником.
• Чтобы закрыть экран <Video Menu>, нажмите
[] или FNC/ на панели монитора.
KW-V_Mid_EU_RU_03.indb 11 1/29/2014 12:54:39 PM

12
ДИСКИ
Для VCD-диска
[ ] Выбор форматного
соотношения. (стр.38)
[]Отображение экрана настройки
картинки. (стр.37)
[]Отображение экрана выбора
размера картинки. (стр.38)
[]Отображение/скрытие кнопок
прямого выбора.
[ ] Выбор аудиоканала (ST:стерео,
LL:левый, RR:правый).
• Для того чтобы непосредственно выбрать
дорожку, нажмите [ ], чтобы отобразить
кнопки прямого выбора, затем...
– Если вы ввели неправильную цифру,
нажмите [CLR], чтобы удалить последний
введенный символ.
• Прикосновение к любой позиции, кроме
кнопок управления, отображает экран
управления источником.
• Чтобы закрыть экран <Video Menu>, нажмите
[] или FNC/ на панели монитора.
❏Выбор режима воспроизведения
1 Откройте экран <Function Menu>.
KW-V50BT KW-V30BT
2
[ ] Выбор режима повторного
воспроизведения.
[]Выбор режима воспроизведения в
произвольном порядке.
• Чтобы закрыть экран <Function Menu>,
нажмите [ ] или FNC/ на панели
монитора.
• Для DVD/DVD-VR/VCD (без PBC): Доступно
повторное воспроизведение.
Для CD/DivX/MPEG1/MPEG2/MP3/WMA/AAC:
Доступны повторное воспроизведение и
воспроизведение в случайном порядке.
– Режим повторного воспроизведения и режим
воспроизведения в произвольном порядке
не могут быть включены одновременно.
• При каждом нажатии кнопки переключается
режим воспроизведения. (Загорается
соответствующий индикатор.)
– Доступные элементы различаются в
зависимости от типов загруженного диска и
воспроизводимого файла.
CHAPTER Повтор текущего раздела.
TITLE Повтор текущего названия.
SONGS Повтор текущей дорожки.
FOLDER Повтор всех дорожек
текущей папки.
FOLDER Произвольное
воспроизведение всех
дорожек текущей папки, а
затем дорожек других папок.
ALL Произвольное
воспроизведение всех
дорожек.
Чтобы отменить повторное воспроизведение/
воспроизведение в случайном порядке:
Нажимайте кнопку последовательно, пока не
исчезнет индикатор.
KW-V_Mid_EU_RU_03.indb 12 1/29/2014 12:54:41 PM
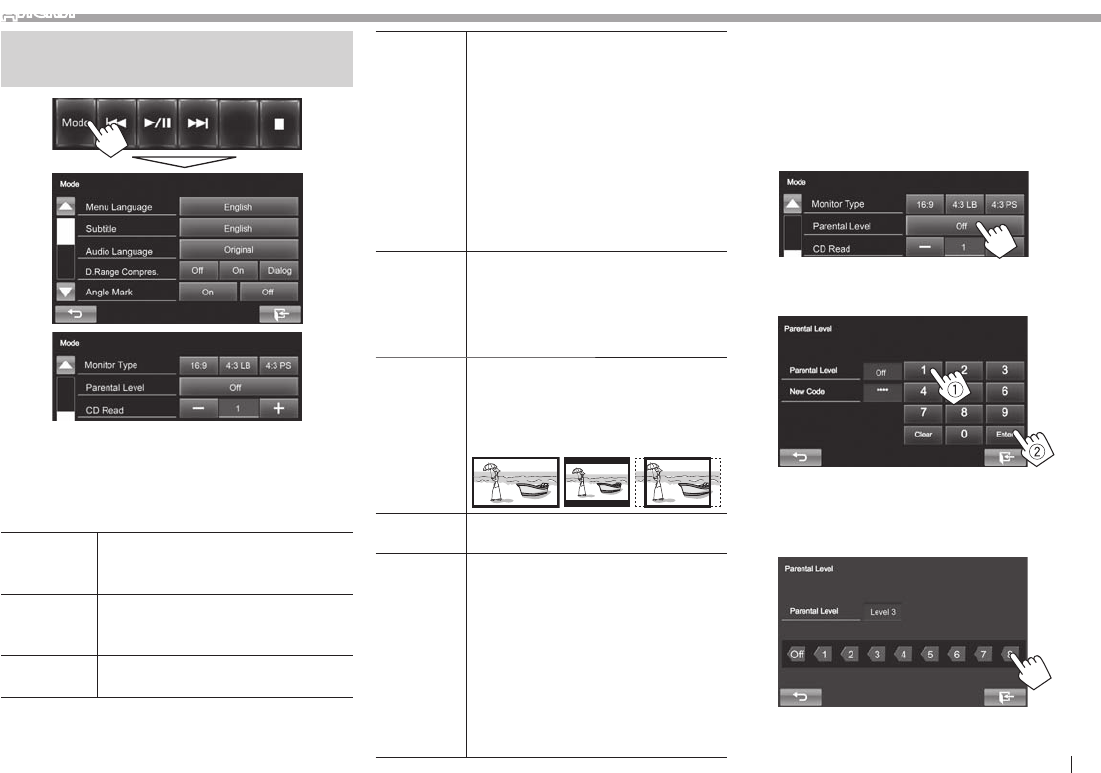
РУCCKИЙ 13
ДИСКИ
Настройки для воспроизведения
дисков
• Элементы, доступные на экране <Mode>,
отличаются в зависимости от воспроизводимых
дисков/файлов.
❏Элементы настройки
<Menu
Language>*
Выбор исходного языка для меню
диска. (По умолчанию: English)
(стр.53)
<Subtitle>* Выбор исходного языка субтитров
или удаление субтитров (Off). (По
умолчанию: English) (стр.53)
<Audio
Language>*
Выбор исходного языка звучания.
(По умолчанию: Original) (стр.53)
<D.Range
Compres.>*
Вы можете изменить динамический
диапазон во время воспроизведения
программы Dolby Digital.
• Off: Выберите эту опцию, чтобы
наслаждаться мощным звуком даже
на небольшой громкости с полным
динамическим диапазоном.
• On (По умолчанию): Выберите эту
опцию, чтобы немного уменьшить
динамический диапазон.
• Dialog: Выберите эту опцию, чтобы
воспроизводить диалог в фильмах
более отчетливо.
<Angle
Mark>
Выберите, нужно ли отображать метку
угла.
• On (По умолчанию): Выберите эту
опцию, чтобы отобразить метку угла.
• Off: Выберите эту опцию, чтобы скрыть
метку угла.
<Monitor
Type>*
Выбор типа монитора для просмотра
широкоэкранного изображения на
внешнем мониторе.
16:9 (По
умолчанию) 4:3 LB 4:3 PS
<Parental
Level>*
Задайте уровень родительского контроля.
(См. столбец справа.)
<CD Read>
Выберите файлы для воспроизведения
или диск, содержащий музыкальные
файлы. Вы не можете изменять
настройку, когда вставлен диск.
• 1 (По умолчанию): Автоматическое
распознавание между дисками с
аудиофайлами и музыкальными
компакт-дисками.
• 2: Принудительное воспроизведение
в качестве музыкального компакт-
диска. При воспроизведении диска с
аудиофайлами звука не слышно.
* Вы можете изменять эти настройки, только когда
воспроизведение остановлено.
Настройка родительского контроля
Настройка родительского контроля не может
выполняться во время воспроизведения DVD.
1 Откройте экран <Parental Level>.
На экране <Mode>:
2 Введите 4-значный родительский пароль
(1) и нажмите [Enter] (2).
• Чтобы очистить введенное значение,
нажмите [Clear].
3 Настройте уровень родительского
контроля (Off, с Level 1 по Level 8).
KW-V_Mid_EU_RU_03.indb 13 1/29/2014 12:54:42 PM
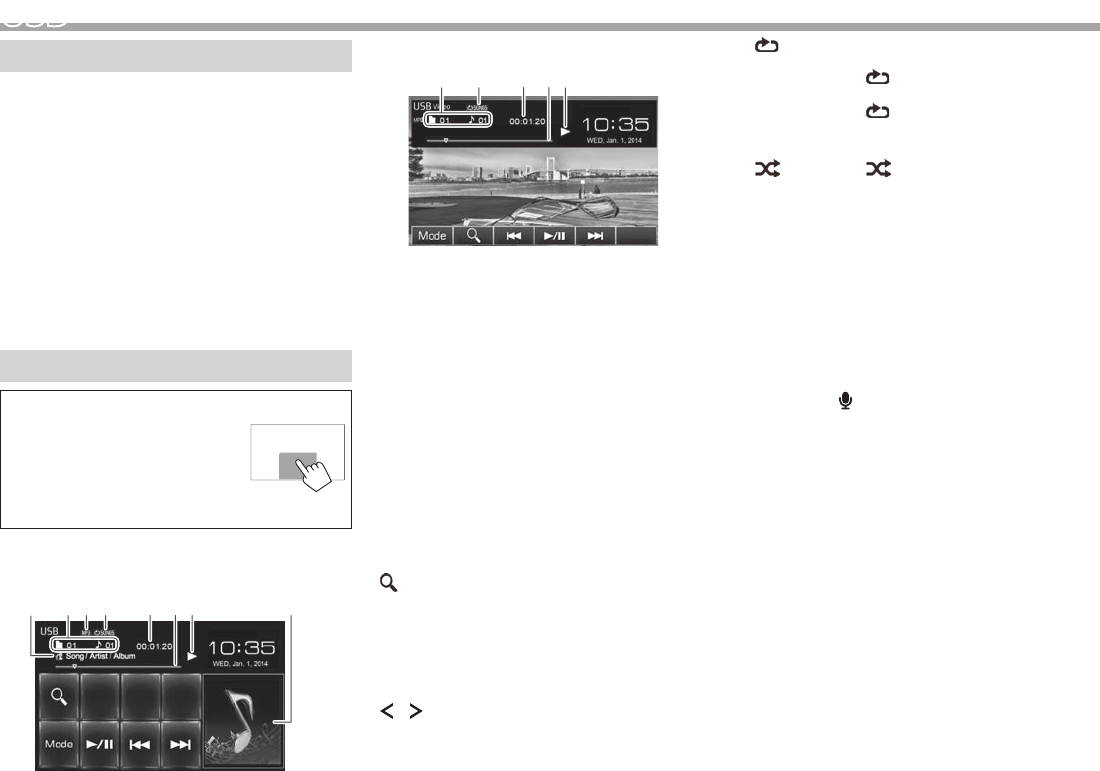
14
USB
Подключение устройства USB
К приемнику можно подключить запоминающее
устройство USB большой емкости, например USB-
память, цифровой аудиопроигрыватель, и т.д.
• За подробной информацией о подключении
USB-устройств обращайтесь на стр. 48.
• Компьютера или портативное устройство HDD
не могут быть подсоединены к входу USB.
• За информацией о воспроизводимых типах
файлов и использовании USB-устройств
обращайтесь на стр. 52.
Когда подсоединено USB-устройство...
В качестве источника звука указывается “USB”, и
начинается воспроизведение.
• Многократное воспроизведение всех дорожек
на устройстве USB осуществляется вплоть до
смены источника.
Воспроизведение
Когда кнопки управления
не отображаются на экране,
прикоснитесь к зоне,
показанной на рисунке.
• Изменение настроек
для воспроизведения
видеоматериалов, см. на
стр. 37.
❏Элементы индикации и кнопки на
экране управления источником
Для аудиофайлов (MP3/WMA/WAV/AAC/FLAC)
34 756 821
Для видеофайлов/файлов изображений
(MPEG1/MPEG2/H.264/WMV/JPEG/BMP/PNG)
4 7562
Информация о воспроизведении
1 Информация о дорожке/файле
• Прикосновение к текстовой информации
переключает тип информации.
2 Информация о текущем воспроизводимом
элементе
3 Аудиоформат
4 Режим воспроизведения (См. столбец справа.)
5 Время воспроизведения
6 Индикатор выполнения
7 Состояние воспроизведения
8 Картинка обложки (Отображается во время
воспроизведения, если файл имеет данные
метки, которые включают картину обложки)
Кнопки операций
[Mode] Изменение настройки времени
отображения картинки на экране
<Mode>. (стр.15)
[]Отображение экрана выбора
списка. (стр.15)
[S] [T]• Выбор дорожки. (Нажмите)
• Поиск назад или вперед.*1
(Удерживать)
[I/W]Начало воспроизведения или
пауза.
[ ] [ ]*2Выбор папки.
[ ]*2 *3 *4Выбор режима повторного
воспроизведения.
• SONGS: Повтор текущей
дорожки/файла.
• FOLDER: Повтор всех
дорожек/файлов в текущей
папке или заданной категории.
[]*2 *3 *4• ALL:
– При выборе дорожки/файла
из папки, произвольное
воспроизведение всех
дорожек/файлов в текущей
папке, затем дорожек/файлов в
следующей папке.
– При выборе дорожки/файла
из категории, произвольное
воспроизведение всех
дорожек/файлов в заданной
категории.
*1 Скорость поиска зависит от типа файла.
*2 Нажмите FNC/ на панели монитора, чтобы отобразить экран
<Function Menu> для выбора элементов. (стр.7)
*3 Чтобы отменить режим воспроизведения в произвольном
порядке или повторного воспроизведения, нажимайте кнопку
последовательно, пока не пропадет индикатор.
*4 Режим повторного воспроизведения и режим произвольного
воспроизведения не могут быть включены одновременно.
KW-V_Mid_EU_RU_03.indb 14 1/29/2014 12:54:42 PM
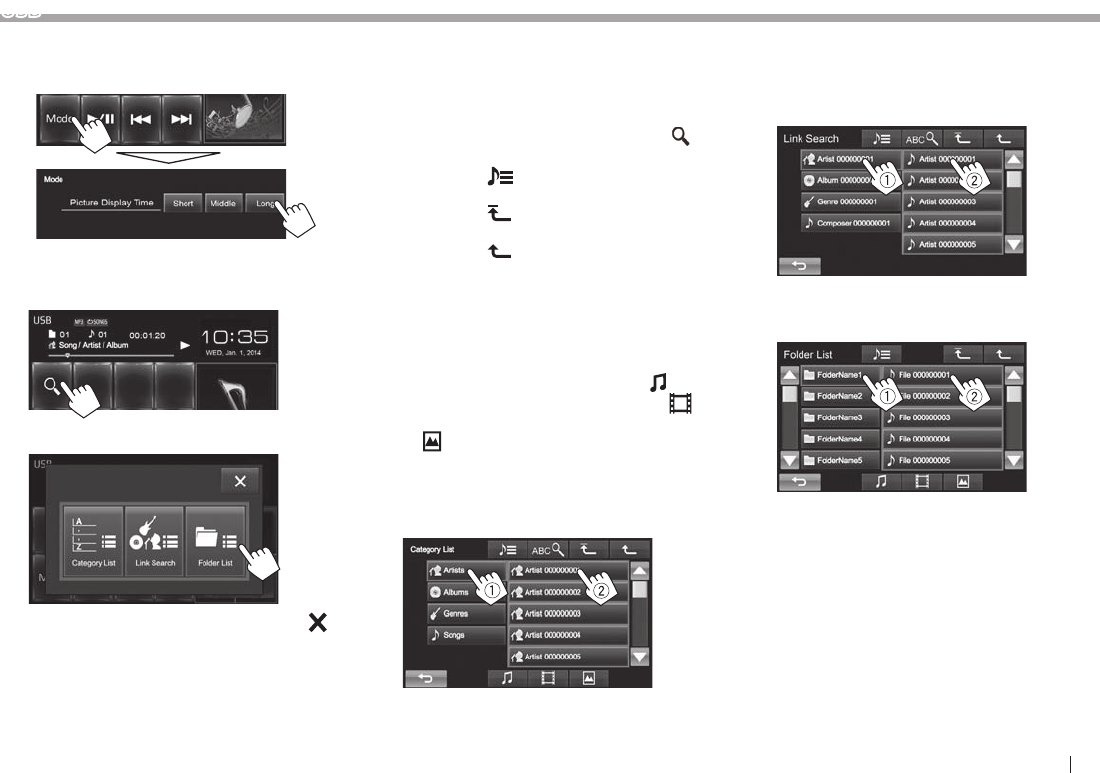
РУCCKИЙ 15
USB
❏ Настройка <Picture Display Time>
Задайте интервал между слайдами во время
слайд-шоу файлов изображений.
❏ Выбор дорожки из списка
1
2 Выберите список.
• Чтобы отменить процедуру, нажмите [ ].
3 Выберите дорожку.
• Вы можете переходить на другие страницы
для отображения других элементов, нажав
[J]/[K].
• Чтобы отобразить список элементов в
алфавитном порядке, нажмите [ABC ],
затем выберите первый символ.
• Нажмите [ ], чтобы открыть папку, в
которой содержится текущая дорожка.
• Нажмите [], чтобы вернуться в корневую
папку.
• Нажмите [], чтобы вернуться на более
высокий уровень.
• Если вы хотите воспроизвести все дорожки
в папке, нажмите [I] справа от желаемой
папки.
• На экране <Category List>/<Folder List>:
Вы можете изменить тип файлов для
отображения в списке: Нажмите [ ] для
отображения списка аудиофайлов, [ ] для
отображения списка видеофайлов или
[] для отображения файлов
неподвижных изображений.
Из экрана <Category List>:
Выберите категорию (1), затем элемент в
выбранной категории (2).
Из экрана <Link Search>:
Выберите тип тега для отображения списка
контента, содержащего такой же тег, как
и воспроизводимая в текущий момент
дорожка/файл (1), затем элемент (2).
Из экрана <Folder List>:
Выберите папку (1), затем элемент в
выбранной папке (2).
KW-V_Mid_EU_RU_03.indb 15 1/29/2014 12:54:43 PM

16
iPod/iPhone
• Для использования приложения iPod touch/
iPhone, см. на стр. 19.
Подготовка
❏ Подключение iPod/iPhone
• За подробной информацией о подключении
iPod/iPhone обращайтесь на стр. 48.
• За информацией о воспроизводимых типах
iPod/iPhone обращайтесь на стр. 53.
Подсоединяйте iPod/iPhone в соответствии с
целью и типом используемого iPod/iPhone.
Проводное соединение
• Для прослушивания музыки:
Используйте кабель USB 2.0 (принадлежность
iPod/iPhone) или KS-U62 (опционная
принадлежность).
• Для просмотра видеоизображения и
прослушивания музыки:
– Для iPod/iPhone, кроме iPhone 5/iPod touch
(пятое поколение)/iPod nano (седьмое
поколение), используйте кабель USB Audio и
Video для iPod/iPhone—KS-U59 (опционная
принадлежность).
– Для iPhone 5/iPod touch (пятое поколение)/
iPod nano (седьмое поколение) используйте
кабель HDMI KS-U60 (опционная
принадлежность) и кабель USB 2.0
(принадлежность iPod/iPhone)/KS-U62
(опционная принадлежность) через адаптер
Lightning-Digital AV (принадлежность iPod/
iPhone).
Подключение Bluetooth
Выполните сопряжение iPod/iPhone через
Bluetooth. (стр.27)
• Для iPhone 5/iPod touch (пятое поколение)/
iPod nano (седьмое поколение): Для просмотра
видеоизображений подсоедините iPod/iPhone к
входному разъему HDMI/MHL с помощью
KS-U60 (опционная принадлежность). (стр.48)
• Для iPod/iPhone, кроме iPhone 5/iPod touch
(пятое поколение)/iPod nano (седьмое
поколение): Вы можете просматривать
видеоизображения через соединение
Bluetooth.
❏ Выбор устройства iPod/iPhone
для воспроизведения и метода
подключения
При первом подключении устройства iPod/
iPhone отображается экран настройки (для
подключения и т.п.). Следуйте процедуре на
экране настройки, чтобы задать настройки.
1 Откройте экран <iPod Settings>.
На экране Home:
• Если вы не можете выбрать [Enter] для
<iPod Setup>, выключите источник аудио/
видео. (стр. 6)
2
• Если не требуется изменять настройку,
нажмите [OK], чтобы выйти из экрана
настройки.
KW-V_Mid_EU_RU_03.indb 16 1/29/2014 12:54:44 PM
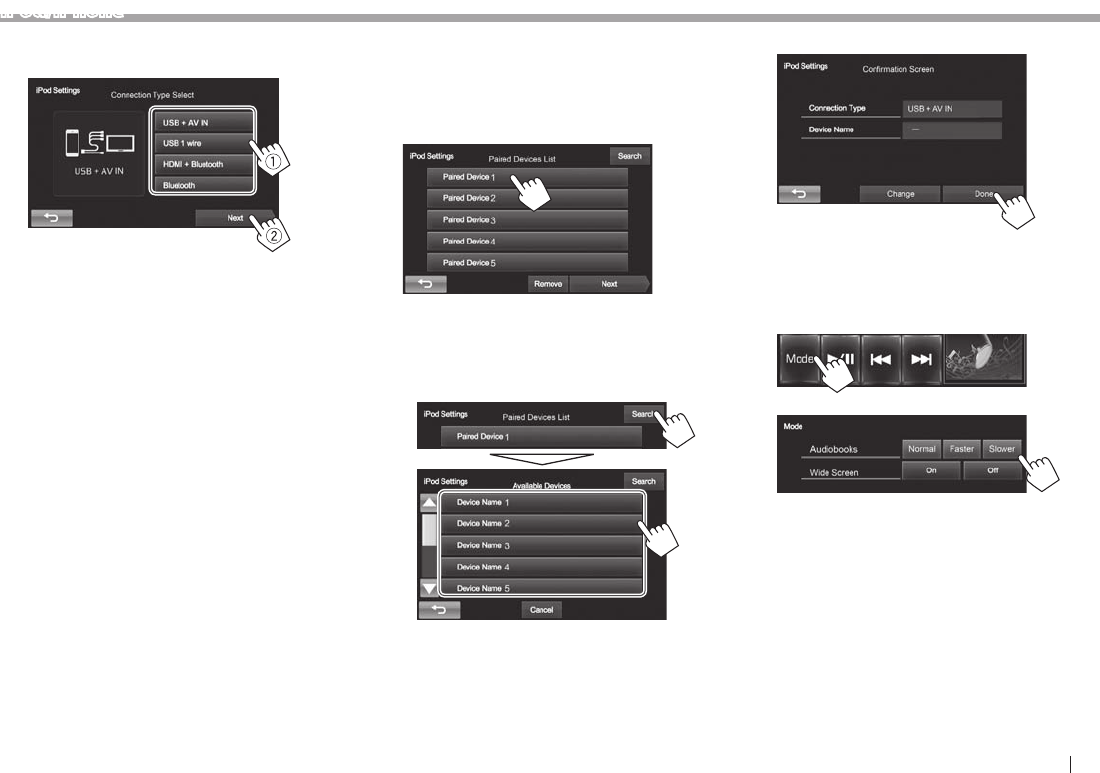
РУCCKИЙ 17
iPod/iPhone
3 Выберите метод подключения (1), затем
нажмите [Next] (2).
<USB +
AV-IN>
Выбирайте эту опцию, когда
iPod/iPhone подсоединен с
помощью KS-U59 (опционная
принадлежность).
<USB 1 wire> Выбирайте эту опцию, когда
iPod/iPhone подсоединен
с помощью кабеля USB 2.0
(принадлежность iPod/iPhone)
или KS-U62 (опционная
принадлежность).
<HDMI +
Bluetooth>
Выбирайте эту опцию, когда
iPod/iPhone подсоединен с
помощью кабеля HDMI KS-U60
(опционная принадлежность)
и кабеля USB 2.0
(принадлежность iPod/
iPhone)/KS-U62 (опционная
принадлежность) через
адаптер Lightning-Digital
AV (принадлежность iPod/
iPhone).
<Bluetooth> Выбирайте эту опцию, когда
iPod/iPhone подсоединен
через Bluetooth.
• При выборе <USB + AV-IN> или <USB 1
wire> переходите к действию 5.
4 При выборе <HDMI + Bluetooth>
или <Bluetooth> в качестве способа
подключения, отображается список
сопряженных устройств. Выберите
целевое устройство.
• Если нужное устройство отсутствует в
списке, нажмите [Search], чтобы выполнить
поиск доступных устройств iPod/iPhone,
затем выберите целевое устройство на
экране <Available Devices>.
– Вы можете переходить на другие
страницы для отображения других
элементов, нажав [J]/[K].
– Чтобы отменить поиск, нажмите [Cancel].
5 Подтвердите настройки.
❏ Выбор предпочитаемых настроек
для воспроизведения на iPod/iPhone
Если в качестве источника выбрано “iPod”...
1
2
<Audiobooks> Выбор скорости
воспроизведения аудиокниг.
<Wide
Screen>*
• [On]: Выберите,
чтобы отображать
видео, совместимое
с широкоформатным
экраном, в
широкоформатном
режиме.
• [Off]: Выберите, чтобы
отключить.
* Вы не можете изменить настройку, когда подсоединен iPod/
iPhone.
KW-V_Mid_EU_RU_03.indb 17 1/29/2014 12:54:44 PM
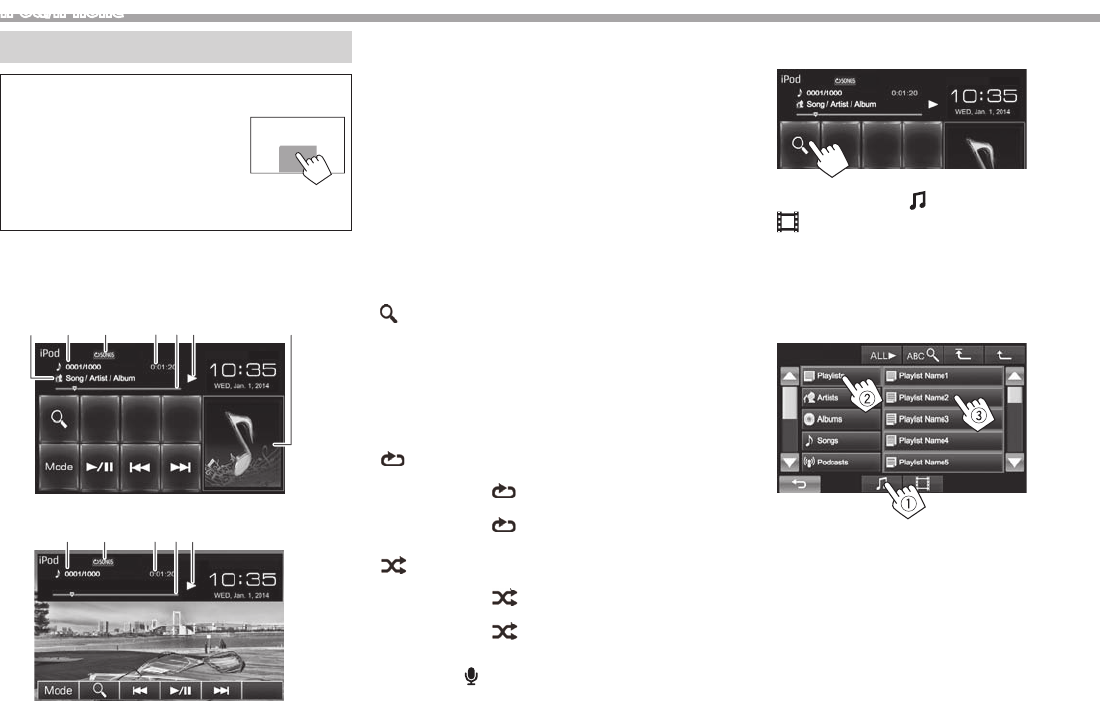
18
iPod/iPhone
Воспроизведение
Когда кнопки управления
не отображаются на экране,
прикоснитесь к зоне,
показанной на рисунке.
• Изменение настроек
для воспроизведения
видеоматериалов, см. на
стр. 37.
❏Элементы индикации и кнопки на
экране управления источником
Для воспроизведения аудио
3 645 721
Для воспроизведения видео
3 6452
Информация о воспроизведении
1 Информация о песне/видеоизображении
• Прикосновение к текстовой информации
переключает тип информации.
2 № дорожки/Общее количество дорожек
3 Режим воспроизведения (См. ниже.)
4 Время воспроизведения
5 Индикатор выполнения
6 Состояние воспроизведения
7 Обложка Artwork (Отображается, если для
песни имеются данные обложки Artwork)
Кнопки операций
[Mode] Переключение настроек для
воспроизведения iPod/iPhone на
экране <Mode>. (стр.17)
[]Отображение списка аудио-/
видеофайлов. (См. столбец справа.)
[S] [T]• Выбор аудио-/видеофайла.
(Нажмите)
• Поиск назад или вперед.
(Удерживать)
[I/W]Начало воспроизведения или
пауза.
[]*1 Выбор режима повторного
воспроизведения.
• SONGS: Функционирует
аналогично “Repeat One”.
• ALL: Функционирует
аналогично “Repeat All”.
[]*1 *2Выбор режима воспроизведения в
произвольном порядке.
•
р
SONGS: Функционирует
аналогично “Shuffle Songs”.
• ALBUMS: Функционирует
аналогично “Shuffle Albums”.
*1 Нажмите FNC/ на панели монитора, чтобы отобразить экран
<Function Menu> для выбора элементов. (стр.7)
*2 Чтобы отменить режим воспроизведения в произвольном
порядке, нажимайте кнопку последовательно, пока не пропадет
индикатор.
❏ Выбор аудио-/видеофайла из списка
1
2 Выберите меню ( : музыка или
: видео) (1), категорию (2), а затем
желаемый элемент (3).
• Выбирайте элемент на выбранном уровне,
пока не начнется воспроизведение
требуемого файла.
Меню аудио:
KW-V_Mid_EU_RU_03.indb 18 1/29/2014 12:54:45 PM
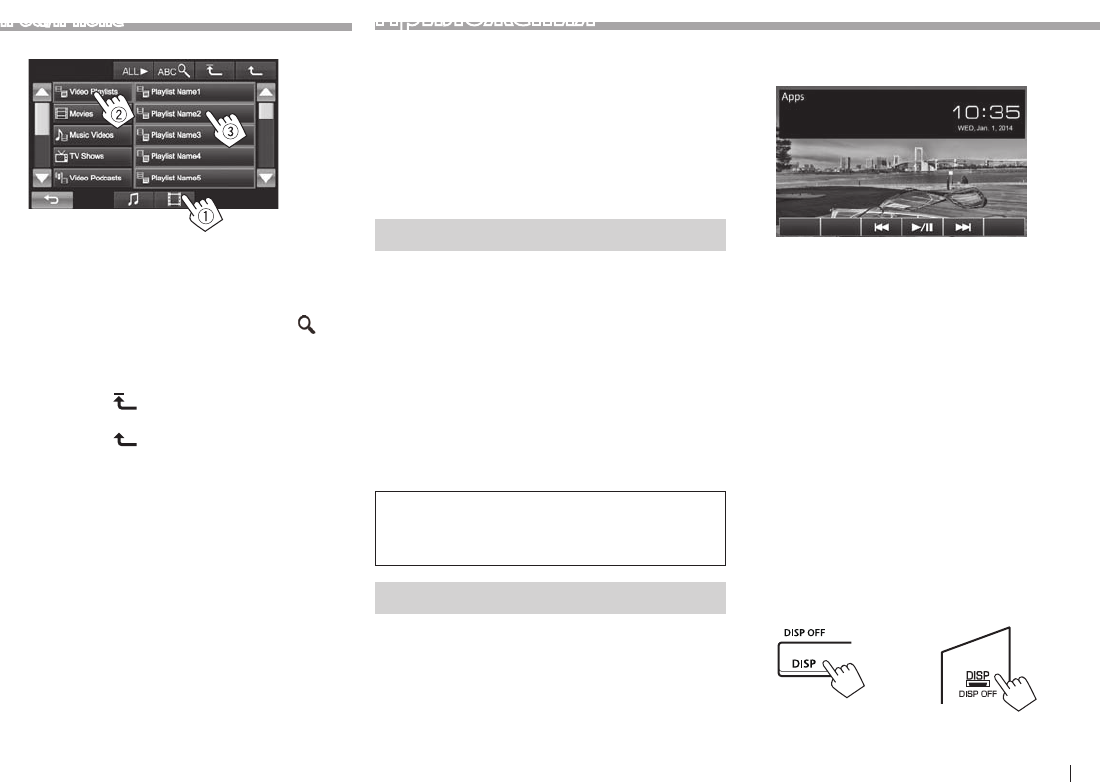
РУCCKИЙ 19
Приложения
Вы можете выбрать приложение на
подключенном iPod touch/iPhone/Android с
помощью данного устройства.
• При использовании приложений iPod touch или
iPhone также см. инструкции по безопасности
на стр. 54.
• За информацией о приложениях, которые вы
можете использовать на данном устройстве,
обращайтесь на сайт
<http://www.jvc.net/cs/car/>.
Подготовка
1 Подключите iPod touch/iPhone/Android.
• Для проводного соединения см. стр.48 для
iPod touch/iPhone или стр.49 для Android.
– Для просмотра видеоизображений
подсоедините устройство с помощью
KS-U59 или KS-U60 (опционная
принадлежность).
• Для соединения Bluetooth см. стр. 27.
2 Выберите устройство iPod touch/iPhone/
Android для использования и метод
подключения на экране <App Settings>.
(стр.35)
При первом подключении устройства
отображается экран настройки (для
подключения и т.п.). Следуйте процедуре на
экране настройки, чтобы задать настройки.
Использование приложения
❏ Воспроизведение
1 Запустите приложение на используемом
iPod touch/iPhone/Android.
2 Выберите “Apps” в качестве источника.
(стр.8)
❏Кнопки на экране управления
источником
[S] [T]Выбор аудио-/видеофайла.
[I/W]Начало воспроизведения или
пауза.
• Вы можете управлять некоторыми функциями
приложений с помощью сенсорной панели.
• Для некоторых приложений, например
для навигационных приложений, кнопки
управления и информация не отображаются.
Вы можете выполнять операции, например
прокрутку карты, на сенсорной панели.
Вы также можете воспроизводить аудио/видео
с помощью самого iPod/iPhone, вместо того
чтобы использовать данное устройство.
❏Переключение на экран приложения
во время прослушивания другого
источника
KW-V50BT KW-V30BT
iPod/iPhone
Меню видео:
• Вы можете переходить на другие страницы
для отображения других элементов, нажав
[J]/[K].
• Чтобы отобразить список элементов в
алфавитном порядке, нажмите [ABC ],
затем выберите первый символ.
• Нажмите [ALL I], чтобы воспроизвести все
песни/видео.
• Нажмите [], чтобы вернуться на верхний
уровень.
• Нажмите [], чтобы вернуться на более
высокий уровень.
• Доступные категории различаются в
зависимости от типа iPod/iPhone.
KW-V_Mid_EU_RU_03.indb 19 1/29/2014 12:54:46 PM
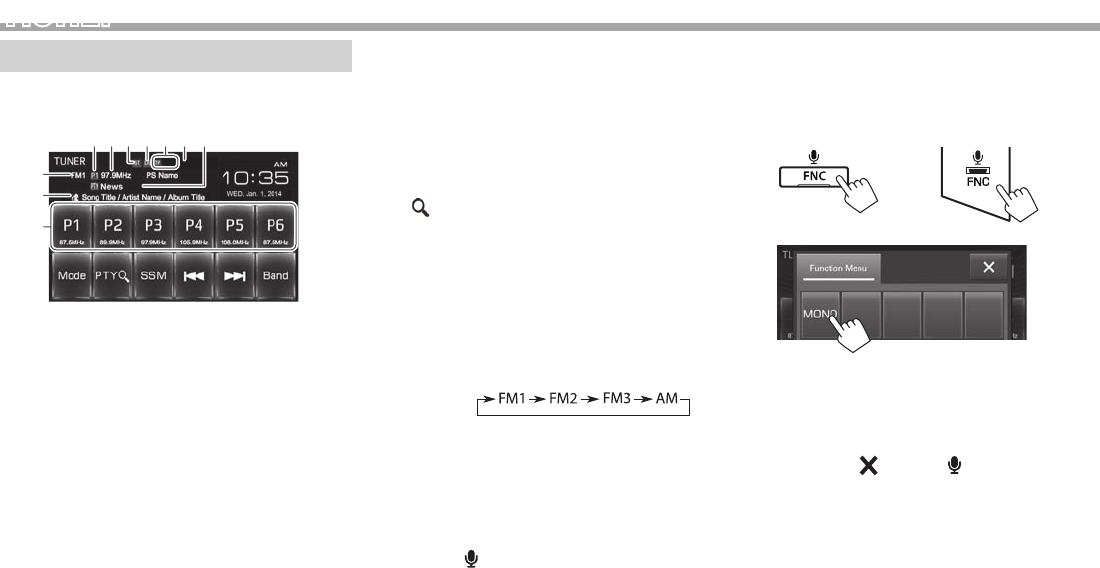
20
ТЮНЕР
Прослушивание р адио
❏Элементы индикации и кнопки на
экране управления источником
9
8
123 4 6
p
75
Информация о приеме тюнера
1 Запрограммированный номер программы.
2 Частота радиостанции, на которую выполнена
настройка в текущий момент/PS (название
радиостанции) для FM Radio Data System при
поступлении сигнала PS
3 Индикатор ST/MO
• Индикатор ST загорается при приеме
стереовещания FM при достаточном уровне
сигнала.
4 Индикатор DX/LO
5 Индикаторы резервного приема (TP/NEWS)
6 Индикатор AF
7 Код PTY для информационной системы FM
Radio Data System
8 Диапазон
9 Текстовая информация
• Прикосновение к текстовой информации
переключает тип информации.
p Список запрограммированных кодов
Кнопки о пераций
[P1] – [P6] • Выбор сохраненной в памяти
радиостанции. (Нажмите)
• Сохранение в памяти текущей
радиостанции. (Удерживать)
[Mode] Переключение настроек для
приема тюнера на экране <Mode>.
(стр.21–23)
[PTY ]*1В ход в режим поиска PTY.
(стр.22)
[SSM] Автоматическое
программирование станций с
наиболее сильными сигналами.
(стр.21)
[S] [T]Поиск радиостанции.
• Автоматический поиск (Нажатие)
• Поиск вручную (Удерживать)
[Band] Выбор диапазона частот.
[MONO]*1*2Включение/выключение
монофонического режима.
(См. столбец справа.)
[TP]*2Включение/отключение режима
резервного приема TA. (стр.22)
*1 Отображается, только если в качестве источника выбрано FM.
*2 Нажмите FNC/ на панели монитора, чтобы отобразить экран
<Function Menu> для выбора элементов. (стр.7)
❏ Улучшение качества приема FM
Включите монофонический режим для улучшения
качества приема.
1 Откройте экран <Function Menu>.
KW-V50BT KW-V30BT
2
Монофонический режим включен. Загорается
индикатор MO.
• Качество приема FM улучшается, но
стереоэффект будет утерян.
• Чтобы закрыть экран <Function Menu>,
нажмите [ ] или FNC/ на панели
монитора.
Чтобы восстановить стереоэффект: Нажмите
[MONO] на экране <Function Menu>.
KW-V_Mid_EU_RU_03.indb 20 1/29/2014 12:54:47 PM
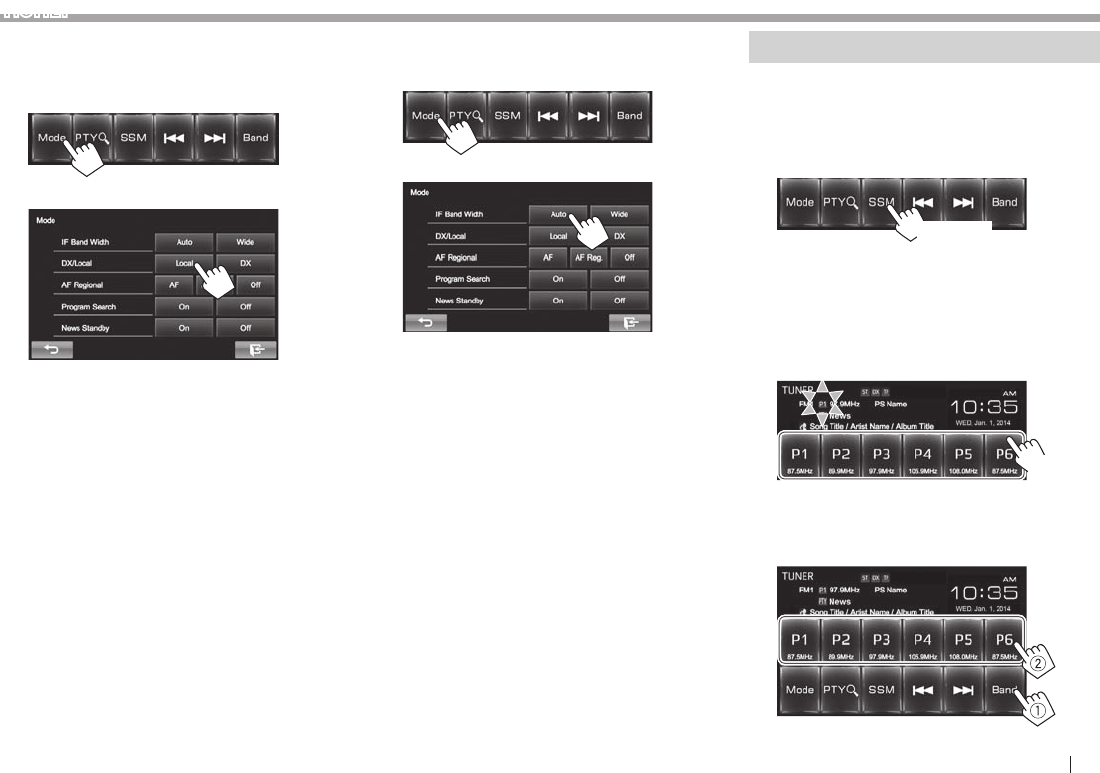
РУCCKИЙ 21
ТЮНЕР
❏ Настройка на FM-радиостанции с
устойчивым сигналом—LO/DX (Local/
Distant-extreme)
1
2
[Local] Выберите эту опцию, чтобы
настройка выполнялась только
на радиостанции с достаточным
уровнем сигнала. Загорается
индикатор LO.
[DX] Отключите функцию. Загорается
индикатор DX.
❏Уменьшение помех во время приема
FM
1
2
[Auto] Повышение избирательности
тюнера для устранения
интерференционных помех
от соседних радиостанций.
(Сопровождается потерей
стереоэффекта.)
[Wide] Могут возникать взаимные помехи
от соседних радиостанций, но
качество звучания при этом
не ухудшается и сохраняется
стереоэффект.
Программирование радиостанций
❏ Сохранение радиостанций
Для каждого диапазона частот можно
запрограммировать 6 радиостанций.
Автоматическое программирование — SSM
(Strong-station Sequential Memory)
(Удерживать)
Автоматически выполняется поиск и сохранение
местных станций с наиболее сильными сигналами.
Программирование в ручную
1 Настройте приемник на сигнал станции,
которую хотите внести в память. (стр.20)
2 Выберите запрограммированный номер.
(Удерживать)
Сохраняется станция, выбранная в действии
1.
❏Выбор запрограммированной
радиостанции
KW-V_Mid_EU_RU_03.indb 21 1/29/2014 12:54:48 PM
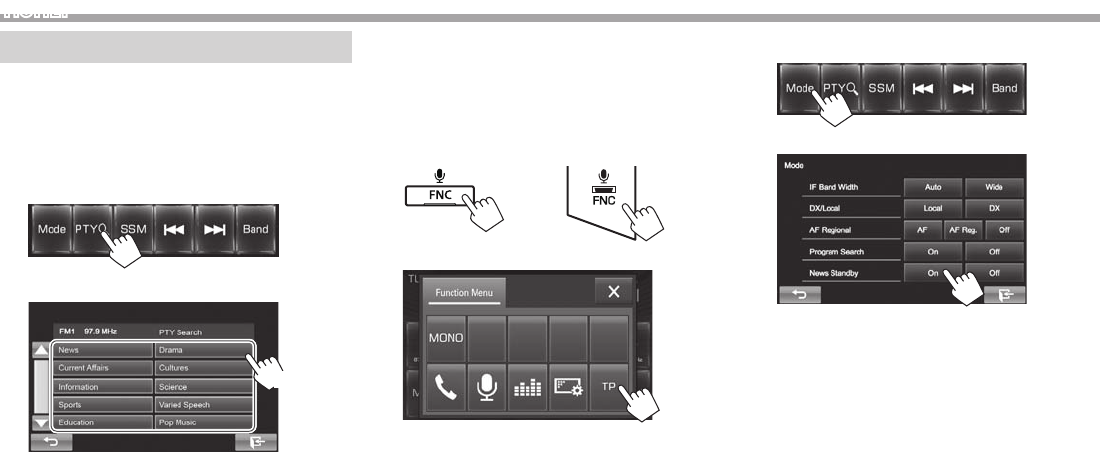
22
ТЮНЕР
Функции FM Radio Data System
❏ Поиск программы FM Radio Data
System — поиск PTY
Вы можете осуществлять поиск предпочитаемых
программ, которые передаются в настоящее
время, выбирая код PTY предпочитаемых
программ.
1
2 Выберите код PTY.
(Удерживать)
• Вы можете переходить на другие страницы
для отображения других элементов, нажав
[J]/[K].
Начинается поиск PTY.
Если есть радиостанция, передающая в эфир
программу с тем же кодом PTY, что был вами
выбран, то осуществляется настройка на эту
радиостанцию.
❏ Включение/отключение функции
резервного приема сообщений о
движении на дорогах/новостей
Резервный п рием TA
1 Откройте экран <Function Menu>.
KW-V50BT KW-V30BT
2
Устройство переходит в режим ожидания для
переключения в режим приема сообщений о
движении на дорогах (TA), когда они доступны.
(Индикатор TP загорается белым цветом.)
Если индикатор TP горит серым цветом,
выполните настройку на другую
радиостанцию, передающую сигналы Radio
Data System.
Отключение функции резервного приема TA:
Нажмите [TP]. (Индикатор TP гаснет.)
• Настройка уровня громкости для сообщений
о движении на дорогах автоматически
запоминается. В следующий раз, когда
устройство переключается в режим приема
сообщений о движении на дорогах, уровень
громкости настраивается на предыдущий
уровень громкости.
Резервный прием новостей
1
2
Устройство переходит в режим ожидания для
переключения в режим приема программы
новостей, когда она доступна. (Индикатор NEWS
загорается белым цветом.)
• Если индикатор NEWS горит серым цветом,
выполните настройку на другую радиостанцию,
передающую сигналы Radio Data System.
Отключение функции резервного приема
новостей: Выберите [Off] для <News Standby>.
(Индикатор NEWS гаснет.)
• Настройка уровня громкости во время приема
новостей автоматически запоминается.
В следующий раз, когда устройство
переключается в режим приема новостей,
уровень громкости настраивается на
предыдущий уровень громкости.
KW-V_Mid_EU_RU_04.indb 22 1/29/2014 2:17:20 PM
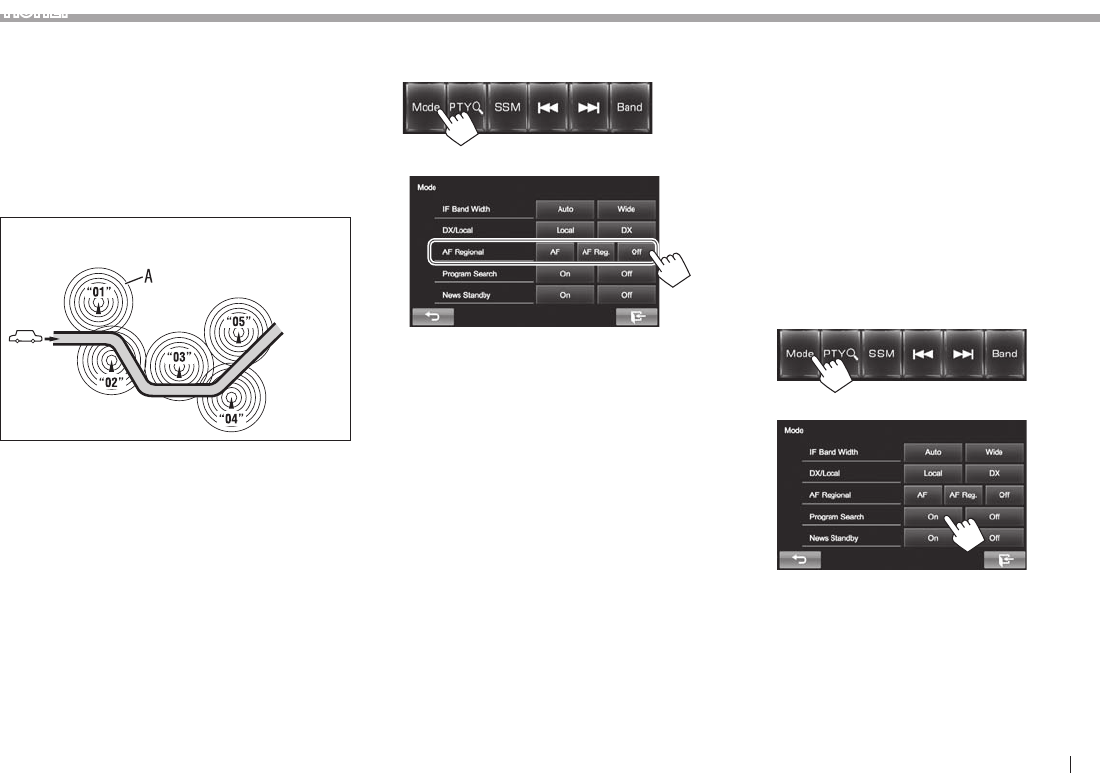
РУCCKИЙ 23
ТЮНЕР
❏Отслеживание той же программы
—Сеть-отслеживающий прием
При поездке по региону, где сигнал недостаточно
сильный для качественного приема в диапазоне
FM, данное устройство автоматически
настраивается на другую радиостанцию FM
Radio Data System в той же сети, которая может
передавать в эфир ту же программу с помощью
более сильных сигналов.
Радиовещание программы А в других диапазонах частот
(01 – 05)
• В настройках, установленных на заводе-
изготовителе, сеть-отслеживающий прием
включен.
Изменение настройки сеть-отслеживающего
приема
1
2
[AF] Переключение на другую
радиостанцию. Программа может
отличаться от принимаемой в
текущий момент программы
(загорается индикатор AF).
[AF Reg.] Переключение на другую
радиостанцию, передающую ту же
программу (загорается индикатор
AF).
[Off] Отмена.
❏ Автоматический выбор
радиостанции — поиск программы
При выборе запрограммированных
радиостанций обычно выполняется настройка на
запрограммированную станцию.
Если уровень сигналов от запрограммированной
радиостанции FM Radio Data System является
недостаточным для качественного приема,
данное устройство с помощью данных AF
настраивается на другую радиостанцию,
по которой может передаваться та же
программа, что передает первоначальная
запрограммированная радиостанция.
Активация поиска программы
1
2
• Настройка устройства на другую радиостанцию
с помощью поиска программы занимает
некоторое время.
Чтобы отключить поиск программы: Выберите
[Off] для <Program Search>.
KW-V_Mid_EU_RU_03.indb 23 1/29/2014 12:54:49 PM
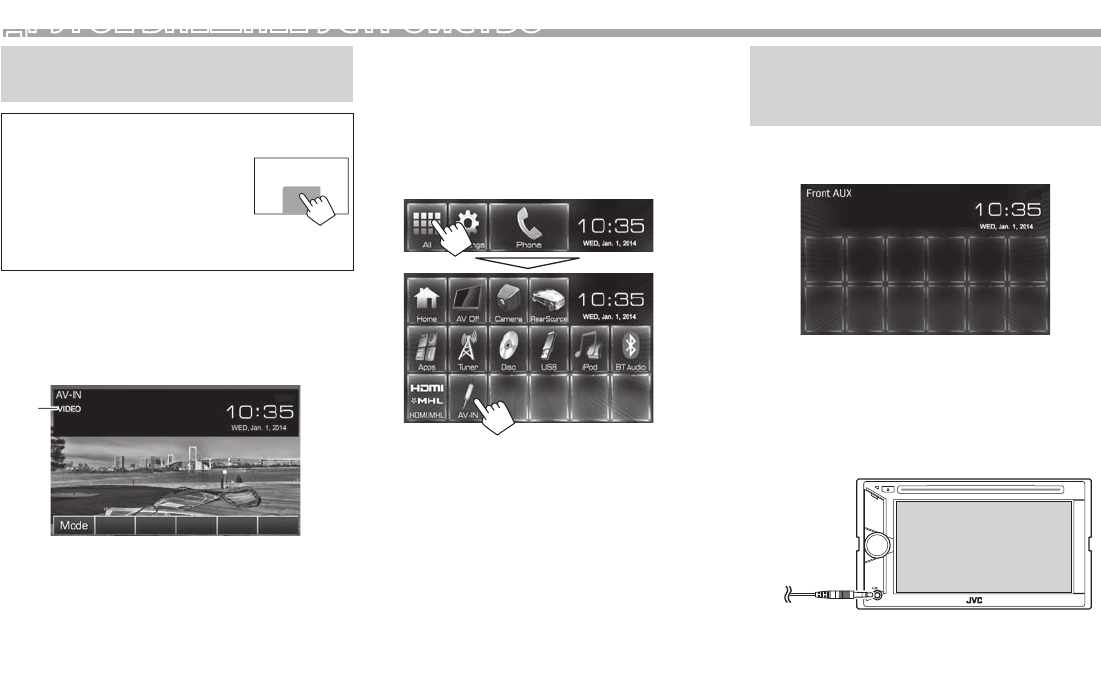
24
ДРУГОЕ ВНЕШНЕЕ УСТРОЙСТВО
Использование внешних аудио-/
видеопроигрывателей — AV-IN
• Когда кнопки управления
не отображаются на экране,
прикоснитесь к зоне,
показанной на рисунке.
– Изменение настроек
для воспроизведения
видеоматериалов, см. на
стр. 37.
Внешний компонент можно подсоединить к
разъему AV-IN1. (стр.49)
❏Элементы индикации и кнопки на
экране управления источником
1
Информация о воспроизведении
1 Имя AV-IN
Кнопки операций
[Mode] Изменение имени AV-IN.
• Нажмите [H] или [I] чтобы выбрать
имя AV-IN.
❏Запуск воспроизведения
1 Подсоедините внешнее устройство к
разъему AV-IN1.
• Чтобы подсоединить внешний компонент,
см. стр.49.
2 Выберите “AV-IN” в качестве источника.
На экране Home:
3 Включите подключенное устройство и
начните воспроизведение звука с его
помощью.
Использование внешних
аудиопроигрывателей — Front
AUX (только для KW-V30BT)
❏Элементы индикации и кнопки на
экране управления источником
❏Запуск воспроизведения
1 Подсоедините внешнее устройство к
гнезду AUX на панели монитора.
• Используйте стереофонический мини-
штекер 3,5 мм (продается отдельно).
2 Выберите “FrontAUX” в качестве
источника. (стр.8)
3 Включите подключенное устройство и
начните воспроизведение звука с его
помощью.
KW-V_Mid_EU_RU_03.indb 24 1/29/2014 12:54:50 PM
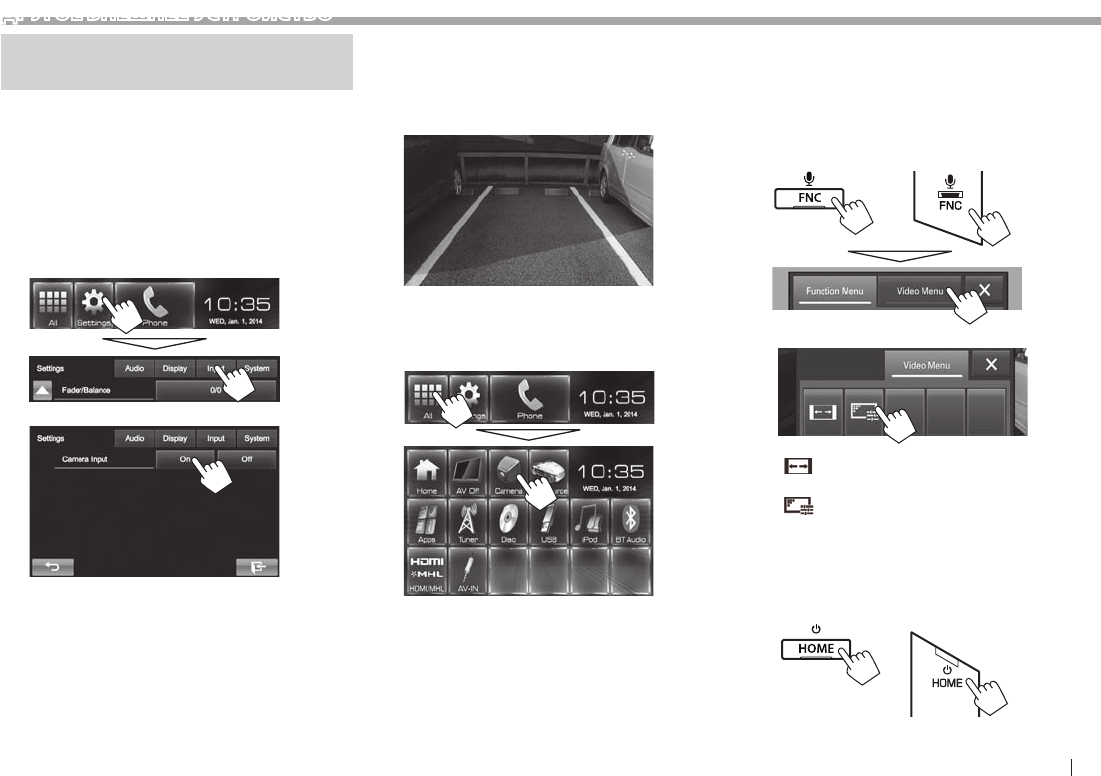
РУCCKИЙ 25
ДРУГОЕ ВНЕШНЕЕ УСТРОЙСТВО
Использование камеры заднего
вида
• Чтобы подсоединить камеру заднего вида, см.
стр. 49.
• Чтобы использовать камеру заднего вида,
необходимо подсоединение провода REVERSE
GEAR SIGNAL. (стр.47)
❏Включение камеры заднего вида
1 Отобразите экран настройки <Input>.
На экране Home:
2
Чтобы отключить: Выберите [Off] для
<Camera Input>.
❏ Отображение картинки с камеры
заднего вида
Экран заднего вида отображается при
переключении коробки передач на задний ход
(R).
Отображение картинки с камеры заднего вида
вручную
На экране Home:
Настройка картинки с камеры заднего вида
При отображении изображения с камеры заднего
вида вручную, вы можете изменить настройку
картинки.
1 Откройте экран <Video Menu>.
KW-V50BT KW-V30BT
2
[ ] Выбор форматного соотношения.
(стр.38)
[ ] Отображение экрана настройки
картинки. (стр.37)
Чтобы выйти из экрана заднего вида
KW-V50BT KW-V30BT
KW-V_Mid_EU_RU_03.indb 25 1/29/2014 12:54:50 PM
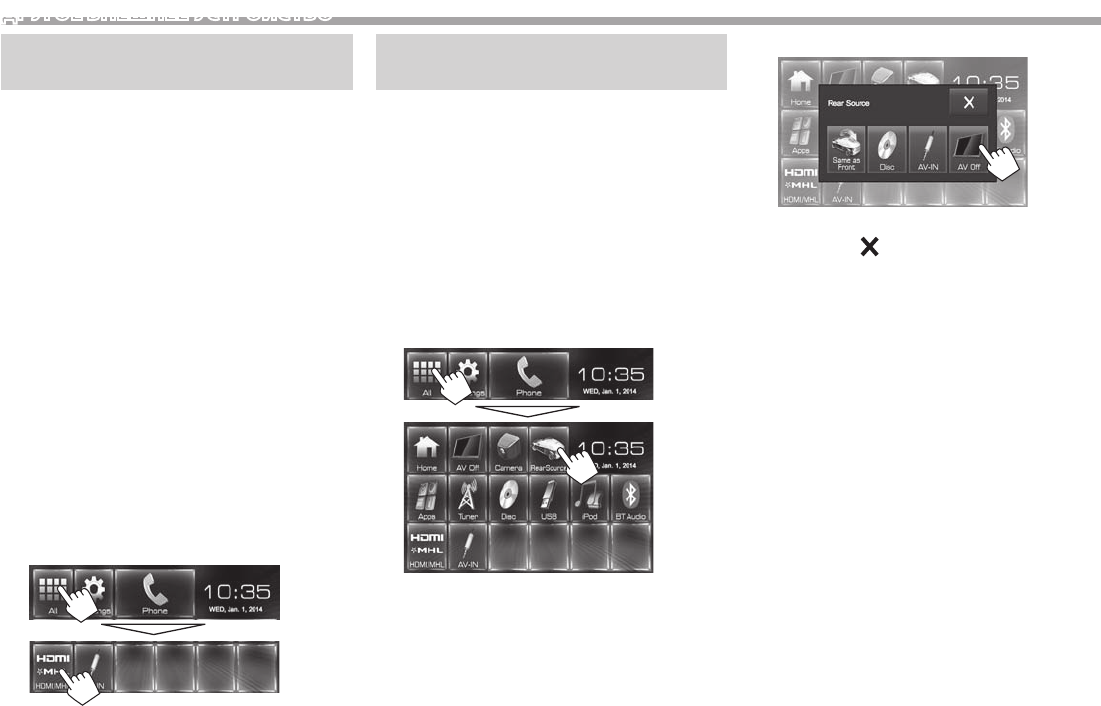
26
ДРУГОЕ ВНЕШНЕЕ УСТРОЙСТВО
Использование смартфона —
HDMI/MHL
❏Что такое HDMI/MHL?
HDMI означает интерфейс для мультимедиа
высокой четкости (High Definition Multi-media
Interface). Соединение HDMI позволяет передавать
сигнал с цифрового видеоисточника (например с
проигрывателя DVD-дисков) без преобразования в
аналоговый формат.
Технология мобильного аудио-видео интерфейса
MHL (Mobile High-definition Link) представляет собой
новую функцию, добавленную к HDMI для дальнейшего
расширения возможностей интерфейса.
Оба интерфейса позволяют подключить ваш смартфон
к данному устройству. Когда смартфон подключен, вы
можете просматривать экран смартфона на мониторе.
❏Отображение экрана смартфона
Вы можете отобразить экран смартфона,
подсоединенного к входному разъему HDMI/MHL.
1 Подсоедините смартфон к входному
разъему HDMI/MHL. (стр.49)
• Используйте кабель HDMI KS-U60
(опционная принадлежность) или кабель
MHL KS-U61 (опционная принадлежность).
2 Выберите “HDMI/MHL” в качестве
источника.
На экране Home:
3 Запустите приложение или
воспроизведение на смартфоне.
Использование внешнего
монитора — Rear Source
Воспроизводимое с заднего источника
содержимое можно передавать на внешний
монитор, подключенный к разъемам AV-OUT
VIDEO и AV-OUT AUDIO, прослушивая при этом
какой-либо другой источник.
• Вы можете управлять воспроизведением
заднего источника с помощью пульта
дистанционного управления. (стр. 43)
❏Отображение изображений с заднего
источника на внешнем мониторе
1 Откройте экран <Rear Source>.
На экране Home:
2 Выберите задний источник.
• Чтобы закрыть экран <Rear Source>,
нажмите [ ].
При включении заднего источника...
• Чтобы просматривать изображение с переднего
источника на заднем мониторе, нажмите
[Same as Front] на экране <Rear Source>.
• Если выбранный источник отличается от “DISC”
или “AV-IN”, на заднем мониторе ничего не
отображается.
KW-V_Mid_EU_RU_03.indb 26 1/29/2014 12:54:52 PM

РУCCKИЙ 27
BLUETOOTH
Информация относительно
использования устройств
Bluetooth®
Bluetooth — это технология мобильной
радиосвязи с малым радиусом действия между
мобильными устройствами (например сотовыми
телефонами), портативными компьютерами и
другими устройствами. Соединение и обмен
данными между устройствами Bluetooth
осуществляется без использования кабелей.
Примечания
• Не выполняйте сложные операции, например
набор номера или использование телефонной
книги, во время управления автомобилем.
Для выполнения данных операций остановите
автомобиль в безопасном месте.
• В зависимости от версии Bluetooth устройства,
не все устройства Bluetooth могут быть
подключены к устройству.
• Данное устройство может не работать с
некоторыми устройствами Bluetooth.
• Качество соединения может зависеть от
условий окружающей среды.
• Некоторые устройства Bluetooth отсоединяются
при выключении данного аппарата.
Информация о Bluetooth: Дополнительные
сведения о функциях Bluetooth можно найти на
веб-сайте JVC по адресу:
<http://www.jvc.net/cs/car/>
Профили Bluetooth
Данное устройство поддерживает следующие
профили Bluetooth:
• HFP (Hands-Free Profile, профиль громкой связи) 1.6
• A2DP (Advanced Audio Distribution Profile, профиль
расширенного распространения звука) 1.2
• AVRCP (Audio/Video Remote Control Profile,
профиль удаленного управления звуком и
видеоизображением) 1.4
• GAP (Generic Access Profile, общий профиль
доступа)
• PBAP (Phonebook Access Profile, профиль доступа к
телефонной книге) 1.0
• SDP (Service Discovery Profile, профиль
обнаружения услуг)
• SPP (Serial Port Profile, профиль последовательного
порта) 1.1
О мобильном телефоне совместим с Phone
book Access Profile (PBAP)
Если мобильный телефон поддерживает PBAP,
вы можете отображать телефонную книгу и
списки звонков на экране сенсорной панели
при подсоединении мобильного телефона.
• Телефонная книга: до 600 записей
• Набранные звонки, принятые звонки и
пропущенные звонки: до 10 записей в каждом
списке
Подключение устройств Bluetooth
❏ Регистрация нового устройства
Bluetooth
При первом подключении устройства Bluetooth
к приемнику выполните сопряжение между
приемником и устройством. Сопряжение
необходимо для обмена данными между
устройствами Bluetooth.
• Метод сопряжения отличается в зависимости от
версии Bluetooth устройства.
– Для устройств с Bluetooth 2.1: Вы можете
выполнить сопряжение устройства с данным
аппаратом с помощью метода SSP (Secure
Simple Pairing), который требует простого
подтверждения.
– Для устройств с Bluetooth 2.0: Вам потребуется
ввести PIN-код как на подключаемом
устройстве, так и на данном аппарате.
• После установления соединения оно
регистрируется в устройстве, даже если
выполняется перезапуск устройства. Всего
можно зарегистрировать до 5 устройств.
• Одновременно может быть подключено два
устройства для телефона Bluetooth и одно
устройство для аудио Bluetooth.
• Для использования функции Bluetooth ее
необходимо включить в устройстве.
• Чтобы использовать зарегистрированное
устройство, необходимо подсоединить
устройство к данному аппарату. (стр.29)
Автоматическое с опряжение
Когда для настройки
<Auto Pairing>
установлено
значение
[ON]
, при подсоединении через USB
происходит автоматическое сопряжение iPhone. (стр.34)
Сопряжение с устройством Bluetooth с
помощью SSP (для Bluetooth 2.1)
Если Bluetooth-устройство совместимо с
Bluetooth 2.1, запрос на сопряжение передается с
доступного устройства.
1 Выполните поиск устройства
(“KW-V****”) с вашего устройства
Bluetooth.
2 Подтвердите запрос как на
подсоединяемом устройстве, так и на
данном аппарате.
123456
OK
• Нажмите [Cancel], чтобы отклонить запрос.
KW-V_Mid_EU_RU_03.indb 27 1/29/2014 12:54:52 PM
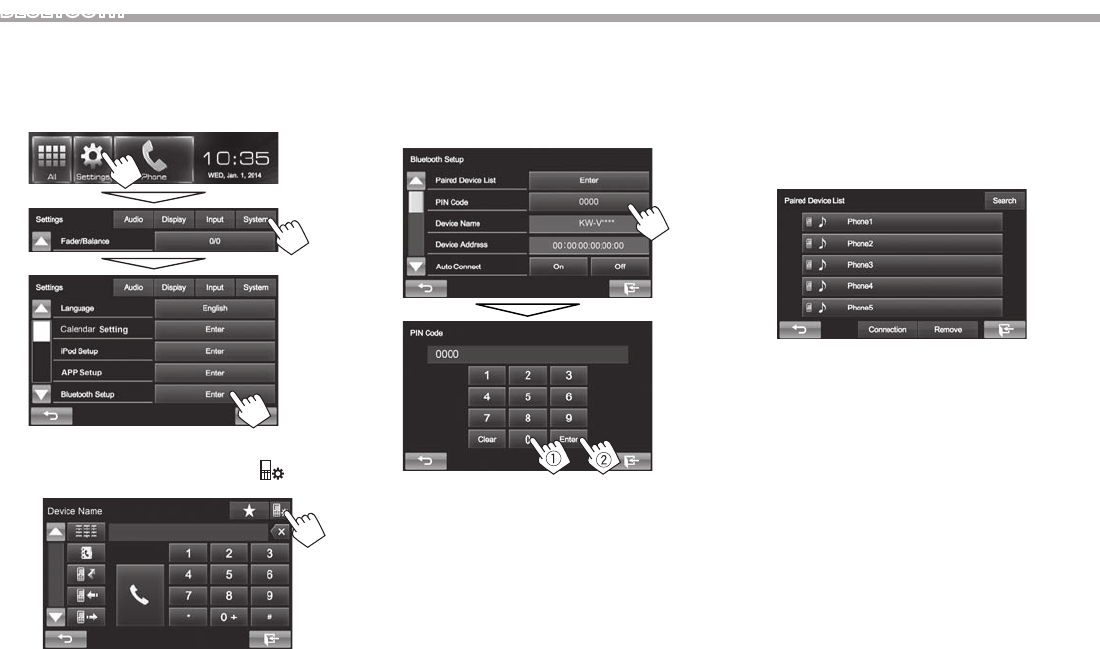
28
BLUETOOTH
Сопряжение с устройством Bluetooth с
целевого устройства с помощью PIN-кода (для
Bluetooth 2.0)
1 Откройте экран <Bluetooth Setup>.
На экране Home:
• Вы также можете отобразить экран
<Bluetooth Setup> нажатием [ ] на
экране управления телефоном. (стр.31)
2 Смените PIN-код.
• Если изменение PIN-кода пропускается,
перейдите к действию 3.
• По умолчанию PIN-код установлен на “0000”.
• Максимальное количество цифр в PIN-коде
составляет 15.
• Нажмите [Clear], чтобы удалить последнюю
запись.
3 Выполните поиск устройства
(“KW-V****”) с вашего устройства
Bluetooth.
4 Выберите устройство (“KW-V****”) на
вашем устройстве Bluetooth.
• Если требуется ввод PIN-кода, введите
“0000” (значение по умолчанию).
Когда сопряжение будет завершено,
сопряженное устройство появится в списке
<Paired Device List>.
• Чтобы использовать сопряженное
устройство, подсоедините это устройство в
<Paired Device List>. (стр.29)
KW-V_Mid_EU_RU_03.indb 28 1/29/2014 12:54:52 PM
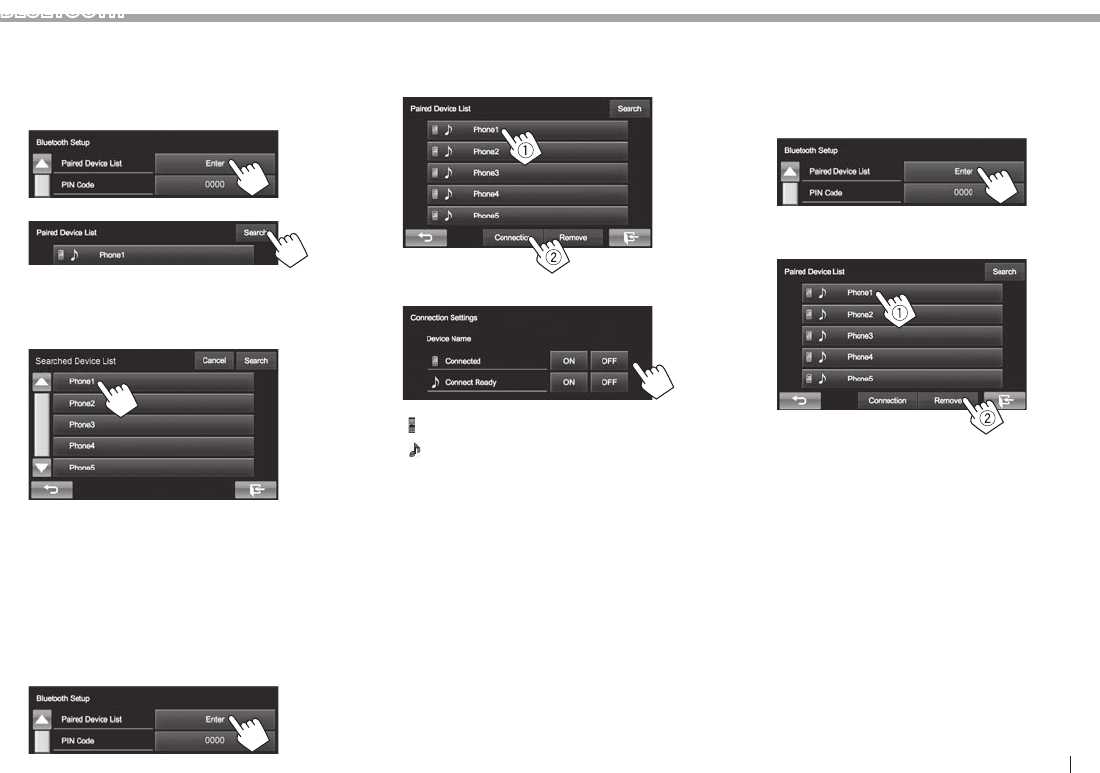
РУCCKИЙ 29
BLUETOOTH
Сопряжение с устройством Bluetooth с
данного устройства с помощью PIN-кода (для
Bluetooth 2.0)
1 Откройте экран <Bluetooth Setup>.
(стр.28)
2
3 Выполните поиск доступных устройств.
• Чтобы отменить поиск устройств, нажмите
[Cancel].
4 Выберите устройство, с которым вы
хотите выполнить сопряжение.
Появляется сообщение для подтверждения.
Нажмите [Pair].
❏ Подключение и отключение
зарегистрированного устройства
Bluetooth
Одновременно может быть подключено два
устройства.
1 Откройте экран <Bluetooth Setup>.
(стр.28)
2
3 Выберите устройство, которое вы
хотите подключить (1), затем нажмите
[Connection] (2).
4 Выберите [On] или [Off] для цели.
: Мобильный телефон
: Аудиоустройство
• Состояние отображает следующим
образом:
– “Connected”: Соединение установлено.
– “Connect Ready”: Соединение может быть
установлено.
– “Disconnected”: Нет установленных
соединений.
❏Удаление зарегистрированного
устройства Bluetooth
1 Откройте экран <Bluetooth Setup>.
(стр.28)
2
3 Выберите устройство для удаления (1),
затем нажмите [Remove] (2).
Появляется сообщение для подтверждения.
Нажмите [Yes].
KW-V_Mid_EU_RU_03.indb 29 1/29/2014 12:54:53 PM
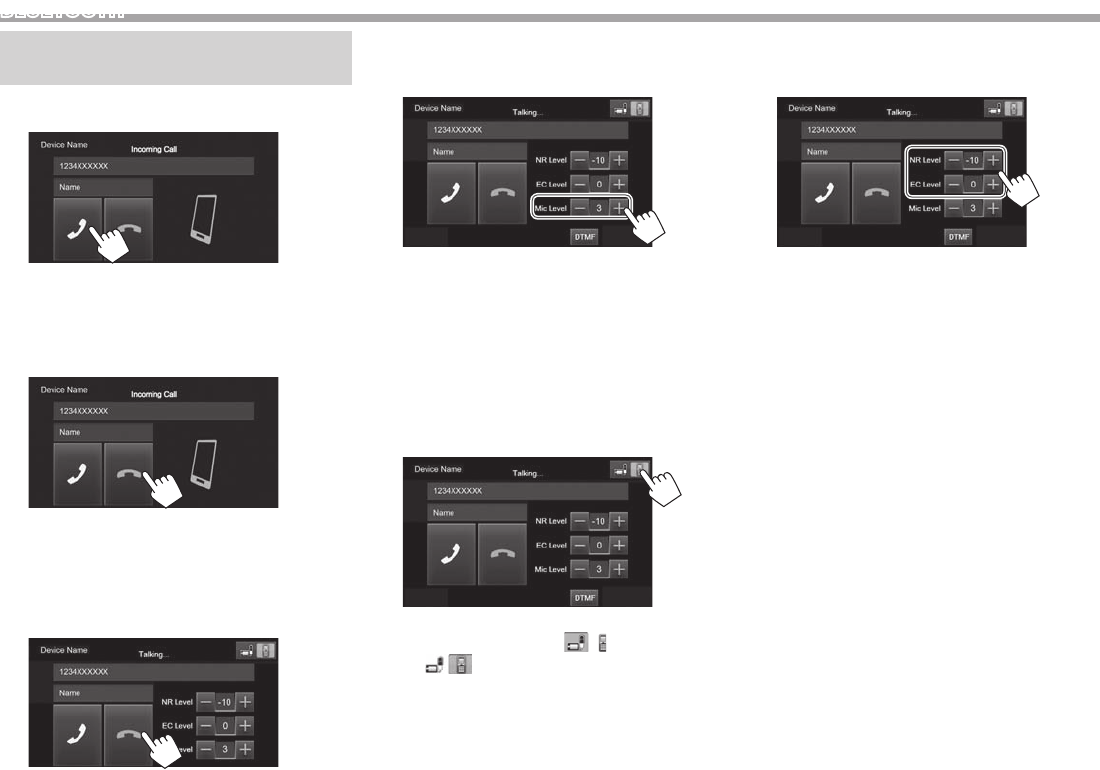
30
BLUETOOTH
Использование мобильного
телефона Bluetooth
❏Прием вызова
При входящем вызове...
• Информация о звонке отображается, если она
определяется.
• Управление телефоном недоступно, пока
отображается изображение с камеры заднего
вида. (стр.25)
Отклонение звонка
Когда для настройки <Auto Answer>
установлено значение [On] (стр.34)
Устройство автоматически отвечает на входящие
звонки.
❏Завершение вызова
Во время разговора...
❏Настройка уровня громкости
звонков/наушника/микрофона
Во время разговора...
• Вы можете регулировать уровень громкости в
диапазоне от 0 до 15 (по умолчанию: 3).
• Эта настройка не влияет на уровень громкости
других устройств.
• Для регулировки уровня громкости звонка/
наушника используйте панель монитора. (стр.6)
❏Переключение между режимом
громкой связи и режимом телефона
Во время разговора...
При каждом нажатии кнопки способ ведения
разговора переключается ( : режим громкой
связи / : режим телефона)
❏ Уменьшение шума/регулировка
уровня подавления эха
Во время разговора...
• Регулировка уровня эха (в диапазоне от –1
до +1, по умолчанию: 0): Отрегулируйте
<EC LEVEL>.
• Регулировка уровня уменьшения шума
(в диапазоне от 0 до –20, по умолчанию: –10) :
Отрегулируйте <NR LEVEL>.
KW-V_Mid_EU_RU_03.indb 30 1/29/2014 12:54:54 PM
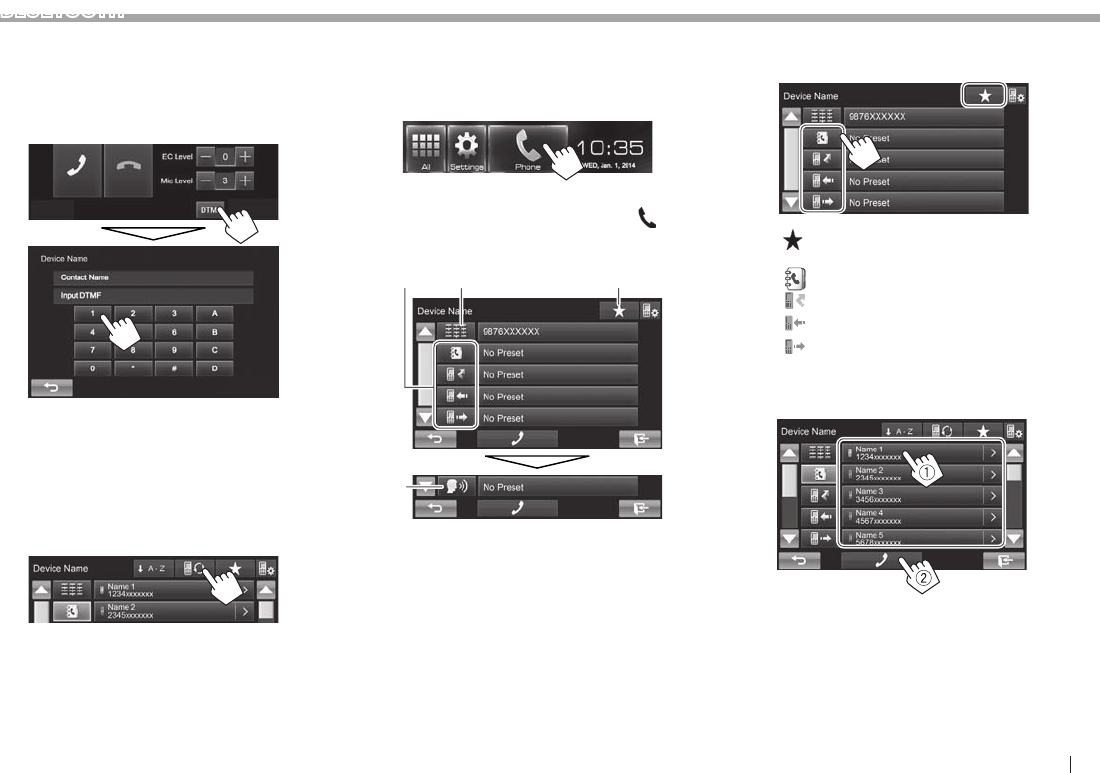
РУCCKИЙ 31
BLUETOOTH
❏ Отправка текста во время звонка
Вы можете отправлять текст во время звонка
с помощью функции DTMF (Dual Tone Multi
Frequency).
Во время разговора...
❏ Переключение между двумя
подключенными устройствами
Когда подключено 2 устройства, вы можете
переключать устройство для использования.
На экране управления телефоном (См. столбец
справа):
• Отображается имя активного устройства.
Устройства переключаются при каждом
нажатии кнопки.
❏ Выполнение вызова
1 Отобразите экран управления
телефоном.
На экране Home:
• Вы также можете отобразить экран
управления телефоном, нажав [] на
экране <Function Menu>. (стр.7)
2 Выбор способа выполнения вызова.
231
4
1Из телефонной книги*/списков звонков
2Прямой ввод номера
3Из списка запрограммированных
номеров
• Чтобы запрограммировать, см.
стр.33.
4Голосовой набор
* Если мобильный телефон не совместим с профилем доступа к
телефонной книге Phone Book Access Profile (PBAP), телефонная
книга не отображается.
Из списка запрограммированных номеров/
телефонной книги/списков звонков
1
[ ] Из списка запрограммированных
номеров
[ ] Из телефонной книги
[ ] Из списка пропущенных звонков
[ ] Из списка принятых звонков
[ ] Из списка набранных звонков
2 Выберите цель (1), затем выполните
вызов (2).
• Вы можете переходить на другие страницы
для отображения других элементов, нажав
[J]/[K].
KW-V_Mid_EU_RU_03.indb 31 1/29/2014 12:54:54 PM
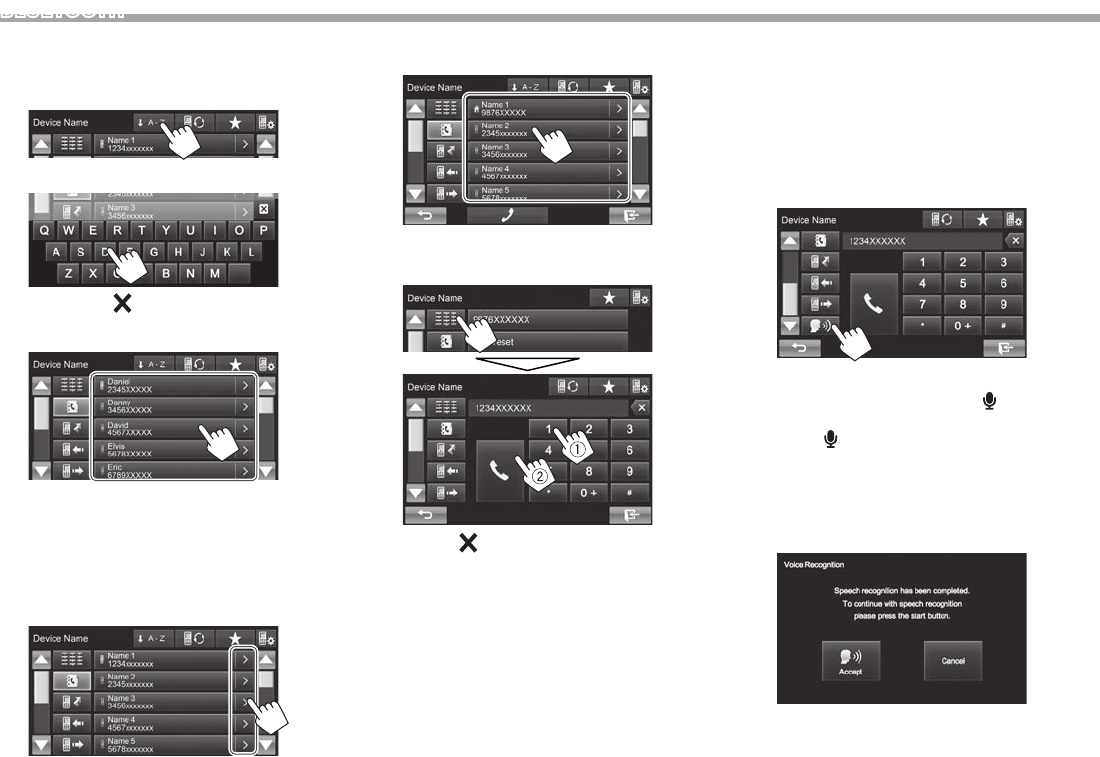
32
BLUETOOTH
• Использование поиска от A до Z в телефонной
книге:
Когда отображается список телефонной книги,
вы можете вести поиск по первому знаку.
1
2 Выберите первый знак.
• Нажмите [ ], чтобы отменить поиск от A
до Z.
3 Выберите телефонный номер из списка.
• Отображение подробной информации для записи:
Когда отображается список телефонной книги,
вы можете отобразить подробную информацию
для записи и выбрать телефонный номер, если
зарегистрировано несколько телефонных номеров.
1 Отобразите подробную информацию
для желаемой записи.
2 Выберите телефонный номер для
вызова.
Прямой ввод номера
Можно ввести до 32 номеров.
• Нажмите [ ], чтобы удалить последнюю
запись.
• Нажмите и удерживайте [0+], чтобы добавить
“+” к номеру телефона.
Голосовой н абор
• Доступно только при наличии в подключенном
мобильном телефоне системы распознавания
голоса.
1 Включите функцию голосового набора.
На экране управления телефоном:
• Последовательно нажимайте [K], чтобы
переключать страницы на экране
управления телефоном.
• Вы также можете включить функцию
голосового набора, нажав [] на экране
<Function Menu> (стр. 7) или удерживая
FNC/ на панели монитора.
2 Произнесите имя человека, которому вы
хотите позвонить.
• Если устройство не сможет найти цель,
отобразится следующий экран. Нажмите
[Accept], затем произнесите имя еще раз.
Чтобы отменить голосовой набор: Нажмите
[Cancel].
KW-V_Mid_EU_RU_03.indb 32 1/29/2014 12:54:55 PM
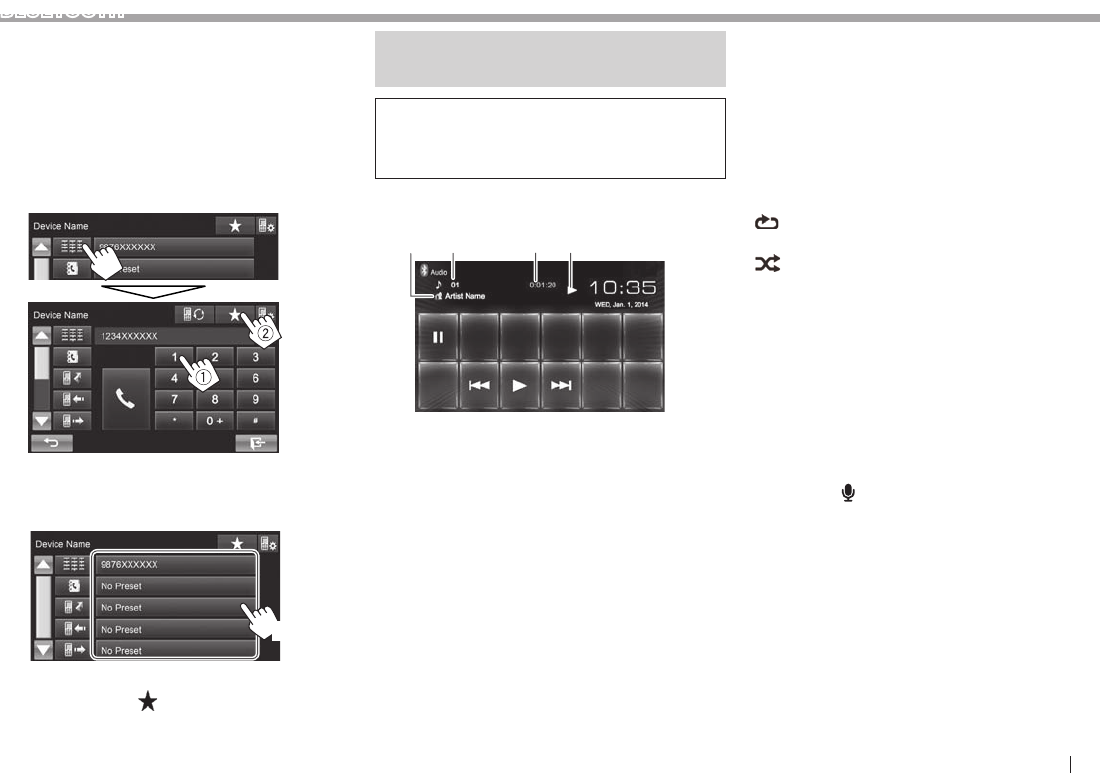
РУCCKИЙ 33
BLUETOOTH
❏ Программирование телефонных
номеров
Можно запрограммировать до 5 номеров.
1 Отобразите экран управления
телефоном. (стр.31)
2 Введите цифры на экране прямого
ввода номера, затем отобразите
запрограммированный список.
3 Выберите запрограммированный номер,
под которым вы хотите сохранить
данные.
(Удерживать)
• Чтобы отобразить запрограммированный
список, нажмите [ ] на экране управления
телефоном.
Использование
аудиопроигрывателя Bluetooth
• Регистрация нового устройства, см. на
стр.27.
• Подключение и отключение устройства, см.
на стр.29.
❏Элементы индикации и кнопки на
экране управления источником
3 421
• Кнопки управления, индикации и информации,
отображаемой на экране различаются в
зависимости от подключенного устройства.
Информация о воспроизведении
1 Данные метки (название текущей дорожки/
имя исполнителя/название альбома)*1
• Прикосновение к текстовой информации
переключает тип информации.
2 № дорожки*1
3 Время воспроизведения*1
4 Состояние воспроизведения*1
Кнопки операций
[ ]*1 *2 *3Выбор режима повторного
воспроизведения.
[]*1 *2 *3Выбор режима воспроизведения
в произвольном порядке.
[W]Пауза воспроизведения.
[I]Начало воспроизведения.
[S] [T]• Выбор дорожки. (Нажмите)
• Поиск назад или вперед.
(Удерживать)
*1 Доступно только для устройств, совместимых с AVRCP 1.3.
*2 Чтобы отменить режим воспроизведения в произвольном
порядке и повторного воспроизведения, нажимайте кнопку
последовательно, пока не пропадет индикатор.
*3 Нажмите FNC/ на панели монитора, чтобы отобразить экран
<Function Menu> для выбора элементов. (стр.7)
KW-V_Mid_EU_RU_03.indb 33 1/29/2014 12:54:56 PM
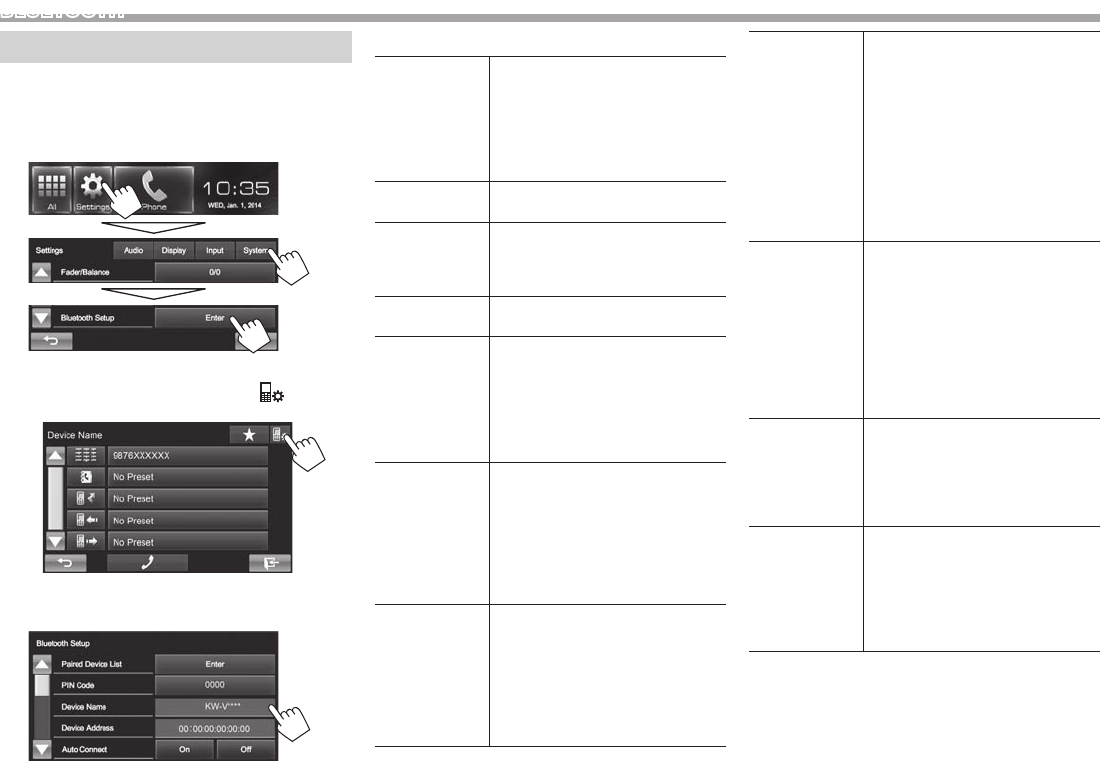
34
BLUETOOTH
Настройки для устройств Bluetooth
Вы можете изменять разнообразные настройки
для использования устройств Bluetooth на экране
<Bluetooth Setup>.
1 Откройте экран <Bluetooth Setup>.
На экране Home:
• Вы также можете отобразить экран
<Bluetooth Setup> нажатием [ ] на
экране управления телефоном. (стр.31)
2 Выполните конфигурацию настроек
Bluetooth.
❏Элементы настройки
<Paired Device
List>
Нажмите [Enter], чтобы
отобразить список
зарегистрированных
устройств. Вы можете
подключить устройство или
удалить зарегистрированные
устройства. (стр.29)
<PIN Code> Изменение PIN-кода устройства.
(стр.28)
<Device
Name>
Отображение названия
устройства для отображения на
устройстве Bluetooth —
KW-V****.
<Device
Address>
Отображение МАС-адреса
устройства.
<Auto
Connect>
• On (По умолчанию): При
включении устройства
автоматически
устанавливается соединение с
последним подсоединенным
устройством Bluetooth.
• Off: Отмена.
<HF/Audio
Output>
Выберите динамики,
используемые для Bluetooth (для
использования как с телефоном,
так и с аудиопроигрывателем).
• Front: Только передние
динамики.
• All (По умолчанию): Все
динамики.
<Auto
Answer>
• On: Аппарат автоматически
отвечает на входящие вызовы
в течение 5 секунд.
• Off (По умолчанию):
Устройство не отвечает
автоматически на вызовы.
Ответ необходимо выполнять
вручную.
<Auto P airing> • On (По умолчанию):
Установление сопряжения
автоматически с
подключенным устройством
iOS (например, iPhone), даже
если функция Bluetooth
отключена на устройстве. (В
зависимости от версии iOS,
автоматическое сопряжение
может не работать для
некоторых устройств.)
• Off: Отмена.
<Ring Mode> • System (По умолчанию):
Используется звук звонка,
установленный на данном
устройстве.
• Phone: Используется звук
звонка, установленный
на данном устройстве. (В
зависимости от мобильного
телефона данная функция
может не работать.)
<Ring Tone
Change>
Когда для параметра <Ring
Mode> установлено значение
<System>, выберите рингтон
для входящих звонков из
[Tone1] (По умолчанию), [Tone2],
[Tone3].
<Initialize> Удерживайте нажатой
кнопку [Enter], чтобы
инициализировать все
настройки, заданные для
мобильного телефона Bluetooth
и аудиопроигрывателя
Bluetooth.
KW-V_Mid_EU_RU_03.indb 34 1/29/2014 12:54:57 PM
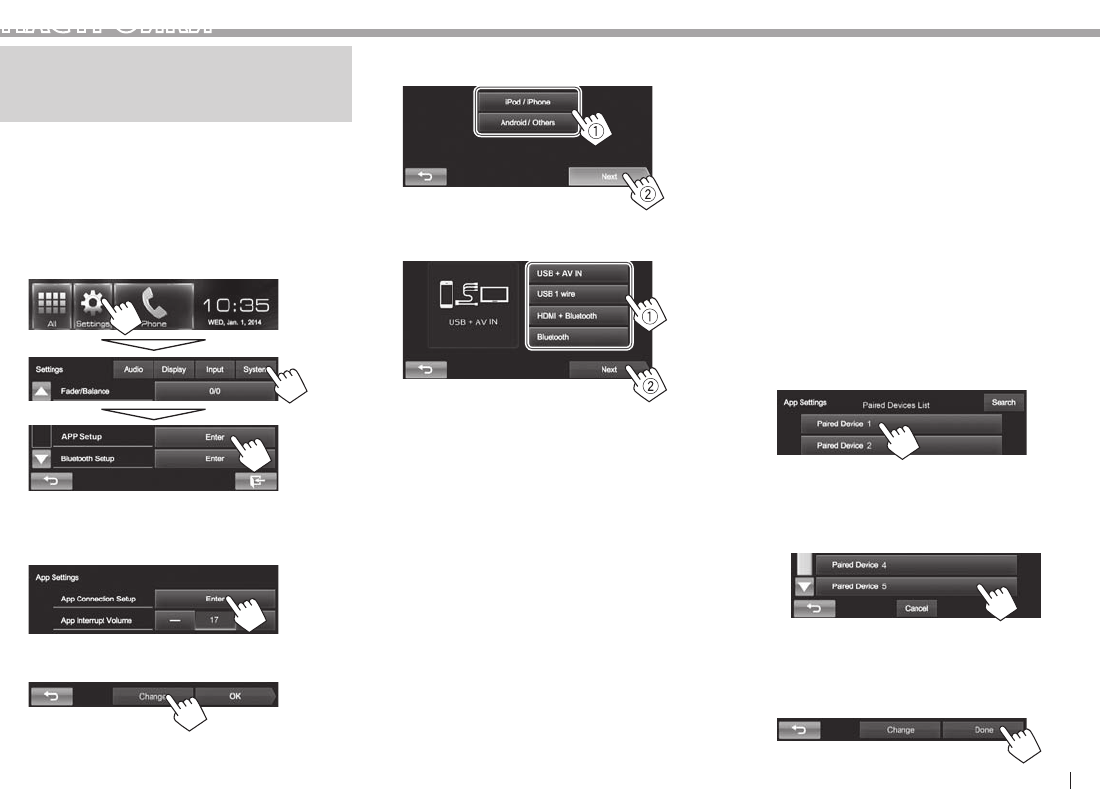
РУCCKИЙ 35
НАСТРОЙКИ
Настройки для использования
приложений на iPod/iPhone/
Android
Перед использованием приложений на iPod/
iPhone/Android выберите устройство для
использования и метод подключения.
1 Выполните сопряжение с устройством
iPod/iPhone/Android через Bluetooth.
(стр.27)
2 Откройте экран <App Settings>.
На экране Home:
• Если вы не можете выбрать [Enter] для
<App Setup>, выключите источник аудио/
видео. (стр. 6)
3
4 Проверьте текущее состояние
устройства, затем нажмите [Change].
• Если не требуется изменять настройку, нажмите
[OK], чтобы выйти из экрана настройки.
5 Выберите тип устройства (1), затем
нажмите [Next] (2).
6 Выберите метод подключения (1), затем
нажмите [Next] (2).
Для Android:
<HDMI/MHL
+ Bluetooth> Выбирайте эту опцию,
когда устройство Android
подсоединено одновременно
с помощью кабеля к входному
разъему HDMI/MHL и через
Bluetooth.
<Bluetooth> Выбирайте эту опцию, когда
устройство подсоединено
через Bluetooth.
Для iPod/iPhone:
<USB +
AV-IN> Выбирайте эту опцию, когда
iPod/iPhone подсоединен с
помощью KS-U59 (опционная
принадлежность).
<USB 1 Wire> Выбирайте эту опцию, когда
iPod/iPhone подсоединен
с помощью кабеля USB 2.0
(принадлежность iPod/
iPhone).
<HDMI +
Bluetooth> Выбирайте эту опцию, когда
iPod/iPhone подсоединен с
помощью кабеля HDMI KS-U60
(опционная принадлежность)
и кабеля USB 2.0
(принадлежность iPod/iPhone)
через адаптер Lightning-
Digital AV (принадлежность
iPod/iPhone).
<Bluetooth> Выбирайте эту опцию, когда
iPod/iPhone подсоединен
через Bluetooth.
• При выборе <USB + AV-IN> или <USB 1
wire> переходите к действию 8.
7 При выборе <HDMI + Bluetooth>
или <Bluetooth> в качестве способа
подключения, отображается список
сопряженных устройств. Выберите
целевое устройство.
• Если нужное устройство отсутствует в
списке, нажмите [Search], чтобы выполнить
поиск доступных устройств iPod/iPhone,
затем выберите целевое устройство на
экране <Available Devices>.
– Вы можете переходить на другие
страницы для отображения других
элементов, нажав [J]/[K].
– Чтобы отменить поиск, нажмите [Cancel].
8 Подтвердите настройки.
KW-V_Mid_EU_RU_03.indb 35 1/29/2014 12:54:57 PM
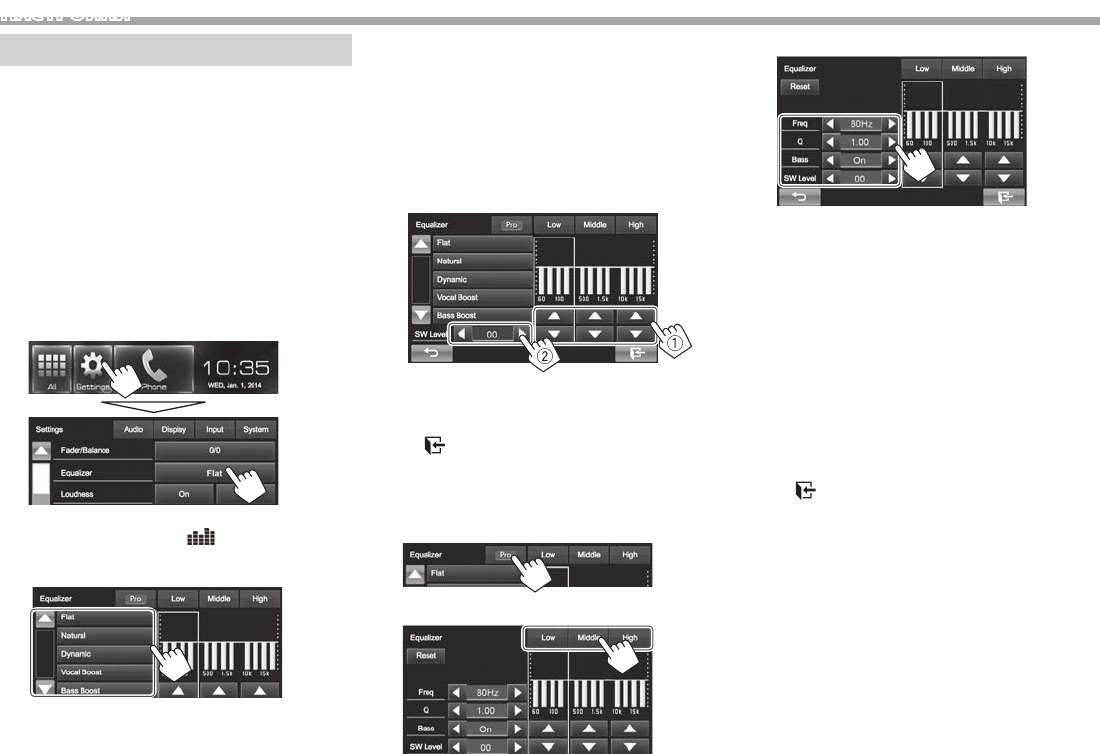
36
НАСТРОЙКИ
Настройки з вучания
❏ Использование зв укового
эквалайзера
• Настройка сохраняется в памяти для каждого
источника до выполнения новой настройки
звучания. Если в качестве источника выбран
диск, настройка сохраняется для каждой из
следующих категорий.
– DVD/DVD-VR/VCD
– CD
– DivX/MPEG1/MPEG2/MP3/WMA/WAV
• Настройка звучания недоступна, когда
источник аудио/видео выключен.
Выбор запрограммированного режима звучания
1 Откройте экран <Equalizer>.
На экране Home:
• Вы также можете отобразить экран
<Equalizer>, нажав [
р
р
р
] на экране
<Function Menu>. (стр.7)
2 Выберите режим звучания.
• Вы можете переходить на другие страницы
для отображения других элементов, нажав
[J]/[K].
Сохранение п ользовательских
настроек—Пользовательская настройка
предустановленного режима звучания
1 Выберите режим звучания. (См. столбец
слева.)
2 Настройте уровень громкости для
каждого диапазона (1), затем выберите
уровень громкости низкочастотного
динамика (2).
Настройки сохраняются, и включается режим
<User>.
• Чтобы завершить процедуру, нажмите
[ ].
Сохранение пользовательских настроек—
Точная настройка звучания
1 Выберите режим звука (см. левую
колонку), затем...
2 Выберите диапазон.
3 Отрегулируйте звук.
<Reset> Изменение уровня каждого
диапазона (Low/Middle/High)
на “0”.
<Freq> Выбор частоты.
<Q> Настройка полосы частот.*1
<Bass> Включение/отключение
низких частот.*2
<SW Level> Настройка уровня
низкочастотного динамика.
Настройки будут перезаписаны, если была
выполнена настройка <User> (см. столбец
слева) и включен режим <User>.
• Чтобы завершить процедуру, нажмите
[].
• Настройки сохраняются в памяти до
выполнения новой настройки звучания.
• Чтобы выполнить регулировки для других
диапазонов, повторите шаги 2 и 3.
*1 Зафиксировано для диапазона высоких частот “High”.
*2 Только для диапазона низких частот “Low”.
KW-V_Mid_EU_RU_03.indb 36 1/29/2014 12:54:58 PM
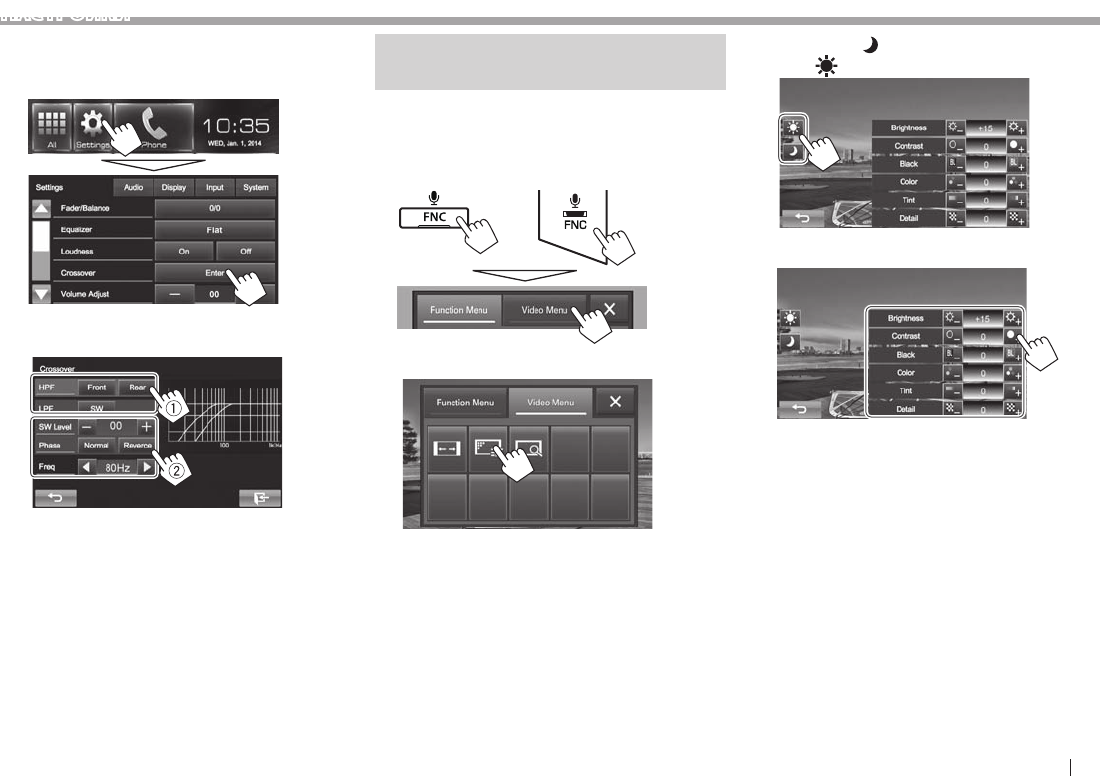
РУCCKИЙ 37
НАСТРОЙКИ
❏ Настройка частоты разделения каналов
1 Откройте экран <Crossover>.
На экране Home:
2 Выберите элемент для настройки (1),
затем выполните настройку (2).
<HPF>
Настройка разделения для передних
([Front]) или задних ([Rear]) динамиков
(фильтр высоких частот).
<LPF>
Настройка разделения для
низкочастотного динамика (фильтр
низких частот).
<SW
Level>
Настройка уровня громкости
низкочастотного динамика.
<Phase>
Выбор фазы низкочастотного
динамика.*
<Freq>
Настройка частоты разделения каналов.
* Нельзя выбрать, если для <Freq> установлено значение
<Through>.
Регулировка для
воспроизведения видео
❏ Настройка картинки
Вы можете настроить качество картинки.
1 Откройте экран <Video Menu>.
KW-V50BT KW-V30BT
2 Отобразите меню настройки.
3 Выберите [ ] (затемнение включено)
или [] (затемнение выключено).
4 Настройте картинку.
<Brightness> Настройка яркости. (от –15
до +15)
<Contrast> Настройка контрастности. (от
–10 до +10)
<Black> Настройка черного цвета. (от
–10 до +10)
<Color> Настройка цвета. (от –10 до
+10)
<Tint> Настройка интенсивности
цвета. (от –10 до +10)
<Detail> Настройка деталей. (от –2
до +2)
KW-V_Mid_EU_RU_03.indb 37 1/29/2014 12:54:59 PM
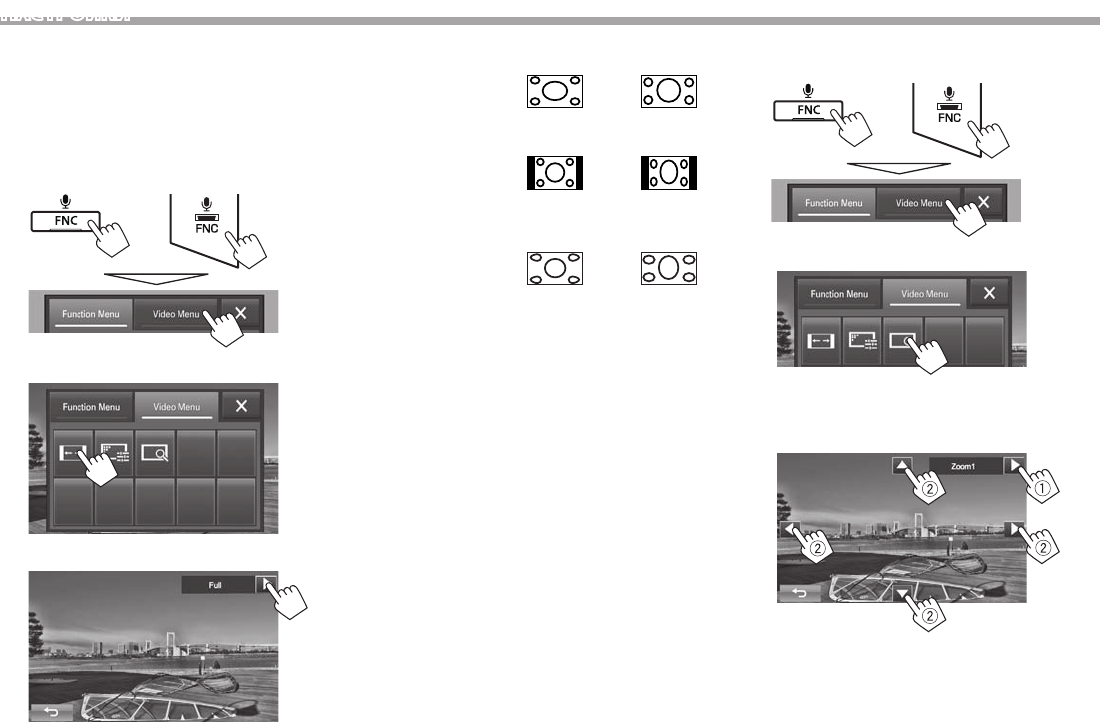
38
НАСТРОЙКИ
❏ Изменение форматного соотношения
Вы можете изменить форматное соотношение
воспроизводимого видеоизображения.
• Вы не можете изменять форматное
соотношение во время воспроизведения USB-
устройства.
1 Откройте экран <Video Menu>.
KW-V50BT KW-V30BT
2 Отобразите меню настройки.
3 Выберите форматное соотношение.
<Full>* Для изображений 16:9
Сигнал 4:3 Сигнал 16:9
<Regular>* Для изображений 4:3
Сигнал 4:3 Сигнал 16:9
<Panorama> Просмотр изображений 4:3 в
широкоэкранном режиме
Сигнал 4:3 Сигнал 16:9
<Zoom1> −
<Zoom3>
Изменение увеличения.
• Форматное соотношение
выбирается автоматически
в соответствии с
видеоисточником.
* Если видеоизображение DivX воспроизводится с настройкой
<Monitor Type>, установленной на значение [16:9]
(стр. 13), формат изображения не устанавливается правильно.
❏ Масштабирование картинки
Вы можете масштабировать картинку (<Full>,
от <Zoom1> до <Zoom3>). Масштабирование
доступно только во время воспроизведения
диска.
• Когда для параметра <Aspect> установлено
значение <Panorama> (см. столбец слева),
изображение масштабируется с форматным
соотношением настройки <Full>.
1 Откройте экран <Video Menu>.
KW-V50BT KW-V30BT
2 Отобразите меню настройки.
3 Измените коэффициент увеличения
(1), затем переместите рамку
масштабирования (2).
• [J][K][H][I] не отображаются, когда выбрано
<Full>.
• Для некоторых видеоисточников функция
масштабирования использоваться не может.
KW-V_Mid_EU_RU_03.indb 38 1/29/2014 12:55:00 PM
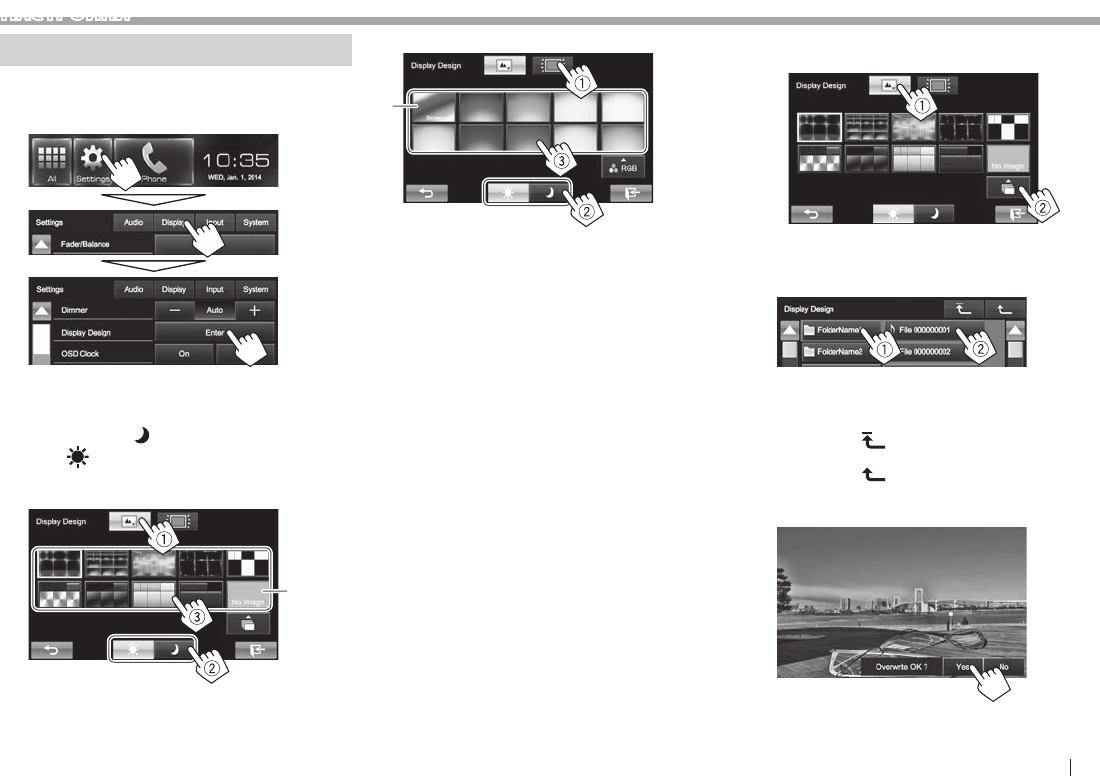
РУCCKИЙ 39
НАСТРОЙКИ
Изменение дизайна индикации
Вы можете изменить фон и цвет панели.
1 Отобразите экран <Display Design>.
На экране Home:
2 Выберите элемент, который вы хотите
изменить (1), выберите настройку
затемнения ([ ]: затемнение включено
или [ ]: затемнение выключено) (2),
затем выберите дизайн или цвет (3).
Чтобы изменить дизайн фона:
*1
Чтобы изменить цвет панели:
*2
• Вы также можете отрегулировать цвет сами.
Нажмите [RGB], чтобы отобразить экран
регулировки цвета, затем отрегулируйте
цвет.
*1 Предварительно сохраните в памяти собственную сцену.
(См. ниже.)
*2 Выбор этой опции постепенно изменяет цвет подсветки.
❏Сохранение любимого изображения
для фона
Вы можете задать ваше любимое изображение
(файл JPEG/PNG/BMP), хранящееся на
подключенном USB-устройстве.
• Используйте файл JPEG/PNG/BMP с
разрешением 800 x 480 пикселей.
• Цвет захваченной картинки может выглядеть
отличным от цвета исходного изображения.
1 Подсоедините USB-устройство, на
котором хранится изображение. (стр.48)
2 Отобразите экран <Display Design>.
(См. столбец слева.)
3 Откройте экран <User Background File
Select>.
4 Выберите файл для использования в
качестве фонового изображения (1),
затем подтвердите выбор (2).
• Вы можете переходить на другие страницы
для отображения других элементов, нажав
[J]/[K].
• Нажмите [], чтобы вернуться в корневую
папку.
• Нажмите [], чтобы вернуться на более
высокий уровень.
5 Подтвердите выбор.
Имеющееся изображение заменяется на новое.
• Нажмите [No], чтобы вернуться к
предыдущему экрану.
KW-V_Mid_EU_RU_03.indb 39 1/29/2014 12:55:01 PM
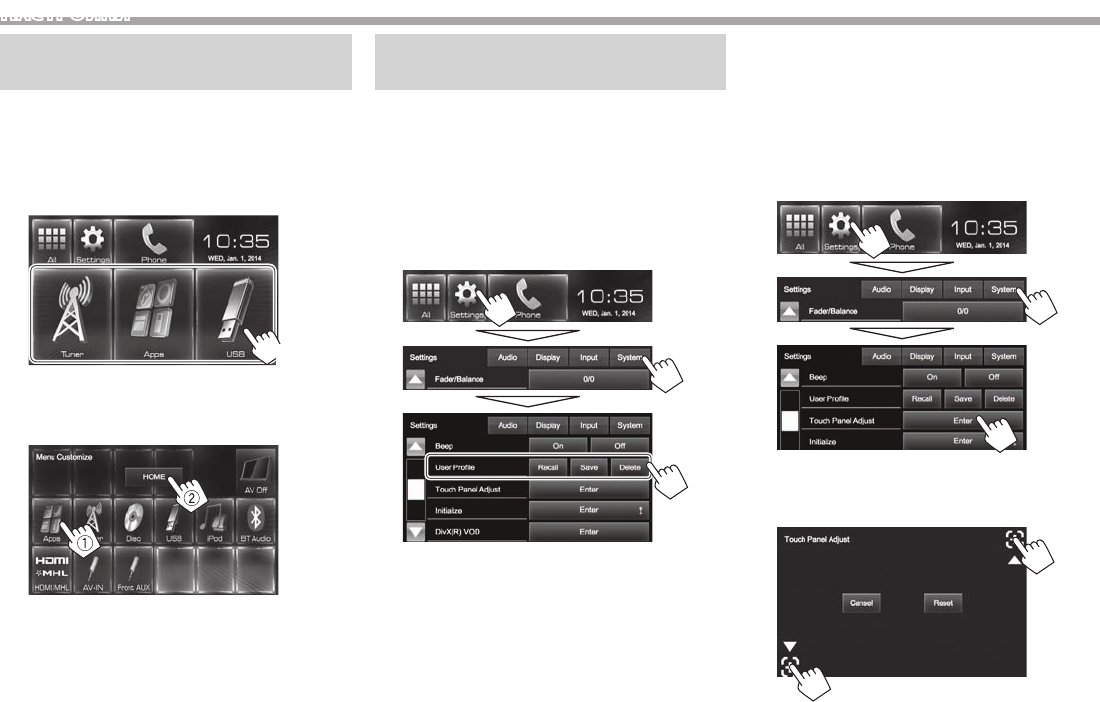
40
НАСТРОЙКИ
Пользовательская н астройка
экрана Home
Вы можете организовать элементы для
отображения на экране Home.
1 Откройте экран <Menu Customize>.
На экране Home:
Нажмите и удерживайте значок, который вы
хотите заменить.
(Удерживать)
2 Выберите элемент, который вы хотите
отобразить в позиции, выбранной в
действии 1 (1), затем нажмите [HOME].
• Повторите эту процедуру, чтобы разместить
значки для других элементов.
Пользовательская настройка
системных параметров
❏ Запоминание/вызов из памяти настроек
Вы можете сохранить следующие настройки в памяти:
• Настройки на экране <Settings>: Fader/
Balance, Equalizer, Loudness, Crossover
(настроек <HPF>/<LPF>/<SW Level>), Volume
Adjust, Speaker Select, Display Design
• Настройки для “AV-IN”: AV-IN Name
На экране Home:
• Последовательно нажимайте [
K
], чтобы
переключать страницы на экране меню
<System>.
[Recall]
Вызов сохраненных в памяти настроек.
[Save]
Сохранение в памяти текущих
настроек.
[Delete]
Удаление сохраненных в памяти
настроек.
Появляется сообщение для подтверждения.
Нажмите [Yes].
❏ Регулировка позиции касания
Вы можете отрегулировать позицию касания
на сенсорной панели, если позиция касания и
выполняемая операция не совпадают.
1 Отобразите экран <Touch Panel Adjust>.
На экране Home:
• Последовательно нажимайте [K], чтобы
переключать страницы на экране меню
<System>.
2 Коснитесь центра меток в нижней левой
и в верхней правой части экрана, как
показано ниже.
• Чтобы сбросить позицию касания, нажмите
[Reset].
• Для отмены текущей операции нажмите
[Cancel].
KW-V_Mid_EU_RU_03.indb 40 1/29/2014 12:55:03 PM
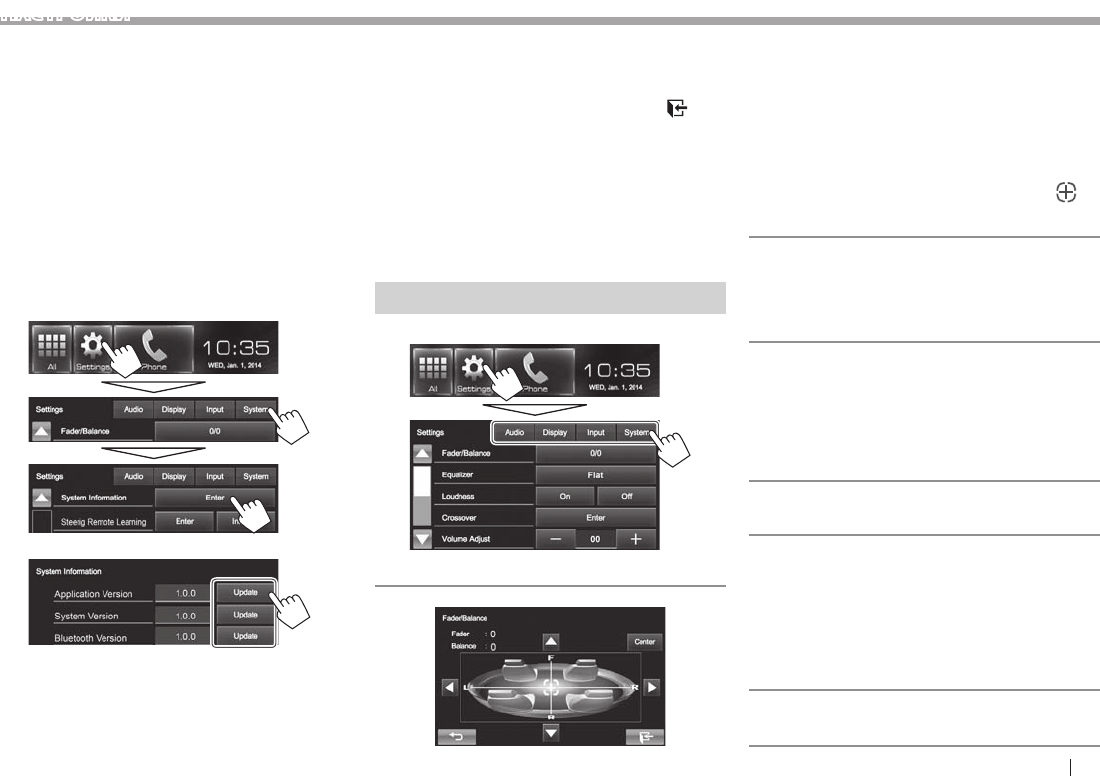
РУCCKИЙ 41
НАСТРОЙКИ
❏ Обновление системы
Вы можете выполнить обновление системы,
подсоединив USB-устройство, содержащее файл
обновления.
• Для обновления системы посетите
<http://www.jvc.net/cs/car/>.
1 Создайте файл обновления, скопируйте
его на USB-устройство и подсоедините
его к данному устройству.
• Чтобы подсоединить USB-устройство, см.
на стр.48.
2
Отобразите экран
<System Information>.
На экране Home:
• Последовательно нажимайте [K], чтобы
переключать страницы на экране меню
<System>.
3
<Application
Version> Обновление программного
обеспечения системы.
<System
Version> Обновление системы.
<Bluetooth
Version> Обновление программного
обеспечения Bluetooth.
Это может занять некоторое время.
Если обновление успешно завершится,
отобразится сообщение “Update Completed”.
Перенастройте приемник.
• Чтобы завершить процедуру, нажмите [ ].
• Если при выполнении обновления произойдет
ошибка, выключите и снова включите питание,
затем попробуйте выполнить обновление еще
раз.
• Даже если вы выключили питание во
время выполнения обновления, вы можете
возобновить выполнение обновления после
включения питания. Обновление будет
выполняться с самого начала.
Элементы меню настройки
❏Отображение экрана меню <Setup>
❏Экран настройки <Audio>
<Fader/Balance>
Fader: Настройка баланса выходного сигнала для
передних и задних динамиков.
• от F6 до R6 (По умолчанию: 0)
– При использовании системы с двумя
динамиками установите для микшера
среднее значение (0).
Balance: Настройка баланса выходного сигнала
для левых и правых динамиков.
• от L6 до R6 (По умолчанию: 0)
Нажмите [J]/[K]/[H]/[I] или перетащите [],
чтобы выполнить настройку.
– Чтобы очистить настройку, нажмите [Center].
<Equalizer>
Изменение режима звучания или настройка и
сохранение настроек эквалайзера для каждого
источника. (стр.36)
• Flat (По умолчанию)/Natural/Dynamic/Vocal
Boost/Bass Boost/Vibrant/User
<Loudness>
Вы можете включать или выключать усиление
звука.
• On (По умолчанию): Увеличьте низкие и
высокие частоты для получения хорошо
сбалансированного звучания при низком
уровне громкости.
• Off: Отмена.
<Crossover>
Настройка частоты разделения каналов.
(стр.37)
<Volume Adjust>
Настройка и сохранение автоматической
настройки уровня громкости для каждого
источника. (Для дисков настройка сохраняется
для каждой из следующих категорий: DVD/DVD-
VR/VCD, CD и DivX/MPEG1/MPEG2/MP3/WMA/WAV.)
Уровень громкости автоматически увеличивается
или уменьшается при смене источника.
• от –15 до +6 (По умолчанию: 00)
<Speaker S elect>
Выбор размера подсоединенного динамика.
• Standard (По умолчанию)/Narrow/Middle/Wide
KW-V_Mid_EU_RU_03.indb 41 1/29/2014 12:55:04 PM
42
НАСТРОЙКИ
❏Экран настройки <Display>
• Вы также можете отобразить экран настройки
<Display>, нажав [ ] на экране <Function
Menu>. (стр. 7)
<Dimmer>
• Auto (По умолчанию): Затемнение экрана и
подсветки кнопок при включении фар.
• On: Включение затемнения.
• O: Отмена.
>ngiseD yalpsiD<
Измените дизайн индикации (фон и цвет панели).
<OSD Clock>
• On: Отображение часов во время
воспроизведения источника видео.
• O (По умолчанию): Отмена.
>noitartsnomeD<
• On (По умолчанию): Включение демонстрации
на экране.
• O: Отмена.
<Scroll>
• Auto: Повтор прокрутки.
• Once (По умолчанию): Однократная прокрутка
отображаемой информации.
• O: Отмена.
При касании информационной строки
выполняется прокрутка текста вне зависимости
от данной настройки.
<GUI Adjust>
Настройка яркости и черного цвета экрана.
Нажмите [Enter], чтобы отобразить экран
настройки, выберите [ ] (затемнение включено)/
[] (затемнение выключено), затем измените
следующие настройки:
• Brightness: Настройка яркости.
– от –15 до +15 (По умолчанию: 00 для
включенного затемнения/+15 для
выключенного затемнения)
• Black: Настройка черного цвета.
– от –10 до +10 (По умолчанию: 00)
❏Экран настройки <Input>
>tupnI aremaC<
• On (По умолчанию): Отображение картинки
с камеры заднего вида при переключении
коробки передач на задний ход (R).
• O: Выберите эту опцию, когда камера не
подсоединена.
❏Экран настройки <System>
>egaugnaL<
Выбор языка текста, используемого для
отображения информации на экране.
• English (По умолчанию)/Español/Français/
Deutsch/Italiano/Nederlands/Руccĸий/
Português/ / / /Türkçe/
/ /
• GUI Language: Выберите язык, используемый
для отображения кнопок управления и
элементов меню.
– English (По умолчанию)/Local (выбранный
выше язык)
<Calendar Setting>
<iPod Setup>
<APP Setup>
• APP Connection Setup: Конфигурация настроек
• APP Interrupt Volume: Регулировка уровня
приложения.
– от 00 до 35 (По умолчанию: 17)
>puteS htooteulB<
Задайте настройки для использования Bluetooth-
устройства, например для подсоединения и
<Beep>
• On (По умолчанию): Включение звука нажатия
кнопки.
• O: Отмена.
<User Prole>
Вы можете сохранять в памяти, вызывать из
памяти или очищать выполненные настройки.
>tsujdA lenaP hcuoT<
Регулировка позиции касания кнопок на экране.
<Initialize>
Инициализируйте все выполненные настройки.
Удерживайте [Enter] для инициализации
настроек.
• После инициализации настроек отрегулируйте
настройки на экране <Initial Settings>.
<DivX® VOD>
У данного устройства имеется собственный
регистрационный код. В целях охраны авторского
права при воспроизведении файла с записанным
регистрационным кодом выполняется
перезапись регистрационного кода устройства.
• Нажмите [Enter] для отображения информации.
• Для возврата к предыдущему экрану нажмите
[OK].
<System Information>
Отображение информации о версии
программного обеспечения. Вы можете обновить
<Steering Remote Learning>
Данная настройка не используется.
KW-V_Mid_EU_RU_03.indb 42 1/29/2014 12:55:04 PM
РУCCKИЙ 43
ПУЛЬТ ДИСТАНЦИОННОГО УПРАВЛЕНИЯ
Установка батарей
❏Установка батарей
R03/LR03/AAA
Вставьте аккумуляторные батареи в пульт
дистанционного управления, соблюдая
полярность (+ и –).
• При уменьшении радиуса действия или
эффективности пульта дистанционного
управления замените батареи.
V Предостережение:
• Неправильная замена батареи приводит к
опасности взрыва. Заменяйте на батареи только
того же или эквивалентного типа.
• Не подвергайте аккумуляторные батареи
действию повышенных температур: не
подвергайте их длительному воздействию
солнечных лучей, не бросайте в огонь и т.п.
Перед использованием пульта
дистанционного управления выполните
следующие действия:
• Направьте пульт дистанционного управления
непосредственно на телеметрический датчик
приемника.
• НЕ подвергайте телеметрический датчик
воздействию яркого света (прямых солнечных
лучей или искусственного освещения).
Операции с помощью пульта
дистанционного управления
(RM-RK256)
❏Основные функции кнопок
ATT Ослабление/восстановление
звука.
DISP На данном устройстве не
работает.
J/K
• Выбор
запрограммированных
радиостанций.
• Выбор названия/элемента/
папки.
/
• Автоматический поиск
радиостанций.
• Поиск радиостанций
вручную. (Удерживать)
• Выбор дорожки.
• Поиск назад/поиск вперед.
(Удерживать)
O/N
• Поиск назад/поиск вперед.
• DVD-Video/DVD-VR/
VCD: Медленное
воспроизведение (во время
паузы).
• DVD-VR/VCD: Медленное
воспроизведение назад не
работает.
VOL +/VOL –
• Настройка уровня звука.
• Функция “2nd VOL” не
работает для данного
устройства.
SOURCE Осуществляет выбор источника
звука.
I/WНачало воспроизведения или
пауза*.
PHONE/ Ответ на входящие вызовы.
BAND/o/
Выбор диапазонов частот.
Останов воспроизведения.
Завершение вызова.
Устанавливает паузу
воспроизведения звука через
интерфейс Bluetooth.
0 – 9
(стр.44)
• Ввод номера во время
удержания SHIFT.
• Функция “SETUP” не работает
для данного устройства.
1 – 6
Ввод номера
запрограммированной
радиостанции во время
удержания SHIFT.
ASPECT
Изменение форматного
соотношения.
Чтобы проверить текущую
настройку формата изображения,
выполните операции на
сенсорной панели. (стр.38)
RETURN Возврат к предыдущему экрану.
TOP M
(стр.44)
• Видео DVD-диск: Отображение
меню дисков.
• DVD-VR: Отображение экрана
оригинальной программы.
• VCD: Возобновление
воспроизведения PBC.
MENU
(стр.44)
• Видео DVD-диск: Отображение
меню дисков.
• DVD-VR: Отображение экрана
“Play List”.
• VCD: Возобновление
воспроизведения PBC.
KW-V_Mid_EU_RU_03.indb 43 1/29/2014 12:55:05 PM

44
ПУЛЬТ ДИСТАНЦИОННОГО УПРАВЛЕНИЯ
F/G/D/E
• Видео DVD-диск: Выбор или
выполнение настроек.
• DivX: Переход назад или вперед
приблизительно на 5 минут.
ENT Подтверждение выбора.
OSD/ На данном устройстве не
работает.
DUAL/ На данном устройстве не
работает.
SHIFT Функции с другими кнопками.
DIRECT/CLR
• При нажатии в сочетании с
кнопкой SHIFT переключение
в режим прямого поиска. (См.
столбец справа.)
• Удаление ошибочного ввода
при нажатии с кнопкой SHIFT.
• Функция “SURROUND”
не работает для данного
устройства.
* Не работает во время прослушивания аудиоустройства
Bluetooth.
❏ Прямой поиск элемента
Частота т юнера
1 Нажмите DIRECT, удерживая при этом SHIFT,
чтобы перейти в режим поиска.
2 Нажмите цифровые кнопки, удерживая при
этом SHIFT, чтобы ввести частоту.
• Чтобы удалить неправильный ввод, нажмите
CLR (очистить), удерживая при этом SHIFT.
3 Нажмите ENT для подтверждения ввода.
DVD-Video/DVD-VR/DivX/MPEG1/MPEG2/MP3/
WMA/VCD/CD
1 Нажмите DIRECT, удерживая при этом SHIFT,
чтобы перейти в режим поиска.
• При каждом нажатии DIRECT элемент для
поиска переключается.
2 Нажмите цифровую кнопку, удерживая при
этом SHIFT, чтобы выбрать желаемый элемент.
• Чтобы удалить неправильный ввод, нажмите
CLR (очистить), удерживая при этом SHIFT.
3 Нажмите ENT для подтверждения выбора.
❏ Разнообразные операции с дисками
Использование меню диска
• DVD-Video/DVD-VR
1 Для DVD Video нажмите TOP M или MENU.
Для DVD-VR нажмите...
• TOP M: Отображение оригинальной
программы
• MENU: Отображение списка
воспроизведения
2 Нажмите F/G/D/E, чтобы выбрать желаемый
элемент для воспроизведения.
3 Нажмите ENT для подтверждения выбора.
• Для диска VCD
Во время воспроизведения PBC...
1 Нажмите DIRECT, удерживая при этом SHIFT,
чтобы перейти в режим поиска.
2 Нажмите цифровую кнопку, удерживая при
этом SHIFT, чтобы выбрать элемент, который
вы хотите воспроизвести.
3 Нажмите ENT для подтверждения выбора.
• Для возврата к предыдущему экрану нажмите
RETURN.
Отмена воспроизведения PBC
1 Нажмите o, чтобы остановить
воспроизведение PBC.
2 Нажмите DIRECT, удерживая при этом SHIFT.
3 Нажмите цифровую кнопку, удерживая при
этом SHIFT, чтобы выбрать желаемую дорожку.
4 Нажмите ENT для подтверждения выбора.
• Для возобновления использования функции
PBC нажмите TOPM или MENU.
KW-V_Mid_EU_RU_03.indb 44 1/29/2014 12:55:05 PM
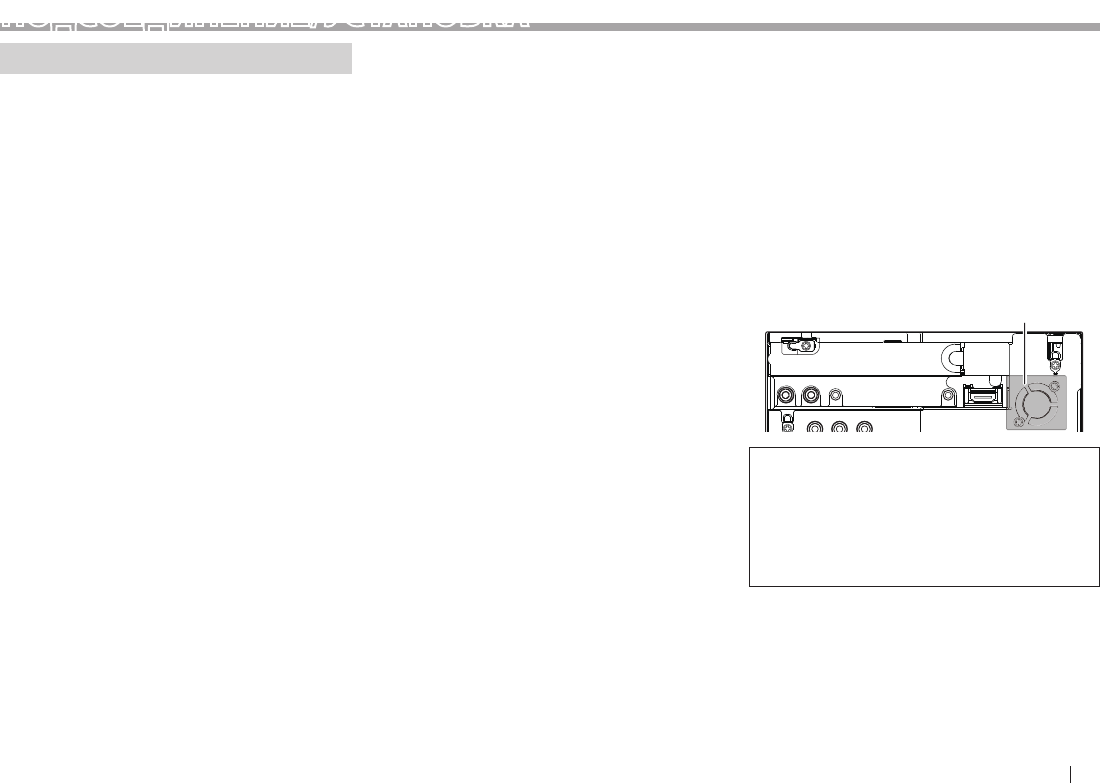
РУCCKИЙ 45
ПОДСОЕДИНЕНИЕ/УСТАНОВКА
Перед установкой устройства
V ПРЕДУПРЕЖДЕНИЯ
• Если вы подсоедините провод зажигания (красный)
и провод аккумуляторной батареи (желтый) к
шасси автомобиля (заземление), это может вызвать
короткое замыкание, что в свою очередь может
привести к возгоранию. Всегда подсоединяйте эти
провода к источнику питания, подающегося через
блок плавких предохранителей.
• Не отсоединяйте плавкий предохранитель
от провода зажигания (красный) и провода
аккумуляторной батареи (желтый). Линия подачи
питания должна подсоединяться к проводам через
плавкий предохранитель.
V Меры предосторожности при установке и
подсоединении
• Монтаж и подключение данного изделия
требуют навыков и опыта. Для обеспечения
максимальной безопасности предоставьте
выполнение монтажных и электротехнических
работ профессионалам.
• Обязательно заземлите устройство на
отрицательный контакт питания постоянного
тока напряжением 12 В.
• Не устанавливайте устройство в месте,
подверженном воздействию прямых солнечных
лучей, чрезмерно высоких температур
или влажности. Избегайте мест с высоким
содержанием пыли или могущие попасть под
брызги воды.
• Не используйте собственные винты. Используйте
только винты, прилагаемые в комплекте
поставки. Использование неправильных винтов
может привести к повреждению устройства.
• Если питание не включается (отображается
сообщение об ошибке “MISWIRING Check wiring
connection then reset unit”, “WARNING Check
wiring connection then reset unit”), возможно,
провод динамика закорочен или касается
шасси автомобиля, что вызвало срабатывание
защитной функции. Поэтому следует проверить
провод динамика.
• Если на замке зажигания вашего автомобиля
отсутствует позиция ACC, подсоедините провода
зажигания к источнику питания, который
можно включать и выключать с помощью
ключа зажигания. Если вы подсоедините
провод зажигания к источнику с постоянным
напряжением, например к проводам
аккумуляторной батареи, батарея может
разрядиться.
• Только для KW-V50BT:
Если консоль оснащена крышкой, обязательно
устанавливайте устройство таким образом,
чтобы панель монитора при закрытии и
открытии не сталкивалась с крышкой.
• Если плавкий предохранитель перегорит,
сначала убедитесь в том, что провода не
соприкасаются, вызывая короткое замыкание,
затем замените старый предохранитель на
новый того же номинала.
• Изолируйте неподсоединенные провода
с помощью виниловой ленты или другого
подобного материала. В целях предотвращения
короткого замыкания, не снимайте колпачки
на концах неподсоединенных проводов или
контактных разъемов.
• Подсоединяйте провода динамиков правильно
к соответствующим им контактным разъемам.
Совместное использование · проводов или
заземление их на какую-либо металлическую
часть в автомобиле может привести к
повреждению устройства или сбою в его работе.
• Если к системе подсоединяется только два
динамика, подсоединяйте соединители либо
к обоим выходным контактным разъемам для
передних динамиков, либо к обоим выходным
контактным разъемам для задних динамиков
(не смешивайте контактные разъемы для
передних и задних динамиков). Например,
если вы подсоединили соединитель ª левого
динамика к контактному выходному разъему
для переднего динамика, не подсоединяйте
соединитель · к выходному контактному
разъему для заднего динамика.
• После того как устройство будет установлено,
проверьте корректность работы стоп-сигналов,
указателей поворота, стеклоочистителей и
другого оборудования автомобиля.
• Выполняйте монтаж устройства таким образом,
чтобы монтажный угол не превышал 30°.
• При установке устройства в автомобиль не
нажимайте слишком сильно на поверхность
панели. Это может привести к царапинам,
повреждению или поломке.
• Данное устройство оснащено охлаждающим
вентилятором для снижения внутренней
температуры. Не устанавливайте устройство в
месте, где работа охлаждающего вентилятора
устройства может оказаться заблокирована.
Закрытие вентиляционных отверстий ухудшит
внутреннее охлаждение и приведет к поломке.
Охлаждающий вентилятор
V ПРЕДОСТЕРЕЖЕНИЕ
Устанавливайте данное устройство в консоль
вашего автомобиля.
Не касайтесь металлических частей данного
устройства во время и непосредственно
после завершения эксплуатации устройства.
Металлические части, например теплосъемник
и корпус могут нагреваться.
❏Прилагаемые принадлежности для
установки
1 Жгут проводки x 1
2 Декоративная панель x 1
3 Удлинительный провод x 1
4 Ключи для демонтажа x 2
5 Микрофон x 1
6 Крепеж для коннектора HDMI/MHL x 1
7 Винты для крепежа (M2.6 x 6 мм) x 1
KW-V_Mid_EU_RU_03.indb 45 1/29/2014 12:55:05 PM
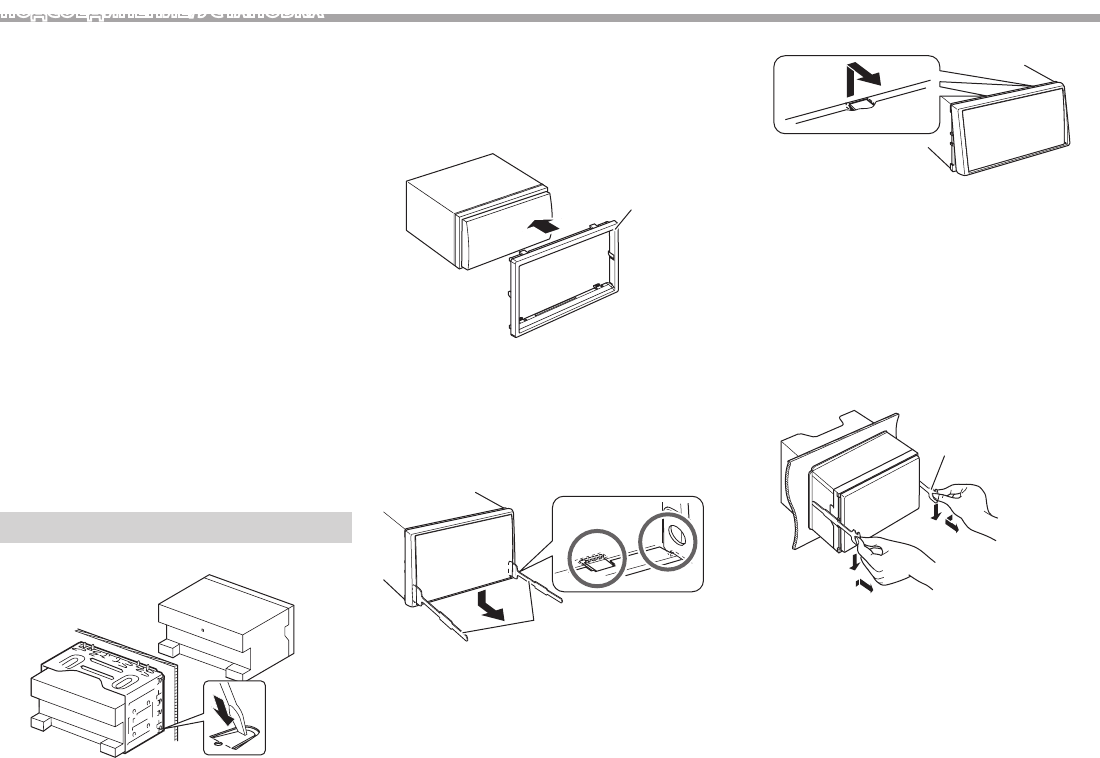
46
ПОДСОЕДИНЕНИЕ/УСТАНОВКА
❏Процедура установки
1 В целях предотвращения короткого
замыкания, извлеките ключ из
замка зажигания и отсоедините ·
аккумуляторной батареи.
2 Надлежащим образом выполните
проводные соединения для каждого
устройства.
3 Подсоедините провода динамиков из
жгута проводки.
4 Возьмите соединитель B жгута проводки
и подсоедините его к соединителю
динамика в автомобиле.
5 Возьмите соединитель A жгута проводки
и подсоедините его к соединителю
внешнего питания в автомобиле.
6 Подсоедините соединитель жгута
проводки к устройству.
7 Установите устройство в автомобиль.
8 Снова подсоедините · аккумуляторной
батареи.
9 Нажмите кнопку сброса настроек.
10 Выполните конфигурацию настроек
<Initial Setup>. (стр.4)
Установка/демонтаж устройства
❏Установка устройства
• Согните щитки монтажной муфты с помощью
отвертки или аналогичного инструмента и
установите ее на место.
❏Установка декоративной панели
Прикрепите декоративную панель (2).
2
❏Снятие декоративной панели
1 Зацепите захваты на ключе для
демонтажа (4) и снимите два фиксатора
в нижней части. Опустите рамку и
потяните ее вперед.
4
2 Отсоедините две верхние точки.
• Таким же образом рамку можно снять с верхней
части.
❏Демонтаж устройства
1 Снимите декоративную панель.
(См. столбец слева.)
2 Вставьте два ключа для демонтажа
(4), затем потяните их на себя, как это
показано на рисунке, таким образом,
чтобы можно было снять устройство.
4
• Соблюдайте осторожность, чтобы не получить
травмы от захватов на ключе для демонтажа.
KW-V_Mid_EU_RU_03.indb 46 1/29/2014 12:55:06 PM

РУCCKИЙ 47
Подсоединение соединителей ISO
Вам может потребоваться модифицировать
проводку прилагаемого жгута проводки,
как это показано на рисунке ниже.
ПОДСОЕДИНЕНИЕ/УСТАНОВКА
Подсоединение
❏ Подсоединение проводов к контактным разъемам
PARKING
BRAKE
REVERSE
GEAR
SIGNAL
Контакт
Цвет и функции соединителя A и B
A4 Желтый Батарея
A5 Синий с белой полосой Регулировка мощности
A6 Оранжевый с белой
полосой Затемнение
A7 Красный Зажигание (ACC)
A8 Черный Подсоединение заземления
B1 Фиолетовый Правый динамик
ª
(задний)
B2 Фиолетовый с черной
полосой Правый динамик
·
(задний)
B3 Серый Правый динамик
ª
(передний)
B4 Серый с черной полосой Правый динамик
·
(передний)
B5 Белый Левый динамик
ª
(передний)
B6 Белый с черной полосой Левый динамик
·
(передний)
B7 Зеленый Левый динамик
ª
(задний)
B8 Зеленый с черной полосой Левый динамик
·
(задний)
Красный
(Провод зажигания)
Устройство
Желтый
(Провод
аккумуляторной
батареи)
Автомобиль
Красный (A7)
Желтый (A4)
Проводка по умолчанию
Стр.49 Стр.49
Разъем USB:
Стр.48–49
Подключите антенный
кабель к разъему
антенны.
Предохранитель 10 А
Подсоедините к жгуту проводки лампы заднего
хода автомобиля при использовании опционной
камеры заднего вида.
Подсоедините к жгуту
проводки выключателя
обнаружения стояночного
тормоза автомобиля.
• Для обеспечения
максимальной безопасности
обязательно подсоединяйте
датчик парковки.
К адаптеру дистанционного управления OE, соответствующему
автомобилю
• Если никаких соединений не выполняется, не давайте кабелю выходить
из-под щитка.
Фиолетовый с белой полосой
(Провод датчика заднего
хода)
Светло-зеленый
(Провод датчика
парковки)
3
1
Голубой с желтой полосой (Провод рулевого пульта
дистанционного управления)
Желтый (Провод аккумуляторной батареи)
Красный (Провод зажигания)
Красный (A7)
Желтый (A4)
Соединитель A
Соединитель B
Стр.48–49
KW-V_Mid_EU_RU_03.indb 47 1/29/2014 12:55:06 PM
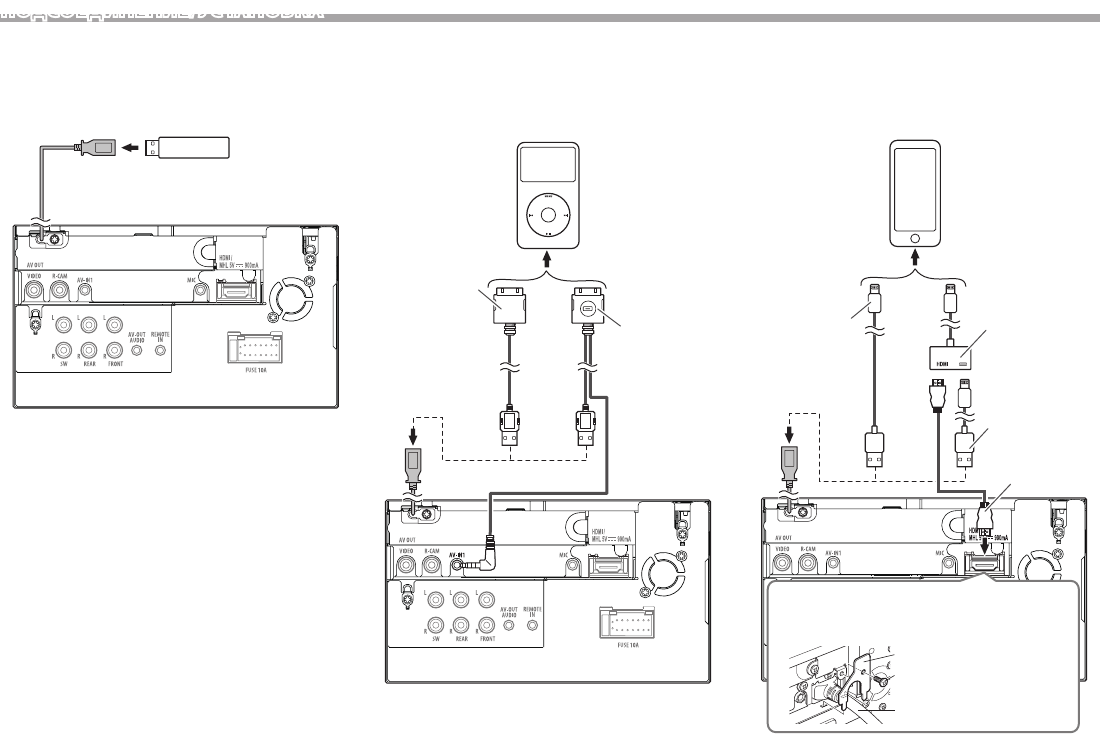
48
ПОДСОЕДИНЕНИЕ/УСТАНОВКА
❏ Подключение устройства USB
USB-устройство
(продается отдельно)
❏ Подключение iPod/iPhone
iPod/iPhone (кроме iPhone 5)/iPod touch
(пятое поколение)/iPod nano (седьмое
поколение) (продается отдельно)
KS-U59
(опционная
принадлежность)
Кабель USB 2.0
(принадлежность
iPod/iPhone)
iPhone 5/iPod touch (пятое поколение)/iPod
nano (седьмое поколение) (продается отдельно)
Адаптер
Lightning-Digital
AV
(принадлежность
iPod/iPhone)
Кабель USB 2.0
(принадлежность
iPod/iPhone) или
KS-U62 (опционная
принадлежность)
Кабель USB 2.0
(принадлежность
iPod/iPhone)
или KS-U62
(опционная
принадлежность)
KS-U60 (опционная
принадлежность)
Кабель HDMI/MHL
6
7
При подсоединении коннектора HDMI/MHL закрепите
кабель HDMI/MHL с помощью крепежа (6) и винта
(7).
KW-V_Mid_EU_RU_03.indb 48 1/29/2014 12:55:07 PM
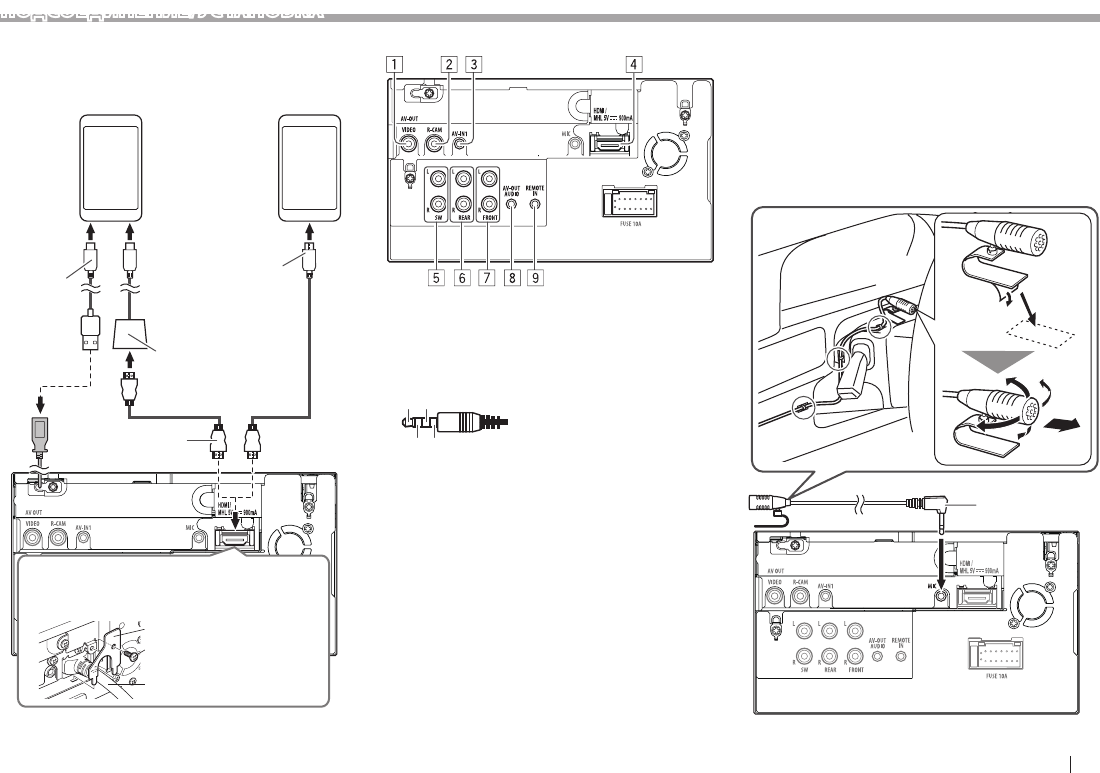
РУCCKИЙ 49
ПОДСОЕДИНЕНИЕ/УСТАНОВКА
❏ Подключение с мартфона
Android и т.п.
(с HDMI)
(продается отдельно)
Android и т.п.
(с MHL)
(продается отдельно)
Micro USB Micro HDMI (Type D)
Адаптер с Micro HDMI на
HDMI
(продается отдельно)
KS-U60 (опционная
принадлежность)
К
абель с Micro
USB на USB
(продается
отдельно)
KS-U61
(опционная
принадлежность)
Кабель HDMI/MHL
6
7
При подсоединении коннектора HDMI/MHL закрепите
кабель HDMI/MHL с помощью крепежа (6) и винта
(7).
❏ Подключение внешних устройств
1 AV-OUT/Выход видеосигнала (Желтый)
2 Вход с камеры заднего вида (Желтый)
3 Вход аудио/видео (AV-IN1)
• Подключайте 4-полюсный мини-штекер
следующего типа:
1
24
31 Левый аудио
2 Правый аудио
3 Заземление
4 Композитный видео
4 Вход HDMI/MHL
5 Выход предусилителя низкочастотного
динамика (монофонический выход)
• Левый выход сабвуфера (Белый)
• Правый выход сабвуфера (Красный)
6 Задний предвыход
• Левый аудиовыход (Белый)
• Правый аудиовыход (Красный)
7 Передний предвыход
• Левый аудиовыход (Белый)
• Правый аудиовыход (Красный)
8 AV-OUT/Аудиовыход (мини-разъем ø3,5)
Мини-разъем стереофонического типа без
сопротивления
9 Вход рулевого пульта дистанционного
управления
❏ Подсоединение микрофона для
Bluetooth
Подсоедините микрофон (5) к разъему MIC.
• Чтобы установить микрофон, снимите липкую
ленту, зафиксируйте в позиции установки,
затем отрегулируйте направление микрофона
в сторону водителя. После установки закрепите
кабель микрофона к автомобилю с помощью
зажимов (продаются отдельно).
5
KW-V_Mid_EU_RU_03.indb 49 1/29/2014 12:55:08 PM

50
СПРАВОЧНАЯ ИНФОРМАЦИЯ
Обслуживание
❏Предостережение, касающееся
чистки устройства
Не используйте какие-либо растворители
(например, разбавитель, бензин и т.д.), моющие
средства или инсектициды. Это может повредить
монитор или устройство.
Рекомендуемый способ чистки:
Осторожно протирайте панель мягкой сухой
тканью.
❏Конденсация влаги
Влага может конденсироваться на линзе внутри
устройства в следующих случаях:
• После включения автомобильного
обогревателя.
• При повышении влажности внутри автомобиля.
Это может привести к неисправной работе
устройства. В этом случае извлеките диск и
оставьте приемник включенным на несколько
часов, чтобы испарилась влага.
❏Как обращаться с дисками
• При извлечении диска из футляра, нажмите на
центральный держатель футляра и снимите
диск, удерживая его за края.
– Всегда удерживайте диск за края. Не
прикасайтесь к поверхности, на которой
находится запись.
• Чтобы поместить диск в футляр, аккуратно
установите диск на центральный держатель
(стороной с изображением вверх).
– После прослушивания обязательно
помещайте диски в их футляры.
❏Хранение дисков в чистом виде
Воспроизведение грязного диска может быть
некорректным.
Если диск загрязнится, протрите его мягкой
тканью по прямой линии от центра к краю.
• Не используйте растворители (например,
обычное средство для чистки кассет,
распыляемые средства, разбавитель, бензин и
т.д.) для чистки дисков.
❏Прослушивание новых дисков
Вблизи внутреннего и внешнего краев новых
дисков иногда бывают грубые выступы. Такой
диск не может быть загружен в приемник.
• Чтобы удалить такие пятна, потрите их
карандашом или шариковой ручкой и т.д.
Дополнительная информация
❏Воспроизведение файла
Воспроизведение файлов DivX (только для
дисков)
• Данное устройство может воспроизводить
файлы DivX с расширениями <.divx>, <.div> или
<.avi> (не зависит от регистра).
• Звуковой поток должен соответствовать
характеристикам MP3 или Dolby Digital.
• Файл, закодированный в режиме
чересстрочной развертки, может
воспроизводиться неправильно.
• Максимальная скорость передачи для
видеосигналов (средняя) составляет 4 Мбит/с.
Воспроизведение файлов MPEG1/MPEG2
• Данное устройство может воспроизводить
файлы MPEG1/MPEG2 с расширениями <.mpg>
или <.mpeg>.
• Формат потока должен быть совместим с
системным/программным потоком MPEG.
Поддерживаются файлы в формате MP@ML
(Основной профиль и основной уровень)/
SP@ML (Простой профиль и основной уровень)/
MP@LL (Основной профиль и низкий уровень).
• Звуковые потоки должны соответствовать
характеристикам MPEG1 Audio Layer-2 или
Dolby Digital.
• Максимальная скорость передачи для
видеосигналов (средняя) составляет 4 Мбит/с.
KW-V_Mid_EU_RU_03.indb 50 1/29/2014 12:55:09 PM

РУCCKИЙ 51
СПРАВОЧНАЯ ИНФОРМАЦИЯ
Воспроизведение файлов JPEG/BMP/PNG
(только для USB)
• Данное устройство может воспроизводить
файлы изображений с расширениями <.jpg>,
<.jpeg>, <.bmp> или <.png>.
• Данное устройство может воспроизводить
файлы, имеющие разрешение от 32 x 32 до
8 192 x 7 680 (PNG: 800 x 480).
В зависимости от разрешения может
потребоваться более продолжительное время
для отображения файла.
• Данное устройство может воспроизводить
файлы JPEG основного формата. Файлы JPEG
прогрессивного формата или формата “без
потерь” невозможно воспроизвести.
Воспроизведение аудиофайлов (для дисков:
MP3/WMA/AAC, для USB: MP3/WMA/WAV/AAC/
FLAC)
• Данный приемник может воспроизводить
файлы с расширением <.mp3>, <.wma>, <.wav>,
<.m4a> или <.flac> (не зависит от регистра).
• Файлы отображаются на данном
устройстве в соответствии со следующими
характеристиками:
– Cкорость передачи данных:
MP3: 8 кбит/с – 320 кбит/с
WMA: 48 кбит/с – 192 кбит/с
AAC: Для дисков: 16 кбит/с – 320 кбит/с
Для USB: 32 кбит/с – 320 кбит/с
– Частота дискретизации:
MP3: 8 кГц – 48 кГц
WMA: Для дисков: 32 кГц – 48 кГц
Для USB: 8 кГц – 48 кГц
WAV: 44,1 кГц
AAC: 16 кГц – 48 кГц
FLAC : 8 кГц – 48 кГц
• Данное устройство может отображать теги ID3
версии 1.0/1.1/2.2/2.3/2.4 (для формата MP3).
• Устройство также может отображать теги WMA/
AAC/FLAC.
• Данный приемник может воспроизводить
файлы, записанные в режиме VBR (переменная
скорость в битах).
• Для файлов,записанных в режиме VBR, по-
разному отображается время от начала
воспроизведения.
• Данное устройство не может воспроизводить
следующие файлы:
– файлы MP3, закодированные в форматах MP3i
и MP3 PRO;
– файлы MP3, закодированные в формате Layer
1/2;
– файлы WMA, закодированные в формате “без
потерь”, профессиональном и голосовом
форматах;
– файлы WMA, основой которых служит формат,
отличный от формата Windows Media® Audio;
– файлы WMA/AAC, защищенные от
копирования по методу DRM.
– Файлы AAC, закодированные каким-либо
другим приложением, кроме iTunes.
– Файлы AAC, защищенные от копирования
с помощью FairPlay (за исключением
хранящихся на iPod).
– файлы, содержащие данные, например, AIFF,
ATRAC3 и т.д.
• Данное устройство может отображать картинки
обложки, отвечающие указанным ниже
требованиям:
– Размер картинки: разрешение от 32 x 32 до
1 232 x 672
– Размер данных: менее 650 КБ
– Тип файла: JPEG/PNG/BMP
Воспроизведение файлов H.264/WMV (только
для USB)
• Данное устройство может воспроизводить
файлы с расширениями <.mp4>, <.wmv>, <.avi>
или <.mkv>.
• Формат потока должен быть совместим с
системным/программным потоком MPEG.
❏Воспроизведение диска
Типы воспроизводимых дисков
Тип диска Формат записи,
тип файла и т.д.
DVD
• Данное устройство не
может воспроизводить
или испускать звук DTS.
Видео DVD-диск*1
DVD-диск однократной
или многократной записи
(DVD-R/-RW *2, +R/+RW *3)
• Видео DVD-диск: UDF-
мост
• DVD-VR
• DivX/MPEG1/MPEG2/MP3/
WMA/AAC: ISO 9660 level1,
level2, Romeo, Joliet
• Видео DVD-диск
• DVD-VR*4
• DivX/MPEG1/
MPEG2
• MP3/WMA/AAC
Dual Disc Сторона DVD
CD/VCD • VCD (Видео
компакт-диск)
• Музыкальный
компакт-диск/
диск для CD-
текста (CD-DA)
Компакт-диск
однократной или
многократной записи
(CD-R/-RW)
• ISO 9660 level1, level2,
Romeo, Joliet
• VCD (Видео
компакт-диск)
• CD-DA
• DivX/MPEG1/
MPEG2
• MP3/WMA/AAC
*
1
Код региона DVD: 2
Если установить видео DVD-диск с неправильным кодом региона, на экране
отображается сообщение “Region Code Error”.
*
2
Диски DVD-R, записанные в формате “multi-border”, тоже воспроизводятся
(кроме двухслойных дисков). Двухслойные диски DVD-RW не воспроизводятся.
*
3
Возможно воспроизведение завершенных дисков +R/+RW (только в
видеоформате). “DVD” выбирается в качестве типа диска когда загружается
диск +R/+RW. Двухслойные диски +RW не воспроизводятся.
*
4
Данное устройство не может воспроизводить содержимое, защищенное
с помощью CPRM (Content Protection for Recordable Media — защита
содержимого для перезаписываемых носителей).
KW-V_Mid_EU_RU_04.indb 51 1/29/2014 6:10:31 PM

52
СПРАВОЧНАЯ ИНФОРМАЦИЯ
Диски, не поддерживаемые для
воспроизведения
• Ниже указаны типы и форматы дисков, не
поддерживаемых для воспроизведения:
– Диски DVD-Audio/DVD-ROM
– MPEG4/WAV/JPEG/FLAC/MKV/DVD+VR/DVD-
RAM, записанные на DVD-R/RW или +R/+RW
– SVCD (Super Video CD), CD-ROM, CD-I (CD-I
Ready), DTS-CD
– MPEG4/WAV/JPEG/FLAC/MKV, записанные на
CD-R/RW
• Диски некруглой формы.
• Диски с окрашенной записываемой
поверхностью или грязные диски.
• Записываемые/перезаписываемые диски,
которые не были финализированы.
• Диски диаметром 8 см. Попытка вставить
диск с помощью адаптера может привести к
неисправности.
Воспроизведение дисков DualDisc
Сторона диска “DualDisc”, отличная от DVD, не
совместима со стандартом “Compact Disc Digital
Audio”. Поэтому, возможно, не рекомендуется на
данном устройстве использовать не-DVD сторону
диска DualDisc.
Воспроизведение дисков однократной или
многократной записи
• Данное устройство может распознавать до
64770 файлов и 254 папок (до 255 файлов в
папке).
• Используйте только “завершенные” диски.
• На данном приемнике возможно
воспроизведение дисков с несколькими
сеансами записи; однако, незавершенные
сеансы будут пропускаться при
воспроизведении.
• Некоторые диски или файлы могут не
воспроизводиться из-за своих характеристик
или условий записи.
• Может отображаться до 64 знаков информации
о диске.
❏О данных, хранящихся на USB-
устройстве/iPod/iPhone
• Мы не несем ответственности за любую потерю
данных на iPod/iPhone или запоминающем
устройстве USB большой емкости в процессе
использования данного устройства.
❏ Воспроизведение USB-устройства
Воспроизводимые файлы на USB-устройстве
• Данное устройство может воспроизводить
файлы следующих типов, сохраненные на
запоминающем устройстве USB большой
емкости.
– JPEG/BMP/PNG/MPEG1/MPEG2/MP3/WMA/
WAV/AAC/FLAC/MPEG4/ H.264/MPEG4 AVC /
WMV (VC-1)
• Данное устройство может распознавать до
5000 файлов и 250 папок (до 999 файлов в
папке).
• Во избежание потери данных убедитесь в том,
что создана резервная копия всех важных
данных.
Замечания по использованию USB-устройства
• Приемник может неправильно воспроизводить
файлы с устройства USB при использовании
удлинителя USB.
• Устройства USB, оснащенные специальными
функциями, такими как безопасность данных,
нельзя использовать с приемником.
• Не используйте устройство USB с 2 или более
разделами.
• В зависимости от конфигурации устройств
USB и коммуникационных портов некоторые
устройства USB могут быть подключены
неправильно, или соединение может быть
потеряно.
• Данное устройство не распознает
запоминающие устройства USB с номинальным
напряжением, отличным от 5 В, и не допускает
превышение 1 А.
• Данное устройство может не распознать карту
памяти, вставленную в USB-устройство чтения
карт.
• К приемнику можно подключить только одно
запоминающее устройство USB. Не используйте
концентратор USB.
• При подключении с помощью кабеля USB
используйте кабель USB 2.0.
• Максимальное количество символов
(1-байтные символы):
– Имена папок: 128 символа
– Имена файлов: 128 символа
• Не используйте устройство USB, если это может
помешать безопасному вождению.
• Не отсоединяйте и не подсоединяйте повторно
устройство USB, когда на дисплее отображается
сообщение “Now Reading...”.
• Электростатический разряд при
подсоединении устройства USB может вызвать
отклонения в воспроизведении устройства. В
этом случае отсоедините устройство USB, затем
выполните сброс настроек данного устройства
и устройства USB.
• При работе с некоторыми видами устройств
USB возможна неправильная работа и сбои
питания.
• Во избежание повреждения не оставляйте
устройство USB в автомобиле и не подвергайте
его воздействию прямых солнечных лучей или
высокой температуры.
KW-V_Mid_EU_RU_03.indb 52 1/29/2014 12:55:09 PM

РУCCKИЙ 53
СПРАВОЧНАЯ ИНФОРМАЦИЯ
❏Замечания по воспроизведению
iPod/iPhone
• iPod/iPhone, которые могут подсоединяться к
данному устройству:
Made for
– iPod with video
– iPod classic
– iPod nano (7th Generation)
– iPod nano (6th Generation)
– iPod nano (5th Generation)
– iPod nano (4th Generation)
– iPod nano (3rd Generation)
– iPod touch (5th Generation)
– iPod touch (4th Generation)
– iPod touch (3rd Generation)
– iPod touch (2nd Generation)
– iPod touch (1st Generation)
– iPhone 5
– iPhone 4S
– iPhone 4
– iPhone 3GS
– iPhone 3G
– iPhone
• При управлении iPod/iPhone некоторые
операции могут выполняться некорректно или
не так, как ожидалось. В этом случае см. веб-
узел компании JVC: <http://www.jvc.net/cs/car/>
• Для некоторых моделей iPod/iPhone работа
может осуществляться с отклонениями или
становиться нестабильной во время операций.
В этом случае отсоедините устройство iPod/
iPhone и проверьте его состояние.
Если работа не улучшится или замедлится,
выполните сброс настроек iPod/iPhone.
• При включении этого устройства iPod/iPhone
заряжается через устройство.
• Текстовая информация может отображаться
неправильно.
❏ Коды языков (при выборе языков DVD/DVD-VR)
AA Афарский GL Галисийский MI Маори SO Сомали
AB Абхазский GN Гуарани MK Македонский SQ Албанский
AF Африкаанс GU Гуярати ML Малайялам SR Сербский
AM Амхарский HA Хауса MN Монгольский SS Cиcвaзи
AR Арабский HI Хинди MO Молдавский ST Сесотхo
AS Ассамский HR Хорватский MR Маратхи SU Суданский
AY Аймара HU Венгерский MS Малайский (MAY) SW Суахили
AZ Азербайджанский HY Армянский MT Мальтийский TA Тамильский
BA Башкирский IA Интерлингва MY Бирманский TE Телугу
BE Белорусский IE Интерлингво NA Науруанский TG Таджикский
BG Болгарский IK Инупиак NE Непальский TH Тайский
BH Бихарийский IN Индонезийский NO Норвежский TI Тигриния
BI Бисламийский IS Исландский OC Окитан TK Туркменский
BN Бенгальский, бангла IW Иврит OM (Афан) Оромо TL Тагальский
BO Тибетский JA Японский OR Ория TN Сетсвана
BR Бретонский JI Идиш PA Panjabi TO Тонга
CA Каталанский JW Яванский PL Польский TR Турецкий
CO Корсиканский KA Грузинский PS Пашто, пушту TS Тсонго
CS Чешский KK Казахский QU Кечуа TT Татарский
CY Валлийский KL Гренландский RM Ретороманский TW Тви
DZ Дзонг-кэ KM Камбоджийский RN Курунди UK Украинский
EL Греческий KN Дравидийский RO Румынский UR Урду
EO Эсперанто KO Корейский (KOR) RW Кинаруанда UZ Узбекский
ET Эстoнcкий KS Кашмирский SA Санскрит VI Вьетнамский
EU Баскский KU Курдский SD Синдхи VO Волапак
FA Персидский KY Киргизский SG Саньё WO Волоф
FI Финский LA Латинский SH Сербо-
хорватский XH Коса
FJ Фиджи LN Лингала SI Сингальский YO Йоруба
FO Фарерский LO Лаосский SK Словацкий ZU Зулусский
FY Фризский LT Литовский SL Словенский
GA Ирландский LV Латвийский, латышский SM Самоанский
GD Гаэльский MG Малагасийский SN Шона
KW-V_Mid_EU_RU_03.indb 53 1/29/2014 12:55:09 PM

54
❏ Использование приложения iPod
touch/iPhone
ИНСТРУКЦИИ ПО БЕЗОПАСНОСТИ
Использование навигационного приложения
iPhone разрешается только в соответствующих
дорожных условиях, если вы абсолютно
уверены, что такое использование не вызовет
риска, препятствий или травм для вас, ваших
пассажиров или других участников дорожного
движения. Требования правил дорожного
движения должны всегда соблюдаться; они могут
отличаться в разных странах. Не следует задавать
пункт назначения, пока автомобиль находится в
движении.
Навигационное сопровождение iPhone может
быть неприменимым к текущей ситуации из-за
изменений в дорожных условиях (например,
изменения на платных дорогах, магистральных
дорогах, в одностороннем движении или других
ограничениях дорожного движения). В таких
случаях соблюдайте текущие дорожные знаки и
ограничения.
• Во время вождения с использование
навигационного приложения iPhone
следует строго соблюдать дорожные знаки.
Навигационное приложение iPhone является
только вспомогательным средством. Водитель
всегда должен сам решать, учитывать или
нет предлагаемую информацию. Мы не
несем ответственности за ошибки в
данных, предложенных навигационным
программным обеспечением для iPhone.
• Не управляйте устройством во время
вождения автомобиля.
❏Звуковые сигналы, передаваемые
задними терминалами
Через аналоговые разъемы (Выход для
динамиков/REAR OUT/FRONT OUT/AV-OUT Audio)
Передается двухканальный сигнал. При
воспроизведении диска с многоканальным
кодированием выполняется преобразование
многоканальных сигналов.
Список сообщений об ошибках
Если во время эксплуатации устройства
произойдет ошибка, отобразится
соответствующее сообщение. Выполните
надлежащее действие в соответствии с
приведенным ниже списком сообщений/
решений/причин.
“No Signal”:
• Начните воспроизведение с внешнего
устройства, подключенного к входу AV-IN1.
• Запустите воспроизведение на смартфоне,
подключенном к входному разъему HDMI/MHL.
• Проверьте кабели и соединения.
• Слишком слабый входной сигнал.
“MISWIRING Check wiring connection then reset
unit”/“WARNING Check wiring connection then
reset unit”:
• Кабель динамика закорочен или вошел в
контакт с шасси автомобиля. Проложите или
изолируйте кабель динамика надлежащим
образом, затем сбросьте настройки устройства.
(стр.3 и53)
“Parking Brake”:
• Воспроизводимое изображение не
отображается, когда не включен стояночный
тормоз.
“Eject Error”/“Loading Error”:
• Извлеките диск принудительно. (стр.3)
“Restricted Device”:
• Убедитесь в том, что подключенный iPod/iPhone
совместим с данным устройством. (стр.53)
“USB Device Error”:
• Отклонения в напряжении питания USB.
• Выключите, а затем снова включите устройство.
• Подключите другое устройство USB.
“Connection Error”:
• Устройство зарегистрировано, но установить
соединение не удается. Подсоедините
зарегистрированное устройство. (стр.29)
“Please Wait...”:
• Устройство выполняет подготовку к
использованию функции Bluetooth. Если
сообщение не исчезает, выключите и снова
включите приемник, после чего выполните
повторное подключение устройства Bluetooth
(или выполните сброс приемника).
“No Voice Device”:
• Подключенный мобильный телефон не имеет
системы распознавания речи.
“No Data”:
• В подключенном телефоне Bluetooth
отсутствуют данные телефонной книги.
“Initialize Error”:
• Устройству не удалось инициализировать
модуль Bluetooth. Попытайтесь выполнить
операцию еще раз.
“Dial Error”:
• Не удалось набрать номер. Попытайтесь
выполнить операцию еще раз.
“Hung Up Error”:
• Звонок еще не завершен. Припаркуйте
автомобиль и завершите звонок, управляя
подключенным мобильным телефоном.
“Pick Up Error”:
• Устройству не удалось принять звонок.
СПРАВОЧНАЯ ИНФОРМАЦИЯ
KW-V_Mid_EU_RU_03.indb 54 1/29/2014 12:55:09 PM

РУCCKИЙ 55
Устранение проблем
Не всякое нарушение в работе устройства
является результатом его неисправности. Перед
обращением в сервисный центр проверьте
следующее.
• Сведения об операциях с внешними
устройствами см. в инструкциях,
входящих в комплект поставки адаптеров,
предназначенных для установления
подключений (а также в инструкциях,
прилагаемых к внешним устройствам).
❏Общие сведения
Динамики при этом отключатся.
• Установите оптимальный уровень громкости.
• Проверьте кабели и соединения.
На экране не отображается изображение.
• Включите экран. (стр.6)
Приемник не работает.
• Перенастройте приемник. (стр.3)
Не работает пульт дистанционного
управления.
• Замените батарейку.
❏Диски
Не удается ни распознать, ни воспроизвести
диск.
• Извлеките диск принудительно. (стр.3)
Диски однократной и многократной записи не
воспроизводятся.
• Вставьте завершенный диск.
• Выполните завершениедиска в помощью
устройства, использованного для записи.
Нельзя пропустить дорожкидисков
однократной и многократной записи.
• Вставьте завершенный диск.
• Выполните завершениедиска в помощью
устройства, использованного для записи.
Воспроизведение не начинается.
• Формат файлов не поддерживается
устройством.
Изображение не появляется на внешнем
мониторе.
• Правильно подсоедините видеокабель.
• Выберите правильный вход на внешнем
мониторе.
Не воспроизводится диск DivX/MPEG1/MPEG2/
MP3/WMA/AAC.
• Запишите дорожки на подходящие диски,
используя совместимое программное
приложение. (стр.51)
• Добавьте к именам файлов правильные коды
разрешения.
Дорожки на диске однократной записи/
перезаписываемом диске воспроизводятся
намеченным образом.
• Порядок воспроизведения может отличаться по
сравнению с другими проигрывателями.
❏USB
“Now Reading...” не исчезает с экрана.
• Выключите, а затем снова включите питание.
Звук иногда прерывается во время
воспроизведения дорожки.
• Дорожки не скопированы в устройство USB
должным образом. Скопируйте дорожки еще
раз и повторите попытку.
Дорожки не воспроизводятся намеченным
образом.
• Порядок воспроизведения может отличаться по
сравнению с другими проигрывателями.
СПРАВОЧНАЯ ИНФОРМАЦИЯ
KW-V_Mid_EU_RU_03.indb 55 1/29/2014 12:55:09 PM

56
❏iPod/iPhone
Динамики при этом отключатся.
• Отсоедините iPod/iPhone, затем подсоедините
его снова.
• Выберите другой источник, затем снова
выберите “iPod”.
iPod/iPhone не включается или не работает.
• Проверьте соединительный кабель и
подключение.
• Обновите версию микропрограммы.
• Зарядите батарею.
• Сбросьте настройки iPod/iPhone.
Звук искажается.
• Отключите эквалайзер на устройстве или на
iPod/iPhone.
Генерируется много шумов.
• Отключите (снимите отметку) “VoiceOver” на
iPod/iPhone. За подробной информацией
обращайтесь на сайт <http://www.apple.com>.
При воспроизведении дорожки, содержащей
обложку, операции недоступны.
• Управление устройством осуществляйте после
загрузки обложки.
Не воспроизводятся видеозаписи.
• Подсоедините с помощью кабеля USB Audio
и Video JVC KS-U59 для iPod/iPhone, кроме
iPhone 5/iPod touch (пятое поколение)/iPod
nano (седьмое поколение), или JVC KS-U60 и
кабеля USB2.0 через адаптер Lightning-Digital
AV для iPhone 5/iPod touch (пятое поколение)/
iPod nano (седьмое поколение). Другие кабели
использоваться не могут.
Звуковое сопровождение видеозаписей не
воспроизводится.
• Подсоедините с помощью кабеля USB Audio
и Video JVC KS-U59 для iPod/iPhone, кроме
iPhone 5/iPod touch (пятое поколение)/iPod
nano (седьмое поколение), или JVC KS-U60 и
кабеля USB2.0 через адаптер Lightning-Digital
AV для iPhone 5/iPod touch (пятое поколение)/
iPod nano (седьмое поколение). Другие кабели
использоваться не могут.
❏Тюнер
Автоматическое программирование SSM не
работает.
• Сохраните радиостанции вручную. (стр.21)
Статические помехи при прослушивании
радио.
• Плотно подсоедините антенну.
❏AV-IN
На экране не появляется изображение.
• Включите видеоустройство, если оно
выключено.
• Правильно подсоедините видеоустройство.
❏Bluetooth
Плохое качество звука телефона.
• Уменьшите расстояние между устройством и
мобильным телефоном Bluetooth.
• Переместите автомобиль в место с более
сильным уровнем сигнала сотовой сети.
При использовании аудиопроигрывателя
Bluetooth происходит прерывание звука.
• Уменьшите расстояние между устройством и
аудиопроигрывателем Bluetooth.
• Отключите устройство, подключенное для
“Bluetooth phone”.
• Выключите, а затем включите приемник.
• (Если звук по-прежнему не воспроизводится)
повторно подключите проигрыватель.
Не удается осуществить управление
подключенным аудиопроигрывателем.
• Проверьте, поддерживает ли подключенный
аудиопроигрыватель профиль AVRCP
(Audio Video Remote Control Profile,
профиль удаленного управления аудио- и
видеоустройствами).
Устройство Bluetooth не обнаруживает
устройство.
• Выполните поиск с устройства Bluetooth еще
раз.
Приемник не выполняет сопряжение с
устройством Bluetooth.
• Для устройств, совместимых с Bluetooth 2.1:
Зарегистрируйте устройство с помощью PIN-
кода. (стр.28)
• Для устройств, совместимых с Bluetooth 2.0:
Введите одинаковый PIN-код для приемника
и целевого устройства. Если в инструкциях по
эксплуатации устройства не указан PIN-код,
попробуйте ввести “0000” или “1234”.
Возникает эхо сигнала или шум.
• Отрегулируйте положение микрофона.
• Отрегулируйте уровень эха или уровень
уменьшения шума. (стр.30)
Устройство не отвечает при попытке
скопировать на него телефонную книгу.
• Возможно, была предпринята попытка
копирования тех же записей (что сохранены) на
устройство.
СПРАВОЧНАЯ ИНФОРМАЦИЯ
KW-V_Mid_EU_RU_03.indb 56 1/29/2014 12:55:09 PM
РУCCKИЙ 57
Технические характеристики
❏Блок монитора
Размер картинки (Ш × В)
KW-V50BT: Ширина 6,95 дюйма
(по диагонали)
156,6 мм x 81,6 мм
KW-V30BT: Ширина 6,1 дюйма
(по диагонали)
136,2 мм x 72 мм
Система отображения
Прозрачная TN ЖК-панель
Система привода Система с активной матрицей
TFT
Число точек 1 152 000 (800H × 480V × RGB)
Количество эффективных пикселей
99,99%
Конфигурация размещения пикселей
Полосовое RGB
Подсветка LED
❏Блок проигрывателя компакт-дисков
Цифроаналоговый преобразователь
24-бит
Аудиодекодер Linear PCM/Dolby Digital/MP3/
WMA/AAC
Видеодекодер MPEG1/MPEG2/DivX
Коэффициент детонации
Ниже измеримого предела
Частотная характеристика
Частота дискретизации 96 кГц:
от 20Гц до 22000Гц
Частота дискретизации 48 кГц:
от 20Гц до 22000Гц
Частота дискретизации 44,1 кГц:
от 20Гц до 20000Гц
Общее гармоническое искажение
0,010% (1 кГц)
Отношение сигнал/помеха
94 дБ (DVD-Video 96 кГц)
Динамический диапазон
91 дБ (DVD-Video 96 кГц)
Формат диска DVD-Video/DVD-VR/VIDEO-CD/
CD-DA
Частота дискретизации
44,1 кГц/48 кГц/96 кГц
Количество бит квантования
16/20/24-бит
❏Характеристики USB-интерфейса
Стандарт USB USB 2.0 High Speed
Совместимые устройства
Запоминающее устройство
большой емкости
Файловая система
FAT 16/32
Максимальная мощность тока питания
постоянное напряжение 5 В
1 A
Цифроаналоговый преобразователь
24-бит
Видеодекодер MPEG1/MPEG2/MPEG4/H.264/
MPEG4 AVC/WMV/JPEG/BMP/
PNG
Аудиодекодер MP3/WMA/AAC/WAV/FLAC
СПРАВОЧНАЯ ИНФОРМАЦИЯ
KW-V_Mid_EU_RU_03.indb 57 1/29/2014 12:55:09 PM

58
❏Блок интерфейса HDMI
Тип коннектора TYPE-A
Входное разрешение
VGA (640 x 480p@59,94 Гц/
60 Гц), 480p (720 x 480p@
59,94 Гц/60 Гц)
Тип входного аудиосигнала
32 кГц, 44,1 кГц, 48 кГц, 16 бит
линейная ИКМ
❏Блок интерфейса MHL
Поддерживаемая версия
MHL2
Входное разрешение
VGA (640 x 480p@59,94 Гц/
60 Гц), 480p (720 x 480p@
59,94 Гц/60 Гц)
Тип входного аудиосигнала
32 кГц, 44,1 кГц, 48 кГц, 16 бит
линейная ИКМ
Максимальная мощность тока питания
постоянное напряжение 5 В
900 мA
❏Блок Bluetooth
Технология Bluetooth 3.0 + EDR
Частота от 2,4 ГГц до 2,4835 ГГц
Выходная мощность
+4 дБм (MAX), 0 дБм (AVE),
Power Class 2
Максимальная зона действия
Около 10 м в зоне прямой
видимости
Аудиокодек SBC/AAC/MP3
Профиль HFP (Hands Free Profile, профиль
громкой связи)
PBAP (Phonebook Access Profile,
профиль доступа к телефонной
книге)
A2DP (Advanced Audio
Distribution Profile,
профиль расширенного
распространения звука)
AVRCP (Audio/Video Remote
Control Profile, профиль
удаленного управления звуком
и видеоизображением)
GAP (Generic Access Profile,
общий профиль доступа)
SDP (Service Discovery Profile,
профиль обнаружения услуг)
SPP (Serial Port Profile, профиль
последовательного порта)
❏Блок тюнера FM
Диапазон частот (50 кГц)
от 87,5 МГц до 108,0 МГц
Полезная чувствительность (S/N: 30 дБ при
девиации 22,5 кГц)
9,3 дБф (0,8 мкВ/75 Ω)
Пороговая чувствительность (S/N: 46 дБ при
девиации 22,5 кГц)
15,2 дБф (1,6 мкВ/75 Ω)
Частотная характеристика (± 3,0 дБ)
от 30 Гц до 15 кГц
Отношение сигнал/помеха
75 дБ (MONO)
Избирательность (± 400 кГц)
≥ 80 дБ
Разделение стереоканалов
45 дБ (1 кГц)
❏Характеристики тюнера ДВ
Диапазон частот (9 кГц)
153 кГц – 279 кГц
Отношение сигнал/помеха
65 дБ
Полезная чувствительность
45 мкВ
❏Характеристики тюнера СВ
Диапазон частот (9 кГц)
531 кГц – 1 611 кГц
Отношение сигнал/помеха
65 дБ
Полезная чувствительность
25 мкВ
СПРАВОЧНАЯ ИНФОРМАЦИЯ
KW-V_Mid_EU_RU_03.indb 58 1/29/2014 12:55:09 PM

РУCCKИЙ 59
❏Видеохарактеристики
Система цветности внешнего входного
видеосигнала
NTSC/PAL
Уровень внешнего входного видеосигнала (RCA/
мини-разъем)
1 В (размах)/75 Ω
Макс. уровень внешнего входного аудиосигнала
(мини-разъем)
2 В/ 25 кΩ
Уровень выходного видеосигнала (разъем RCA)
1 В (размах)/75 Ω
Уровень выходного аудиосигнала (мини-разъем)
1,2 В/ 10 кΩ
❏Аудиохарактеристики
Максимальная мощность (передние и задние)
50 Вт × 4
Максимальная мощность полосы пропускания
(передние и задние)
(при суммарном коэффициенте гармоник менее
1%)
22 Вт × 4
Уровень выхода предусилителя
4 В/10 кΩ
Импеданс выхода предусилителя
≤ 600 Ω
Импеданс громкоговорителей
от 4 Ω до 8 Ω
Диапазон настройки эквалайзера
Low (нижн): 60 Гц, 80 Гц, 100 Гц, 150 Гц, ±10дБ
Mid (средн): 500 Гц, 1 кГц, 1,5 кГц, 2 кГц, ±10дБ
High (высок): 10 кГц, 12,5 кГц, 15 кГц, 17,5кГц,
±10дБ
❏Общие сведения
Рабочее напряжение
14,4 В (допустимо от 10,5 В до
16 В)
Максимальный потребляемый ток
10 A
Монтажные размеры (Ш × В × Г)
182 мм × 111 мм × 162 мм
Диапазон рабочих температур
от –10°C до +60°C
Вес
KW-V50BT: 2,8 кг
KW-V30BT: 2,2 кг
Конструкция и технические требования могут
быть изменены без уведомления.
❏Товарные знаки и лицензии
• Изготовлено по лицензии компании Dolby
Laboratories. Долби и знак в виде двойной
буквы D являются товарными знаками
компании Dolby Laboratories.
• “DVD Logo” является товарным знаком
DVD Format/Logo Licensing Corporation,
зарегистрированным в США, Японии и других
странах.
• Логотип “AAC” является торговой маркой Dolby
Laboratories.
• Microsoft и Windows Media являются либо
зарегистрированными торговыми марками или
торговыми марками корпорации Microsoft в
США и/или других странах.
• “Made for iPod,” and “Made for iPhone” mean
that an electronic accessory has been designed
to connect specifically to iPod, or iPhone,
respectively, and has been certified by the
developer to meet Apple performance standards.
Apple is not responsible for the operation of
this device or its compliance with safety and
regulatory standards. Please note that the use
of this accessory with iPod, or iPhone may affect
wireless performance. iPhone, iPod, iPod classic,
iPod nano, and iPod touch are trademarks of Apple
Inc., registered in the U.S. and other countries.
• Lightning is a trademark of Apple Inc.
• В данном изделии используется технология
защиты от копирования, защищенная патентами
США и другими правами на интеллектуальную
собственность, принадлежащими компании
Rovi Corporation. Обратное конструирование
или разборка запрещены.
• Шрифт для данного изделия разработан
компанией Ricoh.
СПРАВОЧНАЯ ИНФОРМАЦИЯ
KW-V_Mid_EU_RU_03.indb 59 1/29/2014 12:55:09 PM

60
СПРАВОЧНАЯ ИНФОРМАЦИЯ
• DivX®, DivX Certified® and associated logos are
trademarks of Rovi Corporation or its subsidiaries
and are used under license.
• ABOUT DIVX VIDEO: DivX® is a digital video
format created by DivX, LLC, a subsidiary of Rovi
Corporation. This is an official DivX Certified®
device that plays DivX video. Visit divx.com for
more information and software tools to convert
your files into DivX videos.
• ABOUT DIVX VIDEO-ON-DEMAND: This DivX
Certified® device must be registered in order to
play purchased DivX Video-on-Demand (VOD)
movies. To obtain your registration code, locate
the DivX VOD section in your device setup menu.
Go to vod.divx.com for more information on how
to complete your registration.
• THIS PRODUCT IS LICENSED UNDER THE MPEG-
4 VISUAL PATENT PORTFOLIO LICENSE FOR
THE PERSONAL AND NON-COMMERCIAL USE
OF A CONSUMER FOR (i) ENCODING VIDEO
IN COMPLIANCE WITH THE MPEG-4 VISUAL
STANDARD (“MPEG-4 VIDEO”) AND/OR (ii)
DECODING MPEG-4 VIDEO THAT WAS ENCODED
BY A CONSUMER ENGAGED IN A PERSONAL
AND NON-COMMERCIAL ACTIVITY AND/OR WAS
OBTAINED FROM A VIDEO PROVIDER LICENSED
BY MPEG LA TO PROVIDE MPEG-4 VIDEO. NO
LICENSE IS GRANTED OR SHALL BE IMPLIED FOR
ANY OTHER USE. ADDITIONAL INFORMATION
INCLUDING THAT RELATING TO PROMOTIONAL,
INTERNAL AND COMMERCIAL USES AND
LICENSING MAY BE OBTAINED FROM MPEG LA,
LLC. SEE HTTP://WWW.MPEGLA.COM.
• THIS PRODUCT IS LICENSED UNDER THE AVC
PATENT PORTFOLIO LICENSE FOR THE PERSONAL
USE OF A CONSUMER OR OTHER USES IN WHICH IT
DOES NOT RECEIVE REMUNERATION TO (i)ENCODE
VIDEO IN COMPLIANCE WITH THE AVC STANDARD
("AVC VIDEO") AND/OR (ii)DECODE AVC VIDEO
THAT WAS ENCODED BY A CONSUMER ENGAGED
IN A PERSONAL ACTIVITY AND/OR WAS OBTAINED
FROM A VIDEO PROVIDER LICENSED TO PROVIDE
AVC VIDEO. NO LICENSE IS GRANTED OR SHALL
BE IMPLIED FOR ANY OTHER USE. ADDITIONAL
INFORMATION MAY BE OBTAINED FROM MPEG LA,
L.L.C. SEE HTTP://WWW.MPEGLA.COM
• Android является торговой маркой компании
Google Inc.
• Словесный знак Bluetooth® и соответствующие
логотипы являются зарегистрированными
торговыми марками, принадлежащими
компании Bluetooth SIG, Inc., и любое их
использование компанией JVC KENWOOD
Corporation осуществляется по лицензии.
Прочие товарные знаки и торговые марки
являются собственностью соответствующих
владельцев.
• The terms HDMI and HDMI High-Definition
Multimedia Interface, and the HDMI logo are
trademarks or registered trademarks of HDMI
Licensing LLC in the United States and other
countries.
• MHL and the MHL logo are a trademark or
registered trademark of MHL, LLC.
- Incorporates MHL 2
• libFLAC
Copyright (C) 2000,2001,2002,2003,2004,2005,
2006,2007,2008,2009 Josh Coalson
Redistribution and use in source and binary forms,
with or without modification, are permitted
provided that the following conditions are met:
– Redistributions of source code must retain the
above copyright notice, this list of conditions
and the following disclaimer.
– Redistributions in binary form must reproduce
the above copyright notice, this list of
conditions and the following disclaimer in the
documentation and/or other materials provided
with the distribution.
– Neither the name of the Xiph.org Foundation
nor the names of its contributors may be used
to endorse or promote products derived from
this software without specific prior written
permission.
THIS SOFTWARE IS PROVIDED BY THE COPYRIGHT
HOLDERS AND ONTRIBUTORS “AS IS” AND ANY
EXPRESS OR IMPLIED WARRANTIES, INCLUDING,
BUT NOT LIMITED TO, THE IMPLIED WARRANTIES
OF MERCHANTABILITY AND FITNESS FOR
A PARTICULAR PURPOSE ARE DISCLAIMED.
IN NO EVENT SHALL THE FOUNDATION OR
CONTRIBUTORS BE LIABLE FOR ANY DIRECT,
INDIRECT, INCIDENTAL, SPECIAL, EXEMPLARY, OR
CONSEQUENTIAL DAMAGES (INCLUDING, BUT
NOT LIMITED TO, PROCUREMENT OF SUBSTITUTE
GOODS OR SERVICES; LOSS OF USE, DATA, OR
PROFITS; OR BUSINESS INTERRUPTION) HOWEVER
CAUSED AND ON ANY THEORY OF LIABILITY,
WHETHER IN CONTRACT, STRICT LIABILITY, OR
TORT (INCLUDING NEGLIGENCE OR OTHERWISE)
ARISING IN ANY WAY OUT OF THE USE OF THIS
SOFTWARE, EVEN IF ADVISED OF THE POSSIBILITY
OF SUCH DAMAGE.
KW-V_Mid_EU_RU_03.indb 60 1/29/2014 12:55:10 PM

0114EHHMDWJEIN
Having TROUBLE with operation?
Please reset your unit
Refer to page of How to reset your unit
Vous avez des PROBLÈMES de fonctionnement?
Réinitialisez votre appareil
Référez-vous à la page intitulée Comment réinitialiser votre appareil
Затруднения при эксплуатации?
Пожалуйста, перезагрузите Ваше устройство
Для получения информации о перезагрузке Вашего устройства обратитесь на
соответствующую страницу
KW-V_Mid_EU.indb 1 2014/01/28 16:26
