JVC PC X290 X290[J] User Manual LVT1189 002B
User Manual: JVC PC-X290 PC-X290 English, Spanish,
Open the PDF directly: View PDF ![]() .
.
Page Count: 47
LVT1189-002B
[J]
PC-X290
SP-PCX290
CA-PCX290
SP-PCX290
SENSOR
TAPE AUX
PLAY
REC
PLAY
PHONES
P
R
E
S
E
T
U
P
/
R
E
P
E
A
T
P
R
O
G
R
A
M
/
S
E
T
N
W
O
D
T
E
S
E
R
P
O
R
T
N
I
Y
A
L
P
S
I
D
CD/
RANDOM
TUNER/
BAND
PLAY REW FF PAUSEPLAY REW FF
STOP/EJECT
PAUSE
REC
-
+
CD SYNCHRO RECORDING AUTO STOP SYSTEM
CD PORTABLE COMPONENT SYSTEM
STOP/EJECT
STANDBY
AB
VOLUME
H
B
S
/
P
R
E
S
E
T
E
Q
STANDBY/ON
FM MODE
TAPE
CD/
RANDOM
TUNER/
BAND
Consists of CA-PCX290 and SP-PCX290
Consta del CA-PCX290 el SP-PCX290
CD PORTABLE COMPONENT SYSTEM
SISTEMA PORTATIL DE COMPONENTES DE CD
INSTRUCTIONS
MANUAL DE INSTRUCCIONES
For Customer Use:
Enter below the Model No. and Serial
No. which are located either on the rear,
bottom or side of the cabinet. Retain this
information for future reference.
Model No.
Serial No.
English
Español
PC-X290[J]COVER_f.p65 04.4.5, 11:44 AM1

– G-1 –
Warnings, Cautions and Others
Mises en garde, précautions et indications diverses
The lightning flash with arrowhead symbol,
within an equilateral triangle is intended to alert
the user to the presence of uninsulated
“dangerous voltage” within the product’s
enclosure that may be of sufficient magnitude
to constitute a risk of electric shock to persons.
The exclamation point within an equilateral
triangle is intended to alert the user to the
presence of important operating and
maintenance (servicing) instructions in the
literature accompanying the appliance.
For U.S.A.
This equipment has been tested and found to comply with the limits
for a Class B digital device, pursuant to part 15 of the FCC Rules.
These limits are designed to provide reasonable protection against
harmful interference in a residential installation.
This equipment generates, uses and can radiate radio frequency
energy and, if not installed and used in accordance with the
instructions, may cause harmful interference to radio
communications. However, there is no guarantee that interference
will not occur in a particular installation. If this equipment does cause
harmful interference to radio or television reception, which can be
determined by turning the equipment off and on, the user is
encouraged to try to correct the interference by one or more of the
following measures:
Reorient or relocate the receiving antenna.
Increase the separation between the equipment and receiver.
Connect the equipment into an outlet on a circuit different from that
to which the receiver is connected.
Consult the dealer or an experienced radio/TV technician for help.
WARNING: TO REDUCE THE RISK OF FIRE
OR ELECTRIC SHOCK, DO NOT EXPOSE
THIS APPLIANCE TO RAIN OR MOISTURE.
For Canada/pour le Canada
CAUTION: TO PREVENT ELECTRIC SHOCK, MATCH WIDE
BLADE OF PLUG TO WIDE SLOT, FULLY INSERT.
ATTENTION: POUR EVITER LES CHOCS ELECTRIQUES,
INTRODUIRE LA LAME LA PLUS LARGE DE LA FICHE DANS
LA BORNE CORRESPONDANTE DE LA PRISE ET POUSSER
JUSQUAU FOND.
CAUTION
To reduce the risk of electrical shocks, fire, etc.:
1. Do not remove screws, covers or cabinet.
2. Do not expose this appliance to rain or moisture.
ATTENTION
Afin d’éviter tout risque d’électrocution, d’incendie, etc.:
1. Ne pas enlever les vis ni les panneaux et ne pas ouvrir le coffret de
l’appareil.
2. Ne pas exposer l’appareil à la pluie ni à l’humidité.
For Canada/pour le Canada
THIS DIGITAL APPARATUS DOES NOT EXCEED THE CLASS B
LIMITS FOR RADIO NOISE EMISSIONS FROM DIGITAL
APPARATUS AS SET OUT IN THE INTERFERENCE-CAUSING
EQUIPMENT STANDARD ENTITLED “DIGITAL APPARATUS,”
ICES-003 OF THE DEPARTMENT OF COMMUNICATIONS.
CET APPAREIL NUMERIQUE RESPECTE LES LIMITES DE
BRUITS RADIOELECTRIQUES APPLICABLES AUX APPAREILS
NUMERIQUES DE CLASSE B PRESCRITES DANS LA NORME
SUR LE MATERIEL BROUILLEUR: “APPAREILS NUMERIQUES”,
NMB-003 EDICTEE PAR LE MINISTRE DES COMMUNICATIONS.
Caution — STANDBY/ON switch!
Disconnect the mains plug to shut the power off completely. The
STANDBY/ON switch in any position does not disconnect the
mains line. The power can be remote controlled.
Attention — Commutateur STANDBY/ON !
Déconnecter la fiche de secteur pour couper complètement le
courant. Le commutateur
STANDBY/ON
ne coupe jamais
complètement la ligne de secteur, quelle que soit sa position. Le
courant peut être télécommandé.
IMPORTANT FOR LASER PRODUCTS
1. CLASS 1 LASER PRODUCT
2. ATTENTION: N’ouvrez pas le couvercle supérieur. Il n’y a aucune
3. CAUTION: Visible and invisible laser radiation when open and
interlock failed or defeated. Avoid direct exposure to beam.
4. REPRODUCTION OF LABEL: CAUTION LABEL, PLACED
INSIDE THE UNIT.
IMPORTANT POUR PRODUITS LASER
1. PRODUIT LASER CLASSE 1
2. ATTENTION: N’ouvrez pas le couvercle supérieur. Il n’y a aucune
pièce réparable par l’utilisateur à l’intérieur de l’appareil; confiez
toute réparation à un personnel qualifié.
3. ATTENTION: Risque de radiations laser visible et invisible quand
l’appareil est ouvert et que le système de verrouillage ne
fonctionne pas ou a été mis hors service. Évitez toute exposition
directe au rayon.
4. REPRODUCTION DE L’ÉTIQUETTE: ÉTIQUETTE DE
PRÉCAUTION PLACÉE À L’INTERIEUR DE L’APPAREIL.
CAUTION - INVISIBLE LASER RADIATION WHEN OPEN AND INTERLOCKS
DEFEATED. AVOID EXPOSURE TO BEAM.
VORSICHT ! UNSICHTBARE LASERSTRAHLUNG TRITT AUS, WENN DECKEI.
GEÖFFNET UND WENN SICHERHEITSVERRIEGELUNG ÜBERBRÜCKT
IST. NICHT DEM STRAHL AUSSETZEN!
VARNING - OSYNLIG LASERSTRÄLNING NÄR DENNA DEL ÄR ÖPPNAD OCH
SPÄRR ÄR URKOPPLAD STRÅLEN ÄR FARLIG.
ADVARSEL -USYNLIG LASERSTRÅLING VED ÅBNING NÅR
SIKKERHEDSAFBRYDERE ER UDE AF FUNKTION. UNDGÅ
UDSÆTTELSE FOR STRÅLING.
PC-X290[J]SAFETY_f.p65 04.4.5, 11:45 AM1

– 1 –
English
Introduction
About This Manual
This manual is organized as follows:
•The manual mainly explains operations using the
buttons and controls on the unit. You can also use the
buttons on the remote control if they have the same or
similar names (or marks) as those on the unit.
If operation using the remote control is different from
that using the unit, it is then explained.
• Basic and common information that is the same for many
functions is grouped in one place, and is not repeated in
each procedure. For instance, we do not repeat the
information about turning on/off the unit, setting the
volume, changing the sound effects, and others, which are
explained in the section “Common Operations” on pages 9
to 11.
• The following marks are used in this manual:
Gives you warnings and cautions to prevent
damage or risk of fire/electric shock.
Also gives you information which is not good
for obtaining the best possible performance
from the unit.
Gives you information and hints you had better
know.
Precautions
Installation
• Install in a place which is level, dry and neither too hot nor
too cold—between 5˚C (41˚F) and 35˚C (95˚F).
• Install the unit in a location with adequate ventilation to
prevent internal heat built-up in the unit.
• Leave sufficient distance between the unit and the TV.
• Keep the speakers away from the TV to avoid interference
with TV.
DO NOT install the unit in a location near heat
sources, or in a place subject to direct sunlight,
excessive dust or vibration.
We would like to thank you for purchasing one of our JVC products.
Before operating this unit, read this manual carefully and thoroughly to
obtain the best possible performance from your unit, and retain this manual
for future reference.
Power sources
• When unplugging from the wall outlet, always pull the
plug, not the AC power cord.
DO NOT handle the AC power cord with wet
hands.
Moisture condensation
Moisture may condense on the lens inside the unit in the
following cases:
• After starting heating in the room
• In a damp room
• If the unit is brought directly from a cold to a warm place
Should this occur, the unit may malfunction. In this case,
leave the unit turned on for a few hours until the moisture
evaporates, unplug the AC power cord, and then plug it in
again.
Others
• Should any metallic object or liquid fall into the unit,
unplug the unit and consult your dealer before operating
any further.
• If you are not going to operate the unit for an extended
period of time, unplug the AC power cord from the wall
outlet.
DO NOT disassemble the unit since there are no
user serviceable parts inside.
If anything goes wrong, unplug the AC power cord and
consult your dealer.
EN01-12_PC-X290[J]_f.p65 04.4.5, 11:45 AM1

– 2 –
English
Contents
Location of the Buttons and Controls ....................... 3
Front Panel ................................................................. 3
Remote Control .......................................................... 5
Getting Started ............................................................ 6
Unpacking .................................................................. 6
Putting the Batteries into the Remote Control ........... 6
Connecting the Speakers ............................................ 6
Connecting Other Equipment ..................................... 7
Power Supply ............................................................. 8
Common Operations .................................................. 9
Turning On or Off the Power ....................................... 9
Setting the Clock ........................................................ 9
Selecting the Sources................................................... 9
Adjusting the Volume ............................................... 10
Reinforcing the Bass Sound ..................................... 10
Selecting the Sound Modes ...................................... 10
Ensuring Good FM and AM Reception ................... 11
Listening to FM and AM Broadcasts ...................... 12
Tuning in a Station ................................................... 12
Presetting Stations .................................................... 12
Tuning in a Preset Station ........................................ 12
Playing Back CD ....................................................... 13
Loading CD .............................................................. 13
Playing Back the Entire Disc ................................... 13
Basic CD Operations ................................................ 13
Programming the Playing Order of the Tracks
—Program Play .................................................. 14
Playing at Random—Random Play ......................... 15
Repeating Tracks or CD—Repeat Play .................... 15
Playing Introductions—Intro Play ........................... 15
Playing Back Tapes ................................................... 16
Playing Back a Tape ................................................. 16
Recording .................................................................. 17
Recording onto a Tape on Deck A............................ 17
Dubbing Tapes .......................................................... 18
Recording Disc—Disc Synchronized Recording ..... 18
Maintenance .............................................................. 19
Troubleshooting ........................................................ 20
Specifications ............................................................. 20
EN01-12_PC-X290[J]_f.p65 04.4.5, 11:45 AM2

– 3 –
English
SENSOR
TAPE AUX
PLAY
REC
PLAY
PHONES
P
R
E
S
E
T
U
P
/
R
E
P
E
A
T
P
R
O
G
R
A
M
/
S
E
T
N
W
O
D
T
E
S
E
R
P
O
R
T
N
I
Y
A
L
P
S
I
D
CD/
RANDOM
TUNER/
BAND
PLAY REW FF PAUSEPLAY REW FF
STOP/EJECT
PAUSE
REC
-
+
CD SYNCHRO RECORDING AUTO STOP SYSTEM
CD PORTABLE COMPONENT SYSTEM
STOP/EJECT
STANDBY
AB
VOLUME
H
B
S
/
P
R
E
S
E
T
E
Q
STANDBY/ON
FM MODE
u
o
;
s
d
1
4
2
8
9
i
3
5
6
7
p
q
w
r
t
e
y
a
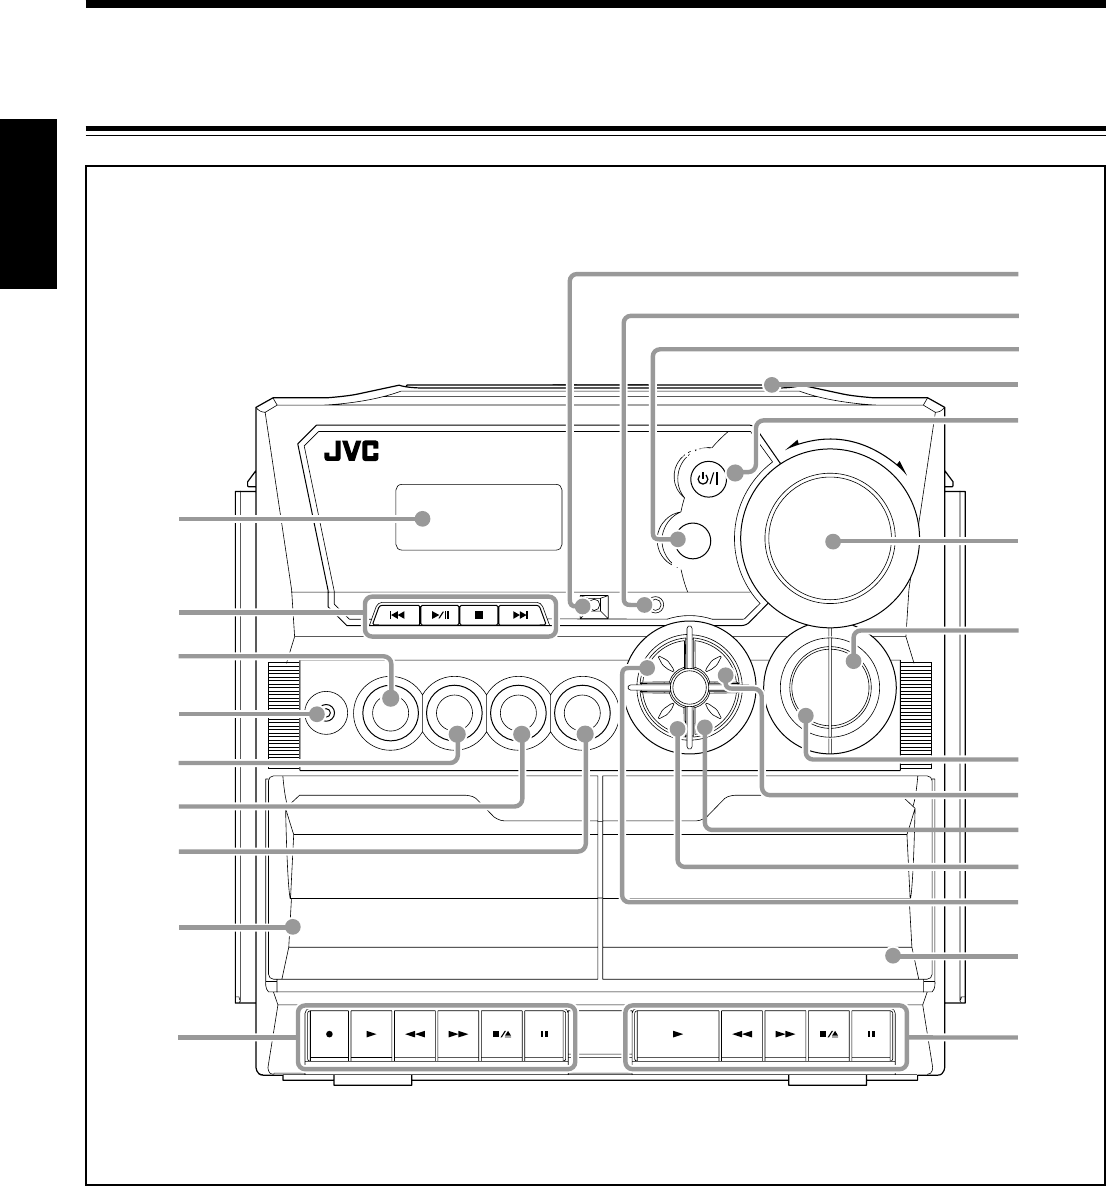
Location of the Buttons and Controls
Become familiar with the buttons and controls on your unit.
Front Panel
EN01-12_PC-X290[J]_f.p65 04.4.5, 11:45 AM3
– 4 –
English
See pages in the parentheses for details.
Front Panel
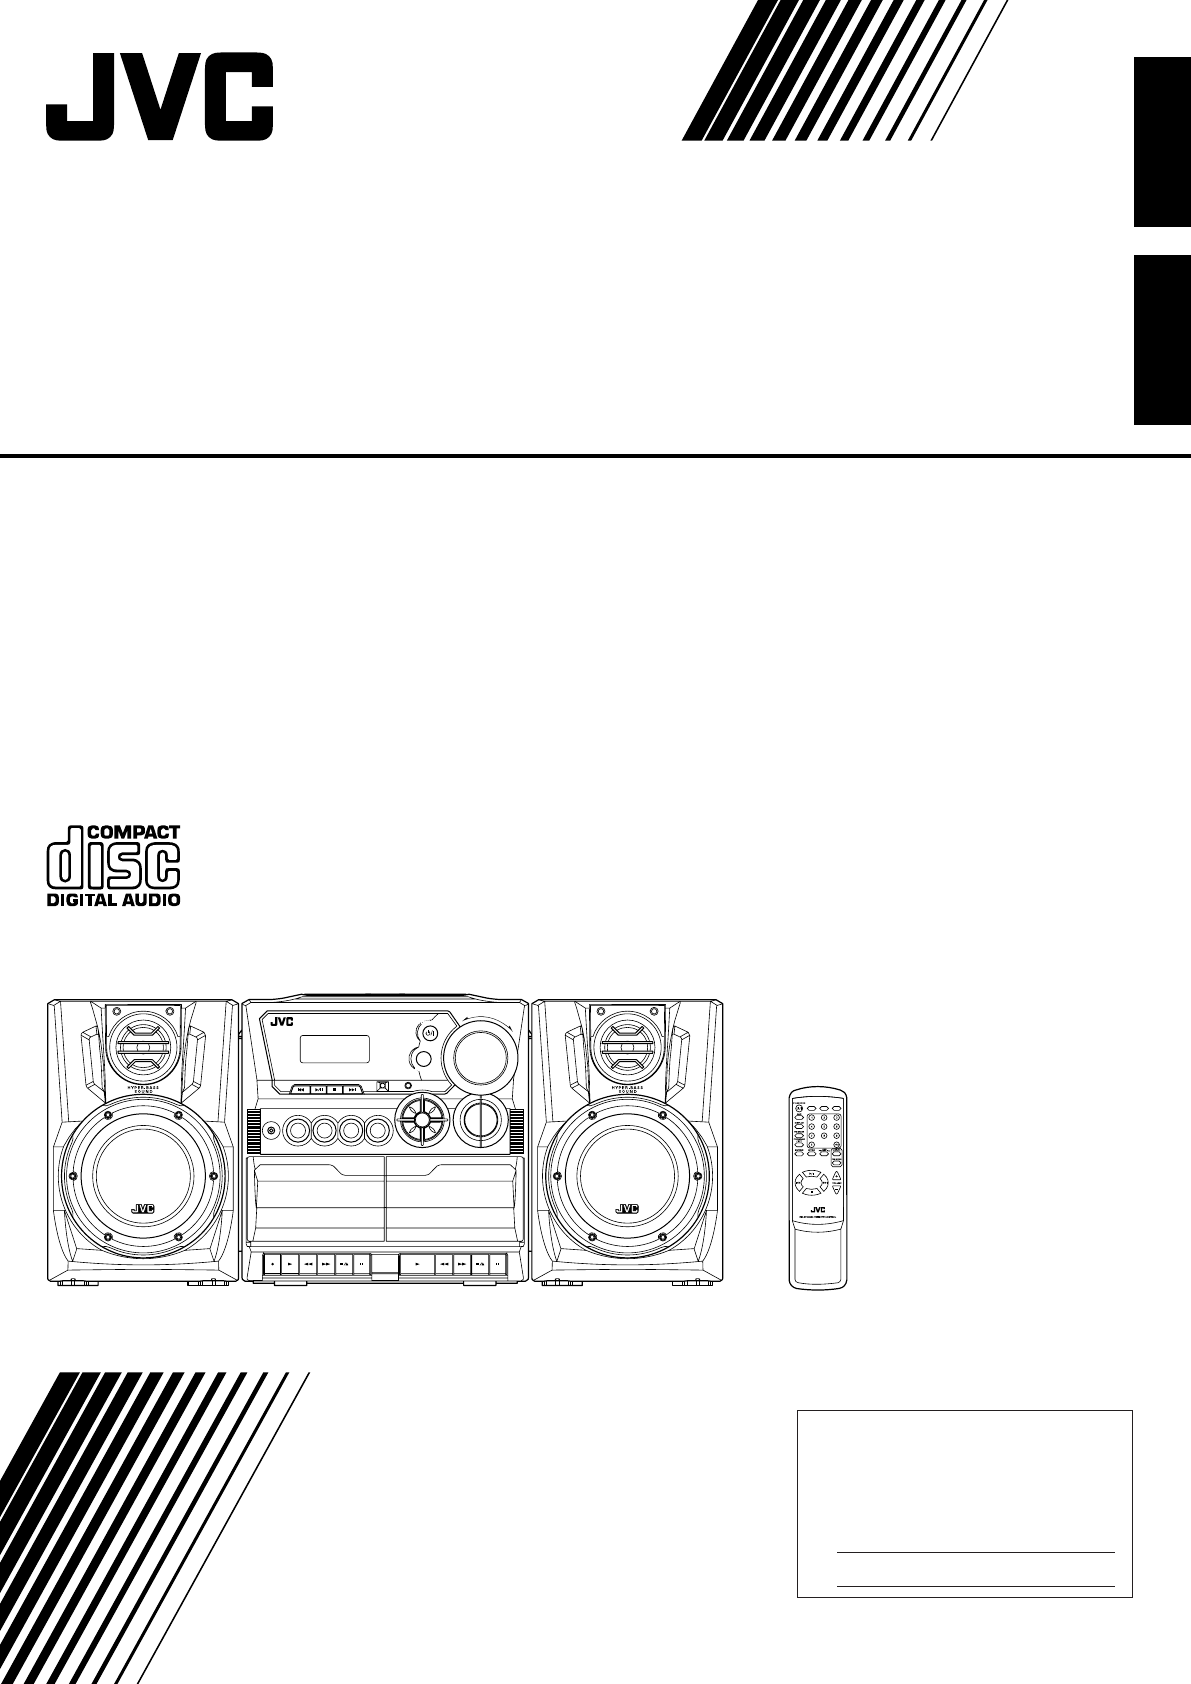
1Display window
2Operation buttons
•4 (9, 12 – 14), 3¥8 (play/pause) (13 – 15),
7 (13 – 15), ¢ (9, 12 – 15)
3TAPE button (9, 16, 18)
4PHONES jack (10)
5CD/RANDOM button (9, 13, 15, 18)
6TUNER/BAND button (9, 12)
7AUX button (9)
8Deck A cassette holder (16)
9Operation buttons for deck A (16 – 18)
• REC ¶, PLAY 3, REW 1, FF ¡,
STOP/EJECT 7/0, PAUSE 8
pSENSOR (Remote sensor)
qSTANDBY lamp (9)
wFM MODE button (12)
e0 OPEN (CD door open/close) (13)
rSTANDBY/ON button (9)
tVOLUME +/– control (10)
yHBS/PRESET EQ (Equalizer) button (10)
uDISPLAY button (9)
iPRESET UP/REPEAT button (12, 15)
oPRESET DOWN button (12)
;PROGRAM/SET button (9, 12, 14)
aINTRO button (15)
sDeck B cassette holder (16)
dOperation buttons for deck B (16)
• PLAY 3, REW 1, FF ¡, STOP/EJECT 7/0,
PAUSE 8
Continued
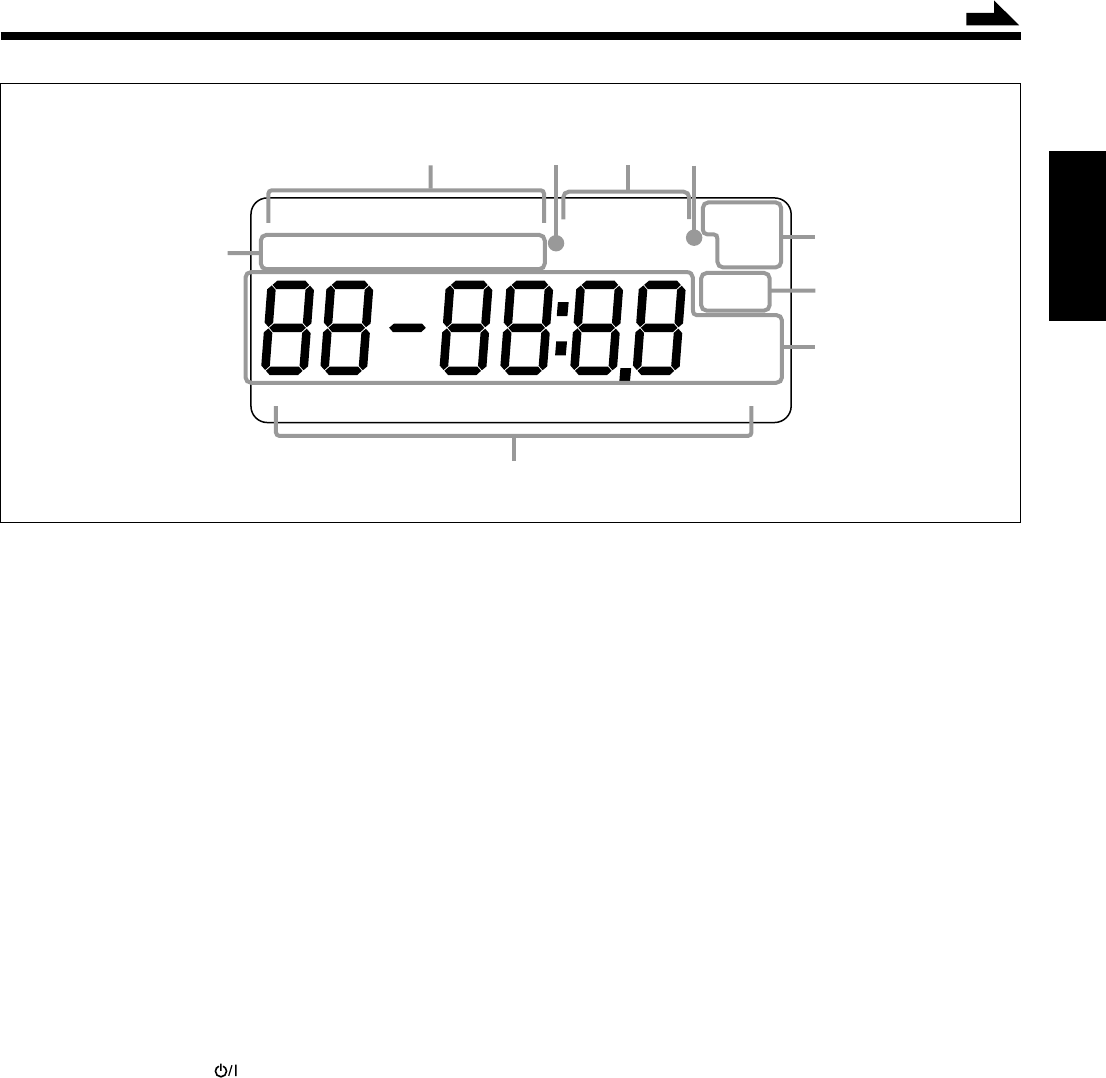
Display Window
REP 1RECSYNCAUXTAPETUNERCD
INTRO PROG RANDOM HBS MUTING ALL
CLASSIC ROCK POP JAZZ FLAT
kHz
MHz
STEREO
MONO
FM AM
AM PM
9
35
4
8
6
7
2
1
Display Window
1CD play mode indicators (14, 15)
• INTRO, PROG, RANDOM
2Source indicators (9)
• CD, TUNER, TAPE, AUX
3HBS (Hyper Bass Sound) indicator (10)
4SYNC REC indicator (18)
5MUTING indicator (10)
6Repeat mode indicators (15)
• REP 1/ALL
7Tuner operation indicators (12)
• STEREO, MONO
8Main display
9Equalizer pattern indicators (10)
• CLASSIC, ROCK, POP, JAZZ, FLAT
EN01-12_PC-X290[J]_f.p65 04.4.5, 11:45 AM4
– 5 –
English
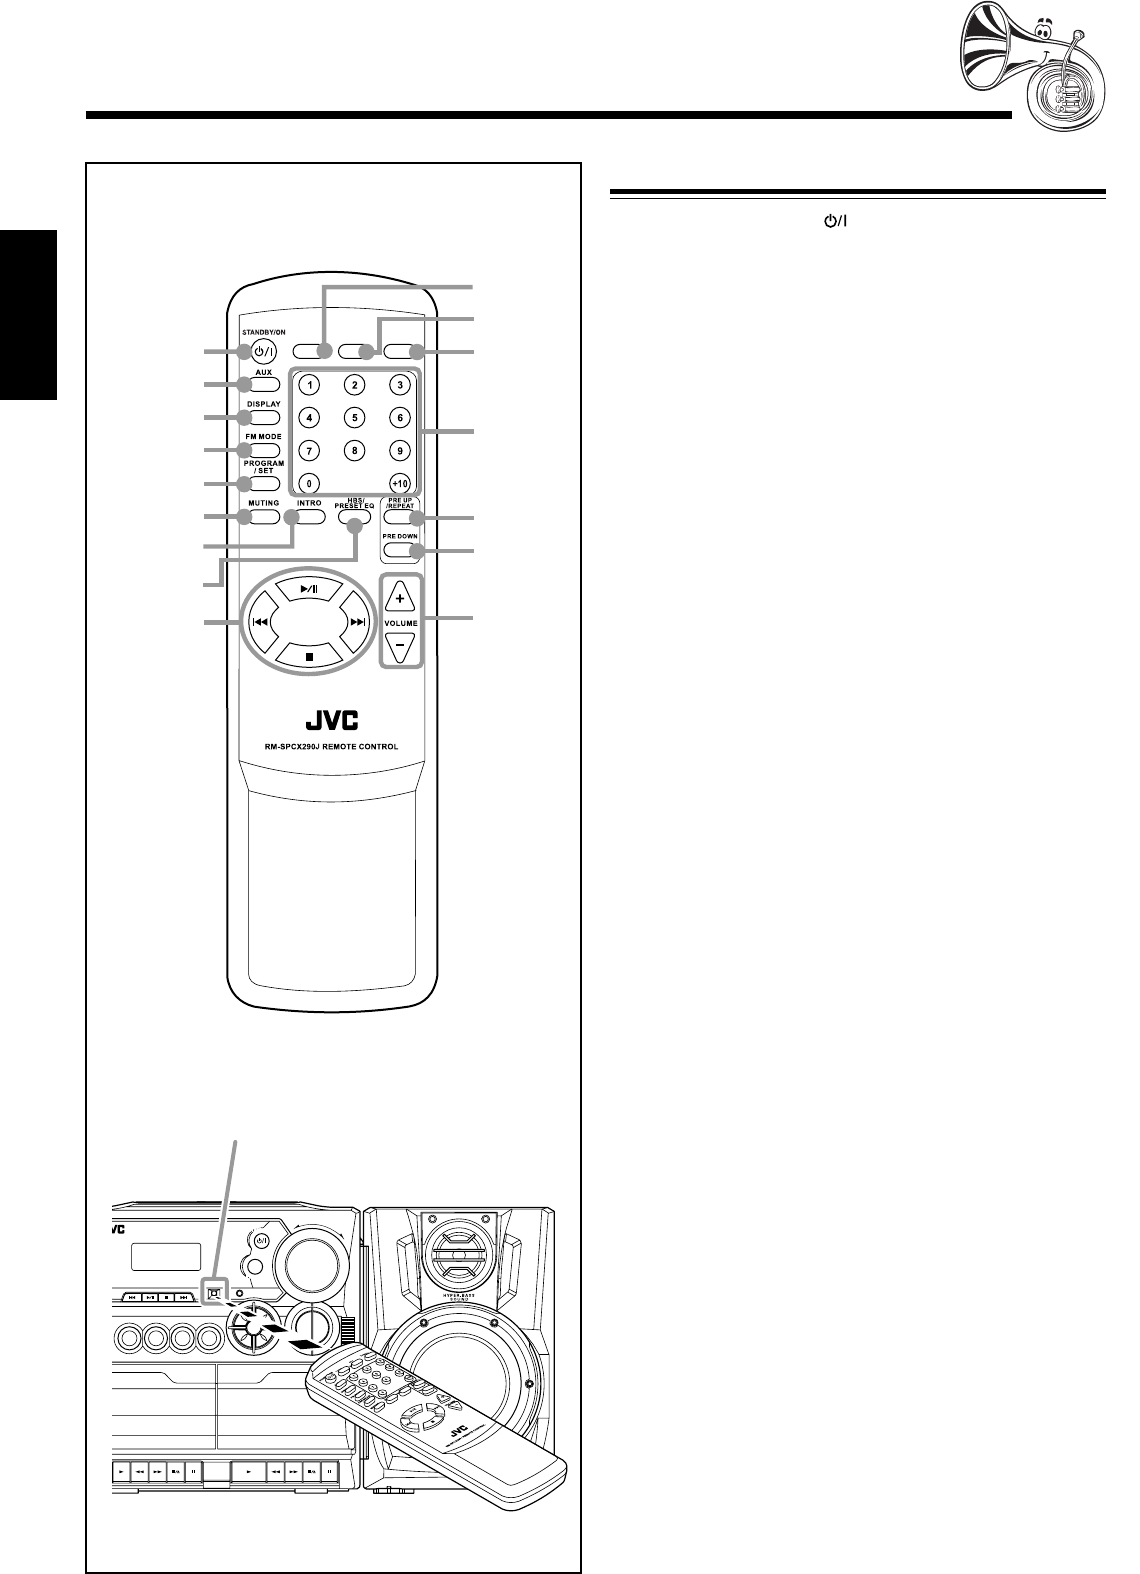
When using the remote control, point it at
the remote sensor on the front panel.
Remote Control
Remote Control
1STANDBY/ON button (9)
2AUX button (9)
3DISPLAY button (9)
4FM MODE button (12)
5PROGRAM/SET button (9, 12, 14)
6MUTING button (10)
7INTRO button (15)
8HBS (Hyper Bass Sound)/PRESET EQ (Equalizer) button
(10)
94
/
6
/
7
/
¢ buttons (12 – 15)
pTAPE button (9, 16, 18)
qCD/RANDOM button (9, 13, 15, 18)
wTUNER/BAND button (9, 12)
eNumber buttons (12 – 14)
rPRE UP/REPEAT button (12, 15)
tPRE DOWN button (12)
yVOLUME +/– buttons (10)
TAPE
CD/
RANDOM
TUNER/
BAND
1
2
3
4
5
6
9
q
p
w
7
8
r
t
e
y
Remote sensor
SENSOR
TAPE AUX
PLAY
E
C
L
AY
P
R
E
S
E
T
U
P
/
R
E
P
E
A
T
P
R
O
G
R
A
M
/
S
E
T
N
W
O
D
T
E
S
E
R
P
O
R
T
N
I
Y
A
L
P
S
I
D
CD/
RANDOM
TUNER/
BAND
PLAY REW FF PAUSEPLAY REW FF
STOP/EJECT
PAUSE
-
+
CD SYNCHRO RECORDING AUTO STOP SYSTEM
CD PORTABLE COMPONENT SYSTEM
STOP/EJECT
STANDBY
B
VOLUME
H
B
S
/
P
R
E
S
E
T
E
Q
STANDBY/ON
FM MODE
EN01-12_PC-X290[J]_f.p65 04.4.5, 11:45 AM5
– 6 –
English
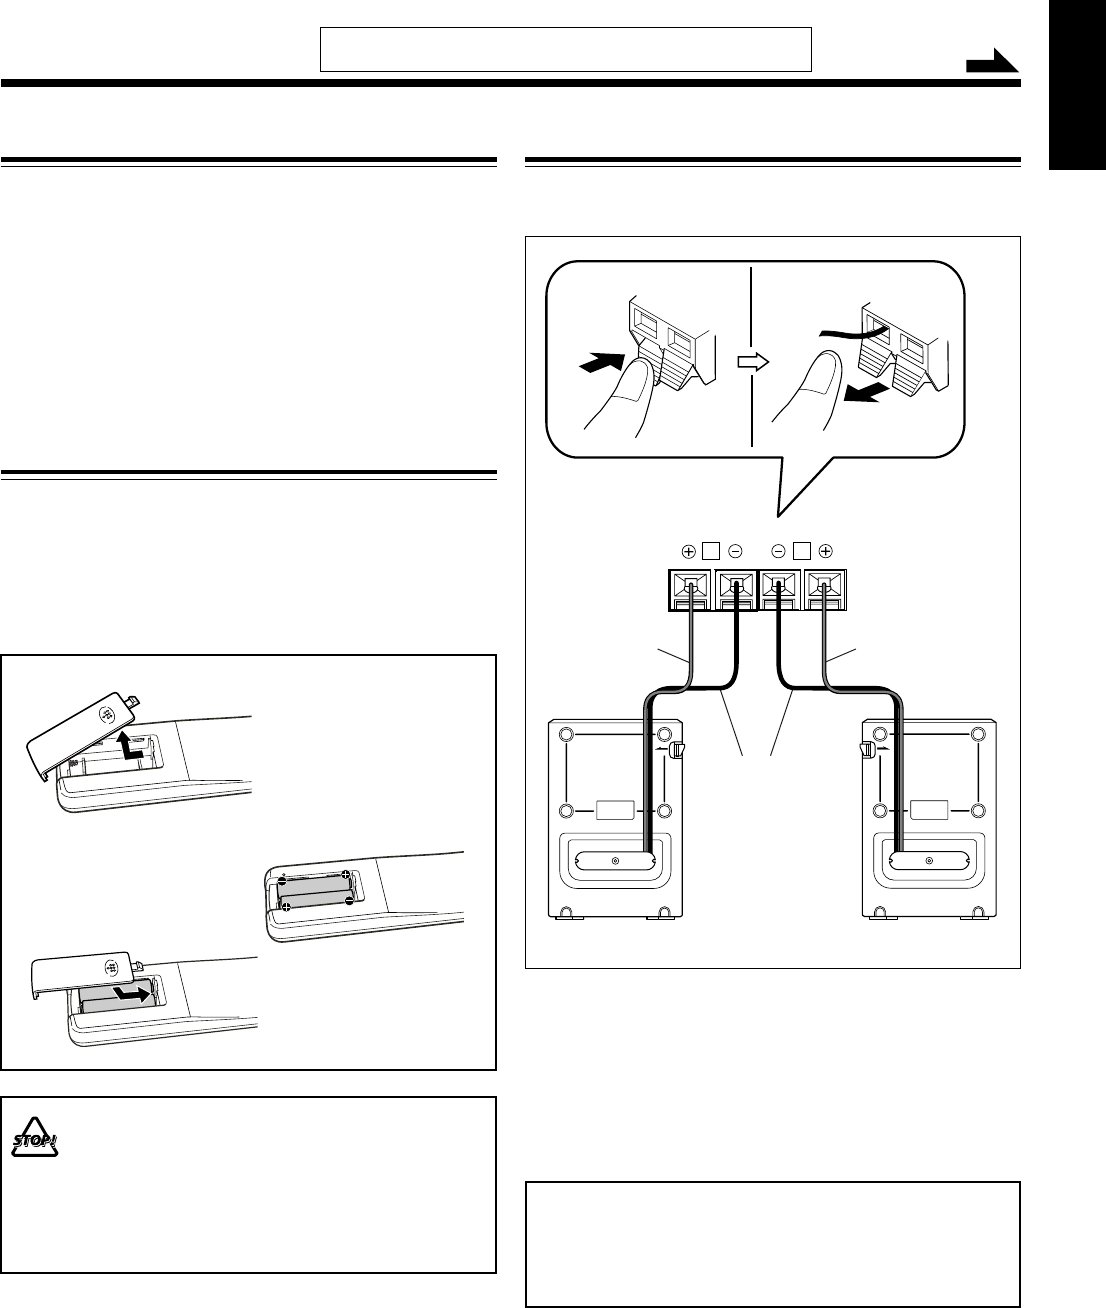
Connecting the Speakers
To connect speakers
You can connect the speakers using the speaker cords.
1
Hold the clamp of the speaker terminal.
2
Insert the end of the speaker cord into the
terminal.
Match the polarity of the speaker terminals: red (ª) to
red (ª) and black (·) to black (·).
3
Release the finger from the clamp.
IMPORTANT:
• Use only speakers with the same speaker impedance as
indicated by the speaker terminals on the rear of the unit.
• DO NOT connect more than one speaker to one
speaker terminal.
Getting Started
Unpacking
After unpacking, check to be sure that you have all the
following items.
The number in the parentheses indicates the quantity of the
pieces supplied.
• Remote control (1)
• AC power cord (1)
If any is missing, consult your dealer immediately.
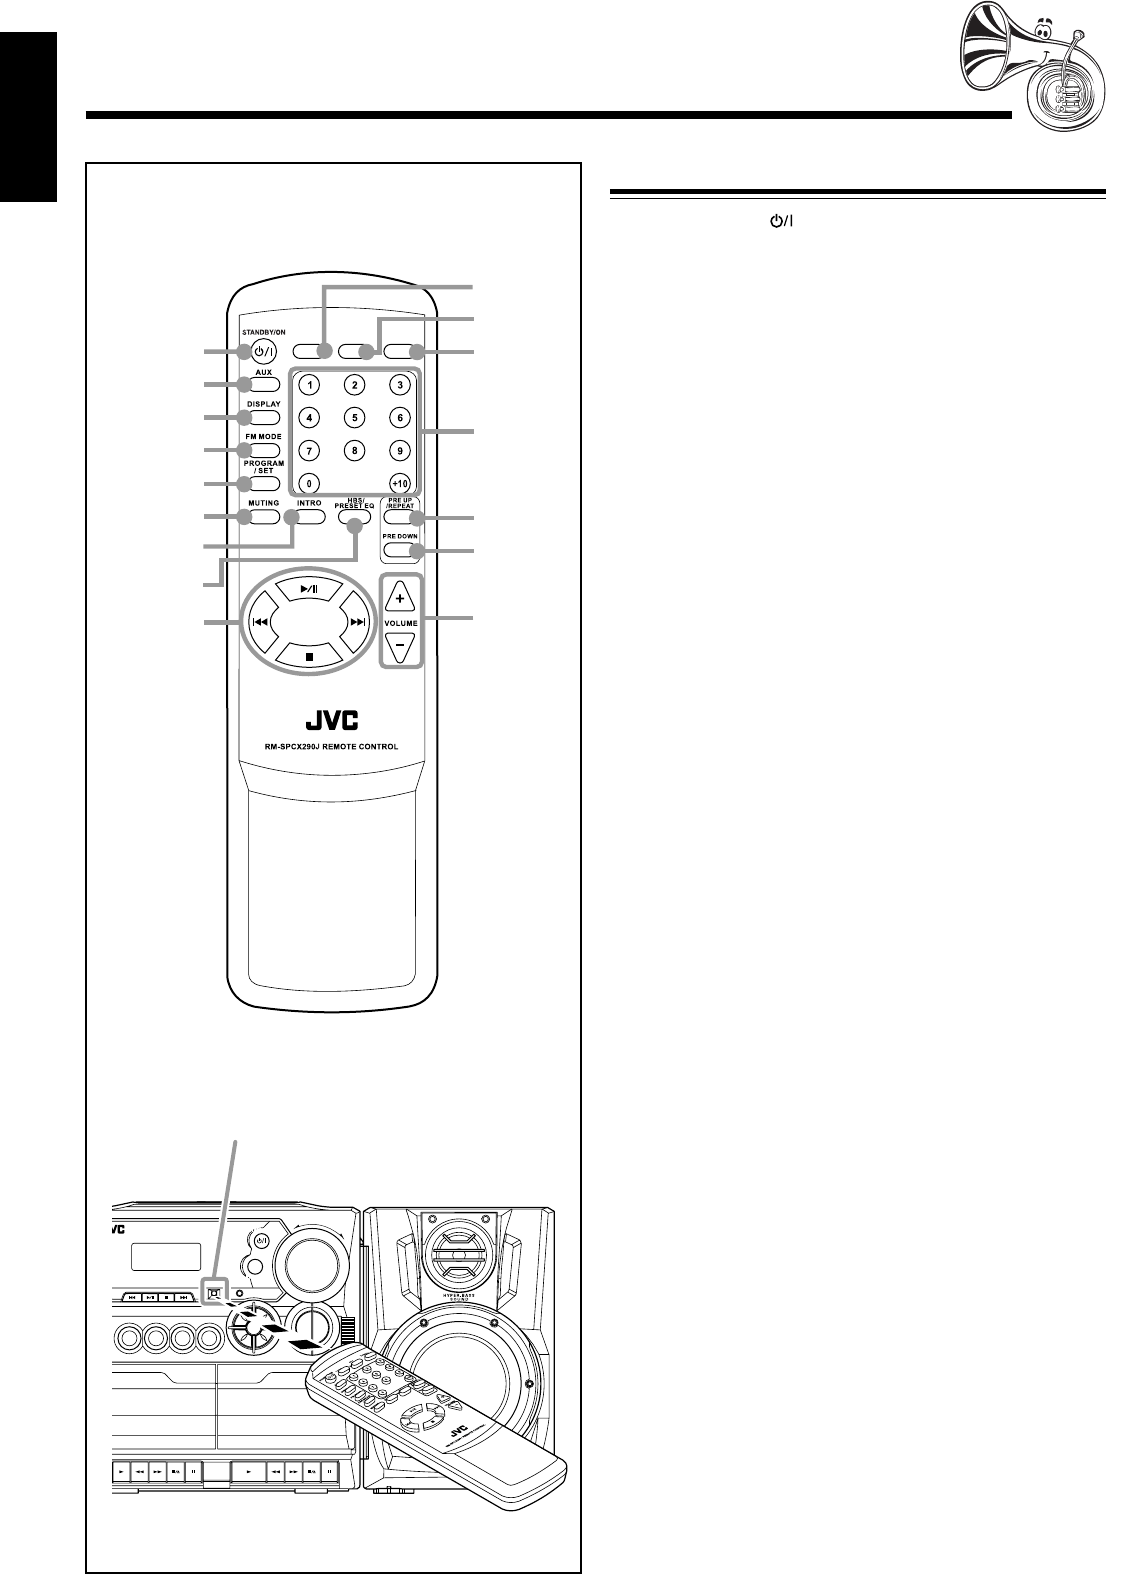
Putting the Batteries into the Remote Control
Insert the batteries—R03(UM-4)/AAA(24F)—into the
remote control, by matching the polarity (+ and –) on the
batteries with the + and – markings on the battery
compartment.
When the remote control can no longer operate the unit,
replace both batteries at the same time.
1
3
• DO NOT use an old battery together with a new one.
• DO NOT use different types of batteries together.
• DO NOT expose batteries to heat or flame.
• DO NOT leave the batteries in the battery
compartment when you are not going to use the
remote control for an extended period of time.
Otherwise, it will be damaged from battery leakage.
R03(UM-4)/AAA(24F)
(not supplied)
2
Continued
Speaker
cord
Speaker
cord
Black
Red Red
L
R
SPEAKER IMPEDANCE MIN 3.2
Ω
Right speaker Left speaker
2,31
Do not connect the AC power cord until all other connections
have been made.
EN01-12_PC-X290[J]_f.p65 04.4.5, 11:45 AM6

– 7 –
English
RL
AC IN
R
2
1
Detaching the speaker system from the main unit
With the lever on the back of the unit pushed in the direction
of the arrow (1), lift up the speaker vertically (2) as the
illustration shows.
ACIN
R
2
1
Attaching the speaker system to the main unit
Fit the speaker into the grooves on the main unit (1) and slide
down the speaker vertically (2) as the illustration shows.
For playing the other equipment through this unit,
connect between the audio output jacks on the other
equipment and AUX IN jacks by using audio cords (not
supplied).
To audio output
Audio/video
equipment
Connecting Other Equipment
You can connect an audio equipment as a playback device.
When you connect and use this equipment, refer also to its
manual.
•DO NOT connect any equipment while the power
is on.
•DO NOT plug in any equipment until all
connections are complete.
Be sure that the plugs of the audio cords are color coded:
White plugs and jacks are for left audio signals, and red ones
for right audio signals.
EN01-12_PC-X290[J]_f.p65 04.4.5, 11:45 AM7
– 8 –
English
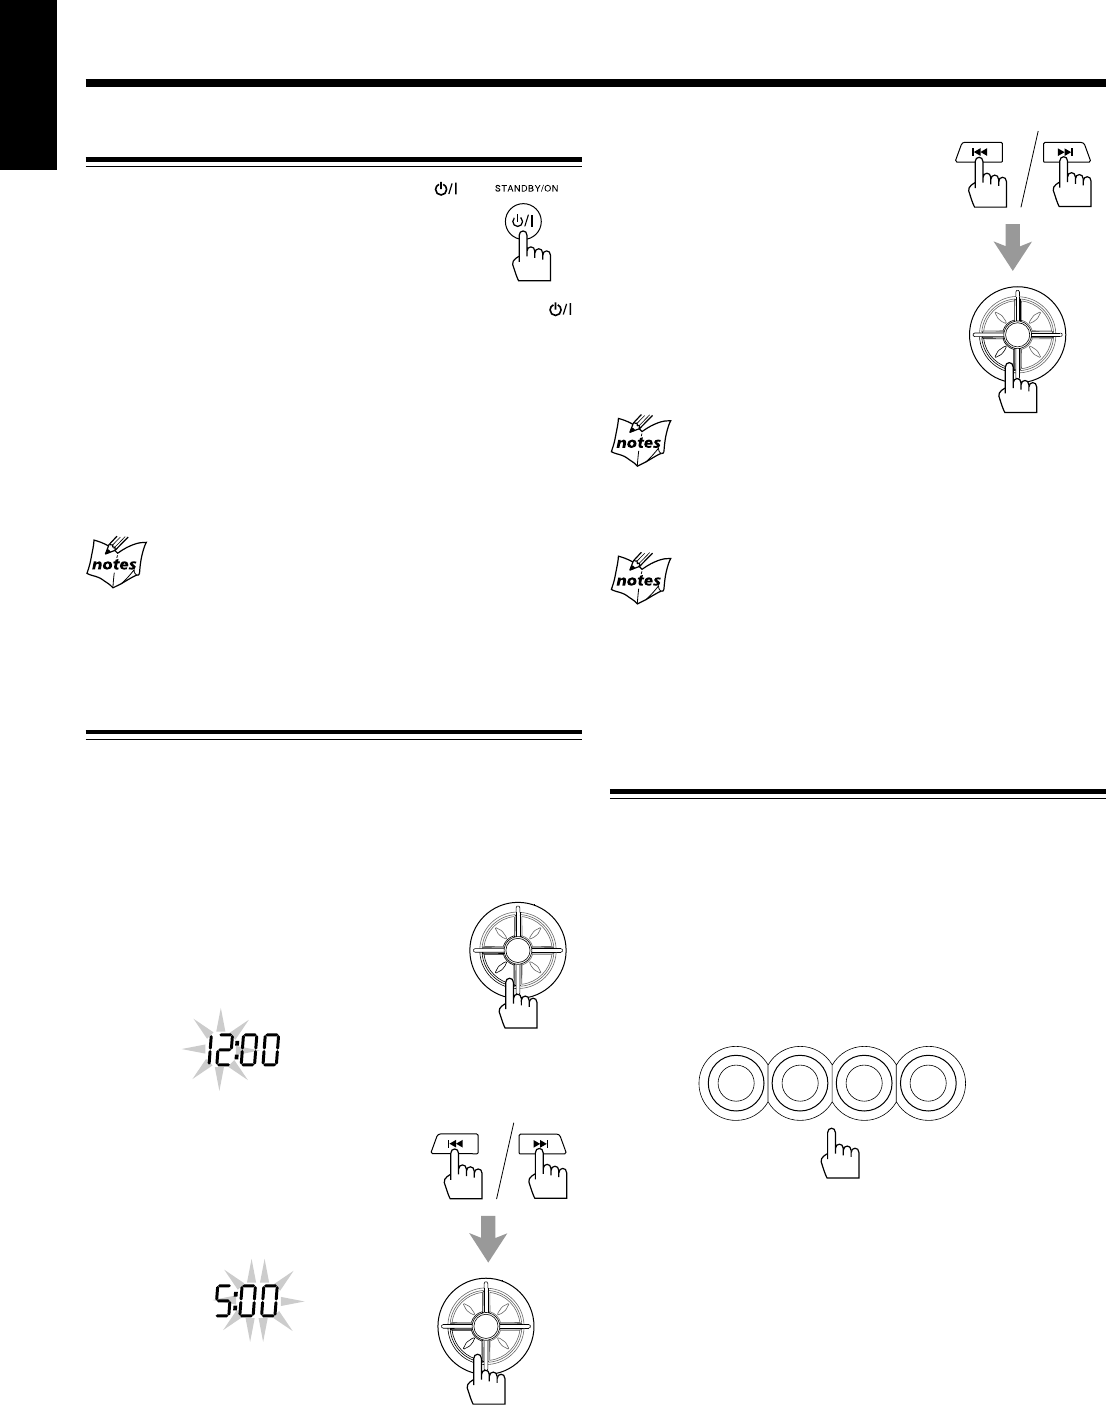
4
3
8
7
1
25
6
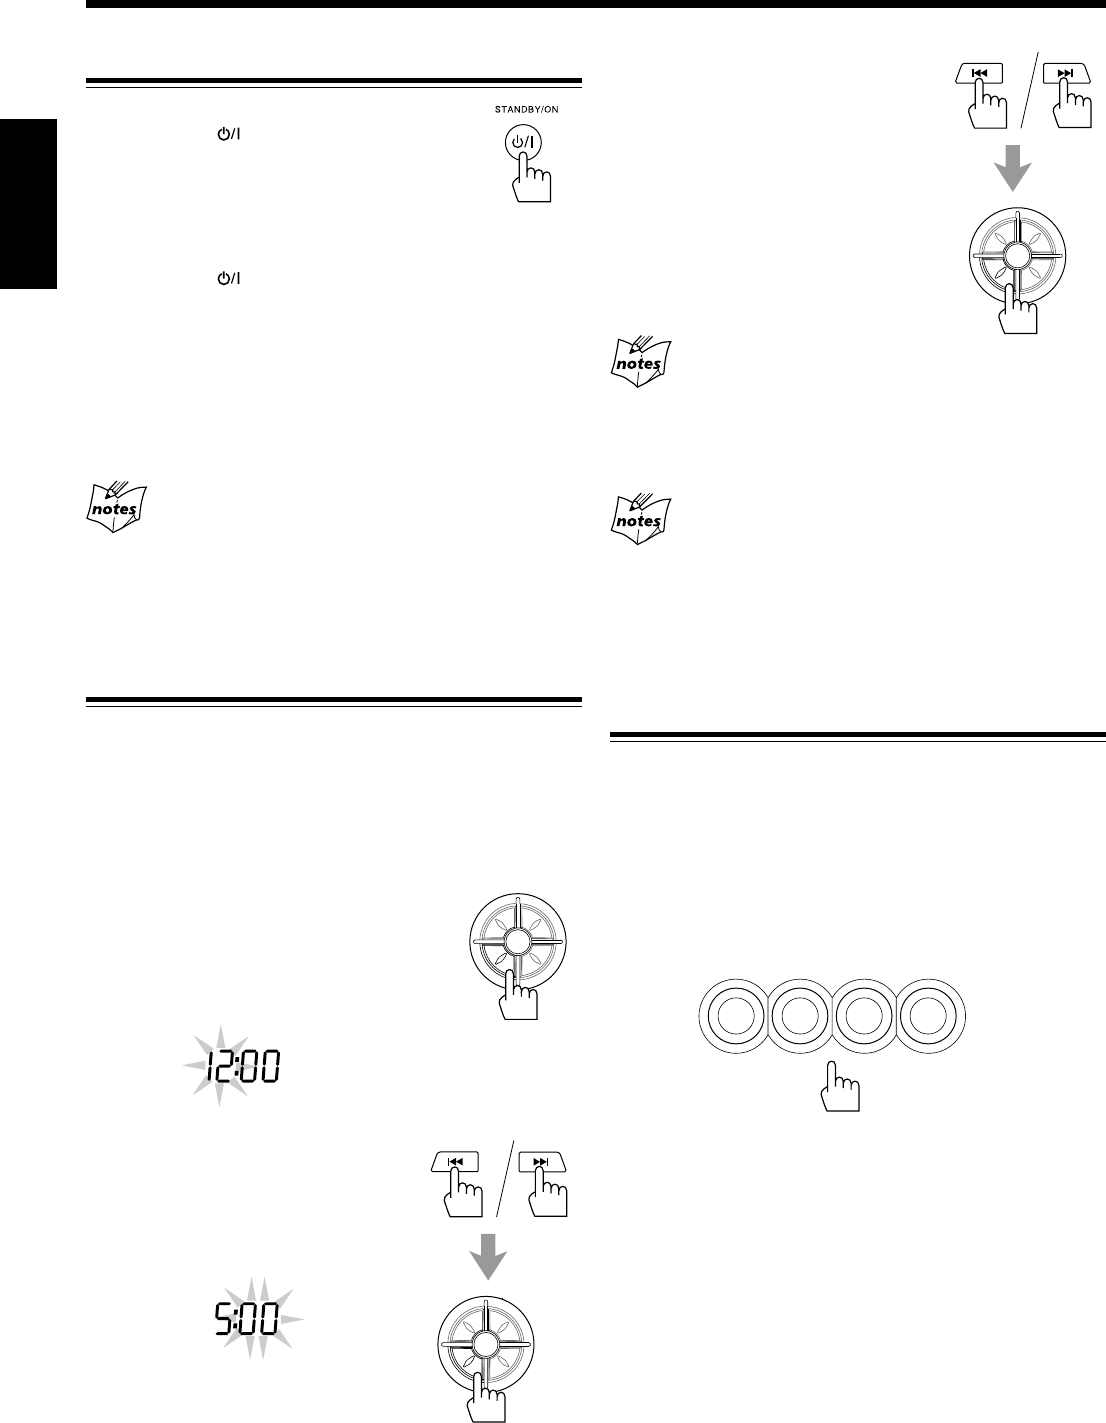
R20(SUM-1)/D(13D)
(not supplied)
• DO NOT use an old battery together with a new one.
• DO NOT use different types of batteries together.
• DO NOT expose batteries to heat or flame.
• DO NOT leave the batteries in the battery
compartment when you are not going to use the unit
for an extended period of time. Otherwise, it will be
damaged from battery leakage.
1
3
2
To insert the batteries
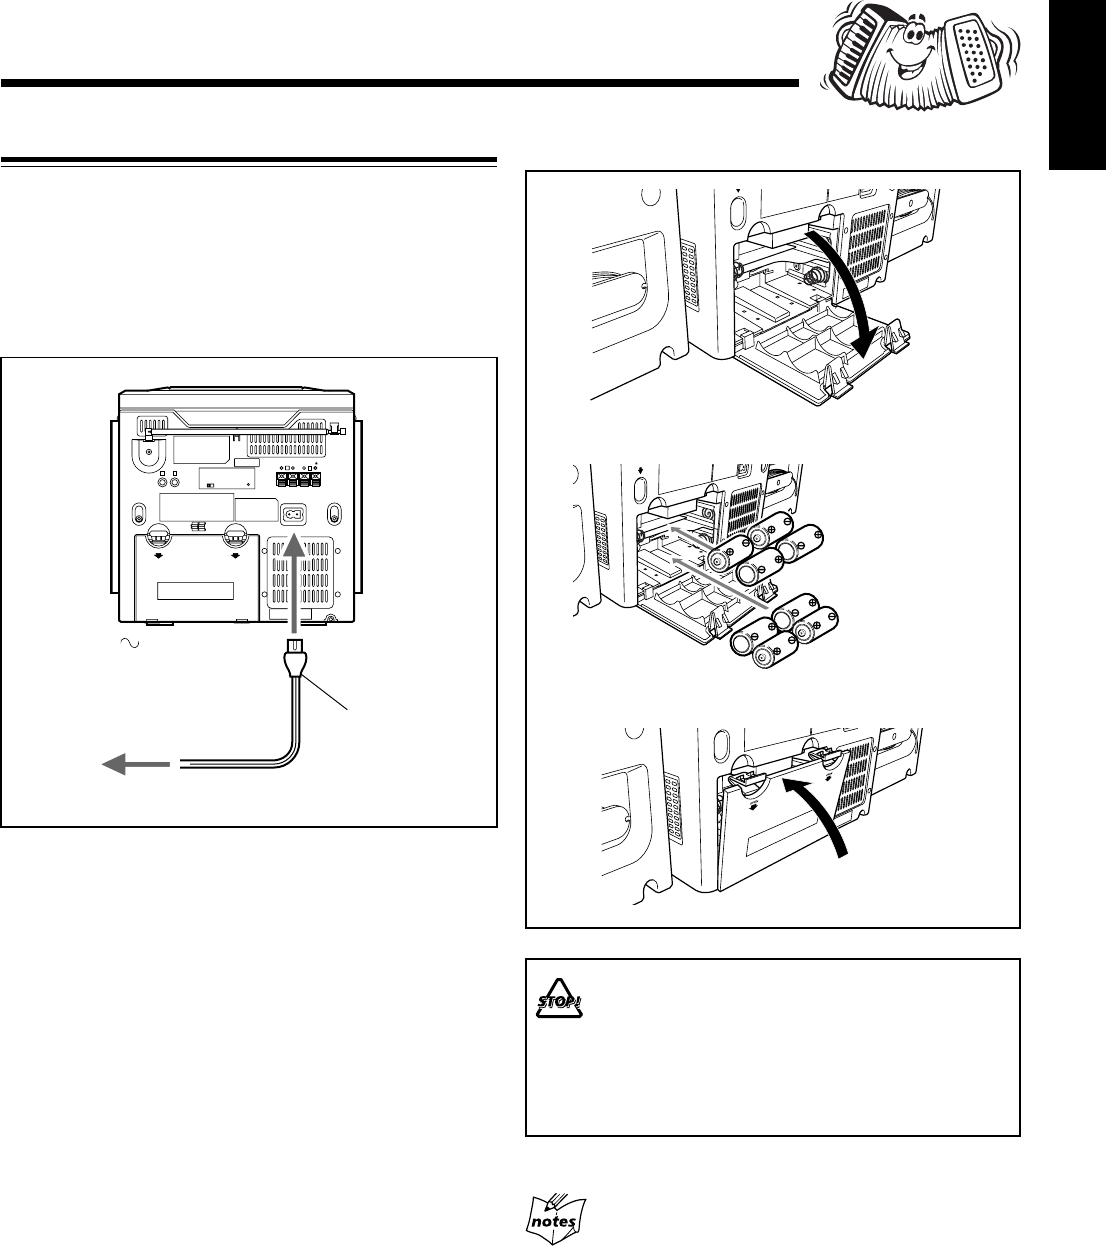
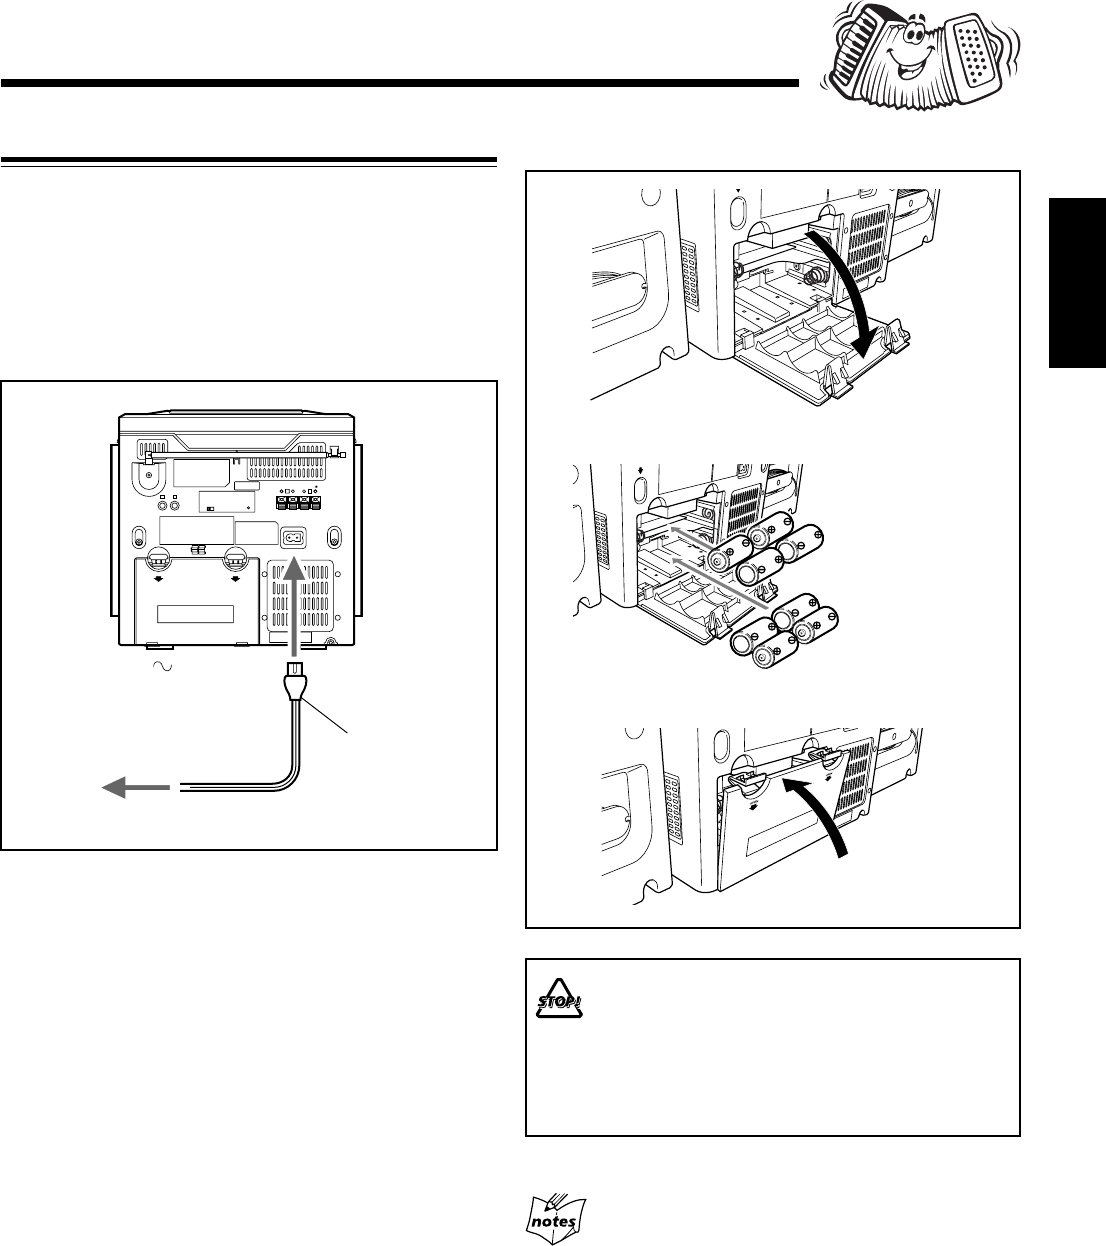
Power Supply
Use AC power or dry batteries (not supplied) to operate the
unit.
• As long as the AC power cord is connected to a power
source, the unit operates on AC power rather than on the
batteries in it.
To connect the AC power cord
AC power cord
(supplied)
1
To the AC IN terminal
2
To a wall outlet
Remove batteries when storing this unit over one month.
EN01-12_PC-X290[J]_f.p65 04.4.5, 11:45 AM8
– 9 –
English
3
Press 4 or ¢ to adjust
the minute, then press
PROGRAM/SET.
If there is a power failure
The clock loses the setting and is reset to “AM 12:00.” You need to
set the clock again. If the batteries are inserted in the unit, this has
no effect on the memory.
To show the clock when CD or tuner is selected
Press DISPLAY.
• Each time you press the button, the display changes the clock
indication and the normal indication alternately. (Operating the
unit while clock indication is displayed change the display to the
normal indication.)
Selecting the Sources
To select the FM/AM broadcasts, press TUNER/BAND.
(See page 12.)
To select CD, press CD/RANDOM then press 6. (See
pages 13 – 15.)
To select tapes, press TAPE then press PLAY 3 for the deck
you want. (See page 16.)
To select the external equipment as the source, press AUX.
The source indicator for the selected source appears on the
display.
Common Operations
Turning On or Off the Power
To turn on the unit, press STANDBY/ON .
• When you use the batteries for power supply,
the backlight of the display dims to save
power consumption.
To turn off the unit (on standby), press STANDBY/ON
again.
The STANDBY lamp on the unit lights red.
A little power is always consumed even while the unit is on
standby.
To switch off the power supply completely, unplug the AC
power cord from the AC outlet. If the batteries are inserted in
the unit, take them out.
When you unplug the AC power cord or if a power
failure occurs
The clock is reset to “AM 12:00” right away, while the tuner preset
stations (see page 12) will be erased in a few days. If the batteries
are inserted in the unit, this has no effect on the memory.
Setting the Clock
Before operating the unit any further, first set the clock built
in this unit.
• When the unit is turned on with CD or tuner selected, press
DISPLAY first to show the clock indication.
1
Press and hold PROGRAM/SET
for more than 2 seconds.
The hour digits start flashing on the
display.
2
Press 4 or ¢ to adjust
the hour, then press
PROGRAM/SET.
The minute digits start flashing on the
display.
AM
PM
P
R
E
S
E
T
U
P
/
R
E
P
E
A
T
P
R
O
G
R
A
M
/
S
E
T
N
W
O
D
T
E
S
E
R
P
O
R
T
N
I
P
R
E
S
E
T
U
P
/
R
E
P
E
A
T
P
R
O
G
R
A
M
/
S
E
T
N
W
O
D
T
E
S
E
R
P
O
R
T
N
I
P
R
E
S
E
T
U
P
/
R
E
P
E
A
T
P
R
O
G
R
A
M
/
S
E
T
N
W
O
D
T
E
S
E
R
P
O
R
T
N
I
TAPE AUX
CD/
RANDOM
TUNER/
BAND
EN01-12_PC-X290[J]_f.p65 04.4.5, 11:45 AM9
– 10 –
English
Adjusting the Volume
You can adjust the volume level only while the unit is turned
on.
Turn the VOLUME +/– clockwise to
increase the volume or counterclockwise
to decrease it.
• The volume level can be adjusted in 31
steps (00 VOL to 30 VOL).
When using the remote control, press VOLUME + to increase
the volume or press VOLUME – to decrease it.
To turn off the sound temporarily
On the remote control ONLY:
Press MUTING.
The sounds is turned off and the MUTING indicator appears
on the display.
To restore the sound, press MUTING again.
The MUTING indicator goes off.
• Adjusting the volume level also cancels the muting.
For private listening
Connect a pair of headphones to the PHONES jack. No sound
comes out of the speakers. Be sure to turn down the volume before
connecting or putting on headphones.
DO NOT turn off (on standby) the unit with the
volume set to an extremely high level; otherwise, a
sudden blast of sound can damage your hearing,
speakers and/or headphones when you turn on the
unit or start playing any source next time.
REMEMBER you cannot adjust the volume level
while the unit is on standby.
-
+
VOLUME
Reinforcing the Bass Sound
The Hyper Bass Sound function provided for this unit can
enhance the bass sound while listening to any source at low
volume.
• You can use this function only for playback.
To turn on the function, press and hold HBS/
PRESET EQ for more than 1 second so that
the HBS indicator appears on the display.
To turn off the function, press and hold the button for more
than 1 second again so that the HBS indicator goes off from
the display.
Selecting the Sound Modes
You can select one of the 5 preset sound modes.
SEA (Sound Effect Amplifier) modes:
CLASSIC: Good for classical music.
ROCK: Boosts low and high frequency. Good for
acoustic music.
POP: Good for vocal music.
JAZZ: Good for jazz music.
FLAT: Normal sound.
• This function only affects the playback sound, but does not
affect your recording.
To select the sound modes, press HBS/
PRESET EQ repeatedly until the indicator for
the sound mode you want appears on the
display.
• Each time you press the button, the sound
modes change as follows:
FLAT
CLASSIC ROCK
POP
JAZZ
P
Y
A
L
S
I
D
H
B
S
/
P
R
E
S
E
T
E
Q
HBS
P
Y
A
L
S
I
D
H
B
S
/
P
R
E
S
E
T
E
Q
EN01-12_PC-X290[J]_f.p65 04.4.5, 11:45 AM10
– 11 –
English
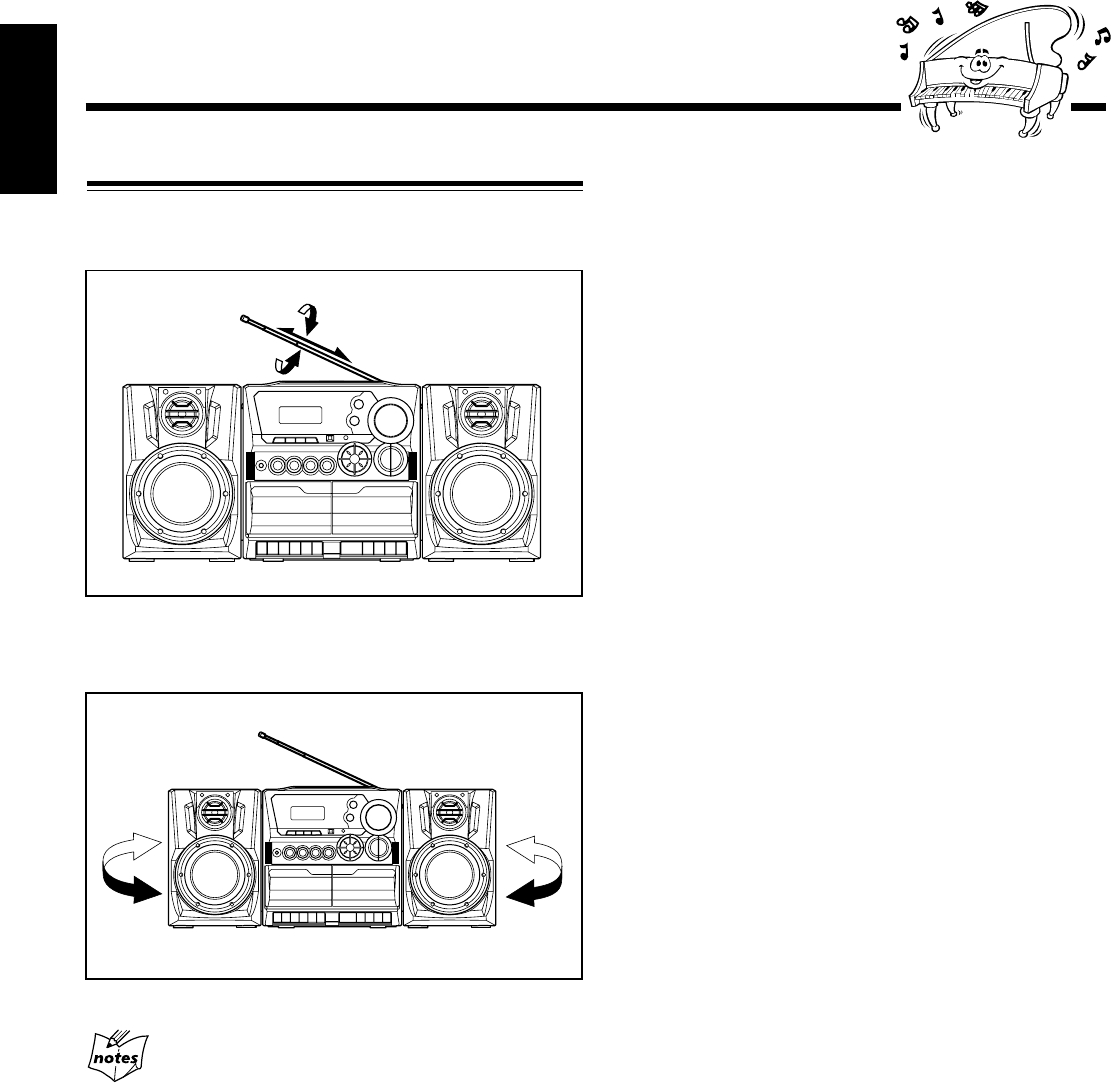
For better reception of both FM and AM
• Make sure the antenna conductors do not touch any other
terminals and connecting cords.
• Keep the antennas away from metallic parts of the unit,
connecting cords, and the AC power cord.
Ensuring Good FM and AM Reception
FM reception: Pull out the antenna and reorient it for better
reception.
AM reception: Reorient the main unit for better reception.
EN01-12_PC-X290[J]_f.p65 04.4.5, 11:45 AM11
– 12 –
English
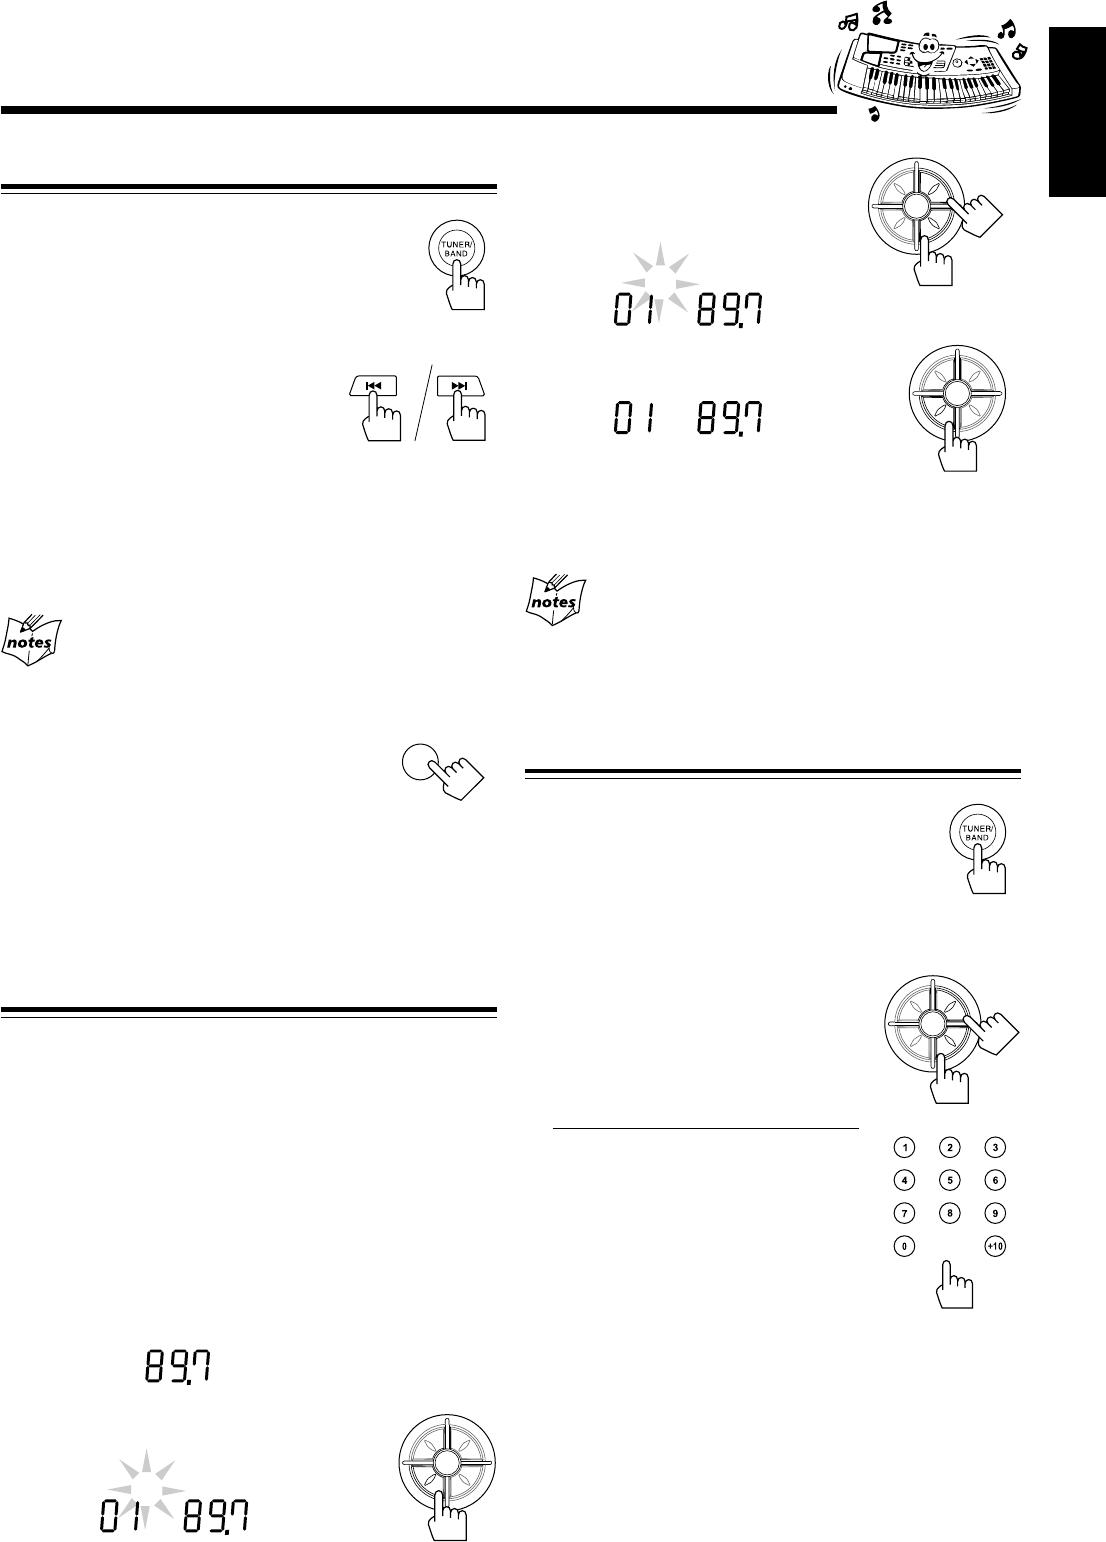
Tuning in a Station
1
Press TUNER/BAND.
The unit automatically tunes in the previously
tuned station (either FM or AM).
• Each time you press the button, the band
alternates between FM and AM.
2
Press and hold 4 or ¢
for more than 1 second.
The unit starts searching for stations
and stops when a station of sufficient
signal strength is tuned in. If a
program is broadcast in stereo, you
can hear stereo sounds (the STEREO
indicator appears).
To stop during searching, press 4
or
¢.
When you press 4 or ¢ briefly and repeatedly
The frequency changes step by step.
To change the FM reception mode
When an FM stereo broadcast is hard to receive
or noisy, press FM MODE so that the MONO
indicator appears on the display. Reception
improves.
To restore the stereo effect, press FM MODE again so that
the MONO indicator goes off.
• The stereo effect is also restored when you tune in another
station.
Presetting Stations
You can preset 10 FM and 10 AM stations.
In some cases, test frequencies have been already memorized
for the tuner since the factory examined the tuner preset
function before shipment. This is not a malfunction. You can
preset the stations you want into memory by following the
presetting method.
• There is a time limit in doing the following steps. If the
setting is canceled before you finish, start from step 2
again.
1
Tune in the station you want to preset.
• See “Tuning in a Station” above.
2
Press PROGRAM/SET.
TUNER
MHz
FM
Listening to FM and AM Broadcasts
3
Press PRESET UP/REPEAT
or PRESET DOWN to select
a preset number.
4
Press PROGRAM/SET again.
The tuned station in step 1 is stored in the
preset number selected in step 3.
• Storing a new station on a used number erases the
previously stored one.
When you unplug the AC power cord or if a power
failure occurs
The preset stations will be erased in a few days. If this happens,
preset the stations again. If the batteries are inserted in the unit, this
has no effect on the memory.
Tuning in a Preset Station
1
Press TUNER/BAND.
The unit automatically tunes in the previously
tuned station (either FM or AM).
• Each time you press the button, the band
alternates between FM and AM.
2
Select a preset number.
Press PRESET UP/REPEAT or
PRESET DOWN.
On the remote control ONLY:
Press the number buttons.
For preset number 5, press 5.
For preset number 10, press +10, then
0.
TUNER
PROG
MHz
STEREO
FM
TUNER
PROG
MHz
STEREO
FM
FM MODE
P
R
E
S
E
T
U
P
/
R
E
P
E
A
T
P
R
O
G
R
A
M
/
S
E
T
N
W
O
D
T
E
S
E
R
P
O
R
T
N
I
P
R
E
S
E
T
U
P
/
R
E
P
E
A
T
P
R
O
G
R
A
M
/
S
E
T
N
W
O
D
T
E
S
E
R
P
O
R
T
N
I
P
R
E
S
E
T
U
P
/
R
E
P
E
A
T
P
R
O
G
R
A
M
/
S
E
T
N
W
O
D
T
E
S
E
R
P
O
R
T
N
I
TUNER
PROG
MHz
STEREO
FM
P
R
E
S
E
T
U
P
/
R
E
P
E
A
T
P
R
O
G
R
A
M
/
S
E
T
N
W
O
D
T
E
S
E
R
P
O
R
T
N
I
EN01-12_PC-X290[J]_f.p65 04.4.5, 11:45 AM12
– 13 –
English
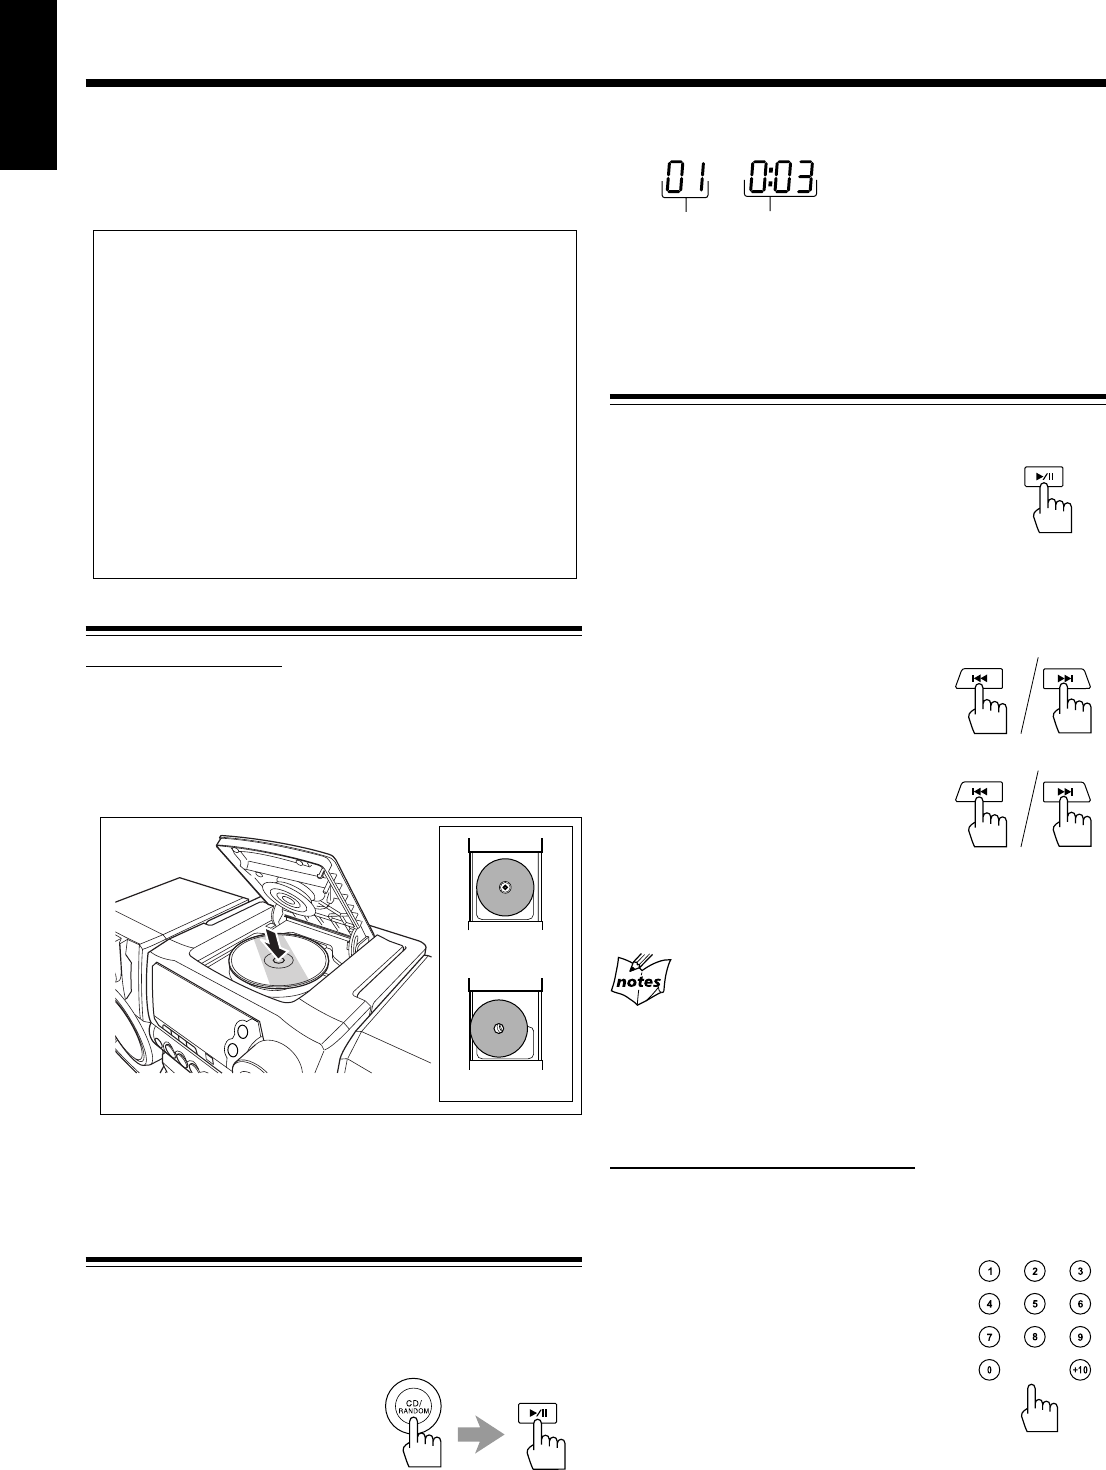
Loading CD
On the unit ONLY:
1
Press 0 OPEN on the disc door to open the
disc door.
2
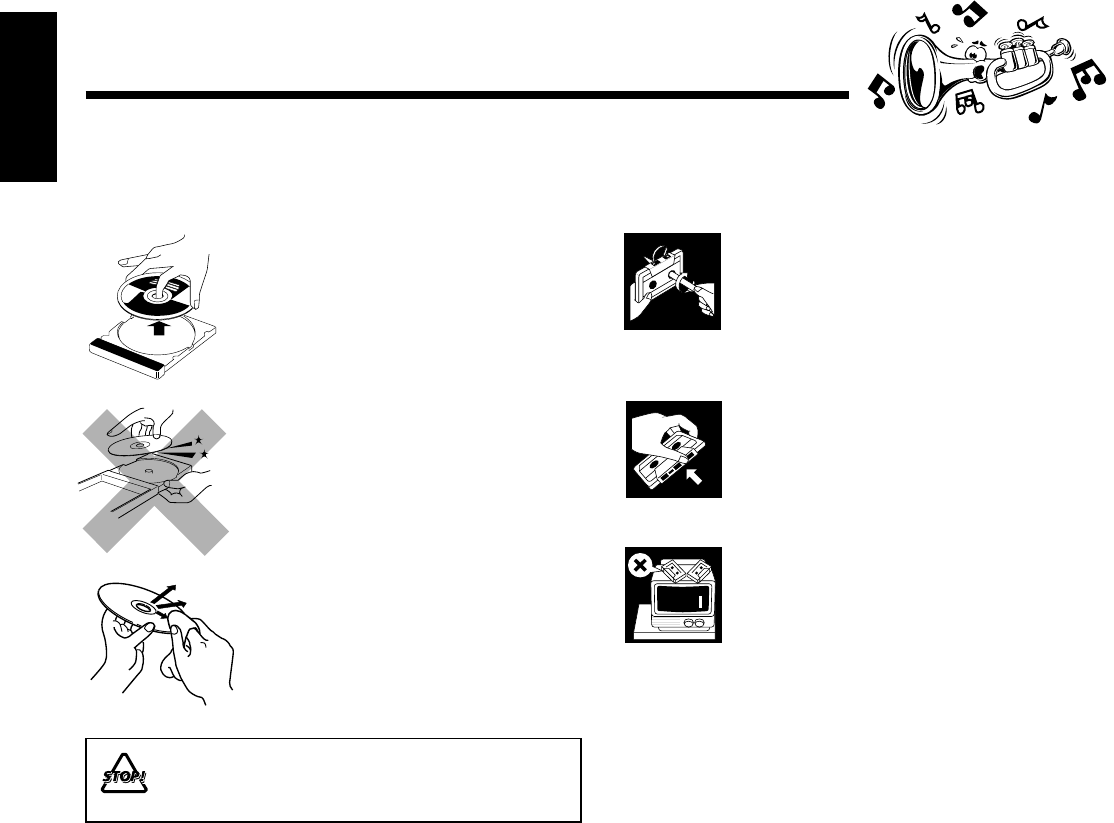
Place a disc correctly with its label side up as
shown below.
3
Press 0 OPEN again to close the disc door.
Playing Back the Entire Disc
You can play CD continuously.
1
Load CD.
2
Press CD/RANDOM,
then 3¥8.
CD play starts from the first
track.
• Pressing CD/RANDOM while the source is CD starts
Random play (see page 15). In this case, press just 3/8
to start playback.
Playing Back CD
To stop during play, press 7.
To remove the disc, press 0 OPEN.
Basic CD Operations
While playing a CD, you can do the following operations.
To stop play for a moment
Press 3¥8.
While pausing, the elapsed playing time flashes
on the display.
To resume play, press 3¥8 again.
To locate a particular point in a track
During play, press and hold 4 or ¢.
•4: Fast reverses the disc.
•¢: Fast forwards the disc.
To go to another track
Press 4 or ¢ repeatedly before or
during playback.
•4: Goes back to the beginning of
the current or previous tracks.
•¢: Skips to the beginning of the next or succeeding
tracks.
If you press and hold 4 or ¢ before playing
You can change the tracks continuously.
To go to another track directly using the number
buttons
On the remote control ONLY:
Pressing the number button(s) before or during play allows
you to start playing the track number you want.
Ex.: For track number 5, press 5.
For track number 10, press +10, then
0.
For track number 15, press +10, then
5.
For track number 20, press +10, +10,
then 0.
For track number 32, press +10, +10,
+10, then 2.
Track number Elapsed playing time
CD
This unit has been designed to play back the following CDs: Audio
CD, CD-R, and CD-RW.
Continued use of irregular shape CDs (heart-shape, octagonal, etc.)
can damage the unit.
When playing a CD-R or CD-RW
User-edited CD-Rs (Recordable) and CD-RWs (Rewritable) can
be played back only if they are already “finalized.”
• You can play back your original CD-Rs or CD-RWs recorded in
music CD format. (However, they may not be played back
depending on their characteristics or recording conditions.)
• Before playing back CD-Rs or CD-RWs, read their instructions
or cautions carefully.
• Some CD-Rs or CD-RWs may not be played back on this unit
because of their disc characteristics, damage or stain on them,
or if the player’s lens is dirty.
• CD-RWs may require a longer readout time. (This is caused by
the fact that the reflectance of CD-RWs is lower than for
regular CDs.)
correct
incorrect
EN13-16_PC-X290[J]_f.p65 04.4.5, 11:45 AM13

– 14 –
English
Programming the Playing Order of the Tracks
—Program Play
You can arrange the order in which the tracks play before you
start playing. You can program up to 20 tracks.
• To use Repeat play (see page 15) for Program play, press
PRESET UP/REPEAT after starting Program play.
• There is a time limit in doing the following steps. If the setting
is canceled before you finish, start from step 2 again.
1
Load CD.
• If the current playing source is not the CD player, press
CD/RANDOM before going to the next step.
2
Press PROGRAM/SET.
The PROG indicator flashes on the display.
• If a program has been stored in memory, the program is
called up.
3
Select a track from the CD.
Press 4 or ¢ to select the
track number.
On the remote control ONLY:
Press the number buttons.
• For how to use the number buttons, see
“To go to another track directly using
the number buttons” on page 13.
4
Press PROGRAM/SET.
5
Repeat steps 3 and 4 to program other tracks
if you want.
6
Press 3¥8 while the PROG indicator
flashes.
The tracks are played in the order you have
programmed.
• If the PROG indicator goes off before you press 3/8,
press PROGRAM/SET, then press 3/8 to start
playback.
Continued
P
R
E
S
E
T
U
P
/
R
E
P
E
A
T
P
R
O
G
R
A
M
/
S
E
T
N
W
O
D
T
E
S
E
R
P
O
R
T
N
I
CD
PROG
P
R
E
S
E
T
U
P
/
R
E
P
E
A
T
P
R
O
G
R
A
M
/
S
E
T
N
W
O
D
T
E
S
E
R
P
O
R
T
N
I
To stop during play, press 7.
The PROG indicator goes off from the display and the unit
exits from Program play. (The program you have made is
stored in memory until you erase the program.)
To check the program contents
Before playing, you can check the program
contents by pressing PROGRAM/SET.
• Each time you press the button, the
programmed tracks are shown on the
display.
To add tracks in the program
1
Press PROGRAM/SET repeatedly to show the last
programmed track.
2
Press PROGRAM/SET repeatedly unit “00” appears as
the track number.
3
Enter the track number(s) you want to add by repeating
steps 3 and 4 on the left.
To edit the program
1
Press PROGRAM/SET repeatedly to show the program
number you want to edit.
2
Enter the track number you want by following steps 3 and
4 on the left.
To erase the entire program before or after play
1
Press PROGRAM/SET.
The PROG indicator flashes on the display.
2
Press 7.
• Ejecting a CD will also erase the entire program.
If you cannot enter a track number
You are trying to program a track number that does not
exist on the CD (for example, selecting track 14 on a CD that only
has 12 tracks).
After you have programmed 20 tracks
The program number returns to “P-01.” Programming
more tracks overwrite the tracks already programmed to those
numbers.
CD
PROG
P
R
E
S
E
T
U
P
/
R
E
P
E
A
T
P
R
O
G
R
A
M
/
S
E
T
N
W
O
D
T
E
S
E
R
P
O
R
T
N
I
EN13-16_PC-X290[J]_f.p65 04.4.5, 11:45 AM14
– 15 –
English
Repeating Tracks or CD—Repeat Play
You can have the CD, the program or the individual track
currently playing repeat as many times as you like.
To repeat play, press PRESET UP/
REPEAT during or before playing. To
use Repeat play for Program play,
Random play and Intro play, press the
button before or after starting playback.
• Each time you press the button,
Repeat play mode changes as follows, and the REP ALL or
REP 1 indicator appears on the display:
REP ALL : Repeats all the tracks (continuously or at
random), or all the tracks in the program.
REP 1 : Repeats one track (except for Random play).
When you select Random play
REP 1 is canceled.
To stop during play, press 7.
The REP indicator goes off from the display and the unit
exits from Repeat play.
• To cancel Repeat play without stopping playback, press
PRESET UP/REPEAT repeatedly until the REP indicator
goes off.
Playing Introductions—Intro Play
Every track or every programmed track of a CD can be
played for the beginning ten seconds.
To use Intro play, press INTRO.
Intro play starts and the INTRO indicator
appears. To use Intro play for Program play
and Random play, press the button after
starting playback.
To stop during play, press 7.
The INTRO indicator goes off from the display and the unit
exits from Intro play.
• To cancel Intro play without stopping playback, press
INTRO again until the INTRO indicator goes off.
If you press INTRO while playing a track after ten
seconds from the beginning
The introduction of the next track begins to play.
Playing at Random—Random Play
The tracks of loaded CD will play at random.
• To use Repeat play for Random play, press PRESET UP/
REPEAT so that REP ALL indicator lights up on the
display after starting Random play (Random play will be
canceled when you select REP 1).
1
Load CD.
• If the current playing source is not the CD player, press
CD/RANDOM before going to the next step.
2
Press CD/RANDOM so that the
RANDOM indicator appears on the
display.
Random play starts.
• If you press CD/RANDOM during CD playback, the
Random play starts after the current track ends.
The tracks are played at random.
Random play ends when all the tracks are played once.
To skip the currently playing track, press ¢.
To stop during play, press 7.
The RANDOM indicator goes off from the display and the
unit exits from Random play.
• To cancel Random play without stopping playback, press
CD/RANDOM so that the RANDOM indicator goes off.
CD
RANDOM
P
R
E
S
E
T
U
P
/
R
E
P
E
A
T
P
R
O
G
R
A
M
/
S
E
T
N
W
O
D
T
E
S
E
R
P
O
R
T
N
I
REP ALL REP 1
Canceled
P
R
E
S
E
T
U
P
/
R
E
P
E
A
T
P
R
O
G
R
A
M
/
S
E
T
N
W
O
D
T
E
S
E
R
P
O
R
T
N
I
EN13-16_PC-X290[J]_f.p65 04.4.5, 11:45 AM15
– 16 –
English
You can play back only type I (Normal) tapes.
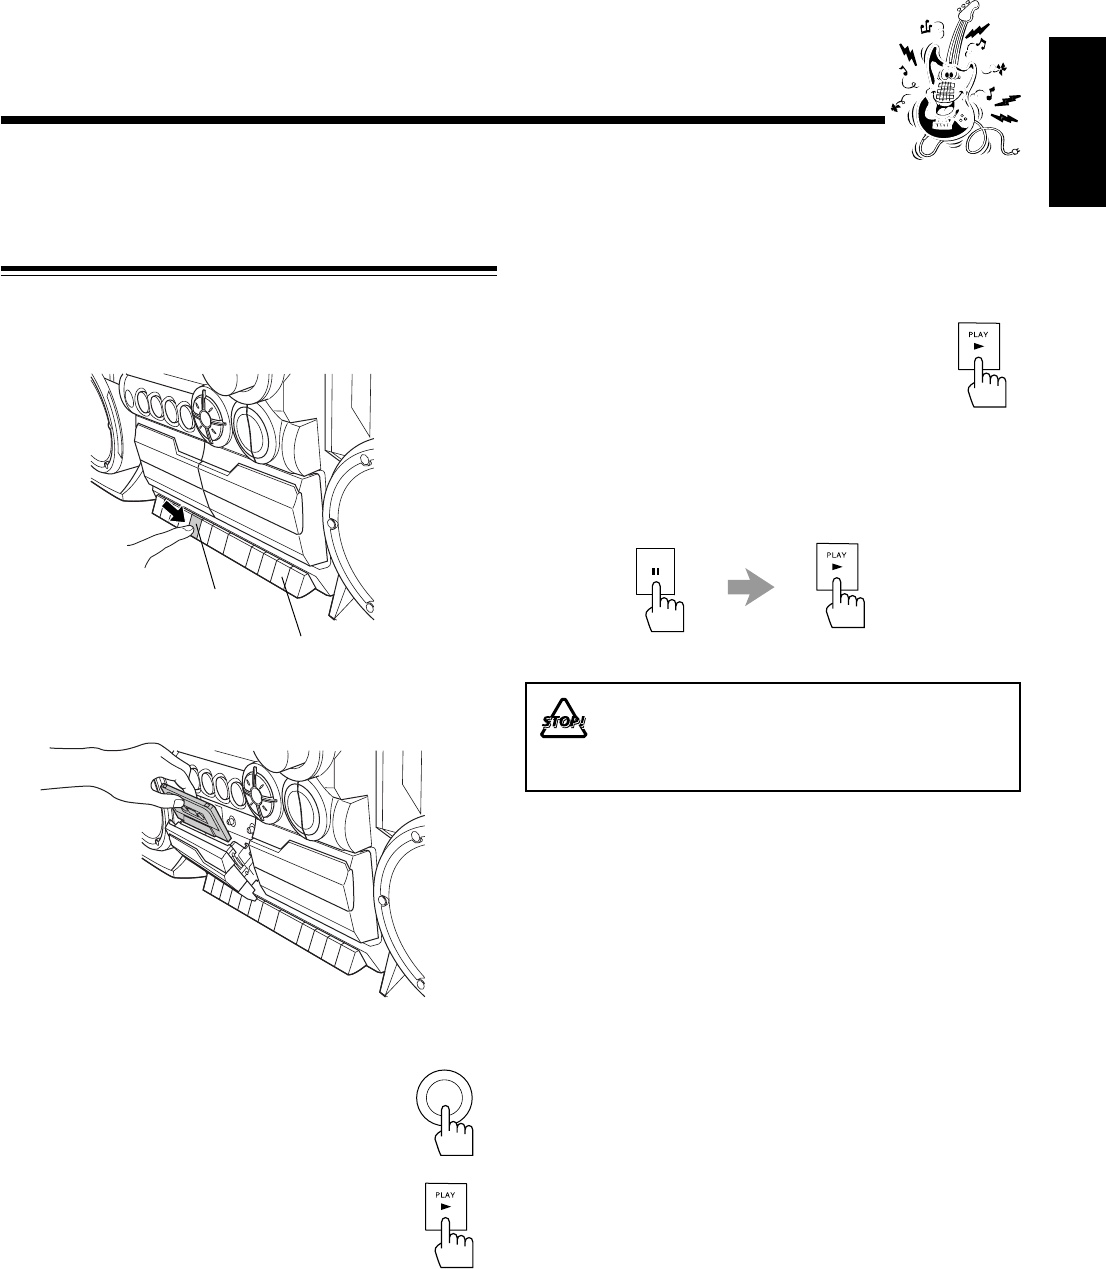
Playing Back a Tape
1
Press STOP/EJECT 7 /0 for the deck you
want to use.
2
Put a cassette in, with the exposed part of the
tape down.
3
Close the cassette holder gently.
4
Press TAPE.
5
Press PLAY 3.
The tape play starts.
When the tape plays to the end, the deck
automatically stops.
To stop during play, press STOP/EJECT 7/0.
To operate the other deck, press STOP/EJECT 7/0, then
PLAY 3 on the other deck.
To fast wind to the left or to the right, press REW 1/
FF ¡ while the tape is not running.
To remove the cassette, press STOP/EJECT 7/0.
To play the tapes in the decks B and A continuously
1
Set the cassette tapes in the decks A and B.
• If the tape direction is set wrong, replace the cassette.
2
Press PLAY 3 for the deck B.
The tape in the deck B begins to play.
3
Press PAUSE 8, then press PLAY 3 for the
deck A.
When the tape in the deck B ends, the tape in the deck A
automatically begins to play.
The use of the C-120 or thinner tape is not
recommended, since characteristic deterioration
may occur and this tape easily jams in the pinch-
rollers and the capstans.
TAPE
Playing Back Tapes
PAUSE
For Deck A
For Deck B
EN13-16_PC-X290[J]_f.p65 04.4.5, 11:45 AM16
– 17 –
English
IMPORTANT:
•It should be noted that it may be unlawful to re-record
pre-recorded tapes, records, or discs without the
consent of the owner of copyright in the sound or video
recording, broadcast or cable program and in any
literary, dramatic, musical, or artistic embodied
therein.
• The recording level is automatically set correctly, so it is
not affected by the VOLUME +/–. Thus, during recording
you can adjust the sound you are actually listening to
without affecting the recording level.
• While recording, you can hear sound modes through the
speakers or headphones (see page 10). However, the sound
is recorded without these effects.
• If recordings you have made have excessive noise or static,
the unit may be too close to a TV. Increase the distance
between the TV and the unit.
• You can use only type I (Normal) tapes for recording.
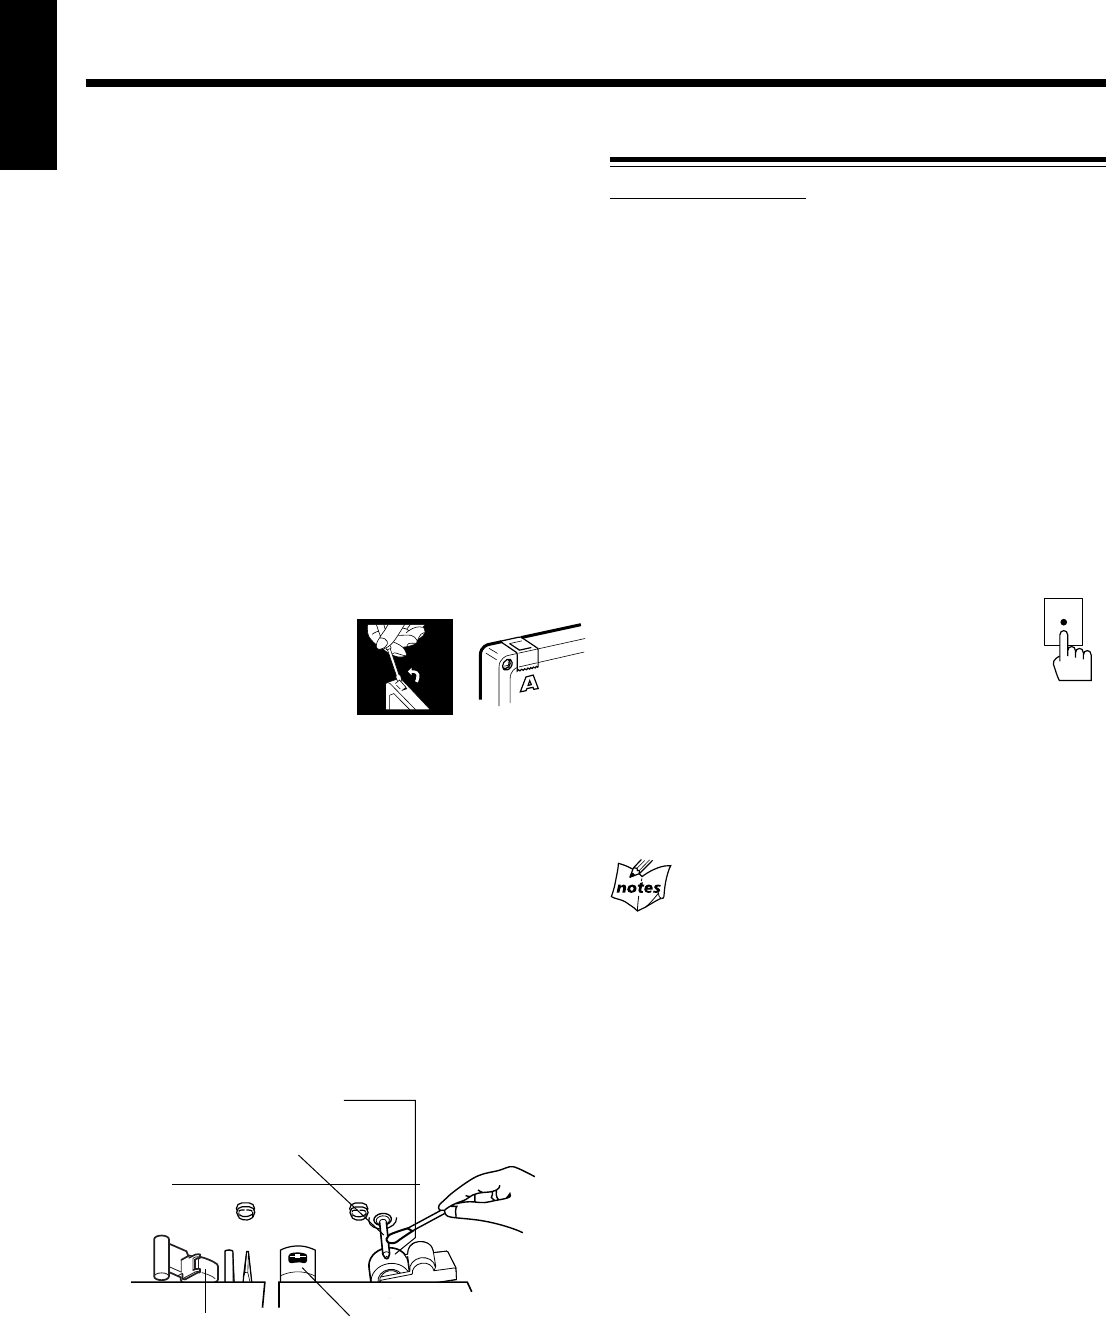
To protect your recording
Cassettes have two small tabs on
the back to protect unexpected
erasure or re-recording.
To protect your recording,
remove these tabs.
To re-record on a protected tape, cover the holes with
adhesive tape.
To keep the best recording and playback sound quality
If the heads, capstans, and pinch rollers of the cassette decks
become dirty, the following will occur:
• Impaired sound quality
• Discontinuous sound
• Fading
• Incomplete erasure
• Difficulty in recording
To clean the heads, capstans, and pinch rollers
Use a cotton swab moistened with alcohol.
To demagnetize the heads
Turn off the unit, and use a head demagnetizer (available at
electronics and record shops).
Recording
Recording onto a Tape on Deck A
On the unit ONLY:
1
Put a recordable cassette into the deck A with
the exposed part of the tape down.
• See also page 16.
2
Close the cassette holder gently.
3
Start playing the source—FM, AM*, CD
player, deck B, or auxiliary equipment
connected to AUX IN jacks.
• When the source is CD, you can also use Disc
Synchronized Recording (see page 18).
• When the source is the deck B, you can also use the
dubbing method. (See “Dubbing Tapes” on page 18.)
* See “To record an AM station—Beat Cut” on page 18.
4
Press REC ¶ for the deck A.
The recording starts.
To stop during recording, press STOP/EJECT 7/0for the
deck A.
To remove the cassette, press STOP/EJECT 7/0 for the
deck A.
You cannot press REC ¶ in the following cases:
• If no cassette is inserted.
• If a protected tape is inserted.
REC
Head
Capstan
Pinch roller
Erase head
(only for the deck A)
EN17-20_PC-X290[J]_f.p65 04.4.5, 11:52 AM17
– 18 –
English
Recording Disc
—Disc Synchronized Recording
You can start disc play and recording at the same time.
1
Put a recordable cassette into the deck A with
the exposed part of the tape down.
• See also page 16.
2
Close the cassette holder gently.
3
Press CD/RANDOM select the CD
player as the source.
• If you want to record tracks in the desired order,
program the playing order (see page 14).
4
Press REC ¶.
The CD playback and recording start automatically.
The SYNC REC indicator appears on the display.
• When the end of the tape is reached, recording stops
and the CD playback is paused.
When CD playback ends, press STOP/EJECT 7/0 to
stop the recording.
• If you press REC ¶ while playing back the CD, the CD
player returns to the beginning of that track and the
recording starts from that track.
You cannot press REC ¶ in the following cases:
• If no cassette is inserted.
• If a protected tape is inserted.
To stop recording for a moment, press PAUSE 8.
The recording is paused, but the CD playback does
not stop.
To resume recording, press PAUSE 8 again.
To stop recording, press STOP/EJECT 7/0.
The recording stops and the CD playback is
paused.
To remove the cassette, press STOP/EJECT 7/0
while recording is stopped.
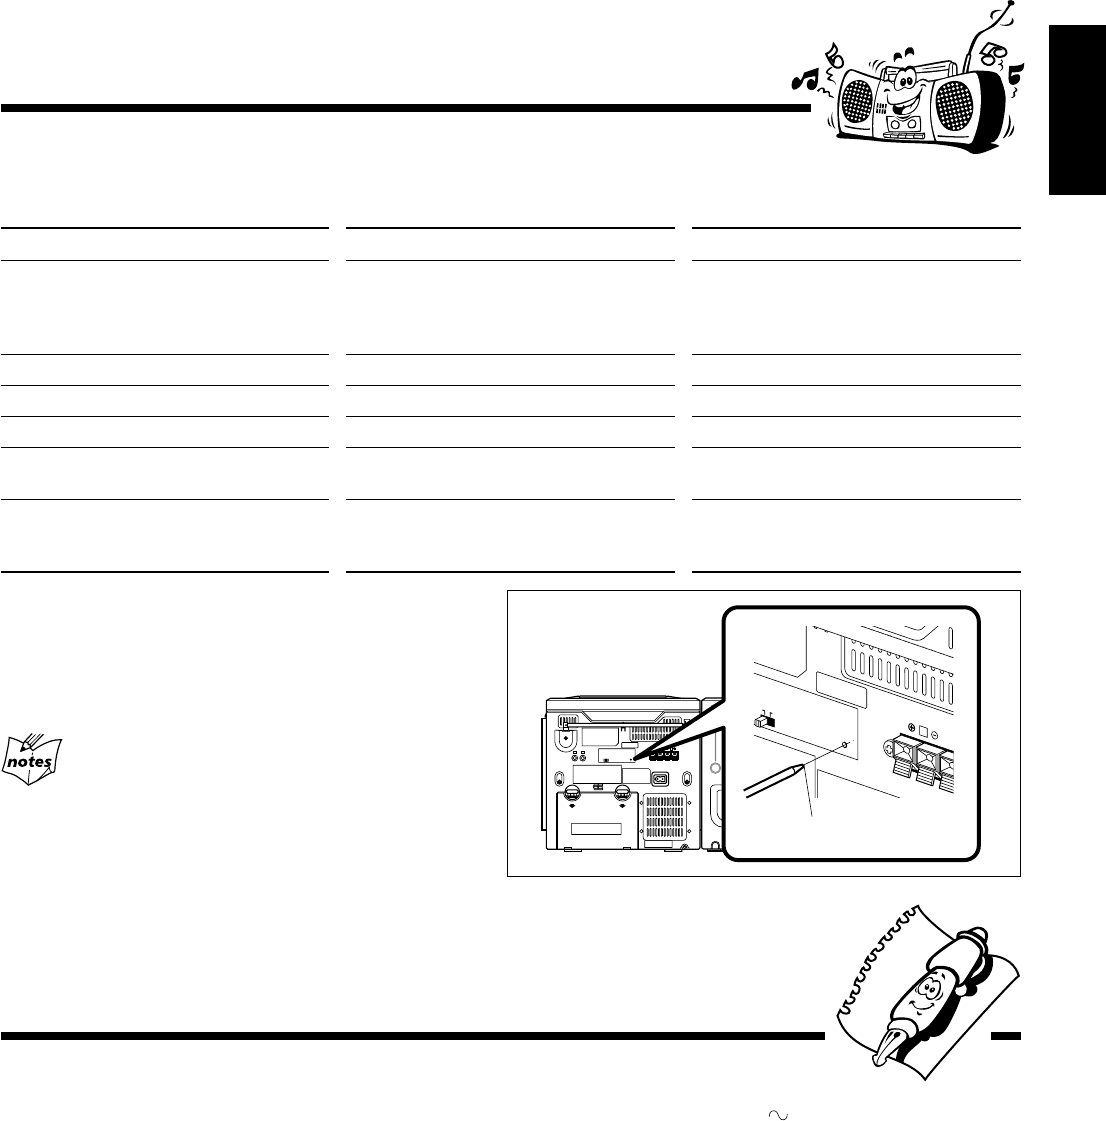
To record an AM station—Beat Cut
While recording an AM broadcast, beats may be heard
(which are never heard when listening to the broadcast
without recording it).
If this occurs, set the BEAT CUT switch on the back of the
unit to 1 or 2 to reduce the beating sound.
Dubbing Tapes
1
Press TAPE.
2
Put the source cassette into the deck B, and a
recordable cassette into the deck A.
3
Press PAUSE 8, then press REC ¶ for the
deck A.
4
Press PLAY 3 for the deck B.
Dubbing starts.
To stop during dubbing, press STOP/EJECT 7/0 for the
deck A.
OPEN OPEN
AC IN
RL
BEAT CUT RESET
12
RL
2+
-
1+
-
SPEAKER IMPEDANCE MIN 3.2
+
-
3 4
+
-
7+
-
8+
-
SUM-1 D SIZE HP2 R20
+
-
6 5
+
-
ANT.
SCREW
AUX IN
RELEASE
SPK LABEL
(PC PLATE )
RELEASE
SPK LABEL
(PC PLATE )
BEAT CUT
12
TAPE
PAUSE
REC
RECSYNCCD
MUTING
REC
PAUSE
STOP/EJECT
STOP/EJECT
EN17-20_PC-X290[J]_f.p65 04.4.5, 11:52 AM18
– 19 –
English
Maintenance
To get the best performance of the unit, keep your discs, tapes, and mechanism clean.
Handling cassette tapes
• If the tape is loose in its cassette, take
up the slack by inserting a pencil in
one of the reels and rotating.
• If the tape is loose, it may get
stretched, cut, or caught in the
cassette.
• Be careful not to touch the tape
surface.
• Avoid the following places to store the
tape:
– In dusty places
– In direct sunlight or heat
– In moist areas
– Near a magnet
Handling discs
• Remove the disc from its case by
holding it at the edge while pressing the
center hole lightly.
• Do not touch the shiny surface of the
disc, or bend the disc.
• Put the disc back in its case after use to
prevent warping.
• Be careful not to scratch the surface of
the disc when placing it back in its
case.
• Avoid exposure to direct sunlight,
temperature extremes, and moisture.
To clean the disc
Wipe the disc with a soft cloth in a
straight line from center to edge.
DO NOT use any solvent—such as conventional
record cleaner, spray, thinner, or benzine—to
clean the disc.
EN17-20_PC-X290[J]_f.p65 04.4.5, 11:52 AM19
– 20 –
English
R
BEAT CUT RESET
12
SPEAKER IMPEDAN
Resetting the unit
If “Troubleshooting” (see above) does not eliminate
malfunctioning (failure to operate or display properly etc.), press
the reset switch on the back of the unit with something having a
sharp point while the unit is turned on.
If you reset the unit
Resetting causes the unit to restore its factory default settings and
results in all the settings made by the user being deleted.
If you are having a problem with your unit, check this list for a possible solution before calling for service.
If you cannot solve the problem from the hints given here, or the unit has been physically damaged, call a qualified person,
such as your dealer, for service.
Troubleshooting
Symptom
No sound is heard.
The disc sound is discontinuous.
The disc does not play.
Impossible to record.
Operations are disabled.
Unable to operate the unit from the remote
control.
Cause
• Connections are incorrect or loose.
• Muting is activated.
The disc is scratched or dirty.
The disc is placed upside down.
Small tabs on the back of the cassette are removed.
The built-in microprocessor may malfunction
due to external electrical interference.
• The path between the remote control and
the remote sensor on the unit is blocked.
• The batteries are exhausted.
Action
• Check all connections and make
corrections. (See pages 6 – 8.)
• Press MUTING to cancel the mute.
(See page 10.)
Clean or replace the disc. (See page 19.)
Place the disc with the label side up.
Cover the holes with adhesive tape.
Unplug the AC power cord after removing the
batteries from the unit, and then plug it back in.
• Remove the obstruction.
• Replace the batteries.
sharp point
Amplifier section—CA-PCX290
Output Power:
5 W per channel, min. RMS, driven into 3.2 Ω at 1 kHz with no
more than 10% total harmonic distortion.
Audio input sensitivity/Impedance (at 1 kHz)
AUX: 1 000 mV/47 kΩ
Speakers/Impedance: 3.2 Ω – 8 Ω
Tuner
FM tuning range: 87.5 MHz – 108.0 MHz
AM tuning range: 530 kHz – 1 710 kHz
CD player
CD Capacity: 1 CD
Dynamic range: 60 dB
Signal-to-noise ratio: 75 dB
Cassette deck
Frequency response
Normal (type I): 50 Hz — 10 000 Hz
Wow and flutter: 0.15% (WRMS)
General
Power requirements: AC 120 V , 60 Hz
DC 12 V (“R20(SUM-1)/D(13D)” batteries
(8))
Power consumption: 20 W (at operation)
3 W (on standby)
Dimensions (approx.): 270 mm x 274 mm x 298 mm (W/H/D)
(10 11/16 in. x 10 3/4 in. x 11 3/4 in.)
Mass (approx.): 4.1 kg (9.1 lbs)
Supplied accessories
See page 6.
Speaker section—SP-PCX290
Type: 2-way bass-reflex type
Speaker units: Woofer: 10 cm (4 in.) cone x1
Tweeter: 5 cm (2 in.) cone x1
Power handling capacity: 5 W
Impedance: 3.2 Ω
Frequency range: 50 Hz — 18 000 Hz
Dimensions (approx.): 180 mm x 270 mm x 228 mm (W/H/D)
(7 1/8 in. x 10 3/4 in. x 9 in.)
Mass (approx.): 1.7 kg (3.8 lbs) each
Specifications Design and specifications are
subject to change without notice.
EN17-20_PC-X290[J]_f.p65 04.4.5, 11:52 AM20
– 1 –
Español
Introducción
Acerca de este manual
Este manual está organizado de la siguiente manera:
•Básicamente, este manual explica las operaciones
utilizando los botones y los controles de la unidad.
También podrá usar los botones del control remoto si
llevan nombres (o marcas) iguales o similares a los de la
unidad.
Si la operación con el control remoto es diferente de la
realizada con la unidad, será explicado en cada caso.
• La información básica y común para las diversas funciones
está agrupada en un lugar, y se evita su repetición en cada
procedimiento. Por ejemplo, la información sobre el
encendido/apagado de la unidad, el ajuste de volumen, el
cambio de los efectos de sonido y otros no se repite, por
haberse explicado en la sección “Operaciones comunes” en
las páginas 9 – 11.
• En este manual se utilizan las siguientes marcas:
Proporciona advertencias y precauciones para
evitar daños o riesgos de incendio/descargas
eléctricas.
También proporciona información útil para
obtener el mejor rendimiento posible de la
unidad.
Proporciona información y sugerencias útiles.
Precauciones
Instalación
• Instale la unidad en un sitio nivelado, seco, que no sea ni
muy frío ni muy caluroso—entre 5°C (41˚F) y 35°C (95˚F).
• Instale la unidad en un sitio bien ventilado para evitar que
se genere calor dentro de la misma.
• Deje un espacio suficiente entre la unidad y el televisor.
• Para evitar interferencias de TV, mantenga los altavoces
alejados del televisor.
NO instale la unidad cerca de fuentes de calor, en
ambientes polvorientos, o en sitios expuestos a la
luz directa del sol o a las vibraciones.
Muchas gracias por adquirir uno de nuestros productos JVC.
Antes de operar esta unidad, lea detenidamente este manual para
comprender a fondo todas las instrucciones y obtener un máximo disfrute
de esta unidad. Guarde este manual para futuras consultas.
Fuentes de alimentación
• Para desenchufar el cable de alimentación de CA del
tomacorriente mural, siempre tire del enchufe, no del cable.
NO TOQUE el cable de alimentación de CA con
las manos mojadas.
Condensación de humedad
Podría condensarse humedad en el lente del interior de la
unidad, en los siguientes casos:
• Después de encender la calefacción de la habitación
• En una habitación húmeda
• Si lleva la unidad directamente desde un lugar frío a otro
cálido
Si se produce condensación, la unidad podría no funcionar
correctamente. En tal caso, deje la unidad encendida durante
algunas horas hasta que se evapore la humedad, luego
desenchufe el cable de alimentación de CA y vuélvalo a
enchufar.
Otros
• Si llegara a entrar líquido o algún objeto metálico dentro de
la unidad, desenchúfela y consulte con su proveedor antes
de intentar su uso otra vez.
• Cuando la unidad no va a se utilizada por un tiempo
prologando, desenchufe el cable de alimentación del
tomacorriente de CA.
NO desarme la unidad; en el interior no hay piezas
que pueda reparar el usuario.
Si hay alguna condición anormal, desenchufe el cable de
alimentación de CA y consulte con su proveedor.
SP01-12_PC-X290[J]_f.p65 04.4.5, 11:49 AM1

– 2 –
Español
Contents
Ubicación de los botones y controles ......................... 3
Panel frontal ............................................................... 3
Control remoto ........................................................... 5
Primeros pasos ............................................................ 6
Desembalaje ............................................................... 6
Colocación de las pilas en el control remoto ............. 6
Conexión de los altavoces .......................................... 6
Conexión de otro equipo ............................................ 7
Fuentes de alimentación ............................................. 8
Operaciones comunes ................................................. 9
Conexión y desconexión de la alimentación .............. 9
Ajuste del reloj ........................................................... 9
Selección de las fuentes ............................................. 9
Ajuste del volumen................................................... 10
Refuerzo de los sonidos graves ................................ 10
Selección de los modos de sonido ............................ 10
Cómo asegurar una buena recepción en FM y AM .. 11
Escuchando radiodifusiones en FM y AM .............. 12
Cómo sintonizar una emisora ................................... 12
Cómo preajustar las emisoras................................... 12
Cómo sintonizar una emisora preajustada................ 12
Reproducción de CD ................................................ 13
Cómo cargar el CD................................................... 13
Para reproducir los discos enteros ............................ 13
Operaciones básicas de CD ...................................... 13
Programando el orden de reproducción de las pistas
—Reproducción programada.............................. 14
Reproducción al azar—Reproducción aleatoria....... 15
Repetición de pistas o de CD
—Reproducción repetida .................................... 15
Reproducción de introducciones—Intro Play .......... 15
Reproducción de las cintas....................................... 16
Reproducción de una cinta ....................................... 16
Grabación .................................................................. 17
Grabación de una cinta en la platina A ..................... 17
Duplicación de cintas ............................................... 18
Grabación de discos
—Grabación sincronizada de discos .................. 18
Mantenimiento .......................................................... 19
Localización de averías............................................. 20
Especificaciones ........................................................ 20
SP01-12_PC-X290[J]_f.p65 04.4.5, 11:49 AM2
– 3 –
Español
SENSOR
TAPE AUX
PLAY
REC
PLAY
PHONES
P
R
E
S
E
T
U
P
/
R
E
P
E
A
T
P
R
O
G
R
A
M
/
S
E
T
N
W
O
D
T
E
S
E
R
P
O
R
T
N
I
Y
A
L
P
S
I
D
CD/
RANDOM
TUNER/
BAND
PLAY REW FF PAUSEPLAY REW FF
STOP/EJECT
PAUSE
REC
-
+
CD SYNCHRO RECORDING AUTO STOP SYSTEM
CD PORTABLE COMPONENT SYSTEM
STOP/EJECT
STANDBY
AB
VOLUME
H
B
S
/
P
R
E
S
E
T
E
Q
STANDBY/ON
FM MODE
u
o
;
s
d
1
4
2
8
9
i
3
5
6
7
p
q
w
r
t
e
y
a
Ubicación de los botones y controles
Familiarícese con los botones y controles de su unidad.
Panel frontal
SP01-12_PC-X290[J]_f.p65 04.4.5, 11:49 AM3
– 4 –
Español
Para los detalles, consulte las páginas entre paréntesis.
Panel frontal
1Ventanilla de visualización
2Botones de operación
•4 (9, 12 – 14), 3¥8 (reproducción/pausa) (13 – 15),
7 (13 – 15), ¢ (9, 12 – 15)
3Botón TAPE (cinta) (9, 16, 18)
4Jack PHONES (10)
5Botón CD/RANDOM (9, 13, 15, 18)
6Botón TUNER/BAND (9, 12)
7Botón AUX (9)
8Portacassette de la platina A (16)
9Botones de operación para la platina A (16 – 18)
• REC ¶, PLAY 3, REW 1, FF ¡,
STOP/EJECT 7/0, PAUSE 8
pSENSOR (El sensor remoto)
qLámpara STANDBY (9)
wBotón FM MODE (12)
e0 OPEN (apertura/cierre de la puerta del CD) (13)
rBotón STANDBY/ON (9)
tControl VOLUME +/– (10)
yBotón HBS/PRESET EQ (ecualizador) (10)
uBotón DISPLAY (9)
iBotón PRESET UP/REPEAT (12, 15)
oBotón PRESET DOWN (12)
;Botón PROGRAM/SET (9, 12, 14)
aBotón INTRO (15)
sPortacassette de la platina B (16)
dBotones de operación para la platina B (16)
• PLAY 3, REW 1, FF ¡, STOP/EJECT 7/0,
PAUSE 8
Continua
Ventanilla de visualización
REP 1RECSYNCAUXTAPETUNERCD
INTRO PROG RANDOM HBS MUTING ALL
CLASSIC ROCK POP JAZZ FLAT
kHz
MHz
STEREO
MONO
FM AM
AM PM
9
35
4
8
6
7
2
1
Ventanilla de visualización
1Indicadores del modo de reproducción de CD (14, 15)
• INTRO, PROG, RANDOM
2Indicadores de fuente (9)
• CD, TUNER, TAPE, AUX
3Indicador HBS (Hyper Bass Sound) (10)
4Indicador SYNC REC (18)
5Indicador MUTING (10)
6Indicadores del modo de repetición (15)
• REP 1/ALL
7Indicadores de operación del sintonizador (12)
• STEREO, MONO
8Pantalla principal
9Indicadores del patrón del ecualizador (10)
• CLASSIC, ROCK, POP, JAZZ, FLAT
SP01-12_PC-X290[J]_f.p65 04.4.5, 11:49 AM4
– 5 –
Español
Utilice el control remoto apuntándolo hacia
el sensor remoto del panel frontal.
Control remoto
Control remoto
1Botón STANDBY/ON (9)
2Botón AUX (9)
3Botón DISPLAY (9)
4Botón FM MODE (12)
5Botón PROGRAM/SET (9, 12, 14)
6Botón MUTING (10)
7Botón INTRO (15)
8Botón HBS (Hyper Bass Sound)/PRESET EQ (ecualizador)
(10)
9Botones 4
/
6
/
7
/
¢ (12 – 15)
pBotón TAPE (9, 16, 18)
qBotón CD/RANDOM (9, 13, 15, 18)
wBotón TUNER/BAND (9, 12)
eBotones numéricos (12 – 14)
rBotón PRE UP/REPEAT (12, 15)
tBotón PRE DOWN (12)
yBotónes VOLUME +/– (10)
TAPE
CD/
RANDOM
TUNER/
BAND
1
2
3
4
5
6
9
q
p
w
7
8
r
t
e
y
El sensor remoto
SENSOR
TAPE AUX
PLAY
E
C
L
AY
P
R
E
S
E
T
U
P
/
R
E
P
E
A
T
P
R
O
G
R
A
M
/
S
E
T
N
W
O
D
T
E
S
E
R
P
O
R
T
N
I
Y
A
L
P
S
I
D
CD/
RANDOM
TUNER/
BAND
PLAY REW FF PAUSEPLAY REW FF
STOP/EJECT
PAUSE
-
+
CD SYNCHRO RECORDING AUTO STOP SYSTEM
CD PORTABLE COMPONENT SYSTEM
STOP/EJECT
STANDBY
B
VOLUME
H
B
S
/
P
R
E
S
E
T
E
Q
STANDBY/ON
FM MODE
SP01-12_PC-X290[J]_f.p65 04.4.5, 11:49 AM5

– 6 –
Español
Conexión de los altavoces
Para conectar los altavoces
Podrá conectar los altavoces utilizando los cables de altavoz.
1
Sostenga la abrazadera del terminal de altavoz.
2
Inserte el extremo del cable del altavoz en el
terminal.
Haga coincidir la polaridad de los terminales de altavoces:
rojo (ª) con rojo (ª) y negro (·) con negro (·).
3
Saque su dedo de la abrazadera.
IMPORTANTE:
•Utilice únicamente altavoces de la misma impedancia de
altavoz que la indicada por los terminales de altavoz en
la parte trasera de la unidad.
•NO conecte más de un altavoz a cada terminal de altavoz.
Primeros pasos
Desembalaje
Después de abrir el paquete, asegúrese de que dispone de
todos los elementos siguientes.
El número entre paréntesis indica la cantidad de piezas
suministradas.
• Control remoto (1)
• Cable de alimentación de CA (1)
Si hay alguna pieza faltante, consulte inmediatamente con su
distribuidor.
Colocación de las pilas en el control remoto
Coloque las pilas—R03(UM-4)/AAA(24F)—dentro del control
remoto, haciendo coincidir sus polaridades (+ y –) de las pilas
con las marcas + y – del compartimiento de las pilas.
Cuando la unidad deje de responder al control remoto,
cambie ambas pilas al mismo tiempo.
1
3
• NO combine una pila usada con otra nueva.
• NO utilice conjuntamente pilas de diferentes tipos.
• NO exponga las pilas al calor o a las llamas.
• NO deje las pilas dentro del compartimiento de las
pilas si no va a usar la unidad por un tiempo
prolongado. De lo contrario, se producirían daños
debido al ácido de las pilas.
R03(UM-4)/AAA(24F)
(no suministradas)
2
Continua
Cable de
altavoz
Cable de
altavoz
Negro
Rojo Rojo
L
R
SPEAKER IMPEDANCE MIN 3.2
Ω
Altavoz izquierdo
2,31
Altavoz derecho
No conecte el cable de alimentación de CA hasta que se
hayan realizado todas las demás conexiones.
SP01-12_PC-X290[J]_f.p65 04.4.5, 11:49 AM6

– 7 –
Español
RL
AC IN
R
2
1
Desmontaje del sistema de altavoz de la unidad principal
Presionando la palanca RELEASE en la parte trasera de la
unidad en la dirección de la flecha (1), levante el altavoz
verticalmente (2), tal como se muestra en la ilustración.
AC IN
R
2
1
Fijación del sistema de altavoz a la unidad principal
Fije el altavoz en las ranuras de la unidad principal (1) y
deslícelo hacia abajo verticalmente (2), tal como se muestra
en la ilustración.
Para reproducir en el otro equipo a través de esta unidad,
utilice cables de audio (no suministradas) para efectuar la
conexión entre los jacks de salida de audio del otro equipo y
los jacks AUX IN.
A salida de audio
Equipo de
audio/vídeo
Conexión de otro equipo
Podrá conectar un equipo de audio como dispositivo de
reproducción.
Para conectar y utilizar este equipo, consulte también el
manual entregado con el mismo.
•NO conecte ningún otro equipo mientras la
alimentación está conectada.
•NO enchufe ningún equipo antes de finalizar
todas las conexiones.
Asegúrese de que los cables de audio se encuentren
codificados por color:
Las clavijas y los jacks blancos son para las señales de audio
del lado izquierdo, y los rojos son para las señales de audio
del lado derecho.
SP01-12_PC-X290[J]_f.p65 04.4.5, 11:49 AM7
– 8 –
Español
4
3
8
7
1
25
6
R20(SUM-1)/D(13D)
(no suministradas)
• NO combine una pila usada con otra nueva.
• NO utilice conjuntamente pilas de diferentes tipos.
• NO exponga las pilas al calor o a las llamas.
• NO deje las pilas dentro del compartimiento de las
pilas si no va a usar la unidad por un tiempo
prolongado. De lo contrario, se producirían daños
debido al ácido de las pilas.
1
3
2
Para insertar las pilas
Fuentes de alimentación
Utilice energía de CA o pilas secas (no suministradas) para
operar la unidad.
• Mientras el cable de alimentación de CA se encuentre
conectado a una fuente de alimentación, la unidad será
alimentada mediante energía de CA, y no mediante las
pilas instaladas en la misma.
Para conectar el cable de alimentación de CA
Cable de
alimentación de CA
(suministrada)
1
Al terminal AC IN
2
Al tomacorriente mural
Saque las pilas antes de guardar esta unidad durante más
de 1 mes.
SP01-12_PC-X290[J]_f.p65 04.4.5, 11:49 AM8
– 9 –
Español
3
Pulse 4 o ¢ para ajustar
los minutos, y luego pulse
PROGRAM/SET.
Si se produce una falla de alimentación
El reloj pierde su ajuste y se reposiciona a “AM 12:00”. Deberá
volverlo a poner en hora. Si las pilas está insertadas en la unidad, la
memoria no será afectada.
Para que se visualice el reloj cuando se selecciona CD o
sintonizador
Pulse DISPLAY.
• Cada vez que pulsa el botón, la pantalla cambia alternativamente
entre indicación del reloj e indicación normal. (Si opera la unidad
con la indicación del reloj visualizada, la pantalla cambia a
indicación normal).
Selección de las fuentes
Para escuchar radiodifusiones FM/AM, pulse
TUNER/BAND. (Véase página 12).
Para seleccionar CD, pulse CD/RANDOM y luego pulse
6. (Véase las páginas 13 – 15).
Para seleccionar cintas, pulse TAPE y luego pulse PLAY 3
de la platina deseada. (Véase página 16).
Para seleccionar un equipo exterior como fuente, pulse AUX.
En la pantalla aparece el indicador de fuente para la fuente
seleccionada.
Operaciones comunes
Conexión y desconexión de la alimentación
Para encender la unidad, pulse
STANDBY/ON .
• Cuando se usan pilas como fuente de
alimentación, la luz de fondo de la pantalla se
oscurece para ahorrar energía.
Para apagar la unidad (en espera), pulse de nuevo
STANDBY/ON .
La lámpara STANDBY de la unidad se enciende en rojo.
Se consume siempre una pequeña cantidad de energía aún
cuando la unidad esté en el modo de espera.
Para desconectar completamente la alimentación,
desenchufe el cable de alimentación de CA de la toma de CA.
Si las pilas están insertadas en la unidad, extráigalas.
Cuando desenchufe el cable de alimentación de CA o se
produzca una falla de alimentación eléctrica
El reloj se reposicionará inmediatamente a “AM 12:00”, mientras
que las emisoras preajustadas (véase página 12) en el sintonizador se
borrarán al cabo de unos días. Si las pilas están insertadas en la
unidad, la memoria no será afectada.
Ajuste del reloj
Antes de continuar operando la unidad, primero ajuste el reloj
incorporado a la misma.
• Al encender la unidad estando seleccionado CD o
sintonizador, pulse primero DISPLAY para que aparezca la
indicación del reloj.
1
Pulse y mantenga pulsado
PROGRAM/SET durante más de
2 segundos.
Los dígitos de la hora comienzan a
parpadear en la pantalla.
2
Pulse 4 o ¢ para ajustar
la hora, luego pulse
PROGRAM/SET.
Los dígitos de los minutos comienzan
a parpadear en la pantalla.
AM
PM
P
R
E
S
E
T
U
P
/
R
E
P
E
A
T
P
R
O
G
R
A
M
/
S
E
T
N
W
O
D
T
E
S
E
R
P
O
R
T
N
I
P
R
E
S
E
T
U
P
/
R
E
P
E
A
T
P
R
O
G
R
A
M
/
S
E
T
N
W
O
D
T
E
S
E
R
P
O
R
T
N
I
P
R
E
S
E
T
U
P
/
R
E
P
E
A
T
P
R
O
G
R
A
M
/
S
E
T
N
W
O
D
T
E
S
E
R
P
O
R
T
N
I
TAPE AUX
CD/
RANDOM
TUNER/
BAND
SP01-12_PC-X290[J]_f.p65 04.4.5, 11:49 AM9
– 10 –
Español
Ajuste del volumen
El nivel de volumen sólo se podrá ajustar mientras la unidad
está encendida.
Gire VOLUME +/– en el sentido de las
agujas del reloj para aumentar el
volumen o en sentido contrario para
disminuirlo.
• El nivel de volumen se puede ajustar en
31 pasos (00 VOL — 30 VOL).
Cuando utilice el control remoto, pulse VOLUME + para
aumentar el volumen o VOLUME – para disminuirlo.
Para desactivar temporalmente el sonido
En el control remoto SOLAMENTE:
Pulse MUTING.
El sonido se apaga y el indicador MUTING aparece en la
pantalla.
Para restablecer el sonido, pulse de nuevo MUTING.
El indicador MUTING se apaga.
• Ajustando el nivel de volumen también se cancela el
silenciamiento.
Para una audición privada
Conecte un par de auriculares al jack PHONES. El sonido no será
escuchado a través de los altavoces. Asegúrese de disminuir el
volumen antes de conectar o de ponerse los auriculares.
NO apague la unidad (en espera) con el volumen
ajustado a un nivel extremadamente alto; de lo
contrario, la sobrecarga acústica repentina podrá
dañar su oído, los altavoces y/o auriculares
cuando vuelva a encender la unidad o la próxima
vez que empiece a reproducir alguna fuente.
RECUERDE que no podrá ajustar el nivel de
volumen mientras la unidad está en el modo de
espera.
-
+
VOLUME
Refuerzo de los sonidos graves
La función Hyper Bass Sound de esta unidad puede resaltar
los sonidos graves mientras escucha cualquier fuente a un
volumen bajo.
• Esta función sólo se podrá utilizar para reproducción.
Para activar la función, pulse y mantenga
pulsado HBS/PRESET EQ durante más de 1
segundo para que el indicador HBS aparezca
en la pantalla.
Para desactivar la función, pulse y mantenga pulsado el
botón otra vez para que el indicador HBS desaparezca de la
pantalla.
Selección de los modos de sonido
Podrá seleccionar uno de los 5 modos de sonido preajustados.
Modos SEA (Amplificador de efecto de sonido):
CLASSIC: Conveniente para la música clásica.
ROCK: Refuerza las frecuencias altas y bajas.
Conveniente para la música acústica.
POP: Conveniente para la música vocal.
JAZZ: Conveniente para la música jazz.
FLAT: Sonido normal.
• Esta función afecta solamente al sonido de reproducción,
pero no al de su grabación.
Para seleccionar los modos de sonido, pulse
repetidamente HBS/PRESET EQ hasta que el
indicador del modo de sonido deseado
aparezca en la pantalla.
• Cada vez que usted pulsa el botón, los
modos de sonido cambian de la manera siguiente:
FLAT
CLASSIC ROCK
POP
JAZZ
P
Y
A
L
S
I
D
H
B
S
/
P
R
E
S
E
T
E
Q
HBS
P
Y
A
L
S
I
D
H
B
S
/
P
R
E
S
E
T
E
Q
SP01-12_PC-X290[J]_f.p65 04.4.5, 11:49 AM10
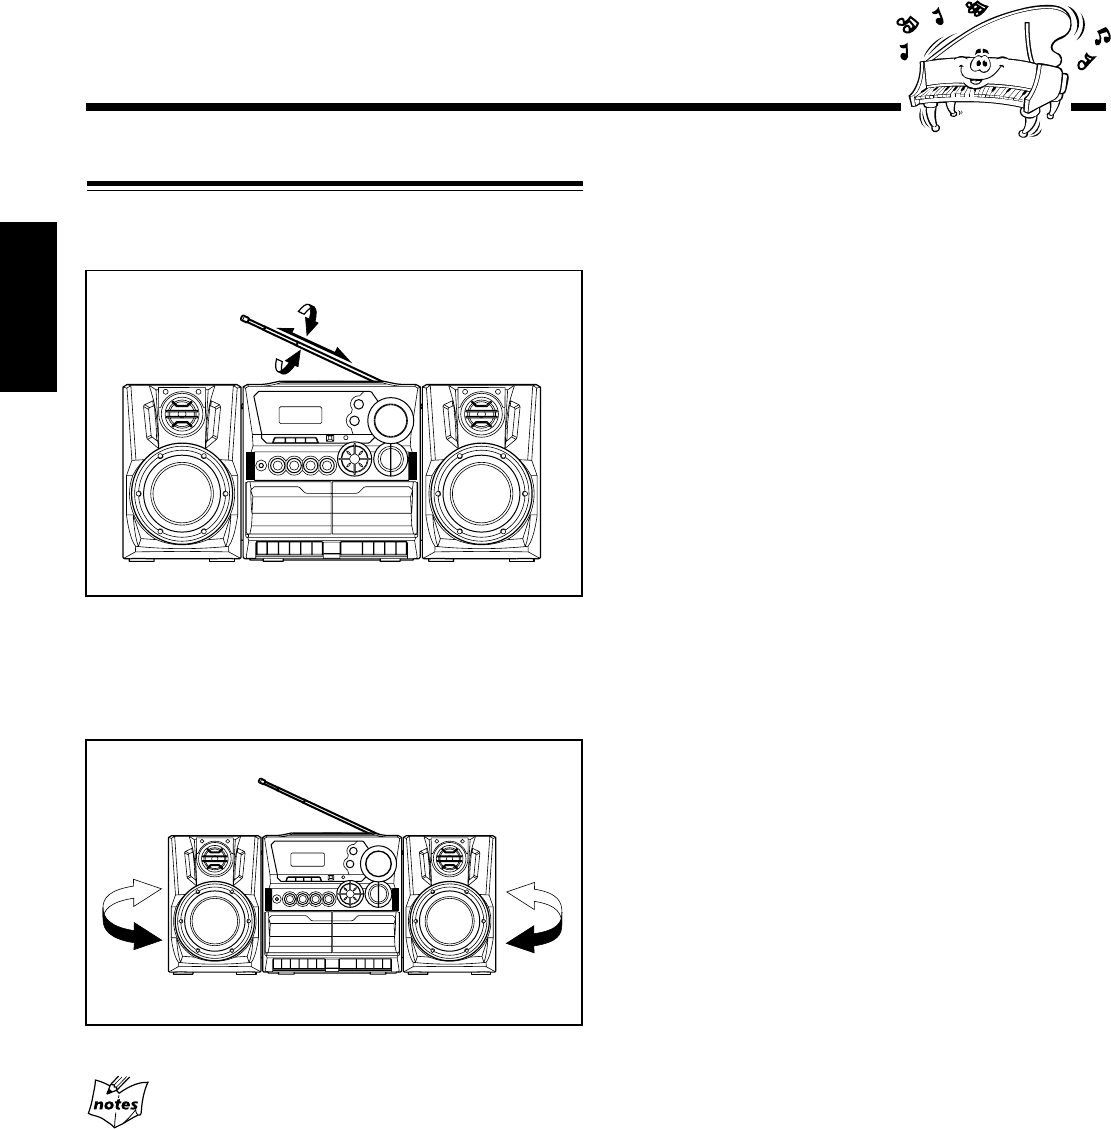
– 11 –
Español
Para una mejor recepción en FM y AM
• Asegúrese de que los conductores de antena no hagan contacto
con otros terminales y cordones de conexión.
• Mantenga las antenas alejadas de las partes metálicas de la
unidad, de los cordones de conexión y del cable de alimentación
de CA.
Cómo asegurar una buena recepción en FM y AM
Recepción en FM: Extraiga la antena y cambie su
orientación para una mejor recepción.
Recepción en AM: Cambie la orientación de la unidad
principal para obtener una mejor
recepción.
SP01-12_PC-X290[J]_f.p65 04.4.5, 11:49 AM11
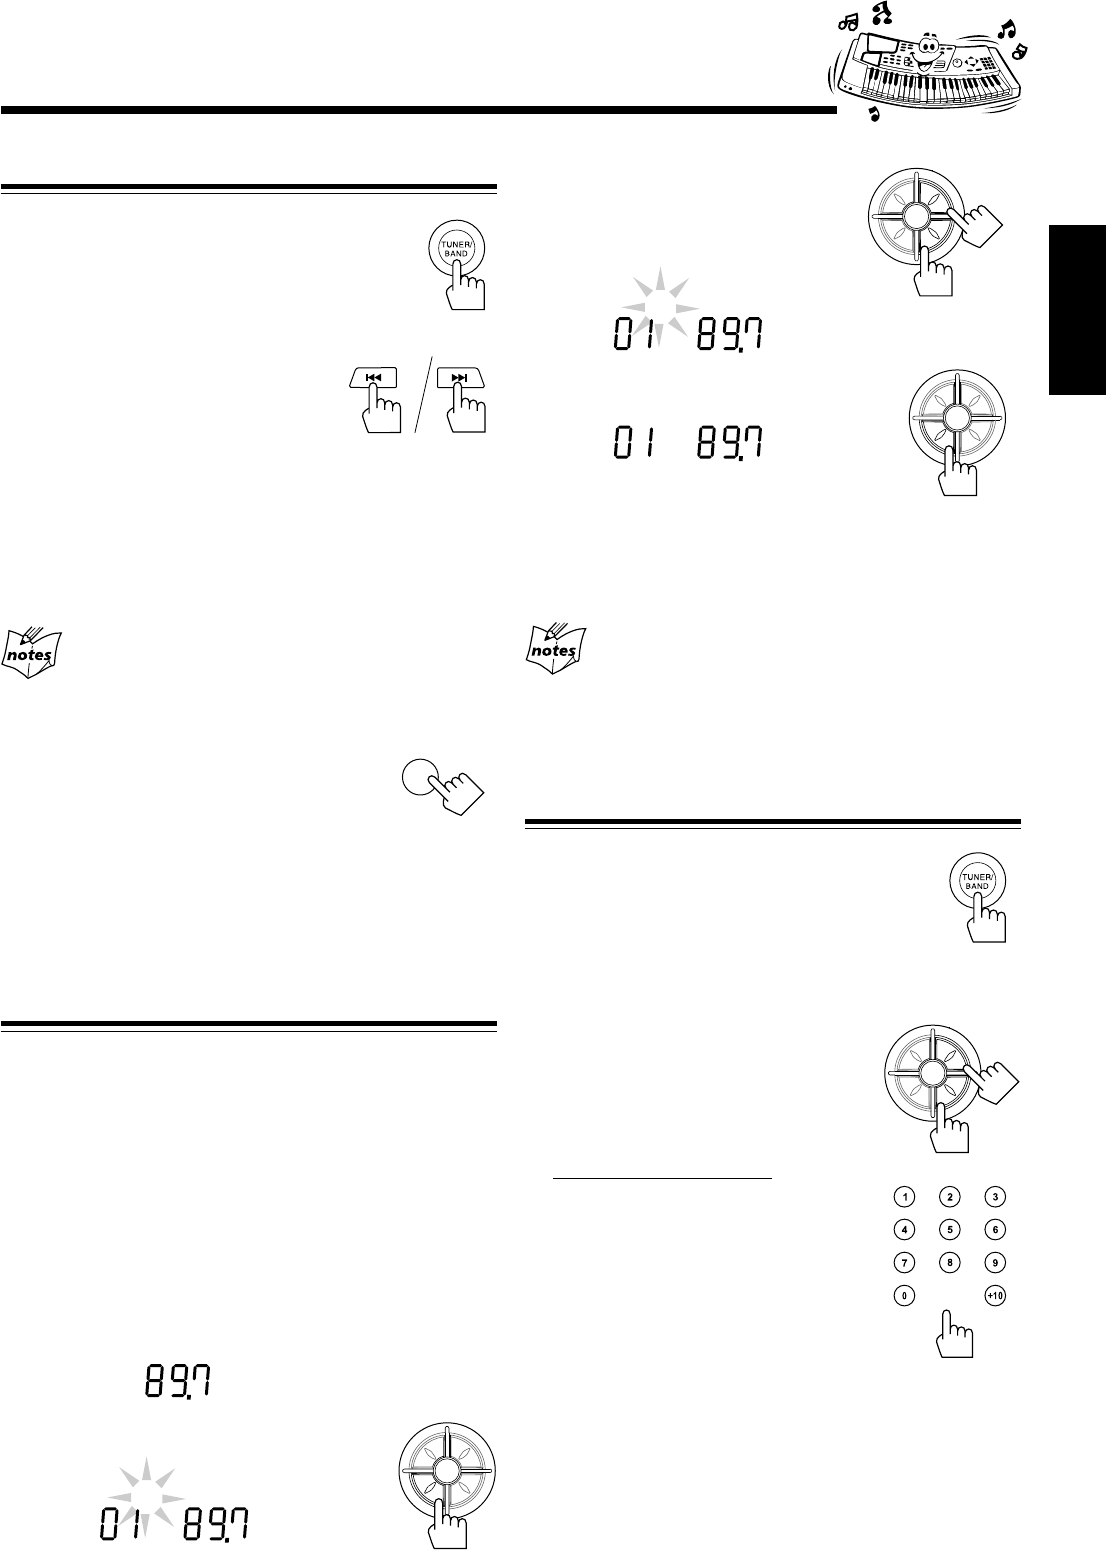
– 12 –
Español
Cómo sintonizar una emisora
1
Pulse TUNER/BAND.
La unidad sintoniza automáticamente la emisora
sintonizada previamente (ya sea FM o AM).
• Cada vez que pulsa el botón, la banda alterna
entre FM y AM.
2
Pulse y mantenga pulsado 4
o ¢ durante más de 1
segundo.
La unidad comienza a efectuar la
búsqueda de las emisoras y se detiene cuando logra
sintonizar una emisora con una intensidad de señal
suficiente. Si un programa se emite en estéreo, podrá
escuchar sonidos estereofónicos (aparece el indicador
STEREO).
Para interrumpir la búsqueda, pulse 4 o ¢.
Cuando pulsa 4 o ¢ momentáneamente y de
forma repetida
La frecuencia cambia paso por paso.
Para cambiar el modo de recepción en FM
Cuando la transmisión en FM estéreo sea difícil
de recibir o hayan ruidos, pulse FM MODE de
manera que el indicador MONO se encienda en
la pantalla. La recepción será mejor.
Para restablecer el efecto estereofónico, pulse FM MODE
otra vez de forma que el indicador MONO se apague.
• El efecto estéreo también se restablece cuando se sintoniza
otra emisora.
Cómo preajustar las emisoras
Usted podrá preajustar 10 emisoras FM y 10 emisoras AM.
En algunos casos, pueden haber frecuencias de prueba
memorizadas en el sintonizador ya que la fábrica ha examinado
la función de preajuste del sintonizador antes de la entrega. Esto
no es una anomalía. Usted podrá preajustar las emisoras que
desee en la memoria siguiendo el método de preajuste.
• Hay un límite de tiempo para realizar los siguientes pasos.
Si se cancelan los ajustes antes de haber terminado,
comience otra vez desde el paso 2.
1
Sintonice la emisora que desea preajustar.
• Consulte “Cómo sintonizar una emisora” más arriba.
2
Pulse PROGRAM/SET.
TUNER
MHz
FM
Escuchando radiodifusiones en FM y AM
3
Pulse PRESET UP/REPEAT
o PRESET DOWN para
seleccionar un número de
preajuste.
4
Pulse PROGRAM/SET otra vez.
La emisora sintonizada en el paso 1 se
almacena en el número de preajuste seleccionado en el
paso 3.
• Cuando almacene una emisora nueva en un número
usado, se borrará la emisora almacenada previamente.
Cuando desenchufe el cable de alimentación de CA o se
produzca una falla de alimentación eléctrica
Las emisoras preajustadas se borrarán al cabo de unos días. En tal
caso, vuelva a preajustar las emisoras. Si las pilas están insertadas en
la unidad, la memoria no será afectada.
Cómo sintonizar una emisora preajustada
1
Pulse TUNER/BAND.
La unidad sintoniza automáticamente la emisora
sintonizada previamente (ya sea FM o AM).
• Cada vez que usted pulsa el botón, la banda
alterna entre FM y AM.
2
Seleccione un número de preajuste.
Pulse PRESET UP/REPEAT o
PRESET DOWN.
En el control remoto:
Pulse los botones numéricos.
Para el número de preajuste 5, pulse 5.
Para el número de preajuste 10, pulse
+10 y luego 0.
TUNER
PROG
MHz
STEREO
FM
TUNER
PROG
MHz
STEREO
FM
FM MODE
P
R
E
S
E
T
U
P
/
R
E
P
E
A
T
P
R
O
G
R
A
M
/
S
E
T
N
W
O
D
T
E
S
E
R
P
O
R
T
N
I
P
R
E
S
E
T
U
P
/
R
E
P
E
A
T
P
R
O
G
R
A
M
/
S
E
T
N
W
O
D
T
E
S
E
R
P
O
R
T
N
I
P
R
E
S
E
T
U
P
/
R
E
P
E
A
T
P
R
O
G
R
A
M
/
S
E
T
N
W
O
D
T
E
S
E
R
P
O
R
T
N
I
TUNER
PROG
MHz
STEREO
FM
P
R
E
S
E
T
U
P
/
R
E
P
E
A
T
P
R
O
G
R
A
M
/
S
E
T
N
W
O
D
T
E
S
E
R
P
O
R
T
N
I
SP01-12_PC-X290[J]_f.p65 04.4.5, 11:49 AM12
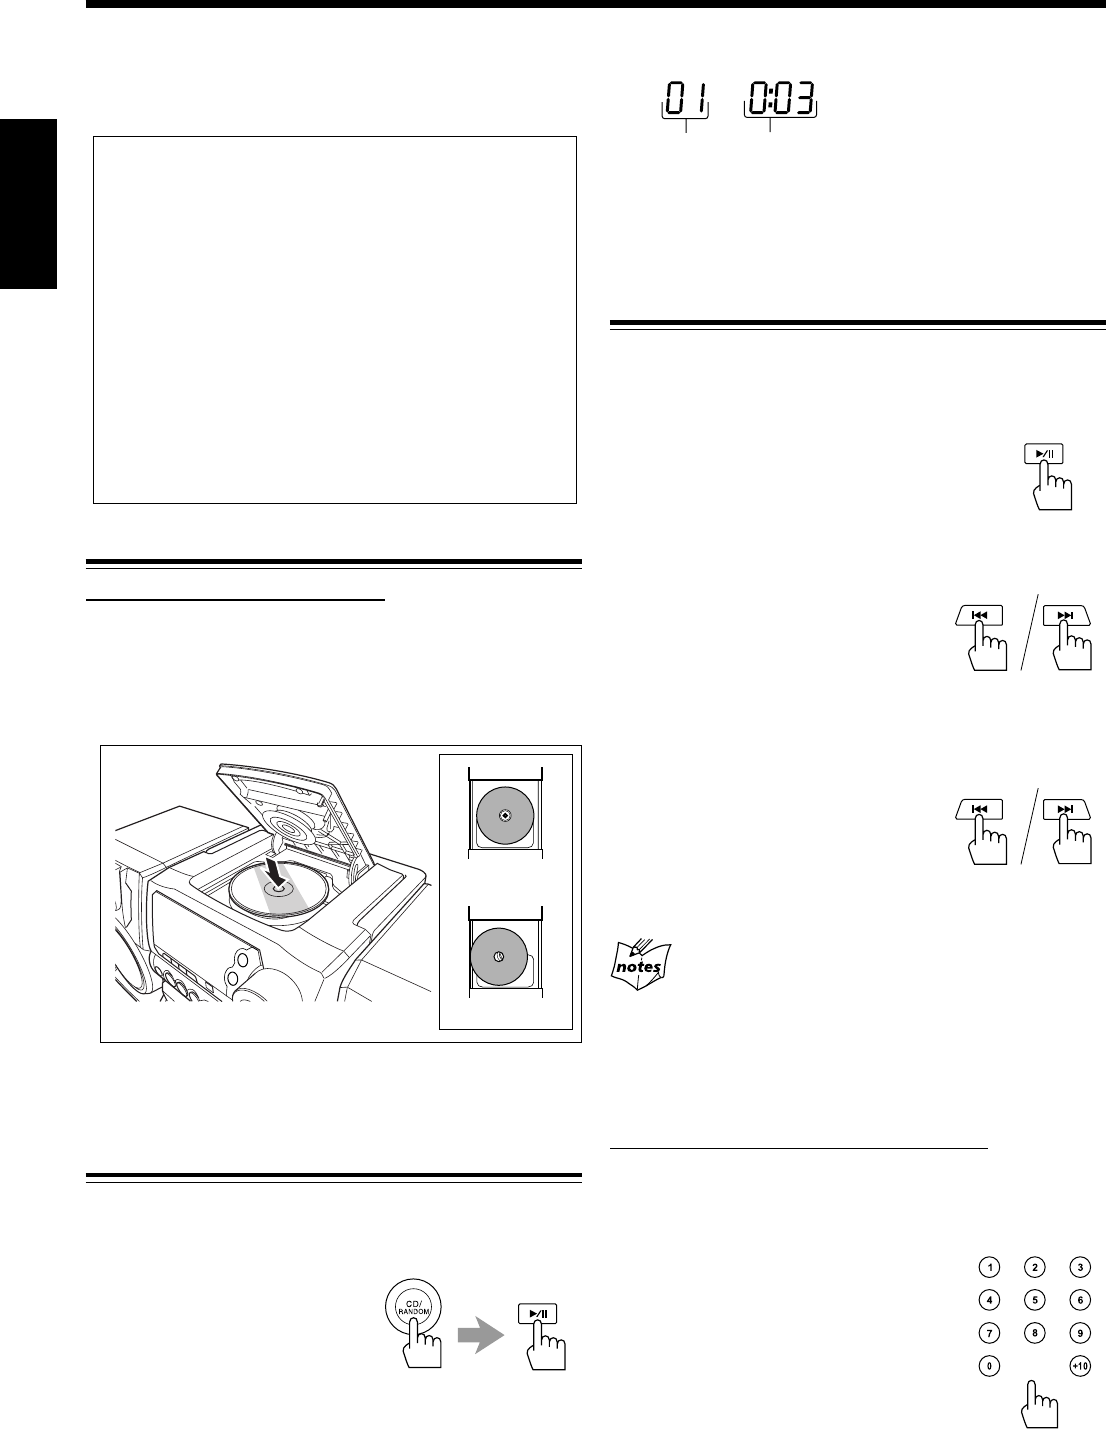
– 13 –
Español
Cómo cargar el CD
En la unidad SOLAMENTE:
1
Pulse 0 OPEN en la puerta del disco para
abrirla.
2
Coloque correctamente el disco, con su etiqueta
hacia arriba, tal como se muestra abajo.
3
Pulse de nuevo 0 OPEN para cerrar la
puerta del disco.
Para reproducir los discos enteros
Podrá reproducir el CD de manera continua.
1
Cargue el CD.
2
Pulse CD/RANDOM, y
luego 3¥8.
El CD se empieza a reproducir
desde la primera pista.
• Si pulsa CD/RANDOM mientras la fuente es CD, se
iniciará la reproducción aleatoria (véase página 15). En
este caso, simplemente pulse 3/8 para iniciar la
reproducción.
Reproducción de CD
Para detener la reproducción, pulse 7.
Para sacar el disco, pulse 0 OPEN.
Operaciones básicas de CD
Mientras reproduce un CD, podrá realizar las operaciones
siguientes.
Para detener la reproducción momentáneamente
Pulse 3¥8.
Mientras está en pausa, el tiempo de reproducción
transcurrido parpadea en la pantalla.
Para continuar con la reproducción, pulse 3¥8 otra vez.
Para localizar un punto determinado en una pista
Durante la reproducción, pulse y
mantenga pulsado 4 o ¢.
•4 : Búsqueda hacia atrás a alta
velocidad.
•¢ : Búsqueda hacia adelante a alta
velocidad.
Para desplazarse a otra pista
Pulse 4 o ¢ repetidas veces antes o
durante la reproducción.
•4 : Retrocede al comienzo de la pista
actual o anteriores.
•¢ : Salta al comienzo de la pista siguiente o posteriores.
Si pulsa y mantiene pulsado 4 o ¢ antes de la
reproducción
Podrá cambiar las pistas continuamente.
Para ir directamente a otra pista usando los botones
numéricos
En el control remoto SOLAMENTE:
Pulsando el(los) botón(es) numérico(s) antes o durante la
reproducción, podrá iniciar la reproducción del número de
pista deseado.
Ej.: Para el número de pista 5, pulse 5.
Para el número de pista 10, pulse
+10 y luego 0.
Para el número de pista 15, pulse
+10, y luego 5.
Para el número de pista 20, pulse
+10, +10 y luego 0.
Para el número de pista 32, pulse
+10, +10, +10, y luego 2.
Número de
pista
Tiempo de reproducción
transcurrido
CD
Esta unidad ha sido diseñada para reproducir los discos CD
siguientes: CD de audio, CD-R y CD-RW.
El uso continuo de discos CD de forma irregular (forma de corazón,
octogonal, etc.) puede dañar la unidad.
Cuando se reproduce un CD-R o CD-RW
Los discos CD-R (regrabables) y los CD-RW (reescribibles)
editados por el usuario sólo se pueden reproducir si ya están
“finalizados”.
• Usted puede reproducir sus discos CD-R o CD-RW originales
grabados en formato CD musical. (No obstante, dependiendo
de sus características o de sus condiciones de grabación,
puede suceder que no se puedan reproducir).
• Antes de reproducir los discos CD-R o CD-RW, lea atentamente
sus correspondientes instrucciones o precauciones.
• Es posible que algunos discos CD-R o CD-RW no se puedan
reproducir en esta unidad debido a las características de los
discos, a daños o manchas en los mismos, o a suciedad en el
lente del reproductor.
• Los discos CD-RW pueden requerir más tiempo para su
lectura. (Esto se debe a que la reflexión de los discos CD-RW
es menor que los discos CD comunes).
correcto
incorrecto
SP13-16_PC-X290[J]_f.p65 04.4.5, 11:49 AM13
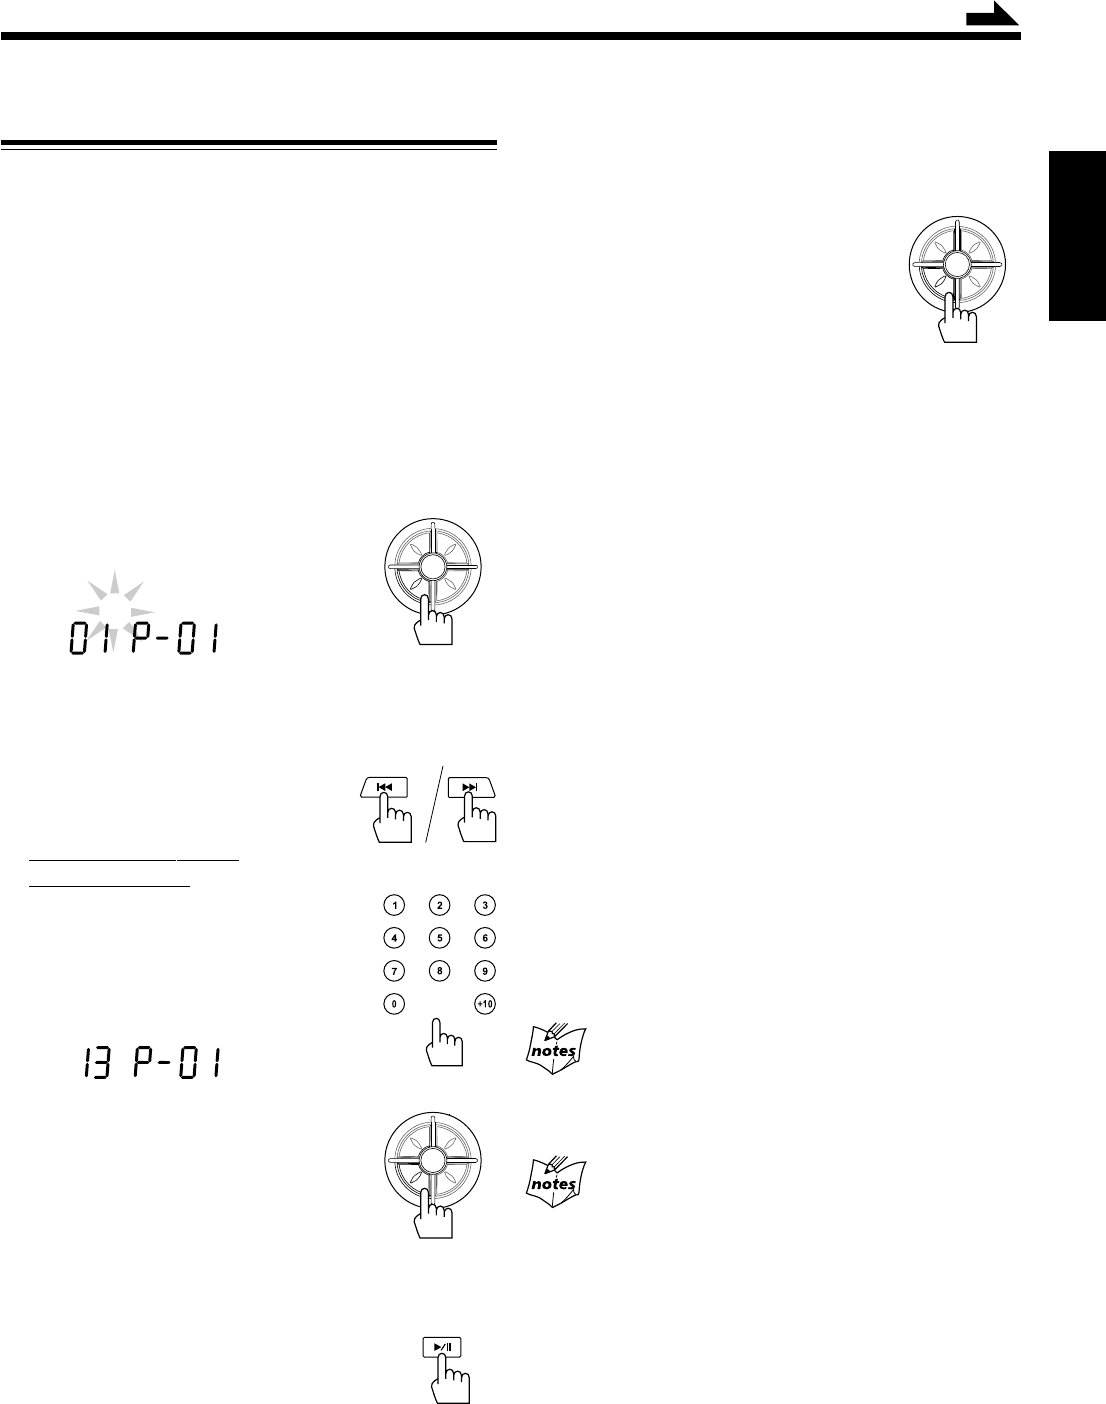
– 14 –
Español
Programando el orden de reproducción de las
pistas—Reproducción programada
Antes de comenzar la reproducción, podrá programar el
orden de reproducción de las pistas. Es posible programar
hasta 20 pistas.
• Para utilizar la reproducción repetida (véase página 15) en
la reproducción programada, pulse PRESET UP/REPEAT
después de iniciar la reproducción programada.
• Hay un límite de tiempo para realizar los siguientes pasos. Si
el ajuste se cancela antes de terminar, comience de nuevo
desde el paso 2.
1
Cargue el CD.
• Si la fuente de reproducción actual no es el reproductor
de CD, pulse CD/RANDOM antes de avanzar al paso
siguiente.
2
Pulse PROGRAM/SET.
El indicador PROG parpadea en la pantalla.
• Si se ha almacenado un programa en la memoria, el
programa será llamado.
3
Seleccione una pista del CD.
Pulse 4 o ¢ para
seleccionar el número de pista.
En el control remoto
SOLAMENTE:
Pulse los botones numéricos.
• Con respecto al uso de los botones
numéricos, consulte “Para ir
directamente a otra pista usando los
botones numéricos” en la página 13.
4
Pulse PROGRAM/SET.
5
Repita los pasos 3 y 4 para programar otras
pistas, si así lo desea.
6
Pulse 3¥8 mientras el indicador
PROG parpadea.
Las pistas se reproducen en el orden programado
por usted.
• Si el indicador PROG se apaga antes de pulsar 3/8,
pulse PROGRAM/SET y luego pulse 3/8 para iniciar
la reproducción.
Continua
P
R
E
S
E
T
U
P
/
R
E
P
E
A
T
P
R
O
G
R
A
M
/
S
E
T
N
W
O
D
T
E
S
E
R
P
O
R
T
N
I
CD
PROG
P
R
E
S
E
T
U
P
/
R
E
P
E
A
T
P
R
O
G
R
A
M
/
S
E
T
N
W
O
D
T
E
S
E
R
P
O
R
T
N
I
Para detener la reproducción, pulse 7.
El indicador PROG se apaga en la pantalla y la unidad sale de
la reproducción programada. (La programación realizada por
usted se retiene en la memoria hasta que la borre).
Para verificar los detalles de la
programación
Antes de la reproducción, podrá verificar los
detalles de la programación pulsando
PROGRAM/SET.
• Cada vez que usted pulsa el botón, la pista
programada se muestra en la pantalla.
Para añadir pistas a la programación
1
Pulse repetidamente PROGRAM/SET para que se
visualice la última pista programada.
2
Pulse repetidamente PROGRAM/SET hasta que aparezca
“00” como número de pista.
3
Introduzca el(los) número(s) de pista(s) que desea añadir
repitiendo los pasos 3 y 4 de la izquierda.
Para editar la programación
1
Pulse repetidamente PROGRAM/SET para que se
visualice el número de programación que desea editar.
2
Introduzca el número de pista deseado siguiendo los pasos
3 y 4 de la izquierda.
Para borrar la programación entera antes o después de
la reproducción
1
Pulse PROGRAM/SET.
El indicador PROG parpadea en la pantalla.
2
Pulse 7.
• Expulsando el CD también se borrará toda la programación.
Si no puede introducir un número de pista
Está intentado programar un número de pista que no existe
en el CD (por ejemplo, seleccionar la pista 14 en un CD que tiene
solamente 12 pistas).
Después de haber programado 20 pistas
El número de la programación vuelve a “P-01”. Si
continúa programando más pistas, las mismas serán sobrescritas
sobre las programadas en los números correspondientes.
CD
PROG
P
R
E
S
E
T
U
P
/
R
E
P
E
A
T
P
R
O
G
R
A
M
/
S
E
T
N
W
O
D
T
E
S
E
R
P
O
R
T
N
I
SP13-16_PC-X290[J]_f.p65 04.4.5, 11:49 AM14
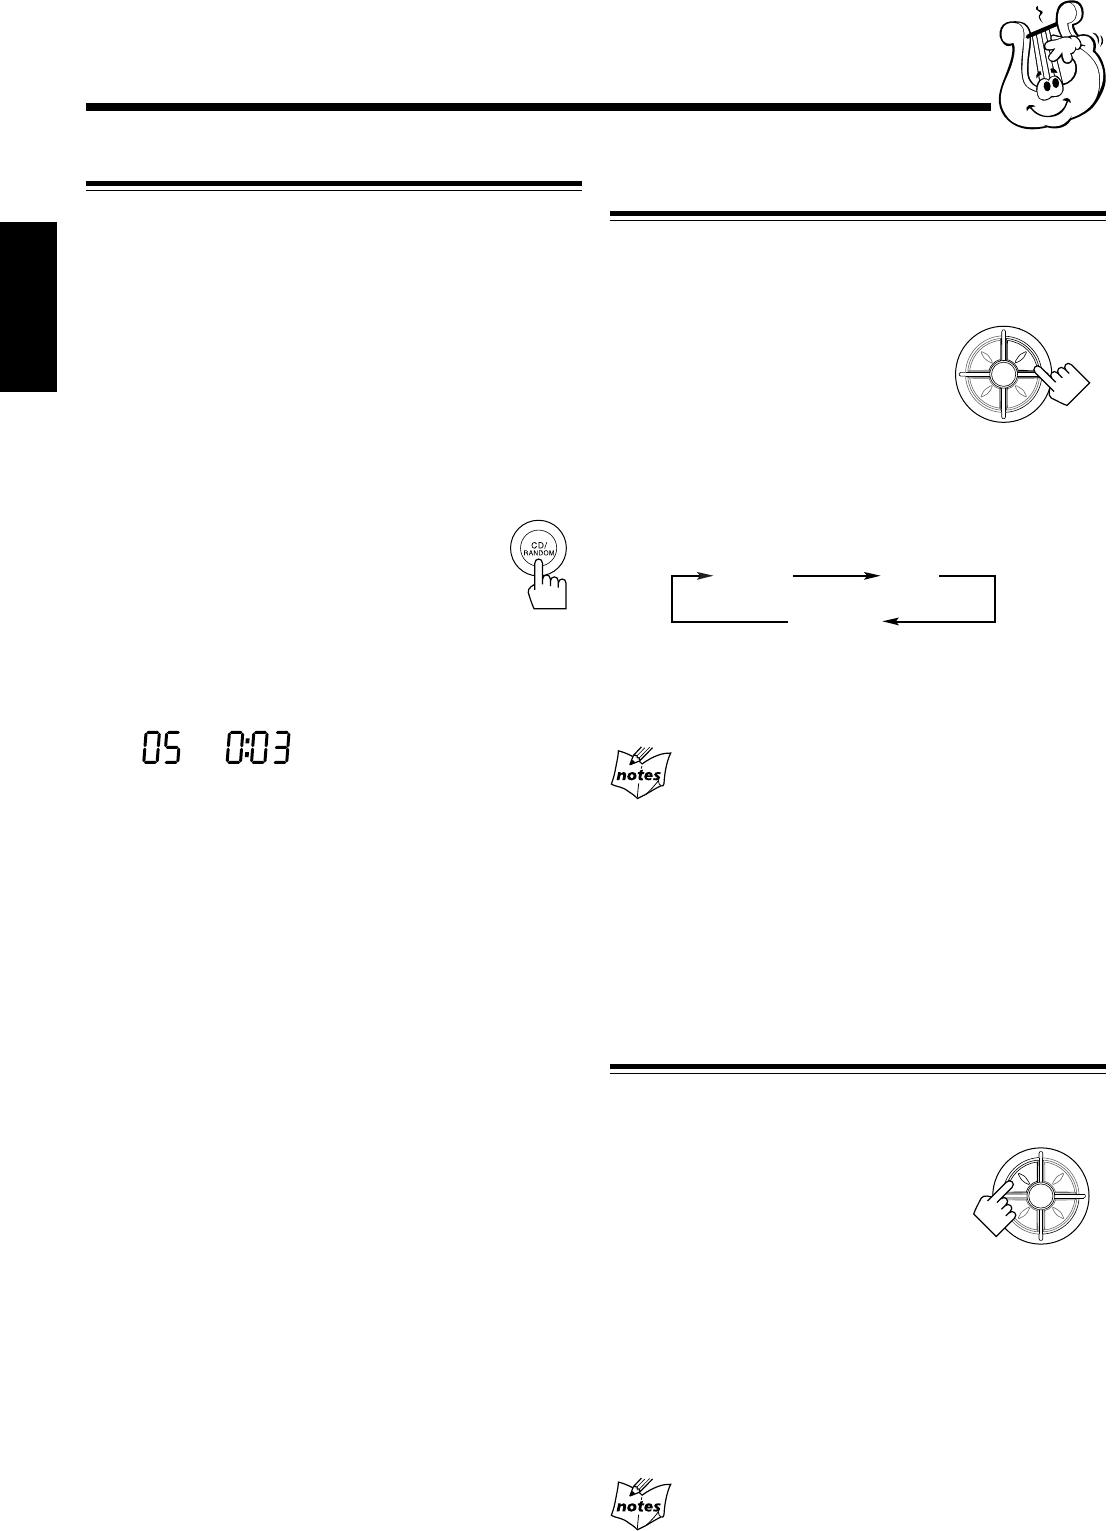
– 15 –
Español
Repetición de pistas o de CD—Reproducción
repetida
Usted podrá hacer que el CD, la programación o la pista
individual que se está reproduciendo en ese momento se
repita tantas veces como se desee.
Para la reproducción repetida, pulse
PRESET UP/REPEAT durante o antes de
la reproducción. Para usar la reproducción
repetida para la reproducción programada,
la reproducción aleatoria y la reproducción
de introducciones, pulse el botón antes o después de iniciar la
reproducción.
• Cada vez que pulsa el botón, el modo de reproducción
repetida cambia de la siguiente manera, y el indicador REP
ALL o REP 1 aparece en la pantalla.
REP ALL : Se repiten todas las pistas (continuamente o al
azar), o todas las pistas de la programación.
REP 1 : Se repite una pista (excepto para reproducción
aleatoria).
Cuando se selecciona reproducción aleatoria
Se cancela REP 1.
Para detener la reproducción, pulse 7.
El indicador REP desaparece de la pantalla y la unidad sale
de la reproducción repetida.
• Para cancelar la reproducción repetida sin detener la
reproducción, pulse repetidamente PRESET UP/REPEAT
hasta que el indicador REP se apague.
Reproducción de introducciones—Intro Play
Es posible reproducir el comienzo de cada pista o de cada
pista programada de un CD durante diez segundos.
Para usar la reproducción de
introducciones, pulse INTRO.
La reproducción de introducciones se inicia
y aparece el indicador INTRO. Para usar la
reproducción de introducciones para
reproducción programada y reproducción aleatoria, pulse el
botón después que se inicie la reproducción.
Para detener la reproducción, pulse 7.
El indicador INTRO desaparece de la pantalla y la unidad
sale de la reproducción de introducciones.
• Para cancelar la reproducción de introducciones sin detener
la reproducción, pulse de nuevo INTRO hasta que el
indicador INTRO se apague.
Si usted pulsa INTRO mientras se está reproduciendo
una pista después de los diez segundos iniciales
Se empezará a reproducir la pista siguiente.
Reproducción al azar—Reproducción aleatoria
Las pistas del CD cargado se reproducen de forma aleatoria.
• Para usar la reproducción repetida para la reproducción
aleatoria, pulse PRESET UP/REPEAT de manera que el
indicador REP ALL se encienda en la pantalla después que
se inicie la reproducción aleatoria (la reproducción
aleatoria se cancela al seleccionar REP 1).
1
Cargue el CD.
• Si la fuente de reproducción actual no es el reproductor
de CD, pulse CD/RANDOM antes de avanzar al paso
siguiente.
2
Pulse CD/RANDOM de manera que
el indicador RANDOM aparezca en
la pantalla.
Se inicia la reproducción aleatoria.
• Si pulsa CD/RANDOM durante la reproducción del CD,
se iniciará la reproducción aleatoria después de finalizar
la pista actual.
Las pistas se reproducen de forma aleatoria.
La reproducción aleatoria finaliza cuando se reproducen
todas las pistas una vez.
Para saltar la pista que se está reproduciendo
actualmente, pulse ¢.
Para detener la reproducción, pulse 7.
El indicador RANDOM se apaga en la pantalla y la unidad
sale de la reproducción aleatoria.
• Para cancelar la reproducción aleatoria sin detener la
reproducción, pulse CD/RANDOM de manera que se
apague el indicador RANDOM.
CD
RANDOM
P
R
E
S
E
T
U
P
/
R
E
P
E
A
T
P
R
O
G
R
A
M
/
S
E
T
N
W
O
D
T
E
S
E
R
P
O
R
T
N
I
REP ALL REP 1
Cancelado
P
R
E
S
E
T
U
P
/
R
E
P
E
A
T
P
R
O
G
R
A
M
/
S
E
T
N
W
O
D
T
E
S
E
R
P
O
R
T
N
I
SP13-16_PC-X290[J]_f.p65 04.4.5, 11:49 AM15
– 16 –
Español
Usted podrá reproducir solamente cintas tipo I (Normal).
Reproducción de una cinta
1
Pulse STOP/EJECT 7 /0 de la platina que
desea usar.
2
Introduzca un cassette, con la parte expuesta
de la cinta hacia abajo.
3
Cierre suavemente el portacassette.
4
Pulse TAPE.
5
Pulse PLAY 3.
La cinta se empieza a reproducir.
Cuando la cinta se reproduce hasta el final, la
platina se detiene automáticamente.
Para detener la reproducción, pulse STOP/EJECT 7/0.
Para operar la otra platina, pulse STOP/EJECT 7/0 y
luego PLAY 3 en la otra platina.
Para rebobinar rápidamente hacia la izquierda o la
derecha, pulse REW 1/FF ¡ mientras la cinta está
detenida.
Para sacar el cassette, pulse STOP/EJECT 7/0.
Para reproducir continuamente las cintas de las
platinas B y A
1
Coloque las cintas cassette en las platinas A y
B.
• Si la dirección de la cinta no es la correcta, saque el
cassette.
2
Pulse PLAY 3 de la platina B.
La cinta de la platina B comenzará a
reproducirse.
3
Pulse PAUSE 8, y luego pulse PLAY 3 para
la platina A.
Cuando termine la cinta de la platina B, la cinta de la
platina A comienza a reproducirse automáticamente.
No se recomienda usar cintas C-120 ni otras más
delgadas, dado que podrían deteriorarse sus
características. Además, estas cintas tienden a
enredarse en los rodillos de presión y en los
cabrestantes.
TAPE
Reproducción de las cintas
PAUSE
Para la platina A
Para la platina B
SP13-16_PC-X290[J]_f.p65 04.4.5, 11:49 AM16
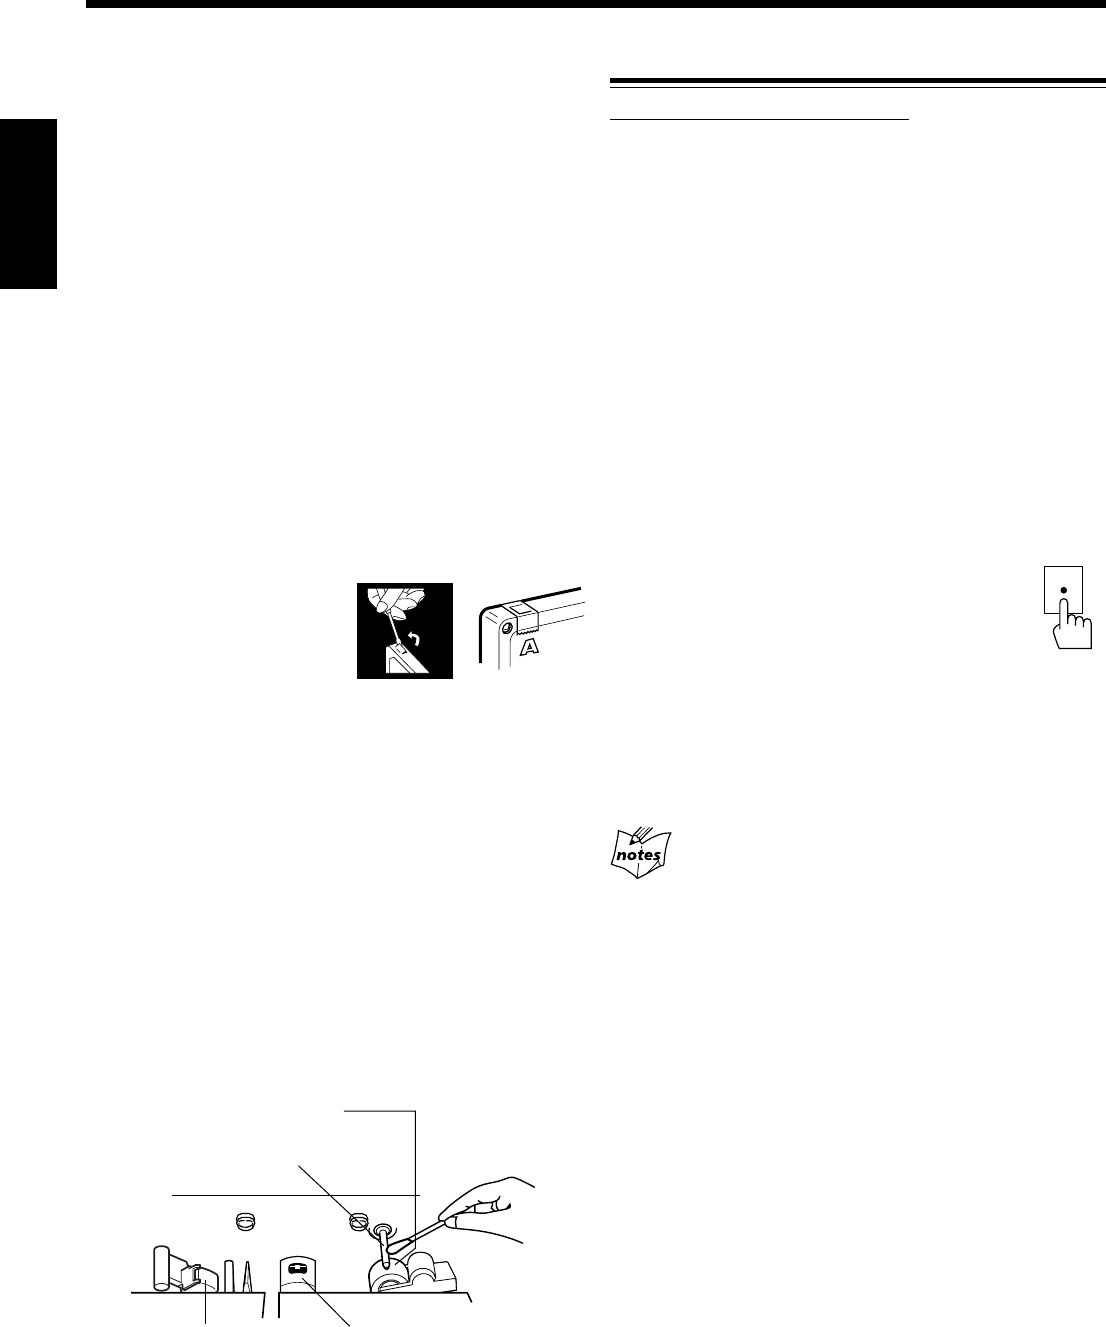
– 17 –
Español
IMPORTANTE:
•Tenga en cuenta que la regrabación de cintas
pregrabadas, grabaciones o discos sin el consentimiento
de los titulares del copyright podría resultar ilegal en
cuanto a grabación de sonido o de vídeo, radiodifusión o
transmisión por cable, y en cualquier forma literaria,
dramática, musical o artística expresada en cada caso.
• El nivel de grabación se ajusta automáticamente al nivel
correcto, y por lo tanto no es afectado por el control JOG
VOLUME +/–. De esta manera, durante la grabación, podrá
ajustar el sonido que está escuchando sin que el nivel de
grabación resulte afectado.
• Cuando está grabando, podrá escuchar los modos de sonido
a través de los altavoces o de los auriculares (véase página
10). No obstante, el sonido será grabado sin estos efectos.
• Si las grabaciones realizadas por usted contienen
demasiado ruido o perturbaciones estáticas, podría ser que
la unidad se encuentre demasiado cerca de un televisor.
Aumente la distancia entre el televisor y la unidad.
• Sólo podrá usar cintas tipo I (Normal) para la grabación.
Para proteger sus grabaciones
Los cassettes tienen dos
lengüetas pequeñas en la parte
posterior para protección contra
el borrado accidental y la
regrabación.
Para proteger sus grabaciones, quite estas lengüetas.
Para volver a grabar una cinta protegida, tape los orificios con
cinta adhesiva.
Para mantener la mejor calidad de sonido de
grabación y reproducción
Si los cabezales, cabrestantes, y rodillos de presión de las
platinas de cassette estuvieran sucios, podría producirse lo
siguiente:
• Pérdida de la calidad del sonido
• Sonido discontinuo
• Desvanecimiento
• Borrado incompleto
• Dificultades en la grabación
Para limpiar los cabezales, cabrestantes y rodillos de presión
Limpie con un palillo de algodón humedecido con alcohol.
Para desmagnetizar los cabezales
Apague la unidad, y utilice un desmagnetizador de cabezales
(disponible en las tiendas que venden productos electrónicos
y discos).
Grabación
Grabación de una cinta en la platina A
En la unidad SOLAMENTE:
1
Ponga un cassette grabable en la platina A
con la parte expuesta de la cinta hacia abajo.
• Véase también la página 16.
2
Cierre suavemente el portacassette.
3
Empiece a reproducir la fuente—FM, AM*,
reproductor de CD, platina B, o el equipo
auxiliar conectado a los jacks AUX IN.
• Cuando la fuente es CD, también podrá usar la
grabación sincronizada del disco (véase la página 18).
• Cuando la fuente es la platina B, también podrá usar el
método de duplicación. (Véase “Duplicación de cintas”
en la página 18).
* Véase “Para grabar una emisora AM—Corte de batido” en la
página 18.
4
Pulse REC ¶ para la platina A.
La grabación se inicia.
Para detener la grabación, pulse STOP/EJECT 7/0 para la
platina A.
Para sacar el cassette, pulse STOP/EJECT 7/0 para la
platina A.
No podrá pulsar REC ¶ en los siguiente casos:
• Si no hay ningún cassette insertado.
• Si se ha insertado una cinta protegida.
REC
Cabezales
Cabrestantes
Rodillos de presión
Cabeza de borrado
(sólo para la platina A)
SP17-20_PC-X290[J]_f.p65 04.4.5, 11:51 AM17
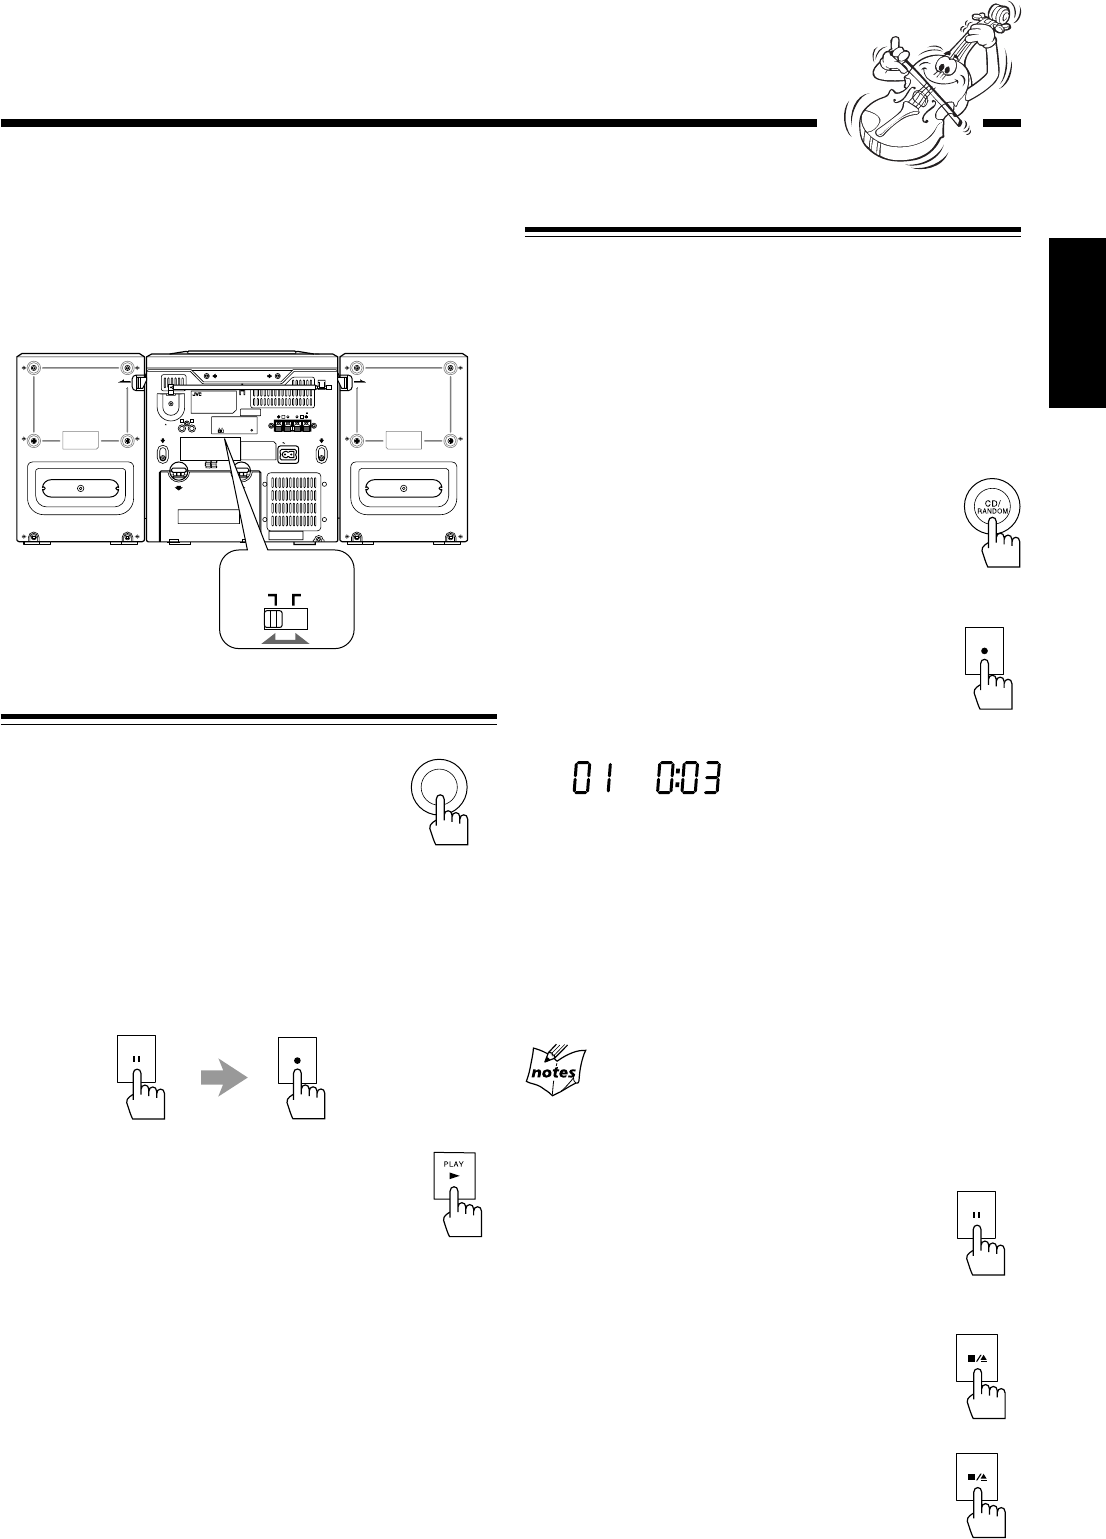
– 18 –
Español
Grabación de discos
—Grabación sincronizada de discos
Podrá iniciar simultáneamente la reproducción y la grabación
del disco.
1
Ponga un cassette grabable en la platina A
con la parte expuesta de la cinta hacia abajo.
• Véase también la página 16.
2
Cierre suavemente el portacassette.
3
Pulse CD/RANDOM para seleccionar
el reproductor de CD como fuente.
• Si desea grabar pistas en el orden deseado,
programe el orden de reproducción (véase
página 14).
4
Pulse REC ¶.
La reproducción y la grabación del CD se inician
automáticamente.
El indicador SYNC REC aparece en la pantalla.
• Cuando se llega al final de la cinta, la grabación se
detiene y la reproducción del CD entra en pausa.
Cuando finaliza la reproducción del CD, pulse STOP/
EJECT 7/0 para detener la grabación.
• Si pulsa REC ¶ mientras se reproduce el CD, el
reproductor de CD vuelve al comienzo de la pista y la
grabación se inicia desde esa pista.
No podrá pulsar REC ¶ en los siguiente casos:
• Si no hay ningún cassette insertado.
• Si se ha insertado una cinta protegida.
Para detener la grabación durante un momento,
pulse PAUSE 8.
La grabación entra en pausa, pero la reproducción
del CD no se detiene.
Para reanudar la grabación, pulse de nuevo PAUSE 8.
Para detener la grabación, pulse
STOP/EJECT 7/0.
La grabación se detiene y la reproducción del CD
entra en pausa.
Para sacar el cassette, pulse STOP/EJECT 7/0
con la grabación detenida.
Para grabar una emisora AM—Corte de batido
Mientras graba un radiodifusión en AM, se podrán escuchar
batidos (que no se escucharían durante la audición del
programa si no lo grabara).
En tal caso, ajuste el interruptor BEAT CUT en la parte
trasera de la unidad a 1 ó 2 para reducir el sonido batiente.
Duplicación de cintas
1
Pulse TAPE.
2
Ponga el cassette fuente en la platina B, y un
cassette grabable en la platina A.
3
Pulse PAUSE 8, y luego pulse REC ¶ de la
platina A.
4
Pulse PLAY 3 de la platina B.
La duplicación se inicia.
Para detener la duplicación, pulse STOP/EJECT 7/0 de la
platina A.
OPEN OPEN
AC IN
RL
BEAT CUT RESET
12
RL
2+
-
1+
-
SPEAKER IMPEDANCE MIN 3.2
+
-
3 4
+
-
7+
-
8+
-
SUM-1 D SIZE HP2 R20
+
-
6 5
+
-
ANT.
SCREW
AUX IN
RELEASE
SPK LABEL
(PC PLATE )
RELEASE
SPK LABEL
(PC PLATE )
BEAT CUT
12
TAPE
PAUSE
REC
RECSYNCCD
MUTING
REC
PAUSE
STOP/EJECT
STOP/EJECT
SP17-20_PC-X290[J]_f.p65 04.4.5, 11:51 AM18
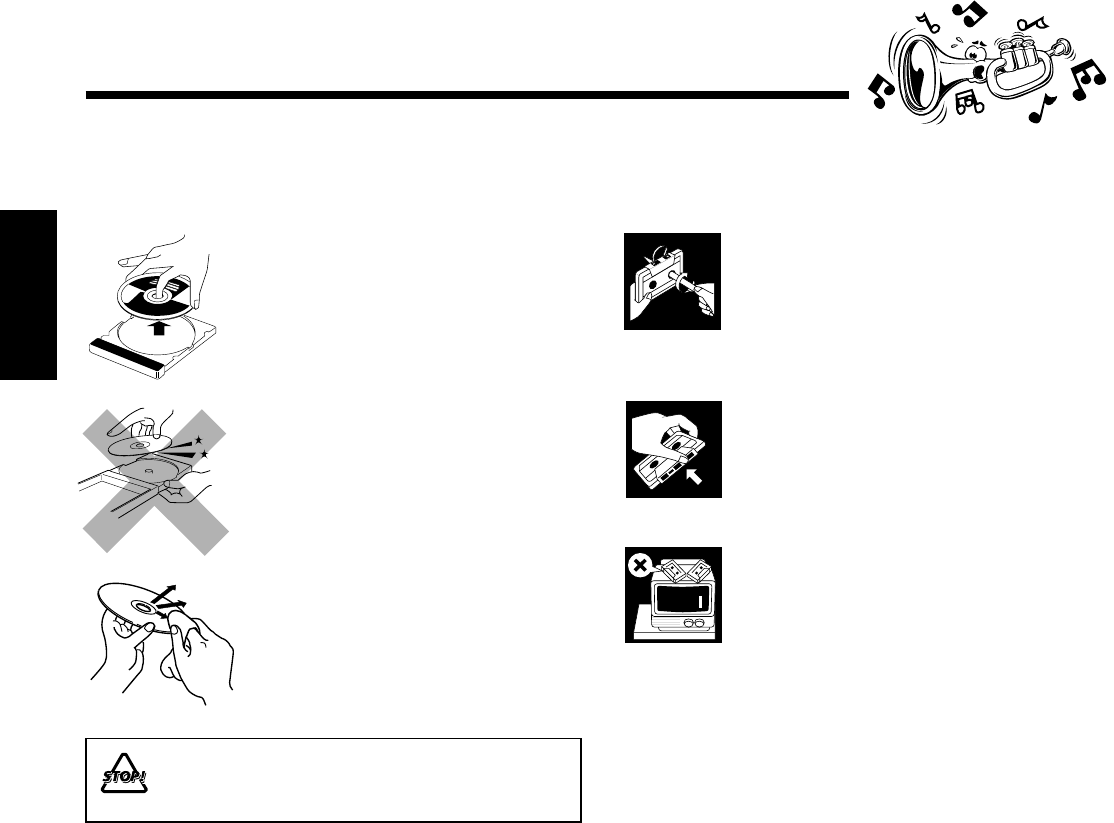
– 19 –
Español
Mantenimiento
Para obtener el máximo rendimiento de la unidad, mantenga limpios los discos, las cintas, y el mecanismo.
Manejo de las cintas cassette
• Si la cinta está floja en su cassette,
elimine la flojedad haciendo girar uno
de los carretes con un lápiz.
• Si la cinta está floja, podría quedar
estirada, cortada o enredada en el
cassette.
• Tenga cuidado de no tocar la
superficie de la cinta.
• No almacene las cintas en:
– Lugares polvorientos
– Expuestos directamente a la luz del
sol o de otras fuentes de calor
– Lugares de mucha humedad
– Cerca de un imán
Manejo de los discos
• Saque el disco de su estuche
sujetándolo por los bordes, mientras
presiona ligeramente el orificio central.
• No toque la superficie brillante del
disco, ni doble el disco.
• Ponga el disco en su estuche después
del uso para que no se deforme.
• Tenga cuidado de no rayar la superficie
del CD cuando vuelva a colocarlo en su
estuche.
• Evite la exposición directa a la luz del
sol, a temperaturas extremas, y a la
humedad.
Para limpiar el disco
Usando un lienzo suave, limpie el disco
con movimientos rectos desde el centro
hacia el borde.
NO utilice ningún tipo de solvente—como
limpiador de discos convencional, pulverizadores,
diluyente, o bencina—para limpiar el CD.
SP17-20_PC-X290[J]_f.p65 04.4.5, 11:51 AM19
– 20 –
Español
R
BEAT CUT RESET
12
SPEAKER IMPEDAN
Reinicialización de la unidad
Si con “Localización de averías” (véase arriba) no se consigue
eliminar el problema (fallo de funcionamiento, visualización
incorrecta, etc.), presione el interruptor de reinicialización en la
parte trasera de la unidad con un objeto puntiagudo, mientras la
unidad está encendida.
Si reinicializa la unidad
La reinicialización hará que la unidad se reposicione a sus ajustes
de fábrica y todos los ajustes realizados por el usuario serán
borrados.
Si experimenta algún problema con su unidad, verifique la siguiente lista para ver si consigue resolver el problema antes de
acudir al centro de servicio.
Si el problema persiste a pesar de las indicaciones contenidas en esta lista, o si la unidad está físicamente dañada, solicite el
servicio a personal cualificado, como por ejemplo, su proveedor.
Localización de averías
Síntom
No se escucha el sonido.
El sonido del disco se interrumpe.
El disco no se reproduce.
Grabación imposible.
No se pueden realizar las operaciones.
No es posible operar la unidad desde el
control remoto.
Causa
• Conexiones flojas o incorrectas.
• Silenciamiento activado.
El disco está rayado o sucio.
El disco está colocado boca abajo.
Se han removido las lengüetas pequeñas del
dorso del cassette.
Puede suceder que el microprocesador
incorporado no esté funcionando correctamente
debido a interferencias eléctricas exteriores.
• Hay un obstáculo en la trayectoria entre el
control remoto y el sensor remoto de la
unidad.
• Las pilas están descargadas.
Solución
• Verifique todas las conexiones y realice las
correcciones. (Véase páginas 6 – 8).
• Pulse MUTING para cancelar el
silenciamiento. (Véase página 10).
Limpie o reemplace el disco. (Véase página 19).
Coloque el disco con el lado de la etiqueta
hacia arriba.
Tape los orificios con cinta adhesiva.
Desenchufe el cable de alimentación de CA
después retirar las pilas de la unidad, y luego
vuélvalo a conectar.
• Saque el obstáculo.
• Cambie las pilas.
objeto puntiagudo
Sección del amplificador—CA-PCX290
Potencia de salida:
5 W por canal, RMS mín, accionado en 3,2 Ω a 1 kHz con una
distorsión armónica total no mayor que 10%.
Sensibilidad/impedancia de entrada de audio (a 1 kHz)
AUX: 1 000 mV/47 kΩ
Altavoces/Impedancia: 3,2 Ω – 8 Ω
Sintonizador
Margen de sintonización de FM: 87,5 MHz – 108,0 MHz
Margen de sintonización de AM: 530 kHz – 1 710 kHz
Reproductor de CD
Capacidad de CD: 1 CD
Margen dinámico: 60 dB
Relación señal a ruido: 75 dB
Platina de cassette
Respuesta de frecuencia
Normal (tipo I): 50 Hz — 10 000 Hz
Lloro y fluctuación: 0,15% (WRMS)
Generalidades
Requisitos de potencia: CA 120 V , 60 Hz
CC 12 V (pilas (8) “R20(SUM-1)/D(13D)”)
Consumo de energía: 20 W (en operación)
3 W (en espera)
Dimensiones (aprox.): 270 mm x 274 mm x 298 mm (An/Al/Pr)
(10 11/16 pulg. x 10 3/4 pulg. x 11 3/4 pulg.)
Peso (aprox.): 4,1 kg (9,1 libras)
Accesorios suministrados
Véase página 6.
Sección del altavoz—SP-PCX290
Tipo: tipo reflector de bajos de 2 vías
Unidades de altavoces: Woofer: cono de 10 cm (4 pulg.) x 1
Tweeter: cono de 5 cm (2 pulg.) x 1
Capacidad de potencia: 5 W
Impedancia: 3,2 Ω
Gama de frecuencias: 50 Hz — 18 000 Hz
Dimensiones (aprox.): 180 mm x 270 mm x 228 mm (An/Al/Pr)
(7 1/8 pulg. x 10 3/4 pulg. x 9 pulg.)
Peso (aprox.): 1,7 kg (3,8 libras) c/u
Especificaciones El diseño y las especificaciones se encuentran
sujetos a cambios sin previo aviso.
SP17-20_PC-X290[J]_f.p65 04.4.5, 11:51 AM20
THIS LIMITED WARRANTY IS VALID ONLY IN THE FIFTY (50) UNITED STATES, THE DISTRICT OF COLUMBIA AND
IN COMMONWEALTH OF PUERTO RICO.
WHAT WE WILL DO:
If this product is found to be defective, JVC will repair or replace defective parts at no charge to the original owner.
Such repair and replacement services shall be rendered by JVC during normal business hours at JVC authorized service
centers. Parts used for replacement are warranted only for the remainder of the Warranty Period. All products and parts
thereof may be brought to a JVC authorized service center on a carry-in basis except for Television sets having a screen
size 25 inches and above which are covered on an in-home basis.
WHAT YOU MUST DO FOR WARRANTY SERVICE:
Return your product to a JVC authorized service center with a copy of your bill of sale. For your nearest JVC authorized
service center, please call toll free: (800) 537-5722.
If service is not available locally, box the product carefully, preferably in the original carton, and ship, insured, with
a copy of your bill of sale plus a letter of explanation of the problem to the nearest JVC Factory Service Center, the
name and location of which will be given to you by the toll-free number.
If you have any questions concerning your JVC Product, please contact our Customer Relations Department.
WHAT IS NOT COVERED:
This limited warranty provided by JVC does not cover:
1. Products which have been subject to abuse, accident, alteration, modification, tampering, negligence, misuse, faulty
installation, lack of reasonable care, or if repaired or serviced by anyone other than a service facility authorized by
JVC to render such service, or if affixed to any attachment not provided with the products, or if the model number
or serial number has been altered, tampered with, defaced or removed;
2. Initial installation and installation and removal for repair;
3. Operational adjustments covered in the Owner's Manual, normal maintenance, video and audio head cleaning;
4. Damage that occurs in shipment, due to act of God, and cosmetic damage;
5. Signal reception problems and failures due to line power surge;
6. Video Pick-up Tubes/CCD Image Sensor, Cartridge, Stylus (Needle) are covered for 90 days from the date of purchase;
7. Batteries (except that Rechargeable Batteries are covered for 90 days from the date of purchase);
There are no express warranties except as listed above.
THE DURATION OF ANY IMPLIED WARRANTIES, INCLUDING THE IMPLIED WARRANTY OF MERCHANTABILITY, IS
LIMITED TO THE DURATION OF THE EXPRESS WARRANTY HEREIN.
JVC SHALL NOT BE LIABLE FOR THE LOSS OF USE OF THE PRODUCT, INCONVENIENCE, LOSS OR ANY OTHER
DAMAGES, WHETHER DIRECT, INCIDENTAL OR CONSEQUENTIAL (INCLUDING, WITHOUT LIMITATION, DAMAGE
TO TAPES, RECORDS OR DISCS) RESULTING FROM THE USE OF THIS PRODUCT, OR ARISING OUT OF ANY BREACH
OF THIS WARRANTY. ALL EXPRESS AND IMPLIED WARRANTIES, INCLUDING THE WARRANTIES OF MERCHANT-
ABILITY AND FITNESS FOR PARTICULAR PURPOSE, ARE LIMITED TO THE WARRANTY PERIOD SET FORTH ABOVE.
Some states do not allow the exclusion of incidental or consequential damages or limitations on how long an
implied warranty lasts, so these limitations or exclusions may not apply to you. This warranty gives you specific
legal rights and you may also have other rights which vary from state to state.
LIMITED WARRANTY
JVC COMPANY OF AMERICA warrants this product and all parts thereof, except as set forth below ONLY TO THE
ORIGINAL PURCHASER AT RETAIL to be FREE FROM DEFECTIVE MATERIALS AND WORKMANSHIP from the date
of original retail purchase for the period as shown below. ("The Warranty Period")
PARTS LABOR
1 YR 90 DAYS
JVC COMPANY OF AMERICA
DIVISION OF JVC AMERICAS CORP.
1700 Valley Road
Wayne, New Jersey 07470
REFURBISHED PRODUCTS CARRY A SEPARATE WARRANTY, THIS WARRANTY DOES NOT APPLY. FOR DETAILS OF
REFURBISHED PRODUCT WARRANTY, PLEASE REFER TO THE REFURBISHED PRODUCT WARRANTY INFORMATION
PACKAGED WITH EACH REFURBISHED PRODUCT.
For customer use:
Enter below the Model No. which is located either on the rear, bottom or side of the cabinet. Retain this information
for future reference.
Model No. : Serial No. :
Purchase data : Name of dealer :
PORTABLE AUDIO 1-90
ONLY FOR PRODUCT PURCHASED IN U.S.A.
USA ONLY
PC-X290[J]WARRANTY_f.p65 04.4.5, 11:48 AM1

BT-51026-1
(0501)
QUALITY SERVICE
HOW TO LOCATE YOUR JVC SERVICE CENTER
Dear Customer,
In order to receive the most satisfaction from your purchase, please read the instruction booklet before
operating the unit. In the event that repairs are necessary, please call 1 (800)537-5722 for your nearest
authorized servicer or visit our website at www.JVC.com
Remember to retain your Bill of Sale for Warranty Service.
Do not service the television yourself
Caution
To prevent electrical shock, do not open the cabinet. There are no user serviceable parts
inside. Please refer to qualified service personnel for repairs.
Accessories
To purchase accessories for your JVC product, please call toll free: 1 (800)882-2345 or
on the web at www.JVC.com
TOLL FREE: 1 (800) 537-5722
http://www.jvc.com
Authorized Service Centers
®
PC-X290[J]WARRANTY_f.p65 04.4.5, 11:48 AM2

MEMO
PC-X290[J]MEMO_f.p65 04.4.5, 11:48 AM1

MEMO
PC-X290[J]MEMO_f.p65 04.4.5, 11:48 AM2

0204TMMMDWORI
EN, SP
© 2004 VICTOR COMPANY OF JAPAN, LIMITED
VICTOR COMPANY OF JAPAN, LIMITED
PC-X290 CD PORTABLE COMPONENT SYSTEM
PC-X290[J]COVER_f.p65 04.4.5, 11:44 AM2
