JVCKENWOOD 39553 Vehicle Console with Bluetooth Transmitter User Manual Impreza Navi
JVC KENWOOD Corporation Vehicle Console with Bluetooth Transmitter Impreza Navi
Contents
- 1. User Manual 1 of 2
- 2. User Manual 2 of 2
User Manual 1 of 2

This supplement contains a detailed descrip-
tion of the Navigation System and instructions
for proper operation.
Please read this supplement carefully before
using your navigation system.
Please keep this supplement with your Owner's
Manual and leave it in the vehicle at the time of
resale. The next owner will need the informa-
tion it contains.
FUJI HEAVY INDUSTRIES LTD., TOKYO, JAPAN
is a registered trademark of FUJI HEAVY INDUSTRIES LTD.
Copyright ©2007, FUJI HEAVY INDUSTRIES LTD.
+ORTG\CA0CXKDQQMࡍࠫ㧞㧜㧜㧣ᐕ㧡㧞㧢ᣣޓᦐᣣޓඦᓟ㧢ᤨ㧠ಽ

1
Contents
Safety Warnings ............................................................................. 2
Before Use....................................................................................... 3
System Components and Controls ............................................... 7
Starting Up the Navigation System .............................................. 9
Volume .......................................................................................... 11
Markers and Controls Displayed on Maps ................................. 12
Screens During Route Setting.................................................................. 12
Screens During Route Guidance ............................................................. 14
Menu Screen Keys and Functions ............................................... 15
Map Operations............................................................................ 17
Selecting Map Orientation ........................................................................ 17
Changing Map Scale.................................................................................... 18
Setting Route................................................................................ 20
Setting Destination...................................................................................... 20
■Setting destination/waypoints by scrolling the map.................................................... 20
■Setting the destination from the navigation menu ....................................................... 22
Route Guidance ............................................................................ 36
Route Guidance Screen .............................................................................. 36
Zoom-in Map at Intersection.................................................................... 37
Dual Map Display.......................................................................................... 38
Freeway Information ................................................................................... 39
Replaying Voice Guidance......................................................................... 40
Compass Mode.............................................................................................. 41
Route Options............................................................................... 42
Setting Route Options ................................................................................ 42
■Search condition .................................................................................................................................. 43
■Detour ......................................................................................................................................................... 44
■Route preferences................................................................................................................................ 45
■Destination and waypoints ............................................................................................................ 45
■Display route............................................................................................................................................ 49
■Route preview......................................................................................................................................... 50
Navigation Setup ......................................................................... 53
Setting Your Navigation System............................................................. 53
■User settings............................................................................................................................................ 54
■Quick POI selection.............................................................................................................................. 56
■Language Selection ............................................................................................................................ 57
■Calibration................................................................................................................................................. 57
■Set clock...................................................................................................................................................... 59
■Vehicle signal........................................................................................................................................... 60
■Restore system defaults.................................................................................................................... 60
Stored Locations .......................................................................... 62
■Memory points....................................................................................................................................... 63
■Avoid area.................................................................................................................................................. 68
■Previous destination (deleting stored locations).............................................................. 70
Other Functions............................................................................ 72
■Displaying POI data............................................................................................................................. 74
■Deleting POI markers.......................................................................................................................... 75
■Editing Quick POI categories......................................................................................................... 75
■SUBARU dealership search.............................................................................................................. 77
Version and Initialization............................................................ 80
Version ............................................................................................................. 80
Initialization of the navigation settings ............................................... 81
General Information .................................................................... 83
When a Problem Occurs ............................................................................ 86
+ORTG\CA0CXKDQQMࡍࠫ㧞㧜㧜㧣ᐕ㧡㧞㧢ᣣޓᦐᣣޓඦᓟ㧢ᤨ㧠ಽ
2
Safety Warnings
You will find a number of WARNINGs, CAUTIONs and NOTEs in this
supplement.
These safety warnings alert you to potential hazards that could
result in injury to you or others.
Please read these safety warnings as well as all other portions of
this supplement carefully in order to gain a better understanding
of how to use your Navigation system safely.
NOTE
A NOTE gives information or suggestions how to make better use of your
Navigation system.
WARNING
A WARNING indicates a situation in which serious injury or
death could result if the warning is ignored.
CAUTION
A CAUTION indicates a situation in which injury or damage to
your vehicle including Navigation system, or both, could result
if the caution is ignored.
+ORTG\CA0CXKDQQMࡍࠫ㧞㧜㧜㧣ᐕ㧡㧞㧢ᣣޓᦐᣣޓඦᓟ㧢ᤨ㧠ಽ
3
Before Use
WARNING
READ THIS MANUAL FIRST
Read this supplement carefully before using your navigation
system. We are not liable for accidents or other problems
resulting from failure to follow the instructions in this sup-
plement.
OBEY LOCAL ROAD SIGNS AND REGULATIONS
Always obey local road signs and regulations while following
instructions given by the navigation system. Some of the
data on the DVD-ROM disc may be outdated due to changes
in local road signs and regulations. Furthermore, the data on
the DVD-ROM disc does not take into account variable fac-
tors such as the weather, road congestion at different times
of the day, temporary road closures due to road construc-
tion, and special events. Local road signs and regulations
always take precedence over directions given by the system.
Failure to obey them could place you in physical danger or in
violation of the law.
DRIVE SAFELY
•Before following an instruction (for example, in the case of
changing direction) given by the system, check that the
action would be safe to take in the current traffic conditions.
Continue to pay attention to safety while following any
instruction.
•Do not be distracted by the navigation screen.
Failure to keep your attention on the road could lead to an
accident. When you need to look at the screen while driving,
do so for the shortest time possible and avoid staring at the
screen.
•You must stop the vehicle in a safe place before operating
the navigation system. For safety's sake, some of the naviga-
tion system's controls and functions cannot be used unless
the vehicle is stationary.
•When you need to look at the monitor, do so for the shortest
time possible. Looking away from the road for too long
could lead to an accident.
•Use this system only in locations where it is legal to do so.
Some states/provinces may have laws prohibiting video
screens within sight of the driver.
VOLUME LEVEL
Keep the system's volume level low enough for you to be
able to hear outside sounds while driving. To do otherwise
may prevent you from reacting appropriately to traffic condi-
tions and could result in an accident.
+ORTG\CA0CXKDQQMࡍࠫ㧞㧜㧜㧣ᐕ㧡㧞㧢ᣣޓᦐᣣޓඦᓟ㧢ᤨ㧠ಽ
4
Before Use
NOTE
Liquid-crystal displays may be difficult to read when wearing polarized
glasses.
CAUTION
FOREIGN OBJECTS
Do not allow foreign objects to enter the disc insertion slot,
including your fingers.
Foreign objects inside the system's main unit could cause an
electric shock or a fire. If the main unit emits smoke or an
unusual smell, stop using the system immediately and you
contact the nearest SUBARU dealer.
NEVER DISASSEMBLE OR MODIFY THE SYSTEM
Any attempt to disassemble or modify any part of the system
could lead to an electric shock or a fire, or some other type of
accident.
Do not continue using the monitor if it malfunctions
If the system shows any sign of malfunctioning (for example,
the monitor gives no picture), stop using it immediately and
contact the nearest SUBARU dealer.
Continuing to use the system could lead to a fire, an electric
shock, or some other type of accident.
CAUTION
If the monitor gets contaminated, emits smoke or an odd smell,
stop using it
If a foreign object gets inside the system, liquid is spilled
onto the system, or the system emits smoke or an unusual
smell, stop using it immediately and contact the nearest
SUBARU dealer. Continuing to use the system could lead to a
fire, an electric shock, or some other type of accident.
The displays contain mercury. Therefore, the displays must be
removed before vehicle disposal. Once the displays have been
removed, please reuse, recycle or dispose of them as hazard-
ous waste.
+ORTG\CA0CXKDQQMࡍࠫ㧞㧜㧜㧣ᐕ㧡㧞㧢ᣣޓᦐᣣޓඦᓟ㧢ᤨ㧠ಽ

5
Before Use
■Points to note before use
Starting the engine before using the system
The navigation system can be used with the ignition key in either the
ON position or the ACC position. To preserve the battery, however, it
should be used with the engine running whenever possible. Using
the system for a long time with the engine off can cause the battery
to run down.
Delay before display of current position
The system will not immediately display a correct indication of your
vehicle's current position after being switched on for the first time or
after the battery has been disconnected for a long time. It will display
a correct current position indication as soon as it receives Global Posi-
tioning System (GPS) signals.
Program reloading after battery disconnection
The navigation program will be erased from the system's memory if
the battery is disconnected. If this happens, load the provided DVD-
ROM disc in the system's main unit and turn the ignition switch to
the ON or ACC position. The system will automatically reload the pro-
gram and start operating normally again.
Incorrect operation on rough roads
The system may operate incorrectly or be unable to read the data on
the DVD-ROM disc when subjected to severe vibration caused by
driving on rough roads.
Handling the GPS antenna
Do not paint the antenna. Doing so could impair or prevent signal
reception.
Disabled switches
Some switches are disabled during operation of the system. These
switches are displayed in fainter colors and no messages are dis-
played for them.
Risk of damage to the main unit
Be mindful of the occupant compartment temperature. Using the
system when the occupant compartment temperature is extremely
high or low can damage it or cause it to malfunction. Also, note that
the system's main unit can be damaged by strong vibration and by
any metallic object or water that gets inside.
Condensation
Condensation can form on the lens inside the main unit when there
is a rapid change in occupant compartment temperature (for exam-
ple, when the heater is switched on in cold weather). Such condensa-
tion can cause the system to operate abnormally. If you wait an hour
or so for the condensation to disappear, the system should start
working normally again. If normal operation is still not restored after
several hours, we recommend that you contact the nearest SUBARU
dealer.
Replacing the DVD-ROM disc
If you need to replace the DVD-ROM disc, make sure the replacement
disc is compatible with your system's main unit. Inserting an incom-
patible disc could damage the unit.
+ORTG\CA0CXKDQQMࡍࠫ㧞㧜㧜㧣ᐕ㧡㧞㧢ᣣޓᦐᣣޓඦᓟ㧢ᤨ㧠ಽ

6
Before Use
■Handling precautions for DVD-ROM discs
•Handle DVD-ROM discs carefully. Any DVD-ROM disc with excessive
warping or scratches on its surface can cause reading errors.
•Store DVD-ROM discs away from direct sunlight, which can cause
warping and render them unusable.
•DVD-ROM discs rotate at high speeds inside the system's main unit.
Never use a cracked or badly warped disc; doing so could damage
the unit.
•To clean a DVD-ROM disc, lightly wipe it with a soft cloth in straight
lines from the center hole toward the outer edge.
•Never clean DVD-ROM discs with benzene, thinner, record spray,
antistatic spray, or chemical swabs.
•Do not touch the DVD-ROM disc's data surface (the surface without
a printed label). A dirty data surface can cause reading errors. Always
hold a DVD-ROM disc by the center hole and at one point on the
outer edge, or by two points on the outer edge.
•Do not write anything on DVD-ROM discs or affix anything, such as
stickers, to them.
+ORTG\CA0CXKDQQMࡍࠫ㧞㧜㧜㧣ᐕ㧡㧞㧢ᣣޓᦐᣣޓඦᓟ㧢ᤨ㧠ಽ
7
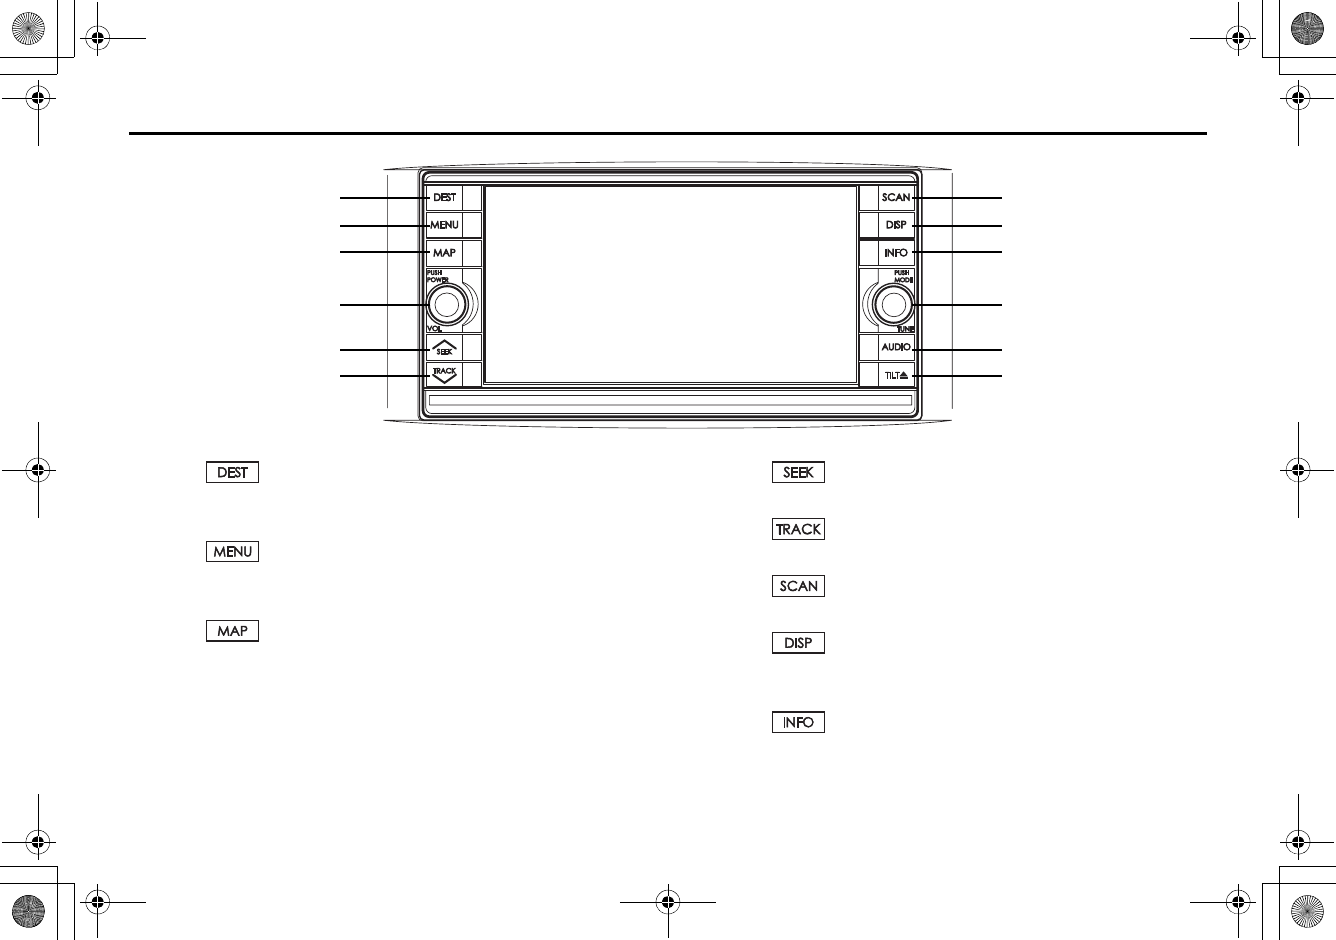
System Components and Controls
(1)
This button is used to display the destination entry screen of
the navigation system.
(2)
This button is used to display the menu screen of the naviga-
tion system.
(3)
This button is used to switch to the navigation system’s cur-
rent map screen from any other screen.
(4) POWER/VOL
This button is used to operate the audio system.
(5)
This button is used to operate the audio system.
(6)
This button is used to operate the audio system.
(7)
This button is used to operate the audio system.
(8)
This button allows you to display SCREEN in which adjust-
ments can be made to the screen.
(9)
This button is used to display the vehicle information screen.
(1)
(2)
(3)
(4)
(5)
(6)
(7)
(8)
(9)
(10)
(11)
(12)
+ORTG\CA0CXKDQQMࡍࠫ㧞㧜㧜㧣ᐕ㧡㧞㧢ᣣޓᦐᣣޓඦᓟ㧢ᤨ㧠ಽ

8
System Components and Controls
(10) MODE/TUNE
This button is used to operate the audio system.
(11)
This button is used to operate the audio system.
(12)
This button is used to take out a disc and/or adjust the tilt of
the monitor.
+ORTG\CA0CXKDQQMࡍࠫ㧞㧜㧜㧣ᐕ㧡㧞㧢ᣣޓᦐᣣޓඦᓟ㧢ᤨ㧠ಽ
9
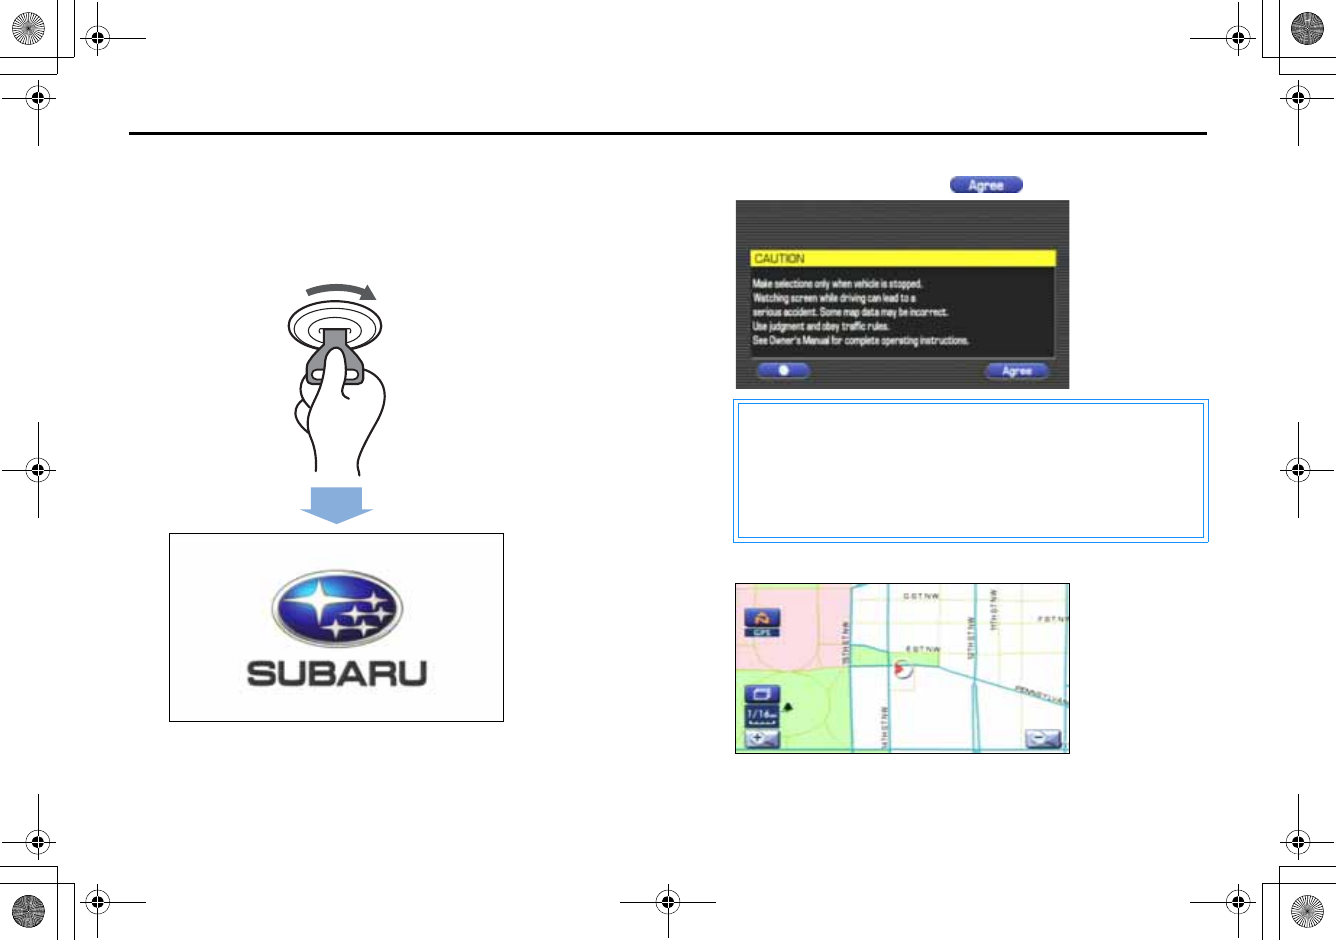
Starting Up the Navigation System
Use the following procedure to start up the navigation system
and display the current map screen.
1Start the engine.
The CAUTION screen will appear, followed by the opening screen.
2Carefully read the instructions on the CAUTION screen
(cited below), then select .
The current map screen will appear.
CAUTION
Make selections only when vehicle is stopped.
Watching screen while driving can lead to a serious accident. Some
map data may be incorrect.
Use judgment and obey traffic rules.
See Owner's Manual for complete operating instructions.
+ORTG\CA0CXKDQQMࡍࠫ㧞㧜㧜㧣ᐕ㧡㧞㧢ᣣޓᦐᣣޓඦᓟ㧢ᤨ㧠ಽ

10
Starting Up the Navigation System
NOTE
•To make a selection, touch the desired key displayed on the screen.
•The CAUTION screen remains on the display unless you select .
•When you use the navigation system for the first time, Eastern Standard Time
(EST) will be displayed. Adjust the system's clock to the right time using the
clock setting screen ("SET CLOCK") as described on Page 59.
+ORTG\CA0CXKDQQMࡍࠫ㧞㧜㧜㧣ᐕ㧡㧞㧢ᣣޓᦐᣣޓඦᓟ㧢ᤨ㧠ಽ

11
Volume
Use this function if you want to change the voice guidance
volume setting from the default setting.
1Press the button.
2Select or to adjust the sound volume.
•Each time is selected, the sound volume turns
down.
Each time is selected, the sound volume turns up.
•If you want to turn off the sound of the navigation sys-
tem, select to display "OFF".
+ORTG\CA0CXKDQQMࡍࠫ㧞㧜㧜㧣ᐕ㧡㧞㧢ᣣޓᦐᣣޓඦᓟ㧢ᤨ㧠ಽ
12
Markers and Controls Displayed on Maps
Screens During Route Setting
Touch a point on the map. A crosshair (scroll mark) will appear
on the screen. Then touch a desired point on the map. The
map will scroll with the selected point at the center.
(1) Time
Indicates the current time.
(2) Map orientation control
Used to select either a "north up" display or "heading up" dis-
play of the map. (See Page 17.)
(3) GPS marker
Shows the status of the signal from GPS satellites. When this
marker appears, your navigation system is receiving GPS sig-
nals and using them to calculate the position of your vehicle.
(4) Screen configuration control
Allows you to select a preferred display type for route guid-
ance. (See Page 36.)
(5) Map scale
Used to display the map scale.
(6) Zoom-out/zoom-in control
or is used to zoom out or zoom in the map.
Select or to select the map scale.
(7) Vehicle marker
Indicates the current position and direction of your vehicle.
(4)
Scroll the map
<Current Position screen>
<Scroll screen>
Press button to
return to the current map
screen.
(1)(1)
(2)
(6)
(7)
(5)
(10)
(9)(8)(11)
(3)
+ORTG\CA0CXKDQQMࡍࠫ㧞㧜㧜㧣ᐕ㧡㧞㧢ᣣޓᦐᣣޓඦᓟ㧢ᤨ㧠ಽ

13
Markers and Controls Displayed on Maps
(8) "Store memory point" key
Stores markers on the map.
This key appears just for a few seconds after a map screen is
selected.
(9) Point of interest (POI) key
Allows you to display the POI selection screen (See Page 72).
On the screen, you can program POIs to appear on a map as
markers. This key appears just for a few seconds after a map
screen is selected.
(10) Distance from current position
Indicates the distance from the current position to the posi-
tion marked by .
(11) Destination/waypoint key
Used to program a destination or waypoint at the position
marked by on a scroll screen.
+ORTG\CA0CXKDQQMࡍࠫ㧞㧜㧜㧣ᐕ㧡㧞㧢ᣣޓᦐᣣޓඦᓟ㧢ᤨ㧠ಽ
14
Markers and Controls Displayed on Maps
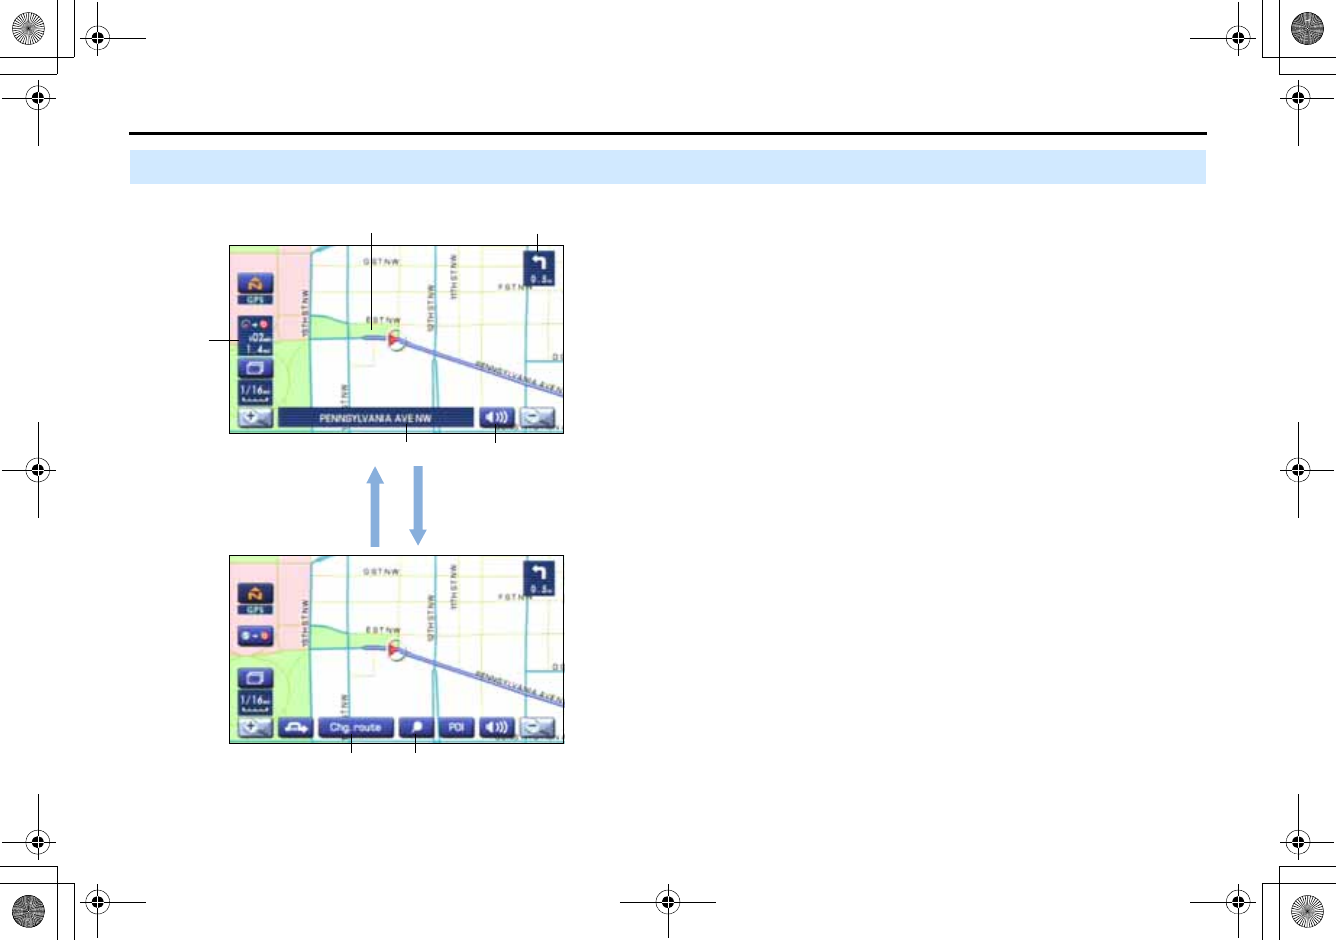
Screens During Route Guidance
(1) Distance and time to destination
Indicates the time (either approximate time required or time
of arrival) and the distance to the destination or a waypoint.
(2) Route
A thick blue line indicates the route you should follow.
(3) Turn guidance arrow
Indicates the direction of your turn at the next intersection/
intersection as well as the distance to the intersection/inter-
section.
(4) "Repeat voice" key
If this key is selected, the last voice guidance will be repeated.
(5) Current road name
Shows the name of the road you are currently driving on.
(6) "Display whole route" key
If this key is selected, a map containing the entire route will
be displayed. (See Page 49.)
(7) "Change route" key
Selecting this key displays the route option menu. Selecting a
new route option causes the system to calculate the selected
route.
(3)
(2)
(1)
(4)
(5)
(6)(7)
Select the screen(5 seconds)
+ORTG\CA0CXKDQQMࡍࠫ㧞㧜㧜㧣ᐕ㧡㧞㧢ᣣޓᦐᣣޓඦᓟ㧢ᤨ㧠ಽ
15
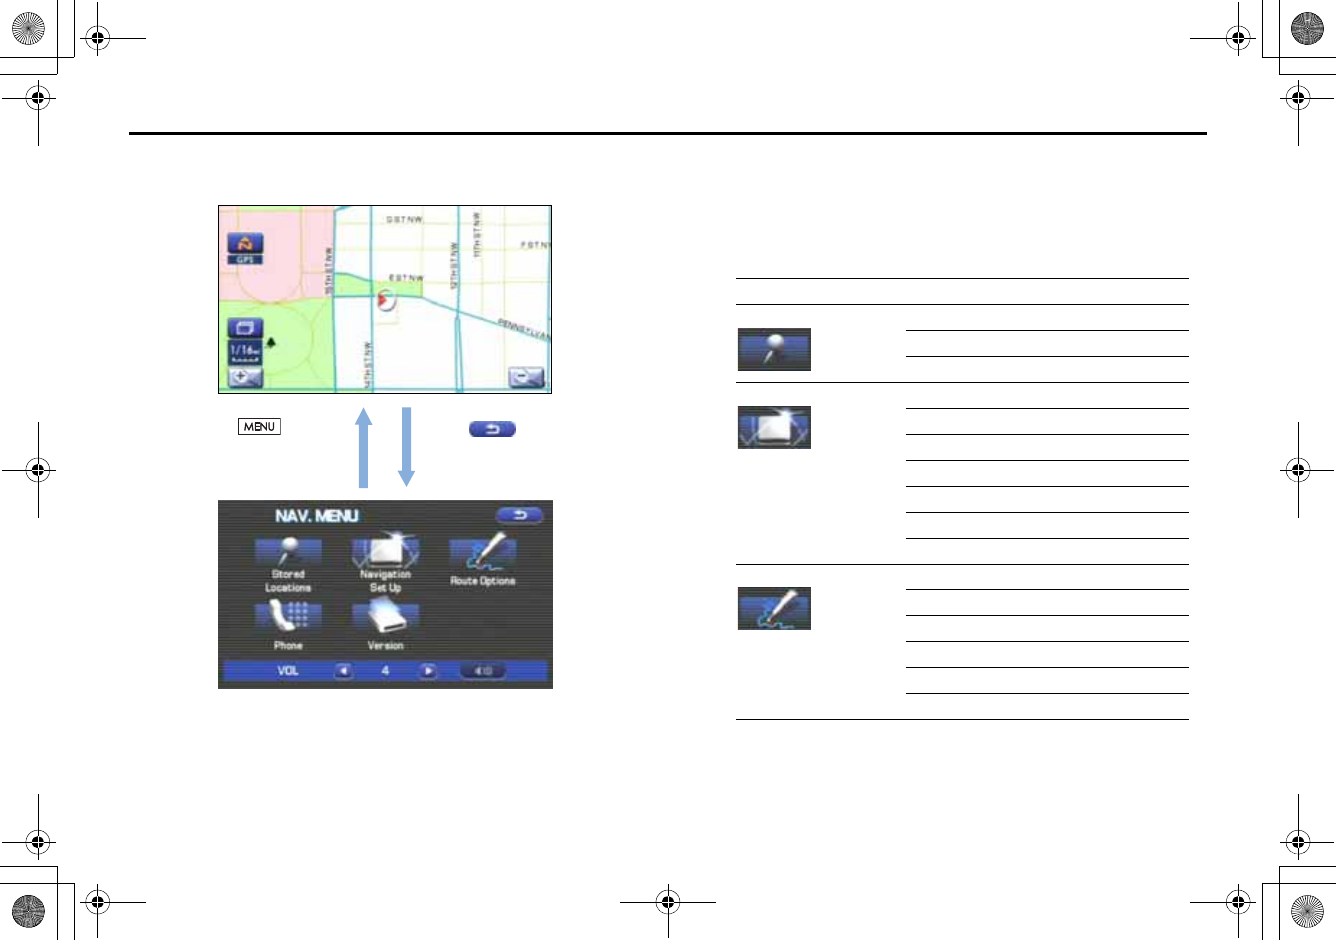
Menu Screen Keys and Functions
The table below shows the keys displayed on the MENU screen,
the functions accessible by selecting these keys, and the pages of
this manual that describe the instructions you should follow when
using these functions.
Select to return to
the current map screen.
<Current map screen>
<Menu screen>
Press button to
display the menu screen.
Menu screen key Function Reference page
Stored Locations Memory Points page 63
Avoid Area page 68
Previous Dest. page 70
Navigation Set Up User Settings page 54
Quick POI Selection page 56
Language page 57
Calibration page 57
Set Clocks page 59
Vehicle Signal page 60
Restore System Defaults page 60
Route Options Search Condition page 43
Detour page 44
Route Pref. page 45
Dest. & Way Pt. page 45
Display Route page 49
Route Preview page 50
+ORTG\CA0CXKDQQMࡍࠫ㧞㧜㧜㧣ᐕ㧡㧞㧢ᣣޓᦐᣣޓඦᓟ㧢ᤨ㧠ಽ
16
Menu Screen Keys and Functions
Phone Bluetooth Phone page 173
Redial List page 183
Received Calls page 183
Phone Book page 185
Memory Location page 178
Bluetooth Settings page 170
Version Version page 80
VOL Volume page 11
Menu screen key Function Reference page
+ORTG\CA0CXKDQQMࡍࠫ㧞㧜㧜㧣ᐕ㧡㧞㧢ᣣޓᦐᣣޓඦᓟ㧢ᤨ㧠ಽ
17
Map Operations
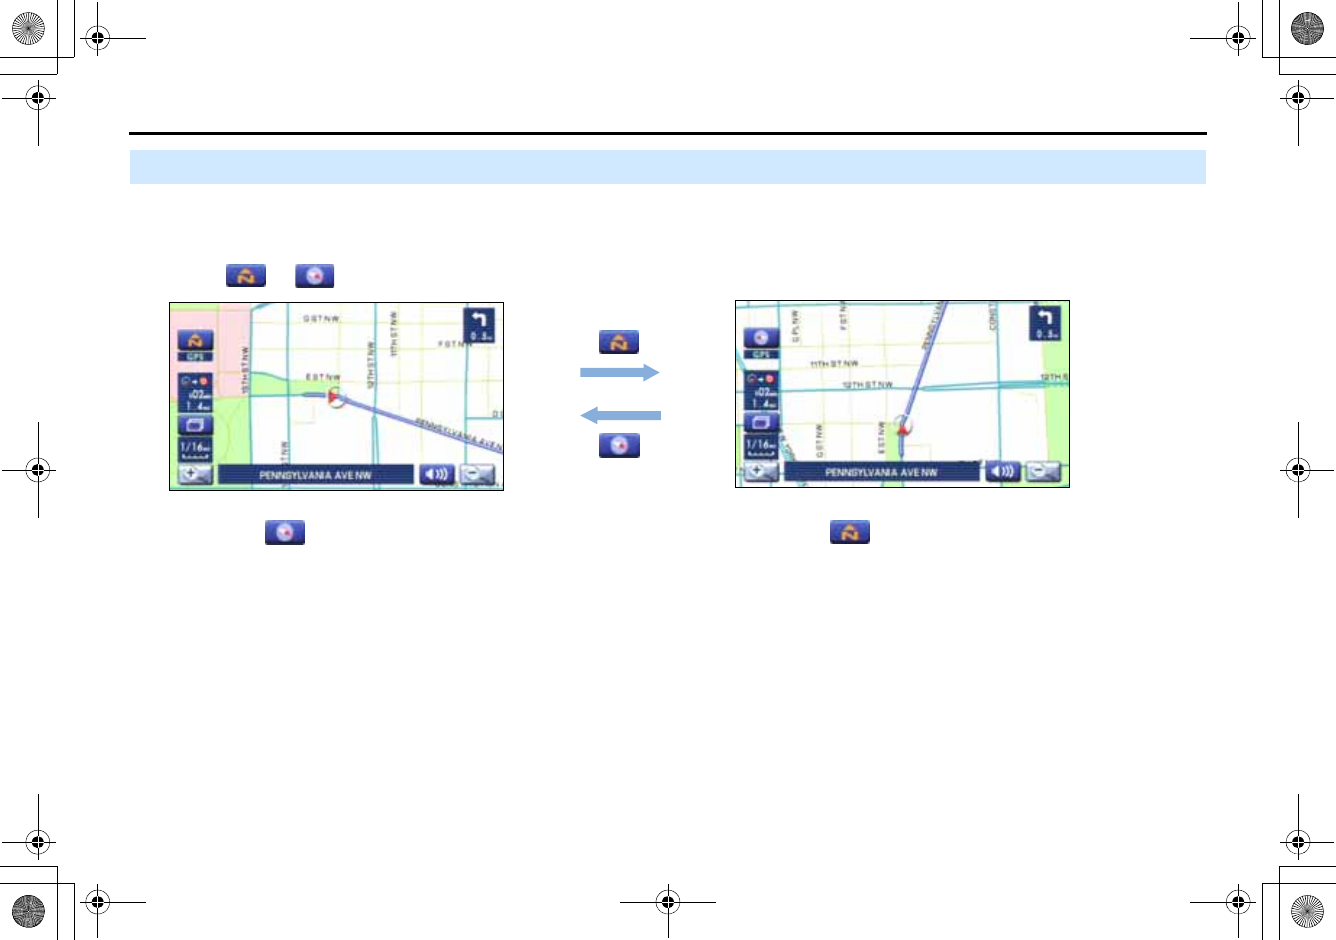
Selecting Map Orientation
You can select either "heading up" or "north up" display on
the current map screen by using the following procedure.
1Select or .
If you select ("heading up" display), the system rotates the
map so that the direction in which you are heading is always
directly upwards on the screen (the red arrow points to the north).
If you select ("north up" display), the system rotates the
map so that north is always directly upwards on the screen.
<"Heading up" display> <"North up" display>
+ORTG\CA0CXKDQQMࡍࠫ㧞㧜㧜㧣ᐕ㧡㧞㧢ᣣޓᦐᣣޓඦᓟ㧢ᤨ㧠ಽ
18
Map Operations
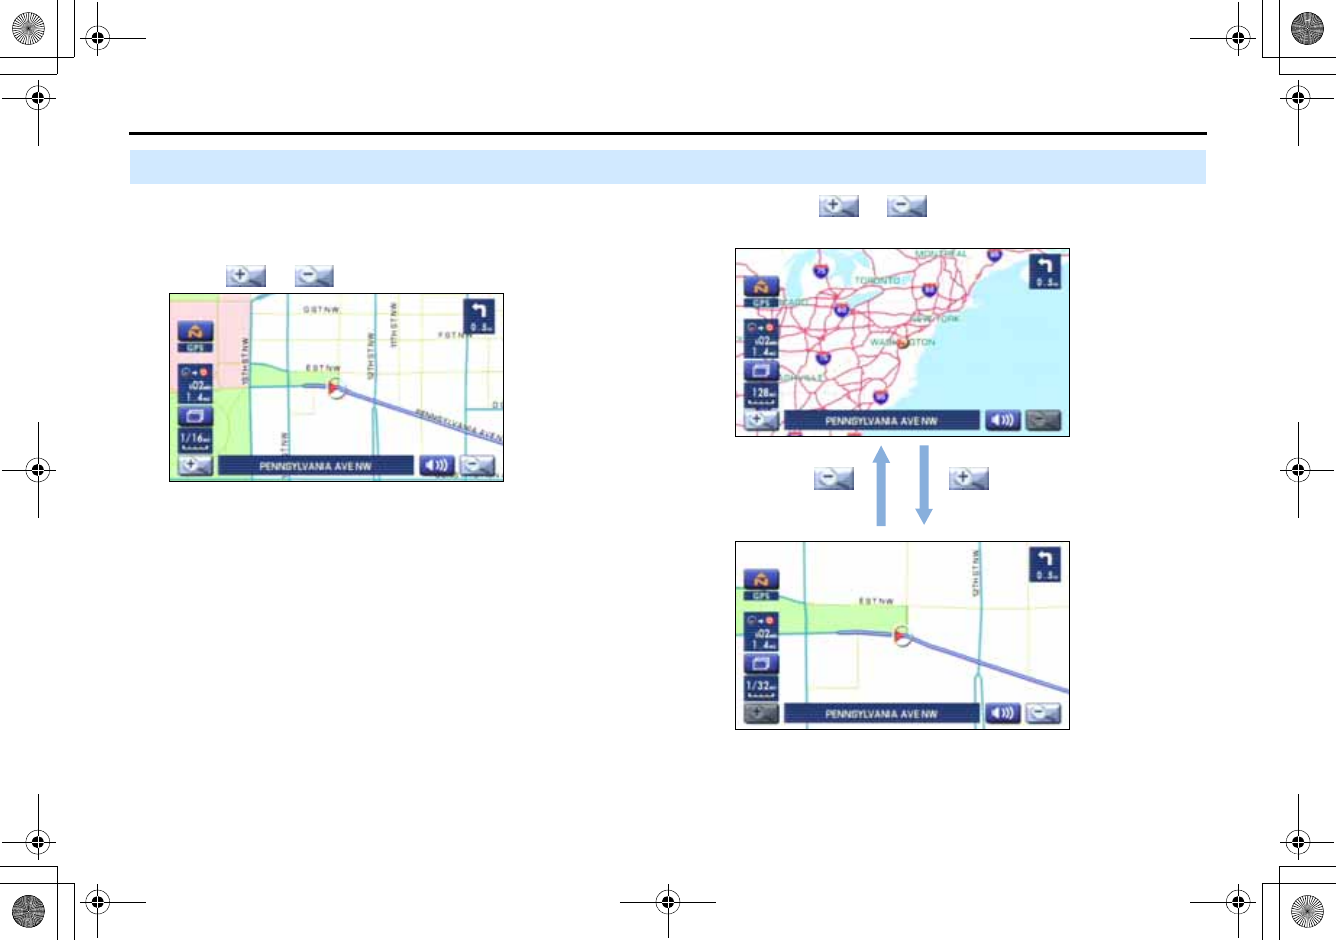
Changing Map Scale
You can increase or decrease the scale of the map using the
following procedure:
1Select or to change the map scale.
2Selecting or changes the scale as shown
below.
+ORTG\CA0CXKDQQMࡍࠫ㧞㧜㧜㧣ᐕ㧡㧞㧢ᣣޓᦐᣣޓඦᓟ㧢ᤨ㧠ಽ
19
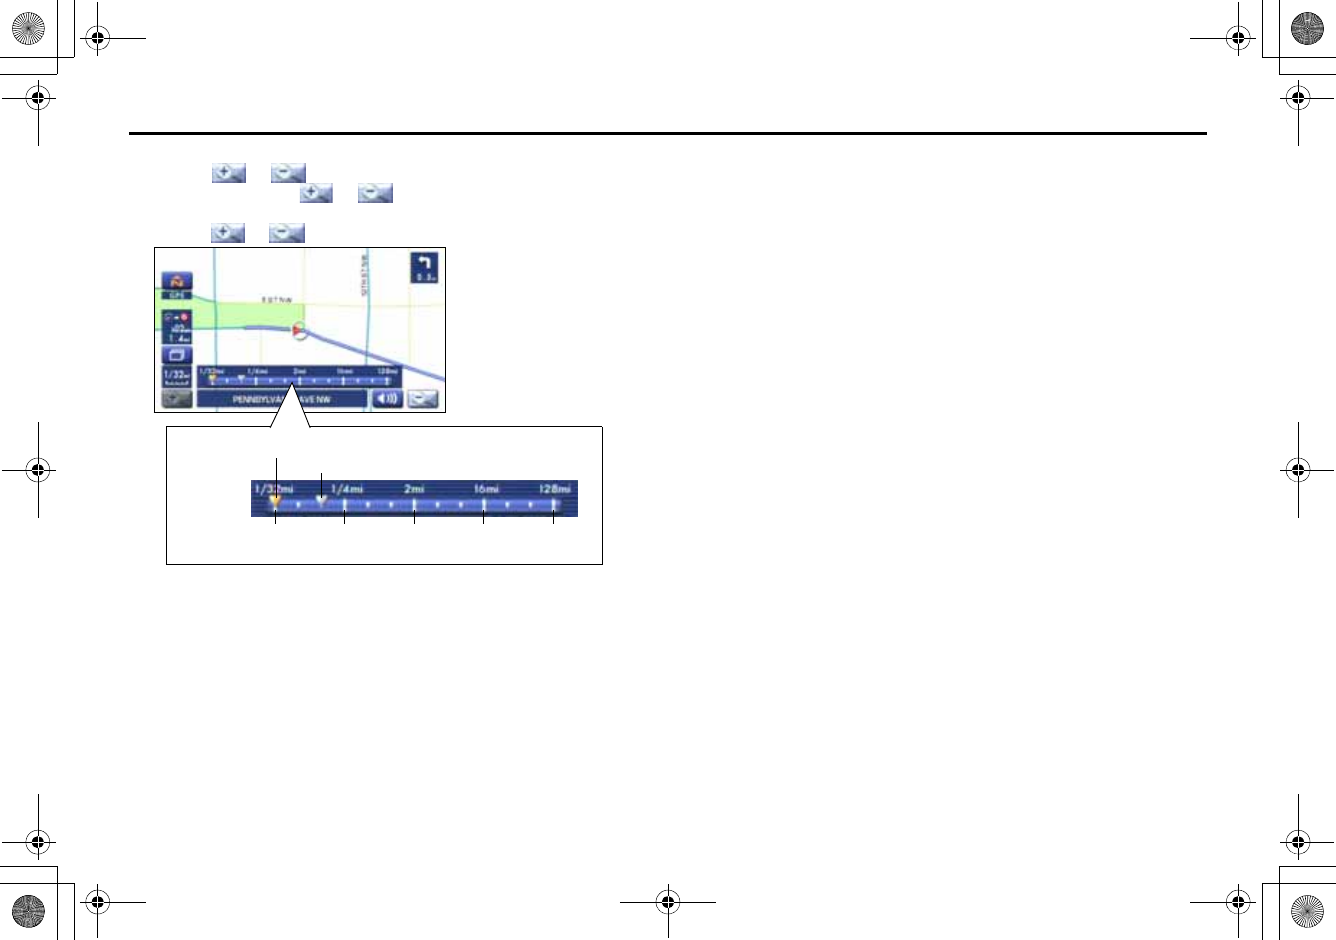
Map Operations
NOTE
•Selecting or allows you to change the map scale.
•You can keep selecting or allows you to change the map scale.
•Selecting either of the following on the scale bar displayed by
selecting or allows you to change to the specified map scale.
•The scale can be displayed in Imperial or metric units. To change the units, See
Page 54.
Imperial display
Metric display
1/32 mi (mile)
50 m
1/4 mi (mile)
500 m
2 mi (mile)
4 km
16 mi (mile)
32 km
128 mi (mile)
256 km
Current scale
<Scale Bar>
Scale to be changed
+ORTG\CA0CXKDQQMࡍࠫ㧞㧜㧜㧣ᐕ㧡㧞㧢ᣣޓᦐᣣޓඦᓟ㧢ᤨ㧠ಽ
20
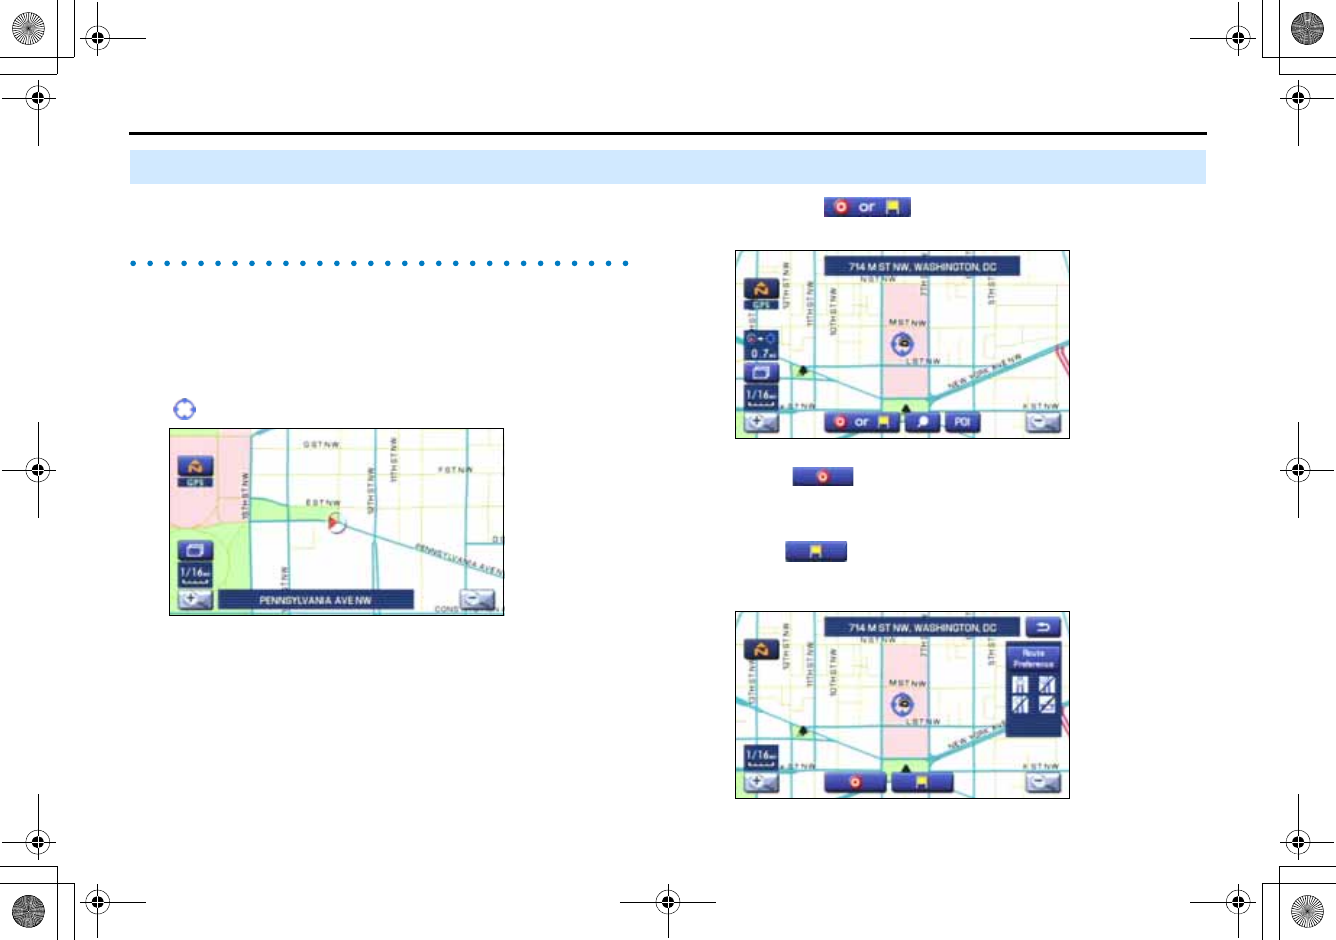
Setting Route
Setting Destination
Setting destination/waypoints by scrolling the
map
Even if you do not know the exact address of your destination or a way-
point on your route to the destination, you can set it by scrolling the
map as follows:
1Touch the screen and scroll the map until the crosshair
reaches the destination or a waypoint.
2Select the (destination or waypoint) key.
The key will separate into the destination key and the waypoint key.
3Select for setting the destination
The system will calculate the route and display the entire route to
the destination on the map.
Select for a waypoint. The system will program the
address of the waypoint on your route (See Page 62). You can set
up to 5 waypoints per trip.
+ORTG\CA0CXKDQQMࡍࠫ㧞㧜㧜㧣ᐕ㧡㧞㧢ᣣޓᦐᣣޓඦᓟ㧢ᤨ㧠ಽ
21
Setting Route
4Select (start).
Route guidance will begin along the displayed route.
NOTE
•If the system cannot find your desired route, select (change
route). This will allow you to access the ROUTE OPTIONS screen, from which
you can prompt the system to calculate a new route. (See Page 42.)
•Selecting (start) for more than ten seconds will start the demon-
stration mode operation.
■Selecting route
Upon setting the destination, the system prepares to calculate three
types of routes to the destination (Quick, Alt., and Short). You can select
from any of the three options as follows:
1Select (3 routes).
The system will be ready for calculation of any route you select
from the three options, namely, Quick (the fastest route), Alt.
(alternative route), and Short (the shortest route).
+ORTG\CA0CXKDQQMࡍࠫ㧞㧜㧜㧣ᐕ㧡㧞㧢ᣣޓᦐᣣޓඦᓟ㧢ᤨ㧠ಽ
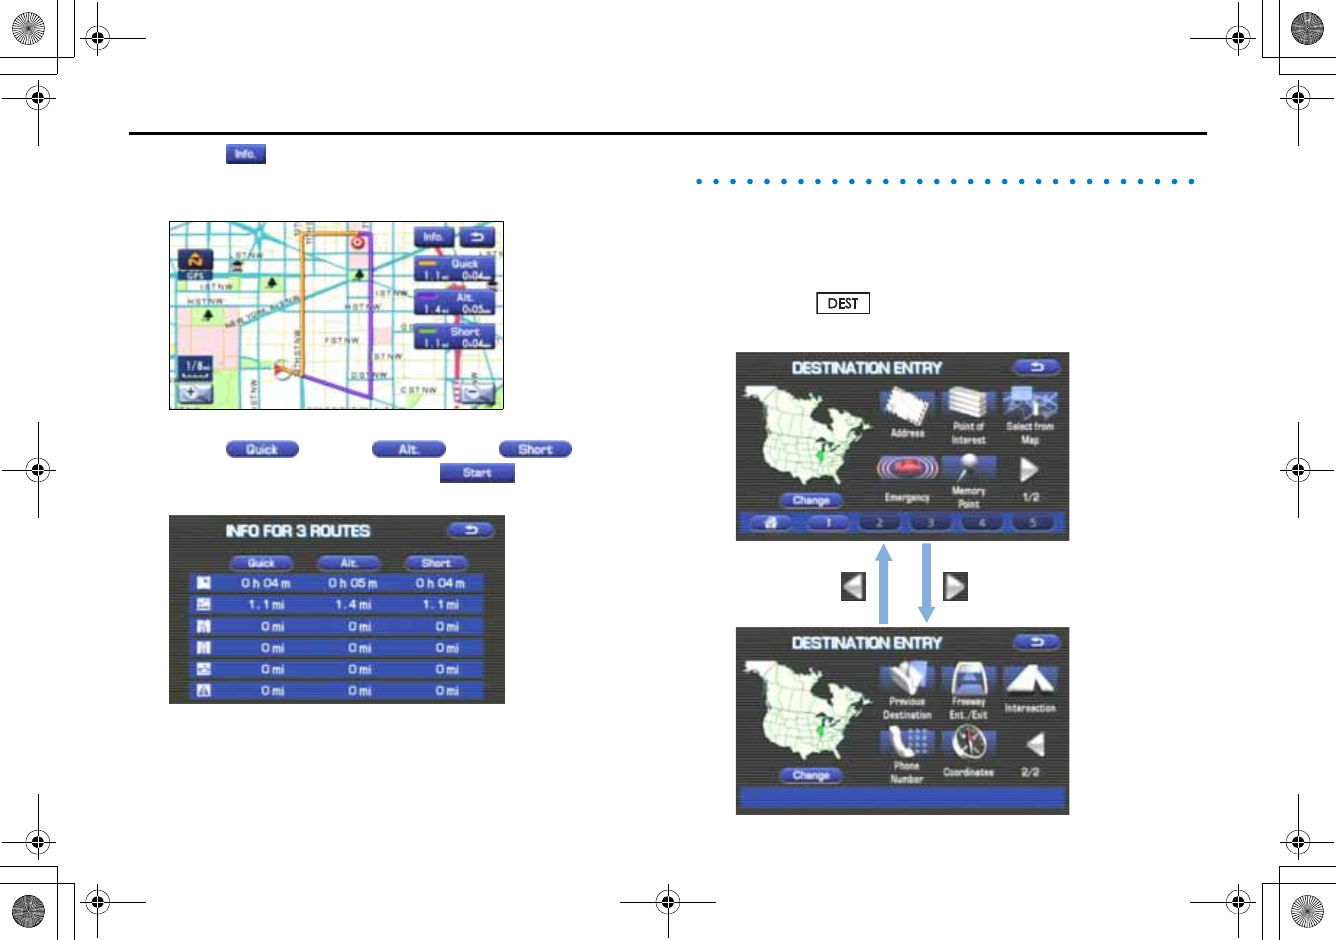
22
Setting Route
2Select (information).
The screen will display details (required time, total distance, roads
used, etc.) regarding each option.
3Select (Quick), (Alt.), (Short)
or as you desire, and then select (Start) to con-
firm your selection.
Setting the destination from the navigation menu
You can set your destination using a variety of methods if you start set-
ting from the DESTINATION ENTRY screen. Before you can use any of
these methods, perform the following steps:
1Press the button.
2Select the method you want to use
+ORTG\CA0CXKDQQMࡍࠫ㧞㧜㧜㧣ᐕ㧡㧞㧢ᣣޓᦐᣣޓඦᓟ㧢ᤨ㧠ಽ
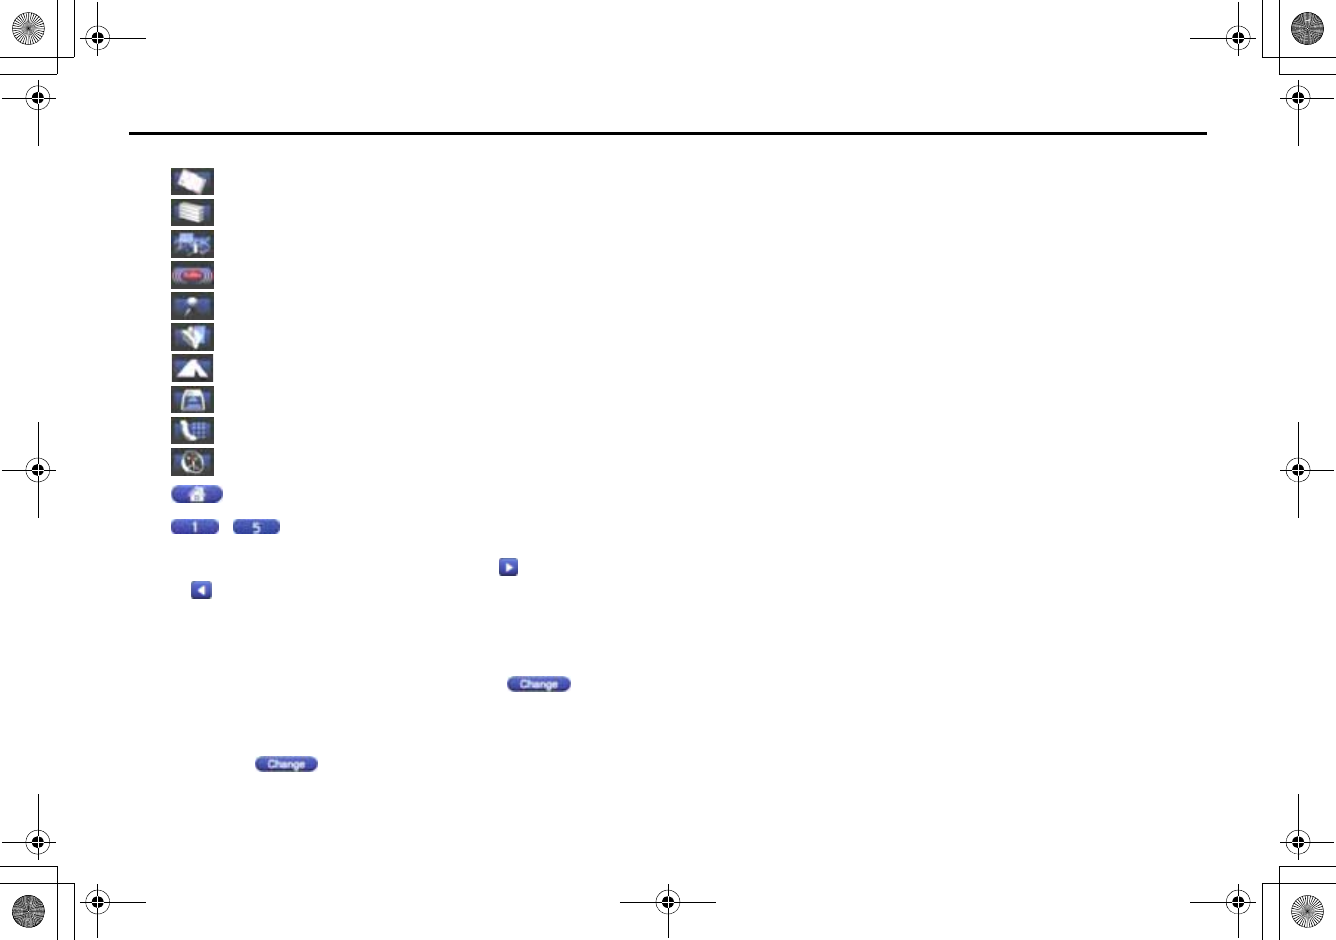
23
Setting Route
You can switch between screens by selecting (next page)
or (previous page).
NOTE
•If the set destination area is different from the one displayed under "Search
Area" in the right part of the screen, you must select the (change)
key and specify the desired area again.
•For the methods marked with an asterisk ( * ), you can use the "Change Search
Area" function to narrow the area where a destination or waypoint is located
by selecting the (change) key (See Page 34).
•Depending on the method used or the status of the map displayed, the
located point may differ from where the facility you want to visit actually
exists.
(Address)* See Page 24.
(Point of Interests)* See Page 27.
(Select from Map) See Page 28.
(Emergency) See Page 30.
(Memory Point) See Page 26.
(Previous Destination) See Page 28.
(Intersection)* See Page 32.
(Freeway Ent/Exit) See Page 29.
(Phone number) See Page 33.
(Coordinates) See Page 31.
(Home) See Page 26.
-(Category1) - (Category5)
+ORTG\CA0CXKDQQMࡍࠫ㧞㧜㧜㧣ᐕ㧡㧞㧢ᣣޓᦐᣣޓඦᓟ㧢ᤨ㧠ಽ
24
Setting Route
■"Address" method
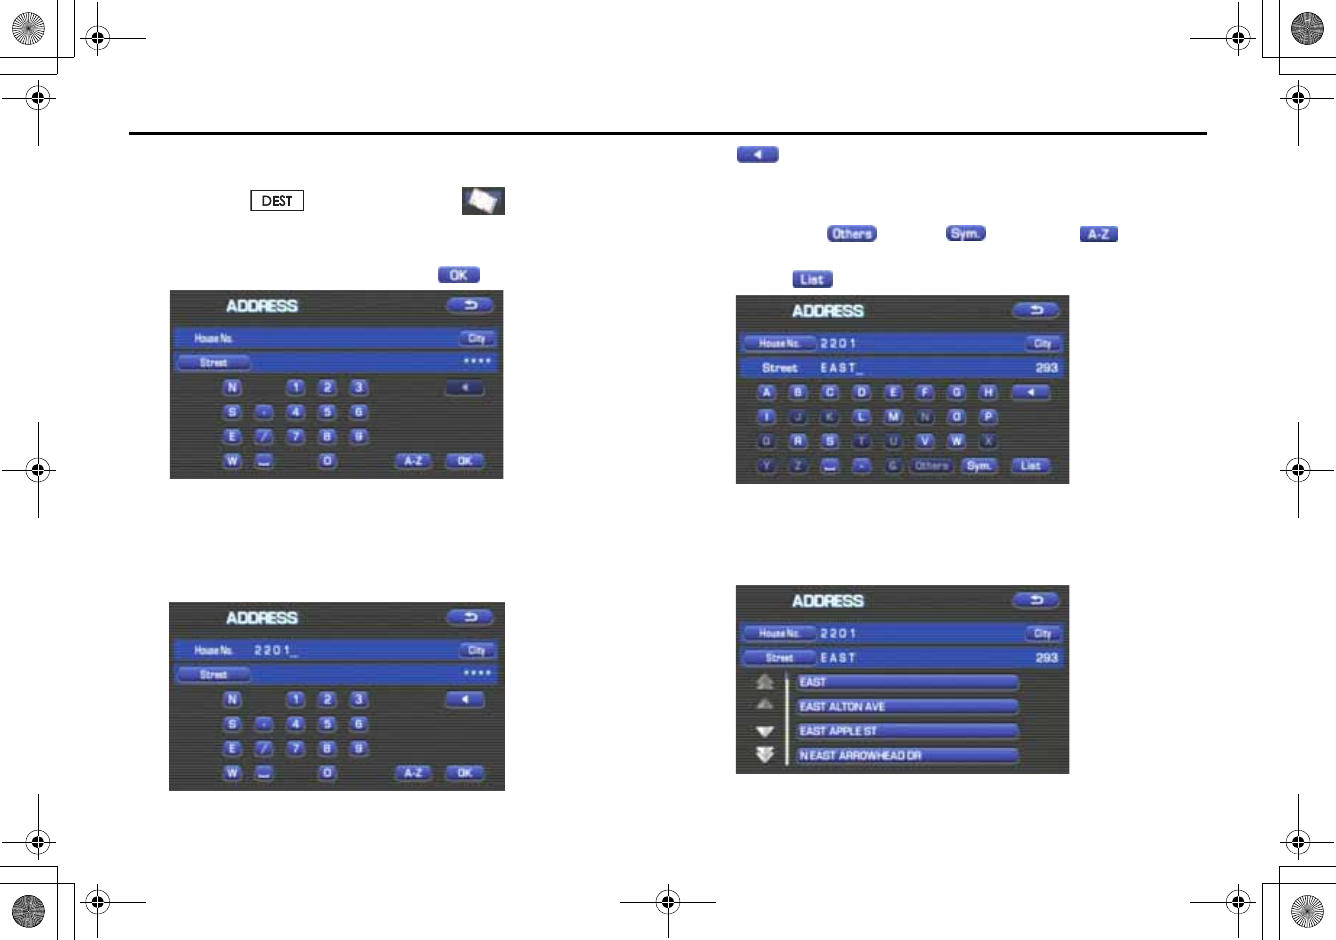
1Press the button and select (address).
2Enter a house number using the keypad on the house
number input screen and select .
3Enter the street name.
If you enter enough letters to identify a street name and advance
to Step 4, a list showing several street names will be displayed.
Select the desired street name from the list.
: Use this key to delete the last character entered. Select it
repeatedly if you want to delete all the characters entered.
You can switch between keypad screens showing different characters
by selecting (others), (symbols) or (alphabet).
4Select (list).
5Select the desired street from the list.
If the same street name exists in more than one city, a list of these
cities will be shown.
+ORTG\CA0CXKDQQMࡍࠫ㧞㧜㧜㧣ᐕ㧡㧞㧢ᣣޓᦐᣣޓඦᓟ㧢ᤨ㧠ಽ
25
Setting Route
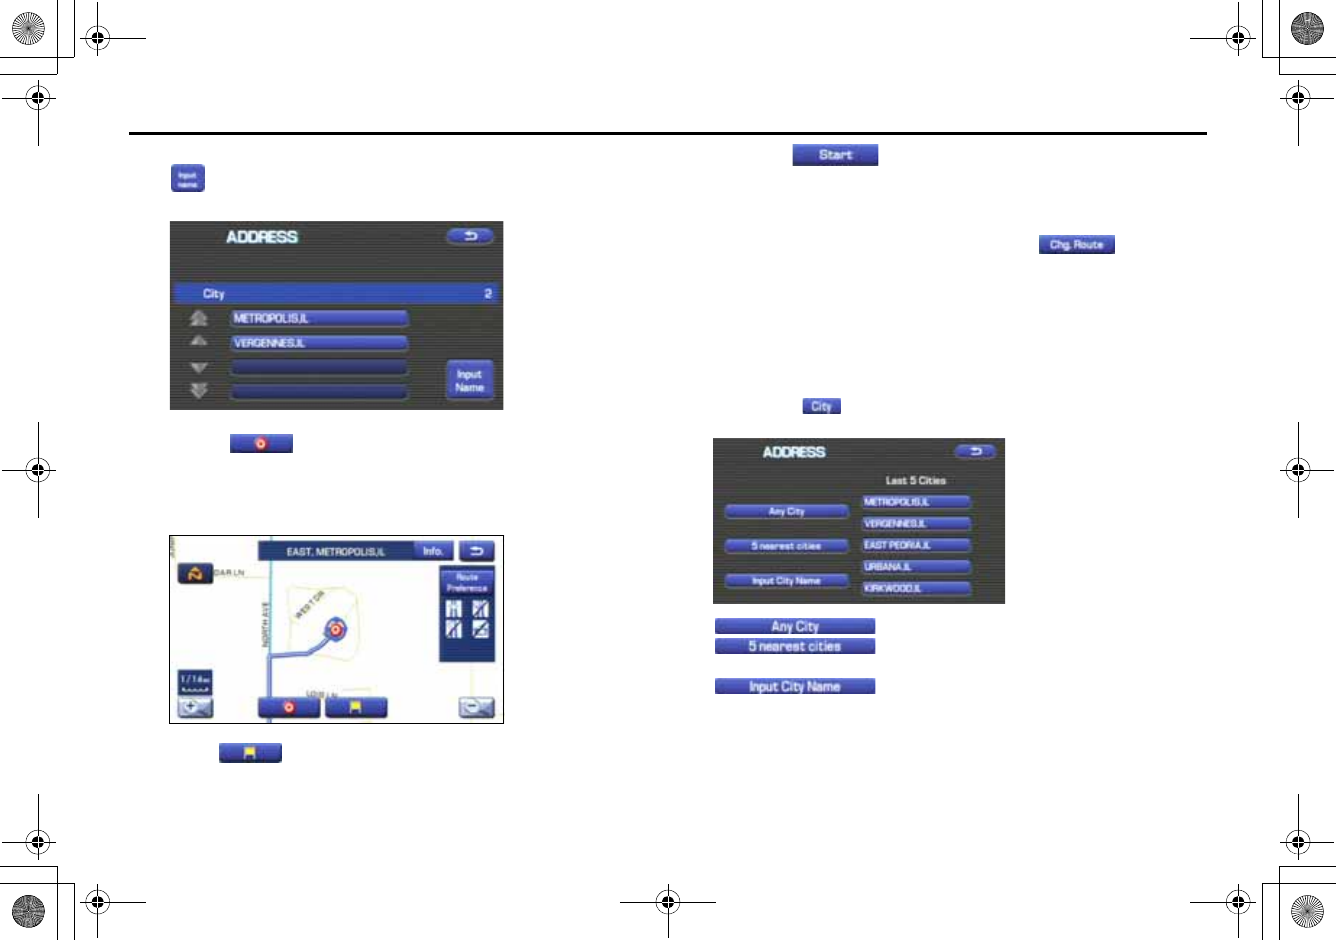
6Select the correct city from the list.
(input name): Use this key to input the city name from the
keypad.
7Select (destination) to set the address entered
in the above steps as your final destination
The system will calculate the route and display the entire route on
the map.
Select (waypoint) to set the address entered in the
above steps as a waypoint on your route.
You can program up to five waypoints per trip.
8Select (start).
Route guidance begins along the displayed route.
NOTE
•If the system cannot find your desired route, select (change
route). This will allow you to access the ROUTE OPTIONS screen, from which
you can prompt the system to calculate a new route. (See Page 42.)
•If your DVD-ROM disc does not contain the relevant house number data, an
error message will be displayed and a street map will appear, allowing you to
set the destination using the map.
•If your destination is not on a road, set a destination point on a main road
nearest to your true destination.
•Selecting the (city) will display a screen that searches the destination
on a city basis.
: Search the destination from all cities.
: Search the destination from the nearby five cities
within 20 miles from the current position.
: Search the destination by inputting the city name.
You can also search the destination from the five cities that you searched in
the past.
+ORTG\CA0CXKDQQMࡍࠫ㧞㧜㧜㧣ᐕ㧡㧞㧢ᣣޓᦐᣣޓඦᓟ㧢ᤨ㧠ಽ
26
Setting Route
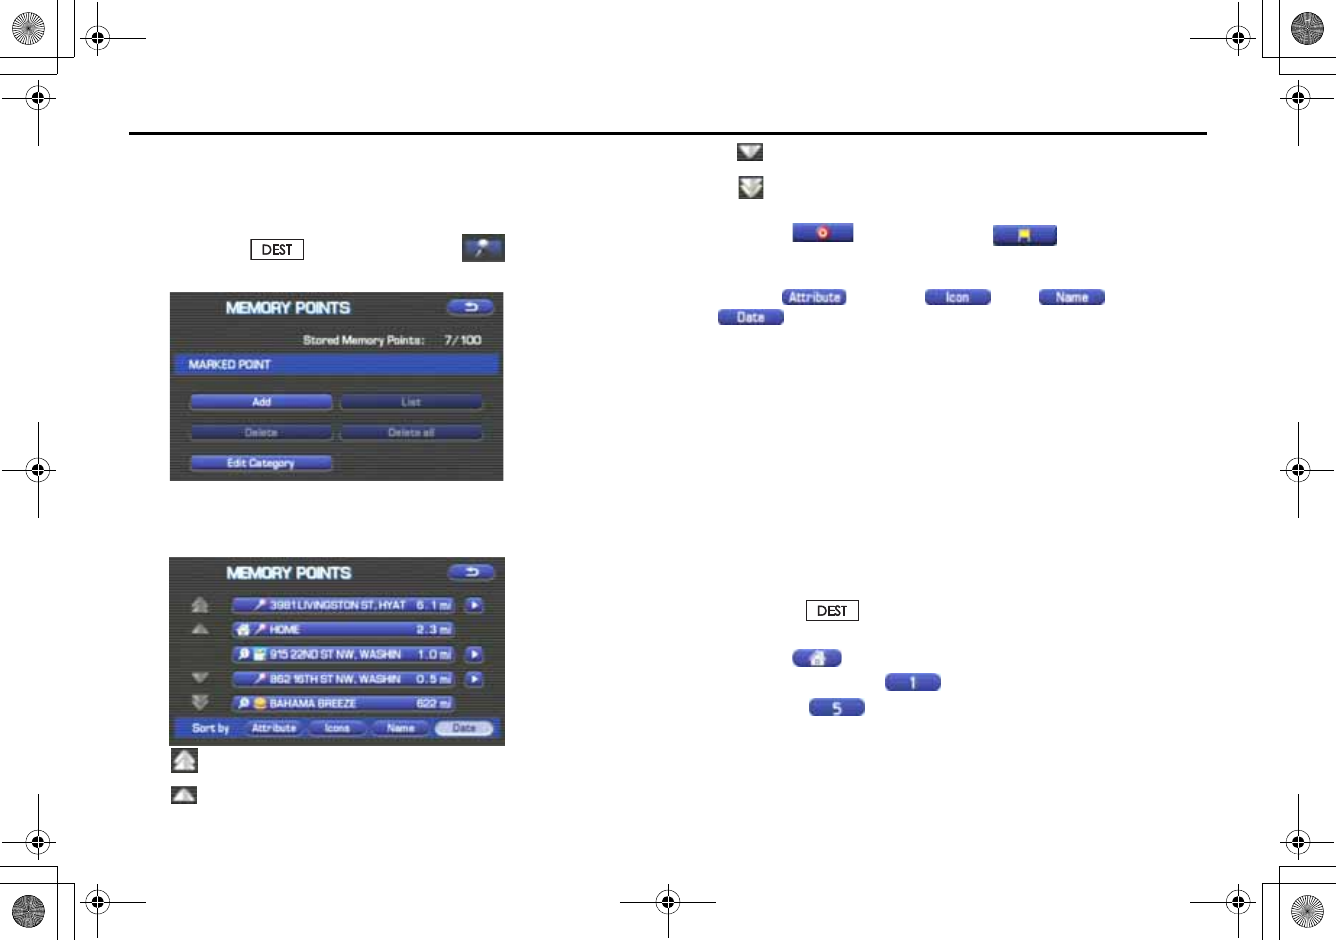
■"Memory Point" method
If you have saved some locations in the system's memory, you can
make use of an appropriate one to set the destination.
1Press the button and select (memory
point).
2Select the address of the desired location (memory
point).
: Use this key to display up to five previous suggestions.
: Use this key to display the previous suggestion.
: Use this key to display the next suggestion.
: Use this key to display up to five of the next suggestions.
3Select (destination) or (waypoint).
NOTE
•Select the (Attribute), (icon), (name), or
(date) key to change the sequence in which memory points are
displayed.
•You cannot use the "Memory Point" method unless there are memory points
stored. To store memory points, See Page 63.
■"Home" method or method using stored destinations
If you have stored your home address in the system's memory, you can
use it for your destination or a waypoint. Similarly, if other locations are
stored in the memory, they can be conveniently used for quick setting
of destination and waypoints.
1First, choose either of the two procedures below to fol-
low the "home" method.
Press the button.
2Select (home) or one of the locations pro-
grammed to keys (Category 1)
through (Category 5).
+ORTG\CA0CXKDQQMࡍࠫ㧞㧜㧜㧣ᐕ㧡㧞㧢ᣣޓᦐᣣޓඦᓟ㧢ᤨ㧠ಽ
27
Setting Route
The map including your home location or the selected location
will be displayed.
3Select (destination) or (waypoint).
NOTE
Icon (home) and keys (Category 1) through (Category
5) are displayed only when you have stored your home location and other loca-
tions in the memory. For instructions on how to store your home location and
other locations.
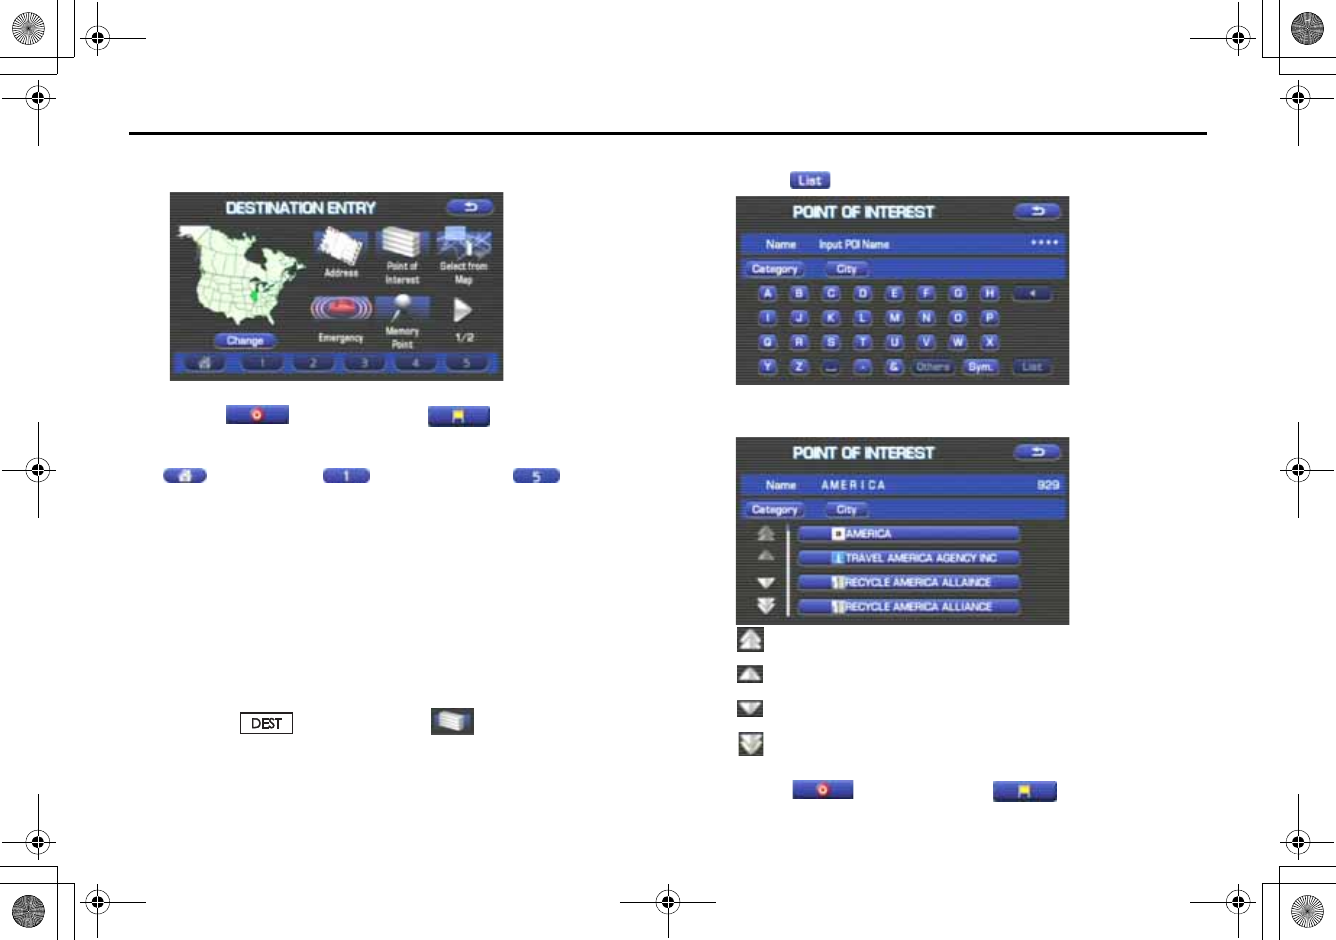
■"Point of Interest" method
You can use a selection from the "Point of Interest" listing as your desti-
nation or a waypoint.
1First, choose either of the two procedures below to fol-
low the "point of interest" method.
Press the button and select (point of interest)
2Enter the name of the desired point of interest and
select .
3Select the desired point of interest from the list.
: Use this key to display up to five previous suggestions.
: Use this key to display the previous suggestion.
: Use this key to display the next suggestion.
: Use this key to display up to five of the next suggestions.
4Select (destination) or (waypoint).
+ORTG\CA0CXKDQQMࡍࠫ㧞㧜㧜㧣ᐕ㧡㧞㧢ᣣޓᦐᣣޓඦᓟ㧢ᤨ㧠ಽ
28
Setting Route
NOTE
•If two or more points of interest share the same name, they will both be listed
on the screen. Choose an appropriate one from the list.
•If there are two or more points of interest with the same name,
select (category) or (Town) to shorten the list.
•Displayed information about a specific facility might not include recent
changes. It is recommended that you check the location or business days/
hours of a desired point of interest before departure.
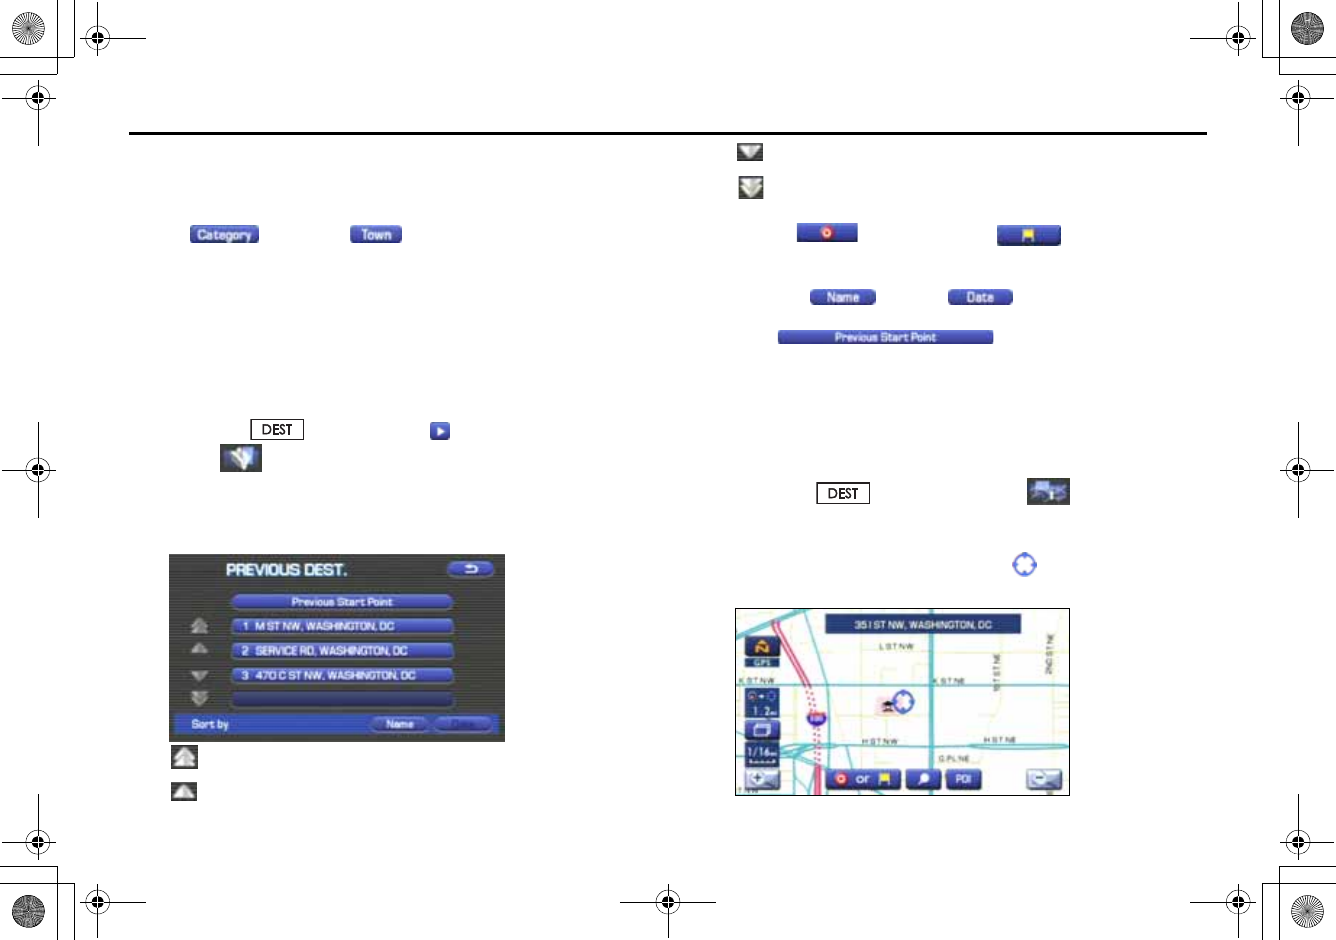
■"Previous Destination" method
This method allows you to choose one of the most recently used 100
destinations or waypoints as your new destination or waypoint.
1Press the button, select , and then
select (previous destination).
2Select a desired location from the Previous Destination
list.
:Use this key to display up to five previous suggestions.
: Use this key to display the previous suggestion.
: Use this key to display the next suggestion.
: Use this key to display up to five of the next suggestions.
3Select (destination) or (waypoint).
NOTE
•You can select (name) or (date) to change the
sequence in which previous destinations are displayed.
•Selecting displays the start point of the
previous guide.
■"Select from Map" method
You can specify a location on the map that was last displayed and use it
for setting the destination or a waypoint.
1Press the button and select (select from
map).
2Scroll the map until the crosshair is at the desired
destination or waypoint.
+ORTG\CA0CXKDQQMࡍࠫ㧞㧜㧜㧣ᐕ㧡㧞㧢ᣣޓᦐᣣޓඦᓟ㧢ᤨ㧠ಽ
29
Setting Route
3Select (destination) or (waypoint).
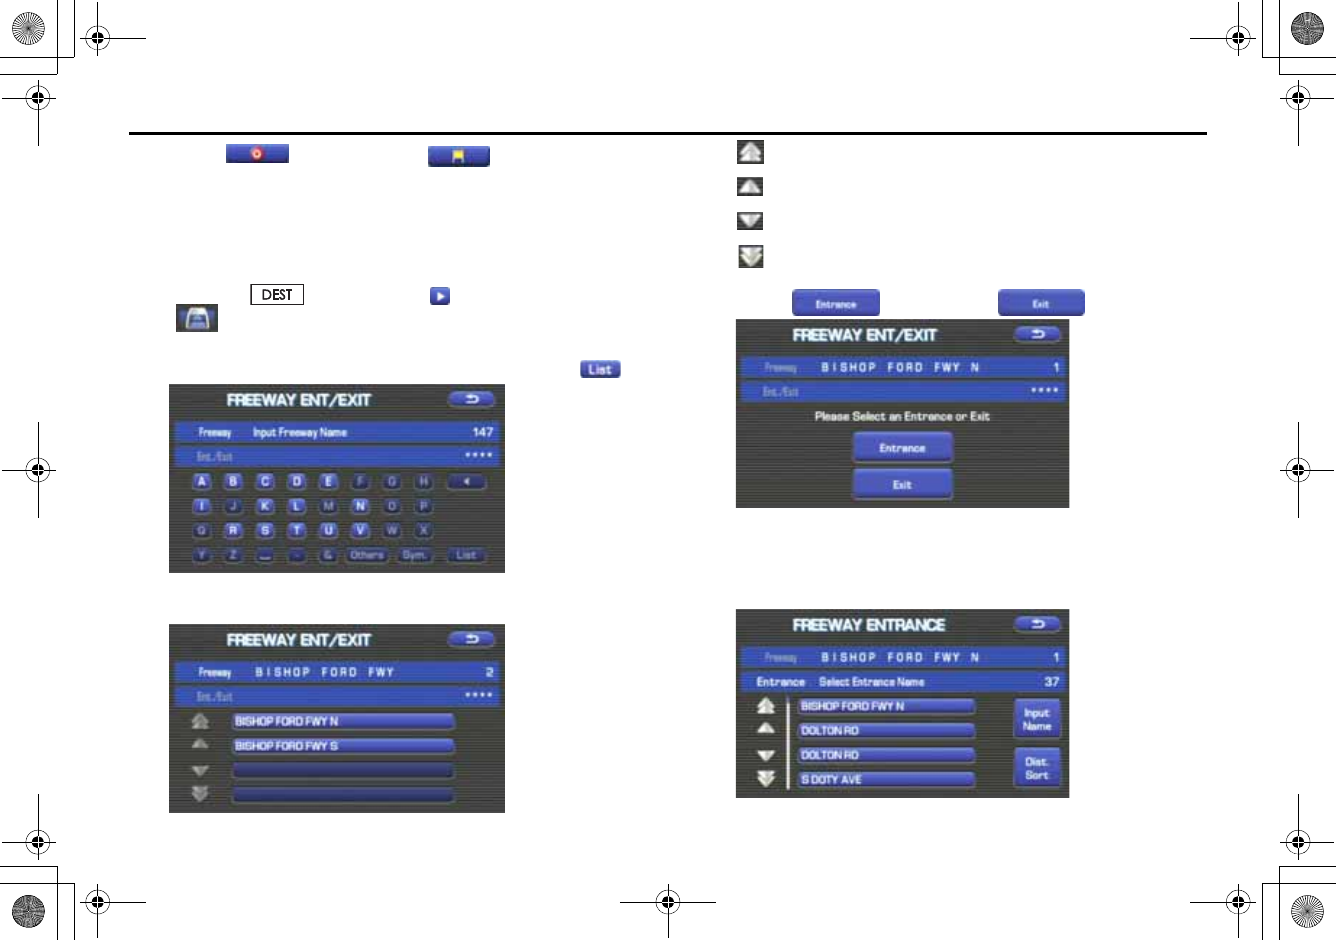
■"Freeway Entrance/Exit" method
You can use the name of a Freeway entrance or exit selected from the
"Freeway Ent./Exit" list for setting your destination or a waypoint.
1Press the button, select , and then select
(Freeway Ent./Exit).
2Enter the name of the desired freeway and select .
3Select the name of the freeway from the list.
: Use this key to display up to five previous suggestions.
: Use this key to display the previous suggestion.
: Use this key to display the next suggestion.
: Use this key to display up to five of the next suggestions.
4Select (entrance) or (exit).
5Select the name of the street from which you will enter
the freeway or to which you will go after leaving the free-
way.
+ORTG\CA0CXKDQQMࡍࠫ㧞㧜㧜㧣ᐕ㧡㧞㧢ᣣޓᦐᣣޓඦᓟ㧢ᤨ㧠ಽ
30
Setting Route
: You must select this key before you can enter the street
name.
: Use this key to search through the list by distance.
: Use this key to search through the list by name (alphabeti-
cal search)
6Select (destination) or (waypoint).
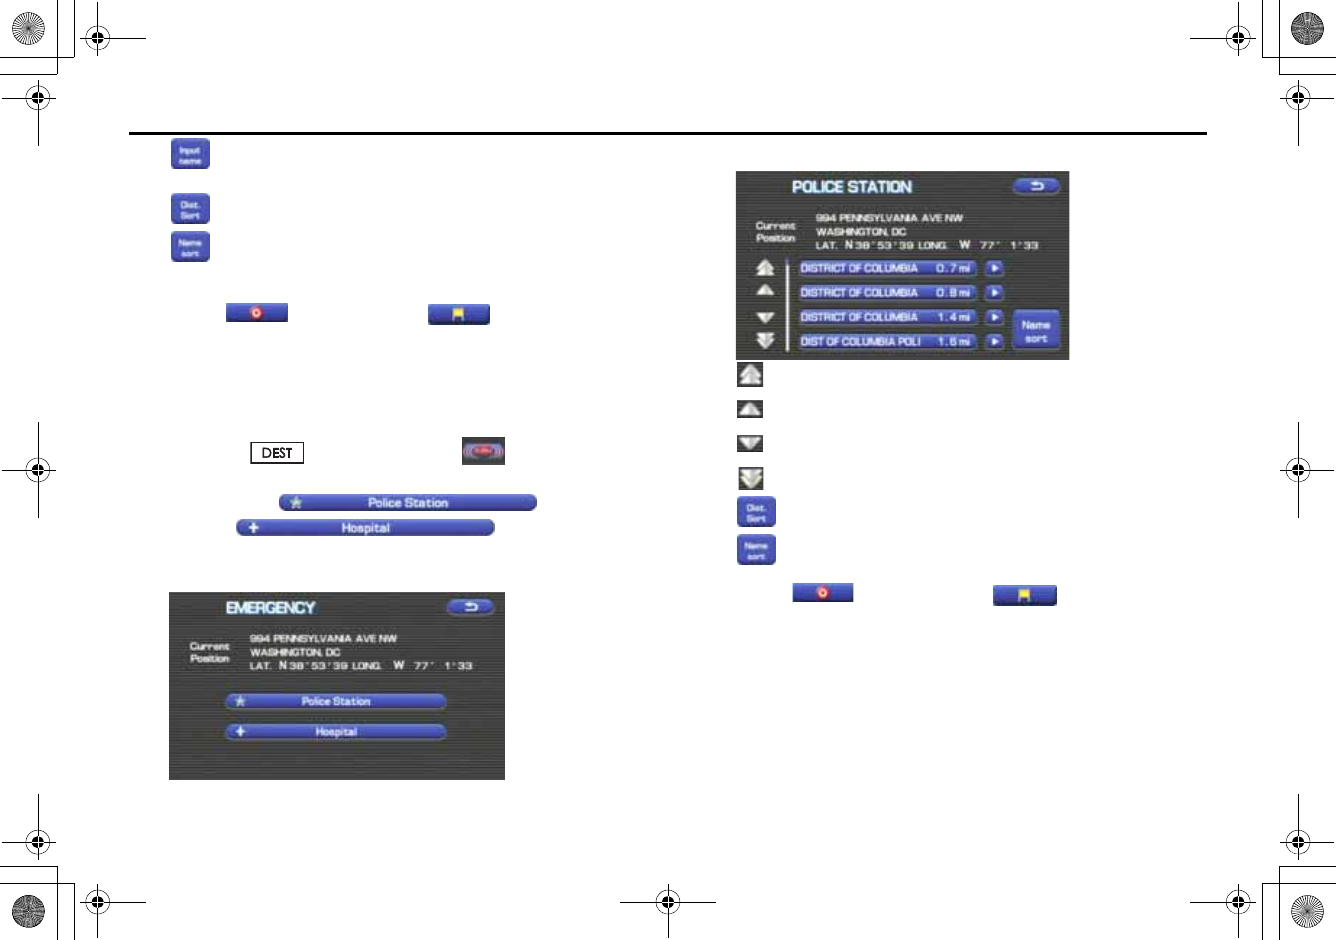
■"Emergency" method
This function allows the nearest police station or hospital to be set as
the destination.
1Press the button and select (emergency).
2Select either (Police sta-
tion) or (Hospital).
The nearest police stations or hospitals will be displayed accord-
ingly.
3Select the desired institution from the list.
: Use this key to display up to five previous suggestions.
: Use this key to display the previous suggestion.
: Use this key to display the next suggestion.
: Use this key to display up to five of the next suggestions.
: Sorts the list by distance.
: Sorts the list in alphabetical order by name.
4Select (destination) or (waypoint).
NOTE
Displayed information about each facility might be changed. It is recommended
that you check the location or business days/hours before departure.
+ORTG\CA0CXKDQQMࡍࠫ㧞㧜㧜㧣ᐕ㧡㧞㧢ᣣޓᦐᣣޓඦᓟ㧢ᤨ㧠ಽ
31
Setting Route
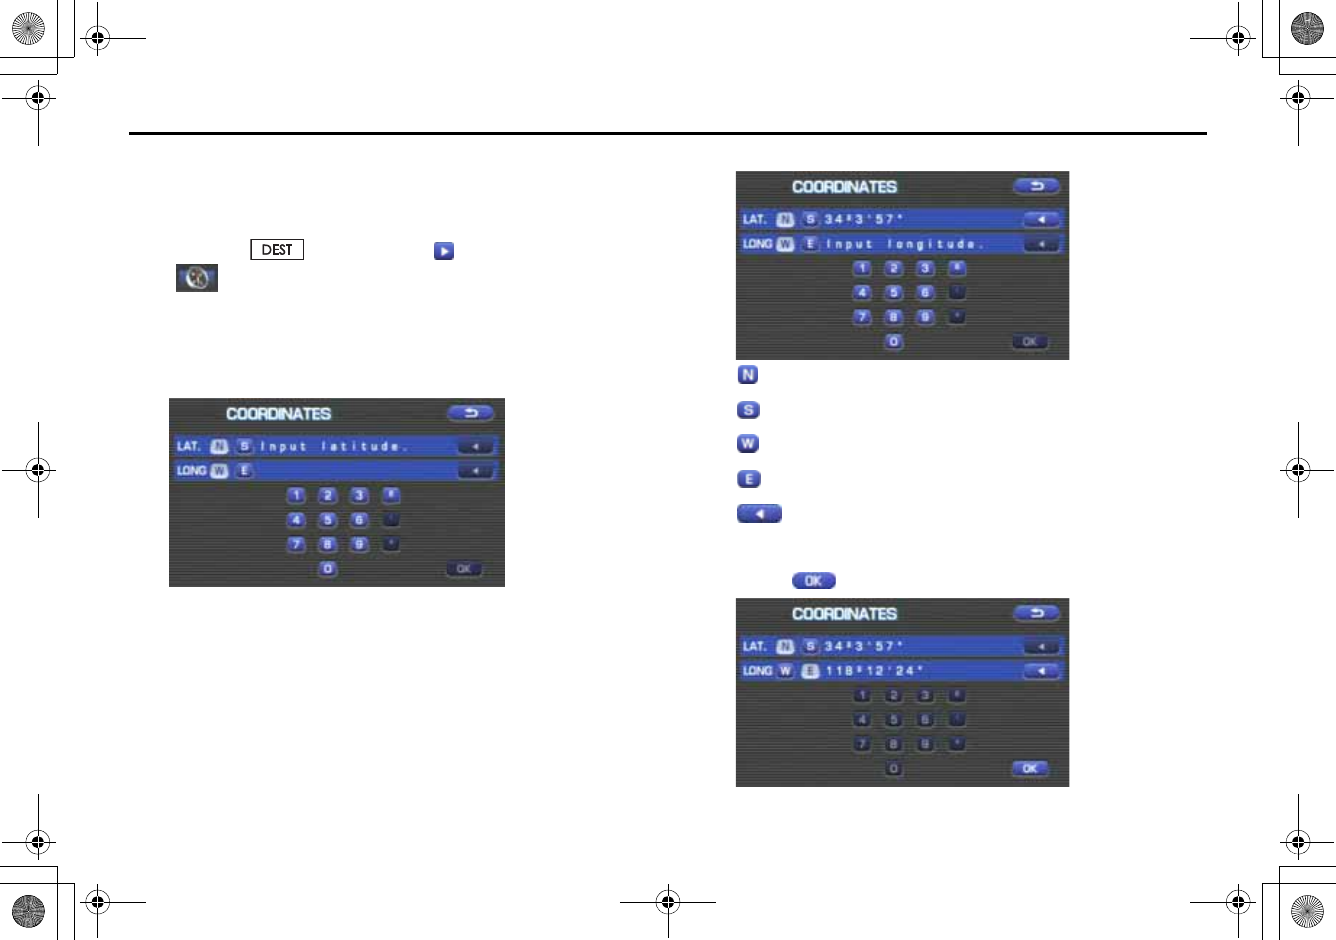
■"Coordinates" method
You can set destinations or waypoints using their latitudes and longi-
tudes as follows:
1Press the button, select , and then select
(coordinates).
2Enter the latitude of the desired location.
Use the numeric keys together with the [°] (degrees), ['] (minutes),
and ["] (seconds) keys.
3Enter the longitude of the location.
: Use this key to switch over to the north latitude.
: Use this key to switch over to the south latitude.
: Use this key to switch over to the west longitude.
: Use this key to switch over to the east longitude.
: Use this key to delete the character last entered. Select it
repeatedly if you want to delete all the characters entered.
4Select (OK).
+ORTG\CA0CXKDQQMࡍࠫ㧞㧜㧜㧣ᐕ㧡㧞㧢ᣣޓᦐᣣޓඦᓟ㧢ᤨ㧠ಽ
32
Setting Route
5Select (destination) or (waypoint).
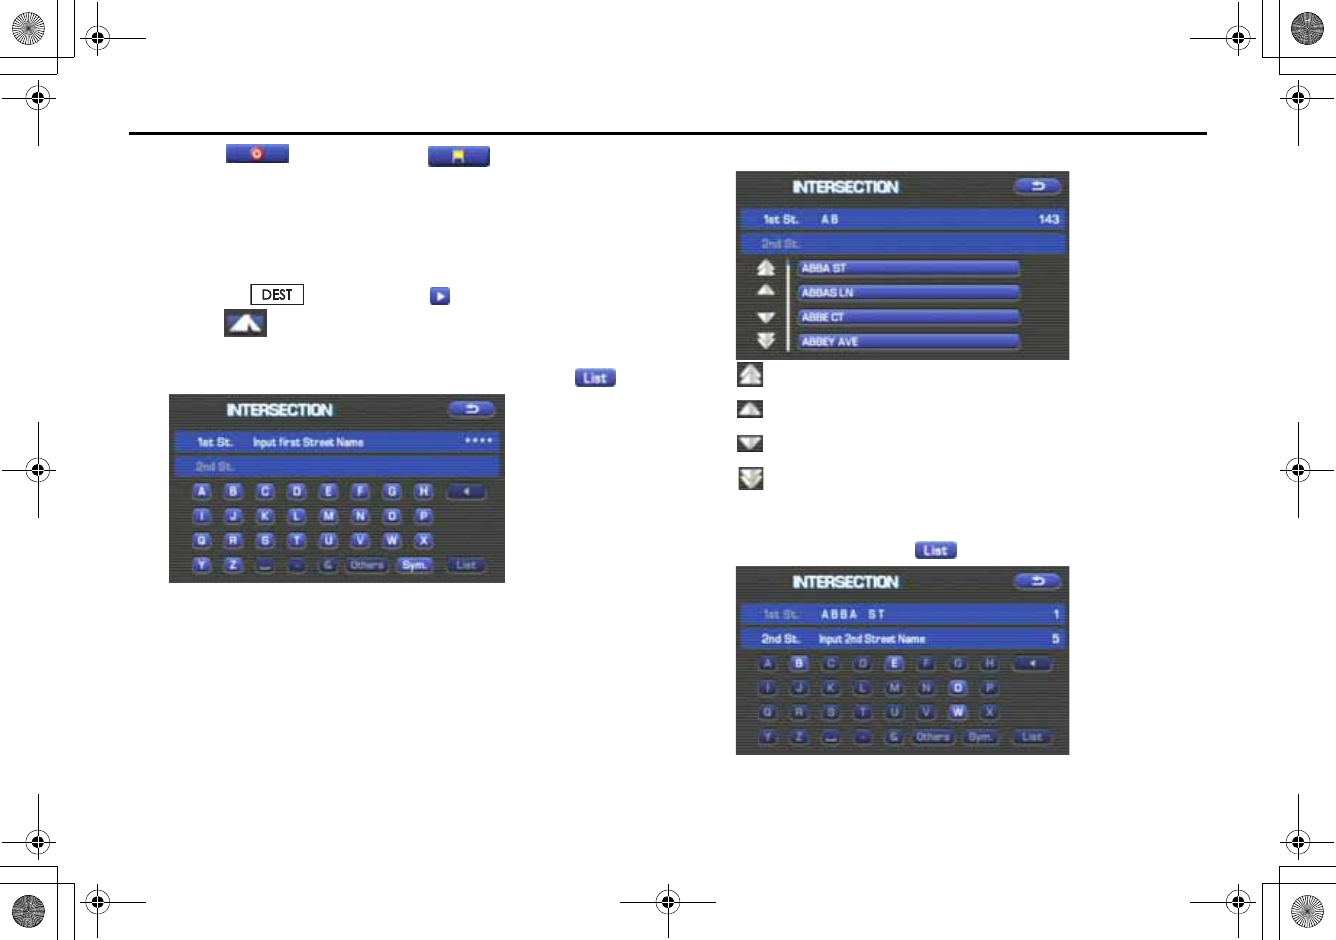
■"Intersection" method
You can use a intersection defined by two street names as a location for
setting your destination or a waypoint.
1Press the button, select , and then
select (Intersection).
2Enter the name of the first street and then select .
3Select the street from the "Intersection" list.
: Use this key to display up to five previous suggestions.
: Use this key to display the previous suggestion.
: Use this key to display the next suggestion.
: Use this key to display up to five of the next suggestions.
4Specify the second street using the same procedure as
the first street. Select (List).
+ORTG\CA0CXKDQQMࡍࠫ㧞㧜㧜㧣ᐕ㧡㧞㧢ᣣޓᦐᣣޓඦᓟ㧢ᤨ㧠ಽ
33
Setting Route
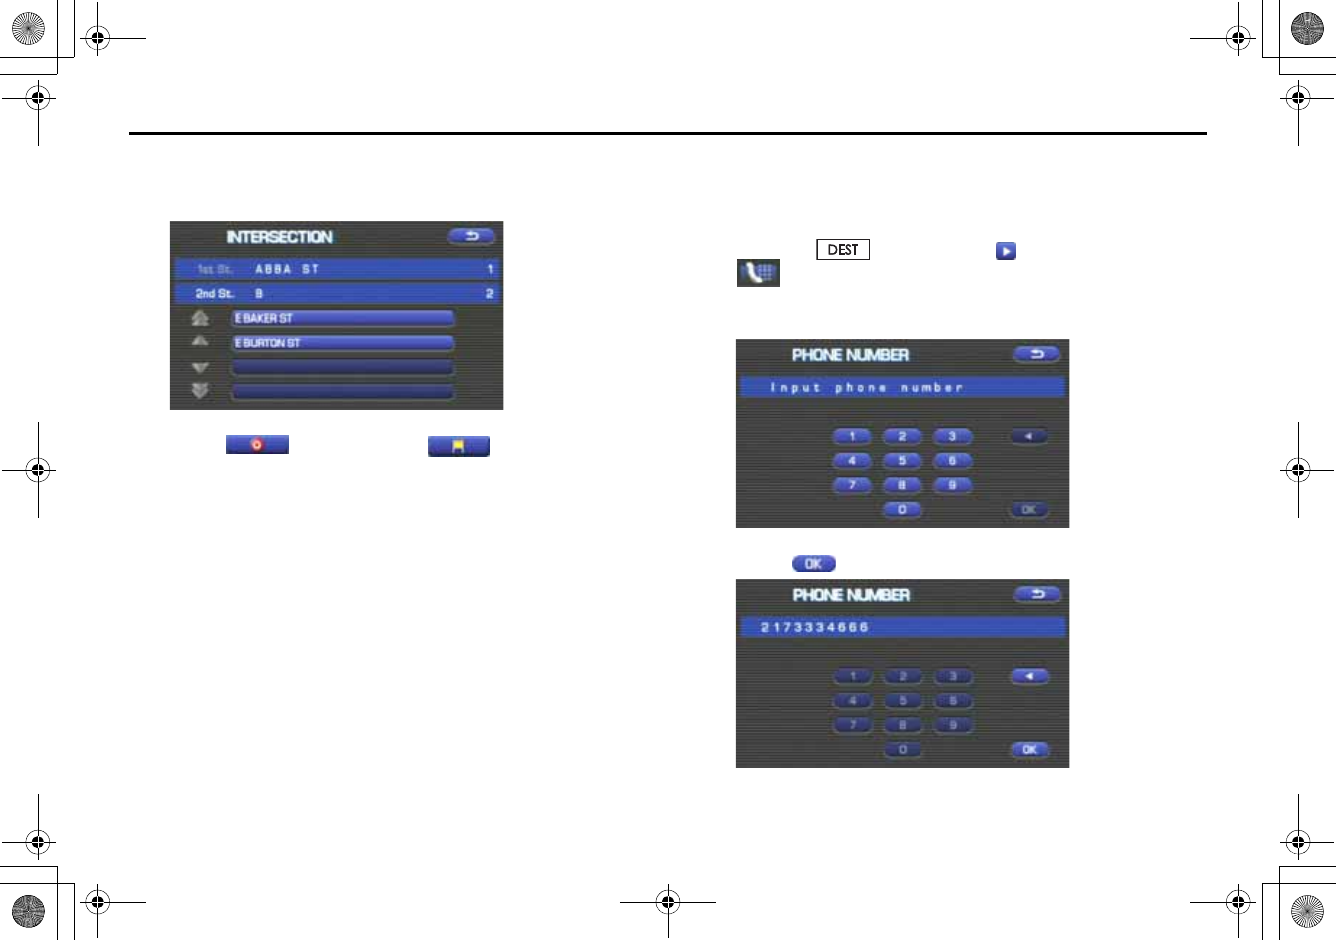
5When there are two or more candidates, a list of intersec-
tions will be displayed. Select an intersection of your des-
tination.
6Select (destination) or (waypoint).
NOTE
No intersection is defined if
•the two streets do not cross each other,
•the two streets are a freeway and a highway,
•either street is for right or left turns only,
•both are one-way streets,
•either street is for U-turns,
•the two streets cross on the inside lane,
•either street is an on/off ramp,
•either street is a frontage street, and/or
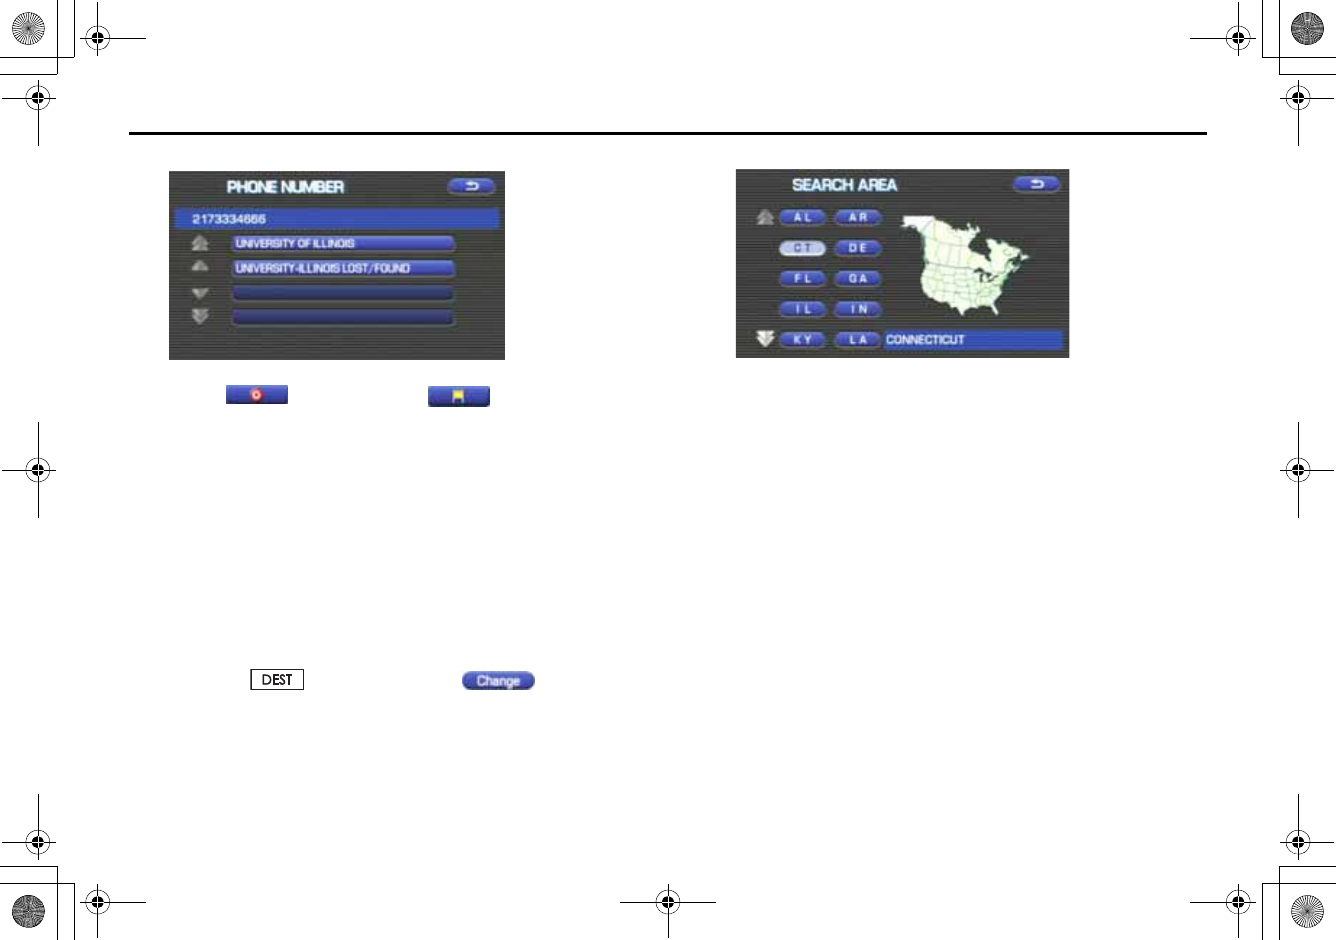
■"Phone number" method
This function allows buildings and the like to be located using their
phone numbers.
1Press the button, select , and then select
(phone number).
2Enter the phone number starting with the area code.
3Select .
+ORTG\CA0CXKDQQMࡍࠫ㧞㧜㧜㧣ᐕ㧡㧞㧢ᣣޓᦐᣣޓඦᓟ㧢ᤨ㧠ಽ
34
Setting Route
4Select your destination.
5Select (destination) or (waypoint).
NOTE
If a number of candidates exist as a result of, for example, different area codes,
these will be displayed in a list. Your desired destination can then be selected
from the list.
■Using "Change Search Area" function
This function designates a general geographical area where the desti-
nation or waypoint you want to set is located.
This function can be used in the methods marked with an asterisk (*) on
Page 22.
1Press the button and select (change).
2Select the desired area.
The DESTINATION ENTRY menu screen will appear.
NOTE
•The SEARCH AREA screen shown above is a sample image. It may be slightly
different from the actual screen image.
•Three map discs are contained in this system. When performing a search for a
different area in your destination search, it is necessary to change the map
disc with another map disc. If an area you want to find is not displayed on the
screen shown above, take out the map disc and change it with a map disc
containing the relevant area.
For details of the map disc, refer to the description given on the next page.
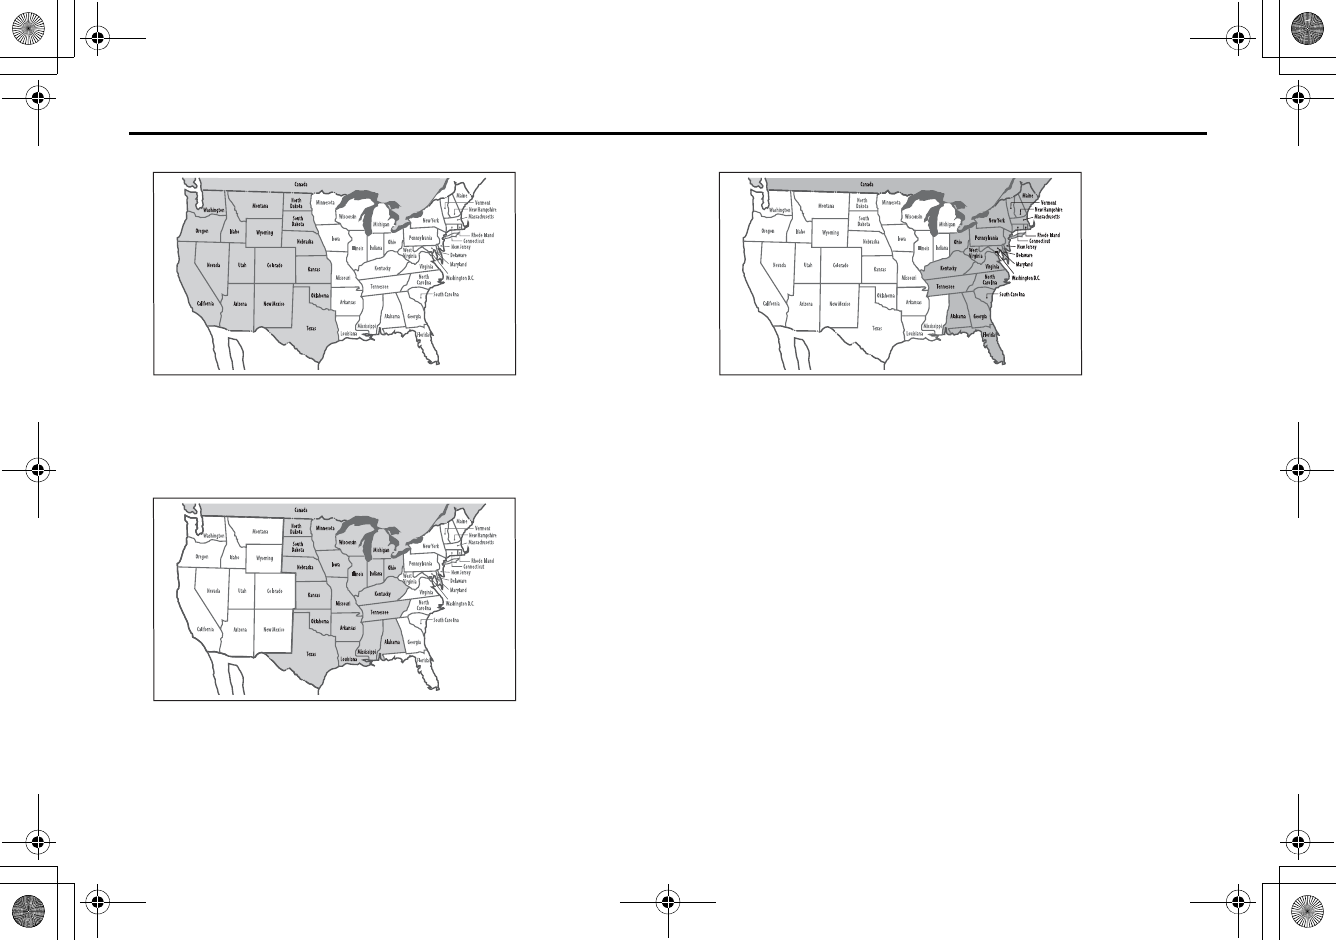
■Map Discs
The three map discs contain different areas, respectively. (West, Mid and
East) Select the map disc containing the destination area you wish and
insert the disc in the navigation system.
Make sure to reselect your destination when you change the map disc.
Refer to the section Set Route in the Instruction Manual for instructions
on reselecting the destination.
+ORTG\CA0CXKDQQMࡍࠫ㧞㧜㧜㧣ᐕ㧡㧞㧢ᣣޓᦐᣣޓඦᓟ㧢ᤨ㧠ಽ
35
Setting Route
■Area (West)
Arizona, California, Colorado, Idaho, Kansas, Montana, Nebraska,
Nevada, New Mexico, North Dakota, Oklahoma, Oregon, South Dakota,
Texas, Utah, Washington, Wyoming, Canada
■Area (Mid)
Alabama, Arkansas, Illinois, Indiana, Iowa, Kansas, Kentucky, Louisiana,
Michigan, Minnesota, Mississippi, Missouri, Nebraska, North Dakota,
Ohio, Oklahoma, South Dakota, Tennessee, Texas, Wisconsin, Canada
■Area (East)
Alabama, Connecticut, Delaware, Florida, Georgia, Kentucky, Maine,
Massachusetts, Maryland, New Hampshire, New Jersey, New York, North
Carolina, Ohio, Pennsylvania, Rhode Island, South Carolina, Tennessee,
Vermont, Virginia, Washington D.C., West Virginia, Canada
NOTE
•Road information for all of the above locations is included on the map discs.
This means that the following operations can be performed regardless of
which map disc is loaded in the system;
-Scrolling Map to Select Destination (Select from Map)
-Selecting Destination from the previously registered points as a memory
point (Home, Memory Point, Previous Destination) within the same area.
-Selecting Destination by Latitude and Longitude (Coordinates), Phone num-
ber, Emergency, and Quick POI.
•After replacing the map disc, stored data including the POI icon on the map
and stored Avoid Street settings will be deleted, and Quick POI selections will
return to default.
•In the Current Location display, the arrival time and the distance to the desti-
nation are displayed for Next Way Point.
+ORTG\CA0CXKDQQMࡍࠫ㧞㧜㧜㧣ᐕ㧡㧞㧢ᣣޓᦐᣣޓඦᓟ㧢ᤨ㧠ಽ
36
Route Guidance
Route Guidance Screen
During route guidance, the system can indicate on a second
screen the directions in which you must make turns at the
next and following intersection in either of two ways: "turn
arrow" or "turn list". Specify your preferred method of indica-
tion as follows:
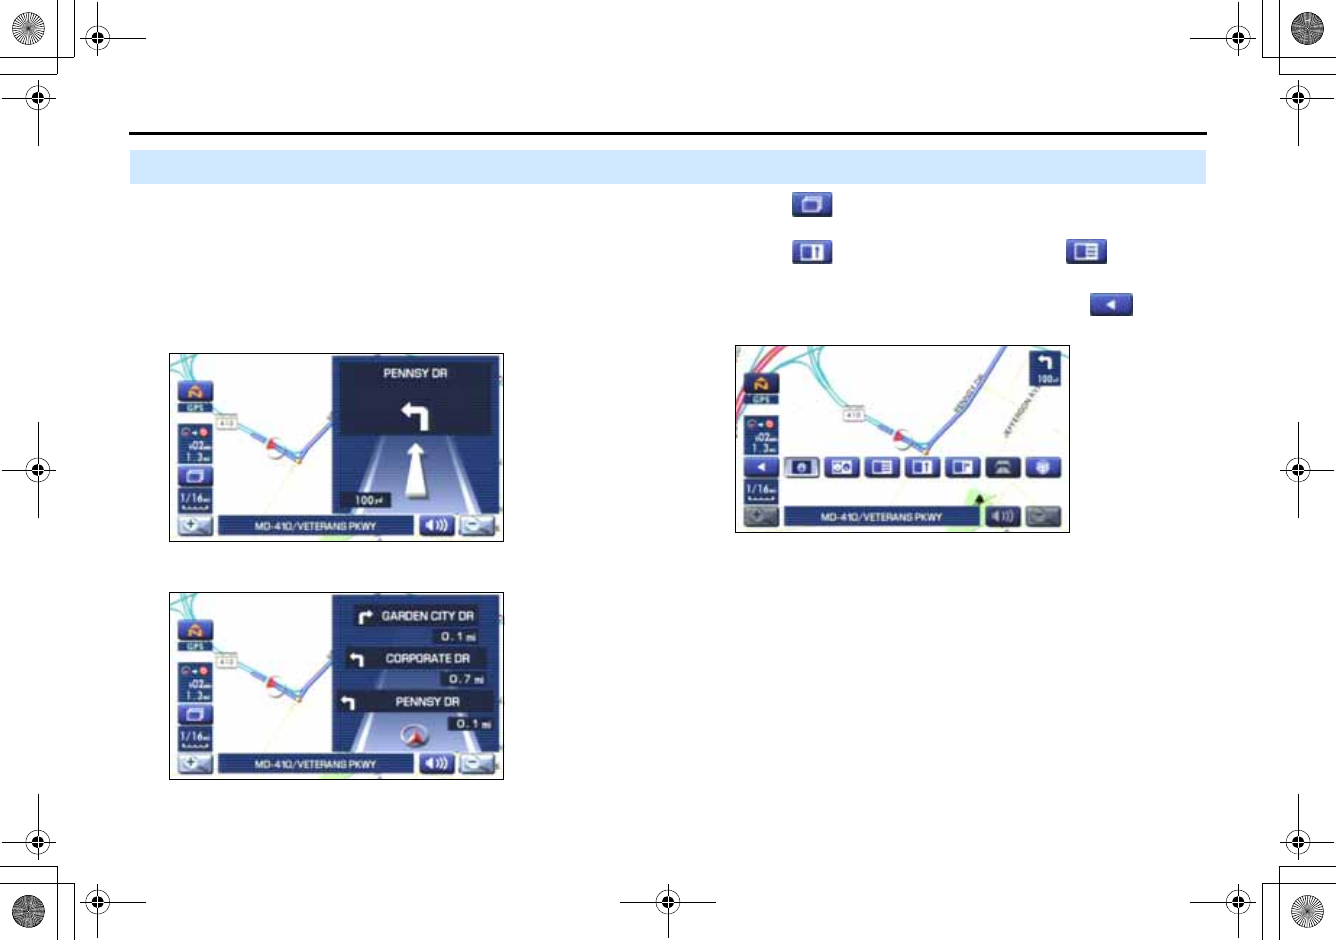
1Select (screen configuration).
2Select for turn arrow indication or for turn list
indication.
If you need not make any further selection, select . The rele-
vant keys will disappear.
<Turn arrow>
Turn direction is indicated by an arrow.
Turn directions are indicated in a list.
<
T
urn
li
st>
+ORTG\CA0CXKDQQMࡍࠫ㧞㧜㧜㧣ᐕ㧡㧞㧢ᣣޓᦐᣣޓඦᓟ㧢ᤨ㧠ಽ
37
Route Guidance
Zoom-in Map at Intersection
Before you arrive at an intersection, the system will automati-
cally show a zoom-in map of the intersection on a second
screen to make the guidance clearer.
As you approach an intersection during route guidance, a zoom-in map
of the intersection automatically appears on a second screen. After you
drive past the intersection, the zoom-in map disappears.
As you approach a fork on a freeway during route guidance, a zoom-in
map of the freeway automatically appears on a second screen, making
the route guidance clearer.
NOTE
Use the following procedure to recall the most recently displayed zoom-in map
of an intersection or a freeway fork.
1. Select (screen configuration).
2. Select (re-display of intersection/range guidance).
If you need not make any further selection, select . The relevant keys
will disappear.
+ORTG\CA0CXKDQQMࡍࠫ㧞㧜㧜㧣ᐕ㧡㧞㧢ᣣޓᦐᣣޓඦᓟ㧢ᤨ㧠ಽ
38
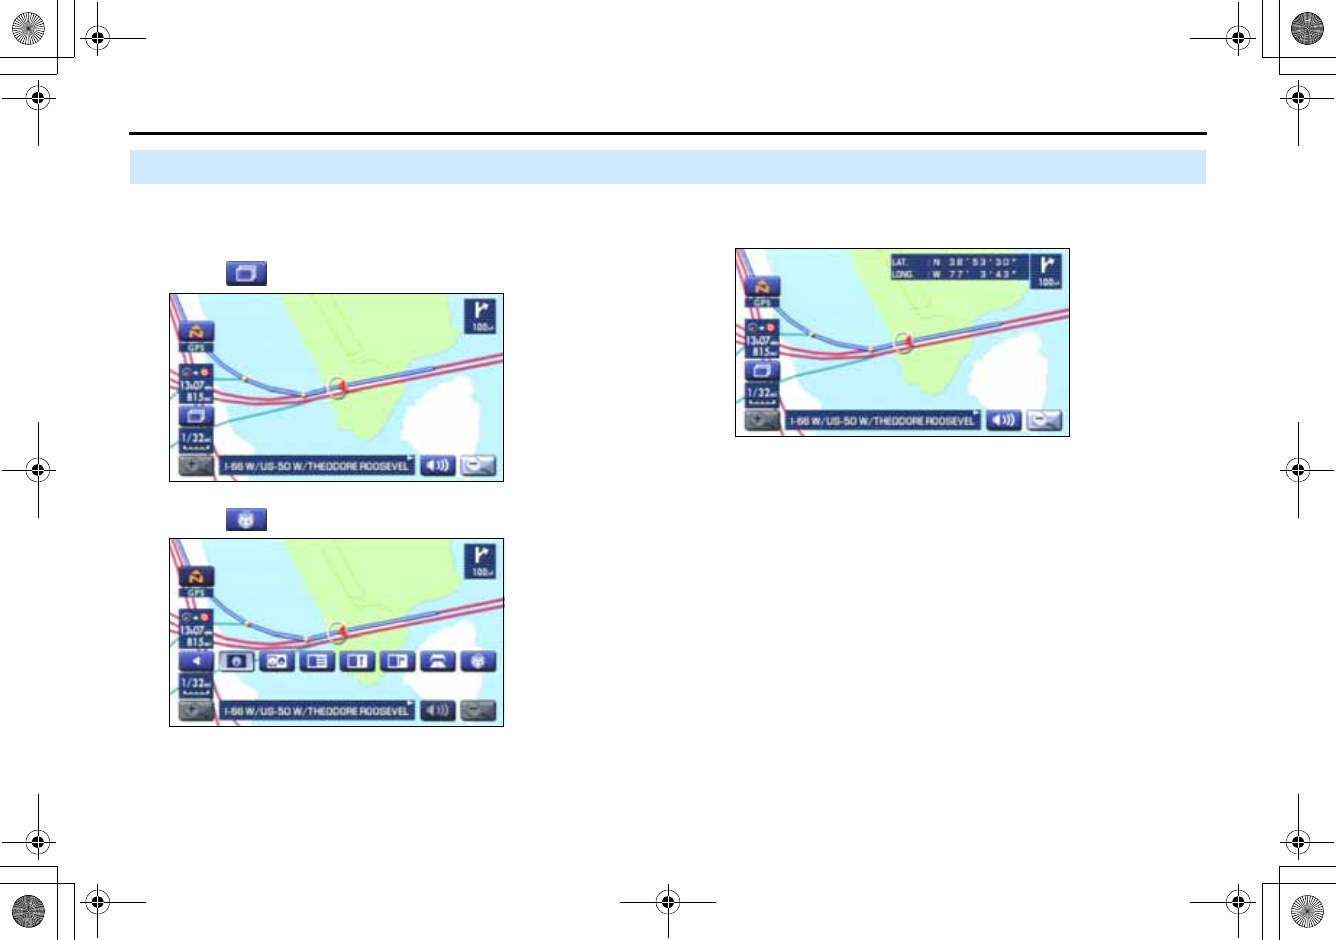
Route Guidance
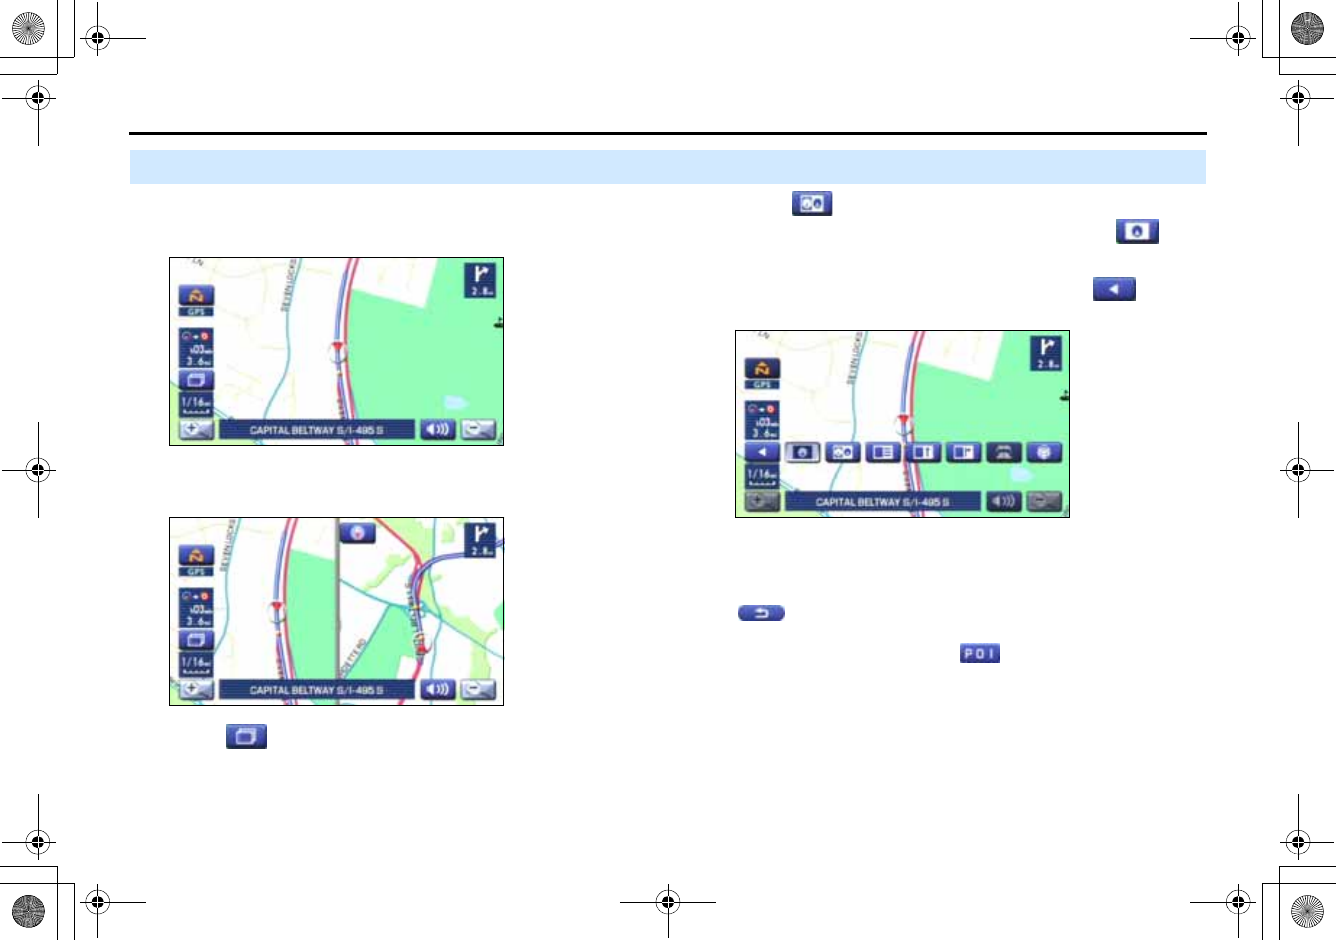
Dual Map Display
You can configure the screen for a dual map display.
1Select (screen configuration).
2Select (dual map).
If you wish to return to the single map display, select (sin-
gle map).
If you need not make any further selection, select . The rele-
vant keys will disappear.
NOTE
If you wish to modify the display selections that have been made for a second
screen, touch the top of the screen. After completing the modification,
select .
•See Page 18 for details on scale changes.
•See Page 72 for details on setting with .
<Single map display>
<Dual map display>
+ORTG\CA0CXKDQQMࡍࠫ㧞㧜㧜㧣ᐕ㧡㧞㧢ᣣޓᦐᣣޓඦᓟ㧢ᤨ㧠ಽ
39
Route Guidance
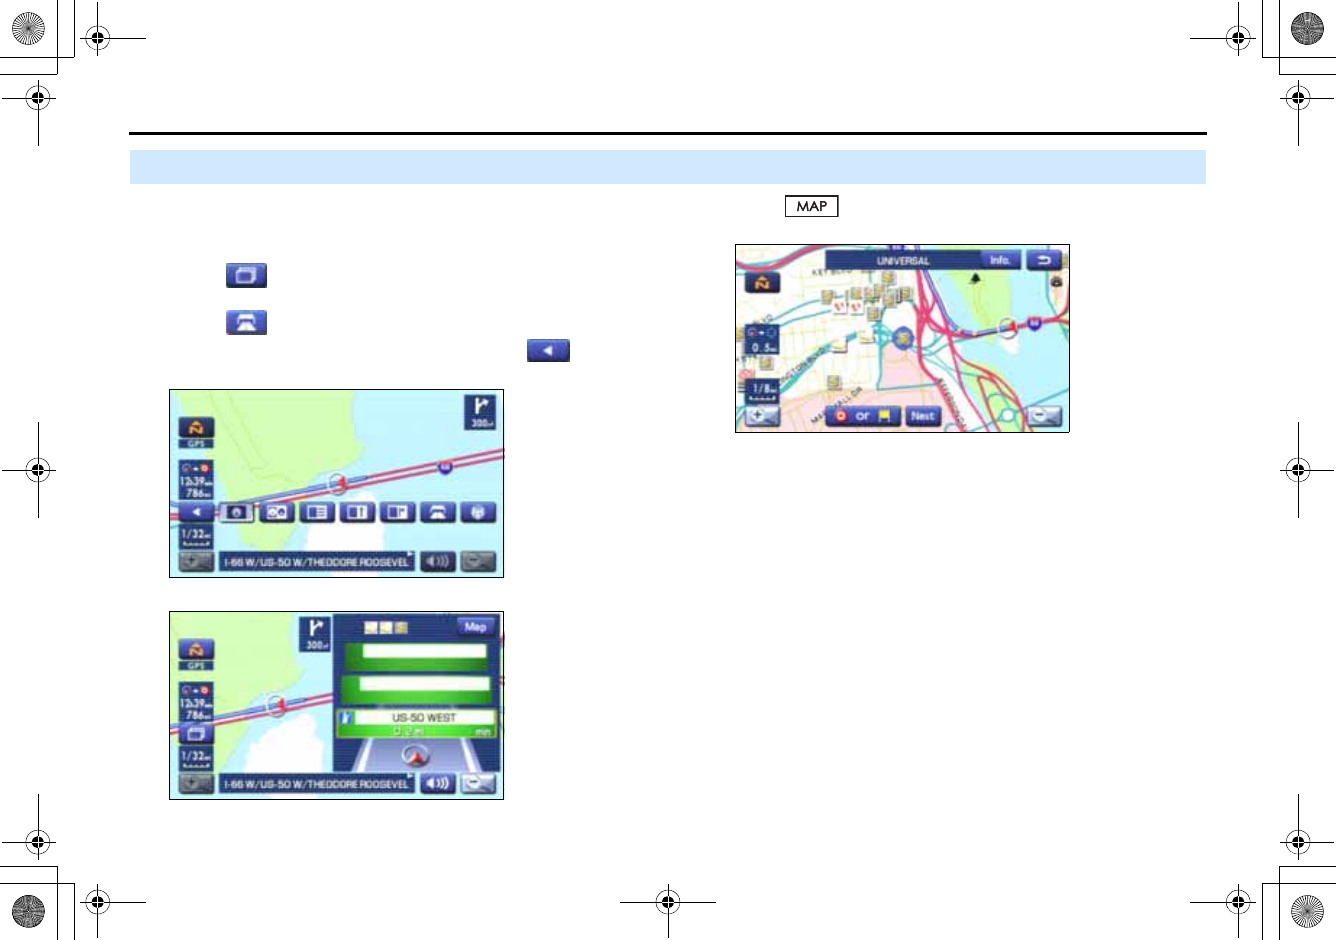
Freeway Information
A list of buildings and facilities along a freeway can be dis-
played on the screen.
1Select (screen configuration).
2Select (freeway information).
If you need not make any further selection, select .
The relevant keys will disappear.
The information of a freeway is displayed.
Select to display the map in the neighborhood together
with the icons of hotels and banks.
This map allows you to set your destination and waypoints. It also
allows you to register them with the Memory Point with the cur-
sor placed on the icon.
+ORTG\CA0CXKDQQMࡍࠫ㧞㧜㧜㧣ᐕ㧡㧞㧢ᣣޓᦐᣣޓඦᓟ㧢ᤨ㧠ಽ
40
Route Guidance
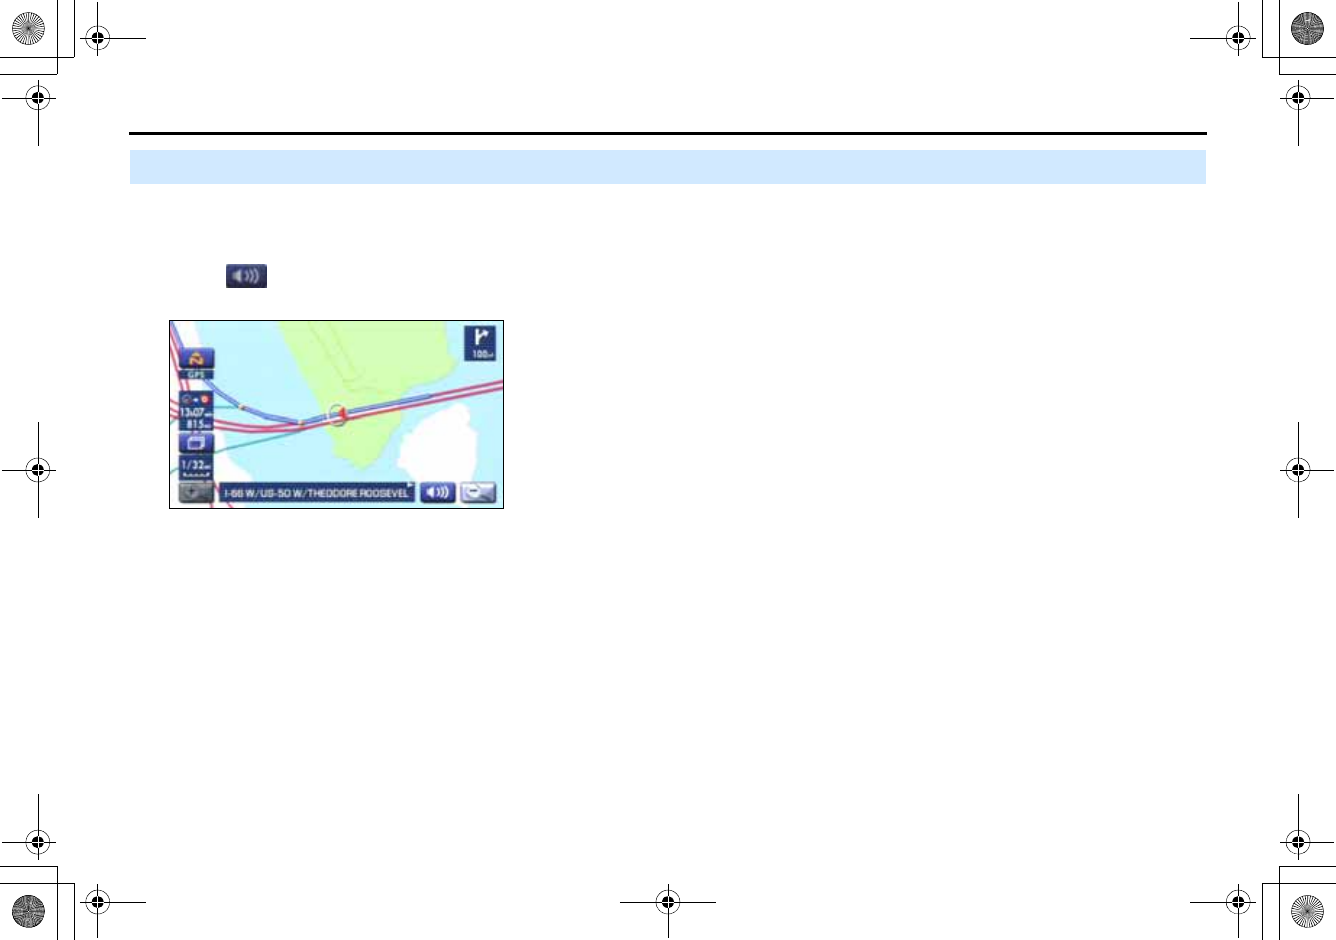
Replaying Voice Guidance
If you want to listen to the last voice guidance again during
route guidance, use the following procedure:
1Select .
You can hear the voice guidance again.
+ORTG\CA0CXKDQQMࡍࠫ㧞㧜㧜㧣ᐕ㧡㧞㧢ᣣޓᦐᣣޓඦᓟ㧢ᤨ㧠ಽ
41
Route Guidance
Compass Mode
Longitude and latitude of present location can be displayed
on the screen.
1Select (screen configuration).
2Select (compass).
3Longitude and latitude of present location are displayed
at upper right of the screen.
+ORTG\CA0CXKDQQMࡍࠫ㧞㧜㧜㧣ᐕ㧡㧞㧢ᣣޓᦐᣣޓඦᓟ㧢ᤨ㧠ಽ