JVCKENWOOD J5175 GPS NAVIGATION SYSTEM / MONITOR WITH DVD RECEIVER / MONITOR WITH RECEIVER User Manual 05 SHORT TERM CONFIDENTIAL DDX DMX
JVC KENWOOD Corporation GPS NAVIGATION SYSTEM / MONITOR WITH DVD RECEIVER / MONITOR WITH RECEIVER 05 SHORT TERM CONFIDENTIAL DDX DMX
Contents
- 1. 05 SHORT-TERM CONFIDENTIAL_User Manual-DDX,DMX
- 2. 05 SHORT-TERM CONFIDENTIAL_User Manual-DNX
- 3. 05 SHORT-TERM CONFIDENTIAL_User Manual-KW
05 SHORT-TERM CONFIDENTIAL_User Manual-DDX,DMX
![Before Use5English• This unit can only play the following tyeps of CDs.• This unit may not correctly play discs which do not have the mark.• You cannot play a disc that has not been finalized. (For the finalization process, see your writing software and your recorder's instruction manual.) Ñ Acquiring GPS signalThe first time you turn on this unit, you must wait while the system acquires satellite signals for the first time. This process could take up to several minutes. Make sure your vehicle is outdoors in an open area away from tall buildings and trees for fastest acquisition.After the system acquires satellites for the first time, it will acquire satellites quickly each time thereafter.How to read this manual• The screens and panels shown in this manual are examples used to provide a clear explanation of operations.For this reason, they may be different from the actual screens or panels, or some display patterns may be different from the actual ones.• Display language: English is used for the purpose of explanation. You can select a display language from the [SETUP] menu. See User Interface Setup (P.73).](https://usermanual.wiki/JVCKENWOOD/J5175.05-SHORT-TERM-CONFIDENTIAL-User-Manual-DDX-DMX/User-Guide-3734690-Page-5.png)
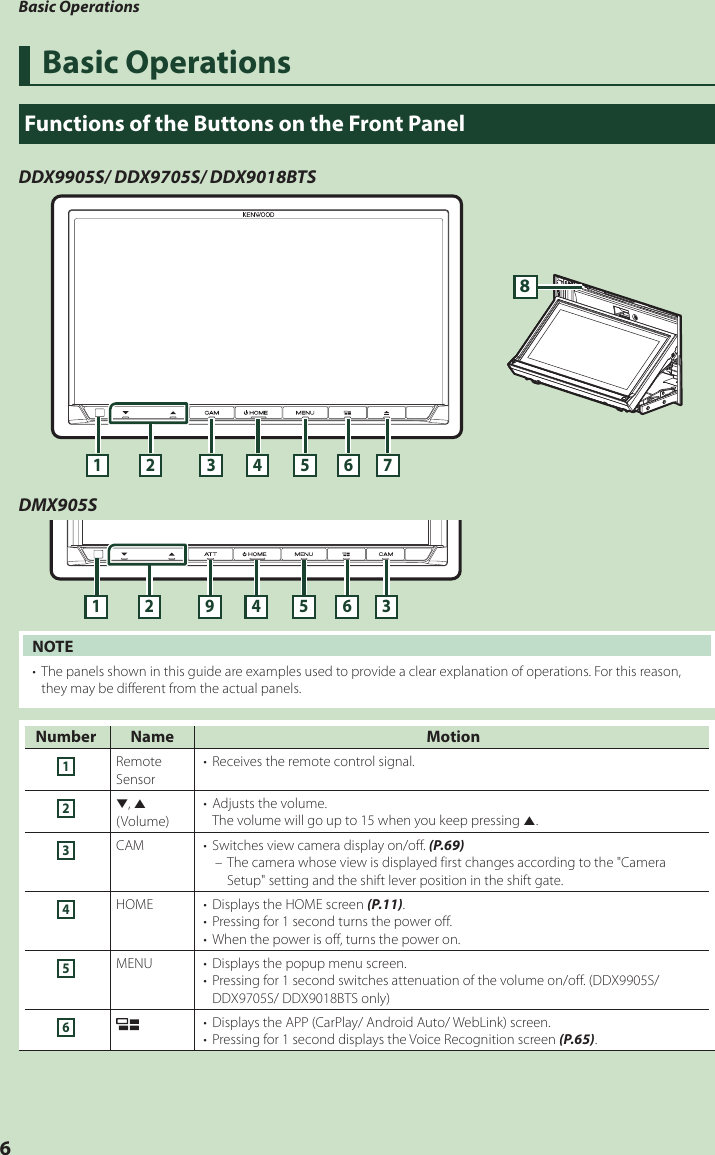
![Basic Operations7EnglishNumber Name Motion7G• Displays the Angle Adjust screen. – [DISC EJECT]: Ejects the disc.• When the panel is opened, pressing closes the panel.• To forcibly eject the disc, press it for 2 seconds and then touch [DISC EJECT] after the message is displayed.8Disc insert slot• A slot to insert a disc media. (DDX9905S/ DDX9705S/ DDX9018BTS only)9AT T • Switches attenuation of the volume on/off.Turning on the UnitThe method of turning on is different depending on the model.1 Press the [HOME] button. The unit is turned on. ●To turn off the unit:1 Press the [HOME] button for 1 second.NOTE• If it is your first time to turn the unit on after installation, it will be necessary to perform Initial setup (P.7).Initial SettingsInitial setupPerform this setup when you use this unit first time.1 Set each item as follows. ■[Language]Select the language used for the control screen and setting items. Default is “American English (en)”.1Touch [Language].2Touch [Language Select].3Select the desired language.4Touch [].For details of operation, see User Interface Setup (P.73). ■[Clock]Sets the synchronization of the clock and adjusts it.For detailed operation, see Calendar/clock settings (P.9).](https://usermanual.wiki/JVCKENWOOD/J5175.05-SHORT-TERM-CONFIDENTIAL-User-Manual-DDX-DMX/User-Guide-3734690-Page-7.png)
![Basic Operations8 ■[Display]Set the button illumination color. If it is hard to see the image on the screen even, adjust the viewing angle.1Touch [Display].2Touch [Key Color].3Select the desired color.4Touch [].5Touch [Viewing Angle].6Select an angle7Touch [].For details of, see Display Setup (P.75). ■[Camera]Set the parameters for the camera.1Touch [Camera].2Set each item and touch [].For details of, see Camera Setup (P.69). ■[OEM SETUP]This function requires a commercial adaptor.Consult your KENWOOD dealer for details. ■[DEMO]Set the demonstration mode. Default is “ON”.1Touch [DEMO] and select ON or OFF.2 Touch [Finish].NOTE• These settings can be made from the SETUP menu. See Setup (P.72).Security Code Setup (DDX9018BTS)You can set up a security code to protect your receiver system against theft.When the Security Code function is activated, the code cannot be changed and the function cannot be deactivated. Note that the Security Code can be set with a 4 digit number of your choice.1 Press the [MENU] button. Popup menu appears.2 Touch [SETUP]. SETUP Menu screen appears.3 Touch [Security]. Security screen appears.4 Touch [Security Code Set] on the Security screen. Security Code Set screen appears.5 Enter a security code with 4 digits and touch [Enter].6 Enter the same code again and touch [Enter].Now, your security code is registered.](https://usermanual.wiki/JVCKENWOOD/J5175.05-SHORT-TERM-CONFIDENTIAL-User-Manual-DDX-DMX/User-Guide-3734690-Page-8.png)
![Basic Operations9EnglishNOTE• Touch [BS] to delete the last entry.• If you enter a different security code, the procedure returns to step 5 (for first code entry).• If you have disconnected the Receiver from the battery, enter the correct security code as that you have entered in step 5 and touch [Enter]. You can use your receiver.To change the security code:1 Touch [Security Code Change] on the Security screen, then repeat step 5 and 6.To clear the security code: 1 Touch [Security Code Cancellation] on the Security screen.Calendar/clock settings1 Press the [MENU] button. Popup menu appears.2 Touch [SETUP]. SETUP Menu screen appears.3 Touch [User Interface]. User Interface screen appears.4 Touch [Time Zone] in the User Interface screen.5 Select the time zone.6 Set each item as follows.Scroll the page to show hidden items. ■[Time Format] Select the time display format.[12-Hour ](Default)/ [24-Hour] ■[Clock] [GPS-SYNC ](Default): Synchronizes the clock time with the GPS.[Manual]: Set the clock manually. ■[Time Zone]Select the time zone. ■[Clock Adjust]If you select [Manual] for Clock, adjust the date and time manually. (P.73)NOTE• Please set the date and time. If they not set, some functions may not work.Adjusting the volumeTo adjust the volume (0 to 40),Press [R] to increase, and press [S] to decrease.Holding [R] increases the volume continuously to level 15.](https://usermanual.wiki/JVCKENWOOD/J5175.05-SHORT-TERM-CONFIDENTIAL-User-Manual-DDX-DMX/User-Guide-3734690-Page-9.png)
![Basic Operations10Monitor Angle Control (DDX9905S/ DDX9705S/ DDX9018BTS) You can adjust the position of the monitor.1 Press the [G] button. Angle Adjust screen appears. 2 Select a number below that represents your desired angle setting.Default is “0”. ■[Off Position]You can store the current monitor angle as the angle during power off. Touch [Memory] when the desired angle is selected.Touch screen operationsTo perform operations on the screen, you need to touch, touch and hold, flick or swipe to select an item, display a setting menu screen or change pages. ●TouchTouch the screen gently to select an item on the screen. ●Touch and holdTouch the screen and keep your finger in place until the display changes or a message is displayed. ●FlickSlide your finger quickly to the left or right on the screen to change the page.You can scroll a list screen by flicking up/ down on the screen. ●SwipeSlide your finger up or down on the screen to scroll the screen.HOME screen descriptionsMost functions can be performed from the HOME screen.65473 121• Widget (P.15) – You can change the widget by flicking left or right on the widget area. – Touch the widget to display the detailed screen.2• Page indication for widgets3• Current source information4• Displays the control screen of the current source.• The artwork is displayed if available from current content.5• Current source information6• Displays the source selection screen. (P.12)7• Short-cut playback source icons (P.12)](https://usermanual.wiki/JVCKENWOOD/J5175.05-SHORT-TERM-CONFIDENTIAL-User-Manual-DDX-DMX/User-Guide-3734690-Page-10.png)
![Basic Operations11EnglishDisplay the HOME screen1 Press the [HOME] button. HOME screen appears.Popup menu1 Press the [MENU] button. Popup menu appears.2 Touch to display the popup menu. 1The contents of the menu are as follows.• Displays the Screen Adjustment screen. (P.72)• Turns the display off. (P.11)• Displays the view camera screen. (P.69)• Displays the SETUP Menu screen. (P.72)• Displays the Audio screen. (P.78)• Displays the control screen of current source. Icon feature differs depending on the source.• Close the popup menu.1• Short-cut buttons: The source changes to the one you have set with a short-cut. For the short-cut setting, refer to Customize Short-cut buttons on HOME screen (P.13).Turn off the screen1 Select [Display OFF] on the popup menu. ●To turn on the screen1 Touch the display.Source selection screen descriptionYou can display icons of all playback sources and options on the source selection screen.4 53211• Changes playback sources.For playback sources, see P.12.2• Page indication3• Changes pages. (Touch []/[ ].)You can also change pages by flicking left or right on the screen.4• Returns to the previous screen.5• Displays the SETUP Menu screen. (P.72)](https://usermanual.wiki/JVCKENWOOD/J5175.05-SHORT-TERM-CONFIDENTIAL-User-Manual-DDX-DMX/User-Guide-3734690-Page-11.png)
![Basic Operations12Select the playback source1 Press the [HOME] button. HOME screen appears.2 Touch [].From the screen, you can select the following sources and functions.• Switches to the Apple CarPlay screen from the connected iPhone. (P.23)• Switches to the Android Auto screen from the connected Android device. (P.23)• Displays the Hands Free screen. (P.63)When connecting as Apple CarPlay or Android Auto, it works as a phone provided in Apple CarPlay or Android Auto.• Switches to the Radio broadcast. (P.37) *2• Switches to the HD Radio broadcast. (P.40) *3• Switches to the SiriusXM® satellite radio broadcast. (P.46) *3• Plays a Bluetooth audio player. (P.58)• Plays a disc. (P.17) *4• Plays an iPod/iPhone. (P.34)• Plays files on a USB device. (P.31)• Switches to Pandora. (P.29) *3• Switches to Spotify. (P.27)• Switches to an external component connected to the AV-IN input terminal. (P.71)• Displays the WebLink screen. (P.26)• Displays the Waze screen. (P.26)• Displays the Audio screen. (P.78)• Puts the unit in standby. (P.12)• For sources and information displayed when an ADS adapter is connected, see OEM Features Operation (P.71).*2 DDX9018BTS only*3 DDX9905S/ DDX9705S/ DMX905S only*4 DDX9905S/ DDX9705S/ DDX9018BTS onlyTo select the playback source on the HOME screenThe 4 items displayed on the source selection screen with large icons are shown on the HOME screen.You can change the items displayed on this area by customizing the source selection screen. (P.13)To select the playback source on the source control screenDisplay source selection buttons by touching []/[ ] or flicking left or right on the source control screen, then select a playback source.Put the unit in standby1 Press the [HOME] button. HOME screen appears.2 Touch [ ].](https://usermanual.wiki/JVCKENWOOD/J5175.05-SHORT-TERM-CONFIDENTIAL-User-Manual-DDX-DMX/User-Guide-3734690-Page-12.png)
![Basic Operations13English3 Touch [STANDBY].Customize Short-cut buttons on HOME screenYou can arrange the positions of the source icons as you like.1 Press the [HOME] button. HOME screen appears.2 Touch [ ].3 Touch and hold the icon which you want to move in the customizing mode.4 Drag the icon to the desired position.Changes the pageSource control screen descriptionsThere are some functions which can be performed from most screens.Indicators561 234Navigation informationShort-cut buttons1 All sources iconDisplays all sources.2 Secondary screen• []/[ ] : The Secondary screen changes to another one every time you touch it. You can also change the Secondary screen by flicking left or right on the screen.• Indicators: Displays the current source condition and so on. – [ATT]: The attenuator is active. – [DUAL]: The dual zone function is active. – [MUTE]: The mute function is active. – [LOUD]: The loudness control function is active.• Navigation information: Displays the current location and the direction. The screen changes to the navigation screen when you touch here.• Short-cut buttons: The source changes to the one you have set with a short-cut. For the short-cut setting, refer to Customize Short-cut buttons on HOME screen (P.13).3 Content listDisplays the track/file/station/channel list.](https://usermanual.wiki/JVCKENWOOD/J5175.05-SHORT-TERM-CONFIDENTIAL-User-Manual-DDX-DMX/User-Guide-3734690-Page-13.png)
![Basic Operations144 • Connected Bluetooth device information.• : Lights up during quick charging of the battery of the connected iPod/ iPhone/ Smartphone.5 Artwork & informationYou can select whether to display an artwork and song information or only song information in more detail.6 Function panelTouch the left side of the screen to display the function panel. Touch again to close the panel.List screenThere are some common function keys in the list screens of most sources.61 23 4 51 Displays the list type selection window.2 Displays a music/movie file list.3 Text scrollScrolls the displayed text.4 etc. Keys with various functions are displayed here.• : Plays all tracks in the folder containing the current track.• : Jumps to the letter you entered (alphabetical search). • : Moves to the upper hierarchy level.5 [ ] / [ ] / [ ] / [ ] Page scrollYou can change pages to display more items by pressing []/[ ].• []/[ ] : Displays the top or bottom page.6 ReturnReturns to the previous screen.NOTE• Buttons which cannot be activated from the list screen are not displayed.](https://usermanual.wiki/JVCKENWOOD/J5175.05-SHORT-TERM-CONFIDENTIAL-User-Manual-DDX-DMX/User-Guide-3734690-Page-14.png)
![Widget15EnglishWidgetPhoto Frame Widget (DDX9905S)You can display a slideshow of the image files stored in the USB memory on the Home screen. Ñ Preparation• Select “ON” for Photo Frame Widget. See Widget Setup (P.15). ●Acceptable Picture filesMax. Picture sizeJPEG (.jpg, .jpeg) *15,000 × 5,000PNG (.png) 1,000 × 1,000BMP (.bmp) 1,000 × 1,000• This unit can only play back files which are less than 50 MB.• The maximum number of files per device is 500.• Picture files may not be played depending on their condition.*1 A progressive format is not supported. Ñ Photo Frame1 Press the [HOME] button.2 Flick the widget area to the left/right to display the photo frame widget.• Scroll the screen to display the hidden part.Widget SetupSet up the widgets on the Home screen.1 Press the [MENU] button. Popup menu appears.2 Touch [SETUP]. SETUP screen appears.3 Touch [User Interface]. User Interface screen appears.4 Touch [Widget SETUP] in the User Interface screen.5 Set each item as follows. ■[Mirroring Widget]Determine whether to use the mirroring widget."ON" (Default)/ "OFF" ■[Photo Frame Widget] (DDX9905S)Determine whether to use the photo frame widget."ON" (Default)/ "OFF" ■[Photo Frame SETUP] (DDX9905S)Make settings related to display of the photo frame widget.6 Touch [ ].](https://usermanual.wiki/JVCKENWOOD/J5175.05-SHORT-TERM-CONFIDENTIAL-User-Manual-DDX-DMX/User-Guide-3734690-Page-15.png)
![Widget16To Photo Frame Setup (DDX9905S)Make settings related to display of the photo frame widget.1 Touch [Photo Frame SETUP] on the Widget SETUP screen.2 Set each item as follows. ■[Sort Order]Specify a file sorting criterion."By Name(Ascending)"/ "By Name(Descending)"/ "By Date(Newest First)" (Default)/ "By Date(Oldest First)" ■[Slide Show Interval]Specify the slideshow interval."5" (Default) to "30" seconds ■[Photo Frame is • • • • •]Display help topics about the photo frame.3 Touch [ ].](https://usermanual.wiki/JVCKENWOOD/J5175.05-SHORT-TERM-CONFIDENTIAL-User-Manual-DDX-DMX/User-Guide-3734690-Page-16.png)
![Disc 17EnglishDisc (DDX9905S/ DDX9705S/ DDX9018BTS) Playing a disc Ñ Insert a disc1 Press the [G] button.2 Touch [DISC EJECT]. The panel opens.3 Insert the disc into the slot. The panel closes automatically.The unit loads the disc and playback starts. Ñ Eject a disc1 Press the [G] button.2 Touch [DISC EJECT].When removing a disc, pull it horizontally.3 Press the [G] button.DVD/ VCD Basic OperationMost functions can be controlled from the source control screen and playback screen.NOTE• Set the remote control mode switch to DVD mode before starting operation for DVD and VCD, see Switch the operation mode (P.85).• The screen shot below is for DVD. It may be different from the one for VCD.1 When the operation buttons are not displayed on the screen, touch 7 area.Control screen12345DVD VCD2Video screen76861 Information display areaDisplays the following information.• Title #, Chapter #: DVD title and chapter number• Track #/Scene #: VCD track or scene number. Scene # is displayed only when Playback control (PBC) is on.](https://usermanual.wiki/JVCKENWOOD/J5175.05-SHORT-TERM-CONFIDENTIAL-User-Manual-DDX-DMX/User-Guide-3734690-Page-17.png)
![Disc 18• Linear PCM, etc.: Audio format• OFF/Zoom2 – 4 (DVD)/ Zoom2 (VCD): Displays the zoom ratio.• [Hide]: Hides the control screen.• [] : Repeats the current content. Each time you touch the key, repeat modes are switched in the following sequence;DVD: Title repeat ( ), Chapter repeat ( ), Repeat off ( )VCD (PBC On): Does not repeatVCD (PBC Off ): Track repeat ( ), Repeat off ( )2 Function panelTouch the left side of the screen to display the function panel. Touch again to close the panel. • I]: Stops playback. Touching twice will play the disc from the beginning when you play it next time.• [] [ ]: Fast-forwards or fast-backward the disc. Each time you touch the key, the speed changes. 2 times, 10 times.• [] [ ] (DVD only): Plays in slow motion forward or backward.• [SETUP] (DVD only): Touch to display the DVD SETUP screen. See DVD Setup (P.22).• [MENU CTRL] (DVD only): Touch to display the DVD-VIDEO disc menu control screen. See DVD Disc Menu Operation (P.21).• [PBC] (VCD only): Touch to turn Playback control (PBC) on or off.• [Audio] (VCD only): Touch to change audio output channels.3 Play mode indicator/ Playing time• D, B, I, etc.: Current play mode indicatorMeanings of the icons are as follows: D (play), B (fast forward), A (fast backward), I (stop), R (resume stop), H (pause), (slow playback), (slow reverse playback).• For confirmation of current playing position. You can drag the circle left or right to change the playing position.4 Operation keys• [E] [F] : Searches for the previous/next content. • Touch and hold to fast-forward or fast-backward the disc. (It will be cancelled automatically after about 50 seconds.)• [DH] : Plays or pauses.• [] : Displays the Graphic Equalizer screen. (P.80)5 Indicator Items• [IN]: Disc insertion status.White: A Disc is inside the unit.Orange: Disc player failure.VCD• [1chLL/2chLL]: Identifies the left audio output of channel 1 or 2.• [1chLR/2chLR]: Identifies the monaural audio output of channel 1 or 2.• [1chRR/2chRR]: Identifies the right audio output of channel 1 or 2.• [1chST/2chST]: Identifies the stereo audio output of channel 1 or 2.• [LL]: Identifies the left audio output.• [LR]: Identifies the monaural audio output.• [RR]: Identifies the right audio output.• [ST]: Identifies the stereo audio output.• [PBC]: The PBC function is on.• [VER1]: The VCD version is 1.• [VER2]: The VCD version is 2.6 Searching areaTouch to search the for next/previous content.7 Key display area Touch to display the control screen.8 [MENU CTRL] (DVD only)Touch to display the DVD-VIDEO disc menu control screen. See DVD Disc Menu Operation (P.21).NOTE• The control screen disappears when no operation is done for 5 seconds.• If you use a remote control, you can jump directly to the desired image by entering the chapter number, scene number, play time, etc. (P.85).](https://usermanual.wiki/JVCKENWOOD/J5175.05-SHORT-TERM-CONFIDENTIAL-User-Manual-DDX-DMX/User-Guide-3734690-Page-18.png)
![Disc 19EnglishMusic CD/ Disc media Basic OperationMost functions can be controlled from the source control screen and playback screen.NOTE• Set the remote controller mode switch to AUD mode before starting operation for Music CD and audio files, see Switch the operation mode (P.85).• In this manual, “Music CD” means a general CD which includes music tracks.“Disc media” means a CD/DVD disc which includes audio or video files.• The screen shot below is for disc media. It may be different from the one for CD.Control screen7345216Open the drawer57Close the drawer57681 CODEC / [ ] / [ ]• When a high-resolution source is played, its format information is displayed. (Disc media only)• [] : Repeats the current track/folder. Each time you touch the key, repeat mode switches in the following sequence; Track/ File repeat ( ), Folder repeat ( ) (Disc media only), Repeat all ( )• [] : Randomly plays all tracks in current folder/disc. Each time you touch the key, random mode switches in the following sequence; Track random ( ) (Music CD only), Folder random ( ) (Disc media only), Random off ( )2 Track informationDisplays the information of the current track/ file. Only a file name and a folder name are displayed if there is no tag information. (Disc media only)3 Play mode indicator/ Playing time• D, B, etc.: Current play mode indicatorMeanings of the icons are as follows: D (play), B (fast forward), A (fast backward), H (pause).4 Operation keys• [1] (Disc media only) : Searches files. For details on search operation, see File search Operation (P.20).• [E] [F] : Searches for the previous/next content. • Touch and hold to fast-forward or fast-backward the disc. (It will be cancelled automatically after about 50 seconds.)• [DH] : Plays or pauses.• [] : Displays the Graphic Equalizer screen. (P.80)5 Content list• Touch the right side of the screen to display the Content list. Touch again to close the list.• Displays the playing list. When you touch a track/file name on the list, playback will start.6 Artwork• Displays/hides artwork area.• The jacket of the currently playing file is displayed. (Disc media only)7 Function panel (Disc media only)Touch the left side of the screen to display the function panel. Touch again to close the panel. • [] [ ] : Searches for theprevious/next folder.](https://usermanual.wiki/JVCKENWOOD/J5175.05-SHORT-TERM-CONFIDENTIAL-User-Manual-DDX-DMX/User-Guide-3734690-Page-19.png)
![Disc 208 Indicator Items• [IN]: Disc insertion status.White: A Disc is inside the unit.Orange: Disc player failure.• [VIDEO]: Identifies the video file.• [MUSIC]: Identifies the music file.Video screen10999 File search area (Video file only)Touch to search for the next/previous file.10 Key display area (Video file only)Touch to display the control screen.File search Operation (Disc media only)You can search for a file according to hierarchy.NOTE• For operations in the list screen, see List screen (P.14).1 Touch [1]. Folder List screen appears.2 Touch the desired folder. When you touch a folder its contents are displayed.3 Touch the desired item in the content list. Playback starts.](https://usermanual.wiki/JVCKENWOOD/J5175.05-SHORT-TERM-CONFIDENTIAL-User-Manual-DDX-DMX/User-Guide-3734690-Page-20.png)
![Disc 21EnglishDVD Disc Menu OperationYou can set up some functions using the DVD-VIDEO disc menu.1 Touch the framed area during playback. Menu Control screen appears.2 Perform your desired operation as follows. ■To display the top menuTouch [TOP].* ■To display the menuTouch [MENU].* ■To display the previous menuTouch [Return].* ■To enter selected itemTouch [Enter]. ■To enable direct operationTouch [Highlight] to enter the highlight control mode (P.21). ■To move the cursorTouch [R], [S], [C], [D]. ■To switch among subtitle languagesTouch [Subtitle]. Each time you touch this key, subtitle languages are switched. ■To switch among audio languagesTouch [Audio]. Each time you touch this key, audio languages are switched. ■To switch among picture anglesTouch [Angle]. Each time you touch this key, picture angles are switched.* These keys may not function depending on the disc. Ñ Highlight controlHighlight control lets you control the DVD menu by touching the menu key directly on the screen.1 Touch [Highlight] on the Menu Control screen.2 Touch your desired item on the screen.NOTE• The highlight control function is cancelled automatically if you do not operate for a predetermined period of time.](https://usermanual.wiki/JVCKENWOOD/J5175.05-SHORT-TERM-CONFIDENTIAL-User-Manual-DDX-DMX/User-Guide-3734690-Page-21.png)
![Disc 22DVD SetupYou can set up the DVD playback functions.1 Touch the framed area during playback.2 Touch [ ] on the left side of the screen. Touch [SETUP]. DVD SETUP screen appears.3 Set each function as follows. ■[Menu Language] / [Subtitle Language] / [Audio Language]See Language setup (P.22). ■[Dynamic Range Control]Sets the dynamic range.[Wide]: The dynamic range is wide.[Normal]: The dynamic range is normal.[Dialog] (Default): Makes the total sound volume larger than the volumes in other modes. This is effective only when the Dolby Digital software is in use. ■[Screen Ratio]Sets the screen display mode.[16:9 ](Default): Displays wide pictures.[4:3 LB]: Displays wide pictures in the Letter Box format (having black stripes at the top and bottom of screen).[4:3 PS]: Displays wide pictures in the Pan & Scan format (showing pictures cut at the right and left ends). Ñ Language setupThis setting is for the languages used for the menu, subtitle, and voice.1 Touch the desired item; [Menu Language], [Subtitle Language], [Audio Language]. Language Set screen appears.2 Select a language.For language codes, refer to DVD Language Codes (P.101).Touch Close to set the entered language and return to the DVD SETUP screen.NOTE• To set the DVD’s original language as the audio language, touch [Original].](https://usermanual.wiki/JVCKENWOOD/J5175.05-SHORT-TERM-CONFIDENTIAL-User-Manual-DDX-DMX/User-Guide-3734690-Page-22.png)
![APPS—Android Auto™/Apple CarPlay23EnglishAPPS—Android Auto™/Apple CarPlayApple CarPlay OperationCarPlay is a smarter, safer way to use your iPhone in the car. CarPlay takes the things you want to do with iPhone while driving and displays them on the screen of the product. You can get directions, make calls, send and receive messages, and listen to the music from iPhone while driving. You can also use Siri voice control to make it easier to operate iPhone.For details about CarPlay, visit https://ssl.apple.com/ios/carplay/.Compatible iPhone devicesYou can use CarPlay with the following iPhone models.• iPhone 7 Plus• iPhone 7• iPhone SE• iPhone 6s Plus• iPhone 6s• iPhone 6 Plus• iPhone 6• iPhone 5s• iPhone 5c• iPhone 5 Ñ Connecting an iPhone1 Connect your iPhone using KCA-iP103 via the USB (Black) terminal. (P.95)When an iPhone compatible with CarPlay is connected to the USB (Black) terminal, the Bluetooth Hands-Free phone currently connected is disconnected.2 Unlock your iPhone. ●Switching the Current Source to the Apple CarPlay Source When Connecting Your iPhoneWhen the iPhone you used previously is connected again, a confirmation message appears to ask whether you are sure to start the CarPlay source.1 Connect iPhone using KCA-iP103 via USB (Black) terminal. 2 Unlock your iPhone.3 Touch the connection message at the bottom of the screen.The current source is connected to the CarPlay source.The connection message is displayed for about 5 seconds.NOTE• If the message disappears, select the CarPlay source on the source selection screen. (P.12) Ñ Operation buttons and available Apps on the home screen of CarPlayYou can use the Apps of the connected iPhone.The items displayed and the language used on the screen differ among the connected devices.To enter the CarPlay mode, touch [Apple CarPlay] icon on the source selection screen. (P.12)3121 [ ]• Displays the home screen of CarPlay.• Touch and hold to activate Siri.2 Application buttonsStarts the application.3 [HOME]Exits the CarPlay screen and displays the Home screen.To exit the CarPlay screen1 Press the [HOME] button.](https://usermanual.wiki/JVCKENWOOD/J5175.05-SHORT-TERM-CONFIDENTIAL-User-Manual-DDX-DMX/User-Guide-3734690-Page-23.png)
![APPS—Android Auto™/Apple CarPlay24 Ñ Use SiriYou can activate Siri.1 Press the [ ] button for 1 second.Press for 1 second2 Talk to Siri.To deactivate1 Press the [ ] button. Ñ Switch to the Apple CarPlay screen while listening to another source1 Press the [ ] button.NOTE• When listening to another source with the Apple CarPlay screen displayed, playing music in the Apple CarPlay mode will switch the current source to the Apple CarPlay source.Android Auto™ OperationAndroid Auto enables you to use the functions of your Android device convenient for driving. You can easily access route guidance, make calls, listen to music, and access convenient functions on the Android device while driving.For details about Android Auto, visit https://www.android.com/auto/ and https://support.google.com/androidauto.Compatible Android devicesYou can use Android Auto with Android devices of Android version 5.0 (Lollipop) or later.NOTE• Android Auto may not be available on all devices and may not be available in all countries or regions. Ñ Connect Android deviceWired connection1 Connect an Android device via the USB terminal. (P.95)To use the hands-free function, connect the Android device via Bluetooth. When an Android device compatible with Android Auto is connected to the USB terminal, the device is connected via Bluetooth automatically, and the Bluetooth Hands-Free phone currently connected is disconnected.2 Unlock your Android device.Wireless connection (Except DDX9018BTS)When the Android device is ready for wireless connection, connecting it via the USB registers Bluetooth and Wi-Fi automatically. Thus, the registered Android device will be able to be connected wirelessly to be used as an Android Auto source.NOTE• Turn on the Bluetooth function and Wi-Fi function of Android device.• If two or more Android devices have been registered, select the Android device to be used as the Android Auto source. (P.25)](https://usermanual.wiki/JVCKENWOOD/J5175.05-SHORT-TERM-CONFIDENTIAL-User-Manual-DDX-DMX/User-Guide-3734690-Page-24.png)
![APPS—Android Auto™/Apple CarPlay25English Ñ Select an Android deviceIf two or more Android devices have been registered, select the Android device to be used as the Android Auto source.1 Press the [MENU] button. Popup menu appears.2 Touch [SETUP]. SETUP screen appears.3 Touch [AV]. AV screen appears.4 Touch [Android Auto Device Select].5 Select an Android device.The registered Android devices ready for wireless connection and the Android device connected via the USB are displayed. Ñ Operation buttons and available Apps on the Android Auto screenYou can perform the operations of the Apps of the connected Android device.The items displayed on the screen differ among the connected Android devices.To enter the Android Auto mode, touch the [Android Auto] icon on the source selection screen. (P.12)11 Application/information buttonsStarts the application or displays information.To exit the Android Auto screen1 Press the [HOME] button. Ñ Using voice control1 Press the [ ] button for 1 second.Press for 1 secondTo cancel1 Press the [ ] button. Ñ Switch to the Android Auto screen while listening to another source1 Press the [ ] button.NOTE• When listening to another source with the Android Auto screen displayed, playing music in the Android Auto mode will switch the current source to the Android Auto source.](https://usermanual.wiki/JVCKENWOOD/J5175.05-SHORT-TERM-CONFIDENTIAL-User-Manual-DDX-DMX/User-Guide-3734690-Page-25.png)
![APPS—Android Auto™/Apple CarPlay26WebLink™/Waze OperationYou can display and control the App on the unit while your smartphone is connected to the USB terminal or Wi-Fi. Ñ Available AppsYou can use the following Apps on this unit. Install the Apps on your smartphone beforehand.WebLink™WebLink™ enables you to use the following Apps with the unit.• Media player• Waze• Yelp• YouTube• OpenWeatherMap• Next RadioWazeWaze is the world's largest community based traffic and navigation App. Join other drivers in your area who share real-time traffic and road info, saving everyone time and gas money on their daily commute.• To use Waze on the unit, you need to install WebLink™ and Waze on your smartphone beforehand. Ñ Connect a smartphoneWired connection1 Connecting a smartphone• Connect an Android device via the USB terminal. (P.95)• Connect your iPhone using KCA-iP103 via the USB (Black) terminal. (P.95)• When your smartphone is connected to a unit, a confirmation message to communicate each other appears on the smartphone. Touch [Allow] to establish connection, or [Ignore] to cancel the connection.• You can check the connection status on the WebLink™ screen on your smartphone.2 Press the [HOME] button.3 Touch [ ].4 Touch [WebLink] or [Waze]. (P.12)Wi-Fi connection (Except DDX9018BTS)1 Press the [HOME] button.2 Touch [ ].3 Touch [WebLink]. (P.12)4 Operate your Android device to activate WebLink App, then connect to this unit.5 Select “Car Multimedia” (initial) as the network to use.6 When the connection is established, then the same screen displayed on the Android device is displayed.• When the smartphone is connected to the unit, a confirmation message to communicate each other appears on the smartphone. Touch [Allow] to establish connection, or [Ignore] to cancel the connection.• You can check the connection status on the WebLink™ screen on your smartphone.](https://usermanual.wiki/JVCKENWOOD/J5175.05-SHORT-TERM-CONFIDENTIAL-User-Manual-DDX-DMX/User-Guide-3734690-Page-26.png)
![APPS—Android Auto™/Apple CarPlay27English Ñ Operation buttons and available Apps on the App screenWebLink source screen11 [ ]Displays the main menu of the “WebLink” source screen. Returns to the previous screen.1 Operate on your smartphone.• When you are asked to communicate between your smartphone and the unit, touch [Allow] to proceed. Ñ Switching to the App screen while listening to another source1 Press the [ ] button.NOTE• When listening to another source with the WebLink screen displayed, playing music in the WebLink mode will switch the current source to the WebLink source.Spotify OperationYou can listen to Spotify on this unit by controlling the application installed in the iPhone or Android.To select the Spotify source, touch [Spotify] icon on the source selection screen. (P.12)Preparation• Install the latest version of the Spotify application "Spotify" on your iPhone or Android.iPhone: Search for "Spotify" in the Apple App Store to find and install the most current version.Android: Search for "Spotify" in Google play to find and install the most current version.• iPhones are connected via either USB or Bluetooth.• Android devices are connected via Bluetooth.• To connect a smartphone via Bluetooth, register it as the Bluetooth device and do the App (SPP) profile setting for the connection beforehand. See Register the Bluetooth device (P.59) and Connect the Bluetooth device (P.60).12345Close the drawer11 Artwork• Displays/hides artwork area.• Picture data is displayed if available from the current content.2 Playing time• For confirmation of play time.3 Operation keys• [] : Displays the Menu screen• [] : New radio station that relates to the artist of the currently being played song is selected and playback starts.](https://usermanual.wiki/JVCKENWOOD/J5175.05-SHORT-TERM-CONFIDENTIAL-User-Manual-DDX-DMX/User-Guide-3734690-Page-27.png)
![APPS—Android Auto™/Apple CarPlay28• [ ] , [ ] : Skips the current song.• [] , [ ] : Plays or pauses the content of the current station.• [] : Saves the currently being played song to My Music.• [] : Displays the Graphic Equalizer screen. (P.80)4 Content informationDisplays the information on the current content being played.5 [ ] / [ ] / [ ] / [ ]• [ ] : Thumbs down to the current contents and skip to the next content. • [ ] : Registers the current content as a favorite content.• [ ] : Repeats the current song.• [ ] : Randomly plays all songs in the current playlist. Ñ Selecting a track1 Touch [ ]. Menu screen appears.2 Select the list type, then select a desired item. ■To select the category and stationTouch the category and station name in the list. ■[ Top] Returns to the top of the list. ■[ Up] Returns to the previous list.About Spotify®Note• Ensure you are logged in to your smartphone application. If you do not have an Spotify account, you can create one for free from your smartphone or at www.spotify.com.• Because Spotify is a third-party service, the specifications are subject to change without prior notice. Accordingly, compatibility may be impaired or some or all of the services may become unavailable.• Some functions of Spotify cannot be operated from this unit.• For issues on using the application, contact Spotify at www.spotify.com.• Establish an Internet connection.](https://usermanual.wiki/JVCKENWOOD/J5175.05-SHORT-TERM-CONFIDENTIAL-User-Manual-DDX-DMX/User-Guide-3734690-Page-28.png)
![APPS—Android Auto™/Apple CarPlay29EnglishPandora® OperationYou can listen to Pandora® on this unit by controlling the application installed in the iPhone or Bluetooth device.To select the Pandora source, touch the [Pandora] icon on the source selection screen. (P.12)Preparation• Install the latest version of the Pandora® application on your iPhone, Android or BlackBerry.iPhone: Search for "Pandora" in the Apple App Store to find and install the most current version.Android: Visit the Google play and search for Pandora to install.BlackBerry: Visit www.pandora.com from the built in browser to download the Pandora application.• iPhones are connected via either USB or Bluetooth.• Android or BlackBerry devices are connected via Bluetooth.• To connect a smartphone via Bluetooth, register it as the Bluetooth device and do the App (SPP) profile setting for the connection beforehand. See Register the Bluetooth device (P.59) and Connect the Bluetooth device (P.60).41321 ArtworkPicture data is displayed if available from the current content.2 Playing timeFor confirmation of play time.3 Operation keys• [] : Searches for a station. For details on searching, see Station list screen (P.29).• [] (Thumbs down) : Thumbs down to the current contents and skips to the next contents. • [] (Thumbs up) : Registers the current content as a favorite content.• [D] , [H] : Plays or pauses the content of the current station.• [F] : Skips the current song. (Note that this function is disabled when the Pandora skip limitation is exceeded.)• [] (Bookmark Song) : Bookmarks a song in the current contents.• [] : Creates a new station. See Creates a new station (P.30).• [] : Displays the Graphic Equalizer screen. (P.80)4 Content informationDisplays the information on the current content being played. Ñ Station list screenYou can perform the following functions from this screen.1 Touch [ ]. Station List screen appears. ■To select the stationTouch the station name in the list. ■To sort the list by registered dateTouch [By Recent]. The list is sorted to begin with the last registered station. ■To sort the list in alphabetical orderTouch [By Name]. You can select the desired letter from the list which corresponds to the station name to help narrow the search range.NOTE• You can operate Pandora by using the remote control function. However, you can perform only play, pause, and skip operations.](https://usermanual.wiki/JVCKENWOOD/J5175.05-SHORT-TERM-CONFIDENTIAL-User-Manual-DDX-DMX/User-Guide-3734690-Page-29.png)
![APPS—Android Auto™/Apple CarPlay30 Ñ Creates a new station1 Touch [ ].2 Touch your desired item. ■Create station from artistCreates a new station based on the artist who is playing now. ■Create station from trackCreates a new station based on the song being played. ■Create station from genreDisplays the genre list screen.Genre list screen1 Touch [Create station from genre].2 The selected genre is created as a new station.About Pandora®NOTE• In the application on your device, log in and create an account with Pandora. (If you are not already a registered user, an account can also be created at www.pandora.com.)• Establish an Internet connection.• Pandora is only available in certain countries. Please visit http://www.pandora.com/legal for more information.• Because Pandora® is a third-party service, the specifications are subject to change without prior notice. Accordingly, compatibility may be impaired or some or all of the services may become unavailable.• Some functions of Pandora® cannot be operated from this unit.• For issues on using the application, please contact Pandora® at pandora-support@pandora.com.](https://usermanual.wiki/JVCKENWOOD/J5175.05-SHORT-TERM-CONFIDENTIAL-User-Manual-DDX-DMX/User-Guide-3734690-Page-30.png)
![USB31EnglishUSBConnecting a USB device1 Connect the USB device with the USB cable. (P.94)2 Press the [HOME] button.3 Touch .4 Touch [USB]. (P.12) Ñ Disconnect the USB device1 Press the [HOME] button.2 Touch a source other than [USB]. 3 Detach the USB device. Ñ Usable USB deviceYou can use a mass-storage-class USB device with this unit. The word “USB device” appearing in this manual indicates a flash memory device. ●About the file systemThe file system should be the one of the following.• FAT16 • FAT32 • exFAT • NTFSNOTE• Install the USB device in the place where it will not affect safe driving.• You cannot connect a USB device via a USB hub and Multi Card Reader.• Take backups of the audio files used with this unit. The files can be erased depending on the operating conditions of the USB device.We shall have no compensation for any damage arising from any erased data.USB Basic OperationMost functions can be controlled from the source control screen and playback screen.NOTE• Set the remote controller mode switch to AUD mode before starting operation, see Switch the operation mode (P.85).Control screen7435216Open the drawer57Close the drawer57681 [CODEC / ] / [ ]• When a high-resolution source is played, its format information is displayed.• [] : Repeats the current track/folder. Each time you touch the key, repeat modes are switched in the following sequence:File repeat ( ), Folder repeat ( ), Repeat all ( )• [] : Randomly plays all tracks in the current folder. Each time you touch the key, random modes are switched in the following sequence:File random ( ), Random off ( )](https://usermanual.wiki/JVCKENWOOD/J5175.05-SHORT-TERM-CONFIDENTIAL-User-Manual-DDX-DMX/User-Guide-3734690-Page-31.png)
![USB322 Track informationDisplays the information on the current file.Only a file name and a folder name are displayed if there is no tag information.3 Play mode indicator/ Playing time• D, B, etc.: Current play mode indicatorMeanings of individual icons are as follows:D (play), B (fast forward), A (fast backward), H (pause).4 Operation keys• 1] : Searches track/file. For details on search operation, see Search Operation (P.33).• E] [F] : Searches the previous/next track/file.Touch and hold to fast forward or fast backward. (It will be cancelled automatically after about 50 seconds.)• [DH] : Plays or pauses.• [] : Displays the Graphic Equalizer screen. (P.80)5 Content list• Touch the right side of the screen to display the Content list. Touch again to close the list.• Displays the playing list. When you touch a track/file name on the list, playback will start.6 Artwork• Displays/hides artwork area.• The jacket of the currently playing file is displayed.7 Function panelTouch the left side of the screen to display the function panel. Touch again to close the panel.• [] [ ] : Searches for the previous/next folder.• [USB DEVICE CHANGE]: Switches to another USB device when two USB devices are connected.8 Indicator Items• [VIDEO]: Identifies the video file.• [MUSIC]: Identifies the music file.Video screen10999 File search area (Video file only)Touch to search for the next/previous file.10 Key display area (Video file only)Touch to display the control screen.](https://usermanual.wiki/JVCKENWOOD/J5175.05-SHORT-TERM-CONFIDENTIAL-User-Manual-DDX-DMX/User-Guide-3734690-Page-32.png)
![USB33EnglishSearch OperationYou can search music or video files by the following operations.1 Touch [1].2 Touch [S].3 Select a list type.NOTE• For operations on the list screen, see List screen (P.14). Ñ Category searchYou can search for a file by selecting a category.1 Touch [Category List].2 Select whether you search audio files or video files .3 Touch the desired category. The list corresponding to your selection appears.4 Touch to select the desired item in the list. Repeat this step until you find the desired file. Ñ Link searchYou can search for a file of the same artist/album/genre as that in the current track.1 Touch [Link Search].2 Touch the desired tag type. You can select from artists, albums and genres. The list corresponding to your selection appears.3 Touch the desired item in the content list. Ñ Folder searchYou can search for a file according to hierarchy.1 Touch [Folder List].2 Touch the desired folder.When you touch a folder its contents are displayed.3 Touch to select your desired item in the list. Repeat this step until you find the desired file.](https://usermanual.wiki/JVCKENWOOD/J5175.05-SHORT-TERM-CONFIDENTIAL-User-Manual-DDX-DMX/User-Guide-3734690-Page-33.png)
![iPod/iPhone34iPod/iPhonePreparation Ñ Connectable iPod/iPhoneThe following models can be connected to this unit.Made for• iPhone 7 Plus• iPhone 7• iPhone SE• iPhone 6s Plus• iPhone 6s• iPhone 6 Plus• iPhone 6• iPhone 5s• iPhone 5c• iPhone 5• iPod touch (6th generation)• iPod touch (5th generation)NOTE• Latest compatible list of iPod/iPhone. For details, see www.kenwood.com/cs/ce/ipod/.• By connecting your iPod/iPhone to this unit with the iPod connection cable KCA-iP103 (optional accessory), you can supply power to your iPod/iPhone as well as charge it while playing music. Note that the power of this unit must be held on.• If you restart playback after connecting the iPod, the music that has been played by the iPod is played first. Ñ Connect iPod/iPhoneWired connectionPreparation• Connect an iPod/iPhone with the KCA-iP103 (optional accessory) while CarPlay is not connected.• With a CarPlay-capable iPhone, turn off CarPlay by operating the iPhone at functional setup before connecting iPhone. For details of the setup method, contact the manufacturer of the terminal.• Plug the iPod/iPhone into the gray USB terminal with the KCA-iP103 (optional accessory).• Only one iPod/iPhone can be connected.1 Connect the iPod/iPhone using the KCA-iP103. (P.95)2 Press the [HOME] button.3 Touch [ ].4 Touch [iPod]. (P.12) ●To disconnect the iPod/iPhone connected with the cable:1 Detach the iPod/iPhone.Bluetooth connectionPair the iPhone through Bluetooth.Preparation• To connect an iPhone via Bluetooth, register it as a Bluetooth device and do the profile setting for the connection beforehand. See Register the Bluetooth device (P.59) and Connect the Bluetooth device (P.60).• Connect an iPhone via Bluetooth while CarPlay and an iPod/iPhone are not connected via USB.](https://usermanual.wiki/JVCKENWOOD/J5175.05-SHORT-TERM-CONFIDENTIAL-User-Manual-DDX-DMX/User-Guide-3734690-Page-34.png)
![iPod/iPhone35EnglishiPod/iPhone Basic OperationNOTE• Set the remote controller mode switch to AUD mode before starting operation, see Switch the operation mode (P.85).Control screen42351Open the drawer652Close the drawer5721 Track information• Displays the information on the current file.• Touch to display the category list screen. See Category search (P.36).2 Artwork• Displays/hides artwork area.• The jacket of the currently being played file is displayed.3 Play mode indicator/ Playing time• D, B, etc.: Current play mode indicatorMeanings of individual icons are as follows:D (play), B (fast forward), A (fast backward), H (pause).4 Operation keys• 1] : Searches for a track/file. For details on search operation, see Search Operation (P.36).• E] [F] : Searches for the previous/next track/file.Touch and hold to fast forward or fast backward. (It will be cancelled automatically after about 50 seconds.)• [DH] : Plays or pauses.• [] : Displays the Graphic Equalizer screen. (P.80)5 Content list• Touch the right side of the screen to display the Content list. Touch again to close the list.• Displays the playing list. When you touch a track/file name on the list, playback will start.6 [ ] / [ ]• [] : Repeats the current track/album. Each time you touch the key, repeat modes are switched in the following sequence:Song repeat ( ), All songs repeat ( ), Repeat off ( )• [] : Randomly plays all tracks in the current album. Each time you touch the key, random modes are switched in the following sequence:Song random ( ), Random off ( )7 Indicator Items• [MUSIC]: Identifies the music file.](https://usermanual.wiki/JVCKENWOOD/J5175.05-SHORT-TERM-CONFIDENTIAL-User-Manual-DDX-DMX/User-Guide-3734690-Page-35.png)
![iPod/iPhone36Search OperationYou can search music files by the following operations.1 Touch [1].2 Touch [S].3 Select a list type.NOTE• For operations on the list screen, see List screen (P.14). Ñ Category searchYou can search for a file by selecting a category.1 Touch [Category List].2 Touch the desired category. The list corresponding to your selection appears.3 Touch to select the desired item in the list. Repeat this step until you find the desired file. Ñ Link searchYou can search for a file of the same artist/album/genre/composer as that in the current track.1 Touch [Link Search].2 Touch the desired tag type. You can select from artists, albums, genres and composers. The list corresponding to your selection appears.3 Touch the desired item in the content list.](https://usermanual.wiki/JVCKENWOOD/J5175.05-SHORT-TERM-CONFIDENTIAL-User-Manual-DDX-DMX/User-Guide-3734690-Page-36.png)
![Radio 37EnglishRadio (DDX9018BTS) Radio Basic OperationMost functions can be controlled from the source control screen.To listen to the Radio source, touch [Radio] icon on the source selection screen. (P.12)NOTE• Set the remote control mode switch to AUD mode before starting operation, see Switch the operation mode (P.85).Control screen234156Open the drawer46Close the drawer7641 Information displayDisplays the information on the current station: FrequencyTouching [] allows you to switch between Content A and Content B.Content A: PS name, Radio Text, Title & ArtistContent B: PTY Genre, Radio Text plusPreset#: Preset number2 Seek modeTouch to switch seek mode in the following sequence: [AUTO1], [AUTO2], [MANUAL].• [AUTO1]: Tunes in a station with good reception automatically.• [AUTO2]: Tunes in the memorized stations one after another.• [MANUAL]: Switches to the next frequency manually.3 Operation keys• [E] [F] : Tunes in a station. The method of switching frequencies can be changed (see 2 Seek mode).• [] : Displays the Graphic Equalizer screen. (P.80)4 Preset list• Touching [ ]/ [ ] allows you to change the display size.• Recalls the memorized station.• When touched for 2 seconds, stores the currently being received station in the memory.5 Band buttonsSwitches bands (between FM and AM).6 Function panelTouch the left side of the screen to display the function panel. Touch again to close the panel. • [TI] (FM only) : Selects the traffic information mode. For details, see Traffic Information (P.39).• [AME] : Presets stations automatically. For details, see Auto memory (P.38).• [PTY] (FM only) : Searches for a program by program type. For details, see Search by program type (P.39).• [MONO] (FM only) : Selects the Monaural reception mode.](https://usermanual.wiki/JVCKENWOOD/J5175.05-SHORT-TERM-CONFIDENTIAL-User-Manual-DDX-DMX/User-Guide-3734690-Page-37.png)
![Radio 387 Indicator Items• [ST]: A stereo broadcast is being received.• [MONO]: The forced monaural function is active.• [TI]: Indicates the reception state of traffic information.White: TP is being received.Orange: TP is not being received.Memory Operation Ñ Auto memoryYou can store stations with good reception in the memory automatically.1 Touch desired band key.2 Touch [ ] on the left side of the screen. Touch [AME].3 Touch [Ye s ]. Auto memory starts. Ñ Manual memoryYou can store the currently being received station in the memory.1 Select the station you wish to store in the memory.2 Touch [FM#] (#:1-15) or [AM#] (#:1-5) in which you want to store the station for 2 seconds until a beep sounds.](https://usermanual.wiki/JVCKENWOOD/J5175.05-SHORT-TERM-CONFIDENTIAL-User-Manual-DDX-DMX/User-Guide-3734690-Page-38.png)
![Radio 39EnglishSelecting Operation Ñ Preset selectYou can list and select memorized stations.1 Touch [ ] on the right side of the screen. Select a station from the list. Ñ Search by program type (FM only)You can tune in the station broadcasting the specified type of program when listening to FM.1 Touch [ ] on the left side of the screen. Touch [PTY]. TUNER PTY Mode screen appears.2 Select a program type from the list.3 Touch [Search].You can search for the station broadcasting the selected type of program.Traffic Information (FM only)You can listen to and watch traffic information automatically when a traffic bulletin starts. However, this feature requires a Radio Broadcast Data System that includes TI information.1 Touch [ ] on the left side of the screen. Touch [TI]. Traffic information mode is set. Ñ When the traffic bulletin startsThe Traffic Information screen appears automatically.NOTE• It is necessary to turn on the Traffic Information function in order to allow the Traffic Information screen to appear automatically.• The volume setting made during reception of traffic information is automatically memorized. When the traffic information is received next time, this unit recalls the volume setting automatically.](https://usermanual.wiki/JVCKENWOOD/J5175.05-SHORT-TERM-CONFIDENTIAL-User-Manual-DDX-DMX/User-Guide-3734690-Page-39.png)
![HD Radio™ Tuner 40HD Radio™ Tuner (DDX9905S/ DDX9705S/ DMX905S) HD Radio Tuner Basic OperationMost functions can be controlled from the source control screen.To listen to the HD Radio source, touch [HD Radio] icon on the source selection screen. (P.12)NOTE• Set the remote control mode switch to AUD mode before starting operation, see Switch the operation mode (P.85).• HD Radio broadcasting is for North American sales area only.• The screen shot below is for tuner. It may be different from the one for HD Radio broadcasting.Control screen432561Open the drawer46Close the drawer3768491 Information displayDisplays the information on the current station: Frequency and ChannelTouching [] allows you to switch between Content A, Content B and Content C.Content A: Station name, Song Title, Artist NameContent B: Station Message, Radio TextContent C: PTY Genre, Album Name2 Seek modeTouch to switch seek mode in the following sequence: [AUTO1], [AUTO2], [MANUAL].• [AUTO1]: Tunes in a station with good reception automatically.• [AUTO2]: Tunes in the memorized stations one after another.• [MANUAL]: Switches to the next frequency manually.3 Picture• Displays/hides picture area.• The picture data or station Logo data is displayed if available from current content. 4 Function panelTouch the left side of the screen to display the function panel. Touch again to close the panel. • [10key Direct]: Display the direct station/ channel search screen. For details, see Direct search (P.43).• [AME]: Presets stations automatically. For details, see Auto memory (P.42).• [RCV]: Change the HD Radio reception mode. For details, see Receive Mode (P.42).• [PTY] (FM only): Searches for a program by program type. For details, see Search by program type (P.43).• [] : Stores the information about the song being received. See Bookmark (P.44).• [Emergency Alerts] : Turn on or off the alert message. See Alert Message (P.45).• [Alert Message Log] : Displays the alert message received. See Alert Message (P.45).](https://usermanual.wiki/JVCKENWOOD/J5175.05-SHORT-TERM-CONFIDENTIAL-User-Manual-DDX-DMX/User-Guide-3734690-Page-40.png)
![HD Radio™ Tuner 41English5 Operation keys• [E] [F] : Tunes in a station. The method of switching frequencies can be changed (see 2 Seek mode).• [CHS] [CHR] : Selects a channel.• [1] : Display the Channel List screen. See Channel search (P.43).• [ ] : Display a list of registered bookmarks. See Bookmark list (P.44).• [] : Displays the Graphic Equalizer screen. (P.80)6 Preset list• Touching [ ]/ [ ] allows you to change the display size.• Recalls the memorized station or channel. • When touched for 2 seconds, stores the currently being received station or channel in the memory.7 Indicator displayWhile receiving an HD Radio station, it lights with orange when the audio is digital and lights with gray when it is analog. While receiving an analog station, it is off.8 Band buttonsSwitches bands (between FM and AM).9 Indicator Items• [MC]: A multicast digital broadcast is being received.• [ANALOG]: An analog broadcast is being received.• [DIGITAL]: A digital broadcast is being received.• [ST]: A stereo broadcast is being received.• [EA]: White: Emergency Alert is on.No light: Emergency Alert is off.Orange: Interrupting or in snooze/ignore state.• Adjacent to traditional main stations are HD2/HD3 Channels, providing new original programming on the FM dial• A music & product discovery feature that enables users to store information about content on the radio, and can deliver interactive information via QR codes• Crystal clear, CD-like digital audio quality to consumers; eliminates background noise• Provides song name, artist, station ID, and other relevant data to enrich the listening experience• Visual images, such as album art of over-the-air broadcasts from HD Radio stations• Delivers critical and life-saving messages to the public during emergency situations](https://usermanual.wiki/JVCKENWOOD/J5175.05-SHORT-TERM-CONFIDENTIAL-User-Manual-DDX-DMX/User-Guide-3734690-Page-41.png)
![HD Radio™ Tuner 42Receive ModeYou can set the radio broadcasts receive mode.1 Touch [ ] on the left side of the screen. Touch [RCV].2 Select a receive mode. ■[Auto]Switch between digital and analog audio automatically. ■[Digital]Select this to tune to digital audio only. ■[Analog]Select this to tune to analog audio only.Memory Operation Ñ Auto memoryYou can store stations with good reception in the memory automatically.1 Touch desired band key.2 Touch [ ] on the left side of the screen. Touch [AME].3 Touch [Ye s ]. Auto memory starts. Ñ Manual memoryYou can store the currently being received station or channel in the memory.1 Select the station or channel you wish to store in the memory.2 Touch [FM#] (#:1-15) or [AM#] (#:1-5) in which you want to store the station or channel for 2 seconds until a beep sounds.Selecting Operation Ñ Preset selectYou can list and select memorized stations or channels.1 Touch [ ] on the right side of the screen. Select a station or channel from the list.](https://usermanual.wiki/JVCKENWOOD/J5175.05-SHORT-TERM-CONFIDENTIAL-User-Manual-DDX-DMX/User-Guide-3734690-Page-42.png)
![HD Radio™ Tuner 43English Ñ Direct searchYou can tune in by entering the desired frequency or channel number.1 Touch [ ] on the left side of the screen. Touch [10key Direct].2 Select the search method.3 Enter the frequency or channel number.4 Touch [Enter].NOTE• To clear the number you entered, touch [BS]. Ñ Channel searchYou can specify the desired channel.1 Touch [1].2 Select the desired content from the list.NOTE• Touch [Info Change] in the channel list. Select the sequence of the list (Song title, artist name, album name). Ñ Search by program type (FM only)You can tune in the station broadcasting the specified type of program when listening to FM.1 Touch [ ] on the left side of the screen. Touch [PTY]. TUNER PTY Mode screen appears.2 Select a program type from the list.3 Touch [Search].You can search for the station broadcasting the selected type of program.](https://usermanual.wiki/JVCKENWOOD/J5175.05-SHORT-TERM-CONFIDENTIAL-User-Manual-DDX-DMX/User-Guide-3734690-Page-43.png)
![HD Radio™ Tuner 44BookmarkStores tag information (title, artist, album, URL, and description) about the song you are listening to now.Detailed information and QR codes can be displayed according to the stored tag information. Ñ Bookmark registration1 Touch [ ] on the left side of the screen. Touch []. Registers a bookmark.NOTE• Up to 100 bookmarks can be registered to this unit. Ñ Bookmark listDisplaying a list of registered bookmarks and detailed information and QR code of the song.1 Touch [ ].2 Select the desired bookmark from the list. The bookmark information appears. ■[ Delete]Deletes the bookmarks being displayed.Bookmark deleteDeleting a bookmark.1 Touch [Delete].2 Select the bookmark to delete from the list. ■[þ All]Select all bookmarks. ■[¨ All]Erases all check marks.3 Touch [Delete]. Confirmation message appears.4 Touch [Ye s ]. Deletes all the selected bookmark(s).](https://usermanual.wiki/JVCKENWOOD/J5175.05-SHORT-TERM-CONFIDENTIAL-User-Manual-DDX-DMX/User-Guide-3734690-Page-44.png)
![HD Radio™ Tuner 45EnglishAlert MessageThis function is to receive alert messages. First, you need to turn on the “Emergency Alerts”. (P.40) Ñ When an Alert Message comes[Snooze]The alert message is erased. Same alert message cannot be displayed for next 10 minutes.[Ignore]The alert message is erased. Same alert message cannot be displayed for next 12 hours.[Allow Alert]Touch to tune to that channel of HD Radio source. Ñ Display of the received Alert MessageYou can read the received alert message afterward.1 Touch [ ] on the left side of the screen. Touch [Alert Message Log].2 Select the desired Alert Message from the list. The Alert Message appears.3 Touch [Close].](https://usermanual.wiki/JVCKENWOOD/J5175.05-SHORT-TERM-CONFIDENTIAL-User-Manual-DDX-DMX/User-Guide-3734690-Page-45.png)
![SiriusXM® 46SiriusXM® (DDX9905S/ DDX9705S/ DMX905S) SiriusXM® Basic OperationOnly SiriusXM® brings you more of what you love to listen to, all in one place. Get over 140 channels, including commercial-free music plus the best sports, news, talk, comedy and entertainment. Welcome to the world of satellite radio. A SiriusXM Vehicle Tuner and Subscription are required. For more information, visit www.siriusxm.com.To listen to the SiriusXM source, touch the [SiriusXM] icon on the source selection screen. (P.12)Activating subscription• Check your Radio ID.The SiriusXM Satellite Radio ID is required for activation and can be found by tuning in Channel 0 as well as on the label found on the SiriusXM Connect tuner and its package.The Radio ID does not include the letters I, O, S or F.• Activate the SiriusXM Connect Vehicle Tuner using either one of the two methods below: – For users in U.S.A. Online: Visit www.siriusxm.com/activatenow Phone: Call SiriusXM Listener Care at 1-866-635-2349 – For users in Canada: Online: Visit http://www.siriusxm.ca/help/activation-help/ Phone: Call XM customer Care at 1-877-438-9677NOTE• Set the remote control mode switch to AUD mode before starting operation, see Switch the operation mode (P.85).• To use SiriusXM® Satellite Radio, the optional accessory is necessary.Control screen273154Open the drawer57Close the drawer65731 Information displayDisplays the information on the current channel: Channel NameP#: Preset number#CH: Channel numberLogo: Channel logoTouching [] allows you to switch between Content A, Content B and Content C. Content A: Artist Name, Song TitleContent B: Content Info, Category NameContent C: Channel Description, Similar Channels[ ] : Touch for 2 seconds to register the artist of the current song as a Content Alert.[ ] : Touch for 2 seconds to register the current song as a Content Alert.For details, see Content Alerts (P.51).](https://usermanual.wiki/JVCKENWOOD/J5175.05-SHORT-TERM-CONFIDENTIAL-User-Manual-DDX-DMX/User-Guide-3734690-Page-46.png)
![SiriusXM® 47English2 Band buttonSwitches among bands. (SXM1/ SXM2/ SXM3/ SXM4)3 Artwork• Displays/hides artwork area.• Displays the album artwork for most SiriusXM music channels4 Operation keys• [1] : Display the Category search screen. For details on search operation, see Category/Channel search (P.49).• DH] : Plays or pauses. See Replay (P.49).• [CHS] [CHR] : Selects a channel.• [] : Displays the Graphic Equalizer screen. (P.80)5 Preset list• Touching [ ]/ [ ] allows you to change the display size.• Recalls the memorized channel. • When touched for 2 seconds, stores the currently being received channel in the memory.6 Indicator displayDisplays the “Mix” (TuneMix™), “Scan” (TuneScan™), (Traffic&Weather), or (SportsFlash™) indicator and the received signal strength of the SiriusXM tuner.7 Function panelTouch the left side of the screen to display the function panel. Touch again to close the panel. • [Direct Channel]: Touch and enter the desired number. For details, see Direct search (P.48).• [SETUP]: Touch to display the SiriusXM SETUP screen. For details, see SiriusXM Setup (P.52).• [Replay]/ [Live]: Touch to turn on or off the replay mode. See Replay (P.49).• [Traffic & Weather]For SXV300 *1Traffic & Weather Now™ allows you to access the latest report whenever you want to hear it. Select your city from the set up menu Select a City for Traffic & Weather (P.57) and press the [Traffic & Weather] button to check the latest report. It will start from the beginning.• (White) : Played already.• (Green) : New information has arrived. • (Purple) : Playing. • (Gray) : No information.For SXV200 or SXV100 *2Turns the Traffic & Weather Jump function on or off.• (White) : Function on.• (Purple) : Playing. • (Gray) : Function off.• [TuneScan]*3 : Allows you to hear a few seconds of songs from each of the SmartFavorite music channels on the current preset band. See TuneScan™ (P.50).• [TuneMix]*4 : When turned ON, shuffles the preset channels on P1-P6 to play a blend of songs from your favorite channels. See TuneMix™ (P.50).• [SportsFlash]*4 :Displays during SportsFlash™. Touch to cancel the SportsFlash™ function and return to the previous channel. See SportsFlash™ (P.52) and SportsFlash™ setup (P.56). *1 Compatible with SXV300 or later tuner models. It may take a few minutes after power on to get the first full report on your city. Traffic channels are not available in Canada. *2 When SXV200 or SXV100 is connected with this unit.*3 Compatible with SXV200 or later tuner models.*4 Compatible with SXV300 or later tuner models.](https://usermanual.wiki/JVCKENWOOD/J5175.05-SHORT-TERM-CONFIDENTIAL-User-Manual-DDX-DMX/User-Guide-3734690-Page-47.png)
![SiriusXM® 48Storing Channels in Preset MemoryYou can store the current channel in memory.1 Tune in the channel you wish to store in the memory.2 Touch [ ] on the right side of the screen.3 Touch [SXM(1-4) P(1-6)] in which you want to store the channel for 2 seconds until a beep sounds.Preset selectYou can list and select memorized channels.To select from the preset list1 Touch [ ] on the right side of the screen. Select a channel from the list.Direct searchYou can tune in a channel directly.1 Touch [ ] on the left side of the screen. Touch [Direct Channel].2 Enter the channel number and touch [Enter].NOTE• To clear the number you entered, touch [BS].](https://usermanual.wiki/JVCKENWOOD/J5175.05-SHORT-TERM-CONFIDENTIAL-User-Manual-DDX-DMX/User-Guide-3734690-Page-48.png)
![SiriusXM® 49EnglishCategory/Channel searchYou can specify the desired category and select a channel.1 Touch [1].2 Select a category. Channel list appears.3 Select the desired content from the list.NOTE• All channels in the selected category appear.• Touching [All-Channels] displays all channels.• Touch [Info Change] in the channel list. Select a desired item.Content info, channel name, artist name, song title, category name• Categories which have the prefix “Featured - “ are Featured Favorites.• Featured Favorites are groups of channels that are created by the SiriusXM Programming department allowing you to discover new channels. Featured Favorite channels are dynamic and can change often, allowing you to discover new channels. – You can set whether to be notified when the featured seasonal theme is updated. (P.57)ReplayYou can replay the last 60 minutes of the program from the current channel.1 Touch [L] or [Replay] on the function panel. ■[E] [F]Press to skip to the previous/next track.Press and hold to rewind or fast forward. (It will be cancelled automatically after about 50 seconds.) ■[DH]Plays or pauses. ■Replay time bar/ Play mode indicatorDisplays the recorded data capacity and playback position.D, B, etc.: Current play mode indicator ■[1]Displays a list of recorded data on a program basis.2 Touch [1] to display an Instant Replay List screen. ■Instant Replay ListTouching this plays back the displayed program.[LIVE]: Touch to return to the live music/content.](https://usermanual.wiki/JVCKENWOOD/J5175.05-SHORT-TERM-CONFIDENTIAL-User-Manual-DDX-DMX/User-Guide-3734690-Page-49.png)
![SiriusXM® 50 ■[Info Change]Touch [Info Change]. Select a desired item.Content info, channel name, artist name, song title, category nameTo return to live music/content1 Touch the left side of the screen.2 Touch [Live].TuneMix™TuneMix™ plays a unique blend of songs from your Preset music channels of the current SiriusXM Preset Band, allowing you to build a custom channel from as few as two to as many as 6 music channels. You can even skip songs you don’t want to hear.1 Touch [ ] on the left side of the screen. Touch [TuneMix] to set ON or OFF.NOTE• Compatible with SXV300 or later tuner models. SmartFavorites, TuneStart™Preset channels 1 through 6 of the current band are SmartFavorites channels.The SiriusXM Vehicle Tuner automatically buffers the broadcast audio content of the SmartFavorites channels in the background.You can rewind and replay up to 30 minutes of any of the missed news, talk, sports or music content on SmartFavorites channels. (see Replay (P.49))When tuning in a SmartFavorites channel, songs will be played from the beginning of each track (TuneStart™). You can enable/disable TuneStart. (see TuneStart™ (P.57)) NOTE• Compatible with SXV200 or later tuner models.TuneScan™TuneScan™ is a feature that plays samples from the starts of multiple buffered songs from each of the SmartFavorites channels that predominantly play music selections.You have easy access to a large sampling of music content and can enjoy hearing a full song by stopping the scan on a song of interest. 1 Touch [ ] on the left side of the screen.2 Touch [TuneScan] to begin scanning your SmartFavorites channels.You will hear a few seconds of the songs from each of the SmartFavorite channels.3 While your favorite song is being played, touch [TuneScan] again to start listening to that song. Scan finishes and the song is played continuously.NOTE• To cancel TuneScan™, touch the left side of the screen. Touch [TuneScan].• Touch and hold [TuneScan] to cancel TuneScan, and the music/content which was present on the channel before starting TuneScan will be played. • Compatible with SXV200 or later tuner models.](https://usermanual.wiki/JVCKENWOOD/J5175.05-SHORT-TERM-CONFIDENTIAL-User-Manual-DDX-DMX/User-Guide-3734690-Page-50.png)
![SiriusXM® 51EnglishTraffic & Weather Now™Traffic & Weather Now™ allows you to access the latest report whenever you want to hear it. Select your city in the set up menu Select a City for Traffic & Weather (P.57). 1 Touch [ ] on the left side of the screen.2 Touch [Traffic & Weather].The report starts from the beginning. To stop and return to the previous channel, touch it again.Indicator display• (White) : Played already.• (Green) : New information arrived.• (Purple) : Playing.• (Gray) : No information.NOTE• Compatible with SXV300 or later tuner models. Content AlertsWhen a broadcast program related to the registered artist, song or team starts, an Alert Content List screen appears to allow you to switch the current channel to the relevant channel.1 When the broadcast of the registered content starts, an Alert Content List screen appears.2 Select a content from the list.NOTE• Touch [Info Change]. Select a desired item.Artist Alert, Song Alert, GameAlert™• To learn how to register artists and songs for the Content Alert function, see 1 Information display in SiriusXM® Basic Operation (P.46).• To learn how to set up the Content Alerts function and select Teams for alerts, see Content Alerts setup (P.54).](https://usermanual.wiki/JVCKENWOOD/J5175.05-SHORT-TERM-CONFIDENTIAL-User-Manual-DDX-DMX/User-Guide-3734690-Page-51.png)
![SiriusXM® 52SportsFlash™SportsFlash™ will notify you when a big play happens during a game with one of your favorite sports teams. Choose to tune in and hear the play unfold like it was live. Continue listening to the game or return to your previous channel.1 When a big play happens during one of the games, an Alert screen appears. ■[Jump]Touch to tune in that channel and play back the big play. ■[Ignore]Touch to cancel this specific SportsFlash alert. Touching [Ignore] will ignore this specific alert but will allow future alerts for this game. ■[Cancel]Touch to cancel SportsFlash alert. No alerts for this game will be displayed afterward.NOTE• Compatible with SXV300 or later tuner models.• To learn how to set up the SportsFlash alert function, see SportsFlash™ setup (P.56). SiriusXM Setup1 Touch [ ] on the left side of the screen. Touch [SETUP]. SiriusXM SETUP screen appears.See the following sections for each setting.• Set up the parental code (P.53)• Set up the Parental Control (P.53)• Set up the skip channel select (P.54)• Set up the Content Alerts (P.54)• Set up the teams for SportsFlash™ (P.56)• Select the city for Traffic & Weather Jump or Traffic & Weather Now™ (P.57)• Select the Featured Bands Update Messages (P.57)• Set up the TuneStart™ (P.57)• Reset to the default settings (P.57)](https://usermanual.wiki/JVCKENWOOD/J5175.05-SHORT-TERM-CONFIDENTIAL-User-Manual-DDX-DMX/User-Guide-3734690-Page-52.png)
![SiriusXM® 53English Ñ Parental codeYou can set a SiriusXM parental code for Parental Control.1 Touch [Parental Code] on the SiriusXM SETUP screen. Parental Pass Check screen appears.NOTE• The code number is set to “0000” as default.2 Enter the current code number and touch [Enter]. Parental Pass 1st screen appears.3 Enter the new code number and touch [Enter]. Parental Pass 2nd screen appears.4 Enter the same code number as that you entered in step 3 and touch [Enter]. The code number is confirmed and the SiriusXM parental code is now set. Ñ Parental ControlParental Control is a feature that provides the user with the ability to prevent unauthorized access to mature content and user selected channels.1 Touch [Parental Control] on the SiriusXM SETUP screen.2 Touch [Mature], [User] or [OFF]. ■[OFF]Deactivates the parental mature and user locks. ■[Mature]Locks channels classified as “mature” only. ■[User]Locks only the selected channels.3 Enter the parental code you originally input in as stated in Parental code (P.53) and touch [Enter].When selecting [User]This allows you to limit access to any SiriusXM channel (Parental Lock Channel).1 Touch [Parental Lock Channel Selection] on the SiriusXM SETUP screen. Parental Pass Check screen appears.NOTE• You need to set up a parental code beforehand as stated in Parental code (P.53).2 Enter the parental code you originally input as stated in Parental code (P.53) and touch [Enter]. Parental Lock Category Select screen appears.3 Touch the desired category in the list. Displays all channels in the selected category.](https://usermanual.wiki/JVCKENWOOD/J5175.05-SHORT-TERM-CONFIDENTIAL-User-Manual-DDX-DMX/User-Guide-3734690-Page-53.png)
![SiriusXM® 54NOTE• Touch [All-Channels] to display all channels.• To delete the parental lock channel setting, touch [Disable All] and then touch [YES] on the confirmation screen.4 Touch each channel on the list and set to ON or OFF.[ON]: Locks the channel.[OFF]: Unlocks the channel.NOTE• Touch [Info Change]. Select a desired item.Content information, Channel name, Artist name, Song title, Category name. Ñ Skip channel selectYou can set the undesired channels to skip.1 Touch [Skip Channel Select]. Skip Category Select screen appears.2 Touch the desired category from the list. Displays all channels in the selected category.3 Touch each channel in the list and set to ON or OFF.NOTE• To delete the skip channel setting, touch [Disable All] and then touch [YES] on the confirmation screen.• Touch [Info Change]. Select a desired item.Content information, Channel name, Artist name, Song title, Category name.• Direct Channel and Preset Memory functions allow you to select channels. Ñ Content Alerts setupActivating content alert1 Touch [Content Alerts] on the SiriusXM SETUP screen. Content Alerts is turned on or off. Default is “ON”.Selecting the content for Content Alerts1 Touch [Content Alerts Contents Set] on the SiriusXM SETUP screen.2 Select the content you want to set up.NOTE• To cancel all alert contents, touch [Clear] and then touch [YES] on the confirmation screen.• Select [OFF] for the content you want to deactivate the content alert for.](https://usermanual.wiki/JVCKENWOOD/J5175.05-SHORT-TERM-CONFIDENTIAL-User-Manual-DDX-DMX/User-Guide-3734690-Page-54.png)
![SiriusXM® 55English3 Touch each content list item you want to check or uncheck.NOTE• You can select (þ) up to 60 artists or songs. ●To delete the Artist and Song1 Touch [Delete].2 Touch the content(s) in the list you want to select. ■[þ All]Selects all contents. ■[¨ All]Clears all check marks.3 Touch [Delete] and then touch [YES] on the confirmation screen.To select a TeamGet alerted when your favorite sports team is playing on another SiriusXM channel with GameAlert™1 Touch [My Games].2 Touch the desired league in the list.3 Touch the team(s) in the list you want to select.NOTE• You can select (þ) up to 30 teams.](https://usermanual.wiki/JVCKENWOOD/J5175.05-SHORT-TERM-CONFIDENTIAL-User-Manual-DDX-DMX/User-Guide-3734690-Page-55.png)
![SiriusXM® 56 Ñ SportsFlash™ setupActivating SportsFlash1 Touch [SportsFlash] on the SiriusXM SETUP screen. SportsFlash is turned on or off. Default is “ON”.Selecting SportsFlash Beep1 Touch [SportsFlash Beep] on the SiriusXM SETUP screen. SportsFlash Beep is turned on or off. Default is “ON”.Selecting the teams for SportsFlash1 Touch [SportsFlash Team Set] on the SiriusXM SETUP screen. Team Set screen appears.2 Touch [Edit].3 Touch the desired league in the list.4 Touch each team(s) in the list you want to select.5 Touch [ ] twice. ■[Edit]Sets and removes teams. ■[Priority]Sets the priority of a team. ■[Clear]Removes all teams that have been set. Touch [Clear]. When the confirmation screen appears, touch [YES].NOTE• SportsFlash™ is available on SXV300 or later tuner models. • Up to 50 teams can be added.Set the SportsFlash™ Team Priority1 Touch [Priority].2 Set the priority of a team. Each time you touch a Team, the priority is set of reset.](https://usermanual.wiki/JVCKENWOOD/J5175.05-SHORT-TERM-CONFIDENTIAL-User-Manual-DDX-DMX/User-Guide-3734690-Page-56.png)
![SiriusXM® 57English3 Touch [Done].NOTE• Priority can be set on up to 5 teams. • When priority has already been set for 5 teams, it cannot be set for any other team. Delete an unnecessary team. Ñ Select a City for Traffic & WeatherYou can select a city for which you wish to receive SiriusXM Traffic & Weather broadcasts and hear them from the beginning.1 Touch [Traffic & Weather City Select] on the SiriusXM SETUP screen.2 Touch [T] and [U] to select a city. Ñ Selecting Featured Bands Update MessagesYou can set whether to be notified when the featured seasonal theme is updated.1 Touch [Featured Bands Update Messages] on the SiriusXM SETUP screen.Featured Bands Update Messages is turned on or off.Default is “ON”. Ñ TuneStart™1 Touch [Tune Start] on the SiriusXM SETUP screen.The TuneStart is turned on or off.Default is “ON”. Ñ Reset1 Touch [SiriusXM Reset] on the SiriusXM SETUP screen. Confirmation screen appears.2 Touch [YES]. All SiriusXM settings are reset to defaults.](https://usermanual.wiki/JVCKENWOOD/J5175.05-SHORT-TERM-CONFIDENTIAL-User-Manual-DDX-DMX/User-Guide-3734690-Page-57.png)
![Bluetooth Control59EnglishRegister the Bluetooth deviceIt is necessary to register the Bluetooth audio player or cell-phone in this unit before using the Bluetooth function.You can register up to 10 Bluetooth devices.NOTE• Up to 10 Bluetooth devices can be registered. If an attempt is made to register the 11th Bluetooth device, the Bluetooth device connected on the earliest date will be deleted to register the 11th one.• This unit is compatible with the Apple Easy Pairing function. When an iPod touch or iPhone is connected to this unit, an authentication dialog appears. Performing operation for authentication on this unit or iOS smartphone registers the smartphone as a Bluetooth device.1 Search for the unit (“DDX****”/ “DMX****”) from your smartphone/cell-phone.Complete steps 1 to 4 within 30 seconds.2 Operate your smartphone/cell-phone according to the displayed messages. ●Confirm the request both on the smartphone/cell-phone. ●Input the PIN Code in your smartphone/cell-phone.PIN Code is set to “0000” as the default.3 Select the function you want to use. ■HFP [Hands Free1]/ [Hands Free2]/ [No Connection.]Select the hands-free number to connect. ■A2DP/SPP [Audio/App]Select if you want to use the audio player app in your smartphone over A2DP, and the other apps in your smartphone over SPP. ■PBAP [Phonebook DL]Select if you want to transfer your phonebook data.4 Touch [Ye s ].When data transmission and connection have completed, the Bluetooth connection icon appears on the screen.Bluetooth Setup1 Press the [MENU] button. Popup menu appears.2 Touch [SETUP]. SETUP Menu screen appears.3 Touch [Bluetooth]. Bluetooth SETUP screen appears.See the following section for each setting.• Connect the Bluetooth device (P.60)• Change the PIN Code (P.61)• Change the device name (P.61)](https://usermanual.wiki/JVCKENWOOD/J5175.05-SHORT-TERM-CONFIDENTIAL-User-Manual-DDX-DMX/User-Guide-3734690-Page-59.png)
![Bluetooth Control60 Ñ Connect the Bluetooth device1 Touch [Select Device] on the Bluetooth SETUP screen.2 Touch the name of the device you want to connect. Profile select screen appears.NOTE• If the icon is lighted, it means that the unit will use that device.3 Set each profile as follows. ■[TEL (HFP) 1], [TEL (HFP) 2]Select when the device is connected with the unit as hands-free phone 1 or 2. ■[Audio (A2DP)/App (SPP)]Select to interwork with an application installed in a smartphone or to use as an audio player.4 Touch [Close].To delete the registered Bluetooth device1 Touch [Delete].2 Touch the device name to check. ■[þ All]Selects all Bluetooth devices. ■[¨ All]Clears all check marks.3 Touch [Delete]. Confirmation message appears.4 Touch [Ye s ].](https://usermanual.wiki/JVCKENWOOD/J5175.05-SHORT-TERM-CONFIDENTIAL-User-Manual-DDX-DMX/User-Guide-3734690-Page-60.png)
![Bluetooth Control61English Ñ Change the PIN Code1 Touch [PIN Code] on the Bluetooth SETUP screen. Change PIN Code screen appears.2 Touch and hold [ ].3 Input the PIN Code.4 Touch [SET]. Ñ Change the device name1 Touch [Device Name] on the Bluetooth SETUP screen. Change Device Name screen appears.2 Touch and hold [ ].3 Input the device name.4 Touch [Enter].Playing the Bluetooth Audio DeviceMost function can be controlled from the source control screen.To select Bluetooth source, touch [Bluetooth] icon on the source selection screen. (P.12) Ñ Bluetooth basic operationControl screen3456211 [ ] / [ ]• [] : Repeats the current track/folder. Each time you touch the key, repeat modes are switched in the following sequence:File repeat ( ), Folder repeat ( ), All songs repeat ( ), Repeat off ( )• [] : Randomly plays all tracks in the current folder. Each time you touch the key, random modes are switched in the following sequence:Folder random ( ), All random ( ), Random off ( )2 Information display *• Displays the name of track information. • Connected device name.3 Operation keys *• [1]: Searches for a file. See File search (P.63).• [E] [F]: Searches for the previous/next content.Touch and hold to fast forward or fast backward. (It will be cancelled automatically after about 50 seconds.)• [D]: Plays.• [H]: Pauses.• []: Displays the Bluetooth SETUP screen.• [] : Displays the Graphic Equalizer screen. (P.80)](https://usermanual.wiki/JVCKENWOOD/J5175.05-SHORT-TERM-CONFIDENTIAL-User-Manual-DDX-DMX/User-Guide-3734690-Page-61.png)
![Bluetooth Control624 Play mode indicator/ Playing timeD, H: Current play mode indicatorMeanings of individual icons are as follows:D (play), B (fast forward), A (fast backward), H (pause), I (stop).5 Artwork• Displays/hides artwork area.• The jacket of the currently playing file is displayed.6 KENWOOD Music MixBluetooth audio devices can be switched easily to play music. See KENWOOD Music Mix (P.62).* These items appear only when the audio player which supports AVRCP profile is connected.NOTE• The operation buttons, indications and information displayed on the screen differ depending on the connected device.• If the operation keys do not appear, operate from the player.• Depending on your cell-phone or audio player, sound may be heard and controlled but text information may not appear.• If the volume is too low, raise it on your cell-phone or audio player. Ñ KENWOOD Music MixUp to five Bluetooth audio device can be connected and switched easily to play music.1 Touch [ ]. A list of registered devices is displayed.2 Touch [ ] of device name you want to connect.• Touching [] displays the Bluetooth device connection setup screen. (P.60)• Touching [] on the left of the connected device ( ) disconnects this device.• : Device used normally.• : Device used for KENWOOD MusicMix3 Touch [ ] (white) on the left of the name of the device to be played.[] (white) changes to [ ] (purple) and starts playback.• (Gray) : Not connected.• (White) : Connected.• (Purple) : During playback.4 Touch [ ].NOTE• If a connected Bluetooth audio device is operated to play music, connections are switched.• When a Bluetooth source is switched to another one, its settings are deleted and the connection is restored to the connection before source switching.](https://usermanual.wiki/JVCKENWOOD/J5175.05-SHORT-TERM-CONFIDENTIAL-User-Manual-DDX-DMX/User-Guide-3734690-Page-62.png)
![Bluetooth Control63English Ñ File search1 Touch [1].2 Touch the desired file or folder.When you touch a folder its contents are displayed.3 Touch the desired item in the content list. Playback starts.NOTE• For operations in the list screen, see List screen (P.14).Using the Hands-Free UnitYou can use the telephone function by connecting the Bluetooth telephone to this unit.NOTE• If you use the hands-free function frequently, move the TEL short-cut button (icon) to the Home screen. (P.13)• While Apple CarPlay or Android Auto is connected, the Bluetooth Hands-Free function and two Bluetooth devices connections cannot be used. Only the Apple CarPlay or Android Auto Hands-Free function can be used. Ñ Make a call1 Press the [HOME] button.2 Touch [ ].3 Touch [TEL]. Hands Free screen appears.NOTE• If your mobile phone supports PBAP, you can display the phone book and call lists onto the touch panel screen when the mobile phone is connected. – Phone book: up to 1000 entries – Up to 50 entries including dialed calls, received calls, and missed calls4 Select a dialing method.](https://usermanual.wiki/JVCKENWOOD/J5175.05-SHORT-TERM-CONFIDENTIAL-User-Manual-DDX-DMX/User-Guide-3734690-Page-63.png)
![Bluetooth Control64• [ ]: Call using call records• []: Call using the phonebook• []: Call using the preset number• []: Call by entering a phone number ●Select the cell-phone to useWhen you connect two cell-phones1) Touch [] to select the phone you want to use. ●Bluetooth SETUP1) Touch [].Bluetooth SETUP screen appears. ●Voice RecognitionP1) Touch []. (P.65)NOTE• Status icons such as battery and antenna icons may differ from those displayed on the cell-phone.• Setting the cell-phone in the private mode can disable the hands-free function.Call using call records1 Touch [ ].2 Select the phone number from the list.Call by entering a phone number1 Touch [ ].2 Enter a phone number with number keys.3 Touch [ ].Call using the preset number1 Touch [ ].2 Touch the name or phone number.Call using the phonebook1 Touch [ ].2 Touch [ ].3 Select the initial.• Characters with no corresponding name will not appear.](https://usermanual.wiki/JVCKENWOOD/J5175.05-SHORT-TERM-CONFIDENTIAL-User-Manual-DDX-DMX/User-Guide-3734690-Page-64.png)
![Bluetooth Control65English• A first character with an accent character such as “ü” can be searched for with a non-accent character “u” . A character with an accent character in a sentence cannot be searched for.4 Select the person you want to call from the list.5 Select the phone number from the list.NOTE• You can sort the phone numbers in the list by last name or first name. For details, see Hands-Free Setup (P.68). Ñ Voice RecognitionYou can access the voice recognition function of the cell-phone connected to this unit. You can search the cell-phone phonebook by voice. (The functionality depends on the cell-phone.) 1 Press the [ ] button for 1 second.Press for 1 second Voice Recognition screen appears.2 Start speaking.NOTE• You can use the voice recognition function by touching [ ] on the Hands Free screen. Ñ Receive a call1 Touch [ ] to answer a phone call or [] to reject an incoming call.NOTE• While monitoring the picture from the view camera, this screen does not appear even if a call comes in.To end call1 While talking, touch [ ].](https://usermanual.wiki/JVCKENWOOD/J5175.05-SHORT-TERM-CONFIDENTIAL-User-Manual-DDX-DMX/User-Guide-3734690-Page-65.png)
![Bluetooth Control66 Ñ Operations during a call ●Adjust the volume of your voice 1) Touch [Speech Quality].2) Touch [T] or [U] for [Microphone Level]. ●Adjust the receiver volumePress the [S] or [R] button. ●Mute your voiceTouch [] to mute or not to mute your voice. ●Output the dial toneTouch [DTMF] to display the tone input screen.You can send tones by touching desired keys on the screen. ●Switching between speaking voice output destinationsTouching []/ [ ] each time switches speaking voice output destinations between the cell-phone and the speaker. ●Call-waitingWhen you receive a new call while talking on the phone, you can answer the newly received call by touching []. The current call is put on hold.Each time you touch [], the caller will change to the other one.When you touch [], the current call will end to be switched to the call waiting on hold. ●To close the Hands-Free popup screenTouching [×] to close the Hands-Free popup screen. To display it again1Press the [HOME] button.2Touch [].3Touch [TEL].](https://usermanual.wiki/JVCKENWOOD/J5175.05-SHORT-TERM-CONFIDENTIAL-User-Manual-DDX-DMX/User-Guide-3734690-Page-66.png)
![Bluetooth Control67English Ñ Phone number presetYou can register frequently used phone numbers in this unit.1 Touch [ ].2 Touch [Edit].3 Select where to preset. ■[Delete all]To delete all preset numbers, touch [Delete all] and then touch [OK] on the confirmation screen.4 Select how to preset. ■[Add number from phonebook]Select the number to preset from the phonebook. See Call using the phonebook (P.64). ■[Add number direct]Enter the telephone number directly and touch [SET]. See Call by entering a phone number (P.64). ■[Delete]To delete a preset number, touch [Delete] and then touch [OK] on the confirmation screen. Ñ Phonebook transferYou can transfer phonebook data from your Bluetooth smartphone using PBAP.1 Touch [ ].2 Touch [ ]. Phonebook data transfer starts.NOTE• If the Phonebook contains more than 1000 entries, Phonebook data cannot be transferred. • If no Phonebook has been downloaded, touching [Download Phonebook Now] will start downloading the Phonebook.Phonebook deletion1 Touch [ ].2 Touch the name to check. ■[þ All]Checks all boxes. ■[¨ All]Clears all check marks.3 Touch [Delete]. Confirmation message appears.4 Touch [OK].](https://usermanual.wiki/JVCKENWOOD/J5175.05-SHORT-TERM-CONFIDENTIAL-User-Manual-DDX-DMX/User-Guide-3734690-Page-67.png)
![Bluetooth Control68Hands-Free SetupYou can make various settings for the Hands-Free function.1 Press the [MENU] button. Popup menu appears.2 Touch [SETUP]. SETUP Menu screen appears.3 Touch [Bluetooth]. Bluetooth SETUP screen appears.4 Touch [TEL SETUP]. TEL SETUP screen appears.5 Set each function as follows. ■[Bluetooth HF/Audio]Select the speakers to output the sound from the cell-phone (such as phone call voice and ringing tone) and Bluetooth audio player.[Front]: Outputs sound from the front speakers.[All ](Default): Outputs sound from all speakers. ■[Auto Response]*Set the automatic response time to pick-up an incoming call.[OFF ](Default): Turns off the Automatic response function.[1]/ [5]/ [10]/ [15]/ [20]/ [25]/ [30]: Sets the ringing time (second). ■[Auto Pairing]When set to “ON”, the Apple Auto Pairing function is turned on to automatically register the iPod touch or iPhone connected to this unit.[ON ](Default): Turns on the Apple Auto Pairing function.[OFF]: Turns off the Apple Auto Pairing function. ■[Sort Order]Set how to sort the data in the cell-phone phonebook.[First]: Sorts data by the first name.[Last ](Default): Sorts data by the last name. ■[Echo Cancel Level]Adjust the level of echo cancellation.Default is “0”. ■[Noise Reduction Level]Reduce the noise generated in the surrounding environment without changing the microphone volume. Use this function when the voice of caller is not clear. Default is “0”.* Either the auto response time set on this unit or the time set on the cell-phone, whichever is shorter takes effect.6 Touch [OK].](https://usermanual.wiki/JVCKENWOOD/J5175.05-SHORT-TERM-CONFIDENTIAL-User-Manual-DDX-DMX/User-Guide-3734690-Page-68.png)
![Other External Components69EnglishOther External ComponentsView CameraNOTE• To connect a camera, see P.94.• To use a rear view camera, a REVERSE lead connection is required. (P.93)• If [Rear Camera Interruption] is active the camera screen is displayed when you shift the gear to the reverse (R) position. Ñ Display the camera screen1 Press the [MENU] button. Popup menu appears.2 Touch [Camera]. View camera screen appears.3 Adjust each item as follows.To erase the caution message, touch the screen.23411 Switching the View Camera *1Touch to change the front view camera or dashboard camera and rear view camera.2 Camera offTouch to exit the camera screen.3 Switching the Guideline *2Touching each time turns on or off the guideline.4 Switching the Angle *2Touching each time changes camera angles:*1 When the front camera or dashboard camera, and rear camera are connected with this unit.*2 When CMOS-3xx series is connected with this unit. Ñ Camera Setup1 Press the [MENU] button. Popup menu appears.2 Touch [SETUP]. SETUP Menu screen appears.3 Touch [Camera]. Camera screen appears.4 Set each item as follows. ■[Rear Camera Interruption][ON]: Displays the picture from the rear view camera when you shift the gear to the reverse (R) position.[OFF ](Default): Select this when no camera is connected. ■[Rear Camera Settings *]1Adjusts the CMOS-3xx series with ID 1 ("Rear Camera") set. For details, see the instruction manual of your camera. ■[Parking Guidelines]You can display parking guidelines to enable easier parking when you shift the gear to the reverse (R) position.Default is “ON”. ■[Guidelines SETUP]If you select [ON] for [Parking Guidelines], you can adjust the parking guidelines. See To adjust the parking guidelines (P.70). ■[Front Camera][ON]: Select this when the front camera is connected.[OFF ](Default): Select this when no camera is connected.](https://usermanual.wiki/JVCKENWOOD/J5175.05-SHORT-TERM-CONFIDENTIAL-User-Manual-DDX-DMX/User-Guide-3734690-Page-69.png)
![Other External Components70 ■[Front Camera Settings *]1Adjusts the CMOS-3xx series with ID 2 ("Front Camera") set. For details, see the instruction manual of your camera. ■[Front Camera Interruption] *2[10 sec]/ [15 sec] (Default)/ [20 sec]: The front camera screen is displayed when return the gear from the reverse (R) position.[OFF]: Cancel.*1 When CMOS-3xx series is connected with this unit.*2 When CMOS-3xx series or front camera is connected with this unit.To adjust the parking guidelinesNOTE• Install the rear view camera in the appropriate position according to the instruction manual supplied with the rear view camera.• When adjusting the parking guidelines, make sure to apply the parking brake to prevent the car from moving.1 Touch [ON] of [Parking Guidelines] in the Camera screen. (P.69)2 Touch [Guidelines SETUP] on the Camera screen.3 Adjust the parking guidelines by selecting the mark.4 Adjusting the position of the selected mark.ABCDMake sure that lines A and B are horizontally parallel, and that lines C and D are of the same length.NOTE• Touch [Initialize] and then touch [Ye s ] to set all the marks to their initial default position.Use Dashboard CameraA Dashboard Camera, DRV-N520 (optional accessory), connected to this unit lets you play video-recorded data and so on.For details, see the instruction manual of the Dashboard Camera DRV-N520 (optional accessory).NOTE• To connect a dashboard camera, see P.95. Ñ Display the dashboard camera screen1 Press the [MENU] button. Popup menu appears.2 Touch [Camera].1231 Switching the View CameraTouch to change the dashboard view camera and rear view camera.2 Camera offTouch to exit the camera screen.](https://usermanual.wiki/JVCKENWOOD/J5175.05-SHORT-TERM-CONFIDENTIAL-User-Manual-DDX-DMX/User-Guide-3734690-Page-70.png)
![Other External Components71English3 Key displayTouch to display the dashboard camera control buttons.External audio/video players (AV-IN)1 Connect an external component to the AV-IN input terminal. (P.94)2 Select [AV-IN] as the source. (P.12)3 Turn on the connected component and start playing the source.OEM Features OperationBy connecting this unit to the bus system of the vehicle using an iDataLink (commercially available), this unit can access the satellite radio source provided for the vehicle and can display vehicle information on this unit.1 Press the [HOME] button. HOME screen appears.2 Touch [ ] on the HOME screen.3 Touch icon.• Displays the control screen of the satellite radio source provided for the vehicle. • Displays the control screen of the media player source provided for the vehicle.• Displays the control screen of the Bluetooth Hands Free function provided for the vehicle.• Displays the control screen of the Bluetooth streaming source provided for the vehicle.• Displays information about the instruments such as a speedometer.• Displays information about the air conditioner of the vehicle. *• Displays information about the Parking Distance Sensor of the vehicle.• Displays information about the tire pressures of the vehicle. *• Displays information about the Radar Detector. ** These ADS adapter features are displayed as the widget on the Home screen. (P.10) You can display the relevant screens by touching the widget.NOTE• Displayable screens, button names, and screen names vary depending on the type of the connected iDataLink and the model of the vehicle. For more details, access the following URL:www.idatalink.com/](https://usermanual.wiki/JVCKENWOOD/J5175.05-SHORT-TERM-CONFIDENTIAL-User-Manual-DDX-DMX/User-Guide-3734690-Page-71.png)
![Setup72SetupMonitor Screen SetupYou can adjust the image quality of video, menu screen, etc.1 Press the [MENU] button. Popup menu appears.2 Touch [Screen Adjustment]. Screen Control screen appears.3 Adjust each setting as follows. ■[Backlight] / [Contrast] / [Black] / [Brightness] / [Color] / [Tint]Adjust each setting. ■[Aspect]Select a screen mode.[Full]: Changes the aspect ratio of video and displays video fully on the screen.[Normal]: Displays video at the ratio of 4:3.[Auto]: DVD, VCD and disc media: 16:9 video is displayed in the Full mode and 4:3 video is displayed in the Regular mode. USB device: Displays video fully (vertically or horizontally) with no ratio change.NOTE• Settings to adjust vary depending on the current source.System Setup1 Press the [MENU] button. Popup menu appears.2 Touch [SETUP].See the following section for each setting.• Set up AV (P.77)• Set up display (P.75)• Set up the user interface (P.73)• Set up camera (P.69)• Set up special (P.74)• Set up Bluetooth (P.59)• Set up security (P.8)](https://usermanual.wiki/JVCKENWOOD/J5175.05-SHORT-TERM-CONFIDENTIAL-User-Manual-DDX-DMX/User-Guide-3734690-Page-72.png)
![Setup73EnglishUser Interface SetupYou can setup user interface parameters.1 Press the [MENU] button. Popup menu appears.2 Touch [SETUP]. SETUP screen appears.3 Touch [User Interface]. User Interface screen appears.4 Set each parameter as follows. ■[Steering Remote Controller] (DDX9018BTS)Sets the desired function in the steering remote controller. See Learning function of steering remote (P.73). ■[Beep] (DDX9705S)Turn the key touch tone on or off.Default is “ON”. ■[Beep Volume] (Except DDX9705S)Set the sound volume of the key touch tone."0" (Off ) – "3" (Default) – "5" ■[Widget SETUP]Set up the widget displayed on the Home screen. (P.15) ■[Parking Assist Display]When an ADS adapter is connected, you can display information about obstacles around the car.[ON]: Always displays information.[Dyn.] (Default): Displays information when the sensor detects obstacles.[OFF]: Cancels this function. This can be set when the iDataLink (commercially available) is connected. ■[Parking Assist Position]Select where to display information about obstacles on the screen (left or right).“Left”/ “Right” (Default)This can be set when the iDataLink (commercially available) is connected. ■[Language Select]Select a language. ■[Time Format] Select the time display format."12-Hour" (Default)/ "24-Hour" ■[Clock][GPS-SYNC ](Default): Synchronizes the clock time with the GPS.[Manual]: Set the clock manually. ■[Time Zone]Select the time zone. ■[Clock Adjust]If you select [Manual] for Clock, adjust the date and time manually. (P.73) Ñ Adjust the date and time manually.1 Touch [Clock] on the User Interface screen.2 Select [Manual].3 Touch [Time Zone] on the User Interface screen.4 Select the time zone.5 Touch [Clock Adjust] on the User Interface screen.6 Adjust the date, then adjust the time.7 Touch [Set]. Ñ Learning function of steering remote (DDX9018BTS)This function is available only when your vehicle is equipped with the electrical steering remote controller.If your steering remote controller is not compliant, learning may not be completed and error message may appear.1 Touch [Steering Remote Controller] in the User Interface screen.](https://usermanual.wiki/JVCKENWOOD/J5175.05-SHORT-TERM-CONFIDENTIAL-User-Manual-DDX-DMX/User-Guide-3734690-Page-73.png)
![Setup74 Steering Remote Controller Setting screen appears.2 Press and hold the steering remote controller buttonNOTE• You can have the unit learned all buttons at a time. In that case, press the all buttons one at a time and after pressing all of them, touch [Learning completed] in Steering Remote Controller Setting screen. However, new functions cannot be learned after this operation.3 Touch the function you want to set.4 Repeat steps 2 and 3 as necessary.5 Touch [Learning completed].NOTE• When changing the function already learned, press and hold the button you want to change in step 2 and then touch to select the changed function from the function list.• Confirm the contents of the settable function on the function list. You cannot edit the function list.• To initialize the contents, touch [Learning initialisation] of [Steering Remote Controller] in User Interface screen. After you touch [Initialise], a confirmation message appears. Follow the message and complete the operation.Special SetupYou can setup special parameters.1 Press the [MENU] button. Popup menu appears.2 Touch [SETUP]. SETUP screen appears.3 Touch [Special]. Special screen appears.4 Set each parameter as follows. ■[DEMO]Select the demonstration mode. Default is “ON”. ■[Software Information]Confirm the software version of this unit. (P.74) ■[Open Source Licenses]Display the open source licenses. ■[Initialize]Touch [Initialize] and then touch [Ye s ] to set all the settings to the initial default settings.• Audio SETUP Memory is not initialized. Ñ Software InformationYou can confirm the software version of this unit.1 Touch [Software Information] in the Special screen.2 Confirm the software version.](https://usermanual.wiki/JVCKENWOOD/J5175.05-SHORT-TERM-CONFIDENTIAL-User-Manual-DDX-DMX/User-Guide-3734690-Page-74.png)
![Setup75EnglishNOTE• For how to update the software, see the relevant update procedure manual which comes with the software.Display Setup1 Press the [MENU] button. Popup menu appears.2 Touch [SETUP]. SETUP screen appears.3 Touch [Display]. Display screen appears.4 Set each parameter as follows. ■[Dimmer]Select the dimmer mode.[OFF]: Does not dim the display and buttons.[ON]: Dims the display and buttons.[SYNC ](Default): Turns the dimmer function on or off when the vehicle light control switch is turned on or off. ■[OSD Clock]Select if you want to display the clock while watching DVD video, etc."ON" (Default)/ "OFF" ■[Key Color]You can set the button illumination color. (P.75) ■[Wallpaper Customize]You can change the wallpaper image or color. (P.76) ■[Viewing Angle]If it is hard to see the image on the screen evenly, adjust the viewing angle. The smaller the (negative) value, the more whitish the image on the screen looks."0" (Default)/ "-1"/ "-2"/ "-3" ■[Screen transition effect] Select whether to use the screen transition effect when the source control screen is switched to the Home screen."ON" (Default)/ "OFF" Ñ Customizing the key colorYou can set the button illumination color. 1 Touch [Key Color] on the Display screen.2 Touch the desired color. ■[User]The color you have set in the process of [Adjust] is registered. ■[Scan]You can set the key color to continuously scan through the color spectrum. ■[Car Color]This can be selected when a compatible ADS adapter is connected.3 Touch [ ].To register an original colorYou can register your original color.1 Touch [User] on the Key Color screen.2 Touch [Adjust].3 Use [−] and [+] to adjust each color value.4 Touch [ ].](https://usermanual.wiki/JVCKENWOOD/J5175.05-SHORT-TERM-CONFIDENTIAL-User-Manual-DDX-DMX/User-Guide-3734690-Page-75.png)
![Setup76 Ñ Change the wallpaper image or color1 Touch [Wallpaper Customize] on the Display screen.2 Select an image.*2*1*3*1 The album art currently being displayed is used as a wallpaper.*2 Select a wallpaper color in advance.*3 Select an original image in advance.To select wallpaper color1 Touch [Wallpaper Color] on the Background screen.2 Select a wallpaper color.*1*1 The color you have selected at [Key Color] is added on the image. If you select “Scan” at [Key Color], you cannot select this image.3 Touch [ ].To register an original imageYou can load an image from the connected USB device and set it as the wallpaper image.Before starting this procedure, it is necessary to connect the device which has the image to load.1 Touch [User1 Select] or [User2 Select] on the Wallpaper Customize screen.2 Select the image to load.3 Touch [Enter]. The selected image is loaded and the display returns to the Wallpaper Customize screen.NOTE• Touching [ ] rotates the image counter-clockwise.• Touching [] rotates the image clockwise.• Picture files: JPEG (.jpg, .jpeg), PNG (.png), BMP (.bmp)](https://usermanual.wiki/JVCKENWOOD/J5175.05-SHORT-TERM-CONFIDENTIAL-User-Manual-DDX-DMX/User-Guide-3734690-Page-76.png)
![Setup77EnglishAV SetupYou can set AV parameters.1 Press the [MENU] button. Popup menu appears.2 Touch [SETUP]. SETUP screen appears.3 Touch [AV]. AV screen appears.4 Set each parameter as follows. ■[Android Auto Device Select]Select the device to be used in the Android Auto mode. (P.25) ■[AV-OUT]You can select an AV source to be output from the AV OUTPUT port.OFF, AV-IN, DISC, USB, or iPod• You cannot select iPod if it is connected via Bluetooth. • If you select USB, iPod, Disc, Spotify, Pandora or Bluetooth audio as the main source, you cannot select USB or iPod as the AV output source.• If you select Mirroring (WebLink/ Waze), Apple CarPlay or Android Auto as the main source, you cannot select DISC (Music CD/ Disc media), USB or iPod as the AV output source. ■[Driving Position]Select the driving position (left or right). “Left” (Default)/ “Right” ■[Wi-Fi SETUP]You can change the device name and display the device address. (P.77) ■[OEM SETUP]Confirm the information about or change the settings for using the ADS adapter. Ñ Change the device name1 Touch [Wi-Fi SETUP] on the AV screen.2 Touch [Device Name]. Change Device Name screen appears.3 Touch and hold [ ].4 Input the device name.5 Touch [Enter].](https://usermanual.wiki/JVCKENWOOD/J5175.05-SHORT-TERM-CONFIDENTIAL-User-Manual-DDX-DMX/User-Guide-3734690-Page-77.png)
![Controlling Audio78Controlling AudioYou can adjust various settings such as audio balance or subwoofer level.1 Press the [MENU] button. Popup menu appears.2 Touch [Audio].See the following section for each setting.• Set up speaker/ X’over (P.78)• Controlling equalizer (P.80)• Set listening position/ DTA (P.83)• Controlling general audio (Fader / Balance) (P.79)• Set volume offset (P.81)• Performing zone control (P.81)• Set sound effect (P.82)• Memory/recall the audio settings (P.84)Speaker/ X’over setup1 Press the [MENU] button. Popup menu appears.2 Touch [Audio]. Audio screen appears.3 Touch [Speaker/Xʼover].4 Select a car type.You can select the car type and speaker network, etc.When you select your car type, the Delay Time Alignment is activated automatically (for timing adjustment of sound output for each channel) to have the highest surround effects.5 Touch the speaker (1) you wish to adjust and set each parameter (2) as follows.12 ■[Speaker]You can select a speaker type and its size to get the best sound effects.When the speaker type and size are selected, the speaker crossover network is set automatically. ■[Location] (Only for Front, Rear)Select the speaker position you have installed.](https://usermanual.wiki/JVCKENWOOD/J5175.05-SHORT-TERM-CONFIDENTIAL-User-Manual-DDX-DMX/User-Guide-3734690-Page-78.png)
![Controlling Audio79English ■[Tweeter] (Only for Front)You can set up the tweeter when you are selecting front speakers.None, Small, Medium, Large ■[Xʼover]Display the speaker crossover setup screen.You can adjust the crossover frequency that was set automatically when you selected the speaker type.For details, see Crossover network setup (P.79) Ñ Crossover network setupYou can set the crossover frequency of speakers.1 Touch [Xʼover].2 Touch the speaker to set up.3 Set each parameter as follows. ■[HPF FREQ]High Pass Filter adjustment. (When Front or Rear is selected on the Speaker Select screen) ■[LPF FREQ]Low Pass Filter adjustment. (When Subwoofer is selected on the Speaker Select screen) ■[Slope]*1Set a crossover slope. ■[Gain]Adjust the gain of the front speaker, rear speaker, or subwoofer. ■[TW Gain] *2Adjust the tweeter level. (When Front is selected on the Speaker Select screen) ■[Phase Inversion]*3Set the phase of subwoofer output.Check [Phase Inversion] to shift the phase 180 degrees. (When Subwoofer is selected on the Speaker Select screen)*1 Only when “LPF FREQ”/“HPF FREQ” is set to a mode other than “Through” in [Xʼover].*2 Only when “Tweeter” is set to “Small”, “Medium”, “Large” in [Speaker Setup].*3 Only when “Subwoofer” is set to a mode other than “None” in [Speaker Setup].Controlling General Audio1 Press the [MENU] button. Popup menu appears.2 Touch [Audio]. Audio screen appears.3 Touch [Fader / Balance].4 Set each parameter as follows. ■[Fader / Balance]Adjust the volume balance around the touched area.[C] and [D] adjust the right and left volume balance.[R] and [S] adjust the front and rear volume balance. ■[Center]Clear the adjustment.](https://usermanual.wiki/JVCKENWOOD/J5175.05-SHORT-TERM-CONFIDENTIAL-User-Manual-DDX-DMX/User-Guide-3734690-Page-79.png)
![Controlling Audio80Equalizer ControlYou can adjust equalizer by selecting the optimized setting for each category.1 Press the [MENU] button. Popup menu appears.2 Touch [Audio]. Audio screen appears.3 Touch [Equalizer].4 Touch the screen and set the Graphic Equalizer as desired. ■Gain level (area in dotted frame)Adjust the gain level by touching each frequency bar.You can select a frequency bar and adjust its level by [R], [S]. ■[Preset Select]Display the screen for selecting the preset equalizer curve. (P.80) ■[Memory]Saves the adjusted equalizer curve as “User1” to “User4”. (P.80) ■[Initialize]Initialize (flatten) the current EQ curve. ■[ALL SRC]Apply the adjusted equalizer curve to all sources. Touch [ALL SRC] and then touch [OK] on the confirmation screen. ■[Bass EXT] (Bass Extend Settings)When turned on, the frequencies lower than 62.5 Hz is set to the same gain level (62.5 Hz). ■[SW Level]Adjust the subwoofer volume. This setting is not available when Subwoofer is set to “None”. See Speaker/ X’over setup (P.78). Ñ Recall the EQ curve1 Touch [Preset Select].2 Select an EQ curve.NOTE• [iPod] is available only for the iPod source. Ñ Save the EQ curve1 Adjust the EQ curve.2 Touch [Memory].3 Select where to save.](https://usermanual.wiki/JVCKENWOOD/J5175.05-SHORT-TERM-CONFIDENTIAL-User-Manual-DDX-DMX/User-Guide-3734690-Page-80.png)
![Controlling Audio81EnglishVolume OffsetFinely adjust the volume of the current source to minimize the difference in volume between different sources.1 Press the [MENU] button. Popup menu appears.2 Touch [Audio]. Audio screen appears.3 Touch [Volume Offset].4 Touch [+] or [−] to adjust the level. ■[Initialize]Returns to the initial settings.NOTE• If you have increased the volume first, then reduce the volume using “Volume Offset”. Switching the current source to another source suddenly may output extremely loud sound.Zone ControlYou can select different sources for front and rear positions in the vehicle.1 Press the [MENU] button. Popup menu appears.2 Touch [Audio]. Audio screen appears.3 Touch [Zone Control]. Zone Control screen appears.4 Touch [Zone Select].5 Touch [Dual Zone].6 Set each source as follows. ■[Zone Select]Touch [Single Zone] to turn off the dual zone function. ■[Front Source] [Rear Source]Select an audio source for each. ■[Rear VOL.]Adjust the rear source volume.](https://usermanual.wiki/JVCKENWOOD/J5175.05-SHORT-TERM-CONFIDENTIAL-User-Manual-DDX-DMX/User-Guide-3734690-Page-81.png)
![Controlling Audio82NOTE• When the rear speaker sound is switched, the audio source that is output at the AV OUTPUT terminal is also switched to the same source.• When the dual zone function is set to on, the following functions are not available. – Output from the subwoofer – Subwoofer Level/ Bass Boost (P.82) – Equalizer Control/ Sound Effect/ Listening Position (P.80, 82, 83) – Speaker Setup (P.78) – High-resolution Sound Source File Playback• You cannot select iPod if it is connected via Bluetooth. • If you select USB, iPod, Disc, Spotify, Pandora or Bluetooth audio as the Front Source, you cannot select USB or iPod as the Rear Source.• If you select Mirroring (WebLink/ Waze), Apple CarPlay or Android Auto as the Front Source, you cannot select DISC (Music CD/ Disc media), USB or iPod as the Rear Source.Sound EffectYou can set sound effects.1 Press the [MENU] button. Popup menu appears.2 Touch [Audio]. Audio screen appears.3 Touch [Sound Effect].4 Set each parameter as follows. ■[Bass Boost]Set the amount of bass boost “OFF”/ “1”/ “2”/ “3”. ■[Loudness]Set the amount of boost of low and high tones.“OFF”, “Low”, “High” ■[Drive Equalizer]Reduces the driving noise by raising the bandwidth.“OFF”, “ON” ■[Space Enhancer]Select the feeling of sound space enhancement.“OFF”/ “Small”/ “Medium”/ “Large”.This setting is not available for the HD Radio tuner source. ■[Supreme]Turn ON/OFF the Supreme function.Technology to extrapolate and supplement with proprietary algorithm, the high-frequency range that is cut off when encoding. ■[Realizer]Virtually make the sound more realistic using the Digital Signal Processor (DSP) system.Select the level from “OFF”/ “1”/ “2”/ “3”. ■[Stage EQ]You can adjust the height of speakers virtually to suit your listening position.“OFF”/ “Low”/ “Middle”/ “High”.](https://usermanual.wiki/JVCKENWOOD/J5175.05-SHORT-TERM-CONFIDENTIAL-User-Manual-DDX-DMX/User-Guide-3734690-Page-82.png)
![Controlling Audio83EnglishListening Position/ DTAListening Position/DTA allows you to improve the sound field depending on the position of the seat you sit. Listening Position/DTA allows you to set “Listening Position” and “Front Focus”. You cannot set both at the same time.1 Press the [MENU] button. Popup menu appears.2 Touch [Audio]. Audio screen appears.3 Touch [Position/DTA].• Set up Listening Position (P.83)• Set up Front Focus (P.83) Ñ Listening PositionAdjust the sound delay time so that the sounds from different speakers arrive at the listener sitting on the selected seat at the same time.1 Touch [Listening Position] on the Position/DTA screen.2 Select a listening position from [Front R] (Right front), [Front L] (Left front), [Front All] (All front), and [All].Position DTA controlYou can fine-adjust your listening position.1 Touch [Adjust].2 Touch [Delay].3 Touch [T] or [U] to adjust the delay time of the selected speaker. 4 Touch [Level].5 Touch [T] or [U] to adjust the sound level of the selected speaker. NOTE• To initialize the Delay and Level settings, touch [Initialize] and [YES] on the confirmation screen. Ñ Front FocusYou can focus the imaginary sound image on the front of the selected seat. 1 Touch [Front Focus] in the Position/DTA screen.2 Select a front focus position.For [Front All] and [All], select Priority L or R depending on which side you want to put the imaginary sound image.](https://usermanual.wiki/JVCKENWOOD/J5175.05-SHORT-TERM-CONFIDENTIAL-User-Manual-DDX-DMX/User-Guide-3734690-Page-83.png)
![Controlling Audio84 Ñ Front Focus fine adjustment1 Touch [Adjust].2 Touch [Delay].3 Set each parameter as follows. ■[Sound Image LR (Front)]Focus the sound image on the front of front seats. ■[Sound Image LR (Rear)]Focus the sound image on the front of rear seats. ■[Size of the Virtual Sound Field]Adjust the size of sound image to meet your taste. If the sound image is shifted from the front, move it back by [Sound Image LR (Front)] or [Sound Image LR (Rear)]. ■[Subwoofer Delay]Adjust the delay time of subwoofer sound.4 Touch [Level].5 Touch [T] or [U] to adjust the sound level of the selected speaker. NOTE• To initialize the Delay and Level settings, touch [Initialize] and [YES] on the confirmation screen.Audio Setup memoryAudio Control settings can be memorized. The memorized settings can be recalled at any time. 1 Press the [MENU] button. Popup menu appears.2 Touch [Audio]. Audio screen appears.3 Touch [Audio Memory]. ■[SETUP Memory]Lock or unlock the Audio SETUP Memory/Recall/Clear. ■[Audio SETUP Memory]Memorize the current audio settings.• Fader/ Balance, Speaker / X’over, Equalizer (User Preset, SW Level), Position/DTA, Sound Effect (P.78) ■[Audio SETUP Recall]Recall the memorized audio setting. ■[Audio SETUP Clear]Clear the AUDIO SETUP Memory and the currently memorized audio settings.](https://usermanual.wiki/JVCKENWOOD/J5175.05-SHORT-TERM-CONFIDENTIAL-User-Manual-DDX-DMX/User-Guide-3734690-Page-84.png)
![Remote control85EnglishRemote controlThis unit can be operated using the remote control.For DDX9018BTS, the remote control is supplied with the unit.For DDX9905S, DDX9705S, DNX875S, and DMX905S the remote control is the optional accessory (KNA-RCDV331).# CAUTION• Put the remote control in a place where it will not move during braking or other operations. A dangerous situation could result, if the remote control falls down and gets wedged under the pedals while driving.• Do not leave the battery near fire or under direct sunlight. A fire, explosion or excessive heat generation may result.• Do not recharge, short, break up or heat the battery or place it in an open fire. Such actions may cause the battery to leak fluid. If spilled fluid comes in contact with your eyes or on clothing, immediately rinse with water and consult a physician.• Place the battery out of reach of children. In the unlikely event that a child swallows the battery, immediately consult a physician.Battery InstallationIf the remote control operates only over shorter distances or does not operate at all, it is possible that the batteries are depleted.In such instances, replace the both batteries with new ones.1 Insert two “AAA”/“R03”-size batteries with the and poles aligned properly, following the illustration inside the case.Functions of the Remote control Buttons Ñ Switch the operation modeThe functions operated from the remote control differ depending on the position of the mode switch.V.SELR.VOLMENUENTERMODE FNC/PBCDVD•T V•AUD•DISP12ABC 3DEF4GHI7PQRS5JKL8TUV09WXYZ6MNOAUDIO ANGLEOPENCLEAR ATTDIRECT2ZONEVOLFM+AM−ZOOMRETURNSRC384ud¢¡1Ee7∞∞∞∞∞∞TOP MENUDVD SETUPSUBTITLEDVDT VNAVAUD••••DVD•T V•AUD• ■AUD modeSwitch to this mode when controlling a selected source or tuner source, etc. ■DVD modeSwitch to this mode when playing a disc media including DVD, VCD, and CD. ■NAV mode/ TV modeNot used.NOTE• When controlling a player that is not integrated in the unit, select “AUD” mode. Ñ Direct search modeUsing the remote control, you can jump directly to the desired file, track chapter, etc. by entering the number corresponding to the content.NOTE• This operation cannot be performed for the USB device and iPod.1 Press the [#BS]/ [DIRECT] button several times until the desired content appears.The available contents are different depending on the source type. ■DVDTitle number/Chapter number](https://usermanual.wiki/JVCKENWOOD/J5175.05-SHORT-TERM-CONFIDENTIAL-User-Manual-DDX-DMX/User-Guide-3734690-Page-85.png)
![Remote control86 ■VCD 1.X and 2.X (PBC OFF)Track number ■VCD 2.X (PBC ON)Scene number/Track number ■Music CDTrack number ■HD Radio tunerFrequency value/Channel number ■SiriusXMChannel number2 Enter the number of the content you want to play using the numeric keypad.3 For DVD or VCD, music CD, press the [ENTER] button.For radio, press the [C] or [D]/ [E] or [F] button. The content corresponding to the number you entered is played. Ñ Basic OperationV.SELR.VOLMENUENTERMODE FNC/PBCDVD•T V•AUD•DISP12ABC 3DEF4GHI7PQRS5JKL8TUV09WXYZ6MNOAUDIO ANGLEOPENCLEAR ATTDIRECT2ZONEVOLFM+AM–ZOOMRETURNSRC384ud¢¡1Ee7∞∞∞∞∞∞TOP MENUDVD SETUPSUBTITLE12517192122232425261820367810121314151691141372211231821242526165171982209612131415Key Name Mode switchFunction1SRC SRC AUD, DVD Switches to the source to be played. In hands-free mode, hangs up the phone.2NAV V.SEL − Switches the screen between the current source and the WebLink screen from the connected iPhone/Android.3MENU IDVD Stops playing and memorizes the last point where the disc stopped. The last point is deleted by pressing twice.4OUT, IN − − Not used.5POSITION LAUD, DVD Pauses the track or file, and resumes playing by pressing twice.For the radio and HD Radio sources in AUD mode, switches the seek mode.6Cursor Key DVD Moves the cursor in the DVD menu.](https://usermanual.wiki/JVCKENWOOD/J5175.05-SHORT-TERM-CONFIDENTIAL-User-Manual-DDX-DMX/User-Guide-3734690-Page-86.png)
![Remote control87EnglishKey Name Mode switchFunction7ENTER ENTER − Performs the selected function.8ROUTE M TOP MENUAUD Screen mode changes each time you press this key during video playback.DVD Returns to the DVD top menu.9VOICE MENU AUD Displays the control screen of current source. (USB, iPod, DISC)DVD Displays the DVD menu.Turns the playback control on or off while playing VCD.10VIEW − AUD, DVD Switches the AV source to be output. 11MAP DIR OPEN − Not used.12R/SFM+/AM– AUD, DVD Selects the folder to be played.For the radio and HD Radio sources in AUD mode, selects FM/ AM band to be received.For the SiriusXM source in AUD mode, selects the band to be received.For the DVD/VCD source in DVD mode, selects the title to be played.13C/DE/FAUD, DVD Selects the track or file to be played.For the radio, HD Radio, and SiriusXM sources in AUD mode, switches to broadcast stations received by the unit.For the DVD/VCD source in DVD mode, selects the chapter/scene/track to be played.14Numeric Keypad AUD Allows you to enter the number to search in the direct search mode.For details on the direct search mode, see Direct search mode (P.85).DVD • Press [1] [2] to fast forward/backward.• Press [4] [5] to slow forward/backward. Switches the slow playback speed each time you press this key.**DVD only15* + CLEAR DVD For the DVD/VCD source, deletes a character while in direct search mode.16# BS DIRECT AUD, DVD Switches to the direct search mode.For details on the direct search mode, see Direct search mode (P.85).17AUDIO AUDIO DVD Switches the voice language each time you press this key.18CANCEL RETURN DVD Displays previous screen.19SUBTITLE SUBTITLE DVD Switches the subtitle language.20− When a call comes in, answers the call.21ANGLE ANGLE DVD Switches the picture angle each time you press this key.22VOL RS VOL RS − Adjusts the volume.23ZOOM ZOOM DVD Switches the zoom ratio (2, 3, 4, Off ) each time you press this key.242 ZONE 2 ZONE AUD, DVD Switches the Dual Zone function on and off.25R.VOL R.VOL − Adjusts volume at rear when the Dual Zone function is on.26AT T AT T − Lowers the volume when pressed once. Restores the previous volume when pressed twice.](https://usermanual.wiki/JVCKENWOOD/J5175.05-SHORT-TERM-CONFIDENTIAL-User-Manual-DDX-DMX/User-Guide-3734690-Page-87.png)
![Connection/Installation89English• Do not press hard on the panel surface when installing the unit to the vehicle. Otherwise scars, damage, or failure may result.• Reception may drop if there are metal objects near the Bluetooth antenna.Bluetooth antenna unit Ñ Supplied accessories for installation1x12(Black 1 m)x13(Gray 1 m)x14(3 m)x15 [1]x26(M5 x 8 mm)x67(M5 x 8 mm)x68 [1]x19(3.5 m) x10x1- [2]x1[1] DDX9905S/ DDX9018BTS/ DMX905S only[2] DDX9018BTS only](https://usermanual.wiki/JVCKENWOOD/J5175.05-SHORT-TERM-CONFIDENTIAL-User-Manual-DDX-DMX/User-Guide-3734690-Page-89.png)
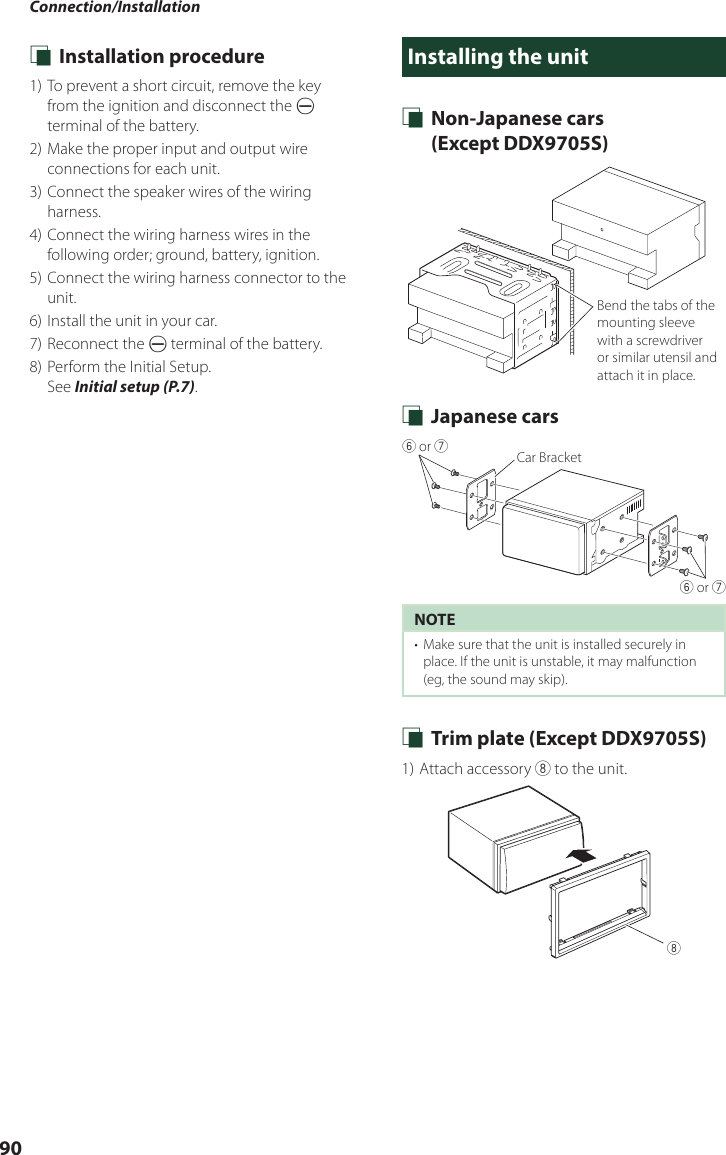
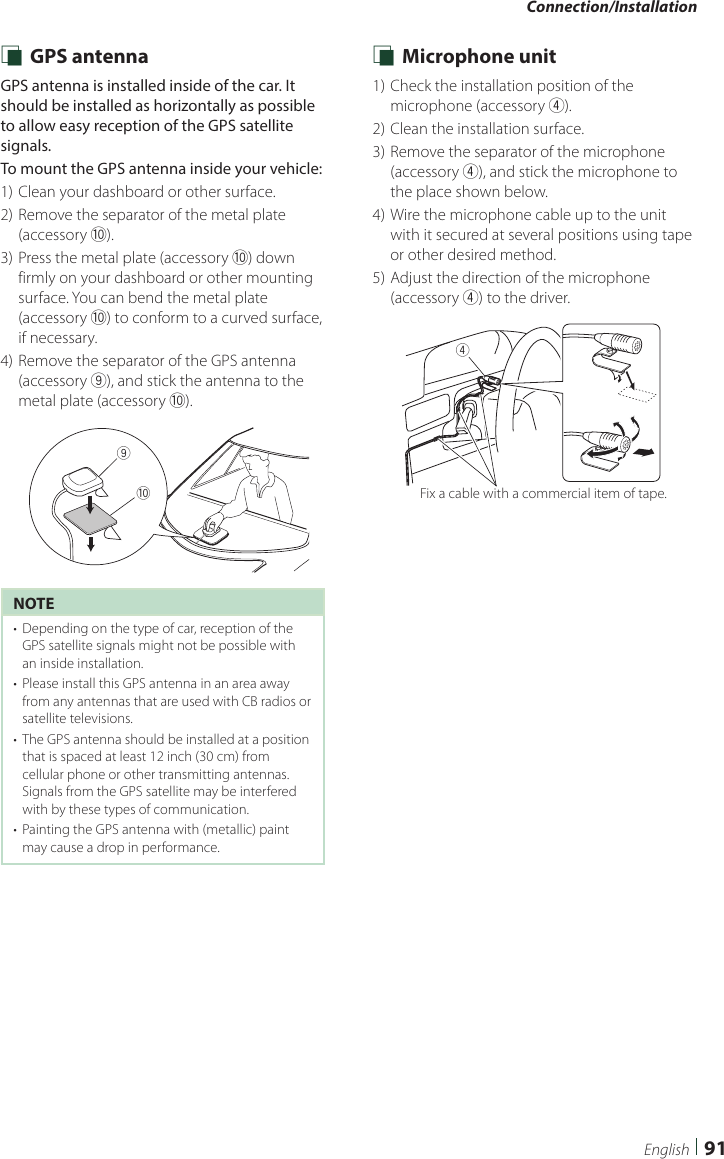

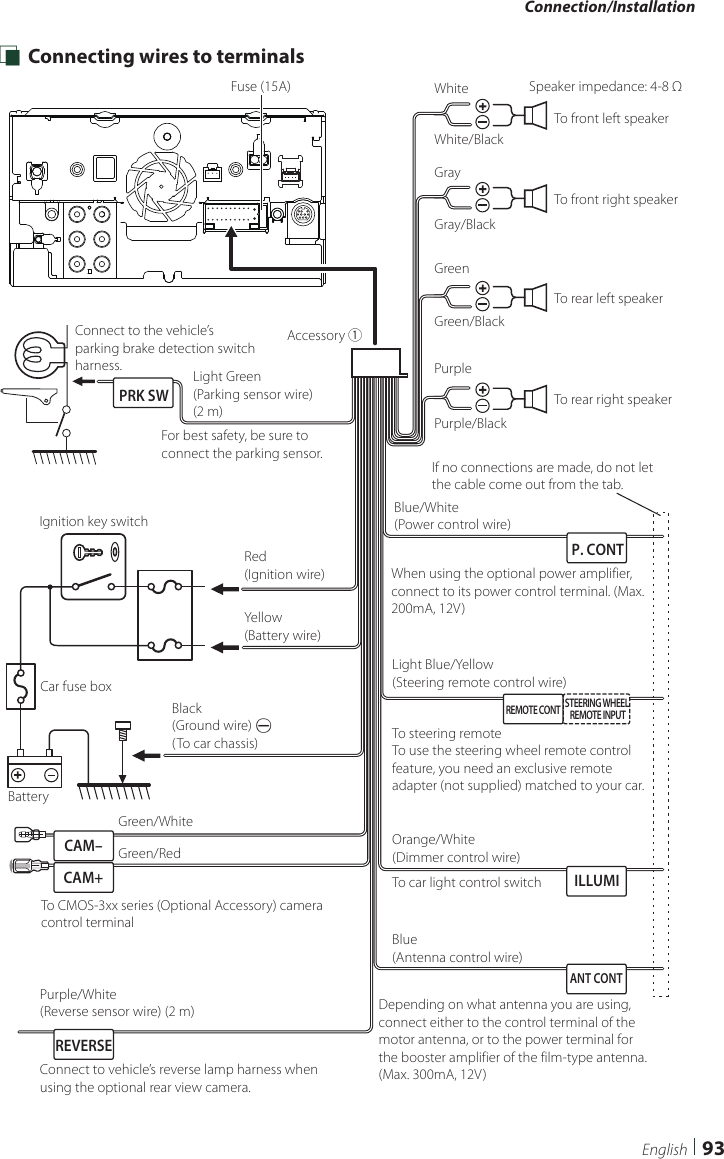
![Connection/Installation94 Ñ Connecting the system and external components213 456781112139101AV Audio output (ø3.5 mini jack)2FM/AM antenna input3When connecting to an external amplifier, connect its ground wire to the car’s chassis to avoid damaging the unit.Rear Audio Preout (Left; White, Right; Red)Front Audio Preout (Left; White, Right; Red)Subwoofer Preout (Left; White, Right; Red)4SiriusXM Connect Vehicle Tuner connector (DDX9905S/ DDX9705S/ DMX905S only)For more information on how to install the SiriusXM Connect Vehicle tuner, consult the installation guide included with the tuner.5iDatalink connector 6AV-IN (CA-C3AV; Optional Accessory) input7Dashboard camera interfaceConnect a Dashboard Camera DRV-N520 (optional accessory). (P.95)8Accessory 9: GPS Antenna9Accessory 4: Bluetooth Microphone10Accessory -: Steering remote harness(DDX9018BTS only)Connect to vehicle’s steering remote harness. Contact your KENWOOD dealer for details.11Rear view camera input (Yellow)12Front view camera/ Dashboard camera input (Yellow)13Visual Output (Yellow) Ñ Connecting a USB deviceUSB device[2]USB (Gray) terminal[1]USB (Black) terminal[1]Accessory 2 (Black) (1 m) [3]Accessory 3 (Gray) (1 m) [3][1] USB maximum power supply current : DC 5 V = 1.5 A[2] Sold separately / Use CA-U1EX to extend the cable if necessary. (Max 500 mA, 5V) [3] See Securing the USB extension cable (P.92).](https://usermanual.wiki/JVCKENWOOD/J5175.05-SHORT-TERM-CONFIDENTIAL-User-Manual-DDX-DMX/User-Guide-3734690-Page-94.png)
![Connection/Installation95English Ñ Connecting an iPod/iPhone ●Lightning connectorKCA-iP103 (0.8m)[3]KCA-iP103 (0.8m)[3]iPod/iPhone[2]iPhone (with CarPlay/ WebLink/ Waze)[2]USB (Gray) terminal[1]USB (Black) terminal[1]Accessory 2 (Black) (1 m) [4]Accessory 3 (Gray) (1 m) [4][1] USB maximum power supply current : DC 5 V = 1.5 A[2] Sold separately[3] Optional accessory[4] See Securing the USB extension cable (P.92). Ñ Connecting an Android smartphoneMicro USB to USB cable[2]Android smartphone[2]USB (Gray) terminal[1]USB (Black) terminal[1]Accessory 2 (Black) (1 m) [3]Accessory 3 (Gray) (1 m) [3][1] USB maximum power supply current : DC 5 V = 1.5 A[2] Sold separately[3] See Securing the USB extension cable (P.92). Ñ Connecting a Dashboard cameraDRV-N520 [1]Front view camera/ Dashboard camera input (Yellow)Dashboard camera interface[1] Optional accessory](https://usermanual.wiki/JVCKENWOOD/J5175.05-SHORT-TERM-CONFIDENTIAL-User-Manual-DDX-DMX/User-Guide-3734690-Page-95.png)