user manual
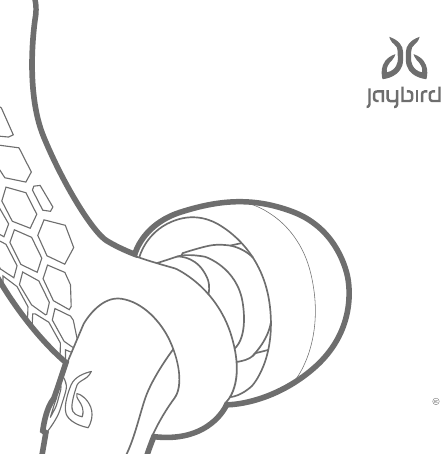
FREEDOM
USER GUIDE
ENGLISH
FCC ID: XX8-F5
IC: 20385-F5
SET-UP
Quick Start ................................................................................................................. 3
In-the-box ................................................................................................................... 9
Fit ............................................................................................................................... 10
Comply ........................................................................................................................ 11
Ear Fins ...................................................................................................................... 13
Cord Management Clips.............................................................................................. 16
Cord Clip ..................................................................................................................... 18
Power On: Music & Calls ............................................................................................. 19
MySound App .............................................................................................................. 20
DETAILED INSTRUCTIONS
Charging / Battery Status .......................................................................................... 22
Charging Clip .............................................................................................................. 24
Controls for Music and Calls ...................................................................................... 29
Pairing ........................................................................................................................ 30
Multipoint ................................................................................................................... 32
ShareMe ..................................................................................................................... 34
Smartwatches ............................................................................................................ 36
Troubleshooting ......................................................................................................... 37
Specs & Warranty ...................................................................................................... 38
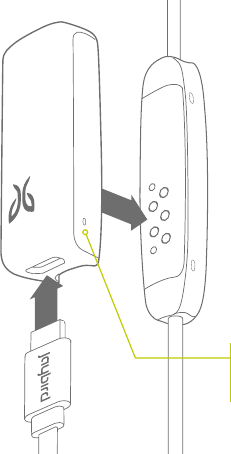
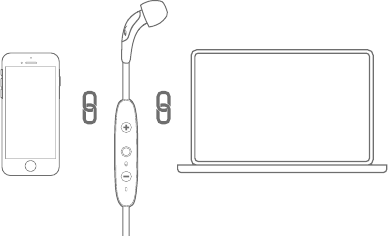
3
REMOVE
AT TACH
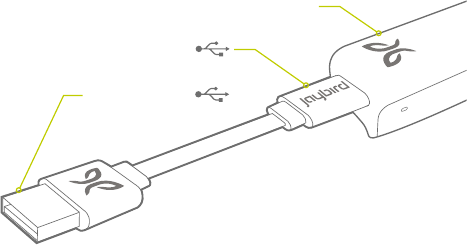
QUICK START
DO NOT
PULL CORD
4
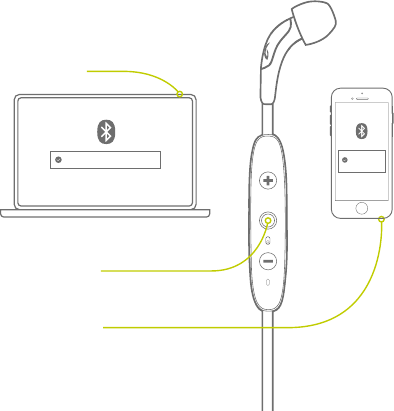
LISTEN FOR
VOICE PROMPT
“HEADPHONES
CONNECTED”
“SEARCHING FOR
YOUR MUSIC DEVICE”
“POWER ON”
PAIRING
4 SEC PUSH
5
MYSOUND
CUSTOMIZE YOUR SOUND SETTINGS
AND SAVE THEM TO YOUR BUDS
6
UNDER-EAROVER-EAR
CHOOSE THE FIT OPTION/COMBINATION
THAT WORKS BEST FOR YOU
SILICONE
EAR TIPS
SILICONE
EAR FINS
COMPLYTM
EAR TIPS
7
OVER-EAR
UNDER-EAR
SHORTEN CORD TO KEEP THE
CONTROLLER SNUG.
FOR RUNNERS
CONNECT YOUR
BUDS TO 2 DEVICES
SIMULTANEOUSLY
PAGE 35
REMEMBER UP
TO 8 DEVICES
PAGE 32
SHARE 1 DEVICE
WITH 2 BUDS
PAGE 37
WITH COMPLETE
REMOTE CONTROLS
PAGE 21
LEAVE YOUR PHONE
BEHIND & PAIR WITH
YOUR SMARTWATCH
PAGE 39
CUSTOMIZE YOUR SOUND
SETTINGS AND SAVE THEM
TO YOUR BUDS
PAGE 22
MYSOUND APPSMARTWATCH
SHARE MEMUSIC + CALLS
MULTIPOINT
PAIRING
Video instructions at jaybirdsport.com
8
9
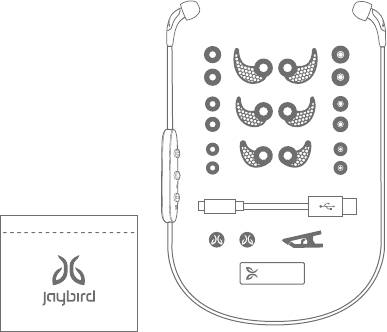
1. Freedom Bluetooth Headphones
2. 3 pairs Silicone Eartips (S,M,L)
3. 3 pairs ComplyTM Premium Foam
Eartips (S,M,L)
4. 3 Pairs Ear Fins (S,M,L)
5. USB Charging Cable
6. 2 Cord Management Clips
7. Cord Clip
8. Charging Clip
9. Carry Pouch
9.
IN-THE-BOX
1.
2.3.
4.
5.
8.
6. 7.
10
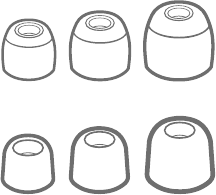
GREAT SOUND PERFORMANCE IS IN
SELECTING THE RIGHT SIZE EARTIP
We love great sound. Make
sure you hear it. Because
everyone’s ears are
different, be sure to try
all sizes of eartips. Only
with the right size eartips
will you enjoy a snug fit &
premium sound quality.
SILICON EAR TIPS
COMPLYTM PREMIUM
SPORT FOAM EAR TIPS
FIT
11
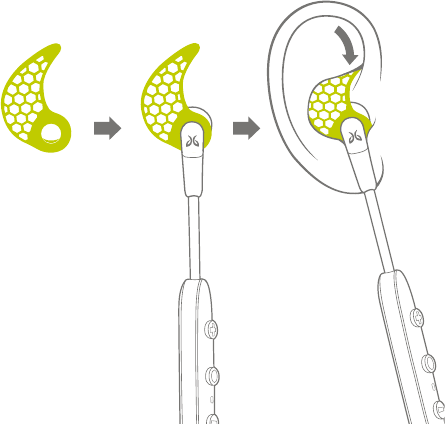
COMPLYTM
Premium Comply™ Foam ear tips exclusively designed for
Jaybird Freedom deliver maximum noise isolation and comfort.
Slide Comply Foam tip onto
Freedom speaker housing.
1 2
3 4
Compress Comply Foam tip by
rolling with fingers.
Pull ear back to open ear canal for
a deeper more secure fit. Insert
entire foam tip into ear.
Hold in place 15-30 sec for foam
to expand and create a seal.
15-30
seconds
12
Slide Comply Foam tip onto
Freedom speaker housing.
1 2
3 4
Compress Comply Foam tip by
rolling with fingers.
Pull ear back to open ear canal for
a deeper more secure fit. Insert
entire foam tip into ear.
Hold in place 15-30 sec for foam
to expand and create a seal.
15-30
seconds
Secure-Fit: Expands to give you a custom
fit and remarkable in-ear retention. Your
earbuds remain secure whether you’re in
the gym, on the slopes, or on the go.
Soft Comfort: Unique memory foam
provides all-day comfort, while
eliminating in-ear irritation and fatigue.
Noise Blocking: Allows you to enjoy your
music in noisy environments without
raising the volume.
Audio Experience: Creates an optimal
seal and channels sound directly into the
ear canal, transforming your listening
experience.
13
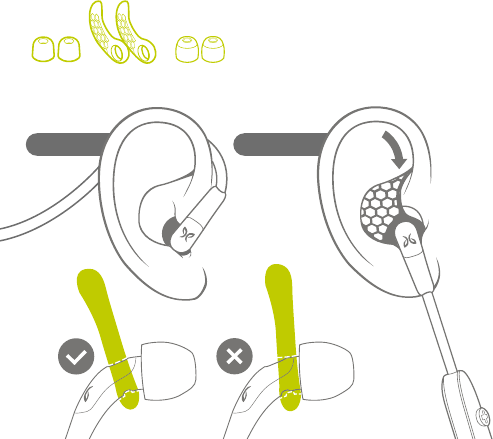
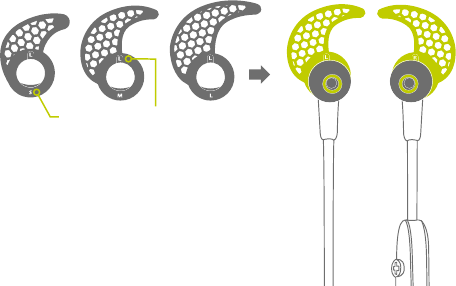
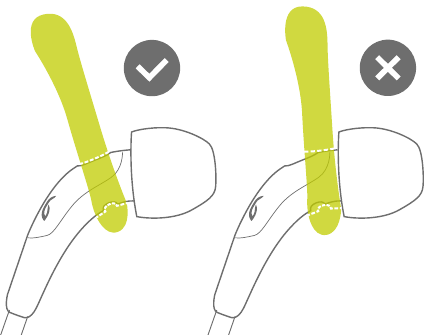
EAR FINS
INSTALL YOUR PREFERRED SIZED
SECURE FIT EAR FINS AS SHOWN.
LEFT
SIZE LEFT / RIGHT
RIGHT
14
Slide the secure-fit ear fins back until the ridges in the fins
line up with the grooves on the buds.
15
LOCK THE TIP OF THE
EAR FIN INTO THE
TOP OF THE BOWL OF
THE EAR AS SHOWN.
You should have a
snug fit with contact
on the lower, back
and top portions of
the bowl of the ear.
16
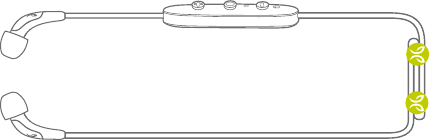
CORD MANAGEMENT CLIPS
BEFORE FITTING, INSTALL THE CORD MANAGEMENT CLIPS
TO REDUCE THE SLACK FOR A CUSTOMIZED FIT.
17
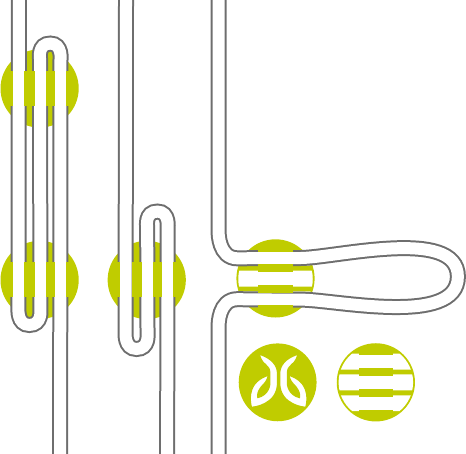
THE CORD CLIPS CAN BE
USED IN THREE WAYS TO
MANAGE THE LENGTH OF
YOUR CORD AND FIND
THE RIGHT FIT FOR YOU.

18
USE THE INCLUDED CORD
CLIP TO SECURE YOUR
FREEDOM BUDS TO THE
BACK OF YOUR SHIRT.
CORD CLIP

19
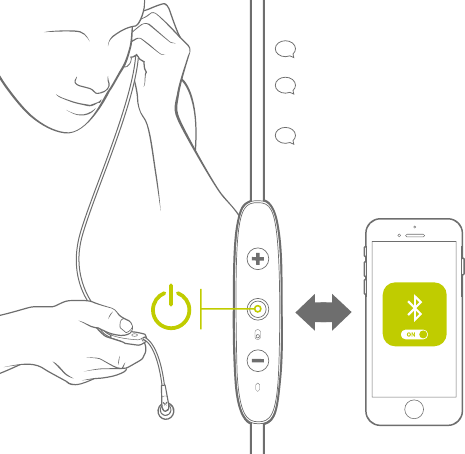
POWER ON
PAIR HEADPHONES TO YOUR
MUSIC DEVICE, PLAY MUSIC,
AND TRY EACH SIZE OF EARTIP
TO FIND THE BEST FIT AND
SOUND PERFORMANCE.
A proper seal is essential for
you to fully appreciate the
high quality audio of Freedom.
FROM OFF STATE HOLD
FOR 4 SEC TO PAIR.
FROM ON STATE HOLD 4
SEC TO POWER OFF.
ALTERNATING RED & GREEN
VOICE PROMPT:
“Searching...”
ON
MICROPHONE
PUSH 1 SEC PUSH 4 SEC PUSH
MUSIC & CALLS
20
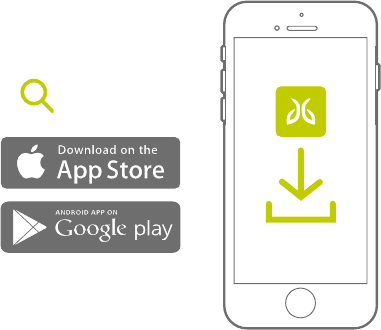
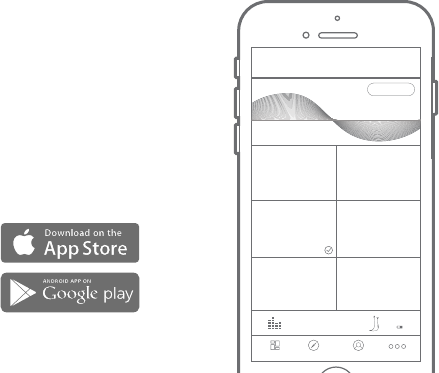
MYSOUND APP
TO CUSTOMIZE THE SOUND
PROFILE ON YOUR NEW FREEDOM
BUDS DOWNLOAD THE JAYBIRD
MYSOUND APP IN THE APPLE OR
GOOGLE PLAY STORE.
Your new sound settings are saved
right on your buds, so you can take
your custom sound with you no matter
where you go with any device you use.
NOTE: The MySound app works with Jaybird
Freedom. Other manufacturers and older
Jaybird headphones are not supported.
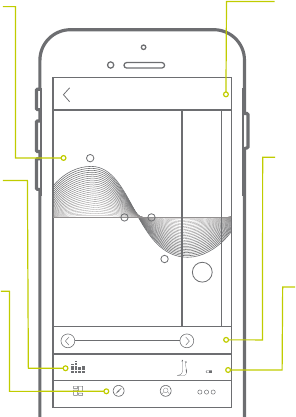
DASHBOARD DISCOVER PROFILE
+
CUSTOMIZE
JAYBIRD SIGNATURE
WARMTH
WARMTH
REMOVE SHARPNESS
JAYBIRD ENHANCED
EXTENDED LISTENING
R & B FREAK
Jaybird Freedom
60%
MORE
21
DASHBOARD DISCOVER PROFILE
HISTORY
SAVE
Jaybird Freedom
60%
MORE
SAVE
HISTORY
DEVICE
MUSIC
DISCOVER
SOUND
Save your new
preset to your
dashboard for easy
access to all your
favorite sound
settings.
Track through a
history of your
changes.
See your
connected
device and
battery status.
Indicates if
music is playing
on your device.
Discover presets
from athletes and
other users.
Customize your
sound settings.
Changes are
saved to your
Freedom buds.
22
Charging the battery before use is
recommended but not required. Freedom
ships partially pre-charged, however initial
charge will vary.
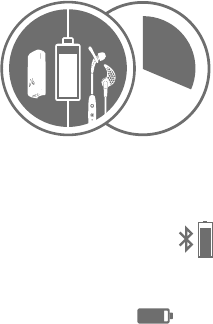
Look for this Bluetooth headset
battery status icon in the top right
corner of your iPhone screen.
Or this icon in the bottom right in
the MySound app to see the status
of Freedom’s battery.
BATTERY LEVEL
The MySound App is able to report
the battery level of your Freedom
headphones to a 1% accuracy.
When not connected to the MySound
App, your Freedom headphones
will announce an average battery
level when you turn them on.
Alternatively, an average battery
level announcement can be
triggered by pressing the Volume +
or Volume – button when connected
and not playing music.
On your Freedom headphones the
values are rounded to the nearest
20%. 26% reported in the App
for example would result in the
following prompt: “Battery 20
percent”.
90%
CHARGING / BATTERY STATUS
8
HRS
4HRS
4HRS
Q
U
I
C
K
C
H
A
R
G
E
20
MIN
=
1 HR
PLAYTIME
ON BUDSON CLIP
PLAY
TIME
23
VOICE PROMPT
LED STATUS
MICRO USB
CHARGING
ARE THE HEADPHONES ON?
IS THE BATTERY LOW?
When not playing music,
pressing ‘Volume + or
Volume –’ will announce
battery status.
Red: Charging
Green: Charged
(while charger clip is attached)
Red+Green Alternating: Pair Mode
No Light: Standby / Play Mode /
Phone Call / Powered Off
The charging clip
that came with your
buds also acts as a
charging dock. 2.5
hrs for full charge
gives 4 + 4 hours of
playtime. 20 mins
charging gives 1 hour
of play time. The clip
can also be charged
separately and used
at a later time.
In Standby* mode, push +, watch LED:
Single Green Flash =
10% or more battery remaining
Single Red Flash =
Below 10% battery remaining
No Light = Powered off
* Standby Mode: Powered and not connected to a
device but not playing music or on a phone call.
24
RED LED = CURRENTLY CHARGING
GREEN LED = FULLY CHARGED
(with USB cable connected to a
power source)
To charge your freedom buds,
securely attach the charging clip to
the back of the controller and insert
the micro USB end of your included
cable into the bottom end of the
charging clip. Plug the other end into
any 5V 500mA USB power source.
This charges both your buds and
the charging clip simultaneously for
extended listening.
CHARGING CLIP
25
In addition to using the USB charging
cable, your charging clip can charge your
buds without having to be connected to
a power source. Your charging clip has
an internal battery and circuitry that
extends your play time by 4 hours. Simply
attach it to the back of the controller and
it automatically start charging.
Every time you attach the charging
clip it will reset your buds by turning
them off. You may turn the your buds
ON and continue to listen to your music
while the charging clip is attached and
transferring power.
NOTE: Although the freedom buds are sweat-
proof, the charging clip is not. Exposing to
moisture or sweat will void the warranty.
Do not use your buds while the USB cable is
plugged into a power source. Doing so could
cause an electric shock if your power source
develops an electrical fault.
4 HRS + 4 HRS
= 8 HRS PLAY TIME
USING THE CHARGING CLIP
TO CHARGE YOUR BUDS
26
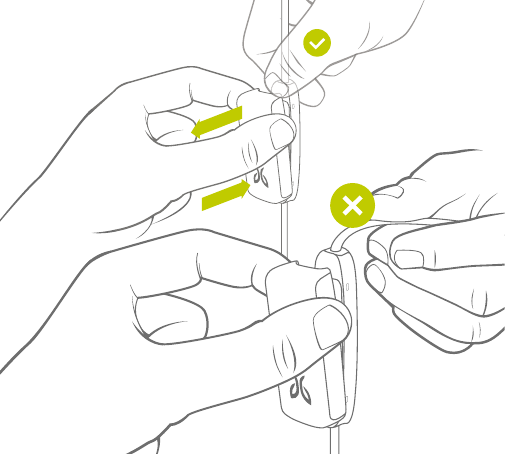
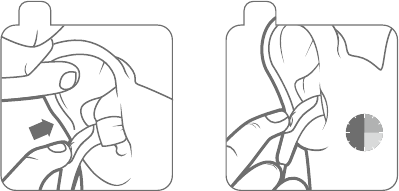
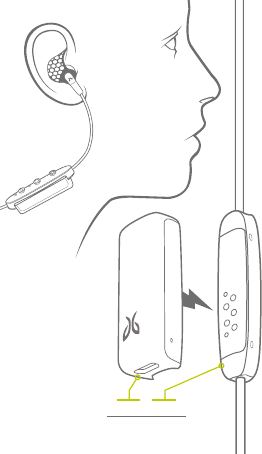
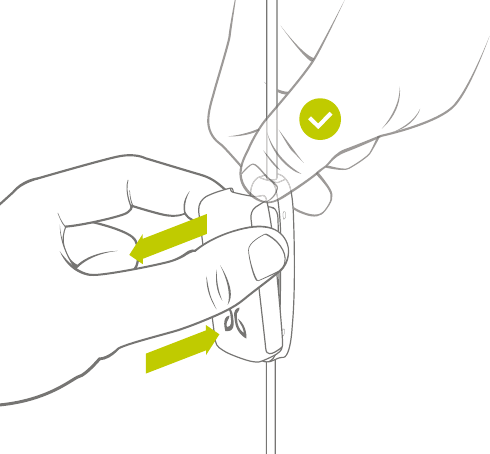
Attach the charging clip by
pushing it directly onto the
back of the controller until you
feel it click securely in place.
When removing the charging
clip apply pressure to the top
of the controller and separate
it from the charging clip.
REMOVE
AT TACH
ATTACHING & REMOVING
THE CHARGING CLIP
27
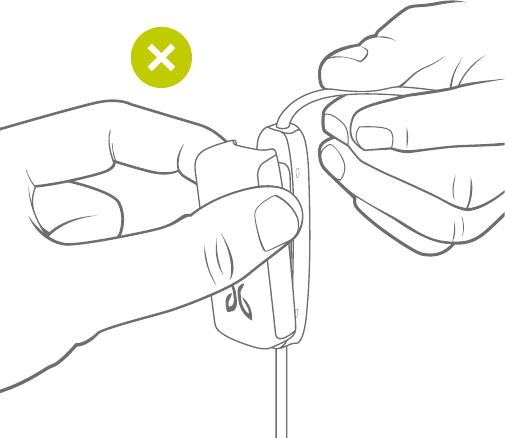
When removing the clip
DO NOT pull on the cord.
Doing this may cause
damage to your device.
DO NOT
PULL CORD
28
Charge your buds/charging clip through any native 5V 500mA USB
power source. If you use a USB wall or car adapter ensure that is
supplies no more than 5V 500mA. USB adapters that supply more
that 5V 500mA may harm smaller electronic devices and may void
your warranty. We recommend using Jaybird approved USB wall
and car adapters (available at jaybirdsport.com).
MICRO USB
CHARGING CLIP
STANDARD USB
29
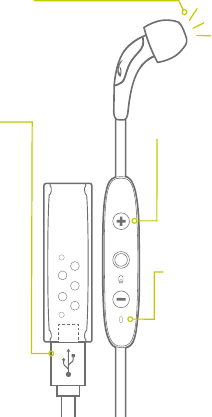
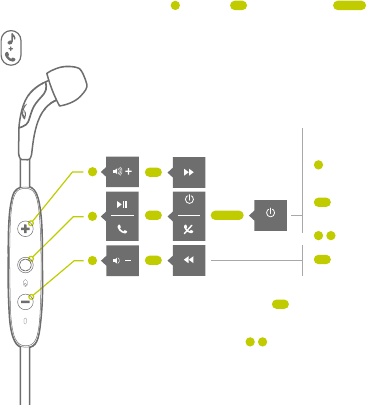
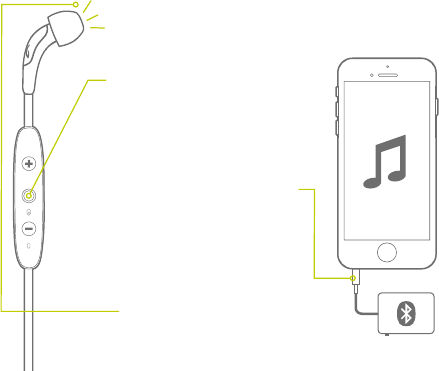
ON
CONTROLS
Switch call to Freedom,
Answer 2nd call,
end call.
Redial
Mute & un-mute call
Reject 1st/2nd call,
switch between 2
calls, voice dial
ADDITIONAL CALL COMMANDS
If you have a 2nd incoming call: On center button will answer
2nd call, hold active and switch between active and hold
When not on a call or playing music: On center button activates
Siri or Voice Commands
OFF
PUSH 1 SEC PUSH 4 SEC PUSH
MUSIC & CALLS
30
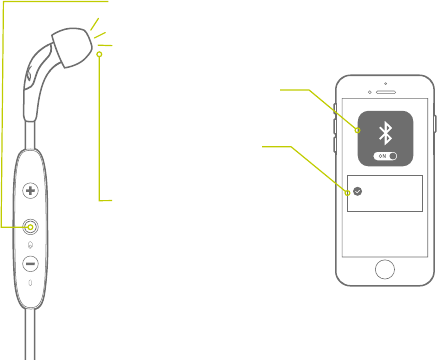
PAIRING
1. With headphones turned off, & within 1 meter (3 ft) of
music device, press & hold center key for more than 4
sec until you see alternating red/green LED and a voice
prompt saying “Searching for your music device”.
2. On your phone/music device,
turn Bluetooth on & have it
search for Bluetooth devices.
3. Check for “Freedom” and
select (enter passcode 0000
if prompted).
4. Freedom voice prompt will say
“headphones connected”.
5. If the pairing is not successful,
switch off headphones by pushing
the center key for more than 4
seconds and repeat the steps
outlined above.
Jaybird
Freedom
31
PAIRING WITH A BLUETOOTH ADAPTER
1. Place headphones and mobile phone
within 1 meter (3 feet) of each other.
2. Put the headphones into pair mode
as outlined on prior page.
3. If using BAU Universal Bluetooth
Adapter put into pair mode also
(see BAU manual).
4. Plug the Bluetooth adapter into
the music device and play a song.
5. The headphones and adapter will
pair automatically (passcode of
adapter must be 0000).
6. After successful pairing and
connecting, the headphones will
say “Headphones connected”.
32
MULTIPOINT
PAIRING WITH SEVERAL BLUETOOTH DEVICES
Multipoint enables you to simultaneously pair and connect your buds
with two different Bluetooth devices. For example you can have your
Freedom buds connected to your laptop and your phone at the same
time. You can listen to music from your laptop and are still able to
answer an incoming call on your phone using your Freedom buds
controller. Pretty wicked, eh?!
33
MULTIPOINT
2. Put your buds back in pairing
mode and then hold down the
center button.
1. Pair your buds to the
first device.
3. Search and select your
Freedom buds on the
second device.
Jaybird Freedom Jaybird
Freedom
34
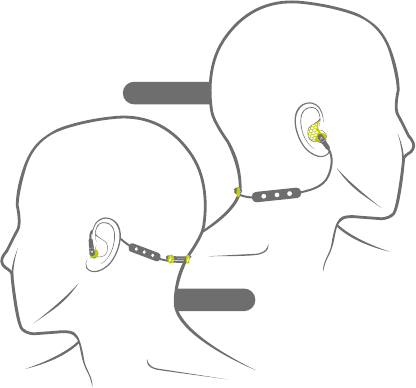
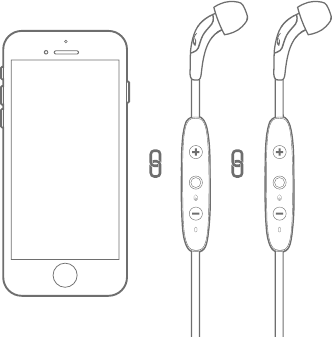
SHARE ME
Share the music you are listening to with another pair of Freedom buds. Follow
these steps to connect a second pair of headphones. Love is in the air!
35
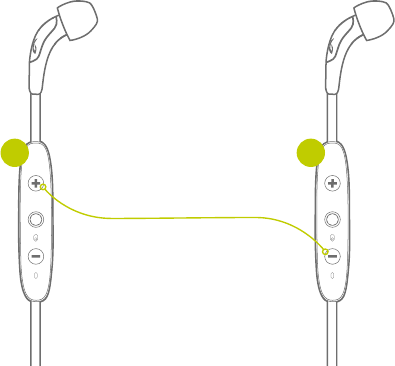
2. Push and hold Vol + on the
connected buds, while you push
and hold the Vol - button on the
second buds until both device LEDs
flash alternating red and green.
Both buds will be connected
when the LEDs stop flashing and
“Headphones connected” will play
on both buds.
3. Play Music.
1. Power on both buds, with just one
of the buds paired and connected
to only one device.
SHARE ME
1 2
36
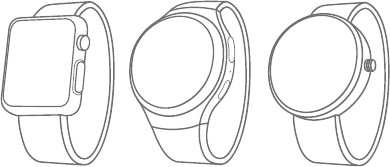
SMARTWATCHES
With the right smartwatch you can leave your phone at home.
Just sync music to your smartwatch and pair with your buds.
Now that’s freedom!
Works with smartwatches like:
NOTE: Some smartwatches use a weaker Bluetooth signal strength which may cause
possible intermittent signal drop.
APPLE MOTOROLASAMSUNG

37
TROUBLESHOOTING
1. To reset your buds to their original factory
settings put your buds in pairing mode by
turning the buds off then press & hold the
center button for more than 4 sec until you see
alternating red/green LED.
If your buds are not responding, connect the charging
clip and USB cable to a power source. This will turn
your buds off and perform a soft reset.
2. While the LEDs are flashing red / green
double tap the center button. Upon
successful factory reset, the LED turns
orange and the device turns off.
LED
NOTE: Once your buds have been reset and you
power on they will automatically go into pairing mode.
Select “Forget” or “Remove” Jaybird Freedom from
your device’s Bluetooth menu and pair again.
FACTORY RESET
RESET

38
SPECIFICATIONS
Bluetooth Version 4.1, Multipoint
Codecs SBC, Customized SBC, AAC (customized SBC codec offers
high fidelity sound without needing APT-X)
Profile Handsfree , Headset , A2DP , AVCRP , SPP
Effective Range 10 meters (30 feet)
Play Time 8 Hrs* (4 hrs on buds plus an additional 4 hrs with
included charging clip)
Standby Time 110 Hrs*
AC Power DC 5V 500mA
Charging Time 2.5 Hrs
Quick Charge 20 Min = 1 Hr play time on buds + an extra hour through
charging clip
Dimensions 23 x 13 mm earbud size, 490 mm cord length
Weight Approx 13 g
* Play time and standby time may vary due to usage conditions. Adding additional bass to your
sound profile through the MySound app may slightly reduce play time.
39
WARNINGS, WARRANTY,
CARE & MAINTENANCE
Full warranty, care & maintenance details at jaybirdgear.com/warranty +1.866.244.3399
WARNING: Due to the isolating characteristics of these headphones do not use while driving, riding a bike or where
vehicular traffic is present, or in any other activity where failure to hear surrounding sounds could be dangerous.
Use of these headphones at excessive volumes may cause permanent hearing damage. Always turn the volume down
before use. Take caution in regards to inserting objects into ear canal, use at own risk. Do not wear the device while it
is connected to a power source driven from main 110V or 220V lines.
Copyright 2016 Jaybird, LLC. All rights reserved. Jaybird, and the Jaybird logo are trademarks of Jaybird, LLC. Bluetooth is
a trademark owned by Bluetooth SIG, Inc. USA, and licensed to Jaybird, LLC. iPhone is a trademark of Apple, Inc., registered
in the U.S. and other countries. Manufactured under Freebit patent numbers EP2177045, US8630436, US8976995 and
corresponding international patents. Assembled in Malaysia.
This device complies with Part 15 of the FCC Rules. Operation is subject to the following two conditions: (1) this device
may not cause harmful interference, and (2) this device must accept any interference received, including interference
that may cause undesired operation. Any changes or modifications to device will void the user’s authority to operate
the device. The battery is recycled. Do not dispose of the battery in fire, as it may cause explosion.
Administrative Regulations on Low Power Radio Waves Radiated Devices warning:
Article 12 - Without permission granted by the NCC, any company, enterprise, or user is not allowed to change
frequency, enhance transmitting power or alter original characteristic as well as performance to an approved low
power radio-frequency devices.
Article 14 - The low power radio-frequency devices shall not influence aircraft security and interfere legal
communications; If found, the user shall cease operating immediately until no interference is achieved. The said legal
communications means radio communications is operated in compliance with the Telecommunications Act. The low
power radio-frequency devices must be susceptible with the interference from legal communications or ISM radio
wave radiated devices.

Avoid excessive volume levels and prolonged
periods of listening. Prolonged listening
at excessive volume levels may cause
permanent hearing disability.
Do not use around road traffic.
Video instructions at jaybirdsport.com
LISTEN RESPONSIBLY
NOTE: This equipment has been tested and found to comply with the limits for a
Class B digital device, pursuant to part 15 of the FCC Rules. These limits are
designed to provide reasonable protection against harmful interference in a
residential installation. This equipment generates uses and can radiate radio
frequency energy and, if not installed and used in accordance with the instructions,
may cause harmful interference to radio communications. However, there is no
guarantee that interference will not occur in a particular installation. If this
equipment does cause harmful interference to radio or television reception, which
can be determined by turning the equipment off and on, the user is encouraged to
try to correct the interference by one or more of the following measures:
- Reorient or relocate the receiving antenna.
- Increase the separation between the equipment and receiver.
-Connect the equipment into an outlet on a circuit different from that to which the
receiver is connected.
-Consult the dealer or an experienced radio/TV technician for help
This device complies with Industry Canada licence-exempt RSS
standard(s). Operation is subject to the following two conditions:
(1)this device may not cause interference, and(2) this device must
accept any interference, includinginterference that may cause
undesired operation of the device.
Le présent appareil est conforme aux CNR d'Industrie Canada
applicables auxappareils radio exempts de licence. L'exploitation
est autorisée aux deux conditions suivantes :(1) l'appareil ne doit
pas produire de brouillage, et(2) l'utilisateur de l'appareil doit
accepter tout brouillage radioélectrique subi, même si le brouillage
est susceptible d'en compromettre lefonctionnement.