Jiangmen Dascom Computer Peripherals DP3300 portable receipt and label printer User Manual DP 330 User Guide 20170615 BT
Jiangmen Dascom Computer Peripherals Co.,Ltd. portable receipt and label printer DP 330 User Guide 20170615 BT
User Manual

D
D
P‐
3
T
h
DAS
C
w
w
3
30
D
h
er
m
C
OM Europ
e
Heuweg
3
89168 Ul
m
German
y
w
w.dascom
Ser
i
Ope
r
D
P-
3
m
al
e
GmbH
3
m
y
.com
i
es
r
ator’s
3
30
Pri
n
Man
u
n
te
r
u
al
r
37992
5
5
b

i
Conformity wit
h
Note: Conform
- using interfa
c
- non-observa
n
- installing co
m
- unauthorized
Die Konformit
ä
Hinweis: Die
K
- Benutzung v
o
- Nichtbeachtu
- Ersetzen von
- Eingriffe dur
c
FCC Part
1. This devic
1) This devi
c
2) This devi
c
2. Changes o
to operate th
e
This equipm
e
FCC Rules.
T
installation.
This equipm
e
instructions,
not occur in
a
which can b
e
one or more
o
Re-orientate
Increase the
s
Connect the
e
Consult the
d
Canadia
n
This device
compatibilit
y
if applicable
h
the above me
ity may be affe
c
c
e cables not co
n
ce of importan
t
m
ponents not ap
manipulation
Dieses Ger
ä
Elektromag
n
werden die
A
ä
t zu den oben
a
K
onformität kan
n
o
n nicht spezifiz
ng wichtiger Hi
n
Bauteilen, die
n
c
h Unbefugte
15 Class
B
c
e complies w
i
c
e may not ca
u
c
e must accep
t
o
r modificatio
n
e
equipment.
e
nt has been t
e
T
hese limits a
r
e
nt generates
u
may cause ha
r
a
particular in
s
e
determined
b
o
f the followi
n
or relocate th
e
s
eparation be
t
e
quipment int
o
d
ealer or an e
x
n
Depart
m
fulfills the Euro
p
y
and relating to
.
ntioned Directi
v
c
ted by:
mplying with th
e
t
instructions in
t
proved for this
d
ä
t erfüllt die Anf
o
n
etischen Vertr
ä
A
nforderungen
b
a
ngeführten Ric
h
n
beeinflusst we
r
ierten Schnittst
e
n
weise der Bedi
n
icht vom Herst
e
B
i
th Part 15 of
t
u
se harmful i
n
t
any interfere
n
n
s not express
l
e
sted and fou
n
r
e designed t
o
u
ses and can
r
r
mful interfer
e
stallation. If t
h
b
y turning the
n
g measures:
e
receiving an
t
t
ween the equ
i
o
an outlet on
x
perienced ra
d
m
ent of C
o
ww
w
p
ean standards
low-voltage el
e
v
es is indicated
b
e
specifications
t
he operator´s
m
d
evice by the m
o
rderungen der
ä
glichkeit sowie
bezüglich RoH
S
h
tlinien ist durc
h
r
den durch:
e
llen
enungsanleitun
e
ller für dieses
G
t
he FCC Rule
s
n
terference.
n
ce received,
ly approved b
n
d to comply
w
o
provide reas
o
r
adiate radio
fr
e
nce to radio
c
h
is equipmen
t
equipment o
ff
tenna.
i
pment and re
c
a circuit diff
e
d
io/TV techni
c
o
mmunic
a
w
.dascom.co
m
requirements b
y
e
ctrical equipme
b
y the CE symb
m
anual
anufacturer
Europäischen
N
bezüglich Elekt
S
und falls anw
e
h
das am Gerät
g
G
erät freigegeb
s
. Operation i
s
including int
e
y the party re
s
w
ith the limit
s
o
nable protect
fr
equency ene
r
c
ommunicati
o
t
does cause h
a
ff
and on, the
u
c
eiver.
e
rent from tha
t
c
ian for help.
a
tions Ra
m
y
complying wit
h
nt. Furthermor
e
ol attached to t
h
N
ormen durch
E
rischer Betrieb
s
e
ndbar R&TTE
e
angebrachte C
E
en wurden
s
subject to th
e
e
rference that
m
s
ponsible for
c
s
for a Class
B
ion against h
a
r
gy and, if not
o
ns. However,
a
rmful interfe
r
u
ser is encour
a
t
to which the
dio Inter
f
h
the Directive
r
e
it fulfills the re
q
h
e device.
E
inhaltung der
R
s
mittel mit Nied
e
e
rfüllt.
E
-Zeichen geke
e
following t
w
m
ay cause un
d
c
ompliance c
o
B
digital devic
e
a
rmful interfe
r
installed and
there is no g
u
r
ence to radio
a
ged to try to
c
receiver is co
f
erence S
t
r
elating to elect
r
q
uirements for
R
R
ichtlinien bezü
g
e
rspannung. De
s
nnzeichnet.
w
o conditions:
d
esired opera
t
o
uld void the
u
e
, pursuant to
r
ence in a resi
d
used in accor
d
u
arantee that i
n
or television
r
c
orrect the int
e
o
nnected.
t
atement
r
omagnetic
R
oHS and R&T
T
g
lich der
s
Weiteren
t
ion.
u
ser's authorit
y
Part 15 of the
d
ential
d
ance with th
e
n
terference w
i
r
eception,
erference by
T
E
y
e
e
i
ll

ii
Thisdevicec
o
conditions:1
)
interferencet
transmitterm
byIndustryC
a
sochosentha
t
communicati
o
Leprésentap
p
L'exploitation
l'utilisateurd
e
compromettr
e
p
eutfonction
n
IndustrieCan
a
Danslebutd
e
typed'anten
n
l'intensiténé
c
gaind'antenn
Battery D
Only disposes
Acknowledg
m
DASCOM is a
Bluetooth is
a
Zebra, CPC
L
Windows is
a
All other tra
d
© 2015 by DA
S
Read
ventilated. Do
o
mplieswithIn
d
)
thisdevicem
a
hatmaycause
ayonlyoperat
e
a
nada.Tored
u
t
theequivale
n
o
n.Maximum
p
p
areilestconf
o
estautorisée
a
e
l'appareildoi
t
e
lefonctionne
m
n
eravecunea
n
a
da.
e
réduirelesris
q
n
eetsongain
d
c
essaireàl'éta
b
emaximaldu
E
isposal
of used batteri
e
m
ents:
registered trad
e
a
registered tr
L
and ZPL are
a
registered tr
a
d
emarks are t
h
S
COM Europe
G
all set up and
o
not operate ne
a
d
ustryCanada
a
ynotcausein
t
undesiredope
eusinganant
e
u
cepotentialra
n
tisotropically
p
oweroutput
p
o
rmeauxCNR
d
a
uxdeuxcondi
t
t
acceptertout
m
ent.Confor
m
n
tenned'unty
p
q
uesdebrouill
a
d
esortequela
p
b
lissementd'u
n
E
UTest:4.5W
/
e
s according ins
e
mark of DASC
O
r
ademark of B
l
registered tra
d
a
demark of
M
h
e property of
G
mbH, Ulm, Ge
o
perating instru
c
a
r a heat sourc
e
ww
w
license‐exemp
t
t
erference;2)
t
rationofthed
e
e
nnaofatype
a
diointerferen
c
radiatedpowe
p
lusmaximum
d
'IndustrieCan
a
t
ionssuivantes
brouillagerad
i
m
émentàlaré
g
p
eetd'ungain
a
geradioélect
r
p
uissanceisotr
o
n
ecommunicat
i
/
m
2
Limiteest
1
tructions and/o
r
O
M Europe Gm
l
uetooth SIG,
d
emarks of Z
e
M
icrosoft Corp
o
their respecti
v
rmany. All righ
t
c
tions before pr
o
e
.
w
.dascom.co
m
t
RSSstandard
(
t
hisdevicemu
s
e
vice.UnderI
n
a
ndmaximum
(
c
etootheruse
r
r(e.i.r.p.)isno
t
antennagain
o
a
daapplicable
s
:(1)l'appareil
i
oélectriquesu
b
g
lementationd
maximal(oui
n
r
iqueàl'intent
i
o
perayonnée
é
i
onsatisfaisan
t
1
0W/m
2
r
your local reg
u
bH
Inc.
e
bra Technol
o
o
ration
v
e owners.
t
s reserved.
o
ceeding with o
m
(
s).Operation
i
s
tacceptanyin
n
dustryCanad
a
(
orlesser)gain
r
s,theantenn
a
t
morethanth
a
o
ftheEUTis:4.
s
auxappareils
nedoitpaspr
o
b
i,mêmesile
b
'IndustrieCan
a
n
férieur)appro
u
i
ondesautres
u
é
quivalente(p.
i
t
e.
Lapuissan
c
u
lations.
o
gies
peration. Do n
i
ssubjecttoth
e
terference,inc
a
regulations,t
h
approvedfor
t
a
typeanditsg
a
a
tnecessaryf
o
5W/m
2
,Limit
i
radioexempt
s
o
duiredebroui
l
b
rouillageests
u
a
da,leprésent
é
u
vépourl'éme
t
u
tilisateurs,ilf
a
i
.r.e.)nedépas
s
c
edesortiema
x
ot operate in a
n
e
followingtw
o
luding
h
isradio
t
hetransmitte
r
a
inshouldbe
o
rsuccessful
i
s10Wm
2
.
s
delicence.
il
lage,et(2)
usceptibled'e
n
é
metteurradi
o
t
teurpar
a
utchoisirle
s
epas
x
imaleplus
n
enclosure unl
e
o
r
n
o
e
ss properly

iii
Lese
n
geschlossene
n
Betrieb
No u
s
replacement p
a
may make the
certain the pri
n
Connecting thi
s
substances.
D
Enth
ä
qualifiziertes
K
Betrieb zu ge
w
des Produkts
g
bevor Sie sie
b
abnehmen od
e
Elektroschock
Drucker nicht i
Specifica
t
DASCOM R
e
Germany :
UK:
France:
Singapore (A
P
Americas:
China:
n
Sie vor der In
b
n
Raum, es sei
d
s
er-serviceable
p
a
rts is required
t
product unsafe
n
ter is disconne
c
s
printer to an u
D
o not operate n
ä
lt keine Teile, d
K
undendienstpe
r
w
ährleisten. Än
g
efährden. Wäh
b
erühren. Verge
e
r das Gerät rei
n
führen. Setzen
n der Nähe von
t
ions are s
u
e
presentativ
e
DASCO
M
DASCO
M
DASCO
M
P
): DASCO
M
Dascom
A
Jiangmen
b
etriebnahme di
e
d
enn dieser wir
d
p
arts inside. R
e
t
o warrant prop
e
to operate. Th
e
c
ted from AC p
o
ngrounded rec
e
ear liquid or spi
d
ie vom Bedien
e
r
sonal. Die Ver
w
derungen oder
rend des Druck
e
wissern Sie sic
h
n
igen bzw. wart
e
Sie den Drucke
Flüssigkeiten
u
u
bject to c
h
e
s:
M
Europe GmbH
M
GB Ltd, Hart
H
M
Europe GmbH
M
AP Pte Ltd, 21
A
mericas Corp,
Dascom Com
p
ww
w
e
Aufbau- und
B
d
ordnungsgem
ä
e
fer service or r
e
e
r, safe operati
o
e
print head and
o
wer before re
m
e
ptacle can res
u
ll liquid into the
e
r instandgeset
z
w
endung von e
c
Modifikationen
d
e
ns werden Dr
u
h
, dass der Dru
c
e
n. Schließen
S
r niemals in die
u
nd lassen Sie
k
h
ange with
, Heuweg 3, D-
8
H
ouse, Priestley
, 117 Avenue V
Bukit Batok Cr
e
34 Lakeview C
o
p
uter Periphals
C
w
.dascom.co
m
B
edienungsanle
ä
ß belüftet. Ne
h
e
pairs to a qual
i
o
n. Any alterat
i
motors get hot
m
oving any cov
e
u
lt in electrical s
h
printer at any ti
m
z
t werden könn
e
c
hten DASCOM
d
ieses Geräts
m
u
ckerkopf und
M
c
ker nicht mehr
S
ie diesen Druc
k
Nähe von feue
r
k
eine Flüssigkei
t
out notice
.
8
9079 Ulm, Ph
o
Road, Basings
t
ictor Hugo 9210
e
scent, #29-81,
o
urt, Verona, V
A
C
o., Ltd, No.39
9
m
itung Betreibe
n
h
men Sie den D
r
i
fied service pr
o
i
on or modificati
during use. W
a
e
rs or performi
n
hock. Never pl
a
m
e.
e
n. Bitte wende
n
Ersatzteilen ist
m
achen die Gar
a
M
otoren heiß. W
a
an die Stromqu
k
er nicht an ein
e
r
- oder explosio
t
en in den Druc
k
.
o
ne: +49 (0) 731
t
oke, Hampshir
e
0 Boulogne-Bill
a
WCEGA Towe
r
A
24482, USA,
P
9
, jinxing Road,
n
Sie den Druck
e
rucker nicht in
d
o
fessional. Use
on of this devic
e
a
it until they co
o
n
g any required
a
ce the printer
n
n
Sie sich bei In
s
notwendig, um
a
ntie ungültig u
n
a
rten Sie, bis si
c
elle angeschlo
s
e
ungeerdete St
e
nsgefährlichen
S
k
er gelangen.
2075 0
e
, RG24 9PU,
P
a
ncourt, Phone
:
r
, 658065, Pho
n
P
hone: +1 (877
)
Jianghai Distric
t
e
r nicht in eine
m
d
er Nähe einer
W
of genuine DA
S
e
voids the use
r
o
l before touchi
n
cleaning or mai
n
ear inflammabl
e
s
tandsetzung o
d
ordnungsgemä
ß
n
d können den
s
c
h die Teile ab
g
s
sen ist, bevor
S
e
ckdose an; di
e
S
toffen. Betreib
e
P
hone: +44 (0) 1
:
+33 (1)73 02
5
n
e: +65 6760 88
)
434 1377
t
Jiangmen
m
kleinen,
W
ärmequelle in
S
COM
r
warranty and
n
g them. Make
ntenance.
e
or explosive
d
er Reparatur a
ß
en, sicheren
s
icheren Betrie
b
g
ekühlt haben,
S
ie Abdeckunge
e
s kann zum
e
n Sie den
256 481481
5
1 98
8
33
n
b
n

1
Table
o
Introducti
o
Printer Fe
a
Quick Star
t
A.
Pap
e
B.
Prin
t
C.
Batt
e
D.
Cha
r
E.
Pow
e
F.
Con
t
G.
Perf
o
Confi
g
urat
i
A.
Inst
a
B.
Con
f
Inte
g
ratin
g
A.
Win
d
Print Dri
v
I.
U
II.
B
III.
B
B.
Win
d
C.
A
nd
r
I.
B
II.
W
D.
A
ppl
B
I.
Media .......
.
A.
Stan
B.
Blac
k
Maintenan
c
A.
Cle
a
B.
Batt
e
I.
G
II.
C
III.
A
IV.
T
e
C.
Trou
G
I.
F
a
II.
D.
Obt
a
APPENDIX
A.
A
pp
e
B.
A
pp
e
Glossar
y
o
Index ........
.
o
f Conte
n
o
n.................
.
a
tures ..........
.
t
Instructio
n
e
r Load .......
.
t
er Installatio
e
ry Installati
o
r
ge Battery ..
.
e
r On ..........
.
t
rol Panel ....
.
o
rming a Pri
n
i
on ..............
.
a
ll Config To
o
f
iguration Se
t
the Printer
d
ows Deskto
v
ers ..............
.
SB ..............
.
luetooth – G
luetooth –
W
d
ows Tablet
s
r
oid Tablets
&
luetooth ......
.
W
i- Fi ............
.
e™ Tablets
&
luetooth ......
.
.
...................
.
dard Media .
.
k Mark Medi
a
c
e and Trou
a
ning ............
.
e
ry Care ......
.
G
etting the M
a
C
harging the
B
A
dditional Ba
t
e
sting the P
o
bleshooting
.
G
eneral Error
a
ult Descrip
t
a
ining Servic
e
...................
.
e
ndix A – D
P
e
ndix B – D
P
f Terms ......
.
.
...................
.
n
ts
.
...................
.
...................
n
s .................
.
...................
n .................
o
n ................
.
...................
.
...................
.
...................
n
ter Sel
f
-Tes
.
...................
o
l .................
t
up ..............
into
y
our B
u
p Computer
s
.
...................
.
...................
eneral .........
W
indows 7 an
s
and Smart
p
&
Smart pho
n
.
...................
.
...................
&
Smartpho
n
.
...................
.
...................
.
...................
a
Position ....
bleshootin
g
.
...................
.
...................
a
ximum Batt
B
attery ........
t
tery and Sa
f
o
wer Adapte
r
.
...................
Conditions .
t
ion and Res
o
e
..................
.
...................
P
-330 Printer
P
-330L Print
e
.
...................
.
...................
ww
w
....................
....................
....................
....................
....................
....................
....................
....................
....................
t ..................
....................
....................
....................
u
siness Ap
p
s
..................
....................
....................
....................
d above ......
p
hones .........
n
es ..............
....................
....................
n
es ..............
....................
....................
....................
....................
g
...................
....................
....................
ery Life ........
....................
f
ety Informati
r
and Batter
y
....................
....................
o
lution .........
....................
....................
Specificatio
n
e
r Specificati
o
....................
....................
w
.dascom.co
m
...................
.
...................
.
...................
.
....................
....................
....................
....................
....................
....................
....................
...................
.
....................
....................
p
lications ..
.
....................
....................
....................
....................
....................
....................
....................
....................
....................
....................
....................
...................
.
....................
....................
...................
.
....................
....................
....................
....................
on ...............
y
...................
....................
....................
....................
....................
...................
.
n
s ................
o
ns ..............
...................
.
...................
.
m
.
...................
.
.
...................
.
.
...................
.
...................
.
...................
.
...................
.
...................
.
...................
.
...................
.
...................
.
.
...................
.
...................
.
...................
.
.
...................
.
...................
.
...................
.
...................
.
...................
.
...................
.
...................
.
...................
.
...................
.
...................
.
...................
.
...................
.
.
...................
.
...................
.
...................
.
.
...................
.
...................
.
...................
.
...................
.
...................
.
...................
.
...................
.
...................
.
...................
.
...................
.
...................
.
.
...................
.
...................
.
...................
.
.
...................
.
.
...................
.
.
...................
.
.
...................
.
.
...................
.
.
...................
.
...................
.
...................
.
...................
.
...................
.
...................
.
...................
.
...................
.
.
...................
.
...................
.
...................
.
.
...................
.
...................
.
...................
.
...................
.
...................
.
...................
.
...................
.
...................
.
...................
.
...................
.
...................
.
...................
.
.
...................
.
...................
.
...................
.
.
...................
.
...................
.
...................
.
...................
.
...................
.
...................
.
...................
.
...................
.
...................
.
...................
.
...................
.
.
...................
.
...................
.
...................
.
.
...................
.
.
...................
.
...................
.
...................
....................
....................
....................
....................
....................
....................
....................
.
...................
....................
....................
.
...................
....................
....................
....................
....................
....................
....................
....................
....................
....................
....................
....................
.
...................
....................
....................
.
...................
....................
....................
....................
....................
....................
....................
....................
....................
....................
....................
.
...................
....................
....................
.
...................
.
...................
.......... 2
.......... 3
.......... 4
.......... 4
.......... 5
.......... 5
.......... 6
.......... 6
.......... 7
.......... 7
.......... 8
.......... 8
.......... 9
........ 11
........ 11
........ 11
........ 11
........ 11
........ 11
........ 12
........ 12
........ 12
........ 12
........ 12
........ 12
........ 13
........ 13
........ 13
........ 14
........ 14
........ 14
........ 14
........ 14
........ 15
........ 15
........ 16
........ 16
........ 16
........ 17
........ 18
........ 18
........ 19
........ 20
........ 22

2 www.dascom.com
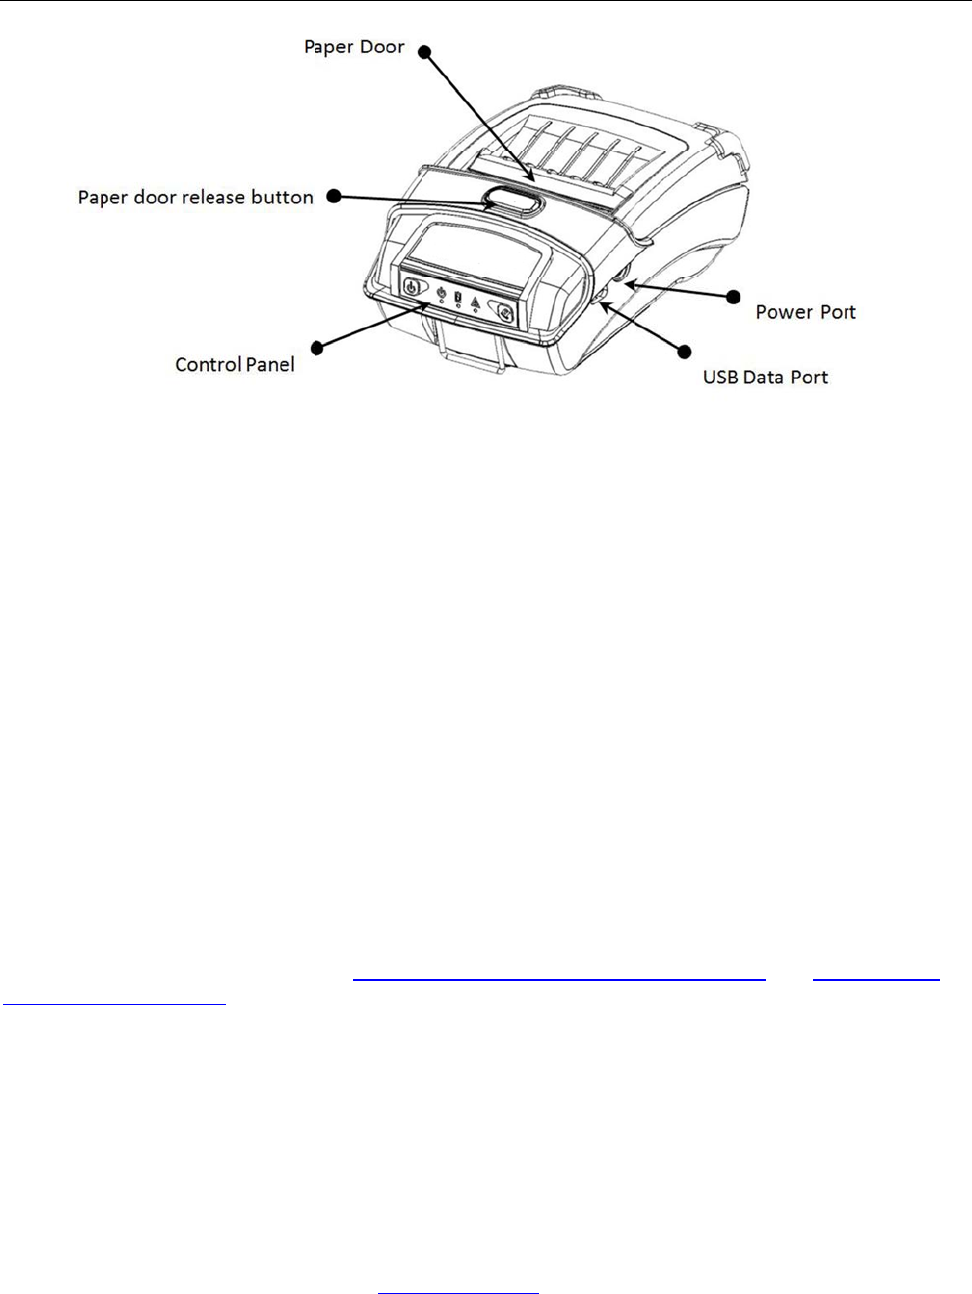
Introduction
Thank you for purchasing the Tally Dascom DP-330 Series mobile thermal printer also referred to in
this manual as the “DP-330” (for Receipt) or “DP-330L” (for Label). The DP-330 series prints on
special thermal media supplied in roll form up to 80 mm wide. All models are equipped with a USB
port which supports cabled communications. All models support an optional internal Bluetooth
interface. Complete specifications may be found in Appendix A – DP-330 Printer Specifications and
Appendix B – DP-330L Printer Specifications.
The remainder of this manual focuses on preparing the printer for initial use and performing tasks that
will be encountered during daily use.
Maintenance and Troubleshooting describes how to maintain the printer for optimal performance and
has information on how to diagnose any problems that may occur.
3
Printe
r
Your DP-3
Ea
s
Qu
i
IP
5
Pri
n
Ex
t
Pri
n
Th
e
Co
m
E
m
For detaile
DP-330L
S
r
Featur
e
30 features
s
y-to-read
c
i
ckly prints
a
5
4 rated for
w
n
t speeds u
t
ensive font
s
n
ter configu
e
latest in b
a
m
patible wi
t
m
ulations th
a
d specifica
t
S
pecificatio
n
e
s
:
c
ontrol face
a
wide vari
e
w
ater and
d
p to 4 ips
s
, characte
r
ration is qu
a
ttery tech
n
t
h Window
s
a
t allow the
t
ions refere
n
n
s.
ww
w
and simple
e
ty of ticket
s
d
ust resista
n
r
sets, bar
c
ick and ea
s
n
ology provi
s
, Windows
printer to b
e
n
ce
A
ppen
d
w
.dascom.co
m
drop-in pa
p
s
, receipts,
a
n
ce... plus
r
c
odes and
g
s
y with a se
t
des for full-
Mobile, Ap
p
e
a drop-in
d
ix A – DP-
3
m
p
er loading
a
nd labels
(
r
ated for re
p
g
raphic cap
a
t
up tool
shift printin
g
p
le iOS, an
d
replaceme
n
3
30 Printer
S
(
330L)
p
eated 6-fo
o
a
bilities
g
in all mod
d
Android
n
t for nearly
S
pecificati
o
o
t drops to
c
es
any mobil
e
o
ns and
A
p
p
c
oncrete
e
printe
r
p
endix B –
4
Quick
S
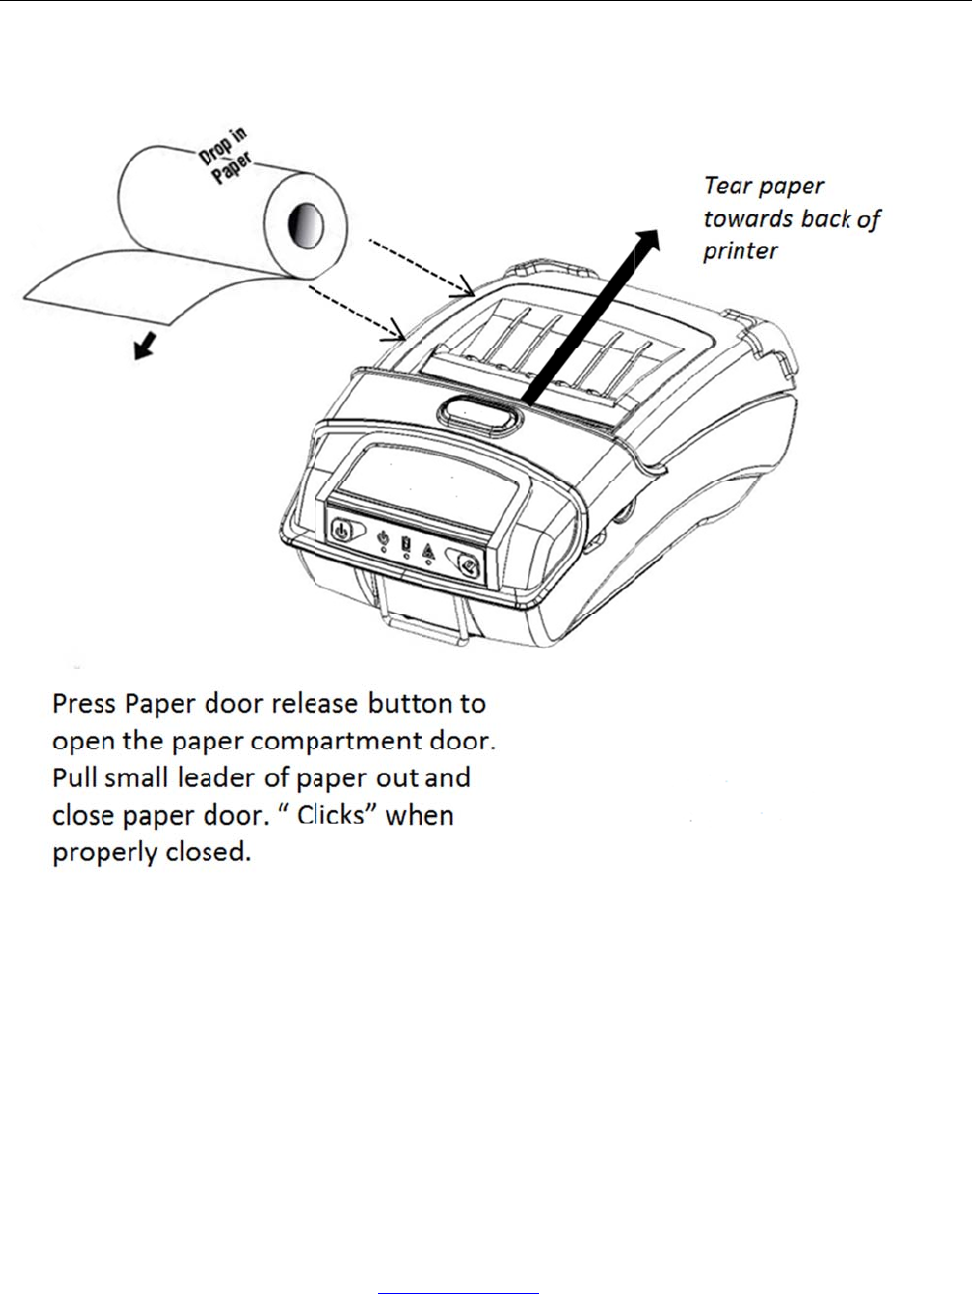
A. Pape
S
tart In
s
r Load
s
tructi
o
ww
w
o
ns
w
.dascom.co
m
m
5
B. Print
e
You could
1) De
s
Theprinte
r
printeris
p
paperhol
d
2) Ha
n
The hand
s
attach the
•Insert the
•Loop the
e
•Repeat th
3) Sh
o
If your prin
cut-outs in
strap to fa
s
Hold the b
u
C. Batt
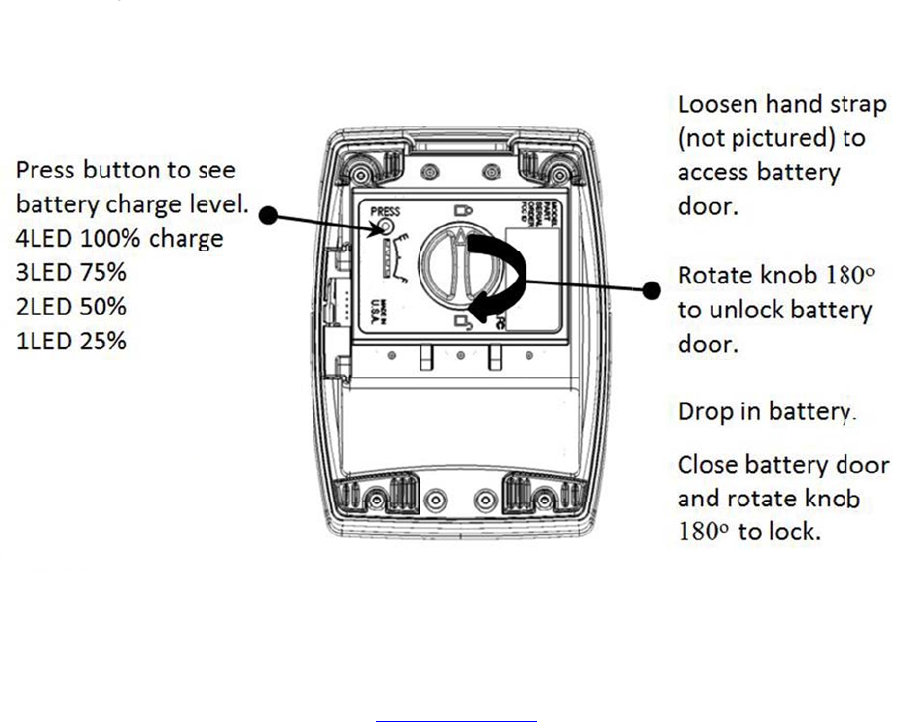
e
e
r Instal
l
put the pri
n
s
ktop Instal
r
mustbei
n
p
lacedinas
d
er.Alsoen
s
n
s Strap In
s
s
trap provi
d
hand strap
end of the
s
e
nd of the
s
is process
f
o
ulder Stra
p
ter is equip
each top c
o
s
ten.
u
ckle and p
e
ry Instal
l
ation
n
ter on des
k
lation
n
stalledhor
tablepositi
s
uretherei
s
tallation
d
es the use
r
to the print
e
s
trap throu
g
s
trap back
a
f
or the opp
o
p
Installatio
n
ped with th
e
o
rner of the
ull the stra
p
lation
ww
w
k
top, carry
w
izontally.Pl
onandthe
r
senoughs
p
r
with a con
v
e
r:
g
h the cut o
u
a
round the
c
o
site end of
n
e
shoulder
s
printer an
d
p
as shown
w
.dascom.co
m
w
ith your ha
acethepri
n
r
eiseasya
c
p
aceforsuf
f
v
enient an
d
ut on the fr
o
c
ut out and
s
the strap.
s
trap optio
n
d
secure th
e
below until
m
nd or carry
n
teronas
o
c
cessforus
e
f
icientvent
d
secure m
e
o
nt of the p
r
s
ecure it o
v
n
. Insert ea
c
e
looped en
d
you achiev
e
it with the
s
o
lid,flat,sta
e
rstothec
o
ilationand
f
e
thod of car
r
r
inter.
v
er.
c
h end of th
e
d
over the
b
e
the desir
e
s
hould stra
p
blesurface
;
o
ntrolpan
e
f
ortheprin
r
ying the pr
i
e
shoulder
s
b
utton on th
e
e
d length.
p
(option)
;
ensureth
e
e
landroll
tout.
i
nter. To
s
trap into th
e
end of th
e
e
e
e

6 www.dascom.com
D. Charge Battery
Uncover the printer ports and plug in your AC power adapter to the Power port (must be a DASCOM-
supplied accessory). The yellow LED will show solid ON while the printer battery is charging.
E. Power On
Depress the Power button on the control panel. The green LED and the red LED will both be lit while
the printer is going through its startup sequence (about 10 seconds). The red LED will go off, leaving
the green LED on to indicate the printer is ready to print.
7
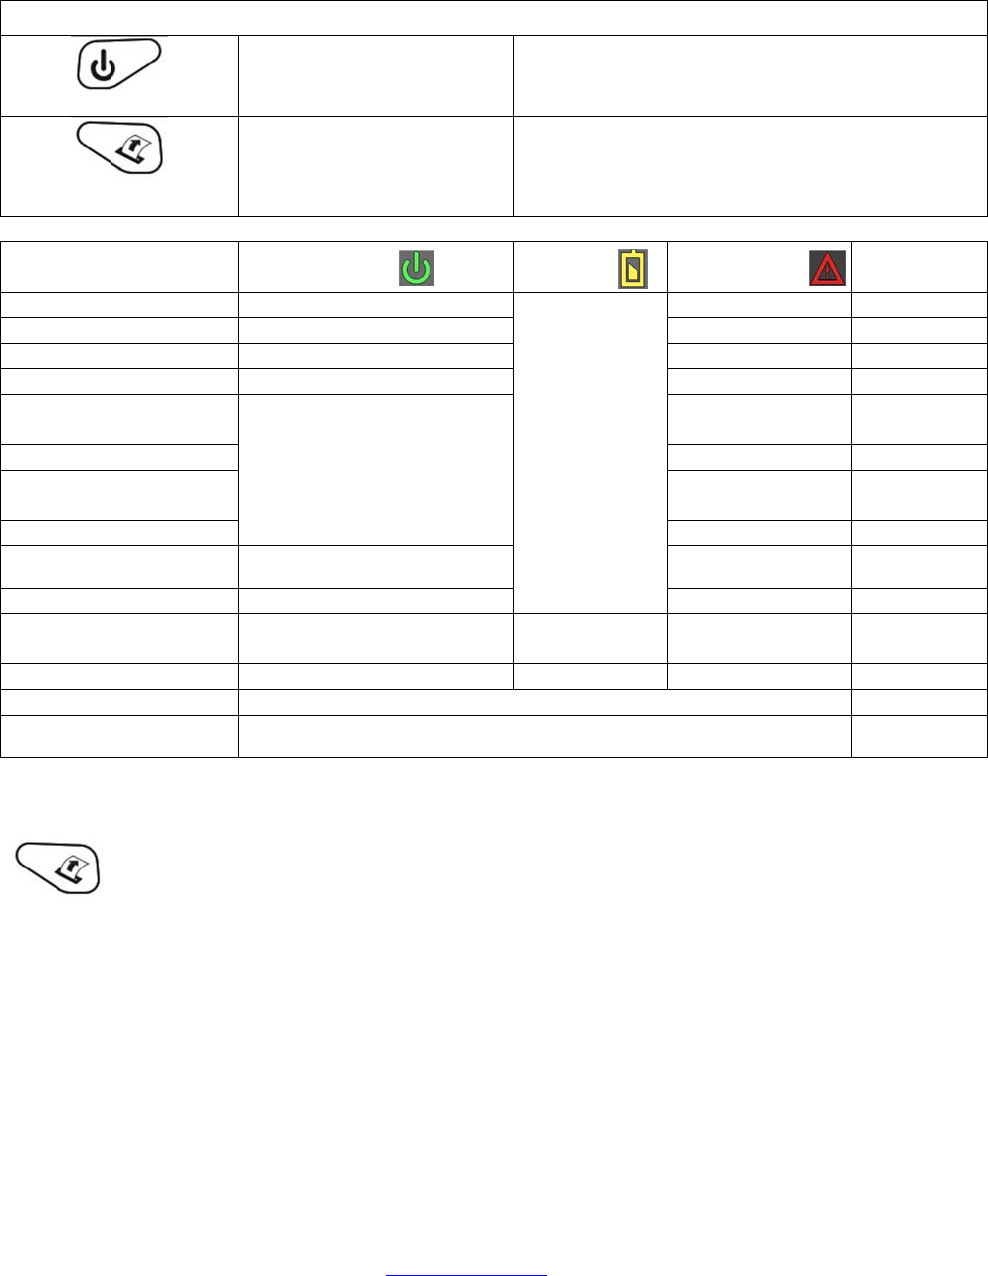
F. Cont
r
Control
P
Powe
r
Paper F
e
Indi
c
Data in Bu
f
No Data in
Ready
Setup Mo
d
Paper End
Media on t
Black Mar
k
positionin
g
Print head
Print head
EEPROM
E
Cannot re
a
volume
Power sav
Download
Downloadi
G. Perf
o
r
ol Pane
l
P
anel
r
Button
e
ed Button
c
ation
f
fe
r
Buffe
r
d
e
/Lid Open
he peele
r
k
/Label
g
erro
r
over heat
over cold
Error
a
d battery
e mode
mode
ng
o
rming a
With powe
r
l
Power
U
Power
D
Toggle
I
A
dvanc
e
Print S
e
Enter C
o
Power
(
Red/Or
a
Fl
a
O
Refe
r
O
Refe
r
Refe
r
O
Printer
S
r
on, press
t
ww
w
U
p
D
own
I
P over US
B
e
pape
r
e
tup Report
o
nfiguratio
n
(
Green/
a
nge)
a
shing (Gre
e
O
n (Green)
r
to buffer s
O
n (Orange
r
to buffer s
On (Red)
On (Red)
r
to buffer s
O
n (Green)
S
elf-Tes
t
t
he paper f
e
w
.dascom.co
m
B
on/off
P
P
P
n
Mode
P
P
P
B
(
Y
e
n)
A
tatus
)
tatus
tatus
Flashing (
Flashin
g
t
e
ed button
f
m
P
ress & Rel
e
P
ress & Hol
d
P
ress twice
P
ress once
P
ress & Hol
d
P
ress & Hol
d
B
attery
Y
ellow)
A
ccordin
g
to actual
volume
Off
Off
Green-Red
g
(Orange)
f
or three se
c
e
ase
d
d
for 3 seco
d
& Turn on
A
lert (
G
Red/O
r
g
O
O
O
O
On
On (
O
Flashi
n
On (
G
On (
G
On
On (
G
O
)
c
onds.
nds
the printe
r
G
reen/
r
ange)
O
ff
O
ff
O
ff
O
ff
(Red)
O
range)
n
g (Red)
G
reen)
G
reen)
(Red)
G
reen)
O
ff
Buzzer
/
/
/
/
buzz ever
y
2 second
s
/
/
/
/
/
/
/
/
/
y
s
8
Config
Configurat
i
(www.das
c
compatibl
e
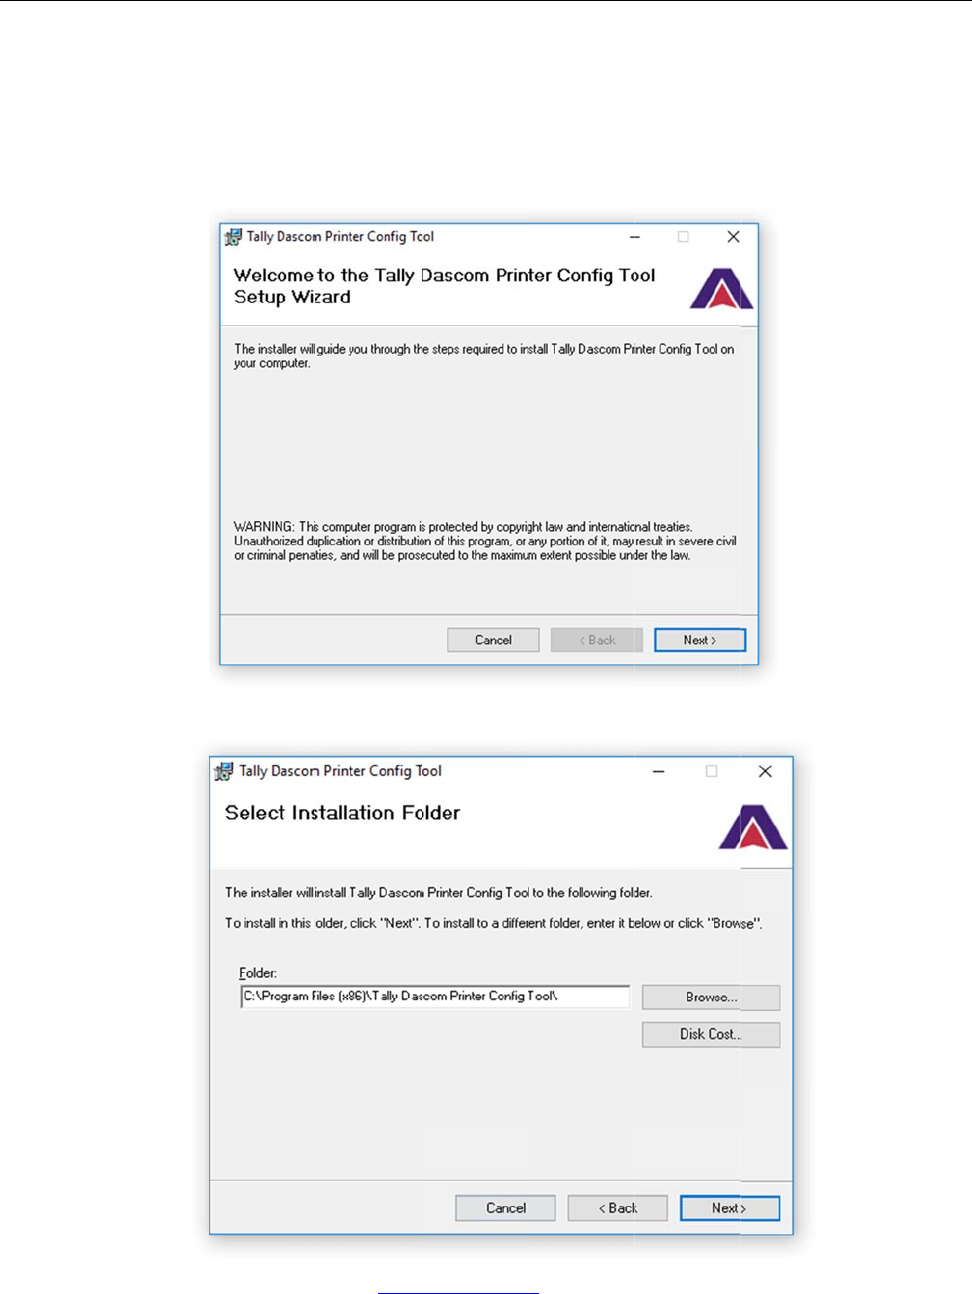
A. Insta
1. Doubl
e
2. Select
uration
i
on of the
D
c
om.com).
T
e
with your
D
ll Config
e
click the c
o
installation
D
P-330 print
T
his allows
D
P-330 co
m
Tool
o
nfig tool s
o
folder, and
ww
w
er is done t
you to con
f
m
municatio
n
o
ftware. Cli
c
click Next t
o
w
.dascom.co
m
hrough a c
o
f
igure the p
r
n
capabilitie
s
c
k Next to c
o
continue.
m
o
nfiguration
r
inter from
a
s
.
ontinue.
tool downl
o
a
ny windo
w
o
aded from
w
s compute
r
the websit
e
r
and is
e

9
3. Click n
e
B. Conf
i
1. Turn t
h
2. Make
s
3. Conne
c
4. Open t
Units
Select bet
w
Max Pape
r
Possible va
When usin
g
errors.
Mark See
k
Possible va
Set the val
u
the media,
t
Front Pap
Possible va
When usin
g
• If the
p
e
xt to conti
n
i
guratio
n
h
e printer O
N
s
ure you in
s
c
t a USB c
a
he configur
a
w
een inches
o
r
Speed
lues: 1.0 to
5
g
labels or h
e
k
ing
lues: Off, Fr
o
u
e when usin
t
he printer wi
er Sensor
T
lues 0-100
%
g
paper with
a
p
rinter is not
n
ue and co
m
n
Setup
N
.
s
talled the l
a
a
ble betwe
e
a
tion tool o
n
o
r millimeter
s
5
.5 ips, Defa
u
e
avy paper s
t
o
nt, Rear, G
a
g regular or
l
ll use the in
d
T
hreshold
%
. Default va
l
a
black on th
detecting bl
a
ww
w
m
plete inst
a
a
test config
u
e
n the print
e
n
the deskt
o
s
. Default se
u
lt = 5.0
t
ock, you ma
a
p. Default=
O
label media
w
d
icator accor
d
l
ue is 75%
e front adju
s
a
ck marks re
w
.dascom.co
m
a
llation.
u
ration tool
.
e
r and a PC
o
p. You co
u
tting is inch
e
y need to d
e
O
ff (Note: R
e
w
ith appropr
i
d
ing to the u
s
s
t this setting
liably, set th
e
m
.
.
u
ld change
t
e
s.
e
crease the
p
e
ar and Gap
i
ate charact
e
s
er choice h
e
to insure th
e
e
Mark Sens
t
he settings
p
aper speed
t
apply to 53
0
e
ristics. To
a
e
re.
e
paper stop
s
itivity to a lo
w
.
t
o prevent p
a
0
L models o
n
a
lign the prin
t
s
at the blac
k
w
er value.
a
per jam
n
ly)
t
ed image to
k
mark.

10 www.dascom.com
• If the printer is detecting false check paper conditions, set the Mark Sensitivity to a higher value.
• If the printer is detecting black marks where none exist, set the Mark Sensitivity to a higher value.
Rear Paper Sensor Threshold (DP-330L models only)
Possible values 0-100%. Default value is 75%
When using paper with a Black on the back adjust this setting to ensure the paper stops at the Black Mark.
• If the printer is not detecting Black Marks reliably, set the Mark Sensitivity to a lower value.
• If the printer is detecting false Check Paper conditions, set the Mark Sensitivity to a higher value.
• If the printer is detecting Black Marks where none exist, set the Mark Sensitivity to a higher value.
Gap Paper Sensor Threshold (DP-330L models only)
Possible values 0-100%. Default value is 75%
When using labels without a Black Mark, adjust this setting to insure the label stops at the gap in between labels.
• If the printer is not detecting gaps between labels reliably, set the Gap Sensitivity to a higher value.
• If the printer is detecting gaps where none exist, set the Gap Sensitivity to a lower value.
Backup Distance Before Printing
Used with Mark Seek. User defined. This is the distance the printer will pull in the paper before starting to print.
Max Mark Search Distance
Used with Mark Seek. User defined. This is the distance the printer will advance paper to seek the mark before
displaying a Paper Out condition.
Stop Distance after Mark
Use with Mark Seeking. User defined. This is the distance the printer will advance the paper after the mark is
detected.
Left Margin
Setting this value will tell the printer how far from the left edge of the paper to start the print job.
Contrast
Possible values 0 – 10. Default value is 5
The lower the value the lighter the print. The higher the value the darker the print.
Paper Energy Values
This is a locked value. These settings are supplied by the paper manufacturer. The default settings cover most
grades of paper. If you are using non-standard paper consult the paper manufacturer for recommended settings.

11 www.dascom.com
Integrating the Printer into your Business Applications
Step by Step – Creating a Link from Host to Printer
A. Windows Desktop Computers
Print Drivers
You may download the appropriate Windows driver from our website. Install the printer driver by the
standard method for your version of Windows.
I. USB
a) Install the printer driver onto your host before connecting the printer. Follow prompts
displayed during installation.
b) Plug the printer into a USB port on your host system using a mini-USB cable.
c) The printer will appear in the “Unspecified” devices section. Right click on the icon.
d) In the popup window, select the Hardware tab. Note the USB port number displayed.
e) Using the “Add Printer” wizard, install the printer using the driver file obtained from
DASCOM and the USB port number noted above.
f) After the printer driver installs, the printer will appear as “Dascom 3-inch printer” under the
“Printers and Faxes” heading of your Windows “Devices and Printers” screen.
II. Bluetooth – General
a) Turn on printer. Make sure Bluetooth on your host device is turned ON.
b) Your host Bluetooth manager may automatically scan for new devices, or you may need to
tell it to scan. The discover name of the DP-330 printer will be “DP-330-XXXxxxxx”, where
XXXxxxxx = the Printer Serial Number.
c) For Pairing, the default passkey is “0000”.
Note: Bluetooth host devices pair after discovery, but only connect to Bluetooth printers
when the host application has asked it to print.
III. Bluetooth – Windows 7 and above
a) Turn on printer. Make sure Bluetooth on your host device is turned ON.
b) Open the “Devices and Printers” folder.
c) Select “Add a Device”. The printer will display using the discover name listed above.
d) Select the printer from the list of devices.
e) Select “Enter the Device’s Pairing Code”. The default pairing code is “0000”.
f) A window will display informing you the device was successfully added, and the printer
name will appear in the devices list. Close this.
g) Printer now appears under “Printer and Faxes” heading of the “Devices and Printers”
screen, as “DP-330-serial #”. The icon may show that it is still configuring.
h) Right click on the printer name or icon and select Properties. Select “Services” tab and
deselect all items except for “SPP”.
i) Now select “Hardware” tab. A virtual com port number will be listed here – make note of
this COM Port number. Use this Com Port number when setting up the printer driver,
under the “port settings”.

12
j)
k)
B. Wind
Thi
C. Andr
o
I. Bl
u
a)
b)
c)
d)
No
t
ho
s
II. Wi
-
Thi
D. Appl
e
Bl
u
I.
Thi
Install the
p
file obtain
e
A
fter the p
r
“Printers a
n
ows Ta
b
s feature a
n
o
id Tabl
e
u
etooth
Turn on pr
i
Your host
B
tell it to sc
a
XXXxxxxx
For Pairin
g
The printe
r
t
e:
A
ndroid
s
t applicatio
-
Fi
s feature a
n
e
™ Tabl
e
u
etooth
s feature a
n
p
rinter driv
e
e
d from DA
S
r
inter driver
n
d Faxes”
h
b
lets and
n
d/or specif
e
ts & S
m
i
nter. Mak
e
B
luetooth
m
a
n. The dis
c
= the Print
e
g
, the defau
l
r
should ap
p
devices pa
n has aske
d
n
d/or specif
e
ts & S
m
n
d/or specif
ww
w
e
r. Using th
S
COM and
t
installs, th
e
h
eading of
y
Smartp
h
ic direction
s
m
art pho
n
e
sure Bluet
o
m
anager ma
cover nam
e
e
r Serial Nu
l
t passkey i
s
p
ear in you
r
ir after disc
o
d
it to print.
ic direction
s
m
artphon
ic direction
s
w
.dascom.co
m
e “Add Prin
t
he COM p
o
e
printer wil
l
y
our Windo
w
h
ones
s
for use w
e
n
es
o
oth on yo
u
y automati
c
e
of the DP
-
mber.
s
“0000”.
r
paired de
v
o
very, but
o
s
for use w
e
es
s
for use w
e
m
ter” wizard,
o
rt number
n
l
appear as
w
s “Device
s
e
re not avai
l
u
r host devi
c
c
ally scan f
o
-
330 printer
v
ices list.
o
nly
conne
c
e
re not avai
l
e
re not avai
l
install the
p
n
oted abov
e
“DP-330-
s
e
s
and Printe
l
able as of
t
c
e is turned
o
r new devi
c
will be “DP
-
c
t
to Blueto
o
l
able as of
t
l
able as of
t
p
rinter usin
g
e
.
e
rial
#
” und
e
rs” screen.
t
his printing
ON.
c
es, or you
-
330-XXXx
x
o
th printers
t
his printing
t
his printing
g
the driver
e
r the
.
may need t
o
x
xxx”, wher
e
when the
.
.
o
e
13
Media
A. Stan
d
DASCOM
complete
a
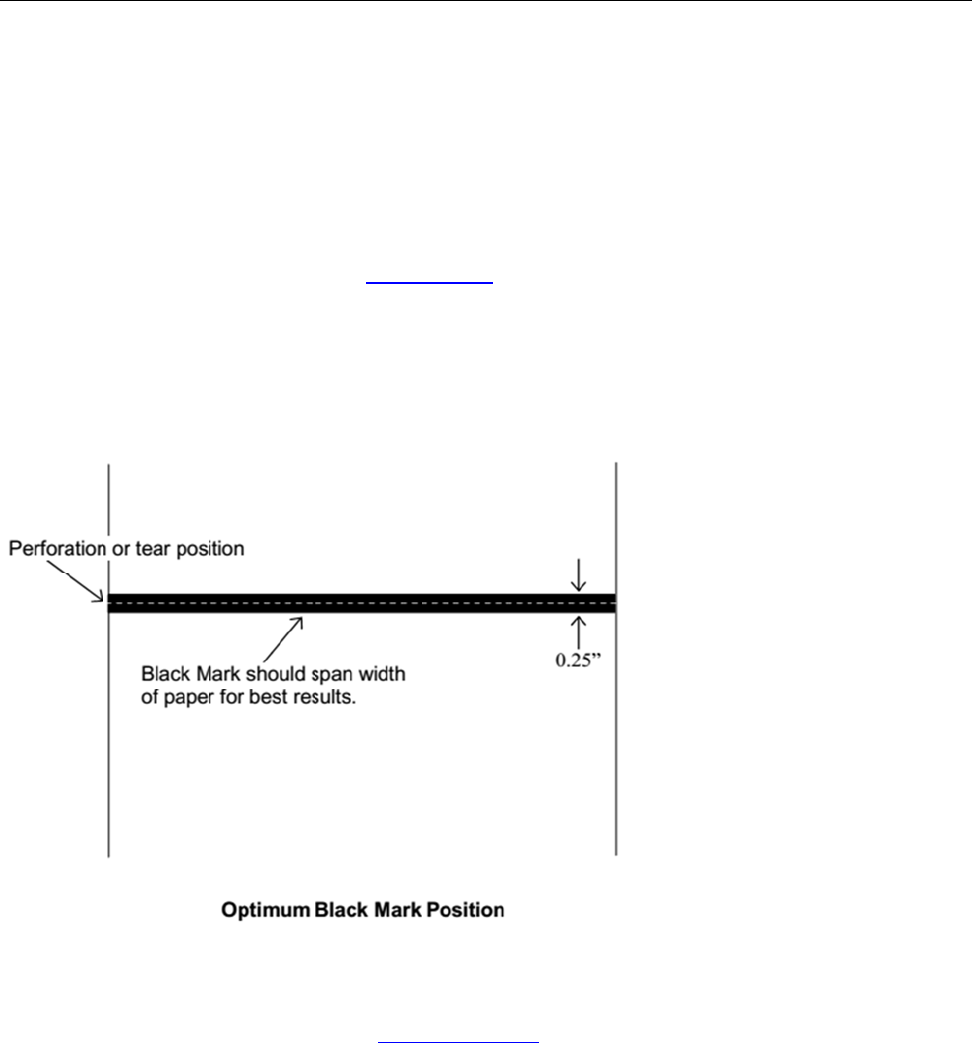
B. Blac
k
For autom
a
When usin
automatic
a
pressing t
h
For non-a
u
command
s
d
ard Me
d
offers a va
r
a
nd up to d
a
k
Mark
M
a
tic ticket p
r
g Mark Se
n
a
lly position
h
e Paper F
e
u
tomatic pa
p
s
.
d
ia
r
iety of med
i
a
te descript
i
M
edia Po
s
r
inting, the
B
n
sing mode
the output
f
e
ed button.
p
er position
ww
w
ia types. Y
o
i
on of our c
o
s
ition
B
lack Mark
(see Confi
g
f
or tear-off
a
ing, refer t
o
w
.dascom.co
m
o
u may co
n
o
nsumable
s
should be
p
g
uration, ea
a
nd printin
g
o
the
Integr
a
m
n
tact your D
A
s
and acce
s
p
ositioned
a
rlier in this
d
g
following
a
a
tor’s Guid
e
A
SCOM sa
s
sory produ
c
a
s shown in
d
ocument),
a
Form Fee
d
e
for sensin
g
les represe
c
ts.
the figure
b
DP-330 pri
d
comman
d
g
and positi
o
ntative for
a
b
elow.
nters will
d
or by
o
ning
a

14 www.dascom.com
Maintenance and Troubleshooting
A. Cleaning
In normal environments, the printer should be cleaned after printing a few rolls of paper or if there are
voids in the printout. For optimum performance and life, you should clean the Print Head and Platen
Roller whenever you load new paper.
To clean the printer areas as described below, use a Thermal Head Cleaning Pen and MCR Cleaning
Card available from DASCOM, or you may use cotton swabs moistened with isopropyl alcohol.
Turn the printer off. Open the Paper Door and remove the paper.
Using a Thermal Head Cleaning Pen, clean the white ceramic surface on the Print Head.
Caution: Do not use sharp objects to clean the print head. This may damage the printer and
require service. Such damage is not covered under warranty.
Clean the Black Mark Sensor below the print head.
Clean the Tear Bar.
Clean the Platen Roller. Turn the Platen Roller with your finger to clean the entire surface.
If a Magnetic Card Reader is installed, pass and MCR Cleaning Card through the MCR slot to
clean the head.
You may also experience a buildup of paper dust in the printer. This may be removed using a can of
compressed air or by vacuuming.
To clean the exterior of the printer, turn the printer off and use a soft cloth moistened with a mild
detergent.
B. Battery Care
I. Getting the Maximum Battery Life
New batteries are shipped in an “uncharged” state and must be charged for at least 4 hours prior to
the first use. Maximum battery capacity is not reached until after completing a minimum of three
complete charge and discharge cycles.
II. Charging the Battery
Plug the power adapter into a power source appropriate for the adapter being used.
Plug the power adapter into the power connector on the side of the printer. The printer’s
battery charging circuitry will analyze the condition of the battery and begin charging it if
necessary.
If the battery is not fully charged, charging will begin and the Battery Indicator will illuminate.
When the battery is fully charged, the Battery Indicator will turn off. Charging may take up to 8
hours (4 hours with external desktop charger accessory) depending on the condition of the
battery.
The printer may be used while the battery is charging, but this will extend the time required to
fully charge the battery.

15
Th
e
will
III. Addi
t
Th
e
Cauti
o
batteri
Th
e
Ta
k
sto
r
bat
t
pe
r
Do
ex
p
On
l
IV. Tes
t
To verify t
h
Te
s
tha
t
Co
n
Ve
r
fun
Note:
If t
A
ft
e
Pe
r
If t
h
not
On
c
tim
e
If the print
e
section for
Note:
Thi
functionin
g
or how lon
g
e
power ad
a
not cause
d
t
ional Bat
t
e
DP-330 s
e
o
n: Risk of
e
es accordi
e
recomme
n
k
e the batte
r
age tempe
t
ery at tem
p
r
manently l
o
not disass
e
p
lode.
l
y dispose
o
t
ing the P
o
h
at the prin
t
s
t the powe
r
t
its output
v
n
nect the p
o
r
ify that the
ctioning pr
o
he battery i
s
e
r the batte
r
r
form a prin
t
o
Make
s
o
Press
a
h
e printer s
u
complete
a
c
e this test
e
the Batte
r
e
r and batt
e
possible c
a
s test only
v
g
properly.
T
g
it may ho
l
a
pter may r
e
d
amage to
t
t
ery and
S
e
ries printe
r
e
xplosion
i
ng to the i
n
n
ded ambi
e
ry out of th
e
rature is 4
0
p
eratures a
b
o
se charge
c
e
mble, shor
t
o
f used batt
e
o
wer Ada
p
t
er’s interna
r
adapter (1
v
oltage is 1
o
wer adapt
e
printer’s B
a
o
perly.
s
already f
u
r
y has bee
n
t
er Self-Te
s
s
ure the pri
n
a
nd hold th
e
u
ccessfully
a
nd the prin
t
has compl
e
r
y Indicator
e
ry do not a
p
a
uses and
s
v
erifies that
T
his test d
o
l
d a charge
.
ww
w
e
main conn
t
he printer
o
S
afety Info
r
s use a 11.
i
f battery i
s
n
struction
s
e
nt tempera
t
e
printer wh
0
-104° Fahr
e
b
ove this ra
c
apacity.
t
circuit, he
a
e
ries accor
d
p
ter and
B
l battery ch
a
00-240VA
C
9 VDC.
e
r to a pow
e
a
ttery Indic
a
u
lly charged
n
charged f
o
s
t.
n
ter is turne
e
Paper Fe
e
prints the S
t
er turns of
f
e
ted succes
will turn off
.
p
pear to su
c
s
olutions.
the power
a
o
es not pro
v
.
w
.dascom.co
m
ected to th
e
o
r battery.
rmation
1 volt 3000
s
replaced
s
.
t
ure for cha
en storing
t
e
nheit (4-4
0
nge for lon
g
a
t above 8
0
d
ing to you
r
B
attery
a
rger is fun
c
C
/50-60Hz,
e
r source a
n
a
tor is illumi
n
, the Batter
y
o
r five minu
t
d off.
e
d Button w
elf-Test, th
e
f
, repeat thi
s
sfully, allo
w
.
c
cessfully
p
a
dapter, th
e
v
ide a valid
i
m
e
printer to
k
mAH Lithi
u
by incorre
c
rging is 68-
t
he printer f
o
0
° Centigra
d
g
periods o
f
0
°C, or incin
r
local regul
c
tioning pr
o
12/24VDC
a
n
d then co
n
n
ated. If ill
u
y
Indicator
w
t
es, discon
n
w
hile turning
e
battery is
s
test with
a
w
the batter
y
p
ass these t
e
internal c
h
i
ndication o
k
eep the b
a
u
m Ion batt
e
c
t type. Di
s
77° Fahren
o
r long peri
o
d
e). Do not
f
time or th
e
erate the b
a
ations
o
perly, perf
o
a
dapter) wi
t
n
nect it to th
u
minated, t
h
w
ill turn off
n
ect the po
w
the printer
functional.
a
known go
o
y
to fully ch
a
ests, refer
t
h
arging circ
u
f the relativ
e
a
ttery fully c
h
e
ry.
s
pose of u
heit (20-25
°
o
ds of time.
store a full
y
e
battery m
a
a
ttery. The
b
o
rm the foll
o
t
h a voltme
t
e printer.
h
e charging
after a sho
r
w
er adapter
on.
If the Self-
T
o
d battery.
a
rge. At th
e
t
o the Trou
b
u
it, and the
e
capacity
o
h
arged and
sed
°
Centigrad
e
The batte
r
y
charged
a
y
b
attery ma
y
o
wing steps
t
er to verify
circuit is
r
t time.
.
T
est does
e
end of thi
s
b
leshooting
battery are
o
f the batte
r
e
).
r
y
y
.
s
r
y

I
16
C. Trou
b
When enc
o
problems
w
encounter
Gene
r
I.
Whenever
some cas
e
causes th
e
Error Indi
c
Flashes,
W
Stays On,
W
Fault I.
Problem
Printer will
Printer tur
n
Battery In
d
light or do
e
power ada
b
leshoo
t
o
untering p
r
w
ith your s
y
with your p
r
r
al Error
C
the printer
d
e
s the audi
b
e
se conditio
c
ato
r
W
ith Alarm
W
ith Alarm
Descripti
o
not turn on
n
s itself off.
d
icator doe
s
e
s not stay
l
pter is con
n
t
ing
r
oblems, th
e
y
stem. Ple
a
r
inter.
C
ondition
s
d
etects an
e
b
le alarm wi
l
ns and ho
w
Possib
Paper
O
closed
Comm
u
o
n and Re
s
P
. B
D
B
E
s
not
l
it when
n
ected.
B
P
p
o
F
a
B
ww
w
e
cause ma
a
se review t
h
s
e
rror condit
l
l also soun
d
w
they may
b
le Cause
O
ut or Pap
e
u
nications e
s
olution
ossible C
a
attery not i
n
D
ischarged
b
attery disc
h
lectrostatic
attery alre
a
ower adapt
o
we
r
a
ulty powe
r
attery not i
n
w
.dascom.co
m
y be the pri
h
e followin
g
ion the Ale
r
d
. Please
r
b
e correcte
d
e
r Door not
f
rro
r
a
use
n
stalled pro
p
b
attery
h
arged
discharge
a
dy fully ch
a
er not recei
r
adapte
r
n
stalled pro
p
m
nter or ma
y
g
tables to
s
r
t (red) Indi
c
r
efer to the
f
d
.
Sol
f
ully Ins
t
Pa
p
the
Ma
k
clo
s
an
d
do
o
the
Ver
set
t
Me
n
be
c
Sol
p
erly Re
m
ma
k
sea
Re
c
Re
p
Ma
y
hu
m
pri
n
but
t
a
rged No
ving Ch
e
bre
a
Ch
e
ad
a
Sh
o
p
erly Re
m
ma
k
sea
y
sometime
s
s
olve comm
o
c
ator will eit
h
f
ollowing ta
b
ution
t
all paper a
n
p
er Feed B
u
error.
k
e sure the
s
ed by ope
n
d
closing it
a
o
r “clicks” cl
o
platen rolle
ify commu
n
t
ings in the
I
n
u. Printer
c
ycled to cl
e
ution
m
ove and r
e
k
ing sure th
ted with do
o
c
harge batt
e
p
lace or rec
y
occur in e
x
m
idity condi
t
n
ter back on
t
on.
action requ
e
ck building
a
kers/fuses
e
ck output
o
a
pter with v
o
o
uld be 19
V
m
ove and r
e
k
ing sure th
ted with do
o
s
be due to
o
n problem
s
h
er flash or
b
le for a lis
t
n
d press th
e
u
tton to cle
a
door is full
y
n
ing the do
o
a
gain until t
h
o
sed. Che
c
r for dama
g
n
ications
I
nterface
power mus
t
e
ar error.
e
install batt
e
e battery is
o
r closed.
e
ry.
harge batt
e
x
treme low
t
ions. Turn
with powe
r
ired.
/vehicle cir
c
.
o
f power
o
ltmeter.
V
DC.
e
install batt
e
e battery is
o
r closed.
other
s
you may
stay on. I
n
t
of what
e
a
r
y
o
r
h
e
c
k
g
e.
t
e
ry
e
ry.
r
c
uit
e
ry
n

17 www.dascom.com
Problem Possible Cause Solution
Battery not charging. Faulty power adapter or
battery Try new power adapter, or
replace battery.
Poor print quality. Low battery Check and recharge battery.
Print head dirty Clean print head. Refer to
“Maintenance” section of this
document.
Poor quality or “old” paper Verify paper from approved
source. Try new roll of
paper.
Paper not feeding. Obstruction in paper path, or
paper improperly installed Check paper path and
reinstall paper (see “Quick
Start Instructions”).
Poor quality paper Verify paper from approved
source.
Paper Door not fully closed Verify door is closed.
Paper does not advance to
black mark reliably. Dirty Black Mark/Paper
Sensor Clean Sensor as described
in “Maintenance” section of
this document.
Black Mark density/contrast Adjust Mark Sensitivity as
described in Device Settings
Menu .
Paper not feeding reliably or
print is compressed vertically Poor quality paper Verify paper from approved
source.
Heavy or thick forms;
specialty paper with slick
finish
Lower the Max Paper Speed
as described in Device
Settings Menu .
Paper Door not fully closed Verify door is closed.
Print Garbled. Improper Serial Interface
configuration Verify printer and host
settings match.
Printer will not print. Paper not loaded correctly Check paper path and
reinstall paper (see “Quick
Start Instructions”).
Cannot print via optional
interface. Interface not configured
correctly Print a self-test to verify
printer settings. Make sure
printer and host set ups
match.
D. Obtaining Service
If service is required for your printer, please contact the company where you purchased your printer.

18 www.dascom.com
APPENDIX
A. Appendix A – DP-330 Printer Specifications
Printing Specifications
Printing Method: Direct thermal.
Printing Resolution: 203 dpi (8 dots per
mm).
Printing Speed: Up to 4 ips.
Printing Width: Up to 72 mm.
Fonts/Characters/Bar Codes
Fonts: Virtually all TrueType fonts, from
6 cpi to 34 cpi depending on emulation
chosen, plus scaling.
International Characters: Most common
sets available.
Unicode support.
Bar Codes: Virtually all 1D and 2D
codes supported, depending on
emulation chosen.
Downloadable firmware, fonts,
graphics, and logos.
Connectivity
Standard (All Units): USB 2.0 PNP.
Wireless Options:
Bluetooth®
Complete Bluetooth® 4.0 Stack
Dual Mode with EDR
Antenna Gain: 0.5 dBi
Universal Port: Data and power port –
allows connection of external devices
such as MCR, barcode scanners,
biometrics, RFID.
Software
Drivers and Utilities: Drivers for XP,
WIN 7, WIN 8.
Compatible with Windows CE/Pocket
PC, Windows Mobile, Apple iOS,
Android. Print utilities and SDK’s for all
platforms. Native App and Web printing.
Printer Setup via internal web page,
access with browser from any host
(tablets and smartphones included).
Emulations: Emulates many popular
printer brands and languages including:
Zebra CPCL and ZPL, Extech, IPL, and
ESC POS. Firmware can be upgraded
as new emulations become available.
Supports direct printing of Postscript,
PDF, PBM, JPG, PNG, BMP, SVG, &
TIFF files.
Print Media
Paper Type: Direct Thermal Roll.
Roll Size: Maximum roll diameter 2.0”
(51 mm), roll widths up to 3.125” (80
mm).
Roll Capacity: Approx. 94’ 28.6 m),
creating 188 6” long receipts.
Core Size: 0.75” Recommended (19
mm).
Power Management
Battery: Rechargeable 3 cell Lithium
Ion, (11.1 V, 3000 mAh, 33.3 Wh).
Endurance: Over 3,500 printed inches
per charge.
Power Option: 100-240 VAC wall
adapter, or 12-24 VDC in-vehicle
adapter. When plugged in, the printer
can be used while recharging the
battery or can be run without the battery
(print & charge adapter).
Physical Specifications
L x W x H: 6.1” x 4.6” x 2.7” (15.5 x 11.7
x 6.9 cm).
Weight: 24 ounces (.68 kg) with battery.
Environmental Specifications
Operating Environment: -10° to 40°C/
0% to 65% RH (non-condensing).
Storage Temp: -25° to 65°C) /
0% to 98% RH (non-condensing).
Rated IP54 per IEC 529
Operator Controls and Indicators
3 LED indicators for general fault,
power and battery status indication.
Buttons for power and paper feed.
Sensors for paper out, black mark
detection, and door open. “Gas gauge”
on battery door.
Memory Capacity
4 MB Flash, 32 MB DDR2. Standard
memory supports large and graphic
intensive print jobs.
Durability and Reliability
Survives multiple 6 foot drops to
concrete (each face) per IEC 68-2.
MTBF: 10,000 hours in normal use.
Regulatory Approvals
FCC Class B, CE mark, RoHS, UL
listed AC adapters, e-mark.
Warranty
Depends on local requirements. Please
contact your national DASCOM sales
office.
Options and Accessories
Universal Port, 3-Track
Simultaneous Read MCR,
barcode scanners, biometrics,
RFID.
AC Wall Adapter, 100 to 240 VAC
o Print and charge version
o Charge only version
In-Vehicle Power Adapter, 12 to
24 VDC
Shoulder Strap
Data Cables; USB
Spare Batteries in Multi-Packs
Media in Case Quantities
Popular Mounting Systems
o In-Vehicle Systems
o Cart Mounting Systems

19 www.dascom.com
B. Appendix B – DP-330L Printer Specifications
Printing Specifications
Printing Method: Direct thermal.
Printing Resolution: 203 dpi (8 dots per
mm).
Printing Speed: Up to 4 ips.
Printing Width: Up to 72 mm.
Fonts/Characters/Bar Codes
Fonts: Virtually all TrueType fonts, from
6 cpi to 34 cpi depending on emulation
chosen, plus scaling.
International Characters: Most common
sets available.
Unicode support.
Bar Codes: Virtually all 1D and 2D
codes supported, depending on
emulation chosen.
Downloadable firmware, fonts,
graphics, and logos.
Connectivity
Standard (All Units): USB 2.0 PNP.
Wireless Options:
Bluetooth®
Complete Bluetooth® 4.0 Stack
Dual Mode with EDR
Antenna Gain: 0.5 dBi
Universal Port: Data and power port –
allows connection of external devices
such as MCR, barcode scanners,
biometrics, RFID.
Software
Drivers and Utilities: Drivers for XP,
WIN 7, WIN 8.
Compatible with Windows CE/Pocket
PC, Windows Mobile, Apple iOS,
Android. Print utilities and SDK’s for all
platforms. Native App and Web printing.
Printer Setup via internal web page,
access with browser from any host
(tablets and smartphones included).
Emulations: Emulates many popular
printer brands and languages including:
Zebra CPCL and ZPL, Extech, IPL, and
ESC POS. Firmware can be upgraded
as new emulations become available.
Supports direct printing of Postscript,
PDF, PBM, JPG, PNG, BMP, SVG, &
TIFF files.
Print Media
Paper Type: Direct Thermal Roll.
Roll Size: Maximum roll diameter 2.625”
(66.7 mm), roll widths up to 3.125” (80
mm).
Roll Capacity:
Label Media: Approx. 75’ (23 m),
creating 148 6” long receipts (with 5.5
mil thick media).
Receipt Media: Approx. 173’ (52.6m),
creating 346 6” long receipts.
Core Size: 0.75” Recommended (19
mm).
Power Management
Battery: Rechargeable 3 cell Lithium
Ion, (11.1 V, 3000 mAh, 33.3 Wh).
Endurance: Over 3,500 printed inches
per charge.
Power Option: 100-240 VAC wall
adapter, or 12-24 VDC in-vehicle
adapter. When plugged in, the printer
can be used while recharging the
battery or can be run without the battery
(print & charge adapter).
Physical Specifications
L x W x H: 6.1” x 4.6” x 2.7” (15.5 x 11.7
x 6.9 cm).
Weight: 24 ounces (.68 kg) with battery.
Environmental Specifications
Operating Environment: -10° to 40°C/
0% to 65% RH (non-condensing).
Storage Temp: -25° to 65°C) /
0% to 98% RH (non-condensing).
Rated IP54 per IEC 529
Operator Controls and Indicators
3 LED indicators for general fault,
power and battery status indication.
Buttons for power and paper feed.
Sensors for paper out, black mark
detection, and door open. “Gas gauge”
on battery door.
Memory Capacity
4 MB Flash, 32 MB DDR2. Standard
memory supports large and graphic
intensive print jobs.
Durability and Reliability
Survives multiple 6 foot drops to
concrete (each face) per IEC 68-2.
MTBF: 10,000 hours in normal use.
Regulatory Approvals
FCC Class B, CE mark, RoHS, UL
listed AC adapters, e-mark.
Warranty
Depends on local requirements. Please
contact your national DASCOM sales
office.
Options and Accessories
Universal Port, 3-Track
Simultaneous Read MCR,
barcode scanners, biometrics,
RFID.
AC Wall Adapter, 100 to 240 VAC
o Print and charge version
o Charge only version
In-Vehicle Power Adapter, 12 to
24 VDC
Shoulder Strap
Data Cables; USB
Spare Batteries in Multi-Packs
Media in Case Quantities
Popular Mounting Systems
o In-Vehicle Systems
o Cart Mounting Systems

20 www.dascom.com
Glossary of Terms
802.11 Wireless networking communication standards created by IEEE.
baud rate The rate at which characters are transmitted over a serial interface. This is also
often referred to as bits per second.
Bluetooth A definition for short range radio frequency communications.
client Any node on a network that requests services from another node (server).
character pitch The horizontal spacing of characters. Measured in cpi.
cpi Characters per inch.
default Value or configuration assumed when the printer is powered on or reset.
DHCP Dynamic Host Configuration Protocol. A method used to centrally control the
assignment of IP addresses on a network.
dpi Dots per inch. Generally used to refer to graphics density or resolution.
font A group of characters of a given shape or style.
interface The connection between the printer and the host computer.
IP Internet Protocol. A specification for packets, or datagrams, of data and an
addressing method to allow the exchange of data with another system. Must be
combined with another protocol such as TCP to create a complete connection
with the other system.
LAN Local Area Network.
LED Light emitting diode.
lpi Lines per inch.
margin An area along any edge of a form where data may not be printed.
Peer-to-Peer A network consisting of only stations (no access point or central server). Same
as Ad-Hoc.
reset Initialization of various operating features of the printer to the value or state
assumed when the printer is powered on.
server Any node on a network that provides services to another node (client).
TCP Transmission Control Protocol. A specification that controls the connection
between systems on a network.

21 www.dascom.com
top of form The vertical position where the first line is printed on the paper. Also the position
the paper is advanced to when a form feed (FF) character is received from the
host or the Form Feed button is pressed on the printer's control panel.
USB Universal Serial Bus.
WAN Wide Area Network. Refers to connections that allow one LAN to communicate
with another LAN(s).
WEP Wired Equivalent Privacy. A security protocol for wireless LANs designed to
provide data security similar to a wired LAN.
WLAN Wireless Local Area Network. A LAN made up of wireless nodes.

22 www.dascom.com
Index
802.11, 27
Add Enterprise Network, 9
Add Personal Network, 9
Address Method, 9
Ad-Hoc, 27
Alert, 6
Android, 3, 17
Android Tablets & Smart
phones, 17
Apple, 3, 18
authentication, 27
Available Networks, 9
Backup Distance Before
Printing, 12
battery, 3, 5, 7, 20, 21, 22,
23
Battery Care, 20
Battery Disposal, ii
Battery Installation, 5
baud rate, 27
Bluetooth, ii, 2, 8, 9, 16, 17,
18, 27
Canadian Department of
Communications Radio
Interference Statement, i
character pitch, 27
Charge Battery, 5
Charging the Battery, 20
Cleaning, 20
client, 27
Com Port, 16
Configuration, 7, 19, 27
Connectivity Parameters, 8
Contrast, 12
Control Panel, 6
CPCL, ii, 10
cpi, 27
Current Emulation, 10
Current Logo Mapping, 13
Current Printer Config, 9
default, 27
Default Font, 10
Default Text Line Spacing,
10
Device Config, 11
DHCP, 27
discover name, 16, 18
Discoverablity, 9
dpi, 27
driver, 16
Drivers, 16
Fault Description and
Resolution, 22
FCC Part 15 Class B, i
features, 28
form, 28
Front Paper Sensor
Threshold, 11
Gap Paper Sensor
Threshold, 12
GateWay, 9
General Error Conditions, 22
Graphics, 13
IMAGE, 10
Image Parameters, 10
infrastructure, 27
interface, 27
IP Address, 9
IP54, 3
LAN, 27
LED, 27
Left Margin, 12
lpi, 27
Maintenance, 2, 20, 23, 24
margin, 27
Mark Seeking, 11, 12
Max Mark Search Distance,
12
Max Paper Speed, 11, 23
Maximum Battery Life, 20
Media, 2, 19, 25, 26
MT3, 10
Obtaining Service, 24
Paired Mode, 8
pairing code, 16
Paper Energy Values, 12
Paper Feed Button, 6
Paper Load, 4
passkey, 16, 18
PDF, 10
Peer-to-Peer, 27
PIN, 8, 9
POSTSCRIPT, 10
power, i, ii
Power Button, 6
Power On, 5
Quick Start Instructions, 4
Rear Paper Sensor
Threshold, 12
reset, 28
Role Policy, 8
Safety Information, 21
Security, 8
Self-Test, 6, 21
server, 28
Set index, 13
Set Width, 13
Specifications, 2, 3, 25, 26
SSID, 28
Stop Distance after Mark, 12
SubNetMask, 9
TCP, 28
Testing the Power Adapter
and Battery, 21
Troubleshooting, 2, 20, 21,
22
Units, 11
Upload Digital Certificate, 9
Upload File, 13
USB, 16, 28
USB port, 2, 16
WAN, 28
web page, 7
WEP, 28
Windows, ii, 3, 15, 16, 17
WLAN, 28