Jiangmen Dascom Computer Peripherals TD11400 Dot Matrix Printer User Manual
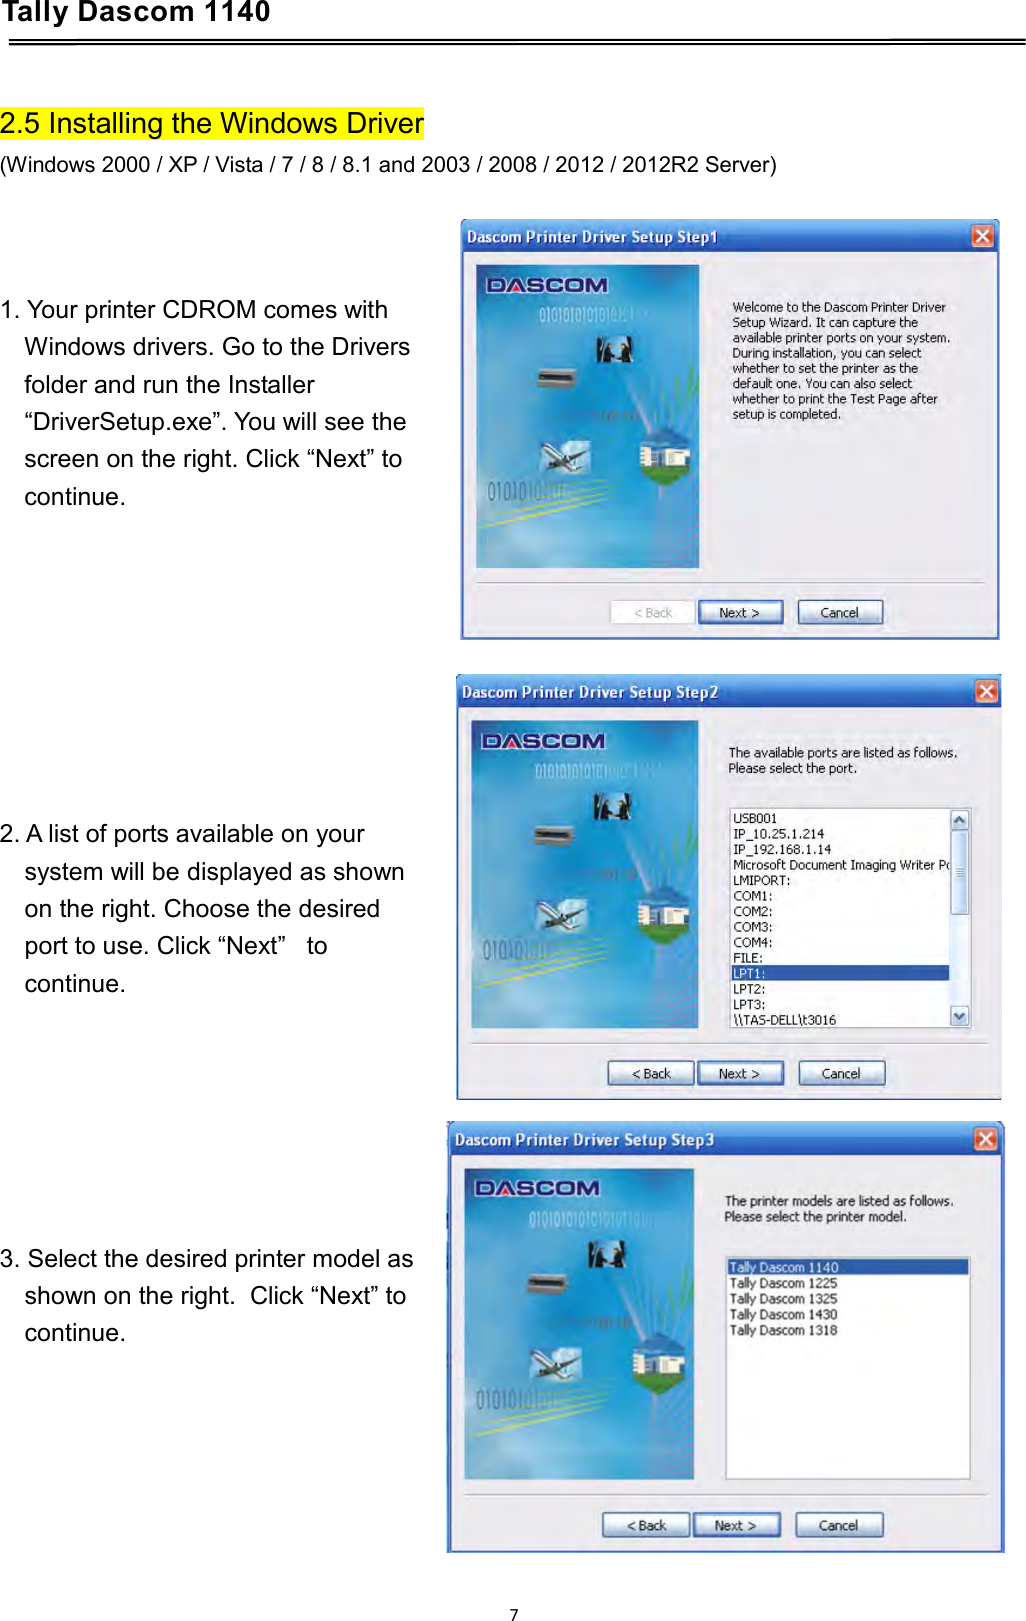
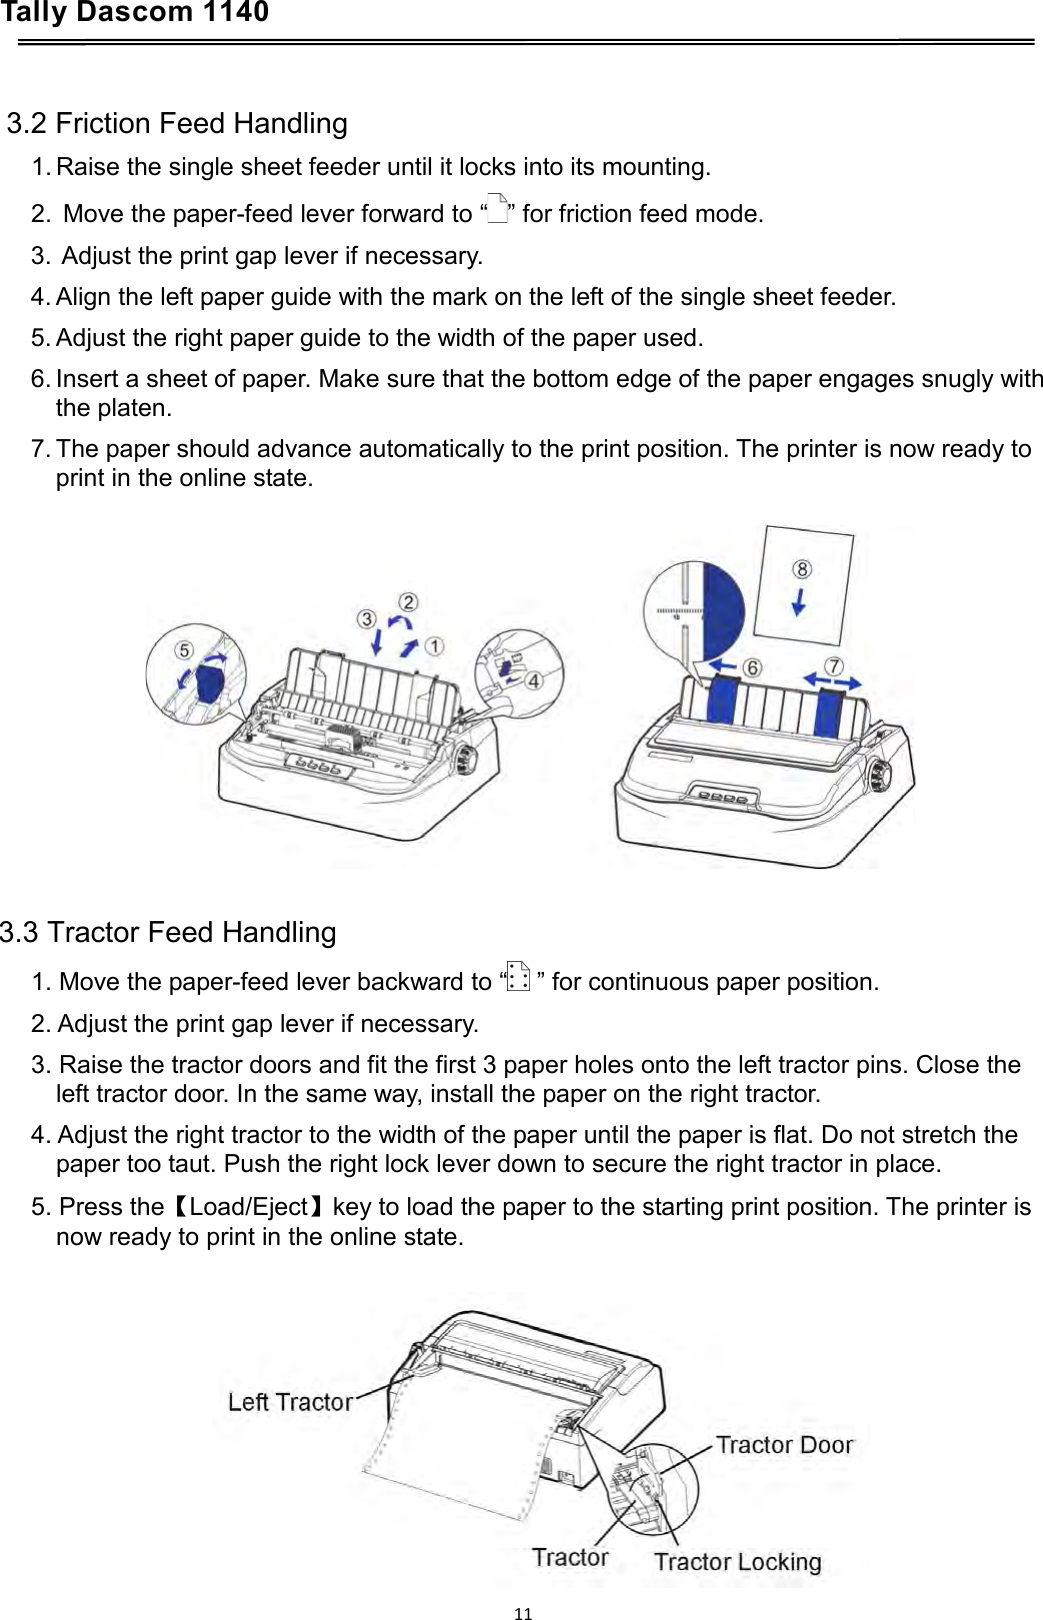
Jiangmen Dascom Computer Peripherals Co.,Ltd. Dot Matrix Printer Users Manual
UserManual.wiki
>
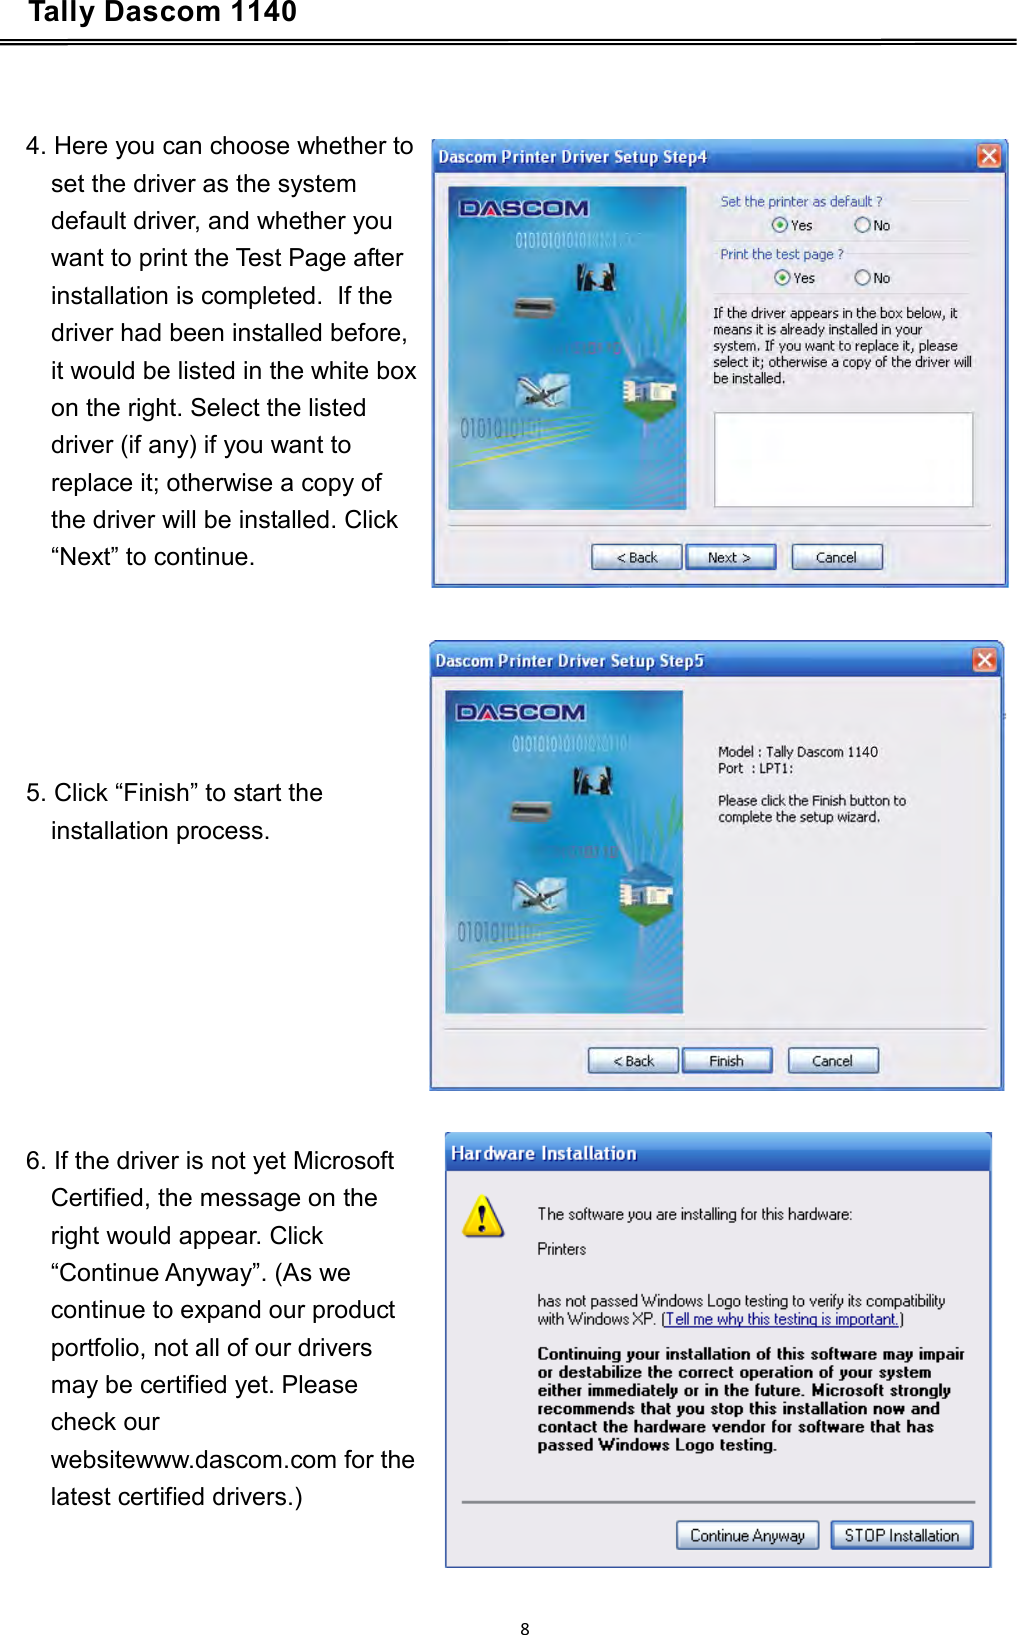
Jiangmen Dascom Computer Peripherals
>
TD11400 User Manual
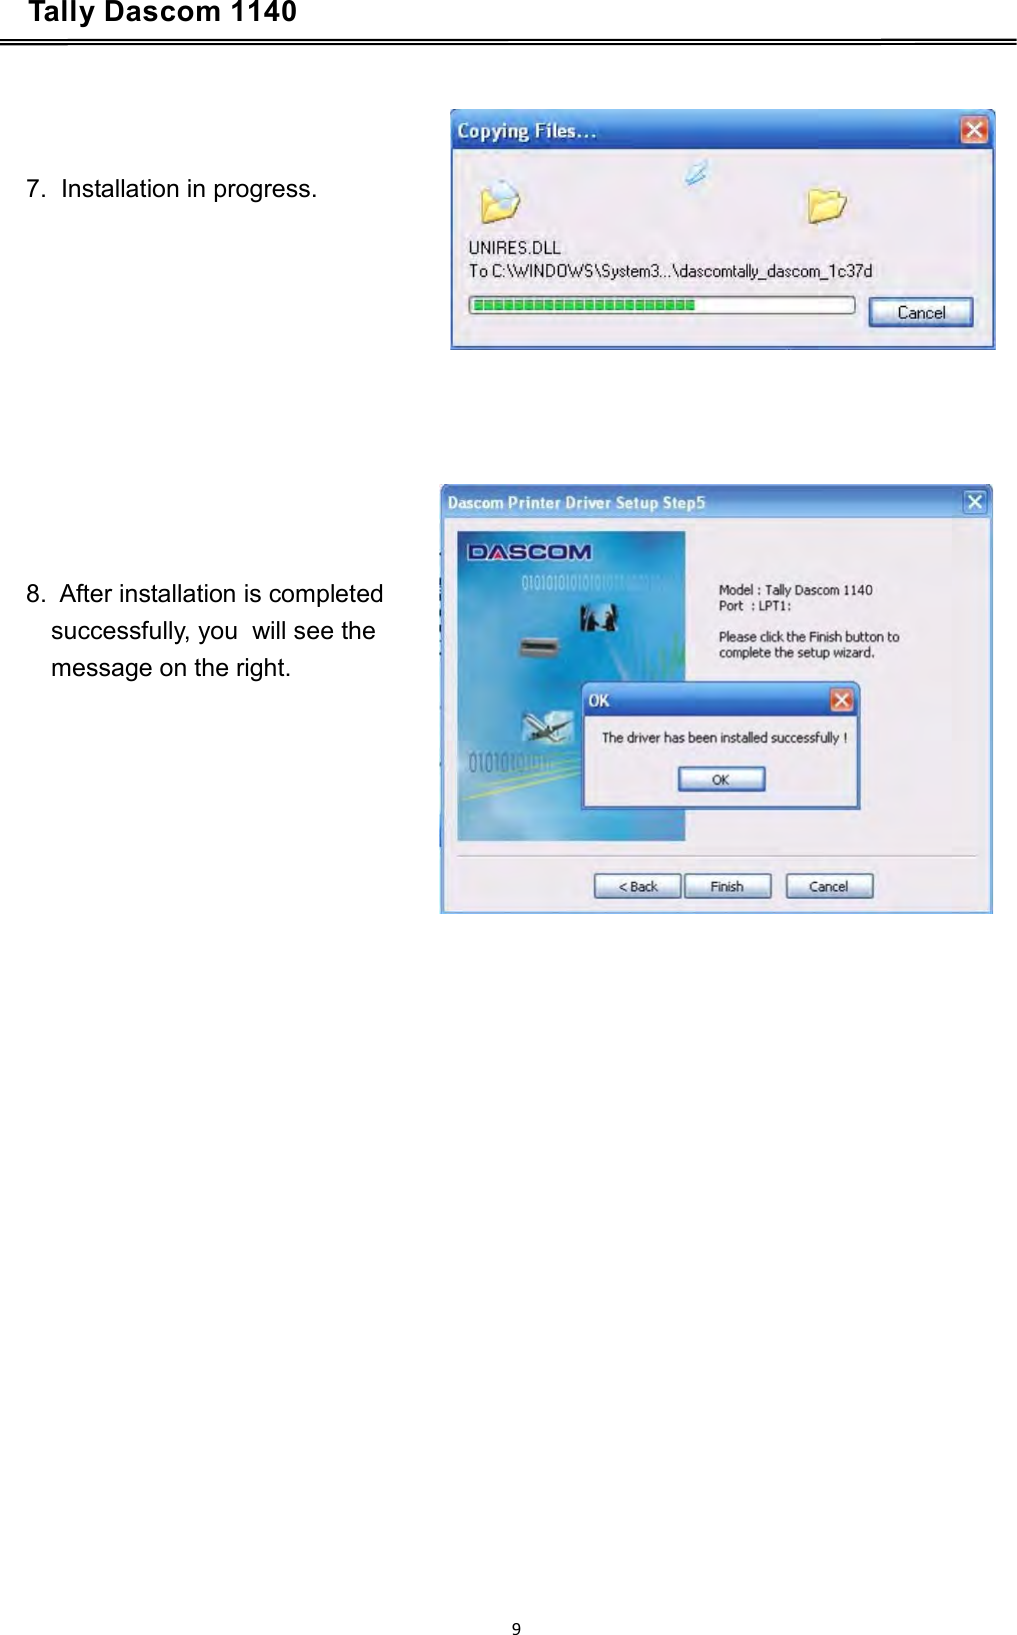
Users Manual
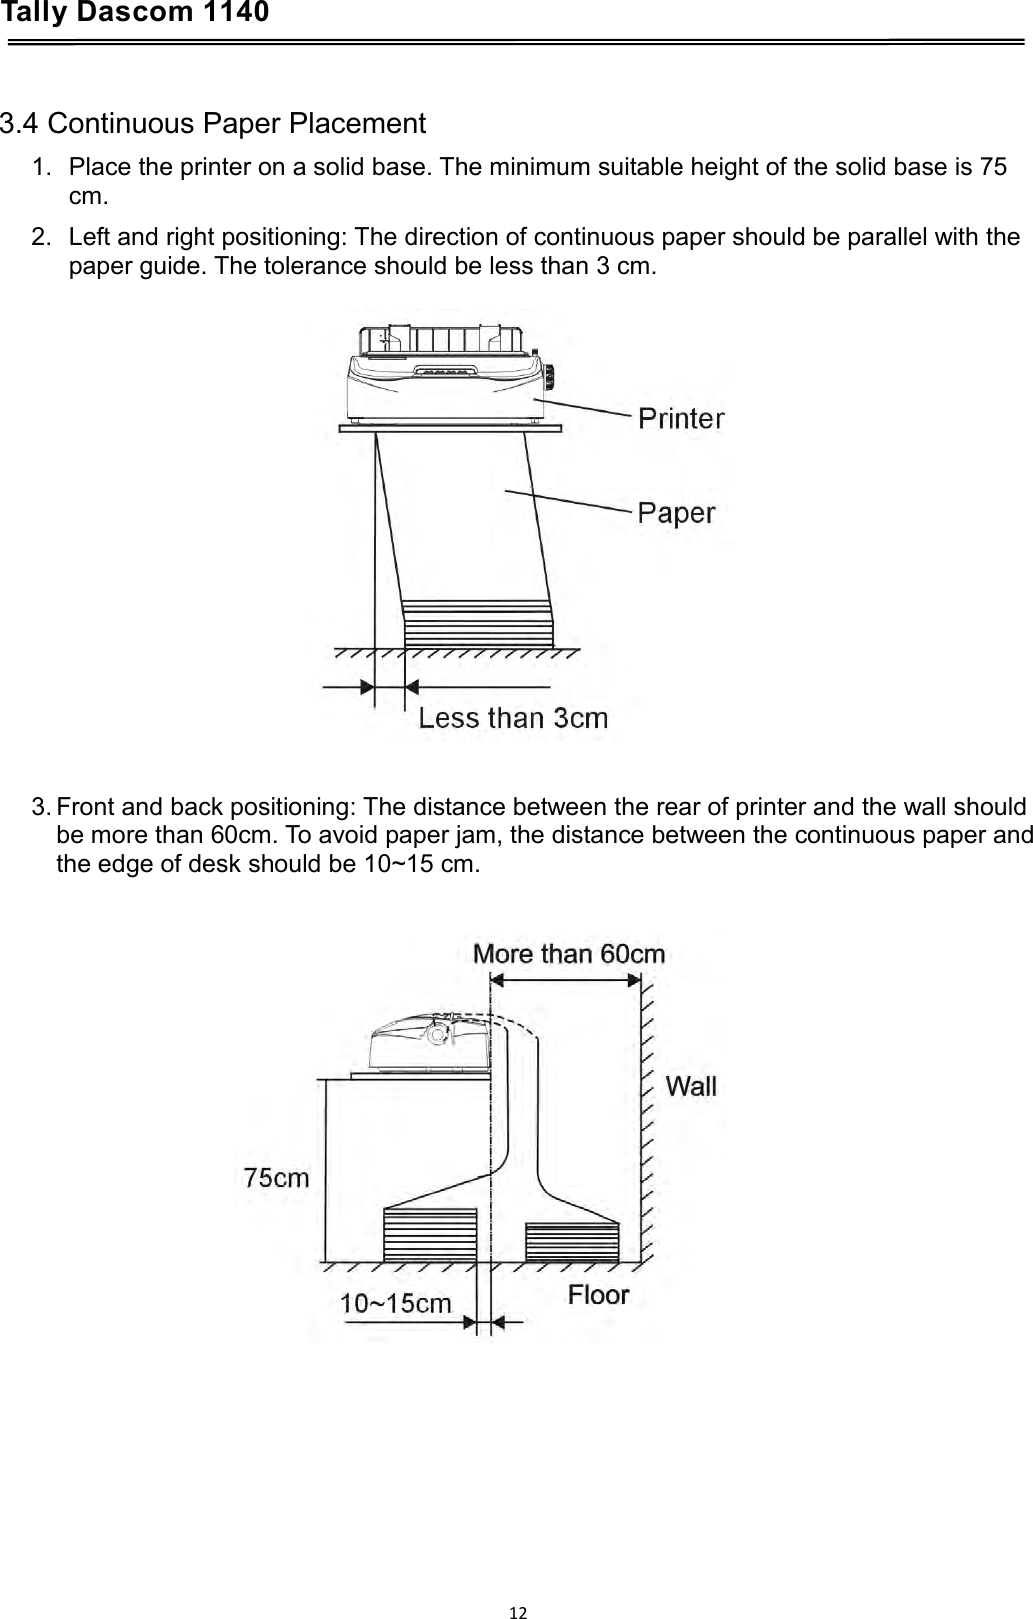
Navigation menu
Upload a User Manual
Namespaces
Wiki Guide
HTML
PDF
Info
Views
User Manual
Discussion / Help
Navigation


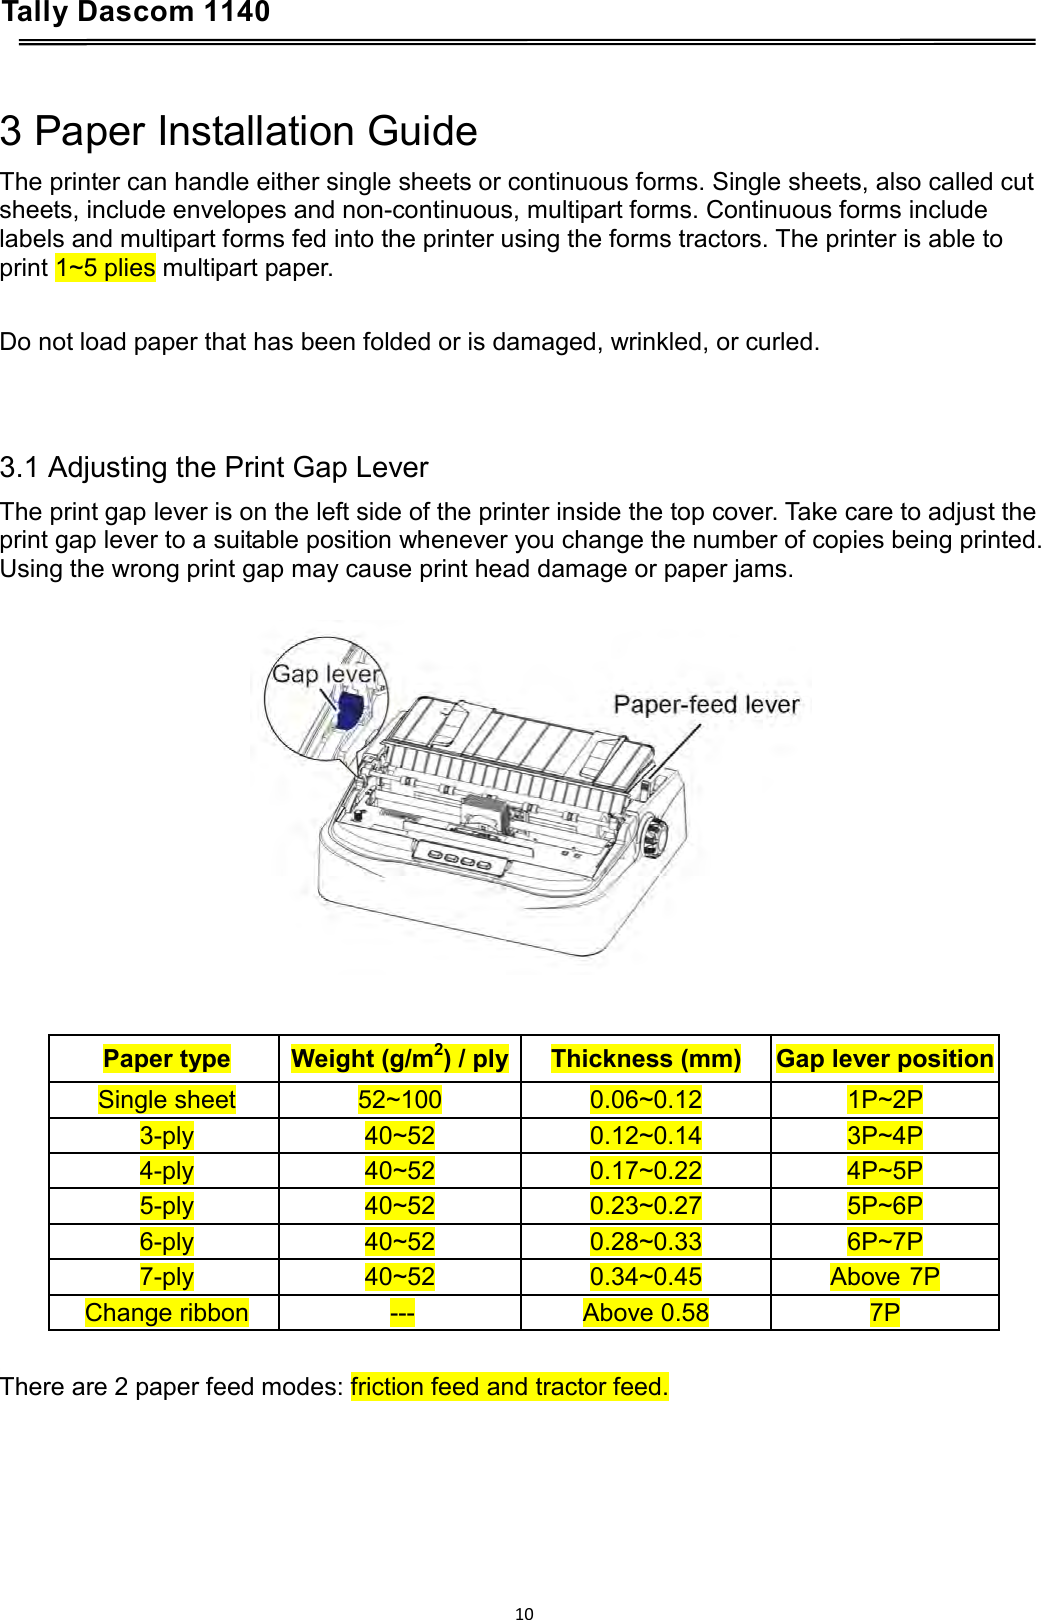
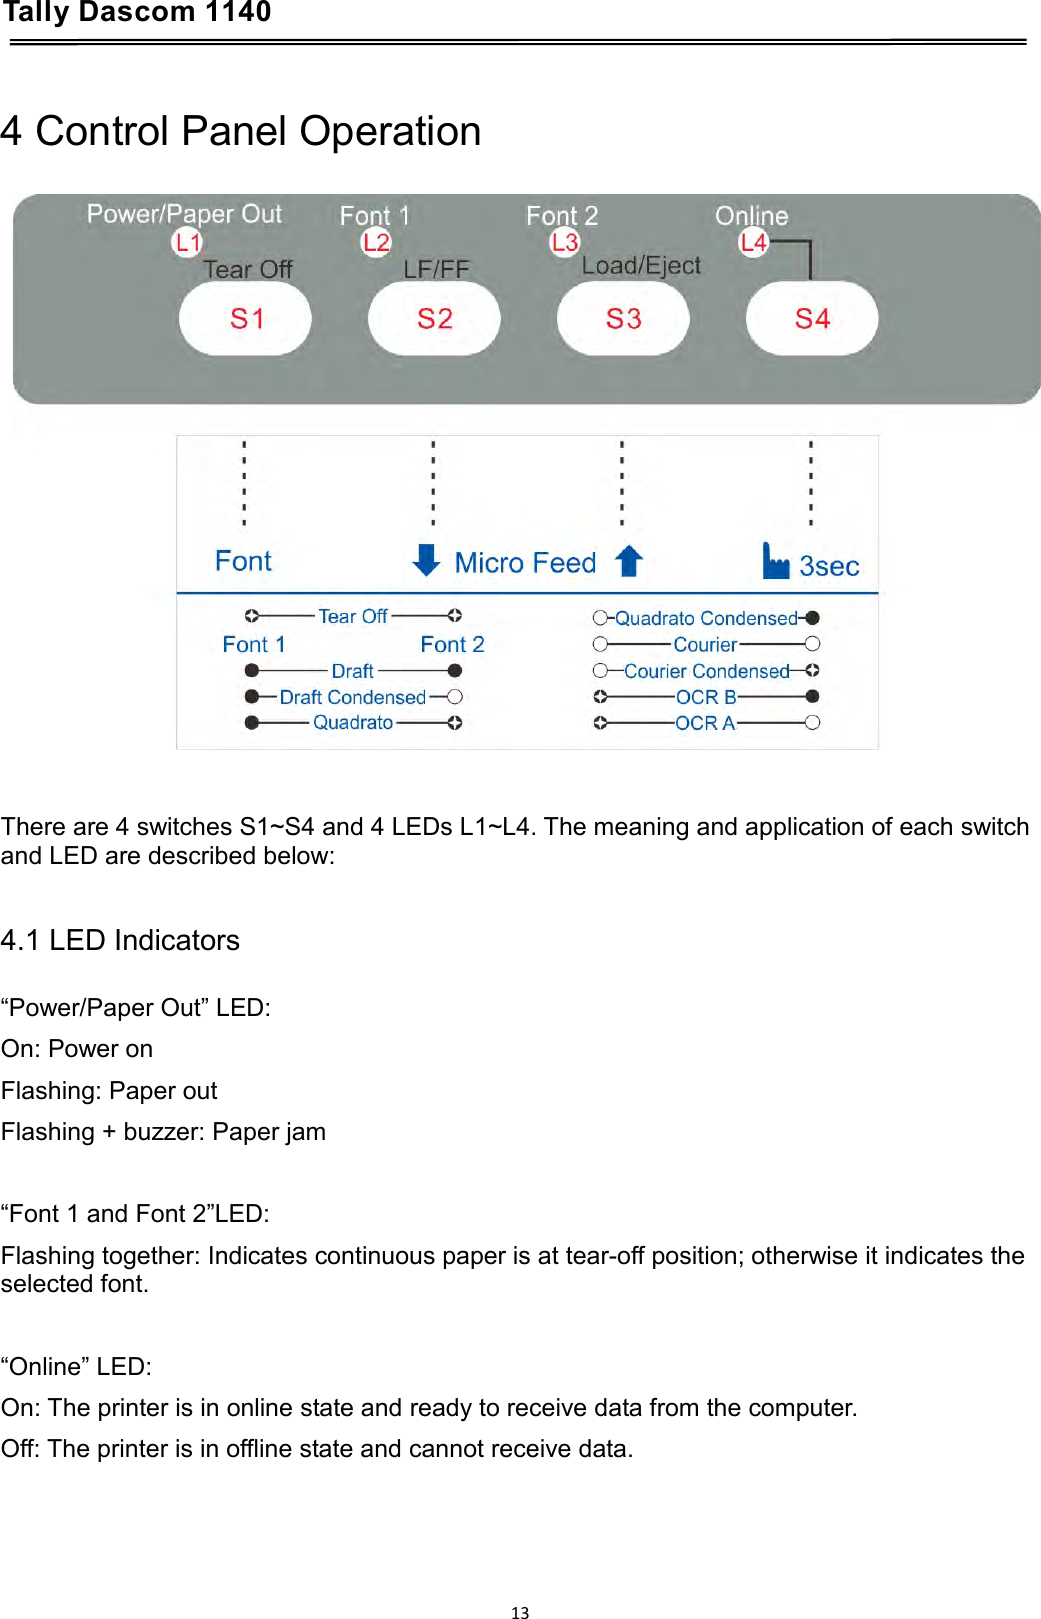
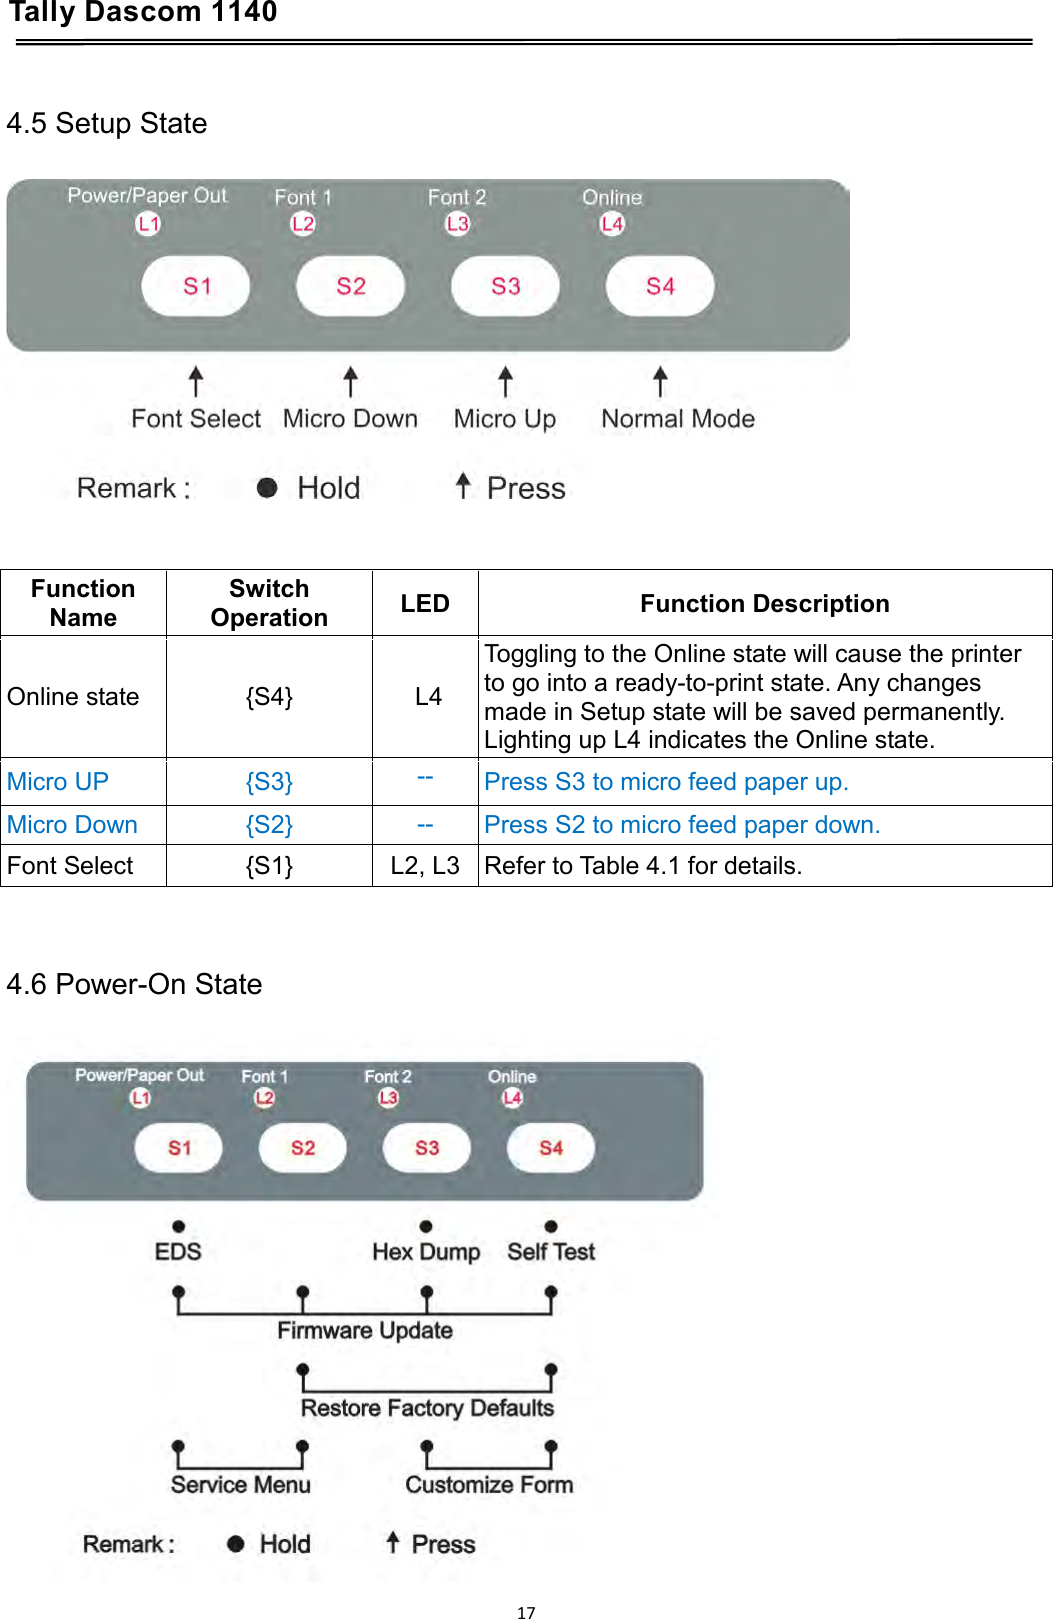
![Tally Dascom 1140 Table 4.3 LED Function L1 Power/Paper Out L2 Font1 L3 Font2 L4 Online 4.3 Panel Operation There are 3 states of operation: Online, Setup and Power On. In the Online state, the keys provide the following functions: Go to Tear Off position, Line Feed/Form Feed, Load/Eject, Clear Buffer and switch to offline state for accessing to Setup state. In the Setup state, the keys provide font selection, and micro feed paper. To enter the Power On state, the user holds down a key or a combination of keys while powering up the printer. This state provides the following functions: Hex-dump, Main Menu setup, print Main Menu, Adjust Factory Defaults, Customize Form, restore factory defaults, and firmware update. The followings describe the 3 states in details. Legend: [A] = press and hold switch A {B} = press and then release switch B [A]+ {B} = press switch B while holding A15](https://usermanual.wiki/Jiangmen-Dascom-Computer-Peripherals/TD11400/User-Guide-2564092-Page-30.png)
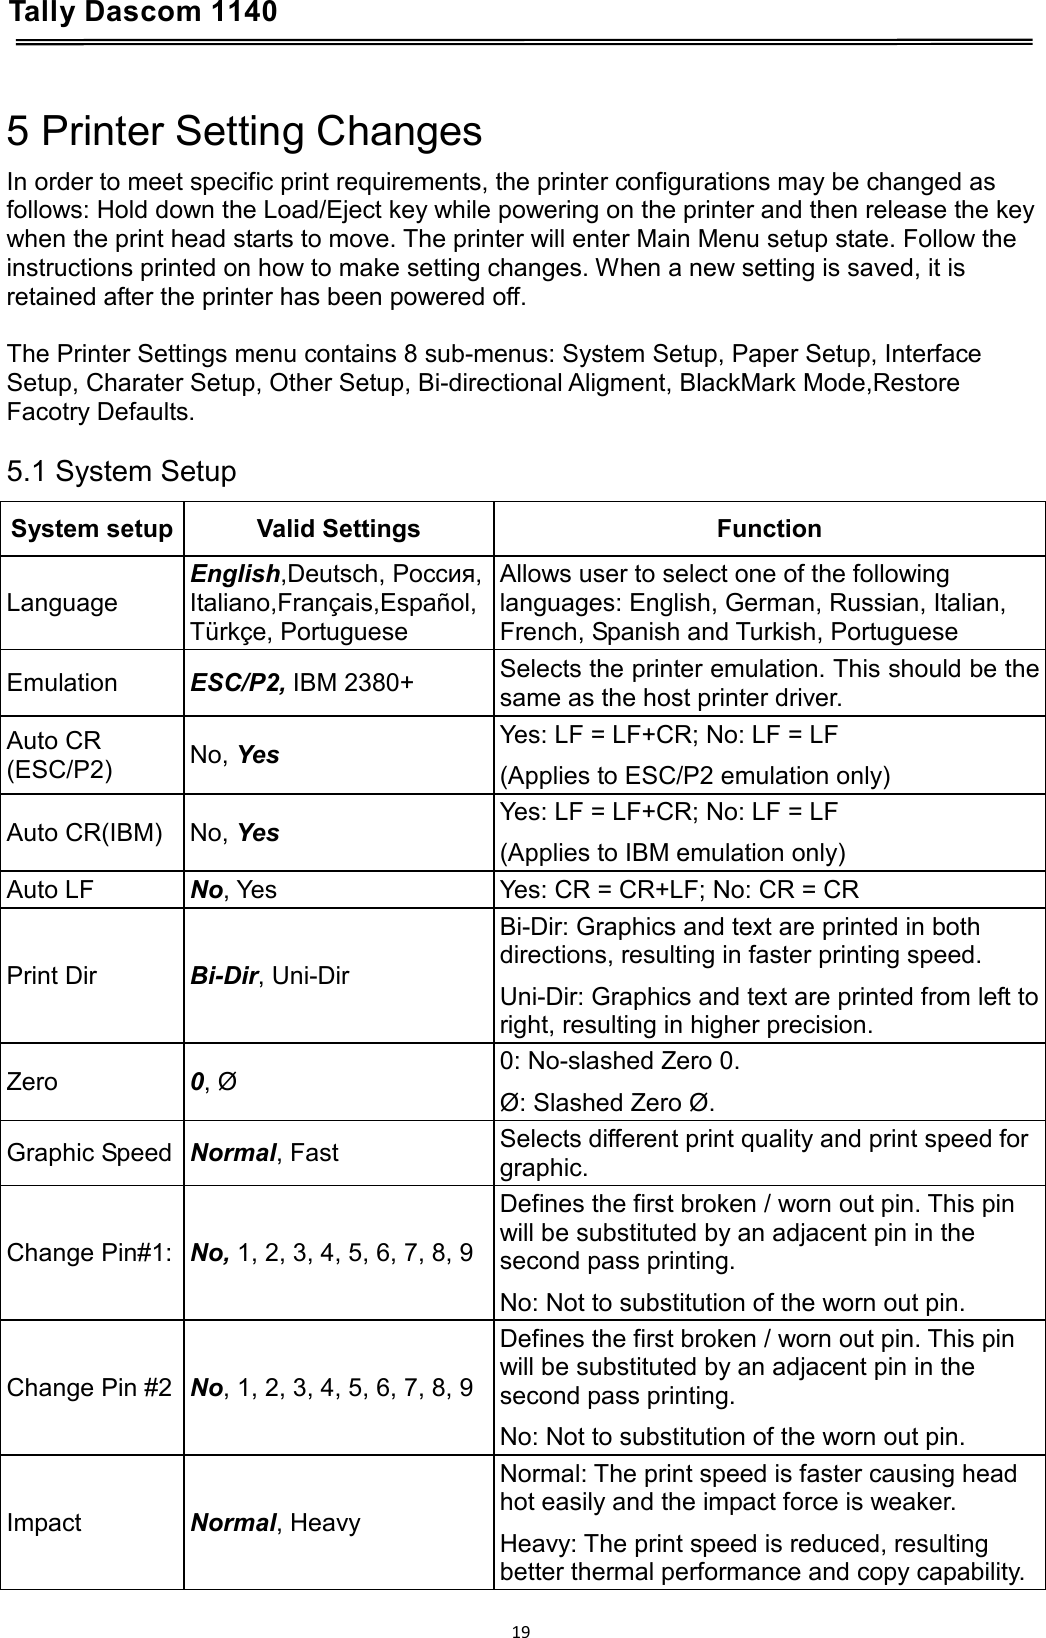
![Tally Dascom 1140 4.4 Online State Function Name Switch Operation LED Function Description Tear Off {S1} L2, L3 flash This is valid for tractor mode only. It feeds the form to the tear-off position. After tearing off the form, printing starts on the next TOF by pressing any key or receiving print data from the host. LF {S2} - Feeds one line with every press of S2 FF [S2] - Pressing this key will feed paper one line forward. By holding down this key, the printer will initially feed a few lines, then perform a form feed (continuous paper mode) or eject the form (single sheet mode). Load/Eject {S3} - ● Load: Automatically loads the paper (according to path selection) when no paper is on the platen. ● Eject: For rear tractor, it retracts the form from the platen to allow users to install cut sheets. (NOTE: Users have to toggle the path selection lever.) For cut sheets, it ejects the form on the platen. Online {S4} L4 Toggles between Online and Offline states. Setup State [S4] L4 Hold the S4 key for 3 seconds. Toggles to 3s Setup state. Indicated by flashing L4. Clear Buffer and Reset [S4]+{S1} -- ● Clears the print buffer. Beeps once upon completion. ● Pressing S1 longer initializes the printer to default settings.Beeps 3 times upon completion. 16](https://usermanual.wiki/Jiangmen-Dascom-Computer-Peripherals/TD11400/User-Guide-2564092-Page-31.png)
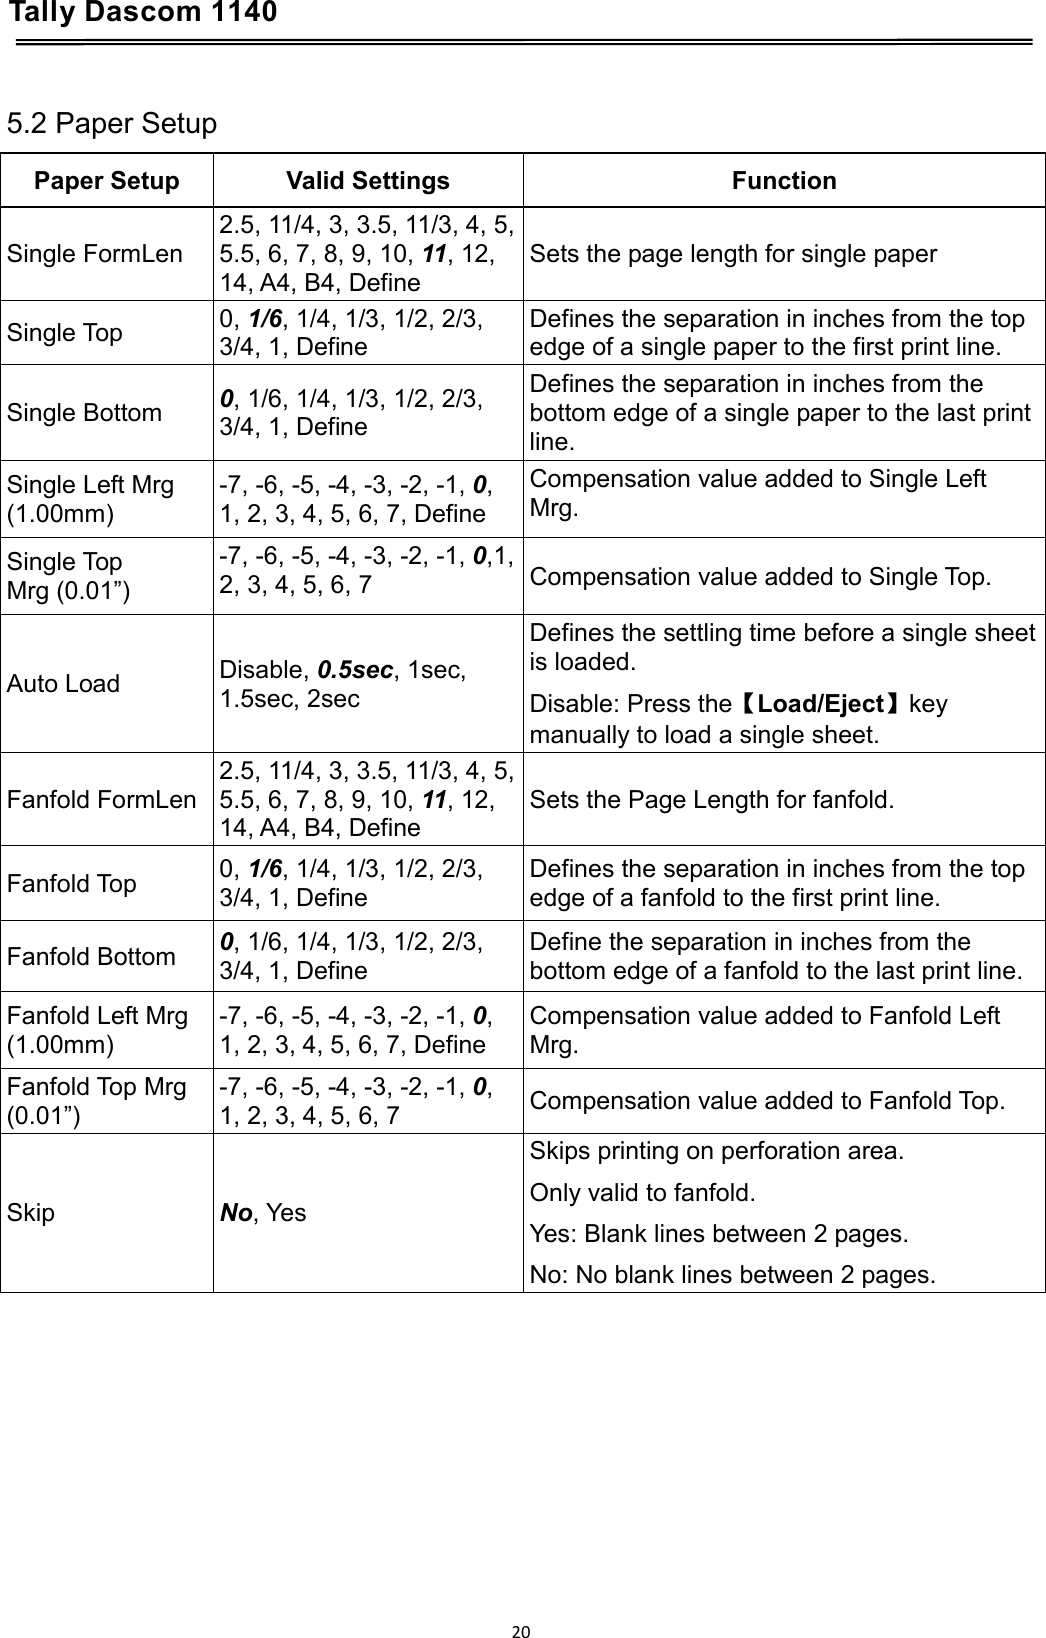
![Tally Dascom 1140 Function Name Switch Operation LED Function Description Hex Dump [S3] - Beeps once to indicate going into hex dump mode: ● Prints data from host in hexadecimal representation. ● Pressing S4 suspends the printing. ● When the hex dump has finished, pressing S4 forces the printing of the last line of data, as any line termination control code from host has no function. ● Switch off the power to terminate the hex dump. Menu Setup / EDS [S1] - Allows for Main Menu setting changes. Please read the instructions printed on how to change settings when this mode is activated. (EDS: Electronic DIP Switch) Self Test / Status Page [S4] - Prints the printer settings and self-test pattern. Firmware Update [S1]+[S2]+[S3]+ [S4] L3, L4 ● Alternate flashing of L3 and L4 indicates ready for firmware update from host. ● When new firmware is being received: L3 and L4 flash together,while L1 and L2 LEDs are constantly on. When downloading is completed, the carriage returns to home position. Printer initializes normally. Restore Factory Defaults [S2] + [S4] - Restore all settings to factory defaults. The carriage initializes and the printer beeps once after restoration. Service Menu [S1] + [S2] - Release the keys till the carriage moves to the left side and the beeper beeps twice. Changes of TOF, tear-off position (fanfold only) are not recovered by Restore Factory Defaults. Not recommend the users change the settings by this function. Customize Form [S3] + [S4] To customize the margins and tear-off position, please refer Chapter 6 for details. 18](https://usermanual.wiki/Jiangmen-Dascom-Computer-Peripherals/TD11400/User-Guide-2564092-Page-33.png)
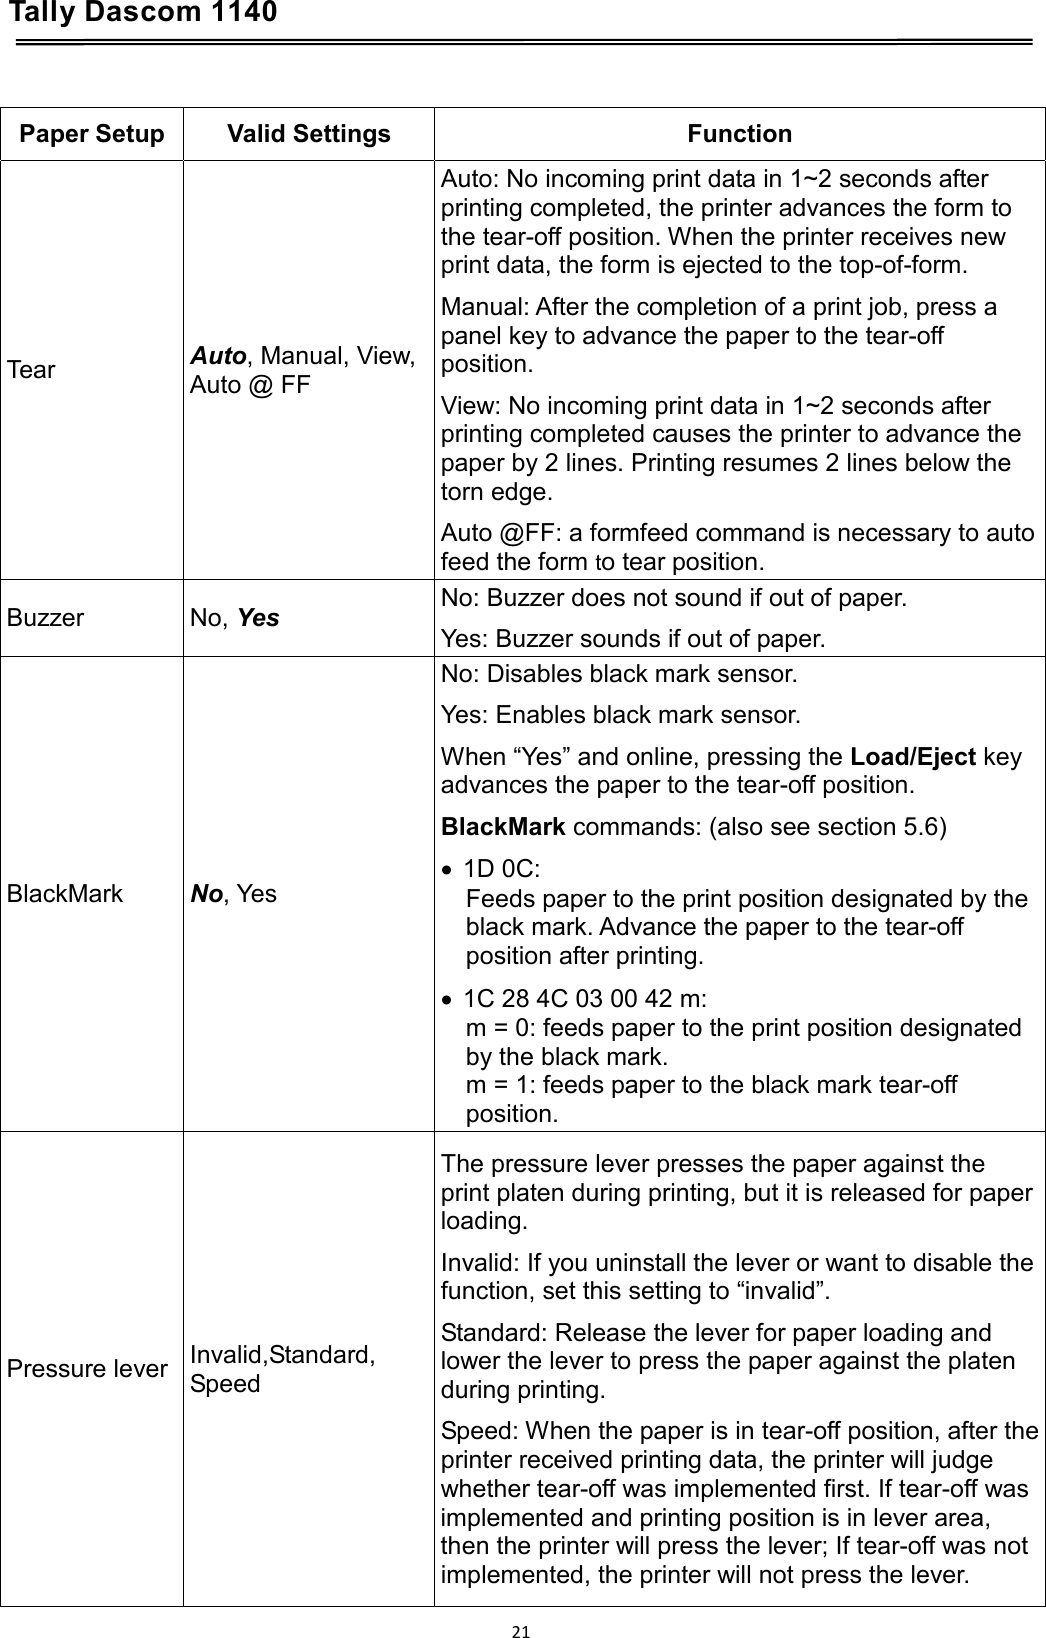
![Tally Dascom 1140 5.6 Black Mark Parameters This printer uses tractors to load fanfold forms with pre-printed black marks. The printer requires 3 parameters to print on paper with black marks: 1. Horizontal offset of black mark from the edge of page (called Black Mark Physical Horizontal Position); later on, this value facilitates the printer to locate its scanner preparing for identifying the black marks. 2. Vertical offset of the first print line from the black mark (called Distance Offset From Black Mark To Print Position); later on, the print makes use of this value to print the first line relative to the black mark. 3. Vertical offset of the tear-off edge from the black mark (called Distance Offset From Black Mark To Tear Position); this value informs the printer the tear-off position of the page. Not to skip or change the order of setting the above 3 parameters. The procedures to set the parameters: 1. Hold down the Tear key while powering on the printer and then release the key when the print head starts to move. After loading paper, the printer prompts the Printer Settings Printer Settings [TEAR]=Back, [LF]=Next, [LOAD/EJECT]=OK, [ONLINE]=Exit, [ONLINE]+[LOAD/EJECT]=Save and restart the printer. System Setup 2. Press the Next or Back keys to scroll forward or backward the sub-menus till the printer shows: BlackMark Mode 3. Press OK to go into the BlackMark menu. The printer prompts: [Black Mark Adjustment Mode] [TEAR]= Back, [LF]= Next, [LOAD/EJECT]=OK, [ONLINE]=Exit, [ONLINE]+[LOAD/EJECT]= Save and restart the printer. Black Mark Physical Horizontal Position Press any key to eject the paper, and load paper with black mark in the Fanfold Path. 4. The last prompt above advises you to press any key to unload the dialog form. Then load a fanfold form with black mark. 35](https://usermanual.wiki/Jiangmen-Dascom-Computer-Peripherals/TD11400/User-Guide-2564092-Page-50.png)
![Tally Dascom 1140 5.7 Bidirectional Alignment When wiggling vertical grids appears in tabular reports, you should adjust the Bidirectional Alignment. The procedures to adjust bi-directional alignment across adjacent line grids: 1. Hold down the Tear key while powering on the printer and then release the key when the print head starts to move. After loading paper, the printer prompts the Printer Settings. Printer Settings [TEAR]=Back, [LF]=Next, [LOAD/EJECT]=OK, [ONLINE]=Exit, [ONLINE]+[LOAD/EJECT]=Save and restart the printer. System Setup 2. Press the Next or Back keys to scroll forward or backward the sub-menus till the printer shows: Bi-directional Alignment 3. Press OK to go into the Bi-directional Test menu. The printer prompts: [Bi-direction Alignment] [TEAR]=-1, [LF]=+1, [LOAD/EJECT]=OK, [ONLINE]=Back, [ONLINE]+[LOAD/EJECT]=Save and restart the printer 50 | | | | | | | | | | | | | | | | | | | | | | | | | | | | | | 4. Every press on “+1” or “-1” shifts the second line to the right or left, respectively, relative to the top line by 1 fine step. After pressing “+1” twice and then “OK”, the printer prompts: 52 | | | | | | | | | | | | | | | | | | | | | | | | | | | | | | 5. Repeat the adjustment till two grid lines align satisfactory as “|”. Press “OK” again. The printer asks if you want to save the correction: Save the parameter settings ([LOAD/EJECT] or [ONLINE] = OK, [LF] = Next)? Yes At this stage, you have the options to save or give up the correction by pressing OK or Next, respectively. If you respond with OK, an asterisk “*” appends to “Yes” to confirm saving change.If you intend to give up the correction by pressing Next, the printer prompts a “No” Then a confirmative response of OK appends an asterisk “*” to the “No” prompt. The printer then exits the Bi-directional Test and proceeds with the next setup menu. 37](https://usermanual.wiki/Jiangmen-Dascom-Computer-Peripherals/TD11400/User-Guide-2564092-Page-52.png)
![Tally Dascom 1140 5.8 Restore Factory Default The procedures to restore factory default settings: 1. Hold down the Tear key while powering on the printer and then release the key when the print head starts to move. After loading paper, the printer prompts the Printer Settings Printer Settings [TEAR]=Back, [LF]=Next, [LOAD/EJECT]=OK, [ONLINE]=Exit, [ONLINE]+[LOAD/EJECT]=Save and restart the printer. System Setup 2. Press the Next or Back keys to scroll forward or backward the sub-menus till the printer shows: Restore Factory Defaults 3. Press OK to go into restore factory default dialog. The printer prompts: [Restore Factory Defaults] Restore factory settings ([LOAD/EJECT]=OK, [ONLINE]=Exit)? Yes 4. At this stage you have the option of OK to restore default setting or Exit to discard the restoration. 5. If input OK, the printer prints an asterisk “*” appending the “Yes” and prompts successful restoration: Restore factory settings successfully 6. The printer beeps once to indicate successful restoration. 38](https://usermanual.wiki/Jiangmen-Dascom-Computer-Peripherals/TD11400/User-Guide-2564092-Page-53.png)
![Tally Dascom 1140 6 Customized Form This printer allows the customization on the form length, Load/Eject, bottom margin and left margin for single sheets and fanfold. Restore Factory Defaults can recover these default values. Selecting the Define value(s) in section 5.2 (Paper Setup menu) allows the printer to take up the customized page formatting value(s). The parameter setting procedures involve: 1. The printer prompts the dialogs and you follow the prompts. 2. Before every measurement or change, the print instructs you to unload the conversation form from the printer. 3. With the exception of measuring the form length for cut sheets, always set the lever to the tractors position . 4. For form length measurement, insert the customized form from the proper paper path. The other six settings are actually done on general fanfold forms --- not the actual customized form. Fanfold paper gives direct visual results on the TOF, bottom and left margins even though cut sheets will be used in actual applicati 6.1 Customize Cut Sheet Form Length 1. Hold down both the Online and TOF keys while powering on the printer and then release the keys when the carriage initializes and beeps once. After loading a form the printer prompts: Customize Form [TEAR]=Back, [LF]=Next, [LOAD/EJECT]=OK, [ONLINE]=Exit, [ONLINE]+[LOAD/EJECT]=Save and restart the printer. Single sheet 2. Press “OK” to start customizing all or part of 4 parameters for single sheet. The printer prompts: [Single sheet] Form Length 39](https://usermanual.wiki/Jiangmen-Dascom-Computer-Peripherals/TD11400/User-Guide-2564092-Page-54.png)
![Tally Dascom 1140 3. You may skip to other customized settings by pressing “Next” or “Back”. Once you press “OK” to continue with form length measurement, the printer prompts: 1.Press any key to clear the Setup Instructions Page from the printer. Insert the Customized Page into the corresponding paper path. Press [LOAD/EJECT] to load and measure the page length. 2.The printer rolls over the entire Customized Page to measure its length. After measurement, press [LOAD/EJECT] to load a blank Setup Instructions Page to report the measured value. 3. Press [LOAD/EJECT] to save the measured value.Repeat the above steps if the printed value is dissatisfactory. illustrations for above step 1 and step 2. 4. Follow the given prompt to unload the conversation form. Load the customized form to allow the printer to scan the page length. After the measurement, load another conversation form to let the printer print out the measured length. The measured form length is: 11.0Inch, approximately equal to 279mm, accuracy of plus or minus 0.1 inches. The measured value has been saved. Remeasure ( [LOAD/EJECT]=OK, [ONLINE] =Exit)? Yes 40](https://usermanual.wiki/Jiangmen-Dascom-Computer-Peripherals/TD11400/User-Guide-2564092-Page-55.png)
![Tally Dascom 1140 5. At this stage: If Load/Eject is pressed, an asterisk “*” is appended to “Yes” and you should repeat the procedures for form length measurement as mentioned. Or, If you input “Exit”, the printer saves the measurement value and proceeds with the next customized setting. 6.2 Customize Cut Sheet TOF 1. After you follow through all the steps in 6.1 or you input “Next” in step 3 in 6.1, the printer prompts: Top Margin 2. You may skip to other customized settings by pressing “Next” or “Back”. Once you press “OK” to continue with customization of cut sheet TOF, the printer prompts: Press any key to eject current page, load paper in the Fanfold paper path, and then proceed as follows: [TEAR] = -(1/72) inch, [LF] = +(1/72) inch, [LOAD/EJECT] = OK, [ONLINE] = Exit, [ONLINE] + [LOAD/EJECT] = Save and restart the printer. 3. Follow the given prompt to unload the conversation form. Ensure the lever is at position. Then press the Load/Eject key to load fanfold paper from tractors. The top edge of the form initially aligns with the printer’s tear-off blade. You may input +/- 1/72” to adjust the TOF position. When you get the desirable TOF, press OK or Exit. The printer prompts the customized TOF value: The defined position is: 4.2 mm. Save the parameter settings ([LOAD/EJECT] or [ONLINE]=OK, [LF]=Next)? Yes 4. At this stage: If Load/Eject is pressed, an asterisk “*” is appended to “Yes” and you should repeat the procedures for form length measurement as mentioned. Or, If you input “Exit”, the printer saves the measurement value and proceeds with the next customized setting. 6.3 Customize Cut Sheet Bottom Margin 1. After you follow through all the steps in 6.2 or you input “Next” twice in step 3 in 6.1, the printer prompts: Bottom Margin 2. The remaining operations are nearly the same as described in section 6.2. The only difference is to input +/- 1/72” till you get the desirable bottom margin. 41](https://usermanual.wiki/Jiangmen-Dascom-Computer-Peripherals/TD11400/User-Guide-2564092-Page-56.png)
![Tally Dascom 1140 6.4 Customize Cut Sheet Left Margin 1. After you follow through all the steps in 6.3 or you input “Next” three times in step 3 in 6.1, the printer prompts: Left Margin 2. The remaining operations are nearly the same as described in section 6.2. The only difference is to input +/- 1/72” till you get the desirable left margin. 6.5 Customize Fanfold Page Formatting Parameters The customizations of the form length, TOF, bottom and left margins for fanfold are exactly the same as describe. All you need is to bypass the Single Sheet menu under Customize Form. Follow step 1 in section 6.1: Customize Form [[TEAR]=Back, [LF]=Next, [LOAD/EJECT]=OK, [ONLINE]=Exit, [ONLINE]+[LOAD/EJECT]=Save and restart the printer. Single sheet Then hit “Next” instead to get into the fanfold parameter menus: [Tractor Paper] Form Length Refer section 6.1 to 6.4 for details on customizing the form length, TOF, bottom margin, and left margin for fanfold. 42](https://usermanual.wiki/Jiangmen-Dascom-Computer-Peripherals/TD11400/User-Guide-2564092-Page-57.png)


![Tally Dascom 1140 12.2 IBM Emulation Command List Command Function BS Backspace HT Horizontal tab CR Carriage return ESC BS Backspace ESC HT Horizontal tab ESC CR Carriage return ESC D Set horizontal tabs ESC X Set horizontal margins ESC d Relative mode inline forward LF Line feed VT Vertical tab FF Form feed ESC LF Line feed ESC VT Vertical tab ESC FF Form feed ESC 0 Select 1/8” line spacing ESC 1 Select 7/72” line spacing ESC 2 Start text line spacing ESC 3 Set graphics line spacing ESC 4 Set top of form ESC 5 Automatic line feed ESC A Set text line spacing ESC B Set vertical tabs ESC C Set form length in lines ESC C NUL Set form length in inches ESC J Graphics variable line spacing ESC N Set automatic perforation skip ESC O Cancel automatic perforation skip ESC [ \ Set vertical units ESC ] Reverse line feed SO Double-wide printing by line SI Condensed printing DC2 Select 10 cpi DC4 Cancel double-wide printing by line ESC SO Double-wide printing by line ESC SI Condensed printing ESC DC2 Select 10 cpi ESC DC4 Cancel double-wide printing by line ESC - Continuous underscore ESC : Select 12 cpi ESC E Select emphasized mode ESC F Cancel emphasized mode ESC G Select double strike mode 91](https://usermanual.wiki/Jiangmen-Dascom-Computer-Peripherals/TD11400/User-Guide-2564092-Page-106.png)