Jiangmen Dascom Computer Peripherals TD2100 Thermal Receipt Printer User Manual Tally Dascom DT 210 230
Jiangmen Dascom Computer Peripherals Co.,Ltd. Thermal Receipt Printer Tally Dascom DT 210 230
UserManual.wiki
>
Jiangmen Dascom Computer Peripherals
>
TD2100 User Manual
Users Manual
Navigation menu
Upload a User Manual
Namespaces
Wiki Guide
HTML
PDF
Info
Views
User Manual
Discussion / Help
Navigation
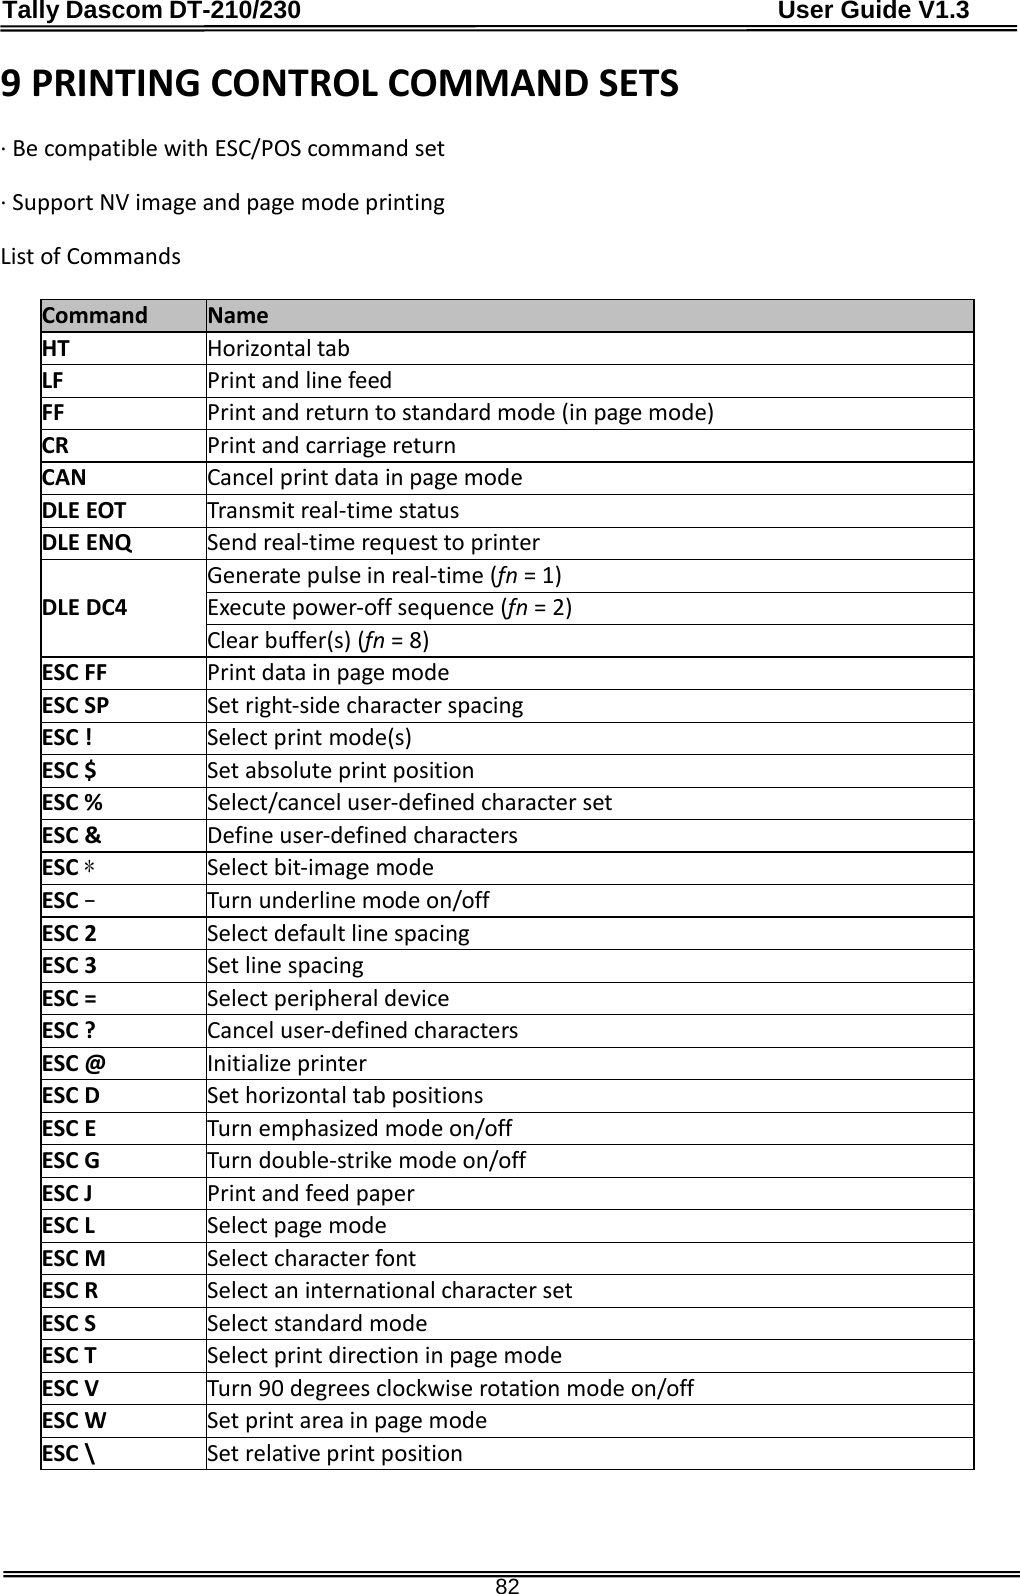
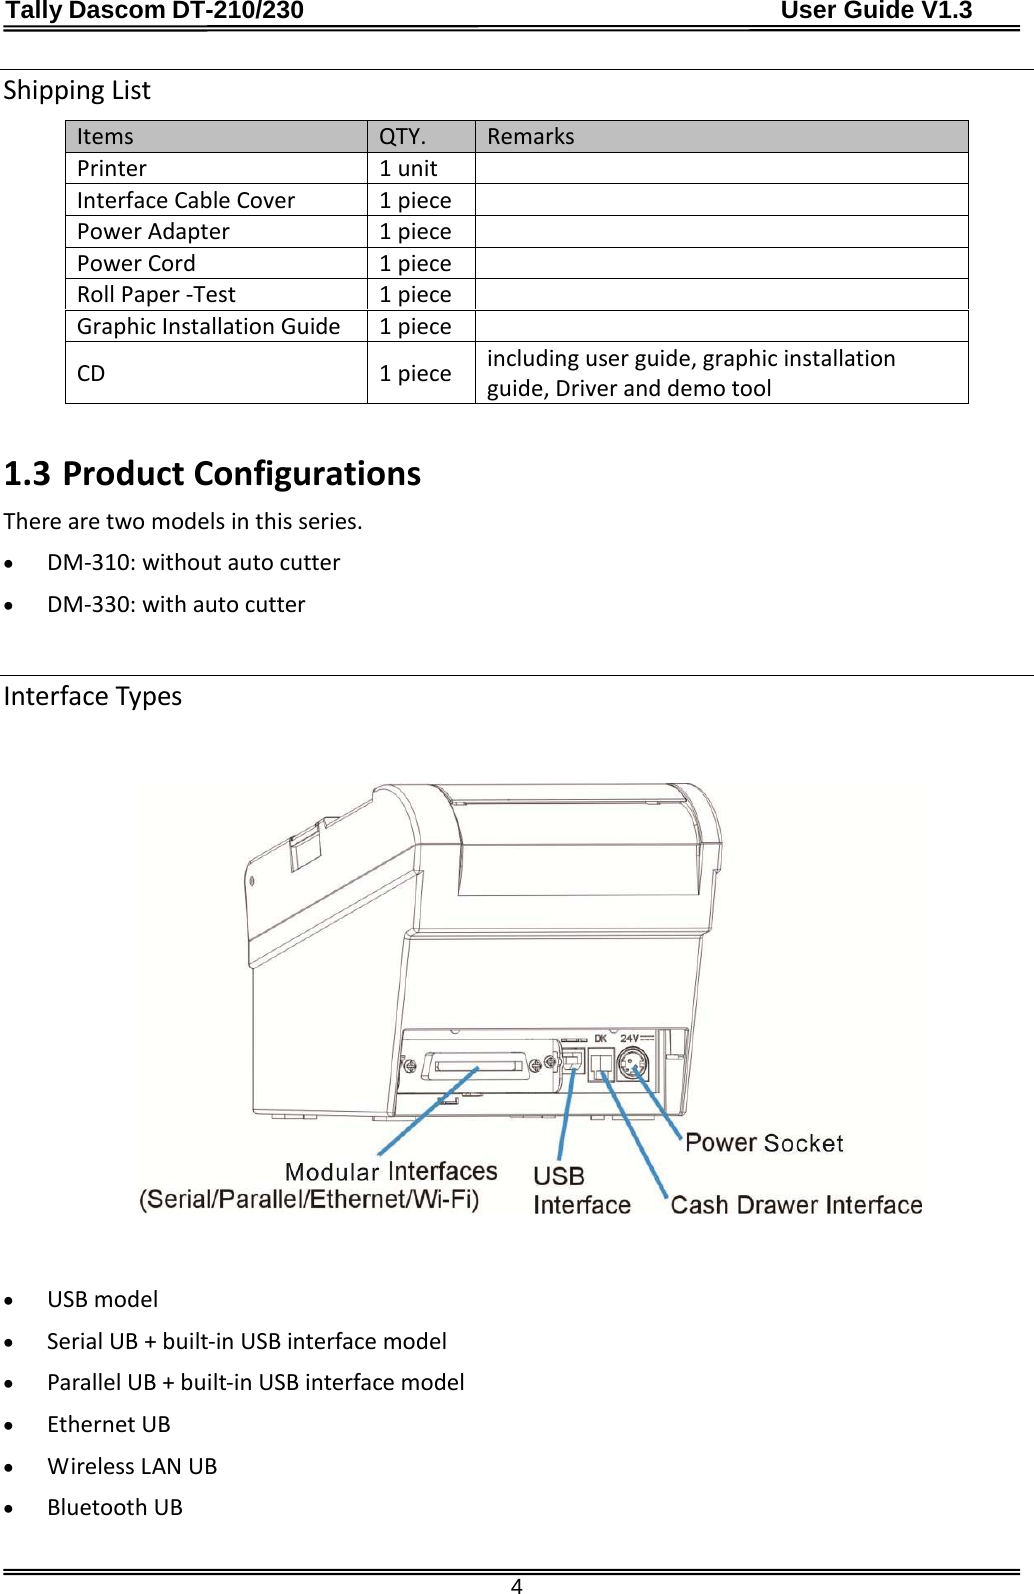
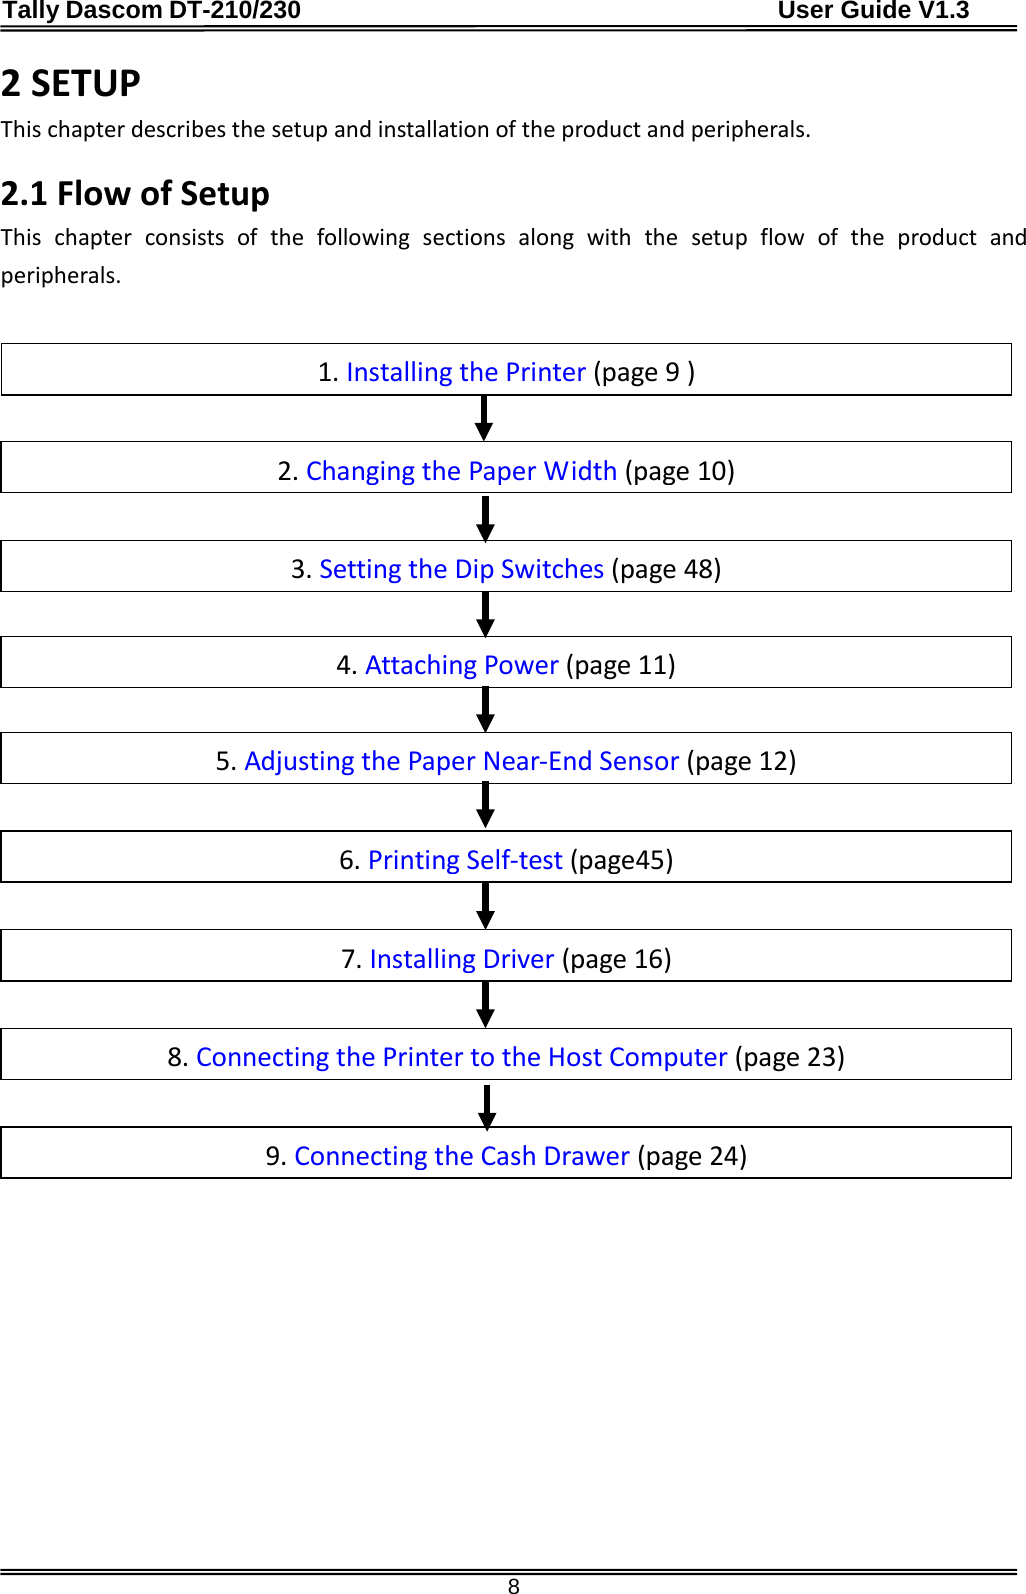
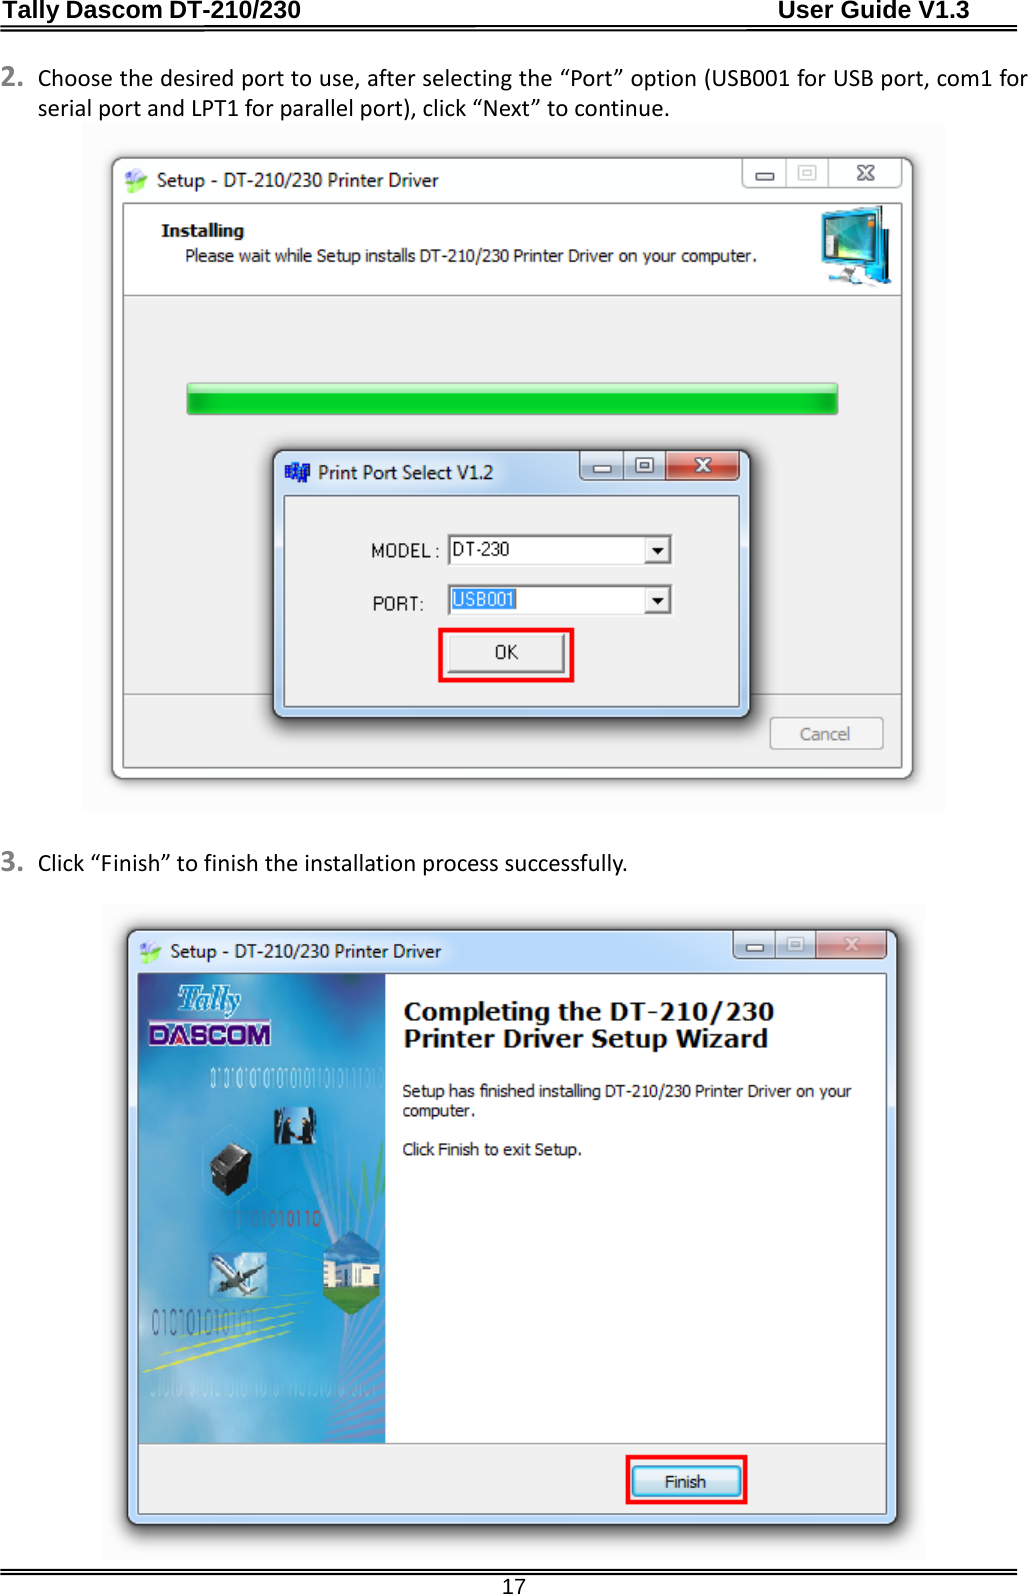
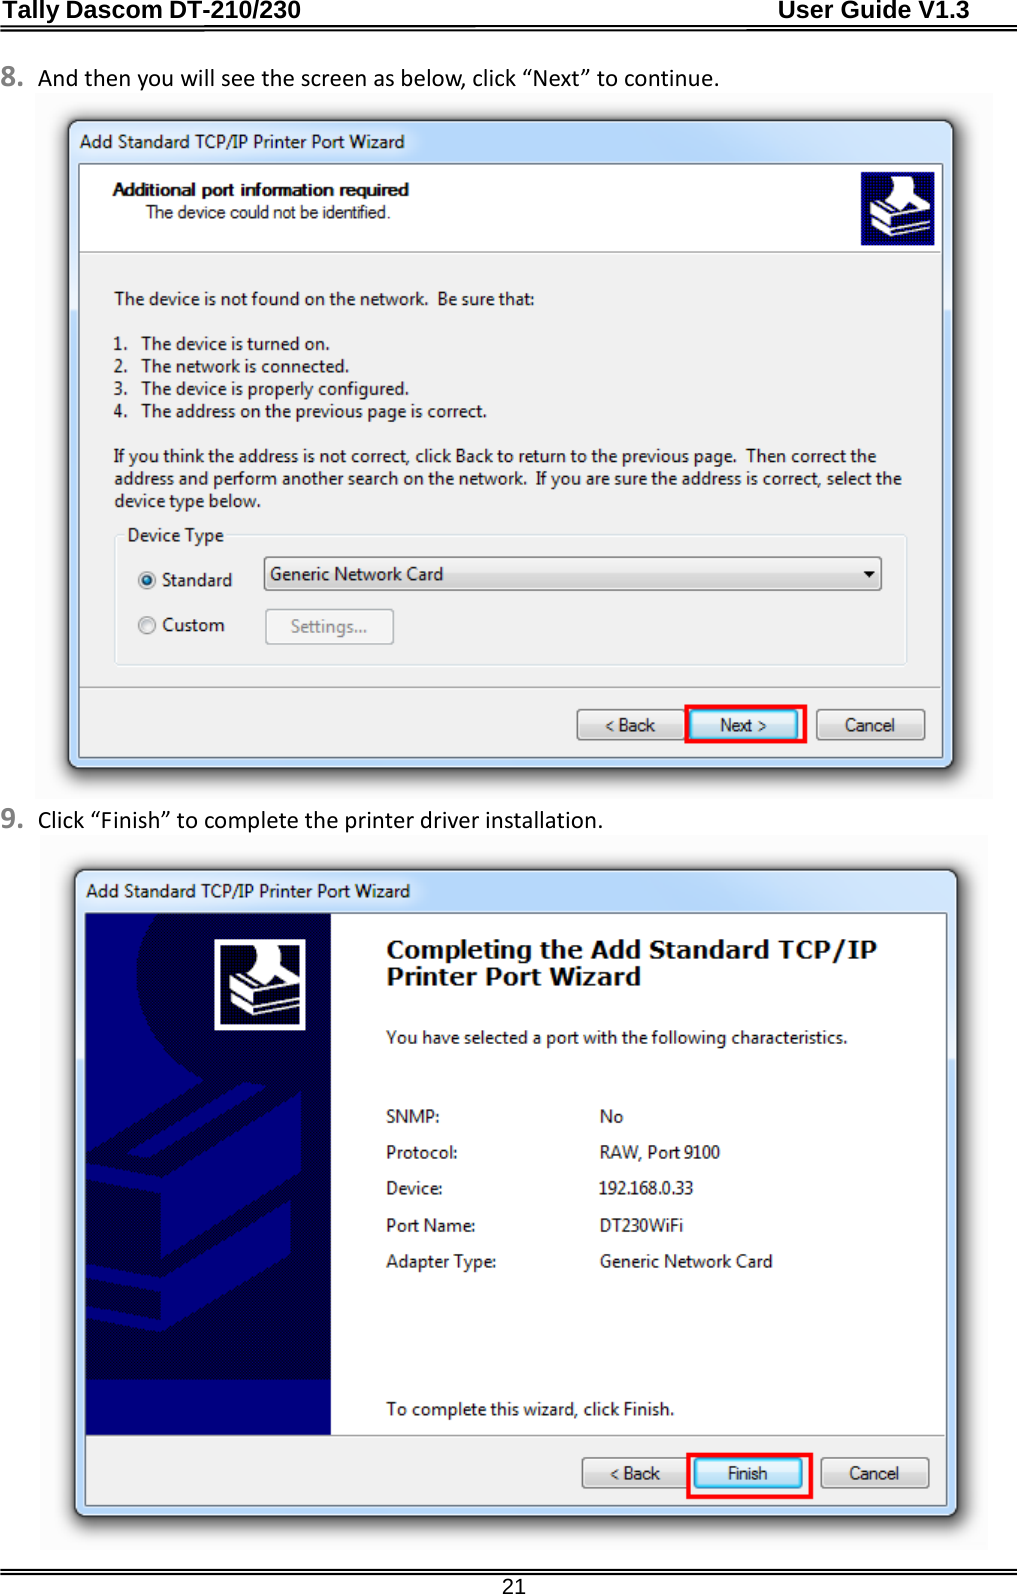
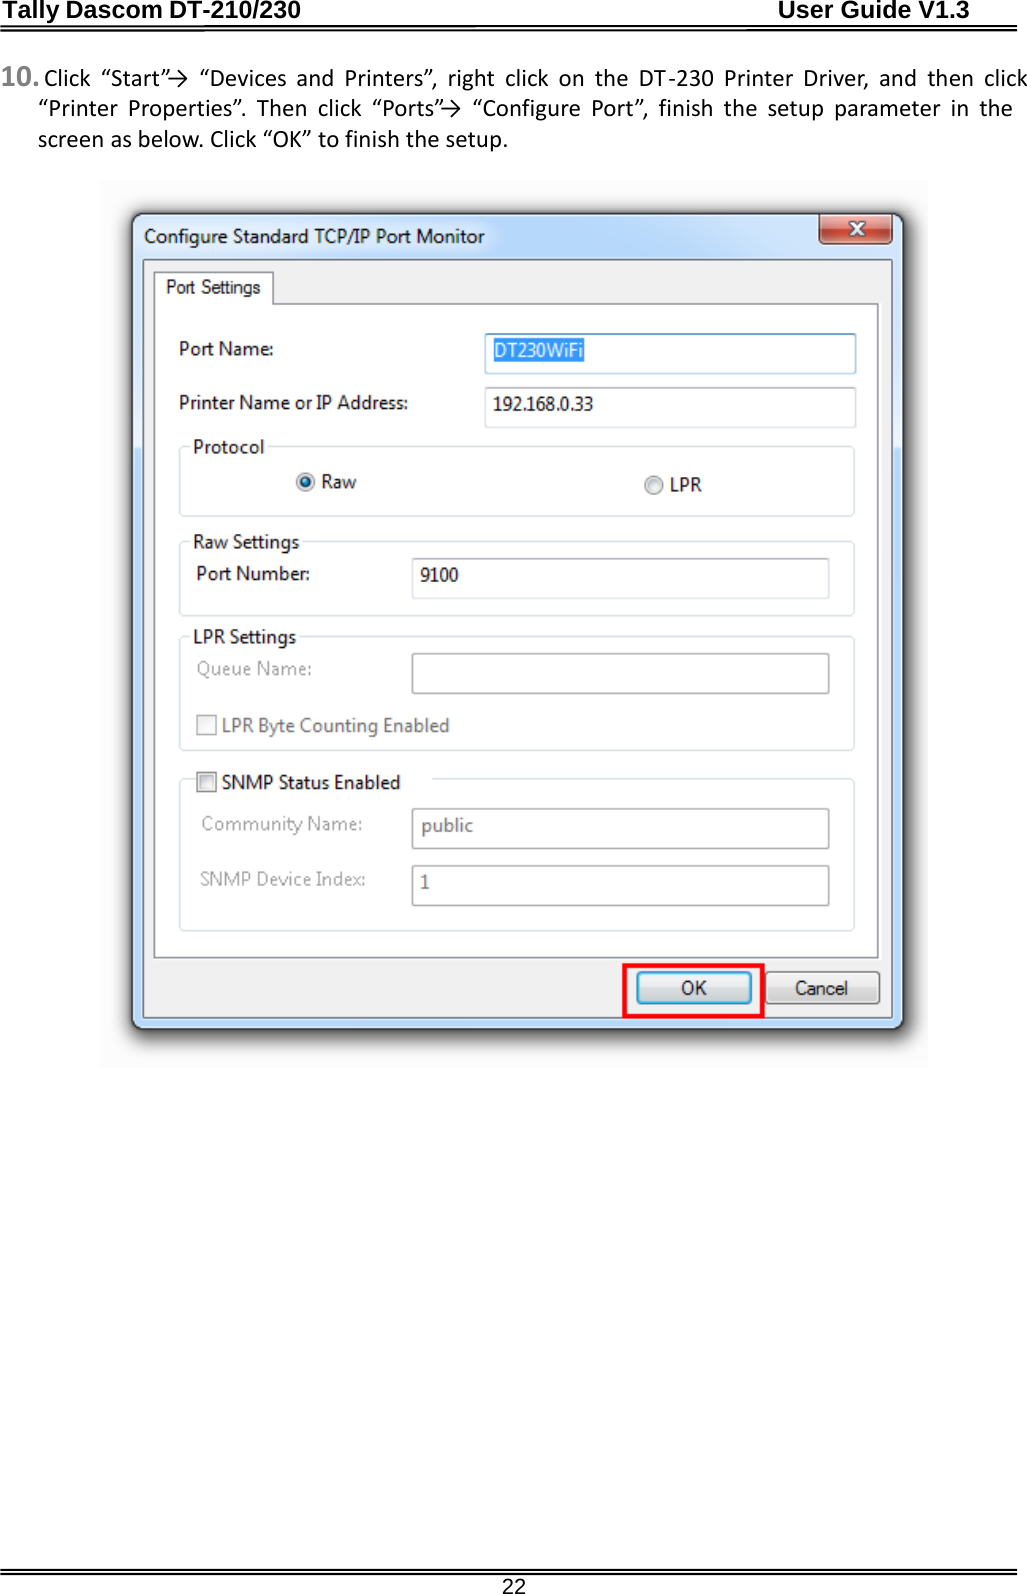
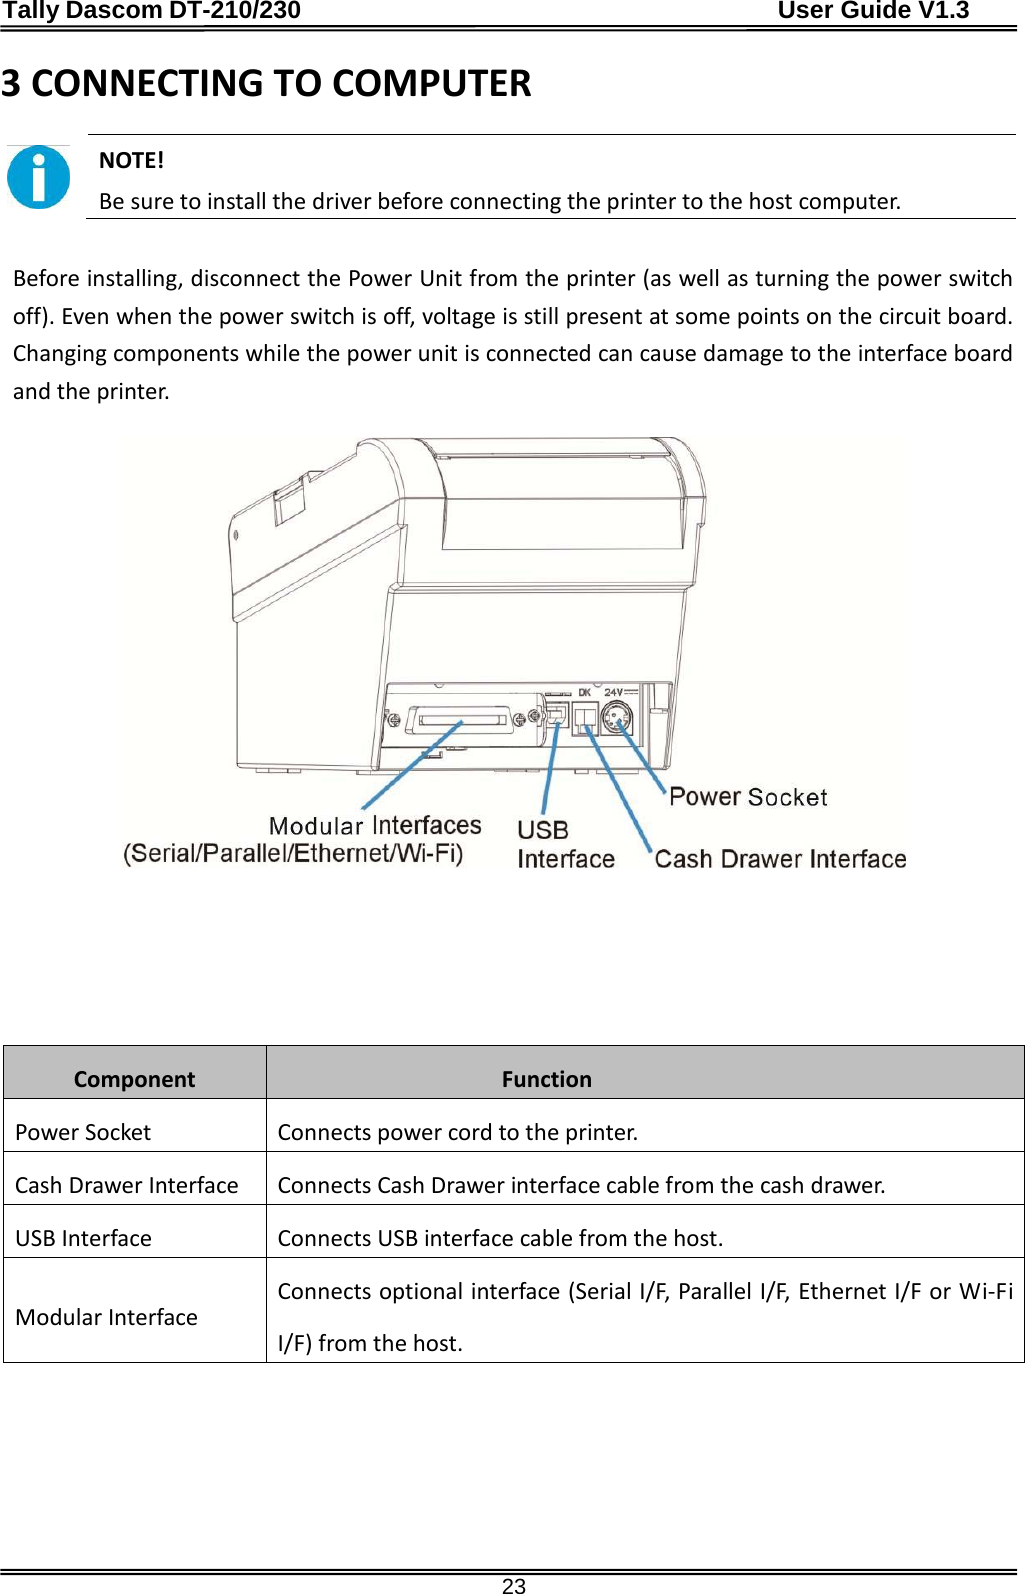
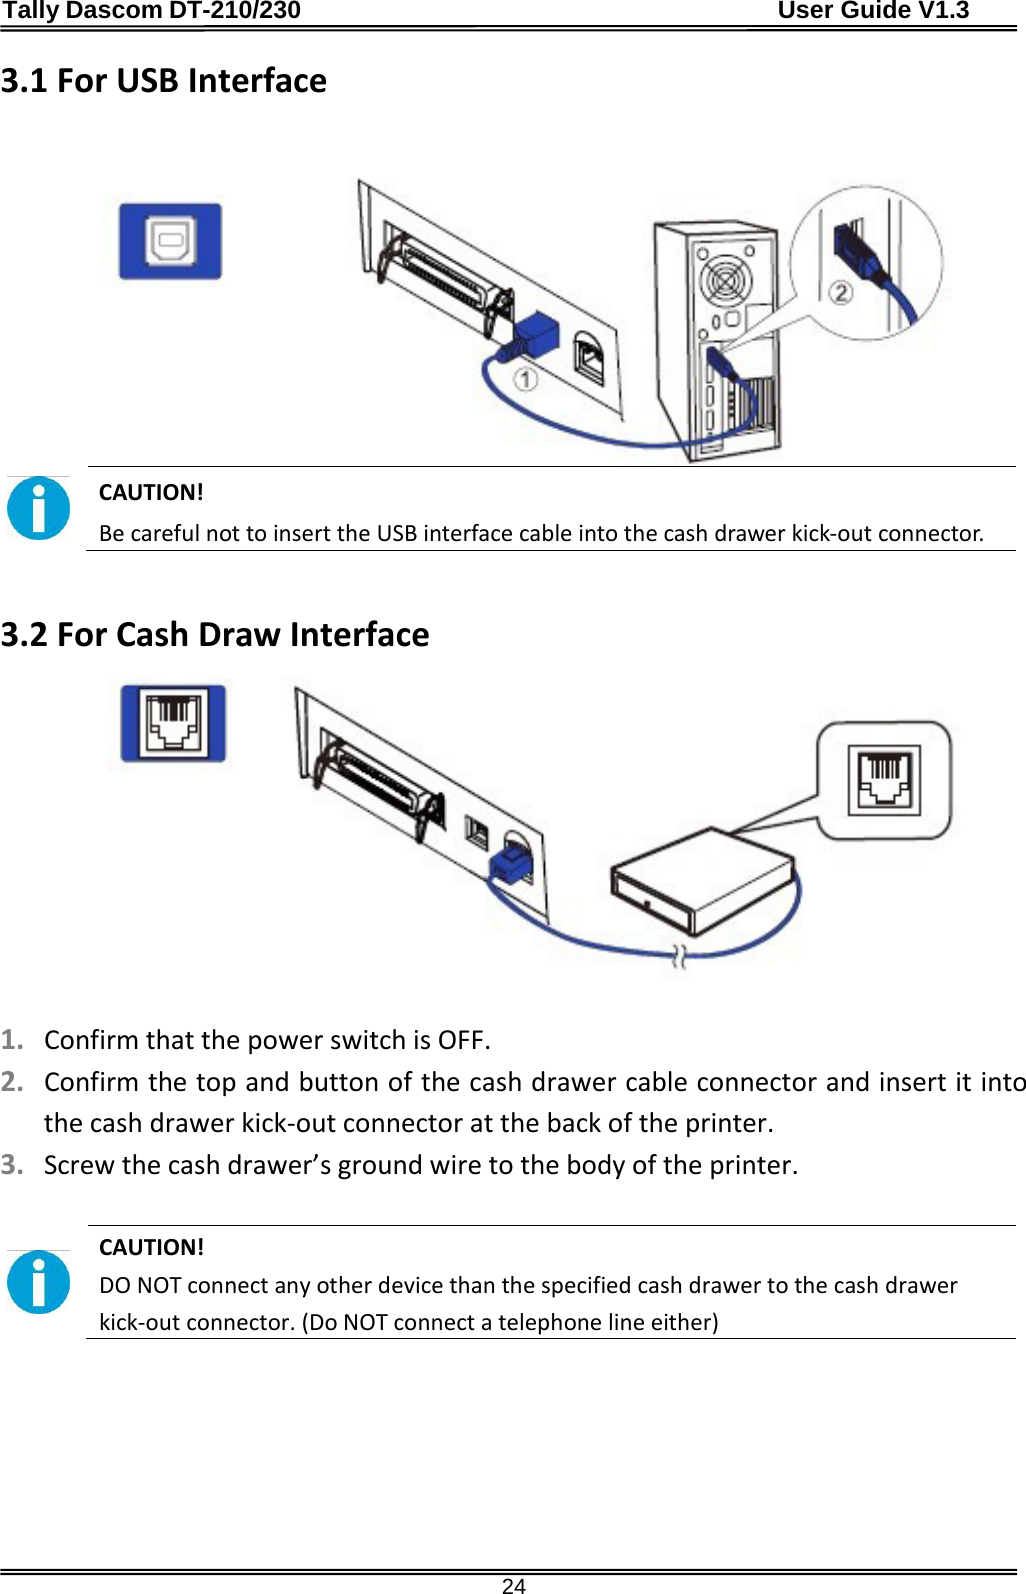
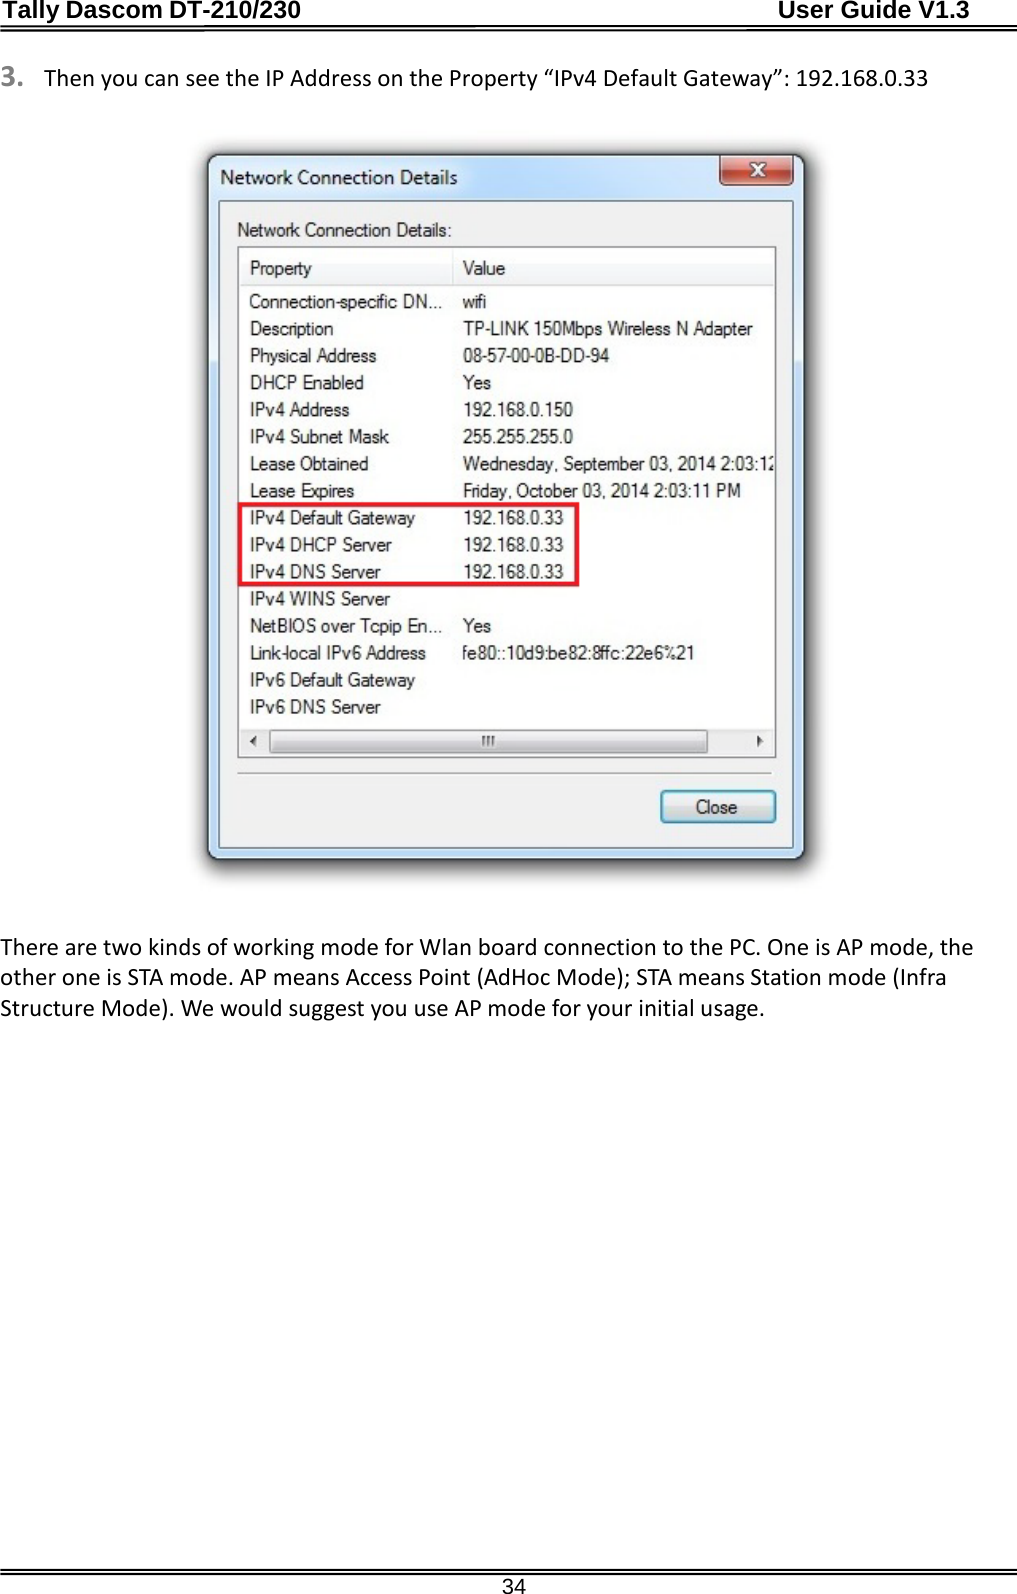
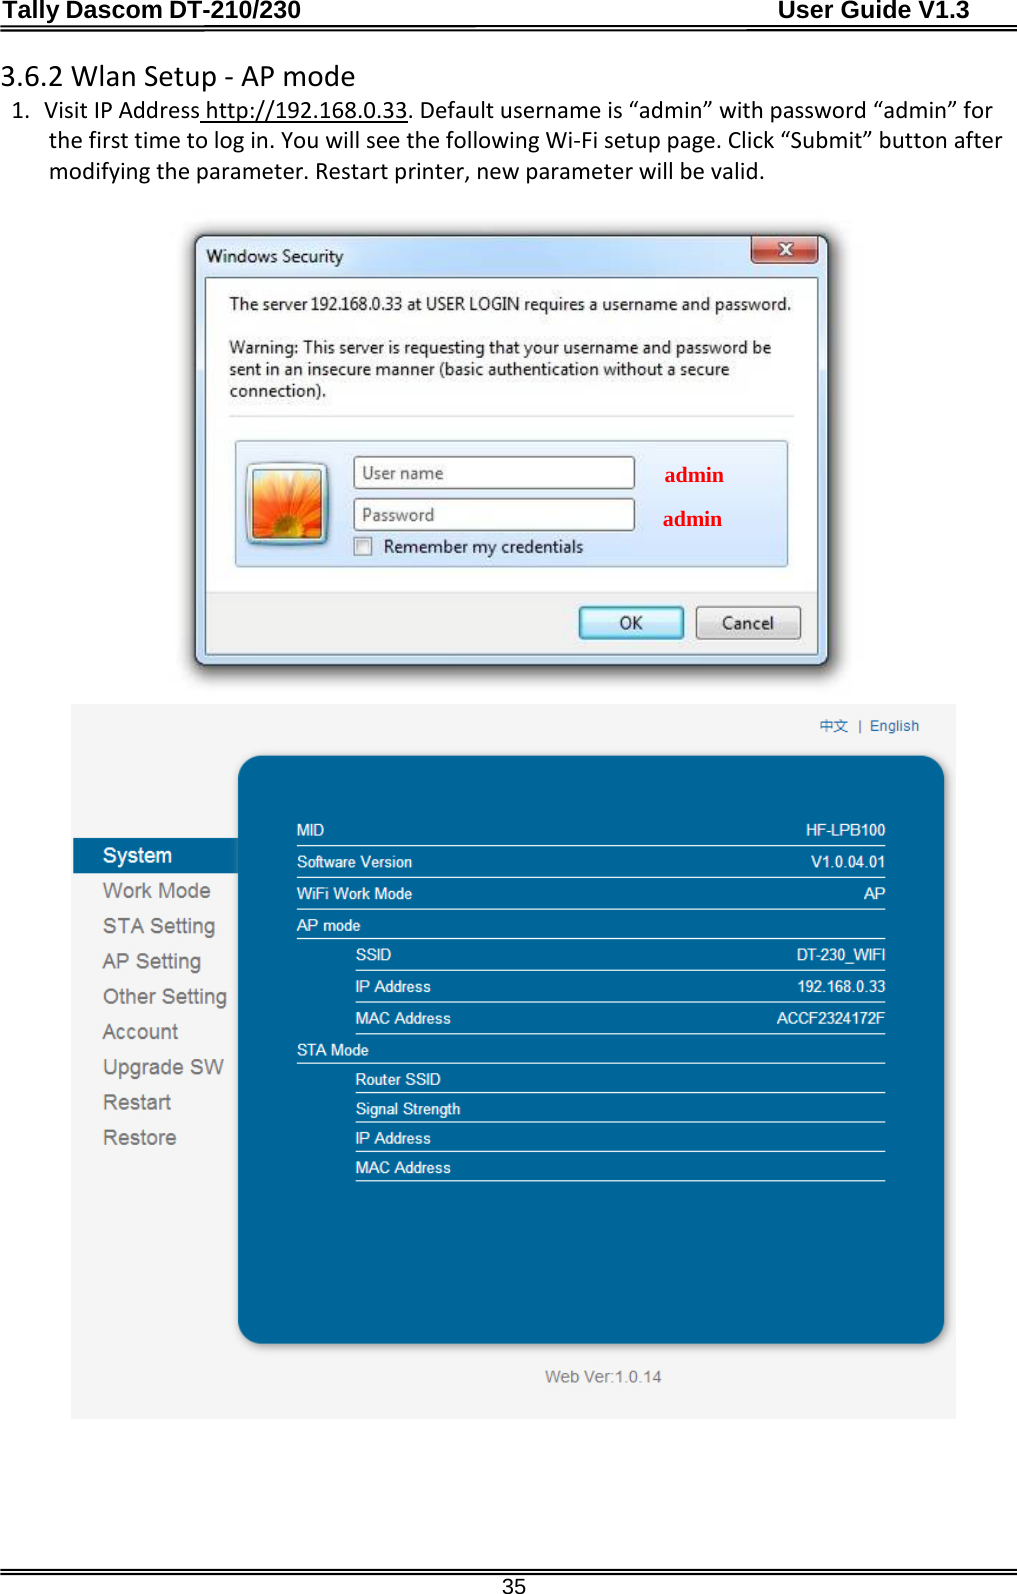
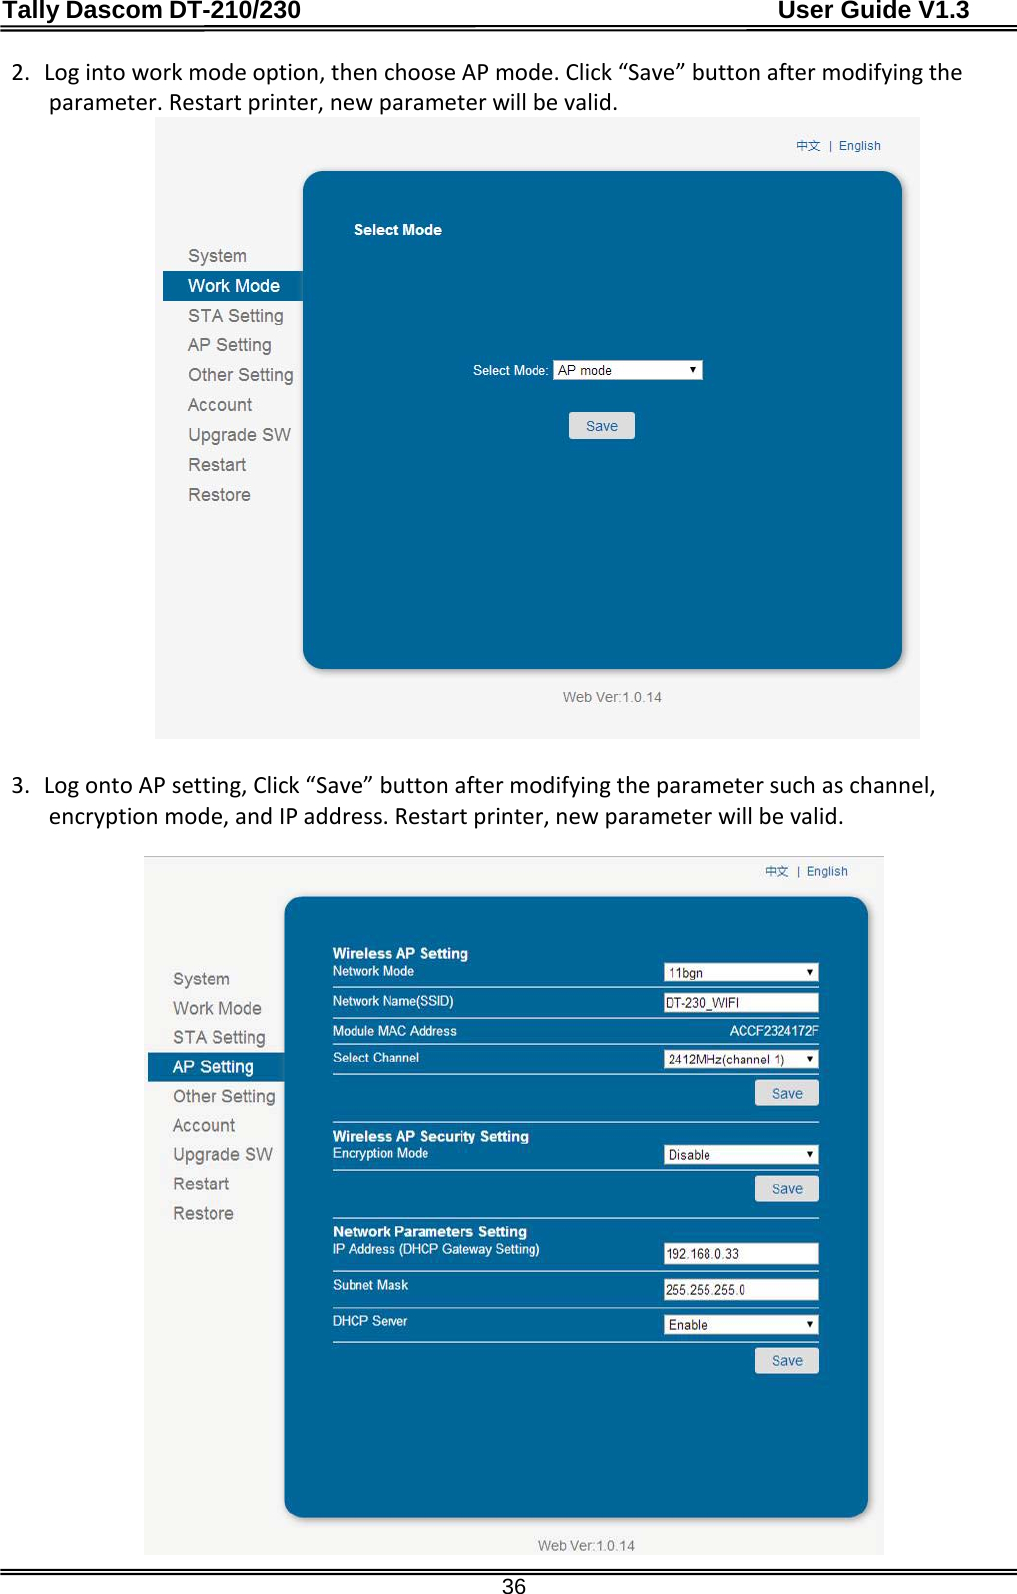
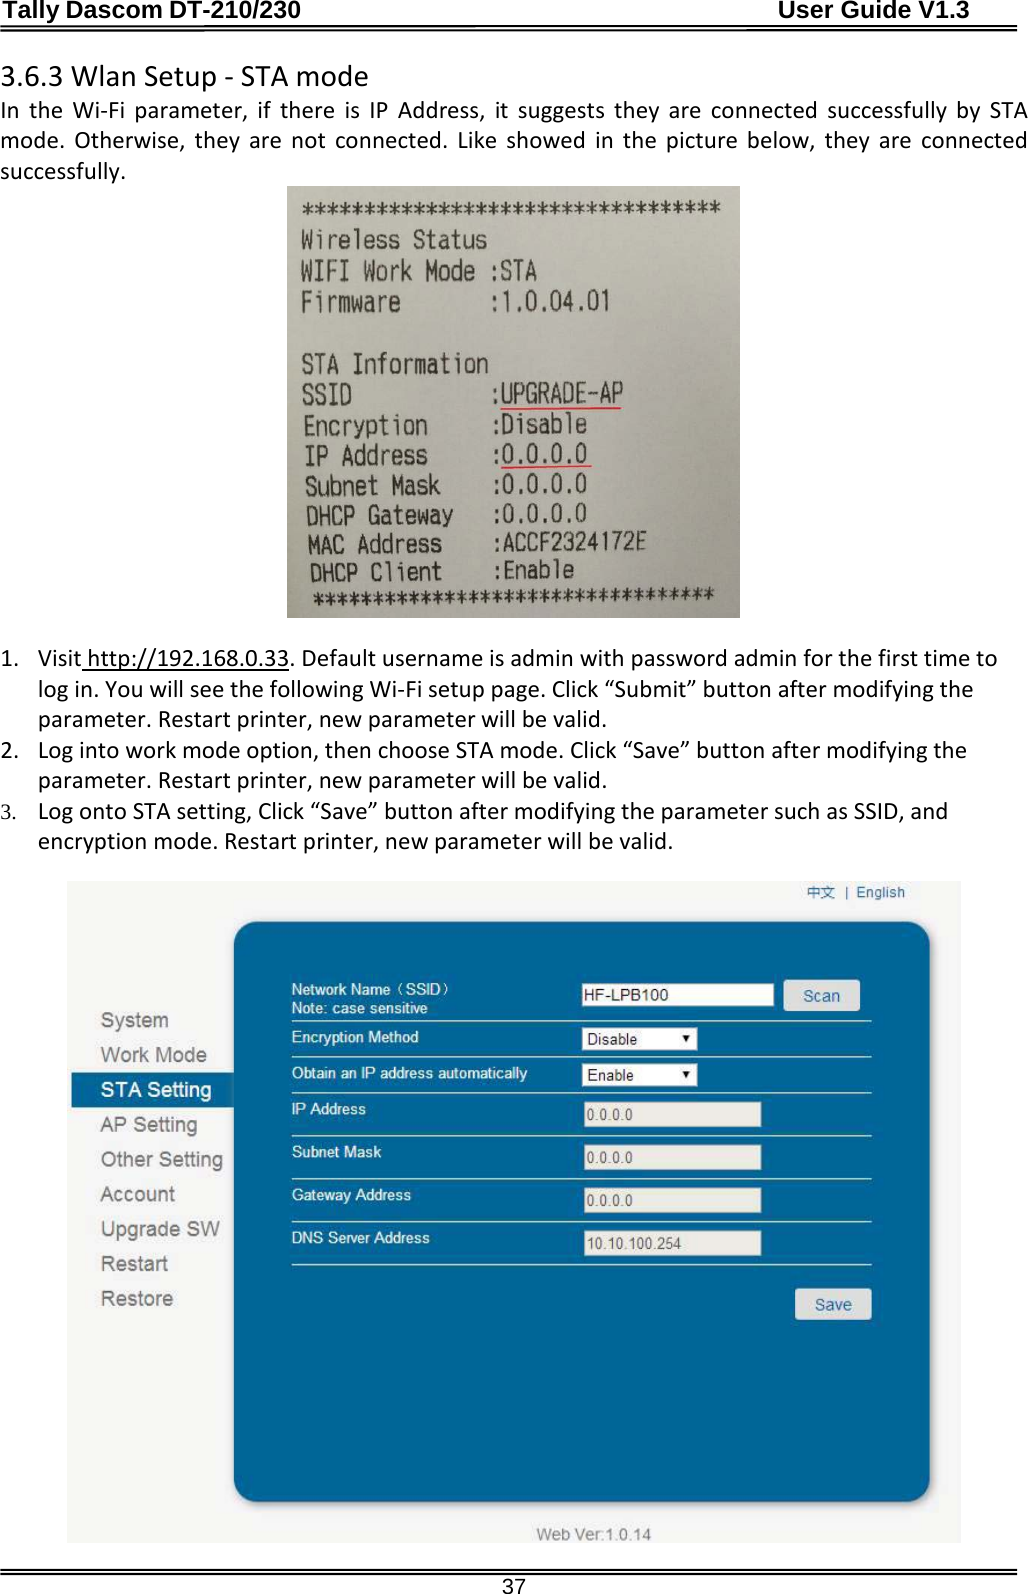
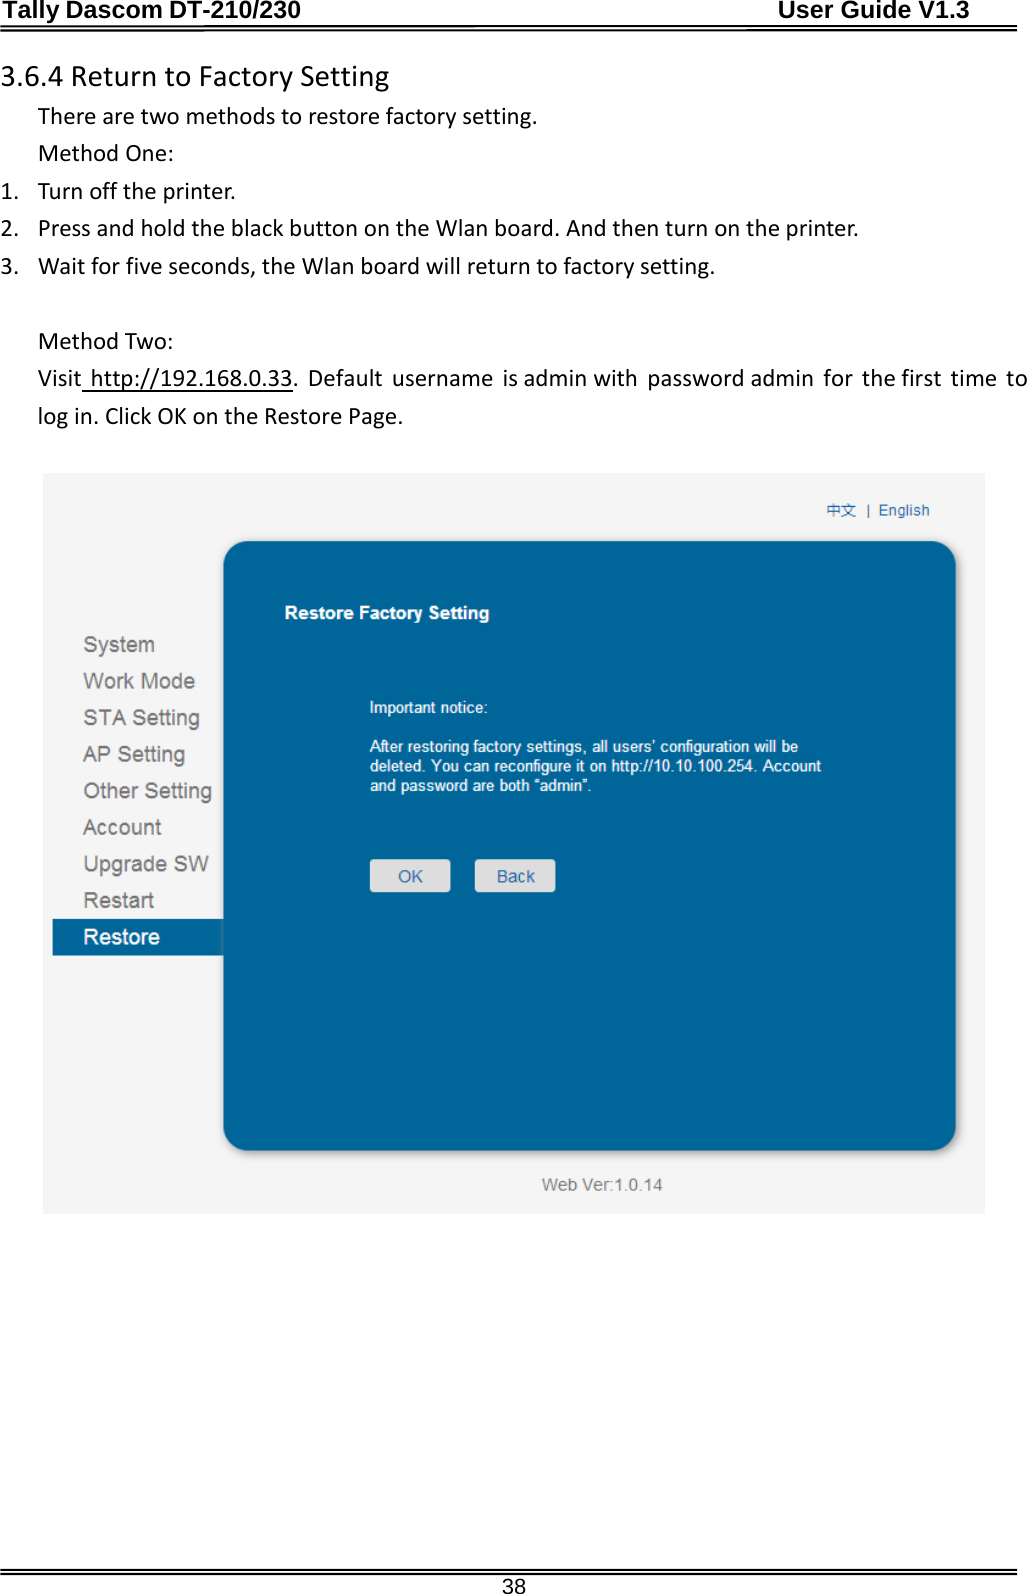
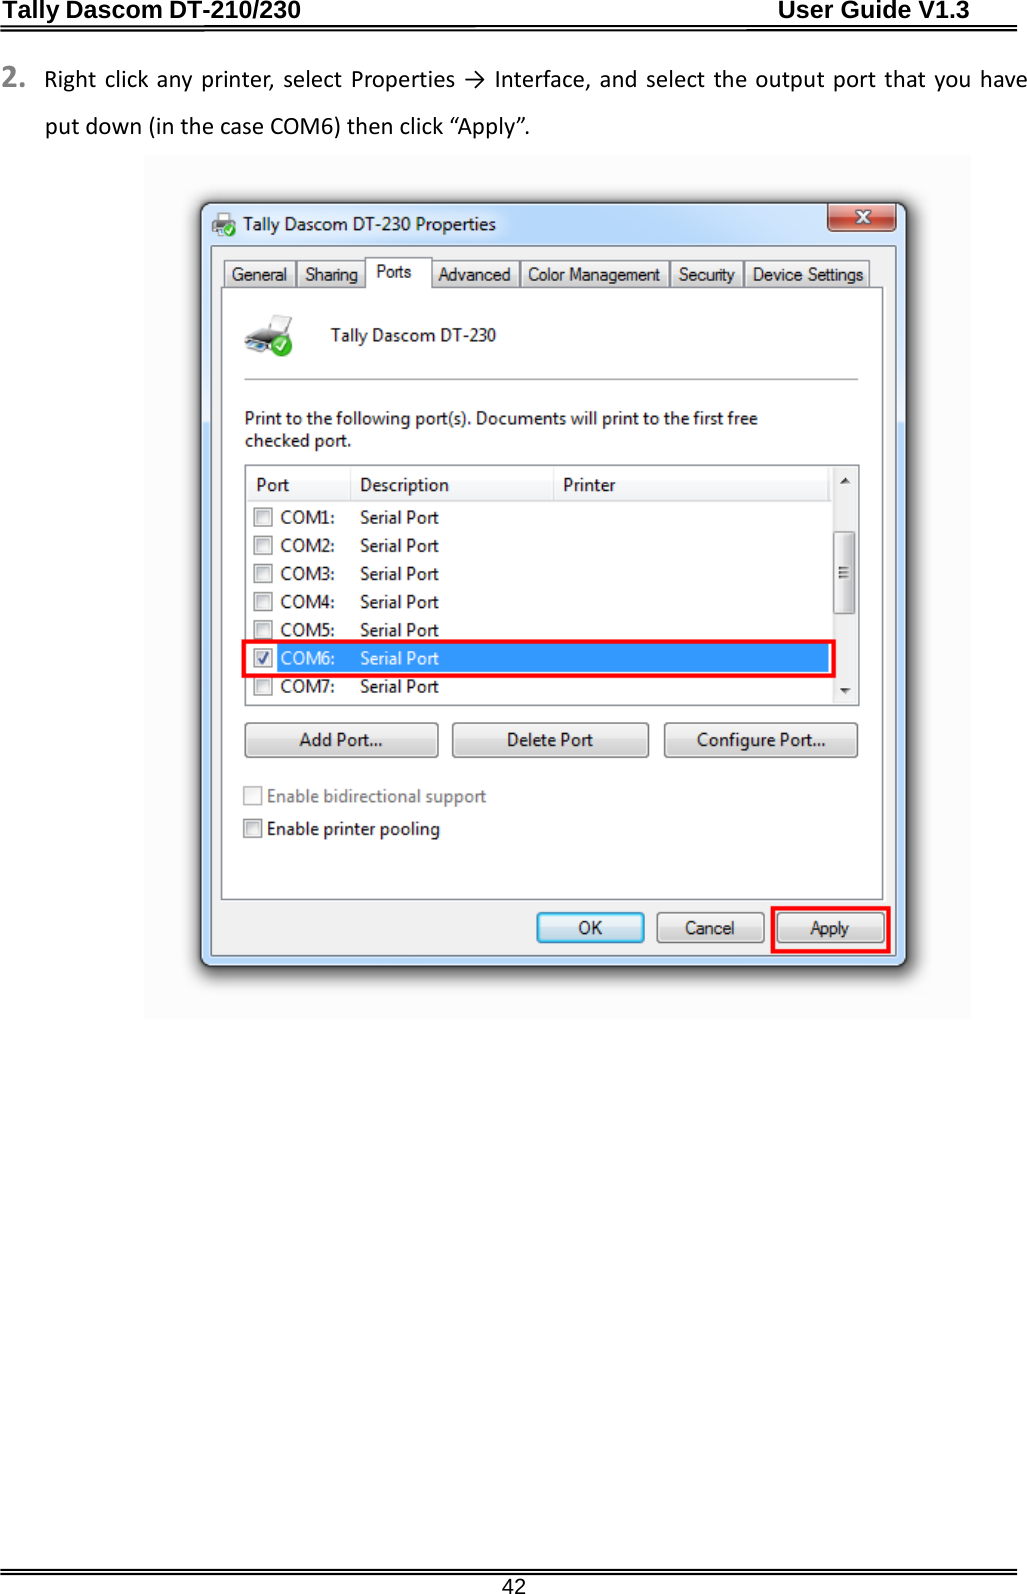
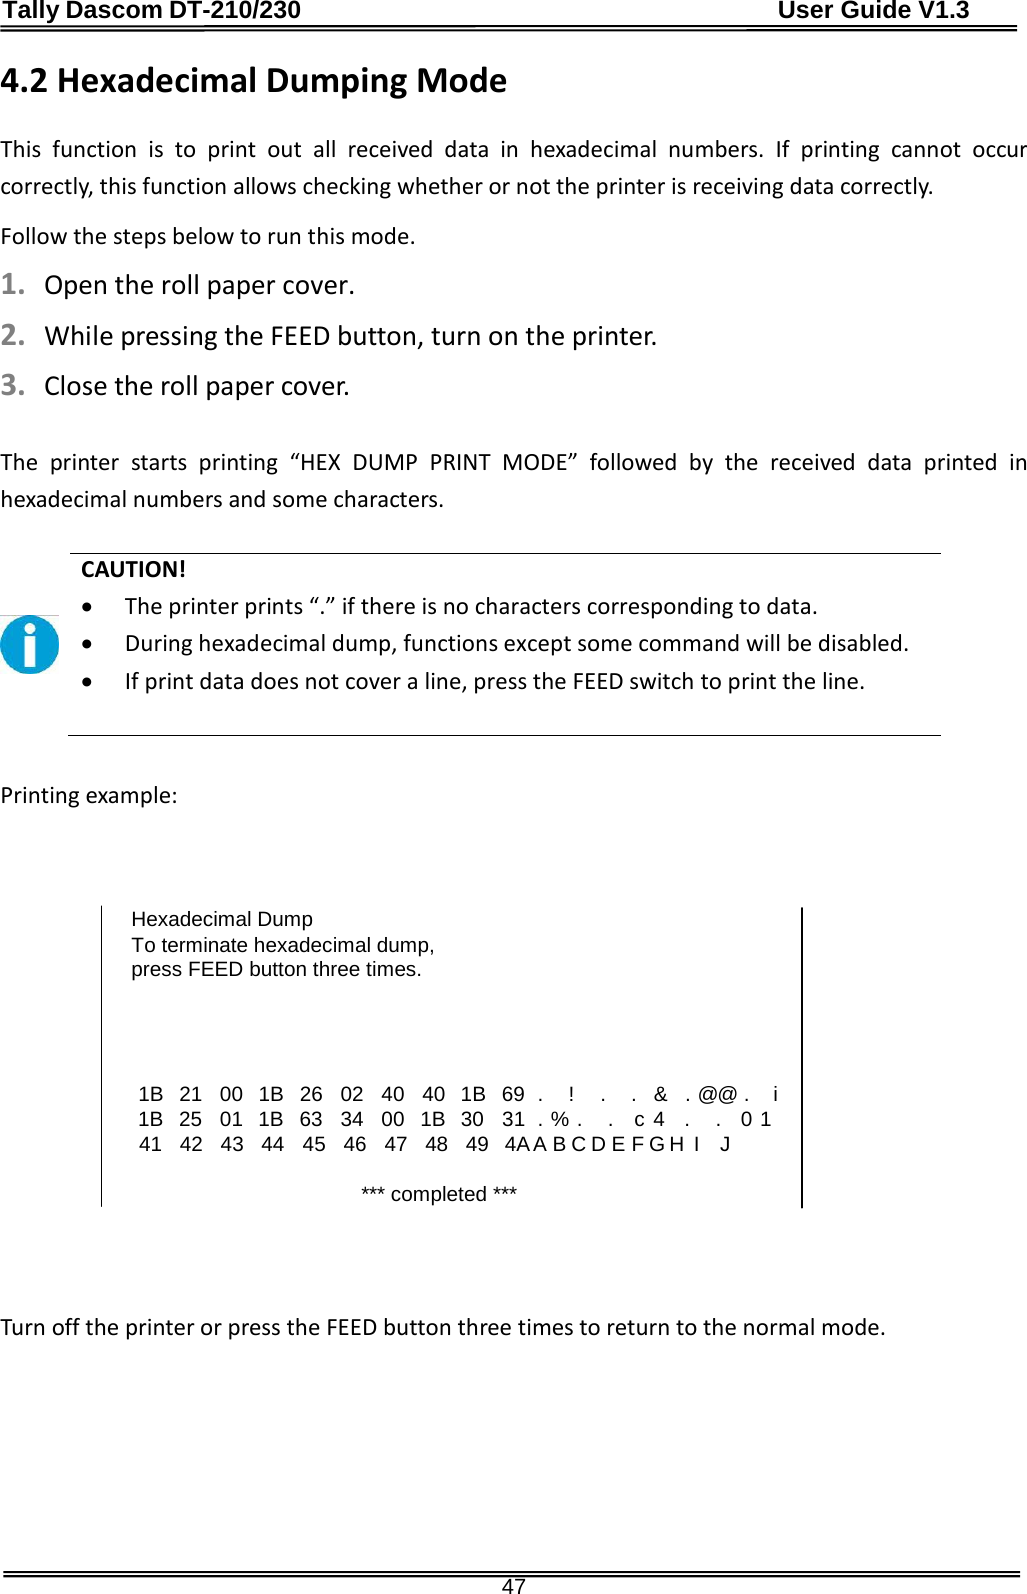
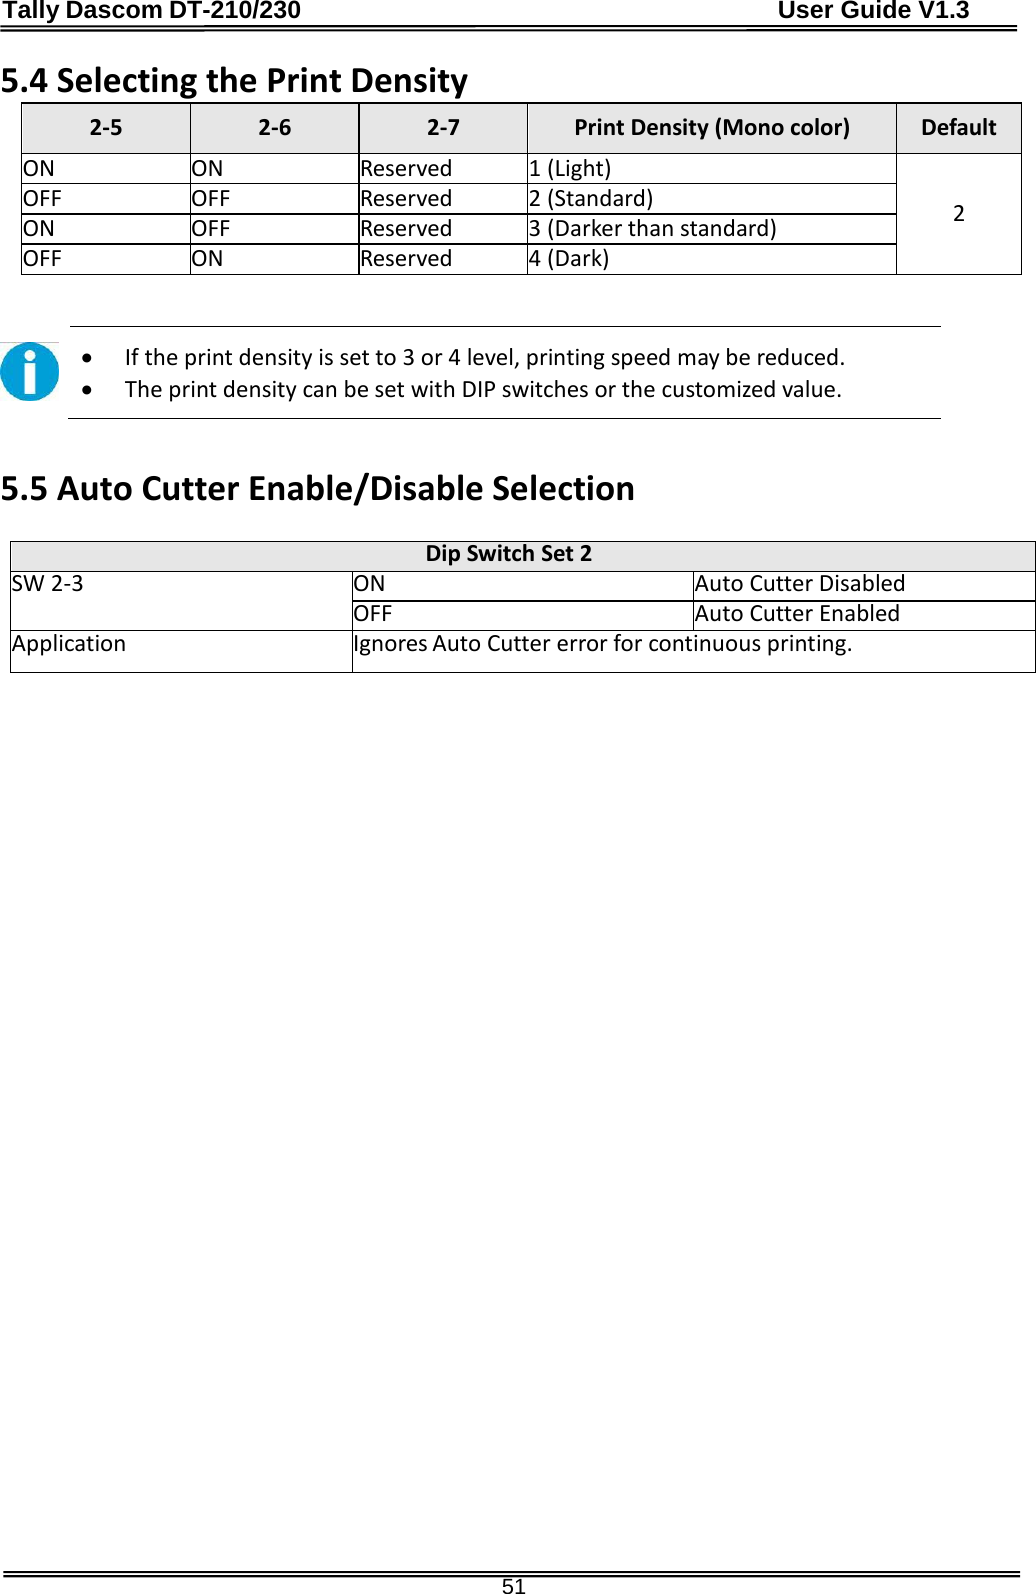
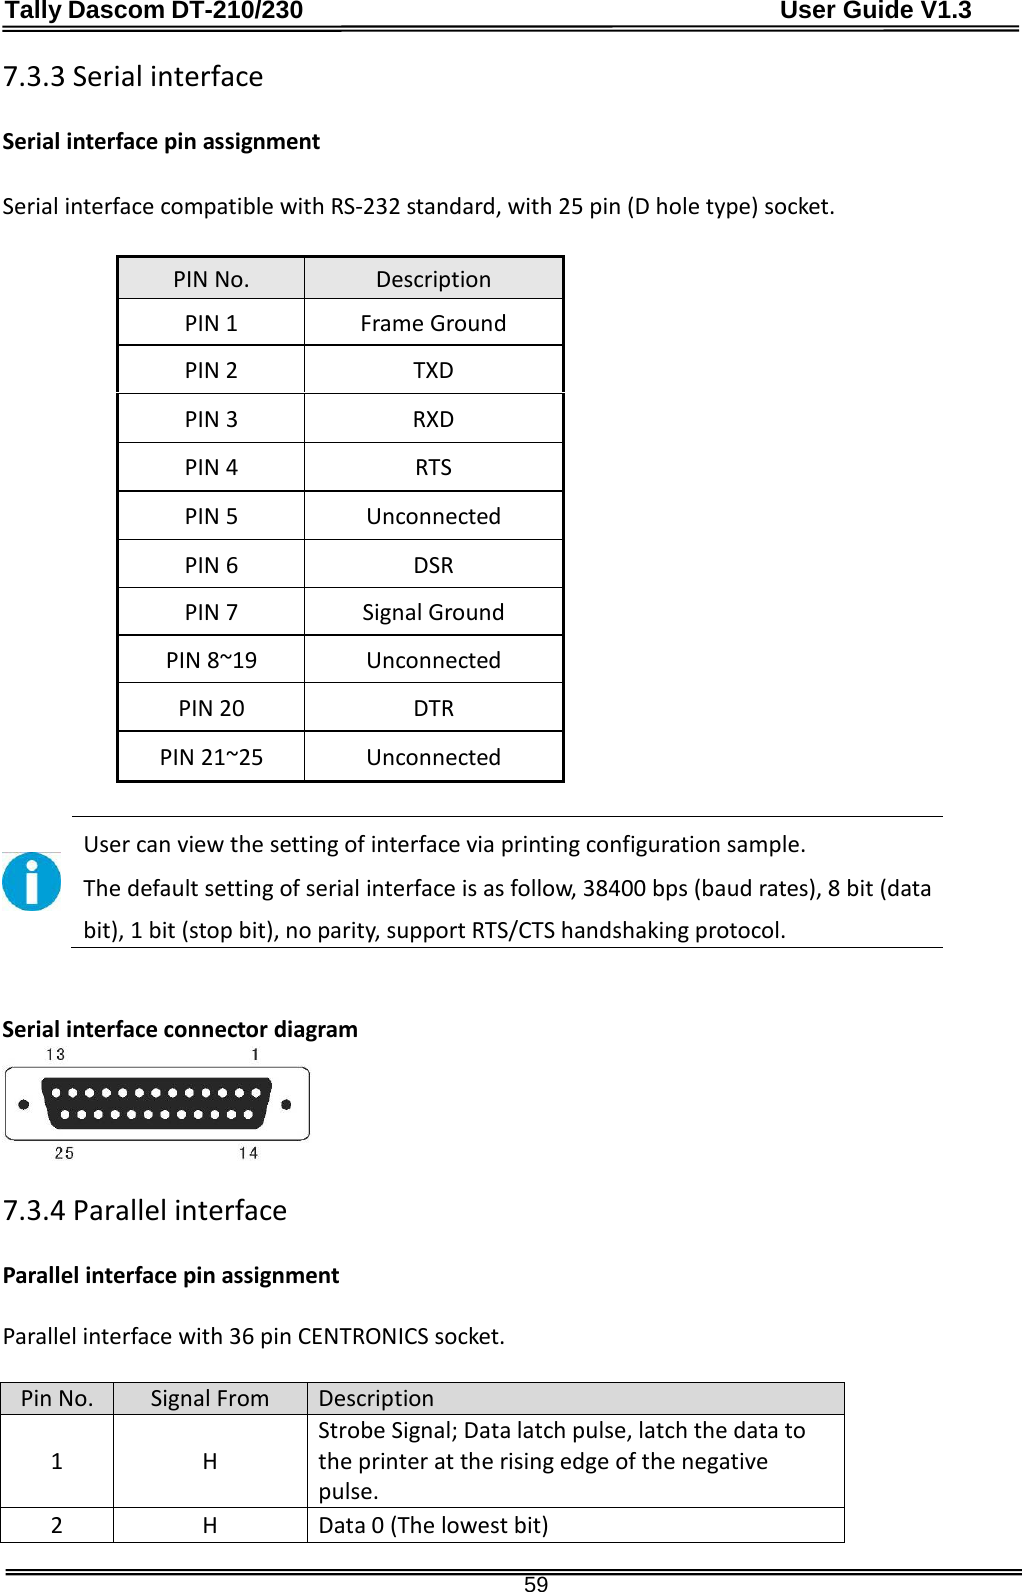
![Tally Dascom DT-210/230 User Guide V1.3 5.5 Auto Cutter Enable/Disable Selection ................................................................................................................ 516 TROUBLESHOOTING .................................................................................................................................. 526.1 Error Status ........................................................................................................................................................ 526.2 Removing Jammed Paper ................................................................................................................................... 536.3 Cleaning Thermal Head ...................................................................................................................................... 547 SPECIFICATIONS ........................................................................................................................................ 557.1 Printer Specification ........................................................................................................................................... 557.2 External Dimension and Mass .............................................................................................................................577.3 Interfaces ........................................................................................................................................................... 587.3.1 USB interface ............................................................................................................................................... 587.3.2 Cash Drawer interface ................................................................................................................................. 587.3.3 Serial interface ............................................................................................................................................ 597.3.4 Parallel interface ......................................................................................................................................... 597.3.5 Ethernet interface ....................................................................................................................................... 617.3.6 Wi-Fi interface ............................................................................................................................................ 617.4 Power Adapter ................................................................................................................................................... 617.5 Paper Specification ............................................................................................................................................ 627.5.1 Printable Area ............................................................................................................................................. 627.5.2 Printing and Cutting Positions ..................................................................................................................... 648 CHARACTER CODE PAGES .......................................................................................................................... 658.1 Common to All Pages (International Character Set: USA) .................................................................................. 658.2 International Character Sets .............................................................................................................................. 668.3 [User-defined page] ........................................................................................................................................... 678.4 [PC437: USA, Standard Europe] ......................................................................................................................... 688.5 [PC850: Multilingual] ......................................................................................................................................... 698.6 [PC852: Latin2] ....................................................................................................................................................708.7 [PC858: Euro] ..................................................................................................................................................... 718.8 [PC860: Portuguese] ...........................................................................................................................................728.9 [PC863: Canadian-French] ................................................................................................................................. 738.10 [PC865: Nordic] .................................................................................................................................................748.11 [PC866: Cyrillic #2] ........................................................................................................................................... 758.12 [KU42: Thai] ......................................................................................................................................................768.13 [TIS11: Thai] ..................................................................................................................................................... 778.14 [TIS18: Thai] ..................................................................................................................................................... 788.15 [PC720: Arabic] ................................................................................................................................................. 798.16 [PC864: Arabic] ................................................................................................................................................ 808.17 [WPC1256: Arabic] ........................................................................................................................................... 819 PRINTING CONTROL COMMAND SETS ........................................................................................................ 82FCC STATEMENT ........................................................................................................................................... 86DASCOM REPRESENTATIVES ......................................................................................................................... 87](https://usermanual.wiki/Jiangmen-Dascom-Computer-Peripherals/TD2100/User-Guide-2514835-Page-5.png)
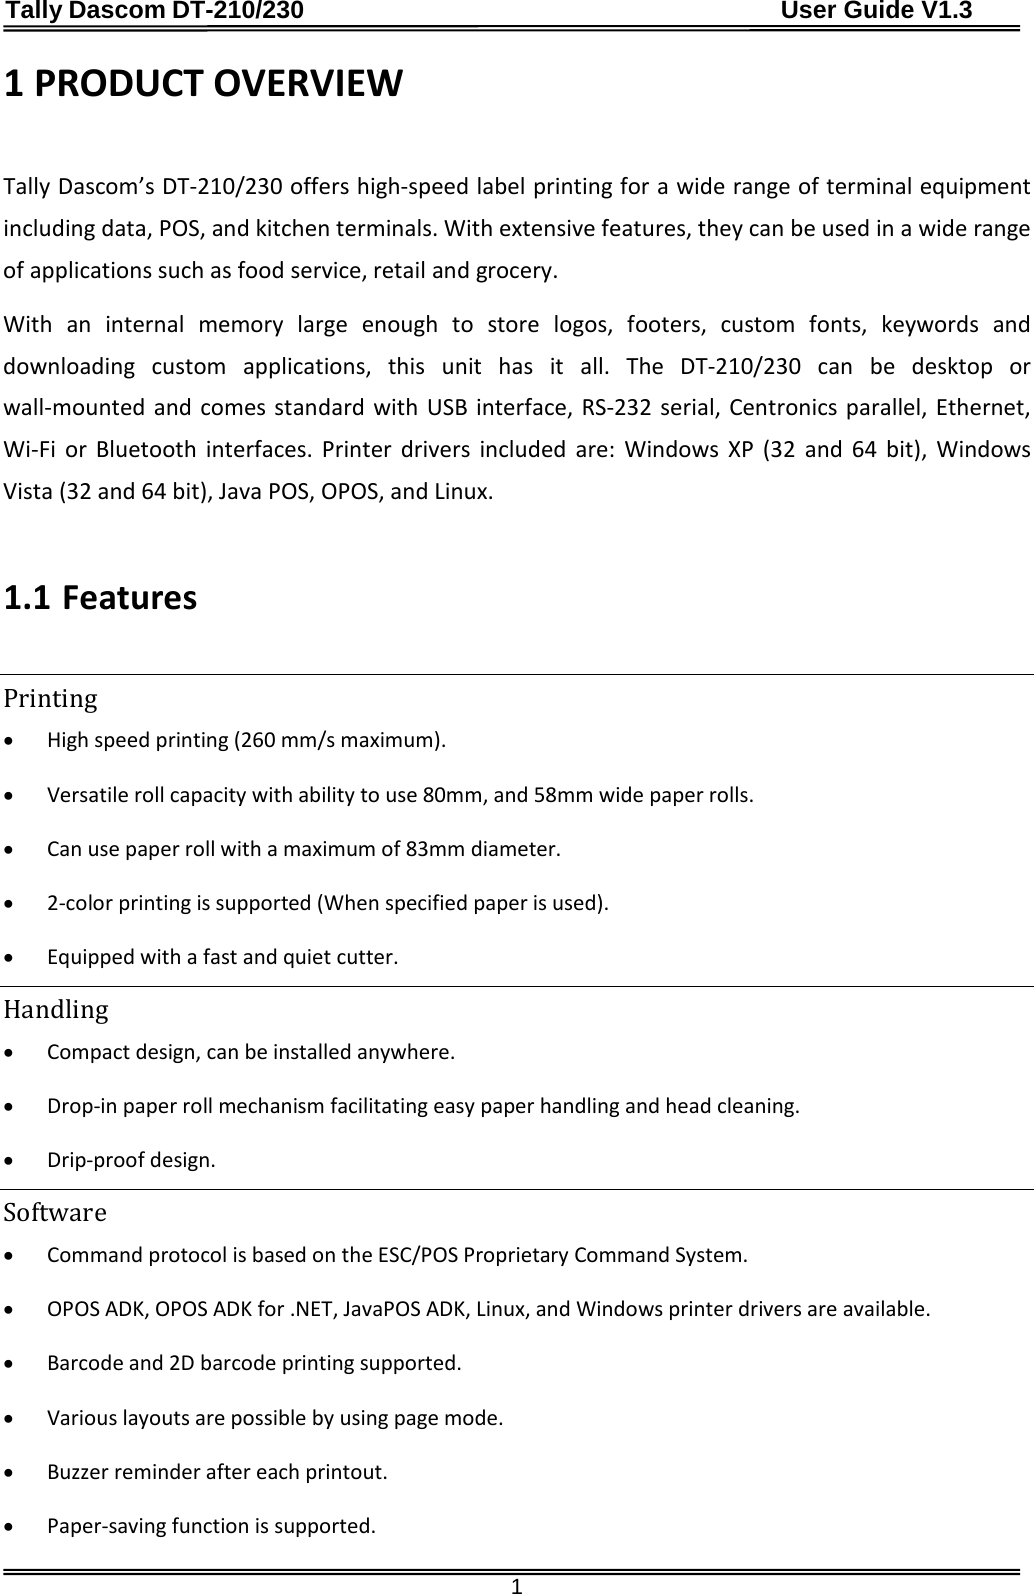
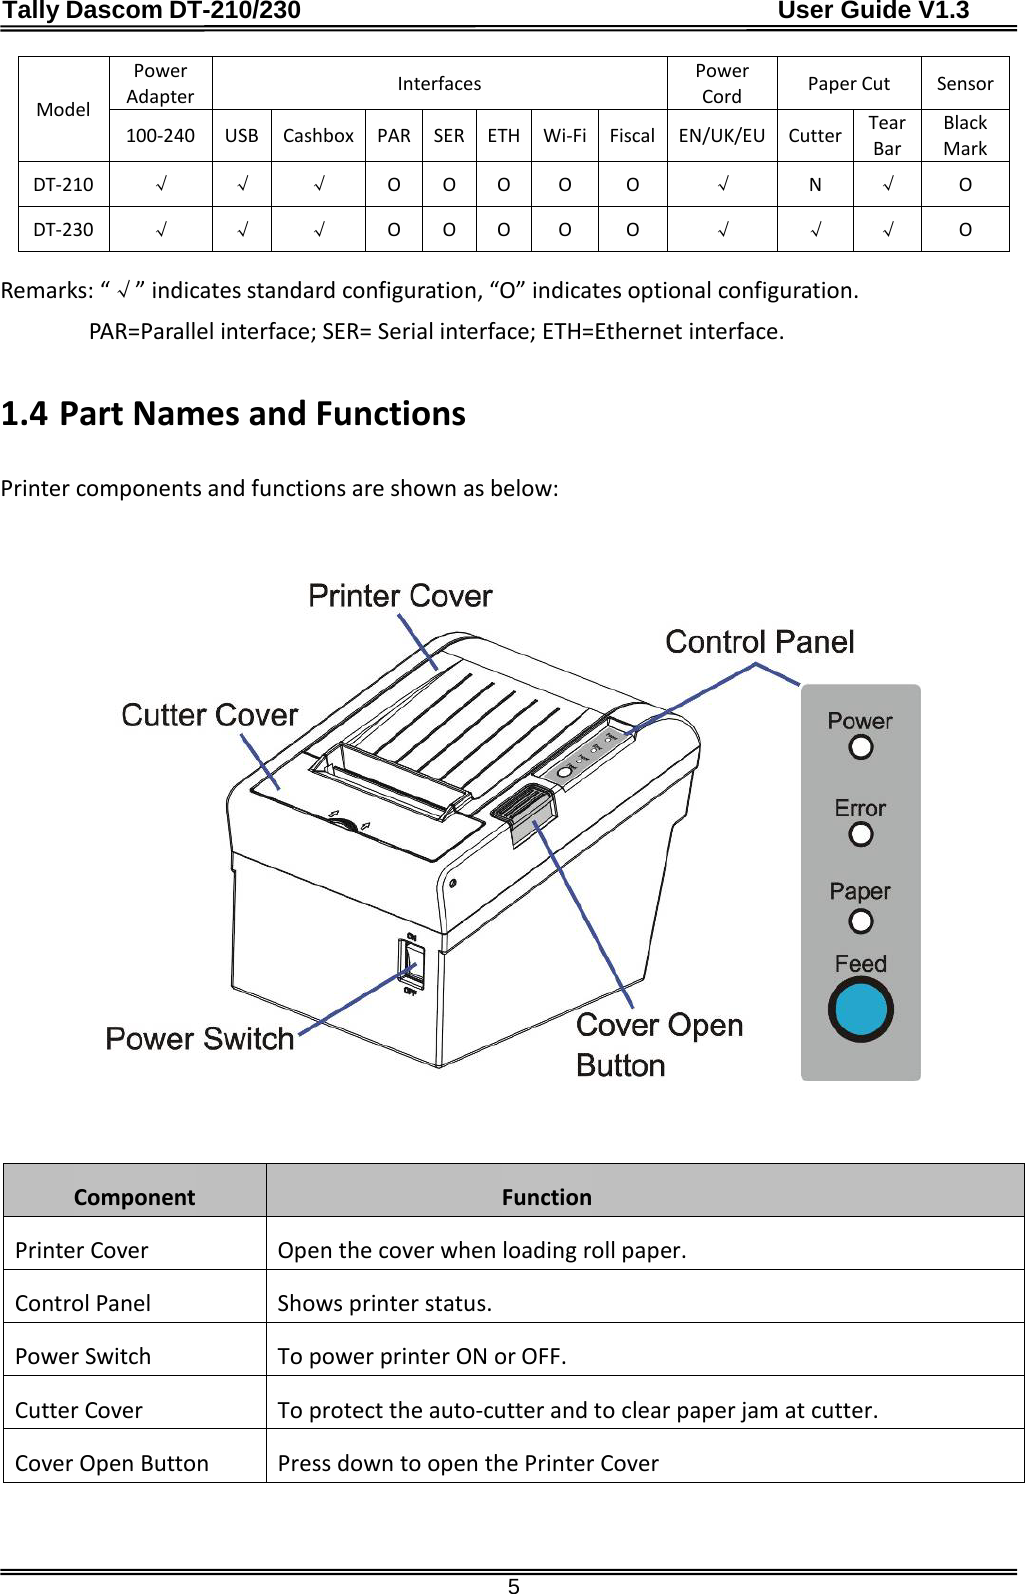
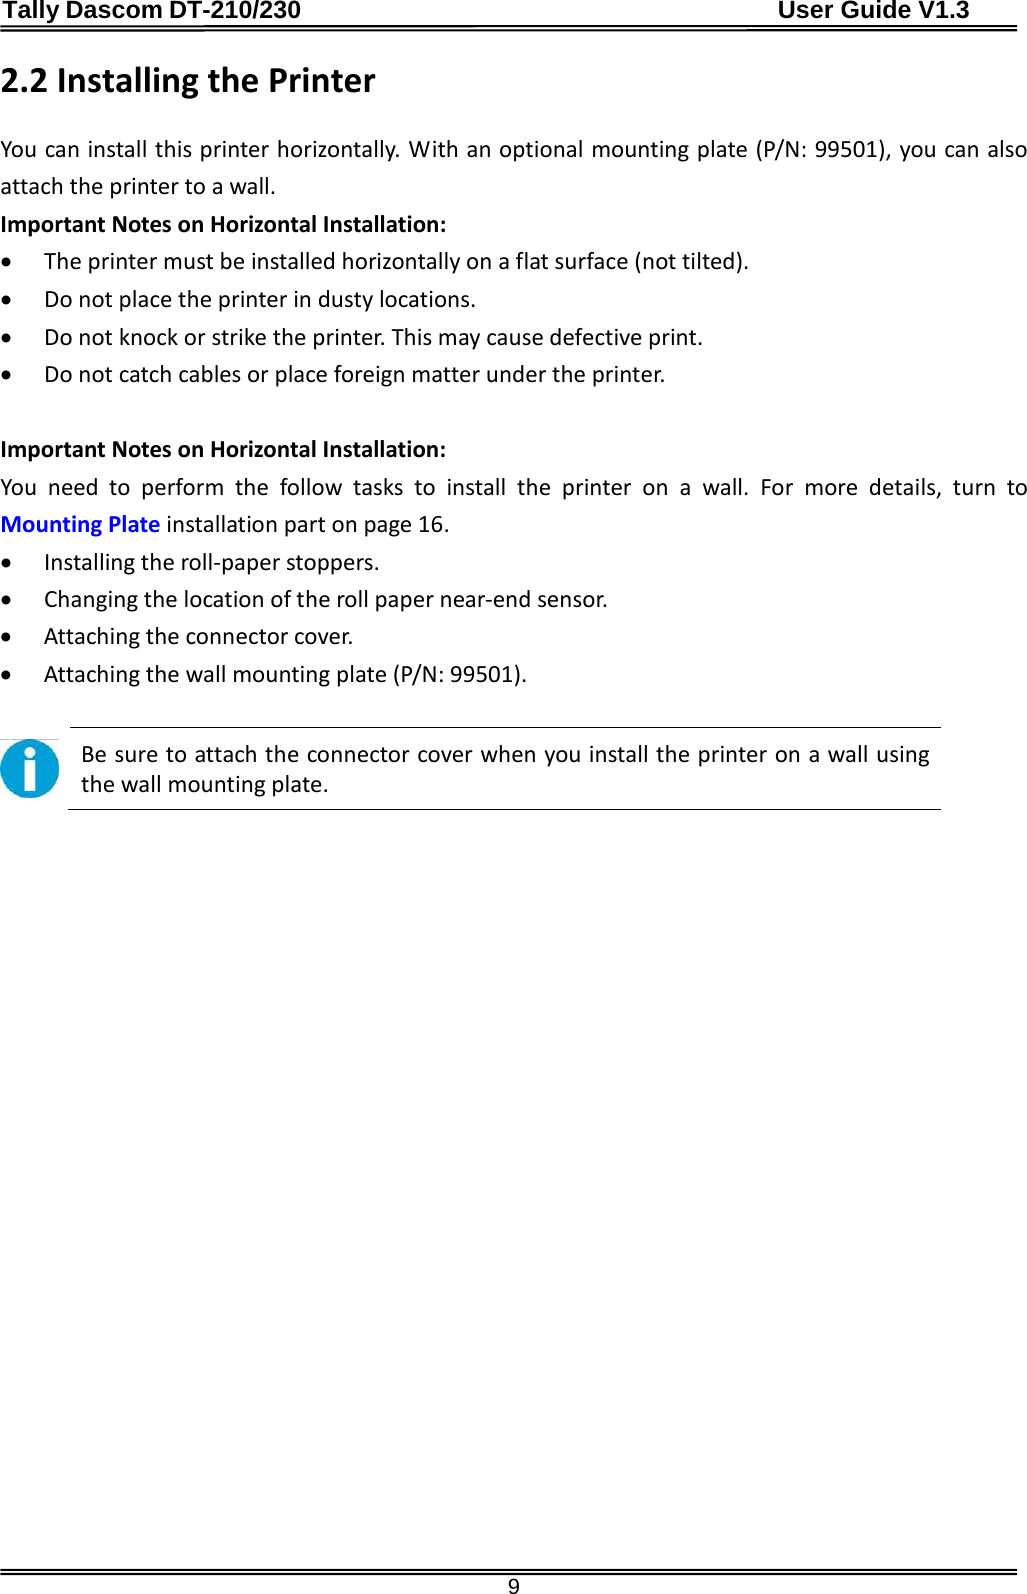
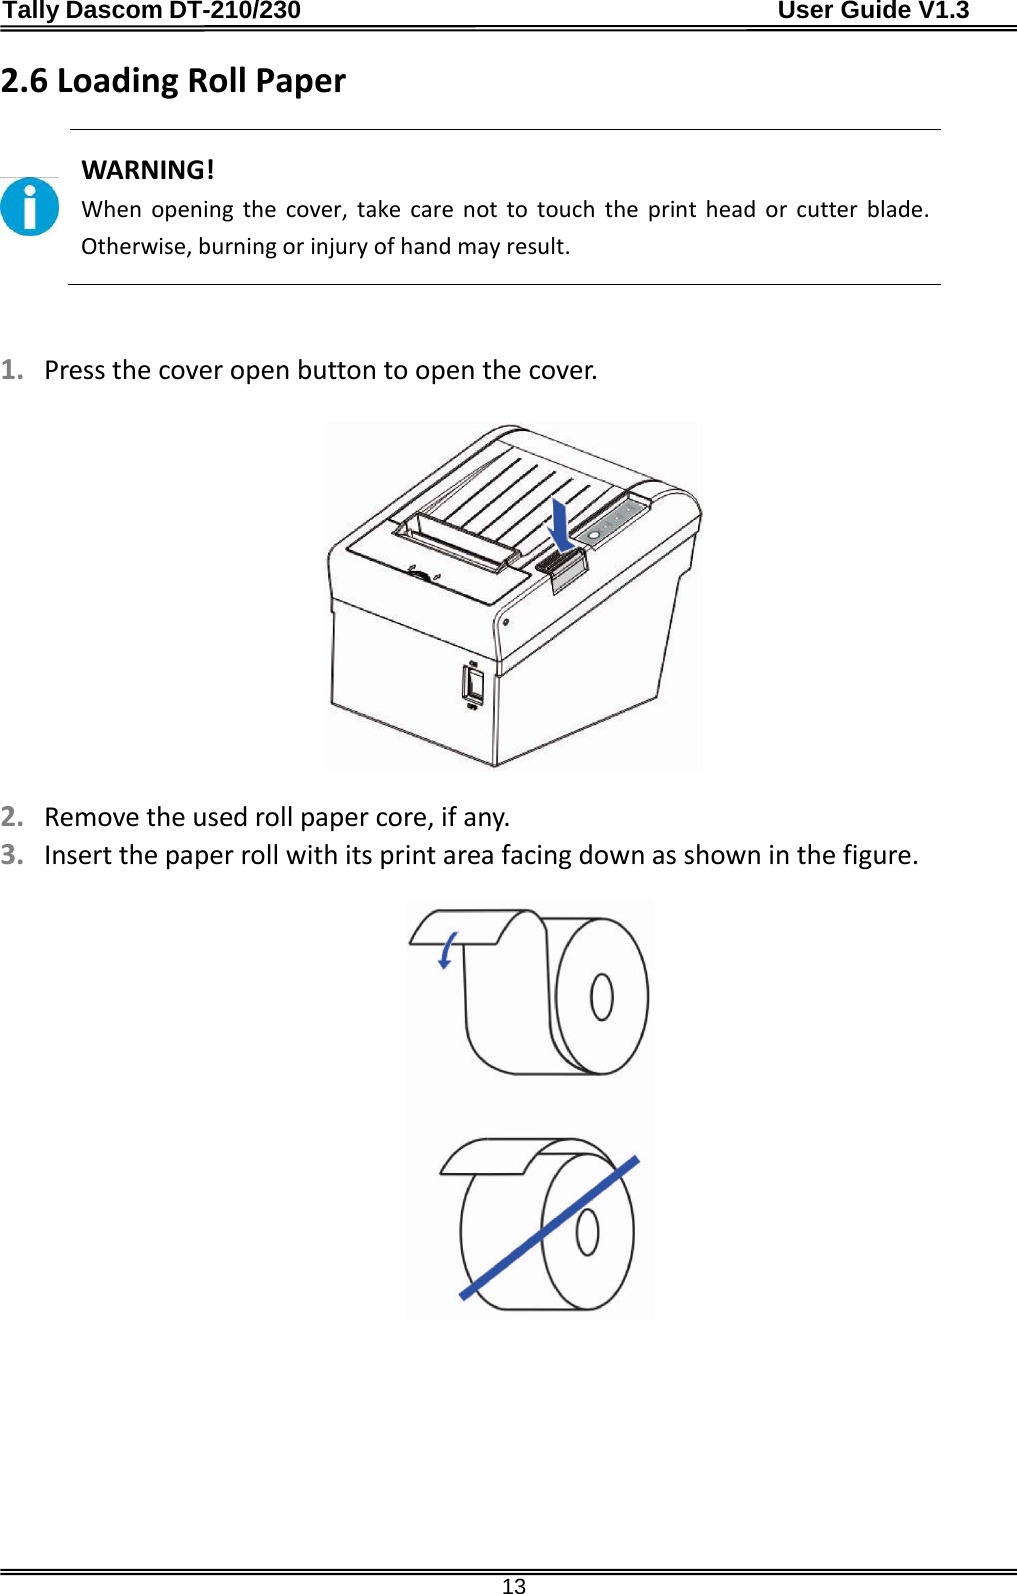

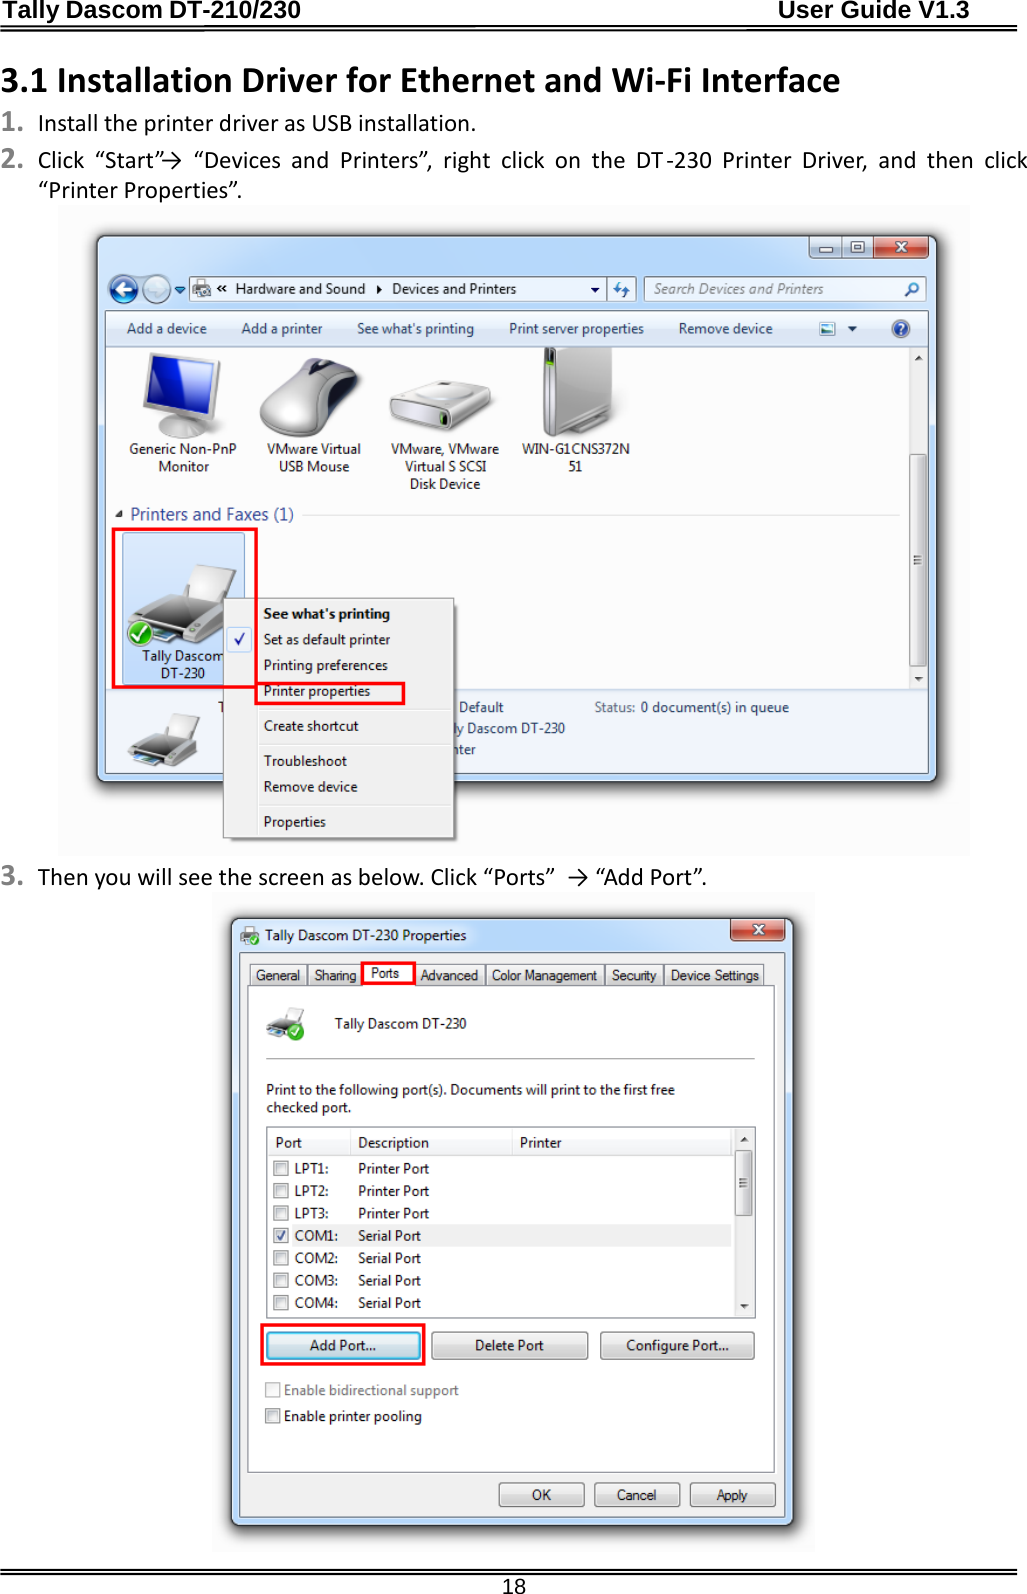

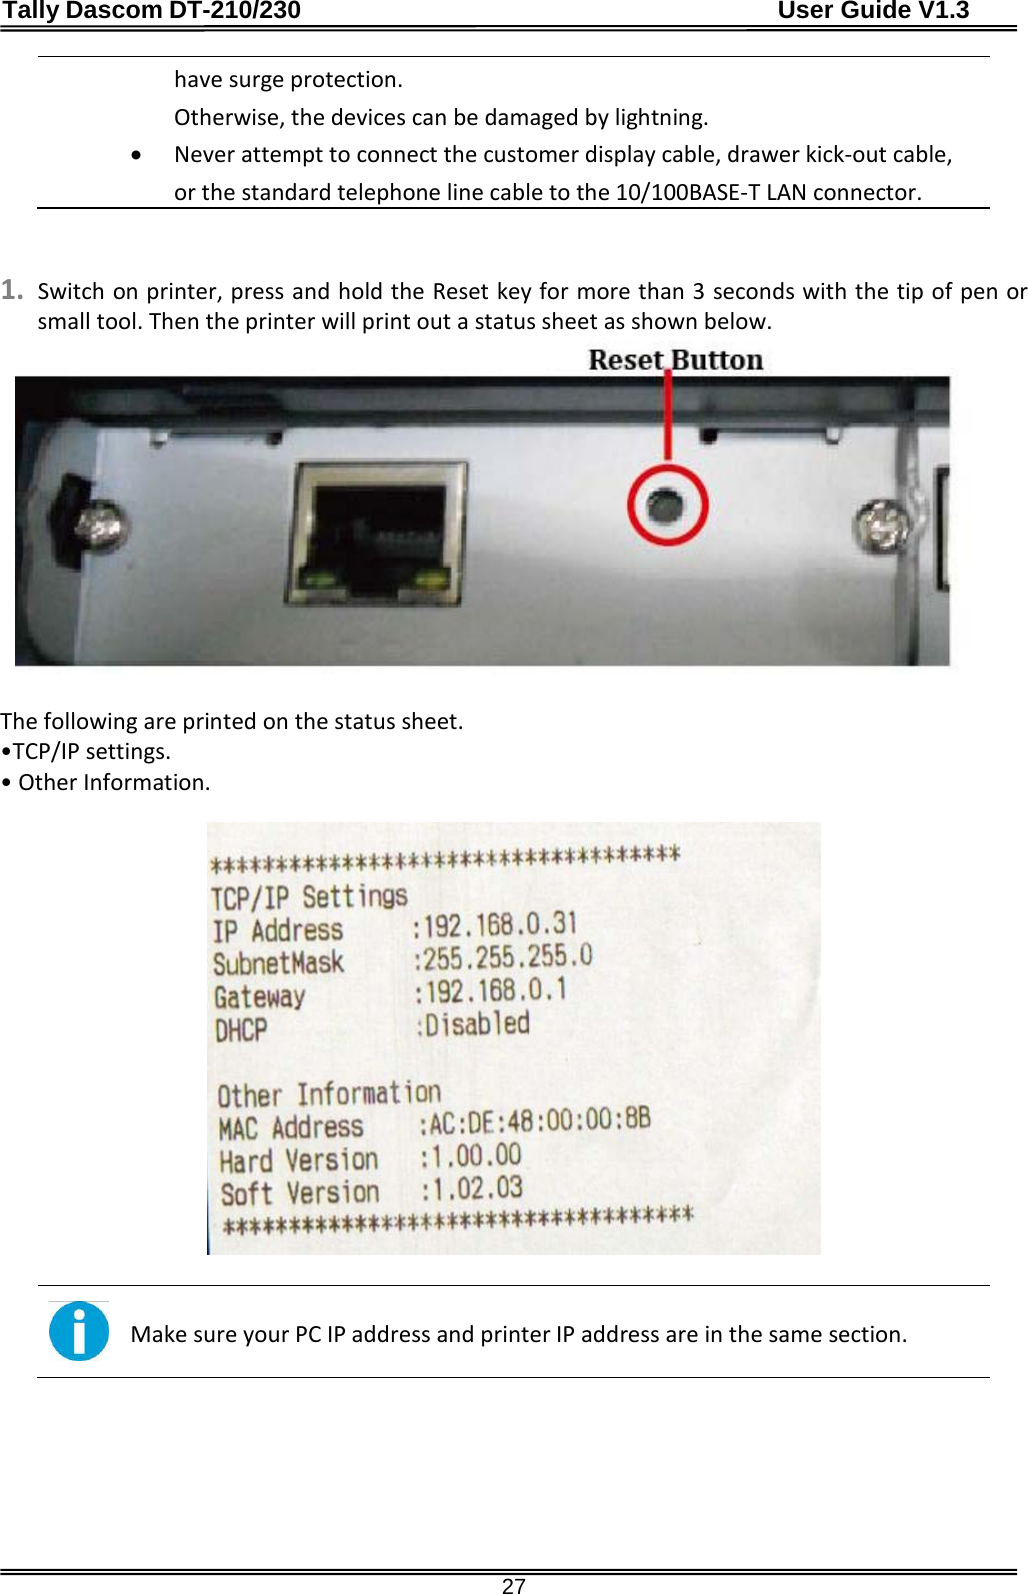
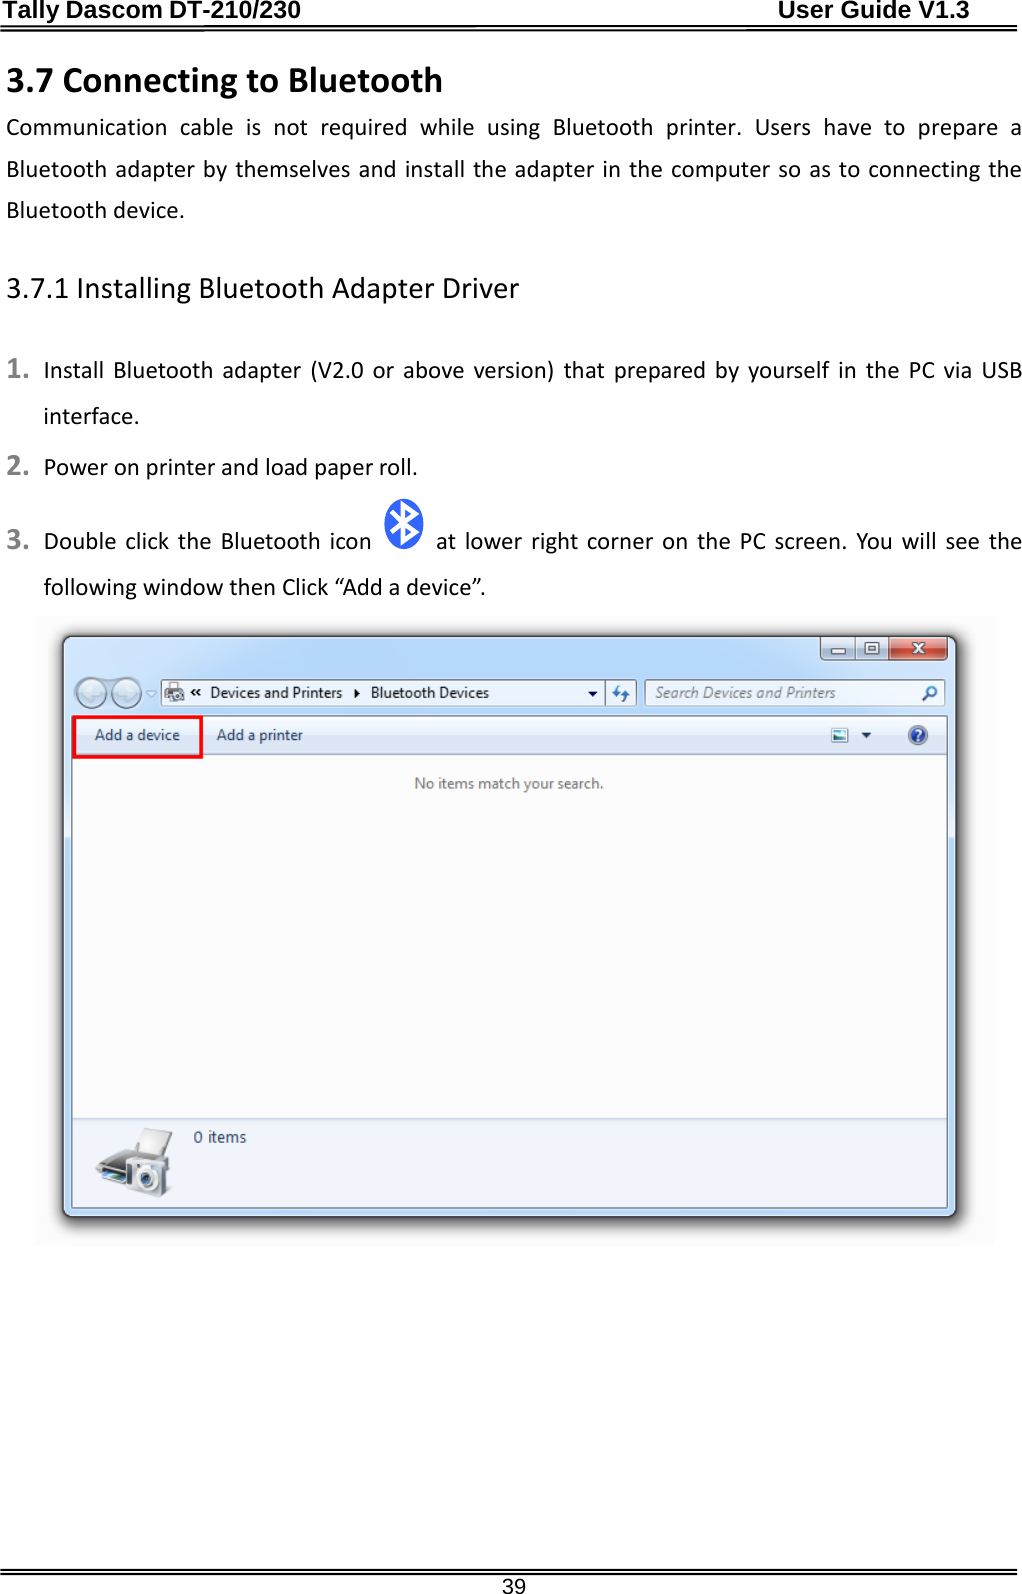
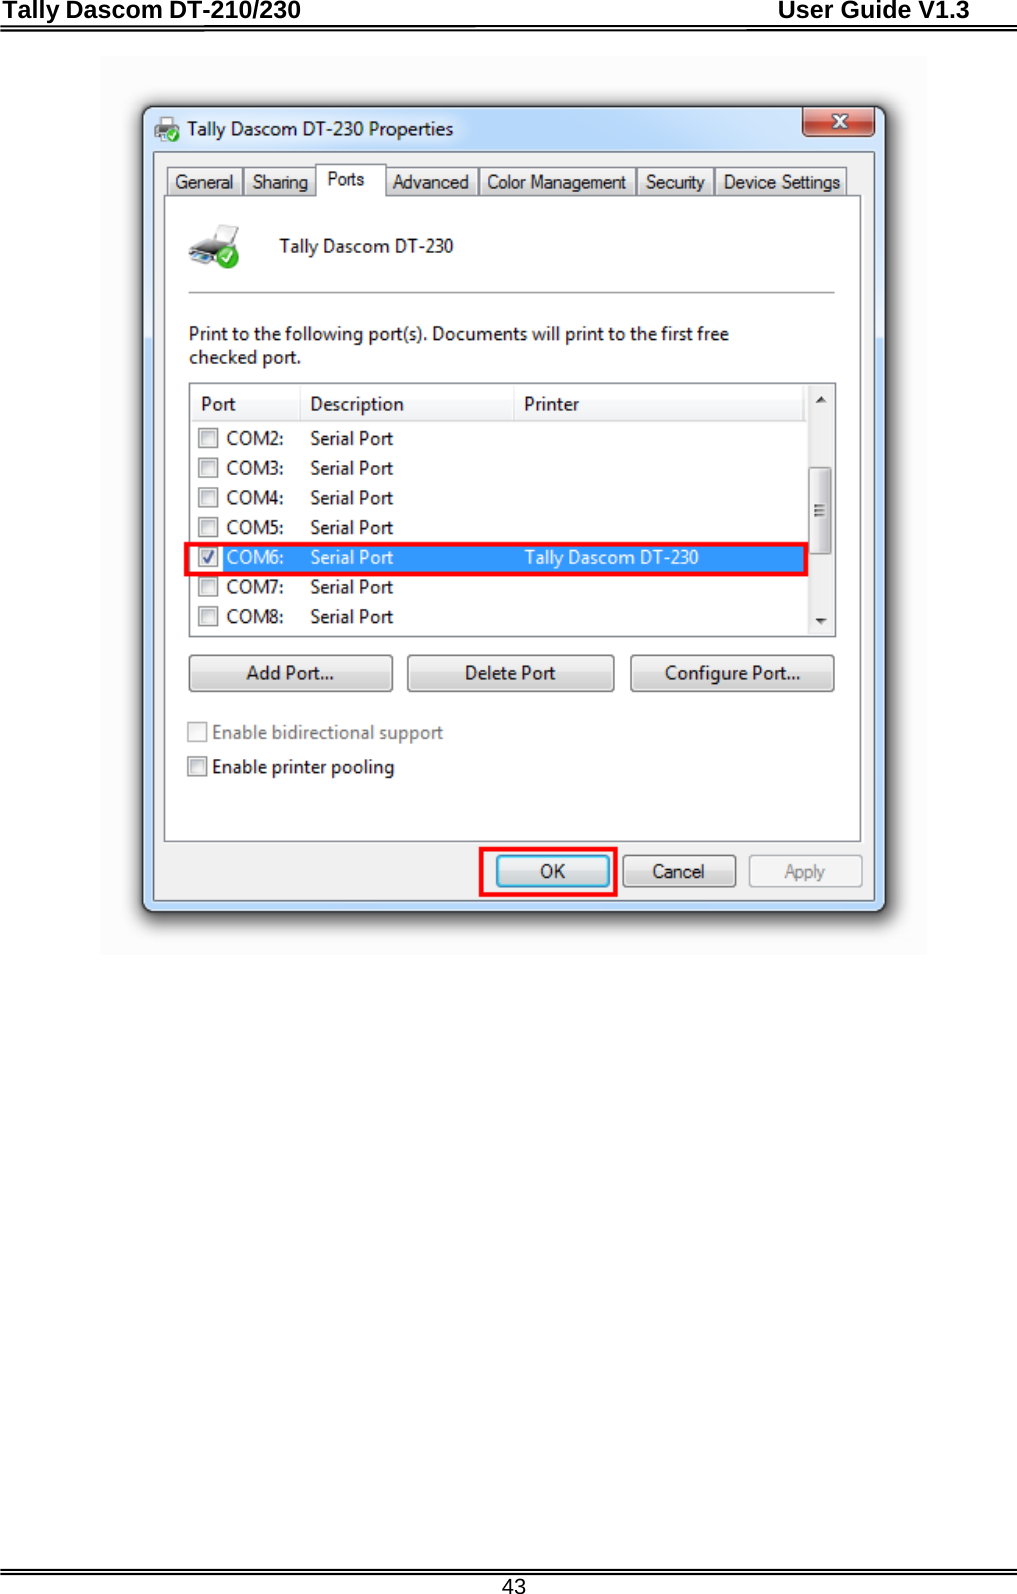
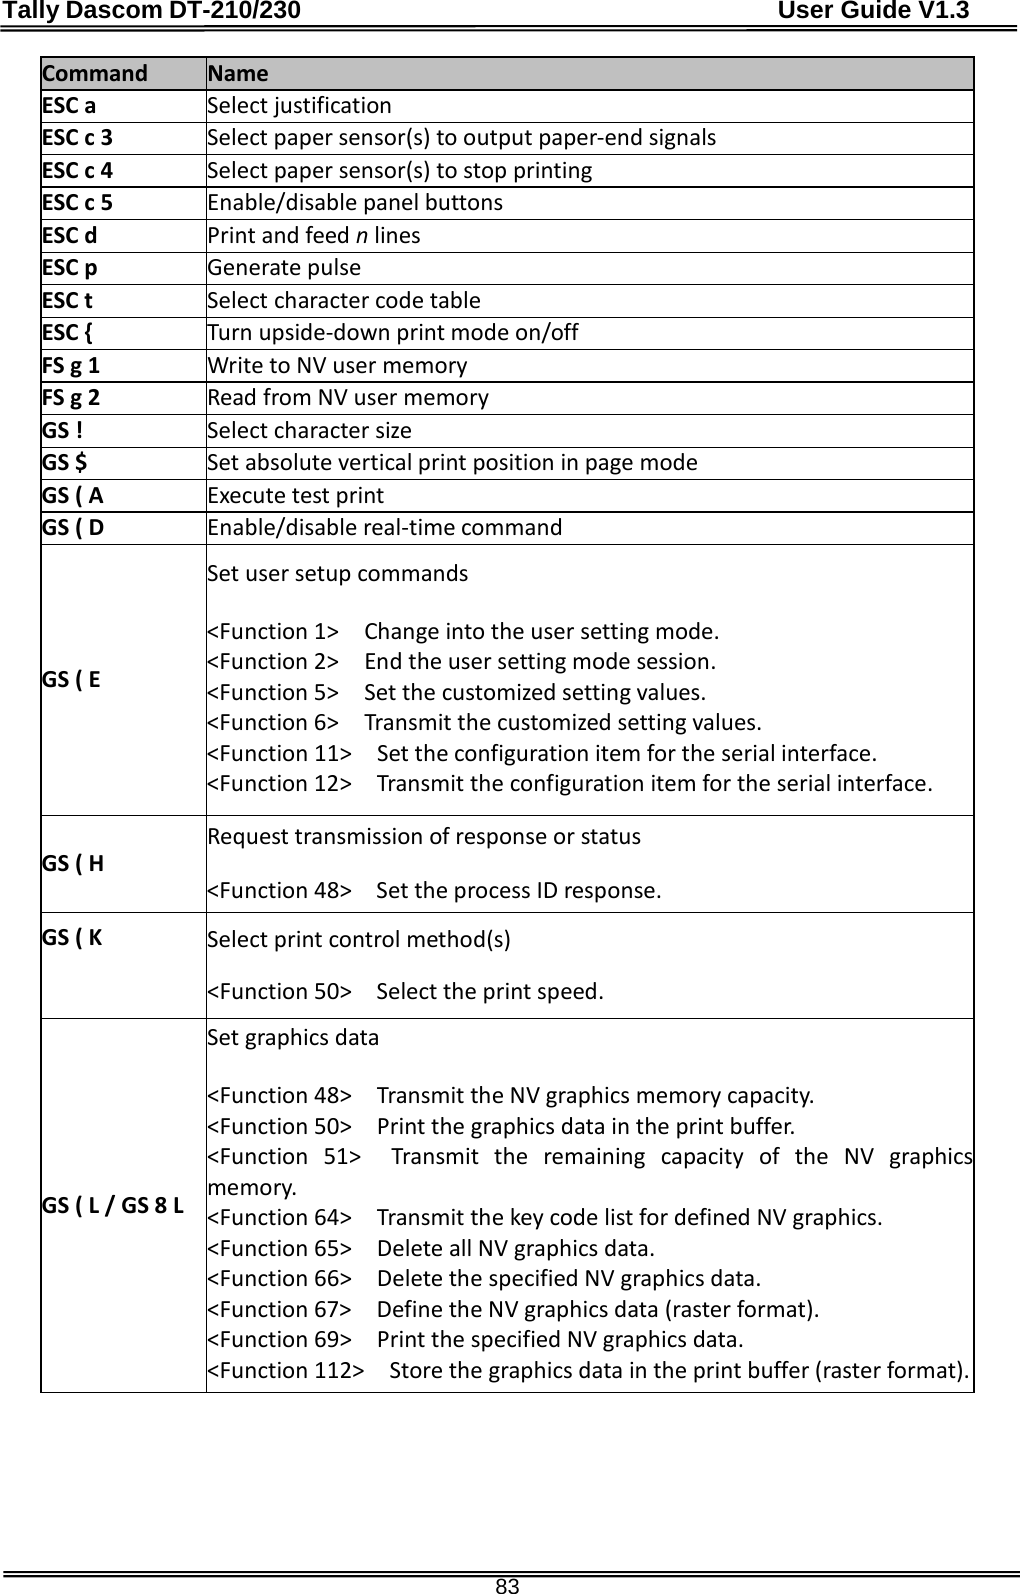
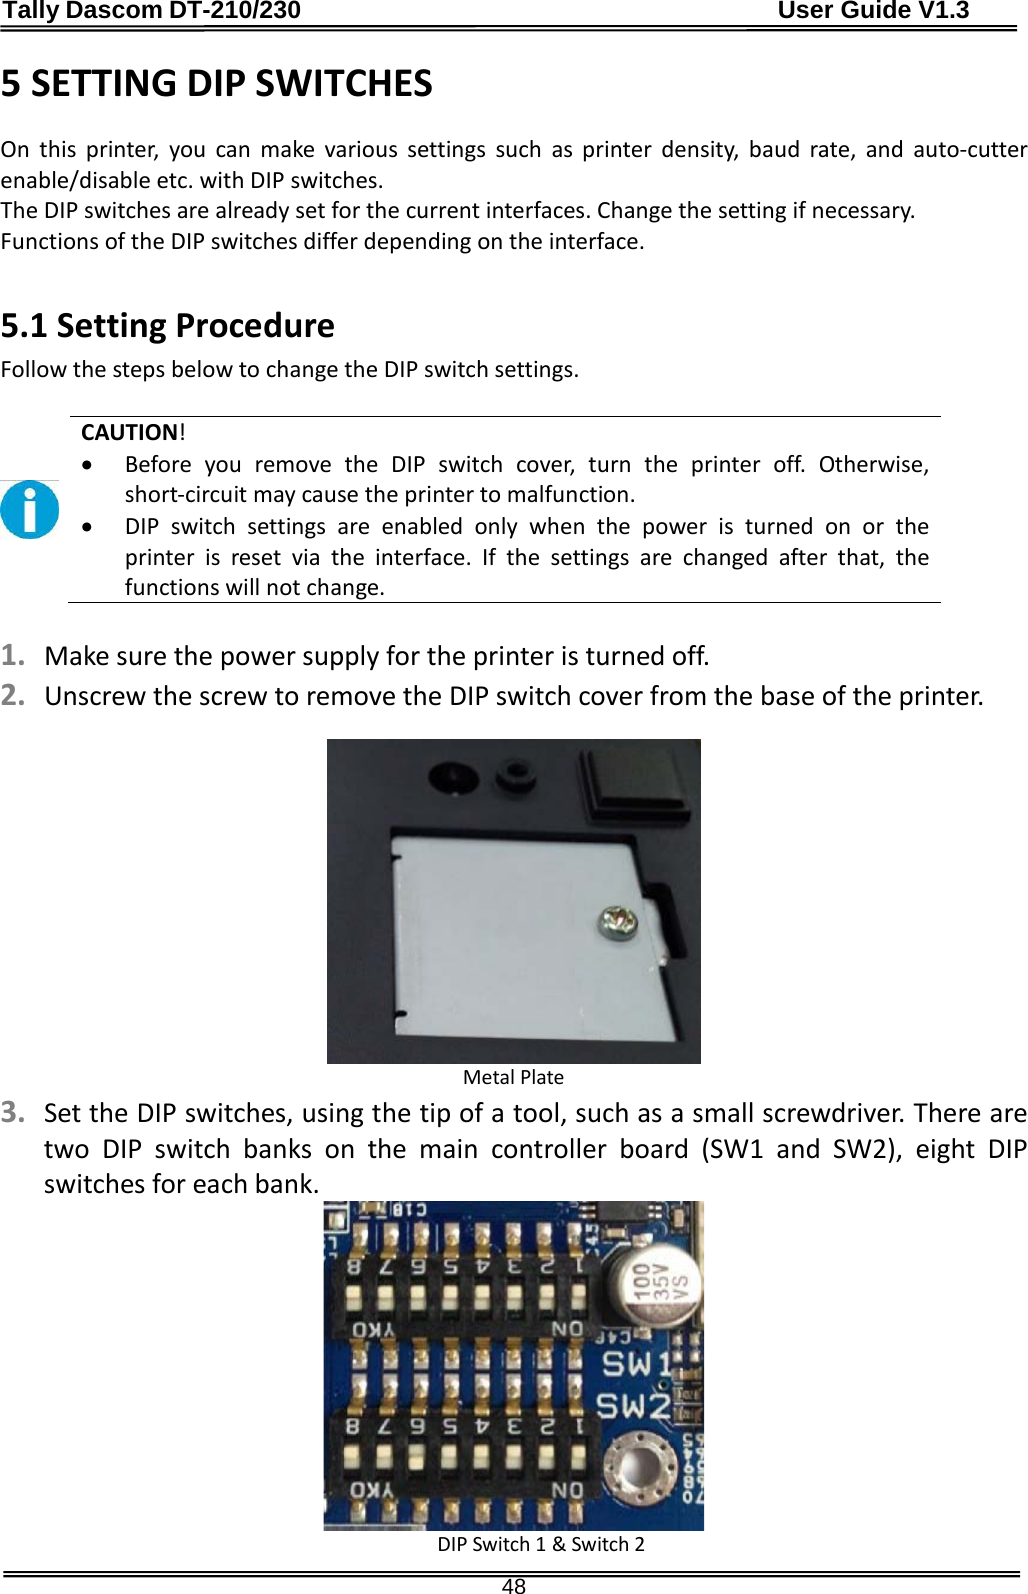
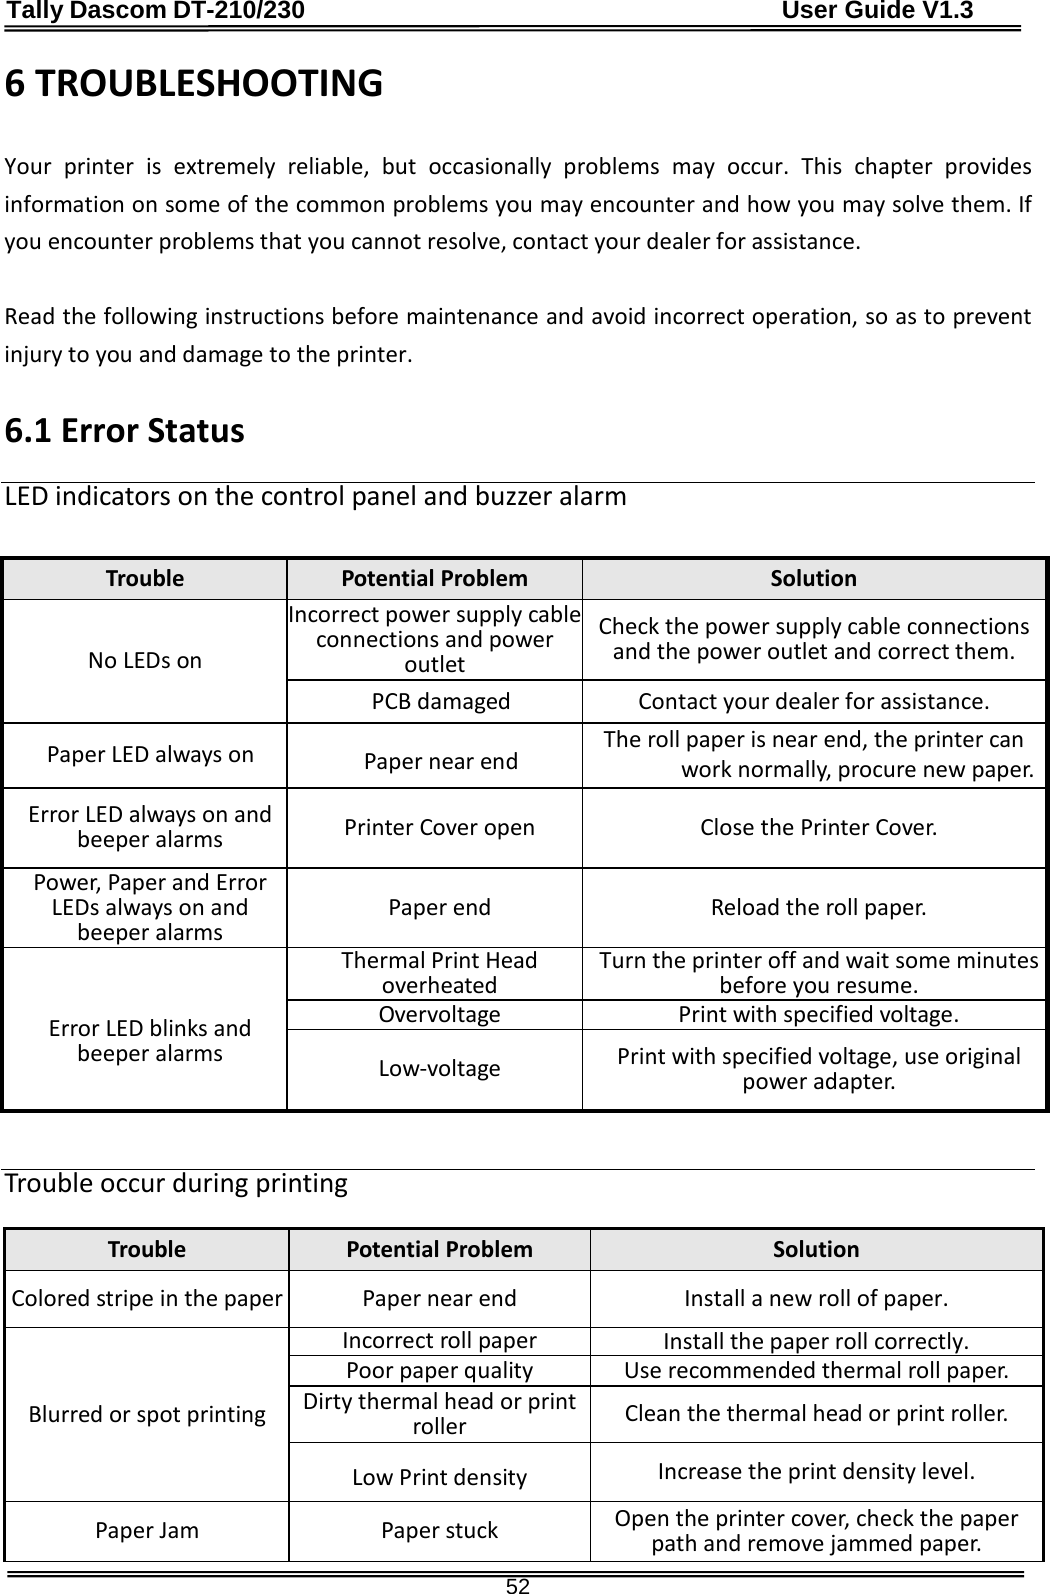
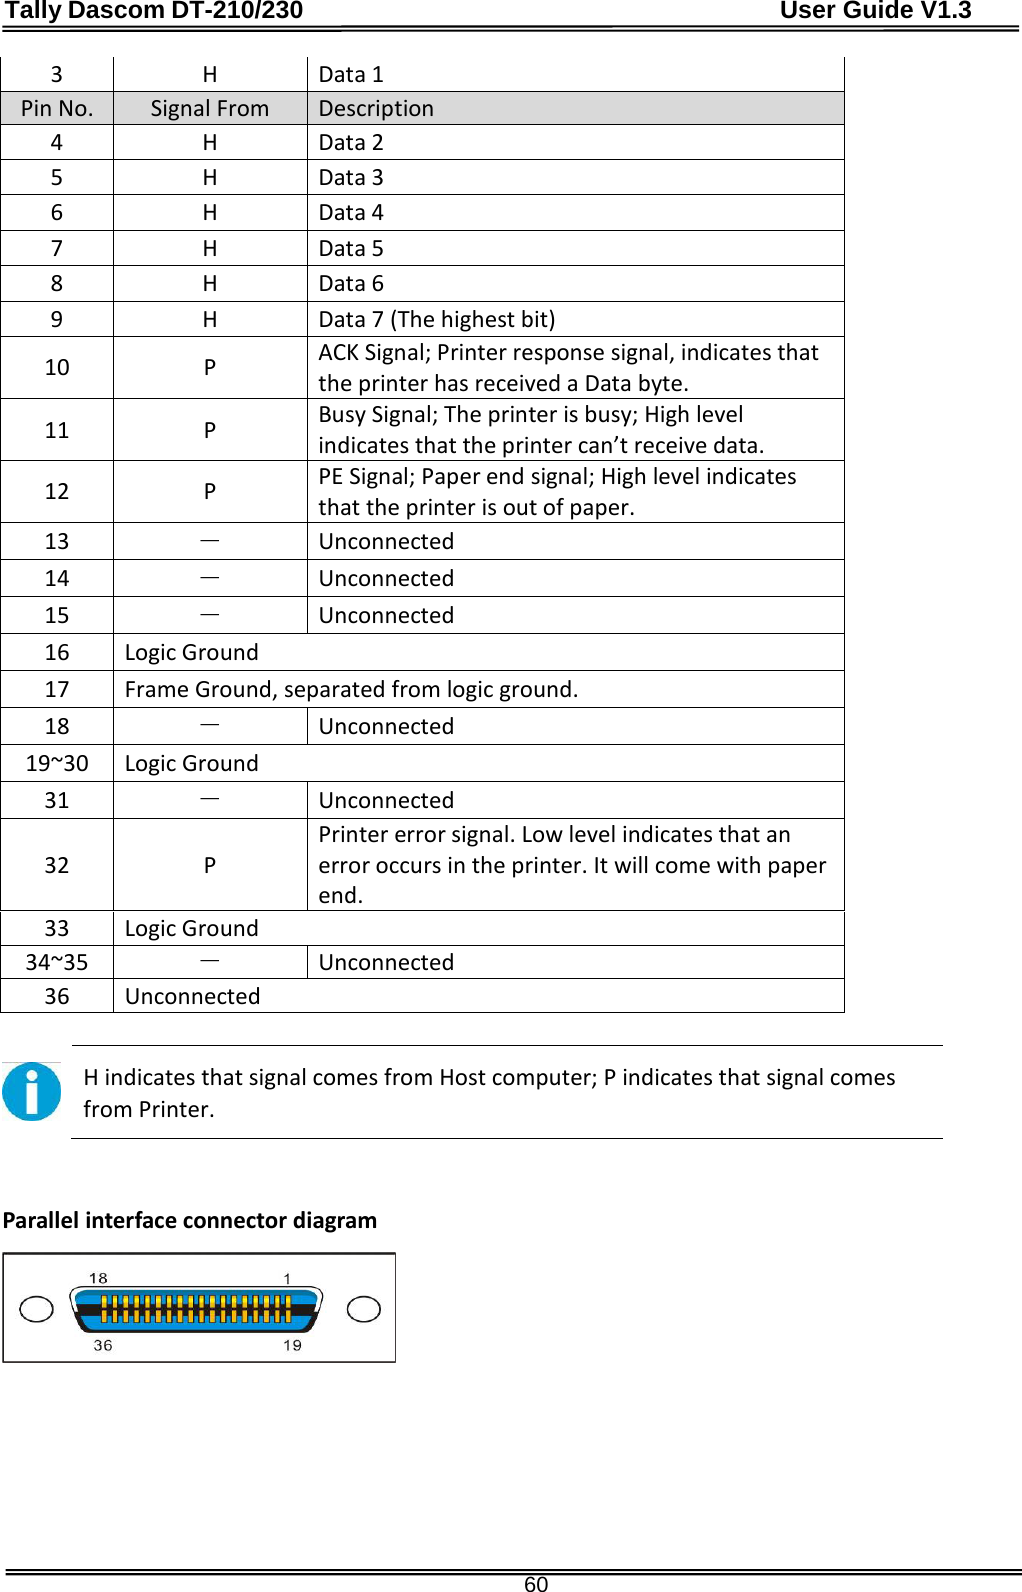
![Tally Dascom DT-210/230 User Guide V1.3 46 Here is the self test status page and its explanation. The printout is an example. It may differ depending of installed options or interfaces: 3. Press the FEED button while the printer is in the self-test mode. Then the printer will print a rolling pattern using only the built-in character set. After printing the following message, the printer is initialized and returned to the normal mode. Model Firmware Version S/N Interface Number of data bits Number of stop bits Flow Control Parity Checking Receive error method Buffer size Resident Character Types Density level DIP Switch setting SELF-TEST Model DT-230 Firmware Version : SV1.02.16 S/N: 000000000000 Serial Interface Baud Rate : 19200 bps Data bits : 8 bits Stop bits : 1 bit Flow Control : DTR/DSR Parity Checking : None Receive error : print ‘?’ Buffer Capacity 48K bytes Resident Character Alphanumeric Simple Chinese Print Density LIGHT [ 1 2 3 4 ] DARK Print Speed : 260mm/s Paper Width : 80mm BM sensor : Disable DIP Switch1 1 2 3 4 5 6 7 8 On Off * * * * * * * * DIP Switch1 1 2 3 4 5 6 7 8 On Off * * * * * * * * If y ou want to continue SELF-TEST Printing, please press FEED button!](https://usermanual.wiki/Jiangmen-Dascom-Computer-Peripherals/TD2100/User-Guide-2514835-Page-51.png)
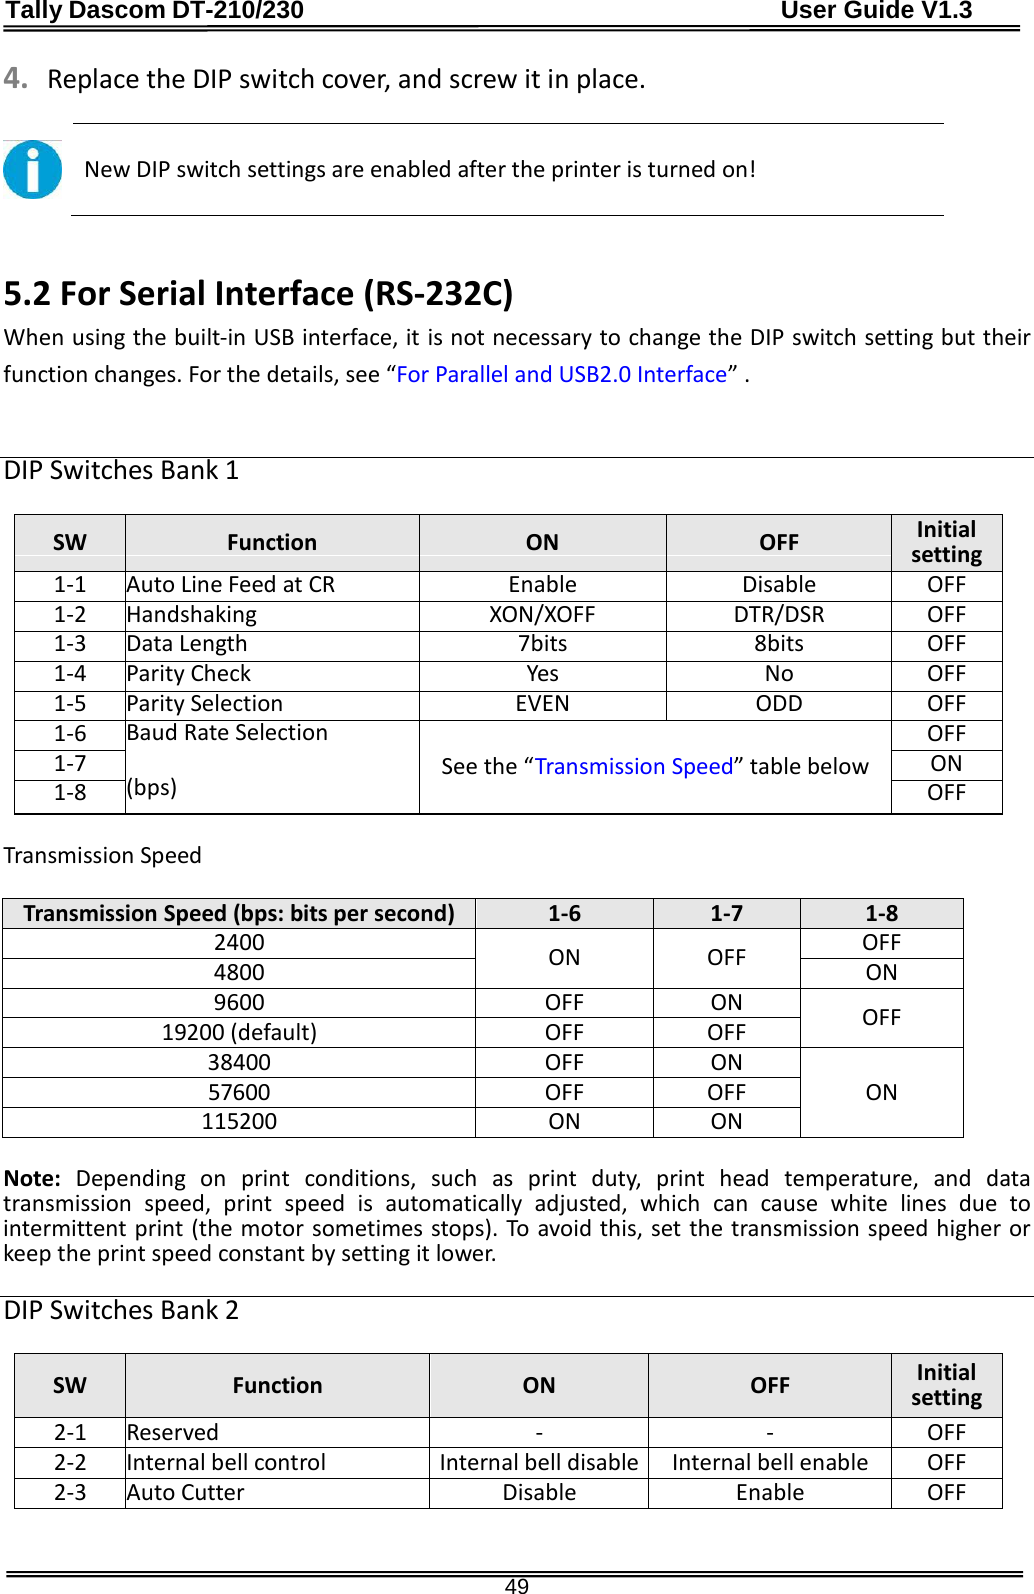
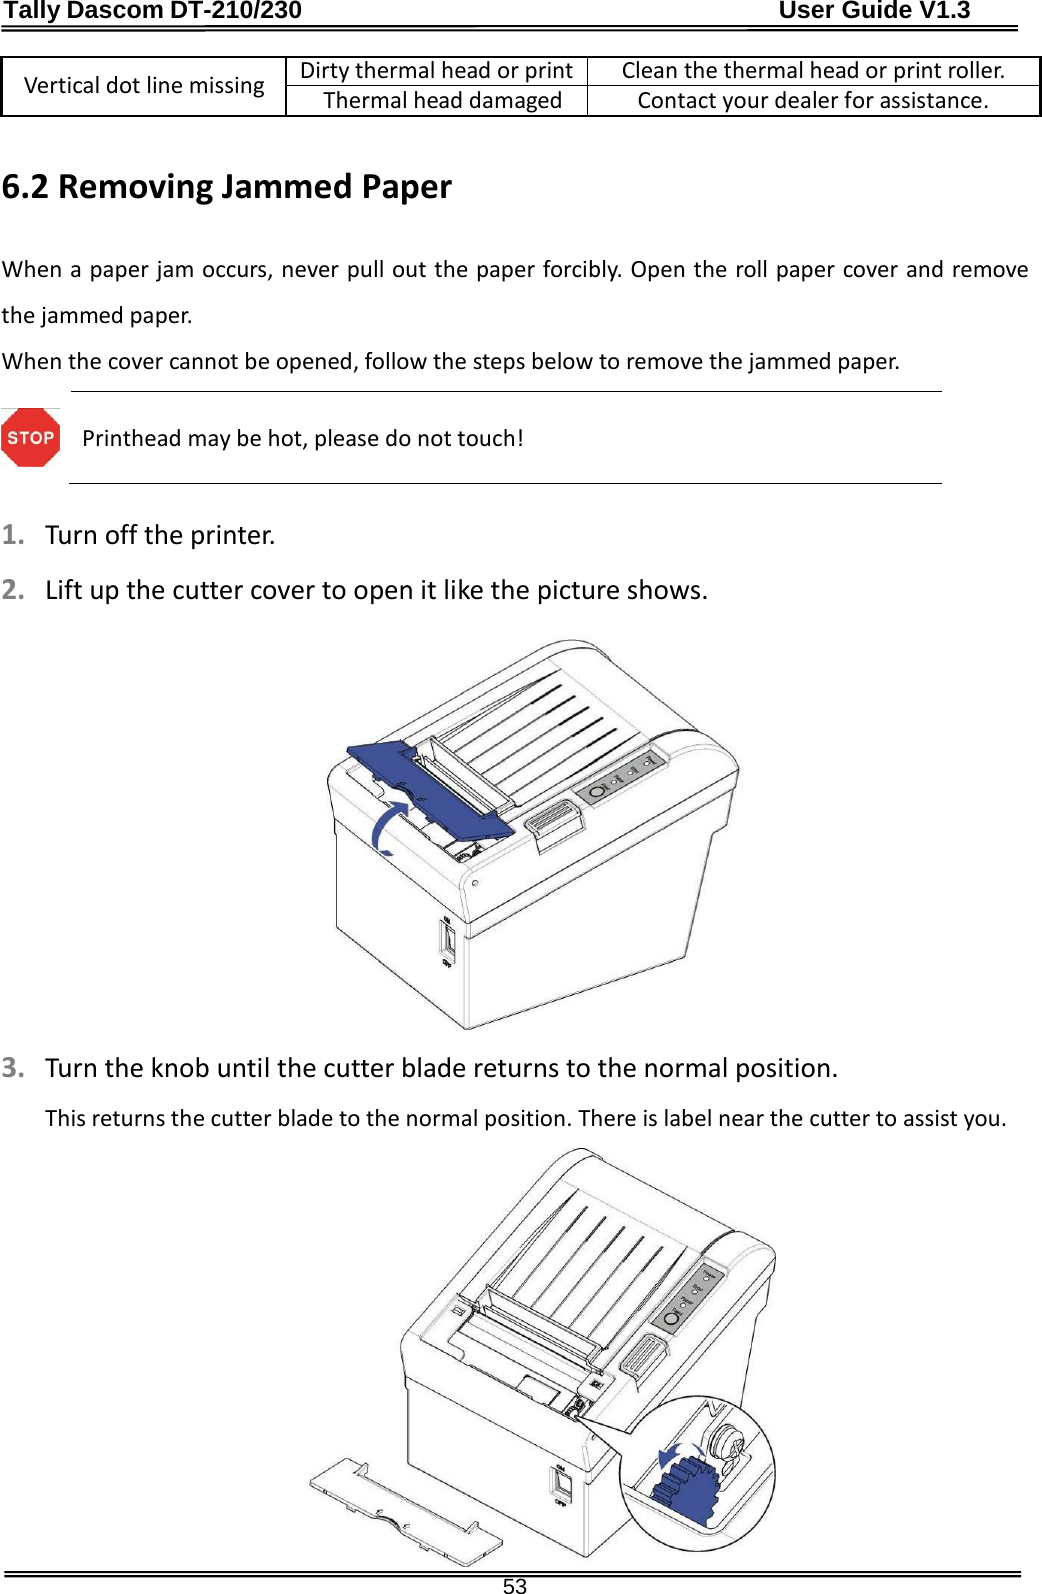
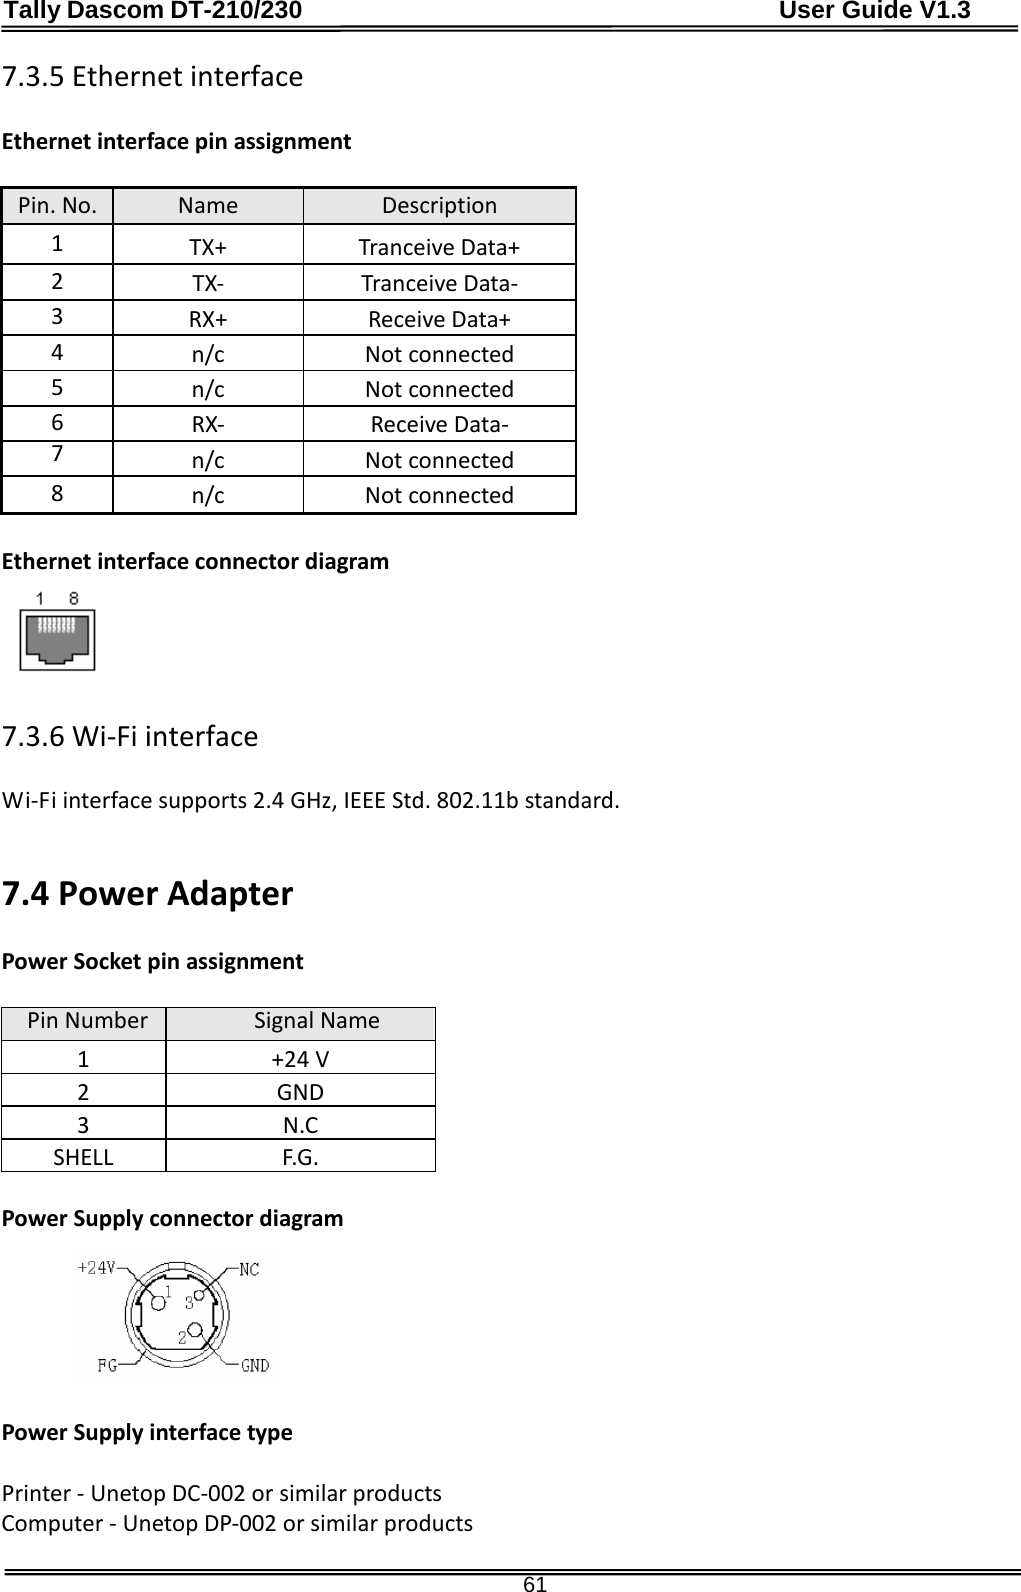
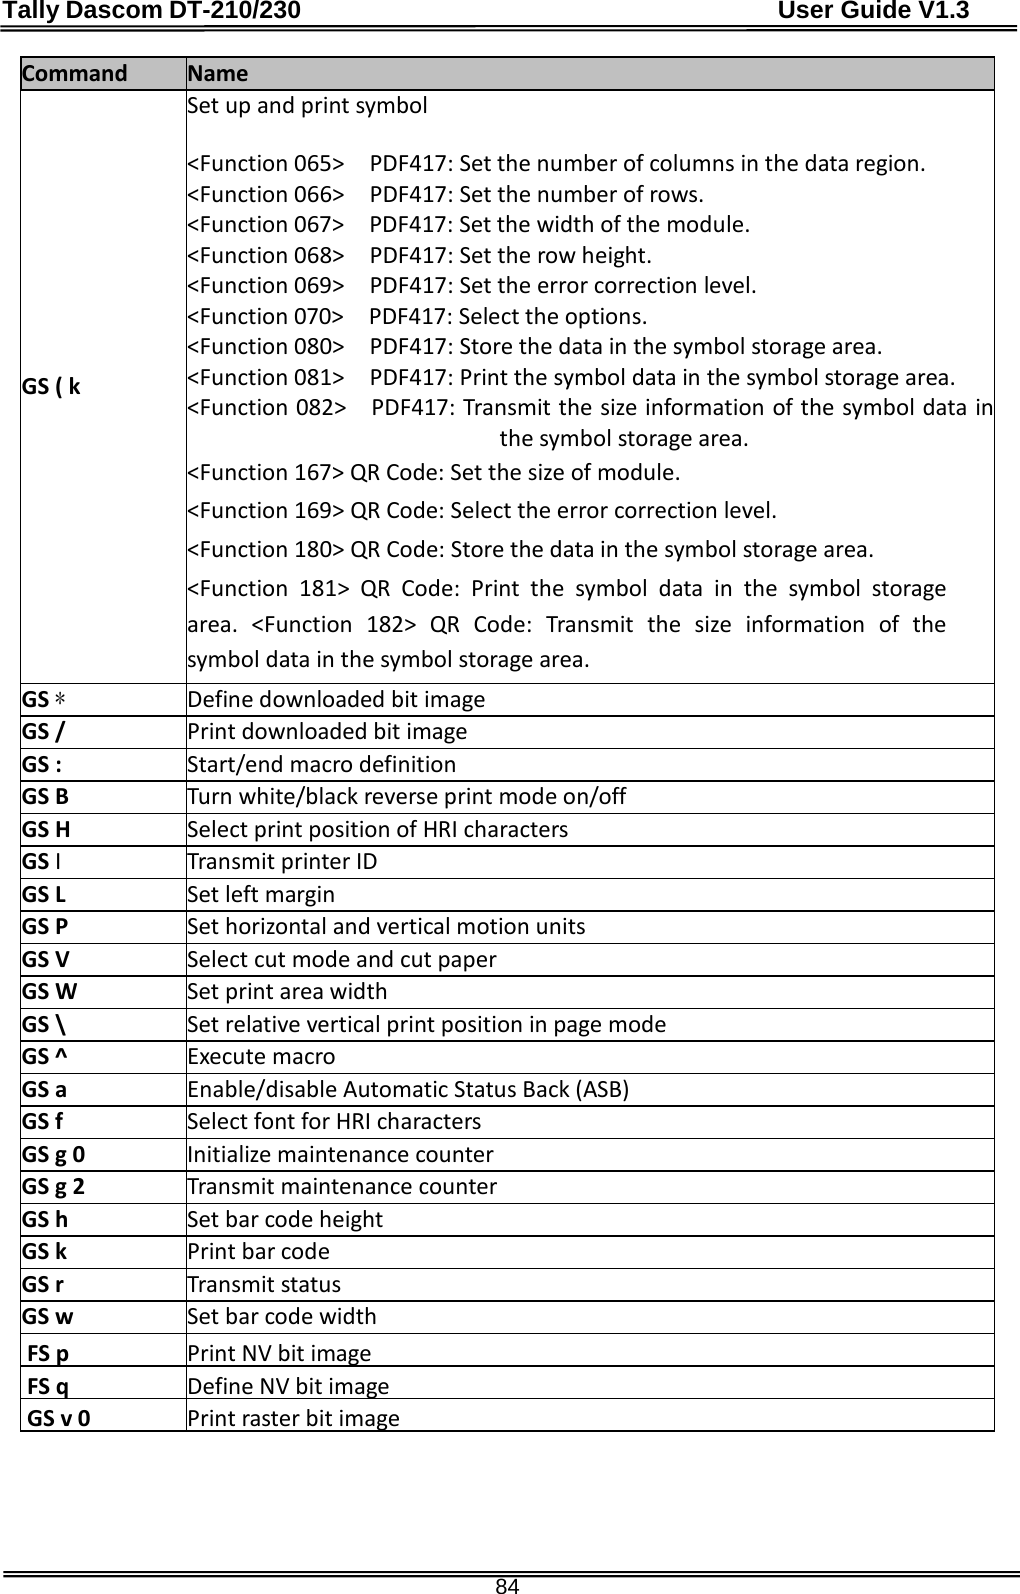
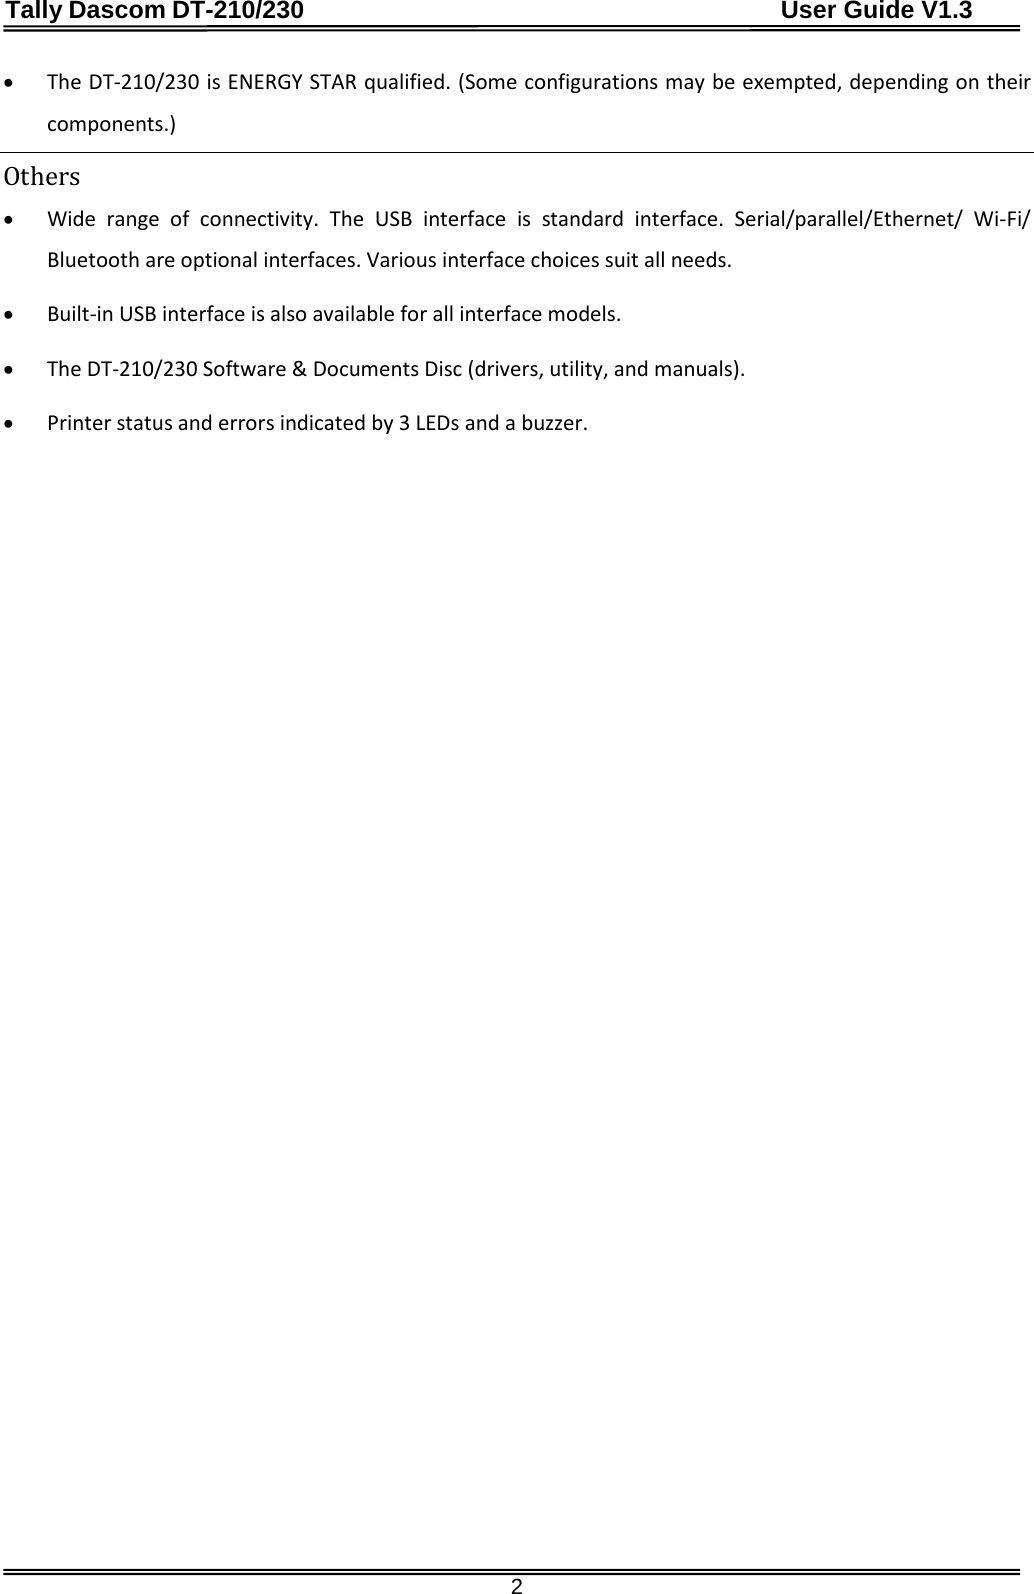
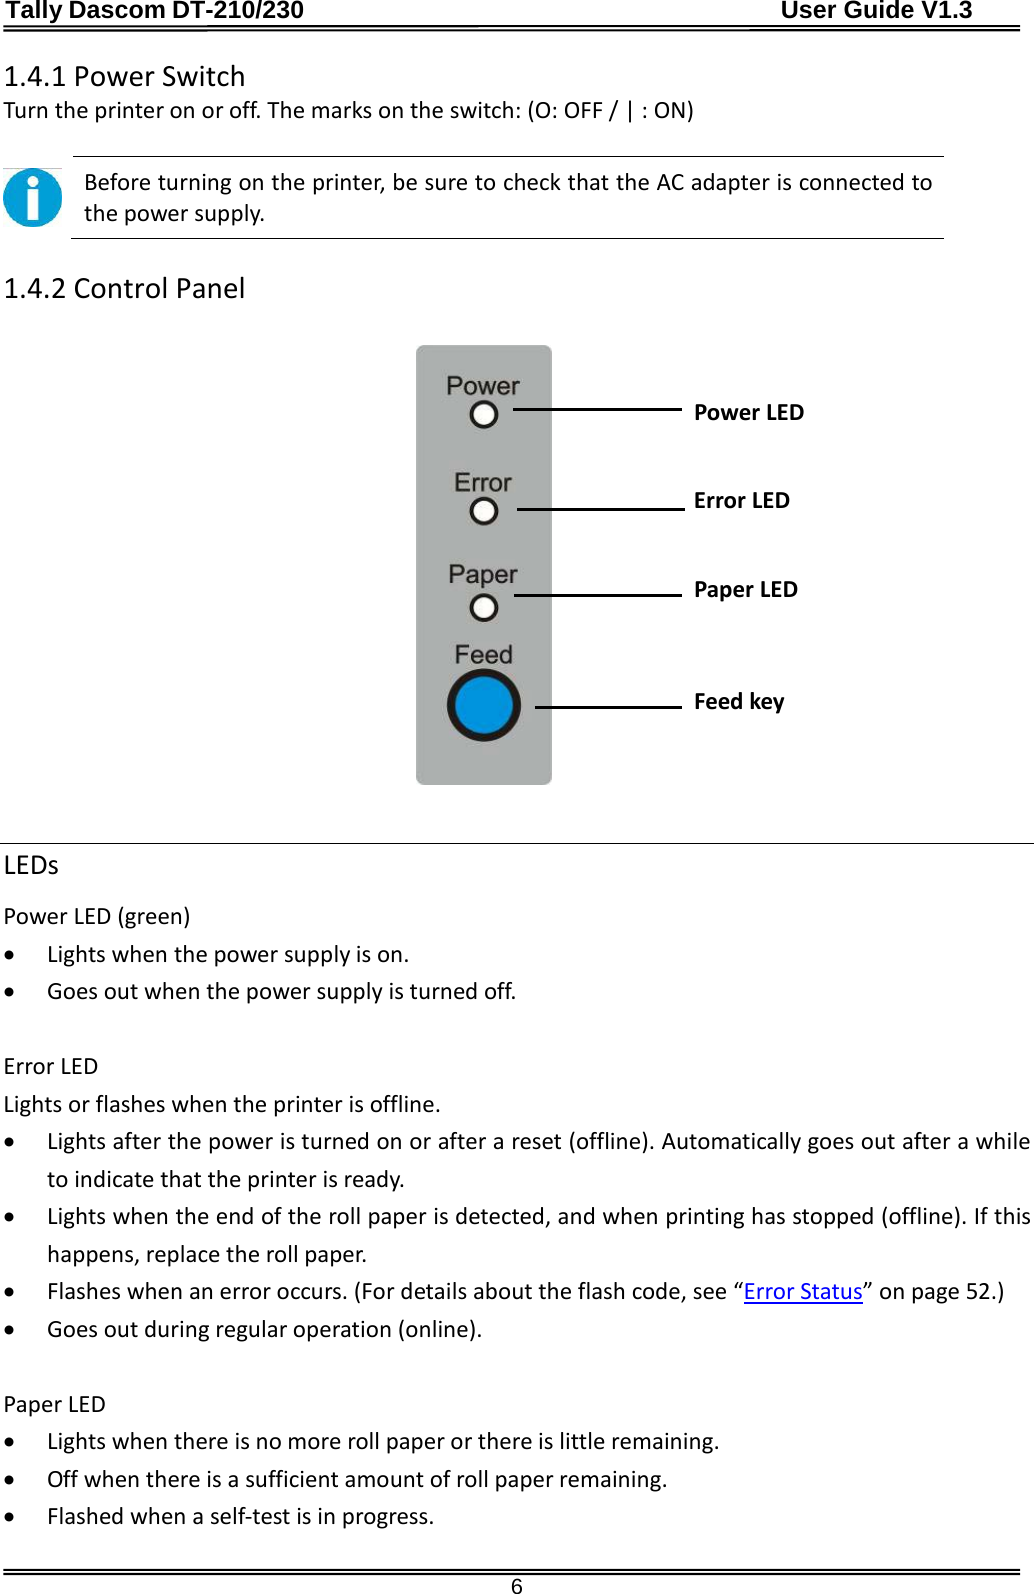
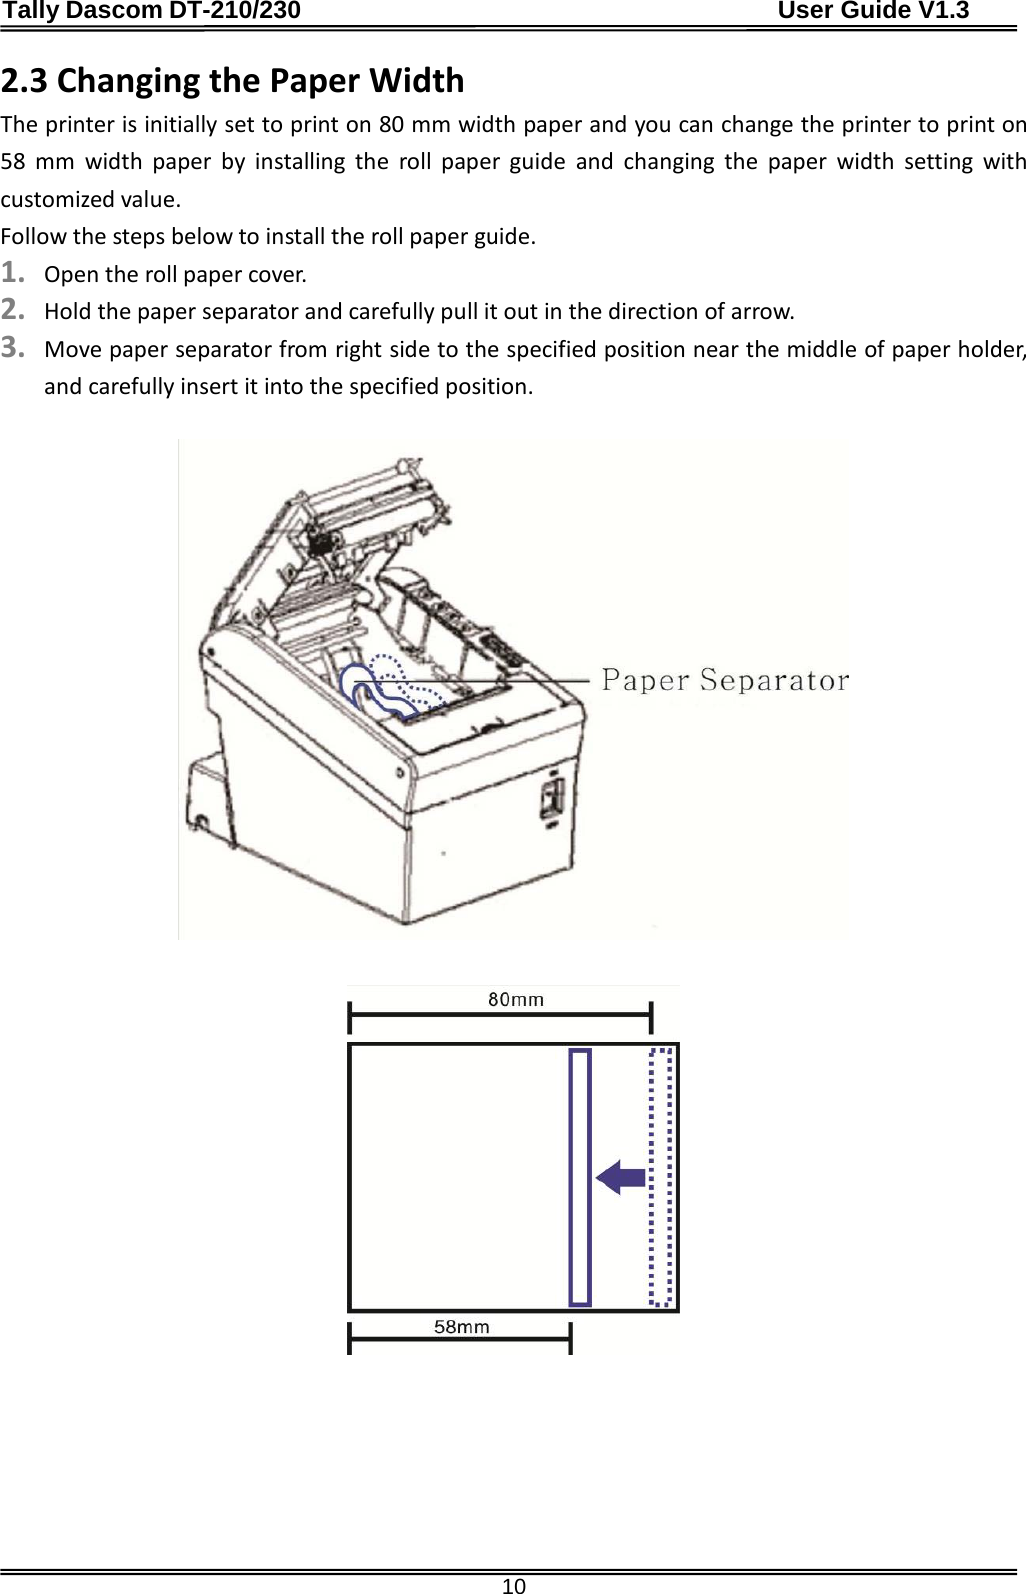
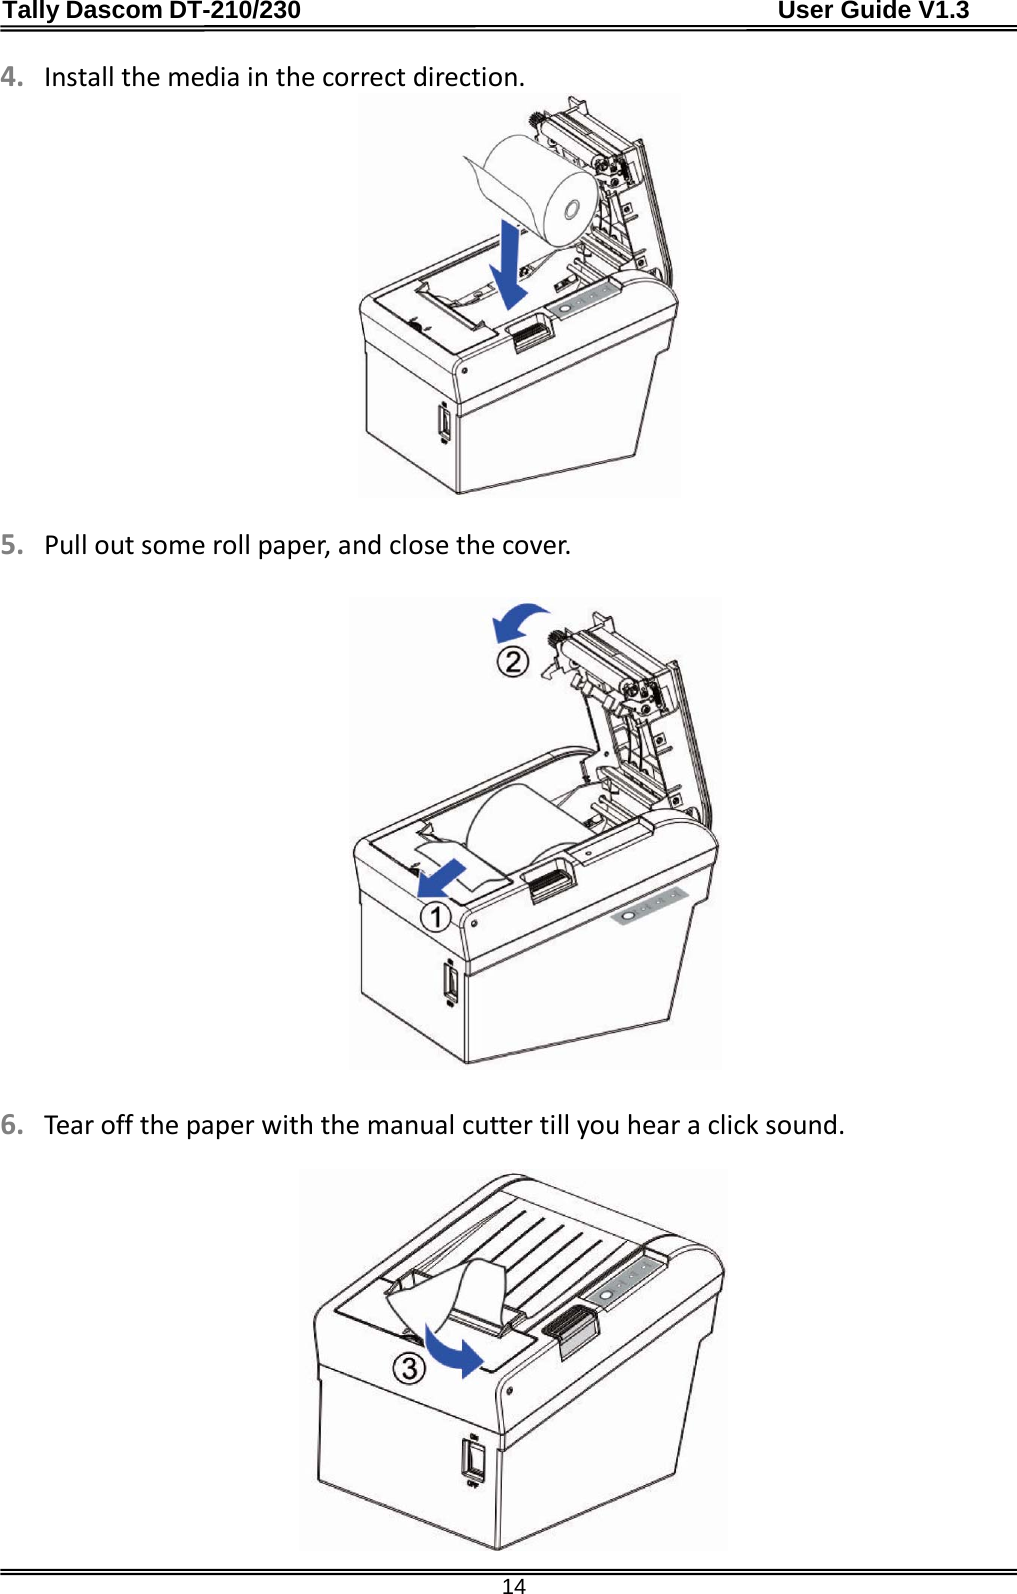
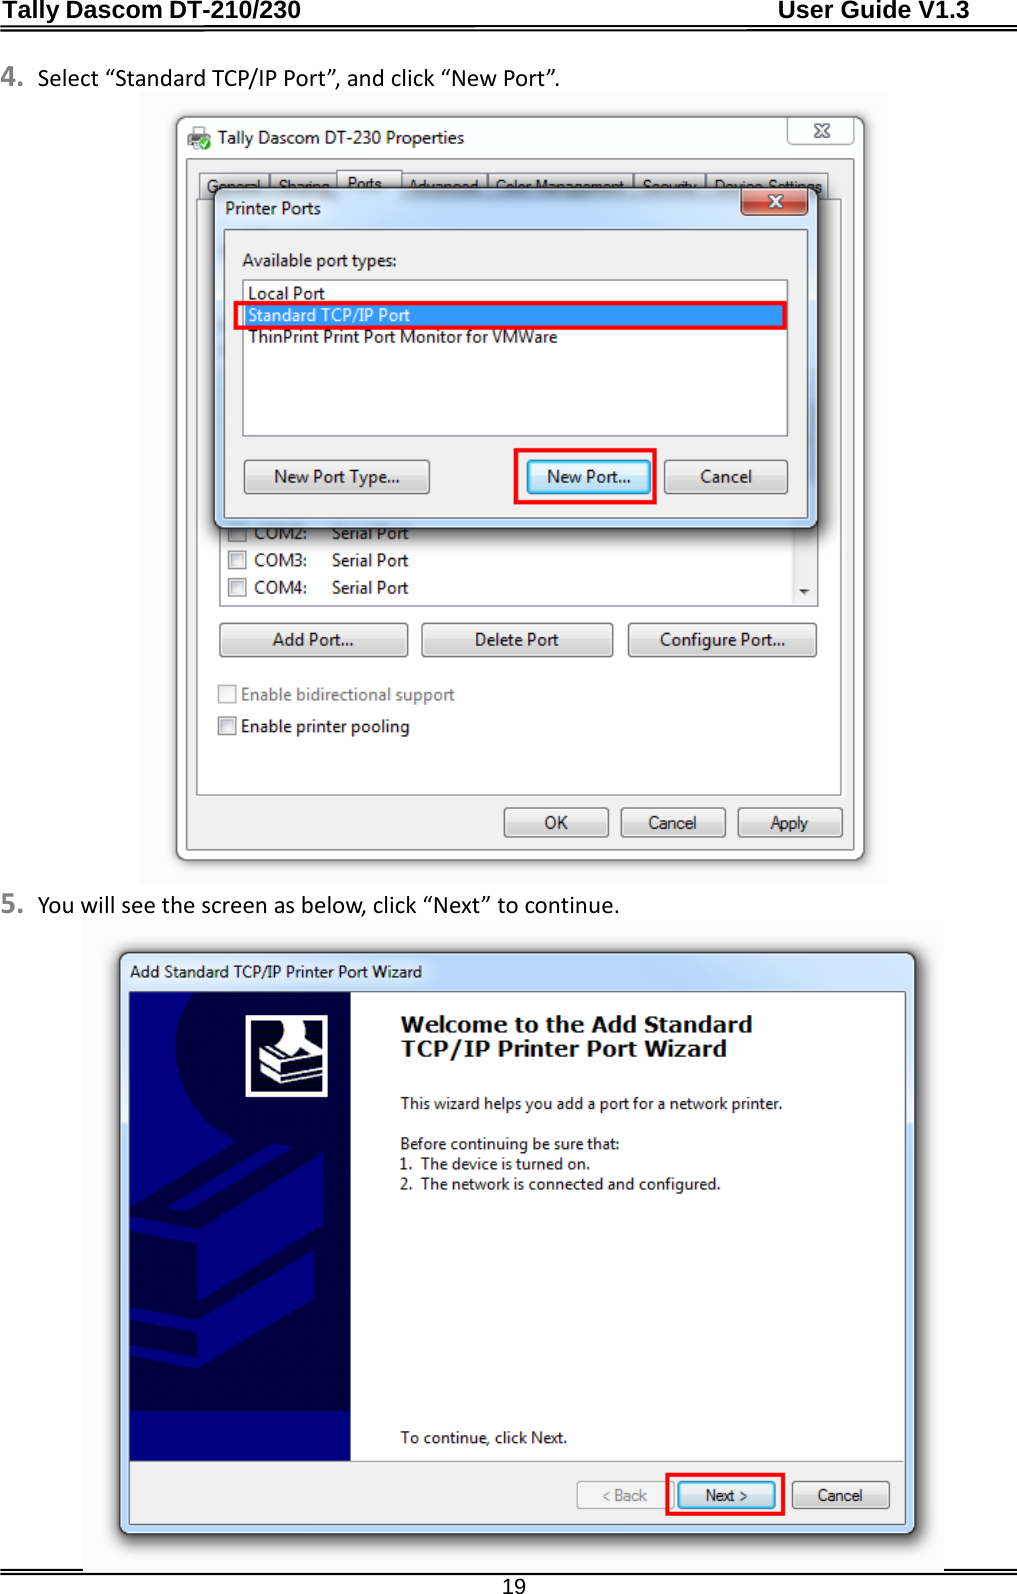
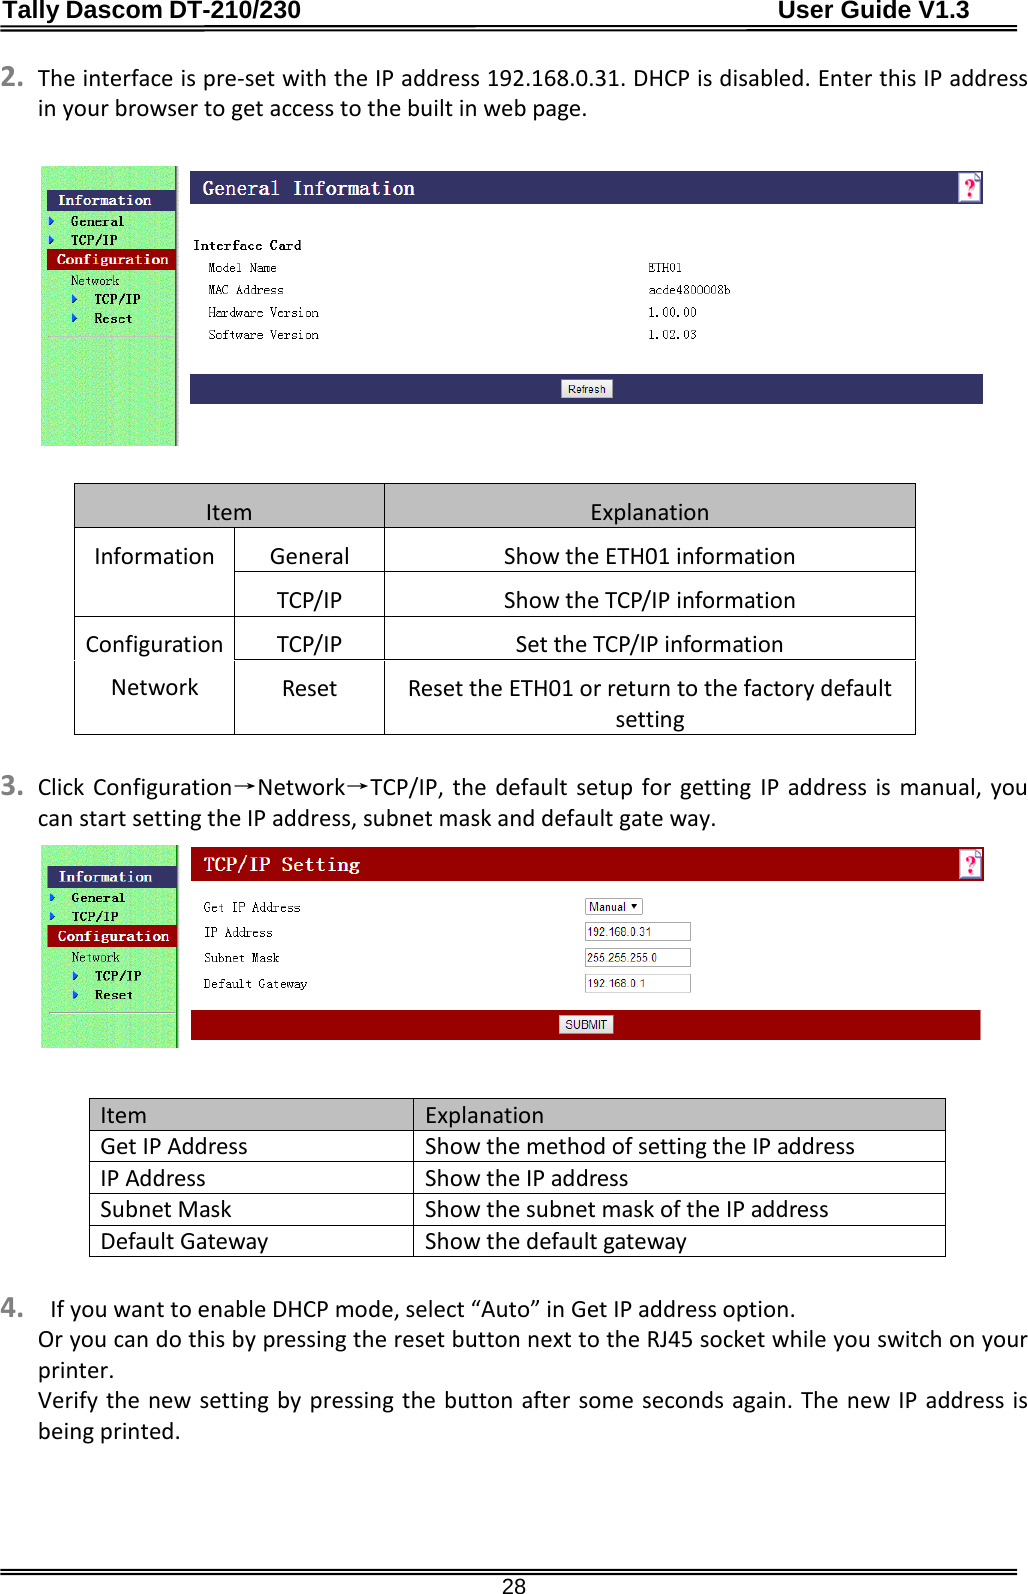
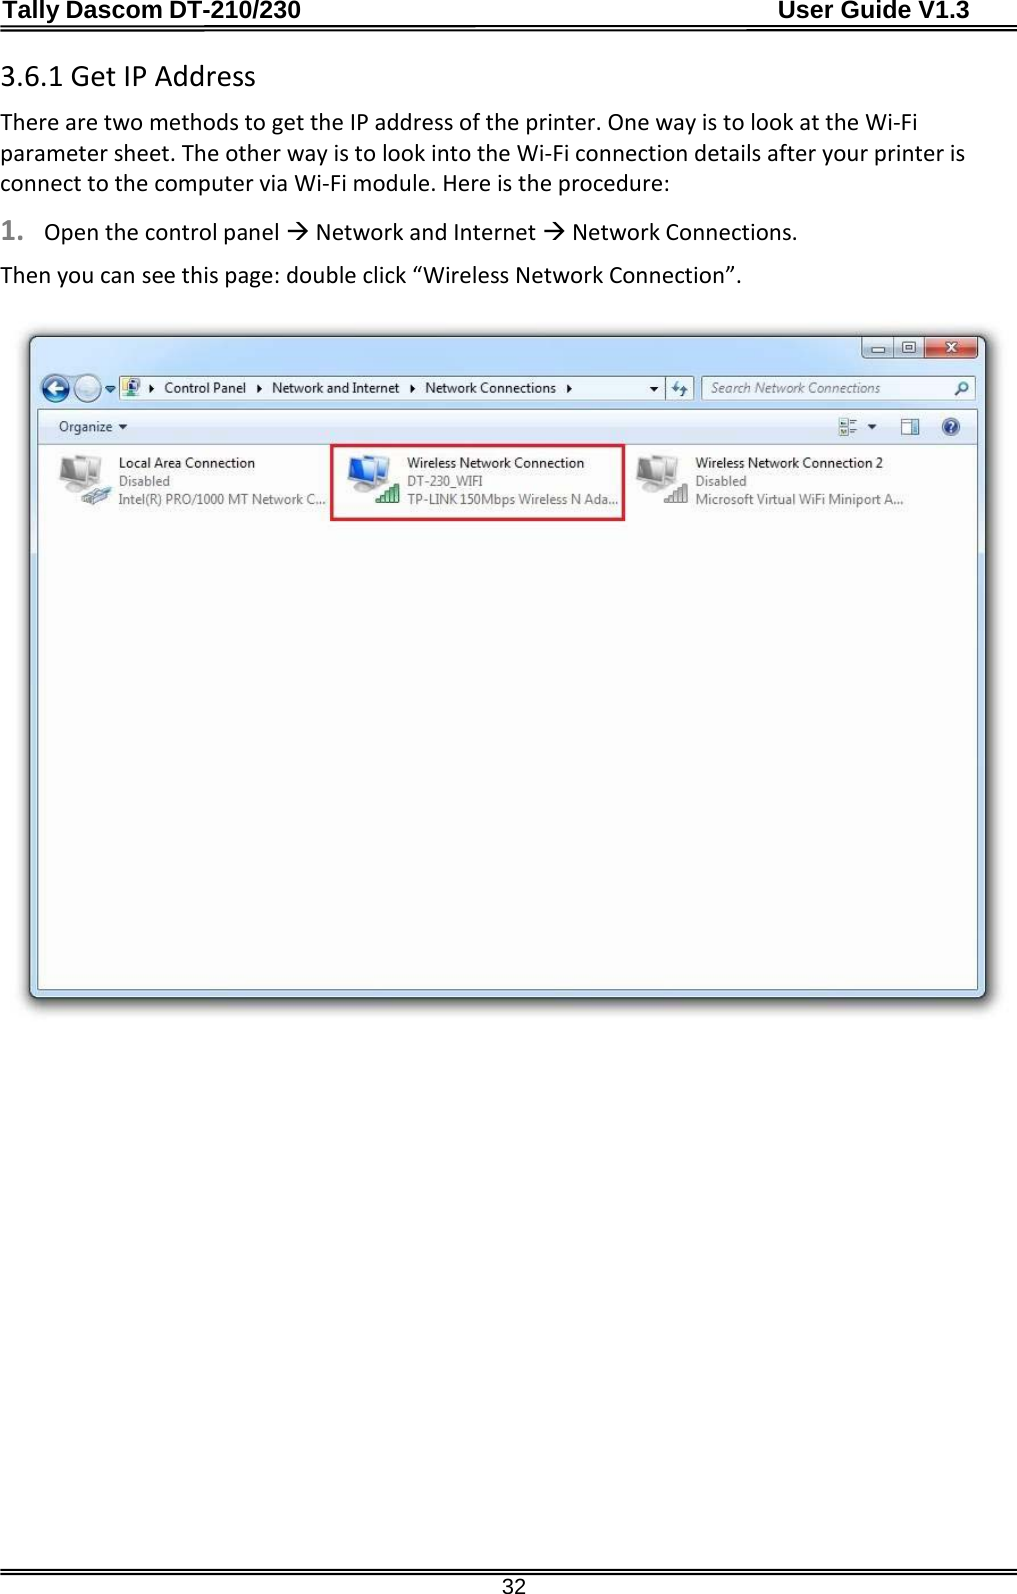
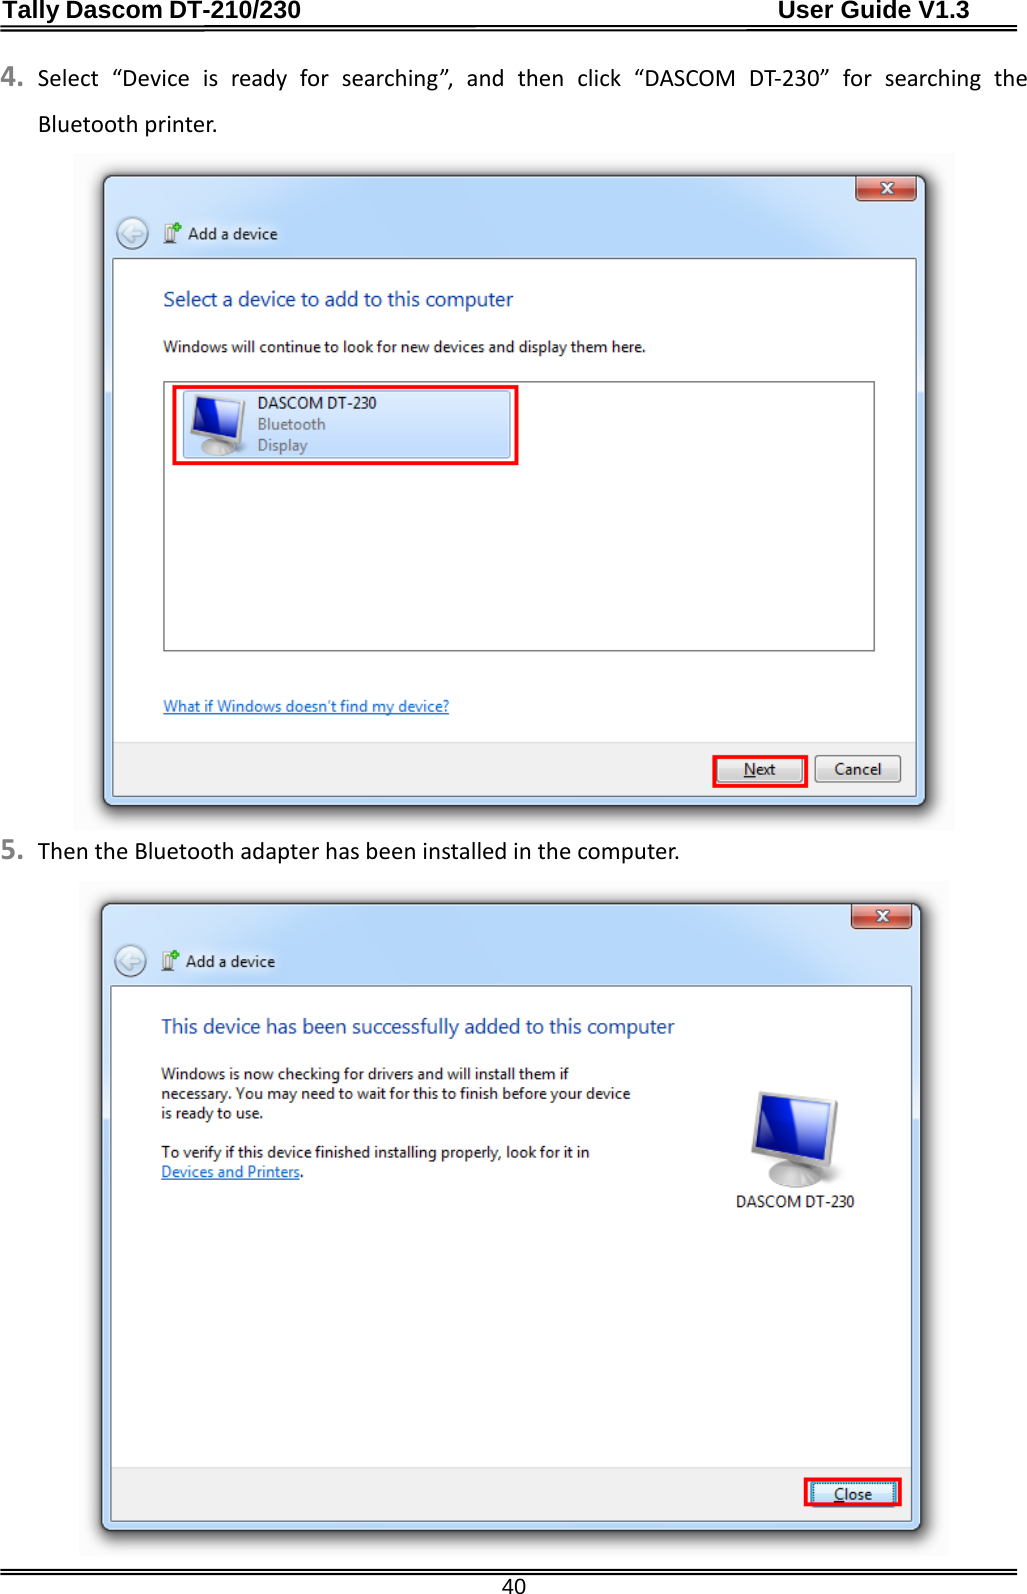
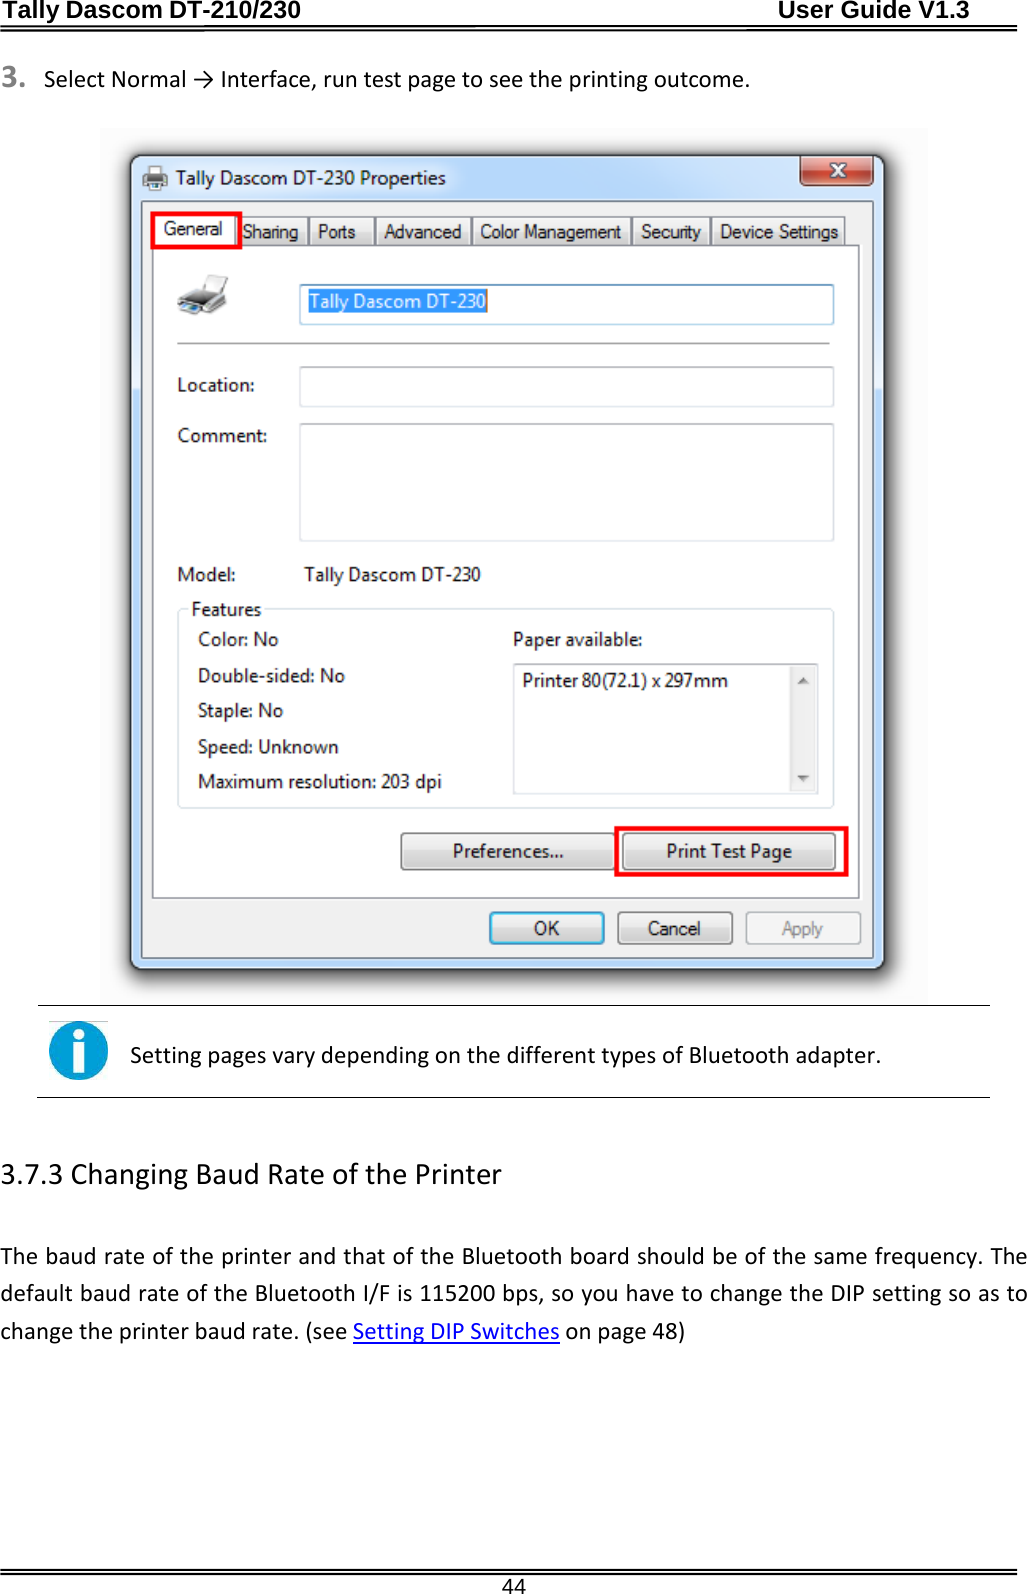
![Tally Dascom DT-210/230 User Guide V1.3 65 8 CHARACTER CODE PAGES • The character code tables show only character configurations. They do not show the actual print pattern. • “SP” in the table shows a space. 8.1 Common to All Pages (International Character Set: USA) HEX 0 1 2 3 4 5 6 7 0 NUL DLE SP 0 @ P ` p 00 16 32 48 64 208 224 240 1 XON ! 1 A Q a q 01 17 33 49 65 209 225 241 2 “ 2 B R b R 02 18 34 50 66 210 226 242 3 XOFF # 3 C S c s 03 19 35 51 67 211 227 243 4 EOT DC4 $ 4 D T d t 04 20 36 52 68 212 228 244 5 ENQ NAK % 5 E U e u 05 21 37 53 69 213 229 245 6 ACK & 6 F V f V 06 22 38 54 198 214 230 246 7 CAN ‘ 7 G W g w 07 23 39 55 199 215 231 247 8 ( 8 H X h x 08 24 40 56 200 216 232 248 9 HT ) 9 I Y i y 09 25 41 57 201 217 233 249 A LF * : J Z j Z 10 26 42 58 202 218 234 250 B ESC + ; K [ k { 11 27 43 59 203 219 235 251 C FF FS , < L \ l | 12 28 44 60 204 220 236 252 D CR GS - = M ] m } 13 29 45 61 205 221 237 253 E RS . > N ^ n ~ 14 30 46 62 206 222 238 254 F / ? O _ o SP 15 31 47 63 207 223 239 255](https://usermanual.wiki/Jiangmen-Dascom-Computer-Peripherals/TD2100/User-Guide-2514835-Page-70.png)
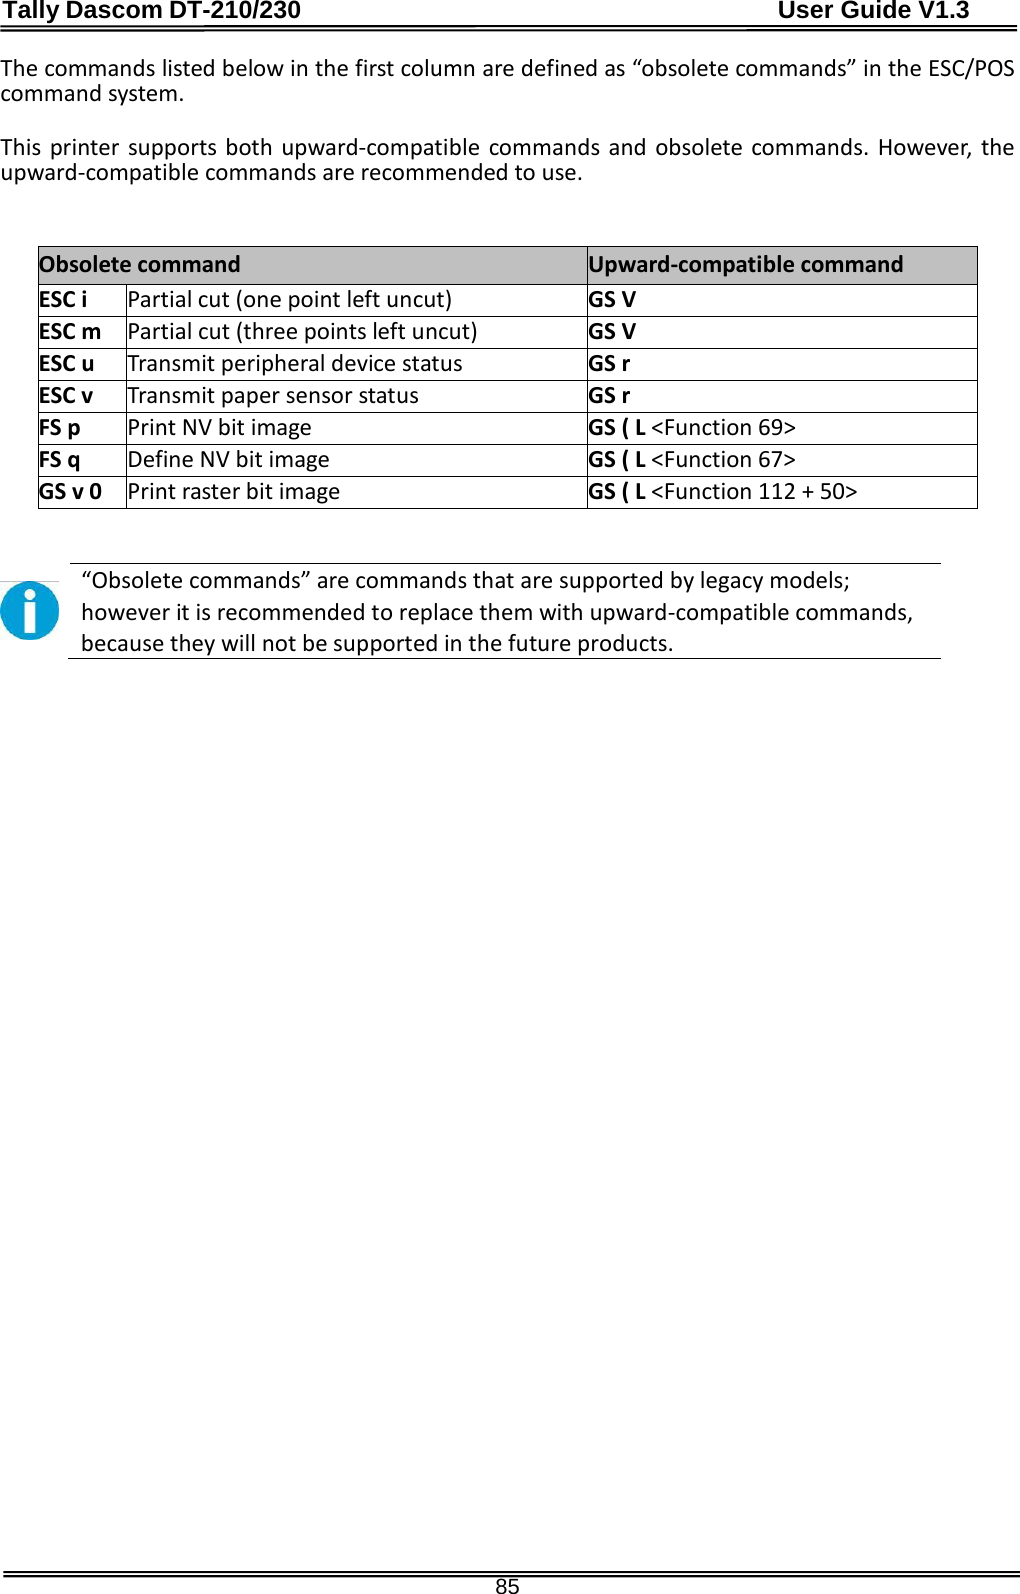
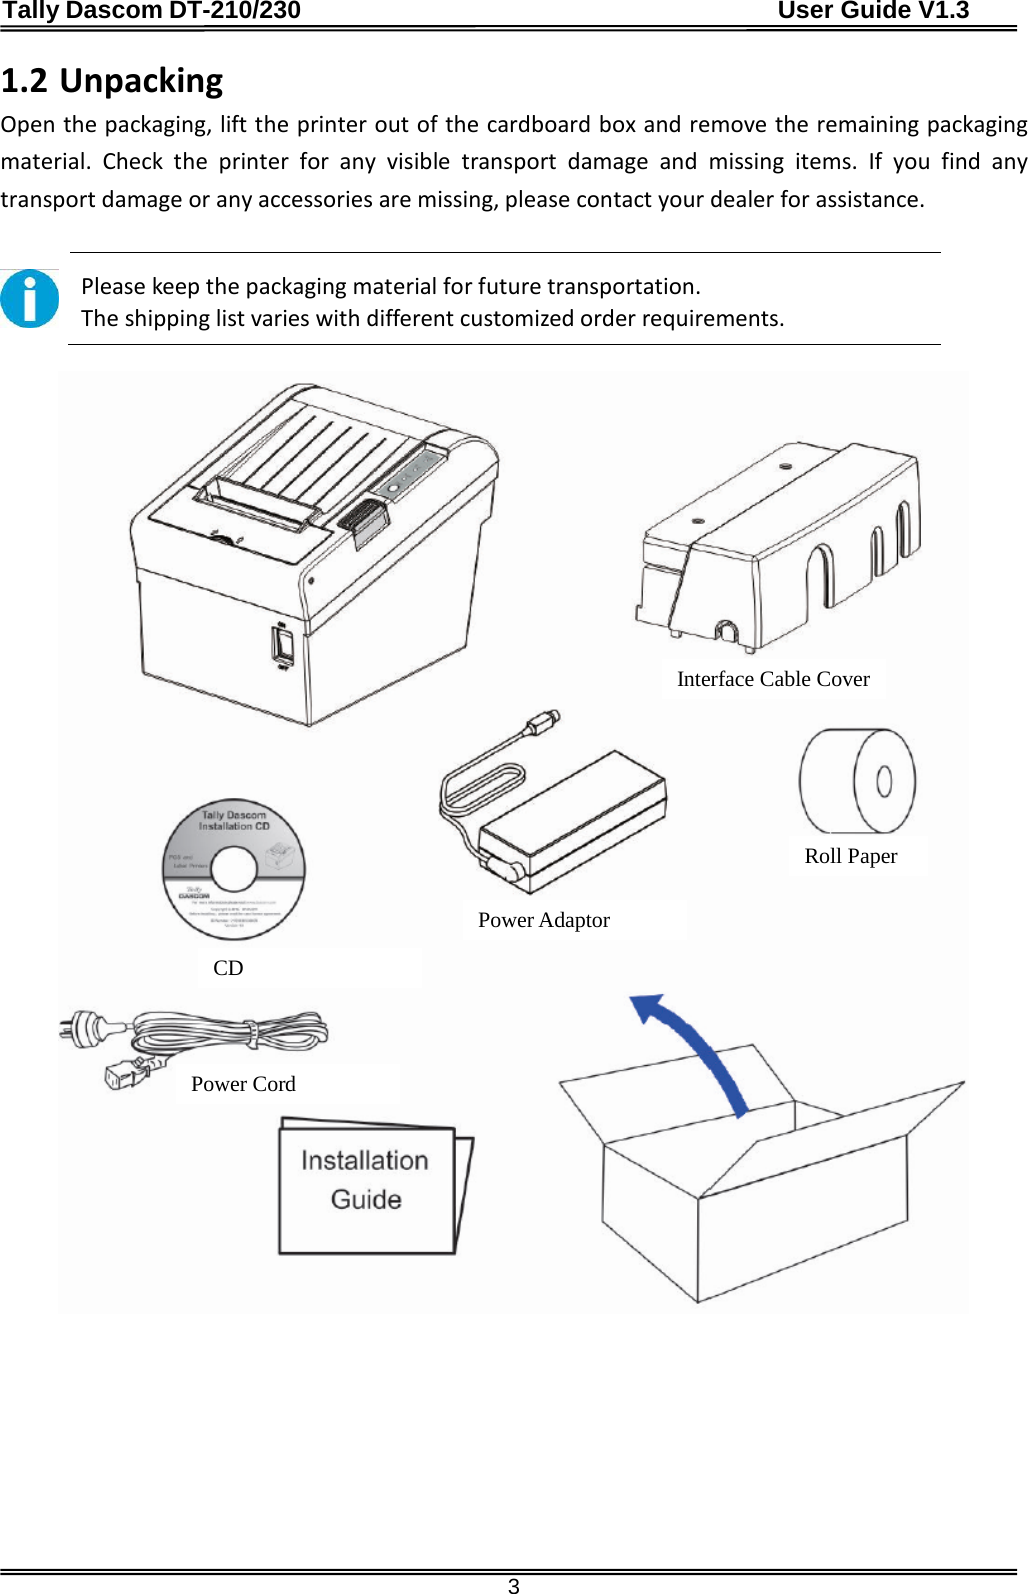
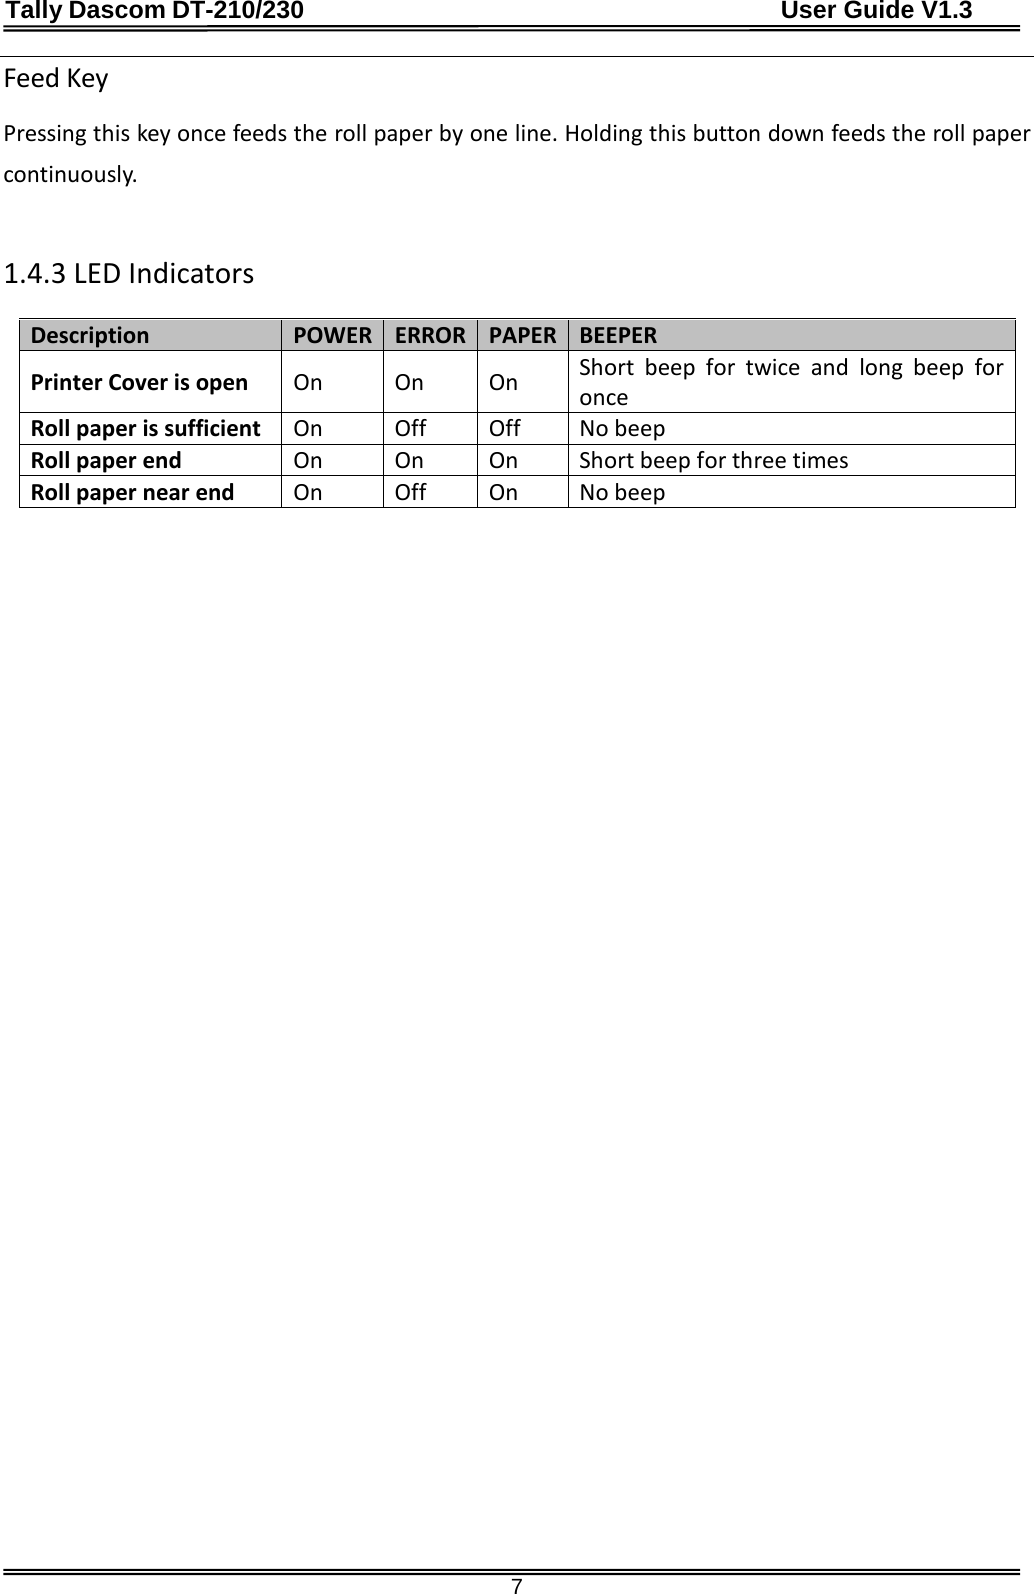
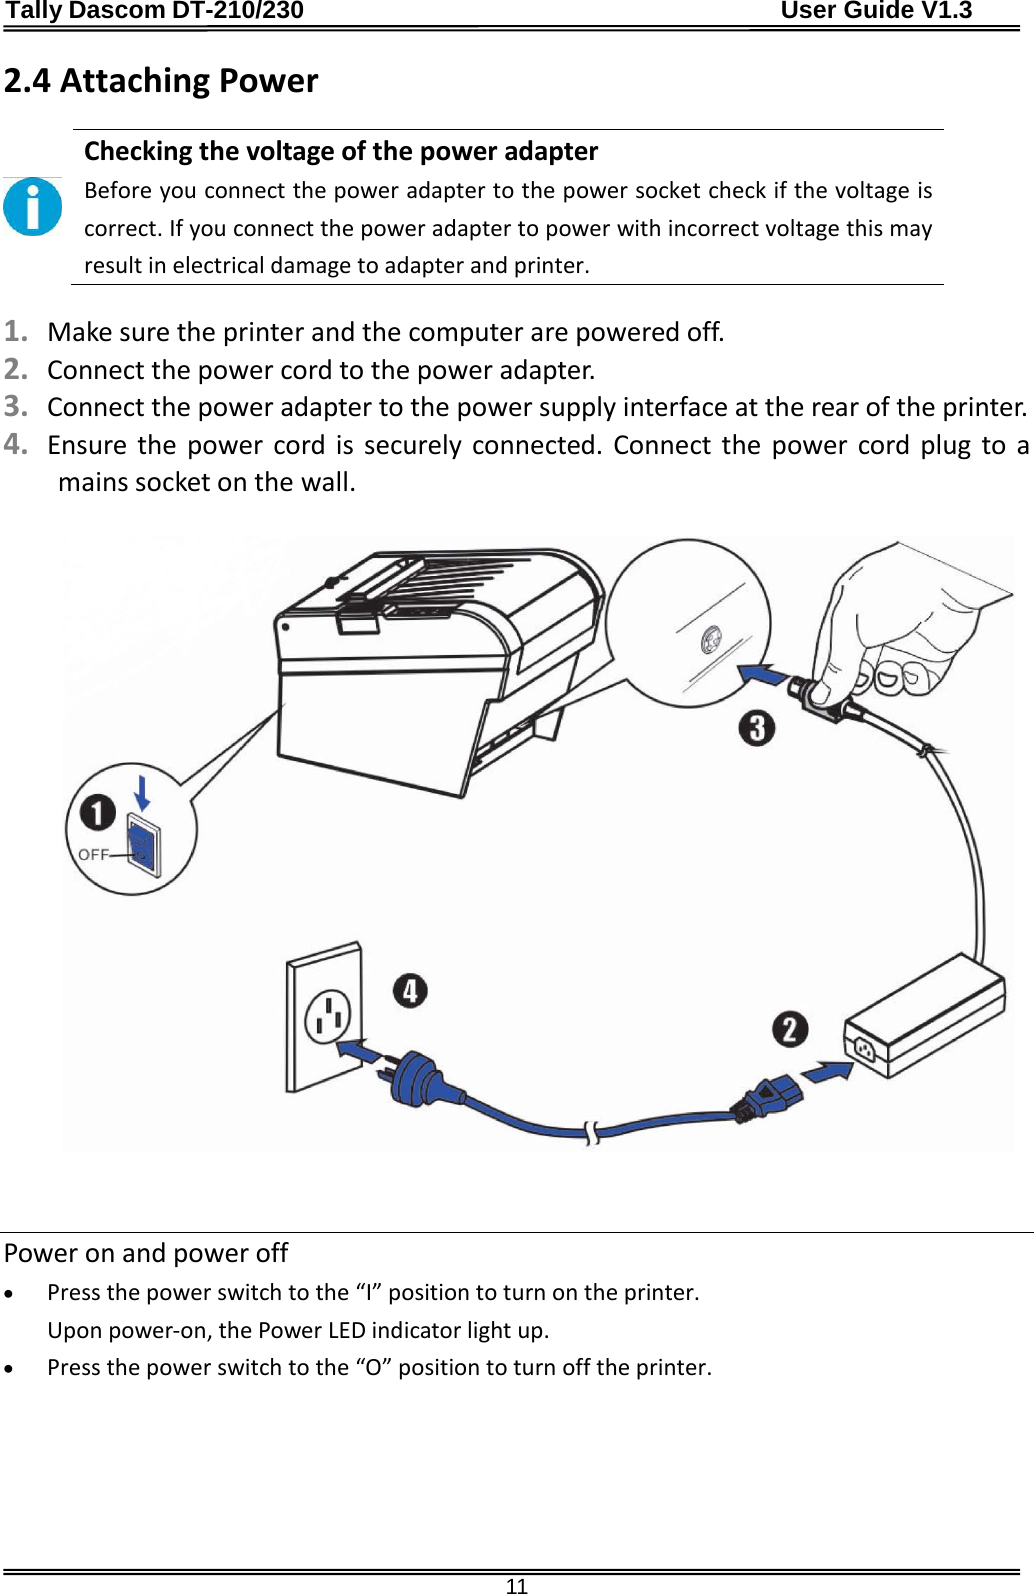
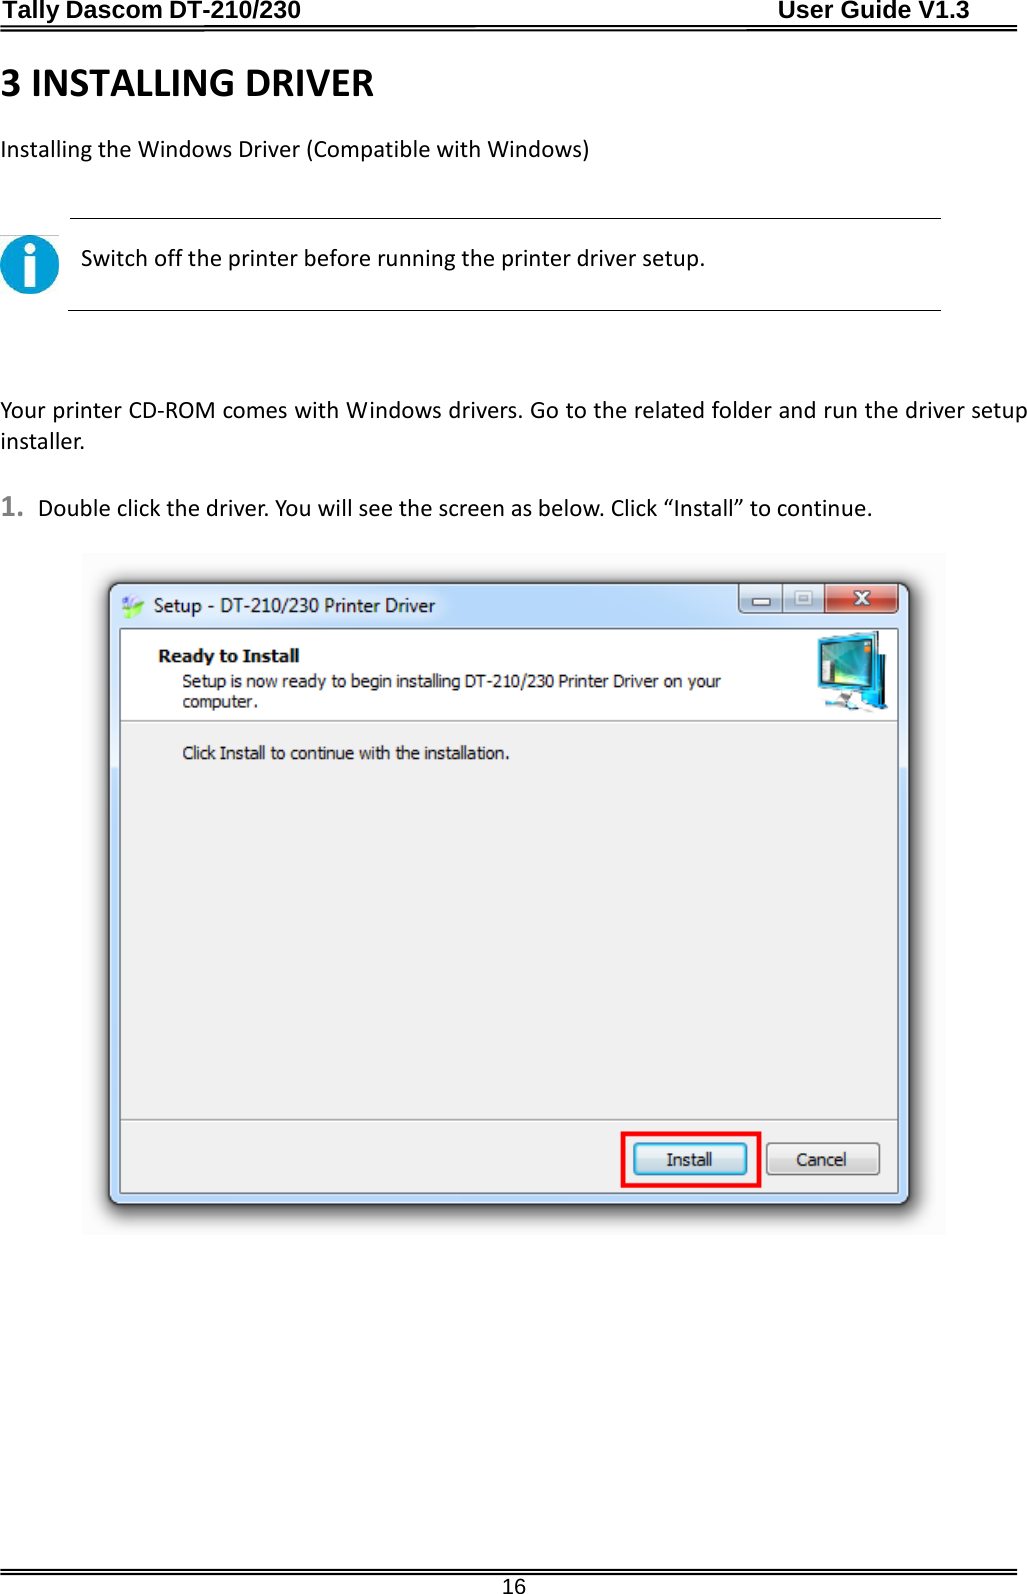
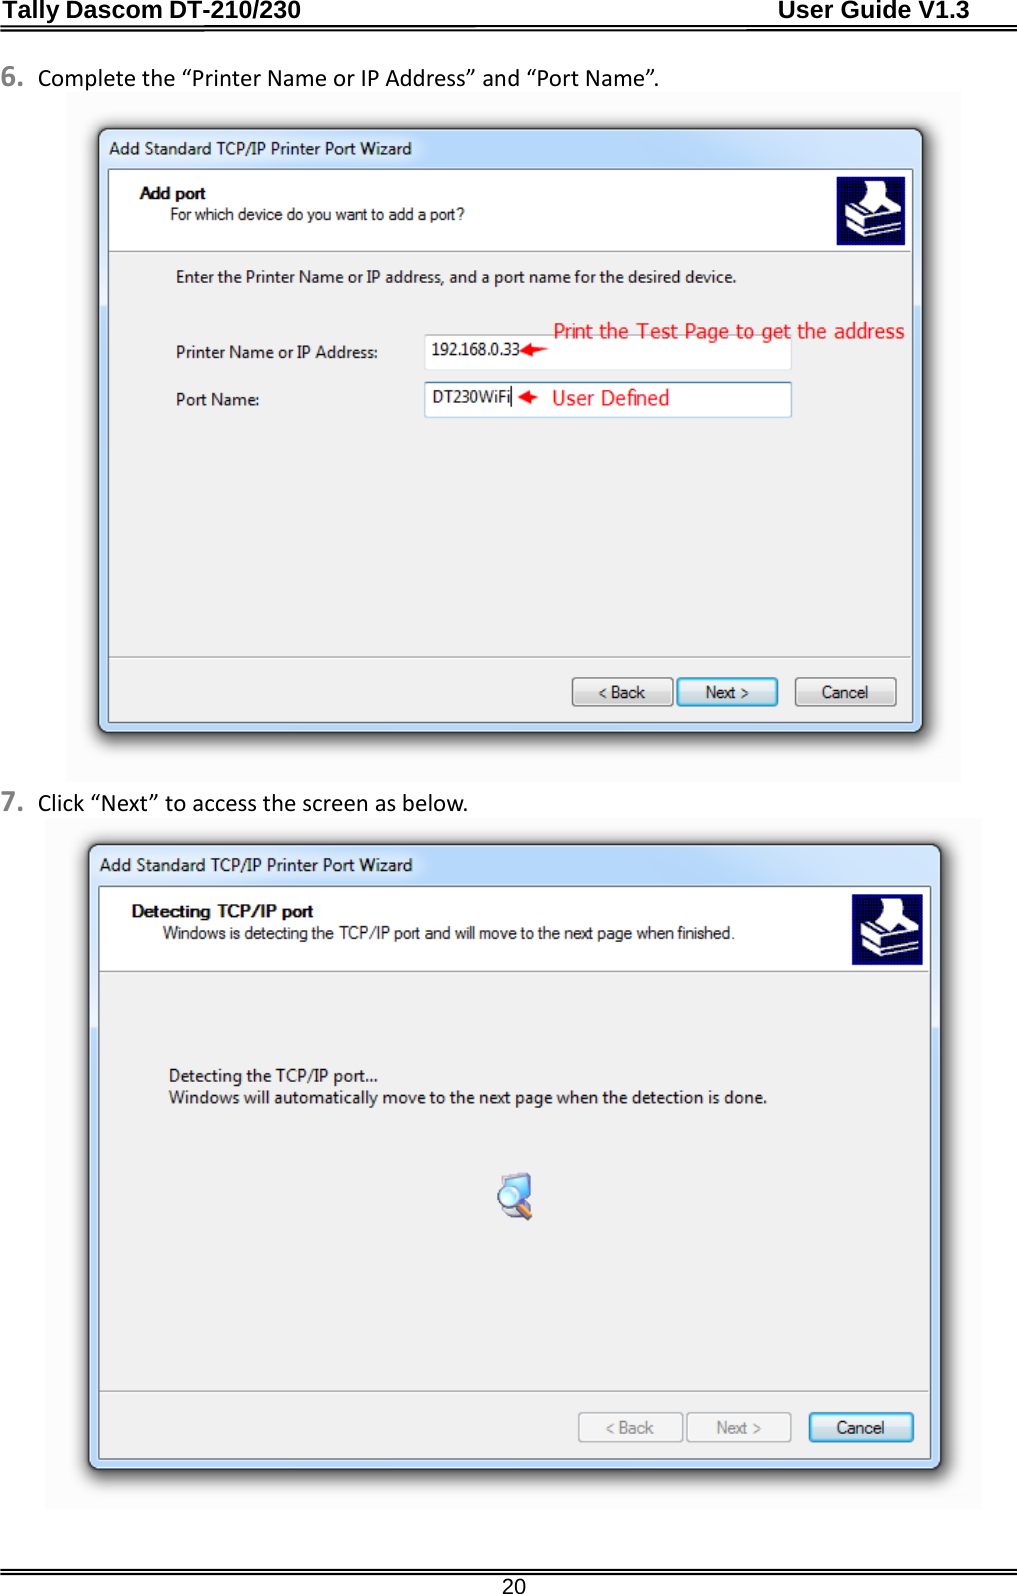
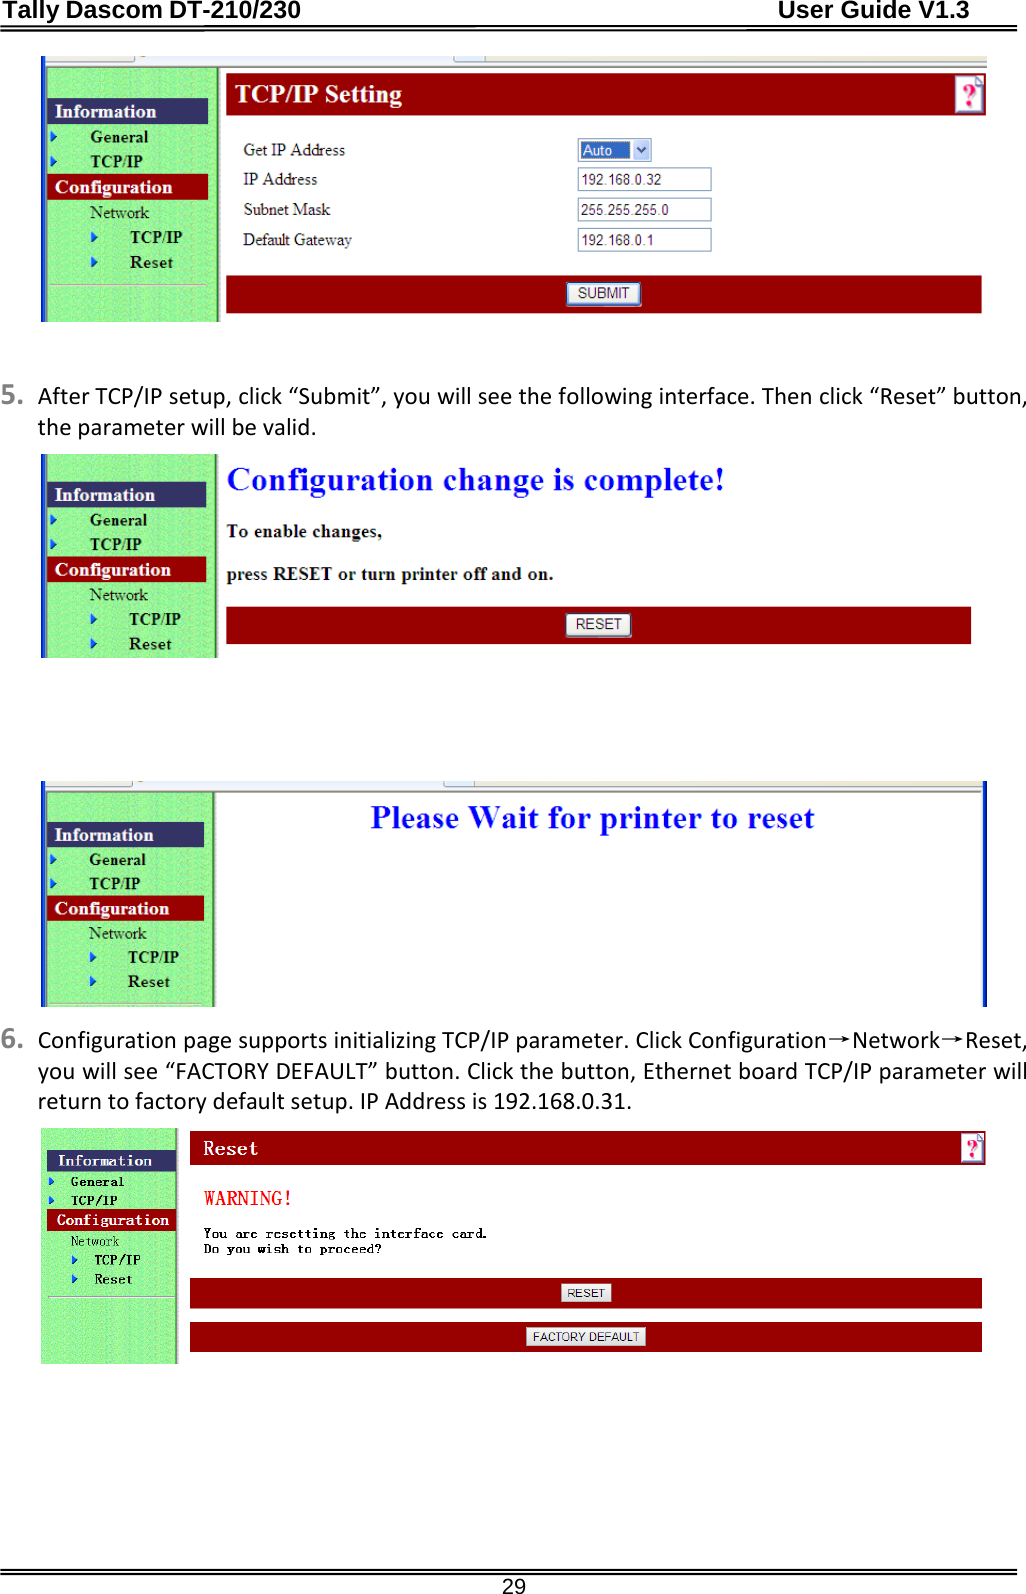
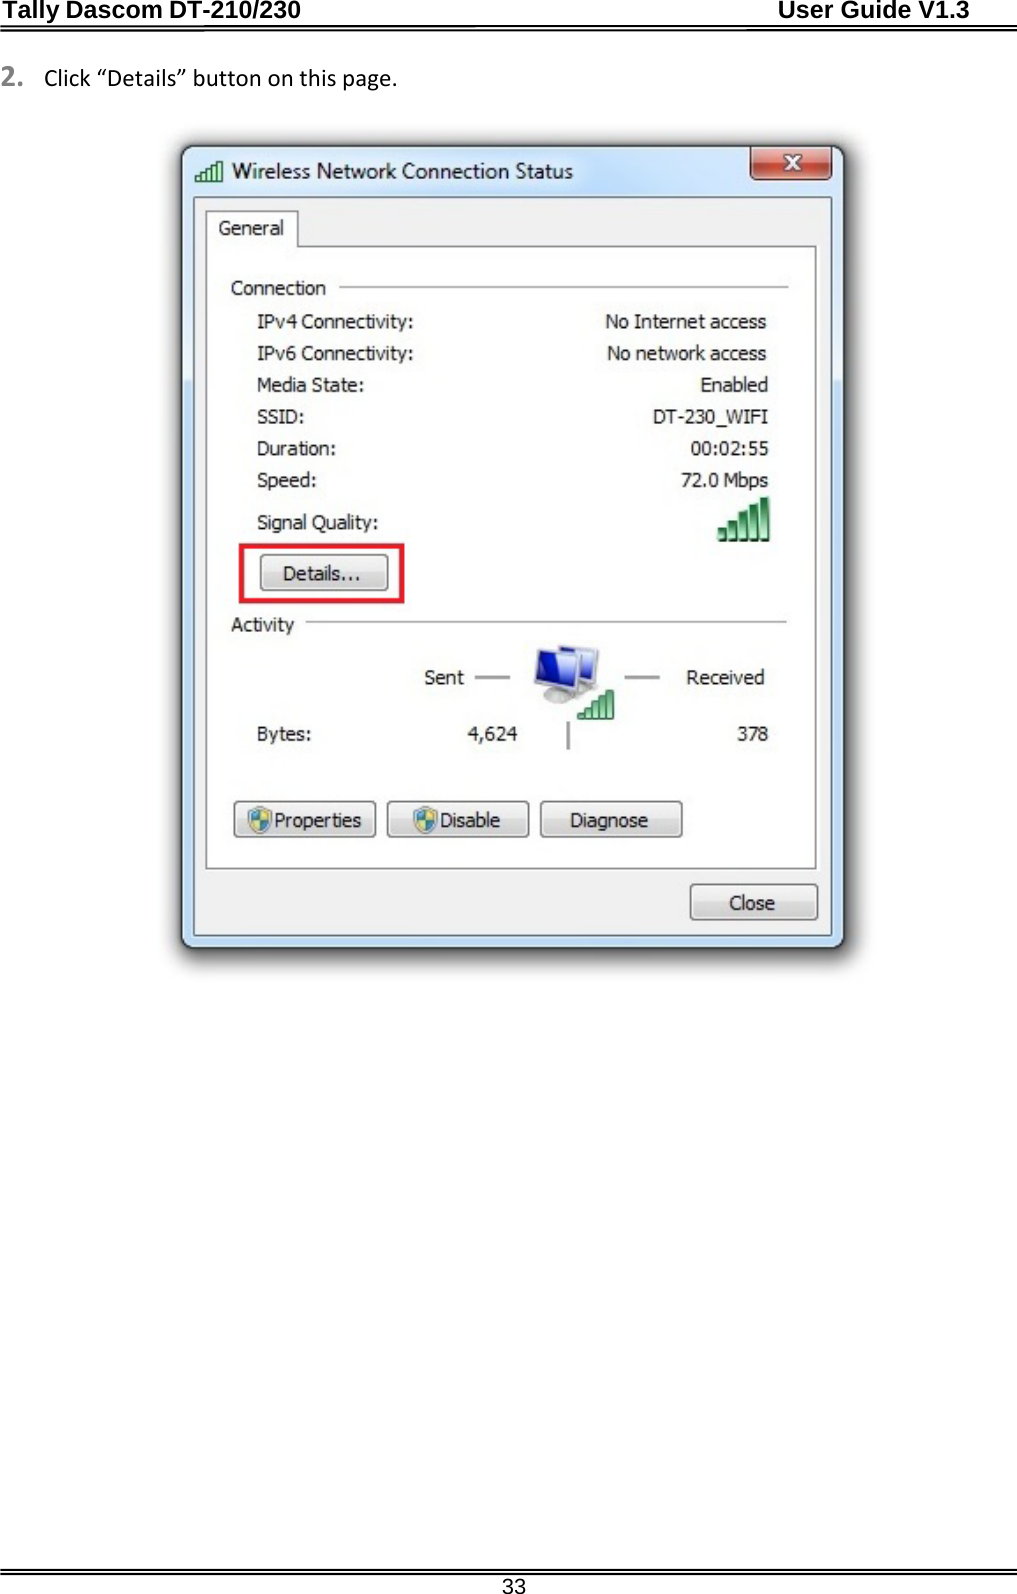
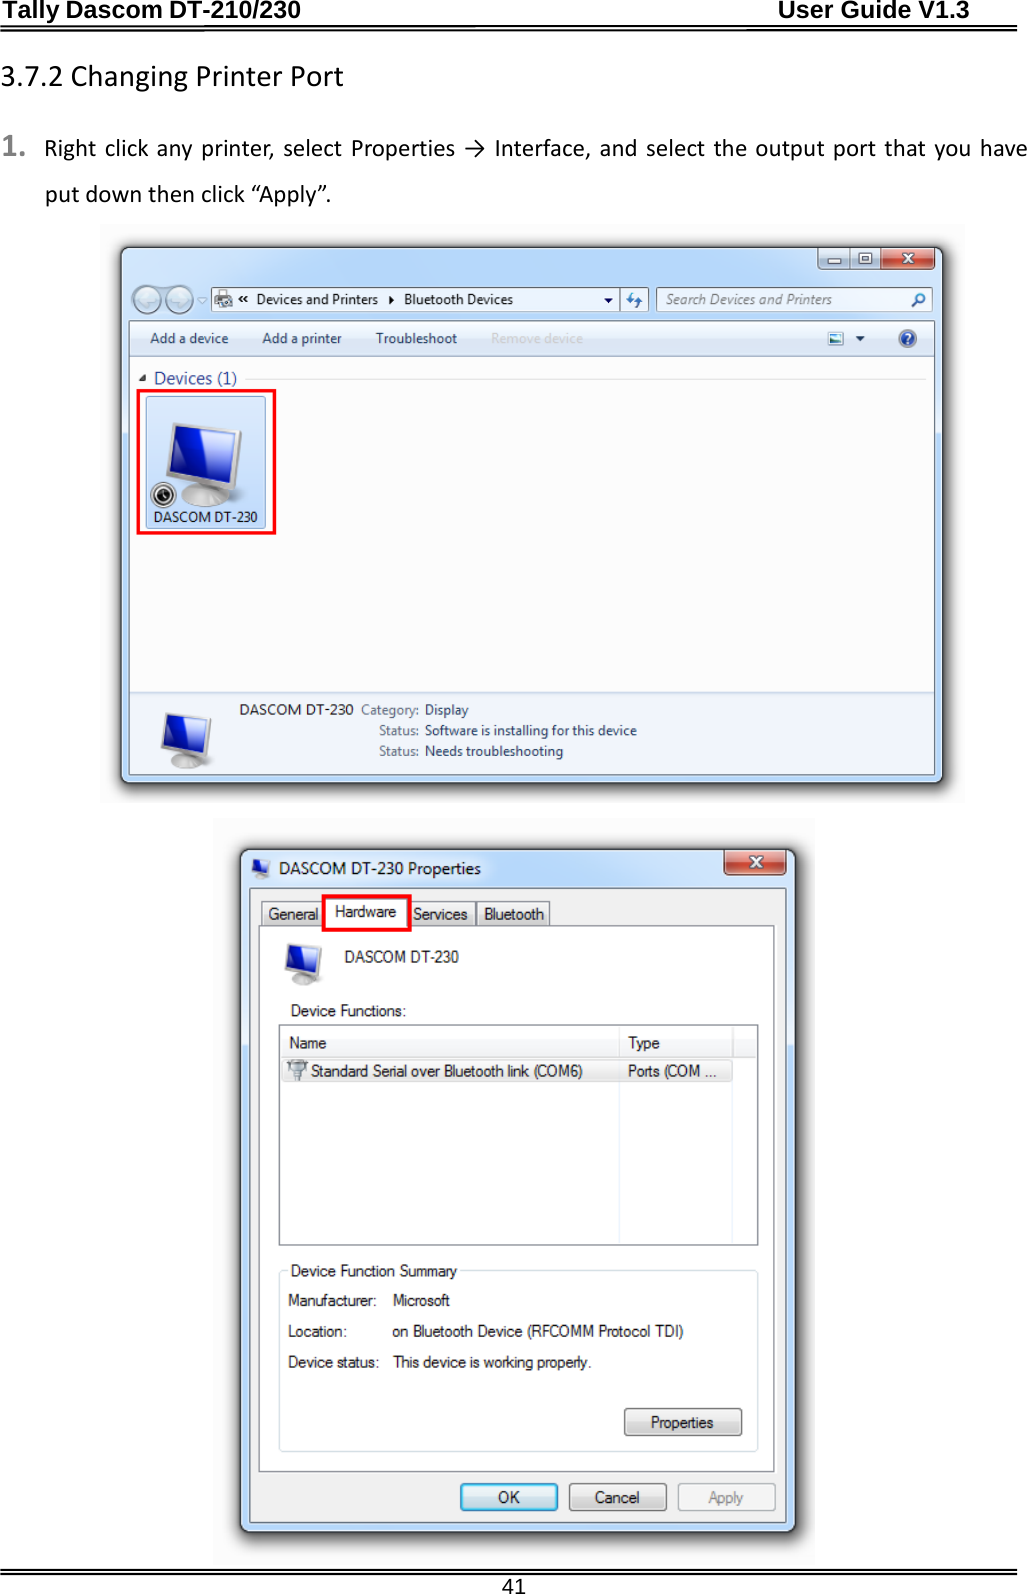
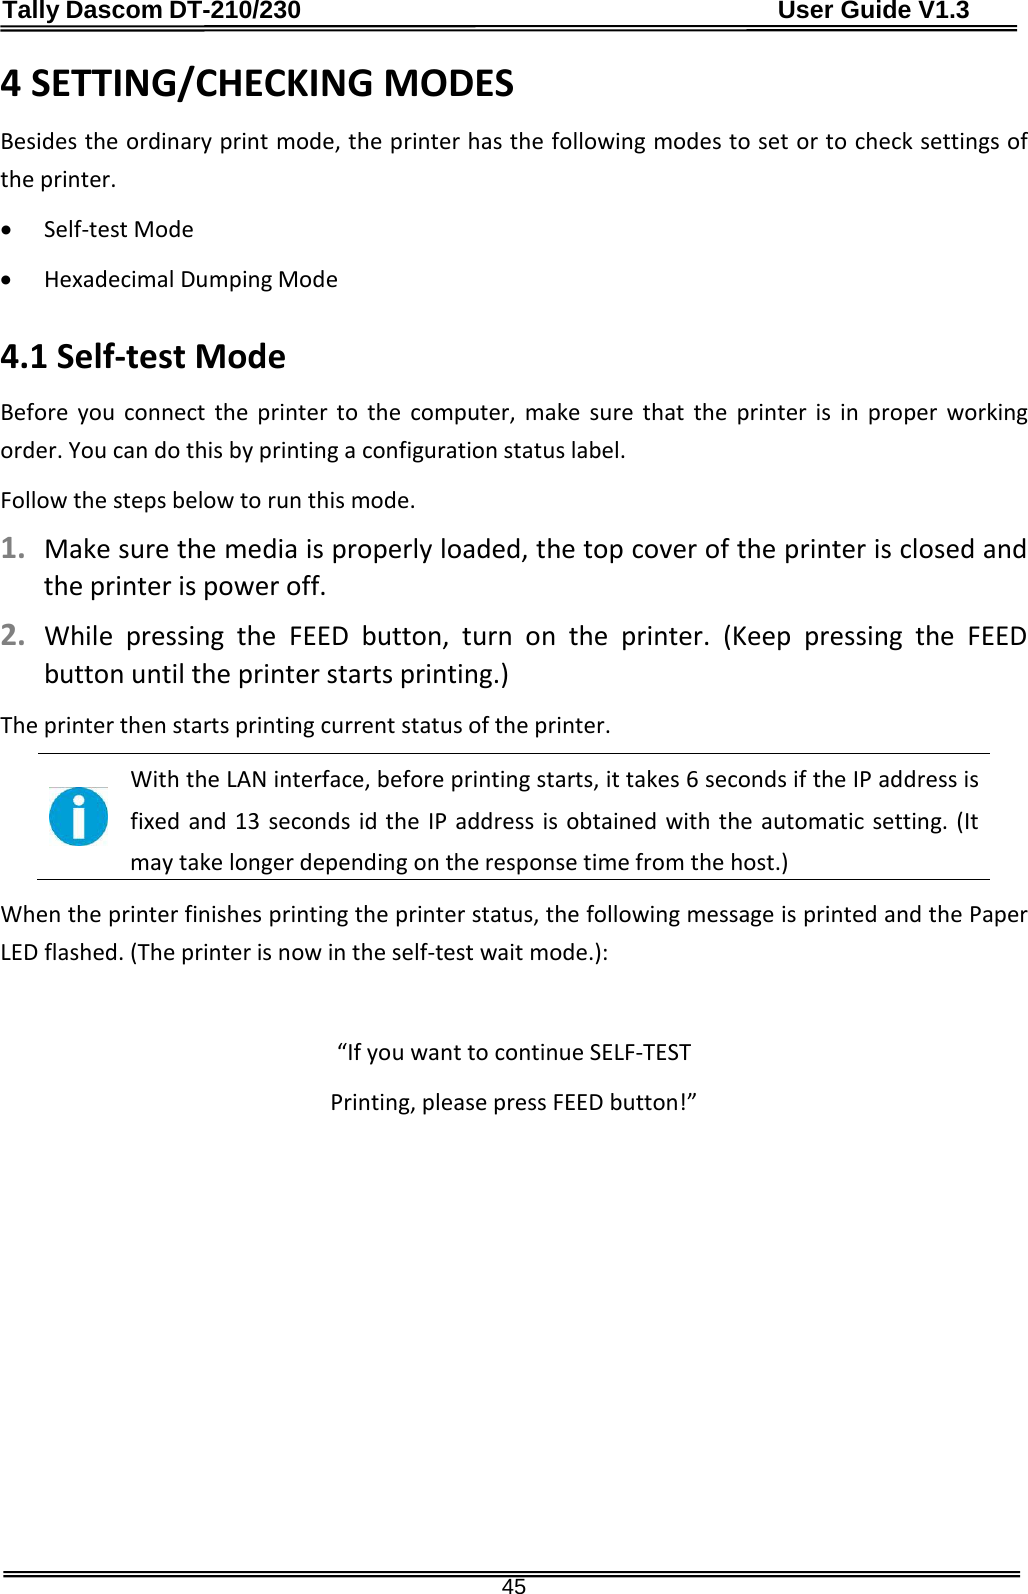
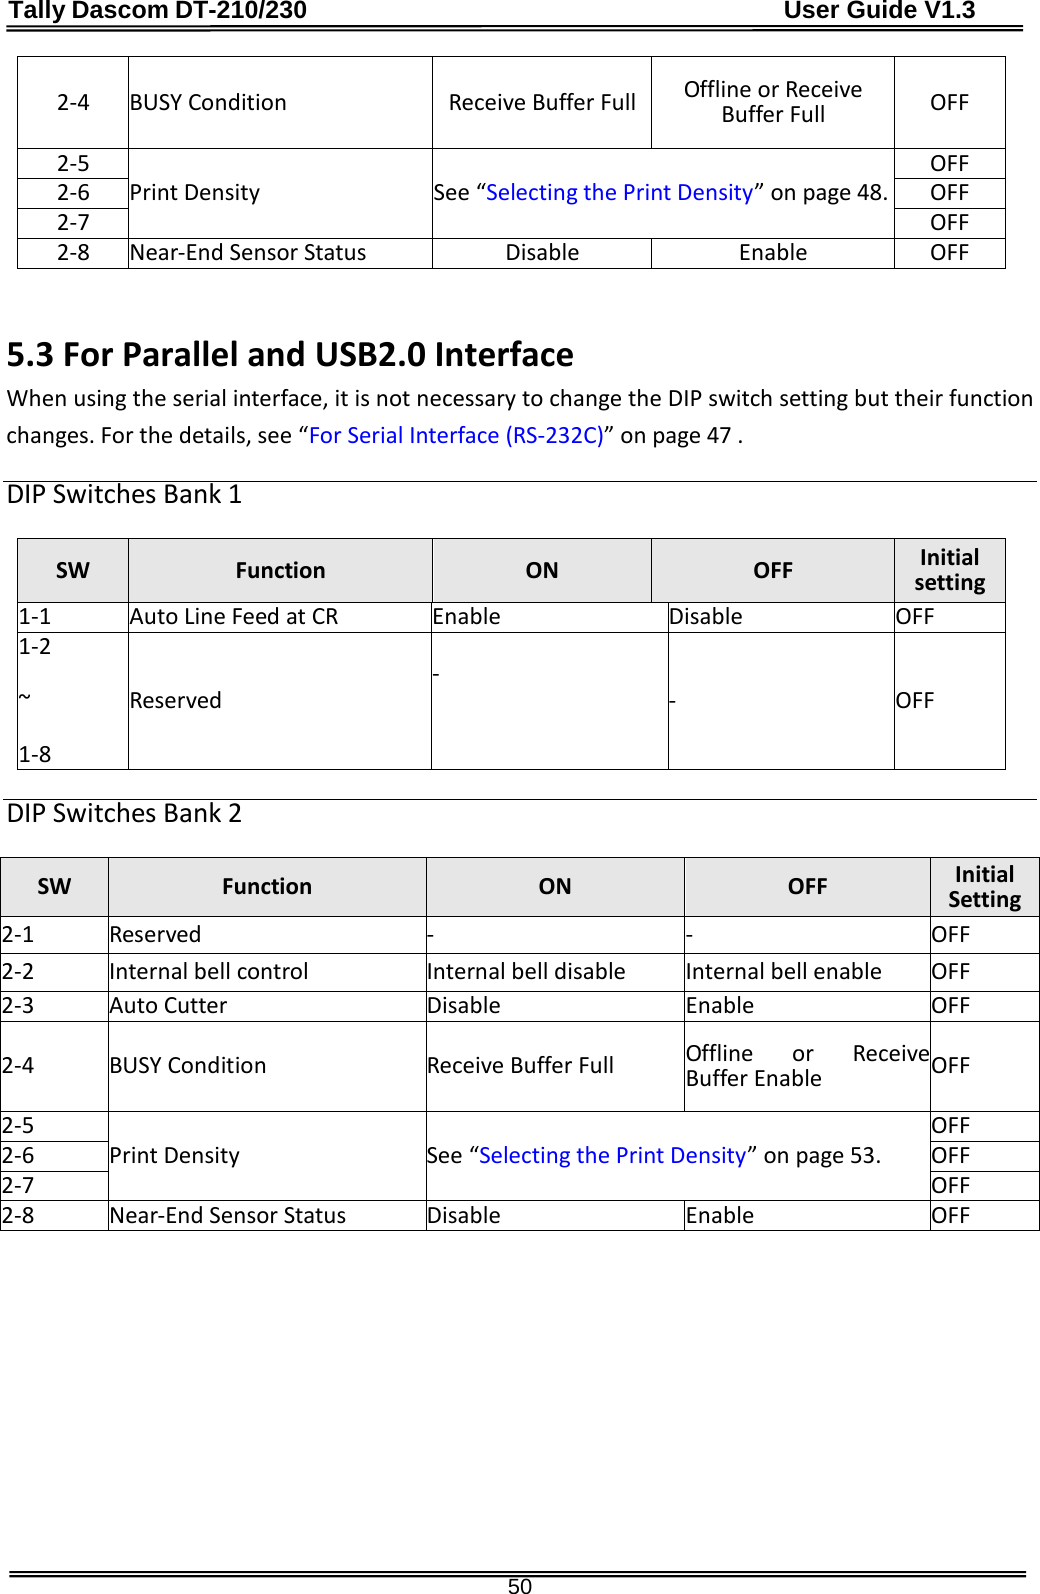
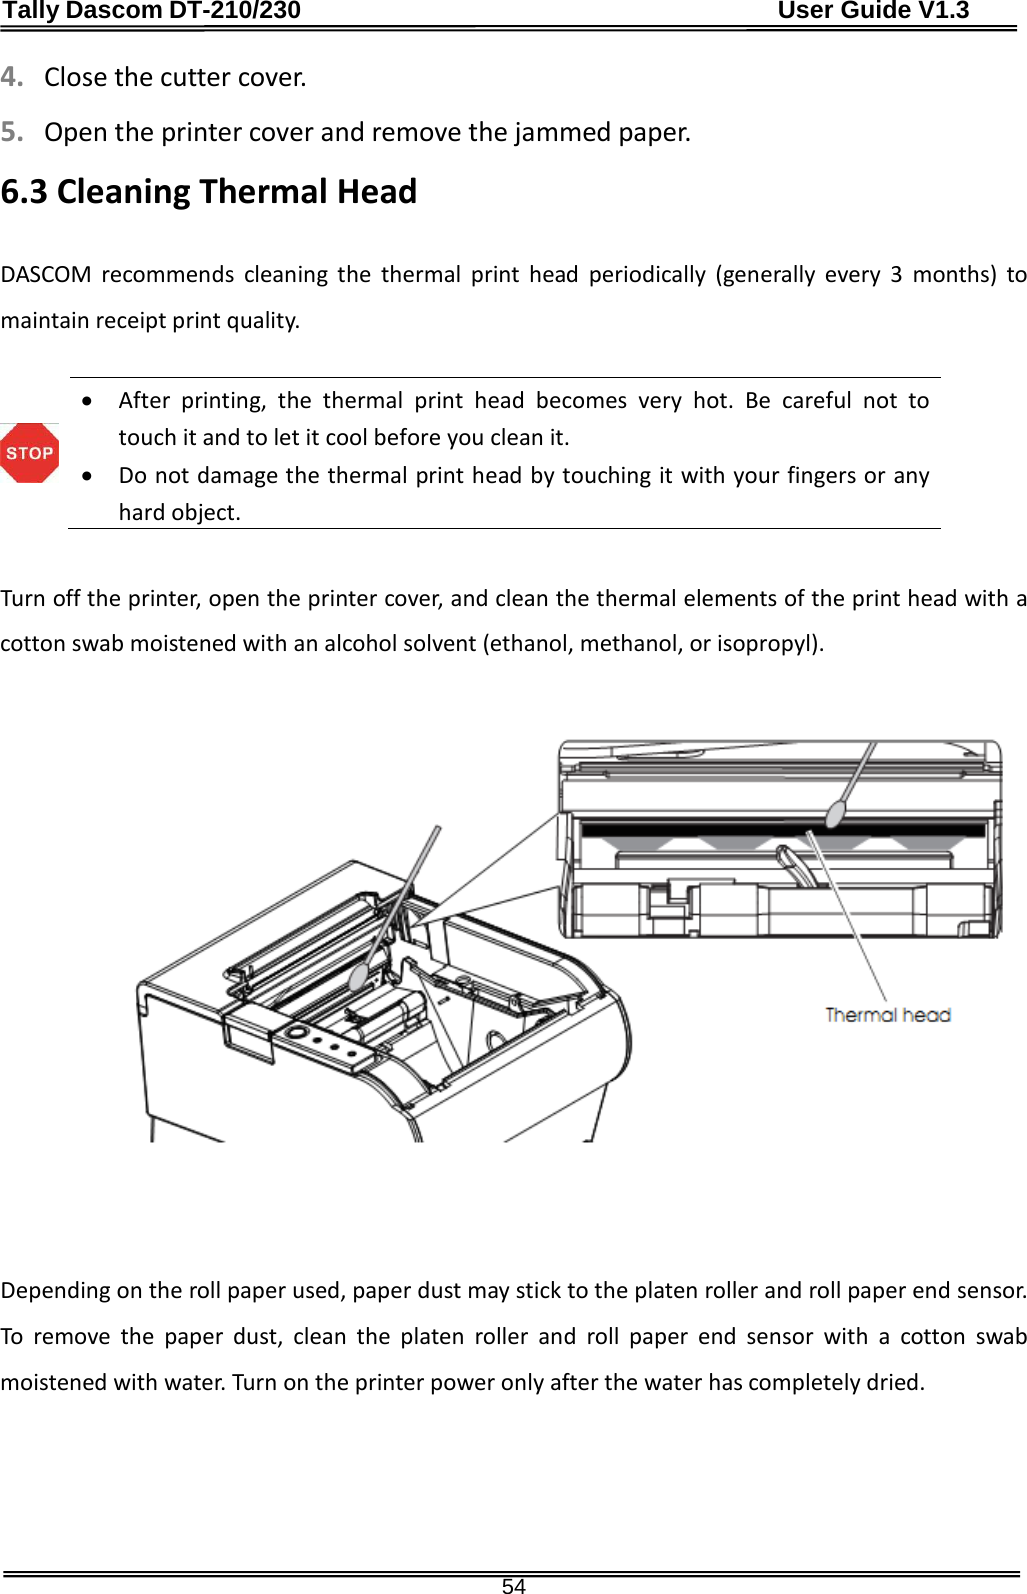
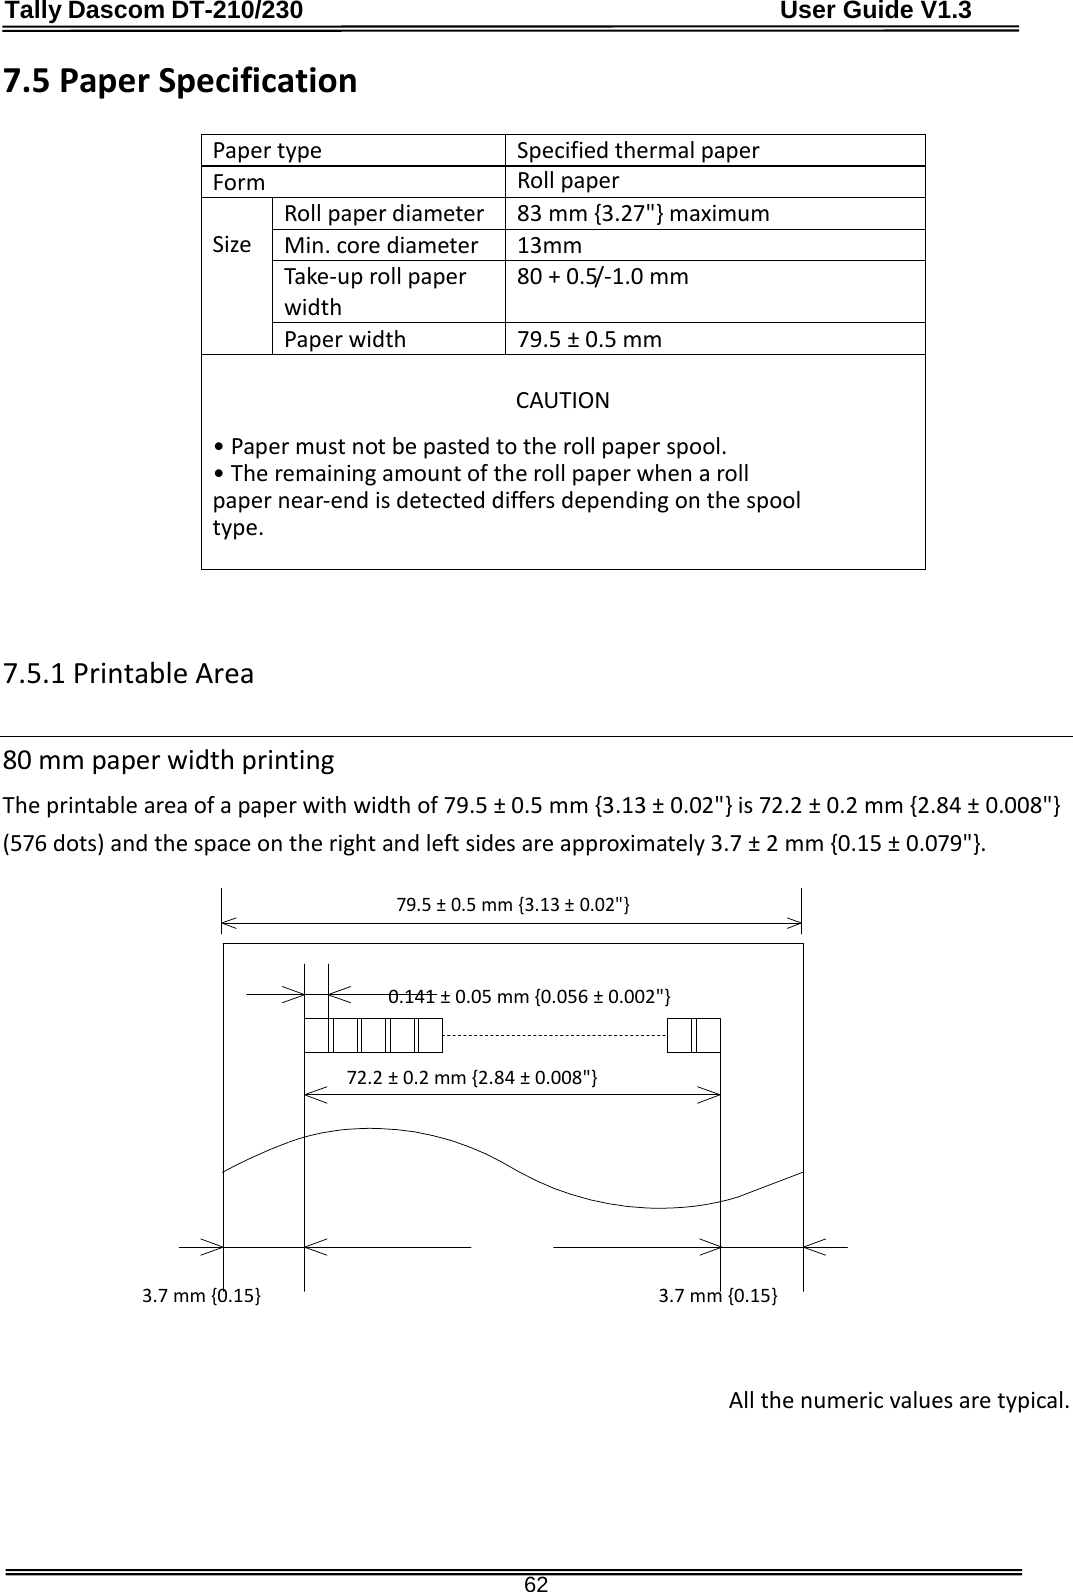
![Tally Dascom DT-210/230 User Guide V1.3 66 8.2 International Character Sets Country ASCII code (Hex) 23 24 40 5B 5C 5D 5E 60 7B 7C 7D 7E USA # $ @ [ \ ] ^ ` { | } ~ France # $ à ° ç § ^ ` é ù è ¨ Germany # $ § Ä Ö Ü ^ ` ä ö ü β U.K. £ $ @ [ \ ] ^ ` { | } ~ Denmark I # $ @ Æ Ø Å ^ ` æ ø å ~ Sweden # ¤ É Ä Ö Å Ü é ä ö å ü Italy # $ @ ° \ é ^ ù à ò è ì Spain I Pt $ @ ¡ Ñ ¿ ^ ` ¨ ñ } ~ Japan # $ @ [ ¥ ] ^ ` { | } ~ Norway # ¤ É Æ Ø Å Ü é æ ø å ü Denmark II # $ É Æ Ø Å Ü é æ ø å ü Spain II # $ á ¡ Ñ ¿ é ` í ñ ó ú Latin America # $ á ¡ Ñ ¿ é ü í ñ ó ú Korea # $ @ [ W ] ^ ` { | } ~ Slovenia/ Croatia # $ Ž Š Đ Ć Č ž š đ ć č China # Ұ @ [ \ ] ^ ` { | } ~](https://usermanual.wiki/Jiangmen-Dascom-Computer-Peripherals/TD2100/User-Guide-2514835-Page-71.png)
![Tally Dascom DT-210/230 User Guide V1.3 67 8.3 [User-defined page] HEX 8 9 A B C D E F 0 SP SP SP SP SP SP SP SP 128 144 160 176 192 208 224 240 1 SP SP SP SP SP SP SP SP 129 145 161 177 193 209 225 241 2 SP SP SP SP SP SP SP SP 130 146 162 178 194 210 226 242 3 SP SP SP SP SP SP SP SP 131 147 163 179 195 211 227 243 4 SP SP SP SP SP SP SP SP 132 148 164 180 196 212 228 244 5 SP SP SP SP SP SP SP SP 133 149 165 181 197 213 229 245 6 SP SP SP SP SP SP SP SP 134 150 166 182 198 214 230 246 7 SP SP SP SP SP SP SP SP 135 151 167 183 199 215 231 247 8 SP SP SP SP SP SP SP SP 136 152 168 184 200 216 232 248 9 SP SP SP SP SP SP SP SP 137 153 169 185 201 217 233 249 A SP SP SP SP SP SP SP SP 138 154 170 186 202 218 234 250 B SP SP SP SP SP SP SP SP 139 155 171 187 203 219 235 251 C SP SP SP SP SP SP SP SP 140 156 172 188 204 220 236 252 D SP SP SP SP SP SP SP SP 141 157 173 189 205 221 237 253 E SP SP SP SP SP SP SP SP 142 158 174 190 206 222 238 254 F SP SP SP SP SP SP SP SP 143 159 175 191 207 223 239 255](https://usermanual.wiki/Jiangmen-Dascom-Computer-Peripherals/TD2100/User-Guide-2514835-Page-72.png)
![Tally Dascom DT-210/230 User Guide V1.3 68 8.4 [PC437: USA, Standard Europe] HEX 8 9 A B C D E F 0 Ç É á ░ └ ╨ α ≡ 128 144 160 176 192 208 224 240 1 ü æ í ▒ ┴ ╤ β ± 129 145 161 177 193 209 225 241 2 é Æ ó ▓ ┬ ╥ Γ ≥ 130 146 162 178 194 210 226 242 3 â ô ú │ ├ ╙ π ≤ 131 147 163 179 195 211 227 243 4 ä ö ñ ┤ ─ ╘ Σ ⌠ 132 148 164 180 196 212 228 244 5 à ò Ñ ╡ ┼ ╒ σ ⌡ 133 149 165 181 197 213 229 245 6 å û a ╢ ╞ ╓ μ ÷ 134 150 166 182 198 214 230 246 7 ç ù o ╖ ╟ ╫ τ ≈ 135 151 167 183 199 215 231 247 8 ê ÿ ¿ ╕ ╚ ╪ Ф ° 136 152 168 184 200 216 232 248 9 ë Ö ┌ ╣ ╔ ┘ Θ • 137 153 169 185 201 217 233 249 A è Ü ¬ ║ ╩ ┌ Ω · 138 154 170 186 202 218 234 250 B ï ¢ ½ ╗ ╦ █ δ √ 139 155 171 187 203 219 235 251 C î £ ¼ ╝ ╠ ▄ ∞ n 140 156 172 188 204 220 236 252 D ì ¥ ¡ ╜ ═ ▌ Φ ² 141 157 173 189 205 221 237 253 E Ä Pt « ╛ ╬ ▐ ε ■ 142 158 174 190 206 222 238 254 F Å ƒ » ┐ ╧ ▀ ∩ SP 143 159 175 191 207 223 239 255](https://usermanual.wiki/Jiangmen-Dascom-Computer-Peripherals/TD2100/User-Guide-2514835-Page-73.png)
![Tally Dascom DT-210/230 User Guide V1.3 69 8.5 [PC850: Multilingual] HEX 8 9 A B C D E F 0 Ç É á ░ └ ð Ó - 128 144 160 176 192 208 224 240 1 ü æ í ▒ ┴ Ð β ± 129 145 161 177 193 209 225 241 2 é Æ ó ▓ ┬ Ê Ô 130 146 162 178 194 210 226 242 3 â ô ú │ ├ Ë Ò ¾ 131 147 163 179 195 211 227 243 4 ä ö ñ ┤ ─ È õ ¶ 132 148 164 180 196 212 228 244 5 à ò Ñ Á ┼ ı Õ § 133 149 165 181 197 213 229 245 6 å û a  ã Í μ ÷ 134 150 166 182 198 214 230 246 7 ç ù o À à Πþ ¸ 135 151 167 183 199 215 231 247 8 ê ÿ ¿ © ╚ Ï Þ ° 136 152 168 184 200 216 232 248 9 ë Ö ® ╣ ╔ ┘ Ú ¨ 137 153 169 185 201 217 233 249 A è Ü ¬ ║ ╩ ┌ Û · 138 154 170 186 202 218 234 250 B ï ø ½ ╗ ╦ █ Ù ¹ 139 155 171 187 203 219 235 251 C î £ ¼ ╝ ╠ ▄ ý ³ 140 156 172 188 204 220 236 252 D ì Ø ¡ ¢ ═ ¦ Ý ² 141 157 173 189 205 221 237 253 E Ä × « ¥ ╬ Ì ¯ ■ 142 158 174 190 206 222 238 254 F Å ƒ » ┐ ¤ ▀ ´ SP 143 159 175 191 207 223 239 255](https://usermanual.wiki/Jiangmen-Dascom-Computer-Peripherals/TD2100/User-Guide-2514835-Page-74.png)
![Tally Dascom DT-210/230 User Guide V1.3 70 8.6 [PC852: Latin2] HEX 8 9 A B C D E F 0 Ç É 128 1 ü Ĺ 129 2 é ĺ 130 3 â ô 131 4 ä ö 132 5 ů ˇL 133 6 ć ˇl 134 7 ç Ś 135 8 ł ś 136 9 ë Ö 137 A Ő Ü 138 B ő Ť 139 C î ˇt 140 D Ź Ł 141 E Ä × 142 F Ć č 143 á 144 í 145 ó 146 ú 147 Ą 148 ą 149 Ž 150 ž 151 Ę 152 ę 153 SP 154 ź 155 Č 156 ş 157 « 158 » 159 ░ 160 ▒ 161 ▓ 162 │ 163 ┤ 164 Á 165 Â 166 Ě 167 Ş 168 ╣ 169 ║ 170 ╗ 171 ╝ 172 Ż 173 ż 174 ┐ 175 └ 176 ┴ 177 ┬ 178 ├ 179 ─ 180 ┼ 181 Ă 182 ă 183 ╚ 184 ╔ 185 ╩ 186 ╦ 187 ╠ 188 ═ 189 ╬ 190 ¤ 191 đ 192 Ð 193 Ď 194 Ë 195 dˇ 196 Ň 197 Í 198 Î 199 ě 200 ┘ 201 ┌ 202 █ 203 ▄ 204 Ţ 205 Ů 206 ▀ 207 Ó 208 β 209 Ô 210 Ń 211 ń 212 ň 213 Š 214 š 215 Ŕ 216 Ú 217 ŕ 218 Ű 219 ý 220 Ý 221 ţ 222 ´ 223 - 224 ˝ 225 ˛ 226 ˇ 227 ˘ 228 § 229 ÷ 230 ¸ 231 ° 232 ¨ 233 • 234 ű 235 Ř 236 ř 237 ■ 238 SP 239 240 241 242 243 244 245 246 247 248 249 250 251 252 253 254 255](https://usermanual.wiki/Jiangmen-Dascom-Computer-Peripherals/TD2100/User-Guide-2514835-Page-75.png)
![Tally Dascom DT-210/230 User Guide V1.3 71 8.7 [PC858: Euro] HEX 8 9 A B C D E F 0 Ç É á ░ └ ð Ó - 128 144 160 176 192 208 224 240 1 ü æ í ▒ ┴ Ð β ± 129 145 161 177 193 209 225 241 2 é Æ ó ▓ ┬ Ê Ô 130 146 162 178 194 210 226 242 3 â ô ú │ ├ Ë Ò ¾ 131 147 163 179 195 211 227 243 4 ä ö ñ ┤ ─ È õ ¶ 132 148 164 180 196 212 228 244 5 à ò Ñ Á ┼ € Õ § 133 149 165 181 197 213 229 245 6 å û a  ã Í μ ÷ 134 150 166 182 198 214 230 246 7 ç ù o À à Πþ ¸ 135 151 167 183 199 215 231 247 8 ê ÿ ¿ © ╚ Ï Þ ° 136 152 168 184 200 216 232 248 9 ë Ö ® ╣ ╔ ┘ Ú ¨ 137 153 169 185 201 217 233 249 A è Ü ¬ ║ ╩ ┌ Û · 138 154 170 186 202 218 234 250 B ï ø ½ ╗ ╦ █ Ù ¹ 139 155 171 187 203 219 235 251 C î £ ¼ ╝ ╠ ▄ ý ³ 140 156 172 188 204 220 236 252 D ì Ø ¡ ¢ ═ ¦ Ý ² 141 157 173 189 205 221 237 253 E Ä × « ¥ ╬ Ì ¯ ■ 142 158 174 190 206 222 238 254 F Å ƒ » ┐ ¤ ▀ ´ SP 143 159 175 191 207 223 239 255](https://usermanual.wiki/Jiangmen-Dascom-Computer-Peripherals/TD2100/User-Guide-2514835-Page-76.png)
![Tally Dascom DT-210/230 User Guide V1.3 72 8.8 [PC860: Portuguese] HEX 8 9 A B C D E F 0 Ç É á ░ └ ╨ α ≡ 128 144 160 176 192 208 224 240 1 ü À í ▒ ┴ ╤ β ± 129 145 161 177 193 209 225 241 2 é È ó ▓ ┬ ╥ Γ ≥ 130 146 162 178 194 210 226 242 3 â ô ú │ ├ ╙ π ≤ 131 147 163 179 195 211 227 243 4 ã õ ñ ┤ ─ ╘ Σ ⌠ 132 148 164 180 196 212 228 244 5 à ò Ñ ╡ ┼ ╒ σ ⌡ 133 149 165 181 197 213 229 245 6 Á Ú a ╢ ╞ ╓ μ ÷ 134 150 166 182 198 214 230 246 7 ç ù o ╖ ╟ ╫ τ ≈ 135 151 167 183 199 215 231 247 8 ê Ì ¿ ╕ ╚ ╪ Ф ° 136 152 168 184 200 216 232 248 9 Ê Õ Ò ╣ ╔ ┘ Θ • 137 153 169 185 201 217 233 249 A è Ü ¬ ║ ╩ ┌ Ω · 138 154 170 186 202 218 234 250 B Í ¢ ½ ╗ ╦ █ δ √ 139 155 171 187 203 219 235 251 C Ô £ ¼ ╝ ╠ ▄ ∞ n 140 156 172 188 204 220 236 252 D ì Ù ¡ ╜ ═ ▌ Φ ² 141 157 173 189 205 221 237 253 E Ã Pt « ╛ ╬ ▐ ε ■ 142 158 174 190 206 222 238 254 F Å Ó » ┐ ╧ ▀ ∩ SP 143 159 175 191 207 223 239 255](https://usermanual.wiki/Jiangmen-Dascom-Computer-Peripherals/TD2100/User-Guide-2514835-Page-77.png)
![Tally Dascom DT-210/230 User Guide V1.3 73 8.9 [PC863: Canadian-French] HEX 8 9 A B C D E F 0 Ç É ¦ ░ └ ╨ α ≡ 128 144 160 176 192 208 224 240 1 ü È ´ ▒ ┴ ╤ β ± 129 145 161 177 193 209 225 241 2 é Ê ó ▓ ┬ ╥ Γ ≥ 130 146 162 178 194 210 226 242 3 â ô ú │ ├ ╙ π ≤ 131 147 163 179 195 211 227 243 4 Â Ë ¨ ┤ ─ ╘ Σ ⌠ 132 148 164 180 196 212 228 244 5 à Ï ¸ ╡ ┼ ╒ σ ⌡ 133 149 165 181 197 213 229 245 6 ¶ û ³ ╢ ╞ ╓ μ ÷ 134 150 166 182 198 214 230 246 7 ç ù ¯ ╖ ╟ ╫ τ ≈ 135 151 167 183 199 215 231 247 8 ê ¤ Î ╕ ╚ ╪ Ф ° 136 152 168 184 200 216 232 248 9 ë Ô ┌ ╣ ╔ ┘ Θ • 137 153 169 185 201 217 233 249 A è Ü ¬ ║ ╩ ┌ Ω · 138 154 170 186 202 218 234 250 B ï ¢ ½ ╗ ╦ █ δ √ 139 155 171 187 203 219 235 251 C î £ ¼ ╝ ╠ ▄ ∞ n 140 156 172 188 204 220 236 252 D Ù ¾ ╜ ═ ▌ Φ ² 141 157 173 189 205 221 237 253 E À Û « ╛ ╬ ▐ ε ■ 142 158 174 190 206 222 238 254 F § ƒ » ┐ ╧ ▀ ∩ SP 143 159 175 191 207 223 239 255](https://usermanual.wiki/Jiangmen-Dascom-Computer-Peripherals/TD2100/User-Guide-2514835-Page-78.png)
![Tally Dascom DT-210/230 User Guide V1.3 74 8.10 [PC865: Nordic] HEX 8 9 A B C D E F 0 Ç É á ░ └ ╨ α ≡ 128 144 160 176 192 208 224 240 1 ü æ í ▒ ┴ ╤ β ± 129 145 161 177 193 209 225 241 2 é Æ ó ▓ ┬ ╥ Γ ≥ 130 146 162 178 194 210 226 242 3 â ô ú │ ├ ╙ π ≤ 131 147 163 179 195 211 227 243 4 ä ö ñ ┤ ─ ╘ Σ ⌠ 132 148 164 180 196 212 228 244 5 à ò Ñ ╡ ┼ ╒ σ ⌡ 133 149 165 181 197 213 229 245 6 å û a ╢ ╞ ╓ μ ÷ 134 150 166 182 198 214 230 246 7 ç ù o ╖ ╟ ╫ τ ≈ 135 151 167 183 199 215 231 247 8 ê ÿ ¿ ╕ ╚ ╪ Ф ° 136 152 168 184 200 216 232 248 9 ë Ö ┌ ╣ ╔ ┘ Θ • 137 153 169 185 201 217 233 249 A è Ü ¬ ║ ╩ ┌ Ω · 138 154 170 186 202 218 234 250 B ï ø ½ ╗ ╦ █ δ √ 139 155 171 187 203 219 235 251 C î £ ¼ ╝ ╠ ▄ ∞ n 140 156 172 188 204 220 236 252 D ì Ø ¡ ╜ ═ ▌ Φ ² 141 157 173 189 205 221 237 253 E Ä Pt « ╛ ╬ ▐ ε ■ 142 158 174 190 206 222 238 254 F Å ƒ ¤ ┐ ╧ ▀ ∩ SP 143 159 175 191 207 223 239 255](https://usermanual.wiki/Jiangmen-Dascom-Computer-Peripherals/TD2100/User-Guide-2514835-Page-79.png)
![Tally Dascom DT-210/230 User Guide V1.3 75 8.11 [PC866: Cyrillic #2] HEX 8 9 A B C D E F 0 А Р 128 1 Б С 129 2 В Т 130 3 Г У 131 4 Д Ф 132 5 Е Х 133 6 Ж Ц 134 7 З Ч 135 8 И Ш 136 9 Й Щ 137 A К Ъ 138 B Л Ы 139 C М Ь 140 D Н Э 141 E О Ю 142 F П Я 143 а 144 б 145 в 146 г 147 д 148 е 149 ж 150 з 151 и 152 й 153 к 154 л 155 м 156 н 157 о 158 п 159 ░ 160 ▒ 161 ▓ 162 │ 163 ┤ 164 ╡ 165 ╢ 166 ╖ 167 ╕ 168 ╣ 169 ║ 170 ╗ 171 ╝ 172 ╜ 173 ╛ 174 ┐ 175 └ 176 ┴ 177 ┬ 178 ├ 179 ─ 180 ┼ 181 ╞ 182 ╟ 183 ╚ 184 ╔ 185 ╩ 186 ╦ 187 ╠ 188 ═ 189 ╬ 190 ╧ 191 ╨ 192 ╤ 193 ╥ 194 ╙ 195 ╘ 196 ╒ 197 ╓ 198 ╫ 199 ╪ 200 ┘ 201 ┌ 202 █ 203 ▄ 204 ▌ 205 ▐ 206 ▀ 207 р 208 с 209 т 210 у 211 ф 212 х 213 ц 214 ч 215 ш 216 щ 217 ъ 218 ы 219 ь 220 э 221 ю 222 я 223 Ё 224 ё 225 Є 226 є 227 Ї 228 ї 229 Ў 230 ў 231 ° 232 • 233 · 234 √ 235 № 236 ¤ 237 ■ 238 SP 239 240 241 242 243 244 245 246 247 248 249 250 251 252 253 254 255](https://usermanual.wiki/Jiangmen-Dascom-Computer-Peripherals/TD2100/User-Guide-2514835-Page-80.png)
![Tally Dascom DT-210/230 User Guide V1.3 76 8.12 [KU42: Thai] HEX 8 9 A B C D E F 0 ┌ ๐ SP ฒ ย เ 128 144 160 176 192 208 224 240 1 ┐ ๑ ก ณ ร แ 129 145 161 177 193 209 225 241 2 └ ๒ ข ด ฤ โ 130 146 162 178 194 210 226 242 3 ┘ ๓ ค ต ล ใ 131 147 163 179 195 211 227 243 4 │ ๔ ฆ ถ ว ไ 132 148 164 180 196 212 228 244 5 ─ ๕ ง ท ศ ๆ 133 149 165 181 197 213 229 245 6 ├ ๖ จ ธ ษ ฯ 134 150 166 182 198 214 230 246 7 ┤ ๗ ฉ น ส 135 151 167 183 199 215 231 247 8 ┴ ๘ ช บ ห 136 152 168 184 200 216 232 248 9 ┬ ๙ ซ ป ฬ 137 153 169 185 201 217 233 249 A ┼ ฃ ฌ ผ อ 138 154 170 186 202 218 234 250 B █ ฅ ญ ฝ ฮ 139 155 171 187 203 219 235 251 C ← โ ฎ พ ะ 140 156 172 188 204 220 236 252 D ↑ ใ ฏ ฟ ฦ 141 157 173 189 205 221 237 253 E → ไ ฐ ภ า 142 158 174 190 206 222 238 254 F ↓ เ ฑ ม า۫ SP 143 159 175 191 207 223 239 255](https://usermanual.wiki/Jiangmen-Dascom-Computer-Peripherals/TD2100/User-Guide-2514835-Page-81.png)
![Tally Dascom DT-210/230 User Guide V1.3 77 8.13 [TIS11: Thai] HEX 8 9 A B C D E F 0 เ ฐ ภ ะ เ ๐ 128 144 160 176 192 208 224 240 1 ก ฑ ม แ ๑ 129 145 161 177 193 209 225 241 2 ข ฒ ย า โ ๒ 130 146 162 178 194 210 226 242 3 ฆ ณ ร า۫ ใ ๓ 131 147 163 179 195 211 227 243 4 ค ด ฤ ไ ๔ 132 148 164 180 196 212 228 244 5 ฅ ต ล ๅ ๕ 133 149 165 181 197 213 229 245 6 ฆ ถ ฦ ๆ ๖ 134 150 166 182 198 214 230 246 7 ง ท ว ๗ 135 151 167 183 199 215 231 247 8 จ ธ ศ ๘ 136 152 168 184 200 216 232 248 9 ┌ ฉ น ษ ๙ 137 153 169 185 201 217 233 249 A ┐ ช บ ส ๚ 138 154 170 186 202 218 234 250 B └ ซ ป ห ─ ๛ 139 155 171 187 203 219 235 251 C ┘ ฌ ผ ฬ ┴ โ 140 156 172 188 204 220 236 252 D │ ญ ฝ อ ┬ ใ 141 157 173 189 205 221 237 253 E ─ ฎ พ ฮ ┼ ε ไ 142 158 174 190 206 222 238 254 F ├ ฏ ฟ ฯ۫ ฿ ๏ SP 143 159 175 191 207 223 239 255](https://usermanual.wiki/Jiangmen-Dascom-Computer-Peripherals/TD2100/User-Guide-2514835-Page-82.png)
![Tally Dascom DT-210/230 User Guide V1.3 78 8.14 [TIS18: Thai] HEX 8 9 A B C D E F 0 ┌ โ SP ฐ ภ ะ เ ๐ 128 144 160 176 192 208 224 240 1 ┐ ใ ก ฑ ม แ ๑ 129 145 161 177 193 209 225 241 2 └ ข ฒ ย า โ ๒ 130 146 162 178 194 210 226 242 3 ┘ ฃ ณ ร า۫ ใ ๓ 131 147 163 179 195 211 227 243 4 │ ค ด ฤ ไ ๔ 132 148 164 180 196 212 228 244 5 ─ ฅ ต ล ๅ ๕ 133 149 165 181 197 213 229 245 6 ├ ฆ ถ ฦ ๆ ๖ 134 150 166 182 198 214 230 246 7 ┤ ง ท ว ๗ 135 151 167 183 199 215 231 247 8 ┴ จ ธ ศ ๘ 136 152 168 184 200 216 232 248 9 ┬ ฉ น ษ ๙ 137 153 169 185 201 217 233 249 A ┼ ช บ ส ๛ 138 154 170 186 202 218 234 250 B █ ซ ป ห 139 155 171 187 203 219 235 251 C ← ฌ ผ ฬ 140 156 172 188 204 220 236 252 D ↑ ญ ฝ อ 141 157 173 189 205 221 237 253 E → ฎ พ ฮ ไ 142 158 174 190 206 222 238 254 F ↓ เ ฏ ฟ ฯ۫ ฿ ๏ SP 143 159 175 191 207 223 239 255](https://usermanual.wiki/Jiangmen-Dascom-Computer-Peripherals/TD2100/User-Guide-2514835-Page-83.png)
![Tally Dascom DT-210/230 User Guide V1.3 79 8.15 [PC720: Arabic] HEX 8 9 A B C D E F 0 SP SP ب ░ └ ╨ ض ≡ 128 144 160 176 192 208 224 240 1 SP ة ▒ ┴ ╤ ط 129 145 161 177 193 209 225 241 2 é ت ▓ ┬ ╥ ظ 130 146 162 178 194 210 226 242 3 a ô ث │ ├ ╙ ع 131 147 163 179 195 211 227 243 4 SP ¤ ج ┤ ─ ╘ غ 132 148 164 180 196 212 228 244 5 à - ح ╡ ┼ ╒ ف 133 149 165 181 197 213 229 245 6 SP û خ ╢ ╞ ╓ μ 134 150 166 182 198 214 230 246 7 ç ù د ╖ ╟ ╫ ق ≈ 135 151 167 183 199 215 231 247 8 ê ء ذ ╕ ╚ ╪ ك ° 136 152 168 184 200 216 232 248 9 ë آ ر ╣ ╔ ┘ ل · 137 153 169 185 201 217 233 249 A è أ ز ║ ╩ ┌ م · 138 154 170 186 202 218 234 250 B ï ؤ س ╗ ╦ █ ن √ 139 155 171 187 203 219 235 251 C î £ ش ╝ ╠ ▄ ه ⁿ 140 156 172 188 204 220 236 252 D SP إ ص ╜ ╬ ▌ و 2 141 157 173 189 205 221 237 253 E SP ئ « ╛ ╧ ▐ ى ■ 142 158 174 190 206 222 238 254 F SP ا » ┐ SP ▀ ي SP 143 159 175 191 207 223 239 255](https://usermanual.wiki/Jiangmen-Dascom-Computer-Peripherals/TD2100/User-Guide-2514835-Page-84.png)
![Tally Dascom DT-210/230 User Guide V1.3 80 8.16 [PC864: Arabic] HEX 8 9 A B C D E F 0 ° β SP ٠ ¢ ذ - ? 128 144 160 176 192 208 224 240 1 · ∞ ١ ء ر ف ? 129 145 161 177 193 209 225 241 2 · φ آ ٢ آ ز ق ن 130 146 162 178 194 210 226 242 3 √ ± £ ٣ أ س ك ه 131 147 163 179 195 211 227 243 4 ▒ ½ ¤ ٤ ؤ ش ل 132 148 164 180 196 212 228 244 5 ─ ¼ أ ٥ ع ص م ى 133 149 165 181 197 213 229 245 6 │ ≈ SP ٦ ئ ض ن ي 134 150 166 182 198 214 230 246 7 ┼ « € ٧ ا ط ه 135 151 167 183 199 215 231 247 8 ┤ » ا ٨ ب ظ و ق 136 152 168 184 200 216 232 248 9 ┬ لأ ب ٩ ة ع ى لآ 137 153 169 185 201 217 233 249 A ├ ت ف ت غ ي 138 154 170 186 202 218 234 250 B ┴ SP ث ؛ ث | ض ل 139 155 171 187 203 219 235 251 C ┐ SP ، س ج ¬ ع ك 140 156 172 188 204 220 236 252 D ┌ لا ج ش ح ÷ ي 141 157 173 189 205 221 237 253 E └ ا ح ص خ × غ ■ 142 158 174 190 206 222 238 254 F ┘ ء خ ؟ د ع م SP 143 159 175 191 207 223 239 255](https://usermanual.wiki/Jiangmen-Dascom-Computer-Peripherals/TD2100/User-Guide-2514835-Page-85.png)
![Tally Dascom DT-210/230 User Guide V1.3 81 8.17 [WPC1256: Arabic] HEX 8 9 A B C D E F 0 € گ SP ° ہ ذ à 128 144 160 176 192 208 224 240 1 ‚ ‘ ، ± ء ر ل 129 145 161 177 193 209 225 241 2 پ ’ ¢ ² آ ز â 130 146 162 178 194 210 226 242 3 ƒ “ £ ³ أ س م 131 147 163 179 195 211 227 243 4 „ ” ¤ ´ ؤ ش ن Ô 132 148 164 180 196 212 228 244 5 … • ¥ μ إ ص ه 133 149 165 181 197 213 229 245 6 † – ¦ ¶ ئ ض و 134 150 166 182 198 214 230 246 7 ‡ — § · ا × ç ÷ 135 151 167 183 199 215 231 247 8 ˆ ک ¨ ¸ ب ط è 136 152 168 184 200 216 232 248 9 ‰ ™ © ¹ ة ظ é ù 137 153 169 185 201 217 233 249 A ٹ ڑ ه ؛ ت ع ê 138 154 170 186 202 218 234 250 B ‹ › « » ث غ ë û 139 155 171 187 203 219 235 251 C Œ œ ¬ ¼ ج - ى ü 140 156 172 188 204 220 236 252 D چ SP ½ ح ف ي SP 141 157 173 189 205 221 237 253 E ژ SP ® ¾ خ ق î SP 142 158 174 190 206 222 238 254 F ڈ ں ¯ ؟ د ك ï ے 143 159 175 191 207 223 239 255](https://usermanual.wiki/Jiangmen-Dascom-Computer-Peripherals/TD2100/User-Guide-2514835-Page-86.png)