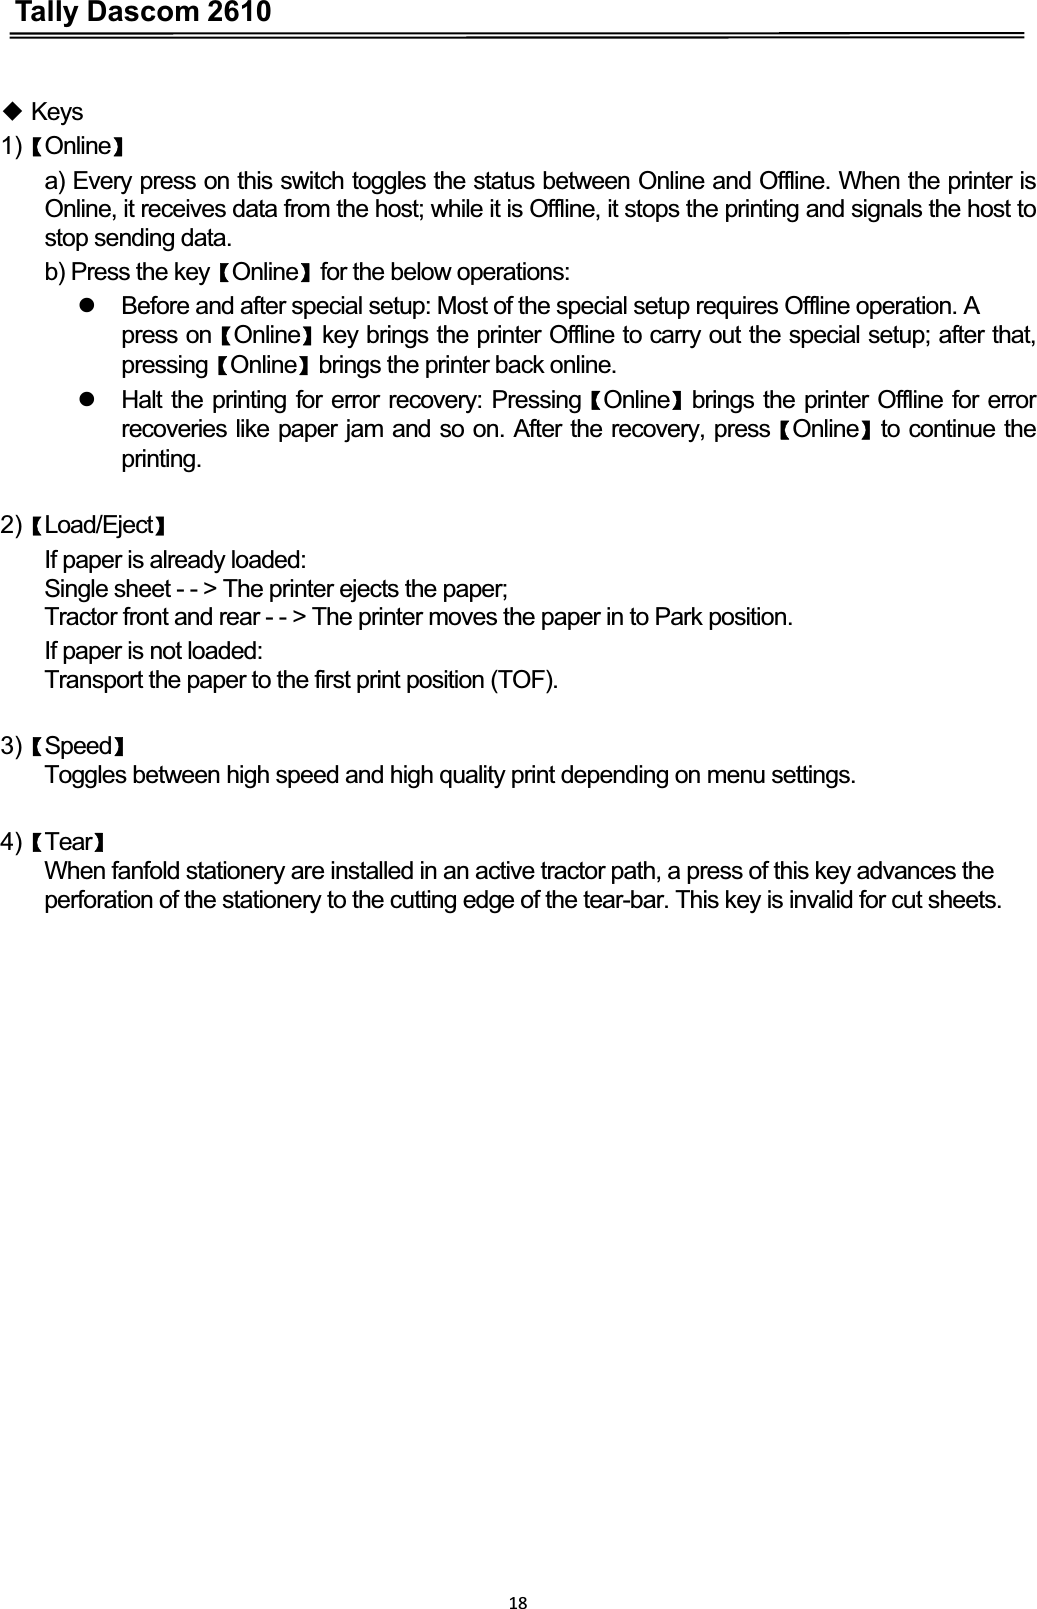
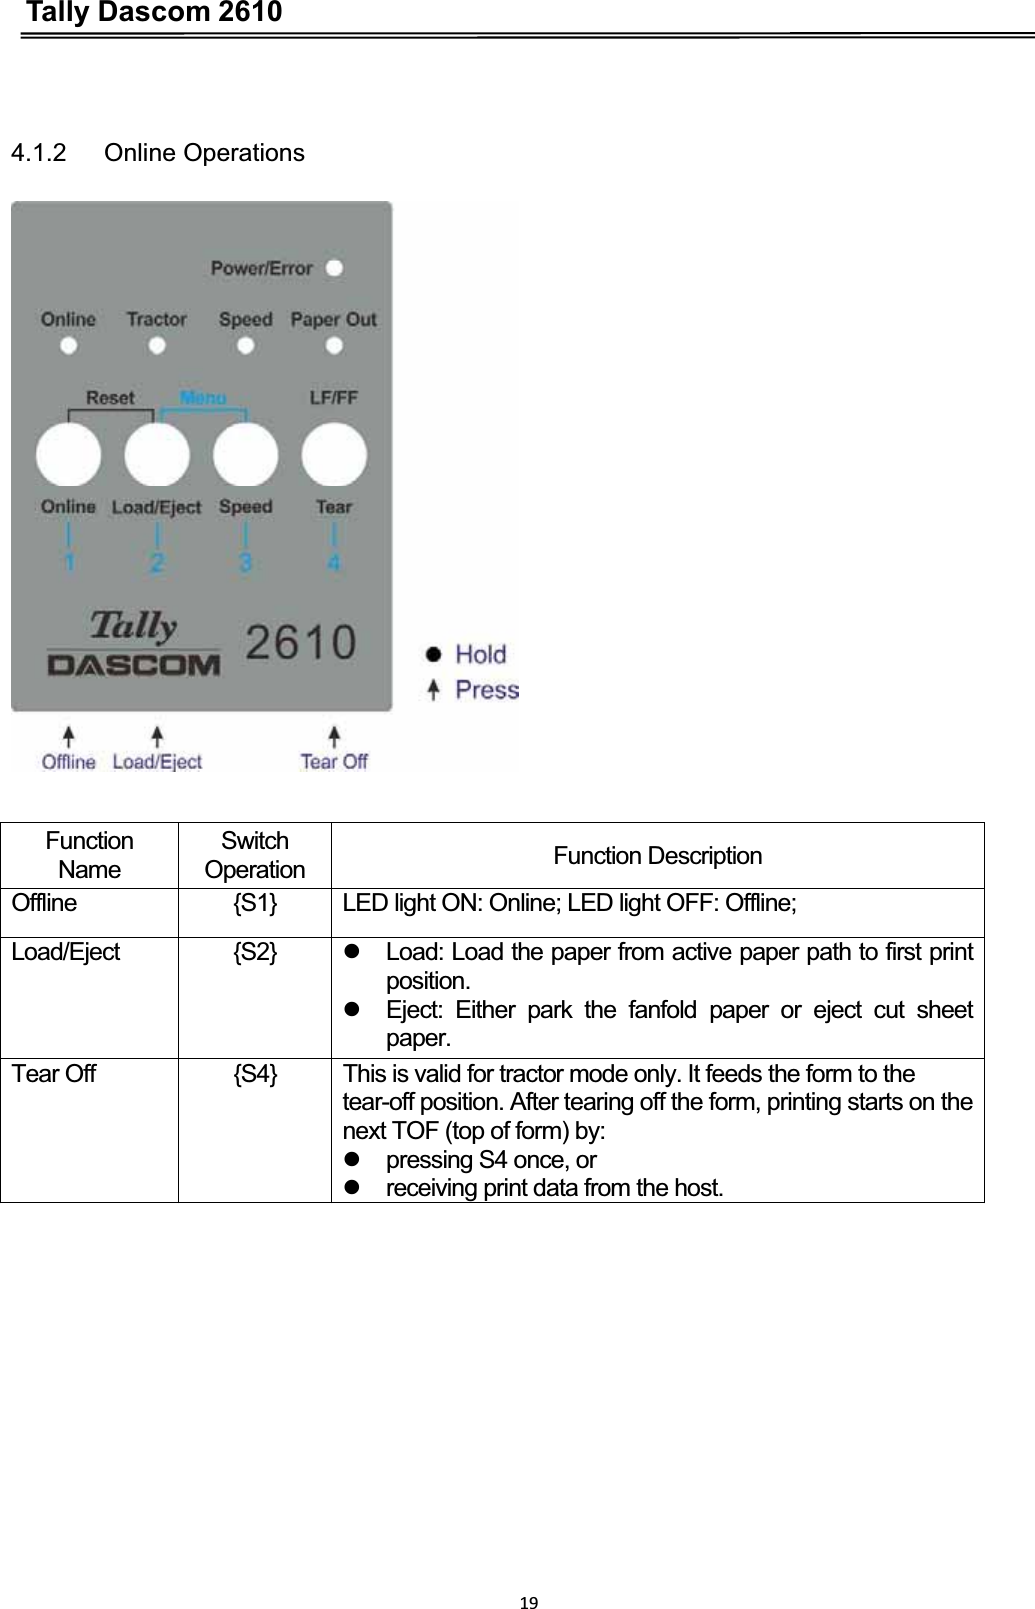
Jiangmen Dascom Computer Peripherals TD26000 Dot Matrix Printer User Manual 2610 UG LED LCD 12 12 04 00
Jiangmen Dascom Computer Peripherals Co.,Ltd. Dot Matrix Printer 2610 UG LED LCD 12 12 04 00
UserManual.wiki
>
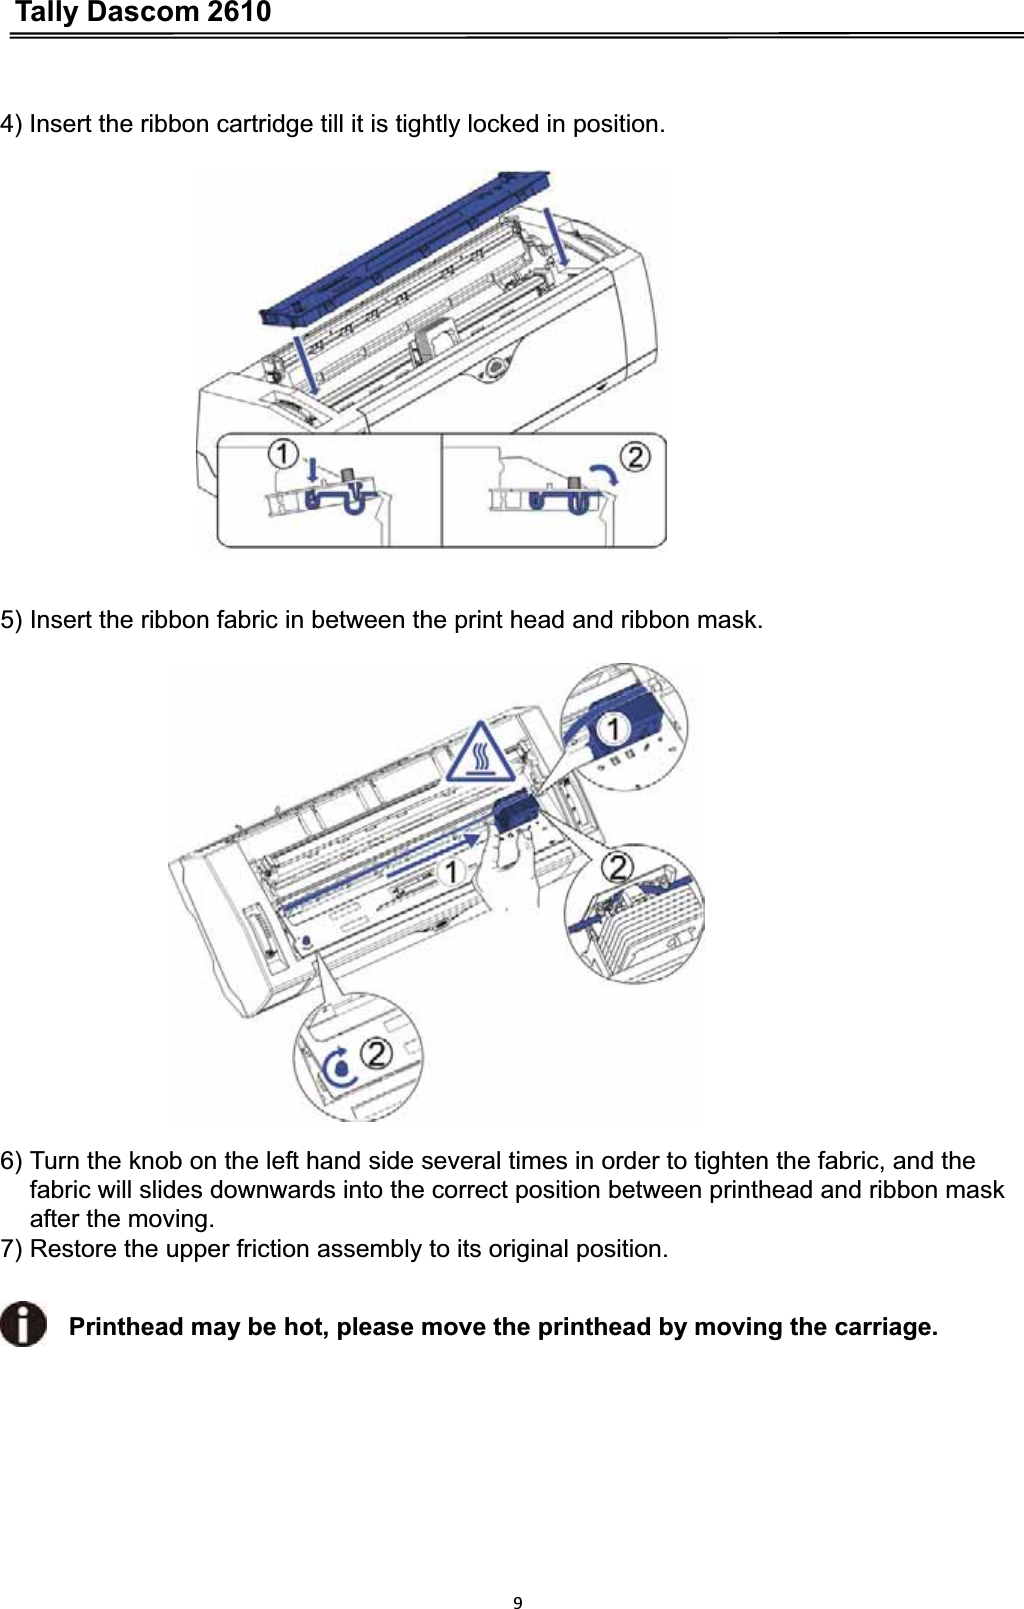
Jiangmen Dascom Computer Peripherals
>
TD26000 User Manual
>
users manual
Contents
1.
users manual
2.
user manual
users manual
Navigation menu
Upload a User Manual
Namespaces
Wiki Guide
HTML
PDF
Info
Views
User Manual
Discussion / Help
Navigation

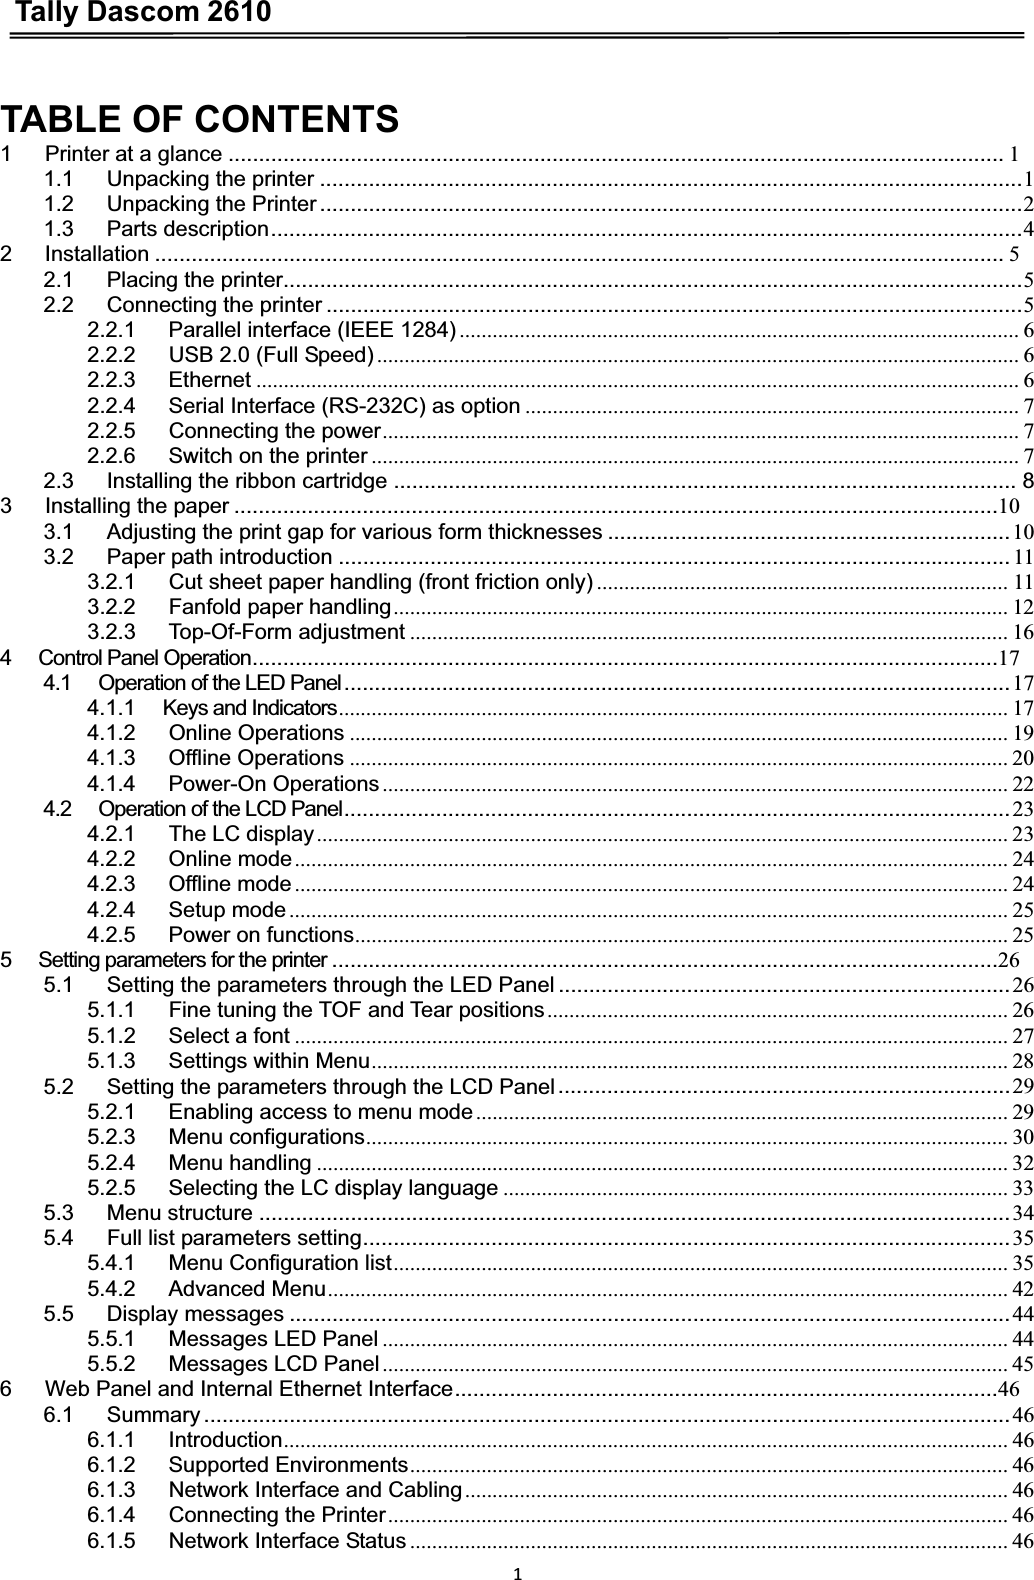

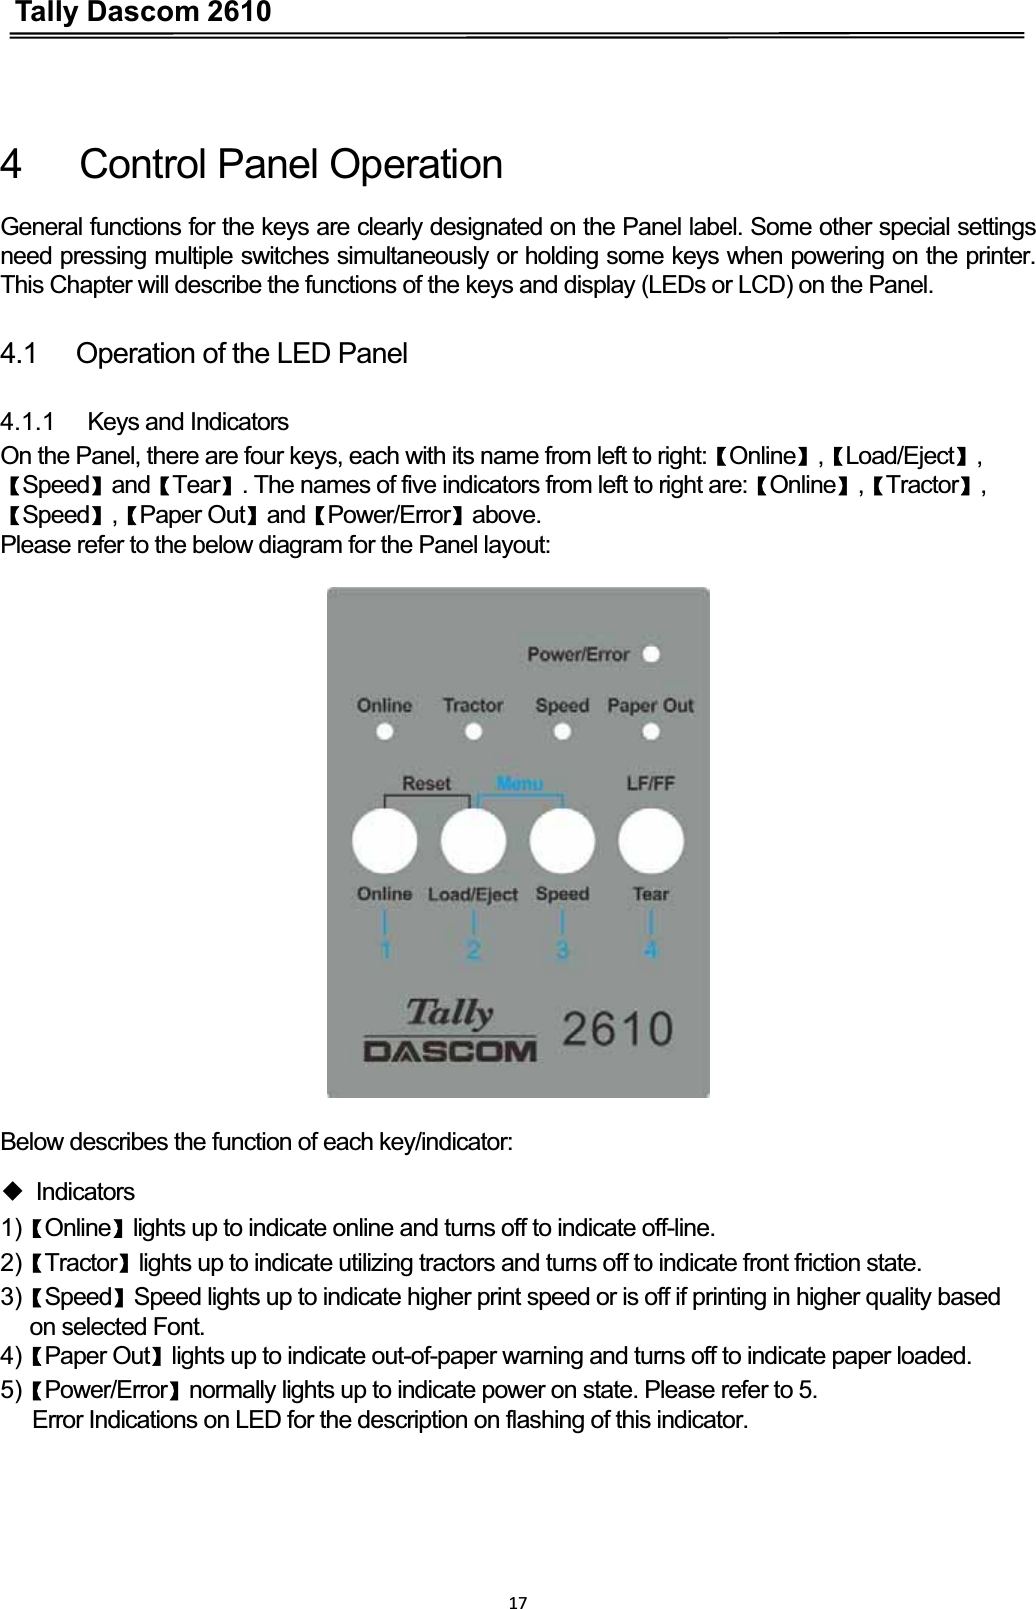
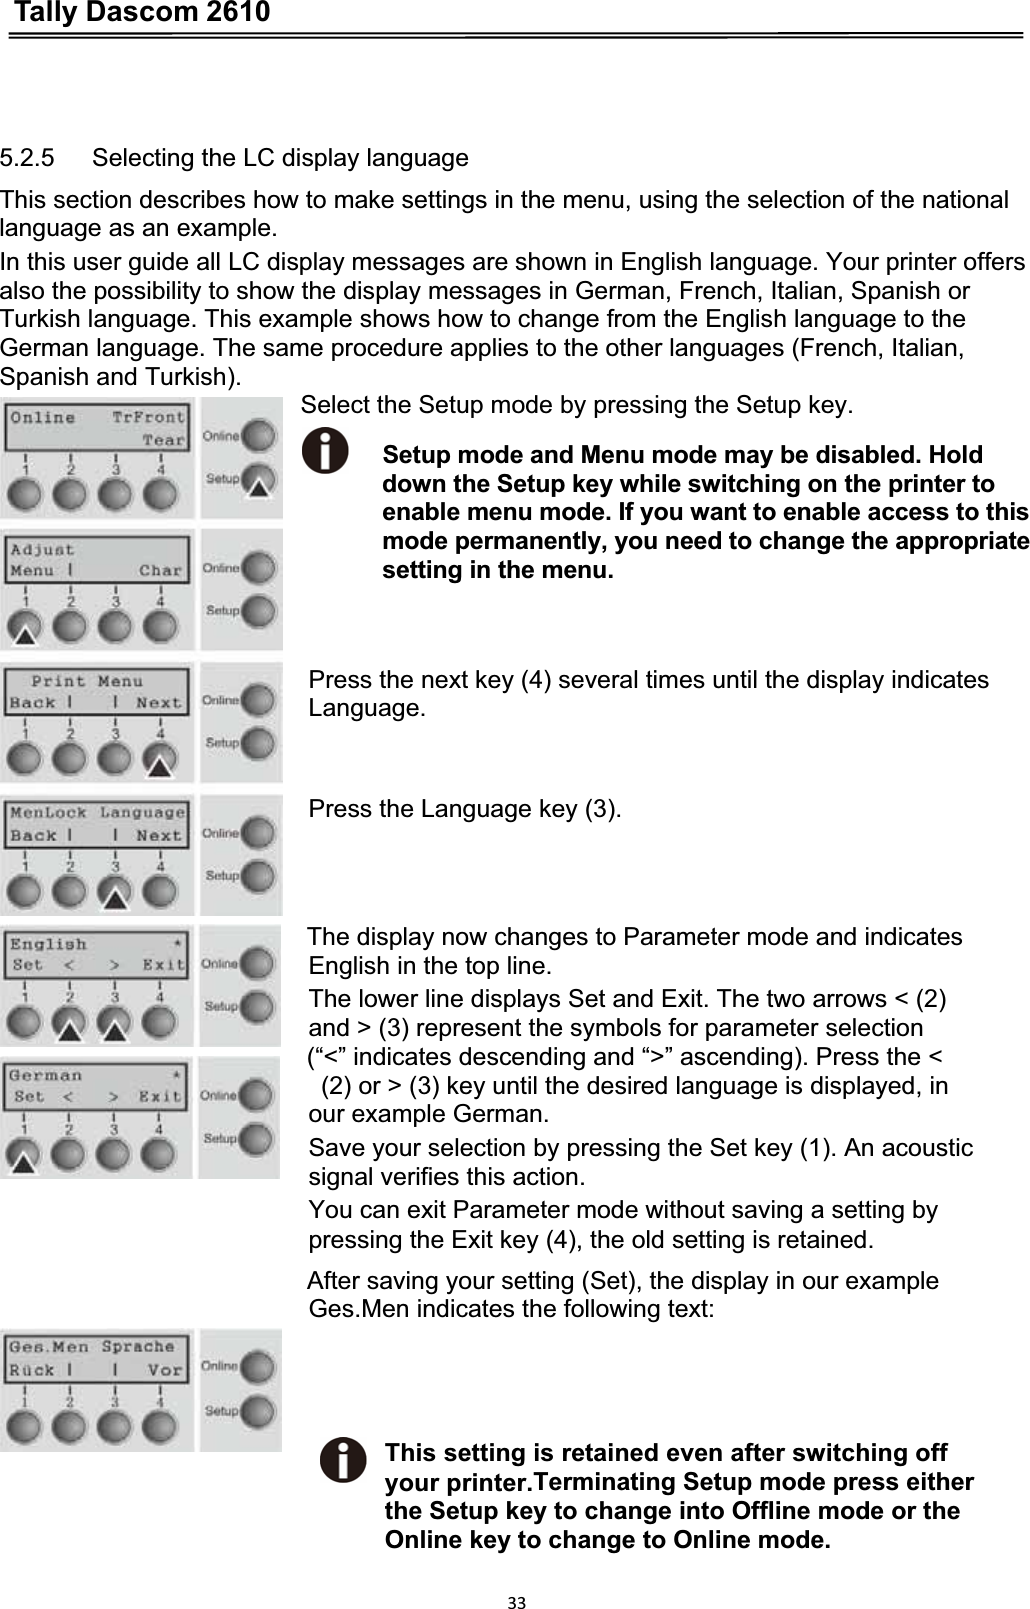
![Tally Dascom 2610204.1.3 Offline Operations Function NameSwitch Operation z Function Description. Online {S1} z LED light ON: Online; LED light OFF: Offline. Load/Eject {S2} z Load: Load the paper from active paper path to first print position. z Eject: Either park the fanfold paper or eject cut sheet paper. Speed {S3} z Toggle Between HS-Draft /Draft or NLQ/LQ. LF/FF {S4} z Brief press: Linefeed, Longer hold: Formfeed. Setup Menu [S2] +[S3] z Enter Printer Setup Menu. Clear Buffer and Reset [S1] +[S2] z Clears the print buffer. z Initializes the printer to power on configuration.](https://usermanual.wiki/Jiangmen-Dascom-Computer-Peripherals/TD26000.users-manual/User-Guide-1945130-Page-34.png)
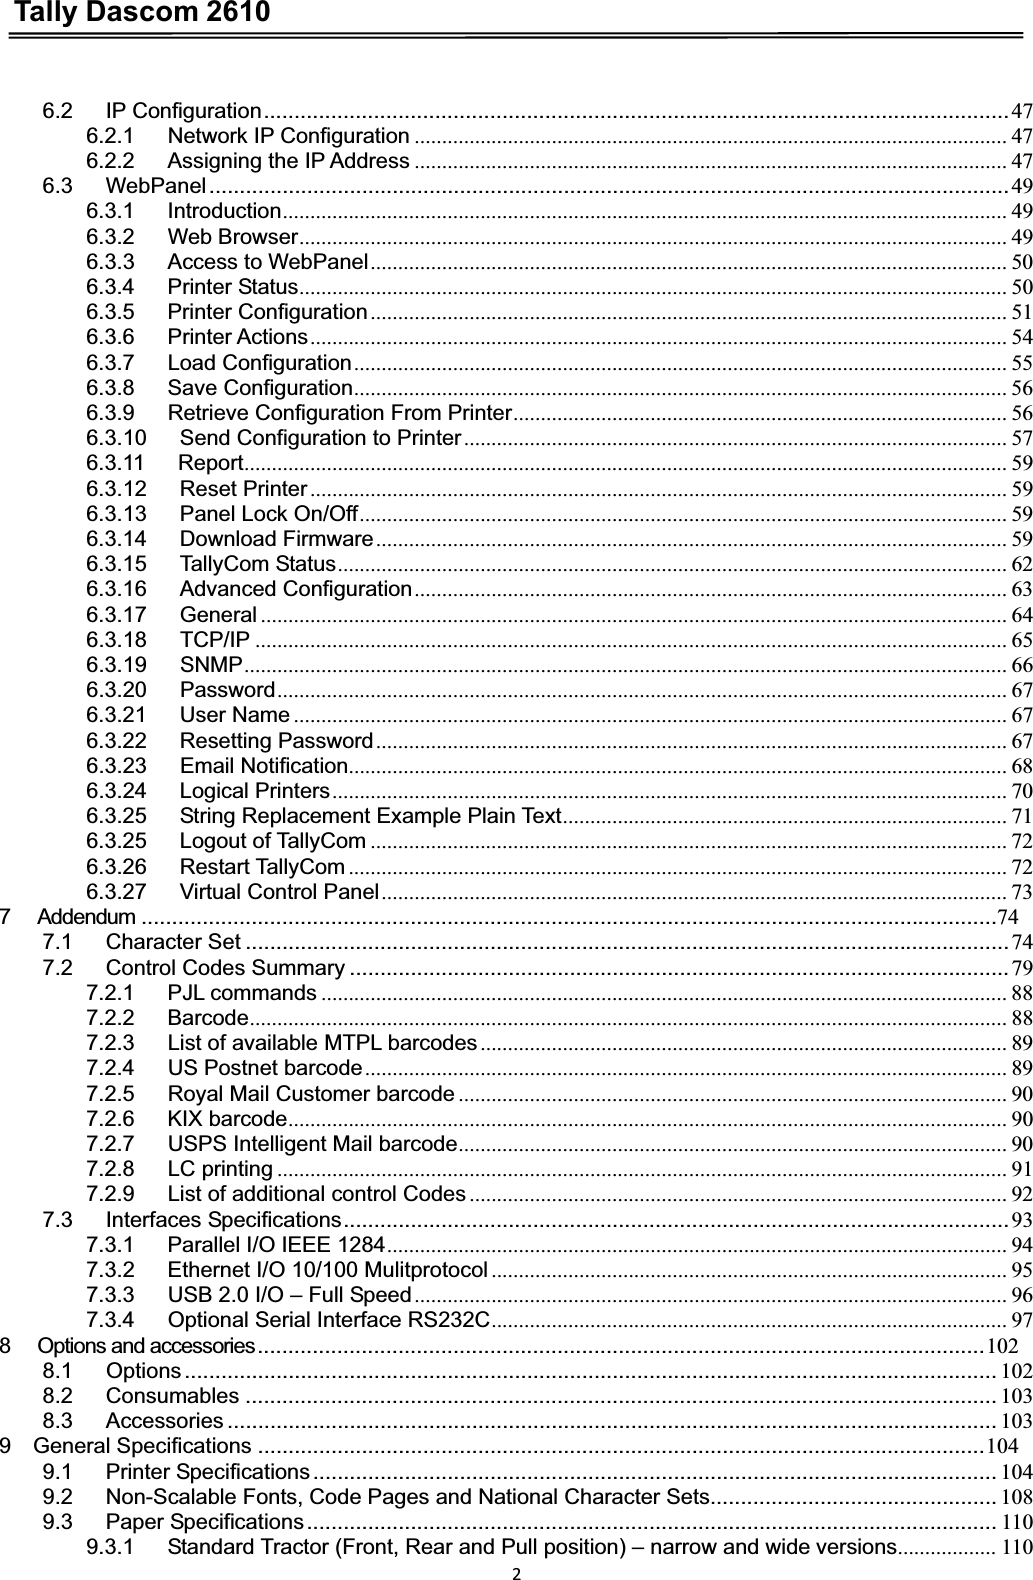
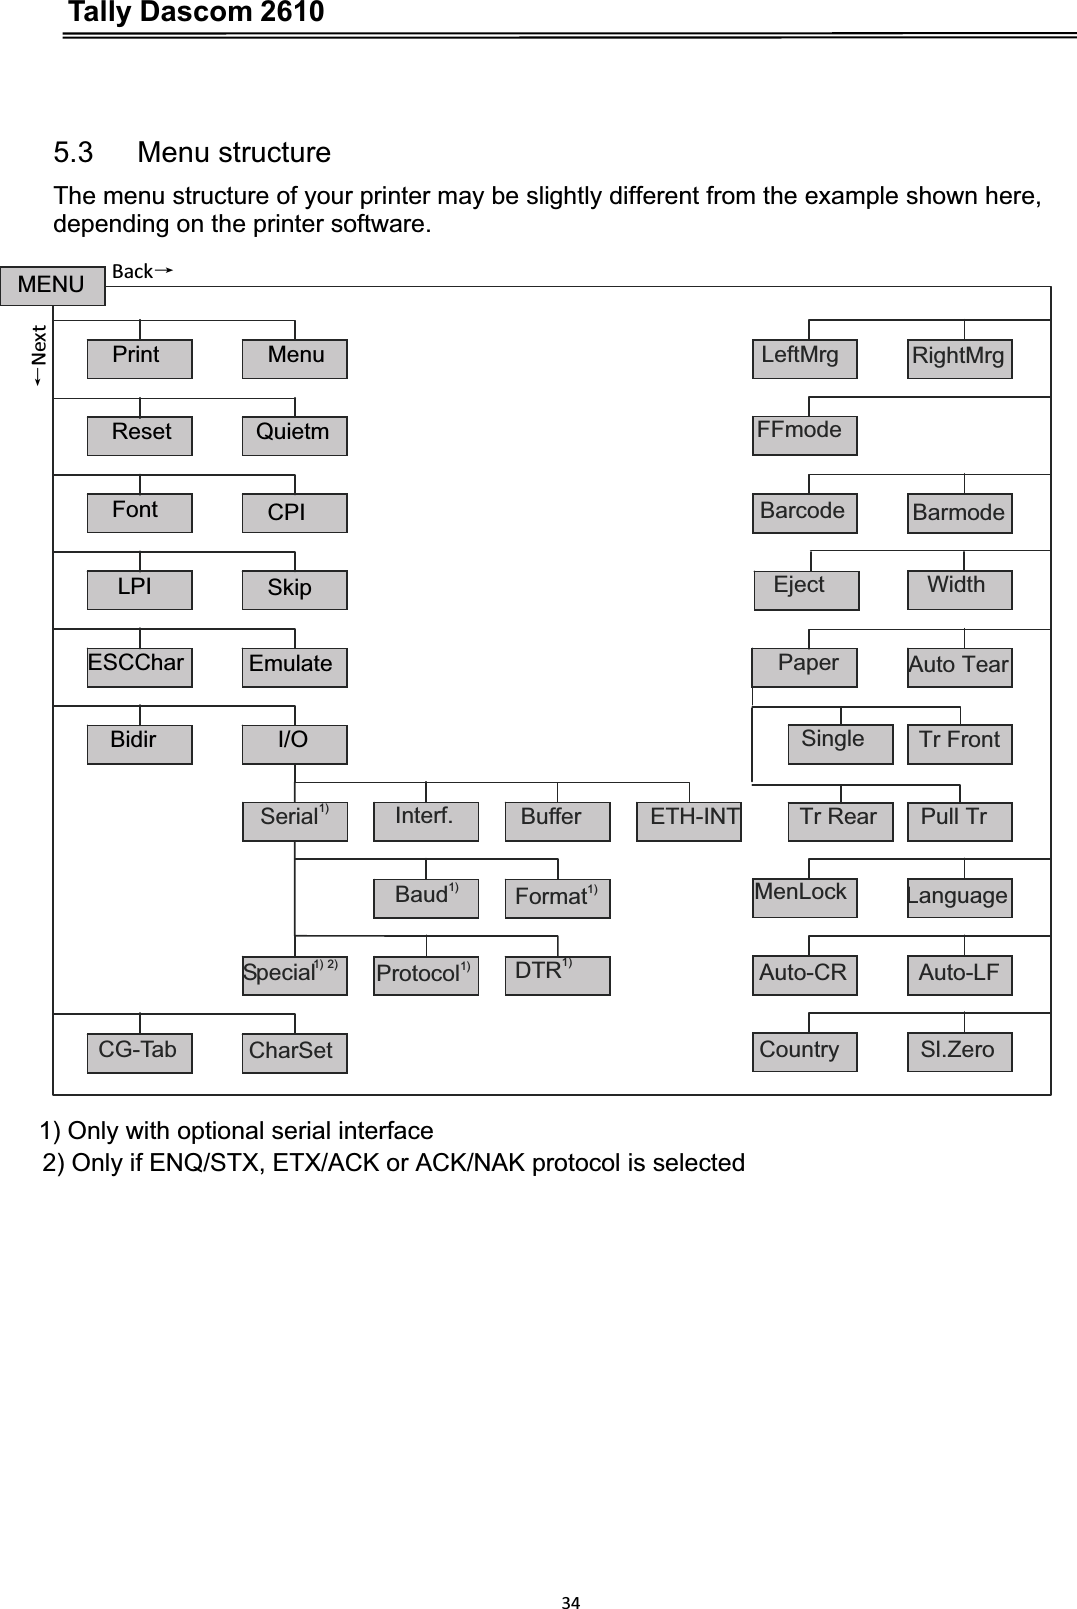
![Tally Dascom 2610224.1.4 Power-On Operations Function Name Switch Operation Function Description Technical Setup [S1] z Start Technical Setup / Advanced Menu (This also includes Self Test Mode). Menu Unlock [S2]+[S3] z Override Menu Lock Function if Menu is locked.Status Page [S4] z Print Status Page. Load Defaults [S1]+[S2]+ [S3]+[S4] z Load Default Settings. Detail descriptions of the above functions: ƹ Technical Setup See Chapter 5 for details. ƹ Menu Unlock PressingɋLoad/EjectɌandɋSpeedɌkeys simultaneously overrides. Menu unlock function if menu is locked.ƹ Status Page Print the setup of the printer (Menu). ƹ Load Defaults Print the setup of the menu and the parameters.](https://usermanual.wiki/Jiangmen-Dascom-Computer-Peripherals/TD26000.users-manual/User-Guide-1945130-Page-36.png)

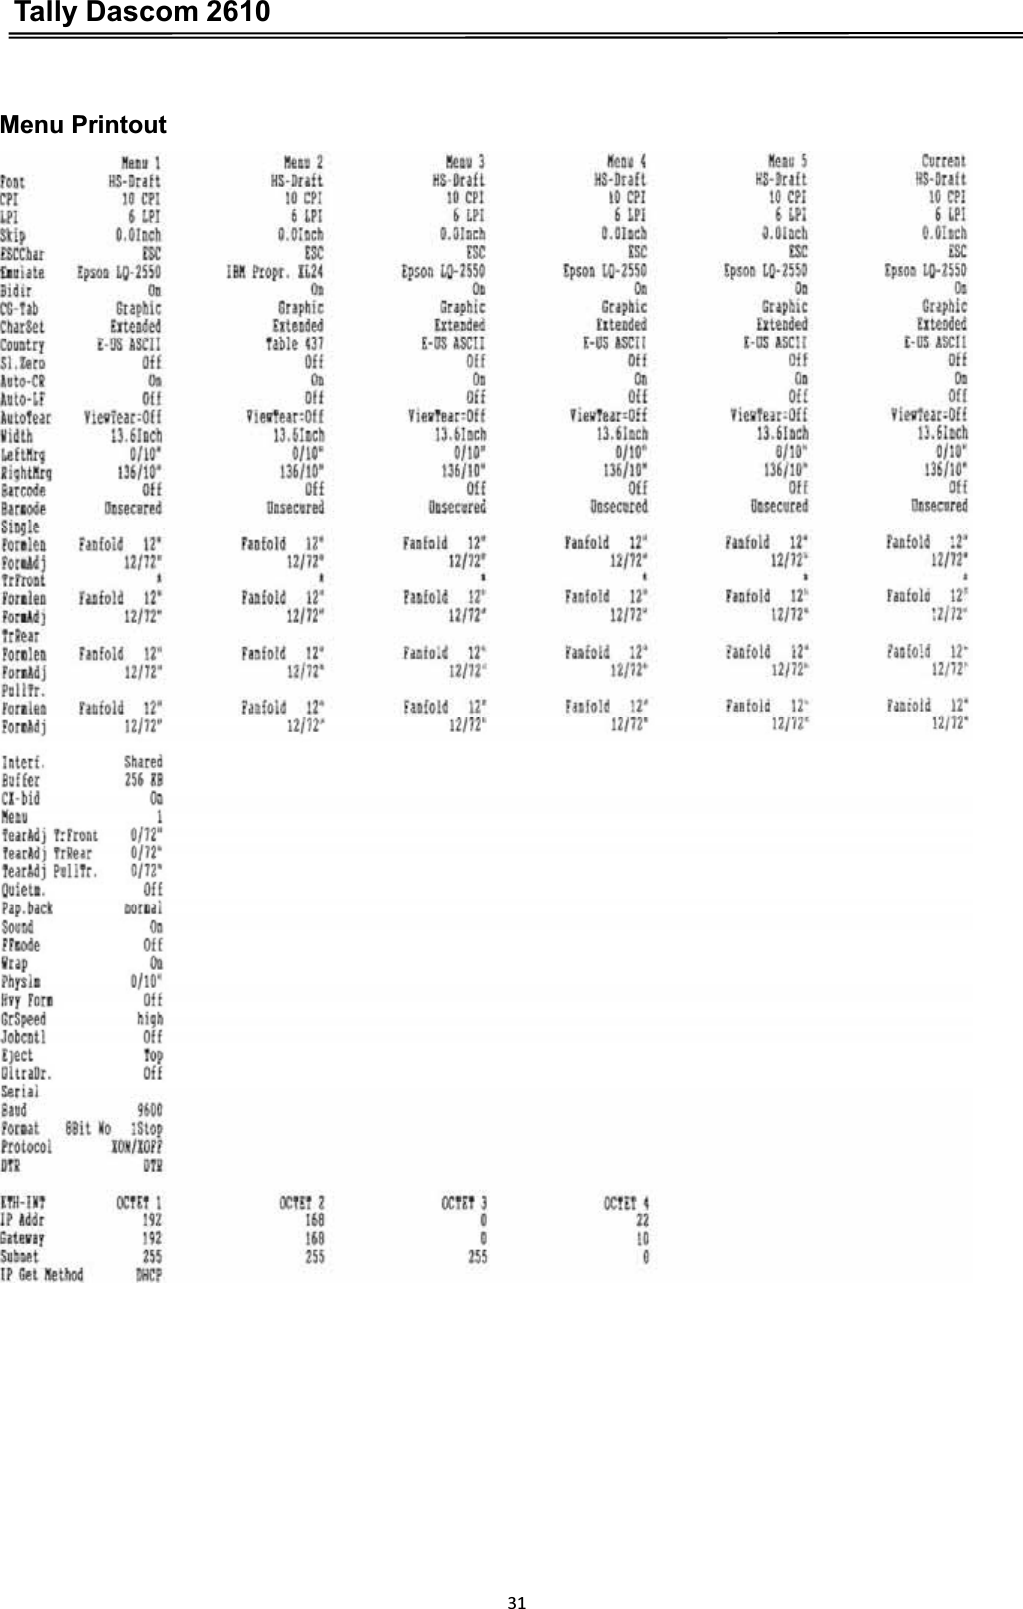
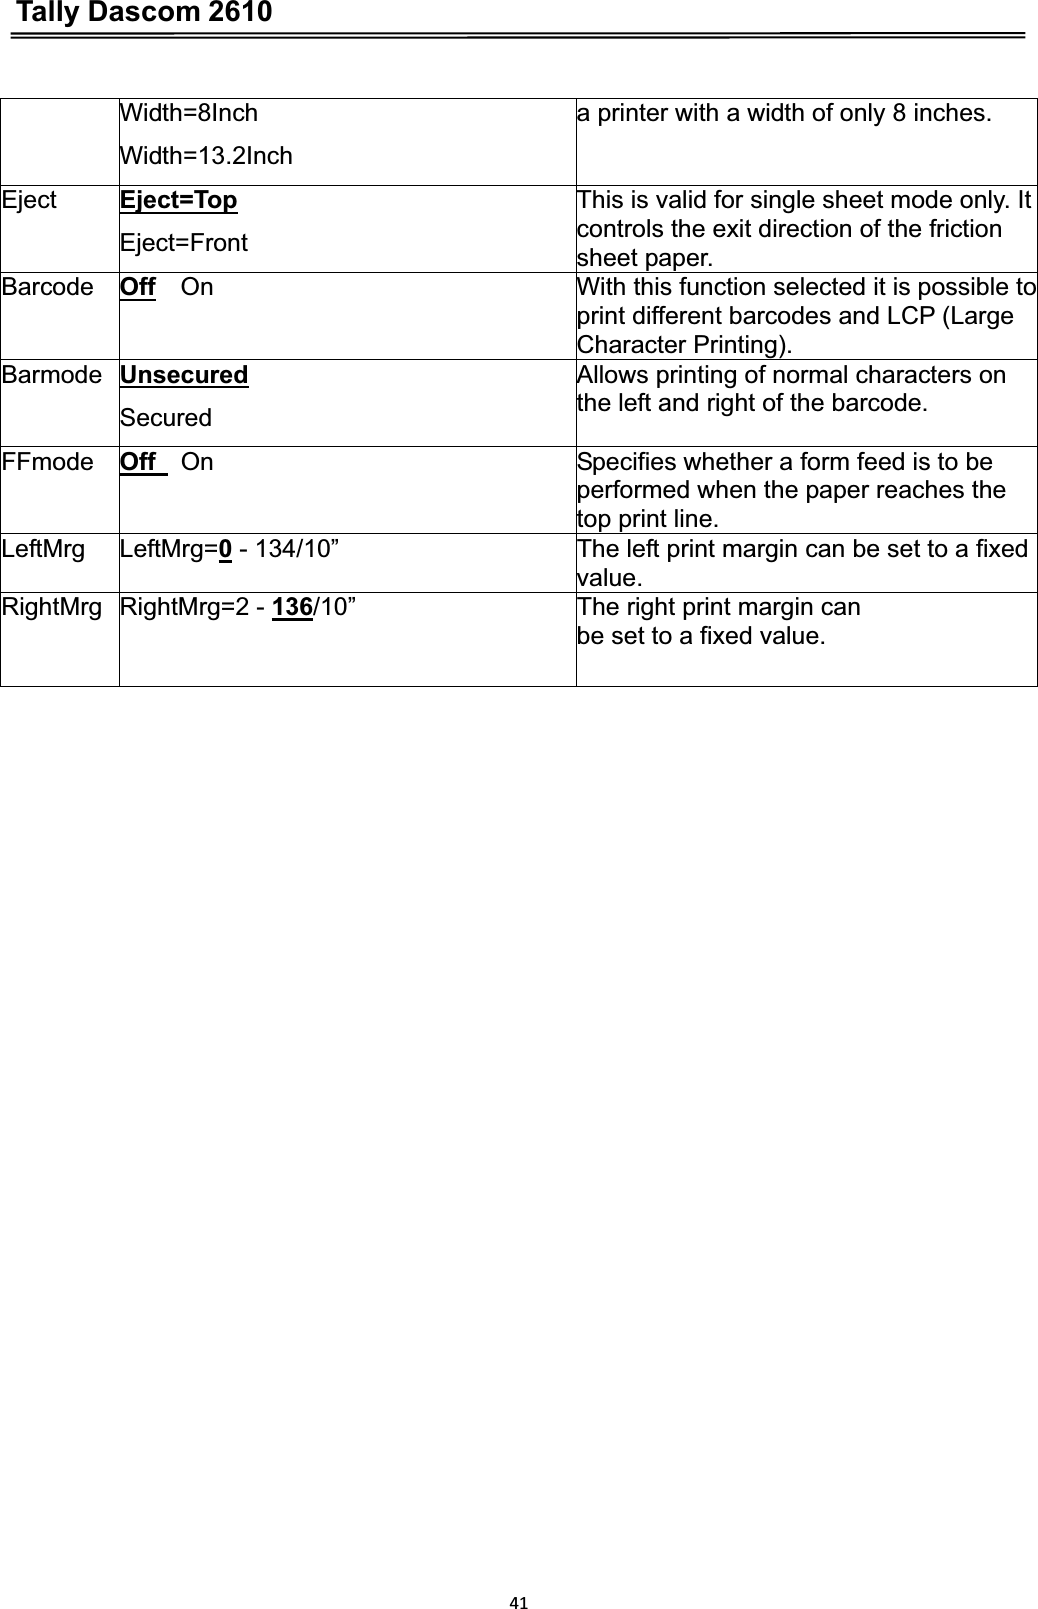
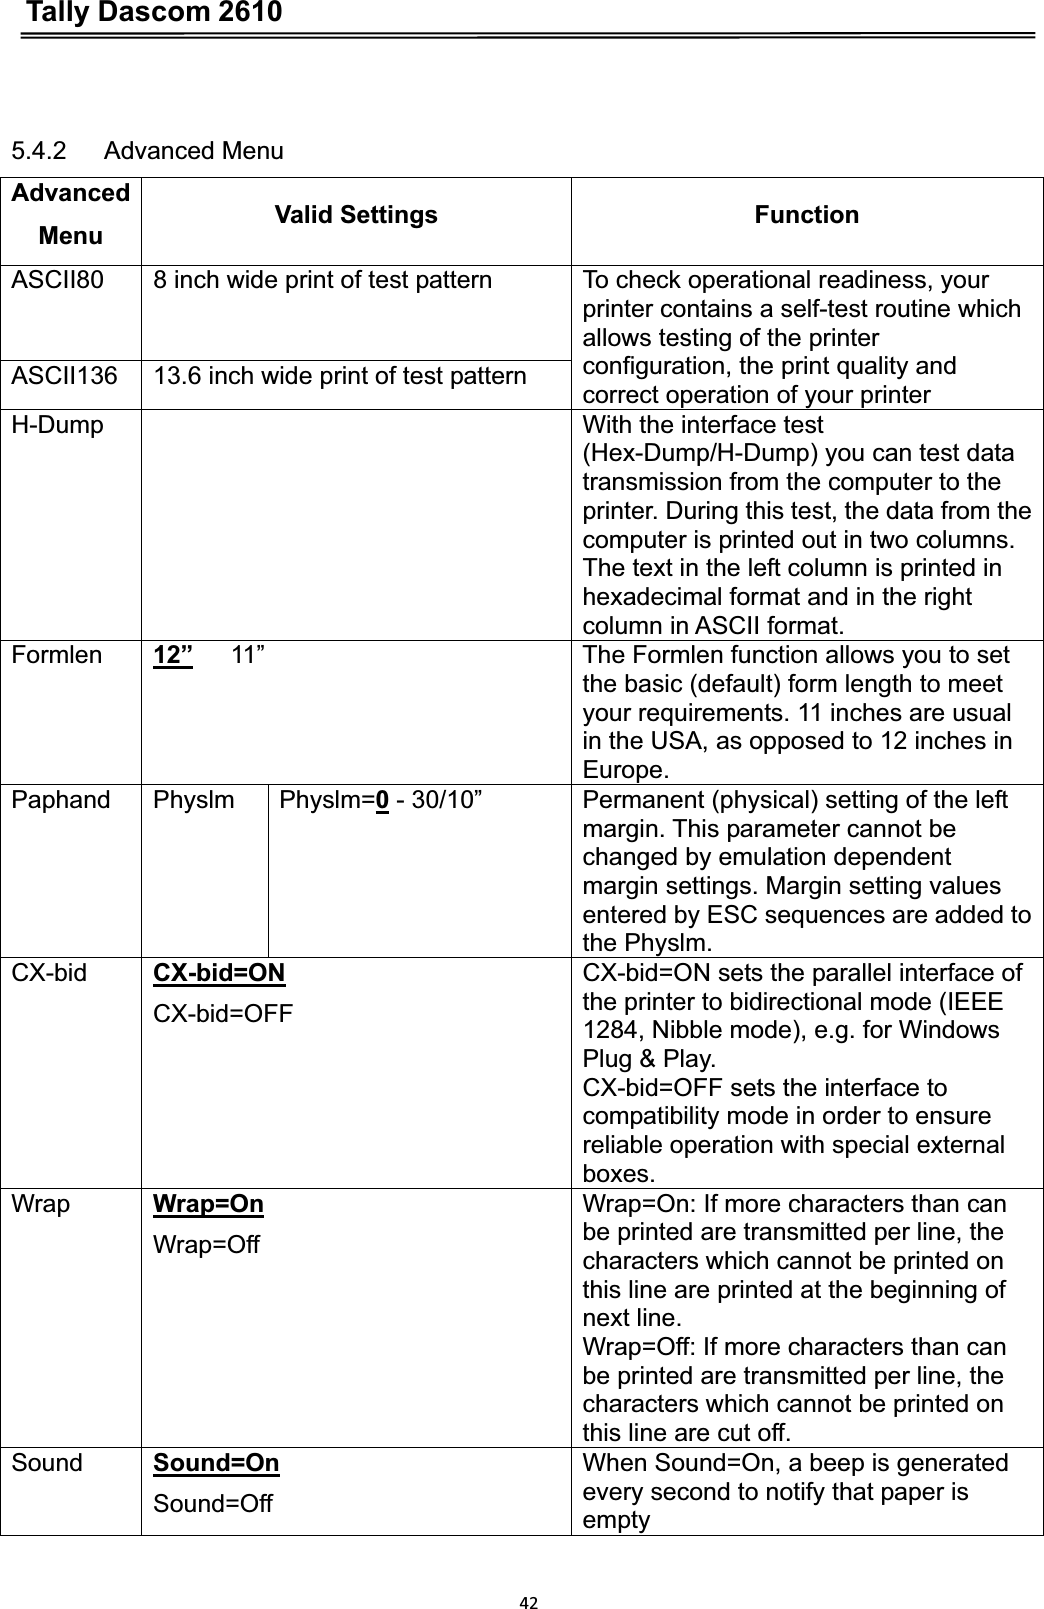
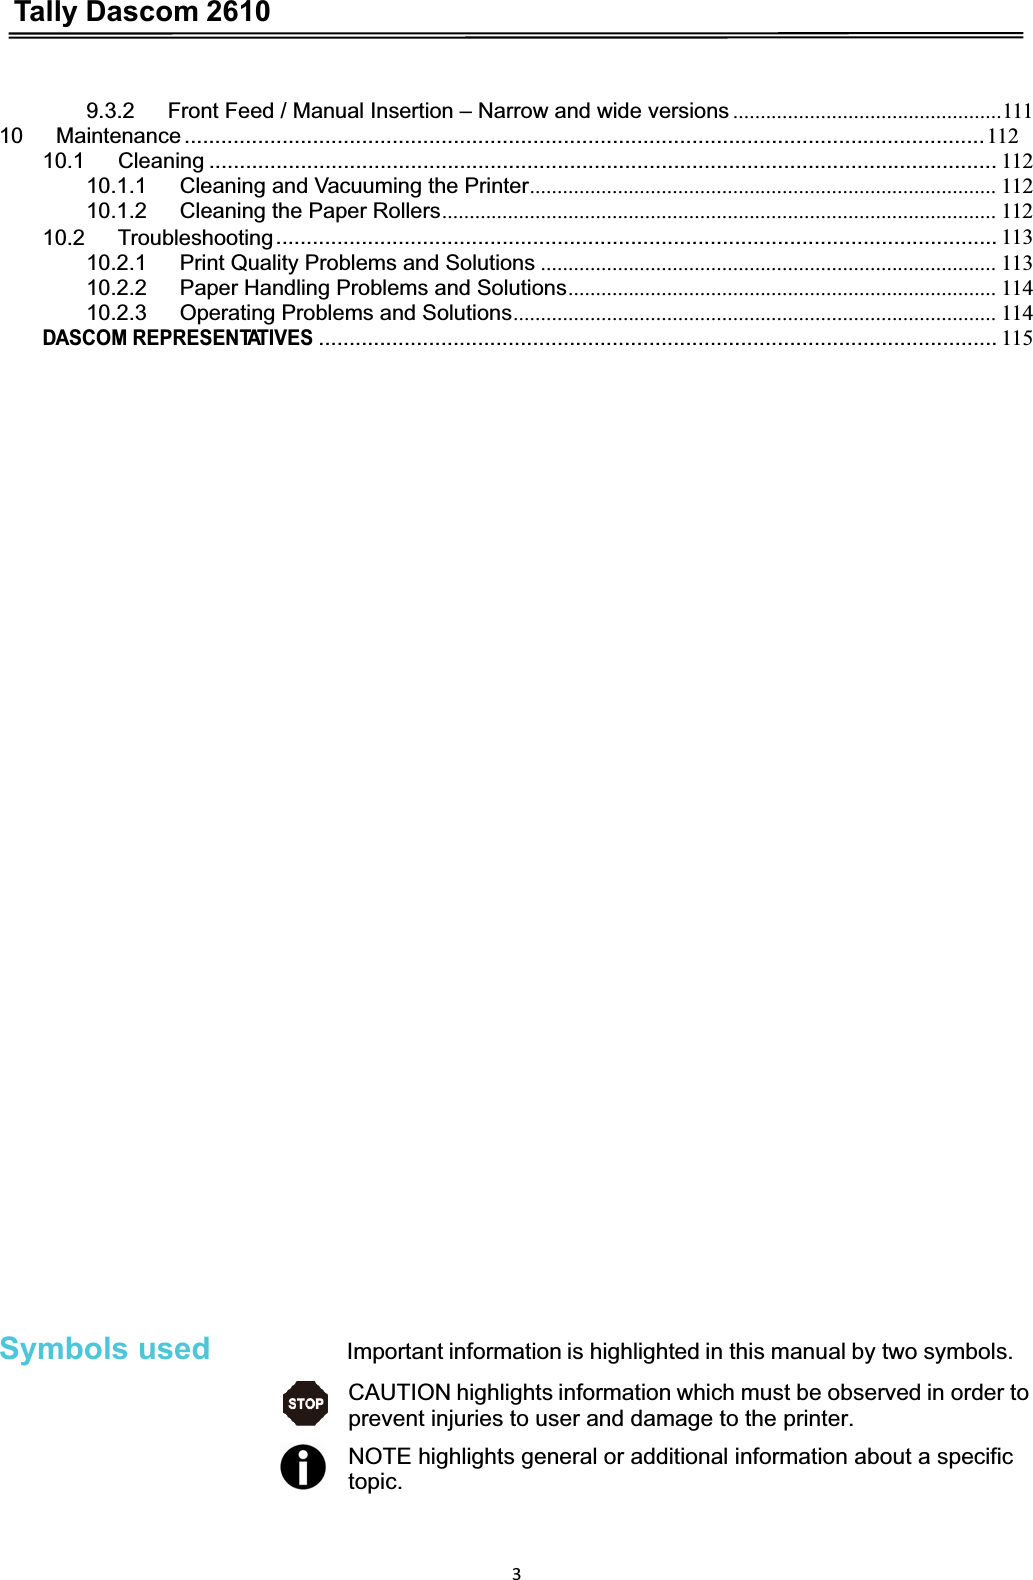
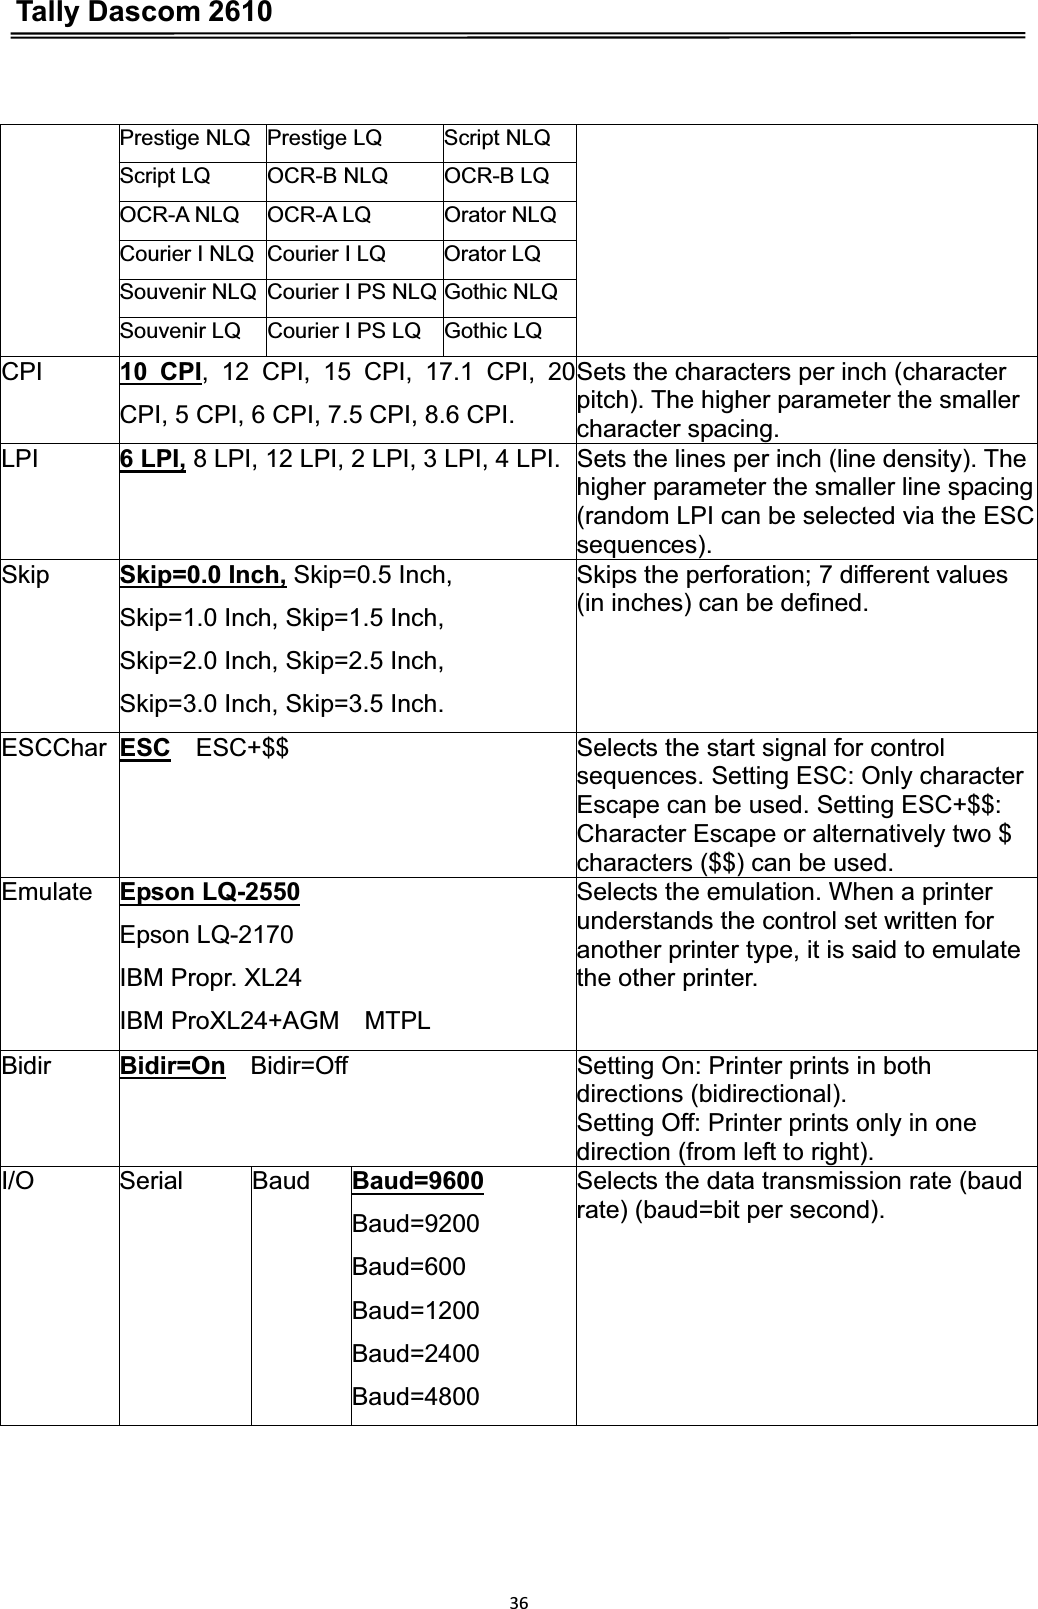
![Tally Dascom 2610355.4 Full list parameters setting In order to meet individual requirements of printer functionality, users may modify the printer configuration settings accordingly as follows: start by pressing [Load/Eject] + [Speed] in offline mode. The printer will enter Main Menu settings setup mode. Follow the instructions printed on how to do the required setting changes. When a new setting is saved, it becomes effective, even when printer is power cycled. 5.4.1 Menu Configuration list Menu Valid Settings Function Adjust TOF Tear Setting the tear position. Setting the first printing line (TOF). Print Print the menu settings. Menu Load Menu=1 Load Menu=2 Load Menu=3 Load Menu=4 Load Menu=5 A menu is loaded, you can choose between five menus. Reset Reset Menu Yes No Press the No (1) or Yes (2) key to select the desired setting. All manually altered settings in the current menu are lost when it is reset to the default settings. We therefore recommend that you print out the menu first. Quietm Off On Switches between normal and quiet mode printing. For all printing modes, the print-out is made with the bidirectional method in quiet mode printing. In the first step the first row of pins is activated, during the second step the second row is used. HS-Draft Draft Roman NLQ; Roman LQ Roman PS NLQRoman PS LQCourierNLQ Sans Serif NLQ Sans Serif LQFontCourier LQ S Serif PS NLQ S Serif PS LQThis parameter selects the character style and its quality permanently.](https://usermanual.wiki/Jiangmen-Dascom-Computer-Peripherals/TD26000.users-manual/User-Guide-1945130-Page-49.png)
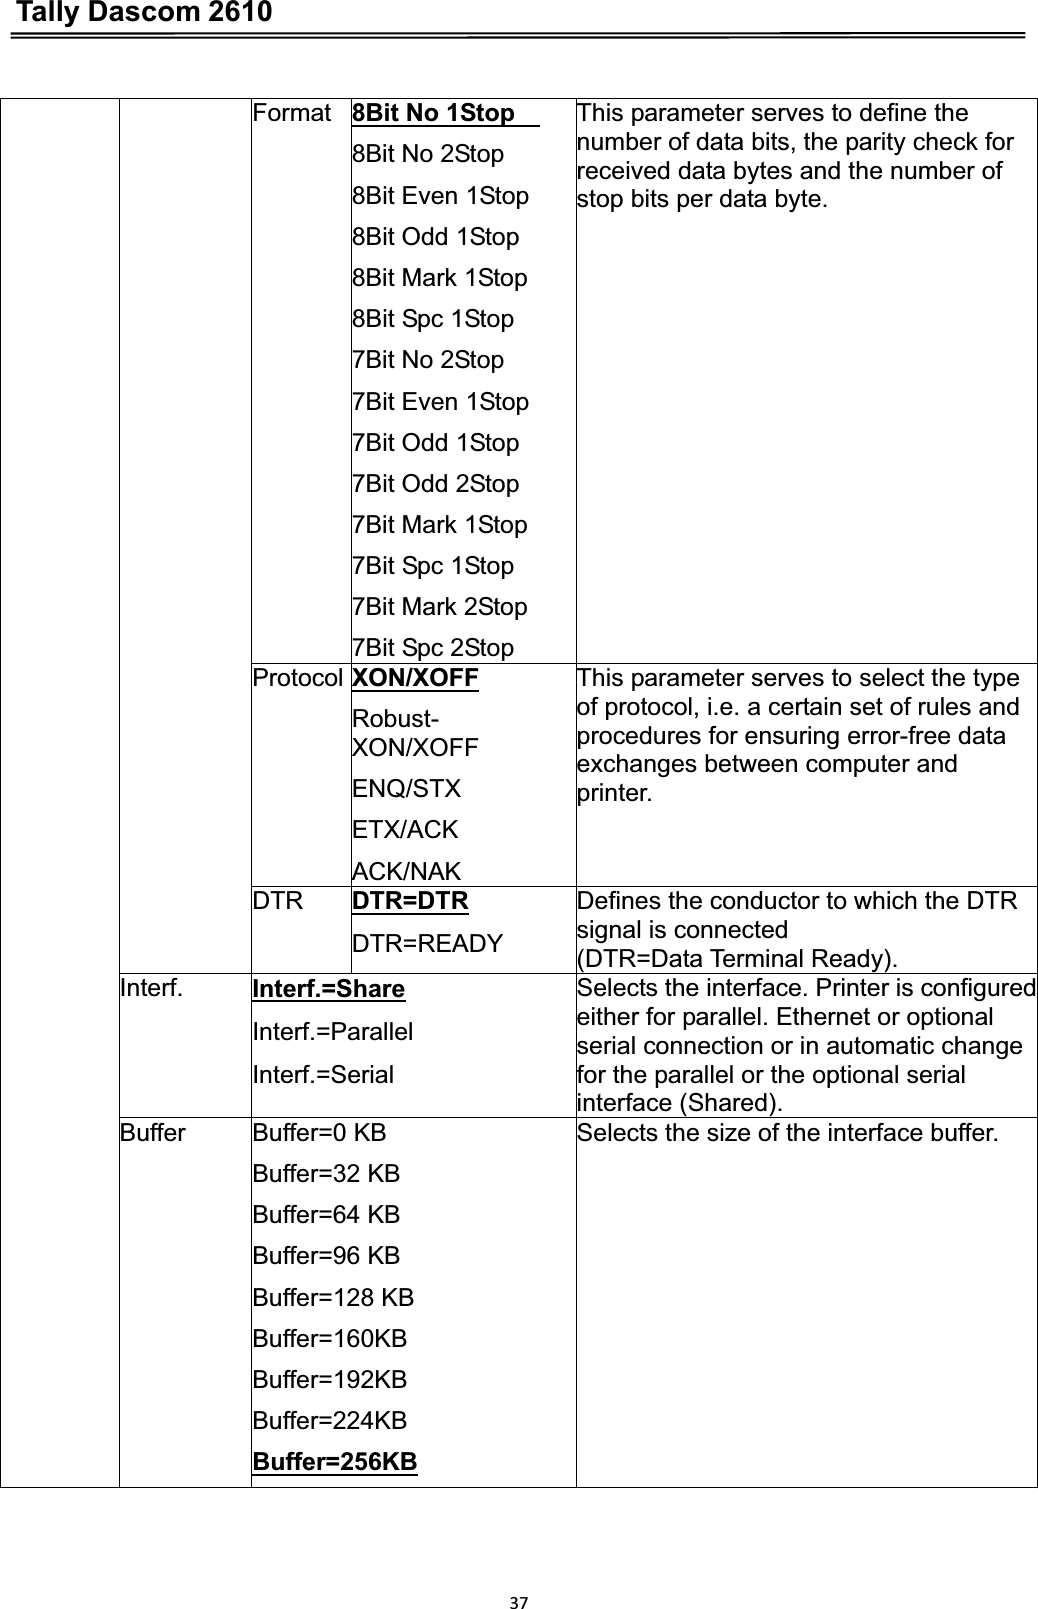

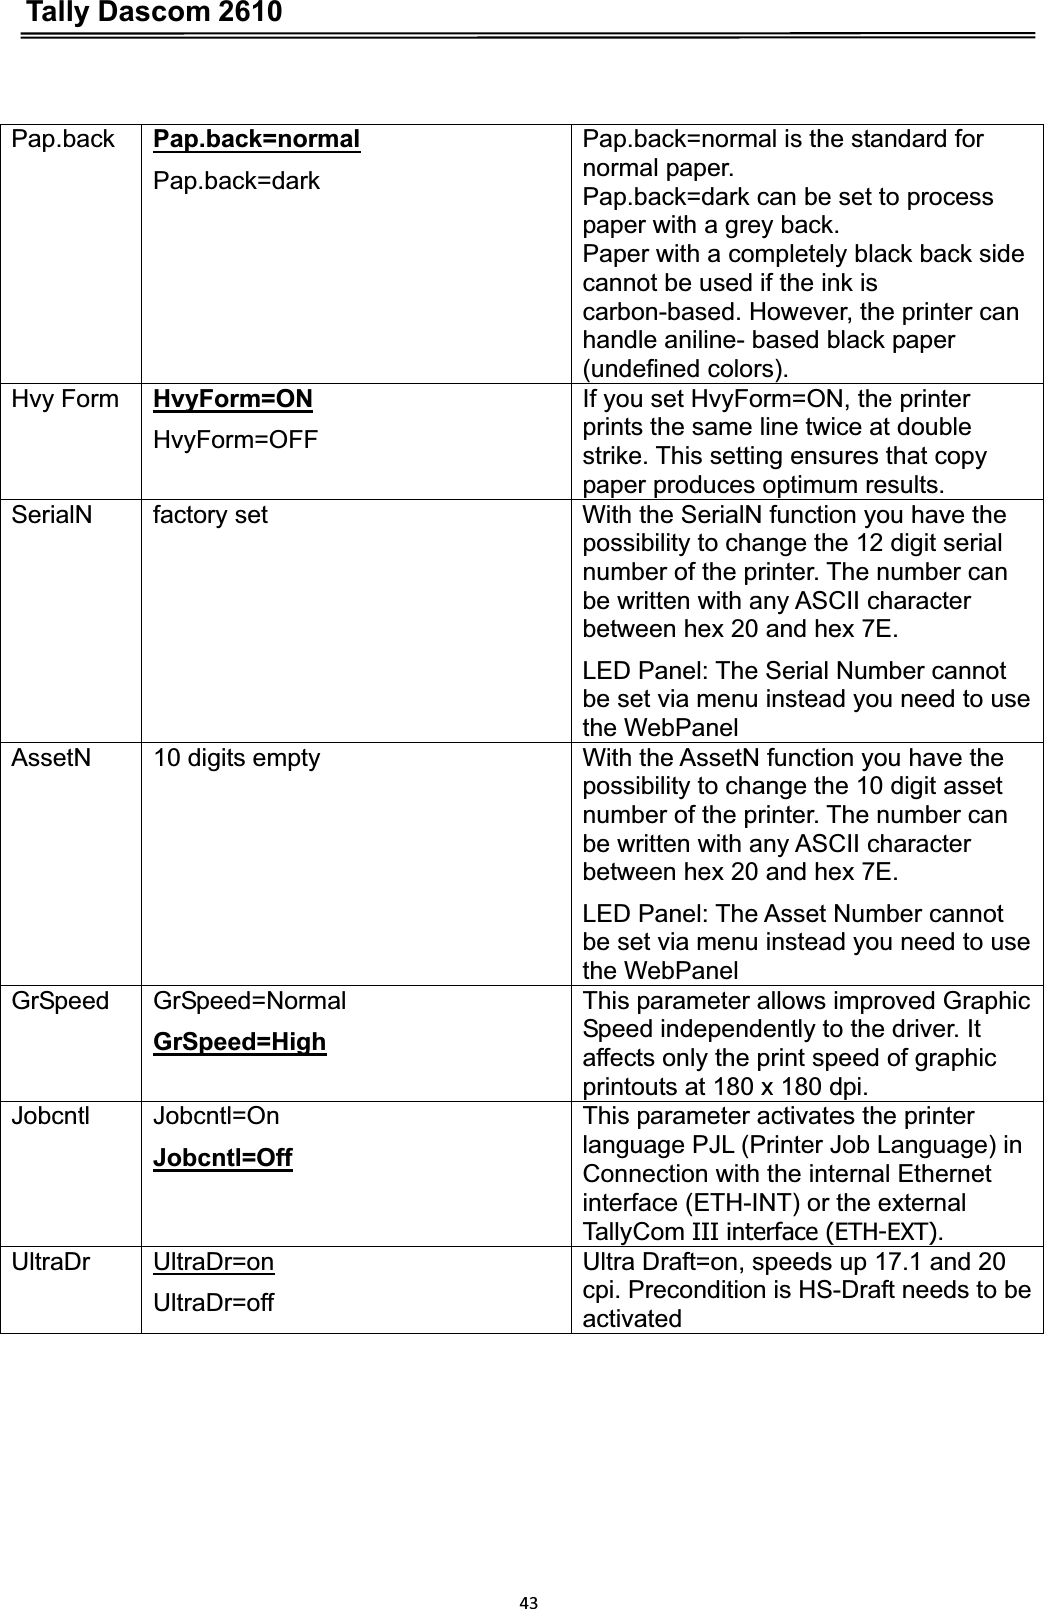
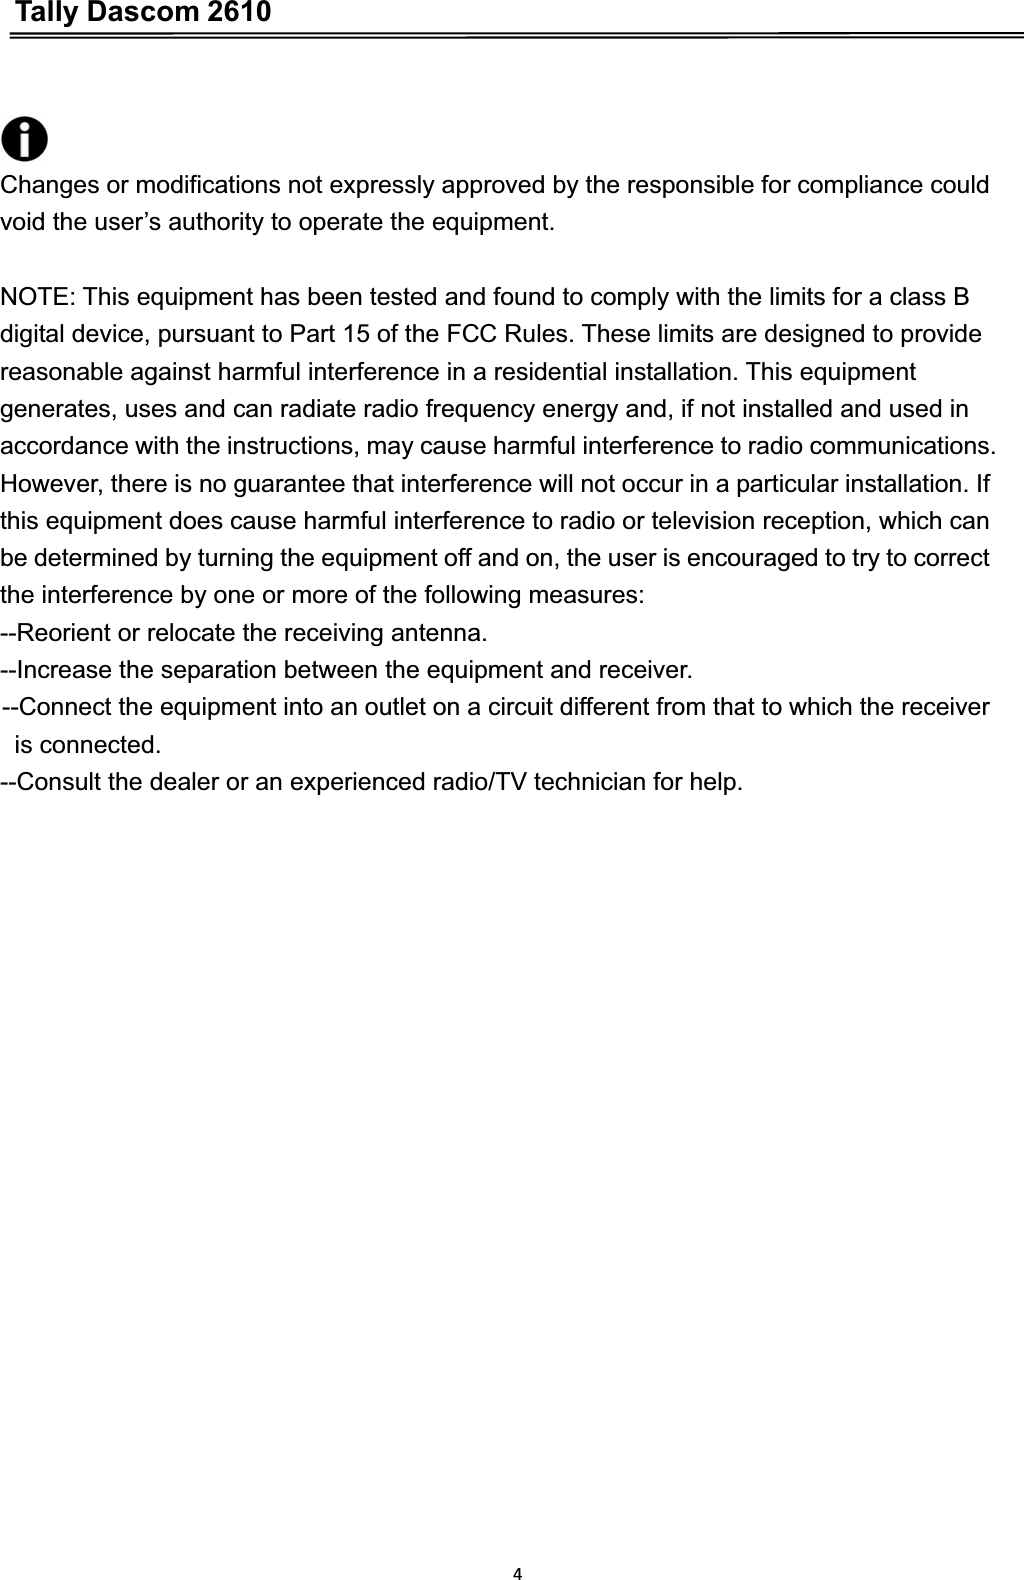
![Tally Dascom 261039Coax/Twinax Table 437 New-437 Table 737 775 Baltic Table 850 New-Dig 850 Table 851 Table 852 Table 857 Table 858 Table 860 Table 861 Old-Code 860 Table 863 Flarro 863 Table 865 865 Hebrew Table 866 866 Bulgaria 866 Ukraine 866 Kazakhst Kamenicky Mazovia Siemens Turk DEC Turkish Table 1250 Table 1251 Table 1252 Table 1253 Table 1254 Table 1257 Sl.Zero Sl.Zero=Off Sl.Zero=On Selects if normal zero (0) or the slashed zero (Ø) is printed. AutoCR On Off Switches the automatic carriage return on or off after receiving the signal LF (line feed).AutoLF Off On Switches the automatic line feed (LF) on or off after receiving the signal CR (carriage return). Menlock Off Menu All With MenLock=Off, all functions and settings are accessible without restriction in Online, Offline and Setup mode. If MenLock=Menu is activated, all functions and settings are still accessible in Online and Offline mode, however, in Setup mode you can only access the parameter groups Adjust (setting the print head gap [Head], top of form [TOF] and tear position [Tear]), Paperway (setting the paper path), Font (setting the font) and the character spacing (CPI), while access to Menu mode (Menu key) is disabled.If you select MenLock=All, you can access the Online/Offline, Load/Park, Paper and Paper Feed (LineFeed/Form Feed, / ) functions in Online and Offline mode while Setup mode is disabled. In this case, the Setup menu can only be called up by holding the key Setup while switching on the printer. Language English German French ItalianSpanish Turkish The menu can be shown in six languages. Paper Single TrFront TrRear PullTr Selects the paper parameters Formlen (form length), FormAdj (first printing position/TOF) separately for each paper source in the current menu.](https://usermanual.wiki/Jiangmen-Dascom-Computer-Peripherals/TD26000.users-manual/User-Guide-1945130-Page-53.png)
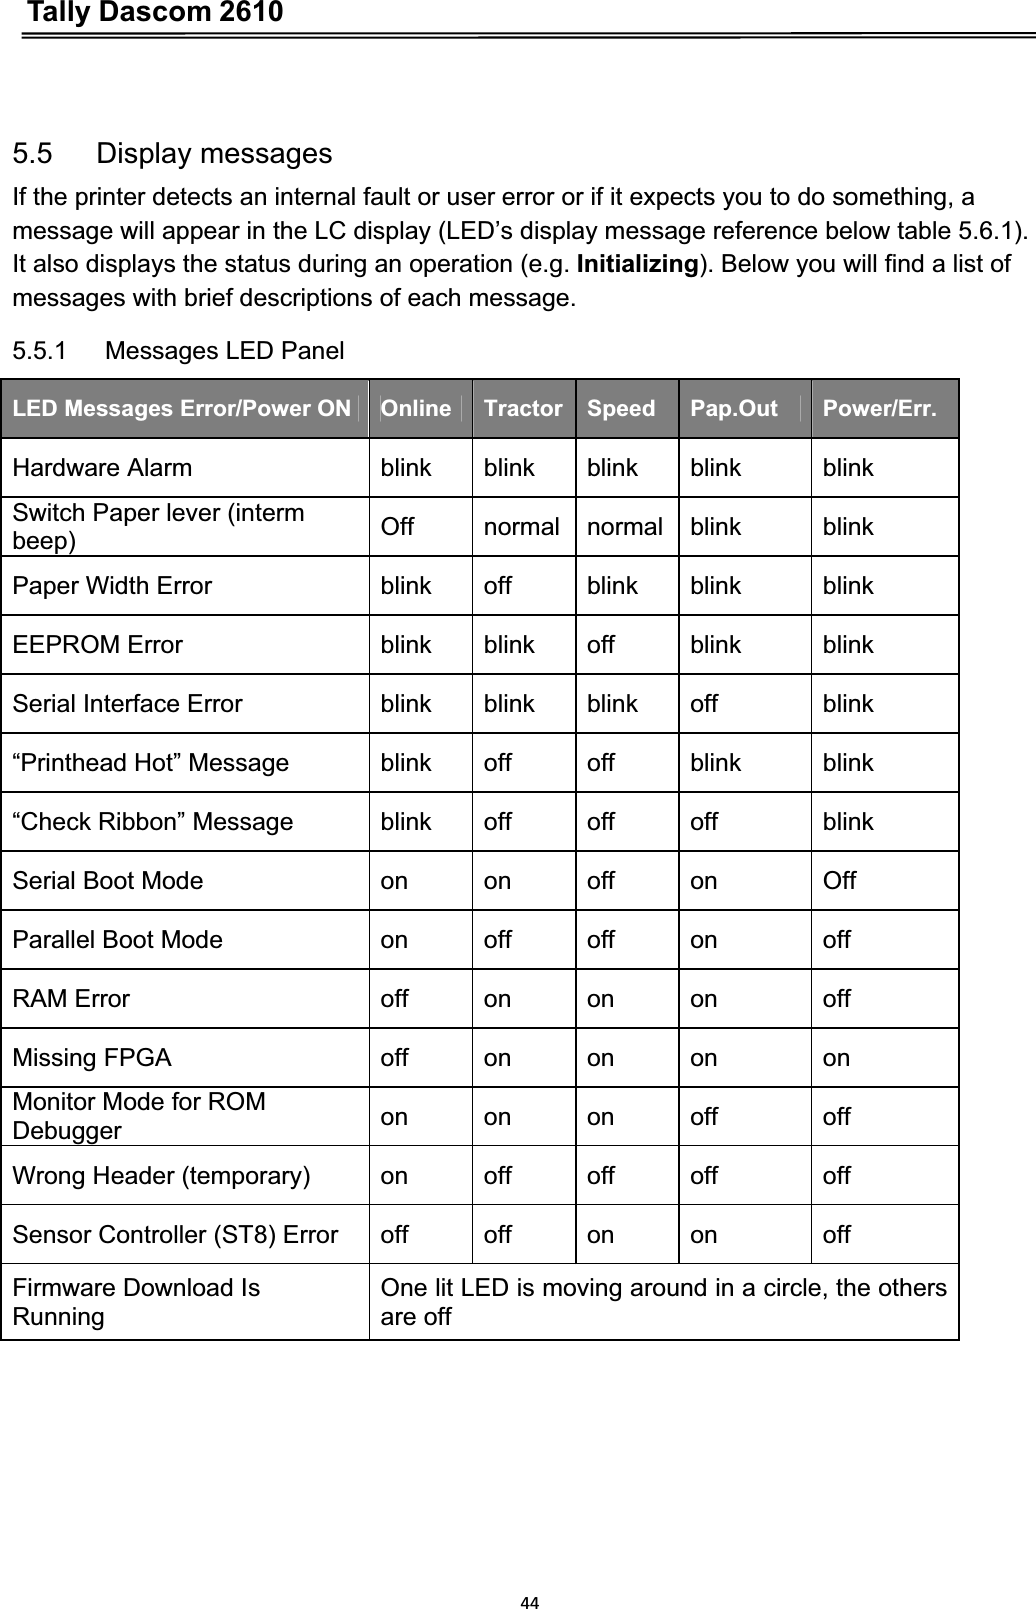
![Tally Dascom 261040Lines =6 – 144 Default 6LPI = 66 Sets the form length via line formats. Please note that the adjustment in Lines depends on the selected LPI. For example 8 LPI at a selected line number of 96 lines results in a form length of 12 inches (96lines/[8lines/inch]) = 12 inches. The selectable range is between 3 and 21 inches, i.e. for 2 LPI from 6 to 42 lines and for 12 LPI from 24 to 262 lines. If the form length is set it will not be changed by changing the LPI later on. FormlenStandard No formatDIN A3 (420 mm) DIN A4 (297 mm) DIN A5 (210 mm) DIN B5 (250 mm) DIN B6 (176 mm) DIN C6 (162 mm) Executive 10.5"Letter 11" Fanfold 12” Legal 14" Selects the form length by standard formats. Using Standard, different paper formats can be selected directly, e.g. DIN A4, Legal, Letter. The Menu indicates No format if a value is selected by the Line function or ESC sequences, which does not correspond to a standard format. FormAdj FormAdj=0 - 134/72” Default 12/72” Sets the first print position of a form in n/72 inch, separately adjustable for each paper path. Autotear ViewTear =OffView=1s/3s/6s Tear=1s/3s/6s Tear at TOF The auto tear function or the auto view function can be selected as desired. When auto view is switched on, the last printed text is visible. As soon as data is received the paper moves to the “normal” print position. After printing the printer waits for the given interval to bring the paper once more to the auto view position.The paper is in the tear off position when auto tear is switched on, the perforation ofthe positioned at the tear off edge of the printer. If data is received, the paper returns to the normal print position. After printing, the printer waits for the given interval to bring the paper once more to the tear off position. If the tear off edge does is not aligned with the perforation of the paper then this can be corrected. Width Width=13.6Inch Selects the line length in inches. With the setting of 8 Inch, the printer operates like](https://usermanual.wiki/Jiangmen-Dascom-Computer-Peripherals/TD26000.users-manual/User-Guide-1945130-Page-54.png)