Jiangmen Dascom Computer Peripherals TD5130P Dot Matrix Printer User Manual UG 5130T preliminary tv04
Jiangmen Dascom Computer Peripherals Co.,Ltd. Dot Matrix Printer UG 5130T preliminary tv04
UserManual.wiki
>
Jiangmen Dascom Computer Peripherals
>
TD5130P User Manual
user manual
Navigation menu
Upload a User Manual
Namespaces
Wiki Guide
HTML
PDF
Info
Views
User Manual
Discussion / Help
Navigation


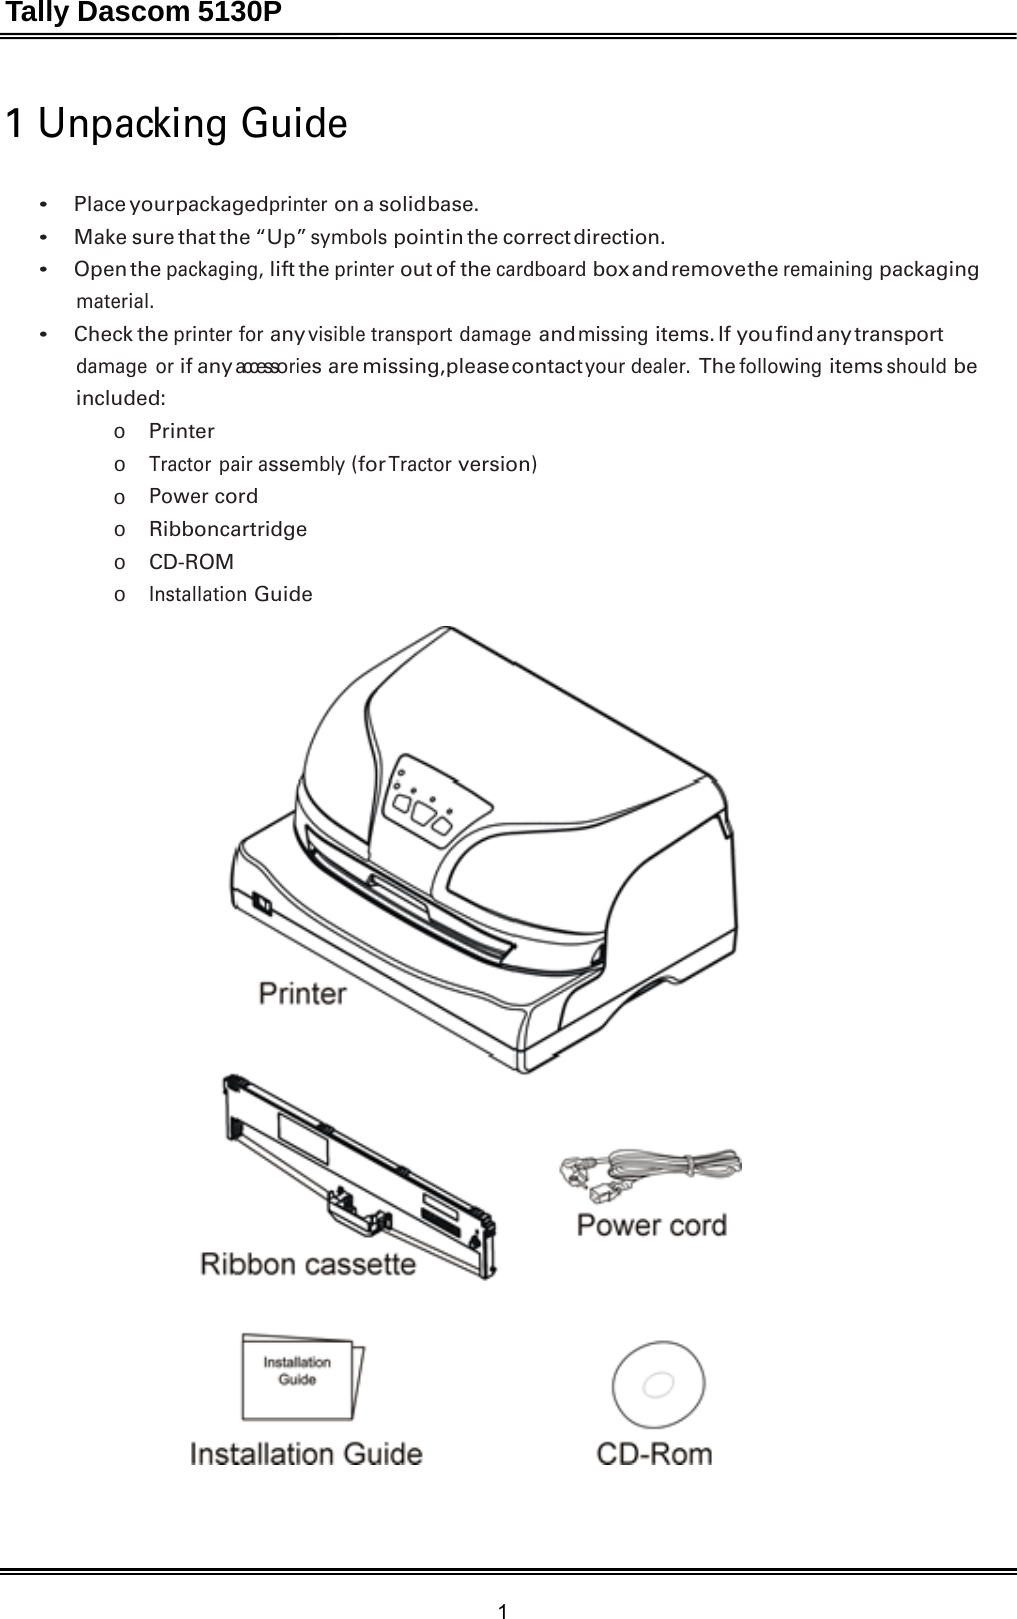
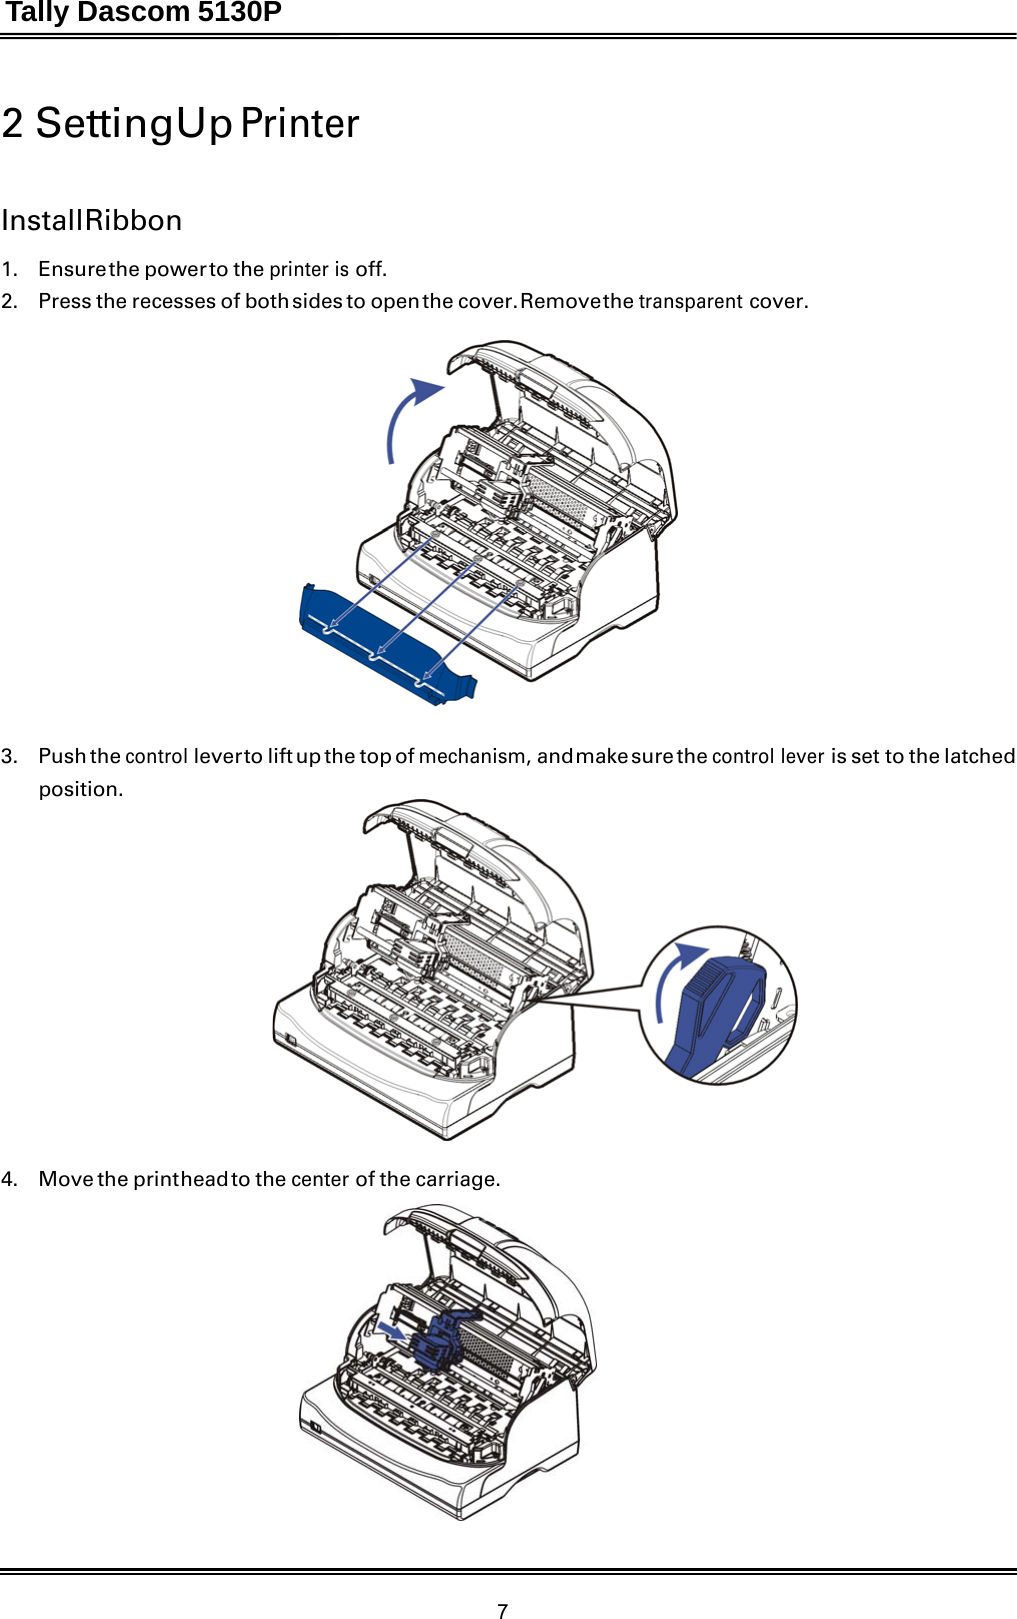

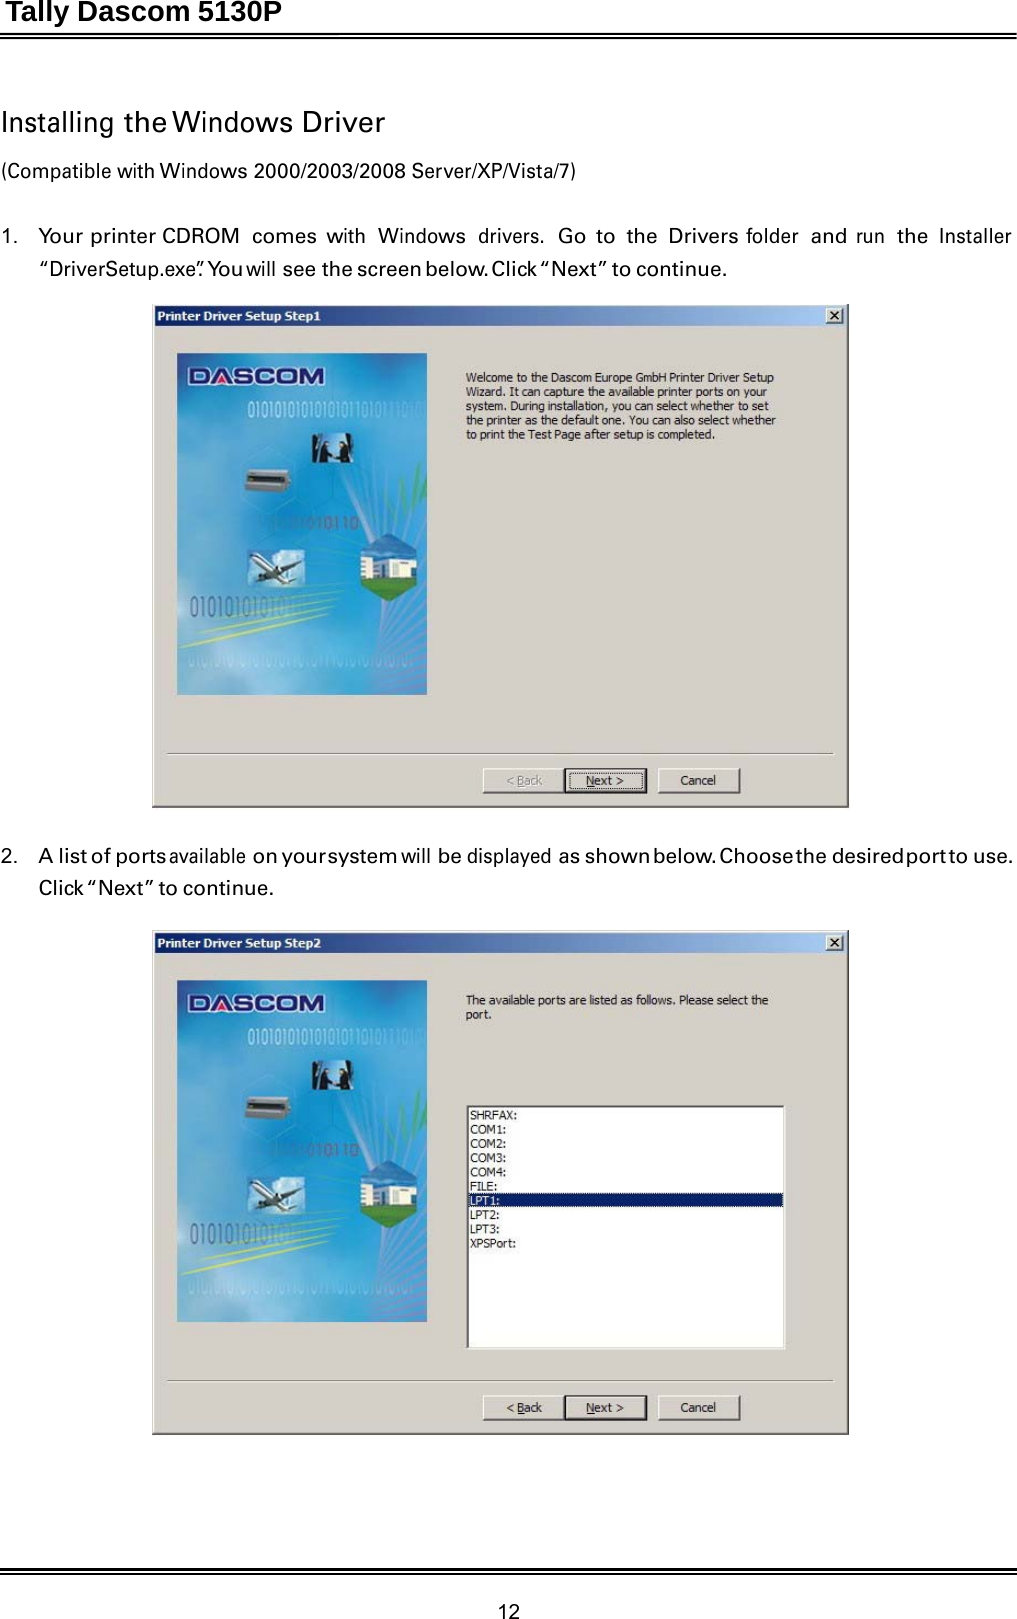
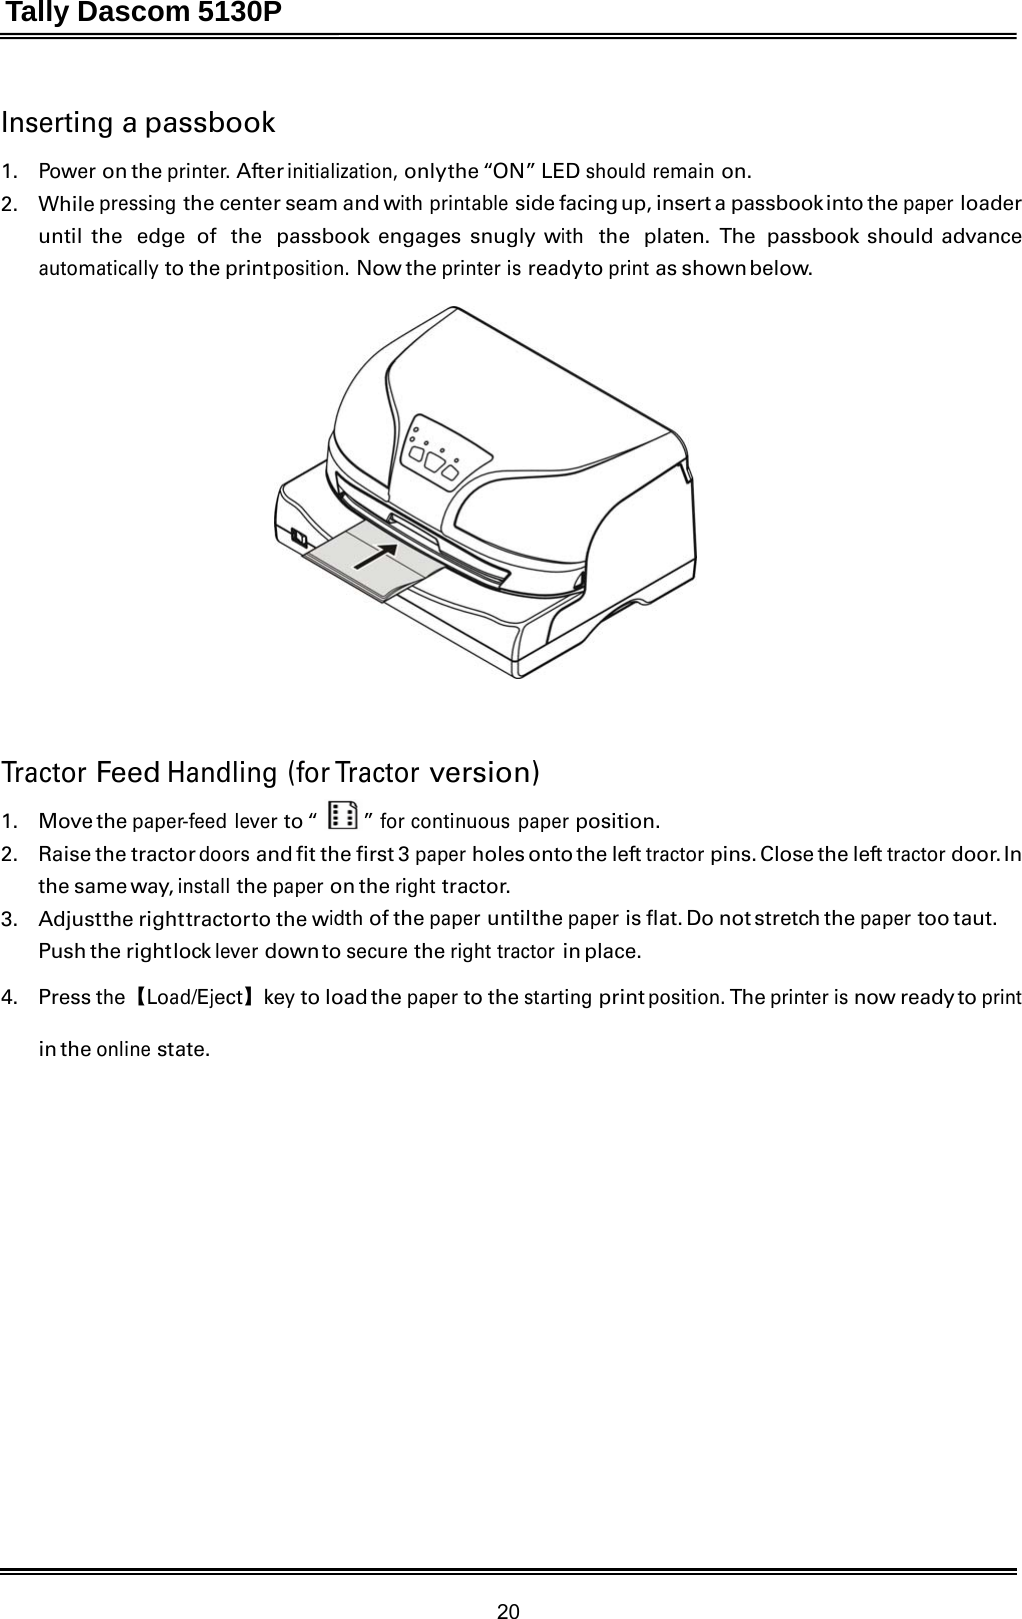
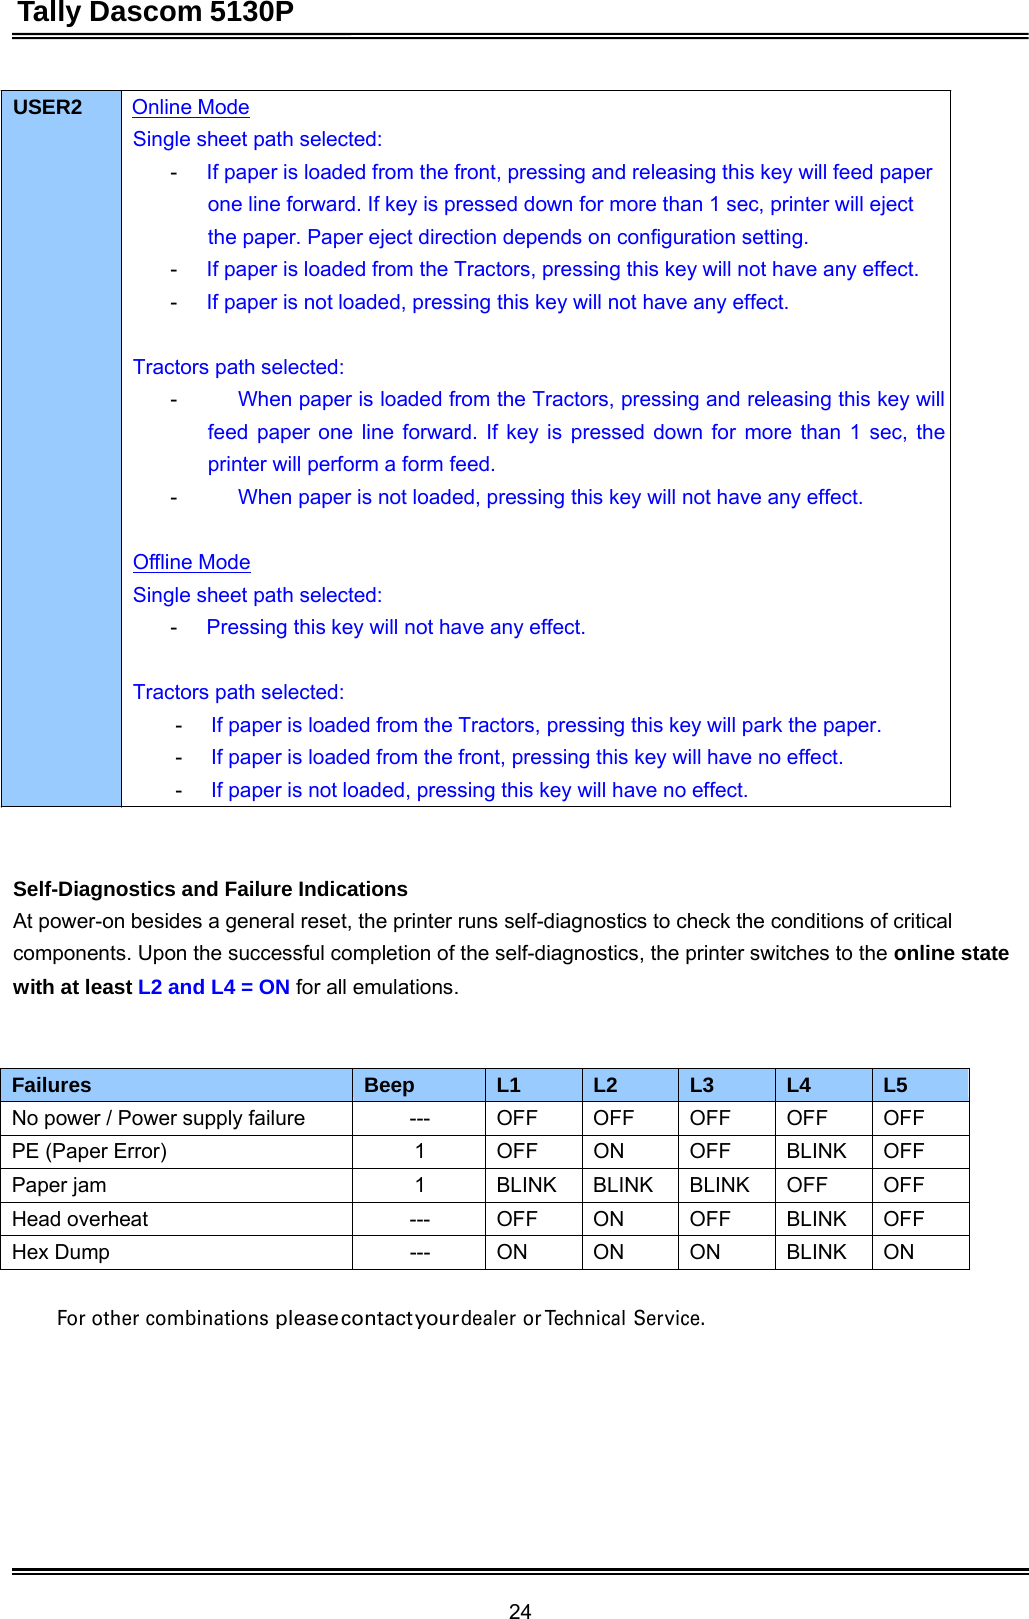
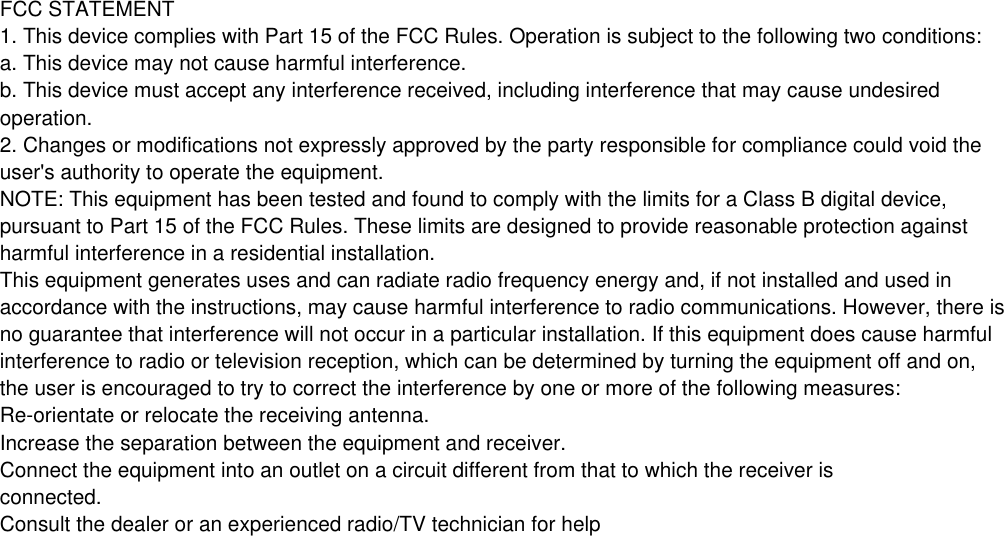
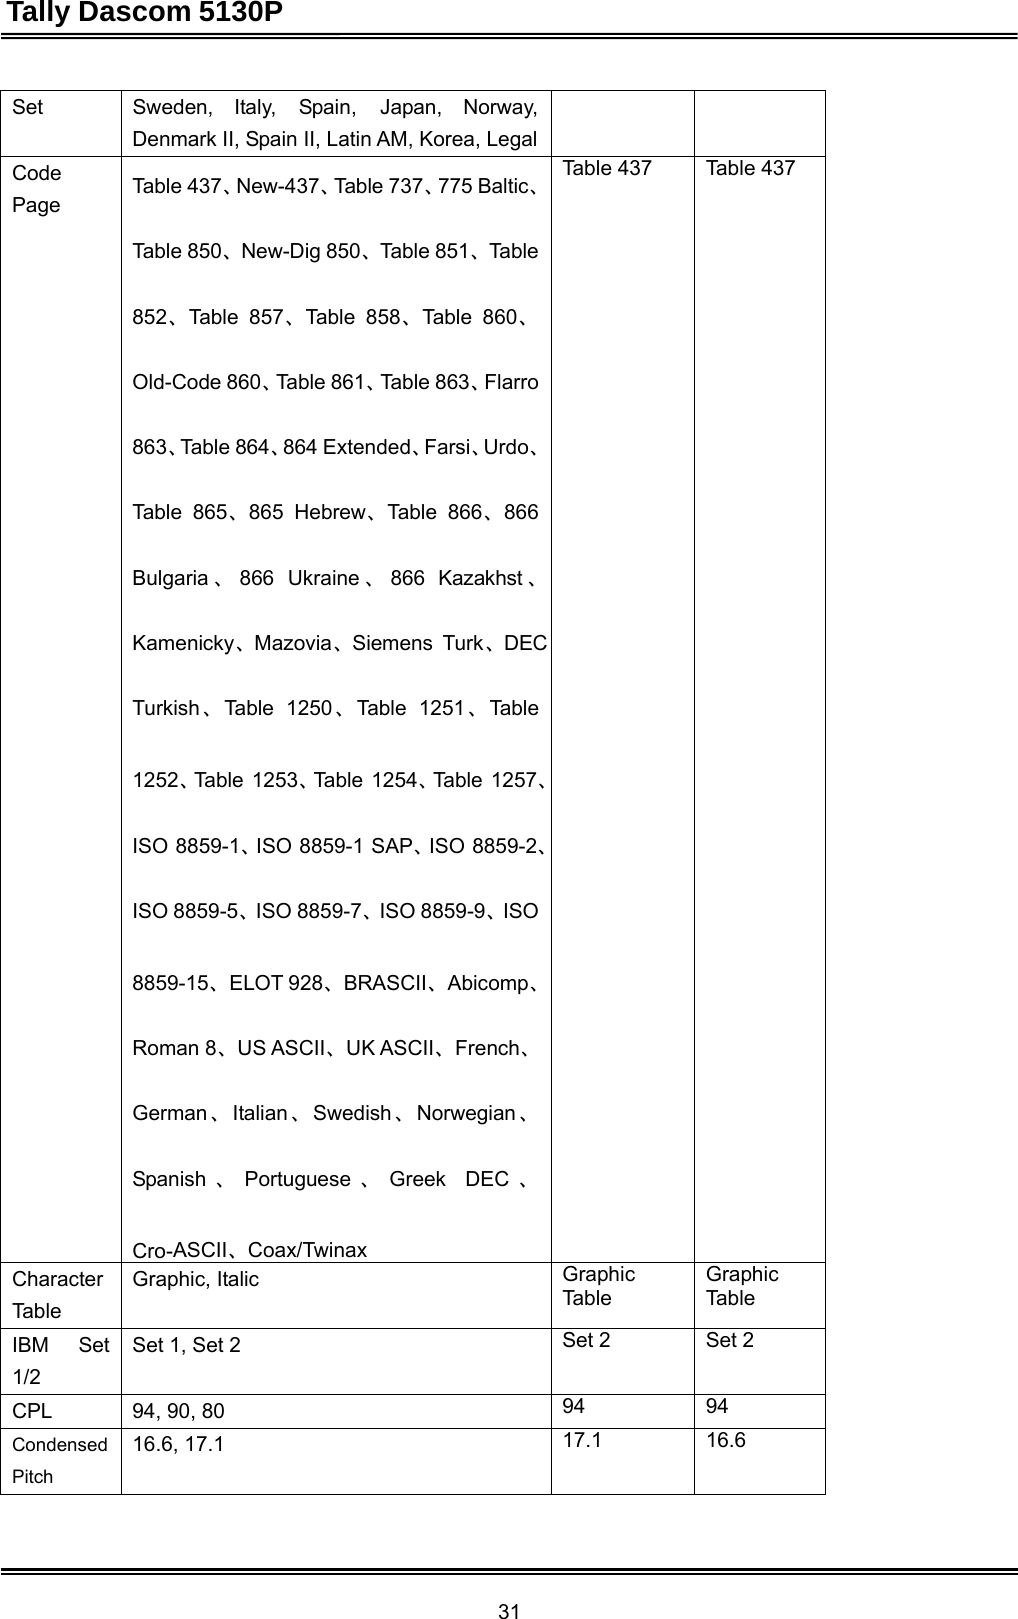
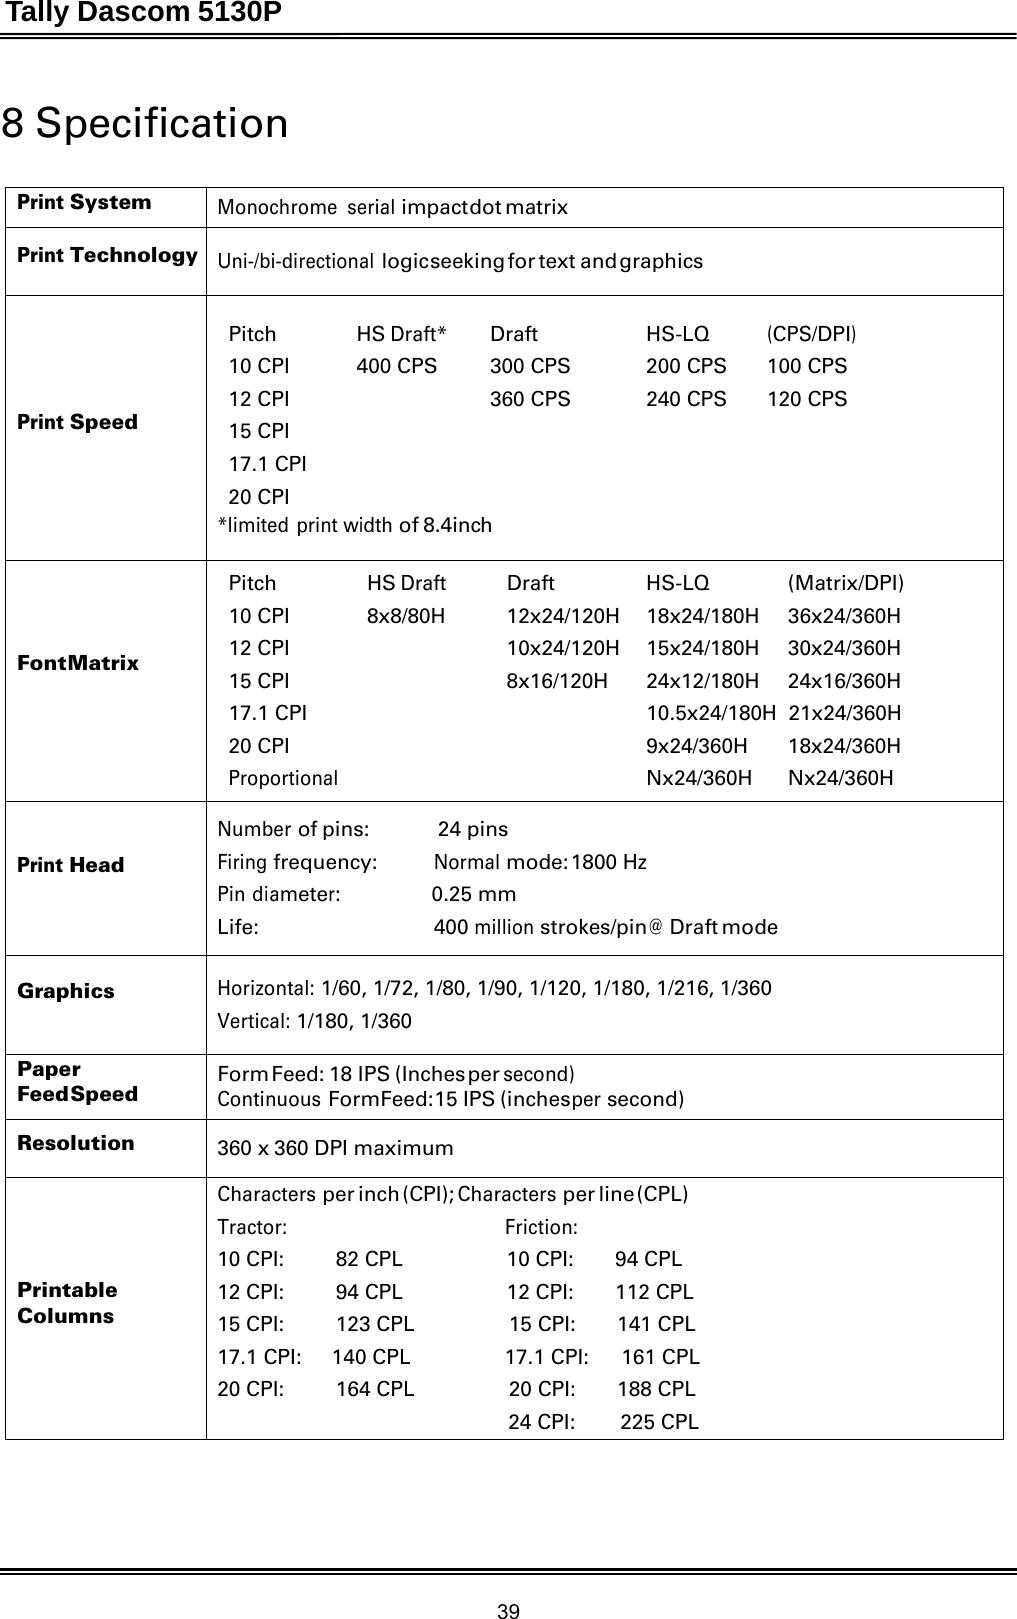
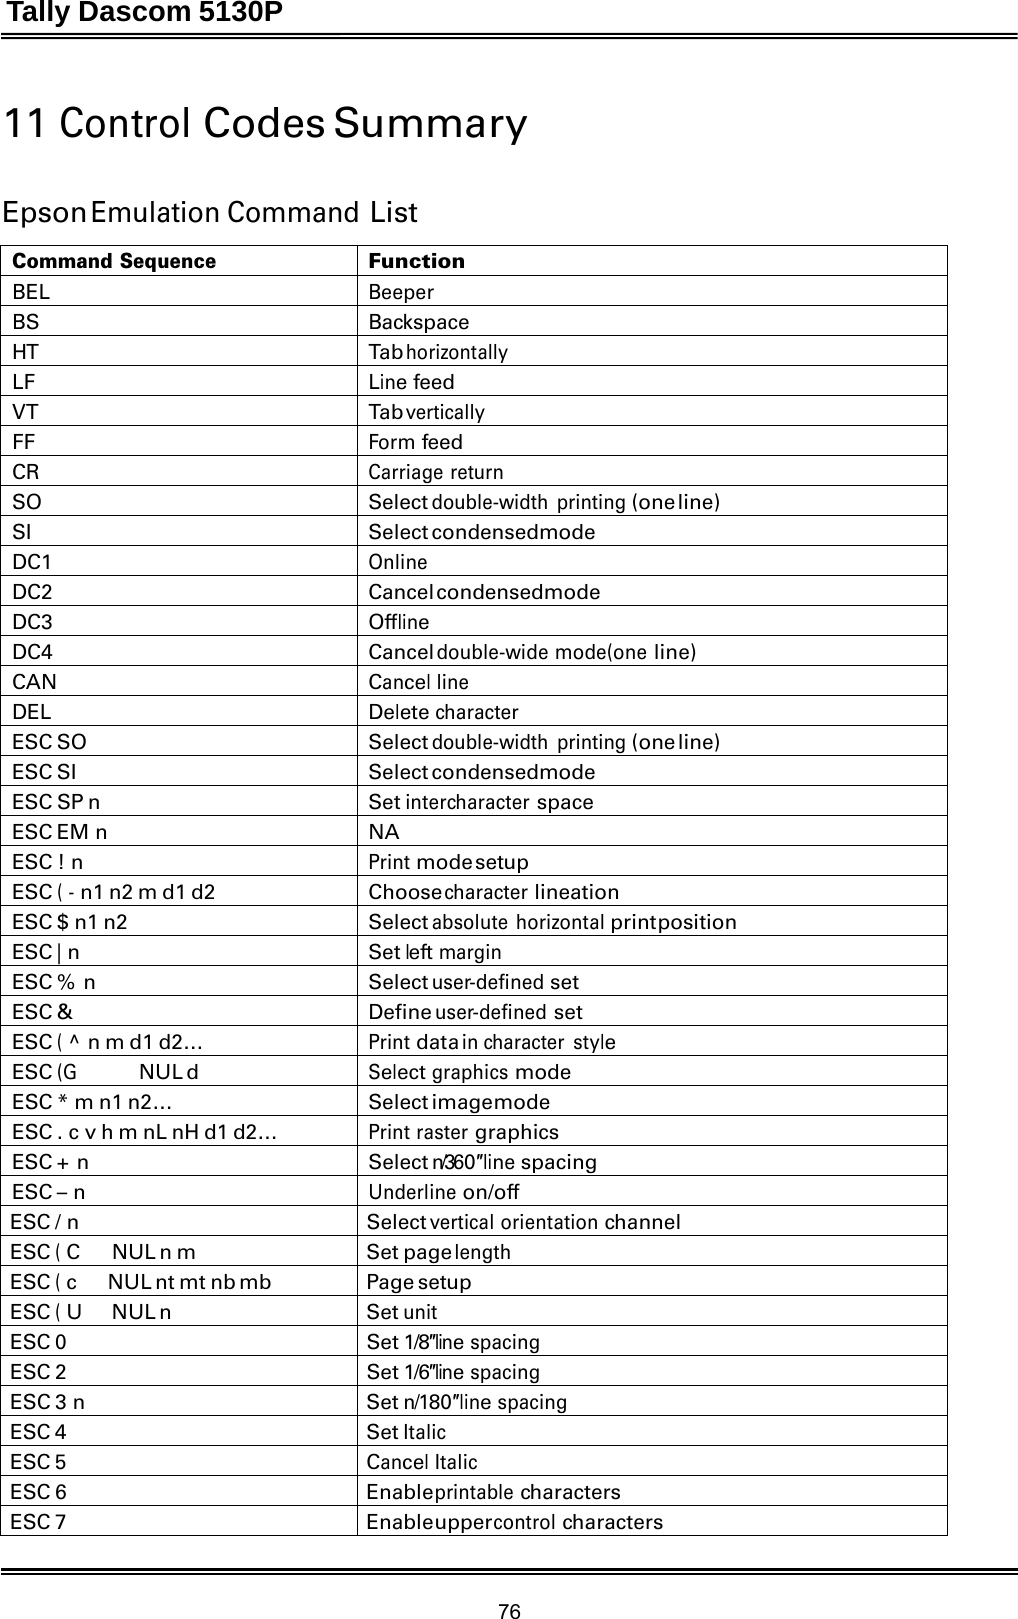
![Tally Dascom 5130P 25 Power-On Functions with Cover Open USER1 OFFLINE USER2 Utilities Remarks X X BOOT or Firmware Upgrade L1&L2 blink alternatively. X Self Test Print Font- and Codepage test page X Self Test Endless running ASCII TREE X Self Test Configuration test page with menusettings X* Suspend cover open detection *Press OFFLINE after power on. The printer resets and goes online. Firmware Update With the cover open, hold USER1 and OFFLINE at power-on to activate the Firmware Upgrade process. In DOS mode, type COPY /B firmware-file LPT1: [Enter] to transfer new firmware to the printer. It takes a few minutes for completion. Then the printer resets and goes to online. Power-On Functions with Cover Closed USER1 OFFLINE USER2 Utilities Remarks X Self Test Print Font- and Codepage test page X Self Test Endless running ASCII TREE X Self Test Configuration test page with menu settings X X Setup ● Language selection See Fig 2 for Setup dialogs orientation. In native languages.](https://usermanual.wiki/Jiangmen-Dascom-Computer-Peripherals/TD5130P/User-Guide-1750968-Page-39.png)
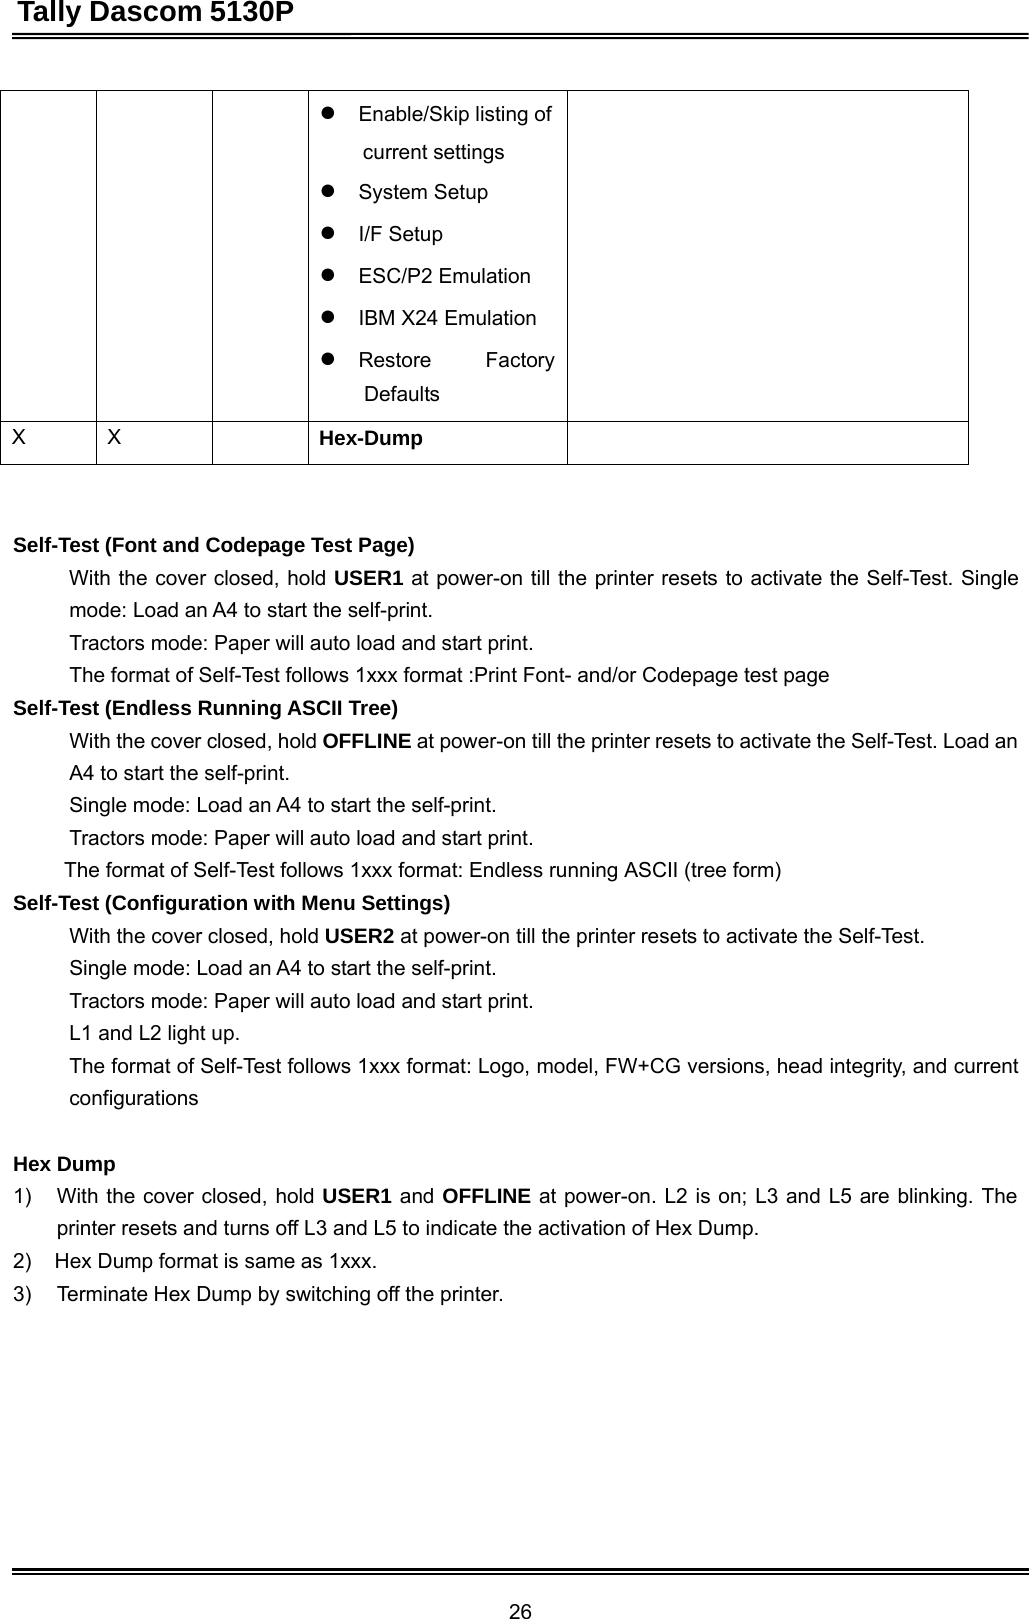
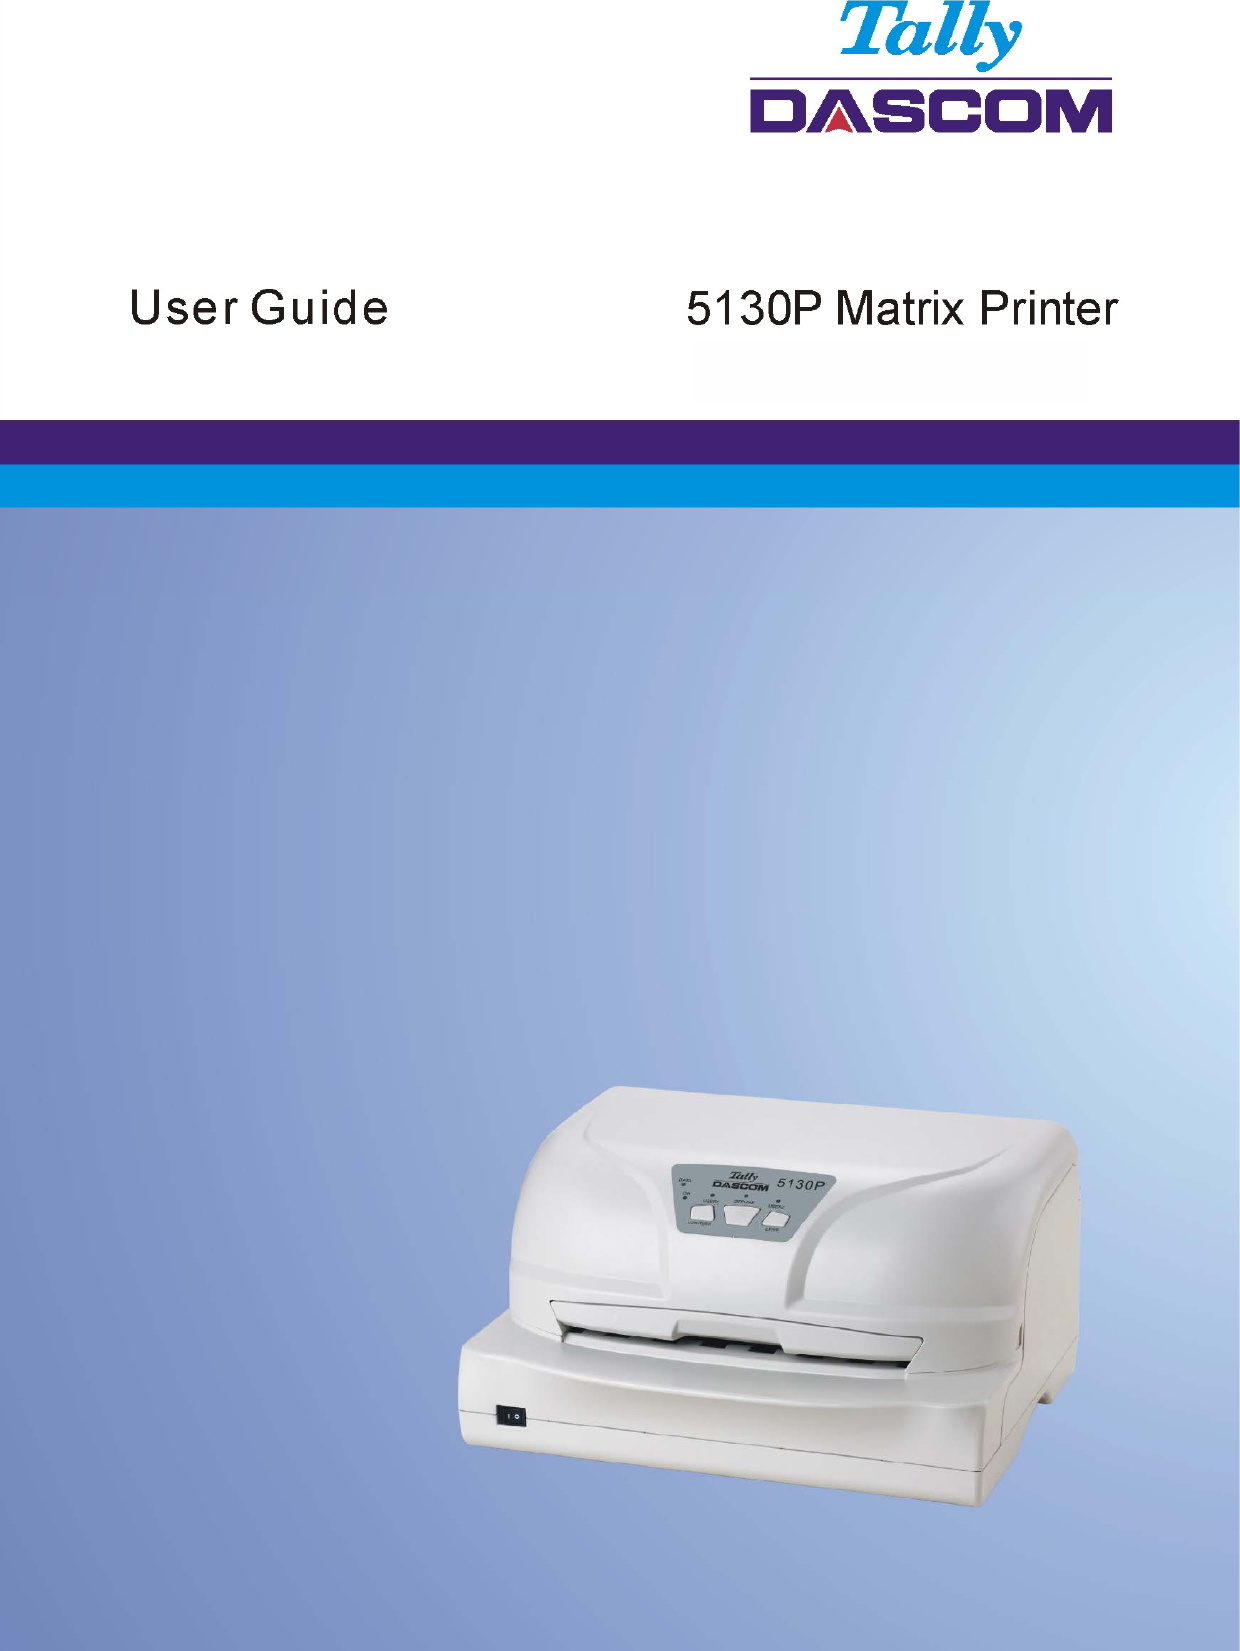
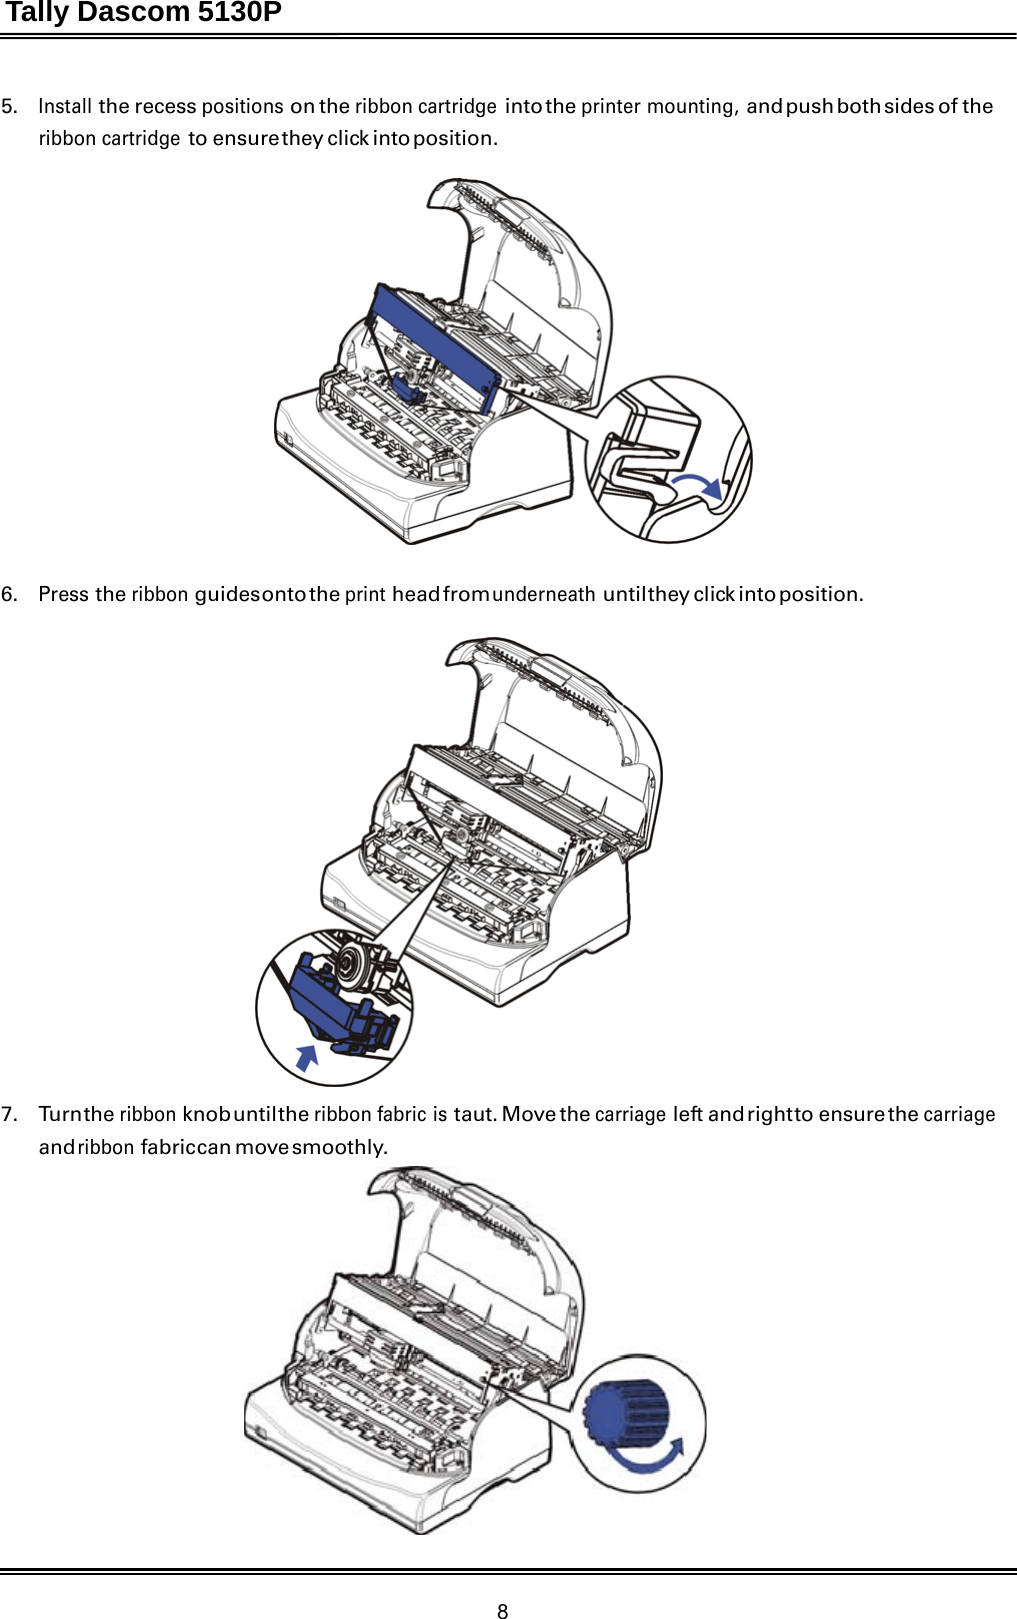
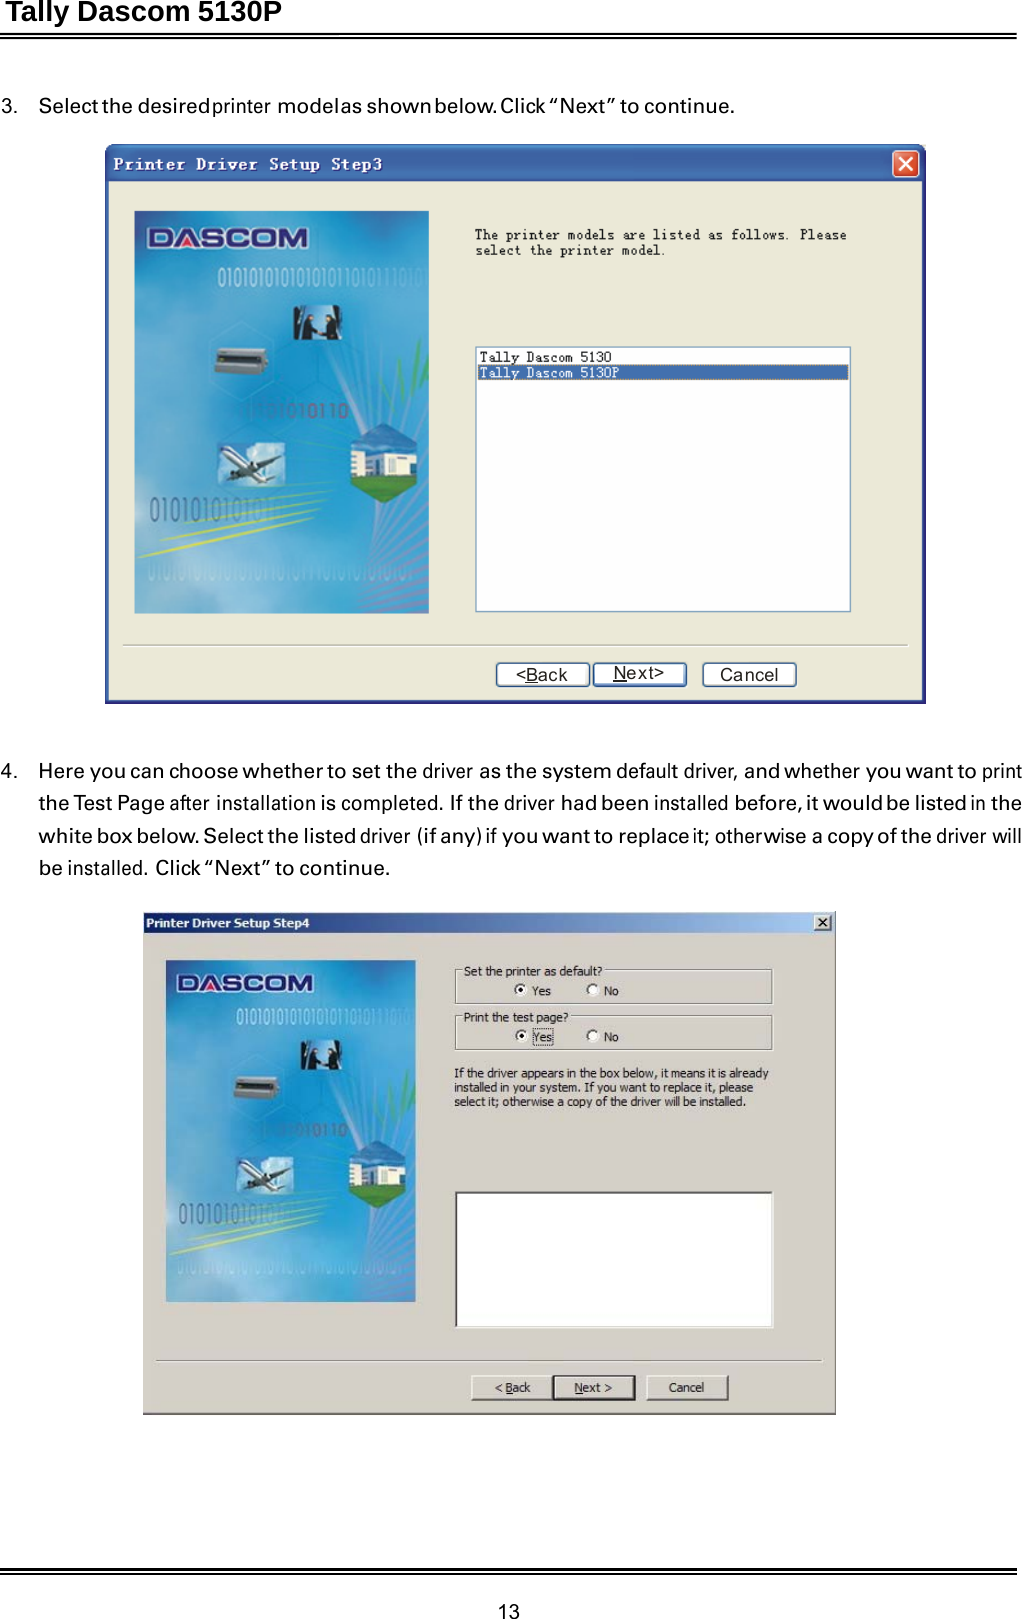
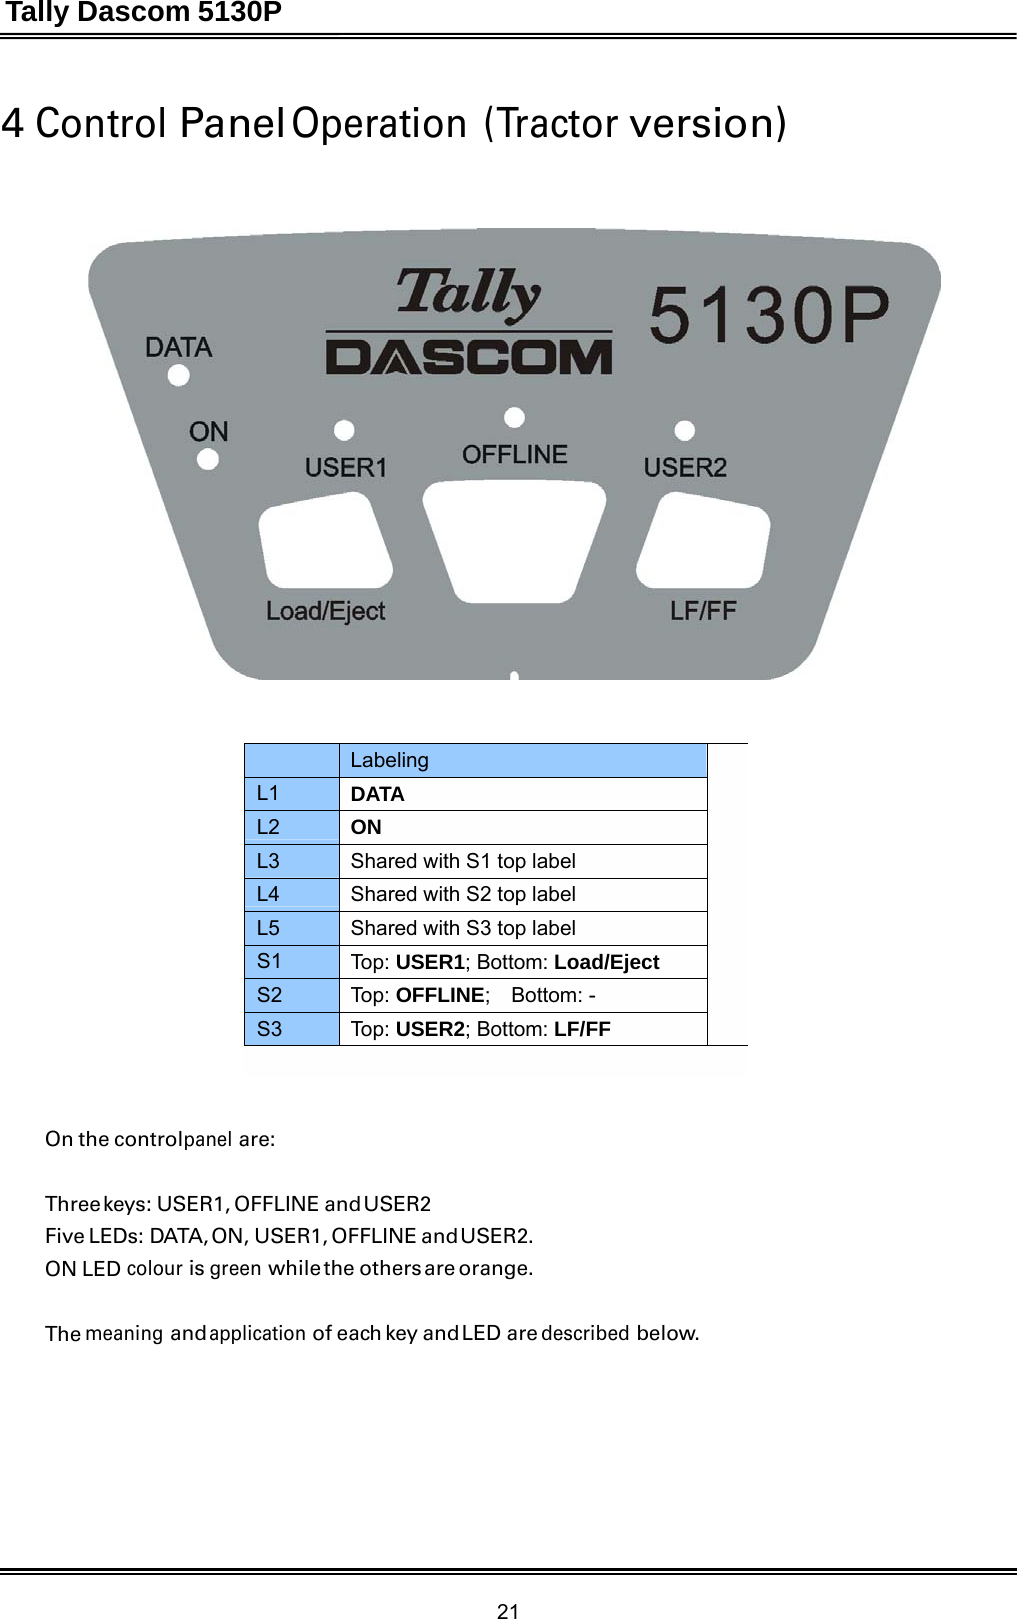
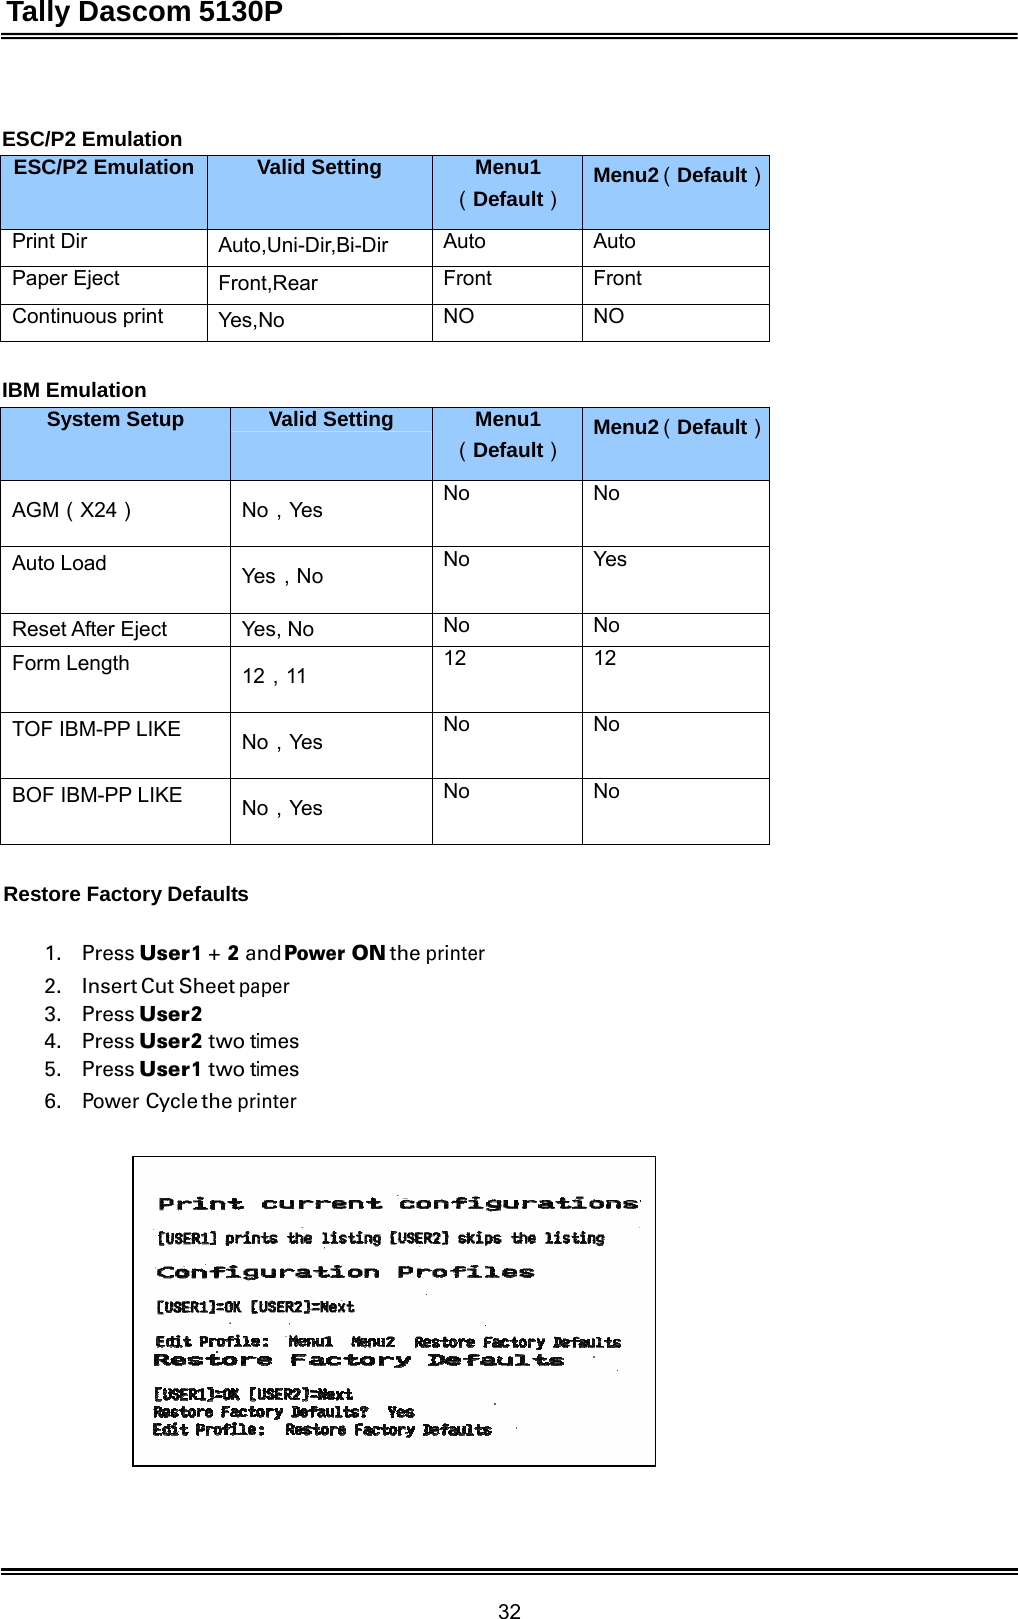
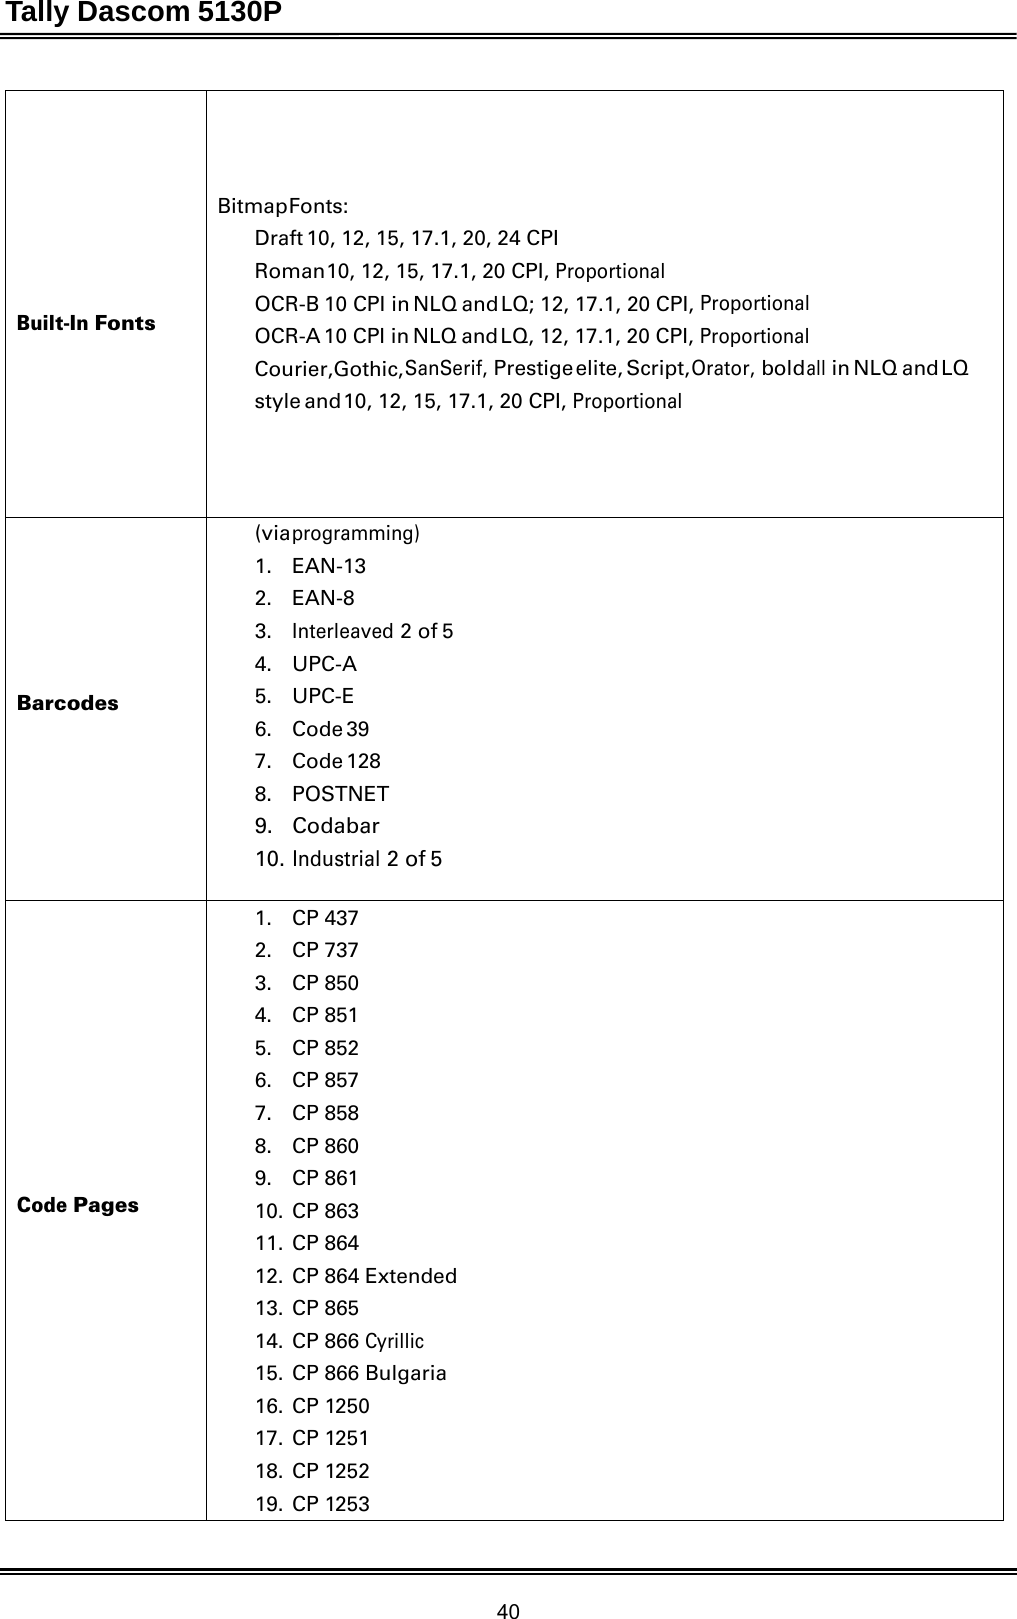
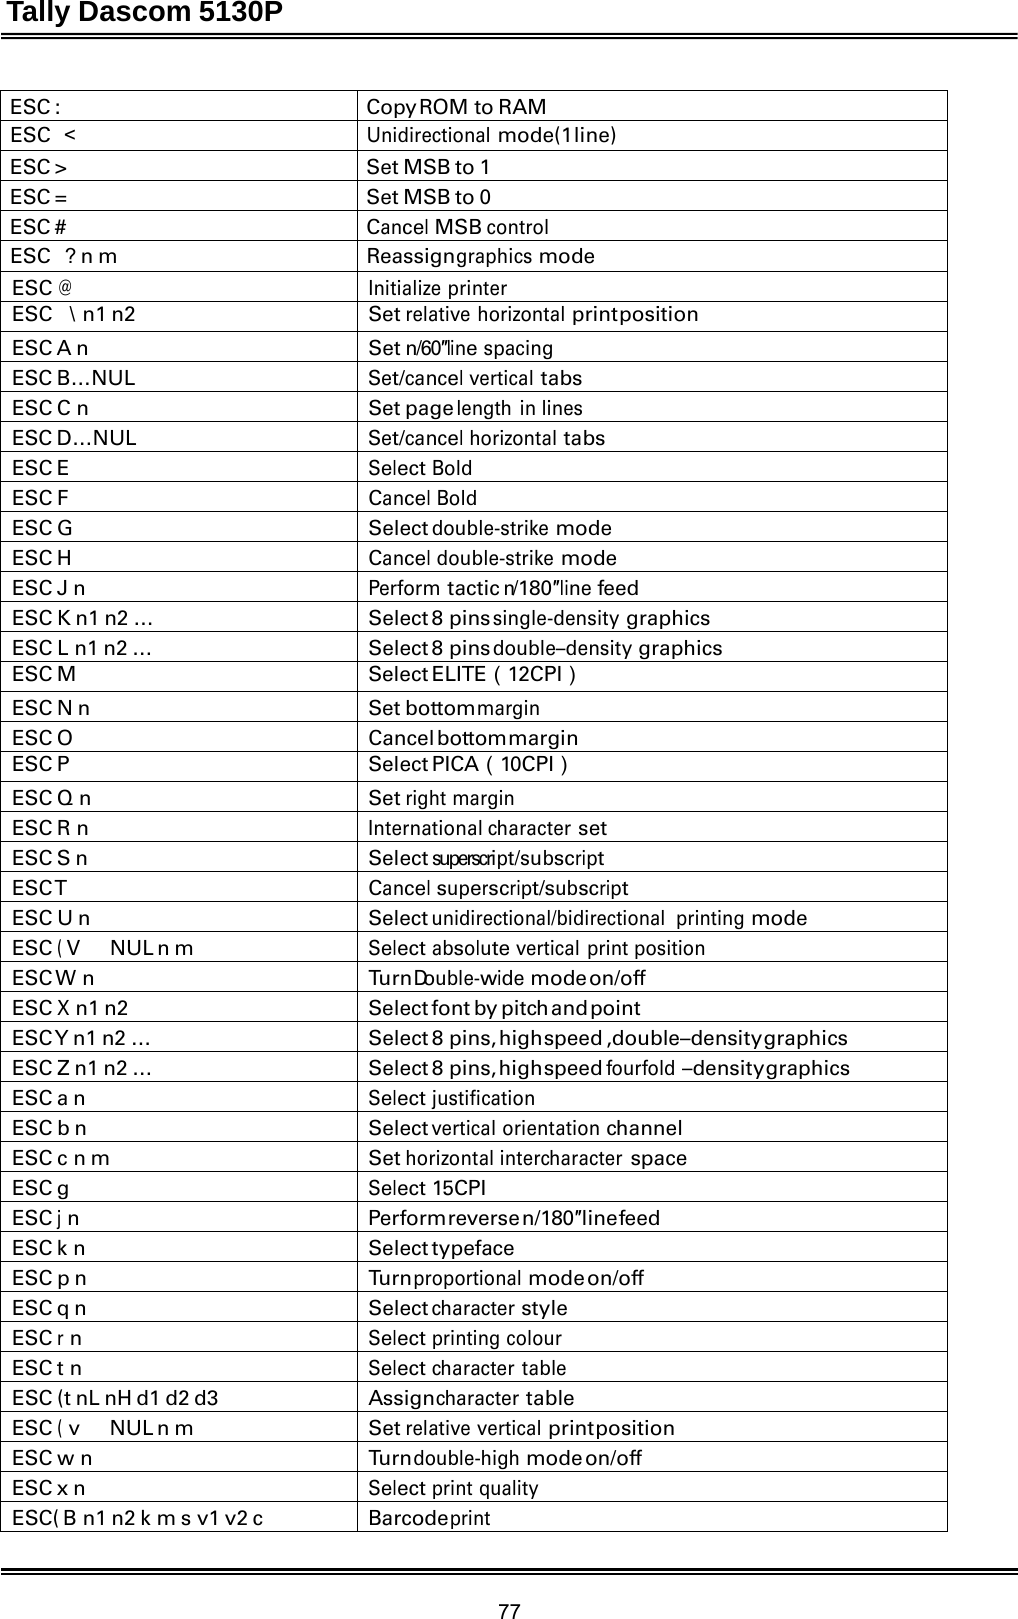
![Tally Dascom 5130P 27 Setup Menu With the cover closed, holding USER1 and USER2 at power-on brings up the Setup Menu. The printer resets and L1~L2=ON and waits for paper insertion. All printed dialogs in the Setup Menu are viewed in up-right orientation as in Fig. 2. [NOTE: 1xxx dialog is up side down when viewed by users.] Rear of printer English Deutsch … Setup dialog Fig.2---Setup dialogs in up-right orientation viewed by operators. Language Selection (This feature is not supported in all models) 1) List out all languages in native characters and underline the tentative language. Assign USER1=OK and USER2=Next. Fig. 3 illustrates the operation of language selection. 2) Advance the page for preview and wait for key press. Retract the paper for printing. 3) Each pressing of USER2 repeats 1~2. 4) Once the language is selected, subsequent dialogs are prompted in the selected language. All subsequent dialogs in selected language. Aktuelle Konfiguration? [USER1]=OK [USER2]= Weiter English Deutsch Рос с и я.. [USER1]=OK [USER2]=Next English Deutsch Ро с с и я .. [USER1]=OK [USER2]=Next Dialog starts from this line. Key assignment in native language. Enable/Skip Listing Current Configurations The termination of language selection immediately prompts the “Print current configurations?” This allows or skips the listing of current configurations before going into parameters setting. USER1 prints the listing and USER2 skips the listing. Contents of the listing: Current configurations for Menu1 and Menu2.](https://usermanual.wiki/Jiangmen-Dascom-Computer-Peripherals/TD5130P/User-Guide-1750968-Page-41.png)
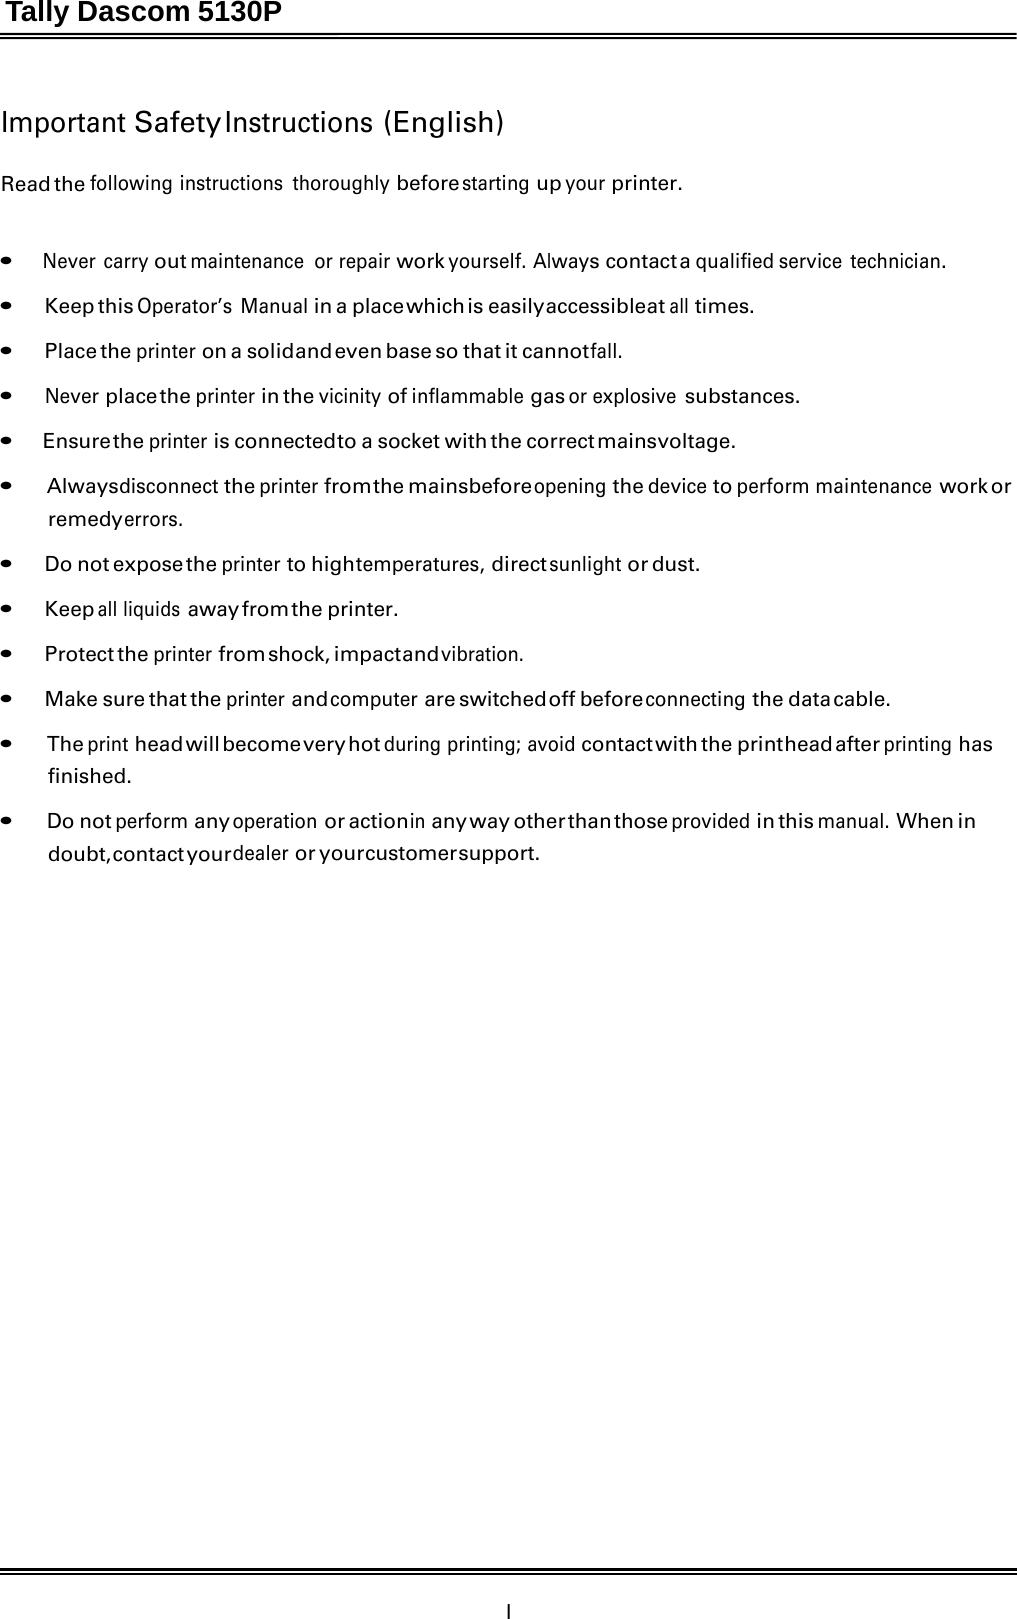
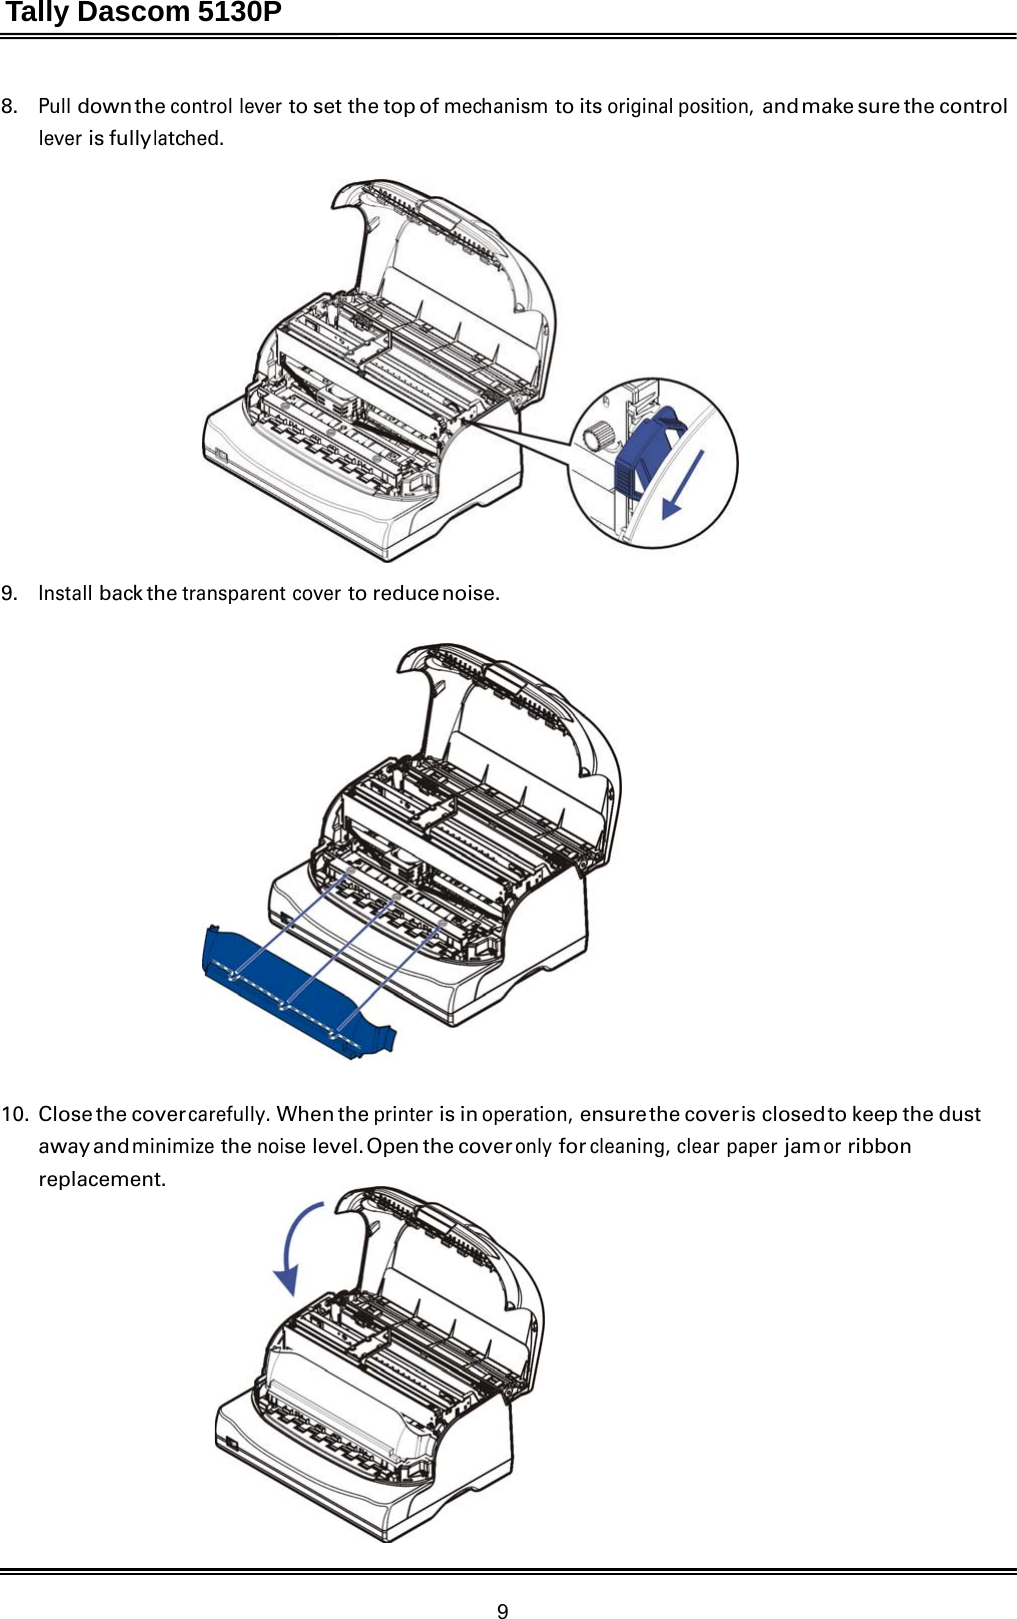
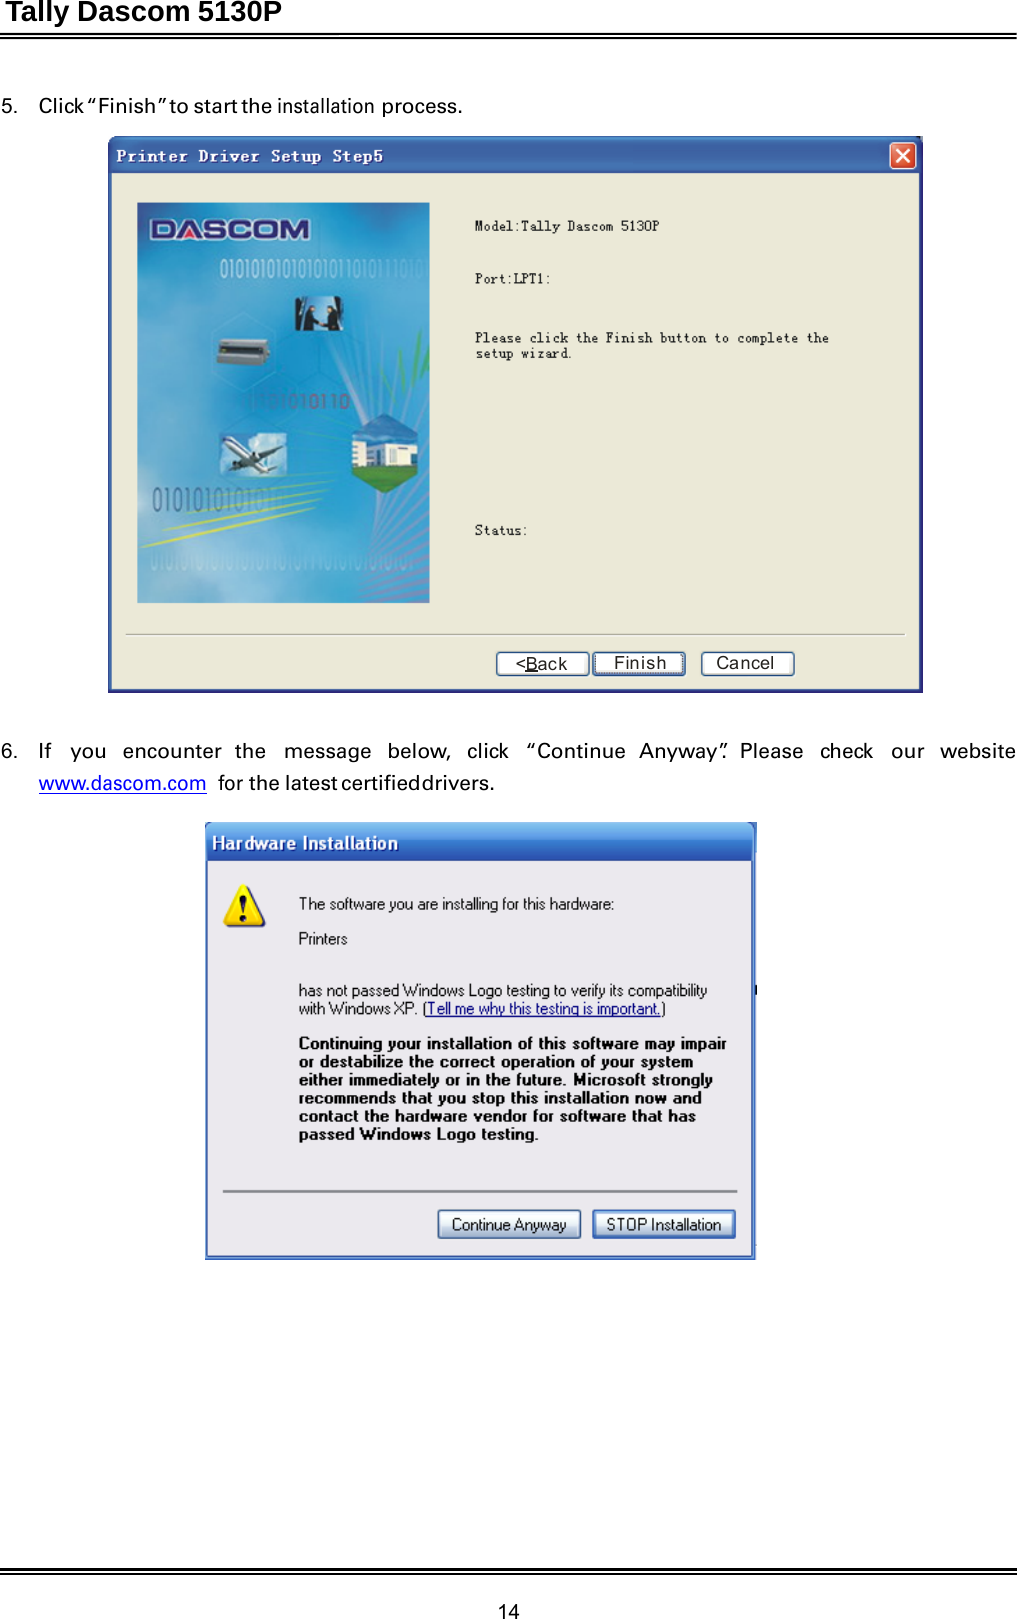
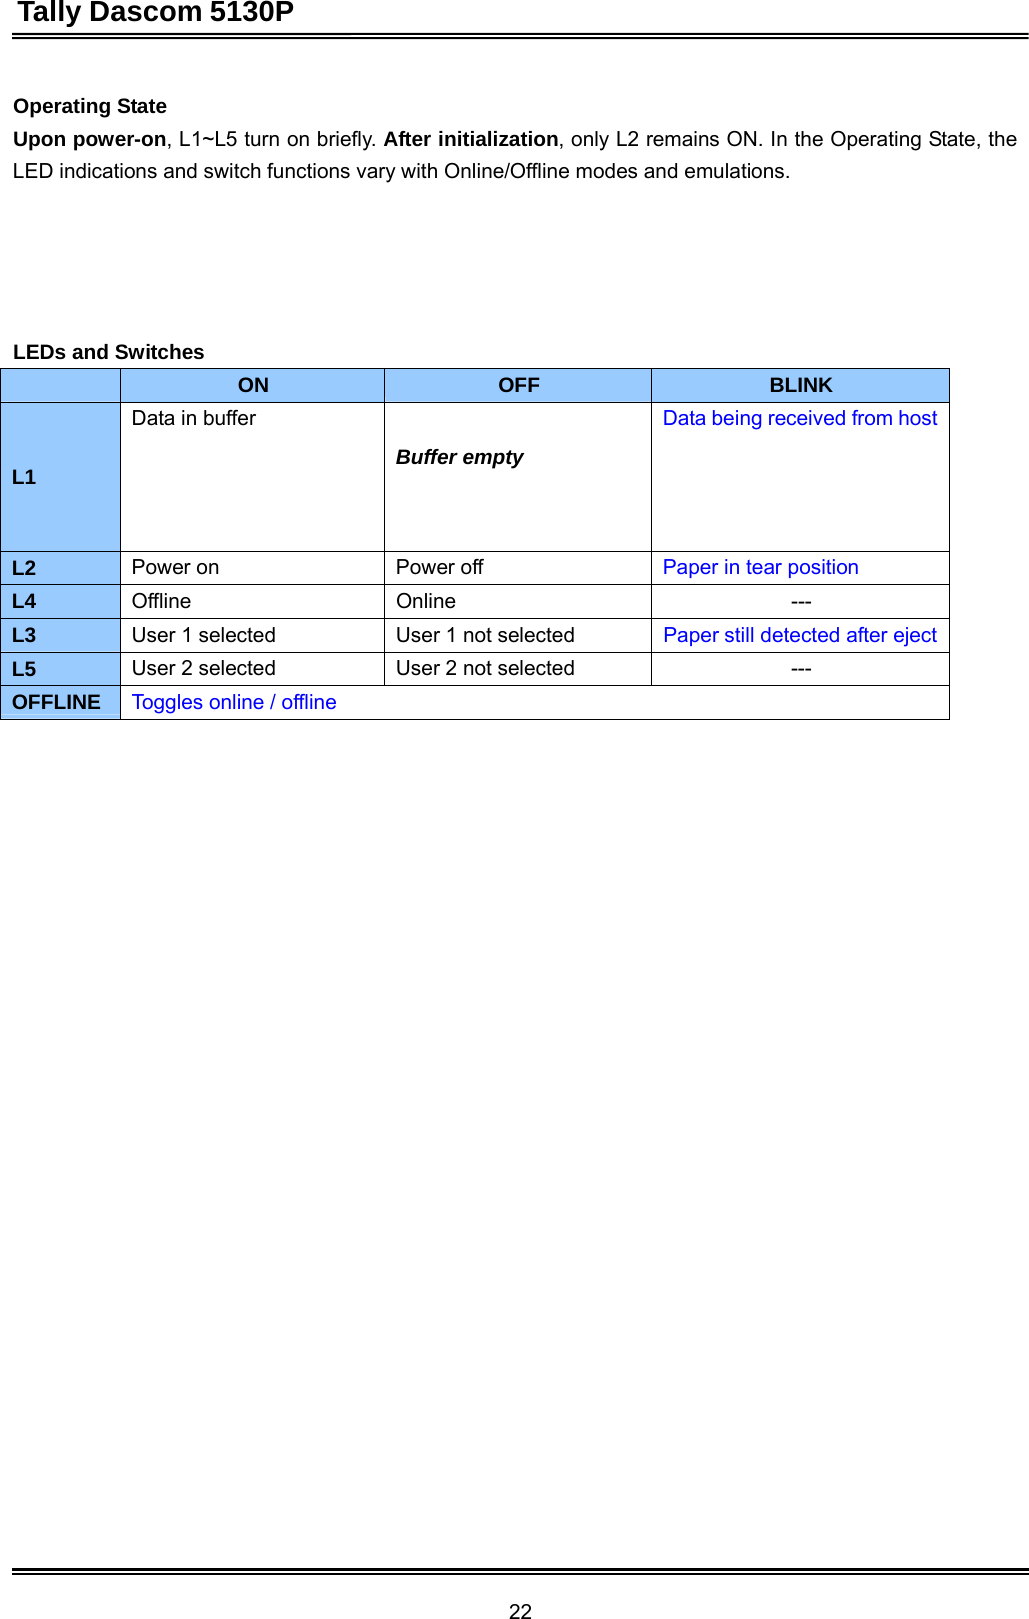
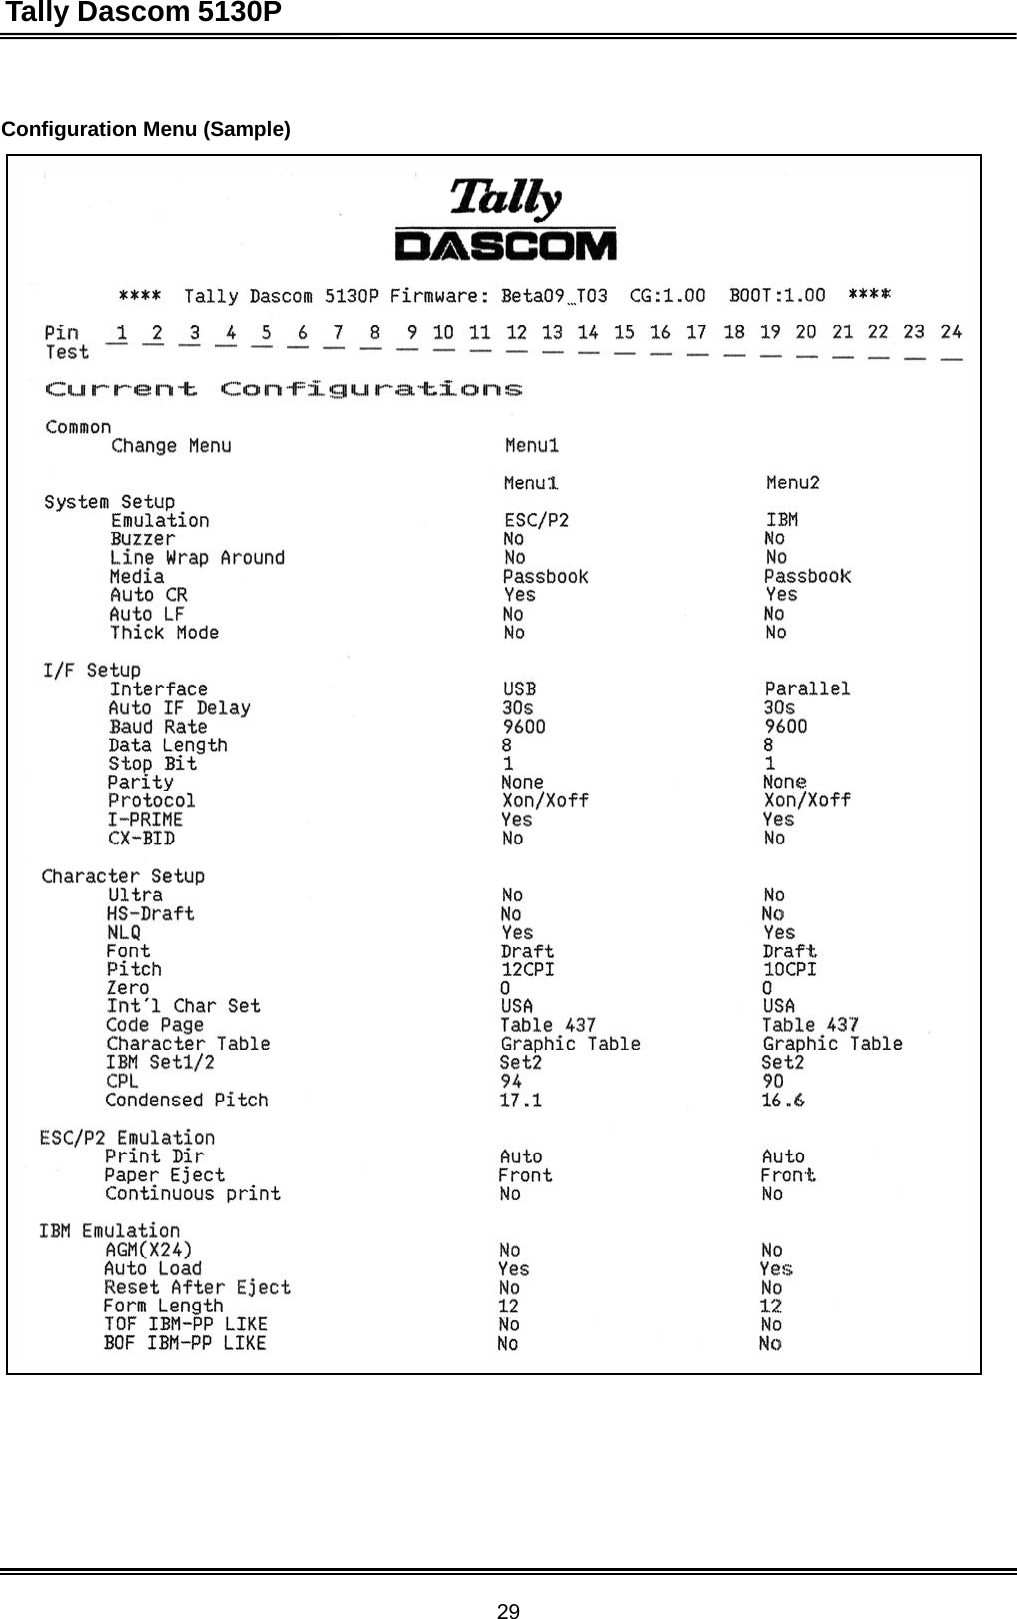
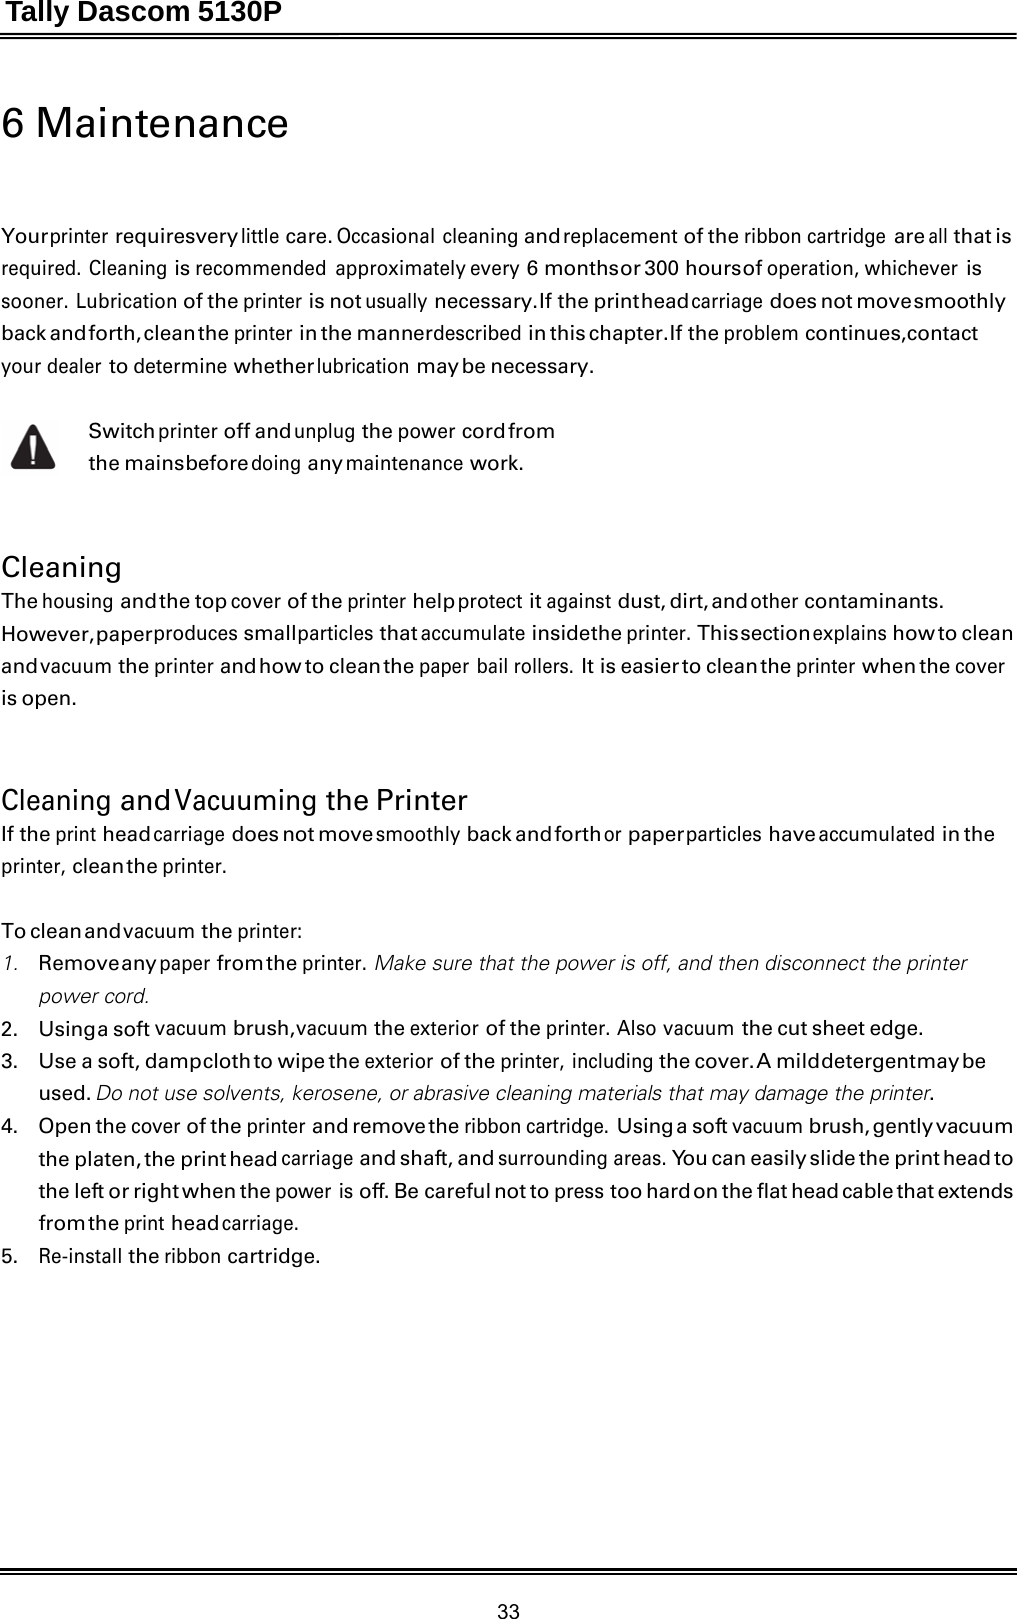
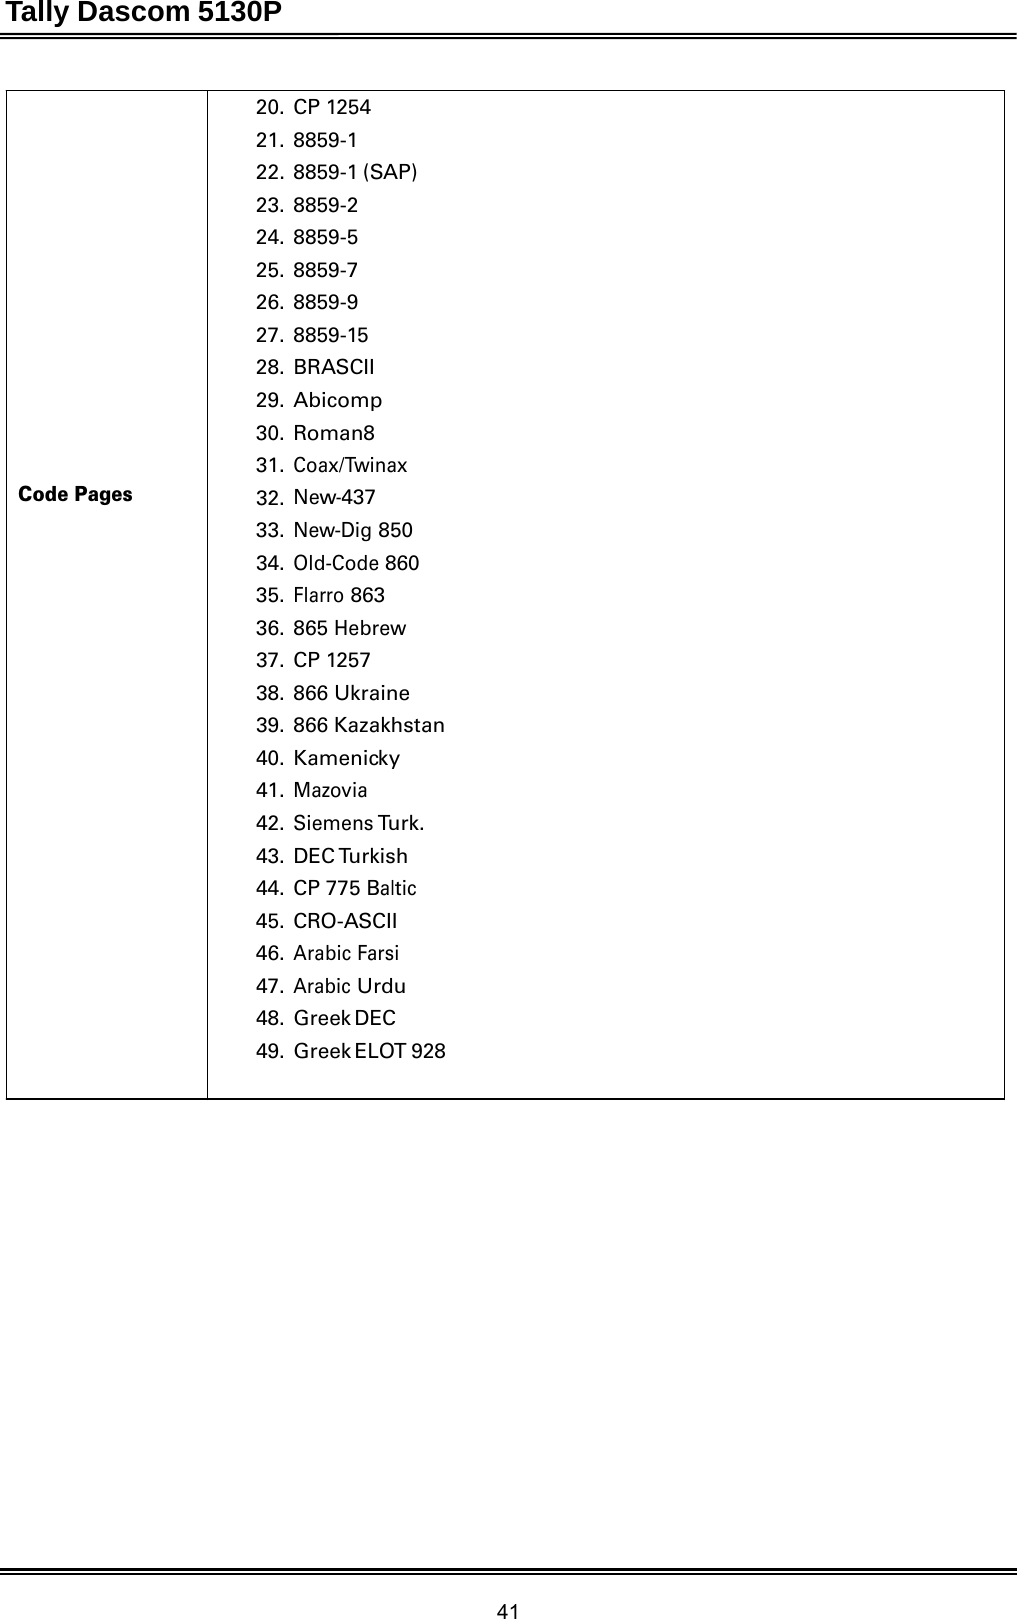
![Tally Dascom 5130P 28 Configuration Profiles The termination of Listing Current Configuration brings the Edit Profile menu. Successive pressing of USER2 scrolls out remaining choices, highlighted in brown. Edit Profile: Menu1 Menu2 Restore Factory Defaults [USER1]=OK [USER2]=Next NOTE: Menu1 and Menu2 cannot assign the same I/F. Menu1=Profile for USER1; Menu=Profile for USER2. How to Change Current Configurations The configuration (emulation, I/F and so on) for each profile is carried out in a Q&A session with the below keys assignment. The same key assignment applies universally to the offspring of individual menu. Keys for Setup [USER1]=OK [USER2]=Next [OFFLINE]=Exit “OK” implies accepting the latest printed item (a menu selection or a parameter) “Next” requests for printing next item “Exit” immediately leaves the current menu or parameter setting In parameters menus, the press of OFFLINE prompts: Save setting? OK Press USER1 to save the settings collectively with a beep. Press of USER2 appends a “NO” to the “OK”; then press USER1 to exit without saving.](https://usermanual.wiki/Jiangmen-Dascom-Computer-Peripherals/TD5130P/User-Guide-1750968-Page-42.png)
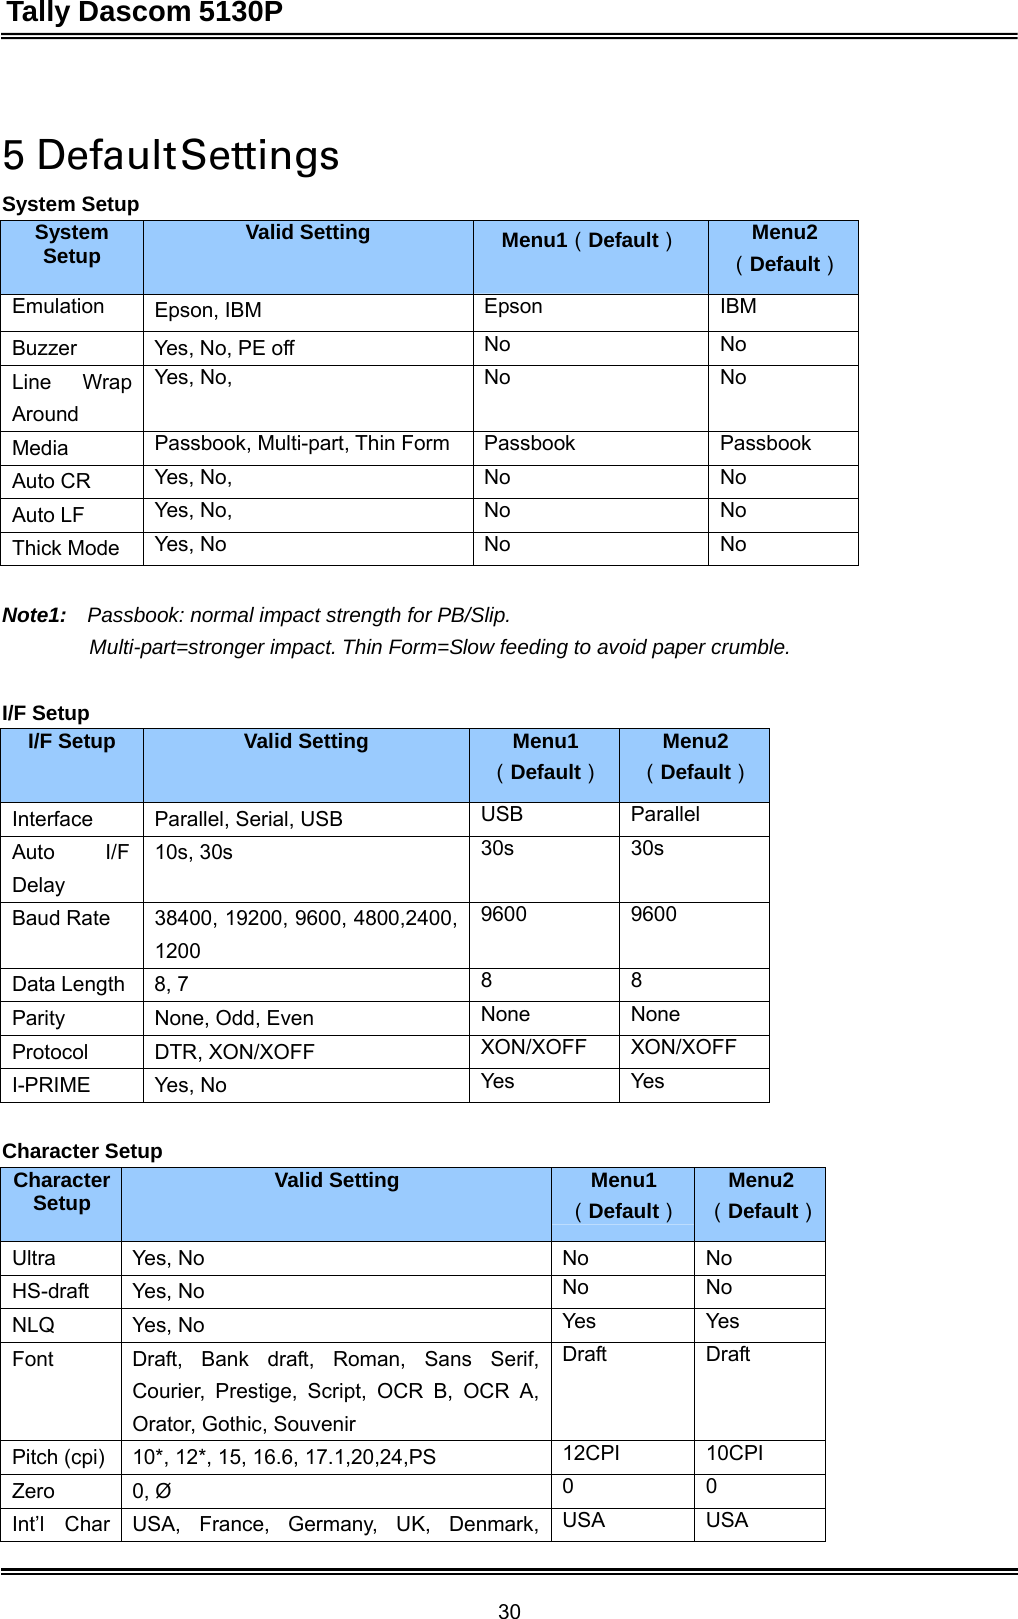
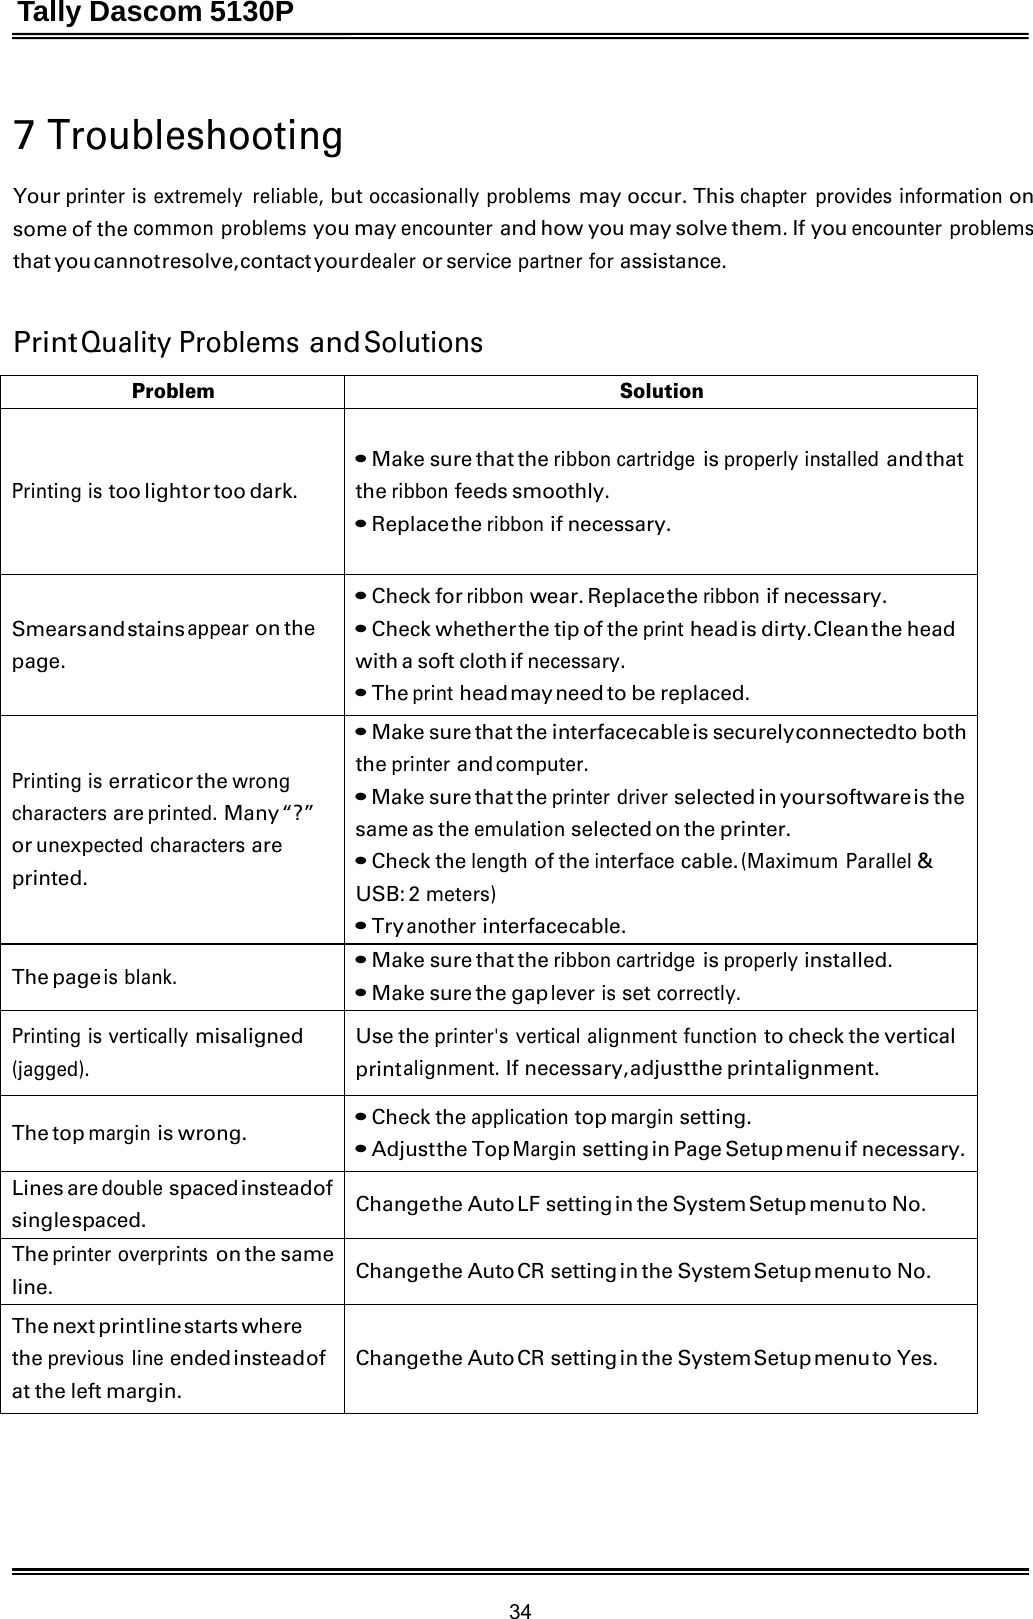
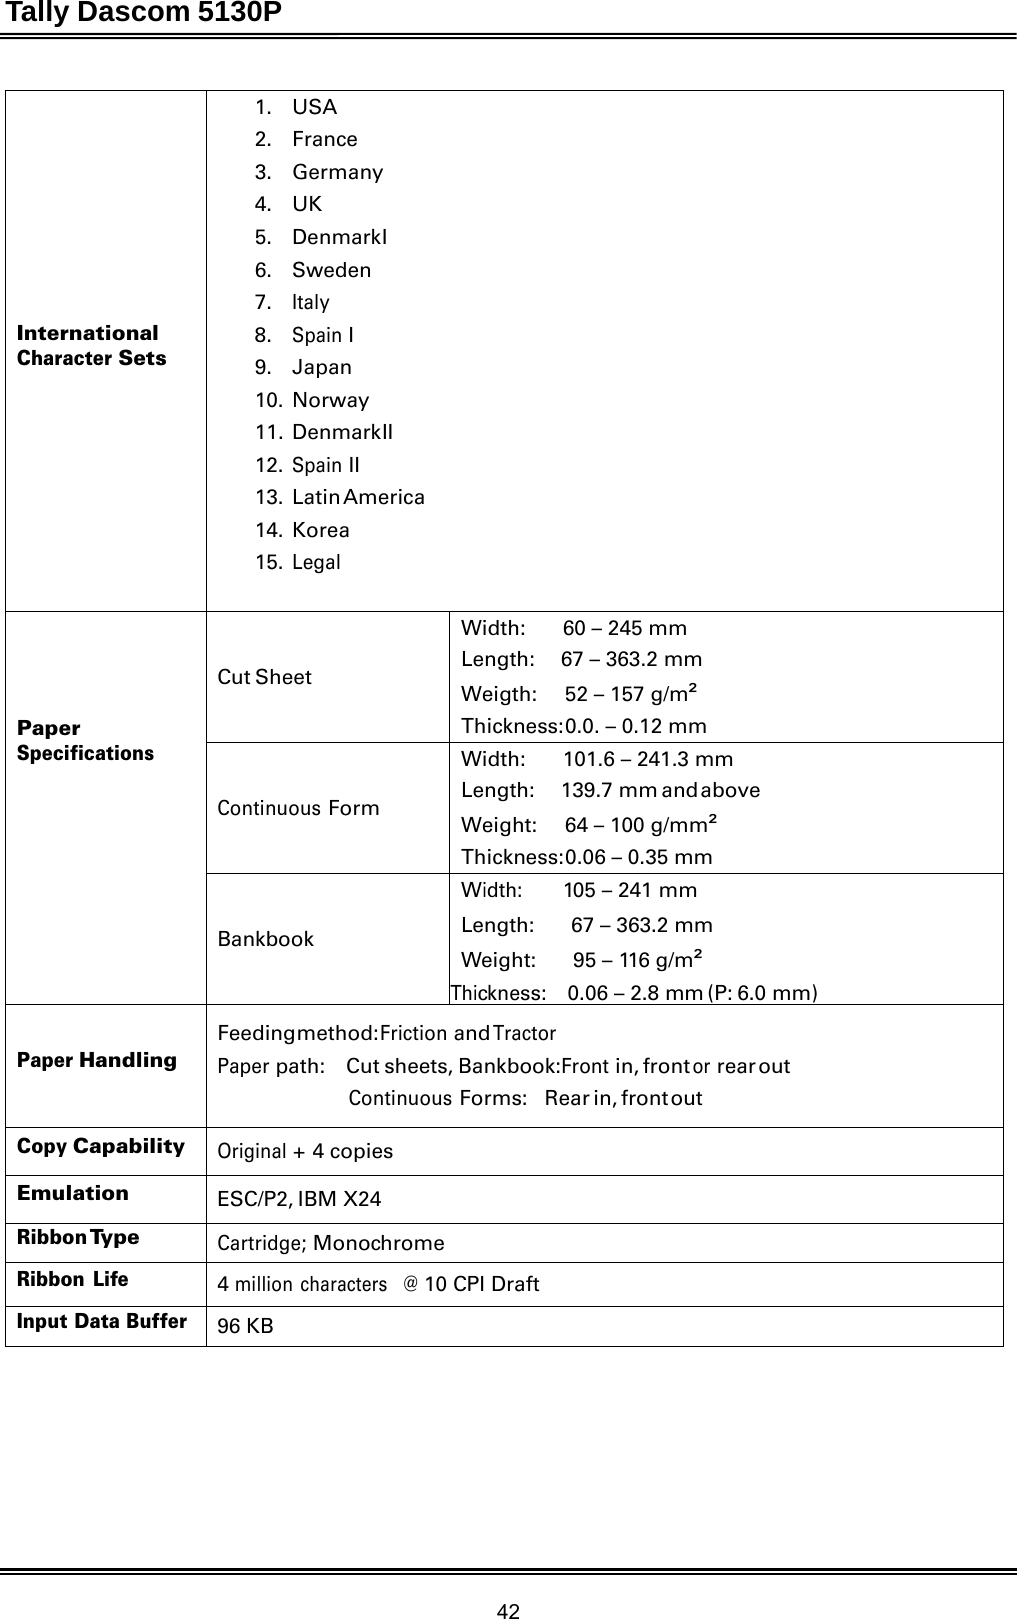

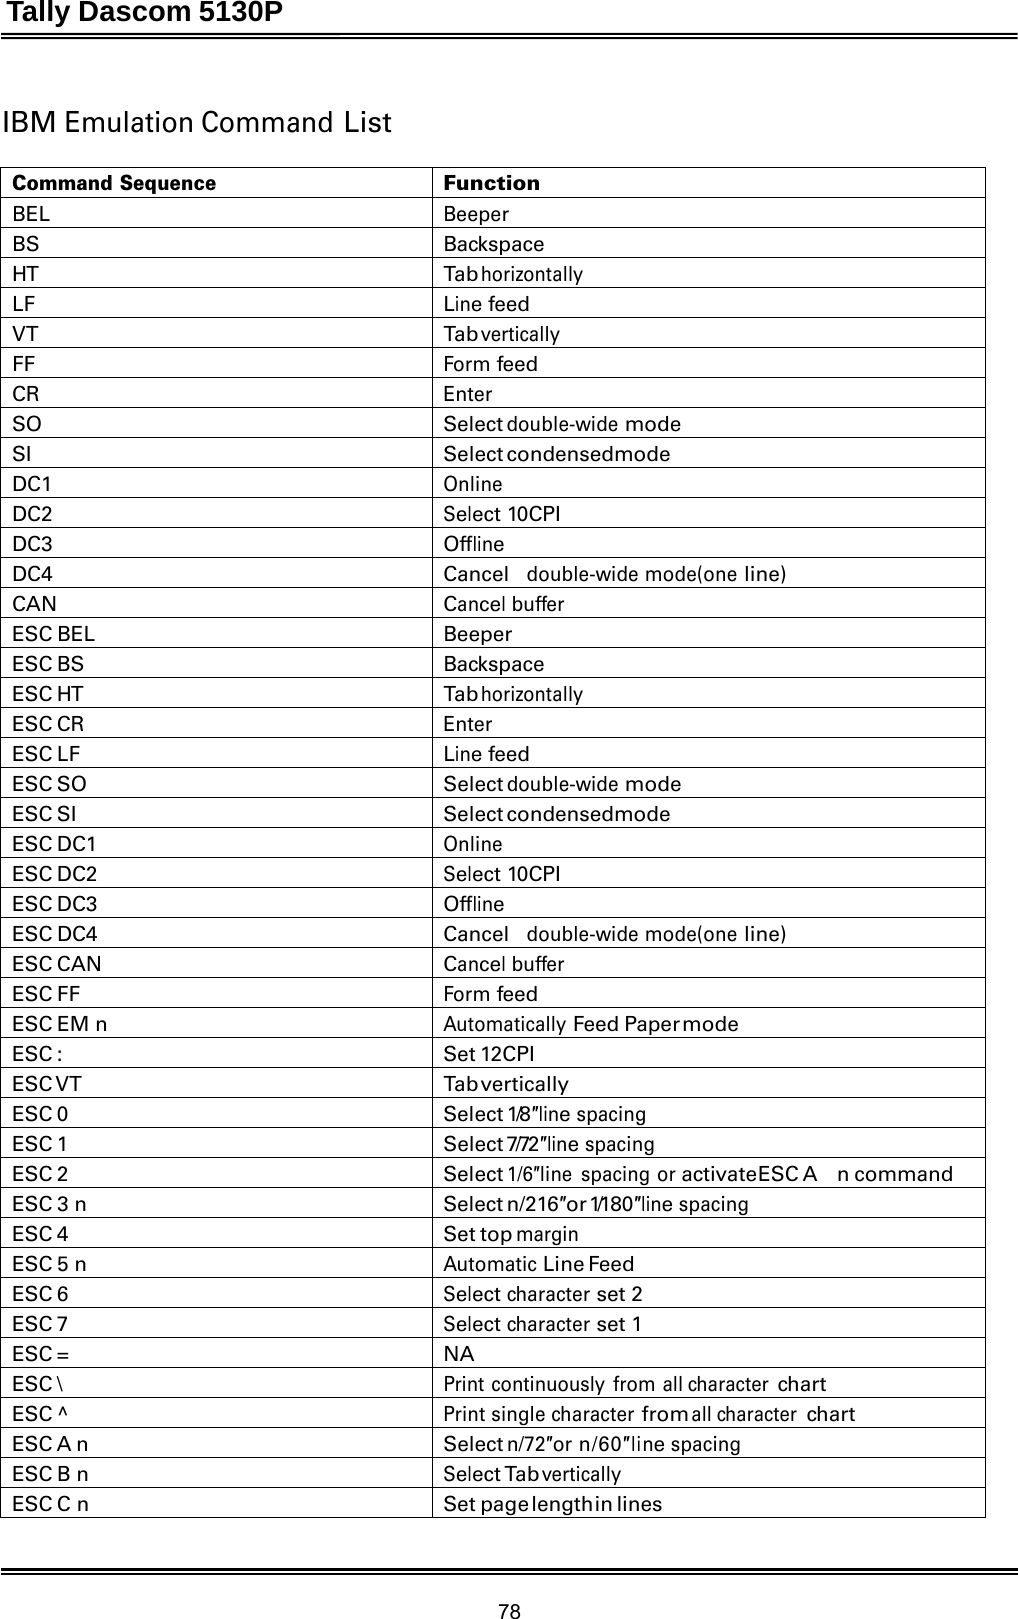
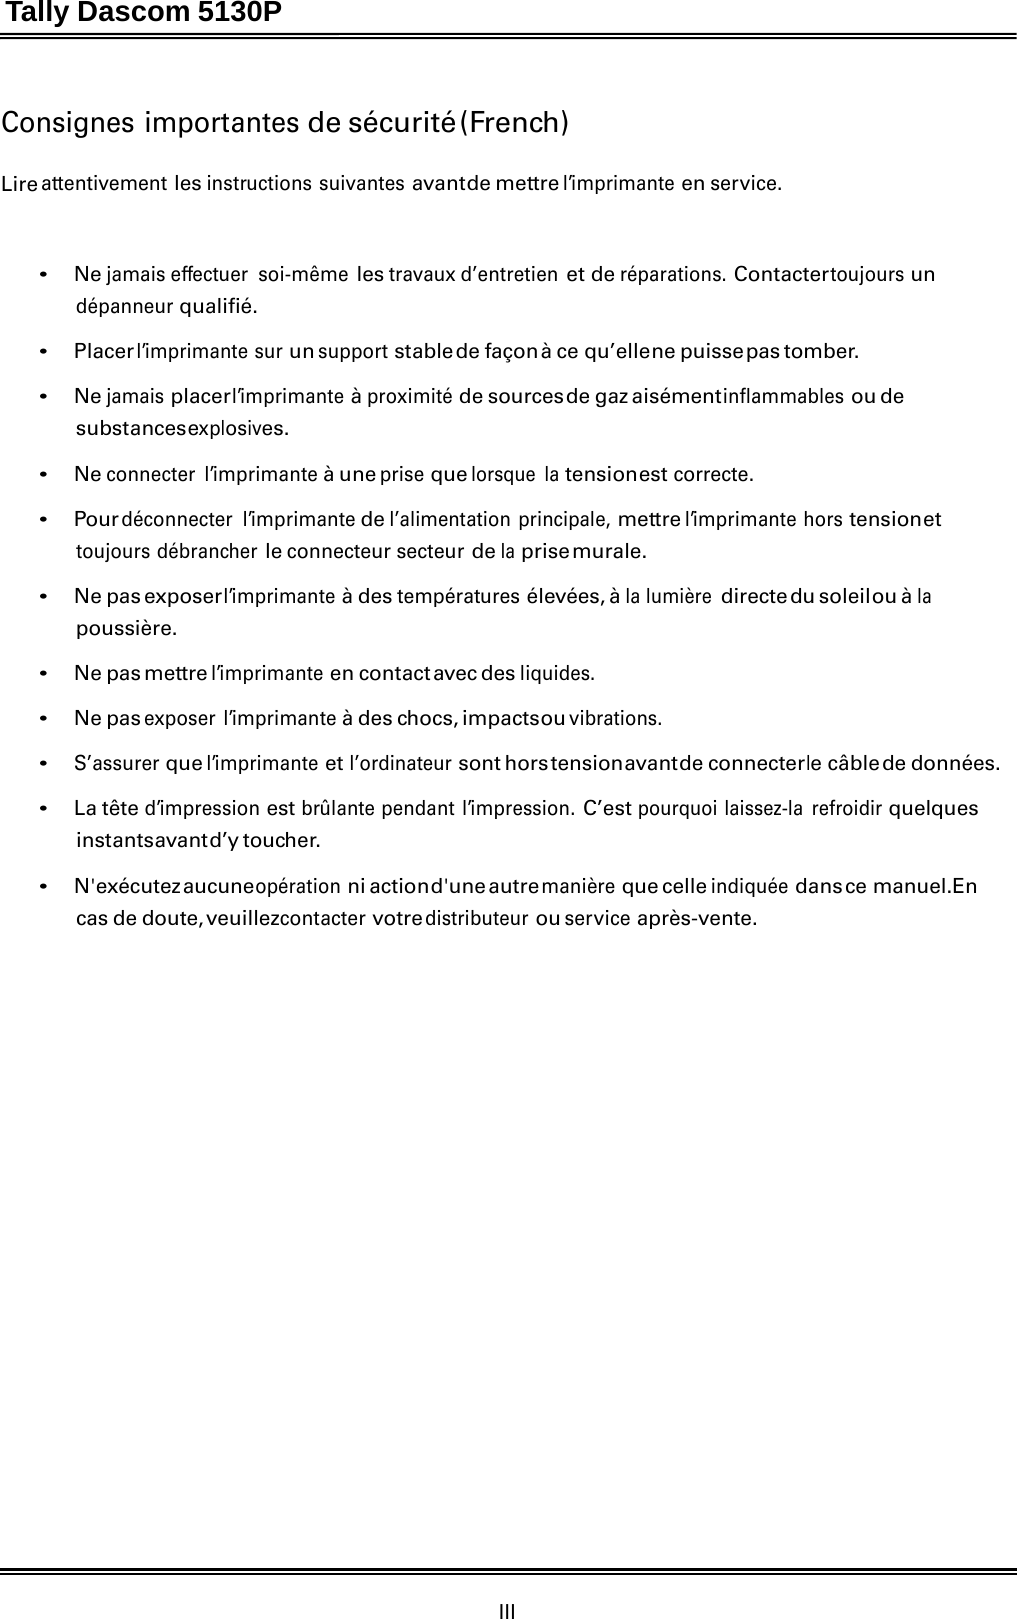
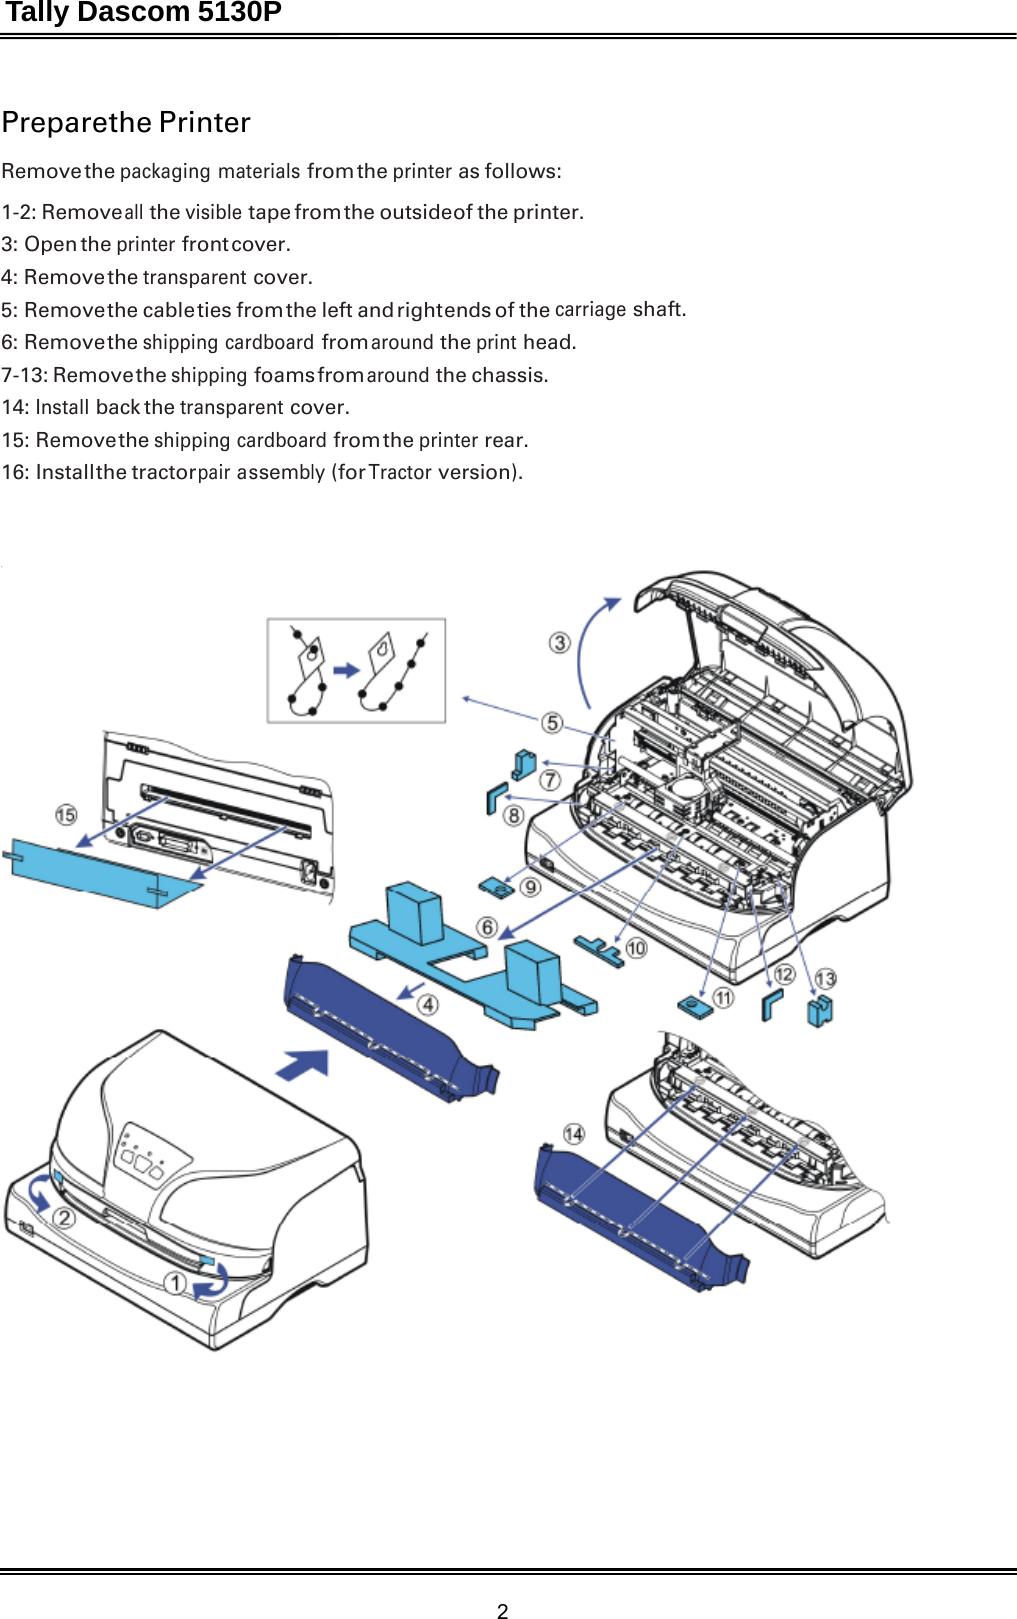
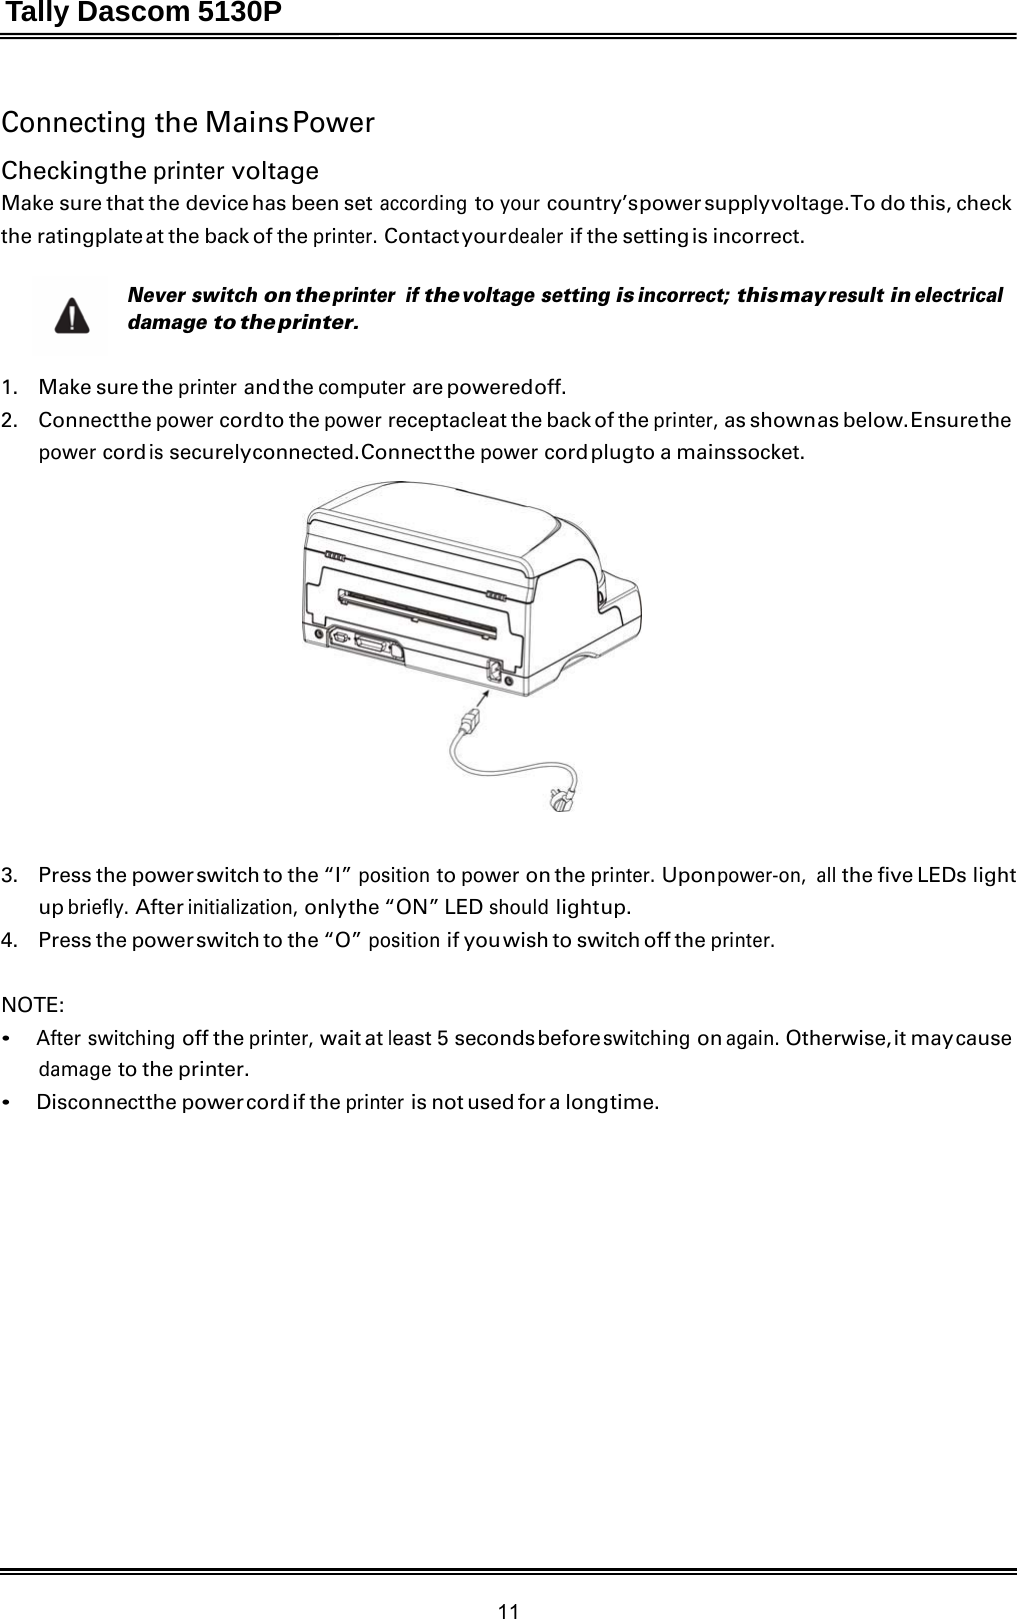
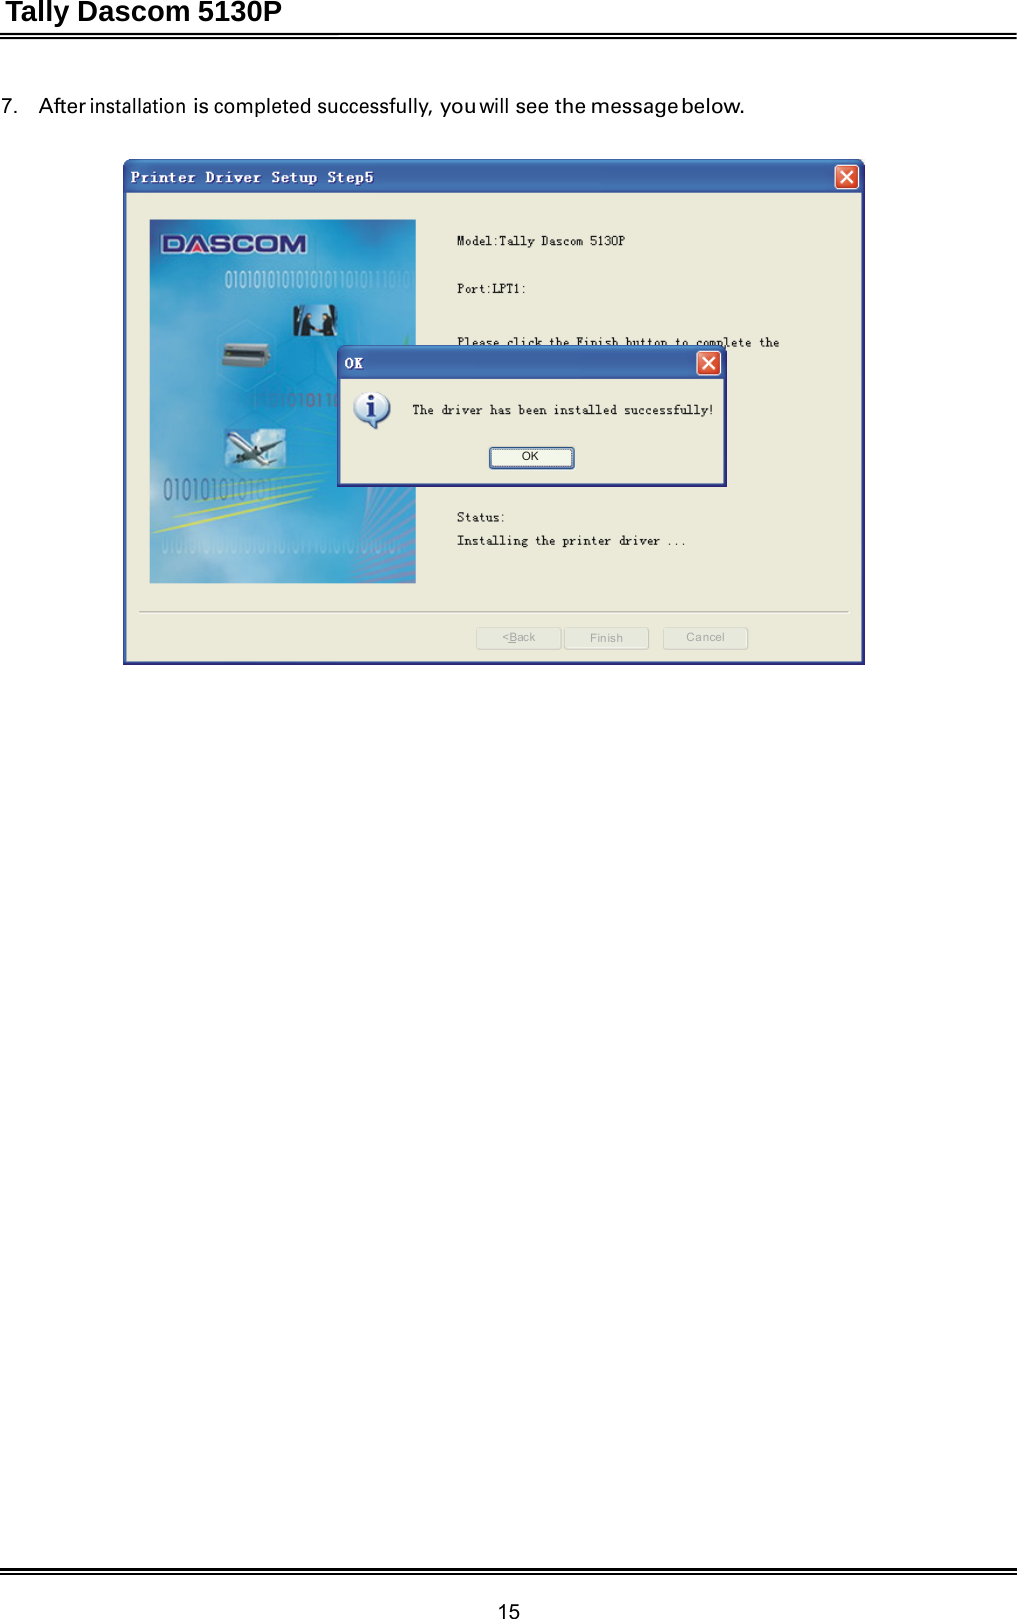
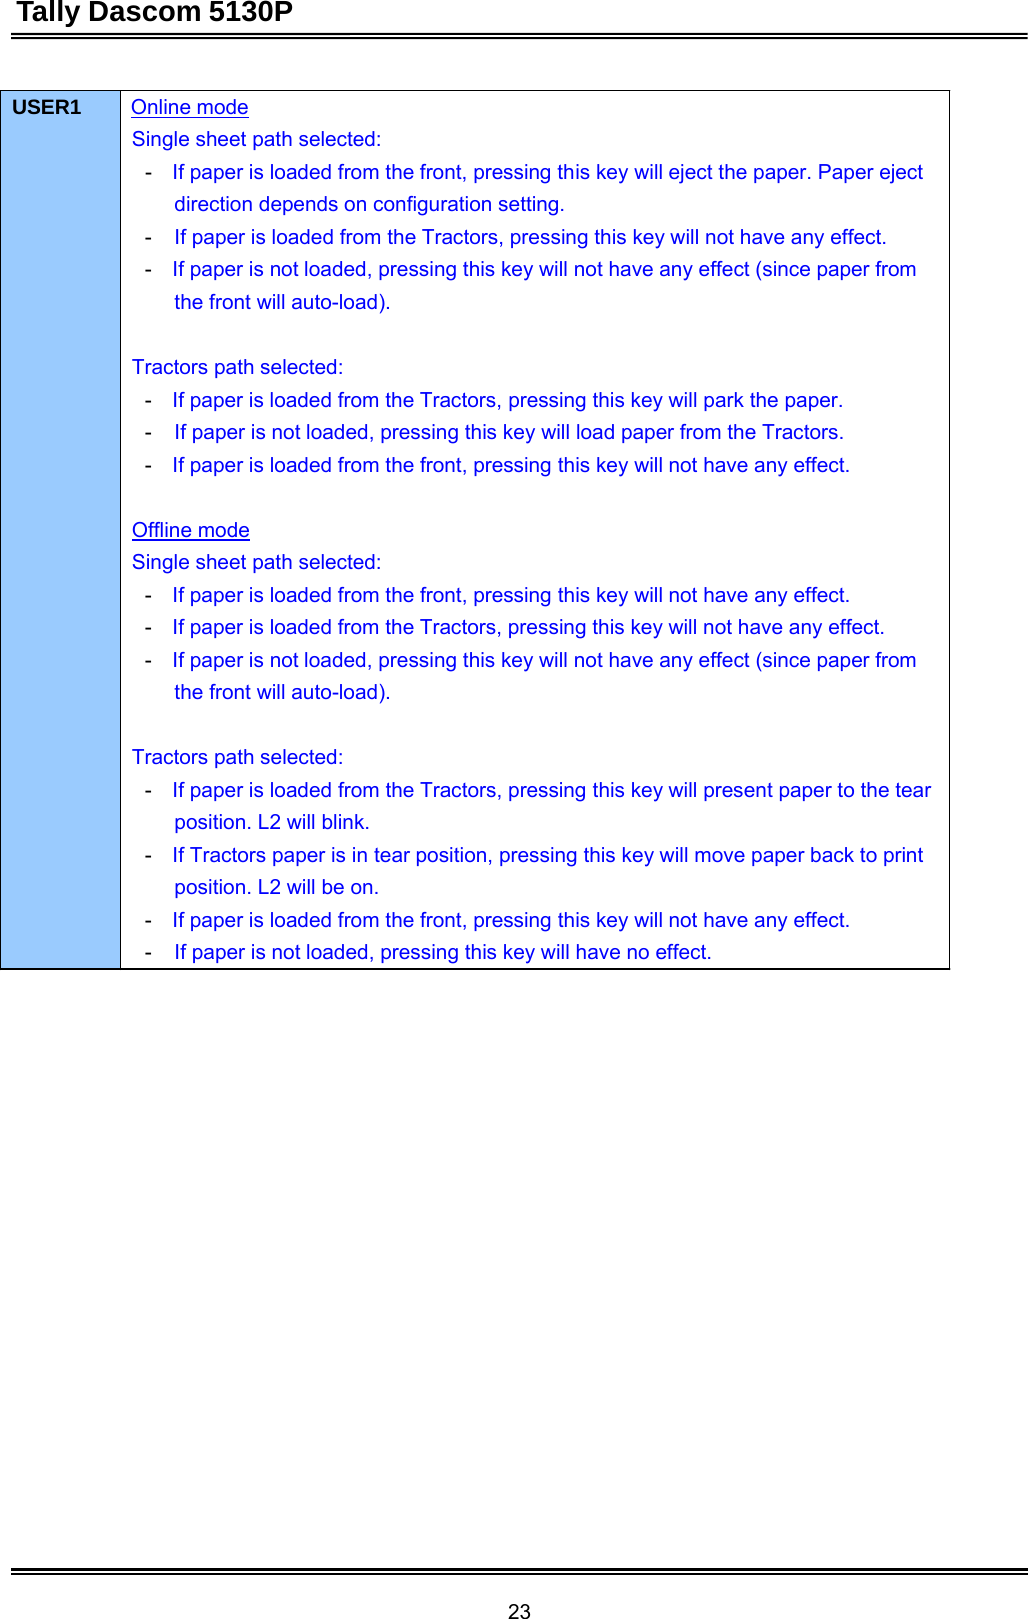
![Tally Dascom 5130P 79 ESC C NUL n Set page length in inches ESC D Select Tab horizontally ESC E Select bold ESC F Cancel bold ESC G Select double-strike mode ESC H Cancel double-strike mode ESC I n Select printing mode ESC J n Perform n/180″or n/216″single line feed ESC K n1 n2 V1 V2 …Vn Normal density graphics ESC L n1 n2 V1 V2 …Vn Dual-Density Bit Image Graphics (Half Speed) ESC N n Select bottom margin ESC O Cancel bottom margin ESC P n Set proportional intercharacter ESC Q n Offline ESC R Clear tab ESC S n Select superscript/subscript ESC T Cancel superscript/subscript ESC U n Select bidirectional printing on/off ESC W n Select double-wide printing mode(continuous) ESC X n m Set left and right margin ESC Y n1 n2 V1 V2 …Vn Select double -density graphics ESC Z n1 n2 V1 V2 …Vn Select fourfold -density graphics ESC [- n1 n2 m1 m2 Select line ESC [@ n1 n2 m1 m2 m3 m4 Select printing mode ESC [I n1 n2 Hf Ls Hs Lf Sm NUL Hc Lc Select font and pitch ESC [ K n1 n2 init id para1 para2 …paran Set initialization condition ESC [ T n1 n2 n3 n4 Hc Lc Set code page ESC [\ Set vertical unit ESC [d Select printing quality ESC [f n1 n2 k m s v1 v2c Set barcode parameters ESC [g n1 n2 m Select high-density graphics printing ESC [p n1 n2 Set barcode data ESC ] Feed paper in reverse direction ESC_ n Print upper-line ESC- n Print underline ESC d n m Move the current printing position ESC j Stop printing ESC r n Select printing colour ESC * m Select graphic mode If you need more details regarding the emulation commands, please contact us.](https://usermanual.wiki/Jiangmen-Dascom-Computer-Peripherals/TD5130P/User-Guide-1750968-Page-93.png)