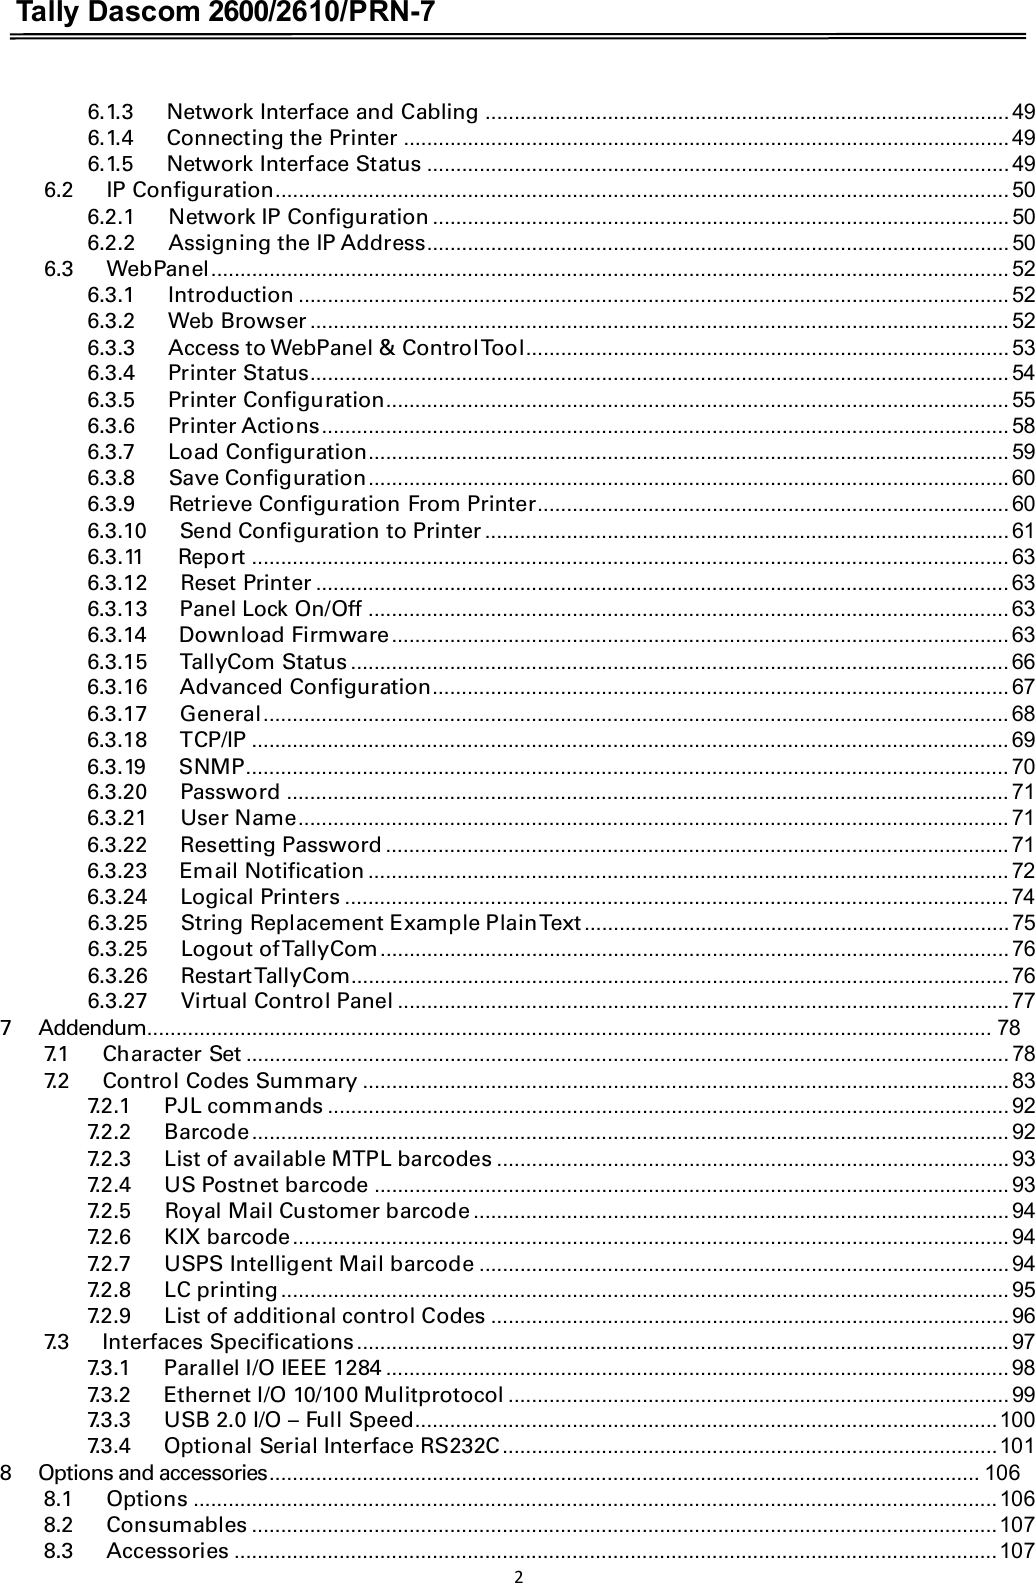
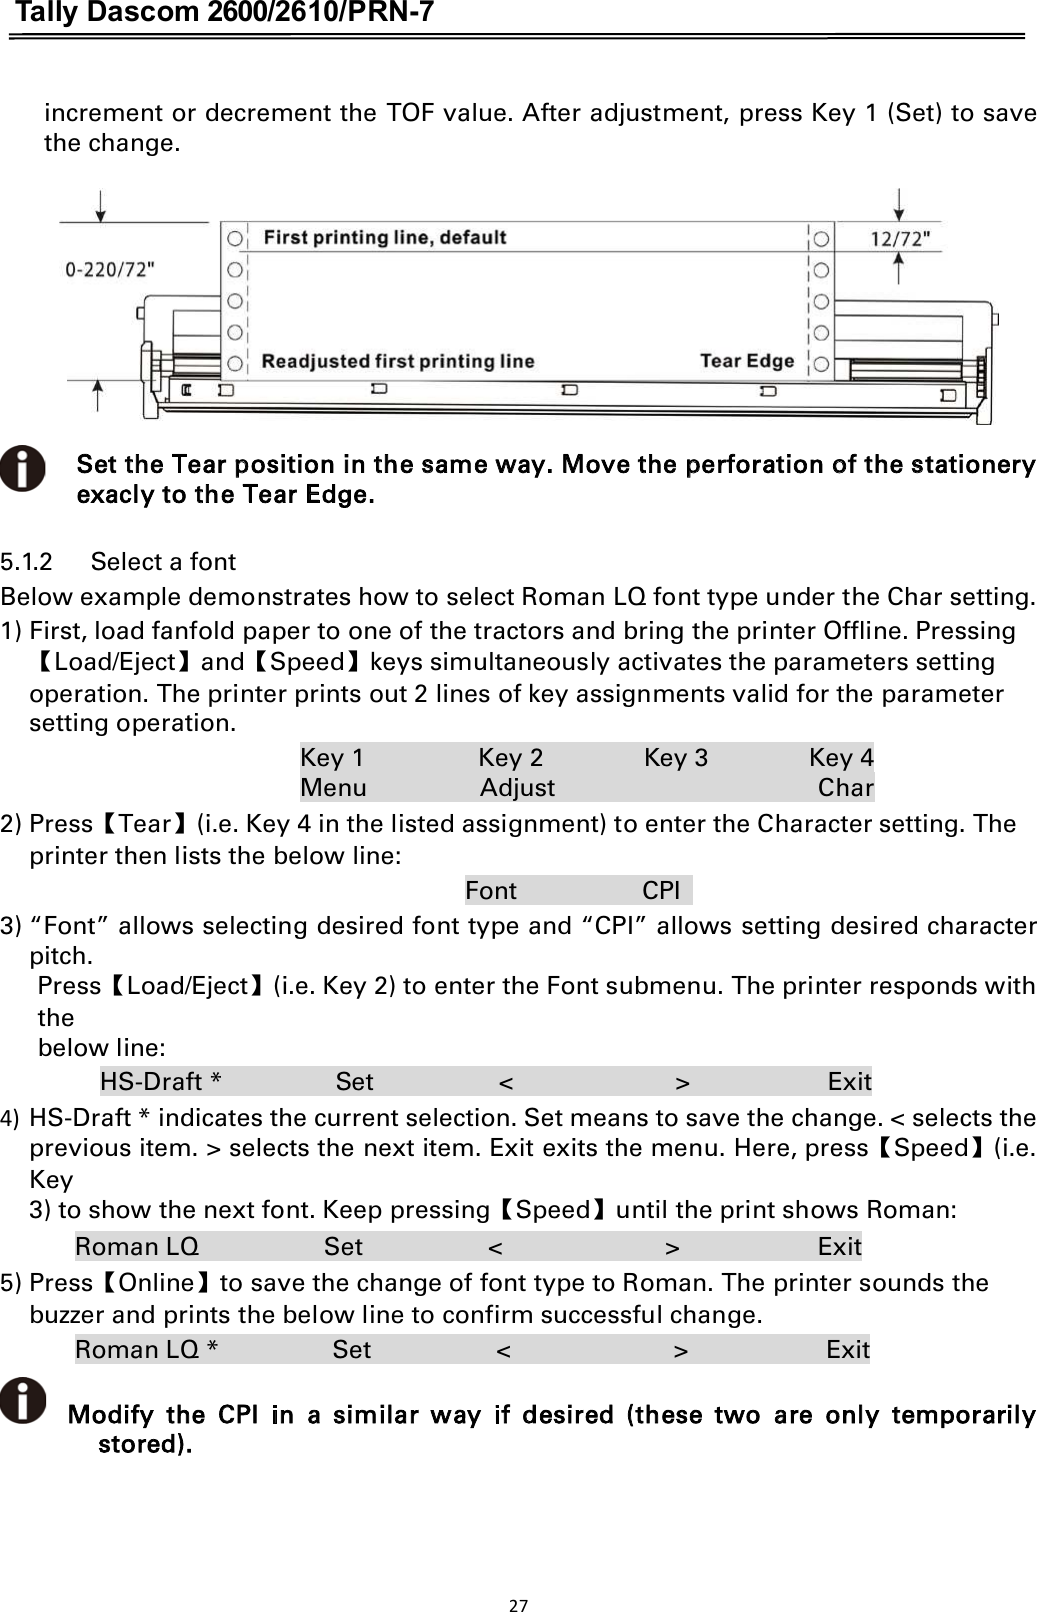
Jiangmen Dascom Computer Peripherals TDPRN70 Dot Matrix Printer User Manual Part1
Jiangmen Dascom Computer Peripherals Co.,Ltd. Dot Matrix Printer Part1
UserManual.wiki
>
Jiangmen Dascom Computer Peripherals
>
TDPRN70 User Manual
>
User manual
Contents
1.
User manual
2.
User manual Part2
User manual
Navigation menu
Upload a User Manual
Namespaces
Wiki Guide
HTML
PDF
Info
Views
User Manual
Discussion / Help
Navigation
![Tally Dascom 2600/2610/PRN-7 Önemli Güvenlik Talimatları (Turkish) Lütfen, yazıcıyı iúletime geçirmeden önce bu güvenlik talimatlarını bütünüyle dikkatle okuyun. xBakım ve tamir çalıúmalarını kesinlikle ve hiçbir surette kendi baúınıza yapmayın; her zaman kalifiyebir uzman servis-teknisyenine haber verin. xYazıcıyı, üzerinden yere düúmesi mümkün olmayacak sabit ve düz bir zemine yerleútirin. xYazıcıyı kesinlikle ve hiçbir surette kolayca yanabilecek gaz veya patlayıcı maddeler içeren nesnelerin yakınına koymayın. xYazıcı akım kablosunu sadece do÷ru gerilime sahip bir prize takın. xYazıcıyı úebeke a÷ından ayırmak istedi÷inizde, yazıcıyı kapatın ve a÷-fiúini her zaman prizden çıkartın. xYazıcıyı ne yüksek ısılı ne de do÷rudan güneú ıúı÷ına ve toza mâruz kalan mekânlarda bulundurun. xYazıcı hiçbir sıvı maddeyle temasta olmamalıdır. xYazıcı hiçbir sarsıntıya, darbeye veya titreúime mâruz kalmamalıdır. xVeri kablosu ba÷lanmadan önce hem yazıcının hem de bilgisayarın kapalıolduklarından emin olmalısınız. xYazıcının baúı basma esnasında yüksek ısıya ulaúıyor. Bu yüzden lütfen dokunmadan önce kısa süre so÷umasını bekleyin. xYazıcının iúletimi ve kullanımında bu dokümantasyondaki talimatların hiç dıúına çıkmayın. Sorunlu görünen hususlarda lütfen imâlatçınıza veya müúteri hizmetleri servisinize baúvurun. Cihaz YHHOHNWULNSUL]LQLQKHU]DPDQNROD\FDHULúLOHELOLUROPDVÕJHUHNLU VIII](https://usermanual.wiki/Jiangmen-Dascom-Computer-Peripherals/TDPRN70.User-manual/User-Guide-2617223-Page-9.png)


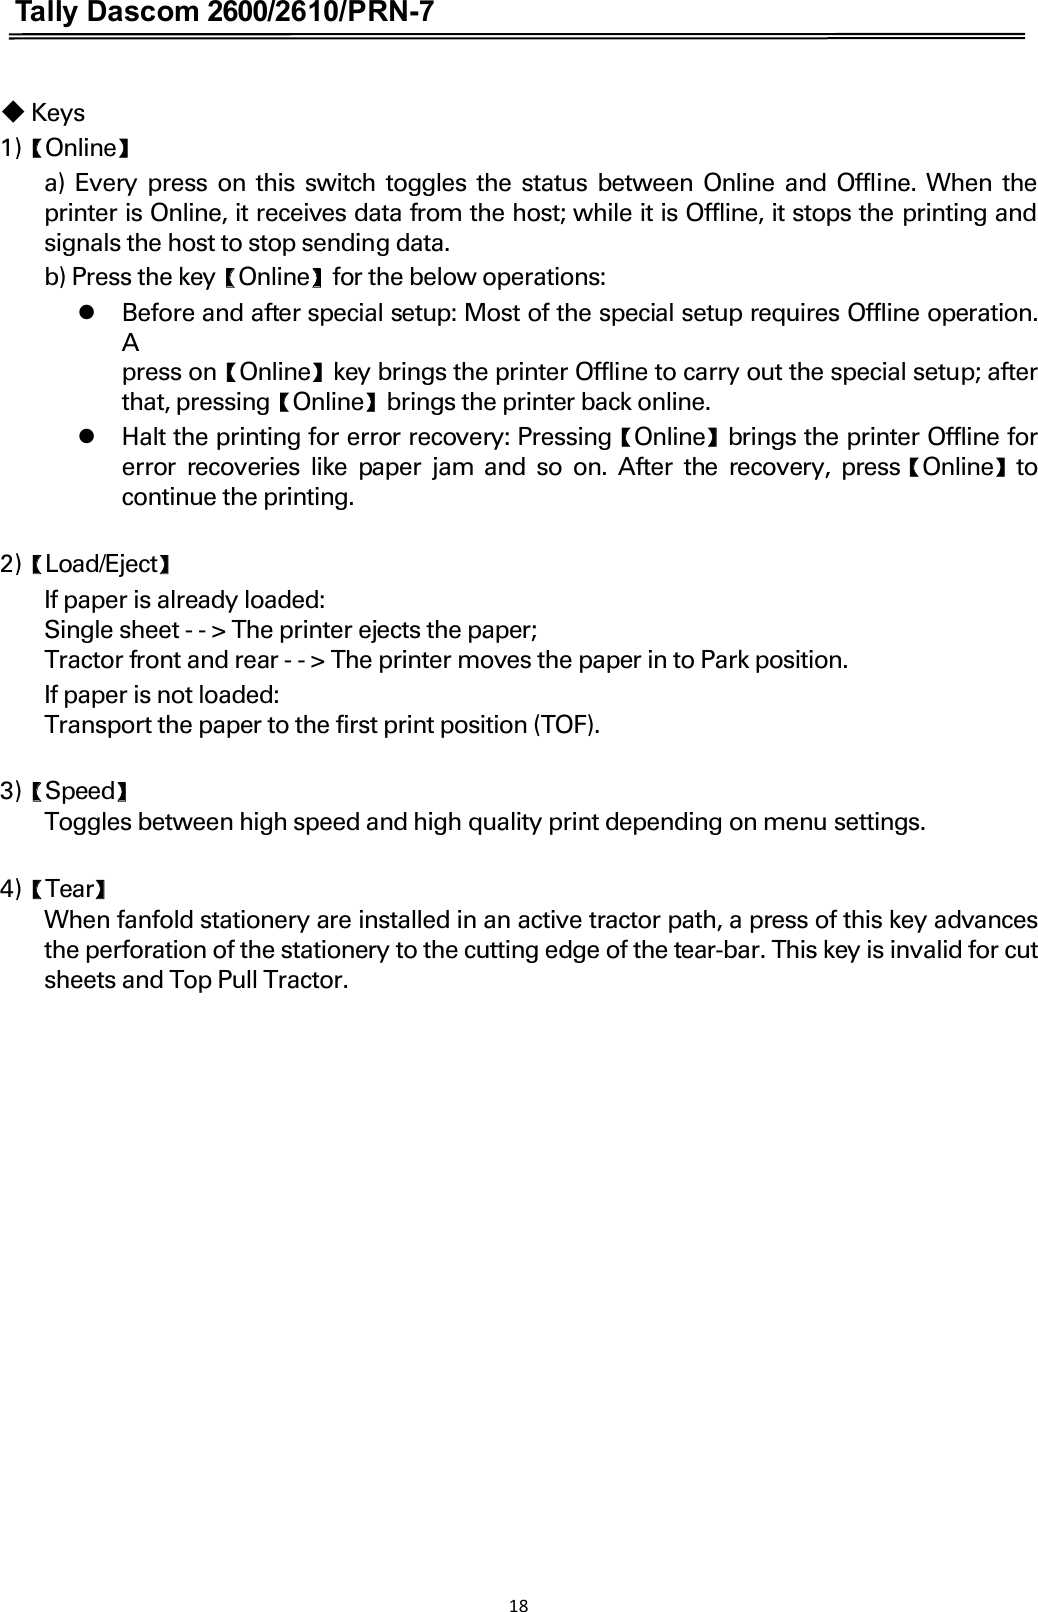
![Tally Dascom 2600/2610/PRN-7 4.1.3 Offline Operations Function Name Switch Operation zFunction Description. Online {S1} zLED light ON: Online; LED light OFF: Offline. Load/Eject {S2} zLoad: Load the paper from active paper path to first print position. zEject: Either park the fanfold paper or eject cut sheet paper. Speed {S3} zToggle Between HS-Draft /Draft or NLQ/LQ. LF/FF {S4} zBrief press: Linefeed, Longer hold: Formfeed. Setup Menu [S2] +[S3] zEnter Printer Setup Menu. Clear Buffer and Reset [S1] +[S2] zClears the print buffer. zInitializes the printer to power on configuration. 20](https://usermanual.wiki/Jiangmen-Dascom-Computer-Peripherals/TDPRN70.User-manual/User-Guide-2617223-Page-33.png)
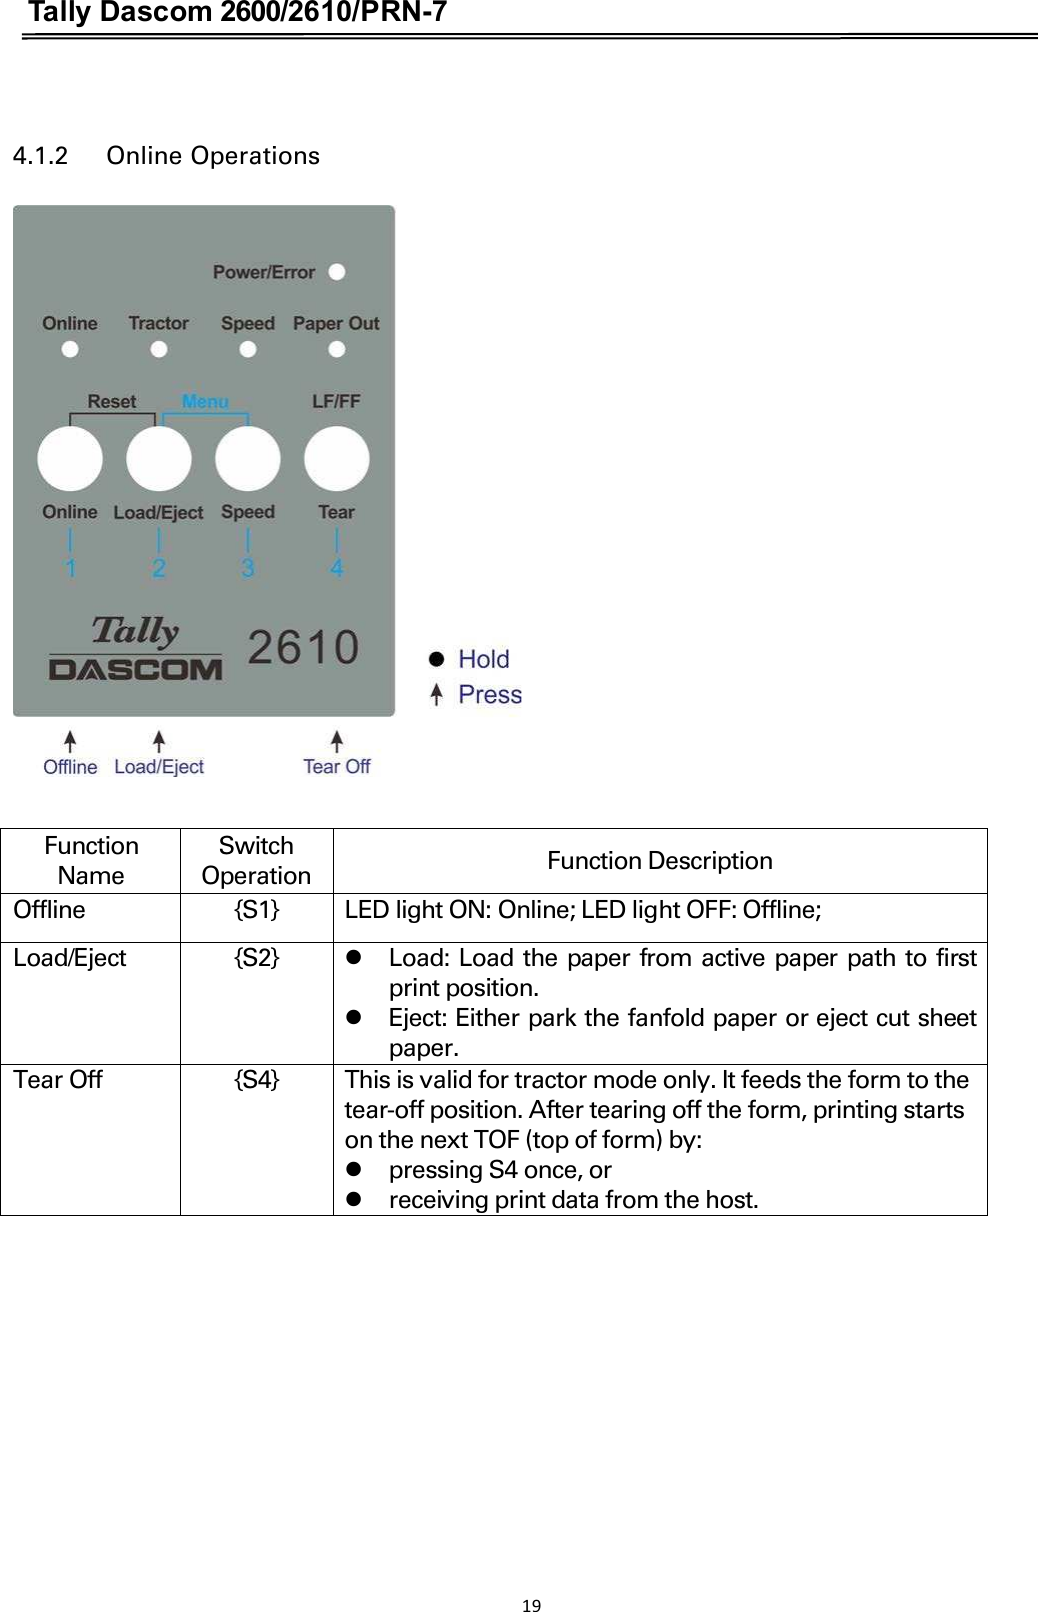
![Tally Dascom 2600/2610/PRN-7 4.1.4 Power-On Operations Function Name Switch Operation Function Description Technical Setup [S1] zStart Technical Setup / Advanced Menu (This also includes Self Test Mode). Menu Unlock [S2]+[S3] zOverride Menu Lock Function if Menu is locked. Status Page [S4] zPrint Status Page. Load Defaults [S1]+[S2]+ [S3]+[S4] zLoad Default Settings. Detail descriptions of the above functions: 䕺 Technical Setup See Chapter 5 for details. 䕺 Menu Unlock PressingɋLoad/EjectɌandɋSpeedɌkeys simultaneously overrides. Menu unlock function if menu is locked. 䕺 Status Page Print the setup of the printer (Menu). 䕺 Load Defaults Print the setup of the menu and the parameters. 22](https://usermanual.wiki/Jiangmen-Dascom-Computer-Peripherals/TDPRN70.User-manual/User-Guide-2617223-Page-35.png)

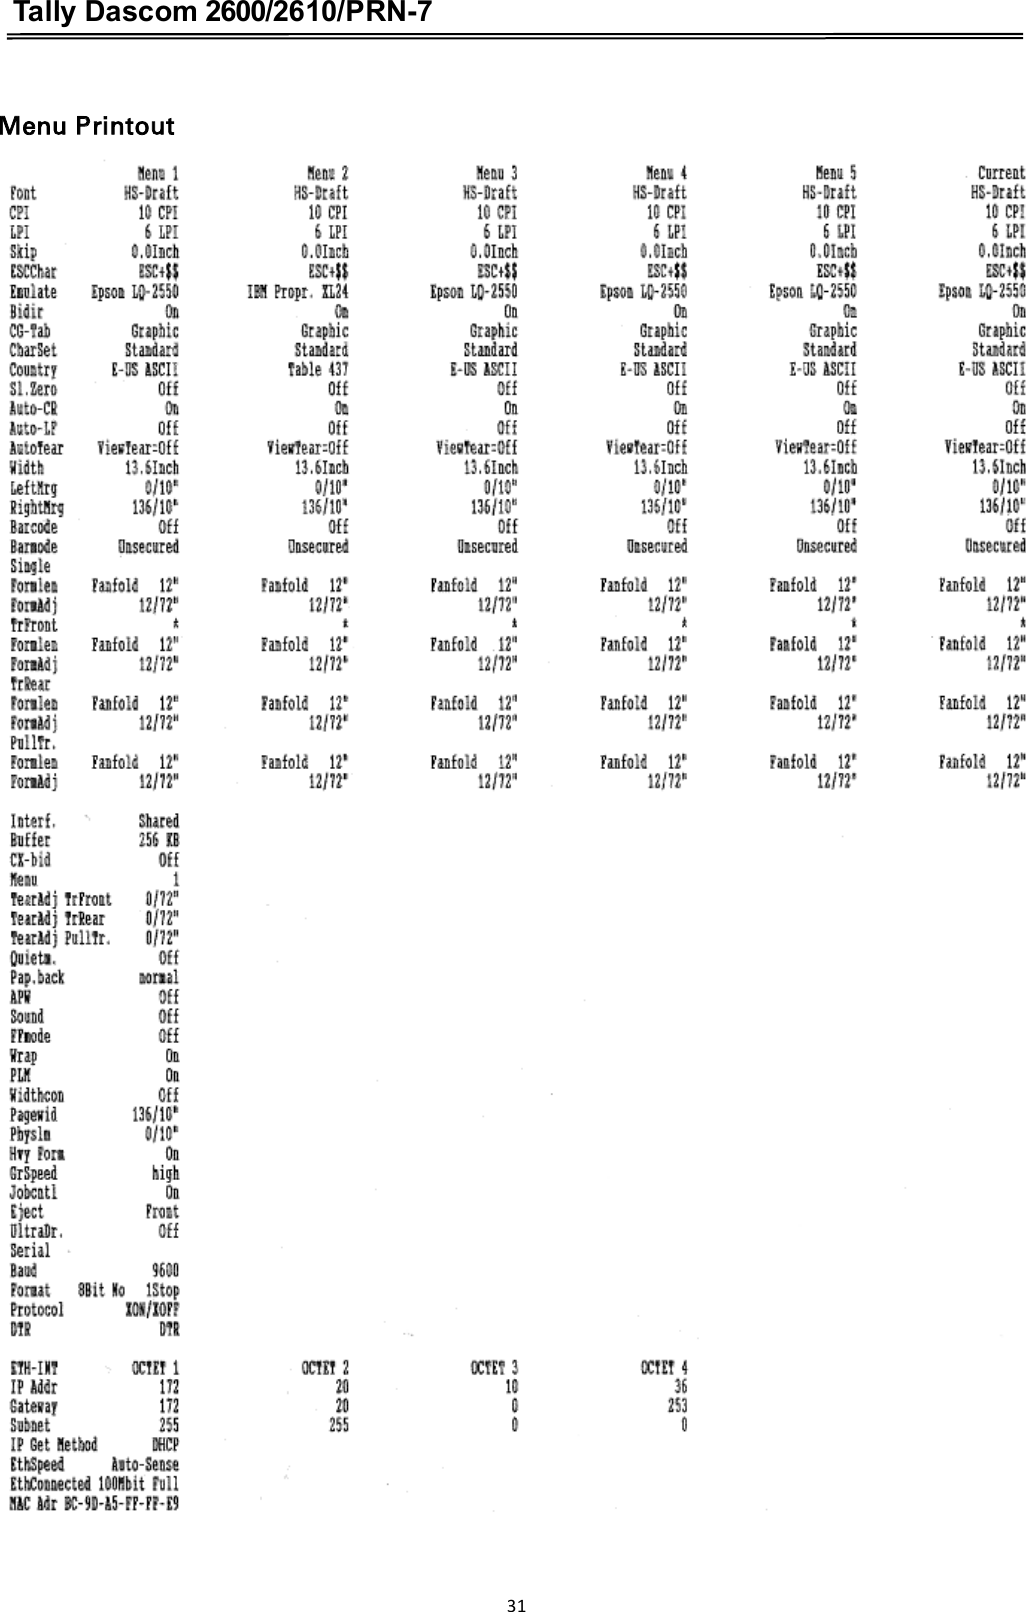

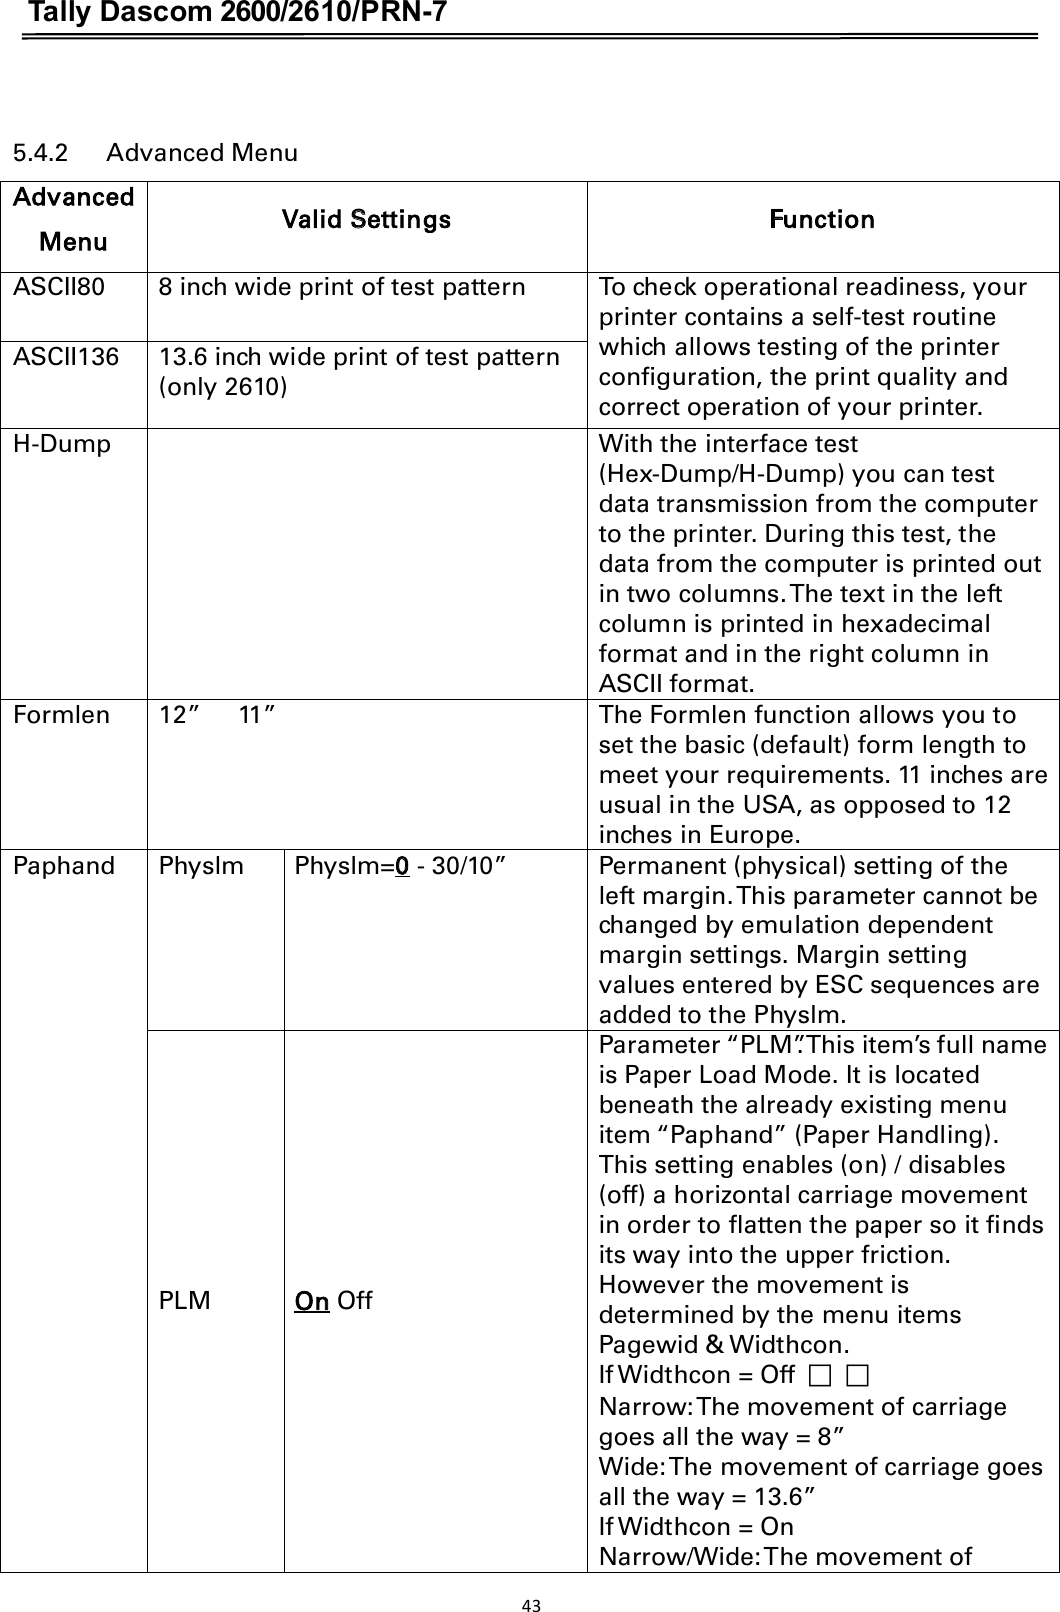
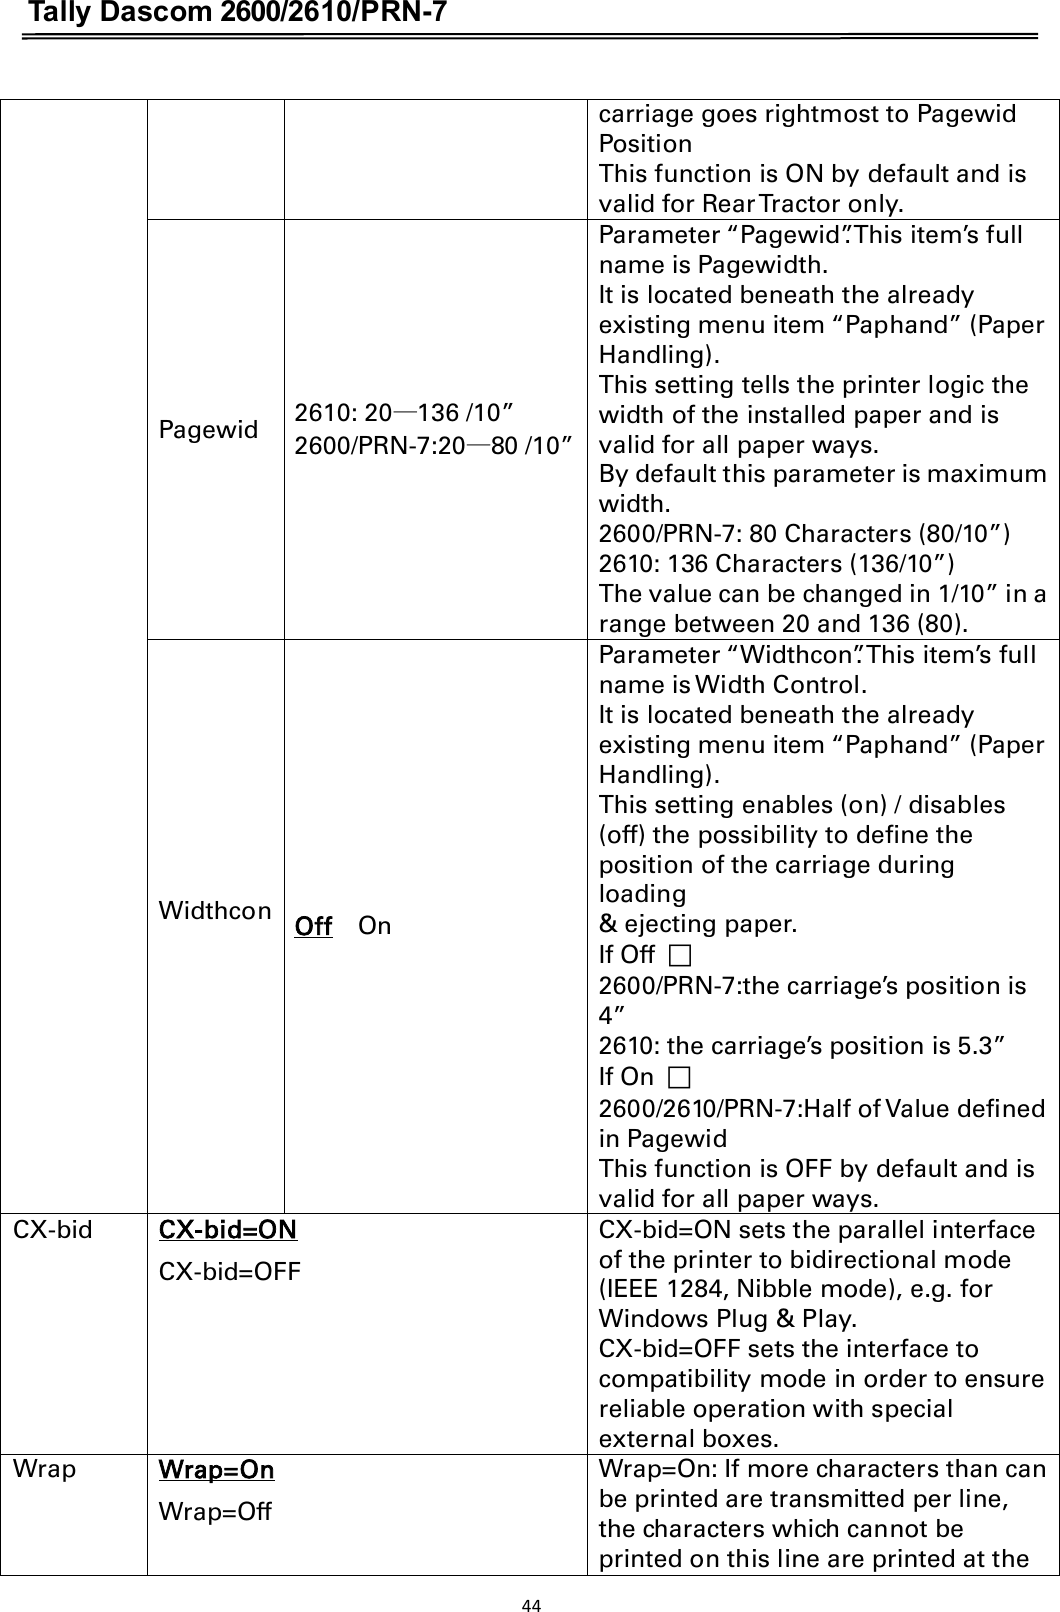
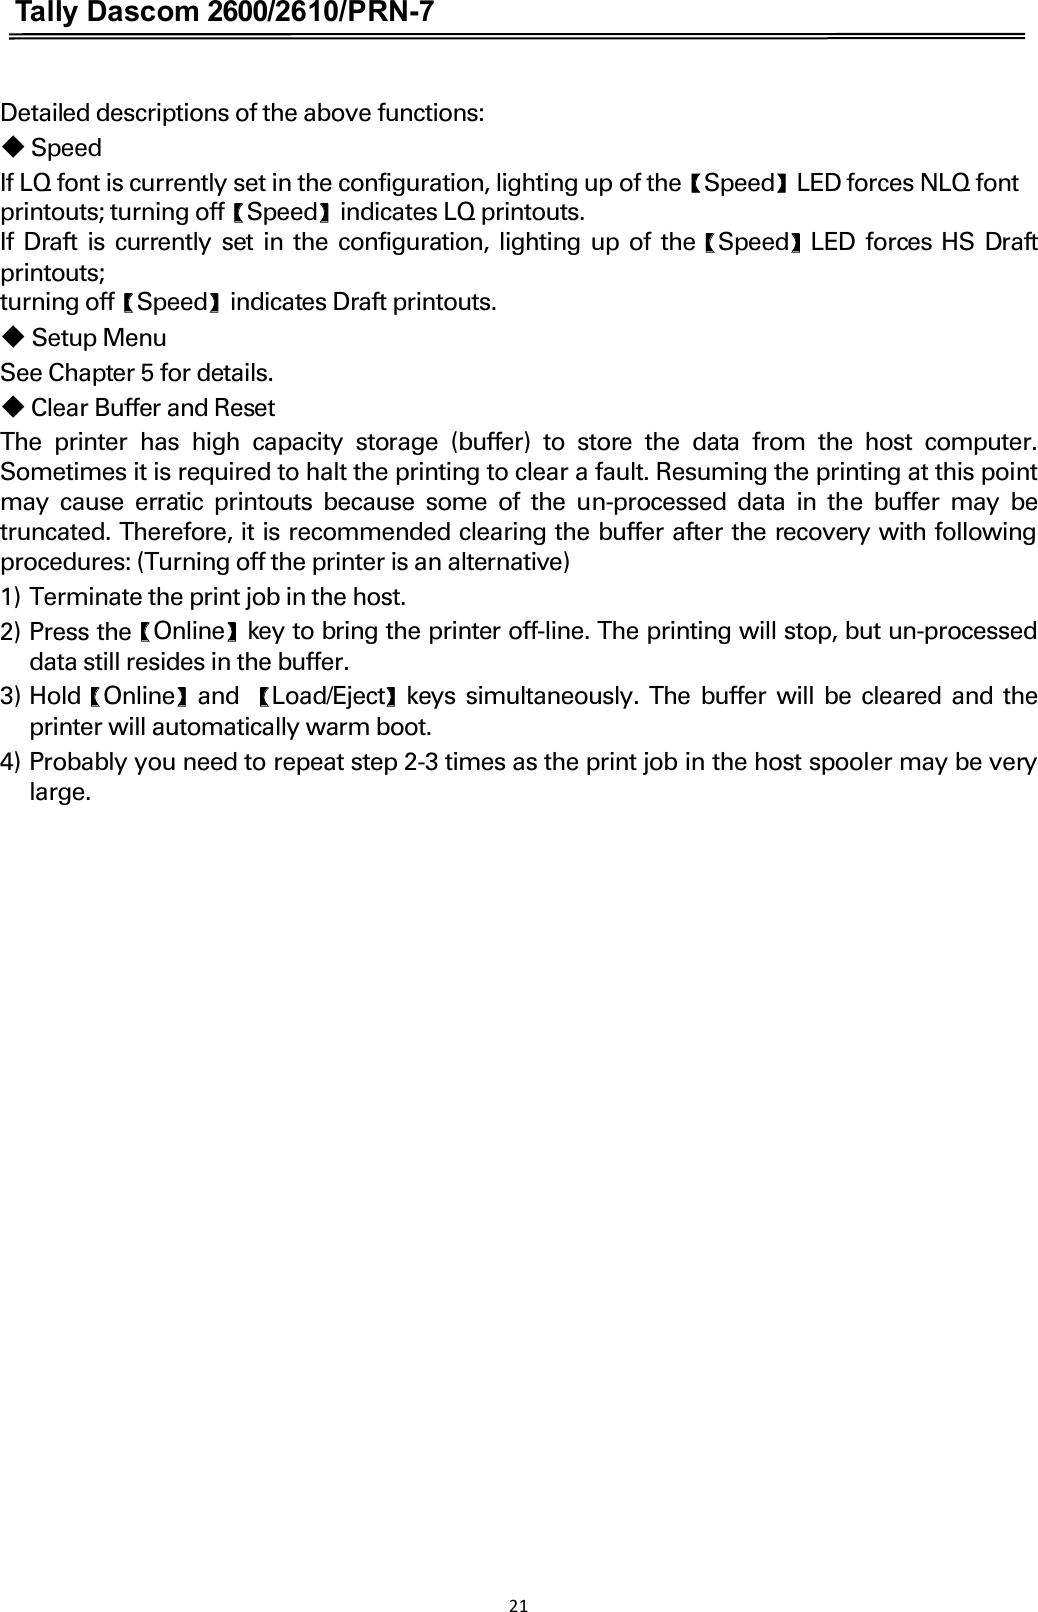
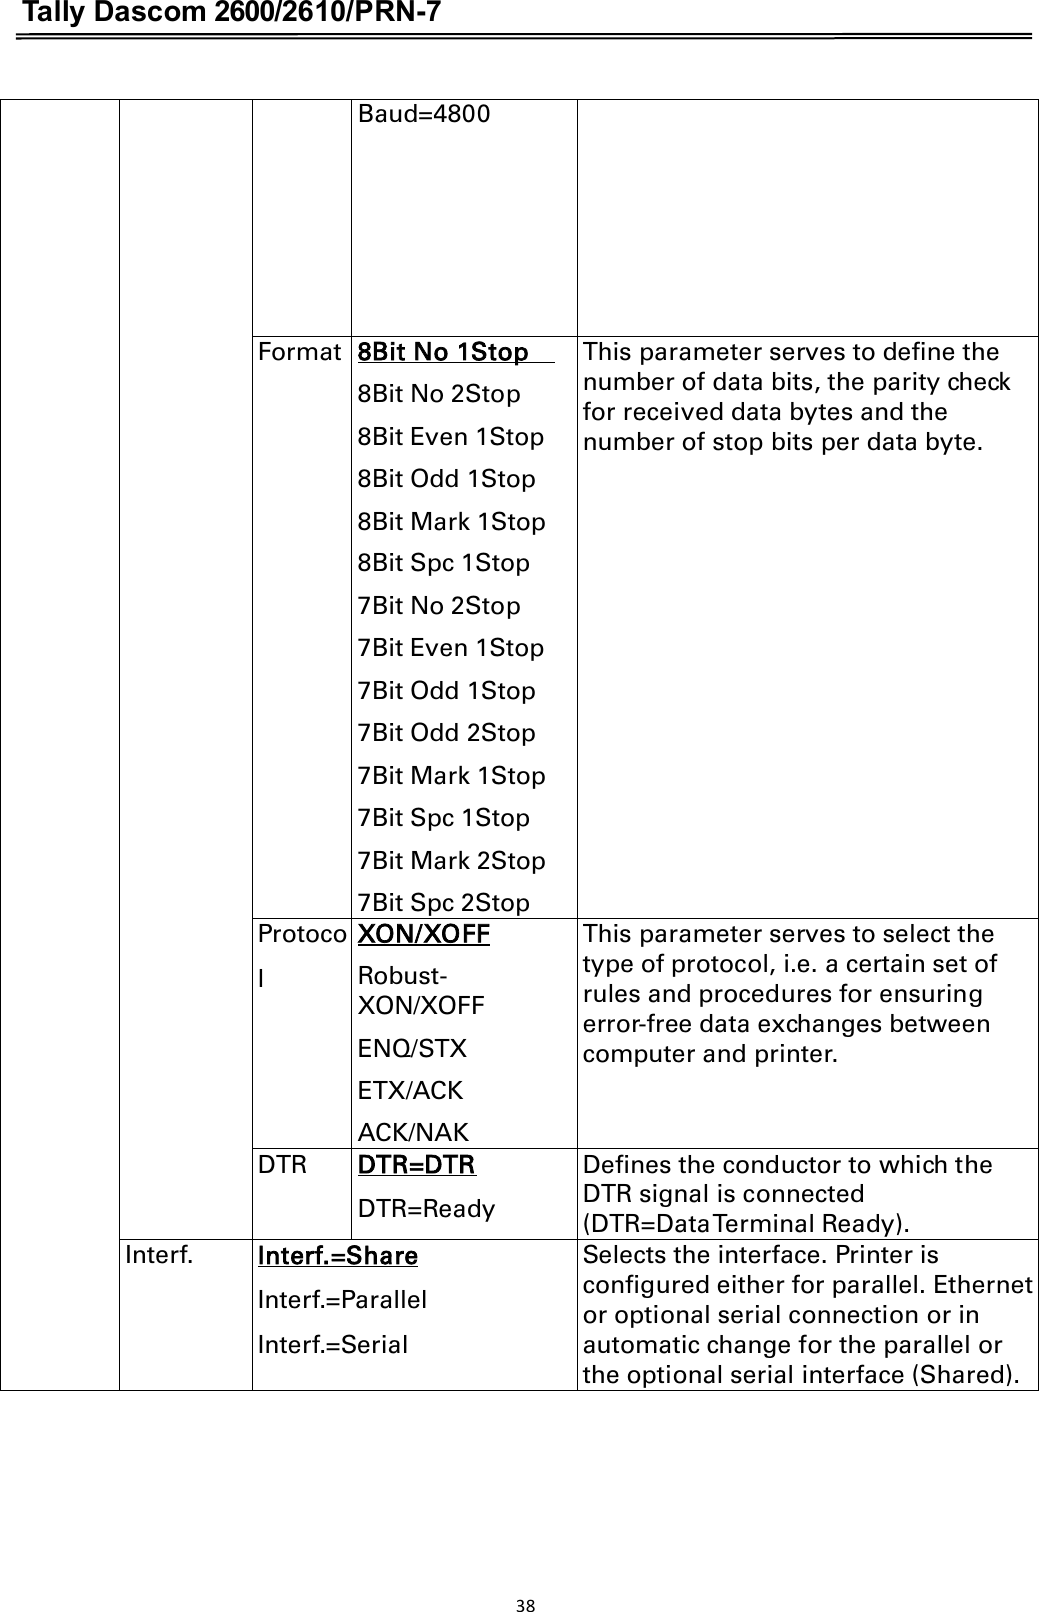
![Tally Dascom 2600/2610/PRN-7 5.4 Full list parameters settingIn order to meet individual requirements of printer functionality, users may modify the printer configuration settings accordingly as follows: start by pressing [Load/Eject] + [Speed] in offline mode. The printer will enter Main Menu settings setup mode. Follow the instructions printed on how to do the required setting changes. When a new setting is saved, it becomes effective, even when printer is power cycled. 5.4.1 Menu Configuration list Menu Valid Settings Function Adjust TOF Tear Setting the tear position. Setting the first printing line (TOF). Print Print the menu settings. Menu Load Menu=1 Load Menu=2 Load Menu=3 Load Menu=4 Load Menu=5 A menu is loaded, you can choose between five menus. Reset Reset Menu Yes No Press the No (1) or Yes (2) key to select the desired setting. All manually altered settings in the current menu are lost when it is reset to the default settings. We therefore recommend that you print out the menu first. Quietm Off On Switches between normal and quiet mode printing. For all printing modes, the print-out is made with the bidirectional method in quiet mode printing. In the first step the first row of pins is activated, during the second step the second row is used. Font HS-Draft Draft Roman NLQ This parameter selects the character style and its quality permanently. Roman LQ Roman PS NLQ Roman PS LQ CourierNLQ Sans Serif NLQ Sans Serif LQ Courier LQ S Serif PS NLQ S Serif PS LQ 36](https://usermanual.wiki/Jiangmen-Dascom-Computer-Peripherals/TDPRN70.User-manual/User-Guide-2617223-Page-49.png)
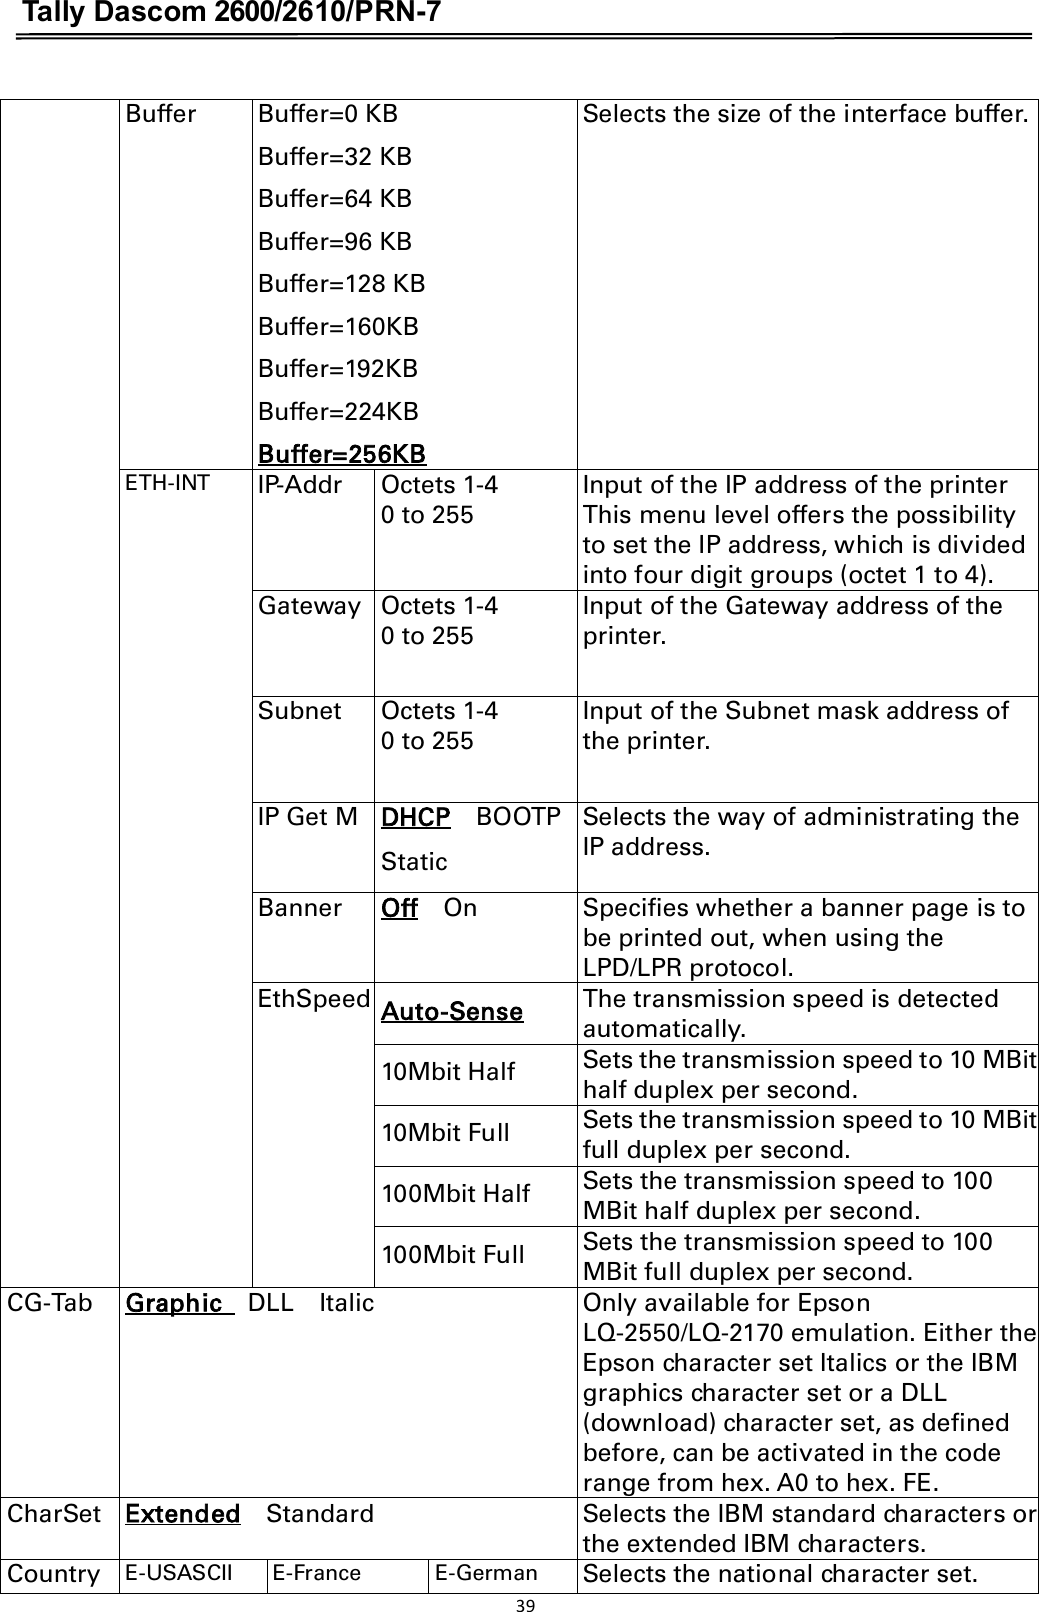
![Tally Dascom 2600/2610/PRN-7 E-UK E-Denmark I E-Sweden These character sets can be used according to the selected emulation. E-Italy E-Spain I E-Japan E-Norway E-Denmark II E-Spain II E-L.America E-Korea E-Legal ISO8859-1 ISO8859-1 SAP ISO8859-2 ISO8859-5 ISO8859-7 ISO8859-9 ISO8859-15 ELOT-928 BRASCII Abicomp Roman8 US-ASCII French German Italian Swedish Norwegian Spanish Portuguese Greek DEC Cro-ASCII Coax/Twinax Table 437 New-437 Table 737 775 Baltic Table 850 New-Dig 850 Table 851 Table 852 Table 857 Table 858 Table 860 Table 861 Old-Code 860 Table 863 Flarro 863 Table 865 865 Hebrew Table 866 866 Bulgaria 866 Ukraine 866 Kazakhst Kamenicky Mazovia Siemens Turk DEC Turkish Table 1250 Table 1251 Table 1252 Table 1253 Table 1254 Table 1257 Sl.Zero Sl.Zero=Off Sl.Zero=On Selects if normal zero (0) or the slashed zero (Ø) is printed. AutoCR On Off Switches the automatic carriage return on or off after receiving the signal LF (line feed). AutoLF Off On Switches the automatic line feed (LF) on or off after receiving the signal CR (carriage return). Menlock Off Menu All With MenLock=Off, all functions and settings are accessible without restriction in Online, Offline and Setup mode. If MenLock=Menu is activated, all functions and settings are still accessible in Online and Offline mode, however, in Setup mode you can only access the parameter groups Adjust (setting the print head gap [Head], top of form [TOF] and tear position [Tear]), Paperway (setting the paper path), Font (setting the font) and the character spacing (CPI), while access to Menu mode (Menu key) is disabled. If you select MenLock=All, you can 40](https://usermanual.wiki/Jiangmen-Dascom-Computer-Peripherals/TDPRN70.User-manual/User-Guide-2617223-Page-53.png)
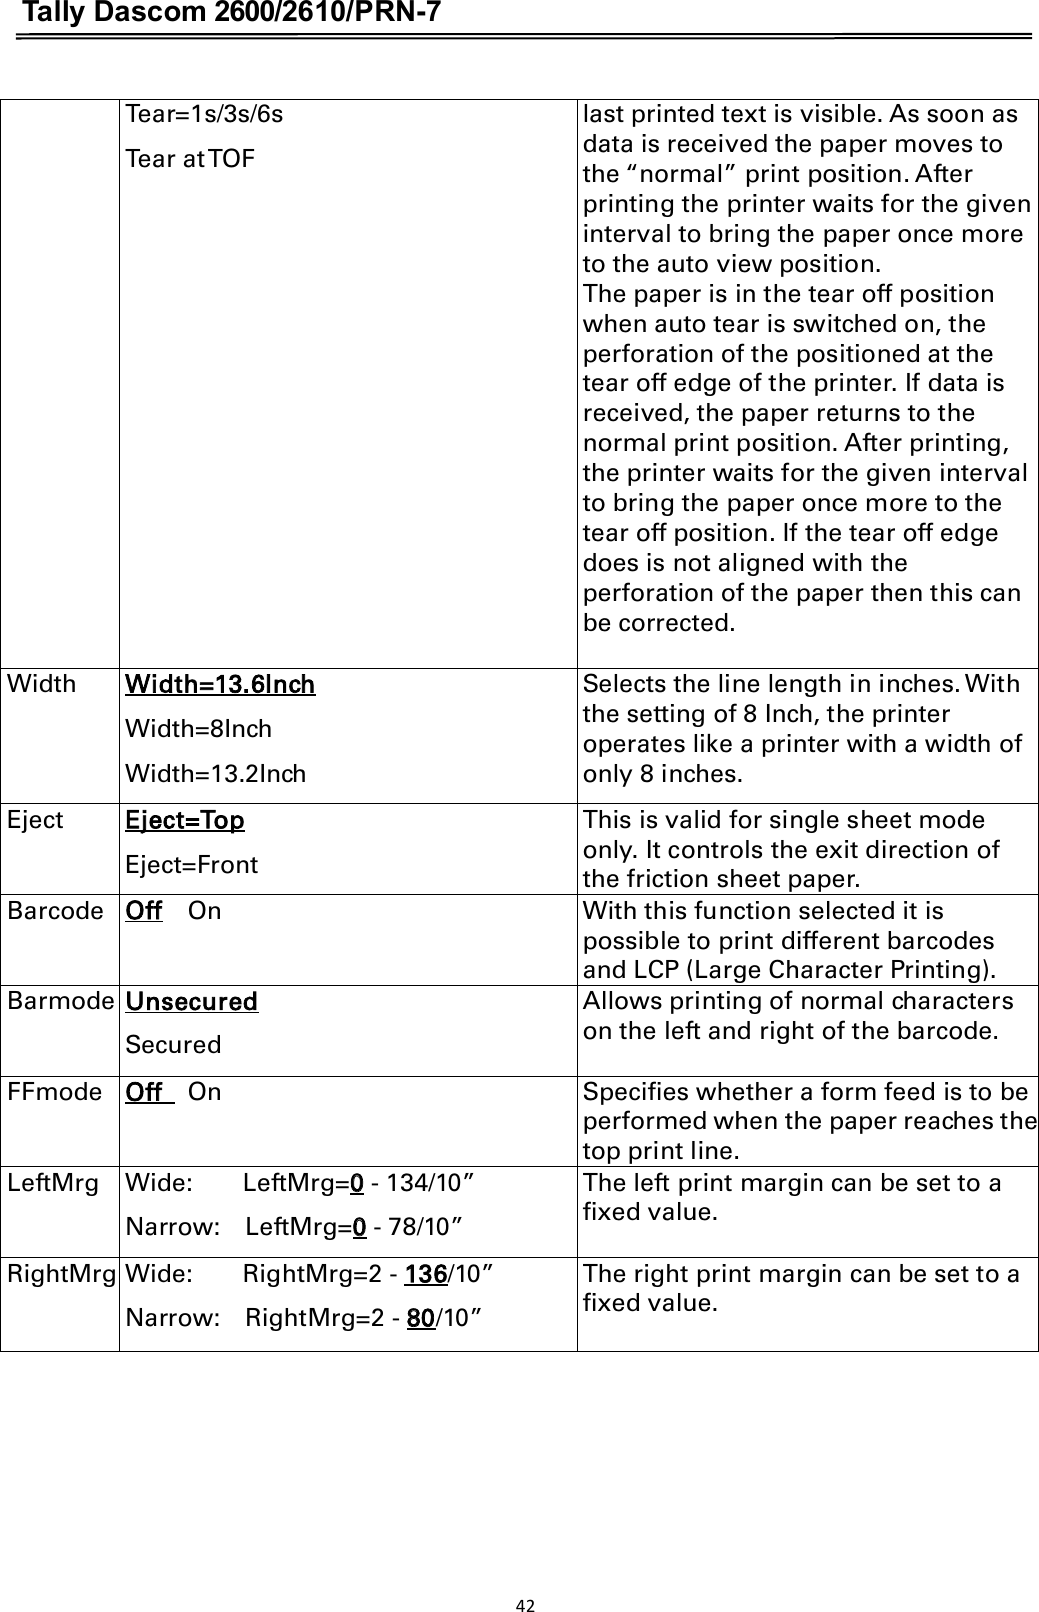
![Tally Dascom 2600/2610/PRN-7 access the Online/Offline, Load/Park, Paper and Paper Feed (LineFeed/Form Feed, / ) functions in Online and Offline mode while Setup mode is disabled. In this case, the Setup menu can only be called up by holding the key Setup while switching on the printer. Language English German French Italian Spanish Turkish The menu can be shown in six languages. Paper Single TrFront TrRear PullTr Selects the paper parameters Formlen (form length), FormAdj (first printing position/TOF) separately for each paper source in the current menu. Formlen Lines =6 – 132 Default 6LPI = 66 Single:3ü22 inches TrFrontǃTrRear ǃ PullTr˖1ü22 inches Sets the form length via line formats. Please note that the adjustment in Lines depends on the selected LPI. For example 8 LPI at a selected line number of 96 lines results in a form length of 12 inches (96lines/[8lines/inch]) = 12 inches. The selectable range is between 3 and 21 inches, i.e. for 2 LPI from 6 to 42 lines and for 12 LPI from 24 to 262 lines. If the form length is set it will not be changed by changing the LPI later on. Standard No format DIN A3 (420 mm) DIN A4 (297 mm) DIN A5 (210 mm) DIN B5 (250 mm) DIN B6 (176 mm) DIN C6 (162 mm) Executive 10.5" Letter 11" Fanfold 12” Legal 14" Selects the form length by standard formats. Using Standard, different paper formats can be selected directly, e.g. DIN A4, Legal, Letter. The Menu indicates No format if a value is selected by the Line function or ESC sequences, which does not correspond to a standard format. FormAdj FormAdj=0 -220/72” Default 12/72” Sets the first print position of a form in n/72 inch, separately adjustable for each paper path. Autotear ViewTear =Off View=1s/3s/6s The auto tear function or the auto view function can be selected as desired. When auto view is switched on, the 41](https://usermanual.wiki/Jiangmen-Dascom-Computer-Peripherals/TDPRN70.User-manual/User-Guide-2617223-Page-54.png)