Jiangmen Dascom Computer Peripherals TDPRN70 Dot Matrix Printer User Manual Part2
Jiangmen Dascom Computer Peripherals Co.,Ltd. Dot Matrix Printer Part2
UserManual.wiki
>
Jiangmen Dascom Computer Peripherals
>
TDPRN70 User Manual
>
User manual Part2
Contents
1.
User manual
2.
User manual Part2
User manual Part2
Navigation menu
Upload a User Manual
Namespaces
Wiki Guide
HTML
PDF
Info
Views
User Manual
Discussion / Help
Navigation
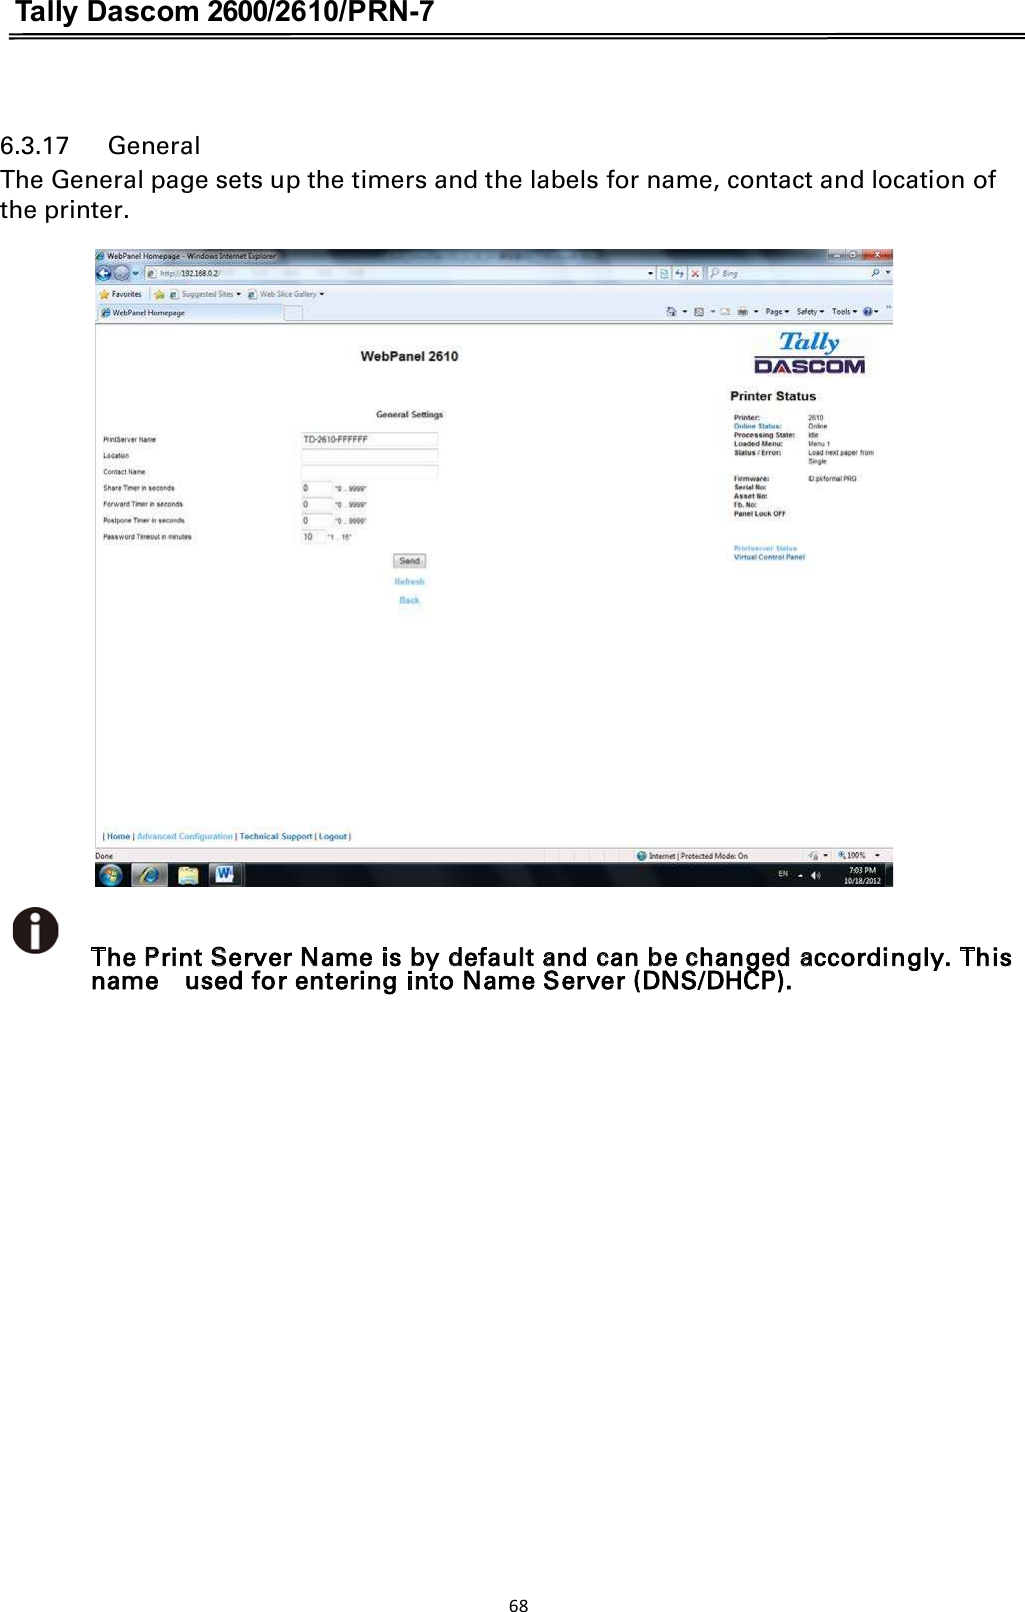

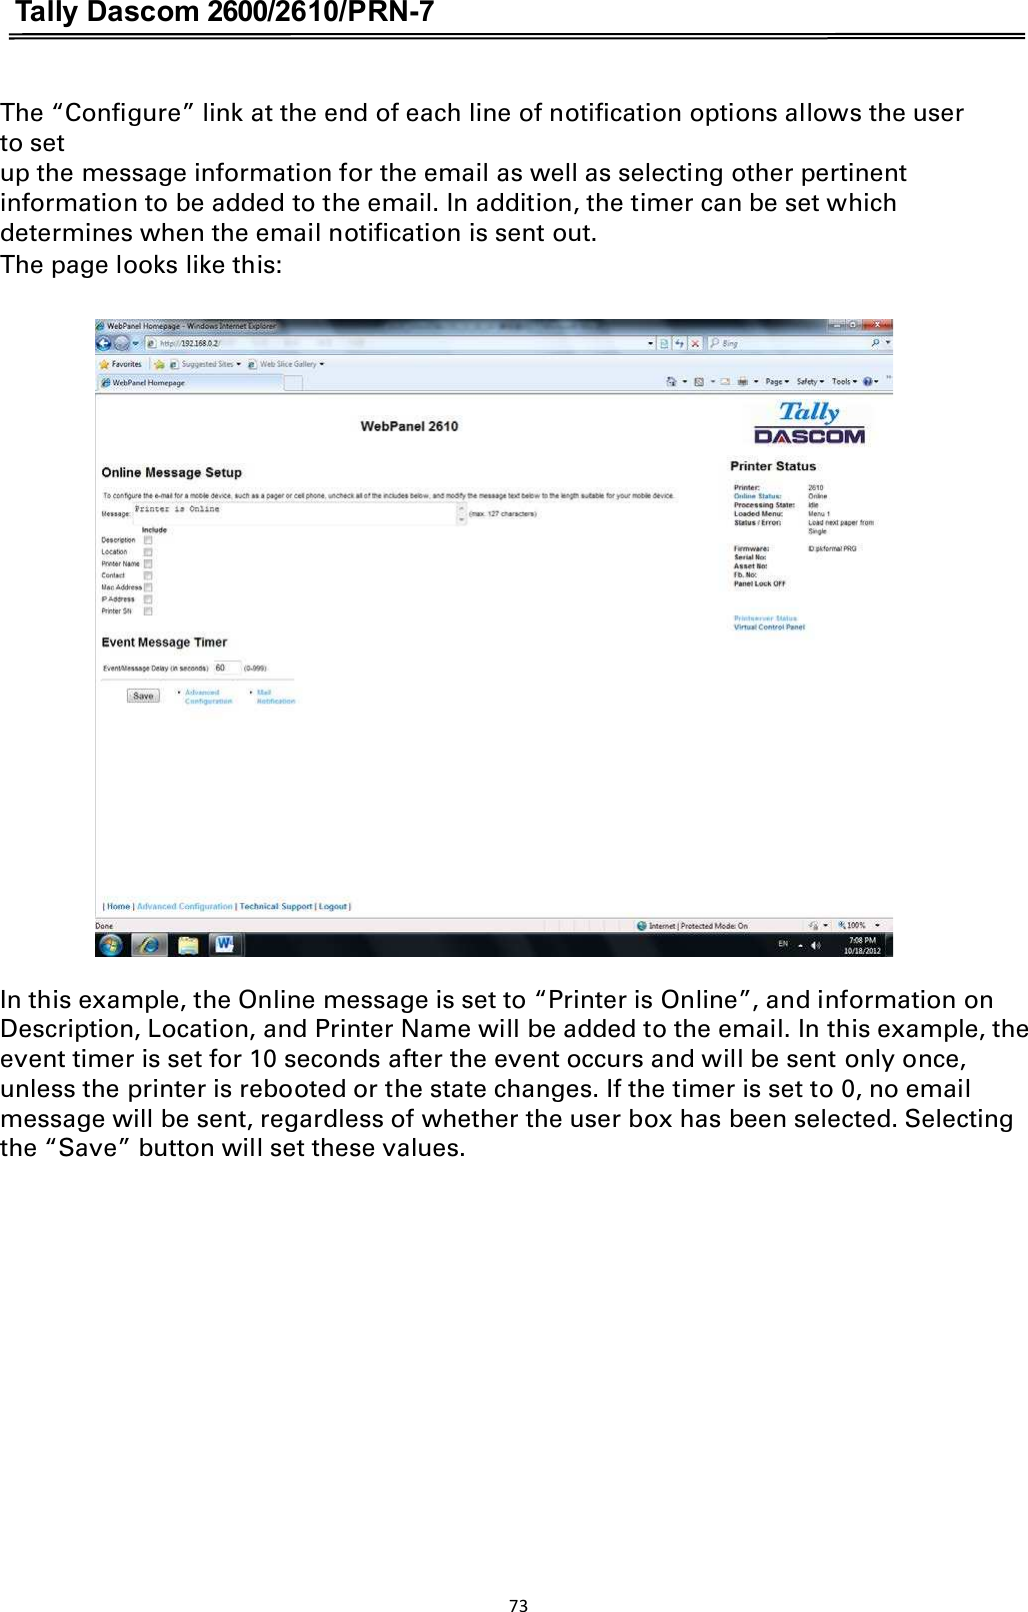
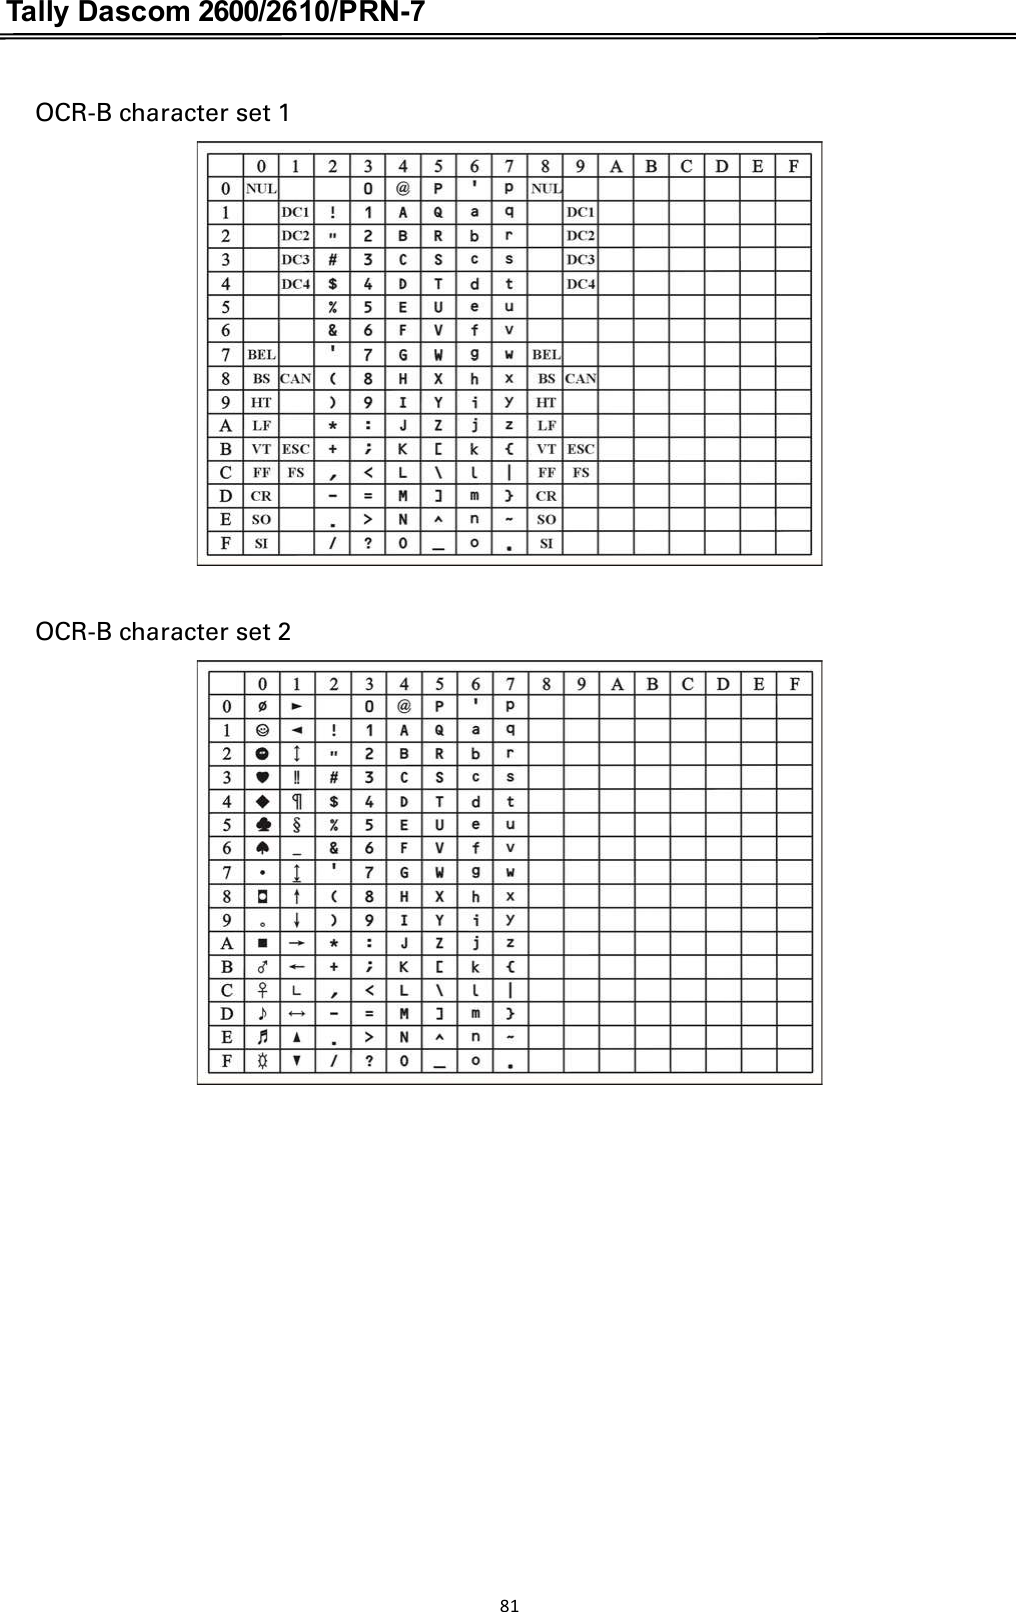
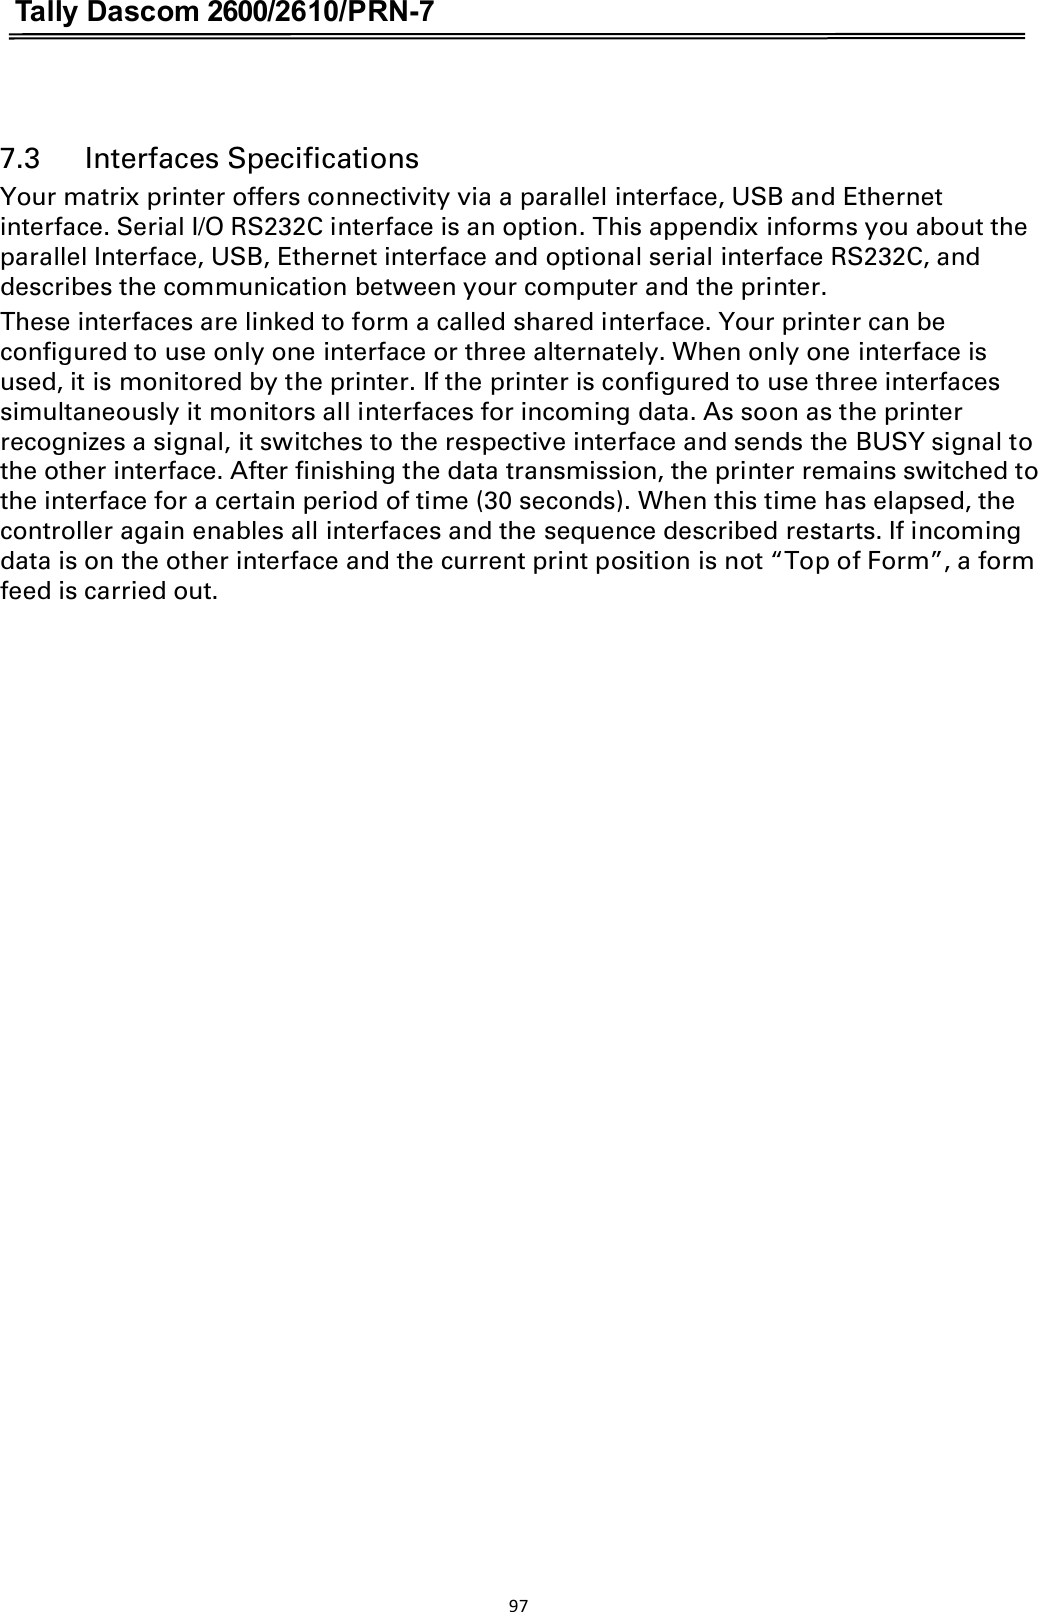
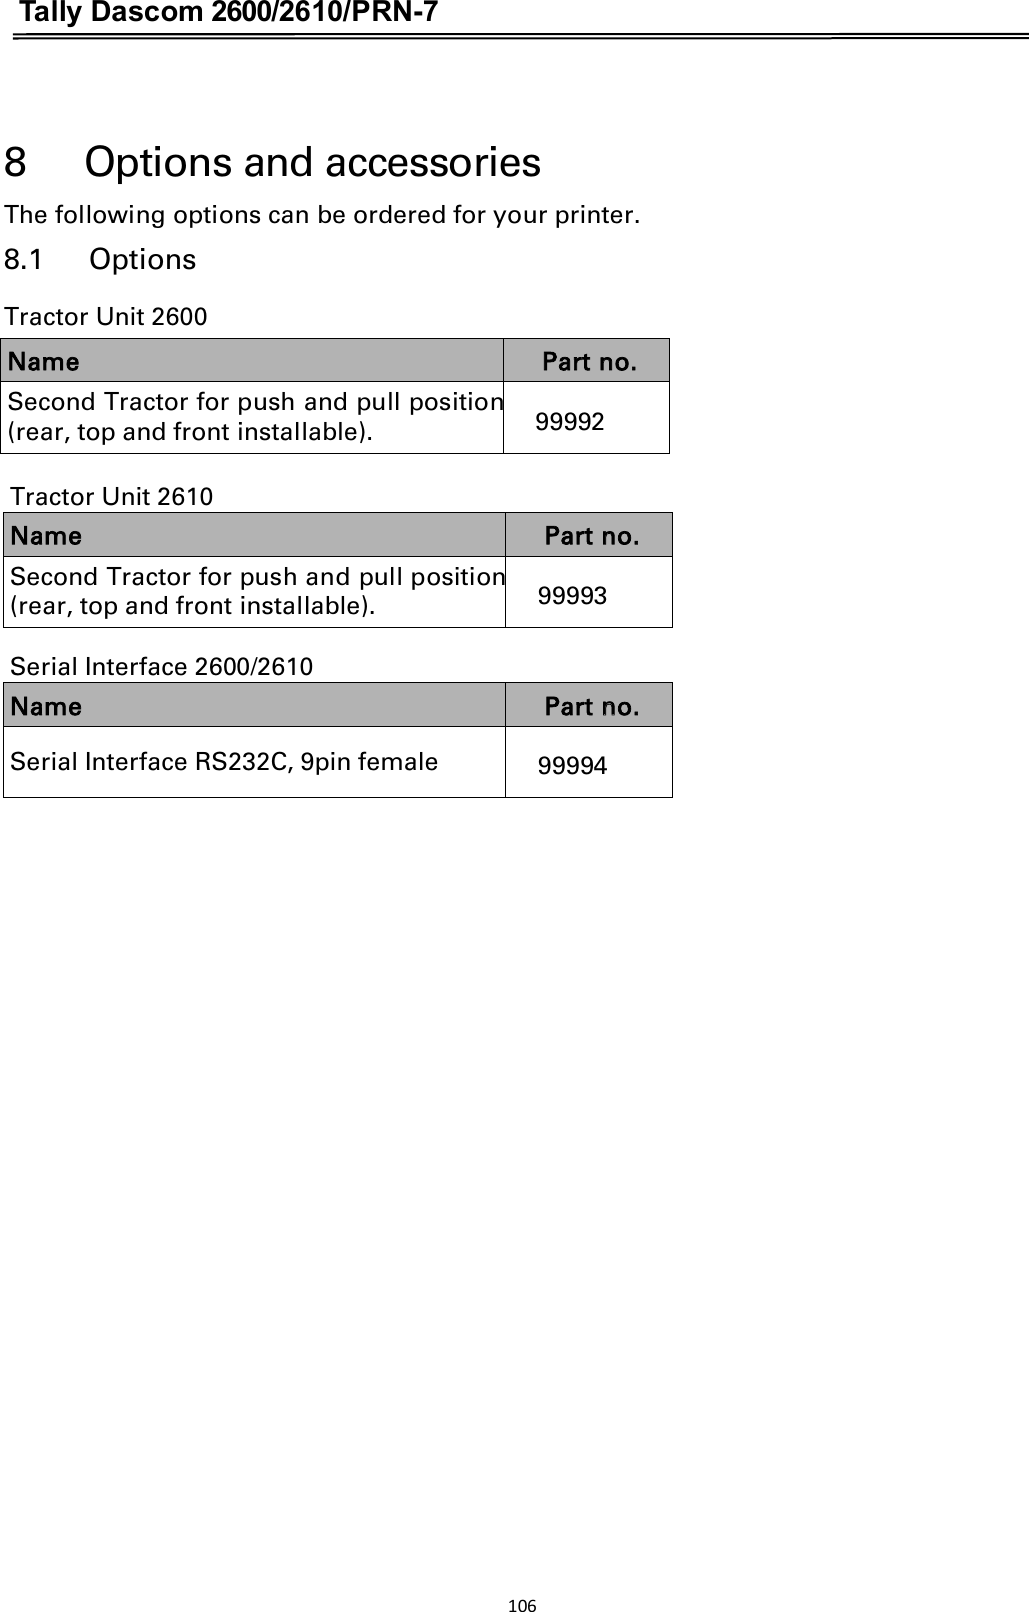
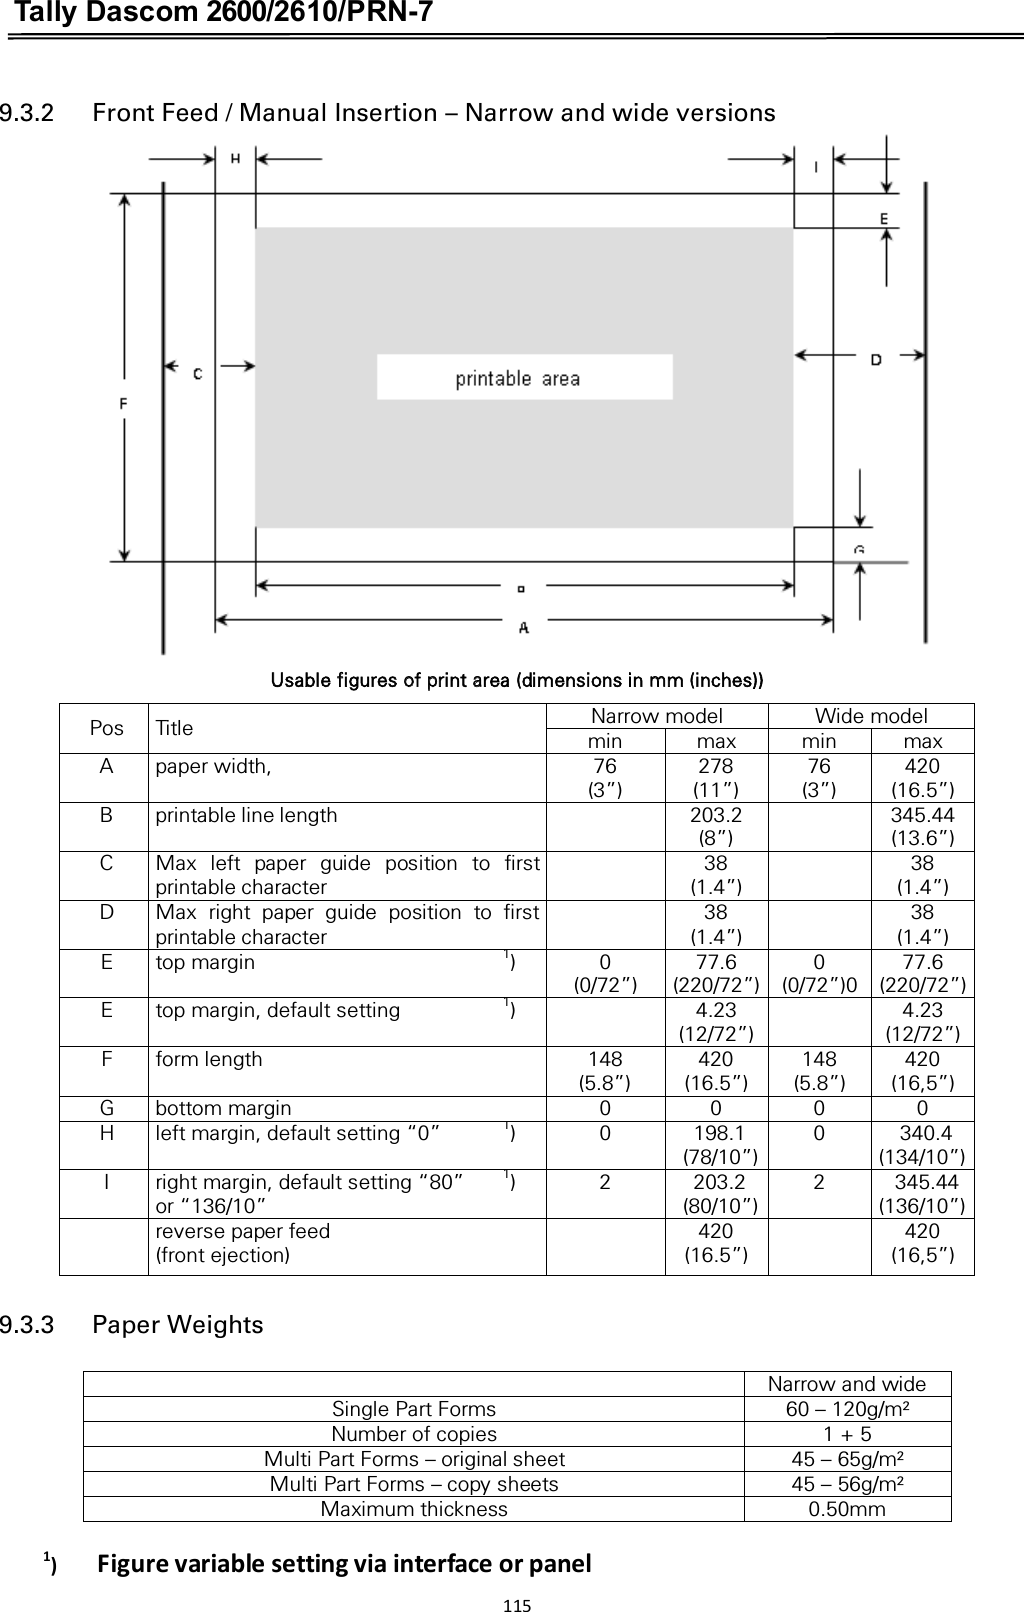
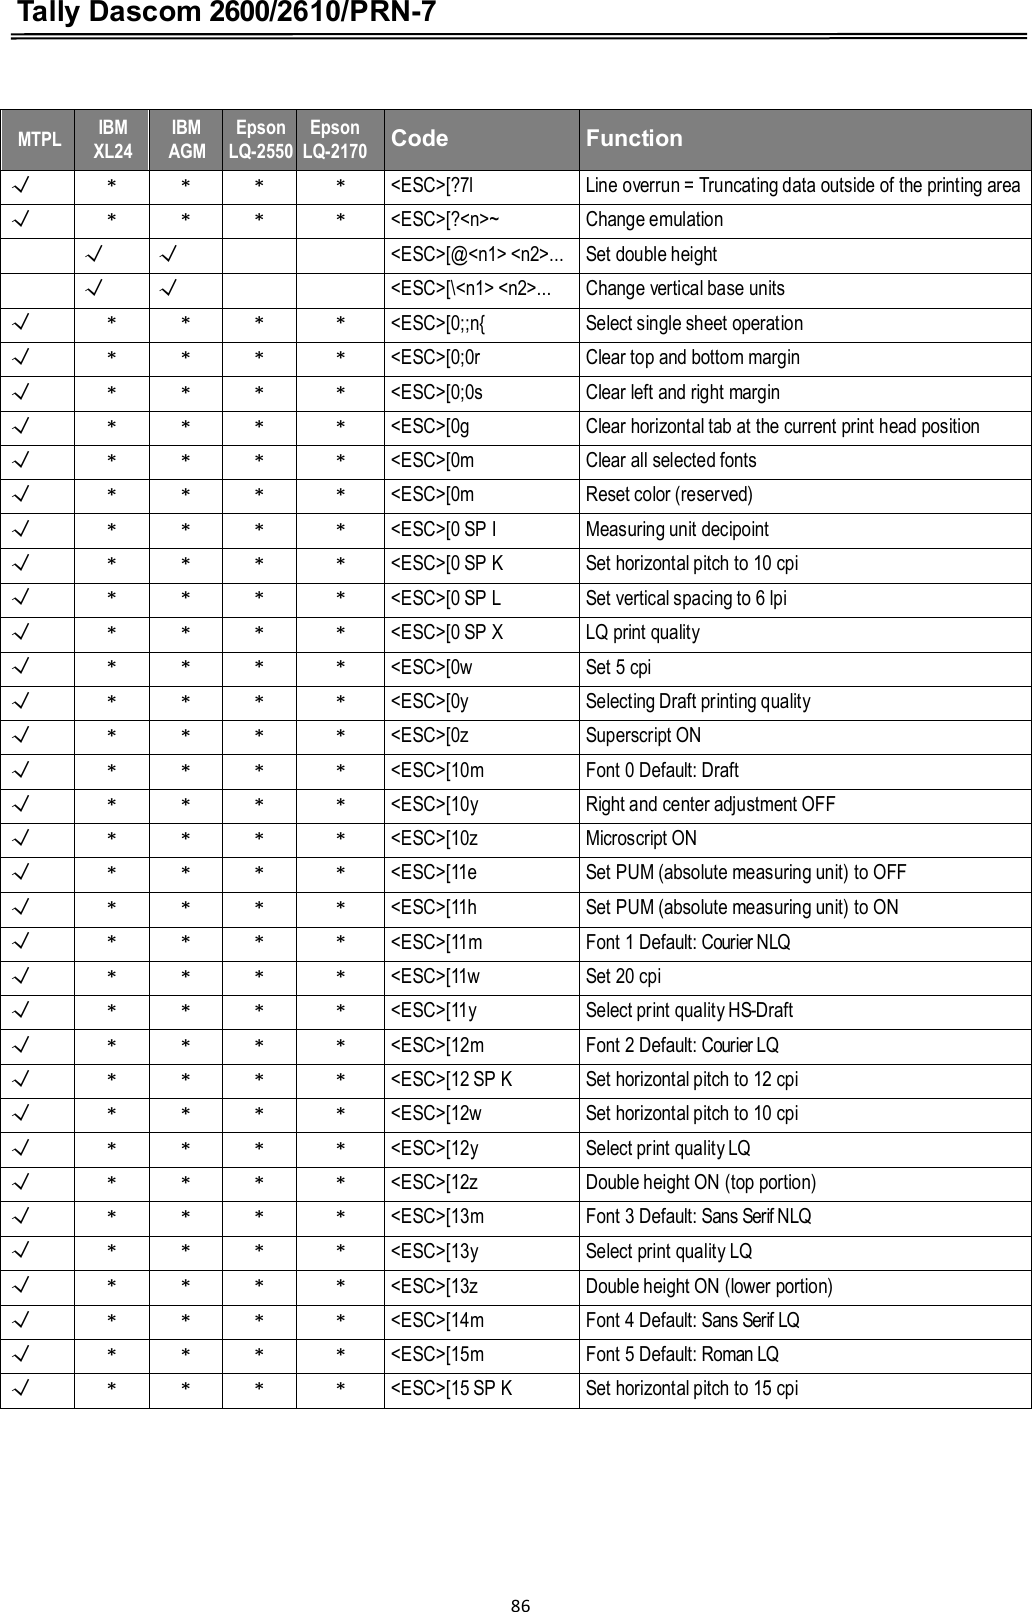
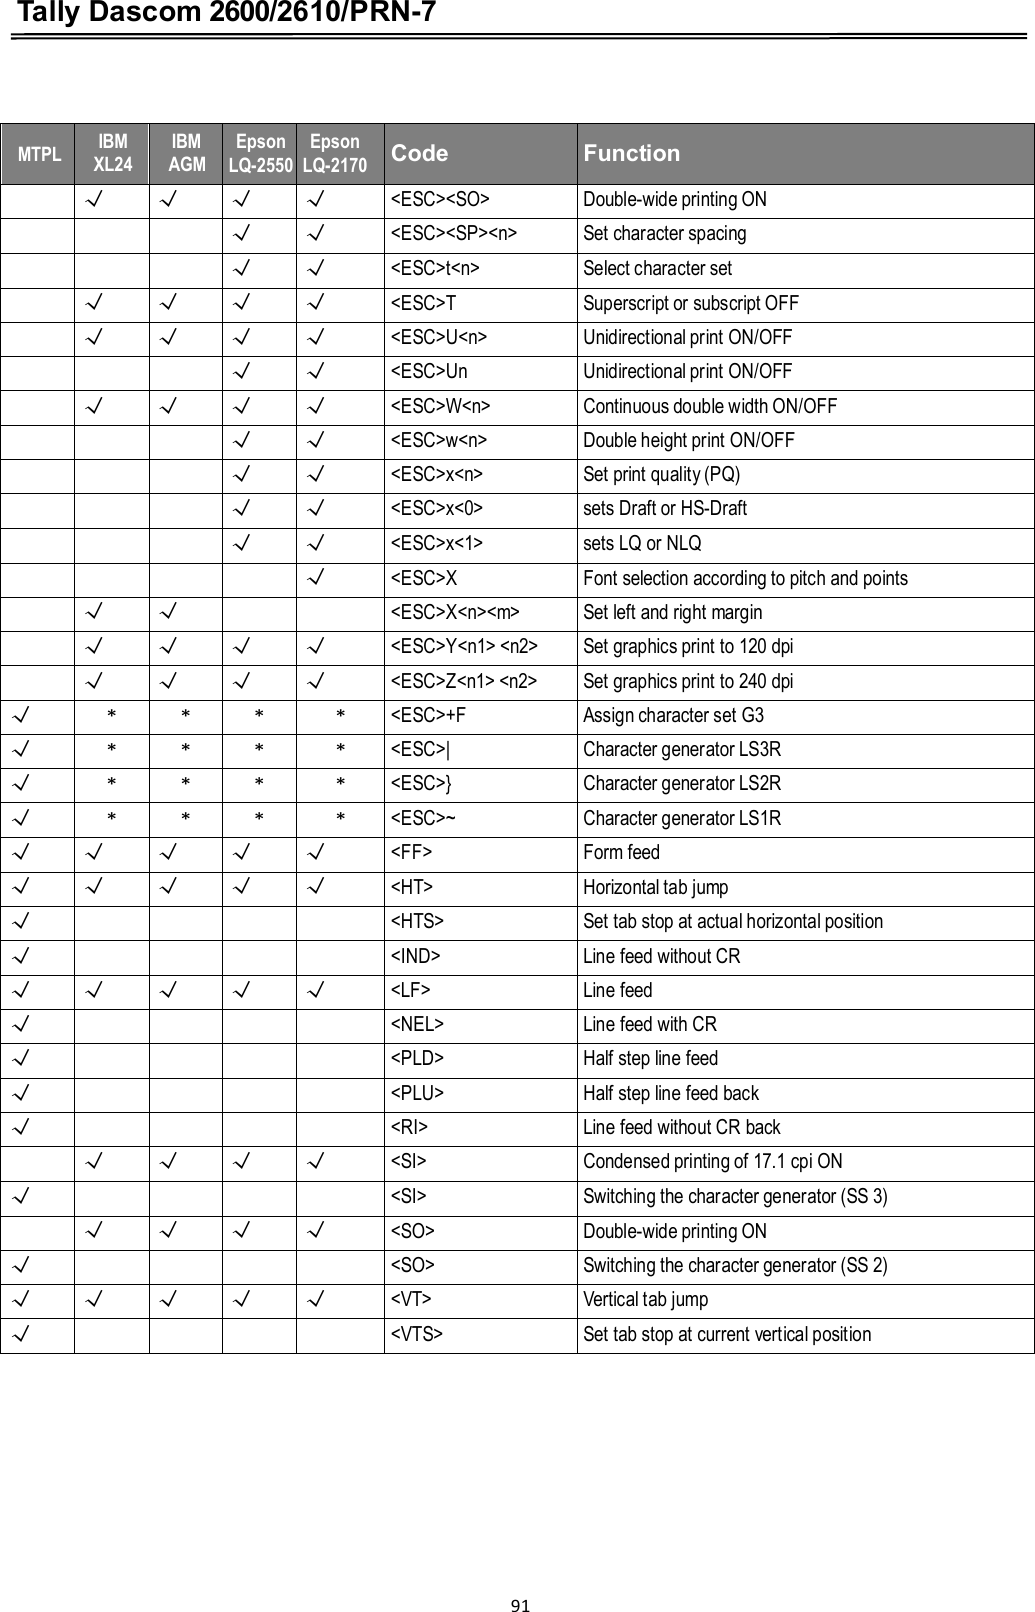
![Tally Dascom 2600/2610/PRN-7 MTPL IBM XL24 IBM AGM EpsonLQ-2550 EpsonLQ-2170 Code Function Ĝ Ĝ Ĝ <ESC>*<4><n1> <n2> Set graphics print to 80 dpi Ĝ Ĝ Ĝ <ESC>*<40><n1> <n2> Set graphics print to 360 dpi Ĝ * * * * <ESC>*MI>F Assign character set G2 Ĝ Ĝ Ĝ <ESC>-<n> Underlining ON/OFF Ĝ <ESC>/<m> Select vertical tab channels Ĝ <ESC>. Printing raster graphics Ĝ Ĝ <ESC>: Condensed printing 12 cpi ON Ĝ Ĝ <ESC>:<0><n><m> Copy ROM character set Ĝ Ĝ <ESC>< Unidirectional printing for 1 line Ĝ Ĝ <ESC>= Set bit 8 = 0 Ĝ Ĝ <ESC>=<C1><C2>... Load font/character set Ĝ Ĝ <ESC>> Set bit 8 = 1 Ĝ Ĝ <ESC>?<s><n> Reload a graphics mode Ĝ Ĝ <ESC>@ Initialize printer Ĝ * * * * <ESC>[ MTPL start character for programmingsequence Ĝ * * * * <ESC>[:y Right justification and centering OFF Ĝ * * * * <ESC>[=z Bold ON Ĝ * * * * <ESC>[>z Bold OFF Ĝ * * * * <ESC>[?1~ MTPL command set Ĝ * * * * <ESC>[?10~ Barcode interpretation OFF Ĝ * * * * <ESC>[?11~ Start barcode interpretation Ĝ * * * * <ESC>[?4~ MTPL + IBM Proprinter-24 command set Ĝ * * * * <ESC>[?50h Selecting character sets with 256 characters Ĝ * * * * <ESC>[?50l Selecting character sets with 94 characters Ĝ * * * <ESC>[?51h Proportional fonts automatic NLQ and LQ Ĝ * * * <ESC>[?51l Proportional fonts in draft mode possible( f ) Ĝ * * * * <ESC>[?52h Font selection (ESC[10...19m]) possible onlyfor NLQ and LQ Ĝ * * * * <ESC>[?52l Font selection (ESC[10...19m]) Draft Ĝ * * * * <ESC>[?53h Extended character set Ĝ * * * * <ESC>[?53l Standard character set Ĝ * * * * <ESC>[?6~ MTPL + EPSON LQ-2550 command set Ĝ * * * * <ESC>[?8~MTPL + EPSON LQ-2170 command setĜ * * * * <ESC>[?7h Line overrun = CR + LF 85](https://usermanual.wiki/Jiangmen-Dascom-Computer-Peripherals/TDPRN70.User-manual-Part2/User-Guide-2617229-Page-31.png)
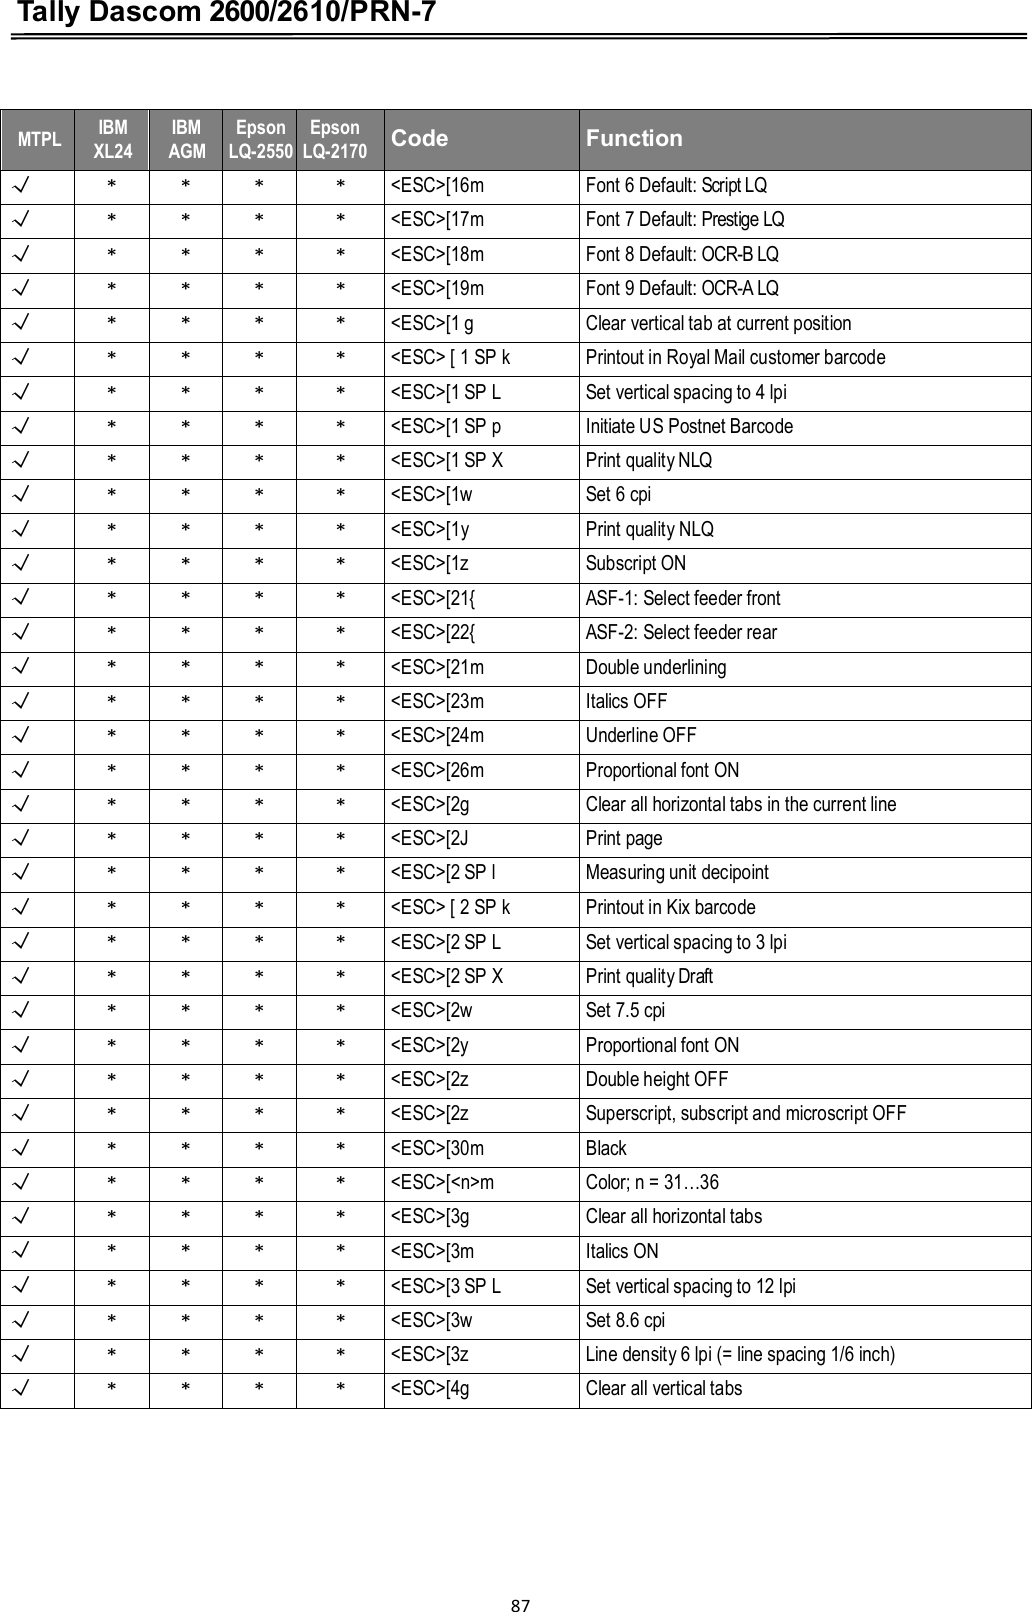

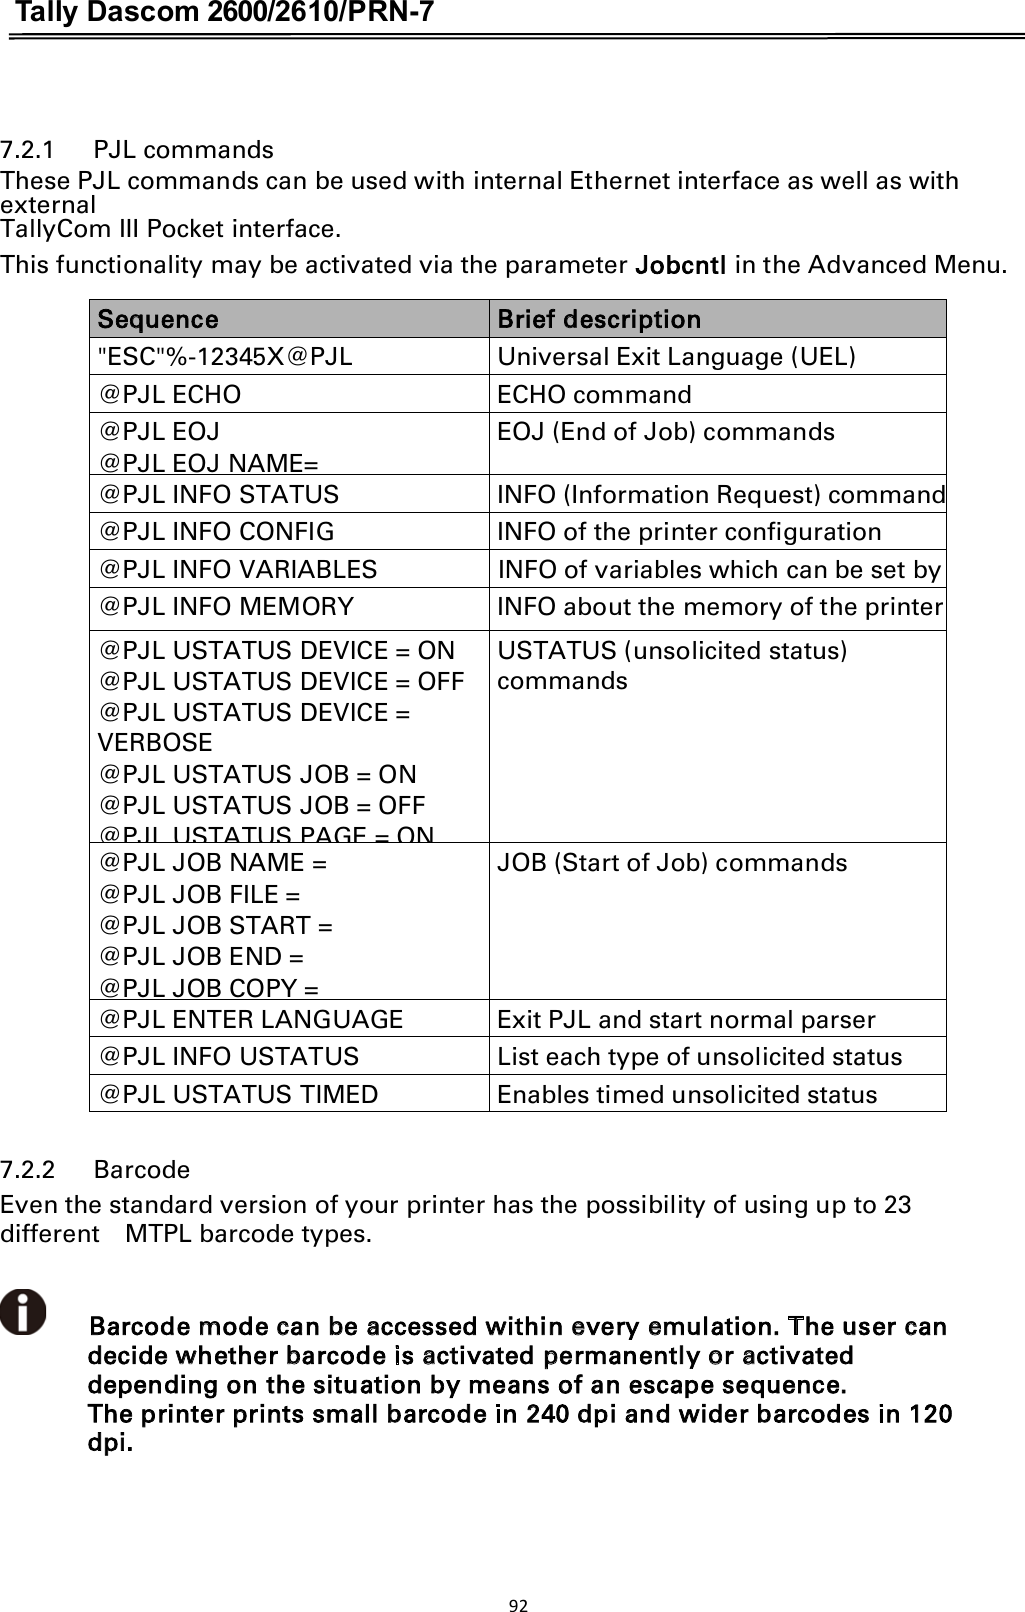
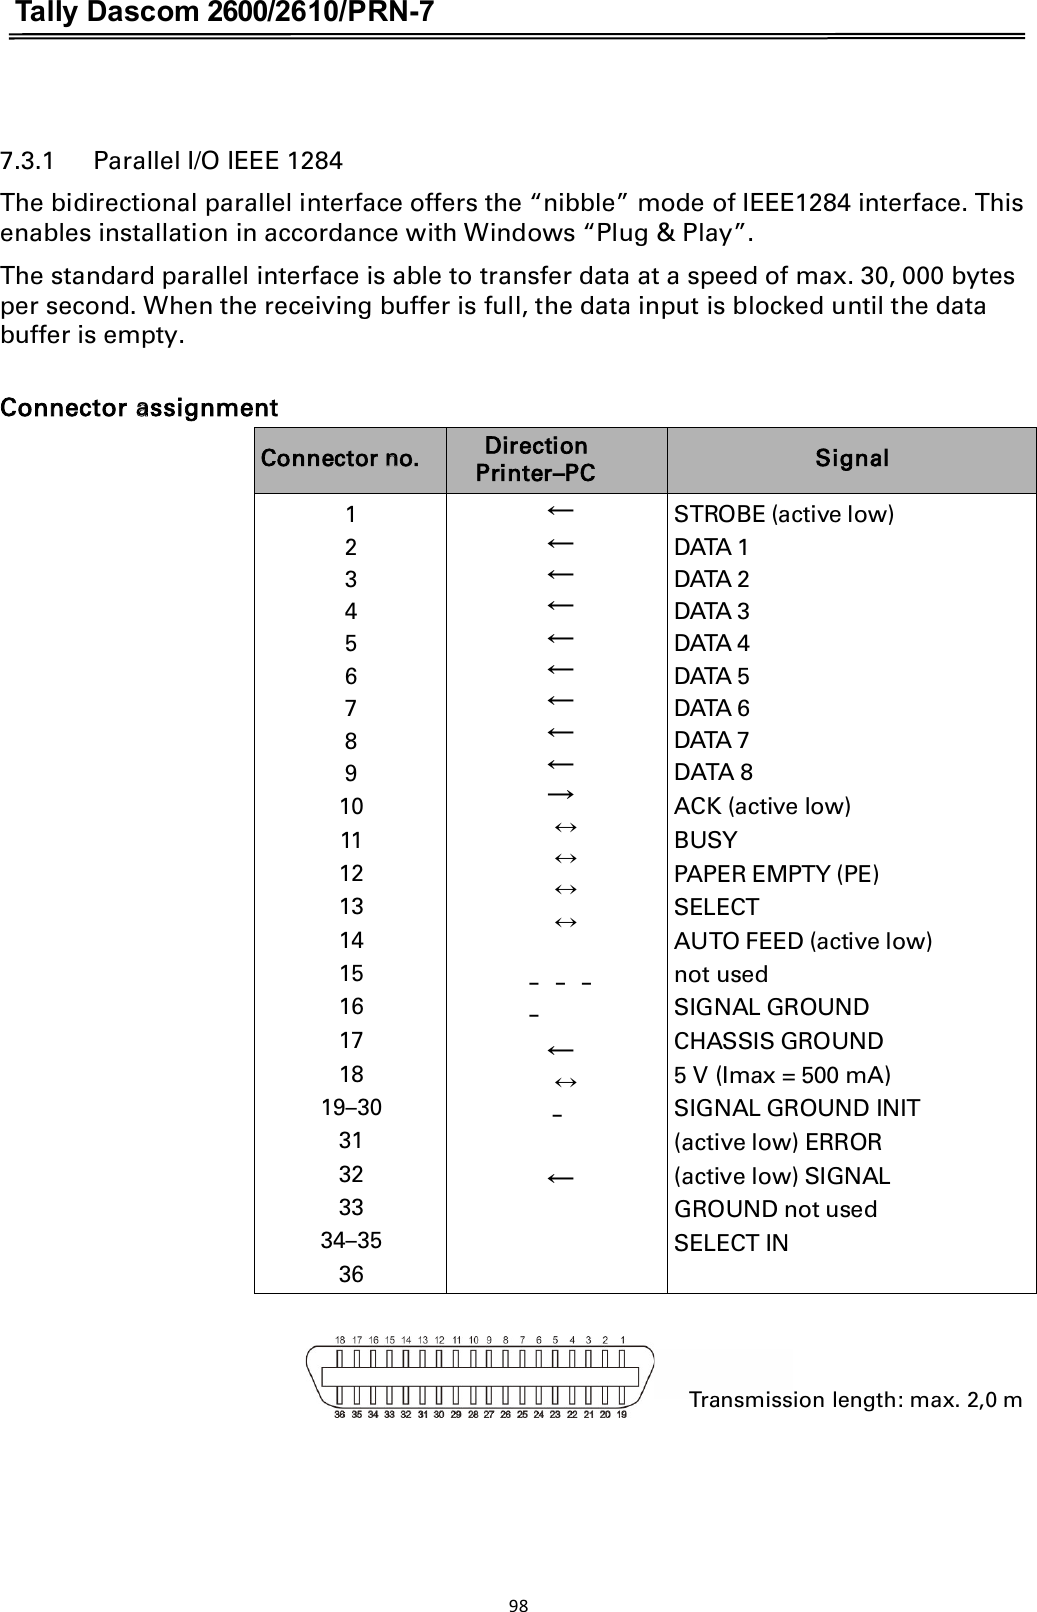
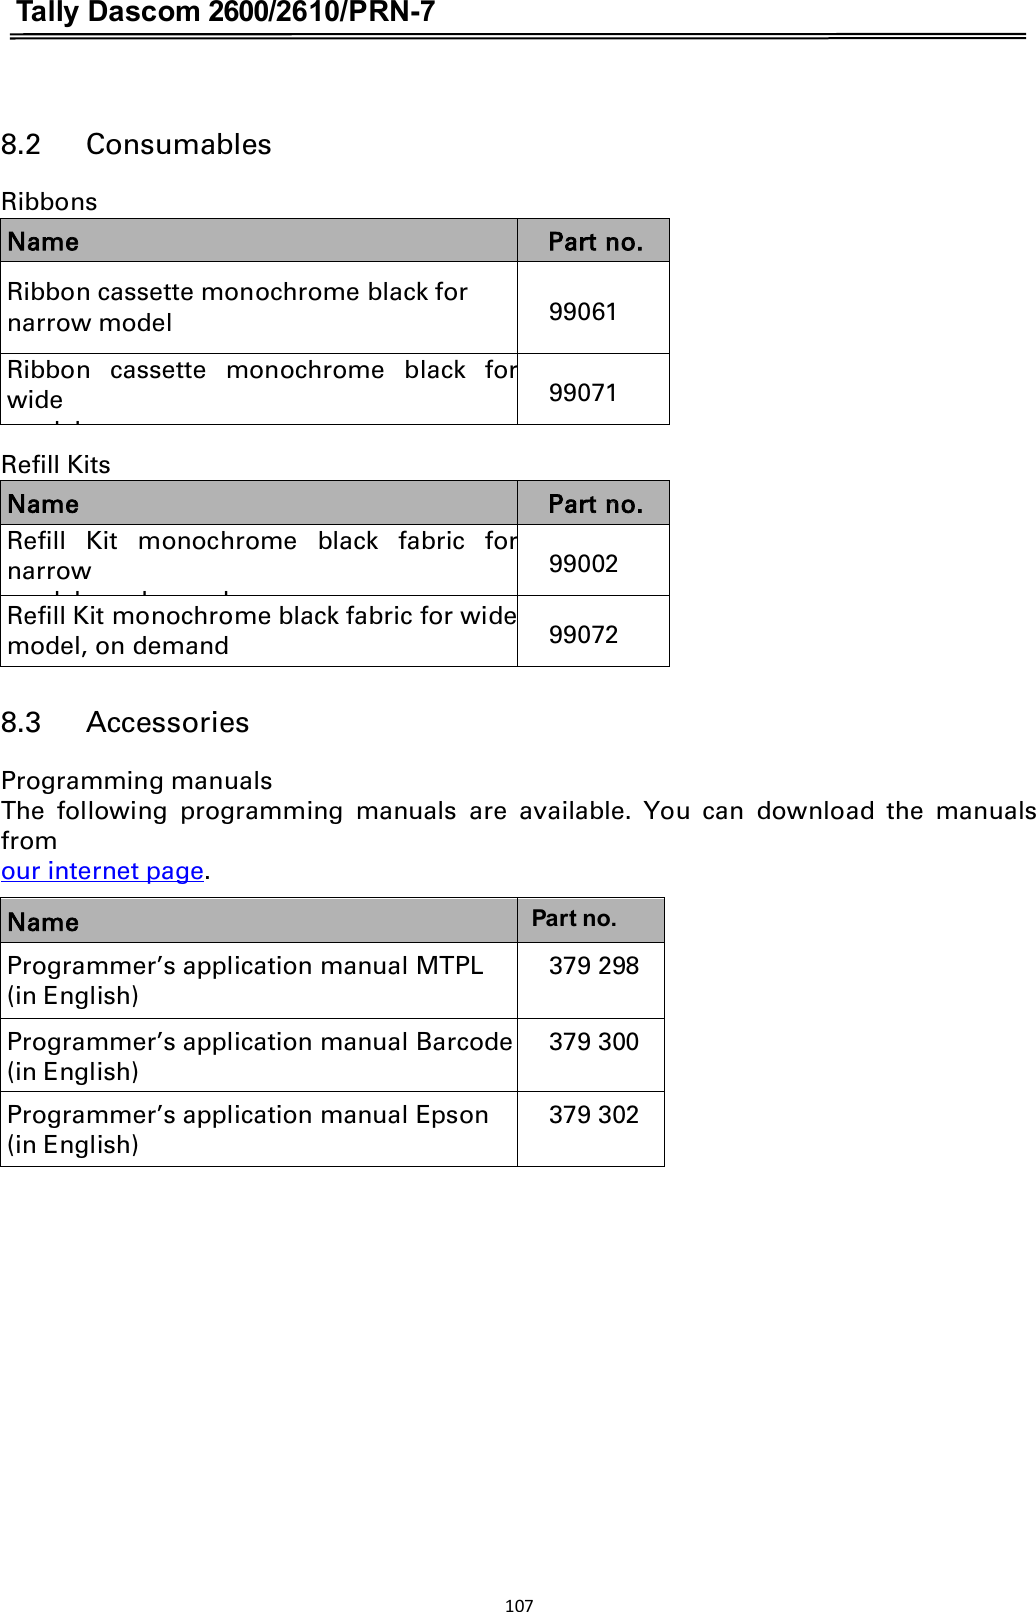
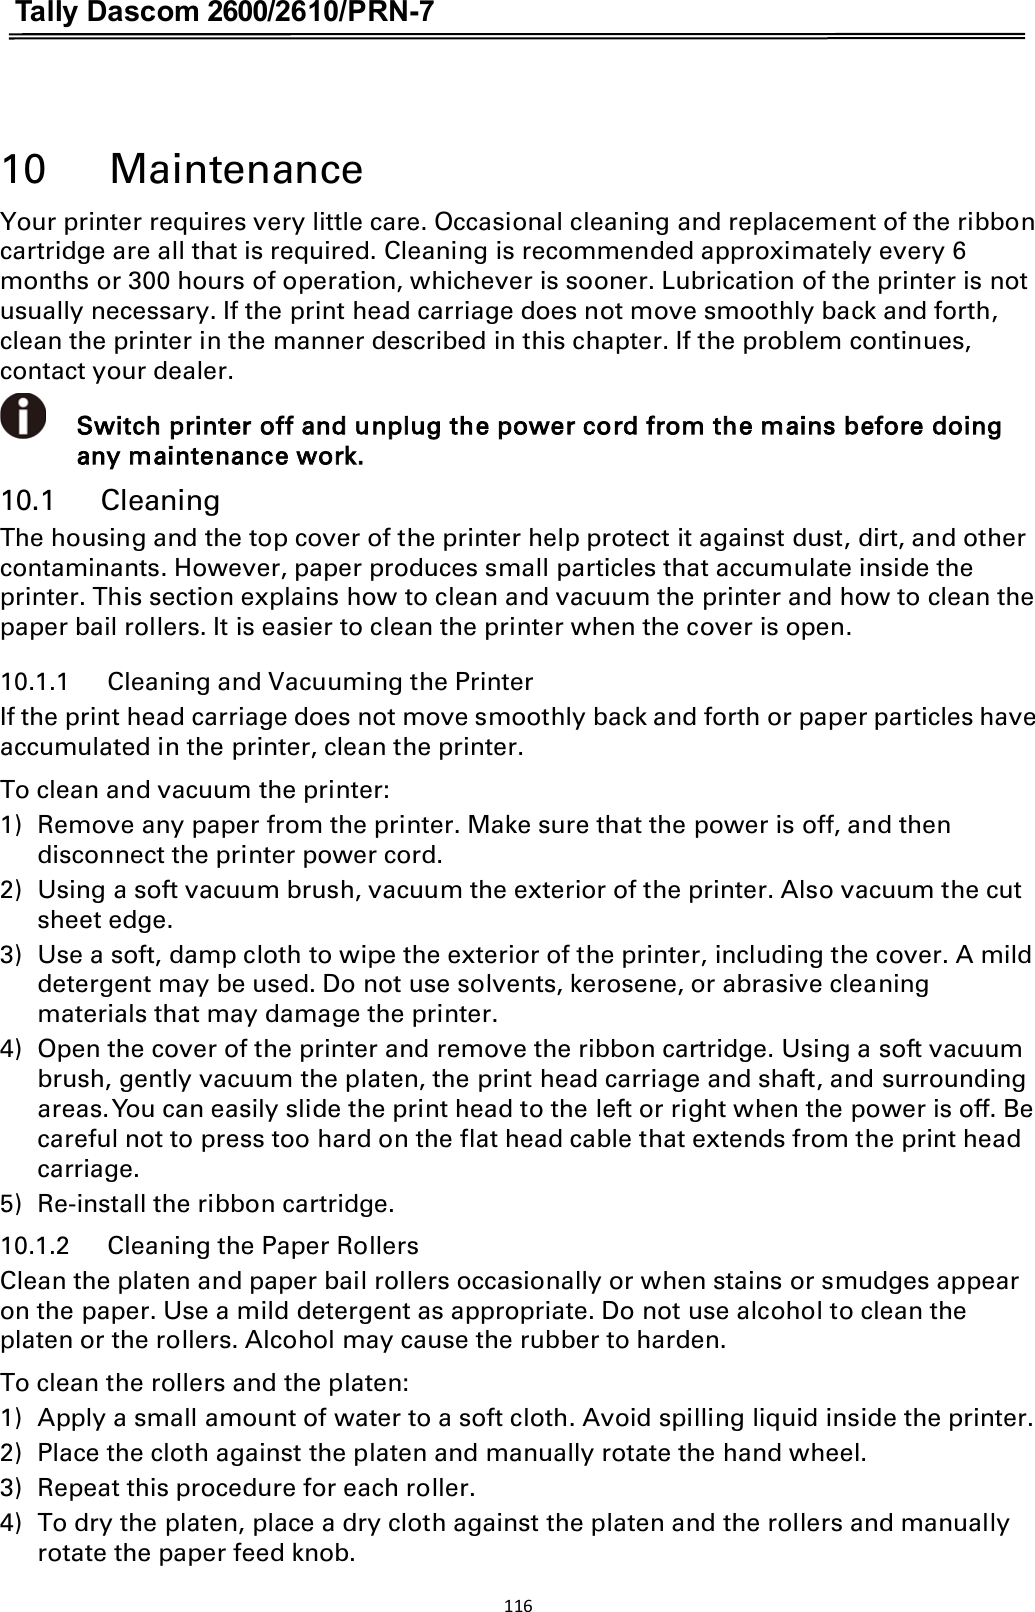
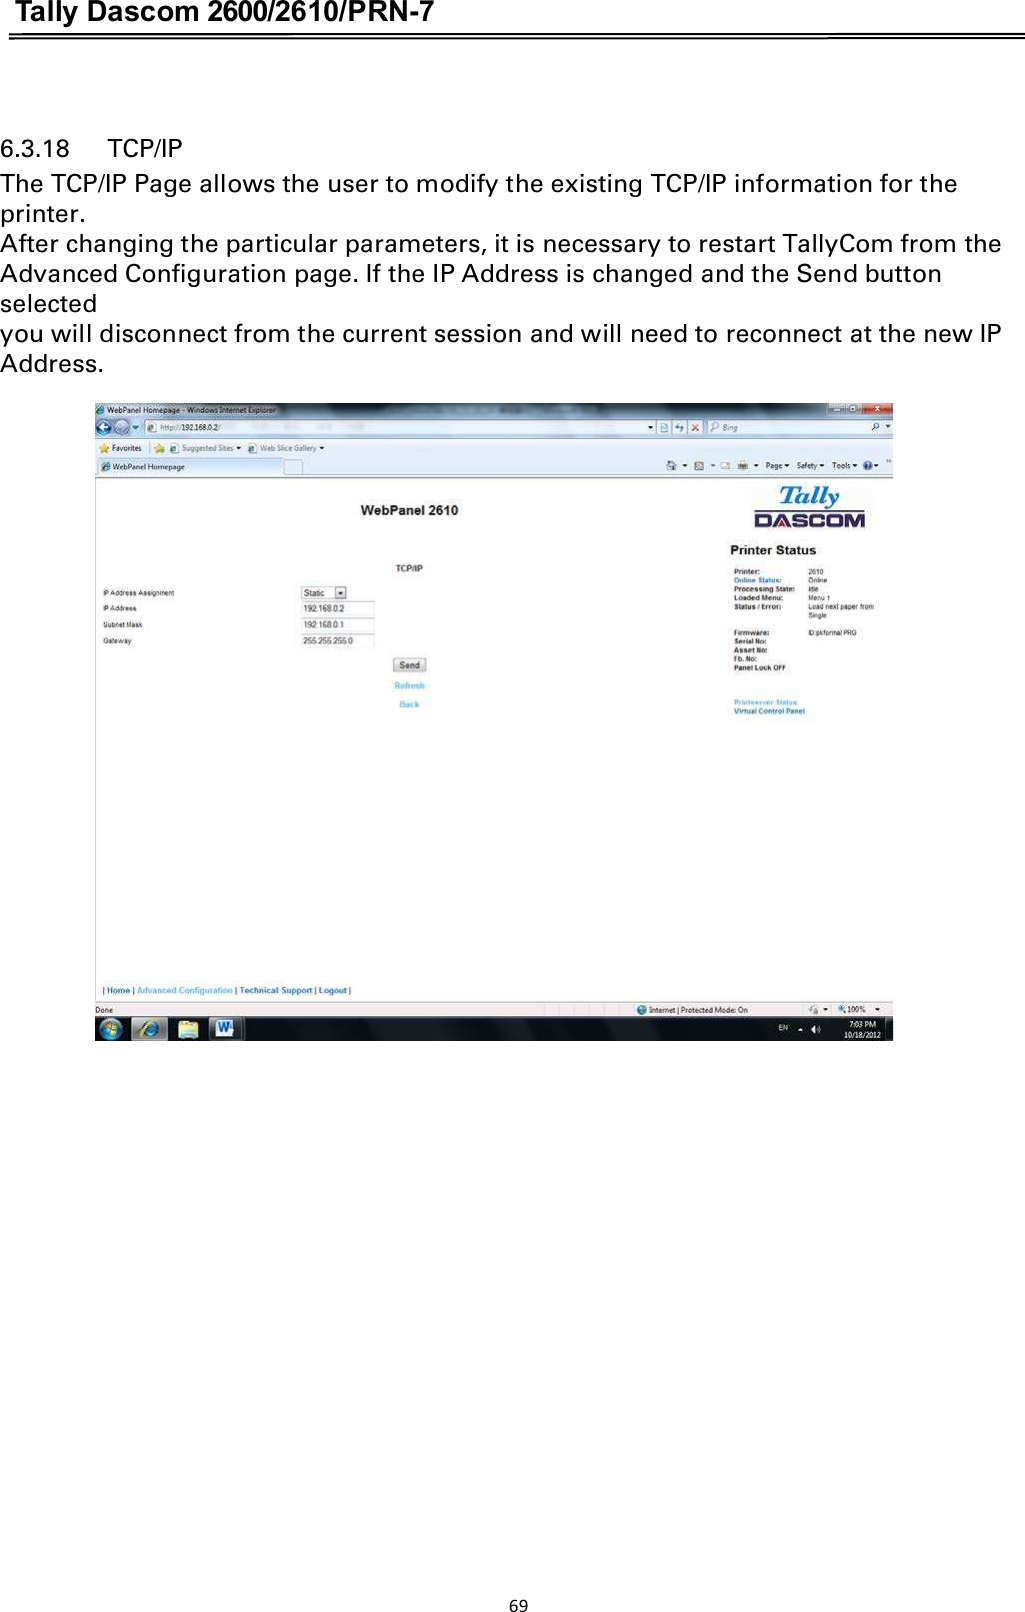
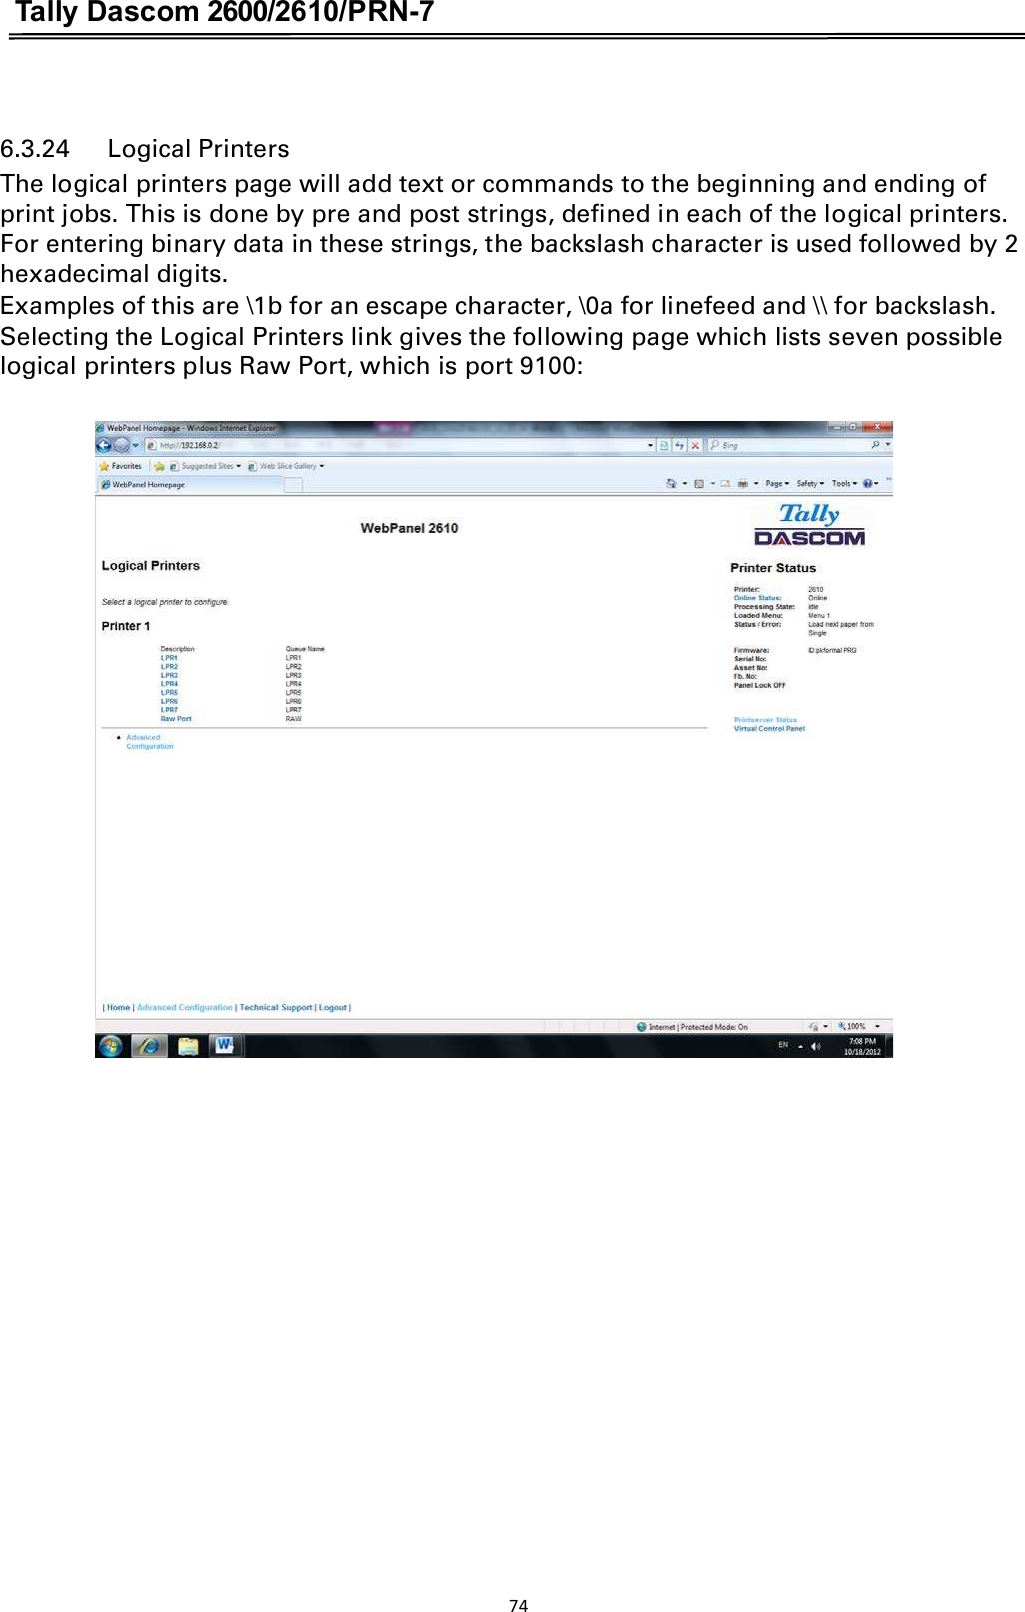
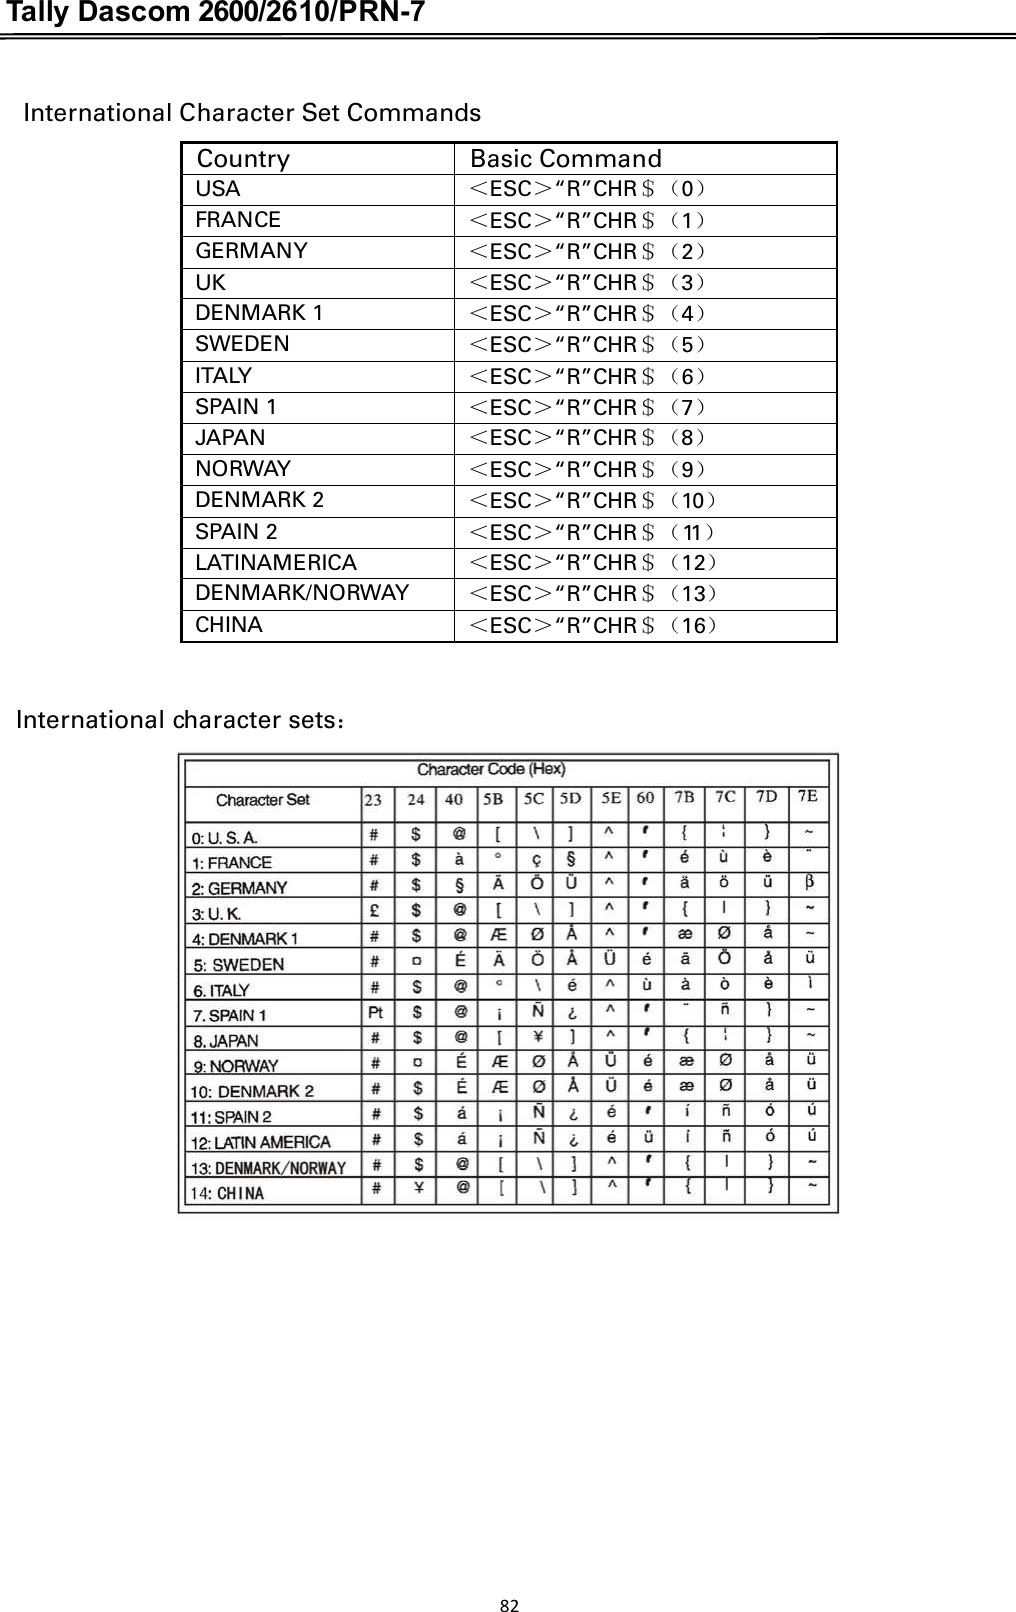
![Tally Dascom 2600/2610/PRN-7 Example:ASCIIESC[9SPK<data>HEX1B5B39026B<data> 7.2.8 LC printing Certain professional applications may require unusually Large character sizes. Therefore your printer has the possibility of scaling standard size characters up to factor 99 by means of control sequences (LCP*). The Header sequence defines the parameters (e.g. height) once. This definition remains until the printer is switched off. The printable LCP* information is transmitted in an LCP “bracket” (SI). The following character sets (with national characters) are available. ID 23 24 40 5B 5C 5D 5E 60 7B 7C 7D 7E US ASCII 01 # $ @ [ \ ] ? ` { | } ¯ GERMAN 02 # $ § Ä * Ü ? ` ä * ü ß The character sets are selected via the following LCP sequence ESC ”P“ ”L“ ”S“ n ESC ”\“. The value of n may range between 01 and 02 (as ASCII characters) – see ID column in the above table. To select e.g. the German character set, you must use the following data set: ASCII ESC P L S 0 1 ESC \ HEX 1B 50 4C 53 30 31 1B 5C DEC 27 80 76 83 48 49* 27 92 The printout of LCP characters can be selected in all of the emulations. Prerequisite: Printer must be in Barcode mode. Note that this printer supports some scalable fonts in the LQ-2170 emulation if a compatible driver is used. 95](https://usermanual.wiki/Jiangmen-Dascom-Computer-Peripherals/TDPRN70.User-manual-Part2/User-Guide-2617229-Page-41.png)
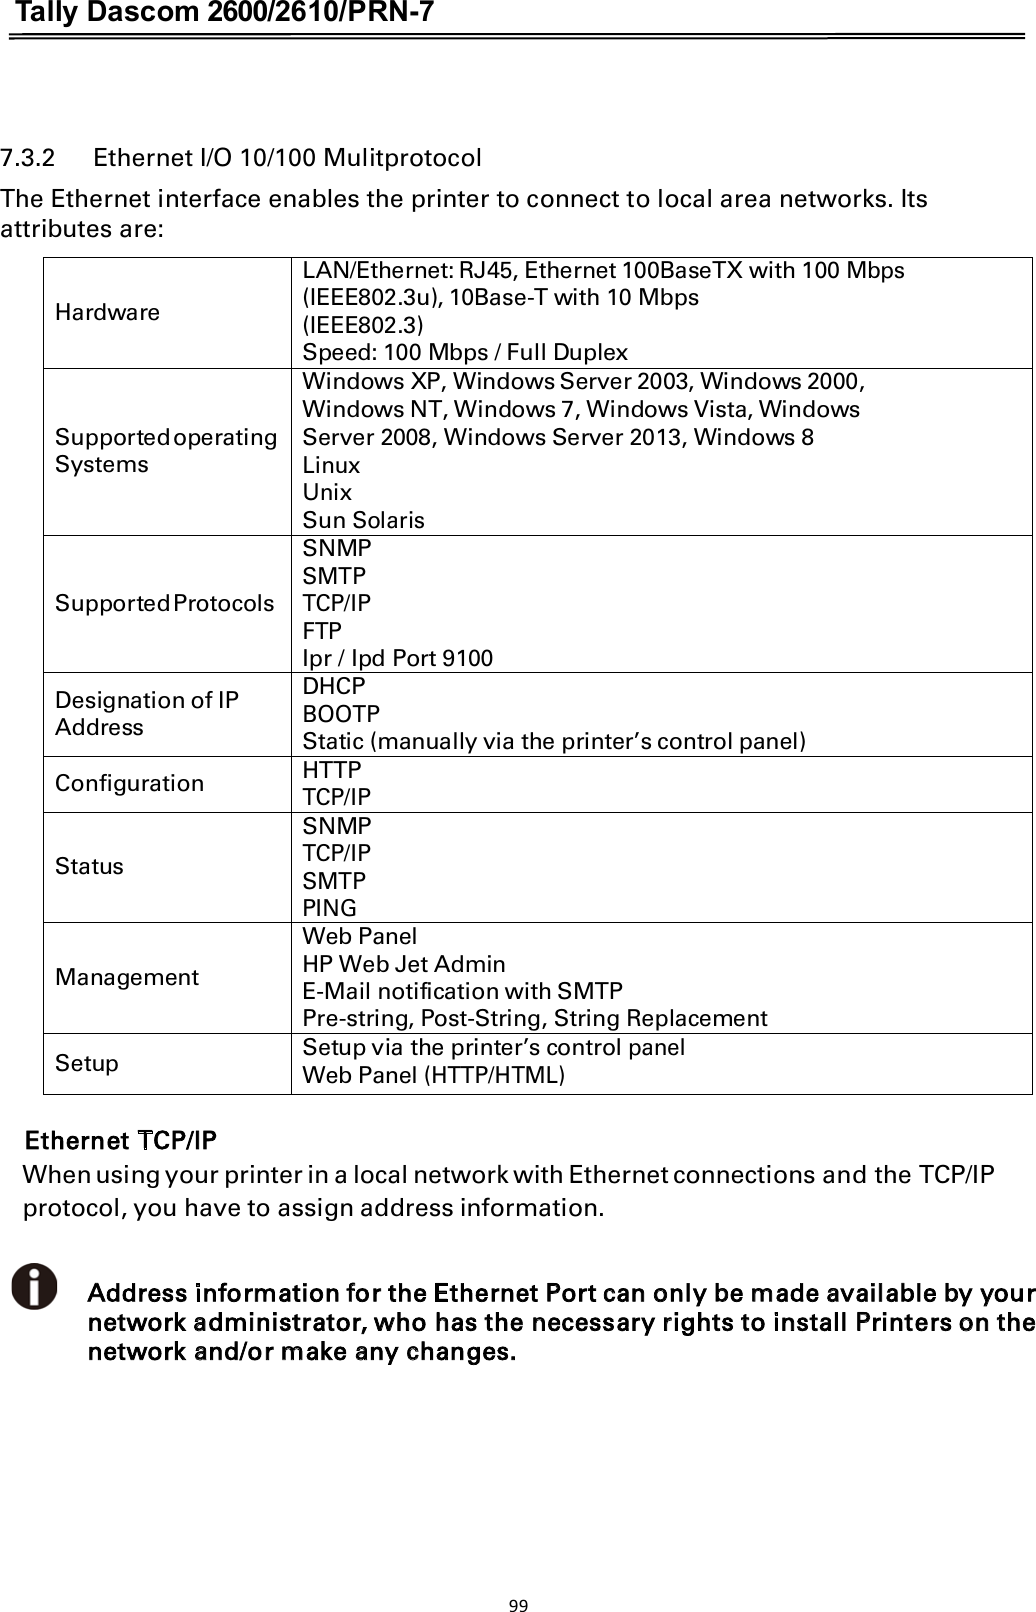
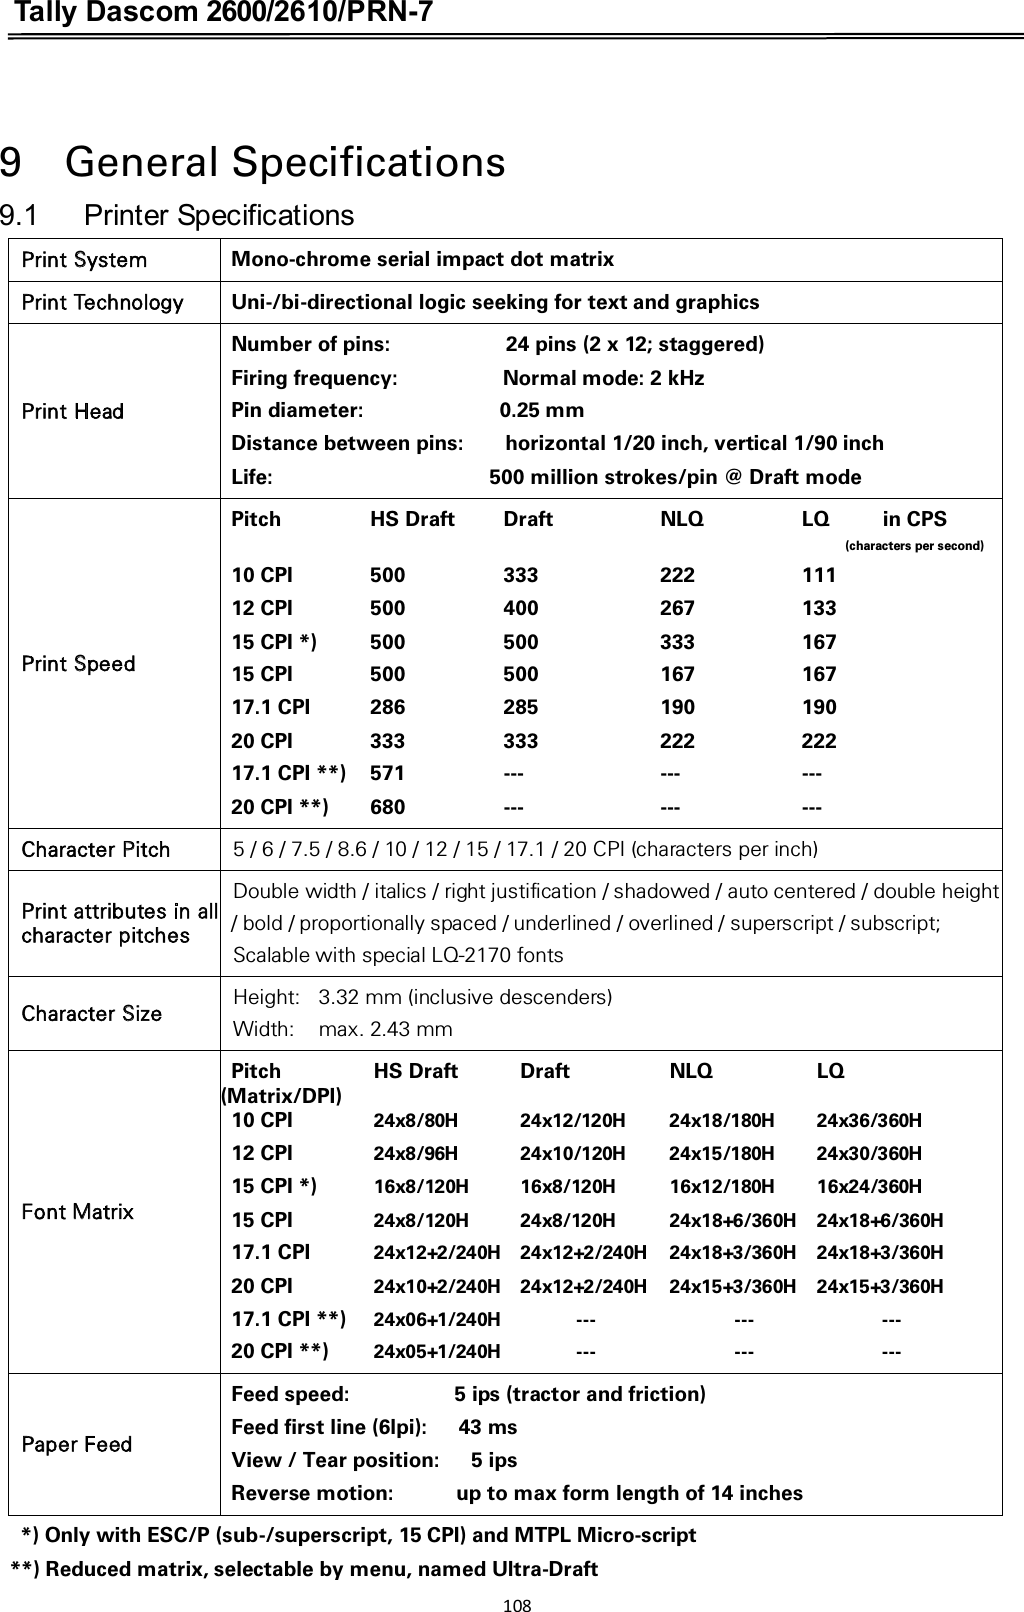
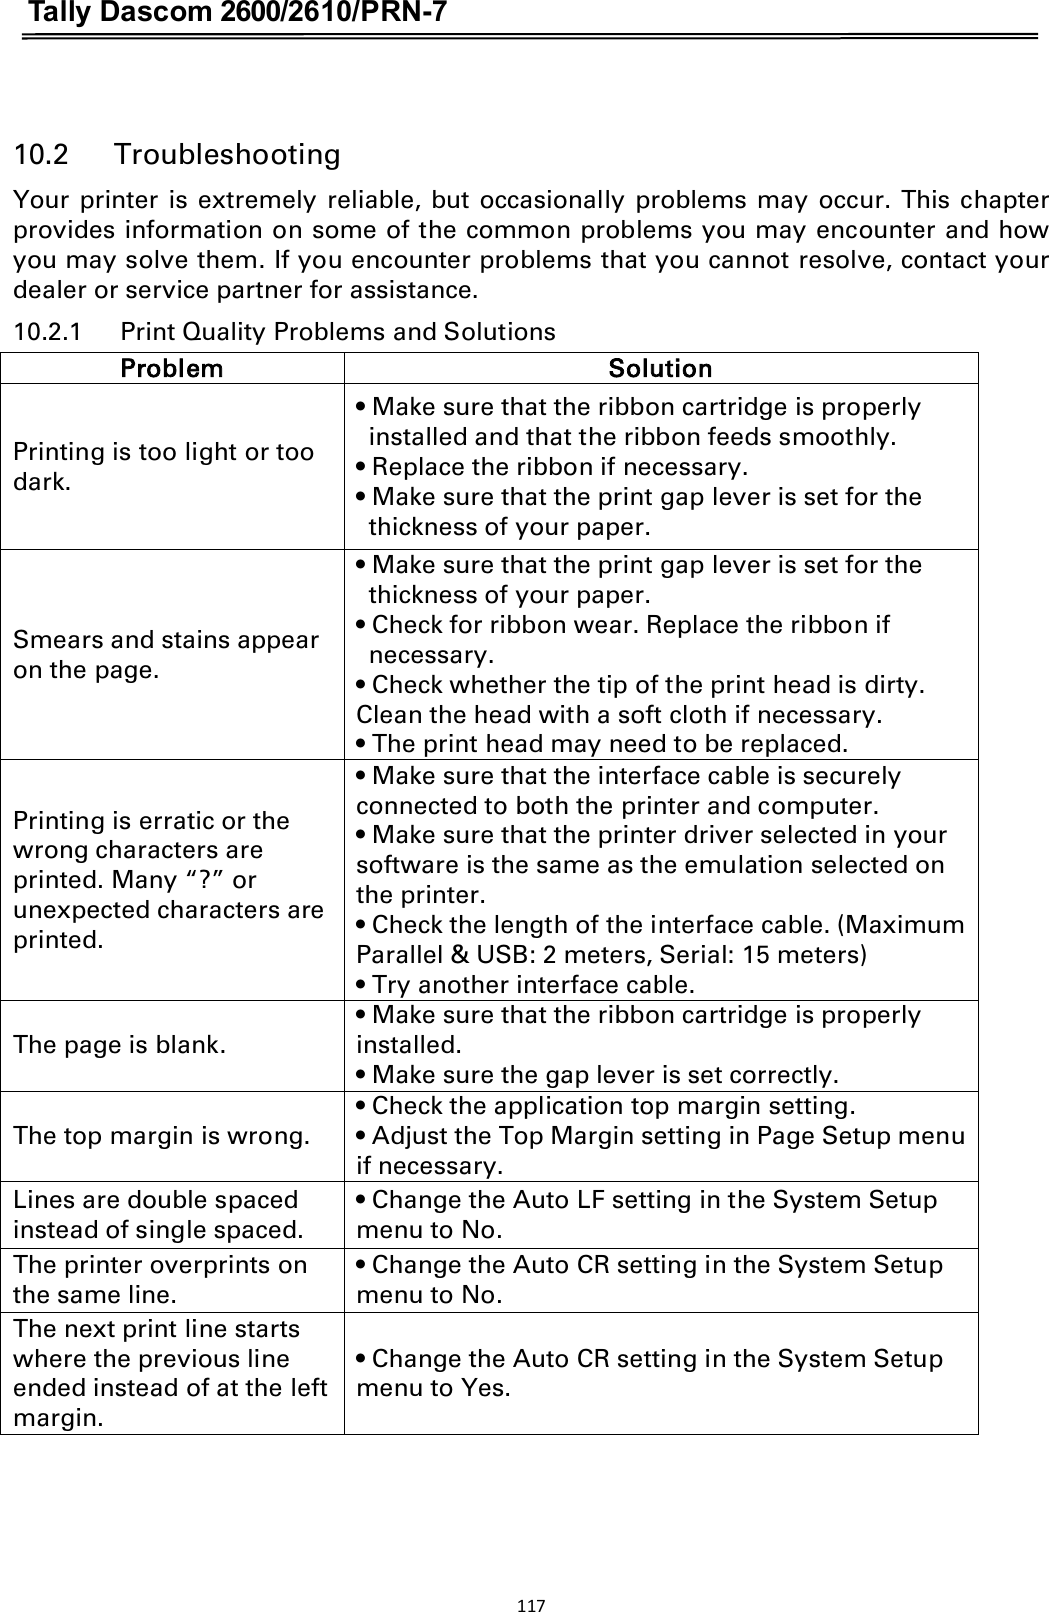
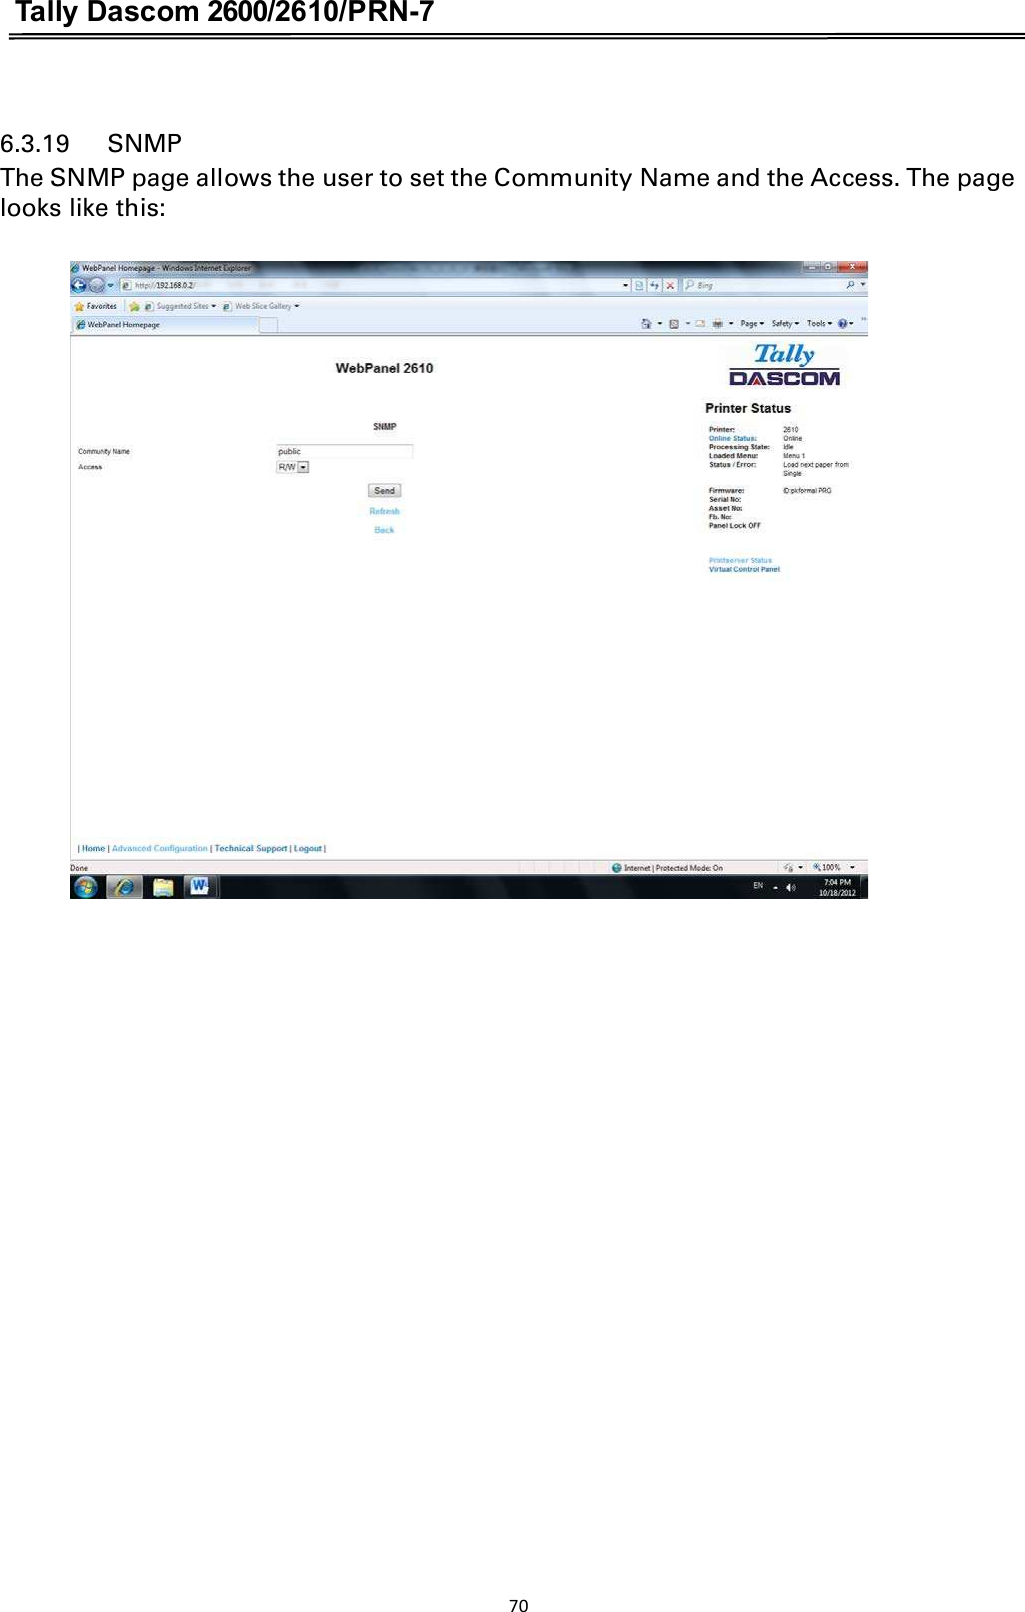
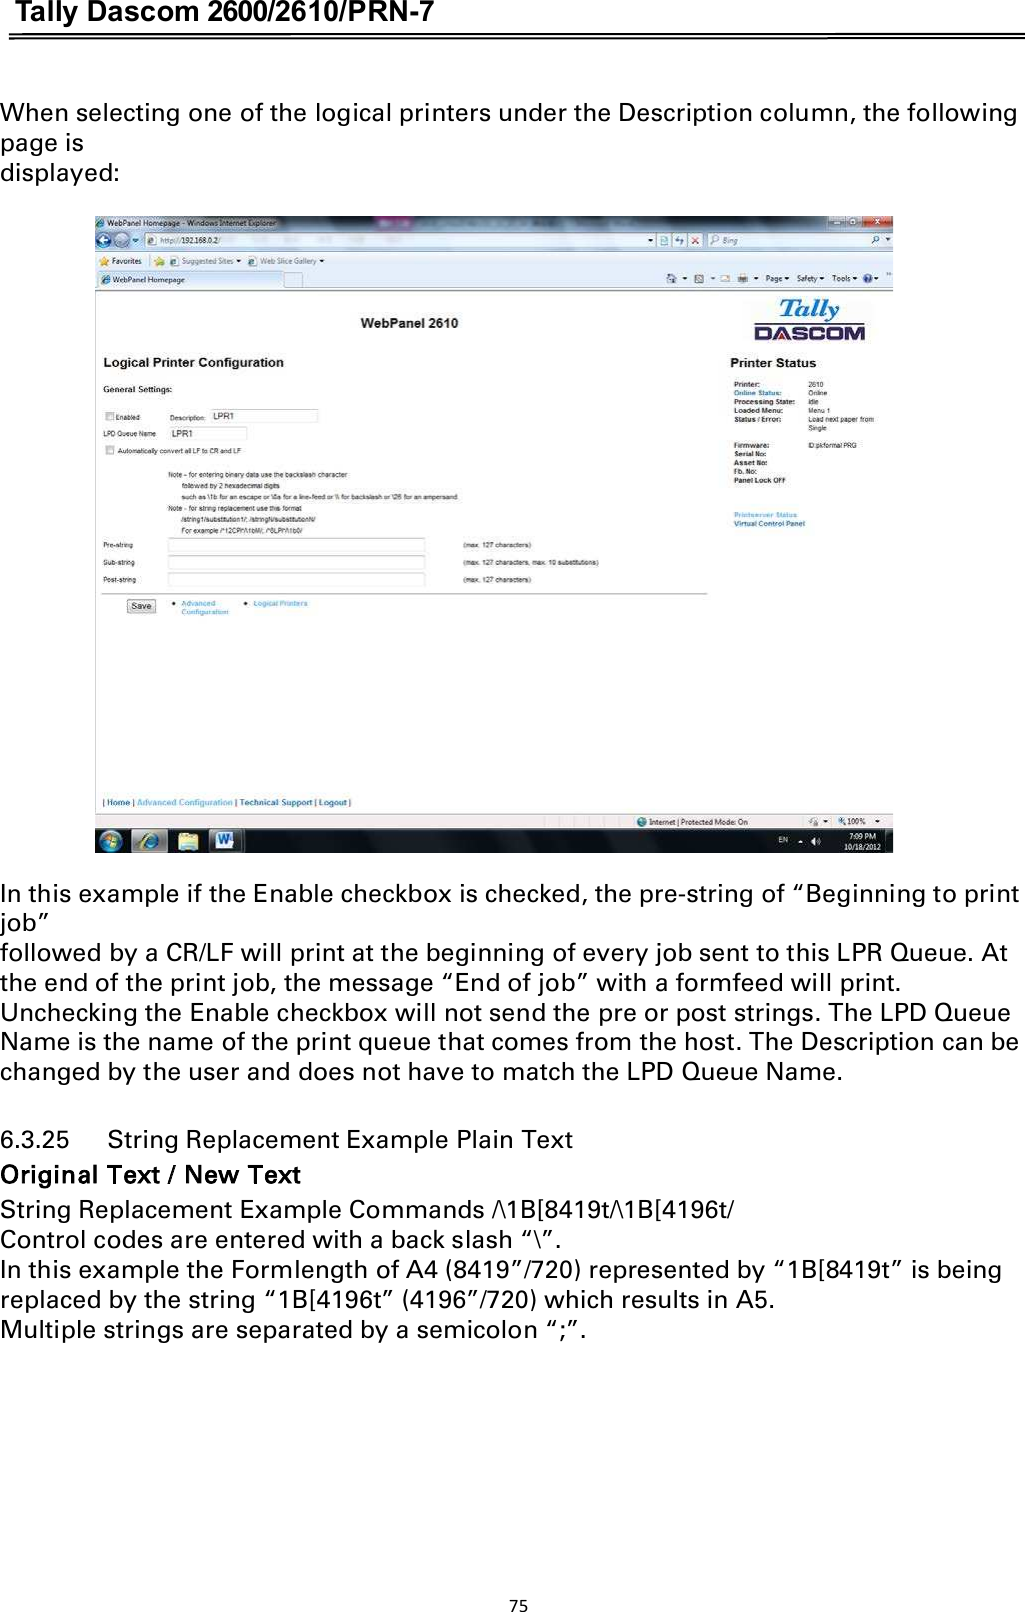
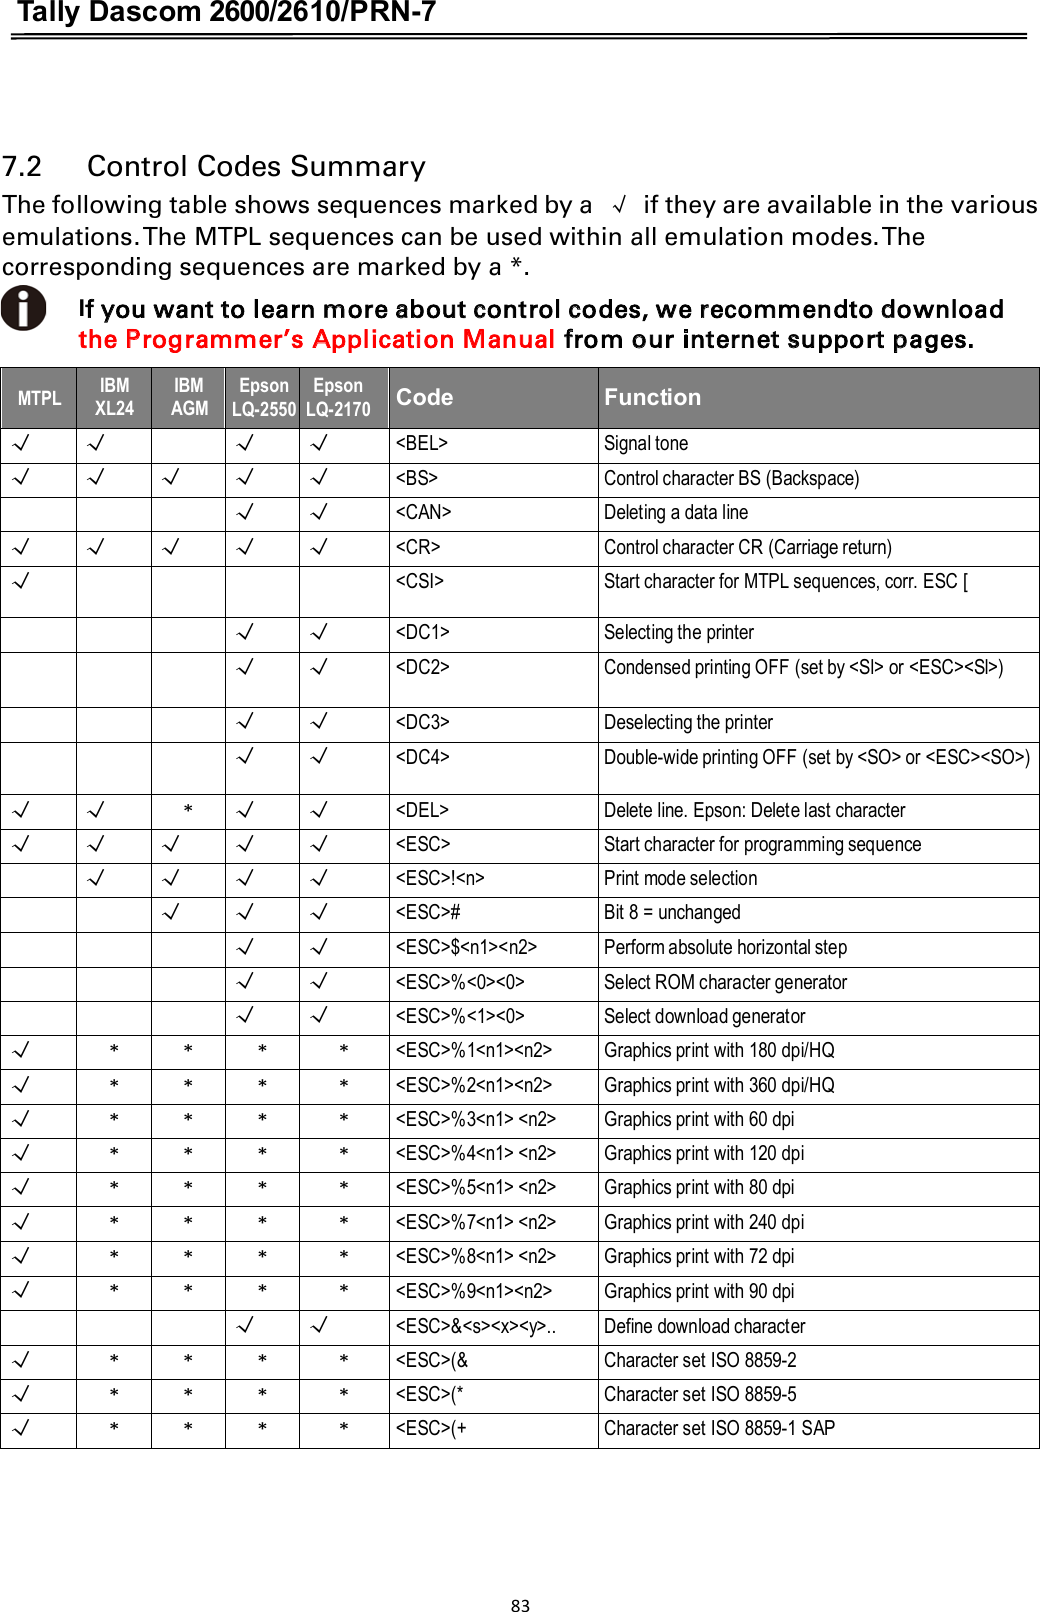
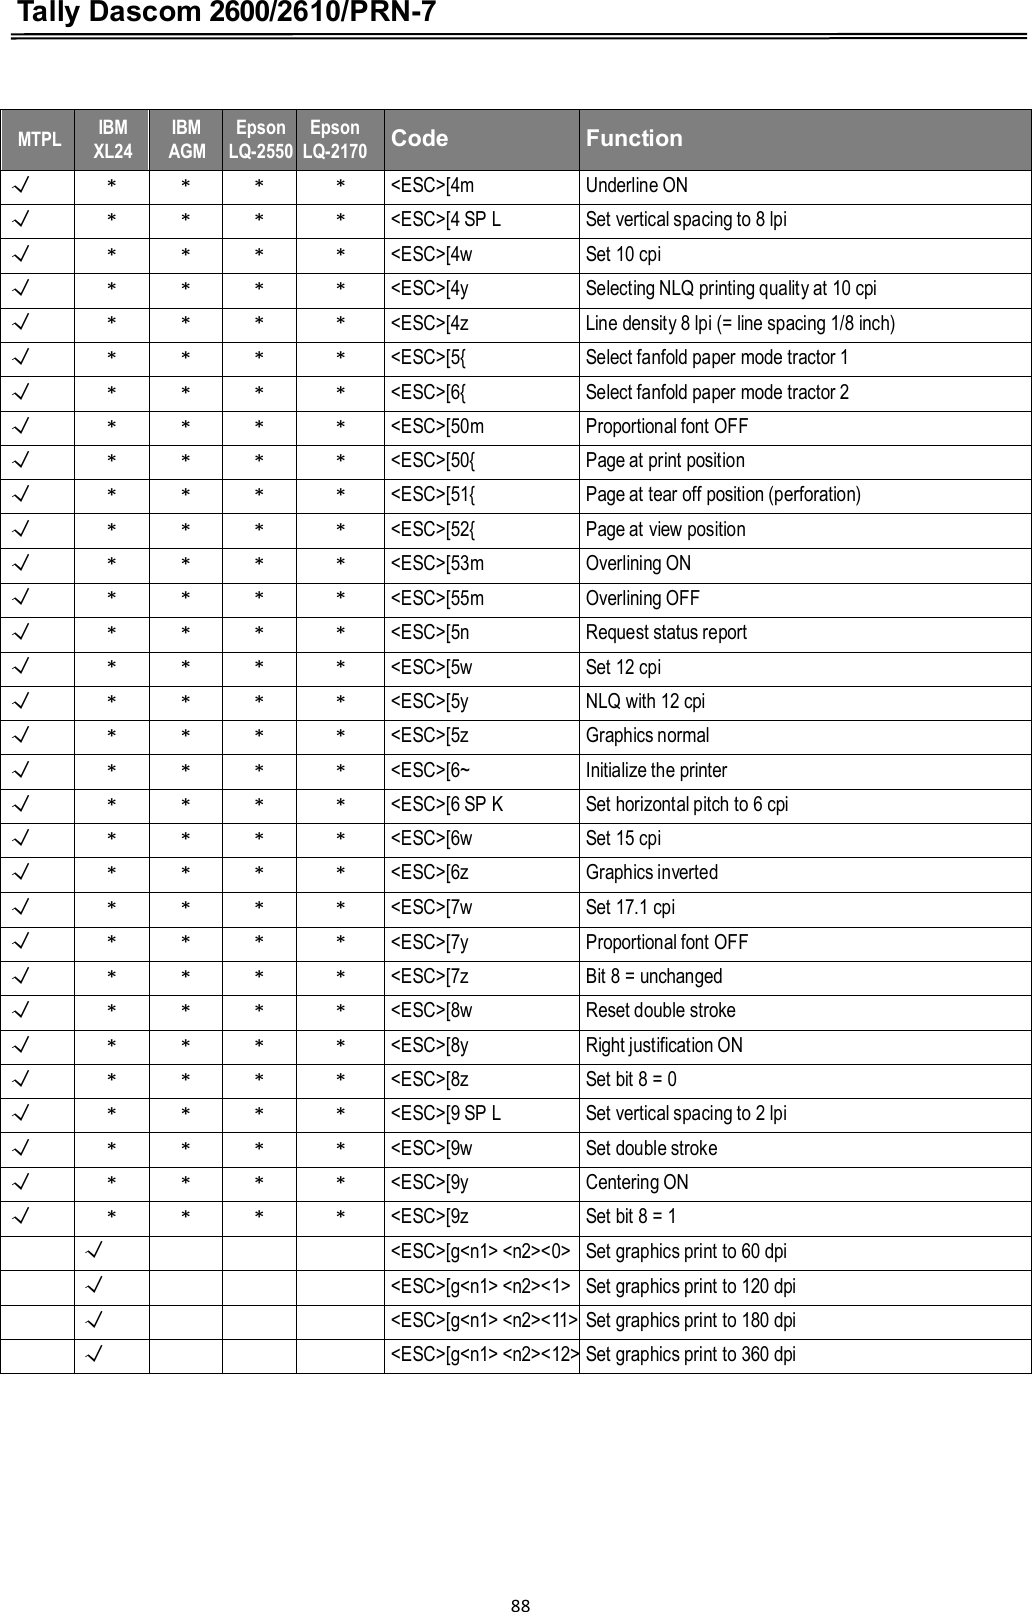
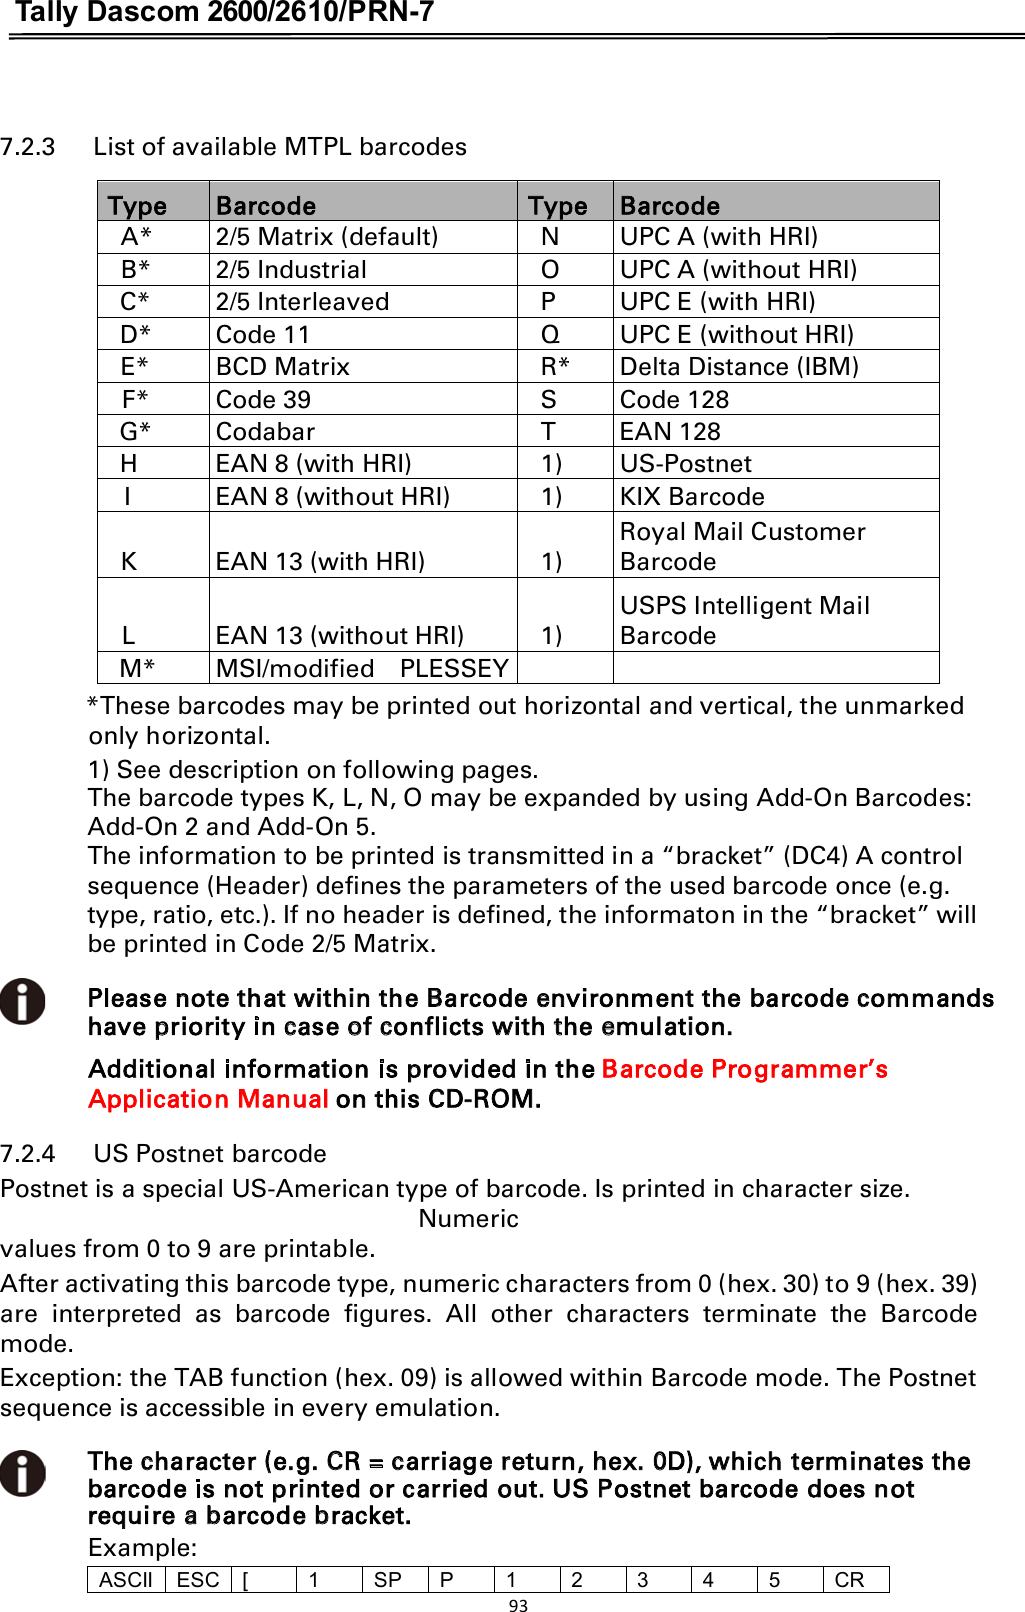
![Tally Dascom 2600/2610/PRN-7 7.2.9 List of additional control Codes You can use both the ESC sequences and the control codes Sequences Control codesFunction<ESC>[?10~ <ESC>[?11~ <ESC> PSC 0 <ESC> \ <ESC> PSC 1 <ESC> \ <ESC> PLS <n> <ESC> \ <ESC>[<n><SP>s <ESC>[20<SP>s <ESC>[16<SP>s <ESC>[25<SP>s <ESC>[15<SP>s <ESC>[26<SP>s <ESC>[1 SP p <ESC>[1 SP k <ESC>[2 SP k <ESC>[9 SP k — — — — — — <DC4> <DLE> <EM> <SI> <SUB> — — —— Barcode Off Barcode On Unsecured mode Secured mode LCP character set Sends a character as ASCII character; n > 0–255 decimalBarcode bracket Start code LCP Header Termination code Header LCP bracket Start code Barcode-Header US-Postnet Barcode Royal Mail Customer Bar- code Kix-Barcode USPS Intelligent Mail Header Function <DLE> [!] nn EM LCP header [ ] = optional nn = factor <SUB> [F] a [nn][;xyz][;p] EM Barcode header [ ] = optional a = Barcode type p = 0: Barcode horizontal p = 9: Barcode vertical Additional information is provided in the Barcode Programmer’s Application Manual on this CD-ROM. 96](https://usermanual.wiki/Jiangmen-Dascom-Computer-Peripherals/TDPRN70.User-manual-Part2/User-Guide-2617229-Page-42.png)