Jing Mold Electronic Technology 511AS 2 in 1 tablet PC User Manual XC0CT0x XC1CT0x
Jing Mold Electronic Technology (Shen Zhen) Co., Ltd. 2 in 1 tablet PC XC0CT0x XC1CT0x
User Manual

User Manual

The illustrations in this user’s manual are for reference only.
Actual product specications may vary with territories.
The information in this user’s manual is subject to change without
notice.
THE MANUFACTURER OR RESELLER SHALL NOT BE LIABLE
FOR ERRORS OR OMISSIONS CONTAINED IN THIS MANUAL
AND SHALL NOT BE LIABLE FOR ANY CONSEQUENTIAL
DAMAGES, WHICH MAY RESULT FROM THE PERFORMANCE
OR USE OF THIS MANUAL.
The information in this user’s manual is protected by copyright laws.
No part of this manual may be photocopied or reproduced in any
form without prior written authorization from the copyright owners.
Product names mentioned herein may be trademarks and/or
registered trademarks of their respective owners/companies.
The software described in this manual is delivered under a license
agreement. The software may be used or copied only in accordance
with the terms of the agreement.
This product incorporates copyright protection technology that is
protected by U.S. patents and other intellectual property rights.
Reverse engineering or disassembly is prohibited.
Notice

TABLE OF CONTENTS
Notice ...............................................................................................2
Preface .............................................................................................5
1.1 Regulations Information ...................................................5
1.2 Safety Instructions............................................................6
1.3 Notes for this Manual .......................................................7
1.4 Release History ................................................................7
Getting to know the basics ...............................................................8
2.1 Product Specication .......................................................8
2.2 Product Overview ...........................................................10
2.3 Preparing your Tablet PC...............................................13
3.1 Using the touch panel ....................................................14
3.2 Cleaning the screen .......................................................14
Docking...........................................................................................15
4.1 Docking Specication .....................................................15
4.2 Docking Overview ..........................................................16

4.3 Using your Docking ........................................................17
4.4 Using the special keys (Optional)...................................19
4.5 Using the Touchpad .......................................................22
BIOS SETUP ..................................................................................23
5.1 About BIOS Setup ..........................................................23
5.1.1 When to Use BIOS Setup ?..................................23
5.1.2 How to Run BIOS Setup ?....................................23
5
English
1.1 Regulations Information
CAUTION: Any changes or modifications not expressly approved
by the guarantee of this device could void the user's au-
thority to operate the equipment.
Preface
• CE Compliance
This device is classed as a technical information equipment (ITE) in class B and
is intended for use in living room and oce.
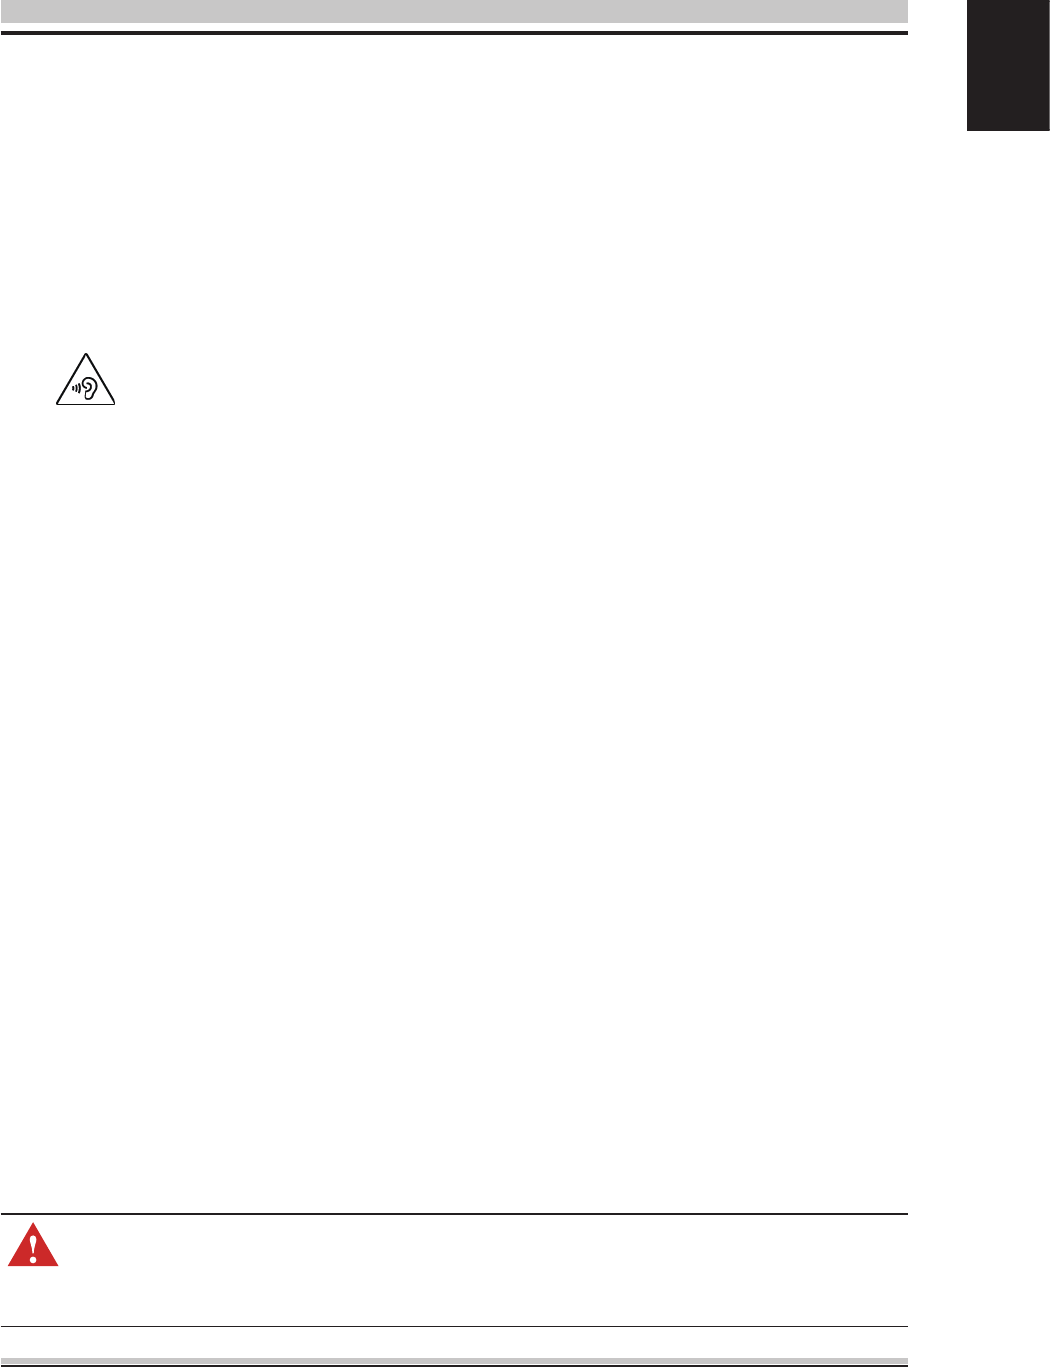
• PREVENTION OF HEARING LOSS
Listening to music at high volume levels and for extended durations
can damage one's hearing. In order to reduce the risk of damage to
hearing, one should lower the volume to a safe, comfortable level, and
reduce the amount of time listening at high levels. Headsets should
comply with EN 50332-2 requirements.
6
English
The following safety precautions will increase the life of the
Computer. Follow all Precautions and instructions.
1.2 Safety Instructions
• The unit can be operated at an ambient temperature of max. 35oC (95oF).
Do not subject it to temperature below 5oC (41oF) or above 35oC (95oF).
CAUTION! RISK OF EXPLOSION IF BATTERY IS REPLACED BY AN
INCORRECT TYPE DISPOSE OF USED BATTERIES ACCORDING
TO THE INSTRUCTIONS.
CAUTION! Danger of explosion if battery is incorrectly replaced. Replace only
with the same or equivalent type recommended by the manufacturer.
Dispose of used batteries according to the manufacturer's instructions.
For better environmental protection, waste batteries should be collected
separately for recycling or special disposal.
Do not place this device underneath heavy loads or in an
unstable position.
Do not use or expose this device around magnetic elds
as magnetic interference may affect the performance of
the device.
Do not expose this device to high levels of direct sunlight,
high-humidity or wet conditions.
Do not block the air vents to this device or impede the
airow in any way.
Do NOT expose to or use near liquid, rain, or moisture.
Do NOT use the modem during electrical storms.
7
English
CAUTION! Important information that must be followed for safe op-
eration.
1.3 Notes for this Manual
NOTE : Information for special situations.
1.4 Release History
Version Revision Note
1.0 First Released
Date
5.2016

8
English
Getting to know the basics
2.1 Product Specication
This User’s Manual provides instructions and illustrations on
how to operate this Tablet. It is recommended to read this
manual carefully before using this Tablet.
・Power
・Memory
DDRIII
・CPU
・Physical Characteristic
Dimension
Weight
(depend upon the actually shipping product)
11.6": 295.5 x 184.4 x 8.9mm
10.1": 255.4 x 171.4 x 8.9mm
11.6": 800g (tablet only), 1520g (w/keyboard)
10.1": 660g (tablet only), 1160g (w/keyboard)
Support Processor Intel® Cherry Trail Type 3
DDR3L 256 x 16 bit 4pcs, 2GB or
DDR3L 512 x 16 bit 4pcs, 4GB
AC Adapter 10 Watts for non-3G (5V/2A) or 15 Watts for 3G (5V/3A)
Li-polymer Battery
Battery
・Audio
Speaker/MIC Build-in 2 speakers and internal MIC support
・Storage
Storage EMMC 32GB or 64GB

9
English
・I/O Port
Micro USB 2.0 port
Phone jack
USB3.0 type-C
Micro-HDMI
x 1
3.5 mm x 1 (microphone+headphone)
x 1
x 1
・Communication Port
Wireless LAN + Bluetooth IEEE802.11b/g/n or IEEE802.11 a/b/g/n support
BT4.0, UART interface
・Display
LCD 11.6” panel 1366x768 IPS or 1920x1080 IPS
10.1” panel 800*1280, IPS or 1920*1200 IPS
CAUTION: MODEL IS DESIGNED TO USE WITH THE DC INPUT:
5V/2A OR 5V/3A ADAPTER ONLY.
NOTE : Before you use a battery for the rst time or if a battery
hasn't been used for a long time , please fully charge
the battery rst.
・Webcam
Webcam Build-in Webcam module
WWAN 3G (Optional) USB interface
DC-in x 1
Touch panel 11.6" or 10.1” TSP, Capacitive, 10 ngers touch, G+G

10
English
2.2 Product Overview
This section provides the description of basic aspects of the
Tablet PC. Refer to the following illustration to identify the
components on this side of the Tablet PC. Features and
congurations vary by model.
NOTE: The product’s color, I/O port, indicator location, and speci-
cation will depend upon the actually shipping product.
1 2 3 4 5 6
7
8
9
10
11
12
13141215
15
11
English
Function DescriptionTop Side Components
Webcam The built-in Webcam allows picture taking or
video recording.
This high-denition touch panel provides
excellent viewing features for photos, videos,
and other multimedia les on your Tablet PC.
1
Touch panel
2
Power button Turns on the power of your Tablet computer.
Volume Volume up / down.
Battery charging
indicator
Ambient light
sensor
It allows the system to automatically adjust
the brightness of the display depending on
the ambient light condition.
Charging : blinking green
Full battery : green LED on
Micro HDMI port Connect an external monitor.
Microphone Built-in microphone.
USB3.0 type-C Connect an USB device. (such as USB Zip
drive, keyboard or mouse) into this jack.
Support data transmission/USB2.0/USB3.0, don’t support video/
audio/charging.
7
8
5
4
3
9
6
12
English
11
Function DescriptionTop Side Components
12 Stereo speakers Produce stereo sound.
13
10
14 Windows KEY
(Optional)
Touch this button to go back to the Start
screen. If you are already in the Start screen,
touch this button to go back to the last app
you opened.
Connect the AC adapter into this connector.
Power connector
Micro USB2.0 port
(With charge)
Connect an USB device. (such as USB Zip
drive, keyboard or mouse) into this jack.
Support data transmission/charging, but DC-in will be the priority
when DC-in and micro USB ADP coexist; don’t support OTG.
Connect the docking.
Dock Connector
Headphone and
Microphone jack
(Optional)
Connect amplied speakers, headphones or
microphone into this jack.
15
13
English
CAUTION: Do not use inferior extension cords as this may result in
damage to your Tablet PC. The Tablet PC comes with
its own AC adapter. Do not use a different adapter to
power the computer and other electrical devices.
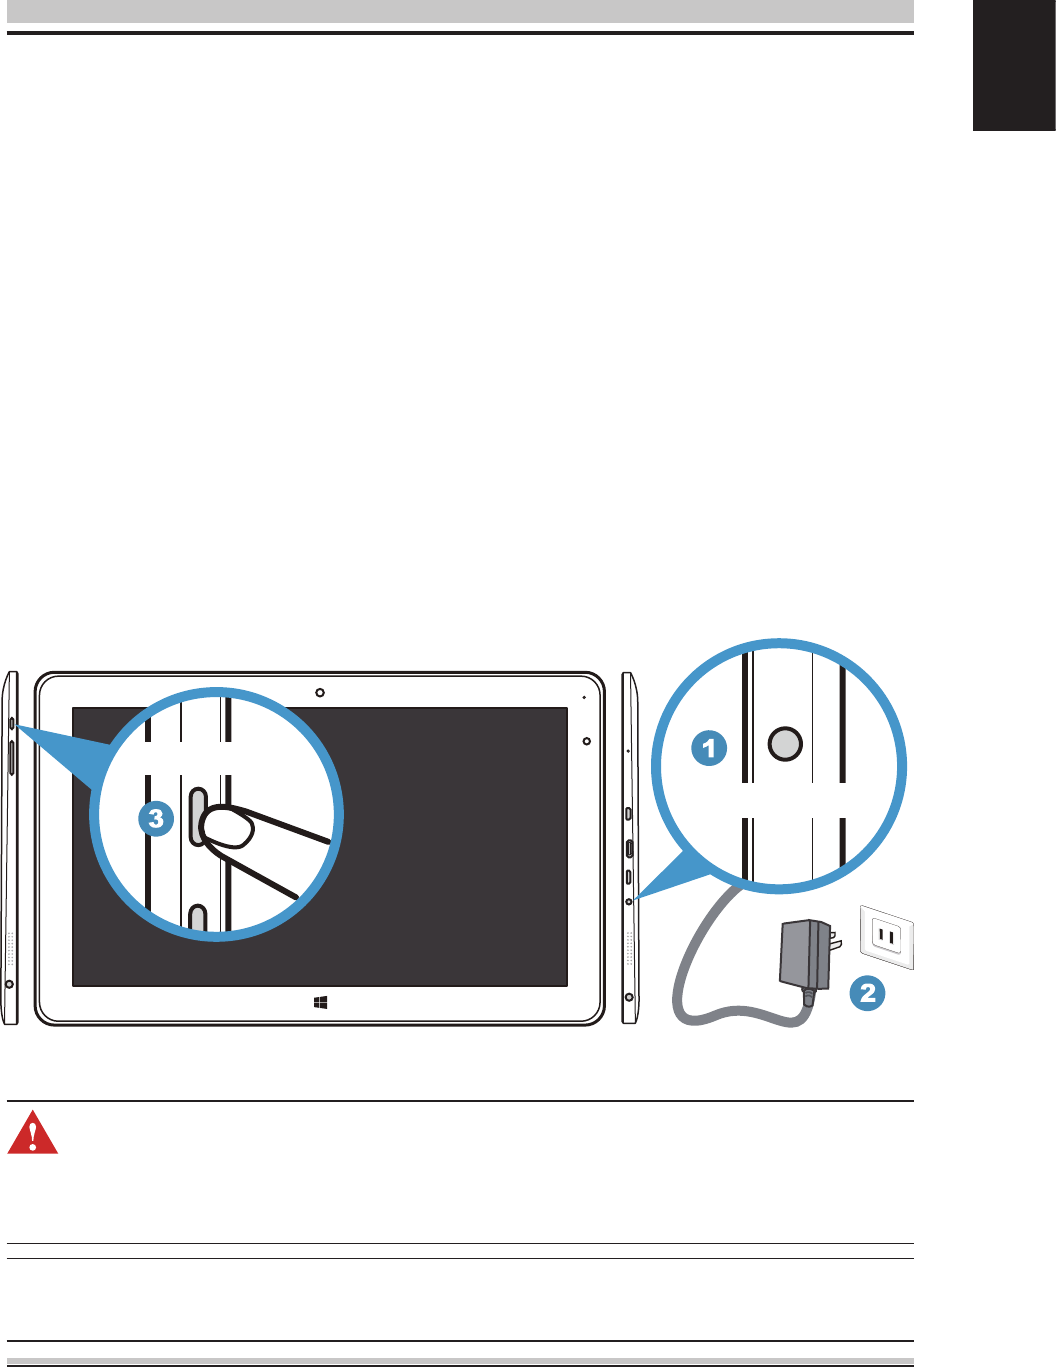
2.3 Preparing your Tablet PC
Note that the AC adapter included in the package is approved
for your Tablet PC; using other adapter model may damage
either the Tablet PC or other devices attached to it.
1. Plug the AC adapter cable into the DC Power Jack of your
Tablet PC.
2. Plug in the power adapter to an electrical outlet to start
charging the battery. (For rst-time use, you need to turn your
Tablet PC o and charge it for 6 hours. After that you can
recharge the battery as needed.)
3. Switching the power on : Press the power button to turn on
your Tablet PC.
NOTE: The power adapter may become warm when in use. Be sure
not to cover the adapter and keep it away from your body.
DC Power Jack
Power Button
14
English
3.1 Using the touch panel
Using the touch panel on selected models can operate following
gestures. Gestures allow you to launch programs and access
the settings of your Tablet.
CAUTION: Keep your ngers dry and clean while using the touch-
panel. Also keep the touch panel dry and clean. The
touch panel is sensitive to nger movements. Therefore,
the lighter the touch, the better theresponse. Tapping too
hard will not increase the touch panel’s responsiveness.
Touch panel
3.2 Cleaning the screen
Follow these rules for cleaning the outside and handling your
screen on the computer :
1. Turn o the system and disconnect all cables.
2. Use a damp, or cleaning cloth, soft, lint-free cloth with gentle
water only and gently wipe the screen surface.
3. Do not spray liquid directly on the screen.

15
English
Docking
4.1 Docking Specication
・Physical Characteristic
・I/O Port
micro USB2.0 x 1
・Input
Keyboard Standard KB
Pointing Device PS2 Touch Pad with 2 buttons
Dimension
Weight
(depend upon the actually shipping product)
11.6": 295.5 x 184.4 x 8.5mm
10.1": 255.4 x 171.4 x 8.5mm
11.6": 720g
10.1": 500g
16
English
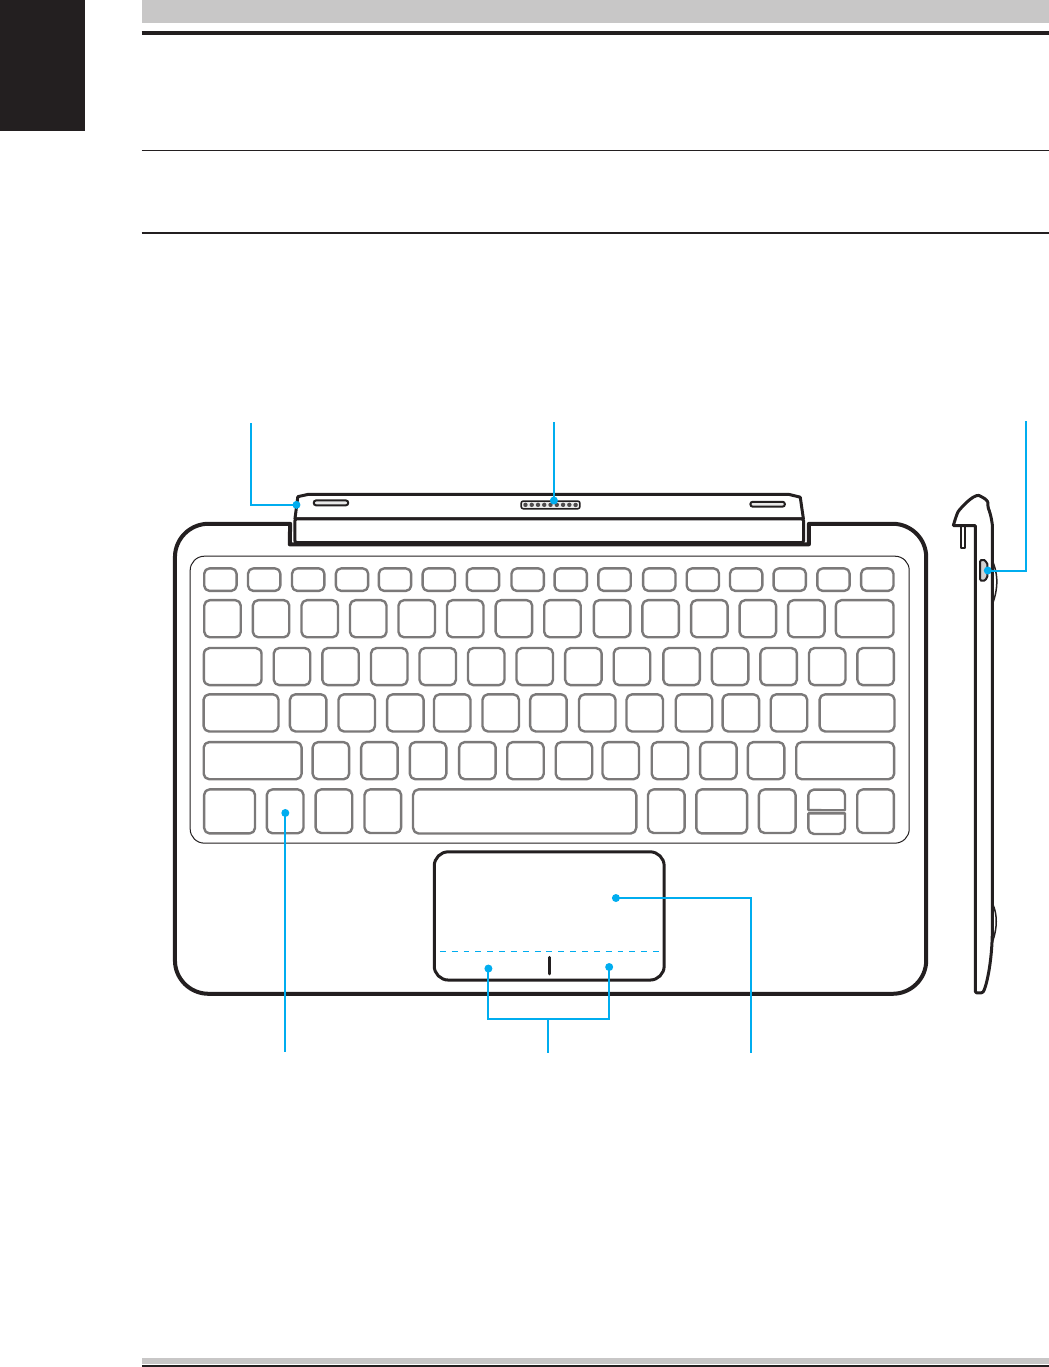
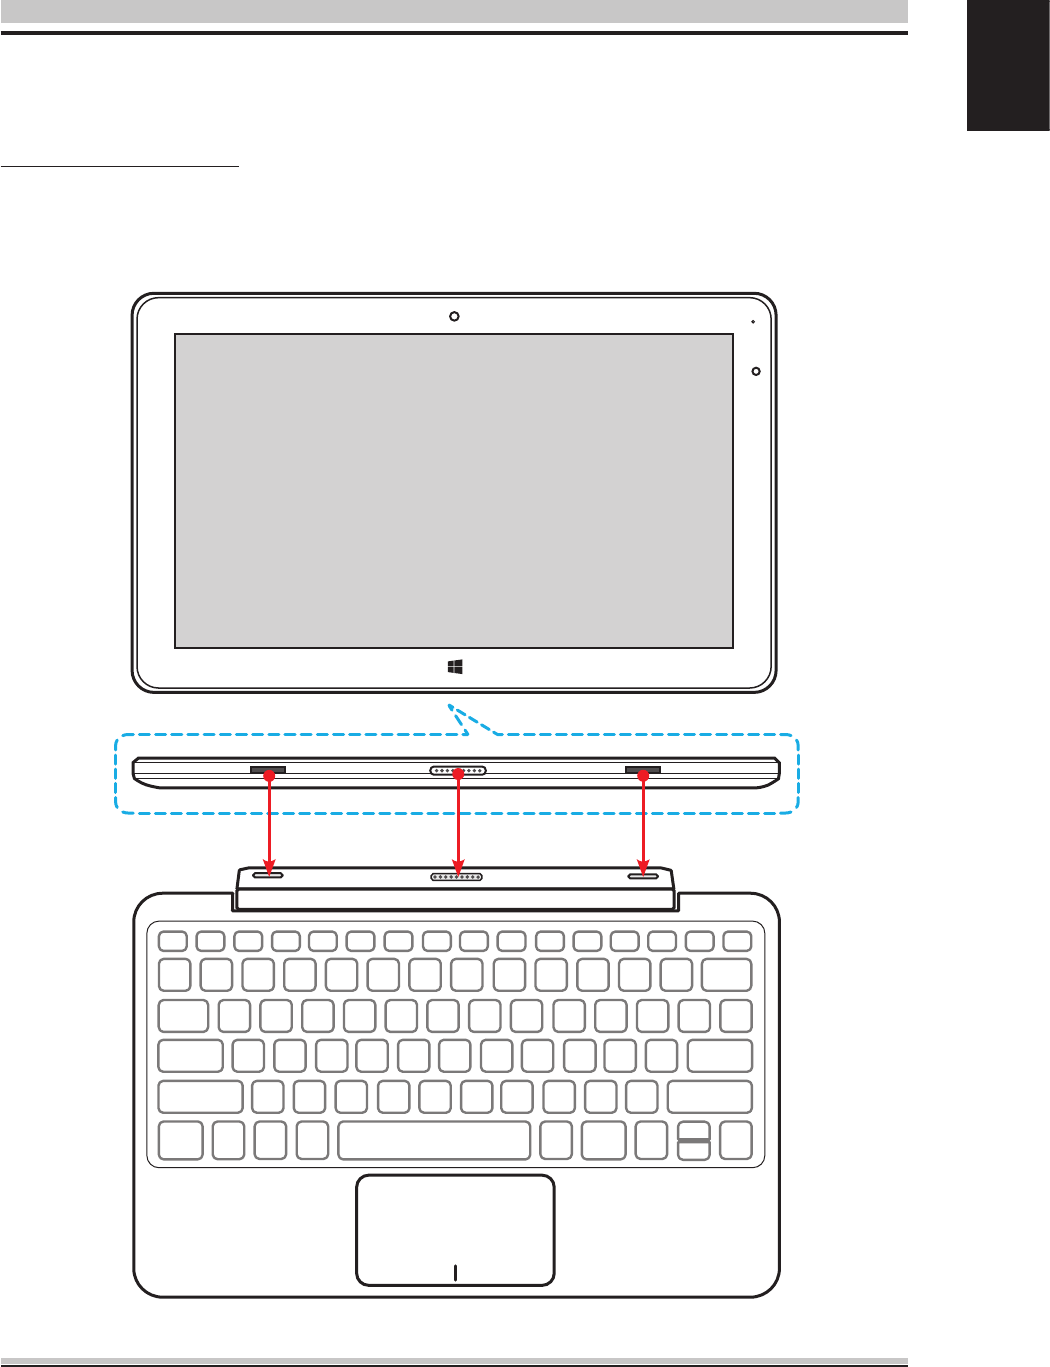
4.2 Docking Overview
This section provides the description of basic aspects of the product.
NOTE: The product’s color, I/O port, indicator location, and speci-
cation will depend upon the actually shipping product.
Dock Connector
Keyboard Touchpad
Hinge Micro USB2.0 Port
Left and right
touchpad buttons
17
English
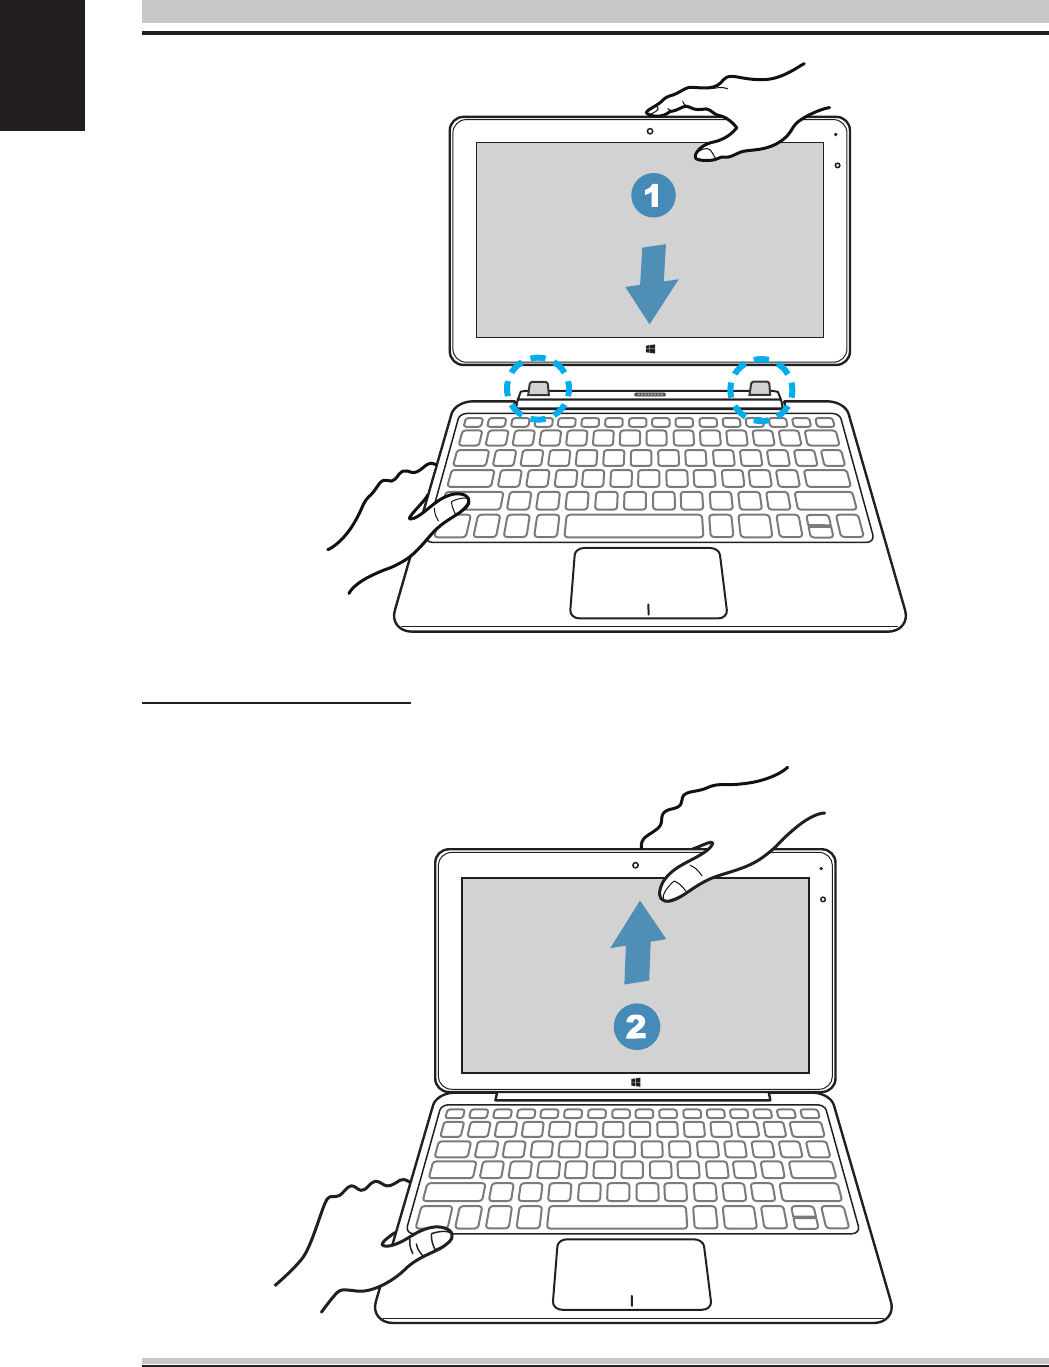
4.3 Using your Docking
To dock your tablet
Align the tablet with the docking. Push the tablet gently towards the
docking until it locks into place.
18
English
To undock your tablet
Pull the tablet upwards, away from the docking.
19
English
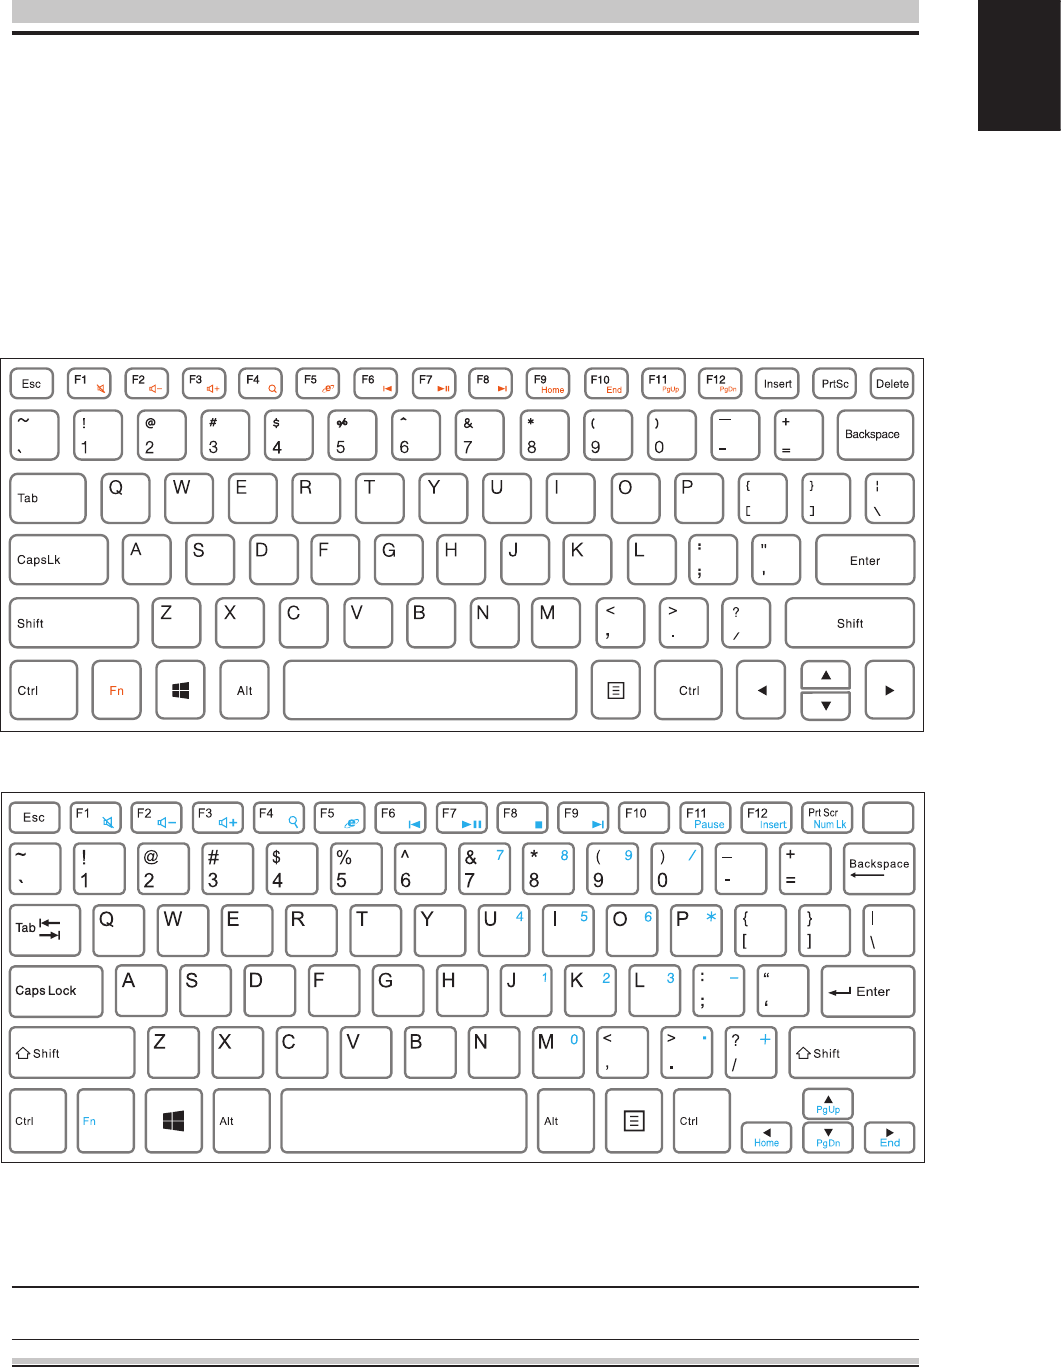
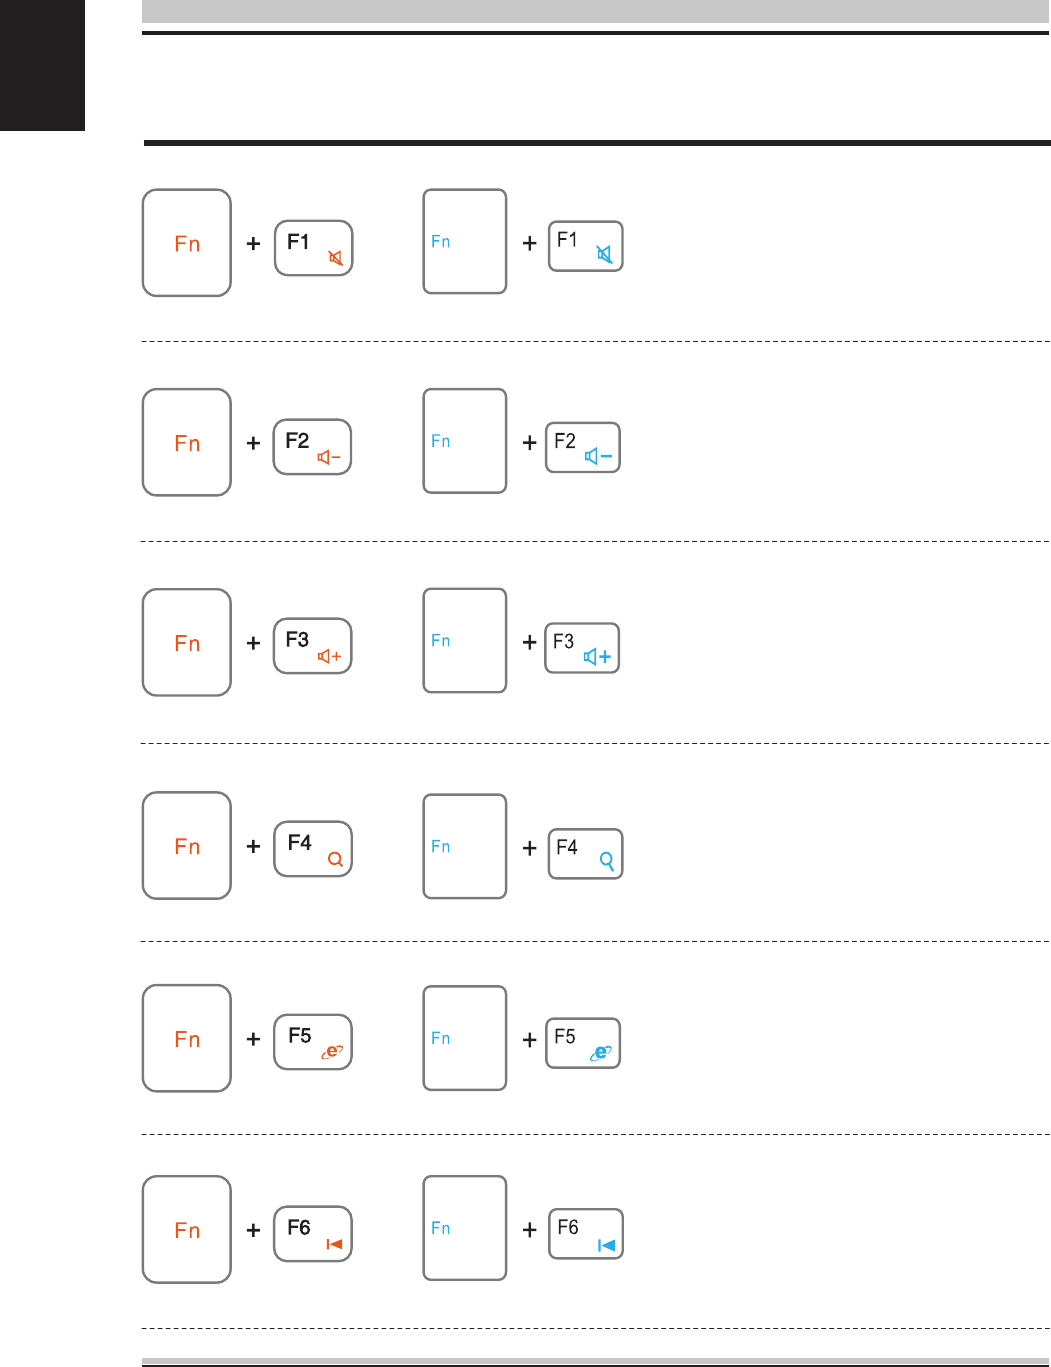
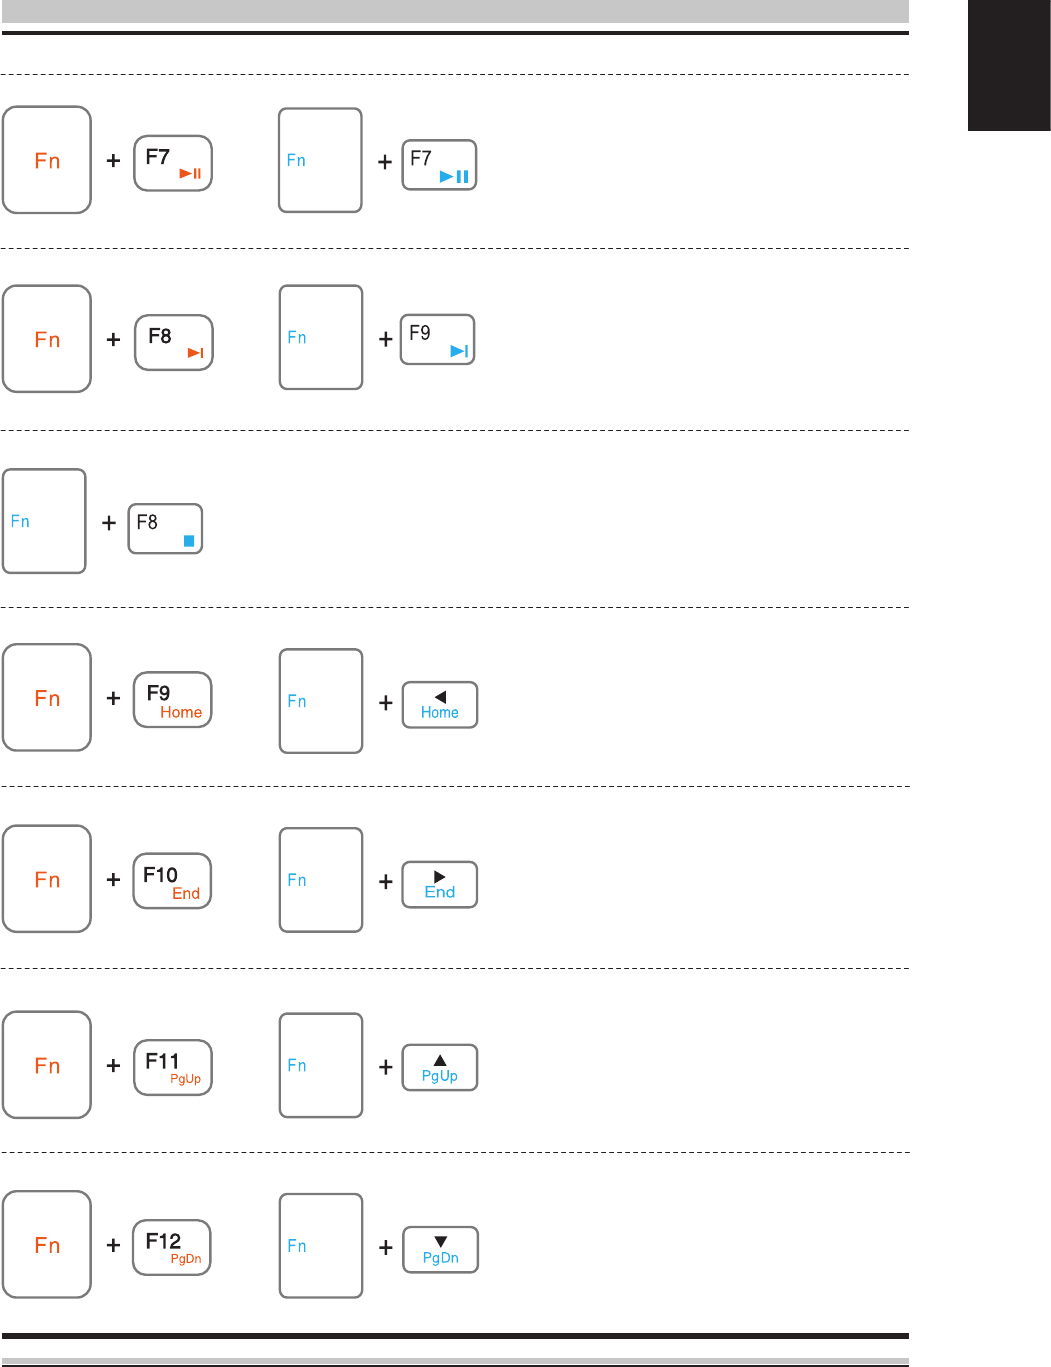
The following denes the colored hot keys on the Keyboard.
The colored commands can only be accessed by rst pressing
and holding the function key while pressing a key with a colored
command.
Delete
4.4 Using the special keys (Optional)
NOTE: The keyboard diers for each territory.
20
English
Launches the Search bar.
Special keys
MUTE mode.
Decreases the volume.
Increases the volume.
or
or
or
or
or Launches the Microsoft Edge
Browser.
or Returns to the start of track or
previous track when playing
music.
21
English
Scroll to the start of a
document or web page.
Scroll to the end of a
document or web page.
Scroll up of a document or
web page.
Scroll down of a document or
web page.
or
Starts playing music from
your playlist. Resumes or
pauses the current playback.
or Skips to the next track during
playback music.
or
or
or
or
Stop playback.
22
English
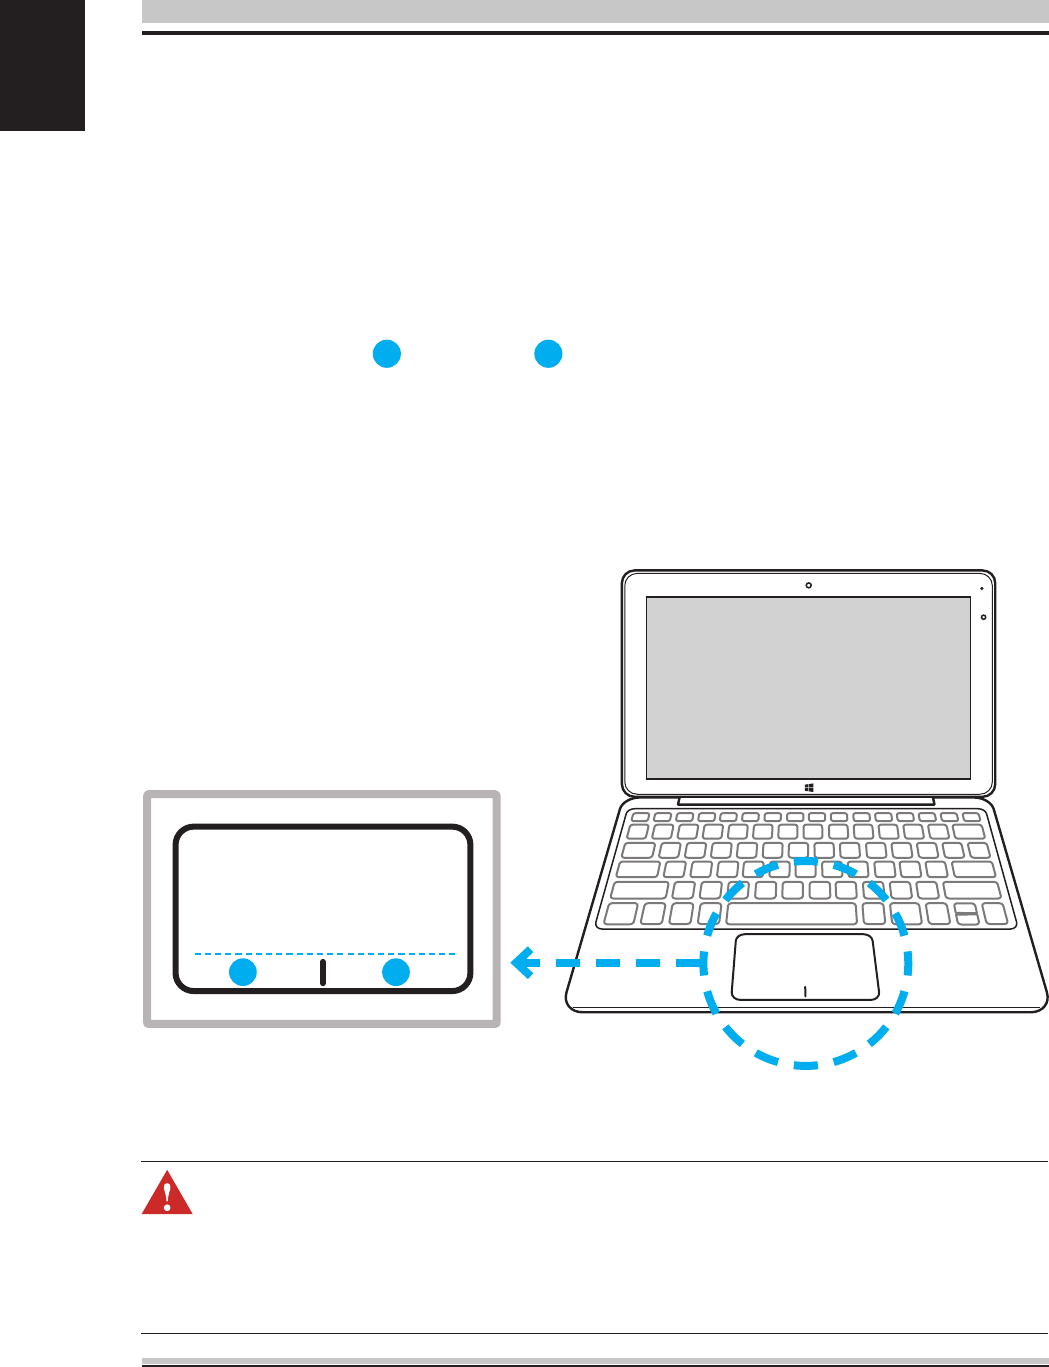
4.5 Using the Touchpad
The touchpad is a rectangular electronic panel located just below
your keyboard. You can use the static-sensitive panel of the
touchpad and slide it to move the cursor.
You can use the buttons below the touchpad as left and right
mouse buttons.
Press the left 1 and right 2 buttons located on the buttom of
the touchpad to make selections and run functions. These two
buttons are similar to the left and right buttons on a mouse.
Tapping on the touchpad produces similar results.
CAUTION:
Keep your ngers dry and clean while using the touch-
pad. Also keep the touchpad dry and clean. The touch-
pad is sensitive to finger movements. Therefore, the
lighter the touch, the better theresponse. Tapping too
hard will not increase the touchpad's responsiveness.
Touchpad
12
23
English
BIOS SETUP
5.1 About BIOS Setup
5.1.1 When to Use BIOS Setup ?
5.1.2 How to Run BIOS Setup ?
You may need to run the BIOS Setup when:
・
An error message appears on the screen during the system
booting
up and is requested to run SETUP.
・ You want to change the default settings for customized
features.
・You want to reload the default BIOS settings.
To run the BIOS Setup Utility, turn on the computer and press the
[Del] or [F2] key during the POST procedure.
If the message disappears before you respond and you still wish
to enter Setup, either restart the system by turning it OFF and
ON, or simultaneously pressing [Ctrl]+[Alt]+[Del] keys to restart.
The setup function only can be invoked by pressing [Del] or [F2]
key during POST that provide an approach to change some
setting and conguration the user prefer, and the changed values
will save in the NVRAM and will take eect after the system
rebooted.
Press [F7] key for Boot Menu.
The default BIOS (Basic Input/Output System) is already properly
congured and optimized, there is normally no need to run this
utility.
CAUTION! We strongly recommend that you change the BIOS set-
tings only with the help of a trained service personnel.

24
English
・ When OS support is Windows 10 :
1. Click the Start menu and select Settings.
2. Select Update and Security.
3. Click Recovery
4. Under Advanced startup, click Restart now.
The system will restart and show the Windows 10 boot menu.
5. Select Troubleshoot.
6. Choose Advanced options.
7. Select UEFI Firmware Settings.
8. Click Restart to restart the system and enter UEFI (BIOS).
NOTE : The drivers, BIOS and utilities bundled in the support DVD
may vary by models and are subject to change without notice.
FCC NOTE
This device complies with part 15 of the FCC Rules. Operation is subject to the
condition that this device does not cause harmful interference (1) this device may not
cause harmful interference, and (2) this device must accept any interference received,
including interference that may cause undesired operation.
Any changes or modifications not expressly approved by the party responsible for
compliance
could void the user's authority to operate the equipment.
NOTE: This equipment has been tested and found to comply with the limits for a Class
B digital device, pursuant to Part 15 of the FCC Rules. These limits are designed to
provide reasonable protection against harmful interference in a residential installation.
This equipment generates, uses and can radiate radio frequency energy and, if not
installed and used in accordance with the instructions, may cause harmful interference
to radio communications. However, there is no guarantee that interference will not
occur in a particular installation.
If this equipment does cause harmful interference to radio or television reception,
which can be determined by turning the equipment off and on, the user is encouraged
to try to correct the interference by one or more of the following measures:
-- Reorient or relocate the receiving antenna.
-- Increase the separation between the equipment and receiver.
-- Connect the equipment into an outlet on a circuit different
from that to which the receiver is connected.
-- Consult the dealer or an experienced radio/TV technician for help.
The device has been evaluated to meet general RF exposure requirement. The device
can be used in portable exposure condition without restriction.
FCC ID: FPW-511AS