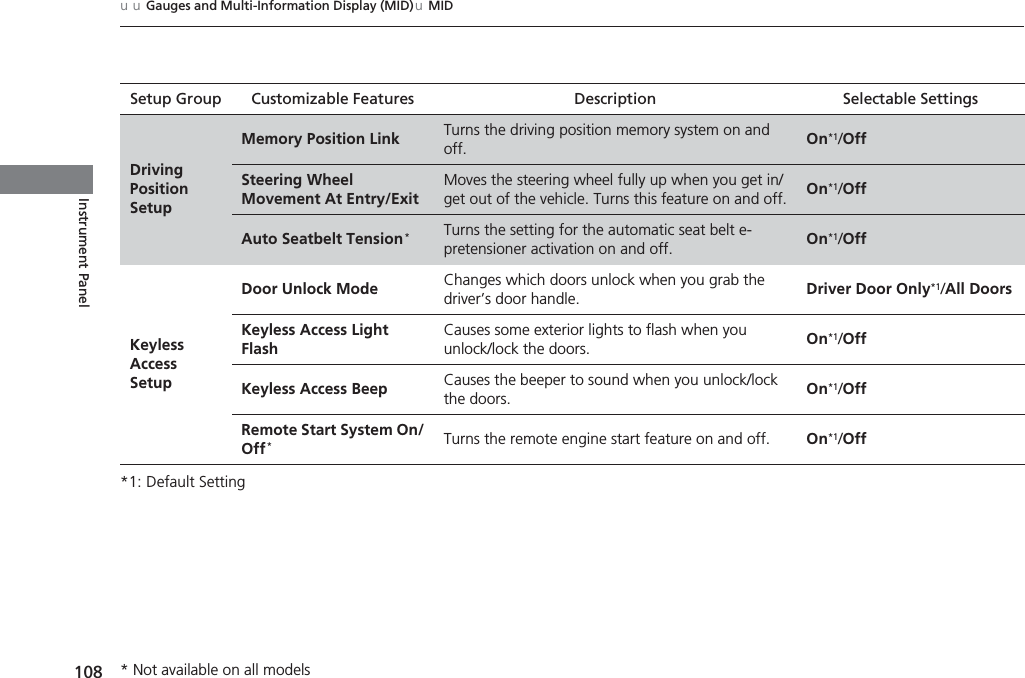
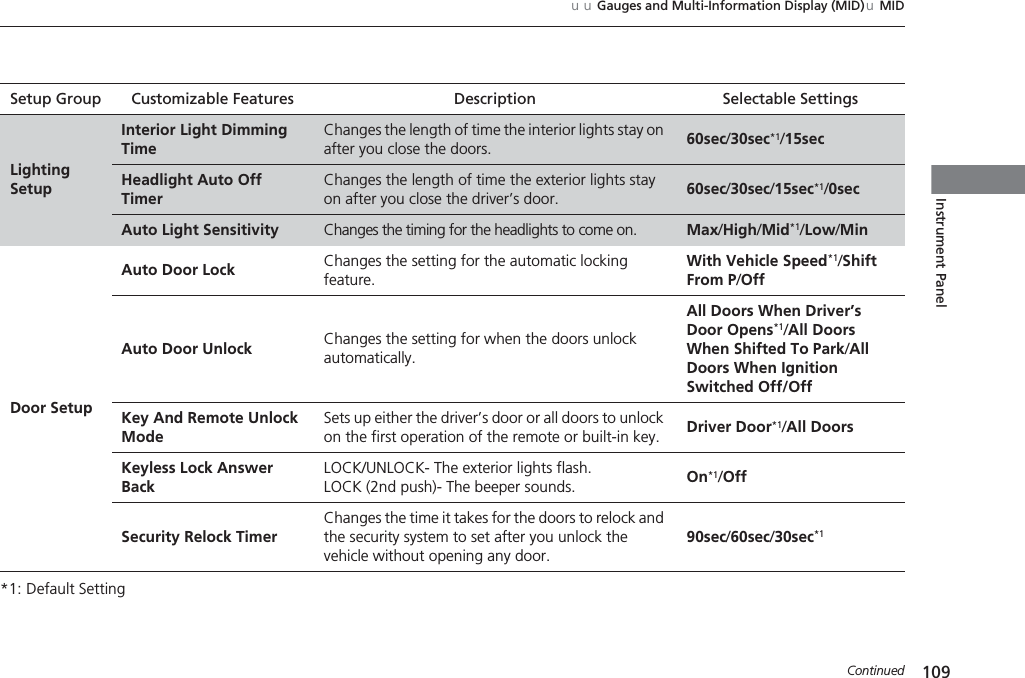
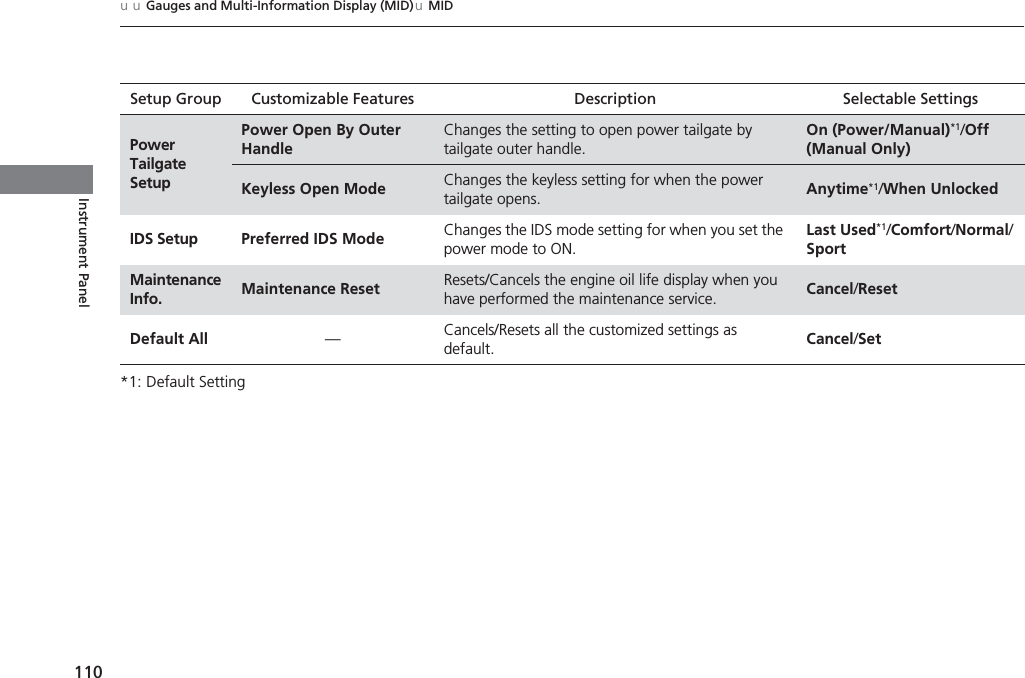
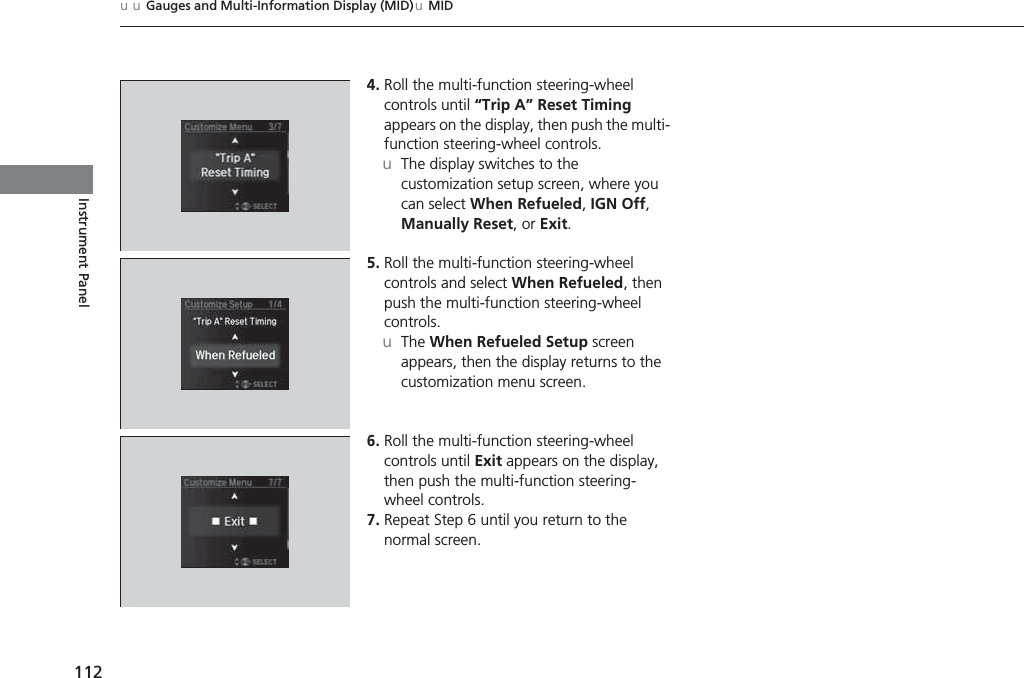
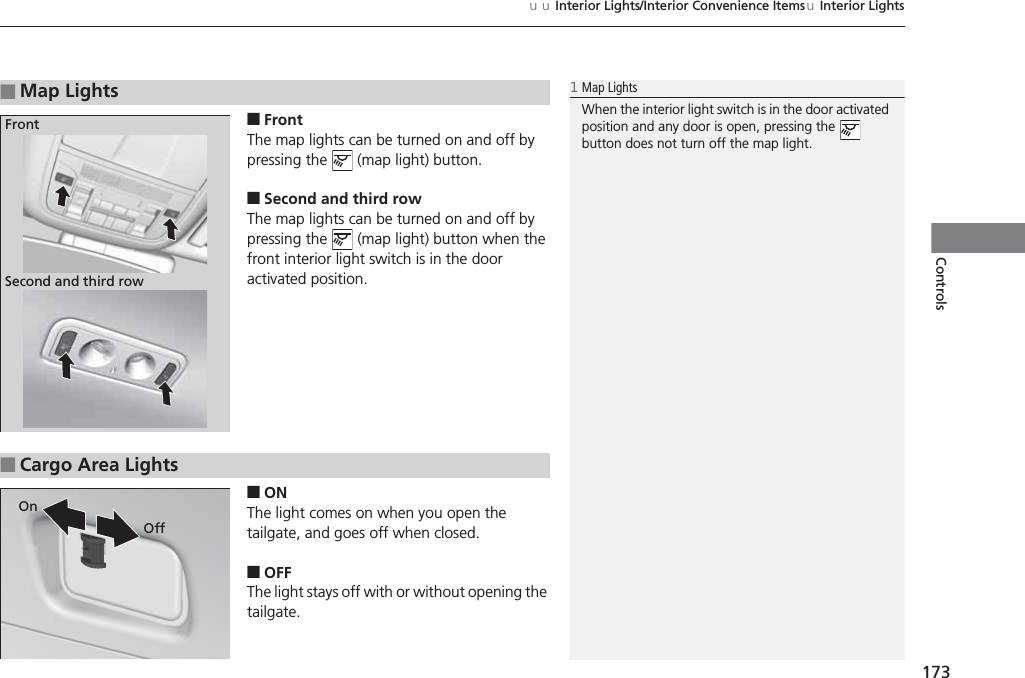
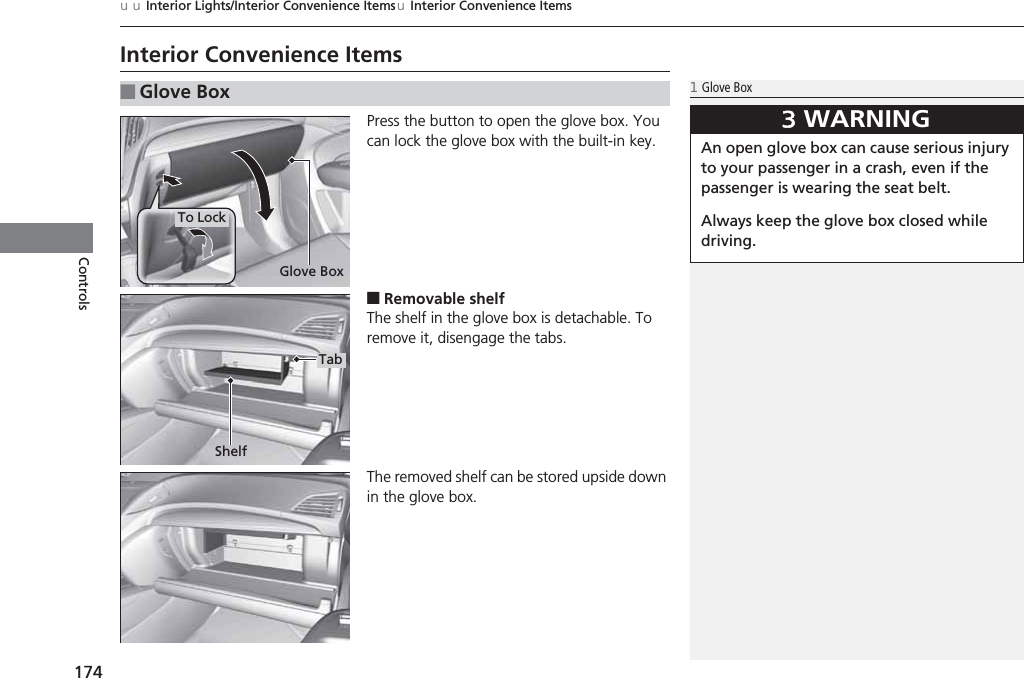
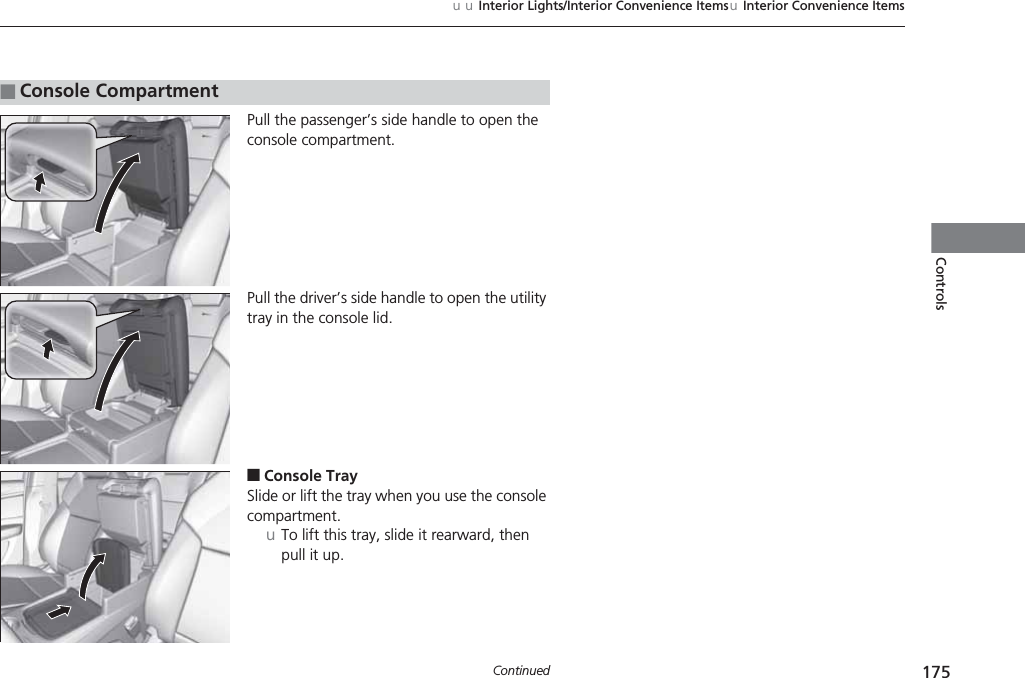
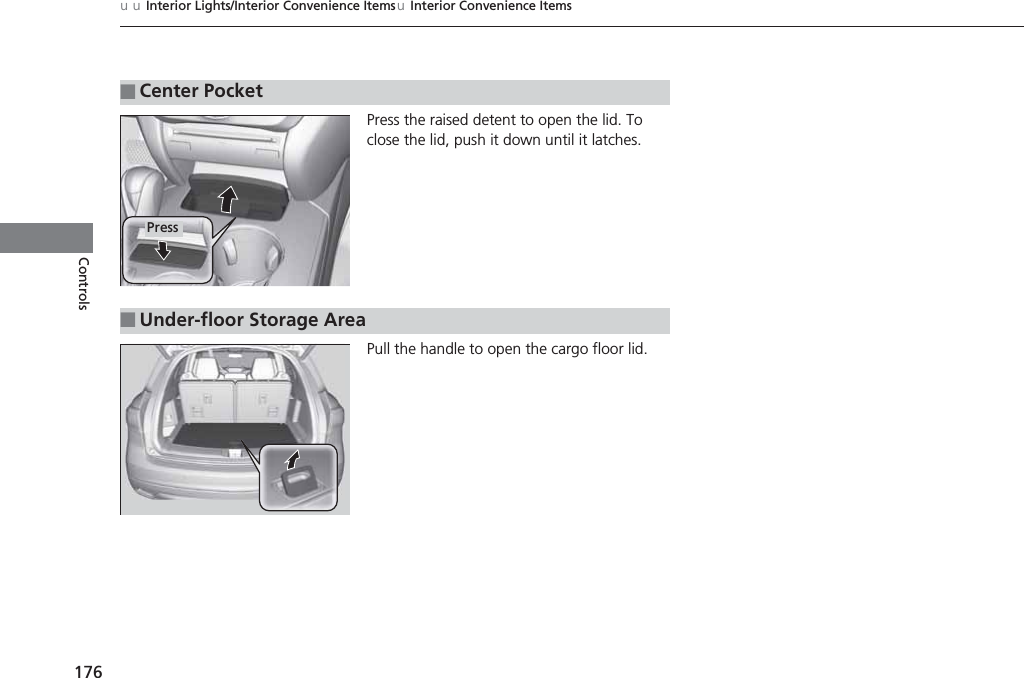
Johnson Controls Interiors BLUE15M Bluetooth Telematics Device User Manual 14 ACURA MDX 31TZ56000

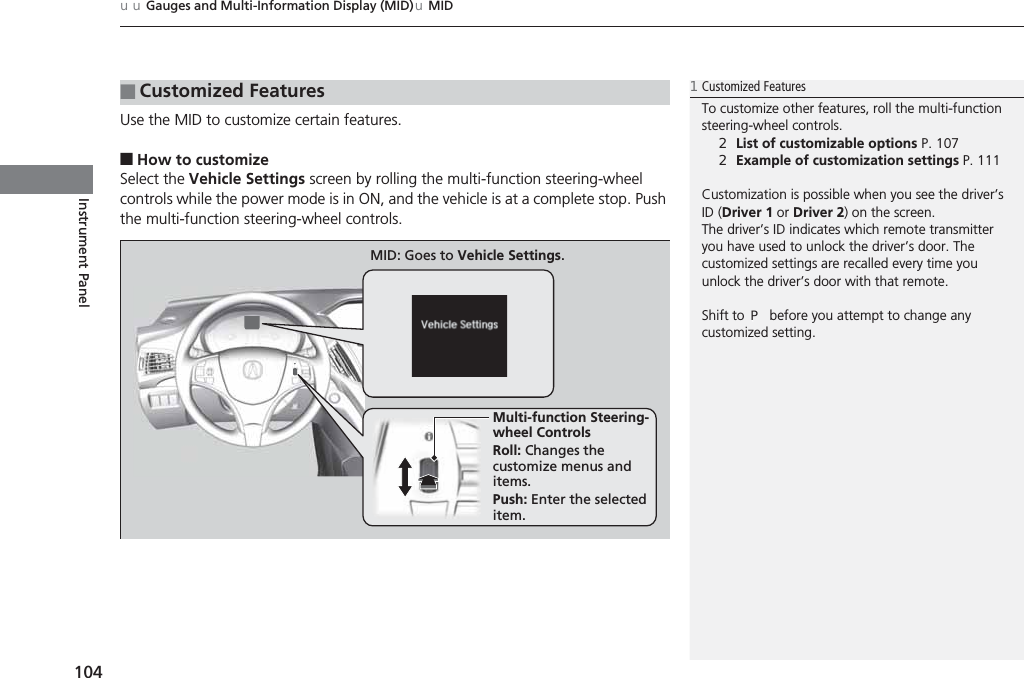
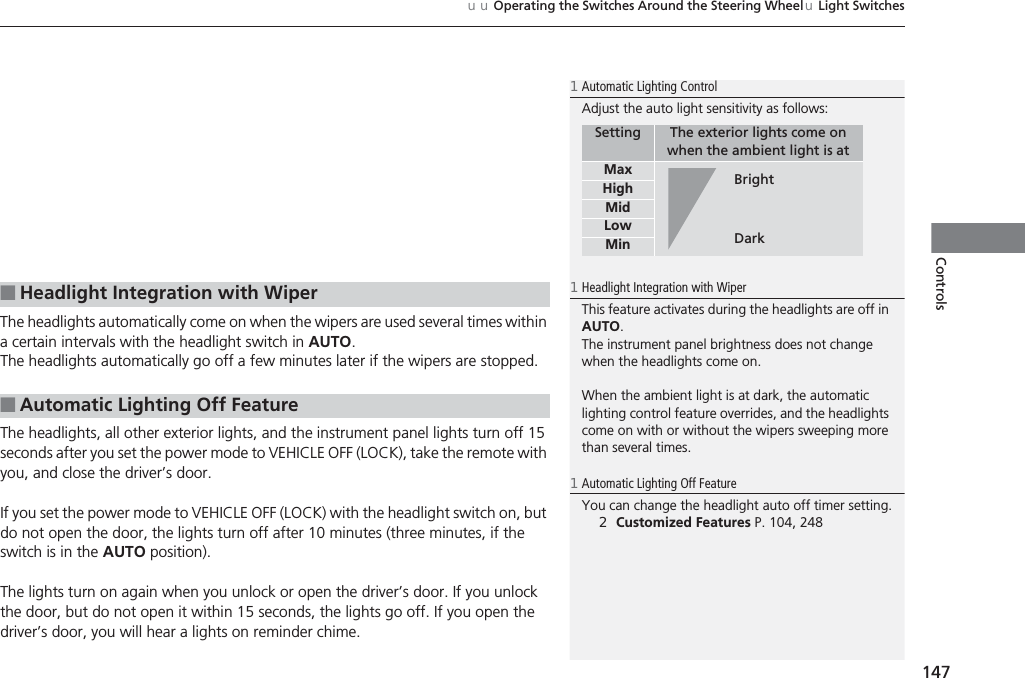
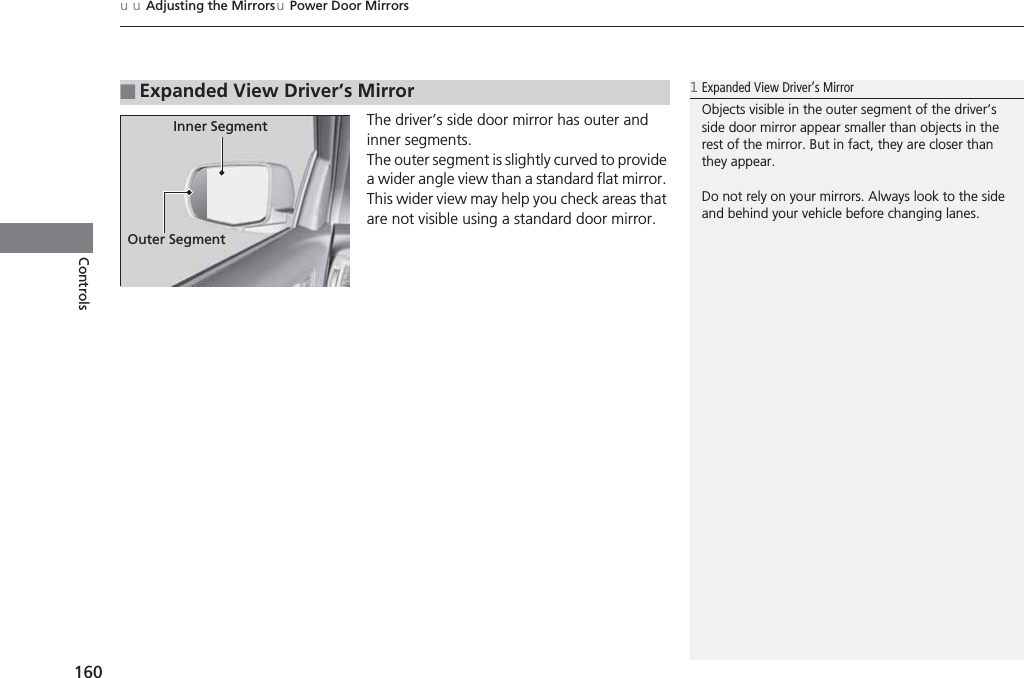
Johnson Controls Interiors L.L.C. Bluetooth Telematics Device 14 ACURA MDX 31TZ56000

Contents

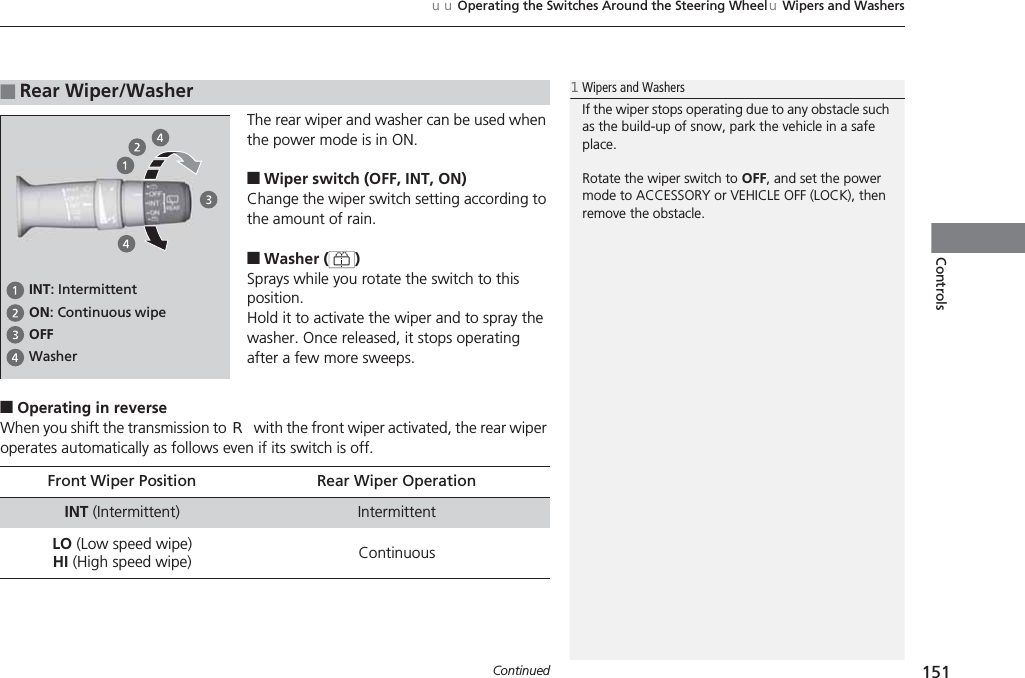
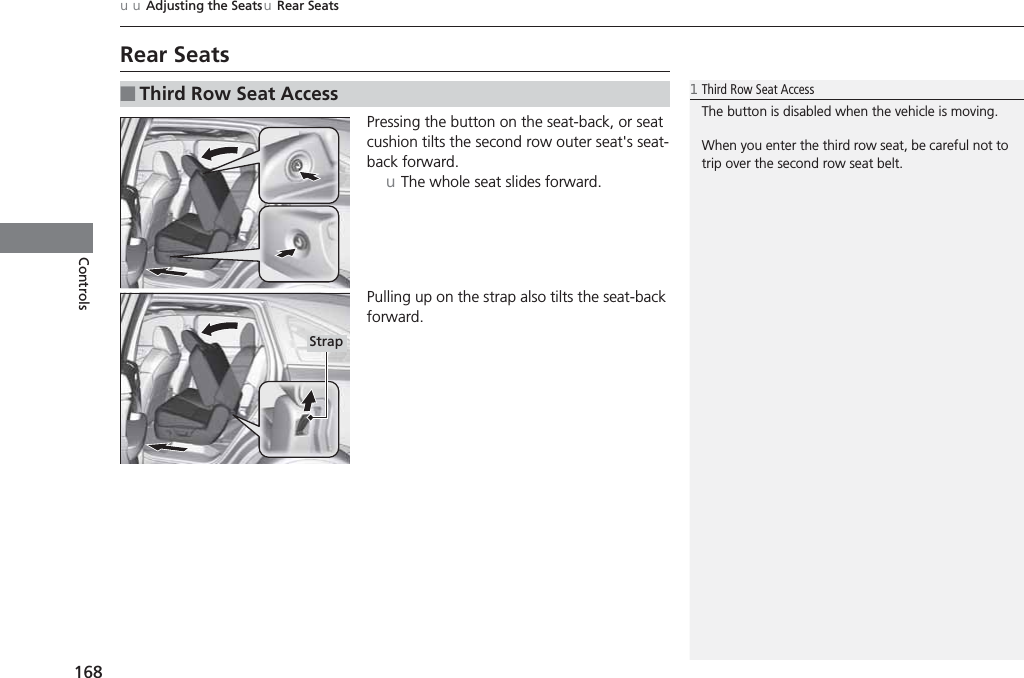
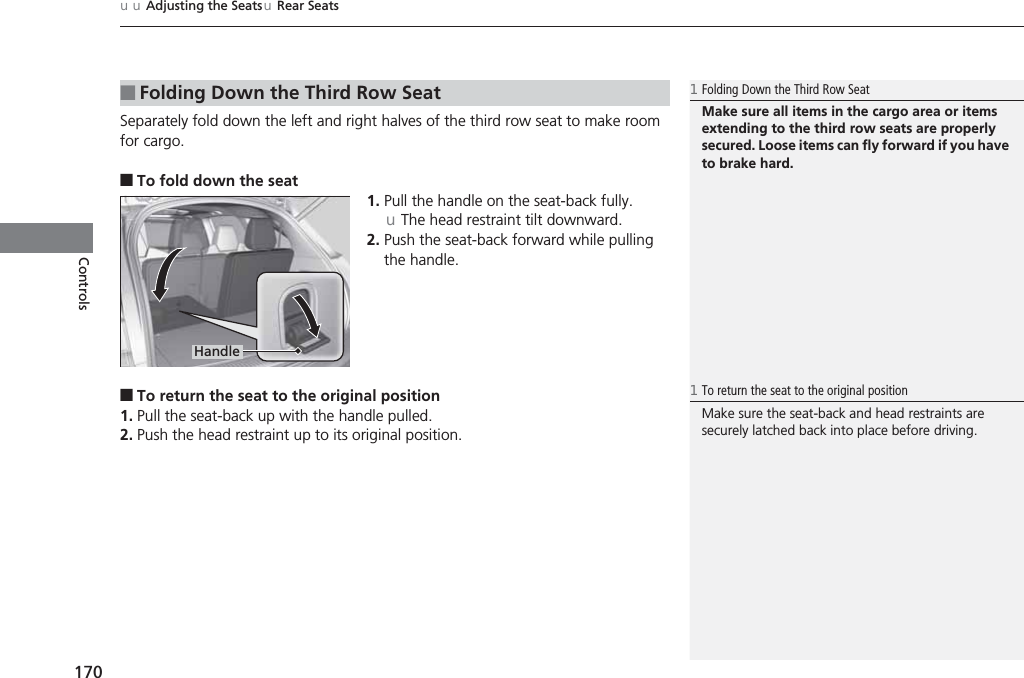
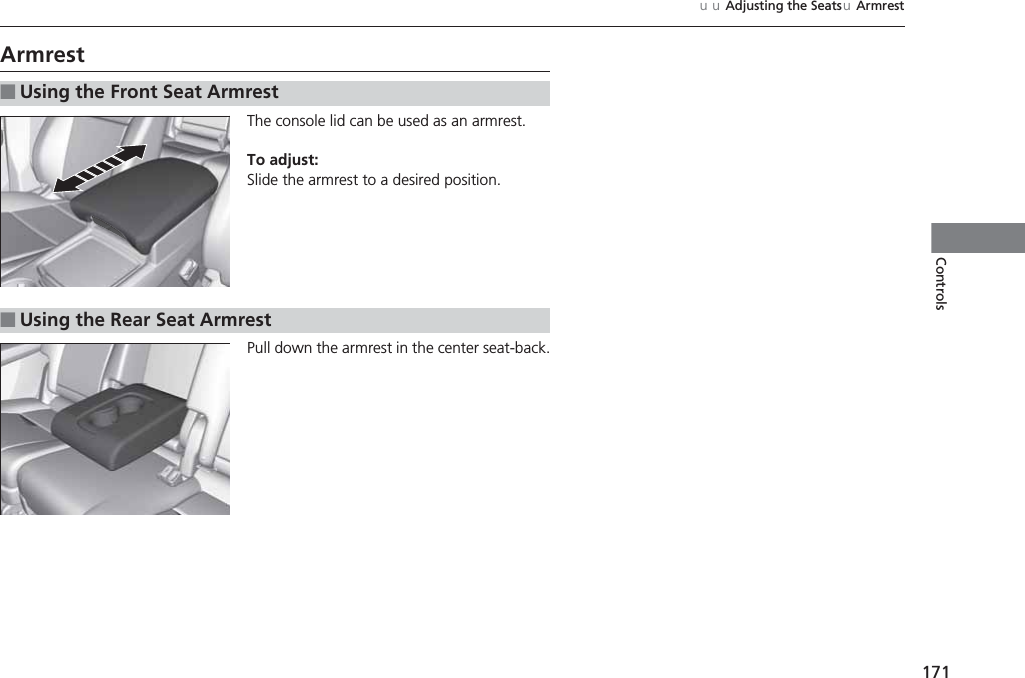
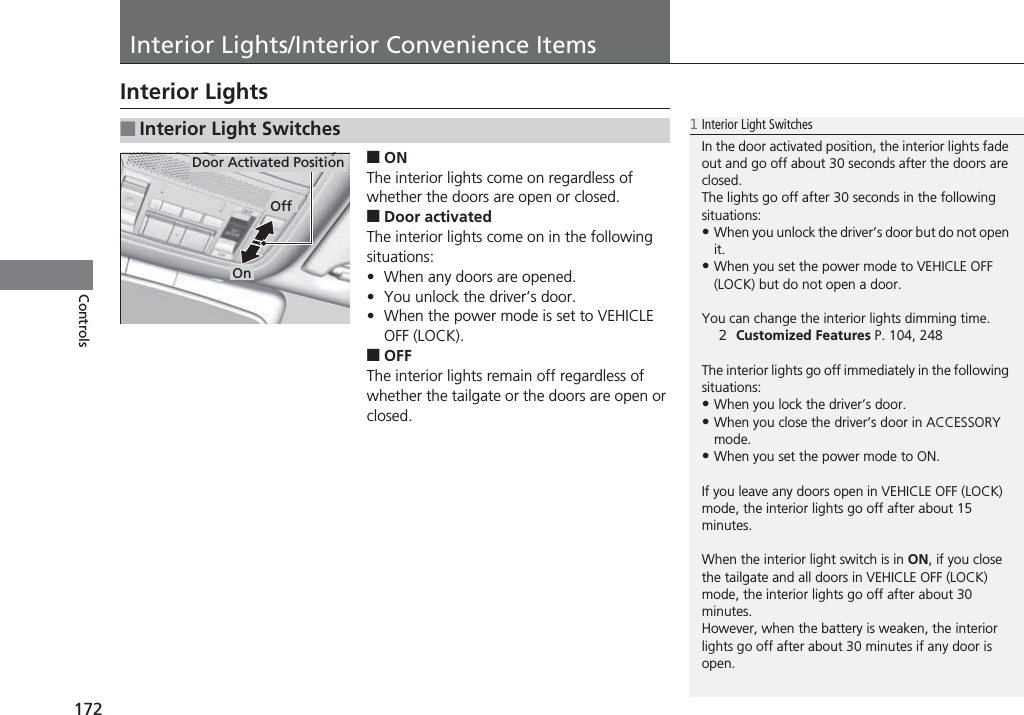
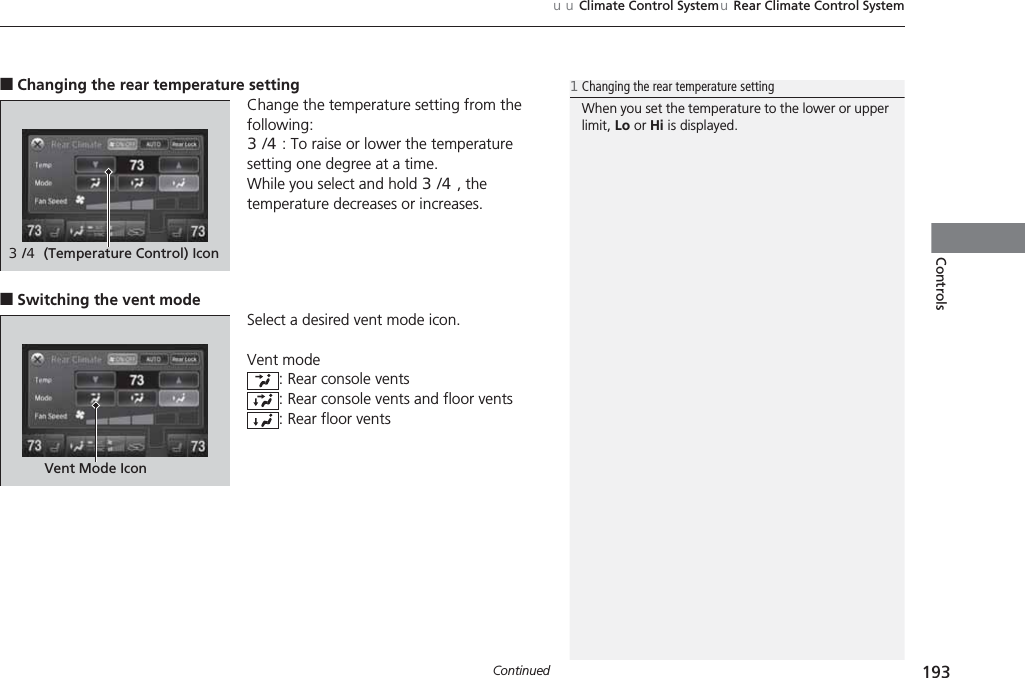
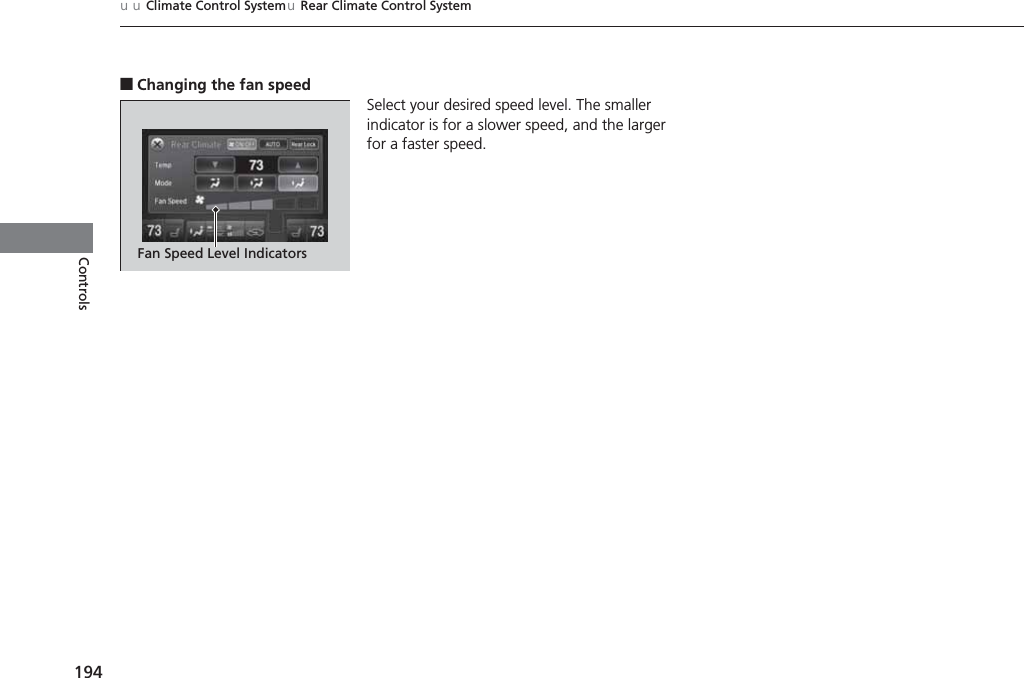
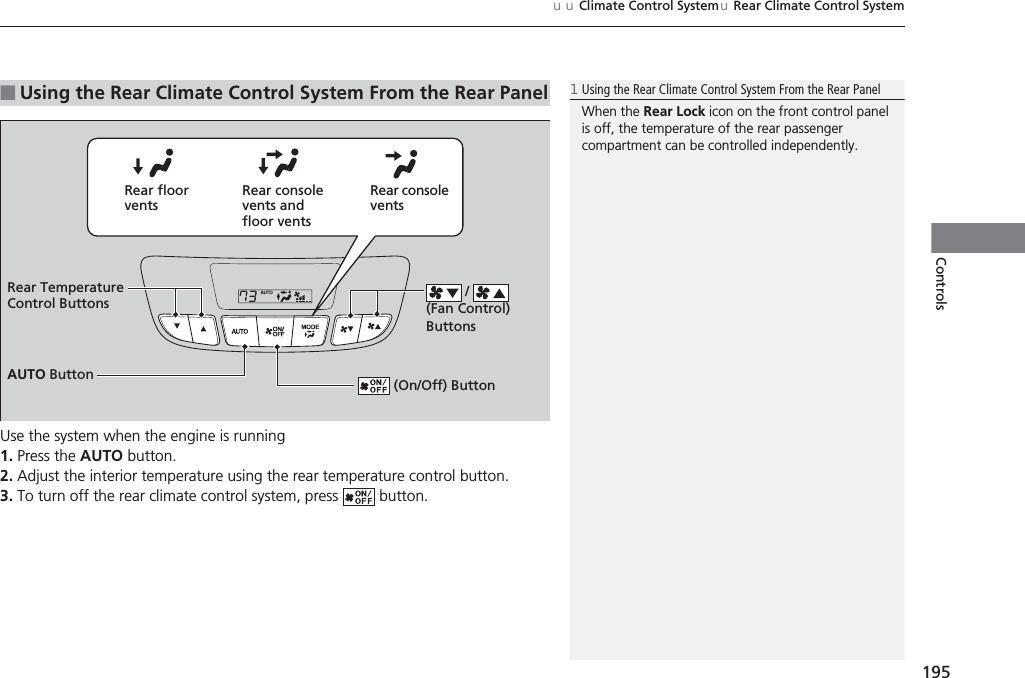
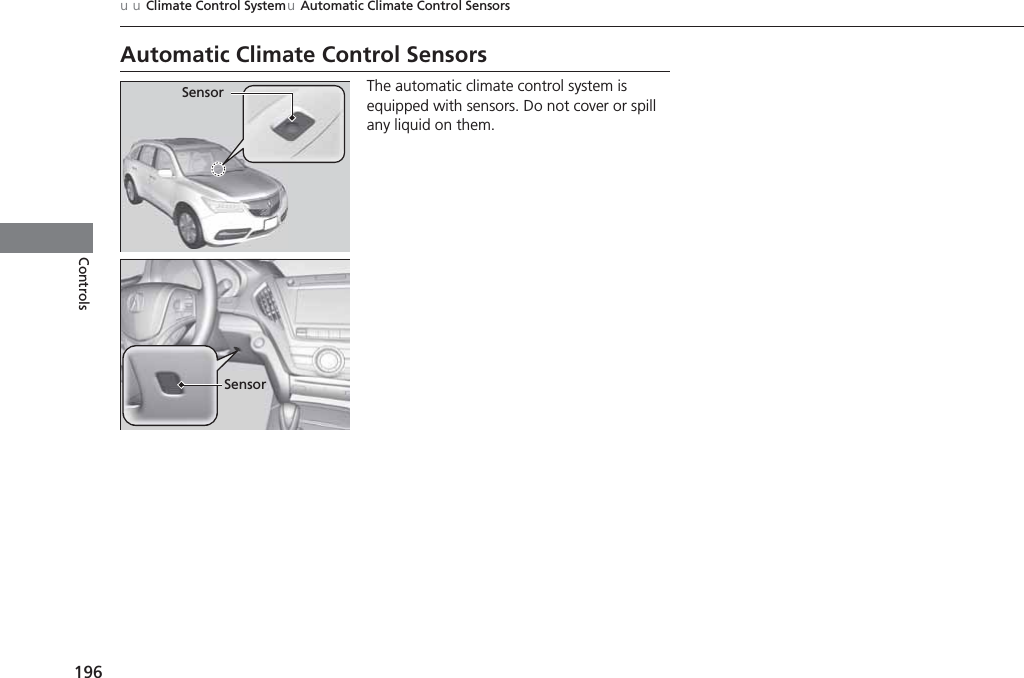
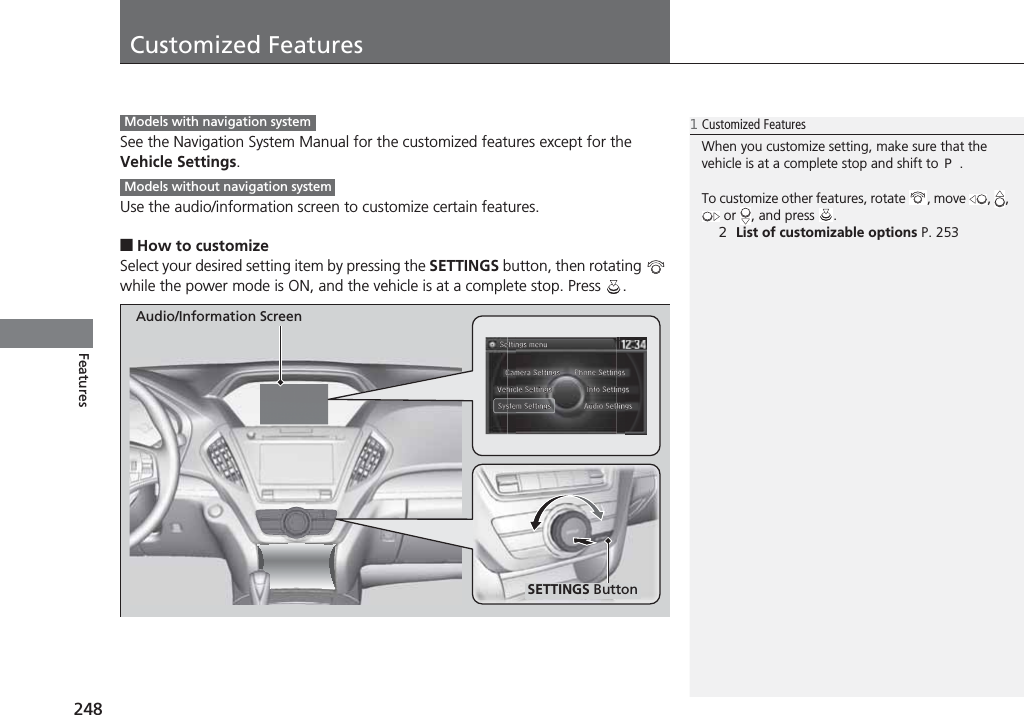
Owners Manual_part 1

ContentsThis owner’s manual should be considered a permanent part of the vehicle and should remain with the vehicle when it is sold.This owner’s manual covers all models of your vehicle. You may find descriptions of equipment and features that are not on your particular model.Images throughout this owner’s manual (including the front cover) represent features and equipment that are available on some, but not all, models. Your particular model may not have some of these features.This owner’s manual is for vehicles sold in the United States and Canada.The information and specifications included in this publication were in effect at the time of approval for printing. Honda Motor Co., Ltd. reserves the right, however, to discontinue or change specifications or design at any time without notice and without incurring any obligation.2Safe Driving P. 25For Safe Driving P. 26 Seat Belts P. 31 Airbags P. 392Instrument Panel P. 69Indicators P. 70 Gauges and Multi-Information Display (MID) P. 972Controls P. 113Clock P. 114 Locking and Unlocking the Doors P. 115Opening and Closing the Moonroof P. 140Adjusting the Seats P. 1612Features P. 197Audio System P. 198 Audio System Basic Operation P. 203Customized Features P. 248 HomeLink® Universal Transceiver P. 2662Driving P. 303Before Driving P. 304 Towing a Trailer P. 309Parking Your Vehicle P. 377Multi-View Rear Camera * P. 3822Maintenance P. 387Before Performing Maintenance P. 388 Maintenance MinderTM P. 391Checking and Maintaining Wiper Blades P. 413Climate Control System Maintenance P. 431 Cleaning P. 4322Handling the Unexpected P. 437Tools P. 438 If a Tire Goes Flat P. 439Overheating P. 463 Indicator, Coming On/Blinking P. 465When You Cannot Open the Tailgate P. 4772Information P. 479Specifications P. 480 Identification Numbers P. 482Emissions Testing P. 485 Warranty Coverages P. 487
ContentsChild Safety P. 54 Exhaust Gas Hazard P. 66 Safety Labels P. 67Opening and Closing the Tailgate P. 128 Security System P. 135 Opening and Closing the Windows P. 138Operating the Switches Around the Steering Wheel P. 141 Adjusting the Mirrors P. 158Interior Lights/Interior Convenience Items P. 172 Climate Control System P. 185Audio Error Messages P. 239 General Information on the Audio System P. 244Bluetooth® HandsFreeLink® P. 268 Compass* P. 301Off-Highway Driving Guidelines P. 320 When Driving P. 322 Braking P. 367Refueling P. 383 Fuel Economy P. 385 Accessories and Modifications P. 386Maintenance Under the Hood P. 395 Replacing Light Bulbs P. 407Checking and Maintaining Tires P. 417 Battery P. 426 Remote Transmitter Care P. 427Engine Does Not Start P. 457 Jump Starting P. 460 Shift Lever Does Not Move P. 462Fuses P. 469 Emergency Towing P. 475When You Cannot Unlock the Fuel Fill Door P. 476Devices that Emit Radio Waves P. 483 Reporting Safety Defects P. 484Authorized Manuals P. 489 Client Service Information P. 490Quick Reference Guide P. 2Safe Driving P. 25Instrument Panel P. 69Controls P. 113Features P. 197Driving P. 303Maintenance P. 387Handling the Unexpected P. 437Information P. 479Index P. 491
2Quick Reference GuideQuick Reference GuideVisual Index❙Steering Wheel Adjustments (P157)❙ENGINE START/STOP Button (P141)❙Navigation System* () See the Navigation System Manual❙Audio/Information Screen (P211)❙Hazard Warning Button❙On Demand Multi-Use DisplayTM (P204)❙Audio System (P198)❙System Indicators (P70)❙Gauges (P97)❙Multi-Information Display (MID) (P98)❙Climate Control System (P185)❙Rear Defogger/Heated Door Mirror Button (P154)❙ (Vehicle Stability Assist (VSA®) System OFF) Button (P359)❙Lane Departure Warning (LDW) Button* (P351)❙Parking Sensor System Button * (P379)❙Collision Mitigation Braking SystemTM (CMBSTM) OFF Button* (P375)❙Headlight Washer Button* (P152)❙Heated Windshield Button* (P154)❙ (Surround View Camera) Button* () See the Navigation System ManualCanadian models
3Quick Reference Guide❙Wipers/Washers (P149)❙Audio Remote Controls (P202)❙Headlights/Turn Signals (P144, 145)❙Paddle Shifter (Shift down) (P332)❙Paddle Shifter (Shift up) (P332)❙Horn (Press an area around  .)❙Voice Control Buttons (P268)❙Bluetooth® HandsFreeLink® System Voice Control Buttons (P268)❙Brightness Control (P153)❙Cruise Control Buttons* (P334)❙Adaptive Cruise Control (ACC) with Low Speed Follow (LSF) Buttons* (P337)❙TRIP Button (P98)❙Distance Button* (P342)❙Lane Keeping Assist System (LKAS) Button* (P354)❙Multi-function Steering-wheel Controls (P98)❙Heated Steering Wheel Button* (P181)* Not available on all models
Visual Index4Quick Reference Guide❙Power Window Switches (P138)❙Hood Release Handle (P396)❙Driver’s Side Interior Fuse Box (P471)❙Driver’s Knee Airbag (P46)❙Door Mirror Controls (P159)❙Power Door Lock Master Switch (P126)❙Memory Buttons (P156)❙SET Button (P156)❙Passenger’s Front Airbag (P42)❙Shift LeverAutomatic Transmission (P329)❙USB Port (P199)❙Rearview Mirror (P158)❙IDS Button (P333)❙Driver’s Front Airbag (P42)❙Parking Brake (P367)❙Auxiliary Input Jack (P200)❙Accessory Power Socket (P178)❙Accessory Power Socket (P178)❙Passenger’s Side Interior Fuse Box (P472)❙Glove Box (P174)❙Power Tailgate Button (P132)❙Fuel Fill Door Release Button (P384)
5Quick Reference Guide❙Side Curtain Airbags (P50)❙Coat Hook (P180)❙Grab Handle❙Seat Belt with Detachable Anchor (P36)❙Accessory Power Socket (P179)❙Side Airbags (P48)❙Map Lights (P173)❙Seat Belts (P34)❙Front Seat (P161)❙Moonroof Switch (P140)❙Sunglasses Holder (P181)❙Sun Visors❙Vanity Mirrors❙Seat Belt to Secure a Child Seat (P61)❙LATCH to Secure a Child Seat (P59)❙Seat Belt (Installing a Child Seat) (P61)❙Third Row Seat (P170)❙Second Row Seat (P162)❙HDMI Jack* () See the Navigation System Manual❙AC Power Outlet* (P179)❙Cargo Area Light (P173)* Not available on all models
Visual Index6Quick Reference Guide❙How to Refuel (P384)❙High-Mount Brake Light (P412)❙Opening/Closing the Tailgate (P129)❙Back-Up Lights (P411)❙Multi-View Rear Camera (P382)❙Tailgate Outer Handle (P129)❙Rear Side Marker Lights (P410)❙Taillights (P410)❙Brake Light and Rear Turn Signal Lights (P409)❙Rear Wiper (P151)❙Maintenance Under the Hood (P395)❙Windshield Wipers (P149, 413)❙Tires (P417, 439)❙Door Lock/Unlock Control (P117)❙Power Door Mirrors (P159)❙Headlights (P145, 407)❙Side Marker Lights (P145, 408)❙Front Turn Signal/Parking Lights (P144, 408)
7Quick Reference GuideSafe Driving (P25)Airbags (P39)●Your vehicle is fitted with airbags to help protect you and your passengers during a moderate-to-severe collision.Child Safety (P54)●All children 12 and younger should be seated in the rear seat.●Smaller children should be properly restrained in a forward-facing child seat.●Infants must be properly restrained in a rear-facing child seat.Exhaust Gas Hazard (P66)●Your vehicle emits dangerous exhaust gases that contain carbon monoxide. Do not run the engine in confined spaces where carbon monoxide gas can accumulate.Before Driving Checklist (P30)●Before driving, check that the front seats, head restraints, steering wheel, and mirrors have been properly adjusted.Seat Belts (P31)●Fasten your seat belt and sit upright well back in the seat.●Check that your passengers are wearing their seat belts correctly.Fasten your lap belt as low as possible.
8Quick Reference GuideInstrument Panel (P69)System IndicatorsMalfunction Indicator LampLow Oil Pressure IndicatorCharging System IndicatorAnti-lock Brake System (ABS) IndicatorVehicle Stability Assist (VSA®) System IndicatorVSA® OFF IndicatorSpeed-sensitive Electric Power Steering (EPS) System IndicatorLights RemindersLights On IndicatorHigh Beam IndicatorImmobilizer System IndicatorSeat Belt Reminder IndicatorSystem IndicatorsSystem Message IndicatorParking Brake and Brake System Indicator (Red)Supplemental Restraint System IndicatorLow Fuel IndicatorGauges (P97)/Multi-Information Display (MID) (P98)/System Indicators (P70)Low Tire Pressure/TPMS IndicatorTurn Signal and Hazard Warning IndicatorsKeyless Access System IndicatorTemperature Gauge Security System Alarm IndicatorFuel GaugeTachometerMIDSpeedometerShift Lever Position IndicatorGear Position IndicatorBrake System Indicator (Amber)SH-AWD Indicator*Blind Spot Information (BSI) Indicator*System IndicatorsCollision Mitigation Brake SystemTM (CMBSTM) Indicator*Forward Collision Warning (FCW) Indicator*Lane Departure Warning (LDW) Indicator*Lane Keeping Assist System (LKAS) Indicator*Adaptive Cruise Control (ACC) with Low Speed Follow (LSF) Indicator*U.S.CanadaU.S.Canada
9Quick Reference GuideControls (P113)Clock (P114)aEnter the Clock Adjustment screen.2Adjusting the Clock (P114)bRotate   to change hour, then press .cRotate   to change minute, then press .The navigation system receives signals from GPS satellites, updating the clock automatically.Models with navigation systemENGINE START/STOP Button (P141)Press the button to change the vehicle’s power mode.Turn Signals (P144)Lights (P145)Turn Signal Control LeverRightLeftLight Control SwitchesLow BeamHigh BeamFlashing* Not available on all models
10Quick Reference GuideWipers and Washers (P149)*1:Models with automatic intermittent wipers*2:Models without automatic intermittent wipersWiper/Washer Control LeverAdjustment Ring: Low Sensitivity*1   : Long Delay*2: High Sensitivity*1   : Short Delay*2MISTOFFAUTO*1: Wiper speed varies automaticallyINT*2: Low speed with intermittentLO: Low speed wipeHI: High speed wipePull toward you to spray washer fluid.Steering Wheel (P157)●To adjust, push and hold the adjustment switch to move the steering wheel to the desired position.Unlocking the Front Doors from the Inside (P125)●Pull either front door inner handle to unlock and open it at the same time.Tailgate (P129, 130)●Touch the tailgate outer handle to unlock and open the tailgate.●Press the power tailgate button on the driver’s door or the remote transmitter to open and close the power tailgate.Tailgate Outer Handle
11Quick Reference GuidePower Door Mirrors (P159)●With the power mode in ON, move the selector switch to L or R.●Push the appropriate edge of the adjustment switch to adjust the mirror.●Press the folding button* to fold in and out the door mirrors.Selector SwitchAdjustment SwitchFolding Button*Power Windows (P138)●With the power mode in ON, open and close the power windows.●If the power window lock button is in the off position, each passenger’s window can be opened and closed with its own switch.●If the power window lock button is in the on position (indicator is on), each passenger’s window switch is disabled.Power Window Lock ButtonWindow SwitchIndicator* Not available on all models
12Quick Reference GuideClimate Control System (P185)●Press the AUTO button to activate the climate control system.●Press the   button to turn the system on or off.●Press the   button to defrost the windshield.The climate control system is voice operable. See the navigation system manual for complete details.Models with navigation systemDriver’s Side Temperature Control SwitchAir flows from floor and windshield defroster vents.Air flows from floor vents.Air flows from floor and dashboard vents.Air flows from dashboard vents.AUTO ButtonPassenger’s Side Temperature Control Switch (On/Off) ButtonDriver’s Side Temperature IconPassenger’s Side Temperature IconOn Demand Multi-Use DisplayTM (Windshield Defroster) Button (Rear Defogger/Heated Door Mirror) ButtonA/C (Air Conditioning) and SYNC (Synchronized) IconRecirculation/Fresh Air Mode IconFan Control IconREAR (Rear Climate Control) IconRear Climate Control (P195)●Press the AUTO button to activate the rear climate control system.●Press the   button to turn the system on or off.Rear Temperature Control Buttons /   (Fan Control) ButtonAUTO Button (On/Off) ButtonMode Control ButtonAir flows from the rear floor vents.Air flow from the rear console vents and floor vents.Air flows from the rear console vents.
13Quick Reference GuideFeatures (P197)Audio system (P198) For navigation system operation () See the Navigation System Manual*1:Icons that appear on the screen vary by the source selected.Audio/Information ScreenInterface Dial/ENTER Button (Power) ButtonCD Slot (CD Eject) ButtonSETTINGS ButtonVOL (Volume) KnobBACK Button MENU ButtonAUDIO ButtonINFO ButtonOn Demand Multi-Use DisplayTMPHONE Button (Tune Down) Icon*1 (Skip/Seek) Icon*1Audio Source*1 (Skip/Seek) Icon*1Presets*1 (Tune Up) Icon*1More*1 ButtonShortcuts*1
14Quick Reference GuideAudio Remote Controls (P202)●SOURCE ButtonPress and release to change the audio mode: FM/AM/CD/XM®/USB/iPod®/Bluetooth® Audio/Pandora®/AhaTM/AUX.●Left Selector WheelRoll to adjust the volume up/down.Radio:Shift to a side to change the preset station.Shift to a side and hold to select the next or previous strong station.CD/USB device:Shift to a side to skip to the beginning of the next song or return to the beginning of the current song.Shift to a side and hold to change a folder.Left Selector WheelSOURCE Button
15Quick Reference GuideDriving (P303)Release ButtonShift LeverDepress the brake pedal and press the release button to move out of (P.Move the shift lever without pressing the release button.Press the release button to move the shift lever.●ShiftingParkTurn off or start the engine.Transmission is locked.ReverseUsed when reversing.NeutralTransmission is not locked.DriveNormal driving. D-paddle shift mode can be used.S PositionSequential shift mode can be used.Paddle Shifters (P331)M IndicatorShift Down (- Paddle ShifterShift Up (+ Paddle Shifter●Paddle shifters allow you to shift gears much like a manual transmission (1st through 6th). This is useful for engine braking.●D-paddle shift mode: The transmission will shift back to automatic mode once the system detects that the vehicle is cruising.●Sequential shift mode: Holds the selected gear, and the M indicator comes on.●The selected gear position is shown in the instrument panel.Selected Gear NumberAutomatic Transmission (P328)●Shift to (P and depress the brake pedal when starting the engine.Shift Lever Position Indicator
16Quick Reference GuideVSA® OFF Button (P359)●The vehicle stability assist (VSA®) system helps stabilize the vehicle during cornering, and helps maintain traction while accelerating on loose or slippery road surfaces.●VSA® comes on automatically every time you start the engine.●To turn VSA® on or off, press and hold the button until you hear a beep.Cruise Control (P334)●Cruise control allows you to maintain a set speed without keeping your foot on the accelerator pedal.●To use cruise control, press the CRUISE button, then press the RES/+/SET/– button once you have achieved the desired speed (above 25 mph or 40 km/h).Tire Pressure Monitoring System (TPMS) (P363)●The TPMS monitors tire pressure.●The TPMS is turned on automatically every time you start the engine.Refueling (P383)aPress the fuel fill door release button.bTurn the fuel fill cap slowly to remove the cap.cPlace the cap in the holder on the fuel fill door.dAfter refueling, screw the cap back on until it clicks at least once.Fuel recommendation: Unleaded premium gasoline with a pump octane number 91 or higher recommendedFuel tank capacity: 19.5 US gal (74.0 ℓ)
17Quick Reference GuideMaintenance (P387 )Under the Hood (P395)●Check engine oil, engine coolant, and windshield washer fluid. Add when necessary.●Check brake fluid.●Check the battery condition monthly.aPull the hood release handle under the corner of the dashboard.bLocate the hood latch lever, pull the lever up, and lift up the hood.cWhen finished, close the hood and make sure it is firmly locked in place.Lights (P407)●Inspect all lights regularly.Wiper Blades (P413)●Replace blades if they leave streaks across the windshield.Tires (P417)●Inspect tires and wheels regularly.●Check tire pressures regularly.●Install snow tires for winter driving.
18Quick Reference GuideHandling the Unexpected (P437)Flat Tire (P439)●Park in a safe location and repair the flat tire using the tire repair kit.●Park in a safe location and replace the flat tire with the compact spare tire located under the cargo area.Indicators Come On (P465)●Identify the indicator and consult the owner’s manual.Vehicles with tire repair kitVehicles with compact spare tire kitEngine Won’t Start (P457)●If the battery is dead, jump start using a booster battery.Blown Fuse (P474)●Check for a blown fuse if an electrical device does not operate.Overheating (P463)●Park in a safe location. If you do not see steam under the hood, open the hood, and let the engine cool down.Emergency Towing (P475)●Call a professional towing service if you need to tow your vehicle.
19Quick Reference GuideWhat to Do IfThe power mode does not change from VEHICLE OFF (LOCK) to ACCESSORY. Why?●The steering wheel may be locked.●Move the steering wheel left and right after pressing the ENGINE START/STOP button.The power mode does not change from ON to VEHICLE OFF (LOCK). Why?The shift lever should be moved to (P.Why does the brake pedal pulsate slightly when applying the brakes?This can occur when the ABS activates, and does not indicate a problem. Apply firm, steady pressure on the brake pedal. Never pump the brake pedal.
20Quick Reference GuideThe rear door cannot be opened from inside the vehicle. Why?Check if the childproof lock is in the lock position. If so, open the rear door with the outside door handle.To cancel this function, push the lever to the unlock position.Why do the doors lock after I unlocked the doors using a remote transmitter?If you do not open the doors within 30 seconds, the doors are relocked automatically for security.Why does the beeper sound when I open the driver’s door?The beeper sounds when:●The exterior lights are left on.●The power mode is in ACCESSORY.Why does the beeper sound when I start driving?The beeper sounds when:●Driver and/or front passenger are not wearing their seat belts.●The parking brake lever is not fully released.
21Quick Reference GuideWhy does the beeper sound when I turn the engine off?The beeper sounds when you turn off the engine with the driver’s door open.Why do I hear a screeching sound when I apply the brake pedal?The brake pads may need to be replaced. Have your vehicle inspected by a dealer.Unleaded gasoline with a Pump Octane Number (PON) of 91 or higher is recommended.Is it possible to use unleaded gasoline with a Pump Octane Number (PON) of 87 or higher on this vehicle?Unleaded gasoline with a Pump Octane Number (PON) of 91 or higher is recommended.Use of lower octane gasoline can cause occasional metallic knocking noise in the engine and will result in decreased engine performance.Use of gasoline with a pump octane less than 87 can lead to engine damage.
22Quick Reference GuideCalifornia Proposition 65 WarningEvent Data RecordersThis vehicle is equipped with an event data recorder (EDR). The main purpose of an EDR is to record, in certain crash or near crash-like situations, such as an air bag deployment or hitting a road obstacle, data that will assist in understanding how a vehicle’s systems performed. The EDR is designed to record data related to vehicle dynamics and safety systems for a short period of time, typically 30 seconds or less. The EDR in this vehicle is designed to record such data as:•How various systems in your vehicle were operating;•Whether or not the driver and passenger safety belts were buckled/fastened;•How far (if at all) the driver was depressing the accelerator and/or brake pedal; and,•How fast the vehicle was traveling.These data can help provide a better understanding of the circumstances in which crashes and injuries occur. NOTE: EDR data are recorded by your vehicle only if a non-trivial crash situation occurs; no data are recorded by the EDR under normal driving conditions and no personal data (e.g., name, gender, age, and crash location) are recorded. However, other parties, such as law enforcement, could combine the EDR data with the type of personally identifying data routinely acquired during a crash investigation.WARNING: This product contains or emits chemicals known to the state of California to cause cancer and birth defects or other reproductive harm.To read data recorded by an EDR, special equipment is required, and access to the vehicle or the EDR is needed. In addition to the vehicle manufacturer, other parties, such as law enforcement, that have the special equipment, can read the information if they have access to the vehicle or the EDR. The data belongs to the vehicle owner and may not be accessed by anyone else except as legally required or with the permission of the vehicle owner.Service Diagnostic RecordersThis vehicle is equipped with service-related devices that record information about powertrain performance. The data can be used to verify emissions law requirements and/or help technicians diagnose and solve service problems. It may also be combined with data from other sources for research purposes, but it remains confidential.California Perchlorate Contamination Prevention ActThe airbags, seat belt tensioners, and CR type batteries in this vehicle may contain perchlorate materials - special handling may apply. See www.dtsc.ca.gov/hazardouswaste/perchlorate/As you read this manual, you will find information that is preceded by a   symbol. This information is intended to help you avoid damage to your vehicle, other property, or the environment.NOTICE
23Quick Reference GuideA Few Words About SafetyYour safety, and the safety of others, is very important. And operating this vehicle safely is an important responsibility.To help you make informed decisions about safety, we have provided operating procedures and other information on labels and in this manual. This information alerts you to potential hazards that could hurt you or others.Of course, it is not practical or possible to warn you about all the hazards associated with operating or maintaining your vehicle. You must use your own good judgement.You will find this important safety information in a variety of forms, including:●Safety Labels - on the vehicle.●Safety Messages - preceded by a safety alert symbol 3 and one of three signal words: DANGER, WARNING, or CAUTION.These signal words mean:●Safety Headings - such as Important Safety Precautions.●Safety Section - such as Safe Driving.●Instructions - how to use this vehicle correctly and safely.This entire book is filled with important safety information - please read it carefully.3DANGERYou WILL be KILLED or SERIOUSLY HURT if you don’t follow instructions.3WARNINGYou CAN be KILLED or SERIOUSLY HURT if you don’t follow instructions.3CAUTIONYou CAN be HURT if you don’t follow instructions.
24
25Safe DrivingYou can find many safety recommendations throughout this chapter, and throughout this manual.For Safe DrivingImportant Safety Precautions.............. 26Important Handling Information......... 28Your Vehicle’s Safety Features............ 29Seat BeltsAbout Your Seat Belts........................ 31Fastening a Seat Belt.......................... 34Seat Belt Inspection............................ 38AirbagsAirbag System Components............... 39Types of Airbags ................................ 42Front Airbags (SRS) ............................ 42Driver’s Knee Airbag .......................... 46Side Airbags....................................... 48Side Curtain Airbags .......................... 50Airbag System Indicators.................... 51Airbag Care ....................................... 53Child SafetyProtecting Child Passengers ............... 54Safety of Infants and Small Children .. 56Safety of Larger Children ................... 64Exhaust Gas HazardCarbon Monoxide Gas....................... 66Safety LabelsLabel Locations.................................. 67
26Safe DrivingFor Safe DrivingThe following pages explain your vehicle’s safety features and how to use them properly. The safety precautions below are ones that we consider to be among the most important.Important Safety Precautions■Always wear your seat beltA seat belt is your best protection in all types of collisions. Airbags are designed to supplement seat belts, not replace them. So even though your vehicle is equipped with airbags, make sure you and your passengers always wear your seat belts, and wear them properly.■Restrain all childrenChildren ages 12 and under should ride properly restrained in a back seat, not the front seat. Infants and small children should be restrained in a child seat. Larger children should use a booster seat and a lap/shoulder seat belt until they can use the belt properly without a booster seat.■Be aware of airbag hazardsWhile airbags can save lives, they can cause serious or fatal injuries to occupants who sit too close to them, or are not properly restrained. Infants, young children, and short adults are at the greatest risk. Be sure to follow all instructions and warnings in this manual.■Don’t drink and driveAlcohol and driving don’t mix. Even one drink can reduce your ability to respond to changing conditions, and your reaction time gets worse with every additional drink. So don’t drink and drive, and don’t let your friends drink and drive, either.1Important Safety PrecautionsSome states, provinces and territories prohibit the use of cell phones other than hands-free devices by the driver while driving.
27uuFor Safe DrivinguImportant Safety PrecautionsSafe Driving■Pay appropriate attention to the task of driving safelyEngaging in cell phone conversation or other activities that keep you from paying close attention to the road, other vehicles, and pedestrians could lead to a crash. Remember, situations can change quickly, and only you can decide when it is safe to divert some attention away from driving.■Control your speedExcessive speed is a major factor in crash injuries and deaths. Generally, the higher the speed, the greater the risk, but serious injuries can also occur at lower speeds. Never drive faster than is safe for current conditions, regardless of the maximum speed posted.■Keep your vehicle in safe conditionHaving a tire blowout or a mechanical failure can be extremely hazardous.To reduce the possibility of such problems, check your tire pressures and condition frequently, and perform all regularly scheduled maintenance.
28uuFor Safe DrivinguImportant Handling InformationSafe DrivingImportant Handling InformationYour vehicle has higher ground clearance than a passenger vehicle designed for use only on pavement. Higher ground clearance has many advantages for off-highway driving. It allows you to travel over bumps, obstacles, and rough terrain. It also provides good visibility so you can anticipate problems earlier.These advantages come at some cost. Because your vehicle is taller and rides higher off the ground, it has a higher center gravity making it more susceptible to tripping or roll over if you make abrupt turns. Utility vehicles have a significantly higher rollover rate than other types of vehicles. In a rollover crash, an unbelted person is significantly more likely to die than a person wearing a seat belt. As a reminder, make sure you and your passengers always wear seat belts.1Important Handling InformationFor information on how to reduce the risk of rollover, read:2Driving Guidelines for Your Utility Vehicle P. 3272Off-Highway Driving Guidelines P. 320Failure to operate your vehicle correctly might result in a crash or a rollover.
29uuFor Safe DrivinguYour Vehicle’s Safety FeaturesContinuedSafe DrivingYour Vehicle’s Safety FeaturesThe following checklist will help you take an active role in protecting yourself and your passengers.1Your Vehicle’s Safety FeaturesYour vehicle is equipped with many features that work together to help protect you and your passengers during a crash.Some features do not require any action on your part. These include a strong steel framework that forms a safety cage around the passenger compartment, front and rear crush zones, a collapsible steering column, and tensioners that tighten the front seat belts in a sufficient crash.However, you and your passengers cannot take full advantage of these features unless you remain seated in the correct position and always wear your seat belts. In fact, some safety features can contribute to injuries if they are not used properly.67891012Safety CageCrush ZonesSeats and Seat-BacksHead RestraintsCollapsible Steering ColumnSeat BeltsFront AirbagsSide Curtain AirbagsDoor LocksSide Airbags11Seat Belt Tensioners/Seat Belt e-pretensioners*67899101111127Knee Airbag10* Not available on all models
uuFor Safe DrivinguYour Vehicle’s Safety Features30Safe DrivingFor the safety of you and your passengers, make a habit of checking these items each time before you drive.•After everyone has entered the vehicle, be sure all doors and the tailgate are closed and locked. Locking the doors and the tailgate helps prevent an occupant from being ejected and an outsider from unexpectedly opening a door or the tailgate.2Locking/Unlocking the Doors from the Inside P. 124•Adjust your seat to a position suitable for driving. Be sure the front seats are adjusted as far to the rear as possible while allowing the driver to control the vehicle. Sitting too close to a front airbag can result in serious or fatal injury in a crash.2Adjusting the Seats P. 161•Adjust head restraints to the proper position. Head restraints are most effective when the center of the head restraint aligns with the center of your head. Taller persons should adjust their head restraint to the highest position.2Adjusting the Head Restraints P. 164•Always wear your seat belt, and make sure you wear it properly. Confirm that any passengers are properly belted as well.2Fastening a Seat Belt P. 34•Protect children by using seat belts or child seats according to a child’s age, height and weight.2Child Safety P. 54■Safety Checklist1Safety ChecklistIf the door and/or tailgate open message appears on the multi-information display (MID), a door and/or the tailgate is not completely closed. Close all doors and the tailgate tightly until the message disappears.
31ContinuedSafe DrivingSeat BeltsAbout Your Seat BeltsSeat belts are the single most effective safety device because they keep you connected to the vehicle so that you can take advantage of many built-in safety features. They also help keep you from being thrown against the inside of the vehicle, against other passengers, or out of the vehicle. When worn properly, seat belts also keep your body properly positioned in a crash so that you can take full advantage of the additional protection provided by the airbags.In addition, seat belts help protect you in almost every type of crash, including:-frontal impacts-side impacts-rear impacts-rollovers■Lap/shoulder seat beltsAll seven seating positions are equipped with lap/shoulder seat belts with emergency locking retractors. In normal driving the retractor lets you move freely while keeping some tension on the belt. During a collision or sudden stop the retractor locks to restrain your body. The front passenger’s, second row and third row seat belts also have a lockable retractor for use with child seats.2Installing a Child Seat with a Lap/Shoulder Seat Belt P. 611About Your Seat BeltsSeat belts cannot completely protect you in every crash. But in most cases, seat belts can reduce your risk of serious injury.Most states and all Canadian provinces and territories require you to wear seat belts.3WARNINGNot wearing a seat belt properly increases the chance of serious injury or death in a crash, even though your vehicle has airbags.Be sure you and your passengers always wear seat belts and wear them properly.
uuSeat Belts uAbout Your Seat Belts32Safe Driving■Proper use of seat beltsFollow these guidelines for proper use:•All occupants should sit upright, well back in the seat, and remain in that position for the duration of the trip. Slouching and leaning reduce the effectiveness of the belt and can increase the chance of serious injury in a crash.•Never place the shoulder part of a lap/shoulder seat belt under your arm or behind your back. This could cause very serious injuries in a crash.•Two people should never use the same seat belt. If they do, they could be very seriously injured in a crash.•Do not put any accessories on the seat belts. Devices intended to improve comfort or reposition the shoulder part of a seat belt can reduce the protective capability and increase the chance of serious injury in a crash.Your vehicle monitors front seat belt use. If the power mode is set to ON before the driver’s seat belt is fastened, the beeper will sound and the indicator will blink. If the driver does not fasten the belt before the beeper stops, the indicator will remain on.The beeper will also periodically sound and the indicator will blink while driving until the driver’s and front passenger’s seat belts are fastened.■Seat Belt Reminder1About Your Seat BeltsIf a rear seat passenger moves around and extends the seat belt, the lockable retractor may activate. If this happens, release the retractor by unfastening the seat belt and allow the belt to retract completely. Then refasten the belt.1Seat Belt ReminderThe indicator will also come on if a front passenger does not fasten their seat belt within six seconds after the power mode is set to ON.When no one is sitting in the front passenger’s seat, the indicator will not come on and the beeper will not sound.The indicator also may not come on and the beeper may not sound when the occupant is not heavy enough to trigger the weight sensor. Such occupants (e.g., infants and smaller children) should be moved to the rear seat as a deploying front airbag likely will injure or kill them.2Protecting Child Passengers P. 54
33uuSeat BeltsuAbout Your Seat BeltsSafe DrivingThe front seats are equipped with automatic seat belt tensioners to enhance safety.The tensioners automatically tighten the front seat belts during a moderate-to-severe frontal collision, sometimes even if the collision is not severe enough to inflate the front airbags or the driver’s knee airbag.Are the motor-powered pretensioners that start to retract the front seat belts when the CMBSTM, brake assist system, or VSA® system is in operation. They may also activate when you steer the vehicle hard, or the vehicle is impacted. After retracted, the seat belts are slackened to their original positions.As convenient features, the e-pretensioners slightly retract the seat belts when you latch the seat belt buckle, depress the brake pedal more aggressively than you normally do, or make a sharp turn, and fully retract when you release the seat belt buckle.■Automatic Seat Belt Tensioners1Automatic Seat Belt TensionersThe seat belt tensioners can only operate once.If a tensioner is activated, the SRS indicator will come on. Have a dealer replace the tensioner and thoroughly inspect the seat belt system as it may not offer protection in a subsequent crash.During a moderate-to-severe side impact, the tensioner on that side of the vehicle also activates.■Seat Belt e-pretensioners*1Seat Belt e-pretensioners*If only the e-pretensioners were activated, no components need to be replaced.The e-pretensioners may not work if:•Supplemental Restraint System Indicator is on.•Vehicle Stability Assist (VSA®) System Indicator is on.* Not available on all models
34uuSeat Belts uFastening a Seat BeltSafe DrivingFastening a Seat BeltAfter adjusting a front seat to the proper position, and while sitting upright and well back in the seat:2Adjusting the Seats P. 1611. Pull the seat belt out slowly.2. Insert the latch plate into the buckle, then tug on the belt to make sure the buckle is secure.uMake sure that the belt is not twisted or caught on anything.When you or the front passenger insert the latch plate into the buckle, the front seat belt retracts automatically.2Seat Belt e-pretensioners* P. 331Fastening a Seat BeltNo one should sit in a seat with an inoperative seat belt or one that does not appear to be working correctly. Using a seat belt that is not working properly may not protect the occupant in a crash. Have a dealer check the belt as soon as possible.Never insert any foreign objects into the buckle or retractor mechanism.Pull out slowly.Correct Seated Posture.Latch PlateBuckleModels with CMBSTM* Not available on all models
Continued 35uuSeat BeltsuFastening a Seat BeltSafe Driving3. Position the lap part of the belt as low as possible across your hips, then pull up on the shoulder part of the belt so the lap part fits snugly. This lets your strong pelvic bones take the force of a crash and reduce the chance of internal injuries.4. If necessary, pull up on the belt again to remove any slack, then check that the belt rests across the center of your chest and over your shoulder. This spreads the forces of a crash over the strongest bones in your upper body.The front seats have adjustable shoulder anchors to accommodate taller and shorter occupants.1. Move the anchor up and down while holding the release button.2. Position the anchor so that the belt rests across the center of your chest and over your shoulder.1Fastening a Seat BeltTo release the belt, push the red PRESS button then guide the belt by hand until it has retracted completely.When exiting the vehicle, be sure the belt is out of the way and will not get caught by closing the door.3WARNINGImproperly positioning the seat belts can cause serious injury or death in a crash.Make sure all seat belts are properly positioned before driving.Lap belt as low as possible■Adjusting the Shoulder Anchor1Adjusting the Shoulder AnchorThe shoulder anchor height can be adjusted to four levels. If the belt contacts your neck, lower the height one level at a time.After an adjustment, make sure that the shoulder anchor position is secure.Push
uuSeat Belts uFastening a Seat Belt36Safe Driving1. Pull out the seat belt’s small latch plate and the latch plate from each holding slot in the ceiling.2. Line up the triangle marks on the small latch plate and anchor buckle. Make sure the seat belt is not twisted. Attach the belt to the anchor buckle.3. Insert the latch plate into the buckle. Properly fasten the seat belt the same way you fasten the lap/shoulder seat belt.■Seat Belt with Detachable Anchor1Seat Belt with Detachable AnchorTo unlatch the detachable anchor, insert the latch plate into the slot on the side of the anchor buckle.3WARNINGUsing the seat belt with the detachable anchor unlatched increases the chance of serious injury or death in a crash.Before using the seat belt, make sure the detachable anchor is correctly latched.Small Latch PlateLatch PlateSmall Latch PlateLatch PlateSmall Latch PlateAnchor BuckleLatch PlateBuckle
37uuSeat BeltsuFastening a Seat BeltSafe DrivingIf you are pregnant, the best way to protect yourself and your unborn child when driving or riding in a vehicle is to always wear a seat belt and keep the lap part of the belt as low as possible across the hips.■Advice for Pregnant Women1Advice for Pregnant WomenEach time you have a checkup, ask your doctor if it is okay for you to drive.To reduce the risk of injuries to both you and your unborn child that can be caused by an inflating front airbag:•When driving, sit upright and adjust the seat as far back as possible while allowing full control of the vehicle.•When sitting in the front passenger’s seat, adjust the seat as far back as possible.Wear the shoulder belt across the chest avoiding the abdomen.Wear the lap part of the belt as low as possible across the hips.
38uuSeat Belts uSeat Belt InspectionSafe DrivingSeat Belt InspectionRegularly check the condition of your seat belts as follows:•Pull each belt out fully, and look for frays, cuts, burns, and wear.•Check that the latches work smoothly and the belts retract easily.uIf a belt does not retract easily, cleaning the belt may correct the problem. Only use a mild soap and warm water. Do not use bleach or cleaning solvents. Make sure the belt is completely dry before allowing it to retract.Any belt that is not in good condition or working properly will not provide proper protection and should be replaced as soon as possible.A belt that has been worn during a crash may not provide the same level of protection in a subsequent crash. Have your seat belts inspected by a dealer after any collision.1Seat Belt Inspection3WARNINGNot checking or maintaining seat belts can result in serious injury or death if the seat belts do not work properly when needed.Check your seat belts regularly and have any problem corrected as soon as possible.
39ContinuedSafe DrivingAirbagsAirbag System Components13678101199996129
40uuAirbagsuAirbag System ComponentsSafe DrivingThe front, driver’s knee, front side, and side curtain airbags are deployed according to the direction and severity of impact. Both side curtain airbags are deployed in a rollover. The airbag system includes:aTwo SRS (Supplemental Restraint System) front airbags. The driver’s airbag is stored in the center of the steering wheel; the front passenger’s airbag is stored in the dashboard. Both are marked SRS AIRBAG.bDriver’s knee airbag. The knee airbag is stored under the steering column. It is marked SRS AIRBAG.cTwo side airbags, one for the driver and one for a front passenger. The airbags are stored in the outer edges of the seat-backs. Both are marked SIDE AIRBAG.dTwo side curtain airbags, one for each side of the vehicle. The airbags are stored in the ceiling, above the side windows. The front and rear pillars are marked SIDE CURTAIN AIRBAG.eAn electronic control unit that continually monitors and records information about the sensors, the airbag activators, the seat belt tensioners, and driver and front passenger seat belt use when the power mode is in ON.fAutomatic front seat belt tensioners. The driver’s and front passenger’s seat belts incorporate sensors that detect whether or not they are fastened.The front seat belt tensioners also include the e-pretensioners.gA driver’s seat position sensor. If the seat is too far forward, the airbag will inflate with less force.hWeight sensors in the front passenger’s seat. The front passenger’s airbag will be turned off if the weight on the seat is 65 lbs (29 kg) or less (the weight of an infant or small child).Models with CMBSTMiImpact sensors that can detect a moderate to severe front or side impact.jAn indicator on the dashboard that alerts you that the front passenger’s front airbag has been turned off.kAn indicator on the instrument panel that alerts you to a possible problem with your airbag system or seat belt tensioners.lSafing SensormA rollover sensor that detects whether the vehicle is about to roll over.
41uuAirbagsuAirbag System ComponentsSafe DrivingAirbags can pose serious hazards. To do their job, airbags must inflate with tremendous force. So, while airbags help save lives, they can cause burns, bruises, and other minor injuries, and sometimes even fatal ones if occupants are not wearing their seat belts properly and sitting correctly.What you should do: Always wear your seat belt properly, and sit upright and as far back from the steering wheel as possible while allowing full control of the vehicle. A front passenger should move their seat as far back from the dashboard as possible.Remember, however, that no safety system can prevent all injuries or deaths that can occur in a severe crash, even when seat belts are properly worn and the airbags deploy.Do not place hard or sharp objects between yourself and a front airbag. Carrying hard or sharp objects on your lap, or driving with a pipe or other sharp object in your mouth, can result in injuries if your front airbag inflates.Do not attach or place objects on the front and driver’s knee airbag covers. Objects on the covers marked SRS AIRBAG could interfere with the proper operation of the airbags or be propelled inside the vehicle and hurt someone if the airbags inflate.■Important Facts About Your Airbags1Important Facts About Your AirbagsDo not attempt to deactivate your airbags. Together, airbags and seat belts provide the best protection.When driving, keep hands and arms out of the deployment path of the front airbag by holding each side of the steering wheel. Do not cross an arm over the airbag cover.
42uuAirbagsuTypes of AirbagsSafe DrivingTypes of AirbagsYour vehicle is equipped with four types of airbags:•Front airbags: Airbags in front of the driver’s and front passenger’s seats.•Driver’s knee airbag: Airbag under the steering column.•Side airbags: Airbags in the driver’s and front passenger’s seat-backs.•Side curtain airbags: Airbags above the side windows.Each is discussed in the following pages.Front Airbags (SRS)The front SRS airbags inflate in a moderate-to-severe frontal collision to help protect the head and chest of the driver and/or front passenger.SRS (Supplemental Restraint System) indicates that the airbags are designed to supplement seat belts, not replace them. Seat belts are the occupant’s primary restraint system.The front airbags are housed in the center of the steering wheel for the driver, and in the dashboard for the front passenger. Both airbags are marked SRS AIRBAG.■Housing Locations1Types of AirbagsThe airbags can inflate whenever the power mode is in ON.After an airbag inflates in a crash, you may see a small amount of smoke. This is from the combustion process of the inflator material and is not harmful. People with respiratory problems may experience some temporary discomfort. If this occurs, get out of the vehicle as soon as it is safe to do so.1Front Airbags (SRS)Dual-Stage, Multiple-Threshold Front Airbags (SRS)Your vehicle is equipped with dual-stage, multiple-threshold front airbags (SRS).During a frontal crash severe enough to cause one or both front airbags to deploy, the airbags can inflate at different rates, depending on the severity of the crash, whether or not the seat belts are latched, and/or other factors. Frontal airbags are designed to supplement the seat belts to help reduce the likelihood of head and chest injuries in frontal crashes.
Continued 43uuAirbagsuFront Airbags (SRS)Safe DrivingFront airbags are designed to inflate during moderate-to-severe frontal collisions. When the vehicle decelerates suddenly, the sensors send information to the control unit which signals one or both front airbags to inflate.A frontal collision can be either head-on or angled between two vehicles, or when a vehicle crashes into a stationary object, such as a concrete wall.While your seat belt restrains your torso, the front airbag provides supplemental protection for your head and chest.The front airbags deflate immediately so that they won’t interfere with the driver’s visibility or the ability to steer or operate other controls.The total time for inflation and deflation is so fast that most occupants are not aware that the airbags deployed until they see them lying in front of them.■Operation■How the Front Airbags Work1How the Front Airbags WorkAlthough the driver’s and front passenger’s airbags normally inflate within a split second of each other, it is possible for only one airbag to deploy. This can happen if the severity of a collision is at the margin, or threshold that determines whether or not the airbags will deploy. In such cases, the seat belt will provide sufficient protection, and the supplemental protection offered by the airbag would be minimal.
44uuAirbagsuFront Airbags (SRS)Safe Driving■When front airbags should not deployMinor frontal crashes: Front airbags were designed to supplement seat belts and help save lives, not to prevent minor scrapes, or even broken bones that might occur during a less than moderate-to-severe frontal crash.Side impacts: Front airbags can provide protection when a sudden deceleration causes a driver or front passenger to move toward the front of the vehicle. Side airbags and side curtain airbags have been specifically designed to help reduce the severity of injuries that can occur during a moderate-to-severe side impact which can cause the driver or passenger to move toward the side of the vehicle.Rear impacts: Head restraints and seat belts are your best protection during a rear impact. Front airbags cannot provide any significant protection and are not designed to deploy in such collisions.Rollovers: Seat belts, and in vehicles equipped with a rollover sensor, side airbags, and side curtain airbags offer the best protection in a rollover. Because front airbags could provide little if any protection, they are not designed to deploy during a rollover.■When front airbags deploy with little or no visible damageBecause the airbag system senses sudden deceleration, a strong impact to the vehicle framework or suspension might cause one or more of the airbags to deploy. Examples include running into a curb, the edge of a hole, or other low fixed object that causes a sudden deceleration in the vehicle chassis. Since the impact is underneath the vehicle, damage may not be readily apparent.■When front airbags may not deploy, even though exterior damage appears severeSince crushable body parts absorb crash energy during an impact, the amount of visible damage does not always indicate proper airbag operation. In fact, some collisions can result in severe damage but no airbag deployment because the airbags would not have been needed or would not have provided protection even if they had deployed.
45uuAirbagsuFront Airbags (SRS)Safe DrivingYour front airbags have advanced features to help reduce the likelihood of airbag related injuries to smaller occupants.The driver’s advanced front airbag system includes a seat position sensor.If the seat is too far forward, the airbag inflates with less force, regardless of the severity of the impact.The passenger’s advanced front airbag system has weight sensors.Although Acura recommends against carrying an infant or small child in front, if the sensors detect the weight of a child (up to about 65 lbs or 29 kg), the system will automatically turn off the passenger’s front airbag.■Advanced Airbags1Advanced AirbagsIf there is a problem with the driver’s seat position sensor, the SRS indicator will come on and the airbag will inflate with full (normal) force, regardless of the driver’s seating position.For both advanced front airbags to work properly:•Do not spill any liquid on or under the seats.•Do not put any object under the passenger’s seat.•Make sure any objects are positioned properly on the floor. Improperly positioned objects can interfere with the advanced airbag sensors.•All occupants should sit upright and wear their seat belts properly.•Do not place any cover over the passenger side dashboard.Make sure the floor mat behind the front passenger’s seat is hooked to the floor mat anchor. An improperly placed mat can interfere with the advanced airbag sensors.2Floor Mats P. 433Driver’s Seat Position SensorPassenger’s Seat Weight Sensors
46uuAirbagsuDriver’s Knee AirbagSafe DrivingDriver’s Knee AirbagThe driver’s knee SRS airbag inflates in a moderate to severe frontal collision to help keep the driver in the proper position and to help maximize the benefit provided by the vehicles other safety features.SRS (Supplemental Restraint System) indicates that the airbag is designed to supplement seat belts, not replace them. Seat belts are the occupant’s primary restraint system.The driver’s knee airbag is housed under the steering column for the driver.The airbag is marked SRS AIRBAG.When the driver’s front airbag inflates, the driver’s knee airbag also inflates.■Housing Locations1Driver’s Knee AirbagDo not attach accessories on or near the driver’s knee airbag. They can interfere with the proper operation of the airbag, or hurt someone if an airbag inflates.Housing Location■OperationWhen inflatedKnee Airbag
47uuAirbagsuDriver’s Knee AirbagSafe Driving■When driver’s knee airbag deploys with little or no visible damageBecause the airbag system senses sudden deceleration, a strong impact to the vehicle framework or suspension might cause one or more of the airbags to deploy.Examples include running into a curb, the edge of a hole, or other low fixed object that causes a sudden deceleration in the vehicle chassis. Since the impact is underneath the vehicle, damage may not be readily apparent.■When driver’s knee airbag may not deploy, even though exterior damage appears severeSince crushable body parts absorb crash energy during an impact, the amount of visible damage does not always indicate proper airbag operation. In fact, some collisions can result in severe damage but no airbag deployment because the airbags would not have been needed or would not have provided protection even if they had deployed.
48uuAirbagsuSide AirbagsSafe DrivingSide AirbagsThe side airbags help protect the torso and pelvis of the driver or a front passenger during a moderate-to-severe side impact.The side airbags are housed in the outside edge of the driver’s and passenger’s seat-backs.Both are marked SIDE AIRBAG.When the sensors detect a moderate-to-severe side impact, the control unit signals the side airbag on the impact side to immediately inflate.■Housing Locations1Side AirbagsDo not attach accessories on or near the side airbags. They can interfere with the proper operation of the airbags, or hurt someone if an airbag inflates.Do not cover or replace the front seat-back covers without consulting a dealer.Improperly replacing or covering front seat-back covers can prevent your side airbags from properly deploying during a side impact.Housing Location■OperationWhen inflatedSide Airbag
49uuAirbagsuSide AirbagsSafe Driving■When a side airbag deploys with little or no visible damageBecause the airbag system senses sudden acceleration, a strong impact to the side of the vehicle’s framework can cause a side airbag to deploy. In such cases, there may be little or no damage, but the side impact sensors detected a severe enough impact to deploy the airbag.■When a side airbag may not deploy, even though visible damage appears severeIt is possible for a side airbag to not deploy during an impact that results in apparently severe damage. This can occur when the point of impact was toward the far front or rear of the vehicle, or when the vehicle’s crushable body parts absorbed most of the crash energy. In either case, the side airbag would not have been needed nor provided protection even if it had deployed.
50uuAirbagsuSide Curtain AirbagsSafe DrivingSide Curtain AirbagsSide curtain airbags help protect the heads of the driver and passengers in outer seating positions during a moderate-to-severe side impact. The side curtain airbags equipped in this vehicle are also designed to help reduce the likelihood of partial and complete ejection of vehicle occupants through side windows in crashes, particularly rollover crashes.The side curtain airbags are located in the ceiling above the side windows on both sides of the vehicle.The side curtain airbag is designed to deploy in a rollover or a moderate-to-severe side impact.■Housing Locations1Side Curtain AirbagsIf the SRS control unit senses that your vehicle is about to rollover, it immediately deploys both side curtain airbags and activates both front seat belt tensioners.The airbag on the passenger’s side will deploy, even if there are no passengers on that side of the vehicle.To get the best protection from the side curtain airbags, occupants should wear their seat belts properly and sit upright and well back in their seats.Do not attach any objects to the side windows or roof pillars as they can interfere with the proper operation of the side curtain airbags.Side Curtain Airbag Storage■OperationDeployed Side Curtain Airbag
Continued 51uuAirbagsuAirbag System IndicatorsSafe Driving■When side curtain airbags deploy in a frontal collisionOne or both side curtain airbags may inflate in a moderate to severe angled frontal collision.In this case, the side curtain airbags will deploy slightly after the front airbags.Airbag System IndicatorsIf a problem occurs in the airbag system, the SRS indicator will come on and a message appears on the MID.■When the power mode is set to ONThe indicator comes on for a few seconds, then goes off. This tells you the system is working properly.If the indicator comes on at any other time, or does not come on at all, have the system checked by a dealer as soon as possible. If you don’t, your airbags and seat belt tensioners may not work properly when they are needed.■SRS (Supplemental Restraint System) Indicator1SRS (Supplemental Restraint System) Indicator3WARNINGIgnoring the SRS indicator can result in serious injury or death if the airbag systems or tensioners do not work properly.Have your vehicle checked by a dealer as soon as possible if the SRS indicator alerts you to a possible problem.
uuAirbagsuAirbag System Indicators52Safe Driving■When the passenger airbag off indicator comes onThe indicator comes on to alert you that the passenger’s front airbag has been turned off.This occurs when the front passenger’s weight sensors detect 65 lbs (29 kg) or less, the weight of an infant or small child, on the seat.Infants and small children should always ride properly restrained in a back seat.2Child Safety P. 54Objects placed on the seat can also cause the indicator to come on.If the front passenger seat is empty, the passenger’s front airbag will not deploy and the indicator will not come on.■Passenger Airbag Off Indicator1Passenger Airbag Off IndicatorIf the indicator comes on with no front passenger and no objects on the passenger’s seat, or with an adult riding there, something may be interfering with the weight sensors. Such as:•An object hanging on the seat or in the seat-back pocket.•A child seat or other object pressing against the rear of the seat-back.•A rear passenger pushing or pulling on the back of the front passenger’s seat.•The front seat or seat-back is forced back against an object on the seat or floor behind it.•An object placed under the front passenger’s seat.If none of these conditions exist, have your vehicle checked by a dealer as soon as possible.The passenger airbag off indicator may come on and goes off repeatedly if the total weight on the seat is near the airbag cutoff threshold.U.S. Canada
53uuAirbagsuAirbag CareSafe DrivingAirbag CareYou do not need to, and should not, perform any maintenance on or replace any airbag system components yourself. However, you should have your vehicle inspected by a dealer in the following situations:■When the airbags have deployedIf an airbag has inflated, the control unit and other related parts must be replaced. Similarly, once an automatic seat belt tensioner has been activated, it must be replaced.■When the vehicle has been in a moderate-to-severe collisionEven if the airbags did not inflate, have your dealer inspect the following: the driver’s seat position sensor, weight sensors in the passenger’s seat, front seat belt tensioners, and each seat belt that was worn during the crash.■Do not remove or modify a front seat without consulting a dealerThis would likely disable the driver’s seat position sensor or the weight sensors in the passenger’s seat. If it is necessary to remove or modify a front seat to accommodate a person with disabilities, contact an Acura dealer. For U.S. vehicles, Acura Client Service at 800-382-2238 and for Canadian vehicles, Acura Client Service at 888-9-ACURA-9.1Airbag CareWe recommend against the use of salvaged airbag system components, including the airbag, tensioners, sensors, and control unit.
54Safe DrivingChild SafetyProtecting Child PassengersEach year, many children are injured or killed in vehicle crashes because they are either unrestrained or not properly restrained. In fact, vehicle accidents are the number one cause of death of children ages 12 and under.To reduce the number of child deaths and injuries, every state, Canadian province and territory requires that infants and children be properly restrained when they ride in a vehicle.Children should sit properly restrained in a rear seat. This is because:•An inflating front or side airbag can injure or kill a child sitting in the front seat.•A child in the front seat is more likely to interfere with the driver’s ability to safely control the vehicle.•Statistics show that children of all sizes and ages are safer when they are properly restrained in a rear seat.1Protecting Child PassengersThe National Highway Traffic Safety Administration and Transport Canada recommend that all children ages 12 and under be properly restrained in a rear seat. Some states or provinces/territories have laws restricting where children may ride.3WARNINGChildren who are unrestrained or improperly restrained can be seriously injured or killed in a crash.Any child too small for a seat belt should be properly restrained in a child seat. A larger child should be properly restrained with a seat belt, using a booster seat if necessary.
55uuChild SafetyuProtecting Child PassengersSafe Driving•Any child who is too small to wear a seat belt correctly must be restrained in an approved child seat that is properly secured to the vehicle using either the lap belt portion of the lap/shoulder belt or the lower anchors of the LATCH system.•Never hold a child on your lap because it is impossible to protect them in the event of a collision.•Never put a seat belt over yourself and a child. During a crash, the belt would likely press deep into the child and cause serious or fatal injuries.•Never let two children use the same seat belt. Both children could be very seriously injured in a crash.•Do not allow children to operate the doors, windows or seat adjustments.•Do not leave children in the vehicle unattended, especially in hot weather when the inside of the vehicle can get hot enough to kill them. They could also activate vehicle controls causing it to move unexpectedly.1Protecting Child PassengersTo deactivate a lockable retractor, release the buckle and allow the seat belt to wind up all the way.To remind you of the passenger’s front airbag hazards and child safety, your vehicle warning came with a label on the dashboard (U.S. models) and has labels on the front visors. Please read and follow the instructions on these labels.2Safety Labels P. 673WARNINGAllowing a child to play with a seat belt or wrap one around their neck can result in serious injury or death.Instruct children not to play with any seat belt and make sure any unused seat belt a child can reach is buckled, fully retracted, and locked.
56uuChild SafetyuSafety of Infants and Small ChildrenSafe DrivingSafety of Infants and Small ChildrenAn infant must be properly restrained in a rear-facing, reclining child seat until the infant reaches the seat maker’s weight or height limit for the seat, and the infant is at least one year old.■Positioning a rear-facing child seatChild seats must be placed and secured in a rear seating position.When properly installed, a rear-facing child seat may prevent the driver or a front passenger from moving their seat all the way back, or from locking their seat-back in the desired position.It can also interfere with proper operation of the passenger’s advanced front airbag system.2Airbags P. 39If this occurs, we recommend that you install the child seat directly behind the front passenger’s seat, move the seat as far forward as needed, and leave it unoccupied. Or, you may wish to get a smaller rear-facing child seat.■Protecting Infants1Protecting InfantsRear-facing child seats should never be installed in a forward facing position.Always refer to the child seat manufacturer’s instructions before installation.3WARNINGPlacing a rear-facing child seat in the front seat can result in serious injury or death during a crash.Always place a rear-facing child seat in the rear seat, not the front.
Continued 57uuChild SafetyuSafety of Infants and Small ChildrenSafe DrivingIf a child is at least one year old and within the weight range indicated by the child seat manufacturer, the child should be properly restrained in a firmly secured forward-facing child seat.■Forward-facing child seat placementWe strongly recommend placing a forward-facing child seat in a rear seating position.Placing a forward-facing child seat in the front seat can be hazardous, even with advanced front airbags that automatically turn the passenger’s front airbag off. A rear seat is the safest place for a child.■Protecting Smaller Children1Protecting Smaller ChildrenEducate yourself about the laws and regulations regarding child seat use where you are driving, and follow the child seat manufacturer’s instructions.Many experts recommend use of a rear-facing seat for a child up to two years old if the child’s height and weight are appropriate for a rear-facing seat.3WARNINGPlacing a forward-facing child seat in the front seat can result in serious injury or death if the front airbag inflates.If you must place a forward-facing child seat in front, move the vehicle seat as far back as possible, and properly restrain the child.
uuChild SafetyuSafety of Infants and Small Children58Safe DrivingMost child seats are LATCH-compatible (Lower Anchors and Tethers for CHildren). Some have a rigid-type connector while others have a flexible-type connector. Both are equally easy to use. Some existing and previously owned child seats can only be installed using the seat belt. Whichever type you choose, follow the child seat manufacturer’s use and care instructions as well as the instructions in this manual. Proper installation is key to maximizing your child’s safety. In seating positions and vehicles not equipped with LATCH, a LATCH-compatible child seat can be installed using the seat belt and a top tether for added security. This is because all child seats are required to be designed so that they can be secured with a lap belt or the lap part of a lap/shoulder belt. In addition, the child seat manufacturer may advise that a seat belt be used to attach a LATCH-compatible seat once a child reaches a specified weight. Please read the child seat owner’s manual for proper installation instructions.■Important consideration when selecting a child seatMake sure the child seat meets the following three requirements:•The child seat is the correct type and size for the child.•The child seat is the correct type for the seating position.•The child seat is compliant with Federal Motor Vehicle Safety Standard 213 or Canadian Motor Vehicle Safety Standard 213.■Selecting a Child Seat1Selecting a Child SeatInstallation of a LATCH-compatible child seat is simple.LATCH-compatible child seats have been developed to simplify the installation process and reduce the likelihood of injuries caused by incorrect installation.
59uuChild SafetyuSafety of Infants and Small ChildrenContinuedSafe DrivingA LATCH-compatible child seat can be installed in the second row seats. A child seat is attached to the lower anchors with either the rigid or flexible type of connectors.1. Locate the lower anchors under the marks.2. Place the child seat on the vehicle seat then attach the child seat to the lower anchors according to the instructions that came with the child seat.uWhen installing the child seat, make sure that the lower anchors are not obstructed by the seat belt or any other object.■Installing a LATCH-Compatible Child SeatMarksRigid TypeLower Anchors
uuChild SafetyuSafety of Infants and Small Children60Safe Driving3. Put the outer head restraint to it’s upper-most position, then route the tether strap between the head restraint legs, and secure the tether strap hook onto the anchor. Make sure the strap is not twisted.3. Put the center head restraint to it’s lowest position, then route the tether strap over the top of the head restraint and secure the tether strap hook onto the anchor. Make sure the strap is not twisted.4. Tighten the tether strap as instructed by the child seat manufacturer.5. Make sure the child seat is firmly secured by rocking it forward and back and side to side; little movement should be felt.6. Make sure any unused seat belt that a child can reach is buckled, the lockable retractor is activated, and the belt is fully retracted and locked.2Protecting Child Passengers P. 54Flexible TypeOuter positions1Installing a LATCH-Compatible Child SeatFor your child’s safety, when using a child seat installed using the LATCH system, make sure that the child seat is properly secured to the vehicle. A child seat that is not properly secured will not adequately protect a child in a crash and may cause injury to the child or other vehicle occupants.Tether Strap HookAnchorCenter positionAll positions
Continued 61uuChild SafetyuSafety of Infants and Small ChildrenSafe Driving1. Place the child seat on the vehicle seat.2. Route the seat belt through the child seat according to the seat maker’s instructions, and insert the latch plate into the buckle.uInsert the latch plate fully until it clicks.3. Slowly pull the shoulder part of the belt all the way out until it stops. This activates the lockable retractor.4. Let the seat belt completely wind up into the retractor, then try to pull it out to make sure the retractor is locked.uIf you are able to pull the shoulder belt out, the lockable retractor is not activated. Pull the seat belt all the way out, and repeat steps 3 – 4.5. Grab the shoulder part of the seat belt near the buckle, and pull up to remove any slack from the lap part of the belt.uWhen doing this, place your weight on the child seat and push it into the vehicle seat.■Installing a Child Seat with a Lap/Shoulder Seat Belt1Installing a Child Seat with a Lap/Shoulder Seat BeltA child seat that is not properly secured will not adequately protect a child in a crash and may cause injury to the child or other vehicle occupants.
uuChild SafetyuSafety of Infants and Small Children62Safe Driving6. Make sure the child seat is firmly secured by rocking it forward and back and side to side; little movement should be felt.7. Make sure any unused seat belt that a child can reach is buckled, the lockable retractor is activated, and the belt is fully retracted and locked.2Protecting Child Passengers P. 54A tether anchorage point is provided behind each second and third row seating position. A child seat that is installed with a seat belt and comes with a tether can use the tether for additional security.1Installing a Child Seat with a Lap/Shoulder Seat BeltTo deactivate a lockable retractor, release the buckle and allow the seat belt to wind up all the way.■Adding Security with a TetherTether Anchorage PointsSecond row seat1Adding Security with a TetherSince a tether can provide additional security to the lap/shoulder seat belt installation, we recommend using a tether whenever one is available.Tether Anchorage PointsThird row seat
63uuChild SafetyuSafety of Infants and Small ChildrenSafe Driving■Using a second row anchor1. Put the outer head restraint to it’s upper-most position, then route the tether strap between the head restraint legs, and secure the tether strap hook onto the anchor. Make sure the strap is not twisted.1. Put the center head restraint to it’s lowest position, then route the tether strap over the top of the head restraint and secure the tether strap hook onto the anchor. Make sure the strap is not twisted.2. Tighten the tether strap as instructed by the child seat manufacturer.■Using a third row anchor1. Pull up the head restraint and push rearwards until it latches, then route the tether strap through the head restraint legs. Make sure the strap is not twisted.2. Open the anchor cover.3. Secure the tether strap hook onto the anchor.4. Tighten the tether strap as instructed by the child seat manufacturer.AnchorSecond row seatTether Strap HookOuter positionsCenter positionAll positionsTether Strap HookAnchorThird row seat
64uuChild SafetyuSafety of Larger ChildrenSafe DrivingSafety of Larger ChildrenThe following pages give instructions on how to check proper seat belt fit, what kind of booster seat to use if one is needed, and important precautions for a child who must sit in front.When a child is too big for a child seat, secure the child in a rear seat using the lap/shoulder seat belt. Have the child sit upright and all the way back, then answer the following questions.■Checklist•Do the child’s knees bend comfortably over the edge of the seat?•Does the shoulder belt cross between the child’s neck and arm?•Is the lap part of the seat belt as low as possible, touching the child’s thighs?•Will the child be able to stay seated like this for the whole trip?If you answer yes to all these questions, the child is ready to wear the lap/shoulder seat belt correctly. If you answer no to any question, the child needs to ride on a booster seat until the seat belt fits properly without a booster seat.■Protecting Larger Children■Checking Seat Belt Fit1Safety of Larger Children3WARNINGAllowing a child age 12 or under to sit in front can result in injury or death if the passenger’s front airbag inflates.If a larger child must ride in front, move the vehicle seat as far to the rear as possible, have the child sit up properly and wear the seat belt properly, using a booster seat if needed.
65uuChild SafetyuSafety of Larger ChildrenSafe DrivingIf a lap/shoulder seat belt cannot be used properly, position the child in a booster seat in a rear seating position. For the child’s safety, check that the child meets the booster seat manufacturer’s recommendations.Your vehicle has a rear seat where children can be properly restrained. If you ever have to carry a group of children, and a child must ride in front:•Make sure you read and fully understand the instructions and safety information in this manual.•Move the front passenger seat as far back as possible.•Have the child sit upright and well back in the seat.•Check that the seat belt is properly positioned so that the child is secure in the seat.■Monitoring child passengersWe strongly recommend that you keep an eye on child passengers. Even older, more mature children sometimes need to be reminded to fasten their seat belts and sit up properly.■Booster Seats1Booster SeatsWhen installing a booster seat, make sure to read the instructions that came with it, and install the seat accordingly.There are high- and low-type booster seats. Choose a booster seat that allows the child to wear the seat belt correctly.Some U.S. states, and Canadian provinces and territories require children to use a booster seat until they reach a given age or weight (e.g. six years or 60 lbs). Be sure to check current laws in the state or province, or territory where you intend to drive.■Protecting Larger Children-Final Checks
66Safe DrivingExhaust Gas HazardCarbon Monoxide GasThe engine exhaust from this vehicle contains carbon monoxide, a colorless, odorless, and highly toxic gas. As long as you properly maintain your vehicle, carbon monoxide gas will not get into the interior.■Have the exhaust system inspected for leaks whenever•The exhaust system is making an unusual noise.•The exhaust system may have been damaged.•The vehicle is raised for an oil change.When you operate a vehicle with the tailgate open, airflow can pull exhaust gas into the interior and create a hazardous condition. If you must drive with the tailgate open, open all the windows and set the climate control system as shown below.1. Select the fresh air mode.2. Select the   mode.3. Set the fan speed to high.4. Set the temperature control to a comfortable setting.Adjust the climate control system in the same manner if you sit in your parked vehicle with the engine running.1Carbon Monoxide GasAn enclosed area such as a garage can quickly fill up with carbon monoxide gas.Do not run the engine with the garage door closed. Even when the garage door is open, drive out of the garage immediately after starting the engine.3WARNINGCarbon monoxide gas is toxic.Breathing it can cause unconsciousness and even kill you.Avoid any enclosed areas or activities that expose you to carbon monoxide.
67Safe DrivingSafety LabelsLabel LocationsThese labels are in the locations shown. They warn you of potential hazards that can cause serious injury or death. Read these labels carefully.If a label comes off or becomes hard to read (except for the U.S. dashboard label which may be removed by the owner), contact a dealer for a replacement.Sun VisorU.S. models Canadian modelsRadiator CapU.S. modelsU.S. models onlyDashboardCanadian modelsDoorjambsU.S. models onlySun Visor
68
69Instrument PanelThis chapter describes the buttons, indicators, and gauges that are used while driving.Indicators ............................................ 70Multi-Information Display (MID) Warning and Information Messages ............... 84Gauges and Multi-Information Display (MID)Gauges.............................................. 97MID ................................................... 98
70Instrument PanelIndicatorsIndicator Name On/Blinking Explanation MessageParking Brake and Brake System Indicator (Red)●Comes on for a few seconds when you set the power mode to ON, then goes off.●Comes on when the parking brake is applied, and goes off when it is released.●Comes on when the brake fluid level is low.●Comes on if there is a problem with the brake system.●The beeper sounds and the indicator comes on if you drive with the parking brake not fully released.●Comes on while driving - Make sure the parking brake is released. Check the brake fluid level.2What to do when the indicator comes on while driving P. 467●Comes on along with the ABS indicator - Have your vehicle checked by a dealer.2If the Brake System Indicator (Red) Comes On P. 467Brake System Indicator (Amber)●Comes on for a few seconds when you set the power mode to ON, then goes off.●Comes on if there is a problem with a system related to braking other than the conventional brake system.●Comes on while driving - Have your vehicle checked by a dealer.●With this indicator on, your vehicle still has normal braking ability.U.S.Canada(Red)U.S.Canada(Amber)U.S.Canada
71uuIndicatorsuContinuedInstrument PanelIndicator Name On/Blinking Explanation MessageLow Oil Pressure Indicator●Comes on when you set the power mode to ON, and goes off when the engine starts.●Comes on when the engine oil pressure is low.●Comes on while driving - Immediately stop in a safe place.2If the Low Oil Pressure Indicator Comes On P. 465Malfunction Indicator Lamp●Comes on when you set the power mode to ON, and goes off either when the engine starts or after several seconds if the engine did not start. If “readiness codes” have not been set, it blinks five times before it goes off.●Comes on if there is a problem with the emissions control systems.●Blinks when a misfire in the engine’s cylinders is detected.●Readiness codes are part of the on board diagnostics for the emissions control systems.2Testing of Readiness Codes P. 485●Comes on while driving - Have your vehicle checked by a dealer.●Blinks while driving - Stop in a safe place where there are no flammable objects. Stop the engine for 10 minutes or more, and wait for it to cool down. Then, take your vehicle to a dealer.2If the Malfunction Indicator Lamp Comes On or Blinks P. 466Charging System Indicator●Comes on when you set the power mode to ON, and goes off when the engine starts.●Comes on when the battery is not charging.●Comes on while driving - Turn off the climate control system and rear defogger in order to reduce electricity consumption.2If the Charging System Indicator Comes On P. 465
72uuIndicatorsuInstrument PanelIndicator Name On/Blinking Explanation MessageShift Lever Position Indicator●Indicates current shift lever position. 2Shifting P. 329 —Transmission Indicator●Blinks if the transmission system has a problem.●Blinks while driving - Avoid sudden starts and acceleration and have your vehicle checked by a dealer immediately.M (sequential shift mode) Indicator/Gear Position Indicator●Comes on when the manual sequential shift mode is applied. 2Sequential Shift Mode P. 331 —
73uuIndicatorsuContinuedInstrument PanelIndicator Name On/Blinking Explanation MessageSeat Belt Reminder Indicator●Comes on and the beeper sounds if you are not wearing a seat belt when you set the power mode to ON.●If the front passenger is not wearing a seat belt, the indicator comes on about a few seconds later.●Blinks while driving if either you or the front passenger has not fastened a seat belt. The beeper sounds and the indicator blinks at regular intervals.●The beeper stops and the indicator goes off when you and the front passenger fasten their seat belts.●Stays on after you or the front passenger has fastened the seat belt - A detection error may have occurred in the sensor. Have your vehicle checked by a dealer.2Seat Belt Reminder P. 32Low Fuel Indicator●Comes on when the fuel reserve is running low (approximately 2.5 U.S. gal./9.5 Liter left).●Blinks if there is a problem with the fuel gauge.●Comes on - Refuel your vehicle as soon as possible.●Blinks - Have your vehicle checked by a dealer.
74uuIndicatorsuInstrument PanelIndicator Name On/Blinking Explanation MessageAnti-lock Brake System (ABS) Indicator●Comes on for a few seconds when you set the power mode to ON, then goes off.●If it comes on at any other time, there is a problem with the ABS.●Stays on constantly - Have your vehicle checked by a dealer. With this indicator on, your vehicle still has normal braking ability but no anti-lock function.2Anti-lock Brake System (ABS) P. 369Supplemental Restraint System Indicator●Comes on for a few seconds when you set the power mode to ON, then goes off.●Comes on if a problem with any of the following is detected:-Supplemental restraint system-Side airbag system-Side curtain airbag system-Seat belt tensioner●Stays on constantly or does not come on at all - Have your vehicle checked by a dealer.
75uuIndicatorsuContinuedInstrument PanelIndicator Name On/Blinking Explanation MessageVehicle Stability Assist (VSA®) System Indicator●Comes on for a few seconds when you set the power mode to ON, then goes off.●Blinks when VSA®, or trailer stability assist is active.●Comes on if there is a problem with the VSA®, hill start assist, trailer stability assist or brake lighting system.●Stays on constantly - Have your vehicle checked by a dealer.2VSA® (Vehicle Stability Assist), aka ESC (Electronic Stability Control), System P. 3582Trailer Stability Assist* P. 3172Hill start assist system P. 326●When Trailer Stability Assist Problem is displayed on the MID, the VSA® does not activate.VSA® OFF Indicator●Comes on for a few seconds when you set the power mode to ON, then goes off.●Comes on when you deactivate VSA®.2VSA® On and Off P. 359 —* Not available on all models
76uuIndicatorsuInstrument PanelIndicator Name On/Blinking Explanation MessageSpeed-sensitive Electric Power Steering (EPS) System Indicator●Comes on when you set the power mode to ON, and goes off when the engine starts.●Comes on if there is a problem with the EPS system.●Stays on constantly or does not come on at all - Have your vehicle checked by a dealer.2If the Speed-Sensitive Electric Power Steering (EPS) System Indicator Comes On P. 467Low Tire Pressure/TPMS Indicator●Comes on for a few seconds when you set the power mode to ON.●Comes on if the tire pressure of any of the tires becomes significantly low.●Blinks for about one minute, and then stays on if there is a problem with the TPMS, or when a compact spare tire* is temporarily installed.●Comes on while driving - Stop in a safe place, check tire pressures, and inflate the tire(s) if necessary.●Blinks and remains on - Have your vehicle checked by a dealer. If the vehicle is fitted with a compact spare, get your regular tire repaired or replaced and put back on your vehicle as soon as you can.Turn Signal Indicators●Blinks when you operate the turn signal lever.●Blinks along with all turn signals if you press the hazard warning button.●Does not blink or blinks rapidly - A turn signal light bulb has blown. Change the bulb immediately.2Front Turn Signal/Front Side Marker/Parking Light Bulbs P. 408—High Beam Indicator●Comes on when the high beam headlights are on. ——* Not available on all models
77uuIndicatorsuContinuedInstrument PanelIndicator Name On/Blinking Explanation MessageLights On Indicator●Comes on whenever the light switch is on, or in AUTO when the exterior lights are on.●If you set the power mode to ACCESSORY or VEHICLE OFF (LOCK) while the lights are on, a chime sounds when the driver’s door is opened.—Immobilizer System Indicator●Comes on briefly when you set the power mode to ON, then goes off.●Comes on if the immobilizer system cannot recognize the key information.●Blinks - You cannot start the engine. Set the power mode to VEHICLE OFF (LOCK), then select the ON mode again.●Repeatedly blinks - The system may be malfunctioning. Have your vehicle checked by a dealer.●Do not attempt to alter this system or add other devices to it. Electrical problems can occur.—
78uuIndicatorsuInstrument PanelIndicator Name On/Blinking Explanation MessageSecurity System Alarm Indicator●Blinks when the security system alarm has been set. 2Security System Alarm P. 135 —System Message Indicator●Comes on for a few seconds when you set the power mode to ON, then goes off.●Comes on along with a beep when a problem is detected. A system message on the MID appears at the same time.●While the indicator is on, roll the multi-function steering wheel control to see the message again.●Refer to the Indicators information in this chapter when a system message appears on the MID. Take the appropriate action for the message.●The MID does not return to the normal screen unless the warning is canceled, or the multi-function steering-wheel controls is rolled.—CRUISE MAIN Indicator*●Comes on when you press the CRUISE button. 2Cruise Control P. 334 —CRUISE CONTROL Indicator*●Comes on when you have set a speed for cruise control. 2Cruise Control P. 334 —* Not available on all models
79uuIndicatorsuContinuedInstrument PanelIndicator Name On/Blinking Explanation MessageKeyless Access System Indicator●Comes on for a few seconds when you set the power mode to ON.●Comes on as soon as a problem is detected in the keyless access system or keyless starting system.●Have your vehicle checked by a dealer.Super Handling-All Wheel DriveTM (SH-AWD®) Indicator*●Comes on for a few seconds when you set the power mode to ON, then goes off.●Comes on if there is a problem with the SH-AWD® system.●Blinks when the differential temperature is too high.●Stays on constantly - The engine drives the front wheels only in this state. Have your vehicle checked by a dealer.●Blinks while driving - Stop in a safe place, shift to (P, and idle the engine until the indicator goes off. If the indicator does not stop blinking, take your vehicle to a dealer.2Super Handling-All Wheel DriveTM (SH-AWD®)* P. 363* Not available on all models
80uuIndicatorsuInstrument PanelIndicator Name On/Blinking Explanation MessageForward Collision Warning (FCW) Indicator*●Comes on for a few seconds when you set the power mode to ON, then goes off.●Comes on when you have customized FCW to turn off.●Comes on if there is a problem with the FCW system.●Stays on constantly without FCW off - Have your vehicle checked by a dealer.●Comes on when the FCW system shuts itself off.●Stays on - The temperature inside the FCW system is too high. The system activates when the temperature inside the system cools down.2Automatic shutoff P. 348●Stays on - The area around the camera is blocked by dirt, mud, etc. Stop your vehicle in a safe place, and wipe it off with a soft cloth.●Have your vehicle checked by a dealer if the indicator and message come back on after you cleaned the area around the camera.2Automatic shutoff P. 348* Not available on all models
81uuIndicatorsuContinuedInstrument Panel*1:Models without LKAS*2:Models with LKASIndicator Name On/Blinking Explanation MessageLane Departure Warning (LDW) Indicator*●Comes on for a few seconds when you set the power mode to ON, then goes off.●Comes on if there is a problem with the LDW system.●Stays on constantly - Have your vehicle checked by a dealer.●Comes on when the LDW system shuts itself off.●Stays on - The temperature inside the LDW camera is too high.Use the climate control system to cool down the camera.The system activates when the temperature inside the camera cools down.2LDW Camera P. 351●Stays on - The area around the camera is blocked by dirt, mud, etc. Stop your vehicle in a safe place, and wipe it off with a soft cloth.●Have your vehicle checked by a dealer if the indicator and message come back on after you cleaned the area around the camera.2LDW Camera P. 351*1*2Models without LKAS* Not available on all models
82uuIndicatorsuInstrument PanelIndicator Name On/Blinking Explanation MessageAdaptive Cruise Control (ACC) with Low Speed Follow (LSF) Indicator (Amber)*●Comes on for a few seconds when you set the power mode to ON, then goes off.●Comes on if there is a problem with ACC with LSF.●Comes on while driving - Have your vehicle checked by a dealer.Adaptive Cruise Control (ACC) with Low Speed Follow (LSF) Indicator (Green)*●Comes on when you press the MAIN button. 2Adaptive Cruise Control (ACC) with Low Speed Follow (LSF)* P. 337 —Lane Keeping Assist System (LKAS) Indicator (Amber)*●Comes on for a few seconds when you set the power mode to ON, then goes off.●Comes on if there is a problem with the LKAS.●Stays on constantly - Have your vehicle checked by a dealer.Lane Keeping Assist System (LKAS) Indicator (Green)*●Comes on when you press the MAIN button. 2Lane Keeping Assist System (LKAS)* P. 353 —* Not available on all models
83uuIndicatorsuInstrument PanelIndicator Name On/Blinking Explanation MessageBlind Spot Information (BSI) Indicator*●Comes on for a few seconds when you set the power mode to ON, then goes off.●Stays on while BSI is turned off.—●Comes on when mud, snow, or ice accumulates in the vicinity of sensor.●Comes on while driving - Remove the obstacle in the vicinity of sensor.2Blind Spot Information (BSI) System* P. 361●Comes on if there is a problem with the system.●Comes on while driving - Have your vehicle checked by a dealer.Collision Mitigation Brake SystemTM (CMBSTM) Indicator*●Comes on for a few seconds when you set the power mode to ON, then goes off.●Comes on when you deactivate the CMBSTM. A MID message appears for a few seconds.●Comes on if there is a problem with the CMBSTM.●Stays on constantly without the CMBSTM off - Have your vehicle checked by a dealer.2Collision Mitigation Braking SystemTM (CMBSTM)* P. 371* Not available on all models
84uuIndicatorsuMulti-Information Display (MID) Warning and Information MessagesInstrument PanelMulti-Information Display (MID) Warning and Information MessagesThe following messages appear only on the MID. Roll the multi-function steering-wheel controls to see the message again with the system message indicator on.Message Condition Explanation●Appears if any door or the tailgate is not completely closed.●Goes off when all doors and the tailgate are closed.●Appears when the fuel fill cap is loose or is not installed.2Tighten Fuel Cap Message P. 466
85uuIndicatorsuMulti-Information Display (MID) Warning and Information MessagesContinuedInstrument PanelMessage Condition Explanation●Appears when the washer fluid is low. ●Refill washer fluid.2Refilling Window Washer Fluid P. 406●Appears while you are customizing the settings and the shift lever is moved out of (P.2Customized Features P. 104●Appears when the transmission fluid temperature is too high.●Stop in a safe place in (P. Let the engine idle until the message disappears.●Appears when there is a problem with the sensor on the battery.●Have your vehicle checked by a dealer.2Checking the Battery P. 426●Appears along with the battery charging system indicator when the battery is not charging.●Turn off the climate control system and rear defogger to reduce electricity consumption.2If the Charging System Indicator Comes On P. 465Canadian models
86uuIndicatorsuMulti-Information Display (MID) Warning and Information MessagesInstrument PanelMessage Condition Explanation●Appears when the scheduled maintenance is due soon.●Consequently, Maintenance Due Now and Maintenance Past Due follow. 2Maintenance Minder Messages on the Multi-Information Display (MID) P. 392●Appears when the engine coolant temperature gets abnormally high. 2Overheating P. 463●Appears when there is a problem with the power tailgate system.●Manually open or close the power tailgate.●Have your vehicle checked by a dealer.U.S.Canada
87uuIndicatorsuMulti-Information Display (MID) Warning and Information MessagesContinuedInstrument PanelMessage Condition Explanation●Appears if there is a problem with the starting system. ●Hold the ENGINE START/STOP button up to 15 seconds to start the engine.2Starting the Engine P. 322Have your vehicle checked by a dealer.●Appears when you set the power mode to ACCESSORY or ON. 2Starting the Engine P. 322●Appears when the steering wheel is locked. ●Move the steering wheel left and right after pressing the ENGINE START/STOP button.U.S.Canada
88uuIndicatorsuMulti-Information Display (MID) Warning and Information MessagesInstrument PanelMessage Condition Explanation●Appears if you press the ENGINE START/STOP button to turn the engine off without the shift lever in (P.●Press the ENGINE START/STOP button twice after moving the shift lever to (P.●Appears when the power mode is in ACCESSORY.—●Appears after the driver’s door is opened when the power mode is in ACCESSORY.●Press the ENGINE START/STOP button twice with your foot off the brake pedal to change the power mode to VEHICLE OFF (LOCK).●Appears when you close the door with the power mode is in ON without the keyless access remote inside the vehicle.●Disappears when you bring the keyless access remote back inside the vehicle and close the door.2Keyless Access Remote Reminder P. 143●Appears when the keyless access remote battery becomes weak.●Replace the battery as soon as possible.2Replacing the Button Battery P. 427●Appears if the keyless access remote battery is too weak to start the engine or the key is not with you to start the engine.The beeper sounds six times.●Bring the keyless access remote in front of the ENGINE START/STOP button to be touched with.2If the Keyless Access Remote Battery is Weak P. 458
89uuIndicatorsuMulti-Information Display (MID) Warning and Information MessagesContinuedInstrument PanelMessage Condition Explanation●Appears when pressing the IDS button.uPress again to change the next mode. 2Integrated Dynamics System (IDS) P. 333●Appears if there is a problem with the radiator system. ●Drive slowly to prevent overheating and have your vehicle checked by a dealer as soon as possible.●Appears when there is a problem with the headlights. ●Appears while driving - The low beam headlights may not be on. When conditions allow you to drive safety, have your vehicle checked by a dealer as soon as possible.●Appears if there is a problem with the parking sensor system*.●Check if the area around the sensor(s) is covered with mud, ice, snow, etc. If the indicator(s) stays on or the beeper does not stop even after you clean the area, have the system checked by a dealer.* Not available on all models
90uuIndicatorsuMulti-Information Display (MID) Warning and Information MessagesInstrument PanelMessage Condition Explanation●Flashes when the system senses a likely collision with a vehicle in front of you.●Take the appropriate means to prevent a collision (apply the brakes, change lanes, etc.)2Collision Mitigation Braking SystemTM (CMBSTM)* P. 3712Forward Collision Warning (FCW)* P. 3462Adaptive Cruise Control (ACC) with Low Speed Follow (LSF) * P. 337●Appears when your vehicle is too close to the traffic lane lines. The beeper sounds.●Take appropriate action to keep your vehicle within the lane lines.2Lane Departure Warning (LDW)* P. 350●Appears if there is a problem with the e-pretensioner system*.●Have your vehicle checked by a dealer.* Not available on all models
91uuIndicatorsuMulti-Information Display (MID) Warning and Information MessagesContinuedInstrument PanelMessage Condition Explanation●Appears when ACC with LSF has been automatically canceled.●You can resume the set speed after the condition that caused ACC with LSF to cancel improves. Press the RES/+/SET/– switch up.2Adaptive Cruise Control (ACC) with Low Speed Follow (LSF)* P. 337●Appears if anything covers the radar sensor cover and prevents the sensor from detecting a vehicle in front.●May appear when driving in bad weather (rain, snow, fog, etc.)●When the radar sensor gets dirty, stop your vehicle in a safe place, and wipe off dirt using a soft cloth.●Have your vehicle checked by a dealer if the message does not disappear even after you clean the sensor cover.●Appears when the vehicle speed slows down to 25 mph (40 km/h) and the vehicle ahead of you goes out of the ACC with LSF range while ACC with LSF is in operation.●ACC with LSF has been automatically canceled.2Adaptive Cruise Control (ACC) with Low Speed Follow (LSF)* P. 337●Appears when pressing the RES/+/SET/– switch down while the vehicle speed is less than 25 mph (40 km/h) and the vehicle ahead of you goes out of the ACC with LSF range.●ACC with LSF cannot be set.2Adaptive Cruise Control (ACC) with Low Speed Follow (LSF)* P. 337●Appears when the distance between your vehicle and the vehicle ahead of you is too close while ACC with LSF is in operation.●ACC with LSF has been automatically canceled.2Adaptive Cruise Control (ACC) with Low Speed Follow (LSF)* P. 337Models with ACC with LSF* Not available on all models
92uuIndicatorsuMulti-Information Display (MID) Warning and Information MessagesInstrument PanelMessage Condition Explanation●Appears when pressing the RES/+/SET/– switch down while the distance between your vehicle and the vehicle ahead of you is too close.●ACC with LSF cannot be set.2Adaptive Cruise Control (ACC) with Low Speed Follow (LSF)* P. 337●Appears when pressing the RES/+/SET/– switch down while the driver’s seat belt is unfastened.●ACC with LSF cannot be set.2Adaptive Cruise Control (ACC) with Low Speed Follow (LSF)* P. 337●Appears when pressing the RES/+/SET/– switch down while the shift lever is in any position other than (D.●ACC with LSF cannot be set.2Adaptive Cruise Control (ACC) with Low Speed Follow (LSF)* P. 337* Not available on all models
93uuIndicatorsuMulti-Information Display (MID) Warning and Information MessagesContinuedInstrument PanelMessage Condition Explanation●Appears when the vehicle is stopped on a very steep slope while ACC with LSF is in operation.●ACC with LSF has been automatically canceled.2Adaptive Cruise Control (ACC) with Low Speed Follow (LSF)* P. 337●Appears when pressing the RES/+/SET/– switch down while the vehicle is stopped on a very steep slope.●ACC with LSF cannot be set.2Adaptive Cruise Control (ACC) with Low Speed Follow (LSF)* P. 337●Appears when pressing the RES/+/SET/– switch down while the parking brake is applied.●ACC with LSF cannot be set.2Adaptive Cruise Control (ACC) with Low Speed Follow (LSF)* P. 3372Parking Brake P. 367* Not available on all models
94uuIndicatorsuMulti-Information Display (MID) Warning and Information MessagesInstrument PanelMessage Condition Explanation●Appears when your vehicle is stopped by ACC with LSF for more than five minutes. The beeper sounds.—●Appears when your vehicle is stopped by ACC with LSF for more than nine and a half minutes.uThe display starts the countdown when ACC with LSF is cancelled within 30 seconds. The beeper sounds.—●Appears if ACC with LSF is canceled while your vehicle is automatically stopped by ACC with LSF. The beeper sounds.●Immediately depress the brake pedal.●Appears when pressing the RES/+/SET/– switch down while the vehicle is moving and the brake pedal is depressed.●ACC with LSF cannot be set.2Adaptive Cruise Control (ACC) with Low Speed Follow (LSF)* P. 337* Not available on all models
95uuIndicatorsuMulti-Information Display (MID) Warning and Information MessagesContinuedInstrument PanelMessage Condition Explanation●Appears when you unlock and open the driver’s door while the engine is running by two-way keyless access remote.2Remote Engine Start with Vehicle Feedback* P. 324Models with two-way keyless access remote* Not available on all models
96uuIndicatorsuMulti-Information Display (MID) Warning and Information MessagesInstrument PanelMessage Condition Explanation●Appears when the vehicle is driving out of a detected line. The beeper sounds simultaneously if selected by customization.●Keep the vehicle within the lane you are driving.●The color of either line changes from white to amber as the vehicle gets closer to that side of the lane line.●Blinks when you fail to steer the vehicle. The beeper sounds simultaneously if selected by customization.●Operate the steering wheel to resume the LKAS.●Appears when the LKAS is in operation, or the LKAS button is pressed, but there is a problem with a system related to the LKAS. The LKAS cancels automatically. The beeper sounds simultaneously if selected by customization.●If any other system indicators come on, such as the VSA®, ABS and brake system, take appropriate action.2Indicators P. 70●Appears when the LKAS is in operation, or the LKAS button is pressed, but there the temperature inside the LKAS camera is too high. The LKAS cancels automatically. The beeper sounds simultaneously if selected by customization.●Use the climate control system to cool down the camera.●Goes off - The camera has been cooled down. Pressing the LKAS button can resume the system.2LKAS camera P. 354Models with LKAS
97Instrument PanelGauges and Multi-Information Display (MID)GaugesGauges include the speedometer, tachometer, fuel gauge, and related indicators. They are displayed when the power mode is in ON.Displays your driving speed in mph (U.S.) or km/h (Canada).Shows the number of engine revolutions per minute.Displays the amount of fuel left in the fuel tank.Displays the temperature of the engine coolant.■Speedometer■Tachometer■Fuel Gauge■Temperature Gauge1Fuel GaugeNOTICEYou should refuel when the reading approaches  .Running out of fuel can cause the engine to misfire, damaging the catalytic converter.The actual amount of remaining fuel may differ from the fuel gauge reading.E1Temperature GaugeNOTICEDriving with the temperature gauge pointer in the upper zone can cause serious engine damage. Pull safely to the side of the road and allow engine temperature to return to normal.2Overheating P. 463
98uuGauges and Multi-Information Display (MID)uMIDInstrument PanelMIDThe MID shows the odometer, trip meter, outside temperature indicator, and other gauges. It also displays important messages such as warnings and other helpful information.Roll the multi-function steering-wheel controls or press the TRIP button to change the display.■Switching the DisplayBlank Instant Fuel Economy/Average Fuel EconomyRange Elapsed Time Average SpeedSH-AWD®*/IDSVehicle SettingsTire Pressure for Each TireEngine Oil Life Turn-by-Turn Directions*Multi-function Steering-wheel Controls* Not available on all models
99uuGauges and Multi-Information Display (MID)uMIDContinuedInstrument PanelShows the total number of miles (U.S.) or kilometers (Canada) that your vehicle has accumulated.■OdometerTRIP ButtonOutside TemperatureTrip A Trip BOdometerTRIPTRIPTRIP
uuGauges and Multi-Information Display (MID)uMID100Instrument PanelShows the total number of miles (U.S.) or kilometers (Canada) driven since the last reset. Meters A and B can be used to measure two separate trips.■Resetting a trip meterTo reset a trip meter, display it, then press and hold the TRIP button until the trip meter is reset to 0.0.Shows the outside temperature in Fahrenheit (U.S.) or Celsius (Canada).■Adjusting the outside temperature displayAdjust the temperature reading up to ±5°F or ±3°C if the temperature reading seems incorrect.Shows the estimated average fuel economy of each trip meter in mpg (U.S.) or l/100 km (Canada). The display is updated at set intervals. When a trip meter is reset, the average fuel economy is also reset.■Trip Meter■Outside Temperature■Average Fuel Economy1Trip MeterSwitch between trip meter A and trip meter B by pressing the TRIP button.1Outside TemperatureThe temperature sensor is located in the front bumper.Road heat and exhaust from another vehicle can affect the temperature reading when your vehicle speed is less than 19 mph (30 km/h).It may take several minutes for the display to be updated after the temperature reading has stabilized.Use the MID’s customized features to correct the temperature.2Customized Features P. 1041Average Fuel EconomyYou can change when to reset the average fuel economy.2Customized Features P. 104
Continued 101uuGauges and Multi-Information Display (MID)uMIDInstrument PanelShows the instant fuel economy as a bar graph in mpg (U.S.) or l/100 km (Canada).Shows the estimated distance you can travel on the remaining fuel. This distance is estimated from the fuel economy of your trips in the past.Shows the time elapsed since the last time Trip A or Trip B was reset.Shows the average speed in mph (U.S.) or km/h (Canada) since the last time Trip A or Trip B was reset.■Instant Fuel Economy■Range■Elapsed Time■Average Speed1Elapsed TimeYou can change when to reset the elapsed time.2Customized Features P. 1041Average SpeedYou can change when to reset the average speed.2Customized Features P. 104
uuGauges and Multi-Information Display (MID)uMID102Instrument PanelThe indicators on the display show the amount of torque being transferred to the right front, left front, right rear, and left rear wheels.2Super Handling-All Wheel DriveTM (SH-AWD®)* P. 363Shows the current mode for IDS.2Integrated Dynamics System (IDS) P. 333Shows you turn-by-turn driving directions to your destination linked with the navigation system.2Refer to the navigation system■SH-AWD® Torque Distribution Monitor*■Current Mode for IDS■Turn-by-Turn Directions1Turn-by-Turn DirectionsYou can select whether the turn-by-turn display comes on or not during the route guidance.2Customized Features P. 1042Refer to the navigation systemModels with navigation system* Not available on all models
103uuGauges and Multi-Information Display (MID)uMIDContinuedInstrument PanelShows the remaining oil life and Maintenance MinderTM.2Maintenance MinderTM P. 391Shows each tire’s pressure.2Tire Pressure Monitoring System (TPMS) P. 363■Engine Oil Life and Maintenance Items■Tire Pressure Monitor
uuGauges and Multi-Information Display (MID)uMID104Instrument PanelUse the MID to customize certain features.■How to customizeSelect the Vehicle Settings screen by rolling the multi-function steering-wheel controls while the power mode is in ON, and the vehicle is at a complete stop. Push the multi-function steering-wheel controls.■Customized Features1Customized FeaturesTo customize other features, roll the multi-function steering-wheel controls.2List of customizable options P. 1072Example of customization settings P. 111Customization is possible when you see the driver’s ID (Driver 1 or Driver 2) on the screen.The driver’s ID indicates which remote transmitter you have used to unlock the driver’s door. The customized settings are recalled every time you unlock the driver’s door with that remote.Shift to (P before you attempt to change any customized setting.Multi-function Steering-wheel ControlsRoll: Changes the customize menus and items.Push: Enter the selected item.MID: Goes to Vehicle Settings.
105uuGauges and Multi-Information Display (MID)uMIDContinuedInstrument Panel■Customization flowRoll the multi-function steering-wheel controls to select Vehicle Settings and push the multi-function steering-wheel controls.Vehicle Settings“Trip A” Reset TimingLanguage SelectionAdjust Outside Temp. DisplayMemory Position LinkDoor Unlock ModeKeyless Access BeepDriver Assist System Setup*Meter SetupDriving Position SetupKeyless Access Setup“Trip B” Reset TimingTurn by Turn Display*Forward Collision Warning Distance*ACC Forward Vehicle Detect Beep*ACC Display Speed Unit*RollPushPushPushPushPushRollLane Keeping Assist Suspend Beep*Blind Spot Info*Steering Wheel Movement At Entry/ExitAuto Seatbelt Tension*RollRollRemote Start System On/Off*RollPushKeyless Access Light FlashRollRollRollRoll* Not available on all models
106uuGauges and Multi-Information Display (MID)uMIDInstrument PanelExitDoor SetupIDS SetupDefault AllLighting SetupKey And Remote Unlock ModeAuto Door LockAuto Door UnlockKeyless Lock Answer BackSecurity Relock TimerInterior Light Dimming TimeHeadlight Auto Off TimerAuto Light SensitivityRollPushPushRollRollRollRollRollRollPower Tailgate SetupPushPower Open By Outer HandleKeyless Open ModePushMaintenance Info.RollPushPreferred IDS ModeRollRollRoll
107uuGauges and Multi-Information Display (MID)uMIDContinuedInstrument Panel■List of customizable options*1:Default SettingSetup Group Customizable Features Description Selectable SettingsDriver Assist System Setup*Forward Collision Warning Distance*Changes at which distance FCW* or CMBSTM* alerts, or turns FCW* on and off. Long/Normal*1/Short/OffACC Forward Vehicle Detect Beep*Causes the system to beep when the system detects a vehicle, or when the vehicle goes out of the ACC with LSF range.On/Off*1ACC Display Speed Unit*Changes the speed unit for ACC with LSF on the MID. mph*1/km/h (U.S.)mph/km/h*1 (Canada)Lane Keeping Assist Suspend Beep*Causes the system to beep when the LKAS is suspended. On/Off*1Blind Spot Info*Changes the setting for the blind spot information. Audible And Visual Alert*1/Visual Alert/OffMeter SetupLanguage Selection Changes the displayed language. English*1/Francais/EspañolAdjust Outside Temp. Display Adjusts the temperature reading by a few degrees.-5°F ~ ±0°F*1 ~ +5°F (U.S.)-3°C ~ ±0°C*1 ~ +3°C (Canada)“Trip A” Reset Timing Changes the setting of how to reset trip meter A, average fuel economy A, average speed A, and elapsed time A.When Refueled/IGN Off/Manually Reset*1“Trip B” Reset Timing Changes the setting of how to reset trip meter B, average fuel economy B, average speed B, and elapsed time B.When Refueled/IGN Off/Manually Reset*1Turn by Turn Display*Select whether the turn-by-turn display comes on during the route guidance. On*1/Off* Not available on all models
108uuGauges and Multi-Information Display (MID)uMIDInstrument Panel*1: Default SettingSetup Group Customizable Features Description Selectable SettingsDriving Position SetupMemory Position Link Turns the driving position memory system on and off. On*1/OffSteering Wheel Movement At Entry/ExitMoves the steering wheel fully up when you get in/get out of the vehicle. Turns this feature on and off. On*1/OffAuto Seatbelt Tension*Turns the setting for the automatic seat belt e-pretensioner activation on and off. On*1/OffKeyless Access SetupDoor Unlock Mode Changes which doors unlock when you grab the driver’s door handle. Driver Door Only*1/All DoorsKeyless Access Light FlashCauses some exterior lights to flash when you unlock/lock the doors. On*1/OffKeyless Access Beep Causes the beeper to sound when you unlock/lock the doors. On*1/OffRemote Start System On/Off*Turns the remote engine start feature on and off. On*1/Off* Not available on all models
109uuGauges and Multi-Information Display (MID)uMIDContinuedInstrument Panel*1: Default SettingSetup Group Customizable Features Description Selectable SettingsLighting SetupInterior Light Dimming TimeChanges the length of time the interior lights stay on after you close the doors. 60sec/30sec*1/15secHeadlight Auto Off TimerChanges the length of time the exterior lights stay on after you close the driver’s door. 60sec/30sec/15sec*1/0secAuto Light Sensitivity Changes the timing for the headlights to come on. Max/High/Mid*1/Low/MinDoor SetupAuto Door Lock Changes the setting for the automatic locking feature.With Vehicle Speed*1/Shift From P/OffAuto Door Unlock Changes the setting for when the doors unlock automatically.All Doors When Driver’s Door Opens*1/All Doors When Shifted To Park/All Doors When Ignition Switched Off/OffKey And Remote Unlock ModeSets up either the driver’s door or all doors to unlock on the first operation of the remote or built-in key. Driver Door*1/All DoorsKeyless Lock Answer BackLOCK/UNLOCK- The exterior lights flash.LOCK (2nd push)- The beeper sounds. On*1/OffSecurity Relock TimerChanges the time it takes for the doors to relock and the security system to set after you unlock the vehicle without opening any door.90sec/60sec/30sec*1
110uuGauges and Multi-Information Display (MID)uMIDInstrument Panel*1: Default SettingSetup Group Customizable Features Description Selectable SettingsPower Tailgate SetupPower Open By Outer HandleChanges the setting to open power tailgate by tailgate outer handle.On (Power/Manual)*1/Off (Manual Only)Keyless Open Mode Changes the keyless setting for when the power tailgate opens. Anytime*1/When UnlockedIDS Setup Preferred IDS Mode Changes the IDS mode setting for when you set the power mode to ON.Last Used*1/Comfort/Normal/SportMaintenance Info. Maintenance Reset Resets/Cancels the engine oil life display when you have performed the maintenance service.  Cancel/ResetDefault All —Cancels/Resets all the customized settings as default. Cancel/Set
111uuGauges and Multi-Information Display (MID)uMIDContinuedInstrument Panel■Example of customization settingsThe steps for changing the “Trip A” Reset Timing setting to When Refueled are shown below. The default setting for “Trip A” Reset Timing is Manually Reset.1. Roll the multi-function steering-wheel controls to select Vehicle Settings, then push the multi-function steering-wheel controls. 2. Roll the multi-function steering-wheel controls until Meter Setup appears on the display.3. Push the multi-function steering-wheel controls.uLanguage Selection appears first on the display.
112uuGauges and Multi-Information Display (MID)uMIDInstrument Panel4. Roll the multi-function steering-wheel controls until “Trip A” Reset Timing appears on the display, then push the multi-function steering-wheel controls.uThe display switches to the customization setup screen, where you can select When Refueled, IGN Off, Manually Reset, or Exit.5. Roll the multi-function steering-wheel controls and select When Refueled, then push the multi-function steering-wheel controls.uThe When Refueled Setup screen appears, then the display returns to the customization menu screen.6. Roll the multi-function steering-wheel controls until Exit appears on the display, then push the multi-function steering-wheel controls.7. Repeat Step 6 until you return to the normal screen.
113ControlsThis chapter explains how to operate the various controls necessary for driving.Clock .................................................. 114Locking and Unlocking the DoorsKey Types and Functions .................. 115Locking/Unlocking the Doors from the Outside .......................................... 117Low Keyless Access Remote Signal Strength......................................... 123Locking/Unlocking the Doors from the Inside ............................................. 124Childproof Door Locks ..................... 126Auto Door Locking/Unlocking .......... 127Opening and Closing the Tailgate... 128Security SystemImmobilizer System .......................... 135Security System Alarm...................... 135Opening and Closing the Windows ... 138Opening and Closing the Moonroof.. 140Operating the Switches Around the Steering WheelENGINE START/STOP Button............. 141Turn Signals..................................... 144Light Switches.................................. 145Daytime Running Lights ................... 148Wipers and Washers ........................ 149Brightness Control ........................... 153Defogger/Heated Door Mirror.......... 154Driving Position Memory System ...... 155Adjusting the Steering Wheel........... 157Adjusting the MirrorsInterior Rearview Mirror................... 158Power Door Mirrors ......................... 159Adjusting the SeatsAdjusting the Seat Positions............. 161Rear Seats........................................ 168Armrest ........................................... 171Interior Lights/Interior Convenience ItemsInterior Lights .................................. 172Interior Convenience Items .............. 174Climate Control SystemUsing Automatic Climate Control .... 185Rear Climate Control System ........... 192Automatic Climate Control Sensors... 196
114ControlsClockAdjusting the ClockYou can adjust the time manually in the audio/information screen, with the power mode in ON.■Using the Settings menu on the audio/information screen1. Press the SETTINGS button.2. Rotate  to select System Settings, then press .uRepeat the procedure to select Clock Adjustment.3. Rotate   to change hour, then press  .4. Rotate   to change minute, then press .■Adjusting the Time1ClockThese indications are used to show how to operate the interface dial.Rotate   to select.Press  to enter.You can customize the clock display to show the 12 hour clock or 24 hour clock.2Customized Features P. 248You can turn the clock display in the audio/information screen on and off.2Customized Features P. 248The clock is automatically updated through the navigation system, so the time does not need to be adjusted.Models with navigation system
115ContinuedControlsLocking and Unlocking the DoorsKey Types and FunctionsThis vehicle comes with the following keys:Use the keyless access remote to start and stop the engine, and to lock and unlock all the doors and tailgate. You can also use the keyless access system to lock and unlock the doors and tailgate.■Keys1Key Types and FunctionsAll the keys have an immobilizer system. The immobilizer system helps to protect against vehicle theft.2Immobilizer System P. 135The keys contain precision electronics.Adhere to the following advice to prevent damage to the electronics:•Do not leave the keys in direct sunlight, or in locations with high temperature or high humidity.•Do not drop the keys or set heavy objects on them.•Keep the keys away from liquids.•Do not take the keys apart except for replacing the battery.If the circuits in the keys are damaged, the engine may not start, and the keyless access system may not work.If the keys do not work properly, have them inspected by a dealer.You can remotely start the engine using the two-way keyless access remote.2Remote Engine Start with Vehicle Feedback* P. 324Models with two-way keyless access remoteModels with two-way keyless access remoteModels without two-way keyless access remote* Not available on all models
uuLocking and Unlocking the DoorsuKey Types and Functions116Controls■Keyless access remoteThe built-in key can be used to lock/unlock the doors when the keyless access remote battery becomes weak or the power door lock/unlock operation is disabled.To remove the built-in key, pull it out while sliding the release knob. To reinstall the built-in key, push the built-in key into the keyless access remote until it clicks.Contains a number that you will need if you purchase a replacement key.Built-in KeyRelease KnobModels with two-way keyless access remoteRelease KnobBuilt-in KeyModels without two-way keyless access remote■Key Number Tag1Key Number TagKeep the key number tag separate from the key in a safe place outside of your vehicle.If you wish to purchase an additional key, contact a dealer.If you lose your key and you cannot start the engine, contact a dealer.
117uuLocking and Unlocking the DoorsuLocking/Unlocking the Doors from the OutsideContinuedControlsLocking/Unlocking the Doors from the Outside■Locking the doorsPress the lock button.Once:uSome exterior lights flash, all the doors and tailgate lock, and the security system sets.Twice (within five seconds after the first push):uThe beeper sounds and verifies the security system is set.■Unlocking the doorsPress the unlock button.Once:uSome exterior lights flash twice, and the driver’s door unlocks.Twice:uThe remaining doors and tailgate unlock.*1: Checking Door Lock Status* P. 122■Using the Remote Transmitter1Locking/Unlocking the Doors from the OutsideYou can lock or unlock doors using the remote transmitter or keyless access system only when the power mode is in VEHICLE OFF.1Using the Remote TransmitterIf you do not open a door within 30 seconds of unlocking the vehicle with the remote transmitter, the doors will automatically relock.You can change the relock timer setting.2Customized Features P. 104, 248If the interior light switch is in the door activated position, the interior lights come on when you press the unlock button.No doors opened: The lights fade out after 30 seconds.Doors relocked with the remote: The lights go off immediately.2Interior Lights P. 172The remote transmitter uses low-power signals, so the operating range may vary depending on the surroundings.The remote will not lock the vehicle when a door or the tailgate is open.LEDUnlock ButtonLock ButtonLED*1Unlock ButtonLock Button* Not available on all models
uuLocking and Unlocking the DoorsuLocking/Unlocking the Doors from the Outside118ControlsWhen you carry the keyless access remote, you can lock/unlock the doors and the tailgate.You can lock/unlock the doors within a radius of about 32 inches (80 cm) of the outside door handle. You can open the tailgate within about 32 inches (80 cm) radius from the tailgate outer handle.■Using the Keyless Access System1Using the Remote TransmitterIf the distance at which the remote transmitter works varies, the battery is probably low.If the LED does not come on when you press a button, the battery is dead.2Replacing the Button Battery P. 427You can customize the door lock mode and keyless lock acknowledgement setting.2Customized Features P. 104, 248Models without rear door touch sensorModels with rear door touch sensor
Continued 119uuLocking and Unlocking the DoorsuLocking/Unlocking the Doors from the OutsideControls■Locking the doors and tailgatePress the door lock button on a front door, rear doors* or the tailgate.uSome exterior lights flash; the beeper sounds; all the doors and tailgate lock; and the security system sets.1Using the Keyless Access System•Do not leave the keyless access remote in the vehicle when you get out. Carry it with you.•Even if you are not carrying the keyless access remote, you can lock/unlock the doors and unlock the tailgate while someone else with the remote is within range.•The door may be unlocked if the door handle is covered with water in heavy rain or in a car wash if the keyless access remote is within range.•If you grip a door handle wearing gloves, the door sensor may be slow to respond or may not respond by unlocking the doors.•The door may not open if you pull it immediately after gripping the door handle. Grip the handle again and confirm that the door is unlocked before pulling the handle.•Even within the 32 inches (80 cm) radius, you may not be able to lock/unlock the doors with the keyless access remote if it is above or below the outside handle.•The keyless access remote may not operate if it is too close to the door and door glass.Door Lock ButtonLock Button* Not available on all models
uuLocking and Unlocking the DoorsuLocking/Unlocking the Doors from the Outside120Controls■Unlocking the doors and tailgateGrab the driver’s door handle:uThe driver’s door unlocks.uSome exterior lights flash twice and the beeper sounds twice.Grab the front passenger’s or rear* door handle:uAll the doors unlock.uSome exterior lights flash twice and the beeper sounds twice.Press and hold the tailgate outer handle:uAll doors and the tailgate unlock and open.uSome exterior lights flash twice and the beeper sounds twice.2Opening/Closing the Tailgate Using the Tailgate Outer Handle P. 1291Using the Keyless Access SystemWhen you go into the keyless access system working range with all the doors locked, the LED puddle lights come on for 30 seconds.The lights do not come on if you have previously stayed within the range for more than two minutes, or the doors have been locked for a few days.The feature activates again after you drive the vehicle, then lock the doors.If you do not open a door within 30 seconds of unlocking the vehicle, the doors will automatically relock.The light flash, beeper, and unlock settings can be customized using the audio/information screen or multi-information display (MID).2Customized Features P. 104, 248You can also unlock and open with the power tailgate.2Opening/Closing the Tailgate Using the Tailgate Outer Handle P. 129Models with navigation systemTailgate Outer Handle* Not available on all models
Continued 121uuLocking and Unlocking the DoorsuLocking/Unlocking the Doors from the OutsideControlsFully insert the key and turn it.■Locking the front doorsPush the lock tab forward a or push the master door lock switch in the lock direction b, and close the door.■Locking the rear doorsPush the lock tab forward and close the door.■Lockout prevention systemThe doors and tailgate cannot be locked when the keyless access remote is inside the vehicle.■Locking/Unlocking the Doors Using a Key1Locking/Unlocking the Doors Using a KeyWhen you lock the driver’s door with a key, all the other doors and tailgate lock at the same time. When unlocking, the driver’s door unlocks first. Turn the key a second time within a few seconds to unlock the remaining doors and the tailgate.You can customize the door unlock mode setting.2Customized Features P. 104, 248LockUnlock■Locking a Door Without Using a Key1Locking a Door Without Using a KeyWhen you lock the driver’s door, all the other doors and tailgate lock at the same time.Make sure you have the key in your hand before locking the door to prevent it from being locked in the vehicle.
uuLocking and Unlocking the DoorsuLocking/Unlocking the Doors from the Outside122ControlsYou can remotely check if your vehicle’s doors are all locked or any are unlocked from distance up to 328 feet (100 meters), using the keyless access remote.Press the lock button, the Amber (LEFT) LED blinks once. Then after three seconds one of the following feedback will come:•Green (center) comes on: Acknowledges that the doors are locked.•Red (right) comes on: Acknowledges that doors are not locked, or any door is not completely closed.•Red (right) blinks three times: The remote does not receive the door lock status from the vehicle.■Checking Door Lock Status*1Checking Door Lock Status*Operate the remote in an open space. If there are buildings or other obstacles between your vehicle and the remote, the remote may not work even within the operable range. However, the range of unlock, all doors, and panic functions are the same as the standard keyless access remote.2Using the Remote Transmitter P. 117When checking the door lock status, you can also start or stop the engine.2Remote Engine Start with Vehicle Feedback* P. 324RedGreenAmberLock Button* Not available on all models
123uuLocking and Unlocking the DoorsuLow Keyless Access Remote Signal StrengthControlsLow Keyless Access Remote Signal StrengthThe vehicle transmits radio waves to locate the keyless access remote when locking/unlocking the doors and tailgate, or to start the engine.In the following cases, locking/unlocking the doors and tailgate, or starting the engine may be inhibited or operation may be unstable:•Strong radio waves are being transmitted by nearby equipment.•You are carrying the keyless access remote together with telecommunications equipment, laptop computers, cell phones, or wireless devices.•A metallic object is touching or covering the keyless access remote.1Low Keyless Access Remote Signal StrengthCommunication between the keyless access remote and the vehicle consumes the keyless access remote’s battery.The keyless access remote battery lasts about two years. This changes by how often you use the remote.The battery is consumed whenever the keyless access remote is receiving strong radio waves. Avoid placing it near electrical appliances such as televisions and personal computers.
124uuLocking and Unlocking the DoorsuLocking/Unlocking the Doors from the InsideControlsLocking/Unlocking the Doors from the Inside■Locking a doorPush the lock tab forward.■Unlocking a doorPull the lock tab rearward.■Using the Lock Tab1Using the Lock TabWhen you lock the door using the lock tab on the driver’s door, all the other doors and tailgate lock at the same time.When you unlock the door using the lock tab on the driver’s door, only the driver’s door will unlock.To UnlockLock TabTo Lock
Continued 125uuLocking and Unlocking the DoorsuLocking/Unlocking the Doors from the InsideControlsPull the front door inner handle.uThe door unlocks and opens in one motion.Unlocking and opening the driver’s door from the inner handle unlocks all the other doors.To avoid all the doors to be unlocked, use the lock tab on the driver’s door to unlock, then lock again before opening the door.uThis setting works for one time only. If you do not want all the doors to be unlocked all the time, customize the Auto Door Unlock setting to Off using the MID or audio/information screen.■Unlocking Using the Front Door Inner Handle1Unlocking Using the Front Door Inner HandleThe front door inner handles are designed to allow front seat occupants to open the door in one motion. However this feature requires that front seat occupants never pull a front door inner handle while the vehicle is in motion.Children should always ride in a rear seat where childproof door locks are provided.2Childproof Door Locks P. 126Inner Handle
uuLocking and Unlocking the DoorsuChildproof Door Locks126ControlsPress the master door lock switch in as shown to lock or unlock all doors and the tailgate.Childproof Door LocksThe childproof door locks prevent the rear doors from being opened from the inside regardless of the position of the lock tab.Slide the lever in the rear door to the lock position, and close the door.■When opening the doorOpen the door using the outside door handle.■Using the Master Door Lock Switch1Using the Master Door Lock SwitchWhen you lock/unlock either front door using the master door lock switch, all the other doors and tailgate lock/unlock at the same time.To UnlockMaster Door Lock SwitchTo Lock■Setting the Childproof Door Locks1Childproof Door LocksTo open the door from the inside when the childproof door lock is on, put the lock tab in the unlock position, lower the rear window, put your hand out of the window, and pull the outside door handle.LockUnlock
127uuLocking and Unlocking the DoorsuAuto Door Locking/UnlockingControlsAuto Door Locking/UnlockingYour vehicle locks all doors and unlocks all doors or the driver’s door automatically when a certain condition is met.■Drive lock modeAll doors and tailgate lock when the vehicle’s speed reaches about 10 mph (15 km/h).■Driver’s door open modeAll doors unlock when the driver’s door is opened.■Auto Door Locking■Auto Door Unlocking1Auto Door Locking/UnlockingYou can turn off or change to another auto door locking/unlocking setting using the audio/information screen or MID.2Customized Features P. 104, 248
128ControlsOpening and Closing the TailgatePrecautions for Opening/Closing the TailgateAlways make sure individuals and objects are clear of the tailgate before opening or closing it.■Opening the tailgate•Open the tailgate all the way.uIf it is not fully opened, the tailgate may come down accidentally by its own weight.•Be careful when it is windy. The wind may cause the tailgate to close.■Closing the tailgateKeep the tailgate closed while driving to:uAvoid possible damage.uPrevent exhaust gas from leaking into the vehicle.2Carbon Monoxide Gas P. 661Precautions for Opening/Closing the TailgateBe careful not to hit your head on the tailgate or to put your hands between the tailgate and the cargo area when closing the tailgate.When operating the power tailgate, make sure there is enough space around your vehicle. People near the tailgate may be seriously hurt if the tailgate hits or closes on their heads. Be especially cautious if children are around.When you are storing or picking up luggage from the cargo area while the engine is idling, do not stand in front of the exhaust pipe. You may get burned.Do not allow any passenger in the cargo space. They may get hurt during hard braking, a sudden acceleration, or a crash.3WARNINGClosing a power tailgate while anyone is in the path of the tailgate can cause serious injury.Make sure everyone is clear before closing the power tailgate.
129uuOpening and Closing the TailgateuOpening/Closing the Tailgate Using the Tailgate Outer HandleControlsOpening/Closing the Tailgate Using the Tailgate Outer HandleWhen all the doors are unlocked, the tailgate is unlocked. Press the tailgate outer handle for more than one second, and wait until you hear three beeps before you lift open the tailgate.uReleasing the outer handle within one second with one beep enables the power tailgate operations.2Power Tailgate Outer Handle P. 132Even if the tailgate is locked, you can open the tailgate if you carry the keyless access remote.To manually close the tailgate, grab the inner handle, pull the tailgate down, and push it closed from outside.1Opening/Closing the Tailgate Using the Tailgate Outer HandleDo not leave the keyless access remote inside the cargo area and close the tailgate. The beeper sounds and the tailgate cannot be closed.Even if you are not carrying the keyless access remote, you can lock/unlock the doors while someone else with the remote is within range.Tailgate Outer HandleInner Handle
130uuOpening and Closing the TailgateuOpening/Closing the Power TailgateControlsOpening/Closing the Power TailgateThe power tailgate can be operated by pressing the power tailgate button on the remote transmitter or driver's door, or pressing the outer handle or button on the tailgate.■The power tailgate can be opened when:•The tailgate is fully closed.•The shift lever is in (P.•Press and hold the tailgate button on the remote transmitter for about one second when the power mode is in VEHICLE OFF (LOCK).uIf you have changed the Keyless Open Mode setting to When Unlocked, you need to unlock the tailgate before you press the tailgate button to open it.2Customized Features P. 104■The power tailgate can be closed when:•The tailgate is fully open.•The shift lever is in (P.•Press and hold the tailgate button on the remote transmitter for about one second when the power mode is in VEHICLE OFF (LOCK).1Opening/Closing the Power TailgateThe power tailgate may not open or close under the following conditions:•The vehicle is parked on a steep hill.•The vehicle is swayed in a strong wind.•The tailgate or the roof is covered with snow or ice.If you close the power tailgate when all the doors are locked, the power tailgate locks automatically.If you replace the battery or the power tailgate fuse while the tailgate is open, the power tailgate may be disabled. The power tailgate resumes once you manually close the tailgate.Installing aftermarket components other than Acura genuine accessories on the power tailgate may prevent it from fully opening or closing.Make sure the power tailgate is fully open before you get your luggage in and out.Make sure the power tailgate is fully closed before you start the vehicle.
Continued 131uuOpening and Closing the TailgateuOpening/Closing the Power TailgateControlsPress the power tailgate button for more than one second to operate when the power mode is in VEHICLE OFF (LOCK).To reverse direction while the power tailgate is in operation, press the button again. The beeper sounds three times and the tailgate reverses direction.■Customizing when to open the tailgateAnytime: The power tailgate unlocks and opens at the same time. This is the default setting.When Unlocked: The tailgate opens when all doors are unlocked.2Customized Features P. 104, 248■Remote Transmitter1Opening/Closing the Power TailgateIf the power tailgate meets resistance while opening or closing, the auto reverse feature reverses the direction. The beeper sounds three times.The auto reverse function stops sensing when the tailgate is almost closed to make sure that it fully closes.Do not touch the sensors located on both sides of the tailgate. The power tailgate does not close if you touch either sensor when you are trying to close the tailgate.Be careful not to scratch the sensors with a sharp object. If scratched, they can be damaged, and the power tailgate closing feature malfunctions.Power Tailgate Button
132uuOpening and Closing the TailgateuOpening/Closing the Power TailgateControlsTo open or close the power tailgate, press the power tailgate button for about one second. The beeper sounds and some exterior lights flash.To reverse direction while the power tailgate is in operation, press the button again. The beeper sounds three times and the tailgate reverses direction.To open the power tailgate, press the outer handle for one second. The beeper sounds and some exterior lights flash.■Power Tailgate ButtonPower Tailgate Button■Power Tailgate Outer HandlePower Tailgate Outer Handle
Continued 133uuOpening and Closing the TailgateuOpening/Closing the Power TailgateControlsPress the button on the tailgate to close the power tailgate.If you press the button again while the power tailgate is closing, it reverses direction.If you manually close the power tailgate, it latches automatically.■Power Tailgate Close Button1Power Tailgate Close ButtonIf you press the power tailgate close button while the tailgate is automatically opening, the power tailgate operation reverses direction.Power Tailgate Close Button■Auto-Closer1Auto-CloserThe auto-closer feature does not activate if you press the tailgate outer handle while the power tailgate is closing.Do not put any force on the tailgate while the power tailgate is latching.Keep your hands away from the tailgate when you manually close the tailgate and let it latch automatically. It is dangerous to put your hands around the tailgate as it starts to latch itself.
uuOpening and Closing the TailgateuOpening/Closing the Power Tailgate134ControlsAutomatically lowers the power tailgate when there is a possibility that the fully opened power tailgate can fall down by its own weight (for example, by snow on the tailgate). The beeper sounds while the power tailgate lowers.■Power Tailgate Fall Detection1Power Tailgate Fall DetectionIf you try to manually close the power tailgate immediately after it fully opens, the power tailgate fall detection may activate.Once the power tailgate fall detection activates, wait until the power tailgate fully closes. Keep away from the power tailgate when it is in motion.If the power tailgate fall detection constantly activates, consult at a dealer.
135ContinuedControlsSecurity SystemImmobilizer SystemThe immobilizer system prevents a key that has not been pre-registered from starting the engine. Each key contains electronic transmitters that use electronic signals to verify the key.Pay attention to the following when pressing the ENGINE START/STOP button:•Do not allow objects that emit strong radio waves near the ENGINE START/STOP button.•Make sure the key is not covered by or touching a metal object.•Do not bring a key from another vehicle’s immobilizer system with the keyless access remote.Security System AlarmThe security system alarm activates when the tailgate, hood, or doors are opened without the key, remote transmitter or keyless access system.■When the security system alarm activatesThe horn sounds intermittently, and all of the exterior lights flash.■To deactivate the security system alarmUnlock the vehicle using the key, remote transmitter, or keyless access system. The system, along with the horn and flashing lights, is deactivated.1Immobilizer SystemNOTICELeaving the keyless access remote in the vehicle can result in theft or accidental movement of the vehicle.Always take the key with you whenever you leave the vehicle unattended.Do not alter the system or add other devices to it.Doing so may damage the system and make your vehicle inoperable.1Security System AlarmThe security alarm continues for a maximum of two minutes until the security system alarm deactivates.
uuSecurity SystemuSecurity System Alarm136Controls■Setting the security system alarmThe security system alarm automatically sets when the following conditions have been met:•The power mode is set to VEHICLE OFF (LOCK).•The hood is closed.•All doors and the tailgate are locked from outside with the key, remote transmitter, or keyless access system.■When the security system alarm setsThe security system alarm indicator in the instrument panel blinks. When the blinking interval changes after about 15 seconds, the security system alarm is set.■To cancel the security system alarmThe security system alarm is canceled when the vehicle is unlocked using the key, remote transmitter, keyless access system, or the power mode is set to ON. The security system alarm indicator goes off at the same time.1Security System AlarmDo not set the security system alarm when someone is in the vehicle or a window is open. The system can accidentally activate when unlocking the door with the lock tab.If the battery goes dead after you have set the security system alarm, the security alarm may go off once the battery is recharged or replaced.If this occurs, deactivate the security system alarm by unlocking a door using the key, remote transmitter, or keyless access system.Do not attempt to alter this system or add another device to it.
137uuSecurity SystemuSecurity System AlarmControls■The panic button on the remote transmitterIf you press the panic button for approximately one second, the following will occur for about 30 seconds:•The horn sounds.•Some exterior lights flash.■Canceling panic modePress any button on the remote transmitter, or set the power mode to ON.■Panic ModePanic Button
138ControlsOpening and Closing the WindowsOpening/Closing the Power WindowsThe power windows can be opened and closed when the power mode is in ON, using the switches on the doors. The driver’s side switches can be used to open and close all of the windows.The power window lock button on the driver’s side must be switched off (not pushed in, indicator off) to open and close the windows from anywhere other than the driver’s seat.When the power window lock button is pushed in, the indicator comes on and you can only operate the driver’s window. Turn the power window lock button on when children are in the vehicle.■Automatic operationTo open: Push the switch down firmly.To close: Pull the switch up firmly.The window opens or closes completely. To stop the window at any time, push or pull the switch briefly.■Manual operationTo open: Push the switch down lightly, and hold it until the desired position is reached.To close: Pull the switch up lightly, and hold it until the desired position is reached.■Opening/Closing Windows with Auto-Open/Close Function1Opening/Closing the Power WindowsThe power windows can be operated for up to 10 minutes after you set the power mode to VEHICLE OFF (LOCK).Opening either front door cancels this function.Auto ReverseIf a power window senses resistance when closing automatically, it stops closing and reverse direction.The driver’s window auto reverse function is disabled when you continuously pull up the switch.The auto reverse function stops sensing when the window is almost closed to ensure that it fully closes.3WARNINGClosing a power window on someone’s hands or fingers can cause serious injury.Make sure your passengers are away from the windows before closing them.ONOFFPower Window Lock ButtonRear Passenger’s Window SwitchesFront Passenger’s Window SwitchDriver’s Window SwitchIndicator
139uuOpening and Closing the WindowsuOpening/Closing the Power WindowsControlsTo open: Press the unlock button twice within 10 seconds and hold it down the second time. If the windows stop midway, repeat the procedure.To open: Unlock the driver’s door with the key. Within 10 seconds of returning the key to the central position, turn the key in the unlock direction and hold it there.To close: Lock the driver’s door with the key. Within 10 seconds of returning the key to the central position, turn the key in the lock direction and hold it there.Release the key to stop the windows/moonroof at the desired position. If you want further adjustment, repeat the same operation.■Opening Windows and the Moonroof with the RemoteUnlock Button■Opening/Closing Windows and the Moonroof with the KeyClose Open
140ControlsOpening and Closing the MoonroofYou can only operate the moonroof when the power mode is in ON. Use the switch in the front of the ceiling to open and close the moonroof.■Automatic operationTo open: Pull the switch back firmly.To close: Push the switch forward firmly.The moonroof will automatically open or close all the way. To stop the moonroof midway, touch the switch briefly.■Manual operationTo open: Pull the switch back lightly, and hold it until the desired position is reached.To close: Push the switch forward lightly, and hold it until the desired position is reached.■Tilting the moonroof upTo tilt: Push on the center of the moonroof switch.To close: Push the switch forward firmly, then release.■Opening/Closing the Moonroof1Opening/Closing the MoonroofNOTICEOpening the moonroof in below freezing temperature or when it is covered with snow or ice can damage the moonroof panel or motor.The power moonroof can be operated for up to 10 minutes after you set the power mode to VEHICLE OFF (LOCK).Opening either front door cancels this function.When resistance is detected, the auto reverse function causes the moonroof to change directions, then stop. Auto reverse stops sensing when the moonroof is almost closed to ensure that it fully closes.3WARNINGOpening or closing the moonroof on someone’s hands or fingers can cause serious injury.Make sure all hands and fingers are clear of the moonroof before opening or closing it.OpenClose Tilt
141ContinuedControlsOperating the Switches Around the Steering WheelENGINE START/STOP Button■Changing the Power Mode1ENGINE START/STOP ButtonENGINE START/STOP Button Operating RangeYou can start the engine when the keyless access remote is inside the vehicle.The engine may also run if the keyless access remote is close to the door or window, even if it is outside the vehicle.ON mode:Indicator in the button is off, if the engine is running.If the keyless access remote battery is weak, beeper sounds and the To Start, Hold Remote Near Start Button message appears on the MID.2If the Keyless Access Remote Battery is Weak P. 458If the power mode does not change from VEHICLE OFF to ACCESSORY, press the ENGINE START/STOP button while moving the steering wheel left and right. The steering wheel will unlock, allowing the mode to change.Operating RangeVEHICLE OFF (LOCK)Indicator in the button is off.The steering wheel is locked. The power to all electrical components is turned off.ACCESSORYIndicator in the button is on.Indicator in the button blinks (from ON to ACCESSORY).Operate the audio system and other accessories in this position.ONIndicator in the button is on.All electrical components can be used.Press the button.Press the button without the shift lever in (P.Shift to (P, then press the button.IndicatorWithout pressing the brake pedal
142uuOperating the Switches Around the Steering WheeluENGINE START/STOP ButtonControlsIf you leave the vehicle for 30 to 60 minutes with the shift lever in (P and the power mode in ACCESSORY, the vehicle automatically goes into the mode similar to VEHICLE OFF (LOCK) to avoid the battery drain.When in this mode:The steering wheel does not lock.You cannot lock or unlock doors with the remote transmitter or the keyless access system.Press the ENGINE START/STOP button to switch the mode to VEHICLE OFF (LOCK).If you open the driver’s door when the power mode is set to ACCESSORY, a warning buzzer sounds.■Automatic Power Off■Power Mode Reminder
143uuOperating the Switches Around the Steering Wheel uENGINE START/STOP ButtonControlsWarning buzzers may sound from inside or/and outside the vehicle to remind you that the keyless access remote is out of the vehicle. If the buzzer continues even after the remote is put back inside, place it within its operational range.■When the power mode is in ONIf the keyless access remote is taken out of the vehicle, and the driver’s door is closed, warning buzzers sound from both inside and outside the vehicle. A warning message on the MID notifies the driver inside that the remote is out.■When the power mode is in ACCESSORYIf the keyless access remote is taken out of the vehicle, and the driver’s door is closed, a warning buzzer sounds from outside the vehicle.■Keyless Access Remote Reminder1Keyless Access Remote ReminderWhen the keyless access remote is within the system’s operational range, and the driver’s door is closed, the warning function cancels.If the keyless access remote is taken out of the vehicle after the engine has been started, you can no longer change the ENGINE START/STOP button mode or restart the engine. Always make sure if the remote is in your vehicle when you operate the ENGINE START/STOP button.Removing the keyless access remote from the vehicle through a window does not activate the warning buzzer.Do not put the keyless access remote on the dashboard or in the glove box. It may cause the warning buzzer to go off. Under some other conditions that can prevent the vehicle from locating the remote, the warning buzzer may also go off even if the remote is within the system’s operational range.
144uuOperating the Switches Around the Steering WheeluTurn SignalsControlsTurn SignalsThe turn signals can be used when the power mode is in ON.■One-touch turn signalWhen you lightly push up or down and release the turn signal lever, the exterior turn signals and turn signal indicator blink three times.This feature can be used when signaling for a lane change.Right TurnLeft Turn
145uuOperating the Switches Around the Steering WheeluLight SwitchesContinuedControlsLight SwitchesRotating the light switch turns the lights on and off, regardless of the power mode setting.■High beamsPush the lever forward until you hear a click.■Low beamsWhen in high beams, pull the lever back to return to low beams.■Flashing the high beamsPull the lever back, and release it.■Lights offTurn the lever to OFF either when:•The shift lever is in (P.•The parking brake is applied.To turn the lights on again, turn the lever to OFF to cancel the lights off mode. Even if you do not cancel the lights off mode, the lights come on automatically when:•The shift lever is moved out of (P and the parking brake is released.•The vehicle starts to move.■Manual Operation1Light SwitchesIf you leave the power mode in VEHICLE OFF (LOCK) with the lights on, a light on reminder chime sounds when you open the driver’s door.Do not leave the lights on when the engine is off because it will cause the battery to discharge.Your vehicle is equipped with the automatic headlight adjusting system that automatically adjusts the vertical angle of the high/low beam headlights. If you find a significant change in the vertical angle of the headlights, there may be a problem with the system. Have your vehicle checked by a dealer.Canadian models with rear entertainment systemHigh BeamsFlashing the high beamsLow BeamsTurns on parking, side marker, tail, and rear license plate lightsTurns on headlights, parking, side marker, tail, and rear license plate lights
uuOperating the Switches Around the Steering WheeluLight Switches146ControlsAutomatic lighting control can be used when the power mode is in ON.When the light switch is in AUTO, the headlights and other exterior lights will switch on and off automatically depending on the ambient brightness.uYou can change the auto light sensitivity setting.2Customized Features P. 104, 248■Automatic Lighting Control1Automatic Lighting ControlWe recommend that you turn on the lights manually when driving at night, in a dense fog, or in dark areas such as long tunnels or parking facilities.The light sensor is in the location shown below.Do not cover this light sensor with anything; otherwise, the automatic lighting system may not work properly.Light SensorModels with Automatic Intermittent WipersModels without Automatic Intermittent WipersLight Sensor
147uuOperating the Switches Around the Steering WheeluLight SwitchesControlsThe headlights automatically come on when the wipers are used several times within a certain intervals with the headlight switch in AUTO.The headlights automatically go off a few minutes later if the wipers are stopped.The headlights, all other exterior lights, and the instrument panel lights turn off 15 seconds after you set the power mode to VEHICLE OFF (LOCK), take the remote with you, and close the driver’s door.If you set the power mode to VEHICLE OFF (LOCK) with the headlight switch on, but do not open the door, the lights turn off after 10 minutes (three minutes, if the switch is in the AUTO position).The lights turn on again when you unlock or open the driver’s door. If you unlock the door, but do not open it within 15 seconds, the lights go off. If you open the driver’s door, you will hear a lights on reminder chime.■Headlight Integration with Wiper■Automatic Lighting Off Feature1Automatic Lighting ControlAdjust the auto light sensitivity as follows:Setting The exterior lights come on when the ambient light is atMaxHighMidLowMinBrightDark1Headlight Integration with WiperThis feature activates during the headlights are off in AUTO.The instrument panel brightness does not change when the headlights come on.When the ambient light is at dark, the automatic lighting control feature overrides, and the headlights come on with or without the wipers sweeping more than several times.1Automatic Lighting Off FeatureYou can change the headlight auto off timer setting.2Customized Features P. 104, 248
148uuOperating the Switches Around the Steering WheeluDaytime Running LightsControlsDaytime Running LightsThe daytime running lights come on when the following conditions have been met:•The power mode is in ON.•The headlight switch is AUTO, or in  .•The parking brake is released.The daytime running lights are off once the headlight switch is turned on, or when the head light switch is in AUTO and it is getting darker outside.
149uuOperating the Switches Around the Steering WheeluWipers and WashersContinuedControlsWipers and WashersThe windshield wipers and washers can be used when the power mode is in ON.■MISTThe wipers run at high speed until you release the lever.■Wiper switch (OFF, INT*, LO, HI)Change the wiper switch setting according to the amount of rain.■Adjusting the delayTurn the adjustment ring to adjust the wiper delay.■WasherSprays while you pull the lever toward you.When you release the lever, the wipers make two or three more sweeps before stopping.■Windshield Wipers/Washers1Wipers and WashersNOTICEDo not use the wipers when the windshield is dry.The windshield will get scratched, or the rubber blades will get damaged.NOTICEIn cold weather, the blades may freeze to the windshield, becoming stuck.Operating the wipers in this condition may damage the wipers. Use the defroster to warm the windshield, then turn the wipers on.If the vehicle speeds up while the wipers are operating intermittently, the length of the wipe interval shortens. When the vehicle starts moving, the wipers make a single sweep. When the vehicle speeds up, the wiper operation’s shortest delay setting ( ) and the LO setting become the same.Turn the washers off if no washer fluid comes out.The pump may get damaged.The wiper motor may stop motor operation temporarily to prevent an overload. Wiper operation will return to normal within a few minutes, once the circuit has returned to normal.Intermittent Time Adjustment RingMISTINT: Low speed with intermittentOFFLO: Low speed wipeHI: High speed wipePull to use washer.Long delayShort delay* Not available on all models
uuOperating the Switches Around the Steering WheeluWipers and Washers150ControlsWhen you push the lever down to AUTO, the windshield wipers sweep once, and go into the automatic mode.The wipers operate intermittently, at low speed, or at high speed and stops in accordance with the amount of rainfall the rainfall sensor detects.■Auto sensitivity adjustmentWhen in AUTO, you can also adjust the rainfall sensor sensitivity using the intermittent time adjustment ring.Sensor sensitivity■Automatic Intermittent Wipers*1Automatic Intermittent Wipers*The rainfall sensor is in the location shown below.Do not put the wiper lever in AUTO when cleaning the windshield or driving through a car wash. If the wiper lever is in AUTO, and the power mode is in ON, the rainfall sensor may respond to your hand or car wash liquids, and the wipers may operate automatically.Rainfall SensorLow: The wipers start to react to a larger amount of rainfall.High: The wipers start to react to a smaller amount of rainfall.* Not available on all models
Continued 151uuOperating the Switches Around the Steering WheeluWipers and WashersControlsThe rear wiper and washer can be used when the power mode is in ON.■Wiper switch (OFF, INT, ON)Change the wiper switch setting according to the amount of rain.■Washer ( )Sprays while you rotate the switch to this position.Hold it to activate the wiper and to spray the washer. Once released, it stops operating after a few more sweeps.■Operating in reverseWhen you shift the transmission to (R with the front wiper activated, the rear wiper operates automatically as follows even if its switch is off.■Rear Wiper/Washer1Wipers and WashersIf the wiper stops operating due to any obstacle such as the build-up of snow, park the vehicle in a safe place.Rotate the wiper switch to OFF, and set the power mode to ACCESSORY or VEHICLE OFF (LOCK), then remove the obstacle.INT: IntermittentOFFON: Continuous wipeWasherFront Wiper Position Rear Wiper OperationINT (Intermittent) IntermittentLO (Low speed wipe)HI (High speed wipe) Continuous
uuOperating the Switches Around the Steering WheeluWipers and Washers152ControlsTurn the headlights on and press the headlight washer button to operate.The headlight washers also operate when you turn the windshield washers for the first time after the power mode is set to ON.■Headlight WashersCanadian models1Headlight WashersThe headlight washers use the same fluid reservoir as the windshield washers.
153uuOperating the Switches Around the Steering WheeluBrightness ControlControlsBrightness ControlWhen the power mode is in ON, you can use the (+ or (- button to adjust instrument panel brightness.To brighten: Press the (+ button.To dim: Press the (- button.You will hear a beep when the brightness reaches minimum or maximum. The MID will return to its original state several seconds after you adjust the brightness.■Brightness level indicatorThe brightness level is shown on the MID while you are adjusting it.1Brightness ControlInstrument panel brightness varies, depending on whether the exterior lights are on or off. The instrument panel dims to reduce glare when they are on.When it is bright outside and the headlight integration with the wiper is activated, the instrument panel brightness does not change.Rolling the multi-function steering-wheel controls switches the display.If you press the (+ button until the brightness display is up to max, the beeper sounds. This cancels the reduced instrument panel brightness when the parking lights are on.The brightness can be set differently for when the exterior lights are on, and when they are off.(+ Button(- Button
154uuOperating the Switches Around the Steering WheeluDefogger/Heated Door MirrorControlsDefogger/Heated Door MirrorPress the heated windshield button to deice the windshield when the power mode is in ON.Press the rear defogger and heated door mirror button to defog the rear window and mirrors when the power mode is in ON.The rear defogger and heated door mirrors automatically switch off after 10-30 minutes depending on the outside temperature.■Heated Windshield ButtonCanadian models1Defogger/Heated Door MirrorThis system consumes a lot of power, so turn it off when the window has been defogged or deiced.1Heated Windshield ButtonWhen the outside temperature is below 4°C, the heated windshield may automatically activate. The system deactivates itself once the outside temperature reaches 6°C.■Rear Defogger/Heated Door Mirror Button1Rear Defogger/Heated Door Mirror ButtonNOTICEWhen cleaning the inside of the rear window, be careful not to damage the heating wires.It is critical to wipe the window from side to side along the defogger heating wires.
155uuOperating the Switches Around the Steering Wheel uDriving Position Memory SystemContinuedControlsDriving Position Memory SystemYou can store two driver’s seat (except for power lumbar), steering wheel and door mirror positions with the driving position memory system.When you unlock and open the driver’s door with a remote transmitter, or keyless access system, the seat and door mirrors adjust automatically to one of the two preset positions.The steering wheel will move to the stored position when you set the power mode to ACCESSORY.The MID shows you which remote transmitter you used to unlock the vehicle when you enter.•DRIVER 1 transmitter is linked to memory button 1.•DRIVER 2 transmitter is linked to memory button 2.1Driving Position Memory SystemUsing the audio/information screen or MID, you can disable the automatic seat, steering wheel and door mirrors adjustment function.2Customized Features P. 104, 248DRIVER 1 DRIVER 2
uuOperating the Switches Around the Steering WheeluDriving Position Memory System156Controls1. Set the power mode to ON. Adjust the driver’s seat, the steering wheel and the door mirrors to the desired position.2. Press the SET button.uYou will hear a beep, and the memory button indicator light will blink.3. Press memory button (1 or (2 within five seconds of pressing the SET button.uOnce the seat, the steering wheel and the outside mirror positions have been memorized, the indicator light on the button you pressed stays on.1. Move the shift lever to (P.2. Apply the parking brake.3. Press a memory button ((1 or (2).uYou will hear a beep, and the indicator light will blink.The seat, the steering wheel and the door mirrors will automatically move to the memorized positions. When it has finished moving, you will hear the beep, and the indicator light stays on.■Storing a Position in Memory1Storing a Position in MemoryAfter you press the SET button, the storing operation will be canceled when: •You do not press the memory button within five seconds.•You readjust the seat, the steering wheel or the outside mirror position before the double-beep.•You set the power mode to any position except ON.Memory Button 1Memory Button 2SET Button■Recalling the Stored Position1Recalling the Stored PositionThe seat will stop moving if you:•Press the SET button, or a memory button ((1 or (2).•Adjust the seat, the steering wheel or the door mirror position.•Shift into any position except (P.Memory Buttons
157uuOperating the Switches Around the Steering WheeluAdjusting the Steering WheelControlsAdjusting the Steering WheelThe steering wheel height and distance from your body can be adjusted so that you can comfortably grip the steering wheel in an appropriate driving posture.Push and hold the adjustment switch to move the steering wheel in, out, up or down.uMake sure you can see the instrument panel gauges and indicators.1Adjusting the Steering WheelMake any steering wheel adjustments before you start driving.3WARNINGAdjusting the steering wheel position while driving may cause you to lose control of the vehicle and be seriously injured in a crash.Adjust the steering wheel only when the vehicle is stopped.Adjustment Switch
158ControlsAdjusting the MirrorsInterior Rearview MirrorAdjust the angle of the rearview mirror when you are sitting in the correct driving position.When driving after dark, the automatic dimming rearview mirror and power door mirrors* reduce the glare from headlights behind you.■Automatic Dimming Rearview Mirror and Power Door Mirrors*1Adjusting the MirrorsKeep the inside and outside mirrors clean and adjusted for best visibility.Adjust the mirrors before you start driving.2Adjusting the Seat Positions P. 161IndicatorSensor1Automatic Dimming Rearview Mirror and Power Door Mirrors*The auto dimming function cancels when the shift position is in (R.* Not available on all models
159uuAdjusting the MirrorsuPower Door MirrorsContinuedControlsPower Door MirrorsYou can adjust the door mirrors when the power mode is in ON.■Mirror position adjustmentL/R selector switch: Select the left or right mirror. After adjusting the mirror, return the switch to the center position.Mirror position adjustment switch: Press the switch left, right, up, or down to move the mirror.■Folding door mirrors*Press the folding button to fold in and out the door mirrors.If activated, either side door mirror automatically tilts downward when you put the shift lever in (R; this improves close-in visibility on the selected side of the vehicle when backing up. The mirror automatically returns to its original position when you shift out of (R.To activate this feature, set the power mode to ON, and slide the selector switch to the left or right side.Selector SwitchAdjustment SwitchFolding Button■Reverse Tilt Door MirrorSelector Switch* Not available on all models
uuAdjusting the MirrorsuPower Door Mirrors160ControlsThe driver’s side door mirror has outer and inner segments.The outer segment is slightly curved to provide a wider angle view than a standard flat mirror. This wider view may help you check areas that are not visible using a standard door mirror.■Expanded View Driver’s MirrorInner SegmentOuter Segment1Expanded View Driver’s MirrorObjects visible in the outer segment of the driver’s side door mirror appear smaller than objects in the rest of the mirror. But in fact, they are closer than they appear.Do not rely on your mirrors. Always look to the side and behind your vehicle before changing lanes.
161ContinuedControlsAdjusting the SeatsAdjusting the Seat PositionsAdjust the driver’s seat as far back as possible while allowing you to maintain full control of the vehicle. You should be able to sit upright, well back in the seat and be able to adequately press the pedals without leaning forward, and grip the steering wheel comfortably. The passenger’s seat should be adjusted in a similar manner, so that it is as far back from the front airbag in the dashboard as possible.■Adjusting the front power seats1Adjusting the SeatsThe National Highway Traffic Safety Administration and Transport Canada recommend that drivers allow at least 10 inches (25 cm) between the center of the steering wheel and the chest.Always make seat adjustments before driving.Once a seat is adjusted correctly, rock it back and forth to make sure it is locked in position.3WARNINGSitting too close to a front airbag can result in serious injury or death if the front airbags inflate.Always sit as far back from the front airbags as possible while maintaining control of the vehicle.Move back.Allow sufficient space.Horizontal Position AdjustmentHeight AdjustmentSeat-back Angle AdjustmentLumbar Support Adjustment** Not available on all models
162uuAdjusting the SeatsuAdjusting the Seat PositionsControls■Adjusting the second row manual seatsSeat-back Angle AdjustmentPull up the lever to change the angle.Horizontal Position AdjustmentPull up the bar to move the seat, then release the bar.
Continued 163uuAdjusting the SeatsuAdjusting the Seat PositionsControlsAdjust the driver’s seat-back to a comfortable, upright position, leaving ample space between your chest and the airbag cover in the center of the steering wheel.The front seat passenger should also adjust their seat-back to a comfortable, upright position.Reclining a seat-back so that the shoulder part of the belt no longer rests against the occupant’s chest reduces the protective capability of the belt. It also increases the chance of sliding under the belt in a crash and being seriously injured. The farther a seat-back is reclined, the greater the risk of injury.■Adjusting the Seat-Backs1Adjusting the Seat-BacksDo not put a cushion, or other object, between the seat-back and your back. Doing so may interfere with proper seat belt or airbag operation.If you cannot get far enough away from the steering wheel and still reach the controls, we recommend that you investigate whether some type of adaptive equipment may help.3WARNINGReclining the seat-back too far can result in serious injury or death in a crash.Adjust the seat-back to an upright position, and sit well back in the seat.
uuAdjusting the SeatsuAdjusting the Seat Positions164ControlsYour vehicle is equipped with head restraints in all seating positions.Head restraints are most effective for protection against whiplash and other rear-impact crash injuries when the center of the back of the occupant’s head rests against the center of the restraint. The tops of the occupant’s ears should be level with the center height of the restraint.■Adjusting the front and second row outer head restraint positionsTo raise the head restraint: Pull it upward.To lower the head restraint: Push it down while pressing the release button.■Adjusting the Head Restraints1Adjusting the Head RestraintsIn order for the head restraint system to work properly:•Do not hang any items on the head restraints, or from the restraint legs.•Do not place any objects between an occupant and the seat-back.•Install each restraint in its proper location.3WARNINGImproperly positioning head restraints reduces their effectiveness and increases the likelihood of serious injury in a crash.Make sure head restraints are in place and positioned properly before driving.Position head in the center of the head restraint.
Continued 165uuAdjusting the SeatsuAdjusting the Seat PositionsControlsA passenger sitting in the second row center seating position should adjust the height of their head restraint to an appropriate position before the vehicle begins moving.To raise the head restraint:Pull it upward.To lower the head restraint:Push it down while pressing the release button.Head restraints can be removed for cleaning or repair.To remove a head restraint:Pull the restraint up as far as it will go. Then push the release button, and pull the restraint up and out.To reinstall a head restraint:Insert the legs back in place, then adjust the head restraint to an appropriate height while pressing the release button. Pull up on the restraint to make sure it is locked in position.■Changing the Second Row Center Seat Head Restraint Position■Removing and Reinstalling the Head Restraints1Removing and Reinstalling the Head Restraints3WARNINGFailure to reinstall, or correctly reinstall, the head restraints can result in severe injury during a crash.Always replace the head restraints before driving.Front and second row head restraints
166uuAdjusting the SeatsuAdjusting the Seat PositionsControlsA passenger in the third row seating position should put the head restraint in the upright position before the vehicle begins moving.To fold down the head restraint:Pull the handle.To put the head restraint back in the upright position:Pull up the head restraint and push rearward until it latches.■Folding Down the Third Row Head RestraintHandle
167uuAdjusting the SeatsuAdjusting the Seat PositionsControlsAfter all occupants have adjusted their seats and head restraints, and put on their seat belts, it is very important that they continue to sit upright, well back in their seats, with their feet on the floor until the vehicle is safely parked and the engine is off.Sitting improperly can increase the chance of injury during a crash. For example, if an occupant slouches, lies down, turns sideways, sits forward, leans forward or sideways, or puts one or both feet up, the chance of injury during a crash is greatly increased.In addition, an occupant who is out of position in the front seat can be seriously or fatally injured in a crash by striking interior parts of the vehicle or being struck by an inflating front airbag.■Maintain a Proper Sitting Position1Maintain a Proper Sitting Position3WARNINGSitting improperly or out of position can result in serious injury or death in a crash.Always sit upright, well back in the seat, with your feet on the floor.
168uuAdjusting the SeatsuRear SeatsControlsRear SeatsPressing the button on the seat-back, or seat cushion tilts the second row outer seat's seat-back forward. uThe whole seat slides forward. Pulling up on the strap also tilts the seat-back forward.■Third Row Seat Access1Third Row Seat AccessThe button is disabled when the vehicle is moving.When you enter the third row seat, be careful not to trip over the second row seat belt.Strap
Continued 169uuAdjusting the SeatsuRear SeatsControlsSeparately fold down the left and right halves of the second row seat to make room for cargo.1. Store the center seat belt first. Insert the latch plate into the slot on the side of the anchor buckle.2. Retract the seat belt into the holder on the ceiling.2Seat Belt with Detachable Anchor P. 363. Lower the center head restraint to its lowest position. Put the armrest back into the seat-back.4. Pull up on the seat-back angle adjustment lever.To return the seat to the original position, pull up the seat-back in the upright position.■Folding Down the Second Row Seat1Folding Down the Second Row SeatMake sure that the folded seat-back does not press against the front passenger seat, as this can cause the weight sensors in the front passenger seat to work improperly.2Passenger Airbag Off Indicator P. 52The front seats must be far enough forward so they do not interfere with the second row seats as they fold down.To lock the seat-back upright, push it backwards until it locks.Make sure the seat-back, head restraints and seat cushion are securely latched back into place before driving. Also, make sure all rear shoulder belts are positioned in front of the seat-back, and the center shoulder belt is re-positioned in the holding slot.Lever
uuAdjusting the SeatsuRear Seats170ControlsSeparately fold down the left and right halves of the third row seat to make room for cargo.■To fold down the seat1. Pull the handle on the seat-back fully.uThe head restraint tilt downward.2. Push the seat-back forward while pulling the handle.■To return the seat to the original position1. Pull the seat-back up with the handle pulled.2. Push the head restraint up to its original position.■Folding Down the Third Row Seat1Folding Down the Third Row SeatMake sure all items in the cargo area or items extending to the third row seats are properly secured. Loose items can fly forward if you have to brake hard.Handle1To return the seat to the original positionMake sure the seat-back and head restraints are securely latched back into place before driving.
171uuAdjusting the SeatsuArmrestControlsArmrestThe console lid can be used as an armrest.To adjust:Slide the armrest to a desired position.Pull down the armrest in the center seat-back.■Using the Front Seat Armrest■Using the Rear Seat Armrest
172ControlsInterior Lights/Interior Convenience ItemsInterior Lights■ONThe interior lights come on regardless of whether the doors are open or closed.■Door activatedThe interior lights come on in the following situations:•When any doors are opened.•You unlock the driver’s door.•When the power mode is set to VEHICLE OFF (LOCK).■OFFThe interior lights remain off regardless of whether the tailgate or the doors are open or closed.■Interior Light Switches1Interior Light SwitchesIn the door activated position, the interior lights fade out and go off about 30 seconds after the doors are closed.The lights go off after 30 seconds in the following situations:•When you unlock the driver’s door but do not open it.•When you set the power mode to VEHICLE OFF (LOCK) but do not open a door.You can change the interior lights dimming time.2Customized Features P. 104, 248The interior lights go off immediately in the following situations:•When you lock the driver’s door.•When you close the driver’s door in ACCESSORY mode.•When you set the power mode to ON.If you leave any doors open in VEHICLE OFF (LOCK) mode, the interior lights go off after about 15 minutes.When the interior light switch is in ON, if you close the tailgate and all doors in VEHICLE OFF (LOCK) mode, the interior lights go off after about 30 minutes.However, when the battery is weaken, the interior lights go off after about 30 minutes if any door is open.Door Activated PositionOffOn
173uuInterior Lights/Interior Convenience ItemsuInterior LightsControls■FrontThe map lights can be turned on and off by pressing the   (map light) button.■Second and third rowThe map lights can be turned on and off by pressing the   (map light) button when the front interior light switch is in the door activated position.■ONThe light comes on when you open the tailgate, and goes off when closed.■OFFThe light stays off with or without opening the tailgate.■Map Lights1Map LightsWhen the interior light switch is in the door activated position and any door is open, pressing the   button does not turn off the map light.FrontSecond and third row■Cargo Area LightsOffOn
174uuInterior Lights/Interior Convenience ItemsuInterior Convenience ItemsControlsInterior Convenience ItemsPress the button to open the glove box. You can lock the glove box with the built-in key.■Removable shelfThe shelf in the glove box is detachable. To remove it, disengage the tabs.The removed shelf can be stored upside down in the glove box.■Glove Box1Glove Box3WARNINGAn open glove box can cause serious injury to your passenger in a crash, even if the passenger is wearing the seat belt.Always keep the glove box closed while driving.Glove BoxTo LockShelfTab
175uuInterior Lights/Interior Convenience ItemsuInterior Convenience ItemsContinuedControlsPull the passenger’s side handle to open the console compartment.Pull the driver’s side handle to open the utility tray in the console lid.■Console TraySlide or lift the tray when you use the console compartment.uTo lift this tray, slide it rearward, then pull it up.■Console Compartment
176uuInterior Lights/Interior Convenience ItemsuInterior Convenience ItemsControlsPress the raised detent to open the lid. To close the lid, push it down until it latches.Pull the handle to open the cargo floor lid.■Center PocketPress■Under-floor Storage Area
Continued 177uuInterior Lights/Interior Convenience ItemsuInterior Convenience ItemsControls■Front seat beverage holdersAre located in the console between the front seats.■Second row seat beverage holdersFold the armrest down to use the rear seat beverage holders.■Third row seat beverage holders■Beverage Holders1Beverage HoldersNOTICESpilled liquids damage the upholstery, carpeting, and electrical components in the interior.Be careful when you are using the beverage holders. Hot liquid can scald you.
uuInterior Lights/Interior Convenience ItemsuInterior Convenience Items178ControlsThe accessory power sockets can be used when the power mode is in ACCESSORY or ON.■Accessory power socket (center pocket)Open the lid and the cover to use it.■Accessory power socket (console compartment)Pull the handle and open the cover to use it.■Accessory Power Sockets1Accessory Power SocketsNOTICEDo not insert an automotive type cigarette lighter element.This can overheat the power socket.The accessory power sockets are designed to supply power for 12 volt DC accessories that are rated 180 watts or less (15 amps).To prevent battery drain, only use the power socket with the engine running.
Continued 179uuInterior Lights/Interior Convenience ItemsuInterior Convenience ItemsControls■Accessory power socket (cargo area)Open the cover to use it.The AC power outlet can be used when the engine is running.Open the cover to use it. Plug in the appliance slightly, turn it 90° clockwise, then push it all the way.■AC Power Outlet*1AC Power Outlet*NOTICEDo not use the AC power outlet for electric appliances that require high initial peak wattage, such as cathode-ray tube type televisions, refrigerators, electric pumps, etc. It is not suitable for devices that process precise data, such as medical equipment, and that require an extremely stable power supply, such as microcomputer-controlled electric blankets, touch sensor lamps, etc.The AC power outlet is designed to supply power for up to 115 volt appliances that are rated 150 watts or less.Continued use of any electric appliance/device exceeding these ratings may result in damage to the appliance/device.* Not available on all models
uuInterior Lights/Interior Convenience ItemsuInterior Convenience Items180ControlsThere is a coat hook on the rear grab handle of both sides. Pull it down to use it.The tie-down anchors on the cargo area floor can be used to install a net for securing items.■Coat Hooks1Coat HooksThe coat hooks are not designed for large or heavy items.■Tie-down AnchorsAnchorAnchor
Continued 181uuInterior Lights/Interior Convenience ItemsuInterior Convenience ItemsControlsTo open the sunglasses holder, push and release the indent. To close, push it again until it latches.You can store eyeglasses and other small items in this holder.The power mode must be in ON to use the heated steering wheel.Press the button on the left side of the steering wheel.When a comfortable temperature is reached, press the button again to turn it off.The heated steering wheel is turned off every time you start the engine, even if you turned it on the last time you drove the vehicle.■Sunglasses Holder1Sunglasses HolderKeep the holder closed while driving except when accessing stored items.Push■Heated Steering WheelCanadian models1Heated Steering WheelDo not use the heated steering wheel continuously when the engine is off. Under such conditions, the battery may be weakened, making the engine difficult to start.IndicatorHeated Steering Wheel Button
uuInterior Lights/Interior Convenience ItemsuInterior Convenience Items182ControlsIf the power mode is in ON:Seat heater - The HI setting heats the seats faster than the LO setting.Seat ventilation* - The HI setting ventilates the seats faster than the LO setting.1. Select .2. Change the setting with one of the following:The Heat/Cool* level indicators: Select your desired level setting. The left is for a LO setting, the center is for a MID setting, and to the right for a HI setting.(+/(-: To go up or down one level at a time.AUTO*: The system automatically selects the setting most suitable to the ambient environment.OFF: Turn off the system.When a comfortable temperature is reached while using the seat heaters in HI, select MID or LO to keep the seat warm.■Front Seat Heaters and Seat Ventilation*1Front Seat Heaters and Seat Ventilation*Do not use the seat heaters and the seat ventilation even in LO when the engine is off. Under such conditions, the battery may be weakened, making the engine difficult to start.3WARNINGHeat induced burns are possible when using seat heaters. Persons with a diminished ability to sense temperature (e.g., persons with diabetes, lower-limb nerve damage, or paralysis) or with sensitive skin should not use seat heaters.Models with seat ventilationModels without seat ventilation* Not available on all models
Continued 183uuInterior Lights/Interior Convenience ItemsuInterior Convenience ItemsControlsThe power mode must be in ON to use the seat heaters. The HI setting heats the seats faster than the LO setting.Press the seat heater button:Once - The HI setting (three indicators on)Twice - The MID setting (two indicators on)Three times - The LO settingFour times - The OFF setting (no indicators on)■Second Row Outer Seat Heaters*1Second Row Outer Seat Heaters*Do not use the seat heaters even in LO when the engine is off. Under such conditions, the battery may be weakened, making the engine difficult to start.3WARNINGHeat induced burns are possible when using seat heaters.Persons with a diminished ability to sense temperature (e.g., persons with diabetes, lower-limb nerve damage, or paralysis) or with sensitive skin should not use seat heaters.* Not available on all models
uuInterior Lights/Interior Convenience ItemsuInterior Convenience Items184ControlsPull the tab and roll up the sunshade all the way. Use the hooks to hang it.■Integrated Sunshades*1Integrated Sunshades*Use the sunshades only when the windows are fully closed. Using the shade while a window is open can unhook and blow off the shade, hitting and hurting anyone sitting near the window.TabHook* Not available on all models
185ContinuedControlsClimate Control SystemUsing Automatic Climate ControlThe automatic climate control system maintains the interior temperature you select. The system also selects the proper mix of heated or cooled air that raises or lowers the interior temperature to your preference as quickly as possible.Use the system when the engine is running.1. Press the AUTO button.2. Adjust the interior temperature using the driver’s side or passenger’s side temperature control switch.3. Press the   (On/Off) button to cancel.1Using Automatic Climate ControlIf any buttons/icons on the touch screen are pressed while using the climate control system in AUTO, the function of the button/icon that was pressed will take priority.The AUTO indicator will go off, but functions unrelated to the button/icon that was pressed will be controlled automatically.To prevent cold air from blowing in from outside, the fan may operate at low speed for a while after the AUTO button has been pressed.If the interior is very warm, you can cool it down more rapidly by partially opening the windows, turning the system on auto, and setting the temperature to low. Change the fresh mode to recirculation mode until the temperature cools down.When you set the temperature to the lower or upper limit, Lo or Hi is displayed.Pressing the   button switches the climate control system between on and off. When turned on, the system returns to your last selection.When you unlock the doors with your remote, the driver’s ID (Driver 1 or Driver 2) is detected, and the climate control settings are turned to the respective mode automatically when you set the power mode to ON. (On/Off) Button AUTO ButtonOn Demand Multi-Use DisplayTMDriver’s Side Temperature Control SwitchPassenger’s Side Temperature Control SwitchPassenger’s Side TemperatureDriver’s Side Temperature
uuClimate Control SystemuUsing Automatic Climate Control186ControlsIn addition to the button/switch controls, you can operate the climate control system from the On Demand Multi-Use DisplayTM touch screen.■Operating from the On Demand Multi-Use DisplayTM1Using Automatic Climate ControlYou can store two customized climate control settings to the system and recall them from the On Demand Multi-Use DisplayTM.2Shortcuts P. 205On Demand Multi-Use DisplayTMA/C (Air Conditioning) and SYNC (Synchronized) IconDriver’s Side Temperature Control IconRecirculation/Fresh Air mode IconFan Control IconPassenger’s Side Temperature Control Icon
Continued 187uuClimate Control SystemuUsing Automatic Climate ControlControls■Changing the interior temperature setting1. Select the driver’s or passenger’s side temperature control icon.2. Change the temperature setting from the following:Temperature bar: Select a point where your desired temperature setting is.Farther to the left is for a lower, and to the right for a higher setting.3/4: To raise or lower the temperature setting one degree at a time.While you select and hold 3/4, the temperature decreases or increases.MAX COOL ON/OFF: To rapidly cool down the interior.uThe A/C indicator comes on. The setting returns to the previously selected value when you select it again.MAX HEAT ON/OFF: To rapidly warm up the interior.uThe A/C indicator goes off. The setting returns to the previously selected value when you select it again.1Using Automatic Climate ControlWhen you set the temperature to the lower or upper limit, Lo or Hi is displayed.When you set the MAX COOL or MAX HEAT, MAX COOL or MAX HEAT is displayed.The side you selected.Temperature Bar
uuClimate Control SystemuUsing Automatic Climate Control188Controls■Switching the vent modeSelect a desired vent mode icon, or Front Mode Auto: The system automatically selects the vent mode most suitable to the ambient environment.Vent mode: Dashboard vents: Dashboard and floor vents: Floor vents: Floor and defroster vents■A/C on and off1. Select A/C.2. Select ON or OFF.1Switching the vent modeWhile the climate control system is in AUTO, Front Mode Auto is highlighted.
Continued 189uuClimate Control SystemuUsing Automatic Climate ControlControls■SYNC on and off1. Select SYNC.2. Select ON for synchronized mode.uWhen in synchronized mode, the front passenger’s side temperature and the rear passenger compartment become the same as the driver’s side settings.3. Adjust the temperature or change the mode from the driver’s side.■Changing the fan speed1. Select .2. Change the fan speed with one of the following:The fan speed level indicators: Select your desired speed level. The smaller indicator is for a slower speed, and the larger for a faster speed.(+/(-: To go up or down one level at a time.Fan AUTO: The system automatically selects the fan speed most suitable to the ambient environment.1SYNC on and offWhen you press the   button, the system synchronizes the driver's and front passenger's temperature settings.When the system is not in SYNC mode, the driver's side temperature, the front passenger’s side temperature and the rear passenger compartment (if it is on) can be set separately.You can also turn off SYNC mode by changing the front passenger’s side temperature or rear passenger’s temperature.The system adjusts each temperature based on the information of the sunlight sensor and the sun position updated by the navigation system’s GPS.Models with navigation system1Changing the fan speedWhile the climate control system is in AUTO, Fan AUTO is highlighted.Fan Speed Level Indicators
190uuClimate Control SystemuUsing Automatic Climate ControlControls■Switching between the recirculation and fresh air modes1. Select   or   currently shown.2. Switch the mode depending on environmental conditions to the following: (Recirculation Mode): Recirculates air from the vehicle’s interior through the system. (Fresh Air Mode): Maintains outside ventilation. Keep the system in fresh air mode in normal situations.
191uuClimate Control SystemuUsing Automatic Climate ControlControlsPress the   button to turn the air conditioning system on and automatically switch the system to fresh air mode.Press the   button again to turn off, the system returns to the previous settings.■To rapidly defrost the windows1. Press the   button.2. Select the recirculation mode.2Switching between the recirculation and fresh air modes P. 190■Defrosting the Windshield and Windows1Defrosting the Windshield and WindowsFor your safety, make sure you have a clear view through all the windows before driving.Do not set the temperature near the upper or lower limit.When cold air hits the windshield, the outside of the windshield may fog up.If the side windows fog up, adjust the vents so that the air hits the side windows.1To rapidly defrost the windowsAfter defrosting the windows, switch over to fresh air mode.If you keep the system in recirculation mode, the windows may fog up from humidity. This impedes visibility.
192uuClimate Control SystemuRear Climate Control SystemControlsRear Climate Control SystemUse the system when the engine is running.1. Select REAR.2. Select AUTO.uThe rear system changes to AUTO mode.3. Adjust the rear passenger’s compartment temperature using the temperature bar.4. Select the ON/OFF to cancel.uWhen the turned back on, the system returns to your last selection.■Using the Rear Climate Control System From the Front Panel1Rear Climate Control SystemIf any icons on the touch screen are pressed while using the rear climate control system in AUTO, the function of the icon that was pressed will take priority.Rear Lock: Appears on the front panel. When selected, it disables the rear panel control.LOCK: Appears on the rear control panel while the rear lock is on.If the rear lock is on while in SYNC mode, the rear control panel is disabled. LOCK SYNC appears on the rear control panel.On Demand Multi-Use DisplayTM3/4 (Temperature Control) IconFan Speed Level IndicatorsON/OFF IconAUTO IconRear Lock IconVent Mode Icon
Continued 193uuClimate Control SystemuRear Climate Control SystemControls■Changing the rear temperature settingChange the temperature setting from the following:3/4: To raise or lower the temperature setting one degree at a time.While you select and hold 3/4, the temperature decreases or increases.■Switching the vent modeSelect a desired vent mode icon.Vent mode: Rear console vents: Rear console vents and floor vents: Rear floor vents1Changing the rear temperature settingWhen you set the temperature to the lower or upper limit, Lo or Hi is displayed.3/4 (Temperature Control) IconVent Mode Icon
194uuClimate Control SystemuRear Climate Control SystemControls■Changing the fan speedSelect your desired speed level. The smaller indicator is for a slower speed, and the larger for a faster speed.Fan Speed Level Indicators
195uuClimate Control SystemuRear Climate Control SystemControlsUse the system when the engine is running1. Press the AUTO button.2. Adjust the interior temperature using the rear temperature control button.3. To turn off the rear climate control system, press   button.■Using the Rear Climate Control System From the Rear Panel1Using the Rear Climate Control System From the Rear PanelWhen the Rear Lock icon on the front control panel is off, the temperature of the rear passenger compartment can be controlled independently.Rear floor ventsRear console vents and floor ventsRear console vents /   (Fan Control) Buttons (On/Off) ButtonRear Temperature Control ButtonsAUTO Button
196uuClimate Control SystemuAutomatic Climate Control SensorsControlsAutomatic Climate Control SensorsThe automatic climate control system is equipped with sensors. Do not cover or spill any liquid on them.SensorSensor
197FeaturesThis chapter describes how to operate technology features.Audio SystemAbout Your Audio System................ 198USB Port .......................................... 199Auxiliary Input Jack .......................... 200Audio System Theft Protection ......... 201Audio Remote Controls.................... 202Audio System Basic Operation ........ 203On Demand Multi-Use DisplayTM....... 204Audio/Information Screen ................ 211Adjusting the Sound ........................215Display Setup ...................................216Playing AM/FM Radio....................... 217Playing XM® Radio ...........................221Playing a CD .................................... 224Playing an iPod®............................... 227Playing Internet Radio ...................... 231Playing a USB Flash Drive ................. 234Playing Bluetooth® Audio................. 237Audio Error MessagesCD Player......................................... 239iPod®/USB Flash Drive....................... 240Pandora®......................................... 241AhaTM Radio..................................... 243General Information on the Audio SystemXM® Radio Service ........................... 244Recommended CDs ......................... 245Compatible iPod®, iPhone®, and USB Flash Drives................................................. 247Customized Features........................ 248Defaulting All the Settings ............... 265HomeLink® Universal Transceiver ... 266Bluetooth® HandsFreeLink®Using HFL ........................................ 268HFL Menus ...................................... 270Compass*.......................................... 301* Not available on all models
198FeaturesAudio SystemAbout Your Audio SystemSee the Navigation System Manual for operation of the audio system, AcuraLink, rear entertainment system*, Bluetooth® HandsFreeLink®, and voice commands for these features.The audio system features AM/FM radio and XM® Radio service. It can also play audio CDs, WMA/MP3/AAC files, USB flash drives, and iPod®, iPhone® and Bluetooth® devices.You can operate the audio system from the buttons and switches on the panel or the icons on the touchscreen interface.1About Your Audio SystemXM® Radio is available on a subscription basis only. For more information on XM® Radio, contact a dealer.2General Information on the Audio System P. 244XM® Radio is available in the United States and Canada, except Hawaii, Alaska, and Puerto Rico.XM® is a registered trademark of Sirius XM Radio, Inc.Video CDs, DVDs*, and 3-inch (8-cm) mini CDs are not supported.iPod® and iPhone® are registered trademarks owned by Apple Inc.State or local laws may prohibit the operation of handheld electronic devices while operating a vehicle.When the screen is viewed through polarized sunglasses, a rainbow pattern may appear on the screen due to optical characteristics of the screen. If this is disturbing, please operate the screen without polarized sunglasses.Models with navigation systemModels without navigation systemRemote ControlsiPod®USB Flash Drive* Not available on all models
199uuAudio SystemuUSB PortFeaturesUSB PortInstall the iPod® dock connector or the USB flash drive to the USB port.1USB Port•Do not leave the iPod® or USB flash drive in the vehicle. Direct sunlight and high temperatures may damage it.•We recommend using an extension cable with the USB port.•Do not connect the iPod® or USB flash drive using a hub.•Do not use a device such as a card reader or hard disk drive, as the device or your files may be damaged.•We recommend keeping your data backed up before using the device in your vehicle.•Displayed messages may vary depending on the device model and software version.If the audio system does not recognize the iPod®, try reconnecting it a few times or reboot the device. To reboot, follow the manufacturer’s instructions provided with the iPod® or visit www.apple.com/ipod.
200uuAudio System uAuxiliary Input JackFeaturesAuxiliary Input JackUse the jack to connect standard audio devices.1. Open the AUX cover.2. Connect a standard audio device to the input jack using a 1/8 inch (3.5 mm) stereo miniplug.uThe audio system automatically switches to the AUX mode.1Auxiliary Input JackYou can return to the AUX mode by selecting Change Source on the Audio menu screen or Audio Source on the touchscreen.
201uuAudio SystemuAudio System Theft ProtectionFeaturesAudio System Theft ProtectionThe audio system is disabled when it is disconnected from the power source, such as when the battery is disconnected or goes dead. In certain conditions, the system may display Enter code. If this occurs, reactivate the audio system.■Reactivating the audio system1. Set the power mode to ON.2. Turn on the audio system.3. Press and hold the audio system power button for more than two seconds.uThe audio system is reactivated when the audio control unit establishes a connection with the vehicle control unit. If the control unit fails to recognize the audio unit, you must go to a dealer and have the audio unit checked.
202uuAudio System uAudio Remote ControlsFeaturesAudio Remote ControlsAllows you to operate the audio system while driving.SOURCE ButtonCycles through the audio modes as follows:FM  AM  XM  CD  USB  iPod®  Bluetooth® Audio   Pandora®  AhaTM  AUXLeft Selector WheelRoll Up: To increase the volume.Roll Down: To decrease the volume.Push: To mute. Push again to unmute.•When listening to the radioShift to the right: To select the next preset radio station.Shift to the left: To select the previous preset radio station.Shift to the right and hold: To select the next strong station.Shift to the left and hold: To select the previous strong station.•When listening to a CD, iPod®, USB flash drive, or Bluetooth® AudioShift to the right: To skip to the next song.Shift to the left: To go back to the beginning of the current or previous song.Shift to the right and hold: To go to the group up. (Bluetooth® Audio only)Shift to the left and hold: To go to the group down. (Bluetooth® Audio only)•When listening to a CD or USB flash driveShift to the right and hold: To skip to the next folder.Shift to the left and hold: To go back to the previous folder.•When listening to Pandora® and AhaTMShift to the right: To skip to the next song.Shift to the right and hold: To select the next station.Shift to the left and hold: To select the previous station.1Audio Remote ControlsThe CD mode appears only when a CD is loaded. Pandora®, Bluetooth® Audio, or AhaTM mode appears when a connection (Bluetooth® or USB) is established with a device.To select audio mode, press the SOURCE button, then shift the left selector wheel to the right or left.Left Selector WheelSOURCE Button
203FeaturesAudio System Basic OperationTo use the audio system, the power mode must be in ACCESSORY or ON.Use the interface dial or MENU button to access some audio functions.Press   to switch between the normal and extended display for some functions.Interface dial: Rotate left or right to scroll through the available choices. Press to set your selection. Move right, left, up or down to select secondary menu.MENU button: Press to select any mode. The available mode includes Change Source, Station List, Save Preset, Radio Text, Music Search, and play modes. Play modes can be also selected from Scan, Random/Repeat, and so on.BACK button: Press to go back to the previous display. button: Press to change the audio/information screen brightness.Press   once and make an adjustment.uEach time you press  , the mode switches between the daytime mode, nighttime mode and off mode.1Audio System Basic OperationThese indications are used to show how to operate the interface dial.Rotate   to select.Press  to enter.Move  ,  ,   or   to select secondary menu.Audio Menu Items2Station List P. 2192Save Preset P. 218, 2232Radio Text P. 2202Music Search P. 225, 229, 2352Scan P. 226, 2362Random/Repeat P. 226, 230, 236When you unlock the doors with your remote, the driver’s ID (Driver 1 or Driver 2) is detected, and the audio system settings and preset memory are turned to the respective mode automatically when you set the power mode to ON.Interface DialMENU ButtonBACK Button Button
204uuAudio System Basic OperationuOn Demand Multi-Use DisplayTMFeaturesOn Demand Multi-Use DisplayTMUse the On Demand Multi-Use DisplayTM to operate the audio system.Select Audio Source, then select an icon on the source list to switch the audio source.Select More to display the menu items.■Selecting an Audio Source1On Demand Multi-Use DisplayTMIcons that appear on the screen vary by the source selected.Select   to go back to the previous screen.Use the  / / /  icons to turn the page.X■Displaying the Menu ItemsSelect Audio Source.Source List IconsSelect More.Menu Items
205uuAudio System Basic OperationuOn Demand Multi-Use DisplayTMContinuedFeaturesYou can preset the settings of three categories (Phone, Climate, Audio) from Shortcuts.■ShortcutsShortcuts Icon
uuAudio System Basic OperationuOn Demand Multi-Use DisplayTM206Features■PhoneYou can preset five previously stored speed dial entries, and make a call from one of the preset numbers, or call history when the phone is paired and connected to the vehicle‘s Bluetooth® HandsFreeLink® (HFL) system. 2Phone Setup P. 274To preset a speed dial:1. Select Shortcuts.2. Select Phone.3. Select Speed Dial.4. Select Edit or No Entry.uIf you select No Entry, go to step 6.5. Select Add.uFive presets appear. Select a No Entry preset or an existing preset.uThe screen changes to a list of previously stored speed dial entries.6. Select a number you want to store as a shortcut.To make a call from a speed dial entry:1. Select Shortcuts.2. Select Phone.3. Select Speed Dial.4. Select a preset number.uDialing starts automatically.1Phone2Speed Dial P. 285Dial iconYou can make a call using the keyboard on the On Demand Multi-Use DisplayTM to input numbers.2To make a call using a phone number P. 290
Continued 207uuAudio System Basic OperationuOn Demand Multi-Use DisplayTMFeaturesTo delete a speed dial:1. Select Shortcuts.2. Select Phone.3. Select Speed Dial.4. Select Edit.5. Select Delete.6. Select the preset number with the phone number you want to delete.To make a call from call history:1. Select Shortcuts.2. Select Phone.3. Select Call History.4. Select a phone number.uDialing starts automatically.1PhoneThe call history displays the last six dialed, received, or missed calls.
uuAudio System Basic OperationuOn Demand Multi-Use DisplayTM208Features■ClimateYou can store two sets of your preferred temperature, fan speed, and vent mode settings to the climate control system.To store a set of the climate control settings:1. Select Shortcuts.2. Adjust the climate control system to your preference.2Climate Control System P. 1853. Select Climate.4. Select Edit.5. Select Add.6. Select Preset 1 or Preset 2 you want to store your settings to.To recall one of the settings:1. Select Shortcuts.2. Select Climate.3. Select Preset 1 or Preset 2.To delete a preset:1. Select Shortcuts.2. Select Climate.3. Select Edit.4. Select Delete.5. Select Preset 1 or Preset 2 you want to delete.1ClimateYou can also store a set by pressing and holding the preset number you want to store that setting after step 3.
Continued 209uuAudio System Basic OperationuOn Demand Multi-Use DisplayTMFeatures■AudioYou can store up to six radio stations when playing AM, FM, or XM® radio.To preset a station or song:1. Tune to a radio station.2Playing AM/FM Radio P. 2172Playing XM® Radio P. 2212. Select Shortcuts.3. Select Audio.4. Select Edit or No Entry.uIf you select No Entry, go to step 6.5. Select Add.6. Select the preset icon you want to store the station or song to.To play a preset station or song:1. Select Shortcuts.2. Select Audio.3. Select a preset icon.To delete a preset station or song:1. Select Shortcuts.2. Select Audio.3. Select Edit.4. Select Delete.5. Select the preset icon with the radio station or a song you want to delete.1AudioYou can also preset a station or song by pressing and holding the preset icon you want to store that station or song after step 3.
uuAudio System Basic OperationuOn Demand Multi-Use DisplayTM210Features1. Select More, then Sound Settings.2. Use (+, (- or other icons to adjust the setting.1. Select More, then Screen Settings.2. Use (+, (- or other icons to adjust the setting.■Adjusting the Sound1Adjusting the SoundSelect Off, Low, Mid or High for the SVC setting.2Adjusting the Sound P. 215Instead of using (+, (- or icons, you can also touch the point where your desired setting is.■Changing the Screen Settings1Changing the Screen SettingsThe followings are adjustable screen settings:•Sync Display BrightnessSelects whether the screen brightness synchronizes with the instruments panel brightness.•Brightness•Contrast•Black Level•DisplayChanges between the daytime or nighttime modes.•BeepMutes a beep that sounds every time you touch the screen.•KeyboardChanges the on-screen keyboard from the alphabetical order to the qwerty type.•VibrationTurns on and off the vibration when you touch the screen.•Fade TimerSets the screen black out timing.Instead of using (+, (- or icons, you can also touch the point where your desired setting is.
211uuAudio System Basic OperationuAudio/Information ScreenContinuedFeaturesAudio/Information ScreenDisplays the audio status and wallpaper. From this screen, you can go to various setup options.Press the PHONE, INFO and AUDIO buttons to go to the corresponding display.■Switching the DisplayAudioInfoPhoneAUDIO ButtonPHONE ButtonINFO Button
212uuAudio System Basic OperationuAudio/Information ScreenFeatures■AudioShows the current audio information.■PhoneShows the HFL information. 2Bluetooth® HandsFreeLink® P. 268■InfoShows the Trip Computer or Clock/Wallpaper and other information. Rotate   to select an item, then press  .■Trip computer (Current Drive)Shows the range, and instant and average fuel economy of the current trip, as well as the average fuel economy from your last trip.■Trip computer (History of Trip A)Shows the range, average fuel economy and distances traveled for the current trip, as well as the average fuel economy and distances traveled during the last three driving cycles.Each time you reset the trip meter A, the information on the display updates. The history of the previous three driving cycles is kept.■Deleting the history manually1. Move  on the History of Trip A screen to select Delete History, then press  .2. You will receive a confirmation message on the screen. Rotate   to select Yes, then press  .■Clock/WallpaperShows a clock screen or an image you import.
Continued 213uuAudio System Basic OperationuAudio/Information ScreenFeaturesYou can change, store, and delete the wallpaper on the audio/information screen.■Import wallpaperYou can import up to three images, one at a time, for wallpaper from a USB flash drive.1. Connect the USB flash drive to the USB port.2USB Port P. 1992. Press the SETTINGS button.3. Rotate   to select System Settings, then press .uRepeat the procedure to select Clock, Clock/Wallpaper Type.4. Move   to select Wallpaper.uThe screen will change to the wallpaper list.5. Move   to select Add New, then press  .6. Rotate   to select a desired picture.uThe preview is displayed on the left side on the screen.7. Press  , then move   to select Start Import.uThe confirmation message will appear. Then the display will return to the wallpaper list.■Wallpaper Setup1Wallpaper Setup•When importing wallpaper files, the image must be in the USB flash drive’s root directory.Images in a folder cannot be imported.•The file name must be fewer than 64 characters.•The file format of the image that can be imported is BMP (bmp) or JPEG (jpg).•The individual file size limit is 6 MB.•The maximum image size is 1,680 x 936 pixels. If the image size is less than 420 × 234 pixels, the image is displayed in the middle of the screen with the extra area appearing in black.•Up to 255 files can be selected.•If the USB flash drive does not have any pictures, the No files detected message appears.
uuAudio System Basic OperationuAudio/Information Screen214Features■Select wallpaper1. Press the SETTINGS button.2. Rotate  to select System Settings, then press  .uRepeat the procedure to select Clock/Wallpaper Type.3. Move  to select Wallpaper.uThe screen changes to the wallpaper list.4. Rotate   to select a desired wallpaper.uThe preview is displayed on the left side on the screen.5. Press .uThe pop-up menu appears on the screen.6. Rotate  to select Set, then press  .uThe display will return to the wallpaper list.■Delete wallpaper1. Press the SETTINGS button.2. Rotate  to select System Settings, then press  .uRepeat the procedure to select Clock/Wallpaper Type.3. Move  to select Wallpaper.uThe screen changes to the wallpaper list.4. Rotate   to select a wallpaper that you want to delete, then press  .uThe preview is displayed on the left side on the screen.5. Press .uThe pop-up menu appears on the screen.6. Rotate  to select Delete, then press  .uThe confirmation message will appear.7. Rotate  to select Yes, then press   to delete completely.uThe display will return to the wallpaper list.1Wallpaper SetupFrom the pop-up menu, rotate   to select Preview and press   to see a preview at full-size screen.To go back to the previous screen, press   to select OK, or press the BACK button.When the file size is large, it takes a while to be previewed.
215uuAudio System Basic OperationuAdjusting the SoundFeaturesAdjusting the Sound1. Press the SETTINGS button.2. Rotate   to select Audio Settings, then press .3. Rotate   to select Sound, then press  .Rotate   to scroll through the following choices:1Adjusting the SoundThe SVC has four modes: Off, Low, Mid, and High.SVC adjusts the volume level based on the vehicle speed. As you go faster, audio volume increases. As you slow down, audio volume decreases.SETTINGS ButtonSpeed-sensitive Volume CompensationBassTrebleFaderBalanceSubwooferSVC
216uuAudio System Basic OperationuDisplay SetupFeaturesDisplay SetupYou can change the brightness or color theme of the audio/information screen.1. Press the SETTINGS button.2. Rotate  to select System Settings, then press .3. Rotate   to select Brightness, then press .4. Rotate   to adjust the setting, then press .1. Press the SETTINGS button.2. Rotate  to select System Settings, then press .3. Rotate   to select Background Color, then press  .4. Rotate   to select the setting you want, then press  .■Changing the Screen Brightness1Changing the Screen BrightnessYou can change the Contrast and Black Level settings in the same manner.■Changing the Screen’s Color Theme
217uuAudio System Basic OperationuPlaying AM/FM RadioContinuedFeaturesPlaying AM/FM RadioAudio/Information ScreenOn Demand Multi-Use DisplayTMTune Up/Down IconsSelect   or   to tune the radio frequency.MENU ButtonPress to display the menu items. (Power) ButtonPress to turn the audio system on and off.Audio SourceSelect to change a band or change an audio source.To listen to a stored channel, select 1-6 (AM) or 1-12 (FM).PresetsSelect to store a station.Skip/Seek IconsSelect   or   to search up and down the selected band for a station with a strong signal.MoreSelect to display the menu items.BACK ButtonPress to go back to the previous display.VOL (Volume) Knob (Pushed out)Turn to adjust the volume.Interface Dial/ENTER ButtonPress and turn to select preset radio stations.Move up, down, right and left to select secondary menu.
uuAudio System Basic OperationuPlaying AM/FM Radio218FeaturesTo store a station:1. Tune to the selected station.2. Press the MENU button.3. Rotate  to select Save Preset, then press  .4. Rotate   to select the preset number you want to store that station, then press .You can also store that station by the following procedure.1. Tune to the selected station.2. Rotate   to select the preset number you want to store the station.3. Press and hold   for a few seconds.1. Tune to the selected station.2. Select More.3. Select Save Preset.4. Select the preset number you want to store that station.You can also store that station by the following procedure.1. Tune to the selected station.2. Change the display to the preset screen.3. Select and hold the preset number you want to store that station.■Preset Memory1Playing AM/FM RadioThe ST indicator appears on the display indicating stereo FM broadcasts.Stereo reproduction in AM is not available.Switching the Audio ModePress the SOURCE button on the steering wheel.2Audio Remote Controls P. 202You can also switch the mode by pressing the MENU button and selecting Change Source on the Audio menu screen.You can store 6 AM stations and 12 FM stations into the preset memory.Interface DialOn Demand Multi-Use DisplayTM
219uuAudio System Basic OperationuPlaying AM/FM RadioContinuedFeaturesProvides text data information related to your selected RDS-capable FM station.■To find an RDS station from Station List1. Press the MENU button while listening to an FM station.2. Rotate   to select Station List, then press  .3. Rotate   to select the station, then press  .■Manual updateUpdates your available station list at any time.1. Press the MENU button while listening to an FM station.2. Rotate   to select Station List, then press  .3. Rotate   to select Refresh, then press  .■Radio Data System (RDS)
220uuAudio System Basic OperationuPlaying AM/FM RadioFeatures■Radio textDisplay the radio text information of the selected RDS station.1. Press the MENU button.2. Rotate  to select Radio Text, then press  .■ScanSamples each of the strongest stations on the selected band for 10 seconds.1. Press the MENU button.2. Rotate  to select Scan, then press  .To turn off scan, press   to select Cancel Scan, or press the BACK button.1. Select More.2. Select Scan.To turn off scan, select Cancel Scan.Interface DialOn Demand Multi-Use DisplayTM
221uuAudio System Basic OperationuPlaying XM® RadioContinuedFeaturesPlaying XM® RadioAudio/Information ScreenOn Demand Multi-Use DisplayTMCategory Up/Down IconsSelect   or   to display and select an XM® Radio category.MENU ButtonPress to display the menu items. (Power) ButtonPress to turn the audio system on and off.Audio SourceSelect to change an audio source.To listen to a stored channel, select 1-12.PresetsSelect to store a station.Skip/Seek IconsSelect   or   to the previous or next channel.In channel mode, select and hold to change the channel rapidly.MoreSelect to display the menu items.BACK ButtonPress to go back to the previous display.VOL (Volume) Knob (Pushed out)Turn to adjust the volume.Interface Dial/ENTER ButtonPress and turn to select preset radio stations.Move up, down, right and left to select secondary menu.
uuAudio System Basic OperationuPlaying XM® Radio222Features1. Select the XM® mode.2Audio Remote Controls P. 2022On Demand Multi-Use DisplayTM P. 2042. Press the MENU button.3. Rotate  to select Channel List, then press  .4. Rotate   to select a channel from a list, then press  .2. Select a channel using the  ,  ,  ,   icons on the tune mode screen or the preset numbers (1-12) on the preset mode screen.To change the tune mode:1. Select the XM® mode.2. Press the MENU button.3. Rotate  to select XM Tune Mode, then press  .4. Rotate  to select Channel Mode or Category Mode, then press  .2. Select More.3. Select XM Tune Mode.4. Select Channel Mode or Category Mode.■To Play the XM® Radio1Playing XM® RadioIn the channel mode, all available channels are selectable. In the category mode, you can select a channel within a category (Jazz, Rock, Classical, etc.).There may be instances when XM® Radio does not broadcast all the data fields (artist name, title). This does not indicate a problem with your audio system.Interface DialOn Demand Multi-Use DisplayTMInterface DialOn Demand Multi-Use DisplayTM
223uuAudio System Basic OperationuPlaying XM® RadioFeaturesTo store a station:1. Tune to the selected station.2. Press the MENU button.3. Rotate   to select Save Preset, then press  .4. Rotate   to select the preset number you want to store that station, then press .You can also store that station by the following procedure.1. Tune to the selected station.2. Rotate   to select the preset number you want to store the station.3. Press and hold   for a few seconds.1. Tune to the selected station.2. Select More.3. Select Save Preset.4. Select the preset number you want to store that station.You can also store that station by the following procedure.1. Tune to the selected station.2. Change the display to the preset screen.3. Select and hold the preset number you want to store that station.■Preset Memory1Playing XM® RadioYou can store 12 XM® stations into the preset memory.Interface DialOn Demand Multi-Use DisplayTM
224uuAudio System Basic OperationuPlaying a CDFeaturesPlaying a CDYour audio system supports audio CDs, CD-Rs and CD-RWs in either MP3, WMA, or AAC*1 format. With the CD loaded, select the CD mode.*1:Only AAC format files recorded with iTunes® are playable on this unit.Audio/Information ScreenMENU ButtonPress to display the menu items.CD SlotInsert a CD about halfway into the CD slot. (CD Eject) ButtonPress to eject a CD.Folder Up/Down IconsSelect   to skip to the next folder, and   to skip to the beginning of the previous folder in MP3, WMA, or AAC.Audio SourceSelect to change an audio source.Skip/Seek IconsSelect   or   to change tracks (files in MP3, WMA, or AAC).Select and hold to move rapidly within a track/file.MoreSelect to display the menu items.BACK ButtonPress to go back to the previous display.Interface Dial/ENTER ButtonPress and turn to select an item, then press to set your selection.Move up, down, right and left to select secondary menu.On Demand Multi-Use DisplayTM (Power) ButtonPress to turn the audio system on and off.VOL (Volume) Knob (Pushed out)Turn to adjust the volume.
Continued 225uuAudio System Basic OperationuPlaying a CDFeatures1. Press the MENU button.2. Rotate   to select Music Search, then press .3. Rotate  , move   or  , then press   to select a file from the Music Search list.You can also select a file by the following procedure.1. Rotate   or press   to display the song list.2. Rotate  , move   or  , then press   to select a file from the list.■How to Select a File from the Music Search List (MP3/WMA/AAC)1Playing a CDNOTICEDo not use CDs with adhesive labels. The label can cause the CD to jam in the unit.WMA and ACC files protected by digital rights management (DRM) cannot be played.The audio system displays Unplayable File, then skips to the next file.Text data appears on the display under the following circumstances:•When you select a new folder, file, or track.•When you change the audio mode to CD.•When you insert a CD.If you eject the CD but do not remove it from the slot, the system reloads the CD automatically after several seconds.Folder SelectionFile Selection
uuAudio System Basic OperationuPlaying a CD226FeaturesYou can select scan, repeat, and random modes when playing a track or file.1. Press the MENU button.2. Rotate   to select Scan or Random/Repeat, then press  .3. Rotate   to select a mode, then press  .1. Select More.2. Select Scan or Random/Repeat.3. Select a mode.■To turn off a play mode1. Press the MENU button.2. Rotate   to select the mode you want to turn off, then press  .1. Select More.2. Select the mode you want to turn off.■How to Select a Play Mode1How to Select a Play ModePlay Mode Menu ItemsScanScan Folders (MP3/WMA/AAC): Provides 10-second sampling of the first file in each of the main folders.Scan Tracks: Provides 10-second sampling of all tracks on the CD (all files in the current folder in MP3, WMA, or AAC).Random/RepeatRepeat Folder (MP3/WMA/AAC): Repeats all files in the current folder.Repeat Track: Repeats the current track/file.Random in Folder (MP3/WMA/AAC): Plays all files in the current folder in random order.Random All Tracks: Plays all tracks/files in random order.Random/Repeat is selected.Interface DialRandom/Repeat is selected.On Demand Multi-Use DisplayTMInterface DialOn Demand Multi-Use DisplayTM
227uuAudio System Basic OperationuPlaying an iPod®ContinuedFeaturesPlaying an iPod®Connect the iPod® using your dock connector to the USB port, then select the iPod mode.2USB Port P. 199Audio/Information ScreenMENU ButtonPress to display the menu items.Album BarSelect to search for an album.Audio SourceSelect to change an audio source.Skip/Seek IconsSelect   or   to change songs.Select and hold to move rapidly within a song.MoreSelect to display the menu items. (Power) ButtonPress to turn the audio system on and off.BACK ButtonPress to go back to the previous display.Interface Dial/ENTER ButtonPress and turn to select an item, then press to set your selection.Move up, down, right and left to select secondary menu.USB IndicatorAppears when an iPod® is connected.Album ArtOn Demand Multi-Use DisplayTMVOL (Volume) Knob (Pushed out)Turn to adjust the volume.Album Art Icon
uuAudio System Basic OperationuPlaying an iPod®228FeaturesYou can select albums in the category you selected by the Music Search list.1. Select the album bar.uThe image of the current album is displayed.2. Select  or  icon to search for an album.uWhen the album image you are looking for appears, select it to play.■How to Select an Album1How to Select an AlbumThis function may not be available depending on models or versions.Select   to go back to the previous screen.XSelect an album image.Select the album bar.Album Bar Album Image
Continued 229uuAudio System Basic OperationuPlaying an iPod®Features1. Press the MENU button.2. Rotate   to select Music Search, then press .3. Rotate  , move   or  , then press   to select a song from the Music Search list.You can also select a song by the following procedure.1. Rotate   or press   to display the song list.2. Rotate  , move   or  , then press   to select a song from the list.■How to Select a Song from the Music Search List1How to Select a Song from the Music Search ListAvailable operating functions vary on models or versions. Some functions may not be available on the vehicle’s audio system.If there is a problem, you may see an error message on the audio/information screen.2iPod®/USB Flash Drive P. 240
W WAudio System Basic OperationuPlaying an iPod®230FeaturesYou can select repeat and shuffle modes when playing a file.1. Press the MENU button.2. Rotate   to select Shuffle/Repeat, then press .3. Rotate   to select a mode, then press  .1. Select More.2. Select Shuffle/Repeat.3. Select a mode.■To turn off a play mode1. Press the MENU button.2. Rotate   to select the mode you want to turn off, then press  .1. Select More.2. Select the mode you want to turn off.■How to Select a Play Mode1How to Select a Play ModePlay Mode Menu ItemsRepeat Song: Repeats the current track.Shuffle Albums: Plays all available albums in a selected list (playlists, artists, albums, songs, genres, or composers) in random order.Shuffle All Songs: Plays all available files in a selected list (playlists, artists, albums, songs, genres, or composers) in random order.Interface DialOn Demand Multi-Use DisplayTMInterface DialOn Demand Multi-Use DisplayTM
231uuAudio System Basic OperationuPlaying Internet RadioContinuedFeaturesPlaying Internet RadioConnect a compatible phone through Bluetooth®.You can also connect the phone using your dock connector to the USB port.Select Audio Source to select Pandora or Aha mode.Compatible phones only1Playing Internet RadioPandora®, the Pandora logo, and the Pandora trade dress are trademarks or registered trademarks of Pandora Media, Inc., used with permission. Pandora is currently available exclusively in the United States.U.S. modelsiPhone®Audio/Information ScreenAlbum ArtUSB IndicatorAppears when a phone is connected.Rating IconBACK ButtonPress to go back to the previous display.Skip IconSelect to skip a song.MoreSelect to display the menu items.Station Up/Down IconsSelect to change a station.Audio SourceSelect Pandora®* or AhaTM.Play/Pause IconSelect to resume or play a song.Like/Dislike IconsSelect to evaluate a song. (Power) ButtonPress to turn the audio system on and off.Interface Dial/ENTER ButtonPress and turn to select an item, then press to set your selection. Move up, down, right and left to select secondary menu.On Demand Multi-Use DisplayTMVOL (Volume) Knob (Pushed out)Turn to adjust the volume.Bluetooth® IndicatorAppears when your phone is connected to HFL.MENU ButtonPress to display the menu items.* Not available on all models
uuAudio System Basic OperationuPlaying Internet Radio232FeaturesYou can operate some of the Pandora® menu items from your vehicle’s audio system. The available items are:■Operating a menu itemThe menu items are shown in the lower half of the audio/information screen.Rotate   to select an item and press  .To select Change Source, press the MENU button, then press  .■Pandora® Menu•Skip Forward •Dislike•Play/Pause •Bookmark Track•Station List •Bookmark Artist•Like •Change SourceU.S. models1Playing Internet RadioTo find out if your phone is compatible with this feature, visit www.acura.com/handsfreelink, or call 1-888-528-7876.Pandora® is a personalized Internet radio service that selects music based on an artist, song, or genre a user enters, and streams what is likely to be of interest.To use this service in your vehicle, the Pandora® app must first be installed on your phone. Visit www.pandora.com. for more information.If you cannot operate Pandora® through the audio system, it may be streaming through Bluetooth® Audio. Make sure Pandora® mode on your audio system is selected.U.S. models1Pandora® MenuAvailable operating functions vary on software versions. Some functions may not be available on the vehicle’s audio system.If there is a problem, you may see an error message on the audio/information screen.2Pandora® P. 241There are restrictions on the number of songs you can skip or dislike in a given hour.
233uuAudio System Basic OperationuPlaying Internet RadioFeaturesYou can operate some of the AhaTM menu items from your vehicle’s audio system. The available items are:■Operating a menu itemThe menu items are shown in the lower half of the audio/information screen.Rotate   to select an item and press  .To select Change Source or Stations, press the MENU button, then press  .■AhaTM Radio Menu•Like •Tracks•Dislike •Reply•Play/Pause •Change Source•15sec rewind •Stations•30sec skip1AhaTM Radio MenuAhaTM by Harman is a cloud-based service that organizes your favorite web content into live radio stations. You can access podcasts, internet radio, location-based services, and audio updates from social media sites.Available operating functions vary on software versions. Some functions may not be available on the vehicle’s audio system.If there is a problem, you may see an error message on the audio/information screen.2AhaTM Radio P. 243The menu items vary depending on the station you selected.To use this service in your vehicle, the AcuraLink app must be installed on your phone. Visit owners.acura.com/apps for more information.You must have a previously set up Aha account prior to using the service in your vehicle. Visit www.aharadio.com for more information.
234uuAudio System Basic OperationuPlaying a USB Flash DriveFeaturesPlaying a USB Flash DriveYour audio system reads and plays sound files on a USB flash drive in either MP3, WMA, or AAC*1 format.Connect your USB flash drive to the USB port, then select the USB mode.2USB Port P. 199*1:Only AAC format files recorded with iTunes® are playable on this unit.Audio/Information ScreenBACK ButtonPress to go back to the previous display.MoreSelect to display the menu items.Audio SourceSelect to change an audio source.USB IndicatorAppears when a USB flash drive is connected.Folder Up/Down IconsSelect   to skip to the next folder, and   to skip to the beginning of the previous folder.Skip/Seek IconsSelect   or   to change files.Select and hold to move rapidly within a file. (Power) ButtonPress to turn the audio system on and off.Interface Dial/ENTER ButtonPress and turn to select an item, then press to set your selection. Move up, down, right and left to select secondary menu.MENU ButtonPress to display the menu items.On Demand Multi-Use DisplayTMVOL (Volume) Knob (Pushed out)Turn to adjust the volume.
Continued 235uuAudio System Basic OperationuPlaying a USB Flash DriveFeatures1. Press the MENU button.2. Rotate   to select Music Search, then press .3. Rotate  , move   or  , then press   to select a file from the Music Search list.You can also select a file by the following procedure.1. Rotate   or press   to display the song list.2. Rotate  , move   or  , then press   to select a file from the list.■How to Select a File from the Music Search List1Playing a USB Flash DriveUse the recommended USB flash drives.2General Information on the Audio System P. 244Files in WMA/ACC format protected by digital rights management (DRM) cannot be played.The audio system displays Unplayable File, and then skips to the next file.If there is a problem, you may see an error message on the audio/information screen.2iPod®/USB Flash Drive P. 240Folder SelectionFile Selection
uuAudio System Basic OperationuPlaying a USB Flash Drive236FeaturesYou can select scan, repeat, and random modes when playing a file.1. Press the MENU button.2. Rotate   to select Scan or Random/Repeat, then press  .3. Rotate   to select a mode, then press  .1. Select More.2. Select Random/Repeat.3. Select a mode.■To turn off a play mode1. Press the MENU button.2. Rotate   to select the mode you want to turn off, then press  .1. Select More.2. Select the mode you want to turn off.■How to Select a Play Mode1How to Select a Play ModePlay Mode Menu ItemsScanScan Folders: Provides 10-second sampling of the first file in each of the main folders.Scan Tracks: Provides 10-second sampling of all files in the current folder.Random/RepeatRepeat Folder: Repeats all files in the current folder.Repeat Track: Repeats the current file.Random in Folder: Plays all files in the current folder in random order.Random All Tracks: Plays all files in random order.Random/Repeat is selected.Interface DialRandom/Repeat is selected.On Demand Multi-Use DisplayTMInterface DialOn Demand Multi-Use DisplayTM
237uuAudio System Basic OperationuPlaying Bluetooth® AudioContinuedFeaturesPlaying Bluetooth® AudioYour audio system allows you to listen to music from your Bluetooth®-compatible phone.This function is available when the phone is paired and connected to the vehicle’s Bluetooth® HandsFreeLink® (HFL) system.2Phone Setup P. 2741Playing Bluetooth® AudioNot all Bluetooth-enabled phones with streaming audio capabilities are compatible with the system.For a list of compatible phones:•U.S.: Visit www.acura.com/handsfreelink, or call 1-888-528-7876.•Canada: Visit www.handsfreelink.ca, or call 1-888-528-7876.In some states, it may be illegal to perform some data device functions while driving.If more than one phone is paired to the HFL system, there will be a delay before the system begins to play.Bluetooth® IndicatorAppears when your phone is connected to HFL.Play IconPause Icon MoreSelect to display the menu items.Audio SourceSelect to change an audio source. (Power) ButtonPress to turn the audio system on and off.Interface Dial/ENTER ButtonPress and turn to select an item, then press to set your selection. Move up, down, right and left to select secondary menu.Skip/Seek IconsSelect  or  to change files.MENU ButtonPress to display the menu items.Folder Up/Down IconsSelect  or  to change folders.On Demand Multi-Use DisplayTMVOL (Volume) Knob (Pushed out)Turn to adjust the volume.Audio/Information Screen
uuAudio System Basic OperationuPlaying Bluetooth® Audio238Features1. Make sure that your phone is paired and connected to HFL.2. Select the Bluetooth® Audio mode.If the phone is not recognized, another HFL-compatible phone, which is not compatible for Bluetooth® Audio, may already be connected.■To pause or resume a file1. Press the MENU button.2. Rotate  to select Play or Pause, then press  .Select the play icon or pause icon.■To Play Bluetooth® Audio Files1To Play Bluetooth® Audio FilesTo play the audio files, you may need to operate your phone. If so, follow the phone maker’s operating instructions.The pause function may not be available on some phones.Switching to another mode pauses the music playing from your phone. This function may not be available on some phones.Interface DialOn Demand Multi-Use DisplayTM
239FeaturesAudio Error MessagesCD PlayerIf a disc error occurs, you may see the following error messages.Error Message Cause SolutionUnplayable File Track/file format not supported ●Current track/file will be skipped. The next supported track/file plays automatically.Bad DiscPlease Check Owner’s ManualPush Eject Mechanical error●Press the   (eject) button and remove the disc, and check that the error message is cleared.●Check that the disc is not damaged or deformed, and insert the disc again.2Protecting CDs P. 246●If the error message reappears, press the   button, and pull out the disc.●Insert a different disc.If the new disc plays, there is a problem with the first disc.●If the error message repeats, or the disc cannot be removed, contact a dealer.Do not try to force the disc out of the player.Mecha ErrorBad DiscPlease Check Owner’s ManualServo errorCheck Disc Disc error ●Check that the disc is not damaged or deformed.2Protecting CDs P. 246Heat Error High temperature ●Turn the audio system off and allow the player to cool down until the error message is cleared.
240uuAudio Error MessagesuiPod®/USB Flash DriveFeaturesiPod®/USB Flash DriveIf an error occurs while playing an iPod® or USB flash drive, you may see the following error messages. If you cannot clear the error message, contact a dealer.Error Message SolutionUSB Error Appears when there is a problem with the audio system. Check if the device is compatible with the audio system.Incompatible USB DevicePlease Check Owner’s Manual.Appears when an incompatible device is connected. Disconnect the device. Then turn the audio system off, and turn it on again. Do not reconnect the device that caused the error.Unsupported Version Appears when an unsupported iPod® is connected. If it appears when a supported iPod® is connected, update the iPod® software to the newer version.Connect Retry Appears when the system does not acknowledge the iPod®. Reconnect the iPod®.Unplayable File Appears when the files in the USB flash drive are DRM or an unsupported format. This error message appears for about three seconds, then plays the next song.No DataAppears when the iPod® is empty.Appears when the USB flash drive is empty or there are no MP3, WMA, or AAC files in the USB flash drive.Check that compatible files are stored on the device.Unsupported Appears when an unsupported device is connected. If it appears when a supported device is connected, reconnect the device.iPod®USB flash driveiPod® and USB flash drive
241uuAudio Error MessagesuPandora®ContinuedFeaturesPandora®If an error occurs while playing Pandora®, you may see the following error messages. If you cannot clear the error message, contact a dealer.Error Message SolutionIncompatible USB DevicePlease Check Owner’s ManualAppears when an incompatible device is connected. Disconnect the device. Then turn the audio system off, and turn it again. Do not reconnect the device that caused the error.There is no station list in the device.Please add the station list to your device.No stations have been created.Please create a station on the device.Appears when there is no station list on the device. Use the device to create a station.Music licenses force us to limit the number of tracks you may skip each hour.Appears when you try to skip a song or select Dislike over the predetermined number of times in an hour.U.S. modelsAudio/Information ScreenOn Demand Multi-Use DisplayTM
242uuAudio Error MessagesuPandora®FeaturesError Message SolutionUnable to save rating.Unable to save bookmark.orUnable to skip.Appears when the commanded operation is failed. Try again later.No data Appears when no data is available with Pandora® activated. Reboot the app and reconnect the device.Unsupported Appears when Pandora® version is not supported. Update Pandora® to the latest version.PANDORA system maintenance. Appears when the Pandora® server is in maintenance. Try again later.Cannot connect to PANDORA. When stopped, make sure PANDORA is running on the phone.For iPhone, set connection priority to USB and reconnect.Appears when Pandora® is unable to play music. Check your device.
243uuAudio Error MessagesuAhaTM RadioFeaturesAhaTM RadioIf an error occurs while playing AhaTM Radio, you may see the following error messages.If you cannot clear the error message, contact a dealer.Error Message SolutionIncompatible USB DevicePlease Check Owner’s ManualAppears when an incompatible device is connected. Disconnect the device. Then turn the audio system off, and turn it on again. Do not reconnect the device that caused the error.
244FeaturesGeneral Information on the Audio SystemXM® Radio Service1. You need your radio ID ready before registering for subscription. To see the ID in the display: Turn the interface dial until 0 appears.2. Have your radio ID and credit card number ready, and either call or visit the XM® website to subscribe.Switch to the XM® mode by using the SOURCE button on the steering wheel, or through the On Demand Multi-Use DisplayTM, and stay in this mode for about 30 minutes until the service is activated. Make sure your vehicle is in an open area with good reception.Loading:XM® is loading the audio or program information.Ch off air:The channel is not currently broadcasting.Ch unauthorized:XM® radio is receiving information update from the network.No signal:The signal is too weak in the current location.Ch unavailable:No such channel exists, the channel is not part of your subscription, or the artist or title information is unavailable.Check antenna:There is a problem with the XM® antenna. Contact a dealer.■Subscribing to XM® Radio■Receiving XM® Radio■XM® Radio Display Messages1Subscribing to XM® RadioContact Information for XM® Radio:•US: XM® Radio at www.siriusxm.com or 1-800-852-9696•Canada: XM® Canada at www.xmradio.ca, or 1-877-209-00791Receiving XM® RadioThe XM® satellites are in orbit over the equator; therefore, objects south of the vehicle may cause satellite reception interruptions. Satellite signals are more likely to be blocked by tall buildings and mountains the farther north you travel from the equator.You may experience reception problems under the following circumstances:•In a location with an obstruction to the south of your vehicle.•In tunnels•On the lower level of a multi-tiered road•Large items carried on the roof rack
245uuGeneral Information on the Audio SystemuRecommended CDsContinuedFeaturesRecommended CDs•Use only high-quality CD-R or CD-RW discs labeled for audio use.•Use only CD-R or CD-RW discs on which the recordings are closed.•Play only standard round-shaped CDs.•Some software files may not allow for audio play or text data display.•Some versions of MP3, WMA or AAC formats may be unsupported.1Recommended CDsA Dual-disc cannot play on this audio unit. If recorded under certain conditions, a CD-R or CD-RW may not play either.■CDs with MP3, WMA or AAC filesThe CD packages or jackets should have one of these marks.
uuGeneral Information on the Audio SystemuRecommended CDs246Features■Protecting CDsFollow these precautions when handling or storing CDs:•Store a CD in its case when it is not being played.•When wiping a CD, use a soft clean cloth from the center to the outside edge.•Handle a CD by its edge. Never touch either surface.•Never insert foreign objects into the CD player.•Keep CDs out of direct sunlight and extreme heat.•Do not place stabilizer rings or labels on the CD.•Avoid fingerprints, liquids, and felt-tip pens on the CD.1Protecting CDsNOTICEDo not insert a damaged CD. It may be stuck inside and damage the audio unit.Examples:●Damaged CDsBubbled/WrinkledWith Label/StickerUsing Printer Label KitSealed With Plastic Ring●Poor quality CDsChipped/CrackedWarped Burrs●Small CDs3-inch (8-cm) CD●Bubbled, wrinkled, labeled, and excessively thick CDs
247uuGeneral Information on the Audio System uCompatible iPod®, iPhone®, and USB Flash DrivesFeaturesCompatible iPod®, iPhone®, and USB Flash Drives•Use a recommended USB flash drive of 256 MB or higher.•Some digital audio players may not be compatible.•Some USB flash drives (e.g., a device with security lockout) may not work.•Some software files may not allow for audio play or text data display.•Some versions of MP3, WMA, or AAC formats may be unsupported.■iPod® and iPhone® Model CompatibilityModeliPod® (5th generation)iPod classic® 80GB/160GB (launch in 2007)iPod classic® 120GB (launch in 2008)iPod classic® 160GB (launch in 2009)iPod nano® (1st to 6th generation) launch in 2010iPod touch® (1st to 4th generation) launch in 2010iPhone® 3G/iPhone® 3GS/iPhone® 4/iPhone® 4S■USB Flash Drives1iPod® and iPhone® Model CompatibilityThis system may not work with all software versions of these devices.1USB Flash DrivesFiles on the USB flash drive are played in their stored order. This order may be different from the order displayed on your PC or device.
248FeaturesCustomized FeaturesSee the Navigation System Manual for the customized features except for the Vehicle Settings.Use the audio/information screen to customize certain features.■How to customizeSelect your desired setting item by pressing the SETTINGS button, then rotating   while the power mode is ON, and the vehicle is at a complete stop. Press  .1Customized FeaturesWhen you customize setting, make sure that the vehicle is at a complete stop and shift to (P.To customize other features, rotate  , move  ,  ,  or  , and press  .2List of customizable options P. 253Models with navigation systemModels without navigation systemSETTINGS ButtonAudio/Information Screen

Navigation menu