Juniper Systems 24243 Rugged Handheld Computer User Manual 15 0093 Exhibit Cover
Juniper Systems, Inc. Rugged Handheld Computer 15 0093 Exhibit Cover
Manual

5015 B.U. Bowman Drive Buford, GA 30518 USA Voice: 770-831-8048 Fax: 770-831-8598
Certification Exhibit
FCC ID: VSF24243
ACS Project Number: 15-0093
INTRODUCTION
The following information contains operating instructions for the
Sensus FieldLogic® Hand-Held Device [HHD], which is primarily
designed to collect and store utility meter readings with built-in
capability for expanded uses. The HHD interfaces to a personal
computer [PC] through Wi-Fi® or an ethernet-enabled charging
stand used for uploading pre-programmed meter reading route
information. The computer must be equipped with Sensus
FieldLogic System software.
The Model FL6501 accepts meter reading data entered manually
on a built-in keypad or electronically through the TouchRead®
System AutoGun, or wirelessly with the CommandLink or FMT.
AutoGun options include cable-connected and RF (no cable
required) styles.
The Model FL6502 includes all features of the Model FL6501,
plus it can read Sensus RadioRead® Meter Transceiver Units
[MXUs].
Features include:
• Ergonomic design with a transective LCD screen for ease
of viewing
• A backlit keypad for additional illumination in areas with
insufcient lighting
• Bluetooth and Wi-Fi enabled
• A rechargeable, self-contained Lithium Ion battery pack
• Optional integrated GPS, camera, and barcode scanner
• A weather-resistant, high impact, UV-stabilized plastic
watertight case
• User friendly controls and operation
AQG-10072-01
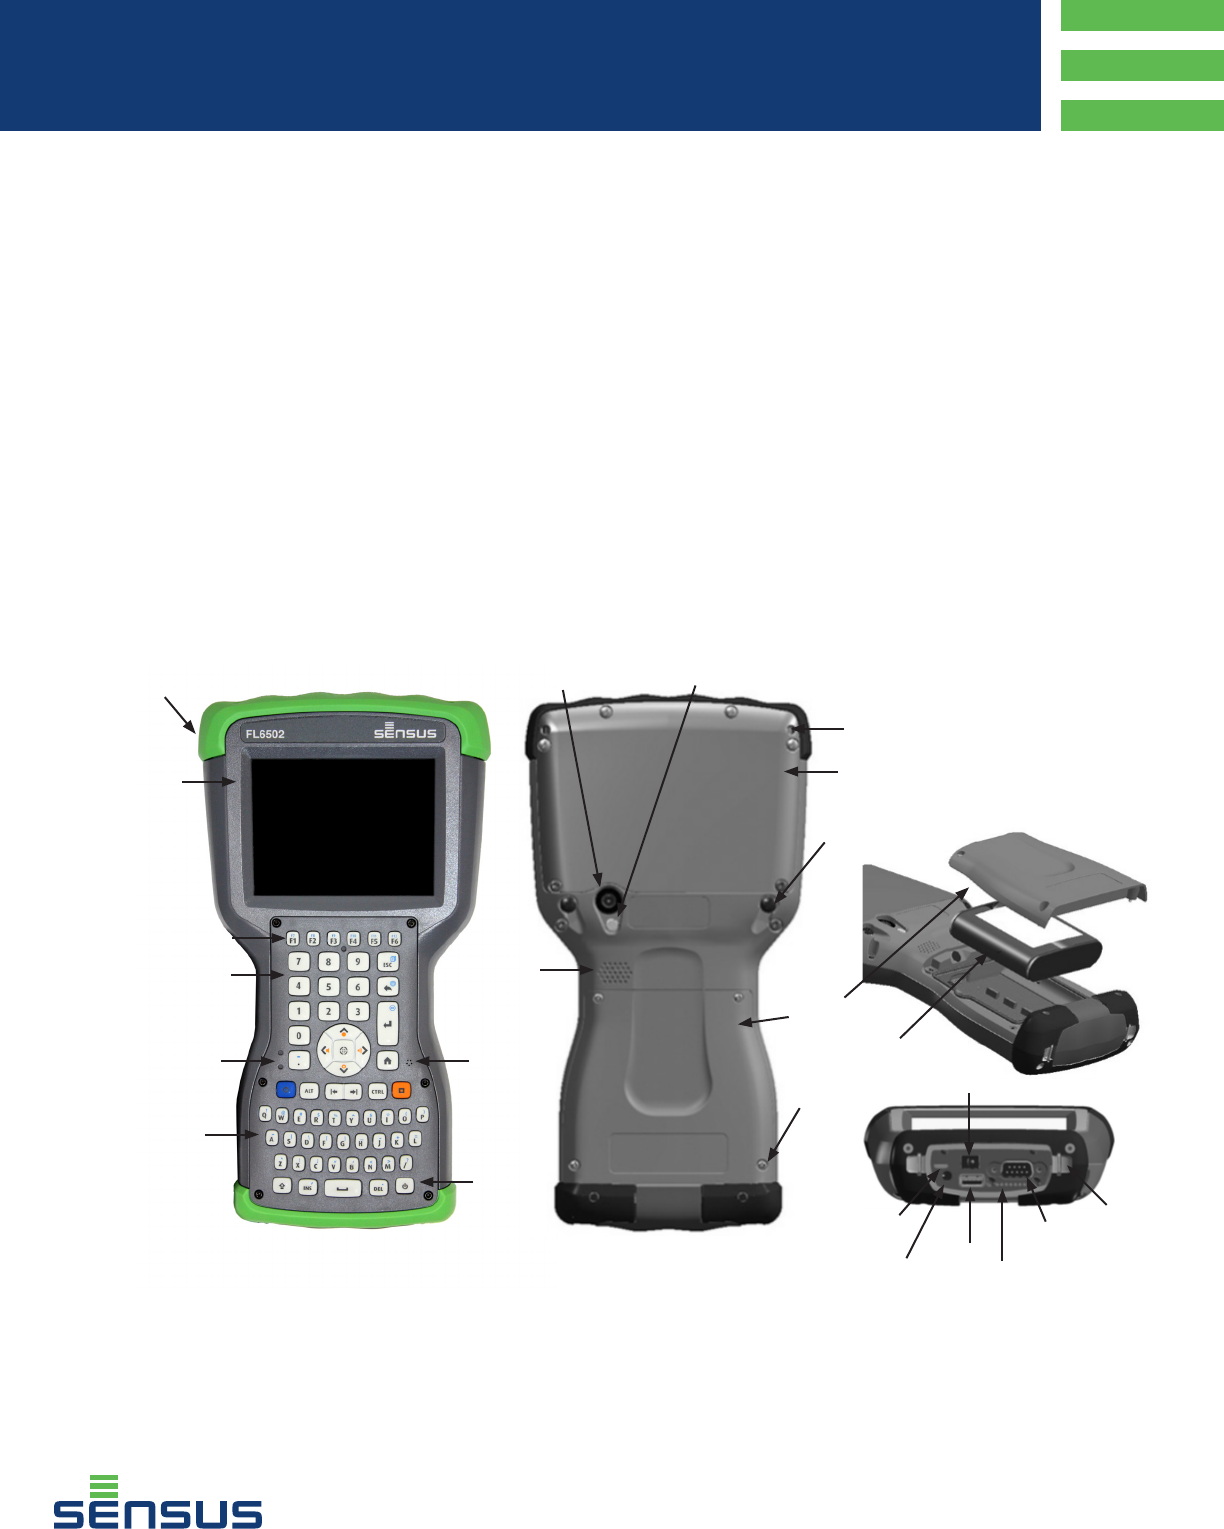
FL6500 Series
Quick Guide
Touchscreen
Power
Button
Top Bumper
QWERTY
Keyboard
Microphone
Stylus/Tether
Attachment
Point
Function Keys
Numeric
Keyboard
Expansion Door
LED
Indicators
Optional
Camera Lens
Optional Camera Flash
and Flashlight Window
Speaker
Battery
Compartment
Door
Battery Door
Screws
Hand Strap
Attachment
Point
Battery Pack
Hand Strap
Attachment
Point
Micro
USB
Port
Microphone/
Speaker Jack
USB Port
Docking Pin
Contacts
12-24V DC Jack
9-pin Serial
Port
GETTING STARTED
If this is the rst time using the FL650x, you will need to do the
following.
1. Install the battery pack. The FL650X uses a rechargeable Li-
Ion battery pack. The battery compartment is accessed from
the back of the handheld as shown in the diagram on page 1.
• Loosen the four (4) captive screws that hold the
battery compartment door in place using a #1
Phillips-head screwdriver and remove the door.
Note: The FL650X is not sealed against water and dust
when the battery door is not installed.
• Place the battery in the compartment, ensuring that the
+ and - symbols are aligned.
• Replace the door and tighten the screws.
2. Install the optional SD/SIM cards if using. Ask your Sensus
representative for detailed instructions if required.
3. The FL650X comes with a power charger. Plug the AC
charger into a wall socket and the DC end into the FL650x
power jack to start the battery charging. Charge the battery
pack at room temperature (68°F or 20°C) for 4 to 5 hours.
There is a red LED on the front of the handheld that blinks
while the battery is charging. The red LED will turn solid
once the battery is fully charged.
4. The FL650x includes a hand strap, stylus, and tether.
• If the hand strap is not attached or you want it on the
opposite side you will need to attach it via the points as
shown in the diagram on page 1.
• The stylus is attached to one end of the stylus tether. If
you want the tether attached to the handheld, push the
free tether loop through one of the attachment points on
the back of the handheld as shown in the diagram on
page 1. Insert the stylus through the loop and tighten,
then place the stylus into the provided holder.
POWER UP
1. Press the power button. The FL650X will power on and
begin the startup process. A splash screen will appear that
indicates the progress of the startup.
2. A Microsoft® Windows Embedded Handheld screen will
appear, then an Update Time screen appears. If needed,
adjust the time zone, date and time and tap OK. You may
need to restart the handheld.
3. To suspend the handheld at any point, press the power
button.
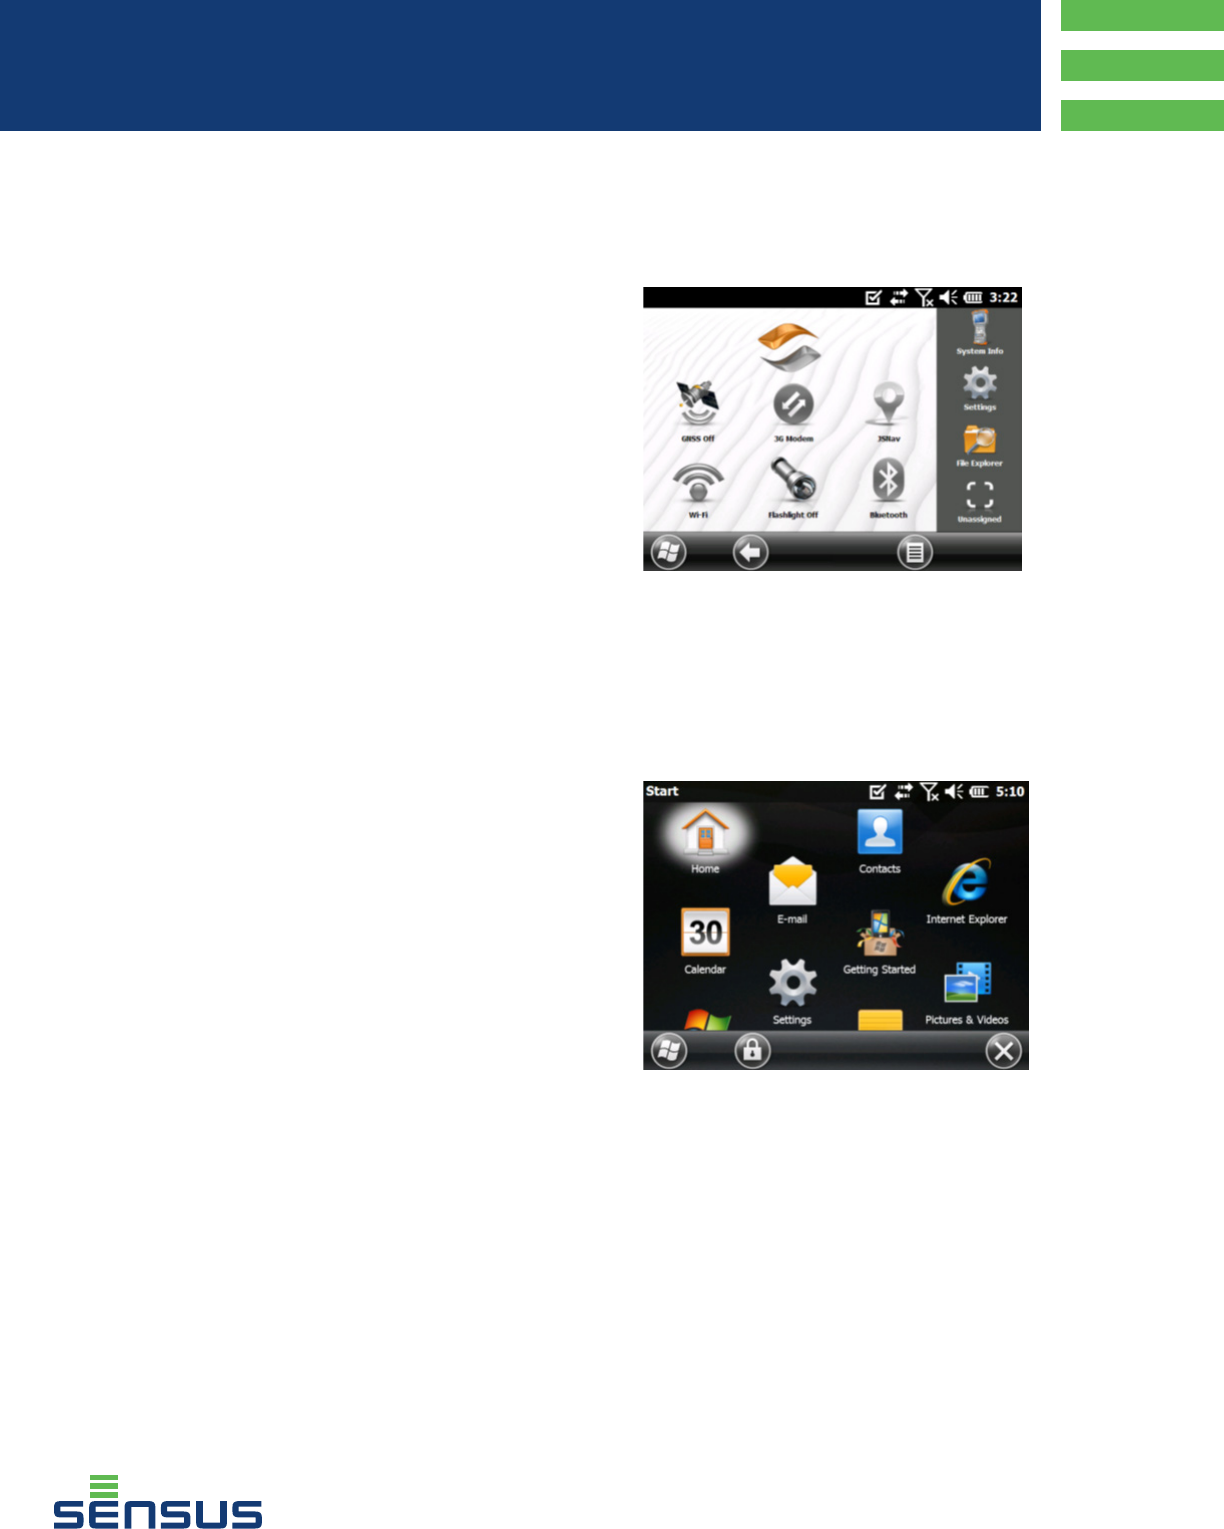
HOME SCREEN/WINDOWS START MENU
Once you have powered on the FL650X, a Home screen will
appear similar to the one seen here.
The Home screen is the main control center for the FL650X
and will appear any time the FL650X is turned on. The content
varies based on which model you have and can be custom-
ized. In addition, you can access the Home screen from any
other screen by pressing and releasing the Home screen key
on the keyboard.
The Windows Start menu gives you access to all of the appli-
cations on the FL650X.
You can access the Windows Start menu from any screen by
tapping the Windows tile (soft key) on the display or pressing
the orange key + Home keys on the keyboard.
Note: The orange key then home key sequence toggles back
and forth between the Home screen and Windows Start menu.
The home key takes you to the Home screen. The Windows
soft key toggles between the Windows Start menu and the last
screen shown.
AQG-10072-01
FL6500 Series
Quick Guide

NAVIGATION
The Windows® Embedded Handheld operating system en-
hances the ability of the handheld to recognize touch gestures,
making it easy to use a nger to navigate. The keyboard or the
stylus also can be used.
Navigation options vary depending on the screen you are
viewing.
VERTICAL AND HORIZONTAL MOVEMENT
• Flick up, down, or sideways on the touchscreen.
• For more precise positioning, touch, hold, and move the
screen up or down.
• Use the scroll bar if it is available.
• Use the navpad to move around on a screen.
• A horizontal scrolling menu is located on control panel
screens near the top.
TOUCHSCREEN SELECTION
• Press or tap the function gadget or application icon you
want to select, turn on, activate, or turn off.
• Press and hold a function gadget to bring up a control
panel, menu, or list.
KEYBOARD SELECTION
• Use the up, down, right, and left arrow keys on the nav-
pad to select (highlight) a gadget or icon on the screen. A
ring appears around the selection.
• Perform the selected action by pressing the return key
or the center action key. For dashboard gadgets like Wi-
Fi, one press of the return key shows you which icon is
selected, a second key press performs the action, and a
third key press turns the action off. For application icons
on the Start screen or in favorites, continue to use the
arrow keys on the navpad and return or action keys until
you get to the screen or menu you want.
FIELDLOGIC INSTALLATION
FieldLogic setup and conguration is handled through
FieldLogic Hub which runs on a PC. For instructions on how
to install FieldLogic Hub, please see the FieldLogic Hub Quick
Guide or the FieldLogic Installation Guide.
FieldLogic Hub allows you to set up the device congurations
that you will want to use within FieldLogic and also allows you
to dene which primary and secondary tasks for FieldLogic
Tools will appear on the home screen of the FL650X.
Once you have the appearance and congurations dened in
FieldLogic Hub there are two different methods you can use to
install the conguration bundles on the FL650X.
1. Connect the FL650X directly to the PC running FieldLogic
Hub using the ethernet connection. Once connected,
you can register the FL650X in Hub and the default
conguration will automatically be downloaded into the
FL650X.
2. Use a USB ash drive to transfer the conguration bundles.
Plug in a USB ash drive to the PC running FieldLogic Hub
and then in Hub, go to Tools > Create installation media
and follow the steps as directed. Once you are nished, you
can remove the USB ash drive from the PC and plug it into
your FL650X. The installation les will automatically upload
once the USB ash drive is plugged in.
Once you have installed the software, the FL650X screen will
appear with FieldLogic Tools as an option in the Start menu.
AQG-10072-01
FL6500 Series
Quick Guide

8601 Six Forks Road, Suite 700
Raleigh, NC 27615
1-800-638-3748
© All products purchased and services performed are subject to Sensus’ terms of sale, available at either http://na.sensus.com/TC/TermsConditions.pdf or 1-800-638-3748.
Sensus reserves the right to modify these terms and conditions in its own discretion without notice to the customer.
This document is for informational purposes only.
COMPLIANCE
Attention!
Any changes or modications made to this device that are not expressly
approved by Sensus may void the authority granted to the user to operate the
equipment.
Attention!
Note: This equipment has been tested and found to comply with the limits for
a Class B digital device, pursuant to Part 15 of the FCC Rules. These limits
are designed to provide reasonable protection against harmful interference
in a residential installation. This equipment generates, uses, and can radiate
radio frequency energy and, if not installed and used in accordance with
the instructions, may cause harmful interference to radio communications.
However, there is no guarantee that interference will not occur in a particular
installation.
If this equipment does cause harmful interference to radio or television
reception, which can be determined by turning the equipment off and on, the
user is encouraged to try to correct the interference by one or more of the
following measures:
• Reorient or relocate the receiving antenna
• Increase the separation between the equipment and receiver
• Connect the equipment into an outlet on a circuit different form that to
which the receiver is connected
• Consult the dealer or an experienced radio/TV technician for help
Radiation Hazard!
This equipment complies with FCC radiation exposure limits set forth for an
uncontrolled environment. This equipment is in direct contact with the body
of the user under normal operating conditions. This transmitter must not be co-
located or operating in conjunction with any other antenna or transmitter.
Attention!
Under Industry Canada regulations, this radio transmitter may only operate
using an antenna of a type and maximum (or lesser) gain approved for the
transmitter by Industry Canada. To reduce potential radio interference to other
users, the antenna type and its gain should be so chosen that the equivalent
isotropically radiated power (e.i.r.p.) is not more than that necessary for
successful
communication.
Conformément à la réglementation d’Industrie Canada, le présent émetteur
radio peut fonctionner avec une antenne d’un type et d’un gain maximal
(ou inférieur) approuvé pour l’émetteur par Industrie Canada. Dans le but
de réduire les risques de brouillage radioélectrique à l’intention des autres
utilisateurs, il faut choisir le type d’antenne et son gain de sorte que la
puissance isotrope rayonnée équivalente (p.i.r.e.) ne dépasse pas l’intensité
nécessaire à l’établissement d’une communication satisfaisante.
Attention!
This device complies with Industry Canada license-exempt RSS standard(s).
Operation is subject to the following two conditions: (1) this device may not
cause interference, and (2) this device must accept any interference, including
interference that may cause undesired operation of the device.
Le présent appareil est conforme aux CNR d’Industrie Canada applicables
aux appareils radio exempts de licence. L’exploitation est autorisée aux deux
conditions suivantes : (1) l’appareil ne doit pas produire de brouillage, et (2)
l’utilisateur de l’appareil doit accepter tout brouillage radioélectrique subi,
même si le brouillage est susceptible d’en compromettre le fonctionnement.
AQG-10072-01
FL6500 Series
Quick Guide