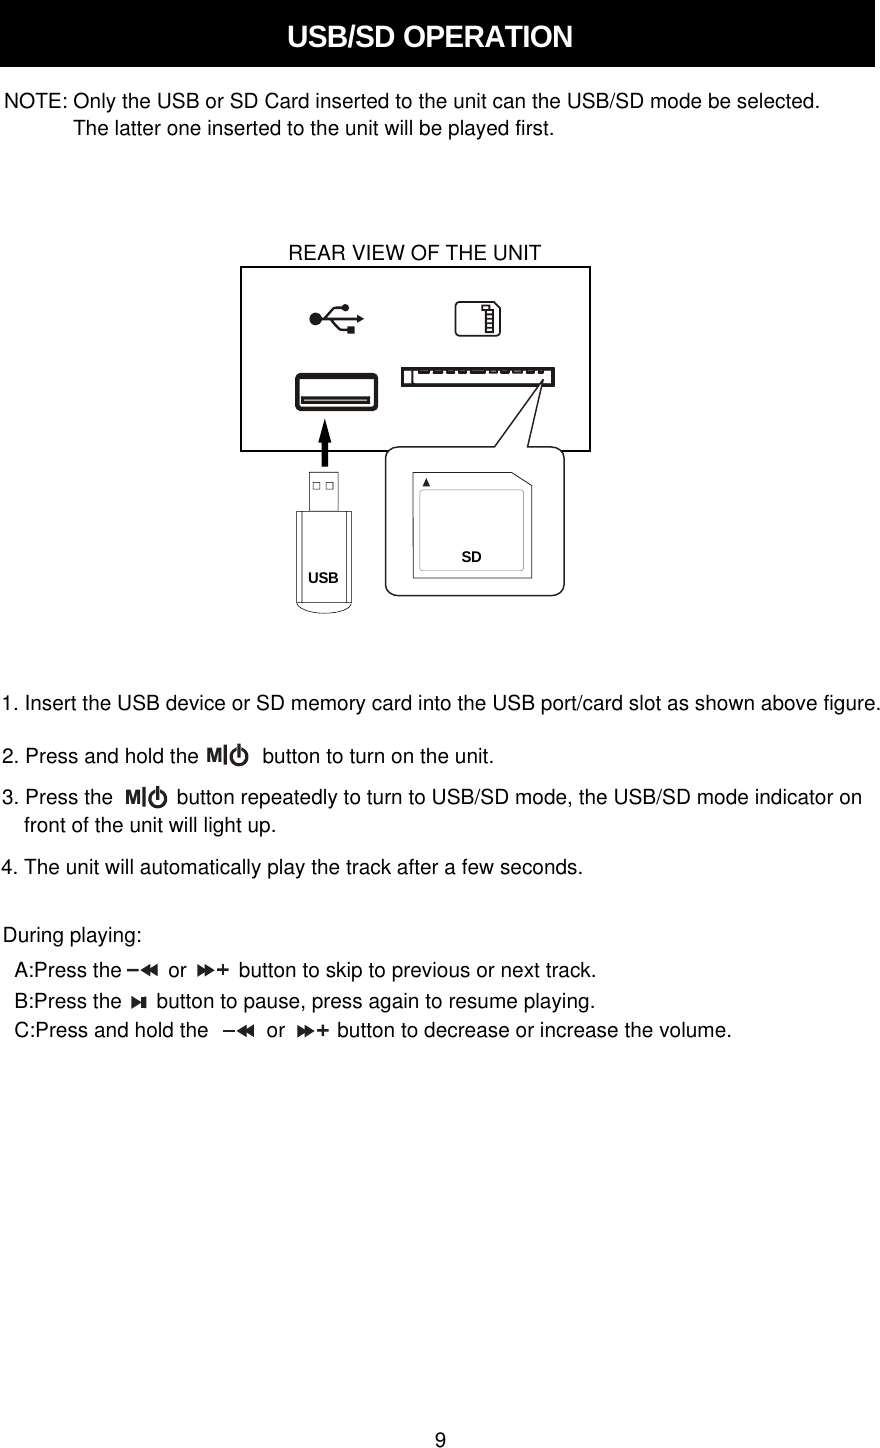
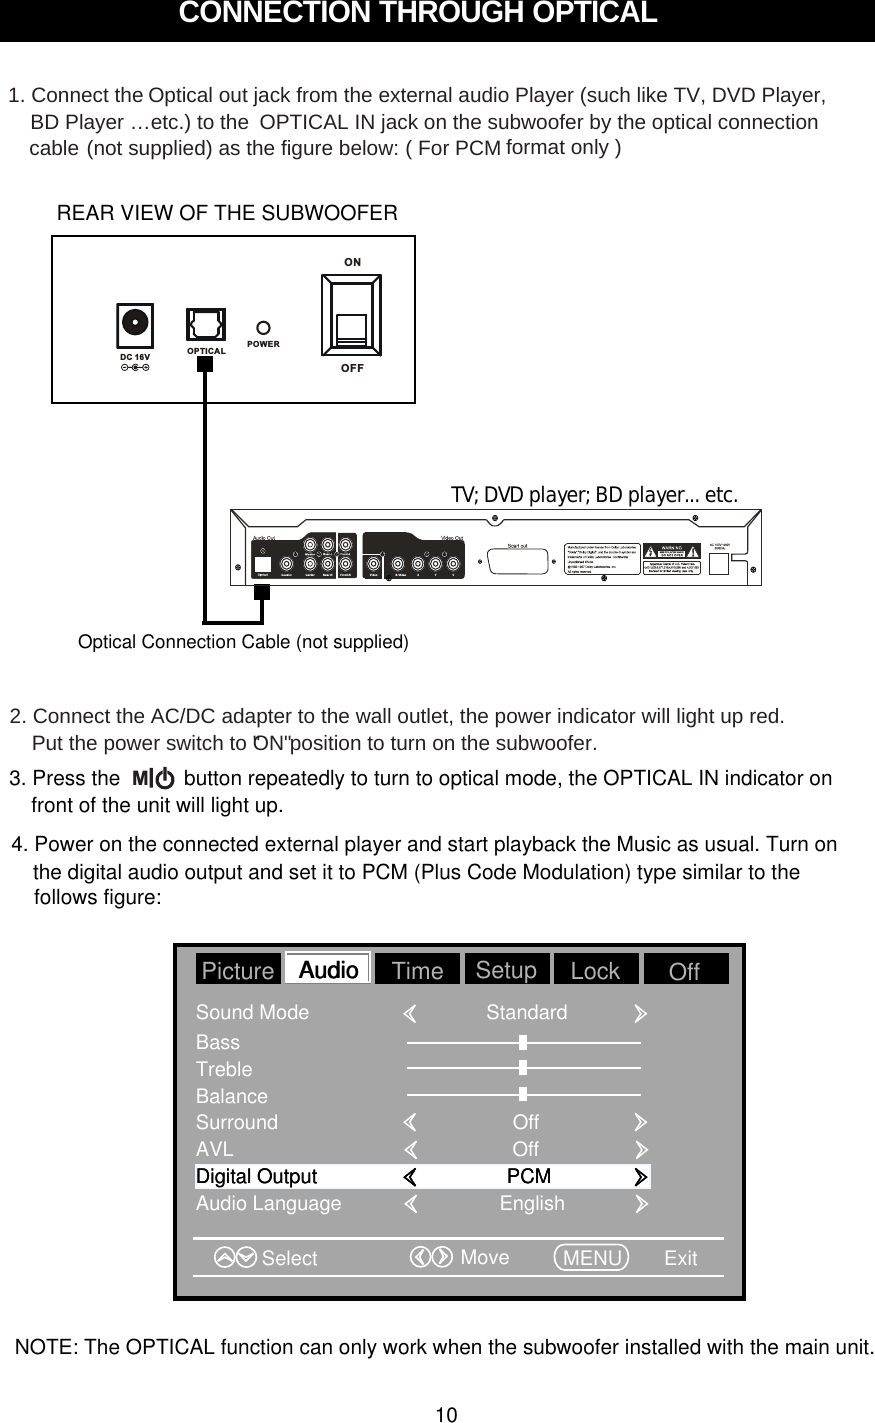
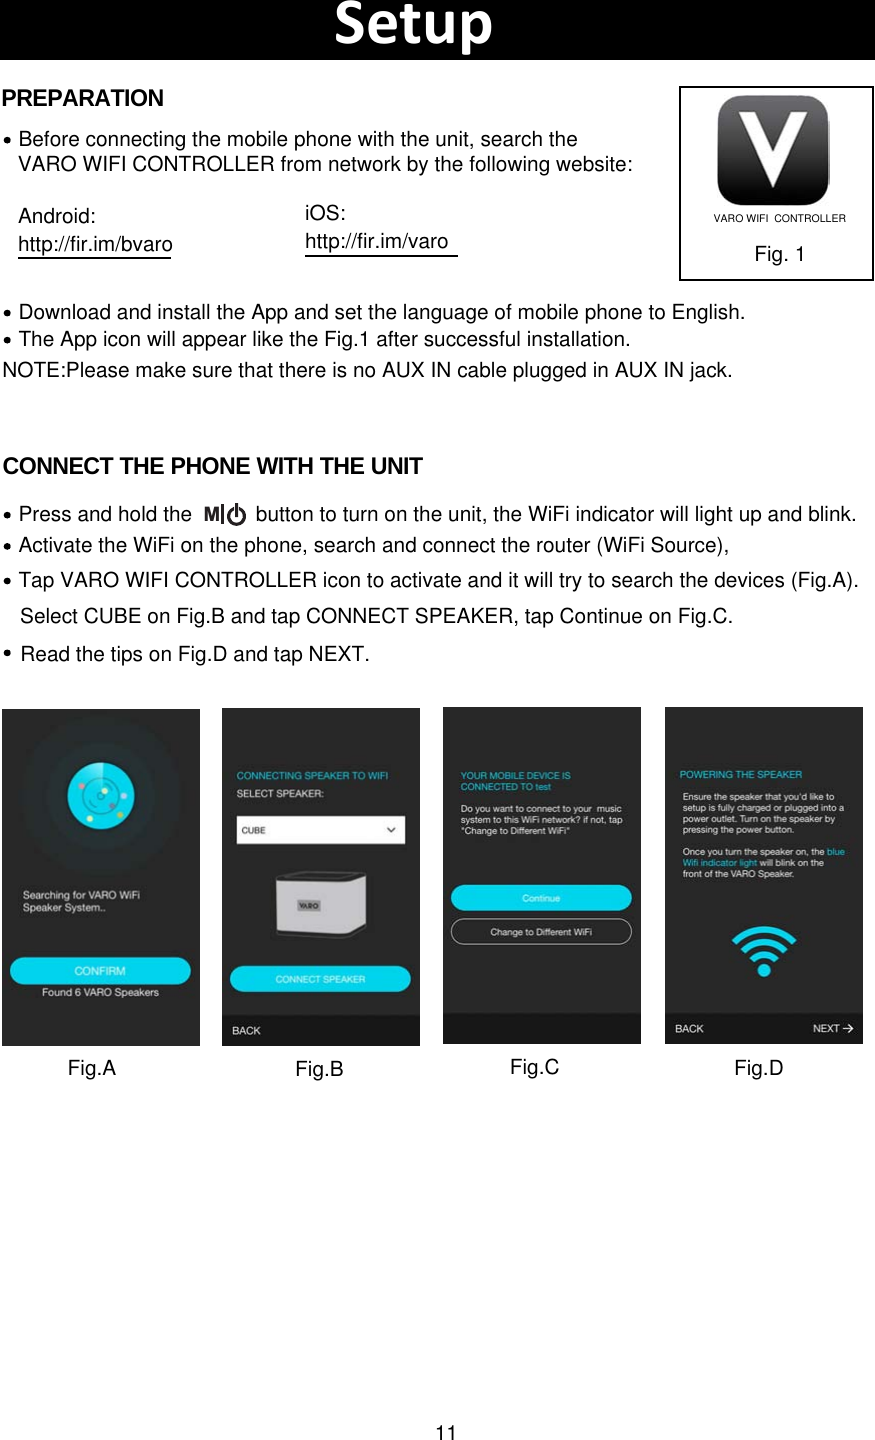
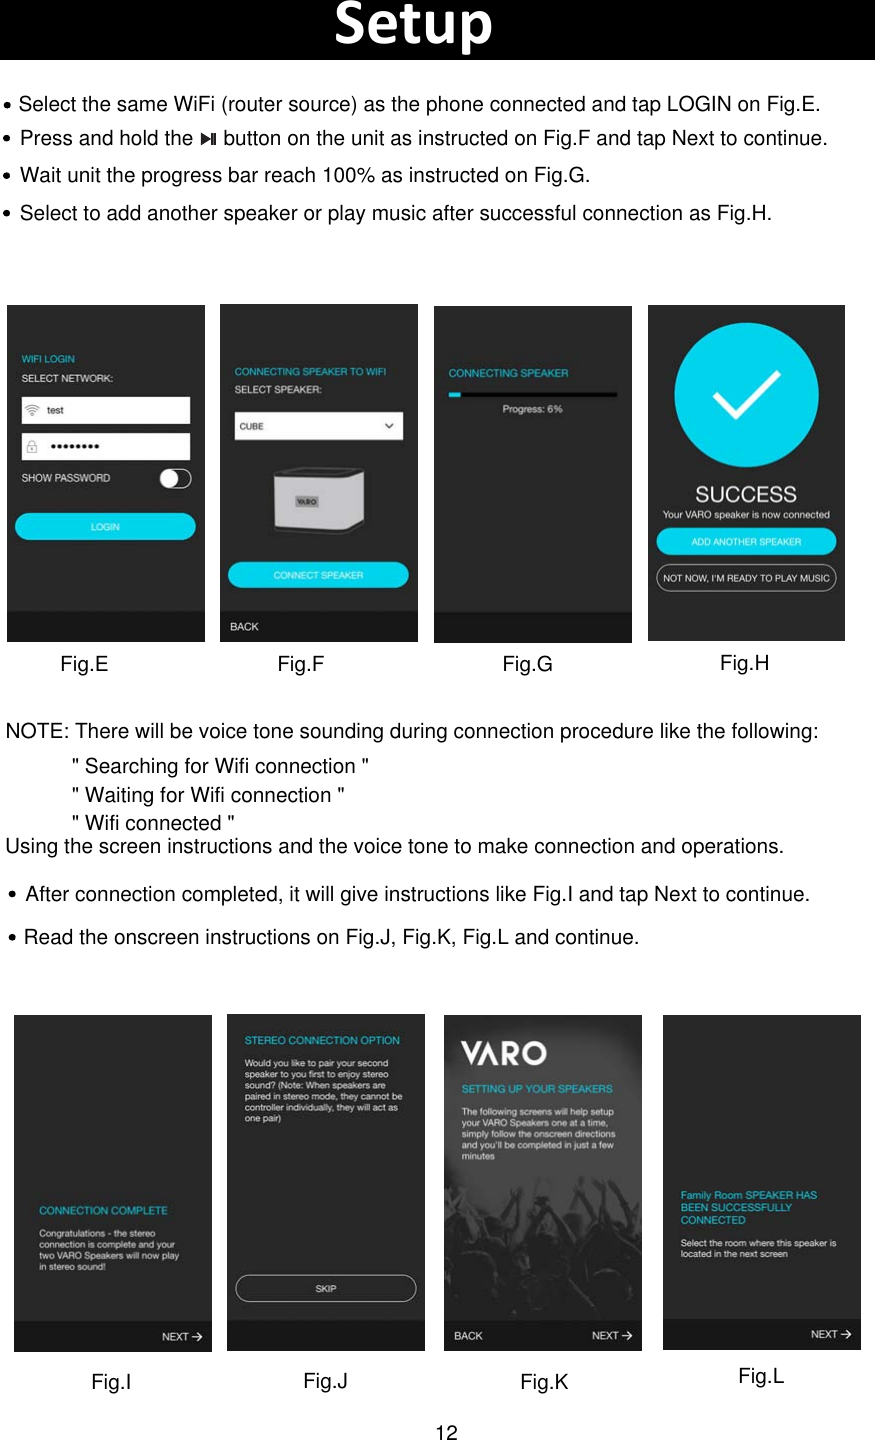
Junlan Electronic CAW02013 SAMSUNG POWERED WIFI SURROUND SPEAKER User Manual

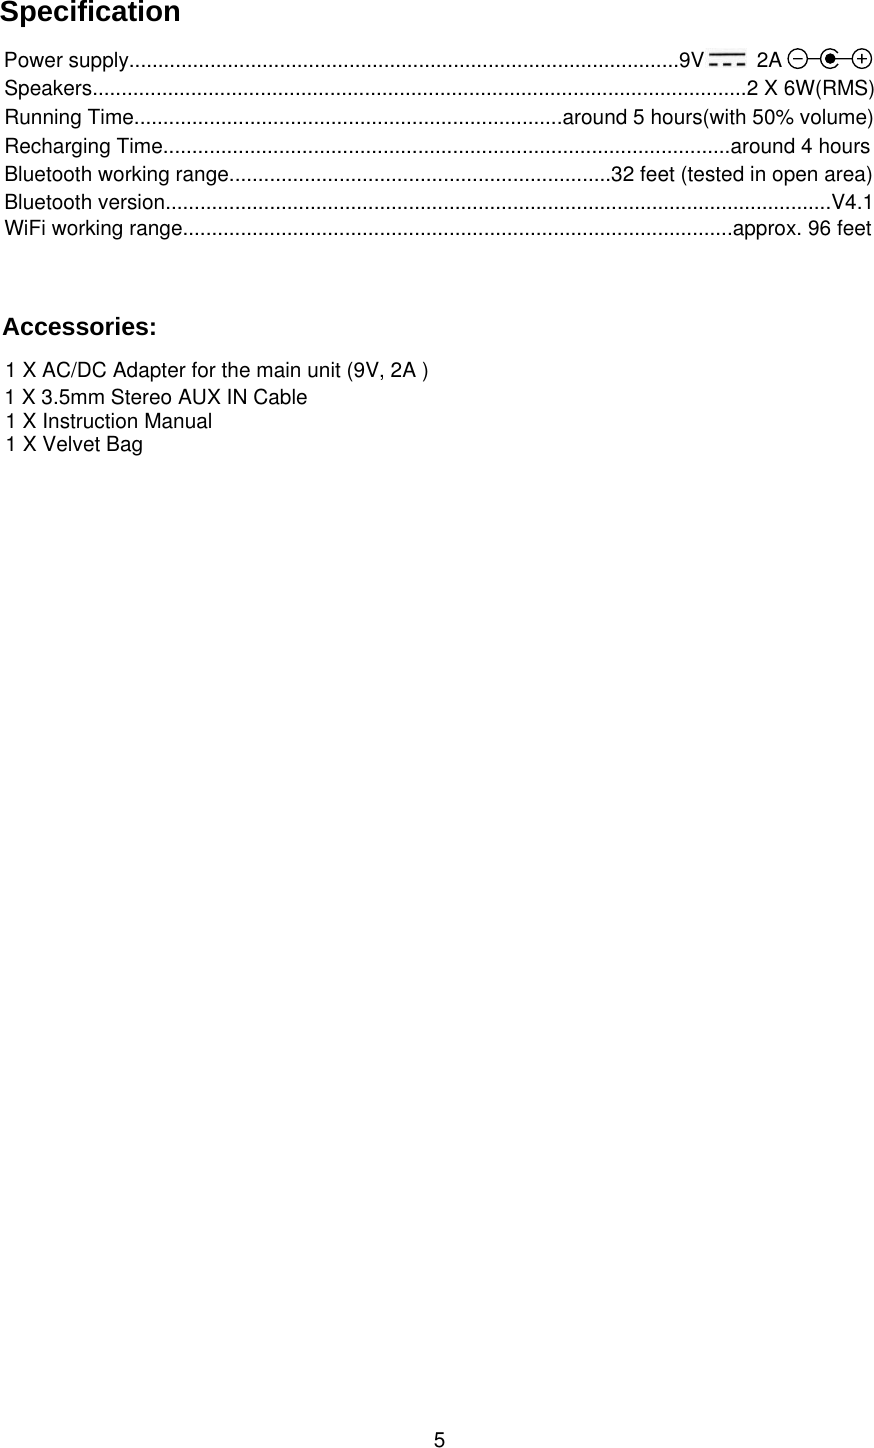
Shenzhen Junlan Electronic Ltd SAMSUNG POWERED WIFI SURROUND SPEAKER

User Manual

SAMSUNG POWEREDWIFI SURROUND SPEAKER MODEL:CAW-02013PLEASE READ THIS INSTRUCTION MANUAL CAREFULLY BEFORE OPERATION AND KEEP IT FOR FUTURE REFERENCE
2    WARNING:Changes or modifications to this unit  not expressly approved by the party responsible for compliance could void the user’s authority to operate the equipment. NOTE: This equipment has been tested and found to comply with the limits for a Class B digital device, pursuant to Part 15 of the FCCRules. These limits are designed to provide reasonable protection against harmful interferencein a residential installation. This equipment generates, uses, and can radiate radio frequency energy and, if not installed and used in accordance with the instructions, may cause harmful interference to radio communications. However, there is no guarantee that interference will not occur in a particular installation. If this equipment does cause harmful interference to radio or television reception, which can be determined by turning the equipment off and on, the user is encouraged to  try to correct theinterference by one or more of the following measures:     •Reorient or relocate the receiving antenna.Increase the separation between the equipment and receiver.Connect the equipment into an outlet on a circuit different from that to which the receiver is connected.Consult the dealer or an experienced radio/TV technician for help. •••FCC WarningsFCC NOTICE:To assure continued compliance, follow the attached installation instructions and use only shielded cables when connecting to other devices. Modifications not authorized by the manufacturer may void user’s authority to operate this device.To maintain compliance with FCC’s RF Exposure guidelines, This equipment should be installed and operated with minimum distance between 20cm the radiator your body: Use only the supplied antenna.
3
4LOCATION OF CONTROLSTOP VIEWFRONT VIEWREAR VIEW1. Play/Pause (WiFi Pairing) Button2. Previous (Volume Down) Button3. Next (Volume Up) Button4. Mode (Power On/Off) Button6. WiFi Indicator7. Bluetooth Indicator8. AUX IN Indicator9. SD/USB Indicator10. OPTICAL Indicator12. AUX IN Jack11. DC IN Jack1 2 3 456 7 8 9 1011 12 13 14MAIN UNIT:5. Battery Indicator14. SD Card Slot13. USB Port
Accessories:SpecificationPower supply...............................................................................................9V         2ASpeakers.................................................................................................................2 X 6W(RMS)1 X 3.5mm Stereo AUX IN Cable1 X Instruction Manual1 X AC/DC Adapter for the main unit (9V, 2A )1 X Velvet BagRunning Time..........................................................................around 5 hours(with 50% volume)Recharging Time..................................................................................................around 4 hoursBluetooth working range..................................................................32 feet (tested in open area)WiFi working range...............................................................................................approx. 96 feet Bluetooth version...................................................................................................................V4.15
RECHARGINGThe battery indicator will flash blue during low battery level.Battery IndicatorBattery Indicator ButtonUsing the supplied Adapter to recharge through the DC IN jack at the rear of the main unit.During playing, press the battery indicator button to display the battery level.Battery IndicatorThe red indicator will light up when charging, it will turn blue after fully charged.6
BLUETOOTH OPERATIONPairing the speaker with Bluetooth devices (phone or music device)1. Press and hold the           button to turn on the unit.5. Once paired successfully, Bluetooth indicator will stop blinking and a tone will be heard.6. If pairing is unsuccessful, turn off the speaker first and then re-pair following above steps.M2. Press the           button repeatedly to turn to Bluetooth mode, the Bluetooth indicator on  Mfront of the unit will light up and blink, and a tone sounds, now it is entering pairing mode.3. Activate the Bluetooth function on your Bluetooth device (phone or music device). Pleaserefer to the manufacturer’s instructions of your device.4. Once you have activated Bluetooth on your device, select the speaker “CAW-02013” fromthe list of available Bluetooth devices.7. Once you have paired the speaker with a device, the speaker will remember this deviceand will pair automatically when the device’s Bluetooth is activated and in range.8. If you want to pair it with a new device, press and hold the          button to disconnect the  current pairing.During playing:A:Press the        or         button to skip to previous or next track.B:Press the      button to pause, press again to resume playing.C:Press and hold the          or         button to decrease or increase the volume.NOTE: During playing, please do not insert the AUX IN cable into the AUX IN Jack, or it will switch to AUX IN mode, the AUX IN indicator will light up, it will switch to WiFi mode when unplug 7the AUX IN cable.
2. Press and hold the           button to turn on the unit.M3. Press the           button repeatedly to turn to AUX IN mode, the AUX IN indicator onMfront of the unit will light up.    ~  Insert the other end to the AUX IN jack on the rear of the main unit.1. Connected the external audio device to the unit by an      ~  Insert one end to the Phone; Line Out or AUX Out Jack on the external audio device. audio connection cable with 3.5mm stereo mini jacks as:Mobile Phone(Audio Connection Cable supplied) To AUX IN jack on the rear of the unitConnect to the Phones; AUX Out;Line Out Jack of the external devices (Such like MP3 Player; cell phones;  iPod/iPad ... etc)AUX IN OPERATION4. Play music as usual on your external device.MP38NOTE: It will switch to AUX IN mode when AUX IN cable plugged into the AUX IN jack in any other modes( such as WiFi, Bluetooth, USB, SD, OPTICAL).
USB/Sd OPERATIONNOTE: Only the USB or SD Card inserted to the unit can the USB/SD mode be selected.The latter one inserted to the unit will be played first.USBSd1. Insert the USB device or SD memory card into the USB port/card slot as shown above figure.2. Press and hold the           button to turn on the unit.M3. Press the           button repeatedly to turn to USB/SD mode, the USB/SD mode indicator onMfront of the unit will light up.During playing:A:Press the        or         button to skip to previous or next track.B:Press the      button to pause, press again to resume playing.C:Press and hold the          or         button to decrease or increase the volume.4. The unit will automatically play the track after a few seconds.REAR VIEW OF THE UNIT9
CONNECTION THROUGH OPTICAL  TV; DVD player; BD player... etc.   4. Power on the connected external player and start playback the Music as usual. Turn on1. Connect the Optical out jack from the external audio Player (such like TV, DVD Player,BD Player …etc.) to the   (not supplied) as the figure below: ( F or PCM format only )follows figure:BassTrebleBalanceSelect Move MENU ExitSound Mode StandardSurround OffAVL OffAudio Language EnglishPicture Time Setup Lock OffAudioAudioDigital Output PCMDigital Output PCMOPTICAL IN jack on the subwoofer by the optical connectioncablethe digital audio output and set it to PCM (Plus Code Modulation) type similar to theOptical Connection Cable (not supplied)OP TIC A LONOFFPO WERDC 1 6VREAR VIEW OF THE SUBWOOFER3. Press the           button repeatedly to turn to optical mode, the OPTICAL IN indicator onMfront of the unit will light up.2. Connect the AC/DC adapter to the wall outlet, the power indicator will light up red. Put the power switch to "ON" position to turn on the subwoofer.NOTE: The OPTICAL function can only work when the subwoofer installed with the main unit.10
11Download and install the App and set the language of mobile phone to English.Before connecting the mobile phone with the unit, search theVARO WIFI CONTROLLER from network by the following website:The App icon will appear like the Fig.1 after successful installation.Fig. 1PREPARATIONCONNECT THE PHONE WITH THE UNITActivate the WiFi on the phone, search and connect the router (WiFi Source),  Press and hold the           button to turn on the unit, the WiFi indicator will light up and blink. Tap VARO WIFI CONTROLLER icon to activate and it will try to search the devices (Fig.A).SetupVARO WIFI  CONTROLLERNOTE:Please make sure that there is no AUX IN cable plugged in AUX IN jack.MAndroid:http://fir.im/bvaroiOS:http://fir.im/varoFig.A Fig.BSelect CUBE on Fig.B and tap CONNECT SPEAKER, tap Continue on Fig.C. Fig.C Fig.DRead the tips on Fig.D and tap NEXT.
SetupNOTE: There will be voice tone sounding during connection procedure like the following:" Searching for Wifi connection "" Waiting for Wifi connection "" Wifi connected "Select the same WiFi (router source) as the phone connected and tap LOGIN on Fig.E.Fig.EPress and hold the     button on the unit as instructed on Fig.F and tap Next to continue.Fig.FWait unit the progress bar reach 100% as instructed on Fig.G.     Fig.G Fig.HSelect to add another speaker or play music after successful connection as Fig.H.Using the screen instructions and the voice tone to make connection and operations.After connection completed, it will give instructions like Fig.I and tap Next to continue.     Fig.IRead the onscreen instructions on Fig.J, Fig.K, Fig.L and continue.Fig.J Fig.K Fig.L12
SetupWait unit the progress bar reach 100% as instructed on Fig.G.     If it displays like Fig.M, tap Try Again to repeate the above stated steps to reconnect.Fig.M Fig.NIf it does not fail to connect, continue to set the SPEAKER LOCATION, tap Custom...column on Fig.N to rename the speaker location. Input the name and confirm on Fig.O. Fig.O13
Glance at The Function of Each Icon On SPEAKER CONTROLS page (Fig.P), tap       to return to home page. Tap          to  Fig.PRename, browse the Speaker Info and Preset Content. Tap         Add a New Speaker toadd more speaker as onscreen instructions. Tap Pause All to pause playing on all speakers, tap again to resume play all speakers. Tap volume level bar to adjust the volume, tap Home Page Speaker Info PageSTEREO icon to set to LEFT channel or RIGHT channel.Tap  on SPEAKER CONTROLS page to set solo or multi mode. as onscreen instructions like Fig.Q. Fig.Q.  Fig.R. Drag down slowly from the top of the SPEAKER CONTROLS page window until the upward arrow head appears then release to update the SPEAKER CONTROLS page, if there is  existing connected speaker, it will appear on the SPEAKER CONTROLS page. See Fig.R.14
15Guide of Using App FunctionsHome PageOn Home Page, tap Search to search the desired music shown on the below pictures.On Home Page, tap Favorites to to listen your favorite music, on music playing page,  tap the       icon to add songs to My Playlist,Favorites My MusicOn Home Page, tap My Music to listen from native music, My Playlist or Recently Played music.TuneInOn Home Page, tap TuneIn to listen online radio, or other programes. On Home Page, tap iHeartRadio and sign up to listen iHeart radio. iHearttap the       icon to add songs to Favorites.
Guide of Using App FunctionsOn Home Page, tap Sportify to listen music.  SportifyOn Home Page, tap Add More Services to add the desired online programs platform. Tap Line in, Bluetooth, USB Devices or Optical to switch function mode on Fig.S.Tap Setings to check the Version and Feedback information on Fig.T.Fig.S Fig.TNOTE: Other detail functions like adding, cancel, delete, manage...customize, etc. can be  operated according to the onscreen instructions. 16
FAQQ: Can't stream music to the device?A: Make sure your phone or PAD are in the same Wi-Fi network as your device. If you use 3rd. music APP, please check if the APP supports Airplay, DLNA or Qplay protocol.Q: Can the APP system be controlled independently by two different phones/tablets at the same time or can it only be controlled with one? A:It can be controlled by different phones / tablets.Q: Can I play my MP3 music collection on the iphone? A: Yes. You just have to install the controller app on the iPhone. In the  app, you will see an option to play music on "This iPhone".Q: What kinds of  music format does it support?A: Most of the format is available. Such as MP3, WMA, AAC (AAC+), Apple lossless, FLAC, APE, etc.Q:Does it support multi-room playback?A: Yes. Playback the same song in multiple speakers with minimal latency (less than 5 ms) or different songs in multiple speakers with one App.Q: Does the wireless transmission  have loss of sound quality?A:No. You mobile devices or other devices just send control instructions, and the adapter will download songs metadata, decoding it  and then playback in local speaker, so there is no lose of the music quality through wireless transmission.Q: Does it support R&L channel?A: Yes, this is supported. You can find the sign in APP.17

Navigation menu