Junlan Electronic RP3000BT Car DVD Player User Manual
Shenzhen Junlan Electronic Ltd Car DVD Player
Manual
(BT/DVD/CD/MP3/SD/USB/AM/FM/CLOCK)
(Instruction Manual)
BEFORE USING PLEASE READ THIS MANUAL CAREFULLY
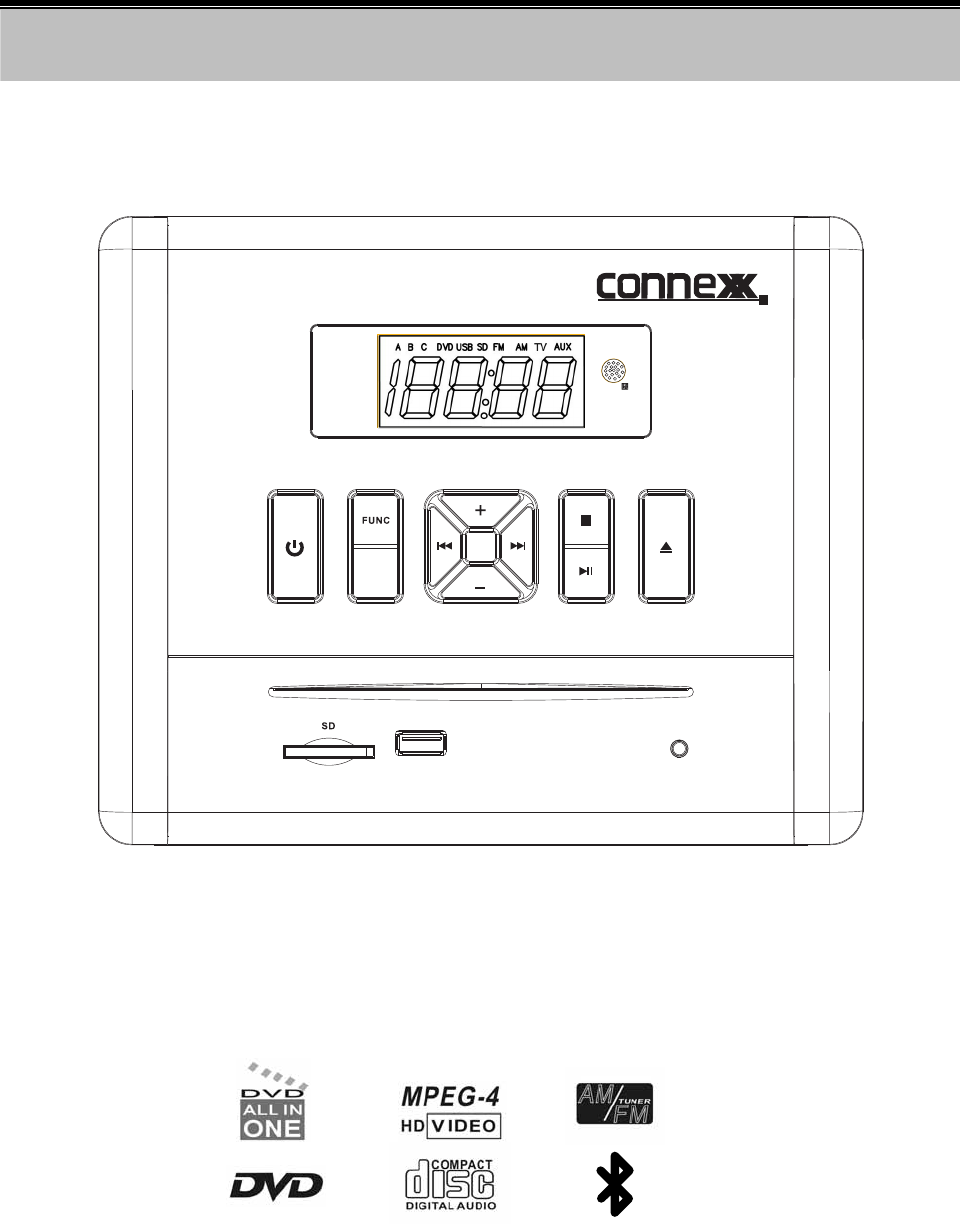
Receiver System RP-3000
USB
A/ B / C
AUX
BT
1
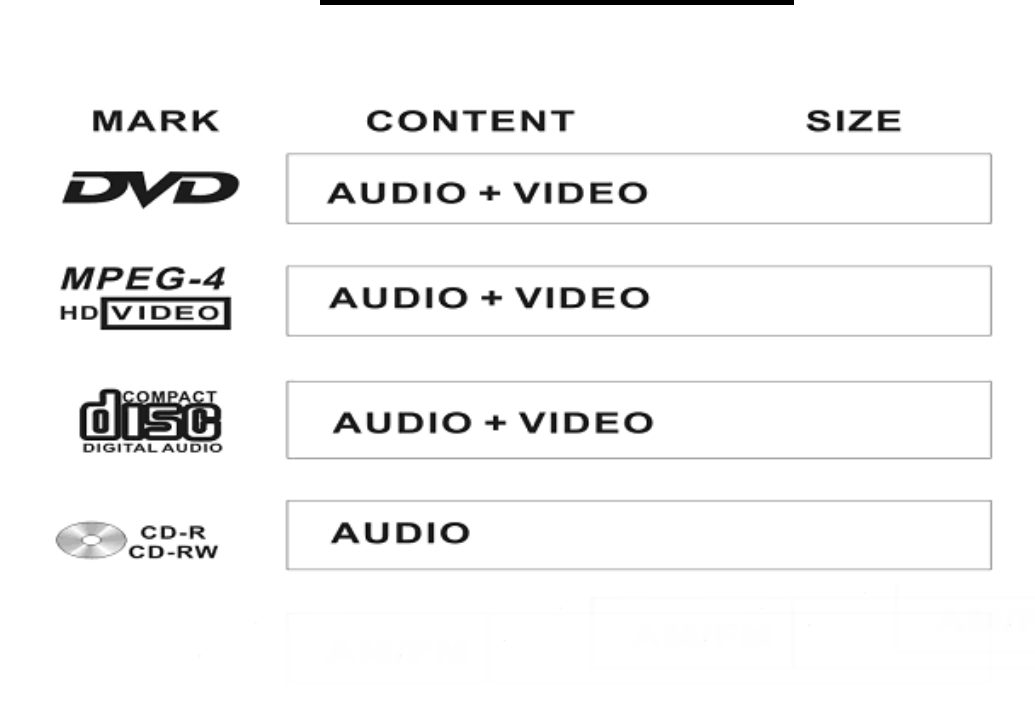
COMPATIBLE DISCS
ACCESSORIES
1 X Instruction manual
1 X Remote control
1 X FM-Antenna (Pig Tail)
One composite audio/video cable
6 X Mounting Screws
Wire Harness for DC power and speakers
DC Power extension (Red and Black wire) wires
Optional AC/DC Adapter
4.72"
4.72"
4.72"
4.72"
2 X Batteries
12 Play/ Pause button
2
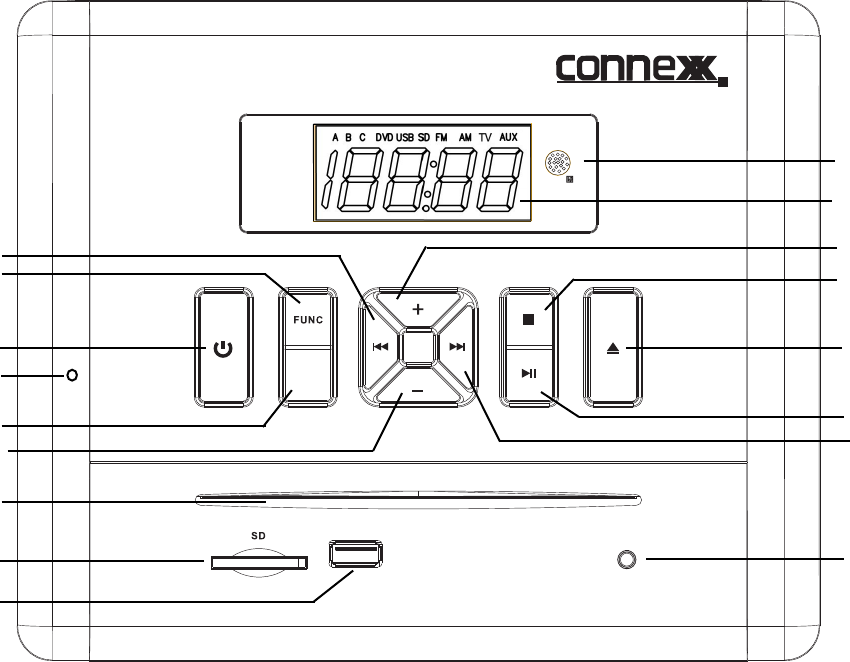
Location of Controls
3
8
2
9
10
11
13
14
16
17
A/B/C
4
USB
1
5
15
6
7
12
AUX
NOTE 4:This reset button is under screw cover.when unit is frozen for some reason,remove the left side
screw cover,use a paper clip and reset.
3 Standby button
6 Volume - button
9 USB port
15 Volume+ button
4 Reset button 5 Audio channel switch
(NOTE)
1 Tune-/Previous button
2 Function button
7 Disc loader
8 SD card slot
10 AUX
11 Tune+ / Next button
13 Eject button
14 Stop button
16 LED display
17 Remote sensor
3
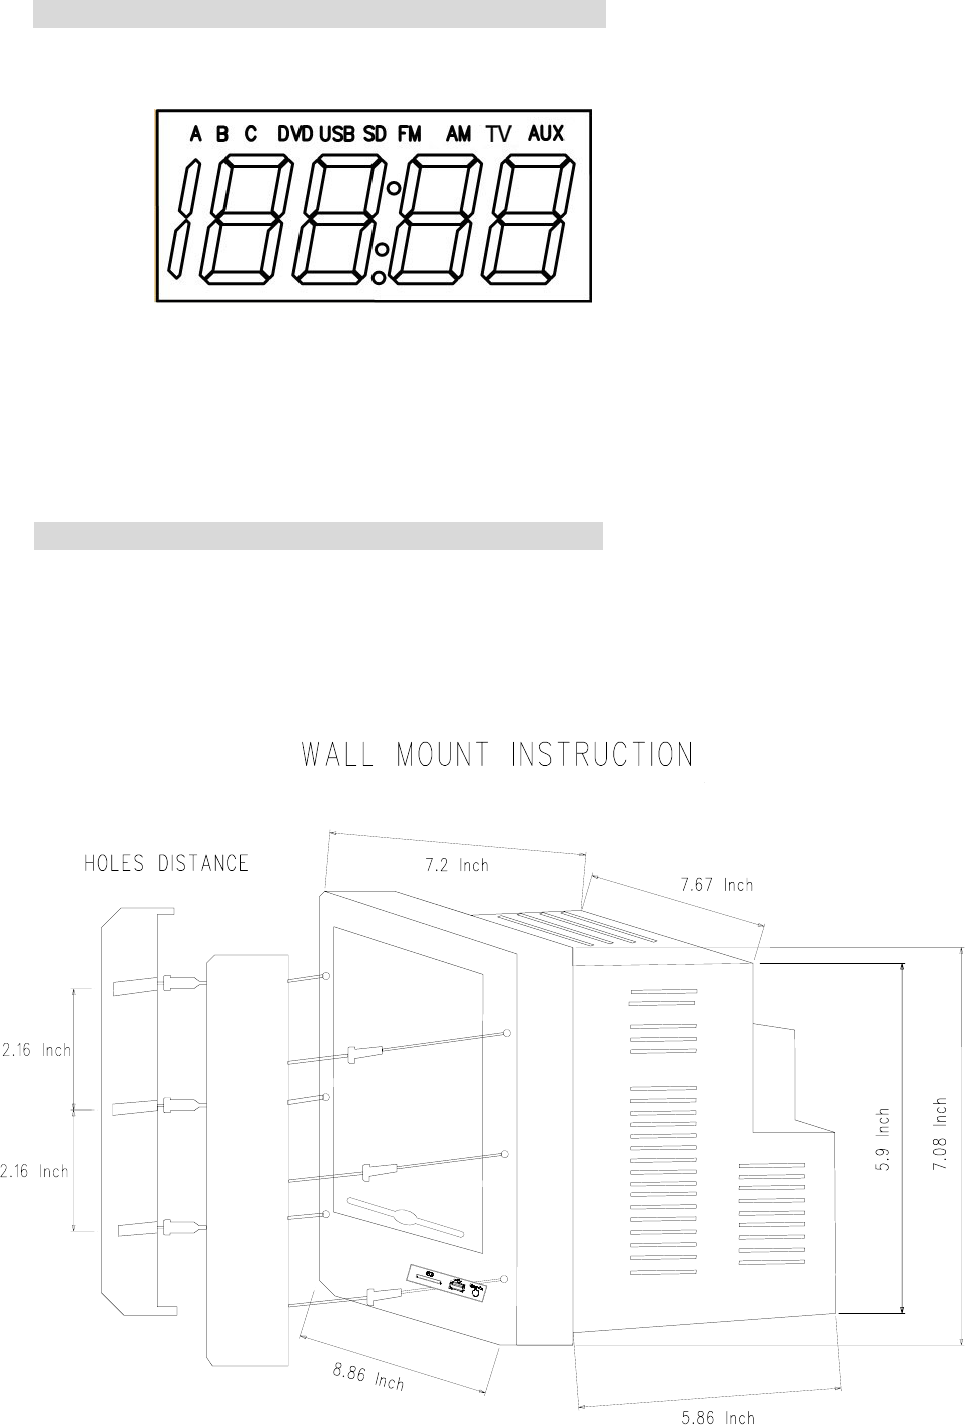
DVD/USB/SD/RADIO/TV/AUX ICONS DISPLAY
MOUNTING AND CUT OUT INSTRUCTIONS
The 6X mounting screws are in the owner’s manual bag.
Note:
·Remove screw caps and carefully take mounting covers off.
·Connect and test hareness and wiring before wiring.
·Screw the unit in place, replace screw caps.
Time
4
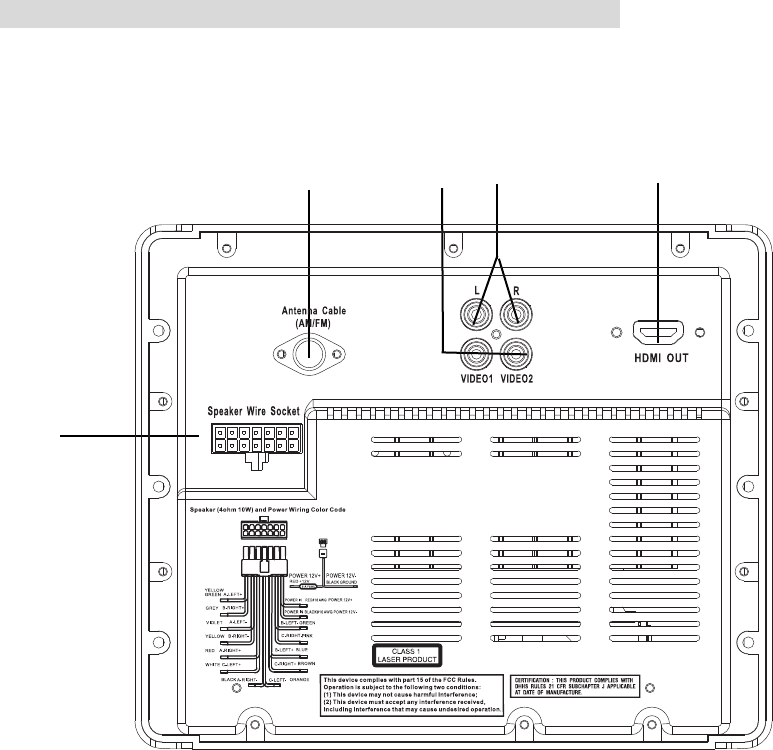
REFERENCE DRAWING FOR REAR CABINET
2 Wire harness for 12V DC power and 6 speakers
3 CVBS(2 Video output) 4 Aux (L/R) TV audio input
5 HDMI OUTPUT
1
2
3 4 5
(OUTPUT)
AUX TV
1 Automotive antenna socket (AM/FM/)
5
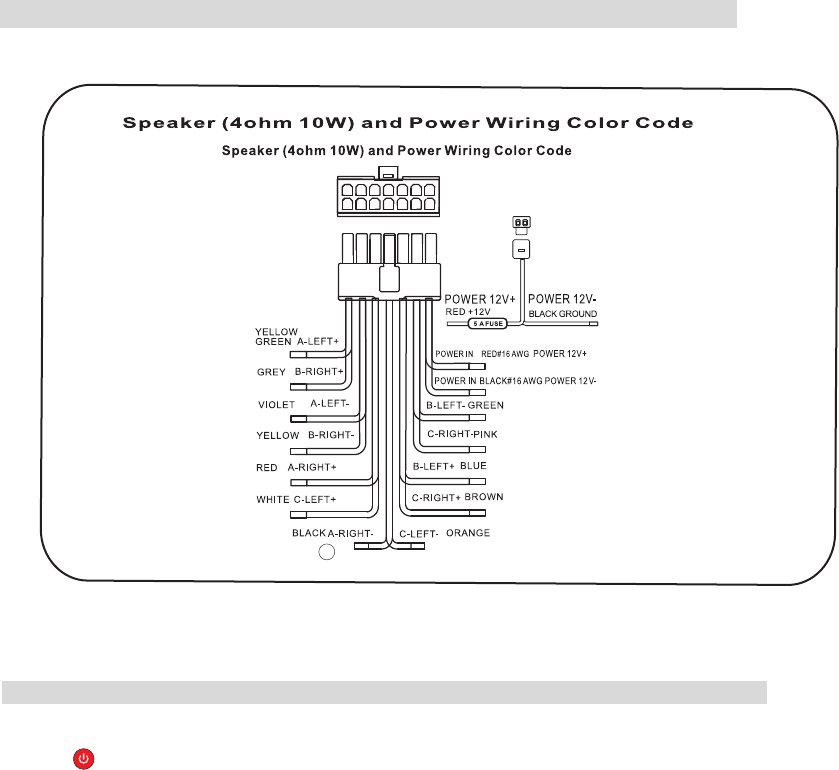
Wire harness for 12V DC power & 6 speakers guide diagram
Basic Operations
TIME SETUP
3. Once completed, the minute digit will be flashing, then press the UP or DOWN button to adjust minute. when finished,
1. When in standby mode, press the power button on the unit or remote to turn on the unit.
MODE SHIFT
Note
-Once the disc is loaded, the unit will automatically shift to DVD mode.
2. Press FUNC button on the remote control or FUNC button on the unit to shift modes between
bt /DVD/USB/SD/FM/AM/ TV/AUX.
-Skip and play/pause functions may not be compatible with all connected bluetooth devices.
4. Press PREV and NEXT buttons to skip to the previous and next track..
2. Activate the Bluetooth connection on the external device.
find "RP3000BT" in your device pairing list and select it to pair and connect your device to the unit.
1. Press FUNC button on the remote control until " bt " appears on the screen.
BLUETOOTH
Note
5. Press button to select play or pause mode.
3. The unit will search and reconnect to previous bluetooth device that was connected if available. If it is your first
time connecting,
Carefully read wiring diagram: the wrong connections reversing polarity
(positive and negative power wiring) can cause distortation and / or damage the power amplifiers.
1.Press to enter standby mode, press and hold CADJ/MEMO button on the remote control to enter time setup interface.
The LED
display will show the default time with the hour digit flashing.
2. Press UP and down to select 12 or 24 hours mode, then press CADJ/MEMO to confirm, after confirming, the hour digit
will be flashing, press UP or DOWN button to adjust hour, press CADJ/MEMO again to confirm hour.
Press CADJ/MEMO to confirm, time setting is over.

1. Use function button to cycle to either FM or AM which will be shown with indicator light on LED diaplay.
5. Press CH + and CH- buttons on the remote control to select and play the stored stations..
PLAY RADIO
2. Press and hold ( or ) button to seach stations automatically. To store a searched station,
4.. Press MEMO button on the remote control to display on the LED the preset for selected station.
-A total of 30 AM stations and 30 FM stations can be stored into the unit's memory.
Note
- Fully extend and relocate the antenna to improve the reception.
DISC PLAYBACK
1.One disc is inserted, unit will automactically shift to DVD mode and begin playback.
2.Press button to eject the disc.
3.Press buttons to go through the menu and press ENTER button to confirm the selections.
4.Press PREV and NEXT button to skip to the previous or next chapter / track..
5.Press REV and FWD buttons to search through the chapter/track backward and forward at different speed.
6. Press ANGLE button to select different camera angles that available in the disc.
7. Press SUBTITLE button to select a different subtitle language if available on the disc.
8. Press TITLE button to enter title menu.
-Function mentioned above may not be available on all the discs.
Note
9. Press MENU button to enter disc root menu.
USB/SD CARD PLAYBACK
1. Insert USB drive or USB card into appropriate slot.
2. Press FUNC button until indicator light shows USB or SD.
3. Press buttons to go through the menu and press ENTER button to confirm the selection.
-The USB player supports MP3/ AVI /WMA/JPEG formats.
Note
TV/AUX PLAYBACK
1. Connect your external audio device (MP3 player/cell phones, etc.) to the AUX IN 2 jack in the front
of the unit with an 3.5mm audio cable (not supplied). Or connect DVD player, VCR, DVR, etc to the
AUX 1 jack in the rear of the unit with the RCA audio cable.
2. Press FUNC button on the remote control until desired indicator light, either TV or AUX is highlighted.
3. Activate your external device.
-The TV can also connected to the VIDEO OUT in the rear of the unit with an AV cable to watch video files.
Note
10. Press OSD button to display the disc inforamtion.
6
press MEMO button, the screen will diaplay the order, eg: P01, then press MEMO again to confirm.
Press CH- and CH+ button to play the stored station.
3. when a station searched, press MEMO to display the storage, press CH+ or CH- to select a order,
eg:select P20 as the storage position, press MEMO to confirm the position. next time, press CH+
or CH- to find P20 to play the station stored.
7
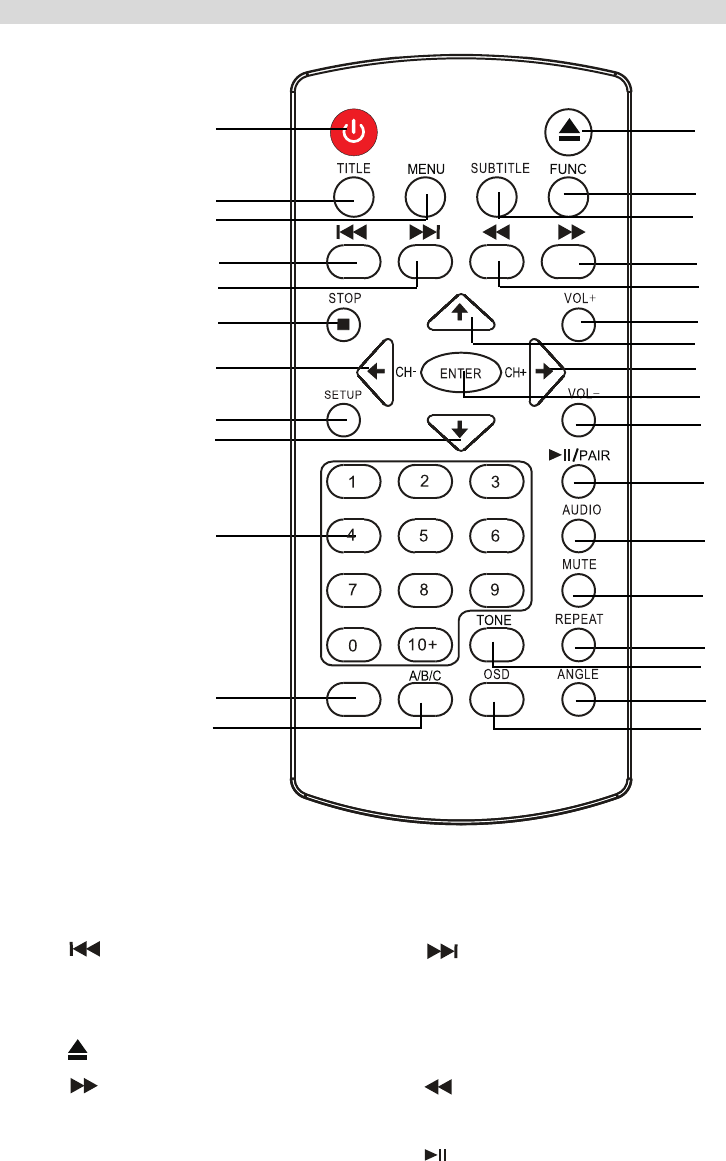
REFERENCE DIAGRAM AND KEY FOR REMOTE CONTROL
1
2
3
4
5
6
7
8
9
10
11
12
13
14
15
16
17
18
19
20
21
22
23
24
25
26
27
28
29
6 STOP
9 SEARCH-
8 SETUP
7 CH-
27 TONE
SEARCH+
SEARCH-
CADJ/ ME O
1 POWER
2 TITLE 3 MENU
12
A/B/C
18
VOL+
15
SUBTITLE
21 ENTER
24
AUDIO
26 REPEAT
11
CADJ/MEMO
20
CH+
23
29
OSD
28
ANGLE
25 MUTE
22
VOL-
19
SEARCH+
16
FWD
10 NUMBER KEYPAD
17 REV
14 FUNC
/
PAIR
13
EJECT
DISC
4 PREV 5 NEXT
M

8
1 POWER
Press this button to shut off power and enter standby mode, press it again to activate.
3 MENU
8 SETUP
Press this button and the setup screen will appear if available for the current mode .
7 CH –
Press this button to select last station.
10. NUMBER KEYPAD
Press these button to select channel
Press this button to switch the menu mode. For a DVD, press MENU to open the menu during playback.
2 TITLE
Press this button to access the DVD menu.
4 PREV
Press this button to skip back to the previous selection.
5 NEXT
Press this button to skip to the next chapter/track.
6 STOP
Press this button to stop play for the current DVD or CD. Press the /ENTER button to resume playback.
9 SEARCH-
Press this button to search previous radio channal.
Press this button to select desired speaker channel.
12. A/B/C
13.
Press this button to eject CD or DVD. Don't press to load as discs load automactically.
14. FUNC
Press this button to store a desired station to memory.
Set the clock time.
11. CADJ/MEMO
Press this button to choose between AM and FM radio modes and select the desired DVD, AUX, TV
or BLUETOOTH mode.

9
28.ANGLE
23. /PAIR
26. REPEAT
For DVD or CD, press this button to repeat current chapter or track. Press it again to repeat the entire DVD or CD.
20. CH +
Press this button to select the next station.
22. VOL –
Press this button to turn the volume down.
15. SUBTITLE
Press this button to select different subtitle languages if applicable.
27. TONE
Press this button to change audio settings, such as speakers base and treble level.
16. FWD
17. REV
18. VOL+
Press this button to turn the volume up.
19. SEARCH +
Press this button to search next radio channel.
29. OSD
Press to show status information on the screen.
Press this button to rewind. Each time it is pressed, the speed with which it rewinds accelerates. Conitune pressing it
to return back to normal playback speed.
21. ENTER
Press this button to pairing blue tooth, pause the playing track or vedio, press again to replay.
Press this button to select different viewing angles if available.
Press this button to confirm the desired/hightlighted selection.
25. MUTE
Press this button to turn off sound, press again to resume.
24. AUDIO
Press this button to enter audio mode.
the speed with which it fast forward.
Continue pressing it to return back to normal playback speed.
Press this button to play fast forward, each time it is press,

10
No Sound
*Make sure the connections are secure between player and speakers.
*Make sure the correct input is selected on the monitor.
No Picture
*Make sure the connection are secure between RP3000BT and the monitor.
*Make sure the RP3000BT is in the correct mode (e.g., DVD mode)
Disc does not play
*Make sure the disc is loaded correctly (label side is facing up on the disc tray).
*Make sure the disc is clean and not damaged.
Remote controller does not work
*Move any obstacles between RP3000BT and remote control.
*Point the remote controller at the remote control sensor.
*Check the battery.
TECHNICAL SPECIFICATIONS
Laser Wave length 650um
Video AUTO/NTSC
Frequency response 20 Hz-20KHz
Signal/noise ratio >60dB
Dynamic rang >60dB(1KHz)
Video out output level:1vp-p/ Load impedance :75 imbalance/
negative polarity
Power supply DC 12-14.4V
Power consumption <55W
Dimensions (WxHxD) 218(L)x185(H)x169(D)mm
AM Frequency range AM 520 ~ 1710KHz
FM Frequency range FM87.5 ~ 108MHz
Output power 30W(RMS)
TM
For your convenience, we have enlisted some points to solve problems, you may encounter while using the
CONNEX RP3000BT.
TM
X
FCC Warning:
This equipment has been tested and found to comply with the limits for a Class B digital device,
pursuant to Part 15 of the FCC Rules. These limits are designed to provide reasonable protection
against harmful interference in a residential installation. This equipment generates uses and can
radiate radio frequency energy and, if not installed and used in accordance with the instructions,
may cause harmful interference to radio communications. However, there is no guarantee that
interference will not occur in a particular installation. If this equipment does cause harmful
interference to radio or television reception, which can be determined by turning the equipment off
and on, the user is encouraged to try to correct the interference by one or more of the following
measures:
-- Reorient or relocate the receiving antenna.
-- Increase the separation between the equipment and receiver.
-- Connect the equipment into an outlet on a circuit different from that to which the receiver is
connected.
-- Consult the dealer or an experienced radio/TV technician for help.
This device complies with part 15 of the FCC Rules. Operation is subject to the following two
conditions:
(1) This device may not cause harmful interference, and (2) this device must accept any
interference received, including interference that may cause undesired operation.
Changes or modifications not expressly approved by the party responsible for compliance could
void the user's authority to operate the equipment.