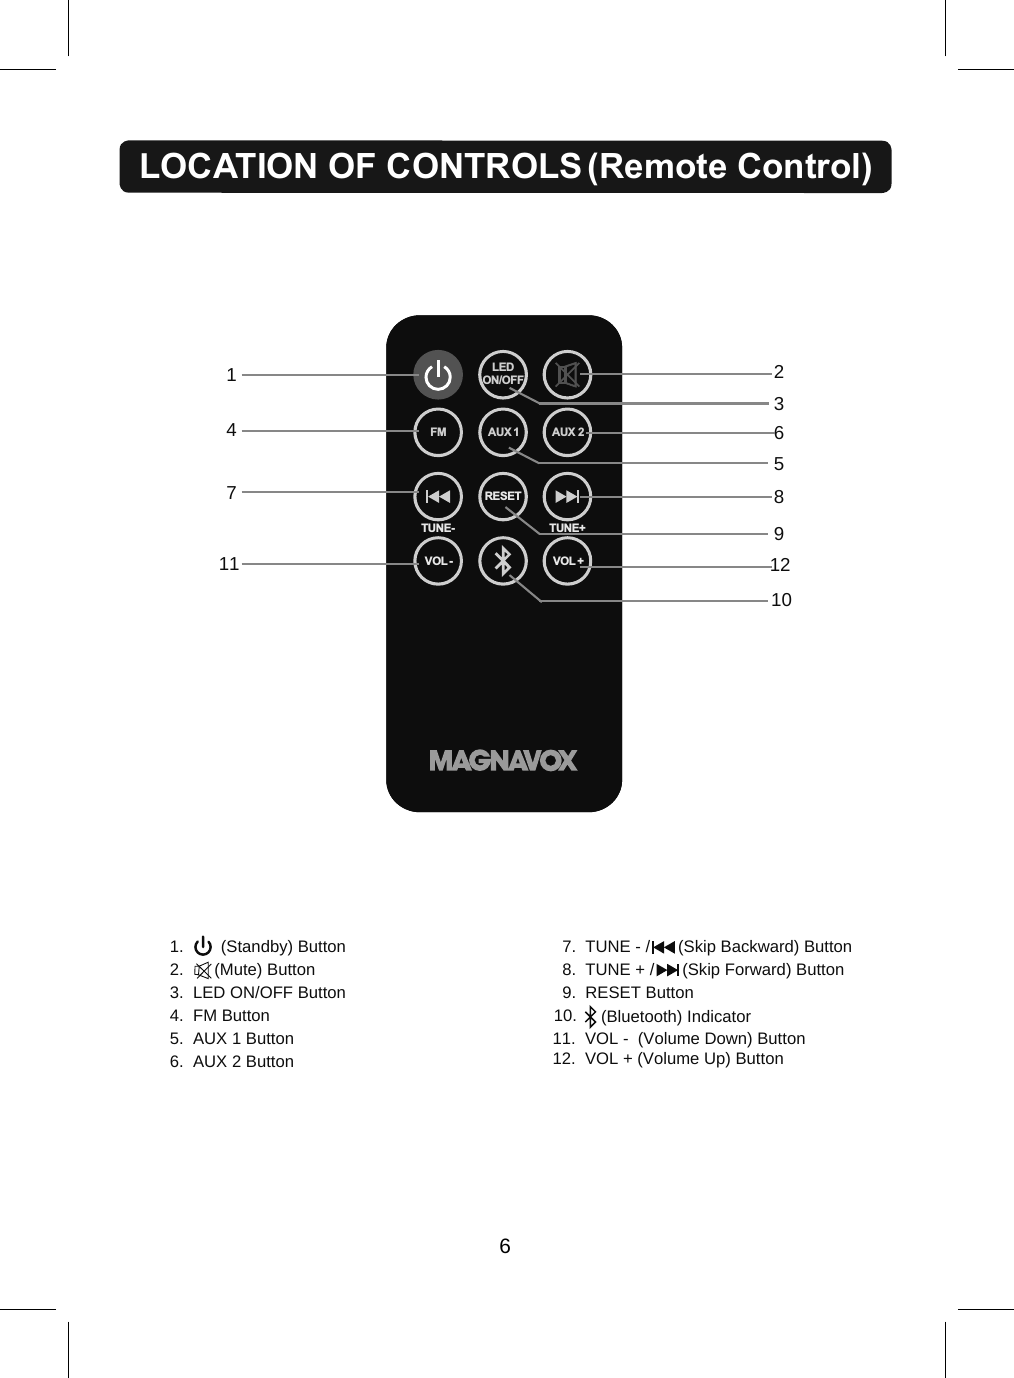
Junlan Electronic TSBA5131 JUKEBOX SPEAKER SYSTEM WITH COLOR CHANGING LIGHTS FM STEREO RADIO AND BLUETOOTH WIRELESS TECHNOLOGY User Manual 1

Shenzhen Junlan Electronic Ltd JUKEBOX SPEAKER SYSTEM WITH COLOR CHANGING LIGHTS FM STEREO RADIO AND BLUETOOTH WIRELESS TECHNOLOGY 1

User Manual

2Before using the unit, be sure to read all operatinginstructions carefully. Please note that these are generalprecautions and may not pertain to your unit For example,this unit may not have the capability to be connected to anoutdoor antenna.1. Read these instructionsAll the safety and operating instructions should be read before the product is operated.2. Keep these instructionsThe sately and operating instructions should be retained for future reference.CALIFORNIA PROP 65 WARNING:This product contains chemicals known to the State of California to cause birth defects or other reproductive harm. For more information on these regulations and a list of chemicals, log on the following website: http://www.oehha.ca.gov/prop65.html,03257$17 6$)(7< ,16758&7,216 This device complies with part 15 of the FCC Rules. Operation is subject to the following two conditions: (1) This device may not cause harmful interference, and (2) this device must accept any interference received, including interference that may cause undesired operation.This equipment complies with FCC radiation exposure limits set forth for an uncontrolled environment. This equipment should be installed and operated with minimum distance 20cm between the radiator & your body.
3
POWERON  OFFAUX IN 1AUX IN 2RLDC IN DC      12V,2AANT TO DC IN JACKTo Wall OutletConnect the small plug from the supplied AC/DC Adaptor to DC IN Jack on the rear of unit. Connect the AC/DC Adaptor to a wall outlet having AC 100-240V~, 50/60Hz.NOTE: This AC/DC Adaptor is intended to be correctly orientated in a vertical or floor mount position.432:(5 6285&(
151210897111416131.  Remote SensorIJOn the front of unitij2.  POWER ON/OFF Switch3.  DC IN Jack (DC      12V, 2A,                 )4.  AUX IN 2 Jacks5.  AUX IN 1 Jack6.  FM Wire Antenna7.  STANDBY / FM Indicator 8.       (Bluetooth) Indicator9.  AUX 1 Indicator10.  AUX 2 Indicator11.  VOL -  (Volume Down) Button12.  VOL + (Volume Up) Button13.        (Standby) Button14. TUNE - /       (Skip Backward) Button15. TUNE + /       (Skip Forward) Button16. SOURCE -- LED ON/OFF Button261345POWERON  OF FAUX I N 1AUX I N 2RLDC IN DC      12 V, 2AANTPOWERON  OFFAUX IN 1AUX IN 2RLDC IN DC      12V,2AANTAUX 1 AUX 2STANDBY/FMSOURCE LED ON/OFFVOL+VOL-TUNE- TUNE+AUX 1 AUX 2STANDBY/FMSOURCE LED ON/OFFVOL+VOL-TUNE- TUNE+5/2&$7,21 2) &21752/6
LEDON/OFFFM AUX 1 AUX 2TUNE-RESETTUNE+VOL - VOL +214711681253910  1.        (Standby) Button2.  ლ (Mute) Button3.  LED ON/OFF Button4.  FM Button5.  AUX 1 Button6.  AUX 2 Button7.  TUNE - /      (Skip Backward) Button8.  TUNE + /      (Skip Forward) Button9.  RESET Button10.  611.  VOL -  (Volume Down) Button12.  VOL + (Volume Up) Button/2&$7,21 2) &21752/6 5HPRWH &RQWURO(Bluetooth) Indicator
During first time use, slide the insulation film out from the battery tray and  discard it as illustrated to the right:When the battery is consumed, replace the battery as shown below:1.  Push the tap on the battery tray and slide it out as the illustrated below:2.  Install a new CR 2025 button cell to the battery tray as the polarity makings       on the rear of remote cabinet.3.  Close the battery tray.BATTERY PRECAUTIONS:Follow these precautions when using the battery in this device:Remarks:Ɣ:KHQWKHUHLVDQREVWDFOHEHWZHHQWKHXQLWDQG    the transmitter, the transmitter may not operate.Ɣ:KHQGLUHFWVXQOLJKWDQLQFDQGHVFHQWODPS    fluorescent lamp or any other strong light shines     on the REMOTE SENSOR of the unit, the remote     operation may be unstable.Fig.1 Fig.2 Fig.37Remote Sensor7KLV SURGXFW FRQWDLQV D FRLQEXWWRQ FHOO EDWWHU\ ,I WKH FRLQEXWWRQ FHOO EDWWHU\ LVVZDOORZHG LW FDQ FDXVH VHYHUH LQWHUQDO EXUQ LQ MXVW  KRXUV DQG FDQ OHDG WRGHDWK.HHS QHZ DQG XVHG EDWWHULHV DZD\ IURP FKLOGUHQ ,I WKH EDWWHU\ FRPSDUWPHQW GRHV QRWFORVH VHFXUHO\ VWRS XVLQJ WKH SURGXFW DQG NHHS LW DZD\ IURP FKLOGUHQ,I \RX WKLQN EDWWHULHV PLJKW KDYH EHHQ VZDOORZHG RU SODFHG LQVLGH DQ\ SDUW RI WKH ERG\VHHN LPPHGLDWH PHGLFDO DWWHQWLRQ8.  Approx.12 feet°°%$77(5< ,167$//$7,21 5HPRWH &RQWURO1. Use only the size and type of battery specified.2. Be sure to follow the correct polarity when installing the battery as indicated in the battery compartment. A reversed battery may cause damage to the device.            the batteries to prevent damage or injury from possible battery leakage.5. Do not try to recharge the battery not intended to be recharged; it can overheat and rupture.           (Follow battery manufacturer’s instructions.)6. Do not dispose of battery in fire. Battery may explodes or leak.7. Clean the battery contacts and also those of the device prior to battery installation.3. Do not mix different types of batteries together (e.g. Alkaline and Carbon-zinc) or old batteries with fresh ones.4. If the batteries in the device are consumed or the device is not to be used for a long period of time, remove ())(&7,9( ',67$1&( 2) 5(027( 75$160,77(5
8*(1(5$/ 23(5$7,21 &RQQHFW WKH VXSSOLHG $&'& $GDSWRU WR WKH XQLW DQG ZDOO RXWOHW DV SUHYLRXVO\ LQVWUXFWHG 6OLGH WKH 3RZHU 212)) 6ZLWFK RQ WKH UHDU RI XQLW WR WXUQ WKH XQLW WR VWDQGE\ PRGH 3UHVV WKH 6WDQGE\ %XWWRQ RQ WKH XQLW DSSUR[LPDWHO\  VHFRQGV WKHQ UHOHDVH WKH EXWWRQ RUSUHVV WKH 6WDQGE\ %XWWRQ RQ WKH 5HPRWH &RQWURO WR WXUQ WKH XQLW 21 IURP VWDQGE\ PRGH7KH LQGLFDWRU ZLOO LOOXPLQDWH 3UHVV WKH 6285&(  /(' 212)) %XWWRQ RQ WKH UHSHDWHGO\ WR VZLWFK WR GHVLUHG SOD\EDFN PRGH 2USUHVV WKH IXQFWLRQ VHOHFWLRQ EXWWRQV RQ WKH 5HPRWH &RQWURO WR VZLWFK WR GHVLUH PRGH GLUHFWO\7KH FRUUHVSRQG LQGLFDWRU ZLOO LOOXPLQDWH DQG EOLQN ZLWK \RXU VHOHFWLRQ VHH OLVW EHORZ3OD\EDFN 0RGH ,QGLFDWRUV%7 %OXHWRRWK ,QGLFDWRU ZLOO LOOXPLQDWH DQG EOLQN)0 5DGLR 67$1'%<)0 ,QGLFDWRU ZLOO LOOXPLQDWH DQG EOLQN$8;  $8;  ,QGLFDWRU ZLOO LOOXPLQDWH$8;  $8;  ,QGLFDWRU ZLOO LOOXPLQDWH 'XULQJ SOD\EDFN3UHVV WKH 92/ 9ROXPH  %XWWRQV RQ WKH XQLW RU 5HPRWH &RQWU O WR DGMXVW YROXPH OHYHO DV GHVLUHG3UHVV WKH 087( %XWWRQ RQ WKH 5HPRWH &RQWURO WR WXUQ RII WKH VRXQG WHPSRUDU  SUHVV DJDLQWR WXUQ LW EDFN 3UHVV DQG KROG WKH 6285&( ± /(' 212)) %XWWRQ RQ WKH XQLW RU SUHVV WKH /(' 212)) %XWWRQRQ WKH 5HPRWH FRQWURO WR WXUQ 212)) WKH 'HFRUDWLYH /(' /LJKWV :KHQ ILQLVKHG SUHVV DQG KROG WKH 6WDQGE\ %XWWRQ RQ WKH XQLW DSSUR[LPDWHO\  VHFRQG RUSUHVV WKH 6WDQGE\ %XWWRQ RQ WKH 5HPRWH &RQWURO WR WXUQ WKH XQLW WR VWDQGE\ PRGH7KH 67$1'%<)0 ZLOO LOOXPLQDWH DQG VWRS EOLQNLQJ XUQ RII WKH XQLW E\ VOLGLQJ WKH 32:(5 212))6ZLWFK RQ WKH UHDU RI XQLW WR 2)) SRVLWLRQ $OO WKH LQGLFDWRUV ZLOO WXUQ RII R VDYLQJ HQHUJ\ XQSOXJ WKH $&'& $GDSWRU IURP ZDOO RXWOHWლRQLQJFRUUHVSRQGLQJRLO\RQRQIf the unit will not be used over a long period of time, W723(5$7,21
9%7 %OXHWRRWK%7 %OXHWRRWK SDLULQJ)LUVW WLPH XVH RU UHSDLULQJ WKH XQLW WR D QHZ %7 'HYLFH SDLU DV IROORZV 3RZHU RQ WKH XQLW DV SUHYLRXVO\ LQVWUXFWHG 3UHVV WKH 6285&( ± /(' 212)) %XWWRQ RQ WKH XQLW UHSHDWHGO\ XQWLO WKH %OXHWRRWK ,QGLFDWRU2U SUHVV WKH %OXHWRRWK %XWWRQ RQ WKH 5HPRWH &RQWURO WR HQWHU %7 PRGH GLUHFWO\ WKH%OXHWRRWK ,QGLFDWRU LOOXPLQDWH DQG EOLQN 3RZHU RQ WKH H[WHUQDO %7 'HYLFH DQG HQWHU WR %7 VHDUFKLQJ PRGH 6WDUW SDLULQJ IROORZLQJ WKH RQVFUHHQ LQVWUXFWLRQV IURP WKH H[WHUQDO %7 'HYLFH $IWHU SDLUHG WKH %OXHWRRWK ,QGLFDWRU ZLOO VWRSEOLQNLQJ ,I SDLULQJ LV FRPSOHWH \RX PD\ QRZ SOD\ PXVLF ZLWK \RXU H[WHUQDO %7 'HYLFH 'XULQJ SOD\EDFN3UHVV WKH %XWWRQ RQ WKH XQLW WR SDXVH SUHVV DJDLQ WR UHVXPH QRUPDO SOD\EDFN3UHVV WKH 087( %XWWRQ RQ WKH 5HPRWH &RQWURO WR WXUQ RII WKH VRXQG WHPSRUDU \ SUHVVDJDLQ WR WXUQ LW EDFN3UHVV WKH 781(  RU 781(  %XWWRQV RQ WKH XQLW RU 5HPRWH &RQWURO UHSHDWHGO\ WRVNLS WUDFNV1RWHV:KHQ WKH H[WHUQDO %7 'HYLFH VHDUFKH WKH XQLW RXU PRGHO QXPEHU ³0+7%7´ ZLOO DSSHDURQ WKH GLVSOD\ RI H[WHUQDO %7 'HYLFH,I ZKLOH SDLULQJ \RX DUH DVNHG IRU D FRGH SOHDVH WU\  RU 1RUPDO RSHUDWLRQ DIWHU SDLULQJ 7XUQ RQ WKH %7 IXQFWLRQ RI WKH H[WHUQDO %7 'HYLFH 3RZHU RQ WKH XQLW DQG HQWHU WR %7 PRGH DV SUHYLRXVO\ LQVWUXFWHG %OXHWRRWK ,QGLFDWRU ZLOOLOOXPLQDWH DQG EOLQN :DLW D IHZ VHFRQGV XQWLO WKH XQLW LV DXWRPDWLFDOO\ SDLUHG WR WKH H[WHUQDO %7 'HYLFH ³ ,QGLFDWRU ZLOOVWRS EOLQNLQJ $IWHU SDLULQJ LV FRPSOHWH \RX PD\ QRZ SOD\ PXVLF ZLWK \RXU H[WHUQDO %7 'HYLFHლ6WDQGE\ZLOOLOIRUVis illuminated and blinking.
)0 5DGLR 3RZHU RQ WKH XQLW DV SUHYLRXVO\ LQVWUXFWHG 3UHVV WKH 6285&( ± /(' 212)) %XWWRQ RQ WKH XQLW UHSHDWHGO\ XQWLO WKH 67$1'%<)0 ,QGLFDWRU LV2U SUHVV WKH )0 %XWWRQ RQ WKH 5HPRWH &RQWURO WR HQWHU )0 5DGLR PRGH GLUHFWO\WKH67$1'%<)0,QGLFDWRU ZLOO LOOXPLQDWH DQG EOLQN 3UHVV DQG KROG WKH %XWWRQV RQ WKH XQLW RU 5HPRWH &RQWURO WR DXWRVHDUFK DQG SOD\V WKH SUHYLRXVQH[W DYDLODEOH UDGLR VWDWLRQV 5HSHDW WKH VDPH SURFHGXUH XQWLO WKH GHVLUHG VWDWLRQ V  ,I \RX ZDQW HDUFK WKH VWDWLRQV IURP EHJLQQLQJ SUHVV WKH 5(6(7 %XWWRQ RQ WKH 5HPRWH$QWHQQDV7KLV XQLW KDV D )0 ZLUH DQWHQQD ZKLFK SURYLGHV DGHTXDWH UHFHSWLRQ LQ PRVW DUHDV ,I UHFHSWLRQ LV ZHDNXQZRXQG DQG H[WHQGHG WR LWV IXOO OHQJWK RU UHDVVHPEOH WKH RWKHU GLUHFWLRQORFDWLRQ WR LPSURYH UHFHSWLRQ781(  RU 781( LRXQGIWR UHVControl then search through the radio stations again as instructed on Number 3.illuminated and blink.10
 1. Insert one of the plugs from supplied Audio connection cable (with 3.5mm stereo mini plugs) tothe Phones Jack; Line Out Jack or AUX Out Jack on external audio device such as iPhones;iPad; iPod; MP3 Player; Discman … etc as shown below.2. Power on the unit as previously instructed.4. Play the music on the connected external Audio device as usual. (Make sure the volume levelof the external device is in high level. Otherwise, sound from this unit is weak).1. Insert one end of RCA connection cable to the Audio Out Jacks (RCA Type) on externalVideo/Audio device such like TV; DVD Player; VCR … etc as shown below.2. Power on the unit as previously instructed.4. Play the music on the connected external Audio device as usual. (Make sure the volume levelof the external device is in high level. Otherwise, sound from this unit is weak).POWERON  OFFAU X IN 1AU X IN 2RLDC I N DC      12V,2 AANTRear Panel POWERON  OFFAUX IN 1AUX IN 2RLDC I N DC      12V,2AANT( Connection Cable Not Included )Rear Panel DVD( Audio Connection Cable Included )11$8; $8; 3. Press the SOURCE – LED ON/OFF Button on the unit repeatedly until the AUX 1 Indicator isilluminated and blinking. Or, press the AUX 1 Button on the Remote Control to enter AUX 1 modedirectly, the AUX 1 Indicator will illuminate.3. Press the SOURCE – LED ON/OFF Button on the unit repeatedly until the AUX 2 Indicator isilluminated and blinking. Or, press the AUX 2 Button on the Remote Control to enter AUX 2 modedirectly, the AUX 2 Indicator will illuminate.
Check the follows before requesting service:SYMPTOM POSSIBLE CAUSENo power AC/DC Adaptor had notwall outletPOWER Switch is in OFFposition on the rear of unit to ONpositionThe unit in standby mode  Press and hold the(Standby) Button on the unit2 seconds thenrelease the button or Pressthe (Standby) Button onthe Remote Control to turnon the unit from standbymodeNo Sound Volume in minimum position     Rise volume level by presstheThe connected device isnot in playback modePlays the music/movie in theconnected device as usualSound output of theweakRise the volume level of thedeviceInput source incorrectSound distortion Volume level too highpress theVolume level of the connectedevice too high the connected deviceBT not functioningThe external BT device toofar from the unitPlace the external BTdevice close to the unitRemote notfunctioningThe button cell in the remotecontrol consumedReplace it by new button cellSet the input source as tReduce the volume level byPOSSIBLE SOULTIONVOL (Volume) + ButtonVOL (Volume) - ButtonReduce the volume and/or bass level of12connect to and unitConnect the AC/DC Adaptor to  the wall outlet and unitSlide the POWER ON/OFF Switch approximately/paird/pairdconnected /pairddeviceconnected /pairdsourcepaird /pairdThe external BT device had not pair to the unitPair the external BT device to the unit as page 97528%/(6+227,1* *8,'(he desiredd/
Power Source: ………………………………DC      12V, 2A, Centre PositivePower Source of Remote Control: ….DC      3V, 1 x CR 2025 Button Cell (Included)  Power Consumption: ………………………………………………………….. Max. 24 WRadio FM Band Coverage: …………………………………………….…. 87.5-108MHzBT Effective Range: ...................................…………......... Up to 32 Feet in open areaRemote Control Effective Range: ……………………………Up to 12 Feet in open area  Audio Power: ……………………………………………………………..20W RMS (4 x 5W)Impedance of Speakers: ……………………………………………….. 3 Ohm;10W x 4  1 x Owner’s Manual1 x Remote Control (Use 1 x CR 2025 button cell, already installed) 1 x Audio Connection Cable with 3.5mm Stereo Mini Plugs1 x AC/DC Adaptor (Input: AC 100-240V~, 50/60Hz, 0.6A; Output: DC      12V, 2000mA , Centre Positiveͨ13*(1(5$/ 63(&,),&$7,216$&&(6625,(6
LIMITED WARRANTY

Navigation menu