Junlan Electronic TSBA5131 JUKEBOX SPEAKER SYSTEM WITH COLOR CHANGING LIGHTS FM STEREO RADIO AND BLUETOOTH WIRELESS TECHNOLOGY User Manual 1
Shenzhen Junlan Electronic Ltd JUKEBOX SPEAKER SYSTEM WITH COLOR CHANGING LIGHTS FM STEREO RADIO AND BLUETOOTH WIRELESS TECHNOLOGY 1
User Manual

2
Before using the unit, be sure to read all operating
instructions carefully. Please note that these are general
precautions and may not pertain to your unit For example,
this unit may not have the capability to be connected to an
outdoor antenna.
1. Read these instructions
All the safety and operating instructions should be read
before the product is operated.
2. Keep these instructions
The sately and operating instructions should be retained
for future reference.
CALIFORNIA PROP 65 WARNING:
This product contains chemicals known to the State of
California to cause birth defects or other reproductive harm.
For more information on these regulations and a list of
chemicals, log on the following website:
http://www.oehha.ca.gov/prop65.html
,03257$17 6$)(7< ,16758&7,216
This device complies with part 15 of the FCC Rules. Operation is
subject to the following two conditions:
(1) This device may not cause harmful interference, and (2) this
device must accept any interference received, including interference
that may cause undesired operation.
This equipment complies with FCC radiation exposure limits set forth for
an uncontrolled environment.
This equipment should be installed and operated with minimum distance
20cm between the radiator & your body.
3
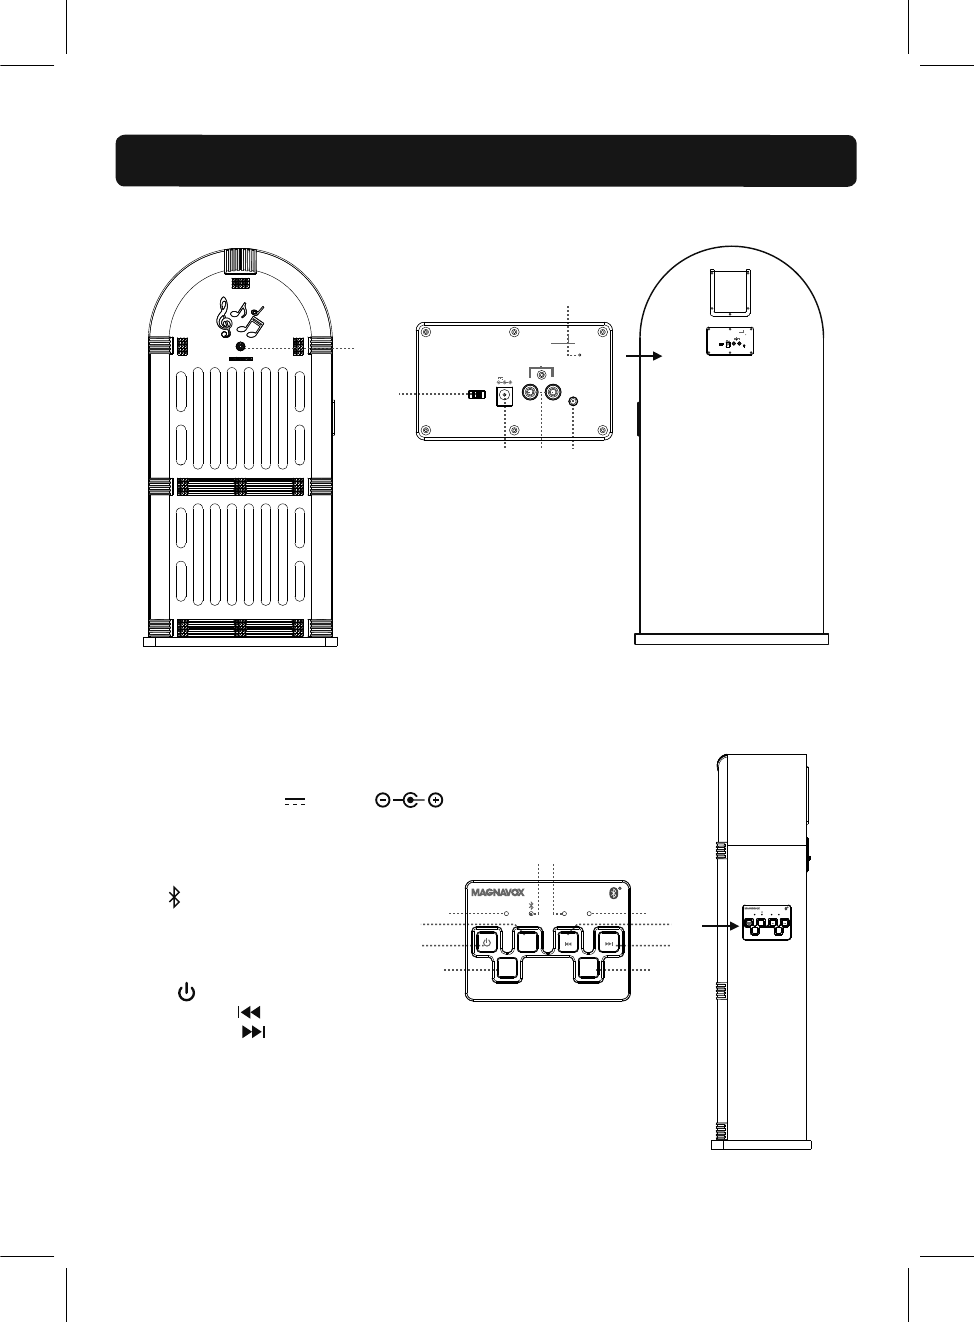
POWER
ON OFF
AUX IN 1
AUX IN 2
RL
DC IN
DC 12V,2A
ANT
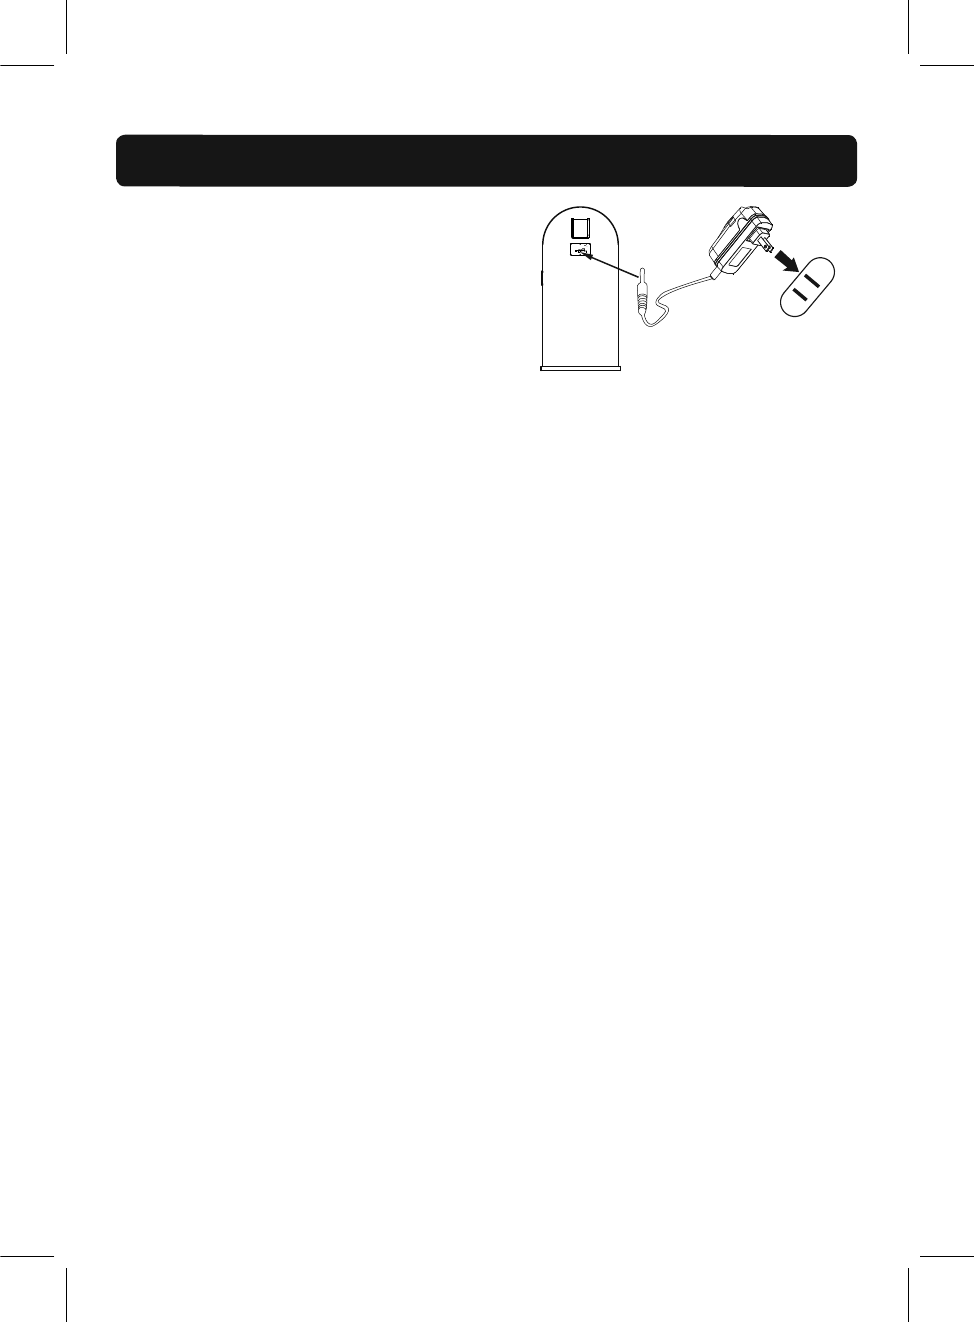
TO DC IN JACK
To Wall Outlet
Connect the small plug from the supplied AC/DC Adaptor
to DC IN Jack on the rear of unit. Connect the AC/DC
Adaptor to a wall outlet having AC 100-240V~,
50/60Hz.
NOTE: This AC/DC Adaptor is intended to be
correctly orientated in a vertical or floor mount
position.
4
32:(5 6285&(
15
12
10
89
7
11
14
16
13
1. Remote SensorIJOn the front of unitij
2. POWER ON/OFF Switch
3. DC IN Jack (DC 12V, 2A, )
4. AUX IN 2 Jacks
5. AUX IN 1 Jack
6. FM Wire Antenna
7. STANDBY / FM Indicator
8. (Bluetooth) Indicator
9. AUX 1 Indicator
10. AUX 2 Indicator
11. VOL - (Volume Down) Button
12. VOL + (Volume Up) Button
13. (Standby) Button
14. TUNE - / (Skip Backward) Button
15. TUNE + / (Skip Forward) Button
16. SOURCE -- LED ON/OFF Button
2
6
1
345
POWER
ON OF F
AUX I N 1
AUX I N 2
RL
DC IN
DC 12 V, 2A
ANT
POWER
ON OFF
AUX IN 1
AUX IN 2
RL
DC IN
DC 12V,2A
ANT
AUX 1 AUX 2
STANDBY/FM
SOURCE
LED
ON/OFF
VOL+VOL-
TUNE- TUNE+
AUX 1 AUX 2
STANDBY/FM
SOURCE
LED
ON/OFF
VOL+VOL-
TUNE- TUNE+
5
/2&$7,21 2) &21752/6
LED
ON/OFF
FM AUX 1 AUX 2
TUNE-
RESET
TUNE+
VOL - VOL +
2
1
4
7
11
6
8
12
5
3
9
10
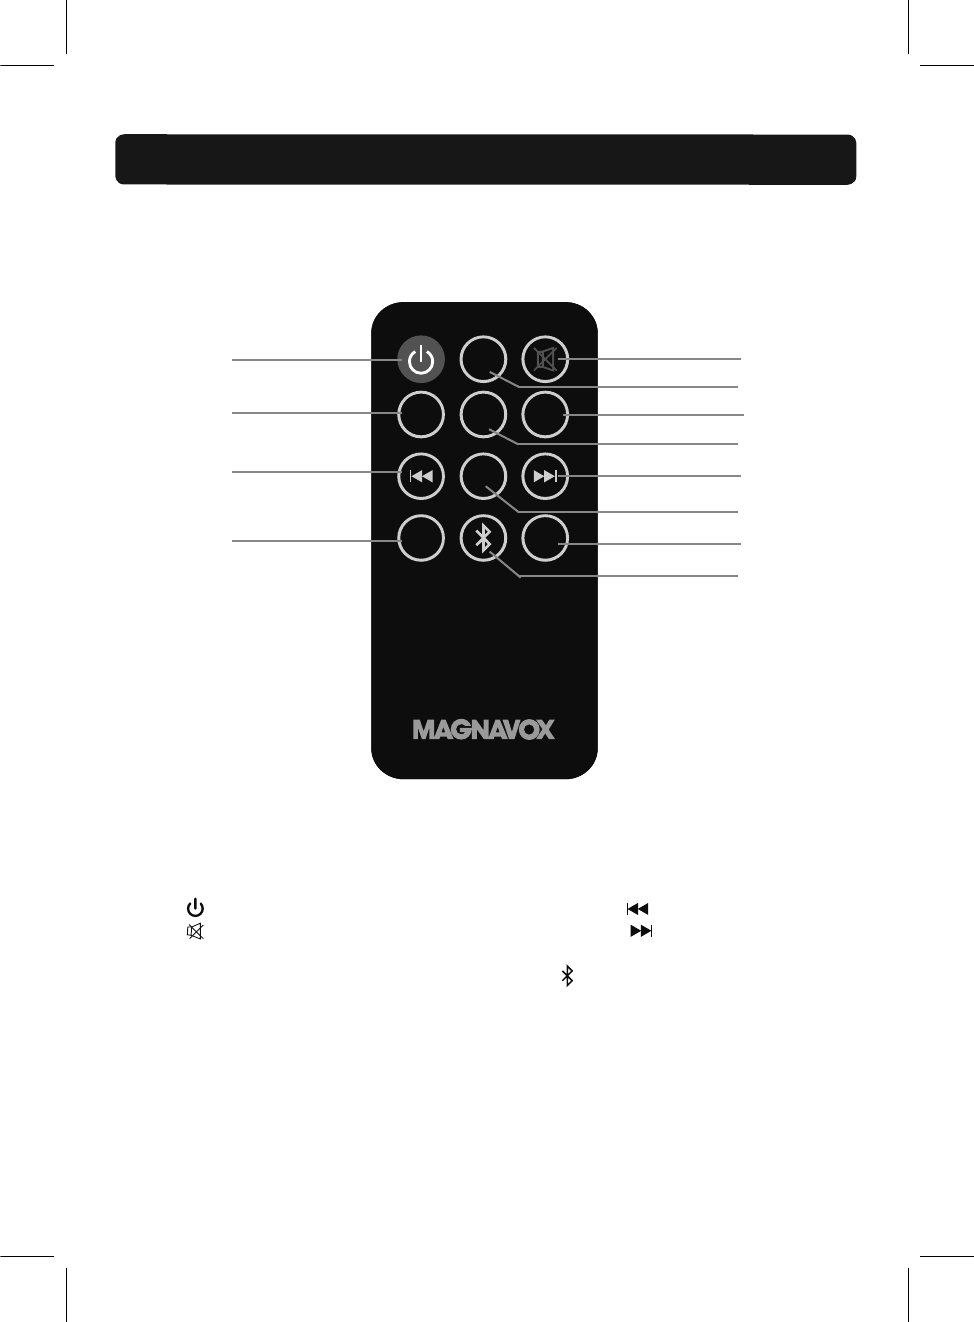
1. (Standby) Button
2. ლ (Mute) Button
3. LED ON/OFF Button
4. FM Button
5. AUX 1 Button
6. AUX 2 Button
7. TUNE - / (Skip Backward) Button
8. TUNE + / (Skip Forward) Button
9. RESET Button
10.
6
11. VOL - (Volume Down) Button
12. VOL + (Volume Up) Button
/2&$7,21 2) &21752/6 5HPRWH &RQWURO
(Bluetooth) Indicator
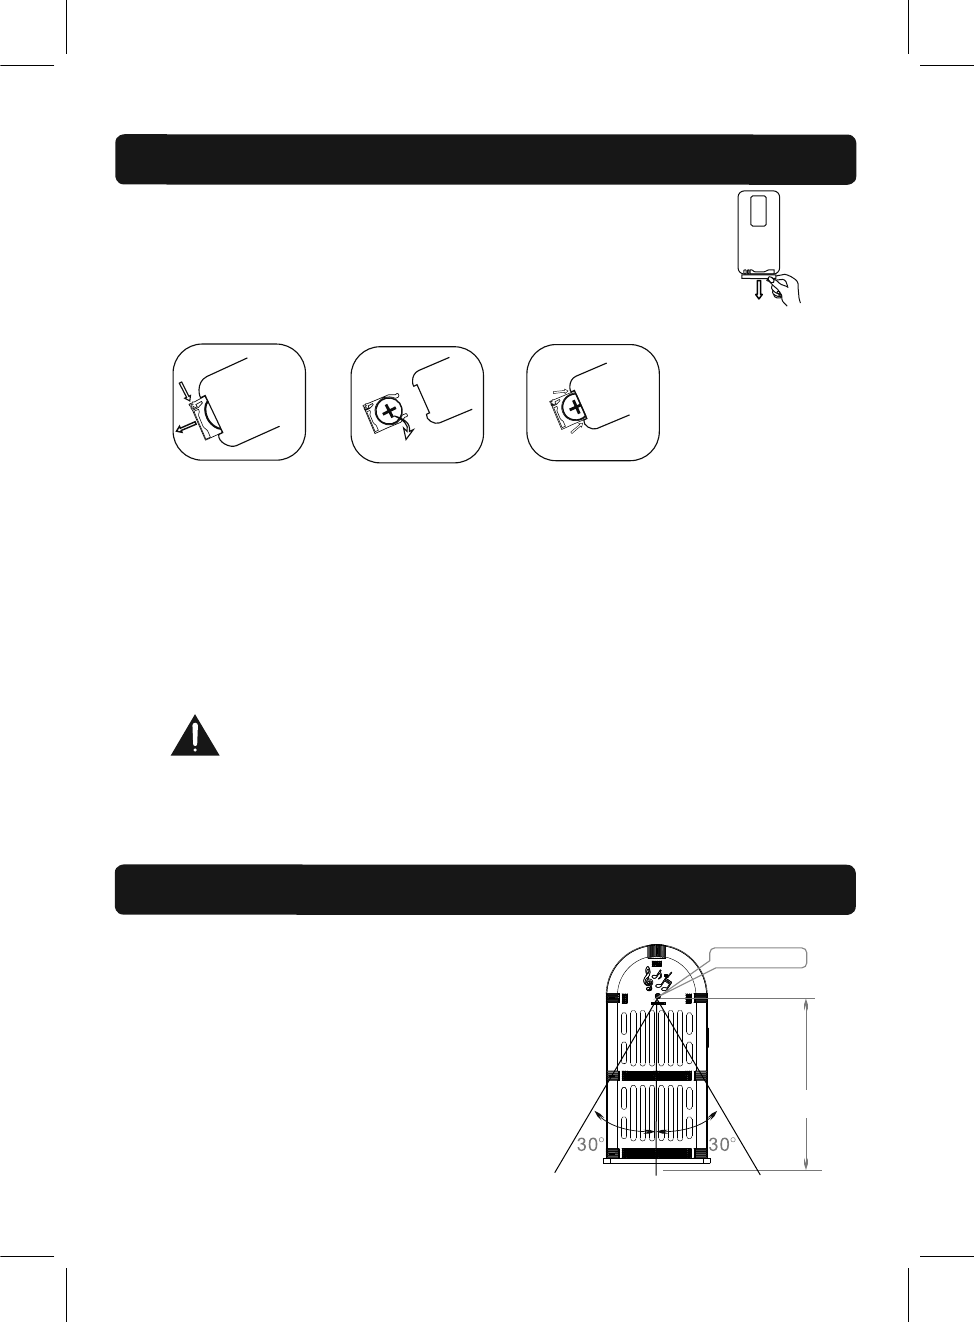
During first time use, slide the insulation film out from the battery tray and
discard it as illustrated to the right:
When the battery is consumed, replace the battery as shown below:
1. Push the tap on the battery tray and slide it out as the illustrated below:
2. Install a new CR 2025 button cell to the battery tray as the polarity makings
on the rear of remote cabinet.
3. Close the battery tray.
BATTERY PRECAUTIONS:
Follow these precautions when using the battery in this device:
Remarks:
Ɣ:KHQWKHUHLVDQREVWDFOHEHWZHHQWKHXQLWDQG
the transmitter, the transmitter may not operate.
Ɣ:KHQGLUHFWVXQOLJKWDQLQFDQGHVFHQWODPS
fluorescent lamp or any other strong light shines
on the REMOTE SENSOR of the unit, the remote
operation may be unstable.
Fig.1 Fig.2 Fig.3
7
Remote Sensor
7KLV SURGXFW FRQWDLQV D FRLQEXWWRQ FHOO EDWWHU\ ,I WKH FRLQEXWWRQ FHOO EDWWHU\ LV
VZDOORZHG LW FDQ FDXVH VHYHUH LQWHUQDO EXUQ LQ MXVW KRXUV DQG FDQ OHDG WR
GHDWK
.HHS QHZ DQG XVHG EDWWHULHV DZD\ IURP FKLOGUHQ ,I WKH EDWWHU\ FRPSDUWPHQW GRHV QRW
FORVH VHFXUHO\ VWRS XVLQJ WKH SURGXFW DQG NHHS LW DZD\ IURP FKLOGUHQ
,I \RX WKLQN EDWWHULHV PLJKW KDYH EHHQ VZDOORZHG RU SODFHG LQVLGH DQ\ SDUW RI WKH ERG\
VHHN LPPHGLDWH PHGLFDO DWWHQWLRQ
8.
Approx.12 feet
°°
%$77(5< ,167$//$7,21 5HPRWH &RQWURO
1. Use only the size and type of battery specified.
2. Be sure to follow the correct polarity when installing the battery as indicated in the battery
compartment. A reversed battery may cause damage to the device.
the batteries to prevent damage or injury from possible battery leakage.
5. Do not try to recharge the battery not intended to be recharged; it can overheat and rupture.
(Follow battery manufacturer’s instructions.)
6. Do not dispose of battery in fire. Battery may explodes or leak.
7. Clean the battery contacts and also those of the device prior to battery installation.
3. Do not mix different types of batteries together (e.g. Alkaline and Carbon-zinc) or old batteries
with fresh ones.
4. If the batteries in the device are consumed or the device is not to be used for a long period of
time, remove
())(&7,9( ',67$1&( 2) 5(027( 75$160,77(5

8
*(1(5$/ 23(5$7,21
&RQQHFW WKH VXSSOLHG $&'& $GDSWRU WR WKH XQLW DQG ZDOO RXWOHW DV SUHYLRXVO\ LQVWUXFWHG
6OLGH WKH 3RZHU 212)) 6ZLWFK RQ WKH UHDU RI XQLW WR WXUQ WKH XQLW WR VWDQGE\ PRGH
3UHVV WKH 6WDQGE\ %XWWRQ RQ WKH XQLW DSSUR[LPDWHO\ VHFRQGV WKHQ UHOHDVH WKH EXWWRQ RU
SUHVV WKH 6WDQGE\ %XWWRQ RQ WKH 5HPRWH &RQWURO WR WXUQ WKH XQLW 21 IURP VWDQGE\ PRGH
7KH LQGLFDWRU ZLOO LOOXPLQDWH
3UHVV WKH 6285&( /(' 212)) %XWWRQ RQ WKH UHSHDWHGO\ WR VZLWFK WR GHVLUHG SOD\EDFN PRGH 2U
SUHVV WKH IXQFWLRQ VHOHFWLRQ EXWWRQV RQ WKH 5HPRWH &RQWURO WR VZLWFK WR GHVLUH PRGH GLUHFWO\
7KH FRUUHVSRQG LQGLFDWRU ZLOO LOOXPLQDWH DQG EOLQN ZLWK \RXU VHOHFWLRQ VHH OLVW EHORZ
3OD\EDFN 0RGH ,QGLFDWRUV
%7 %OXHWRRWK ,QGLFDWRU ZLOO LOOXPLQDWH DQG EOLQN
)0 5DGLR 67$1'%<)0 ,QGLFDWRU ZLOO LOOXPLQDWH DQG EOLQN
$8; $8; ,QGLFDWRU ZLOO LOOXPLQDWH
$8; $8; ,QGLFDWRU ZLOO LOOXPLQDWH
'XULQJ SOD\EDFN
3UHVV WKH 92/ 9ROXPH %XWWRQV RQ WKH XQLW RU 5HPRWH &RQWU O WR DGMXVW YROXPH OHYHO DV GHVLUHG
3UHVV WKH 087( %XWWRQ RQ WKH 5HPRWH &RQWURO WR WXUQ RII WKH VRXQG WHPSRUDU SUHVV DJDLQ
WR WXUQ LW EDFN
3UHVV DQG KROG WKH 6285&( ± /(' 212)) %XWWRQ RQ WKH XQLW RU SUHVV WKH /(' 212)) %XWWRQ
RQ WKH 5HPRWH FRQWURO WR WXUQ 212)) WKH 'HFRUDWLYH /(' /LJKWV
:KHQ ILQLVKHG SUHVV DQG KROG WKH 6WDQGE\ %XWWRQ RQ WKH XQLW DSSUR[LPDWHO\ VHFRQG RU
SUHVV WKH 6WDQGE\ %XWWRQ RQ WKH 5HPRWH &RQWURO WR WXUQ WKH XQLW WR VWDQGE\ PRGH
7KH 67$1'%<)0 ZLOO LOOXPLQDWH DQG VWRS EOLQNLQJ
XUQ RII WKH XQLW E\ VOLGLQJ WKH 32:(5 212))
6ZLWFK RQ WKH UHDU RI XQLW WR 2)) SRVLWLRQ $OO WKH LQGLFDWRUV ZLOO WXUQ RII
R VDYLQJ HQHUJ\ XQSOXJ WKH $&'& $GDSWRU IURP ZDOO RXWOHW
ლ
RQ
LQJ
FRUUHVSRQGLQJ
R
LO\
RQ
RQ
If the unit will not be used over a long period of time, W
7
23(5$7,21

9
%7 %OXHWRRWK
%7 %OXHWRRWK SDLULQJ
)LUVW WLPH XVH RU UHSDLULQJ WKH XQLW WR D QHZ %7 'HYLFH SDLU DV IROORZV
3RZHU RQ WKH XQLW DV SUHYLRXVO\ LQVWUXFWHG
3UHVV WKH 6285&( ± /(' 212)) %XWWRQ RQ WKH XQLW UHSHDWHGO\ XQWLO WKH %OXHWRRWK ,QGLFDWRU
2U SUHVV WKH %OXHWRRWK %XWWRQ RQ WKH 5HPRWH &RQWURO WR HQWHU %7 PRGH GLUHFWO\ WKH
%OXHWRRWK ,QGLFDWRU LOOXPLQDWH DQG EOLQN
3RZHU RQ WKH H[WHUQDO %7 'HYLFH DQG HQWHU WR %7 VHDUFKLQJ PRGH 6WDUW SDLULQJ IROORZLQJ WKH RQ
VFUHHQ LQVWUXFWLRQV IURP WKH H[WHUQDO %7 'HYLFH $IWHU SDLUHG WKH %OXHWRRWK ,QGLFDWRU ZLOO VWRS
EOLQNLQJ
,I SDLULQJ LV FRPSOHWH \RX PD\ QRZ SOD\ PXVLF ZLWK \RXU H[WHUQDO %7 'HYLFH
'XULQJ SOD\EDFN
3UHVV WKH %XWWRQ RQ WKH XQLW WR SDXVH SUHVV DJDLQ WR UHVXPH QRUPDO SOD\EDFN
3UHVV WKH 087( %XWWRQ RQ WKH 5HPRWH &RQWURO WR WXUQ RII WKH VRXQG WHPSRUDU \ SUHVV
DJDLQ WR WXUQ LW EDFN
3UHVV WKH 781( RU 781( %XWWRQV RQ WKH XQLW RU 5HPRWH &RQWURO UHSHDWHGO\ WR
VNLS WUDFNV
1RWHV
:KHQ WKH H[WHUQDO %7 'HYLFH VHDUFKH WKH XQLW RXU PRGHO QXPEHU ³0+7%7´ ZLOO DSSHDU
RQ WKH GLVSOD\ RI H[WHUQDO %7 'HYLFH
,I ZKLOH SDLULQJ \RX DUH DVNHG IRU D FRGH SOHDVH WU\ RU
1RUPDO RSHUDWLRQ DIWHU SDLULQJ
7XUQ RQ WKH %7 IXQFWLRQ RI WKH H[WHUQDO %7 'HYLFH
3RZHU RQ WKH XQLW DQG HQWHU WR %7 PRGH DV SUHYLRXVO\ LQVWUXFWHG %OXHWRRWK ,QGLFDWRU ZLOO
LOOXPLQDWH DQG EOLQN
:DLW D IHZ VHFRQGV XQWLO WKH XQLW LV DXWRPDWLFDOO\ SDLUHG WR WKH H[WHUQDO %7 'HYLFH ³ ,QGLFDWRU ZLOO
VWRS EOLQNLQJ
$IWHU SDLULQJ LV FRPSOHWH \RX PD\ QRZ SOD\ PXVLF ZLWK \RXU H[WHUQDO %7 'HYLFH
ლ
6WDQGE\
ZLOO
LO
IRU
V
is illuminated and blinking.

)0 5DGLR
3RZHU RQ WKH XQLW DV SUHYLRXVO\ LQVWUXFWHG
3UHVV WKH 6285&( ± /(' 212)) %XWWRQ RQ WKH XQLW UHSHDWHGO\ XQWLO WKH 67$1'%<)0 ,QGLFDWRU LV
2U SUHVV WKH )0 %XWWRQ RQ WKH 5HPRWH &RQWURO WR HQWHU )0 5DGLR PRGH GLUHFWO\WKH67$1'%<)0
,QGLFDWRU ZLOO LOOXPLQDWH DQG EOLQN
3UHVV DQG KROG WKH %XWWRQV RQ WKH XQLW RU 5HPRWH &RQWURO WR DXWR
VHDUFK DQG SOD\V WKH SUHYLRXVQH[W DYDLODEOH UDGLR VWDWLRQV
5HSHDW WKH VDPH SURFHGXUH XQWLO WKH GHVLUHG VWDWLRQ V
,I \RX ZDQW HDUFK WKH VWDWLRQV IURP EHJLQQLQJ SUHVV WKH 5(6(7 %XWWRQ RQ WKH 5HPRWH
$QWHQQDV
7KLV XQLW KDV D )0 ZLUH DQWHQQD ZKLFK SURYLGHV DGHTXDWH UHFHSWLRQ LQ PRVW DUHDV ,I UHFHSWLRQ LV ZHDN
XQZRXQG DQG H[WHQGHG WR LWV IXOO OHQJWK RU UHDVVHPEOH WKH RWKHU GLUHFWLRQORFDWLRQ WR LPSURYH UHFHSWLRQ
781( RU 781(
LRXQG
I
WR UHV
Control then search through the radio stations again as instructed on Number 3.
illuminated and blink.
10
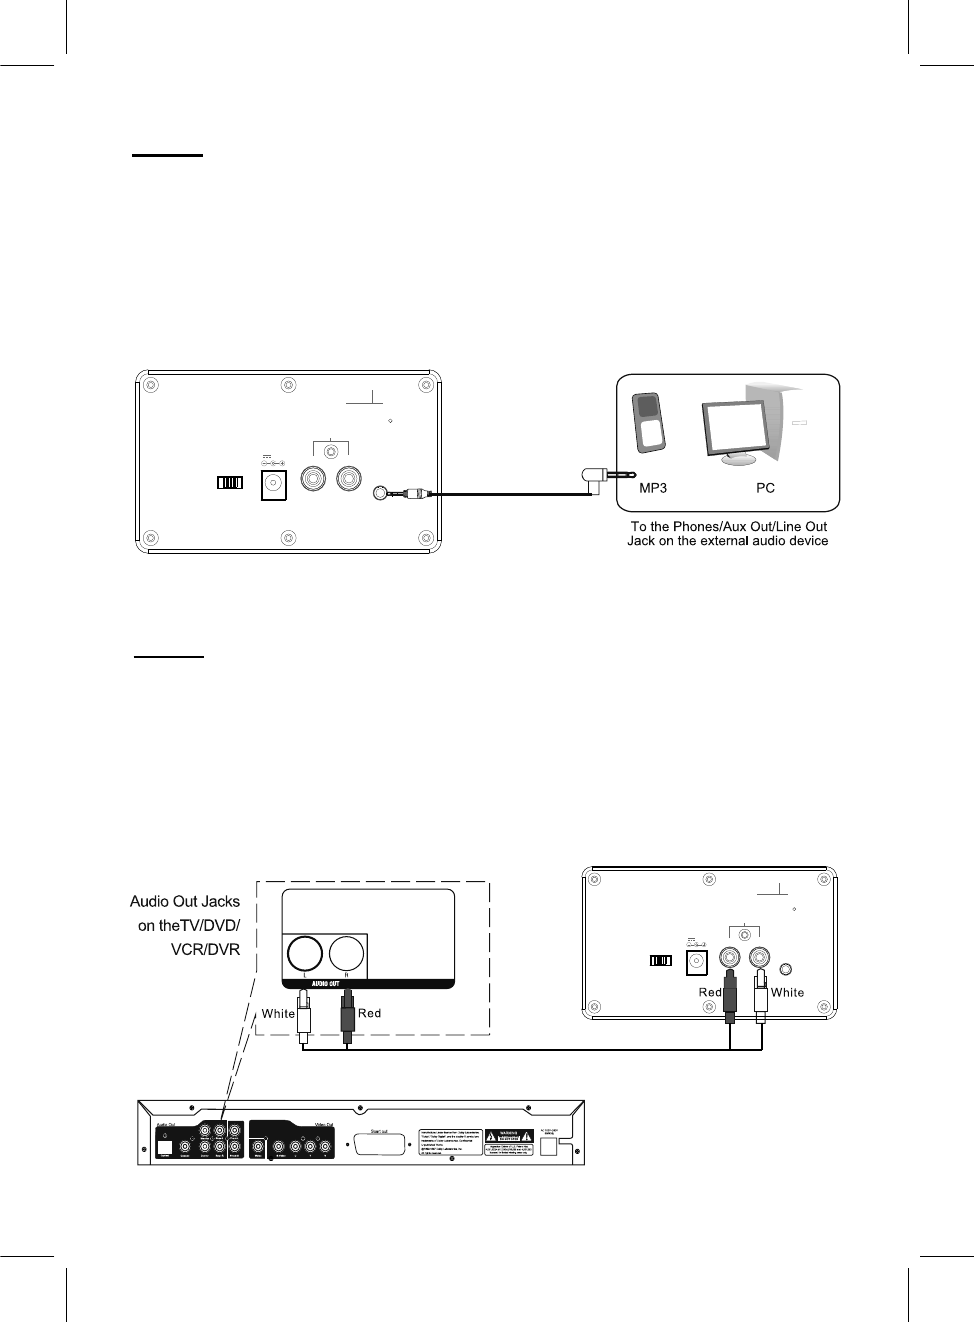
1. Insert one of the plugs from supplied Audio connection cable (with 3.5mm stereo mini plugs) to
the Phones Jack; Line Out Jack or AUX Out Jack on external audio device such as iPhones;
iPad; iPod; MP3 Player; Discman … etc as shown below.
2. Power on the unit as previously instructed.
4. Play the music on the connected external Audio device as usual. (Make sure the volume level
of the external device is in high level. Otherwise, sound from this unit is weak).
1. Insert one end of RCA connection cable to the Audio Out Jacks (RCA Type) on external
Video/Audio device such like TV; DVD Player; VCR … etc as shown below.
2. Power on the unit as previously instructed.
4. Play the music on the connected external Audio device as usual. (Make sure the volume level
of the external device is in high level. Otherwise, sound from this unit is weak).
POWER
ON OFF
AU X IN 1
AU X IN 2
RL
DC I N
DC 12V,2 A
ANT
Rear Panel
POWER
ON OFF
AUX IN 1
AUX IN 2
RL
DC I N
DC 12V,2A
ANT
( Connection Cable Not Included )
Rear Panel
DVD
( Audio Connection
Cable Included )
11
$8;
$8;
3. Press the SOURCE – LED ON/OFF Button on the unit repeatedly until the AUX 1 Indicator is
illuminated and blinking. Or, press the AUX 1 Button on the Remote Control to enter AUX 1 mode
directly, the AUX 1 Indicator will illuminate.
3. Press the SOURCE – LED ON/OFF Button on the unit repeatedly until the AUX 2 Indicator is
illuminated and blinking. Or, press the AUX 2 Button on the Remote Control to enter AUX 2 mode
directly, the AUX 2 Indicator will illuminate.
Check the follows before requesting service:
SYMPTOM POSSIBLE CAUSE
No power AC/DC Adaptor had not
wall outlet
POWER Switch is in OFF
position on the rear of unit to ON
position
The unit in standby mode Press and hold the
(Standby) Button on the unit
2 seconds then
release the button or Press
the (Standby) Button on
the Remote Control to turn
on the unit from standby
mode
No Sound Volume in minimum position Rise volume level by press
the
The connected device is
not in playback mode
Plays the music/movie in the
connected device as usual
Sound output of the
weak
Rise the volume level of the
device
Input source incorrect
Sound distortion Volume level too high
press the
Volume level of the connecte
device too high the connected device
BT not functioning
The external BT device too
far from the unit
Place the external BT
device close to the unit
Remote not
functioning
The button cell in the remote
control consumed
Replace it by new button cell
Set the input source as t
Reduce the volume level by
POSSIBLE SOULTION
VOL (Volume) + Button
VOL (Volume) - B
utton
Reduce the volume and/or bass
level of
12
connect to and unit
Connect the AC/DC Adaptor to
the wall outlet and unit
Slide the POWER ON/OFF Switch
approximately
/paird
/paird
connected /paird
device
connected /paird
source
paird /paird
The external BT device had
not pair to the unit
Pair the external BT device to the
unit as page 9
7528%/(6+227,1* *8,'(
he desired
d/

Power Source: ………………………………DC 12V, 2A, Centre Positive
Power Source of Remote Control: ….DC 3V, 1 x CR 2025 Button Cell (Included)
Power Consumption: ………………………………………………………….. Max. 24 W
Radio FM Band Coverage: …………………………………………….…. 87.5-108MHz
BT Effective Range: ...................................…………......... Up to 32 Feet in open area
Remote Control Effective Range: ……………………………Up to 12 Feet in open area
Audio Power: ……………………………………………………………..20W RMS (4 x 5W)
Impedance of Speakers: ……………………………………………….. 3 Ohm;10W x 4
1 x Owner’s Manual
1 x Remote Control (Use 1 x CR 2025 button cell, already installed)
1 x Audio Connection Cable with 3.5mm Stereo Mini Plugs
1 x AC/DC Adaptor (Input: AC 100-240V~, 50/60Hz, 0.6A;
Output: DC 12V, 2000mA , Centre Positiveͨ
13
*(1(5$/ 63(&,),&$7,216
$&&(6625,(6

LIMITED WARRANTY