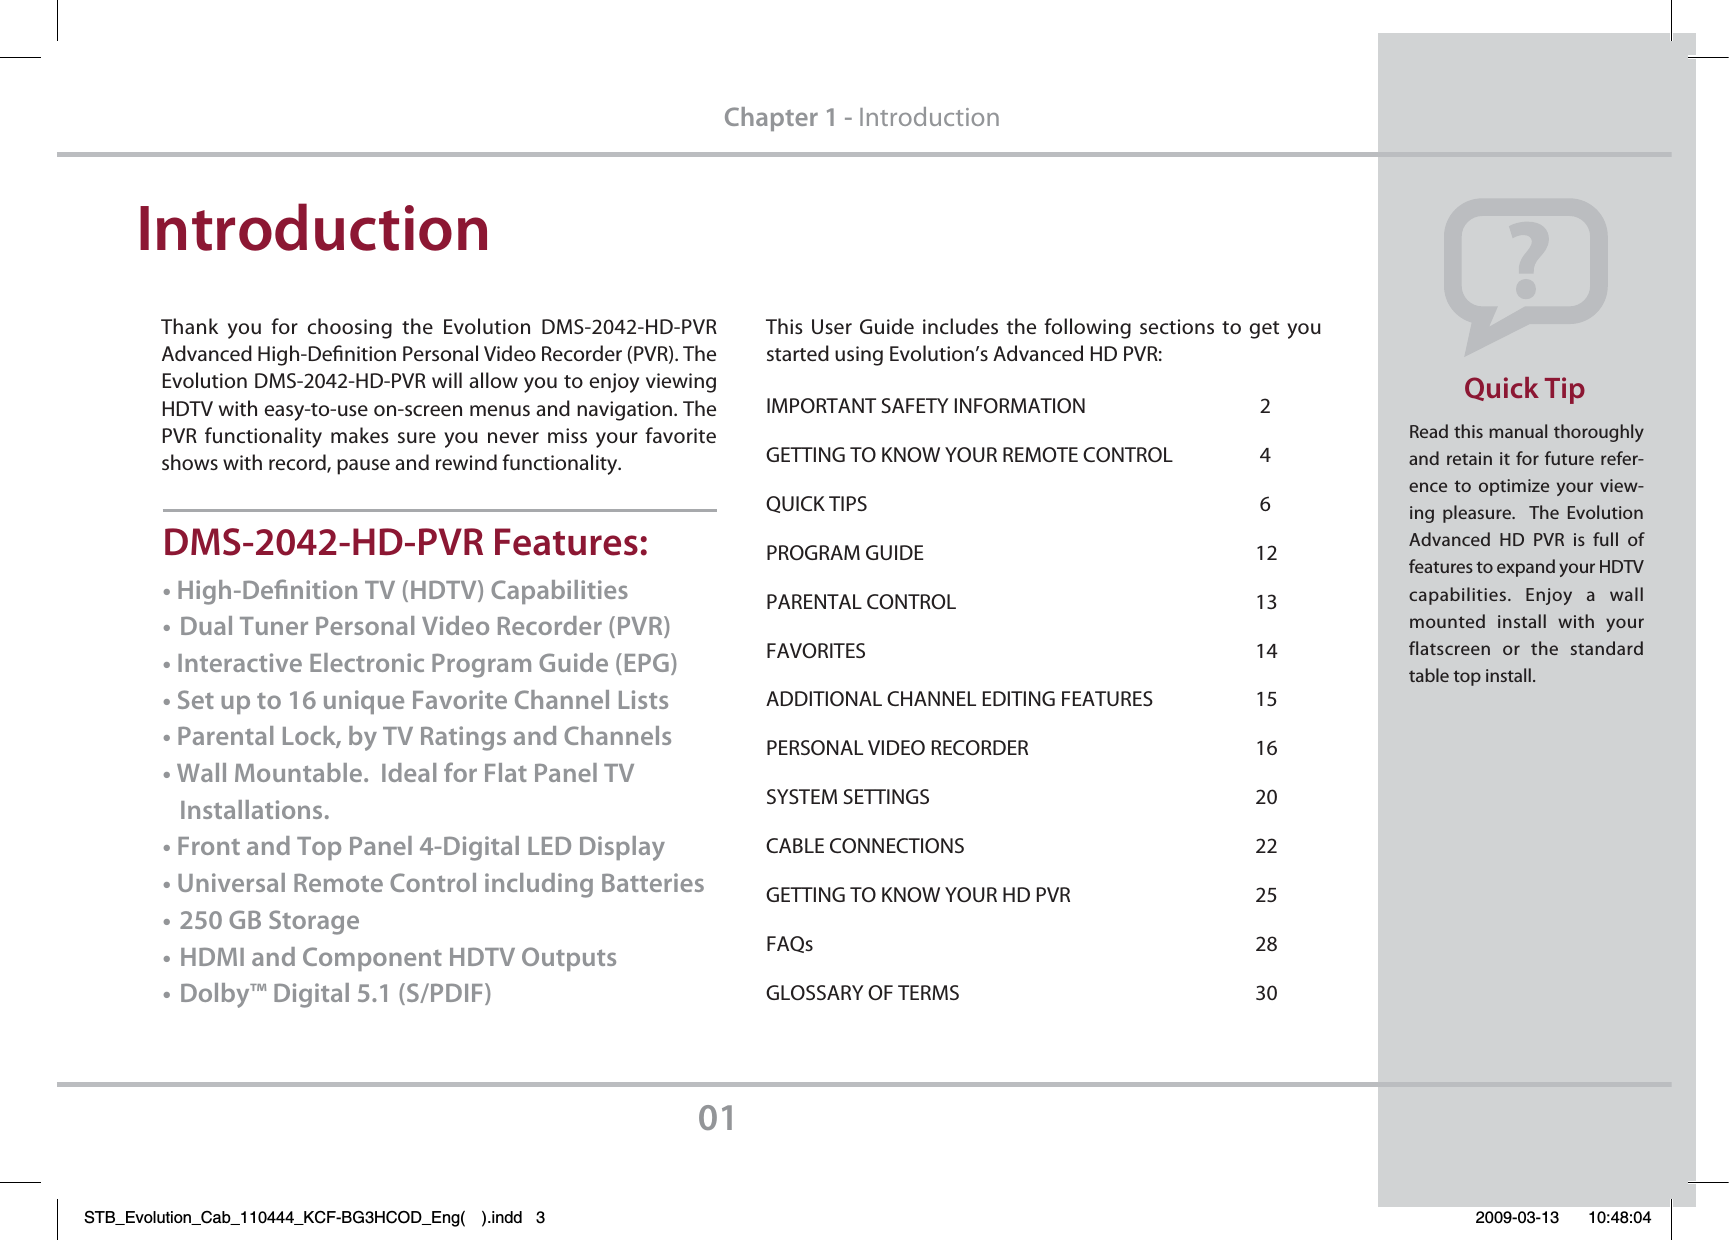
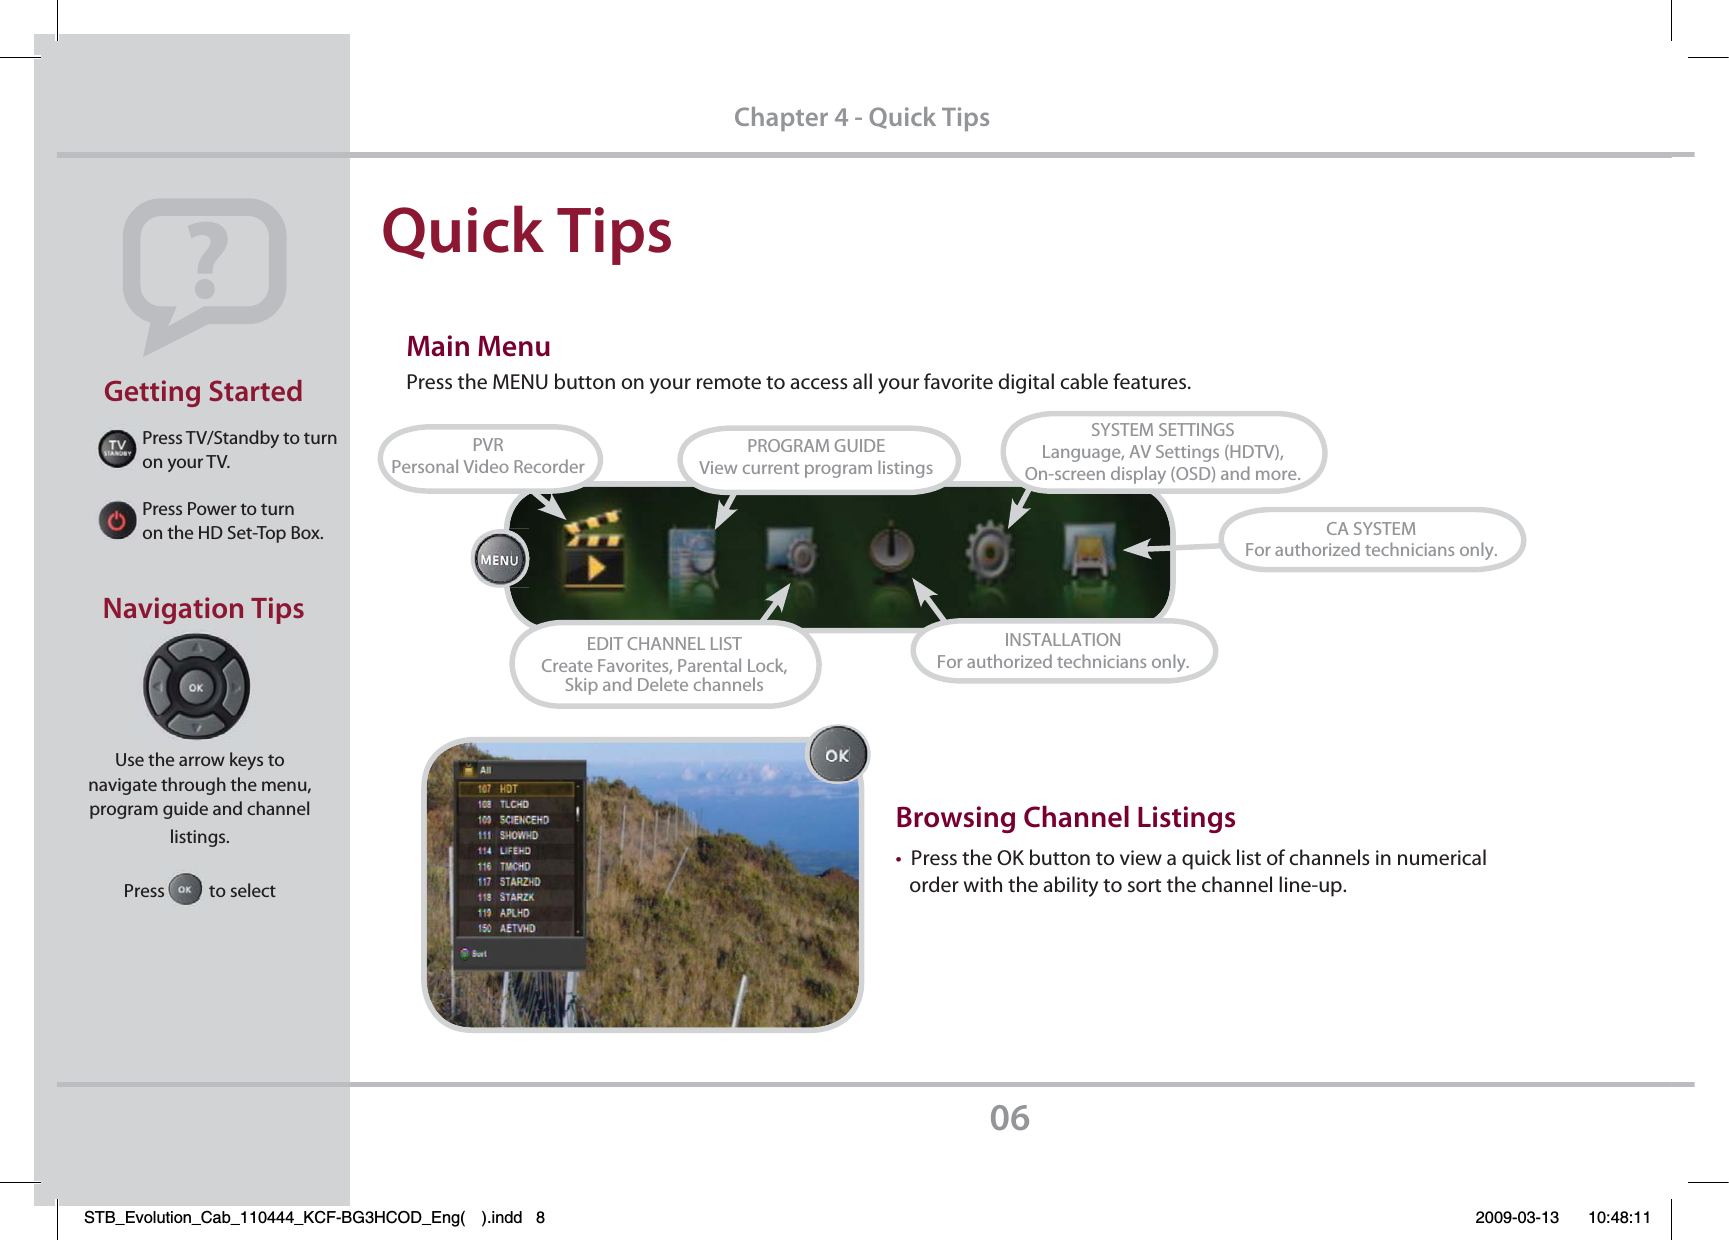
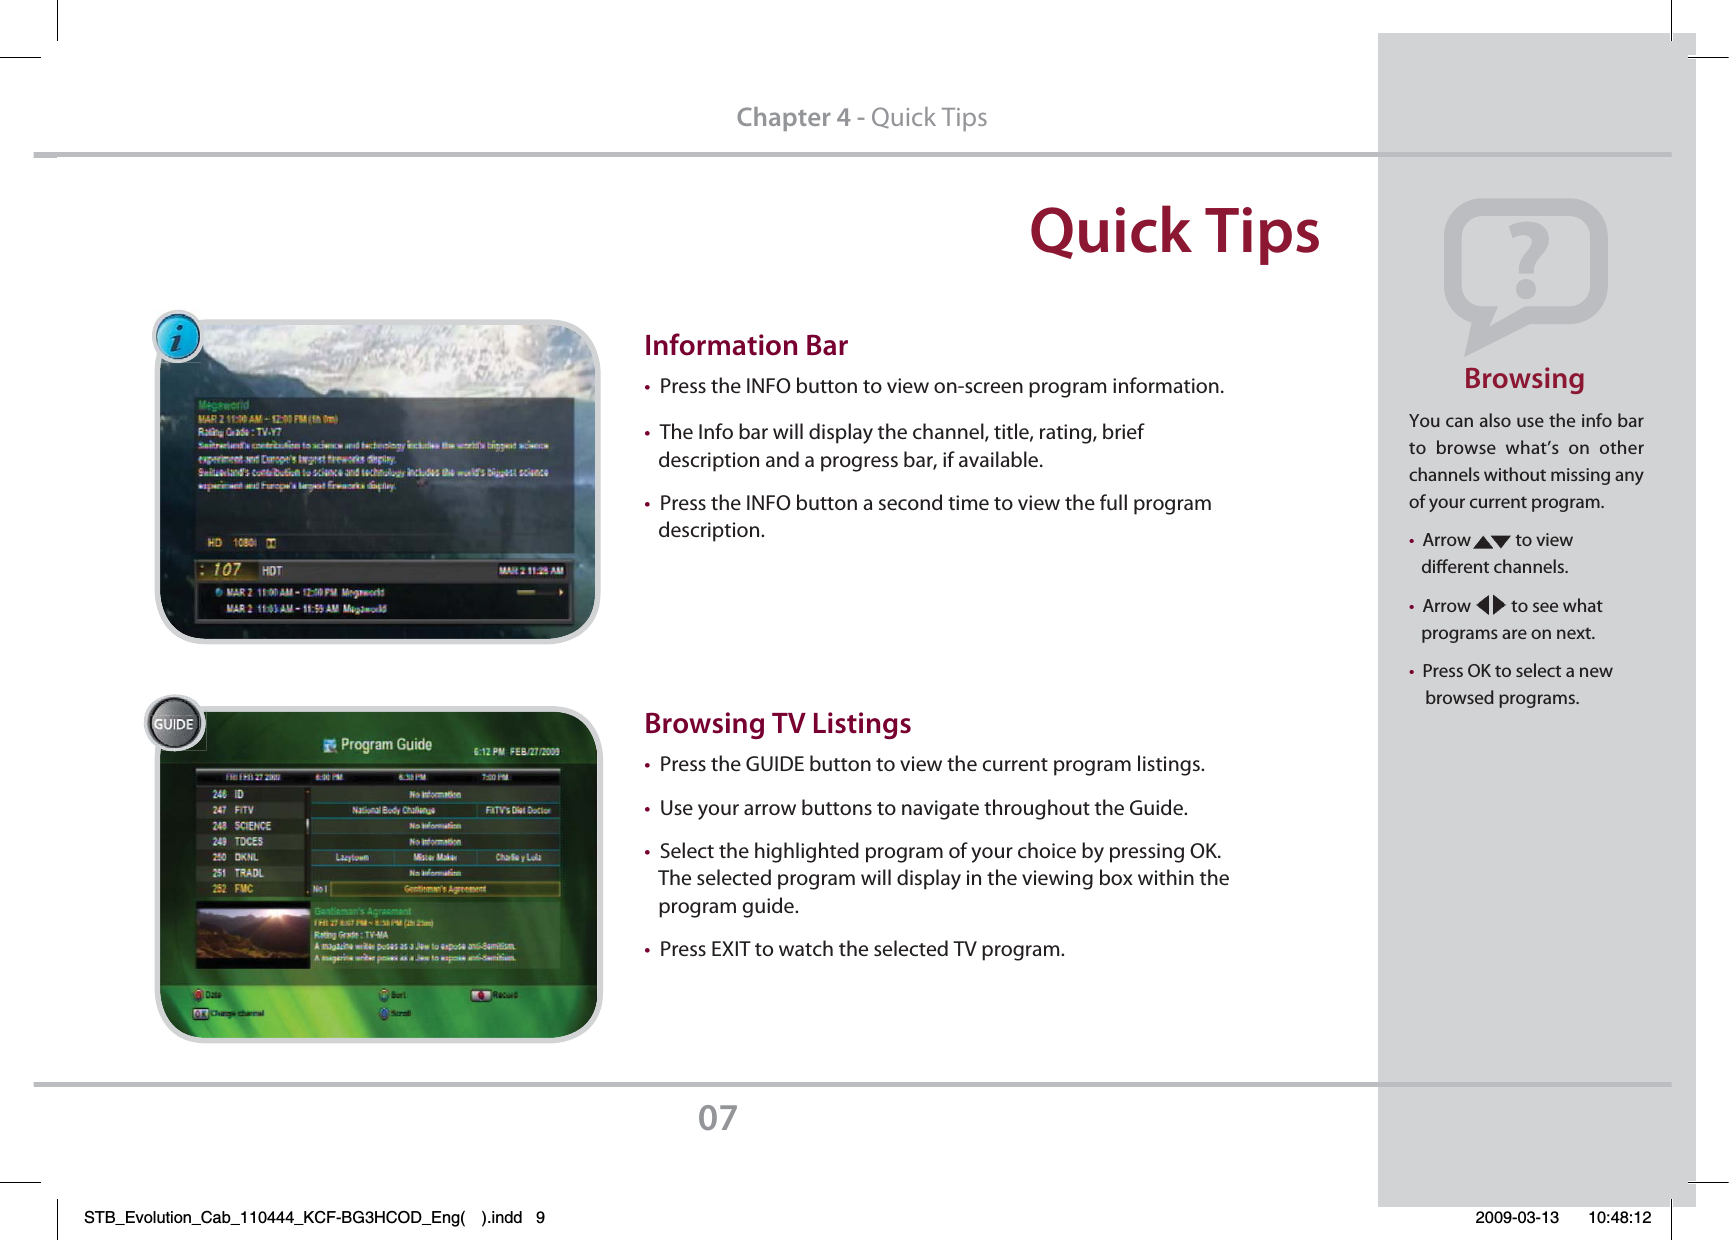
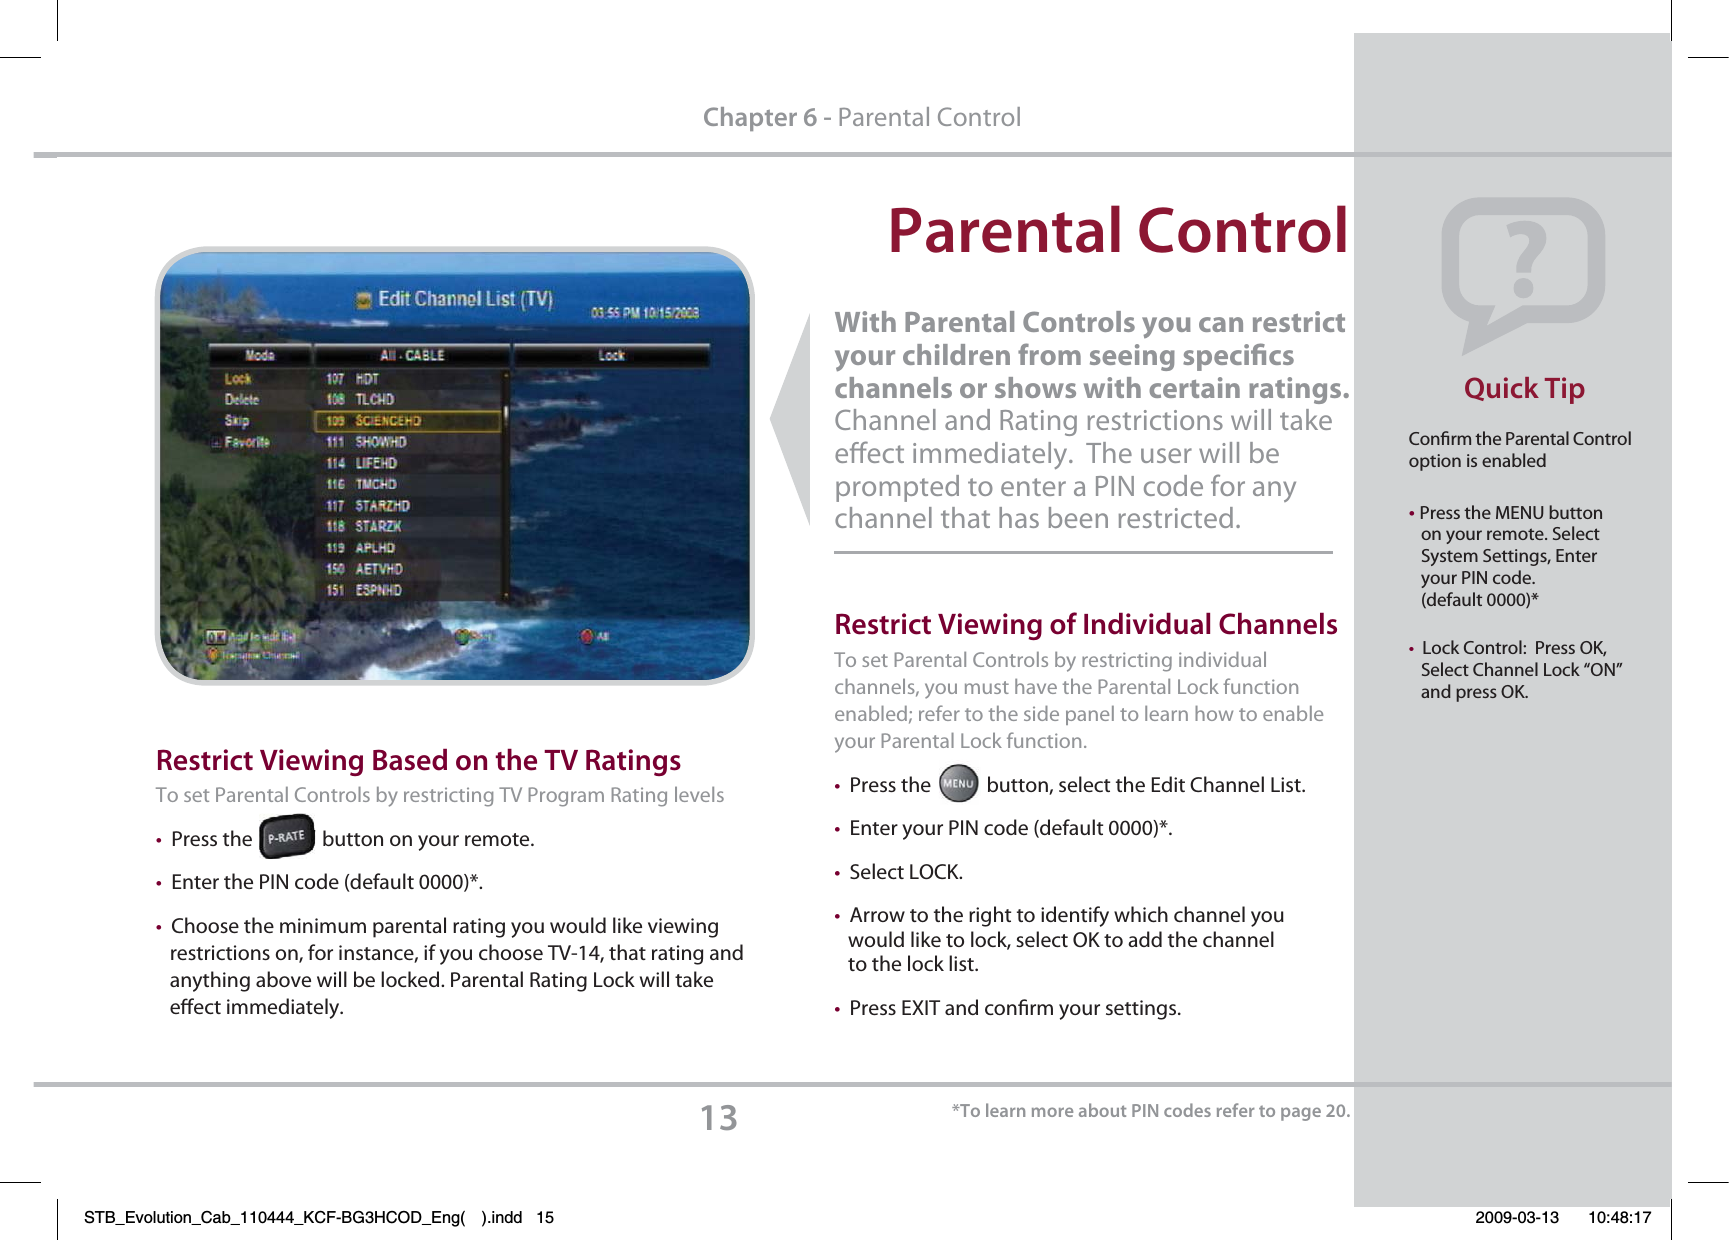
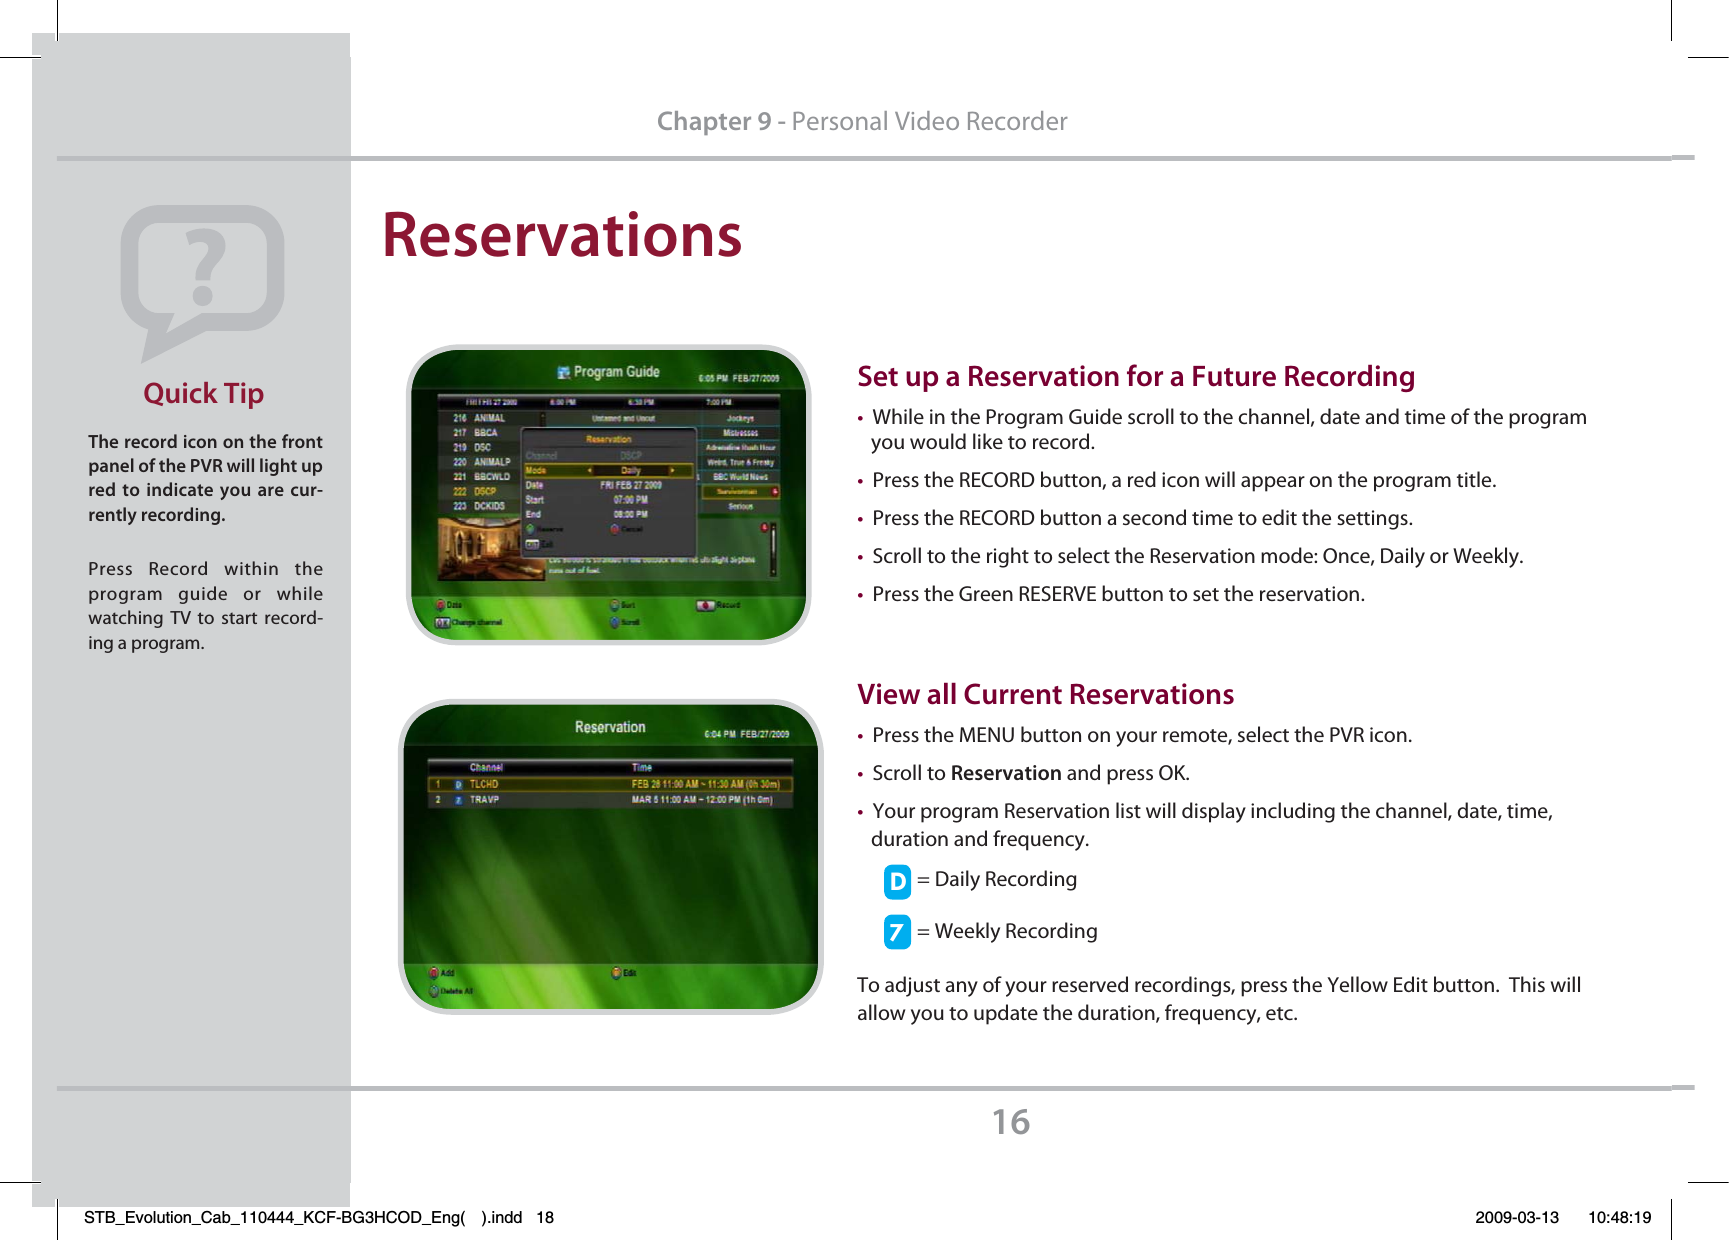
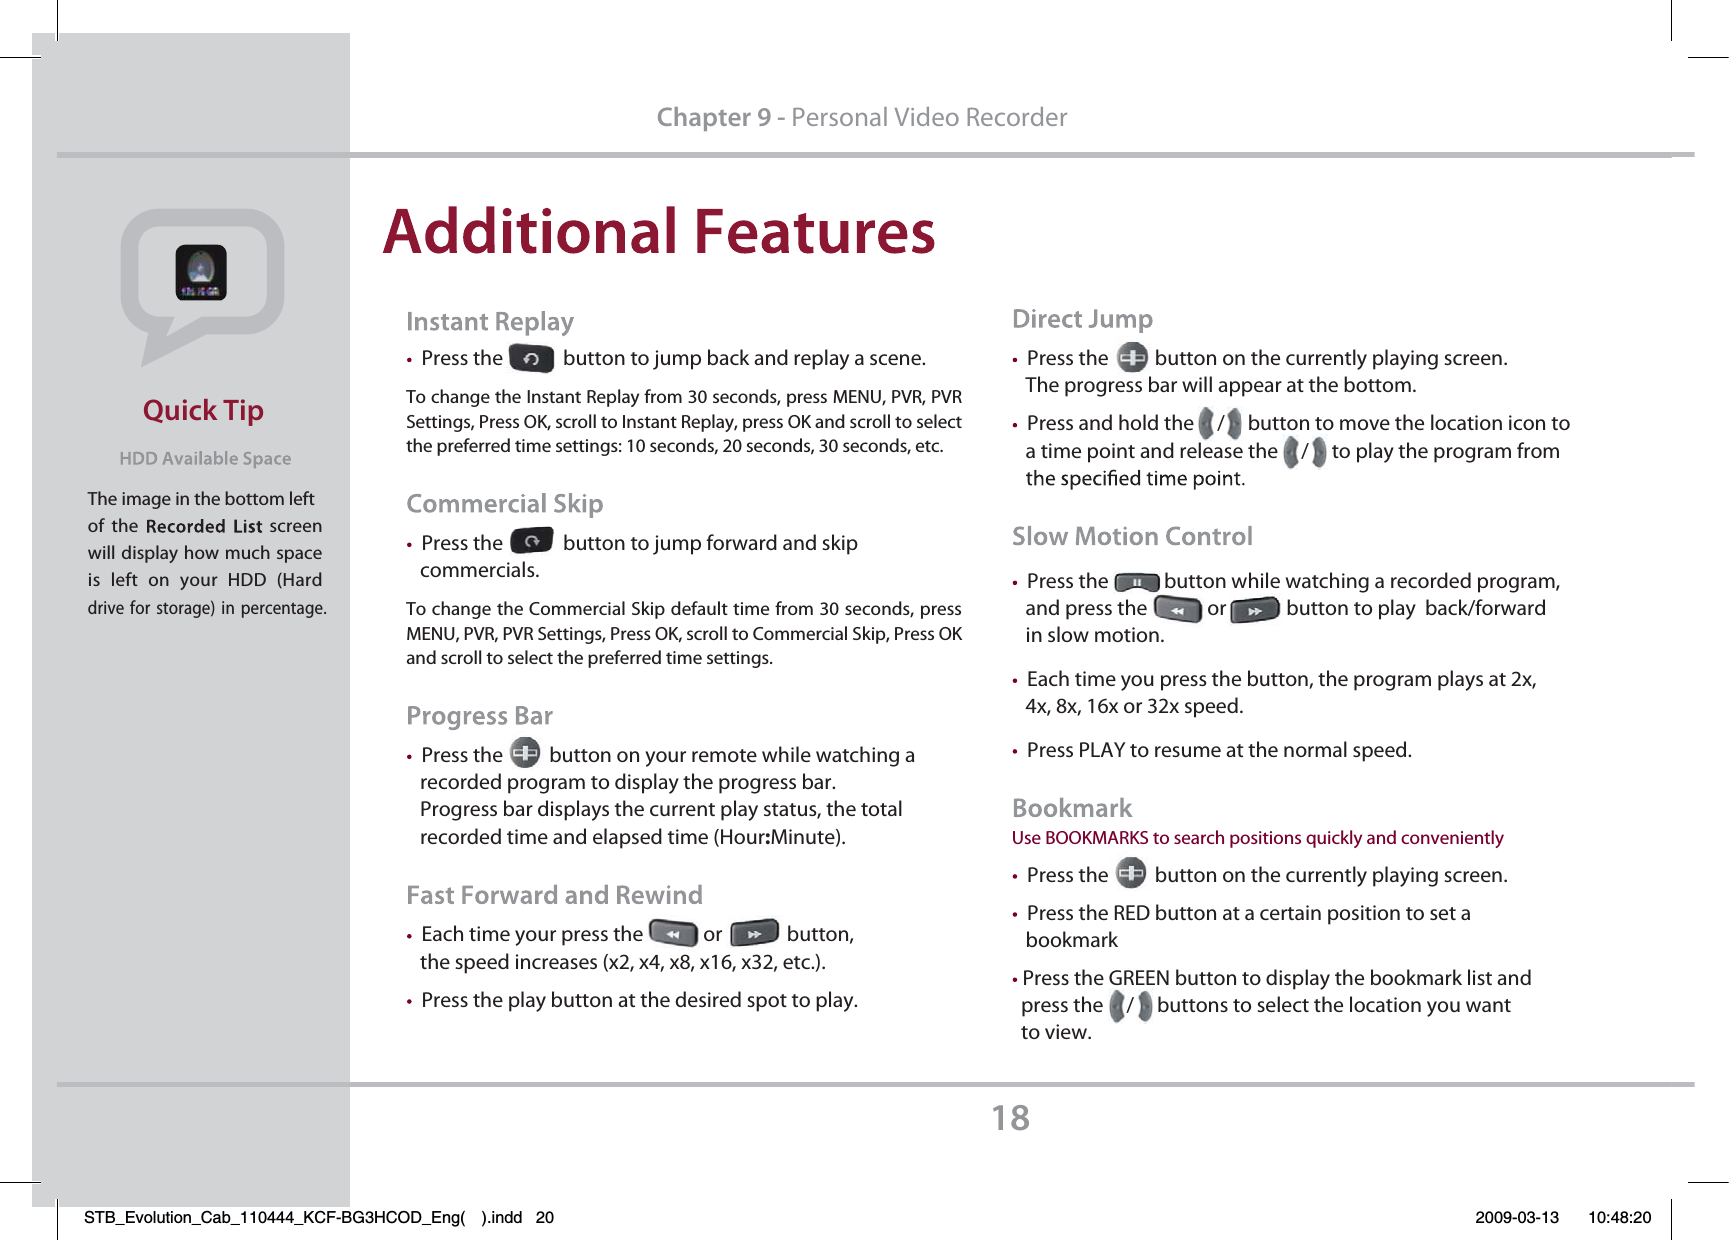
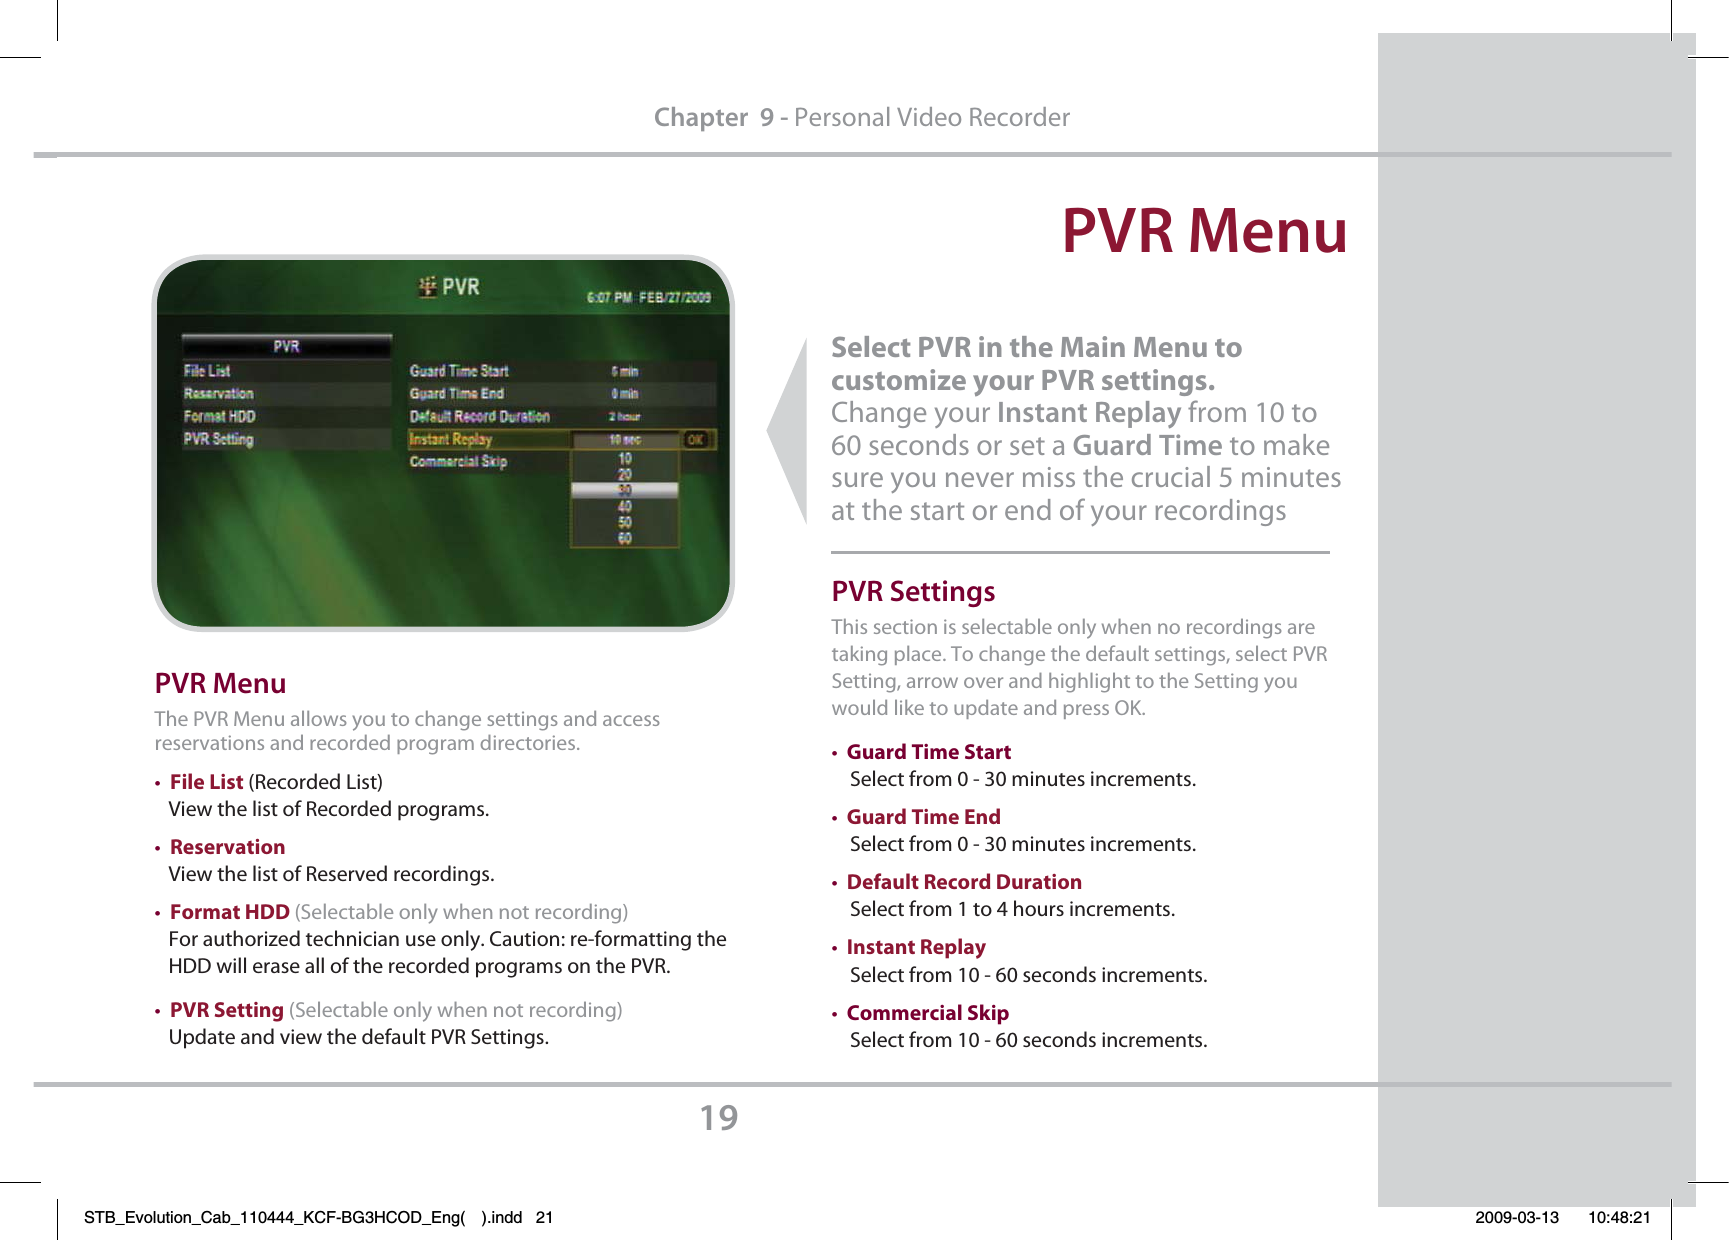
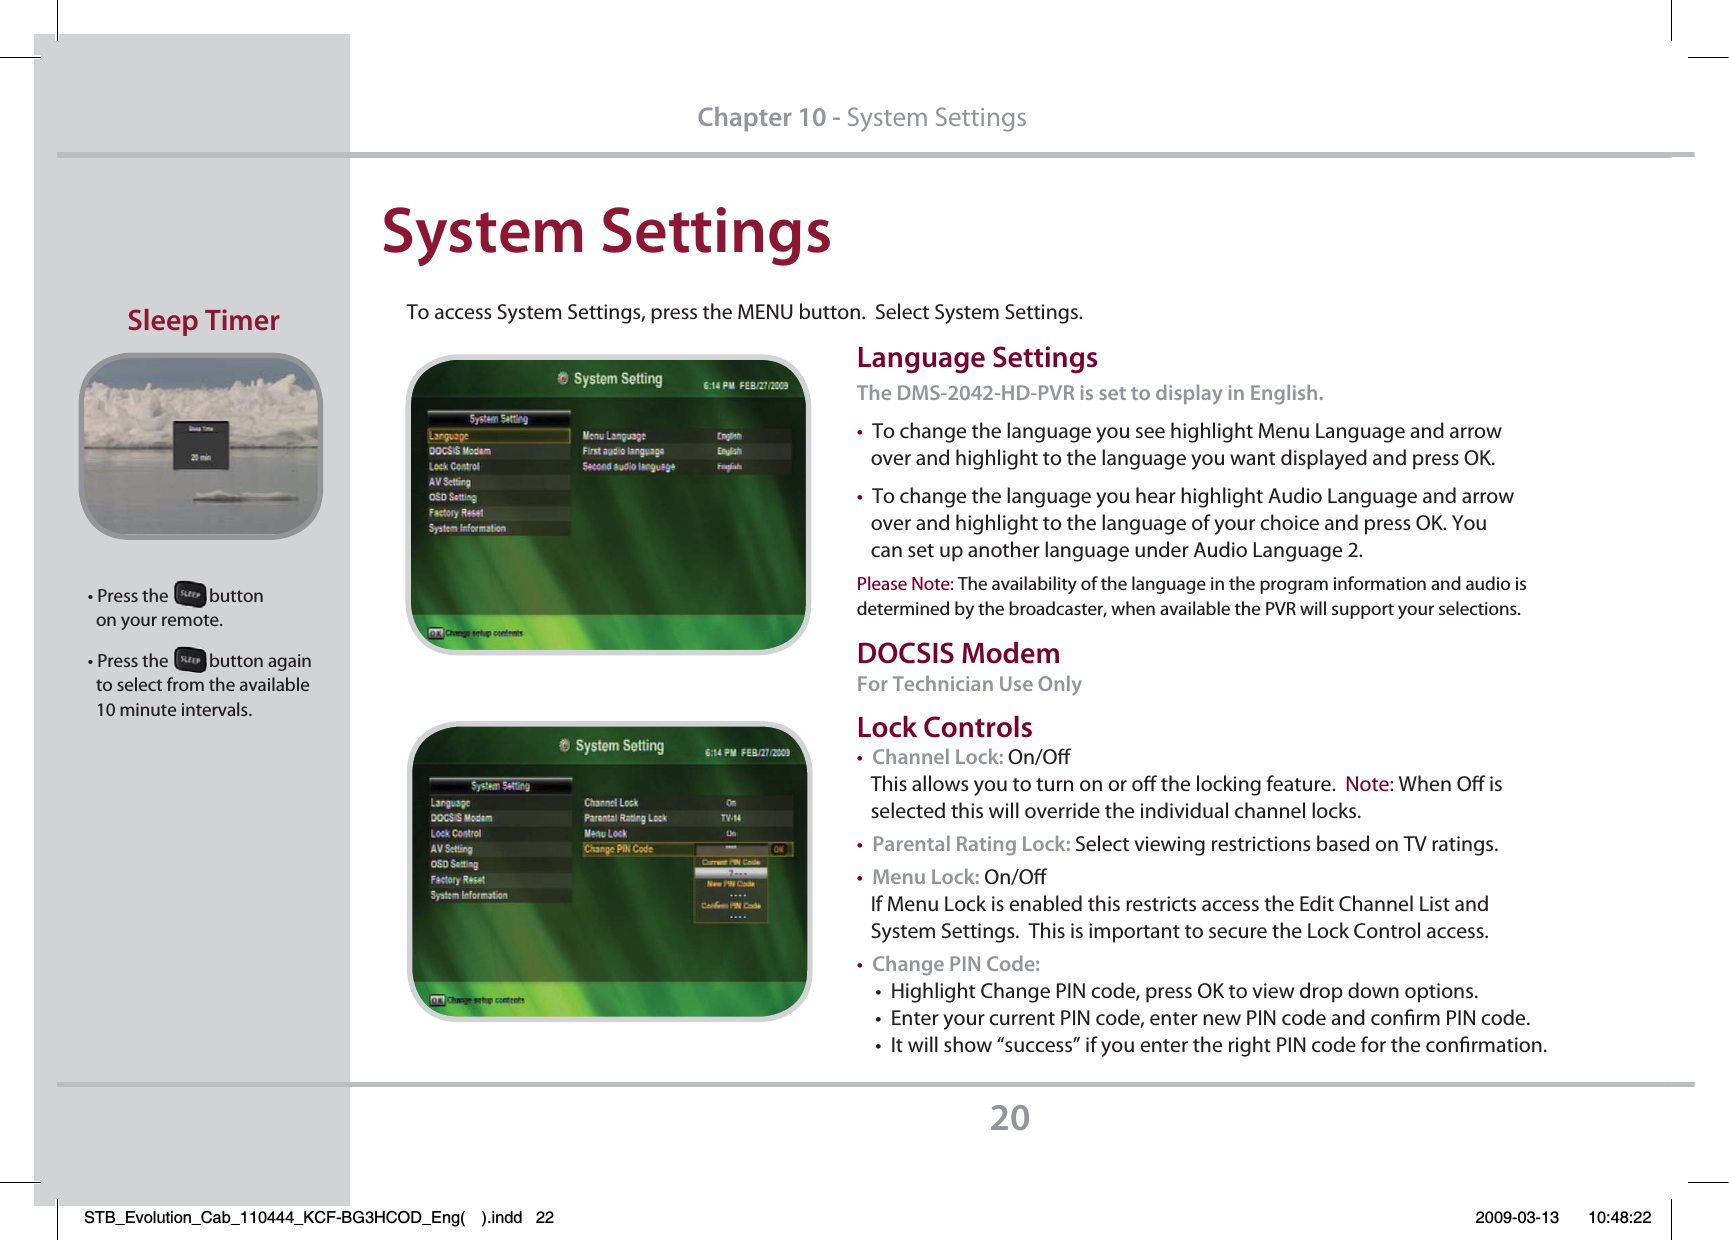
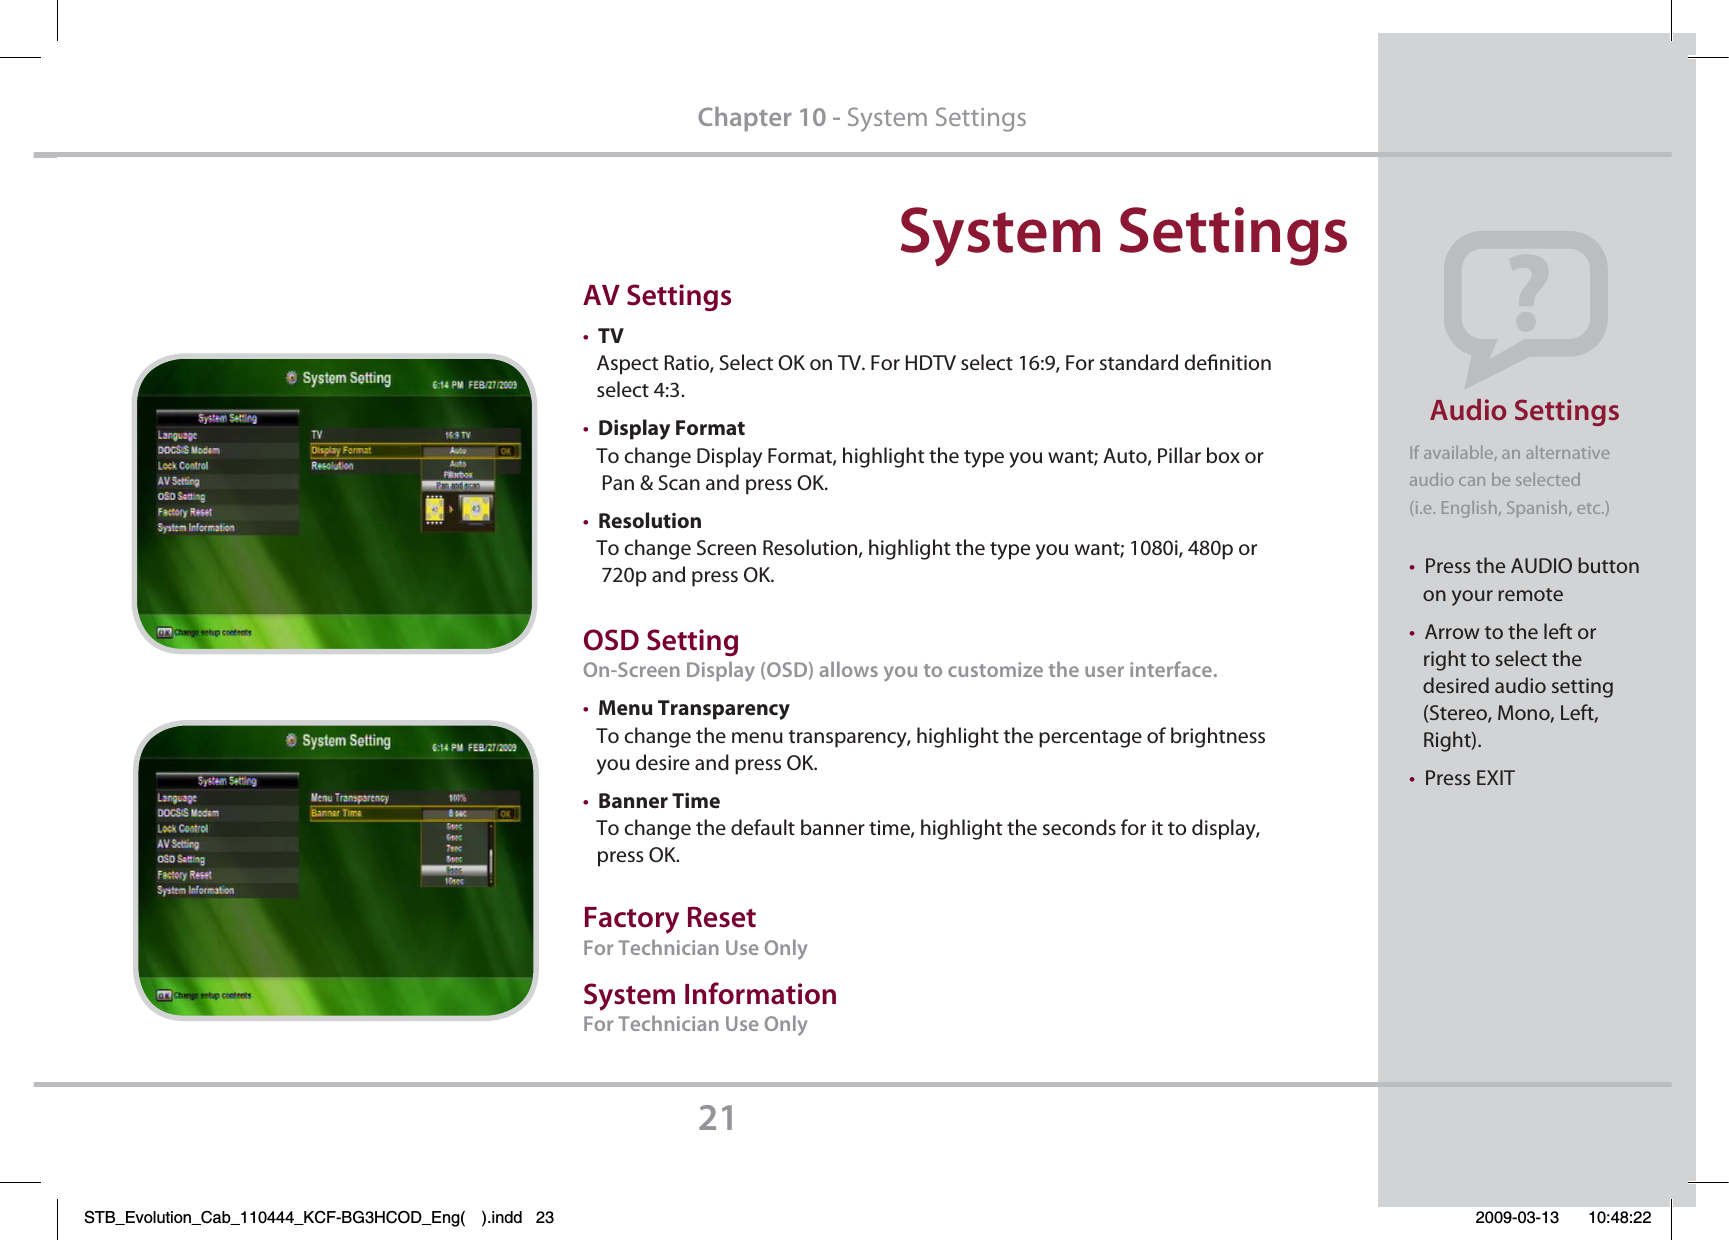
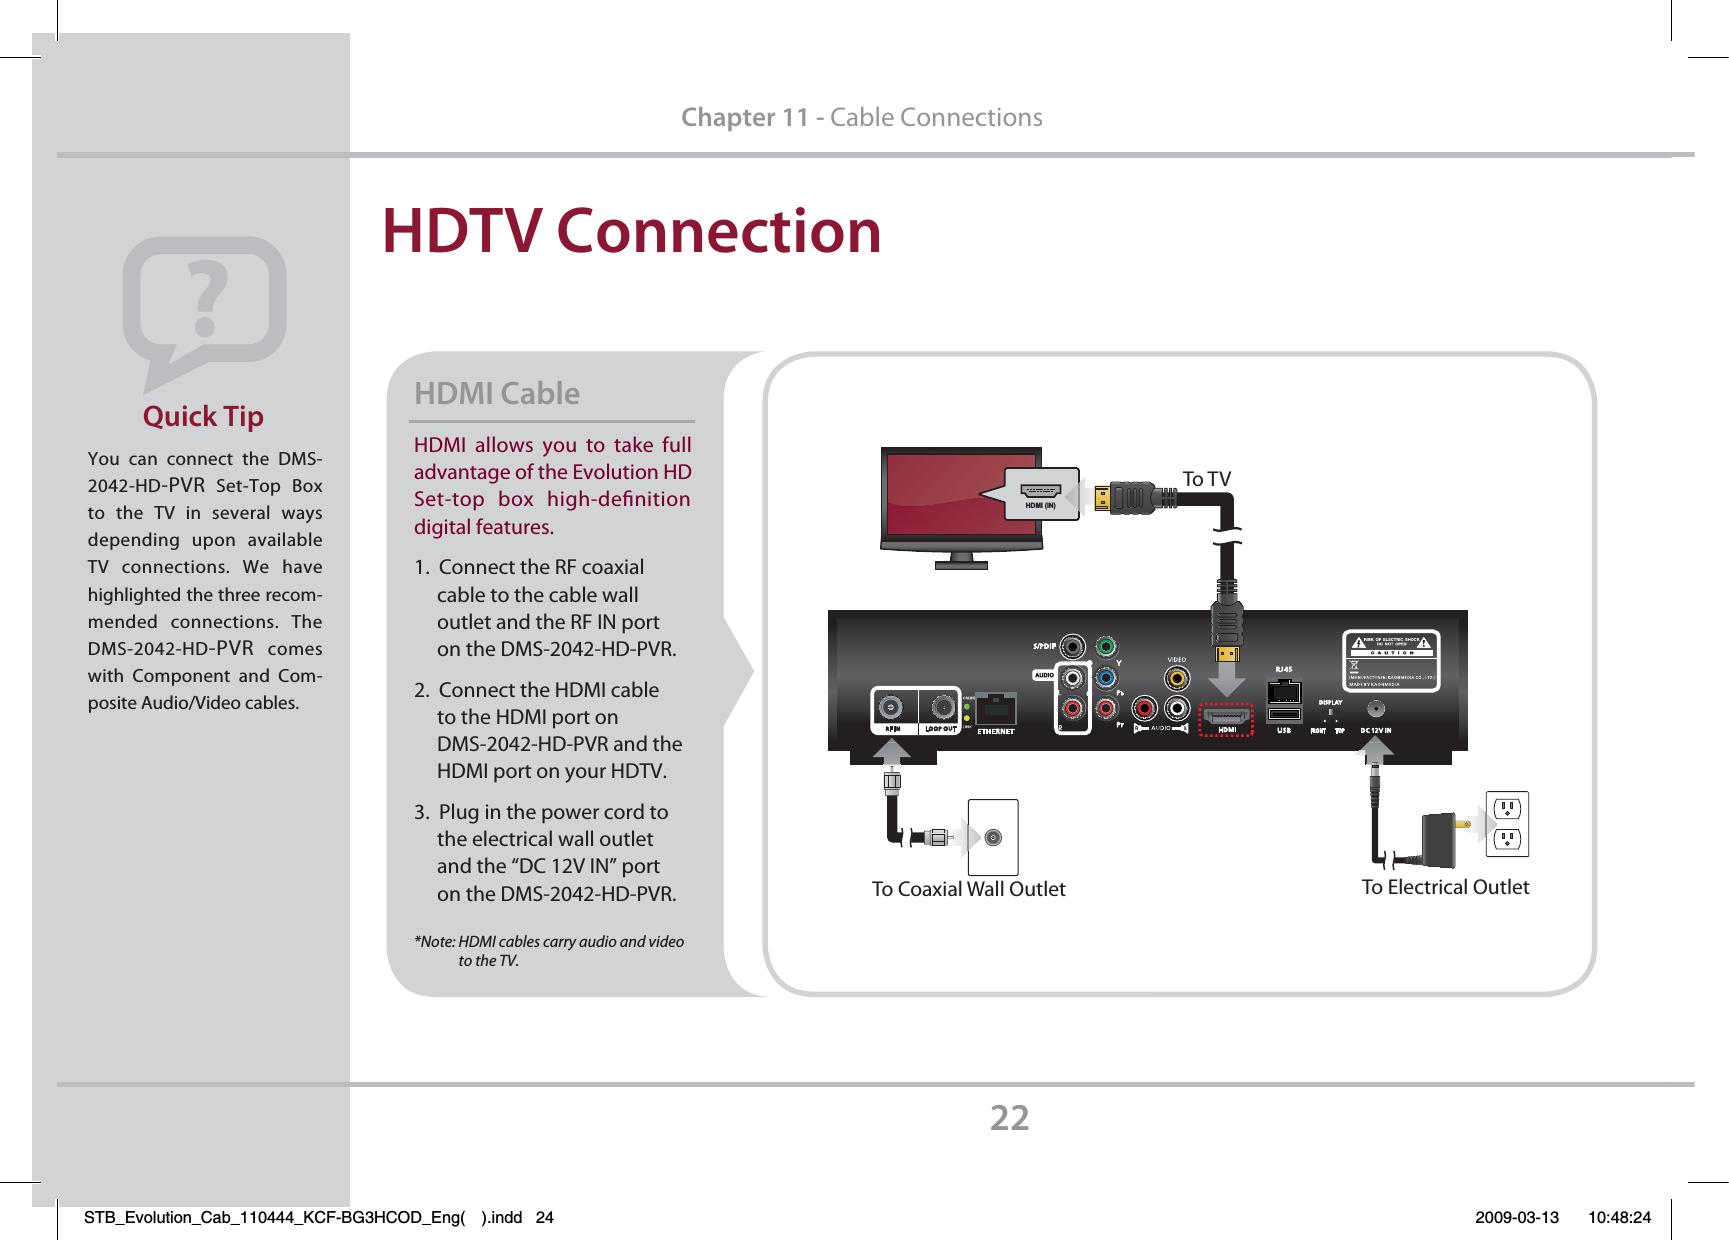
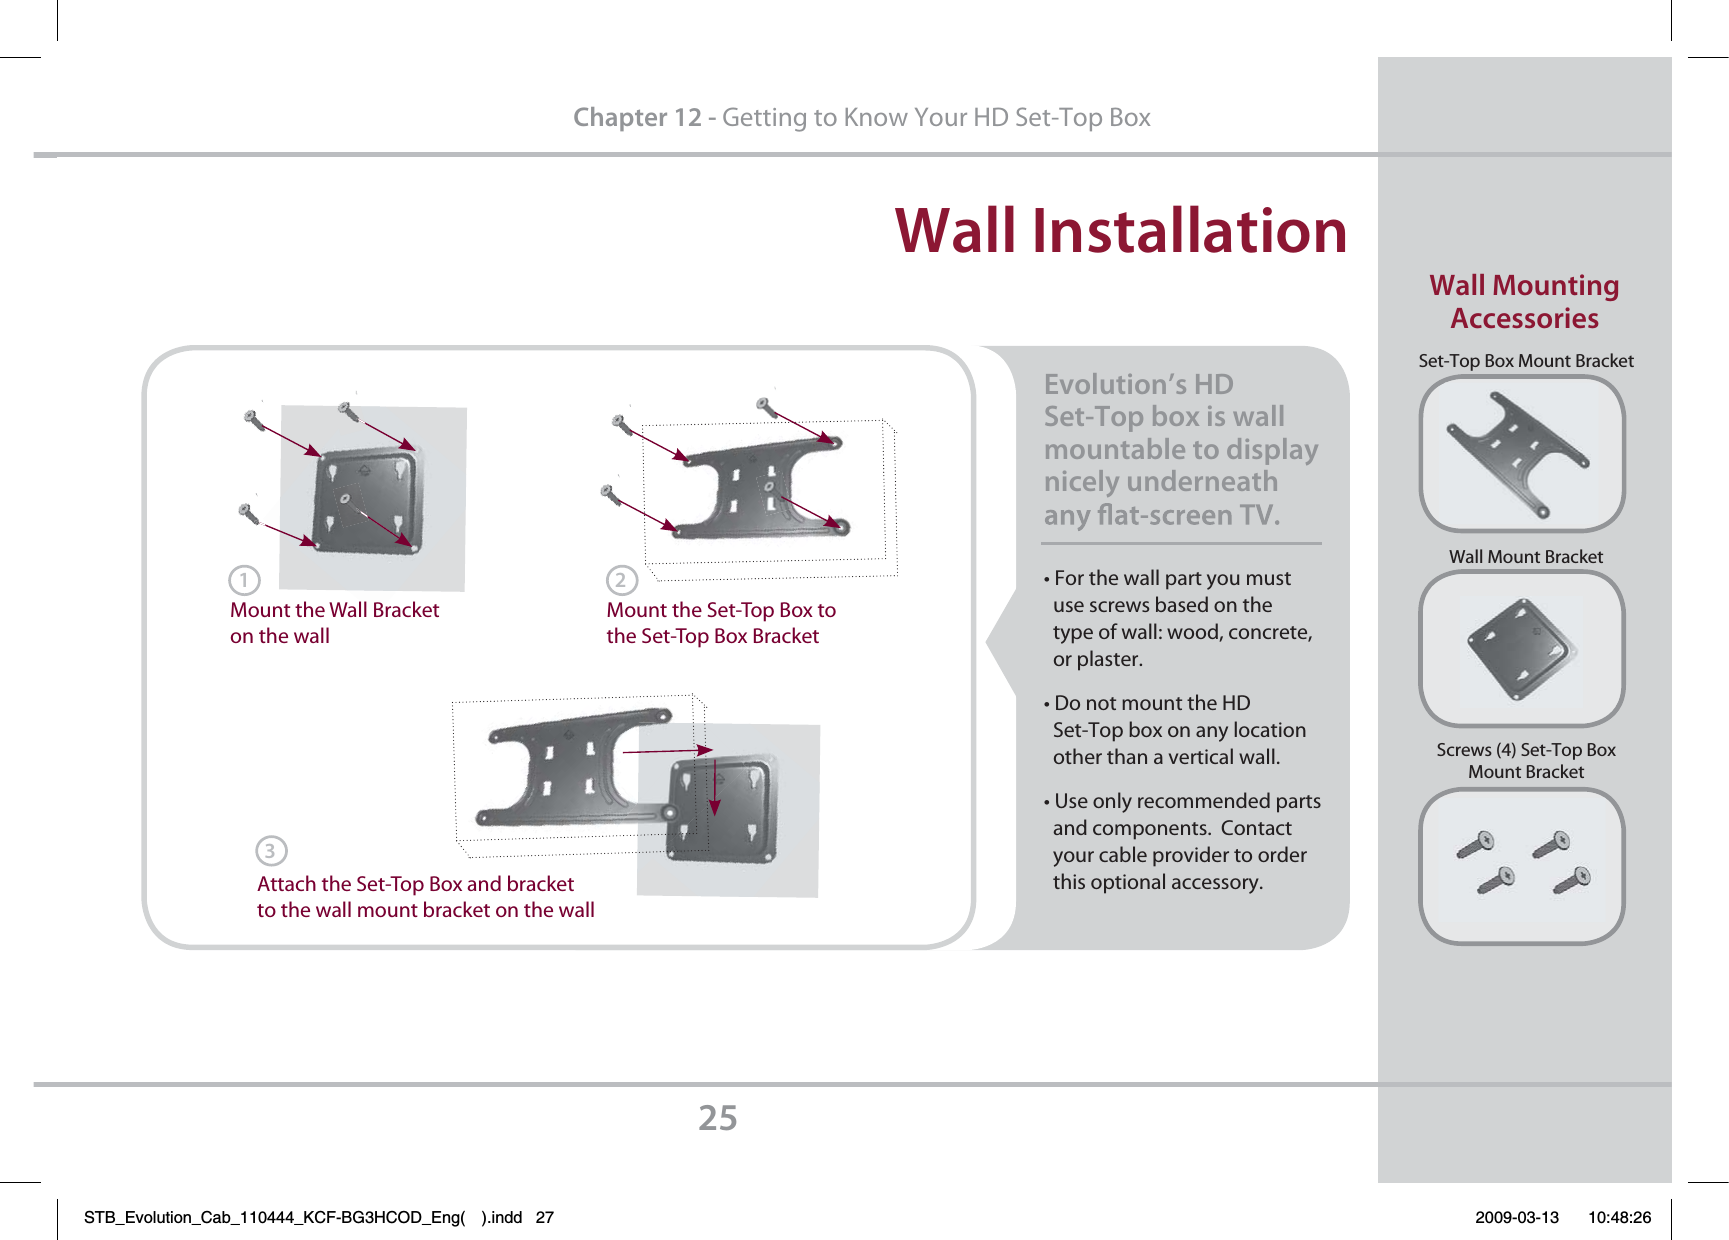
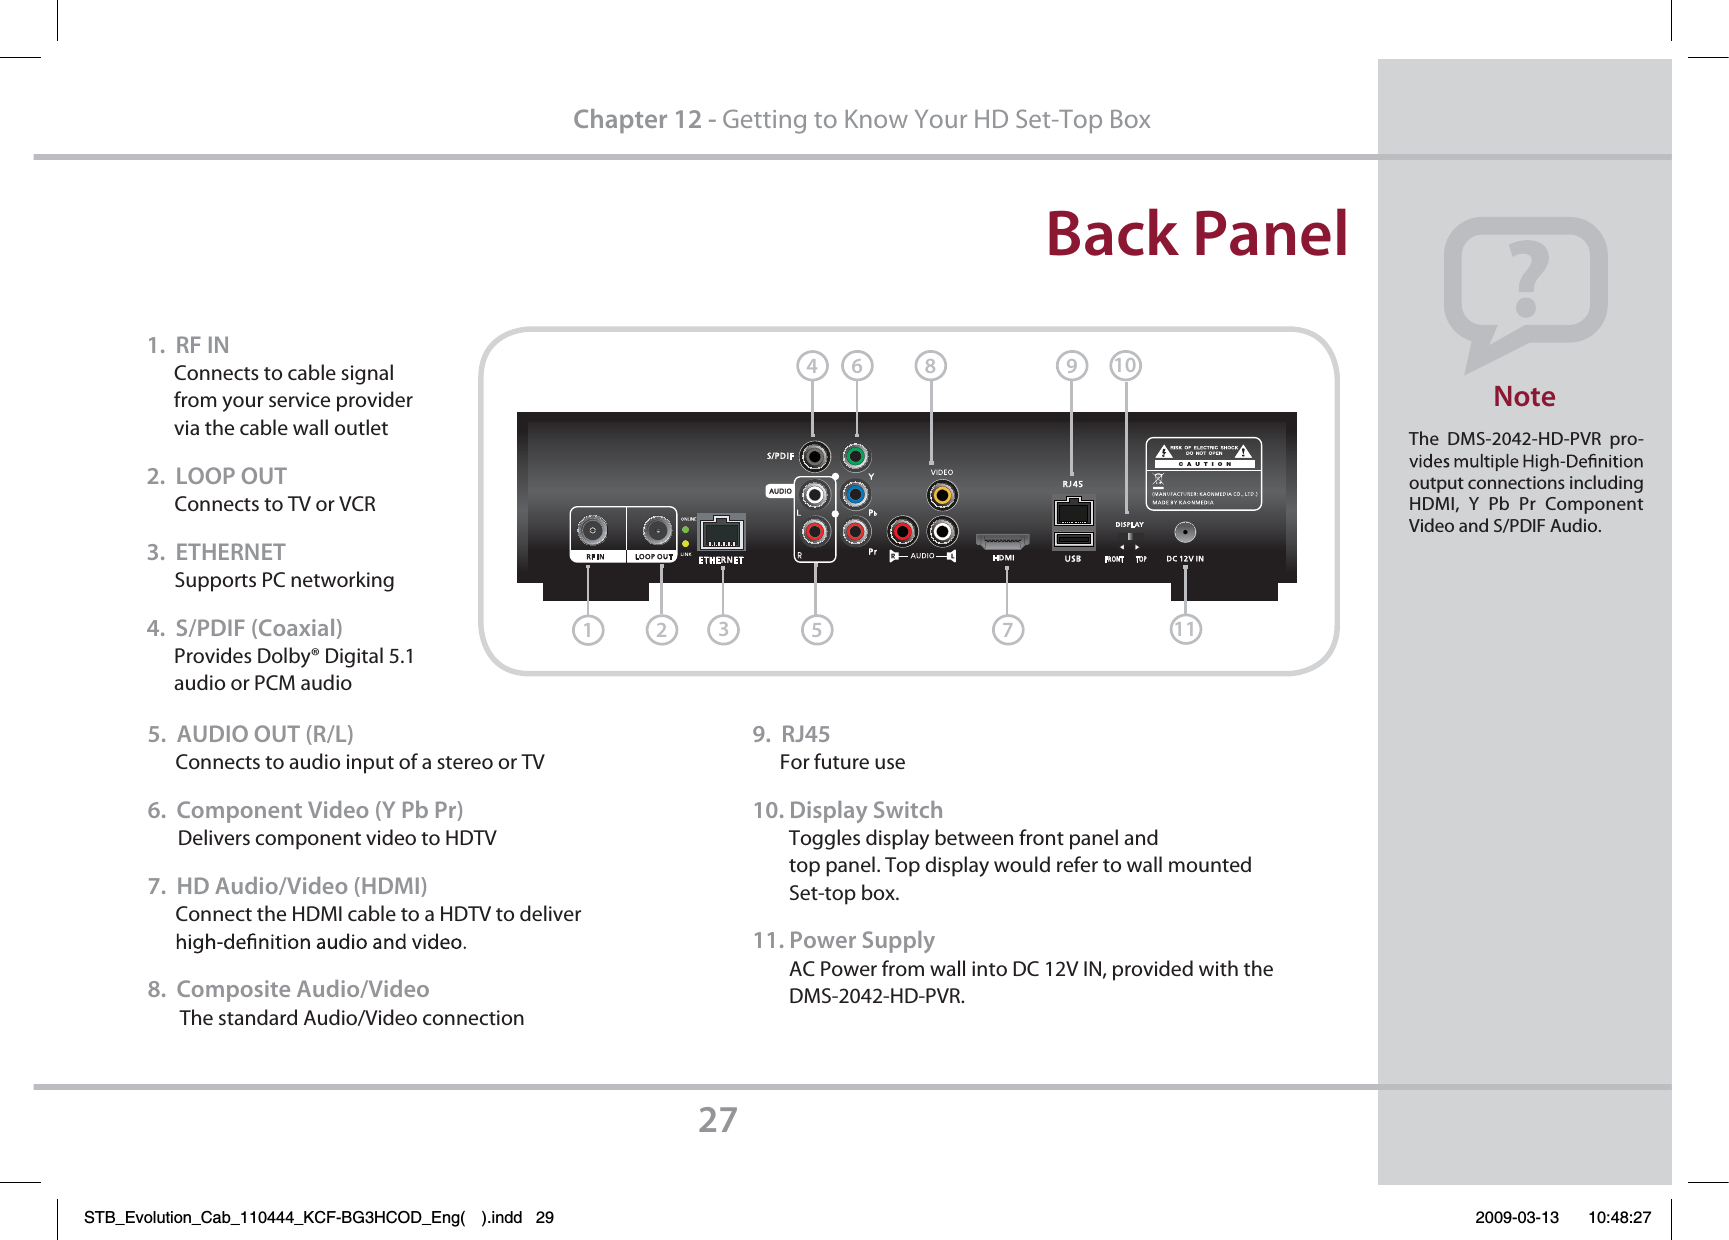
KAONMEDIA KCF-BG3HCOD Digital Cable Broadcast Receiver User Manual STB Evolution Cab 110444 KCF BG3HCOD Eng indd

KAONMEDIA Co., Ltd. Digital Cable Broadcast Receiver STB Evolution Cab 110444 KCF BG3HCOD Eng indd

Manual

User GuideEvolution - Ideas to Solutions for a Digital WorldAdvanced High-Denition Personal Video Recorder STB_Evolution_Cab_110444_KCF-BG3HCOD_Eng( ).indd   1 2009-03-13     10:48:02
© 2009 Evolution Digital, LLC.  All Rights Reserved.Information to the userNOTE:  This equipment has been tested and found to comply with the limits for a Class B digital device, pursuant to part 15 of the FCC Rules. These limits are designed to provide reason-able protection against harmful interference in a residential installation.  This equipment generates, uses and can radiate radio frequency energy and, if not installed and used in accordance with the instructions, may cause harmful interference to radio communications. However, there is no guarantee that interference will not occur in a particular installation. If this equipment does cause harmful interference to radio or television reception, which can be determined by turning the equipment off and on, the user is encouraged to try to correct the interference by one or more of the following measures:-  Reorient or relocate the receiving antenna.-  Increase the separation between the equipment and receiver.-   Connect the equipment into an outlet on a circuit different from that to which the receiver is connected.-  Consult the dealer or an experienced radio/TV technician for help.CAUTION :  Changes or modifications not expressly approved by the party responsible for compliance could void the user's authority to operate the equipment.STB_Evolution_Cab_110444_KCF-BG3HCOD_Eng( ).indd   2 2009-03-13     10:48:04
Read this manual thoroughly and retain it for future refer-ence to optimize your view-ing pleasure.  The Evolution Advanced HD PVR is full  of features to expand your HDTV capabilities. Enjoy a wall mounted install  with your flatscreen or the standard table top install.Quick Tip01Chapter 1 - IntroductionIntroductionThank  you for choosing the Evolution DMS-2042-HD-PVR      Advanced High-Denition Personal Video Recorder (PVR). The        Evolution DMS-2042-HD-PVR will allow you to enjoy viewing HDTV with easy-to-use on-screen menus and navigation. The PVR functionality makes sure you never miss your favorite shows with record, pause and rewind functionality.This User Guide includes the following sections to get you started using Evolution’s Advanced HD PVR:IMPORTANT SAFETY INFORMATION    2GETTING TO KNOW YOUR REMOTE CONTROL  4QUICK TIPS     6PROGRAM GUIDE    12PARENTAL CONTROL    13FAVORITES    14ADDITIONAL CHANNEL EDITING FEATURES   15PERSONAL VIDEO RECORDER   16SYSTEM SETTINGS    20CABLE CONNECTIONS     22GETTING TO KNOW YOUR HD PVR   25FAQs     28GLOSSARY OF TERMS    30t)JHI%FöOJUJPO57)%57$BQBCJMJUJFTt%VBM5VOFS1FSTPOBM7JEFP3FDPSEFS173t*OUFSBDUJWF&MFDUSPOJD1SPHSBN(VJEF&1(t4FUVQUPVOJRVF'BWPSJUF$IBOOFM-JTUTt1BSFOUBM-PDLCZ573BUJOHTBOE$IBOOFMTt8BMM.PVOUBCMF*EFBMGPS'MBU1BOFM57*OTUBMMBUJPOTt'SPOUBOE5PQ1BOFM%JHJUBM-&%%JTQMBZt6OJWFSTBM3FNPUF$POUSPMJODMVEJOH#BUUFSJFTt(#4UPSBHFt)%.*BOE$PNQPOFOU)%570VUQVUTt%PMCZ%JHJUBM41%*'%.4)%173'FBUVSFTSTB_Evolution_Cab_110444_KCF-BG3HCOD_Eng( ).indd   3 2009-03-13     10:48:04
*NQPSUBOU4BGFUZ*OGPSNBUJPORead this manual  carefully before using the product. Use only as instructed. The cautions described contain important information about safety, and are categorized into: Danger, Warning and Notice.    The company will not take any responsibility for accidents or damage result-ing from careless handling by  the user.*NQPSUBOU             DangerIf the user mishandles the product, there is a risk of loss of life or critical injury.tConnect the power cord only to A/C outlets as specied by  the user manual or product specication. If the power cord    is connected to a non-specied A/C outlet, it could result in   re or electric shock.tThe product must not be exposed to water or liquid of any  sort, or be exposed to drips or splashes. It could result in re   or electric shock.tDo not place heavy objects, including the product itself, on   top of the power cord. If it is damaged, it could result in re   or electric shock.tDo not place metal objects on top of the apparatus. If metal   objects fall into the apparatus, it could result in re or   electric shock.tDo not repair, disassemble or modify this apparatus your  self. It might cause re or electric shock.  If internal checking   or maintenance is needed, please contact your service   center or agency.tDo not block or cover any ventilation opening. A re might   result from overheating.tTurn o and unplug the power as quickly as possible during  electric storms. Failure to do so could result in re or electric   shock.tRemove the antenna’s power plug from the outlet as quickly  as possible during electric storms.  Failure to do so could   result in re or electric shock.tDo not drop the apparatus (for example by putting it in a  place where it may fall) or subject it to impact. The product   might be damaged. If it is damaged, please turn o the   power and remove the plug from the power outlet, or re or   electric shock may result.tNever touch the power cord with wet hands. It could result  in an electric shock.$IBQUFSImportant Safety Information$"65*0/5PSFEVDFUIFSJTLPGFMFDUSJDBMTIPDLEPOPUSFNPWFUIFDPWFS/PVTFSTFSWJDFBCMFQBSUTJOTJEF3FGFSBOZTFSWJDJOHUPRVBMJ-öFE4FSWJDFQFSTPOOFM3*4,0'&-&$53*$"-4)0$,%0/0501&/STB_Evolution_Cab_110444_KCF-BG3HCOD_Eng( ).indd   4 2009-03-13     10:48:05
*NQPSUBOU4BGFUZ*OGPSNBUJPO03$IBQUFSImportant Safety Information             WarningIf the product is mishandled, the user might receive a serious or minor injury. Damage or loss to the user’s property might also result.tThe product must not be exposed to water or liquid. If the   apparatus is exposed to drips or splashes, it might cause a   problem that cannot be repaired.tDo not repair, disassemble or modify this apparatus   yourself. It might be seriously damaged, possibly beyond     repair.tTurn o the power and unplug the power cord as quickly   as possible during electric storms. They might damage the   apparatus.tRemove the antenna’s power plug from the outlet as quickly  as possible during electric storms, or the apparatus might be   damaged.              Notice  If the product is mishandled, it might cause minor damage.tIf the apparatus becomes marked, clean it gently with a soft  cloth or towel. Never use chemical solvents such as   benzene, thinner, acetone or other solvents. The surface of   the apparatus might become discolored and the paint  might peel.tDo not place or keep the apparatus in the following  situations. Doing so might cause problems.  - where it is too hot or cold.  - where there is high humidity.  - where there are excessive temperatures, for example in      front of airconditioners or heating vents.  - where there is dust or soot.  - in conned areas where the heat cannot be released.  - where it is exposed to direct sunlight.tTurn the apparatus o or unplug the power cord if it is   to remain unused for a long period of time.tDo not place heavy objects on top of this apparatus. It   might cause malfunction or damage.tIf the apparatus is so seriously damaged that it cannot be   repaired, or has stopped working altogether, dispose of it   properly in accordance with the local laws or regulations in   your area.The DMS-2042-HD-PVR is provided with a DC 14V IN AC Power Supply. It has been designed to meet the require-ments of the DMS-2042-HD-PVR.  No other power supply should be used with this set-top box unless provided by your cable provider.*NQPSUBOUSTB_Evolution_Cab_110444_KCF-BG3HCOD_Eng( ).indd   5 2009-03-13     10:48:06
The Left SidePGZPVS3FNPUF1. Press and hold OK + MENU     buttons for 3 seconds until     red LED button on remote     turns on.2. Enter 3 digit code using     number pad.*3. Press OK. Remote LED     blinks indicating code     accepted.Note: If the code is not ac-cepted return to step 2 and enter the next 3 digit code listed for the TV.*Refer to separate Code Sheet   supplied with the remote control.1SPHSBNNJOH:PVS3FNPUFGPS57$POUSPMChapter 3 - Getting to Know Your Remote ControlPowerTurn on or o the HD Set-Top BoxTV StandbyTurn your TV on or offC.C.Closed CaptioningTV/STBPress to switch between TV and Set-Top Box modeP-RateTo set or view Parental Rating LocksTV/RadioToggle between TV & Audio channelsNote: Audio channels may not be available in all areasGuidePress to enter or exit the electronic program guideArrowsNavigation through various menus and screens MenuEnter or exit the main menuRed ButtonMultifunction KeyGreen “Sort” ButtonTo sort the channel listings173)JHIMJHIU1SPHSFTT#BS                Display Recorded                Program Progress              3FDPSEFE-JTU                Display List of                 Recorded Programs                *OTUBOU3FQMBZ                Jump back and                                  replay a scene.                 $PNNFSDJBM4LJQ                Jump forward and                  skip commercials.Record Pause StopRewind PlayFast-ForwardSTB_Evolution_Cab_110444_KCF-BG3HCOD_Eng( ).indd   6 2009-03-13     10:48:10
The Right SidePGZPVS3FNPUFChapter 3 - Getting to Know Your Remote Controlt When inserting batteries, make sure that the polarity (+/-) is correct.t The Red LED on the top right of the remote is a visual Indicator that conrms the re-mote has power when a but-ton is pressed.t Your remote may vary slightly from the one pictured here. However, basic functions should remain the same./PUFLED IndicatorTV InputThis selects available inputsAudioPress to select the sound mode (Mono, Left, Right, Stereo)LastReturn to the previous channel or screenSleepSelect a time interval (10 Min., 30 Min. etc.) for automatic shut offMuteTo turn sound on/offOKPress to quickly view the Channel Listing by channel number. To confirm your choice of channel selection through the guide or direct entry. ExitPress at any time to return to watching TVBlue ButtonMultifunction Keys• Info Button - View the description of the current or highlighted Program while   watching TV, if available.• Scroll while in Program Guide• Rename Favorite List while editing Channel List.Yellow ButtonMultifunction KeysRename Channels while browsing Channel ListingsSTB_Evolution_Cab_110444_KCF-BG3HCOD_Eng( ).indd   7 2009-03-13     10:48:10
2VJDL5JQTUse the arrow keys to navigate through the menu, program guide and channel listings.Press           to select(FUUJOH4UBSUFE.BJO.FOVPress the MENU button on your remote to access all your favorite digital cable features.          #SPXTJOH$IBOOFM-JTUJOHT     tPress the OK button to view a quick list of channels in numerical           order with the ability to sort the channel line-up.     $IBQUFS2VJDL5JQTEDIT CHANNEL LISTCreate Favorites, Parental Lock, Skip and Delete channelsSYSTEM SETTINGSLanguage, AV Settings (HDTV),     On-screen display (OSD) and more.INSTALLATIONFor authorized technicians only.CA SYSTEMFor authorized technicians only.OKOK/BWJHBUJPO5JQTPress TV/Standby to turn on your TV.Press Power to turn on the HD Set-Top Box.PROGRAM GUIDEView current program listingsPVRPersonal Video RecorderSTB_Evolution_Cab_110444_KCF-BG3HCOD_Eng( ).indd   8 2009-03-13     10:48:11
2VJDL5JQTYou can also use the info bar to browse what’s on other channels without missing any of your current program. tArrow           to view    dierent channels.tArrow          to see what   programs are on next. tPress OK to select a new    browsed programs.#SPXTJOH07$IBQUFSQuick Tips *OGPSNBUJPO#BStPress the INFO button to view on-screen program information. tThe Info bar will display the channel, title, rating, brief    description and a progress bar, if available.  tPress the INFO button a second time to view the full program    description.#SPXTJOH57-JTUJOHTtPress the GUIDE button to view the current program listings.tUse your arrow buttons to navigate throughout the Guide.  tSelect the highlighted program of your choice by pressing OK.     The selected program will display in the viewing box within the    program guide.  tPress EXIT to watch the selected TV program.INFOGUIDESTB_Evolution_Cab_110444_KCF-BG3HCOD_Eng( ).indd   9 2009-03-13     10:48:12
2VJDL5JQTMake sure to confirm the Parental  Control  option is enabled: tPress the MENU button on   your remote. Select System    Settings, Enter your PIN    code (default 0000)*.tLock Control:  Press OK,          Select Channel Lock “ON”    and press OK.Quick Tip081"3&/5"-$0/530-$IBQUFS2VJDL5JQT3BUJOH-PDLTo restrict viewing based on the TV Program RatingtPress the P-RATE button on your remote.tEnter the PIN code (default 0000)*.tChoose the minimum parental rating you would like viewing restrictions    on. For instance, if you choose TV-14, that rating and anything above will    be locked.  Parental Rating Lock will take eect immediately.$IBOOFM-PDLTo lock individual channelstPress the MENU button, select the Edit Channel List icon.tEnter your PIN code (default 0000)*.tSelect LOCK.tArrow to the right to identify which channel you would like to lock   select OK to add that channel to the lock list.tPress EXIT and conrm your settings.MENU5PMFBSONPSFBCPVU1*/DPEFTSFGFSUPQBHFSTB_Evolution_Cab_110444_KCF-BG3HCOD_Eng( ).indd   10 2009-03-13     10:48:13
2VJDL5JQTWhile setting up your Favorite List, tPress the BLUE button  tKeyboard displays,    arrows to navigate    and OK to selecttPress the RED Save    button.09$IBQUFSQuick Tips'"703*5&44FU6Q'BWPSJUF-JTUTtPress MENU button.tSelect the Edit Channel List icon on the main menu.tEnter the PIN code (default 0000)*.tScroll to favorites, select OK to expand the list of customizable favorites.tSelect a favorite list. tArrow to the right and individually add channels by pressing OK.tPress EXIT and Save your new favorite list.  "DDFTT:PVS'BWPSJUF-JTUT tPress the Green SORT button.  tUse Arrow buttons to highlight favorites.  tArrow to the right to select the Favorite list. tPress OK.  tThe selected Favorite channel list will display. 3FOBNF'BWPSJUFTMENU5PMFBSONPSFBCPVU1*/DPEFTSFGFSUPQBHFSTB_Evolution_Cab_110444_KCF-BG3HCOD_Eng( ).indd   11 2009-03-13     10:48:13
2VJDL5JQTCHECK YOUR PROGRESStPress the PROGRESS BAR   button on  your remote.tThe progress bar displays    the current play status, the   total recorded time and    elapsed time.tThe hour and minute of    the total duration (top) and    cursor duration (bottom)   will display on the right.1SPHSFTT#BS101"64&3&8*/%-*7&57$IBQUFS2VJDL5JQT1BVTF-JWF57TimeShift FunctionalitytPress the PAUSE  button on your remote to pause live TV.t1MFBTFNote: You must be on the channel you would like to pause for at    least 5 seconds before the pause functionality will start to work.  tLive TV will pause for approximately 30 minutes before resuming live TV.tPress PLAY at any time to resume.  Press the Progress Bar button to view    the progress bar at the bottom of the screen.3FXJOE-JWF57You can rewind live TV on the channel you are currently watchingtPress the REWIND  button on your remote to rewind live TV.tThe rewind function only applies to the current channel you are viewing.   You must be on the channel for at least 5 seconds for the rewind                functionality to start to work.  You will only be able to rewind for the    time you have been on the channel.Please note: While you are in rewind mode, if you switch to another channel, then switch back to the program you have rewinded, the former channel will not save your rewind location but rather return to live TV.  We recommend pressing the Record button if you would like to re-access this program later.5PMFBSONPSFBCPVU1*/DPEFTSFGFSUPQBHFSTB_Evolution_Cab_110444_KCF-BG3HCOD_Eng( ).indd   12 2009-03-13     10:48:14
2VJDL5JQT11$IBQUFSQuick Tips1&340/"-7*%&03&$03%&3173)PXUP3FDPSEWhile Watching TVtPress the RECORD button.tA notice will appear on the top right side of your screen to indicate    the recording has started, this includes the recording time remaining.  tPress the RECORD button a second time to edit the settings.While in the Electronic Program Guide (EPG)tScroll to the channel, date and time of the program you would like to record.tPress the RECORD button, a red icon will appear on the program title.tPress the RECORD button a second time to edit the settings.8BUDI:PVS3FDPSEFE1SPHSBNT tPress the RECORDED LIST button to view a list of recorded programs.tScroll to the recorded program of your choice and press OK.Note: tThe Movie Clip image will display for programs not yet watched, recorded    programs that have been view will display a screen shot of the program.tChoose to #FHJO from the start of the program or Continue the program    from where it was last stopped watching.5PMFBSONPSFBCPVU1*/DPEFTSFGFSUPQBHFTo STOP a recordingtPress the stop button at any    time while recording.tThe stop list will display.tPress the up/down buttons    to select the program you    would like to stop recording,     press OK to select.tPress the STOP button    to conrm the end of    recording.Quick TipSTB_Evolution_Cab_110444_KCF-BG3HCOD_Eng( ).indd   13 2009-03-13     10:48:15
1SFTTUIF(6*%&CVUUPOPSTFMFDU1SPHSBN(VJEFGSPN.BJO.FOV1SPHSBN(VJEF(6*%&$0/530-44FMFDU1SPHSBNSelect a program by pressing the OK button on your remote.tThe selected program will display in the “Viewing    Window”.tThe Program Information will display the program    title, time, rating, and a brief description.tPress EXIT to watch the selected program.View Future DatestPress the RED date button on your remote to view    program listings for future dates. tHighlight the date you would like to view.  tPress the RED button on your remote a second    time to return to today’s date or press EXIT to    return to watching TV.Time Scroll to the right to view future program information.  ChannelUse the arrow  buttons to navigate the program guide by channels. Premium or Pay Per View channels may have a “$” sign next to the channel and may not be available for viewing without upgrading your ser-vice.  Please contact your Ser-vice Provider to discuss your premium channel options. Not all guide information may be available at all times./PUF$IBQUFSProgram GuideThe channel list displayed is the currently sorted list (i.e. favorites)Viewing Window displays currently selected programScheduled Program ListingsProgram InformationScroll Program InformationPress the BLUE button on your remote to scroll and view the complete program description of the selected program.View Additional Channel Lists and Sort GuidePress the GREEN button to sort the program guide alphabetically (A-Z or Z-A), with favorite lists, locked channels or numerically.Record Programs listed in the Program GuidetScroll to the channel, date and time of the program you would    like to record.tPress the Record button on your remote, a red record icon will appear.Available Guide ControlsSTB_Evolution_Cab_110444_KCF-BG3HCOD_Eng( ).indd   14 2009-03-13     10:48:16
With Parental Controls you can restrict your children from seeing specics channels or shows with certain ratings.   Channel and Rating restrictions will take eect immediately.  The user will be prompted to enter a PIN code for any channel that has been restricted.  1BSFOUBM$POUSPMQuick Tip133FTUSJDU7JFXJOH#BTFEPOUIF573BUJOHTTo set Parental Controls by restricting TV Program Rating levels tPress the               button on your remote.tEnter the PIN code (default 0000)*.tChoose the minimum parental rating you would like viewing   restrictions on, for instance, if you choose TV-14, that rating and    anything above will be locked. Parental Rating Lock will take    eect immediately.$IBQUFSParental ControlConrm the Parental Control option is enabled tPress the MENU button   on your remote. Select    System Settings, Enter    your PIN code.   (default 0000)* tLock Control:  Press OK,          Select Channel Lock “ON”    and press OK.3FTUSJDU7JFXJOHPG*OEJWJEVBM$IBOOFMTTo set Parental Controls by restricting individual channels, you must have the Parental Lock function enabled; refer to the side panel to learn how to enable your Parental Lock function.tPress the            button, select the Edit Channel List. tEnter your PIN code (default 0000)*. tSelect LOCK.tArrow to the right to identify which channel you    would like to lock, select OK to add the channel    to the lock list.tPress EXIT and conrm your settings.  5PMFBSONPSFBCPVU1*/DPEFTSFGFSUPQBHFSTB_Evolution_Cab_110444_KCF-BG3HCOD_Eng( ).indd   15 2009-03-13     10:48:17
$SFBUFVQUPGBWPSJUFMJTUTXJUIVOJRVFOBNFTGPSFBTZBDDFTTXIJMFXBUDIJOH57PSVTJOHUIFHVJEF5P4FU6Q'BWPSJUF-JTUT1. Press MENU button.2. Select Edit Channel List icon on the     Main Menu.3. Enter the PIN code (default 0000)*, if     prompted.4. Highlight favorites, select OK to expand    favorite list to display favorite lists.5. Select a favorite list and press the        BLUE button to rename.       a. Keyboard displays, use arrows to           navigate and OK to select.     b. Press the RED Save button.6. Arrow to the right and individually     add channels by pressing OK.7. Press EXIT and OK to save your new      favorite list.tPress the Green SORT    button. tUse Arrow buttons to    highlight favorites. tArrow to the right to    select the Favorite list of    your choice. tPress OK.  7JFX'BWPSJUFTChapter 7 - FavoritesSelect Edit Channel List iconExpandFavoritesMain Menu Press OK to select5PMFBSONPSFBCPVU1*/DPEFTSFGFSUPQBHFSTB_Evolution_Cab_110444_KCF-BG3HCOD_Eng( ).indd   16 2009-03-13     10:48:18
"EEJUJPOBM$IBOOFM&EJUJOH'FBUVSFTChapter 8 - Additional Channel Editing Featurest1SFTTUIFCVUUPOPO   your remote to access    Closed Captioning.t$IPPTFGSPNUIFGPMMPXJOH   options: O, CC1 and CC3.  CC1  is he primary closed    captioning language. CC3  is the secondary closed captioning language.t"SSPXSJHIUBOETFMFDUUIF  option of your choice.t1SFTT0,UPTBWFUIF$MPTFE  Captioning settings.%FMFUF$IBOOFMTCaution: All channel deleting will be nal. To restore deleted channels you will need to contact your cable provider.tTo delete specic channels, press the MENU button, select the Edit Channel   List icon.tEnter your PIN code (default 0000)* if prompted.tHighlight and select DELETE, Arrow to the right and individually select    channels to delete by pressing OK.tPress EXIT and it will prompt you to save your selection.  4LJQ$IBOOFMTChannel skipping only applies if you are currently viewing all channels. The skipped channel will not appear while browsing Channel Listing or viewing the Program Guide.tTo skip specic channels, press the MENU button, select Edit Channel List.tEnter your PIN code (default 0000)*, if prompted.tHighlight and select SKIP, Arrow to the right to identify which channel you        would like to skip, select OK.tPress EXIT and it will prompt you to save your selection.    $MPTFE$BQUJPO5PMFBSONPSFBCPVU1*/DPEFTSFGFSUPQBHFSTB_Evolution_Cab_110444_KCF-BG3HCOD_Eng( ).indd   17 2009-03-13     10:48:18
3FTFSWBUJPOT5IFSFDPSEJDPOPOUIFGSPOUQBOFMPGUIF173XJMMMJHIUVQSFEUPJOEJDBUFZPVBSF DVS-SFOUMZSFDPSEJOHPress Record within the        program guide or while watching TV to start record-ing a program.Chapter 9 - Personal Video Recorder4FUVQB3FTFSWBUJPOGPSB'VUVSF3FDPSEJOHtWhile in the Program Guide scroll to the channel, date and time of the program    you would like to record.tPress the RECORD button, a red icon will appear on the program title.tPress the RECORD button a second time to edit the settings.   tScroll to the right to select the Reservation mode: Once, Daily or Weekly.  tPress the Green RESERVE button to set the reservation.7JFXBMM$VSSFOU3FTFSWBUJPOTtPress the MENU button on your remote, select the PVR icon. tScroll to 3FTFSWBUJPOand press OK.tYour program Reservation list will display including the channel, date, time,    duration and frequency.             = Daily Recording             = Weekly RecordingTo adjust any of your reserved recordings, press the Yellow Edit button.  This will allow you to update the duration, frequency, etc.D7Quick TipSTB_Evolution_Cab_110444_KCF-BG3HCOD_Eng( ).indd   18 2009-03-13     10:48:19
Evolution’s DMS-2042-HD-PVR allows you to record on the spot or set fu-ture Reservations for programs you’d like to record.  The PVR will record up UPQSPHSBNTBUUIFTBNFUJNFXIJMFXBUDIJOHBOPUIFS Simply press Record on the program of your choice.3FDPSEFE-JTUQuick Tip17Chapter 9 - Personal Video RecorderPress the Recorded List     button to view available  recorded programs for your viewing pleasure.To %FMFUF a recorded pro-gram from the Recorded List, press the Yellow Edit button. Scroll to Delete and press OK. CAUTION: Once you press OK, the program will be per-manently deleted..BOBHF:PVS3FDPSEFE1SPHSBNTSet up Directories to easily navigate through your recorded programs. Create personal folders for favorite recordings (i.e. Sitcoms, Movies, Kids programs, etc.).tWhile in the 3FDPSEFE-JTU screen, press the Yellow EDIT    button to create a “New Folder”.  tPress the Yellow EDIT button a 2nd time to rename.tType the name of your choice using the arrow buttons.    Press OK to select the letters and symbols.tPress the RED button to Save your new directory title.Helpful Tips:  While renaming, use the Green Delete button to backspace. Select any blank square to add a space.0SHBOJ[F3FDPSEFE1SPHSBNTCategorize Your Recordings into Folders. tPress the              button on your remote. Once folders    are created, highlight a recorded program you would    like to move.tPress the Yellow EDIT button, use the arrow buttons    to scroll to “MOVE”, press OK to select.tSelect the directories from the list by scrolling    up/down, press OK on the directory of your choice.Note: The recorded list will bring up the last directory (folder) viewed. If you are in a subdirectory (i.e. AV:/Movies/Dad’s) press the OK button to change directo-ries. You must be on the top folder icon to return back to the main directory screen.STB_Evolution_Cab_110444_KCF-BG3HCOD_Eng( ).indd   19 2009-03-13     10:48:20
The image in the bottom leftof the  screen will display how much space is left on your HDD (Hard drive for storage) in percentage.Quick Tip18Press the             button to jump back and replay a scene.To change the Instant Replay from 30 seconds, press MENU, PVR, PVR Settings, Press OK, scroll to Instant Replay, press OK and scroll to select the preferred time settings: 10 seconds, 20 seconds, 30 seconds, etc.Press the             button to jump forward and skip    commercials. To change the Commercial Skip default time from 30 seconds, press MENU, PVR, PVR Settings, Press OK, scroll to Commercial Skip, Press OK and scroll to select the preferred time settings.Press the          button on your remote while watching a    recorded program to display the progress bar.    Progress bar displays the current play status, the total    recorded time and elapsed time (Hour:Minute).Each time your press the             or              button,    the speed increases (x2, x4, x8, x16, x32, etc.).Press the play button at the desired spot to play.Chapter 9 - Personal Video RecorderPress the          button on the currently playing screen.    The progress bar will appear at the bottom.Press and hold the     /     button to move the location icon to    a time point and release the     /     to play the program from Press the            button while watching a recorded program,      and press the             or             button to play  back/forward    in slow motion.Each time you press the button, the program plays at 2x,    4x, 8x, 16x or 32x speed.Press PLAY to resume at the normal speed.Use BOOKMARKS to search positions quickly and convenientlyPress the          button on the currently playing screen. Press the RED button at a certain position to set a    bookmarkPress the GREEN button to display the bookmark list and   press the     /     buttons to select the location you want   to view.STB_Evolution_Cab_110444_KCF-BG3HCOD_Eng( ).indd   20 2009-03-13     10:48:20
PVR Menu19Chapter  9 - Personal Video RecorderSelect PVR in the Main Menu to         customize your PVR settings.  Change your Instant Replay from 10 to 60 seconds or set a Guard Time to make sure you never miss the crucial 5 minutes at the start or end of your recordings PVR MenuThe PVR Menu allows you to change settings and access reservations and recorded program directories.tFile List (Recorded List)   View the list of Recorded programs.tReservation   View the list of Reserved recordings.tFormat HDD (Selectable only when not recording)   For authorized technician use only. Caution: re-formatting the   HDD will erase all of the recorded programs on the PVR.tPVR Setting (Selectable only when not recording)   Update and view the default PVR Settings.PVR SettingsThis section is selectable only when no recordings are   taking place. To change the default settings, select PVR Setting, arrow over and highlight to the Setting you would like to update and press OK. tGuard Time Start    Select from 0 - 30 minutes increments.tGuard Time End    Select from 0 - 30 minutes increments.tDefault Record Duration     Select from 1 to 4 hours increments.tInstant Replay    Select from 10 - 60 seconds increments.tCommercial Skip     Select from 10 - 60 seconds increments.STB_Evolution_Cab_110444_KCF-BG3HCOD_Eng( ).indd   21 2009-03-13     10:48:21
4ZTUFN4FUUJOHTt1SFTTUIFCVUUPO  on your remote.  t1SFTTUIFCVUUPOBHBJO  to select from the available   10 minute intervals.Chapter 10 - System SettingsTo access System Settings, press the MENU button.  Select System Settings.-BOHVBHF4FUUJOHT5IF%.4)%173JTTFUUPEJTQMBZJO&OHMJTIt  To change the language you see highlight Menu Language and arrow    over and highlight to the language you want displayed and press OK. t To change the language you hear highlight Audio Language and arrow    over and highlight to the language of your choice and press OK. You    can set up another language under Audio Language 2.Please Note: The availability of the language in the program information and audio is     determined by the broadcaster, when available the PVR will support your selections.%0$4*4.PEFN'PS5FDIOJDJBO6TF0OMZ-PDL$POUSPMTtChannel-PDL On/O   This allows you to turn on or o the locking feature.  Note: When O is    selected this will override the individual channel locks. t1BSFOUBM3BUJOH-PDL Select viewing restrictions based on TV ratings.t.FOV-PDL On/O    If Menu Lock is enabled this restricts access the Edit Channel List and    System Settings.  This is important to secure the Lock Control access. t$IBOHF1*/$PEFt Highlight Change PIN code, press OK to view drop down options.  t Enter your current PIN code, enter new PIN code and conrm PIN code. t It will show “success” if you enter the right PIN code for the conrmation.  4MFFQ5JNFSSTB_Evolution_Cab_110444_KCF-BG3HCOD_Eng( ).indd   22 2009-03-13     10:48:22
4ZTUFN4FUUJOHTIf available, an alternative audio can be selected (i.e. English, Spanish, etc.)tPress the AUDIO button   on your remotetArrow to the left or   right to select the    desired audio setting    (Stereo, Mono, Left,    Right).tPress EXIT"VEJP4FUUJOHTChapter 10 - System Settings"74FUUJOHTtTV   Aspect Ratio, Select OK on TV. For HDTV select 16:9, For standard denition    select 4:3.tDisplay Format   To change Display Format, highlight the type you want; Auto, Pillar box or     Pan & Scan and press OK. tResolution   To change Screen Resolution, highlight the type you want; 1080i, 480p or     720p and press OK.04%4FUUJOH0O4DSFFO%JTQMBZ04%BMMPXTZPVUPDVTUPNJ[FUIFVTFSJOUFSGBDFtMenu Transparency   To change the menu transparency, highlight the percentage of brightness    you desire and press OK.tBanner Time   To change the default banner time, highlight the seconds for it to display,         press OK.'BDUPSZ3FTFU'PS5FDIOJDJBO6TF0OMZ4ZTUFN*OGPSNBUJPO'PS5FDIOJDJBO6TF0OMZSTB_Evolution_Cab_110444_KCF-BG3HCOD_Eng( ).indd   23 2009-03-13     10:48:22
HDMI allows you to take full advantage of the Evolution HD Set-top box high-definition digital features.1.  Connect the RF coaxial     cable to the cable wall      outlet and the RF IN port      on the DMS-2042-HD-PVR.2.  Connect the HDMI cable      to the HDMI port on      DMS-2042-HD-PVR and the      HDMI port on your HDTV.3.  Plug in the power cord to      the electrical wall outlet      and the “DC 12V IN” port      on the DMS-2042-HD-PVR.*Note: HDMI cables carry audio and video               to the TV.HDMI Cable HDTV ConnectionYou can connect the DMS-2042-HD-PVR Set-Top Box to the TV in several ways depending upon available TV connections. We have highlighted the three recom-mended connections. The DMS-2042-HD-PVR comes with Component and Com-posite Audio/Video cables. Quick Tip22Chapter 11 - Cable ConnectionsTo Electrical OutletTo Coaxial Wall OutletHDMI (IN)To T VSTB_Evolution_Cab_110444_KCF-BG3HCOD_Eng( ).indd   24 2009-03-13     10:48:24
1. Connect the RF coaxial cable to the cable wall outlet and the RF IN port on the PVR.2. Connect the Green, Red and Blue wire connections to the matching color ports on the TV and HD Set-top box. This pro-vides the video signal.3.  Connect the Red and White wire connections to the match-ing color ports on the TV and HD Set-top box, leaving the Yellow  video cable unplugged. This provides the audio signal.4. Connect the power cord to      the electrical wall outlet and the “DC 12V IN” port on the PVR.Component Video/ Composite Audio  HD Video/Analog Audio Connection23Chapter 11 - Cable ConnectionsYPbPrLRAUDIOTo TVTo Electrical OutletTo Coaxial Wall OutletSTB_Evolution_Cab_110444_KCF-BG3HCOD_Eng( ).indd   25 2009-03-13     10:48:24
Analog Audio/Video ConnectionComposite  Audio/Video       connect your TV.  These AV Cables are provided with your DMS-2042-HD-PVR and pro-vide both audio and video inone cable.Quick Tip24Chapter 11 - Cable Connections1.  Connect the RF coaxial     cable to the cable wall      outlet and the RF IN port      on the DMS-2042-HD-PVR.2. Connect the Red, White and     Yellow wire connections to      the matching color ports on      the TV and HD Set-top box.     This provides both video      and audio signals to your      TV.3.  Plug in the power cord to      the electrical wall outlet      and the “DC 12V IN” port      on your DMS-2042-HD-PVR.Composite Audio/Video Cable To Electrical OutletTo Coaxial Wall OutletTo TVVIDEORAUDIOLSTB_Evolution_Cab_110444_KCF-BG3HCOD_Eng( ).indd   26 2009-03-13     10:48:25
t'PSUIFXBMMQBSUZPVNVTUVTFTDSFXTCBTFEPOUIFUZQFPGXBMMXPPEDPODSFUFPSQMBTUFSt%POPUNPVOUUIF)%4FU5PQCPYPOBOZMPDBUJPOPUIFSUIBOBWFSUJDBMXBMMt6TFPOMZSFDPNNFOEFEQBSUTBOEDPNQPOFOUT$POUBDUZPVSDBCMFQSPWJEFSUPPSEFSUIJTPQUJPOBMBDDFTTPSZEvolution’s HD Set-Top box is wall mountable to display nicely underneath Wall Installation4FU5PQ#PY.PVOU#SBDLFU8BMM.PVOU#SBDLFU4DSFXT4FU5PQ#PY.PVOU#SBDLFUWall Mounting Accessories25Chapter 12 - (FUUJOHUP,OPX:PVS)%4FU5PQ#PY3AUUBDIUIF4FU5PQ#PYBOECSBDLFUUPUIFXBMMNPVOUCSBDLFUPOUIFXBMM.PVOUUIF4FU5PQ#PYUPUIF4FU5PQ#PY#SBDLFU2.PVOUUIFWBMM#SBDLFUPOUIFXBMM1STB_Evolution_Cab_110444_KCF-BG3HCOD_Eng( ).indd   27 2009-03-13     10:48:26
Front PanelCaution: Please do not plug in the main power supply cord the connections.The Smart Card is inserted by your cable provider. A Smart Card looks similar to a credit card and entitles you to view and listen to all the channels you choose to subscribe to.  Do not remove the Smart Card unless instructed to do so by your cable provider.Conditional Access261.   Record       LED Indicator and button for Recording a program2.   Stop       Stop a Recording3.   Stand by (Power)4.  Back       Exit from parameter and cancel selected function.5.  Guide       To display the Electronic Program Guide.6.  Channel    Channel up/down or select item or sub-menu.       7.  OK      To select a program, a highlighted line or parameter value.8.  Volume        To turn the volume up/down or select a sub-menu item.9.  USB       Connects to support devices.10.  Smart Card Slot         Smart Card enables service to the HD Set-top box.Chapter 12 - Getting to Know Your HD Set-Top Box39681012745STB_Evolution_Cab_110444_KCF-BG3HCOD_Eng( ).indd   28 2009-03-13     10:48:27
1.  RF IN      Connects to cable signal       from your service provider       via the cable wall outlet2.  LOOP OUT      Connects to TV or VCR3.  ETHERNET      Supports PC networking4.  S/PDIF (Coaxial)      Provides Dolby® Digital 5.1       audio or PCM audioBack PanelThe DMS-2042-HD-PVR pro-output connections including HDMI,  Y Pb  Pr Component Video and S/PDIF Audio.  Note275.  AUDIO OUT (R/L)      Connects to audio input of a stereo or TV6.  Component Video (Y Pb Pr)      Delivers component video to HDTV    7.  HD Audio/Video (HDMI)      Connect the HDMI cable to a HDTV to deliver 8.  Composite Audio/Video       The standard Audio/Video connection9.  RJ45      For future use10. Display Switch        Toggles display between front panel and         top panel. Top display would refer to wall mounted         Set-top box. 11. Power Supply        AC Power from wall into DC 12V IN, provided with the         DMS-2042-HD-PVR.Chapter 12 - Getting to Know Your HD Set-Top Box6791234581011STB_Evolution_Cab_110444_KCF-BG3HCOD_Eng( ).indd   29 2009-03-13     10:48:27
'"2T8IZXPOUNZ)%4FU5PQ#PYUVSOPO tDouble check that the power cord is connected to the HD Set-Top Box and the AC wall outlet. If the HD Set Top Box is connected to another unit (such as a switched outlet or DVD player), verify that that unit is powered on.tPress the Power (Stand By) button on the top, front of the HD Set-Top Box instead of the remote control. The batteries in the remote control may be depleted.8IZ EP * IBWF OP TPVOE XIFO WJFXJOH DBCMFDIBOOFMT t  Verify that the MUTE button on remote control  has not been pressed; try pressing the MUTE button to restore sound.     Double check that you television is not currently MUTED.tDouble check your audio connections.  Refer to the CABLE CONNECTIONS section on pages 22-24 to verify the correct cables are being used for the audio ports.  If they match the diagrams, make sure they are rmly connected to the ports on both the TV and HD Set Top Box.8IZDBOU*WJFXBMMDIBOOFMTXIJMF*NSFDPSEJOH tDepending on which channels you are recording, the list of available channels to watch may be limited.  Once all record-ings have decreased to one or none, all channels will become available.8IBUTIPVME*EPJGUIFSFJTOPWJEFPPSQJDUVSFPOUIF574DSFFO tTry another channel, this channel may be restricted from viewing or enter your PIN code (default 0000)*.tVerify that your TV is powered on and press TV/STB to assure the HD Set Top Box is on the correct mode.t%PVCMFDIFDLBMMZPVSDBCMFDPOOFDUJPOTJODMVEJOHWFSJ-GZJOHZPVSDPBYDBCMFJTTFDVSFMZUJHIUFOFEPOUPCPUIUIFDBCMFXBMMPVUMFU BOEUIF */165QPSU PG ZPVS)% 4FU5PQ#PY  Verify that all video cables between the HD Set-Top Box and the TV are rmly connected.  Refer to the CABLE CONNEC-TION section on pages 22-24 for more detailed information regarding the correct connections and alternative video cable          options.tIf the HD Set-Top Box video output is connected to a home theater unit, verify that the home theater unit is powered on and set to the appropriate input source.  Refer to your home theater manual for more detailed instructions.5IF173EJEOUSFDPSEUIFCFHJOOJOHPGNZTIPXIPXEP*öYUIJT t  Some shows start or end a couple of minutes prior to the     allocated time slot.  Press Menu, PVR, PVR Settings, Guard Time Start or End.  This allows you to add a buer to your programs recordings.Chapter 13 - Frequently Asked Questions5PMFBSONPSFBCPVU1*/DPEFTSFGFSUPQBHFSTB_Evolution_Cab_110444_KCF-BG3HCOD_Eng( ).indd   30 2009-03-13     10:48:28
'"2TChapter 13 - Frequently Asked Questions8IZXPOUNZTFUUPQCPYSFTQPOEXIFO*QSFTTBLFZPOUIFSFNPUFDPOUSPM t1SFTT5745#UPWFSJGZUIBUUIFSFNPUFDPOUSPMJTJOUIFSJHIU NPEF Verify that there are no obstructions between the re-mote control and the HD Set-Top Box. Aim the remote control directly at the front panel, not the TV or DVD player.  If this still doesn’t work, try to stand closer to the HD Set-Top Box, there may be too large a distance between the remote and front panel.t  If nothing happens, check  the bat-teries for possible replacement.  If the remote still doesn’t work, use the front panel of your HD Set-Top Box to press the arrow up button.  If the channel changes, then most likely you have a faulty remote that may need to be re-placed.  Why won’t the PVR let me record any more programs?t$IFDLZPVSBWBJMBCMFIBSEESJWFTQBDFCZQSFTTJOHUIF3F-corded List button and view the icon in the bottom left side of your screen.  The PVR contains 250 gigabytes.t5IF173POMZBMMPXTZPVUPSFDPSEUXPQSPHSBNTBUBUJNFdouble check to make sure you don’t already have two pro-grams being recorded.8IBUJG*GPSHPUNZ1*/$PEF tContact your cable provider and they will be able to reset them back to the default 0000 code for you.  That will allow you to enter a new PIN code. Refer to page 14 to learn how to change your PIN code.)PXEP*DPOUSPMXIBUNZDIJMEXBUDIFT t8JUIUIF1BSFOUBM$POUSPMGFBUVSFPGUIF)%4FU5PQ#PYZPVDBOSFTUSJDUWJFXJOHPGDFSUBJONBUFSJBMPOZPVS57  You can set a lock to restrict viewing based on TV ratings, such as TV-14 or TV-MA, or completely lock  out certain chan-nels.  t  For more information, refer to the PARENTAL CONTROL section on this manual found on page 13.*TJUOFDFTTBSZUPHFUBOFX57UPXBUDI)%57 tTo view HD channels from your cable provider in their native resolution, a high-denition “capable” or “ready” television is required.  tYou will also need to use digital cable connections such as the HDMI cable or the Digital Component Video Cables to view HD channels. *GZPVOFFEBEEJUJPOBMTVQQPSUQMFBTFEPOUIFTJUBUFUPDPOUBDUZPVS$BCMF1SPWJEFS1MFBTFWJTJUPVSXFCTJUFFWPMVUJPOCCDPNUPWJFXUIFNPTUVQUPEBUF&WPMVUJPO6TFS(VJEFGPSZPVS)%173XXXFWPMVUJPOCCDPNSTB_Evolution_Cab_110444_KCF-BG3HCOD_Eng( ).indd   31 2009-03-13     10:48:28
(MPTTBSZPG5FSNT30$IBQUFSGlossary of Terms173tPersonal Video Recorder*OTUBOU3FQMBZtPress the Instant Replay button to jump back and replay     a scene.$PNNFSDJBM4LJQtCommercial Skip allows you to jump forward and skip     commercials.1SPHSFTT#BStThe Progress bar displays the current play status, the total    recorded time and elapsed time (Hour:Minute).)%%tHard drive for storage, to format means to permanently    erase all your recorded programs, please use this with    caution.3FDPSEFE-JTU'JMF-JTUtThe list of recorded programs(VBSE5JNFtSet a (VBSE5JNF to make sure you never miss the crucial    5 or 10 minutes at the start or end of your recordings.3FTFSWBUJPOtSet up a Reservation to record a future or currently    showing program.  Select the Reservation frequency:    Once, Daily or Monthly.#PPLNBSLtBookmark favorite scenes for fast recall during the    playback mode.  Recorded items will have no bookmarks,   you must add them.04%tOn-Screen Display, change your display settings.#BOOFS5JNFtThe amount of time the banners and menus display on    your screen.STB_Evolution_Cab_110444_KCF-BG3HCOD_Eng( ).indd   32 2009-03-13     10:48:28
STB_Evolution_Cab_110444_KCF-BG3HCOD_Eng( ).indd   33 2009-03-13     10:48:28
Evolution - Ideas to Solutions for a Digital World(800) 315-2253www.evolutionbb.comDIGITALDMS2042HDPVRREV1STB_Evolution_Cab_110444_KCF-BG3HCOD_Eng( ).indd   34 2009-03-13     10:48:29

Navigation menu