KAONMEDIA KCF-BG3HCOD Digital Cable Broadcast Receiver User Manual STB Evolution Cab 110444 KCF BG3HCOD Eng indd
KAONMEDIA Co., Ltd. Digital Cable Broadcast Receiver STB Evolution Cab 110444 KCF BG3HCOD Eng indd
Manual

User Guide
Evolution - Ideas to Solutions for a Digital World
Advanced High-Denition Personal Video Recorder
STB_Evolution_Cab_110444_KCF-BG3HCOD_Eng( ).indd 1 2009-03-13 10:48:02

© 2009 Evolution Digital, LLC. All Rights Reserved.
Information to the user
NOTE:
This equipment has been tested and found to comply with the limits for a Class B digital device, pursuant to part 15 of the FCC Rules. These limits are designed to provide reason-
able protection against harmful interference in a residential installation.
This equipment generates, uses and can radiate radio frequency energy and, if not installed and used in accordance with the instructions, may cause harmful interference to radio
communications. However, there is no guarantee that interference will not occur in a particular installation. If this equipment does cause harmful interference to radio or television
reception, which can be determined by turning the equipment off and on, the user is encouraged to try to correct the interference by one or more of the following measures:
- Reorient or relocate the receiving antenna.
- Increase the separation between the equipment and receiver.
- Connect the equipment into an outlet on a circuit different from that to which the receiver is connected.
- Consult the dealer or an experienced radio/TV technician for help.
CAUTION :
Changes or modifications not expressly approved by the party responsible for compliance could void the user's authority to operate the equipment.
STB_Evolution_Cab_110444_KCF-BG3HCOD_Eng( ).indd 2 2009-03-13 10:48:04

Read this manual thoroughly
and retain it for future refer-
ence to optimize your view-
ing pleasure. The Evolution
Advanced HD PVR is full of
features to expand your HDTV
capabilities. Enjoy a wall
mounted install with your
flatscreen or the standard
table top install.
Quick Tip
01
Chapter 1 - Introduction
Introduction
Thank you for choosing the Evolution DMS-2042-HD-PVR
Advanced High-Denition Personal Video Recorder (PVR). The
Evolution DMS-2042-HD-PVR will allow you to enjoy viewing
HDTV with easy-to-use on-screen menus and navigation. The
PVR functionality makes sure you never miss your favorite
shows with record, pause and rewind functionality.
This User Guide includes the following sections to get you
started using Evolution’s Advanced HD PVR:
IMPORTANT SAFETY INFORMATION 2
GETTING TO KNOW YOUR REMOTE CONTROL 4
QUICK TIPS 6
PROGRAM GUIDE 12
PARENTAL CONTROL 13
FAVORITES 14
ADDITIONAL CHANNEL EDITING FEATURES 15
PERSONAL VIDEO RECORDER 16
SYSTEM SETTINGS 20
CABLE CONNECTIONS 22
GETTING TO KNOW YOUR HD PVR 25
FAQs 28
GLOSSARY OF TERMS 30
t)JHI%FöOJUJPO57)%57$BQBCJMJUJFT
t%VBM5VOFS1FSTPOBM7JEFP3FDPSEFS173
t*OUFSBDUJWF&MFDUSPOJD1SPHSBN(VJEF&1(
t4FUVQUPVOJRVF'BWPSJUF$IBOOFM-JTUT
t1BSFOUBM-PDLCZ573BUJOHTBOE$IBOOFMT
t8BMM.PVOUBCMF*EFBMGPS'MBU1BOFM57
*OTUBMMBUJPOT
t'SPOUBOE5PQ1BOFM%JHJUBM-&%%JTQMBZ
t6OJWFSTBM3FNPUF$POUSPMJODMVEJOH#BUUFSJFT
t(#4UPSBHF
t)%.*BOE$PNQPOFOU)%570VUQVUT
t%PMCZ%JHJUBM41%*'
%.4)%173'FBUVSFT
STB_Evolution_Cab_110444_KCF-BG3HCOD_Eng( ).indd 3 2009-03-13 10:48:04
*NQPSUBOU4BGFUZ*OGPSNBUJPO
Read this manual carefully
before using the product.
Use only as instructed. The
cautions described contain
important information about
safety, and are categorized
into: Danger, Warning and
Notice. The company will
not take any responsibility for
accidents or damage result-
ing from careless handling by
the user.
*NQPSUBOU
Danger
If the user mishandles the product, there is a risk of loss of life
or critical injury.
tConnect the power cord only to A/C outlets as specied by
the user manual or product specication. If the power cord
is connected to a non-specied A/C outlet, it could result in
re or electric shock.
tThe product must not be exposed to water or liquid of any
sort, or be exposed to drips or splashes. It could result in re
or electric shock.
tDo not place heavy objects, including the product itself, on
top of the power cord. If it is damaged, it could result in re
or electric shock.
tDo not place metal objects on top of the apparatus. If metal
objects fall into the apparatus, it could result in re or
electric shock.
tDo not repair, disassemble or modify this apparatus your
self. It might cause re or electric shock. If internal checking
or maintenance is needed, please contact your service
center or agency.
tDo not block or cover any ventilation opening. A re might
result from overheating.
tTurn o and unplug the power as quickly as possible during
electric storms. Failure to do so could result in re or electric
shock.
tRemove the antenna’s power plug from the outlet as quickly
as possible during electric storms. Failure to do so could
result in re or electric shock.
tDo not drop the apparatus (for example by putting it in a
place where it may fall) or subject it to impact. The product
might be damaged. If it is damaged, please turn o the
power and remove the plug from the power outlet, or re or
electric shock may result.
tNever touch the power cord with wet hands. It could result
in an electric shock.
$IBQUFSImportant Safety Information
$"65*0/5PSFEVDFUIFSJTLPG
FMFDUSJDBMTIPDLEPOPUSFNPWFUIF
DPWFS/PVTFSTFSWJDFBCMFQBSUT
JOTJEF3FGFSBOZTFSWJDJOHUPRVBMJ-
öFE4FSWJDFQFSTPOOFM
3*4,0'&-&$53*$"-4)0$,
%0/0501&/
STB_Evolution_Cab_110444_KCF-BG3HCOD_Eng( ).indd 4 2009-03-13 10:48:05
*NQPSUBOU4BGFUZ*OGPSNBUJPO
03
$IBQUFSImportant Safety Information
Warning
If the product is mishandled, the user might receive a serious
or minor injury. Damage or loss to the user’s property might
also result.
tThe product must not be exposed to water or liquid. If the
apparatus is exposed to drips or splashes, it might cause a
problem that cannot be repaired.
tDo not repair, disassemble or modify this apparatus
yourself. It might be seriously damaged, possibly beyond
repair.
tTurn o the power and unplug the power cord as quickly
as possible during electric storms. They might damage the
apparatus.
tRemove the antenna’s power plug from the outlet as quickly
as possible during electric storms, or the apparatus might be
damaged.
Notice
If the product is mishandled, it might cause minor damage.
tIf the apparatus becomes marked, clean it gently with a soft
cloth or towel. Never use chemical solvents such as
benzene, thinner, acetone or other solvents. The surface of
the apparatus might become discolored and the paint
might peel.
tDo not place or keep the apparatus in the following
situations. Doing so might cause problems.
- where it is too hot or cold.
- where there is high humidity.
- where there are excessive temperatures, for example in
front of airconditioners or heating vents.
- where there is dust or soot.
- in conned areas where the heat cannot be released.
- where it is exposed to direct sunlight.
tTurn the apparatus o or unplug the power cord if it is
to remain unused for a long period of time.
tDo not place heavy objects on top of this apparatus. It
might cause malfunction or damage.
tIf the apparatus is so seriously damaged that it cannot be
repaired, or has stopped working altogether, dispose of it
properly in accordance with the local laws or regulations in
your area.
The DMS-2042-HD-PVR is
provided with a DC 14V IN
AC Power Supply. It has been
designed to meet the require-
ments of the DMS-2042-HD-
PVR. No other power supply
should be used with this set-
top box unless provided by
your cable provider.
*NQPSUBOU
STB_Evolution_Cab_110444_KCF-BG3HCOD_Eng( ).indd 5 2009-03-13 10:48:06
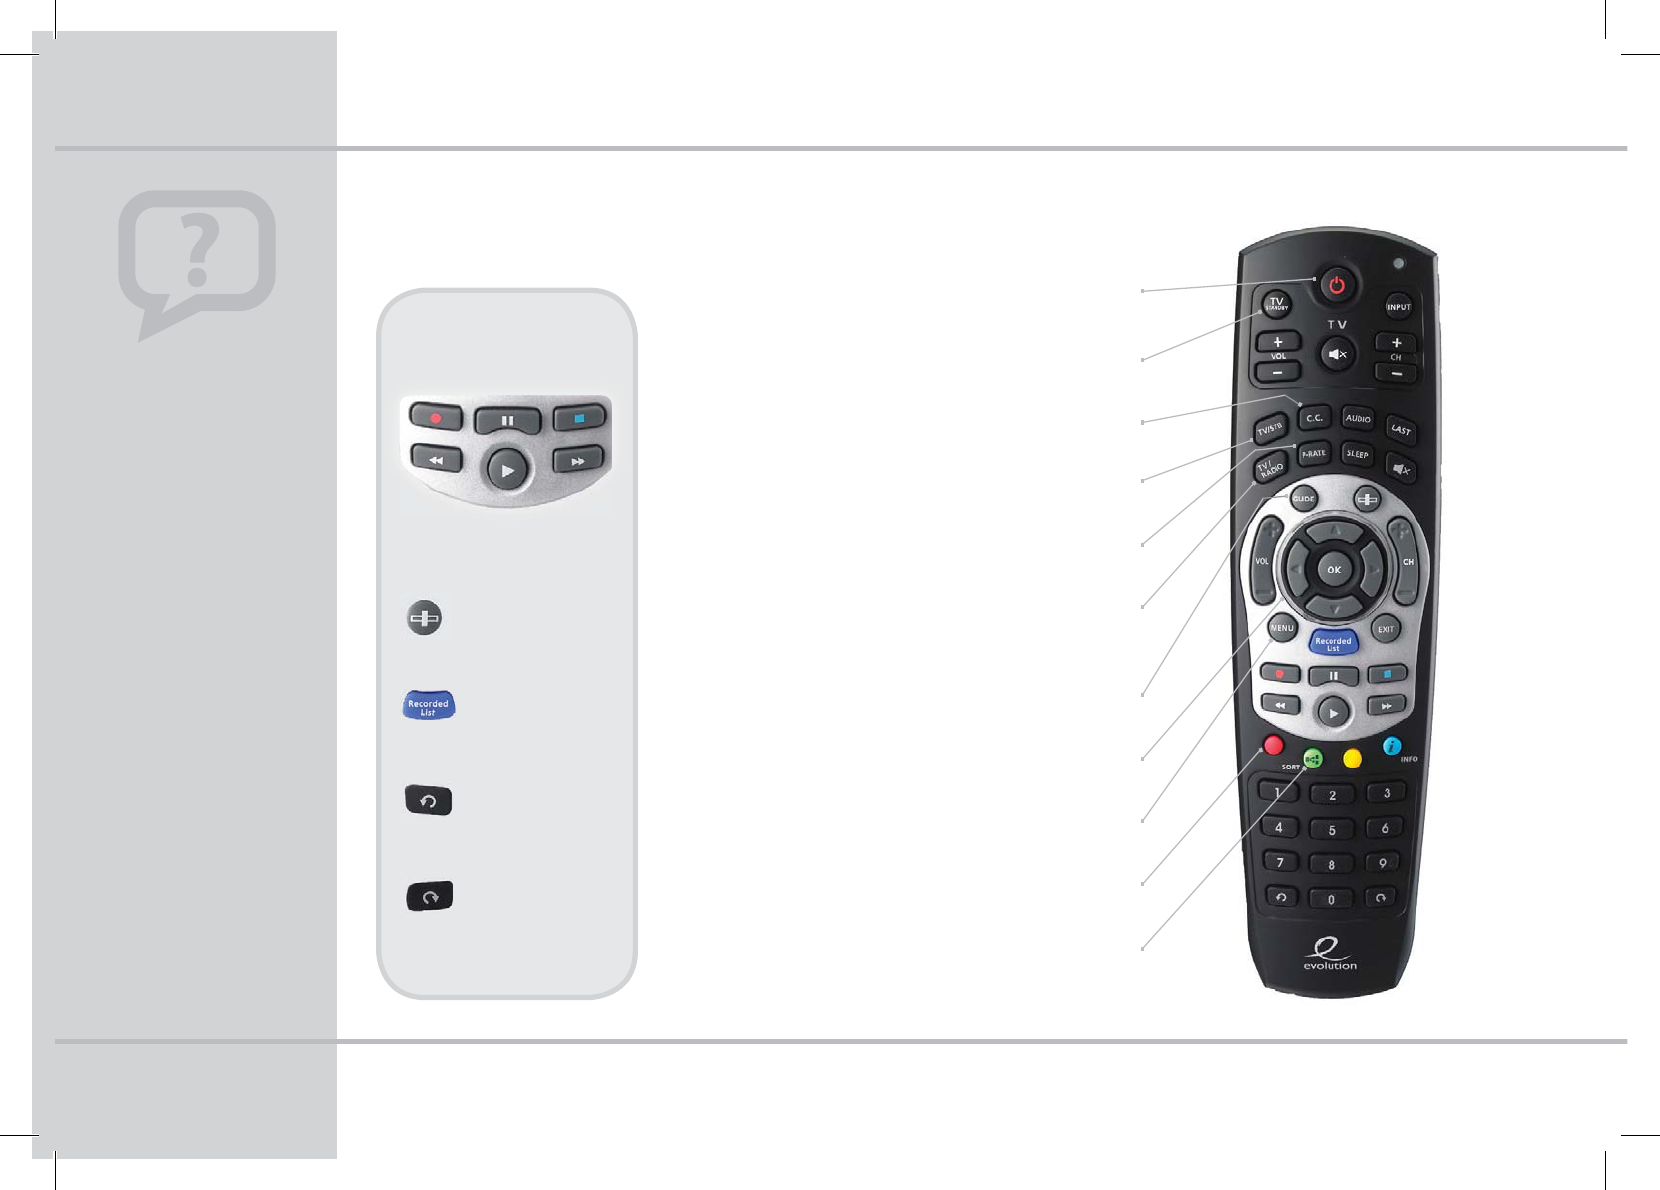
The Left SidePGZPVS3FNPUF
1. Press and hold OK + MENU
buttons for 3 seconds until
red LED button on remote
turns on.
2. Enter 3 digit code using
number pad.*
3. Press OK. Remote LED
blinks indicating code
accepted.
Note: If the code is not ac-
cepted return to step 2 and
enter the next 3 digit code
listed for the TV.
*Refer to separate Code Sheet
supplied with the remote control.
1SPHSBNNJOH
:PVS3FNPUFGPS
57$POUSPM
Chapter 3 - Getting to Know Your Remote Control
Power
Turn on or o the HD Set-Top Box
TV Standby
Turn your TV on or off
C.C.
Closed Captioning
TV/STB
Press to switch between TV and Set-Top Box mode
P-Rate
To set or view Parental Rating Locks
TV/Radio
Toggle between TV & Audio channels
Note: Audio channels may not be available in all areas
Guide
Press to enter or exit the electronic program guide
Arrows
Navigation through various menus and screens
Menu
Enter or exit the main menu
Red Button
Multifunction Key
Green “Sort” Button
To sort the channel listings
173)JHIMJHIU
1SPHSFTT#BS
Display Recorded
Program Progress
3FDPSEFE-JTU
Display List of
Recorded Programs
*OTUBOU3FQMBZ
Jump back and
replay a scene.
$PNNFSDJBM4LJQ
Jump forward and
skip commercials.
Record Pause Stop
Rewind Play
Fast-
Forward
STB_Evolution_Cab_110444_KCF-BG3HCOD_Eng( ).indd 6 2009-03-13 10:48:10

The Right SidePGZPVS3FNPUF
Chapter 3 - Getting to Know Your Remote Control
t When inserting batteries,
make sure that the polarity
(+/-) is correct.
t The Red LED on the top
right of the remote is a visual
Indicator that conrms the re-
mote has power when a but-
ton is pressed.
t Your remote may vary
slightly from the one pictured
here. However, basic functions
should remain the same.
/PUF
LED Indicator
TV Input
This selects available inputs
Audio
Press to select the sound mode (Mono, Left, Right, Stereo)
Last
Return to the previous channel or screen
Sleep
Select a time interval (10 Min., 30 Min. etc.) for automatic shut off
Mute
To turn sound on/off
OK
Press to quickly view the Channel Listing by channel number. To confirm your choice of
channel selection through the guide or direct entry.
Exit
Press at any time to return to watching TV
Blue Button
Multifunction Keys
• Info Button - View the description of the current or highlighted Program while
watching TV, if available.
• Scroll while in Program Guide
• Rename Favorite List while editing Channel List.
Yellow Button
Multifunction Keys
Rename Channels while browsing Channel Listings
STB_Evolution_Cab_110444_KCF-BG3HCOD_Eng( ).indd 7 2009-03-13 10:48:10
2VJDL5JQT
Use the arrow keys to
navigate through the menu,
program guide and channel
listings.
Press to select
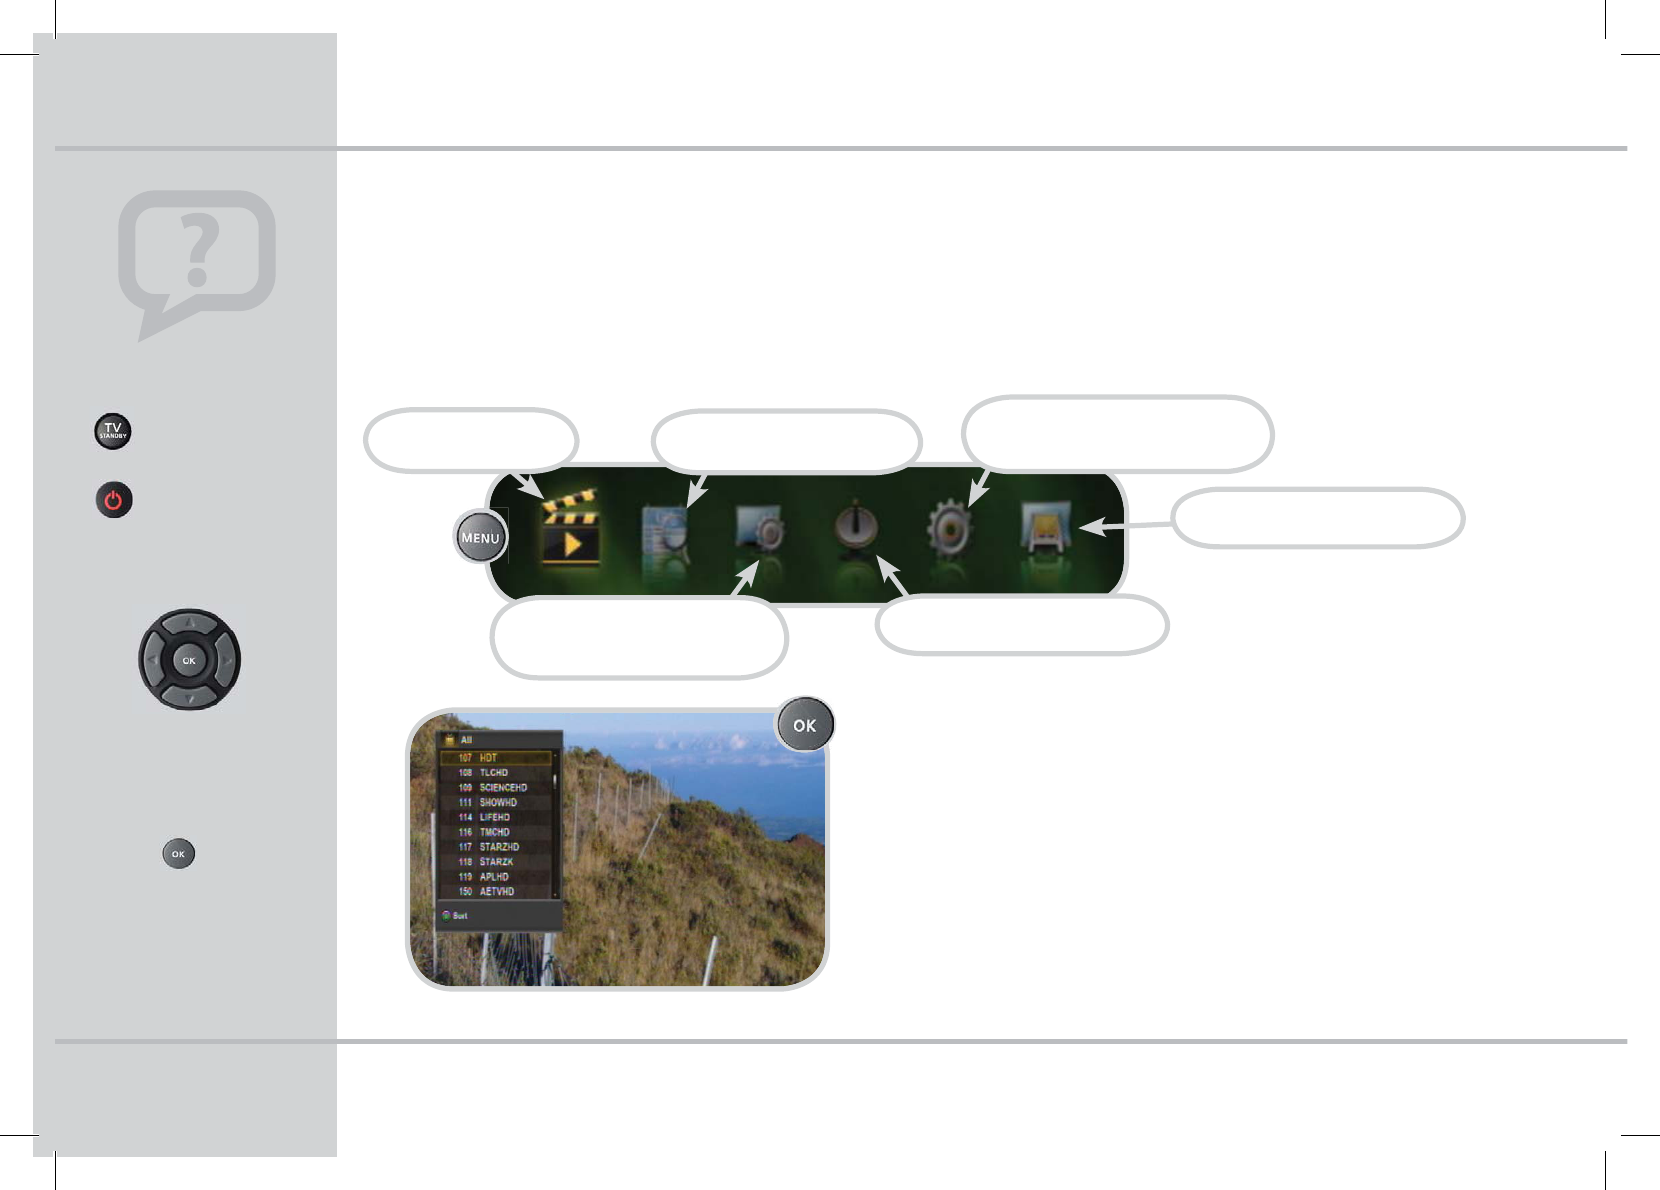
(FUUJOH4UBSUFE
.BJO.FOV
Press the MENU button on your remote to access all your favorite digital cable features.
#SPXTJOH$IBOOFM-JTUJOHT
tPress the OK button to view a quick list of channels in numerical
order with the ability to sort the channel line-up.
$IBQUFS2VJDL5JQT
EDIT CHANNEL LIST
Create Favorites, Parental Lock,
Skip and Delete channels
SYSTEM SETTINGS
Language, AV Settings (HDTV),
On-screen display (OSD) and more.
INSTALLATION
For authorized technicians only.
CA SYSTEM
For authorized technicians only.
OK
OK
/BWJHBUJPO5JQT
Press TV/Standby to turn
on your TV.
Press Power to turn
on the HD Set-Top Box.
PROGRAM GUIDE
View current program listings
PVR
Personal Video Recorder
STB_Evolution_Cab_110444_KCF-BG3HCOD_Eng( ).indd 8 2009-03-13 10:48:11
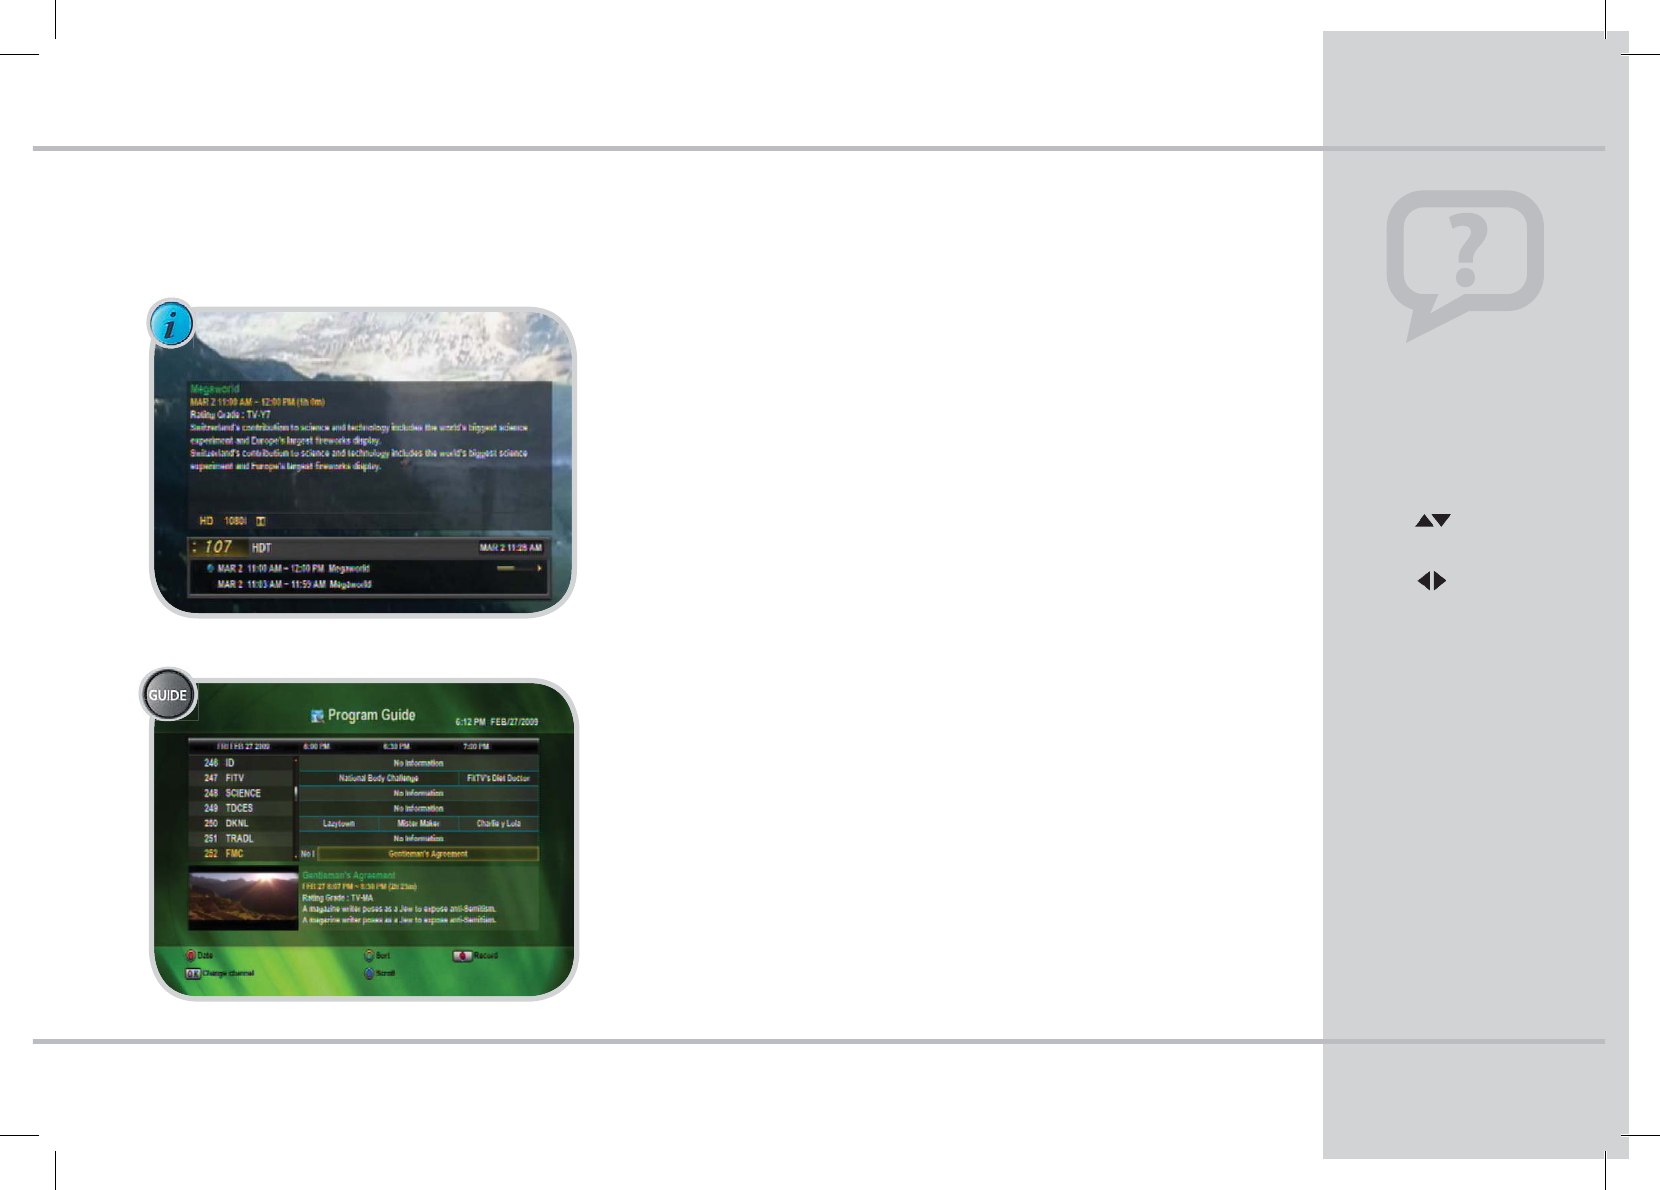
2VJDL5JQT
You can also use the info bar
to browse what’s on other
channels without missing any
of your current program.
tArrow to view
dierent channels.
tArrow to see what
programs are on next.
tPress OK to select a new
browsed programs.
#SPXTJOH
07
$IBQUFSQuick Tips
*OGPSNBUJPO#BS
tPress the INFO button to view on-screen program information.
tThe Info bar will display the channel, title, rating, brief
description and a progress bar, if available.
tPress the INFO button a second time to view the full program
description.
#SPXTJOH57-JTUJOHT
tPress the GUIDE button to view the current program listings.
tUse your arrow buttons to navigate throughout the Guide.
tSelect the highlighted program of your choice by pressing OK.
The selected program will display in the viewing box within the
program guide.
tPress EXIT to watch the selected TV program.
INFO
GUIDE
STB_Evolution_Cab_110444_KCF-BG3HCOD_Eng( ).indd 9 2009-03-13 10:48:12

2VJDL5JQT
Make sure to confirm the
Parental Control option is
enabled:
tPress the MENU button on
your remote. Select System
Settings, Enter your PIN
code (default 0000)*.
tLock Control: Press OK,
Select Channel Lock “ON”
and press OK.
Quick Tip
08
1"3&/5"-$0/530-
$IBQUFS2VJDL5JQT
3BUJOH-PDL
To restrict viewing based on the TV Program Rating
tPress the P-RATE button on your remote.
tEnter the PIN code (default 0000)*.
tChoose the minimum parental rating you would like viewing restrictions
on. For instance, if you choose TV-14, that rating and anything above will
be locked. Parental Rating Lock will take eect immediately.
$IBOOFM-PDL
To lock individual channels
tPress the MENU button, select the Edit Channel List icon.
tEnter your PIN code (default 0000)*.
tSelect LOCK.
tArrow to the right to identify which channel you would like to lock
select OK to add that channel to the lock list.
tPress EXIT and conrm your settings.
MENU
5PMFBSONPSFBCPVU1*/DPEFTSFGFSUPQBHF
STB_Evolution_Cab_110444_KCF-BG3HCOD_Eng( ).indd 10 2009-03-13 10:48:13

2VJDL5JQT
While setting up your
Favorite List,
tPress the BLUE button
tKeyboard displays,
arrows to navigate
and OK to select
tPress the RED Save
button.
09
$IBQUFSQuick Tips
'"703*5&4
4FU6Q'BWPSJUF-JTUT
tPress MENU button.
tSelect the Edit Channel List icon on the main menu.
tEnter the PIN code (default 0000)*.
tScroll to favorites, select OK to expand the list of customizable favorites.
tSelect a favorite list.
tArrow to the right and individually add channels by pressing OK.
tPress EXIT and Save your new favorite list.
"DDFTT:PVS'BWPSJUF-JTUT
tPress the Green SORT button.
tUse Arrow buttons to highlight favorites.
tArrow to the right to select the Favorite list.
tPress OK.
tThe selected Favorite channel list will display.
3FOBNF'BWPSJUFT
MENU
5PMFBSONPSFBCPVU1*/DPEFTSFGFSUPQBHF
STB_Evolution_Cab_110444_KCF-BG3HCOD_Eng( ).indd 11 2009-03-13 10:48:13

2VJDL5JQT
CHECK YOUR PROGRESS
tPress the PROGRESS BAR
button on your remote.
tThe progress bar displays
the current play status, the
total recorded time and
elapsed time.
tThe hour and minute of
the total duration (top) and
cursor duration (bottom)
will display on the right.
1SPHSFTT#BS
10
1"64&3&8*/%-*7&57
$IBQUFS2VJDL5JQT
1BVTF-JWF57
TimeShift Functionality
tPress the PAUSE button on your remote to pause live TV.
t1MFBTFNote: You must be on the channel you would like to pause for at
least 5 seconds before the pause functionality will start to work.
tLive TV will pause for approximately 30 minutes before resuming live TV.
tPress PLAY at any time to resume. Press the Progress Bar button to view
the progress bar at the bottom of the screen.
3FXJOE-JWF57
You can rewind live TV on the channel you are currently watching
tPress the REWIND button on your remote to rewind live TV.
tThe rewind function only applies to the current channel you are viewing.
You must be on the channel for at least 5 seconds for the rewind
functionality to start to work. You will only be able to rewind for the
time you have been on the channel.
Please note: While you are in rewind mode, if you switch to another channel, then
switch back to the program you have rewinded, the former channel will not save your
rewind location but rather return to live TV. We recommend pressing the Record
button if you would like to re-access this program later.
5PMFBSONPSFBCPVU1*/DPEFTSFGFSUPQBHF
STB_Evolution_Cab_110444_KCF-BG3HCOD_Eng( ).indd 12 2009-03-13 10:48:14
2VJDL5JQT
11
$IBQUFSQuick Tips
1&340/"-7*%&03&$03%&3173
)PXUP3FDPSE
While Watching TV
tPress the RECORD button.
tA notice will appear on the top right side of your screen to indicate
the recording has started, this includes the recording time remaining.
tPress the RECORD button a second time to edit the settings.
While in the Electronic Program Guide (EPG)
tScroll to the channel, date and time of the program you would like to record.
tPress the RECORD button, a red icon will appear on the program title.
tPress the RECORD button a second time to edit the settings.
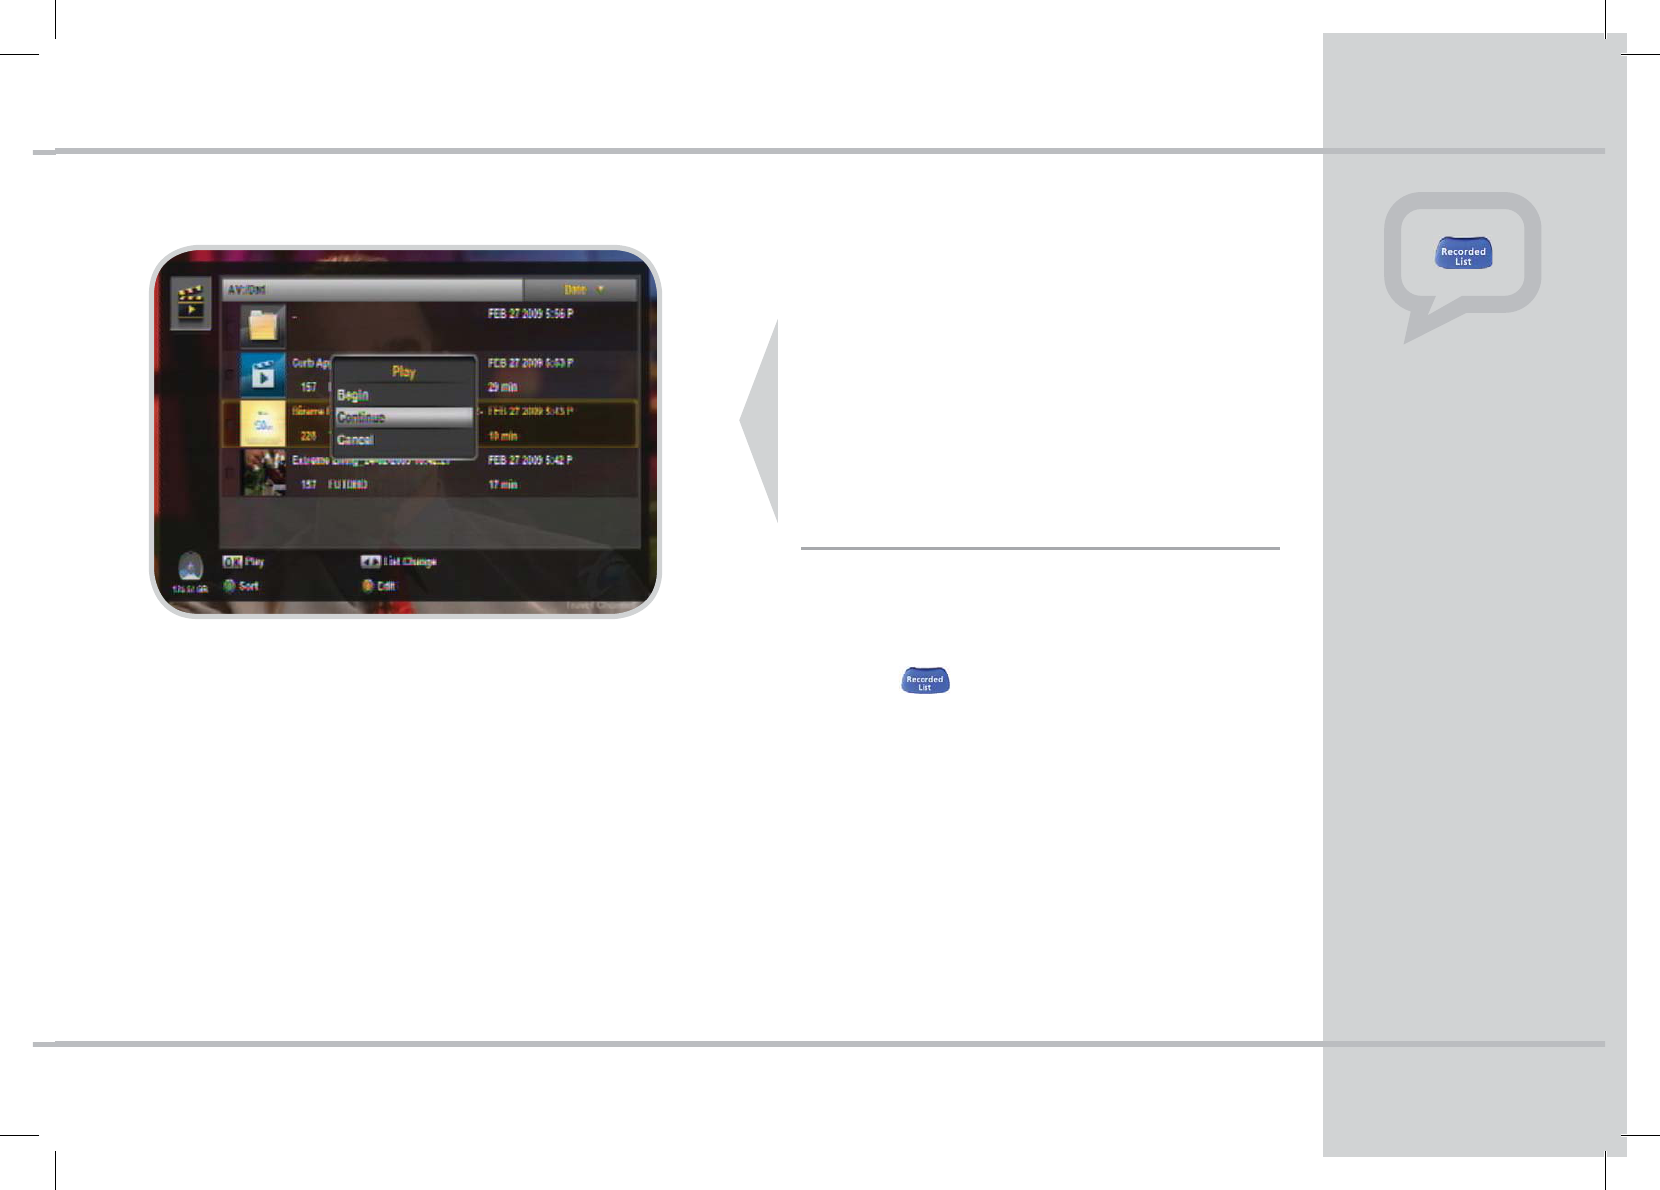
8BUDI:PVS3FDPSEFE1SPHSBNT
tPress the RECORDED LIST button to view a list of recorded programs.
tScroll to the recorded program of your choice and press OK.
Note:
tThe Movie Clip image will display for programs not yet watched, recorded
programs that have been view will display a screen shot of the program.
tChoose to #FHJO from the start of the program or Continue the program
from where it was last stopped watching.
5PMFBSONPSFBCPVU1*/DPEFTSFGFSUPQBHF
To STOP a recording
tPress the stop button at any
time while recording.
tThe stop list will display.
tPress the up/down buttons
to select the program you
would like to stop recording,
press OK to select.
tPress the STOP button
to conrm the end of
recording.
Quick Tip
STB_Evolution_Cab_110444_KCF-BG3HCOD_Eng( ).indd 13 2009-03-13 10:48:15
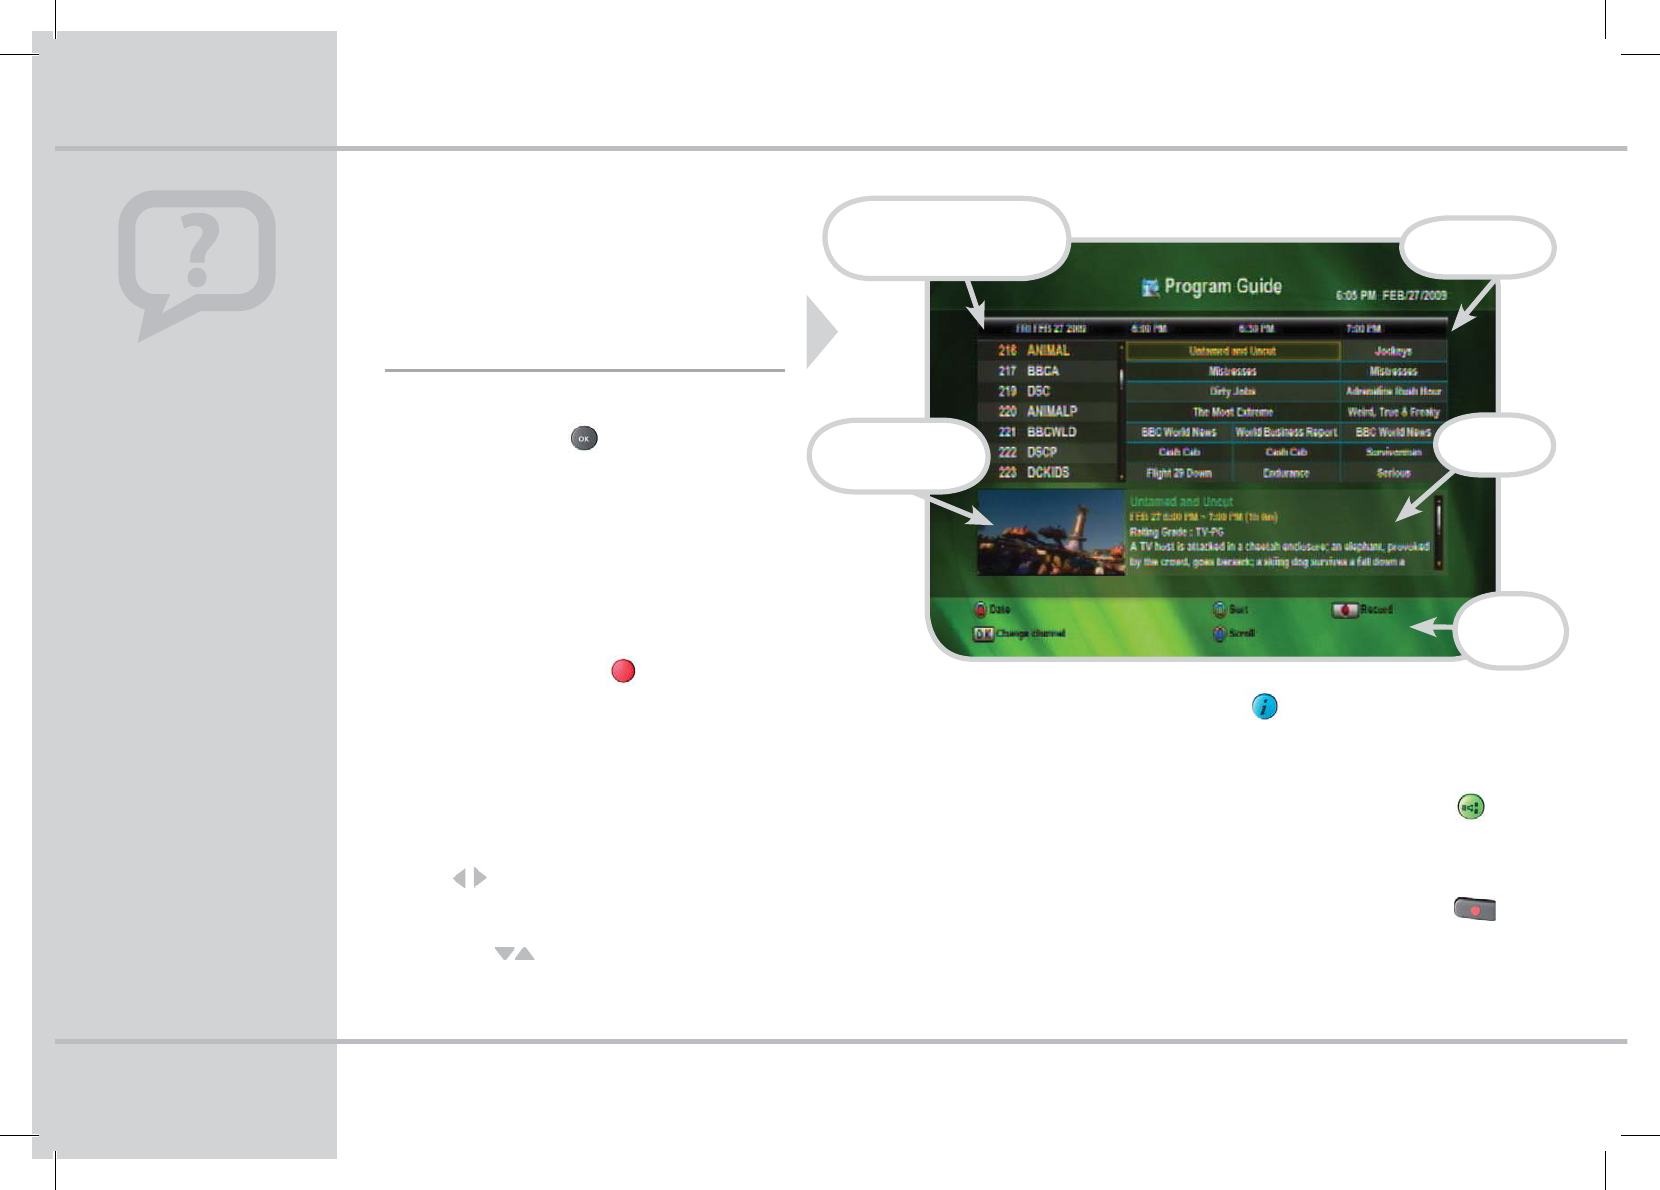
1SFTTUIF(6*%&CVUUPOPSTFMFDU
1SPHSBN(VJEFGSPN.BJO.FOV
1SPHSBN(VJEF
(6*%&$0/530-4
4FMFDU1SPHSBN
Select a program by pressing the OK button
on your remote.
tThe selected program will display in the “Viewing
Window”.
tThe Program Information will display the program
title, time, rating, and a brief description.
tPress EXIT to watch the selected program.
View Future Dates
tPress the RED date button on your remote to view
program listings for future dates.
tHighlight the date you would like to view.
tPress the RED button on your remote a second
time to return to today’s date or press EXIT to
return to watching TV.
Time
Scroll to the right to view future program information.
Channel
Use the arrow buttons to navigate the program guide
by channels.
Premium or Pay Per View
channels may have a “$” sign
next to the channel and may
not be available for viewing
without upgrading your ser-
vice. Please contact your Ser-
vice Provider to discuss your
premium channel options.
Not all guide information may
be available at all times.
/PUF
$IBQUFSProgram Guide
The channel list displayed
is the currently sorted list
(i.e. favorites)
Viewing Window
displays currently
selected program
Scheduled
Program Listings
Program
Information
Scroll Program Information
Press the BLUE button on your remote to scroll and view the complete
program description of the selected program.
View Additional Channel Lists and Sort Guide
Press the GREEN button to sort the program guide alphabetically
(A-Z or Z-A), with favorite lists, locked channels or numerically.
Record Programs listed in the Program Guide
tScroll to the channel, date and time of the program you would
like to record.
tPress the Record button on your remote, a red record icon will appear.
Available
Guide
Controls
STB_Evolution_Cab_110444_KCF-BG3HCOD_Eng( ).indd 14 2009-03-13 10:48:16

With Parental Controls you can restrict
your children from seeing specics
channels or shows with certain ratings.
Channel and Rating restrictions will take
eect immediately. The user will be
prompted to enter a PIN code for any
channel that has been restricted.
1BSFOUBM$POUSPM
Quick Tip
13
3FTUSJDU7JFXJOH#BTFEPOUIF573BUJOHT
To set Parental Controls by restricting TV Program Rating levels
tPress the button on your remote.
tEnter the PIN code (default 0000)*.
tChoose the minimum parental rating you would like viewing
restrictions on, for instance, if you choose TV-14, that rating and
anything above will be locked. Parental Rating Lock will take
eect immediately.
$IBQUFSParental Control
Conrm the Parental Control
option is enabled
tPress the MENU button
on your remote. Select
System Settings, Enter
your PIN code.
(default 0000)*
tLock Control: Press OK,
Select Channel Lock “ON”
and press OK.
3FTUSJDU7JFXJOHPG*OEJWJEVBM$IBOOFMT
To set Parental Controls by restricting individual
channels, you must have the Parental Lock function
enabled; refer to the side panel to learn how to enable
your Parental Lock function.
tPress the button, select the Edit Channel List.
tEnter your PIN code (default 0000)*.
tSelect LOCK.
tArrow to the right to identify which channel you
would like to lock, select OK to add the channel
to the lock list.
tPress EXIT and conrm your settings.
5PMFBSONPSFBCPVU1*/DPEFTSFGFSUPQBHF
STB_Evolution_Cab_110444_KCF-BG3HCOD_Eng( ).indd 15 2009-03-13 10:48:17

$SFBUFVQUPGBWPSJUFMJTUT
XJUIVOJRVFOBNFTGPSFBTZ
BDDFTTXIJMFXBUDIJOH57PS
VTJOHUIFHVJEF
5P4FU6Q'BWPSJUF-JTUT
1. Press MENU button.
2. Select Edit Channel List icon on the
Main Menu.
3. Enter the PIN code (default 0000)*, if
prompted.
4. Highlight favorites, select OK to expand
favorite list to display favorite lists.
5. Select a favorite list and press the
BLUE button to rename.
a. Keyboard displays, use arrows to
navigate and OK to select.
b. Press the RED Save button.
6. Arrow to the right and individually
add channels by pressing OK.
7. Press EXIT and OK to save your new
favorite list.
tPress the Green SORT
button.
tUse Arrow buttons to
highlight favorites.
tArrow to the right to
select the Favorite list of
your choice.
tPress OK.
7JFX'BWPSJUFT
Chapter 7 - Favorites
Select
Edit Channel List
icon
Expand
Favorites
Main Menu Press OK
to select
5PMFBSONPSFBCPVU1*/DPEFTSFGFSUPQBHF
STB_Evolution_Cab_110444_KCF-BG3HCOD_Eng( ).indd 16 2009-03-13 10:48:18
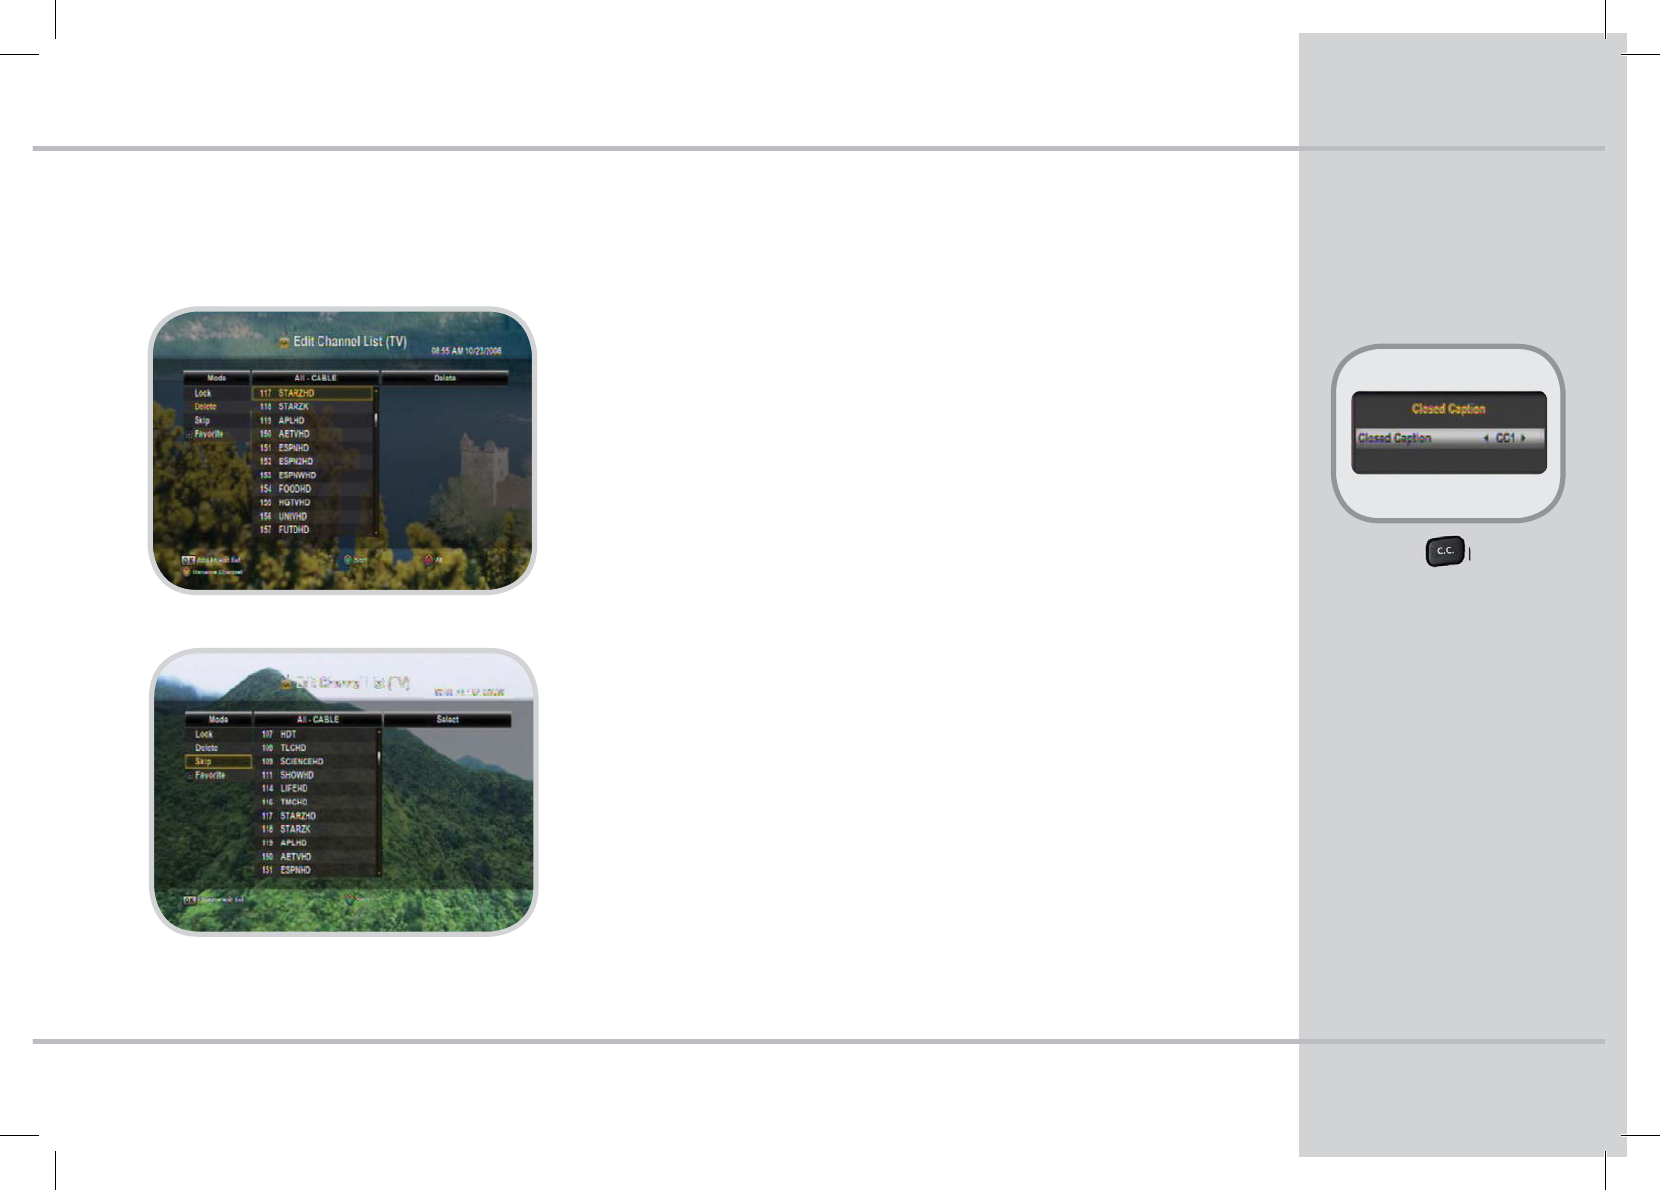
"EEJUJPOBM$IBOOFM&EJUJOH'FBUVSFT
Chapter 8 - Additional Channel Editing Features
t1SFTTUIFCVUUPOPO
your remote to access
Closed Captioning.
t$IPPTFGSPNUIFGPMMPXJOH
options: O, CC1 and CC3.
CC1 is he primary closed
captioning language.
CC3 is the secondary closed
captioning language.
t"SSPXSJHIUBOETFMFDUUIF
option of your choice.
t1SFTT0,UPTBWFUIF$MPTFE
Captioning settings.
%FMFUF$IBOOFMT
Caution: All channel deleting will be nal. To restore deleted channels you
will need to contact your cable provider.
tTo delete specic channels, press the MENU button, select the Edit Channel
List icon.
tEnter your PIN code (default 0000)* if prompted.
tHighlight and select DELETE, Arrow to the right and individually select
channels to delete by pressing OK.
tPress EXIT and it will prompt you to save your selection.
4LJQ$IBOOFMT
Channel skipping only applies if you are currently viewing all channels.
The skipped channel will not appear while browsing Channel Listing or
viewing the Program Guide.
tTo skip specic channels, press the MENU button, select Edit Channel List.
tEnter your PIN code (default 0000)*, if prompted.
tHighlight and select SKIP, Arrow to the right to identify which channel you
would like to skip, select OK.
tPress EXIT and it will prompt you to save your selection.
$MPTFE$BQUJPO
5PMFBSONPSFBCPVU1*/DPEFTSFGFSUPQBHF
STB_Evolution_Cab_110444_KCF-BG3HCOD_Eng( ).indd 17 2009-03-13 10:48:18

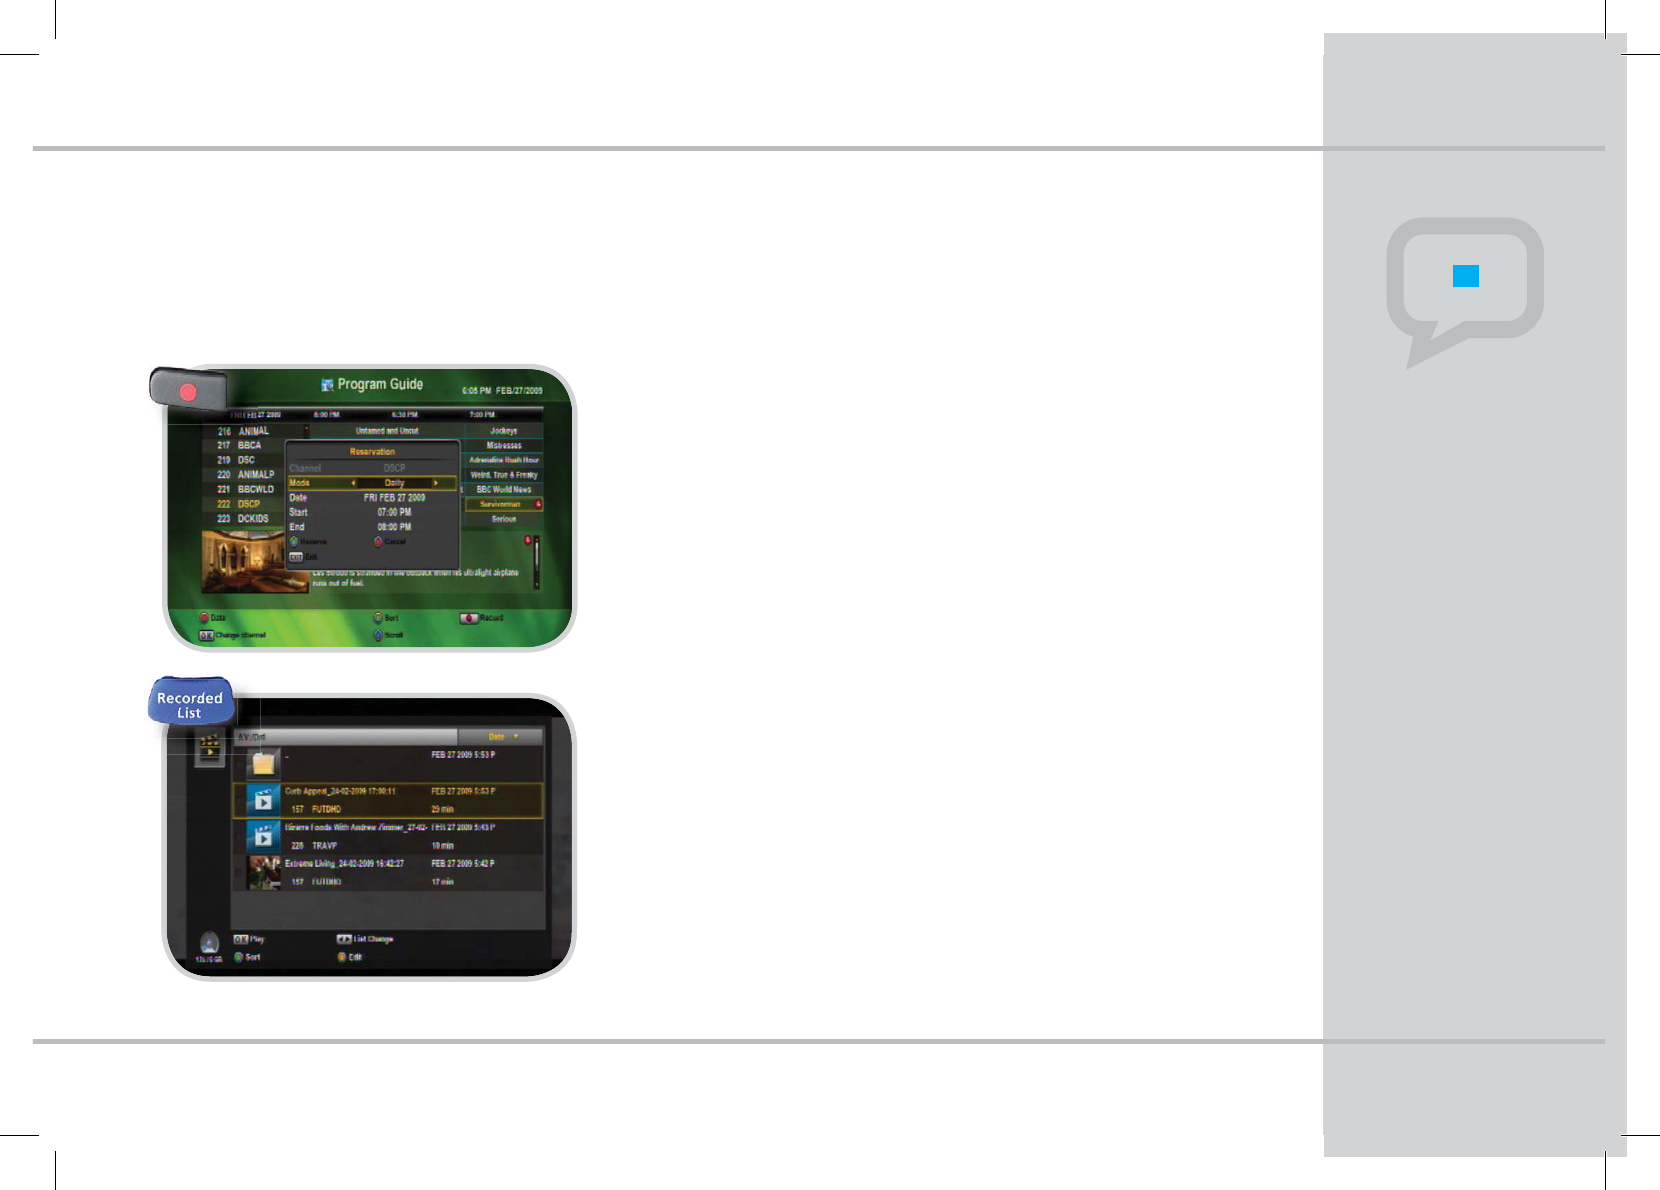
3FTFSWBUJPOT
5IFSFDPSEJDPOPOUIFGSPOU
QBOFMPGUIF173XJMMMJHIUVQ
SFEUPJOEJDBUFZPVBSF DVS-
SFOUMZSFDPSEJOH
Press Record within the
program guide or while
watching TV to start record-
ing a program.
Chapter 9 - Personal Video Recorder
4FUVQB3FTFSWBUJPOGPSB'VUVSF3FDPSEJOH
tWhile in the Program Guide scroll to the channel, date and time of the program
you would like to record.
tPress the RECORD button, a red icon will appear on the program title.
tPress the RECORD button a second time to edit the settings.
tScroll to the right to select the Reservation mode: Once, Daily or Weekly.
tPress the Green RESERVE button to set the reservation.
7JFXBMM$VSSFOU3FTFSWBUJPOT
tPress the MENU button on your remote, select the PVR icon.
tScroll to 3FTFSWBUJPOand press OK.
tYour program Reservation list will display including the channel, date, time,
duration and frequency.
= Daily Recording
= Weekly Recording
To adjust any of your reserved recordings, press the Yellow Edit button. This will
allow you to update the duration, frequency, etc.
D
7
Quick Tip
STB_Evolution_Cab_110444_KCF-BG3HCOD_Eng( ).indd 18 2009-03-13 10:48:19
Evolution’s DMS-2042-HD-PVR allows
you to record on the spot or set fu-
ture Reservations for programs you’d
like to record. The PVR will record up
UPQSPHSBNTBUUIFTBNFUJNFXIJMF
XBUDIJOHBOPUIFS Simply press Record
on the program of your choice.
3FDPSEFE-JTU
Quick Tip
17
Chapter 9 - Personal Video Recorder
Press the Recorded List
button to view available
recorded programs for your
viewing pleasure.
To %FMFUF a recorded pro-
gram from the Recorded
List, press the Yellow Edit
button. Scroll to Delete and
press OK.
CAUTION: Once you press
OK, the program will be per-
manently deleted.
.BOBHF:PVS3FDPSEFE1SPHSBNT
Set up Directories to easily navigate through your recorded
programs. Create personal folders for favorite recordings
(i.e. Sitcoms, Movies, Kids programs, etc.).
tWhile in the 3FDPSEFE-JTU screen, press the Yellow EDIT
button to create a “New Folder”.
tPress the Yellow EDIT button a 2nd time to rename.
tType the name of your choice using the arrow buttons.
Press OK to select the letters and symbols.
tPress the RED button to Save your new directory title.
Helpful Tips: While renaming, use the Green Delete button
to backspace. Select any blank square to add a space.
0SHBOJ[F3FDPSEFE1SPHSBNT
Categorize Your Recordings into Folders.
tPress the button on your remote. Once folders
are created, highlight a recorded program you would
like to move.
tPress the Yellow EDIT button, use the arrow buttons
to scroll to “MOVE”, press OK to select.
tSelect the directories from the list by scrolling
up/down, press OK on the directory of your choice.
Note: The recorded list will bring up the last directory
(folder) viewed. If you are in a subdirectory (i.e. AV:/
Movies/Dad’s) press the OK button to change directo-
ries. You must be on the top folder icon to return back
to the main directory screen.
STB_Evolution_Cab_110444_KCF-BG3HCOD_Eng( ).indd 19 2009-03-13 10:48:20
The image in the bottom left
of the screen
will display how much space
is left on your HDD (Hard
drive for storage) in percentage.
Quick Tip
18
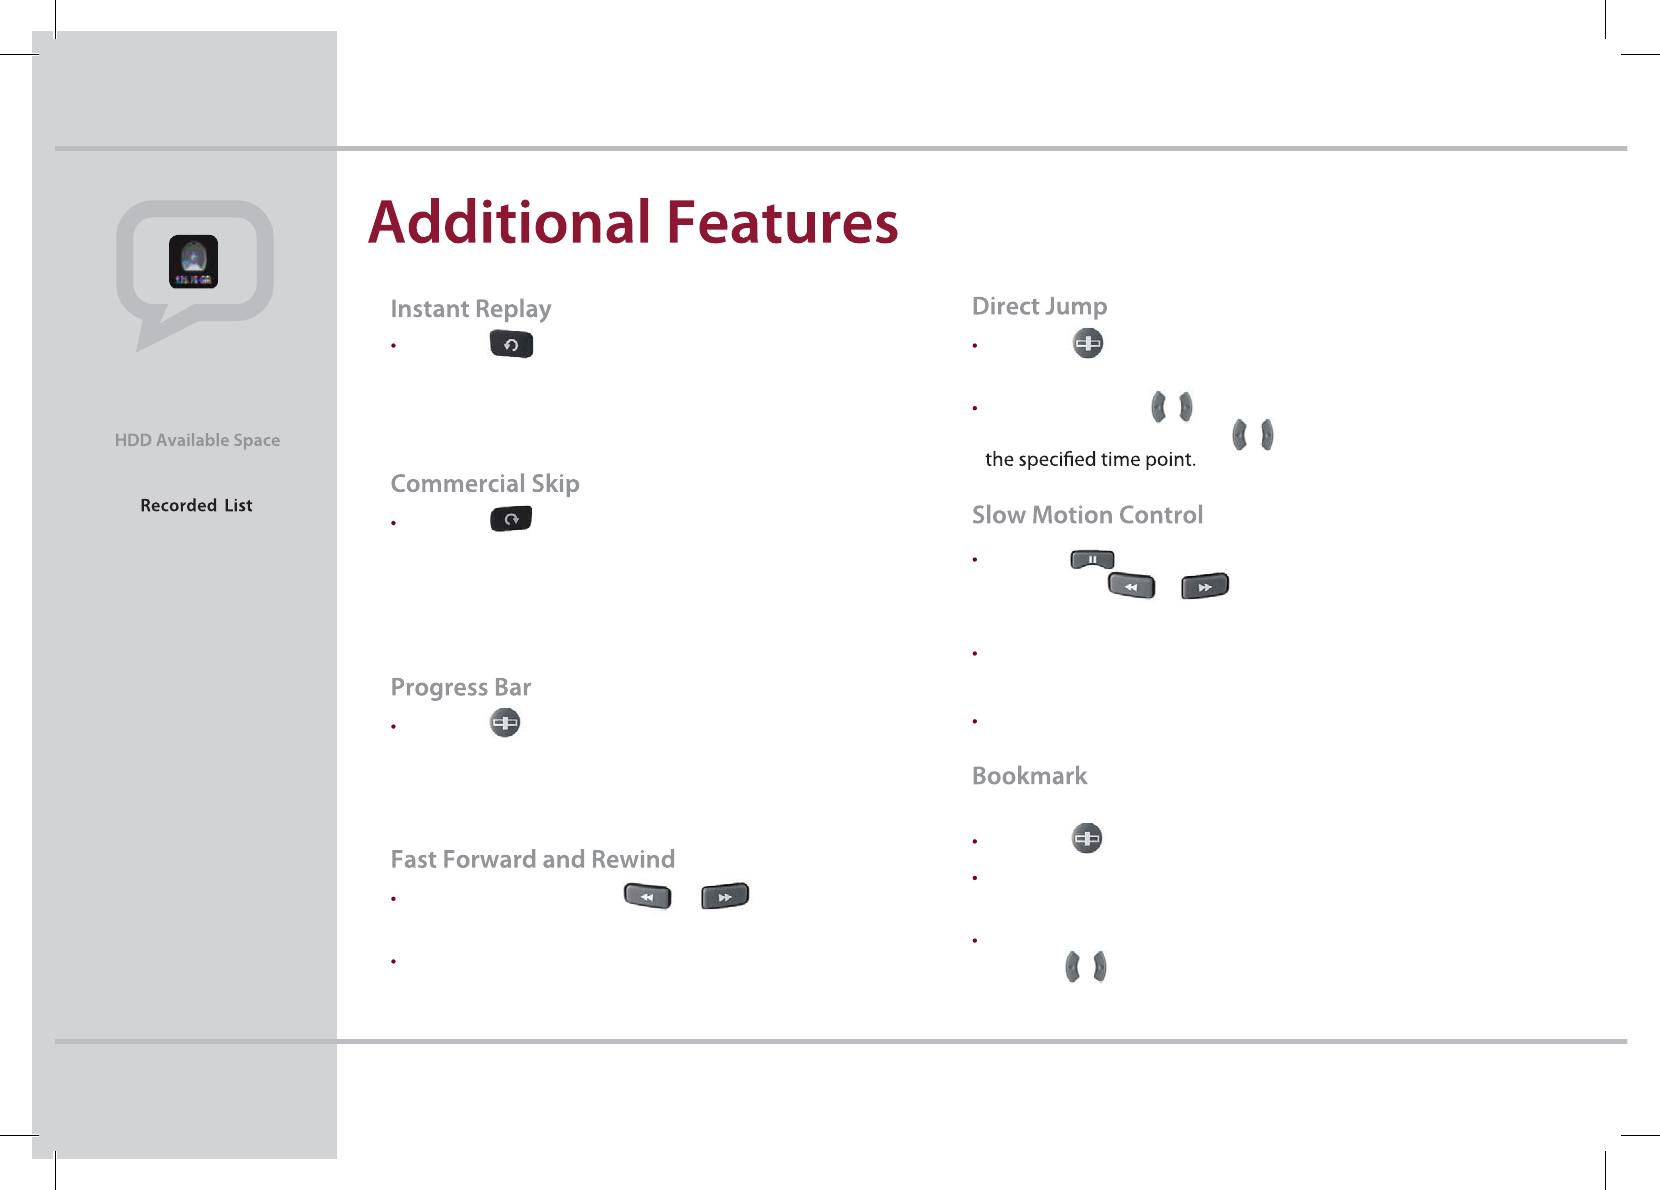
Press the button to jump back and replay a scene.
To change the Instant Replay from 30 seconds, press MENU, PVR, PVR
Settings, Press OK, scroll to Instant Replay, press OK and scroll to select
the preferred time settings: 10 seconds, 20 seconds, 30 seconds, etc.
Press the button to jump forward and skip
commercials.
To change the Commercial Skip default time from 30 seconds, press
MENU, PVR, PVR Settings, Press OK, scroll to Commercial Skip, Press OK
and scroll to select the preferred time settings.
Press the button on your remote while watching a
recorded program to display the progress bar.
Progress bar displays the current play status, the total
recorded time and elapsed time (Hour:Minute).
Each time your press the or button,
the speed increases (x2, x4, x8, x16, x32, etc.).
Press the play button at the desired spot to play.
Chapter 9 - Personal Video Recorder
Press the button on the currently playing screen.
The progress bar will appear at the bottom.
Press and hold the / button to move the location icon to
a time point and release the / to play the program from
Press the button while watching a recorded program,
and press the or button to play back/forward
in slow motion.
Each time you press the button, the program plays at 2x,
4x, 8x, 16x or 32x speed.
Press PLAY to resume at the normal speed.
Use BOOKMARKS to search positions quickly and conveniently
Press the button on the currently playing screen.
Press the RED button at a certain position to set a
bookmark
Press the GREEN button to display the bookmark list and
press the / buttons to select the location you want
to view.
STB_Evolution_Cab_110444_KCF-BG3HCOD_Eng( ).indd 20 2009-03-13 10:48:20
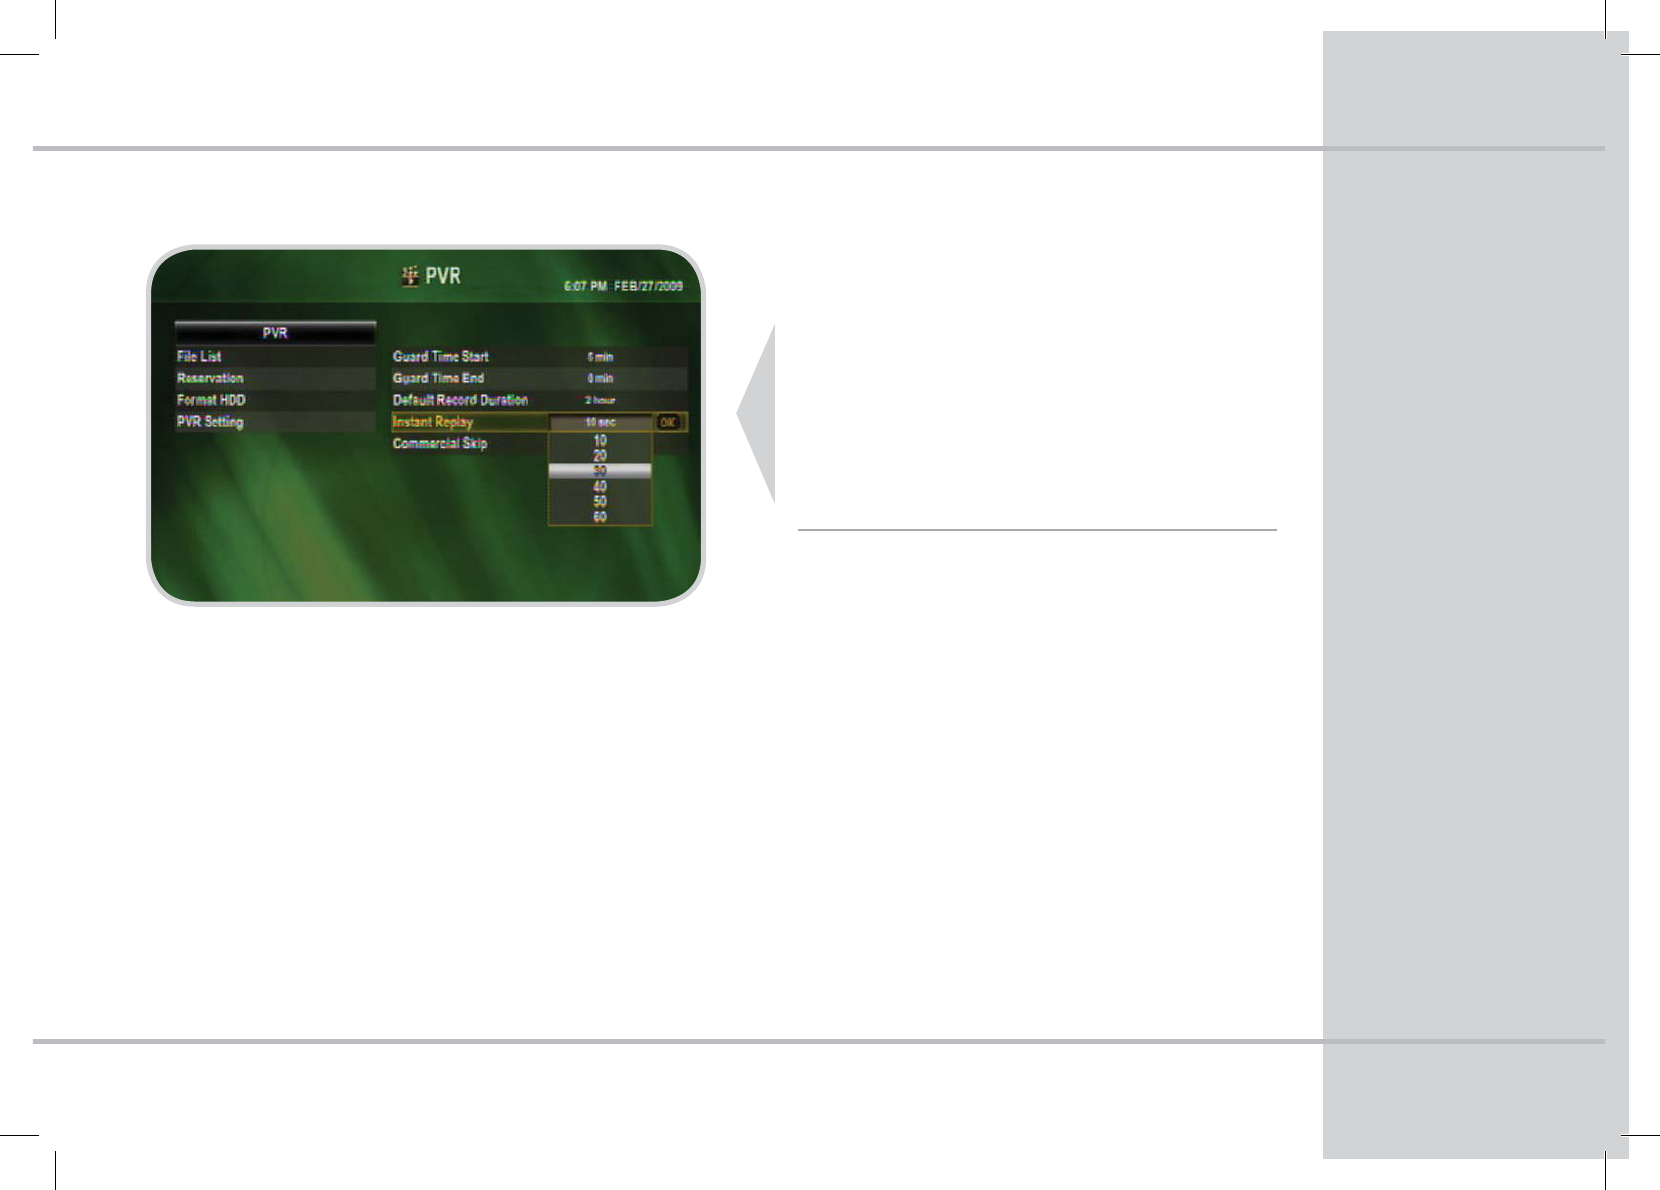
PVR Menu
19
Chapter 9 - Personal Video Recorder
Select PVR in the Main Menu to
customize your PVR settings.
Change your Instant Replay from 10 to
60 seconds or set a Guard Time to make
sure you never miss the crucial 5 minutes
at the start or end of your recordings
PVR Menu
The PVR Menu allows you to change settings and access
reservations and recorded program directories.
tFile List (Recorded List)
View the list of Recorded programs.
tReservation
View the list of Reserved recordings.
tFormat HDD (Selectable only when not recording)
For authorized technician use only. Caution: re-formatting the
HDD will erase all of the recorded programs on the PVR.
tPVR Setting (Selectable only when not recording)
Update and view the default PVR Settings.
PVR Settings
This section is selectable only when no recordings are
taking place. To change the default settings, select PVR
Setting, arrow over and highlight to the Setting you
would like to update and press OK.
tGuard Time Start
Select from 0 - 30 minutes increments.
tGuard Time End
Select from 0 - 30 minutes increments.
tDefault Record Duration
Select from 1 to 4 hours increments.
tInstant Replay
Select from 10 - 60 seconds increments.
tCommercial Skip
Select from 10 - 60 seconds increments.
STB_Evolution_Cab_110444_KCF-BG3HCOD_Eng( ).indd 21 2009-03-13 10:48:21
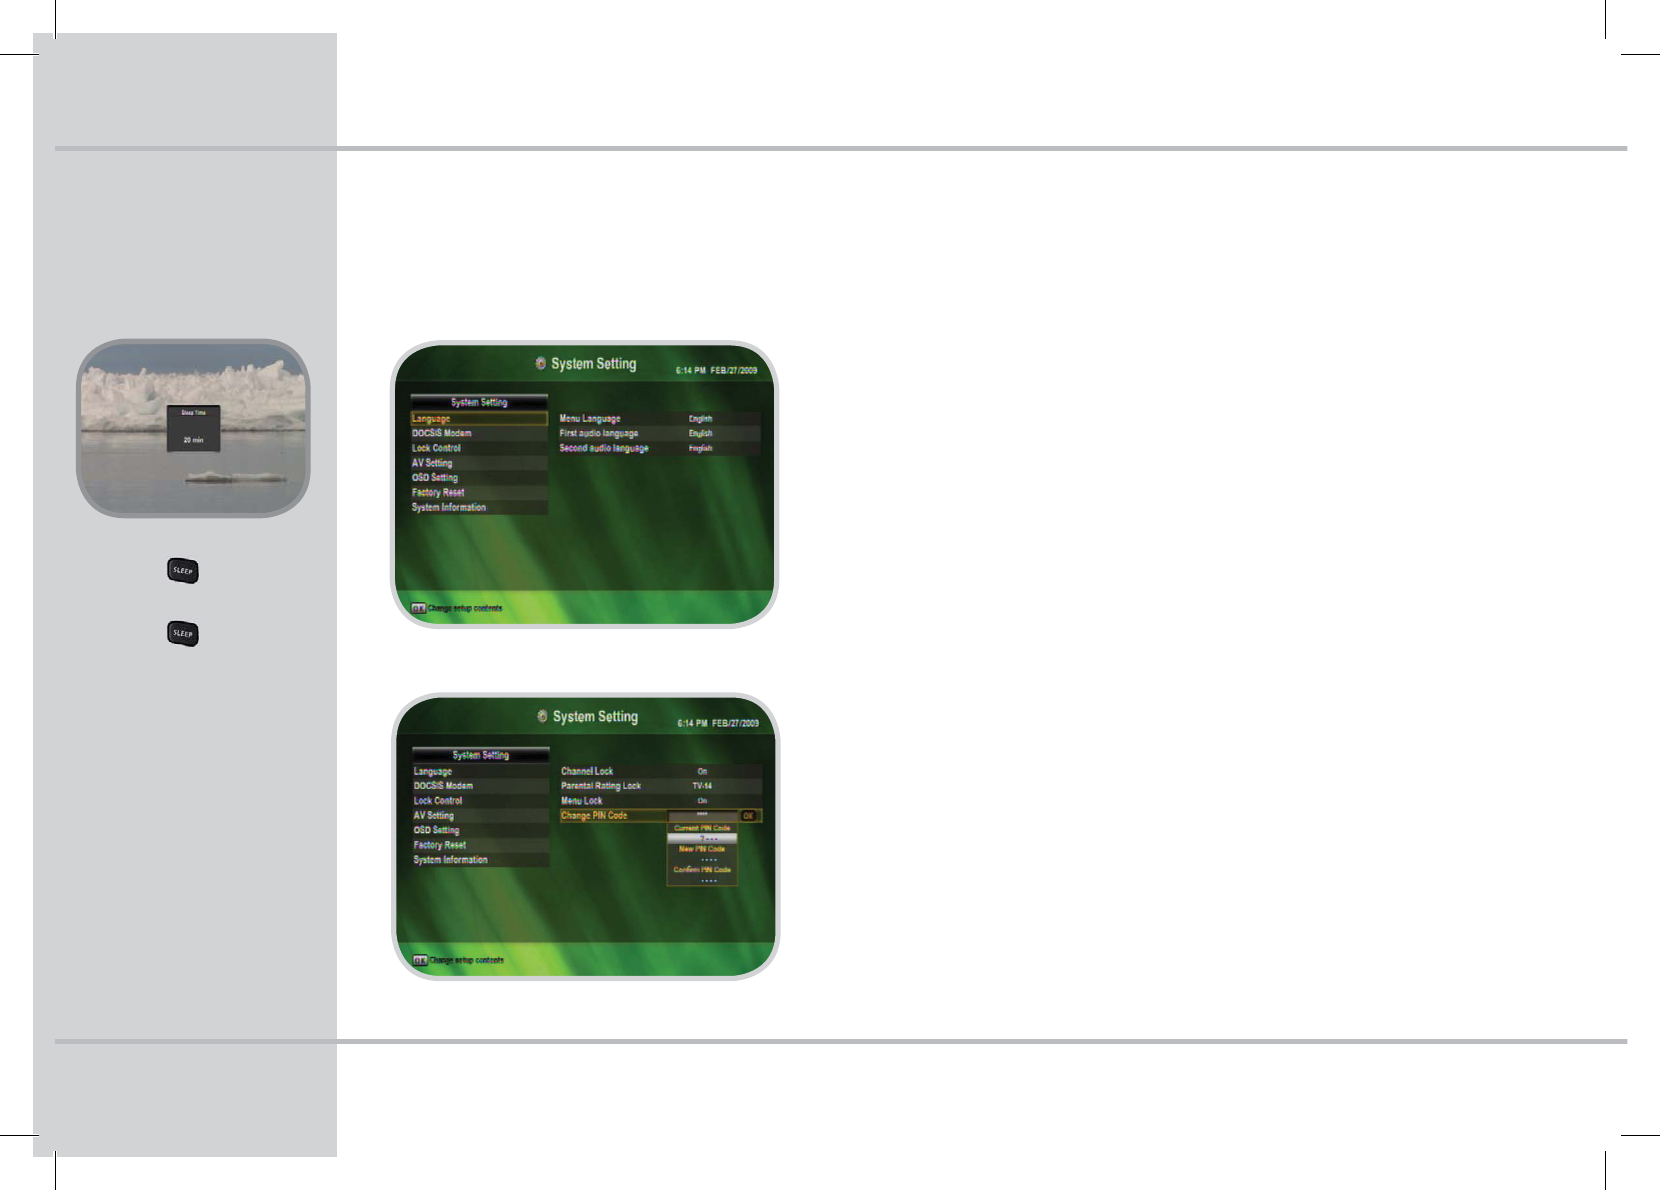
4ZTUFN4FUUJOHT
t1SFTTUIFCVUUPO
on your remote.
t1SFTTUIFCVUUPOBHBJO
to select from the available
10 minute intervals.
Chapter 10 - System Settings
To access System Settings, press the MENU button. Select System Settings.
-BOHVBHF4FUUJOHT
5IF%.4)%173JTTFUUPEJTQMBZJO&OHMJTI
t To change the language you see highlight Menu Language and arrow
over and highlight to the language you want displayed and press OK.
t To change the language you hear highlight Audio Language and arrow
over and highlight to the language of your choice and press OK. You
can set up another language under Audio Language 2.
Please Note: The availability of the language in the program information and audio is
determined by the broadcaster, when available the PVR will support your selections.
%0$4*4.PEFN
'PS5FDIOJDJBO6TF0OMZ
-PDL$POUSPMT
tChannel-PDL On/O
This allows you to turn on or o the locking feature. Note: When O is
selected this will override the individual channel locks.
t1BSFOUBM3BUJOH-PDL Select viewing restrictions based on TV ratings.
t.FOV-PDL On/O
If Menu Lock is enabled this restricts access the Edit Channel List and
System Settings. This is important to secure the Lock Control access.
t$IBOHF1*/$PEF
t Highlight Change PIN code, press OK to view drop down options.
t Enter your current PIN code, enter new PIN code and conrm PIN code.
t It will show “success” if you enter the right PIN code for the conrmation.
4MFFQ5JNFS
STB_Evolution_Cab_110444_KCF-BG3HCOD_Eng( ).indd 22 2009-03-13 10:48:22

4ZTUFN4FUUJOHT
If available, an alternative
audio can be selected
(i.e. English, Spanish, etc.)
tPress the AUDIO button
on your remote
tArrow to the left or
right to select the
desired audio setting
(Stereo, Mono, Left,
Right).
tPress EXIT
"VEJP4FUUJOHT
Chapter 10 - System Settings
"74FUUJOHT
tTV
Aspect Ratio, Select OK on TV. For HDTV select 16:9, For standard denition
select 4:3.
tDisplay Format
To change Display Format, highlight the type you want; Auto, Pillar box or
Pan & Scan and press OK.
tResolution
To change Screen Resolution, highlight the type you want; 1080i, 480p or
720p and press OK.
04%4FUUJOH
0O4DSFFO%JTQMBZ04%BMMPXTZPVUPDVTUPNJ[FUIFVTFSJOUFSGBDF
tMenu Transparency
To change the menu transparency, highlight the percentage of brightness
you desire and press OK.
tBanner Time
To change the default banner time, highlight the seconds for it to display,
press OK.
'BDUPSZ3FTFU
'PS5FDIOJDJBO6TF0OMZ
4ZTUFN*OGPSNBUJPO
'PS5FDIOJDJBO6TF0OMZ
STB_Evolution_Cab_110444_KCF-BG3HCOD_Eng( ).indd 23 2009-03-13 10:48:22

HDMI allows you to take full
advantage of the Evolution HD
Set-top box high-definition
digital features.
1. Connect the RF coaxial
cable to the cable wall
outlet and the RF IN port
on the DMS-2042-HD-PVR.
2. Connect the HDMI cable
to the HDMI port on
DMS-2042-HD-PVR and the
HDMI port on your HDTV.
3. Plug in the power cord to
the electrical wall outlet
and the “DC 12V IN” port
on the DMS-2042-HD-PVR.
*Note: HDMI cables carry audio and video
to the TV.
HDMI Cable
HDTV Connection
You can connect the DMS-
2042-HD-PVR Set-Top Box
to the TV in several ways
depending upon available
TV connections. We have
highlighted the three recom-
mended connections. The
DMS-2042-HD-PVR comes
with Component and Com-
posite Audio/Video cables.
Quick Tip
22
Chapter 11 - Cable Connections
To Electrical Outlet
To Coaxial Wall Outlet
HDMI (IN)
To T V
STB_Evolution_Cab_110444_KCF-BG3HCOD_Eng( ).indd 24 2009-03-13 10:48:24
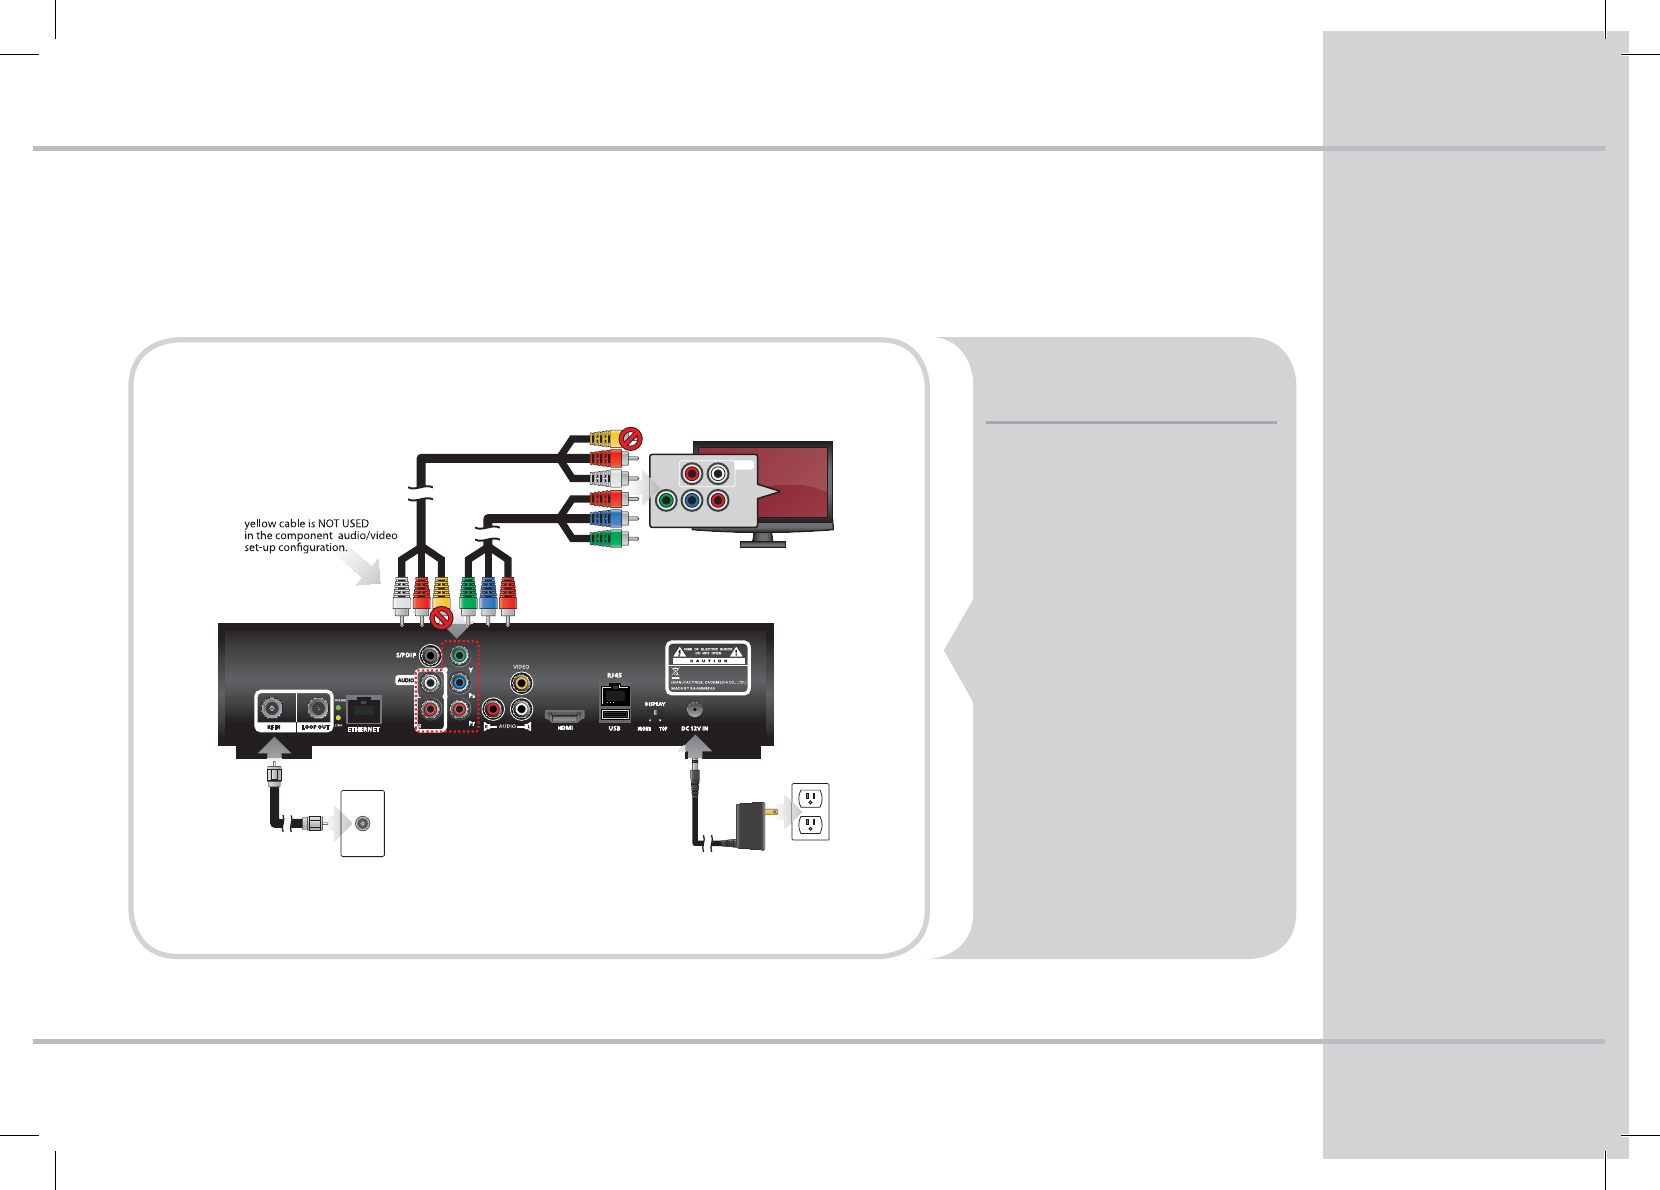
1. Connect the RF coaxial cable
to the cable wall outlet and the
RF IN port on the PVR.
2. Connect the Green, Red and
Blue wire connections to the
matching color ports on the TV
and HD Set-top box. This pro-
vides the video signal.
3. Connect the Red and White
wire connections to the match-
ing color ports on the TV and HD
Set-top box, leaving the Yellow
video cable unplugged. This
provides the audio signal.
4. Connect the power cord to
the electrical wall outlet and the
“DC 12V IN” port on the PVR.
Component Video/
Composite Audio
HD Video/Analog Audio Connection
23
Chapter 11 - Cable Connections
YPbPr
LR
AUDIO
To TV
To Electrical Outlet
To Coaxial Wall Outlet
STB_Evolution_Cab_110444_KCF-BG3HCOD_Eng( ).indd 25 2009-03-13 10:48:24
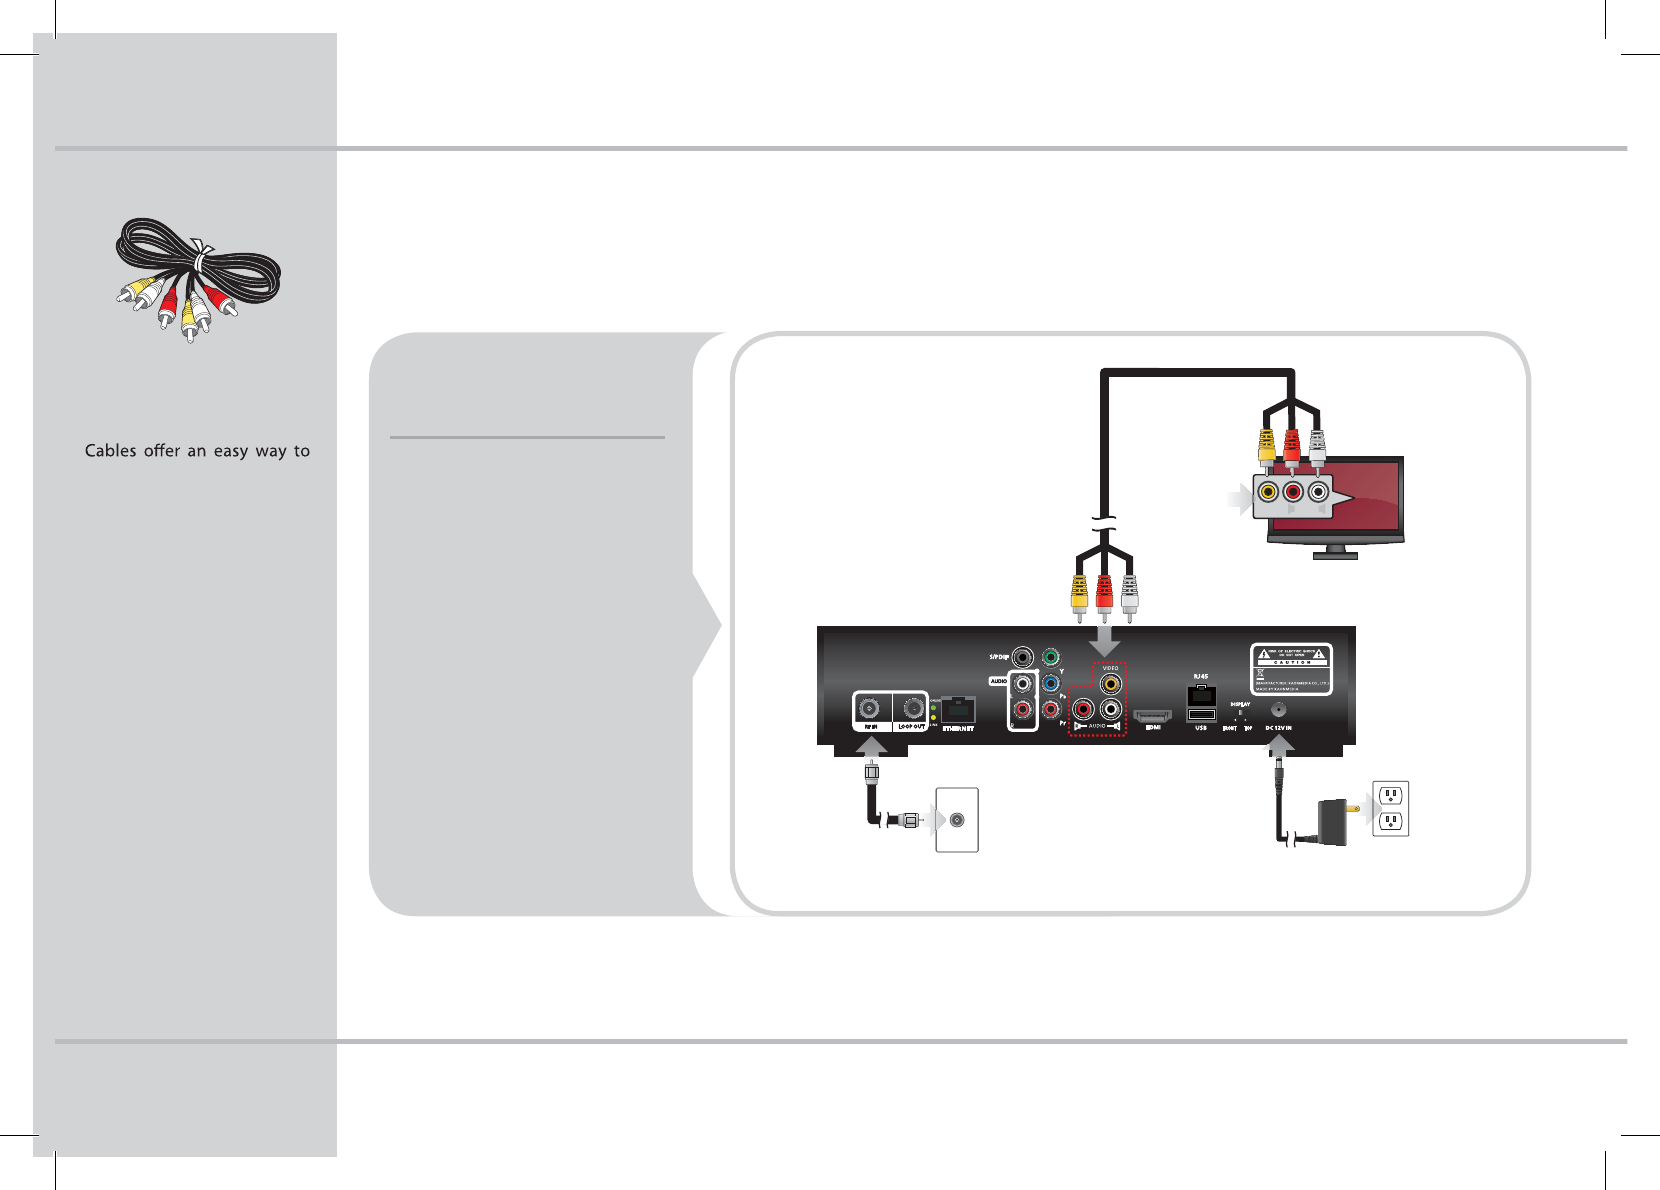
Analog Audio/Video Connection
Composite Audio/Video
connect your TV. These AV
Cables are provided with your
DMS-2042-HD-PVR and pro-
vide both audio and video in
one cable.
Quick Tip
24
Chapter 11 - Cable Connections
1. Connect the RF coaxial
cable to the cable wall
outlet and the RF IN port
on the DMS-2042-HD-PVR.
2. Connect the Red, White and
Yellow wire connections to
the matching color ports on
the TV and HD Set-top box.
This provides both video
and audio signals to your
TV.
3. Plug in the power cord to
the electrical wall outlet
and the “DC 12V IN” port
on your DMS-2042-HD-PVR.
Composite Audio/
Video Cable
To Electrical Outlet
To Coaxial Wall Outlet
To TV
VIDEO
R
AUDIO
L
STB_Evolution_Cab_110444_KCF-BG3HCOD_Eng( ).indd 26 2009-03-13 10:48:25
t'PSUIFXBMMQBSUZPVNVTU
VTFTDSFXTCBTFEPOUIF
UZQFPGXBMMXPPEDPODSFUF
PSQMBTUFS
t%POPUNPVOUUIF)%
4FU5PQCPYPOBOZMPDBUJPO
PUIFSUIBOBWFSUJDBMXBMM
t6TFPOMZSFDPNNFOEFEQBSUT
BOEDPNQPOFOUT$POUBDU
ZPVSDBCMFQSPWJEFSUPPSEFS
UIJTPQUJPOBMBDDFTTPSZ
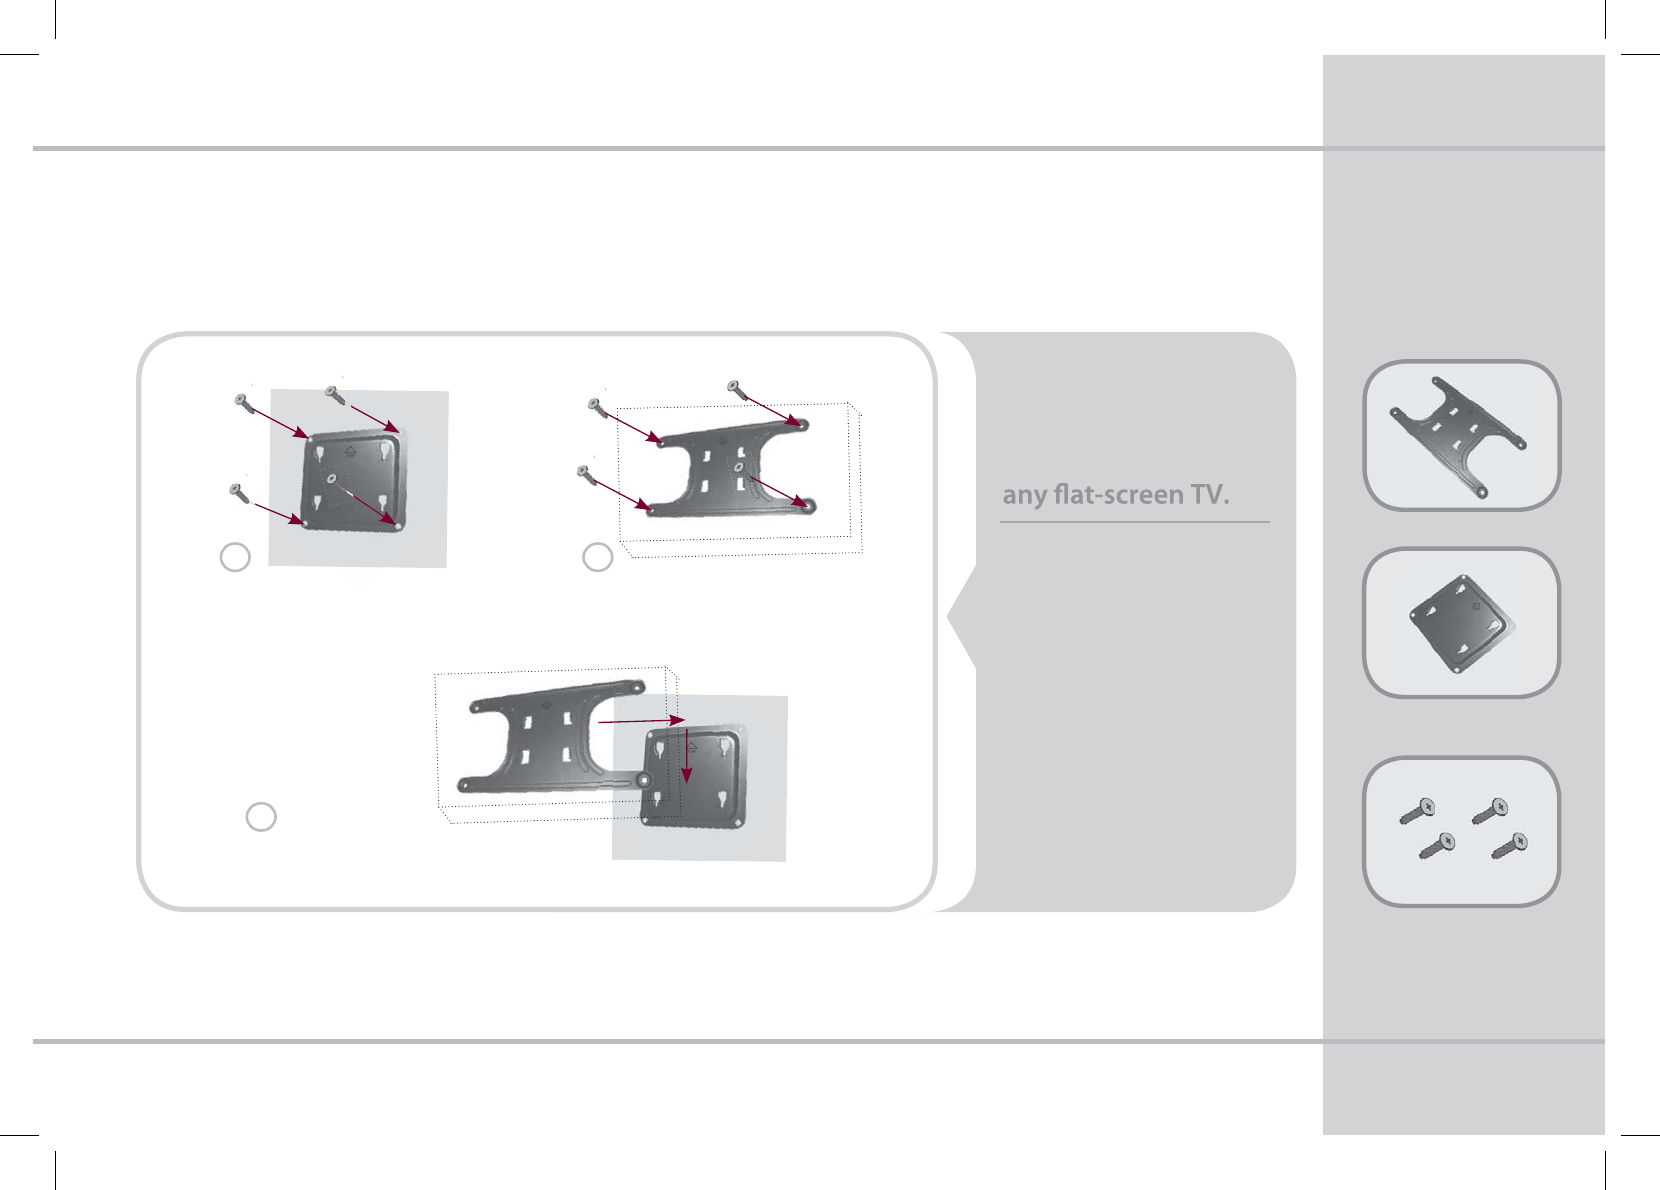
Evolution’s HD
Set-Top box is wall
mountable to display
nicely underneath
Wall Installation
4FU5PQ#PY.PVOU#SBDLFU
8BMM.PVOU#SBDLFU
4DSFXT4FU5PQ#PY
.PVOU#SBDLFU
Wall Mounting
Accessories
25
Chapter 12 - (FUUJOHUP,OPX:PVS)%4FU5PQ#PY
3
AUUBDIUIF4FU5PQ#PYBOECSBDLFU
UPUIFXBMMNPVOUCSBDLFUPOUIFXBMM
.PVOUUIF4FU5PQ#PYUP
UIF4FU5PQ#PY#SBDLFU
2
.PVOUUIFWBMM#SBDLFU
POUIFXBMM
1
STB_Evolution_Cab_110444_KCF-BG3HCOD_Eng( ).indd 27 2009-03-13 10:48:26
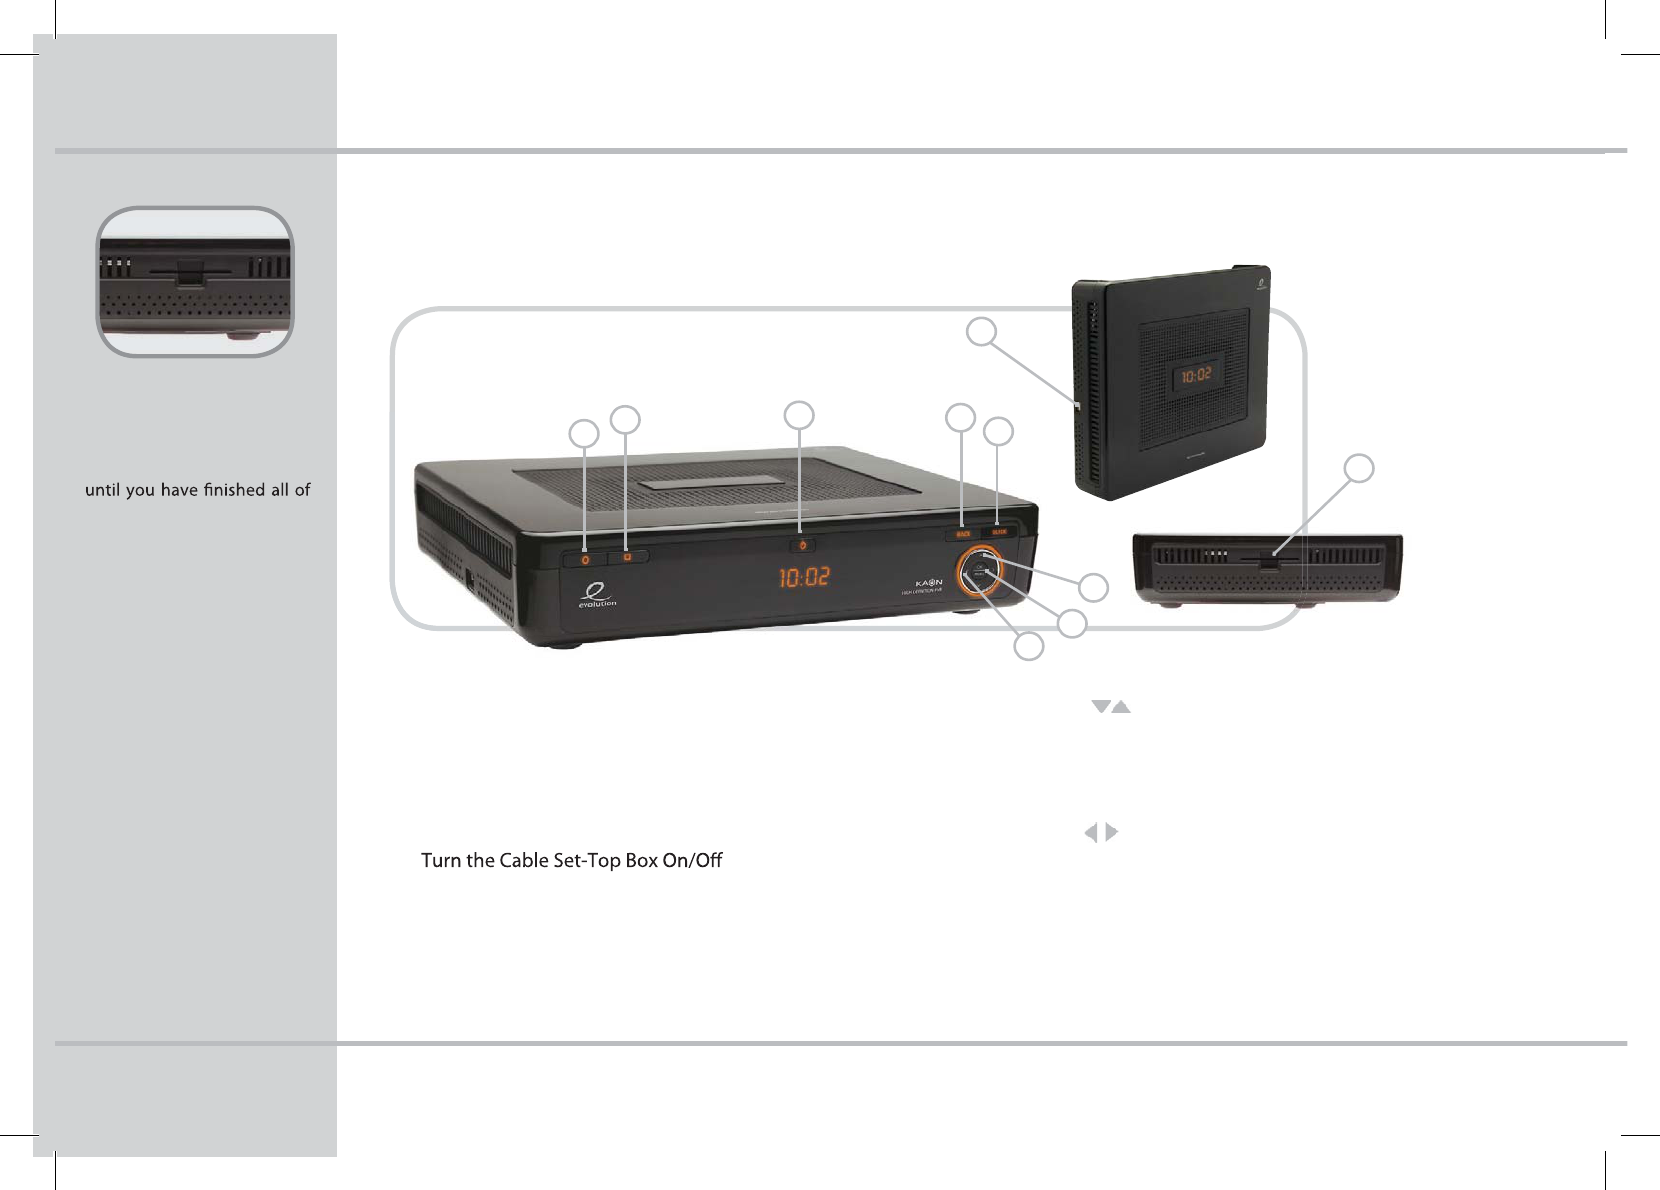
Front Panel
Caution: Please do not plug in
the main power supply cord
the connections.
The Smart Card is inserted by
your cable provider. A Smart
Card looks similar to a credit
card and entitles you to view
and listen to all the channels
you choose to subscribe to.
Do not remove the Smart
Card unless instructed to do
so by your cable provider.
Conditional Access
26
1. Record
LED Indicator and button for Recording a program
2. Stop
Stop a Recording
3. Stand by (Power)
4. Back
Exit from parameter and cancel selected function.
5. Guide
To display the Electronic Program Guide.
6. Channel
Channel up/down or select item or sub-menu.
7. OK
To select a program, a highlighted line or parameter value.
8. Volume
To turn the volume up/down or select a sub-menu item.
9. USB
Connects to support devices.
10. Smart Card Slot
Smart Card enables service to the HD Set-top box.
Chapter 12 - Getting to Know Your HD Set-Top Box
3
9
6
8
10
12
7
45
STB_Evolution_Cab_110444_KCF-BG3HCOD_Eng( ).indd 28 2009-03-13 10:48:27
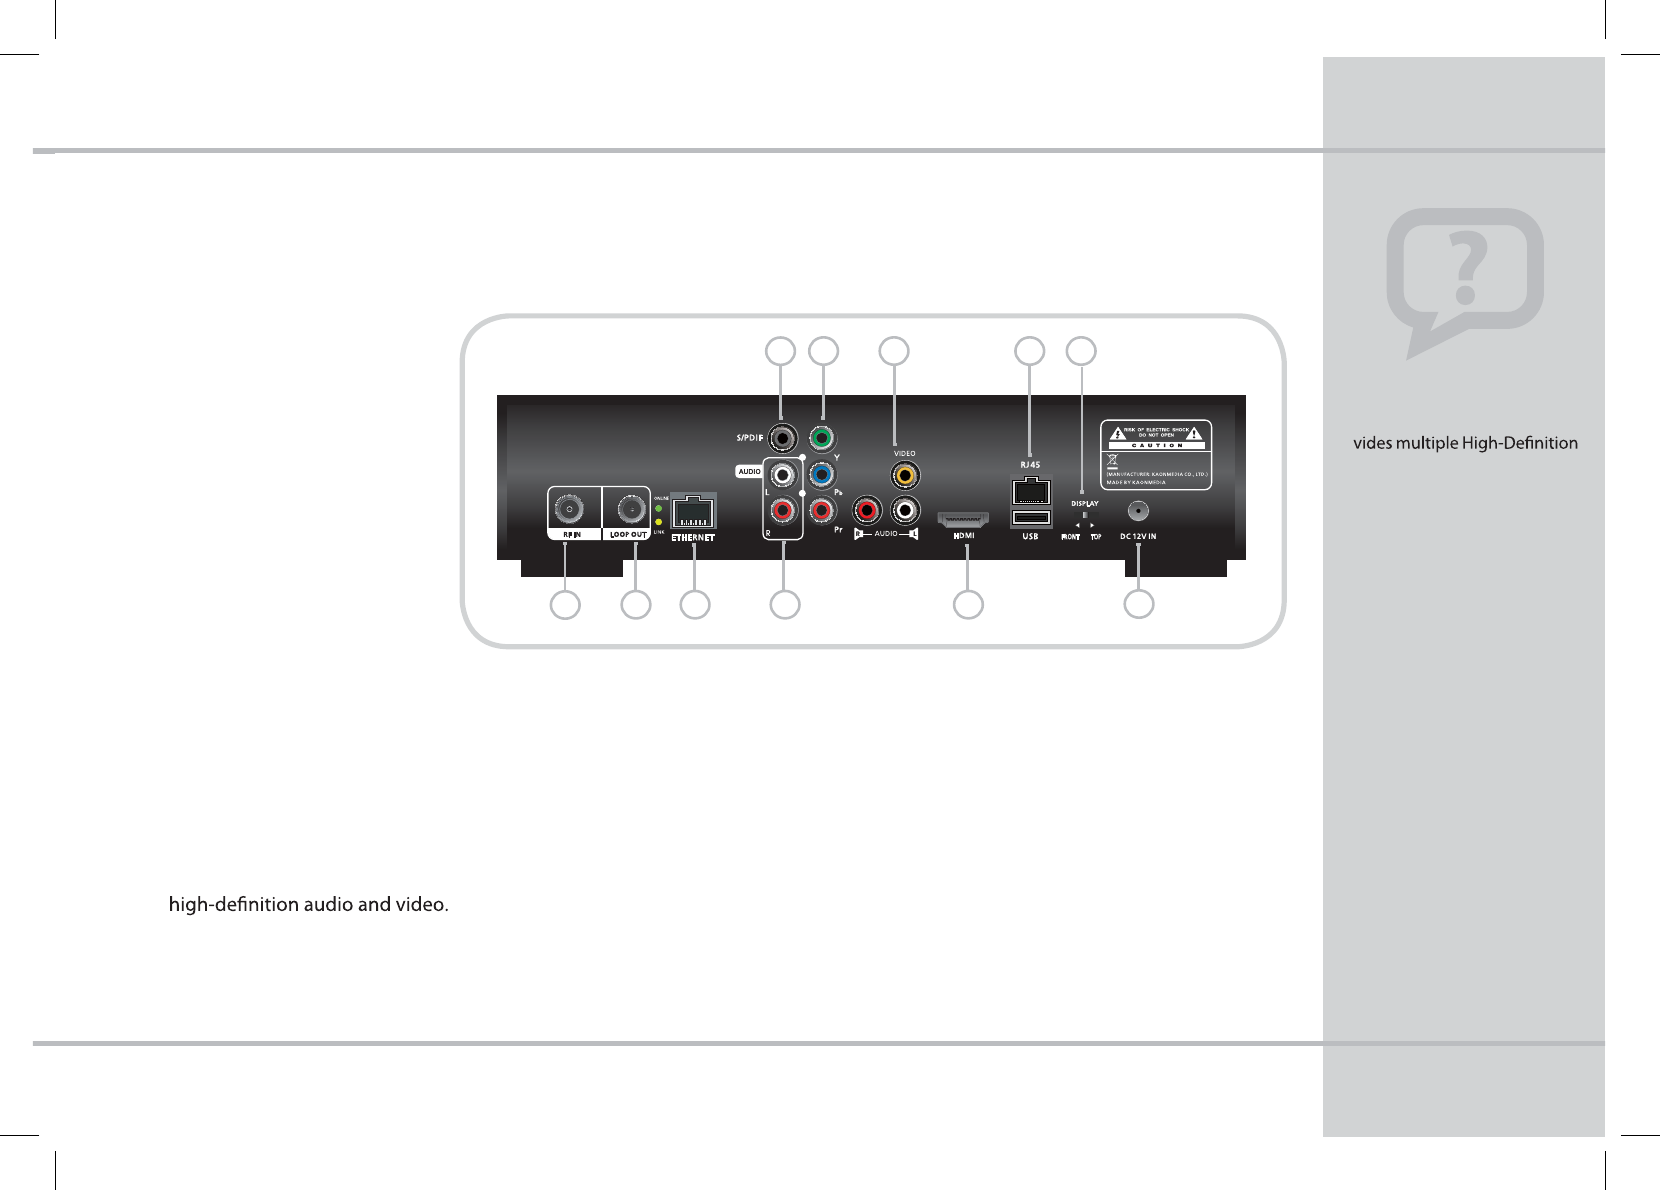
1. RF IN
Connects to cable signal
from your service provider
via the cable wall outlet
2. LOOP OUT
Connects to TV or VCR
3. ETHERNET
Supports PC networking
4. S/PDIF (Coaxial)
Provides Dolby® Digital 5.1
audio or PCM audio
Back Panel
The DMS-2042-HD-PVR pro-
output connections including
HDMI, Y Pb Pr Component
Video and S/PDIF Audio.
Note
27
5. AUDIO OUT (R/L)
Connects to audio input of a stereo or TV
6. Component Video (Y Pb Pr)
Delivers component video to HDTV
7. HD Audio/Video (HDMI)
Connect the HDMI cable to a HDTV to deliver
8. Composite Audio/Video
The standard Audio/Video connection
9. RJ45
For future use
10. Display Switch
Toggles display between front panel and
top panel. Top display would refer to wall mounted
Set-top box.
11. Power Supply
AC Power from wall into DC 12V IN, provided with the
DMS-2042-HD-PVR.
Chapter 12 - Getting to Know Your HD Set-Top Box
6
7
9
123
4
5
810
11
STB_Evolution_Cab_110444_KCF-BG3HCOD_Eng( ).indd 29 2009-03-13 10:48:27

'"2T
8IZXPOUNZ)%4FU5PQ#PYUVSOPO
tDouble check that the power cord is connected to the HD
Set-Top Box and the AC wall outlet. If the HD Set Top Box is
connected to another unit (such as a switched outlet or
DVD player), verify that that unit is powered on.
tPress the Power (Stand By) button on the top, front of the HD
Set-Top Box instead of the remote control. The batteries in the
remote control may be depleted.
8IZ EP * IBWF OP TPVOE XIFO WJFXJOH DBCMF
DIBOOFMT
t Verify that the MUTE button on remote control has not
been pressed; try pressing the MUTE button to restore sound.
Double check that you television is not currently MUTED.
tDouble check your audio connections. Refer to the CABLE
CONNECTIONS section on pages 22-24 to verify the correct
cables are being used for the audio ports. If they match the
diagrams, make sure they are rmly connected to the ports on
both the TV and HD Set Top Box.
8IZDBOU*WJFXBMMDIBOOFMTXIJMF*NSFDPSEJOH
tDepending on which channels you are recording, the list of
available channels to watch may be limited. Once all record-
ings have decreased to one or none, all channels will become
available.
8IBUTIPVME*EPJGUIFSFJTOPWJEFPPSQJDUVSFPOUIF
574DSFFO
tTry another channel, this channel may be restricted from
viewing or enter your PIN code (default 0000)*.
tVerify that your TV is powered on and press TV/STB to assure
the HD Set Top Box is on the correct mode.
t%PVCMFDIFDLBMMZPVSDBCMFDPOOFDUJPOTJODMVEJOHWFSJ-
GZJOHZPVSDPBYDBCMFJTTFDVSFMZUJHIUFOFEPOUPCPUIUIF
DBCMFXBMMPVUMFU BOEUIF */165QPSU PG ZPVS)% 4FU5PQ
#PY Verify that all video cables between the HD Set-Top Box
and the TV are rmly connected. Refer to the CABLE CONNEC-
TION section on pages 22-24 for more detailed information
regarding the correct connections and alternative video cable
options.
tIf the HD Set-Top Box video output is connected to a home
theater unit, verify that the home theater unit is powered on
and set to the appropriate input source. Refer to your home
theater manual for more detailed instructions.
5IF173EJEOUSFDPSEUIFCFHJOOJOHPGNZTIPXIPX
EP*öYUIJT
t Some shows start or end a couple of minutes prior to the
allocated time slot. Press Menu, PVR, PVR Settings, Guard Time
Start or End. This allows you to add a buer to your programs
recordings.
Chapter 13 - Frequently Asked Questions
5PMFBSONPSFBCPVU1*/DPEFTSFGFSUPQBHF
STB_Evolution_Cab_110444_KCF-BG3HCOD_Eng( ).indd 30 2009-03-13 10:48:28

'"2T
Chapter 13 - Frequently Asked Questions
8IZXPOUNZTFUUPQCPYSFTQPOEXIFO*QSFTTBLFZ
POUIFSFNPUFDPOUSPM
t1SFTT5745#UPWFSJGZUIBUUIFSFNPUFDPOUSPMJTJOUIFSJHIU
NPEF Verify that there are no obstructions between the re-
mote control and the HD Set-Top Box. Aim the remote control
directly at the front panel, not the TV or DVD player. If this
still doesn’t work, try to stand closer to the HD Set-Top Box,
there may be too large a distance between the remote and
front panel.
t If nothing happens, check the bat-
teries for possible replacement. If the
remote still doesn’t work, use the front
panel of your HD Set-Top Box to press
the arrow up button. If the channel
changes, then most likely you have a
faulty remote that may need to be re-
placed.
Why won’t the PVR let me record
any more programs?
t$IFDLZPVSBWBJMBCMFIBSEESJWFTQBDFCZQSFTTJOHUIF3F-
corded List button and view the icon in the bottom left side of
your screen. The PVR contains 250 gigabytes.
t5IF173POMZBMMPXTZPVUPSFDPSEUXPQSPHSBNTBUBUJNF
double check to make sure you don’t already have two pro-
grams being recorded.
8IBUJG*GPSHPUNZ1*/$PEF
tContact your cable provider and they will be able to reset
them back to the default 0000 code for you. That will allow
you to enter a new PIN code. Refer to page 14 to learn how to
change your PIN code.
)PXEP*DPOUSPMXIBUNZDIJMEXBUDIFT
t8JUIUIF1BSFOUBM$POUSPMGFBUVSFPGUIF)%4FU5PQ#PY
ZPVDBOSFTUSJDUWJFXJOHPGDFSUBJONBUFSJBMPOZPVS57 You
can set a lock to restrict viewing based
on TV ratings, such as TV-14 or TV-MA,
or completely lock out certain chan-
nels.
t For more information, refer to the
PARENTAL CONTROL section on this
manual found on page 13.
*TJUOFDFTTBSZUPHFUBOFX57UP
XBUDI)%57
tTo view HD channels from your cable
provider in their native resolution, a high-denition “capable”
or “ready” television is required.
tYou will also need to use digital cable connections such as
the HDMI cable or the Digital Component Video Cables to view
HD channels.
*GZPVOFFEBEEJUJPOBMTVQQPSU
QMFBTFEPOUIFTJUBUFUPDPOUBDU
ZPVS$BCMF1SPWJEFS
1MFBTFWJTJUPVSXFCTJUF
FWPMVUJPOCCDPNUPWJFXUIF
NPTUVQUPEBUF&WPMVUJPO
6TFS(VJEFGPSZPVS)%173
XXXFWPMVUJPOCCDPN
STB_Evolution_Cab_110444_KCF-BG3HCOD_Eng( ).indd 31 2009-03-13 10:48:28

(MPTTBSZPG5FSNT
30
$IBQUFSGlossary of Terms
173
tPersonal Video Recorder
*OTUBOU3FQMBZ
tPress the Instant Replay button to jump back and replay
a scene.
$PNNFSDJBM4LJQ
tCommercial Skip allows you to jump forward and skip
commercials.
1SPHSFTT#BS
tThe Progress bar displays the current play status, the total
recorded time and elapsed time (Hour:Minute).
)%%
tHard drive for storage, to format means to permanently
erase all your recorded programs, please use this with
caution.
3FDPSEFE-JTU'JMF-JTU
tThe list of recorded programs
(VBSE5JNF
tSet a (VBSE5JNF to make sure you never miss the crucial
5 or 10 minutes at the start or end of your recordings.
3FTFSWBUJPO
tSet up a Reservation to record a future or currently
showing program. Select the Reservation frequency:
Once, Daily or Monthly.
#PPLNBSL
tBookmark favorite scenes for fast recall during the
playback mode. Recorded items will have no bookmarks,
you must add them.
04%
tOn-Screen Display, change your display settings.
#BOOFS5JNF
tThe amount of time the banners and menus display on
your screen.
STB_Evolution_Cab_110444_KCF-BG3HCOD_Eng( ).indd 32 2009-03-13 10:48:28

STB_Evolution_Cab_110444_KCF-BG3HCOD_Eng( ).indd 33 2009-03-13 10:48:28

Evolution - Ideas to Solutions for a Digital World
(800) 315-2253
www.evolutionbb.com
DIGITAL
DMS2042HDPVRREV1
STB_Evolution_Cab_110444_KCF-BG3HCOD_Eng( ).indd 34 2009-03-13 10:48:29