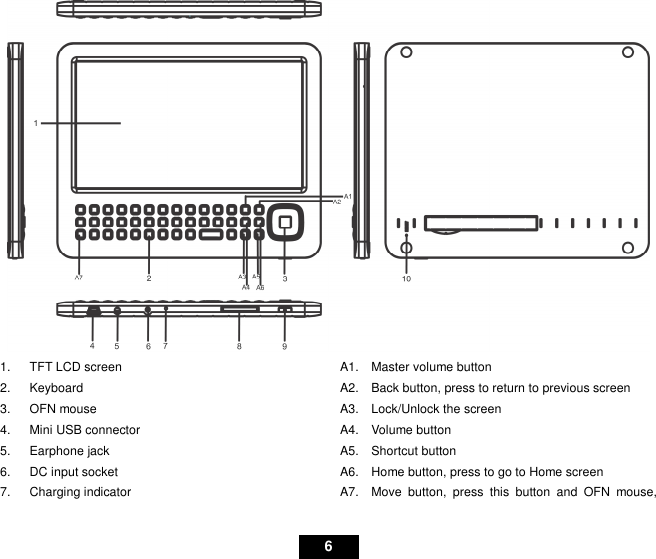
KEEN HIGH HOLDING WR780 Wifi E-book User Manual manual

KEEN HIGH HOLDING(HK) LIMITED Wifi E-book manual

User Manual

  Wifi Ebook WR780 User’s Manual
                                                                                                                                                      i TABLE OF CONTENTS Introduction.............................................................................................................................................................................................1 FCC Warning:..............................................................................................................................................Error! Bookmark not defined. FCC STATEMENT....................................................................................................................................................................................2 Important Safety Precautions................................................................................................................................................................3 Main Features .........................................................................................................................................................................................4 Controls and Connections.....................................................................................................................................................................5 Getting Started........................................................................................................................................................................................7 Charging...............................................................................................................................................................................................7 Inserting Media.....................................................................................................................................................................................8 Connecting to the PC ...........................................................................................................................................................................8 Turn on/off ............................................................................................................................................................................................9 Lock and Unlock...................................................................................................................................................................................9 Basic icons on the screen ....................................................................................................................................................................9 Home......................................................................................................................................................................................................10 Customizing the Home Screen...........................................................................................................................................................11 Applications Menu..............................................................................................................................................................................13 Using the Keyboard..............................................................................................................................................................................14 Sleep/Wake button .............................................................................................................................................................................15 Making a Wireless Connection ...........................................................................................................................................................15 E-Book Reader......................................................................................................................................................................................16 Reading a book ..................................................................................................................................................................................16 Reading E-Book with background music............................................................................................................................................17 Downloading a book...........................................................................................................................................................................17 Browser .................................................................................................................................................................................................18 Open Browser.....................................................................................................................................................................................18
                                                                                                                                                      ii Setting your home page .....................................................................................................................................................................18 Open a Web Page..............................................................................................................................................................................18 Refresh a Web Page ..........................................................................................................................................................................18 Zoom in and Out of a Webpage .........................................................................................................................................................18 Open a New Browser Window ...........................................................................................................................................................18 Finding Text within a Webpage...........................................................................................................................................................19 Select Links within Webpages............................................................................................................................................................19 Downloading unknown application from the Web ..............................................................................................................................20 Manage Bookmarks ...........................................................................................................................................................................20 Customize Browser Options...............................................................................................................................................................21 E-mail.....................................................................................................................................................................................................21 Open E-mail........................................................................................................................................................................................21 Account Settings ................................................................................................................................................................................22 Reading E-mails.................................................................................................................................................................................22 Photo Browser......................................................................................................................................................................................23 Music .....................................................................................................................................................................................................24 Video Player..........................................................................................................................................................................................25 Alarm Clock...........................................................................................................................................................................................27 Calculator..............................................................................................................................................................................................28 ApkInstaller...........................................................................................................................................................................................28 Explorer.................................................................................................................................................................................................29 Settings .................................................................................................................................................................................................30 Set Date & Time .................................................................................................................................................................................32 Frequently Asked Questions...............................................................................................................................................................33 Specification .........................................................................................................................................................................................34
  1 Introduction  Thank you for purchasing this device.    This device enables you to surf the internet via wireless connection with multimedia playback.  This manual contains important safety information and operation instructions, so please read all the instructions carefully before using the device and keeps it for future reference.                We have done our best to produce a complete and accurate manual; however, we cannot ensure there are no errors or omissions. We also have no responsibility for damages or loss of data caused by improper operation.  The instruction manual is subject to change for improvement without notice.  Trademarks and trade names used in this user’s manual are owned by their respective companies or organizations.
  2  FCC Warning: Warning:    Changes or modifications to this unit not expressly approved by the party responsible for compliance could void the user’s authority to operate the equipment.  FCC STATEMENT NOTE:    This equipment has been tested and found to comply with the limits for a Class B digital device, pursuant to Part 15 of the FCC Rules.   These limits are designed to provide reasonable protection against harmful interference in a residential installation.    This equipment generates, uses and can radiate radio frequency energy and, if not installed and used in accordance with the instructions, may cause harmful interference to radio communications.  However, there is no guarantee that interference will not occur in a particular installation.    If this equipment does cause harmful interference to radio  or  television  reception,  which  can  be  determined  by  turning  the  equipment  off  and  on,  the  user  is  encouraged  to  try  to  correct  the interference by one or more of the following measures:    Reorient or relocate the receiving antenna.   Increase the separation between the equipment and receiver.   Connect the equipment into an outlet on a circuit different from that to which the receiver is connected.   Consult the dealer or an experienced radio/TV technician for help. WARNING:  THE  MANUFACTURER  IS  NOT  RESPONSIBLE  FOR  ANY  RADIO  OR  TV  INTERFERENCE  CAUSED  BY  UNAUTHORIZED MODIFICATIONS TO THE DEVICE. ANY SUCH MODIFICATIONS COULD VOID THE USER'S AUTHORITY TO OPERATE THE EQUIPMENT.    Note: The AC Adapter with one ferrite core and shielding USB cable with one ferrite core are designed for exclusive use with this product. Don't use others for this product.
  3  Contact: Roy Rayn Shaghal Ltd. 2231 Colby Ave. L.A., C.A., 90064 U.S.A.  Tel: (310) 966-1133 Fax: (310) 966-1134 www.Ematic.us E-mail: ematicr@gmail.com  Important Safety Precautions Always  follow these basic  safety precautions  when  using your  device.  This will  reduce  the risk of  fire, electric  shock,  product damage  and personal injury.  Warning:  Do  not  remove  the  cover or  back  to  reduce the risk  of  electric  shock.  There are  no  user-serviceable  parts  inside.  Refer servicing to qualified personnel.  Warning: Do not expose the device to rain or moisture to prevent fire or electric shock hazard.   Do not expose the device to water (dripping or splashing) and no objects filled with liquids, such as vases, should be placed on the unit.   Keep the device away from direct sunlight and heat source such as radiators or stoves.   Do not block the ventilation openings. Slots and openings on the unit are provided for ventilation. The openings should never be blocked by placing your device on a cushion, sofa or other similar surface.   Do not place the device on unstable cart, stand, tripod, bracket or table. The unit may fall, resulting in possible damage or injury.   Never place heavy or sharp objects on the LCD panel or frame.   Only use the AC adapter included with device. Using any other adapter will void your warranty.   Protect the power cord from being walked on or pinched particularly at plugs, receptacles and the point where the cord attached to the
  4 device.   Unplug the power from the outlet when the unit is not in use.      The socket-outlet shall be installed near the equipment and shall be easily accessible. Warning that excessive sound pressure from earphones and headphones can cause hearing loss. CAUTION: RISK OF EXPLOSION IF BATTERY IS REPLACED BY AN INCORRECT TYPE.                     DISPOSE OF USED BATTERIES ACCORDING TO THE INSTRUCTIONS    Cleaning   Before cleaning the device make sure it is turned off.   Never spray or pour liquid directly onto the screen or plastic casing.   To clean the LCD screen, wipe the screen with a clean, soft, lint-free cloth. This removes dust and other particles. If it is still not clean, apply a small amount of non-ammonia, non-alcohol based glass cleaner on a clean, soft, lint-free cloth to clean the screen.   To clean the plastic casing, use a soft, dry cloth. If it is still not clean, apply a small amount of non-ammonia, non-alcohol based, mildly non-abrasive detergent on a clean, soft, lint-free cloth to clean the surface.   To clean the frame, use a soft, dry cloth. Disclaimer: Authorized Dealer does not recommend the use of any ammonia or alcohol-based cleaners on the LCD screen or plastic casing. Some chemical cleaners have been reported to damage the screen and/or display case. Authorized Dealer will not be liable for damage resulting from the use of any ammonia or alcohol-based cleaners.   Main Features   7 inch TFT LCD screen,800*480 16:9
  5   Full keyboard   OFN (Optical Finger Navigation) mouse and shortcut button   Decorative appearance, good quality   Surf the web via wireless connections   Read and download E-Books   Send and receive E-mails   Listen to music, view pictures and videos   Download, install and play games.   Download, install and use Android Applications.       Controls and Connections
  6  1.  TFT LCD screen 2.  Keyboard 3.  OFN mouse 4.  Mini USB connector 5.  Earphone jack   6.  DC input socket 7.  Charging indicator A1.    Master volume button A2.    Back button, press to return to previous screen A3.    Lock/Unlock the screen A4.    Volume button A5.    Shortcut button A6.    Home button, press to go to Home screen A7.    Move  button,  press  this  button  and  OFN  mouse,
  7 8.  SD card socket 9.  Power/lock button 10.  Reset hole  then  you  can  drag  the  music,  pictures,  files  and applications icon to the certain place.     Getting Started Charging Your device comes with a Lithium polymer integrated rechargeable battery.   New batteries are not charged when shipped. Before you start using your device, you need to charge the battery.   Follow the steps below to connect your device to the power outlet and charge the battery.     Plug one end of the AC power adaptor into the power jack on your device.   Plug the other end into a power outlet. The battery icon is changing indicates charging.   Note: The red charging LED will light up when the battery is charging. Once the battery is fully charged, the charging LED will turn green. If your device is totally out of battery, it may take a while before you can power up your device. Only plug the charger/adapter into DC port that the device will be in the charging state. Battery performance depends on your usage patterns.   Tips to improve battery performance As the device has a large screen, it will consume a lot of power. To extend battery life, you can consider the following:     Reduce display brightness.   Reduce web search.   Turn off Wi-Fi.   NOTE
  8   If not use this machine for a long time, in order to avoid damage caused by battery excessive consumption, please be sure to make a battery charge and discharge once within one month to prevent battery from running down.     With built in Lithium polymer batteries, it has to be charged regularly. The battery damage caused by excessive consumption of polymer battery will not be covered by guarantee. If use the charger which is not exclusively equipped for this machine, the problem caused by it also not be covered by guarantee.        If the device has no quantity of electric charge, you can not connect to the PC to copy files, you should charge first. Inserting Media The device supports SD card. You can operate music, pictures, files and applications on the device through a memory card. When no SD card inserted, your device will read the internal memory. Note: Do not use any force while inserting a memory card.  Connecting to the PC Files can be transferred directly into the device by using the USB data cable.   Make sure that your computer has been started before you start   Connect the mini plug of the USB cable to the mini USB port on your device and plug the other end into a free USB port to your PC.   The computer system detects “New hardware” and starts to install the driver automatically. Wait for the system to finish the installation. When it has finished, a new “Removable Disk” will be created in “My Computer”.   Drag and drop the files on your computer to the “Removable Disk”.   To disconnect the USB cable from the computer, double click the Safely Remove Hardware icon on the task bar. Click the USB Mass Storage Device, and then click OK. Then you can unplug the player safely. Note: Before connecting to the PC, make sure that you have turned on your device.
  9 If the battery runs down, it needs recharging before connecting to PC. Please do not disconnect the USB cable during loading. It may cause malfunction of the player and the files.  Turn on/off   To turn on the device, press and hold the power button.   To turn off the device, press and hold the power button.  Lock and Unlock Locking the device manually   Press the Power Unlock the device   Press the Unlock button   Use the OFN mouse to drag Unlock   from bottom to up You can also set the master volume level from the lock screen. Drag Sound   from top to bottom to toggle sound between ON and OFF modes. Basic icons on the screen : Press to return to the home screen; Press and hold for 1 second to switch between tasks. : The notification panel shows information about connections, messages and other items. : Wi-Fi net connection.
  10 : Battery status. : Time display. / : press    to increase volume; press    to decrease volume. : Press to return to previous screen; Press to exit a dialog box, options menu or notifications panel; Press to cancel an operation; In browser mode, press and hold to access Favorites and browse history pages. : Press to open the options list. : Application icon, Press to open application menu.  Home
  11 The device owns OFN mouse and keyboard, you can use OFN mouse to choose one certain item to enter, and the keyboard make the input more conveniently.   Press Shortcut button to add your favorite application icon on the home screen, and then you can use it easily. The device owns strong E-Book reader function and supports different ways to read the E-Book. In the home menu, you can read the E-Book as below: Press the E-Book Reader , choose the book you want to read; Press the Now Reading, you can continue reading from the previous page you have read, because the device will save your reading history automatically. Press the Library, choose the book you want to read. Customizing the Home Screen Customize the Home screen to suit your preferences. Add Shortcuts Use Shortcuts for quick access to applications. -- On the home screen, press shortcut key on the keyboard or press    on the home screen to go to the shortcut window, and then press Add to pop up the Add window. -- Press Shortcuts, then press a selection, then follow the prompts to add it to the Home screen: Applications, Bookmark, Contact, Music playlist, Settings  Adding Shortcuts from Applications -- Navigate to a Home screen   -- Press Applications -- Press an application icon. The shortcut icon is automatically placed on the selected Home screen  Removing Shortcuts -- Press the Shortcut icon until Application changes into the trash bin , then press the Move key and move the OFN mouse to drag the icon
  12 into the trash bin, while both the icon and the trash bin turns into red , after that you can release to remove the widget from the home screen.  Add Widgets Widgets are self-contained application that you can place on the Home screen to enter your favorite features.  Adding Widgets to Home screen -- - On the home screen, press shortcut key on the keyboard or press    on the home screen to go to the shortcut window, then Press Add to pop up the Add window. -- Press Widgets, and then press a widget to add it to a home screen.  Removing Widgets -- Press the widget icon until Application changes into the trash bin , then press the Move key and move the OFN mouse to drag the icon into the trash bin, while both the icon and the trash bin turns into red   after that you can release to remove the widget from the home screen.    Add Folders On the home screen, press shortcut key on the keyboard or press    on the home screen to go to the shortcut window, and then Press Add to pop up the Add window. -- Press Folders, and then Press a selection: New folder.   Removing Folders -- Press and hold the Folder icon until the Application changes into trash bin , then drag the icon into the trash bin, while both the icon and the trash bin turns into red , after that you can release to remove the widget from the home screen.    Change the Wallpaper
  13 Choose a picture to display in the background of the Home screen. You can choose from pre-load wallpaper images.   -- On the home screen, press shortcut key on the keyboard or press    on the home screen to go to the shortcut window, and then Press Add to pop up the Add window. -- Choose a source image:     -Pictures: Choose a picture from an installed memory card. Press a picture to select it, and then use the crop tool to resize the picture, if desired. Press Save to save the pictures as wallpaper.     - Live wallpapers: Choose from pre-loaded interactive animated wallpapers. Press a wallpaper to see an example, then Press Set wallpaper.     - Wallpapers: Choose from pre-loaded wallpaper images. Press a wallpaper, then Press Set wallpaper. Applications Menu  The Applications menu screen holds all the applications on the device. Applications that you download and install from the web are also added to the applications screen.
  14 You can place the applications on the home screen for quick access to the application.     From a Home screen, press Applications icon.   Select one application icon and hold on it, then you can add it on the home screen.  Using the Keyboard    The keyboard lets you enter text, such as passwords, filenames, E-mail messages, etc. Or you can use the on-screen keyboard when you launch certain applications.   Each letter appears on the screen when entering texts.   Press Num key on the keyboard, then you can input the numbers.   Press ABC (character),⇑(Capitalized or not), ?123 (number), or ALT (symbols) on the keyboard to switch between different input
  15 modes.   Long press on the on-screen keyboard to show the accented characters.   Press and hold the word you have typed to activate the following edit text options: Select all, Select text; Cut all, Copy all, Input method.   Press Back key or Press    to exit.  Sleep/Wake button When you are not actively using device, you can short press [ ] button to turn off the display and save the battery. When you turn off the display, You can short press [ ] button or keyboard or OFN to turn on the display.  Making a Wireless Connection Before you can surf the Internet, send and receive E-mails, download content and other applications, you must join a Wi-Fi network that is connected to the Internet.   For Wi-Fi networks that are not secured with a PIN code, you can easily connect to them and access the Internet freely. However, for Wi-Fi networks that are secured with password, you need to have the password to access the Internet.   From the home screen or Application menu, Press Settings to enter setting interface. Or on the home screen, press , then select Settings on the menu bar.   Press Settings > Wireless & networks.     Press Wi-Fi to turn on wireless connection. ⇑  appears in the Wi-Fi checkbox.   Press Wi-Fi settings. Your device will start to scan for the networks within range and display a list of available Wi-Fi networks.   Press the Wi-Fi network that you want your device to be connected with. If the network is not secured with a password, your device will start to establish a link with it.
  16 If it is a secured network, you will be prompted to select the security option (for networks secured with WEP) and enter the wireless password.     Press on the password field to launch the onscreen keyboard. Enter the password and Press Connect.     Your device will start to establish a link to the network. Once a connection established, —Connected will appear below the name of the Wi-Fi network.   Press Home key to return to the home screen, will appear on the status bar of your home screen. Note: This device does not support 802.11n network, make sure network connection is 802.11b/g. E-Book Reader This device supports different ways to open the E-Book; users can read the book more conveniently. You can view and download books through this E-Book Reader application.   Reading a book   From a Home screen or Application menu, Press E-Book Reader or Library to enter book interface, or press Now Reading to go to the previous page you have read and continue reading.   Press Bookshelf to enter book list.   Select a book and Press to enter.   Press the oron the OFN mouse to go the previous or next page.   Press   to zoom in or zoom out the font size.   Press   to open menu bar, then you can   Press Font Size to change font size for your desired reading preference: S, M, L, XL, and XXL.   Press Go To to jump to the desired page.   Press Bookmarks to use bookmarks in the book: Show Bookmarks, Add Bookmarks, Delete Bookmarks.
  17   Press BookInfo to view book details.   Press Auto Flip to set the page turning automatically at a certain time: Manual, 15s, 30s, 60s, 90s, and 120s. On book list interface, select a book and hold to pop up a window, then you can Press View to read or Press Delete to delete book.  Reading E-Book with background music 1.  In the home menu, press Music icon to enter the Music mode. 2.  Press to select the desired audio file to start playing the song. 3.  Press the    icon to go back to the home menu. 4.  In the home menu, press E-Book Reader or Library icon to enter the E-Book mode. 5.  Press to select the desired E-Book to start reading the book. Now, you can read your book with background music.  Downloading a book   From a Home screen or Application menu, Press E-Book Reader to enter book interface.   Press Download Books to download book.   Select a catalog and Press to enter.   Select the desired book, which displays in thumbnails of the covers, and Press to enter.   Press Download. Your device begins to download the book in the background. Once the download is completed, you will get a notification, and the book will appears on the bookshelf.
  18 Browser The device is equipped with a full HTML Browser, which allows you to enter the internet. Note: You must join a Wi-Fi network that is connected to the internet before you can surf the web via the browser application. Open Browser From a Home screen or Application menu, Press Browser. Setting your home page By default, the home page is www.google.com   Enter the web address, then press    and Press More.   Press Add bookmark, then you can go to the address more conveniently.   Open a Web Page   In the Browser window, enter the web address in the URL field using the onscreen keyboard and Press Go. Note: As you enter the address, matching web page addresses will appear on the screen. Press an address to go directly to that web page or continue to enter the web page address. Refresh a Web Page   On the web page, press  .   Press Refresh. Zoom in and Out of a Webpage   Press the zoom control icon to zoom in and zoom out. Open a New Browser Window You can open multiple browser windows and switch between different web pages.
  19   In the Browser window, press   and then press New Window. A new browser window opens and enters the home page.   Switch between browser windows   In the Browser window, press    and then press Windows.   Press to select the browser window you wish to display.   Finding Text within a Webpage   When viewing a webpage, press    and then Press More > Find on page.   Enter the text. The matching texts are highlighted on the screen.     Press or to go to the previous or next matching text.   Select Links within Webpages Web page links   Press and hold the link   A pop-up menu opens.   Press to select Open, Open in new window, Bookmark link, Save link, Share link or Copy link URL. E-mail links   Press and hold the link A pop-up menu opens   Press to select Send E-mail or Copy.  If you select Send E-mail, the E-mail application will launch automatically.    Enter the recipient and subject using the onscreen keyboard and Press Next.    Enter the message and then Press Send to send the E-mail, Save as draft or Discard.  Tip: If you exit the E-mail application without saving the message you have composed, the message will be automatically saved as draft in
  20 the Draft folder of your default E-mail account.    Downloading unknown application from the Web Before you can download web applications, you must first enable downloading from the Settings menu.   Press  , and then Press Settings > Applications.   Press Unknown sources to enable or disable the downloading of unknown applications. When enabled, ⇑appears next to the option. Note:  Applications  downloaded  from  the  web  can  be  from unknown  sources.  To  protect  your  device  and  personal  data,  download applications only from trusted sources.   View your downloads   In the Browser window, Press    and then Press More > Downloads. Manage Bookmarks You can store as many bookmarks as you want on your device. Bookmark a webpage   In the Browser window, go to the web page you want to bookmark.   Press    and then Press More>Add bookmark to enter the bookmark name.   Edit the location if needed.   Press OK. Open a bookmark   In the Browser window, press    and then Press Bookmarks. The bookmark option opens.   Press to select the bookmark to open it.
  21 Customize Browser Options You can customize the Browser to suit your browsing preferences by setting the display, privacy, and security options. In the Browser window, press    and then Press More > Settings to modify the following browser settings according to your preference.  Page content settings   Text size   Default zoom   Open pages in overview   Text encoding   Block pop-up windows   Load images When ⇑appears next to the option, the setting is enabled. To disable, Press the option again.   E-mail Use E-mail to view and manage all your E-mail accounts in one application. Note: You must join a Wi-Fi network that is connected to the internet before you can surf the web via the browser application. Open E-mail   From a Home screen or Application menu, Press E-mail.   Input your E-mail address and password and Press Next.   Press to select your account type: POP3, IMAP or Exchange.   Press Next.   Enter the Account name (optional) and Your name (optional) to be displayed on outgoing messages, and then Press Done.   The E-mail application will start to load your messages. It might take a few minutes for the messages to load completely. Note: When you have set up an E-mail account, the account will open by default when you open E-mail.
  22 If you have set up more than one E-mail account, the E-mail accounts will appear in Your accounts list. Press to select the account you wish to access.   Enter E-mailbox interface, press    ,then you can   Refresh: Check for new messages.   Compose: Compose and send E-mail messages.   Folders: View you E-mail folders.   Accounts: View all accounts. To ad a new account, press Menu key or Press    to select Add account. To delete an E-mail account, Press and hold the E-mail account that you want to delete, and then Press Remove account to delete.   Account settings: Make account settings. Account Settings   On E-mailbox interface, press Menu key or Press    to show the menu bar.   Press Account settings, then you can   Account name: Edit your account name   Your name: Edit your name   E-mail check frequency: Never, Every 5 minutes, Every 10 minutes, Every 15minutes, Every 30 minutes, Every hour.   Default account: Set your E-mails will be sent from this account by default.   E-mail notifications: Set notification on the status bar when a new E-mail arrives.   Select ringtone: Set ringtone from the list for the arrival of new E-mails.   Incoming settings: Modify incoming server settings.   Outgoing settings: Modify outcoming server settings. Reading E-mails   On E-mailbox, select a mail and Press to open.   Reply to E-mail messages, Press Reply or Reply all.
  23   Delete an E-mail message, Press Delete.   Press    to show the menu bar, then you can   Delete an E-mail message   Forward an E-mail message   Reply E-mail message   Mark E-mail message as unread  Photo Browser  The Photo Browser application lets you view photos and images stored in the internal memory or memory card.   From a Home screen or Application menu, Press Photo Browser to enter photo mode.
  24   Select a folder and Press to enter the photos are displayed in thumbnails.   Select a photo and Press to view in browsing mode. On photo thumbnail list, select a photo and hold to pop up a window, then you can   Delete the photo   See photo details   Set the current photo as wallpaper While viewing a photo, Press the OFN mouse to pop up a tool bar.     Press  or  to view the previous or next photo.   Press repeatedly to zoom in a photo.   Press repeatedly to zoom out a photo.   Press repeatedly to adjust the brightness of the photo.   Press repeatedly to rotate a photo clockwise.   Press repeatedly to rotate a photo counterclockwise.   Press to toggle between the browsing and slideshow mode.   Press to go to the Selections menu to customize the Settings, set photo as wallpaper or Return to the previous screen.   Press    to exit, and return to previous screen.  Music The Music application lets you play digital audio files stored in the internal memory or memory card.   From a Home screen or Application menu, Press Music to enter music library.   The music is displayed into different categories such as Albums, Artists, Songs and Playlists.     Press to select a category and Press a song in the category to start playback.   Press    to return to previous screen.
  25 On music library interface, select a song and hold to pop up a window, then you can   Play the selected song.   Add to playlist.   Delete the song.   Search song from music library or internet. While listening to music,     Press to select songs from the list.   Press to turn shuffle on or off.(Shuffle is off when the icon is gray).   Press to cycle through the repeat modes: Repeat all songs, Repeat current song, Repeat is off.   Press to pause or resume the song playback.   Press to go to previous or next song.   Drag the progressive bar to the desired playing point. On the playing interface, press  , then there will pop up a menu bar.   Press Library to go to music library.   Press Party shuffle to make Part shuffle on or Party shuffle off.   Press Add to playlist to add a playlist.   Press Delete to delete the song.  Video Player The Video Player application lets you play video files stored in the internal memory or memory card.   From a Home screen or Application menu, Press Video Player to enter video list.   Select and Press a video to start playback.   Press    to return to previous screen.
  26 On video list, select a video and hold to pop up a window, and then Press Delete to delete the video file. While viewing a video, Press the OFN mouse to pop up a tool bar.     Drag the progressive bar to the desired playing point.   Press to set bookmark,then the next time video playing will start from the bookmark.     Press to adjust video brightness.   Press to go to previous or next video.   Press to pause or resume the video playback.   Press repeatedly to change display mode :full screen, original, 16:9, 4:3   Press to return to previous screen.   Press to pop up a selection window, then you can   Delete Bookmark and play from beginning   Delete bookmark   Change play mode: Single, Repeat one, Repeat all, Return   Get a help   Return to previous screen
  27 Alarm Clock    From a Home screen or Application menu, Press Alarm Clock to enter.   Press the clock to select a clock mode to be displayed on the screen. There are 5 modes, and Press the desired one for your choice.   Press    to pop up the menu bar, then you can,   Press Add alarm to add an alarm clock, then to set Time, Ringtone, Vibrate, Repeat and Label.   Press Hide clock or Show clock.   Settings. You can set: Alarm in silent mode, Alarm volume, Snooze duration, Side button behavior.   To delete an alarm clock, hold the selected alarm, and then there will pop up a window, you can Press Delete alarm.   Press    to exit and return to previous screen. Note:  ⇑indicates that the option is activated.
  28 When the alarm rings, Press Snooze or Dismiss to snooze or dismiss the alarm.  Calculator You can use the Calculator to perform simply and advanced arithmetical calculations.   From a Home screen or Application menu, Press Calculator  to enter.     Press on the numbers and mathematical operators to perform simple calculations.   Press    to pop up a menu bar, Press Advanced panel to access operators such as sin, cos, tan, log etc.   To clear calculation histories, Press Clear history.   Press    to exit and return to previous screen.  ApkInstaller   From a Home screen or Application menu, Press ApkInstaller to enter applications management.   Press Install to install the desired application. Find the right path, and Press the application to install.   Press Manage to manage all the applications. Press the selected application, a pop up window appears, then you can   Launch into the application   Export the application   Uninstall the application   Cancel the window   Press Exit to exit from the application management. Note: Applications downloaded from the web can be from unknown sources. To protect your device and personal data, download applications only from trusted sources. Also, download and install the application matches to your device with Android 2.1 operating system.
  29 Explorer The Explorer application is a free file manager for your device. It allows you to browse files and folders stored on your device and SD card.   From a Home screen or Application menu, Press Explorer to enter files management.   Select memory source first: SD card or Internal Memory.   Related function of icons:   Home: Go to the Home interface of the files management.     Level Up: Go to the upper directory.   Multi: Multi choose the folders or files.   Editor: Edit the folder or file.   Back: Backward operation.   Next: Forward operation.   Then select and Press to enter the desired files at the right path.   Select a folder or file and hold to pop up a window, then you can:     Copy: Press Copy, then select the desired path, Press Editor > Paste.   Delete: Press Delete, then to delete the selected folder or file.   Move: Press Move, then select the desired path, Press Editor > Paste.   Rename: Press Rename, and then input a new name.   To edit multi folders or files at a time,   Press Multi   Select the folders or files   Press Editor, and then edit the folders or files.
  30 Settings  The system settings let you customize and configure your device.   From a Home screen or Application menu, Press Settings to enter setting interface. Or on the home screen, press , then  select Settings on the menu bar.   Press the settings items to make the desired configuration. ⇑indicates that the option is activated.   Press      to exit and return to previous screen. Wireless & networks Configure your device wireless connections, such as Wi-Fi.   Wi-Fi   Wi-Fi settings Sound & display Set the device and notification ring tones, or set screen brightness and screen timeout.
  31   Sound settings   Media volume   Notification ringtone   Audible selection   SD card notifications   Display settings   Orientation   Animation   Brightness   Screen timeout Location & security Set location and security.   Use wireless networks   Visible passwords Applications Manage applications.   Unknown sources: Allow install of non-Market application.   Quick launch: Set keyboard shortcuts to launch applications.   Manage applications: Manage and remove installed applications.   Running services: View and control current running services.   Development: Set options for application development. Privacy Restore all settings to the factory default. SD card & device storage Show the available storage card memory (when SD card is inserted) or the device internal memory (when no SD card is inserted).   SD card   Total space
  32   Available space   Unmount SD card   Format SD card   Internal flash storage   Available space   Internal device storage   Available space Language & keyboard Set the language and keyboard.   Select locale   Android keyboard   Device keyboard   User dictionary Date & time Set date and time. Update Media Library Update the media library. Online Help Get an online help. About device View information about your device. Set Date & Time   From a Home screen or Application menu, Press Settings to enter setting interface. Or on the home screen, press , then  select Settings on the menu bar.   Select Date &Time and Press to enter, then you can     Automatic: Use network-provided values   Set date: Press + or – on each date field to change the Month, Day and Year, then Press Set to confirm the date setting.
  33   Select time zone   Set time: Press + or – on each time field to change the Hour and Minute, then Press Set to confirm the time setting.   Use 24-hour format or not   Select date format Frequently Asked Questions 1.  My device does not turn on.   Make sure that the power adapter is securely connected   Make sure that you are using the power adapter that was included with your device.   Make sure that the device is turned on. 2.      My device does not recognize the memory card.   Make sure that you have inserted a certified memory card.   Make sure that you have inserted the memory card correctly.   With your memory card inserted, power off and reset the device. 3.  My device shows a low-battery warning       The device is low on power and needs to be charged before you can use it. 4.  I cannot access the web       Check the wireless signal indicator in the status bar at the top of the screen. If there is no signal, you are not connected. 5.          The display freezes or does not respond   Press and hold the power button to turn device off and turn it on again. 6.  There is no sound coming from the device   Unplug and reconnect the headset. Make sure that the connector is pushed in all the way.       The volume may be deactivated or set too low.
  34 Specification Display Digital LCD, TFT Panel size: 7 inches Screen aspect ratio: 16:9 Resolution: 800*480 pixels I/O  DC in Power Supply  AC Adapter (Input: 100~240V AC, 50~60Hz; Output: DC 5V 2A) Battery  2100mAh, Book reading Time >4hrs, Audio playtime>7 hrs, Video playtime >3 hrs, Wi-Fi> 2hrs Operating system  Android 2.1 USB port  Mini USB 2.0(high speed) device Wireless  WI-FI 802.11b/g Supported card  SD card Supported photo format  JPEG, BMP, PNG, GIF Supported audio format  Free: WAV, FLAC, APE, OGG vobris With royalty fee: MP3,WMA,unprotected AAC Supported video format Free: XviD(720P@25fps), MPEG4(ASP) (720P@25fps), FLV(720P@25fps), Option (With royalty fee):  wmv(D1@30fps),  rmvb(720P@25fps),mpeg4(720P@25fps),  H.264(720P@25fps), Divx(720P@25fps) Supported eBook format  PDF( include Adobe DRM Support) , e-Pub , FB2, TXT,   Storage condition  Humidity<90%,-20~60°C Working condition  Humidity <80%,0~45°C Size L*W*H : (mm)  180*145.8*9.9MM

Navigation menu