KENWIN KENWIN00001 Internet Radio Micro Hi-Fi System User Manual SMBB ENG V1 9
KENWIN INDUSTRIAL (H.K.) LTD. Internet Radio Micro Hi-Fi System SMBB ENG V1 9
UserManual.wiki
>
KENWIN
>
KENWIN00001 User Manual
User Manual
Navigation menu
Upload a User Manual
Namespaces
Wiki Guide
HTML
PDF
Info
Views
User Manual
Discussion / Help
Navigation


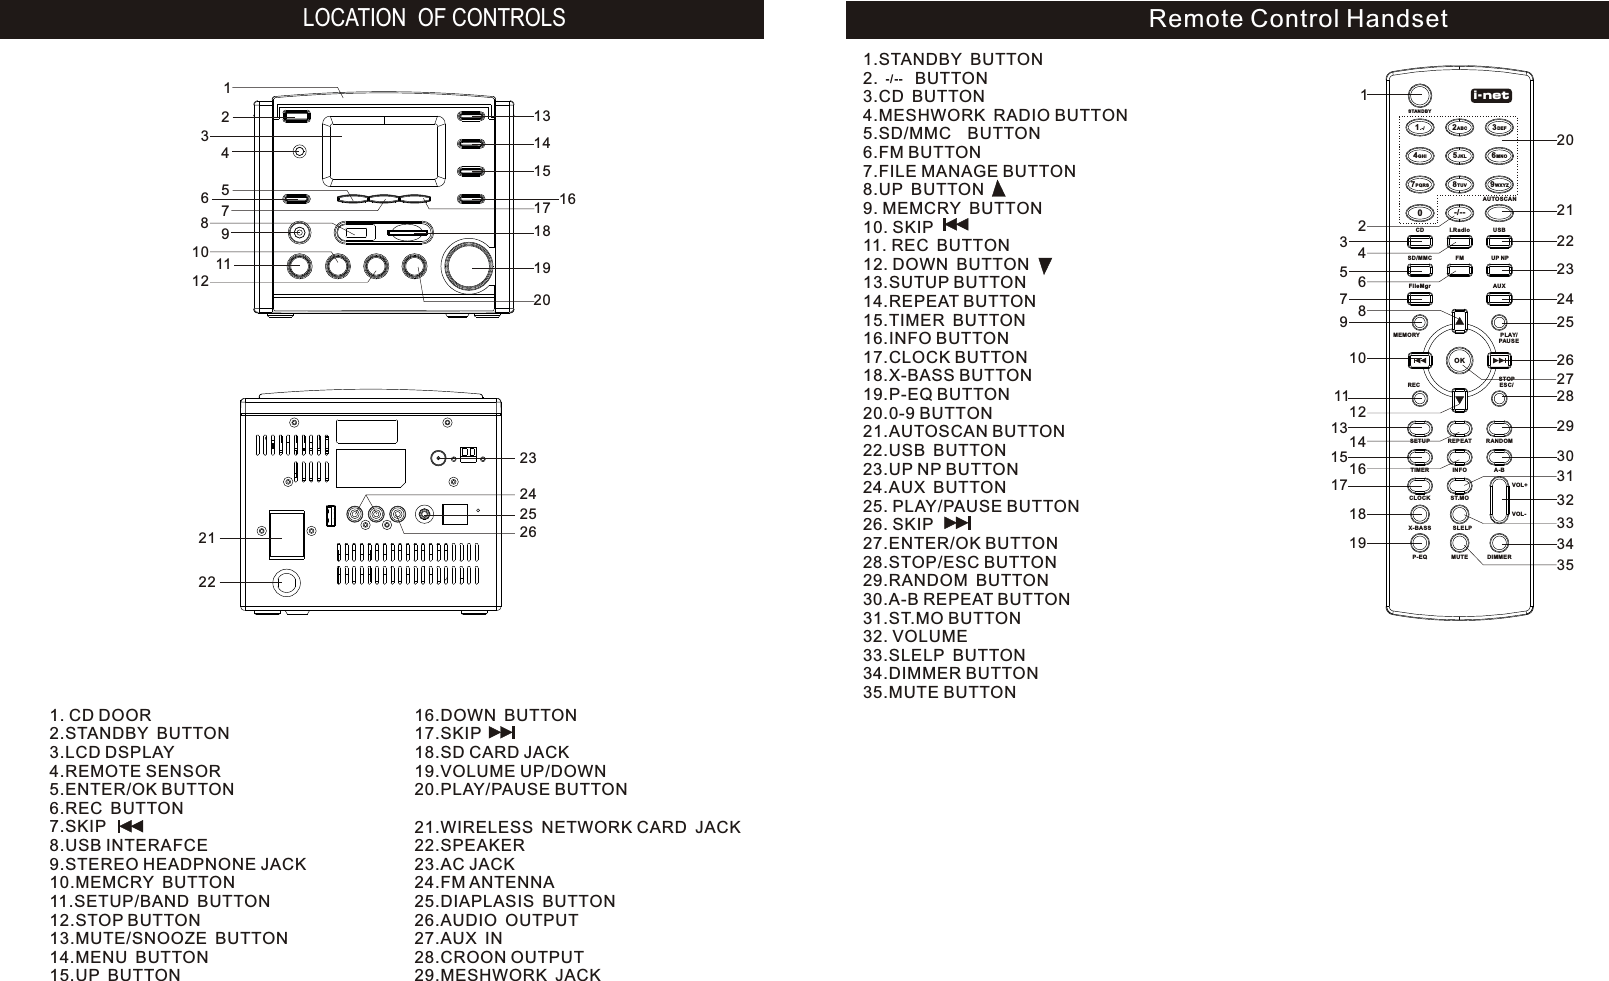

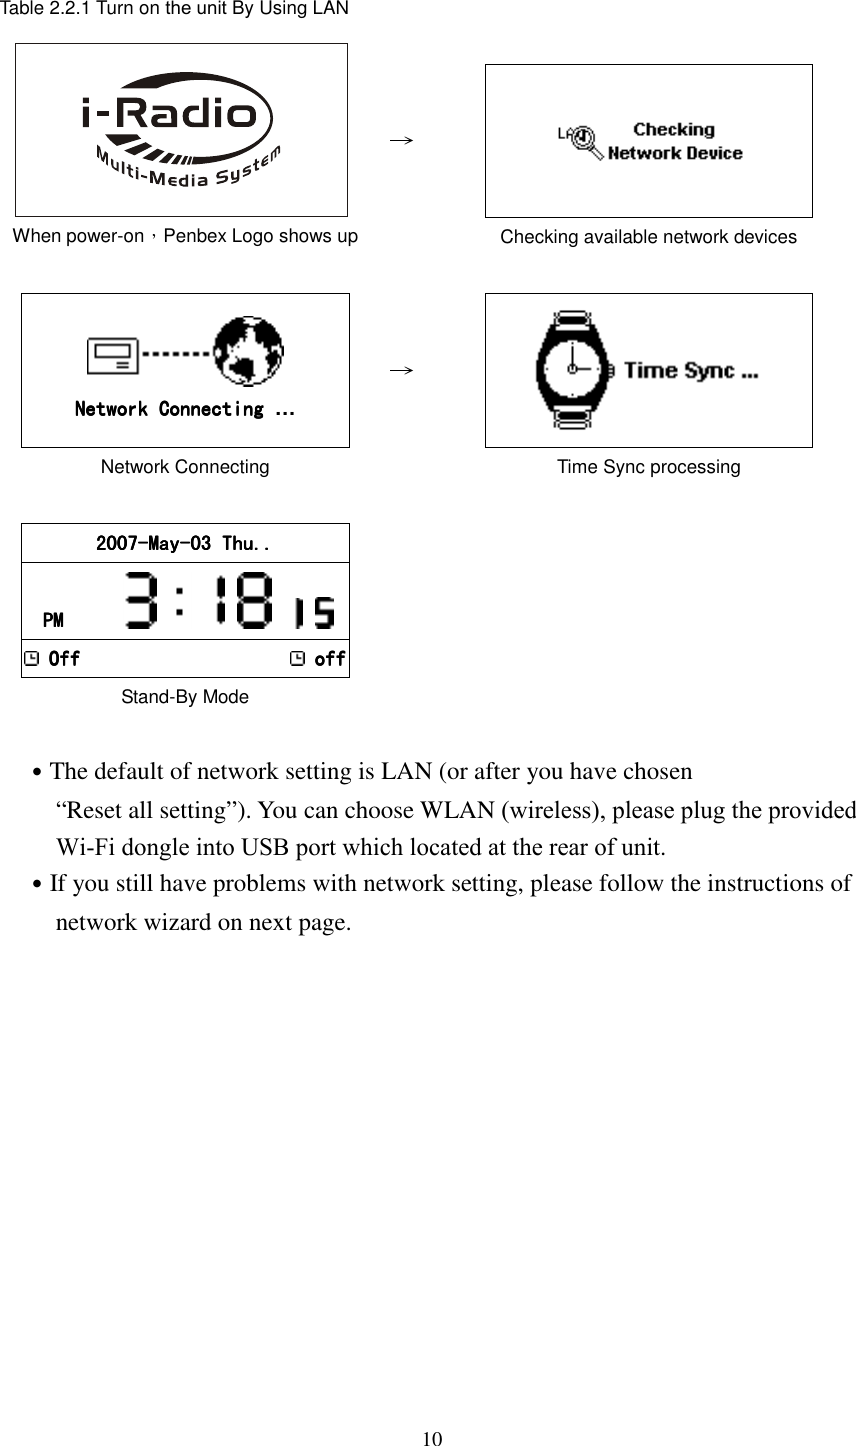
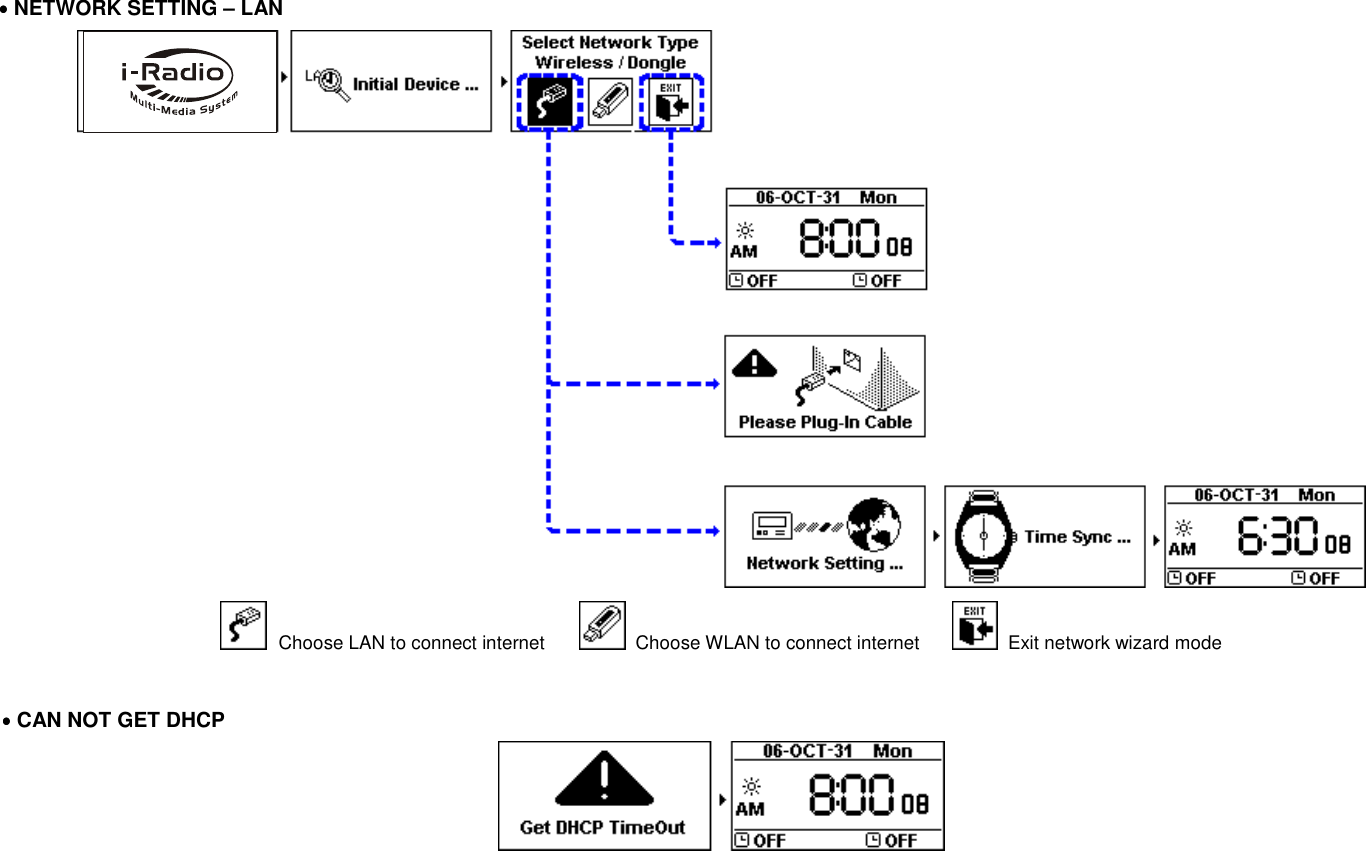
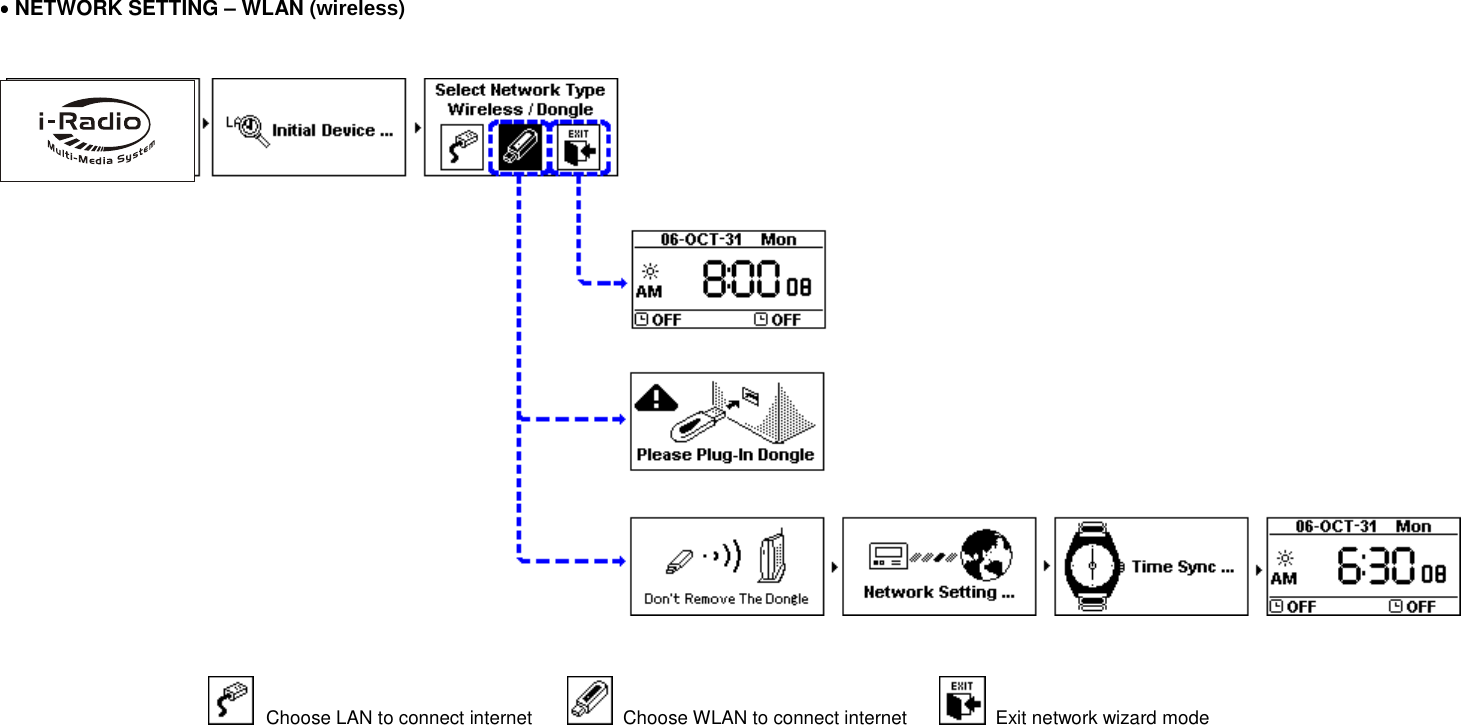
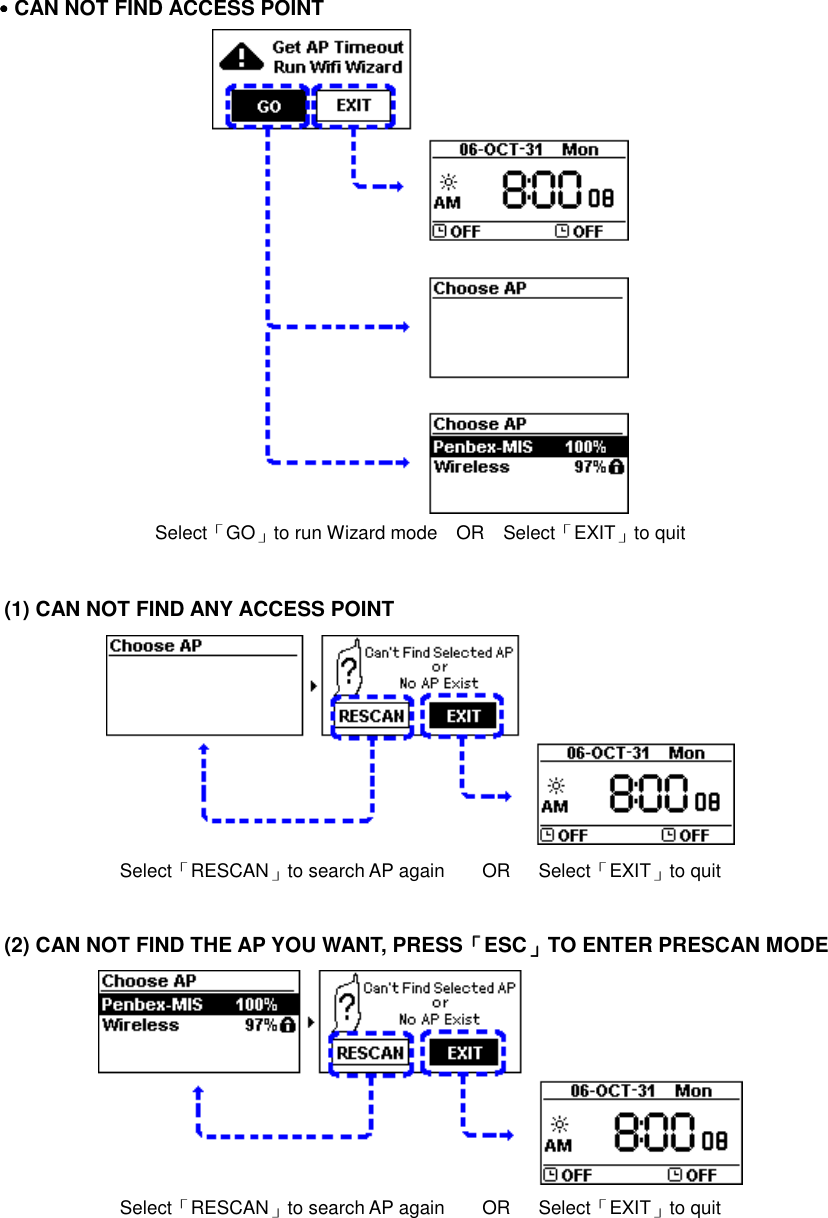
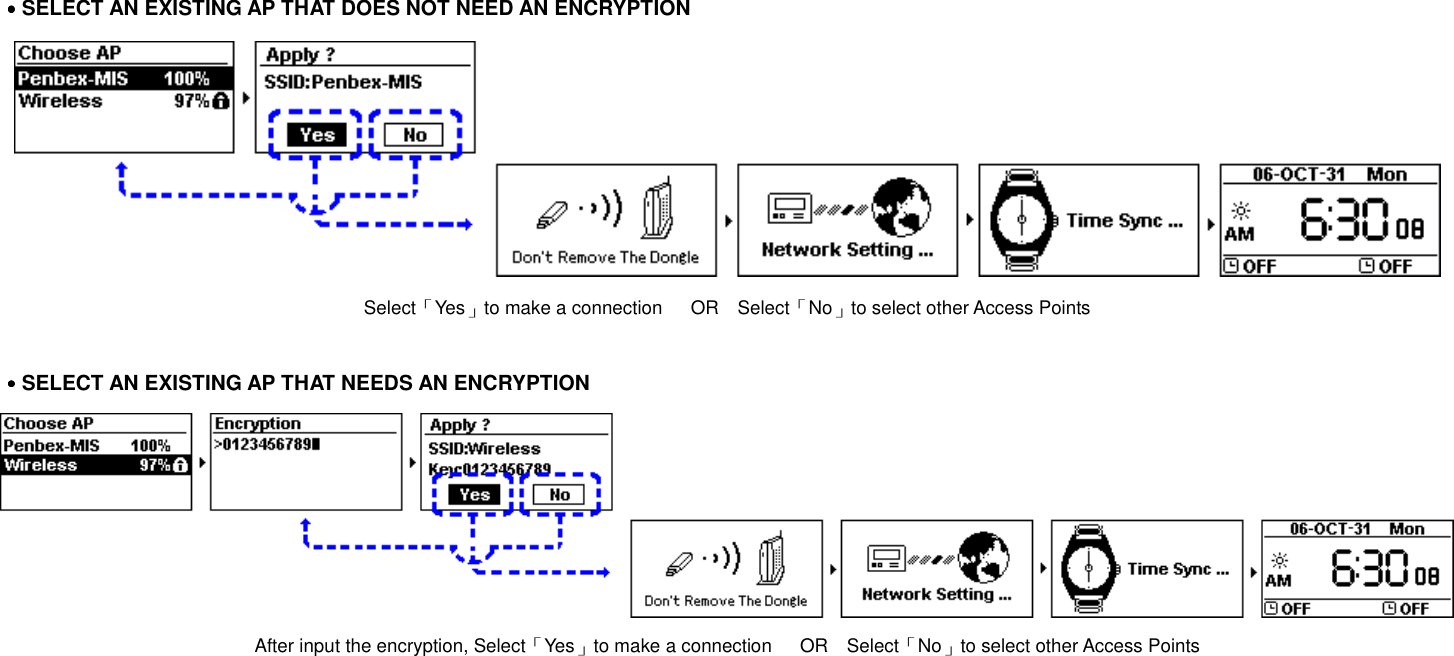
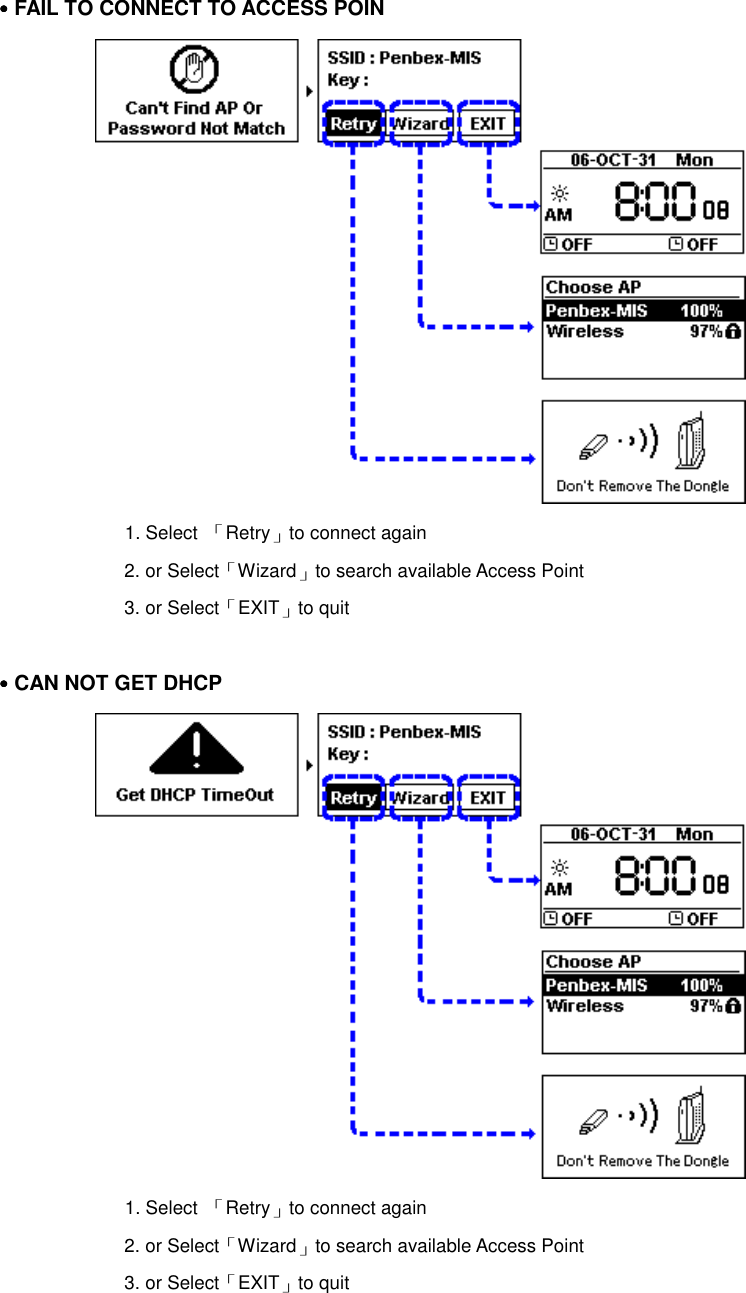
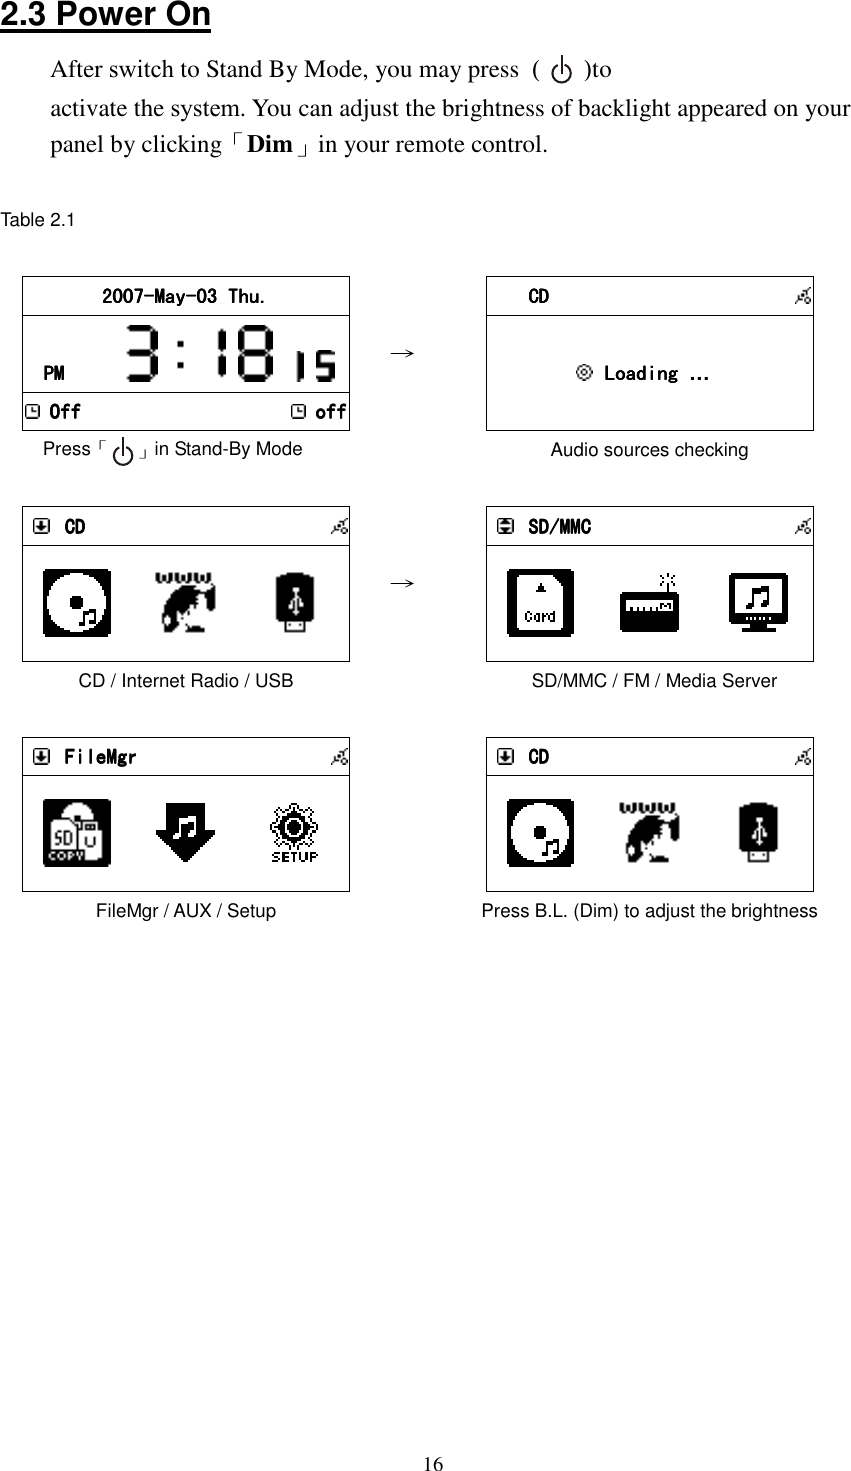
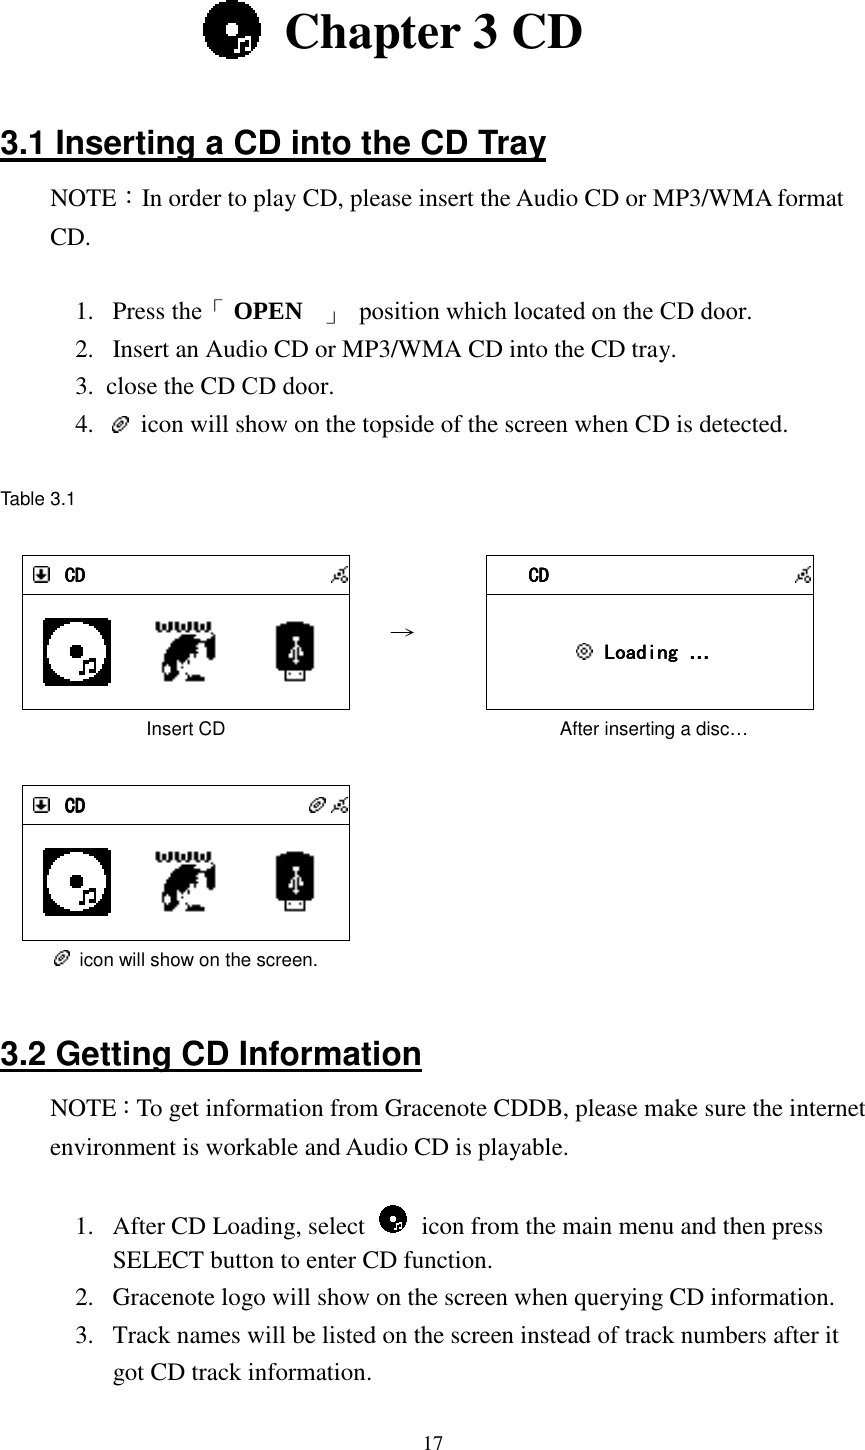
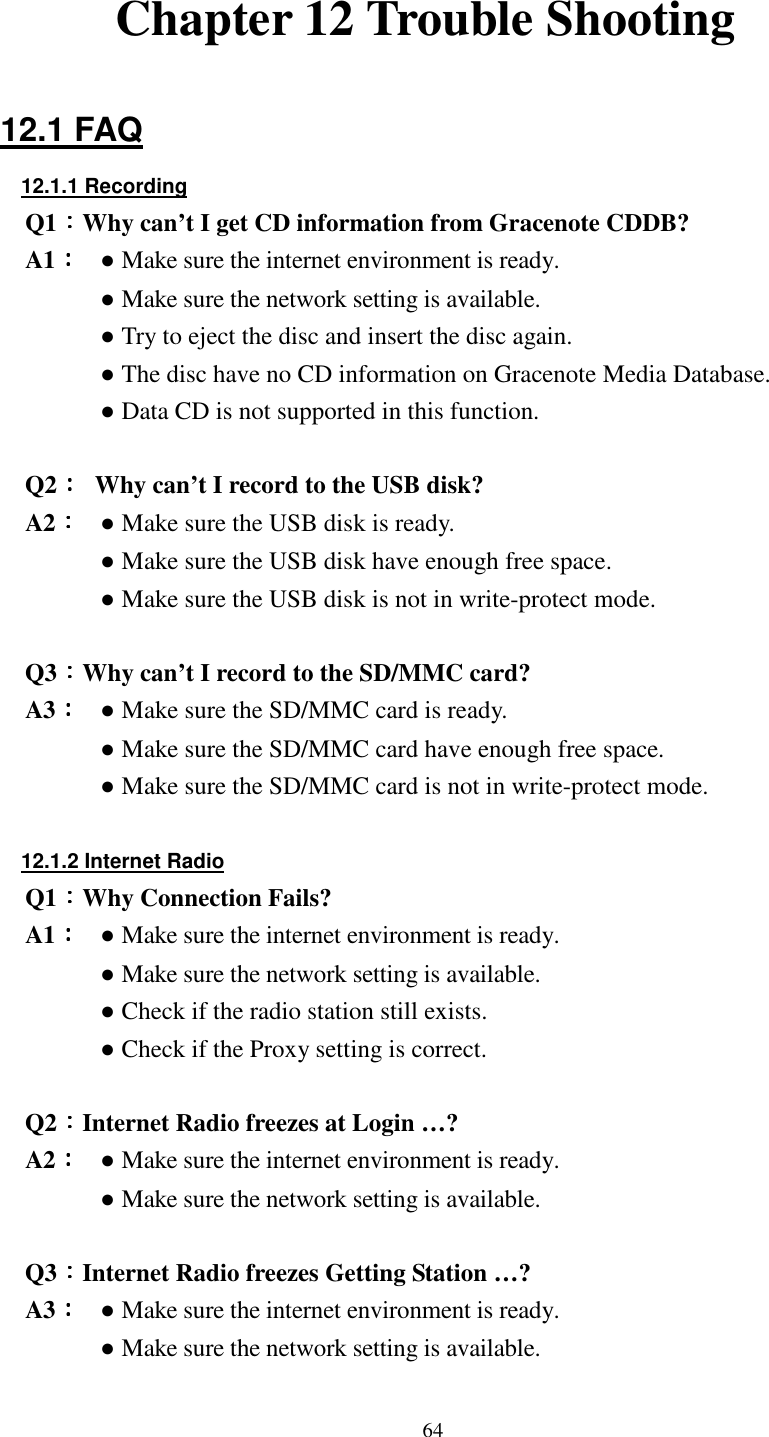
![18Table 3.2 CDCDCDCD Press「SELECT」 → CDCDCDCD Loading Loading Loading Loading … Processing Connecting to Gracenote → CDCDCDCD All All All All Track 01 Track 01 Track 01 Track 01 Track 02 Track 02 Track 02 Track 02 Not update yet CDCDCDCD All All All All Can Can Can Can’t Stop Loving Yout Stop Loving Yout Stop Loving Yout Stop Loving You Do You Remember Do You Remember Do You Remember Do You Remember Update CD information from CDDB 1 CDCDCDCD All All All All Unknow Track 01 Unknow Track 01 Unknow Track 01 Unknow Track 01 Unkn Unkn Unkn Unknow Track 02ow Track 02ow Track 02ow Track 02 Shown “Unknow” if information is not available 3.3 Playing an Audio CD There are two ways to play an Audio CD. A. Playing all the tracks within the disc 1. Highlight [ All] (or scroll down to the first track name). 2. Press「PLAY」or「SELECT/OK」button to play all songs. B. Playing selected tracks within the disc 1. Scroll up/down to a track name, then press「MEMORY」button to make a check mark . 2. Repeat the step 1 to select other songs. 3. Press「PLAY」or「SELECT/OK」button to play these marked songs. NOTE:Not all audio CD has CD track information](https://usermanual.wiki/KENWIN/KENWIN00001/User-Guide-890680-Page-23.png)
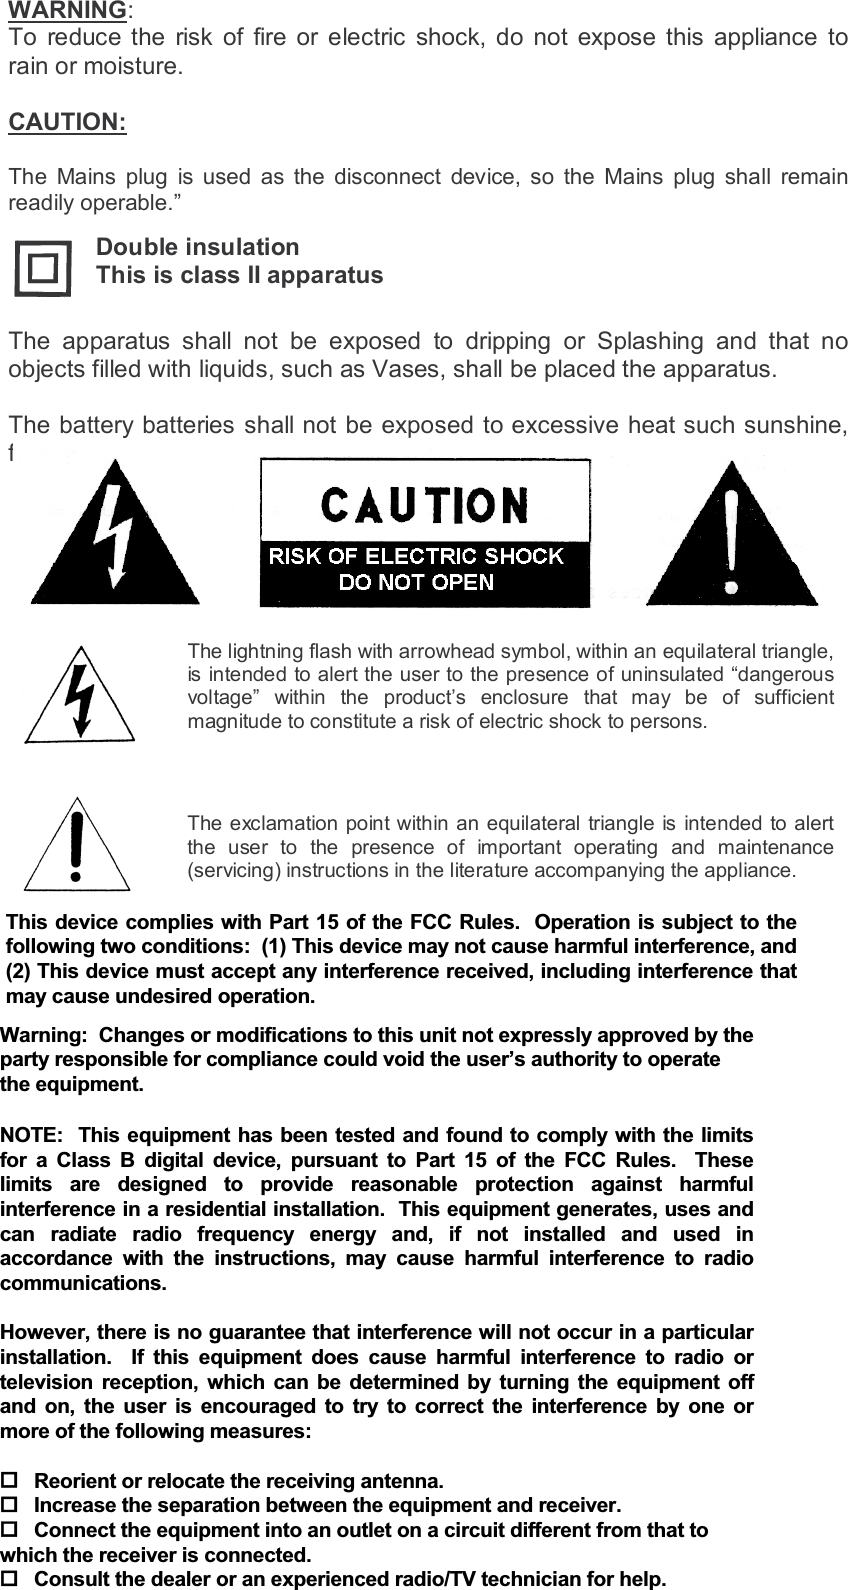
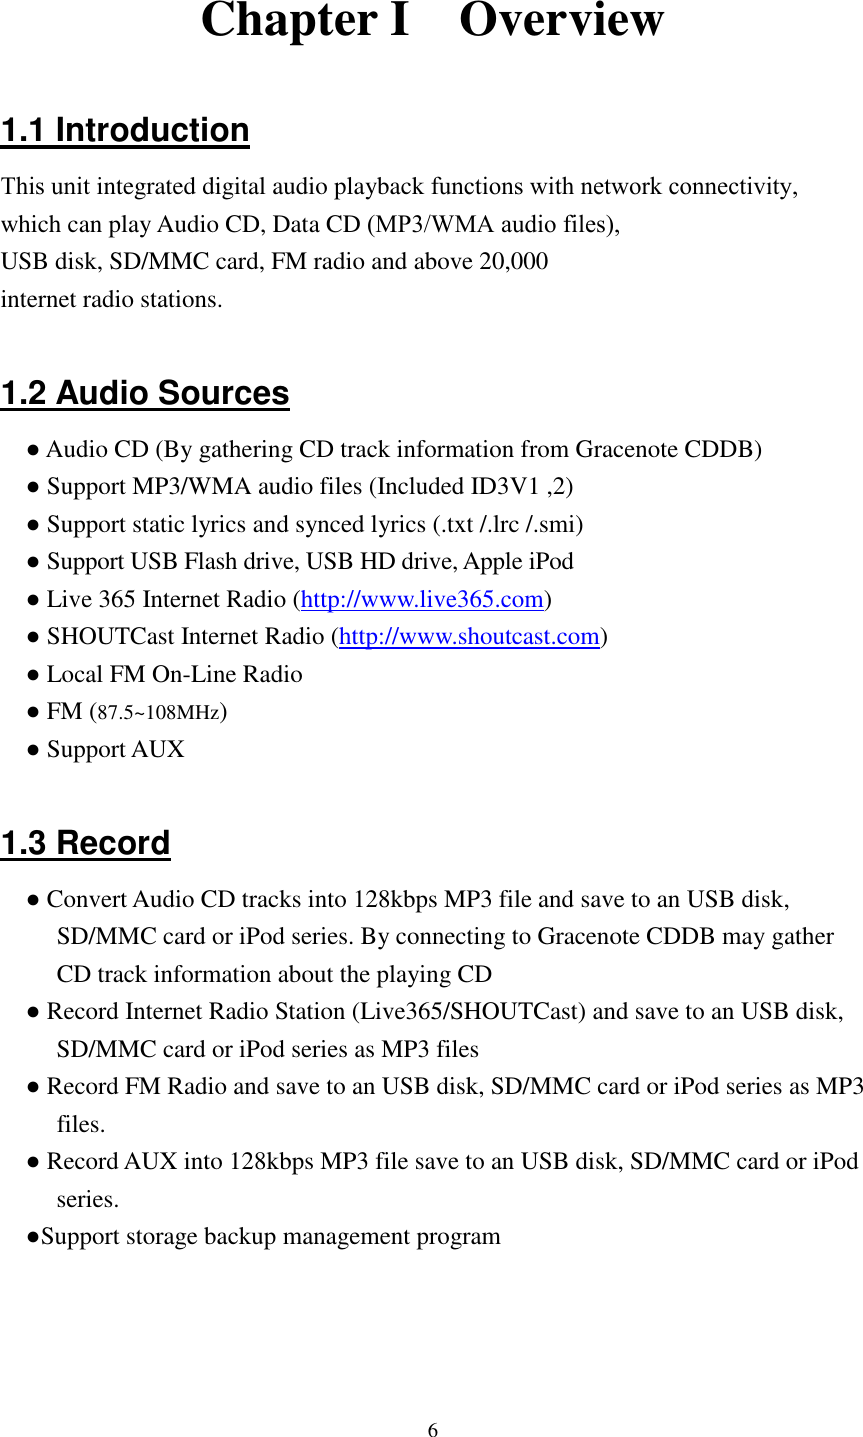
![19Table 3.3 CDCDCDCD All All All All Can Can Can Can’t Stop Loving Yout Stop Loving Yout Stop Loving Yout Stop Loving You Do You Remember Do You Remember Do You Remember Do You Remember Select [All], then press PLAY or SELECT to play or CDCDCDCD All All All All Can Can Can Can’t Stop Loving Yout Stop Loving Yout Stop Loving Yout Stop Loving You Do You Remember Do You Remember Do You Remember Do You Remember Press「MEMORY」to make a check mark , then press「PLAY」to play. 001/012 001/012 001/012 001/012 CanCanCanCan’t Stop Loving Yout Stop Loving Yout Stop Loving Yout Stop Loving You Phil CollinsPhil CollinsPhil CollinsPhil Collins *** Love Songs: A Compilation*** Love Songs: A Compilation*** Love Songs: A Compilation*** Love Songs: A Compilation 02020202::::30303030 04040404::::30303030 Music playing 3.4 Playing an MP3/WMA CD NOTE: 1. Support MP3/WMA audio files. 2. Support static lyrics and synced lyrics (.txt /.lrc /.smi) 3. Not support MPEG 1 Layer 2 format. There are two ways to play an Audio CD. A. Playing all the tracks within the disc 1. Highlight [ All] (or scroll down to the first track name). 2. Press「PLAY」or「SELECT/OK」button to play all songs. B. Playing selected tracks within the disc 1. Scroll up/down to a track name, then press「MEMORY」button to make a check mark . 2. Repeat the Step 1 to select other songs. 3. Press「PLAY」or「SELECT/OK」button to play these marked songs. C. Playing one song within a folder or disc 1. Scroll up/down to a file name, then press「MEMORY」button to make a check mark . 2. Press「PLAY」or「SELECT/OK」button to play the song.](https://usermanual.wiki/KENWIN/KENWIN00001/User-Guide-890680-Page-24.png)
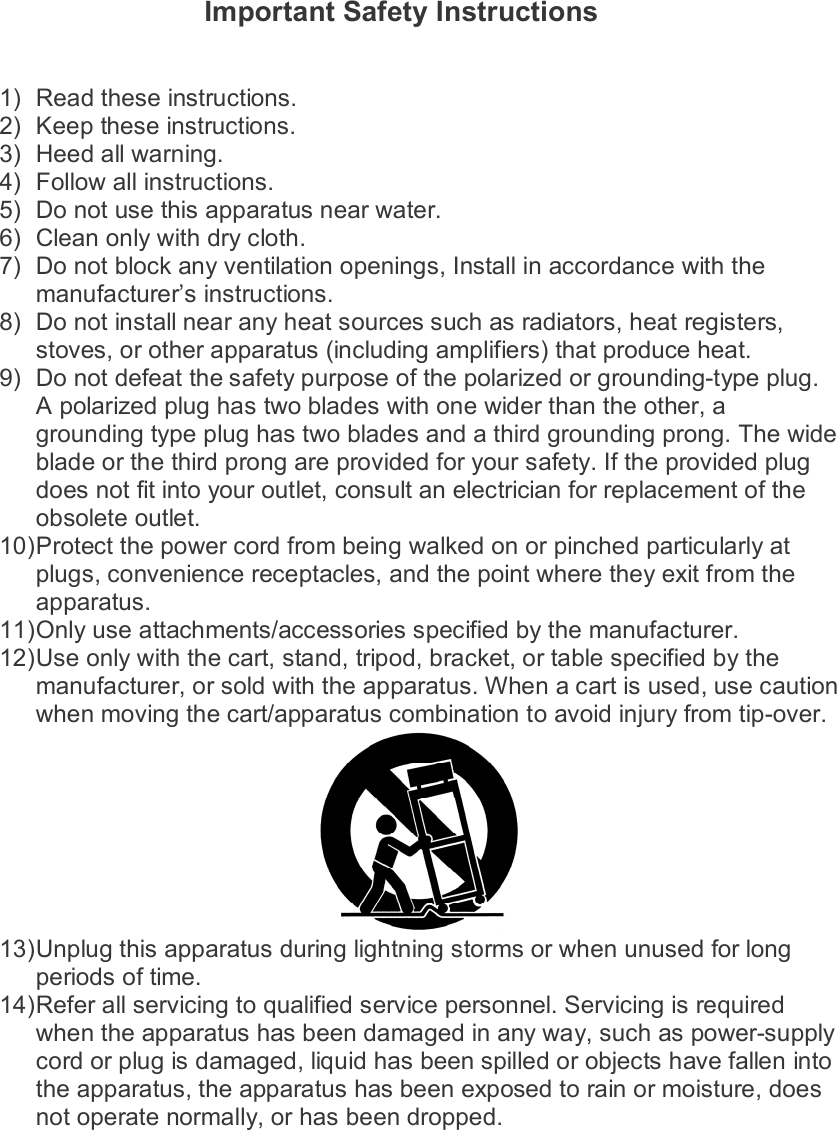
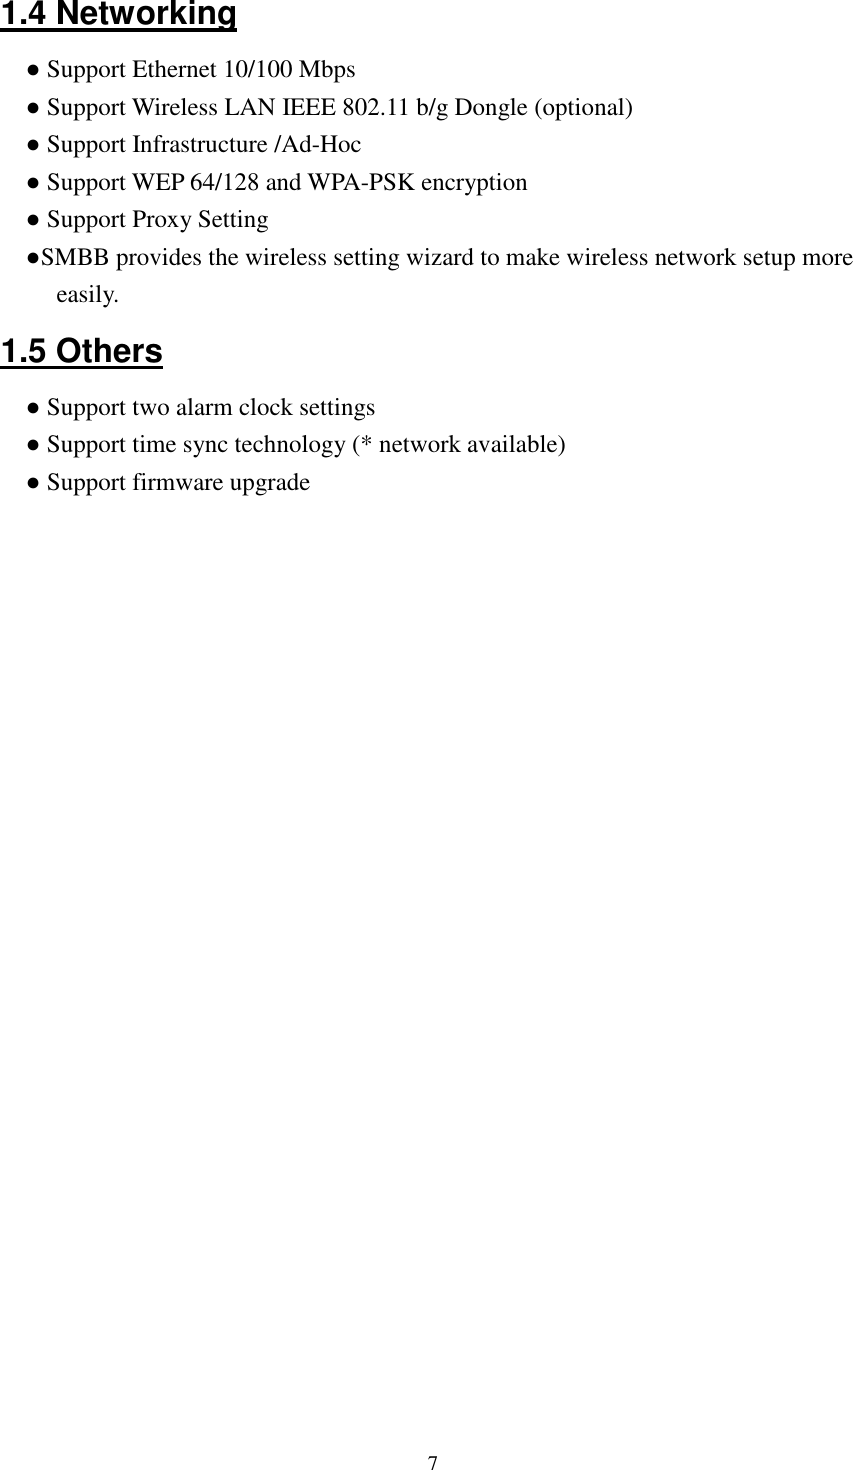
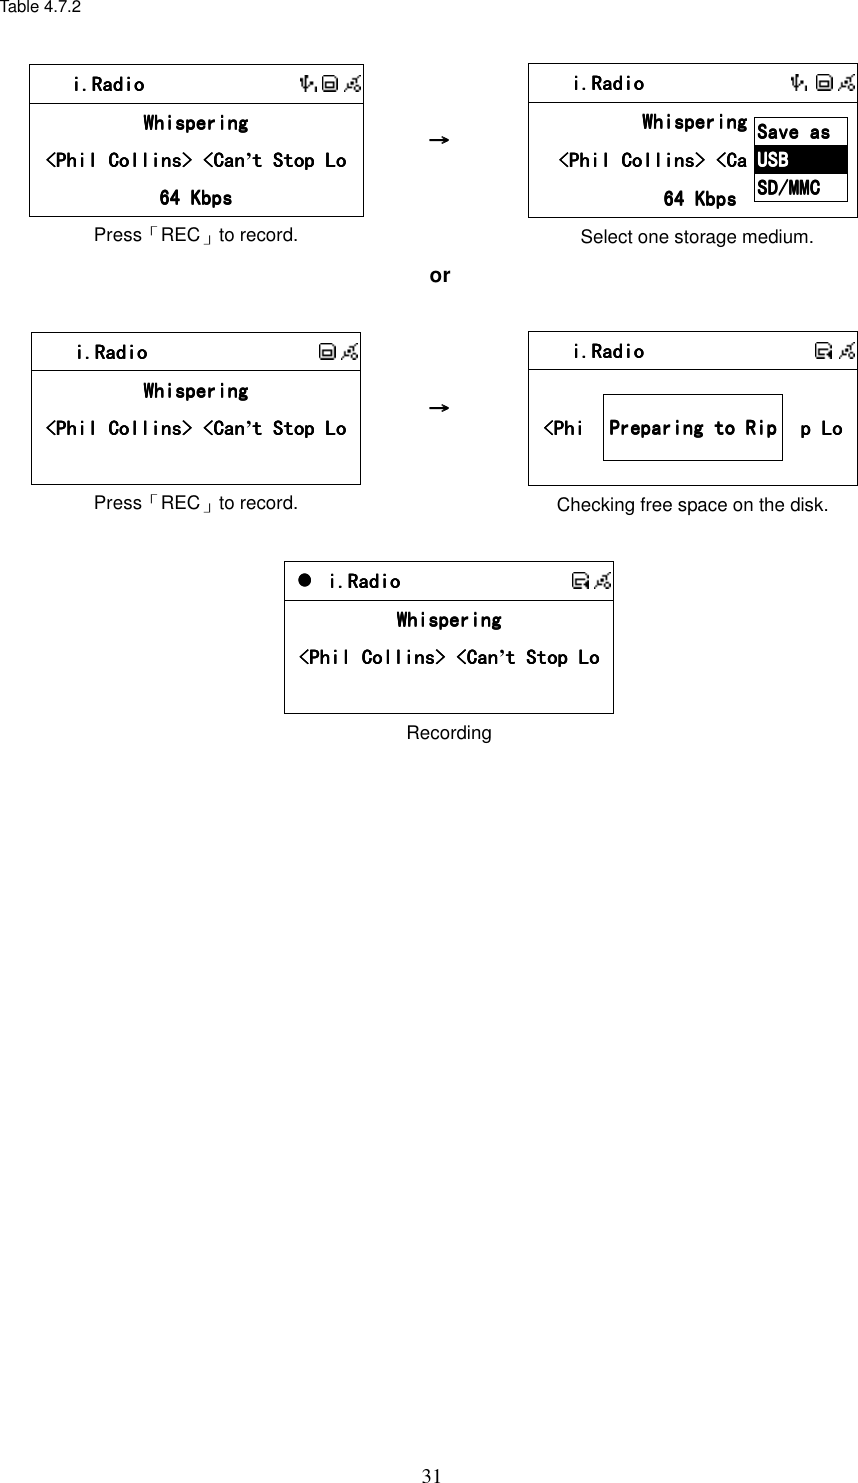
![20Table 3.4 CDCDCDCD All All All All Phil Collins Phil Collins Phil Collins Phil Collins Do You Do You Do You Do You RememberRememberRememberRemember Select [All], then press PLAY or SELECT to play. or CDCDCDCD All All All All Phil Collins Phil Collins Phil Collins Phil Collins Do You Remember Do You Remember Do You Remember Do You Remember Press「MEMORY」, then press「PLAY」to play. 001/012 001/012 001/012 001/012 CanCanCanCan’t Stop Loving Yout Stop Loving Yout Stop Loving Yout Stop Loving You Phil CollinsPhil CollinsPhil CollinsPhil Collins *** Love Songs: A Compilation*** Love Songs: A Compilation*** Love Songs: A Compilation*** Love Songs: A Compilation 02020202::::30303030 00004444::::30303030 Music playing 3.5 CD Ripping ˙Press「REC」to rip ˙Auto-categorization function will be activated when ripping a song to USB or SD/MMC. ˙iPod will be updated after ripping a song to iPod. ˙CD will not be recorded if the Audio CD is under protection. 3.5.1 Converting All the Tracks within the Disc 1. Insert an Audio CD into the CD tray. 2. Select icon from the main menu, then press 「SELECT/OK」button to enter CD function. 3. Highlight [ All] and, then press「REC」button to record. 4. If both USB Disk and SD/MMC Card are detected, scroll up/down to select a storage medium where you want to store recording files, then press「SELECT/OK」to start recording. 5. icon will show on the topside of the screen when converting. 6. In any reason it has failed to convert. System will stop recording. 3.5.2 Converting Selected Tracks within the Disc 1. Insert an Audio CD into the CD tray. 2. Select icon from the main menu, then press「SELECT/OK」button to](https://usermanual.wiki/KENWIN/KENWIN00001/User-Guide-890680-Page-25.png)
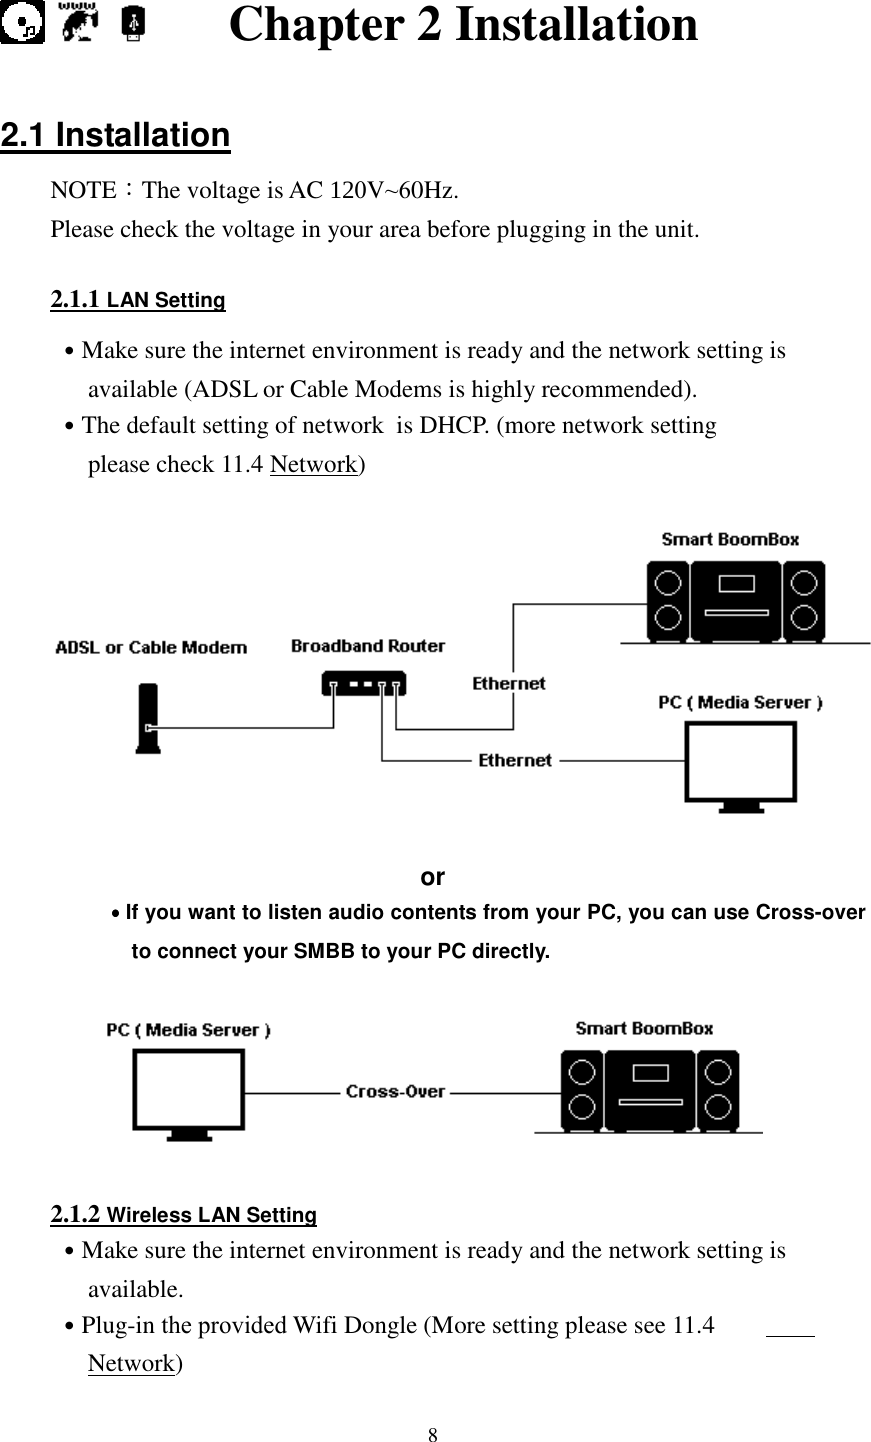
![21enter CD function. 3. Scroll up/down to a track name, then press「MEMORY」button to make a check mark . 4. Repeat the Step 3 to select other songs and then press「REC」button to record. 5. If both USB Disk and SD/MMC Card are detected, scroll up/down to select a storage medium where you want to store recording files, then press 「SELECT/OK」to start recording. 6. icon will show on the topside of the screen when converting. 7. In any reason it has failed to convert. System will stop recording. Table 3.5.2 CDCDCDCD All All All All Can Can Can Can’t Stop Loving Yout Stop Loving Yout Stop Loving Yout Stop Loving You Do You Remember Do You Remember Do You Remember Do You Remember Select [All], then press「REC」to rip → 001/001/001/001/012012012012 CanCanCanCan’t Stop Loving Yout Stop Loving Yout Stop Loving Yout Stop Loving You Phil CollinsPhil CollinsPhil CollinsPhil Collins *** Love Songs: A Compilation*** Love Songs: A Compilation*** Love Songs: A Compilation*** Love Songs: A Compilation 02020202::::30303030 04040404::::30303030 icon will show on the screen when ripping or CDCDCDCD All All All All Can Can Can Can’t Stop Loving Yout Stop Loving Yout Stop Loving Yout Stop Loving You Do You Remember Do You Remember Do You Remember Do You Remember Press MEMORY, then Press REC to rip → 001001001001/001/001/001/001 CanCanCanCan’t Stop Loving Yout Stop Loving Yout Stop Loving Yout Stop Loving You Phil CollinsPhil CollinsPhil CollinsPhil Collins *** Love Songs: A Compilation*** Love Songs: A Compilation*** Love Songs: A Compilation*** Love Songs: A Compilation 02020202::::30303030 04040404::::30303030 icon will show on the screen when ripping. or CDCDCDCD All All All All Can Can Can Can’t Stop Loving Yout Stop Loving Yout Stop Loving Yout Stop Loving You Do You Remember Do You Remember Do You Remember Do You Remember Press MEMORY, then Press REC to rip → CDCDCDCD All All All All Can Can Can Can’t Stop Loving t Stop Loving t Stop Loving t Stop Loving Do You Remember Do You Remember Do You Remember Do You Remember Save as Save as Save as Save as USBUSBUSBUSB SD/MMCSD/MMCSD/MMCSD/MMC Select USB or SD/MMC if necessary. or CDCDCDCD All All All All Can Can Can Can’t Stop Loving Yout Stop Loving Yout Stop Loving Yout Stop Loving You Do You Remember Do You Remember Do You Remember Do You Remember Press MEMORY, then Press REC to rip. CDCDCDCD All All All All Can Can Can Can’t Stop Loving Yout Stop Loving Yout Stop Loving Yout Stop Loving You Do You Remember Do You Remember Do You Remember Do You Remember If no storage media, the action will stop.](https://usermanual.wiki/KENWIN/KENWIN00001/User-Guide-890680-Page-26.png)
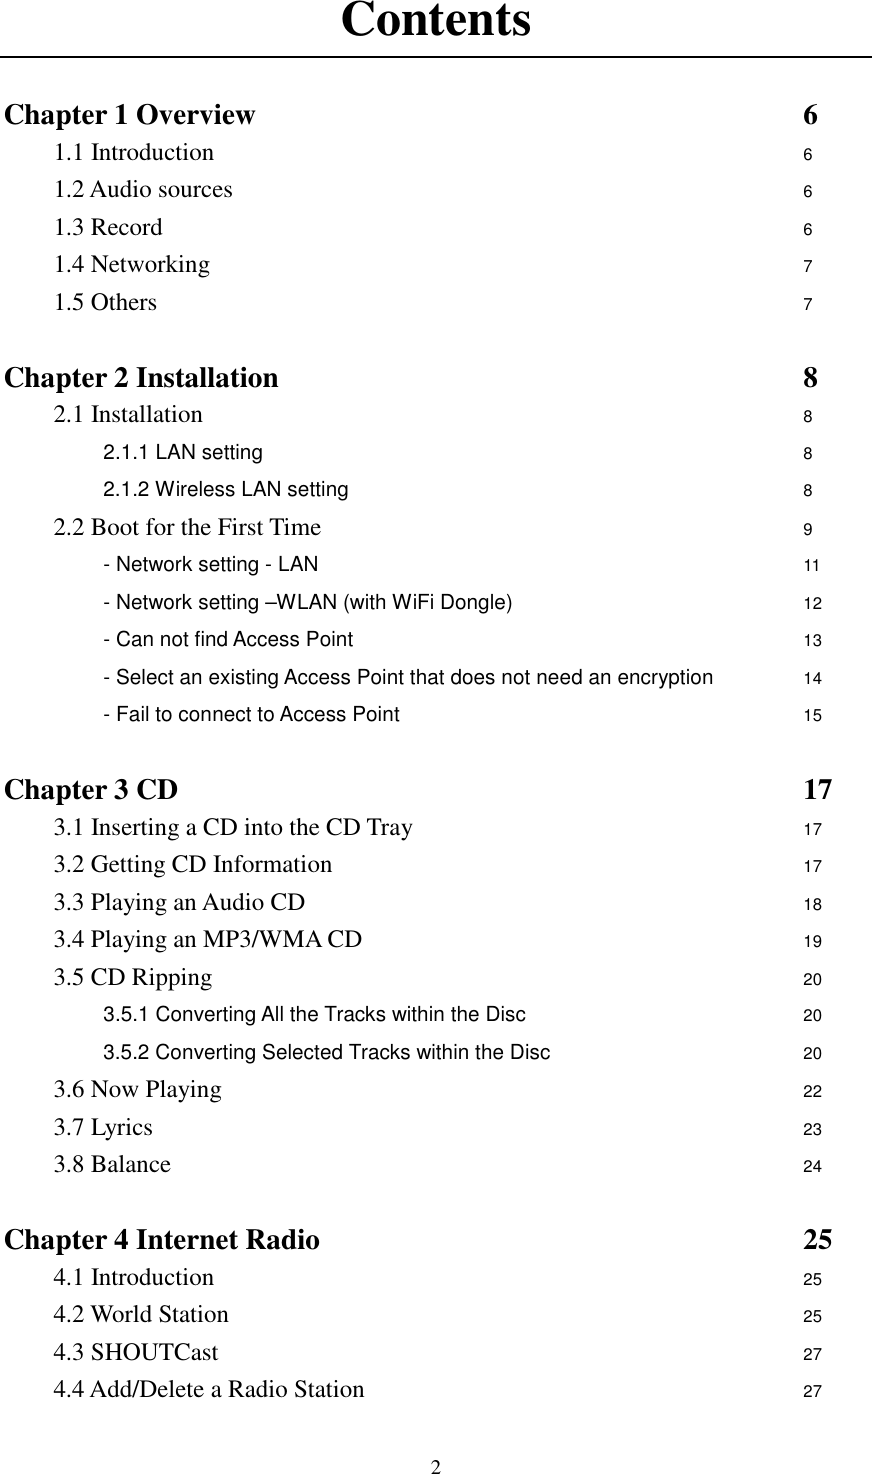
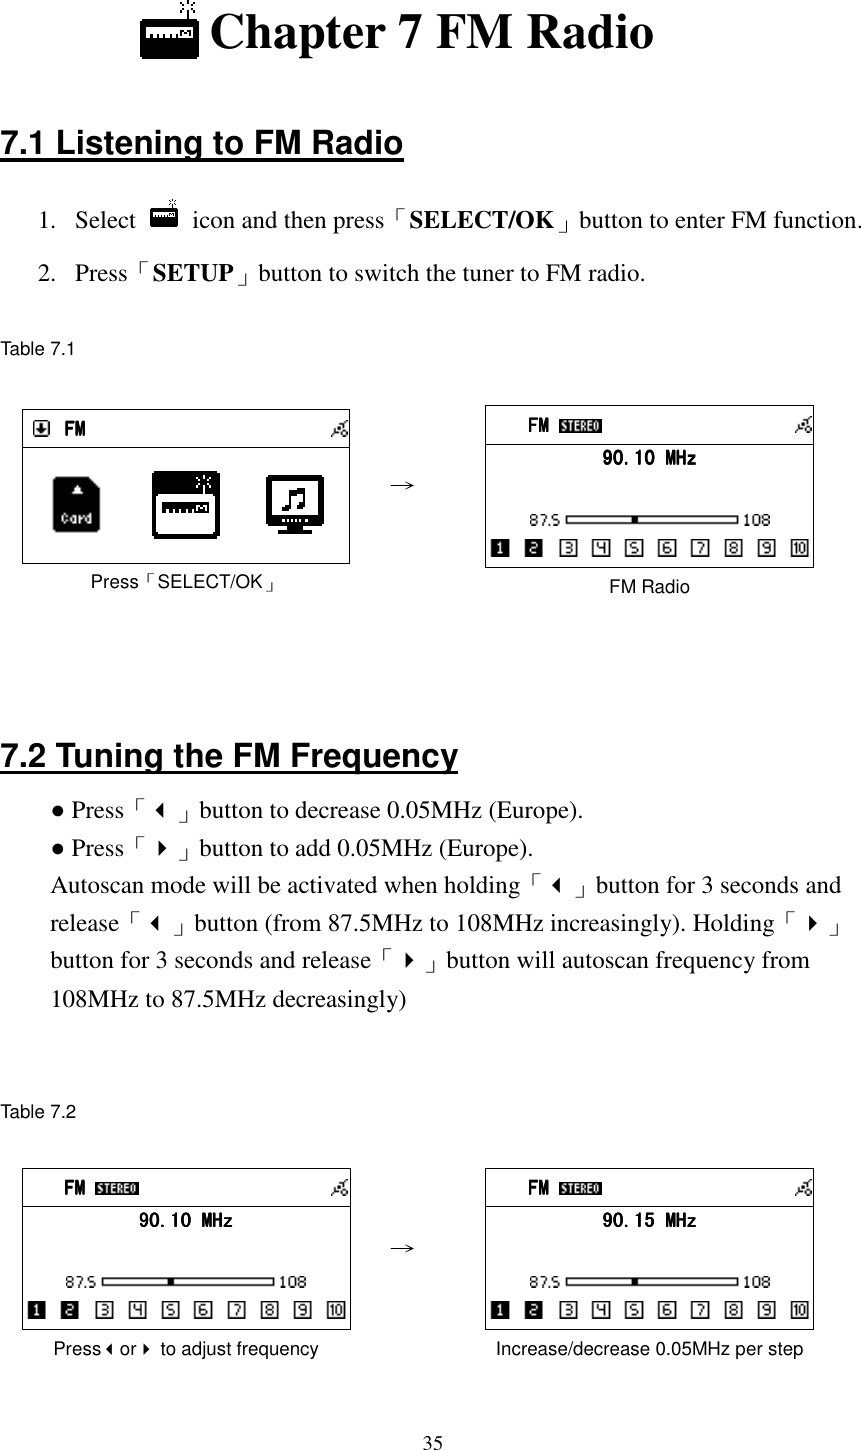
![25 Chapter 4 Internet Radio 4.1 Introduction Internet radio is an audio broadcasting service transmitted via the Internet. By using internet radio devices, listeners receive a continuous stream of audio from internet radio stations. Unit supports many audio stream sources such as Microsoft (mms://..), Live365, and SHOUTCast. ˙Live 365 (http://www.live365.com) ˙SHOUTCast (http://www.shoutcast.com) Today most traditional FM radio stations in the world offer on-line radio services or programs. It can connect to those on-line radio services or programs. Moreover, this system categorizes those stations by country, and sort them under World Station file. This makes it easy to search or find a particular radio station. 4.2 World Station System requirements: Recommend broadband internet connection (xDSL/Cable Modem). However, Internet Radio does not support PPPoE(ADSL) or ISP Proxy (cable modem). We strongly recommend connecting with a broadband router to have better quality of audio streaming. ˙If there is no internet connection on your unit, Wizard mode will be automatically activated. Please follow the instructions shown on the screen to establish network connection. 4.2.1 Listen to World Station ˙Go to[Main] menu, choose and press「SELECT/OK」button. ˙Choose [World Station] and then press「SELECT/OK」button. ˙Scroll up/down to a station and then press「SELECT/OK」button to play. ˙You will hear music after buffering reaches to 100%. Note 1::::For fast search for an internet radio, press「「「「」」」」button to jump from radio stations started with alphabet A to alphabet B, alphabet B to alphabet C, and](https://usermanual.wiki/KENWIN/KENWIN00001/User-Guide-890680-Page-30.png)

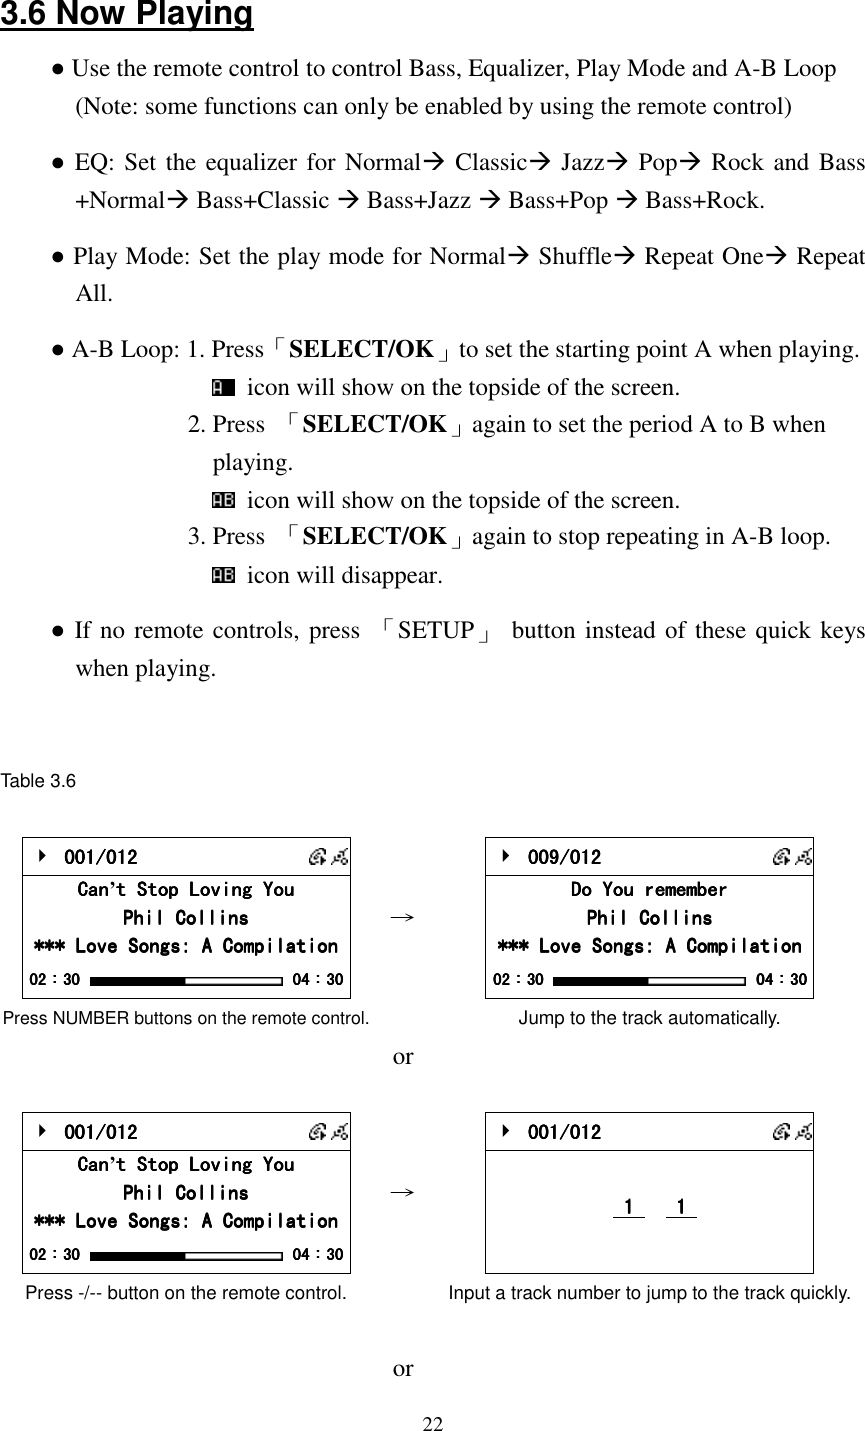
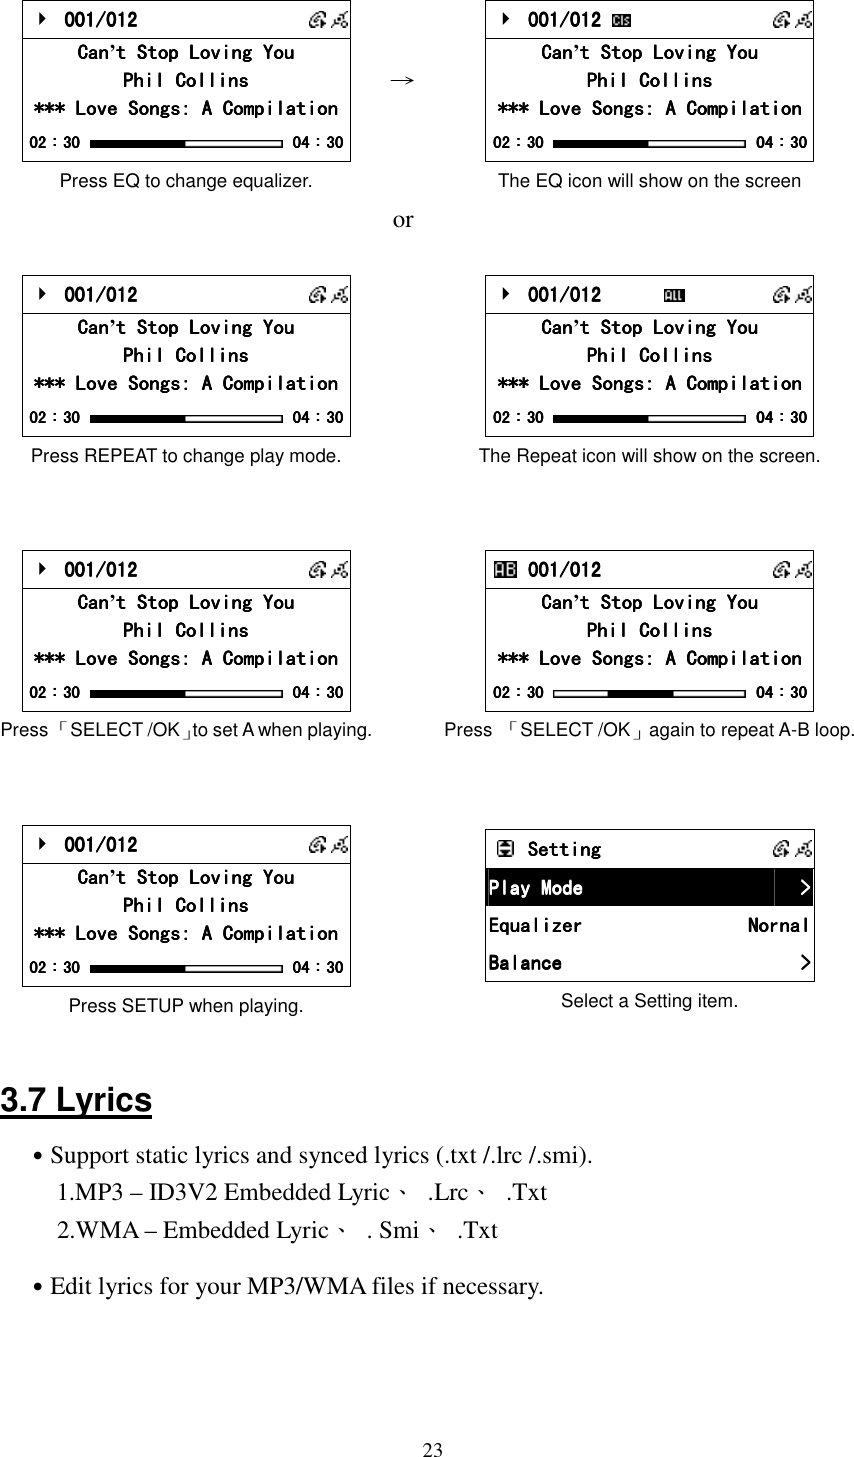
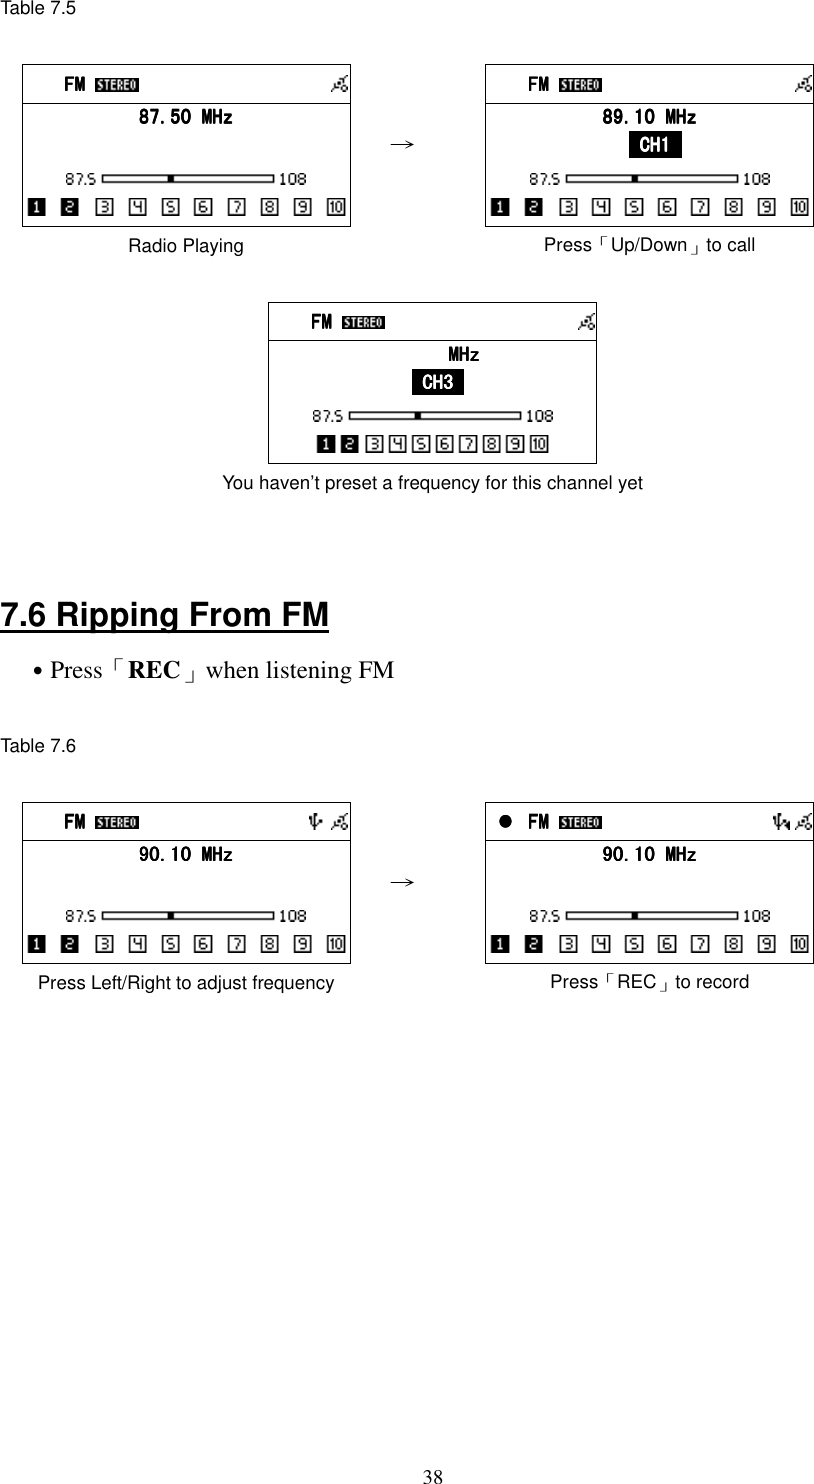
![274.3 SHOUTCast System requirements: Recommend broadband internet connection (xDSL/Cable Modem). However, Internet Radio does not support PPPoE(ADSL) or ISP Proxy (cable modem). We strongly recommend connecting with a broadband router to have better quality of audio streaming. 4.3.1 Listen to SHOUTCast ˙Go to[Main] menu, choose and press「SELECT/OK」button. ˙Choose [World Station] and then press「SELECT/OK」button. ˙Scroll up/down to a station and then press「SELECT/OK」button to play. ˙You will hear music after buffering reaches to 100%. Note 1::::For fast search for an internet radio, press「「「「」」」」button to jump from radio stations started with alphabet A to alphabet B, alphabet B to alphabet C, and so on. Press「「「「」」」」button to jump backward. Note 2::::Press「「「「INFO」」」」to know the total amount of internet radio stations in a specific category and which one you are browsing. 4.4 Add/ Delete a Radio Station NOTE:The maximum radio station can be memorized is 20. ˙Roll to your favorite radio station that you want to add into FAVORITE. ˙Hold「SELECT/OK」button for 2 seconds and the rolling bar will blink twice. ˙The radio station you have chosen will add into your FAVORITE after blinking stops. ˙You can add a station into FAVORITE by pressing「MEMORY」when playing ˙SMBB will inform you If a station you try to add into FAVORITE exists already. ˙It may consume more than 1 storage space if the information of a radio station is extensive.](https://usermanual.wiki/KENWIN/KENWIN00001/User-Guide-890680-Page-32.png)
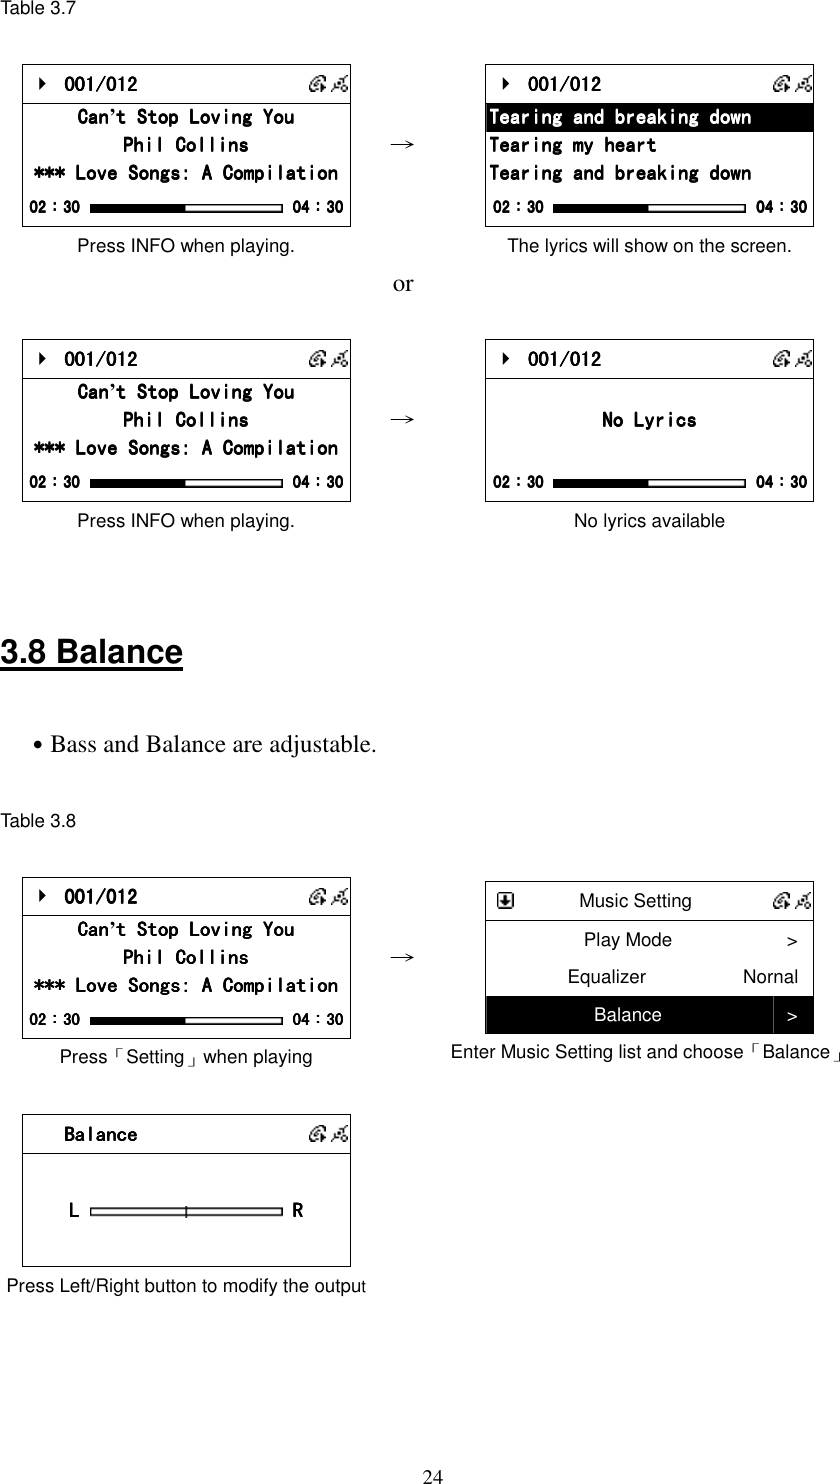
![28Table 4.4 World StationWorld StationWorld StationWorld Station BCC News RadioBCC News RadioBCC News RadioBCC News Radio BCC ClassicalBCC ClassicalBCC ClassicalBCC Classical BCC PopBCC PopBCC PopBCC Pop Press「SELECT / OK」or「MEMORY」for 2 sec. →→→→ World StationWorld StationWorld StationWorld Station BCBCBCBCC News RadioC News RadioC News RadioC News Radio BCC ClassicalBCC ClassicalBCC ClassicalBCC Classical BCC PopBCC PopBCC PopBCC Pop Rolling bar blinks twice FavoriteFavoriteFavoriteFavorite BCC News RadioBCC News RadioBCC News RadioBCC News Radio Adding a station into FAVORITE →→→→ FavoriteFavoriteFavoriteFavorite BCC News RadioBCC News RadioBCC News RadioBCC News Radio Hold「SELECT/OK」2 seconds for deleting a station Delete FavoriteDelete FavoriteDelete FavoriteDelete Favorite Delete tDelete tDelete tDelete this station?his station?his station?his station? Confirm FavoriteFavoriteFavoriteFavorite Choose「Yes」then press「SELECT/OK」to delete 4.5 Access to Live365 System requirements: Recommend broadband internet connection (xDSL/Cable Modem). However, Internet Radio does not support PPPoE(ADSL) or ISP Proxy (cable modem). We strongly recommend connecting with a broadband router to have better quality of audio streaming. ˙Access the web page http://www.live365.com by PC. ˙Sign up for a free membership or pay for a VIP membership. 4.5.1 Listen to Live365 1. Choose「SETUP」 2. Roll to [Live365 Account], and press「SELECT/OK」button 3. Key in Live365 Account and Password 4. Save and Exit](https://usermanual.wiki/KENWIN/KENWIN00001/User-Guide-890680-Page-33.png)
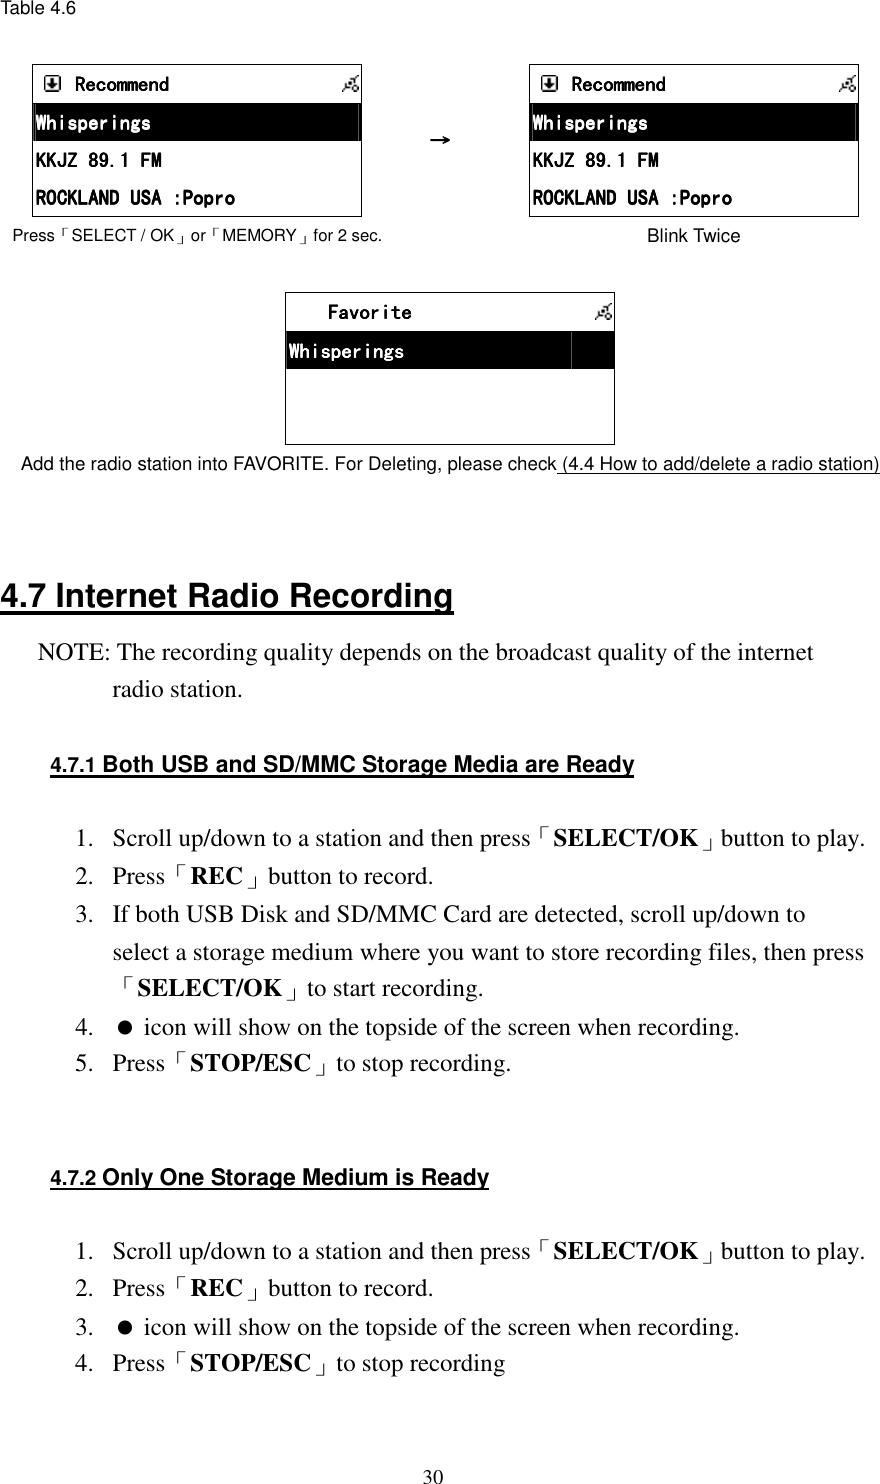
![29 SettingSettingSettingSetting Live365Live365Live365Live365 >>>> Load INILoad INILoad INILoad INI >>>> InformationInformationInformationInformation >>>> Press SETUP and choose Live365 →→→→ Live365 LoginLive365 LoginLive365 LoginLive365 Login AccountAccountAccountAccount >>>> PasswordPasswordPasswordPassword >>>> Input Account and Password ˙Go to [Main] menu , choose and press「SELECT/OK」button. ˙Roll to [Live365], and press「SELECT/OK」button. ˙Choose your favorite radio station , and then press「SELECT/OK」button. ˙You will hear music after buffering reaches to 100%. RecommendRecommendRecommendRecommend WhisperingsWhisperingsWhisperingsWhisperings KKJZ 89.1 FMKKJZ 89.1 FMKKJZ 89.1 FMKKJZ 89.1 FM ROCKLAND USA :PoproROCKLAND USA :PoproROCKLAND USA :PoproROCKLAND USA :Popro Choose a radio station and press「SELECT/OK」 →→→→ i.Radioi.Radioi.Radioi.Radio Buffering 80%Buffering 80%Buffering 80%Buffering 80% Buffering i.Radioi.Radioi.Radioi.Radio WhisperingWhisperingWhisperingWhispering <Phil Collins> <Can<Phil Collins> <Can<Phil Collins> <Can<Phil Collins> <Can’t Stop Lot Stop Lot Stop Lot Stop Lo CD 128KbpsCD 128KbpsCD 128KbpsCD 128Kbps Music Playing 4.6 Add/Delete A Radio Station in/from Live365 NOTE: Once you add or delete a radio station from Live365 in your unit, it will also change your favorite stations that have been stored in Live365 online web site. ˙Move the rolling bar on the radio station you want to add. ˙Hold「SELECT/OK」for 2 seconds, the rolling bar will blink twice. ˙The radio station you have chosen will add into your FAVORITE .](https://usermanual.wiki/KENWIN/KENWIN00001/User-Guide-890680-Page-34.png)
![32 Chapter 5 USB/iPod 5.1 Playing Songs on the USB Disk 1. Insert an USB Disk with MP3/WMA audio files to USB port. 2. icon will show on the topside of the screen when USB is detected. 3. Select icon from the main menu and then press「SELECT/OK」 button to enter USB function. 4. Scroll up/down to a song, folder or [ All], then press「PLAY」button to play. 5. Select marked songs or folders: Press「MEMORY」button to make a check mark , then press「PLAY」button to play these marked songs. Table 5.1 USBUSBUSBUSB All All All All Phil Collin Phil Collin Phil Collin Phil Collinssss Do You Remember Do You Remember Do You Remember Do You Remember Press「PLAY」button or USBUSBUSBUSB All All All All Phil Collins Phil Collins Phil Collins Phil Collins Do You Remember Do You Remember Do You Remember Do You Remember Press「MEMORY」to make a check mark , then press「PLAY」to play. 001/012 001/012 001/012 001/012 CanCanCanCan’t Stop Loving Yout Stop Loving Yout Stop Loving Yout Stop Loving You Phil CollinsPhil CollinsPhil CollinsPhil Collins *** Love Songs: A Compilation*** Love Songs: A Compilation*** Love Songs: A Compilation*** Love Songs: A Compilation 02020202::::30303030 04040404::::30303030 Playing 5.2 Apple iPod Support NOTE: iPod firmware version 2006/3/23 and 2006/6/28 are recommended: ˙˙˙˙2006/3/23 ˙˙˙˙2006/6/28](https://usermanual.wiki/KENWIN/KENWIN00001/User-Guide-890680-Page-37.png)
![335.2.1 Supported iPod Models iPod IPod Firmware USB DOCK iPod 3G 2006/6/28 2006/3/23 iPod List OK Audio Out Only iPod Shuffle 2006/6/28 2006/3/23 iPod List OK N/A iPod nano 2006/6/28 2006/3/23 iPod List OK Menu , Play/Pause , Arrow up , Arrow Down , SELECT , PREV/FR , NEXT/FF IPod nano 2 Ver 1.1.2 iPod List OK Menu , Play/Pause , Arrow up , Arrow Down , SELECT , PREV/FR , NEXT/FF iPod Video 2006/6/28 2006/3/23 iPod List OK Menu , Play/Pause , Arrow up , Arrow Down , SELECT , PREV/FR , NEXT/FF 5.2.2 Supported iTunes Versions iTunes 6.0.5.20 or higher 5.3 Playing Songs on Apple iPod 1. Connect Apple iPod and Smart Boombox with an USB cable. 2. icon will show on the topside of the screen when USB is detected. 3. Select icon and then press 「SELECT/OK」to enter USB function. 4. Scroll up/down to a song, then press 「PLAY」or 「SELECT/OK」button to play. Table 5.3 USBUSBUSBUSB Select [USB], then press SELECT to enter. → USBUSBUSBUSB All SongsAll SongsAll SongsAll Songs >>>> ArtistsArtistsArtistsArtists >>>> AlbumsAlbumsAlbumsAlbums >>>> Browse songs by songs, artists or albums.](https://usermanual.wiki/KENWIN/KENWIN00001/User-Guide-890680-Page-38.png)
![34 Chapter 6 SD/MMC 6.1 Playing Songs on the SD/MMC Card 1. Insert a SD/MMC card with MP3/WMA audio files into the SD/MMC slot. 2. icon will show on the topside of the screen when SD/MMC is detected. 3. Select icon from the main menu and then press「SELECT/OK」 button to enter SD/MMC function. 4. Scroll up/down to a song, folder or, [ All] then press「PLAY」button to play. 5. Select marked songs or folders: Press「MEMORY」button to make a check mark , then press「PLAY」button to play these marked songs. Table 6.1 SD/MMCSD/MMCSD/MMCSD/MMC All All All All Phil Collins Phil Collins Phil Collins Phil Collins Do You Remember Do You Remember Do You Remember Do You Remember Press「PLAY」to play → SD/MMCSD/MMCSD/MMCSD/MMC All All All All Phil Collins Phil Collins Phil Collins Phil Collins Do You Remember Do You Remember Do You Remember Do You Remember Press「MEMORY」to make a check mark , then press「PLAY」to play. 001/012 001/012 001/012 001/012 CanCanCanCan’t Stop Loving Yout Stop Loving Yout Stop Loving Yout Stop Loving You Phil CollinsPhil CollinsPhil CollinsPhil Collins *** Love Songs: A Compilation*** Love Songs: A Compilation*** Love Songs: A Compilation*** Love Songs: A Compilation 02020202::::30303030 04040404::::30303030 Playing](https://usermanual.wiki/KENWIN/KENWIN00001/User-Guide-890680-Page-39.png)
![367.3 Prescanning All Active FM Radio Stations 1. Go to [FM], press and hold「SELECT/OK」until “Pre-Scan” shows on the screen. 2. Release「SELECT/OK」button and start scanning all active radio stations. 3. Press「PLAY」to listen to the radio stations that have been found by prescanning 4. You can also excusive Pre-Scanning by press「Prescan」 button on your remote control. 5. Please see 7.5 presetting a favorite station to add your favorite radio stations. Table 7.3 FM FM FM FM 90.10 MHz90.10 MHz90.10 MHz90.10 MHz PrePrePrePre----ScanScanScanScan Press and hold「SELECT/OK」until “Pre-Scan” shows on the screen → FM FM FM FM 87.50 MHz87.50 MHz87.50 MHz87.50 MHz PrePrePrePre----Scanning Scanning Scanning Scanning … Release「SELECT/OK」button to start scanning all active radio stations from 87.5MHz. 1 FM FM FM FM 88889999.30 MHz.30 MHz.30 MHz.30 MHz PrePrePrePre----Scanning Scanning Scanning Scanning … Finding an available radio station → 1 FM FM FM FM 92.10 MHz92.10 MHz92.10 MHz92.10 MHz PrePrePrePre----Scanning Scanning Scanning Scanning … Finding an available radio station 1 FM FM FM FM 108.00 MHz108.00 MHz108.00 MHz108.00 MHz PrePrePrePre----Scanning CompletedScanning CompletedScanning CompletedScanning Completed Prescanning completed → 1 FM FM FM FM 90.10 MHz90.10 MHz90.10 MHz90.10 MHz Press「PLAY」to listen to the radio stations that have been found by prescanning](https://usermanual.wiki/KENWIN/KENWIN00001/User-Guide-890680-Page-41.png)
![377.4 Presetting a Favorite Station 1. System supports 10 preset channels. Press「MEMORY」button to preset the listening station. CH1 icon will flash on the screen. 2. Press Left or Right button to switch the channel number, then press 「SELECT/OK」to confirm it. ˙Press number [1] button for 3 seconds on your remote control will add a radio station into preset station channel (press number [0] button for 3 seconds will add a station into preset channel ).... Table 7.4 FM FM FM FM 90.10 MHz90.10 MHz90.10 MHz90.10 MHz Press Left / Right to find a frequency you want to store → FM FM FM FM 99992222....10101010 MHz MHz MHz MHz PresetPresetPresetPreset Press「SELECT/OK」button and then “Preset” will show up FM FM FM FM 99992222....10101010 MHz MHz MHz MHz CH1 CH1 CH1 CH1 CH1 icon will flash on the screen. → 1 FM FM FM FM 99992222....10101010 MHz MHz MHz MHz CH2 CH2 CH2 CH2 Press orto find a channel, and press「SELECT/OK」button to store 7.5 Listening to a Preset Station ˙Press UP/DOWN to select a channel ˙Under FM mode, press number key [1]-[0] on your remote control will play the stations in your preset channel 1-10.](https://usermanual.wiki/KENWIN/KENWIN00001/User-Guide-890680-Page-42.png)
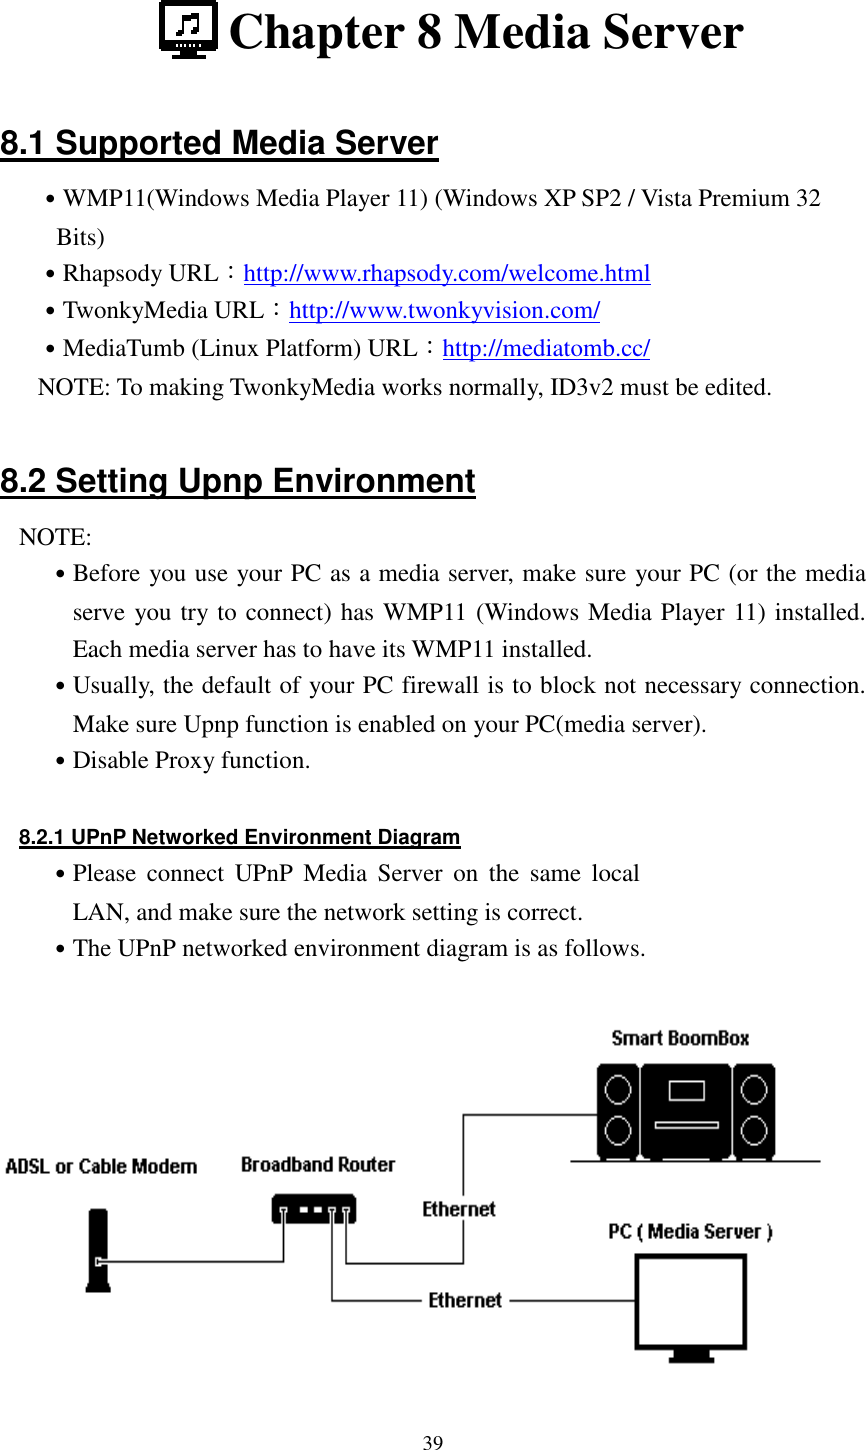
![40or 8.3 Playing Songs on UPnP Media Server 1. Select icon from the main menu and then press 「SELECT/OK」 button to enter Media Server function. 2. Enter [Browse] to select one of all available media servers. 3. Scroll up/down to [All songs], [Artists], [Albums], [Genres] or other items, then press「SELECT/OK」button to enter. 4. Scroll up/down to a song or folder, then press「PLAY」button to play. Table 8.3 MainMainMainMain BrowseBrowseBrowseBrowse >>>> Press「SELECT/OK」to browse a media server or ServersServersServersServers Windows Media Connect ( PenbexWindows Media Connect ( PenbexWindows Media Connect ( PenbexWindows Media Connect ( Penbex Intel AV Media Server (LianbanIntel AV Media Server (LianbanIntel AV Media Server (LianbanIntel AV Media Server (Lianban MediaTombMediaTombMediaTombMediaTomb Select one server, then press [SELECT/OK] UPNPUPNPUPNPUPNP All Image Items All Image Items All Image Items All Image Items >>>> All Audio ItemsAll Audio ItemsAll Audio ItemsAll Audio Items >>>> All Video ItemsAll Video ItemsAll Video ItemsAll Video Items >>>> Select a song or folder, then press「PLAY」to play.](https://usermanual.wiki/KENWIN/KENWIN00001/User-Guide-890680-Page-45.png)
![41 Chapter 9 File Manager 9.1 Copy/Move Files to an USB Disk or SD/MMC Card 1. Insert a CD-ROM, USB disk or SD/MMC card. 2. Select icon from the main menu, then press「SELECT/OK」button to enter File Manager function. 3. Scroll up/down to [CD], [USB] or [SD/MMC], then press「SELECT/OK」 button to enter. 4. Scroll up/down to a file or folder, then press「MEMORY」button to make a check mark 5. Press 「REC」button to select [Copy] or [Move], then press 「SELECT/OK」 button.. icon will show on the screen. 6. Select a target directory. 7. Press「REC」button to select [Paste], then press「SELECT/OK」button to paste. Table 9.1 FileMgrFileMgrFileMgrFileMgr CDCDCDCD >>>> USBUSBUSBUSB >>>> SD/MMCSD/MMCSD/MMCSD/MMC >>>> Select [USB], then press「SELECT/OK」 or FileMgFileMgFileMgFileMgrrrr AllAllAllAll Recording Recording Recording Recording Readme.txt Readme.txt Readme.txt Readme.txt Select a file or folder, then press 「MEMORY」. FileMgrFileMgrFileMgrFileMgr AllAllAllAll Recording Recording Recording Recording Readme.txt Readme.txt Readme.txt Readme.txt CopyCopyCopyCopy MoveMoveMoveMove DelDelDelDel Press「REC」, then select a function. FileMgrFileMgrFileMgrFileMgr CDCDCDCD >>>> USBUSBUSBUSB >>>> SD/MMCSD/MMCSD/MMCSD/MMC >>>> icon will show on the screen. FileMgrFileMgrFileMgrFileMgr CDCDCDCD >>>> USBUSBUSBUSB >>>> SD/MMCSD/MMCSD/MMCSD/MMC >>>> Select a target directory. 1 FileMgrFileMgrFileMgrFileMgr No files No files No files No files PastePastePastePaste CancelCancelCancelCancel Press「REC」again to paste.](https://usermanual.wiki/KENWIN/KENWIN00001/User-Guide-890680-Page-46.png)
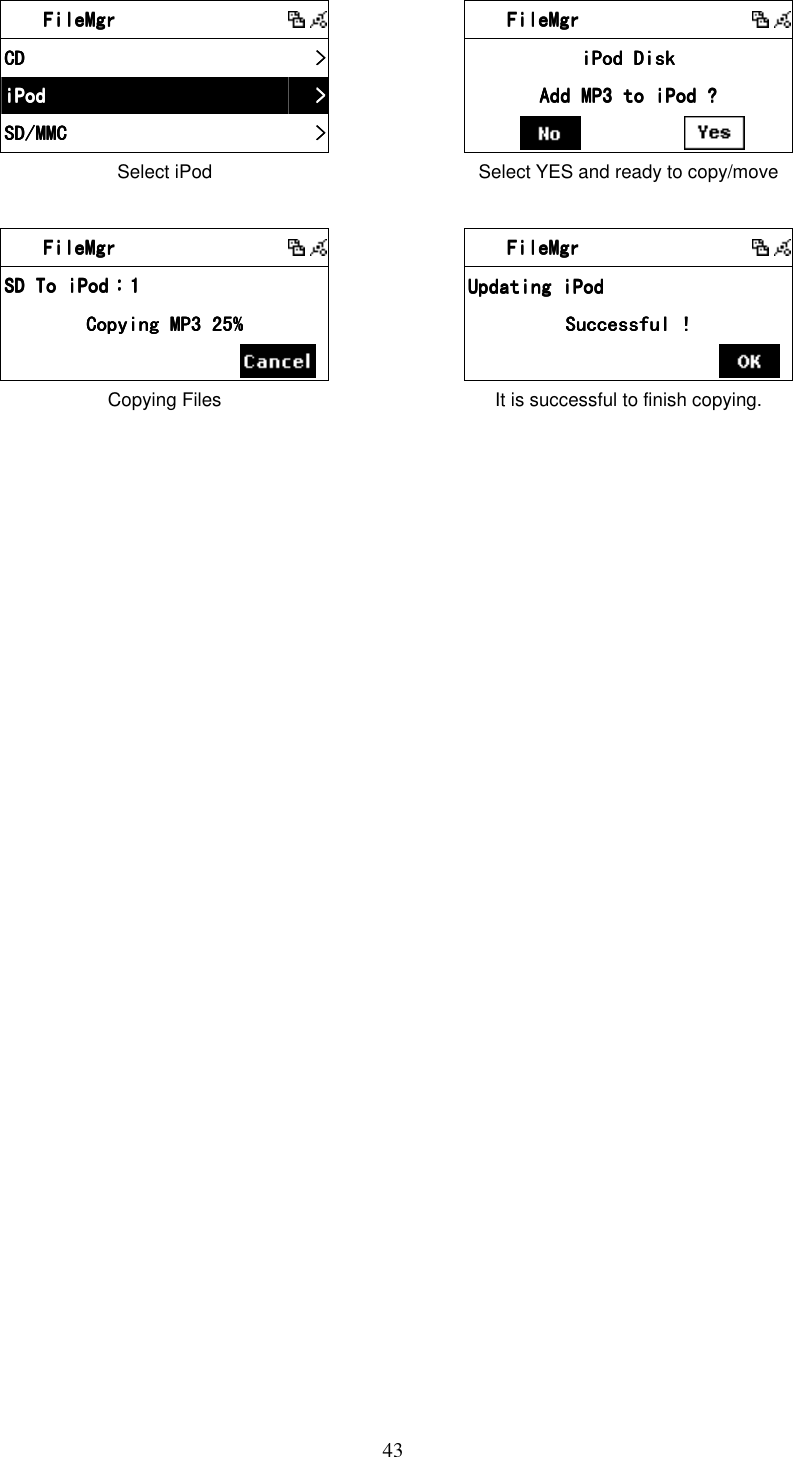
![42 FileMgrFileMgrFileMgrFileMgr USB To SDUSB To SDUSB To SDUSB To SD::::1/11/11/11/1 Copying 25%Copying 25%Copying 25%Copying 25% Copying files FileMgrFileMgrFileMgrFileMgr USB To SDUSB To SDUSB To SDUSB To SD::::1/11/11/11/1 Successful !Successful !Successful !Successful ! It is successful to finish copying. 9.2 Copy/Move Files to iPod 1. Select icon from the main menu, then press「SELECT/OK」button to enter File Manager function. 2. Select [SD/MMC] function and then press「SELECT/OK」button. 3. Scroll up/down to a MP3 file or folder, then press「MEMORY」 button to make a check mark . 4. Press「REC」 button to select [Copy] or [Move], then press 「SELECT/OK」 button. icon will show on the screen. 5. Select [iPod], then press「SELECT/OK」button. 6. Select [Yes] and then press「SELECT/OK」button to paste. 7. After finishing, iPod will be updated. NOTE: System only supports audio files with MP3 format. Table 9.2 FileMgrFileMgrFileMgrFileMgr CDCDCDCD >>>> iPodiPodiPodiPod >>>> SD/MMCSD/MMCSD/MMCSD/MMC >>>> Select SD/MMC or FileMgrFileMgrFileMgrFileMgr AllAllAllAll Recording Recording Recording Recording Hello.mp3 Hello.mp3 Hello.mp3 Hello.mp3 Select a file or folder, then press「MEMORY」 FileMgrFileMgrFileMgrFileMgr AllAllAllAll Recording Recording Recording Recording Hello.mp3 Hello.mp3 Hello.mp3 Hello.mp3 CopyCopyCopyCopy MoveMoveMoveMove DelDelDelDel Press「REC」, then select a function. FileMgrFileMgrFileMgrFileMgr CDCDCDCD >>>> iPodiPodiPodiPod >>>> SD/MMCSD/MMCSD/MMCSD/MMC >>>> icon will show on the screen.](https://usermanual.wiki/KENWIN/KENWIN00001/User-Guide-890680-Page-47.png)
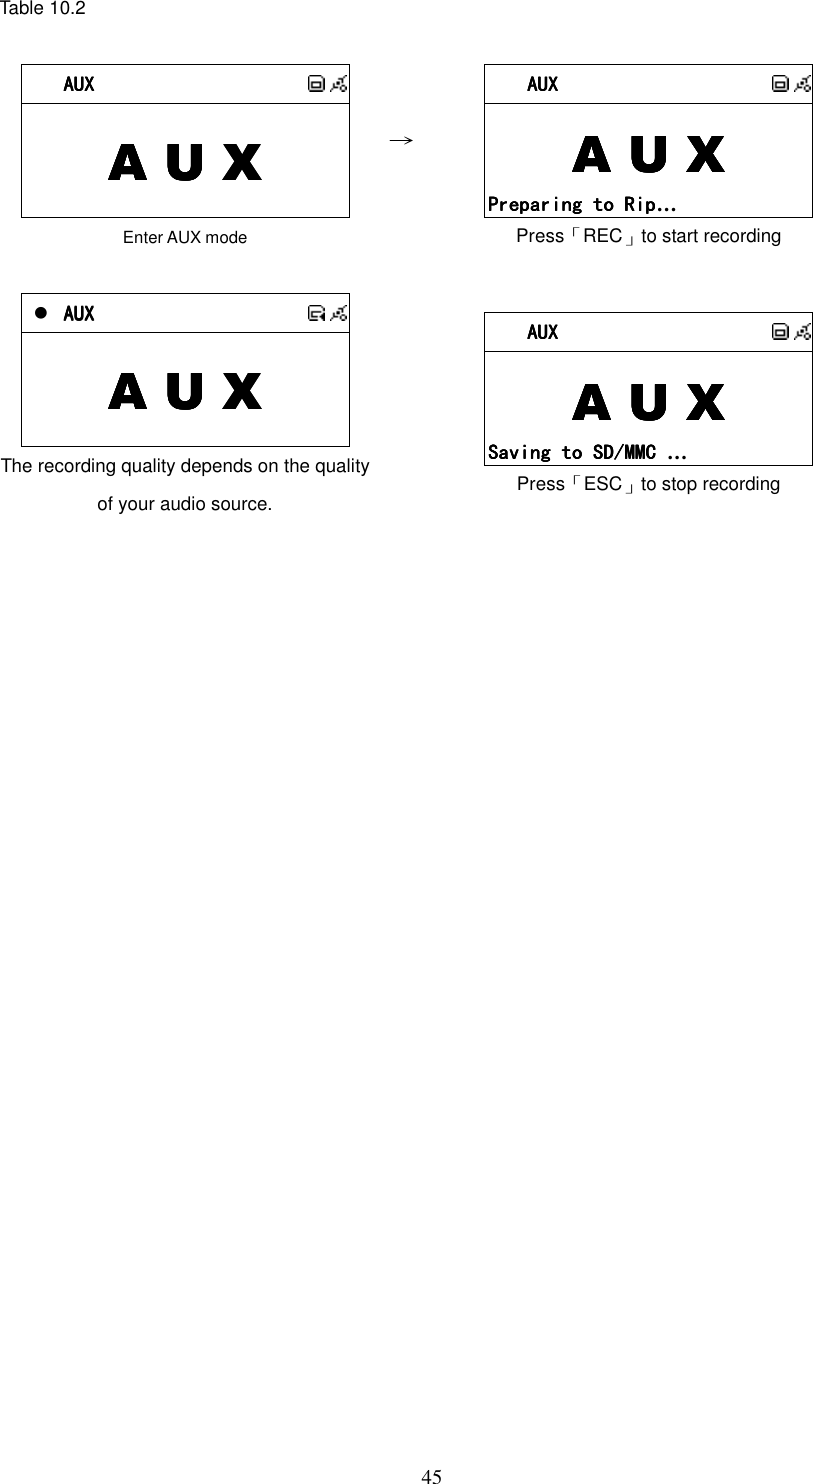
![44 Chapter 10 AUX 10.1 AUX Mode 1. Select icon from the main menu, press「SELECT/OK」button to enter. 2. AUX will appear on the screen. Plug in audio source and start playing. 3. In AUX mode, Volume and Equalizer are adjustable. Table 10.1 AUXAUXAUXAUX Select [AUX] and press「SELECT/OK」 → AUXAUXAUXAUX A U XA U XA U XA U X Enter AUX Mode AUXAUXAUXAUX A U XA U XA U XA U X In AUX mode, volume and P-EQ are adjustable 1 AUX AUX AUX AUX A U XA U XA U XA U X Adjusting EQ 10.2 Recording in AUX Mode System can play different audio sources (such as MP3 Player, Discman.) 1. Select icon from the main menu, press「SELECT/OK」button to enter. 2. AUX will appear on the screen. Plug in audio source and start playing. 3. Press「REC」to start recording. 4. Press「STOP/ESC」to quit](https://usermanual.wiki/KENWIN/KENWIN00001/User-Guide-890680-Page-49.png)
![46 Chapter 11 Setup 11.1 Date & Time ˙Support NTP (network time protocol), and auto-sync time via internet at 12:00 am/pm everyday and every time when pressing POWER button to turn on or off.. ˙Support manual date & time settings. ˙Support DST & Time Zone settings Table 11.1 The Time Sync function will auto-run when turn on/off and 12:00 am/pm everyday. 11.1.1 Setting the Date ˙Press「SETUP」button, then scroll up/down to [Date & Time] and press 「SELECT/OK」button. ˙The default [TimeSync] is Yes. ˙To change the year, month, and day, scrolling up/down and press「SELECT/OK」button to confirm. ˙After finish setting, then press「STOP/ESC」button to save and exit. Table 11.1.1 SettingSettingSettingSetting Date & TimeDate & TimeDate & TimeDate & Time >>>> AlarmAlarmAlarmAlarm >>>> SleepSleepSleepSleep >>>> Select [Date & Time], and press「SELECT/OK」 → Date & TimeDate & TimeDate & TimeDate & Time TimeSyncTimeSyncTimeSyncTimeSync YesYesYesYes DateDateDateDate >>>> TimeTimeTimeTime >>>> The default TimeSync is Yes](https://usermanual.wiki/KENWIN/KENWIN00001/User-Guide-890680-Page-51.png)
![47 Date & TimeDate & TimeDate & TimeDate & Time TimeSyncTimeSyncTimeSyncTimeSync YesYesYesYes DateDateDateDate >>>> TimeTimeTimeTime >>>> Scroll to [Date] and press「SELECT/OK」 → DateDateDateDate 2006 09 072006 09 072006 09 072006 09 07 Scroll Up / Down to adjust the year, month, and day Date & TimeDate & TimeDate & TimeDate & Time TimeSyncTimeSyncTimeSyncTimeSync YesYesYesYes DateDateDateDate >>>> TimeTimeTimeTime >>>> After finishing, the changes will be saved 11.1.2 Setting the Time ˙Press「SETUP」button, then scroll up/down to [Date & Time] and press 「SELECT/OK」button to enter [Time] submenu. ˙The default [TimeSync] is Yes. ˙To change the hours and minutes, scrolling up/down and press「SELECT/OK」button to confirm. ˙After finish setting, then press「STOP/ESC」button to exit and save. Table 11.1.2 SettingSettingSettingSetting Date & TimeDate & TimeDate & TimeDate & Time >>>> AlarmAlarmAlarmAlarm >>>> SleepSleepSleepSleep >>>> Select [Date & Time], and press「SELECT/OK」 → Date & TimeDate & TimeDate & TimeDate & Time TimeSyncTimeSyncTimeSyncTimeSync YesYesYesYes DateDateDateDate >>>> TimeTimeTimeTime >>>> The default TimeSync is Yes Date & TimeDate & TimeDate & TimeDate & Time TimeSyncTimeSyncTimeSyncTimeSync YesYesYesYes DateDateDateDate >>>> TimeTimeTimeTime >>>> Scroll to [Time] and press「SELECT/OK」 → DateDateDateDate 13 13 13 13 :::: 41 41 41 41 :::: 23 23 23 23 Scroll Up / Down to adjust the hours and minutes](https://usermanual.wiki/KENWIN/KENWIN00001/User-Guide-890680-Page-52.png)
![48 Date & TimeDate & TimeDate & TimeDate & Time TimeSyncTimeSyncTimeSyncTimeSync YesYesYesYes DateDateDateDate >>>> TimeTimeTimeTime >>>> After finishing, the changes will be saved 11.1.3 Setting the Time formation ˙Press「SETUP」button, then scroll up/down to [Date & Time] and press 「SELECT/OK」button to enter [Time Format] submenu. ˙Press「SELECT/OK」button to choose to 12-hour or 24-hour. ˙After finish setting, then press「STOP/ESC」button to exit and save. Table 11.1.3 SettingSettingSettingSetting Date & TimeDate & TimeDate & TimeDate & Time >>>> AlarmAlarmAlarmAlarm >>>> Play ModePlay ModePlay ModePlay Mode NormalNormalNormalNormal Select [Date & Time], and press「SELECT/OK」 → Date & TimeDate & TimeDate & TimeDate & Time DateDateDateDate >>>> TimeTimeTimeTime >>>> Time FormatTime FormatTime FormatTime Format 24242424 Choose [Time Format] to change Date & TimeDate & TimeDate & TimeDate & Time DDDDateateateate >>>> TimeTimeTimeTime >>>> Time FormatTime FormatTime FormatTime Format 12121212 Press「SELECT/OK」to confirm 11.2 Alarm ˙Support two alarm clock settings. ˙Support Daily alarm clock. ˙Support different alarm-clock sound (Beep / i.Radio / USB / SD/MMC / FM). 11.2.1 Setting the Alarm 1. Press 「SETUP」button, then scroll up/down to [Alarm] and press「SELECT/OK」button to enter 2. Press [Use Alarm 1] submenu and press「SELECT/OK」button to activate the](https://usermanual.wiki/KENWIN/KENWIN00001/User-Guide-890680-Page-53.png)
![49alarm. The default [Use Alarm 1] is Yes. 3. Scroll to [Set Alarm 1] to set the alarm clock. 4. Press「SELECT/OK」button to confirm. Table 11.2.1 AlarmAlarmAlarmAlarm Use Alarm 1Use Alarm 1Use Alarm 1Use Alarm 1 YESYESYESYES Set Alarm 1Set Alarm 1Set Alarm 1Set Alarm 1 >>>> Use Alarm 2Use Alarm 2Use Alarm 2Use Alarm 2 NoNoNoNo The default [Use Alarm 1] is Yes. → AlarmAlarmAlarmAlarm Use Alarm 1Use Alarm 1Use Alarm 1Use Alarm 1 YESYESYESYES Set Alarm 1Set Alarm 1Set Alarm 1Set Alarm 1 >>>> Use Alarm 2Use Alarm 2Use Alarm 2Use Alarm 2 NoNoNoNo Scroll to [Set Alarm 1] to set the alarm clock Alarm 1Alarm 1Alarm 1Alarm 1 11114 4 4 4 :::: 54 : 00 54 : 00 54 : 00 54 : 00 Scroll Up / Down to adjust the hours and minutes 2007200720072007----MayMayMayMay----03 Thu..03 Thu..03 Thu..03 Thu.. PMPMPMPM PM 6:00PM 6:00PM 6:00PM 6:00 offoffoffoff After finishing, the changes will be saved 1 2007200720072007----MayMayMayMay----03 Thu..03 Thu..03 Thu..03 Thu.. PMPMPMPM PM 6:00PM 6:00PM 6:00PM 6:00 offoffoffoff will show if DST (Day Saving Time) is chosen Note::::Some models can activate/disarm alarms by press Alarm 1/Alarm 2 button when the system in Stand By mode. 11.2.2 Setting the Alarm Sound 1. Press「SETUP」and scroll up/down to [Alarm] and press「SELECT/OK」. 2. Scroll down to [Alarm Source] and then press「SELECT/OK」button to enter. 3. Press UP/DOWN button to determine an alarm sound, and then press「SELECT/OK」button to confirm.](https://usermanual.wiki/KENWIN/KENWIN00001/User-Guide-890680-Page-54.png)
![50Table 11.2.2 Alarm SourceAlarm SourceAlarm SourceAlarm Source BeepBeepBeepBeep CDCDCDCD Internet RadioInternet RadioInternet RadioInternet Radio Scroll UP/DOWN button to determine an alarm sound, and then press「SELECT/OK」button to confirm NOTE: ˙If the alarm sound is unset or not ready, “Beep” will be the default alarm sound. ˙The alarm goes off with the sound source in the standby mode when time is up. ˙The default alarm source of i.Radio is the first radio station under the FAVORITE file. 11.2.3 Disarming the Alarm ˙When alarm time is up in the “Stand-By Alarm” Mode. The screen will be highlighted and the alarm source will be played. ˙Press「Stand By」, or「STOP/ESC」, or「Alarm」to disarm alarm. ˙You can press any key to disarm the alarm in normal mode. Table 11.2.3 2007200720072007----MayMayMayMay----03 Wed.03 Wed.03 Wed.03 Wed. PMPMPMPM PM 3:20PM 3:20PM 3:20PM 3:20 offoffoffoff STAND BY Mode → AlarmAlarmAlarmAlarm PMPMPMPM PM 3:20PM 3:20PM 3:20PM 3:20 offoffoffoff When alarm time is up, the screen will be highlighted AlarmAlarmAlarmAlarm PMPMPMPM PM 3:20PM 3:20PM 3:20PM 3:20 offoffoffoff When alarm time is up, the screen will be highlighted SnoozeSnoozeSnoozeSnooze PMPMPMPM PM 3:20PM 3:20PM 3:20PM 3:20 offoffoffoff if Snooze function is activated, press [Snooze] to enter SNOOZE mode](https://usermanual.wiki/KENWIN/KENWIN00001/User-Guide-890680-Page-55.png)
![51 1 2007200720072007----MayMayMayMay----03 Thu..03 Thu..03 Thu..03 Thu.. PMPMPMPM PM 3:20PM 3:20PM 3:20PM 3:20 offoffoffoff Press [STAND BY] or [STOP/ESC] to disarm the alarm 11.3 Sleep ˙Sleep mode is able to be turned ON/OFF. 11.3.1 SLEEP Mode ˙Press 「SLEEP」 button to switch sleep timer to 5 min, 10 min, 15 min, 20 min or 30 min. ˙ icon will show on the top side of the screen when the sleep timer is on. Table 11.3.1 CDCDCDCD Press「SLEEP」to set sleep timer. → CDCDCDCD icon will show on the screen. 11.4 Network ˙Support LAN (Ethernet) and WLAN (802.11b/g wifi Dongle is optional) ˙Support Wi-Fi Encryption WEP64/128 and WPA-PSK ˙Support dynamic IP via DHCP (Dynamic Host Configuration Protocol) and static IP. Default setting is Ethernet and DHCP. ˙Support Upnp. ˙Auto-detect and auto-run LAN or WLAN(wireless LAN) environment.](https://usermanual.wiki/KENWIN/KENWIN00001/User-Guide-890680-Page-56.png)
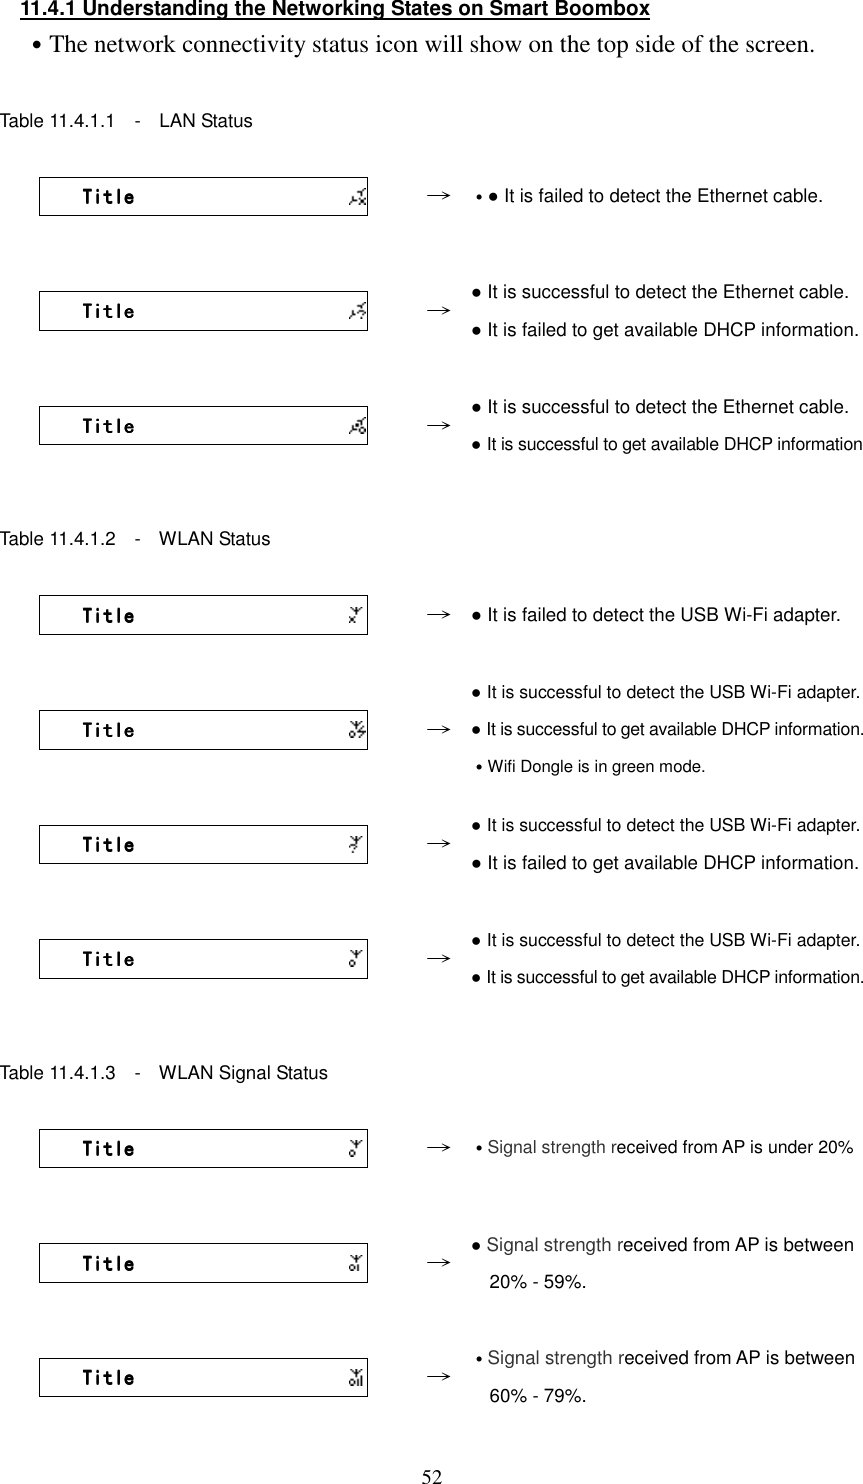
![53 TitleTitleTitleTitle → ˙Signal strength received from AP is above 80%. NOTE:Single strength above 70% is considered as a good single source. 11.4.2 Setting the Wi-Fi Connectivity 1. Insert a Wi-Fi USB adapter into the USB connector. (The Wi-Fi USB adapter is optional) 2. Press「SETUP」button, then scroll up/down to [Network] and press「SELECT/OK」button. 3. Select [Connect] and switch [LAN] to [WLAN]. 4. Press「STOP/ESC」button to quit Wizard. 5. Scroll up/down to [Wireless] and then press「SELECT/OK」button to enter. 6. Scroll up/down to [Site Survey], [Connect Mode], [SSID] or [Encryption], then press「SELECT/OK」button to enter. 7. Press UP/DOWN and「SELECT/OK」button to set each necessary item. 8. icon will show on the topside of the screen when the wireless setting is successful. Table 11.4.2 NetworkNetworkNetworkNetwork ConnectConnectConnectConnect LANLANLANLAN IP SettingIP SettingIP SettingIP Setting >>>> Use ProxyUse ProxyUse ProxyUse Proxy NoNoNoNo Select [Connect] and switch [LAN] to [WLAN]. → NetworkNetworkNetworkNetwork WizardWizardWizardWizard >>>> IP SettingIP SettingIP SettingIP Setting >>>> WirelessWirelessWirelessWireless >>>> [Wireless] item will appear on the screen. WirelessWirelessWirelessWireless SSIDSSIDSSIDSSID >>>> EncryptionEncryptionEncryptionEncryption >>>> Site SurveySite SurveySite SurveySite Survey >>>> Set each necessary Wi-Fi setting item. → WirelessWirelessWirelessWireless SSIDSSIDSSIDSSID >>>> EncryptionEncryptionEncryptionEncryption >>>> SitSitSitSite Surveye Surveye Surveye Survey >>>> will show when the setting is successful. 11.4.3 Setting the Wi-Fi Connectivity by Wi-Fi Wizard 1. Insert a Wi-Fi USB adapter into the USB connector. (The Wi-Fi USB adapter is optional). 2. Press「SETUP」button, then scroll up/down to [Network] and press](https://usermanual.wiki/KENWIN/KENWIN00001/User-Guide-890680-Page-58.png)
![54「SELECT/OK」button. 3. Select [Connect] and switch [LAN] to [WLAN]. 4. Select [Wizard] and then press「SELECT/OK」button to enter. 5. Scroll up/down to an Access Point and then press「SELECT/OK」button. 6. If the Access Point is protected with an encryption key, press「SELECT/OK」button, then press UP/DOWN/LEFT/RIGHT button to input the key to access the Access Point. 7. icon will show on the topside of the screen when the wireless setting is successful. Table 11.4.3 NetworkNetworkNetworkNetwork ConnectConnectConnectConnect LANLANLANLAN IP SettingIP SettingIP SettingIP Setting >>>> Use ProxyUse ProxyUse ProxyUse Proxy NoNoNoNo Select [Connect] and switch [LAN] to [WLAN]. → NetworkNetworkNetworkNetwork Connect(any~)Connect(any~)Connect(any~)Connect(any~) WLANWLANWLANWLAN WizardWizardWizardWizard >>>> IP SettingIP SettingIP SettingIP Setting >>>> Select [Wizard] and press [SELECT/OK] button WizardWizardWizardWizard ap01ap01ap01ap01 61%61%61%61% DDDD----LINKLINKLINKLINK 85%85%85%85% defaultdefaultdefaultdefault 21%21%21%21% Enter [Wizard], then all available AP and its signal strength will be shown on the screen. → WizardWizardWizardWizard >>>> Use UP/DOWN (or number key) to input an encryption key to access the AP if necessary. After key-in the encryption key, press 「SELECT/OK」and press 「STOP/ESC」to exit WizardWizardWizardWizard Proofing the encryption key… NetworkNetworkNetworkNetwork Connect(ap01)Connect(ap01)Connect(ap01)Connect(ap01) WLANWLANWLANWLAN IP SettingIP SettingIP SettingIP Setting >>>> WirelessWirelessWirelessWireless >>>> will show when the setting is successful.](https://usermanual.wiki/KENWIN/KENWIN00001/User-Guide-890680-Page-59.png)
![5511.4.4 Inputting Static IP 1. Press「SETUP」button, then scroll up/down to [Network] and press「SELECT/OK」button. 2. Scroll up/down to [IP Setting] and then press「SELECT/OK」button to enter. 3. Select [IP Source] and press「SELECT/OK」button to switch [Dynamic] to [Static]. 4. Scroll up/down to [TCP/IP] and then press「SELECT/OK」 button to start editing.. 5. Press UP/DOWN button to change characters, then press LEFT/RIGHT button to shift. 6. After finishing, press「REC」button to confirm. Table 11.4.4 NetworkNetworkNetworkNetwork ConnectConnectConnectConnect LANLANLANLAN IP SettingIP SettingIP SettingIP Setting >>>> Use ProxyUse ProxyUse ProxyUse Proxy NoNoNoNo Select [IP Setting], then press「SELECT./OK」 → IP SettingIP SettingIP SettingIP Setting IP SourceIP SourceIP SourceIP Source DymanicDymanicDymanicDymanic Press「SELECT/OK」to switch [IP Source] to [Static] IP SettingIP SettingIP SettingIP Setting IP SourceIP SourceIP SourceIP Source StaticStaticStaticStatic TCP/IPTCP/IPTCP/IPTCP/IP >>>> DNSDNSDNSDNS >>>> Select [TCP/IP], then press「SELECT./OK」 → TCP/IPTCP/IPTCP/IPTCP/IP IPIPIPIP 192.169.001.100192.169.001.100192.169.001.100192.169.001.100 MaskMaskMaskMask 255.255.255.000255.255.255.000255.255.255.000255.255.255.000 GWGWGWGW 192.169.001.254192.169.001.254192.169.001.254192.169.001.254 Press UP/DOWN (or number key) then LEFT/RIGHT to input IP. NOTE:When IP setting value (including IP, Subnet Mask, or Gateway) is illegal, IP setting will change to default value. TCP/IPTCP/IPTCP/IPTCP/IP The IP Setting Value isThe IP Setting Value isThe IP Setting Value isThe IP Setting Value is illegal ! Setting isillegal ! Setting isillegal ! Setting isillegal ! Setting is Changed to Default !Changed to Default !Changed to Default !Changed to Default !](https://usermanual.wiki/KENWIN/KENWIN00001/User-Guide-890680-Page-60.png)
![5611.4.5 Inputting DNS 1. Press「SETUP」button, then scroll up/down to [Network] and press「SELECT/OK」button. 2. Select [DNS] and then press「SELECT/OK」button. 3. Press UP/DOWN button to change characters, then press LEFT/RIGHT button to shift. 4. After finishing, press「SELECT/OK」button to confirm. Table 11.4.5 IP SettingIP SettingIP SettingIP Setting IP SourceIP SourceIP SourceIP Source StaticStaticStaticStatic TCP/IPTCP/IPTCP/IPTCP/IP >>>> DNSDNSDNSDNS >>>> Select [DNS] and press「SELECT/OK」button → DNSDNSDNSDNS DNS1DNS1DNS1DNS1 168.095.001.001168.095.001.001168.095.001.001168.095.001.001 DNS2DNS2DNS2DNS2 000.000.000.000000.000.000.000000.000.000.000000.000.000.000 Press UP/DOWN (or number key) then LEFT/RIGHT to input IP 11.4.6 Inputting Proxy 1. Press「SETUP」button, then scroll up/down to [Network] and press 「SELECT/OK」button. 2. Scroll up/down to [Use Proxy] and then press「SELECT/OK」 button to switch to [Yes]. 3. Scroll up/down to [Proxy Server] and then press「SELECT/OK」 button to input domain name or IP address. 4. Press「SELECT/OK」button, then press UP/DOWN button to change characters, press LEFT/RIGHT button to shift. 5. After finishing, press「SELECT/OK」button to confirm. 6. Scroll up/down to [Proxy Port] and then press「SELECT/OK」button to input port number. 7. Repeat the step 4~5.](https://usermanual.wiki/KENWIN/KENWIN00001/User-Guide-890680-Page-61.png)
![57 Table:Input Method Key Description OK / Select End editing STOP/ESC Delete a character Up Change character 0-9, a-z ,A-Z, symbol DOWN Change character 0-9, a-z ,A-Z, symbol LEFT Shift to left RIGHT Shift to right 1 1./_!@# $ % ^ & * : ; ' " / \ ( ) [ ] { } space 2 2 abc ABC 3 3 def DEF 4 4 ehi EHI 5 5 jkl JKL 6 6 mno MNO 7 7 pqrs PQRS 8 8 tuv TUV 9 9 wxyz WXYZ 0 0 Table 11.4.6.1 Proxy ServerProxy ServerProxy ServerProxy Server >>>> Ready to Editing → Proxy ServerProxy ServerProxy ServerProxy Server >pr>pr>pr>proxy.hinet.neoxy.hinet.neoxy.hinet.neoxy.hinet.netttt Press UP/DOWN (or number key) then LEFT/RIGHT to input characters. Proxy ServerProxy ServerProxy ServerProxy Server >proxy.hinet.net>proxy.hinet.net>proxy.hinet.net>proxy.hinet.net Press「SELECT/OK」to confirm](https://usermanual.wiki/KENWIN/KENWIN00001/User-Guide-890680-Page-62.png)
![58˙Select [Proxy Port] to input a proxy server port Table:Input Method Key Description OK / Select End editing STOP/ESC Delete a character Up Change character 0-9 DOWN Change character 0-9 LEFT Shift to left RIGHT Shift to right 1 1 2 2 3 3 4 4 5 5 6 6 7 7 8 8 9 9 0 0 Table 11.4.6.2 Proxy PortProxy PortProxy PortProxy Port >>>> Ready to Edit → Proxy Proxy Proxy Proxy PortPortPortPort >808>808>808>8080000 Press UP/DOWN (or number key) then LEFT/RIGHT to input characters Proxy PortProxy PortProxy PortProxy Port >8080>8080>8080>8080 Press「SELECT/OK」to confirm](https://usermanual.wiki/KENWIN/KENWIN00001/User-Guide-890680-Page-63.png)
![5911.5 Live365 Login 1. Press「SETUP」button, then scroll up/down to [Live365] and press 「SELECT/OK」button. 2. Scroll up/down to [Account] and then press「SELECT/OK」button to input username. 3. Press「SELECT/OK」button, then press UP/DOWN button to change characters, press LEFT/ RIGHT button to shift. 4. After finishing, press「SELECT/OK」button to confirm, and then press 「STOP/ESC」button to quit. 5. Scroll up/down to [Password] and then press 「SELECT/OK」 button to input password. 6. Repeat the step 3~4. Table 11.5 SettingSettingSettingSetting Live365Live365Live365Live365 >>>> InformationInformationInformationInformation >>>> Reset all SettingsReset all SettingsReset all SettingsReset all Settings >>>> Select [Live365], then press「SELECT/OK」. →→→→ Live365 Live365 Live365 Live365 AccoAccoAccoAccountuntuntunt >>>> PasswordPasswordPasswordPassword >>>> Select [Account] and [Password] to input info. AccountAccountAccountAccount >>>> Press「SELECT/OK」, then press UP/DOWN to input. or PasswordPasswordPasswordPassword >>>> Press「SELECT/OK」, then press UP/DOWN to input Table:Input Method Key Description OK / Select End editing STOP/ESC Delete a character Up Change character 0-9, a-z ,A-Z, symbol DOWN Change character 0-9, a-z ,A-Z, symbol LEFT Shift to left RIGHT Shift to right](https://usermanual.wiki/KENWIN/KENWIN00001/User-Guide-890680-Page-64.png)
![601 1./_!@# $ % ^ & * : ; ' " / \ ( ) [ ] { } space 2 2 abc ABC 3 3 def DEF 4 4 ehi EHI 5 5 jkl JKL 6 6 mno MNO 7 7 pqrs PQRS 8 8 tuv TUV 9 9 wxyz WXYZ 0 0 11.6 Information ● Display the firmware version and network information. Example: Model NameModel NameModel NameModel Name Penbex Smart Boom BoxPenbex Smart Boom BoxPenbex Smart Boom BoxPenbex Smart Boom Box VersionVersionVersionVersion OSOSOSOS::::xxxxxxxxxxxxxxxxxxxxxxxxxxxxxxxx SWSWSWSW::::xxxxxxxx . xxxxxxxxxxxx . xxxxxxxxxxxx . xxxxxxxxxxxx . xxxx uPuPuPuP::::XxXXxXXxXXxXXXXX NetworkNetworkNetworkNetwork IP SourceIP SourceIP SourceIP Source::::DHCPDHCPDHCPDHCP MACMACMACMAC::::xxxxxxxxxxxxxxxxxxxxxxxxxxxxxxxxxxxxxxxxxxxxxxxx IPIPIPIP::::xxx.xxx.xxx.xxxxxx.xxx.xxx.xxxxxx.xxx.xxx.xxxxxx.xxx.xxx.xxx SMSMSMSM::::xxx.xxx.xxx.xxxxxx.xxx.xxx.xxxxxx.xxx.xxx.xxxxxx.xxx.xxx.xxx GWGWGWGW::::xxx.xxx.xxx.xxxxxx.xxx.xxx.xxxxxx.xxx.xxx.xxxxxx.xxx.xxx.xxx Network TypeNetwork TypeNetwork TypeNetwork Type SSIDSSIDSSIDSSID::::xxxxxxxxxxxx 11.7 Language ˙Support 12 languages – English、German、Spanish、Portuguese、French、](https://usermanual.wiki/KENWIN/KENWIN00001/User-Guide-890680-Page-65.png)
![61Italian、Swedish、Finland、Dutch、Danish、Traditional Chinese. The default language of the Smart Boombox is English. Table 11.7 SettingSettingSettingSetting LanguageLanguageLanguageLanguage >>>> InformationInformationInformationInformation >>>> Reset all SettingsReset all SettingsReset all SettingsReset all Settings >>>> Select「SETUP」and then choose「Language」 →→→→ LanguageLanguageLanguageLanguage 中文中文中文中文 EnglishEnglishEnglishEnglish GermanGermanGermanGerman Select language and press「SELECT/OK」button 11.8 Reset All Settings ● Reset all settings to factory default. Warning : All settings will be reset to factory default. 11.9 Firmware Upgrade ˙Support upgrade by using USB or SD/MMC ˙Support online upgrade 11.9.1 Upgrade firmware by using USB / SD/MMC 1. Get an accurate firmware version (please check your model number) from manufactures. The firmware version file appears as .UPG file. 2. Copy the file [image.upg] to the root directory on a USB disk or SD/MMC card. 3. Insert the USB disk or SD/MMC card into the USB connector or SD/MMC slot. 4. Press 「SETUP」button, then scroll up/down to [Firmware Upgrade] and press「SELECT/OK」button. 5. Scroll up/down to [Yes] and then press「SELECT/OK」button to upgrade. 6. Unit will restart automatically after finishing upgrade. 7. During upgrade, Do not switch off or press any function key, this will cause damage.](https://usermanual.wiki/KENWIN/KENWIN00001/User-Guide-890680-Page-66.png)
![62NOTE: It strongly recommends resetting all setting after upgraded. Table 11.9.1 SettingSettingSettingSetting InformationInformationInformationInformation >>>> Reset all SettingsReset all SettingsReset all SettingsReset all Settings >>>> Firmware UpgraFirmware UpgraFirmware UpgraFirmware Upgradededede >>>> Select [Firmware Upgrade], then press「SELECT/OK」 →→→→ UpgradeUpgradeUpgradeUpgrade NoNoNoNo YesYesYesYes >>>> Select [Yes] and press「SELECT/OK」to confirm UpgradeUpgradeUpgradeUpgrade Proofing Proofing Proofing Proofing … Proofing the upgrade image file… →→→→ Processing Processing Processing Processing … Upgrading the firmware… CDCDCDCD The upgrade is complete. 11.9.2 On-line upgrade 1. Make sure the internet environment is ready 2. Press「SETUP」button, then scroll up/down to [Firmware Upgrade] and press「SELECT/OK」button. 3. System will restart automatically after finishing upgrade. 4. Systrem must not be switched off or press any function key during the upgrade procedure. NOTE: It strongly recommends resetting all setting after upgraded. Table 11.9.2 SettingSettingSettingSetting InformationInformationInformationInformation >>>> Reset all SettingsReset all SettingsReset all SettingsReset all Settings >>>> Firmware UpgradeFirmware UpgradeFirmware UpgradeFirmware Upgrade >>>> Select [Firmware Upgrade], then press「SELECT/OK」 →→→→ UpgradeUpgradeUpgradeUpgrade NoNoNoNo YesYesYesYes >>>> Select [Yes] and press「SELECT/OK」to confirm](https://usermanual.wiki/KENWIN/KENWIN00001/User-Guide-890680-Page-67.png)
![631 UpgradeUpgradeUpgradeUpgrade NoNoNoNo YesYesYesYes LoadLoadLoadLoad SD/MMCSD/MMCSD/MMCSD/MMC OnlineOnlineOnlineOnline Scroll Up/Down, select [Online], and press「SELECT/OK」 1 UpgradeUpgradeUpgradeUpgrade CheckiCheckiCheckiChecking Firmware ng Firmware ng Firmware ng Firmware … Searching for updated firmware version 1 UpgradeUpgradeUpgradeUpgrade SMBB_20070423_IMAGE_VER_1SMBB_20070423_IMAGE_VER_1SMBB_20070423_IMAGE_VER_1SMBB_20070423_IMAGE_VER_1 SMBB_20070425_IMAGE_VER_1SMBB_20070425_IMAGE_VER_1SMBB_20070425_IMAGE_VER_1SMBB_20070425_IMAGE_VER_1 Available version will show on the screen →→→→ 1 UpgradeUpgradeUpgradeUpgrade VisibleVisibleVisibleVisible::::01.00.00.0001.00.00.0001.00.00.0001.00.00.00 Upgrade ToUpgrade ToUpgrade ToUpgrade To::::02.00.00.0002.00.00.0002.00.00.0002.00.00.00 Select [Yes] to confirm 1 UpgradeUpgradeUpgradeUpgrade Downloading Downloading Downloading Downloading … 33 % Completed33 % Completed33 % Completed33 % Completed >Press Cancel to Exit<>Press Cancel to Exit<>Press Cancel to Exit<>Press Cancel to Exit< Downloading…press「ESC/STOP」to cancel download Processing Processing Processing Processing … Upgrading the firmware… CDCDCDCD The upgrade is complete.](https://usermanual.wiki/KENWIN/KENWIN00001/User-Guide-890680-Page-68.png)