KENWIN KENWIN00001 Internet Radio Micro Hi-Fi System User Manual SMBB ENG V1 9
KENWIN INDUSTRIAL (H.K.) LTD. Internet Radio Micro Hi-Fi System SMBB ENG V1 9
KENWIN >
User Manual

KW-1004iR
User’s Manual
1.-/ 2ABC 3DEF
4GHI 5JKL 6MNO
7PQRS 8TUV 9WXYZ
0-/--
AUTOSC AN
CD i.R adi o USB
SD/MMC FM M.S erv er
FileMg r AUX
OK
REC
STOP
ESC/
REPEAT RANDOM
TIMER INFO A-B
CLOCK ST.MO
X-BASS SLELP
P-EQ MUT E
MEMORY PLAY/
PAUSE
SETUP
DIMMER
STANDBY
i net
-
VOL+

!"
!
#
$
!
%&
This device complies with Part 15 of the FCC Rules. Operation is subject to the
following two conditions: (1) This device may not cause harmful interference, and
(2) This device must accept any interference received, including interference that
may cause undesired operation.
Warning: Changes or modifications to this unit not expressly approved by the
party responsible for compliance could void the user’s authority to operate
the equipment.
NOTE: This equipment has been tested and found to comply with the limits
for a Class B digital device, pursuant to Part 15 of the FCC Rules. These
limits are designed to provide reasonable protection against harmful
interference in a residential installation. This equipment generates, uses and
can radiate radio frequency energy and, if not installed and used in
accordance with the instructions, may cause harmful interference to radio
communications.
However, there is no guarantee that interference will not occur in a particular
installation. If this equipment does cause harmful interference to radio or
television reception, which can be determined by turning the equipment off
and on, the user is encouraged to try to correct the interference by one or
more of the following measures:
Reorient or relocate the receiving antenna.
Increase the separation between the equipment and receiver.
Connect the equipment into an outlet on a circuit different from that to
which the receiver is connected.
Consult the dealer or an experienced radio/TV technician for help.

'& (
)& *
+& ,
-& .
/& 0
1& 2
3& 04
$
5& 0
%&
6& 078
97
4
':&;
''&<=
')&>
?
=8
'+&>
'-&(!!
8
!

2
Contents
Chapter 1 Overview 6
1.1 Introduction 6
1.2 Audio sources 6
1.3 Record 6
1.4 Networking 7
1.5 Others 7
Chapter 2 Installation 8
2.1 Installation 8
2.1.1 LAN setting 8
2.1.2 Wireless LAN setting 8
2.2 Boot for the First Time 9
- Network setting - LAN 11
- Network setting –WLAN (with WiFi Dongle) 12
- Can not find Access Point 13
- Select an existing Access Point that does not need an encryption 14
- Fail to connect to Access Point 15
Chapter 3 CD 17
3.1 Inserting a CD into the CD Tray 17
3.2 Getting CD Information 17
3.3 Playing an Audio CD 18
3.4 Playing an MP3/WMA CD 19
3.5 CD Ripping 20
3.5.1 Converting All the Tracks within the Disc 20
3.5.2 Converting Selected Tracks within the Disc 20
3.6 Now Playing 22
3.7 Lyrics 23
3.8 Balance 24
Chapter 4 Internet Radio 25
4.1 Introduction 25
4.2 World Station 25
4.3 SHOUTCast 27
4.4 Add/Delete a Radio Station 27

3
Contents
4.5 Access to Live365 28
4.6 Add/Delete A Radio Station in/from Live365 29
4.7 Internet Radio Recording 30
4.7.1 Both USB and SD/MMC Storage Media are Ready 30
4.7.2 Only One Storage Medium is Ready 30
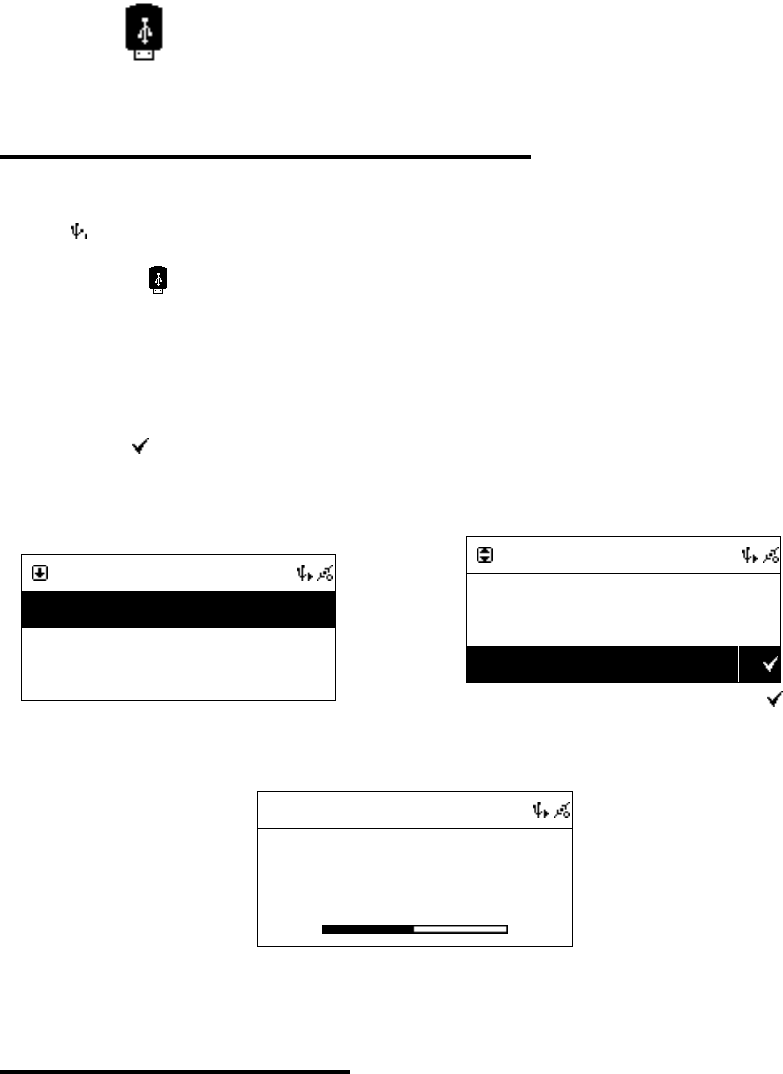
Chapter 5 USB / iPod 32
5.1 Playing Songs on the USB Disk 32
5.2 Apple iPod Support 32
5.2.1 Supported iPod Models 33
5.2.2 Supported iTunes Version 33
5.3 Playing Songs on Apple iPod 33
Chapter 6 SD/MMC 34
6.1 Playing Songs on the SD/MMC Card 34
Chapter 7 FM Radio 35
7.1 Listening to FM Radio 35
7.2 Tuning the FM Frequency 35
7.3 Prescanning All Active FM Radio Stations 36
7.4 Presetting a Favorite Station 37
7.5 Listening to a Preset Station 37
7.6 Ripping From FM 38
Chapter 8 Upnp – Media Server 39
8.1 Supported Media Server 39
8.2 Setting Upnp Environment 39
8.2.1 UPnP Networked Environment Diagram 39
8.3 Playing Songs on UPnP Media Server 40
Chapter 9 File Manager 41
9.1 Copy/Move Files to an USB Disk or SD/MMC Card 41
9.2 Copy/Move Files to iPod 42

4
Contents
Chapter 10 AUX 44
10.1 AUX Mode 44
10.2 Recording in AUX Mode 44
Chapter 11 Setup 46
11.1 Date & Time 46
11.1.1 Setting the Date 46
11.1.2 Setting the Time 47
11.1.3 Setting the Time formation 48
11.2 Alarm 48
11.2.1 Setting the Alarm 48
11.2.2 Setting the Alarm Sound 49
11.2.3 Disarming the Alarm 50
11.3 Sleep 51
11.3.1 SLEEP Mode 51
11.4 Network 51
11.4.1 Understanding the Networking States on Smart Boombox 52
11.4.2 Setting the Wi-Fi Connectivity 53
11.4.3 Setting the Wi-Fi Connectivity by Wi-Fi Wizard 53
11.4.4 Inputting Static IP 55
11.4.5 Inputting DNS 56
11.4.6 Inputting Proxy 56
11.5 Live365 Login 59
11.6 Information 60
11.7 Language 60
11.8 Reset All Settings 61
11.9 Firmware Upgrade 61
11.9.1 Upgrade Firmware by Using USB / SD/MMC 61
11.9.2 On-Line Upgrade 62
Chapter 12 Trouble Shooting 63
12.1 FAQ 63
12.1.1 Recording 63
12.1.2 Internet Radio 63

5
NOTICE:
Recording/Ripping any audio content made with this system is only
for your personal use. It should not be sold, distributed, and played for a
public audience without copyright holder’ permission.
Copyright Description
WARNING:
Gracenote Logo must appear on the items printed in full color
Gracenote Logo must appear on the items printed in full colorGracenote Logo must appear on the items printed in full color
Gracenote Logo must appear on the items printed in full color
Gracenote Logo must appear on the user manual
Gracenote Logo must appear on the user manualGracenote Logo must appear on the user manual
Gracenote Logo must appear on the user manual
Devices contains Gracenote technology must
Devices contains Gracenote technology mustDevices contains Gracenote technology must
Devices contains Gracenote technology must have Gracenote Logo
have Gracenote Logo have Gracenote Logo
have Gracenote Logo
visible on the front of the device.
visible on the front of the device.visible on the front of the device.
visible on the front of the device.
iPod is produced by Apple
iPod is produced by AppleiPod is produced by Apple
iPod is produced by Apple®
iTunes is produced by Apple
iTunes is produced by AppleiTunes is produced by Apple
iTunes is produced by Apple®
MusicID service is provided by Gracenote™
For more information visit http://www.gracenote.com
SAFETY PRECAUTIONS
1
ENGLISH
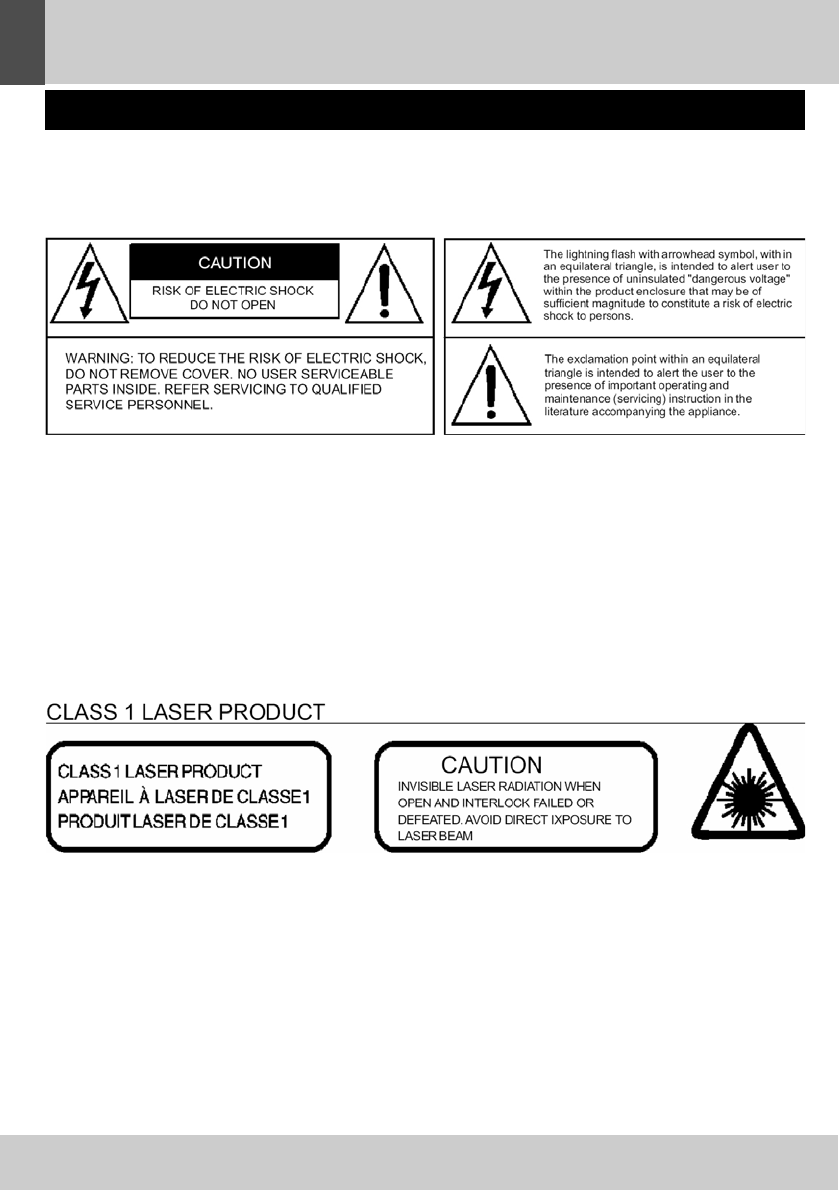
HAZARD WARNING: TO REDUCE THE RISK OF FIRE OR ELECTRIC SHOCK,
DO NOT EXPOSE THIS PRODUCT TO RAIN OR MOISTURE.
ESD Remark:
In case of malfunction due to electrostatic discharge just reset the product (reconnect of power
source may be required) to resume normal operation
WARNINGS
To reduce the risk of fire or electric shock, do
not expose this appliance to rain or moisture
EXPLANATION OF GRAPHIC SYMBOLS
This product contains a low-power laser emitter

SAFETY PRECAUTIONS
2
ENGLISH
Condensation
• Water droplets or condensation may form
inside the CD player if it is left in a warm,
damp atmosphere.
• The product may not operate correctly if
condensation forms inside it.
• Leave the product in a warm, dry room for 1 to
2 hours to allow the condensation to evaporate.
In the event of a problem, unplug the power cord
and contact a qualified repair technician.
Warning: Ventilation
Your personal CD player has ventilation holes,
which should never be obstructed.
Liquid warning:
Never allow liquids to splash or drip onto the
product. Never place a liquid-filled container
(e.g. vase, jar, etc.) above it.
• The apparatus shall not be exposed to dripping
or splashing and that no objects filled with
liquids, such as vases, shall be placed on
apparatus
• The mains plug is used as the disconnect
device and it shall remain readily operable.
To be completely disconnect the power input,
the mains plug of apparatus shall be
disconnected from the mains.
• The apparatus will be use in open area
• The ventilation should not be impedde by
covering the ventilation openings with items
such as newspaper, table-cloths, curtains etc
• No naked flame sources such as lighted
candles should be placed on the apparatus;
• Attention should be drawn to the environmental
aspects of battory disposal;
• The use of apparatus in moderate climates.
PRECAUTIONS FOR USE
To ensure safe, appropriate use of your personal
CD player, please follow the advice below:
Location
• Do not use the product in extremely hot, cold,
dusty or damp conditions.
• Place the product on a smooth, flat surface.
• Ensure that air is free to circulate through the
product. Do not use it in a poorly ventilated place,
cover it with a cloth or place it on carpet.
Power supply
• Before using the product, check that its rated
voltage is suitable for your mains supply.
Safety precautions
•When you plug in or unplug the power cord,
always Hold the plug rather than the cable.
Pulling the cord could damage it and create a
hazard.
•Always unplug the product from the mains if
you do not intend to use it for an extended period.
•The STANDBY button does not disconnect the
product from the mains power supply.
To disconnect the product from the power supply,
you must unplug the power cord.
•This product should only be used in a horizon-
tal position.
Keep minimum distances(5 cm)around the apparatus
for sufficient ventilation;
The ventilation should not be impeded by covering
the ventilation openings with items, such as
newspapers, table-cloths, curtains, etc;
No naked flame sources, such as lighted candles,
should be placed on the apparatus;
Attention should be drawn to the environmental
aspects of battery disposal. Don't throw used
batteries in dust bin. Please contact your retailer
in order to protect the environment.
Don't use the apparatus in tropical climates;
The apparatus shall not be exposed to dripping
or splashing and that no objects filled with liquids,
such as vases, shall be placed on the apparatus.
1
2
3
4
5
67
89
10 11
12
13
14
15
16
17
18
19
20
21
22
23
24
25
26
1
2
34
56
78
9
10
11
12
1314
1516
17
18
19
20
21
22
23
24
25
26
27
29
28
30
32
31
33
34
35
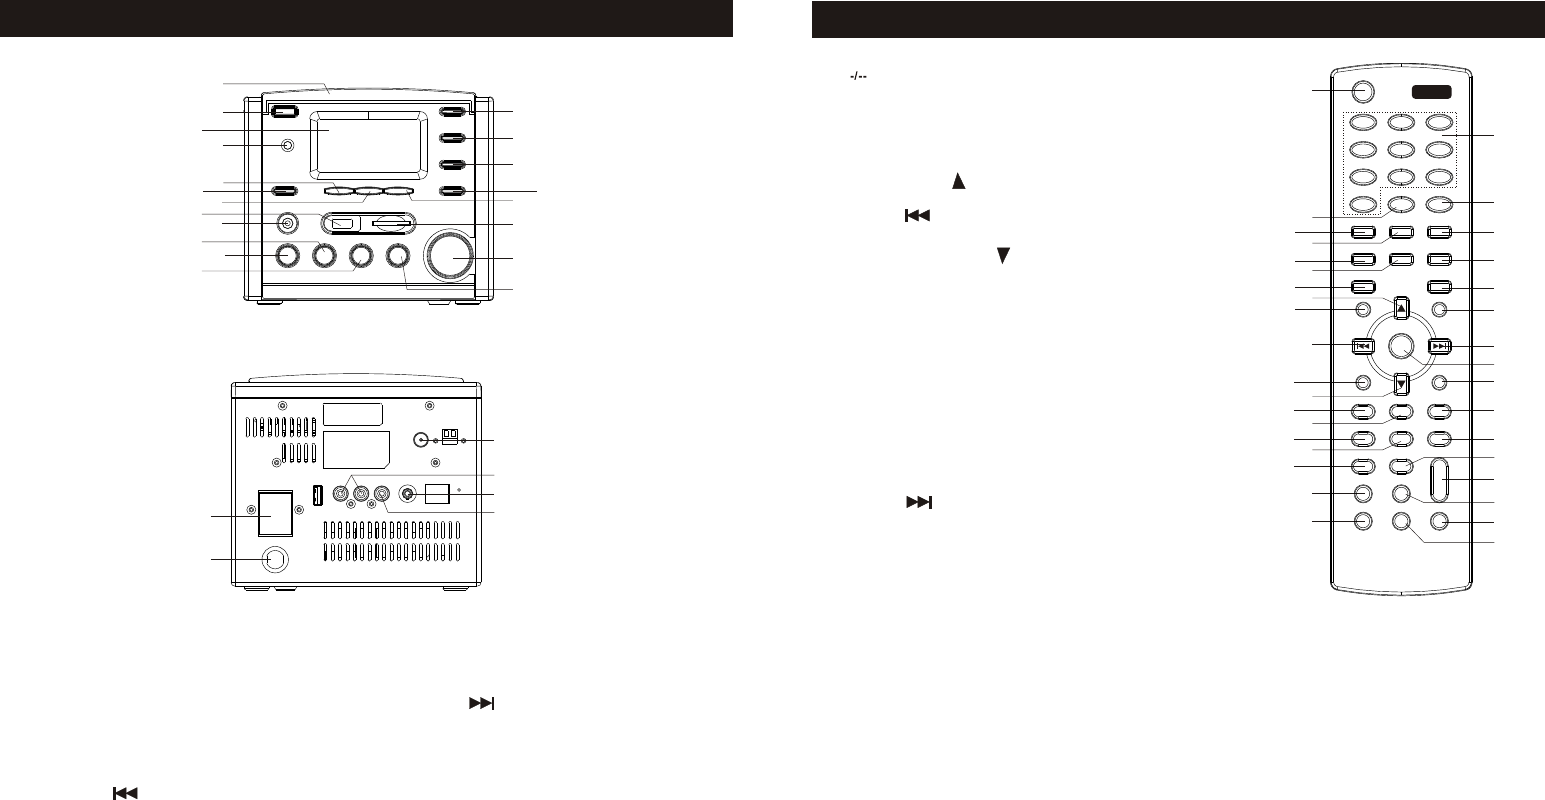
1. CD DOOR
2.STANDBY BUTTON
3.LCD DSPLAY
4.
5.ENTER/OK BUTTON
6.REC
7.SKIP
8.
9.
10.MEMCRY
11.SETUP/BAND
12.STOP
13.MUTE/SNOOZE
14.MENU
15.UP
REMOTE SENSOR
USB INTERAFCE
STEREO HEADPNONE JACK
BUTTON
BUTTON
BUTTON
BUTTON
BUTTON
BUTTON
BUTTON
LOCATION OF CONTROLS Remote Control Handset
1.STANDBY BUTTON
2. BUTTON
3.CD BUTTON
4.MESHWORK RADIO BUTTON
5.SD/MMC BUTTON
6.FM BUTTON
7.FILE MANAGE BUTTON
8.UP BUTTON
9. MEMCRY BUTTON
10. SKIP
11. REC BUTTON
12. DOWN BUTTON
13.SUTUP BUTTON
14.REPEAT BUTTON
15.TIMER BUTTON
16.INFO BUTTON
17.CLOCK BUTTON
18.X-BASS BUTTON
19.P-EQ BUTTON
20.0-9 BUTTON
21.AUTOSCAN BUTTON
22.USB BUTTON
23.UP NP BUTTON
24.AUX BUTTON
25. PLAY/PAUSE BUTTON
26. SKIP
27.ENTER/OK BUTTON
28.STOP/ESC BUTTON
29.RANDOM BUTTON
30.A-B REPEAT BUTTON
31.ST.MO BUTTON
32. VOLUME
33.SLELP BUTTON
34.DIMMER BUTTON
35.MUTE BUTTON
16.DOWN
17.SKIP
18.
19.
20.PLAY/PAUSE
21.WIRELESS NETWORK CARD JACK
22.SPEAKER
23.
24.
25.DIAPLASIS BUTTON
26.AUDIO OUTPUT
27.AUX IN
28.CROON OUTPUT
29.MESHWORK JACK
BUTTON
SD CARD JACK
VOLUME UP/DOWN
BUTTON
AC JACK
FM ANTENNA
1.-/ 2ABC 3DEF
4GHI 5JKL 6MNO
7PQR S 8TU V 9WX YZ
0-/--
AUTOSCAN
CD i.Radi o US B
SD/MMC F M UP NP
FileMgr AUX
OK
REC
STO P
ESC/
REPEAT RANDOM
TIMER INFO A-B
CLOCK ST.M O
X-BASS S LE LP
P-EQ MUT E
MEMORY PL AY/
PAUS E
SETUP
DIMMER
STAN DB Y
i net
-
VOL+
VOL-

6
Chapter I Overview
1.1 Introduction
This unit integrated digital audio playback functions with network connectivity,
which can play Audio CD, Data CD (MP3/WMA audio files),
USB disk, SD/MMC card, FM radio and above 20,000
internet radio stations.
1.2 Audio Sources
● Audio CD (By gathering CD track information from Gracenote CDDB)
● Support MP3/WMA audio files (Included ID3V1 ,2)
● Support static lyrics and synced lyrics (.txt /.lrc /.smi)
● Support USB Flash drive, USB HD drive, Apple iPod
● Live 365 Internet Radio (http://www.live365.com)
● SHOUTCast Internet Radio (http://www.shoutcast.com)
● Local FM On-Line Radio
● FM (87.5~108MHz)
● Support AUX
1.3 Record
● Convert Audio CD tracks into 128kbps MP3 file and save to an USB disk,
SD/MMC card or iPod series. By connecting to Gracenote CDDB may gather
CD track information about the playing CD
● Record Internet Radio Station (Live365/SHOUTCast) and save to an USB disk,
SD/MMC card or iPod series as MP3 files
● Record FM Radio and save to an USB disk, SD/MMC card or iPod series as MP3
files.
● Record AUX into 128kbps MP3 file save to an USB disk, SD/MMC card or iPod
series.
●Support storage backup management program

7
1.4 Networking
● Support Ethernet 10/100 Mbps
● Support Wireless LAN IEEE 802.11 b/g Dongle (optional)
● Support Infrastructure /Ad-Hoc
● Support WEP 64/128 and WPA-PSK encryption
● Support Proxy Setting
●SMBB provides the wireless setting wizard to make wireless network setup more
easily.
1.5 Others
● Support two alarm clock settings
● Support time sync technology (* network available)
● Support firmware upgrade
8
Chapter 2 Installation
2.1 Installation
NOTE:The voltage is AC 120V~60Hz.
Please check the voltage in your area before plugging in the unit.
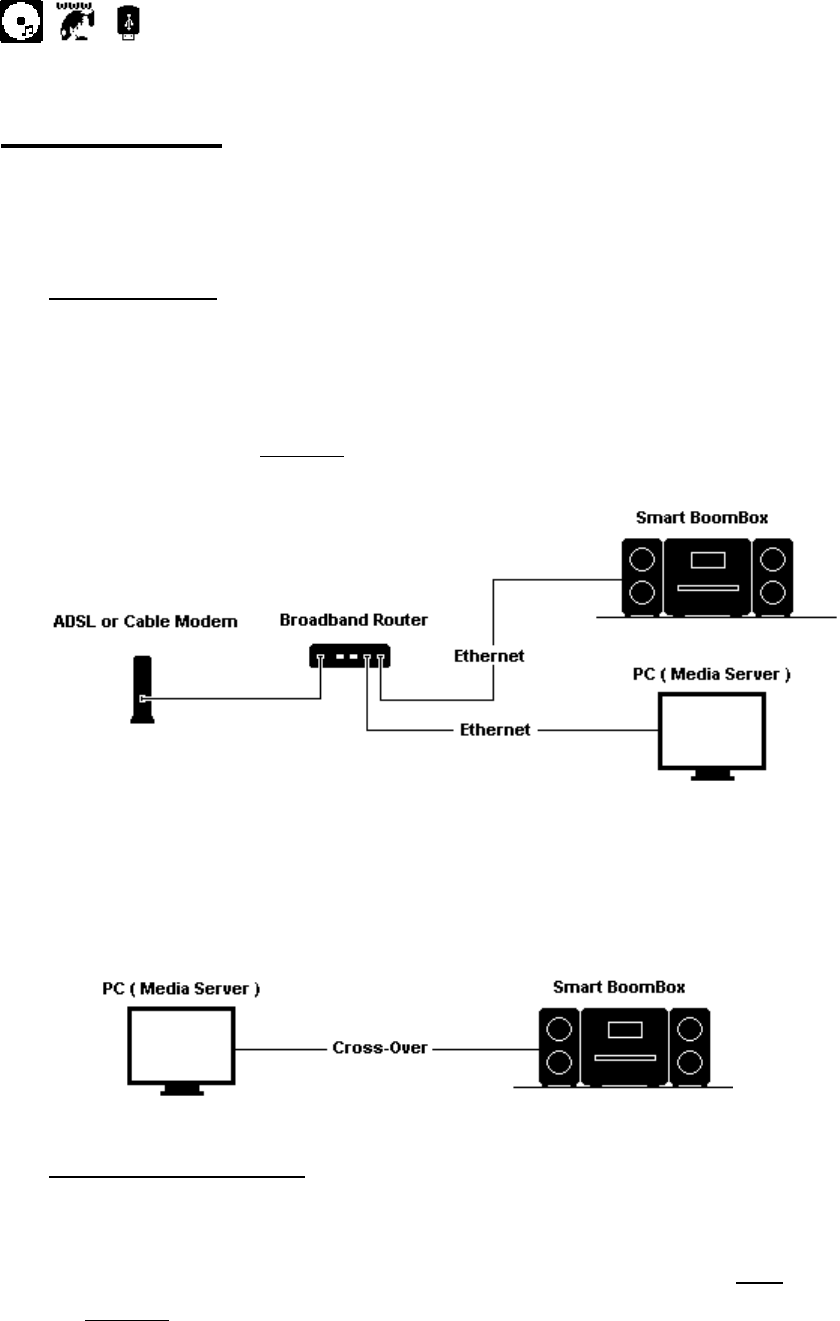
2.1.1 LAN Setting
˙Make sure the internet environment is ready and the network setting is
available (ADSL or Cable Modems is highly recommended).
˙The default setting of network is DHCP. (more network setting
please check 11.4 Network)
or
˙
˙˙
˙If you want to listen audio contents from your PC, you can use Cross-over
to connect your SMBB to your PC directly.
2.1.2 Wireless LAN Setting
˙Make sure the internet environment is ready and the network setting is
available.
˙Plug-in the provided Wifi Dongle (More setting please see 11.4
Network)
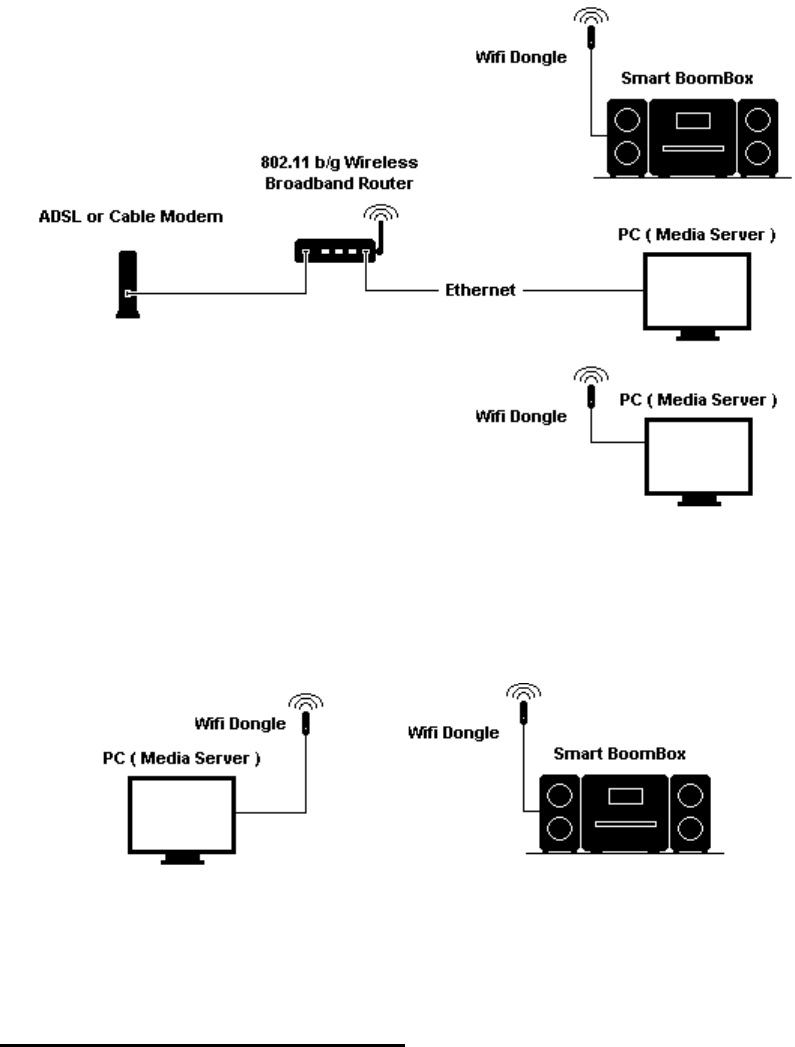
9
or
˙
˙˙
˙you can receive your audio contents from PC’s under wireless environment
by using Ad-hoc.
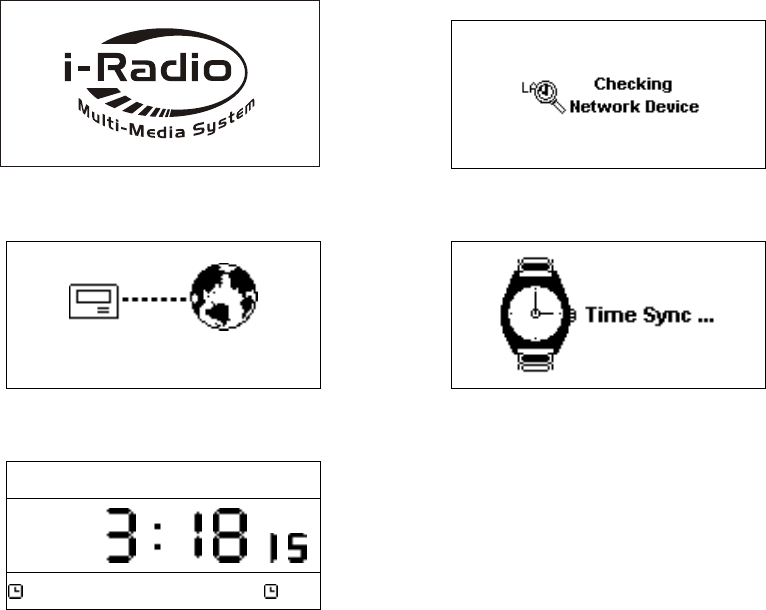
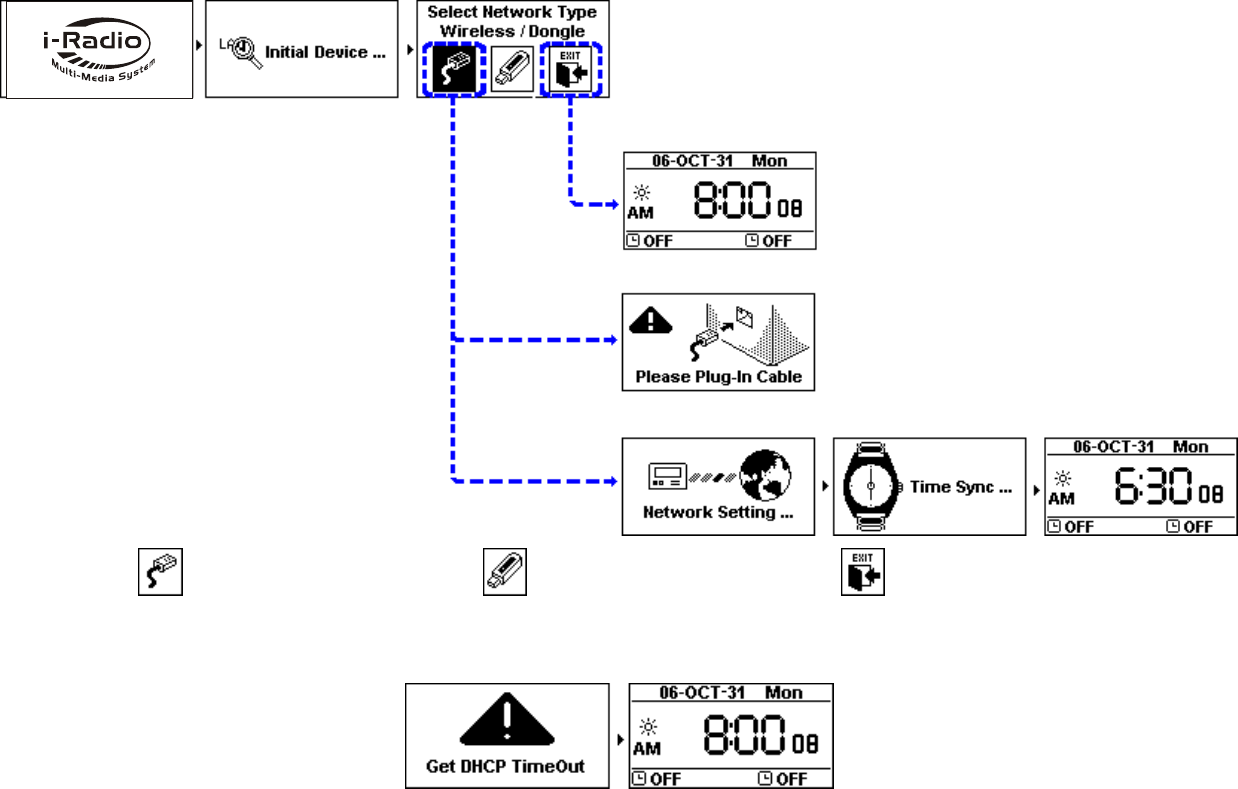
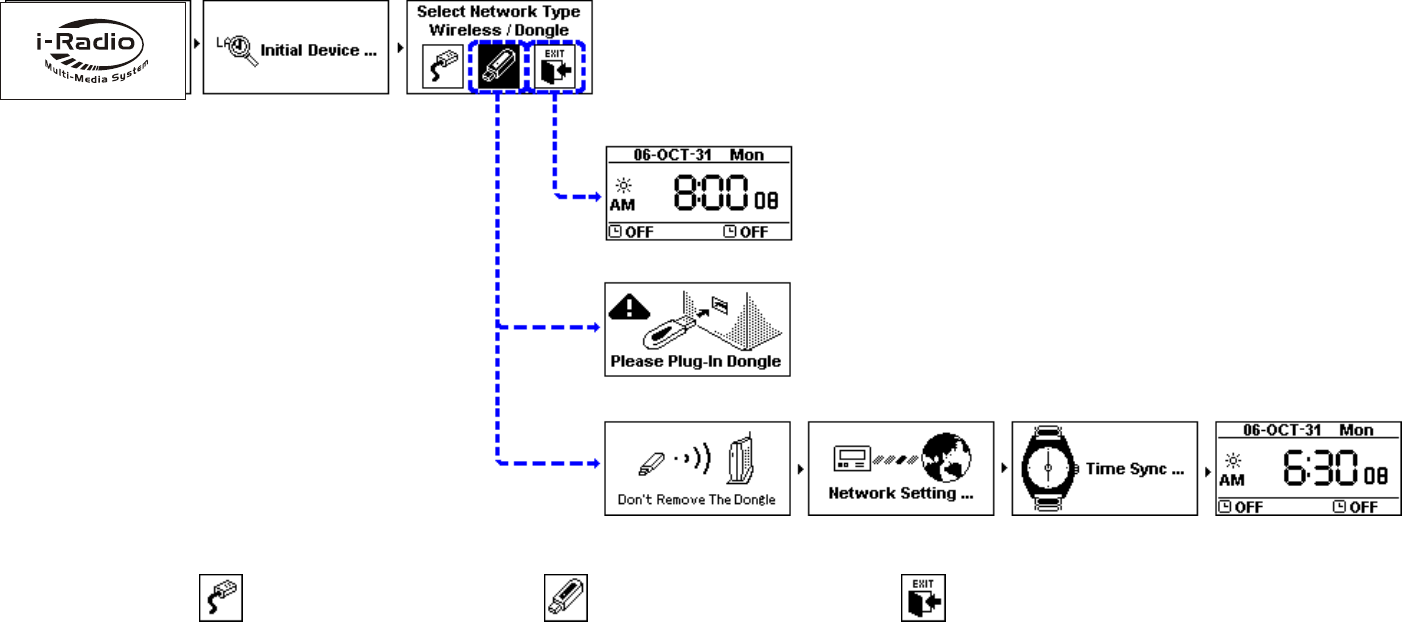
2.2 Boot for The First Time
When you turn on the system at the first time, it will check the environment
and search for any available internet protocol automatically. If there is no network
devices connected, you should plug-in LAN or WiFi dongle and
follow the instructions of network wizard. After system does link to the network, it
will process time sync, and then goes to standby mode. Usually it will take 6-30
seconds to finish the whole process.
10
Table 2.2.1 Turn on the unit By Using LAN
When power-on,Penbex Logo shows up
→
1
Checking available network devices
Network Connecting
Network Connecting Network Connecting
Network Connecting …
Network Connecting
→
Time Sync processing
2007
20072007
2007-
--
-May
MayMay
May-
--
-03 Thu..
03 Thu..03 Thu..
03 Thu..
PM
PMPM
PM
Off
OffOff
Off off
offoff
off
Stand-By Mode
˙The default of network setting is LAN (or after you have chosen
“Reset all setting”). You can choose WLAN (wireless), please plug the provided
Wi-Fi dongle into USB port which located at the rear of unit.
˙If you still have problems with network setting, please follow the instructions of
network wizard on next page.
˙
˙˙
˙NETWORK SETTING – LAN
Choose LAN to connect internet
Choose WLAN to connect internet
Exit network wizard mode
˙
˙˙
˙CAN NOT GET DHCP
˙
˙˙
˙NETWORK SETTING – WLAN (wireless)
Choose LAN to connect internet
Choose WLAN to connect internet
Exit network wizard mode
˙
˙˙
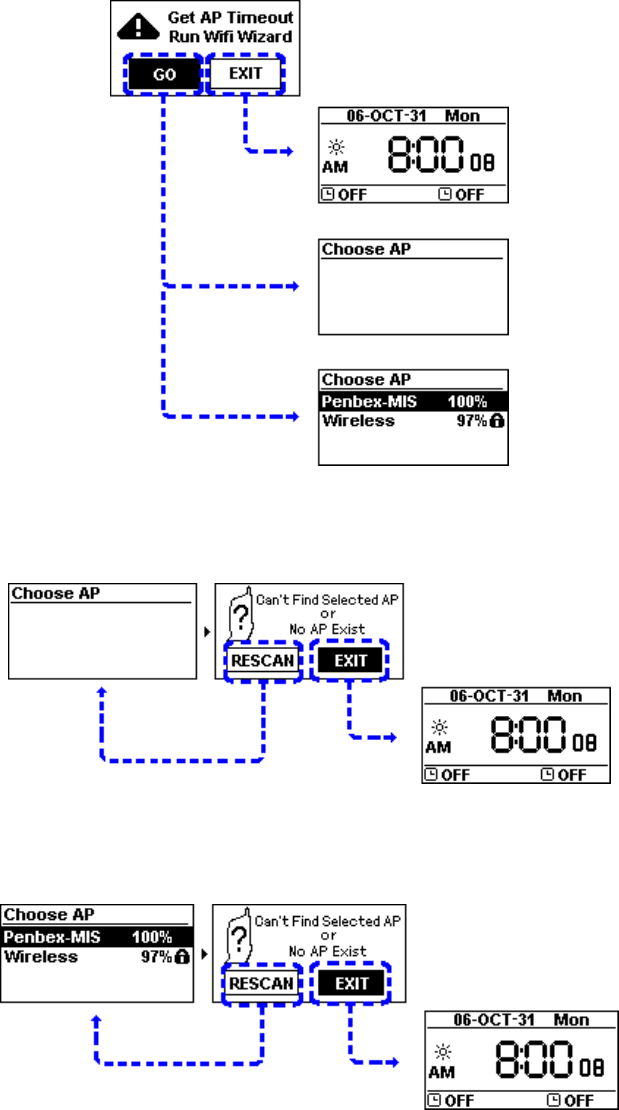
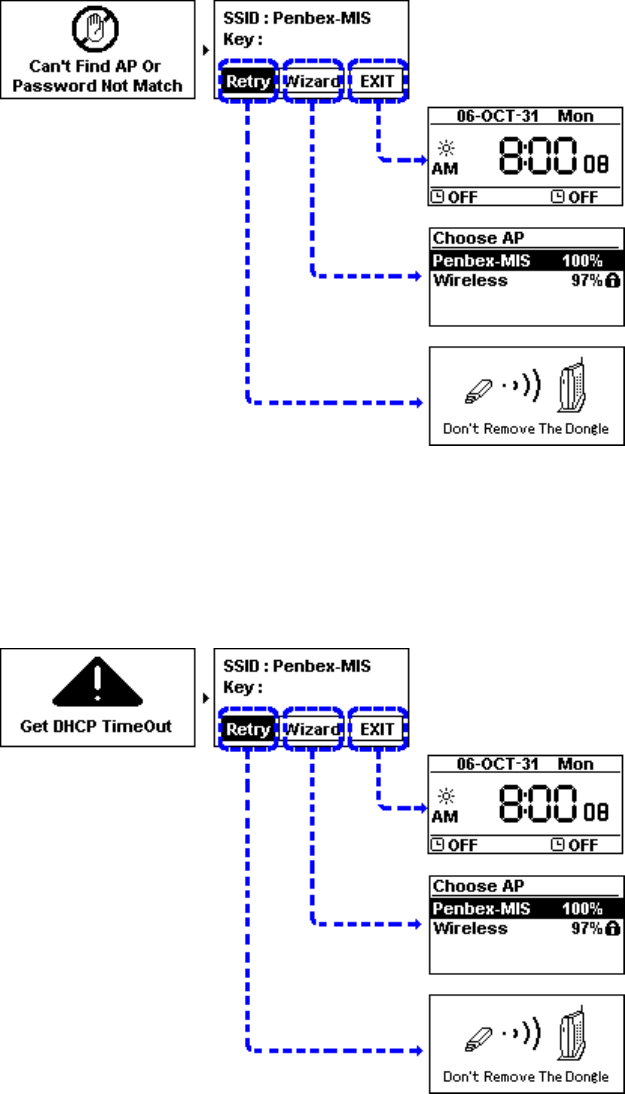
˙CAN NOT FIND ACCESS POINT
Select「GO」to run Wizard mode OR Select「EXIT」to quit
(1) CAN NOT FIND ANY ACCESS POINT
Select「RESCAN」to search AP again OR Select「EXIT」to quit
(2) CAN NOT FIND THE AP YOU WANT, PRESS「
「「
「ESC」
」」
」TO ENTER PRESCAN MODE
Select「RESCAN」to search AP again OR Select「EXIT」to quit
˙
˙˙
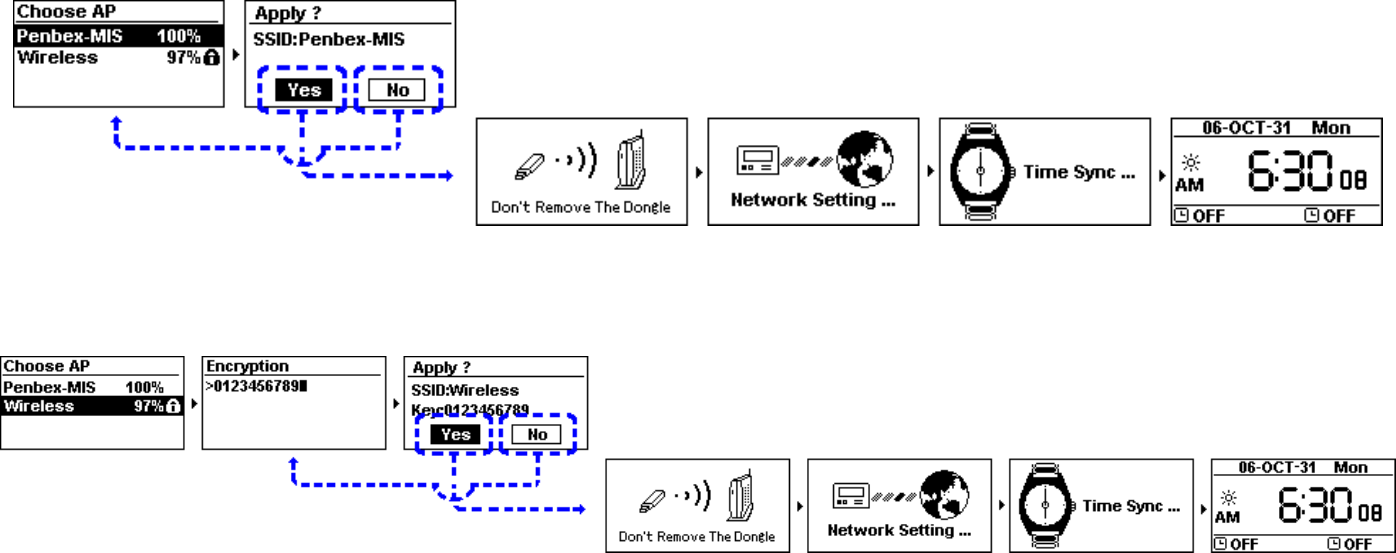
˙SELECT AN EXISTING AP THAT DOES NOT NEED AN ENCRYPTION
Select「Yes」to make a connection OR Select「No」to select other Access Points
˙
˙˙
˙SELECT AN EXISTING AP THAT NEEDS AN ENCRYPTION
After input the encryption, Select「Yes」to make a connection OR Select「No」to select other Access Points
˙
˙˙
˙FAIL TO CONNECT TO ACCESS POIN
1. Select 「Retry」to connect again
2. or Select「Wizard」to search available Access Point
3. or Select「EXIT」to quit
˙
˙˙
˙CAN NOT GET DHCP
1. Select 「Retry」to connect again
2. or Select「Wizard」to search available Access Point
3. or Select「EXIT」to quit
16
2.3 Power On
After switch to Stand By Mode, you may press ( )to
activate the system. You can adjust the brightness of backlight appeared on your
panel by clicking「Dim」in your remote control.
Table 2.1
2007
20072007
2007-
--
-May
MayMay
May-
--
-03 Thu.
03 Thu.03 Thu.
03 Thu.
PM
PMPM
PM
Off
OffOff
Off off
offoff
off
Press「 」in Stand-By Mode
→
CD
CDCD
CD
Loading
Loading Loading
Loading …
Audio sources checking
CD
CDCD
CD
CD / Internet Radio / USB
→
SD/MMC
SD/MMCSD/MMC
SD/MMC
SD/MMC / FM / Media Server
1
FileMgr
FileMgrFileMgr
FileMgr
FileMgr / AUX / Setup
1
CD
CDCD
CD
Press B.L. (Dim) to adjust the brightness
17
Chapter 3 CD
3.1 Inserting a CD into the CD Tray
NOTE:In order to play CD, please insert the Audio CD or MP3/WMA format
CD.
1. Press the「 OPEN 」 position which located on the CD door.
2. Insert an Audio CD or MP3/WMA CD into the CD tray.
3. close the CD CD door.
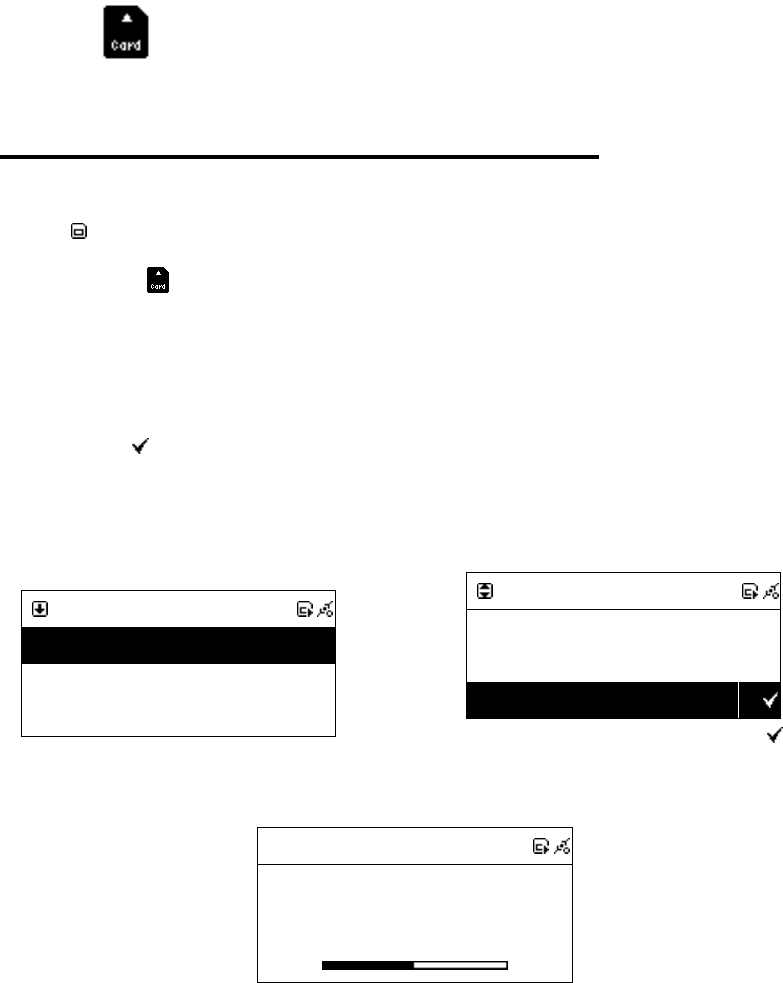
4. icon will show on the topside of the screen when CD is detected.
Table 3.1
CD
CDCD
CD
Insert CD
→
CD
CDCD
CD
Loading
Loading Loading
Loading …
After inserting a disc…
CD
CDCD
CD
icon will show on the screen.
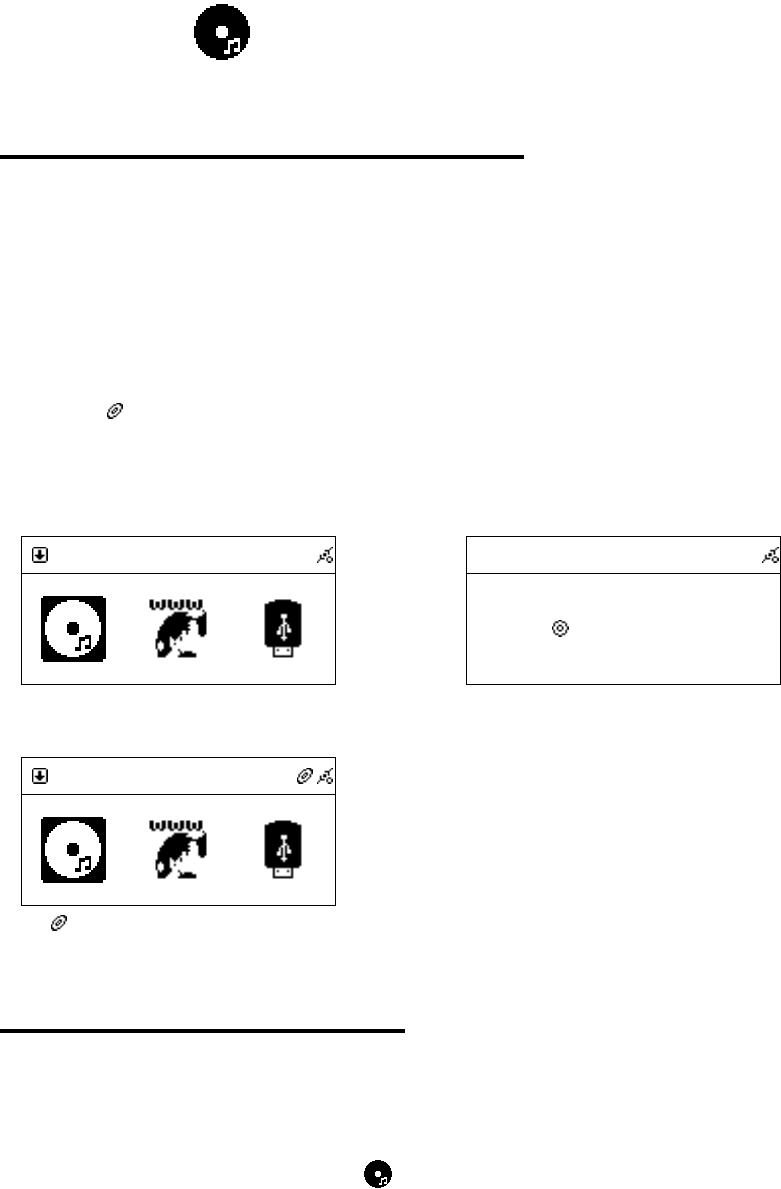
3.2 Getting CD Information
NOTE:To get information from Gracenote CDDB, please make sure the internet
environment is workable and Audio CD is playable.
1. After CD Loading, select icon from the main menu and then press
SELECT button to enter CD function.
2. Gracenote logo will show on the screen when querying CD information.
3. Track names will be listed on the screen instead of track numbers after it
got CD track information.
18
Table 3.2
CD
CDCD
CD
Press「SELECT」
→
CD
CDCD
CD
Loading
Loading Loading
Loading …
Processing
Connecting to Gracenote
→
CD
CDCD
CD
All
All All
All
Track 01
Track 01 Track 01
Track 01
Track 02
Track 02 Track 02
Track 02
Not update yet
CD
CDCD
CD
All
All All
All
Can
Can Can
Can’t Stop Loving You
t Stop Loving Yout Stop Loving You
t Stop Loving You
Do You Remember
Do You Remember Do You Remember
Do You Remember
Update CD information from CDDB
1
CD
CDCD
CD
All
All All
All
Unknow Track 01
Unknow Track 01 Unknow Track 01
Unknow Track 01
Unkn
Unkn Unkn
Unknow Track 02
ow Track 02ow Track 02
ow Track 02
Shown “Unknow” if information is not available
3.3 Playing an Audio CD
There are two ways to play an Audio CD.
A. Playing all the tracks within the disc
1. Highlight [ All] (or scroll down to the first track name).
2. Press「PLAY」or「SELECT/OK」button to play all songs.
B. Playing selected tracks within the disc
1. Scroll up/down to a track name, then press「MEMORY」button to make a
check mark .
2. Repeat the step 1 to select other songs.
3. Press「PLAY」or「SELECT/OK」button to play these marked songs.
NOTE:Not all audio CD has CD track information
19
Table 3.3
CD
CDCD
CD
All
All All
All
Can
Can Can
Can’t Stop Loving You
t Stop Loving Yout Stop Loving You
t Stop Loving You
Do You Remember
Do You Remember Do You Remember
Do You Remember
Select [All], then press PLAY or SELECT to
play
or
CD
CDCD
CD
All
All All
All
Can
Can Can
Can’t Stop Loving You
t Stop Loving Yout Stop Loving You
t Stop Loving You
Do You Remember
Do You Remember Do You Remember
Do You Remember
Press「MEMORY」to make a check mark , then
press「PLAY」to play.
001/012
001/012 001/012
001/012
Can
CanCan
Can’t Stop Loving You
t Stop Loving Yout Stop Loving You
t Stop Loving You
Phil Collins
Phil CollinsPhil Collins
Phil Collins
*** Love Songs: A Compilation
*** Love Songs: A Compilation*** Love Songs: A Compilation
*** Love Songs: A Compilation
02
0202
02:
::
:30
3030
30
04
0404
04:
::
:30
3030
30
Music playing
3.4 Playing an MP3/WMA CD
NOTE: 1. Support MP3/WMA audio files.
2. Support static lyrics and synced lyrics (.txt /.lrc /.smi)
3. Not support MPEG 1 Layer 2 format.
There are two ways to play an Audio CD.
A. Playing all the tracks within the disc
1. Highlight [ All] (or scroll down to the first track name).
2. Press「PLAY」or「SELECT/OK」button to play all songs.
B. Playing selected tracks within the disc
1. Scroll up/down to a track name, then press「MEMORY」button to make a
check mark .
2. Repeat the Step 1 to select other songs.
3. Press「PLAY」or「SELECT/OK」button to play these marked songs.
C. Playing one song within a folder or disc
1. Scroll up/down to a file name, then press「MEMORY」button to make a
check mark .
2. Press「PLAY」or「SELECT/OK」button to play the song.

20
Table 3.4
CD
CDCD
CD
All
All All
All
Phil Collins
Phil Collins Phil Collins
Phil Collins
Do You
Do You Do You
Do You Remember
RememberRemember
Remember
Select [All], then press PLAY or SELECT to play.
or
CD
CDCD
CD
All
All All
All
Phil Collins
Phil Collins Phil Collins
Phil Collins
Do You Remember
Do You Remember Do You Remember
Do You Remember
Press「MEMORY」, then press「PLAY」to play.
001/012
001/012 001/012
001/012
Can
CanCan
Can’t Stop Loving You
t Stop Loving Yout Stop Loving You
t Stop Loving You
Phil Collins
Phil CollinsPhil Collins
Phil Collins
*** Love Songs: A Compilation
*** Love Songs: A Compilation*** Love Songs: A Compilation
*** Love Songs: A Compilation
02
0202
02:
::
:30
3030
30
0
00
04
44
4:
::
:30
3030
30
Music playing
3.5 CD Ripping
˙Press「REC」to rip
˙Auto-categorization function will be activated when ripping a song to USB or
SD/MMC.
˙iPod will be updated after ripping a song to iPod.
˙CD will not be recorded if the Audio CD is under protection.
3.5.1 Converting All the Tracks within the Disc
1. Insert an Audio CD into the CD tray.
2. Select icon from the main menu, then press 「SELECT/OK」button
to enter CD function.
3. Highlight [ All] and, then press「REC」button to record.
4. If both USB Disk and SD/MMC Card are detected, scroll up/down to
select a storage medium where you want to store recording files, then press
「SELECT/OK」to start recording.
5. icon will show on the topside of the screen when converting.
6. In any reason it has failed to convert. System will stop recording.
3.5.2 Converting Selected Tracks within the Disc
1. Insert an Audio CD into the CD tray.
2. Select icon from the main menu, then press「SELECT/OK」button to
21
enter CD function.
3. Scroll up/down to a track name, then press「MEMORY」button to make a
check mark .
4. Repeat the Step 3 to select other songs and then press「REC」button to
record.
5. If both USB Disk and SD/MMC Card are detected, scroll up/down to
select a storage medium where you want to store recording files, then press
「SELECT/OK」to start recording.
6. icon will show on the topside of the screen when converting.
7. In any reason it has failed to convert. System will stop recording.
Table 3.5.2
CD
CDCD
CD
All
All All
All
Can
Can Can
Can’t Stop Loving You
t Stop Loving Yout Stop Loving You
t Stop Loving You
Do You Remember
Do You Remember Do You Remember
Do You Remember
Select [All], then press「REC」to rip
→
001/
001/001/
001/012
012012
012
Can
CanCan
Can’t Stop Loving You
t Stop Loving Yout Stop Loving You
t Stop Loving You
Phil Collins
Phil CollinsPhil Collins
Phil Collins
*** Love Songs: A Compilation
*** Love Songs: A Compilation*** Love Songs: A Compilation
*** Love Songs: A Compilation
02
0202
02:
::
:30
3030
30
04
0404
04:
::
:30
3030
30
icon will show on the screen when ripping
or
CD
CDCD
CD
All
All All
All
Can
Can Can
Can’t Stop Loving You
t Stop Loving Yout Stop Loving You
t Stop Loving You
Do You Remember
Do You Remember Do You Remember
Do You Remember
Press MEMORY, then Press REC to rip
→
001
001001
001/001
/001/001
/001
Can
CanCan
Can’t Stop Loving You
t Stop Loving Yout Stop Loving You
t Stop Loving You
Phil Collins
Phil CollinsPhil Collins
Phil Collins
*** Love Songs: A Compilation
*** Love Songs: A Compilation*** Love Songs: A Compilation
*** Love Songs: A Compilation
02
0202
02:
::
:30
3030
30
04
0404
04:
::
:30
3030
30
icon will show on the screen when ripping.
or
CD
CDCD
CD
All
All All
All
Can
Can Can
Can’t Stop Loving You
t Stop Loving Yout Stop Loving You
t Stop Loving You
Do You Remember
Do You Remember Do You Remember
Do You Remember
Press MEMORY, then Press REC to rip
→
CD
CDCD
CD
All
All All
All
Can
Can Can
Can’t Stop Loving
t Stop Loving t Stop Loving
t Stop Loving
Do You Remember
Do You Remember Do You Remember
Do You Remember
Save as
Save as Save as
Save as
USB
USBUSB
USB
SD/MMC
SD/MMCSD/MMC
SD/MMC
Select USB or SD/MMC if necessary.
or
CD
CDCD
CD
All
All All
All
Can
Can Can
Can’t Stop Loving You
t Stop Loving Yout Stop Loving You
t Stop Loving You
Do You Remember
Do You Remember Do You Remember
Do You Remember
Press MEMORY, then Press REC to rip.
CD
CDCD
CD
All
All All
All
Can
Can Can
Can’t Stop Loving You
t Stop Loving Yout Stop Loving You
t Stop Loving You
Do You Remember
Do You Remember Do You Remember
Do You Remember
If no storage media, the action will stop.

22
3.6 Now Playing
● Use the remote control to control Bass, Equalizer, Play Mode and A-B Loop
(Note: some functions can only be enabled by using the remote control)
● EQ: Set the equalizer for Normal Classic Jazz Pop Rock and Bass
+Normal Bass+Classic Bass+Jazz Bass+Pop Bass+Rock.
● Play Mode: Set the play mode for Normal Shuffle Repeat One Repeat
All.
● A-B Loop: 1. Press「SELECT/OK」to set the starting point A when playing.
icon will show on the topside of the screen.
2. Press 「SELECT/OK」again to set the period A to B when
playing.
icon will show on the topside of the screen.
3. Press 「SELECT/OK」again to stop repeating in A-B loop.
icon will disappear.
● If no remote controls, press 「SETUP」 button instead of these quick keys
when playing.
Table 3.6
0
00
001/012
01/012 01/012
01/012
Can
CanCan
Can’t Stop Loving You
t Stop Loving Yout Stop Loving You
t Stop Loving You
Phil Collins
Phil CollinsPhil Collins
Phil Collins
*** Love Songs: A Compilation
*** Love Songs: A Compilation*** Love Songs: A Compilation
*** Love Songs: A Compilation
02
0202
02:
::
:30
3030
30
04
0404
04:
::
:30
3030
30
Press NUMBER buttons on the remote control.
→
009/012
009/012 009/012
009/012
Do You remember
Do You rememberDo You remember
Do You remember
Phil Collins
Phil CollinsPhil Collins
Phil Collins
*** Love Songs: A Compilation
*** Love Songs: A Compilation*** Love Songs: A Compilation
*** Love Songs: A Compilation
02
0202
02:
::
:30
3030
30
04
0404
04:
::
:30
3030
30
Jump to the track automatically.
or
001/012
001/012 001/012
001/012
Can
CanCan
Can’t Stop Loving You
t Stop Loving Yout Stop Loving You
t Stop Loving You
Phil Collins
Phil CollinsPhil Collins
Phil Collins
*** Love Songs: A Compilation
*** Love Songs: A Compilation*** Love Songs: A Compilation
*** Love Songs: A Compilation
02
0202
02:
::
:30
3030
30
04
0404
04:
::
:30
3030
30
Press -/-- button on the remote control.
→
001/012
001/012 001/012
001/012
1
1 1
1
1
1 1
1
Input a track number to jump to the track quickly.
or

23
001/012
001/012 001/012
001/012
Can
CanCan
Can’t Stop Loving You
t Stop Loving Yout Stop Loving You
t Stop Loving You
Phil Collins
Phil CollinsPhil Collins
Phil Collins
*** Love Songs: A Compilation
*** Love Songs: A Compilation*** Love Songs: A Compilation
*** Love Songs: A Compilation
02
0202
02:
::
:30
3030
30
04
0404
04:
::
:30
3030
30
Press EQ to change equalizer.
→
001/012
001/012 001/012
001/012
Can
CanCan
Can’t Stop Loving You
t Stop Loving Yout Stop Loving You
t Stop Loving You
Phil Collins
Phil CollinsPhil Collins
Phil Collins
*** Love Songs: A Compilation
*** Love Songs: A Compilation*** Love Songs: A Compilation
*** Love Songs: A Compilation
02
0202
02:
::
:30
3030
30
04
0404
04:
::
:30
3030
30
The EQ icon will show on the screen
or
001/012
001/012 001/012
001/012
Can
CanCan
Can’t Stop Loving You
t Stop Loving Yout Stop Loving You
t Stop Loving You
Phil Collins
Phil CollinsPhil Collins
Phil Collins
*** Love Songs: A Compilation
*** Love Songs: A Compilation*** Love Songs: A Compilation
*** Love Songs: A Compilation
02
0202
02:
::
:30
3030
30
04
0404
04:
::
:30
3030
30
Press REPEAT to change play mode.
001/012
001/012 001/012
001/012
Can
CanCan
Can’t Stop Loving You
t Stop Loving Yout Stop Loving You
t Stop Loving You
Phil Collins
Phil CollinsPhil Collins
Phil Collins
*** Love Songs: A Compilation
*** Love Songs: A Compilation*** Love Songs: A Compilation
*** Love Songs: A Compilation
02
0202
02:
::
:30
3030
30
04
0404
04:
::
:30
3030
30
The Repeat icon will show on the screen.
001/012
001/012 001/012
001/012
Can
CanCan
Can’t Stop Loving You
t Stop Loving Yout Stop Loving You
t Stop Loving You
Phil Collins
Phil CollinsPhil Collins
Phil Collins
*** Love Songs: A Compilation
*** Love Songs: A Compilation*** Love Songs: A Compilation
*** Love Songs: A Compilation
02
0202
02:
::
:30
3030
30
04
0404
04:
::
:30
3030
30
Press 「SELECT /OK」to set A when playing.
001/012
001/012 001/012
001/012
Can
CanCan
Can’t Stop Loving You
t Stop Loving Yout Stop Loving You
t Stop Loving You
Phil Collins
Phil CollinsPhil Collins
Phil Collins
*** Love Songs: A Compilation
*** Love Songs: A Compilation*** Love Songs: A Compilation
*** Love Songs: A Compilation
02
0202
02:
::
:30
3030
30
04
0404
04:
::
:30
3030
30
Press 「SELECT /OK」again to repeat A-B loop.
001/012
001/012 001/012
001/012
Can
CanCan
Can’t Stop Loving You
t Stop Loving Yout Stop Loving You
t Stop Loving You
Phil Collins
Phil CollinsPhil Collins
Phil Collins
*** Love Songs: A Compilation
*** Love Songs: A Compilation*** Love Songs: A Compilation
*** Love Songs: A Compilation
02
0202
02:
::
:30
3030
30
04
0404
04:
::
:30
3030
30
Press SETUP when playing.
Setting
SettingSetting
Setting
Play Mode
Play ModePlay Mode
Play Mode
>
>>
>
Equa
EquaEqua
Equalizer
lizerlizer
lizer
Nornal
NornalNornal
Nornal
Balance
BalanceBalance
Balance
>
>>
>
Select a Setting item.
3.7 Lyrics
˙Support static lyrics and synced lyrics (.txt /.lrc /.smi).
1.MP3 – ID3V2 Embedded Lyric、 .Lrc、 .Txt
2.WMA – Embedded Lyric、 . Smi、 .Txt
˙Edit lyrics for your MP3/WMA files if necessary.

24
Table 3.7
001/012
001/012 001/012
001/012
Can
CanCan
Can’t Stop Loving You
t Stop Loving Yout Stop Loving You
t Stop Loving You
Phil Collins
Phil CollinsPhil Collins
Phil Collins
*** Love Songs: A Compilation
*** Love Songs: A Compilation*** Love Songs: A Compilation
*** Love Songs: A Compilation
02
0202
02:
::
:30
3030
30
04
0404
04:
::
:30
3030
30
Press INFO when playing.
→
001/012
001/012 001/012
001/012
Tearing and breaking down
Tearing and breaking downTearing and breaking down
Tearing and breaking down
Tearing my heart
Tearing my heartTearing my heart
Tearing my heart
Tearing and breaking down
Tearing and breaking downTearing and breaking down
Tearing and breaking down
02
0202
02:
::
:30
3030
30
04
0404
04:
::
:30
3030
30
The lyrics will show on the screen.
or
001/012
001/012 001/012
001/012
Can
CanCan
Can’t Stop Loving You
t Stop Loving Yout Stop Loving You
t Stop Loving You
Phil Collins
Phil CollinsPhil Collins
Phil Collins
*** Love Songs: A Compilation
*** Love Songs: A Compilation*** Love Songs: A Compilation
*** Love Songs: A Compilation
02
0202
02:
::
:30
3030
30
04
0404
04:
::
:30
3030
30
Press INFO when playing.
→
001/012
001/012 001/012
001/012
No Lyrics
No LyricsNo Lyrics
No Lyrics
02
0202
02:
::
:30
3030
30
04
0404
04:
::
:30
3030
30
No lyrics available
3.8 Balance
˙Bass and Balance are adjustable.
Table 3.8
001/012
001/012 001/012
001/012
Can
CanCan
Can’t Stop Loving You
t Stop Loving Yout Stop Loving You
t Stop Loving You
Phil Collins
Phil CollinsPhil Collins
Phil Collins
*** Love Songs: A Compilation
*** Love Songs: A Compilation*** Love Songs: A Compilation
*** Love Songs: A Compilation
02
0202
02:
::
:30
3030
30
04
0404
04:
::
:30
3030
30
Press「Setting」when playing
→
Music Setting
Play Mode >
Equalizer Nornal
Balance >
Enter Music Setting list and choose「Balance」
Balance
BalanceBalance
Balance
L
L L
L R
R R
R
Press Left/Right button to modify the outpu
t

25
Chapter 4 Internet Radio
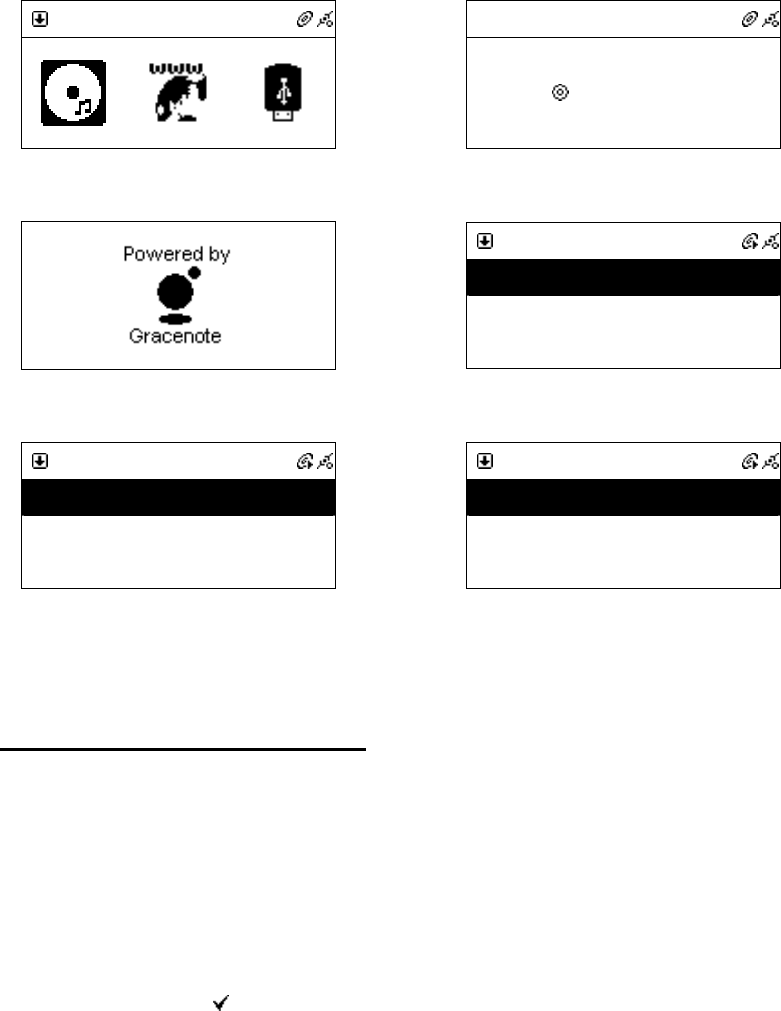
4.1 Introduction
Internet radio is an audio broadcasting service transmitted via the Internet. By
using internet radio devices, listeners receive a continuous stream of audio from
internet radio stations. Unit supports many audio stream sources such as
Microsoft (mms://..), Live365, and SHOUTCast.
˙Live 365 (http://www.live365.com)
˙SHOUTCast (http://www.shoutcast.com)
Today most traditional FM radio stations in the world offer on-line radio
services or programs. It can connect to those on-line radio services or
programs. Moreover, this system categorizes those stations by country, and sort them
under World Station file. This makes it easy to search or find a particular radio
station.
4.2 World Station
System requirements: Recommend broadband internet connection (xDSL/Cable
Modem). However, Internet Radio does not support PPPoE(ADSL) or ISP Proxy
(cable modem). We strongly recommend connecting with a broadband router to
have better quality of audio streaming.
˙If there is no internet connection on your unit, Wizard mode will be
automatically activated. Please follow the instructions shown on the screen to
establish network connection.
4.2.1 Listen to World Station
˙Go to[Main] menu, choose and press「SELECT/OK」button.
˙Choose [World Station] and then press「SELECT/OK」button.
˙Scroll up/down to a station and then press「SELECT/OK」button to play.
˙You will hear music after buffering reaches to 100%.
Note 1:
::
:For fast search for an internet radio, press「
「「
「」
」」
」button to jump from radio
stations started with alphabet A to alphabet B, alphabet B to alphabet C, and
26
so on. Press「
「「
「」
」」
」button to jump backward.
Note 2:
::
:Press「
「「
「INFO」
」」
」to know the total amount of internet radio stations in a specific
category and which one you are browsing.
Table 4.2.1 Listen to Internet Radio
Internet Radio
Internet RadioInternet Radio
Internet Radio
Choose Internet Radio
→
I.Radio
I.RadioI.Radio
I.Radio
Favorite
FavoriteFavorite
Favorite
>
>>
>
World Station
World StationWorld Station
World Station
>
>>
>
SHOUTCast
SHOUTCastSHOUTCast
SHOUTCast
>
>>
>
Choose World Station
World Station
World StationWorld Station
World Station
Africa
AfricaAfrica
Africa
>
>>
>
Americas
AmericasAmericas
Americas
>
>>
>
Asia
AsiaAsia
Asia
>
>>
>
Categorized by Area
→
Asia
AsiaAsia
Asia
South Korea
South KoreaSouth Korea
South Korea
>
>>
>
SriLanka
SriLankaSriLanka
SriLanka
>
>>
>
Taiwan
TaiwanTaiwan
Taiwan
>
>>
>
Categorized by Country
World Station
World StationWorld Station
World Station
Africa
AfricaAfrica
Africa
>
>>
>
Americas
AmericasAmericas
Americas
>
>>
>
Asia
AsiaAsia
Asia
>
>>
>
Press/button for fast search
→
World Station
World StationWorld Station
World Station
Caribbean
CaribbeanCaribbean
Caribbean
>
>>
>
Europe
EuropeEurope
Europe
>
>>
>
Middle East
Middle EastMiddle East
Middle East
>
>>
>
The name of Radio stations change alphabetically
USA
USAUSA
USA
‘A
AA
A’ NET STATION
NET STATION NET STATION
NET STATION
.977 The Oldies Channel
.977 The Oldies Channel.977 The Oldies Channel
.977 The Oldies Channel
007 Audio
007 Audio 007 Audio
007 Audio -
--
- #1 For The
#1 For The #1 For The
#1 For The
Press「INFO」
→
1/999
1/9991/999
1/999
‘A
AA
A’ NET STATION
NET STATION NET STATION
NET STATION
.977 The Oldies Channel
.977 The Oldies Channel.977 The Oldies Channel
.977 The Oldies Channel
007 Audio
007 Audio 007 Audio
007 Audio -
--
- #1 For The
#1 For The #1 For The
#1 For The
The amount of radio stations will show on the screen
Int
IntInt
Internet Radio
ernet Radioernet Radio
ernet Radio
BCC News Radio
BCC News RadioBCC News Radio
BCC News Radio
BCC Classical
BCC ClassicalBCC Classical
BCC Classical
Bcc Pop
Bcc PopBcc Pop
Bcc Pop
Categorized by Radio Station
→
Internet Radio
Internet RadioInternet Radio
Internet Radio
BCC News Radio
BCC News RadioBCC News Radio
BCC News Radio
<BCC News>
<BCC News><BCC News>
<BCC News>
24 Kbps
24 Kbps24 Kbps
24 Kbps
Playing
Note:
::
:Not support REC function for those radio stations in World Station

27
4.3 SHOUTCast
System requirements: Recommend broadband internet connection (xDSL/Cable
Modem). However, Internet Radio does not support PPPoE(ADSL) or ISP Proxy
(cable modem). We strongly recommend connecting with a broadband router to
have better quality of audio streaming.
4.3.1 Listen to SHOUTCast
˙Go to[Main] menu, choose and press「SELECT/OK」button.
˙Choose [World Station] and then press「SELECT/OK」button.
˙Scroll up/down to a station and then press「SELECT/OK」button to play.
˙You will hear music after buffering reaches to 100%.
Note 1:
::
:For fast search for an internet radio, press「
「「
「」
」」
」button to jump from radio
stations started with alphabet A to alphabet B, alphabet B to alphabet C, and
so on. Press「
「「
「」
」」
」button to jump backward.
Note 2:
::
:Press「
「「
「INFO」
」」
」to know the total amount of internet radio stations in a specific
category and which one you are browsing.
4.4 Add/ Delete a Radio Station
NOTE:The maximum radio station can be memorized is 20.
˙Roll to your favorite radio station that you want to add into FAVORITE.
˙Hold「SELECT/OK」button for 2 seconds and the rolling bar will blink twice.
˙The radio station you have chosen will add into your FAVORITE after blinking
stops.
˙You can add a station into FAVORITE by pressing「MEMORY」when playing
˙SMBB will inform you If a station you try to add into FAVORITE exists already.
˙It may consume more than 1 storage space if the information of a radio station is
extensive.
28
Table 4.4
World Station
World StationWorld Station
World Station
BCC News Radio
BCC News RadioBCC News Radio
BCC News Radio
BCC Classical
BCC ClassicalBCC Classical
BCC Classical
BCC Pop
BCC PopBCC Pop
BCC Pop
Press「SELECT / OK」or「MEMORY」for 2 sec.
→
→→
→
World Station
World StationWorld Station
World Station
BC
BCBC
BCC News Radio
C News RadioC News Radio
C News Radio
BCC Classical
BCC ClassicalBCC Classical
BCC Classical
BCC Pop
BCC PopBCC Pop
BCC Pop
Rolling bar blinks twice
Favorite
FavoriteFavorite
Favorite
BCC News Radio
BCC News RadioBCC News Radio
BCC News Radio
Adding a station into FAVORITE
→
→→
→
Favorite
FavoriteFavorite
Favorite
BCC News Radio
BCC News RadioBCC News Radio
BCC News Radio
Hold「SELECT/OK」2 seconds for deleting a station
Delete Favorite
Delete FavoriteDelete Favorite
Delete Favorite
Delete t
Delete tDelete t
Delete this station?
his station?his station?
his station?
Confirm
Favorite
FavoriteFavorite
Favorite
Choose「Yes」then press「SELECT/OK」to delete
4.5 Access to Live365
System requirements: Recommend broadband internet connection (xDSL/Cable
Modem). However, Internet Radio does not support PPPoE(ADSL) or ISP Proxy
(cable modem). We strongly recommend connecting with a broadband router to
have better quality of audio streaming.
˙Access the web page http://www.live365.com by PC.
˙Sign up for a free membership or pay for a VIP membership.
4.5.1 Listen to Live365
1. Choose「SETUP」
2. Roll to [Live365 Account], and press「SELECT/OK」button
3. Key in Live365 Account and Password
4. Save and Exit
29
Setting
SettingSetting
Setting
Live365
Live365Live365
Live365
>
>>
>
Load INI
Load INILoad INI
Load INI
>
>>
>
Information
InformationInformation
Information
>
>>
>
Press SETUP and choose Live365
→
→→
→
Live365 Login
Live365 LoginLive365 Login
Live365 Login
Account
AccountAccount
Account
>
>>
>
Password
PasswordPassword
Password
>
>>
>
Input Account and Password
˙Go to [Main] menu , choose and press「SELECT/OK」button.
˙Roll to [Live365], and press「SELECT/OK」button.
˙Choose your favorite radio station , and then press「SELECT/OK」button.
˙You will hear music after buffering reaches to 100%.
Recommend
RecommendRecommend
Recommend
Whisperings
WhisperingsWhisperings
Whisperings
KKJZ 89.1 FM
KKJZ 89.1 FMKKJZ 89.1 FM
KKJZ 89.1 FM
ROCKLAND USA :Popro
ROCKLAND USA :PoproROCKLAND USA :Popro
ROCKLAND USA :Popro
Choose a radio station and press「SELECT/OK」
→
→→
→
i.Radio
i.Radioi.Radio
i.Radio
Buffering 80%
Buffering 80%Buffering 80%
Buffering 80%
Buffering
i.Radio
i.Radioi.Radio
i.Radio
Whispering
WhisperingWhispering
Whispering
<Phil Collins> <Can
<Phil Collins> <Can<Phil Collins> <Can
<Phil Collins> <Can’t Stop Lo
t Stop Lot Stop Lo
t Stop Lo
CD 128Kbps
CD 128KbpsCD 128Kbps
CD 128Kbps
Music Playing
4.6 Add/Delete A Radio Station in/from Live365
NOTE: Once you add or delete a radio station from Live365 in your unit,
it will also change your favorite stations that have been stored in
Live365 online web site.
˙Move the rolling bar on the radio station you want to add.
˙Hold「SELECT/OK」for 2 seconds, the rolling bar will blink twice.
˙The radio station you have chosen will add into your FAVORITE .

30
Table 4.6
Recommend
RecommendRecommend
Recommend
Whisperings
WhisperingsWhisperings
Whisperings
KKJZ 89.1 FM
KKJZ 89.1 FMKKJZ 89.1 FM
KKJZ 89.1 FM
RO
RORO
ROCKLAND USA :Popro
CKLAND USA :PoproCKLAND USA :Popro
CKLAND USA :Popro
Press「SELECT / OK」or「MEMORY」for 2 sec.
→
→→
→
Recommend
RecommendRecommend
Recommend
Whisperings
WhisperingsWhisperings
Whisperings
KKJZ 89.1 FM
KKJZ 89.1 FMKKJZ 89.1 FM
KKJZ 89.1 FM
ROCKLAND USA :Popro
ROCKLAND USA :PoproROCKLAND USA :Popro
ROCKLAND USA :Popro
Blink Twice
Favorite
FavoriteFavorite
Favorite
Whisperings
WhisperingsWhisperings
Whisperings
Add the radio station into FAVORITE. For Deleting, please check (4.4 How to add/delete a radio station)
4.7 Internet Radio Recording
NOTE: The recording quality depends on the broadcast quality of the internet
radio station.
4.7.1 Both USB and SD/MMC Storage Media are Ready
1. Scroll up/down to a station and then press「SELECT/OK」button to play.
2. Press「REC」button to record.
3. If both USB Disk and SD/MMC Card are detected, scroll up/down to
select a storage medium where you want to store recording files, then press
「SELECT/OK」to start recording.
4. icon will show on the topside of the screen when recording.
5. Press「STOP/ESC」to stop recording.
4.7.2 Only One Storage Medium is Ready
1. Scroll up/down to a station and then press「SELECT/OK」button to play.
2. Press「REC」button to record.
3. icon will show on the topside of the screen when recording.
4. Press「STOP/ESC」to stop recording

31
Table 4.7.2
i.Radio
i.Radioi.Radio
i.Radio
Whispering
WhisperingWhispering
Whispering
<Phil Collins> <Can
<Phil Collins> <Can<Phil Collins> <Can
<Phil Collins> <Can’t Stop Lo
t Stop Lot Stop Lo
t Stop Lo
64 Kbps
64 Kbps64 Kbps
64 Kbps
Press「REC」to record.
→
→→
→
i.Radio
i.Radioi.Radio
i.Radio
Whispering
WhisperingWhispering
Whispering
<Phil Collins> <Ca
<Phil Collins> <Ca<Phil Collins> <Ca
<Phil Collins> <Ca
64 Kbps
64 Kbps 64 Kbps
64 Kbps
Save as
Save as Save as
Save as
USB
USBUSB
USB
SD/MMC
SD/MMCSD/MMC
SD/MMC
Select one storage medium.
or
i.Radio
i.Radioi.Radio
i.Radio
Whispering
WhisperingWhispering
Whispering
<Phil Collins> <Can
<Phil Collins> <Can<Phil Collins> <Can
<Phil Collins> <Can’t Stop Lo
t Stop Lot Stop Lo
t Stop Lo
Press「REC」to record.
→
→→
→
i.Radio
i.Radioi.Radio
i.Radio
<Phi
<Phi<Phi
<Phi
p Lo
p Lop Lo
p Lo
Preparing to Rip
Preparing to RipPreparing to Rip
Preparing to Rip
Checking free space on the disk.
i.Radio
i.Radioi.Radio
i.Radio
Whispering
WhisperingWhispering
Whispering
<Phil Collins> <Can
<Phil Collins> <Can<Phil Collins> <Can
<Phil Collins> <Can’t Stop Lo
t Stop Lot Stop Lo
t Stop Lo
Recording
32
Chapter 5 USB/iPod
5.1 Playing Songs on the USB Disk
1. Insert an USB Disk with MP3/WMA audio files to USB port.
2. icon will show on the topside of the screen when USB is detected.
3. Select icon from the main menu and then press「SELECT/OK」 button
to enter USB function.
4. Scroll up/down to a song, folder or [ All], then press「PLAY」button to play.
5. Select marked songs or folders: Press「MEMORY」button to make a check
mark , then press「PLAY」button to play these marked songs.
Table 5.1
USB
USBUSB
USB
All
All All
All
Phil Collin
Phil Collin Phil Collin
Phil Collins
ss
s
Do You Remember
Do You Remember Do You Remember
Do You Remember
Press「PLAY」button
or
USB
USBUSB
USB
All
All All
All
Phil Collins
Phil Collins Phil Collins
Phil Collins
Do You Remember
Do You Remember Do You Remember
Do You Remember
Press「MEMORY」to make a check mark , then
press「PLAY」to play.
001/012
001/012 001/012
001/012
Can
CanCan
Can’t Stop Loving You
t Stop Loving Yout Stop Loving You
t Stop Loving You
Phil Collins
Phil CollinsPhil Collins
Phil Collins
*** Love Songs: A Compilation
*** Love Songs: A Compilation*** Love Songs: A Compilation
*** Love Songs: A Compilation
02
0202
02:
::
:30
3030
30
04
0404
04:
::
:30
3030
30
Playing
5.2 Apple iPod Support
NOTE: iPod firmware version 2006/3/23 and 2006/6/28 are recommended:
˙
˙˙
˙2006/3/23
˙
˙˙
˙2006/6/28
33
5.2.1 Supported iPod Models
iPod IPod Firmware
USB DOCK
iPod 3G 2006/6/28
2006/3/23 iPod List OK Audio Out Only
iPod Shuffle
2006/6/28
2006/3/23 iPod List OK N/A
iPod nano
2006/6/28
2006/3/23 iPod List OK
Menu , Play/Pause , Arrow up , Arrow Down , SELECT ,
PREV/FR , NEXT/FF
IPod nano 2
Ver 1.1.2 iPod List OK Menu , Play/Pause , Arrow up , Arr
ow Down , SELECT ,
PREV/FR , NEXT/FF
iPod Video
2006/6/28
2006/3/23 iPod List OK
Menu , Play/Pause , Arrow up , Arrow Down , SELECT ,
PREV/FR , NEXT/FF
5.2.2 Supported iTunes Versions
iTunes 6.0.5.20 or higher
5.3 Playing Songs on Apple iPod
1. Connect Apple iPod and Smart Boombox with an USB cable.
2. icon will show on the topside of the screen when USB is detected.
3. Select icon and then press 「SELECT/OK」to enter USB function.
4. Scroll up/down to a song, then press 「PLAY」or 「SELECT/OK」button to
play.
Table 5.3
USB
USBUSB
USB
Select [USB], then press SELECT to enter.
→
USB
USBUSB
USB
All Songs
All SongsAll Songs
All Songs
>
>>
>
Artists
ArtistsArtists
Artists
>
>>
>
Albums
AlbumsAlbums
Albums
>
>>
>
Browse songs by songs, artists or albums.
34
Chapter 6 SD/MMC
6.1 Playing Songs on the SD/MMC Card
1. Insert a SD/MMC card with MP3/WMA audio files into the SD/MMC slot.
2. icon will show on the topside of the screen when SD/MMC is detected.
3. Select icon from the main menu and then press「SELECT/OK」 button
to enter SD/MMC function.
4. Scroll up/down to a song, folder or, [ All] then press「PLAY」button to play.
5. Select marked songs or folders: Press「MEMORY」button to make a check
mark , then press「PLAY」button to play these marked songs.
Table 6.1
SD/MMC
SD/MMCSD/MMC
SD/MMC
All
All All
All
Phil Collins
Phil Collins Phil Collins
Phil Collins
Do You Remember
Do You Remember Do You Remember
Do You Remember
Press「PLAY」to play
→
SD/MMC
SD/MMCSD/MMC
SD/MMC
All
All All
All
Phil Collins
Phil Collins Phil Collins
Phil Collins
Do You Remember
Do You Remember Do You Remember
Do You Remember
Press「MEMORY」to make a check mark , then
press「PLAY」to play.
001/012
001/012 001/012
001/012
Can
CanCan
Can’t Stop Loving You
t Stop Loving Yout Stop Loving You
t Stop Loving You
Phil Collins
Phil CollinsPhil Collins
Phil Collins
*** Love Songs: A Compilation
*** Love Songs: A Compilation*** Love Songs: A Compilation
*** Love Songs: A Compilation
02
0202
02:
::
:30
3030
30
04
0404
04:
::
:30
3030
30
Playing
35
Chapter 7 FM Radio
7.1 Listening to FM Radio
1. Select icon and then press「SELECT/OK」button to enter FM function.
2. Press「SETUP」button to switch the tuner to FM radio.
Table 7.1
FM
FMFM
FM
Press「SELECT/OK」
→
FM
FM FM
FM
90.10 MHz
90.10 MHz90.10 MHz
90.10 MHz
FM Radio
7.2 Tuning the FM Frequency
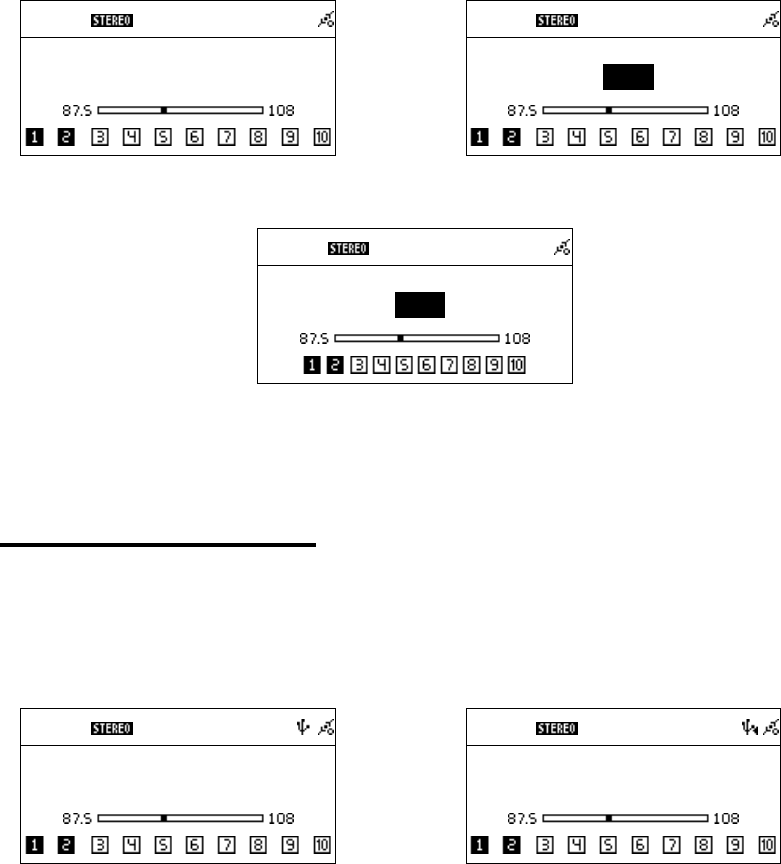
● Press「」button to decrease 0.05MHz (Europe).
● Press「」button to add 0.05MHz (Europe).
Autoscan mode will be activated when holding「」button for 3 seconds and
release「」button (from 87.5MHz to 108MHz increasingly). Holding「」
button for 3 seconds and release「」button will autoscan frequency from
108MHz to 87.5MHz decreasingly)
Table 7.2
FM
FM FM
FM
90.10 MHz
90.10 MHz90.10 MHz
90.10 MHz
Pressor to adjust frequency
→
FM
FM FM
FM
90.
90.90.
90.15
1515
15 MHz
MHz MHz
MHz
Increase/decrease 0.05MHz per step
36
7.3 Prescanning All Active FM Radio Stations
1. Go to [FM], press and hold「SELECT/OK」until “Pre-Scan” shows on the
screen.
2. Release「SELECT/OK」button and start scanning all active radio stations.
3. Press「PLAY」to listen to the radio stations that have been found by
prescanning
4. You can also excusive Pre-Scanning by press「Prescan」 button on your
remote control.
5. Please see 7.5 presetting a favorite station to add your favorite radio stations.
Table 7.3
FM
FM FM
FM
90.10 MHz
90.10 MHz90.10 MHz
90.10 MHz
Pre
PrePre
Pre-
--
-Scan
ScanScan
Scan
Press and hold「SELECT/OK」until
“Pre-Scan” shows on the screen
→
FM
FM FM
FM
87.50 MHz
87.50 MHz87.50 MHz
87.50 MHz
Pre
PrePre
Pre-
--
-Scanning
Scanning Scanning
Scanning …
Release「SELECT/OK」
button to start scanning all
active radio stations from 87.5MHz.
1
FM
FM FM
FM
8
88
89
99
9.30 MHz
.30 MHz.30 MHz
.30 MHz
Pre
PrePre
Pre-
--
-Scanning
Scanning Scanning
Scanning …
Finding an available radio station
→
1
FM
FM FM
FM
92.10 MHz
92.10 MHz92.10 MHz
92.10 MHz
Pre
PrePre
Pre-
--
-Scanning
Scanning Scanning
Scanning …
Finding an available radio station
1
FM
FM FM
FM
108.00 MHz
108.00 MHz108.00 MHz
108.00 MHz
Pre
PrePre
Pre-
--
-Scanning Completed
Scanning CompletedScanning Completed
Scanning Completed
Prescanning completed
→
1
FM
FM FM
FM
90.10 MHz
90.10 MHz90.10 MHz
90.10 MHz
Press「PLAY」to liste
n to the radio stations that have
been found by prescanning
37
7.4 Presetting a Favorite Station
1. System supports 10 preset channels. Press「MEMORY」button to preset the
listening station. CH1 icon will flash on the screen.
2. Press Left or Right button to switch the channel number, then press
「SELECT/OK」to confirm it.
˙Press number [1] button for 3 seconds on your remote control will add a radio
station into preset station channel (press number [0] button for 3 seconds will
add a station into preset channel ).
..
.
Table 7.4
FM
FM FM
FM
90.10 MHz
90.10 MHz90.10 MHz
90.10 MHz
Press Left / Right to find a frequency you
want to store
→
FM
FM FM
FM
9
99
92
22
2.
..
.10
1010
10 MHz
MHz MHz
MHz
Preset
PresetPreset
Preset
Press「SELECT/OK」button and then “Preset” will
show up
FM
FM FM
FM
9
99
92
22
2.
..
.10
1010
10 MHz
MHz MHz
MHz
CH1
CH1 CH1
CH1
CH1 icon will flash on the screen.
→
1
FM
FM FM
FM
9
99
92
22
2.
..
.10
1010
10 MHz
MHz MHz
MHz
CH2
CH2 CH2
CH2
Press orto find a channel, and press
「SELECT/OK」button to store
7.5 Listening to a Preset Station
˙Press UP/DOWN to select a channel
˙Under FM mode, press number key [1]-[0] on your remote control will play the
stations in your preset channel 1-10.
38
Table 7.5
FM
FM FM
FM
87.50 MHz
87.50 MHz87.50 MHz
87.50 MHz
Radio Playing
→
FM
FM FM
FM
89.10
89.1089.10
89.10 MHz
MHz MHz
MHz
CH1
CH1 CH1
CH1
Press「Up/Down」to call
1
FM
FM FM
FM
MHz
MHz MHz
MHz
CH3
CH3 CH3
CH3
You haven’t preset a frequency for this channel yet
7.6 Ripping From FM
˙Press「REC」when listening FM
Table 7.6
FM
FM FM
FM
90.10 MHz
90.10 MHz90.10 MHz
90.10 MHz
Press Left/Right to adjust frequency
→
FM
FM FM
FM
90.
90.90.
90.10
1010
10 MHz
MHz MHz
MHz
Press「REC」to record
39
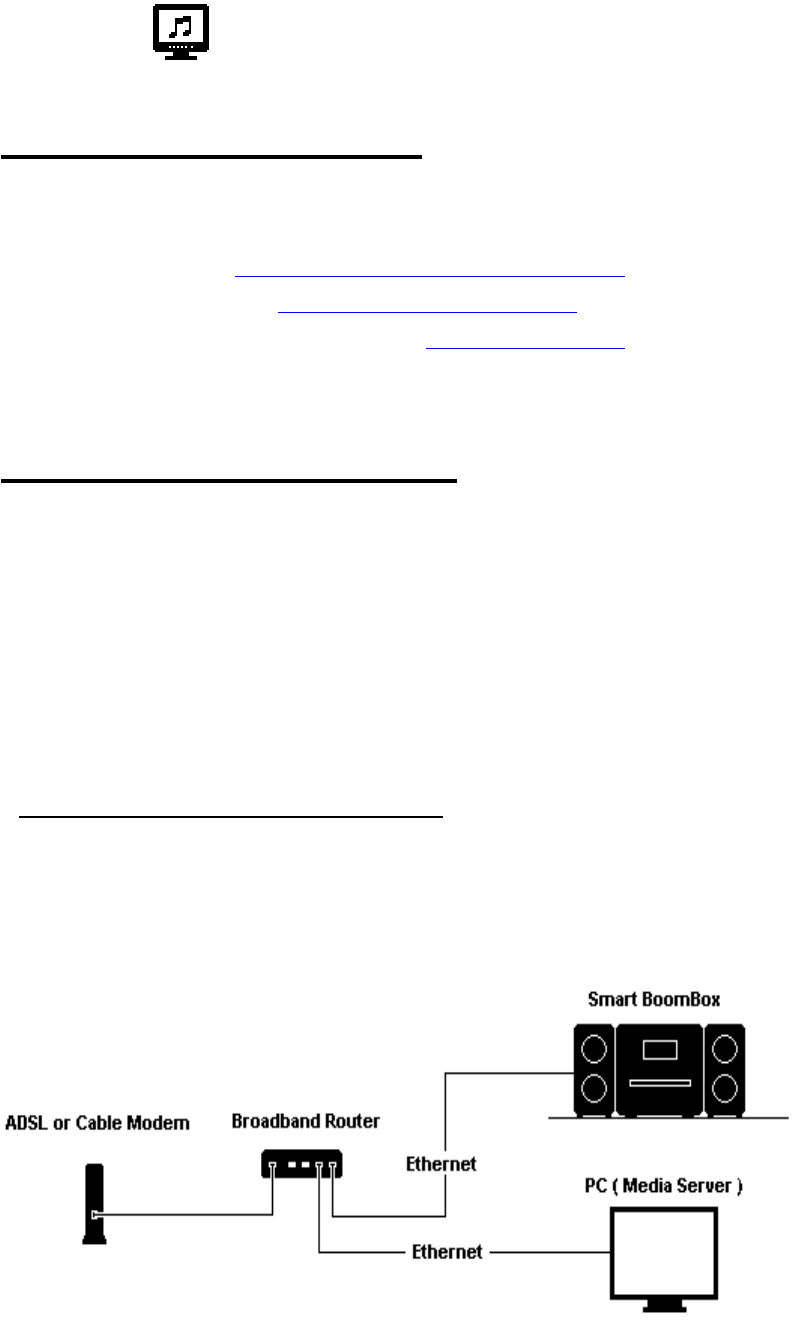
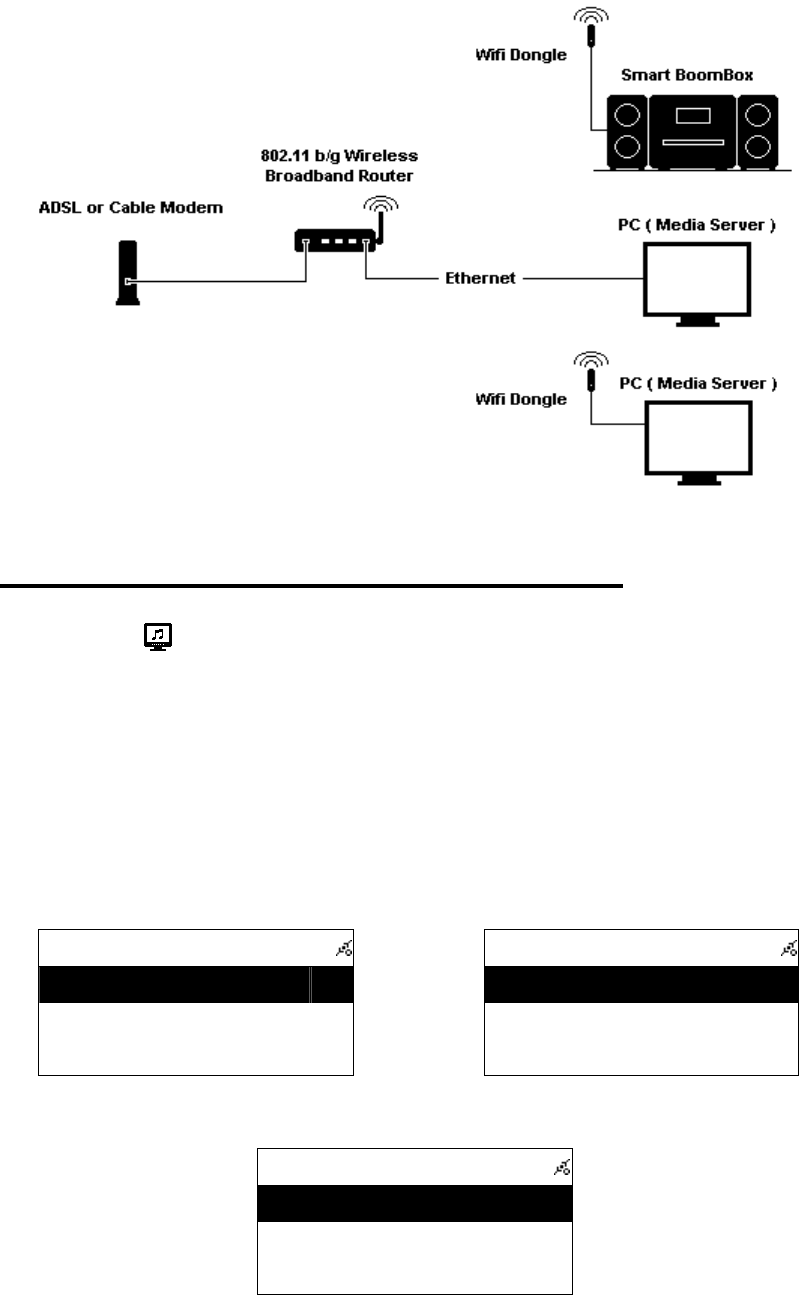
Chapter 8 Media Server
8.1 Supported Media Server
˙WMP11(Windows Media Player 11) (Windows XP SP2 / Vista Premium 32
Bits)
˙Rhapsody URL:http://www.rhapsody.com/welcome.html
˙TwonkyMedia URL:http://www.twonkyvision.com/
˙MediaTumb (Linux Platform) URL:http://mediatomb.cc/
NOTE: To making TwonkyMedia works normally, ID3v2 must be edited.
8.2 Setting Upnp Environment
NOTE:
˙Before you use your PC as a media server, make sure your PC (or the media
serve you try to connect) has WMP11 (Windows Media Player 11) installed.
Each media server has to have its WMP11 installed.
˙Usually, the default of your PC firewall is to block not necessary connection.
Make sure Upnp function is enabled on your PC(media server).
˙Disable Proxy function.
8.2.1 UPnP Networked Environment Diagram
˙Please connect UPnP Media Server on the same local
LAN, and make sure the network setting is correct.
˙The UPnP networked environment diagram is as follows.
40
or
8.3 Playing Songs on UPnP Media Server
1. Select icon from the main menu and then press 「SELECT/OK」 button
to enter Media Server function.
2. Enter [Browse] to select one of all available media servers.
3. Scroll up/down to [All songs], [Artists], [Albums], [Genres] or other items,
then press「SELECT/OK」button to enter.
4. Scroll up/down to a song or folder, then press「PLAY」button to play.
Table 8.3
Main
MainMain
Main
Browse
BrowseBrowse
Browse
>
>>
>
Press「SELECT/OK」to browse a media server
or
Servers
ServersServers
Servers
Windows Media Connect ( Penbex
Windows Media Connect ( PenbexWindows Media Connect ( Penbex
Windows Media Connect ( Penbex
Intel AV Media Server (Lianban
Intel AV Media Server (LianbanIntel AV Media Server (Lianban
Intel AV Media Server (Lianban
MediaTomb
MediaTombMediaTomb
MediaTomb
Select one server, then press [SELECT/OK]
UPNP
UPNPUPNP
UPNP
All Image Items
All Image Items All Image Items
All Image Items
>
>>
>
All Audio Items
All Audio ItemsAll Audio Items
All Audio Items
>
>>
>
All Video Items
All Video ItemsAll Video Items
All Video Items
>
>>
>
Select a song or folder, then press「PLAY」to play.
41
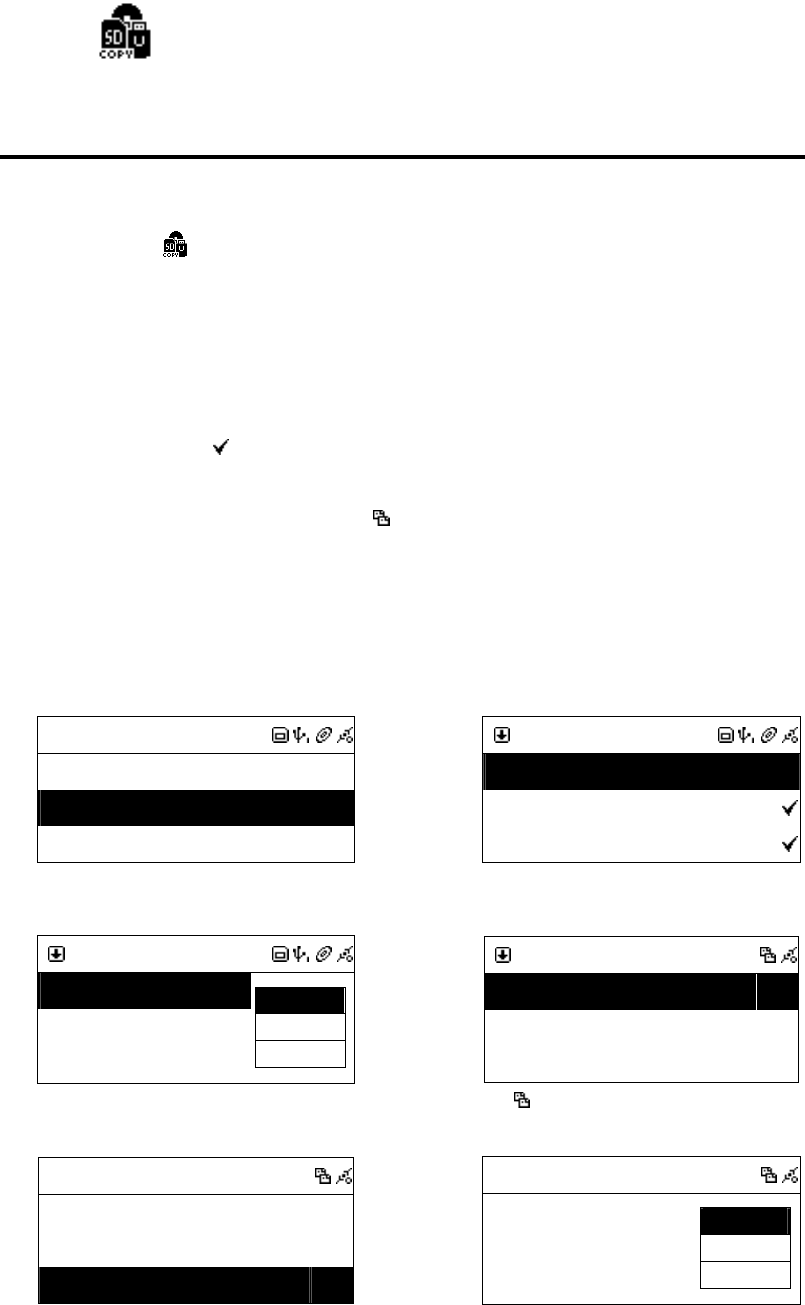
Chapter 9 File Manager
9.1 Copy/Move Files to an USB Disk or SD/MMC Card
1. Insert a CD-ROM, USB disk or SD/MMC card.
2. Select icon from the main menu, then press「SELECT/OK」button to
enter File Manager function.
3. Scroll up/down to [CD], [USB] or [SD/MMC], then press「SELECT/OK」
button to enter.
4. Scroll up/down to a file or folder, then press「MEMORY」button to make a
check mark
5. Press 「REC」button to select [Copy] or [Move], then press
「SELECT/OK」 button.. icon will show on the screen.
6. Select a target directory.
7. Press「REC」button to select [Paste], then press「SELECT/OK」button to
paste.
Table 9.1
FileMgr
FileMgrFileMgr
FileMgr
CD
CDCD
CD
>
>>
>
USB
USBUSB
USB
>
>>
>
SD/MMC
SD/MMCSD/MMC
SD/MMC
>
>>
>
Select [USB], then press「SELECT/OK」
or
FileMg
FileMgFileMg
FileMgr
rr
r
All
AllAll
All
Recording
Recording Recording
Recording
Readme.txt
Readme.txt Readme.txt
Readme.txt
Select a file or folder, then press 「MEMORY」.
FileMgr
FileMgrFileMgr
FileMgr
All
AllAll
All
Recording
Recording Recording
Recording
Readme.txt
Readme.txt Readme.txt
Readme.txt
Copy
CopyCopy
Copy
Move
MoveMove
Move
Del
DelDel
Del
Press「REC」, then select a function.
FileMgr
FileMgrFileMgr
FileMgr
CD
CDCD
CD
>
>>
>
USB
USBUSB
USB
>
>>
>
SD/MMC
SD/MMCSD/MMC
SD/MMC
>
>>
>
icon will show on the screen.
FileMgr
FileMgrFileMgr
FileMgr
CD
CDCD
CD
>
>>
>
USB
USBUSB
USB
>
>>
>
SD/MMC
SD/MMCSD/MMC
SD/MMC
>
>>
>
Select a target directory.
1
FileMgr
FileMgrFileMgr
FileMgr
No files
No files No files
No files
Paste
PastePaste
Paste
Cancel
CancelCancel
Cancel
Press「REC」again to paste.
42
FileMgr
FileMgrFileMgr
FileMgr
USB To SD
USB To SDUSB To SD
USB To SD:
::
:1/1
1/11/1
1/1
Copying 25%
Copying 25%Copying 25%
Copying 25%
Copying files
FileMgr
FileMgrFileMgr
FileMgr
USB To SD
USB To SDUSB To SD
USB To SD:
::
:1/1
1/11/1
1/1
Successful !
Successful !Successful !
Successful !
It is successful to finish copying.
9.2 Copy/Move Files to iPod
1. Select icon from the main menu, then press「SELECT/OK」button to
enter File Manager function.
2. Select [SD/MMC] function and then press「SELECT/OK」button.
3. Scroll up/down to a MP3 file or folder, then press「MEMORY」 button to
make a check mark .
4. Press「REC」 button to select [Copy] or [Move], then press
「SELECT/OK」 button. icon will show on the screen.
5. Select [iPod], then press「SELECT/OK」button.
6. Select [Yes] and then press「SELECT/OK」button to paste.
7. After finishing, iPod will be updated.
NOTE: System only supports audio files with MP3 format.
Table 9.2
FileMgr
FileMgrFileMgr
FileMgr
CD
CDCD
CD
>
>>
>
iPod
iPodiPod
iPod
>
>>
>
SD/MMC
SD/MMCSD/MMC
SD/MMC
>
>>
>
Select SD/MMC
or
FileMgr
FileMgrFileMgr
FileMgr
All
AllAll
All
Recording
Recording Recording
Recording
Hello.mp3
Hello.mp3 Hello.mp3
Hello.mp3
Select a file or folder, then press「MEMORY」
FileMgr
FileMgrFileMgr
FileMgr
All
AllAll
All
Recording
Recording Recording
Recording
Hello.mp3
Hello.mp3 Hello.mp3
Hello.mp3
Copy
CopyCopy
Copy
Move
MoveMove
Move
Del
DelDel
Del
Press「REC」, then select a function.
FileMgr
FileMgrFileMgr
FileMgr
CD
CDCD
CD
>
>>
>
iPod
iPodiPod
iPod
>
>>
>
SD/MMC
SD/MMCSD/MMC
SD/MMC
>
>>
>
icon will show on the screen.
43
FileMgr
FileMgrFileMgr
FileMgr
CD
CDCD
CD
>
>>
>
iPod
iPodiPod
iPod
>
>>
>
SD/MMC
SD/MMCSD/MMC
SD/MMC
>
>>
>
Select iPod
FileMgr
FileMgrFileMgr
FileMgr
iPod Disk
iPod DiskiPod Disk
iPod Disk
Add MP3 to iPod ?
Add MP3 to iPod ?Add MP3 to iPod ?
Add MP3 to iPod ?
Select YES and ready to copy/move
FileMgr
FileMgrFileMgr
FileMgr
SD To iPod
SD To iPodSD To iPod
SD To iPod:
::
:1
11
1
Copying MP3 25%
Copying MP3 25%Copying MP3 25%
Copying MP3 25%
Copying Files
FileMgr
FileMgrFileMgr
FileMgr
Updating iPod
Updating iPod Updating iPod
Updating iPod
Successful !
Successful !Successful !
Successful !
It is successful to finish copying.
44
Chapter 10 AUX
10.1 AUX Mode
1. Select icon from the main menu, press「SELECT/OK」button to enter.
2. AUX will appear on the screen. Plug in audio source and start playing.
3. In AUX mode, Volume and Equalizer are adjustable.
Table 10.1
AUX
AUXAUX
AUX
Select [AUX] and press「SELECT/OK」
→
AUX
AUXAUX
AUX
A U X
A U XA U X
A U X
Enter AUX Mode
AUX
AUXAUX
AUX
A U X
A U XA U X
A U X
In AUX mode, volume and P-EQ are adjustable
1
AUX
AUX AUX
AUX
A U X
A U XA U X
A U X
Adjusting EQ
10.2 Recording in AUX Mode
System can play different audio sources (such as MP3 Player, Discman.)
1. Select icon from the main menu, press「SELECT/OK」button to enter.
2. AUX will appear on the screen. Plug in audio source and start playing.
3. Press「REC」to start recording.
4. Press「STOP/ESC」to quit
45
Table 10.2
AUX
AUXAUX
AUX
A U X
A U XA U X
A U X
Enter AUX mode
→
AUX
AUXAUX
AUX
A U X
A U XA U X
A U X
Preparing to Rip
Preparing to RipPreparing to Rip
Preparing to Rip…
Press「REC」to start recording
1
AUX
AUXAUX
AUX
A U X
A U XA U X
A U X
The recording quality depends on the qual
ity
of your audio source.
1
AUX
AUXAUX
AUX
A U X
A U XA U X
A U X
Saving to SD/MMC
Saving to SD/MMC Saving to SD/MMC
Saving to SD/MMC …
Press「ESC」to stop recording
46
Chapter 11 Setup
11.1 Date & Time
˙Support NTP (network time protocol), and auto-sync time via internet at 12:00
am/pm everyday and every time when pressing POWER button to turn on or
off..
˙Support manual date & time settings.
˙Support DST & Time Zone settings
Table 11.1
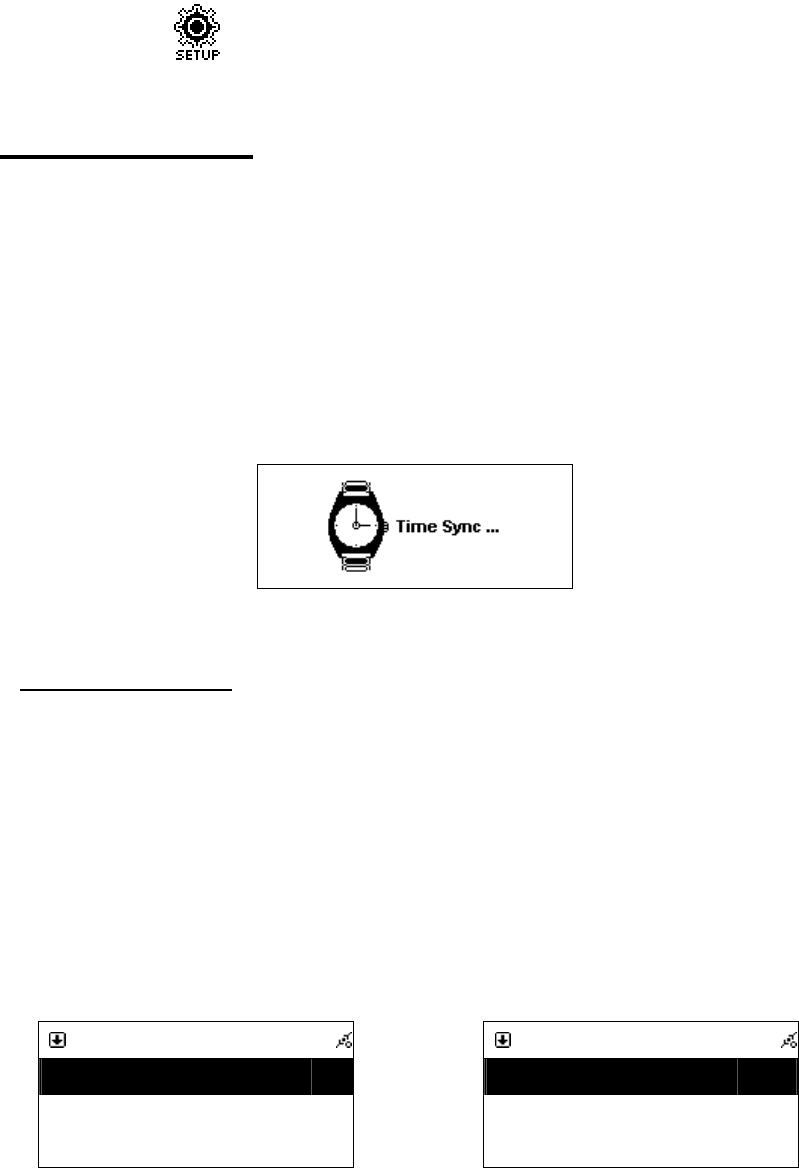
The Time Sync function will auto-run when turn on/off and 12:00 am/pm everyday.
11.1.1 Setting the Date
˙Press「SETUP」button, then scroll up/down to [Date & Time] and press
「SELECT/OK」button.
˙The default [TimeSync] is Yes.
˙To change the year, month, and day, scrolling up/down and press
「SELECT/OK」button to confirm.
˙After finish setting, then press「STOP/ESC」button to save and exit.
Table 11.1.1
Setting
SettingSetting
Setting
Date & Time
Date & TimeDate & Time
Date & Time
>
>>
>
Alarm
AlarmAlarm
Alarm
>
>>
>
Sleep
SleepSleep
Sleep
>
>>
>
Select [Date & Time], and press「SELECT/OK」
→
Date & Time
Date & TimeDate & Time
Date & Time
TimeSync
TimeSyncTimeSync
TimeSync
Yes
YesYes
Yes
Date
DateDate
Date
>
>>
>
Time
TimeTime
Time
>
>>
>
The default TimeSync is Yes
47
Date & Time
Date & TimeDate & Time
Date & Time
TimeSync
TimeSyncTimeSync
TimeSync
Yes
YesYes
Yes
Date
DateDate
Date
>
>>
>
Time
TimeTime
Time
>
>>
>
Scroll to [Date] and press「SELECT/OK」
→
Date
DateDate
Date
2006 09 07
2006 09 072006 09 07
2006 09 07
Scroll Up / Down to adjust the year, month, and day
Date & Time
Date & TimeDate & Time
Date & Time
TimeSync
TimeSyncTimeSync
TimeSync
Yes
YesYes
Yes
Date
DateDate
Date
>
>>
>
Time
TimeTime
Time
>
>>
>
After finishing, the changes will be saved
11.1.2 Setting the Time
˙Press「SETUP」button, then scroll up/down to [Date & Time] and press
「SELECT/OK」button to enter [Time] submenu.
˙The default [TimeSync] is Yes.
˙To change the hours and minutes, scrolling up/down and press「SELECT/OK」
button to confirm.
˙After finish setting, then press「STOP/ESC」button to exit and save.
Table 11.1.2
Setting
SettingSetting
Setting
Date & Time
Date & TimeDate & Time
Date & Time
>
>>
>
Alarm
AlarmAlarm
Alarm
>
>>
>
Sleep
SleepSleep
Sleep
>
>>
>
Select [Date & Time], and press「SELECT/OK」
→
Date & Time
Date & TimeDate & Time
Date & Time
TimeSync
TimeSyncTimeSync
TimeSync
Yes
YesYes
Yes
Date
DateDate
Date
>
>>
>
Time
TimeTime
Time
>
>>
>
The default TimeSync is Yes
Date & Time
Date & TimeDate & Time
Date & Time
TimeSync
TimeSyncTimeSync
TimeSync
Yes
YesYes
Yes
Date
DateDate
Date
>
>>
>
Time
TimeTime
Time
>
>>
>
Scroll to [Time] and press「SELECT/OK」
→
Date
DateDate
Date
13
13 13
13 :
::
: 41
41 41
41 :
::
: 23
23 23
23
Scroll Up / Down to adjust the hours and minutes
48
Date & Time
Date & TimeDate & Time
Date & Time
TimeSync
TimeSyncTimeSync
TimeSync
Yes
YesYes
Yes
Date
DateDate
Date
>
>>
>
Time
TimeTime
Time
>
>>
>
After finishing, the changes will be saved
11.1.3 Setting the Time formation
˙Press「SETUP」button, then scroll up/down to [Date & Time] and press
「SELECT/OK」button to enter [Time Format] submenu.
˙Press「SELECT/OK」button to choose to 12-hour or 24-hour.
˙After finish setting, then press「STOP/ESC」button to exit and save.
Table 11.1.3
Setting
SettingSetting
Setting
Date & Time
Date & TimeDate & Time
Date & Time
>
>>
>
Alarm
AlarmAlarm
Alarm
>
>>
>
Play Mode
Play ModePlay Mode
Play Mode
Normal
NormalNormal
Normal
Select [Date & Time], and press「SELECT/OK」
→
Date & Time
Date & TimeDate & Time
Date & Time
Date
DateDate
Date
>
>>
>
Time
TimeTime
Time
>
>>
>
Time Format
Time FormatTime Format
Time Format
24
2424
24
Choose [Time Format] to change
Date & Time
Date & TimeDate & Time
Date & Time
D
DD
Date
ateate
ate
>
>>
>
Time
TimeTime
Time
>
>>
>
Time Format
Time FormatTime Format
Time Format
12
1212
12
Press「SELECT/OK」to confirm
11.2 Alarm
˙Support two alarm clock settings.
˙Support Daily alarm clock.
˙Support different alarm-clock sound (Beep / i.Radio / USB / SD/MMC / FM).
11.2.1 Setting the Alarm
1. Press 「SETUP」button, then scroll up/down to [Alarm] and press
「SELECT/OK」button to enter
2. Press [Use Alarm 1] submenu and press
「SELECT/OK」button to activate the
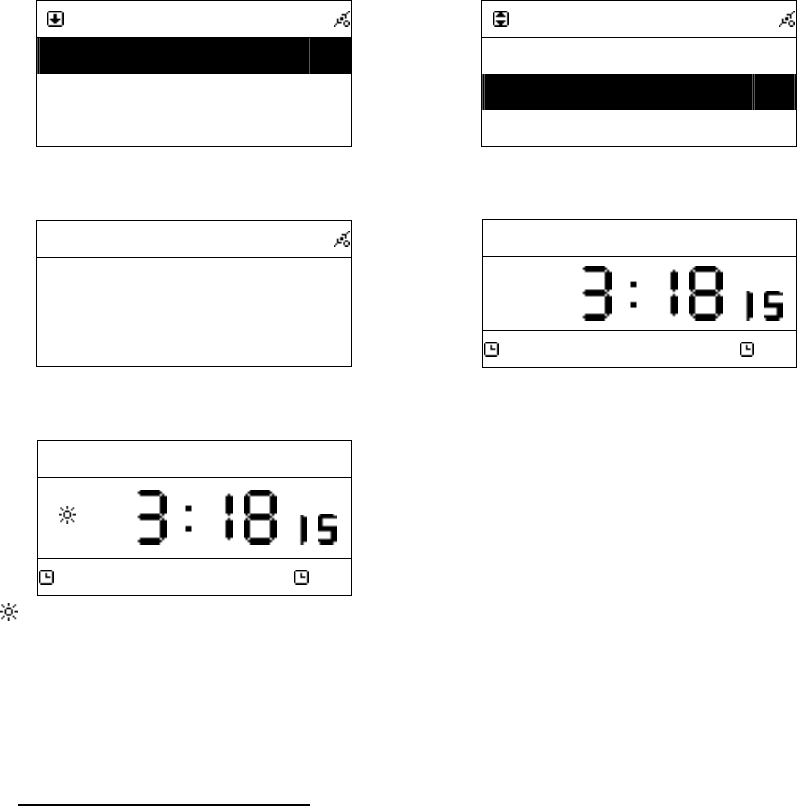
49
alarm. The default [Use Alarm 1] is Yes.
3. Scroll to [Set Alarm 1] to set the alarm clock.
4. Press「SELECT/OK」button to confirm.
Table 11.2.1
Alarm
AlarmAlarm
Alarm
Use Alarm 1
Use Alarm 1Use Alarm 1
Use Alarm 1
YES
YESYES
YES
Set Alarm 1
Set Alarm 1Set Alarm 1
Set Alarm 1
>
>>
>
Use Alarm 2
Use Alarm 2Use Alarm 2
Use Alarm 2
No
NoNo
No
The default [Use Alarm 1] is Yes.
→
Alarm
AlarmAlarm
Alarm
Use Alarm 1
Use Alarm 1Use Alarm 1
Use Alarm 1
YES
YESYES
YES
Set Alarm 1
Set Alarm 1Set Alarm 1
Set Alarm 1
>
>>
>
Use Alarm 2
Use Alarm 2Use Alarm 2
Use Alarm 2
No
NoNo
No
Scroll to [Set Alarm 1] to set the alarm clock
Alarm 1
Alarm 1Alarm 1
Alarm 1
1
11
14
4 4
4 :
::
: 54 : 00
54 : 00 54 : 00
54 : 00
Scroll Up / Down to adjust the hours and minutes
2007
20072007
2007-
--
-May
MayMay
May-
--
-03 Thu..
03 Thu..03 Thu..
03 Thu..
PM
PMPM
PM
PM 6:00
PM 6:00PM 6:00
PM 6:00 off
offoff
off
After finishing, the changes will be saved
1
2007
20072007
2007-
--
-May
MayMay
May-
--
-03 Thu..
03 Thu..03 Thu..
03 Thu..
PM
PMPM
PM
PM 6:00
PM 6:00PM 6:00
PM 6:00 off
offoff
off
will show if DST (Day Saving Time) is chosen
Note:
::
:Some models can activate/disarm alarms by press Alarm 1/Alarm 2 button when the
system in Stand By mode.
11.2.2 Setting the Alarm Sound
1. Press「SETUP」and scroll up/down to [Alarm] and press「SELECT/OK」.
2. Scroll down to [Alarm Source] and then press「SELECT/OK」button to enter.
3. Press UP/DOWN button to determine an alarm sound, and then press
「SELECT/OK」button to confirm.

50
Table 11.2.2
Alarm Source
Alarm SourceAlarm Source
Alarm Source
Beep
BeepBeep
Beep
CD
CDCD
CD
Internet Radio
Internet RadioInternet Radio
Internet Radio
Scroll UP/DOWN button to determine an alarm sound, and then press「SELECT/OK」button to confirm
NOTE:
˙If the alarm sound is unset or not ready, “Beep” will be the default alarm sound.
˙The alarm goes off with the sound source in the standby mode when time is up.
˙The default alarm source of i.Radio is the first radio station under the
FAVORITE file.
11.2.3 Disarming the Alarm
˙When alarm time is up in the “Stand-By Alarm” Mode. The screen will be
highlighted and the alarm source will be played.
˙Press「Stand By」, or「STOP/ESC」, or「Alarm」to disarm alarm.
˙You can press any key to disarm the alarm in normal mode.
Table 11.2.3
2007
20072007
2007-
--
-May
MayMay
May-
--
-03 Wed.
03 Wed.03 Wed.
03 Wed.
PM
PMPM
PM
PM 3:20
PM 3:20PM 3:20
PM 3:20 off
offoff
off
STAND BY Mode
→
Alarm
AlarmAlarm
Alarm
PM
PMPM
PM
PM 3:20
PM 3:20PM 3:20
PM 3:20 off
offoff
off
When alarm time is up, the screen will be highlighted
Alarm
AlarmAlarm
Alarm
PM
PMPM
PM
PM 3:20
PM 3:20PM 3:20
PM 3:20 off
offoff
off
When alarm time is up, the screen will be
highlighted
Snooze
SnoozeSnooze
Snooze
PM
PMPM
PM
PM 3:20
PM 3:20PM 3:20
PM 3:20 off
offoff
off
if Snooze function is activated, press [Snooze] to
enter SNOOZE mode
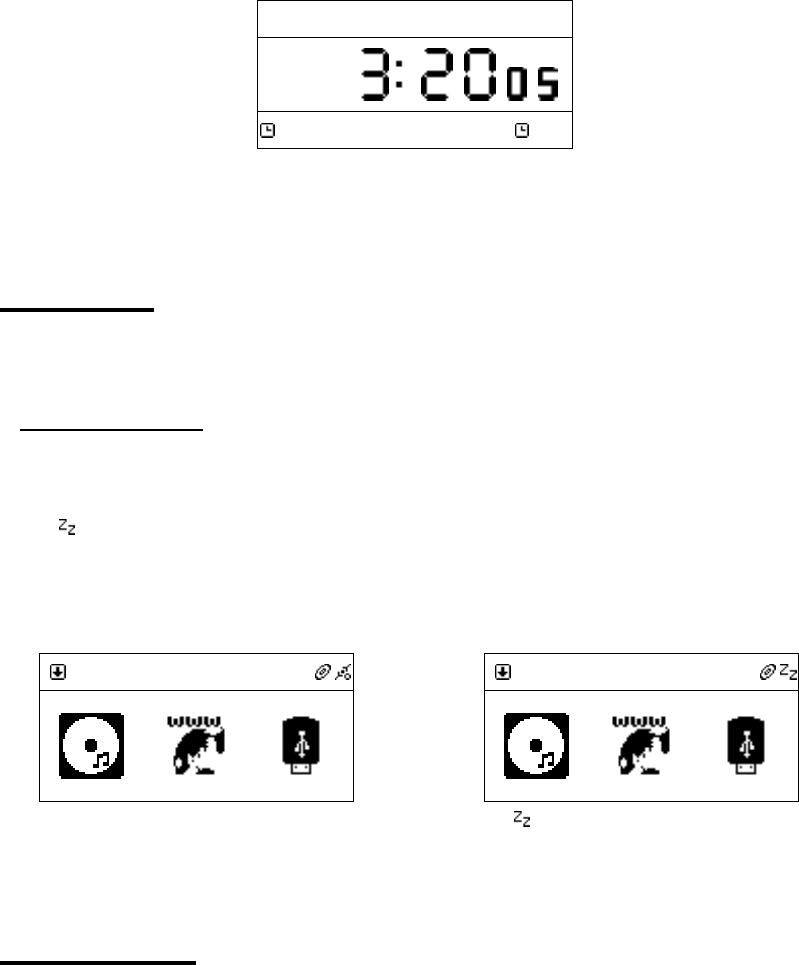
51
1
2007
20072007
2007-
--
-May
MayMay
May-
--
-03 Thu..
03 Thu..03 Thu..
03 Thu..
PM
PMPM
PM
PM 3:20
PM 3:20PM 3:20
PM 3:20 off
offoff
off
Press [STAND BY] or [STOP/ESC] to disarm the alarm
11.3 Sleep
˙Sleep mode is able to be turned ON/OFF.
11.3.1 SLEEP Mode
˙Press 「SLEEP」 button to switch sleep timer to 5 min, 10 min, 15 min, 20 min
or 30 min.
˙ icon will show on the top side of the screen when the sleep timer is on.
Table 11.3.1
CD
CDCD
CD
Press「SLEEP」to set sleep timer.
→
CD
CDCD
CD
icon will show on the screen.
11.4 Network
˙Support LAN (Ethernet) and WLAN (802.11b/g wifi Dongle is optional)
˙Support Wi-Fi Encryption WEP64/128 and WPA-PSK
˙Support dynamic IP via DHCP (Dynamic Host Configuration Protocol) and static
IP. Default setting is Ethernet and DHCP.
˙Support Upnp.
˙Auto-detect and auto-run LAN or WLAN(wireless LAN) environment.
52
11.4.1 Understanding the Networking States on Smart Boombox
˙The network connectivity status icon will show on the top side of the screen.
Table 11.4.1.1 - LAN Status
Title
TitleTitle
Title
→
˙● It is failed to detect the Ethernet cable.
Title
TitleTitle
Title
→
● It is successful to detect the Ethernet cable.
● It is failed to get available DHCP information.
Title
TitleTitle
Title
→
● It is successful to detect the Ethernet cable.
● It is successful to get available DHCP information
Table 11.4.1.2 - WLAN Status
Title
TitleTitle
Title
→
● It is failed to detect the USB Wi-Fi adapter.
Title
TitleTitle
Title
→
● It is successful to detect the USB Wi-Fi adapter.
● It is successful to get available DHCP information.
˙Wifi Dongle is in green mode.
Title
TitleTitle
Title
→
● It is successful to detect the USB Wi-Fi adapter.
● It is failed to get available DHCP information.
Title
TitleTitle
Title
→
● It is successful to detect the USB Wi-Fi adapter.
● It is successful to get available DHCP information.
Table 11.4.1.3 - WLAN Signal Status
Title
TitleTitle
Title
→
˙Signal strength received from AP is under 20%
Title
TitleTitle
Title
→
● Signal strength received from AP is between
20% - 59%.
Title
TitleTitle
Title
→
˙Signal strength received from AP is between
60% - 79%.
53
Title
TitleTitle
Title
→
˙Signal strength received from AP is above
80%.
NOTE:Single strength above 70% is considered as a good single source.
11.4.2 Setting the Wi-Fi Connectivity
1. Insert a Wi-Fi USB adapter into the USB connector. (The Wi-Fi USB adapter
is optional)
2. Press「SETUP」button, then scroll up/down to [Network] and press
「SELECT/OK」button.
3. Select [Connect] and switch [LAN] to [WLAN].
4. Press「STOP/ESC」button to quit Wizard.
5. Scroll up/down to [Wireless] and then press「SELECT/OK」button to enter.
6. Scroll up/down to [Site Survey], [Connect Mode], [SSID] or [Encryption],
then press「SELECT/OK」button to enter.
7. Press UP/DOWN and「SELECT/OK」button to set each necessary item.
8. icon will show on the topside of the screen when the wireless setting is
successful.
Table 11.4.2
Network
NetworkNetwork
Network
Connect
ConnectConnect
Connect
LAN
LANLAN
LAN
IP Setting
IP SettingIP Setting
IP Setting
>
>>
>
Use Proxy
Use ProxyUse Proxy
Use Proxy
No
NoNo
No
Select [Connect] and switch [LAN] to [WLAN].
→
Network
NetworkNetwork
Network
Wizard
WizardWizard
Wizard
>
>>
>
IP Setting
IP SettingIP Setting
IP Setting
>
>>
>
Wireless
WirelessWireless
Wireless
>
>>
>
[Wireless] item will appear on the screen.
Wireless
WirelessWireless
Wireless
SSID
SSIDSSID
SSID
>
>>
>
Encryption
EncryptionEncryption
Encryption
>
>>
>
Site Survey
Site SurveySite Survey
Site Survey
>
>>
>
Set each necessary Wi-Fi setting item.
→
Wireless
WirelessWireless
Wireless
SSID
SSIDSSID
SSID
>
>>
>
Encryption
EncryptionEncryption
Encryption
>
>>
>
Sit
SitSit
Site Survey
e Surveye Survey
e Survey
>
>>
>
will show when the setting is successful.
11.4.3 Setting the Wi-Fi Connectivity by Wi-Fi Wizard
1. Insert a Wi-Fi USB adapter into the USB connector. (The Wi-Fi USB adapter
is optional).
2. Press「SETUP」button, then scroll up/down to [Network] and press
54
「SELECT/OK」button.
3. Select [Connect] and switch [LAN] to [WLAN].
4. Select [Wizard] and then press「SELECT/OK」button to enter.
5. Scroll up/down to an Access Point and then press「SELECT/OK」button.
6. If the Access Point is protected with an encryption key, press「SELECT/OK」
button, then press UP/DOWN/LEFT/RIGHT button to input the key to access
the Access Point.
7. icon will show on the topside of the screen when the wireless setting is
successful.
Table 11.4.3
Network
NetworkNetwork
Network
Connect
ConnectConnect
Connect
LAN
LANLAN
LAN
IP Setting
IP SettingIP Setting
IP Setting
>
>>
>
Use Proxy
Use ProxyUse Proxy
Use Proxy
No
NoNo
No
Select [Connect] and switch [LAN] to [WLAN].
→
Network
NetworkNetwork
Network
Connect(any~)
Connect(any~)Connect(any~)
Connect(any~)
WLAN
WLANWLAN
WLAN
Wizard
WizardWizard
Wizard
>
>>
>
IP Setting
IP SettingIP Setting
IP Setting
>
>>
>
Select [Wizard] and press [SELECT/OK] button
Wizard
WizardWizard
Wizard
ap01
ap01ap01
ap01
61%
61%61%
61%
D
DD
D-
--
-LINK
LINKLINK
LINK
85%
85%85%
85%
default
defaultdefault
default
21%
21%21%
21%
Enter [Wizard], then all available AP and i
ts signal
strength will be shown on the screen.
→
Wizard
WizardWizard
Wizard
>
>>
>
Use UP/DOWN (or number key) to input an
encryption key to access the AP if necessary.
After key-in the encryption key, press
「SELECT/OK」and press 「STOP/ESC」to exit
Wizard
WizardWizard
Wizard
Proofing the encryption key…
Network
NetworkNetwork
Network
Connect(ap01)
Connect(ap01)Connect(ap01)
Connect(ap01)
WLAN
WLANWLAN
WLAN
IP Setting
IP SettingIP Setting
IP Setting
>
>>
>
Wireless
WirelessWireless
Wireless
>
>>
>
will show when the setting is successful.
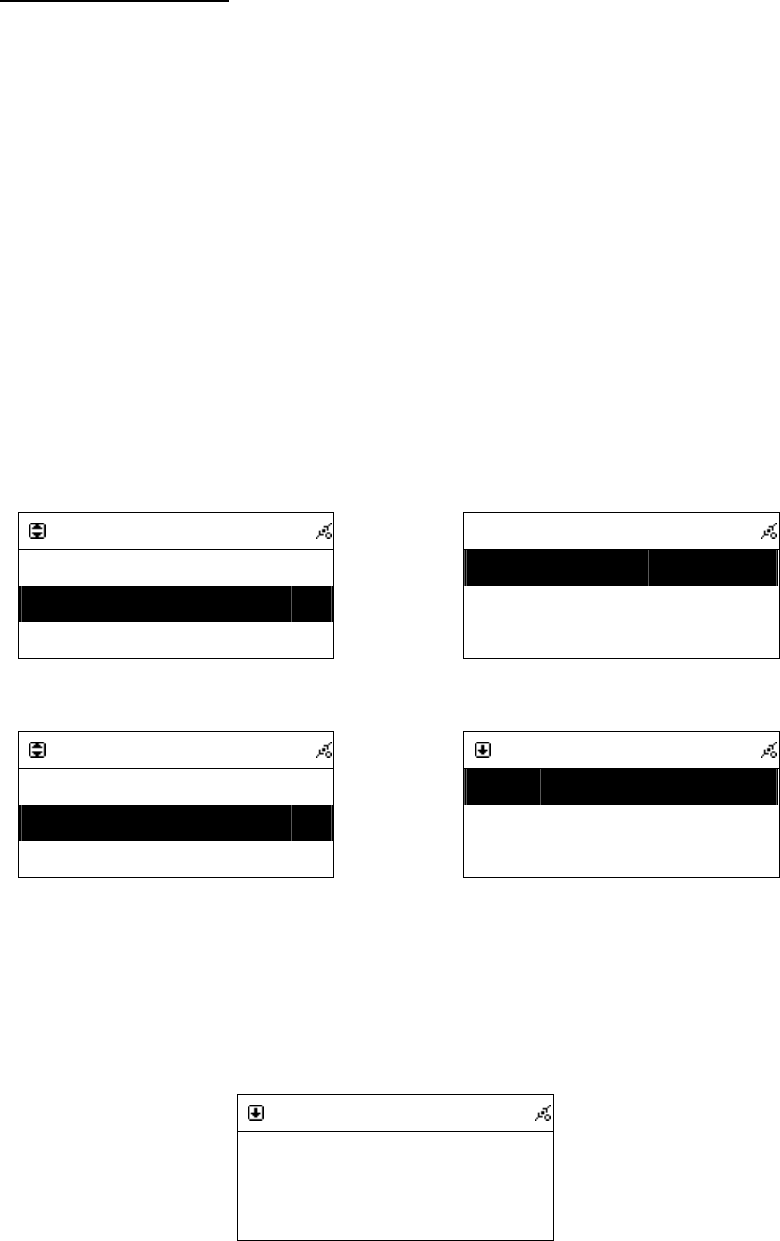
55
11.4.4 Inputting Static IP
1. Press「SETUP」button, then scroll up/down to [Network] and press
「SELECT/OK」button.
2. Scroll up/down to [IP Setting] and then press「SELECT/OK」button to enter.
3. Select [IP Source] and press「SELECT/OK」button to switch [Dynamic] to
[Static].
4. Scroll up/down to [TCP/IP] and then press「SELECT/OK」 button to start
editing..
5. Press UP/DOWN button to change characters, then press LEFT/RIGHT button
to shift.
6. After finishing, press「REC」button to confirm.
Table 11.4.4
Network
NetworkNetwork
Network
Connect
ConnectConnect
Connect
LAN
LANLAN
LAN
IP Setting
IP SettingIP Setting
IP Setting
>
>>
>
Use Proxy
Use ProxyUse Proxy
Use Proxy
No
NoNo
No
Select [IP Setting], then press「SELECT./OK」
→
IP Setting
IP SettingIP Setting
IP Setting
IP Source
IP SourceIP Source
IP Source
Dymanic
DymanicDymanic
Dymanic
Press「SELECT/OK」to switch [IP Source] to [Static]
IP Setting
IP SettingIP Setting
IP Setting
IP Source
IP SourceIP Source
IP Source
Static
StaticStatic
Static
TCP/IP
TCP/IPTCP/IP
TCP/IP
>
>>
>
DNS
DNSDNS
DNS
>
>>
>
Select [TCP/IP], then press「SELECT./OK」
→
TCP/IP
TCP/IPTCP/IP
TCP/IP
IP
IPIP
IP
192.169.001.100
192.169.001.100192.169.001.100
192.169.001.100
Mask
MaskMask
Mask
255.255.255.000
255.255.255.000255.255.255.000
255.255.255.000
GW
GWGW
GW
192.169.001.254
192.169.001.254192.169.001.254
192.169.001.254
Press UP/DOWN (or number key) then
LEFT/RIGHT to input IP.
NOTE:When IP setting value (including IP, Subnet Mask, or Gateway) is illegal,
IP setting will change to default value.
TCP/IP
TCP/IPTCP/IP
TCP/IP
The IP Setting Value is
The IP Setting Value isThe IP Setting Value is
The IP Setting Value is
illegal ! Setting is
illegal ! Setting isillegal ! Setting is
illegal ! Setting is
Changed to Default !
Changed to Default !Changed to Default !
Changed to Default !
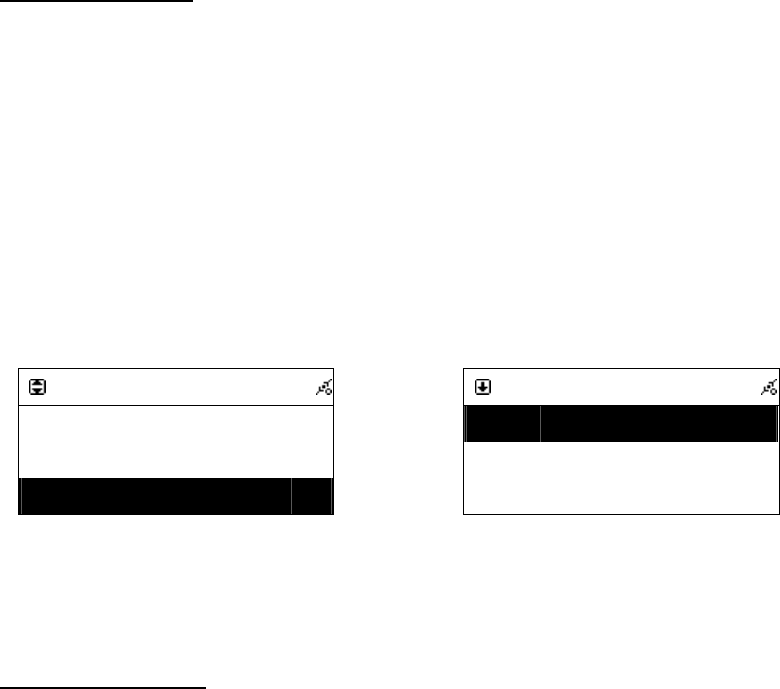
56
11.4.5 Inputting DNS
1. Press「SETUP」button, then scroll up/down to [Network] and press
「SELECT/OK」button.
2. Select [DNS] and then press「SELECT/OK」button.
3. Press UP/DOWN button to change characters, then press LEFT/RIGHT button
to shift.
4. After finishing, press「SELECT/OK」button to confirm.
Table 11.4.5
IP Setting
IP SettingIP Setting
IP Setting
IP Source
IP SourceIP Source
IP Source
Static
StaticStatic
Static
TCP/IP
TCP/IPTCP/IP
TCP/IP
>
>>
>
DNS
DNSDNS
DNS
>
>>
>
Select [DNS] and press「SELECT/OK」button
→
DNS
DNSDNS
DNS
DNS1
DNS1DNS1
DNS1
168.095.001.001
168.095.001.001168.095.001.001
168.095.001.001
DNS2
DNS2DNS2
DNS2
000.000.000.000
000.000.000.000000.000.000.000
000.000.000.000
Press UP/DOWN (or number key) then
LEFT/RIGHT to input IP
11.4.6 Inputting Proxy
1. Press「SETUP」button, then scroll up/down to [Network] and press
「SELECT/OK」button.
2. Scroll up/down to [Use Proxy] and then press「SELECT/OK」 button to
switch to [Yes].
3. Scroll up/down to [Proxy Server] and then press「SELECT/OK」 button to
input domain name or IP address.
4. Press「SELECT/OK」button, then press UP/DOWN button to change
characters, press LEFT/RIGHT button to shift.
5. After finishing, press「SELECT/OK」button to confirm.
6. Scroll up/down to [Proxy Port] and then press「SELECT/OK」button to input
port number.
7. Repeat the step 4~5.
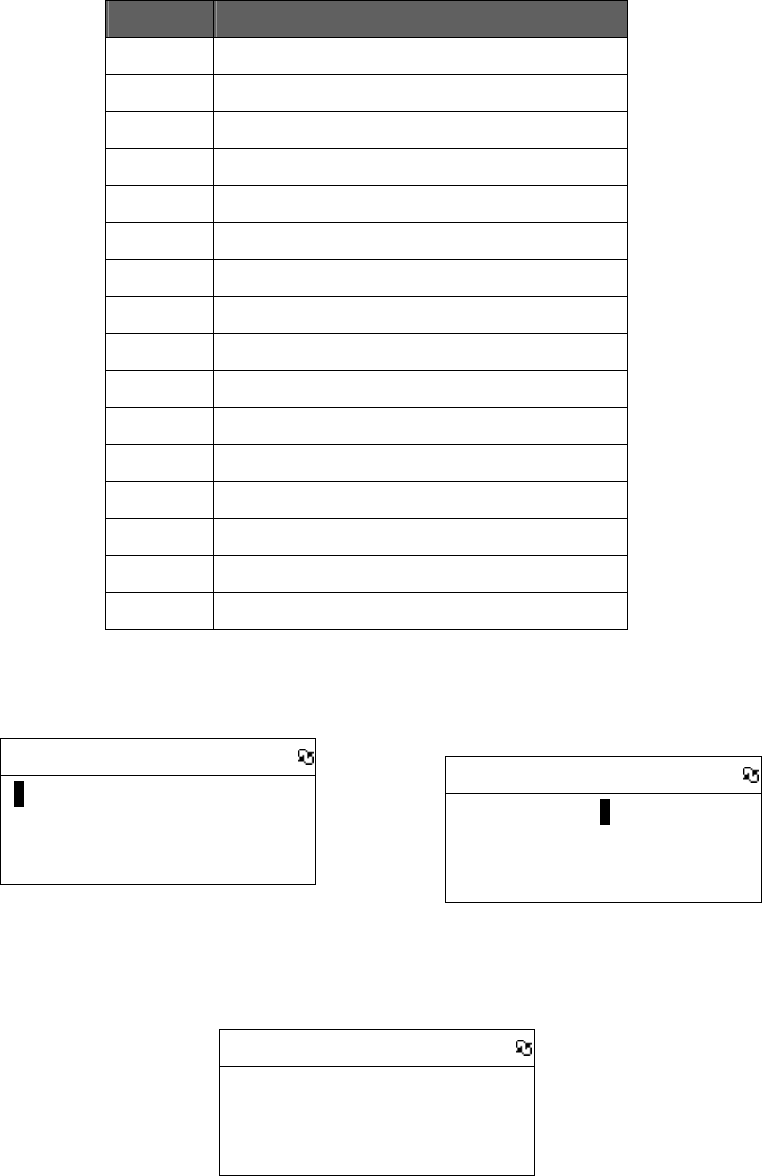
57
Table:Input Method
Key Description
OK / Select
End editing
STOP/ESC
Delete a character
Up Change character 0-9, a-z ,A-Z, symbol
DOWN Change character 0-9, a-z ,A-Z, symbol
LEFT Shift to left
RIGHT Shift to right
1 1./_!@# $ % ^ & * : ; ' " / \ ( ) [ ] { } space
2 2 abc ABC
3 3 def DEF
4 4 ehi EHI
5 5 jkl JKL
6 6 mno MNO
7 7 pqrs PQRS
8 8 tuv TUV
9 9 wxyz WXYZ
0 0
Table 11.4.6.1
Proxy Server
Proxy ServerProxy Server
Proxy Server
>
>>
>
Ready to Editing
→
Proxy Server
Proxy ServerProxy Server
Proxy Server
>pr
>pr>pr
>proxy.hinet.ne
oxy.hinet.neoxy.hinet.ne
oxy.hinet.net
tt
t
Press UP/DOWN (or number key) then
LEFT/RIGHT to input characters.
Proxy Server
Proxy ServerProxy Server
Proxy Server
>proxy.hinet.net
>proxy.hinet.net>proxy.hinet.net
>proxy.hinet.net
Press「SELECT/OK」to confirm

58
˙Select [Proxy Port] to input a proxy server port
Table:Input Method
Key Description
OK / Sele
ct
End editing
STOP/ESC
Delete a character
Up Change character 0-9
DOWN Change character 0-9
LEFT Shift to left
RIGHT Shift to right
1 1
2 2
3 3
4 4
5 5
6 6
7 7
8 8
9 9
0 0
Table 11.4.6.2
Proxy Port
Proxy PortProxy Port
Proxy Port
>
>>
>
Ready to Edit
→
Proxy
Proxy Proxy
Proxy Port
PortPort
Port
>808
>808>808
>8080
00
0
Press UP/DOWN (or number key) then
LEFT/RIGHT to input characters
Proxy Port
Proxy PortProxy Port
Proxy Port
>8080
>8080>8080
>8080
Press「SELECT/OK」to confirm
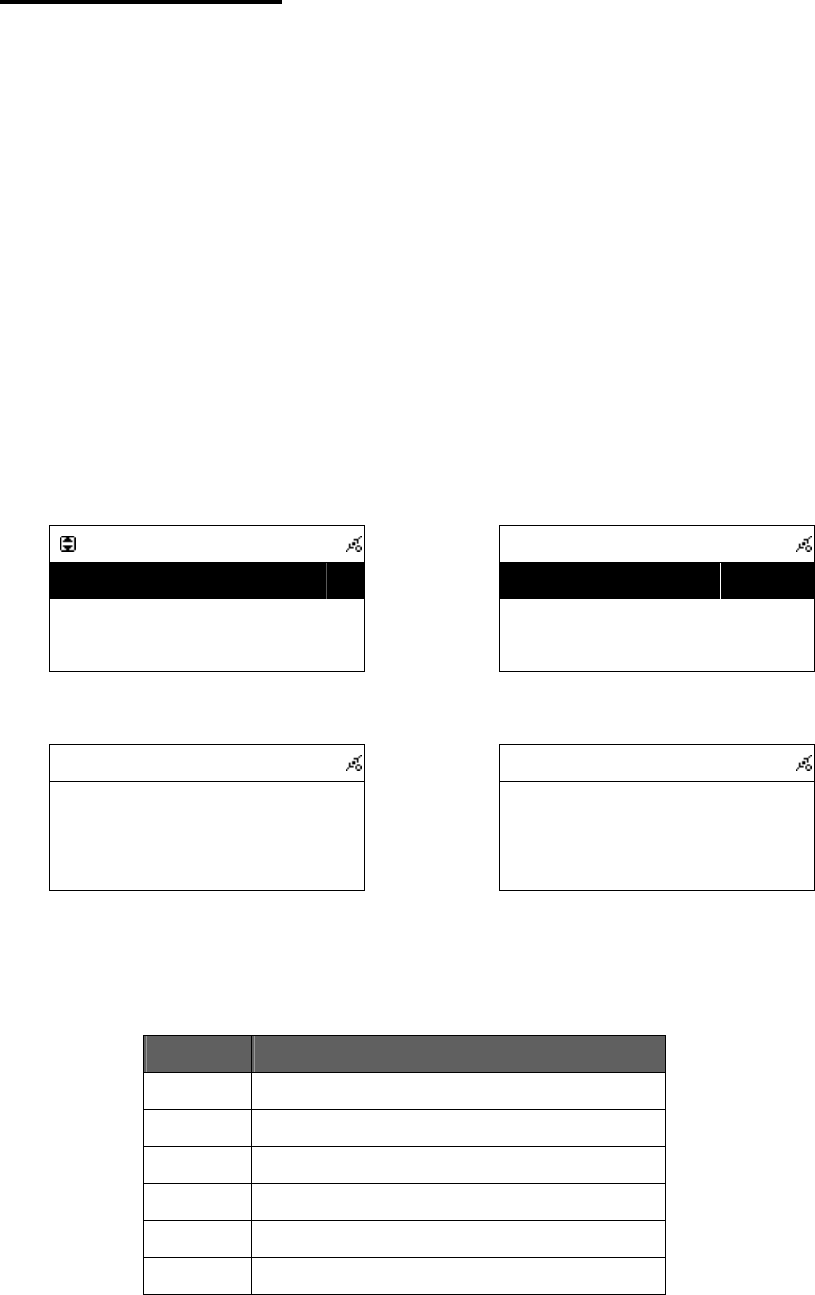
59
11.5 Live365 Login
1. Press「SETUP」button, then scroll up/down to [Live365] and press
「SELECT/OK」button.
2. Scroll up/down to [Account] and then press「SELECT/OK」button to input
username.
3. Press「SELECT/OK」button, then press UP/DOWN button to change
characters, press LEFT/ RIGHT button to shift.
4. After finishing, press「SELECT/OK」button to confirm, and then press
「STOP/ESC」button to quit.
5. Scroll up/down to [Password] and then press 「SELECT/OK」 button to
input password.
6. Repeat the step 3~4.
Table 11.5
Setting
SettingSetting
Setting
Live365
Live365Live365
Live365
>
>>
>
Information
InformationInformation
Information
>
>>
>
Reset all Settings
Reset all SettingsReset all Settings
Reset all Settings
>
>>
>
Select [Live365], then press「SELECT/OK」.
→
→→
→
Live365
Live365 Live365
Live365
Acco
AccoAcco
Account
untunt
unt
>
>>
>
Password
PasswordPassword
Password
>
>>
>
Select [Account] and [Password] to input info.
Account
AccountAccount
Account
>
>>
>
Press「SELECT/OK」, then press UP/DOWN to input.
or
Password
PasswordPassword
Password
>
>>
>
Press「SELECT/OK」, then press UP/DOWN to input
Table:Input Method
Key Description
OK / Select
End editing
STOP/ESC
Delete a character
Up Change character 0-9, a-z ,A-Z, symbol
DOWN Change character 0-9, a-z ,A-Z, symbol
LEFT Shift to left
RIGHT Shift to right

60
1 1./_!@# $ % ^ & * : ; ' " / \ ( ) [ ] { } space
2 2 abc ABC
3 3 def DEF
4 4 ehi EHI
5 5 jkl JKL
6 6 mno MNO
7 7 pqrs PQRS
8 8 tuv TUV
9 9 wxyz WXYZ
0 0
11.6 Information
● Display the firmware version and network information.
Example:
Model Name
Model NameModel Name
Model Name
Penbex Smart Boom Box
Penbex Smart Boom BoxPenbex Smart Boom Box
Penbex Smart Boom Box
Version
VersionVersion
Version
OS
OSOS
OS:
::
:xxxxxxxx
xxxxxxxxxxxxxxxx
xxxxxxxx
SW
SWSW
SW:
::
:xxxxxxxx . xxxx
xxxxxxxx . xxxxxxxxxxxx . xxxx
xxxxxxxx . xxxx
uP
uPuP
uP:
::
:XxX
XxXXxX
XxXX
XX
X
Network
NetworkNetwork
Network
IP Source
IP SourceIP Source
IP Source:
::
:DHCP
DHCPDHCP
DHCP
MAC
MACMAC
MAC:
::
:xxxxxxxxxxxx
xxxxxxxxxxxxxxxxxxxxxxxx
xxxxxxxxxxxx
IP
IPIP
IP:
::
:xxx.xxx.xxx.xxx
xxx.xxx.xxx.xxxxxx.xxx.xxx.xxx
xxx.xxx.xxx.xxx
SM
SMSM
SM:
::
:xxx.xxx.xxx.xxx
xxx.xxx.xxx.xxxxxx.xxx.xxx.xxx
xxx.xxx.xxx.xxx
GW
GWGW
GW:
::
:xxx.xxx.xxx.xxx
xxx.xxx.xxx.xxxxxx.xxx.xxx.xxx
xxx.xxx.xxx.xxx
Network Type
Network TypeNetwork Type
Network Type
SSID
SSIDSSID
SSID:
::
:xxx
xxxxxx
xxx
11.7 Language
˙Support 12 languages – English、German、Spanish、Portuguese、French、
61
Italian、Swedish、Finland、Dutch、Danish、Traditional Chinese. The default
language of the Smart Boombox is English.
Table 11.7
Setting
SettingSetting
Setting
Language
LanguageLanguage
Language
>
>>
>
Information
InformationInformation
Information
>
>>
>
Reset all Settings
Reset all SettingsReset all Settings
Reset all Settings
>
>>
>
Select「SETUP」and then choose「Language」
→
→→
→
Language
LanguageLanguage
Language
中文
中文中文
中文
English
EnglishEnglish
English
German
GermanGerman
German
Select language and press「SELECT/OK」button
11.8 Reset All Settings
● Reset all settings to factory default.
Warning :
All settings will be reset to factory default.
11.9 Firmware Upgrade
˙Support upgrade by using USB or SD/MMC
˙Support online upgrade
11.9.1 Upgrade firmware by using USB / SD/MMC
1. Get an accurate firmware version (please check your model number) from
manufactures. The firmware version file appears as .UPG file.
2. Copy the file [image.upg] to the root directory on a USB disk or SD/MMC
card.
3. Insert the USB disk or SD/MMC card into the USB connector or SD/MMC
slot.
4. Press 「SETUP」button, then scroll up/down to [Firmware Upgrade] and
press「SELECT/OK」button.
5. Scroll up/down to [Yes] and then press「SELECT/OK」button to upgrade.
6. Unit will restart automatically after finishing upgrade.
7. During upgrade, Do not switch off or press any function key, this will cause damage.
62
NOTE: It strongly recommends resetting all setting after upgraded.
Table 11.9.1
Setting
SettingSetting
Setting
Information
InformationInformation
Information
>
>>
>
Reset all Settings
Reset all SettingsReset all Settings
Reset all Settings
>
>>
>
Firmware Upgra
Firmware UpgraFirmware Upgra
Firmware Upgrade
dede
de
>
>>
>
Select [Firmware Upgrade], then press「SELECT/OK」
→
→→
→
Upgrade
UpgradeUpgrade
Upgrade
No
NoNo
No
Yes
YesYes
Yes
>
>>
>
Select [Yes] and press「SELECT/OK」to confirm
Upgrade
UpgradeUpgrade
Upgrade
Proofing
Proofing Proofing
Proofing …
Proofing the upgrade image file…
→
→→
→
Processing
Processing Processing
Processing …
Upgrading the firmware…
CD
CDCD
CD
The upgrade is complete.
11.9.2 On-line upgrade
1. Make sure the internet environment is ready
2. Press「SETUP」button, then scroll up/down to [Firmware Upgrade] and press
「SELECT/OK」button.
3. System will restart automatically after finishing upgrade.
4. Systrem must not be switched off or press any function key during the upgrade
procedure.
NOTE: It strongly recommends resetting all setting after upgraded.
Table 11.9.2
Setting
SettingSetting
Setting
Information
InformationInformation
Information
>
>>
>
Reset all Settings
Reset all SettingsReset all Settings
Reset all Settings
>
>>
>
Firmware Upgrade
Firmware UpgradeFirmware Upgrade
Firmware Upgrade
>
>>
>
Select [Firmware Upgrade], then press「SELECT/OK」
→
→→
→
Upgrade
UpgradeUpgrade
Upgrade
No
NoNo
No
Yes
YesYes
Yes
>
>>
>
Select [Yes] and press「SELECT/OK」to confirm
63
1
Upgrade
UpgradeUpgrade
Upgrade
No
NoNo
No
Yes
YesYes
Yes
Load
LoadLoad
Load
SD/MMC
SD/MMCSD/MMC
SD/MMC
Online
OnlineOnline
Online
Scroll Up/Down, select [Online], and press
「SELECT/OK」
1
Upgrade
UpgradeUpgrade
Upgrade
Checki
CheckiChecki
Checking Firmware
ng Firmware ng Firmware
ng Firmware …
Searching for updated firmware version
1
Upgrade
UpgradeUpgrade
Upgrade
SMBB_20070423_IMAGE_VER_1
SMBB_20070423_IMAGE_VER_1SMBB_20070423_IMAGE_VER_1
SMBB_20070423_IMAGE_VER_1
SMBB_20070425_IMAGE_VER_1
SMBB_20070425_IMAGE_VER_1SMBB_20070425_IMAGE_VER_1
SMBB_20070425_IMAGE_VER_1
Available version will show on the screen
→
→→
→
1
Upgrade
UpgradeUpgrade
Upgrade
Visible
VisibleVisible
Visible:
::
:01.00.00.00
01.00.00.0001.00.00.00
01.00.00.00
Upgrade To
Upgrade ToUpgrade To
Upgrade To:
::
:02.00.00.00
02.00.00.0002.00.00.00
02.00.00.00
Select [Yes] to confirm
1
Upgrade
UpgradeUpgrade
Upgrade
Downloading
Downloading Downloading
Downloading …
33 % Completed
33 % Completed33 % Completed
33 % Completed
>Press Cancel to Exit<
>Press Cancel to Exit<>Press Cancel to Exit<
>Press Cancel to Exit<
Downloading…press「ESC/STOP」to cancel download
Processing
Processing Processing
Processing …
Upgrading the firmware…
CD
CDCD
CD
The upgrade is complete.

64
Chapter 12 Trouble Shooting
12.1 FAQ
12.1.1 Recording
Q1:
::
:Why can’t I get CD information from Gracenote CDDB?
A1:
::
: ● Make sure the internet environment is ready.
● Make sure the network setting is available.
● Try to eject the disc and insert the disc again.
● The disc have no CD information on Gracenote Media Database.
● Data CD is not supported in this function.
Q2:
::
: Why can’t I record to the USB disk?
A2:
::
: ● Make sure the USB disk is ready.
● Make sure the USB disk have enough free space.
● Make sure the USB disk is not in write-protect mode.
Q3:
::
:Why can’t I record to the SD/MMC card?
A3:
::
: ● Make sure the SD/MMC card is ready.
● Make sure the SD/MMC card have enough free space.
● Make sure the SD/MMC card is not in write-protect mode.
12.1.2 Internet Radio
Q1:
::
:Why Connection Fails?
A1:
::
: ● Make sure the internet environment is ready.
● Make sure the network setting is available.
● Check if the radio station still exists.
● Check if the Proxy setting is correct.
Q2:
::
:Internet Radio freezes at Login …?
A2:
::
: ● Make sure the internet environment is ready.
● Make sure the network setting is available.
Q3:
::
:Internet Radio freezes Getting Station …?
A3:
::
: ● Make sure the internet environment is ready.
● Make sure the network setting is available.
65
Q4:
::
:There is a list of available radio station but I can not listen?
A4:
::
: ● Make sure the network setting is available.
● Make sure Firewall is disabled.
● Check if the Proxy setting is correct.
Q5:
::
:What is Data Process Err(4)
A5:
::
: ● Make sure Live365 account/password you input is correct.
Q6:
::
:What is No More Data?
A6:
::
: ● Make sure the network setting is available.
● Check if possible bandwidth limitation issue.