KENWIN KENWIN00005 Soundbar with Wireless Subwoofer User Manual HSB3280 F7 indd
KENWIN INDUSTRIAL (H.K.) LTD. Soundbar with Wireless Subwoofer HSB3280 F7 indd
KENWIN >
Users Manual

Designed for high performance audio in a very compact package
with simple and intuitive set up and daily control
POWER
KW-SB001

Contents
1 Important
Important safety instructions
3
3
5
5
5
6
7
7
8
8
8
9
10
10
12
12
7
2 Your Soundbar System
What’s in the box
Introduction
Overview of the main unit
Overview of the remote control
3 Get started
4 Appendix
5 Specification
Attach the stand
Mount to a wall
General
Connect AUDIO devices
Option 1: Connect this soundbar to
an external device
Option 2: Connect this soundbar to
the TV set
Activite wireless pairing
EN
3
5
8
7
6
6
6
To connect exteral components
Activate wireless pairing
General
Specification

1. Read these instructions – All the safety and operating instructions should be read
before this product is operated.
2. Keep these instructions – The safety and operating instructions should be
retained for future reference.
3. Heed all warnings – All warnings on the appliance and in the operating
instructions should be adhered to.
4. Follow all instructions – All operating and use instructions should be followed.
5. Do not use this apparatus near water – The appliance should not be used near
water or moisture – for example, in a wet basement or near a swimming pool, and
the like.
6. Clean only with dry cloth.
7. Do not block any ventilation openings. Install in accordance with the
manufacture’s instructions.
8. Do not install near any heat sources such as radiators, heat registers, stoves, or
other apparatus (including amplifiers) that produce heat.
9. Do not defeat the safety purpose of the polarized or grounding plug. A polarized
plug has two blades with one wider than the other. A grounding plug has two
blades and a third grounding prong. The wide blade or the third prong is provided
for your safety. If the provided plug does not fit into your outlet, consult an
electrician for replacement of the obsolete outlet.
10. Protect the power cord from being walked on or pinched particularly at the plugs,
convenience receptacles, and at the point where they exit from the apparatus.
11. Only use attachments/accessories specified by the manufacturer.
12. Use only with the cart, stand, tripod, bracket, or table specified by the
manufacturer, or sold with the apparatus. When a cart or rack is used, use caution
when moving the cart/apparatus combination to avoid injury from tip-over.
13. Unplug the apparatus during lightning storms or when unused for long periods of
time.
14. Refer all servicing to qualified personnel. Servicing is required when the
apparatus has been damaged in any way, such as power supply cord or plug is
damaged, liquid has been spilled or objects have fallen into the apparatus has
been exposed to rain or moisture, does not operate normally, or has been
dropped.
I
1 Important
Important safety instruction
EN-3

24. Caution: Danger of explosion if battery is incorrectly replaced. Replace only with the
same or equivalent type.
- Warning: Changes or modifications to this unit not expressly approved by the
party responsible for compliance could void the user’s authority to operate the
equipment.
NOTE: This equipment has been tested and found to comply with the limits for a
Class B digital device, pursuant to Part 15 of the FCC Rules. These limits are
designed to provide reasonable protection against harmful interference in a
residential installation. This equipment generates, uses and can radiate radio frequency
energy and, if not installed and used in accordance with the instructions, may cause
harmful interference to radio communications.
However, there is no guarantee that interference will not occur in a particular installation.
If this equipment does cause harmful interference to radio or television reception, which
can be determined by turning the equipment off and on, the user is encouraged to try to
correct the interference by one or more of the following measures:
� Reorient or relocate the receiving antenna.
� Increase the separation between the equipment and receiver.
� Connect the equipment into an outlet on a circuit different from that to which the
receiver is connected.
� Consult the dealer or an experienced radio/TV technician for help.
� “FCC RF Radiation Exposure Statement Caution: To maintain compliance with the
FCC’s RF exposure guidelines, place the product at least 20cm from nearby
persons.”
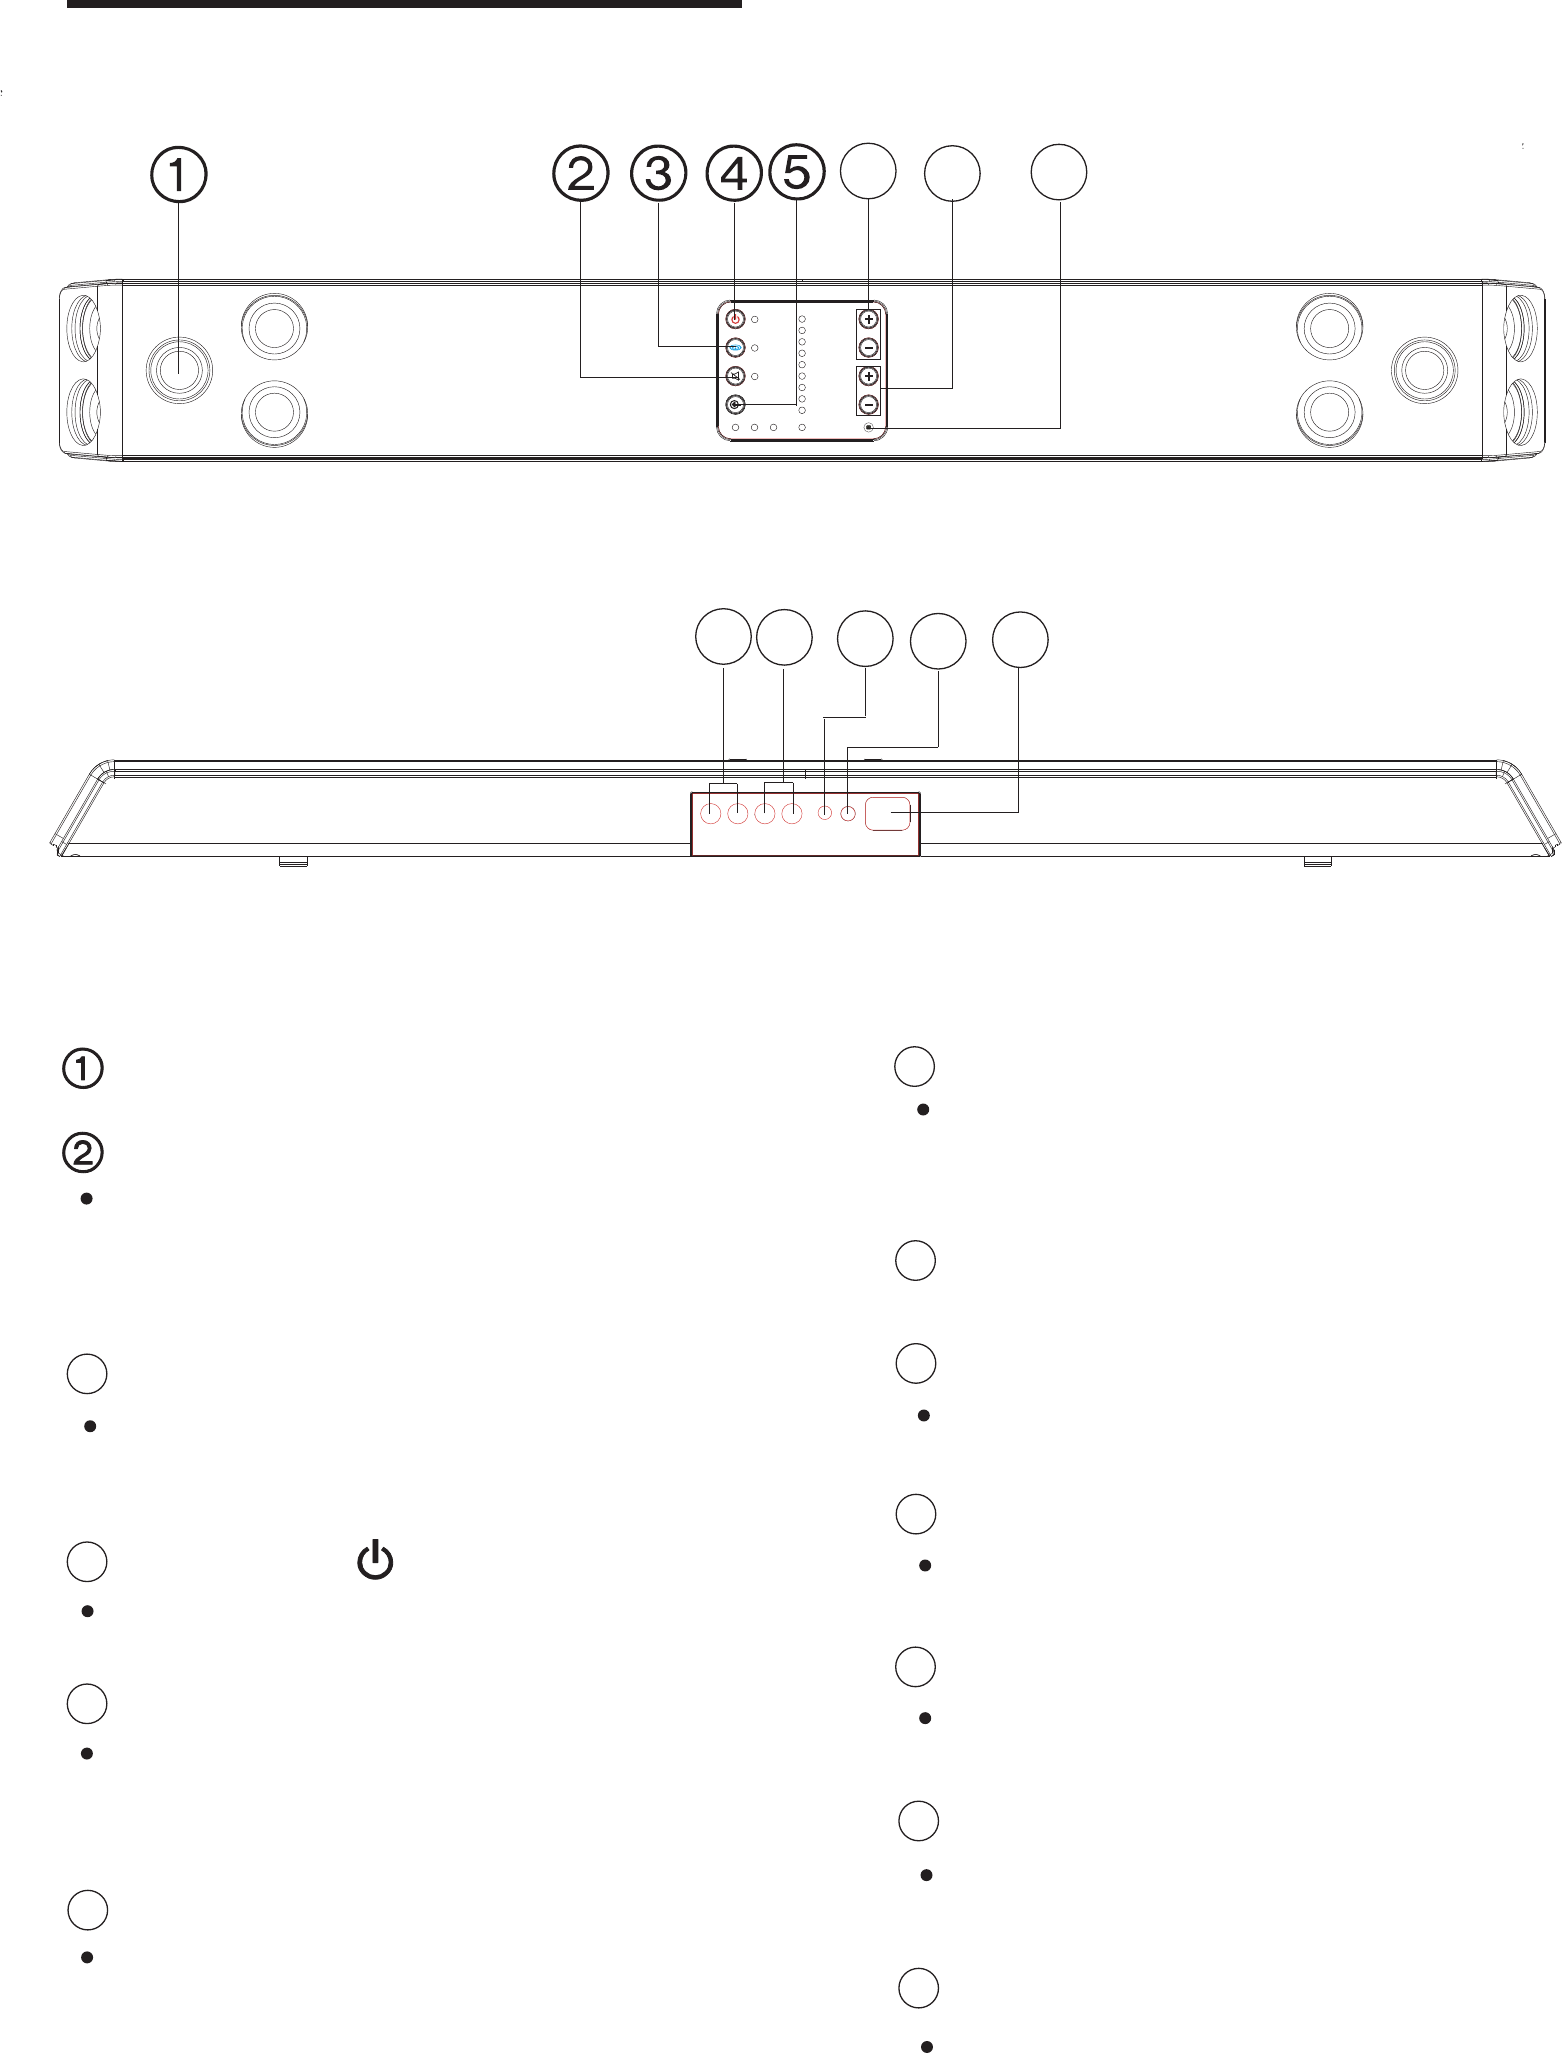
Overview of the main unit
6
910 11 12 13
78
MUTE button
FX SURROUND button
STANDBY button
SOURCE button
SUBWOOFER button
VOLUME +/- button
SPEAKER
Turn on/off the system.
Adjust the volume.
Adjust the output level within
the range of -6dB to +6dB.
AV input socket.
Turning off the sound temporarily.
To restore the sound, press the
button again or adjust the volume.
Listen to a more realistic sound
than stereo sound.
Select the input sound
(AUX IN 1, AUX IN 2, AUX IN 3).
3
4
5
6
7
REMOTE SENSOR
AUX IN 1 jack
8
9
AV input socket.
AUX IN 2 jack
10
Connect audio output socket.
AUX IN 3 jack
11
To pair speakers.
PAIRING button
12
Inlet for power cord.
AC MAINS
13
EN-6
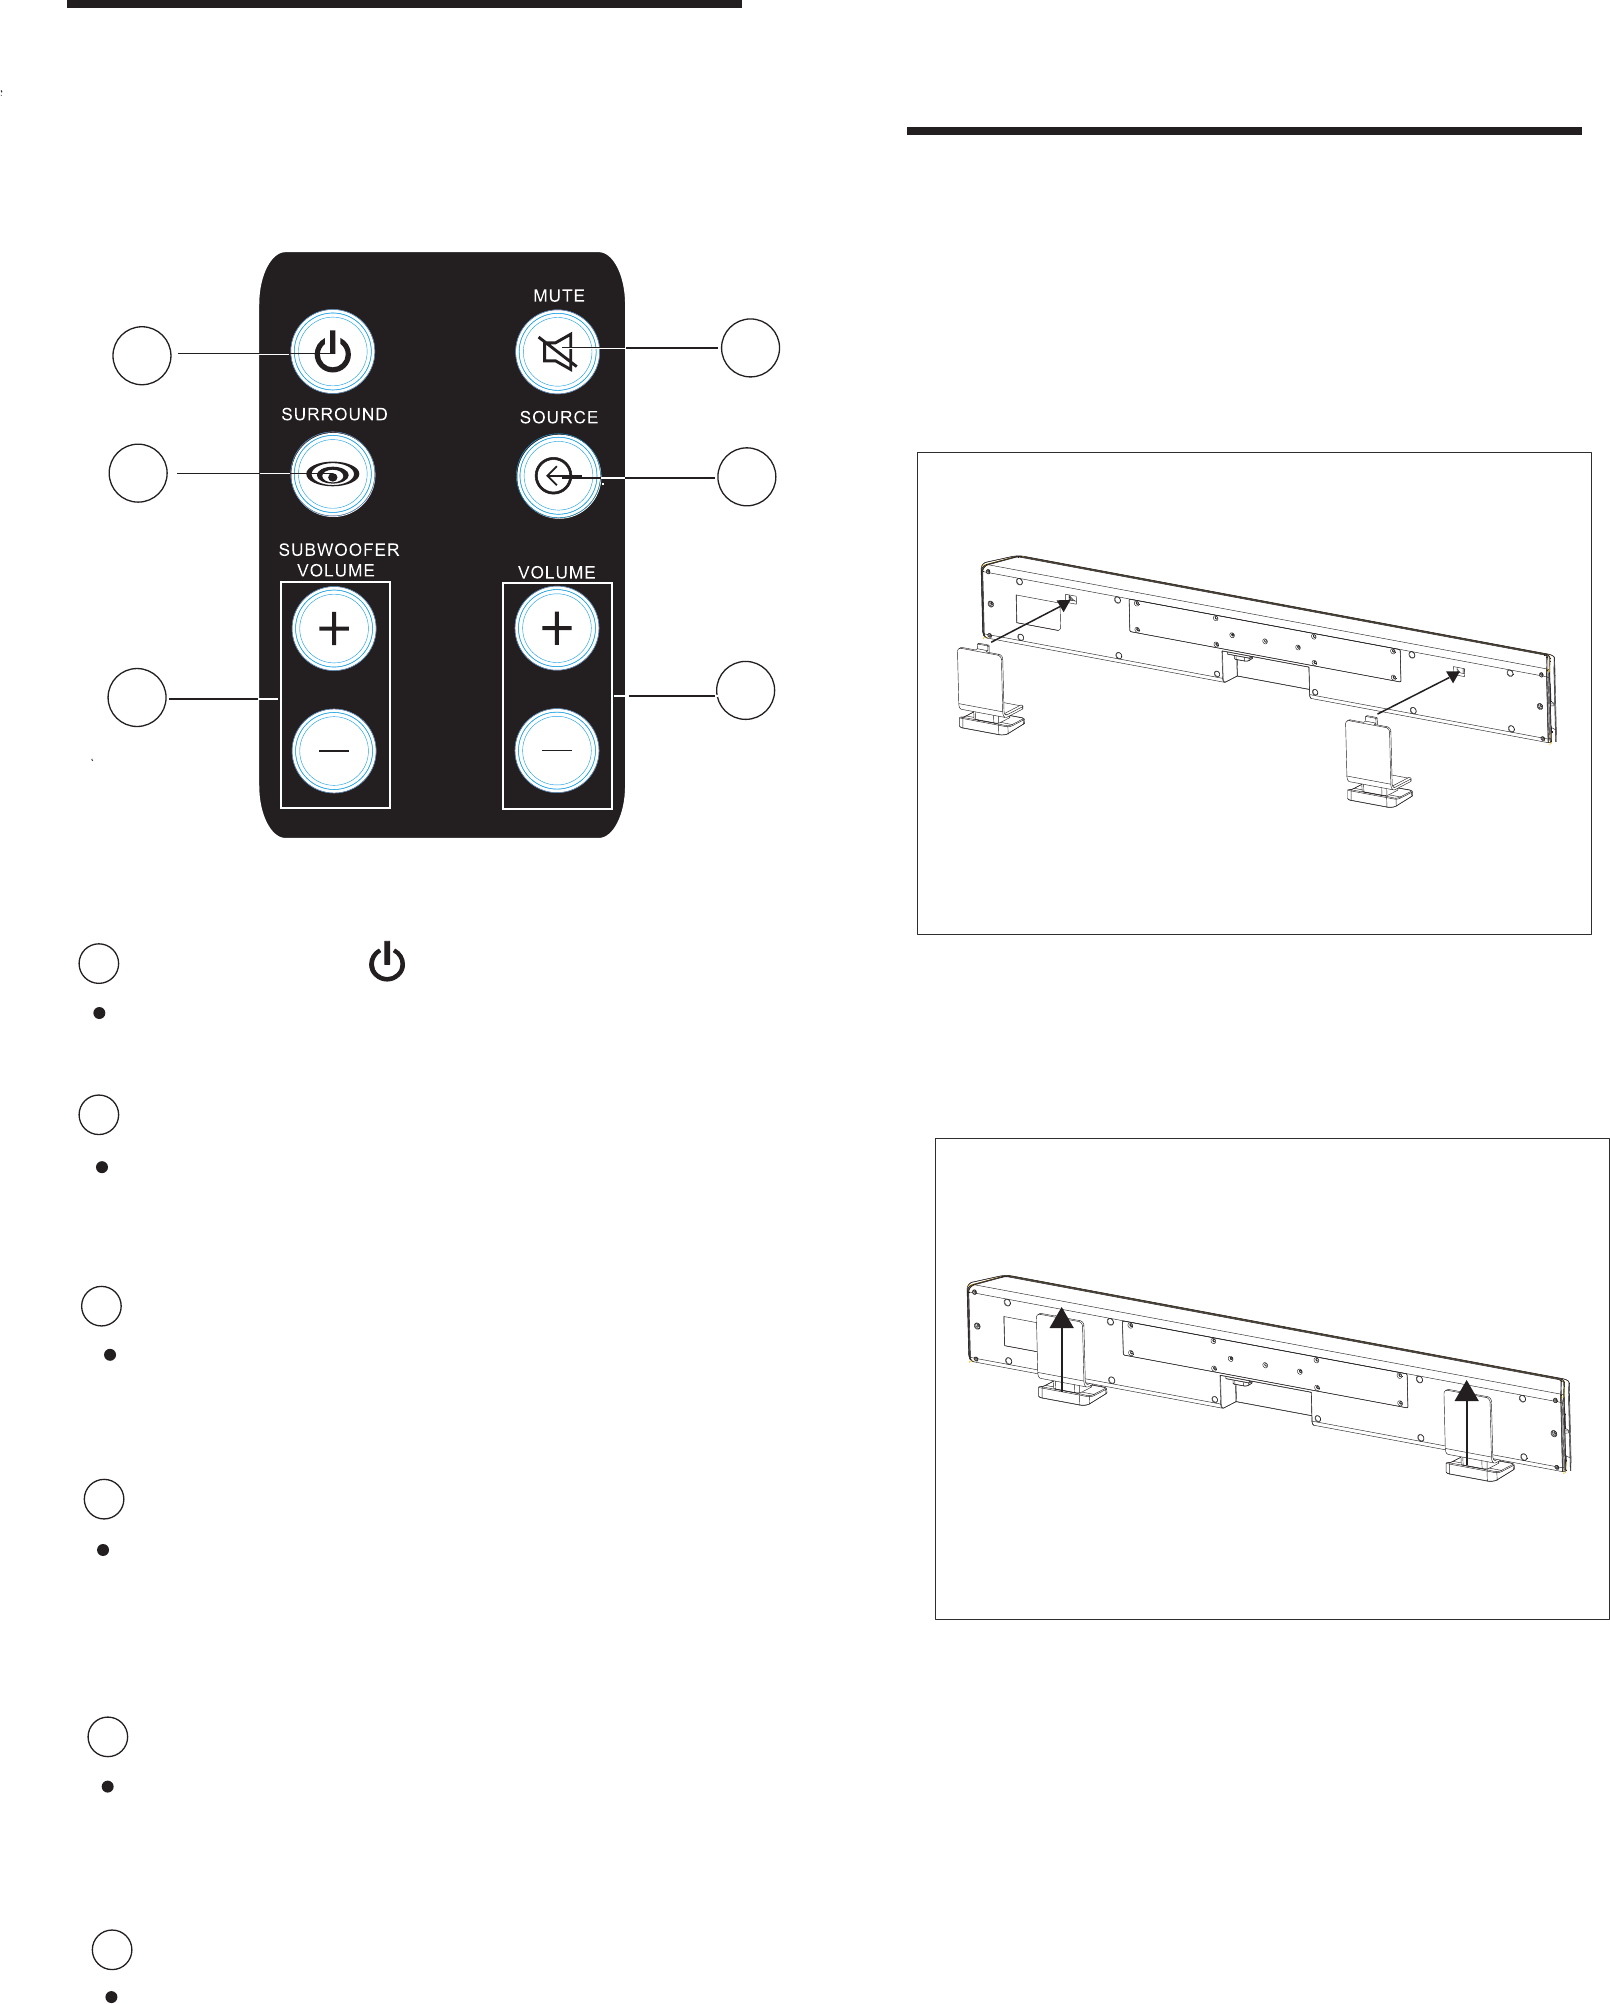
Overview of the remote
control
MUTE button
FX SURROUND button
STANDBY button
SOURCE button
SUBWOOFER VOLUME button
VOLUME +/- button
Turn on/off the system.
Adjust the volume.
Adjust the output level within
the range of -6dB to +6dB.
Turning off the sound temporarily.
To restore the sound, press the
button again or adjust the volume.
Listen to a more realistic sound
than stereo sound.
Select the input sound
(AUX IN 1, AUX IN 2, AUX IN 3).
2
1
5
6
3
4
1
2
3
4
5
6
POWER
Attach the stand
1 Place the supplied table stand onto the
rear of the main unit until the hook enter
the hole of the main unit completely.
2 Slide the supplied table stand upward
along the hole of the main unit.
3 Get started
EN-7

You can also connect the red/white audio
Press SOURCE button on the wireless
sound system to select”AUX IN 1 or 2”
input.
connectors of the AV cable from the TV
to a set of audio input sockets.
Note
It is unnecessary to connect the yellow video •
connectors.
Connect AUDIO devices
Note
There are various ways to connect the soundbar to
•
other audio devices. You only need to select the best
option that fi ts your existing audio device setup.
For AV connection to the soundbar, there are multiple
•
sets of AV sockets available on the main unit. You can
choose either set for an AV connection.
When you connect cables, ensure that the color of the
•
plug matches the color of the socket.
The types of audio devices and connections in the
•
following instructions are for reference only.
Option 1:Connect this soundbar to
an external device
Option 2:Connect this soundbar to
the TV set
You can connect the audio player (e.g.MP3
player) if the player has an available audio
output socket, follow these instructions.
1 If the audio player has a digital output
socket, connect the 3.5mm stereo plug
from the player to the AUX IN 3 socket.
2 Press SOURCE button on the wireless
sound system to select”AUX IN 3” input.
3 Adjust the volume of the wireless sound
system.
Note
To avoid distorted sound, make sure that any equalizer
function of your external device is turned off.
•
Reduce the volume of the wireless aound system
before connecting.
•
AUX IN 3
TV
L R
AUDIO OUT
Not used
AUX IN 1
EN-8

Check if the power voltage, as shown on
the type plate located on the rear of the
set, corresponds to your local AC power
supply. If it does not, cousult your dealer
or service centre.
Connect the power cord of soundbar
and subwoofer to the wall outlet.
soundbar
PAIRING lamp stops blinking.
soundbar
PAIRING
PAIRING lamp
PAIRING
soundbar.
PAIRING lamp
and soundbar
and soundbar
soundbar
cancelled
Activite wireless pairing
Note
•
•
EN-9

Mount the soundbar
Caution
To f ind a suitable mounting location, make the
•
necessary physical and wireless connections.
Mount the soundbar to a solid concrete wall or
•
plaster board wall only!
You can use the supplied bracket to mount the
soundbar to the wall.
1Align the bracket in the chosen location
on a wall. Use a pencil to mark the drilling
positions.
2Drill holes as marked.
4 Appendix
Mount to a wall
Caution
Risk of product damage! Always consult professional
•
personnel to safely mount the product to a wall.
Risk of injury! Ensure that no supply ducts such as gas,
•
water or electricity are harmed when you drill the
holes.
What’s in the supplied mounting kit
2 x wall mount bracket for the soundbar
4 x screws
What else you’ll need
Electric drill•
Screwdriver•
Pencil•
EN-10
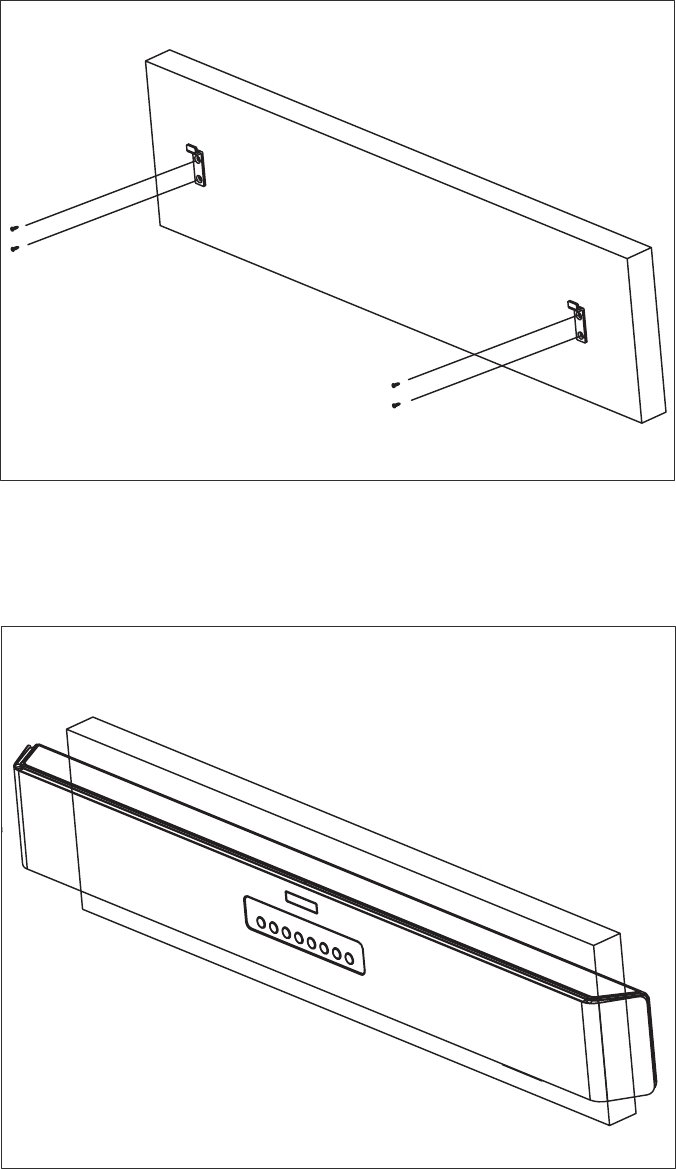
3 Secure the wall mount bracket on the
wall with 4 supplied screws.
4 Hook the soundbar in place.
EN-11

5 Specification
General
Soundbar
Soundbar frequency response 230 - 20,000 Hz
38 - 250 Hz
<1W
Subwoofer frequency response
57mm x 96mm x 780mm
260mm x 500mm x 150mm
Subwoofer
EN-12