KING PROFIT 186 7 TFT DVD PLAYER WITH ATSC TV/AM/FM/USB/SD/BT User Manual
KING PROFIT TRADING LTD. 7 TFT DVD PLAYER WITH ATSC TV/AM/FM/USB/SD/BT
UserManual.wiki
>
KING PROFIT
>
186 User Manual
User Manual
Navigation menu
Upload a User Manual
Namespaces
Wiki Guide
HTML
PDF
Info
Views
User Manual
Discussion / Help
Navigation

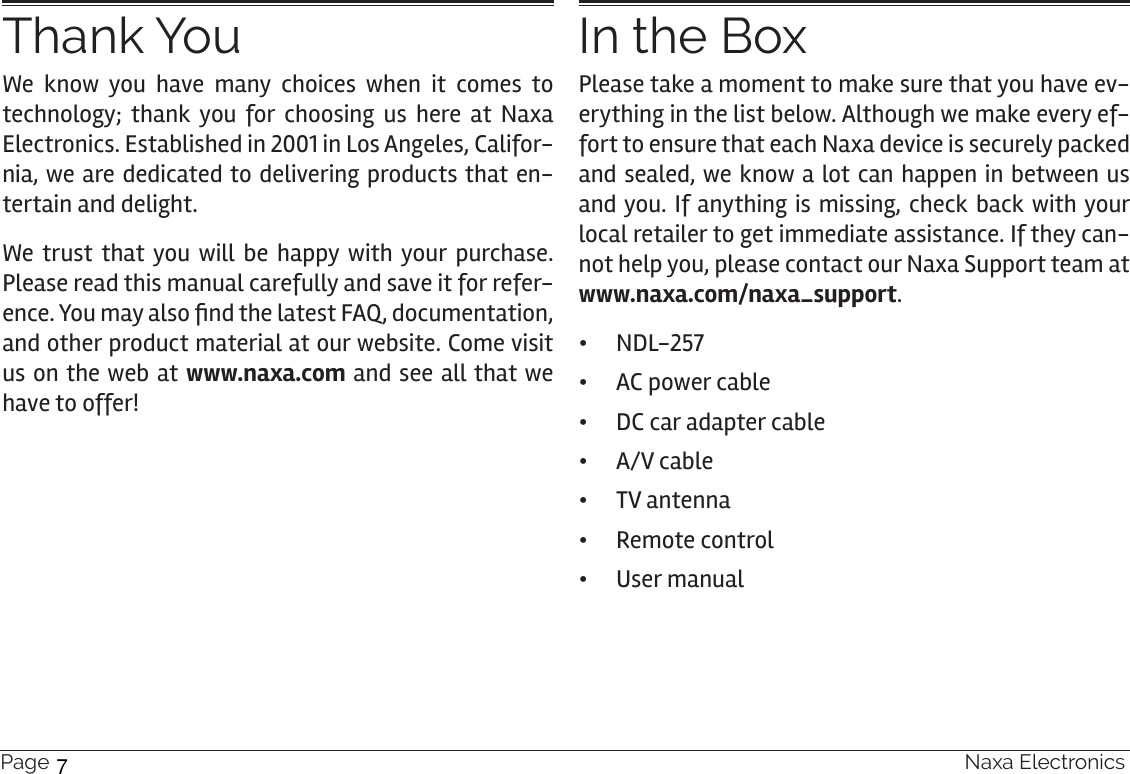

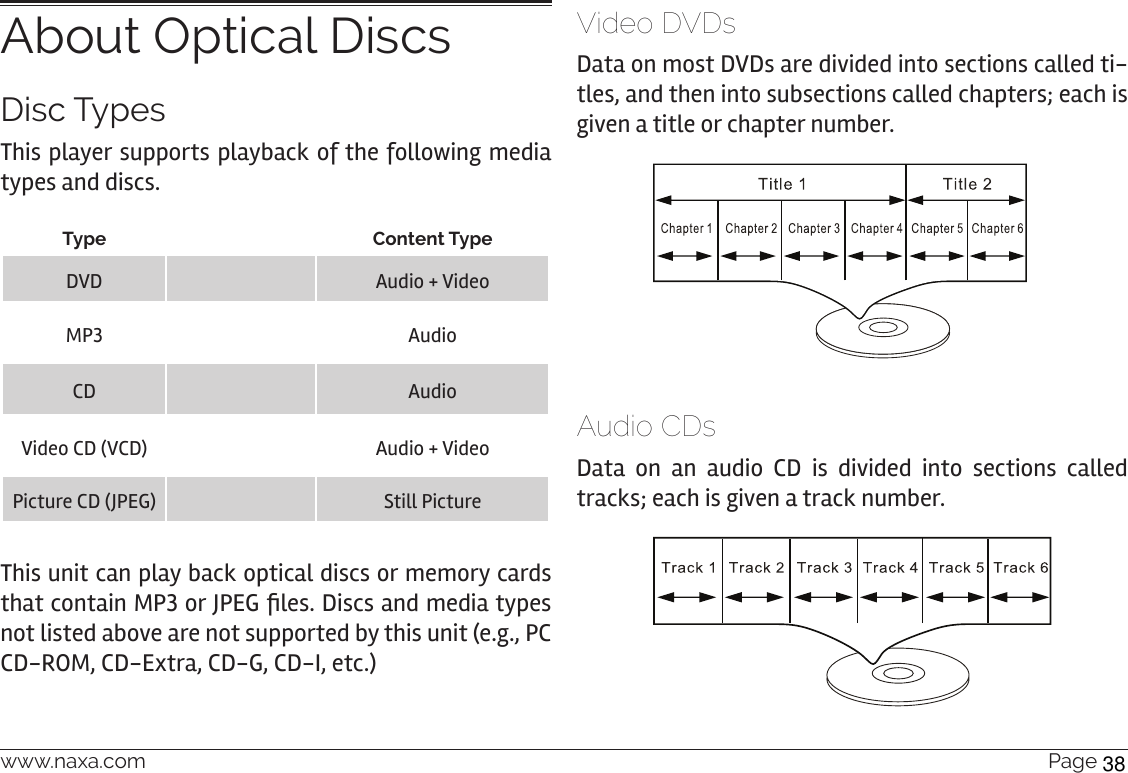
![www.naxa.com Page 13Remote ControlMODE When the FUNCTION switch is set to TV/DVD/BT/AUX, press MODE to change the active function mode between DVD, Bluetooth, and AUX.DEFAULT Reset options.USB/SD While the FUNCTION switch is set to TV/DVD/BT/AUX, press and hold to change the active function mode between DVD/BT, USB, and CARD (SD). DISPLAY ON/OFFTurn the LCD screen on or off. Make sure that the Dis-play switch [29] on the back of the unit is set to ON.MUTE Disable or restore sound.DISPLAY View program information on the LCD screen.ZOOM Change the zoom options.SLOW Slow motion playback.SETUP Access the system menu screen.TITLE/PBCGo to the DVD/SVCD title screen.PLAY/PAUSEStart, pause, or resume playback.STOP Stop playback.UP/FWD/CH+Browse up in a menu or scan forward quickly through a track. Tune to the next channel in the channel list when watching TV.DOWN/REV/CH-Browse down in a menu or scan backward quickly through a track. Tune to the previous chan-nel in the channel list when watching TV.LEFT/PREVBrowse left in a menu or skip to the previous track. 16](https://usermanual.wiki/KING-PROFIT/186/User-Guide-2966954-Page-16.png)
![Page 16 Naxa ElectronicsConnect PowerThe unit can be powered from AC or DC power sources, or by eight (8) C-size batteries.Using AC PowerUse the included AC power cable to connect the player to AC household power. •Connect the two-pronged end of the cable to a household power outlet. •Connect the other end of the cable to the AC Power In socket [34] of the player.⚠The unit supports AC 120 V power only. Do not connect the unit to a power outlet other than that which is indicated here or on the label as this may result in the risk of re or electric shock.Do not handle the power plug with wet hands. Doing so may cause electric shock. Using the DC Car AdapterUse the included DC car adapter to connect the player to DC power socket found on cars, campers, boats, and more. •Connect the large end of the DC car adapter to a standard DC car power socket. •Connect the barrel plug end of the adapter to the DC Power In socket [33] of the player.Using BatteriesThe unit can operate on eight (8) C-size batteries. Batteries designed for high-drain devices are recom-mended (e.g., alkaline or rechargeable Ni-MH).⚠Use only the size and type of batteries specied.Be sure to match the positive and negative poles of the battery with the positive and negative terminals of the battery compart-ment. Reversed or other improper instal-lation can damage the device and other property.19](https://usermanual.wiki/KING-PROFIT/186/User-Guide-2966954-Page-19.png)
![www.naxa.com Page 17Do not install different types of batteries together (e.g., alkaline with carbon-zinc or nickel metal hydride). Do not install old batteries together with new ones.If the device will not be in use for a long time, remove the batteries prevent battery leakage. Battery leakage can cause injury and damage to your device and property.Always follow directions provided by the battery manufacturer. Do not charge bat-teries that are not intended to be re-charged; doing so can cause the batteries to overheat and rupture. Do not incinerate batteries or otherwise ap-ply heat to them; they may explode or leak.Basic FunctionsTurning the Unit On and O To turn the unit on, set the POWER/FUNCTION switch [1] to any position other than OFF. The Power indicator [15] will light red.To turn the unit off, set the POWER/FUNCTION switch to the OFF position. The Power indicator will darken. Adjusting the Volume •Turn the Volume dial [2] clockwise to increase the volume. Turn it counter-clockwise to decrease the volume. •Press the MUTE key on the remote to disable sound output completely. Press the MUTE key again to restore sound output.Turning the Screen On and OYou can turn the LCD screen off to conserve power. 20](https://usermanual.wiki/KING-PROFIT/186/User-Guide-2966954-Page-20.png)
![Page 18 Naxa Electronics •Press the LCD ON/OFF key [10] to turn the screen off. Press it again to turn it back on again. You may want to turn the LCD screen off when listening to music or whenever you are not watching video. The LCD screen consumes a lot of power. You can prolong the lifetime of your batteries if you avoid using the LCD screen.Using the Number KeypadUse the number keypad (1-0, 9) on the remote to input a value when prompted on a menu or option screen.For instance, to go to track 15:1. Press the “1” key.2. Press the “5” key.3. Press the ENTER key.DVD ModeTo set the active source mode to DVD, set the FUNC-TION switch [1] to TV/DVD/BT/AUX.Playing a DVDLoad a DVD disc in the disc compartment. The player will automatically attempt to read the disc. •Press PLAY/PAUSE/ENTER/PAIR [11] to start, pause, or resume playback. •Press STOP/USB/CARD [10] to stop playback. •Press TV MENU/SEARCH on the remote to show the root menu screen of the DVD. (This function will only work with DVDs that have been mastered with a main menu.) •Press the TITLE key on the remote to select a title to play. (This function will only work with DVDs that have been mastered with titles or chapters.)21](https://usermanual.wiki/KING-PROFIT/186/User-Guide-2966954-Page-21.png)
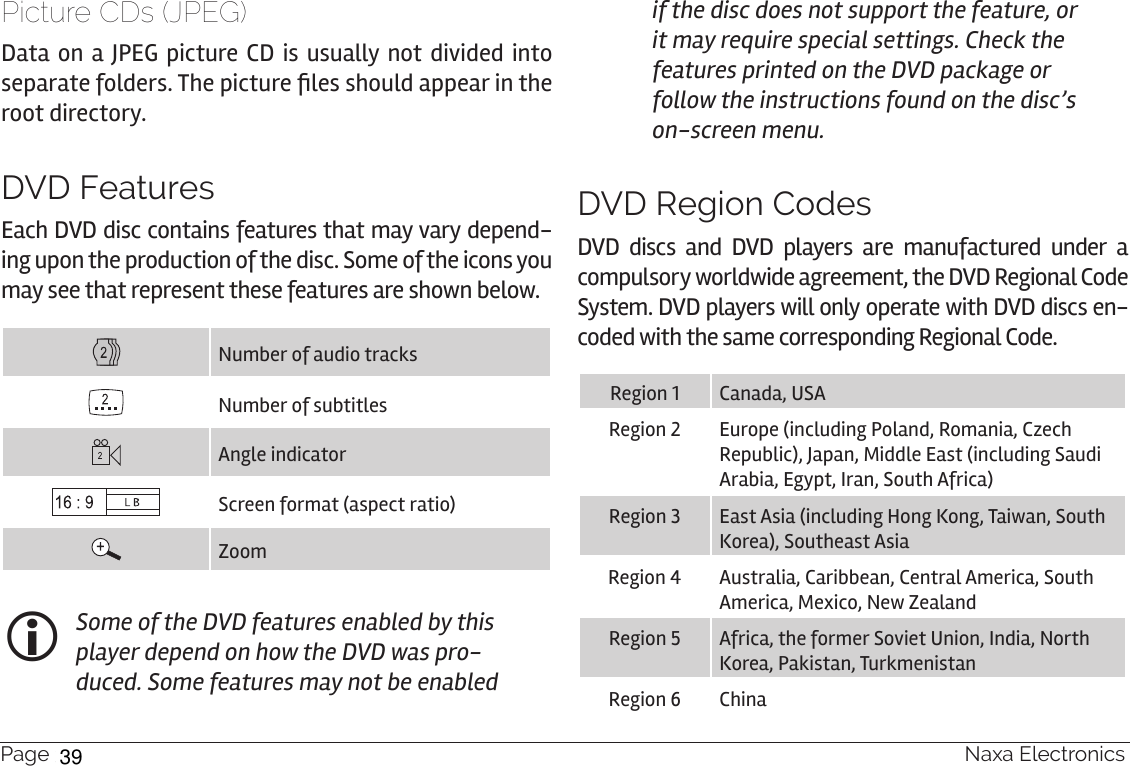
![Page 20 Naxa ElectronicsProgram Screen—DVDProgram Screen—CDPlaying Digital Music/Video FilesThis unit will play discs that contain digital media les instead of DVD video. Refer to the Specications sec-tion to learn more about media le compatibility.When a disc is loaded that contains les, the unit will read the disc and then list all of the les and folders on the LCD screen. • Use the direction buttons to browse the le/folder list; press PLAY/PAUSE/ENTER/PAIR [11] to select an item from the list. •If the item selected was a folder, the unit will display the contents of the folder. • If the item selected was a music or video le, the unit will start playback. 23](https://usermanual.wiki/KING-PROFIT/186/User-Guide-2966954-Page-23.png)
![www.naxa.com Page 21During playback:PREV/LEFT Press to return to the beginning of the track. Continue pressing to skip to the previous track or until you have reached the beginning of the folder.NEXT/RIGHT Press to skip to the next track.FWD/UP (FORWARD)Press to change the rate of forward playback (2x, 4x, 8x, 16x, 32x). Press PLAY/PAUSE/EN-TER/PAIR to resume playback at normal speed (1x).Press and hold to browse up the list of les.REV/DOWN (REVERSE)Press to change the rate of reverse playback (2x, 4x, 8x, 16x, 32x). Press PLAY/PAUSE/EN-TER/PAIR to resume playback at normal speed (1x).Press and hold to browse down the list of les.STOP Press to stop playback. REPEAT Using the remote, press to repeat the current track or all tracks in the folder.Numeric Keypad (0-9, +10)Using the remote, enter a track number and then press ENTER to skip directly to it.Playing Digital Photo FilesThis unit will play discs that contain digital photo les instead of DVD video. Refer to the Specications sec-tion to learn more about photo le compatibility.When a disc is loaded that contains photo les, the unit will read the disc and then list all of the les and fold-ers on the LCD screen. • Use the direction buttons to browse the le/folder list; press PLAY/PAUSE/ENTER/PAIR [11] to select an item from the list. •If the item selected was a folder, the unit will display the contents of the folder. • If the item selected was a photo le, the unit will display the photo (and continue displaying any other photos as a slideshow). The unit will return to the le list when the slideshow ends.24](https://usermanual.wiki/KING-PROFIT/186/User-Guide-2966954-Page-24.png)
![www.naxa.com Page 23TV ModeTo set the active source mode to TV:1. Set the FUNCTION switch [1] to TV/DVD/BT/AUX.2. Press MODE/TV MENU [4] to change from DVD to TV mode. “ATSC” will be displayed on the LCD screen while TV mode is starting. You must connect an antenna to the TV ANT connector found on the back of the unit. The built-in telescopic rod antenna is not used by the TV tuner. An external antenna is included in the box. Connecting an External Antenna •Connect the included external antenna to receive TV signals. (The telescopic rod antenna cannot be used with the TV.) 26](https://usermanual.wiki/KING-PROFIT/186/User-Guide-2966954-Page-26.png)
![www.naxa.com Page 25Watching TVAfter you have searched for and added channels to the Channel list, you can do the following while watching TV:FWD/UP (CH+)Press to tune to the next channel in the chan-nel list.REV/DOWN (CH-)Press to tune to the previous channel in the channel list.PLAY/PAUSE/ENTER/PAIRPress to view the channel list. Press again to pick a channel to watch.PROGRAM View the electronic program guide.AUDIO Press to change the audio track if the broad-cast contains an alternate track (e.g., SAP/MTS programs).Numeric Keypad (0-9)Enter a channel number and then press ENTER to tune to a channel directly. To tune to a sub-channel, enter the entire channel number. For example, press “1” “3” “2” to tune to channel 13-2. MODE/TV MENUPress and hold to view the TV options menu.TV Options MenuAdjust the options for the TV. •While in TV mode, press and hold MODE/TV MENU [4] to access the TV Options menu. •Use the direction keys to browse the menu screens and to adjust the options (PREV/LEFT, NEXT/RIGHT, FWD/UP, REV/DOWN). • Press PLAY/PAUSE/ENTER/PAIR [11] to conrm a highlighted selection. •Press and hold MODE/TV MENU [4] to go back to the previous level or screen. You may also use the arrow keys and the ENTER key on the remote control.Search Menu OptionsCountry Set the location of the unit. Auto Search Automatically nd TV signals within reception range and save them to the Channel list. This will overwrite any previously saved Channel list.28](https://usermanual.wiki/KING-PROFIT/186/User-Guide-2966954-Page-28.png)
![Page 26 Naxa ElectronicsManual SearchManually nd a TV channel. Cong Menu OptionsPicture Adjust the aspect ratio and format of the TV broadcast.Caption Adjust closed caption display options. OSD LanguageAdjust the language used by the TV menus and display items.System Menu OptionsSoftware UpdateFor use by qualied service personnel, only.Information Display system diagnostic information.Restore Fac-tory DefaultReturn all of the TV options to their default settings.Bluetooth® ModeTo set the active source mode to Bluetooth (BT):1. Set the FUNCTION switch [1] to TV/DVD/BT/AUX.2. Press MODE/TV MENU [4] to change from DVD to BT mode. The FM ST/PAIR indicator [17] will light up blue.Use this mode to stream audio wirelessly from play-ers with Bluetooth. Bluetooth devices may include lap-tops, tablets, smartphones, and more. Make sure that the device has its Bluetooth radio enabled and that it is set to be discoverable.Connecting a Device for the First Time (Pairing)Before using a wireless device with Bluetooth, you will need to establish a connection between it and the Boombox. This process is called “pairing” and you will only have to do it once. Once two devices are paired, they will automatically connect when they detect each other.29](https://usermanual.wiki/KING-PROFIT/186/User-Guide-2966954-Page-29.png)
![www.naxa.com Page 271. When you set the Boombox to Bluetooth mode and it does not detect a paired device, it will automati-cally switch to pairing mode. The FM ST/PAIR in-dicator [17] will ash blue when the Boombox is in pairing mode.2. On your Bluetooth device, go to its Bluetooth set-tings menu. 3. Have your Bluetooth device “search for devices”. Select the boombox (NDL-257) when it is found. Enter 0000 as a passkey if the device asks for one.4. When pairing is complete, the Boombox will emit a soft tone and the FM ST/PAIR indicator will light a steady blue. The boombox will automatically connect to your Blue-tooth device next time as long as it has Bluetooth en-abled, is within range, and is set to be visible to paired devices. If the pairing process fails, the FM ST/PAIR indicator will ash slowly. Press PLAY/PAUSE/ENTER/PAIR [11] to return to pairing mode and then repeat steps 2-4. There are many different Bluetooth en-abled devices; we cannot provide instruc-tions for all of them. Please refer to your device manufacturer’s instructions or website to learn more about connecting with Bluetooth.Playing Connected DevicesControl playback from your Bluetooth device. Set the volume level of the Bluetooth device to maxi-mum, then adjust the volume to a comfortable level by turning the VOLUME dial [2] of the boombox.Basic playback (such as play/pause, next, previous) may also be controlled by the boombox and its remote control if your Bluetooth device supports it.30](https://usermanual.wiki/KING-PROFIT/186/User-Guide-2966954-Page-30.png)
![Page 28 Naxa ElectronicsAUX ModeTo set the active source mode to AUX input:1. Set the FUNCTION switch [1] to TV/DVD/BT/AUX.2. Connect an audio player to the AUX IN jack [18] on the front of the unit with a 3.5 mm AUX cable (i.e., a 3.5 mm male-to-male stereo patch cable).When the cable is plugged into the AUX IN jack, the unit will automatically detect it and switch to AUX mode. Disconnect the cable from the AUX IN jack to return to DVD, TV, or Bluetooth mode. When an audio player is connected:1. Set the volume level of the connected audio player to approximately 80%. Adjustment the volume to a comfortable level by turning the VOLUME dial [2] of the unit. 2. Start and control playback with the audio player.USB/Card ModeTo set the active source mode to USB or CARD (SD):1. Set the FUNCTION switch [1] to TV/DVD/BT/AUX.2. Press and hold STOP/USB/CARD [10] to change from DVD to USB or CARD (SD). The LCD screen will display “Detecting Device” then show a list of les on your USB drive or SD card. A USB drive or SD card with compatible media les must be present. If the unit cannot nd a USB drive or SD card, it will return to DVD mode.To change between USB, CARD, and DVD modes, press and hold STOP/USB/CARD.This unit will play digital media les from USB or SD memory cards. Refer to the Specications section to learn more about media le compatibility.When a USB/SD card is loaded that contains les, the unit will read it and then list all of the les and folders on the LCD screen.31](https://usermanual.wiki/KING-PROFIT/186/User-Guide-2966954-Page-31.png)
![www.naxa.com Page 29 • Use the direction buttons to browse the le/folder list; press PLAY/PAUSE/ENTER/PAIR [11] to select an item from the list. •If the item selected was a folder, the unit will display the contents of the folder.If the item selected was a music, video, or photo le, the unit will start playback. Playback controls for USB/Card mode are identical to those in DVD mode. Please refer to the following sec-tions to learn more about the controls available to you during digital media playback: •DVD Mode > Playing Digital Music/Video Files •DVD Mode > Playing Digital Photo FilesRadio (AM/FM) ModeTo set the active source mode to Radio, set the FUNC-TION switch [1] to RADIO. To optimize reception when listening to stations on the FM band, extend the tele-scopic antenna to its full length. To opti-mize reception for AM band stations, gently move the unit around, or position the unit in an open place.Tuning to a Radio Station 1. Select the band. •Set the BAND switch [14] to AM to tune to AM radio frequencies (kHz). •Set the BAND switch [14] to FM to tune to FM radio frequencies (MHz). 2. Tune to a station by turning the TUNING dial [13]. The FM ST/PAIR indicator [17] will light red when the tuner is locked onto an FM stereo broadcast.32](https://usermanual.wiki/KING-PROFIT/186/User-Guide-2966954-Page-32.png)
![Page 30 Naxa ElectronicsSetup MenuAccess the Setup menu to adjust the player options. •To access the Setup menu, open the disc door [7] and then set the FUNCTION switch to TV/DVD/BT/AUX. Press and hold MODE/TV MENU [4] to access the Setup menu. •The “Preference Page” options will not be available unless the player is stopped com-pletely. •Use the direction keys to browse the menu screens and to adjust the options (PREV/LEFT, NEXT/RIGHT, FWD/UP, REV/DOWN). •Press PREV/LEFT [5] to go back to the previous level or screen. • Press PLAY/PAUSE/ENTER/PAIR [11] to conrm a highlighted selection. You may also use the arrow keys and the ENTER key on the remote control.General Setup PageTV Display • Normal/PS: Pan and Scan. The wide-screen image will be displayed on the screen in its na-tive aspect ratio with some part on the left and right cut off.• Normal/LB: Letterbox. The wide-screen image will be displayed in its native aspect ratio with black bands on the upper and lower sections of the screen.• Wide: Widescreen (16:9). If the unit is connected to a widescreen TV set, select this option. The widescreen image will be displayed in full screen in its native aspect ratio while the 4:3 image will be stretched out horizontally to t in the screen.33](https://usermanual.wiki/KING-PROFIT/186/User-Guide-2966954-Page-33.png)
![Page 32 Naxa ElectronicsVideo Setup PagePanel Quality Apply image correction options in varying intensities. (Press PLAY/PAUSE/ENTER/PAIR [11] or ENTER to apply the image correction.)• Sharpness• Brightness• Contrast• Hue• SaturationPreference PageTV Type • PAL: Select this mode if the unit is con-nected to a PAL-format TV (used in China, Hong Kong, Europe, etc). It will convert the video signal of an NTSC disc and output in PAL format.• AUTO: Select this mode to have the system detect the video signal of the disc and match the video signal output format to it.• NTSC: Select this mode if the unit is con-nected to an NTSC-format TV (used in Tai-wan, America, Canada, etc). It will convert the video signal of a PAL disc and output in NTSC format.35](https://usermanual.wiki/KING-PROFIT/186/User-Guide-2966954-Page-35.png)
![Page 34 Naxa ElectronicsOptional ConnectionsConnect to a TV (AV Out)Use your DVD boombox at home with a TV! The TV will need to be able to accept a composite video signal. With the included AV cable:1. Connect the yellow plug of the cable to the yellow composite video input of the TV.2. Connect the red plug of the cable to the red audio input (right) of the TV.3. Connect the white plug of the cable to the white audio input (left) of the TV.4. Connect the yellow, red, and white plugs on the other end of the cable to the A/V Out jacks on the back of the unit (i.e., Composite video out [27] (yel-low) and Stereo audio out [28] (red and white)). 5. Turn the TV and the unit on.6. Set the TV to display the composite video source. You will see the unit’s output on the screen when the source is set correctly. Please refer to the owner’s manual pro-vided with the TV to learn how to set the display source.37](https://usermanual.wiki/KING-PROFIT/186/User-Guide-2966954-Page-37.png)