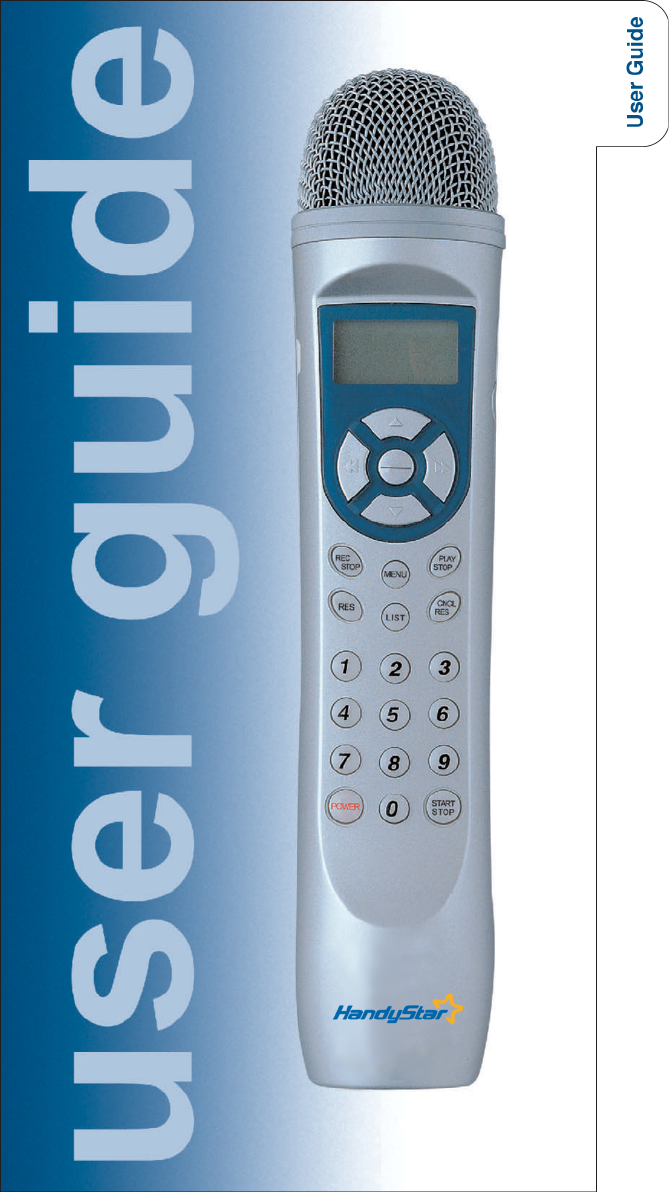
KORI Tech KT-5010 Wireless Karaoke Microphone User Manual new guide rev 4
KORI Tech Co., Ltd. Wireless Karaoke Microphone new guide rev 4
Revised User Manual
2
SAFETY INSTRUCTIONS
Use the following safety guidelines to ensure your own
personal safety and to help protect your electronic device.
CAUTION:TO REDUCE THE RISK OF
ELECTRIC SHOCK, DO NOT
REMOVE MAIN COVER. NO USER
SERVICEABLE PARTS INSIDE.
This symbol indicates high voltage is present inside.
It is dangerous to make any kind of contact with any
inside part of this product.
This symbol alerts you that important literature
concerning operation and maintenance has been
included with this product.
CAUTION:
FCC/CSA regulations state that any unauthorized changes or
modifications to this equipment may void the user's authority
to operate it.
CAUTION:
To prevent damage which may result in fire or electric shock
hazard, do not expose this appliance to rain or moisture.
CAUTION:
Do not store in direct sunlight or expose to high temperatures.
If unit has been stored in a heated area above
180°F - allow sufficient time for the unit to cool
before using.
Always remove the batteries when not using the
product for a prolonged period of time.
CAUTION
RISK OF ELECTRIC SHOCK
DO NOT OPEN
warnings/cautions
3
CAUTION: SAFETY PRECAUTIONS
To reduce the risk of bodily injury, electrical shock,
fire and damage to the equipment, observe the
following precautions:
•Do not spill food or liquids on your system
components, and never operate the product in a
wet environment.
• Do not push any objects into the opening of your
system components. Doing so can cause fire or
electric shock by shorting out interior components.
• Use the correct external power
source. Operate the product only
from the type of power source indicated
on the electrical rating label on
the A/C adapter.
• Use of the product for purposes other than for
which it was originally intended will result in a
void warranty.
DONOT USE THE FOLLOWING BATTERIES
• Nickel cadmium batteries (Ni-cd type)
• Magnesium batteries
4
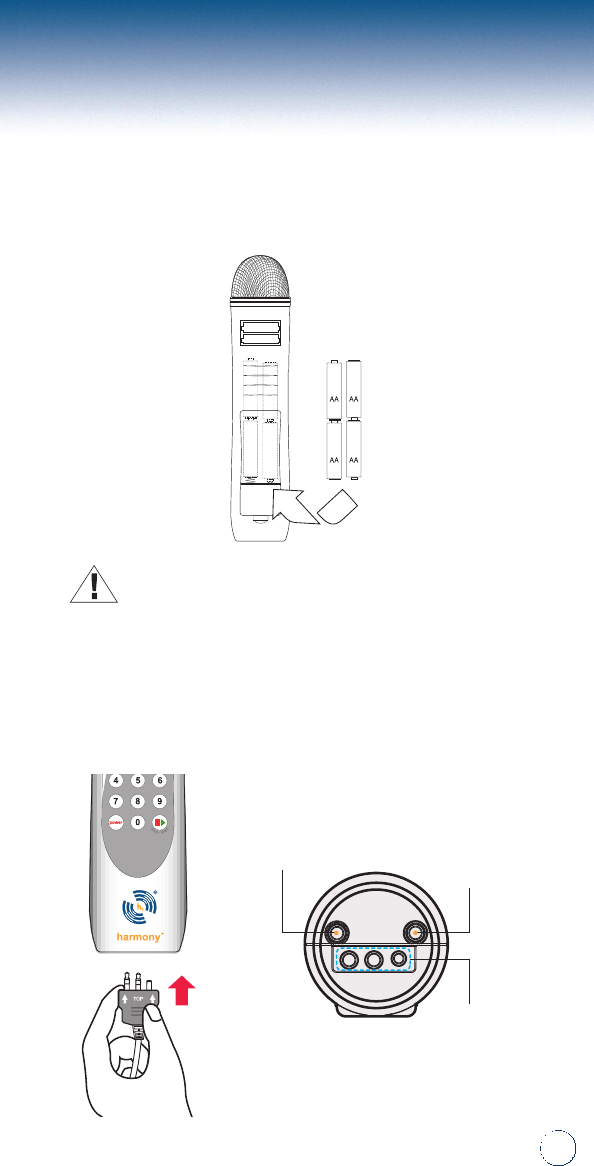
getting started
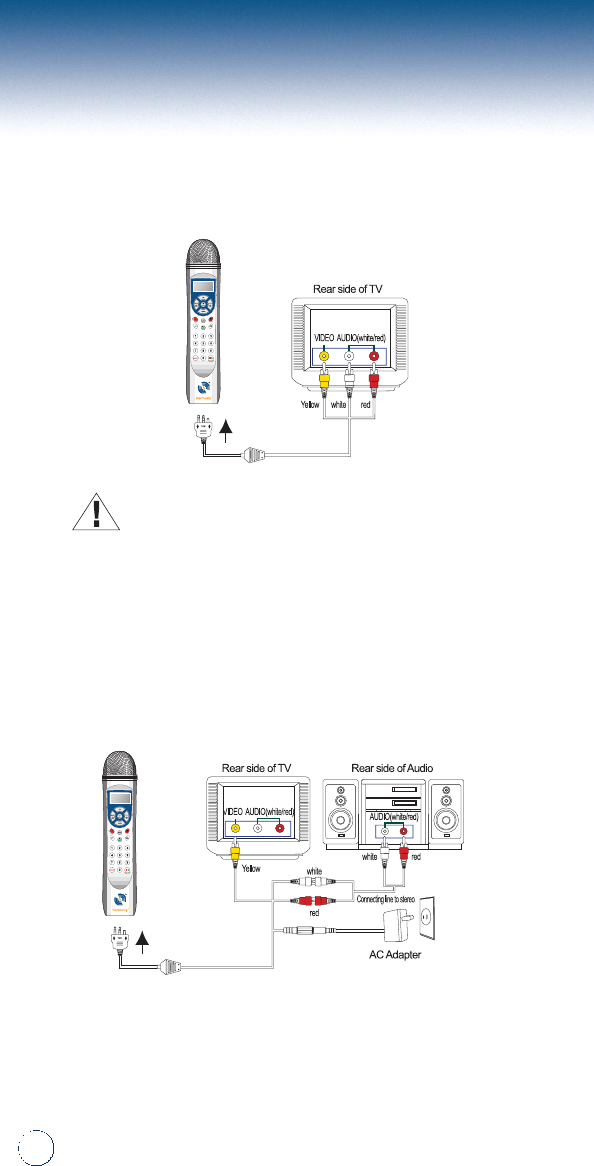
CONNECTIT
1.Connect RCA cable to back of television matching the
connectors by color to the ‘Video In’inputs (see diagram).
CAUTION:If connecting to a Mono TV - insert connectors to
available inputs.If there are only two inputs on the television
place the yellow connector into the yellow input and the red or
white connector into the remaining input.
2.If using an audio system:
a.place yellow connector into the yellow ‘video’input
of television.
b.Place red and white connectors into the red and
white audio inputs of audio system (see diagram).
3.If using the A/C adapter as a power source:
a.Using the black connector on the RCA
cable, connect to A/C adapter.
b.Plug in A/C adapter to a power outlet.
5
CAUTION:Always remove batteries from microphone
when not in use.Never keep batteries in microphone
when using A/C adapter.USE ALKALINE BATTERIES ONLY.
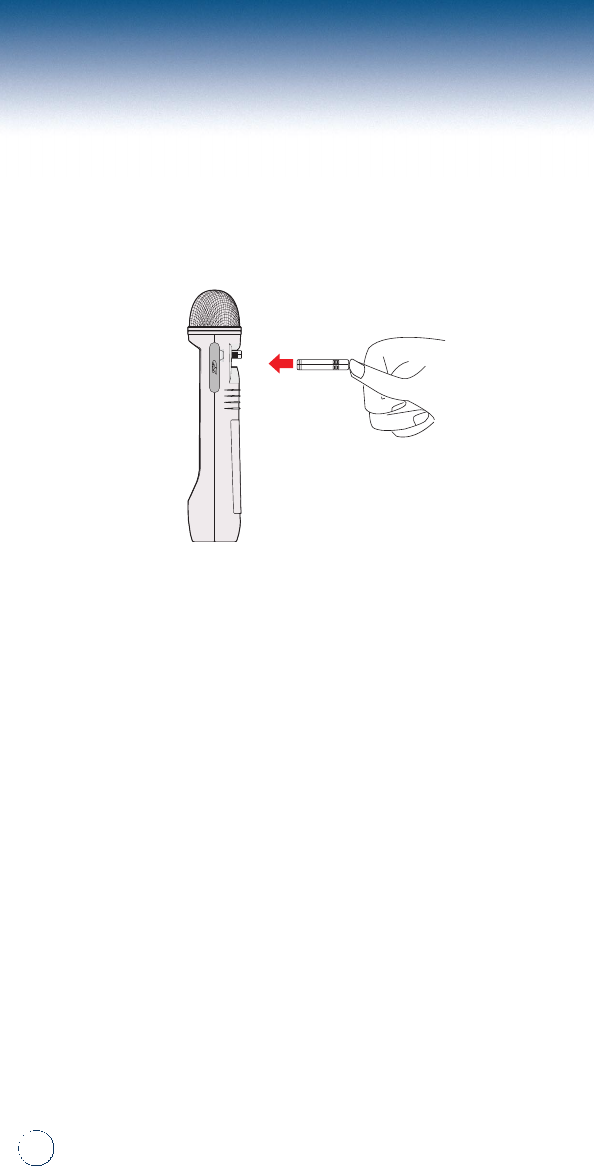
5.For installation of the RCA cable to the microphone,
face the front of the microphone towards you and insert the
cord into the bottom.Make sure the TOP indicator on the top
of the cable is facing towards you.Press up until it is secure.
(see diagram).
Antenna
Connector
Service
Connector
4.If using batteries as a power source:
a.Remove battery cover from back of microphone
and insert 4 ‘AA’batteries (see diagram).Batteries
not included.
RCA
Connectors
6
getting started(cont.)
CAUTION:To remove cable, gently hold and pull down.
(see diagram)
6.Turn on your television and select the appropriate
video channel.
7
7.Turn the power on by pressing the power button.
PLAYWITHIT
1.Open song book, select song and enter the
song # using the keypad, then press the stop/start
button to start the song.
8
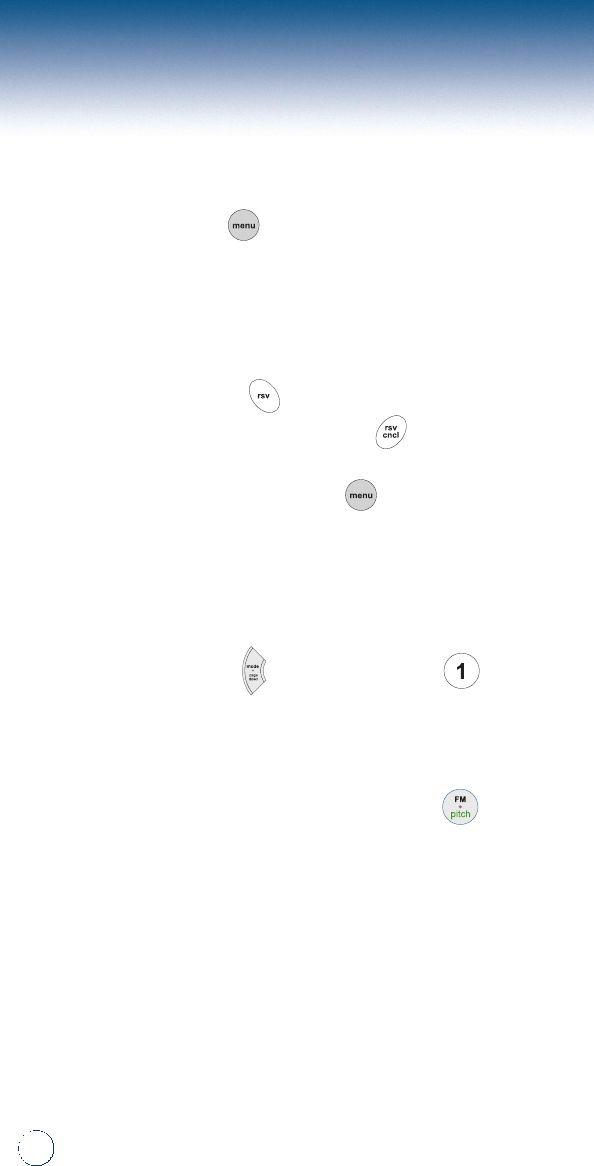
keypad diagram
up
earphone
jack
mode/
page down
LCD
FM
modulation/Pitch
tempo/page up
rec/play/stop
down
rec/start/stop
reserve
list
power stop/start
number
keys
cancel
reserve
menu

9
functions
1.power button- Powers microphone on or off.To turn off,
hold button down a few seconds.
2.start/stop button– Used to play or stop a song.
3.number keys- Used to select a song.
4.reserve button– Reserves selected songs
(32 maximum).
5.
cancel reserve button– Cancels reserved songs selected.
6.list/instrument button– Lists songs on the screen
when a song is NOT playing, While a song is playing it
will show a list of 5 instruments for you to choose from
(original,standard, power, electric, and dance).
7.play/stop button– Used to play or stop a voice/song
that has been recorded.
8.record/stop button– Used to start and stop recording.
9.menu button– Adjusts the volume of the internal
mike., external mike.(Duet microphone), background
music (BGM), echo, melody.Also used to display
the scoring feature.
10.up button– Increases “menu”settings and options
and scrolls up through song list.
11.down button– Decreases “menu”settings and
options and scrolls down through songs list.
12.mode/page down– Displays special modes when
a song is not playing (continuous, repeat, and
random play).When song is playing you can scroll
down the song list page by page.
13.tempo/page up– Used to adjust the tempo when the
song is playing.Also when the song list is on the screen,
you can scroll up page by page.
14.FM modulation/pitch–
Allows you to set the FM channel
to your stereo (104.0 MHz ~ 107.9 MHz) when a song is
NOT playing.When a song is playing it allows you to
adjust the pitch of the song higher or lower (male/female).
15.earphone jack– Allows you to use the microphone
with earphones.
16.LCD– Displays number of the selected song and lyrics.
10
features
Scoring Feature– Used to score a singer’s
performance.The score will show how well the tempo
is kept.Press the button and scroll to turn the
score display on or off.
Reserve Feature– You can reserve songs (32
maximum) and will play in the order that it was
reserved.Press the button and enter the song
number .To cancel a song press the button.
Melody on/off– By pressing the button before a
song is played, you can adjust the volume of the
melody.
Continuous Play– You can activate the continuous
play by pressing the button and selecting for
continuous play while a song is NOT playing.
FM Modulation– To broadcast through a stereo
system for enhanced performance, press the
button.Set the microphone and stereo to the same
frequency (104.0 MHz – 107.9 MHz).FM feature is
activated only when a song is NOT playing.

11
Instrument Setting– By pressing the button
while a song is playing select the best sound for your
song.The following instrument settings are available:
original, standard, power, electric, and dance kit.
Recording Feature– You can record yourself singing
to the music or alone by pressing the button.To
end the recording, simply press the button again.
To listen to your recording press the button while
a song is NOT playing.
12
songpacksTM
INSTALLINGSONGPACKS™
1.Turn the power off on the Microphone.
2.Insert songpacks™starting from the top slot first.Additional
songpacks™must be inserted directly below the previously
inserted songpack™.
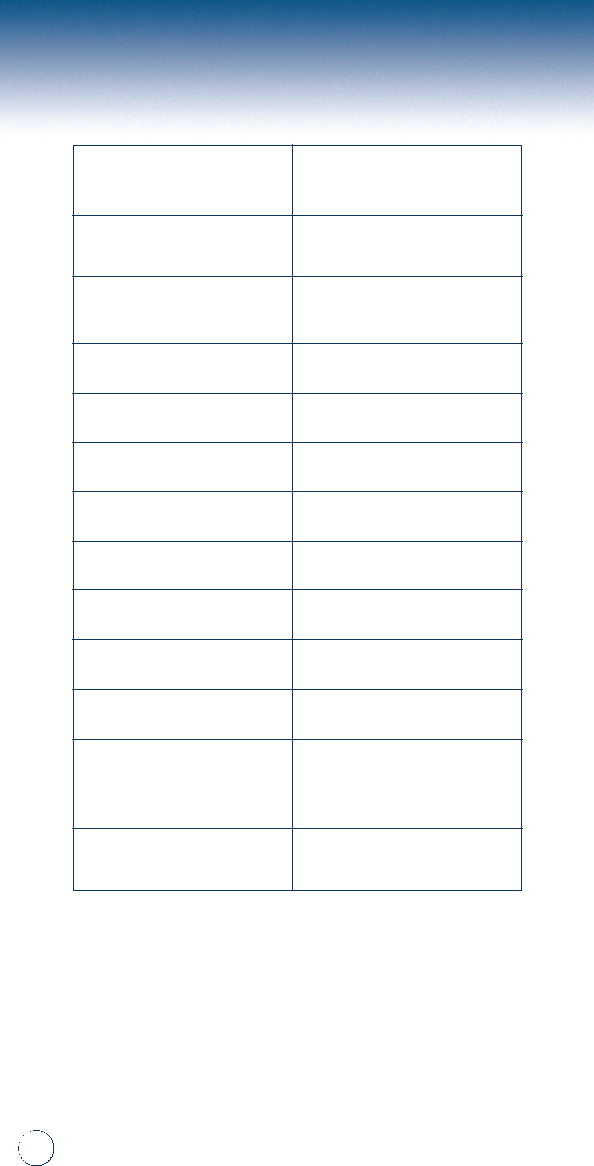
troubleshooting
Microphone doesn't
power on Using the Adapter:
•Verify if adapter is connected to power
source (100V or 200 V).
•Check contact point between cable jack
and adapter jack.
•Reconnect all connectors.
When using batteries:
•Did you insert 4AA batteries?
•Make sure batteries are inserted
(+ \-) correctly.
•Check to see if batteries have charge.
Microphone is
not working •Check the batteries.
•Press the arrow keys to check the
volume level.
Television not responding -
Audio/Video •Check to see if television is set to Video
1, 2 or 3.
•Check for battery wear or A/C adapter
contact to power source.
•Make sure headphones are not attached
to microphone.
•If using a stereo, check stereo volume.
•Verify cables are plugged into the proper
corresponding input on the television.
•If none of these items work, press and
hold the power key and nine key at the
same time.This will reset the unit.
•Only thirty-two songs can be reserved.
•Check to see if the song number input
is correct.
Unable to reserve songs
Problem Solution
13
Voice Frequency Range 200 ~ 15,000 Hz
(-68db)
Battery 1.5V x 4 Alkaline
Battery Life Microphone 3 hours
Duet™2 hours
FM Frequency Channel 104.0 - 107.9 MHz
TV Channel Video Channel
Specifications 215 x 48 (mm)
Weight 240g
Voltage 7V
Wattage 600mA
Resolution 516 x 256 (interlace)
Image Color INDEX 256 Color
Overflow (Under 10V) built-in
protection circuit for
reverse voltage
Operation temperature -20°C + 65°C
specifications
14

limited warranty
1 YEAR LIMITED WARRANTY
TFE World, Inc.warrants to the purchaser that this
product shall be free from all defects in material or
workmanship for 1 year from the original date of
purchase.This warranty does not apply to any product
that has been subject to abuse, misuse, negligence or
accident;please refer to the User Guide for proper
operating instructions and warnings.Defects caused by
tampering, unauthorized alterations or repairs and /or
use of the product other than originally intended are not
covered by this warranty.Defective product will be
repaired or replaced with the same or like model.
For warranty service/technical support call TFE World,
Inc.at (858) 622-1192.
If return of the product is required, carefully repack it in
its original packaging, along with proof of purchase and
a brief explanation of the problem.
Return to:
TFE World,Inc.
Attn:Warranty Department
6725 Mesa Ridge Rd, Ste.102
San Diego, CA 92121
Customer is responsible for all shipping and handling
charges on warranty return items.
This warranty gives you specific legal rights, and you
may have other legal rights that vary from state to
state.
15

16
notes