KTV Global LCM15AA 15" LCD CCTV Monitor User Manual
KTV Global Corporation 15" LCD CCTV Monitor Users Manual
Users Manual

TFT LCD TV
User’s Manual
LCM15AA
LCM17AA
CCTV COLOR MONITOR
LCD Monitor User’s Manual
Installation and cautions during the use
. . . . . . . . . . . . . . . . . . . . . . 2
Location controls
. . . . . . . . . . . . . . . . . . . . . . . . . . . . . . . . . . . . . . . . . . . . . . . . . . . . . . . . . . 4
Functions and control methods
. . . . . . . . . . . . . . . . . . . . . . . . . . . . . . . . . . . . . 5
To connect the power
. . . . . . . . . . . . . . . . . . . . . . . . . . . . . . . . . . . . . . . . . . . . . . . . . . . . . 8
Possible connections
. . . . . . . . . . . . . . . . . . . . . . . . . . . . . . . . . . . . . . . . . . . . . . . . . . . . . . 9
Checklists
. . . . . . . . . . . . . . . . . . . . . . . . . . . . . . . . . . . . . . . . . . . . . . . . . . . . . . . . . . . . . . . . . . . . . . . 10
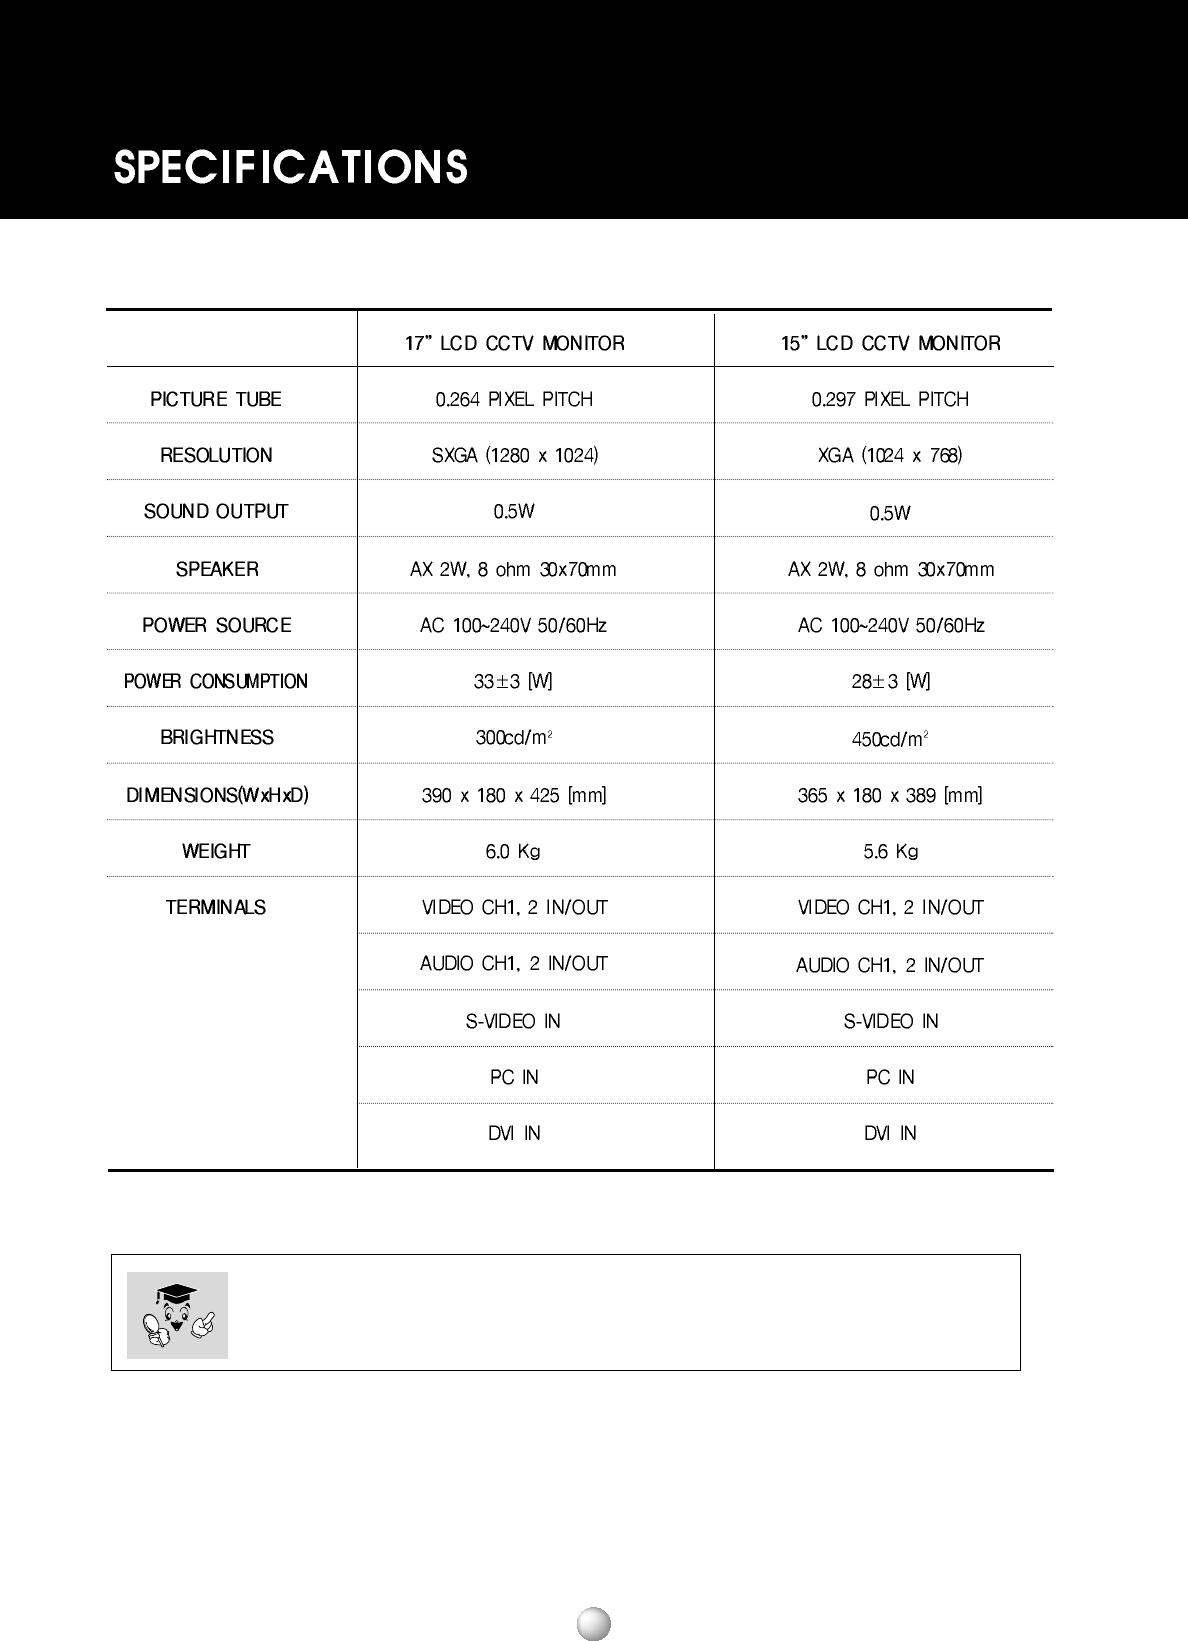
Specifications
. . . . . . . . . . . . . . . . . . . . . . . . . . . . . . . . . . . . . . . . . . . . . . . . . . . . . . . . . . . . . . . . . 11

LCD Monitor User’s Manual
SAFETY NOTES
TThhaannkk yyoouu ffoorr ppuurrcchhaassiinngg oouurr pprroodduucctt
BBeeffoorree uussiinngg iitt pplleeaassee rreeaadd tthhiiss uusseerr''ss mmaannuuaall ccaarreeffuullllyy aanndd aappppllyy iitt ccoorrrreeccttllyy aanndd ssaaffeellyy
PPlleeaassee kkeeeepp tthhiiss mmaannuuaall cclloossee ttoo yyoouu ssoo yyoouu ccaann rreeffeerr ttoo iitt aannyyttiimmee aafftteerr rreeaaddiinngg iitt
AAllssoo ffoorr tthhee ttrraannssppoorrttaattiioonn ooff tthhee pprroodduucctt pplleeaassee aattttaacchh tthhiiss mmaannuuaall wwiitthhoouutt ffaaiill
PPlleeaassee oobbsseerrvvee tthhee nnootteess bbeellooww
1. Use at the rated power voltage
Use of nonrated voltage may cause fire electric shock and breakdown
2. Do not open the cabinet and external cover
The high voltage inside of this product may cause the electric shock
3. Do not remodel or disassemble this product
Remodeling or disassembling in wrong method may cause fire electric shock or breakdown
4. Do not insert or drop any foreign substance such as metals or flammable object inside from the air hole
It may cause fire electric shock or breakdown
If any foreign substance is inserted inside of this product turn off the power pull the plug out of the socket and contact the
sales department Do not use the product with the foreign substance in
5. Do not place any vase potted plant cup medicine and any container with water on this product
If the liquid is spilt it may cause the fire electric shock or breakdown
6. Do not place this product with water nor moisten it
If water flows in it it may cause the fire electric shock or breakdown
If there is water inside of the product turn off the power immediately pull the plug out of the socket and contact the sales
department
Do not use the product with water in it
7. Never touch the antenna lie or power plug if it stars to thunder
It may cause the electric shock
8. If any impact is applied the parts inside of the product may be fallen out or broken to be the cause of fire electric shock or
breakdown
9. Clean the dust on the power plug periodically
The dusty power plug may cause the poor insulation due to the moisture to be the reason of fire
10. Do not destroy process make closer to heating device bend or twist forcibly place any heavy object on nor bind the power
cord or power plug If it is used in the broken condition it may cause fire or electric shock
11. Do not touch the power plug with wet hands
If you pull in or out the power plug with wet hands it may cause electric shocks
12. Put the power plug in firmly
Putting the plug incompletely may cause the electric shock or fire by the generation of heat
13. Do not use any nonrated power socket with numerous devices jointed on one power socket or cable device
The wire of nondesignated capacity may cause the fire due to the generation of heat
14. In case of malfunction turn off the power switch immediately and pull out the power plug
If this product is used in the abnormal condition such as damage to it foreign substance inside of the product generation of
joints smelling smoking overheating and non production of signal it may cause fire electric shock or breakdown
Turn off the power switch immediately pull the power plug out of the socket and contact to the sales store
15. Leave space cm or more from the wall for the installation of the device
Do not install it close to the wall nor block the ventilation of the air
Insufficient ventilation or accumulated heat inside of the product may cause the fire
16. Do not install it at the unstable location such as on the bouncing prop or tilted place
It may be tipped over as it loses balance or damaged as it is fallen down
SAFETY NOTES
LCD Monitor User’s Manual
17. Do not install at the place with moisture or dust
It may cause the fire or the electric shock
18. Do not install it at the place with poisonous gas
It may cause the fire
19. Do not install it at the location with continuous vibration
It may be tipped over as it loses balance or damaged as it is fallen down
20. Do not install it at the place on the strong magnetic field or current field
It may cause fire electric shock or break down
This equipment may be observed deterioration of the picture by electromagnetic radiation in electromagnetic environment
21. Fasten the wheel of the product or shelf with wheels when installing this product
If it moves or is tipped over it may be damaged
22. Do not leave it in the car under the burning sun for a long time
The high temperature may distort the cabinet or the parts inside may be broken down or heated
If you use this product in this condition it may cause the fire electric shock or breakdown due to the short circuit or poor
insulation
23. Do not place any fire source such as candlelight close to this product or place it on this product
If it is tipped over or fallen down it may cause damage or fire
24. Do not sprinkle water drops or water on this product
It may cause the fire the electric shock or breakdown
25. Do not place heavy objects on this product
It may be tipped over as it loses balance or damaged as it is fallen down
26. Do not transport it with the power cord or the connection cable connected
If you move this product with the power cord or the connection cable connected the damaged power cord connection cable
or connection terminal may cause the fire the electric shock or breakdown
27. Pull the power cord out while holding the plug portion
If you pull the power cord out by force the cord may the fire or the electric shock
28. Do not use it outdoor
Dust or rainstorm may cause the fire electric shock or breakdown
29. Do not climb on this product
If you climb on it it may damage or hurt it
30. persons or more shall transport the device which is heavier than kg
If you drop or tip over the device it may damage it
The weight is indicated on the user's manual
31. Use the attached power cord and connection cable or those which are indicated on the user's manual
If you do not use the designated power cord and connection cable it may cause the electric shock or breakdown
32. Turn off the power switch when connecting the power cord or connection cable
If you not turn off when connecting it it may cause the electric shock or breakdown
33. Do not use any chemical such as the paint thinner or benzine to clean the cabinet
It may scratch the surface or disappear the indication to cause wrong operation whch can be the reason for disorder
34. Clean the cabinet with time diluted neutral detergent water on smooth cloth as stirring to remove the contamination
After that clean it with dry cloth to remove any stain
LCD Monitor User’s Manual
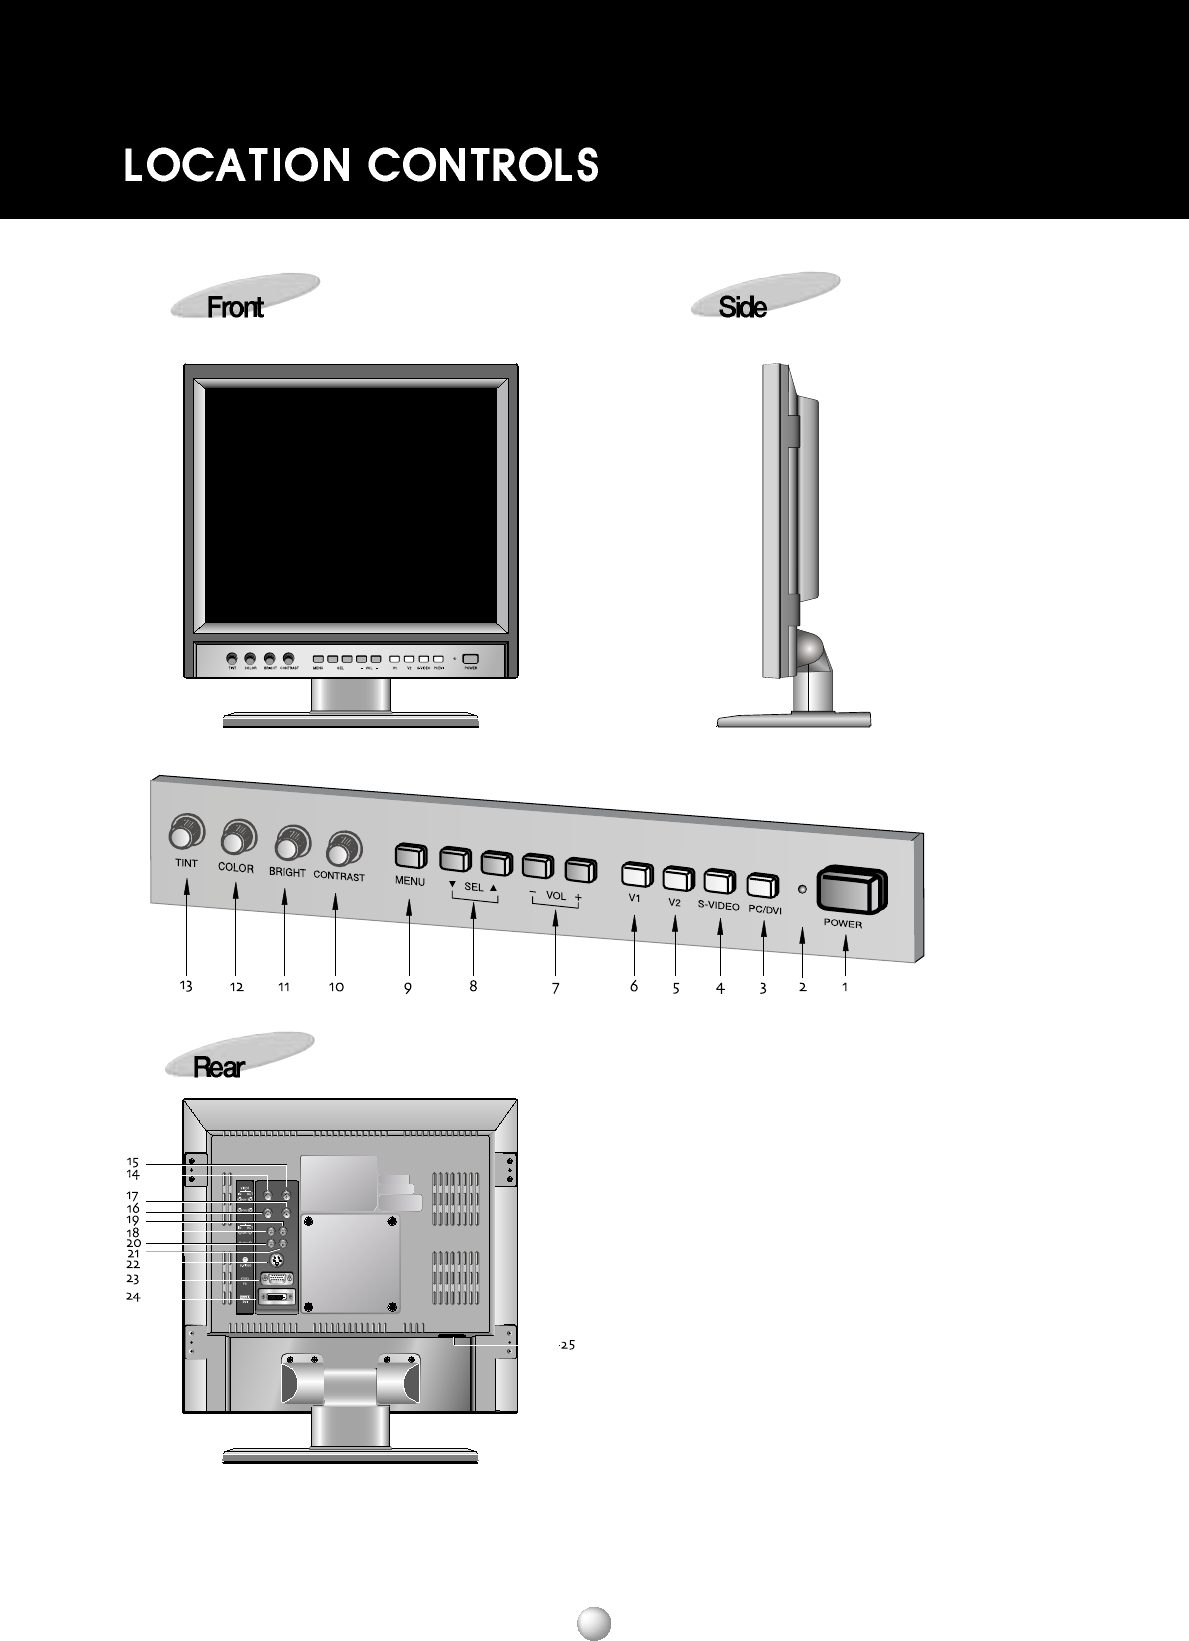
ON/OFF
POWER LED LAMP (STAND BY)
PC/DVI
SVIDEO
VIDEO
VIDEO
VOLUME DOWN/UP
SELECT
MENU
CONTRAST
BRIGHT
COLOR
TINT
VIDEO IN (CH)
VIDEO OUT (CH)
VIDEO IN (CH)
VIDEO OUT (CH)
AUDIO IN (CH)
AUDIO OUT (CH)
AUDIO IN (CH)
AUDIO OUT (CH)
SVIDEO
PC
DVI
AC INLET
LCD Monitor User’s Manual
1. ON/OFF BUTTON
: When you press this ON/OFF BUTTON, the power is turned on and the screen appears. When you press this button
again, the screen disappears.
2. POWER LED LAMP
: When SET is normally operated, a green lamp is turned on. The green lamp flickers in the status of STAND-BY.
STAND BY : ON/OFF BUTTON is off
3. PC/DVI BUTTON
: When you press this button, PC or DVI mode is selected.
4. S-VIDEO BUTTON
: When you press this button, S-VIDEO mode is selected.
If you want to see a clean and clear video through S-VIDEO input, select this.
5. V2 BUTTON
: When you press this button, VIDEO2 mode is selected.
Select this button to insert the camera input or video input into VIDEO CH2 terminal.
6. V1 BUTTON
: When you press this button, VIDEO1 mode is selected.
Select this button to insert the camera input or video input into VIDEO CH1 terminal.
7. VOLUME +, - BUTTON
: Adjust the volume up and down.
8. SEL BUTTON
: When you want to select the desired item in menu, press this button to move.
9. MENU BUTTON
: When you press this button, the menu window appears. When you press this button again, the menu window disappears.
10. CONTRAST
: Adjust the screen s contrast. (Operate in VIDEO1 mode, VIDEO2 mode, and S-VIDEO mode)
11. BRIGHT
: Adjust the screen s brightness. (Operate in VIDEO1 mode, VIDEO2 mode, and S-VIDEO mode)
12. COLOR
: Adjust the screen s color. (Operate in VIDEO1 mode, VIDEO2 mode, and S-VIDEO mode)
13. TINT
: Adjust the screen s tint. (Operate in VIDEO1 mode, VIDEO2 mode, and S-VIDEO mode)
14. 15. 16. 17 VIDEO IN/OUT
: This is the terminal to receive the video from the camera. It is used to connect the video, to connect & record the video, or
to connect many monitors.
18. 19. 20. 21 AUDIO IN/OUTPUT
: It is the terminal to receive the audio from the camera.
It can be used by connecting the external audio equipment.
22. S-VIDEO JACK
: When you want to see a high definition S-VIDEO, use the S-VIDEO input of this monitor. You can enjoy the clean and
clear video.
23.
PC JACK : When you use this monitor as PC monitor, you can use it by connecting the PC Cable to PC Jack of this monitor.
24. DVI JACK : It is the terminal to receive DVI Input. You can use it by connecting DVI Input.
25. POWER INLET
: Inlet the AC power (AC100~240V, 50/60Hz)
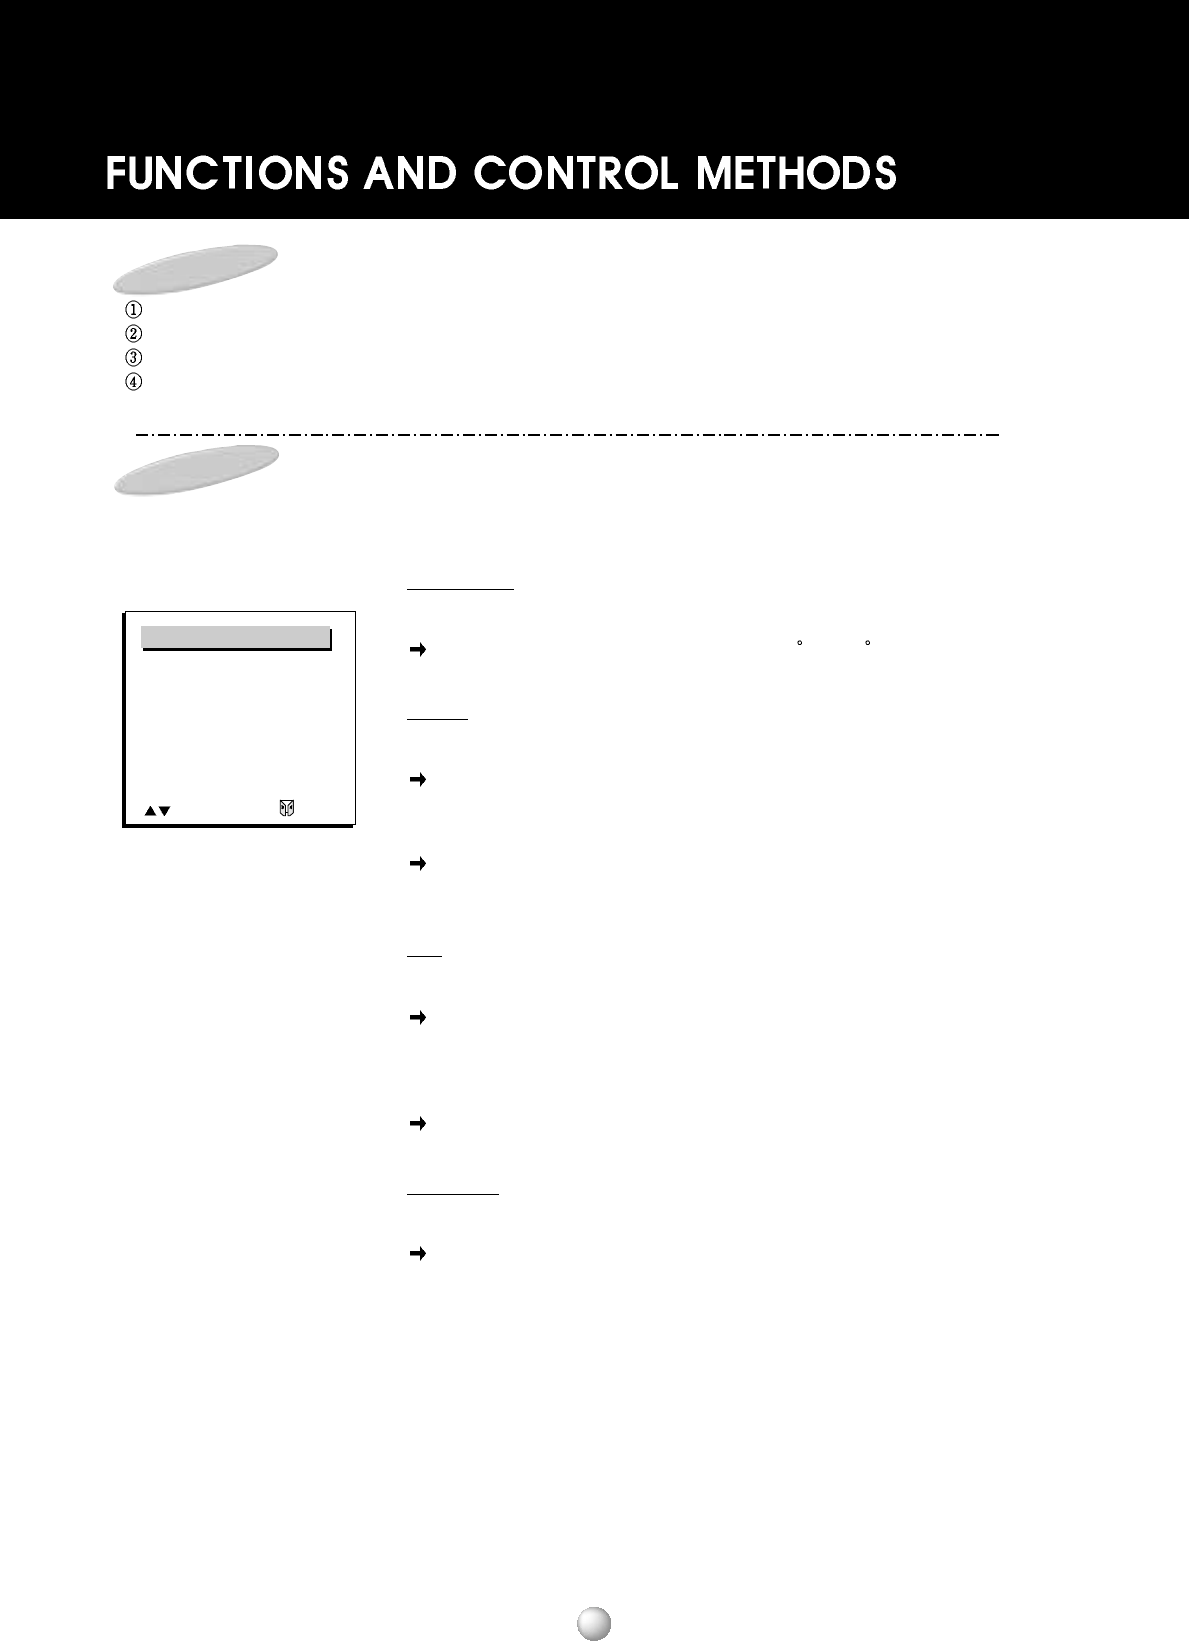
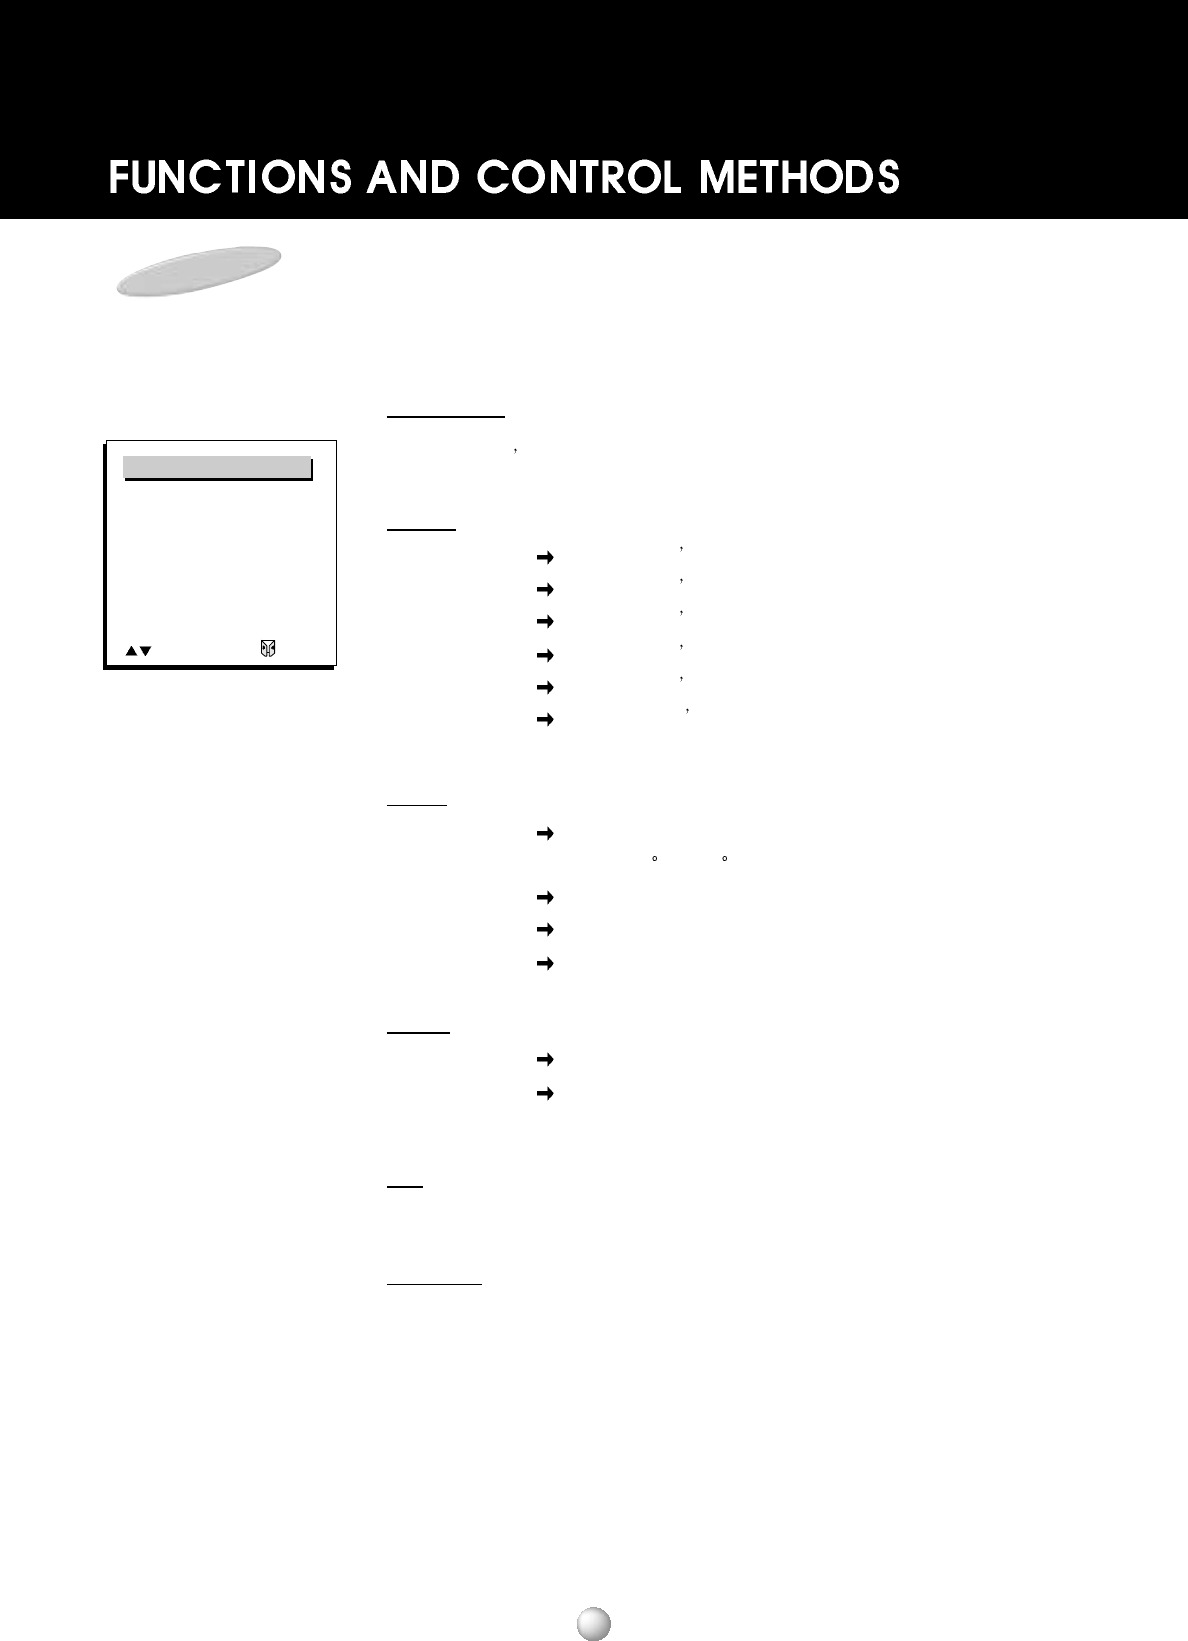
MENU Operation
When you press the MENU button, the MENU window appears on screen.
Press SEL BUTTON to move to the desired item.
Press VIO+ key to select the desired item.
To shut down the MENU window, wait for time when the MENU window disappears or press the MENU button again.
MENU in VIDEO1, VIDEO2, and S-VIDEO
It shows the MOVE button, SEL button, and EXIT button on a bottom of MENU window.
COLOR TEMP
9300/6500
You can select a temperature of desired color.
(9300 K / 6500 K)
UTILITY
ALL BLUE : OFF/ON
When you select ON of ALL BLUE, a full screen is blue.
OVER SCAN : 0%, 5%, 10%
You can select 0% (original screen), 5% (zoom-in screen), or 10% (zoom-in screen) by
selecting OVER SCAN.
OSD
OSD TIMEOUT
You can select the time when OSD window appears on screen in 5 seconds unit up to 5~60
seconds.
OSD TRANSPARENCY
You can select the OSD Transparency in the unit of 20% up to MIN ~ MAX.
LANGUAGE
ENGLISH, FRANÇAIS, DEUTSCH, ESPAÑOL, DANISH, ITALIANO
The above six languages are offered. You can select one of above languages
LCD Monitor User’s Manual
COLOR TEMP
UTILITY
OSD
LANGUAGE
:MOVE +:SEL. :EXIT
MAIN MENU
LCD Monitor User’s Manual
MENU in PC / DV1
When you press the MENU Button, the MENU screen appears.
It shows a resolution, vertical and horizontal frequency of current monitor on the bottom of MENU Window.
AUTO ADJUST
Adjust the screen s status in PC mode automatically.
SCREEN
BRIGHTNESS
Adjust the screen s brightness
CONTRAST
Adjust the screen s contrast
H.POSITION
Adjust the screen s horizontal position
V.POSITION
Adjust the screen s vertical position
PHASE ADJUST
Adjust the screen s phase
CLOCK ADJUST
Adjust the screen s horizontal size through a increase/decrease in the
number of Pixel.
COLOR
COLOR TEMP
Select the temperature of desired color
(USER / 9300 K / 6500 K)
RED
Adjust the red tint of screen
GREEN
Adjust the green tint of screen
BLUE
Adjust the blue tint of screen
UTILITY
RECALL
Go back to a basic default to be delivered from a factory
FULL AUTO
Optimize the screen status in PC mode automatically and set the color
value by re-measuring it
OSD
Same as the operation in VIDEO1, VIDEO2, and S-VIDEO
LANGUAGE
Same as the operation in VIDEO1, VIDEO2, and S-VIDEO
AUTO ADJUST
SCREEN
COLOR
UTILITY
OSD
LANGUAGE
:MOVE +:SEL. :EXIT
MAIN MENU
LCD Monitor User’s Manual
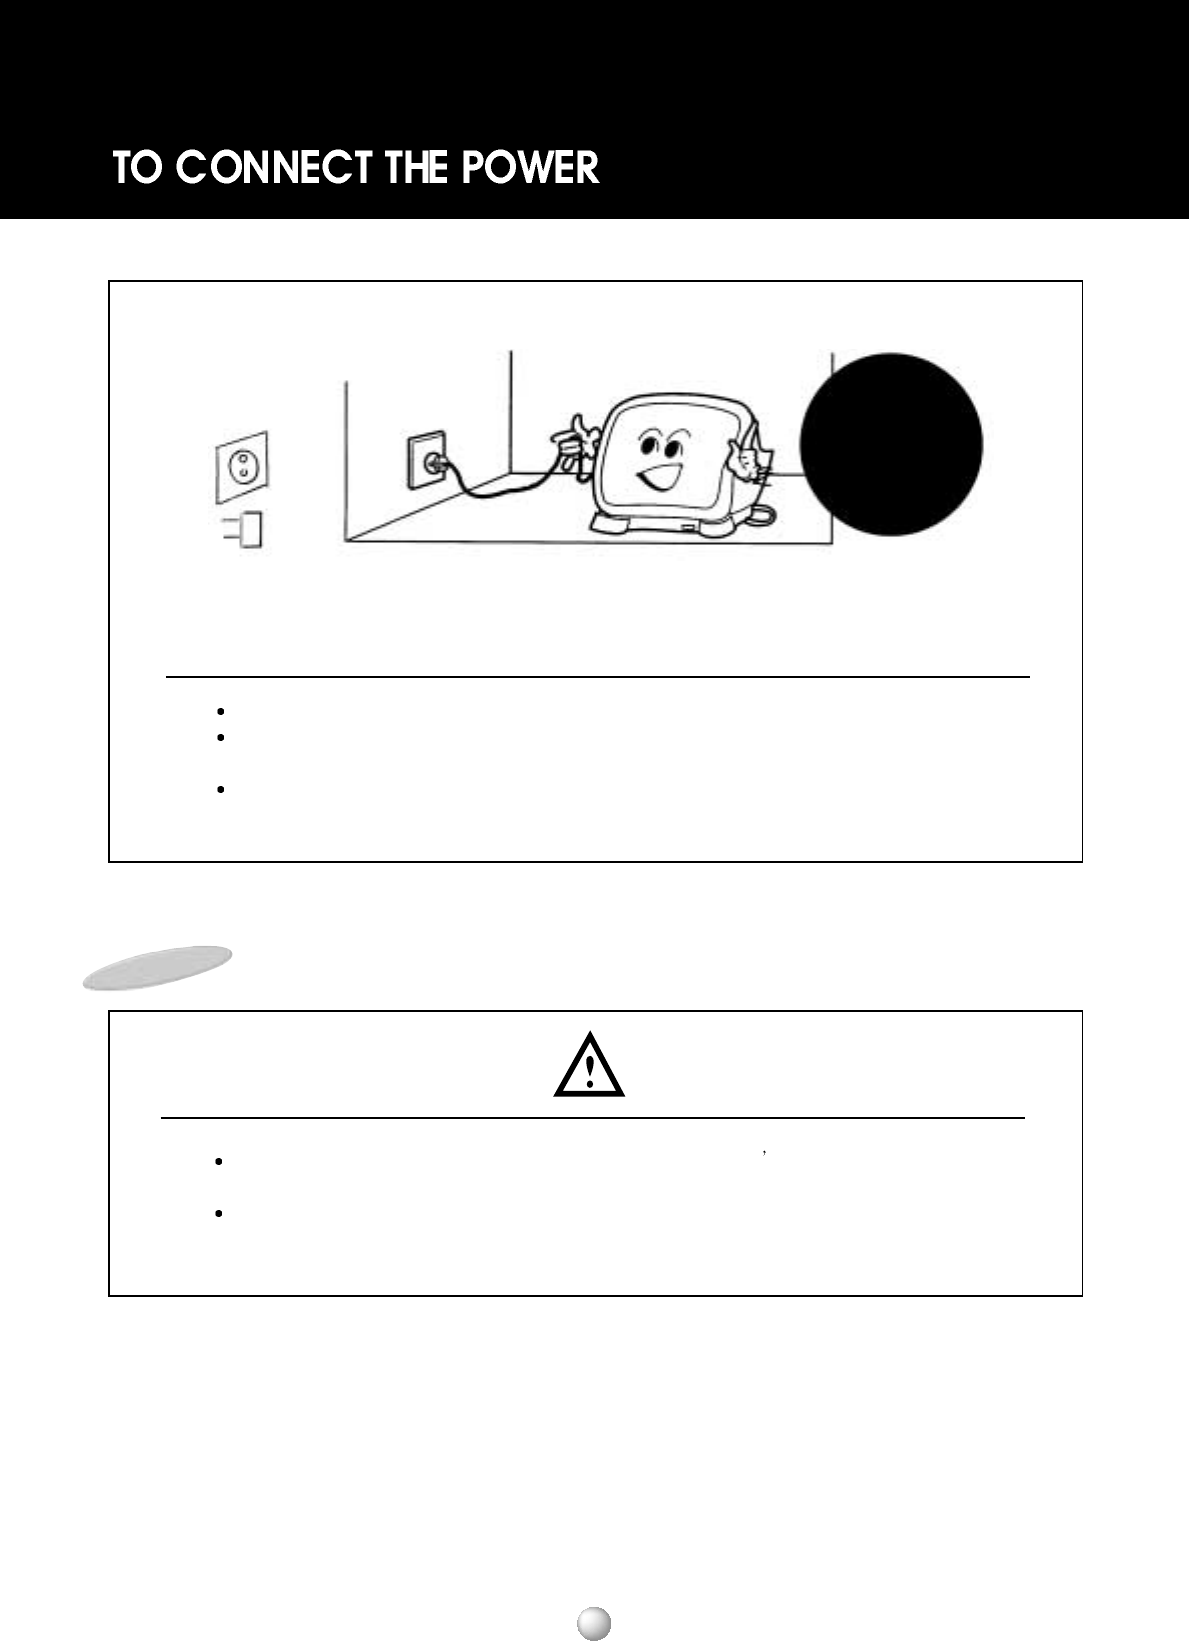
Be sure to connect the conversion plug to the power plug by the outlet!
This monitor can be available both in AC V / V Hz
Various input voltage (within a range of ACV) can be available
(Do not use it in the voltage higher than a rated voltage)
V/V selector switch is not necessary This monitor can be operated directly without a special operation
CAUTION
Make sure to operate this monitor in the rated voltage described in the user s manual or the monitor
(When the voltage higher than the rated voltage is supplied it may give damage to a receiver
If you do not use the monitor for a long time you must pull out the power plug from the inlet for safety
TThhiiss mmoonniittoorr ccaann
bbee aavvaaiillaabbllee
rreeggaarrddlleessss ooff
VV//VV
Plug
Outlet
Conversion plug
LCD Monitor User’s Manual
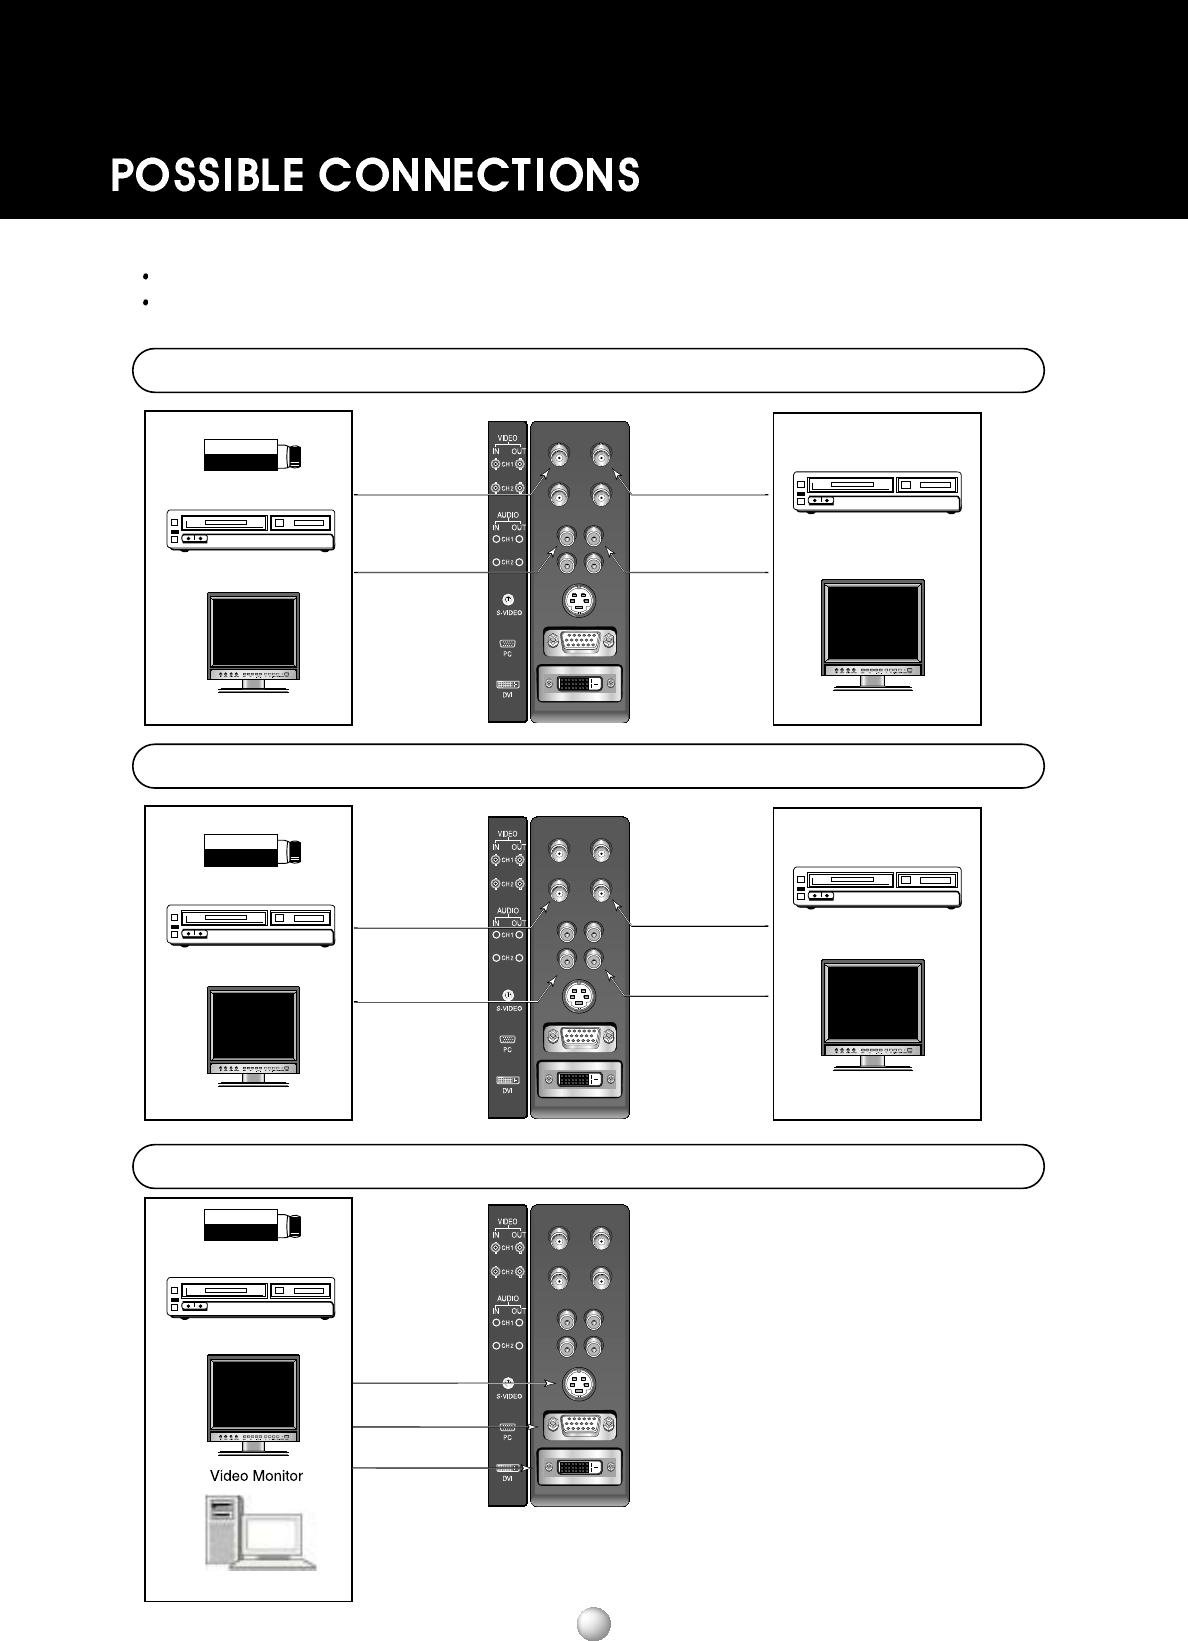
Video camera
Video Monitor
AUDIO IN
Audio signal cable
VIDEO IN
AUDIO OUT
(through out)
VIDEO OUT
(through out)
Video signal cable
Video camera
Video Monitor
Video camera
VCR or DVD
VCR or DVD
VCR or DVD
S-VIDEO IN
D-SUB 15 PIN
(Analog RGB)
DVI(Digital RGB)
AUDIO OUT
(through out)
VIDEO OUT
(through out)
AUDIO IN
Audio signal cable
VIDEO IN
Video signal cable
PC
S-VIDEO / D-SUB 15PIN / DVI connection (Select input S-VIDEO,PC/DVI button)
Read the installation/operation manual thoroughly before connecting equipment.
Turn off the power source before connecting the monitor and external equipment.
VIDEO 1 Connection (Select input VIDEO 1 button)
VIDEO 2 Connection (Select input VIDEO 2 button)
LCD Monitor User’s Manual
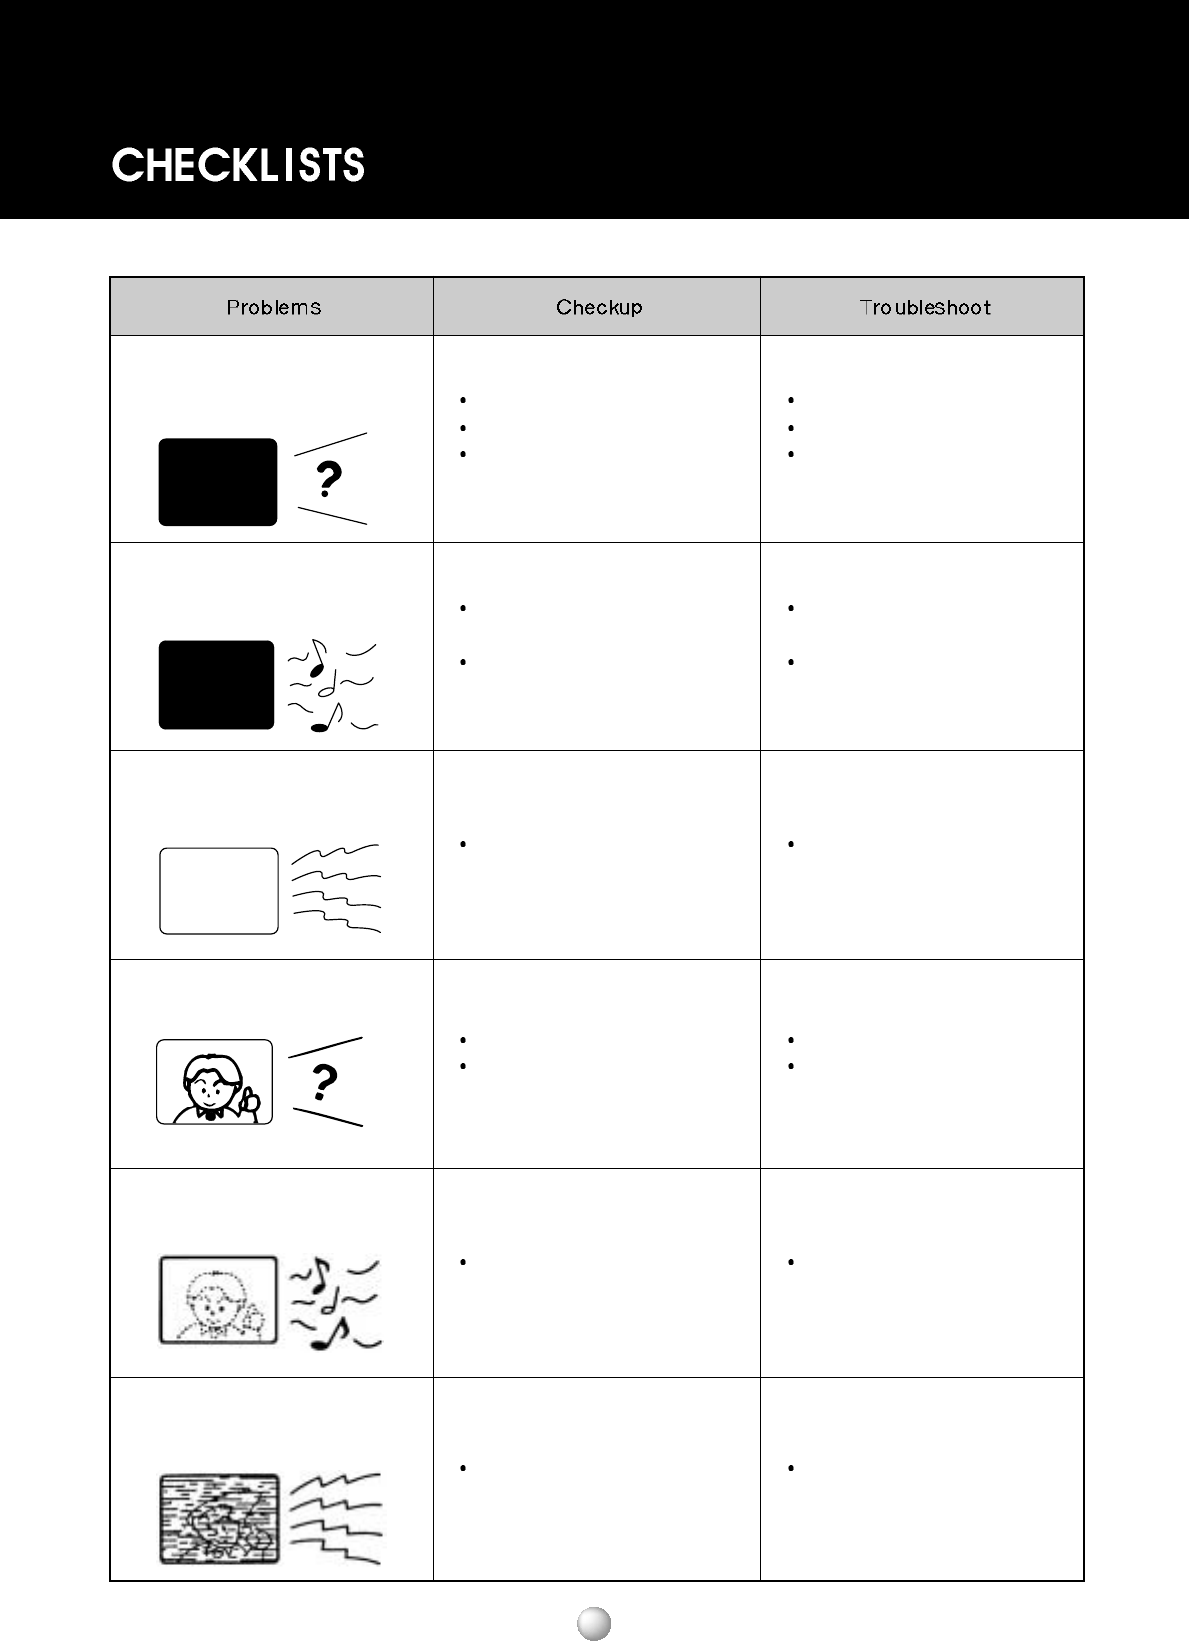
The screen doesn't appear and
the sound is not heard Is the power cord pulled out?
Is the power turned off?
Is this monitor connected with the
external equipment erroneously?
Is the contrast and brightness
wrongly controlled?
Is this monitor connected with the
external equipment erroneously?
Is the external equipment correctly
connected?
Is the volume turned down?
Is this monitor connected with the
external equipment erroneously?
Is the tint and color correctly
adjusted?
Is the external equipment correctly
connected?
Connect the power cord correctly
Press the power button.
Check the cord and then connect it
correctly.
Adjust the contrast and brightness
correctly.
Check the cord and then connect it
correctly.
Check the cord and then connect it
correctly.
Adjust the volume.
Check the cord and then connect it
correctly.
Adjust the contrast and brightness
correctly.
Check the cord and then connect it
correctly.
The sound is heard but the
video doesn't appear
The video appears but it is
interrupted by static
Not the sound is heard
The screen color is not clear
and clean
The screen is shaken and is
affected by static
If your monitor is out of order, check up the below problems firstly.
LCD Monitor User’s Manual
This monitor has received the EMI (Electromagnetic interference) test for the business.
Accordingly, a seller or user needs to know about it. If you purchase the erroneous monitor, be sure to
exchange it into non-business monitor in the shop where you buy it.