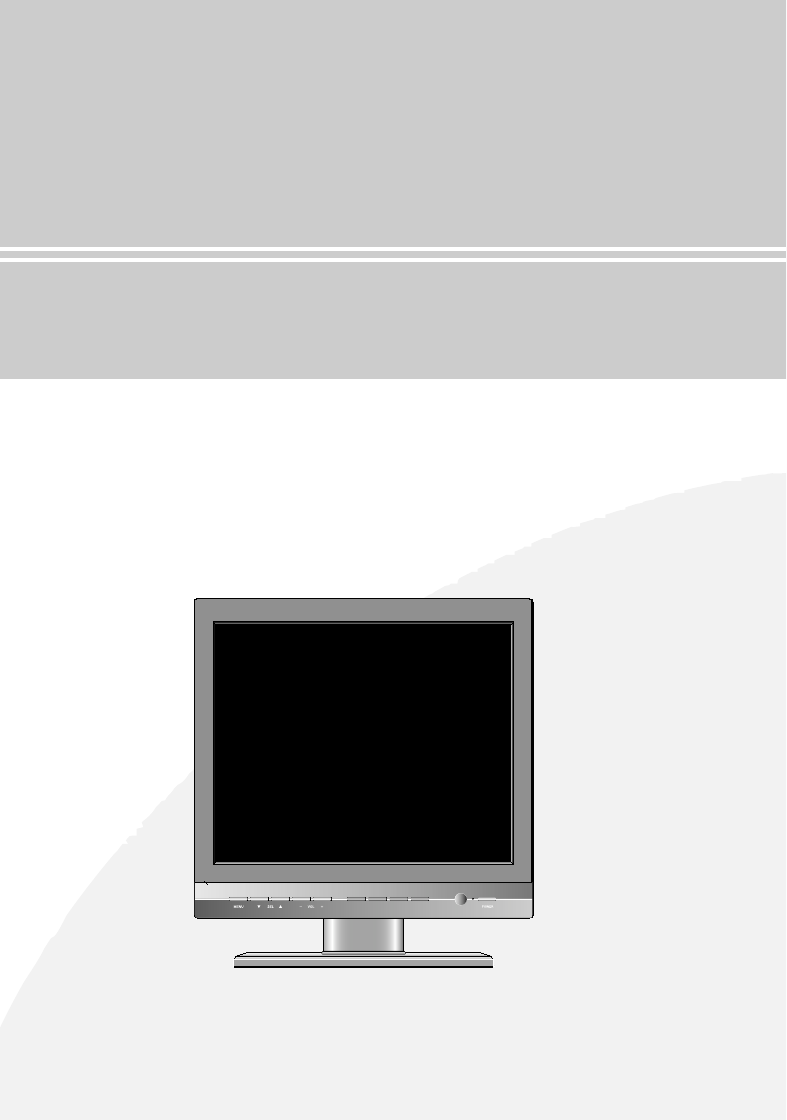
KTV Global LCM17BB 17" TFT LCD CCTV MONITOR User Manual User s Manual H ok
KTV Global Corporation 17" TFT LCD CCTV MONITOR User s Manual H ok
USERS MANUAL

EUT Type: 17” TFT LCD CCTV Monitor
FCC ID: BRFLCM17BB
Test Report No.: GETEC-E3-06-075
FCC Class B Certification
APPENDIX H
: USER’S MANUAL
TFT LCD TV
User’s Manual
VIDEO
VIDEO
PC/DVI
PC/DVI
PIP
PIP
SWAP
SWAP
CCTV COLOR LCD MONITOR
Part No. 11900000
Shock Hazard Marking and Associated Graphical Symbols
Explanation of Safety Related Symbols
This symbol is intended to alert the user to the presence of uninsulated
"dangerous voltage" within the product's enclosure
that may be of sufficient
magnitude to constitute a risk of electric shock to persons.
This symbol is intended to alert the user to the presence of important
operating and maintenance (servicing) instructions in the literature
accompanying the appliance.
WARNING
-
To Reduce The Risk Of Fire Or Electric Shock, Do Not Expose This Apparatus To
Rain Or Moisture.
Important Safety Instructions
3
FCC Requirements
5
Safety Notices
6
Location control
8
REMOTE Control Unit 10
Functions and Control Methods
11
To connect the power
18
Possible connections
19
Troubleshooting Tip
20
Specifications
21
CAUTION
RISK OF ELECTRIC SHOCK
DO NOT OPEN
CAUTION
RISK OF ELECTRIC SHOCK
DO NOT OPEN
CAUTION : TO REDUCE THE RISK OF
ELECTRIC SHOCK, DO NOT REMOVE
COVER (OR BACK).
NO USER-SERVICEABLE PARTS
INSIDE. REFER SERVICING TO
QUALIFIED SERVICE PERSONNEL.
LCD Monitor User’s Manual
LCD Monitor User’s Manual
This device complies with Part 15 of the FCC Rules and Regulations. Operation is subject to the following two
conditions: (1) This device may not cause harmful interference, and (2) this device must tolerate any interfer-
ence encountered, including interference that may cause improper operation.
The equipment has been tested and found to comply with the requirements stipulated in Part 15 of FCC regula-
tions for a Class B digital device. These requirements are designed to provide reasonable protection against
harmful interference in a residential installation.
This equipment generates, uses and can radiate radio frequency energy and, if not installed and used in strict
compliance with the instructions, may disrupt radio communications. However, there is no guarantee that inter-
ference will not occur in a particular installation. If this equipment does cause detrimental interference with radio
or television reception, which can be determined by turning the equipment off and on, the user is encouraged to
try to correct the interference by taking one or more of the following measures:
Reorienting or relocating the receiving antenna.
Increasing the separation between the equipment and the receiver.
Connecting the equipment into an outlet on a circuit different from that to which the
receiver is connected.
Consulting the dealer or an experienced radio/TV technician for help.
Shielded interconnected cables and shielded power cords must be used with this equipment to ensure compli-
ance with the pertinent RFD emission limits governing this device.
Changes or modifications not expressly approved by the manufacturer could void the user's right to operate the
equipment.
Notice of Compliance with Canadian Interference-causing Equipment Regulations.
This Class B digital apparatus meets all requirements of the Canadian Interference-Causing Equipment
Regulations.
Cet appareil numerique de classe B satisfait toutes les exigences des reglementations canadiennes inherentes
aux equipements generant des interferences.
Before connecting the AC power cord to the DC adapter outlet, make sure the voltage designation of
the DC adapter corresponds to the local electrical supply.
Never insert anything metallic into the cabinet openings of the Liquid Crystal Display LCD Monitor:
doing so may create the danger of electric shock.
To avoid electric shock, never touch the inside of the LCD Monitor. Only a qualified technician should
open the case of the LCD Monitor.
Never use your LCD Monitor if the power cord has been damaged. Do not allow anything to rest n the
power cord, and keep the cord away from areas wherepeople can trip over it.
Be sure to hold the plug, not the cord, when disconnecting the LCD Monitor from an electric socket.
Openings in the LCD Monitor cabinet are provided for ventilation. To prevent overheating, these open-
ings should not be blocked or covered. Also, avoid using the LCD Monitor on a bed, sofa, rug, or other
soft surface. Doing so may block the ventilation openings in the bottom of the cabinet.
If you put the LCD Monitor in a bookcase or some other enclosed space, be sure to provide adequate
ventilation. Put your LCD Monitor in a location with low humidity and a minimum of dust.
Do not expose the LCD Monitor to rain or use it near water.
(in kitchen, near swimming pool, etc.). If the LCD Monitor accidentally gets wet, unplug it and contact
an authorized dealer immediately. You can clean the LCD Monitor with a damp cloth when necessary,
but be sure to unplug the LCD Monitor first.
Place the LCD Monitor on a solid surface and treat it carefully.
The screen is made of thin glass with a plastic front surface and be damaged if dropped, hit or
scratched.
Do not clean the front panel with keton-type materials (e.g., acetone), ethyl alcohol, toluene, ethylacid,
methyl, or chloride - these may damage the panel.
Locate your LCD Monitor near an easily accessible AC outlet.
CAUTION
RISK OF ELECTRIC SHOCK
DO NOT OPEN
CAUTION : TO REDUCE THE RISK OF
ELECTRIC SHOCK, DO NOT REMOVE
COVER (OR BACK).
NO USER-SERVICEABLE PARTS
INSIDE. REFER SERVICING TO
QUALIFIED SERVICE PERSONNEL.
LCD Monitor User’s Manual
LCD Monitor User’s Manual
SAFETY NOTES
17. Do not install at the place with moisture or dust
It may cause the fire or the electric shock
18. Do not install it at the place with poisonous gas
It may cause the fire
19. Do not install it at the location with continuous vibration
It may be tipped over as it loses balance or damaged as it is fallen down
20. Do not install it at the place on the strong magnetic field or current field
It may cause fire electric shock or break down
This equipment may be observed deterioration of the picture by electromagnetic radiation in electromagnetic environment
21. Fasten the wheel of the product or shelf with wheels when installing this product
If it moves or is tipped over it may be damaged
22. Do not leave it in the car under the burning sun for a long time
The high temperature may distort the cabinet or the parts inside may be broken down or heated
If you use this product in this condition it may cause the fire electric shock or breakdown due to the short circuit or poor
insulation
23. Do not place any fire source such as candlelight close to this product or place it on this product
If it is tipped over or fallen down it may cause damage or fire
24. Do not sprinkle water drops or water on this product
It may cause the fire the electric shock or breakdown
25. Do not place heavy objects on this product
It may be tipped over as it loses balance or damaged as it is fallen down
26. Do not transport it with the power cord or the connection cable connected
If you move this product with the power cord or the connection cable connected the damaged power cord connection cable
or connection terminal may cause the fire the electric shock or breakdown
27. Pull the power cord out while holding the plug portion
If you pull the power cord out by force the cord may the fire or the electric shock
28. Do not use it outdoor
Dust or rainstorm may cause the fire electric shock or breakdown
29. Do not climb on this product
If you climb on it it may damage or hurt it
30. persons or more shall transport the device which is heavier than kg
If you drop or tip over the device it may damage it
The weight is indicated on the user's manual
31. Use the this unit shall be connected to a mains socket outlet with a protective earthing connection
And connection cable or those which are indicated on the user's manual
If you do not use the designated power cord and connection cable it may cause the electric shock or breakdown
32. Turn off the power switch when connecting the power cord or connection cable
If you not turn off when connecting it it may cause the electric shock or breakdown
33. Do not use any chemical such as the paint thinner or benzine to clean the cabinet
It may scratch the surface or disappear the indication to cause wrong operation whch can be the reason for disorder
34. Clean the cabinet with time diluted neutral detergent water on smooth cloth as stirring to remove the contamination
After that clean it with dry cloth to remove any stain
SAFETY NOTES
TThhaannkk yyoouu ffoorr ppuurrcchhaassiinngg oouurr pprroodduucctt
BBeeffoorree uussiinngg iitt pplleeaassee rreeaadd tthhiiss uusseerr''ss mmaannuuaall ccaarreeffuullllyy aanndd aappppllyy iitt ccoorrrreeccttllyy aanndd ssaaffeellyy
PPlleeaassee kkeeeepp tthhiiss mmaannuuaall cclloossee ttoo yyoouu ssoo yyoouu ccaann rreeffeerr ttoo iitt aannyyttiimmee aafftteerr rreeaaddiinngg iitt
AAllssoo ffoorr tthhee ttrraannssppoorrttaattiioonn ooff tthhee pprroodduucctt pplleeaassee aattttaacchh tthhiiss mmaannuuaall wwiitthhoouutt ffaaiill
PPlleeaassee oobbsseerrvvee tthhee nnootteess bbeellooww
1. Use at the rated power voltage
Use of nonrated voltage may cause fire electric shock and breakdown
2. Do not open the cabinet and external cover
The high voltage inside of this product may cause the electric shock
3. Do not remodel or disassemble this product
Remodeling or disassembling in wrong method may cause fire electric shock or breakdown
4. Do not insert or drop any foreign substance such as metals or flammable object inside from the air hole
It may cause fire electric shock or breakdown
If any foreign substance is inserted inside of this product turn off the power pull the plug out of the socket and contact the
sales department Do not use the product with the foreign substance in
5. Do not place any vase potted plant cup medicine and any container with water on this product
If the liquid is spilt it may cause the fire electric shock or breakdown
6. Do not place this product with water nor moisten it
If water flows in it it may cause the fire electric shock or breakdown
If there is water inside of the product turn off the power immediately pull the plug out of the socket and contact the sales
department
Do not use the product with water in it
7. Never touch the antenna lie or power plug if it stars to thunder
It may cause the electric shock
8. If any impact is applied the parts inside of the product may be fallen out or broken to be the cause of fire electric shock or
breakdown
9. Clean the dust on the power plug periodically
The dusty power plug may cause the poor insulation due to the moisture to be the reason of fire
10. Do not destroy process make closer to heating device bend or twist forcibly place any heavy object on nor bind the power
cord or power plug If it is used in the broken condition it may cause fire or electric shock
11. Do not touch the power plug with wet hands
If you pull in or out the power plug with wet hands it may cause electric shocks
12. Put the power plug in firmly
Putting the plug incompletely may cause the electric shock or fire by the generation of heat
13. Do not use any nonrated power socket with numerous devices jointed on one power socket or cable device
The wire of nondesignated capacity may cause the fire due to the generation of heat
14. In case of malfunction turn off the power switch immediately and pull out the power plug
If this product is used in the abnormal condition such as damage to it foreign substance inside of the product generation of
joints smelling smoking overheating and non production of signal it may cause fire electric shock or breakdown
Turn off the power switch immediately pull the power plug out of the socket and contact to the sales store
15. Leave space cm or more from the wall for the installation of the device
Do not install it close to the wall nor block the ventilation of the air
Insufficient ventilation or accumulated heat inside of the product may cause the fire
16. Do not install it at the unstable location such as on the bouncing prop or tilted place
It may be tipped over as it loses balance or damaged as it is fallen down
LCD Monitor User’s Manual
LCD Monitor User’s Manual
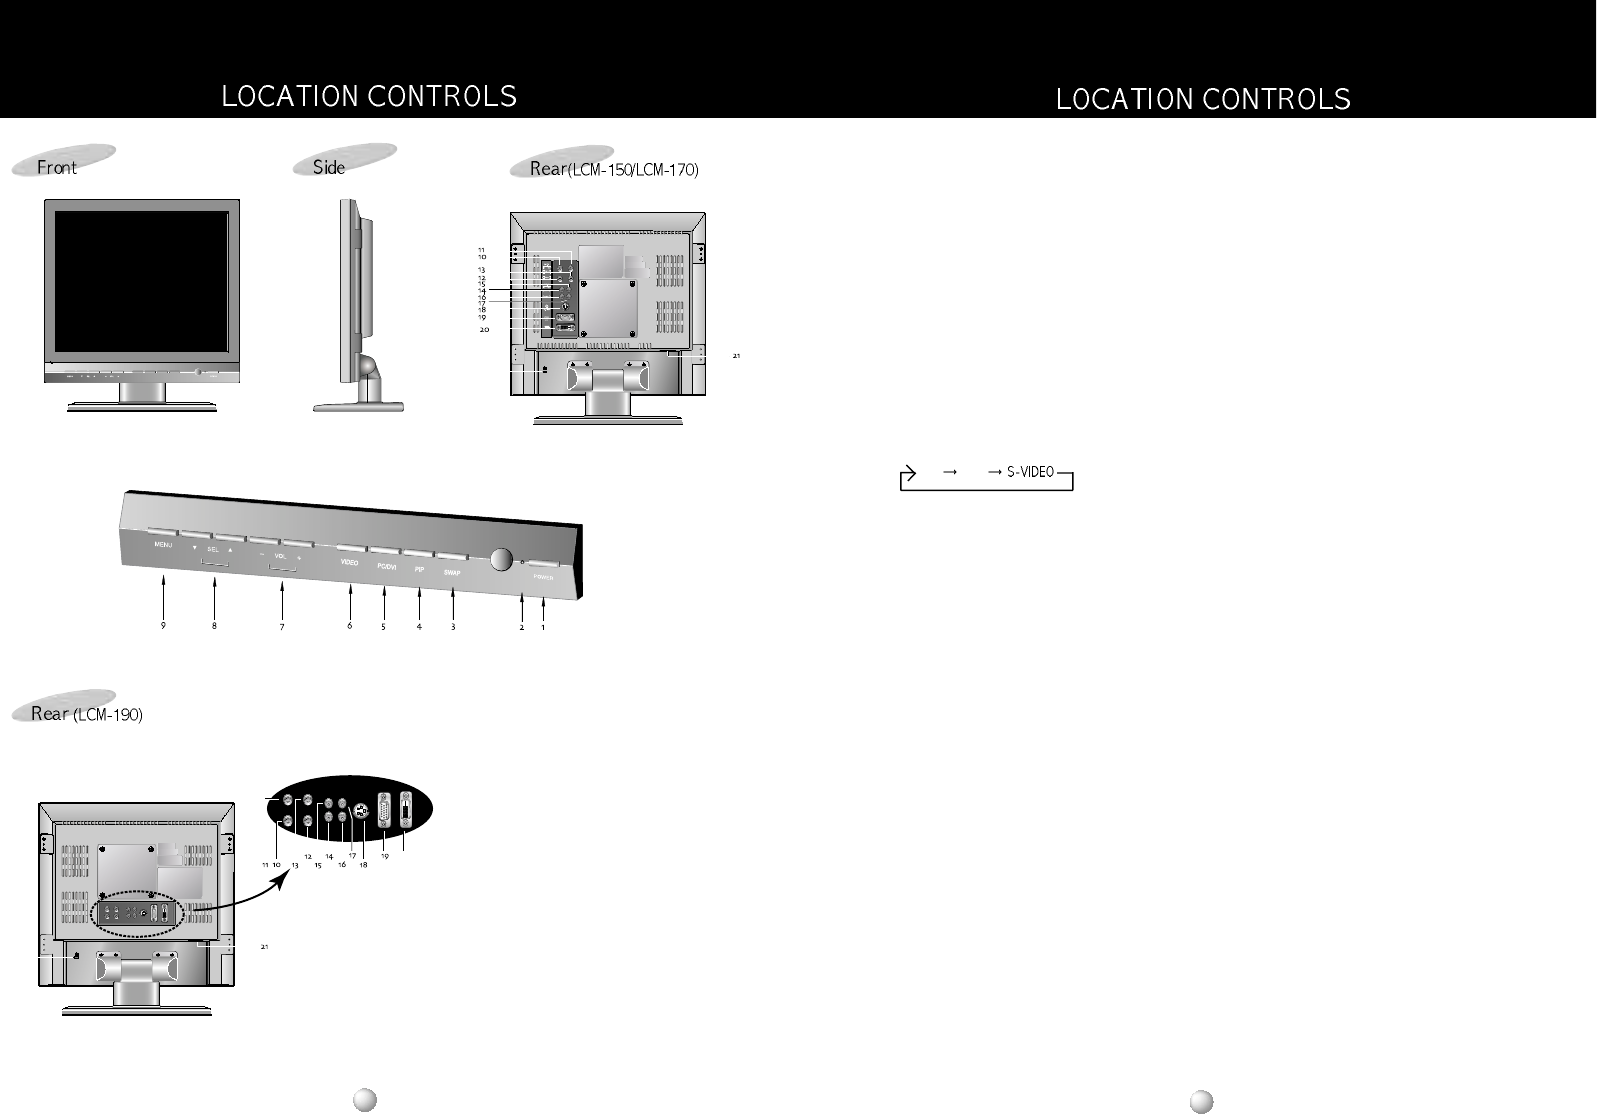
1. POWER BUTTON
:
Press to turn the LCD monitor ON. The POWER LED LAMP will illuminate.
2. POWER LED LAMP
: When SET is normally operated, a green lamp is turned on.
STAND BY : A Red lamp is turned on. (Operate in VIDEO1 mode, VIDEO2 mode, S-VIDEO mode and PC mode)
POWER SAVING : A Amber lamp is turned on. (Operate in PC mode)
3. SWAP BUTTON
: When you press this button, change main screen to sub-screen.
(Only useful in PIP mode)
4. PIP BUTTON
: When you press this button, PIP mode is selected.
5. PC/DVI BUTTON
: When you press this button, PC mode or DVI mode is selected.
6. VIDEO
: Select input source
AV1 AV2
7. VOLUME +, - BUTTON
: Adjust the volume up and down.
8. SEL BUTTON
: When you want to select the desired item in menu, press this button to move.
9. MENU BUTTON
: When you press this button.
the menu window appears. When you press this button again, the menu window disappears.
10. 11. 12. 13 VIDEO IN/OUT
: This is the terminal to receive the video from the camera. It can be used by connecting the
external video equipment.
14. 15. 16. 17. AUDIO IN/OUTPUT
: It is the terminal to receive the audio from the camera.
It can be used by connecting the external audio equipment.
18. S-VIDEO JACK
: When you want to see a high definition S-VIDEO, use the S-VIDEO input of this monitor. You can enjoy the clean and
clear video.
19. PC JACK
: When you use this monitor as PC monitor, you can use it by connecting the PC Cable to PC Jack of this monitor.
20. DVI JACK
: When you use this monitor as DVI monitor, you can use it by connecting the DVI Cable to DVI Jack of this monitor.
21. POWER INLET
: Inlet the AC power (AC100~240V, 50/60Hz)
22. KENSINGTON LOCK HOLE
It will be able to prevent a robbery.
LCD Monitor User’s Manual
VIDEOVIDEO PC/DVIPC/DVI PIPPIP SWAPSWAP
DVI
POWER
POWER LED LAMP (STAND BY)
SWAP
PIP
PC / DVI
VIDEO
VOLUME DOWN/UP
SELECT
MENU
VIDEO IN (CH)
VIDEO OUT(CH)
VIDEO IN (CH)
VIDEO OUT (CH)
AUDIO IN (CH)
AUDIO OUT (CH)
AUDIO IN (CH)
AUDIO OUT (CH)
SVIDEO
PC
DVI
POWER INLET
KENSINGTON LOCK HOLE
DVI
DVI
VIDEO PC/DVI PIP SWAP
DVI
VIDEO PC/DVI PIP SWAP
DVIDVI
VIDEO PC/DVI PIP SWAP
DVI
LCD Monitor User’s Manual
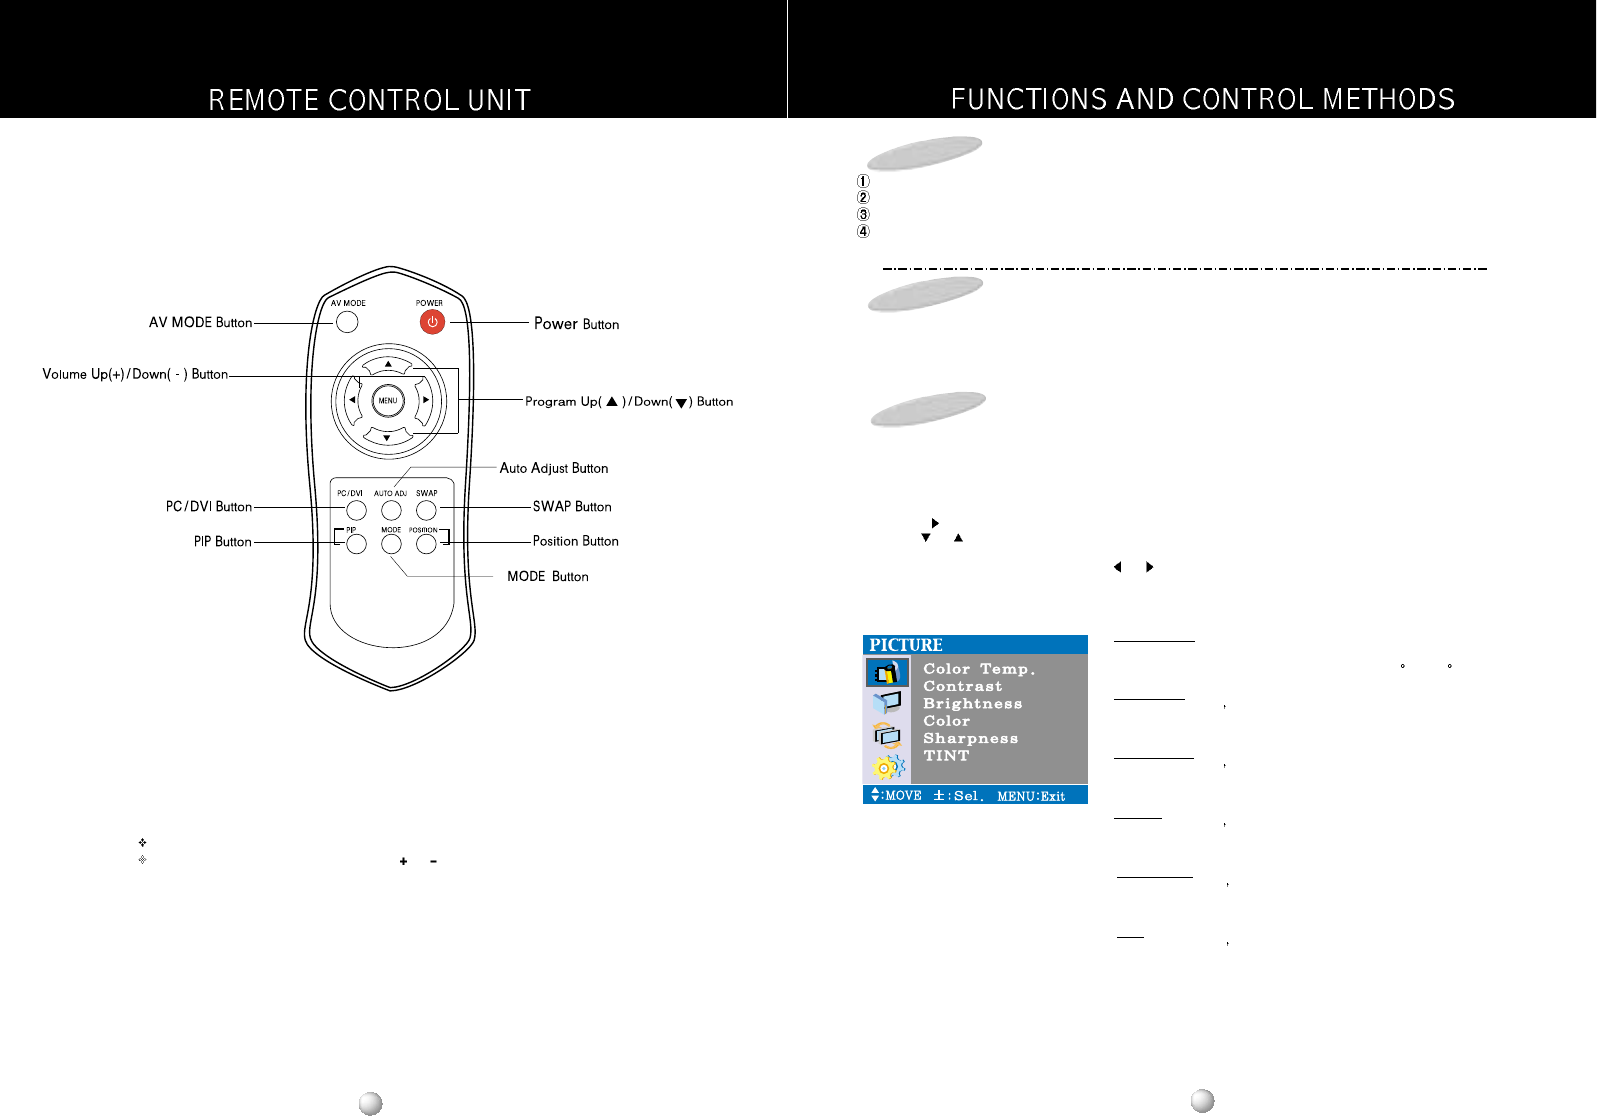
MENU Operation
When you press the MENU button, the MENU window appears on screen.
Press SEL BUTTON to move to the desired item.
Press VOL+/ VOL - key to select the desired item.
To shut down the MENU window, wait for time when the MENU window disappears or press the MENU button again.
MENU in AV1, AV2, and S-VIDEO
It shows the MOVE button, SEL button, and EXIT button on a bottom of MENU window.
LCD Monitor User’s Manual
1. Press the MENU button.
Result : The PICTURE menu is display.
2. Press the [ ] button menu.
3. Use the [ ] or [ ] button to select setting.
Result : The color of characters are changing to yellow.
4. Adjust to satisfy your preference by pressing the [ ] or [ ] button.
5.
When you are satisfied with the settings, press the MENU button repeat-
edly to return to normal view-ing.
COLOR TEMP
9300/6500
: You can select temperature of desired color.(9300 K/ 6500 K)
CONTRAST
: Adjust the screen s contrast.
(Operate in AV1 mode, AV2 mode, and S-VIDEO mode)
BRIGHTNESS
: Adjust the screen s brightness.
(Operate in AV1 mode, AV2 mode, and S-VIDEO mode)
COLOR
: Adjust the screen s color.
(Operate in AV1 mode, AV2 mode, and S-VIDEO mode)
SHARPNESS
: Adjust the screen s sharpness.
(Operate in A V1 mode, AV2 mode, and S-VIDEO mode)
TINT
: Adjust the screen s tint
(Operate in A V1 mode, AV2 mode, and S-VIDEO mode)
(Only use for NTSC system)
PICTURE Setting
LCD Monitor User’s Manual
BATTERY INSTALLATION
Replace two batteries in the battery compartment at the same time.
lnsert "AAA" batteries, observing the polarity ( or ) marked on the unit.
Batteries should last about a year under normal use. lf the operation is unstable(either chan-
nel or volume does not change), replace the batteries. When the hand unit is not used for a
long, or when the batteries are used up, take out the batteries to prevent possible leakage.
To avoid any malfunction of the remote control, press only one button at a time.

LCD Monitor User’s Manual
1.
Press the
[] or [ ]
buttons to select “PIP SIZE"
2. I
t will able to select PIP SIZE by using the
[] or [ ]
buttons.
1.
Press the [ ] or [ ] button to select "PIP POSITION".
2. I
t will able to select PIP POSITION by using the
[] or [ ]
buttons.
LCD Monitor User’s Manual
Size
Position
. Press the Menu button.
2.. Press the [ ] or [ ] button to select "PIP".
1. I
t will able to select want PIP input MODE by using the
[] or [ ]
buttons.
1. Press the [ ] or [ ] button to select "SOURCE".
2. I
t will able to select want signal by using the
[] or [ ]
buttons.
LCD Monitor User’s Manual
PIP Setting
Mode
off PIP DW1 DW2
Source
MENU in PC
When you press the MENU Button, the MENU screen appears.
LCD Monitor User’s Manual
1. Press the MENU button.
Result : The PICTURE menu is display.
2. Press the [ ] button menu.
3. Use the [ ] or [ ] button to select setting.
Result : The color of characters are changing to yellow.
4. Adjust to satisfy your preference by pressing the [ ] or [ ] button.
5.
When you are satisfied with the settings, press the MENU button repeat-
edly to return to normal view-ing.
COLORTEMP
COLOR TEMP
Select the temperature of desired color
( 6500 K / 9300 K/ USER )
RED
Adjust the red tint of screen
GREEN
Adjust the green tint of screen
BLUE
Adjust the blue tint of screen
CONTRAST
Adjust the screen s contrast.
BRIGHTNESS
Adjust the screen s brightness.
1 Press the Menu button.
2. Press the [ ] button
to select "FUNCTION"
3.
Press the
[] or [ ]
button.
4.
Result: The "LANGUAGE" menu is displayed.
5.
Press the
[] or [ ]
button to select which you
want language.
English Francais Deutsch Espanol Portugues Italiano
LCD Monitor User’s Manual
Language
Key Lock
1.
Press the [ ] or [ ] button to select "Key Lock".
2. I
t will able to select On/Off by using the
[] or [ ]
buttons.
Scan Mode
1.
Press the [ ] or [ ] button to select "Scan Mode".
2. I
t will able to select scan mode by using the
[] or [ ]
buttons.
Normal Full Under
Picture Reset
1.
Press the [ ] or [ ] button to select "Picture Reset".
2. I
t will able to select standard state by using the
[] or [ ]
buttons.

LCD Monitor User’s Manual
1 Press the Menu button.
2.
Press the
[] or [ ]
buttons to select "FUNCTION"
3. Press the [ ] button.
4.
Result: The "LANGUAGE" menu is displayed.
5.
Press the
[] or [ ]
button to select which you
want language.
Language
English Francais Deutsch Espanol Portugues
Key Lock
1.
Press the [ ] or [ ] button to select "Key Lock".
2. I
t will able to select On/Off by using the
[] or [ ]
buttons.
Reset
LCD Monitor User’s Manual
1.
Press the [ ] or [ ] button to select "Reset".
2. I
t will able to select standard state by using the
[] or [ ]
buttons.
When the screen is unstable in PC settings, or to make your PC stable by adjusting the Clock and Phase, set the PC in the
following sequence:
1. Press the MENU button.
2. Press the
[] or [ ]
button to select "ADJUSTMENT” and press the [ ]but-
ton.
3. Press the
[] or [ ]
button to select frequency.
4. H Position [] or [ ] button.
V Position [] or [ ] button.
Clock [] or [ ] button.
Phase [] or [ ] button.
5.
When you are satisfied with the settings, press the MENU button repeatedly to
return to normal viewing.
Auto Adjust:
Adjusts the screen’s status in PC mode automatically.
H - Position/V Position:
Adjusts the screen’s horizontal position.
V - Position/V Position:
Adjusts the screen’s vertical position.
Clock:
Adjusts the screen’s horizontal size through a increase/decrease
inthe number of Pixel.
Phase:
Adjusts the screen’s phase
480P MODE:
It will able to select that input signil type is interlace or progressive
at 640 X 480 mode
48
LCD Monitor User’s Manual
AJUSTMENT Setting
LCD Monitor User’s Manual
DVIDVI
DVIDVI
DVIDVI
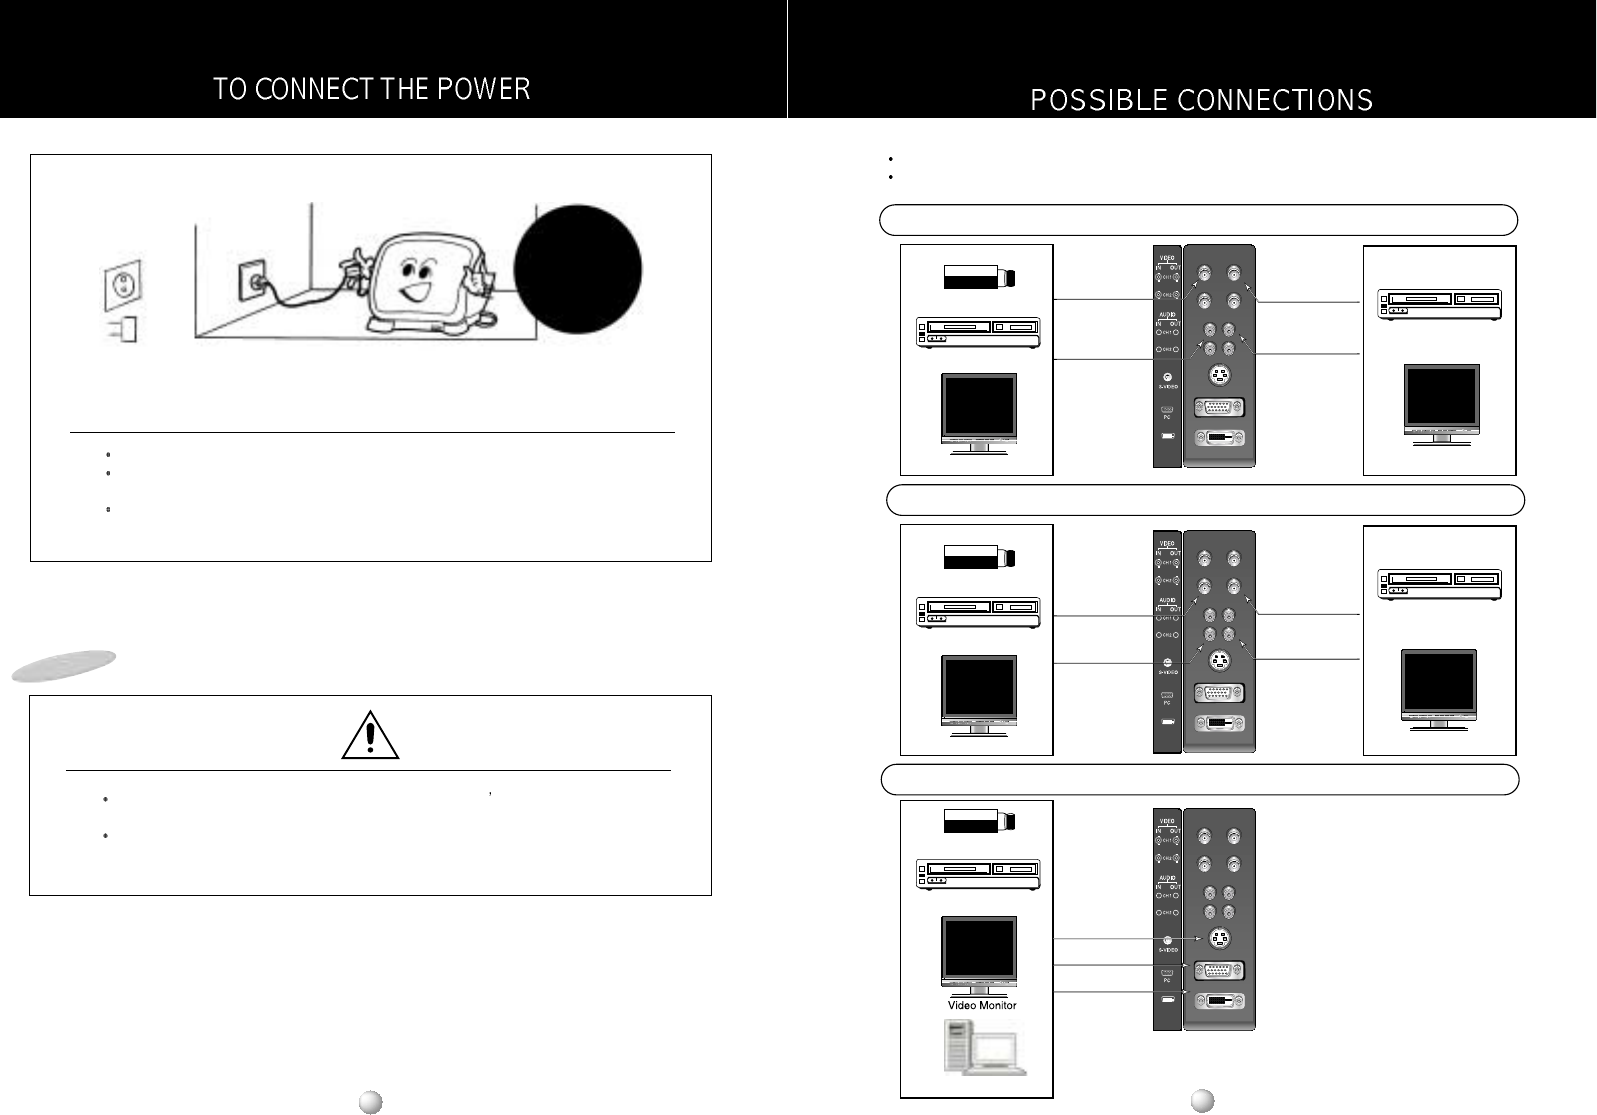
Video camera
Video Monitor
AUDIO IN
Audio signal cable
VIDEO IN
AUDIO OUT
(through out)
VIDEO OUT
(through out)
Video signal cable
Video camera
Video Monitor
Video camera
VCR or DVD
VCR or DVD
VCR or DVD
S-VIDEO IN
D-SUB 15 PIN
(Analog RGB)
DVI PIN
(Digital RGB)
AUDIO OUT
(through out)
VIDEO OUT
(through out)
AUDIO IN
Audio signal cable
VIDEO IN
Video signal cable
PC
VIDEOVIDEO PC/DVIPC/DVI PIPPIP SWSWAPAP
VIDEOVIDEO PC/DVIPC/DVI PIPPIP SWSWAPAP
VIDEOVIDEO PC/DVIPC/DVI PIPPIP SWSWAPAP
VIDEOVIDEO PC/DVIPC/DVI PIPPIP SWSWAPAP
VIDEOVIDEO PC/DVIPC/DVI PIPPIP SWSWAPAP
S-VIDEO / D-SUB 15PIN / DVI connection
Read the installation/operation manual thoroughly before connecting equipment.
Turn off the power source before connecting the monitor and external equipment.
AV 1 Connection
AV 2 Connection
LCD Monitor User’s Manual
Be sure to connect the conversion plug to the power plug by the outlet!
This monitor can be available both in AC V / V Hz
Various input voltage (within a range of ACV) can be available
(Do not use it in the voltage higher than a rated voltage)
V/V selector switch is not necessary This monitor can be operated directly without a special operation
TThhiiss mmoonniittoorr ccaann
bbee aavvaaiillaabbllee
rreeggaarrddlleessss ooff
VV//VV
Plug
Outlet
Conversion plug
CAUTION
Make sure to operate this monitor in the rated voltage described in the user s manual or the monitor
(When the voltage higher than the rated voltage is supplied it may give damage to a receiver
If you do not use the monitor for a long time you must pull out the power plug from the inlet for safety
LCD Monitor User’s Manual

LCD Monitor User’s Manual
LCD Monitor User’s Manual
This monitor has received the EMI (Electromagnetic interference) test for the business.
Accordingly, a seller or user needs to know about it. If you purchase the erroneous monitor, be sure to
exchange it into non-business monitor in the shop where you buy it.
The screen doesn't appear and
the sound is not heard Is the power cord pulled out?
Is the power turned off?
Is this monitor connected with the
external equipment erroneously?
Is the contrast and brightness
wrongly controlled?
Is this monitor connected with the
external equipment erroneously?
Is the external equipment correctly
connected?
Is the volume turned down?
Is this monitor connected with the
external equipment erroneously?
Is the tint and color correctly
adjusted?
Is the external equipment correctly
connected?
Connect the power cord correctly
Press the power button.
Check the cord and then connect it
correctly.
Adjust the contrast and brightness
correctly.
Check the cord and then connect it
correctly.
Check the cord and then connect it
correctly.
Adjust the volume.
Check the cord and then connect it
correctly.
Adjust the contrast and brightness
correctly.
Check the cord and then connect it
correctly.
The sound is heard but the
video doesn't appear
The video appears but it is
interrupted by static
Not the sound is heard
The screen color is not clear
and clean
The screen is shaken and is
affected by static
If your monitor is out of order, check up the below problems firstly.
LCD Monitor User’s Manual
If the signal from the system equals to the standard signal mode, the screen is adjusted auto-
matically. If the signal from the system doesn't equal to the standard signal mode, adjust the
mode with referring to the videocard user guide because the screen might not display or only
the power LED might be Amver. For the display modes listed below, the screen image has
been optimized during manufacture.
Mode
VGA
SVGA
XGA
SXGA
Resolution
720*400
640 * 480
640 * 480
800 * 600
1024 * 768
1024 * 768
1024 * 768
1280 * 1024
Horizontal
Frequency
(KHz)
31.469
31.469
37.500
46.875
48.4
56.5
60.023
64
Vertical
Frequency
(Hz)
70.087
59.940
75.000
75.000
60
70
75.029
60
Pixel Clock
Frequency
(MHz)
28.322
25.175
31.500
49.500
65
75
78.750
80.125
LCD Monitor User’s Manual