KTV Global LTW42DS 42" LCD TV Receiver/Monitor User Manual
KTV Global Corporation 42" LCD TV Receiver/Monitor Users Manual
UserManual.wiki
>
KTV Global
>
LTW42DS User Manual
Users Manual
Navigation menu
Upload a User Manual
Namespaces
Wiki Guide
HTML
PDF
Info
Views
User Manual
Discussion / Help
Navigation

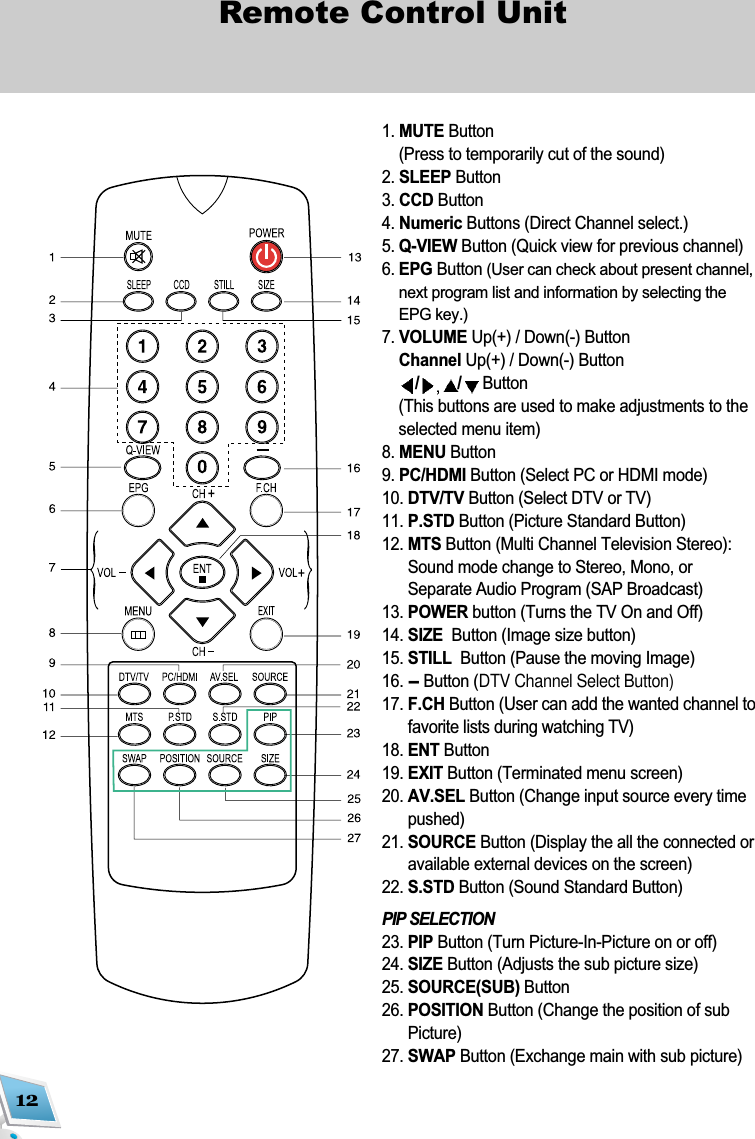
![This will scan all the available Channels. Channel scan should be done before using this product. You should set the proper TV reception method, 'Air' for outdoor air antenna and 'STD, HRC & IRC' foryour cable TV System. For the cable system, please contact your local cable TV provider.1. Press MENU button on the remote control andnavigate by pushing [ ] or [ ] Keys to select'Channel' menu. 2. Press [ ] or [ ] button to enter [Setup]Menu.3. Set your TV reception method among[Air/Cable/Hrc/Irc], 4. Push [ ] or [ ] button to select [Auto Search]and press [ ] or [ ] button again, and thenthe channels are searched automatically5. Press [ ] or [ ] button to display the scannedchannels. Only scanned channels are on dis-play15Setup SelectionScanning Channels (Automatic)To do channel search, set the TV recep-tion method, such as 'Air', 'Cable STD',Cable Hrc' or 'Cable lrc'. All the available Digital(ATSC) and Analog (NTSC) TV channels arescanned in each TV reception method and storedafter the channel scan. When you watch TV, thechannel system is set to DTV as a factory default.All the current stored channels will bereplaced with new channel informationafter doing 'Auto Search'.](https://usermanual.wiki/KTV-Global/LTW42DS/User-Guide-682292-Page-15.png)
![16Setup Selection1. Press MENU button and select [Setup] menuby manipulating [] or [ ]button and then,press [ ]button to get into.2. In this menu, select [Setup Edit] by pressing[] or [ ]button.3. Setup Edit menu will be up when you press[ ]button.* The right side of the menu is for the current available or stored channels. Before you watch TV, asmentioned, channel scan should be done.To Store/Memorize a Channel1. Press ENT [ ] button on the one you select and then input Channel Number.2. Press ENT [ ] button again and the channel configurations will be stored.To Delete a Channel1. Select the channel you would like to delete by manipulating [] or [ ]or [] or [ ]button onRemote Controller.2. Press '-' button to delete the selected one.Channel Edit mode manages Digital andAnalog channels separately.(For example, only available DTV channels will bedisplayed in DTV mode, no analog channels at all).It is recommend setting the channel system(Analog/Digital) proprly before you edit channel.Digital Channel Analog ChannelSetup Edit-Store or Delete the Channels](https://usermanual.wiki/KTV-Global/LTW42DS/User-Guide-682292-Page-16.png)
![Favorite Channel Function is to ease channel change among your frequent watching or favorite chan-nel by separately memorizing them in FAV.To Register as Favorite Channel1. Press [] or [ ]button or [] or [ ]button to select the channel you would like to register in theavailable channel menu on the right side of display.2. Press 'FAV' on the selected one to register it as a favorite channel3. The registered one is displayed in 'Favorite Channel', located at the bottom left of the screen.* After you finish favorite channel registration, by each pressing of FAV, you can change the channelsbetween them.17Setup SelectionDigital TV Channel Analog TV ChannelFAV function manages Digital TVChannels and Analog ones separately.For instance, if FAV button is pressed underDigital TV System(DTV), only DTV channels thatis preset channels are displayed. To use inAnalog, press DTV/TV button on RemoteController to change the mode to Analog andpush FAV.Using Favorite (FAV.) Channel Function](https://usermanual.wiki/KTV-Global/LTW42DS/User-Guide-682292-Page-17.png)
![18Setup SelectionEPG is available only when you watch Digital TV.EPG displays TV Programs with reference to achannel and time interval.1. Press EPG button on the remote control dur-ing watching HD TV Program. 2. Press [ ] or [ ]or [ ] or [ ] button to navi-gate Programs with reference to each channel. 3. You can check the program schedule withreference to a channel and see programinformation by pushing 'OK'. *Not every program has EPG information.The program with information has informa-tion icon in EPG.The information identifies the current channeland status of certain audio and video settings. 1. Press ENT [ ] button on the remote controlduring watching TV. 2. The TV will display information on the chan-nel, the type of sound and status of certainaudio/video settings. 3. The information screen automatically disap-pears after about ten seconds or manuallyby pushing ENT [ ] button again. Displaying EPG(Electronic Program GuideViewing the InformationThe information window will disappearabout 10 seconds later.](https://usermanual.wiki/KTV-Global/LTW42DS/User-Guide-682292-Page-18.png)
![19Setup SelectionThis explains how to change and watch otherInput Sources by pushing AV.SEL buttons1. Press [AV.SEL] button on the Remote con-trol. 2. You can change Input Source to be dis-played every time you press the button. Itchanged among the connected source only.* You can select TV, PC/HDMI Mode directlyby pressing [DTV/TV] / [PC/HDMI] button onthe remote control accordingly. This explains how to change and watch otherInput Sources by pushing 'Source' button.1. Press [Source] button on the remote control.The status of input source will appear.2. Press [] or [ ]button and then push ENT[] button to change the input source. * The Connected (Available) external devicesor port is brightened with "Connected" mes-sage while deactivated ones are in gray andwith "Not Connected" message.Concerning how to connect externaldevices, you can consult "Installation"section.Changing the input modeViewing the Current Connected External Devices](https://usermanual.wiki/KTV-Global/LTW42DS/User-Guide-682292-Page-19.png)
![20Picture ConfigurationThis explains how to change Aspect Ratio to'4:3, 14:9, Panorama and Wide'.Press [SIZE] button on the remote control. TheAspect Ratio is changed in turn as you pressthe button. Wide Panorama Zoom 4:3 14:9 To change the Aspect Ratio in OSD Menu1. Press MENU button on the remote control. 2. Press [] or [ ]button to select '[Picture]menu and push ]button.3. In [Picture] menu, select [Size] with [] or[]button.4. Change Aspect Ratio by pressing [] or [ ]button.Wide Convert display ratio to 16:9Panorama Panorama ModeZoom Zooming the original Image(Press [] or [ ] button to movethe center position of picture.)4:3 Convert display ratio to 4:314:9 Convert display ratio to 14:9Adjusting the Aspect Ratio](https://usermanual.wiki/KTV-Global/LTW42DS/User-Guide-682292-Page-20.png)
![21Picture ConfigurationYour TV has several factory presets whichallow you to control the picture. Press [P.STD] button on the remote control.The picture mode is changed as you press thebutton. Custom Dynamic Standard MovieMildTo change the Picture mode in OSD Menu1. Press MENU [ ] button on the remote control. 2. Press [] or [ ]button to select [Picture]menu and push Volume [ ] button.3. In [Picture] menu, select [Picture Mode] with[] or [ ]button.4. Change the Picture mode by pressing [] or[]button.You can adjust Brightness, Contrast,Sharpness or the depth of Color.1. Press MENU button on the remote control.2. Press [] or [ ]button to select [Picture]menu and push [ ]button.3. In [Picture] menu, select [Picture Mode] with[] or [ ]button and manipulating [] or [ ]button until "Custom" appears.4 Use [] or [ ]button to select amongBrightness, Contrast, Sharpness, Tint andColor and then adjust the values with [] or[]button.Changing the Preset Picture ModeCustomizing the Picture](https://usermanual.wiki/KTV-Global/LTW42DS/User-Guide-682292-Page-21.png)
![22Picture ConfigurationAdjusting the Color ToneThis explains how to change the tone of thescreen.1. Press MENU button on the remote control.2. Press [] or [ ]button to select [Picture]menu and push [] or [ ]button.3. In [Picture] menu, select [Color Tone] with[] or [ ]button4. Change Color Tone Preset with [] or [ ]button.](https://usermanual.wiki/KTV-Global/LTW42DS/User-Guide-682292-Page-22.png)
![23Sound ConfigurationThis TV set offers five sound modes (Custom,Standard, Music, Movie, Speech).Press [S.STD] button on the remote control.The mode is changed one by one every timeyou press it.Custom Standard Music Movie SpeechTo change the Sound mode in OSD Menu1. Press MENU button on the remote control. 2. Press [] or [ ]button to select [Sound]menu and push [ ]button.3. In [Sound] menu, select [Sound Mode] with[] or [ ] button.4. Change the Sound Mode by pressing [] or[]button.This explains how to set and adjust equalizer.1. Press MENU button on the remote control. 2. Press [] or [ ]button to select [Sound]menu and push [ ]button.3. In [Sound] menu, select [Equalizer] with [ ]or [ ]button and push [ ]button.4. Select the Frequency to be set by pressing[] or [ ]button. 5. Adjust the level properly by pressing [] or[]button.Changing the Preset Sound ModeAdjusting the Equalizer](https://usermanual.wiki/KTV-Global/LTW42DS/User-Guide-682292-Page-23.png)
![24Sound ConfigurationAuto Volume normalizes the different soundvolume level that can be different in broadcaststation. This lets you have adjusted mean valueof volume level per channel.1. Press MENU button on the remote control toselect [Sound] menu. 2. Press [ ]button on [Sound] menu.3. Press [] or [ ]button to select [AutoVolume]. 4. Push [] or [ ]button until [Auto Volume] is"on".You can adjust the Stereo or MTS functionmanually. Press [MTS] button on the remote control. Stereo / MonoYou can select between 'Stereo' and 'Mono'when the Stereo broadcasting is received. Stereo: Two speakers out (2 Channels,Left/Right) and the different sound perchannel Mono: Two speakers out but both channel has the same signal (the identical sound).SAP Stereo / SAP MonoYou can select the SAP mode which is 'SAP Stereo', 'SAP Mono' when the SAP broadcasting, which is usually a foreign translation, is received. The mode is automatically detected.SAP Stereo: There is at least one more dubbing language in addition to default language inincoming broadcasting signal. You can change the language by pushing [MTS] buttonSAP Mono: Only default language is on air.* STEREO, MONO, SAP Stereo and SAP Mono modes are automatically detected. You justpress the key to toggle the each mode.Automatic Volume Level ControlSetting MTS (Multi Track Sound) Mode](https://usermanual.wiki/KTV-Global/LTW42DS/User-Guide-682292-Page-24.png)
![25PIP(Picture In Picture) SelectionPIP is the function to display two different inputsource simultaneously.1. Press [PIP] on the remote control.[PIP] is changed as following every time youpress [PIP] buttonOn OffTo set PIP in On Screen Display Menu1. Press MENU button on the remote control.2. Select PIP menu by pressing [] or [ ]but-ton.3. Press [ ]button and select [PIP] by press-ing [] or [ ]button4. Set PIP to "On" with [] or [ ]button* Please check the following PIP combina-tion table of Main and Sub picture.('Graphic-in-Graphic or Video-in-Video' is notsupported)](https://usermanual.wiki/KTV-Global/LTW42DS/User-Guide-682292-Page-25.png)
![26PIP(Picture In Picture) SelectionAdjusting the Size of Sub picturePress [SIZE] button on the remote control. The size is changed in the following order eachpress. Small DOUBLE DOUBLE2To adjust the size in On Screen DisplayMenu 1. Press MENU button on the remote control.2. Select PIP menu by pressing [ ] or [ ] button. 3. Press [ ] button and select [Size] by pressing[] or [ ] button.4. Press [] or [ ]button to adjust the size. You can change the input source of sub picture. Press [P.INPUT] button on the remote control. The input source is changed as you press thebutton. Source change will be available onlyamong connected sources. For more informa-tion, check the PIP Combination table. To change the input source in On ScreenDisplay Menu1. Press MENU button on the remote control.2. Select PIP menu by pressing [ ] or [ ] button. 3. Press [ ]button and select [Input Source]by pressing [] or [ ]button.4. Press [] or [ ]button to change inputsource. (To adjust the input source of Sub picture,PIP should be active.) Changing Input Source of Sub picture](https://usermanual.wiki/KTV-Global/LTW42DS/User-Guide-682292-Page-26.png)
![27PIP(Picture In Picture) SelectionYou can change the position to 'Up', 'Down','Left', 'Right'. The position of Sub picture is changed as youpress [POSITION] button on the remote control.To adjust the position in On Screen DisplayMenu1. Press MENU button on the remote control. 2. Select PIP by pressing [] or [ ]button. 3. Press [] or [ ]button. 4. Select [Position] by pressing [ ] or [ ] button.5. Adjust the position by pressing [] or [ ]button(To adjust the position of Sub picture, PIPshould be active.)Press [SWAP] button on the remote control. To do this in On Screen Display Menu 1. Press MENU button on the remote control. 2. Select PIP by pressing [] or [ ]button. 3. Press [ ]button. 4. Select [SWAP] by pressing [] or [ ]button.5. Pressing [ ] or [ ] button to swap the pictureAdjusting the position of Sub pictureSwapping the main with sub picture in PIP mode](https://usermanual.wiki/KTV-Global/LTW42DS/User-Guide-682292-Page-27.png)
![28Function Selection Changing the OSD Menu languageYou can change the OSD Menu Language.1. Press MENU button on the remote controller 2. Press [] or [ ]button to select [Set Up]menu and push [] or [ ]button3. In [Set Up] menu, select [Language] with [ ]or [ ]button.4. Change Language by pressing [] or [ ]button.If no signal is being received or the signal isvery weak, a blue back screen is automaticallydisplayed instead of the noisy image. 1. Press MENU button on the remote control.2. Press [] or [ ]button to select '[Setup]'menu and push [ ]button to be in.3. Select [Blue Screen] by pressing [] or [ ]button. 4. Set 'On' by pressing [] or [ ]button.Setting the Blue Back Screen](https://usermanual.wiki/KTV-Global/LTW42DS/User-Guide-682292-Page-28.png)
![29Function Selection Setting the Current Time (Time Zone)Time Zone setting is required for setting thetime and receiving EPG properly. Once systemtime is set, all the relevant functions such astimer are available.1. Press MENU button on the remote control. 2. Select Setup menu by pressing [] or [ ]button. 3. Press []button, select 'Time' with [] or [ ]button and press [ ]button again.4. In [Time Zone] menu, manipulate [ ]buttonto select the region you live.1. Press MENU button on the remote control. 2. Select Setup menu by pressing [] or [ ]button. 3. Press [ ]button, select 'Time' with [] or [ ]button and press [ ]button again.4. Select 'On timer' or 'Off timer' by pressing[ ]button.5. Set the time with [] or [ ]button.Automatic Power On and OffThe current time can be check by pressingENT[ ]button on the remote controller.](https://usermanual.wiki/KTV-Global/LTW42DS/User-Guide-682292-Page-29.png)
![30Function Selection Setting the Sleep TimerYou can adjust the time for automatic systemdown.Press [Sleep] button.Sleep Timer is changed as following every timeyou press [Sleep] button.OFF 30Min 60Min 90Min120Min 150Min 180MinTo set the sleep timer in [Setup] menu.1. Press MENU button on the remote control.2. Select Setup menu by pressing [] or [ ]button.3. Press [ ]button, select 'Time' with [] or [ ]button and press [ ]button again 4. Select [Sleep Timer] by pressing [] or [ ]button. 5. Set the timer with [] or [ ]button6. When configuration is done, press MENUbutton to save the changes and exit.Time is automatically set, once you set theTime Zone and then watch a DTV chan-nel. After Time is set, you can use On Timer andOff Timer functions.The current time is automatically receivedor synchronized by Digital TV EPG onceDigital TV channel information is set and stored, itis not required for setting the time.](https://usermanual.wiki/KTV-Global/LTW42DS/User-Guide-682292-Page-30.png)
![31Function Selection Pixel ShiftDue to its fundamental and built-up technologyof LCD, when it is turned on long time of periodespecially with a still image, it can have afterim-age that does not disappear even though it isturned off. During watching TV, this can affectserious image quality problem. However, withthis feature, each pixel of LCD is shifted to rightor left minutely and regularly, surely impossibleto be noticed by human eyes, to protect after-image effect.1. Press MENU button on the remote control. 2. Select 'PIXELSHIFT' or 'SCREEN WIPER' inSetup menu. 3. Set 'PIXELSHIFT' or 'SCREEN WIPER'function 'ON' by pressing [] or [ ]button. * If Screen Wiper is on, in some of time, a ver-tical white bar will be moving from right to leftor vice versa every 3 minutes.When the incoming signal is weak or picturenoise appears at moving image, DNR functionhelps to reduce the noise and eye strain by its filtering proce-dure. 1. Press MENU button on the remote control. 2. Select 'DNR' in Setup menu. 3. Set 'DNR' function 'ON' by pressing [] or[]button.Digital Noise Reduction](https://usermanual.wiki/KTV-Global/LTW42DS/User-Guide-682292-Page-31.png)
![32Function Selection Closed Caption feature is to display On ScreenText Messages during watching TV. This fea-ture is available in both analog and digitalbroadcast.1. Press MENU button on the remote control,select Setup menu by manipulating [] or[]button and press [ ]button.2. Press [] or [ ]to select [Caption] and then[ ]button3. 'Caption' sub menu will appear.Sub Menus of CaptionCaption : Turn the feature on or off.This can be set by [] or[]button.Caption Box : Set the Text Box. You canturn it on or off with [] or[]button.Caption Box Color: change the color ofCaption Box. Press [] or[]button to change it.Viewing Closed Caption](https://usermanual.wiki/KTV-Global/LTW42DS/User-Guide-682292-Page-32.png)
![33Function Selection V-chip feature automatically locks TV Programs(TV Parent Guide Lines) or Movie (MPAA) thatis considered as inappropriate for children. Toactivate, deactivate or set the rating, you shouldenter a PIN (Personal ID Number).1. Press [MENU] button to display the menu.2. Press [] or [ ]button to select 'Setup', andthen press [] or [ ].3. Press [] or [ ]button to select 'V-Chip',and then press [] or [ ].4. The message "Enter PIN" will be appear.Enter your four digit PIN Number. The V-Chip screen will appear. (*The default Pin Number of a new TV set is'0000'.)* To change PIN Number, select Change PinNumber menu and then the menu will appear.Choose and enter 4 digits. How to set up restrictions using the "TV Parental Guidelines".1. Press [] or [ ]button to select 'TV Parent Guide Lines' and then push [] or [ ]button. The menu will appear. You can set up the restrictions in this menu.* Restriction Categories based on six aged base.TV-Y Young ChildrenTV-Y7 Children 7 and overTV-G General AudienceTV-PG Parental GuidanceTV-14 Viewers 14 and OverTV-MA Mature AudienceParental Rating Control (V-Chip)](https://usermanual.wiki/KTV-Global/LTW42DS/User-Guide-682292-Page-33.png)
![34Function Selection For instances, if you block TV-Y, TV-Y7 will automatically be blocked and similarly, if you block the TV-G, all the categories in "young adult" (TV-Y, TV-Y7, TV-G, TV-PG, TV-14, and TV-MA) will be blocked.* Each Restriction Category has additional options, sub-ratings.FV: Fantasy ViolenceD: Sexually Suggestive DialogL: Adult LanguageS: Sexual SituationV: ViolenceV-Chip will automatically block certain sub-categories that are more restrictive. For example, if youblock "L" sub-rating in TV-PG, then the "L" sub ratings in TV-14 and TV-MA will automatically beblocked.How to set up restrictions using the "MPAA"1. Press [] or [ ]button to select 'MPAA Rating" and then push [] or [ ]button. The menu willappear. You can set up the MPAA restrictions in this menu.* Restriction Categories based on six aged base.G General Audience (No Restrictions)PG Parental Guidance SuggestedPG-13 PG-13 (Parents Strongly Cautioned)R R (Restricted. Children under 17 should be accompanied by an adult)NC-17 No Children under age 17.X X (Adults Only)NR Not Rated](https://usermanual.wiki/KTV-Global/LTW42DS/User-Guide-682292-Page-34.png)
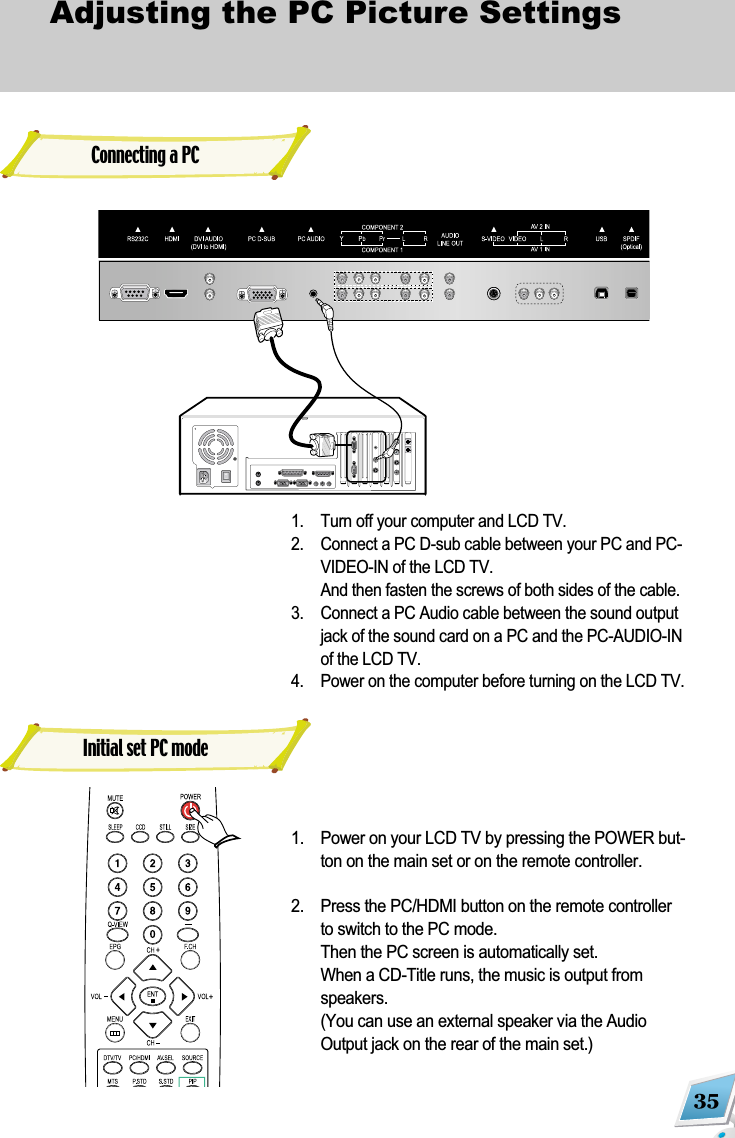
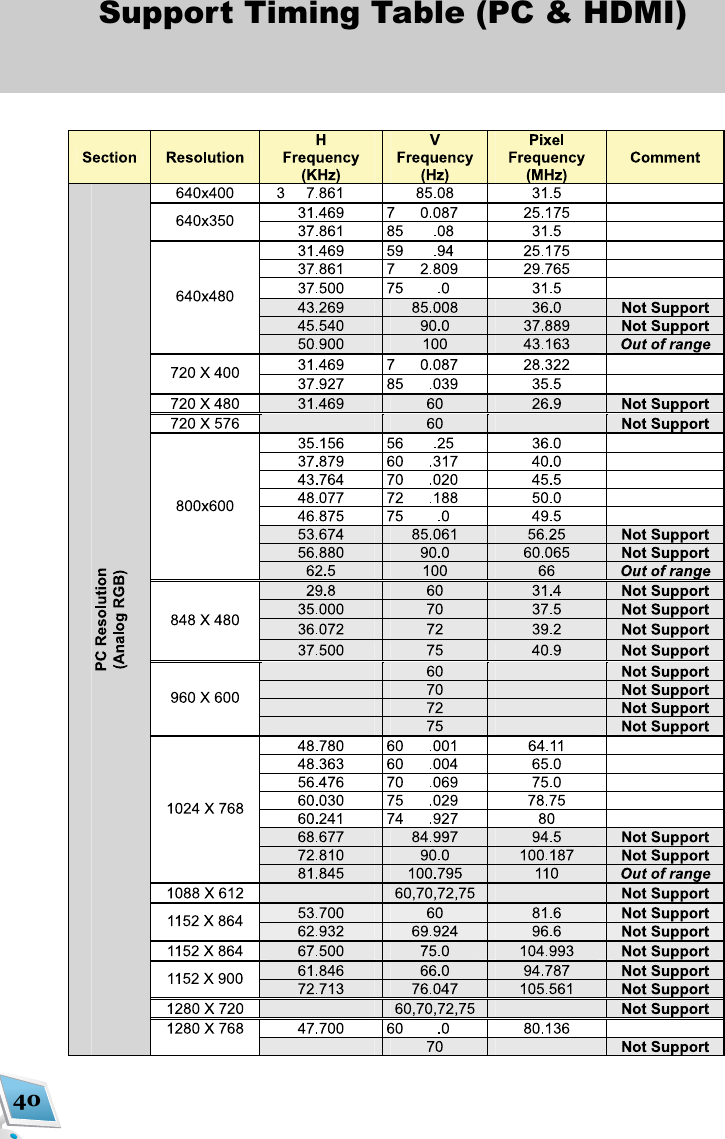
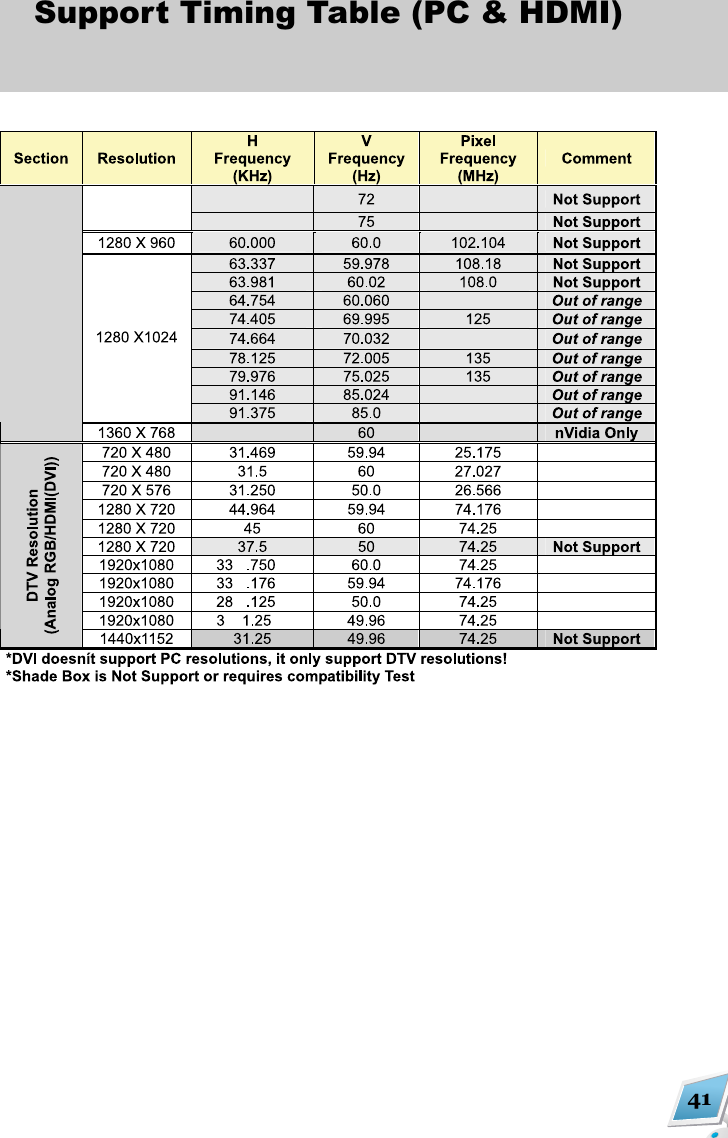
![36Adjusting the PC Picture Settings This LCD TV is designed to be used as a PCMonitor. Concerning the Maximum Resolution,please refer to specification table in Appendix.Since it has driver software implemented, youdon't have to install any additional software.Just PLUG N' PLAY!!! This will display information on current resolu-tion and frequency rate on the bottom of thescreen. To check, press MENU button andselect 'Picture menu'. 1. Select 'PC' and press [] or [ ]button. 2. The resolution and Frequency rate are dis-played on the bottom of the screen.This is the function that the LCD TV Systemfinds the optimal value for adjustment and auto-matically applies it. Use this function when theposition of WINDOWS image is not centered orthe characters on the screen are not clear. 1. Press MENU [ ] button on the remote control. 2. Press [] or [ ]button to select [Picture]menu and push [ ]button.3. In [Picture] menu, select [PC] with [] or [ ]button and push [ ]button.4. Select 'Auto Adjustment' by pressing [] or[]button 5. Press []button and then Automatic adjust-ment starts.Using as a PC MonitorTo use it as a PC monitor, your PC andTV should be connected via D-sub cable(15 Pin Analog). For details, please check theInstallation section.Check the current Resolution and Frequency rateAutomatic Adjustment of the PC picture](https://usermanual.wiki/KTV-Global/LTW42DS/User-Guide-682292-Page-36.png)
![37Adjusting the PC Picture Settings You can adjust the position of a PC picturemanually. Use this function when the picture isnot centered or shifted to sides.1. Press [] or [ ]button. 2. Press [] or [ ]button and then select'Position' by pressing [] or [ ]button. 3. The position adjustment screen is displayedwhen you press [] or [ ]button. 4. Adjust the position by pressing [] or [ ]button and [] or [ ]button.This explains how to set the screen size of PC.1. Press MENU button on the remote control. 2. Press [] or [ ]button to select [Picture]menu and push [] button.3. Select [Picture Size] by pressing [] or [ ]button and adjust the value with [] or [ ]button.Setting the Position of PC PictureAdjusting the PC Picture SizePC Picture SizeWide - Full ScreenReal - Display Real Resolution4:3 - Display in 4:3 aspect ratio](https://usermanual.wiki/KTV-Global/LTW42DS/User-Guide-682292-Page-37.png)
![38Adjusting the PC Picture Settings You can adjust the PC picture, by selecting thepreset values or user value. In this Menu, youcan adjust Brightness, Contrast and Sharpness.To use the preset values1. Press MENU button on the remote control. 2. Press [] or [ ]button to select [Picture]menu and push [ ]button.3. Select [Picture Mode] by pressing [] or [ ]button and adjust the value with [] or [ ]button.You can adjust the color tone of the PC Picture.1. Press MENU button on the remote control. 2. Press [] or [ ]button to select [Picture]menu and push [ ]button.3. Select [Color Tone] by pressing [] or [ ]button and press [ ]button. 4. [Color Tone] Menu will display.5. Adjust RGB by pressing [] or [ ]buttonand [] or [ ]button.Adjusting the PC Picture SettingsAdjusting the Color Tone](https://usermanual.wiki/KTV-Global/LTW42DS/User-Guide-682292-Page-38.png)
![39Adjusting the PC Picture Settings Use this function to adjust the Frequency rangeor Phase.To adjust the Frequency by using OnScreen Display Menu1. Press MENU button on the remote control. 2. Press [] or [ ]button to select [Picture]menu and push [ ]button.3. Select [PC] by pressing [] or [ ]button andpress []button.4. Press [] or [ ]button to select [Frequency]or [Phase]. 5. Press [] or [ ]button to adjust theFrequency range or phase Adjusting the Frequency/Fine Tune](https://usermanual.wiki/KTV-Global/LTW42DS/User-Guide-682292-Page-39.png)