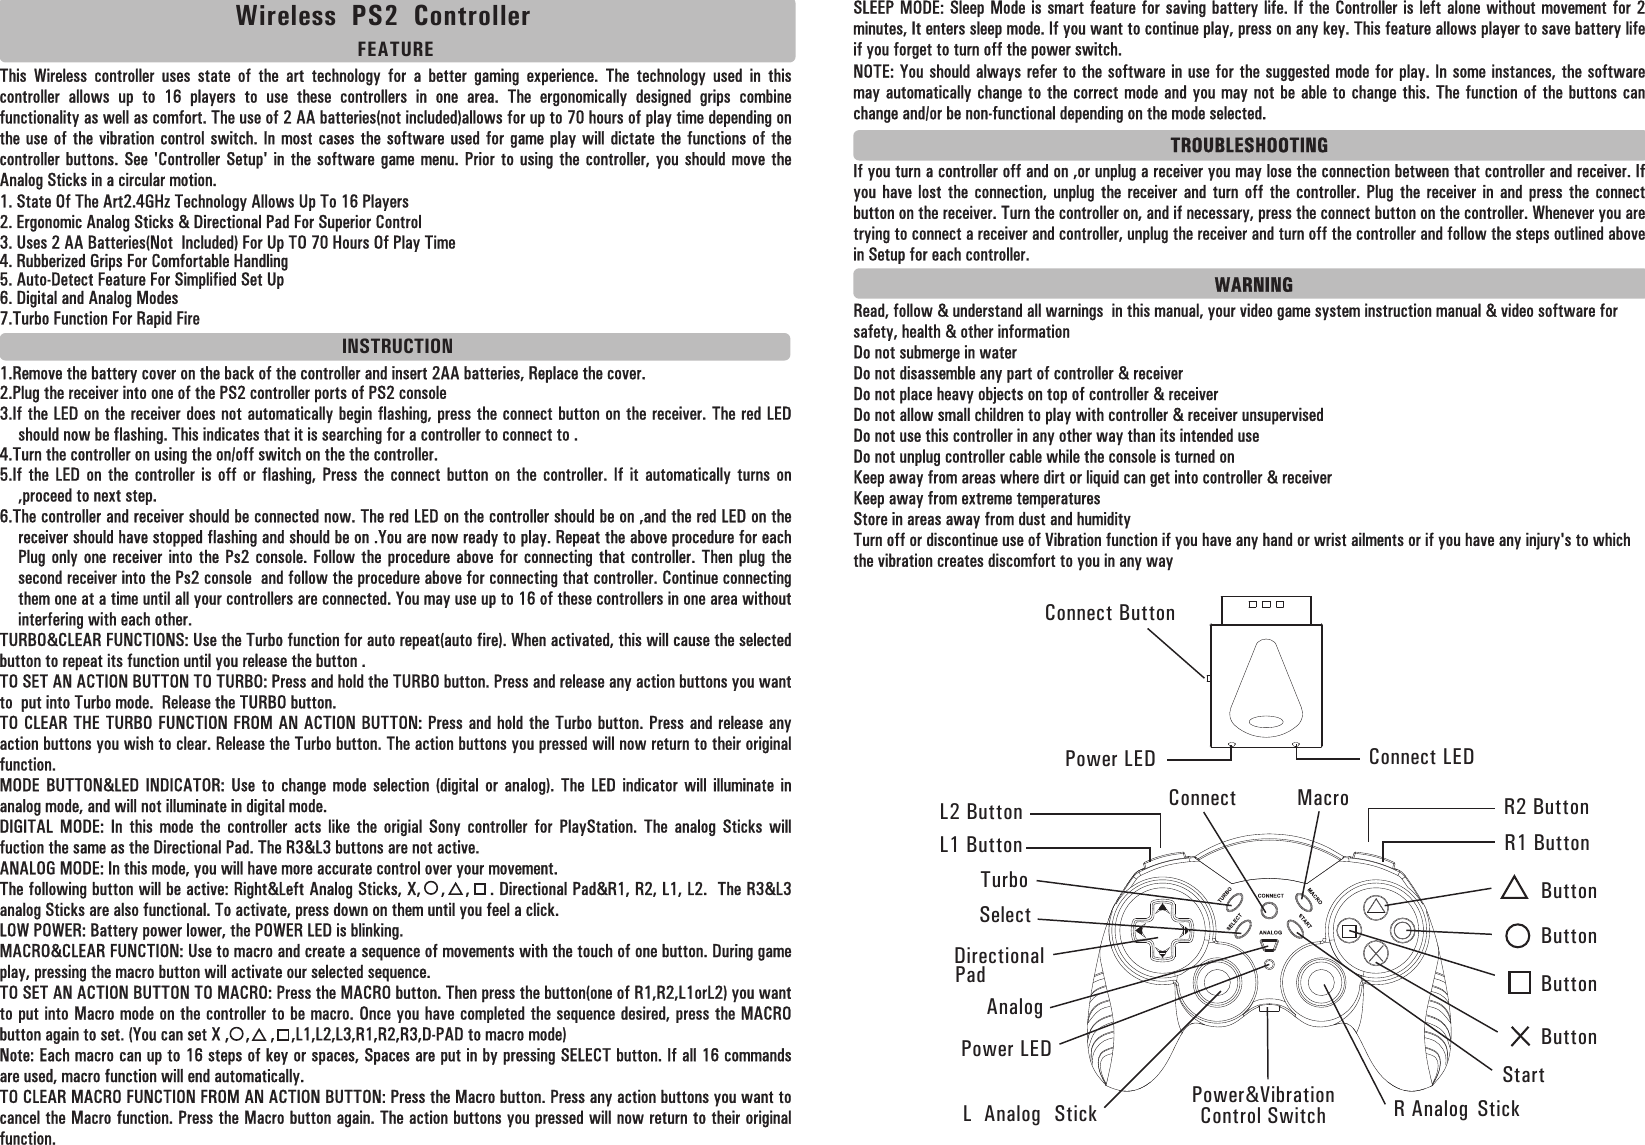
KYE SYSTEMS GG000A 2.4GHz PS2 GAME PAD User Manual users manual

KYE Systems Corp 2.4GHz PS2 GAME PAD users manual

users manual

       Wireless  PS2  Controller          FEATUREThis  Wireless  controller  uses  state  of  the  art  technology  for  a  better  gaming  experience.  The  technology  used  in  this controller  allows  up  to  16  players  to  use  these  controllers  in  one  area.  The  ergonomically  designed  grips  combine functionality as well as comfort. The use of 2 AA batteries(not included)allows for up to 70 hours of play time depending on the use of the vibration control switch. In most cases the software used for game play will dictate the functions of the controller buttons. See 'Controller  Setup'  in  the  software game menu. Prior  to  using  the  controller, you should move  the Analog Sticks in a circular motion.1. State Of The Art2.4GHz Technology Allows Up To 16 Players2. Ergonomic Analog Sticks & Directional Pad For Superior Control 3. Uses 2 AA Batteries(Not  Included) For Up TO 70 Hours Of Play Time4. Rubberized Grips For Comfortable Handling5. Auto-Detect Feature For Simplified Set Up6. Digital and Analog Modes7.Turbo Function For Rapid FireINSTRUCTION1.Remove the battery cover on the back of the controller and insert 2AA batteries, Replace the cover.2.Plug the receiver into one of the PS2 controller ports of PS2 console3.If the LED on the receiver does not automatically begin flashing, press the connect button on the receiver. The red LED should now be flashing. This indicates that it is searching for a controller to connect to .4.Turn the controller on using the on/off switch on the the controller.5.If  the  LED  on  the  controller  is  off  or  flashing,  Press  the  connect  button  on  the  controller.  If  it  automatically  turns  on ,proceed to next step.6.The controller and receiver should be connected now. The red LED on the controller should be on ,and the red LED on the receiver should have stopped flashing and should be on .You are now ready to play. Repeat the above procedure for each Plug only one receiver  into  the  Ps2 console. Follow the procedure  above  for  connecting that controller. Then  plug  the second receiver into the Ps2 console  and follow the procedure above for connecting that controller. Continue connecting them one at a time until all your controllers are connected. You may use up to 16 of these controllers in one area without interfering with each other.TURBO&CLEAR FUNCTIONS: Use the Turbo function for auto repeat(auto fire). When activated, this will cause the selected button to repeat its function until you release the button .TO SET AN ACTION BUTTON TO TURBO: Press and hold the TURBO button. Press and release any action buttons you want to  put into Turbo mode.  Release the TURBO button.TO CLEAR THE TURBO FUNCTION FROM AN ACTION BUTTON: Press and hold the Turbo button. Press and release any action buttons you wish to clear. Release the Turbo button. The action buttons you pressed will now return to their original function. MODE  BUTTON&LED  INDICATOR:  Use  to  change  mode  selection  (digital  or  analog).  The  LED  indicator  will  illuminate  in analog mode, and will not illuminate in digital mode.DIGITAL  MODE:  In  this  mode  the  controller  acts  like  the  origial  Sony  controller  for  PlayStation.  The  analog  Sticks  will fuction the same as the Directional Pad. The R3&L3 buttons are not active.ANALOG MODE: In this mode, you will have more accurate control over your movement. The following button will be active: Right&Left Analog Sticks, X,    ,    ,    . Directional Pad&R1, R2, L1, L2.  The R3&L3 analog Sticks are also functional. To activate, press down on them until you feel a click.LOW POWER: Battery power lower, the POWER LED is blinking.SLEEP MODE: Sleep Mode is smart feature for  saving battery life.  If the Controller is left alone without movement for 2 minutes, It enters sleep mode. If you want to continue play, press on any key. This feature allows player to save battery life if you forget to turn off the power switch.  NOTE: You should always refer to the software in use for the suggested mode for play. In some instances, the software may automatically change to the  correct mode and you may not be able to change this. The  function of the buttons  can change and/or be non-functional depending on the mode selected.TROUBLESHOOTINGIf you turn a controller off and on ,or unplug a receiver you may lose the connection between that controller and receiver. If you  have  lost  the  connection,  unplug  the  receiver  and  turn  off  the  controller.  Plug  the  receiver  in  and  press the  connect button on the receiver. Turn the controller on, and if necessary, press the connect button on the controller. Whenever you are trying to connect a receiver and controller, unplug the receiver and turn off the controller and follow the steps outlined above in Setup for each controller.   WARNINGRead, follow & understand all warnings  in this manual, your video game system instruction manual & video software for safety, health & other informationDo not submerge in waterDo not disassemble any part of controller & receiverDo not place heavy objects on top of controller & receiverDo not allow small children to play with controller & receiver unsupervisedDo not use this controller in any other way than its intended use Do not unplug controller cable while the console is turned on Keep away from areas where dirt or liquid can get into controller & receiverKeep away from extreme temperaturesStore in areas away from dust and humidityTurn off or discontinue use of Vibration function if you have any hand or wrist ailments or if you have any injury's to which the vibration creates discomfort to you in any wayL2 ButtonAnalogStartDirectionalPadConnect MacroTurbo R Analog Power&Vibration  Control Switch  StickL  Analog StickPower LEDR2 ButtonR1 ButtonL1 ButtonSelect Button Button Button ButtonConnect ButtonConnect LEDPower LEDMACRO&CLEAR FUNCTION: Use to macro and create a sequence of movements with the touch of one button. During game play, pressing the macro button will activate our selected sequence.TO SET AN ACTION BUTTON TO MACRO: Press the MACRO button. Then press the button(one of R1,R2,L1orL2) you want to put into Macro mode on the controller to be macro. Once you have completed the sequence desired, press the MACRO button again to set. (You can set X ,    ,     ,    ,L1,L2,L3,R1,R2,R3,D-PAD to macro mode)Note: Each macro can up to 16 steps of key or spaces, Spaces are put in by pressing SELECT button. If all 16 commands are used, macro function will end automatically.TO CLEAR MACRO FUNCTION FROM AN ACTION BUTTON: Press the Macro button. Press any action buttons you want to cancel the Macro function. Press the Macro button again. The action buttons you pressed will now return to their original function.
 Federal  Communications  Commission  (FCC)  Statement  2.4GHz PS2 GAME PAD  FCC ID: FSUGG000A  This device complies with Part 15 of the FCC rules. Operation is subject to the following two conditions:   1)  this device may not cause harmful interference, and   2)  this device must accept any interference received, including interference that may cause undesired operation.  This equipment has been tested and found to comply with the limits for a Class B digital device, pursuant to Part 15 of the FCC rules.  These limits are designed to provide reasonable protection against harmful interference in a residential installation.  This equipment generates, uses and can radiate radio frequency energy and if not installed and used in accordance with the instructions, may cause harmful interference to radio communications.  However, there is no guarantee that interference will not occur in a particular installation.    If this equipment does cause harmful interference to radio or television reception, which can be determined by turning the equipment off and on, the user is encouraged to try correct the interference by one or more of the following measures:  -  Reorient the receiving antenna.  -  Increase the separation between the equipment and receiver.  -  Connect the equipment into and outlet on a circuit different from that to which the receiver is connected.  -  Consult the dealer or an experienced radio/TV technician for help.   Warning: A shielded-type power cord is required in order to meet FCC emission limits and also to prevent interference to the nearby radio and television reception.    It is essential that only the supplied power cord be used.  Use only shielded cables to connect I/O devices to this equipment.  CAUSION: Any changes or modifications not expressly approved by the party responsible for compliance could void your authority to operate the equipment.

Navigation menu